

Page 1

Sauna & Steam
Oceanic Ltd, Pountney Street, Wolverhampton, WV2 4HX
Phone: 01902 450 550 sales@oceanic-saunas.co.uk www.oceanic-saunas.co.uk
Infrared Sauna
Assembly Manual
Page 2
Sauna & Steam
Oceanic Saunas 01902 450 550 sales@oceanic-saunas.co.uk
2
Infrared Sauna Assembly
Table of contents
1. Safety Precautions . . . . . . . . . . . . . . . . . . . . . . . . . . . . . . . . . . . . . . . . .3
2. General . . . . . . . . . . . . . . . . . . . . . . . . . . . . . . . . . . . . . . . . . . . . . . . . . 4
3. Requirements . . . . . . . . . . . . . . . . . . . . . . . . . . . . . . . . . . . . . . . . . . . .4
4. Base . . . . . . . . . . . . . . . . . . . . . . . . . . . . . . . . . . . . . . . . . . . . . . . . . . . 4
5. Fix Corner Panels . . . . . . . . . . . . . . . . . . . . . . . . . . . . . . . . . . . . . . . . . .5
6. Add Door -
Important: Wear goggles and gloves at all times whilst handling the door. . . . . . . . . .5
7. Add Roof . . . . . . . . . . . . . . . . . . . . . . . . . . . . . . . . . . . . . . . . . . . . . . .7
8. Wiring . . . . . . . . . . . . . . . . . . . . . . . . . . . . . . . . . . . . . . . . . . . . . . . . .8
9. Audio Input (AUX) . . . . . . . . . . . . . . . . . . . . . . . . . . . . . . . . . . . . . . . . . 11
10. Bench Assembly . . . . . . . . . . . . . . . . . . . . . . . . . . . . . . . . . . . . . . . . . . 12
11. Fix the bench end rails. . . . . . . . . . . . . . . . . . . . . . . . . . . . . . . . . . . . . . 16
12. Fix the bench . . . . . . . . . . . . . . . . . . . . . . . . . . . . . . . . . . . . . . . . . . . . 16
13. Back Rest Assembly . . . . . . . . . . . . . . . . . . . . . . . . . . . . . . . . . . . . . . . 17
14. Fix the back rest . . . . . . . . . . . . . . . . . . . . . . . . . . . . . . . . . . . . . . . . . . 18
15. Internal Trim . . . . . . . . . . . . . . . . . . . . . . . . . . . . . . . . . . . . . . . . . . . . 19
16. External Trim . . . . . . . . . . . . . . . . . . . . . . . . . . . . . . . . . . . . . . . . . . . . 20
17. Floor Matt Assembly . . . . . . . . . . . . . . . . . . . . . . . . . . . . . . . . . . . . . . . 22
18. Connection to Power . . . . . . . . . . . . . . . . . . . . . . . . . . . . . . . . . . . . . . . 23
19. Keypad functions . . . . . . . . . . . . . . . . . . . . . . . . . . . . . . . . . . . . . . . . . 24
20. Keypad Operation . . . . . . . . . . . . . . . . . . . . . . . . . . . . . . . . . . . . . . . . 25
Page 3

Sauna & Steam
Oceanic Saunas 01902 450 550 sales@oceanic-saunas.co.uk
3
Infrared Sauna Assembly
1. Safety Precautions
Please read these precautions before entering the sauna. If you have any questions or concerns
ask a member of sta before using the sauna.
• Do not wire this sauna on a multi plug or multi socket extension lead.
• Read operating instructions before turning on the sauna.
• Do not cover the heaters as this could cause a re.
• Do not touch the heaters, they are very hot while the sauna is on.
• Do not use back rests as arm rests as you could touch the heater with the side of your arm.
• Elderly persons, pregnant women, or these suering heart disease, high blood pressure, diabetes or
not in good health are advised to seek medical opinion before using a sauna room.
• Do not smoke in the sauna room;
• Avoid using the sauna room immediately after strenuous exercise;
• Do not use the sauna room when under the inuence of alcohol;
• Leave the sauna room at once if you feel sleepy, sick or uncomfortable;
• Ensure there is good ventilation for the sauna room
• We do not recommend this product is used by children under 16years old unless they are supervised
by an adult
• This appliance is not intended for use by persons including children with reduced physical, sensory
or mental capabilities or lack of experience unless they have been given supervisor or instruction
concerning the use by a person responsible for their safety
• Commercial operators should post a notice of these precautions in a prominent position.
Page 4
Sauna & Steam
Oceanic Saunas 01902 450 550 sales@oceanic-saunas.co.uk
4
Infrared Sauna Assembly
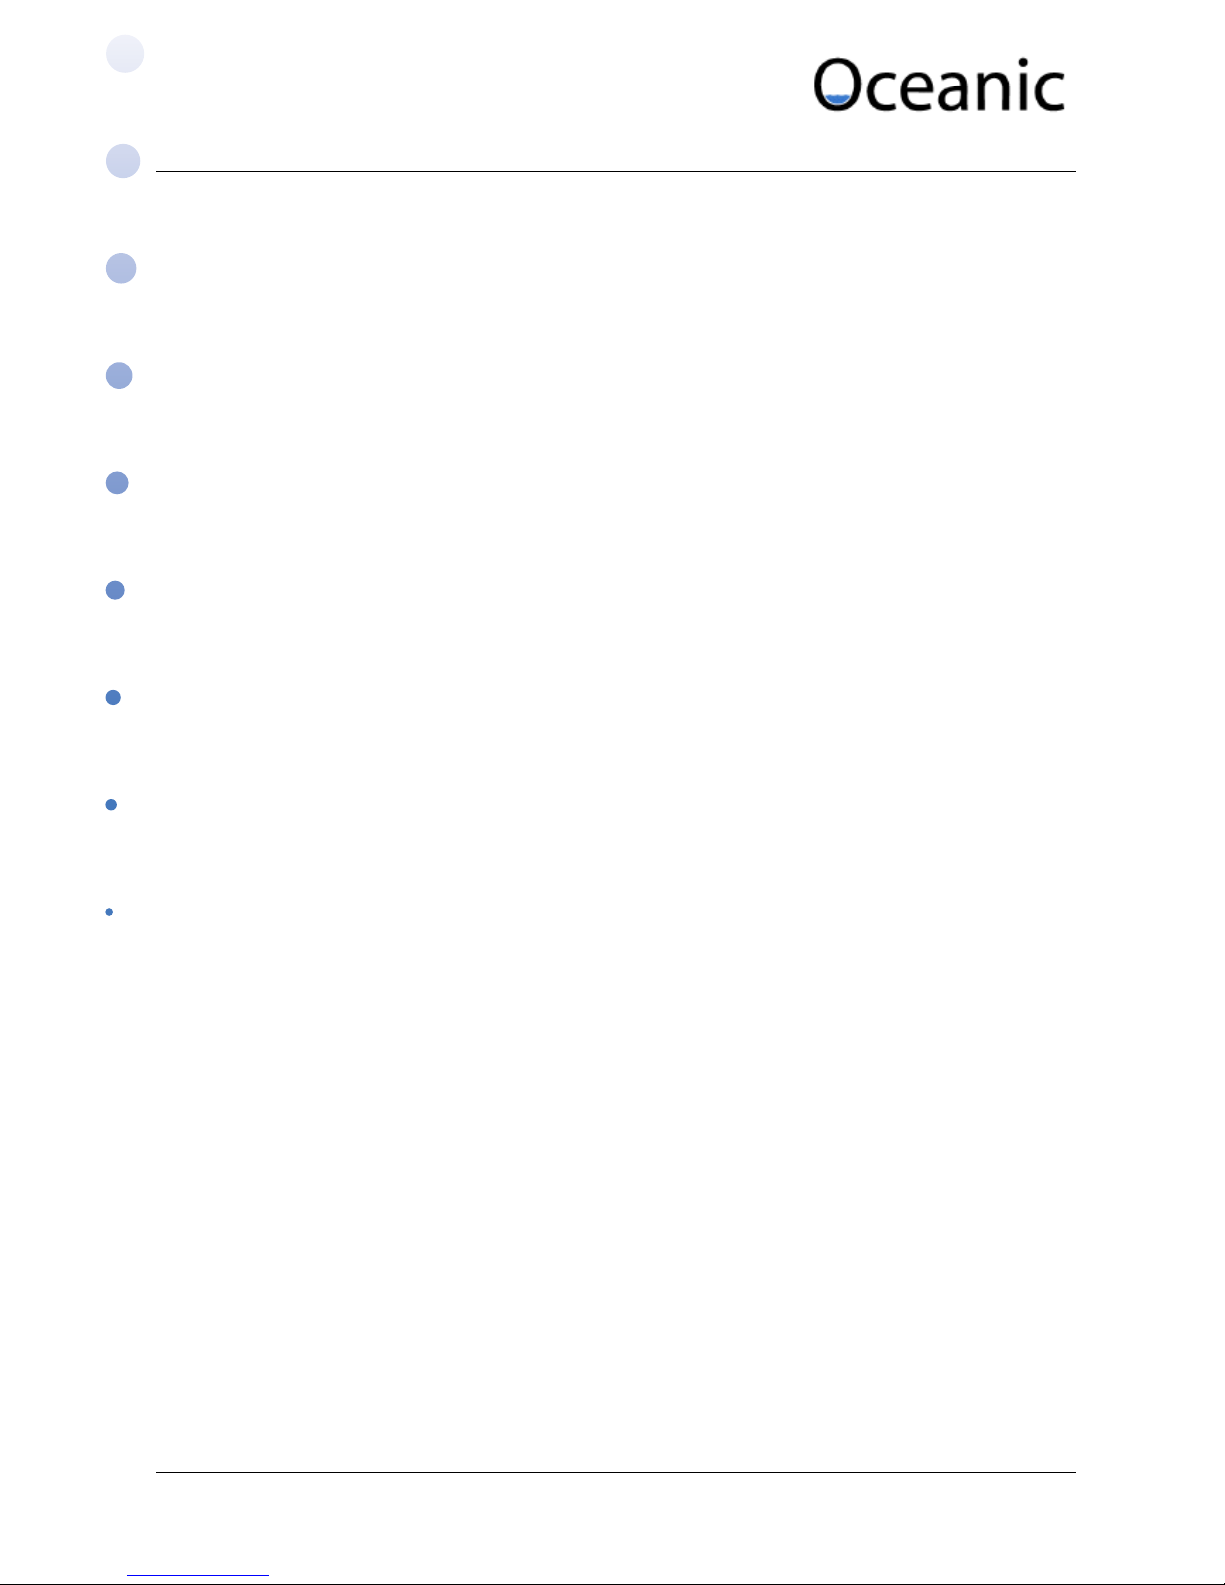
4. Base
i. Lay out the 32 x 32mm base section as shown below with the correct 9mm spacings.
ii. Check the base drawing on the parts list supplied
iii. Check the base with a spirit level, you may need to use packers to get a level base.
iv. Use a set square or measure corner to corner with a tape measure to ensure the base is square.
v. To make the following stages easier we recommend that you x the base to the oor, this is
completely optional and is not required for the structural integrity of the cabin.
2. General
Important Notice: Unless you ordered a “low height wiring kit” it is not possible to install our InfraRed Sauna Cabins with a height lower than 2200mm as the wiring is all done above the sauna.
Before you begin the assembly work we recommended that you read through these instructions
completely in order to familiarise yourself with the procedure.
Each model of sauna has it’s own dedicated parts list, make sure you locate this before continuing.
This sauna cabin is for indoor use only.
Infrared Saunas can be erected onto a level oor that can be vinyl, ceramic, concrete, or wood, but
preferably not carpet.
3. Requirements
You will require the following items:i. The easiest and fastest way to trim this cabin is to use a brad nailer, electric, gas or air all are ok.
The brads we supply are straight 18 gauge 25mm and 40mm length. If you don’t have a nailer
you can pilot & screw or break the individual brads o the strips and use a hammer.
ii. A powered drill/screw driver with drill bits, PH2 and PZ2 driver bits
iii. 4mm drill and countersink tool
iv. Spirit level
v. Hammer
vi. Hand Saw or an electric mitre or cross cut saw is advised for cutting trim to give a professional
nish.
vii. Sand Paper
viii. Window packers or alternatively make some using cross cut saw from spare timber.
ix. Optional: - if it is possible to x the unit to the oor you will need a hammer drill and raw plugs
Page 5
Sauna & Steam
Oceanic Saunas 01902 450 550 sales@oceanic-saunas.co.uk
5
Infrared Sauna Assembly
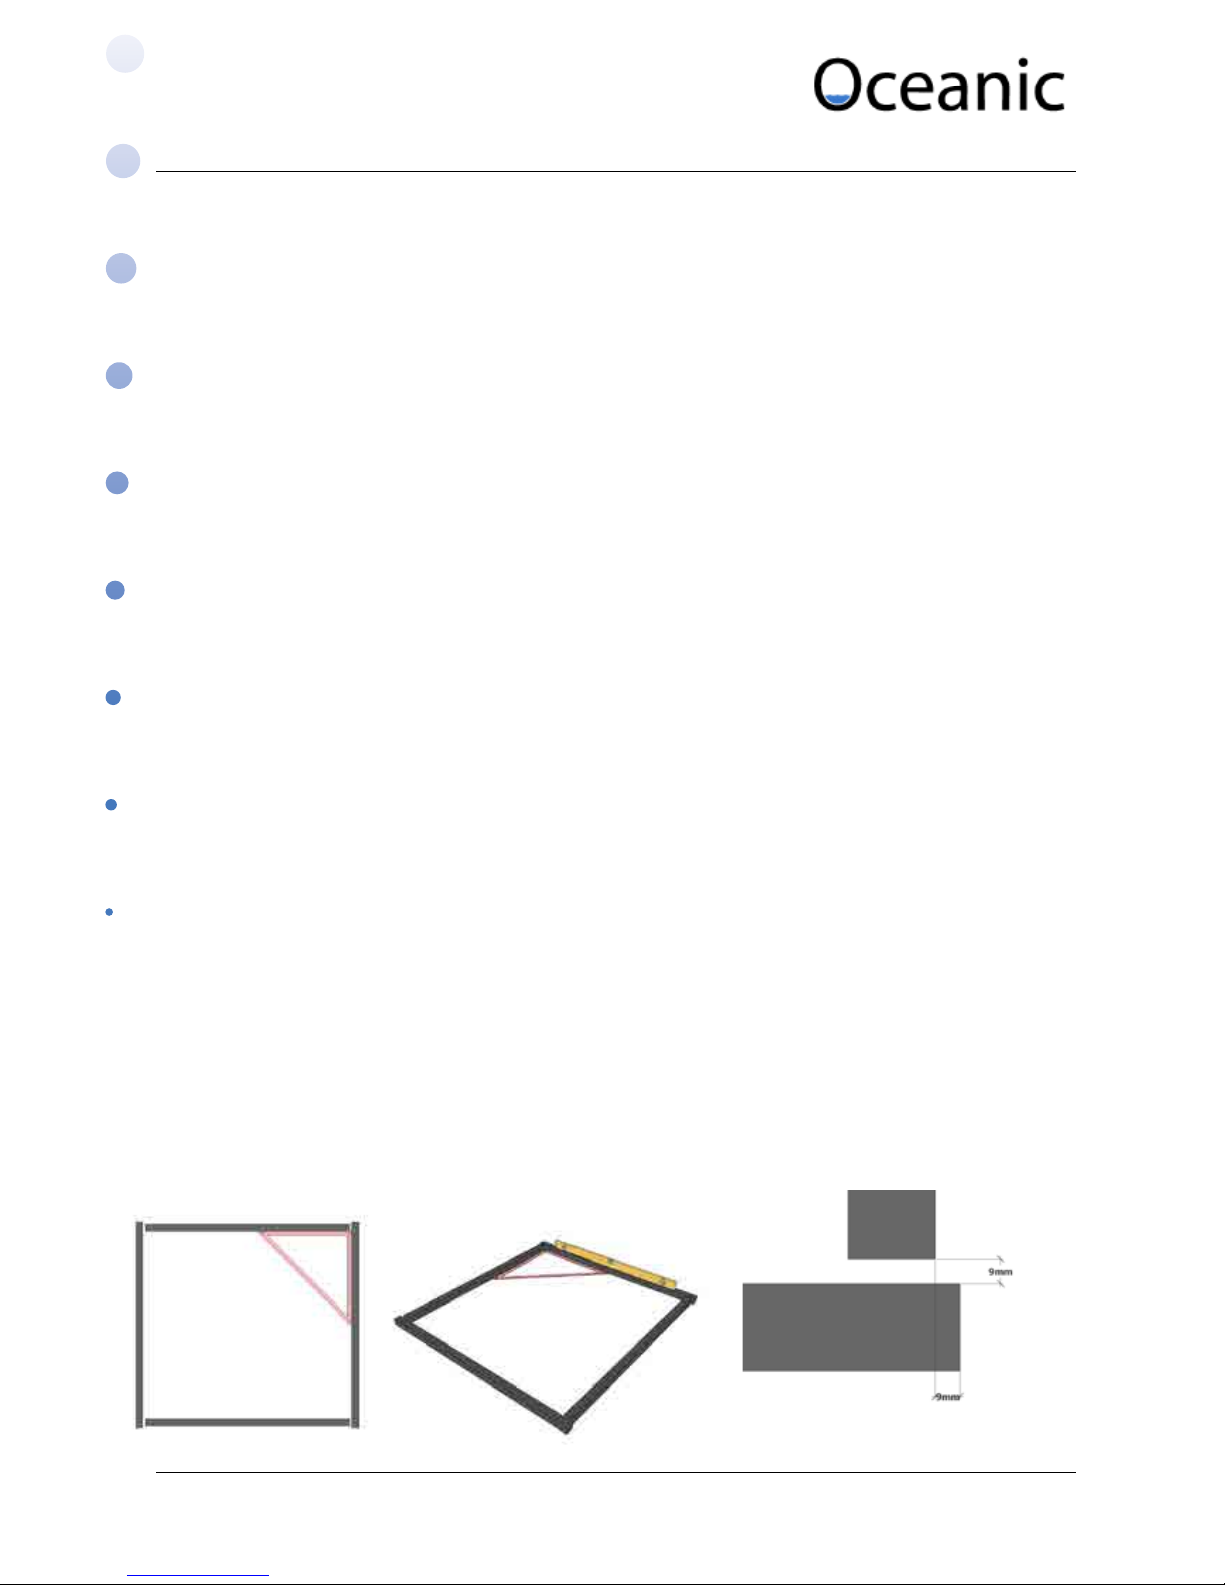
5. Fix Corner Panels
i. Find the oor plan in the parts list for the cabin you are building, this will indicate where each
panel needs to go.
i. Start by xing the corners together, pre drill 4 holes using a 4mm counter sink & drill.
ii. Fix using the 80mm screws provided
6. Add Door - Important: Wear goggles and gloves at all times whilst handling the door.
i. The door is the same size as the full sizes panels so it can be moved around in most cabins. We will show
the dierent ways to join the door with the panels in the following points.
ii. If you are working alone we advise that you remove the glass from the hinges and set to one side.
iii. To install the door as shown in the 2D image below (on the corner against the end of the side panel).
Firstly with 30mm screws evenly x the 4 at brackets down to the inside edge (30mm side) of the
door frame (hinge or handle side just rotate the frame 180
o
). Then x to the end of the side panel using
30mm screws. (see page 19 for trimming edge of panel and magnetic catch info)
Page 6

Sauna & Steam
Oceanic Saunas 01902 450 550 sales@oceanic-saunas.co.uk
6
Infrared Sauna Assembly
iv. To x the door in between two panels or to the inside face of a side panel (as the 2D drawings below).
vi. If you want you can x the other front panel to the door now or later when xing the roof.
v. Pilot and counter sink 4 holes and use
50mm screws to x into the panel adjacent.
Page 7

Sauna & Steam
Oceanic Saunas 01902 450 550 sales@oceanic-saunas.co.uk
7
Infrared Sauna Assembly
7. Add Roof
i. If you are installing the cabin with a restricted height (less than 2200mm) and have purchased
the “Low Height Kit” you will be supplied with an additional guide for xing the roof.
ii. If you have a height of 2200mm or above please use the following steps.
iii. Start with the back roof panel, start from the corners to square up the wall panels, pilot and
counter sink holes and use 60mm screws, don’t screw near the cable holes.
iv. Fix the roof panels to each other in the centres check they are ush on the inside face.
v. When you x above the door use 50mm screws so they don’t stick through top of the frame or
countersink and screw from underneath.
vi. If you levelled and squared the base properly
the door should open perfectly at this stage. If it
doesn’t you may need to pack the base up, use
a spirit level to make things easier.
vii. Fix the other side of the door if you haven’t
already done this at the previous stage.
Page 8

Sauna & Steam
Oceanic Saunas 01902 450 550 sales@oceanic-saunas.co.uk
8
Infrared Sauna Assembly
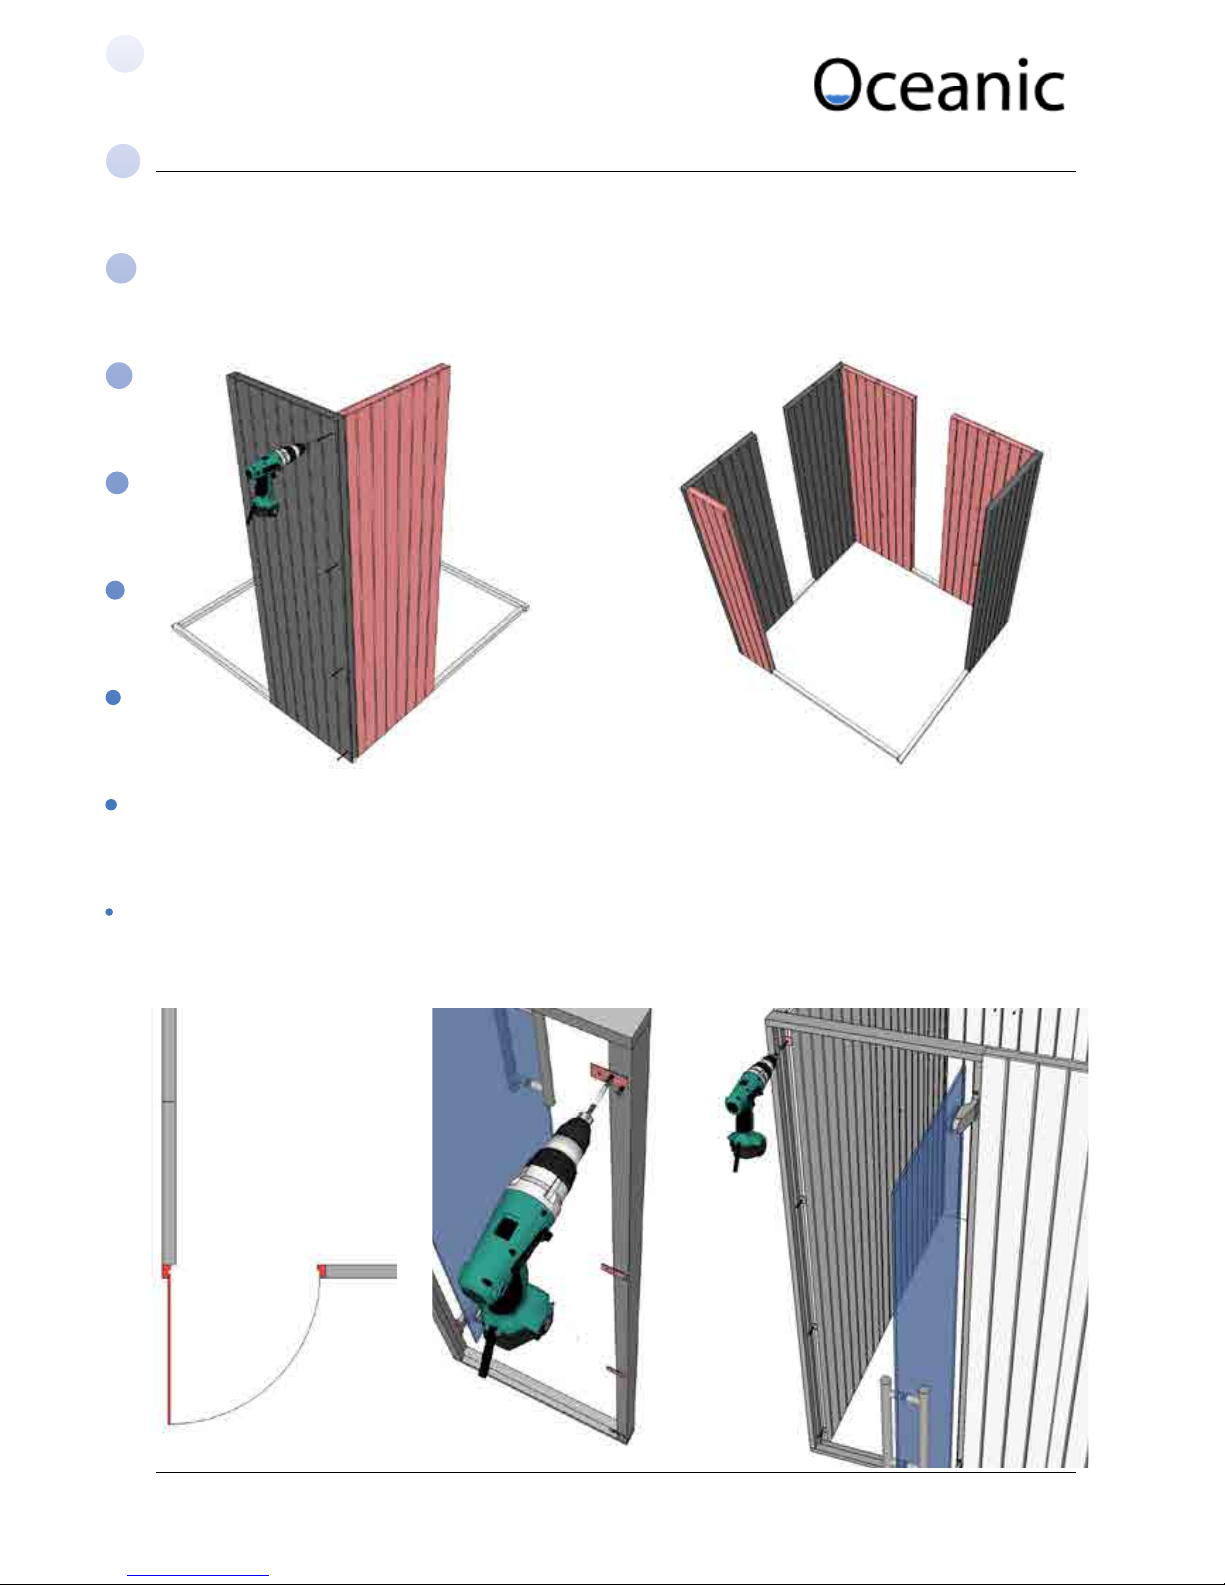
8. Wiring
8.1. Keypad and Temperature Sensor
i. Do not turn any power on until the cabin
has been fully installed.
ii. Refer to the parts list for a wiring
schematic.
iii. Sit the control box on the roof in the
iv. Then pull out of the hole
on the inside.
v. To mount the heaters x
2 x 30mm the 2x 30mm
screws into the two
indicated holes. Leave
them protruding slightly so
you can hang the heaters
o them, similar to how
you would t a picture
frame or clock.
specied position.
iv. The temperature sensor and keypad will already be tted onto there panels, route these across
the roof, through the channels made in the frame to the control box connections and plug them
in.
8.2. Wall Heaters
i. For the heaters use the correct length of cable as shown on the schematic.
ii. Plug the one end into the control as shown below.
iii. Then route the other end down from the roof into the walls panels.
Page 9

Sauna & Steam
Oceanic Saunas 01902 450 550 sales@oceanic-saunas.co.uk
9
Infrared Sauna Assembly
vi. Plug the heater wire in.
vii. Then mount the heater onto
the wall. (Don’t remove grill)
viii. Fix at the bottom with 2 x
30mm screws.
8.3. Under Bench Heaters
i. Pilot drill and screw 2 x 30mm
screws at 700mm centres approx
200- 300mm from the oor, but
most importantly 40mm to the left
o the centre of the wire hole.
ii. Hang the heater onto the screws.
Page 10
Sauna & Steam
Oceanic Saunas 01902 450 550 sales@oceanic-saunas.co.uk
10
Infrared Sauna Assembly
8.4. Lighting
i. Assemble the spot light(s) as shown and t into the ceiling hole(s).
ii. Install either standard or colour changing bulb(s) if supplied
iii. If you ordered the deluxe specication you will be supplied with a remote control to control the
lights, you can choose between many dierent colours, there is also a fade mode.
iii. Secure at the bottom with 1 x 30mm
screw.
iv. Finally Plug the pre wired light cable into the socket on the control box labelled “Light”
Note: It is possible to switch a second lighting circuit separately using the chromo input. This would
be useful if you wanted the option of both white and coloured lighting. Oceanic provides one pre
wired cable as standard.
Page 11

Sauna & Steam
Oceanic Saunas 01902 450 550 sales@oceanic-saunas.co.uk
11
Infrared Sauna Assembly
8.5. Speakers
i. Simply plug the speaker wires into the control box, route the cables across the roof and onto the small
and large connectors on the top of the speakers.
9. Audio Input (AUX)
i. The AUX input allows you to connect
any device that has a 3.5mm jack
output, for example an MP3 player,
smart phone or stereo. You could even
buy a portable bluetooth receiver so you
can connect wirelessly and play music
from you phone without the AUX cable
or MP3 Holder.
ii. To install the MP3 Holder use 2 x
40mm screws at the bottom, do not
overtighten as this will split the wood,
use a hand screw driver for the last few
rotations if you don’t have accurate
speed control of the drill. (Do not screw
in the centre of panels as this could go
through a wire)
iii. Drill diagonally with a 10mm bit at the
top of the panel above the MP3 Holder.
Page 12

Sauna & Steam
Oceanic Saunas 01902 450 550 sales@oceanic-saunas.co.uk
12
Infrared Sauna Assembly
10. Bench Assembly
Important Safety Information.
The benches may have to support the body weight of several bathers. It is important that
they are correctly assembled; the holes for all screws must be predrilled to prevent the timber
splitting. To tighten the screws use a hand held screwdriver or an electrically operated one with
a torque setting that allows the screw to be fully tightened but not to spin as spinning reduces
the holding power of the screw.
Note the use of a good quality PVA adhesive (not supplied) will improve the durability of the
benches.
Maximum loadings;
Up to 1200 mm no centre support 2 x 12.5 stone people
Up to 1800 mm with 1 extra support 3 x 12.5 stones people
Before commencing the construction of the benches nd the specication sheet for the sauna
you are building. This will give detail of the correct quantities and positions of timbers and
xings.
i. Screw the supporting frame together using the 4 large brackets and 20mm screws.
iv. There is a channel cut out of the back of
the trim to hide the cable, pin the trim into
place, make sure you don’t x this trim
anywhere near the centre of panel as you
could pin into a cable.
Page 13

Sauna & Steam
Oceanic Saunas 01902 450 550 sales@oceanic-saunas.co.uk
13
Infrared Sauna Assembly
work bench
scrap timber
scrap timbersquare corner bench slat 19mm corner
mould spacer
ii. Lay the 5 or 6 bench slats face down on a work bench, use two pieces of scrap timber along the
edges of your bench to create a square corner to work o. Use small pieces of corner mould as
19mm spaces.
iii. Lay the supporting frame onto the slats, use spacers along the two edges to give a 19mm
overhang each side.
under frame
19mm corner
mould spacer
19mm corner
mould spacer
Page 14

Sauna & Steam
Oceanic Saunas 01902 450 550 sales@oceanic-saunas.co.uk
14
Infrared Sauna Assembly
iv. Add the cross members, two are positioned 100mm from the ends, the third is centred, a dimension
for A can be found on your parts list.
v. Evenly space out the 14 L brackets and x using 20mm screws.
Page 15

Sauna & Steam
Oceanic Saunas 01902 450 550 sales@oceanic-saunas.co.uk
15
Infrared Sauna Assembly
vi. Use the 30mm screws provided to x down through the cross members into the slats.
vii. If your parts list shows you have a bench leg, add this now as shown. Use 6x 40mm Screws.
Page 16

Sauna & Steam
Oceanic Saunas 01902 450 550 sales@oceanic-saunas.co.uk
16
Infrared Sauna Assembly
11. Fix the bench end rails.
i. Fix the 69 x 19mm bench support rail so the top is at 481mm from the oor. Use 4 x 50mm
screws.
ii. Fit the two support legs using a brad nailer as shown, this can alternatively be done using a
countersink and 30mm screws.
12. Fix the bench
i. Pre dill with countersink, then x 2 x 50mm screws through the under frame of the each end
of the bench as shown. The bench is sat forwards as shown so there is a gap at the back of the
bench, this will be covered by the heater guard later.
Page 17

Sauna & Steam
Oceanic Saunas 01902 450 550 sales@oceanic-saunas.co.uk
17
Infrared Sauna Assembly
13. Back Rest Assembly
i. Refer to the parts list for specic detailed information on the back rest.
i. Layout the back rest frame as to the drawing in the parts list.
ii. Pre drill the top rail with countersink tool.
iii. Screw the top rail onto the uprights.
ii. If there is an L bench in the sauna you are assembling joint as shown using 2 x 60mm screws.
Make sure to pilot and countersink to prevent splitting.
Page 18

Sauna & Steam
Oceanic Saunas 01902 450 550 sales@oceanic-saunas.co.uk
18
Infrared Sauna Assembly
14. Fix the back rest
Pre drill with countersink through the end uprights at the top and bottom, then x the back rest
using 4 x 40mm screws so the bottom is level with the bench.
iv. Pin the slats onto the edge of the uprights using two pins at each joint.
Page 19

Sauna & Steam
Oceanic Saunas 01902 450 550 sales@oceanic-saunas.co.uk
19
Infrared Sauna Assembly
15. Internal Trim
15.2. Corner Uprights
Measure, cut to size and x four of 19x19 corner
mould and x with 32mm brads into the corners of
the room as shown.
15.1. Cornice
Measure, cut to size and x the 19 x 19 corner
mould and x to into place using a brad nailer
and 32mm brads provided. (If you have already
tted the cornice from the roof stage please
continue to the next step. ) Important: Do not pin
near cables, ie the centre of each heater panel.
15.3. Door
i. If you have installed the door on the end face of a side panel then you will need to remove the
standard magnetic catch and t the piece of timber below shown in blue which has a magnetic
catch installed half way down. This timber part is supplied with every door. Make sure the curved
edge is towards the back so you have a ush nish across the front, pin in place with 25 or 35mm
brad nails. You can then trim the other edge using 32x9 overlap.
Magnetic catch
Counter Plate
Page 20

Sauna & Steam
Oceanic Saunas 01902 450 550 sales@oceanic-saunas.co.uk
20
Infrared Sauna Assembly
16. External Trim
16.1. Horizontal top facia
Fix the 65 x 9mm facia with 32mm brads provided, the front facia has been machined with curves on
the ends so you don’t need to mitre you can just butt the other square edge trim upto it.
15.4. Overlap
Use 32x9mm overlap across the joints
between each panel as shown below using
25mm brad nails.
15.5. Internal Skirt
Measure, cut to size and x the 45 x 9mm skirting
around the internal edges of the sauna using 25mm
brad nails.
Page 21

Sauna & Steam
Oceanic Saunas 01902 450 550 sales@oceanic-saunas.co.uk
21
Infrared Sauna Assembly
16.2. External Facia Uprights
Measure cut and x 65 x 9mm facia around
external corners of the sauna with 25mm brads.
16.3. Exterior Skirt
Measure cut and x 45 x 9mm trim around the
bottom edges of the sauna with 25mm brads.
16.4. External Facia Joint Overlap
Measure cut and x 32 x 9mm overlap mould
over the joints between the panels with 25mm
brads.
16.5. Door frame trim (hinge side)
Measure cut and x a 32 x 9mm overlap over the
gap between the panel and door frame.
Page 22

Sauna & Steam
Oceanic Saunas 01902 450 550 sales@oceanic-saunas.co.uk
22
Infrared Sauna Assembly
17. Floor Matt Assembly
i. Refer to the parts list for specic detailed information on the oor matt.
ii. Pre drill holes with 4mm countersink bit.
iii. Fix with 2 x 30mm screws at each joint as shown.
iv. Lay the oor matt in the sauna.
Page 23

Sauna & Steam
Oceanic Saunas 01902 450 550 sales@oceanic-saunas.co.uk
23
Infrared Sauna Assembly
18. Connection to Power
18.1. Domestic unit
Domestic infrared saunas, those with a maximum of 8 IR heaters within the cabin, can be
plugged into a 13Amp socket.
i. Do not plug this sauna into a multi plug or multi extension lead.
ii. Plug the heater in, turn on the socket, then turn on the switch on the RCD switch on the top of
the control box.
18.2. Commercial Unit
All commercial units must be hard wired to an isolated mains supply and cannot be plugged into a
13Amp socket. The control panel must be wired to a single phase 230V supply.
Model No of IR Heaters Total Power (kW) Total Current (A)
IR3030 Corner 8 2.4 10
IR3030 L Shape 9 2.7 11.7
IR3030 Parallel 10 3 13
IR4030 12 3.6 15.7
230V Mains Supply
Isolator Switch
Control Box
To IR heaters
Sensors/lighting/
controls/music etc
Oceanic
Page 24

Sauna & Steam
Oceanic Saunas 01902 450 550 sales@oceanic-saunas.co.uk
24
Infrared Sauna Assembly
Inf rared Control Box Circuit D iagram
NL
Inf rared heater e lement
1 3 57
2 4 68
Contr oller
(Vo ltage:DC5V)
MINI St eam
generator
Sens or
Sp eaker
Sp eaker
Mu sic
in put so cket
Mu sic
Vol ume
Fan
(AC 230V)
Light :AC12V
(M)ax 40W:
chr omo-th era py ights
(AC12V; Max: 40W)
L
Po w er Input
(AC230V)
Circuit
breaker
4
2
2
19. Circuit Diagram
This port is
no longer
required
Page 25

Sauna & Steam
Oceanic Saunas 01902 450 550 sales@oceanic-saunas.co.uk
25
Infrared Sauna Assembly
20. Keypad functions
No Part Description
1 On/o Push to turn the equipment on or o
2 Light Push to turn on the light in the room.
3 Fan / Music Push once to turn on fan (not required) Push twice to turn on speakers
4 Set Preset time and temperature - (you must then press ‘Enter’ to save settings)
5 /\ Increase button
6 \/ Decrease button
7 Enter / Steam Press Enter to save settings. Steam function not required
8 Time display window Display the work time of the steam generator
9 Temp display window Display the detected temperature of steam room
10 Steam Not used
11 Fan Indicated the Fan is active (not required for Oceanic IR sauna)
12 Music Indicated the Speakers have been turned on
13 Light Indicated the Light is turned on
14 Chromo Light to indicate secondary lighting circuit
15 Overheat Indicator LED for overheat - turn machine o and wait for 1 hour before
switching back on, if problem persists contact the seller.
16 L7 Indicates the detected temperature is lower than the preset temperature and
sauna heater is heating.
17 L8 Indicates the detected temperature is higher than the preset temperature and
the sauna heater is idling.
Steam
Fan
Music
Light
Chromo
Overheat
Enter
Steam
OC-ST
TIME TEMP
Fan
Music
Light
Chromo
Set
1
2
3
47
56
17
8 9
16
15
14
1312
11
10
On
O
Page 26

Sauna & Steam
Oceanic Saunas 01902 450 550 sales@oceanic-saunas.co.uk
26
Infrared Sauna Assembly
21. Keypad Operation
i. Once all the cables has been correctly connected to the control box and the box and the power cable
has either been plugged into the wall socket (domestic) or hard wired to the isolated mains supply
(commercial) you can press the ‘On/O’ button on the keypad to turn on the infrared sauna.
ii. The keypad should now display a time and a temperature and L7 should be orange to show that the
lamps are warming up. The time displayed is the length of time that the sauna will stay on for before
turning itself o. The can be can be increased or decreased as described below. The temperature
shown is the current air temperature inside the cabin, the maximum air temperature can be increased
or decreased as described in point iv.
iii. Adjusting the time. Press the ‘Set’ button once. The time will now ash. Increased or decrease the time
using the blue and red arrow keys. Once the correct time is ashing press the Enter key to save the
selection. If you do not press the Enter key the time will not be saved and will revert to the previous
setting. The maximum time you can select is 1hour and 30 minutes for a session.
iv. Adjusting the temperature. Press the ‘Set’ button twice. The temperature will now start ashing.
Increase or decrease using the blue and red arrow keys. Once correct press the ‘Enter’ button to save.
The maximum air temperature is 60 degrees for the infrared sauna.
v. The keypad will remember the time and the temperature that you selected on your previous session
when you turn the sauna on.
vi. To activate the other functions such as turning on the lighting and speakers, press the associated key
the correct number of times as described in the table on the previous page. The associated LED will
light up to show you that the light or speakers are on.
vii. Overheat light. All saunas are tted with a built-in thermal cut-out that trips automatically if the
temperature in the sauna rises above a safe level. The reset button is located in the remote thermostat.
If you cannot ascertain what caused the increase in sauna temperature, do not attempt to reset the
sauna, but either notilfy Oceanic Saunas Ltd, or call in a qualied electrician.
Please read the Infrared Sauna Operation Manual for full instructions on how to use and look after
your infrared sauna.
If you encounter any diculty with this assembly procedure or think we could have explained
anything more clearly we would welcome your comments, please call T: 01902 655425 or T: 01902
871127 technical help line.
Page 27

Sauna & Steam
Oceanic Saunas 01902 450 550 sales@oceanic-saunas.co.uk
27
Infrared Sauna Assembly
22. Mini Steam Generator
The mini steam generator is an optional accessory for domestic infrared sauna cabins only, not for
use in commercial cabins. It is powered and controlled independently from the infrared heaters
but can be run simultaneously as the IR heaters are hermetically sealed. The generator is lled
manually from above, there is a manual drain valve if you need to drain the generator.
22.1. Mini Steam Generator Safety Precautions
i. The equipment must be installed vertically
ii. Stop pouring water into the boiler when the high level LED light (A) turns on. Don’t let the
water reach the holes in the top cover. You can release water using the valve at the bottom.
iii. If overheat indicator LED light turns on, cut o the power supply and do not do not turn back
on until the problem has been resolved. If in doubt please contact our technical team.
22.2. Parameters
Model Power (W)
Voltage
(V)
Current
(A)
Dimensinos
LxWxH (mm)
Class 1 Class 2 Class 3 Class 1 Class 2 Class 3
OC-Mini-1 500 750 1000 210-240 2.1-2.3 3.2-3.6 4.2-4.8 220 x 100 x 340
OC-Mini-2 1000 1500 2000 210-240 4.2-4.6 6.4-7.2 8.4-9.6 220 x 100 x 340
22.3. Mini Steam Generator Circuit Diagram
Page 28

Sauna & Steam
Oceanic Saunas 01902 450 550 sales@oceanic-saunas.co.uk
28
Infrared Sauna Assembly
22.4. Parts Description
No Description
1 Back cover
2 circuit board
3 Side cover
4 Terminal
5 Power entry
6 Heat element
7 Overheat switch
8 Water level indicator LED
9 Control panel
10 SUS tank
11 Water level probe
12 Steam outlet and water inlet
13 Shell
14 Heat preservation cotton
22.5. Installation
i. Position the steam generator on a blank wall panel at low level 150 - 300mm above ground level.
ii. Fix to cabin wall using 40mm Screws and the locating xing points on the back of the heater
iii. Connect the steam generator to a 13Amp socket with RCD protection.
1 2 3 4 5 6 7 8 9
1011
12
14
Fixing points
for 40mm screw
Page 29

Sauna & Steam
Oceanic Saunas 01902 450 550 sales@oceanic-saunas.co.uk
29
Infrared Sauna Assembly
22.6. Controls and Indicators
A - Overow indicator
Water Level Indicators
B - Tank half full
C - Tank near empty - rell before use
Press On/O to turn activate the heater
Drain valve
LED indicator, unit is set to 500W
LED indicator, unit is set to 750W
LED indicator, unit is set to 1000W
LED indicator, generator is currently heating
LED indicator, generator has power
LED indicator, generator has overheated. Overheat switch has been
tripped. Please wait 1hour for unit to cool down. Overheat switch can
be reset inside the unit (see diagram on previous page).
Please contact technical support if reason for overheat is no known.
Control the level of power 500W / 750W / 1000W
A
B
C
500w
500w
750w
750w
1000w
1000w
Power
On/O
Heat
Heat
On/O
On/O
Overheat
Overheat
Page 30

Sauna & Steam
Oceanic Saunas 01902 450 550 sales@oceanic-saunas.co.uk
30
Infrared Sauna Assembly
23. Mini Steam Generator Operation
i. Once the mini steam generator has been installed correctly onto the wall and the power cable
connected to a 13amp socket the unit is ready to use.
ii. Turn the power on at the 13amp socket and press On/O button on the Mini Steam Generator
iii. Note that the LED C should be lit to show the tank is empty
iv. Fill the generator with water from above using a water jug until A is lit. Do not overll the genertor
as the water may start to spit out of the top when heating. If this occurs manually drain some
water out into a container using the drain valve a the bottom of the generator.
v. The generator should now start to heat the water and the ‘Heat’ LED should be lit
vi. You can adjust the amount of steam using the Power button to set the generator to 500W, 750W
or maximum power 1000W.
vii. Once the water level drops to C you can add more water to the generator. Be careful as the unit
will not be very hot.
viii. If you are adding aroma to the water this will alter the surface tension of the water and
may cause it to spit when boiling into steam. If this happens either reduce the amount of overall
liquid in the generator or reduce the amount of aroma in the water. Do not add neat aroma to the
tank, ensure the aroma is diluted. Oceanic aromas are to be diluted 1 part aroma to 20 parts water.
For every 1ltr of water only add a maximum of 50ml of aroma.
ix. Ensure you drain the steam generator after the end of your session.
24. Mini Steam Generator Maintenance
The single biggest problem with steam generation is the build up of scale resulting from
dissolved solids within the water. Scaling can cause the elements to fail, the water level sensors
not to function, premature failure of the O-rings resulting in leaks from around the elements. The
extent of the problem will vary according to the degree of hardness in the local water supply.
For all commercial operators we recommend the use of a water softener.
Expect 2500 hours element life, this can be serious depleted by poor maintenance.
All users must ensure a regular maintenance routine to descale the generator – the frequency
of this will vary according to the degree of hardness in the local water supply and the amount of
time the generator is used for. Check the water for hardness and arrange the descaling routine
accordingly: High levels of hardness descale once every 50 to 100 hours of operation.
Medium levels of hardness descale once every 100 to 250 hours operation.
Low levels of hardness descale once every 250 to 1000 hours of operation.
To descale the generator use a solution of weak acid crystals (such as citric acid) mixed with water
Citric acid can be purchased from: www.oceanic-saunas.co.uk
Descaling procedure
i. Fill the machine using a funnel with pre mixed citric acid
ii. Heat the machine for 2 minutes.
iii. Leave the machine for 4 hours minimum
Page 31

Sauna & Steam
Oceanic Saunas 01902 450 550 sales@oceanic-saunas.co.uk
31
Infrared Sauna Assembly
iv. Drain using the valve at the base of the unit
v. Flush tank twice using cold water and the drain valve.
Follow the instruction supplied with the crystals and allow sucient time for the solution to
dissolve the scale before ushing out the generator. For best results add to water, steam for two
minutes then leave overnight. Empty the next days and ush twice using drain.
Faults arising from a result of a failure to descale the generator are not covered by warranty
25. Guarantee
All generators and heaters are guaranteed for 12 months for domestic and commercial use from
the date of purchase. This guarantee excludes consumable items such as the electrical elements
and failures resulting from misuse or abuse such as a failure to descale.
If you encounter any diculty with this assembly procedure or think we could have explained
anything more clearly we would welcome your comments, please call T: 01902 655425 or T: 01902
871127 technical help line.
 Loading...