

Page 1
FSD-2
5^r"
FLOPPY
DISK
DRIVE
FOR
COMMODORE
C64
Page 2

Page 3
TABLE
OF
CONTENTS
Page
1.
Introduction
2
2.
Specifications
3
3.
Installation
5
Cable
Connections
5
TurningOnPower
5
Disk
Insertion
5
4.
Using
Programs
6
Using
Prepackaged
Software
6
The Disk
Directory
7
Pattern
Matching
and
Wild
Cards
8
5.
Disk
Commands
••••»
10
Reading
the
Error
Channel
,
13
6.
Sequential
Files
14
7.
Random
Files
16
8.
Relative
Files
20
Using
Relative
Files
21
9.
Programming
the
Disk
Controller
•
25
10.
Changing
the
Device
Number
••....
28
Software
Method
28
Hardware
Method
29
Appendices
A.
DescriptionofError
Messages
30
Page 4
1.
Introduction
The
FSD-2
Disk
Drive
isaversatile
and
efficient
disk
drive
built
for
the
Commodore
seriesofpersonal
computers.
This
drive
is
fully
compatible
with
the
Commodore64computer
and
directly
replaces
the
Commodore
1541
Disk
Drive,
giving
much
better
performanceinterms
of
data
loading
and
writing
speed
and
memory
buffer
size*
If
you
are
a
beginner,
the
first
few
chapters
will
help
you
install
and
operate
the
disk
drive.
As
your
skill
and
experience
improves,
you
will
find
more
uses
for
your
disk drive
and
the
more advanced
chapters
will
be
very
helpful.
If
you're
an
experienced
professional,
this
manual
can
give
you
the
information
you
need
to
take
advantageofall
tne
FSD-2
power
and
features.
Regardless
of
the
level
of
your
programming
expertise,
the
FSD-2
will
greatly
increase
the
efficiency
and
capabilityofyour
computer
system.
Pleasebeaware
that
this
manual
is a
reference
guide
to
the
operation
of
the FSD-2
While
it
contains
step
by
step
instructions
and
a
section
to
let
you
easily
use
prepackaged
software,
you
should
become
familiar
with
BASIC
and
the
computer
commands
that
help
you
operate
your
computer
and
its
peripherals.
Remember,
you
don't
need
to
learn
everythinginthis
manual
at
once.
The
first
three
or four
chapters
will
let
you
use
the
disk
drive
for
most
applications,
and
the
following
chapters
tell
you
how
to
set
up
files,
access
any
data,
and
program
the
disk
drive
itselfatthe
machine
language
level.
NOTES:
In
FORMAT
examples,
lower
case
words
need
to
be
replaced
by
an
appropriate
word
or
number
that
you
choose•
Page 5

2.
SPECIFICATIONS
FSD-2
FLOPPY
DISK
DRIVE
♦Slim
line
construction
(low
profile)
and
fully
Commodore
compatible.
♦Disk
size:
5-1/4
inch
diameter.
♦Capacity
Per
Disk
174.8
kbytes
Directory
Entries
144/disk
Sector
Arack
17-21
Bytes/Sector
256
Tracks
•
35
♦Average
NTBF
rateof8000
hours.
♦Power
Requirements
Voltage
117
VAC,
220/230
240
VAC
optional
Frequency
50/60
Hertz
Power
Dissipation
24
Watts
♦Mechanical
Dimensions
Height,
width,
depth
47.5
X150X268mm.
Weight
2.8
kgs.
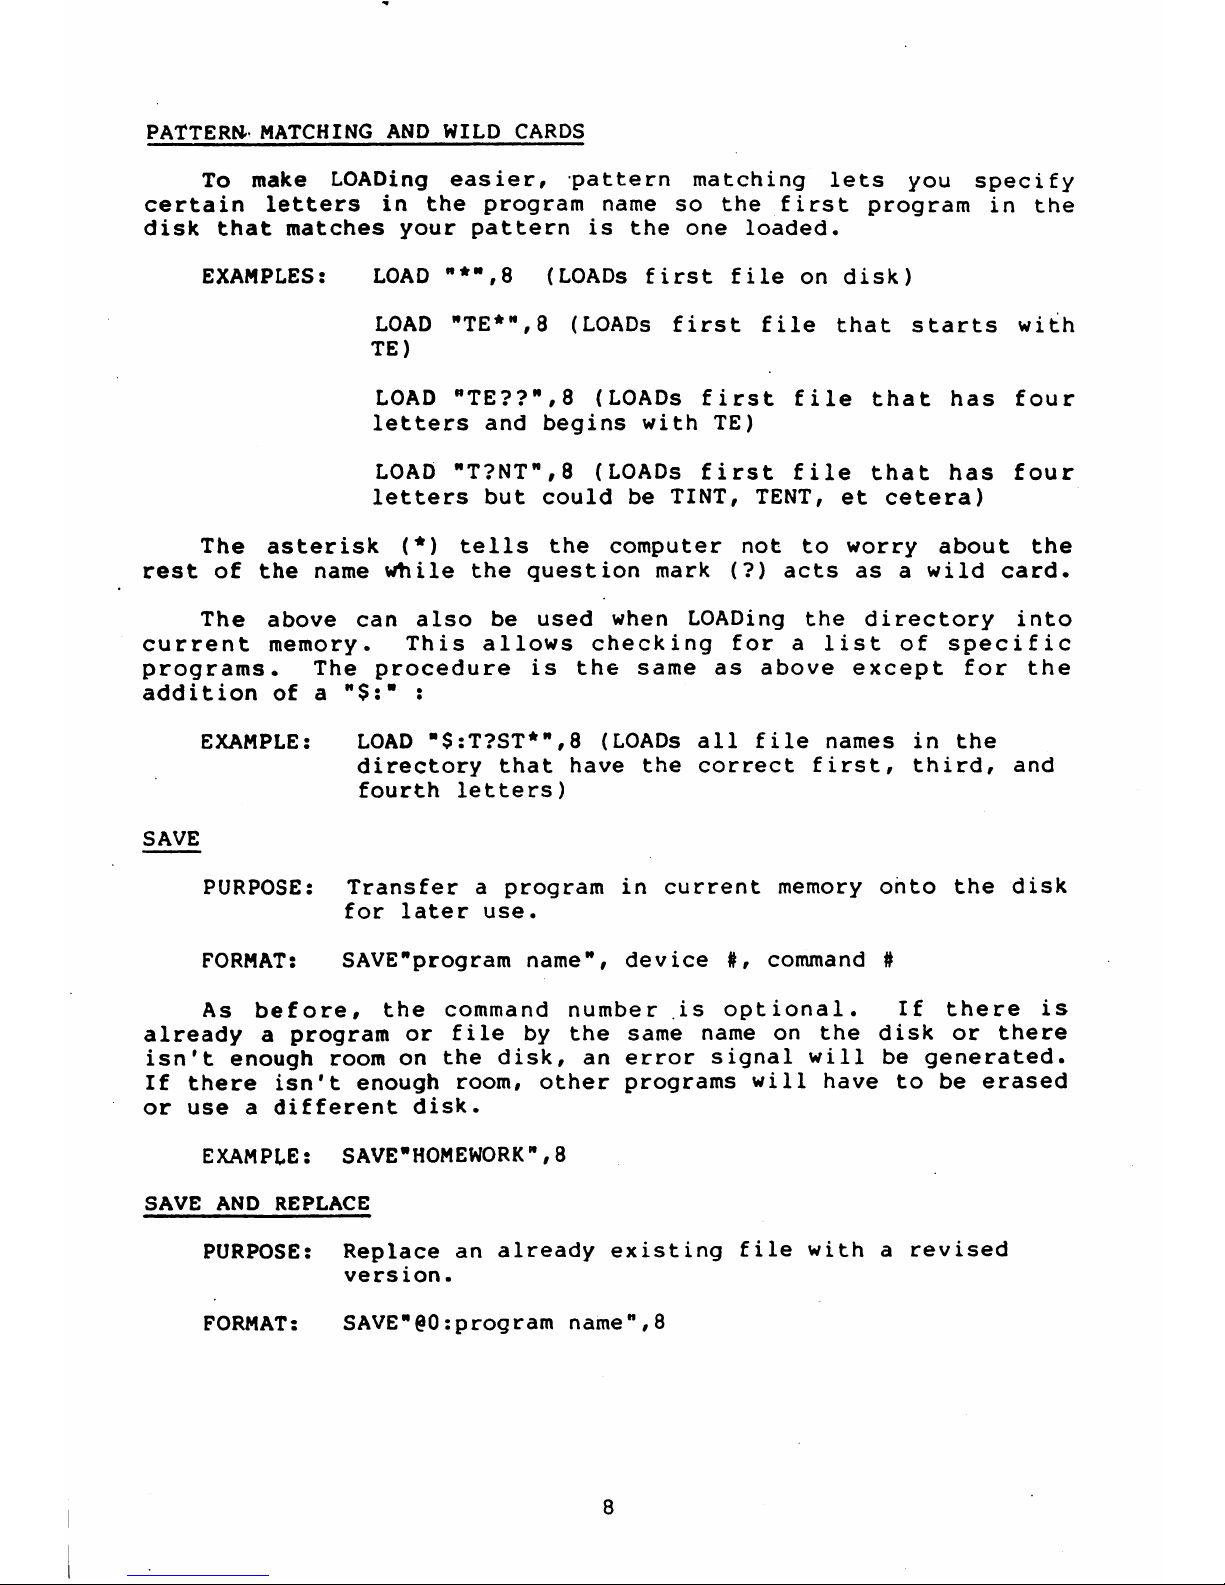
Page 6
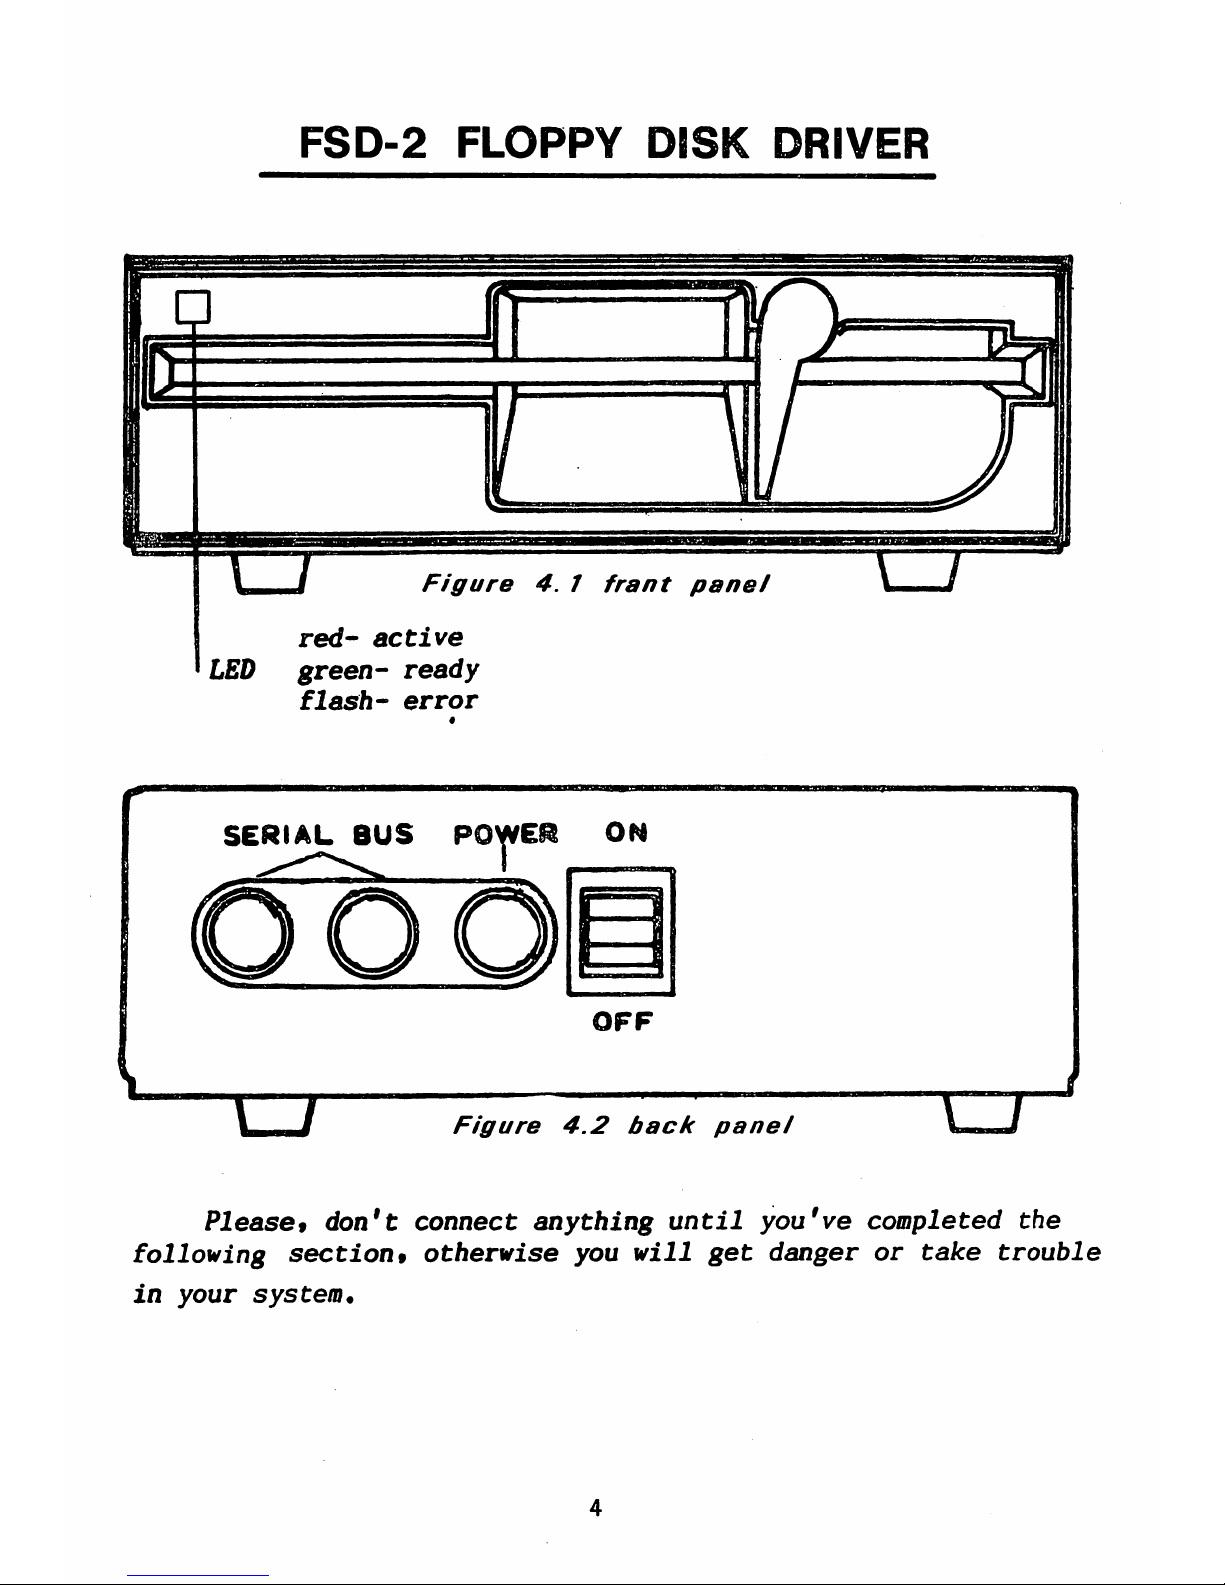
FSD-2
FLOPPY
DISK
DRIVER
Figure4.1
frant
panel
red-
active
LED
green-
ready
flash-
error
SERIAL
BUS
POWER
ON
Figure
4.2
back
panel
Please9
don't
connect
anything
until
you've
completed
the
following
section9
otherwise
you
will
get
danger
or
take
trouble
in
your
system.
Page 7
3.
INSTALLATION
CABLE
CONNECTIONS
First,
plug
the
power
cable
into
the
back
of
the
disk
drive.
It
won't
go.
in
if
you
try
to
put
it in
upside
down.
Next,
plug
the
other
end
into
the
electrical
outlet.
If
the
drive
makes
any
sound
at this
time,
turn
it
off
using
the
switch
on the
back!
Do
not
plug
any
other
cables
into
the
drive
with
the
power
on.
Second,
plug
the
serial
bus
cable
into
either
one
of
the
serial
bus
sockets
on
the
back
of
the
drive.
Turn
off
the
computer
and
plug
the
other
end
of
the
cable
into
the
back
of
the
computer.
You're
ready
to
go!
If
you
haveaprinter
or
another
disk
drive,
attach
its
cable
to
the
remaining
serial
bus
socket
to
"daisy
chain"
the
devices.
If
it'sadisk
drive,
you
will
need
to
change
one
of
the
drives
device
numbers.
TURNING
ON
THE
POWER
When
all
the
devices
are
hooked
together,
the
power
may
be
turned
on.
It is
importanttoturn
them
on
in
the
correct
order:
the
computerisalways
last.
Also:
make
sure
there
are
no
disks
in
the
disk
drive
when
you
turn
on
the
power.
DISK
INSERTION
To
insert
a
disk,
simply
turn
the
lever
to
a
horizontal
position,
slide
the
disk
in
gently
till
it
stops,
and
turn
the
lever
down.
The
disk
goes
in
face
up,
with
the
large
opening
going
in
first
and
the
write-protect
notch
(a
small
square
cutout
in
the
disk)
on
the
left.
Never
remove
a
disk
when
the
drive
light
is
on
i
And
remember,
always
remove
the
Disk
before
the
drive
is
turned
on
or
off!
Data
c^n
be
destroyed
by
the
drive
at
this
time!
Page 8
4.
USING
PROGRAMS
USING
PREPACKAGED
PROGRAMS
If
you
want
to
useaprogram
already
writtenona
disk,
such
asavideo
game,
here's
all
you
have
to
do.
Turn
the
lever
up and
insert
the
preprogrammed
disk
so
the
label
on
the
disk
is
facing
up and
closest
to you.
There
should
be,alittle
notch
on
the
disk
(maybe
covered
with
tape)
that
should
be
on
the
left.
Turn
the
lever
down.
Now,
type
in
LOAD
"program
name"
and
hit
the
RETURN
key.
The
disk
will
make
noise
and
your
screen
will
say:
SEARCHING
FOR
PROGRAM
NAME
LOADING
READY
When
the
screen
says
READY,
just type
in
RUN
and
hit
the
RETURN
key-
your
program-isready
to
use!
LOAD
COMMAND
PURPOSE:
To
transferaprogram
from
the
disk
to
the
computer's
current
memory.
FORMAT:
LOAD"program
,ameM,
device
#,
command
#
The
program
name
is
a
character
string,
that
is,
either
a
name
in
quotes
or
the
contents
of
a
given
string
variable.
The
device
numberispreset
on the
disk
drive's
circuit
board
to
be
8.
If
you
have
more
than
one
drive,
read
the
chapteronchanging
the
device
number.
This
manual
assumes
you're
using8as
the
device
number
for
the
disk
drive.
The
command
numberisoptional.
If
not
given,
or
zero,
the
program
is
loaded
normally,
into
the
start
of
your
computer's
available
memory
for
BASIC
programs.
If
the
number
is
1,
the
program
will
be
loaded
into
exactly
the
same
memory
locations
from
which
it
cane.
The
command
number
1
is
used
mainly
for
machine
language,
character
sets,
and
other
memory
dependant
functions,
EXAMPLES:
LOAD
"TEST",8
LOAD
"Program
#1M,8
LOAD
"Mach
Lang",8,1
LOAD
A$,J,K
Page 9
CAUTION:
Besides
putting
your
program
into
the
computer's
current
memory,
LOAD
wipes
out any
previous
program
there!
NOTE:
As
in
the
last
example,
you
can
use
variables
to
represent
strings,
device
numbers,
and
command
numbers;
just
be
sure
they
are
all
previously
defined
in
your
program*
Also,
see
the
note
on
file names
on
page
9*
THE
DISK
DIRECTORY
Your
disk
drive
is
a
random
access
device.
This
means
the
read/write
head
of
the
drive
can
go
to
any
spot
on
the
disk
and
accessasingle
block
of
data,
which
hold
up
to
256
bytes
of
information.
There
are
683
blocksona
disk.
Fortunately,
you
don't
have
to
worry
about
individual
blocks
of
data
(check
chapter5if
you
do).
There
isaprograminthe
disk
drive
called
the
Disk
Operating
System,orDOS,
that
keeps
track
of
the
blocks
for
you.
It
organizes
them
intoaBlock
Availibility
Nap,
or
BAM,
andadirectory. The
BAN
is
simply
a
checklistofthe
blocks,
and
is
updated
every
timeaprogram
is
SAVEd
oradata
file
OPENed.
The
directory
is
a
list
of
all
programs
and
other
files
stored
on
the
disk*
There
are
144
entries
available,
consisting
of
information
like
file
name
and
type,alist
of
blocks
used,
and
the
starting
block.
Like
the
BAN,
the
directoryisupdated
each
timeaprogramisSAVEd
or
a
file
OPENed.
However,
the
BAN
isn't
updated
until
the
file
is
CLOSEd.
If
not
CLOSEd
properly,
all
data
in
that
file
will
be
lost.
Nore
on
this
later.
The
directory
can
be
LOADed
into
your
computer
memory
just
likeaBASIC
program.
Put
the
disk
in
the
drive
and
type:
L0AD"$",8
The
computer will
say:
SEARCHING
FOR
$
FOUND
$
LOADING
READY
Now
the
directoryisin
current memory,
and
if
you
type
LIST
it
will
be
displayed
on
the
screen.
To
examine
the
directory
from
insideaBASIC
program,
see
chapter6concerning
the
GET#
statement.
Page 10
PATTERN
MATCHING
AND WILD
CARDS
To
make
LOADing
easier,
pattern
matching
lets
you
specify
certain
letters
in
the
program
name
so
the
first
program
in
the
disk
that
matches
your
patternisthe
one
loaded.
EXAMPLES:
LOAD
"*",8
(LOADs
first
file
on
disk)
LOAD
"TE*",8
(LOADs
first
file
that
starts
with
TE)
LOAD
"TE??",8
(LOADs
first
file
that
has
four
letters
and
begins
with
TE)
LOAD
"T?NT",8
(LOADs
first
file
that
has
four
letters
but
could
be
TINT, TENT,
et
cetera)
The
asterisk
(*)
tells
the
computer
not
to
worry about
the
rest
of
the
name
while
the
question
mark
(?)
acts
asawild
card.
The
above
can
also
be
used
when
LOADing
the
directory
into
current
memory.
This
allows
checking
for
a
list
of
specific
programs.
The
procedure
is
the
same
as
above
except
for
the
additionofa
"$:"
:
EXAMPLE: LOAD
"$:T?ST*",8
(LOADs
all
file
names
in
the
directory
that
have
the
correct
first,
third,
and
fourth
letters)
SAVE
PURPOSE:
Transferaprogram
in
current
memory
onto
the
disk
for
later
use.
FORMAT:
SAVE"program
name",
device
#,
command
#
As
before,
the
command
number
is
optional.
If
there
is
alreadyaprogram
or file
by
the
same
name
on
the
disk
or
there
isn't
enough
room
on
the
disk,
an
error
signal
will
be
generated.
If
there
isn't
enough
room,
other
programs
will
have
to
be
erased
or
useadifferent
disk.
EXAMPLE:
SAVE
"HOMEWORK",8
SAVE
AND
REPLACE
PURPOSE:
Replaceanalready
existing
file
witharevised
version.
FORMAT:
SAVE"§0:program
name",8
Page 11
If
you
edit
an
existing
program
and
want
to
save,itunder
the
same
name,
SAVE
AND
REPLACE
does
so
automatically.
If
you
want
to
keep
the
old
version,
save
the
new
version
underadifferent
name*
EXAMPLE:
SAVE"@0:HOMEWORK",8
VERIFY
PURPOSE:
Checks
current
program
with
one
on
the
disk.
FORMAT:
VERIFY"program
name",
device#,command
#
VERIFY
doesabyte
by
byte
comparison
of
the
program
in
current
memory
with
one
on
the
disk,
as
specifiedinthe
VERIFY
command.
EXAMPLE:
VERIFY"OLD
VERSION",8
NOTE
ABOUT
FILE
NAMES:
File
names
must
begin
with
a
letter
notanumber.
Spaces
are
permitted.
While
there
is
no
restrictiononthe
length
of
a
file
name,
all
commands
must
be
58
or
fewer
charactersinlength.
For
example,inthe
above
VERIFY
command,
there
are
10
characters
besides
the
actual
program
name,
so
the
maximum
name
length,inthis
case,
is
48
characters.
Page 12

5,
DISK
COMMANDS
So
far,
you
have
learned
the
simple
ways
of
using
the
disk
drive.
In
order
to
communicate
more
fully
with
the
disk,
disk
commands
need
to
be
used.
Two
of
these,
OPEN
and
PRINT*,
allow
the
creation
and
fillingofa
data
file
on
the
disk.
Just
as
important
is
their
ability
to
openacommand
channel,
allowing
the
exchangeofinformation
between
computer
and
disk
drive.
OPEN
PURPOSE:
CreatesafilebyOPENingacommunication
channel
between
computer
and
disk
drive.
FORMAT:
OPEN
file#,deviceI,(command)
channel#,text
string
The
file
number
shouldbeany
number
from1to
127.
Numbers
from
128
to
255
can
be
used
but
shouldbeavoidedasthey
cause
the
PRINT#
statement
to
generatealinefeed
after
carriage
returns.
The
device
numberisusually
8.
The
channel
number
can
be
any
number from2to
15.
These
refertochannels
used
to
communicate
with
the
disk, and
channels
0
and1are
used
by
the
operating
system
for
LOADing
and
SAVEing.
Channels2through
14
can
be
used
to
send
data
to
files
while
15
is
reservedasthe
command
channel.
The
text
string
is
a
character
string
that
is
used
as
the
name
for
the
file
created.Afile
cannot
be
created
unless
the
file
name
is
specifiedinthe
text
string.
If
you
attempt
to
openafile
already
opened,
the
error
signal
"FILE
OPEN
ERROR"
will
be
generated.
10
Page 13

EXAMPLES:
OPEN
5,8,5,
"TEST"
(createsafile
called
TEST)
OPEN
15,8,15,"I"
(sends
commandtodisk
on
command
channel)
OPEN
A,B,C,Z$
(these
variables
must
be
defined)
Fillsapreviously
OPENed
file
with
data.
PRINT#
file
!,
text
string
The
PRINT!
command
works
exactly
like
the
PRINT
command,
except
the
data goes
to
a
device
other
than
the
screen,
in
this
case
the
disk
drive.
When
used
withadata channel,
PRINT!
sends
informationtoa
buffer
in
the
disk
drive
which
then
LOADs
it
onto
the
disk.
When
used
withacommand
channel,
PRINT!
sends
commandstothe
disk
drive. The
commandisplaced
inside
quotes
as
a
text
string.
EXAMPLES:
PRINT!
7,C$
(fills
file7with
text
string
C$)
PRINT!
15,
"I"
(sends
disk
commandoncommand
(Channel)
INITIALIZE
PURPOSE:
Initializes
disk
driver
to
power
up
condition.
FORMAT:
OPEN
15,8,15,
"I"
or
OPEN
15,8,15:PRINTH5,
"I"
Sometimes,
an
error
condition
on
the
disk
will
prevent
you
from
performinganoperation.
INITIALIZE
returns
the
disk
drive
to
its
original
state
when
power
is
turned
on.
NEW
PURPOSE:
Formats
new
disk
or
re-formats
used
one.
FORMAT:
PRINT!15,
"NEW
0:
disk
name,
id!"
This
command
formatsanew
disk.
It
is
also
useful
to
erase
an
already-formatted
disk,
as
it
erases
the
entire
disk,
puts
timing
and
block
markers
on,
and
creates
the
directory
and
the
BAM.
The
disk
name
is
for
user
convenience
while
the
id!
isa2
digit
alphanumeric
identifier
that
is
placed
in
the
directory
and
every
block
on the
disk.
If
you
switch
disks
while
writing
data,
the
drive
will know
by
checking
the
id#.
EXAMPLES:
OPEN
15,8,15,
"NEW
0:
TEST
DISK,
Al"
OPEN
15,8,15:PRINT!15,"N0:'MYDISK,
MY"
11
Page 14

If
the
disk
needs
erasing
but
not
re
forma11ing,•
the
same
command
is
used,
but
leave
out
the
id#.
EXAMPLE:
OPEN
15,8,15,"N0:
NEW
INFO11
SCRATCH
PURPOSE:
Eraseafile
or
files
from
the disk.
FORMAT:
PRINT#15,
"SCRATCH
0:
filename"
This
command
erases
one
or
more
files
from
the
disk,
making
room
for
new
or
longer
files.
Groups
of
files
can
be
erased
at
one time
by
naming
all
of
them
in
one
scratch
command.
EXAMPLES:
PRINT#15,"S0:TEXT"
(erases
file
called
TEXT)
PRINT#15,"SCRATCH0:
TEXT,
0:TEST,
0:
MUSIC"
(erases
files
TEXT,
TEST,
and
MUSIC)
COPY
PURPOSE:
Duplicateanexisting
file.
FORMAT:
PRINTi.15,
"COPY
0:newfilename=0:oldf
ilenar.e"
COPY
allows
you
to
makeacopy
of
any
programorfile
on
the
disk.
The
new file's
name
must
be.
different
from
the
old
one.
COPY
can
also
combineupto
four
files
into
one
new
one.
EXAMPLES:
PRINT#15,"C
0:BACKUP=0:ORIGINAL"
PRINT#15,"COPY0:NEWFILE=0:
OLD1,0:
OLD2,0"
(combines
OLD1
and
OLD2
into
NEWFILE)
RENAME
PURPOSE:
Change
the
name
of
existing
file.
FORMAT:
PRINT#15#"RENAMEO:
newname=0:
oldname"
This
command
lets
you
change
the
name
of
a
file
once
it's
in
the
disk
directory.
RENAME
will
not
work
on
any
files
that
are
currently
open.
EXAMPLE:
PRINT#15,HR
0:GOODNAME=0:
DUMBNAME"
VALIDATE
PURPOSE:
Removes
wasted
spaces
on
disk.
FORMAT:
OPEN
15,8,15,"V0:"
12
Page 15

Afteradisk
has
-had
many
files
saved
and
erased,
small
gaps
in
the
data
begin
to
accumulate
and
waste
memory
space
on the
disk.
VALIDATE
reorganizes
your
disk
so
you
can
get
the
most
memory
from
the
available
space.
Also,
this
command
removes
files
that
were
OPENed
but
never
properly
CLOSEd.
CAUTION!
VALIDATE
erases
random
files
(see
chapter
7).
If
your
disk
contains
random
files,
DO
NOT
use
this
command!
READING
THE
ERROR
CHANNEL
Without
the
DOS
Support
Program,
there
is
no
way
to
read
the
disk
error
channel
since
you
need
to
use
the
INPUT#
command,
unusable
outsideaprogram.
Here
is
a
simple
BASIC
program
to
read
the
error
channel:
10
OPEN
15,8,15
20
INPUT#15,
A$,
B$,
C$,
D$
30
PRINT
A$,
B$,
C$,
D$
When
you
use
an
INPUT#
from
the
command
channel,
you
read
up
to
four
variables
that
describe
the
error
condition.
The
first,
third,
and
fourth
are
numberssonumberic
variables
can
be
used.
The
inputs
are
organizedasfollows:
First:
error
number
(0
means
no
error).
Second:
error
description.
Third:
track
number
where
error
occurred.
Fourth:
block
(sector)intrack
where
error
occurred.
Errors
on
track
18
concern
the
BAM and
directory.
CLOSE
PURPOSE:
Proper
allocationofdata
blocks,
closes
entry.
FORMAT:
CLOSE
file#
This
command
is
very
important.
Onceafile that
was
opened
is
no
longer
needed
for
data
entry,
IT.
MUST
BE
CLOSED
OR
ELSE
ALL
DATA
IN
THAT
FILE
WILL
BE
LOST.
It
is
very
important
that
the
data
filesbeCLOSEd
before
the
error
channel
(channel
#15)isCLOSEd,
Otherwise,
the
disk
drive
will
CLOSE
them
for
you
but
BASIC
will
still
think
they
are
open
and
let
you
try to
write
to
them.
The
error
channel
should
be
OPENed
first
and
CLOSEd
last
of all
your
files.
NOTE:
If
your
BASIC
program
leads
to
an
error
condition,
all
files
are
CLOSEdinBASIC,
but
not
on
the
disk
drive.
This
is
VERY
DANGEROUS!
Immediately
type:
CLOSE
15:
OPEN
15,8,15:
CLOSE
15
This
will
re-initialize
your
drive
and
make
all
your
files
safe.
13
Page 16

6.
SEQUENTIAL
FILES
Sequential
files
are
stored
and
read
sequentially
from
beginningtoend.
There
are
basically
three
different
types
of
sequential
files
that
can
be
used.
The first
is
the
program
file,
which
is
abbreviatedinthe
directoryasPRG.
The
PRG
is
the
only
sequential
file
that
can
store
and
read
programs.
The
second
file,
sequential
(SEQ),
and
the
third
file,
user
(USR),
are
for
data
handling.
These
two
files
must
be
opened
just like
the
command
channelinthe
last
chapter.
OPEN
PURPOSE:
Openasequential
file.
FORMAT:
OPEN
filet,
device*,
channel*,
"0:
name,
type,
direction"
The
file
number
is
the
same
as
in
previous
uses
of
the
OPEN
command,
the
device
numberisusually8,the
channel
number
is
a
data
channel,2through
14.
It'sagood
idea
to
use
the
same
number
for
both
file
and
channel
numbers,
for
easy
remembering
(you
may
have
noticed
this
in
previous
examples).
The
name
is
the
file
name,
for
which
no
wild
cards
or
pattern
matching
may
be
used
if
you're
creatingawrite
file.
The
type
can
be
any
one
from
the
list
below,
or
at
least
the
first
letter
of
one.
The
direction
must
be
READ
or
WRITE,
or
at
least
their
first
letters.
FILE
TYPE
MEANING
PRG
Program
file
SEQ
Sequential
file
USR
User
file
REL
Relative
(not
implementedinBASIC
2.0)
EXAMPLES:
OPEN
5,8,5,
"0:
DATA,
S,
R"
OPEN
A,B,C,"0:TEXT,
P,W"
OPEN
A,B,C,"0:"
+A$+
"U,W"
(OPENsawrite
file
withaname
specifiedbythe
string
variable
A$)
OPEN
2,8,2
"(30:
PHONES,S,W"
(replaces
old
version
of
the
file
withanew
one)
Once
a
file
has
been
opened
for
reading
or
writing,
three
commands
can
be
used
to
actually
transfer
the
data.
These
commands
are
PRINT*, INPUT*r
and
GET#.
14
Page 17

PRINT#
PURPOSE:
Directs
output
to
previously
opened
file.
FORMAT:
PRINT#
file#,
data
list
(no
space
allowed
between
PRINT
and
*)
The
PRINTf
statement
works
exactly
like
PRINT:
formatting
capabilities
for
punctuation
and
data
types
work
just
the
same.
But
that
means
you
need
to
be
careful
when
putting
data
into
files. The
file
numberisthe
one
just
OPENed
and
the
data
list
consistsofvariables
and/or^text
inside
quotation
marks.
Care
must
be
taken
when
writing
in
data
so
that
it
is
as
easy
as
possibletoread
out later.
Commas
used
to
separate
items
will
cause
spaces
to
be
stored
on
the
disk.
Semi-colons
will
keep
spaces
from
being
stored.
If
both
commas
and
semi-colons
are
absent,acarriage
return
(CR)
will
be
stored
at
the
end
of
the
data
that
is
written
in.
Consider,
the
following
example
program:
10
A$="THISISAH
20
B$="TEST"
30
OPEN
8,8,8,
"0:TEST
,S,W"
40
PRINT#8,A$,B$"OF
THE
DISK"
50
CLOSE8
60
END
If
you
could
see
the
data
and
its
positiononthe
disk,
it
would
look
like
this:
123
4 5 6
7 8 9
10
11
12 13
14
15
16
17
18 i9
20
21
22
23
24
25
THISISA
TESTOF
26
27
28
29
30 31
32
33
34 35
THE
DISKCR
eof
(end
of
file)
The
comma,
semi-colon,
and
carriage
return
have
special
meaning
when storedtothe
disk.
When
used
insideastring
or
quotes,
they
will
be
storedasregular
characters.
When
used
as
a
separator
between
fields,
the
comma
inserts
spaces
(usually
a
waste
of
memory),
the
semi-colon
doesn't,
and
the
CR stores
a
carriage
return
on
the
disk.
These
are
important
when
you
use
GET#
or
INPUT#toretrieve
the
data
you
stored•
GET»
PURPOSE:
To
get
data
from
the
disk
byte
by
byte,
FORMAT:
GET#
file
#,
variable
list
Data
comesinbytebybyte,
including
CR's,
commas,
and
other
separators.
Ge-nerally,
it's
safer
to
use
character
string
variablestoavoid
error
messages.
15
Page 18

EXAMPLES:
GET#8,
A$
GET#5,.A(only
works
for
numerical
data)
GET#A,
B$,
C$,
D$
(GETs
more
than
one
variable
at
a
time)
The
GETf
statement
is
very
useful
when
the
actual
data
contentorstructureisnot
knownr
such
as
a
file
on
a
disk
that
has
been
damaged.
If
you
are
familiar
with
the
file
and
there
are
no
problems,
INPUT!ismore
efficient.
But
to
look
at
data
in
an
unfamiliarordamaged
file,
the
following example
program
will
read
the
contents
out
(in
this
case,
from
the
file
created
in
the
PRINTi
example
program).
10
OPEN
8,8,8,-
"TEST"
20
GET#8,A$:PRINT
A$;
30 IF
ST=0
THEN
20
(ST
isastatus
signal)
40
CLOSE
8
50
END
INPUT#
PURPOSE:
Retrieve
disk
data
in
groups.
FORMAT:
INPUT#
file
#,
variable
The
file
number
is
the
same
as
the
one
OPENed
and
the
variable
can
represent
character
strings
or
numbers.
To
read
a
group
of
data,
separators
are
needed
to
indicate
the
start
and
finish
of
the
group.
These
are
the
comma,
semi-colon,
and
CR,
and
work
as
explained
in
the
section
on
the
PRINT#
command.
Numbers
are
stored
withaspace
in
front
of
them,
which
is
empty
for
positive
numbers
and
containsanegative
sign
for
negative
numbers.
Here'sasample
program:
10
OPEN
8,8,8,"@0:
DATAFILE,S,W"
20
FOR
A=l
TO
10
30
PRINT#8,A
40
NEXT
A
50
CLOSE
8
60
OPEN
2,8,2,"DATAFILE"
70
INPUT#2,B:PRINT
B
80 IF
ST=0
THEN
70
90
CLOSE
2
100
END
This
example
program
will
write
the
numbers1through10to
a
sequential
file
called
DATAFILE.
Lines
70
and
80
will
read
the
data from
the
disk
and
print
it
out.
See
page
20
for
two
useful
sample
programs.
16
Page 19

7.
RANDOM
FILES
Sequential
files
are
fine
when
you're
just
working
with
a
continuous
streamofdata,
but
some
jobs
need
more
flexibility.
For
example,
if
you
have
a
large
mailing
list,
it
would
be
inconvenient
to
scan
the
entire
list
to
find
one
person's
address.
A
random access
meth.od
would
let
you
pick
out
the
desired
data
without
having
to
read
the
whole
file.
There
are
two
file
types
that
can
do
this:
random
files
and
relative
files.
Random
files
are
the
best
choice
when
speed
is
a
desired
factor,
as
in
machine
language
programs.
This
is
because
locationsofthe
data
are
maintainedbythe
program
when
random
files
are
used,
while
relative
file
locations are
maintainedbythe
DOS.
The
problem
is
random
files
are
easy
to
accidentally
remove
from
the
disk
since
the
DOS
doesn't
maintain
them.
Random
files
are
files
that
have been
written
to
a
certain
physical
location
on
the
disk.
The
disk
is
divided
into
35
concentric
rings,
or
tracks,
with
each
track
containing
from
17
to
21
sectors.
TRACK
NUMBER
1
TO
17
18
TO
24
25
TO
30
31
TO
35
SECTOR
RANGE
0
TO
20
0
TO
18
0
TO
17
0
TO
16
TOTAL
SECTORS
21
19
18
17
It
is
possibletoread
and
write
to
any
block
on
the
disk,
as
well
as
determine
which
blocks
are
available
for
use.
The
following
commands
explain
howtouse
the
random
file
functions.
OPEN
PURPOSE:
OPENsadata
channel
for
random
access.
FORMAT:
OPEN
file
4,
device
#,
channel
#,
"#"
When
working
with
random
files, you
need
to
have
two
channels
open
to
the
disk:
the
command
channel
(15)
to
send
commands
and
a
data
channel(2to
14)
for the
data
transfer. The
data
channel
for
random
access
files
is
OPENed
by
selecting
the
pound
sign,
"#", as
the
file
name.
The
additional
n#"
on
the
end
of
the
command
causes
the
disk
to
allocatea256
byte
buffer
for
the
purposeofhandling
the
desired
block
of
data.
If
a
buffer
numberisspecified,
the
allocated
buffer
will
be
the
one
you
specified.
EXAMPLES:
OPEN
5,8,5,"#"
(you
don't
care
which
buffer)
OPEN
A,B,C,"#2lf
(you
specify
buffer
2)
17
Page 20

BLOCK-READ
PURPOSE:
To
readaspecific
block
of
data
from
the
disk.
FORMAT:
PRINT!
file
#,"BLOCK-READ:"
channel
#,
drive
#,
track
!,
block#(BLOCK-READ
can
be
replaced
with
B-R)
The
file
and
channel
numbers
are
ones
that
have
been
OPENed.
The
track
number
and
block
number
indicate
which
256
byte
block
is
to
be
read.
Executing
this
command
causes
the
disk
drive
to
move
the
specified
block
of
data
into
the
buffer
area.
The
data
can
then
be
read
from
the
buffer
area
using
either
INPUT!
or
GET#.
Only
data
in
that
particular
block
will
be
read,
and
any
unused
bytes
in
the
block
will
not
be
read*
The
sample
program
below
uses
BLOCK-READtoread
the
contents
of
block9on
track
5
and
display
the
block's
contents
on
the
screen.
10
OPEN
15f8r15
20
OPEN
8,8,8,"!"
30
PRINT!15,
"B-R:"8,0f5,9
(reads
block
into
buffer)
40
GET!8,
A$
50
PRINT
A$;
60
IF
ST=0
THEN
40
70
PRINT
"READ.
COMPLETE"
80
CLOSE8:
CLOSE
15
.BLOCK-WRITE
PURPOSE:
Writeablock
of.data
to
a
specified
block
location
on
the
disk.
FORMAT:
PRINT!
file
#,
"BLOCK-WRITE:11
drive
#,
channel
!,
track
!,
block
!
BLOCK-WRITE
can
be
shortened
to
B-W.
This
command
causes
data
previously
stored
in
the
buffer
to
be
written
to
the
specified
locationonthe
disk.
The
data
should
be
transferred
to
the
buffer
on
a
data
channel
using
PRINT!
before
BLOCK-WRITEingitinto
the
disk.
The
DOS
keeps
track
of
how
many
bytes
are
stored
into
the
buffer and
stores
the
byte
count into
the
first
byte
of
the
block
when
BLOCK-WRITEisexecuted. This
means
that
only
255
bytes
can
actually
be
writtentoor
read
from
the
block,
since
the
byte
count
uses
the
first
byte
of
the
block.
Here's
an
example
of
a
routine
that
will
write
data
to
the
same
block
that
is
read
in
the
BLOCK-READ
example
above
(track
5,
block
9):
10
OPEN
15,8,15
20
OPEN
8,8,8,"!"
30
FOR
AA=1 TO
32
40
PRINT!8,
"TESTING"
50
NEXT
60
PRINT!15f"B-W:"
8;0>5,9
70
CLOSE8:CLOSE15
18
Page 21

BLOCK-ALLOCATE
PURPOSE:
Determine
if a
particular
block
is
free
and
allocate
it
if
so.
FORMAT:
PRINT#15,"B-A:"
channel
#,drive#,track
»,
block
*
As
mentioned
earlier,
the
DOS
does
not
maintain
the
disk
when
BLOCK-READs
and
BLOCK-WRITEs
are
used.
But
the
user
can
make
sureaparticular
block
is
availablebyusing
the
BLOCK-ALLOCATE
command.
This
allows
use
of
BLOCK
commands
on
a
disk
with
files
already
on
it.
By
checking
the
BAM,
the
command
aetermines
if
the
specified
block
has
been
used.
Since
the
BAM
updates
each
time
a
file
is
stored
on
the
disk,
files
can
be
maintained.
BLOCK
commands
do
not
update
the
BAM
and
so
will
not
be
recognized
unlessaBLOCK-ALLOCATE
has
been
executed.
CAUTION:
the
VALIDATE
command
does
not
recognize
random
files
and
should
never
be
used
on
a
disk
that
has
random
files.
If
BLOCK-ALLOCATE
determines
that
the
specified
block
has
already
been
used,
an
error
signal
(65)
will
be
generated.
The
error
message
tells
you
the
numbers
of
the
next
available
track
and block
on
the
disk.
This
block
does
not
get
allocated,sothe
BLOCK-ALLOCATE command
must
be
used
again,
but
this
time
you
can
be
sure
that
the
block
specifiedisfree
to
use.
The
following
program
will
allocateablock
and
write
to
that
block.
If
the
block
is
already
used,
it
will write
to
the
next
available
one,
as
indicatedbythe
error
message.
c
10
OPEN
15,8,15:OPEN
8,8,8,"#"
20
PRINT#8,"THIS
GOES
INTO
THE
BUFFER"
30
T=5:S=9
40
PRINT#15,"B-A:M0,T,S
50
INPUT#15,A,A$,B,C
60
IF
A=65
THEN
T=B:S=C:
GOTO
40
70
PRINT#15,"B-W:"
8,0,T,S
80
PRINT"DATA
WAS
STORED
IN
TRACK:"T,"
SECTOR:"S
90
CLOSE
8:CLOSE
15
100
END
Line
20
loads
the
buffer
with
text,
lines
30
and
40
check
block9on
track5to
see
if
it's
free,
and
line
50
inputs
the
error
signal.
If
the
block
is
free,
the
data
is
stored
there.
If
block9on
track
5
is
already
used,
line
60
takes
the
new
block
and
track
numbers
and
allocates
the
block
they
specify,
and
then
the
data
is
storedinthe
new
block.
Lines70and
80
read
the
track
and
b]ock
numbers
into
the
computer
and
print
them
on
the
screen.
19
Page 22

8.
RELATIVE
FILES
Relative
files
can
access
any
piece
of
data
on
the
disk,
just
like
random
files,
but
you
don't
have
to
maintain
the
files
in
your
own
program*
The
DOS
maintains
the
data
for
you,
keeping
track
of
the
status
of
your
files.
Because
of
this,
relative
files
are
slower
than
random
files,
but
often
the
extra
convenience
makes
up
for
this.
The
DOS
keeps
track
of
the
tracks
and
sectors
(blocks)
used,
and
even
allows
records
to
overlap
from
one
block
to
the next.
It
does
this
be
establishing
side
sectors,aseries
of
pointers
for
the
beginningofeach
record.
There
can
be6side
sectors
in
a
file,
and
each
side
sector
can
point
to
up
to
120
records.
This
meansafile
can
have
as
many
as
'720
records,
and
since
each
record
can
be
254
characters
long,
one
file
can
fill
the
entire
disk.
The
block
format
consistsofthe
first
two
bytes
specifying
the
track
and
sector
of
the next
data
block.
The
next
254
bytes
contain
the
actual
data.
Any
empty
record
will
have
FF
(hexidecimal
for
all
l's)
in
the
first
byte
and
00
in
the
rest
of
the
record.
The
side
sectors
are
used
to
reference
all
side
sector
locations,
not
just
the
120
data
block
locations
related
to
that
side
sector.
On
the
next
page
you
will
find
a
chart
showing
the
format
of the
relative
files.
20
Page 23

RELATIVE
FILE
FORMAT
DATA
BLOCK:
BYTE
DEFINITION
0,1
...••..
Track
and
sector
of
next
data
block.
2-256
254
bytesofdata.
Bipty
records
contain FF
(all
binary
ones)
in
the
first
byte
followedby00
to
the
end
of
the
record.
Partially
filled
records
are
padded
with
nulls
(00).
SIDE
SECTOR
BLOCK:
BYTE
DEFINITION
0,1
••
Track
and
sectorofnext
side
sector
block.
2
Side
sector
number
(0-5).
3
••«•••••
Record
length.
4,5
Track
and
sectoroffirst
side
sector
(0).
6,7
Track
and
sectorofsecond
side
sector
(1),
8,9
Track
and
sectorofthird
side
sector
(2).
10,11
Track
and
sectoroffourth
side
sector
(3).
12,13
Track
and
sectoroffifth
side
sector
(4).
14,15
Track
and
sectorofsixth
side
sector
(5).
16-256
Track
and
sector
pointersto120
data
blocks.
USING
RELATIVE
FILES
Relative
files
are
created
the
first
time
they
are
OPENed.
That same
file
will
be
used
until
it
is
C LOS
Ed.
A
relative
file
can
only
be
erased fromadisk
by
using
the
SCRATCH
command
or
by
re-formatting
the
entire
disk.
The
"§"
sign,
used
with
SAVE
as
a
SAVE
and
REPLACE,
will
not
work with
relative
files.
FORMAT TO
CREATE
RELATIVE
FILE:
OPEN
file
#,
device#,channel#,"0:name,L,"♦CHR$(rl#)
(record
length)
21
Page 24

EXAMPLES:
OPEN
2,8,2,"0:FILE,L"+CHR$(100)
(record
length
is
100)
OPEN
F,8,F,"0:"
+A$+
",L,"+CHR$(Q)
FORMAT
TO
OPEN
EXISTING
RELATIVE
FILE:
OPEN
file
#,
device#,channel#,w0:name"
EXAMPLE:
OPEN
2,8,6,
"0:
TEST"
V
In
this
case,
the
DOS
can
tell
by
the
syntax
that
it
is a
relative
file.
Both
of
the
above
formats
allow
either
reading
or
writingtothe
file.
HOWEVER:
In
order
to
read
or
write,
BEFORE
ANY
OPERATION,
you
must
position
the
file
pointe'r
to
the
correct
record
position*
POSITION
PURPOSE:
To
POSITION
the
file
pointerata
record.
FORMAT:
PRINT*
file#,"P"
CHR$(channel*)CHR$(rec#
lo)
CHR$(rec#
hi*)CHR$(record
position)
NOTE:
CHR$(record
position)
specifies
the
location
within
the
record
itself
and
is
optional.
Since
there
are
720
records
available
and
the
largest
number
one
byte
can hold
is
256,
two
bytes
must
be
used
to
specify
the
position.
The
rec#lo
contains
the
least
significant
part
of
the
address
and
reclhi
hold
the
most
significant.
The
relationship
is
represented
by:
reel*rec#hi*256♦rec#lo.
The
rec#
is
the
actual
positionina
record
where
data
transfer
starts.
EXAMPLES:
PRINTI15,"PHCHR$(2)CHR$(1)CHR$(0)
PRINTI15,"PWCHR$(CH)CHR$(Rl)CHR$(R2)CHR$(P)
Here'sasample
program
that
createsarelative
file:
10
OPEN
15,8,15
20
OPEN
8,8,8,"0:TEST,L,w+CHR$(50)
30
PRINT#15,ttP"CHR$(8)CHR$(0)CHR$(4)CHR$(l)
40
PRINT#8,CHR$(255)
50
CLOSE8:CLOSE15
22
Page 25

This
program
createsarelative
file
called
TEST
that
will
contain
records
that
are
50
bytes
long.
Line
30
moves
the
pointertothe
first
positioninrecord
#1024
(rec#=256*4+0
=
JL024).
Notice
that
the
POINTER
commandissent
on the
command
channel
while
data
is
sent
on
a
data
channel,8in
this
case.
Since
the
record
didn't
already
exist,
an
error
message
will
be
generated,
warning
you
not
to
use
GET#
or
INPUT#.
Oncearelative
file
exists,
you
can
OPEN
it
and
expand
it
or
access
it
for
data
transfer.
The
file
can
be
expanded
but
the
record
length
cannotbechanged.
To
expandafile
just
specify
a
larger
number
of
records,asin
Line
30
in
the
previous
example
program.
To
write
data
to
an
existing
relative
file
use
the
following:
10
OPEN
15,8,15
20
OPEN
2,8,6,"0:TEST"
30
GOSUB
1000
40
IF
A=100
THEN
STOP
50
PRINT#15,MP"CHR$(6)CHR$(100)CHR$(0)CHR$(l)
60
GOSUB
1000
70
IF
A=50
THEN
PRINT#2,1:GOTO50
80
IF
A=100
THEN
STOP
90
PRINT#2,"123456789"
100
PRINT#15,"P"CHR$(6)CHR$(100)CHR$(0)CHR$(20)
110
PRINT#2,
"JOHN
QWERTY"
120
CLOSE
2:CLOSE15
130
END
1000
INPUT#15,A,A$,B$,C$
1010
IF
(A=50)OR(A<20)
THEN
RETURN
1020
PRINT
"FATAL
ERROR:";
1030
PRINT
A,A$,B$,C$
1040
A=100:RETURN
Lines
10
and
20
open
the
command
andadata
channel.
Lines
30
and
40
check
for
errors.
Line
50
moves
the
file
pointer
to the
100th
record
position.
Since
no
records
exist
yet,
an
error
signal
is
generated.
Lines
60,
70,
and
80
check
for the
error
and
create
100
records.
Line
90
writes9bytes
of
data
to
the
first9locations
in
record
100.
Line
110
then
printsaname
from
that
position.
It
is
important
that
data
is
wrltt.en
into
the
record
sequentiallysodata
alreadyinthe
recordisnot
destroyed.
23
Page 26

The
following
program
reads
back
the
data
put
in
the
file
by
the
previous
program.
10
OPEN
15,8,15
20
OPEN
2,8,6,"0:TEST"
30
GOSUB
1000
r
40
IF
A*=100
THEN
STOP
50
PRINT#15,"P"CHR$(6)CHR$(100)CHR$(0)CHR$(l)
60
GOSUB
1000
70
IF
A=50
THEN
PRINT
A$
80 IP
A=100
THEN
STOP
90
INPUT!2,D$:
PRINT
D$
100
PRINT#15,"P"CHR$(6)CHR$(100)CHR$(0)CHR$(20)
110
INPUT#2,E$:
PRINT
E$
120
CLOSE
2:CLOSE15
130
END
1000
INPUT#15,A,A$,B$,C$
1010
IF
(A=5O)OR(A<20)
THEN
RETURN
1020
PRINT
"FATAL
ERROR:";
1030
PRINT
A,A$,B$,C$
1040
A=*100:
RETURN
Lines
90,
100,
and
110
read
the
record
and
display
the
contentsonthe
screen.
Notice
that
the
carriage
return
sent
to
the
disk
after
each
PRINT#
statementonthe
write
routineisthe
separator
for
each
field
on
the
record.
If
the
file
is
to
be
writtenorread
sequentially,itisn't
necessary
to
adjust
the
pointer
to
each
record.
The
record
pointer
automatically
starts
at
Position1if
no
other
position
has
been
defined.
The
pointer
moves
through
the
record
as
each
field
is
readorwritten.
24
Page 27

9,
PROGRAMMING
THE
DISK
CONTROLLER
The
FSD-2isa
smart
peripheral,
which
means
that
it
contains
its
own
microprocessor
and
memory. An
advanced
programmer
can
access the
microprocessor
and
its
memory,
providingawide
range
of
applications.
Routines
can
be
designed
that
resideinthe
disk
memory
and
operateonthe
microprocessortocontrol
disk
drive
operation.
DOS
programs
can
be
added
that
come
from
the
actual
disk.
There
is
16K
of
ROM
in
the
disk
drive
as
well
as
2K
RAM.
The/
most
useful
area
to
the
advanced
programmer
is
the
buffer
RAJ^SfS*
area
located
between
4000H
and
5FFFH
(theHmeans
it's
^^^W'
hexadecimal
number).
This
area
can
actuallybewritten
into
witri
Machine
Language
level
instructions
and
executed
by
the
disk
controller
(microprocessor).
%
The
methodofhandling
data
transferstoand
from
memory
are
referred
to
as
MEMORY
commands.
There
are
three
basic
MEMORY
commands,
and
some
additional
commands called
USER
commands.
MEMORY-WRITE
PURPOSE:
Transfersupto
34
bytes
of
data
to
drive
memory.
FORMAT:
PRINT#15,"M-W:"CHR$(address
low
byte)
CHR$(address
high
byte)CHR$(#ofcharacters)
CHR$(data)
MEMORY-WRITE
allows
you
to
write
up
to
34
bytes
of
data
at
a
time
into
the
disk
controller's
memory.
MEMORY-EXECUTE
AND
USER
commands
can
be
used
to
run
this
code.
The
low
and
high
bytes
are
the
decimal
equivalent
of
the
hexadecimal
address
in
the
actual
memory
space.
The
number
of
bytes
is
the
decimal
amount
of
bytes
to
be
transferred,upto
34.
The
d^ata
must
be
the
decimal
representationofthe
hexadecimal-coded
instruction
you
wish
sent.
See
the
example
below.
10
OPEN
15,8,15
20
PRINT#i5,"M-W:"CHR$(0)CHR$(112)CHR$(3)CHR$(169)CHR$(8)CHR$(96)
30
CLOSE
15
This
routine
writes
three
bytes
to
locations
7000H,
7001H,
and
7002H
(256*112+0=28672=7000H).
The
three bytes
are:
169
(A9H,aPAGE
ZERO
instruction),
8
(8H,alocation),
96
(60H,aRETURN
instruction).
When
executed,
this
program
would
cause
the
drive
controllertoload
its
accumulator
with
the
contentsoflocation
0008H
and
then
return
control
back
to
the
disk
drive.
25
Page 28

MEMORY-READ
PURPOSE:
Read
data
from
drive
memory.
FORMAT:
PRINT#15
file
#,
-M-R:"
CHR$(address
low
byte)
CHR$(address
high
byte)
The
MEMORY-READ
command
selectsabyte
to
be
read from
a
location
in
the
disk
drive
memory,
specified
by
the
low
and
high
bytes
of
the
location
address.
The
next
byte
read
(using
GET#)
from
channel
#15
will
be
from
the
specified
memory
location.
The
following
example
illustrates
this
by
reading
data from
10
consecutive
bytes,
located
from
FFOOH
to
FFOAH
(in
decimal,
65280
to
'65290).
10
OPEN
15,8,15
20
FOR A
=
1
TO
10
30
PRINT#15,"M-R:"CHR$(A)CHR$(255)
40
GET#15,A$:PRINT
ASC(A$♦CHR$(0));
50
NEXT
60
CLOSE
15
When
using
MEMORY-READ,
any
use
of
INPUT#
on
the
error
channel
will
give
peculiar
results.
This
can
be
clearedupby
using
any
other
command,
except
the
MEMORY
commands.
Here's
a
useful
program
that
reads
the
disk
controller's
memory:
10
OPEN
15,8,15
20
INPUT-LOCATION
PLEASE";A
30
Al
=
INT(A/256):A2=A-Al*256
40
PRINT#15,"M-R:"CHR$(A2)CHR$(A1)
50
FORL=
1
TO
5
.
60
GET#15,A$
70
PRINT
ASC(A$+CHR$(0))
80
NEXT
90
INPUT-CONTINUE-;A$
100 IF
LEFT$(A$,1)«"Y"
THEN
50
110
GOTO
20
MEMORY-EXECUTE
PURPOSE:
Executes
program
in
disk
memory.
FORMAT:
PRINT!15
file
*9-M-E:"CHR$(address
low
byte)
CHR$(address
high
byte)
Once
a
program
has
been
loaded
into
disk
memory
(either
the
16K
in
the
ROM
or
the
2K
in
the
RAM),
the
address
of
the
MEMORY-
EXECUTE
command
specifies
where
program
execution
will
begin.
The
use
of
this
commmand
requires
that
the
programtobe
executed
end
with
an
RTS
instruction,socontrol
will
be
returned
to the
DOS.
Following
is
a
routine
that
writes
an
RTS
(ReTurn
from
Subroutine).
26
Page 29

10
OPEN
15,8,15,"M-W:"CHR$(0)CHR$(5);l;CHR$(96)
20
PRINT#15,"M-E:"CHR$(0)CHR$(19):
REM
JUMPS
TO
BYTE,
RETURNS
30
CLOSE
15
USER
COMMANDS
Along
with
the
USER1
and
USER2
commands
discussed
in
chapter
7f
there
are
others
that,
when
executed,
cause
jumps
to
specific
locations
in
the
disk
drive's
buffer.
This
lets
you
make
longer
routines
that
operate
in
the
disk's memory
along
withajump
table,
even
in
BASIC.
USER
COMMAND
FUNCTION
Ul
or
UA
BLOCK-READ
without
changing
buffer-pointer
U2
or
UB
BLOCK-WRITE
without
changing
buffer-pointer
U3
or
UC
jump
to
0500H
U4
or
UD
jump
to
0503H
U5
or
UE
jump
to
0506H
U6
or
UP
jump
to
0509H
U7
or
UG
jump
to
050CH
U8
or
UH
jumpto050FH
U9
or
UI
jump
to
FFFAH
U;
or
UJ
power-up
vector
UI+
set
Commodore64speed
U-
set
VIC
20
speed
EXAMPLESOFUSER
COMMANDS
PRINT#1S,"U3"
PRINT#15,"U"+CHR$(50+Q)
PRINT#15,"UI"
27
Page 30

10-1.
CHANGING
THE
DEVICE
NUMBER
All
peripherals
need
device
numbers
so
the
computer
can
identify
which
one
you
want
to
transfer
data
to
or
from.
The
FSD-2
is
preset
inside
the
hardware
withadevice
number
of
8,
drive
number
0.
The
disk
knows
its
own device
number
by
looking
at
a
hardware
jumperonthe
circuit
board
and
writing
the
number
based
on
the
jumper
intoasection
of
its
RAN*
The
device
number,canbechanged
by
two
methods,
hardware
and
software.
If
you
are
temporarily
using
two
disk
drives,
using
the
software
method
lets
you
change
one
drive's
device
number
temporarily.
If
you
expect
to
use
two
(or
more)
drives
on
a
permanent
basis,
the
hardware
method
is a
simple
and
permanent
way
to
changeadrive's
device
number.
SOFTWARE
METHOD
The
device
number
is
changed
by
performingaMEMORY-WRITE
to
locations
0077H
and
0078H.
The
command
is
executed
once
the
command
channel
has
been
opened.
FORMAT:
PRINT#
file#,"M-W:
"CHR$(119)CHR$(0)CHR$(2)
CHR$
(address+32)CHR$(address+64)
The
addressisthe
new
device
number
desired.
Belowisan
exampleofchanging
the
device
numberto9.
10
OPEN
15,8,15
20
PRINT#15,"M-W:"CHR$(119)CHR$(0)CHR$(2)CHR$(9+32)CHR$(9+64)
30
CLOSE
15
First,
turn
on
one
drive
and
change
its
device
number,
then
the
next
drive,
until
all
the
drives
are
on.
28
Page 31

10-2.
CHANGING
THE
DEVICE
NUMBER
All
peripherals
need
device
numbers
so
the
computer
can
identify
which
one
you
want
to
transfer
data
to
or
from.
The
FSD-2sdevice
number
is
extremely
easy
to
change.
No
hardware
or
software
modifications
are
needed.
Just
set
the
DIP
switches
on
the
bottom
of
the
drive
to
change
the
drive's
device
number.
Detailed
instructions
are
below.
TO
CHANGE
THE
DEVICE
NUMBER:
1.
TURN
OFF
DISK
DRIVE.
2.
TURN
OVER
AND
LOCATE
TWO
SMALL
DIP
SWITCHES
ABOUT
HALFWAY
TOWARDS
THE
BACK.
3.
SET
SWITCHES
IN
COMBINATION
WHICH
GIVES
DESIRED
DEVICE
NUMBER.
"ON"
IS
TOWARDS
THE
BACK
OF
THE
DRIVE.
DEVICE
NUMBER
SELECTED
BY:
DEVICE
NUMBER:
8
9
10
11
SWITCH
1:
ON
OFF ON OFF
SWITCH
2:
ON
ON
OFF
OFF
4.
DISK
DRIVE
IS
NOW
READY TO
USE
WITH
NEW
DEVICE
NUMBER.
29
Page 32

APPENDIX
B.
DESCRIPTION
OF
ERROR
MESSAGES
Whenever
an
error
signal
is
generated,
the
LED light
on
the
front
panel
of
the
'FSD-2
will
start
flashing.
The disk
drive
will
not
send
the
error
message
to
the
computer
unless
requested.
The
following
routine
inputs
the
error
message
and
prints
it
on
the
computer's
screen.
10
OPEN
15,8,5
20
INPUT#15,A,A$,B$,C$
30
PRINT A,A$,B$,C$
40
CLOSE
15
50
END
Below
isalist
and
explanationofthe
error
messages
used
on
the
FSD-2
Disk Drive:
0:
NO
ERROR
This
is
not
an
indication
of an
error
and
will
occur
when
the
error
channel
is
read
while
the
LED
isn't
flashing.
1:
FILES
SCRATCHED
This
also
is
not
an
error
condition.
Reading
the
error
channel
after
one
or
more
files
have
been
scratched
will
show
this,aswell
as
the
number
of
files
that
have
been
scratched.
2-19:
UNUSED
ERROR
MESSAGE
NUMBERS
20:
READ
ERROR
(block
header
not
found)
The
disk
controller
is
unable
to
locate
the
header
of
the
requested
block.
This
can
be
caused
byabad
header
on
the
disk
or
specifyinganillegal
sector
number.
21:
READ
ERROR
(no
sync
character)
The
disk
controllerisunable
to
detectasync
mark
on
the
desired
track.
Caused
by
misalignmentofthe
read/
write
head
or
disk
not
present,
unformatted,
or
not
seated
properly.
Can
also
indicateahardware
failure.
22:
READ
ERROR
(data
block
not
present)
The
disk
controller
has
been
requestedtoread
or
verify
a
data
block
that
was
not
properly
written.
This
error
message
occurs
in
conjunction
with
the
BLOCK
commands
and
indicatesanillegal
track
and/or
sector
request.
23:
READ
ERROR
(checksum
error
in
data
block)
This
error
message
indicates
that
there
is
an
error
in
one
or
more
of
the
data
bytes.
The
data
has
been
read
into
the DOS
memory,
but
the
checksum
over
the
data
is
in
error. May
also
indicate
grounding
problems.
30
Page 33

24:
READ ERROR
(byte
decoding
error)
The
data
or
header
has
been read into
the
DOS
memory,
butahardware
error
has
been
created
due
to
an
invalid
bit
patterninthe
data
byte.
May
also
indicate
grounding
problems.
25:
WRITE
ERROR
(write-verify
error)
This
messageisgeneratedifthe
controller
detects
a
mismatch
between
the
written
data
and
data
in
the
DOS
memory.
26:
WRITE
PROTECT
ON
The
controller
has been
requestedtowriteadata
block
while
the
write
protect
switchisdepressed.
Typically,
this
is
causedbyusingadisk
withawrite
protect
tab
over
the
notch.
27:
READ
ERROR
(checksum
error
in
header)
Thereisan
errorinthe
headerofthe
requested
data
block.
The
block
has not
been
read
into
the
DOS
memory.
May
also
indicate
grounding
problems.
28:
WRITE
ERROR
(long
data
block)
The
controller
attemptstodetect
the
sync
mark
of
the
next
header
after
writingadata
block.
If
the
sync
mark
does
not
appear
withinapre-determined
time,
the
error
messageisgenerated.
The
error
is
caused
by
a
bad
disk
format
(data
extends
into
the
next block)orby
a
hardware
failure.
29:
DISK
ID
MISMATCH
The
controller
has
been
requestedtoaccessadisk
which
has
not
been
initializedorhasabad
header.
Also
occurs
if
disks
are
switched
during
data
transfer.
30:
SYNTAX
ERROR
(general
syntax)
The
DOS
cannot
interpret
the
command
sent
to
the
command
channel.
Typically,
this
is
caused
by
an
illegal
number
of
file
names
or
patterns
are
illegally
used.
31:
SYNTAX
ERROR
(invalid
command)
The
DOS
doesn't
recognize
the
command.
The
command
must
start
in
the
first
position.
32:
SYNTAX
ERROR
(long
line)
The
command
sent
is
longer
than
58
characters.
33:
SYNTAX
ERROR
(invalid
file
name)
Pattern
matchingisused
invalidlyinthe
OPEN
or
SAVE
command.
31
Page 34

34:
SYNTAX
ERROR
(no
file
given)
The
file
name
was
left
out
of
a
command
or
the DOS
does
not
recognize
it
as
such.
Typically,acolon
(:)
has
been
omitted.
35-38:
NOT
USED
39:
SYNTAX
ERROR
(invalid
command)
May
resultifthe
command
sent
to
the
command channel
is
unrecognizablebythe
DOS.
40-49:
NOT
USED
50:
RECORD
NOT
PRESENT
Result'ofdisk
reading
past
the
last
record
through
the
INPUT*
or
GET#
commands.
This
message
will
also
occur
after
positioningtoa
record
beyond
the
end
of
a
file
inarelative
file.
If
the
intentisto
expand
the
file
by
adding
the
new
record
(withaPRINT#
command),
the
error
message
may
be
ignored.
INPUT
or
GET
should
not
be
used
after
this
error
occurs
without
first
repositioning.
51:
OVERFLOW
IN
RECORD
PRINT*
statement
exceeds
the
record
boundary,
truncating
information.
Since
the
carriage
return,
sent
as
a
record
terminator,iscountedinthe
record
size,
this
message
will
occur
if
the
total
charactersinthe
record
(including
the
final
carriage
return)
exceeds
the
defined
size*
52:
FILE TOO
LARGE
Record
position
within
a
relative
file
indicates
that
disk
overflow
will
result.
53-59:
NOT
USED
60:
WRITE
FILE
NOT
OPEN
A
write
file
that
has
not
been closed
is
being
opened
for
reading.
61:
FILE
NOT
OPEN
A
file
being
accessed
has
not
been
opened
in
the
DOS.
Sometimesinthis
situation,anerror
is
not
generated,
the
requestissimply
ignored.
62:
FILE
NOT
FOUND
The
requested
file
doesn't
exist
on the
indicated
drive.
63:
FILE
EXISTS
The
file
name
of
the
file
being
created
already
exists
on
the
disk.
32
Page 35

64:
FILE
TYPE
MISMATCH
The
file
type
does
not
match
the
file
type
in
the
directory
entry
for
the
requested
file.
65:
NO
BLOCK
Occurs
whenablock
to
be
allocated
has
already
been
allocated.
The
parameters
indicate
the
track
and
sector
available
with
the'
next
highest
number.
If
the
parameters
are
zero,
then
all
blocks
higher
in
number
are
in
use.
66:
ILLEGAL
TRACK
AND
SECTOR
The
DOS has
attemptedtoaccessatrack
or
sector
which
does
not
exist
in
the
format
being
used.
May
indicate
a
problem
reading
the
pointer
to the
next
block.
67:
ILLEGAL
SYTEM
TORS
This
special
error
indicatesanillegal
sytem
track
or
sector.
68,69:
NOT
USED
70:
NO
CHANNEL
(available)
The
requested
channelisnot
available,orall
channels
are
in
use.
A
maximumoffive
sequential
files
may
be
openedatone
time
to
the DOS.
Direct
access
channels
may
have
six
opened
files.
71:
DIRECTORY
ERROR
The BAM
(Block
Availability
Map)
does
not
match
the
internal
count.
There
is
a
problem
in
the
BAN
allocationorthe
BAM has
been
overwritteninDOS
memory.
To
correct
this
problem,
reinitialize
the
disk
to
restore
the
BAM
in
memory. Some active
files
may
be
terminatedbythe
corrective
action.
72:
DISK
FULL
Either
the
blocks
on
the
disk
are
used
up
or
the
directoryisat
its
limit
of
144
entries.
73:
DOS
MISMATCH
DOS1and2are
read
compatible
but
not
write
compatible.
Disks
may
be
interchangeably
read
with
either
DOS,
butadisk
formattedonone
version
cannot
be
written
upon
with
the
other
version because
the
formatisdifferent.
This
error
is
displayed
whenever
an
attemptismade
to
write
uponadisk
which
has
been
formattedina
non-compatible
format.
This
message
may
also
appear
after
power
up.
74:
DRIVE
NOT
READY
An
attempt
has
been
made
to
access
the
disk
drive
when
there
isn'tadisk
in
the
drive.
33
 Loading...