

Oceanic DataMax Pro Owner's Manual

DataMax Pro
owner’s guide
™

COPYRIGHT NOTICE
This owner’s guide is copyrighted, all rights are reserved. It may not, in whole or in part, be copied, photocopied, reproduced, translated, or reduced to any
electronic medium or machine readable form without prior consent in writing from 2002 Design/Oceanic.*
© 2002 Design/Oceanic 1997
DataMax Pro Owner's Guide, Doc. No. 12-1871
TRADEMARK NOTICE
Oceanic, the Oceanic logo, Diving Essentials Redefined, DataMax, Graphic Diver Interface, Tissue Loading Bar Graph, Pre Dive Planning Sequence, and
Variable Ascent Rate Indicator are all registered and unregistered trademarks of Oceanic. All rights are reserved.
PATENT NOTICE
U.S. Patents have been issued , or applied for, to protect the following design features: Graphic Diver Interface, Pre Dive Planning Sequence, Air Time
Remaining, Data Sensing and Processing Device (U.S. Patent no. 4.882,678), Tissue Loading Bar Graph (U.S. Patent no. 4,882,687), and Variable Ascent Rate
Indicator Bar Graph (U.S. Patent no. 5,156,055).
LIMITED TWO-YEAR WARRANTY
For details, refer to the Product Warranty Registration Card provided by your Authorized Oceanic Dealer.
DECOMPRESSION MODEL
The programs within the DataMax Pro simulate the absorption of nitrogen into the body by using a mathematical model. This model is a way to apply a
limited set of data to a large range of experiences. The DataMax Pro dive computer model is based upon the latest research and experiments in decompression
theory. Still, using the DataMax Pro, just as using the U.S. Navy (or other) No-decompression Tables, is no guarantee of avoiding decompression sickness, i.e.
“the bends.” Every diver’s physiology is different, it even varies from day to day. No machine can predict how your body will react to a particular dive profile.
The DataMax Pro is intended for use by divers who have successfully completed a nationally recognized course in scuba diving. It must not be used by
untrained persons who may not have knowledge of the potential risks and hazards of scuba diving. You must obtain proper training before using the DataMax
Pro if you have not already done so. You also must read this owner’s guide completely before diving with the DataMax Pro.
Good diving practices dictate that you plan all of your dives utilizing appropriate dive tables together with this computer which is designed to aid you in both
planning and execution of your dives.
* The blank Oceanic DiveLog in the reference section may be duplicated for personal use only, not for resale.
ii
R5
Read and understand the contents of this manual completely before using the DataMax Pro.
R5
WARNING: As with all underwater life support equipment, improper
use or misuse of this product can cause serious injury or death. Read
and understand this owner’s guide completely before diving. Conduct your dives in such a manner so as to insure that you continuously check the computer's proper function.
WARNING: This computer is not intended for COMMERCIAL use. It
is intended solely for recreational use.
This computer should NOT be utilized for any competitive square
wave diving, as it is intended solely for recreational use in a multilevel diving environment.
If you don't understand the contents of this manual and need
assistance in learning how to use this computer, you should seek
training from your Authorized Oceanic Dealer.
Pay special attention to items
marked with this symbol
WARNING: Never paticipate in sharing or swapping of a dive computer. Doing so may result in onjury or death.
iii
iv
M
O
C
E
D
O
N
See the
index on
T
page 70 to
I
M
E
specific
T
A
N
subject
K
5000 40003000
DataMax
PRO
1
.
0
Z
F
.
C
HINT:
find a
®
CONTENTS
T
S
T
O
P
2
0
F
T
3
0
4
0
A
S
C
E
N
T
I. THE DATAMAX PRO IS EASY TO USE ................................ 1
Introduction......................................... 2
II. DETAILED OPERATION GUIDE ............................................ 9
Operational Modes ............................ 10 Informational Displays ......................18
III. HANDLING THE EXTREMES............................................... 29
Maximum depth ................................ 30 Gauge mode ........................................37
Emergency decompression................ 31 Caution Zone ......................................38
Violation modes ................................. 32 What if your computer quits?............38
Conditional violation......................... 32 Operating temperature ......................39
Permanent violations ........................ 34 Night diving/sharing ..........................40
®
IV. CARE & MAINTENANCE ..................................................... 43
Before the dive................................... 44 Low battery display............................48
During/after the dive......................... 45 Battery replacement procedure.........49
Annual inspections............................ 46 Flooded battery compartment ...........51
Obtaining factory service.................. 47 Regulator installation ........................52
V. REFERENCE......................................................................... 53
Multiple tissue tracking .................... 54 Oceanic DiveLog ................................64
No-decompression limits................... 56 Glossary ..............................................66
Maximum No-D dive profile ............. 57 Index ...................................................70
Specifications..................................... 60 Annual Inspection Record ........... 73-74
Quiz .................................................... 62

THE
DATAMAX PRO
IS
EASY TO USE
1

1
.
0
Z
F
.
C
M
O
C
E
D
O
N
DEPTH
DEPTH
SURFACE
T
I
M
E
T
A
N
K
SURFACE
T
S
T
O
P
2
#
#
0
F
T
3
0
4
0
FT
FT
A
S
C
E
N
T
PSI
PSI
INTRODUCTION
The DataMax Pro was designed to be extremely easy to use and understand. This owner’s guide is divided into five sections designed to make it
easy to learn how to use the “Pro.” The first two sections will show you how
the Pro performs in most typical diving situations. Section three shows how
it will perform under extreme conditions like deep or decompression diving.
Sections four and five present care & maintenance procedures and reference
material. Start here to begin learning about the DataMax Pro.
REGULATOR ATTACHMENT
Because the DataMax Pro is an "Air-Integrated" diving computer, it must
be attached to your regulator before you attempt to operate or use it. It is
best that this installation be performed by an Authorized Oceanic Dealer at
the time of purchase. If this is not possible, refer to the instructions for this
procedure on page 52.
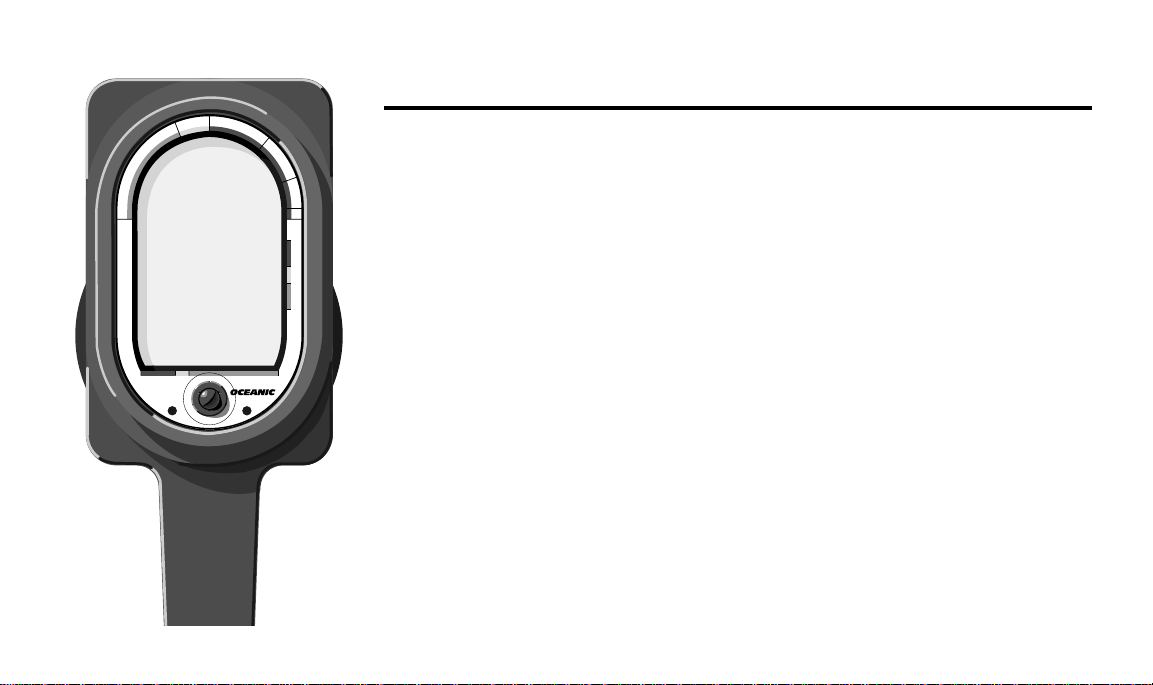
5000 40003000
DataMax
®
PRO
Fig. 1 – Surface Mode
2
a.
®
ACTIVATING THE DISPLAY
After installing the Pro onto your regulator, connect to a full scuba
cylinder. Turn on the tank valve to pressurize the system and activate the
computer by pressing the button under its display (Fig. 1a). Once the Pro
goes through a diagnostic check, it will enter “Surface Mode.”
WARNING - Be sure to inspect your DataMax Pro prior to every dive,
®
DataMax
PRO
®
N
O
D
E
C
O
M
C
Z
.
.
1
0
F
T
S
T
O
P
2
0
F
T
3
0
5000 40003000
T
I
M
E
T
A
N
K
A
S
C
E
N
T
4
0
#
#
PLAN
PLAN
DEPTH
DEPTH
NO DEC
NO DEC
PSI
PSI
FT
FT
checking for any signs of the entrance of moisture, damage to the
button membrane, or damage to the LCD display, and its general
operation. If these or other signs of damage are found, return the
unit to an Authorized Oceanic Dealer or Oceanic Parts & Service.
DO NOT attempt to use until it has received factory service.
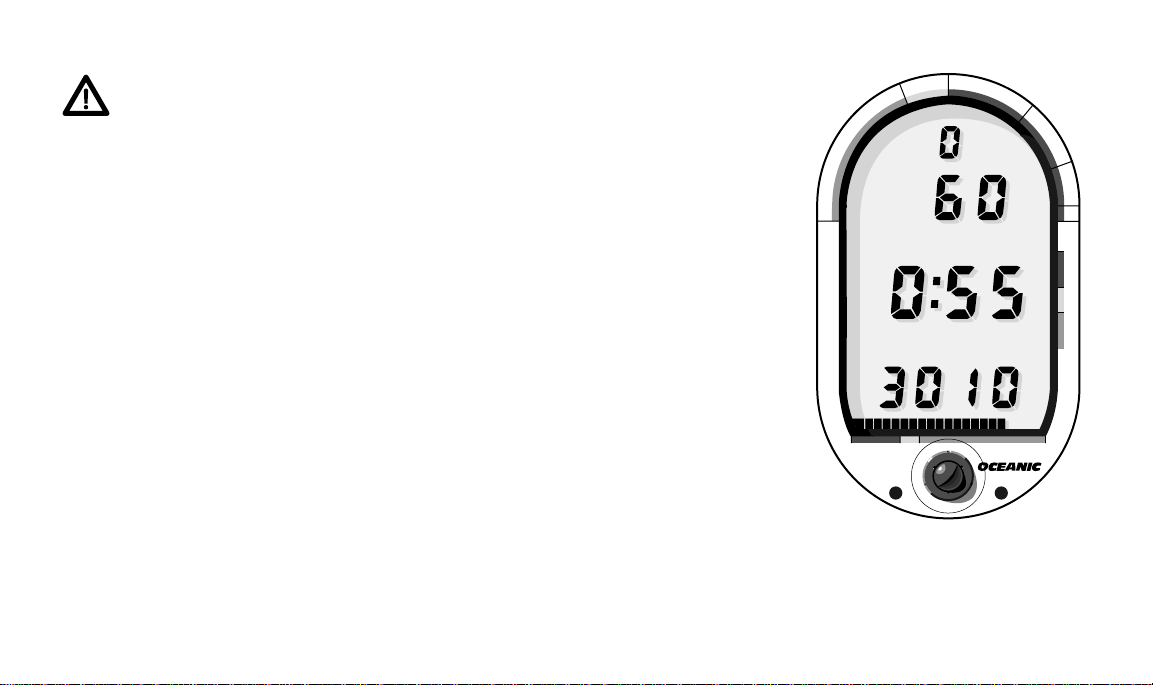
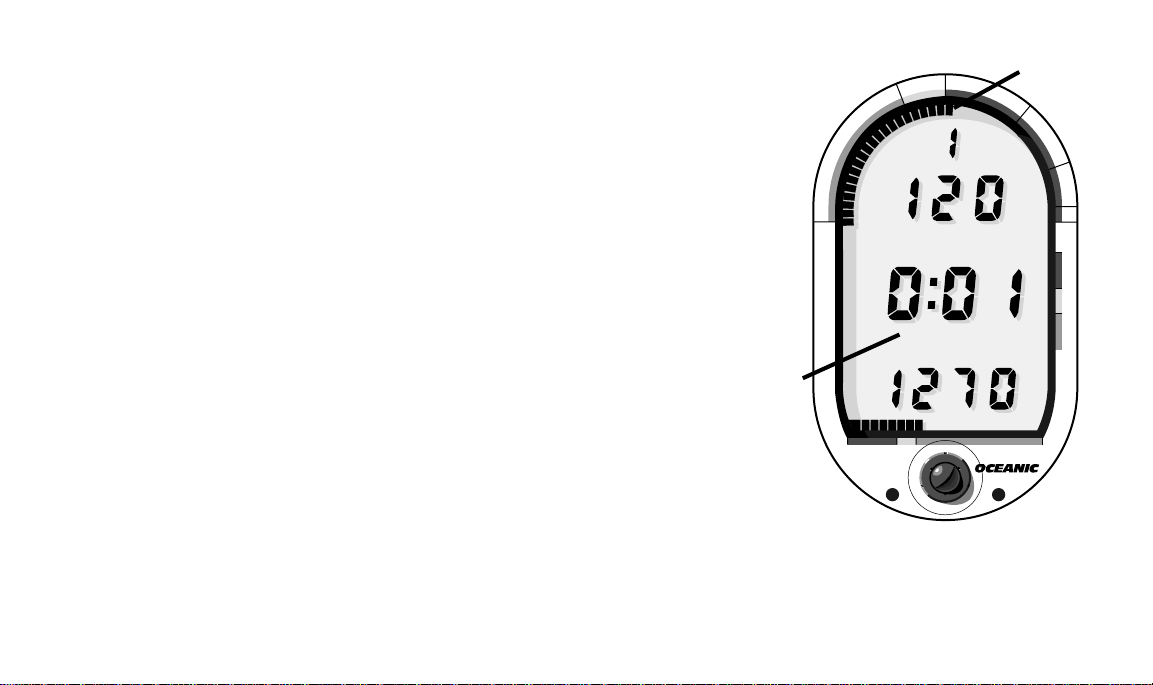
PLANNING YOUR DIVE
surface interval, computed residual nitrogen, and tank pressure. Once a
minute, it alternates with another display called the “Pre Dive Planning
Sequence” (Fig. 2). When planning your next dive, the Pre Dive Planning
Sequence provides adjusted no-decompression limits based upon previous
dives made. The PDPS shows depths from 30 to 160 feet in ten foot intervals
and the available no-decompression time for each. This makes dive planning
extremely simple because you know exactly how much time you can spend at
each depth.
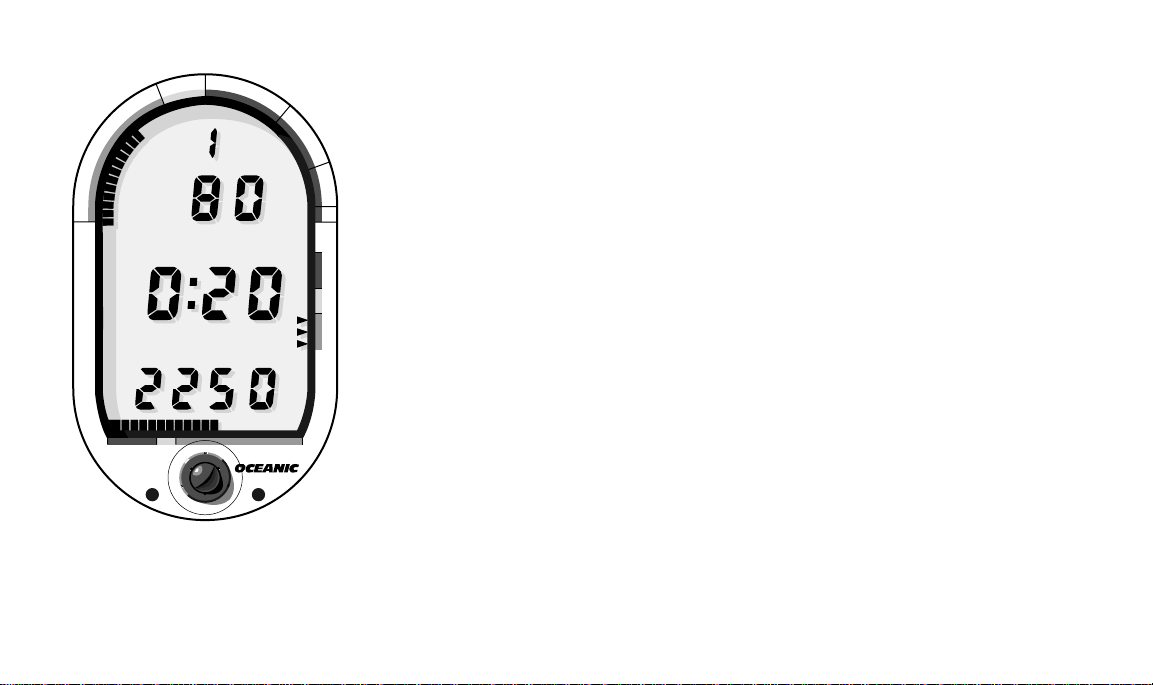
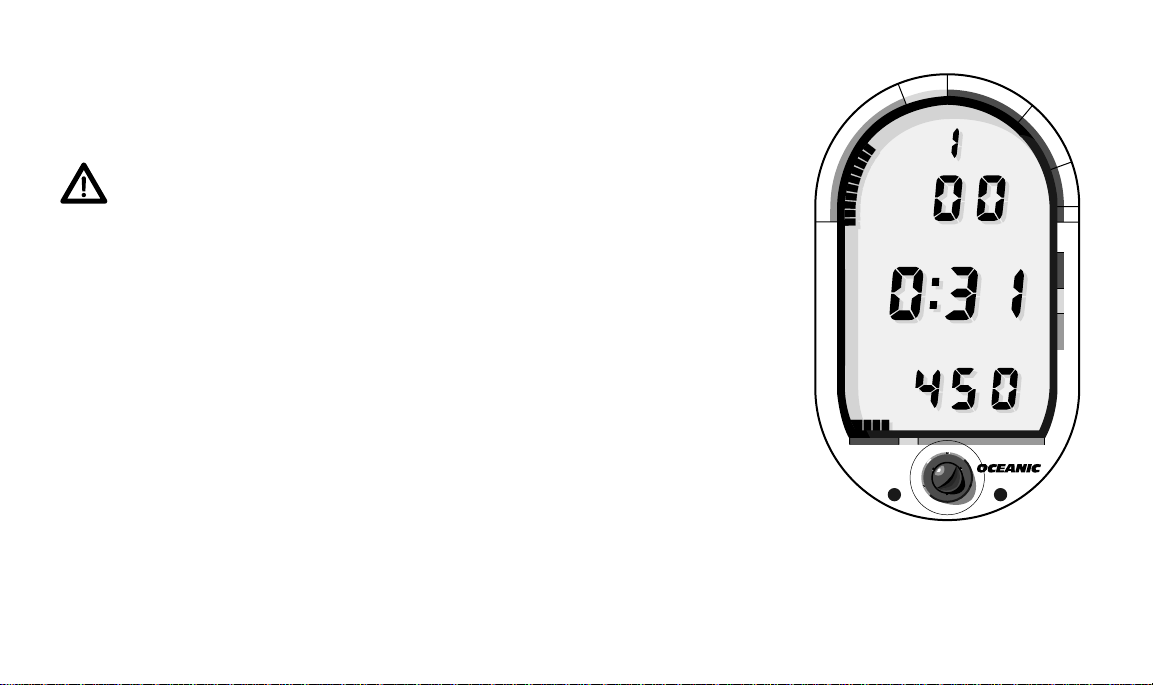
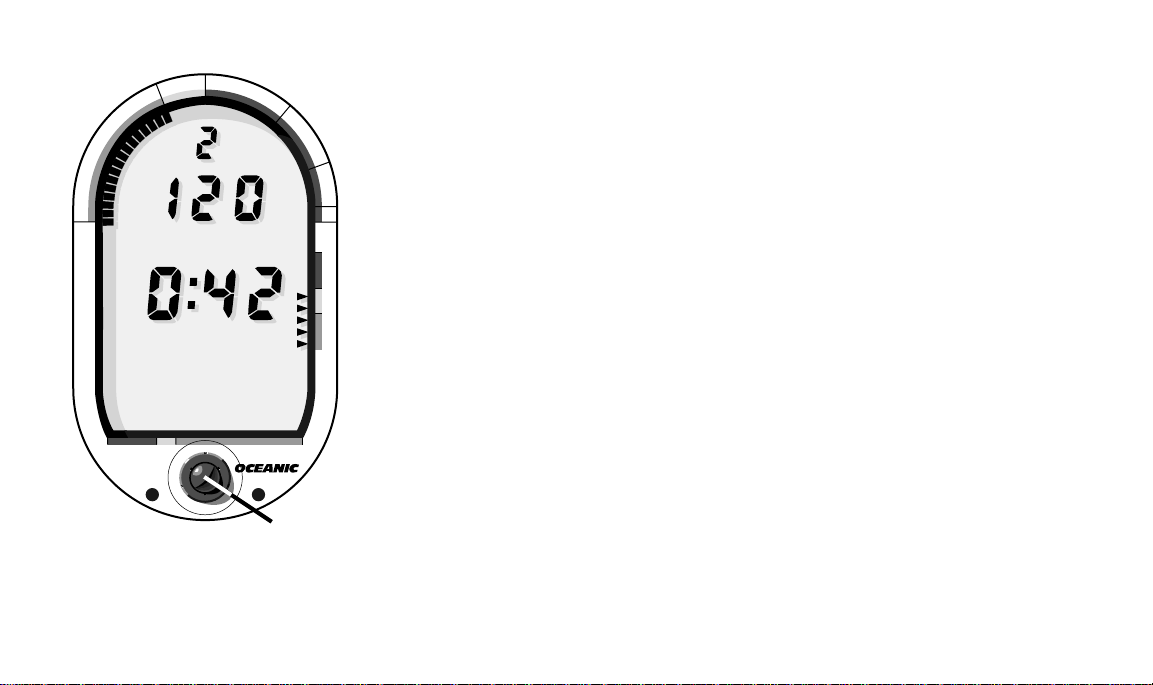
MAKING A DIVE
decompression Dive Mode” (Fig 3). This mode displays dive number, tank
Surface mode shows how many dives you have made, your depth, your
Once you descend below five feet, the DataMax Pro changes to “No-
pressure, nitrogen loading, ascent rate and dive time remaining. Dive time
remaining is really two displays in one. It shows the lesser of air time or no-
Fig. 2 – Pre Dive Planning
Sequence
3
1
.
0
Z
F
.
T
S
#
#
FT
N
T
I
M
E
T
A
N
K
M
O
C
E
D
O
5000 40003000
DataMax
PRO
C
DEPTH
DEPTH
NO DEC
NO DEC
®
Fig. 3 – No-Decompression
Dive Mode
4
T
FT
PSI
PSI
O
P
2
0
F
T
3
0
4
0
A
C
N
decompression time remaining. This display is based upon a comparison of
your personal breathing rate and no-decompression status as monitored at all
times throughout the dive.
An “Alternate Dive Mode” replaces the No-decompression Dive Mode
every 15 seconds to display bottom time and maximum depth. This information is displayed for two seconds before switching back to the NO DEC value.
USING THE
S
E
T
To make it easy to check your dive status on the DataMax Pro, a colorcoded system of graphic displays is used. This “Graphic Diver Interface” is
made up of three bar graphs that have green, yellow and red markers to
indicate normal, caution, and danger zones respectively. The three graphs
“GRAPHIC DIVER INTERFACE”
display tank pressure, ascent rate, and nitrogen loading.
When underwater, you can make quick status checks by glancing at the
three bar graphs and making sure that all are “in the green.” With one quick
glance you can make sure you’re not getting too close to the no-decompres-
®
sion limit, ascending too fast, or getting low on air.
AUDIBLE ALARM
Just in case you aren’t looking at the display when you need to be, an
“Audible Alarm” will alert you when you are approaching or entering a
dangerous situation. The Audible Alarm is accompanied by a part of the
display that flashes, showing you what the alarm is all about.
ASCENDING TO THE SURFACE
A graphic representation of nitrogen absorption can be seen in the
“Tissue Loading Bar Graph” (Fig 4a). This green, yellow, red bar graph
shows how close you are to the no-decompression limit. It “fills–up” with
segments as your depth and bottom time increase. Upon ascent to shallower
depths, the Tissue Loading Bar Graph will begin to recede, giving a visual
representation of nitrogen off–gassing. The TLBG also provides a way to
easily manage decompression by indicating three “ceiling” depths. This is
discussed fully in the “Handling the Extremes” section beginning page 30.
When rising towards the surface, the “Variable Ascent Rate Indicator”
(Fig. 4b) shows how fast you are ascending. The VARI will alert you with a
flashing display and audible alarm if you enter the red zone, indicating that
you have exceeded the prescribed maximum ascent rate and must slow down.
If you have not entered decompression, a safety stop made
between 15-20 feet is strongly recommended as a standard procedure before completing your ascent. Many divers do this to provide a
wider zone of caution from the no-decompression limit. The Tissue Loading
Bar Graph gives a visual representation of just how close you came to the nodecompression limit. The yellow “Caution Zone” (Fig. 4c) provides a further
visual indication of close proximity to decompression. This Caution Zone
portion of the TLBG allows you to make a decision regarding safety stop
duration or necessity. While you cannot provide a guarantee against
the occurrence of decompression sickness, you may choose your own
personal zone of caution based upon your individual age, physique,
c.
1
.
0
Z
F
.
a.
O
N
T
I
M
E
T
A
N
K
O
C
E
D
DataMax
C
M
LOG PLAN
DEPTH MAX
SURFACE BOTTOM
NO DEC AIR
LOW BATT METRIC
5000 40003000
®
PRO
Fig. 4 – Tissue Loading Bar
Graph and Variable Ascent
Rate Indicator
T
S
T
O
P
#
M
FT
PSI
2
0
F
T
3
0
4
0
A
S
C
E
N
T
b.
®
5
.
Z
.
C
M
N
T
I
M
E
T
A
N
K
O
C
E
D
O
DataMax
PRO
#
#
DEPTH
DEPTH
DEC
DEC
5000 40003000
®
Fig. 5 – Decompression
Dive Mode
6
1
0
a.
F
T
S
T
O
P
2
0
F
T
3
0
4
0
FT
FT
A
S
C
E
N
T
PSI
PSI
excessive weight, training, experience, etc., to reduce the statistical
risk.
EMERGENCY DECOMPRESSION
If your depth or bottom time is such that the Tissue Loading Bar Graph
enters the red zone, the DataMax Pro will sound one double beep and switch
to “Decompression Dive Mode.” At this point, the TLBG will indicate a
decompression “ceiling” (Fig. 5a) that the diver must stay below or risk
decompression sickness. Dive Time Remaining (Fig. 5b) will display the total
time needed to exit decompression. You must stay a few feet below the TLBG
indicated ceiling depth until the bar graph recedes into the yellow Caution
b.
Zone before ascending any further.
PLANNING FOR THE NEXT DIVE
BEEP!
BEEP!
After reaching three feet upon ascent, the Surface Mode will display once
again. It alternates with the PDPS and will show adjusted no-decompression
limits based on the nitrogen absorbed during your last dive. The longer the
®
surface interval, the more dive time available in the PDPS.
IT’S REALLY JUST THAT SIMPLE!
The DataMax Pro is designed to help you stay out of trouble with a
minimum of effort reading the displays. The Graphic Diver Interface eliminates any confusion from looking at too many numbers. Just “keep it in the
green” and you’ll greatly reduce your exposure to decompression sickness.
Warning: Using the DataMax Pro, just as using the U.S. Navy
(or other) No-decompression Tables, is no guarantee of avoiding decompression sickness, i.e. "the bends".
OTHER SPECIAL FEATURES
The DataMax Pro also helps you log your dives, dive at high altitudes, and
know when the minimum allowable surface time has elapsed to be able to fly,
according to UHMS guidelines. These special features are described on the
following pages.
LOGGING YOUR DIVES
Immediately after a dive, various information is stored in the DataMax
Pro’s memory that can be accessed in the “Dive Log Mode.” Recalling this
information gives you a chance to record it in your log book. Up to nine dives
are stored and can be accessed by pressing the activation button (Fig. 6a).
Dive Log Mode will automatically scroll through all dives for the most
recent day of diving displaying dive number, maximum depth, bottom time,
and maximum ascent rate (Fig. 6). It also displays the end–of–dive tissue
loading that is handy when making decisions about future dive plans (Fig.
6b). Surface interval replaces Bottom Time in a secondary dive log screen
that immediately follows the primary screen.
N
T
I
M
E
T
A
N
K
b.
M
O
C
E
D
O
5000 40003000
DataMax
PRO
C
LOG
LOG
DEPTH
DEPTH
®
.
Z
#
#
.
1
MAX
MAX
0
BOTTOM
Fig. 6 – Dive Log Mode
Primary Screen
F
T
S
T
FT
FT
BOTTOM
O
a.
P
2
0
F
T
3
0
4
0
A
S
C
E
N
T
®
7
1
.
0
Z
F
.
T
S
N
T
I
M
E
T
A
N
K
M
O
C
E
D
O
5000 40003000
DataMax
PRO
C
®
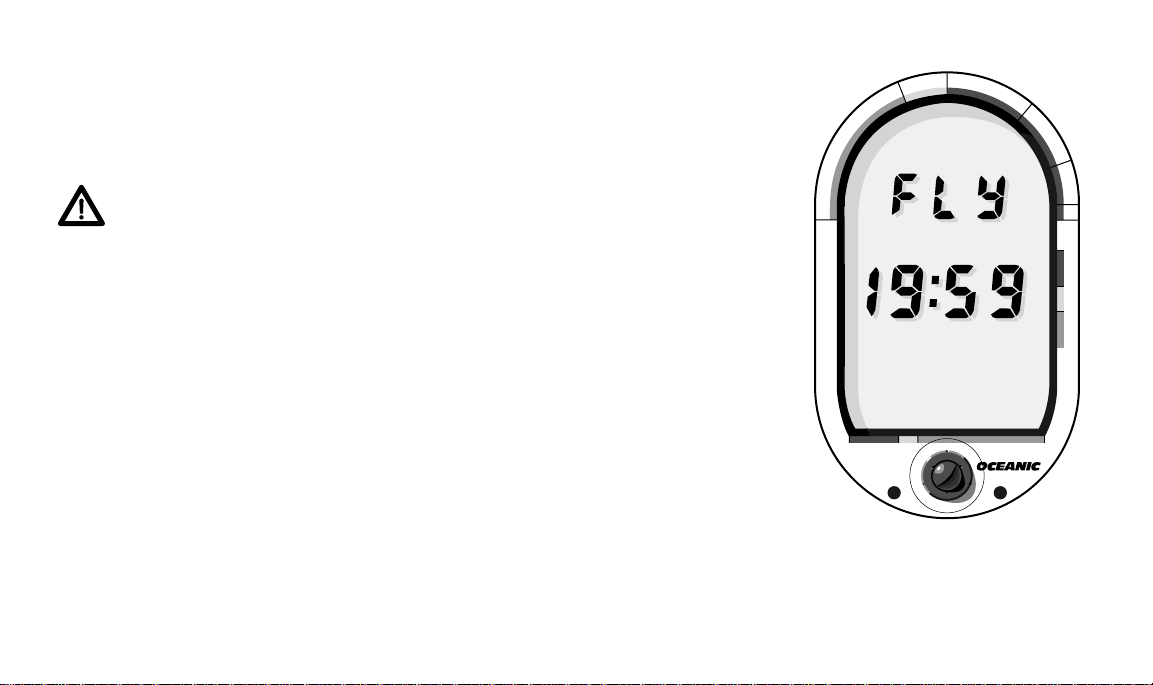
Fig. 7 – Time To Fly Mode
8
T
O
P
2
0
F
T
3
0
4
0
ALTITUDE DIVING
The DataMax Pro automatically compensates for decreased ambient
pressure when activated at high altitudes up to 14,000 feet. Its program
contains a high altitude algorithm that reduces no-decompression limits to
add a larger zone of caution. Whenever it is activated above 4,000 feet, it will
automatically recalibrate itself to measure depth in feet of fresh water.
KNOWING WHEN TO FLY
A
S
C
E
N
T
Due to the present lack of a complete dataset derived from actual human
testing, there are different recommendations cited by various scientific
organizations for the amount of time a diver should wait before flying after
diving. The DataMax Pro follows one of the more conservative of these, cited
by Divers Alert Network (DAN); that divers wait at least twelve hours before
flying in pressurized commercial aircraft, and at least 24 or more if making
repetitive multi-day or decompression dives. The DataMax Pro easily tracks
how much surface time has elapsed with the Time to Fly display (Fig. 7).
This display begins a twenty hour countdown starting four hours after a
®
dive. After the timer reaches zero, twenty–four hours have elapsed. Consistent with your training and own good sense, you may choose when
to fly according to the type of diving you have done after consulting
your DataMax Pro to determine the amount of surface time that has
elapsed. To learn more about flying after diving and DAN's guidelines, see
page 28.

DETAILED
OPERATIONS
GUIDE
9

1
.
0
Z
F
.
#
#
T
PLAN
PLAN
MAX
MAX
BOTTOM
BOTTOM
AIR
AIR
METRIC
METRIC
S
T
O
P
2
0
F
T
3
0
4
0
M
FT
M
FT
A
S
C
E
N
T
PSI
PSI
OPERATIONAL MODES
The DataMax Pro operates in ten different modes. The visual difference
between modes is very evident depending on when you look at the display.
Mode Labels identify the various displays eliminating confusion.
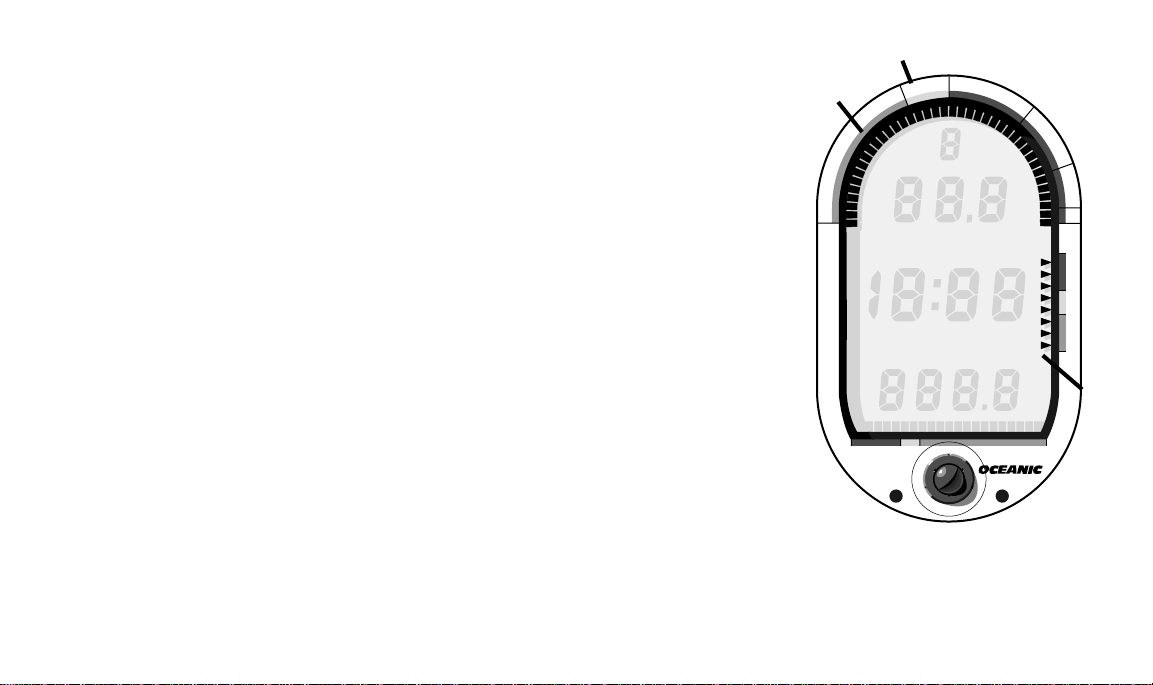
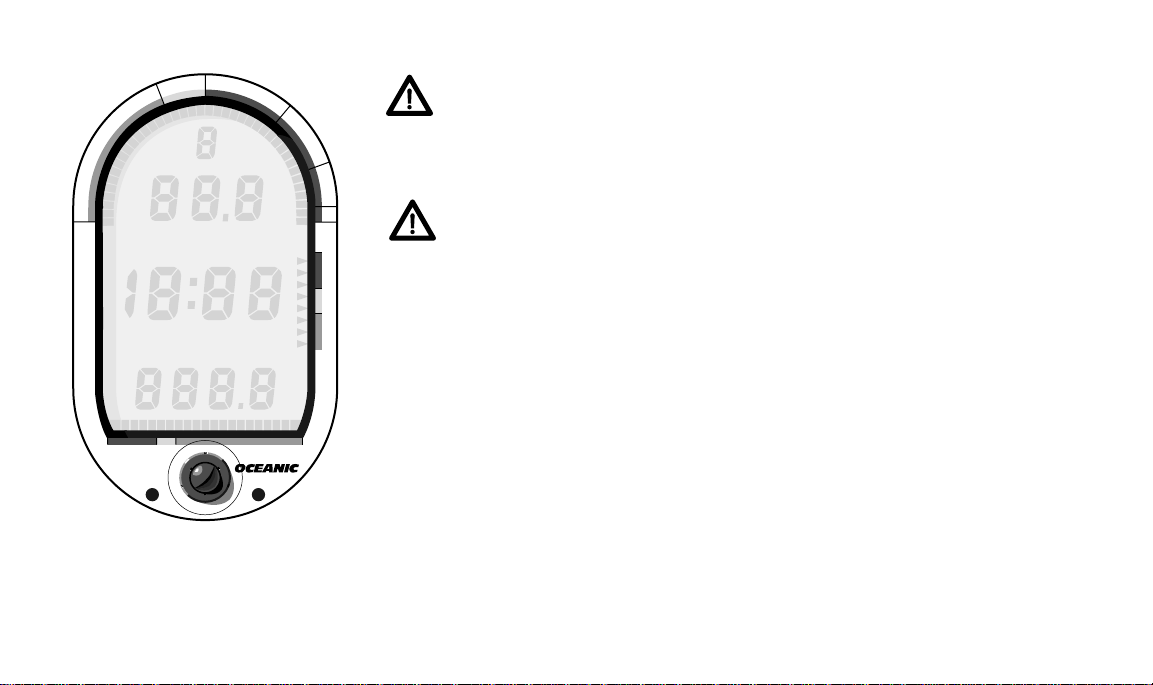
1. DIAGNOSTIC MODE/ACTIVATION
The Diagnostic Mode displays immediately following activation. After
pressing and releasing the activation button (Fig. 8a), Diagnostic Mode will
display all “eights” followed by “dashes” and then a countdown from 9 to 0.
It will then signal a successful diagnostic check with a single “beep” and
enter Surface Mode. During the countdown, the Pro checks its display
functions and battery voltage to ensure everything is working correctly.
Pressurizing the regulator system completes the activation procedure.
C
M
O
C
E
D
LOG
O
N
T
I
M
E
T
A
N
K
LOG
DEPTH
DEPTH
SURFACE
SURFACE
NO DEC
NO DEC
LOW BATT
LOW BATT
5000 40003000
DataMax
®
PRO
Fig. 8 – Diagnostic Mode
10
a.
WARNING: Never activate the DataMax Pro, or turn on your tank
®
valve, if the computer is underwater. This may result in inaccurate
depth and no-decompression time displays. Activation is not possible
deeper than ten feet underwater.
If two hours elapse after activation without making a dive, the Pro will
deactivate to save battery power. Be sure to check your computer before
entering the water to ensure it doesn’t need reactivation.
During Diagnostic Mode, the DataMax Pro measures its own battery
voltage level. If there is not enough battery power to complete a day of
diving, the DataMax Pro will either deactivate itself or not activate at all.
WARNING: If the words "LOW BATT" appear immediately after
activation, Oceanic strongly recommends that you DO NOT dive until
you have obtained battery replacement - especially if you are starting
out on a multi-day dive trip. The voltage level can drop quickly when
the batteries experience a sudden temperature change. (See battery
replacement procedure on page 49.)
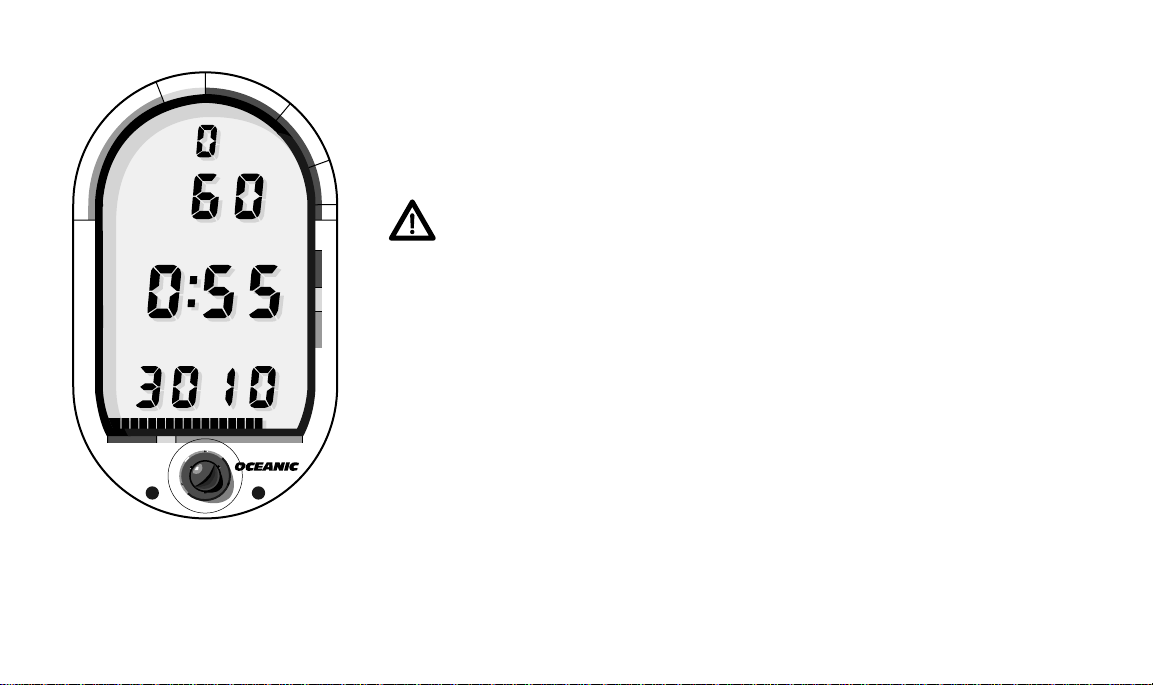
2. SURFACE MODE
Surface Mode immediately follows Diagnostic Mode after initial activation (Fig 9). It also appears after a dive when you ascend shallower than 3
feet. Surface Mode is identified by the Mode Label “SURFACE” immediately
above the Surface Time display. Information available in Surface Mode is
Dive #, Depth, Surface Time, Tank Pressure, plus Tank Pressure and Tissue
Loading Bar Graphs.
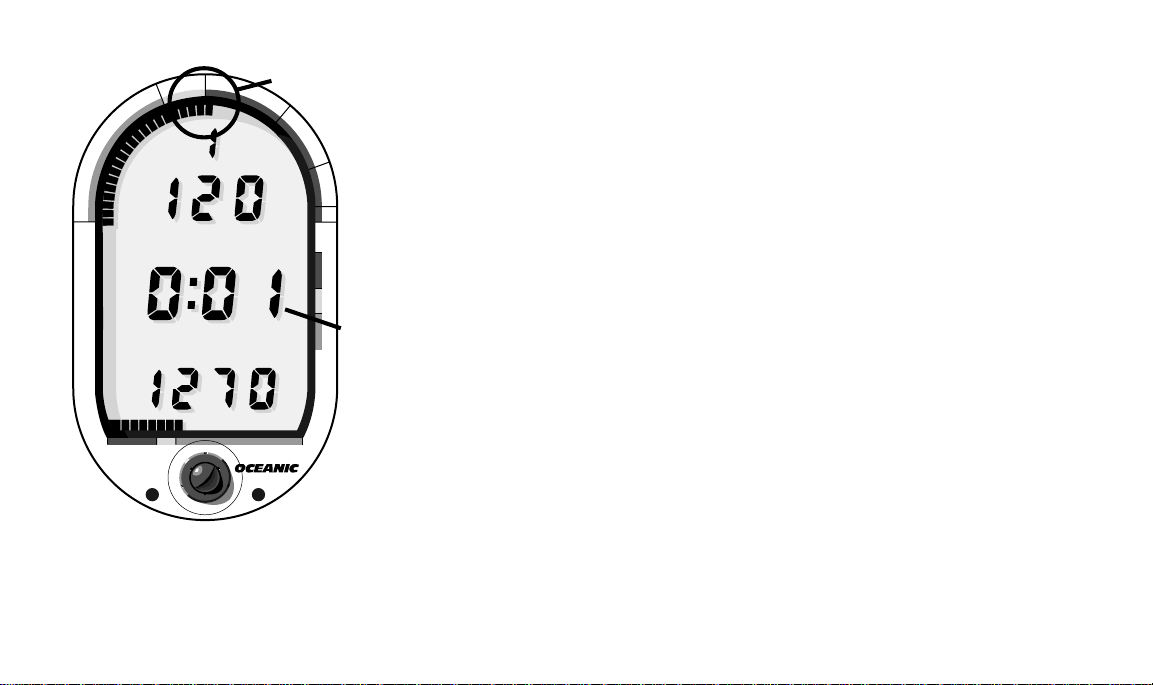
3. PRE DIVE PLANNING SEQUENCE (PDPS) MODE
One minute after activation, or immediately after a dive, the PDPS will
appear (Fig. 10). The PDPS displays the Mode Label “PLAN” at the top of
the LCD. This mode automatically scrolls through depths from 30 to 160
feet, in ten foot increments, showing predicted no-decompression dive times
.
Z
.
C
M
O
N
T
I
M
E
T
A
N
K
O
C
E
D
DataMax
PRO
#
#
DEPTH
DEPTH
SURFACE
SURFACE
5000 40003000
®
Fig. 9 – Surface Mode
1
0
F
T
S
T
O
P
2
0
F
T
3
0
4
0
FT
FT
A
S
C
E
N
T
PSI
PSI
®
11
1
.
0
Z
F
.
C
M
O
C
E
D
O
N
DEPTH
DEPTH
T
I
M
E
NO DEC
T
A
N
K
NO DEC
T
S
T
O
P
2
FT
FT
PSI
PSI
0
F
T
3
0
4
0
A
C
N
#
#
PLAN
PLAN
based upon the diver’s previous dive profiles. The PDPS automatically
replaces Surface Mode once each minute. The information displayed is
Previous Dive #, Depth, No-decompression Dive Time, Tank Pressure, and
the Tank Pressure Bar Graph.
WARNING: The PDPS predicts only no-decompression times for
subsequent dives. Depending on tank size and air consumption, you
may have less time available than shown on the PDPS because of air or
S
E
T
other limitations.
PDPS no-decompression times are displayed up to depths where there is
less than one minute available. This takes into account a descent rate of 75
feet per minute. Before a “clean” dive (no dives in 24 hours) the PDPS nodecompression limits are those found on page 56 in the Reference section.
5000 40003000
DataMax
®
PRO
Fig. 10 – Pre Dive
Planning Sequence
12
®
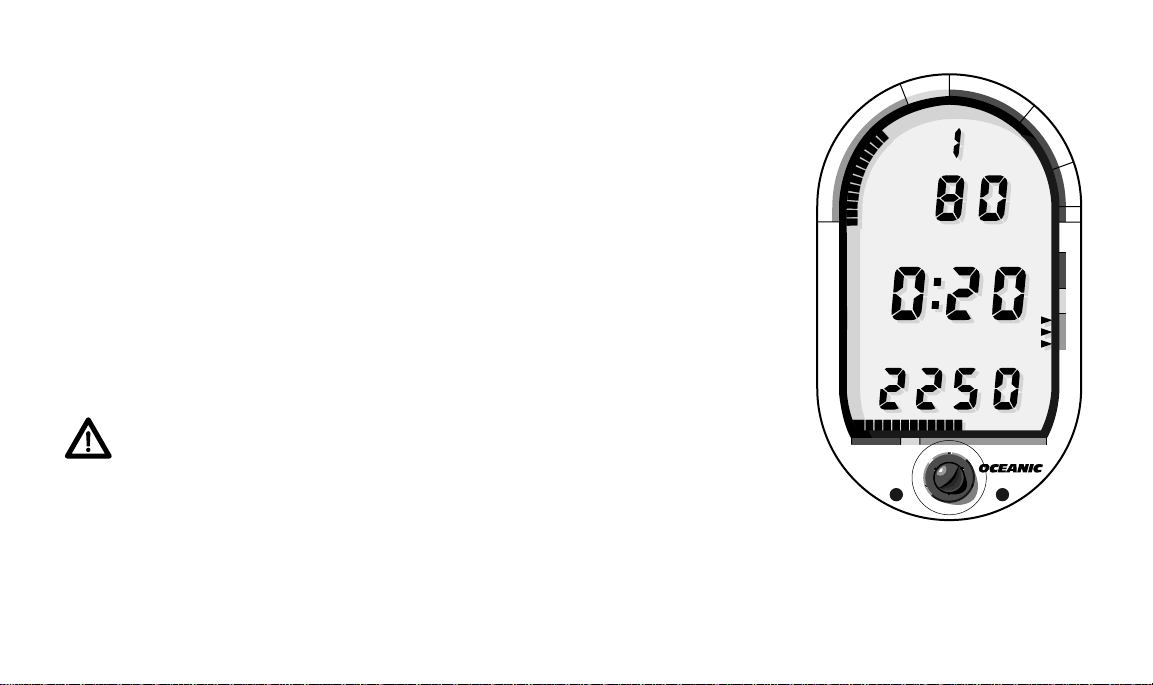
4. NO-DECOMPRESSION DIVE MODE
No-decompression Dive Mode appears when the diver descends deeper
than five feet (Fig. 11). It can be recognized by the “AIR” or “NO DEC”
Mode Label under the Dive Time Remaining display. No-decompression Dive
Mode numerically displays Dive #, Depth, Tank Pressure, and NO DEC or
AIR Dive Time Remaining (whichever is less). The Graphic Diver Interface
is also active, displaying the TLBG, VARI, and Tank Pressure Bar Graph.
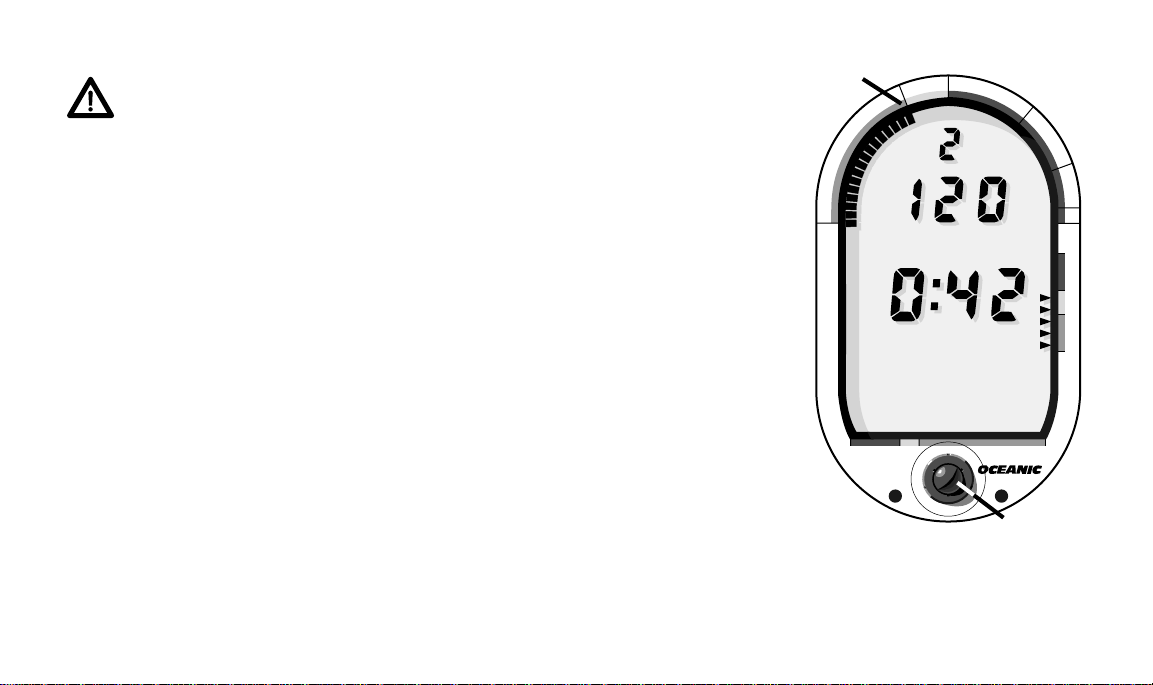
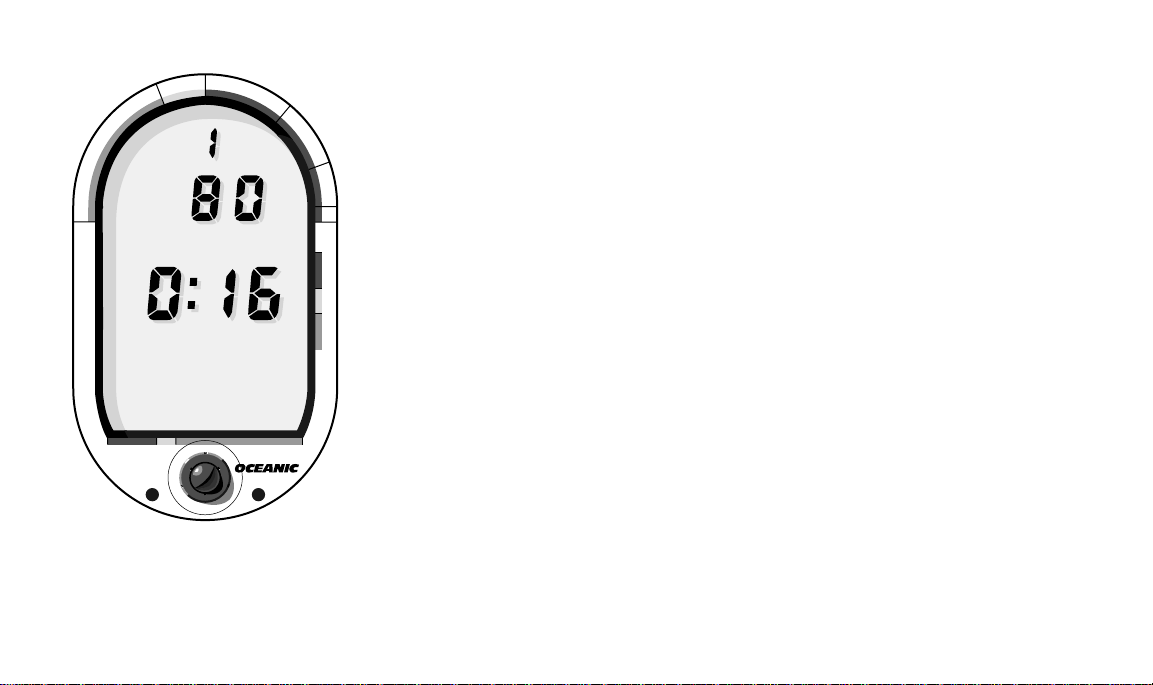
5. ALTERNATE DIVE MODE
Displays of Maximum Depth and Bottom Time are not considered important enough to require constant display on the LCD, so a multiplexing
“Alternate Dive Mode” is used. No-decompression Dive Mode is replaced
every 15 seconds with Alternate Dive Mode for two seconds (Fig. 12). Alternate Dive Mode displays Dive #, Maximum Depth (noted by Mode Labels
“DEPTH MAX FT”, and elapsed Bottom Time (Mode Label “BOTTOM”).
You can easily tell when you are viewing the Alternate Dive Mode because
the Graphic Diver Interface bar graphs disappear.
6. DECOMPRESSION DIVE MODE
The DataMax Pro will allow you to avoid, or easily manage, decompression. Before explaining further, read the following warning.
1
.
0
Z
F
.
C
M
O
C
E
D
O
N
DEPTH
DEPTH
T
I
M
E
NO DEC
T
A
N
K
NO DEC
T
S
T
O
P
2
FT
FT
PSI
PSI
0
F
T
3
0
4
0
A
S
C
E
N
T
#
#
WARNING - Oceanic recommends the application of responsible diving practices and does not recommend decompression diving or diving deeper than 130 feet. As these practices,
among other things, will greatly increase your risk of decompression sickness.
The Decompression Dive Mode activates when the TLBG enters a red
decompression zone (Fig. 13a). When this occurs, the No- decompression
5000 40003000
DataMax
PRO
®
®
Fig. 11 – No-decompression
Dive Mode
13
1
.
0
Z
F
.
#
#
MAX
MAX
BOTTOM
BOTTOM
T
S
T
O
P
FT
FT
®
O
N
T
I
M
E
T
A
N
K
M
O
C
E
D
DEPTH
5000 40003000
DataMax
PRO
C
DEPTH
®
Fig. 12 – Alternate Dive Mode
14
time display also reaches zero and switches to Decompression time (Fig. 13b).
The Mode Label changes from “NO DEC” to “DEC” under the Dive Time
2
0
F
T
3
0
4
0
Remaining display. Decompression Dive Mode numerically displays Dive #,
Depth, Total Decompression Time, and Tank Pressure. Besides continuing
to display the Tank Pressure and VARI bar graphs, the Graphic Diver
Interface displays the TLBG, that now act as a Decompression “ceiling”
indicator. Decompression time displays the total number of minutes required
at all ceilings combined. The TLBG displays the ceiling depth that you must
A
C
N
stay below.
S
E
T
When the Audible Alarm alerts you of entry into decompression, you
must immediately change the focus of your dive to getting back to the surface. Upon hearing the alarm and seeing the TLBG enter the 10 FT. STOP
zone, you should immediately go to a depth slightly deeper than or equal to
10 feet. The amount of decompression credit time you receive is dependent
on depth, with slightly less credit given the deeper you are.
Still, you must never ascend shallower than your decompression ceiling.
Doing so will place the DataMax Pro into a Conditional Violation Mode, and
greatly increase your risk of decompression sickness. Often while
coping with surge and swell, it is difficult to stay at a chosen depth. To
ensure that you do not enter a violation mode you should stay close to, but no
shallower than, the decompression ceiling depth. If the DataMax Pro requires a 10, 20 or 30 foot decompression ceiling, you should stay deeper than
the depth indicated until the TLBG recedes into the next shallower zone.
When that occurs, you can ascend to, but not shallower than, the new ceiling.
Once you have performed the required decompression, the DataMax Pro
will switch to No-decompression Dive Mode allowing additional time underwater. Though more time may be available, you must spend a portion of this
time continuing to decompress at a safety stop deeper than or equal to 10
feet. This will let the TLBG recede further into the yellow Caution Zone or
green No Decom zone. During a dive in which you entered decompression,
you must focus on reducing your tissue loading as much as possible - by
spending as much time as you can at your final safety stop and on the surface
- before your next dive.
7. VIOLATION MODES
The DataMax Pro enters one of three different Violation Modes when you
exceed its ability to predict an ascent procedure. These modes are explained
fully in the “Handling the Extremes” section beginning page 30.
8. GAUGE MODE
If the DataMax Pro enters a Violation Mode, it will operate only in Gauge
Mode on subsequent dives. The DataMax Pro removes the displays that no
longer provide correct information because of the violation (see page 37).
b.
O
N
T
I
M
E
T
A
N
K
M
O
C
E
D
DEPTH
5000 40003000
DataMax
PRO
.
C
DEPTH
DEC
®
Z
#
#
DEC
1
.
0
F
T
S
T
O
P
2
0
F
T
3
0
4
0
FT
FT
A
S
C
E
N
T
PSI
PSI
BEEP!
BEEP!
®
a.
9. DIVE LOG MODE
Dive Log Mode can be accessed on the surface by pressing the button on
the front of the DataMax Pro (Fig. 14a). Pressing and releasing the button
Fig. 13 – Decompression
Dive Mode
15
1
.
0
Z
.
C
M
O
N
T
I
M
E
T
A
N
K
O
C
E
D
DataMax
PRO
#
#
LOG
LOG
DEPTH
MAX
DEPTH
MAX
BOTTOM
BOTTOM
5000 40003000
®
Fig. 14 – Dive Log Mode
Primary Screen
16
F
T
S
T
O
P
2
0
F
T
3
0
4
0
FT
FT
A
C
N
will start the Automatic Dive Log Sequence. This mode displays information
of up to nine dives from your most recent day of diving. Dive Log Mode will
retain this information indefinitely until descent past five feet on your next
dive after twelve hours, or until the battery is removed - in either case, the
log's memory of previous dives will be cleared. Dive Log Mode can be recognized by the Mode Label “LOG” in the top of the display. This mode has a
multiplexing display with each logged dive having two “screens.”
The first screen will display Dive #, Maximum Depth (noted by Mode
Labels “DEPTH MAX FT”), and total Bottom Time (underneath the Mode
S
Label “BOTTOM”). It will also show the TLBG reading that was recorded at
E
the end of the dive, and the maximum ascent rate value reached in the VARI.
T
In the second screen, the Surface Interval between the indicated dive and
the previous one replaces the bottom time display. If the dive shown in the
log display was the only one of the day, Surface Time will represent the time
between initial activation and the beginning of the first dive.
The Dive Log Mode recalls dives from the last recorded to the first, so
your first dive will always be the last shown in the log sequence. When
®
accessing Dive Log Mode, you can choose to either press and release, or press
and hold, the button on the face of the DataMax Pro. Pressing and releasing
a.
the button initiates the Automatic Dive Log Sequence. This sequence will
scroll through previous dives showing each “screen” for about four seconds.
Pressing and holding the button will freeze the information on the
display giving you a chance to write it down in your logbook (A sample
logbook page is provided on page 65 of this guide that can be photo duplicated
for this purpose). Releasing and then holding the button again will display
the secondary log screen of the currently displayed dive. Releasing and
holding the button still again will display the next earlier dive, and so on.
NOTE: Depressing the button for more than six seconds when
viewing the secondary Dive Log screen of the most recent dive
will activate the Audible Alarm Access Mode (see page 26).
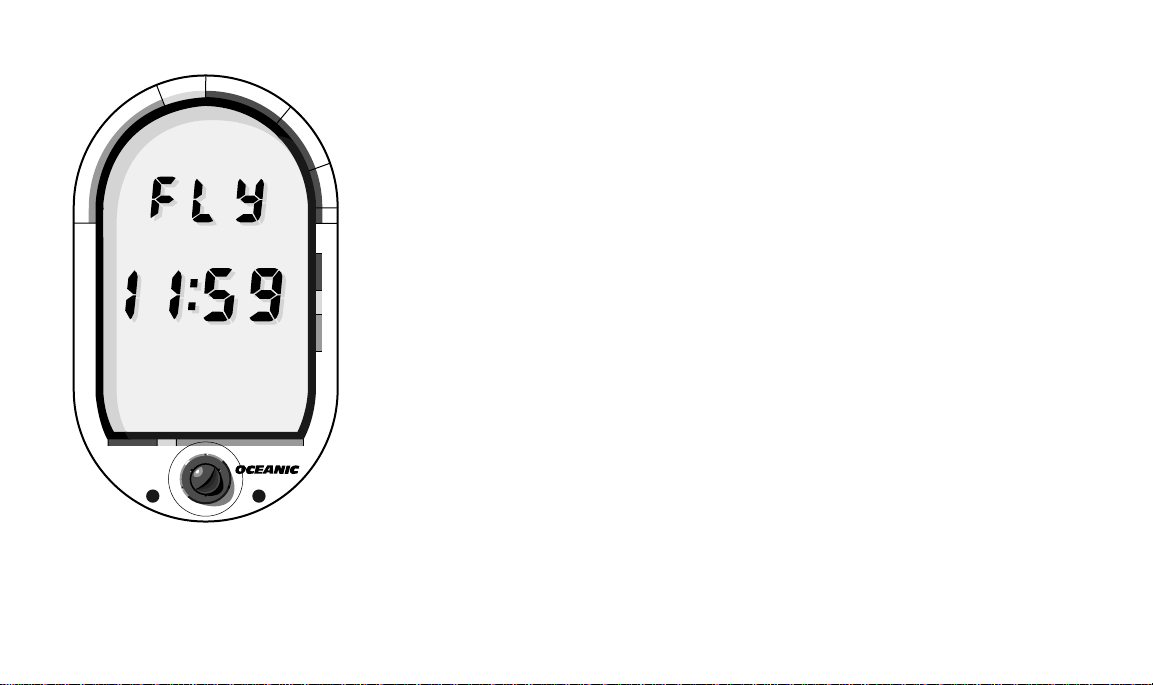
10. TIME TO FLY MODE
The longer you wait to fly after diving, as you should be aware
from your own training, the more you will reduce your exposure to
decompression sickness. The Time To Fly Mode begins displaying four
hours after the last dive has ended to assist you with deciding when enough
surface time has elapsed to fly. It is part of the Pre Dive Planning Sequence
and shows the word “FLY” with a countdown timer below that starts at 20
hours (Fig. 16).
Twelve hours after the last dive, the Dive Counter resets to zero and the
PDPS stops automatically scrolling. Time to Fly Mode now displays continuously, counting down from the remaining twelve hours to zero. After a
surface interval of 12 hours, you may choose to fly, provided that your dive
profile(s) did not enter decompression. (See page 27 for more information
about flying after diving and DAN's guidelines.)
1
.
0
Z
F
.
T
S
T
O
N
T
I
M
E
T
A
N
K
O
C
E
D
O
DataMax
M
PRO
C
5000 40003000
®
Fig. 16 – Time to Fly Mode
P
2
0
F
T
3
0
4
0
A
S
C
E
N
T
®
17
O
N
T
I
M
E
T
A
N
K
M
O
C
E
D
LOG
DEPTH
SURFACE
SURFACE
LOW BATT
LOW BATT
5000 40003000
DataMax
PRO
Z
.
C
#
LOG
DEPTH
NO DEC
NO DEC
®
1
.
0
MAX
MAX
BOTTOM
METRIC
METRIC
F
T
S
T
PLAN
PLAN
M
FT
M
FT
BOTTOM
AIR
AIR
PSI
PSI
O
P
2
0
F
T
WARNING: If your diving could be considered as decompression or repetitive, multi-day, it is strongly recommended that
you wait the full 24 hours after your last dive to add a greater
degree of protection.
3
0
4
0
WARNING: During the remaining 12 hours, the unit is in a
countdown mode only and must be reactivated before it can
A
S
C
E
N
T
be used for another dive.
TELLING THE DIFFERENT MODES APART
The DataMax Pro’s ten different modes are easy to tell apart. Each is
clearly marked with Mode Labels (Fig. 17) and all occur at different times.
Unless you routinely dive to the extremes, you will rarely see the Decompression Dive, Violation, or Gauge Modes. The Diagnostic and Dive Log Modes
occur only upon request by pressing the activation button. Therefore, the
only modes you will see underwater are No-decompression and Alternate
®
Dive. Above water you will view the Pre Dive Planning Sequence, Surface,
and Time to Fly Modes. Become familiar with all ten modes so that you
understand exactly what the DataMax Pro is trying to tell you.
Fig. 17 – Mode Labels
18
INFORMATIONAL DISPLAYS
Each DataMax Pro display represents a unique piece of information. The
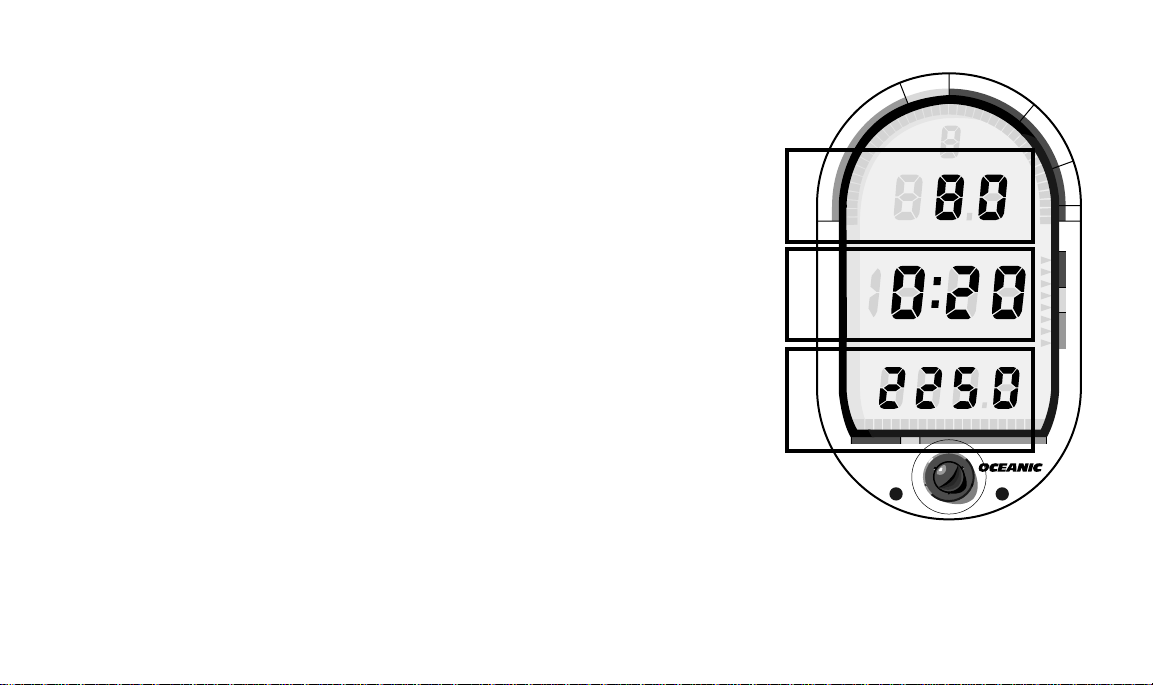
following section describes each display in detail.
Depth Display
The Uppermost portion of the LCD (Fig. 18a) contains a Dive Number
Indicator and the Depth Displays. Depending on the mode that is active, you
may see Depth or Maximum Depth displayed in this area. These displays
indicate depth from 0 to 249 feet in one foot increments (or 0 to 76 meters in
.5 meter increments for the metric version).
Time Display
Located in the middle of the LCD (Fig. 18b), the Time Displays represent
AIR or NO DEC Dive Time Remaining, Bottom, or Surface Times. The
various time displays are in hour:minute format, i.e. 1:06=one hour and six
minutes (not 106 minutes!). The colon that separates the hour and minute
display blinks once per second only when the display is in “real-time.”
Elapsed Surface Time and Bottom Time are real-time displays. Dive Time
Remaining is a calculated projection of time and uses a solid (non-blinking)
colon. This helps you tell the different time displays apart.
Tank Pressure Display
The tank pressure display resides on the lowermost portion of the LCD
(Fig. 18c) and shows how much air is in your tank up to 4,000 psig to the
nearest 10 psi (or .5 kg/cm2 in the metric version).
.
Z
.
C
M
C
E
D
O
N
a. DEPTH
T
I
M
E
T
A
N
K
c. PRESSURE b. TIME
O
DataMax
#
LOG PLAN
DEPTH MAX
SURFACE BOTTOM
NO DEC AIR
LOW BATT METRIC PSI
5000 40003000
®
PRO
Fig. 18 – Display layout
1
0
F
T
S
T
O
P
2
0
F
T
3
0
4
0
M
FT
A
S
C
E
N
T
®
19
1
.
0
Z
F
.
T
N
T
I
M
E
T
A
N
K
M
O
C
E
D
O
DataMax
C
LOG PLAN
DEPTH MAX
SURFACE BOTTOM
NO DEC AIR
LOW BATT METRIC
5000 40003000
®
PRO
S
T
O
P
#
M
FT
PSI
®
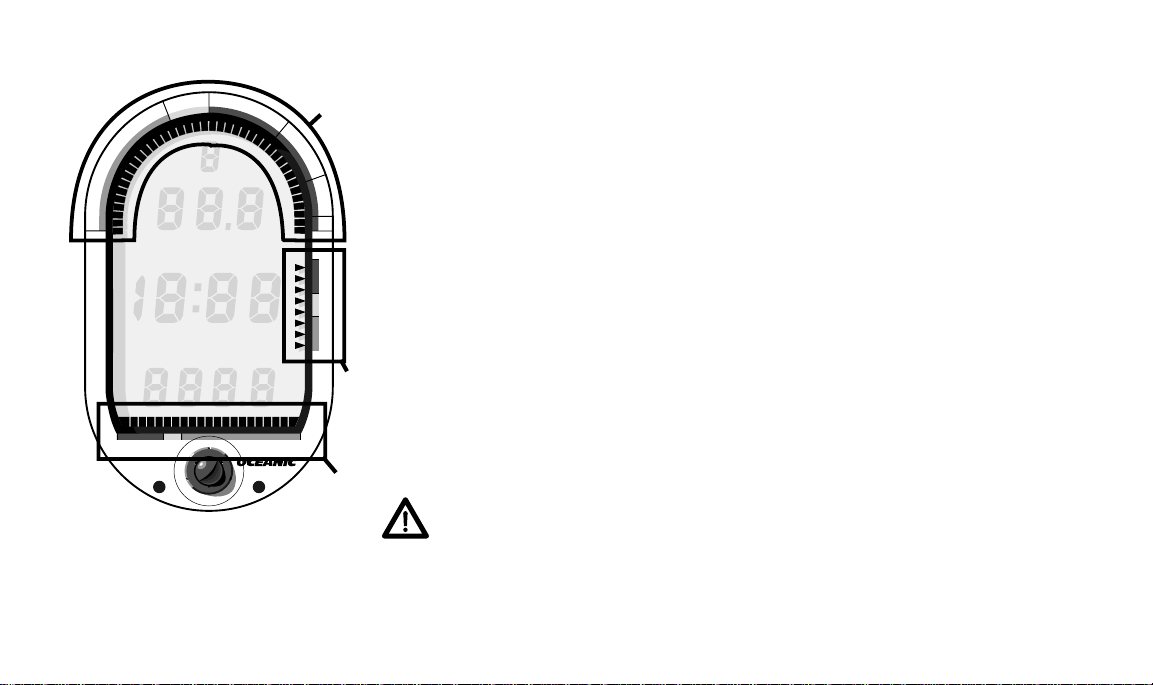
Fig. 19 – Graphic Diver Inter-
face
20
GRAPHIC DIVER INTERFACE
a.
2
0
F
T
3
0
4
0
Three different bar graphs are located around the perimeter of the
DataMax Pro LCD (Fig. 19a). They are color coded green, yellow, and red to
denote normal, caution and danger zones, respectively. The Graphic Diver
Interface allows you to make quick status checks underwater on your nodecompression status, ascent rate, and tank pressure. By keeping these bar
graphs “in the green” at all times, you'll greatly reduce your exposure to
™
decompression sickness. A detailed description of each graph follows.
A
S
C
E
N
T
Tissue Loading Bar Graph™- TLBG
The semicircular graph found at the top of the display is the TLBG. It
monitors twelve different compartments simultaneously and displays the one
that is highest. The TLBG is divided into three main sections; green No
Decom zone, yellow Caution Zone (C.Z.), and red decompression zone. The red
b.
decompression zone is further divided into three decompression “ceiling”
zones of 10, 20, 30, and 40 feet. By referring to the TLBG, you can see a visual
representation of nitrogen absorption and use it to avoid, or easily manage,
decompression.
c.
WARNING: Oceanic advocates responsible diving practices
consistent with your level of formal training and experience,
and does not recommend decompression diving or diving below
130 feet.
 Loading...