

Page 1

OCEANIC
®
AIR XS II
Regulator / BC Inflator System
Owner's Guide
Page 2
THANK YOU for purchasing an Oceanic AIR XS II Regulator/
Inflator system. With this system, you have -
• 2 methods to inflate the BC
• 2 methods to deflate the BC
• automatic venting of excess BC pressure
• an Alternate Air Source Regulator
Be sure to read and understand the instructions in this
Owner's Guide describing how the AIR XS II System operates before attempting to dive with it.
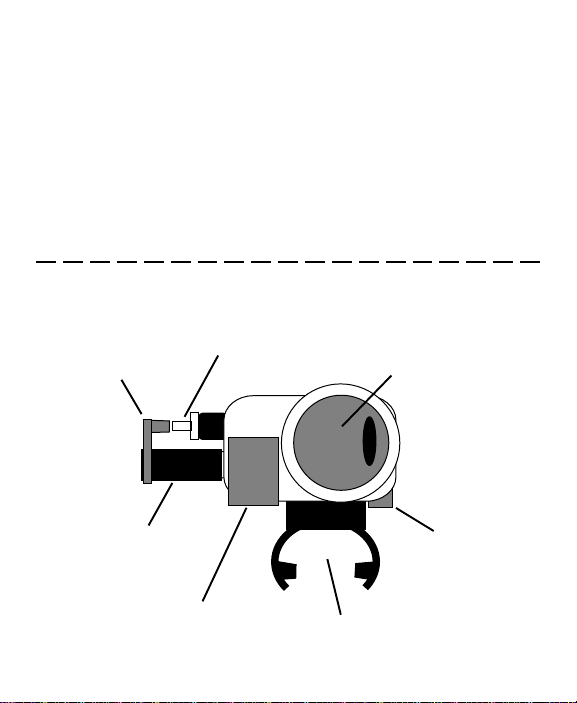
COMPONENTS
INFLATOR HOSE
PROTECTIVE
CAP
COUPLING
PURGE
BUTTON
CORRUGATED
2
HOSE TO
UPPER UNIT
POWER
INFLATOR
BUTTON
MOUTHPIECE
MANUAL
INFLATE/
DEFLATE
BUTTON
Page 3

CONTENTS
INTRODUCTION . . . . . . . . . . . . . . . . . . . . . . . . . . . . . . 2
COMPONENTS . . . . . . . . . . . . . . . . . . . . . . . . . . . . . . . 2
WARRANTY . . . . . . . . . . . . . . . . . . . . . . . . . . . . . . . . 4
COPYRIGHT . . . . . . . . . . . . . . . . . . . . . . . . . . . . . . . . . 4
COMPATIBILITY AND INSTALLATION . . . . . . . . . . . . . . . 5
FEATURES . . . . . . . . . . . . . . . . . . . . . . . . . . . . . . . . . . 5
INFLATOR OPERATION . . . . . . . . . . . . . . . . . . . . . . . . . 7
REGULATOR OPERATION . . . . . . . . . . . . . . . . . . . . . . 9
CARE AND MAINTENANCE . . . . . . . . . . . . . . . . . . . . 10
GUIDELINE FOR MINIMUM SERVICE INTERVALS . . . . . 13
COLD WATER DIVING . . . . . . . . . . . . . . . . . . . . . . . . . 14
RECORDS . . . . . . . . . . . . . . . . . . . . . . . . . . . . . . . . . . 15
3
Page 4

LIMITED TWO-YEAR WARRANTY
Refer to the Warranty Registration form provided by your Authorized
Oceanic Dealer or register on-line at:
www.OceanicWorldwide.com
COPYRIGHT NOTICE
This Owner’s Guide is copyrighted, all rights are reserved. It may not, in
whole or in part, be copied, photocopied, reproduced, translated, or
reduced to any electronic medium or machine readable form without
prior consent in writing from Oceanic / 2002 Design.
Oceanic AIR XS II Owner's Guide
When using Air with this regulator equipment, the Air used
must meet EN132 Annex A standards.
The AIR XS II Regulator/Inflator System' is designed for -
• minimum working pressures of 120 PSI (8.3 BAR)
• nominal working pressures of 140 PSI (9.5 BAR)
• maximum working pressures of 160 PSI (11 BAR)
4
Doc. No. 12-2116
© 2002 Design 1998
San Leandro, CA USA
Page 5

COMPATIBILITY AND INSTALLATION
The AIR XS II low pressure inflator hose is compatible with all Oceanic
first stage regulators. It may not be compatible with other manufacturers'
first stages (thread size = 3/8-24 UNF). Have your AIR XS II installed on
your BC, and the low pressure inflator hose attached to your regulator
first stage, by an Authorized Oceanic Dealer.
Connect the quick disconnect (QD) end of the inflator hose to the AIR XS
II using the QD coupling. To attach it, grasp the coupling on the end of
the inflator hose between the palm of your hand and fingers, and pull
back the coupling release with your thumb and forefinger. While holding
back the coupling release, press it onto the quick release fitting on the
AIR XS II, and let go of the coupling release while continuing to hold the
hose onto the quick release fitting.
Ensure they are firmly attached prior to pressurizing the regulator/inflator
system.
NOTE: Refer to the illustration on page 2 for
identification of components.
FEATURES
OPERATING BUTTONS
The three operating buttons, one located on each side of the mouthpiece
and one above the mouthpiece, can be differentiated by look, position,
and tactile feel. Become familiar with their use to minimize the possibility
of confusion.
• Top - regulator purge button
• Left - power inflator button
• Right - manual inflator/deflator button
5
Page 6

CORRUGATED HOSES/PULL CONNECTOR
Two corrugated hoses are joined by a Pull Connector. By pulling on the
rounded Pull Connector you can operate the Rapid Exhaust Valve located
in the upper (shoulder) unit while you are using the AIR XS II Regulator
without having to remove the Regulator from your mouth. The extended
length of the Hose Assembly prevents any resistance during head movement.
INFLATOR OVERPRESSURE RELIEF VALVE (OPV)
The integrated OPV, located in the upper (shoulder) unit, automatically
vents excess pressure from the BC during ascent or if over pressurized
with the Power Inflator. This component of the AIR XS II operates automatically so no instructions for its use are necessary.
WARNING: The OPV integrated into the upper
(shoulder) unit is set to operate at a lower relief
pressure than the OPV located on the back of the BC to
prevent damage to the material of the BC air cell. It is
imperative that only Oceanic inflator assemblies be
used with Oceanic BCs.
QUICK DISCONNECT CAP (SEE ILLUSTRATION ON PAGE 2)
The rubber Cap secured to the corrugated hose is provided to cover the
quick release inlet fitting of the AIR XS II Power Inflator Assembly. The
Cap must be installed any time the Inflator Hose is disconnected to prevent entry of contaminants.
6
Page 7

INFLATOR OPERATION
WARNING: If you ever hear air, or see bubbles,
escaping from the area around any of the AIR XS II's
connectors, or if the BC fails to hold air, immediately
terminate or postpone the dive until the BC and AIR XS
II can be serviced by an Authorized Oceanic Dealer.
You must not dive with an AIR XS II or BC that exhibits
any signs or symptoms of leakage.
BC INFLATION USING THE POWER INFLATOR
With your Regulator connected to an appropriate cylinder, slowly open
the cylinder valve to pressurize the Regulator/Inflator system. Press the
Power Inflator Button, located on the left side of the AIR XS II Mouthpiece,
until you hear air flowing into the BC. Minor compressions of the Power
Inflator Button will initiate airflow into the BC and allow small adjustments
in buoyancy.
WARNING: If you depress the Power Inflator Button
fully, the BC will inflate rapidly. Be careful not to
overinflate the BC during a dive causing an unwanted
rapid rise toward the surface.
Test the Power Inflator and Overpressure Relief Valve (OPV) prior to each
dive to ensure they are functioning properly. Depress the Power Inflator
until the BC fills completely, forcing the OPV in the upper (shoulder) unit
to open. You will hear the sound of air venting from OPV, indicating that
it is working properly. While the BC is still inflated, listen for any undesired air leakage around the AIR XS II. The BC should stay inflated until
you deflate it manually.
7
Page 8

BC DEFLATION USING THE RAPID EXHAUST VALVE (REV)
The Rapid Exhaust Valve (REV) is located inside the upper (shoulder) unit
of the Inflator Assembly. It is connected to the lower (power) unit by two
Cables located inside the Corrugated Hose and coupled together inside
the Pull Connector.
The REV is operated by grasping the Pull Connector, or the lower (power)
unit and pulling it down (away) from the upper (shoulder) unit. The
Cables pull the Exhaust Valve open, venting air from the BC through the
Vents of the upper unit of the Inflator Assembly.
The amount of air vented depends on how far open the Exhaust Valve is,
the distance you pull the inner Cable, and how long the Exhaust Valve is
open. Short tugs vent small amounts of air for minor changes in buoyancy, and a long pull will vent the entire BC in a matter of seconds.
Use of the REV eliminates water entry even if the Exhaust Valve remains
open after all air is vented from the BC.
BC INFLATION USING THE MANUAL INFLATE/DEFLATE
BUTTON
The Round Button located on the right side of the Mouthpiece is an Inflate/Deflate manual actuator that allows air flow in to, or out of, the BC.
To inflate orally, place the Mouthpiece in your mouth, and after you begin (and continue) to blow in, press the Button with your thumb. This
procedure purges the mouthpiece cavity of water, resulting in less water
entering the BC, potentially prolonging Bladder life.
Some air may continue to leak in to the surrounding water when you are
orally inflating the BC, even after you have released the Inflate/Deflate
Button. This is considered normal and will not impede the efficient oral
inflation of the BC.
8
Page 9

BC DEFLATION USING THE MANUAL INFLATOR/DEFLATOR
BUTTON
To deflate the BC through the Mouthpiece, hold the lower (power) unit
higher than the top of the BC and depress the Round Button located on
the right side of the Mouthpiece to vent the air from the BC.
To ensure complete deflation of the BC, the Mouthpiece must be held
higher than the top of the BC. While underwater, you will hear the air as
it bubbles out through the Mouthpiece.
To prevent entry of water into the BC, be sure to release the Button before
all bubbles stop flowing. To help eliminate unwanted water entry, use the
Rapid Exhaust Valve method of deflation.
REGULATOR OPERATION
In the event that it is necessary for you to share air with another diver,
you should offer your Primary Second Stage to the diver and you should
use the AIR XS II Regulator. Although the AIR XS II Regulator will function
properly with the Purge Button facing up or down, Oceanic recommends
an operational position with the Purge Button facing up, similar to other
Second Stage positioning.
Operation of your AIR XS II Regulator is similar to most other Second
Stages. It provides air on demand with low inhalation resistance and it
has a convenient Purge Button located on the top of the unit's housing
and a comfortable Mouthpiece.
As with most other Second Stages, purging the AIR XS II Regulator of
water can be accomplished in two ways. By pressing the Purge Button
to initiate the flow of air and expulsion of water, or by exhaling a small
puff of air into the Mouthpiece to expel the water.
9
Page 10

CARE AND MAINTENANCE
Your AIR XS II is a reliable piece of equipment that will continue to work
like new for many years to come, if cared for properly.
Follow the procedures below, and have the entire AIR XS II inspected and
serviced annually by your local Authorized Oceanic Dealer.
DISCONNECTING THE INFLATOR HOSE
• Close the Cylinder Valve and purge (vent) the Regulator Assembly
'completely' of all pressure by depressing a second stage Purge
Button.
• Grasp the Quick Disconnect Coupling on the AIR XS II Inflator Hose
(second stage end) between the palm of your hand and fingers, pull
back the Coupling Release with your thumb and forefinger, and
pull it off the quick release fitting of the AIR XS II.
• Place the Protective Cap on the fitting (see illustration on page ??) to
prevent contaminants from entering the AIR XS II's Valve Housing.
POST DIVE CARE
Any exposure to aquatic elements can produce contamination that could
effect the proper function of your dive equipment. Post dive care is the
most important thing you can do to keep your AIR XS II in top condition.
WARNING: DO NOT attempt to remove (or install) the
AIR XS II from (on) a BC. Improper installation may
cause misoperation or BC failure underwater, possibly
resulting in serious injury or death. It will also void
the warranty.
10
Page 11

As soon as possible at the end of each day of diving:
• Flush the exterior of all components thoroughly with fresh water to
remove dissolved salt and other contaminants.
• Flush the Lower (Power) Assembly by running water into the Mouthpiece and out the Exhaust Ports. DO NOT depress the Purge Button
if the Assembly is connected to the First Stage Regulator, doing so
will allow water to flow into the sealed portion of the First Stage.
• If possible, immerse the entire Lower (Power) Assembly in a warm
fresh water bath and soak for one hour, preferably while still connected to the First Stage Regulator and pressurized.
• Remove from the bath and rinse all components of the Assembly
with slow running fresh water. DO NOT use full water pressure.
• Sand that has collected behind the Lower (Power) unit Cover (behind the Purge Button) can be rinsed out by flushing tap water
through the opening in the Cover. Do not pry or lift up on the Purge
Button, or use high pressure water that could damage the internal
Diaphragm.
• If after thoroughly rinsing, sand or debris can still be heard rattling
under the cover, take your BC/AIR XS II Assembly to an Authorized
Oceanic Dealer for inspection and cleaning.
WARNING: DO NOT remove the Purge Cover yourself.
Improper replacement of the Cover could result in an
unexpected undesirable shut off of air delivery while
underwater.
• If possible, lay the complete Assembly flat in a cool, dry place (out
of direct sunlight) and allow the components to dry naturally.
• DO NOT inject or spray Lubricants into or onto the AIR XS II. Doing
so can attract contamination that could subsequently interfere with
proper operation.
11
Page 12

TRANSPORT AND STORAGE
• If possible, transport your BC and AIR XS II Assembly (preferably
dry) in a padded carrying case or equipment bag separated from
sharp items (i.e. dive knife, spear gun, etc.) that might damage or
scratch the components.
• You should also protect the AIR XS II from damage from heavy objects (i.e., dive light, regulator assemblies, tanks, etc.).
• Prior to storing your AIR XS II, ensure that it is clean and dry.
• If you were unable to clean it prior to transport, or if it became exposed to other equipment that was not clean prior to transport (such
as a wet suit), clean it thoroughly and allow it to dry naturally.
SERVICE
WARNING: DO NOT attempt to disassemble or repair
any components of the AIR XS II, or to adjust the
Regulator. Doing so could cause misoperation while
underwater resulting in serious injury or death. It will
also void the warranty.
• Once each year, your complete BC/AIR XS II assembly should be
inspected and serviced by an Authorized Oceanic Dealer. More
frequent service is recommended if you dive in severe conditions or
more frequently than an average diver (see Guidelines on page 13).
• In the event that any component of your Regulator assembly requires
any form of repair or service, take it to an Authorized Oceanic
Dealer for professional service by a trained technician authorized to
perform Oceanic factory authorized service.
• Provide the Dealer with a copy of the original sales receipt and
your copy of the warranty registration card.
• Inspection and service costs are not covered by the limited warranty.
12
Page 13

GUIDELINE FOR MINIMUM SERVICE INTERVAL S
Due to variations of use and storage time that the AIR XS II may be subjected to, the Guidelines and defined Intervals given herein are subject to
the discretion of the Owner of the equipment. Inspection and/or service
indicated must be performed only by an Authorized Oceanic Dealer.
Personally owned equipment used for recreational diving activity:
• Equipment used 100 dives or less per year should be serviced at
least once per year.
• Equipment used more than 100 dives per year should be serviced
after 100 dives prior to further use.
• Equipment stored for more than 6 months should be inspected, and
serviced as required, prior to use.
Equipment used for dive training and/or consumer rental activities:
• Equipment should be inspected prior to every use.
• Equipment should be serviced at least once every 6 months regardless of use.
• Equipment should be serviced after 100 dives prior to further use.
• Equipment stored for more than 3 months should be inspected, and
serviced as required, prior to use.
Regardless of ownership or intended use:
• Equipment should be inspected and serviced if it displays any sign
of leakage or malfunction.
• Equipment should be inspected and serviced if it displays signs of
improper performance or breathing effort.
• Equipment should be inspected and serviced as required if it displays signs of freeflowing.
• Equipment should be inspected and serviced if o-rings or hoses display any signs of deterioration.
13
Page 14

COLD WATER DIVING
Specialized training and skills required for cold water diving will reduce
effects that cold water Temperatures can impose upon the operation of
Oceanic Regulator Second Stage(s).
WARNING: Failure to obtain proper training in the
specialized techniques required for diving in cold
water environments and failure to apply such
techniques to handle situations that could result in
Regulator freezing will place you in risk of serious
injury or death.
All Oceanic Regulator First Stages are classified as being suitable for use
in waters having Temperatures of 50°F (10 °C) and higher.
• Refer to the Regulator Owner's Guide that applies to your model,
Doc. No. 12-2018, 12-2348, or 12-2360.
14
Page 15

AIR XS II
RECORDS
Serial No. ________________________________
Date of Purchase ________________________________
Oceanic Dealer ________________________________
Dealer Phone No.________________________________
_____________________________________________________________
_Date Service Performed Dealer Technician_____
_____________________________________________________________
_____________________________________________________________
_____________________________________________________________
_____________________________________________________________
_____________________________________________________________
INSPECTIONS / SERVICE
15
Page 16

OCEANIC
®
2002 Davis Street
San Leandro, CA 94577
Tel: 510-562-0500
Fax: 510-569-5404
http://www.OceanicWorldwide.com
© 2002 Design, 2004
16
Doc. No. 12-2116-r02 (9/20/04)
 Loading...