

Page 1

REFRIGERATOR
Page 2

CONGRATULAZIONI!
Ottima scelta! Con l’acquisto del nostro elettrodomestico avete scelto un
prodotto affidabile e dalle alte prestazioni, discreto, efficiente, utile: grazie al
freddo che conserva i cibi la nostra alimentazione è più varia e più sana.
Il vostro nuovo apparecchio è facile da usare. Vi preghiamo comunque di
leggere attentamente le istruzioni, in modo da scoprire quei piccoli accorgimenti
che vi consentiranno di sfruttare al massimo le potenzialità del vostro
apparecchio risparmiando energia.
Certi che l’utilizzo vi soddisferà, ci auguriamo di avervi sempre come nostri
clienti.
Il marchio OCEAN.
INDICE
Pagina
Norme di sicurezza /Raccomandazioni................................................. 3
Installazione ............................................................................................ 4
Sicurezza alimentare .............................................................................. 5
Inversione del senso di apertura della porta ........................................ 5
Descrizione generale.............................................................................. 6
Uso del frigorifero................................................................................... 6
Uso dello scomparto ...................................................................... 7
Uso del schermo LCD ........................................................................... 7
Sbrinamento / Pulizia e manutenzione................................................ 10
Guasti e anomalie................................................................................. 11
Page 3
NORME DI SICUREZZA
L’apparecchio è adatto a conservare e congelare alimenti per uso domestico: ogni altro uso è
improprio.
L’installazione deve essere effettuata secondo le istruzioni del presente libretto: un’errata
installazione può danneggiare l’apparecchio. Per eventuali problemi rivolgetevi ai centri di
assistenza autorizzati o, comunque, sempre e solo a personale specializzato.
Prima di ogni operazione di manutenzione staccate la spina di alimentazione elettrica
evitando di tirare il cavo di alimentazione o l’apparecchio, ma afferrando direttamente
la spina.
Le parti destinate al contatto con gli alimenti sono conformi al D.L. n. 108 del 25/01/1992 e
alla direttiva CEE 89/109.
Per qualsiasi operazione di pulizia, vogliate prima sconnettere l’apparecchio dalla
presa di corrente.
Se questo apparecchio ne sostituisce un altro munito di un dispositivo di chiusura a
lucchetto, chiave, serratura o altro, non dimenticatevi di distruggere tale dispositivo, o meglio
ancora di smontare la porta, alfine di evitare che qualcuno resti bloccato all’interno (bambini
che giocano, animali, ecc.).
RACCOMANDAZIONI
Dopo avere sballato l’apparecchio, assicuratevi che non sia stato danneggiato. Un
apparecchio danneggiato non deve essere connesso. In caso di danno, rivolgetevi al vostro
rivenditore entro le 24 ore dall’acquisto. Tenete i materiali dell’imballo fuori dalla portata
dei bambini.
Il circuito del frigorifero contiene il refrigerante isobutano (R600a), un gas naturale che
non inquina, ma che è infiammabile. Durante il trasporto e l’installazione assicuratevi che
nessun componente del circuito sia stato danneggiato. In caso di danno, tenere l’apparecchio
lontano da fonti di calore e aerare il locale dove si trova.
Per un funzionamento ottimale dell’apparecchio, installatelo lontano da fonti di calore e
assicuratevi che l’aria possa circolare intorno all’apparecchio (vedere paragrafo
sull’Installazione).
3
Page 4

INSTALLAZIONE
Prima di procedere all’installazione leggete attentamente le Norme di Sicurezza alfine di
evitare inconvenienti.
Dopo aver sballato l’apparecchio controllate che non sia danneggiato. Eventuali danni vanno
segnalati immediatamente al rivenditore.
Non disperdete nell’ambiente le parti dell’imballo (sacchetti di plastica, strisce di polistirolo
ecc.), né lasciatele alla portata dei bambini.
Se l’apparecchio è stato trasportato in casa vostra in posizione orizzontale, attendete un paio
d’ore prima di inserire la spina elettrica, per dar modo all’olio di rifluire nel compressore.
Collocate l’apparecchio in un ambiente asciutto e aerato, al riparo da agenti atmosferici.
Evitate balconi, verande, terrazzi: l’eccessivo caldo in estate e freddo in inverno potrebbero
alterare il funzionamento dell’apparecchio o addirittura danneggiarlo.
Non mettetelo vicino ad una fonte di calore come un forno o un calorifero e mantenete una
distanza minima di 3/5 cm ai lati e 10 cm sopra. Tenete l’apparecchio staccato dal muro.
Regolate i piedini anteriori in modo che l’apparecchio sia leggermente inclinato indietro: in
questo modo faciliterete la buona chiusura della porta.
La classe climatica del vostro apparecchio è indicata sulla targa dati. Questa determina la
gamma di temperatura ambiente per cui è stato concepito l’apparecchio e che ne garantisce
il buon funzionamento. Quando due classi sono indicate, il buon funzionamento
dell’apparecchio è garantito alle condizioni di ciascuna classe.
Classe Temperatura Ambiente
N 16° a 32°
ST 18° a 38°
T 18° a 43°
Collegamento elettrico
Caratteristiche della presa : 220-230V con presa a terra.
Evitare di usare adattatori o prolunghe.
Evitare di mettere in contatto il cavo con il compressore.
Evitare che il cavo resti sotto l’apparecchio.
L’apparecchio è dotato di messa a terra. Per la vostra sicurezza, connettete l’apparecchio ad
una presa di corrente dotata di messa a terra efficace (conformemente alle norme in vigore
sulla sicurezza dell’installazione elettrica).
Il costruttore declina qualsiasi responsabilità per danni derivanti dalla mancanza di messa a
terra.
ATTENZIONE PRIMA DI EFFETTUARE IL COLLEGAMENTO ELETTRICO
1 – Pulire l’interno dell’apparecchio
2 – Per un corretto funzionamento attendere 2 ore prima di accenderlo.
4
Page 5
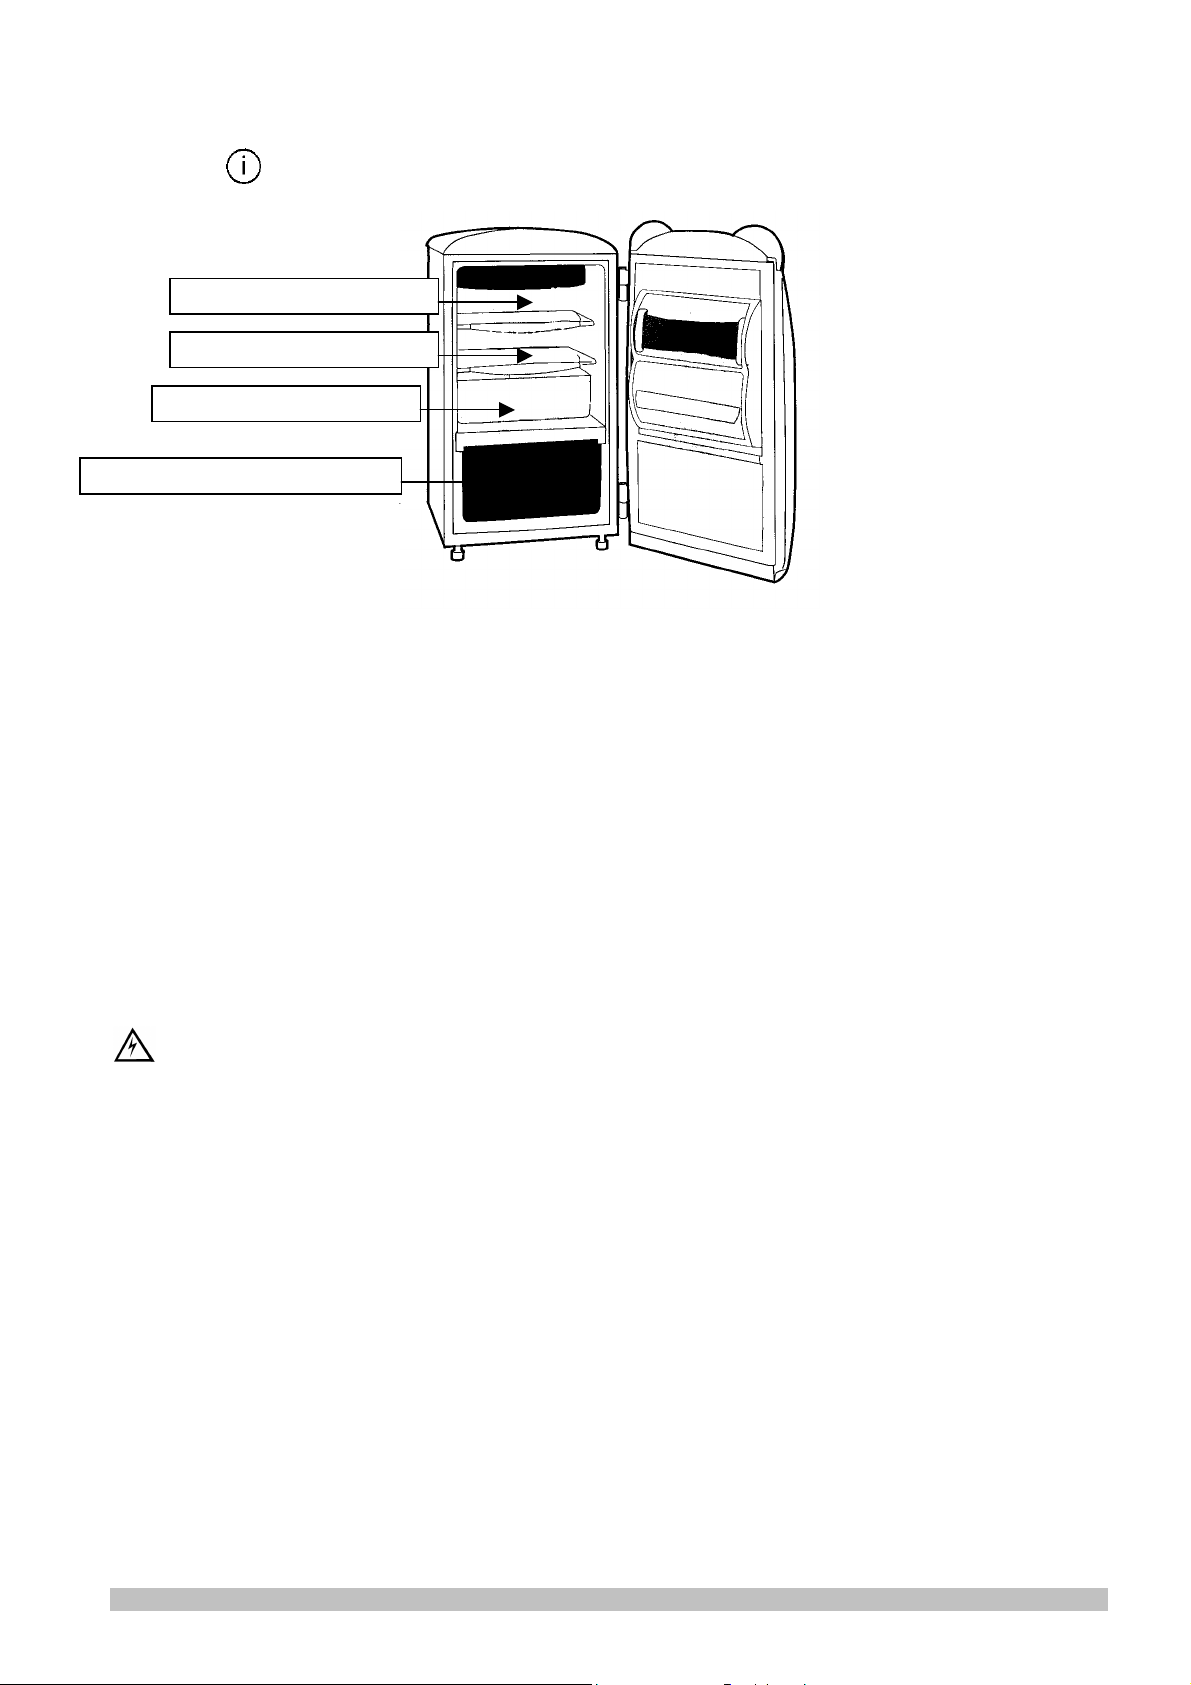
SICUREZZA ALIMENTARE
Latte, formaggio
Carne, pesce, salumi
Frutta e verdura
Scomparto alimenti surgelati
Sistemazione degli alimenti
ATTENZIONE
La temperatura non è totalmente uniforme all’interno della cella, per cui esistono zone
appropriate per ciascun tipo di alimento.
INVERSIONE DEL SENSO DI APERTURA DELLA PORTA
E’ possibile cambiare il senso di apertura della porta (secondo il modello).
L'apparecchio deve sempre essere scollegato dalla corrente prima di procedere al
cambio del senso di apertura della porta.
1.
Togliete con precauzione i copri vite situati sulla porta e sul lato opposto all’apertura
attuale.
2.
Con l’aiuto di un cacciavite adatto, svitate completamente le cerniere della porta e
riposizionatele sul lato opposto.
3.
Rimettete i copri vite nei buchi dove c’erano prima le cerniere.
5
Page 6
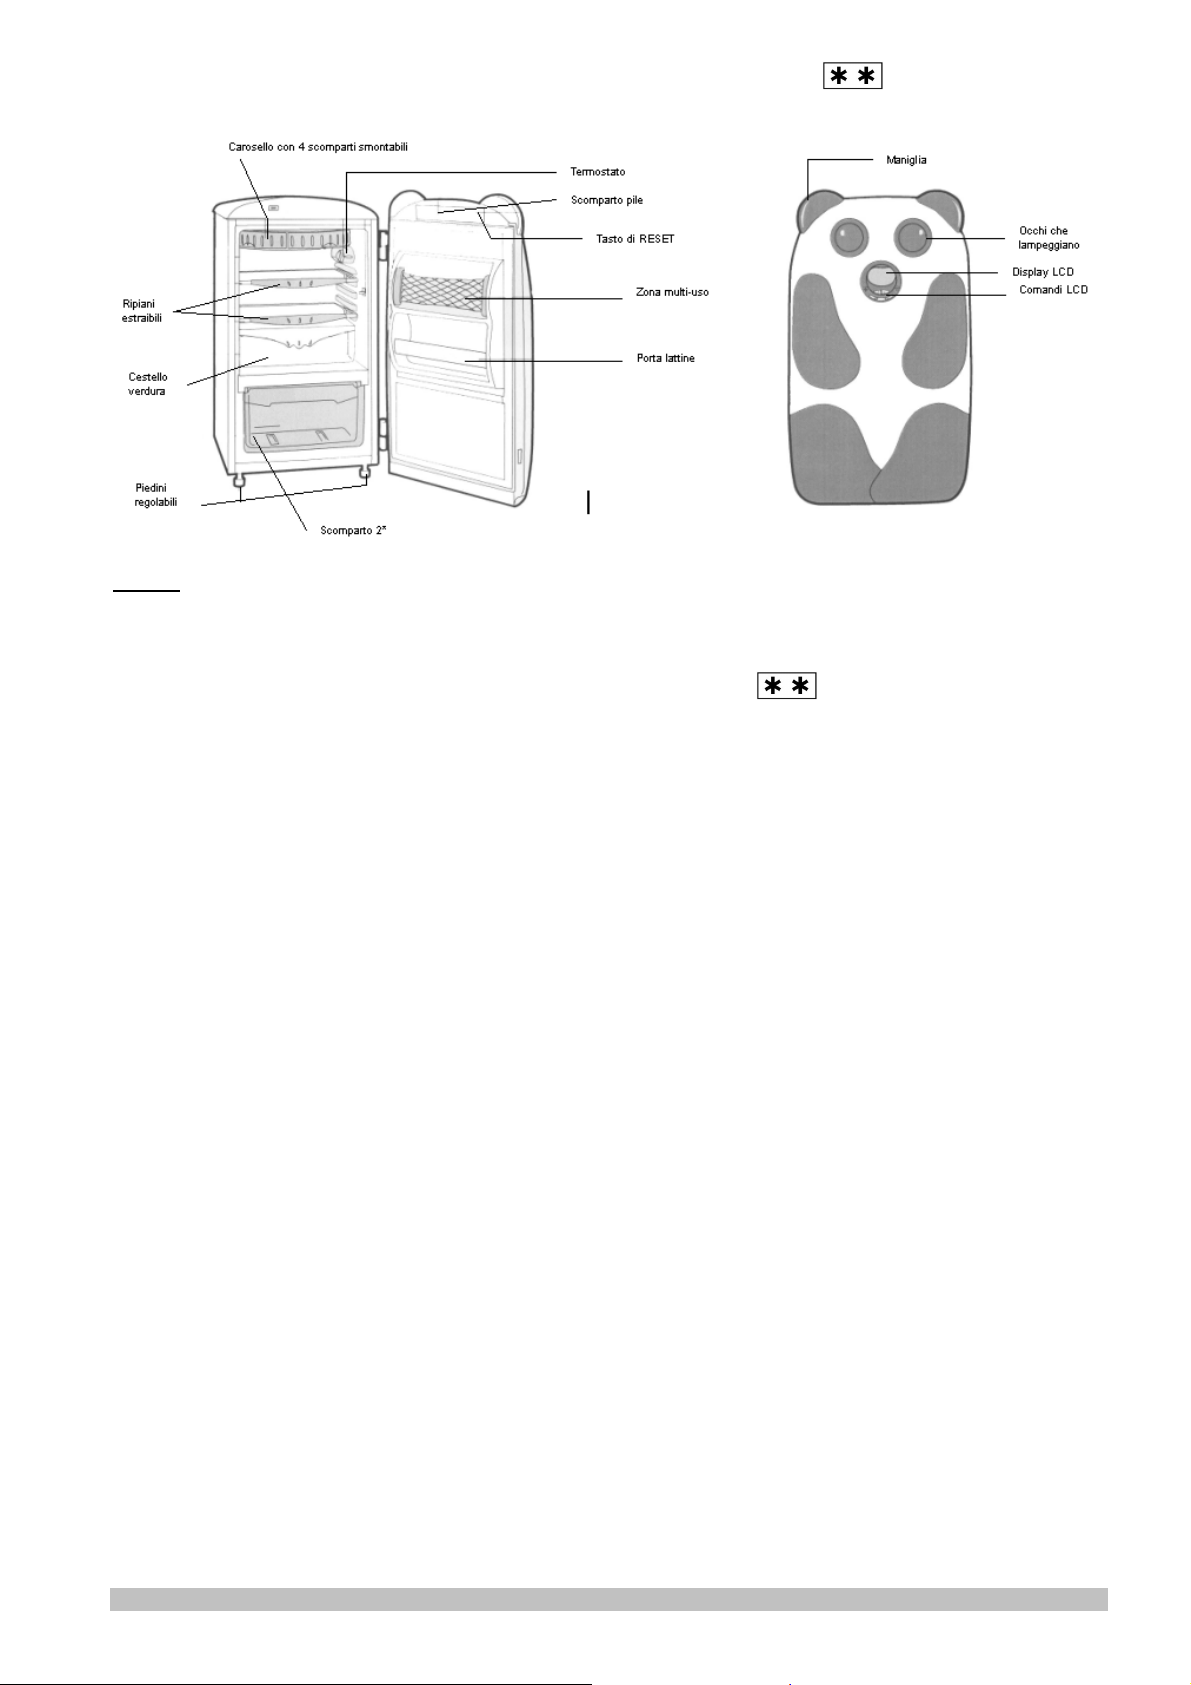
DESCRIZIONE GENERALE
NOTA : tale schema può non corrispondere esattamente al vostro frigorifero così come le i
diversi elementi e la loro posizione possono variare a seconda del modello.
L’apparecchio ha 2 scomparti: uno scomparto superiore per la refrigerazione e la
conservazione di alimenti freschi, e uno scomparto inferiore per la conservazione degli
alimenti surgelati per un periodo massimo di due settimane.
USO DEL FRIGORIFERO
Quando il termostato si trova sulla posizione 0, l’apparecchio non funziona. Per accenderlo
bisogna girare la manopola in senso orario. Il valore 1 corrisponde alla temperatura più
calda, il valore 7 a quella più fredda.
Le temperatura dei due scomparti non possono essere regolate indipendentemente.
Con una temperatura ambiente 16°C, dovete regolare la manopola sulla posizione 1. Per una
temperatura ambiente di ±25°C, potete selezionare i valori 2, 3 o 4.
E’ possibile che il frigorifero non funzioni correttamente se è situato in un ambiente
particolarmente freddo (temperatura 10°C). In questo caso dovete posizionare l’interruttore
sulla posizione 1 per assicurare un buon funzionamento dell’apparecchio.
CONSIGLI
Non mettere nel frigorifero alimenti caldi
Non introdurre mai liquidi infiammabili o esplosivi, quali solventi, acetone, benzina, in
quanto ciò comporterebbe rischi di esplosione.
Per evitare odori è meglio avvolgere o coprirli gli alimenti con carta per alimenti, fogli di
polietilene, carta in alluminio prima di introdurli nel frigorifero.
Lasciate uno spazio sufficiente tra un alimento e l’altro per consentire una corretta
circolazione dell’aria tra di loro.
Non mettete gli alimenti a contatto con la parete di fondo dell’apparecchio.
Non tenete la porta aperta più del necessario.
6
Page 7

USO DELLO SCOMPARTO
Scomparto
Questo scomparto consente di conservare gli alimenti surgelati per un periodo massimo di
due settimane e di fabbricare i cubetti di ghiaccio.
La durata di conservazione degli alimenti surgelati dipende dal tipo di alimento. Verificate
sull’imballo dei prodotti. Non mettete bottiglie o lattine nello scomparto in quanto
potrebbero scoppiare. Non conservate mai limonata, succhi di frutta, birra, vino, bibite in
questo scomparto.
USO DELLO SCHERMO LCD
I comandi dello schermo sono formati da 5 pulsanti:
Il pulsante ROTONDO permette di regolare le funzioni elettroniche della porta, quali la
melodia all’apertura della porta e gli occhi che lampeggiano.
Il pulsante permette di scegliere tra 12 melodie disponibili.
Il pulsante
sveglia
Il pulsante permette di posizionare il cursore sull’elemento che segue.
Il pulsante permette di posizionare il cursore sull’elemento che precede.
permette di regolare la data, l’ora e di programmare l’allarme della
.
Dopo qualche secondo, se nessuna selezione è stata fatta, lo schermo mostra nuovamente
l’ora e la luce si spegne.
Alto-parlante. A ciascuna apertura della porta, l’apparecchio suona la melodia selezionata
dall’utente tra le 12 disponibili. Tuttavia è possibile spegnere il volume sonoro:
1.
Premete il pulsante per fare apparire l’icona dell’altoparlante sullo schermo.
Quest’ultimo inizia a lampeggiare.
2.
Usate i tasti e per regolare l’altoparlante , se volete sentire la melodia scelta, o
su , se volte spegnere il volume sonoro e annullare gli occhi che lampeggiano.
3.
Per convalidare la vostra scelta, premete il pulsante .
Gli occhi che lampeggiano. Si illuminano e lampeggiano ad ogni apertura della porta, a
meno che non abbiate scelto di spegnerli (vedere paragrafo precedente).
1.
Premete sul tasto per fare apparire l’icona degli occhi sullo schermo. Quest’ultima
inizia a lampeggiare.
2.
Usate i tasti e per regolare gli occhi su se volete che si illuminino e
lampeggino, o su se non volete che si illuminino e lampeggino.
3.
Per convalidare la selezione, premete due volte sul tasto o attendete semplicemente
che le icone smettano di lampeggiare.
Display LCD
Comandi
del display
7
Page 8

Allarme. Quando è attivato, l’apparecchio suona la melodia scelta (vedi di seguito
“Regolazione della data e dell’ora). Tuttavia è possibile disattivare l’allarme.
1.
Premete 3 volte il tasto per fare apparire l’icona dell’allarme sullo schermo.
Quest’ultima inizia a lampeggiare.
2.
Usate i tasti et pour regolare l’allarme su se volete attivarlo o su se volete
disattivarlo.
4.
Per convalidare la selezione, premete il tasto o attendete semplicemente che le icone
smettano di lampeggiare.
Regolazione della data e dell’ora
Lo schermo di base mostra la data e l’ora. Per regolarle:
1.
Premete per circa 3 secondi sul tasto finché lampeggia.
2.
Usate i tasti e per selezionare l’anno corretto.
3.
Premete nuovamente sul tasto . E’ il mese che inizia a lampeggiare: usate i tasti e
per selezionare il mese corretto.
4.
Ripetete il punto 3 per regolare il giorno e i minuti.
5.
Per convalidare la vostra regolazione, premete sul tasto . Lo schermo smette allora di
lampeggiare e mostra la data e l’ora.
Regolazione dell’allarme
E’ importante regolare l’ora dell’allarme anche se non si ha intenzione di usarlo in quanto
potrebbe accidentalmente scattare. Affinché l’allarme suoni è necessario che l’icona sia
stata selezionata (vedere sopra “allarme”). Per regolare l’ora dell’allarme:
1.
Premete il tasto . L’ora prestabilita dell’allarme viene mostrata: « 0.00 ».
2.
Premete per circa 3 secondi sul tasto finché l’ora non inizia a lampeggiare.
3.
Usate i tasti e per selezionare l’ora.
4.
Premete il tasto . I minuti lampeggiono. Usate i tasti e per selezionare i minuti.
5.
Per convalidare la vostra regolazione, premete sul tasto .
6.
Per spegnere la melodia dell’allarme quando questo scatta, premete il tasto o il tasto
.
Scelta della melodia
L’utente ha la scelta di 12 melodie. L’altoparlante deve essere regolato su per poter
ascoltare la musica (vedere sezione « Altoparlante»). Una volta scelta la melodia, questa
suonerà tutte le volte che si apre la porta.
1.
Premete il tasto . La prima melodia inizia a suonare e sullo schermo compare il numero
della melodia.
2.
Usate i tasti e per ascoltare le altre melodie.
3.
Per selezionare la melodia che si sta ascoltando, premete il tasto .
4.
In qualsiasi momento è possibile interrompere la melodia che si sta ascoltando premendo
sul tasto .
8
Page 9

Tasto di RESET (azzeramento) delle regolazioni dello schermo LCD
In qualsiasi momento potete annullare tutte le vostre regolazione grazie al tasto « Reset ».
Questo piccolo pulsante nero è situato sullo scomparto delle pile posto sul retro della porta
dell’apparecchio. Per azzerare, premere dolcemente sul tasto con l’aiuto di un oggetto
appuntito (penna, matita…).
Tasto RESET
INSTALLAZIONE O SOSTITUZIONE DELLE PILE (NON FORNITE) DELLO
SCHERMO LCD
1 Aprite la porta. Togliete le 2 piccole viti dello scomparto.
2 Togliete delicatamente lo scomparto facendo attenzione a non tagliare i fili.
3 Togliete il coperchio e, se ci sono, le pile usate.
4 Inserite 3 pile LR20 (tipo D) nello scomparto verificando che i "+" e i "-" sulle pile
corrispondano bene ai "+" e "-" dell’illustrazione situata all’interno dello scomparto.
5 Rimettete al loro posto il coperchio e lo scomparto.
6 Rimettete le 2 viti e chiudete la porta.
9
Page 10

SBRINAMENTO
Il sistema di sbrinamento del frigorifero è automatico. La parete posteriore del
frigorifero si riempie di ghiaccio quando il compressore è in funzione e si sbrina
quando quest’ultimo è spento. Quando il ghiaccio è fuso, evapora da solo.
Lo scomparto deve essere invece sbrinato manualmente quando le strato di
ghiaccio ha uno spessore di circa 4 mm. In ogni caso le sbrinamento deve essere
effettuato almeno 1 volta all’anno.
Per sbrinare potete usare una paletta o un altro strumento in plastica, ma MAI uno
strumento metallico o un apparecchio elettrico.
1. Spegnete l’apparecchio e staccate la spina.
2. Imballate gli alimenti congelati in un sacco e teneteli al fresco.
3. Togliete il ghiaccio usando una paletta di plastica. Lo sbrinamento può essere accelerato
mettendo una pentola di acqua calda nello scomparto e chiudendo la porta.
4. Una volta che il ghiaccio si è staccato, toglietelo. Non usate in nessun caso degli
apparecchi elettrici per accelerare le sbrinamento (es. asciuga capelli).
PULIZIA E MANUTENZIONE
Spegnete l’apparecchio e staccate la spina prima di procedere alla pulizia.
Pulite l’interno con una spugna imbevuta di acqua e bicarbonato per evitare la formazione di
cattivi odori.
Non usate mai del vapore, dei solventi o detergenti abrasivi, in quanto potrebbero
danneggiare l’interno del vostro apparecchio. Non lavate inoltre gli accessori interni nella
lavastoviglie.
SOSTITUZIONE DELLA LAMPADINA
1. Spegnete l’apparecchio e staccate la spina.
2. Togliete la parte trasparente della plafoniera spingendo e staccando leggermente la piccola
aletta inferiore.
3. Togliete la lampadina svitandola in senso antiorario.
4. Mettete una nuova lampadina di 15W avvitandola in senso orario.
5. Rimettete la parte trasparente della plafoniera e accendete l’apparecchio.
10
Page 11

GUASTI E ANOMALIE
Alcuni rumori sono assolutamente normali in un congelatore:
Il gaz refrigerante può produrre gorgoglii mentre circola nel circuito.
Il compressore può produrre ronzii che possono accentuarsi durante l’avvio.
Il “crac” prodotto dalla dilatazione e la contrazione dei materiali usati è normale.
PROBLEMA SOLUZIONE
Il frigorifero non funziona
Verificate che la spina sia ben inserita o che il
fusibile non sia fuso.
Il frigorifero vibra o fa rumore Non avete regolato i piedini.
Il frigorifero raffredda troppo / poco
Verificate il termostato e regolatelo su una
temperatura più adeguata.
Verificate la lampadina e eventualmente
La lampadina non si accende
cambiatela.Verificate ugualmente che la spina
sia inserita o che il fusibile non sia fuso.
Il compressore non riparte dopo un cambio
di temperatura del termostato
E’ normale in quanto il compressore parte dopo
un certo tempo.
Il foro di scolo è otturato. Liberatelo aiutandovi
C’è dell’acqua sul suolo o sui ripiani
per esempio con la punta di un ferro per
lavorare a maglia.
SERVIZIO ASSISTENZA POST VENDITA
Se dopo aver verificato quanto indicato sopra il problema persiste, NON EFFETTUATE
ALCUNA RIPARAZIONE, ma contattate il Servizio di Assistenza Tecnica più vicino.
QUESTO APPARECCHIO RISPETTA LE DIRETTIVE CEE
73/23, 93/68, 89/336, 96/57, 92/31, 94/62
11
Page 12

Dear Customer,
You have just purchased a OCEAN fridge, for which we thank you.
Our research teams have designed a new generation of appliances to make
your life easier.
With its dedicated areas for optimum, flexible storage, clean and fluid lines
allied with appreciable performance, the new OCEAN fridges have everything
you need to conserve your food and provide the answers to your everyday
consumption needs.
The range of OCEAN products includes a wide range of dishwashers, washing
machines and clothes dryers, freezers, cookers and ovens, hotplates and
extractor fans, which you can combine with your new OCEAN fridge.
At the innovative cutting edge, OCEAN thus helps to improve the quality of life
on a daily basis, by offering you simple but high-performance products that are
respectful of the environment, good-looking and reliable.
OCEAN
INDEX
Page
Safety standards / Recommendations ................................................. 13
Installation............................................................................................... 13
Food safety ............................................................................................. 14
Reversing the door opening direction .................................................. 15
General description................................................................................ 15
Using the fridge ...................................................................................... 15
Using the ice-box ............................................................................ 16
Using the LCD screen ............................................................................ 16
De-icing .................................................................................................. 18
Cleaning and maintenance .................................................................... 18
Operating problems / Dimensions......................................................... 19
12
Page 13

SAFETY STANDARDS
This appliance is designed ONLY for domestic conservation of foodstuffs.
Installation must be as instructed in this guide. Incorrect installation could damage the
appliance.
For any operating problems, always and only contact authorised After Sales Service centres,
or qualified personnel.
Before carrying out any maintenance, disconnect the appliance, but not by pulling
on the power supply cable.
If this fridge replaces another, which had a latching, spring-mounted, locking or other closure
system, do not forget to destroy the closure device or better yet remove the door of your old
fridge, so that no-one could become trapped inside (children playing, animals, etc.).
RECOMMENDATIONS
After unpacking the appliance, make sure that it is undamaged. If it is, the reseller should be
notified of any damage within 24 hours of delivery. The packaging materials used are entirely
recyclable (cardboard, PE bubble wrap, EPS, etc.). Keep these materials out of the reach
of children.
The appliance's cooling circuit contains a coolant called isobutane, a relatively clean
natural gas which is nonetheless flammable. During transport and installation of the
appliance, make sure that none of the components of the cooling circuit is damaged. In the
event of damage, keep away from flames and ignition sources, and ventilate the room well.
For optimum operation of the appliance, install it away from sources of heat and make sure
that air can circulate freely around it (see appliance installation).
INSTALLATION
Before installing, carefully read the Recommendations and Safety standards in order
to avoid a certain number of problems.
Install the appliance in a dry, well-ventilated room, away from all sources of heat. Leave a
minimum gap of 10 cm between the top of the appliance and any overhead units. If your
installation does not enable you to do this, then leave 5 cm between the top of the appliance
and any other wall-mounted units, and a gap of 2.5 cm on each side of the appliance.
If your appliance is to be installed next to another fridge or freezer, keep a gap of 5 cm on the
sides to prevent condensation forming on the outside of the appliance.
13
Page 14

The climate class of your fridge is marked on its ID plate. It determines the range of
ambient temperatures for which the cooling unit is designed, and within which correct
operation of the appliance is guaranteed.
Class Ambient temperatures
N 16° to 32°
ST 18° to 38°
T 18° to 43°
Electrical connection
Connector characteristics: 220-230V with earth.
Avoid using adapters or extension leads.
Avoid the cable coming into contact with the compressor.
Avoid trapping the cable under the appliance.
The appliance's electrical installation is earthed. For your safety, connect the appliance to a
power outlet with effective earthing (in conformity with current electrical installation safety
standards).
The manufacture declines all liability for damage caused by the absence of an earth
connection.
CAUTION – BEFORE CONNECTING
1.
Clean the inside of the fridge with warm water containing bicarbonate of soda. Rinse and
dry thoroughly.
2.
Wait for 2 hours before switching on, to ensure that the lubricants in the motor
compressor have stabilised.
FOOD SAFETY
Food storage
Coldest area
- Dairy products, cheese, eggs - Meat, charcuterie, fish - Fruit and vegetables
- Conservation of frozen foods
- Condiments, Drinks
CAUTION
The temperature is not completely uniform throughout the fridge, which is why there are
appropriate areas for each type of food.
14
Page 15

REVERSING THE DOOR OPENING DIRECTION
It is possible to reverse the door opening direction (depending on the model), left instead of
right.
Always unplug the device before reversing the door opening direction.
1.
Carefully remove the screw covers on the door and on the opposite side.
2.
With a suitable screwdriver, remove the door hinges and replace them on the opposite
side.
3.
Replace the screw covers in the now-vacant hinge holes.
GENERAL DESCRIPTION
Remark: your fridge may differ slightly from this diagram. The features and their positions
may vary from one model to another.
The appliance comprises 2 compartments: an upper compartment for refrigerating and
keeping food fresh, and a lower compartment to store frozen foods for a maximum of
2 weeks.
USING THE FRIDGE
When the thermostat is set to 0, the appliance does not operate. To switch it on, you must
turn the knob clockwise. Value 1 corresponds to the warmest temperature and 7 to the
coldest.
The temperatures in the 2 compartments cannot be adjusted separately.
For an ambient temperature of 16°C, you should use a setting of 1. For an ambient
temperature of ±25°C, values 2, 3 or 4 can be selected.
15
Page 16

RECOMMENDATIONS
Do not put hot food or bottles without stopper in the fridge.
NEVER place volatile, flammable or explosive liquids such as solvents, acetone or
petrol inside the fridge, as there is a risk of explosion.
Meat and fish should be wrapped to prevent smells.
Leave sufficient space between food items to enable air to circulate between them.
Never place the food items in contact with the cold wall at the back of the fridge.
The door should not be left open longer than necessary.
USING THE ICE-BOX
This compartment is used to keep food frozen for a maximum of 2 weeks, and to make icecubes.
The conservation time for frozen food depends on the type of food. Refer to the instructions
on the packaging. Do not place bottles or drink cans in the ice-box as they can burst when
their contents freeze. Highly carbonated drinks can even explode! NEVER keep lemonade,
fruit juice, beer, wine, champagne, etc… in the ice-box/freezer compartment.
USING THE LCD SCREEN
The LCD screen has 5 controls:
The button sets the door electronic functions, such as the door opening tune.
The button chooses one of the 12 tunes.
The button sets the date and time and program the alarm.
The button moves the cursor to the preceding item.
The button moves the cursor to the next item.
If no selection is made, after a few seconds the screen displays the time once more.
Loudspeaker. Each time the door is opened, the fridge plays the melody selected from
among 12 possible tunes. The audio can be cut off.
1.
Press once to display the loudspeaker icon on the screen. The icon blinks.
2.
Use the and buttons to set the loudspeaker to to hear the melody or to mute it.
Remark: the "Blinking eyes" function will also be disabled (see next item).
3.
To confirm press .
Blinking eyes. Each time the door opens, the animal's eyes light up and blink, unless the
audio is muted (see previous item):
1.
Press twice to display the eyes icon on the screen.
2.
Use the and buttons to select for the eyes to light up and blink and
otherwise.
3.
To confirm press twice or simply wait for the icon to stop blinking.
LCD
SCREEN
LCD
CONTROLS
16
Page 17

Alarm. When the alarm is enabled, the device plays the selected melody at the chosen time
(see "Setting the date and time" and "Setting the alarm" below). The alarm can also be
disabled. To set the alarm, see "Setting the alarm" below.
1.
Press 3 times to display the alarm icon on the screen. The icon blinks.
2.
Use the and buttons to set the alarm to to enable it or to disable it.
3.
To confirm press or simply wait for the icon to stop blinking.
Setting the date and time
The basic screen displays the date and time. To set the date and time:
1.
Press for approximately 3 seconds until the year blinks.
2.
Use the and buttons to select the correct year.
3.
Press again. The month blinks. Use the and buttons to select the correct month.
4.
Repeat point 3 to set the day, hour and minutes.
5.
To confirm press . The date and time are displayed on the screen.
Setting the alarm
It is important to set the time of the alarm even if you have no intention of using it, because it
might be enabled accidentally and go off at an inappropriate time. To enable the alarm, the
icon must have been selected (see "Alarm" above). To set the time of the alarm:
1.
Press . The alarm default time is displayed: "0.00".
2.
Press for approximately 3 seconds until the hour blinks.
3.
Use the and buttons to set the hour.
4.
Press . The minutes blink. Use the and buttons to set the minutes.
5.
To confirm press .
6.
To stop the alarm melody when it is playing, press or .
Choosing the melody (door opening and alarm)
You may choose one of 12 melodies. The loudspeaker must be set to for the tune to be
heard (see "Loudspeaker" above). Once a tune has been selected, it will play each time the
door opens.
1.
Press . The first tune plays and the screen displays the melody number.
2.
Use the and buttons to listen to the other tunes.
3.
To choose a melody, press while it is playing.
4.
You may interrupt the melody by pressing or .
LCD screen reset button
You can restore all settings to their default values at any time using the "Reset" button. This
little black button is located in the battery compartment at the back of the fridge door. To
reset, gently press the button using a device with a fine tip (ballpoint pen, etc.).
Reset button
17
Page 18

INSTALLING/REPLACING THE LCD SCREEN BATTERIES
(NOT INCLUDED)
1.
Open the door. Remove the compartment's 2 small screws.
2.
Gently remove the compartment, being careful not to tear out the wires.
3.
Remove the cover and, if applicable, the empty batteries.
4.
Insert 3 LR20 batteries (type D) in the compartment, matching the battery "+" and "-"
poles with the "+" and "-" on the illustration in the compartment.
5.
Replace the cover and the compartment.
6.
Replace the 2 small screws and close the door.
DE-ICING
The de-icing system for the fridge is automatic. The inside rear face of the fridge is
covered with frost when the compressor operates and de-ices when it stops. When the
ice melts, the water evaporates by itself.
The ice-box compartment
a thickness of about 4 mm. In any case, this compartment should be de-iced at least
once a year.
When de-icing, you can use a scraper or other plastic implement, but NEVER a metal
instrument or electrical device.
must always be de-iced when the layer of frost reaches
1.
2.
3.
Switch off and disconnect the fridge.
Place your frozen food in a freezer bag and keep it cool.
Remove the ice with a wooden or plastic scraper. You may speed up the process by
placing a bowl of hot water in the compartment and closing the door.
4.
Once the ice is loose, remove it.
NEVER use a metal scraper or electrical device (e.g. blow-dryer) to speed up the process.
CLEANING AND MAINTENANCE
Disconnect the fridge before cleaning it.
Clean the inside with water plus bicarbonate of soda, using a sponge or cloth. This will
prevent the build-up of unpleasant odours.
Never use a steam cleaner, solvent or abrasive detergent, as they could damage the interior
of your appliance. Never wash the interior accessories in the dishwasher.
We recommend that you run the vacuum cleaner over the back of the appliance once a year,
as if it is dirty, its efficiency drops and its energy consumption rises.
18
Page 19

REPLACING THE LIGHT BULB
1.
Disconnect the fridge.
2.
Remove the transparent part of the panel by pressing and slightly separating the lower tab.
3.
Remove the bulb by unscrewing it counter clockwise.
4.
Screw in a new 15W bulb screwing it in clockwise.
5.
Replace the transparent part of the panel, reconnect the fridge and switch it on.
OPERATING PROBLEMS
The fridge creates a number of noises that are perfectly normal:
The coolant gas can create a gurgling sound as it circulates through the system.
The compressor can rumble, a sound which can be more intense when it starts up.
Sharp cracking sounds produced by expansion and contraction of the materials used.
PROBLEM SOLUTION
The fridge does not operate
The fridge vibrates or makes noise Check that it is perfectly level. Adjust the feet.
The fridge is too cold/not cold
enough
The fridge light does not come one
The compressor does not restart
after a temperature change
There is water on the floor or on the
racks
Check that it is properly plugged in, that the fuse has not
blown or that the circuit-breaker has not tripped.
Check the thermostat and adjust it to a more suitable
temperature.
Check the bulb and change it if necessary. Also check that
the plug is correctly inserted, that the fuse has not blown or
that the circuit-breaker has not tripped.
This is normal, as the compressor only restarts after a
certain time.
The drain hole is blocked. Unclog it with a knitting needle.
TECHNICAL ASSISTANCE SERVICE
If you have carried out the above checks, and your problem persists, ATTEMPT NO
REPAIRS YOURSELF. Contact the nearest Technical Assistance Service.
THIS APPLIANCE IS IN CONFORMITY WITH EC DIRECTIVES
73/23, 93/68, 89/336, 96/57, 92/31, 94/62
19
Page 20

C149
 Loading...