

Page 1

Océ
TDS400-CS
User manual
Page 2

Copyright
© 2005, Océ-Technologies B.V. Venlo, The Netherlands
All rights reserved. No part of this wor k may be reproduced, copied, adapted,
or transmitted in any form or by any means without written permission from
Océ.
Océ-Technologies B.V. makes no representation or warranties with respect to
the contents hereof and specifically disclaims any implied warranties of
merchantability or fitness for any particular purpose.
Further, Océ-T echnologies B.V. reserves the right to revise this publication and
to make changes from time to time in the content hereof without obligation to
notify any person of such revision or changes.
Edition 2005-06
Océ-Technologies B.V.
GB
Océ, Océ TDS400-CS, Océ TCS4 scanner, Océ TDS400 printer,
Océ Doc Exec
®
, Océ Image Logic®, Océ Scan logic®, Océ Power
Logic
®
, Océ Print Exec® and Océ Remote Logic® are registered
trademarks of Océ-Technologies B.V.
Adobe
®
and Postscript® 3 are registered trademarks of Adobe®
Systems Incorporated.
Macintosh
®
is a registered trademark of Apple® Computer, Inc.
Microsoft
®
, Windows® , Windows NT®, Windows 95/98®,
Windo ws 2000
®
, Windo ws XP® and Internet Explorer® are either
registered trademarks or trademarks of Microsoft
®
Corporation in
the United States and/or other countries.
AutoCAD
®
is a registered trademark of AutoDesk, Inc.
Novell
®
is a registered trademark of Novell, Inc.
Netscape Navigator
®
is a registered trademark of Netscape Corp.
Pentium
®
is a registered trademark of Intel Corporation.
Energy STAR
®
is a registered trademark of the U.S.
Environmental Protection Agency (EPA).
Products in this publication are referred to by their general trade
names. In most, if not all cases, these designations are claimed as
trademarks or registered trademarks of their respectiv e companies.
Page 3

3
Notes for the reader
Introduction
This manual helps you to use the Océ TDS400-CS. The manual contains a
description of the Océ TDS400-CS and guidelines to use and operate the Océ
TDS400-CS. There are also tips to increase your knowledge of the Océ
TDS400-CS and to help you manage the workflow even better.
Definition
Attention Getters
Parts of this manual require your special attention. These parts provide
important, additional information or are about the prevention of damage to
your properties.
Note, Attention and Caution
The words Note, Attention and Caution indicate these important parts.
■ The word Note comes before additional information about the correct
operation of the Océ TDS400-CS or a tip.
■ A part marked with Attention contains information to prevent damage to
items, for example the Océ TDS400-CS, an original or a file.
■ A part marked with Caution contains information to prevent personal
injury. Caution is found only in manuals that describe physical products.
Safety information
The safety information for this product is included in a separate manual with
the title Safety manual. This manual is part of the documentation set that you
received with your product.
Page 4

4 User manual
Page 5

Contents 5
Contents
Notes for the reader 3
Chapter 1
Introduction
The product concept and complete workflow 12
How to use this manual 14
Available documentation 15
The Océ TDS400-CS users 18
Chapter 2
Get to know the Océ TCS4 scanner
The Océ TCS4 scanner 22
The scanner operator panel 24
Chapter 3
Get to know the Océ Power Logic® controller applications
The Océ Power Logic® controller 28
Océ Settings Editor 31
Introduction to the Océ Power Logic® controller: Océ Settings Editor 31
Overview 32
Overview of the Océ Settings Editor 32
Start the Océ Power Logic® controller applications 39
Use the Océ Settings Editor 40
Define the settings in the Océ Settings Editor 40
Save, load,and print the settings 41
Océ System Control Panel 43
Introduction to the Océ Power Logic® controller: Océ System Control Panel 43
Overview of the Océ System Control Panel 44
Icons 48
Océ Queue Manager 49
Introduction to the Océ Power Logic® controller: Océ Queue Manager 49
Overview of the Océ Queue Manager 51
Icons 54
Océ Scan Manager 55
Introduction to the Océ Power Logic® controller: Océ Scan Manager 55
Overview of the Océ Scan Manager 56
Océ Remote Logic® 60
Introduction to Océ Remote Log ic® 60
Install and start Océ Remote Logic 61
Install Océ Remote Logic® on your system 61
Start the applications with Océ Remote Logic® 64
Page 6

6 User manual
Connect to the controller 67
Use Océ Remote Logic 69
Automatic logon 69
Change the password 70
Log on to the controller applications 71
Océ License Logic 73
About Océ License Logic 73
The possibilities of Océ License Logic 74
The basic workflow of license activation 75
The structure of license files and licenses 76
Chapter 4
Get to know the Océ TDS400 printer
The Océ TDS400 printer 80
The printer operator panel 82
The menu structure of the printer 84
Chapter 5
Get to know the finishing options
Introduction 90
The folder components 93
Chapter 6
Get to know the software applications
Job submission software 96
Job submission methods 96
Accounting software: Océ Account Center 97
Introduction 97
An overview of Océ Account Center 97
Océ Account Logic 99
Introduction to Océ Account logic 99
Summary of Océ Account Logic 100
Océ Power Logic® controller setup 101
Océ Account Console 103
Introduction to Océ Account Console 103
Summary of Océ Account Console 104
Document management software 105
Océ Repro Desk 105
Océ Engineering Exec® 106
Page 7

Contents 7
Chapter 7
Prepare the Océ TDS400-CS for use
Turn the Océ TDS400-CS on and off 108
Turn the Océ TCS4 scanner on and off 108
Turn on and shut down the Océ Power Logic® controller 110
Turn the Océ TDS400 printer on and off 111
Print the menu card of the Océ TDS400 printer 112
Print the configuration report of the Océ TDS400 printer 113
Print the demo print of the Océ TDS400 printer 114
Define the display languages 115
Define the display languages of the scanner and the controller 115
Define the display language of the printer 116
Define the network settings 117
Define the network settings with the Océ Settings Editor 117
Define the network settings at the printer operator panel 118
About the network settings 118
Access the system settings in the system menu 119
Define the DHCP server 120
Define the IP address 121
Define the subnet mask 122
Define the default gateway 123
Define the time-outs 124
About the time-out settings 124
Behaviour of the unused Océ TCS4 scanner and time-out settings 125
Define the sleep mode time-out of the Océ TCS4 scanner 126
Define the panel time-out of the scanner operator panel 127
Define the set time-out of a copy job 128
Define the manual feed time-out at the printer operator panel 129
Chapter 8
Set up your workflow with the Océ Power Logic® controller applications
Introduction 132
Set up your workflow with the Océ Settings Editor 133
Define the job templates 133
Define the automatic original feed setting 135
Define the original release mode 136
Create the stamps and their default settings 137
Define the media series 138
Page 8

8 User manual
Chapter 9
Control your workflow with the Océ Power Logic® controller applications
Control your print and copy workflow with the Océ Queue Manager 140
User operations in the Océ Queue Manager 140
Control your scan workflow with the Océ Scan Manager 143
Create destinations 143
Manage destinations 146
Define a file name 148
Manage the scanned files 149
Introduction to Océ View Station LT 152
Overview of Océ View Station LT 153
Control your licenses with Océ License Logic 158
Log on to Océ License Logic 158
View the current active licenses 160
Get the host id of the Océ system 162
Save the current active licenses 163
Perform a license activation job 164
Chapter 10
Print jobs
Use the printer drivers to send jobs to the Océ TDS400 printer 168
Use Océ Print Exec® Workgroup LT to send print jobs to the Océ TDS400
printer 169
Print on a cut sheet 170
Cancel a print job 172
Chapter 11
Copy jobs
Introduction to copy jobs 174
Use the scanner operator panel 177
Do a basic copy job 181
Do an extended copy job 182
Stop a copy job 185
Extended copy jobs 186
Available settings for copy jobs 186
Improve the copy quality according to the original 188
Make multiple sets of copies 192
Make a copy with a stamp 195
Scale to another media size 197
Make a copy on a cut sheet 199
Make a copy and add a strip 201
Make a copy and remove a strip 203
Make a copy of a specific area of an original 205
Make a copy and delete a specific area of an original 207
Page 9

Contents 9
Chapter 12
Scan-to-file jobs
Introduction to scan-to-file jobs 210
Use the scanner operator panel 213
Do a basic scan-to-file job 217
Do an extended scan-to-file job 218
Stop a scan-to-file job 221
Settings for extended scan-to-file jobs 222
Available settings for scan-to-file jobs 222
'File type' 224
'Resolution' 225
'Original type' and background compensation 226
'Original width' 227
'Remove strip' 228
Chapter 13
Finish copy and print jobs
Overview of the finishing settings 230
Define the folded output delivery 233
Define the folding method 234
Define the folding legend 234
Define the drawing method 235
Define the binding method 236
Define the binding method 236
Define the binding edge value 237
Define the folded package size 238
Define the folded package length 238
Define the folded package width 239
The reinforcement unit 240
The belt unit 241
Off-line folding 242
Page 10

10 User manual
Chapter 14
Maintain the Océ TDS400-CS
Clear the set memory 244
Maintain the Océ TCS4 scanner 246
Clear an original jam 246
Scanner error-messages and solutions 247
Calibrate the scanner 248
Clean the scan area 250
Maintain the Océ TDS400 printer 252
Media 252
Load the media 252
Define the media type and media size 258
Cut the media 260
Define the media series of the Océ TDS400 printer 261
Toner 262
Refill the toner 262
Handle media jams at the Océ TDS400 printer 264
Printer error-messages and solutions 264
Printer system-messages and solutions 267
Clear media jam in the media feed section of the printer 270
Clear media jam in the fuser section 271
Maintain the finishing options 273
The reinforcement unit 273
Insert a new tape roll 273
Empty the waste box 281
Clean the reinforcement knives 283
Handle errors at the reinforcement unit 285
No reinforcement strips on the output 285
Clear tape jam in the reinforcement unit 287
Handle media jams at the folder 289
Clear media jams in the folder 289
Appendix A
System specifications 297
Specifications Océ TCS4 scanner 298
Original types for the Océ TCS4 scanner 300
Specifications Océ Power Logic® controller 302
Specifications Océ TDS400 printer 304
Supported media types and sizes for the Océ TDS400 printer 305
Available media types 305
Available media sizes 307
Standard scale factor 309
Specifications Océ Scan Logic® 311
Specifications drivers and job submission software 313
Appendix B
Miscellaneous 315
Reader's comment sheet 316
Addresses of local Océ organisations 318
Page 11

11
Océ TDS400-CS
User manual
Chapter 1
Introduction
Page 12

12 User manual
The product concept and complete workflow
Definition
A complete Océ solution includes several different hardware and software
products to manage your complete document workflow . The complete
document workflow includes several different jobs and documents. The
following illustration gives an overview of a complete Océ solution and the
document workflow.
Illustration
[1] Overview of a comple te Océ solution. The system set-up and control.
[1] Overview of a complete Océ solution. The system set-up and control.
Different documents
The complete workflow includes the following different documents.
Nr. Document
1 Original
2 Copy
3Print
4 File
Scanner Controller
Printer
Finishing
Options
Job
Submission
Document
Management
Page 13

Introduction 13
Different products
The complete Océ solution is a combination of the following elements.
■ Scanner
■ Controller
■ Printer
■ Finishing options
■ Job submission software
■ Document management software.
Different jobs
The arrows in the illustration show the different possible jobs (see f i gure 1 on
page 12). The complete document workflow of the Océ solution includes the
following different jobs.
■ Print job.
A print job starts with a file (4) and ends with a print (3).
■ Copy job.
A copy job starts with an original (1) and ends with a copy (2).
■ Scan-to-file job.
A scan-to-file job starts with an original (1) and ends with a file (4).
■ Set-up and control the complete workflow.
Do which job where
Use the following products to do the following jobs.
■ Print jobs on the job submission software
■ Copy jobs on the scanner operator panel
■ Scan-to-file jobs on the scanner operator panel
■ Set up and control the complete workflow on the controller.
Note: A setting in the job submission software or driver always overrules a
system setting.
Page 14

14 User manual
How to use this manual
Introduction
You can access a topic quickly through the following methods.
■ Refer to the alphabetical index at the end of the manual.
■ Refer to the table of contents at the beginning of this manual.
Before you turn to the complete table of contents, you can also use the
following table to find a topic quickly.
The sections of this manual
The following table gives an overview of how the chapters are arranged
logically.
Chapters Section Topics
1 - 6 Get to know the system
■ The product concept and
complete workflow.
■ Scanner
■ Controller
■ Printer
■ Finishing options.
■ Software applications.
7 - 9 Set up and control the
system
■ Set up the system.
■ Set up the workflow.
■ Control the workflow.
10 - 13 Use the system
■ Copy job
■ Print job
■ Scan job
■ Finishing options
14 Maintain the system
■ Replace media
■ Add toner
■ Maintain the scanner, printer
and finishing options.
■ Find solutions.
Appendix A
& B
Specifications
■ System specifications
■ Supported media types and
sizes.
Page 15

Introduction 15
Available documentation
Introduction
This manual is part of a complete documentation set. The following table
shows a complete overview of the available documentation.
Page 16

16 User manual
Available documentation
[1] Available documentation
Product Documentation Medium
Océ TDS400-CS Océ TDS400-CS User
manual.
CD-ROM, as a PDF file in
multiple languages.
Océ TDS400-CS Quick
Reference Card.
Paper poster, A3 in colour.
Océ TDS400-CS
Maintenance Card.
Paper poster, A3 in colour.
Océ TCS4 scanner Safety
Manual.
Manual, multilingual.
Océ TDS400 printer Safety
Manual.
Manual, multilingual.
Océ Power Logic
®
controller
Océ TDS-TCS connectivity
manual.
CD-ROM, as a PDF file in
English only.
Océ Power Logic
®
applications on-line help
Embedded in the
applications, as an on-line
help file in multiple
languages.
Océ Windows
®
Printer
Driver
Océ Windows® Printer
Driver User Manual
CD-ROM, as a PDF file in
multiple languages on Océ
Driver Pack CD-ROM.
Océ Windows
®
Printer
Driver on-line help
Embedded in the driver
application as on-line help
file in multiple languages.
Océ PostScript
®
3 driver Océ PostScript® 3 driver
Getting Started
CD-ROM, as a PDF file in
multiple languages on Océ
Driver Pack CD-ROM.
Océ PostScript
®
3 driver
Getting Started
Embedded in the driver
application as on-line help
file in multiple languages.
Océ HDI Driver Océ HDI Driver User
Manual
CD-ROM, as a PDF file in
multiple languages on Océ
Driver Pack CD-ROM.
Océ HDI driver on-line
help
Embedded in the driver
application as on-line help
file in multiple languages.
Page 17

Introduction 17
[1] Available documentation
Note: Visit Océ on the internet at www.oce.com for the latest information.
Océ Windows
®
Raster
Driver
Océ Windows® Raster
Driver User Manual
CD-ROM, as a PDF file in
multiple languages on Océ
Driver Pack CD-ROM.
Océ Windows
®
Raster
Driver on-line help
Embedded in the driver
application as on-line help
file in multiple languages.
Océ Account Center Océ Account Center User
Manual
CD-ROM, as a PDF file in
multiple languages.
Océ Account Logic on-line
help.
Embedded in the
application, as an on-line
help file in multiple
languages.
Océ Account Console
on-line help.
Embedded in the
application, as an on-line
help file in multiple
languages.
Océ License Logic Océ License Logic on-line
help
Embedded in the
application, as an on-line
help file in multiple
languages.
Océ Print Exec
®
Workgroup
Océ Print Exec®
Workgroup User Manual
CD-ROM, as a PDF file in
multiple languages.
Océ Print Exec
®
Workgroup on-line help
Embedded in the driver
application as on-line help
file in multiple languages.
Product Documentation Medium
Page 18

18 User manual
The Océ TDS400-CS users
Introduction
The Océ TDS400-CS has the following types of users.
■ Common user
■ Repro operator
■ Key operator
■ System administrator.
Common user
The common user is a person who uses the system for print, copy and
scan-to-file jobs. The common user has no permission to change the system
settings. Therefore, the common user is referred to as an anonymous user. In
order to be consistent with the Océ Power Logic
®
controller software, in this
manual the common user is referred to as an anonymous user.
Repro operator
The repro operator is responsible for the daily use of the Océ TDS400-CS in a
central repro department. The repro operator has no permission to change the
settings in the Océ Settings Editor.
The repro operator has full permission in the Océ Queue Manager.
Key operator
The key operator is responsible for the user maintenance and the system
settings of the Océ TDS400-CS.
The key operator has the permission to define the key operator settings in the
Océ Settings Editor.
The key operator has full permission in the Océ Queue Manager.
Key operator settings
Mode Settings to change
Key operator
■ System settings
■ Printer settings
■ Scanner settings
■ Job settings for print jobs
■ Job settings for copy jobs
■ Job settings for scan-to-file jobs
Page 19

Introduction 19
System administrator
The system administrator is responsible for the installation and the
configuration of the Océ TDS400-CS in the network environment.
The system administrator has the permission to define the system
administrator settings in the Océ Settings Editor.
System administrator settings
Mode Settings to change
System
administrator
■ System settings
■ Connectivity settings
■ Printer PDL settings
■ Printer pen settings
Page 20

20 User manual
Page 21

21
Océ TDS400-CS
User manual
Chapter 2
Get to know the Océ TCS4 scanner
Page 22

22 User manual
The Océ TCS4 scanner
Introduction
The Océ TCS4 scanner is a wide-format scanner with an optical resolution of
600 dpi.
Illustration
[2] The Océ TCS4 scanner
[2] The Océ TCS4 scanner
1
2
3
4
5
Page 23

Get to know the Océ TCS4 scanner 23
The main components of the Océ TCS4 scanner
Number Component Function
1 Top cover Get access to the glass plate.
2 Original feed table Feed the original.
3 Operator panel Define the job settings.
4 On / off switch Turn the Océ TCS4 scanner on and
off.
5 Integrated receiving tray Receive the originals.
Page 24
24 User manual
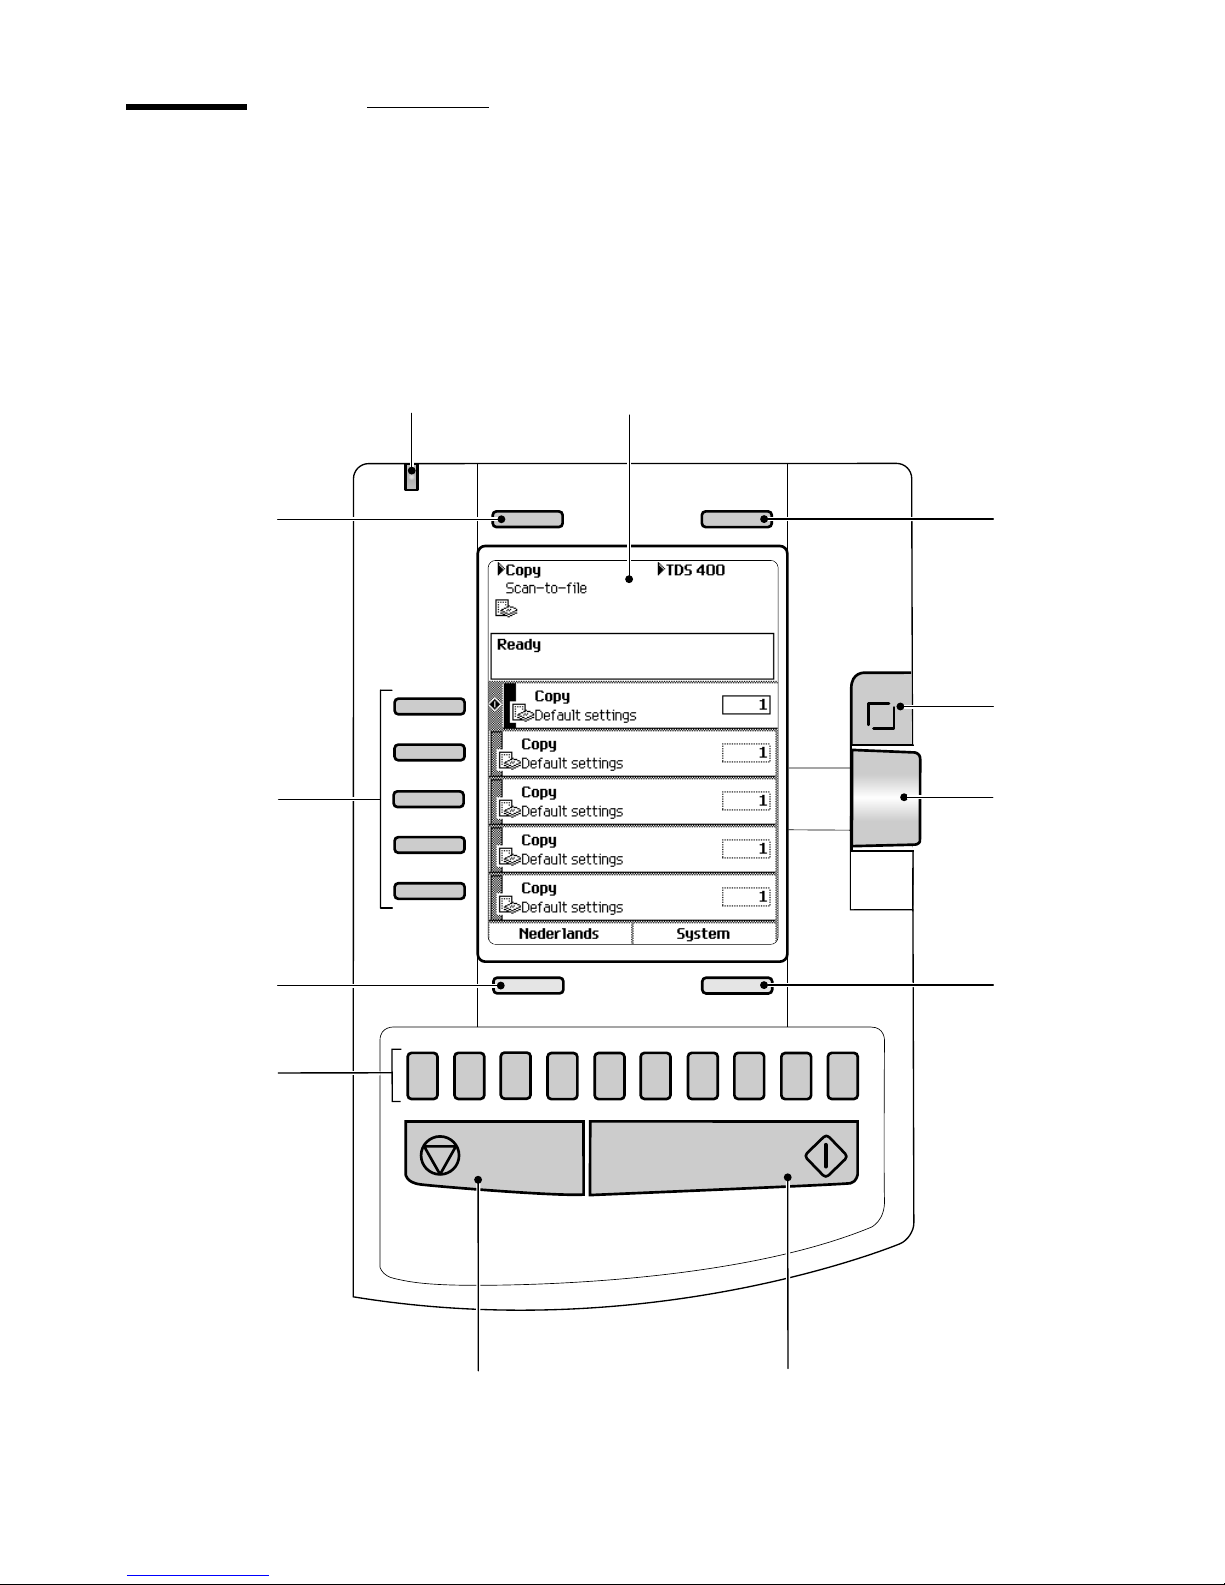
The scanner operator panel
Introduction
Use the scanner operator panel to do a copy or scan-to-file job.
Illustration
[3] The operator panel of the Océ TCS4 scanner
[3] The operator panel of the Océ TCS4 scanner
1
2
3
4
5
6
7
8
9
0
3
5
6
11
4
1
2
7
8
10
9
12
Page 25

Get to know the Océ TCS4 scanner 25
The keys and their functions
[2] The keys and their functions
Number Component Function
1 Green and red light Indicate the status of the scanner.
■ A green light indicates that the scanner is ready.
■ A blinking green light indicates that the scanner is
busy.
■ A red light indicates that an error occurred.
■ A blinking red light indicates that the scanner is busy
and an error occurred.
2 Screen Show the system information in text and icons.
3, 12 Upper softkeys The upper-left softkey can have one of the following
functions.
■ Select the job, 'Copy' or 'Scan-to-file'.
■ Return to the home screen with the 'Home' function.
■ Cancel a set with 'Cancel set' in case of a set copy.
The upper-right softkey can have one of the following
functions.
■ Cancel a setting with the 'Cancel' function.
■ Create and close a set with the 'Create set' and 'Close
set' function.
4 Scroll-wheel key
■ Open a template or a setting
■ Close a setting
■ Define a toggle setting.
5 Scroll wheel
■ Scroll to a setting or template
■ Define the value of a setting.
6, 10 Lower softkeys The lower-left softkey can have one of the following
functions.
■ Select another language.
■ Reset the settings of the templates with the 'Defaults'
function.
The lower-right softkey can have one of the following
functions.
■ Close a setting with the 'Close' function.
■ Open the system settings with the 'System' function.
7 Start key Start a copy or scan-to-file job.
8 Stop key
■ Stop a copy or scan-to-file job
■ Release an original.
Page 26

26 User manual
[2] The keys and their funct i ons
Note: The function of a softkey depends on where you are in the definition the
job settings step.
9 Numeric keys Enter a numeric value.
11 Left softkeys
■ Open a template.
■ Define a setting that contains two values.
This setting is called a toggle setting.
■ Open a setting that contains various values
■ Open a setting that contains various settings.
This setting is called a grouped setting.
Number Component Function
Page 27

27
Océ TDS400-CS
User manual
Chapter 3
Get to know the Océ Power Logic®
controller applications
Page 28

28 User manual
The Océ Power Logic® controller
Introduction
The Océ Power Logic® controller is based on a PC platform running
Windows
®
XP embedded.
The Océ Power Logic
®
controller is required for the following.
■ Process the print jobs
■ Define the default system settings
■ Manage the job queue
■ Manage the set memory
■ Receive jobs over the network.
The location of the Océ Power Logic® controller
You can place the Océ Power Logic® controller in one of the following
locations.
■ Inside the controller cabinet of the Océ TDS400 printer.
■ When you have a monitor, a keyboard and a mouse connected to the Océ
Power Logic
®
controller, the controller is always placed inside a separate
controller cabinet.
Page 29

Get to know the Océ Power Logic® controller applications 29
The applications that run on the Océ Power Logic® controller
[3] Océ applications that can run on the Océ Power Logic® controller
Application Function
Océ System
Control Panel
■ Display the status of the printer
■ Display the media available on the system
■ Display the status of the scanner
■ Display the volume of set memory in use
■ Print the configuration settings
■ Print a demo print.
Océ Settings Editor With the Océ Settings Editor you can view or edit the default
settings of the system.
The repro operator and the anonymous users can only view the
default settings.
To edit the default settings you need a password.
There are two types of settings.
■ Key operator settings (KO settings).
To edit the key operator settings you need a key-operator
password.
■ System administrator settings (SA settings).
To edit the system administrator settings you need a system
administrator password.
Océ Queue
Manager
■ Control and view the job queue
■ Inspect the progress of a job by set and page.
■ Cancel jobs
■ Delete jobs
■ Pause and restart jobs
■ Move jobs to the top of the queue
■ Reprint multiple sets from the history queue.
■ Print jobs from the inbox queue
■ V ie w the properties of jobs in the print queue, inbox queue and
history queue.
Océ Scan Manager
■ Create and manage the destinations for scan to file
■ Define the file names
■ Manage the files
■ View the scanned files.
Océ Account Logic
■ Create an exact record of the print, copy and scan-to-file
volume for accounting purposes.
Page 30

30 User manual
[3] Océ applications that can run on the Océ Power Logic® controller
Note: To perform some of these actions you need a password.
Océ License Logic
■ Manage the licenses for the Océ software applications
Océ Remote
Logic
®
Use Océ Remote Logic
®
to access the Océ System Control Panel,
the Océ Settings Editor, and the Océ Queue Manager from a
remote workstation.
Application Function
Page 31

Get to know the Océ Power Logic® controller applications 31
Océ Settings Editor
Introduction to the Océ Power Logic® controller: Océ Settings
Editor
Definition
This chapter gives information about the Océ Settings Editor . The on-line help
of the Océ Settings Editor application contains exact information about
specific settings.
You can access the Océ Settings Editor locally on the controller if you have a
keyboard, mouse and monitor with your Océ Power Logic
®
controller. You
must use Océ Remote Logic
®
to connect to the Océ Settings Editor when you
do not have a keyboard, mouse and monitor with your Océ Power Logic
®
controller.
Description of the Océ Settings Editor
Use the Océ Settings Editor to define the default settings for the system
according to your requirements.
The Océ Settings Editor contains the following types of settings.
■ Key Operator settings (KO settings).
■ System Administrator settings (SA settings).
■ A password protects the KO settings and the SA settings. Without a
password, you can only view the settings.
The key operator is allowed to change the following groups of settings (see
‘Define the settings in the Océ Settings Editor’ on page 40).
■ Job settings for the print jobs
■ Printer settings
■ System settings.
Page 32

32 User manual
The system administrator is allowed to change the following groups of settings
(see ‘Define the settings in the Océ Settings Editor’ on page 40).
■ Poker settings
■ Printer language (PDL) settings
■ Pen settings
■ Automatic Language Selection (ALS) settings
■ Controller identification settings
■ Set memory reservation settings
■ Connectivity settings.
In the 'Anonymous' mode, the operator is not logged on. The anonymous user
is allowed only to view the settings.
Overview
Overview of the Océ Settings Editor
Introduction
The Océ Settings Editor has the following fields.
■ The menu bar
■ The top toolbar
■ The left toolbar
■ The settings area
■ The status bar.
Page 33

Get to know the Océ Power Logic® controller applications 33
Illustration
[4] The structure of the Océ Set t in gs Edit or
[4] The structure of th e Oc é Settings Editor
[5] The menu bar
[5] The menu bar
[6] The top toolbar
[6] The top toolbar
Page 34

34 User manual
[7] The left toolbar
[7] The left toolbar
Page 35

Get to know the Océ Power Logic® controller applications 35
[8] The settings area
[8] The settings area
Page 36

36 User manual
The menu bar
[4] The menu bar items
[4] The menu bar items
The top toolbar
[5] The buttons of the top to olbar
[5] The buttons of the top toolbar
Menu Function
'File'
■ Log on to a user mode
■ Log off from the previous user mode
■ Open a file that contains saved settings
■ Save the current settings to a file
■ Connect to a different controller ( for remote users only).
■ Close the application.
'Edit'
■ Define the host name
■ Define the default system you want to connect to at the
start-up
■ Use 'Automatic logon', to start the Océ Settings Editor
application automatically in the defined user mode.
'View'
■ Toggle between the display languages
■ Toggle between the display of the KO settings and the SA
settings.
'Help'
■ Access the contents of the on-line help
■ Get more information about the copyright and the version
of the application.
Button Function
'Open' Open a file that contains saved settings.
'Save as...' Save all the KO settings or the SA settings in a file.
'Apply' Apply the changes you made to the settings.
Note: The button is enabled after you change a setting. The
button is disabled after you apply the settings, or after an undo
action.
'Undo' Restore the settings to the state before the settings were
changed. The 'Undo' button does not restore the factory
default.
Note: The button is enabled after you change a setting. The
button is disabled after you apply a changed setting.
Page 37

Get to know the Océ Power Logic® controller applications 37
The left toolbar
[6] The buttons of the left toolbar
[6] The buttons of the left toolbar
Click a button to access the special group of settings of this button. A shadow
highlight indicates which button is activated.
The on-line help in the Océ Settings Editor includes complete information
about the different settings.
The settings area
[7] The parts of the s ettings area
[7] The parts of the se ttin g s are a
Button Function
'Jobs' Gives access to the settings for the jobs.
Note: The 'Jobs' button is only available in the key oper ator
view.
'Printer' Gives access to the settings for the printer.
'System' Gives access to the settings for the system.
'Scanner' Gives access to the settings for the scanner.
Part Function
Tree structure Display the settings.
Open a folder to show all the settings in that folder.
The display does not include the unavailable settings for the
system components.
Update area Define the settings selected in the tree structure.
The update area can contain additional information
(definition and values) about the selected setting.
Only authorised users can change the settings. If the user is
not authorised to change a setting, the update area is greyed
out.
Page 38

38 User manual
The status bar
The status bar at the bottom of the Océ Settings Editor displays the following
(from left to right).
■ The system status ('connected' or 'disconnected').
■ The system name ('local host' if you are working on the controller).
■ The user mode (key operator, system administrator or anonymous).
■ The view mode (KO Settings or SA Settings).
[8] The icons for the co nnection status
[8] The icons for the connection stat us
Icon Description
The Océ Settings Editor is connected to a system.
The Océ Settings Editor is not connected to a system.
Page 39

Get to know the Océ Power Logic® controller applications 39
Start the Océ Power Logic® controller applications
Introduction
You can start the Océ Power Logic® controller applications locally on the
controller or from a remote workstation. This section describes how to start the
applications locally on the Océ Power Logic® controller . The section 'Start the
applications with Océ Remote Logic®' describes how to start the applications
from a remote workstation (see ‘Start the applications with Océ Remote
Logic®’ on page 64).
Start the applications locally on the Océ Power Logic® Controller
1.
Select the 'Launcher' application.
2. Select the required application.
The application starts with your default system.
Page 40

40 User manual
Use the Océ Settings Editor
Define the settings in the Océ Settings Editor
Introduction
The Océ Settings Editor allows you to define the following settings.
■ Key operator settings (KO settings)
■ System administrator settings (SA settings).
You need a password to change the KO settings and SA settings (see ‘Log on
to the controller applications’ on page 71).
Note: Only one key operator, system administrator or repr o oper ator at a time
is authorised to change the settings. An err or message appear s when a second
user tries to log on to the key operator mode or system administrator mode.
Multiple users are authorised to view the settings.
How to define the key operator settings
1.
Log on to the key operator mode.
2. Use the buttons on the left toolbar to display the required group of settings.
3. Select the required settings in the tree structure.
4. Define the settings in the update area.
5. Click the 'Apply' button to confirm the new settings.
6. Log off from the key operator mode to prevent unauthorised use of the
application.
How to define the system administrator settings
1.
Log on to the system administrator mode.
2. Use the buttons on the left toolbar to display the required group of settings.
3. Select the required settings in the tree structure.
4. Define the settings in the update area.
5. Click the 'Apply' button to confirm the new settings.
6. Log off from the system administrator mode to pre vent unauthorised use of the
application.
Page 41

Get to know the Océ Power Logic® controller applications 41
Save, load,and print the settings
Introduction
It is possible that you need different settings for different customers,
departments or other conditions. For this reason, you can save the settings to a
file and then load the settings from a file.
The Océ TDS400-CS has the following special files for your use.
1. Backup.kos/Backup.sas
These files contain the previous values for the key operator settings and the
system administrator settings before the last 'Apply'.
2. Current.kos/Current.sas
These files contain the values for the key operator settings and the system
administrator settings after the last 'Apply'.
If you need a complete overview of all settings defined in the Océ Settings
Editor, you can print a list of all current settings.
How to save the settings to a file
1.
From the 'File' menu, select 'Save as'.
You can also click the 'Save as' button on the toolbar.
If the client is a local client, the screen displays a dialogue box. The user can
enter a file name. The file is saved in the specified directory on the system.
If the client is a remote client, the screen displays a dialogue box. The user can
enter a directory name and a file name.
Note: Repro operators and anonymous users are not authorised to save the
settings to a file.
Page 42

42 User manual
How to load the settings from a file
1.
From the 'File' menu, select 'Open'.
You can also click the 'Open' button on the toolbar.
The screen displays a dialogue box from where you can browse to the required
file.
2. Click the 'Apply' button.
The settings are transferred to the system.
When you are logged on as a key operator, the system only loads the KO
settings.
When you are logged on as a system administrator, the system only loads the
SA settings.
Repro operators and anonymous users are not authorised to load the settings
from a file.
How to print a list of the current settings
1.
From the 'System' menu in the Océ System Control Panel, select 'Print
settings'.
A list of the current settings on the Océ Power Logic
®
controller is printed.
Page 43

Get to know the Océ Power Logic® controller applications 43
Océ System Control Panel
Introduction to the Océ Power Logic® controller: Océ System
Control Panel
Definition
The Océ System Control Panel application provides you with the following
information about the status of the system.
■ Status of the printer
■ Descriptions of the different types and sizes of available media on the
system
■ Status of the scanner
■ Status of the controller
■ The amount of set memory in use.
You can access the Océ System Control Panel locally on the controller if you
have a ke yboard, mouse and monitor with your Océ Power Logic
®
controller.
If you do not have a keyboard, mouse and monitor with your Océ Power
Logic
®
controller you must use Océ Remote Logic® to connect to the Océ
System Control Panel.
See 'Océ Power Logic
®
controller: Océ Settings Editor' for information about
how to start the application locally on the controller.(see ‘Start the Océ Power
Logic® controller applications’ on page 39).
See 'Océ Power Logic
®
controller: Océ Remote Logic®' for information about
how to start the application from a remote workstation. (see ‘Start the
applications with Océ Remote Logic®’ on page 64).
User operations in the Océ System Control Panel
The Océ System Control Panel allows you to
■ Print your system configuration (see ‘Save, load,and print the settings’ on
page 41)
■ Clear the system memory (see ‘Clear the set memory’ on page 244)
■ Shut down the system (see ‘Turn on and shut down the Océ Power Logic®
controller’ on page 110)
Page 44

44 User manual
Overview of the Océ System Control Panel
Introduction
The Océ System Control Panel contains the following items.
1. The menu bar
2. The toolbar, with buttons to access the view area
3. The status of the printer
4. An overview of the loaded media types
5. The status of the scanner
6. The status of the Océ Power Logic
®
controller
7. The amount of set memory in use
8. The status bar
Illustration
[9] The structure of the Océ System C ontrol Panel
[9] The structure of the Océ System Control Panel
Page 45

Get to know the Océ Power Logic® controller applications 45
The menu bar
[9] The items of the menu bar
[9] The items of the menu bar
Menu Items
'File'
■ Click 'Log on' to select the user mode. Then enter the
password.
■ Click 'Log off' to leave the user mode.
■ Click 'Connect to' and select a different controller (only for
remote users).
■ Click 'Close' to leave the Océ System Control panel.
'Edit' Click 'Options' to define the following.
■ The 'Host name'.
■ The 'Default system'.
■ The 'Automatic logon'. Use 'Automatic logon' to start up
automatically in the defined user mode.
■ Select the two screen languages.
'View'
■ Select one of the display languages for the application.
■ Display the items for the status control. Click an item to
view the status. The items correspond with the buttons of
the toolbar.
'System'
■ Click 'Print settings' to print a report of the configuration
settings.
■ Click 'Demo print' to make a demo print.
■ Click 'Clear system' to remove all the jobs from the system.
■ Click 'Shut down' to shut down the system.
'Help'
■ Click 'Contents' to access the topics of the on-line help.
■ Click 'About' for general information about the Océ System
Control Panel.
Page 46

46 User manual
The toolbar
Click the buttons on the toolbar of the Océ System Control Panel to check the
status of the items in the view area. If operator action is required, the
appropriate button will flash.
[10] The buttons of the toolbar
[10] The buttons of the toolbar
Item Function
'Printer' View the status of the printer. If the printer operator panel
displays an error, the 'Printer' status windo w of the Océ System
Control Panel will display the same error.
'Media' View the status of the media (available, empty or disabled).
The 'Media' display also shows information about the av ailable
media sizes and media types.
Note: When a roll is disabled, the roll icon is greyed out. The
text '-disabled-' replaces the media information.
'Controller' Vie w the status of the controller.
'Memory' Check the amount of set memory that is available. The
percentage on the right-hand side of the set memory meter
indicates the amount of set memory in use. The colours
indicate the following.
■ Green indicates that the set memory has sufficient space for
a large print job or many small jobs.
■ Orange indicates that the set memory approaches the red
zone. Large print jobs may not be possible.
■ Red indicates that the set memory is (nearly) full. The
system does not accept new print jobs. Remove files or wait
until files are printed and automatically removed from the
memory.
Note: Define the threshold values for the orange zone and the
red zone in the Océ Settings Editor.
Page 47

Get to know the Océ Power Logic® controller applications 47
The status bar
The status bar at the bottom of the Océ System Control Panel displays the
following.
■ The system status (connected or disconnected).
■ The system name ('local host' if you work on the Océ Power Logic
®
controller).
■ The job status (for example 'Printing').
■ The user mode (Key operator, Repro operator, System administrator,
Service operator or 'Anonymous').
[11] The icons of the status bar
[11] The icons of the status bar
Icon Function
The Océ System Control Panel is connected to a system.
The Océ System Control Panel is not connected to a
system.
Page 48

48 User manual
Icons
The Océ System Control Panel uses a number of icons to display the
information about the media available on the printer. The following icons are
used.
Icon Description
The media roll is available and the roll is ready to print
The media roll is disabled.
The media roll is enabled but empty.
Page 49

Get to know the Océ Power Logic® controller applications 49
Océ Queue Manager
Introduction to the Océ Power Logic® controller: Océ Queue
Manager
Definition
This chapter describes how to view and manage the jobs with the Océ Queue
Manager.
You can access the Océ Queue Manager locally on the controller if you have a
keyboard, mouse and monitor with your Océ Power Logic
®
controller.You
must use Océ Remote Logic
®
to connect to the Océ Queue Manager when you
do not have a keyboard, mouse and monitor with your Océ Power Logic
®
controller.
(see ‘Introduction to the Océ Power Logic® controller: Océ Settings Editor’
on page 31) for information about how to start the application locally on the
controller . (s ee ‘Start the Océ Power Logic® controller applications’ on
page 39).
(see ‘Start the applications with Océ Remote Logic®’ on page 64) for
information about how to start the application from a remote workstation .
Description of the Océ Queue Manager
The Océ Queue Manager application provides you with a graphical image of
the print queue, the history queue or the inbox queue
The Océ Queue Manager allows you to do the following.
■ View the queue of jobs.
■ Cancel the current job.
■ Delete jobs in the queue.
■ Place jobs on hold in the queue.
■ Print jobs from the history queue.
■ Print jobs from the inbox queue.
■ Move jobs to the top of the queue.
■ Give priority to jobs in the queue.
■ Restart the jobs that were placed on hold in the queue.
Page 50

50 User manual
User modes
The Océ Queue Manager has the following user modes.
■ The key operator mode
■ The repro operator mode
■ The system administrator mode
■ The service operator mode.
Note: The service operator mode is for the Océ service engineer only.
The user modes provide the following permissions.
The key operator, the repro operator and the system administrator user modes
allow you to hold, resume or delete the jobs or to move the jobs to the top of
the queue.
The anonymous user mode only allows the user to view the queue. All the
buttons and menu items are disabled in this mode. The anonymous user is
allowed to delete the jobs when the user works locally with the Océ Queue
Manager on the controller.
Note: The key operator, the system administrator and the repro operator have
the same access permissions to functions in the Océ Queue Manager and the
Océ System Control Panel. The permissions to access the settings in the Océ
Settings Editor vary according to the different user modes.
Page 51

Get to know the Océ Power Logic® controller applications 51
Overview of the Océ Queue Manager
Introduction
This section contains an overview of the Océ Queue Manager application. Use
the Océ Queue Manager to manage the jobs in the job queue.
Illustration
[10] The Océ Queue Manage
[10] The Océ Queue Manage
The structure of the Océ Queue Manager
The Océ Queue Manager contains the following items.
1. The menu bar
2. The tool bar
3. The window for the print queue
4. The window for the inbox queue or history queue
5. The status bar
Page 52

52 User manual
The Océ Queue Manager uses columns to display the following information
for each job.
■ The current status and the schedule of the job
■ The name of the job
■ The type of job (a print job or a copy job)
■ The name of the user who sent the print job
■ The number of sets and pages
■ Remarks.
Note: Drag the table header separators to change the width of the columns.
Drag a column to a new position to change the sequence of the columns.
The menu bar
[12] The items of the menu bar
[12] The items of the menu bar
Menu Items
'File'
■ Click 'Log on' to select the user mode. Then enter the password.
■ Click 'Log off' to leav e the user mode.
■ Click 'Connect to' and select a different controller (only for
remote users).
■ Click 'Close' to leave the Océ Queue Manager.
'Edit' Click 'Options' to define the following.
■ The 'Host name'.
■ The 'Default system'.
■ The 'Automatic logon'. Use 'Automatic logon' to start up
automatically in the defined user mode.
■ Select the two screen languages.
'View'
■ Toggle between the defined display languages.
■ Toggle between the 'Inbox' queue and the 'History' queue.
■ Define the 'Column options'. Select the table headers you want
to see when you open the Océ Queue Manager.
'Job' Display the actions for a job. The menu items correspond with the
toolbar buttons.
'Help'
■ Click 'Contents' to access the topics of the on-line help.
■ Click 'About' for general information about the Océ Queue
Manager.
Page 53

Get to know the Océ Power Logic® controller applications 53
The toolbar
[13] The toolbar butto ns
[13] The toolbar buttons
The status bar
The status bar at the bottom of the Océ Queue Manager displays the following.
■ The system status (connected or disconnected).
■ The system name ('local host' if you work on the Océ Power Logic
®
controller).
■ The job status (for example 'Printing').
■ The user mode ('Key operator', 'Repro operator', 'System administrator',
'Service operator' or 'Anonymous').
The window for the print queue
The print queue window in the left-hand pane contains two sections.
■ The top section above the separation line shows the job that is printed.
■ The bottom section under the separation line shows the jobs that wait to be
printed. The window displays the jobs in the order in which the jobs are
received.
The window for the inbox queue or history queue
The inbox queue in the right-hand pane contains the jobs that were sent to the
inbox on the controller. You can print the jobs, delete the jobs and view the
properties of the jobs. The print jobs are sent to the inbox when the setting KO
- System - Job management - Print jobs in the Océ Settings Editor is set to
inbox or when 'Send to inbox' is enabled in the driver.
The history queue in the right-hand pane contains the jobs that have been
printed. You can print the jobs, delete the jobs and view the properties of the
jobs. Use the setting KO - System - Job management - History queue - Print
job lifetime in the Océ Settings Editor to define how long the jobs must remain
in the history queue.
Button Function
'Hold' Place a job on hold in the print queue .
'Resume' Continue a job that was placed on hold.
'Move to top' Move a job to the top of the print queue, to give the job priority.
'Delete' Delete a job from the print queue.
'Properties' View the properties of a selected job .
'Print' Print a job from the print queue.
Page 54

54 User manual
Icons
The Océ Queue Manager uses a number of icons to display information about
a job in the queue. The following icons are used.
Icon Description
Receiving a job in the inbox or the print queue.
Received a job in the print queue.
Processing a job in the print queue.
Processed a job in the print queue.
An active job in the print queue (bold font and abo ve the grey
separation line).
Printing a job.
Delivering a job to the history queue.
Delivered a job to the history queue.
Deleted a job.
A job that is put on hold by default . This icon indicates that
the job is displayed in the inbox.
A job is on hold.
Warning, a media request.
Page 55

Get to know the Océ Power Logic® controller applications 55
Océ Scan Manager
Introduction to the Océ Power Logic® controller: Océ Scan
Manager
Definition
This chapter describes how to use the Océ Scan Manager for your scan-to-file
jobs.
Access the Océ Scan Manager local on the controller. You must have a
keyboard, mouse and monitor with your Océ Power Logic
®
controller to use
the Océ Scan Manager.
See "Océ Power Logic® controller: Océ Settings Editor" for information about
how to start the application locally on the controller . (see ‘Start the Océ Power
Logic® controller applications’ on page 39).
Description of the Océ Scan Manager
The Océ Scan Manager allows you to do the following.
■ Create the destinations for scan-to-file
■ Define the file names
■ Print scanned files
■ Retrieve scanned files.
Océ View Station LT
Océ View Station LT is an application that runs with Océ Scan Manager. Océ
View Station LT enables you to view the scanned file.
When 'Auto view' is enabled, Océ View Station LT starts automatically to
display the scanned file when the scan to file is complete. (see ‘Manage the
scanned files’ on page 149).
User modes
Only the key operator and the service operator are allo wed to make changes in
Océ Scan Manager.
Page 56

56 User manual
Overview of the Océ Scan Manager
Introduction
This section contains an overview of the Océ Scan Manager application. Use
the Océ Scan Manager for scan to file.
Illustration
[11] The Océ Scan Manager
[11] The Océ Scan Manager
The structure of the Océ Scan Manager
The Océ Scan Manager has the following fields.
■ The menu bar
■ The top tool bar
■ The destination area
■ The scanned files area
■ The status bar.
Page 57

Get to know the Océ Power Logic® controller applications 57
The menu bar
[14] The menu bar it ems
[14] The menu bar items
Component Function
'File'
■ When no objects are selected, you can do the following
from the 'File' menu.
■ Log on to a user mode
■ Log off from the previous user mode.
When a destination is selected, you can do the following from
the 'File' menu.
■ Add a new destination
■ Delete the selected destination
■ View the properties of the selected destination
■ Open the destination
■ Save the destination.
When a file is selected, the 'File' menu includes the following
items.
■ View the properties of the selected file
■ Delete the selected file
■ Print the selected file
■ View the selected file.
'Edit'
■ Use 'Automatic logon', to start the Océ Scan Manager
application automatically in the defined user mode.
'View'
■ Toggle between the display languages
■ Refresh the list of files.
'System'
■ Clear the temporary store
■ Use 'Auto view' to enable or disable the automatic view of
the scan file.
'Help'
■ Access the contents of the on-line help
■ Get more information about the copyright and the version
of the application.
Page 58

58 User manual
The tool bar
[15] The buttons of the toolbar
[15] The buttons of the toolbar
The destination area
[16] The parts o f the destination ar ea
[16] The parts of the destination area
The scanned files area
The scanned files area shows the files scanned to the destination selected in the
destination area.
The scanned files that are scanned last, are shown on the bottom of the list.
When you cannot see the files that are scanned last, use the 'Refresh' button
( ) on the toolbar to update the view or select 'Refresh' in the 'View' menu .
Component Function
'New' Create a destination
'Delete' Delete a destination
'View' View the scanned file
'Refresh' Update the screen.
'Print' Print a scanned file.
Component Function
The tree
structure
(left-hand pane
of the main
window)
Displays the following.
■ The destinations
■ The temporary store
■ The 'Unsent' folder.
The destination
area (right-hand
pane of the main
window)
Displays the following.
■ The file name
■ The file type
■ The file resolution
■ The file size
■ The pixel size of the image
■ The original size.
Page 59

Get to know the Océ Power Logic® controller applications 59
The following information is shown for each file.
■ The file name
■ The file size
■ When the file was last modified
■ The resolution of the file
■ The size of the image in the file
■ The progress status of the current scan job.
The status bar
The status bar of Océ Scan Manager displays the following information.
■ The system status (connected, disconnected)
■ The system to which Océ Scan Manage r is c o nn e c t ed
■ The scan clicks (indicates the area that is scanned)
■ A message field
■ The user mode.
Icon Description
Océ Scan Manager is connected to a system.
Océ Scan Manager is not connected to a system.
Page 60

60 User manual
Océ Remote Logic®
Introduction to Océ Remote Logic®
The applications of Océ Remote Logic®
You must use Océ Remote Logic® to connect to the Océ Power Logic®
controller applications when you do not have a keyboard, mouse and monitor
with your Océ Power Logic
®
controller .
You can use Océ Remote Logic
®
to run the following applications from a
remote workstation.
■ Océ Settings Editor
Use the application to change the default settings of the system.
■ Océ Queue Manager
Use the application to manage the print jobs.
■ Océ System Control Panel
Use the application to view the status of the printer, the scanner and the
controller. You can also view the media available on the printer and the
amount of set memory in use.
User modes
The Océ Remote Logic® controller applications have different user modes (see
‘The Océ TDS400-CS users’ on page 18). An additional user mode is the
'Service operator' mode. This mode is for the Océ technician only.
Page 61

Get to know the Océ Power Logic® controller applications 61
Install and start Océ Remote Logic
Install Océ Remote Logic® on your system
Introduction
The Océ Remote Logic® application can run on all platforms with Java
Virtual Machine. This section describes the installation procedures for the
different types of platforms.
Before you begin
To install Océ Remote Logic® on Windo ws® 9.x, NT, ME, XP, or 2000, your
system must be at least equipped with a Pentium
®
233 with 32 Mb RAM.
Installation procedure for Microsoft® Windows® platforms
1.
Insert the Océ Remote Logic® CD-ROM or the Océ Power Logic® controller
CD-ROM into the CD-ROM drive of your PC.
2. The installation starts automatically. If does not start automatically, run
Setup.exe.
3. Select the required language in the installation wizard and click 'OK'.
[12] Select the setu p language
[12] Select the setup language
4. Follow the instructions on the screen to complete the installation of Océ
Remote Logic
®
.
Note: Y ou can only use Océ Remote Logic
®
when TCP/IP is enabled on your
system. Refer to your system administrator for help with the installation
procedure for TCP/IP.
Page 62

62 User manual
Installation procedure for UNIX platforms
1.
Check if a Java Runtime Environment (JRE) is installed on the system.
2. From the directory Products/remotelogic/UNIX , unpack the contents of the
file RemoteLogic_vX.tar to a subdirectory on the system.
3. Use tar xvf RemoteLogic_vX.tar to unpack the file.
4. Set the environment variable RL_VM_HOME to point to the installation of
the JVM.
5. Run the file remotelogic with the applications as parameters (for example
remotelogic QM SCP SE to start the three applications), or use remotelogic
AL as the application launcher.
UNIX versions and the required JRE
Note:
OS = Operating System, JRE = Java Runtime Environment
UNIX version OS
version
JRE Default
installation
directory
IBM
®
AIX 4.1.5 1.1.6 /usr/jdk_base
IBM
®
AIX 4.2.1 1.1.8 /usr/jdk_base
IBM
®
AIX 4.3.3 +
fix
1.2.2 /usr/jdk_dev2
IBM
®
AIX 4.3.3.10
+ fix
1.3.0 /usr/jdk_java130
SUN
®
Solaris 2.6 1.1.6
HP-UX 10.20 1.1.3
LINUX
®
1.0 1.1.3
LINUX
®
1.2 1.1.8
Page 63

Get to know the Océ Power Logic® controller applications 63
Where to download the Java Runtime Environments
[17] Download Java Runtime Environments
[17] Download Java Runtime Environments
Installation procedure for other platforms
1.
Install Java Virtual Machine (version 1.1.8).
2. From the Océ Remote Logic
®
CD-ROM, load RemoteLogic_vX.tar or
RemoteLogic_vX.zip .
3. Set the environment variable RL_VM_HOME to point to the Java
Products/remotelogic/UNIX installation directory.
4. If necessary, edit the Océ Remote Logic
®
script or batch file.
5. Use the Océ Remote Logic
®
script or batch file to start the applications.
Platform Preferred version Download location
1 1.1.8 http://www.ibm.com/java
2 C.01.18.xx http://www.unix.hp.com/java
3 N/A http://www.ibm.com/java
Page 64

64 User manual
Start the applications with Océ Remote Logic®
Introduction
Use the following 2 methods to start the applications with Océ Remote Logic®.
■ Use the programs menu of your operating system.
■ Use a command line parameter.
Use the programs menu to start the applications
1. Select 'Océ Remote Logic'
2. Select the 'Launcher' application.
3. Select the required application.
The application starts with your default system.
Note: Y ou can select another system than your default system (see ‘Connect to
the controller’ on page 67).
Use command line parameters to start the applications
Six command line parameters are available to facilitate the start of the
applications.
■ configfile=<config_file>
Sets the configuration file to use.
■ server=server
Sets the indicated server as the server to connect to.
■ language1=lang
Specifies the first language in combination with the parameter
country1=country .
■ country1=country
Specifies the first language in combination with the parameter
language1=language .
■ language2=lang
Specifies the second language in combination with the parameter
country2=country .
■ country2=country
Specifies the second language in combination with the parameter
language2=language .
Page 65

Get to know the Océ Power Logic® controller applications 65
Note: Always use a matching combination of language and country (see the
following table).
Parameters of supported languages
[18] Parameters of supported languages
[18] Parameters of supported languages
Apply the parameters to the applications
Apply the parameters to the following applications.
■ QM.exe (Océ Queue Manager)
■ SCP.exe (Océ System Control Panel)
■ SE.exe (Océ Settings Editor)
■ AL.exe (Application launcher).
Language Language parameters Country parameters
Danish da DK
Swedish sv SV
Norwegian no NO
Finnish fi FI
Hungarian hu HU
Czech cs CZ
Polish pl PO
German de DE
Dutch nl NL
UK English en GB
US English en US
French fr FR
Italian it IT
Spanish es ES
Portuguese pt PT
Chinese simplified cn CN
Chinese traditional cn TW
Japanese ja JP
Page 66

66 User manual
The easiest method to apply the parameters to the applications is to create a
shortcut for an application. Then add the command line properties.
Note: The .exe files are usually located in C:\Program Files\Remote
Logic\Bin.
Example of a command line parameter
The example below shows how to start the controller applications with the
configuration file 'Myconfig.cfg', connected to the 'MyTCS400' server. The
first language is set to UK English and the second language is set to French.
C:\Program Files\Remote Logic\Bin\AL.exe
configFile=Myconfig.cfg
server=MyTCS400 language1=en country1=GB language2=fr
country2=FR .
Page 67

Get to know the Océ Power Logic® controller applications 67
Connect to the controller
Introduction
After you start one of the Océ Remote Logic® applications, you must connect
to the Océ Power Logic
®
controller of the Océ TDS400-CS. You must connect
to the system for every separate application.
You can do the following when you connect to the controller.
■ Select a system from the drop-down list.
■ Add a system to the drop-down list.
■ Remove a system from the drop-down list.
When the Océ TDS400-CS is not available in the 'Connect to' dialogue box,
you must add the Océ TDS400-CS to the list of available systems.
How to connect to a system
1.
Open the application you want to run.
2. From the 'File' menu, select 'Connect to'.
3. Select the system from the drop-down list.
4. Click 'OK'.
Note: From the 'File' menu, select 'Options' to define the default system. This
is recommended if you frequently connect to the same system.
How to add a system
1.
From the 'File' menu, select 'Connect to'.
2. Click 'Edit'.
The 'Edit systems' dialogue box appears.
3. Enter the IP address or the name of the system in the 'Systems' box.
4. Click 'Add'.
The system is added to the list.
5. Click 'OK' 2 times to return to the application.
Page 68

68 User manual
How to remove a system
1.
From the 'File' menu, select 'Connect to'.
2. Click 'Edit'.
The 'Edit systems' dialogue box appears.
3. Select the system you want to remove.
4. Click 'Remove'.
The system is removed from the list.
5. Click 'OK' 2 times to return to the application.
Page 69

Get to know the Océ Power Logic® controller applications 69
Use Océ Remote Logic
Automatic logon
Introduction
The 'Automatic logon' option enables you to start an application automatically
in the indicated user mode.
How to enable automatic logon
Automatic logon is now enabled.
Step Action
1 From the 'Edit' menu, select 'Options'.
The 'Options' window appears.
2 Select the 'Enable automatic logon' checkbox.
3 From the drop-down box, select the user mode for the automatic
logon.
4 Enter the password that corresponds to the selected user mode.
5 Click 'OK'.
Page 70

70 User manual
Change the password
How to change the password
1.
From the 'File' menu, select 'Log on'.
2. Click 'Password' in the dialogue box.
3. Open the drop-down list and select a user.
4. Enter the old password.
5. Enter the new password .
6. Enter the new password a second time to confirm.
7. Click 'OK' to save the new password.
Page 71

Get to know the Océ Power Logic® controller applications 71
Log on to the controller applications
User modes
The Océ Power Logic® controller has the following user modes.
■ Key operator
■ Repro operator
■ System administrator
■ Service operator.
Chapter 1 contains more information about the types of users (see ‘The Océ
TDS400-CS users’ on page 18). Chapter 12 contains more information about
the user modes in the Océ Settings Editor (see ‘Introduction to the Océ Power
Logic® controller: Océ Settings Editor’ on page 31). Log on to the correct user
mode in the Océ Settings Editor to change the key operator settings or the
system administrator settings.
Only assigned operators are allowed to use the user modes. Different
passwords are required to access the user modes.
You do not need a password for the anonymous user mode.
Passwords
■ The default password for the system administrator is SysAdm .
■ The default password for the key operator is KeyOp .
■ The default password for the repro operator is ReproOp .
When a user is logged on, the user can change the password for the current user
mode. (see ‘Change the password’ on page 70)
Note: The passwords are case sensitive.
Page 72

72 User manual
Authorisation
Only one key operator, system administrator or repro operator at a time is
authorised to change the settings.
An error message appears when a second user tries to log on to the key operator
mode or system administrator mode.
There is no limitation of users authorised to view the settings.
[13] Error messag e when a second u ser tries to log on
[13] Error message when a second user tries to log on
How to log on to the controller applications
1. From the 'File' menu, select 'Log on'.
2. Select the required user name.
3. Enter the password.
4. Click 'OK'.
You are now logged on as special user. When you are not logged on, you hav e
'Anonymous' user permissions. (see ‘The Océ TDS400-CS users’ on page 18).
The status bar at the bottom shows the user mode.
The logon is limited to one user only.
Note: You must separately log on to each application.
How to log off from the controller applications
From the 'File' menu, select 'Log off'.
You return to the anonymous user mode. Log off from the controller
applications to prevent unauthorised use.
Note: You must separately log off from each application.
Page 73

Get to know the Océ Power Logic® controller applications 73
Océ License Logic
About Océ License Logic
Introduction
The Océ applications and options are protected against unauthorised use. You
need to activate the license to enable an application or option for use. Océ
License Logic enables you to manage the licenses very easy.
This section describes the following.
■ The basic concept of Océ License Logic
■ How to use Océ License Logic.
Page 74

74 User manual
The possibilities of Océ License Logic
Introduction
Océ License Logic has the following possibilities.
Possibilities
■ View the current active licenses
■ Get the host id of the Océ system
■ Save the active licenses
■ Perform a license activation job.
You can activate new licenses or saved licenses.
Page 75

Get to know the Océ Power Logic® controller applications 75
The basic workflow of license activation
Introduction
Before you can use the possibilities of Océ License Logic, you must log on to
Océ License Logic. The following workflow describes per step when to use
which possibility.
The workflow
1.
Select the new options you need.
Use the following possibilities of Océ License Logic to do so.
■ View the current active licenses
You can make a list of new options you need and make a list of license
numbers. Océ needs the list of new options and the license numbers to
create a new license file.
■ Get the host id of the Océ system.
Océ needs the host id of your Océ system to create a new license file.
2. Send the list of new options you need, the list of license numbers and the host
id to Océ.
Océ creates and delivers one or more new license files.
3. Create a back-up of the current active licenses if necessary.
Use the following possibility of Océ License Logic to do so.
■ Save the current active licenses
4. Activate the licenses.
Use the following possibility of Océ License Logic to do so.
■ Perform a license activation job.
The license activation job guides you through the following steps.
1. Locate the license file
2. Preview the new active licenses
3. Accept the end user license agreement
4. Finish the license activation job
5. Restart the controller of the Océ system.
Note: Perform the license activation job for each license file.
Page 76

76 User manual
The structure of license files and licenses
Introduction
A license file contains a license per option of your Océ system. You can view
the current active licenses with Océ License Logic. You can preview the new
active licenses with Océ License Logic during the license activation job.
A license file contains licenses of the same license-type
A license file you receive from Océ contains only licenses of the same
license-type. The following license types are possible.
■ Demo
■ Resale.
If you order demo and resale licenses, you receive 2 license files.
Page 77

Get to know the Océ Power Logic® controller applications 77
What you see per situation
What you see per situation depends on the license file you use.
[19] What you see de pends on the situat ion
[19] What you see depends on the situation
Situation What do you see
View the current active
licenses.
You see the following.
■ All current active demo licenses
■ All current active resale licenses
■ All current other not active options.
Océ delivered one or more
license files.
You see one of the following options.
■ A demo license file
■ A resale license file
■ A demo license file and a resale license
file.
Preview the demo licenses
during the license activation
job if you use the license file
with demo licences.
You see the following.
■ All current active demo licenses
■ All new active demo licenses.
Note: You can not see the current active
resale licenses at this point.
Preview the resale licenses
during the license activation
job if you use the license file
that contains the resale
licences.
You see the following.
■ All current active resale licenses
■ All new active resale licenses.
Note: You can not see the current active
demo licenses at this point.
Preview the demo and resale
licenses during the license
activation job if you use the
saved licenses of your
back-up file.
You see the following.
■ All demo licenses that where active at the
time you created the back-up file
■ All resale licenses that where active at the
time you created the back-up file
The license activa tion job is
finished.
You see the following.
■ All current active demo licenses
■ All new active demo licenses
■ All current active resale licenses
■ All new resale licenses
■ All current other not active options.
Page 78

78 User manual
Page 79

79
Océ TDS400-CS
User manual
Chapter 4
Get to know the Océ TDS400
printer
Page 80

80 User manual
The Océ TDS400 printer
Introduction
The printer is a 36 inch black and white LED printer with a true resolution of
600 dpi. The Océ TDS400 printer is default available with an automatic 1-roll
unit and an Integrated Receiving Tray as the output delivery device. An
automatic 2-roll unit is available as an option. Each of the rolls can contain
different types and sizes of media. The size and type of the available media are
indicated on the operator panel.
Illustration
[14] The Océ TDS400 printer
[14] The Océ TDS400 printer
1
2
3
4
5
6
Page 81

Get to know the Océ TDS400 printer 81
The main components of the Océ TDS400 printer
Nr. Component Function
1 Left cover Provide access to the toner
2 Fuser unit Provide access to the fuser section
3 Op erator panel Set up the print system and the folder
settings
4 M anual feed table Use if you need to print or copy on a cut
sheet.
5 Drawer with media roll Provide access to the media roll
6 I ntegrated Receiving
Tray
Receive the copies and prints
Page 82

82 User manual
The printer operator panel
Introduction
This section describes the parts and the functions of the Océ TDS400 printer
operator panel. Use the printer operator panel to select your print settings or
finishing settings.
[15] The Océ TDS40 0 Printer operator p anel
[15] The Océ TDS400 Printer operator panel
The components of the User manual operator panel.
1. The display
2. The 'previous' key
3. The 'next/select' key
4. The 'stop' key
5. The 'on-line' key with green LED
6. The navigation keys.
on-line
stop
next/select
previous
6
5
1
2
3
4
Page 83

Get to know the Océ TDS400 printer 83
The display
In the on-line mode the display shows the feedback about the print job status
and system messages.
In the off-line mode the display shows the off-line menu. (see ‘The menu
structure of the printer’ on page 84)
On the right-hand side the display shows the menu level indicator. The menu
level indicator presents in a graphic way the activ e printer menu level. The
menu structure of the printer has a maximum of 4 printer menu levels.
The keys
The printer operator panel contains the following keys.
[20] The keys
[20] The keys
Key Function
'previous' Return to a higher menu level
'next/select' Select an option or a setting in the menu
'stop' Stop the current print job
'on-line'
■ Switch between the on-line mode (the green light above
the key is on) and the off-line mode (the green light above
the key is off) of the printer.
■ Activate the program mode and enter the top menu le vel
navigation
■ select another mode at the same menu level
■ display the next or the previous option from the option list
Page 84

84 User manual
The menu structure of the printer
Introduction
In the off-line mode the printer operator panel allows you to define settings.
The table below shows the menu structure of the printer . If you browse through
the tree, the menu level indicator shows the actual menu level.
Page 85

Get to know the Océ TDS400 printer 85
The menu structure of the Océ TDS400 printer with setting references
[21] The menu structure of the Océ TDS400 printer
Setting
reference
'Media settings' 'Roll 1' / 'Roll 2' 'Width' /
'Material'
(see ‘Define
the media type
and media
size’ on
page 258)
'Manual feed' 'Material' (see ‘Define
the media type
and media
size’ on
page 258)
'Time out' (see ‘Define
the manual
feed time-out
at the printer
operator
panel’ on
page 129)
'Cut media' (see ‘Cut the
media’ on
page 260)
'Print info' 'Configuration' (see ‘Print the
configuration
report of the
Océ TDS400
printer’ on
page 113)
Page 86

86 User manual
'Menu card' (see ‘Print the
menu card of
the Océ
TDS400
printer’ on
page 112)
'Demo print' (see ‘Print the
demo print of
the Océ
TDS400
printer’ on
page 114)
'Folding' 'Delivery' 'Stacker' /
'Belt' / 'First
Fold'
(see ‘Define
the folded
output
delivery’ on
page 233)
'Input' 'Legend' 'Trailing' /
'Leading'
(see ‘Define
the folding
legend’ on
page 234)
'Method' 'Standard' /
'Afnor' /
'Ericsson'
(see ‘Define
the drawing
method’ on
page 235)
'Binding' 'Off' / 'On' /
'Reinforce'
(see ‘Define
the binding
method’ on
page 236)
Setting
reference
Page 87

Get to know the Océ TDS400 printer 87
'Binding edge' (see ‘Define
the binding
edge value’ on
page 237)
'Package' 'Length'/ (see ‘Define
the folded
package
length’ on
page 238)
'Width' (see ‘Define
the folded
package
width’ on
page 239)
'Clean RU knife'
'Configuration' 'Language' (see ‘Define
the display
language of
the printer’ on
page 116)
'Paper series' (see ‘Define
the media
series of the
Océ TDS400
printer’ on
page 261)
'System' 'Clear setmem'
'Diagnostic
mode'
Setting
reference
Page 88

88 User manual
[21] The menu structure of the Océ TDS400 printer
Note: The menu structure is also displayed in the menu card of the Océ
TDS400 printer that you can print. (see ‘Print the menu card of the Océ
TDS400 printer’ on page 112)
'Network sett.' 'adapter 1' /
'adapter 2'
'Use DHCP
server'
(see ‘Define
the DHCP
server’ on
page 120)
'IP address' (see ‘Define
the IP address’
on page 121)
'Subnetmask' (see ‘Define
the subnet
mask’ on
page 122)
'Default
gateway'
(see ‘Define
the default
gateway’ on
page 123)
'Installation' 'start install.'
Setting
reference
Page 89

89
Océ TDS400-CS
User manual
Chapter 5
Get to know the finishing options
Page 90

90 User manual
Introduction
Introduction
The Océ TDS400 printer is default available with an automatic 1-roll unit and
an Integrated Receiving Tray as the output delivery device. The Integrated
Receiving Tray is advised for a low production environment and a lot of same
size output.
It is possible to expand your standard configuration with one of the following
finishing options.
Page 91

Get to know the finishing options 91
Finishing options
[22] Océ TDS400 finishing options
Component Function Position of the component
Output
Delivery
Tray
Collects output at the rear side of
the printer.
This option is advised for a
higher production environment
with many different output sizes
that you want to stack neatly . The
stack capacity is 150 prints.
Note: If you install an Output
Delivery Tray, the printer
requires more space.
[16] Output delivery tray
[16] Output delive ry tray
Compact
Output
Stacker
Collects output in the Integrated
Receiving T ray, but has a
mechanism to prevent the output
of different sizes to collide.
This option is also advised for a
higher production environment
with many different output sizes
that you want to stack neatly . The
stack capacity is 100 prints.
Note: If you install an Compact
Output Tr ay, the printer requir es
the same space.
[17] Compact output stacker
[17] Compact output stacker
Folder Folds the output
[18] Folder
[18] Folder
Page 92

92 User manual
[22] Océ TDS400 finishing options
Note: Y ou can use both a Compact Output Stacker and a folder . You can not use
both an Output Delivery Tray and a folder.
The optional reinfor cement unit
adds reinforcement strips to
folded output
[19] Reinforcement unit
[19] Reinforcement unit
The optional belt unit transports
the folded output and provides
high capacity stacking of the
folded output
[20] Belt unit
[20] Belt unit
Component Function Position of the component
Page 93

Get to know the finishing options 93
The folder components
Introduction
The folder folds the output according to the selected folding settings.
Attention: You can only fold paper. If you attempt to fold polyester,
transparent or vellum media, a media jam will occur.
Illustration
[21] Océ TDS400 folder
[21] Océ TDS400 folder
1
2
3
4
56
7
8
Page 94

94 User manual
Folder components
[23] The components of the folder
[23] The components of the folder
Component Function
1Lever
2Stacker
3 Belt unit
4 Second fold section
5 Reinforcement unit
6 Folder transport section
7 First fold section
8 First fold delivery
Page 95

95
Océ TDS400-CS
User manual
Chapter 6
Get to know the software
applications
Page 96

96 User manual
Job submission software
Job submission methods
Send print jobs to the Océ TDS400-CS
You can send your print jobs to the Océ TDS400-CS in various ways. The
default configuration of the Océ TDS400-CS contains printer drivers, Océ
Print Exec
®
Workgroup LT and FTP
Note: You upgrade to the full version of Océ Print Exec
®
workgroup with a
license key in Océ License Logic.
After you send jobs to the printer, you can manage the jobs through the Océ
Queue Manager and the printer operator panel.
Note: The settings defined in the printer drivers or the job submission tools
always overrule the settings defined in the Océ Settings Editor.
Page 97

Get to know the software applications 97
Accounting software: Océ Account Center
Introduction
An overview of Océ Account Center
Introduction
Use Océ Account Center to manage the account information of the print, copy
and scan-to-file jobs for your Océ TDS and Océ TCS devices.
Océ Account Center consists of the following two software modules.
■ Océ Account Logic
Océ Account Logic runs on the Océ Power Logic
®
controller. You can
connect to Océ Account Logic from a remote workstation through a web
browser.
The users use Océ Account Logic to enter the account information. The user
can enter the account information for the copy and scan-to-file jobs and for
the print jobs. The users can enter the account information at the Océ Power
Logic
®
controller and at the workstation.
The administrator can manage Océ Account Logic from the
'Administration' screen on the application.
■ Océ Account Console.
Océ Account Console runs on a PC that functions as a server . You can
connect to Océ Account Console from a remote workstation through a web
browser . Access to Océ Account Console application is password protected
and limited to authorised personnel.
The administrator uses Océ Account Console to create the 'Account
information' dialogue. The administrator publishes the 'Account
information' dialogue for Océ Account Logic and other applications.
The bookkeeper uses Océ Account Console to retrieve and export the log
data. The bookkeeper uses the log data for accounting purposes.
Definition
Page 98

98 User manual
Illustration
Overview of the workflow
The administrator defines and distributes the 'Account information' dialogue.
The users enter the account information when the users print, copy or scan to
file.
The bookkeeper collects the account data and converts the account data to
invoices.
Page 99

Get to know the software applications 99
Océ Account Logic
Introduction to Océ Account logic
Definition
Use Océ Account Logic to link account information to your job. The account
information requirements are defined and managed by the administrator.
Purpose
Use Océ Account Logic for the following.
■ Enter the account information for the print jobs
■ Manage print jobs that do not have valid account information
■ Enter account information for the copy and scan-to-file jobs
■ Lock and unlock the scanner
■ Administer Océ Account Logic (administrators only).
Page 100

100 User manual
Summary of Océ Account Logic
Sections
Océ Account Logic has the following three sections.
■ The 'Copy & File' tab
Use this tab to enter account information for copy jobs and scan-to-file jobs.
■ The 'Print' tab
Use this tab to enter account information for print jobs.
■ The 'Administration' window.
Use this window to define the administrative settings for the application.
Access to this window is password protected and limited to the application
administrator.
 Loading...