

Page 1
Océ TDS400
Digital Multifunctional System
User Manual
Page 2

Océ-Technologies B.V.
This manual contains a description of the Océ TDS400 and the copying that
can be done with it. The introduction (chapter 1) contains a general description
of the working methods for using the copier and it is recommended that you
read at least this chapter.
Trademarks
Products in this manual are referred to by their trade names. In most, if not all
cases, these designations are claimed as trademarks or registered trademarks of
their respective companies.
Safety information
This manual contains the following safety information:
Appendix B lists ‘Instructions for safe use’.
■
information before you start to actually use the copier.
information such as safety data sheets can also be found in appendix B.
Where applicable, cautions and warnings are used throughout this manual to
■
draw your attention to safety precautions to be taken.
You are advised to read this
Technical safety
Internet
Check Océ on the internet at www.oce.com for:
the latest drivers
■
the latest user manuals
■
product development
■
Copyright
Océ-Technologies B.V. Venlo, The Netherlands © 2001
All rights reserved. No part of this work may be reproduced, copied, adapted,
or transmitted in any form or by any means without written permission from
Océ.
Océ-Technologies B.V. makes no representation or warranties with respect to
the contents hereof and specifically disclaims any implied warranties of
merchantability or fitness for any particular purpose.
Further, Océ-Technologies B.V. reserves the right to revise this publication and
to make changes from time to time in the content hereof without obligation to
notify any person of such revision or changes.
Edition 1.2
GB
Page 3

Contents
Chapter 1
Introduction
About this manual 10
The Océ TDS400 12
The Océ TDS400 concept and components 13
The Océ TDS400 printer 13
The Océ TDS400 scanner 13
The Océ Power Logic® controller 14
Océ TDS400 options 15
Océ TDS400 users 17
User interaction 17
The data flow to the Océ TDS400 19
Chapter 2
Use the Océ TDS400 to print
Printer operator panel 22
Display 23
Menu level indicator 23
Buttons 24
How to turn on and turn off the Océ TDS400 printer 25
Cancel a print 26
Menu structure 27
Media type and size on the printer 27
Manual feed 29
Cut media 30
Print info 31
Print the configuration report 31
Print the menu card 31
Print the demo print 32
Configuration 33
Select a language 33
Network settings 33
Paper series 35
System menu 37
Clear set memory 37
Diagnostic mode 37
Status messages 38
Contents 3
Page 4

Chapter 3
Error messages 39
Menu structure of the printer 41
Use the Océ TDS400 to copy
Scanner operator panel 44
The buttons 45
The display 46
Menu level indicator 47
Copy jobs 48
Turn on and turn off the Océ TDS400 scanner 49
Start the copy process 50
Make copies 50
Number of copies 51
Select the use of roll 1 or roll 2 or manual feed 52
Select the input mode 52
To copy sets 53
Specify the zoom factor 53
The exposure settings 54
Deliver originals after scanning 56
Enable automatic feed of the original 56
Define settings for the next original 57
Copy on pre-cut sheets 57
Stop a copy job 59
Set synchro or standard cut 59
Adjust the leading or the trailing strip 60
Mirror-image copies 63
Release original 63
Menu structure of the scanner 64
Chapter 4
Use the Océ TDS400 to Scan
Introduction 66
Make a scan 67
Settings to scan 68
Destination 68
Check print 69
Resolution 69
File format 70
Optimisation 71
Menu structure Océ TDS400 Scanner 72
Scan Manager 73
4 Océ TDS400 Digital Multifunctional System User Manual
Page 5

Chapter 5
Tree view 74
Table view 74
Actions from the Scan Manager 76
Destinations 76
Scanned files 79
Manage the temporary store 81
How to retrieve scanned files? 82
Get files via FTP 83
Océ View Station (LT) 84
Menu options 85
Function buttons 86
View error 87
Océ Power Logic®: The Settings Editor
Introduction 90
How to start up and shut down the controller 91
Settings Editor 92
General structure 93
Menu bar 94
Top toolbar 94
Left toolbar 96
Settings area 96
Status bar 97
How to access the Settings Editor 98
Start Océ Settings Editor 98
How to perform actions from the Settings Editor 99
Key Operator settings 101
System Administrator settings 102
Chapter 6
Océ Power Logic®: System Control Panel
Introduction 106
Structure 106
Icons 108
User operations 109
Chapter 7
Océ Power Logic®: Queue Manager
Introduction 112
Contents 5
Page 6

Chapter 8
Structure 112
Modes 114
Icons 116
Managing print jobs 117
Océ Power Logic®: Remote Logic
Introduction 120
Installation procedure for MS Windows® systems 121
Installation procedure for Unix systems 123
IBM AIX 124
HP-UX 124
Linux 124
Installation procedure for Other systems 125
Use Océ Remote Logic® 126
User modes 127
Log in 128
Log out 128
To change the password 129
Automatic login 129
Language 129
Help 130
Command line parameters 130
How to use the remote system 132
Chapter 9
Océ Print Exec® LT Web
Introduction to Océ Print Exec® LT Web 134
Basic concepts 134
Requirements for the user browser software 134
Requirements for the network infrastructure 134
How to connect to the Print Exec® LT Web 134
Chapter 10
Océ Power Logic®: Account Logging
The account logging option 138
1 Enable the Account logging option 138
2 The account log file 138
3 Make copy, print, or scan jobs 139
4 How to retrieve the account files 140
6 Océ TDS400 Digital Multifunctional System User Manual
Page 7

Chapter 11
Chapter 12
5 Use the generated accounting file 142
Account information in the log file 144
Account information for the media format 144
Account information for the media weights 145
Structure of the account file 146
Description of all the parameters in the account log file 146
Printer supplies and scanner maintenance
Media 152
The paper rolls 153
How to program media settings 158
How to refill toner 159
Maintenance of the glass platen and the reference roller of the scanner 162
How to solve problems
Introduction 166
Original jams in scanner 167
How to clear a paper jam 168
How to solve a jam in the fuser section 169
Appendix A
Appendix B
Summary and tables
The Océ TDS400 172
Printer operator panel 173
Scanner operator panel 174
Product specifications Océ TDS400 175
List of available material types and sizes 180
Material types 180
Automatic format selection 182
Summary of standard zoom formats 183
Safety information
Instructions for safe use 186
Safety data sheets 188
Safety data sheet Océ TDS400 printer 189
Safety data sheet Océ TDS400 printer and scanner 190
Contents 7
Page 8

Appendix C
Safety data sheet Océ B5 toner 191
Safety data sheet Océ D5 Developer 193
Safety data sheet Océ OPC drum 195
Safety data sheet Océ Cleaner A 197
EPA Energy Star® 199
Miscellaneous
Notation conventions 202
Reader’s comment sheet 203
Addresses of local Océ organisations 205
Index 207
8 Océ TDS400 Digital Multifunctional System User Manual
Page 9

Chapter 1
Introduction
Océ TDS400
Digital Multifunctional System
User Manual
This chapter contains a general introduction to the Océ
TDS400. This chapter describes the main features, the
options and the software applications provided with the
system.
9
Page 10

About this manual
This manual contains the following chapters
Chapter 1: Introduction
Contains a general introduction to the Océ TDS400
system, a general description of the main features, delivery options and
software applications provided with the system.
Chapter 2: Use the Océ TDS400 to print
Contains a short description of how
to use the printer.
Chapter 3: Use the Océ TDS400 to copy
Contains a description of how to use
the scanner to make copies.
Chapter 4: Use the Océ TDS400 to scan
Describes how to scan the originals
to a file.
Chapter 5: Océ Power Logic®: The Settings Editor
Gives information about
the Settings Editor. For details about specific settings, refer to the Help on the
Settings Editor.
Chapter 6: Océ Power Logic®: The System Control Panel
Describes how to
look at the system status of the Océ TDS400.
Chapter 7: Océ Power Logic®: The Queue Manager
Describes how to view
and manage jobs in the Océ TDS400 print queue, inbox queue, and history
queue. It shows how to cancel the active print and how to delete the prints, how
to hold the print jobs in the queue, how to restart the jobs, and how to move
jobs to top.
Chapter 8: Océ Power Logic®: Remote Logic
describes the installation and
the functionality of the Océ TDS400 remote controller applications.
Chapter 9: Océ Print Exec® LT Web
describes an optional job submission
application which allows you to send print jobs to a printer from your web
browser.
Chapter 10: Océ Power Logic®: Account logging
describes an optional
feature that enables you to track how many jobs you make for a customer. This
chapter describes how you use the accounting functionality for this purpose.
10 Océ TDS400 Digital Multifunctional System User Manual
Page 11

Chapter 11: Printer supplies and scanner maintenance
Describes how to load
paper and how to refill the toner, and how to provide maintenance to the
scanner.
Chapter 12: How to solve problems
Describes the problems that can occur
when you use the Océ TDS400.
Appendix A: Summary and tables
Contains the product specifications for the
Océ TDS400, a list of available material types and sizes.
Appendix B: Safety information
Contains the approved weight limits,
instructions for safe use, the available safety data sheets and the correct
®
E
NERGY STAR
Appendix C: Miscellaneous
specifications.
Contains the notation conventions, a reader’s
comment sheet and the addresses of local Océ organisations.
Introduction 11
Page 12
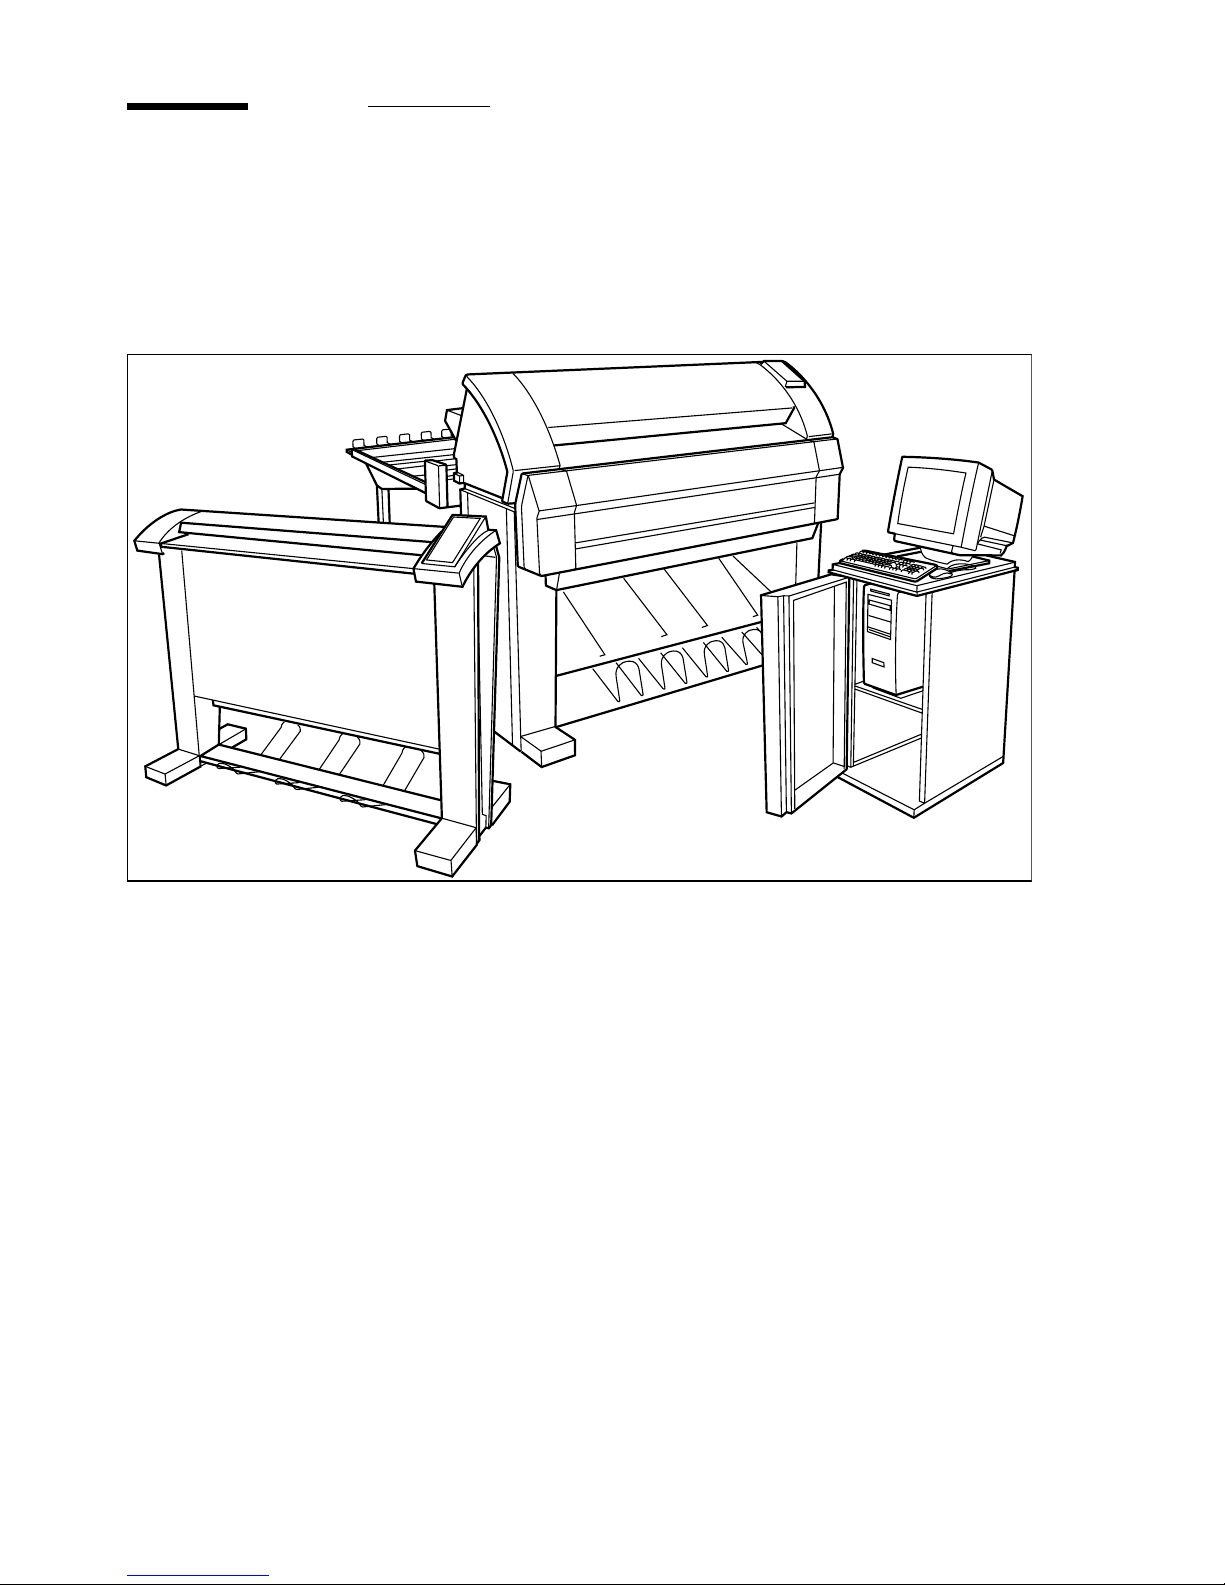
The Océ TDS400
The Océ TDS400 is a wide format, black and white, multifunctional system to
print, to scan and to copy wide format documents. The system includes a
printer (1 or 2 rolls) a controller and an optional scanner.
[1] Océ TDS400
12 Océ TDS400 Digital Multifunctional System User Manual
Page 13

The Océ TDS400 concept and components
The Océ TDS400 printer
The Océ TDS400 printer is available with an automatic 1- or 2-roll unit and
manual feed.Use manual feed when you want to print a job on a media type
and/or size that is not available on one of the paper rolls.
Note:
engine. You can insert cut sheet material in this slot, one sheet at a time.
to ‘Copy on pre-cut sheets’ on page 57 on how to copy on pre-cut sheets.
Note:
sizes’ on page 180.
The Océ TDS400 is a 600 DPI LED printer with a speed of 3 meters per
minute.
You can perform a number of activities at the Océ TDS400 printer. You can set
the media type and size, stop a print job or select your preferred language from
the printer operator panel (see chapter 2, ‘Use the Océ TDS400 to print’ on
page 21 for more details).
The Océ TDS400 is delivered with drivers and job submission software to
enable you to print from AutoCad®, Windows® or Macintosh® applications.
The manual feed is a special slot just above the paper drawers on the
Refer
Only use material as specified in ‘List of available material types and
The Océ TDS400 scanner
The Océ TDS400 scanner supports a wide range of copy activities. It provides
a large number of functions for defining original and copy related settings. You
can specify particular media, feeding and quality enhancement options from
the scanner operator panel. In combination with the Océ TDS400 printer it
forms a powerful productivity tool.
The scanner scans your originals. You can print the originals (copy job) or you
can store the scanned original in a file (Océ Scan Logic®). The scanner has
different quality modes which are provided by Océ Image Logic®.
Introduction 13
Page 14

Green button principle
■
The Océ TDS400 is easy to use. Press the green button on the scanner operator
panel to start the basic copy jobs. If you have difficult copy jobs, you change
the default copy settings with the help of the other settings on the scanner
operator panel.
The Océ Power Logic® controller
The Océ TDS400 is equipped with a controller to process the print jobs and the
copy jobs. The controller can have Océ Remote Logic® to control your print
jobs, make your default printer settings and monitor the printer status.
The Océ Power Logic® controller
processes the print jobs and the copy jobs. It
also processes the optional scan to file jobs.
Set processing
■
When you send a file to the printer, the file is processed once and can be printed
many times. The Océ TDS400 has a set memory to store a maximum of 135
A0s which allows you to create the same sets that are sorted either by page or
by set.
Spool memory
■
The Océ TDS400 has a spool memory which provides a queuing system for
files you want to print. The spool memory allows many users to send the print
jobs to the Océ TDS400 at the same time. The print jobs are put in the print
queue where they wait to be printed. The job that is put first into the queue is
printed first.
Network connectivity
■
The Océ TDS400 controls a number of common network protocols. The Océ
TDS400 can be used in may networks like TCP/IP, NetBEUI® and Novell® .
Settings Editor
The Settings Editor allows you to set the default settings of the
Océ TDS400 according to your companies requirements.
Refer to ‘Océ Power Logic®: The Settings Editor’ on page 89, for complete
information about the Settings Editor application.
System Control Panel
provides you with status information about the system.
14 Océ TDS400 Digital Multifunctional System User Manual
The Océ System Control Panel (SCP) application
Page 15

Refer to ‘Océ Power Logic®: System Control Panel’ on page 105, for
complete information about the System Control Panel.
Queue Manager
design of the print queue. You can manage jobs in the print queue, history
queue, or inbox queue.
Refer to ‘Océ Power Logic®: Queue Manager’ on page 111, for complete
information about the Queue Manager.
Océ Remote Logic®
View system status (Océ System Control Panel).
■
Manage print jobs (Océ Queue Manager).
■
Change settings (Océ Settings Editor).
Océ TDS400 options
By default, the Océ TDS400 has an automatic 1 roll unit and is equipped with
a receiving tray as the output delivery device. The receiving tray is the rack on
the bottom of the printer (see figure 1 on page 12).
The Queue Manager (QM) application gives a graphical
enables you to:
Automatic 2-roll unit
The Océ TDS400 is available with an automatic 2-roll
unit. Each of the rolls can be loaded with print material of a different size or
type. The size and type of the available media are indicated on the operating
panel.
Compact output stacker
The optional compact output stacker offers a smart
and efficient disposition of printed or copied drawings (up to 100 prints) on
PPC material and some other materials.
Copy Delivery tray
Collects copies at the rear of printers as they are printed.
Introduction 15
Page 16
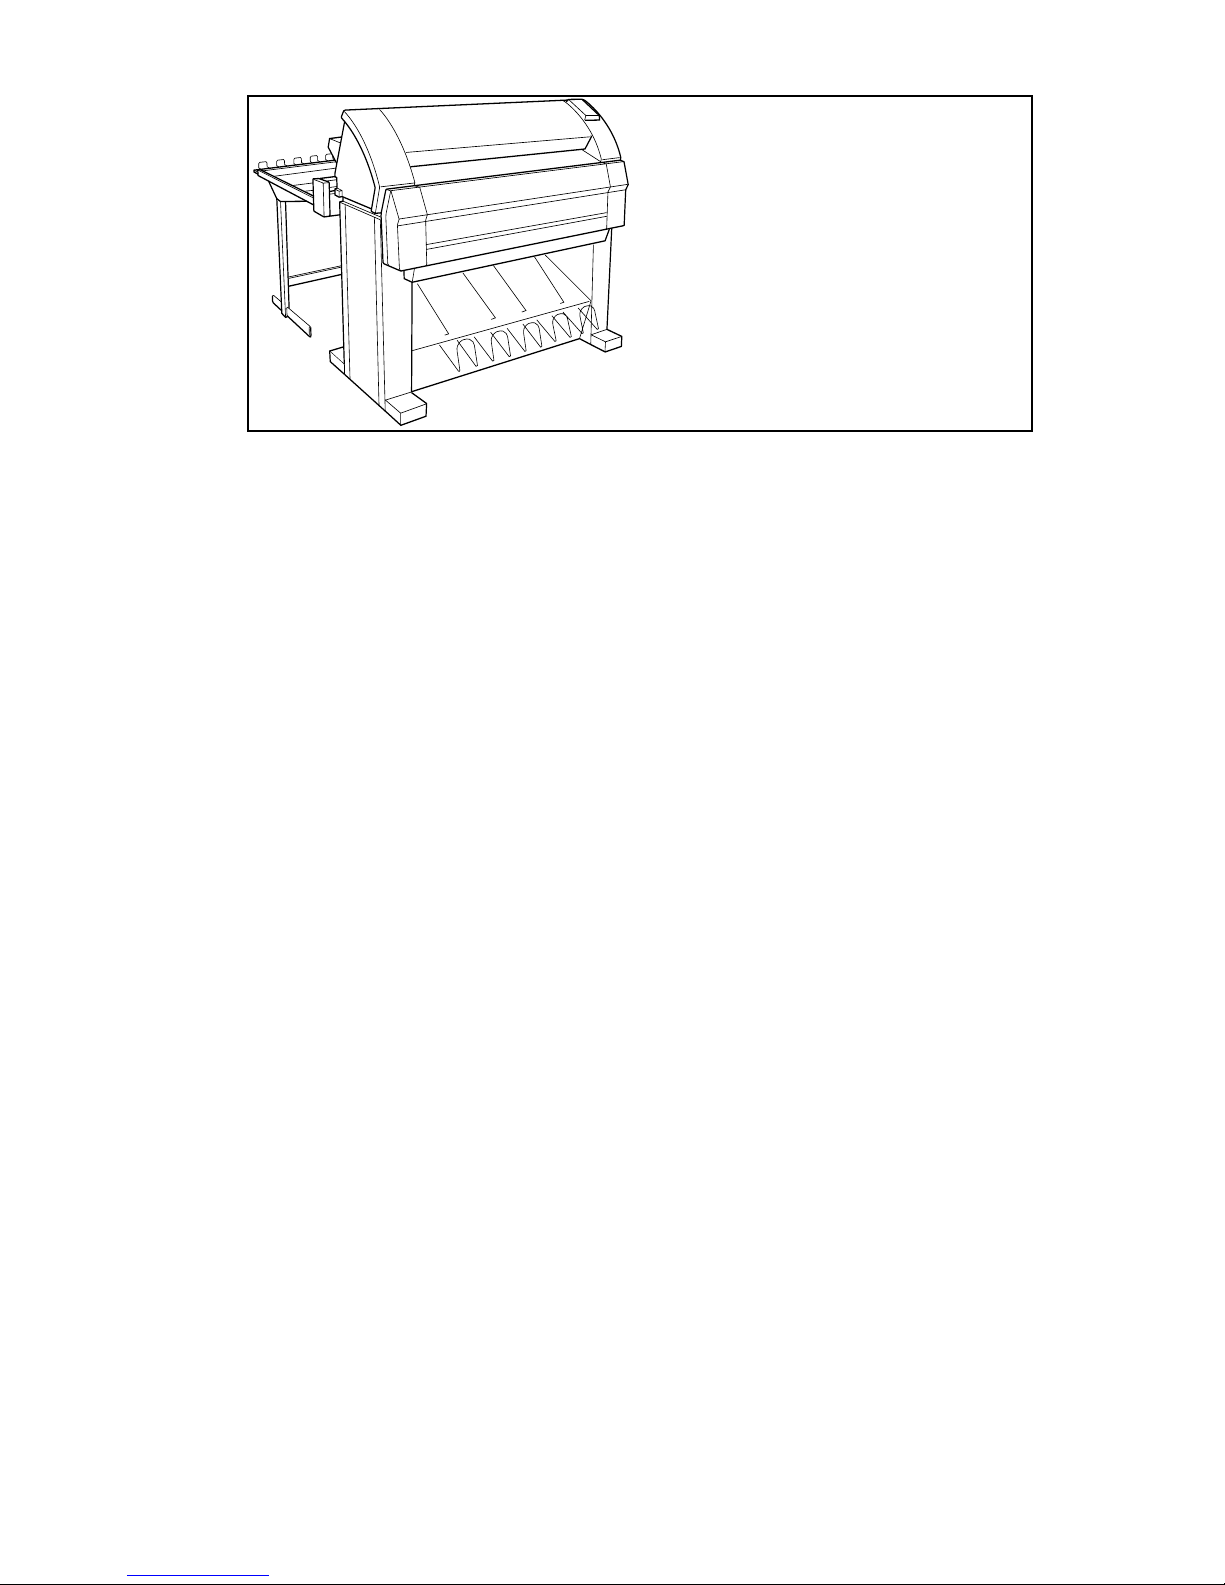
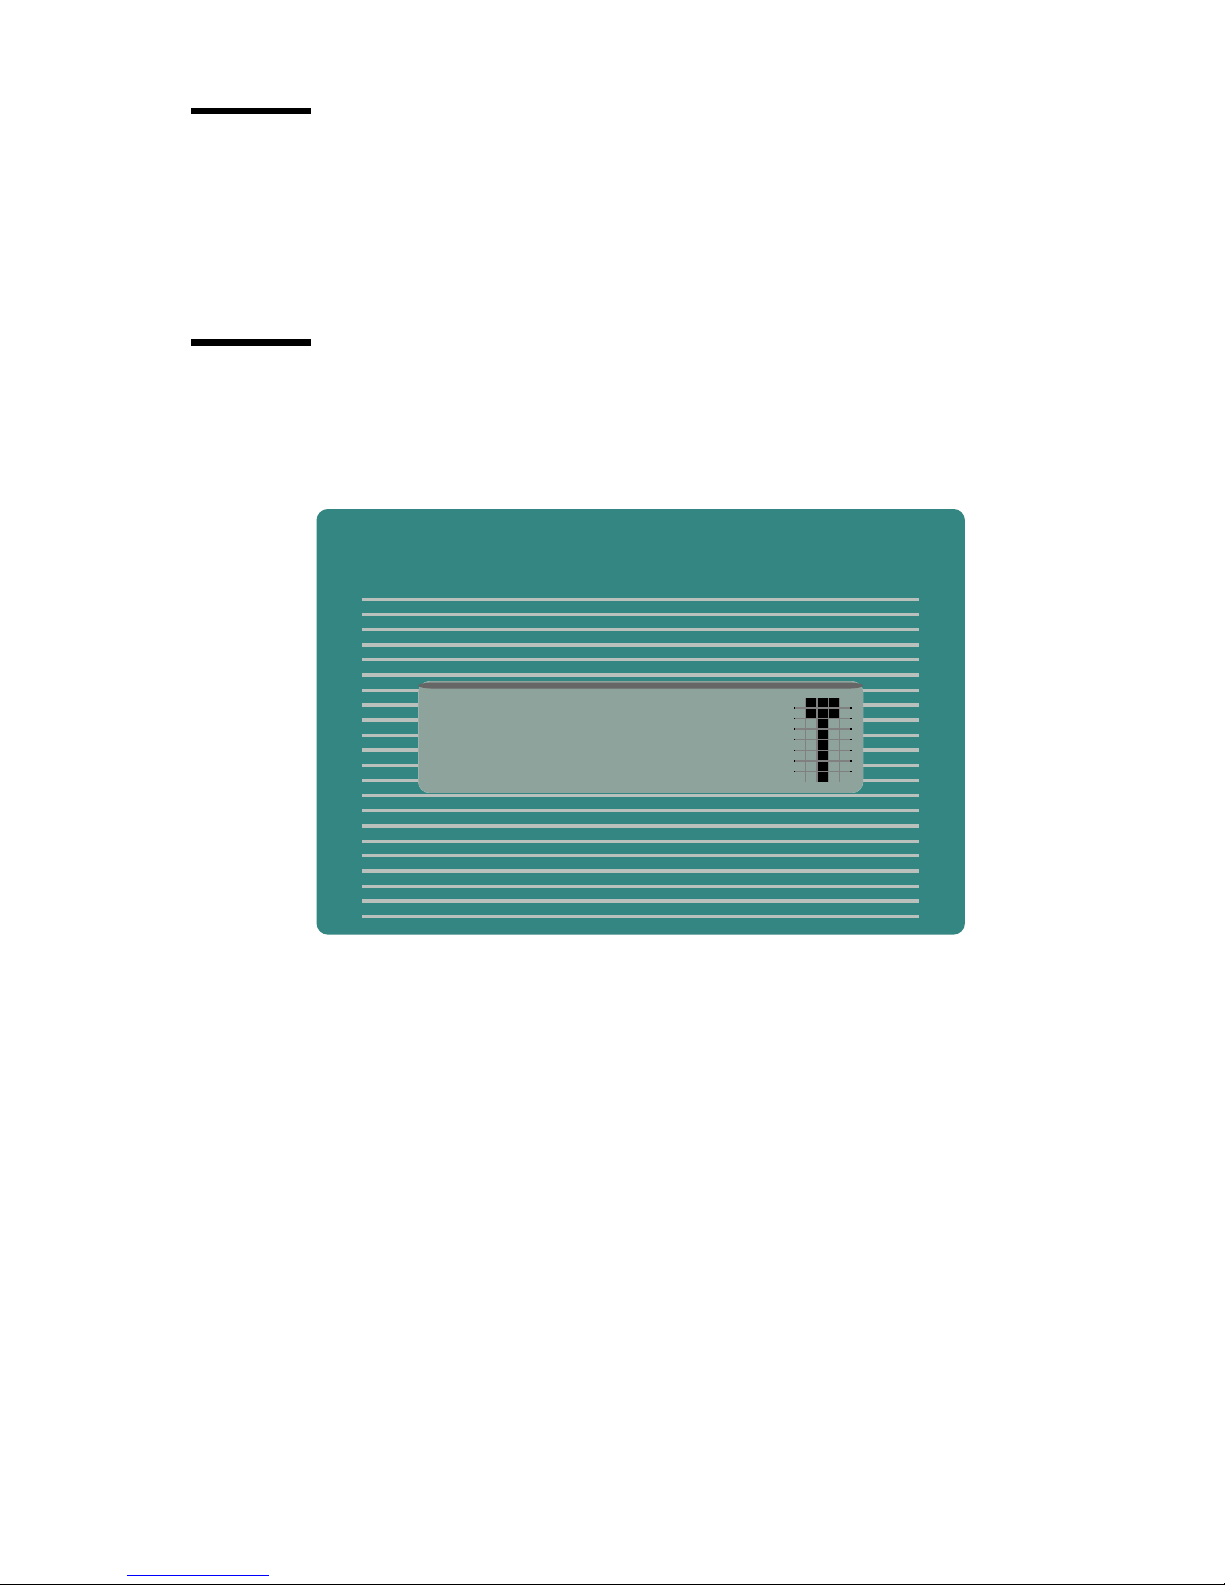
[2] Copy Delivery Tray
Graphical User Interface
The Graphical User Interface (GUI) consists of a
screen, a mouse, a keyboard and software. You use the screen, mouse and
keyboard to interact with the graphical user interface of the controller. With the
GUI you can perform Key Operator and System Administrator tasks in a
graphical way. Settings are visible within one window so that it is much easier
to view and change them.
Océ Scan Logic®
Enables you to scan a document to file for later (re)use. You
can use the files in other applications or print them out.
Scan Manager with Océ View Station (LT)
■
The Scan Manager is an application available only locally on the controller.
With the Scan Manager you can:
configure the destinations for scan to file
■
increase your productivity with automatic file naming
■
view the scans
■
Refer to ‘Use the Océ TDS400 to Scan’ on page 65 for complete information
about the Scan Manager application.
Adobe® PostScript® 3/PDF
®
PostScript
3. For Japanese 5 extra fonts are optional. They can be enabled
with a password in the Settings Editor.
Océ Print Exec® LT Web
send a set of plots or drawing files to an Océ TDS printer. You can send the
settings for these jobs from your workstation, using your web browser.
Account logging
you make for a customer. This chapter describes how you use the accounting
functionality for this purpose.
16 Océ TDS400 Digital Multifunctional System User Manual
The Océ TDS400 fully supports Adobe®
Optional software which allows you to create and
An optional feature that enables you to track how many jobs
Page 17

Océ TDS400 users
The Océ TDS400 has the following user types:
System administrator
The Océ TDS400 system administrator installs and
makes the configuration for Océ TDS400. The system administrator defines
the printer-language settings, pen settings and Automatic Language Sensing
(ALS) settings. The system administrator can help the users who need to install
the printer drivers on their workstations. See chapter 10, ‘Océ Power Logic®:
Account Logging’ on page 137 for complete information. The configuration
information is in the Océ TDS400 Connectivity Manual provided with the Océ
TDS400.
Key operator
The Océ TDS400 key operator is responsible for the daily
maintenance of the Océ TDS400. The key operator replenishes toner when
necessary, loads media as needed and defines the default printer settings for
recurring print jobs. Also, the key operator defines all time settings, such as
panel time out and sleep mode time out. See ‘Océ Print Exec® LT Web’ on
page 133 for more information.
Repro operator
the Océ TDS400
settings. The Repro Operator has no rights to change settings in the Settings Editor.
In the Queue Manager and the System Control Panel the repro operator has the
same user rights as the Key Operator and System Administrator
The repro operator is responsible for the daily operations on
. The Repro Operator settings are a subset of the Key Operator
.
Anonymous user
either a PC user who has remote access to the system through one or more
drivers (Windows
applications (Océ Queue Manager, Océ System Control Panel and Océ
Settings Editor), or the print submission/print management applications, or a
user performing a copy job at the scanner.
Service operator
installation and maintenance of the Océ TDS400.
User interaction
You can operate the Océ TDS400 from different locations: local and remote:
Introduction 17
Typically, an anonymous user on the Océ TDS400 can be
®
driver, AutoCAD® ADI/HDI or PostScript®) or the remote
The Océ TDS400 service operator is responsible for
Page 18

Operator panels
■
The Océ TDS400 has two operator panels to make the settings for the print
jobs and the copy jobs. See ‘Printer operator panel’ on page 22 and ‘Scanner
operator panel’ on page 44 for complete information.
Océ Remote Logic®
■
Use the remote logic to make the default key operator and system
administrator settings (Settings Editor). To see the status of the jobs in the
print queue you use the Queue Manager. The ‘System Control Panel’ shows
the status of the complete system.
Océ Scan Logic®
■
With ‘Scan Manager’ and ‘Océ View Station (LT) you can define all
important settings for scanning.
Printer drivers
■
With the Océ TDS400 one or more printer drivers can be used, including
Print Exec® LT Web, Windows® driver, AutoCad® ADI/HDI and
PostScript®. With these drivers PC users can access the Océ TDS400
remotely, from their applications, to print their files. More information about
installing, configuring and use of the drivers can be found in the
documentation provided with the drivers. All Océ drivers (except Postscript)
can be freely downloaded from the Web at www.oce.com.
Use a Remote Control Format (RCF) file or an Océ Job Ticket (OJT) to give
■
instruction to the Océ TDS400 how to manage a remote print job. You can
make the special settings on an operator panel, or with the user interface (UI)
on a workstation or PC. The RCF file or the job ticket describe the input sets,
the output sets and the processing to form the outputs. See the ‘Remote
Control Format Reference Manual’ and the ‘Océ Job Ticket Reference
Manual’ for complete information about Remote Control Format (RCF) files
or Océ Job Ticket (OJT).
18 Océ TDS400 Digital Multifunctional System User Manual
Page 19
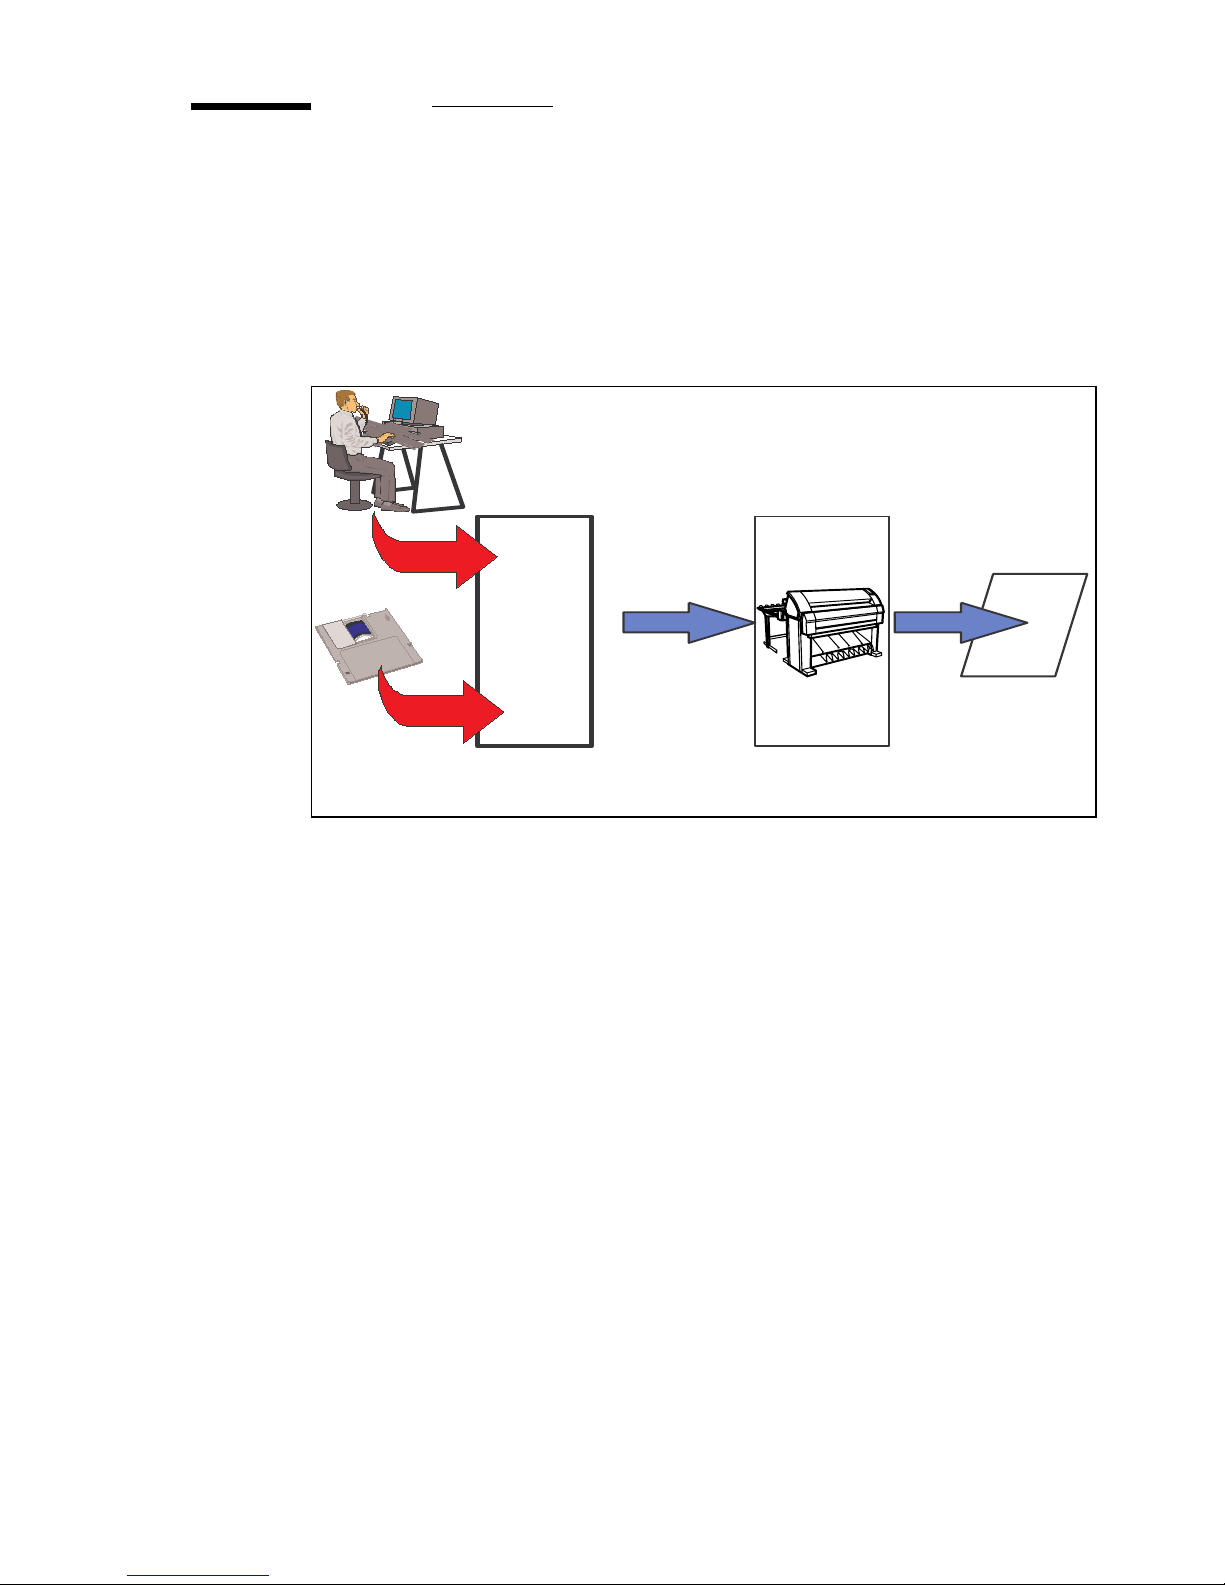
The data flow to the Océ TDS400
Connect the Océ TDS400 to a host environment, which can be a stand alone
PC/Workstation or a PC/Workstation connected to a network. It accepts
different standard format vector and raster data files from the host environment
and converts these into high quality prints ((see figure 3)).
Job
Settings
Print
File
Application
Software
[3] Data flow to the Océ TDS400
Printfile + RCF
Océ TDS400
Print
When an Océ TDS400 receives vector, raster, Adobe® PostScript® or PDF
(optional, Adobe® PostScript® 3™)data it will generate a print with the
settings as specified in the Settings Editor.
Each print job has remote control commands to indicate the settings for a job.
This so called header contains the job and the file defined settings in Océ Job
Ticket (OJT). The OJT settings overwrite the settings defined in the Settings
Editor. Except for pen settings and job management which have priority over
the Océ Job Ticket settings.
Introduction 19
Page 20

To compose such a header, you can:
Compose the header within your application. Please refer to the Océ Job
■
Ticket (OJT) manual.
Use an Windows® and/or AutoCad® HDI driver to generate both a plottable
■
file (e.g. HP-RTL, HP-GL/2) and the appropriate header with
RCF-commands. Please refer to the Windows® / Autocad® Driver
documentation.
Use the Océ Job submission software like Océ Print Exec® LT Web in order
■
to compose jobs of plottable files in a very flexible and user friendly way (see
chapter 5, ‘Océ Power Logic®: The Settings Editor’ on page 89).
20 Océ TDS400 Digital Multifunctional System User Manual
Page 21

Océ TDS400
Digital Multifunctional System
User Manual
Chapter 2
Use the Océ TDS400 to print
This chapter explains how to print with the Océ TDS400.
21
Page 22
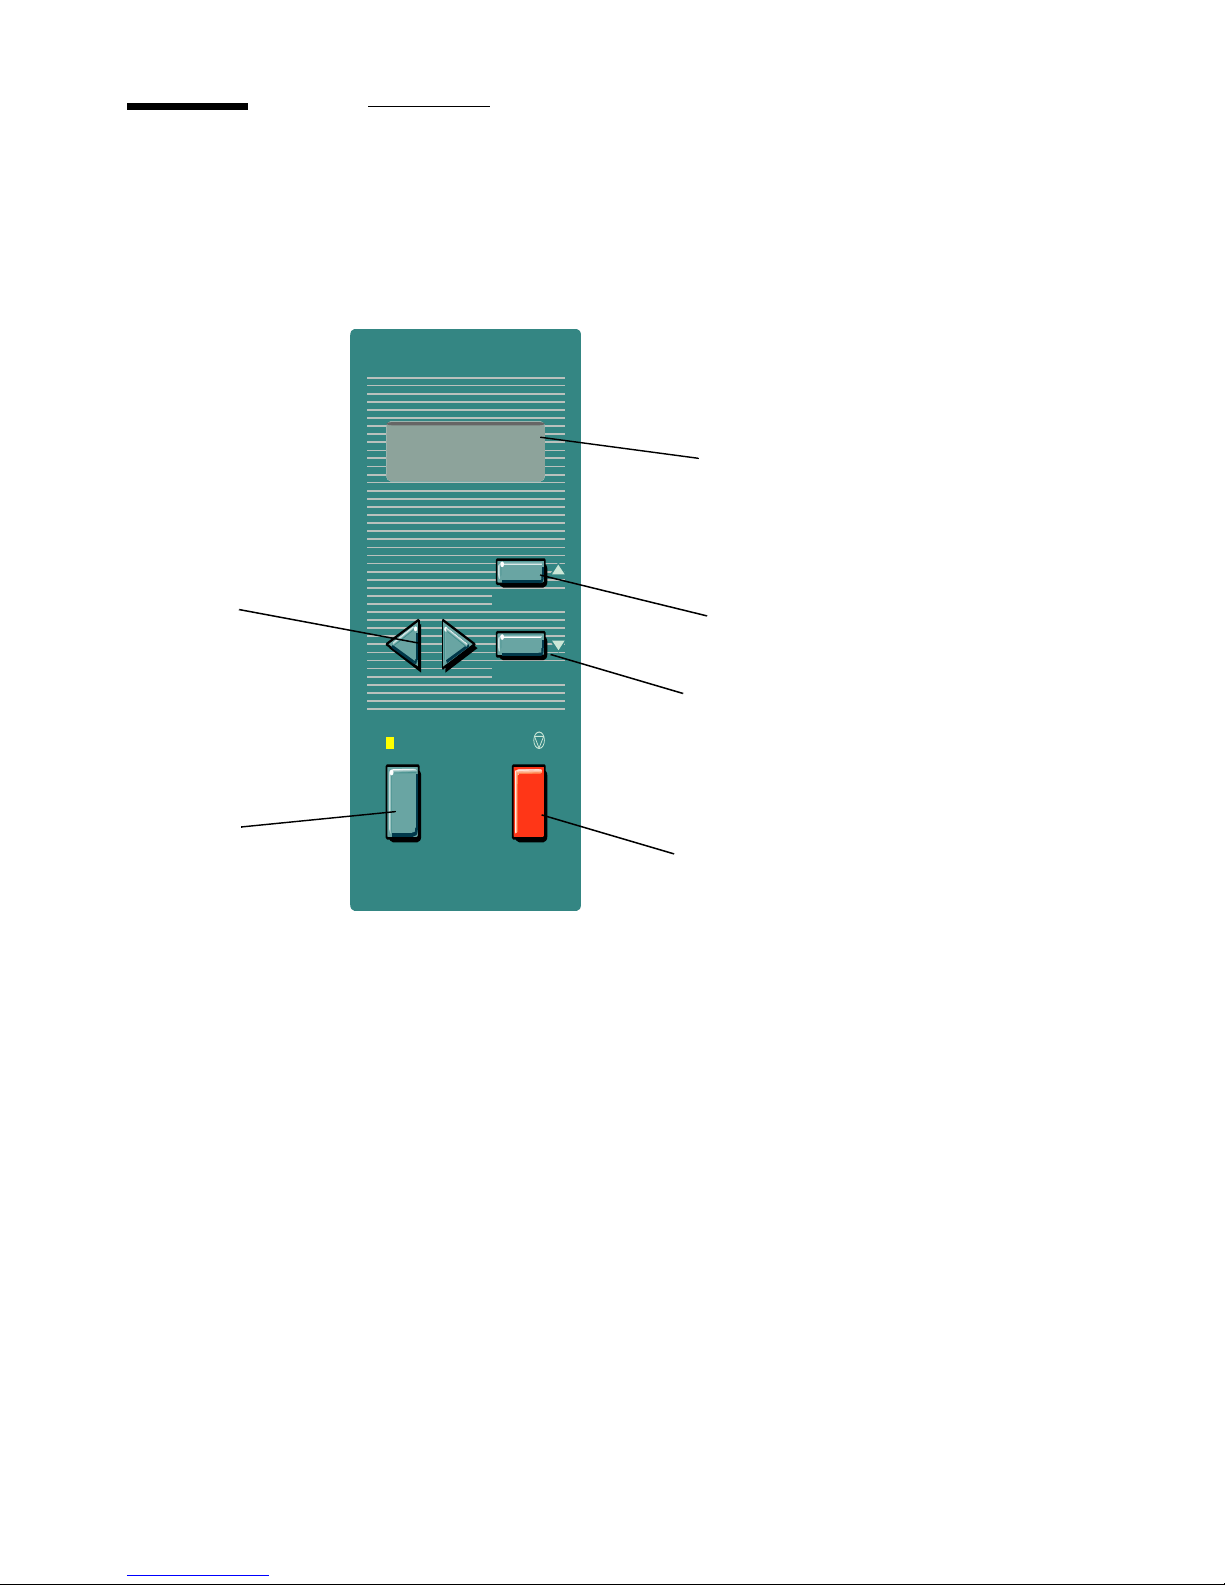
Printer operator panel
The operator panel on the right hand side is easy to use (see figure 4). The
panel has buttons and a display.
Alphanumeric display
Browse
buttons
On line
button
previous
Previous
button
next/select
Next/select
button
on-line stop
Stop button
[4] Printer operator panel
22 Océ TDS400 Digital Multifunctional System User Manual
Page 23
Display
The display shows the feedback about print job status and error messages see
page 38and page 39 in normal mode. In off-line mode it shows the ‘off-line’
menu (see figure on page 41).
Menu level indicator
The menu level indicator indicates the current position in the menu. Press the
‘Previous’ button to scroll through the menu.
Use the Océ TDS400 to print 23
Page 24

Buttons
With the buttons on the operator panel you can make the settings for the Océ
TDS400 Printer.
The following buttons are available
Available Buttons
Button types Function
On line button
Next/select button
Previous button
Browse buttons
Stop button
Press the on line button to put the printer on line or off line. To
activate the program mode and to enter the top level menu. You
can use the ‘next/select’ button, the ‘previous’ button and the
browse button to go through the menu. If the green light above
the on line button is on, the printer is on line; if this light is off,
the printer is off line.
To select an option or a setting in the menu. Or in case a submenu is present, enter a menu on a lower level.
Press this button to go one level higher in the menu.
These two buttons are used to select another mode at the same
level of the menu, or to display the next or previous option from
the option list.
The red stop button is used to stop the present print job.
24 Océ TDS400 Digital Multifunctional System User Manual
Page 25
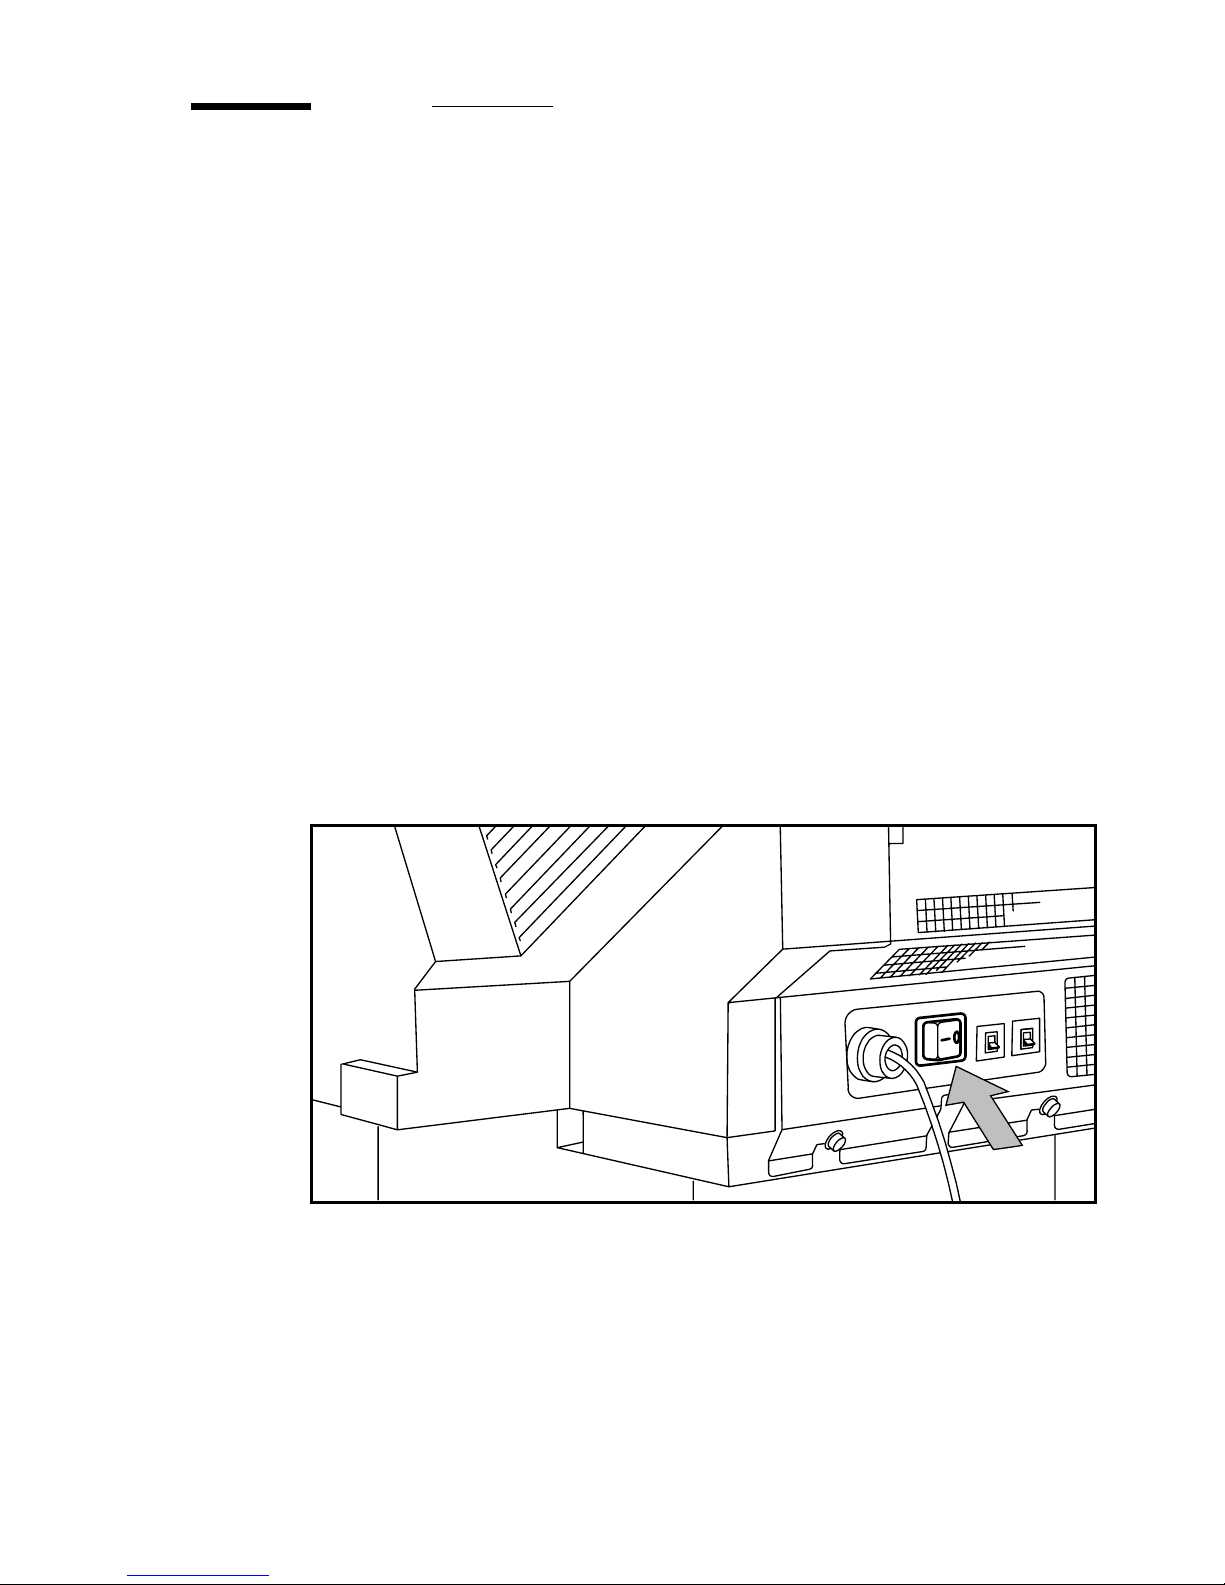
How to turn on and turn off the Océ
TDS400 printer
To turn on the system:
turn on the printer.
■
turn on the scanner (see page 49).
■
turn on the controller(see page 26).
■
When you turn on the system, it is ready for operation. In this state, the
machine is in the stand-by mode.
If the system is not in use for more than 1 minute, the operator panel returns
automatically to the stand-by mode. The operator panel of the scanner is
activated in the following conditions:
you feed an original
■
a button on the operator panel is pressed
■
▼▼▼▼
Turn on the printer
Set the ON/OFF switch at the rear of the printer to position ‘1’ (see figure 5).
1
If the power supply is connected, the green switch lights.
[5] On/off switch of the printer
Note:
When ‘Ready’ is displayed on the operator panel, the printer is ready for
use.
Use the Océ TDS400 to print 25
Page 26

▼▼▼▼
Turn off the printer
Set the ON/OFF switch at the rear of the printer to position ‘0’ (see figure 4).
1
Attention:
you loose information or that a paper jam occurs.
▼▼▼▼
▼▼▼▼
Turn on the controller
Press the button on the front of the controller.
1
Turn off the controller
Select the ‘Shut down’ option from the System Control Panel. You can do this
1
through both the controller and through Remote Logic®.
Switch off the controller and the monitor.
2
Cancel a print
Cancel a print before you start the print or during the print.
▼▼▼▼
Cancel a print
Press the ‘stop’ button.
1
The printer stops.
When the printer runs, the paper is cut.
The paper is always ejected.
If you switch off the printer during a print job, it is possible that
26 Océ TDS400 Digital Multifunctional System User Manual
Page 27

Menu structure
On the Océ TDS400 printer operator panel, you can do a number of actions.
These actions include:
Media settings (material and size).
■
Print info (configuration report, menu card and demo print).
■
Configuration (connectivity issues).
■
System (clear set memory and diagnostic mode).
■
Media type and size on the printer
One of the features of the Océ TDS400 printer is the automatic media change
function. This function allows the printer to take another roll of the same
format and copy material when the roll becomes empty when you print. You
must configure this setting in the Settings Editor (see ‘Océ Power Logic®: The
Settings Editor’ on page 89).
If you activate this function the machine automatically switches to the other
roll, if the used one becomes empty. The switch only occurs if the kind of
media and the width of the material is the same for both rolls.
Note:
The Océ TDS400 Printer can not identify the copy material type and
format. Fill the media and indicate the type and the size as described in
‘Media’ on page 152.
See ‘List of available material types and sizes’ on page 180 for a summary of
all materials for the use with the Océ TDS400 Printer.
If you insert a new roll with another material or with a different width, you
have to program the new roll specifications. Refer to ‘List of available material
types and sizes’ on page 180.
Note:
The machines switches automatically to the other roll if the used roll
becomes empty, if you activate this function in the Settings Editor.
Use the Océ TDS400 to print 27
Page 28

▼▼▼▼
Set the media width settings
Press the ‘on line’ button to put the printer off line.
1
Select the ‘Media settings’ item with the or button.
2
Press ‘next/select’ to enter the ‘Media settings’ menu.
3
Select ‘Roll 1’or ‘Roll 2’ with the or button.
4
Press ‘next/select’ to enter the ‘Roll’ or ‘Manual feed’ menu.
5
Select the ‘Width’ item with the or button.
6
Press ‘next/select’ to enter the ‘Width’ menu.
7
Select the desired width with the or button.
8
Press ‘next/select’ to confirm the selected width.
9
Press ‘on line’ to put the printer on line again.
10
▼▼▼▼
Set the media type settings
Press the ‘on line’ button to put the printer off line.
1
Select the ‘Media settings’ item with the or button.
2
Press ‘next/select’ to enter the ‘Media settings’ menu.
3
Select ‘Roll 1’
4
Press ‘next/select’ to enter the ‘Roll’ or ‘Manual feed’ menu.
5
Select the ‘Material’ item with the or button.
6
Press ‘next/select’ to enter the ‘Material’ menu.
7
Select the desired media material with the or button.
8
Press ‘next/select’ to confirm the selected media material.
9
Press ‘on line’ to put the printer on line again.
10
Roll 2’
, ‘
Manual feed’ with the or button.
, ‘
28 Océ TDS400 Digital Multifunctional System User Manual
Page 29
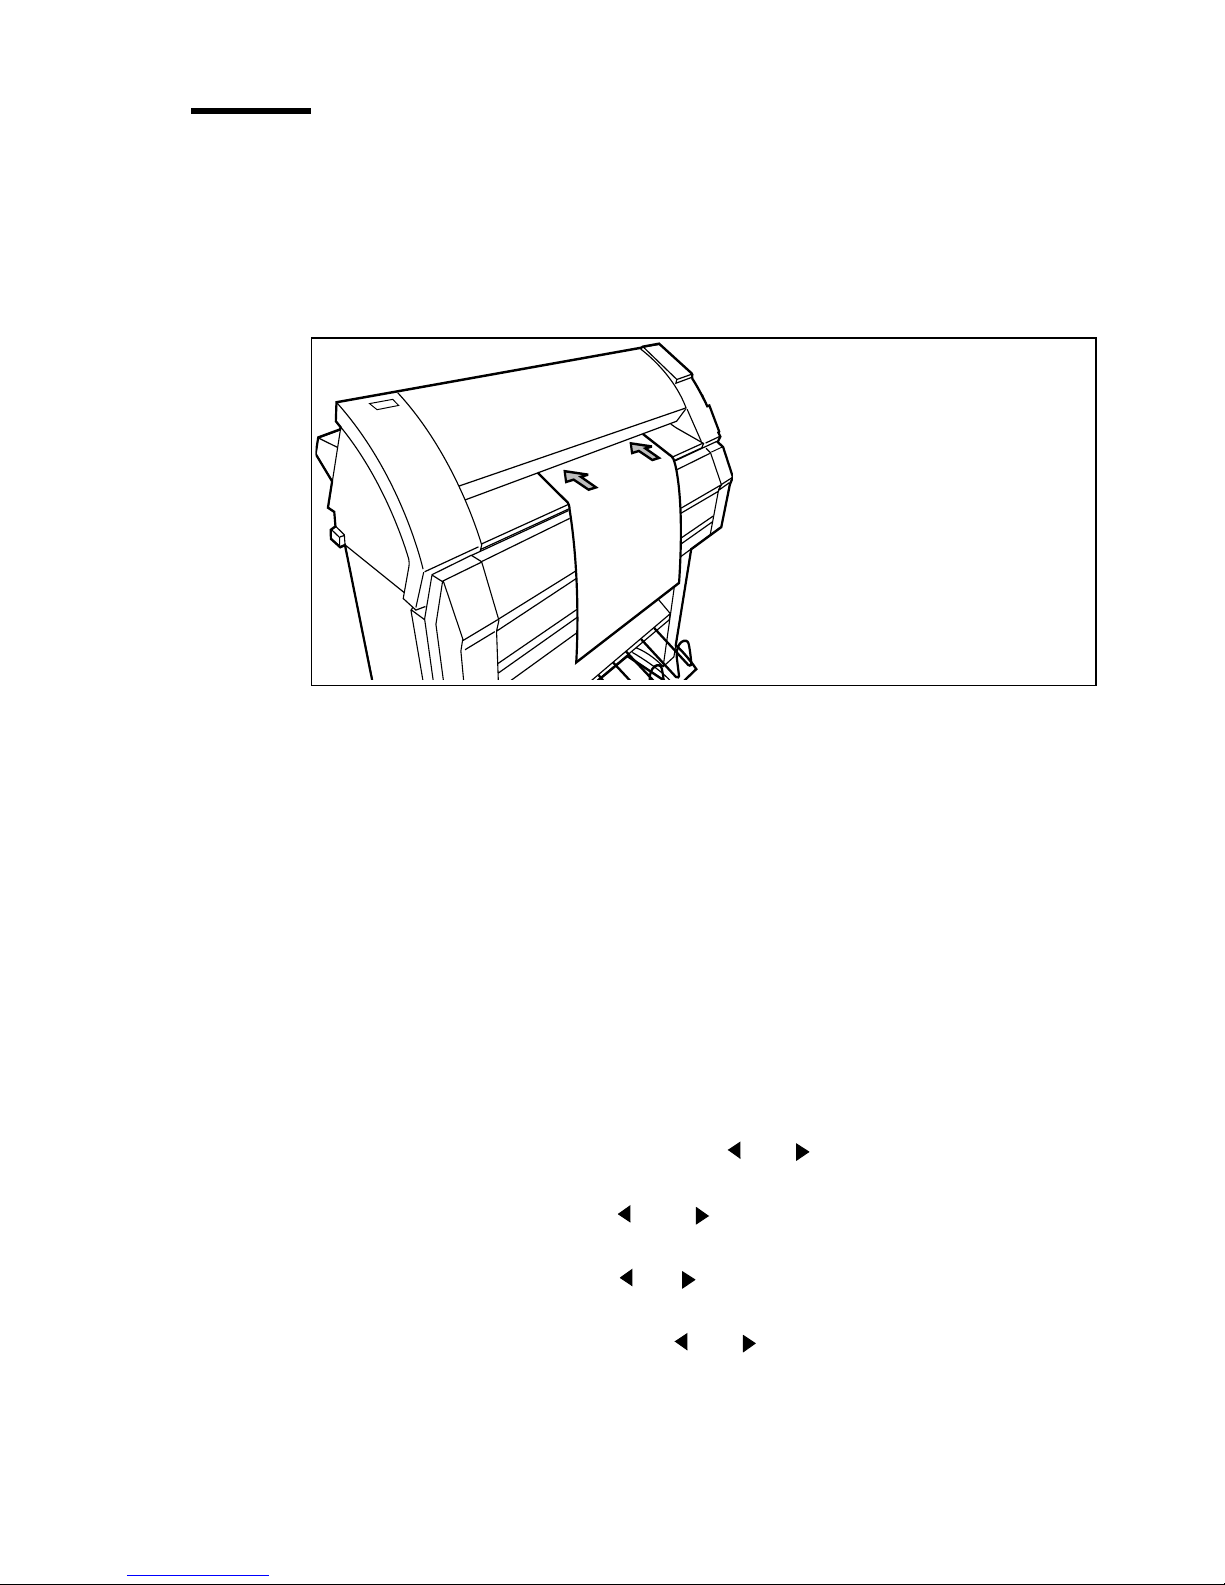
Manual feed
There are two possibilities to select manual feed:
via remote control commands added to the print file (by means of Plot
■
Director or drivers).
choose ‘manual feed’ on the scanner operator panel.
■
[6] Manual feed
▼▼▼▼
If you want to use manual feed, you must:
program the media settings (material and feed time out) on the printer
1
send the file
2
feed the sheet of material
3
hold the material until the printer pulls in the first part of the material.
4
If you select manual feed, the printer will inform you to feed the sheet into the
printer. There is a time out between 1 and 10 minutes. Default is 1 minute.
Set the time-out for manual feed
Default is 1 minute.
Press ‘on line’ to put the printer off line.
1
Select the ‘Media settings’ item with the or button.
2
Press ‘next/select’ to enter the ‘Media settings’ menu.
3
Select ‘Manual feed’ with the or button.
4
Press ‘next/select’ to enter the ‘Manual feed’ menu.
5
Select the ‘Time out’ with the or button.
6
Press ‘next/select’ to enter the ‘Time out’ menu.
7
Select the desired time out with the or button.
8
Press ‘next/select’ to confirm the selected time-out.
9
Press ‘on line’ to put the printer on line again.
10
Use the Océ TDS400 to print 29
Page 30

Cut media
If the material does not have a straight leading edge, you can cut the material
at right angles from the roll.
▼▼▼▼
Cut the material from roll 1 or roll 2
Open the drawer.
1
Feed the paper manually until it is 5 cm above the top drawer.
2
Press the ‘on line’ button to put the printer off line.
3
Close the paper drawer.
4
Select the ‘Media settings’ item with the or button.
5
Press ‘next/select’ to enter the ‘Media settings’ menu.
6
Select ‘Cut media’ with the or button.
7
Press ‘next/select’ to cut the paper.
8
Open the paper drawer.
9
Remove the scrap of material.
10
Feed the material until you can see the material and put the material into
11
position ((see figure 57 on page 153) and 61 on page 155).
Close the drawer.
12
Press the ‘on line’ button to put the printer on line again.
13
30 Océ TDS400 Digital Multifunctional System User Manual
Page 31

Print info
You have the possibility to print:
the configuration report
■
the menu card
■
a demo plot
■
Print the configuration report
The configuration report shows the configuration and the settings of the
system.
▼▼▼▼
How to print the configuration report
Press the ‘on line’ button to put the printer off line.
1
Select the ‘Print info’ item with the or button.
2
Press ‘next/select’ to enter the ‘Print info’ menu.
3
Select the ‘Configuration’ item with the or button.
4
Press ‘next/select’ to print the configuration report
5
Press ‘on line’ to put the printer on line again to print the report.
6
Print the menu card
You can print the menu of the printer, to guide you through the menu.
▼▼▼▼
How to print the menu card
Press the ‘on line’ button to put the printer off line.
1
Select the ‘Print info’ item with the or button.
2
Press ‘next/select’ to enter the ‘Print info’ menu.
3
Select the ‘Menu card’ item with the or button.
4
Press ‘next/select’ to print the menu chart
5
Press ‘on line’ to put the printer on line again to print the menu card.
6
.
.
Use the Océ TDS400 to print 31
Page 32

Print the demo print
After the installation of the Océ TDS400, you can print the demo print, to
check the printer and the controller.
▼▼▼▼
Make a demo print
Press the ‘on line’ button to put the printer off line.
1
Select the ‘Print info’ item with the or button.
2
Press ‘next/select’ to enter the ‘Print info’ menu.
3
Select the ‘Demo print’ item with the or button.
4
Press ‘next/select’ to print the demo print
5
Press ‘on line’ to put the printer on line again to print the demo print.
6
.
32 Océ TDS400 Digital Multifunctional System User Manual
Page 33

Configuration
Select a language
On the operator panel of the Océ TDS400 Printer you can indicate which
language you use to display the printer information, like status and error
messages.
▼▼▼▼
Select a language
Press the ‘on line’ button to put the printer off line.
1
Select the ‘Configuration’ item with the or button.
2
Press ‘next/select’ to enter the ‘Configuration’ menu.
3
Select ‘Language’ with the or button.
4
Press ‘next/select’ to enter the ‘Language’ menu.
5
Select the desired language with the or button.
6
Press ‘next/select’ to confirm the selected language.
7
Press ‘on line’ to put the printer on line again.
8
Turn the printer ‘off’ and ‘on’ again.
9
Network settings
The Océ TDS400 has 2 network adapters. To set the network settings you must
enter the network data in 4 fields.
Use DHCP server. The Dynamic Host Configuration Protocol (
■
protocol to automate the assignment of Internet Protocol (IP) addresses in a
network. Without DHCP, the IP address must be entered manually.
IP address. An IP address has two parts: one part identifies the network (with
■
the network number) and the other part identifies the specific machine or host
within the network (with the host number).
Subnetmask. A subnet (short for ‘subnet work’) is an identifiably separate
■
part of an organization's network. To manage routing that could and should
be handled within an organization.
Set default gateway
■
another network.
DHCP) is a
A gateway is a network point that acts as an entrance to
Use the Océ TDS400 to print 33
Page 34

▼▼▼▼
Set use DHCP server
Press the ‘on line’ button to put the printer off line.
1
Select the ‘System’ item with the or button.
2
Press ‘next/select’ to enter the ‘System’ menu.
3
Select ‘Network sett.’ with the or button.
4
Enter password.
5
Press ‘next/select’ to enter the ‘Network sett.’ menu.
6
Select ‘adapter 1’ or ‘adapter 2’with the or button
7
Press ‘next/select’ to enter the ‘adapter 1’ or ‘adapter 2’ menu
8
Select ‘Use DHCP server.’ with the or button.
9
Select ‘Yes’or ‘No’ with the or button.
10
Press ‘next/select’ to confirm.
11
Press ‘on line’ to put the printer on line again.
12
▼▼▼▼
Set the IP address
Press the ‘on line’ button to put the printer off line.
1
Select the ‘System’ item with the or button.
2
Press ‘next/select’ to enter the ‘System’ menu.
3
Enter password.
4
Select ‘Network sett.’ with the or button.
5
Press ‘next/select’ to enter the ‘Network sett.’ menu.
6
Select ‘adapter 1’ or ‘adapter 2’with the or button
7
Press ‘next/select’ to enter the ‘adapter 1’ or ‘adapter 2’ menu
8
Select ‘IP address’ with the or button
9
The first three digits flash.
Enter the first three numbers of the ‘IP address’ with the or button.
10
Press ‘next/select’ to confirm, the next digits flash.
11
Enter the next three numbers of the ‘IP address’ with the or button.
12
Press ‘next/select’ to confirm, the next digits flash.
13
Enter the next numbers of the ‘IP address’ with the or button.
14
Press ‘next/select’ to confirm, the next digits flash.
15
Enter the next numbers of the ‘IP address’ with the or button.
16
Press ‘next/select’ to confirm.
17
Press ‘on line’ to put the printer on line again.
18
▼▼▼▼
34 Océ TDS400 Digital Multifunctional System User Manual
Set the Subnetmask
Press the ‘on line’ button to put the printer off line.
1
Select the ‘System’ item with the or button.
2
Press ‘next/select’ to enter the ‘System’ menu.
3
Enter password.
4
Select ‘Network sett.’ with the or button.
5
Press ‘next/select’ to enter the ‘Network sett.’ menu.
6
Page 35

Select ‘adapter 1’ or ‘adapter 2’with the or button
7
Press ‘next/select’ to enter the ‘adapter 1’ or ‘adapter 2’ menu
8
Select ‘Subnetmask’ with the or button
9
The first three digits flash.
Enter the first three numbers of the ‘Subnetmask’ with the or button.
10
Press ‘next/select’ to confirm, the next digits flash.
11
Enter the next three numbers of the ‘Subnetmask’ with the or button.
12
Press ‘next/select’ to confirm, the next digits flash.
13
Enter the next numbers of the ‘Subnetmask’ with the or button.
14
Press ‘next/select’ to confirm, the next digits flash.
15
Enter the next numbers of the ‘Subnetmask’ with the or button.
16
Press ‘next/select’ to confirm.
17
Press ‘on line’ to put the printer on line again.
18
▼▼▼▼
To set the Default gateway
Press the ‘on line’ button to put the printer off line.
1
Select the ‘System’ item with the or button.
2
Press ‘next/select’ to enter the ‘System’ menu.
3
Enter password.
4
Select ‘Network sett.’ with the or button.
5
Press ‘next/select’ to enter the ‘Network sett.’ menu.
6
Select ‘adapter 1’ or ‘adapter 2’with the or button
7
Press ‘next/select’ to enter the ‘adapter 1’ or ‘adapter 2’ menu
8
Select ‘Default gateway’ with the or button
9
The first three digits flash.
Enter the first three numbers of the ‘Default gateway’ with the or button.
10
Press ‘next/select’ to confirm, the next digits flash.
11
Enter the next three numbers of the ‘Default gateway’ with the or button.
12
Press ‘next/select’ to confirm, the next digits flash.
13
Enter the next numbers of the ‘Default gateway’ with the or button.
14
Press ‘next/select’ to confirm, the next digits flash.
15
Enter the next numbers of the ‘Default gateway’ with the or button.
16
Press ‘next/select’ to confirm.
17
Press ‘on line’ to put the printer on line again.
18
Paper series
You must enter the paper series that you use in the printer. Choose between:
DIN
■
DIN CARTO
■
Use the Océ TDS400 to print 35
Page 36

Only 8.5 inch
■
Mix 8.5/9 inch
■
▼▼▼▼
To set a paper series
Press the ‘on line’ button to put the printer off line.
1
Select the ‘Configuration’ item with the or button.
2
Press ‘next/select’ to enter the ‘Configuration’ menu.
3
Select ‘Paper series’ with the or button.
4
Press ‘next/select’ to enter the ‘Paper series’ menu.
5
Select the required paper series with the or button.
6
Press ‘next/select’ to confirm.
7
Press ‘on line’ to put the printer on line again.
8
36 Océ TDS400 Digital Multifunctional System User Manual
Page 37

System menu
To enter the System menu you need a password. The password for the System
menu is: stops’ .
Clear set memory
The set memory indicates the available memory. If an error occurs, for example
the set memory reaches its limits, you must clear the set memory.
▼▼▼▼
Clear set memory
Press the ‘on line’ button to put the printer off line.
1
Select the ‘System’ item with the or button.
2
Press ‘next/select’ to enter the ‘System’ menu.
3
Enter the password to get access.
4
Select the ‘Clear setmem’ item with the or button.
5
Press ‘next/select’ to enter the ‘Clear setmem’ menu.
6
Select ‘Yes’or ‘No’ with the or button.
7
Press ‘next/select’ to confirm the setting.
8
Press ‘on line’ to put the printer on line again.
9
Turn ‘off’ and ‘on’ the controller.
10
Diagnostic mode
The Diagnostic mode is only meant for the Océ service technician.
Use the Océ TDS400 to print 37
Page 38

Status messages
Status Messages
Status messages Explanation
Off-line
Reset printer
Connecting.....
Printer asleep
Please wait
Printer ready
Preparing job
Printing
Load roll 1
A2
Paper
Load roll 2
A2
Paper
Manual feed
A2
Paper
Open left cover
Refill toner
Press <on-line>
Conditioning
Printer ready
Roll 1 empty
Printer ready
Roll 2 empty
Printer running
Roll 1 empty
Printer running
Roll 2 empty
Job cancelled
Close roll unit
The printer is off-line.
Change options.
Turn the printer off and turn the printer on.
There is no communication between the controller and the printer.
Wait until there is communication.
The printer is in low power mode.
The energy is saved.
The printer downloads the language.
Wait until the printer is prepared to operate.
The printer is prepared to print.
The printer prepares a print or copy job.
The printer prints.
The printer detects that the required media is not available on roll
1.
Fill roll 1 with the indicated media.
The printer detects that the required media is not available on roll
2.
Fill roll 2 with the indicated media.
The printer detects that the required media is not available in the
manual feed.
Put the required media in the manual feed.
The toner container is empty.
Refill the toner container.
The machine improves the print quality by optimising the
toner concentration.
Wait until the toner concentration is at the correct level.
The paper roll 1 is empty.
Reload roll 1.
The paper roll 2 is empty.
Reload roll 2.
The paper roll 1 is empty.
Reload roll 1 after the printers stops printing.
The paper roll 2 is empty.
Reload roll 2 after the printers stops printing.
The current print or copy job is cancelled
The roll unit is open.
Close the roll unit.
38 Océ TDS400 Digital Multifunctional System User Manual
Page 39

Status Messages (continued)
Status messages Explanation
Sensor not free
Remove paper
Press <on-line>
Paper retracted
Press <on-line>
Copy too short
Remove paper
Press <on-line>
Inputflap open
Close inputflap
Inputflap open
Remove paper
Press <on-line>
Roll 1 empty
Open roll unit
Roll 2 empty
Open roll unit
The paper of one of the rolls is transferred after the marker (see
‘Feed the material’ on page 155) when power is applied to the
printer.
Take the paper back.
Press <on-line>
Put the paper into the manual feed.
Press <on-line>
The length of the print material is less than 420 mm. This can occur with the manual feed.
Use an original longer than 420 mm.
The input flap is open.
Close the input flap.
The input flap is open during the print process
Remove the paper and press <on-line>.
The paper on roll 1 is empty.
Open the roll unit and replace it.
The paper on roll 2 is empty.
Open the roll unit and replace it.
Error messages
Error messages
Error messages Explanation
Copy too late
Remove paper
Press <on-line>
Speed failure
Remove paper
Press <on-line>
Knife 1 error
Remove paper
Press <on-line>
Knife 2 error
Remove paper
Press <on-line>
Roll retract err
Press <on-line>
The copy is too late at the paperpath output sensor
Remove the print material.
A paper jam occurred.
Remove the paper jam and press <on-line>
An error occurred during the cut of the roll.
Check the paper in the roll unit and remove if necessary.
Press <on-line>.
An error occurred during the cut of the roll.
Check the paper in the roll unit and remove if necessary.
Press <on-line>.
Print material error when the roll unit takes back the material.
Use the Océ TDS400 to print 39
Page 40

Error messages (continued)
Error messages Explanation
Roll init error
Open roll unit
Press <on-line>
Input too late
Open roll unit
Press <on-line>
Deposit error
Press <on-line>
Illegal language on
controller
using UK English
Press <on-line>
Close roll unit
Rewind paper
Press <on-line>
A sensor of the roll unit is activated when power is applied to the
printer.
Open the roll unit.
Guide the paper to the marker (see ‘Feed the material’ on
page 155).
Press <on-line>
The input sheet is too late.
Open the roll unit
If necessary, withdraw roll and rewind
Press <on-line>
An error in the compact output stacker occurred.
The compact output stacker stops.
The print process continues.
Press <on-line>.
The controller has an illegal language.
The controller uses the English language instead of the selected
language.
Call service.
Press <on-line>
While you printed, the roll unit opened.
Rewind the paper.
Close the roll unit.
Press <on-line>
40 Océ TDS400 Digital Multifunctional System User Manual
Page 41

Menu structure of the printer
When you browse through the tree, the left items are displayed on top. The
upper items are displayed first.
A0 (841x1189mm)
A1 (594x841mm)
A2 (420x594mm)
A3 (297x420mm)
B1+ (707x1000mm)
B2+ (500x707mm)
Width B2 (500x700mm)
Roll 1 E+ (36x48”)
Roll 2 B+ (12x18”)
Media settings Paper 64g
Material Transparent 110g
Material Film 3.5
Manual feed Translucent
Time out 67 seconds
Cut media Cutting...
Configuration Printing...
Print info Menu card Printing...
Demo print Printing...
Language Nederlands
Configuration
Paper series DIN CARTO
System Enter
Installation Enter password start install.
password
UK English
more...
DIN
ONLY 8.5”
MIX 8.5/9”
Clear setmem Yes
Diagnostic
mode
Network sett. adapter 1 IP address 123.456.789.123
B1 (700x1000mm)
E (34x44”)
D (22x34”)
C (17x22”)
B (11x17”)
D+ (24x36”)
C+ (18x24”)
30x42”
Paper 75g
Transparent 75 g
Transparent 90 g
Vellum
Film 4.5
No
Yes
No
adapter 2 IP address 123.456.789.123
Use DHCP
server
Subnetmask 123.456.789.123
Default
gateway
Use DHCP
server
Subnetmask 123.456.789.123
Default
gateway
Yes
No
123.456.789.123
Yes
No
123.456.789.123
Use the Océ TDS400 to print 41
Page 42

42 Océ TDS400 Digital Multifunctional System User Manual
Page 43

Océ TDS400
Digital Multifunctional System
User Manual
Chapter 3
Use the Océ TDS400 to copy
This chapter contains a description how to copy with the
Océ TDS400.
43
Page 44

Scanner operator panel
Make the settings with the scanner operator panel. The display gives you the
feedback and the available menu options.
.
Input button
Media button
Exposure
button
Zoom
button
button
set file
sheet copy
input output extra
manual
roll 2
roll 1
media
zoom
stripexposure
Extra buttonOutput
Alphanumeric
display
Browse
buttons
Confirm
button
trailing
leading
Strip button
Start button
- button
[7] Scanner operator panel
44 Océ TDS400 Digital Multifunctional System User Manual
start
Copy quantity
display
Cancel button
+ button
+
-
cancel
Page 45

The buttons
The input button
The output button
The extra button
Select a single original or a set originals.
Select a copy or a file (scan to file) as your output.
This button allows you to enter the ‘extra’ mode of the
scanner and return to the normal mode. Set the properties for the original, the
scanned files and for the scanner in the ‘extra’ mode.
The browse buttons (left , right )
Move in one level of the menu structure
as the display shows. Browse the preset zoom values.
The browse buttons (up , down )
Move between the levels of the menu
structure as the display shows. Adjust the zoom value with an accuracy of 1
percent.
The confirm button
Confirm the current setting in the menu structure. If you
press the confirm button a second time in the current menu item, you restore
the previous setting.
The strip button
strip. The icon flashes. Use the browse buttons
change
the value. The icon remains on if you press another settings button and
Press this button to add or to remove a ‘leading’ or a ‘trailing’
(left , right , up , down )
to
select a different value than the default value.
The cancel button
Press this button one time to set the copy counter to the
default value. Press this button twice to change all settings to their default
values. The scan stops if you press this button.
The - and + buttons
The start button
Change the number of copies.
Press the green start button to start the scan or to
restart the copy process.
The zoom button
buttons (left
Enters the zoom mode. The icon flashes. Use the browse
right ) to browse the preset zoom values. Use the browse
,
buttons (up , down ) to adjust the zoom value with an accuracy of 1 percent.
The exposure button
enters the exposure mode. The icon flashes. Use the
browse buttons to change the exposure value.
The media button
Select roll 1, roll 2 or manual feed. The equivalent icon is
on.
Use the Océ TDS400 to copy 45
Page 46

The display
The display shows the feedback about the scan/copy job status (see table
below) in normal mode. In off-line mode it shows the off-line menu (see
page 64) and (see page 72))
.
Status messages
Status Messages Explanation
Scanner ready
Connecting..... There is no communication between the controller and the
Scanner asleep
Scanner running
Please wait
Remove original
Press <cancel>
Original too long
Press <cancel>
Wrong orig. type
Press <cancel>
Set closed
Reset scanner Turn the scanner on and off.
+ = add
= close
The scanner is prepared to scan.
Add an original to the set and press the start button .
After the last scan of the set, remove the original and press
the start button
scanner.
Wait until the there is communication.
The scanner is in low power mode.
The scanner scans.
The scanner downloads the languages.
There is an original on the table while you turn on the scanner.
The message appears if you pressed the ‘cancel’ button
while you scan.
Remove the original.
Press cancel
Use an original shorter than 15 meter.
This message shows when you select ‘Background compensation’ and ‘Blueprint’ as original.
Press cancel.
You closed the copy set.
.
to close the set
.
46 Océ TDS400 Digital Multifunctional System User Manual
Page 47

Menu level indicator
The menu level indicator indicates the current position in the menu. Press the
‘Previous’ button to scroll through the menu.
set file
sheet copy
input output extra
[8] Menu level indicator on the scanner operator panel
Use the Océ TDS400 to copy 47
Page 48

Copy jobs
Your printer system has a 1 roll or 2 roll unit. Use the ‘media’ button, on the
scanner operator panel, to select a roll, or to select the manual feed on the
printer.
You must set the media type on the printer.
Note:
You can make 1:1 copies and you can decrease or increase your original from
25% to 400%. You can set the zoom value in fixed steps or in% steps. The
default zoom is set in the Settings Editor.
The Océ TDS400 cuts the paper to the length of the original, the synchro cut.
If you select the standard cut mode, the copy is cut at a standard length, (see
‘Set synchro or standard cut’ on page 59).
The automatic exposure gives background-free copies from most
line-drawings. Select the correct original type if you have an extremely dark or
light original, or an original with pasted parts or photographs (see ‘The
exposure settings’ on page 54).
With the Océ TDS400 Copier you can do a number of basic tasks. These tasks
include:
Turn on, turn off the scanner
■
Make copies
■
Select the required media
■
Select the manual feed
■
Specify the zoom factor
■
Select the exposure setting
■
Select to add or remove a strip
■
Select the input mode
■
Select the output mode
■
Select extra settings
■
Deliver originals after scanning
■
Define settings for the next original
■
Select autofeed of the original
■
Stop a copy job
■
48 Océ TDS400 Digital Multifunctional System User Manual
Page 49

You can also do a number of special copy jobs. These special copy jobs
include:
Copy non standard size originals
■
Define the copy size
■
Define image quality: Optimisation for line/text/photo or blueprint mode
■
Background compensation for line/text/photo or blueprint mode
■
Edit function: mirror
■
Turn on and turn off the Océ TDS400 scanner
To turn on the system:
turn on the scanner.
■
turn on the printer (see page 25).
■
turn on the controller (see page 26).
■
When you turn on the system, it is ready for operation. In this state, the
machine is in the stand-by mode. There is no need to turn it off after each copy
job. You can leave the system turned on for the rest of the day. At all times, the
Océ TDS400 is ready to use.
▼▼▼▼
If the system is not in use for more than 1 minute, the operator panel returns
automatically to the stand-by mode. The operator panel of the scanner is
activated in the following conditions:
you feed an original
■
a button on the operator panel is pressed
■
Turn on the scanner
Set the ON/OFF switch at the rear of the scanner, to position ‘1’ (see figure 9).
1
If the power supply is connected, the green switch lights.
[9] On/off switch of the scanner
Use the Océ TDS400 to copy 49
Page 50

The system is ready to use. You can turn ON and OFF the scanner
Note:
separate from the printer and without any particular order.
▼▼▼▼
Turn off the scanner
Set the on/off switch at the rear of the scanner, to position ‘0’ (see figure 9).
1
Start the copy process
If you press the ‘start’ button, and you do not change any settings, the settings
of the previous copy job are used or the default settings of the machine are
used:
number of copies 1
■
use roll 1
■
zoom 100%
■
synchro cut
■
no leading /trailing edge
■
auto exposure on; exposure setting 0.
■
Default settings are used in the following situations:
after turn on
■
after you press ‘cancel’ twice
■
after a time-out of 1 minute (since the end of previous copy job has expired).
■
If the ‘start’ button is pressed the original will be scanned. The original returns
to the operator if you have enabled the rewind function (see page 56). You can
make settings for the next job.
When the original returns, remove the original. A new original can be fed and
you can program new settings.
Make copies
The copying process starts when you press the ‘start’ button. Before you press
the ‘start’ button, you can change the settings.
▼▼▼▼
Feed the original
Insert the original face down and right aligned, along the original guide line on
1
the scanner feed table so that you can see the line (see figure 10).
50 Océ TDS400 Digital Multifunctional System User Manual
Page 51

[10] Insert the original
The original will be transported about 1 centimetre to a defined position.
Specify the number of copies with the ‘+’ or ‘-’ buttons.
2
Press the ‘media’ button to select a roll or to select ‘manual feed’.
3
Press the ‘input’ button to specify how a job is sorted: ‘sheet’ (output 1-1, 2-2,
4
3-3, or ‘set’ (output 1-2-3, 1-2-3).
Press the ‘zoom’ button to specify a reduction or an enlargement factor, if
5
needed.
Press the ‘exposure’ button to correct for a lighter or darker original, if needed.
6
Press the ‘strip’ button to add or remove a strip, if needed.
7
Press the green ‘start’ button to start the copy job. The original is fed into the
8
scanner. The printer starts.
Collect your output.
9
If you make a copy within the time-out of 1 minute, the machine will use the
settings of the previous copy job.
Number of copies
To have multiple copies from one original, enter the number of copies on the
scanner operator panel. The original is scanned just once and the required
number of copies are processed.
Refer to ‘Product specifications Océ TDS400’ on page 175 for the limitation
of multiple copy jobs.
Use the Océ TDS400 to copy 51
Page 52

▼▼▼▼
Select the number of copies
Enter the number of copies (1 upto 99) with the ‘+’ or ‘-’ button on the scanner
1
operator panel.
The display shows the number of copies.
Select the use of roll 1 or roll 2 or manual feed
You can select between two rolls or manual feed with the ‘media’ button.
When a roll is selected, the copy material is taken from the selected roll.
Only use paper as specified in ‘List of available material types and sizes’
Note:
on page 180.
▼▼▼▼
Select roll 1, roll 2
Press the ‘media’ button until the indicator that matches your selection lights.
1
Enter the media width if you have selected ‘Manual feed’ (see ‘Media type and
2
size on the printer’ on page 27).
Set the correct media type settings (see ‘Set the media type settings’ on
3
page 28).
Press the confirm button.
4
Select the input mode
You can use the ‘Input’ setting to indicate how a job is sorted: the ‘sheet’
option prepares each sheet as a separate job (see figure 11).
Select ‘set’ to keep the copies together and to prevent the interruption with a
print job. ‘set’ makes a copy for each sheet in a set and continues with the next
copy of the complete set (see figure 11).
52 Océ TDS400 Digital Multifunctional System User Manual
Page 53

:
Print 3 copies of a 3 - page document
Output with the input mode ‘sheet’
[11] Difference between the ‘sheet’ option and the ‘set’ option
▼▼▼▼
Select the input mode
Press the ‘input’ button to select the input mode ‘sheet’ or ‘set’.
1
The selected indicator lights.
To copy sets
page 3
page 3
page 3
page 2
page 2
page 2
page 1
page 1
page 1
page 3
page 2
page 1
page 3
page 2
page 1
page 3
page 2
page 1
Output with the input mode ‘set’.
Use the input mode ‘set’ to copy sets of originals. The originals will be scanned
sheet by sheet and the image information will be stored in memory. When you
press the start button to close the set the printer prints the output.
▼▼▼▼
How to copy sets
Press the ‘input’ button to select the input mode ‘set’.
1
Insert an original.
2
Add the originals to the set and press the start button .
3
After the last scan of the set, remove the original and press the start button
4
to close the set.
Specify the zoom factor
With the Océ TDS400 you can reduce or enlarge your original from 25% to
400%. Press the ‘zoom’ button to enter the zoom mode. You can select the
zoom factor by means of the browse buttons when the indication flashes.
Use the Océ TDS400 to copy 53
Page 54

Choose between the fixed step zoom mode by means of the right and left
browse buttons. In fixed steps mode 8 pre-set zoom settings are available.
Choose the % zoom mode by means of the up and down browse buttons.
You can configure the fixed zoom steps in the Settings Editor. Also refer
Note:
to ‘Summary of standard zoom formats’ on page 183.
▼▼▼▼
Select the zoom factor with pre-set zoom steps
Press the ‘zoom’ button. The indicator flashes.
1
Specify the zoom ratio with the or button.
2
The display shows the selected ratio. If you make the adjustments with this
button, one of the indications above the button flashes. If the adjustment is
different from the default setting, the indication lights.
▼▼▼▼
Select the zoom factor with 1% zoom steps
Press the ‘zoom’ button. The indicator flashes.
1
Specify the zoom ratio with the or button.
2
The display shows the selected ratio. If you make adjustments with this button,
one of the indications above the button flashes. If the adjustment is different
from the default setting, the indication lights.
The exposure settings
You can modify the exposure quality to improve the image quality. To modify
the exposure you can choose between:
use of the lighter and darker buttons
■
enable or disable automatic background compensation
■
adjust the Océ Image Logic® based on the original type you want to copy
■
The default exposure settings makes background-free copies of most line
drawings. The automatic background compensation is activated. The
background is measured when you scan an original. The result of some
originals can not match your requirements.
When you copy very light or dark originals, or originals with unequal
background density, the result can not meet your requirements (e.g. too much
background).
54 Océ TDS400 Digital Multifunctional System User Manual
Page 55

Default the automatic background compensation is active and the exposure
level is 0.
The automatic background compensation will provide a good quality copy
from a large variety of originals. The automatic background compensation
setting, which is switched on (by default), ensures the production of
background-free copies of most line drawings.
▼▼▼▼
▼▼▼▼
Adjust the exposure setting
Press the ‘Exposure’ button.
1
Select the needed exposure value with the or button.
2
Set the automatic background compensation
Press the ‘extra’ button.
1
Select ‘Original’ with the or button.
2
Press the button to enter the ‘Original’ menu.
3
Select ‘Background comp.’ with the or button.
4
Press the button to enter the ‘Background comp. menu.
5
Select ‘on’or ‘off’ with the or button.
6
Press the confirm button.
7
The Océ TDS400 Copier allows you to adjust the exposure setting according
to the type of image on the original. There are three original types available:
Lines/text
■
Photo
■
Blueprint
■
▼▼▼▼
By default ‘Lines/text’ is selected with the background compensation enabled.
This is the best setting for originals with characters and line art.
Select ‘Photo’ when the original consists of a combination of characters, line
■
art and picture images.
Note:
If you select ‘Photo’, the ‘Background compensation’ will be
switched off automatically.
Select ‘Blue print’ when you want to copy an original with an image in
■
negative (image in white on dark background). The copy will be positive
(image in black on white background).
Improve the copy quality according to the type of image
Press the ‘extra’ button.
1
Select ‘Original type’ with the or button.
2
Press the button to enter the ‘Original type’ menu.
3
Select ‘Lines/text’, ‘Blueprint’ or ‘Photo’ with the or button.
4
Use the Océ TDS400 to copy 55
Page 56

Press the button to enter the ‘Lines/text’, ‘Blueprint’ or ‘Photo’ menu.
5
Select the needed original type.
6
Press the confirm button.
7
Deliver originals after scanning
You can choose for delivery of the original at the front (rewind) or the rear side
of the scanner. Use the output at the rear side of the scanner if your originals
are:
thick
■
very thin
■
damaged
■
in a carrier sheet.
■
The rewind setting will return to default when,
the ‘cancel’ button is pressed,
■
the panel time out has exceeded.
■
▼▼▼▼
Enable the rewind function
Press the ‘extra’ button.
1
Select ‘Scanner’ with the or button.
2
Press the button, to enter the ‘Scanner’ menu.
3
Select ‘Rewind original’ with the or button.
4
Press the button, to enter the ‘Rewind original’ menu.
5
Select ‘on’ or ‘off’ with the or button.
6
Press the ‘confirm’ button.
7
Enable automatic feed of the original
To increase the productivity enable Automatic feed, no need to press the ‘start’
button, except for the first original. If you disable automatic feed you must
press the ‘start’ button.
▼▼▼▼
To enable automatic feed
Press the ‘extra’ button.
1
Select ‘Scanner’ with the or button.
2
Press the button, to enter the ‘Scanner’ menu.
3
Select ‘Autofeed orig.’ with the or button.
4
Press the button, to enter the ‘Autofeed orig.’ menu.
5
56 Océ TDS400 Digital Multifunctional System User Manual
Page 57

Select ‘on’ or ‘off’ with the or button.
6
Press the ‘confirm’ button.
7
Define settings for the next original
For each original you need to copy you can specify new settings.
▼▼▼▼
Define settings for the next copy job
Select all the needed settings for the next original.
1
Insert the next original.
2
Copy on pre-cut sheets
If you copy a job on a media type and/or size that is not available on one of the
paper rolls, you can manually feed sheets instead of reloading paper rolls. You
can insert pre-cut copy material in this slot, one sheet at a time. To set the time
out for manual feed refer to ‘Set the time-out for manual feed’ on page 58.
▼▼▼▼
Copy on pre-cut sheets
Enter the type of the copy material on the printer operator panel.
1
Press the ‘media’ button to select ‘manual feed’. The indicator lights.
2
Note:
The minimum length of the print material must be 420 mm.
[12] Manual feed
Enter the number of copies.
3
Select the copy size.
4
Feed the original.
5
Use the Océ TDS400 to copy 57
Page 58

Press the ‘start’ button .
6
Take your sheet of copy material to the side of the printer that contains the
7
sheet feed (see figure 12).
Align the copy material with your hands to the format indication and the label
8
on the manual feed table.
Move the copy material forward in the cut of the roller. A paper bulge must
9
appear over the full width of the page.
Hold the paper with your hands until the printer pulls in the first part of the
10
sheet.
The bulge decreases or disappears. After a few seconds, the printer pulls the
complete sheet.
If the copy job requires more sheets, the display indicates to feed the
Note:
next sheet.
Repeat the steps 7 to 10 to complete the job.
11
Collect your output.
12
The printer prints the image on the side of the sheet which is facing up.
Note:
▼▼▼▼
Attention:
When you feed a sheet of material in the manual feed while a
normal print job runs, a media jam can occur.
Set the time-out for manual feed
Default is 60 seconds.
Press ‘on line’ on the printer operator panel, to enter the main menu.
1
Select the ‘media settings’ item with the or button.
2
Press ‘next/select’ to enter the ‘media settings’ menu.
3
Select ‘manual feed’ with the or button.
4
Press ‘next/select’ to enter the ‘manual feed’ menu.
5
Select the ‘time out’ with the or button.
6
Press ‘next/select’ to enter the ‘time out’ menu.
7
Select the desired timeout with the or button.
8
Press ‘next/select’ to confirm the selected timeout.
9
Press ‘on line’ to leave the main menu.
10
58 Océ TDS400 Digital Multifunctional System User Manual
Page 59

Stop a copy job
Press the ‘cancel’ button to interrupt the original transport.
▼▼▼▼
Stop a job
Press the ‘cancel’ button.
1
The original transport is stopped.
The message ‘Remove original’, ‘Press cancel’ appears on the scanner display.
2
Open the scanner cover and remove the original.
3
Close the cover.
4
Press the ‘cancel’ button. The message disappears on the scanner display.
5
Set synchro or standard cut
In synchro cut mode, the copy is cut at the length of the original. The length
depends on the zoom factor and the leading or trailing strip setting. The default
is Synchro cut mode.
In standard cut mode, the copy is cut at a standard format length (portrait). You
select the length of the standard format with the browse buttons.
Example: select 36 inches, means select a format of 36 inches width and a
corresponding 48 inches length. Independent of the roll width, the material is
cut at a length of 48 inches.
▼▼▼▼
When you select standard cut, the system always cuts at the selected length. If
the original length is shorter or longer than the selected length, the cut is made
at the selected length.
Select synchrone cut
Press the ‘extra’ button.
1
Select ‘Paper copy’ with the or button.
2
Press button, to enter the ‘Paper copy’ menu.
3
Select ‘cut length’ with the or button.
4
Press button, to enter the ‘cut length’ menu.
5
Select ‘on’ or ‘off’ with the or button.
6
Press the ‘confirm’ button.
7
Use the Océ TDS400 to copy 59
Page 60

▼▼▼▼
Select standard cut
Press the ‘extra’ button.
1
Select ‘Paper copy’ with the or button.
2
Press button, to enter the ‘Paper copy’ menu.
3
Select ‘cut length’ with the or button.
4
Press button, to enter the ‘cut length’ menu.
5
Select a standard paper format with the or button.
6
Press the ‘confirm’ button.
7
Adjust the leading or the trailing strip
To increase the copy length to accommodate for a filing strip select a positive
leading or trailing strip.
If you do not want the filing strip to show on the copy, select a negative leading
or trailing strip. The adjustment steps are indicated on the operator panel,
expressed in millimetres or 0.1 inches.
▼▼▼▼
Adjust the leading or the trailing strip
Press the ‘strip’ button to toggle between ‘leading’ and ‘trailing’ strip.
1
Select a positive or negative value in steps of 10 mm with the or button.
2
Select a positive or negative value in steps of 1 mm with the or button.
3
The length of the selected strip is shown in the display. If the adjustment differs
from the default setting, the indication lights.
Attention:
If you make the strip larger than the strip on the original, you can
loose information.
See the figures on the next pages to make a difference between rolls and
manual feed, when you adjust the strips.
60 Océ TDS400 Digital Multifunctional System User Manual
Page 61

Leading/trailing strip when you use rolls of paper
Leading edge
Null Positive Negative
Trailing edge
Negative Positive Null
[13] Use of rolls
Copy
Original
Use the Océ TDS400 to copy 61
Page 62

Leading/trailing strip when you use pre-cut sheets of paper
Leading edge
Null Positive Negative
Trailing edge
Negative Positive Null
[14] Use pre-cut sheets
Copy
Original
62 Océ TDS400 Digital Multifunctional System User Manual
Page 63

Mirror-image copies
You can make a mirror-image copy of an original, as shown in the next figure:
[15] Example of a mirror-image copy
▼▼▼▼
To make a mirror-image copy
Press the ‘extra’ button.
1
Select ‘Paper copy’ with the or button.
2
Press the button to enter the ‘Paper copy’ menu.
3
Select ‘Mirror’ with the or button.
4
Press the button to enter the ‘Mirror’ menu.
5
Select ‘on’ or ‘off with the or button.
6
Press the confirm button.
7
Release original
For originals on thinner types of media it will be you can enable Release
original. With Release original enabled the original will be fully released after
it is scanned.
Press the ‘extra’ button.
1
Select ‘Scanner’ with the or button.
2
Press the button to enter the ‘Scanner’ menu.
3
Select ‘Release orig.’with the or button.
4
Press the button to enter the ‘Poster mode’ menu
5
Select ‘on’or ‘off’with the or button.
6
Press the confirm button.
7
Make other settings if required.
8
Feed the original.
9
Press the ‘start’ button.
10
The original is fully released after the scanner has completed its scan run.
Use the Océ TDS400 to copy 63
Page 64

Menu structure of the scanner
f
Original type Blueprint
Original Photo
Background comp. on
Cut length B (11x17”)
Paper copy C+ (18x24”)
Lines/text
off
Synchrone cut
Standard cut
A0 (841x1189mm)
A1 (594x841mm)
A2 (420x594mm)
A3 (297x420mm)
E (34x44”)
D (22x34”)
C (17x22”)
E+ (36x48”)
D+ (24x36”)
B+ (12x18”)
30”x42”
B1+ (707x1000mm)
B2+ (500x707mm)
B2 (500x700mm)
Scanner
Mirror on
Rewind original on
Autofeed orig. on
Release orig. on
UK English
Language Nederlands
more...
Print menu chart
Printing...
off
off
off
off
64 Océ TDS400 Digital Multifunctional System User Manual
Page 65

Océ TDS400
Digital Multifunctional System
User Manual
Chapter 4
Use the Océ TDS400 to Scan
This chapter describes how to use Océ Scan Logic® with
the Océ TDS400.
65
Page 66

Introduction
‘Océ Scan Logic®’ is an option which enables you to scan a document and
send it to a specific directory on the network. It makes full use of Océ Image
Logic®, a quality enhancement technology. Enable Océ Scan Logic® through
a password in the settings editor. A graphical user interface is supplied with the
‘Océ Scan Logic®’ option.
You scan in order to:
Use the documents again
■
Archive the documents
■
E-mail the documents
■
Prints the documents at a later time
■
A scan is made at the Océ TDS400 scanner. On the scanner operator panel, you
select the resolution and the destination of the scan.
You can store a generated file on the controller (temporary store) or move the
scan towards a network destination.
With Océ View Station (LT) you can see the scanned documents later. Océ
View Station (LT) comes with the Scan Manager application.
The optional Graphical User Interface (GUI) on the controller and a
Note:
memory configuration of 256 Mb are required to use Océ Scan Logic®.
66 Océ TDS400 Digital Multifunctional System User Manual
Page 67

Make a scan
To scan an original to file is an easy operation. If the settings (see ‘Settings to
scan’ on page 68) are correct, you must press the start button on the scanner
operator panel.
▼▼▼▼
How to make a scan
Place your original face-down, right aligned along the original guide.
1
Select the appropriate original type.
2
Press the ‘Output’ button to select ‘File’.
3
Select a Destination (see ‘Destinations’ on page 76).
4
Press the start button
5
.
The original is scanned.
Note:
Select auto-feed on/off, rewind original on/off, and release paper
on/off in the ‘scanner’ menu on the scanner panel (see ‘Menu structure Océ
TDS400 Scanner’ on page 72). When release paper is enabled, the original
will be fully released after it is scanned.
On the controller, Océ View Station starts, to show the result of the scan (see
6
figure 16).
[16] Océ View Station
Use the Océ TDS400 to Scan 67
Page 68

Settings to scan
Press the ‘Extra’ button on the scanner operator panel to access the settings to
make a scan. The following options are available in the ‘File’ menu:
Destination
You can store your scan either in the temporary storage on the
controller or you can store it on a network destination. You can define a
maximum of six destinations in the Scan Manager application. You can select
one of these destinations on the scanner operator panel.
Check print
A Check print is a print from the scanned original. You can turn
the check print on or off.
File resolution
The Océ TDS400 Scan Logic® option can scan three
resolutions: 200, 300 or 400 dots per inch (DPI). The higher the resolution, the
better the image quality. Higher resolution also causes larger sizes of files.
File format
To define the internal order of the scanned files, select between
TIFF (Tagged Image File Format), CALS-I (Continuous Acquisition and Life
Cycle support), or PDF (Portable Document Format).
Optimise size
Select this option to decrease the size of the file or to get good
quality.
Set the scan size In the ‘Original’ menu.
Destination
You can store your scan either in the temporary store on the controller or on a
network destination. You can define up to six destinations in the Scan Manager
application. On the scanner operator panel you can choose one of these
destinations.
▼▼▼▼
68 Océ TDS400 Digital Multifunctional System User Manual
Select a destination
Press the ‘extra’ button.
1
Select ‘Destination’ with he or button.
2
Press the button, to enter the ‘Destination’ menu.
3
Select the needed ‘Destination’ with he or button.
4
Press the confirm button.
5
Page 69

Note:
convenience, you are able to define understandable nicknames in the Scan
Manager application (see ‘Create a destination’ on page 76).
Check print
A check print is a print from the scanned original. You can turn check print on
or off.
The names of the destinations can be any. However, for your
▼▼▼▼
Select check print
Press the ‘output’ button to select ‘file’.
1
Press the ‘extra’ button.
2
Select ‘check print’ with he or button.
3
Press the button, to enter the ‘check print’ menu.
4
Select ‘on’ or ‘off’with he or button.
5
Press the confirm button.
6
Resolution
The Océ TDS400 Scan Logic® option can scan three resolutions:
■
■
■
To reach the best print quality on the Océ TDS400 select 300 dpi.
▼▼▼▼
Select the resolution
200 dots per inch (dpi)
300 dpi
400 dpi
Press the ‘output’ button to select ‘file’.
1
Press the ‘extra’ button.
2
Select ‘File resolution’ with he or button.
3
Press the button, to enter the ‘File resolution’ menu.
4
Select the needed resolution with he or button.
5
Press the confirm button.
6
Use the Océ TDS400 to Scan 69
Page 70

File format
To define the internal order of the scanned files, select between TIFF (Tagged
Image File Format), CALS-I (Continuous Acquisition and Life Cycle support),
or PDF (Portable Document Format).
Within the ‘Tiff format’ option, you can define 9 different Tiff subformats. The
‘Organization’ and ‘Compression’ of the file are determined by the Tiff
subformat you select.
Organization
■
■
■
Note:
Select ‘Raw’ in another case.
Compression
■
■
■
Stripped
Tiled
Raw
Select ‘Stripped’ or ‘Tiled’ when you can use these organizations later.
Group 4
Group 3-1D
None
▼▼▼▼
Select ‘Group 4’ or ‘Group 3-1D’ when you can use these compressions
Note:
later. Choose ‘None’ in another case.
‘Group 4’ or ‘Group 3-1D’ are compression methods which are best for
Note:
text and vector drawings. If you select these compressions to scan a photo with
many grey scales these compressions can cause a negative compression: the
file size increases instead of decreases.
Select file format
Press the ‘output’ button to select ‘file’.
1
Press the ‘extra’ button.
2
Select ‘File format’ with the or button.
3
Press the button, to enter the ‘File format’ menu.
4
Select the required format or subformat with the or button.
5
Press the confirm button.
6
70 Océ TDS400 Digital Multifunctional System User Manual
Page 71

Optimisation
You can turn File size optimisation’ or ‘off’. If you select ‘on’ the file size is
smaller, the scan quality will be less.
▼▼▼▼
Select optimise size
Press the ‘output’ button to select ‘file’.
1
Press the ‘extra’ button.
2
Select ‘Optimise size’ with he or button.
3
Press the button, to enter the ‘Optimise size’ menu.
4
Select ‘on’ or ‘off’ with he or button.
5
Use the Océ TDS400 to Scan 71
Page 72

Menu structure Océ TDS400 Scanner
w=A0 l=synch
w=A1 l=synch
w=A2 l=synch
w=A3 l=synch
w=A4 l=synch
w=34” l=synch
Standard size w=17” l=synch
Scan size w=36” l=synch
Original w=B1+ l=synch
Custom width w=123mm l=synch
Custom size w=123mm l=12.3”
Original type Blueprint
Background comp. on
Destination Destination 4
Check print on
File 200 dpi
File resolution 300 dpi
File format TIFF G4 tiled
Optimize size on
Lines/text
Photo
off
Destination 1
Destination 2
Destination 3
Destination 5
Destination 6
off
400 dpi
TIFF G3 RAW
TIFF G3 strip
TIFF G3 tiled
TIFF G4 RAW
TIFF G4 strip
TIFF unc. RAW
TIFF unc. strip
TIFF unc. tiled
CALS
PDF unc.
PDF G4
off
w=22” l=synch
w=11” l=synch
w=8.5” l=synch
w=24” l=synch
w=18” l=synch
w=12” l=synch
w=9” l=synch
w=30” l=synch
w=B1 l=synch
w=B2 l=synch
w=B2+ l=synch
l= synch
A0
Scanner Release orig. on
72 Océ TDS400 Digital Multifunctional System User Manual
Rewind original on
Autofeed orig. on
Language Nederlands
Print menu chart Printing...
off
off
off
UK English
more...
Page 73

Scan Manager
The Scan Manager is an application available local on the controller. With the
Scan Manager you can configure the destinations for scan logic. To increase
your productivity you can define automatic file naming. This way you can do
batch scans without operating the controller.
During scanning, Scan Manager displays the filename and the status of the file
generation process. When the scan is completed a view of the scanned image
is automatically displayed on the controller.
Figure 17 shows an example of the Scan Manager application. The left part
displays a tree view containing folders containing destinations. The right part
displays a table view containing the content of the folder currently selected.
[17] Overview of the Scan Manager application
Note:
user mode to do specific tasks with Scan Manager (see ‘Océ TDS400 users’ on
page 17).
Use the Océ TDS400 to Scan 73
Not all options are available to all users. You must log into a particular
Page 74

Tree view
The tree view displays:
■
■
■
If you scan to a particular destination, that destination is displayed bold and the
corresponding icon changes. The destination you scanned last to, is displayed
bold.
If for any reason a scan can not be sent to the correct remote destination, the
file is stored in the ‘Unsent’ folder.
Table view
The table view (on the right side of figure 17 on page 73) displays the
filenames of the files in the opened destination or temporary folder.
the system name
the collapsible destination tree
the collapsible temporary store tree.
Each file has the following information:
Name
■
Size
■
Typ e
■
Modified
■
Resolution
■
Image size.
■
If the currently viewed destination is the one you are scanning to, then the
scanned file appears at the end of the table. If you currently view another
destination than the one you are scanning to, then the scanned to destination is
displayed bold.
It is possible that there are more files in the table than fit on screen. The most
recent scanned file appears at the end of the table. Under these circumstances
it is possible that your most recent scanned file is not visible in the table on
screen. In this case you can update the table view.
74 Océ TDS400 Digital Multifunctional System User Manual
Page 75

▼▼▼▼
Update the table view
From the ‘View’ menu select ‘Refresh’ or click the ‘Refresh’ button on the
1
toolbar (see figure 18). If the opened destination is also the one which is
currently scanned to, then the view is automatically updated.
[18] ‘Refresh’ button on the toolbar
Use the Océ TDS400 to Scan 75
Page 76

Actions from the Scan Manager
The Scan Manager enables you to make settings for Océ Scan Logic®. You can
edit and view the destination properties. You can also view the properties of
scanned files.
Destinations
A destination is a place where you scan your file to. You can create, delete and
lock destinations. You can also define automatic filenaming to ensure your
files get the desired names.
A destination can also be a file server or a PC of an end user. It is better to select
remote destinations instead of the local ones. The local destinations are
temporary and cannot contain a lot of scan files.
▼▼▼▼
Create a destination
Select ‘Destinations’ in the tree view.
1
From the ‘File’ menu select ‘New’ or click the ‘New’ button on the toolbar (see
2
figure 19).
[19] ‘New’ button on the toolbar
76 Océ TDS400 Digital Multifunctional System User Manual
Page 77

The following dialogue box appears (see figure 20):
[20] ‘Destination properties’ window
Enter a name for the destination in the ‘Name’ text box. This name also
3
appears on the scanner operator panel in the ‘Destination’ menu.
Select a destination type from the ‘Type’ drop-down list box.
4
Select between:
File Transfer Protocol (FTP),
■
Server Messages Block (SMB),
■
local store in the temporary store on the controller.
■
Enter the name of the system you want to scan your files to in the ‘System’ text
5
box.
Note:
Names in Japanese can only be entered for remote destinations in
SMB.
Enter a path of the target folder in the ‘Path’ text box, or click the ‘Browse’
6
button to select the path. The path selection is only available if you select ‘On
the controller’ as ‘Type’.
Enter, if needed, a user name for the network destination in the ‘User name’
7
textbox.
Enter, if needed, the correct password for the network destination in the
8
‘Password’ text box.
Click ‘OK’ to accept the destination properties.
9
Note:
You can create six destinations.
A key operator can select if a destination can be modified by an anonymous
user. This is done by locking and unlocking a destination.
▼▼▼▼
Lock a destination
Select a destination.
1
Use the Océ TDS400 to Scan 77
Page 78

From the ‘File’ menu select ‘Properties’.
2
Check the ‘Locked’ check box.
3
Click ‘OK’ to accept the destination settings.
4
The destination properties are now locked.
This option is only available if you are logged on as a Key operator (see
Note:
chapter 9, ‘Océ Print Exec® LT Web’ on page 133).
▼▼▼▼
▼▼▼▼
Unlock a destination
Select a destination.
1
From the ‘File’ menu select ‘Properties’.
2
Uncheck the ‘Locked’ check box.
3
Click ‘OK’ to accept the destination settings.
4
The destination properties are now unlocked.
This option is only available if you are logged on as a Key operator (see
Note:
‘Océ Print Exec® LT Web’ on page 133).
Delete a destination
Select a destination.
1
Open the ‘File’ menu and select ‘Delete’ or click the ‘Delete’ button on the
2
toolbar (see figure 21).
[21] ‘Delete’ button on the toolbar
The selected destination is deleted.
This option is only available if you are logged on as a Key operator or
Note:
as a Repro operator.
You are not able to delete the last destination.
Note:
▼▼▼▼
Define file name
Select a destination.
1
From the ‘File’ menu select ‘Properties’.
2
The ‘Destination properties’ screen appears (see figure 20 on page 77).
Enter a name in the ‘Base name’ textbox.
3
The ‘Base name’ may contain ‘###’ for automatic file naming. The
Note:
‘###’ will be replaced by an ascending number. You may place as many
dots in the ‘Base name’.
Check or uncheck the ‘Add appropriate file extension’ check box to add or
4
respectively leave out an appropriate file extension. The file extension can be
set in the Settings Editor.
Click ‘OK’ to accept the settings.
5
78 Océ TDS400 Digital Multifunctional System User Manual
Page 79

▼▼▼▼
Set or Change destination properties
Select a destination.
1
From the ‘File’ menu select ‘Properties’ or click the ‘Properties’ button on the
2
toolbar (see figure 22).
[22] ‘Properties’ button on the toolbar
The ‘Destination properties’ screen appears as in figure 20 on page 77.
Change the destination properties as described in ‘Create a destination’ on
3
page 76.
Scanned files
The right pane of the Scan Manager contains the scanned files and additional
information about the files. You can view, print and delete these files. You can
also view the file properties.
▼▼▼▼
▼▼▼▼
View a scanned file
Select a file in the right pane.
1
From the ‘File’ menu select ‘View’ or click the ‘View’ button on the toolbar
2
(see figure 23).
[23] ‘View’ button on the toolbar
Océ View Station (see ‘Océ View Station (LT)’ on page 84) starts and displays
the file.
Note:
When you make a scan Océ View Station starts automatically, and shows
the result of the scan.
Print a scanned file
Select a file in the right pane.
1
From the ‘File’ menu select ‘Print’ or click the ‘Print’ button on the toolbar
2
(see figure 24).
[24] ‘Print’ button on the toolbar
Use the Océ TDS400 to Scan 79
Page 80

The selected file will be printed with the default settings as defined in the
Settings Editor.
▼▼▼▼
▼▼▼▼
Delete a scanned file
Select a file in the right pane.
1
From the ‘File’ menu select ‘Delete’ or click the ‘Delete’ button on the toolbar
2
(see figure 25).
[25] ‘Delete’ button on the toolbar.
The selected file will be deleted.
This option is only available if you are logged on as a Key operator
Note:
or as a Repro operator.
View properties of a scanned file
Select a file in the right pane.
1
From the ‘File’ menu select ‘Properties’ or click the ‘Properties’ button on the
2
toolbar (see figure 26).
[26] ‘Properties’ button on the toolbar.
The following window appears (see ‘‘Scanfile properties’ window’ on
page 81):
80 Océ TDS400 Digital Multifunctional System User Manual
Page 81

[27] ‘Scanfile properties’ window
Click ‘OK’ to close the ‘Scanfile properties’ window.
3
▼▼▼▼
Automatically view a file after scanning
You can choose to view a file automatically after scanning:
From the ‘System’ menu select ‘Auto view’.
1
When you scan, Océ View Station starts automatically and show the scanned
file.
Manage the temporary store
When you normally scan the originals to a file, many files are created in the
temporary store. You can clean the temporary store:
manual: from the ‘System’ menu select the ‘Purge’ command.
■
automatic: you must make some settings in the Océ TDS400 Settings Editor.
■
Use the Océ TDS400 to Scan 81
Page 82

How to retrieve scanned files?
When you scan your files will be stored in the destination you set. This can be
on the local controller or on a remote system. You can retrieve your files from
the local host via File Transfer Protocol (FTP) (see figure 28). Also if during
scanning to a remote destination, something goes wrong, you can retrieve your
files from the local host.
P
T
F
a
i
v
s
e
l
i
f
t
e
G
G
e
t
f
i
l
e
s
v
i
a
F
T
P
Power Logic Controller
Windows NT® 4.0
Remote client
Windows®95 / 98
[28] How to retrieve scan files?
Remote client
Windows® NT 4.0
82 Océ TDS400 Digital Multifunctional System User Manual
Page 83

Get files via FTP
Launch an FTP client.
1
Enter the ‘ftp’ command.
2
A DOS box now appears with the FTP prompt.
Enter the ‘Open’ command followed by either the registered name of the Océ
3
Power Logic® Controller or the IP address (for example: 194.2.66.146) to
connect to the NGC and press Enter: ‘open 194.2.66.146’.
Note:
host_name” in the FTP client.
The connection with the NGC is now established and a window appears asking
you for a user name.
Enter your user name ‘anonymous’, and enter as your password also
4
‘anonymous’.
A connection is now set up for the default user ‘anonymous’.
Note:
connection.
Set the transmission mode to binary by entering ‘binary’.
5
Go to the ‘tempstore’ directory using the following command: ‘cd tempstore\’.
6
Go to the ‘scan’ directory if you want to retrieve a file from a destination on
7
the local host,
or
go to the ‘unsent’ directory if you want to retrieve a file from ‘unsent’ folder
on the local host.
Get the data file (for example: bugatti.tif) via the ‘get’ command:
8
‘get bugatti.tif’.
Quit FTP by entering the ‘bye’ command.
9
Instead of performing steps 2 and 3 you could also enter “ftp
As there is no registered user, you can press Enter to initiate the
Use the Océ TDS400 to Scan 83
Page 84

Océ View Station (LT)
With Océ View Station (LT) you can view your scanned files. This can be
automatically (see ‘Automatically view a file after scanning’ on page 81) after
scanning or via Scan Manager (see ‘Print a scanned file’ on page 79).
Océ View Station has the following menu’s (see figure 29):
File
■
View
■
Preference
■
Help
■
[29] Océ View Station
84 Océ TDS400 Digital Multifunctional System User Manual
Page 85

Menu options
File menu
Command What does it do?
Close
Properties
View menu
Command What does it do?
Fit
1:1
Magnify
Reduce
Refresh
Invert
Mirror
Rotate 90 CCW
Rotate 90 CW
Rotate 180
Sample
Negate
Scale to gray
Monochrome
Closes the active document
Provides technical information about, and allows you to change
certain properties of the document.
Scales the image to fill the window.
Displays the image at a 1:1 scale factor.
Zooms into the page.
Zooms out of the page.
Redraws all windows displaying the active document.
Reverses the black and white parts of the image.
Mirrors the image.
Rotates the image 90 degrees counter-clockwise.
Rotates the image 90 degrees clockwise.
Rotates the image 180 degrees.
When active, displays only a sample of bilevel raster pixels.
Reverses the raster image pixels on display and changes which are
dominant for scaling.
When active, displays the active bilevel raster image as though it
were a greyscale image.
An image or screen having only background and foreground colours. Same as black-and-white or bilevel.
Preference menu
Command What does it do?
View ribbon
Status bar
Use the Océ TDS400 to Scan 85
View Ribbon displays and removes the ribbon that contains buttons. The View Ribbon appears, by default, below the menu bar. It
serves as a fast means of selecting some File, View, and Preference
menu commands.
Status Bar displays and removes the Status Bar at the bottom of the
Océ View Station window. The Status Bar displays the pointer
co-ordinates and a status line.
Page 86

Preference menu (continued)
Command What does it do?
Reference
Detail
Measurement
Help menu
Command What does it do?
About
You can retrieve help about Océ View Station via the Scan Manager.
Note:
Function buttons
Reference displays or removes a small, usually floating window.
This window displays the entire current page in miniature. The
crossed box inside the Reference window indicates which part of
the page is displayed in the document window.
By moving or resizing the crossed box, you change which area of
the page is displayed.
Displays or removes the Detail window.
When active, allows you to measure lines and areas on the image.
Shows information about Océ View Station.
Below the menu’s there are function buttons in a ribbon. This ribbon can be
turned on and off (see ‘View ribbon’ on page 85).
234 5 6 8 9 10111217
[30] Function buttons in Océ View Station
The above figure displays the buttons:
Invert: Reverses the black and white parts of the image.
1
Fit: Scales the image to fill the window.
2
1:1: Displays the image at a 1:1 scale factor.
3
Magnify: Zooms into the page.
4
Reduce: Zooms out of the page.
5
Mirror: Mirrors the image.
6
Rotate 90 CCW: Rotates the image 90 degrees counter-clockwise.
7
Rotate 90 CW: Rotates the image 90 degrees clockwise.
8
Rotate 180: Rotates the image 180 degrees.
9
Measurement When active, allows you to measure lines and areas on the
10
image.
Reference. This small floating window displays the entire current page in
11
miniature for reference.
Displays or removes the Detail window.
12
86 Océ TDS400 Digital Multifunctional System User Manual
Page 87

View error
When the memory is almost full it can occur that the viewer does not show the
scanned file. Instead it shows a red border with a red cross (see figure 31).
[31] Error view in Océ View Station
Use the Océ TDS400 to Scan 87
Page 88

88 Océ TDS400 Digital Multifunctional System User Manual
Page 89

Océ TDS400
Digital Multifunctional System
User Manual
Chapter 5
Océ Power Logic®: The Settings
Editor
This chapter gives information about the Settings Editor.
For details about specific settings, refer to the Help on the
Settings Editor.
89
Page 90

Introduction
Use the Settings Editor to set the default settings of the Océ TDS400 according
to your companies requirements. 2 types of users can determine settings in the
Settings Editor, Key Operators and System Administrators. You can log in as
either Key Operator or System Administrator. Key Operators and System
Administrators have different rights to determine settings.
90 Océ TDS400 Digital Multifunctional System User Manual
Page 91

How to start up and shut down the
controller
Take the following actions to start up the controller:
▼▼▼▼
▼▼▼▼
Start up the Océ controller
Turn on the controller and the screen.
1
After the initial system test of the controller the applications, Queue Manager,
System Control Panel, Settings Editor and Scan Manager are automatically
started and the Océ TDS400 is ready for operation.
Note:
The Queue Manager and the System Control Panel applications are
visible on the screen; however the Settings Editor is minimised, to save screen
estate.
Take the following actions to shut down the controller:
Shut down the Océ controller
Go to the System Control Panel application.
1
Select the ‘Shutdown’ option from the ‘System’ menu.
2
Confirm shutdown by clicking on the ‘Yes’ button in the ‘Shut down’ window.
3
The system automatically performs the shutdown procedure for the controller.
Finally, the Windows NT® ‘Shutdown Computer’ window appears, which
informs you that you can turn off your computer.
Note:
Turn off your computer and display.
4
You can now restart the controller by pressing the ‘Restart’ button.
Note:
The Océ TDS400 has a sleep mode. The sleep mode powers off almost
all the power supplies after a certain time of inactivity.
Océ Power Logic®: The Settings Editor 91
Page 92

Settings Editor
The Settings Editor is one of the controller applications for the Océ TDS400.
The Settings Editor allows users and operators to view settings of the system.
If authorised, the settings of the system can be modified on the Settings Editor.
With the Settings Editor two groups of settings can be configured:
Key Operator settings (KO settings)
■
The Key Operator group allows authorised users to configure default settings
for copy and print jobs, default off-line fold settings and scan to file options.
With the Key Operator settings also the printer, system and scanner defaults
can be set or modified. A subset of the Key Operator settings are the Repro
Operator settings. The Repro Operator has no rights to change settings in the
Settings Editor. In the Queue Manager and the System Control Panel the
repro operator has the same user rights as the Key Operator and System
Administrator. See ‘User modes’ on page 127.
System Administrator settings (SA settings)
■
The System Administrator group allows authorised users to configure default
printer language (PDL) settings and printer pen settings. It also allows the
System Administrator to configure system and connectivity settings.
These groups of settings can be selected from the ‘View’ menu of the Settings
Editor.
Setting dependencies
The Settings Editor is used to display and edit a
specified group of settings. Some settings are related to other settings,
however. If you want to change settings which have dependencies with other
settings you will be prompted with a message. When a setting is changed, the
system automatically updates the related settings.
Also, when you change certain settings, such as measurement unit or paper
series, all related settings are instantaneously converted to the new setting
(with a bullet for the settings that are changed).
92 Océ TDS400 Digital Multifunctional System User Manual
Page 93

[32] Settings Editor
General structure
The Settings Editor is structured as follows:
Menu bar
■
Top toolbar
■
Left toolbar
■
Settings area
■
Status bar
■
Océ Power Logic®: The Settings Editor 93
Page 94

Menu bar
The menu bar of the Settings Editor contains the following menus:
File
log out of the previously selected user mode, open an existing setting file, save
the current settings to a file, connect to a different controller (only for remote
users) or exit the Settings Editor.
Edit
which you can view your default system and the display languages (first and
second) for the Settings Editor application. The ‘Auto login’ option allows you
to start the Settings Editor application automatically in the specified user
mode.
If you select the ‘File’ menu you can log in as a particular type of user,
If you select ‘Options’ from the ‘Edit’ menu, a window is displayed in
View
as defined in the Edit options window and to switch between KO settings and
SA settings.
Help
Editor’ and ‘About Settings Editor’.
[33] Menu bar
Top toolbar
The top toolbar of the Settings Editor contains four control buttons: ‘Open’,
‘Save as’, ‘Apply’ and ‘Undo’.
The ‘View’ menu allows you to switch between the display languages
The ‘Help’ menu contains the following options: ‘Contents of Settings
[34] Top toolbar
Open
Save as
When you click on the ‘Open’ button, you open a saved file.
All Key Operator and System Administrator settings can be saved in
a file. This way you can have different settings for different customers,
departments or other situations.
94 Océ TDS400 Digital Multifunctional System User Manual
Page 95

Note:
These settings can only be saved in Key Operator or System
Administrator mode.
▼▼▼▼
Apply
When you click on the ‘Apply’ button, the changes you have made
become effective. Initially, this button is disabled. It is enabled after the first
setting is changed and disabled again after the apply action is performed or
after an undo action.
Undo
This button restores the settings to the state it was in the last time the
settings were applied (and not back to the factory default). Initially, the ‘Undo’
button is disabled. This button is enabled the moment the first setting is
changed. It is disabled after an Apply action is performed or after an undo
action
Save settings to file
Open the ‘File’ menu and select ‘Save as’, or press the ‘Save as’ button on the
1
toolbar.
You now have two possibilities:
If the client is a local client, a dialogue is displayed and the user can supply
■
a file name. The file is saved in a predefined directory on the system.
If the client is a remote client, a dialogue box is displayed and the user can
■
supply a directory and a file name.
Note:
All settings in the current view mode are saved; not only the ones that
are currently visible.
A few special files are available here:
Default.kos/Default.sas
■
These files contain the factory default settings for the Key Operator and
System Administrator, respectively, and can not be changed.
Backup.kos/Backup.sas
■
These files contain a previous version of the settings for the Key Operator
and System Administrator, respectively (before the last Apply).
Current.kos/Current.sas
■
These files contain the version of the settings for the Key Operator and
System Administrator after the last Apply.
When an Apply is performed, first the contents of the current settings is copied
to the backup file. There are two versions of this file, one for KO settings and
one for SA settings. These files are always stored on the system.
Océ Power Logic®: The Settings Editor 95
Page 96

▼▼▼▼
Open a saved file
Open the ‘File’ menu and select ‘Open’, or press the ‘Open’ button on the
1
toolbar.
A dialogue box is displayed from where you can choose the correct file.
Click the ‘Apply’ button.
2
The loaded settings are transferred to the system.
Note:
Administrator.
Left toolbar
There are four different buttons available at the left toolbar of the Settings
Editor. These are ‘Jobs’, ‘Printer’, ‘Scanner’ and ‘System’. Each button
provides access to a specific group of settings. By clicking on each of these
buttons, you can get access to the settings related to the selected group.
A shadow highlight is used to indicate which button is activated.
This is only possible if the user is logged in as a Key Operator or System
[35] Left toolbar
Settings area
The settings area consists of two parts: a setting tree and an update area.
Tree structure
on the settings, folders can be opened to show all the entries or closed to hide
all the entries below these folders.
96 Océ TDS400 Digital Multifunctional System User Manual
Most settings are displayed using a tree structure. By clicking
Page 97

The settings for system components that are not available are not displayed.
So, if you do not have a folder, no folder settings are available. This means that
different configurations result in different tree structures.
Note:
When a tree item has been changed, this item will be marked with a
bullet.
Update area
The user can move through the tree and select a setting. If he
selects a setting for which he is authorised, he can edit the setting in the update
area.
If the user is not authorised for a particular setting, the update area is greyed
and no changes can be made.
Note that a few settings, such as basic card and pen settings, are not edited from
the tree structured, but are accessed directly from the settings area.
The update area contains some additional information about the selected
setting. This includes a brief definition of the setting, as well as the minimum,
maximum and default values (if appropriate).
[36] Settings area
Status bar
The Settings Editor has a status bar displaying the following information (left
to right):
Océ Power Logic®: The Settings Editor 97
Page 98

System status (icon for connected or disconnected)
■
The following icons are used:
The Settings Editor is connected to a system.
The Settings Editor is not connected to a system.
System name (‘localhost’ if you are working at the controller)
■
User mode (Repro operator, Key Operator, System Administrator or
■
anonymous)
View mode (KO settings or SA settings).
■
How to access the Settings Editor
In order to perform special Key Operator functions, you must log into the
Settings Editor
As these functions are restricted to a dedicated Key Operator, a password is
required to access them. The service engineer will provide this password to
you upon installation.
as a Key Operator.
Only one Key Operator or System Administrator at a time is authorised
Note:
to make modifications. However, there may be multiple users viewing the
settings. When a second user tries to log in as Key Operator or as System
Administrator, an error message is displayed.
Start Océ Settings Editor
You can start the Océ TDS applications on the controller as well as on a remote
workstation.
▼▼▼▼
▼▼▼▼
Start Océ Settings Editor on the Océ Power Logic® Controller
Select the 'Launcher' application.
1
Select Settings Editor. Océ Settings Editor starts.
2
Start Océ Settings Editor on a remote workstation
You must first install Océ Remote Logic® as described (see
Note:
‘Installation procedure for MS Windows® systems’ on page 121).
Select 'Océ Remote Logic®' via the 'Start' menu.
1
98 Océ TDS400 Digital Multifunctional System User Manual
Page 99

Select the 'Launcher' application.
2
Select Settings Editor. Océ Settings Editor starts.
3
How to perform actions from the Settings Editor
You can perform a number of activities from the Settings editor. These
activities include:
Save settings to file
■
Load settings from a file
■
Save and load settings
can be saved in a file or loaded from a file. This way you can have different
settings for different customers, departments or other situations.
All Key Operator and System Administrator settings
▼▼▼▼
Note:
These settings can only be saved in Key Operator or System
Administrator mode.
Save settings to file
Open the ‘File’ menu and select ‘Save as’.
1
You now have two possibilities:
If the client is a local client, a dialogue is displayed and the user can supply
■
a file name. The file is saved in a predefined directory on the system.
If the client is a remote client, a dialogue box is displayed and the user can
■
supply a directory and a file name.
Note:
All settings in the current view mode are saved; not only the ones that
are currently visible.
A few special files are available here:
Default.kos/Default.sas
■
These files contain the factory default settings for the Key Operator and
System Administrator, respectively, and can not be changed.
Backup.kos/Backup.sas
■
These files contain a previous version of the settings for the Key Operator
and System Administrator, respectively (before the last Apply).
Current.kos/Current.sas
■
These files contain the version of the settings for the Key Operator and
System Administrator after the last Apply.
When an Apply is performed, first the contents of the current settings is copied
to the backup file. There are two versions of this file, one for KO settings and
one for SA settings. These files are always stored on the system.
Océ Power Logic®: The Settings Editor 99
Page 100

▼▼▼▼
Load a settings file
Open the ‘File’ menu and select ‘Open’.
1
A dialogue box is displayed from where you can choose the right file.
Click the ‘Apply’ button.
2
The loaded settings are transferred to the system.
This is only possible if the user is logged in as a Key Operator or System
Note:
Administrator.
100 Océ TDS400 Digital Multifunctional System User Manual
 Loading...