

Oce TDS320 User Manual

Océ TDS320
User Manual

Copyright
© 2005 Océ-Technologies B.V. Venlo, The Netherlands
All rights reserved. No part of this work may be reproduced, copied, adapted,
or transmitted in any form or by any means without written permission from
Océ.
Océ-Technologies B.V. makes no representation or warranties with respect to
the contents hereof and specifically disclaims any implied warranties of
merchantability or fitness for any particular purpose.
Further, Océ-Technologies B.V. reserves the right to revise this publication and
to make changes from time to time in the content hereof without obligation to
notify any person of such revision or changes.
Edition 2005-12
Océ-Technologies B.V.
US
This manual contains a functional and task-oriented description of the Océ
TDS320 multifunctional digital system release 1.0
Trademarks
Products in this manual are referred to by their trade names. In most, if not all
cases, these designations are claimed as trademarks or registered trademarks of
their respective companies.
Safety information
Where applicable, cautions and warnings are used throughout this manual to
draw your attention to safety precautions to be taken.
The safety information for this product is included in a separate Safety manual.
This manual is part of the documentation set that you received with your
product.
Internet
Check Océ on the Internet at www.oce.com for:
■ the latest drivers
■ product development

Table of Contents 3
Table of Contents
Table of Contents 3
Chapter 1
Introduction
The Océ TDS320 8
The Océ TDS320 concept and components 9
The Océ TDS320 printer 9
The Océ TDS320 scanner 9
The Océ Power Logic® controller 10
Océ TDS320 options 11
Océ TDS320 users 13
User interaction 13
The data flow to the Océ TDS320 15
Chapter 2
Use the Océ TDS320 to print
Printer operator panel 18
Display 19
Menu level indicator 19
Keys 20
How to turn on and turn off the Océ TDS320 printer 21
Cancel a print 22
Menu structure 23
Media type and size on the printer 23
Manual feed 25
Cut media 26
Print info 27
Print the configuration report 27
Print the menu card 27
Print the demo print 28
Configuration 29
Select a language 29
Network settings 29
Paper series 32
Clear set memory 32
Diagnostic mode 32
Status messages 33

4 Océ TDS320 User Manual
Error messages 34
Menu structure of the printer 36
Chapter 3
Use the Océ TDS320 to copy
Scanner operator panel 38
The keys 39
The display 40
Menu level indicator 41
Copy jobs 42
Turn on and turn off the Océ TDS320 scanner 43
Start the copy process 44
Make copies 44
Number of copies 45
Select the use of roll 1 or roll 2 or manual feed 46
Select the input mode 47
To copy sets 47
Specify the zoom factor 48
The exposure settings 48
Deliver originals after scanning 50
Enable automatic feed of the original 50
Define settings for the next original 51
Copy on pre-cut sheets 51
Stop a copy job 54
Set synchro or standard cut 54
Adjust the leading or the trailing strip 55
Mirror-image copies 57
Release original 57
Menu structure of the scanner 58
Chapter 4
Use the Océ TDS320 to Scan to file
Introduction 60
Make a scan 61
Settings to scan 62
Destination 62
Checkprint 63
Resolution 63
File format 64
Optimization 65
Menu structure Océ TDS320 Scanner 66
Océ Scan Manager 67

Table of Contents 5
Tree view 68
Table view 68
Actions from the Océ Scan Manager 70
Destinations 70
Scanned files 74
Manage the temporary store 76
How to retrieve scanned files 77
Get files via FTP 78
Océ View Station LT 79
Menu options 80
Function buttons 81
View error 82
Chapter 5
Install and start Océ Remote Logic® on a workstation
Introduction 84
Installation procedure for MS Windows® systems 85
Installation procedure for Unix systems 87
IBM AIX 88
HP-UX 88
Linux 88
Installation procedure for Other systems 89
Start Océ Remote Logic® on your system 90
Command line parameters 90
How to use the remote system 93
Chapter 6
Océ Power Logic®: The Settings Editor
Introduction 96
How to start up and shut down the controller 97
Océ Settings Editor 98
General structure 99
Menu bar 100
Top toolbar 100
Left toolbar 101
Settings area 101
Status bar 103
How to access the Océ Settings Editor 103
Start Océ Settings Editor 103
How to perform actions from the Océ Settings Editor 104
Key Operator settings 106
System Administrator settings 107

6 Océ TDS320 User Manual
Chapter 7
Printer supplies and maintenance
Media 110
The paper rolls 110
Reload paper 111
How to program media settings 115
How to refill toner 117
Clean the glass platen and the reference roller of the scanner 120
Chapter 8
How to solve problems
Introduction 124
Original jams in scanner 125
Paper jams in the printer 127
Paper jam in the material feed section 127
Paper jam in the fuser section 128
Appendix A
Summary and tables
The Océ TDS320 132
Printer operator panel 133
Scanner operator panel 134
Product specifications Océ TDS320 135
List of available material types and sizes 139
Material types 139
Automatic format selection 141
Summary of standard zoom formats 142
Appendix B
Miscellaneous
Notation conventions 146
Reader’s comment sheet 147
Addresses of local Océ organizations 149
Index 151

7
Océ TDS320
User Manual
Chapter 1
Introduction
This chapter contains a general introduction to the Océ
TDS320. This chapter describes the main features, the
options and the software applications provided with the
system.
8 Océ TDS320 User Manual
The Océ TDS320
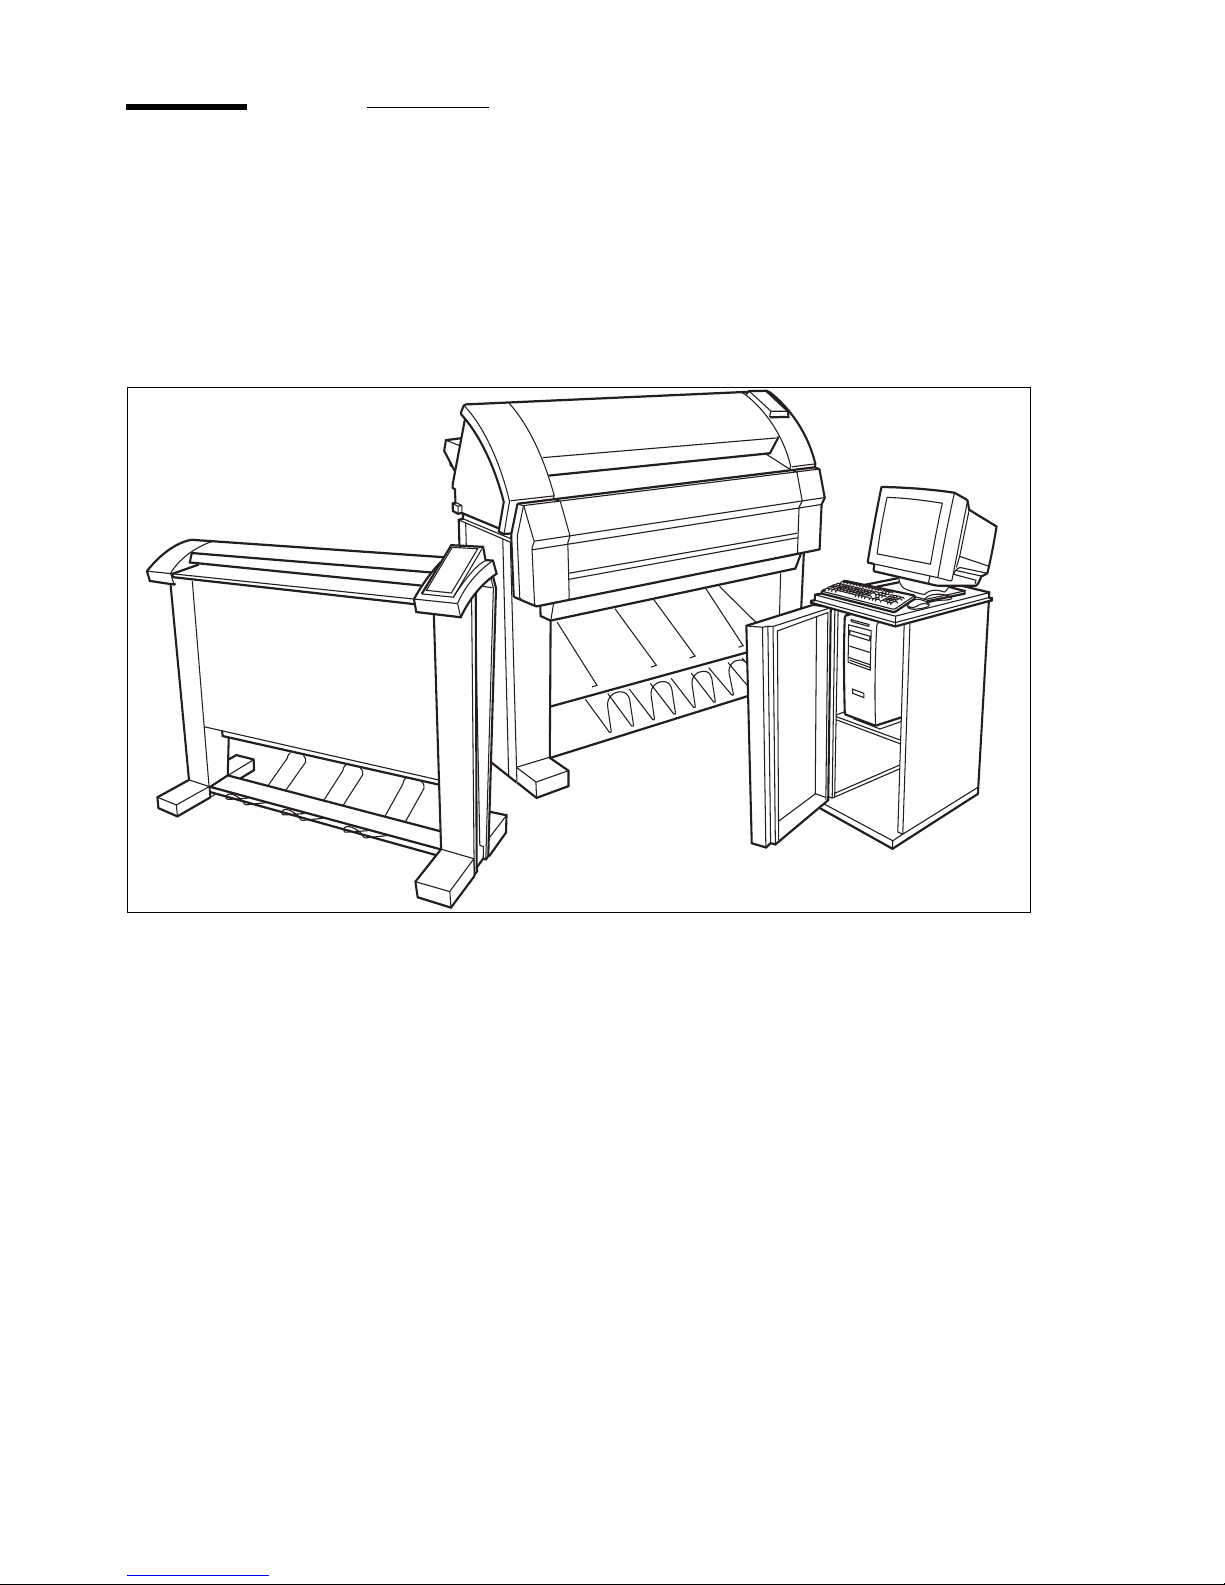
The Océ TDS320 is a wide format, black and white, multifunctional system.
The Océ TDS320 offers a broad range of print, copy, and scan-to-file
functionality. The system includes a printer (1 or 2 rolls), a controller and an
optional scanner.
[1] Océ TDS320

Introduction 9
The Océ TDS320 concept and components
The Océ TDS320 printer
The Océ TDS320 printer is available with an automatic 1- or 2-roll unit and
manual feed. Use manual feed when you want to print a job on a media type or
size that is not available on one of the paper rolls.
Note: The manual feed is a special slot just above the paper drawers on the
printer. You can insert cut sheet material in this slot, one sheet at a time. Refer
to
‘Copy on pre-cut sheets’ on page 51 on how to copy on pre-cut sheets.
Note: Only use material as specified in ‘List of available material types and
sizes’ on page 139.
The Océ TDS320 is a 600 DPI LED printer with a print speed of 1.8 A0 or 3
meters per minute.
You can perform a number of activities at the Océ TDS320 printer. You can set
the media type and size, stop a print job or select your preferred language from
the printer operator panel (see
chapter 2, ‘Use the Océ TDS320 to print’ on
page 17 for more details).
The Océ TDS320 is delivered with drivers and job submission software to
enable you to print from AutoCAD®, Windows® or Macintosh® applications.
The Océ TDS320 scanner
The Océ TDS320 scanner supports a wide range of copy activities. It provides
a large number of functions for defining original and copy related settings. You
can specify particular media, feeding and quality enhancement options from
the scanner operator panel. In combination with the Océ TDS320 printer it
forms a powerful productivity tool.
The scanner scans your originals. You can print the originals (copy job) or you
can store the scanned original in a file (Océ Scan Logic®). The scanner has
different quality modes which are provided by Océ Image Logic®.

10 Océ TDS320 User Manual
■ Green key principle
The Océ TDS320 is easy to use. Press the green key on the scanner operator
panel to start the basic copy jobs. If you have difficult copy jobs, you change
the default copy settings with the help of the other settings on the scanner
operator panel.
The Océ Power Logic® controller
The Océ TDS320 is equipped with a controller to process the print jobs and the
copy jobs. The controller can have Océ Remote Logic® to make your default
printer settings.
The Océ Power Logic® controller processes the print jobs and the copy jobs. It
also processes the optional scan to file jobs.
■ Set processing
When you send a file to the printer, the file is processed once and can be printed
many times. The Océ TDS320 has a set memory to store a maximum of 1000
A0s which allows you to create the same sets that are sorted either by page or
by set.
■ Spool memory
The Océ TDS320 has a spool memory which provides a queuing system for
files you want to print. The spool memory allows many users to send the print
jobs to the Océ TDS320 at the same time. The print jobs are put in the print
queue where they wait to be printed. The job that is put first into the queue is
printed first.
■ Network connectivity
The Océ TDS320 controls a number of common network protocols. The Océ
TDS320 can be used in many networks like TCP/IP and Novell®.
■ Security
You can increase the security level of the Océ Power Logic® Controller from
Standard to Medium or High. The security levels Medium and High are meant
for organizations with special security requirements. For example
governmental organizations, and organizations in the defense or the aerospace
industry.

Introduction 11
Attention: When you increase the security level to Medium or High, some of
the functions of the system cannot operate. When the security level is set to
Standard, all Océ Power Logic® features are available.
When you increase the security level to Medium, the following features are not
available.
■ Scan to file to remote destinations
■ Océ Remote Logic
®
■ Printing through Novell Pserver
■ Various network connectivity protocols.
When you increase the security level to High, the following features are not
available.
■ Scan to file to remote destinations
■ Océ Remote Logic
®
■ Printing through FTP (File Transfer Protocol)
■ Printing through Novell Pserver
■ Various network connectivity protocols.
Note: Please contact your local Océ Service organization for complete
information.
Océ Remote Logic® enables you to connect to the Océ Power Logic
®
Controller from a remote workstation.
Océ Settings Editor The Océ Settings Editor allows you to set the default
settings of the Océ TDS320 according to your companies requirements.
Refer to ‘Océ Power Logic®: The Settings Editor’ on page 95, for complete
information about the Océ Settings Editor application.
Océ TDS320 options
By default, the Océ TDS320 has an automatic 1 roll unit and is equipped with
a receiving tray as the output delivery device. The receiving tray is the rack on
the bottom of the printer (see figure 1 on page 12).
Automatic 2-roll unit The Océ TDS320 is available with an automatic 2-roll
unit. Each of the rolls can be loaded with print material of a different size or

12 Océ TDS320 User Manual
type. The size and type of the available media are indicated on the operating
panel.
Compact Output Stacker The optional compact output stacker offers a smart
and efficient disposition of printed or copied drawings (up to 100 prints) on
PPC material and some other materials.
Graphical User Interface The Graphical User Interface (GUI) consists of a
screen, a mouse, a keyboard and software. You use the screen, mouse and
keyboard to interact with the graphical user interface of the controller. With the
GUI you can perform Key Operator and System Administrator tasks in a
graphical way. Settings are visible within one window so that it is much easier
to view and change them.
Océ Scan Logic® Enables you to scan a document to file for later (re)use. You
can use the files in other applications or print them out.
■ Océ Scan Manager with Océ View Station LT
The Océ Scan Manager is an application available only locally on the
controller. With the Océ Scan Manager you can:
■ configure the destinations for scan-to-file jobs
■ increase your productivity with automatic file naming
■ view the scans
Refer to ‘Use the Océ TDS320 to Scan to file’ on page 59 for complete
information about the Scan Manager application.
Adobe® PostScript® 3/PDF The Océ TDS400 fully supports Adobe
®
PostScript
®
3. For Japanese 5 extra fonts are optional. They can be enabled
with a password in the Océ Settings Editor.
Océ Print Exec
TM
LT Océ Print Exec
TM
LT is optional software to create and
submit your print jobs.

Introduction 13
Océ TDS320 users
The Océ TDS320 has the following user types:
System administrator The Océ TDS320 system administrator installs and
makes the configuration for Océ TDS320. The system administrator defines
the printer-language settings, pen settings and Automatic Language Sensing
(ALS) settings. The system administrator can help the users who need to install
the printer drivers on their workstations. See
chapter 7, ‘Printer supplies and
maintenance’ on page 109 for complete information. The configuration
information is in the Océ TDS320 Connectivity Manual provided with the Océ
TDS320.
Key operator The Océ TDS320 key operator is responsible for the daily
maintenance of the Océ TDS320. The key operator replenishes toner when
necessary, loads media as needed and defines the default printer settings for
recurring print jobs. Also, the key operator defines all time settings, such as
panel time out and sleep mode time out.
Repro operator The repro operator is responsible for the daily operations on
the Océ TDS320
. The Repro Operator settings are a subset of the Key Operator
settings. The Repro Operator has no rights to change settings in the Océ Settings
Editor.
Anonymous user Typically, an anonymous user on the Océ TDS320 can be
either a PC user who has remote access to the system through one or more
drivers (Océ Windows
®
Printer driver, AutoCAD® HDI or PostScript®) or the
remote applications (Océ Settings Editor), or the print submission/print
management applications, or a user performing a copy job at the scanner.
Service operator The Océ TDS320 service operator is responsible for
installation and maintenance of the Océ TDS320.
User interaction
You can operate the Océ TDS320 from different locations: local and remote:
■ Operator panels
The Océ TDS320 has two operator panels to make the settings for the print

14 Océ TDS320 User Manual
jobs and the copy jobs. See ‘Printer operator panel’ on page 18 and ‘Scanner
operator panel’ on page 38 for complete information.
■ Océ Remote Logic®
Use the Océ Remote Logic® to make the default key operator and system
administrator settings (Océ Settings Editor).
■ Océ Scan Logic®
With Océ Scan Manager and Océ View Station LT you can define all
important settings for scanning.
■ Printer drivers
With the Océ TDS320 one or more printer drivers can be used, including Océ
Windows® Printer driver, AutoCAD® HDI and PostScript®. With these
drivers PC users can access the Océ TDS320 remotely, from their
applications, to print their files. More information about installing,
configuring and use of the drivers can be found in the documentation
provided with the drivers. All Océ drivers (except Postscript) can be freely
downloaded from the Web at www.oce.com.

Introduction 15
The data flow to the Océ TDS320
Connect the Océ TDS320 to a workstation connected to a network. It accepts
different standard format vector and raster data files from the host environment
and converts these into high quality prints
(see figure 2).
[2] Data flow to the Océ TDS320
When an Océ TDS320 receives vector, raster, Adobe® PostScript® or PDF
(optional, Adobe® PostScript® 3™) data it will generate a print with the
settings as specified in the Océ Settings Editor.
Each print job has remote control commands to indicate the settings for a job.
This so-called header contains the job and the file defined settings in Océ Job
Ticket (OJT). The OJT settings overwrite the settings defined in the Océ
Settings Editor. Except for pen settings and job management which have
priority over the Océ Job Ticket settings.
Application
Software
Océ TDS320
Printfile
Print
Job
Settings
Print
File

16 Océ TDS320 User Manual
To compose such a header, you can:
■ Compose the header within your application. Please refer to the Océ Job
Ticket (OJT) manual.
■ Use an Windows® and/or AutoCAD® HDI driver to generate both a
printable file (e.g. HP-RTL, HP-GL/2) and the appropriate header with
RCF-commands. Please refer to the Windows® / AutoCAD® Driver
documentation.
■ Use the Océ job submission software like Océ Print Exec
TM
LT to compose
jobs of printable files in a flexible and user friendly way. Please consult the
on-line help on the Océ Print Exec
TM
LT application for detailed
information.

17
Océ TDS320
User Manual
Chapter 2
Use the Océ TDS320 to print
This chapter explains how to print with the Océ TDS320.
18 Océ TDS320 User Manual
Printer operator panel
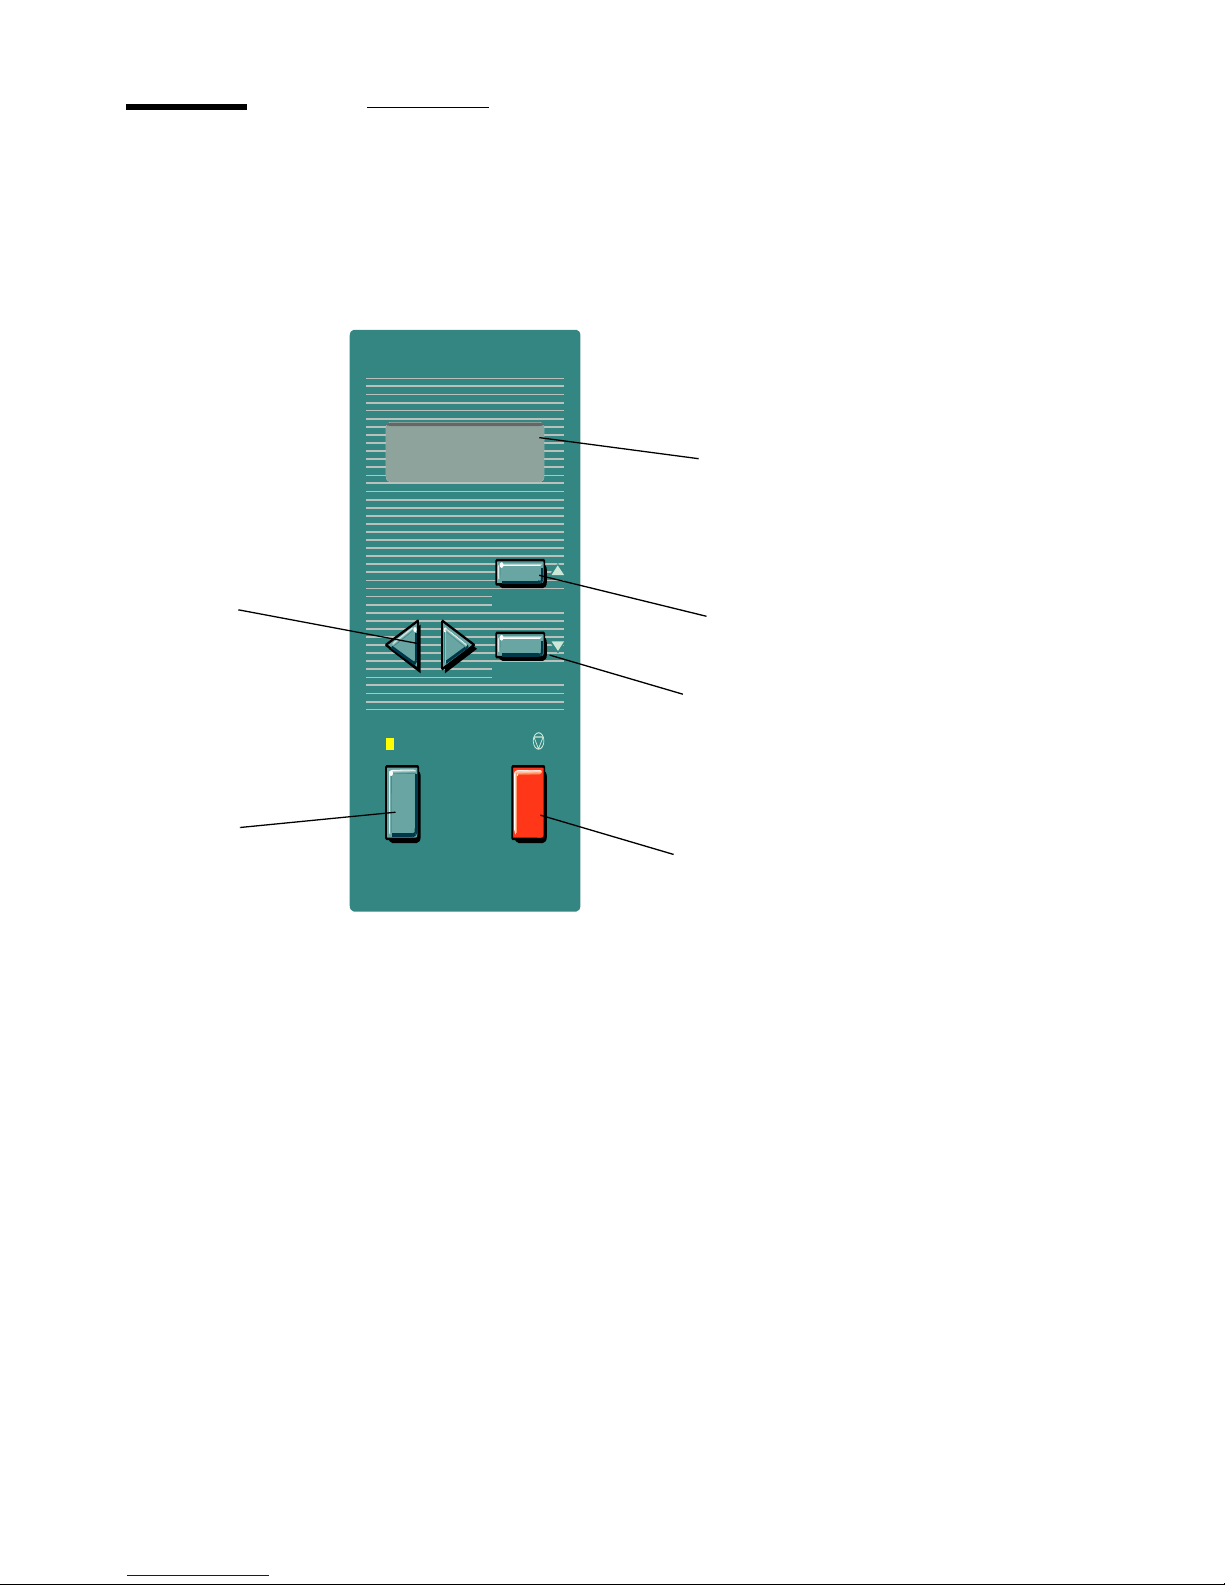
The operator panel on the right hand side is easy to use (see figure 3). The
panel has keys and a display.
[3] Printer operator panel
next/select
previous
on-line stop
Stop key
On-line
key
Browse
keys
Next/select
key
Previous
key
Alphanumeric display
Use the Océ TDS320 to print 19
Display
The display shows the feedback about print job status and error messages see
page 33 and page 34 in normal mode. In off-line mode it shows the ‘off-line’
menu (see figure on page 36).
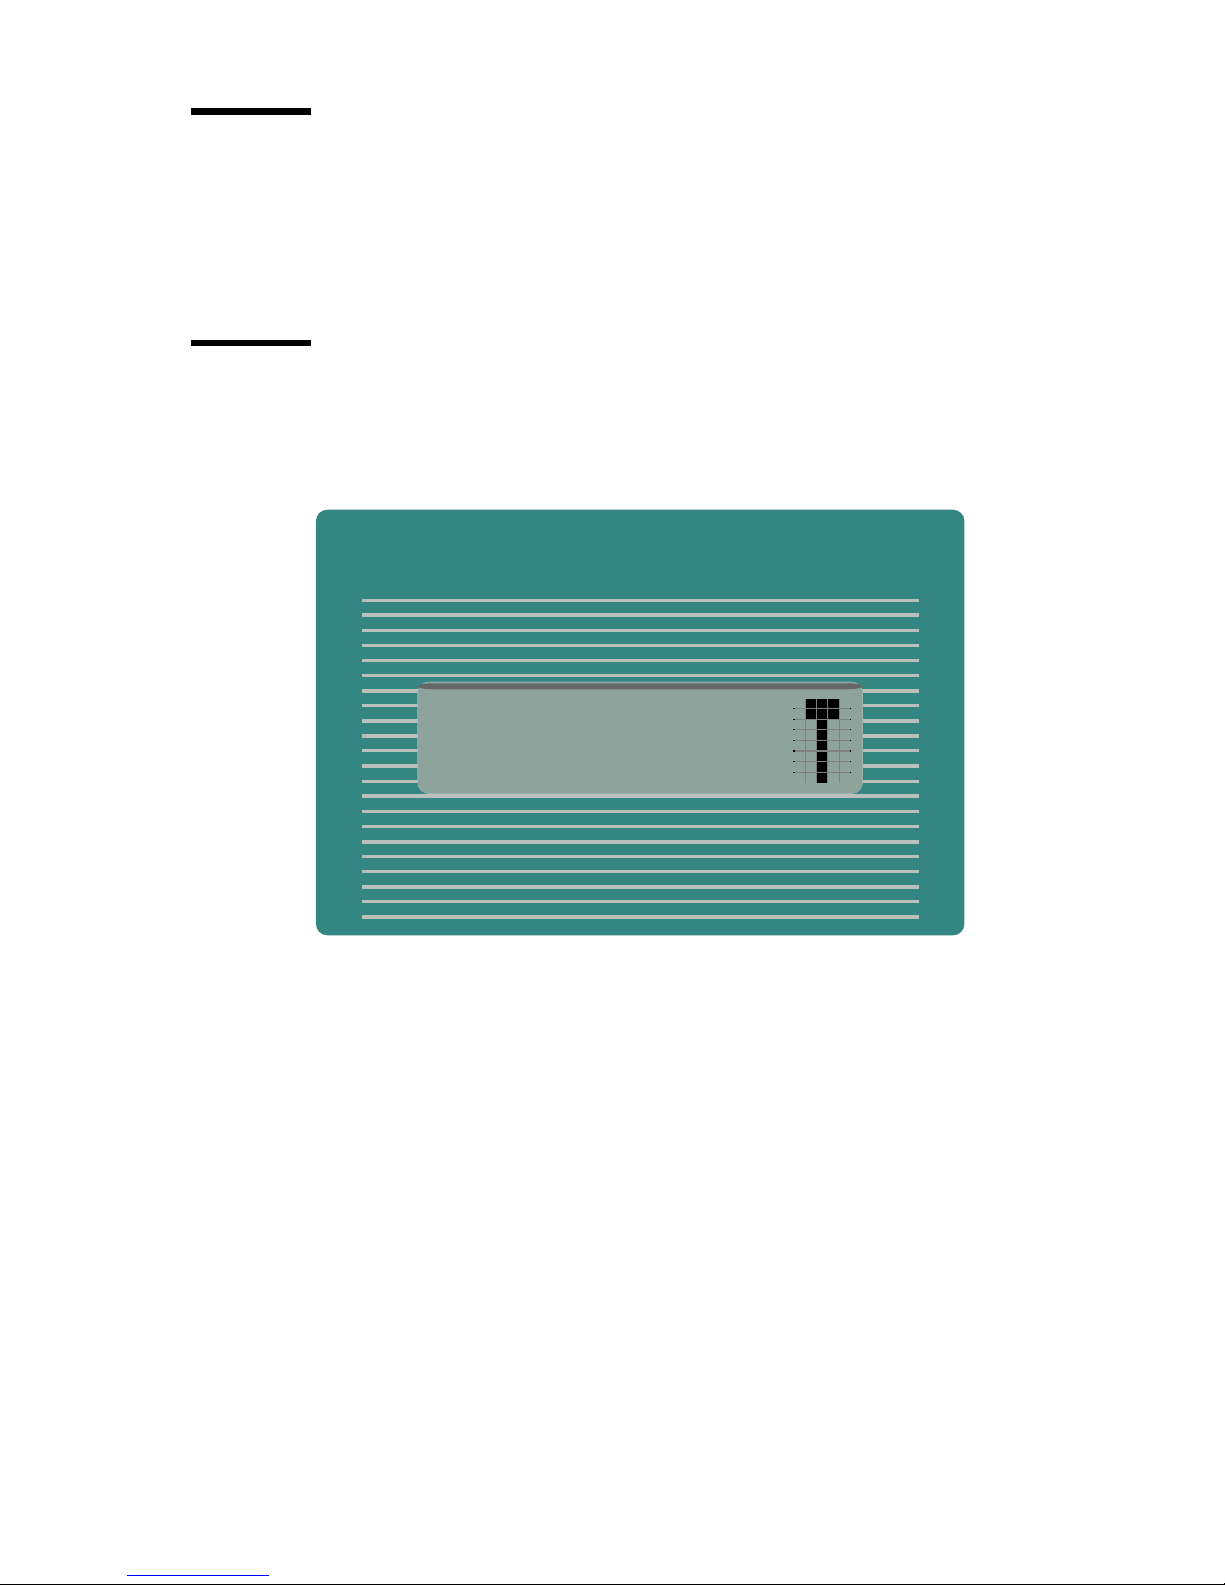
Menu level indicator
The menu level indicator indicates the current position in the menu. Press the
Previous key to scroll through the menu.
[4] Menu level indicator in the top level of the menu

20 Océ TDS320 User Manual
Keys
With the keys on the operator panel you can make the settings for the Océ
TDS320 Printer.
The following keys are available
Available keys
Key types Function
On-line key Press the On-line key to put the printer on-line or off-line. To ac-
tivate the program mode and to enter the top level menu. You
can use the Next/select key, the Previous key and the Browse
key to go through the menu. If the green light above the On-line
key is on, the printer is on-line; if this light is off, the printer is
off-line.
Next/select key To select an option or a setting in the menu. Or in case a
sub-menu is present, enter a menu on a lower level.
Previous key Press this key to go one level higher in the menu.
Browse keys These two keys are used to select another mode at the same level
of the menu, or to display the next or previous option from the
option list.
Stop key The red Stop key is used to stop the current print job.

Use the Océ TDS320 to print 21
How to turn on and turn off the Océ
TDS320 printer
To turn on the system:
■ turn on the printer.
■ turn on the scanner (see page 43).
■ turn on the controller(see page 22).
When you turn on the system, it is ready for operation. In this state, the
machine is in the stand-by mode.
If the system is not in use for more than 1 minute, the operator panel returns
automatically to the stand-by mode. The operator panel of the scanner is
activated in the following conditions:
■ you feed an original
■ a key on the operator panel is pressed
▼ Turn on the printer
1 Set the ON/OFF switch at the rear of the printer to position ‘1’ (see figure 5).
If the power supply is connected, the green switch lights.
[5] On/off switch of the printer
Note: When ‘Ready’ is displayed on the operator panel, the printer is ready for
use.

22 Océ TDS320 User Manual
▼ Turn off the printer
1 Set the ON/OFF switch at the rear of the printer to position ‘0’ (see figure 3).
Attention: If you switch off the printer during a print job, it is possible that
you lose information or that a paper jam occurs.
▼ Turn on or off the controller
1 Press the key on the front of the controller to turn the controller on or off.
Cancel a print
Cancel a print before you start the print or during the print.
▼ Cancel a print
1 Press the Stop key.
The printer stops.
When the printer runs, the paper is cut.
The paper is always ejected.

Use the Océ TDS320 to print 23
Menu structure
On the Océ TDS320 printer operator panel, you can do a number of actions.
These actions include:
■ Media settings (material and size).
■ Print info (configuration report, menu card and demo print).
■ Configuration (connectivity issues).
■ System (clear set memory and diagnostic mode).
Media type and size on the printer
One of the features of the Océ TDS320 printer is the automatic media change
function. This function allows the printer to take another roll of the same
format and copy material when the roll becomes empty when you print. You
must configure this setting in the Océ Settings Editor
(see ‘Océ Power Logic®:
The Settings Editor’ on page 95).
If you activate this function the machine automatically switches to the other
roll, if the used one becomes empty. The switch only occurs if the kind of
media and the width of the material is the same for both rolls.
Note: The Océ TDS320 Printer cannot identify the copy material type and
format. Fill the media and indicate the type and the size as described in
chapter , ‘Media’ on page 110.
See ‘List of available material types and sizes’ on page 139 for a summary of
all materials for the use with the Océ TDS320 Printer.
If you insert a new roll with another material or with a different width, you
have to program the new roll specifications. Refer to
‘List of available material
types and sizes’ on page 139.
Note: The machines switches automatically to the other roll if the used roll
becomes empty, if you activate this function in the Océ Settings Editor.

24 Océ TDS320 User Manual
▼ Set the media width settings
1 Press the On-line key to put the printer off-line.
2 Select the ‘Media settings’ item with the or key.
3 Press Next/select to enter the ‘Media settings’ menu.
4 Select ‘Roll 1’or ‘Roll 2’ with the or key.
5 Press Next/select to enter the ‘Roll’ or ‘Manual feed’ menu.
6 Select the ‘Width’ item with the or key.
7 Press Next/select to enter the ‘Width’ menu.
8 Select the desired width with the or key.
9 Press Next/select to confirm the selected width.
10 Press On-line to put the printer on-line again.
▼ Set the media type settings
1 Press the On-line key to put the printer off-line.
2 Select the ‘Media settings’ item with the or key.
3 Press Next/select to enter the ‘Media settings’ menu.
4 Select ‘Roll 1’, ‘Roll 2’, ‘Manual feed’ with the or key.
5 Press Next/select to enter the ‘Roll’ or ‘Manual feed’ menu.
6 Select the ‘Material’ item with the or key.
7 Press Next/select to enter the ‘Material’ menu.
8 Select the desired media material with the or key.
9 Press Next/select to confirm the selected media material.
10 Press On-line to put the printer on-line again.
Use the Océ TDS320 to print 25
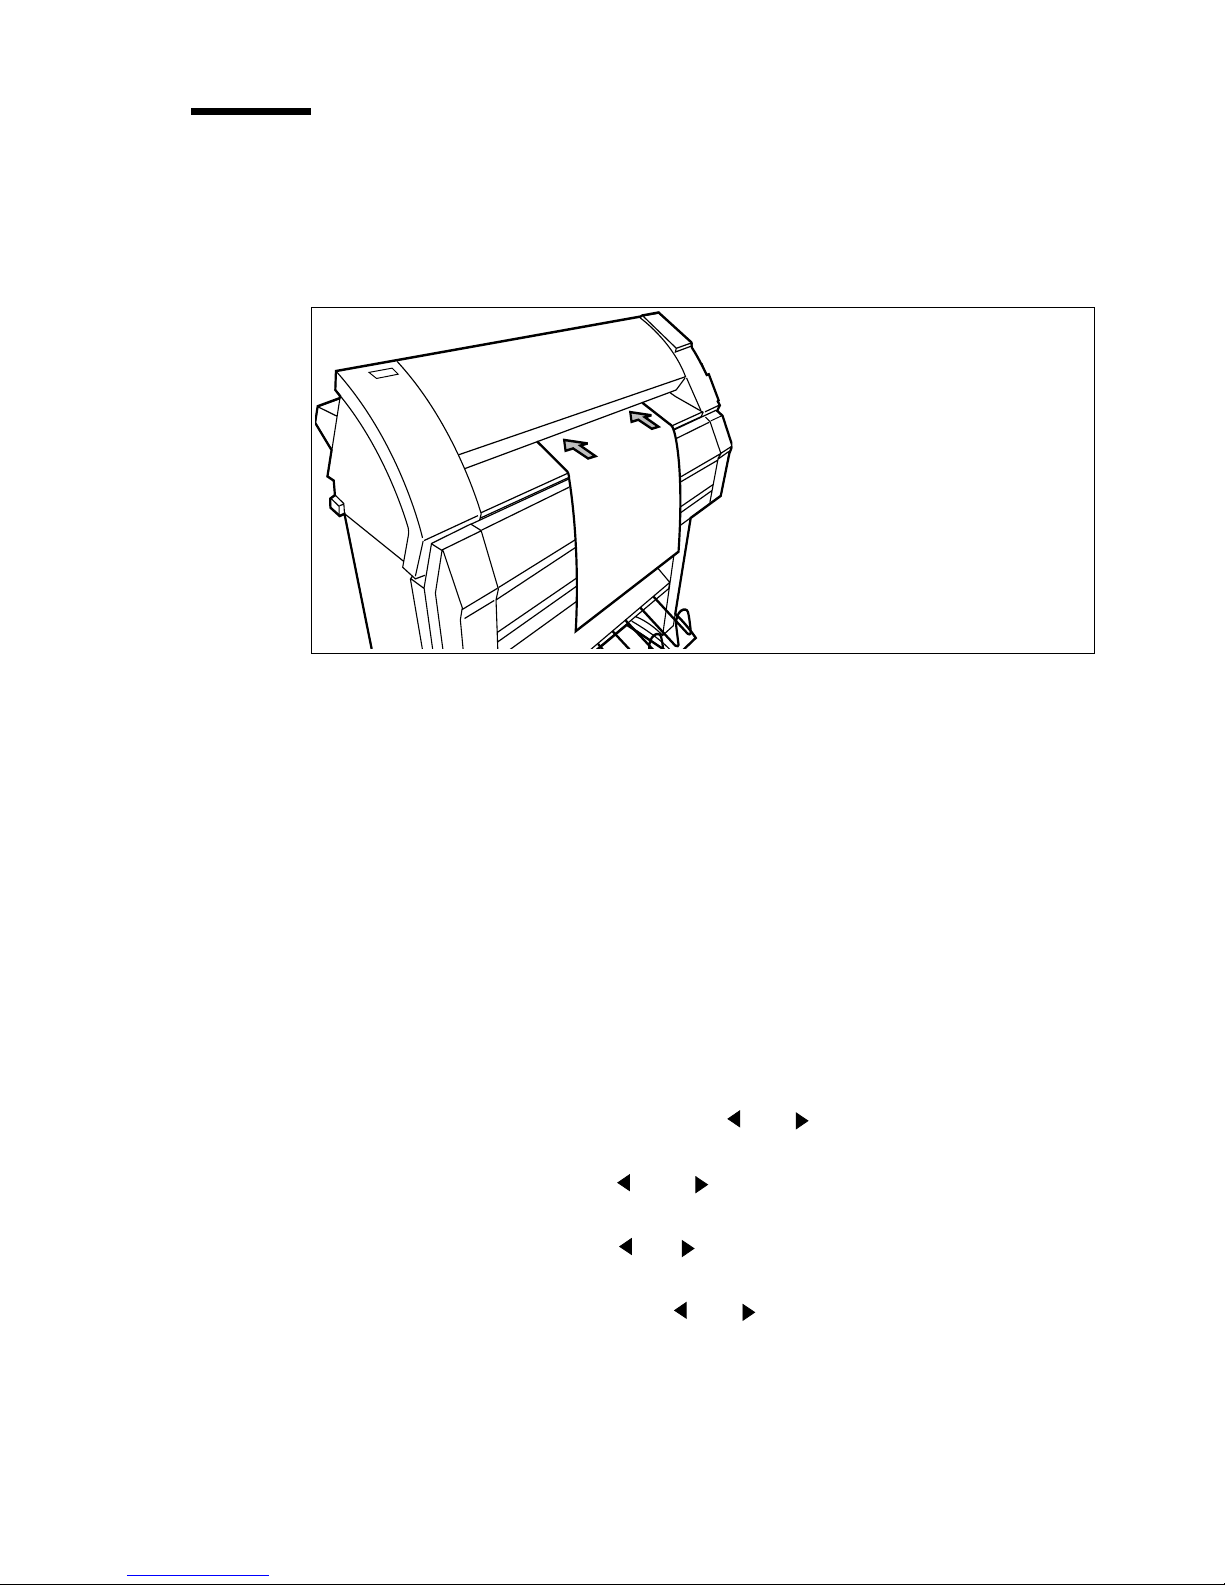
Manual feed
There are two possibilities to select manual feed:
■ via remote control commands added to the print file (by means of drivers).
■ choose ‘manual feed’ on the scanner operator panel.
[6] Manual feed
If you want to use manual feed, you must:
1 program the media settings (material and feed time out) on the printer
2 send the file
3 feed the sheet of material
4 hold the material until the printer pulls in the first part of the material.
If you select manual feed, the printer will inform you to feed the sheet into the
printer. There is a time out between 1 and 10 minutes. Default is 1 minute.
▼ Set the time-out for manual feed
Default is 1 minute.
1 Press On-line to put the printer off-line.
2 Select the ‘Media settings’ item with the or key.
3 Press Next/select to enter the ‘Media settings’ menu.
4 Select ‘Manual feed’ with the or key.
5 Press Next/select to enter the ‘Manual feed’ menu.
6 Select the ‘Time out’ with the or key.
7 Press Next/select to enter the ‘Time out’ menu.
8 Select the desired time out with the or key.
9 Press Next/select to confirm the selected time-out.
10 Press On-line to put the printer on-line again.

26 Océ TDS320 User Manual
Cut media
If the material does not have a straight leading strip, you can cut the material
at right angles from the roll.
▼ Cut the material from roll 1 or roll 2
1 Open the drawer.
2 Feed the paper manually until it is 5 cm above the top drawer.
3 Press the On-line key to put the printer off-line.
4 Close the paper drawer.
5 Select the ‘Media settings’ item with the or key.
6 Press Next/select to enter the ‘Media settings’ menu.
7 Select ‘Cut media’ with the or key.
8 Press Next/select to cut the paper.
9 Open the paper drawer.
10 Remove the scrap of material.
11 Feed the material until you can see the material and put the material into
position
(see figure 46 on page 113) and (see figure 50 on page 115).
12 Close the drawer.
13 Press the On-line key to put the printer on-line again.

Use the Océ TDS320 to print 27
Print info
You have the possibility to print:
■ the configuration report
■ the menu card
■ a demo plot
Print the configuration report
The configuration report shows the configuration and the settings of the
system.
▼ How to print the configuration report
1 Press the On-line key to put the printer off-line.
2 Select the ‘Print info’ item with the or key.
3 Press Next/select to enter the ‘Print info’ menu.
4 Select the ‘Configuration’ item with the or key.
5 Press Next/select to print the configuration report.
6 Press On-line to put the printer on-line again to print the report.
Print the menu card
You can print the menu of the printer, to guide you through the menu.
▼ How to print the menu card
1 Press the On-line key to put the printer off-line.
2 Select the ‘Print info’ item with the or key.
3 Press Next/select to enter the ‘Print info’ menu.
4 Select the ‘Menu card’ item with the or key.
5 Press Next/select to print the menu chart.
6 Press On-line to put the printer on-line again to print the menu card.

28 Océ TDS320 User Manual
Print the demo print
After the installation of the Océ TDS320, you can print the demo print, to
check the printer and the controller.
▼ Make a demo print
1 Press the On-line key to put the printer off-line.
2 Select the ‘Print info’ item with the or key.
3 Press Next/select to enter the ‘Print info’ menu.
4 Select the ‘Demo print’ item with the or key.
5 Press Next/select to print the demo print.
6 Press On-line to put the printer on-line again to print the demo print.

Use the Océ TDS320 to print 29
Configuration
Select a language
On the operator panel of the Océ TDS320 Printer you can indicate which
language you use to display the printer information, like status and error
messages.
▼ Select a language
1 Press the On-line key to put the printer off-line.
2 Select the ‘Configuration’ item with the or key.
3 Press Next/select to enter the ‘Configuration’ menu.
4 Select ‘Language’ with the or key.
5 Press Next/select to enter the ‘Language’ menu.
6 Select the desired language with the or key.
7 Press Next/select to confirm the selected language.
8 Press On-line to put the printer on-line again.
9 Turn the printer ‘off’ and ‘on’ again.
Network settings
The Océ TDS320 has 2 network adapters. To set the network settings you must
enter the network data in 4 fields.
■ Use DHCP server. The Dynamic Host Configuration Protocol (DHCP) is a
protocol to a u tom a te the assig nment of Internet Protocol ( IP) addresses in a
netw ork . W ithou t DHCP, th e IP address m u st be entered m a nu a lly .
■ IP address. An IP address has two parts: one part identifies the network (with
the network number) and the other part identifies the specific machine or host
within the network (with the host number).
■ Subnetmask. A subnet (short for ‘subnet work’) is an identifiably separate
part of an organization's network. To manage routing that could and should
be handled within an organization.
■ Set default gateway A g atew ay is a netw ork point tha t a cts a s a n entra nce to
another netw ork .
Enter the following ‘password’ (key sequence) to get access to the System
menu on the printer to set the network settings.

30 Océ TDS320 User Manual
▼ Enter the System menu
1 Press arrow left ( ).
2 Press the Stop key.
3 Press arrow right ( ).
4 Press the Stop key.
5 Press arrow left ( ).
6 You can now enter the System menu.
▼ Set use DHCP server
1 Press the On-line key to put the printer off-line.
2 Select the ‘System’ item with the or key.
3 Press Next/select to enter the ‘System’ menu.
4 Select ‘Network sett.’ with the or key.
5 Enter the ‘password’ (key sequence) to get access to the ‘System’ menu.
6 Press Next/select to enter the ‘Network sett.’ menu.
7 Select ‘adapter 1’ or ‘adapter 2’with the or key
8 Press Next/select to enter the ‘adapter 1’ or ‘adapter 2’ menu
9 Select ‘Use DHCP server.’ with the or key.
10 Select ‘Yes’ or ‘No’ with the or key.
11 Press Next/select to confirm.
12 Press On-line to put the printer on-line again.
▼ Set the IP address
1 Press the On-line key to put the printer off-line.
2 Select the ‘System’ item with the or key.
3 Press Next/select to enter the ‘System’ menu.
4 Enter the ‘password’ (key sequence) to get access to the ‘System’ menu.
5 Select ‘Network sett.’ with the or key.
6 Press Next/select to enter the ‘Network sett.’ menu.
7 Select ‘adapter 1’ or ‘adapter 2’with the or key
8 Press Next/select to enter the ‘adapter 1’ or ‘adapter 2’ menu
9 Select ‘IP address’ with the or key
The first three digits flash.
10 Enter the first three numbers of the ‘IP address’ with the or key.
11 Press Next/select to confirm, the next digits flash.
12 Enter the next three numbers of the ‘IP address’ with the or key.
13 Press Next/select to confirm, the next digits flash.
14 Enter the next numbers of the ‘IP address’ with the or key.
15 Press Next/select to confirm, the next digits flash.
16 Enter the next numbers of the ‘IP address’ with the or key.
17 Press Next/select to confirm.
18 Press On-line to put the printer on-line again.
 Loading...