

Page 1
Océ TDS100
Quick reference guide
Page 2

Copyright
© 2005, Océ-Technologies B.V. Venlo, The Netherlands
All rights reserved. No part of this wor k may be reproduced, copied, adapted,
or transmitted in any form or by any means without written permission from
Océ.
Océ-Technologies B.V. makes no representation or warranties with respect to
the contents hereof and specifically disclaims any implied warranties of
merchantability or fitness for any particular purpose.
Further, Océ-T echnologies B.V. reserves the right to revise this publication and
to make changes from time to time in the content hereof without obligation to
notify any person of such revision or changes.
Edition 2005-2
Océ-Technologies B.V.
GB
This manual is a part of a documentation set. The following table
displays the complete list.
Note: Visit Océ on the internet at www.oce.com for more
information.
Document Publication
medium
Contents
Safety
manual
Paper book
■ Instructions for safe use.
■ Safety data sheets.
Quick
reference
guide
Paper book
■ A short description on how to operate the
Océ TDS100.
User manual CD-ROM
■ A complete description on how to operate
and maintain the Océ TDS100.
Page 3

Contents 3
Contents
Chapter 1
About the Océ TDS100
The components 6
The operator panel 8
Make copies 11
Replace media rolls 12
Add toner 13
Clear jams 15
Page 4

4 Quick reference guide
Page 5

5
Océ TDS100
Qui c k re fe renc e g ui de
Chapter 1
About the Océ TDS100
Page 6
6 Quick reference guide
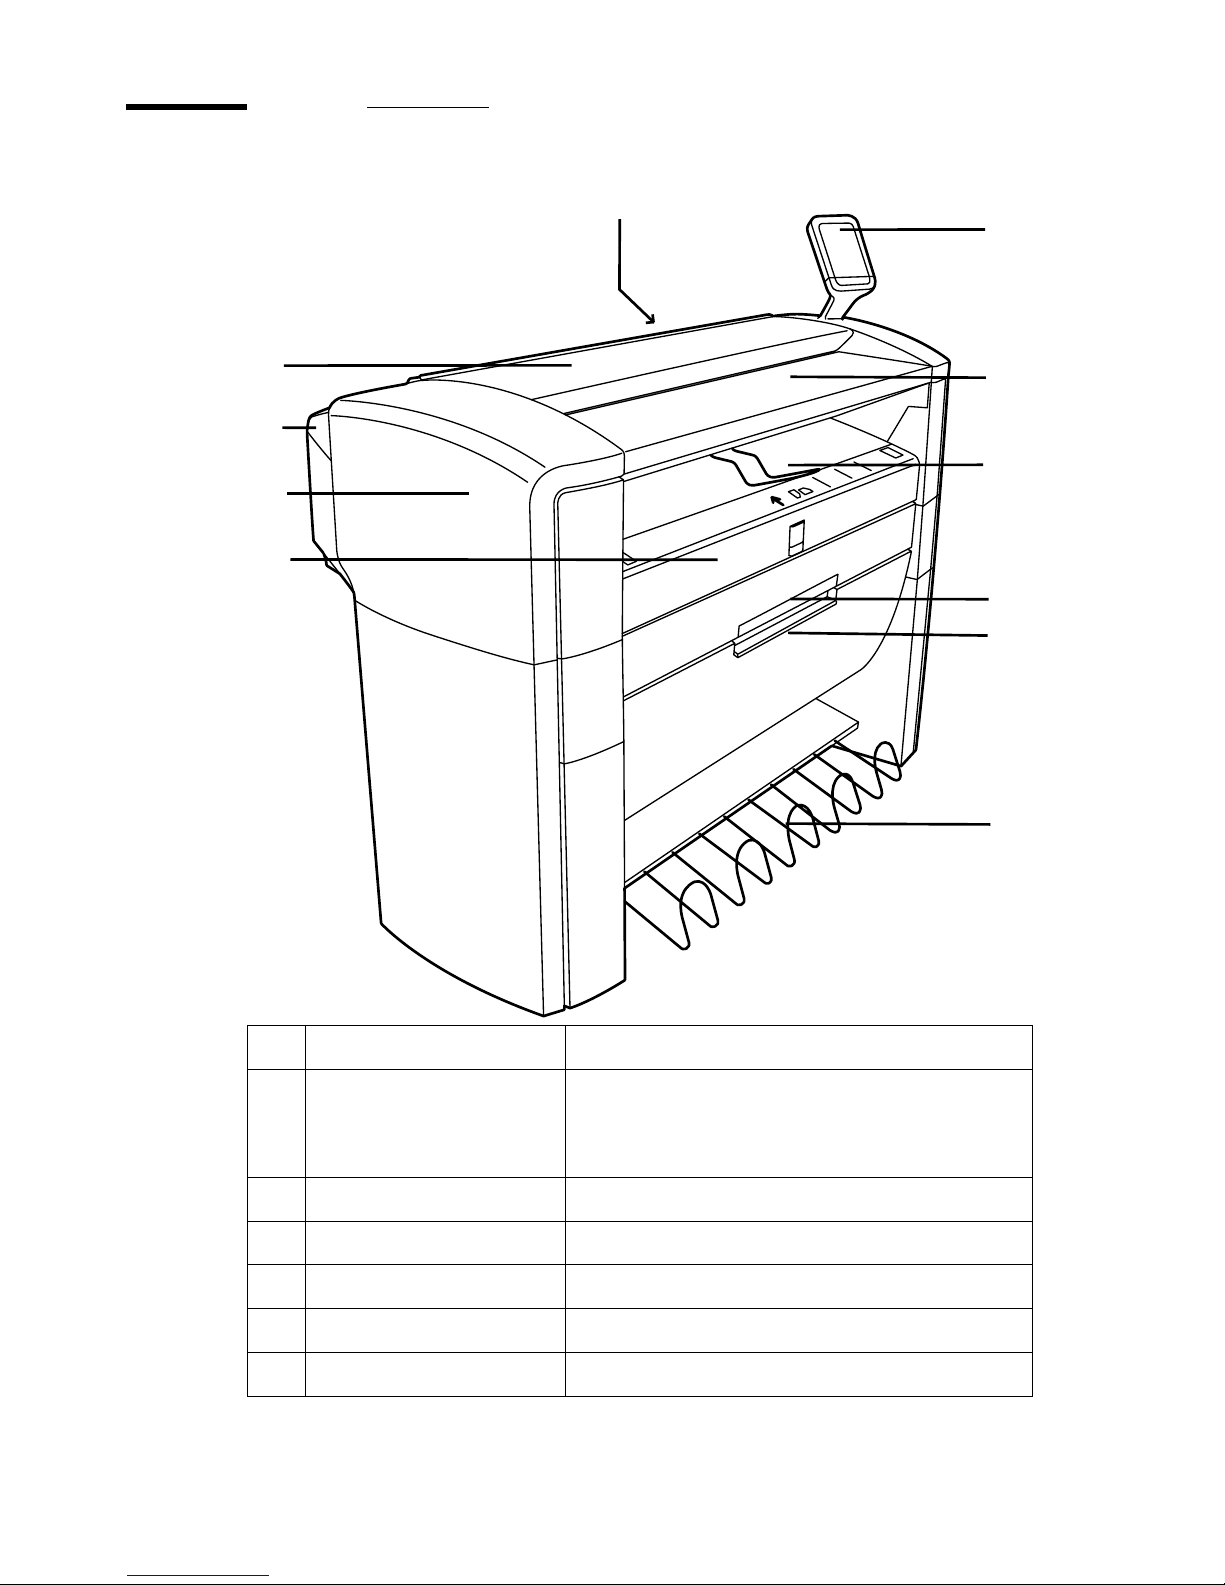
The components
Nr. Component Function
1 On / off switch Turn on and off the Océ TDS100.
Note: The on / off switch is not visible in the
illustration.
2 Operator panel Set up, start and control the copy jobs.
3 Original feed table Feed the original.
4 Manual feed table Feed the media manually .
5 Roll 1 (drawer) Feed the media automatically from roll 1.
6 Roll 2 (door) Feed the media automatically from roll 2.
8
2
1
3
4
6
5
7
11
1
0
9
Page 7

About the Océ TDS100 7
Note: Some components may not be available on your Océ TDS100 due to the
differences between the configurations.
7 Integrated receiving
tray
Receive the copies.
8 Top cover Give access to the transparent plate.
9 Fuser cover Give access to the fuser.
Note: The fuser is not visible in the
illustration.
10 Left cover Give access to the fill opening of the toner
reservoir , the waste toner bag and to the
handle of the fuser cover.
11 Middle cover Give access to the underside of the manual
feed table.
Nr. Component Function
Page 8

8 Quick reference guide
The operator panel
4
2
0
-2
-4
media
paper
roll 1
trailing
synchro
film
roll 2
leading
standard
feed
manual
strip
cut
toner media jam
6
8
1234 5
1413
1
0
1
2
7
9
1
1
Page 9

About the Océ TDS100 9
The indicators
Nr. Indicator Function
1 'Toner' Indicate that the Océ TDS100 has run out of toner.
2 Green light Indicate that the copier is ready.
A blinking green light indicates that the copier runs a
copy job.
3 Red light Indicate that an error has occurred.
4'Media
jam'
■ Indicate that the original or copy media has
jammed.
■ Indicate that the media roll is empty for a 1 roll and
2 roll configuration.
■ Indicate that you can remove the cut off strip
5Display
■ Display the media size when you change a roll.
■ Display the strip length when you add or remove a
strip.
■ Display a message code.
■ Display the length of the original when you copy
manually on cut sheet media
Page 10

10 Quick reference guide
The keys
Note:
Some functions may not be available on your Océ TDS100 due to the
differences in the configurations.
Nr. Key Function
6 'Media' Select the media type.
7 'Feed' Select the media feed method.
8 Exposure Adjust the exposure.
Use the exposure setting to correct the background of
the copy.
9 'Strip' Select the edge for the strip.
■ 'Trailing'
Use the adjustment key to set the trailing strip length.
A positive v alue adds a strip, a negati ve value remo ves
a strip.
■ 'Leading'
Use the adjustment key to set the leading strip length.
A positive v alue adds a strip, a negati ve value remo ves
a strip.
10 Adjustment
key
■ Adjust the strip length.
■ Adjust the media size for a new roll.
■ Adjust the media size for the standard cut size.
11 'Cut' Select the cut method.
■ 'Synchro' enables you to cut the copy to the same
size as the original.
■ 'Standard' enables you to cut the copy to the same
size as a standard size. Use the adjustment key to set
the standard size.
12 Copies Adjust the number of copies.
13 Stop
■ When you press the stop key while the copier runs
a copy job, the copy job will stop.
■ When you press the stop key once while you set up
a copy job, the number of copies returns to 1.
■ When you press the stop key twice while you set up
a copy job, the default values return.
14 Start Start the copy job.
Page 11

About the Océ TDS100 11
Make copies
How to copy on a roll medium (automatically)
How to copy on a cut sheet (manually)
Step Action
1 Place the original centrally and face down on the original feed table.
The Océ TDS100 moves the original to the back.
2 Make the required settings.
3 Press the green start key.
Step Action
1 Place the original centrally and face down on the original feed table.
The Océ TDS100 moves the original to the back.
2 Place the cut sheet centrally on the manual feed table.
The Océ TDS100 pulls in the sheet.
3 Make the required settings.
4 Press the green start key.
Page 12

12 Quick reference guide
Replace media rolls
How to replace a media roll
Step Action
1 Open the drawer with roll 1 or the door in front of roll 2.
2 Replace the media roll and follow the instructions on the sticker.
3 Use the 'Feed' key to select the roll number of the new roll.
3 Use the 'Media' key to select the media type of the new roll.
4 Use the adjustment key to select the media size of the new roll.
5 Close the drawer with roll 1or the door in front of roll 2.
Page 13

About the Océ TDS100 13
Add toner
How to add toner
Step Action
1 Loosen the nut at the left back side.
Open the left cover.
2 Before you open the bottle, shake the toner bottle thoroughly.
Put the toner bottle in the bottle holder.
Turn the bottle clockwise to fasten the bottle.
Page 14

14 Quick reference guide
3 Turn the bottle in the vertical position.
4 Wait until the bottle is empty.
Return the bottle into the original position.
5 Turn the bottle anticlockwise to loosen the bottle from the bottle
holder.
6 Pull the waste toner bag from its holder.
Close the waste toner bag.
7 Slide the new waste toner bag over the holder.
8 Close the left cover and tighten the nut at the left back side.
Step Action
1
2
Page 15

About the Océ TDS100 15
Clear jams
How to remove a jammed original
Step Action
1 Open the top cover in case of a fragile original.
Pull the top cover tow a rds you and lift the top cover to open it.
2 Pull the original carefully with two hands towards you
3 Check on a media jam also and clear the media jam if necessary
Page 16

16 Quick reference guide
How to remove the media from the manual feed table
Attention: Make sure you lower the sheet feeder before you remove the
media.
Step Action
1 Open the middle cover.
2 Press the two handles at the underside of the manual feed table to
lower the manual feed table.
3 Remove the jammed media carefully
4 Lift the manual feed table until you hear or feel a click.
1
2
2
Page 17

About the Océ TDS100 17
How to remove the media from the fuser unit
Caution: The fuser section can be hot.
Attention: The jammed media can contain loo se toner.
Step Action
1 Turn off the Océ TDS100.
2 Loosen the nut at the left back side.
Open the left cover.
3 Lift the green handle and open the fuser cover.
4 Remove the jammed media carefully.
Note: Make sure that you remove all jammed media.
1
Page 18

18 Quick reference guide
5 Lift the green handle and close the fuser cover.
6 Close the left cover.
Tighten the nut at the left back side.
7 Turn on the Océ TDS100.
Step Action
 Loading...