

Page 1

Océ TCS300
Océ User manual
User manual
Page 2

Edition 2006-04
GB
Océ-Technologies B.V.
Océ-Technologies B.V.
Copyright
2006, Océ-Technologies B.V. Venlo, The Netherlands.
All rights reserved. No part of this work may be reproduced, copied, adapted, or
transmitted in any form or by any means without written permission from Océ.
Océ-Technologies B.V. makes no representation or warranties with respect to the
contents hereof and specifically disclaims any implied warranties of
merchantability or fitness for any particular purpose.
Further, Océ-Technologies B.V. reserves the right to revise this publication and to
make changes from time to time in the content hereof without obligation to notify
any person of such revision or changes.
Page 3

3
Trademarks
Trademarks
Océ, Océ TCS300, Océ TCS300 printer, Océ Doc Exec®, Océ Image Logic®, Océ
Scan Logic
®
, Océ Power Logic®, Océ Print Exec® and Océ Remote Logic® are
registered trademarks of Océ-Technologies B.V.
Adobe
®
and PostScript® 3 are registered trademarks of Adobe® Systems
Incorporated.
Macintosh
®
is a registered trademark of Apple® Computer, Inc.
Microsoft
®
, Windows® , Windows NT®, Windows 95/98®, Windows 2000®,
Windows XP
®
and Internet Explorer® are either registered trademarks or trademarks
of Microsoft
®
Corporation in the United States and/or other countries.
AutoCAD
®
is a registered trademark of Autodesk, Inc.
Novell
®
is a registered trademark of Novell, Inc.
Netscape Navigator
®
is a registered trademark of Netscape Corp.
Pentium
®
is a registered trademark of Intel Corporation.
Energy STAR
®
is a registered trademark of the U.S. Environmental Protection
Agency (EPA).
Products in this publication are referred to by their general trade names. In most, if
not all cases, these designations are claimed as trademarks or registered trademarks
of their respective companies.
Page 4

4
Trademarks
Page 5

5
Contents
Contents
Chapter 1
Introduction . . . . . . . . . . . . . . . . . . . . . . . . . . . . . . . . . . . . . . . . . . . . . . . . . . . . . . . 9
Notes for the reader. . . . . . . . . . . . . . . . . . . . . . . . . . . . . . . . . . . . . . . . . 10
How to use this manual . . . . . . . . . . . . . . . . . . . . . . . . . . . . . . . . . . . . . . 11
Available documentation . . . . . . . . . . . . . . . . . . . . . . . . . . . . . . . . . . . . . 13
The Océ TCS300 users . . . . . . . . . . . . . . . . . . . . . . . . . . . . . . . . . . . . . . 14
Chapter 2
Get to know the Océ TCS300 colour printing system hardware. . . . . . . . . . . . 17
The Océ TCS300 colour printing system. . . . . . . . . . . . . . . . . . . . . . . . . 18
The Océ Power Logic® controller . . . . . . . . . . . . . . . . . . . . . . . . . . . . . . 19
The Océ TCS300 printer . . . . . . . . . . . . . . . . . . . . . . . . . . . . . . . . . . . . . 21
The Océ TCS300 printer. . . . . . . . . . . . . . . . . . . . . . . . . . . . . . . . . . . 21
The printer operator panel. . . . . . . . . . . . . . . . . . . . . . . . . . . . . . . . . . 23
The on-line mode and the off-line mode . . . . . . . . . . . . . . . . . . . . . . . 26
The finishing options . . . . . . . . . . . . . . . . . . . . . . . . . . . . . . . . . . . . . . . . 29
The finishing options . . . . . . . . . . . . . . . . . . . . . . . . . . . . . . . . . . . . . . 29
The optional copy receiving rack. . . . . . . . . . . . . . . . . . . . . . . . . . . . . 30
Chapter 3
Prepare the Océ TCS300 for use . . . . . . . . . . . . . . . . . . . . . . . . . . . . . . . . . . . . . 35
Introduction . . . . . . . . . . . . . . . . . . . . . . . . . . . . . . . . . . . . . . . . . . . . . . . 36
Turn on and off the Océ TCS300. . . . . . . . . . . . . . . . . . . . . . . . . . . . . . . 37
Turn on and off the Océ TCS300 printer and the Océ Power Logic® con-
troller . . . . . . . . . . . . . . . . . . . . . . . . . . . . . . . . . . . . . . . . . . . . . . . . . 37
Set the timers. . . . . . . . . . . . . . . . . . . . . . . . . . . . . . . . . . . . . . . . . . . . . . 40
The energy save mode timer . . . . . . . . . . . . . . . . . . . . . . . . . . . . . . . 40
The sleep mode timer . . . . . . . . . . . . . . . . . . . . . . . . . . . . . . . . . . . . . 42
Define the display language of the Océ TCS300. . . . . . . . . . . . . . . . . . . 44
Set another language for the Océ TCS300 Settings Editor . . . . . . . . . . . 46
Configure the regional settings of the Océ TCS300 . . . . . . . . . . . . . . . . 47
Configure the network settings of the Océ TCS300. . . . . . . . . . . . . . . . . 48
Chapter 4
Use the Océ Settings Editor to control your workflow . . . . . . . . . . . . . . . . . . . 53
Purpose of the Océ TCS300 Settings Editor . . . . . . . . . . . . . . . . . . . . . 54
User roles and authorisations . . . . . . . . . . . . . . . . . . . . . . . . . . . . . . . . . 56
Log in as an authorised user . . . . . . . . . . . . . . . . . . . . . . . . . . . . . . . . . . 57
View the settings . . . . . . . . . . . . . . . . . . . . . . . . . . . . . . . . . . . . . . . . . . . 58
Check your licenses. . . . . . . . . . . . . . . . . . . . . . . . . . . . . . . . . . . . . . . . . 60
Page 6

6
Contents
Define the media sizes. . . . . . . . . . . . . . . . . . . . . . . . . . . . . . . . . . . . . . . 62
Configure the 'Media request time-out' . . . . . . . . . . . . . . . . . . . . . . . . . . 63
Manage the media profiles. . . . . . . . . . . . . . . . . . . . . . . . . . . . . . . . . . . . 64
Download a media profile from the Océ web site. . . . . . . . . . . . . . . . . . . 65
Update a media profile . . . . . . . . . . . . . . . . . . . . . . . . . . . . . . . . . . . . . . . 66
Set up unattended / overnight printing optimisation. . . . . . . . . . . . . . . . . 67
Chapter 5
Print jobs to the Océ TCS300 . . . . . . . . . . . . . . . . . . . . . . . . . . . . . . . . . . . . . . . . 69
What you need to know before you send your print jobs . . . . . . . . . . . . . 70
Send print jobs to the Océ TCS300 . . . . . . . . . . . . . . . . . . . . . . . . . . . . . 71
Use the printer drivers to send jobs to the Océ TCS300 printer . . . . . . . 72
Use FTP to send jobs to the Océ TCS300. . . . . . . . . . . . . . . . . . . . . . . . 73
Stop or delete an active job. . . . . . . . . . . . . . . . . . . . . . . . . . . . . . . . . . . 74
Handle the media for the print jobs . . . . . . . . . . . . . . . . . . . . . . . . . . . . . 75
Define the correct media for your jobs . . . . . . . . . . . . . . . . . . . . . . . . 75
Change the default drying time . . . . . . . . . . . . . . . . . . . . . . . . . . . . . . 77
Cut the output and clean cut a roll of media . . . . . . . . . . . . . . . . . . . . 78
Chapter 6
Ensure the best output quality. . . . . . . . . . . . . . . . . . . . . . . . . . . . . . . . . . . . . . . 81
Introduction how to ensure the best output quality. . . . . . . . . . . . . . . . . . 82
Define the output quality . . . . . . . . . . . . . . . . . . . . . . . . . . . . . . . . . . . . . 83
The quality modes. . . . . . . . . . . . . . . . . . . . . . . . . . . . . . . . . . . . . . . . 83
Output type, output quality and print speed. . . . . . . . . . . . . . . . . . . . . 84
Recommended media types and quality modes . . . . . . . . . . . . . . . . . 85
Colour Management . . . . . . . . . . . . . . . . . . . . . . . . . . . . . . . . . . . . . . 96
Define the colour settings. . . . . . . . . . . . . . . . . . . . . . . . . . . . . . . . 96
'Colour feel'. . . . . . . . . . . . . . . . . . . . . . . . . . . . . . . . . . . . . . . . . . 100
'Enhanced colours: RGB input data'. . . . . . . . . . . . . . . . . . . . . . . 101
'Enhanced colours: CMYK input data' . . . . . . . . . . . . . . . . . . . . . 102
'Enhanced colours: Rendering intent'. . . . . . . . . . . . . . . . . . . . . . 103
'Colour Management' in the Océ Settings Editor . . . . . . . . . . . . . 105
Check the output quality . . . . . . . . . . . . . . . . . . . . . . . . . . . . . . . . . . . . 108
Output quality problems . . . . . . . . . . . . . . . . . . . . . . . . . . . . . . . . . . 108
'Quality check' print . . . . . . . . . . . . . . . . . . . . . . . . . . . . . . . . . . . . . . 113
'Tone scale area check' print. . . . . . . . . . . . . . . . . . . . . . . . . . . . . . . 114
'Demo print' . . . . . . . . . . . . . . . . . . . . . . . . . . . . . . . . . . . . . . . . . . . . 115
Optimise the output quality. . . . . . . . . . . . . . . . . . . . . . . . . . . . . . . . . . . 116
Optimise the output quality on the printer . . . . . . . . . . . . . . . . . . . . . 116
Use the Optimise print quality wizard . . . . . . . . . . . . . . . . . . . . . . . . 118
Chapter 7
License management . . . . . . . . . . . . . . . . . . . . . . . . . . . . . . . . . . . . . . . . . . . . . 121
Introduction to managing licenses . . . . . . . . . . . . . . . . . . . . . . . . . . . . . 122
Page 7

7
Contents
The 'Licenses' tab in the Settings Editor . . . . . . . . . . . . . . . . . . . . . . . . 122
The basic workflow of license activation . . . . . . . . . . . . . . . . . . . . . . . . 123
The structure of license files and licenses . . . . . . . . . . . . . . . . . . . . . . . 124
Check your licenses. . . . . . . . . . . . . . . . . . . . . . . . . . . . . . . . . . . . . . . . 126
Get a new license . . . . . . . . . . . . . . . . . . . . . . . . . . . . . . . . . . . . . . . . . 127
Save the currently active licenses . . . . . . . . . . . . . . . . . . . . . . . . . . . . . 129
Chapter 8
Maintain the Océ TCS300 printer . . . . . . . . . . . . . . . . . . . . . . . . . . . . . . . . . . . . 131
Replace the media. . . . . . . . . . . . . . . . . . . . . . . . . . . . . . . . . . . . . . . . . 132
Replace the ink tanks. . . . . . . . . . . . . . . . . . . . . . . . . . . . . . . . . . . . . . . 139
Replace a defective printhead . . . . . . . . . . . . . . . . . . . . . . . . . . . . . . . . 142
Replace the maintenance cassette . . . . . . . . . . . . . . . . . . . . . . . . . . . . 147
Chapter 9
System messages and solutions. . . . . . . . . . . . . . . . . . . . . . . . . . . . . . . . . . . . 151
Overview . . . . . . . . . . . . . . . . . . . . . . . . . . . . . . . . . . . . . . . . . . . . . . . . 152
Required media not available . . . . . . . . . . . . . . . . . . . . . . . . . . . . . . . . 154
End of roll. . . . . . . . . . . . . . . . . . . . . . . . . . . . . . . . . . . . . . . . . . . . . . . . 155
Cover or door opened . . . . . . . . . . . . . . . . . . . . . . . . . . . . . . . . . . . . . . 156
Remove jammed media. . . . . . . . . . . . . . . . . . . . . . . . . . . . . . . . . . . . . 157
Temperature or humidity out of range . . . . . . . . . . . . . . . . . . . . . . . . . . 159
Carriage away from home position too long . . . . . . . . . . . . . . . . . . . . . 160
Clear the set memory. . . . . . . . . . . . . . . . . . . . . . . . . . . . . . . . . . . . . . . 161
Correct system errors . . . . . . . . . . . . . . . . . . . . . . . . . . . . . . . . . . . . . . 162
Deal with permanent errors . . . . . . . . . . . . . . . . . . . . . . . . . . . . . . . . . . 163
Appendix A
Specifications of the Océ TCS300 . . . . . . . . . . . . . . . . . . . . . . . . . . . . . . . . . . . 165
Specifications Océ Power Logic® controller . . . . . . . . . . . . . . . . . . . . . 166
Specifications Océ TCS300 printer . . . . . . . . . . . . . . . . . . . . . . . . . . . . 168
Preferred media types and sizes . . . . . . . . . . . . . . . . . . . . . . . . . . . . . . 170
Typical drying times . . . . . . . . . . . . . . . . . . . . . . . . . . . . . . . . . . . . . . . . 173
Specifications drivers and job submission software. . . . . . . . . . . . . . . . 175
Appendix B
Reader's comment sheet . . . . . . . . . . . . . . . . . . . . . . . . . . . . . . . . . . . . . . . . . . 177
Reader's comment sheet . . . . . . . . . . . . . . . . . . . . . . . . . . . . . . . . . . . 178
Appendix C
Addresses of local Océ organisations . . . . . . . . . . . . . . . . . . . . . . . . . . . . . . . 181
Addresses of local Océ organisations . . . . . . . . . . . . . . . . . . . . . . . . . . 182
Page 8

8
Contents
Page 9

9
Chapter 1
Introduction
Page 10

10 Chapter 1 Introduction
Notes for the reader
Notes for the reader
Introduction
This manual helps you to use the Océ TCS300. The manual contains a description
of the Océ TCS300 and guidelines to use and operate the Océ TCS300. There are
also tips to increase your knowledge of the Océ TCS300 and to help you manage the
workflow even better.
Definition
Attention Getters
Parts of this manual require your special attention. These parts provide important,
additional information or are about the prevention of damage to your properties.
Note, Attention and Caution
The words Note, Attention and Caution indicate these important parts.
■ The word Note comes before additional information about the correct operation
of the Océ TCS300 or a tip.
■ A part marked with Attention contains information to prevent damage to items,
for example the Océ TCS300, an original or a file.
■ A part marked with Caution contains information to prevent personal injury.
Caution is found only in manuals that describe physical products.
Safety information
The safety information for this product is included in a separate manual with the title
Safety manual. This manual is part of the documentation set that you received with
your product.
Page 11

11
How to use this manual
How to use this manual
Introduction
You can access a topic quickly through the following methods.
■ Refer to the alphabetical index at the end of the manual.
■ Refer to the table of contents at the beginning of this manual.
Before you turn to the complete table of contents, you can also use the following
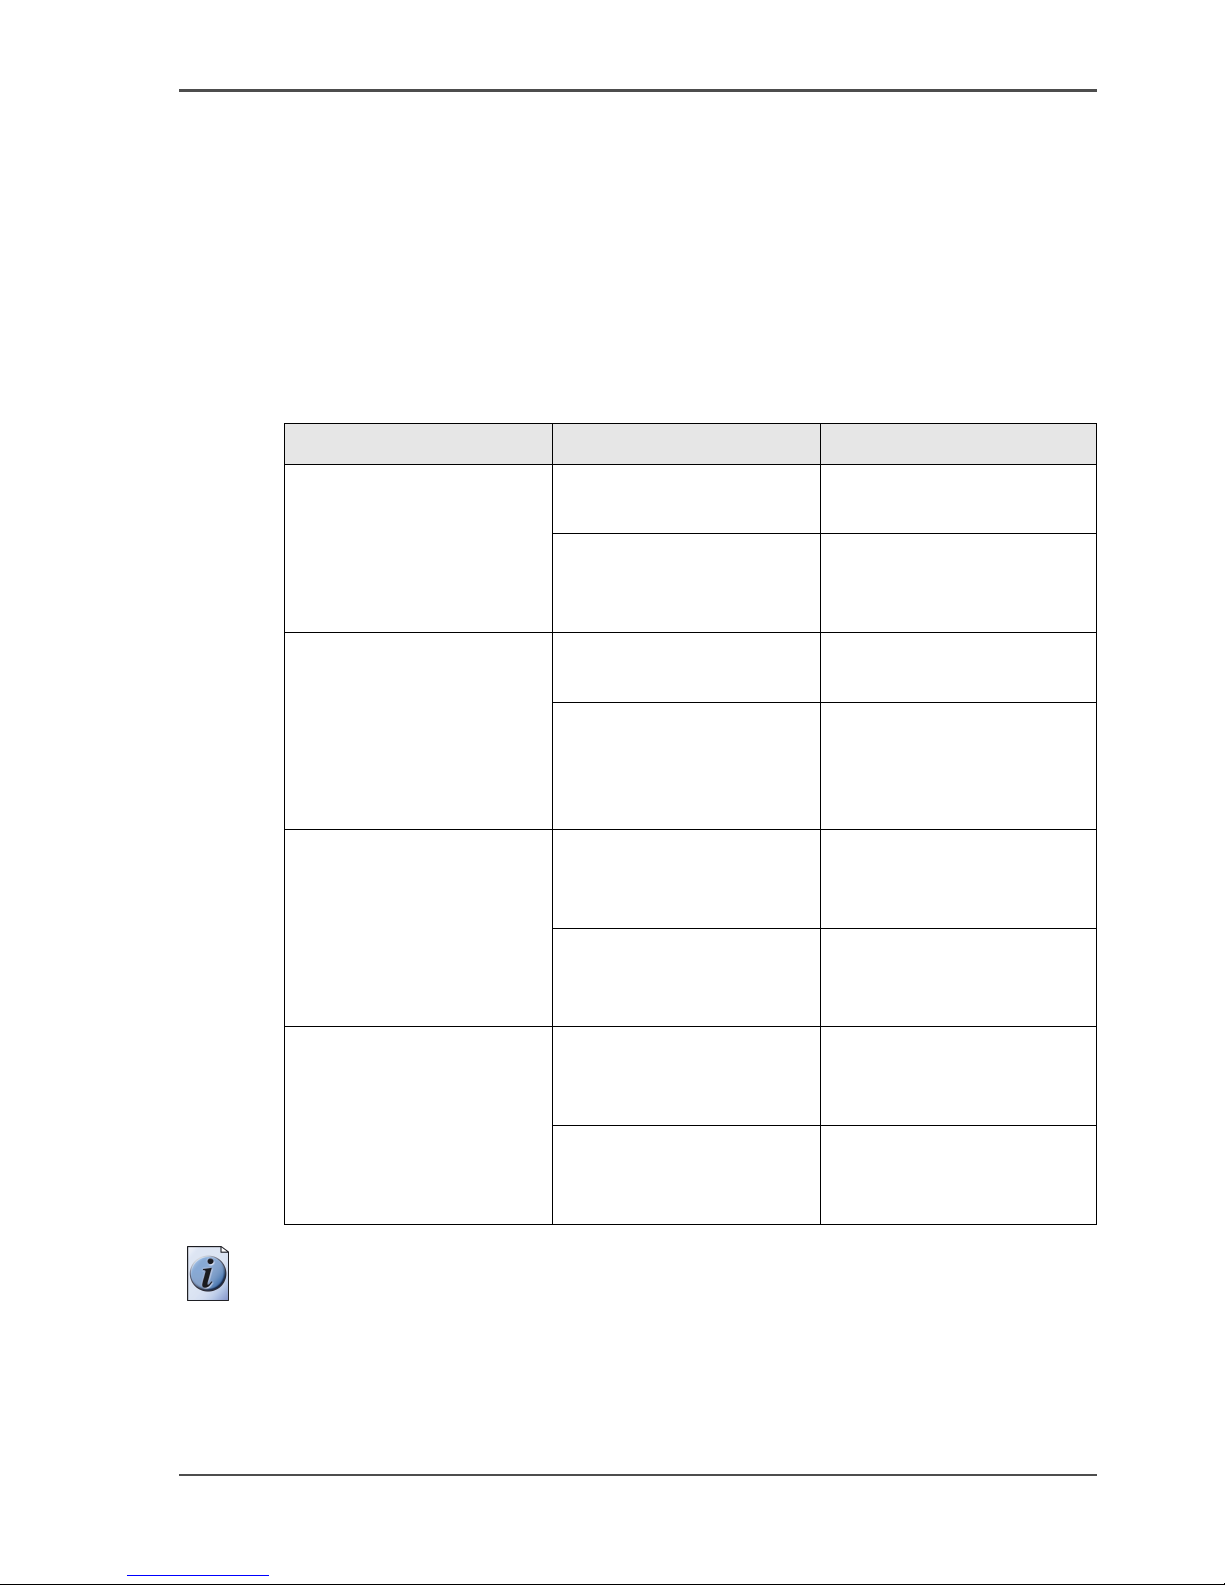
table to find a topic quickly.
The sections of this manual
The following table gives an overview of how the chapters are arranged logically.
[1]
Chapters Section Top ic s
1 Introduction
■ Explanation regarding the manual and how to
use it.
■ Overview of available documentation
■ Overview of the users of the printer.
2 Get to know the system
■ General system description
■ Controller
■ Printer
■ Finishing options
3 Prepare the system for use
■ Turn the system on and off
■ Define the time-outs
■ Set the system language
■ Configure the network settings
4 Use the web based
application to control your
workflow
Océ Settings Editor
5 Use the system Print jobs
6 Ensure the best quality
output
■ Define the output quality
■ Check the output quality
■ Optimise the output quality
7 License Management Manage the 'Licenses'
8 Maintain the system Maintenance actions on the printer
9 System messages and
solutions
■ System messages
■ Printer messages
Appendix A Specifications
■ System specifications
■ Supported media types and sizes
Page 12

12 Chapter 1 Introduction
How to use this manual
Appendix B General information Reader's comment sheet
Appendix C General information Addresses of local Océ organisations
Chapters Section Top ics
Page 13
13
Available documentation
Available documentation
Introduction
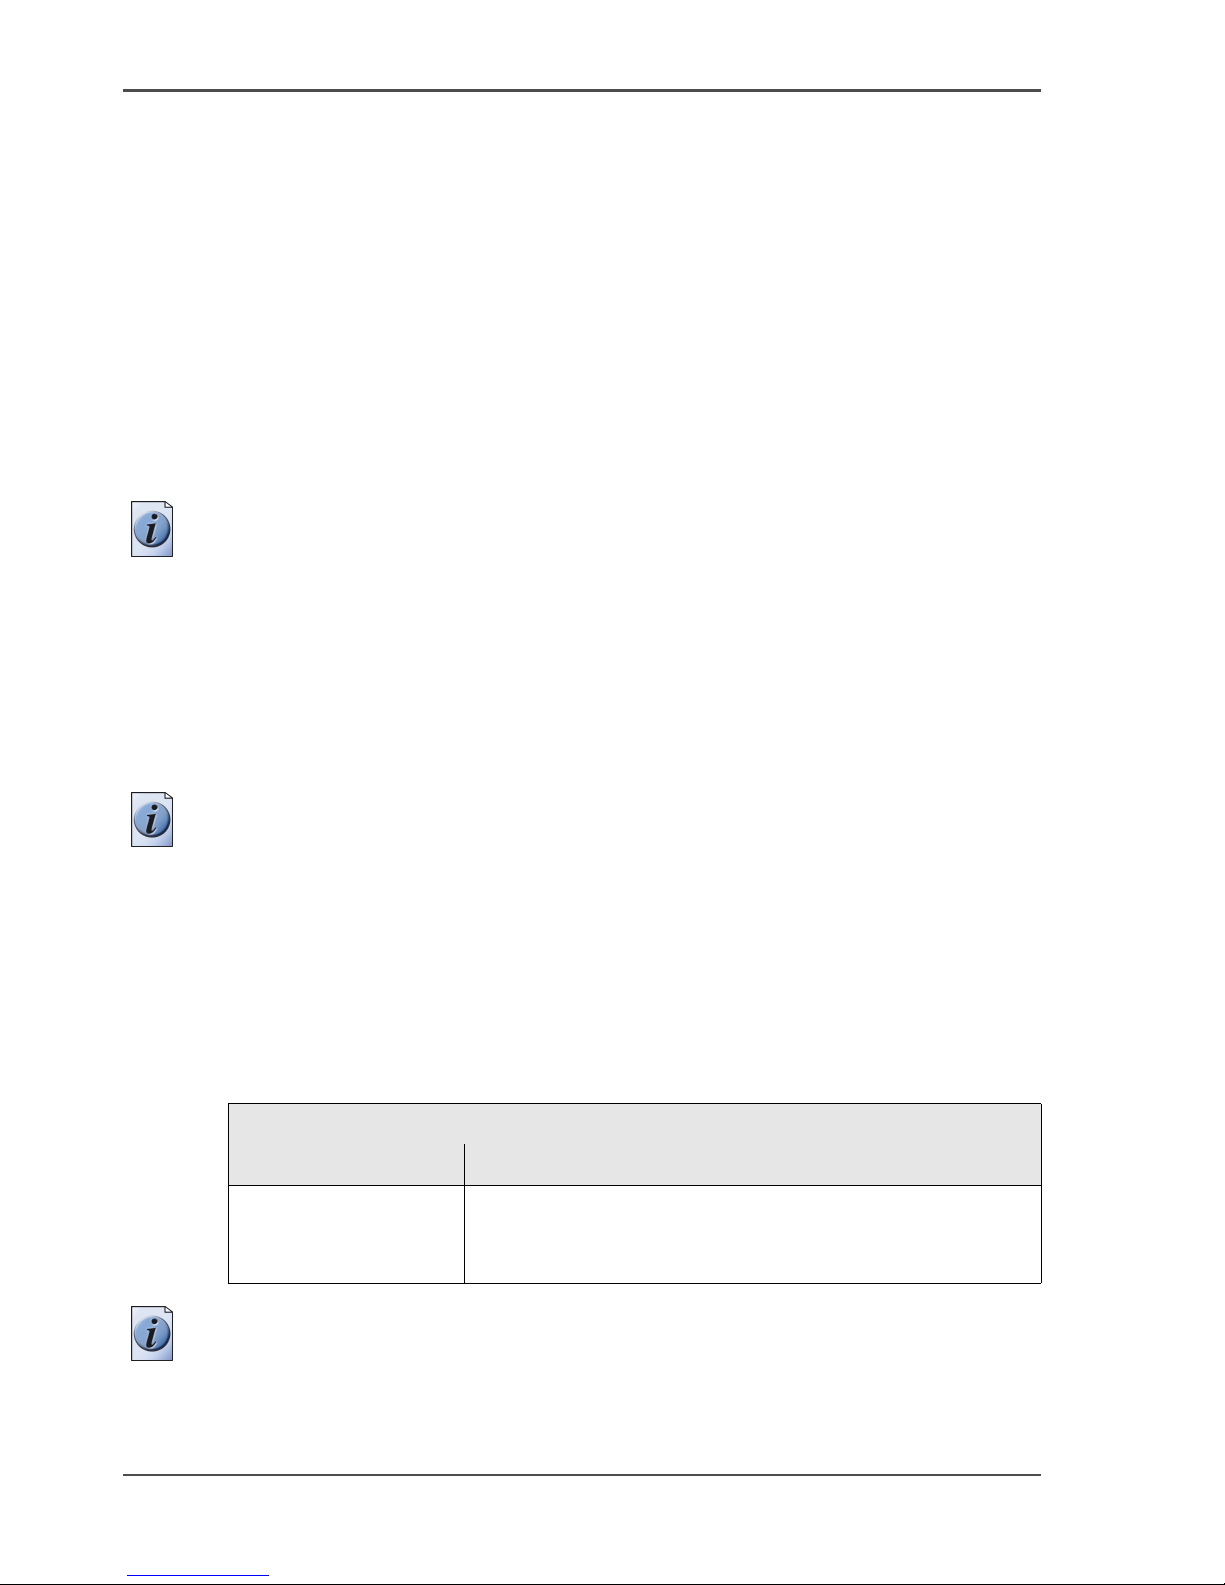
This manual is part of a complete documentation set. The following table shows a
complete overview of the available documentation.
Available documentation
[2]
Note: Visit Océ on the internet at www.oce.com for the latest information.
[2] Available documentation
Product Documentation Medium
Océ TCS300 Océ TCS300 User
manual
CD-ROM, as a PDF file in
multiple languages.
Océ TCS300 Safety
Manual
Hardcopy manual
(multilingual), also
available as a PDF file.
Océ Power Logic
®
controller
Océ TDS-TCS
connectivity manual
CD-ROM, as a PDF file in
English only.
On-line Help Océ
TCS300
®
Settings Editor
application
Embedded in the
application, as an on-line
help file in multiple
languages.
Océ Windows
®
Printer
Driver
Océ Windows® Printer
Driver User Manual
CD-ROM, as a PDF file in
multiple languages on Océ
Driver Pack CD-ROM.
Océ Windows
®
Printer
Driver On-line Help
Embedded in the driver
application as on-line help
file in multiple languages.
Océ PostScript
®
3 driver Océ PostScript® 3 driver
Getting Started
CD-ROM, as a PDF file in
multiple languages on Océ
Driver Pack CD-ROM.
Océ PostScript
®
3 driver
Getting Started
Embedded in the driver
application as on-line help
file in multiple languages.
Page 14
14 Chapter 1 Introduction
The Océ TCS300 users
The Océ TCS300 users
Introduction
The Océ TCS300 has the following types of users.
■ Common user
■ Key operator
■ System administrator
■ Power user.
You can logon on as one of the above mentioned users to work in the Océ TCS300
Settings Editor. Each user has different rights in the application.
Note: (see ‘User roles and authorisations’ on page 56) for more information about
the user modes and how to log on as a specific type of user.
Common user
The common user is a person who uses the system for print jobs. The common user
has no permission to change the system settings. Therefore, the common user is also
referred to as an anonymous user.
Note: You do not need a password if you are a common user.
Key operator
The key operator is responsible for the user maintenance and the system settings of
the Océ TCS300.
The key operator has the permission to define the key operator settings in the Océ
Settings Editor.
[3]
Note: The default password for the key operator is KeyOp.
Key operator settings
Mode Settings to change
Key operator
■ System settings
■ Printer settings
■ Job settings for print jobs.
Page 15

15
The Océ TCS300 users
System administrator
The system administrator is responsible for the installation and the configuration of
the Océ TCS300 in the network environment.
The system administrator has the permission to define the system administrator
settings in the Océ Settings Editor.
[4]
Note: The default password for the system administrator is SysAdm.
Power user
When one person is responsible for all tasks on the Océ TCS300 it is advised to work
with the system as a power user. The power user has the combined rights of the key
operator and the system administrator.
[5]
Note: The default password for the power user is PowUsr.
System administrator settings
Mode Settings to change
System administrator
■ System settings
■ Security settings
■ Connectivity settings
■ Printer PDL settings
■ Printer pen settings.
Power user settings
Mode Settings to change
Power user Key operator settings
■ System settings
■ Printer settings
■ Job settings for print jobs.
System settings
■ System settings
■ Security settings
■ Connectivity settings
■ Printer PDL settings
■ Printer pen settings.
Page 16

16 Chapter 1 Introduction
The Océ TCS300 users
Page 17

17
Chapter 2
Get to know the Océ TCS300
colour printing system
hardware
Page 18
18 Chapter 2 Get to know the Océ TCS300 colour printing system hardware
The Océ TCS300 colour printing system
The Océ TCS300 colour printing system
Introduction
The Océ TCS300 is a modular wide-format colour printing system.
The Océ TCS300 offers a wide range of print functionality. The Océ TCS300 uses
the CMYK colour model. The printer contains printheads for cyan, magenta, yellow,
and black (CMYK) and is based on thermal inkjet technology.
The Océ Settings Editor application that manages and configures the colour printing
system runs on an embedded web server on the Océ Power Logic
®
controller.
Therefore, you do not need a monitor, mouse and keyboard attached to the controller.
You can access the homepage of the controller application from any networked
workstation.
The Océ TCS300 colour printing system consists of the following modules.
■ The Océ Power Logic
®
controller.
■ The printer.
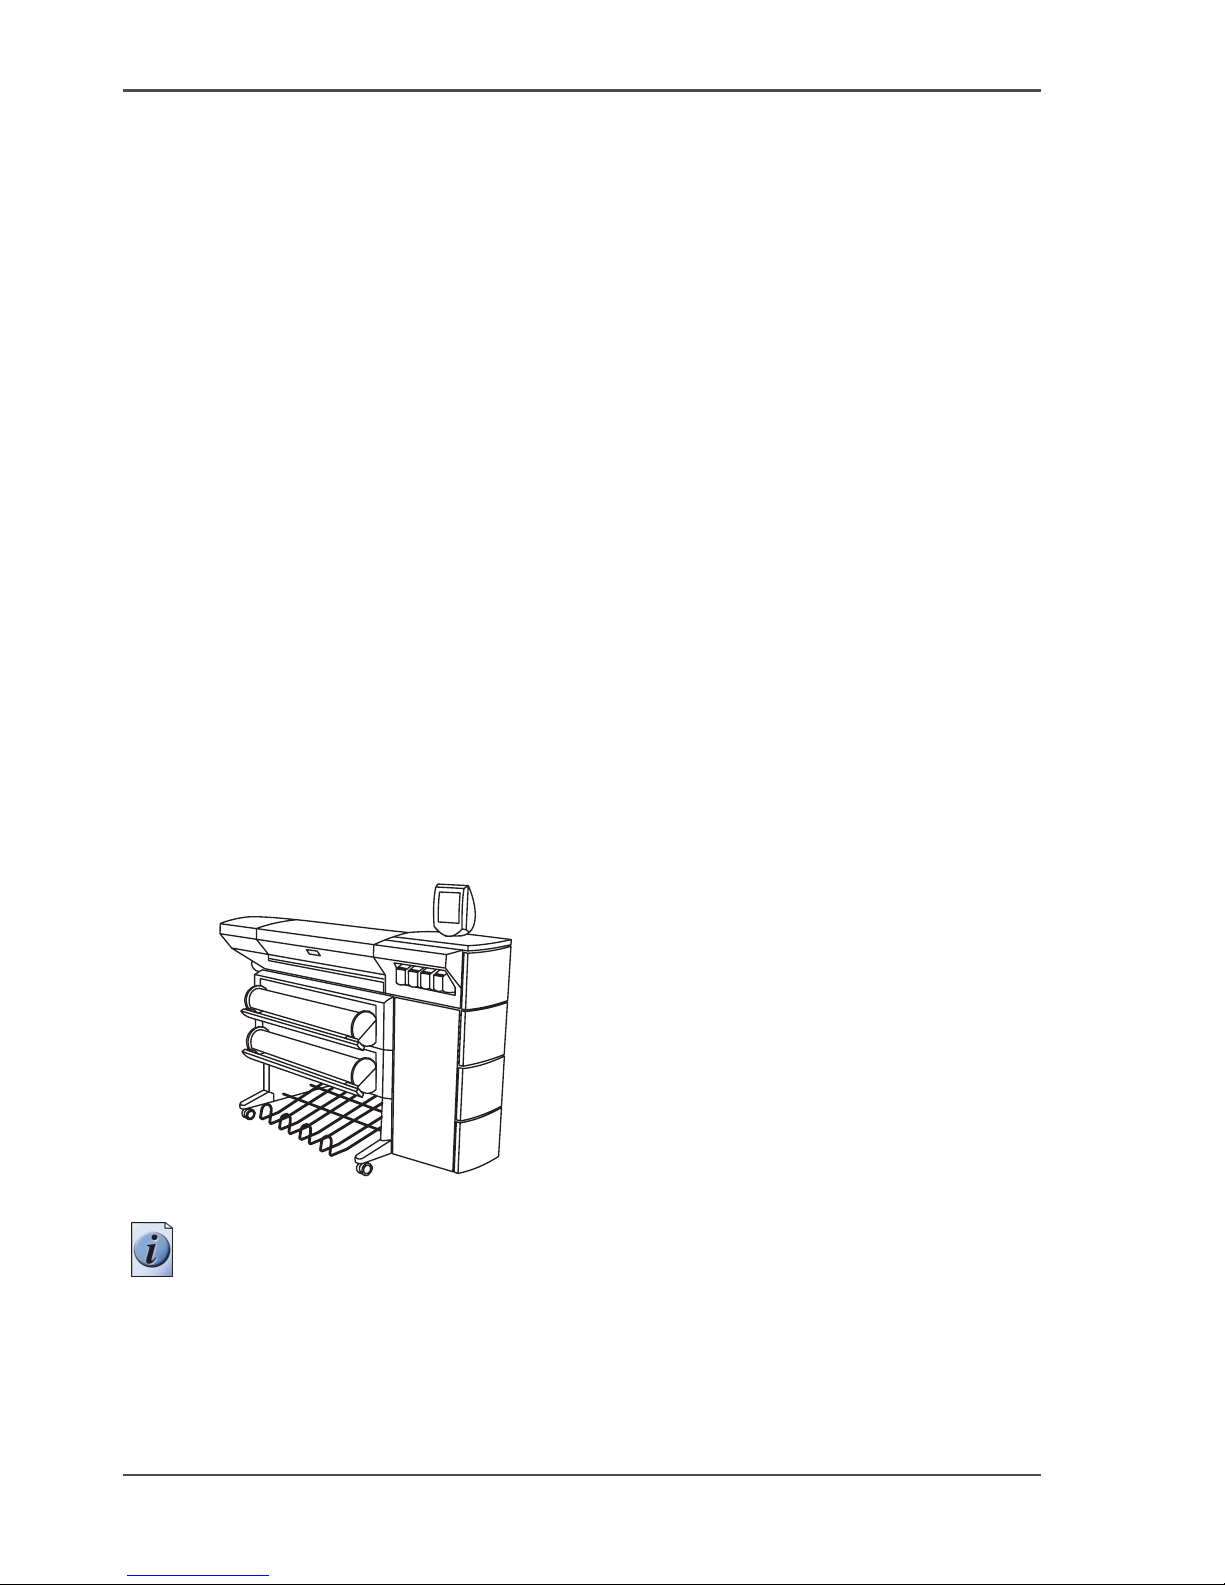
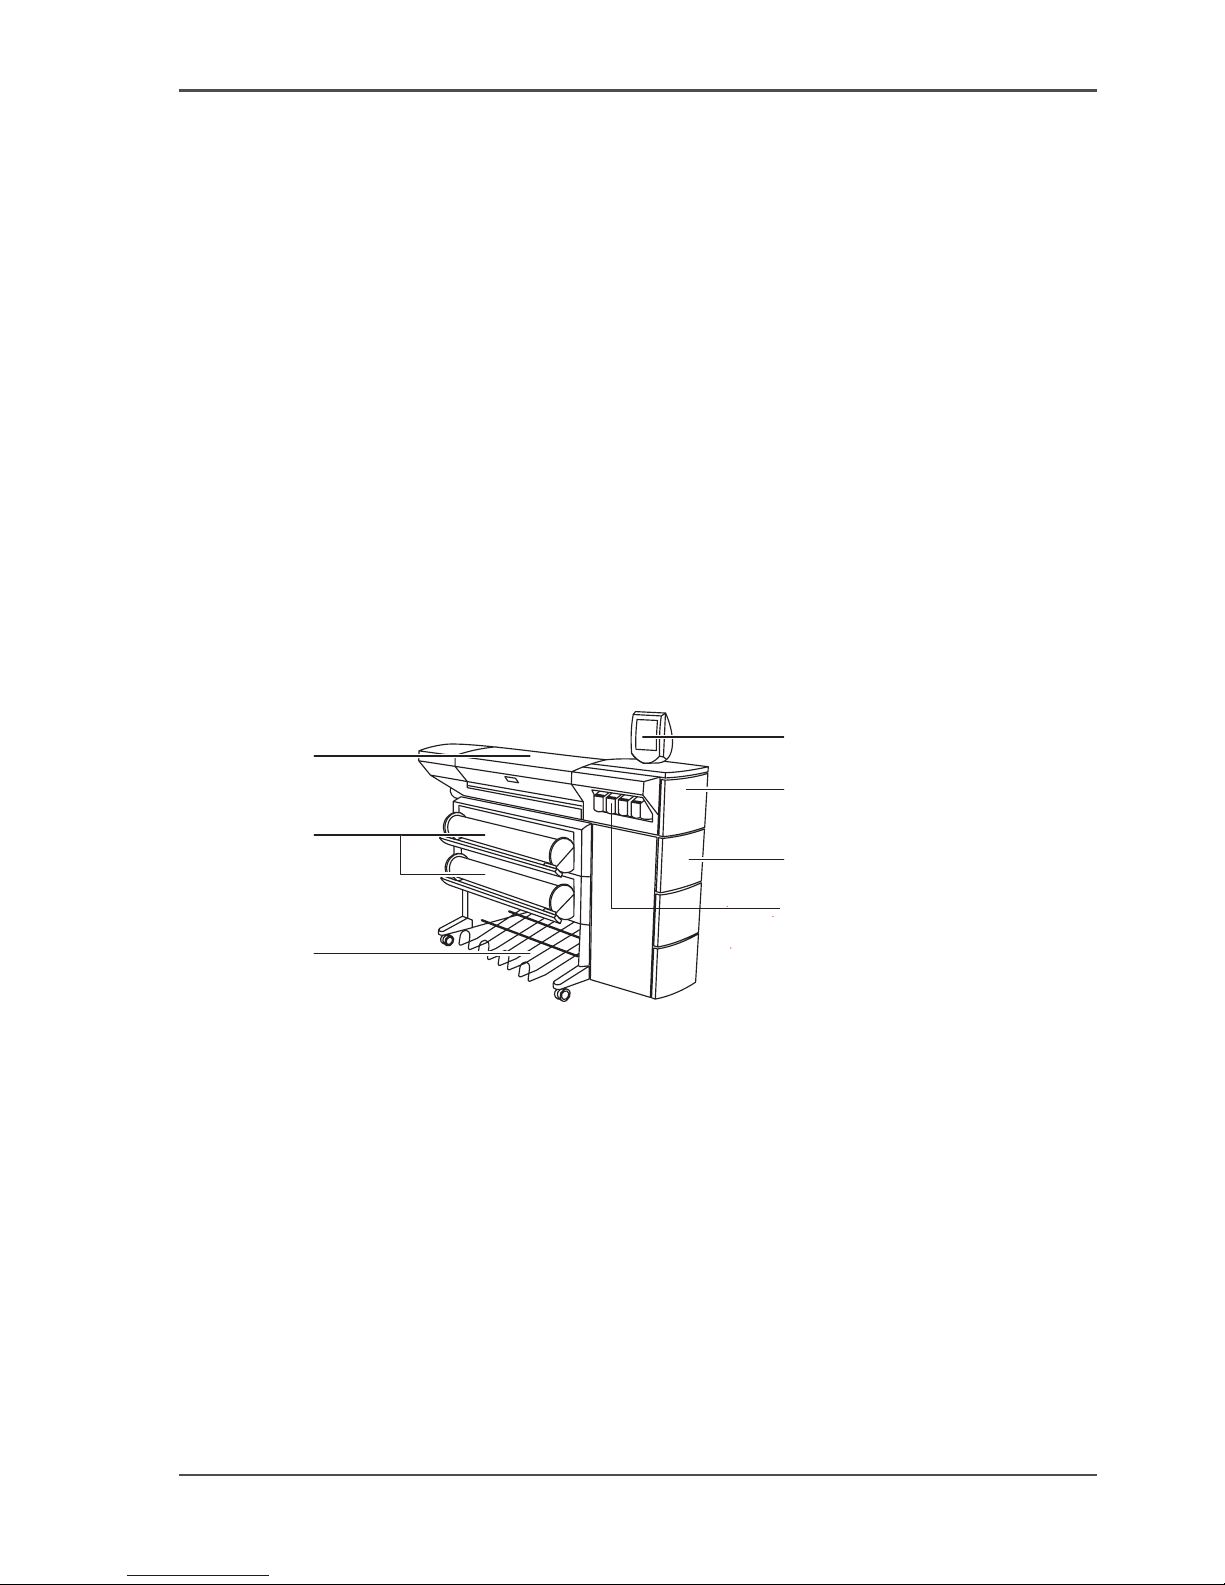
The Océ TCS300 main components
Your configuration is a very lean configuration that consists of a printer and a
controller only. Thanks to the web based access to the Océ Settings Editor you do
not need a monitor, a keyboard and a mouse to connect to the controller. The Océ
Power Logic
®
controller is placed inside the controller cabinet of the printer. This
adds to the compactness of the system and renders a small footprint.
[1]
[1] The Océ TCS300 colour printing system
Note: The Océ Power Logic® controller is not visible in the illustration. The
controller is placed inside the controller cabinet on the right hand side of the printer
(without a monitor, a keyboard and a mouse attached).
Page 19
19
The Océ Power Logic® controller
The Océ Power Logic® controller
Introduction
The Océ Power Logic
®
controller is based on a PC platform running Windows® XP
Embedded.
Use the Océ Power Logic
®
controller to do the following.
■ define the default system settings
■ receive jobs over the network
■ process the print jobs
■ manage licenses
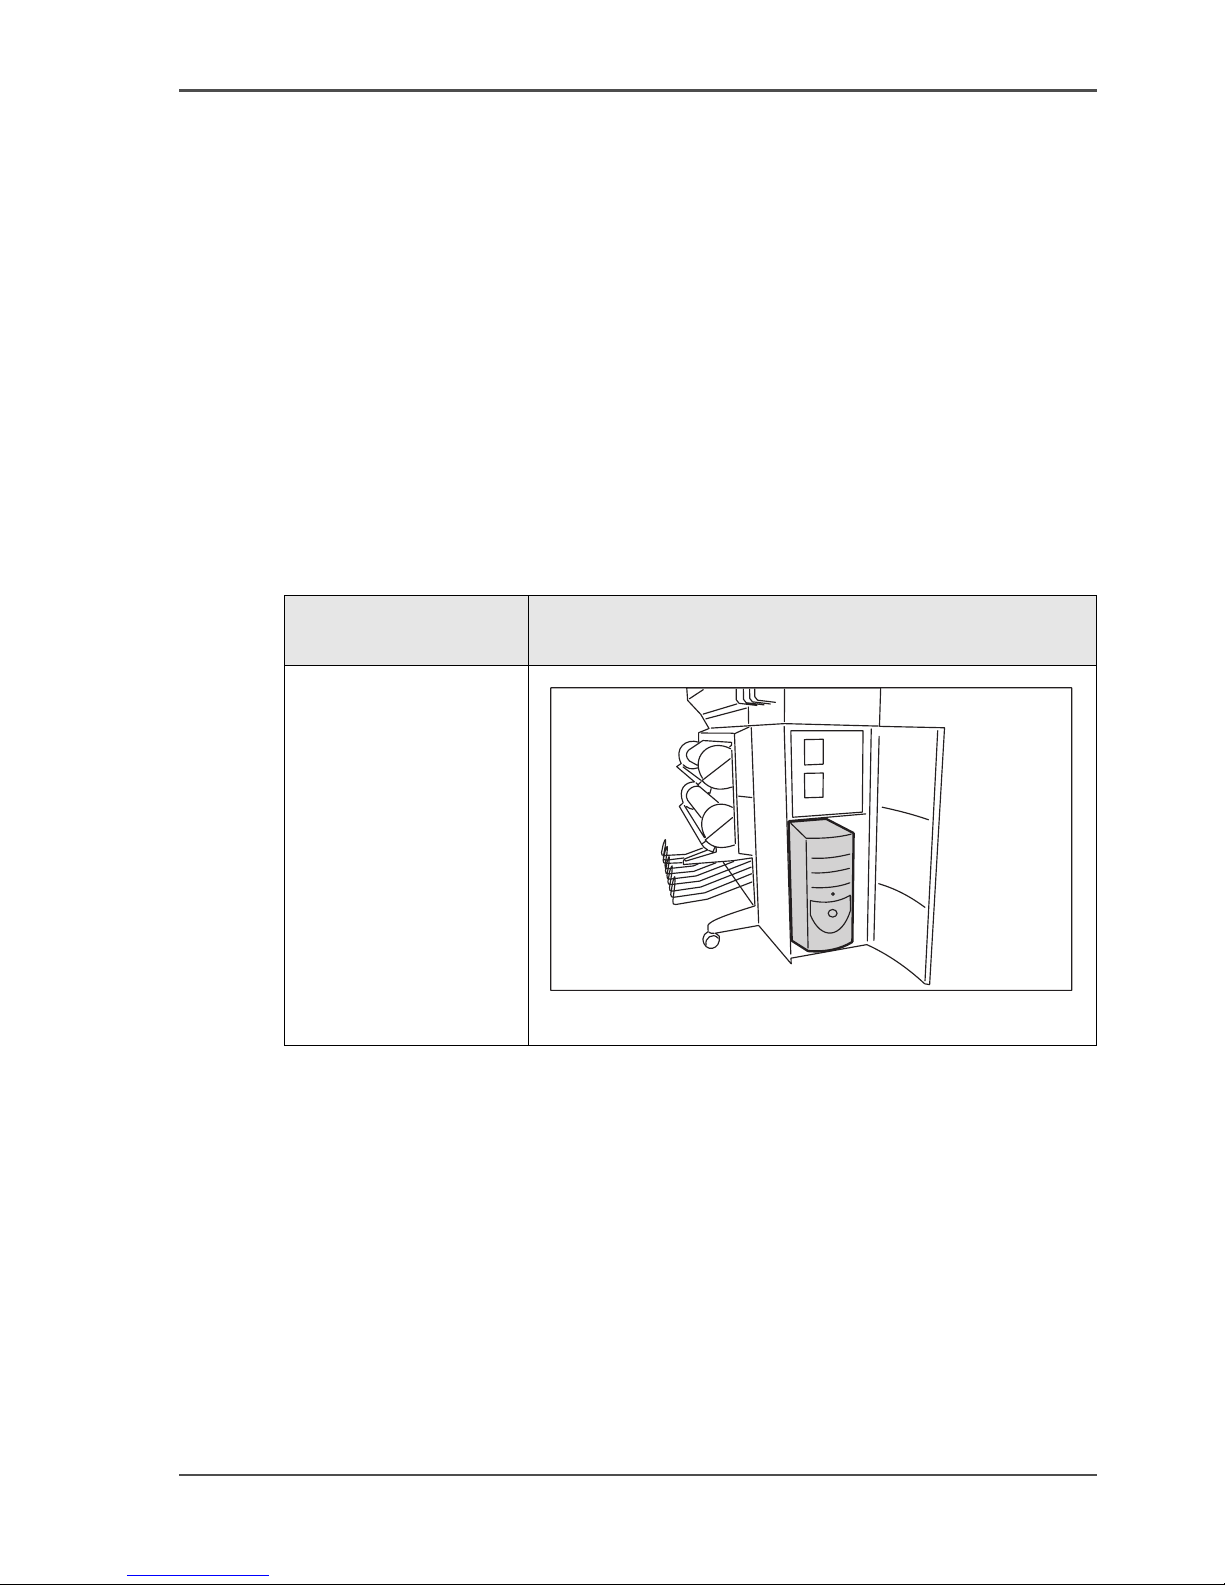
The location of the Océ Power Logic
®
controller
[6]
[6] The location of the Océ Power Logic® controller
Location of the
controller
Illustration
Integrated in the
right-hand side of the
Océ TCS300 printer.
[2]
[2] The Océ Power Logic® controller (printer)
Page 20
20 Chapter 2 Get to know the Océ TCS300 colour printing system hardware
The Océ Power Logic® controller
The web application that runs on the Océ Power Logic® controller
The Settings Editor is a web application that runs on the embedded Océ TCS300 web
server. You can use an internet browser (Microsoft
®
Internet Explorer 5.0, 5.5 and
6.0 and Mozilla
®
Firefox® 1.0 and 1.5) to open the home page of the Settings Editor.
This application gives you access to the settings to manage the configuration and
preferences of the Océ TCS300. The settings related to the system configuration
need to be configured only once. The settings that are more related to workflow
preferences or an optimal tuning of the print job processing can be changed when
necessary. To be able to edit settings in the Settings Editor you must log in using one
of three predefined user roles because the settings are all password protected.
[7]
[7] Océ web application that runs on the Océ Power Logic® controller
Application Description
Océ Settings Editor With the Océ Settings Editor you can view or edit the
default settings of the system.
All users can view the default settings.
To edit the settings you need a password.
There are two types of settings.
■ Key Operator settings
To edit the key operator settings you need to log on
with the key operator password.
■ System Administrator settings
To edit the system administrator settings you need
to log on with the system administrator password.
Note: If you log on as a Power user, you
can edit all the settings.
Page 21
21
The Océ TCS300 printer
The Océ TCS300 printer
The Océ TCS300 printer
Introduction
The Océ TCS300 printer is a 36 inch colour printer with a true resolution of 600 dpi
and is standard available with multiple media rolls. Please ask your Océ
representative for the available media roll configurations. Each of the rolls can
contain different types and sizes of media. The size and type of the loaded media are
indicated on the operator panel. There are two finishing options available for the Océ
TCS300 printer (see ‘The finishing options’ on page 29).
The Océ TCS300 printer uses the CMYK colour model. The printer contains
printheads for cyan, magenta, yellow, and black (CMYK) which are based on
thermal inkjet technology.
Illustration
[3]
[3] The Océ TCS300 printer (2 roll version)
5
7
6
1
3
4
2
Page 22
22 Chapter 2 Get to know the Océ TCS300 colour printing system hardware
The Océ TCS300 printer
The main components of the Océ TCS300 printer
[8]
Note: The copy receiving rack is an optional feature. The copy receiving rack is
required for the 3 roll version (see ‘The optional copy receiving rack’ on page 30).
Number Component Function
1. The printer operator panel View the printer information.
2. The top cover Get access to the carriage with
the printheads.
3. The media rolls Provide the media for your
printed output.
4. The integrated receiving tray Receive the output (option).
5. The ink tanks Provide the ink for your printed
output.
6. The Océ Power Logic
®
controller door
Get acces to the optionally
integrated Océ Power Logic
®
controller.
7. The maintenance door Get access to the maintenance
cassette.
Page 23
23
The printer operator panel
The printer operator panel
Introduction
This section describes the parts and the functions of the printer operator panel. You
can turn the printer operator panel for easy viewing to both sides.
Use the printer operator panel to view system information when the system is in the
on-line mode and to do actions when the system is in the off-line mode.
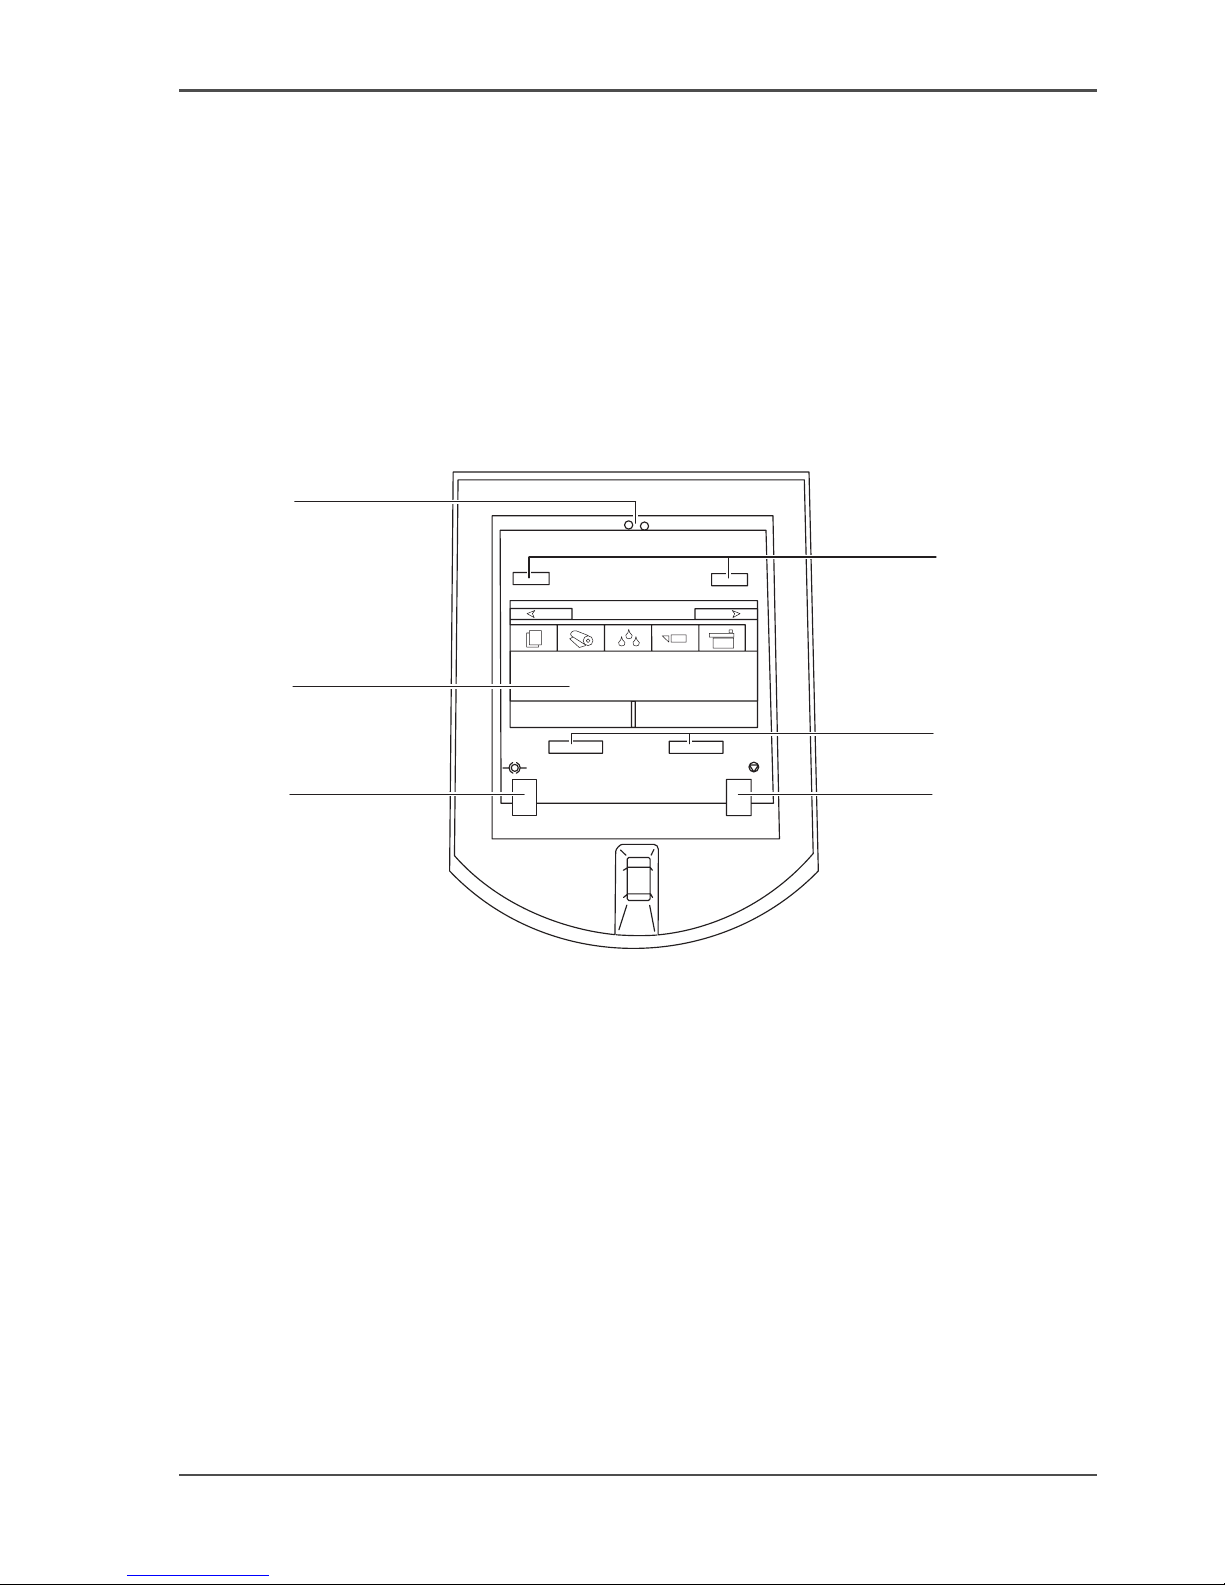
The main components of the printer operator panel are the following.
[4]
[4] The operator panel of the Océ TCS300 printer
All systemsOK.
Demo prints Nederlands
5
1
6
3
4
2
Page 24
24 Chapter 2 Get to know the Océ TCS300 colour printing system hardware
The printer operator panel
The keys and their functions
[9]
[9] The keys and their functions (1 – 2)
Number Component Function
1 The upper softkeys The function of a softkey depends on the mode
of the printer operator panel. (see ‘The on-line
mode and the off-line mode’ on page 26)
Use the upper softkeys to do the following
■ Scroll through the information tabs on the
on-line screen
■ Scroll through the wizard cards on the
off-line screen
■ Step through the wizards on the off-line
screen.
2 The red attention
LEDs
When operator action is required, the red
LEDs illuminate and you will hear an audio
signal.
The printer has the following types of signals.
■ An attention signal
A short interrupted audio signal. The red
LEDs flash two times.
■ A warning signal
A short interrupted audio signal. The red
LEDs remain illuminated.
■ An error signal
A long, uninterrupted audio signal. The
LEDs flash continuously.
Note: The chapter System
messages and solutions describes
how to correct possible errors.
3 The screen The screen of the printer operator panel
displays different types of information. The
type of information depends on the mode of
the system.
When the printer is in the on-line mode, the
screen displays general system information
and job information.
When the printer is in the off-line mode, the
screen displays various wizards for user action
(see ‘The on-line mode and the off-line mode’
on page 26).
Page 25
25
The printer operator panel
Note: The function of a softkey depends on where you are in the definition of the job
settings.
4 The on-line / off-line
key with green LED
Use the on-line / off-line key to switch
between the on-line mode and the off-line
mode on the screen. When you press the
on-line / off-line key while the printer is active,
the printer finishes the print. Then the printer
goes off-line. The next section contains more
information about the on-line mode and the
off-line mode (see ‘The on-line mode and the
off-line mode’ on page 26).
5 The stop key Use the stop key to delete or to stop a job (see
‘Stop or delete an active job’ on page 74).
6 The lower softkeys. The function of a softkey depends on the mode
of the printer operator panel. (see ‘The on-line
mode and the off-line mode’ on page 26)
Use the lower softkeys to do the following
■ Select items on the on-line screen
■ select the wizards on the off-line screen
■ Select options in the wizards on the off-line
screen.
[9] The keys and their functions (2 – 2)
Number Component Function
Page 26
26 Chapter 2 Get to know the Océ TCS300 colour printing system hardware
The on-line mode and the off-line mode
The on-line mode and the off-line mode
Introduction
Use the on-line / off-line key to switch between the on-line mode and the off-line
mode on the screen of the printer operator panel. When you press the on-line /
off-line key while the printer is active, the printer finishes the print. Then the printer
goes off-line.
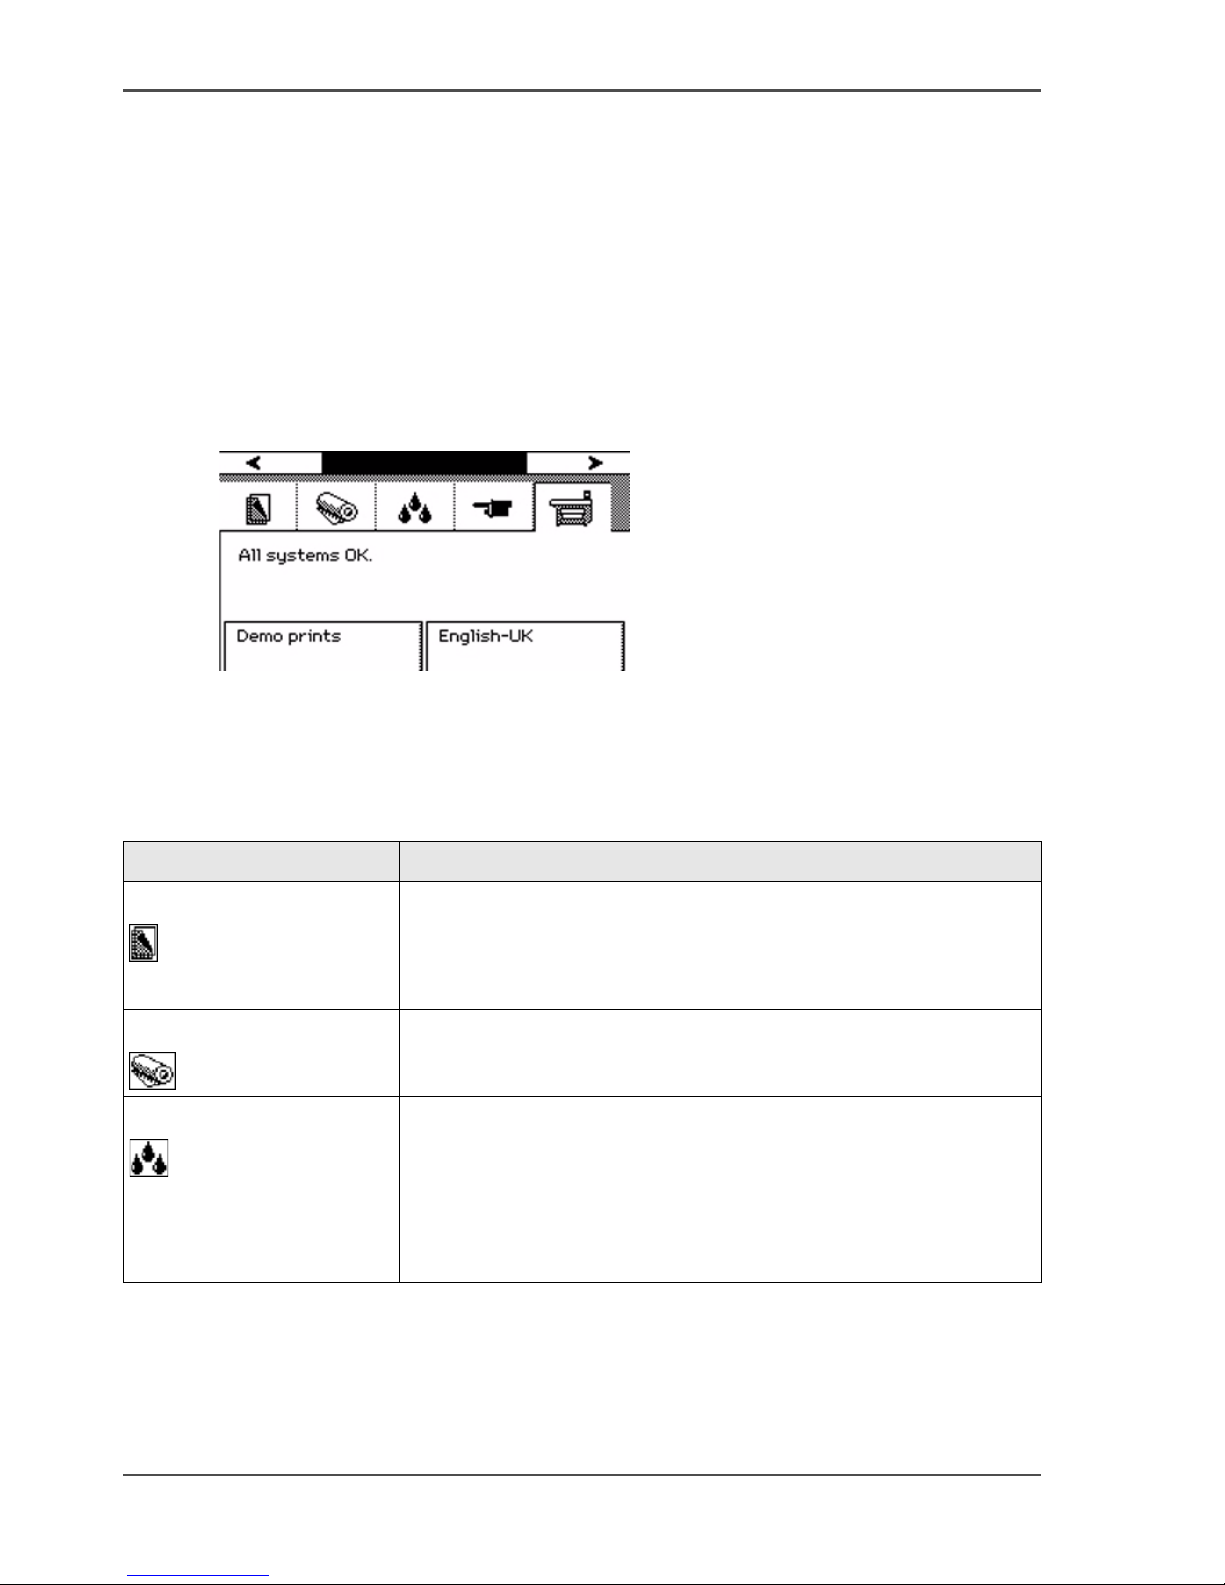
The on-line mode
[5]
[5] The on-line mode (system information card)
When the printer is in the on-line mode, the green LED is on. The screen of the
printer operator panel displays the following 5 information cards.
[10]
[10] On-line mode - Information cards (1 – 2)
Information card Displayed information
Job information
[6]
■ Job status
■ Job name
■ Progress indication
■ Selected print mode
Media information
[7]
The media types and media sizes loaded on the system
Ink level information
[8]
There are four indication types.
■ Percentage of ink in a tank (1% - 100%).
■ 'Ink tank empty' (0%). The indication for the empty tank
blinks and an exclamation symbol is added.
■ The ink tank is not in place. The indication shows a dashed
indication for the tank.
Page 27

27
The on-line mode and the off-line mode
Use the upper softkeys to scroll through the information tabs.
The off-line mode
Press the on-line / off-line key to enter the off-line mode. When the printer is in the
off-line mode, the green LED is off. The printer operator panel displays a set of
wizards. A wizard always requires a user action. When you initially enter the off-line
mode, the printer operator panel displays the wizards 1 and 2. The next time you
enter the off-line mode, you return to the previous position.
[11]
[11] The off-line mode
Use the upper softkeys to navigate through the wizard cards (graphical
representation of the wizards) and through the wizard steps ('Back', 'Next'). Use the
lower softkeys to select a wizard card or an option within the wizards.
You can select the following wizards.
[11]
Printhead information
[9]
The status of each printhead. There are two status types.
■ All printheads OK
■ Printhead error
System information
[10]
■ Error messages and warnings about the maintenance cassette.
Select the lower left softkey 'Demo print' to do the following.
■ Make a demo print.
■ Print an overview of the current Settings Editor settings.
■ Print a quality check print.
■ Print a tone scale area check print.
Select the lower right softkey 'Language' to do the following.
■ Toggle between two display languages.
[10] On-line mode - Information cards (2 – 2)
Information card Displayed information
Page 28
28 Chapter 2 Get to know the Océ TCS300 colour printing system hardware
The on-line mode and the off-line mode
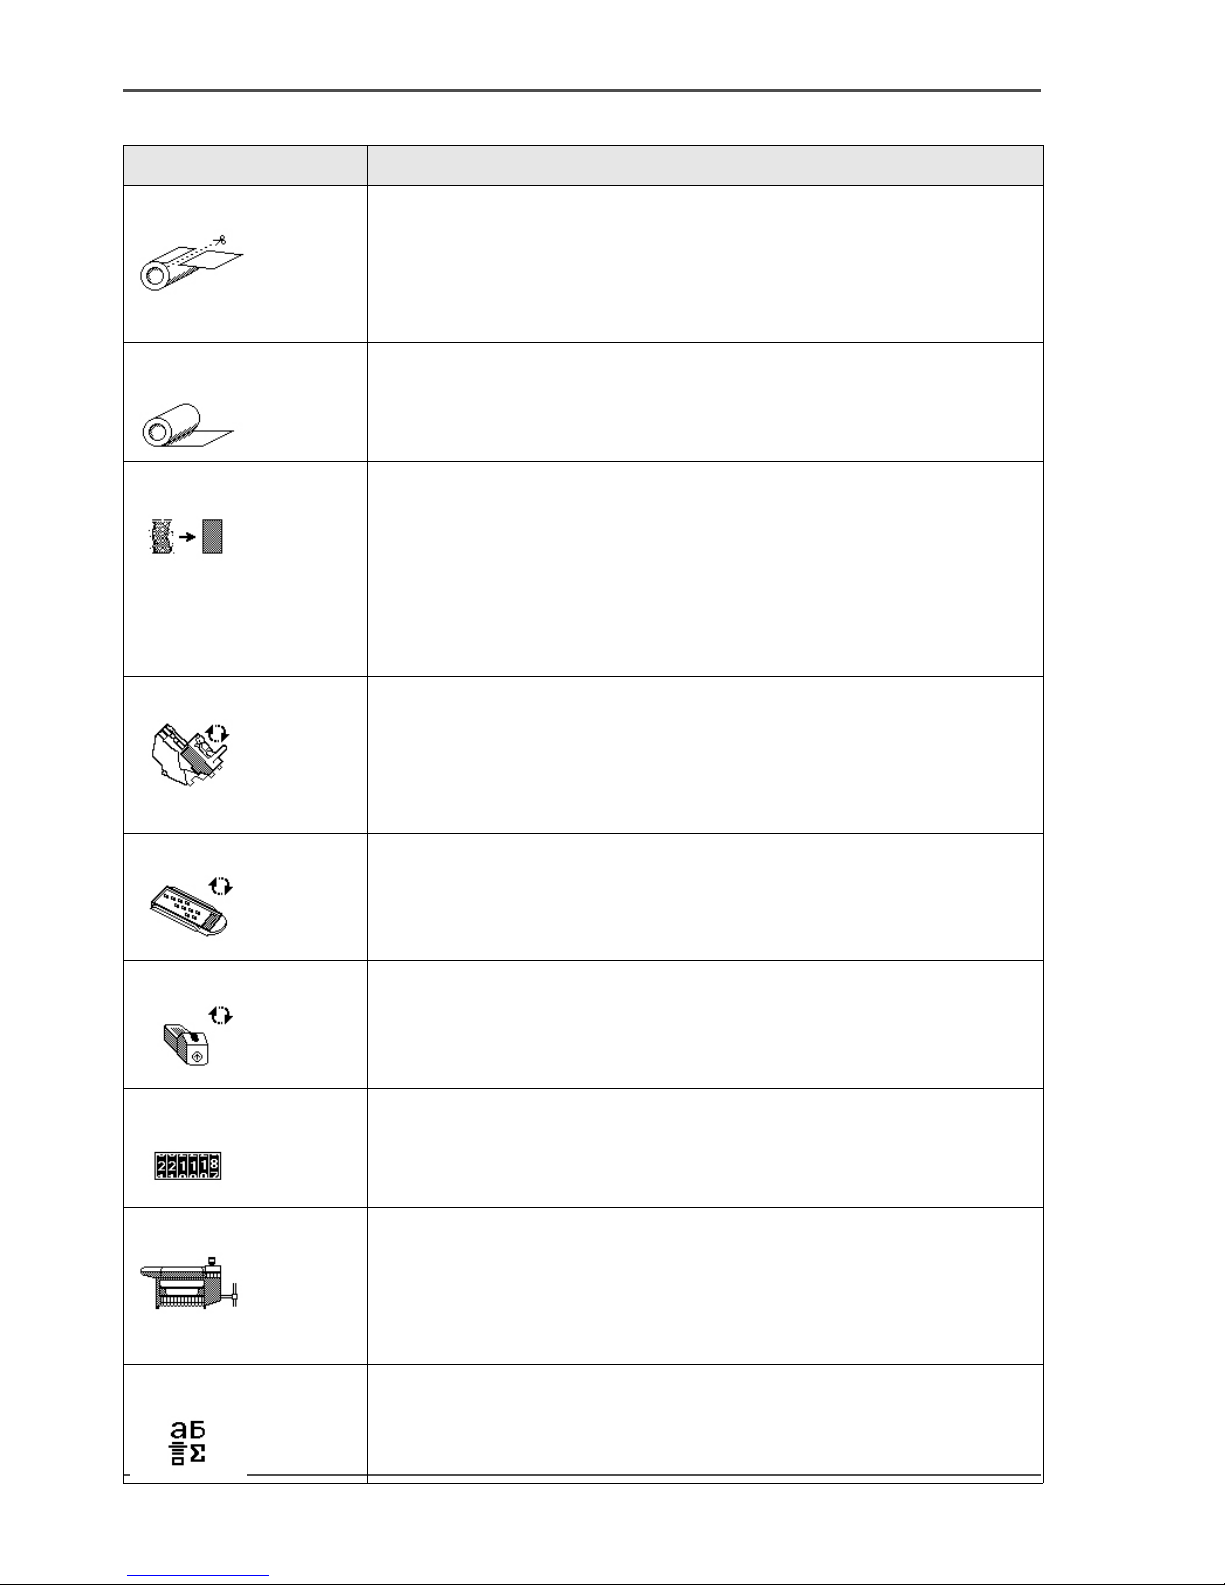
[11] Overview Océ TCS300 printer wizards
Wizard Reference
'Feed & cut'
[12]
(see ‘Cut the output and clean cut a roll of media’ on page 78)
Use this wizard to do the following.
■ Cut the output.
■ Clean cut a roll of media. Use this option to cut the media on the
roll so that the edge is straight.
'Change media type'
[13]
(see ‘Replace the media’ on page 132)
Use this wizard to correct the type of media when an incorrect media
type was defined when the roll was loaded.
'Optimise print quality'
[14]
(see ‘Use the Optimise print quality wizard’ on page 118)
Use this wizard to correct problems with the output quality. The
wizard performs the following actions.
■ Detect weak or failing nozzles.
The Océ TCS300 automatically compensates the detected
nozzles in future prints to make sure that print quality is optimal.
■ Align the printheads and optimise the paper transport.
'Replace printhead'
[15]
(see ‘Replace a defective printhead’ on page 142)
Use this wizard to replace a defective printhead, after the printer
operator panel displays an error message and prompts you to replace
the defective printheads. Only replace the printheads the system
indicates.
'Replace cassette'
[16]
(see ‘Replace the maintenance cassette’ on page 147)
Use this wizard to replace the maintenance cassette, after the printer
operator panel displays the message 'Maintenance cassette nearly
full.'.
'Replace ink tank'
[17]
(see ‘Replace the ink tanks’ on page 139)
Use this wizard to replace the ink tank when the ink level indicator
on the printer operator panel shows 0%. The indicator flashes when
the ink tank is empty.
'Display counters'
[18]
Select this wizard to check the amount of media and ink that is used
since the system was installed. Press the softkey for 'Finish' to return
to the off-line screen.
'Configure system'
[19]
(see ‘Configure the network settings of the Océ TCS300’ on page 48)
You can perform the following actions in the 'Configure system'
wizard.
■ Configure the network settings.
■ Clear the set memory.
'Language'
[20]
Toggle between the two languages that you defined in the Océ
Settings Editor. (see ‘Define the display language of the Océ
TCS300’ on page 44)
Page 29
29
The finishing options
The finishing options
The finishing options
Introduction
It is possible to expand your Océ TCS300 printer with one of the following finishing
options.
The finishing options
[12]
[12] The finishing options
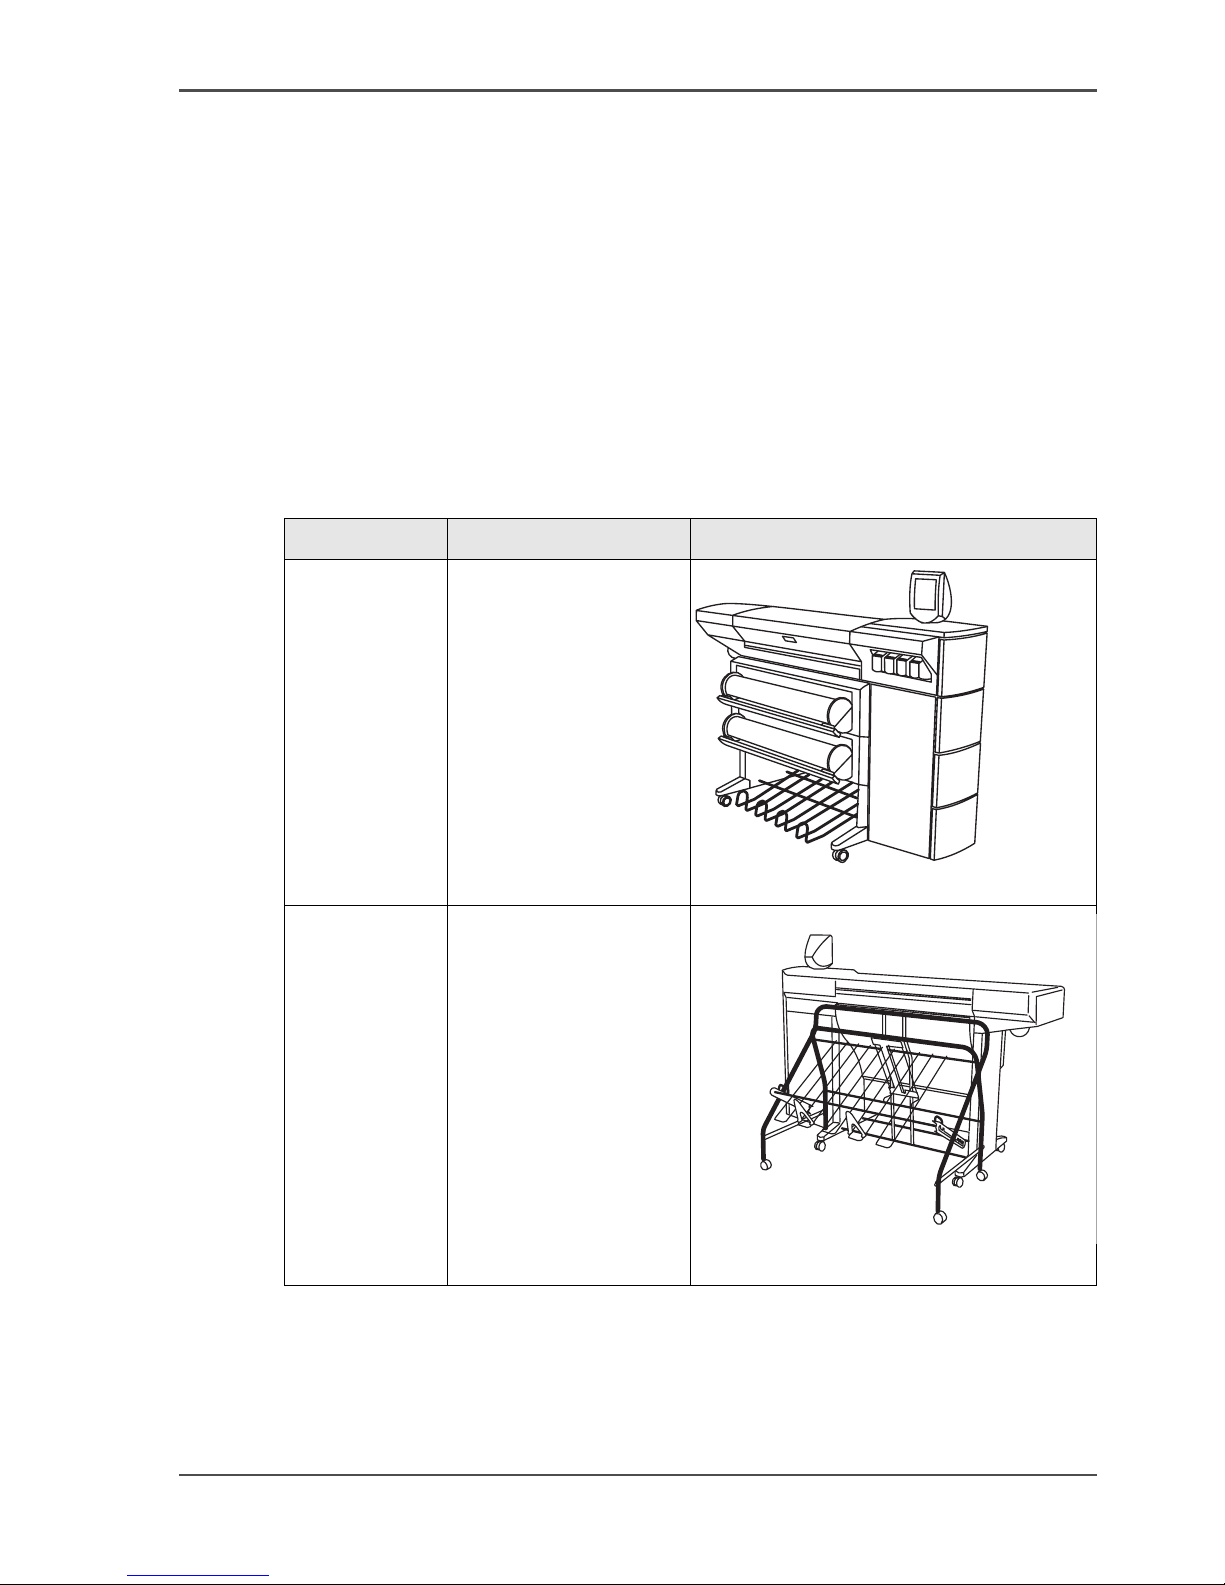
Component Function Position of the component
Integrated
Receiving
Tray
This option is advised
for a low production
environment and a lot
of same size output.
The Integrated
Receiving Tray is not
available for the 3 roll
version.
[21]
[21] The Integrated Receiving Tray
Copy
Receiving
Rack
Collects output at the
rear side of the printer.
This option is advised
for a higher production
environment. The copy
receiving rack can
collect a maximum of
100 prints.
[22]
[22] The Copy Receiving Rack
Page 30

30 Chapter 2 Get to know the Océ TCS300 colour printing system hardware
The optional copy receiving rack
The optional copy receiving rack
Introduction
The copy receiving rack is a movable tray that you can place behind the printer. The
copy receiving rack is an option for the 1-roll configuration and the 2-roll
configuration of the Océ TCS300 printer, but is required when you have a 3 roll
configuration.
Purpose
Use the copy receiving rack to collect the printed output. You need to adjust the copy
receiving rack before you can collect the printed output. How to adjust the copy
receiving rack depends on the type of print job that you run.
The components
[23]
[23] The optional copy receiving rack
Page 31

31
The optional copy receiving rack
[13]
How to adjust for standard print jobs
Attention: The copy receiving rack can collect a maximum of 15 prints in this
position. When you try to collect more prints, the prints can get damaged.
1. Place the rack with side I against the back of the printer.
2. Secure the rack with the breaks of the wheels.
3. Place the trailing edge stoppers at the end of the tray.
4. Adjust the rack with the guides into the position marked with the following figure.
[24]
[24] Rack adjustment for standard print jobs
Use the handles on the left and right guide to lower the tray.
Take the end of the tray to lift the tray.
Note: The position of the leading edge stopper is not important in this situation.
How to adjust for productive print jobs with same media sizes
Attention: The copy receiving rack can collect a maximum of 100 prints in this
position.
1. Place the rack with side II against the back of the printer.
2. Secure the rack with the breaks of the wheels.
3. Place the trailing edge stoppers at the end of the first sheet for a straight stack.
4. Adjust the rack with the guides into the position marked with the following figure.
[13] The components and functions of the copy receiving rack
Nr. Component Function
1 Adjust guides Adjust the rack
2 Leading edge stopper Stop the print at the leading edge
3 Trailing edge stopper Stop the print at the trailing edge
4 Left and right handle Lower the rack
5 End of the rack Lift the rack
Page 32

32 Chapter 2 Get to know the Océ TCS300 colour printing system hardware
The optional copy receiving rack
[25]
[25] Rack adjustment for productive print jobs with same media sizes
Use the handles on the left and right guide to lower the tray.
Take the end of the tray to lift the tray.
5. Adjust the leading edge stopper into the position that is equal to the size of the print.
The marks on the leading edge stopper show the cut length in portrait direction.
Press the handle on the leading edge stopper to adjust the leading edge stopper.
Note: You can collect all types of media in this position except Photo-gloss and
Film.
How to adjust for productive print jobs with different media sizes
Attention: The copy receiving rack can collect a maximum of 100 prints in this
position.
1. Place the rack with side II against the back of the printer.
2. Secure the rack with the breaks of the wheels.
3. Place the trailing edge stoppers at the tray.
4. Adjust the rack with the guides into 1 of the 4 positions marked with the following
figure to find the balance for the longest print.
[26]
[26] Rack adjustment for productive print jobs with different media sizes
Use the handles on the left and right guide to lower the tray.
Take the end of the tray to lift the tray.
5. Adjust the leading edge stopper into the position that is equal to the size of the
shortest print.
The marks on the leading edge stopper show the cut length in portrait direction.
Press the handle on the leading edge stopper to adjust the leading edge stopper.
Page 33

33
The optional copy receiving rack
How to adjust for productive print jobs with humid prints
Attention: The copy receiving rack can collect a maximum of 100 prints in this
position.
1. Place the rack with side II against the back of the printer.
2. Secure the rack with the breaks of the wheels.
3. Place the trailing edge stoppers at the tray.
4. Adjust the rack with the guides into the position marked with one of the following
figures.
[27]
[27] Rack adjustment for standard print jobs with humid prints
[28]
[28] Rack adjustment for standard print jobs with very humid prints
Use the handles on the left and right guide to lower the tray.
Take the end of the tray to lift the tray.
Note: The mark for very humid prints is at the bottom of the adjust guides. Lift and
turn the guides to adjust the rack into the position for very humid prints.
Page 34

34 Chapter 2 Get to know the Océ TCS300 colour printing system hardware
The optional copy receiving rack
Page 35

35
Chapter 3
Prepare the Océ TCS300 for
use
Page 36

36 Chapter 3 Prepare the Océ TCS300 for use
Introduction
Introduction
This chapter contains all the information you need to prepare your Océ TCS300 for
use.
You can learn more about the following.
■ Turn on and off the Océ TCS300.
■ Set the Océ TCS300 printer timers.
■ Define the display language of the Océ TCS300.
■ Define the language of the Océ TCS300 Settings Editor.
■ Define the regional settings of the Océ TCS300.
■ Configure the network settings of the Océ TCS300.
Page 37

37
Turn on and off the Océ TCS300 printer and the Océ Power Logic® controller
Turn on and off the Océ TCS300
Turn on and off the Océ TCS300 printer and the Océ Power
Logic
®
controller
Introduction
The Océ Settings Editor application contains an important setting for the start up and
shut down of the printer and Océ Power Logic® controller.
The path of the 'Synchronise controller power on/off' setting is the following.
'Preferences' - 'System defaults'- 'Timers'.
Depending on this setting, you can turn on and off the Océ TCS300 printer and the
Océ Power Logic
®
controller together or separately.
You can define if this setting is 'On' or 'Off'.
The following paragraphs describe how to turn on and off the Océ TCS300 when the
above setting is set to either 'On' or 'Off'.
The Océ TCS300 printer and Océ Power Logic
®
controller have 2 energy save modes
that enable you to prevent unnecessary power consumption when the system remains
turned on in an idle state (see ‘The energy save mode timer’ on page 40) an (see ‘The
sleep mode timer’ on page 42).
Note: The Océ TCS300 printer has a separate main power switch on the backside
of the printer. Set this main power switch to the position 1, after you connect the Océ
TCS300 printer to the main power supply with the main power cable.
The main power switch must be set to the position 1, before you can turn the system
on, as described below
Only set the main power switch to the position 0 if you want to disconnect the Océ
TCS300 printer from the main power supply, for example in case you want to move
your printer to another location or in case your printer will not be used for a longer
period of time (weeks).
Page 38

38 Chapter 3 Prepare the Océ TCS300 for use
Turn on and off the Océ TCS300 printer and the Océ Power Logic® controller
[29]
[29] The power switch on the backside of the printer.
[30]
[30] The On / off button of the Power Logic® controller (front).
Turn on the Océ Power Logic® controller and the printer
[31]
[31] The On / off button of the printer (front)
Page 39

39
Turn on and off the Océ TCS300 printer and the Océ Power Logic® controller
[14]
Note: When you turn on the Océ Power Logic®controller, the Océ Power
Logic
®
controller needs some preparation time before it can handle jobs. The
preparation time for print jobs is two and a half minutes.
Turn off the Océ Power Logic® controller and the printer
There are 2 possibilities.
[15]
Note: The Océ Power Logic ®controller needs a few minutes to finish the shut down
process. To turn off the main power, wait until the shut down process has finished.
Setting: 'Synchronise
controller power on/off'
Action
Set to 'On' Press the On / off button on the printer
The Océ Power Logic
®
controller and the printer
both start up.
Set to 'Off'. 1. Press the On / off button on the Océ Power Logic
®
controller.
2. Press the On / off button on the printer.
Setting: 'Synchronise
controller power on/off'
Action
Set to 'On' Press the On / off button on the printer. The Océ
Power Logic
®
controller and the printer both shut
down.
Set to 'Off'.
■ Press the On / off button on the printer. (The
printer shuts down.)
■ Open the controller cabinet to access the Océ
Power Logic
®
controller.
■ Press the On / off button on the controller. (The
Océ Power Logic
®
controller shuts down.)
Page 40

40 Chapter 3 Prepare the Océ TCS300 for use
The energy save mode timer
Set the timers
The energy save mode timer
Introduction
The Océ TCS300 printer has 2 modes to prevent unnecessary power consumption.
■ The energy save mode.
■ The sleep mode.
This section describes the energy save mode.
The energy save mode
The Océ TCS300 printer uses less energy in the energy save mode than in the normal
operating mode.
Both the printer and the Océ Power Logic
®
controller remain turned on.
You can define the following energy save mode settings in the Océ Setting Editor.
[16]
Note: By default, the 'Energy save mode timer on/off' is enabled and the 'Energy
save mode time-out' is set to 5 minutes.
If you must change the default settings in the Océ Settings Editor proceed as follows.
[16] Energy save mode settings in the Océ Setting Editor
'Preferences'- 'System defaults''Sleep mode and energy mode'
'Energy save mode timer on/off'
'Preferences' - 'System defaults''Timers'
'Energy save mode time-out'
On Use this setting to define the delay in
minutes before the Océ TCS300 printer
enters the energy save mode.
Off Not applicable
Page 41

41
The energy save mode timer
[17]
When the Océ TCS300 is in the energy save mode, there are four ways to activate
the system.
■ press a key on the printer operator panel
■ send a job
■ press the retract button to retract a roll
■ load a roll
[17] Change the Key Operator settings in the Océ Settings Editor
Step Action
1 Access the home page of the Océ TCS300 Settings Editor in your browser
application.
2 Navigate to the energy save mode settings.
'Preferences'- 'System defaults'- 'Sleep mode and energy mode'
'Preferences' - 'System defaults'- 'Timers'
3 Click the value of the setting you want to change.
4 Enter the key operator password in the dialogue box.
5 Change the required settings and confirm.
6 To prevent unauthorised use, make sure that you log out when you are ready
.
Page 42

42 Chapter 3 Prepare the Océ TCS300 for use
The sleep mode timer
The sleep mode timer
Introduction
The Océ TCS300 printer has 2 modes to prevent unnecessary power consumption.
■ The energy save mode.
■ The sleep mode.
This section describes the sleep mode.
The sleep mode
The Océ TCS300 printer uses less energy in the sleep mode than in the normal
operating mode and even less energy than in the energy save mode.
The power supply of the printer is turned off in the sleep mode. The Océ Power
Logic
®
controller remains turned on.
You can define the following sleep mode settings in the Océ Setting Editor.
[18]
Note: By default, the 'Sleep mode timer' is enabled and the 'Sleep mode time-out' is
set to 30 minutes.
If you must change the default settings in the Océ Settings Editor proceed as follows.
[18] Sleep mode settings in the Océ Setting Editor
'Preferences'- 'System defaults''Sleep mode and energy mode'
'Sleep mode timer on/off'
'Preferences' - 'System defaults''Timers'
'Sleep mode time-out'
On Use this setting to define the delay in
minutes before the Océ TCS300 printer
enters the sleep mode.
Off Not applicable
Page 43

43
The sleep mode timer
[19]
When the Océ TCS300 is in the sleep mode, there are two ways to activate the
system.
■ send a job
■ press the On / off button of the printer
The printer needs about 1 minute to wake up from the sleep mode. The green LED
illuminates. This indicates that the system wakes up. During the wake-up period, the
screen remains blank.
Note: The sleep mode complies with the EPA Energy Star
®
sleep mode requirements
for wide format printers.
[19] Change the Key Operator settings in the Océ Settings Editor
Step Action
1 Access the home page of the Océ TCS300 Settings Editor in your browser
application.
2 Navigate to the sleep mode settings.
'Preferences'- 'System defaults'- 'Sleep mode and energy mode'
'Preferences' - 'System defaults'- 'Timers'
3 Click the value of the setting you want to change.
4 Enter the key operator password in the dialogue box.
5 Change the required settings and confirm.
6 To prevent unauthorised use make sure that you log out when you are ready.
Page 44

44 Chapter 3 Prepare the Océ TCS300 for use
Define the display language of the Océ TCS300
Define the display language of the Océ TCS300
Introduction
The Océ Settings Editor allows you to define the 'First language' (the default display
language) and the 'Second language' (the alternative display language) for the printer
operator panel.
The 'First language' and the 'Second language' you defined in the Océ Setting Editor
are also the display languages that are available on the printer operator panel. You
can toggle between these two languages using the operator panel.
Before you begin
Access the Océ Settings Editor. This setting can be edited by the key operator and
the power user.
How to define the default and the alternative display languages in the Océ
Settings Editor
1. Select 'Preferences' - 'System defaults' - 'Regional settings'.
2. Click the value for 'First language',
or
3. Click 'Edit' in the 'Regional settings' bar to access a window for all regional settings.
4. Select the first display language that you can choose for the operator panel from the
drop down list.
5. Click 'Ok' to confirm your entries or 'Cancel' to reject your entries.
6. Repeat the same steps to define a second display language for the operator panel.
Note: The Océ TCS300 supports 19 display languages.
Page 45

45
Define the display language of the Océ TCS300
How to change the display language on the on-line screen of the printer operator
panel
Note: Only the first language (default language) and the second language
(alternative language) defined in the Océ Settings Editor are available on the
operator panel.
1. Use the upper softkeys to select the 'System' tab.
2. Press the lower right softkey to toggle between the first language and the second
language.
[32]
[32] Press the lower-right softkey to change the language
How to change the display language on the off-line screen of the printer operator
panel
Note: Only the first language (default language) and the second language
(alternative language) defined in the Océ Settings Editor are available on the
operator panel.
1. Press the on-line / off-line key to set the printer off-line.
2. Use the upper softkeys to scroll to the 'Language' card.
[33]
[33] The language card on the off-line screen
3.
Press the softkey below the 'Language' card to toggle between the first language and
the second language.
Page 46

46 Chapter 3 Prepare the Océ TCS300 for use
Set another language for the Océ TCS300 Settings Editor
Set another language for the Océ TCS300 Settings Editor
Introduction
The language setting of the internet browser you use defines the language in which
the user interface of the Settings Editor is displayed.
Note: This language setting does not influence the language on the printer operator
panel.
Purpose
Change the language setting of the user interface of the Settings Editor.
Note: If the selected language cannot be supported, the standard user interface
language for the Settings Editor will be UK English.
How to change the language setting in Microsoft® Internet Explorer
1. Open Microsoft
®
Internet explorer.
2. Select Tools menu - Internet options. The internet options window appears.
3. Make sure the General tab is selected.
4. Click the Languages button in the lower part of the window. Another window opens.
5. Select the language of your choice. A new language can be added to the list with the
Add button.
6. Move the newly added language up in the list to the top position.
7. Click OK to confirm or Cancel to close both windows again.
8. Click Refresh in the toolbar or close and reopen Microsoft
®
Internet Explorer.
How to change the language setting in Mozilla
®
Firefox
1. Open Mozilla
®
Firefox.
2. Select the Tools menu - Options. The Options window appears.
3. Make sure you have selected the General option in the left hand part of the window.
4. Click the Languages button. Another window opens.
5. Select the language of your choice. A new language can be added to the list with the
Add button.
6. Move the newly added language up in the list to the top position.
7. Click OK to confirm or Cancel to close both windows again.
8. Click Reload in the toolbar or close and reopen Mozilla
®
Firefox.
Page 47

47
Configure the regional settings of the Océ TCS300
Configure the regional settings of the Océ TCS300
Purpose
The regional settings are configured during the installation of your Océ TCS300. If
you want to change the initial configuration, you can do so in the 'Regional settings'.
Define the following settings for the printer.
■ 'First language' and 'Second language' of the printer operator panel
■ 'Measurement unit'
■ 'Media sizes'
■ 'Date format'
■ 'Time format'
■ 'Current date and time'
Note: Every time you change the 'Measurement unit', the Océ Power Logic
®
controller recalculates the values from mm to inches and vice versa. If you
repeatedly switch between this setting a slight calculation difference can occur due
to rounding differences.
How to define the regional settings
1. Select 'Preferences' - 'System defaults' - 'Regional settings'.
2. Click a single value, for example the value selected for first language 'First
language',
or
3. Click 'Edit' in the 'Regional settings' bar to access a window for all regional settings.
4. Modify the settings. You can choose between settings that are commonly used in the
USA or settings the are commonly used in the rest of the world.
5. Click 'Ok' to confirm you entries or 'Cancel' to reject your entries.
Page 48

48 Chapter 3 Prepare the Océ TCS300 for use
Configure the network settings of the Océ TCS300
Configure the network settings of the Océ TCS300
Introduction
The system administrator is responsible for installing and configuring the Océ
TCS300 in the network environment. There are two ways to configure the network
settings.
■ From the printer operator panel
The off-line screen on the printer operator panel contains a wizard to configure
the network settings.
■ With the System Administrator settings in the Océ Settings Editor.
The Océ Settings Editor allows you to configure a large number of system
settings. The system administrator and the power user are authorised to define the
system settings.
Actions in the Configure system wizard
You can perform the following actions in the 'Configure system' wizard.
■ Enable DHCP
■ Set the IP address
■ Set the IP subnet mask
■ Set the default gateway
■ Configure the DNS settings
■ Configure the primary and secondary WINS
■ Clear the set memory. (see ‘Clear the set memory’ on page 161).
The 'Configure system' wizard also contains installation settings and service
settings. A password protects the installation settings and the service settings. Only
Océ service engineers can access the installation settings and the service settings.
How to configure the system from the printer operator panel
1. Press the on-line / off-line key to set the printer off-line (see ‘The on-line mode and
the off-line mode’ on page 26).
2. Use the upper softkeys to scroll to the 'Configure system' card.
[34]
3. Press the softkey below the 'Configure system' card to enter the wizard.
The screen displays the message 'Use this wizard to configure the system.'
Page 49

49
Configure the network settings of the Océ TCS300
4. Press the key for 'Next'.
The screen displays the message 'Select item.'
5. Use the lower softkeys to select 'Network settings adapter 1'.
[35]
6. Press the key for 'Next'.
7. The screen displays the current settings for the selected adaptor. The system
indicates which settings are received through DHCP with a round dot.
Use the lower softkeys to scroll through the settings. Press the key for 'Edit', to
change the network settings.
8. The screen displays 'Use DHCP server for adapter 1?'. Use the lower softkeys to
select 'Yes' or 'No'.
[36]
Continue with step 9 when you select 'Yes'.
Continue with step 10 when you select 'No'.
Press the key for 'Undo', to cancel your settings.
9. After you select 'Yes', press the key for 'Next'.
The wizard will lead you through a series of dialogues where you can enable DHCP
or define the IP addresses for the following.
■ The default gateway
■ DNS
■ WINS.
Press the key for 'Apply' to confirm the settings and to exit the wizard
The system indicates whether you have to reboot the Océ Power logic controller to
apply the new network settings. This can, for example, be the case when settings are
received through DHCP. When no indication appears, you do not need to reboot the
Océ Power logic controller.
Note: When 'Synchronise controller power on / off' is set to 'On', you must turn the
printer off and on to reboot the Océ Power Logic controller.
10. After you select 'No', press the key for 'Next' to manually define the network settings.
Page 50

50 Chapter 3 Prepare the Océ TCS300 for use
Configure the network settings of the Océ TCS300
11. The screen displays 'Set IP address for adapter 1'.
[37]
Press the keys for - and + to define the IP address.
After you finish an octet, press the key for 'Next' to go to the next octet.
12. Press the key for 'Next' after you finish the last octet. The screen displays 'Set subnet
mask for adapter 1'.
[38]
Press the keys for - and + to define the subnet mask.
After you finish an octet, press the key for 'Next' to go to the next octet.
13. Press the key for 'Next' after you finish the last octet. The screen displays 'Set default
gateway for adapter 1'.
[39]
Press the keys for - and + to define the default gateway.
After you finish an octet, press the key for 'Next' to go to the next octet.
14. After you finish the last octet, the wizard will lead you through a series of dialogues
where you can configure DNS, and the primary and secondary WINS.
15. After you completed these dialogues, the screen shows an overview of all the
network settings.
Page 51

51
Configure the network settings of the Océ TCS300
[40]
16. The final dialogue allows you to define a password protection for the 'Configure
system' wizard. You can enable the password protection to prevent accidental
changes in the configuration of the system.
The password is fixed and cannot be changed. Use the lower left (= a) and right (=
b) soft keys of the operator panel to enter the password: abbab. When the
password-protection is enabled, you must enter this password the next time you want
to edit the network settings. You can disable the password protection again at the end
of the 'Configure system' wizard.
17. Press the key 'Apply' to confirm the settings and to exit the wizard.
The system indicates whether you have to restart the Océ Power Logic
®
controller
to apply the new network settings. This can, for example, be the case when settings
are received through DHCP. When no indication appears, you do not need to reboot
the Océ Power Logic
®
controller.
Note: When 'Synchronise controller power on / off' is set to 'On', you must turn the
printer off and on to restart the Océ Power Logic
®
controller.
How to configure the network settings in the Océ TCS300 Settings Editor
1. Click 'Configuration' - 'Network'- 'TCP/IP'.
You can expand or collapse the settings that belong to the 'TCP/IP' group. The
expanded view displays all the settings and the values that are currently active.
2. Click 'Edit' in the group bar to access the 'Edit' window. You can edit all the settings
of the 'TCP/IP' group in one window.
or
3. To edit only one setting in the 'TCP/IP' group, click a single setting value in the
expanded list.
Note: Log on as System administrator or Power user in the Settings Editor.
For example, click 'Enable DHCP' to display a window where you can change the
setting.
Note: This window also contains a short explanation of the setting.
4. Click 'Ok' to confirm you entries or 'Cancel' to reject your entries.
Page 52

52 Chapter 3 Prepare the Océ TCS300 for use
Configure the network settings of the Océ TCS300
Page 53

53
Chapter 4
Use the Océ Settings Editor to
control your workflow
Page 54

54 Chapter 4 Use the Océ Settings Editor to control your workflow
Purpose of the Océ TCS300 Settings Editor
Purpose of the Océ TCS300 Settings Editor
Definition
The Settings Editor is an application that runs on the embedded Océ TCS300 web
server. You can use an internet browser (Microsoft® Internet Explorer 5.0, 5.5 and
6.0 and Mozilla
®
Firefox 1.0.) to open the home page of the Settings Editor.
This application gives you access to the settings to manage the configuration and
preferences of the Océ TCS300. The settings related to the system configuration
need to be configured only once. The settings that are more related to workflow
preferences or an optimal tuning of the print job processing can be changed when
necessary. To work with the Settings Editor you must log in using one of three
predefined user roles because the settings are all password protected.
'Configuration' tab
Editable for System administrator and Power user.
The 'Configuration' tab contains the settings to manage the network and security
aspects of the Océ TCS300. These settings are configured during installation and do
not need frequent adjustment.
[20]
'Preferences' tab
Editable for Key operator and Power user.
The 'Preferences' tab contains the settings to fine tune the processes and the
performance of the Océ TCS300. You can customise the system settings to support
your company's workflow and processes.
[21]
Tab Groups
'Configuration'
■ 'Overview'
Contains a summary of the settings organised in
different groups.
■ 'Network'
■ 'PDLs'
Tab Groups
'Preferences'
■ 'Overview'
Contains a summary of the settings organised in
different groups.
■ 'System defaults'
■ 'Print job defaults'
■ 'Colour management'
■ 'Pen settings'
Page 55

55
Purpose of the Océ TCS300 Settings Editor
'Support' tab
Editable for System administrator and Power user.
[22]
Tab Groups
'Support' 'About'
Gives information about the system version.
'Media'
■ Gives an overview of the media profiles that are active
on the system.
■ Manages media profiles.
'Licenses'
■ Check licenses.
■ Find information to order a new license.
■ Install a new license.
Page 56

56 Chapter 4 Use the Océ Settings Editor to control your workflow
User roles and authorisations
User roles and authorisations
Introduction
The settings in the Settings Editor must be configured and managed to enable the
optimal performance of the Océ TCS300.
You can view all the settings in the Settings Editor but when you want to edit a
setting, a message appears. This message indicates that the setting is password
protected. You must log in, before you have the rights and authorisations to change
a setting. Logging in requires a password.
Overview of user roles and authorisations
The table below displays the different user roles and the authorisations that belong
to the role.
[23]
Role Authorisation
Anonymous user You have not logged on. You have read rights to all the
settings. You are not allowed to edit the settings.
System administrator You have read and write access to the settings in the
'Configuration' tab and the 'Media' manager. In addition
you can also manage the 'Licenses'.In the 'Configuration'
tab you find mostly IT related settings.
Note: You can also access the setting to
change the system administrator password on
the 'Preferences' tab.
Key operator You have read and write access to the settings in the
'Preferences' tab. In this tab you find mostly system
behaviour related settings and default print job settings.
Power user You have the combined rights of a system administrator
and a key operator.
Page 57

57
Log in as an authorised user
Log in as an authorised user
Purpose
In order to have read and write access for the Settings Editor, you must log in as an
authorised user. There are 3 user roles, system administrator, key operator and power
user who are authorised to edit the settings. You do not need to log in before you start
a session. The system will only display a message when you need to log in to
perform an action.
Before you begin
Access the home page of the Settings Editor. Navigate through the tabs and select
the value of a setting you wish to change.
How to log in as an authorised user
1. After you click the value of the setting you want to edit, a log in window appears.
2. You can select a user role from the drop down list.
Note: The user role with the required authorisation is already selected.
3. Enter the password (default passwords are Key operator: KeyOp, System
administrator: SysAdm, Power user: PowUsr).
Note: For security reasons it may be useful to periodically change the password for
the 3 access modes (Key operator, System administrator, Power user) to the Settings
Editor.
4. Click 'Ok' to confirm your entry.
Result
If the password is entered incorrectly, a message appears. You can enter the password
again to get read and write access.
Note: Once you have logged in, the log in lasts for the duration of the browser
session. If you have not been active for more than 30 minutes, the session expires and
you need to login again.
Page 58

58 Chapter 4 Use the Océ Settings Editor to control your workflow
View the settings
View the settings
Purpose
Check the settings and the values that are stored when you create a back-up file.
When to do
Before you create a back-up file of the data in the Settings Editor.
Note: Not all settings are stored in the back-up file. The network settings and the
passwords are excluded from the back-up file for security reasons. License
information and media profiles are not included in the back-up file either.
How to check the settings that are stored in a back-up file
1. Click the 'Configuration' tab or the 'Preferences' tab.
2. Click 'View set' in thetop-right hand corner of the screen. A secondary window is
opened.
3. Scroll through the list of settings. The first column displays the setting and the
second column displays the values. A "*"indicates that the value of the setting is
different from the original default value.
How to save the settings in a back-up file
1. Click the 'Configuration' tab or the 'Preferences' tab.
2. Click 'Save set' in thetop-right hand corner of the screen. A secondary window is
opened.
3. Navigate to a location on the network to store the back-up file.
4. Save the settings<hostname of printer><date>.xml file. The file name is not fixed.
You can change the name if required.
5. Click 'Ok' to confirm or 'Cancel' to close the window without storing the back-up
file.
Page 59

59
View the settings
How to load a back-up file
1. Click the 'Configuration' tab or the 'Preferences' tab.
2. Click 'Open set' in thetop-right hand corner of the screen. A secondary window is
opened.
3. Navigate to a location on the network and select the back-up file.
4. Click 'Ok' to load the back-up file or 'Cancel'.
5. Restart the Océ Power Logic
®
controller.
Result
If you have more than one Océ TCS300 you can use the save and load functions to
quickly and easily roll out the same settings for all the Océ TCS300 print systems.
Note: You can print the information with the standard print function of your
browser.
Page 60

60 Chapter 4 Use the Océ Settings Editor to control your workflow
Check your licenses
Check your licenses
About the licenses
The 'Licenses' tab in the Océ TCS300 Settings Editor allows you to manage the
licenses that are active on your system. A license is needed to activate certain
functions on your Océ TCS300.
You can use the 'Licenses' tab to perform the following tasks.
■ View the current active licenses.
■ Get the host id of the Océ system.
■ Save the active licenses.
■ Perform a license activation job.
You can activate new licenses or saved licenses.
License information overview
Click 'Support'- 'Licenses' to view the available licenses.
You can view the license information for the following purposes.
■ Check the active licenses on license state, license type and license duration.
■ Check how long a demo license is valid.
■ View all options available for your Océ system.
The list of options depends on the type and version of the Océ system.
■ Make a list of new options you need.
■ Make a list of license numbers.
[24]
Information Description
'Option' This field displays the name of the option.
For Océ TCS300 the following licenses are available.
■ Océ TCS300 base license.
■ Adobe
®
PostScript 3 / PDF.
■ Japanese PostScript fonts.
■ Simplified Chinese PostScript fonts.
■ Traditional Chinese PostScript fonts.
'State' This field displays one of the following license states.
■ 'Authorised'. You are authorised to use the function.
■ 'Not authorised'. You are not authorised to use the function, you need to
get a license for the function.
■ 'Expired'. Your license was a temporary license. You need to get a new
license to use the function.
■ 'Update configuration'. This state indicates that there is a newer version
of a function (e.g. more scan memory for scan-to-file).
Page 61

61
Check your licenses
'License type' This field displays one of the following license types.
■ 'Resale'.
■ 'Demo'.
'Duration in
days'
This field displays the time your license is valid.
'License
number'
This field displays a license number.
Information Description
Page 62

62 Chapter 4 Use the Océ Settings Editor to control your workflow
Define the media sizes
Define the media sizes
Introduction
Use this setting to define the default media range.
If you want to select a new media size on the operator panel of the printer, only the
sizes in the defined media series are available.
When 'Auto format' is enabled, the 'Media sizes' setting selects which sizes are used
(only those available in the 'Media sizes').
Before you begin
Access the Settings Editor. The setting is editable for the key operator and the power
user.
How to define the media series in the Settings Editor
1. Navigate to 'Preferences' - 'System defaults' - 'Regional settings'.
2. Click the value for 'Media sizes' to access the edit window.
[25]
3. Click 'Ok' to confirm your entries or 'Cancel' to reject your entries.
Setting Group Va lu es
'Media sizes' 'DIN' A0, A1, A2, A3, A4, E+ (36 inch),
ISO B1, ISO B2
'DIN carto' A0, A1, A2, A3, A4, E+ (36 inch),
500 mm, 700 mm
'ANSI small' E, D, C, B, A, E+ (36 inch), 30 inch
'ANSI mixed' E, D, C, B, A, E+, D+, C+, B+, A+,
30 inch
Page 63

63
Configure the 'Media request time-out'
Configure the 'Media request time-out'
Introduction
The printer operator panel displays a media request when a media is requested that
is not available. When this setting is disabled, the media request will be displayed
until it is resolved.
Note: When enabled, the printer deletes the job when the media request is not
resolved within a given period.
When to do
Enable the setting and define a suitable time-out period that does not interfere with
the print productivity. To avoid the deletion of jobs, disable this setting.
How to configure the 'Media request time-out'
1. Click 'Preferences' - 'System defaults'- 'Timers'.
2. Click 'Edit' in the 'Timers' bar or click the value of the 'Media request time-out'
setting.
3. When you enable the setting, you must enter a time period as well. If you choose to
disable the setting, the time period will not be adjustable.
4. Click 'Ok' to confirm you entries or 'Cancel' to reject your entries.
Page 64

64 Chapter 4 Use the Océ Settings Editor to control your workflow
Manage the media profiles
Manage the media profiles
Introduction
The quality of your printed output is greatly influenced by the media type that you
select. Therefore, it is important to make sure that the media related settings of your
system are set to generate an optimal print result.
You can set the media related settings in the following places.
■ Print job submission applications:
Select a media type and media format.
■ Printer operator panel:
Define the media types and formats available on the printer.
■ Printer:
Load the correct media.
■ Settings Editor:
Check the availability of the required media profiles and / or retrieve the correct
media profile on the corporate web site www.oce.com.
The Settings Editor allows you to manage the media profiles on the printer.
Before you begin
This setting is editable for the Key operator or Power user.
How to check the media profiles
1. Click 'Support' - 'Media'
2. Find the media type in the list of supported media types.
3. Click the media type, for example 'Standard paper', to check the settings of the
required media profile.
Result
If you are not sure that you have the latest version of the media profile, you can click
the hyperlink at the top of the page to access the media profiles download page on
the corporate web site. Check the date of the media profile of your choice and if
necessary update the media profile in the Océ TCS300 Settings Editor. More
information about the media profiles is available in the 'Work with media profiles'
section of the on-line help.
Page 65

65
Download a media profile from the Océ web site
Download a media profile from the Océ web site
When to do
When a new media profile is available or an existing media profile needs to be
updated you can retrieve the required media profile from the corporate web site.
The next step is to upload the media profile to the Océ TCS300 Power Logic
®
controller.
How to download a media profile from the Océ web site
1. Access the corporate web site in your internet browser: www.oce.com
2. Click Support and Downloads - Downloads - Colour profiles - Product: choose Océ
TCS300.
3. Download the correct zip file to a location on your workstation.
4. Extract the files in the zip file.
The zip file contains at least an instruction file how to handle the media profiles.
5. Follow the steps described in the instruction file.
Result
The zip file is stored on the workstation. If you have problems downloading the file,
please contact the Océ Helpdesk.
Page 66

66 Chapter 4 Use the Océ Settings Editor to control your workflow
Update a media profile
Update a media profile
When to do
When you have downloaded the zip file you need to upload the media profile to
update the previous media profile.
Before you begin
Extract the contents of the zip file to a folder. See the instruction file you
downloaded with the media profile.
This setting is editable for the System administrator or Power user.
How to update a media profile
1. Click 'Support' - 'Media'.
2. Click the check box of the media profile you want to update.
3. Click the 'Update' button in the toolbar above the media profiles list.
4. Click Browse to navigate to the correct file on your workstation.
5. Select the media profile and click Upload or 'Cancel'.
6. Reboot the system after the upload of the file is completed.
Result
A warning message appears to inform you of the consequences for the print jobs.
The file is stored on the Océ Power Logic
®
controller. The new file is visible in the
media profile list on the 'Media' tab.
Note: If an older version of the file was active on the controller, this file will be
overwritten by the new file.
Page 67

67
Set up unattended / overnight printing optimisation
Set up unattended / overnight printing optimisation
Introduction
The Océ TCS300 has the possibility to print unattended, for example outside office
hours. To use this option, navigate to 'Preferences'- 'System defaults' - 'Calibration'
to change the setting 'Overnight printing optimisation' in the Océ Settings Editor.
When the setting 'Overnight printing optimisation' is set to 'On', the system will
automatically perform checks, after the selected number of prints, to ensure a
consistent output quality. For each check, the system uses approximately 25
centimetres of the loaded media roll.
Set up overnight printing
The setting 'Overnight printing optimisation' has the following options.
[26]
Calibration is only possible when one of the following media types (minimal media
size is A0) is loaded on the system. If you use another media size or a media type not
mentioned in the list below, the system will display an error message.
■ Draft paper
■ Standard paper
■ Premium coated paper
■ Bond
■ Coated bond
■ Matt photo paper
■ High gloss photo paper
■ Deluxe bond
■ Recycled plain paper
■ Plain paper coated
Note: When these media types are not available on the system, the check is delayed
until the next time a print is made on one of these media types.
Setting Function
'Off' The system will not check the output quality.
'On'
Recomme
nded
value: 100
The system checks for failing printhead nozzles and corrects the
alignment.
You can define the number of prints after which the system
automatically does a check.
Page 68

68 Chapter 4 Use the Océ Settings Editor to control your workflow
Set up unattended / overnight printing optimisation
Page 69

69
Chapter 5
Print jobs to the Océ TCS300
Page 70

70 Chapter 5 Print jobs to the Océ TCS300
What you need to know before you send your print jobs
What you need to know before you send your print jobs
Definition
Before you send print jobs to the Océ TCS300, remember the following.
■ The values defined in the Océ Settings Editor are default values for the general
system behaviour. You can define a number of job settings in the printer drivers
or the job submission tools. The settings defined in the printer drivers or the job
submission tools always overrule the settings defined in the Océ Settings Editor.
■ Make sure that you define the correct quality mode for your job (see ‘The quality
modes’ on page 83).
■ Make sure that you define the correct media type for your job (see
‘Recommended media types and quality modes’ on page 85).
■ Make sure that you define the correct job settings. For example, orientation,
rotation, and media type.
Note: When the requested media type is not available on the printer, the printer will
give a media request. Depending on the 'Media request time-out' settings in the Océ
Settings Editor ((see ‘Configure the 'Media request time-out'’ on page 63)), the
printer waits until the media is loaded or the print job will be deleted after the
time-out has expired.
Page 71

71
Send print jobs to the Océ TCS300
Send print jobs to the Océ TCS300
You can send your print jobs to the Océ TCS300 in various ways. The default
configuration of the Océ TCS300 includes the following options to send a print job.
■ Océ Windows
®
printer driver
■ Océ PostScript
®
driver
■ Océ HDI driver
■ FTP
■ LPR
The jobs are sent directly to the printer.
Note: The settings defined in the printer drivers or the job submission tools always
overrule the settings defined in the Océ Settings Editor.
Page 72

72 Chapter 5 Print jobs to the Océ TCS300
Use the printer drivers to send jobs to the Océ TCS300 printer
Use the printer drivers to send jobs to the Océ TCS300
printer
Introduction
The Océ TCS300 printer is delivered with a driver pack CD-ROM. You can also
download the latest Océ drivers, free of charge, from our Web site www.oce.com.
With these drivers PC users can access the Océ TCS300 printer remotely from their
applications, to print their files.
Note: More information about how to install, configure and use the drivers is
available in the documentation provided with the drivers.
Available printer drivers
(see ‘Specifications drivers and job submission software’ on page 175) for a list of
the available printer drivers that you can use to print files from your software
applications.
Note: Please check www.oce.com, section drivers for the latest driver-updates.
Page 73

73
Use FTP to send jobs to the Océ TCS300
Use FTP to send jobs to the Océ TCS300
Introduction
The Océ TCS300 supports printing through FTP.
You can print the files through FTP in the following ways.
■ Via a command line prompt
■ Via n FTP application
■ From a Web browser
The Océ TCS300 has a dedicated FTP Jobs folder. You cannot delete or change this
folder. It is created at installation and protected. The most convenient way to print
files through FTP is to drag and drop the files or to copy and paste the files, into this
'Jobs' folder on the FTP site of your Océ TCS300 controller. The documents in the
folder are printed on the Océ TCS300.
Web browsers that support job submission through FTP
[27]
Level of functionality Web browser Operation
Supports drag and drop of
files
Microsoft
®
Internet
Explorer 5.5.
Mozilla
®
Firefox® 1.0
and 1.5.
Drag the jobs into the
'Jobs' folder on the FTP
site of your Océ TCS300.
Supports copy and paste
of files.
Microsoft
®
Internet
Explorer 5.5.
Mozilla
®
Firefox® 1.0
and 1.5.
Paste the jobs into the
'Jobs' folder on the FTP
site of your Océ TCS300.
Page 74

74 Chapter 5 Print jobs to the Océ TCS300
Stop or delete an active job
Stop or delete an active job
Introduction
This section describes how to 'Stop' or 'Delete' an active job on the printer operator
panel.
How to 'Stop' or 'Delete' an active print job on the printer operator panel
1. Press the 'Stop' key on the printer operator panel.
The printer stops immediately.
A dialogue box on the screen asks the user to 'Resume' or 'Stop' the job.
When you do not select an option, the printer automatically continues the printing
after 5 minutes.
[41]
2. Use the lower softkeys to indicate if you want to 'Resume' or 'Stop' the job.
3. If you select 'Resume' the printer continues to print the job.
4. If you select 'Stop' the active job is permanently deleted.
Note: When you delete a job, the drying is not skipped. Press the key for 'Skip
drying' to cancel the drying during the drying time. You can use the 'Feed & cut'
wizard to cut the output.
Page 75

75
Define the correct media for your jobs
Handle the media for the print jobs
Define the correct media for your jobs
Definition
To achieve optimal output quality, make sure that you load and define the correct
media type on the printer.
You can use the 'Change media type' wizard, to load a media roll and to change the
media type defined on the system.
Make sure you define the correct media type for your job. Make sure the media type
and the media format defined in your job is available on the printer.
Define the correct media on the printer and the correct settings in the job submission
tools to set the Océ TCS300 for productive use or high output quality.
[28]
Note: The above procedure is based on DIN media sizes. You can also use this
procedure with ANSI media sizes.
When productivity with different media sizes is the most important
requirement.
1 Load and define 2 or 3 media rolls on the printer with different media sizes
and the same media types.
2 Use the 'Landscape' orientation to print a job on a media size that is one
size smaller than the media defined on the system. For example, A1 prints
in landscape on A0 and A2 prints in landscape on A1. You are not required
to cut the media by hand.
3 Use the 'Auto rotate' setting in the Océ Settings Editor or the job
submission tools to rotate the orientation automatically.
Page 76

76 Chapter 5 Print jobs to the Océ TCS300
Define the correct media for your jobs
[29]
[30]
When productivity is the only important requirement.
1 Load and define two media rolls on the printer with the same media sizes
and the same media types.
Note: When roll 1 is empty, the printer switches automatically
to roll 2. You can load a new roll while the printing process
continues.
When the output quality is the most important requirement.
1 Load and define 2 or 3 media rolls on the printer with the same media sizes
and with different media types.
2 Select the media types you define based on the output quality you require.
Page 77

77
Change the default drying time
Change the default drying time
Introduction
You can change the drying time with a percentage of the default drying time. For
example, when you set the default drying time for Premium coated paper, under the
conditions used in the table describing the typical drying times, to 200 the drying
time will be 0'40".
Before you begin
This setting can be edited by the system administrator or the power user.
How to change the default drying time
1. Access the home page of the Océ Settings Editor.
2. Navigate to 'Support' - 'Media'.
3. Select the required media type from the media list and click 'Edit'.
A window appears where you can change the 'Drying time correction' of the media
type.
4. Define the required percentage.
5. Confirm or cancel the changes you made.
Note: See (see ‘Typical drying times’ on page 173) to get an overview of the typical
drying times per media type.
Page 78

78 Chapter 5 Print jobs to the Océ TCS300
Cut the output and clean cut a roll of media
Cut the output and clean cut a roll of media
Introduction
The off-line screen of the printer operator panel contains the 'Feed & cut' wizard that
helps you do the following.
■ Cut the output.
■ Clean cut a roll of media. Use this option to cut the roll so that the edge is straight.
Note: You can only use the 'Feed & cut' wizard to cut the output when 'Automatic
media cut' is disabled in the Océ Settings Editor. When 'Automatic media cut' is
enabled in the Océ Settings Editor, the system automatically cuts the output.
How to use the Feed & cut wizard to cut the output.
1. Press the On-line / off-line key to set the printer off-line.
2. Use the upper softkeys to scroll to the 'Feed & cut' card.
[42]
3. Press the softkey below the 'Feed & cut' card to enter the wizard.
The screen displays the message 'Preparing Feed & cut...'. The system prepares for
the feed and cut. This can take between 0 and 20 seconds.
[43]
4. Press the key for 'Feed' to feed the output in steps of 5 cm.
[44]
5. Press the key for 'Cut' to cut the output.
Page 79

79
Cut the output and clean cut a roll of media
When you do not require to cut the output, press the key for 'Finish' to return to the
on-line screen.
After you select 'Cut', the system returns to the on-line menu.
How to use the Feed & cut wizard to clean cut a roll of media
1. Press the On-line / off-line key to set the printer off-line.
2. Use the upper softkeys to scroll to the 'Feed & cut' card.
3. Press the softkey below the 'Feed & cut' card to enter the wizard.
■ When multiple rolls are available on the system, the screen displays the message
'Select roll for Feed & cut.'
■ When 1 roll is available on the system, the wizard moves directly to the 'Cut'
screen.
4. The screen displays the message 'Select roll for Feed & cut.' Use the lower softkeys
to select a media roll to clean cut.
[45]
5. Press the key for 'Next' to continue. The screen displays the message 'Length to cut
from roll '
[46]
6. Use the lower softkeys to select the cut length option. Select one of the following.
■ 'Long strip'
Feeds the media with a full roll rotation feed (50 cm) before the printer cuts the
media.
■ 'Short strip'
The printer automatically cuts the media with the least possible media waste (20
cm).
7. Press the key for 'Finish' to confirm the settings. The screen displays the message
'Cutting sheet...'.
Page 80

80 Chapter 5 Print jobs to the Océ TCS300
Cut the output and clean cut a roll of media
[47]
After the sheet is cut, you automatically exit the wizard.
Page 81

81
Chapter 6
Ensure the best output quality
Page 82

82 Chapter 6 Ensure the best output quality
Introduction how to ensure the best output quality
Introduction how to ensure the best output quality
Introduction
This chapter describes how to make sure you have the best quality for your print jobs.
■ The Océ TCS300 offers several methods that help you to define the best print
mode for your job. These methods are described in the Define the output quality
section of this chapter.
■ The Océ TCS300 has 3 methods that help you to identify and analyse changes in
the output quality, the 'Quality check' print, the 'Tone scale area check' print, and
the 'Demo print'. The Check the output quality section of this chapter describes
these 3 methods.
■ When you find problems with the output quality, the Optimise the output
quality section of this chapter helps you to correct the problems.
To optimise the colours of your printed output, you can adjust the Colour
Management settings. The Colour Management section of this chapter gives an
overview of these Colour Management settings.
When to do
Only do actions to optimise the output quality based on the information supplied in
the 'Check the output quality' section.
When you are not satisfied with the output quality, use the following procedure
1. Make sure that you loaded and defined the correct media type on the printer.
Use the 'Change media type' wizard to change the media type defined on the system.
(see ‘Replace the media’ on page 132).
Also make sure you defined the correct media type for your job.
2. Make sure you defined the correct output mode for your job. (see ‘Introduction how
to ensure the best output quality’ on page 82).
3. When you have defined the correct media and the correct print mode, and you are
still not satisfied with the output quality, use the wizards to achieve optimal output
quality. (see ‘Optimise the output quality on the printer’ on page 116).
4. Use the prints generated by the 'Quality check' print, the 'Tone scale area check' print
and the 'Demo print' to evaluate the quality of the prints and the colours.
Page 83

83
The quality modes
Define the output quality
The quality modes
Introduction
The Océ TCS300 enables you to select the correct quality mode for your output
requirements. You can define the required quality mode in the printer driver. You can
define the default quality mode in the Océ Settings Editor.
The Quality modes
Use these modes to define the output quality. You can select the following.
[31]
[31] The output quality
Quality mode Function
'Check' The print speed is maximum. This quality mode is used for
fast printing of (line) drawings with good output quality.
For other types of jobs, like print jobs with area coverages,
you can use this quality mode to check if all the
information is visible on the printed output. For these print
jobs the output quality is good.
'Release' The print speed is very high. This quality mode is best for
drawings, very good for images and provides a good
combination of output quality and productivity. In this
quality mode the printer will automatically optimise the
print quality and the productivity based on the file content.
Drawings will be printed twice as fast as images, resulting
in optimal productivity and quality for most customers.
The Océ TCS300 further offers Dynamic switching
Tec hn olo gy. In case a print job has mixed contents
(drawings and images), the printer will adjust the print
quality and the productivity automatically during the print
process, without customer intervention.
'Presentation' Select this quality mode if you need the best possible
output quality. Especially for images, posters. The print
speed is high.
Page 84

84 Chapter 6 Ensure the best output quality
Output type, output quality and print speed
Output type, output quality and print speed
Introduction
The type of your printed output depends on the following parameter.
■ The colour mode ('Greyscale' / 'Colour')
The quality of your printed output depends on the following parameters.
■ The media type
■ The quality mode
■ The print speed
The lower the print speed, the better the output quality.
The following table describes the relation between these parameters.
The relation between the output type and the quality parameters
[32]
[32] The relation between the output quality parameters
Colour mode Quality mode Print speed for all media
(per A0, not including the
drying time and the
processing time)
(minutes' seconds")
'Greyscale' 'Check' 0'41"
'Release' Between 1'00" and 3'40",
dependant on file content
(the printer automatically
optimises between print
quality and productivity.
'Presentation' 3'40"
'Colour' 'Check' 1'03"
'Release' Between 3'05" and 6'15",
dependant on file content
(the printer automatically
optimises between print
quality and productivity.
'Presentation' 9'15"
Page 85

85
Recommended media types and quality modes
Recommended media types and quality modes
Introduction
The selection of the media and the quality modes depends on the application of the
output. The tables give you an idea of which media type and quality modes to use in
a work process.
CAD drawings - Greyscale
[48]
[48] Example 2D CAD monochrome drawing
Page 86

86 Chapter 6 Ensure the best output quality
Recommended media types and quality modes
[33]
[33] CAD drawings - Greyscale
When to use Recommended media type Recommended Quality
mode
To check a drawing Draft paper
Standard paper
Tracing paper
Bond
Translucent bond
'Check'
'Release'
To release a
drawing
Draft paper
Standard paper
Tracing paper
Premium coated paper
Matt film
Bond
Translucent bond
Deluxe bond
'Release'
To present a
drawing
Draft paper
Standard paper
Tracing paper
Premium coated paper
Matt film
Bond
Translucent bond
Deluxe bond
'Release'
To archive a
drawing
Matt film
Color vellum
'Release'
Diazo Tracing paper
Matt film
Translucent bond
Color vellum
'Release'
Page 87

87
Recommended media types and quality modes
CAD and GIS drawings - Colour
[49]
[49] Example 2D CAD colour drawing
Page 88

88 Chapter 6 Ensure the best output quality
Recommended media types and quality modes
[50]
[50] Example GIS map
[34]
[34] CAD and GIS drawings - Colour (1 – 2)
When to use Recommended media type Recommended quality
mode
To check a drawing Draft paper
Standard paper
Tracing paper
Bond
Translucent bond
'Check'
To release a drawing Draft paper
Standard paper
Premium coated paper
Matt film
Bond
Deluxe bond
'Release'
Page 89

89
Recommended media types and quality modes
CAD and GIS drawings - Colour (high density)
[51]
[51] Example photo realistic impression
To present a drawing Draft paper
Standard paper
Premium coated paper
Matt film
Bond
Coated bond
'Release'
To archive a drawing Matt film 'Release'
[34] CAD and GIS drawings - Colour (2 – 2)
When to use Recommended media type Recommended quality
mode
Page 90

90 Chapter 6 Ensure the best output quality
Recommended media types and quality modes
[52]
[52] Example drawing with mixed content
[35]
[35] CAD and GIS drawings - Colour (high density)
When to use Recommended media type Recommended quality
mode
To release a drawing Premium coated paper
High gloss photo paper
Photo matt paper
'Release'
To present a drawing Premium coated paper
High gloss photo paper
Photo matt paper
'Release'
'Presentation'
Page 91

91
Recommended media types and quality modes
Logo and Business graphics - Colour
[53]
[53] Example of logo
Page 92

92 Chapter 6 Ensure the best output quality
Recommended media types and quality modes
[54]
[54] Example business colour
[36]
Business graphics and 3D CAD - Colour
[36] Logo and Business graphics - Colour
When to use Recommended media type Recommended quality
mode
To release a
document
Premium coated paper
High gloss photo paper
Photo matt paper
'Release'
To present a
document
Premium coated paper
High gloss photo paper
Photo matt paper
'Release'
'Presentation'
Page 93

93
Recommended media types and quality modes
[55]
[55] Example of business graphics
Page 94

94 Chapter 6 Ensure the best output quality
Recommended media types and quality modes
[56]
[56] Example of 3D CAD drawing with rendering
[37]
[37] Business graphics and 3D CAD - Colour
When to use Recommended media type Recommended quality
mode
To release a
document
Premium coated paper
High gloss photo paper
Photo matt paper
'Release'
To present a
document
Premium coated paper
High gloss photo paper
Photo matt paper
'Release'
'Presentation'
Page 95

95
Recommended media types and quality modes
Photos - Colour
[57]
[57] Example of a photo
[38]
[38] Photos - Colour
When to use Recommended media type Recommended quality
mode
To release a photo High gloss photo paper
Photo matt paper
'Release'
To present a photo High gloss photo paper
Photo matt paper
'Release'
'Presentation'
Page 96

96 Chapter 6 Ensure the best output quality
Define the colour settings
Colour Management
Define the colour settings
Priorities in the colour settings
When you want to print a document in colour on the Océ TCS300 the colour
information that is defined in the files can be set in the different steps of the process
from document creation to document production. In order to get the best output
results you need to be aware of these methods to define the colour information of the
document you want to print.
The colour information that you can create in the various steps described below each
have a different priority. When you create a document that you want to print in
colour, the priority of the colour settings is also illustrated in the table below.
[39]
Stages in the process of making a colour print Priority
Document
The colour settings are already embedded in the
document (only applicable for PDF files).
1
Application
The colour settings can be defined in the application that
you use to create or edit the document.
You can set the following parameters in the application.
■ Set colour or black and white.
■ Define the input profile, RGB input data or CMYK
input data (see ‘'Enhanced colours: RGB input data'’
on page 101) (see ‘'Enhanced colours: CMYK input
data'’ on page 102)
(you cannot correct this for a PDF file)
■ Define the rendering intent (see ‘'Enhanced colours:
Rendering intent'’ on page 103)
Note: You can only overrule the colour
settings of a PDF file with an Adobe
®
application such Adobe Acrobat
®
for
example.
2
Page 97

97
Define the colour settings
Note: It is advised to align the colour management settings that have been made in
the different stages before you start the print job. The colour space of the document
and the settings for the print have to match. This means that if you have set the colour
settings in more than 1 stage of the process described above, you must check if the
colour settings do not counteract with eachother.
Job submission-file type-colour management settings
The way in which you submit a print job to the printer defines in most cases the file
type of the document. If you use a printer driver, the original file type will be changed
by the driver into a standard file type. The printer checks the file type of the
document and based on the file type the printer applies the default colour
management settings of the Océ Settings Editor.
If you use FTP or LPR to send a job to the printer, the file type is not changed. The
file is sent to the printer the way in which it was saved in the application you used to
Printer drivers
The (Océ Windows printer driver) offers colour
management settings. You can select the required colour
management settings in the driver or you can indicate to
use the printer's default settings. Make sure the colour
settings do not conflict with the colour settings that may
be set in another stage of the process.
Note: The Océ HDI driver and the
PostScript
®
driver do not support the settings
for colour management. With the drivers you
can only indicate to use the default printer
settings for colour management. In this case
the printer will use the colour settings for the
HP-GL path defined in the Océ Settings
Editor.
3
The Océ Settings Editor offers 3 default paths for colour
settings, based on the file type of the document:
■ HP-GL path
■ TIFF path
■ PostScript/PDF path
These settings are applied when the controller cannot
recognise or detect any colour settings for the file to be
printed.
4
Stages in the process of making a colour print Priority
Page 98

98 Chapter 6 Ensure the best output quality
Define the colour settings
create or edit the file. If there is no embedded colour profile present in the document,
the printer checks the file type of the document and based on the file type the printer
applies the default colour management settings of the Océ Settings Editor.
If you want to use the embedded colour profile for your print job (for example,
embedded profile created with Adobe
®
Illustrator) you can choose between 2
options. You can use the WPD driver where you can indicate to follow the colour
settings managed by the application. You can also send the job via FTP or LPR. If
the controller can recognise the embedded colour profile, it will be applied. If the
embedded colour profile cannot be recognised, the controller applies the default
colour settings managed by the Océ Settings Editor.
The table below gives an overview of the relation between the job submission
method, the file type and the colour management settings
[40]
Job submission
method
File type Colour management settings
Windows printer driver The driver converts all
files into HP-GL/2
You can define the colour
settings in:
■ The printer driver.
■ The Océ Settings Editor, by
choosing the printer's
default in the driver settings.
■ The application, by
choosing the setting 'None,
managed by application' in
the driver
HDI printer driver The driver converts all
files into HP-GL/2
You can define the colour
settings only in the Océ
Settings Editor, the driver has
no colour settings and uses the
printer's defaults for colour
jobs.
You can adjust the default
colour settings for the HP-GL
path in the Settings Editor,
since the HDI driver converts
all the files into HP-GL/2
Page 99

99
Define the colour settings
PostScript® printer
driver
The driver converts all
files into
PostScript/PDF
You can define the colour
settings in:
■ The Océ Settings Editor, the
driver has no colour settings
and uses the printer's
defaults for colour jobs.
You can adjust the default
colour settings for the
PostScript/PDF path in the
Settings Editor, since the
driver converts all the files
into PostScript/PDF.
LPR/FTP The documents are
sent to the printer
without being
converted to another
file type.
The controller
recognises the
following file types.
■ Vector: HP-GL,
HP-GL/2,
CalComp
■ Raster: HP-RTL,
TIFF 6.0, NIFF,
CALS-I, NIRS, C4,
ASCII
■ PostScript/PDF
Depending on the file type of
the job, the default settings of
one of the 3 file type paths is
used in the Océ Settings Editor
when there is no embedded
colour profile present in the
file. Use the Settings Editor to
adjust the colour settings for the
print job.
Job submission
method
File type Colour management settings
Page 100

100 Chapter 6 Ensure the best output quality
'Colour feel'
'Colour feel'
Path: 'Preferences'- 'Colour management'- 'For HP-GL, HP-GL/2 and
HP-RTL files'
Path: 'Preferences' - 'Colour management'- 'For TIFF files'
Path: 'Preferences'- 'Colour management' - 'For PostScript and PDF files'
One of the options you have to finetune your output quality is to adjust the 'Colour
Management' settings.
With the 'Colour Management' setting 'Colour feel' you can finetune the look and
feel of the printed colours.
Note: You can select the 'Colour feel' setting for each input 'File type' ('HP-GL,
HP-GL/2, HP-RTL' / 'TIFF' / 'PostScript
®
, PDF').
[41]
[41] Overview of the 'Colour feel' settings.
'Colour feel' Description
'Océ CAD colours' This setting gives bright saturated colours.
Advised for: line and vector drawings.
'Océ enhanced colours' This setting gives photo-realistic colours.
Advised for: photos or graphic art presentations.
If you select 'Océ enhanced colours' you can also
adjust the advanced Colour Management settings.
■ 'Enhanced colours: RGB input data'
■ 'Enhanced colours: CMYK input data' (only for
'File type''PostScript
®
, PDF')
■ 'Enhanced colours: Rendering intent'
'Simulated Océ TCS400
CAD colours'
Use this setting to get a print with colours similar to
the Océ TCS400 printer.
'Simulated non-Océ
printer: vivid colours'
Use this setting to get a print with colours similar to a
non-Océ printer, that prints vivid colours.
'Simulated non-Océ
printer: match screen
colours'
Use this setting to get a print with colours similar to a
non-Océ printer, that prints match screen colours.
'Simulated non-Océ
printer: no colour
correction'
Use this setting to get a print with colours similar to a
non-Océ printer, that prints without colour correction.
'None, managed by
application'
Use this setting if your colour management is
completely done by the application that generated the
print file.
 Loading...