

Page 1

Océ | User Guide
Océ
Océ PRISMAproduction Server V3.02
APA-Module
Page 2

...and Training?
For this product we also offer seminars at
our International Training Center in Poing.
Information:
Phone +49 8121 72-3940
Fax +49 8121 72-3950
Océ Printing Systems GmbH
Postfach 1260
85581 Poing
Germany
March 2004 Edition
A29247-X2-X-8-7670
Copyright Océ Printing Systems GmbH 2002, 2003, 2004
All rights reserved, including rights of translation, reprinting, reproduction by copying
or any other method.
Offenders will be liable for damages. All rights, including rights created by patent grant
or registration of a utility model or design, are reserverd.
Delivery subject to availability; right of technical modification reserved.
All hardwware and software names used are trademarks of their respective owners.
Page 3

Introduction
r
Access Rights
The PRISMAproduction Desktop
APA-Module Components
The PRISMAproduction Explore
Configuration
Network Functions
Print Job Manager
Command Line Interface
Linedata
More chapters->
Page 4

A29247-X2-X-8-7670
Page 5

Index
Page 6

A29247-X2-X-8-7670
Page 7

Contents
1 Introduction............................................................................................................1
1.1 PRISMAproduction Server V3 .................................................................................1
1.2 Introduction to the APA-Module...............................................................................3
2 User ID’s and Access Rights.................................................. ... .... ... ... ... .... ... .......5
3 The PRISMAproduction Desktop .............. ... .... ... ... ... .... ... ....................................9
3.1 Login........................................................................................................................9
3.2 Main Pop Up Menu................................................................................................10
Contents
3.2.1 Applications Used by More than One Module ........... ... ...............................11
3.2.2 Available Applications for the APA-Module Functions.................................12
3.2.3 'System' menu .............................................................................................13
3.2.4 The 'Utilities' Menu ......................................................................................14
4 APA-Module Components ............... .... ... ... ................................................. ... ... .. 17
4.1 Introduction to the APA Processes........................................................................17
4.2 APA-Module Sample Window................................................................................18
4.3 APA Testjobs.........................................................................................................20
4.4 Import AFP Data Window ......................................................................................20
4.5 Convert AFP Resources.................................. .... ... ... ... .... .....................................22
4.6 The APA-Module LU 6.2 Connection..................................................................... 24
4.6.1 Introduction..................................................................................................24
4.6.2 Components of APA-Module LU 6.2............................................................26
4.6.3 LU6.2 Connection Status................................. ... .... .....................................26
4.6.4 The LU 6.2Config Module............................................................................31
4.6.5 The SNA2TCP Communications Module ....................................................31
4.6.6 SNAP-IX - General Summary......................................................................32
4.6.7 Application/ Example...................................................................................33
4.6.8 Terminal Emulation......................................................................................35
4.7 Web Client.............................................................................................................39
4.7.1 Introduction..................................................................................................39
A29247-X2-X-8-7670
Page 8

Contents
4.7.2 Login............................................................................................................41
4.7.3 Login as Administrator.................................................................................42
4.7.4 Administration..............................................................................................43
4.7.5 QickPrint Easy.............................................................................................45
4.7.6 QuickPrint Advanced .............. ................................................ .... ... ... ... ........48
4.7.7 APA Print.....................................................................................................51
4.7.8 PJM in the Web ...........................................................................................53
5 PRISMAproduction Explorer ..............................................................................57
5.1 Introduction............................................................................................................57
5.2 Using the Eplorer...................................................................................................59
5.2.1 Explorer Tree................................................. ... ... ... .....................................60
5.2.2 Application area...........................................................................................60
5.2.3 Menu bar......................................................................................................62
5.2.4 Menu ’Help’..................................................................................................62
5.2.5 Toolbar.........................................................................................................62
5.2.6 Status bar ............................... ... ................................................. ... ..............62
5.2.7 The ‘Explorer’ Menu.....................................................................................63
5.2.8 Customising the Explorer window........................................ ... .....................6 3
5.3 Task related Workspaces ......................................................................................65
5.3.1 Workspace 'Basic Operator'.........................................................................66
5.3.2 Workspace 'Operator with Job Submission'.................................................66
5.3.3 Workspace ’Job Submission’.......................................................................66
5.4 Configuration .........................................................................................................67
5.5 Connections...........................................................................................................67
5.6 Server Files............................................................................................................69
5.6.1 Libraries.......................................................................................................69
5.6.2 Devices........................................................................................................69
5.6.3 Archives.......................................................................................................69
5.6.4 GCI/LCDS....................................................................................................70
5.7 Job Lists.................................................................................................................71
5.7.1 General........................................................................................................71
5.7.2 Authorisations for jobs .................................................................................72
5.7.3 Icons for short Information...........................................................................72
5.7.4 Column Titles...............................................................................................73
5.7.5 Job States....................................................................................................75
5.7.6 Menu Functions...........................................................................................76
5.7.7 Filters...........................................................................................................80
A29247-X2-X-8-7670
Page 9

Contents
5.7.8 Interrupt Printing.............................. ................................................ .... ........8 4
5.7.9 Job Positioning ............................................................................................85
5.7.10 Detailed status of a job ................................................................................86
5.8 Servers .................................................................................................................. 88
5.9 Services.................................................................................................................90
5.10 Messages ..............................................................................................................91
5.10.1 The 'Messages' Menu..................................................................................94
5.10.2 The 'View' Menu ..........................................................................................98
5.10.3 The 'Help' Menu.........................................................................................102
5.10.4 Operator Requests ....................................................... ... ... .......................103
5.11 Vario PJM............................................................................................................105
5.11.1 Functions of the Menu Bar/Tool Bar................................ ..........................105
5.11.2 Functions of the Status Bar ............. ................................................ .... ... ... 105
5.11.3 Functions of the Tabs ...................................................... ... .......................106
5.12 PJM......................................................................................................................115
5.13 Printer Pool.......................................................................................................... 116
5.13.1 The 'Printer' Menu...................................................................................... 119
5.13.2 The 'View' Menu ........................................................................................123
5.13.3 The 'Help' Menu.........................................................................................125
5.14 LCDS Channe l................................................. .... ................................................ 127
5.15 LCDS Resour ces Import............................................ ... .... ...................................128
5.16 LCDS Resour ces Export............................ ... ... .... ... ... ... .... ...................................129
5.17 Print File Manager ............................................................................................... 131
5.18 LU6.2 ...................................................................................................................131
5.19 PDC .....................................................................................................................131
5.20 OLDS-Services.................................................................................................... 131
5.21 Directo ry View er .............................. ... .... ... ... ................................................. ... ... 132
6 Configuration ..................................................................................................... 137
6.1 Introduction..........................................................................................................137
6.2 User Administration .............................................................................................140
6.2.1 Introduction................................................................................................140
6.2.2 Login..........................................................................................................141
6.2.3 Permission Groups....................................................................................142
6.2.4 User Interfaces ..........................................................................................142
6.2.5 Configuration User.....................................................................................144
6.2.6 Configuration Personal Data......................................................................148
6.2.7 Configuration Permissions.........................................................................149
A29247-X2-X-8-7670
Page 10

Contents
6.3 Job Queues .........................................................................................................151
6.4 Cluster .................................................................................................................151
6.5 Logging................................................................................................................153
6.6 Events..................................................................................................................154
6.7 System.................................................................................................................155
6.7.1 System parameter .................. ... ................................................................155
6.7.2 ODS-Parameter.........................................................................................156
6.7.3 Job-Parameter...........................................................................................158
6.7.4 EMail Notification.......................................................................................159
6.8 Master/Slave........................................................................................................160
6.9 Device Configuration ...........................................................................................162
6.10 Service ac tiva tio n.................... .... ... ... ................................................ .... ... ............163
6.11 Backup.................................................................................................................163
6.12 Library paths........................................................................................................165
6.13 Licenses...............................................................................................................166
6.13.1 Introduction................................................................................................166
6.13.2 Functions of the License Manager....................... ... ...................................166
6.14 Printer ..................................................................................................................175
6.14.1 The ‘Printer’ Menu .....................................................................................175
6.14.2 Active Notification Interface .......................................................................176
6.14.3 The ’Help’ Menu.........................................................................................178
6.14.4 Printer Overview Area................................................................................178
6.14.5 Configuring a new Printer ..........................................................................179
6.14.6 Printer Configuration Area .........................................................................180
6.14.7 General......................................................................................................181
6.14.8 Print Parameter..........................................................................................185
6.14.9 Custom specific infopages and resources for configured printers .............189
6.14.10 Job Queues ...............................................................................................190
6.14.11 Cluster .......................................................................................................190
6.14.12 Colors ........................................................................................................191
6.14.13 Input Devices.............................................................................................191
6.14.14 Output Devices ..........................................................................................192
6.14.15 Printer Active Notification Interface............................................................192
6.14.16 Grey Curves...............................................................................................194
6.14.17 Custom specific infopages and resources for configured printers .............197
6.15 Printer-Input Devices ...........................................................................................198
6.16 Paper ...................................................................................................................198
A29247-X2-X-8-7670
Page 11

Contents
6.17 Toner ...................................................................................................................201
6.18 Color Verification ................................................................................................. 201
6.19 LP ........................................................................................................................202
6.19.1 Using PRISMAproduction LP.....................................................................202
6.19.2 Submitting a Print Job with ”lpr”.................................................................203
6.19.3 Getting Spool Queue Information with ”lpq”...............................................204
6.19.4 Cancel Print Jobs with ”lprm”........ ... ... ... .... ... .............................................204
6.19.5 Control Function ”lpc” ................................................................................205
6.20 Download (license dependent)............................................................................207
6.21 HotDir...................................................................................................................208
6.22 TicketRules..........................................................................................................209
7 PRISMAproduction Network Functions...........................................................213
7.1 Remote Printing Using rcmd............... ................................................. ... ... .... ......213
7.2 PRISMA SNMP Interface..................................................................................... 216
7.2.1 Querying MIB Leaf Elements Using the Command snmpget.................... 224
7.2.2 Querying Multiple MIB Elements Using the Command snmpwalk............. 226
7.2.3 Modifying Individual MIB Elements Using the Command snmpset ...........229
8 Print Job Manager .............................................................................................231
8.1 Introduction..........................................................................................................231
8.2 Basic Steps to submit a new Print Job with the APA-Module..............................232
8.3 Overview Main Window .......... ... ... ... ... ................................................. ... ... .... ... ... 235
8.4 The 'Ticket' Menu.................................................................................................236
8.5 ’Job Parameter’ Section....................................................................................... 237
8.5.1 Jobsplitting per Job Copies........................................................... ... ..........239
8.6 ’List of Files’ Section (‘Edit’ Menu)................ ... .... ... ... ... .... ...................................241
8.6.1 Columntitels...............................................................................................243
8.6.2 File Selection Box............... ... ... .... ... ................................................ .... ... ... 243
8.6.3 File Formats........................................ ... .... ... ............................................. 246
8.6.4 Logical Paths.............................................................................................247
8.7 ’Job Attributes’ Section ........................................................................................248
8.7.1 Messages ..................................................................................................249
8.7.2 Store output...............................................................................................250
8.7.3 Print ...........................................................................................................251
8.7.4 Header ...................................................................................................... 257
8.7.5 Start Job Events ........................................................................................258
8.7.6 Start Print Events....................................................................................... 259
A29247-X2-X-8-7670
Page 12

Contents
8.7.7 Notification.................................................................................................260
8.8 The ‘Job’ Menu ....................................................................................................261
8.9 The ‘Utilities’ menu ..............................................................................................264
8.10 Set Working Mode...............................................................................................265
8.11 Edit File Properties with the APA-Module............................................................266
8.11.1 Resource Libraries.....................................................................................267
8.11.2 Resource File Extensions..........................................................................271
8.11.3 Resources..................................................................................................273
8.11.4 Options ......................................................................................................275
8.11.5 Custom settings.........................................................................................280
8.12 PJM in Command Line Mode ..............................................................................281
8.12.1 Calling the PJM Commandline: .................................................................282
8.12.2 Syntax Examples for Use Cases...............................................................286
8.12.3 Return Codes.............................................................................................287
8.12.4 Description of the Océ Custom Ticket ........... ... ... ... ...................................291
9 Command Line Interface...................................................................................305
9.1 Job Editor.............................................................................................................305
9.2 Spsprt-to-JobTicket Converter ................................................ ... ... ......................309
9.3 Printer Administrator............................................................................................310
9.4 Message Information ...........................................................................................315
9.5 Job Queue Information ......................................................................................318
9.6 PRISMA Command Line Tools............................................................................321
10 Linedata..............................................................................................................325
Index ..............................................................................................................................329
A29247-X2-X-8-7670
Page 13

Introduction PRISMAproduction Server V3
1 Introduction
1.1 PRISMAproduction Server V3
PRISMAproduction Server V3 is the 3rd generation of the Océ printserver for IPDS pr inting
systems.
Due to the following features PRISMAproduction is a high performance printer server,
which combines stability and flexibility for production printing:
• A better throughput of data allows you to connect more and faster printing systems.
• You can manage and print jobs of more than 2 gigabyte.
• An extended LINUX server operating system supports modern server technologies
such as UDMA/ATA, RAID, Pentium 4 and XEON processors.
• The combination of several servers in a network increases performance and guarantees high system stability.
• SNMP assists you in monitoring an maintaining the system locally or via remote control.
• PRISMAproduction Server V3 is a modular system which allows you to combine all
available language modules in one system.
• PRISMAproduction Server V3 is also a scalable system providing print perfor mance up
to 1000 ipm. You can enhance performance and stability by selecting from a variety of
industrial standard server models, by cross-lin king serv ers and by the use of multi- processor systems.
• The "Print while spooling/downloading" functio n enables PRISMAproduction Server V3
to start printing during the tr ansmission of data. This function is provided for MVS Direct
and MVS Download users as well as for offline users.
A29247-X2-X-8-7670 1
Page 14

PRISMAproduction Server V3 Introduction
Graphical User Interface
The administration and configuration of the system is centralized in the PRISMAproduction
Explorer. This java-based graphical user interface has the following features:
• Monitoring and handling of all print jobs inde pende nt of th e prin ter langu age, workflow
and interface by means of the common spool.
• Changes in the configuration are detected aut omatically, e.g. printers and resources
can be added dynamically to the system without restating the GUI.
• Status changes are communicated by events, i.e. no polling in monitoring components
necessary, better overall performance.
• Exact repositioning and reprinting of jobs in case of an error.
• The PRISMAproduction Explorer also works as a st andalone application in a distributed
network allowing you to realize a centralized administ ration of t he system independ ant
of the physical location of the server(s).
2 A29247-X2-X-8-7670
Page 15
Introduction Introduction to the APA-Module
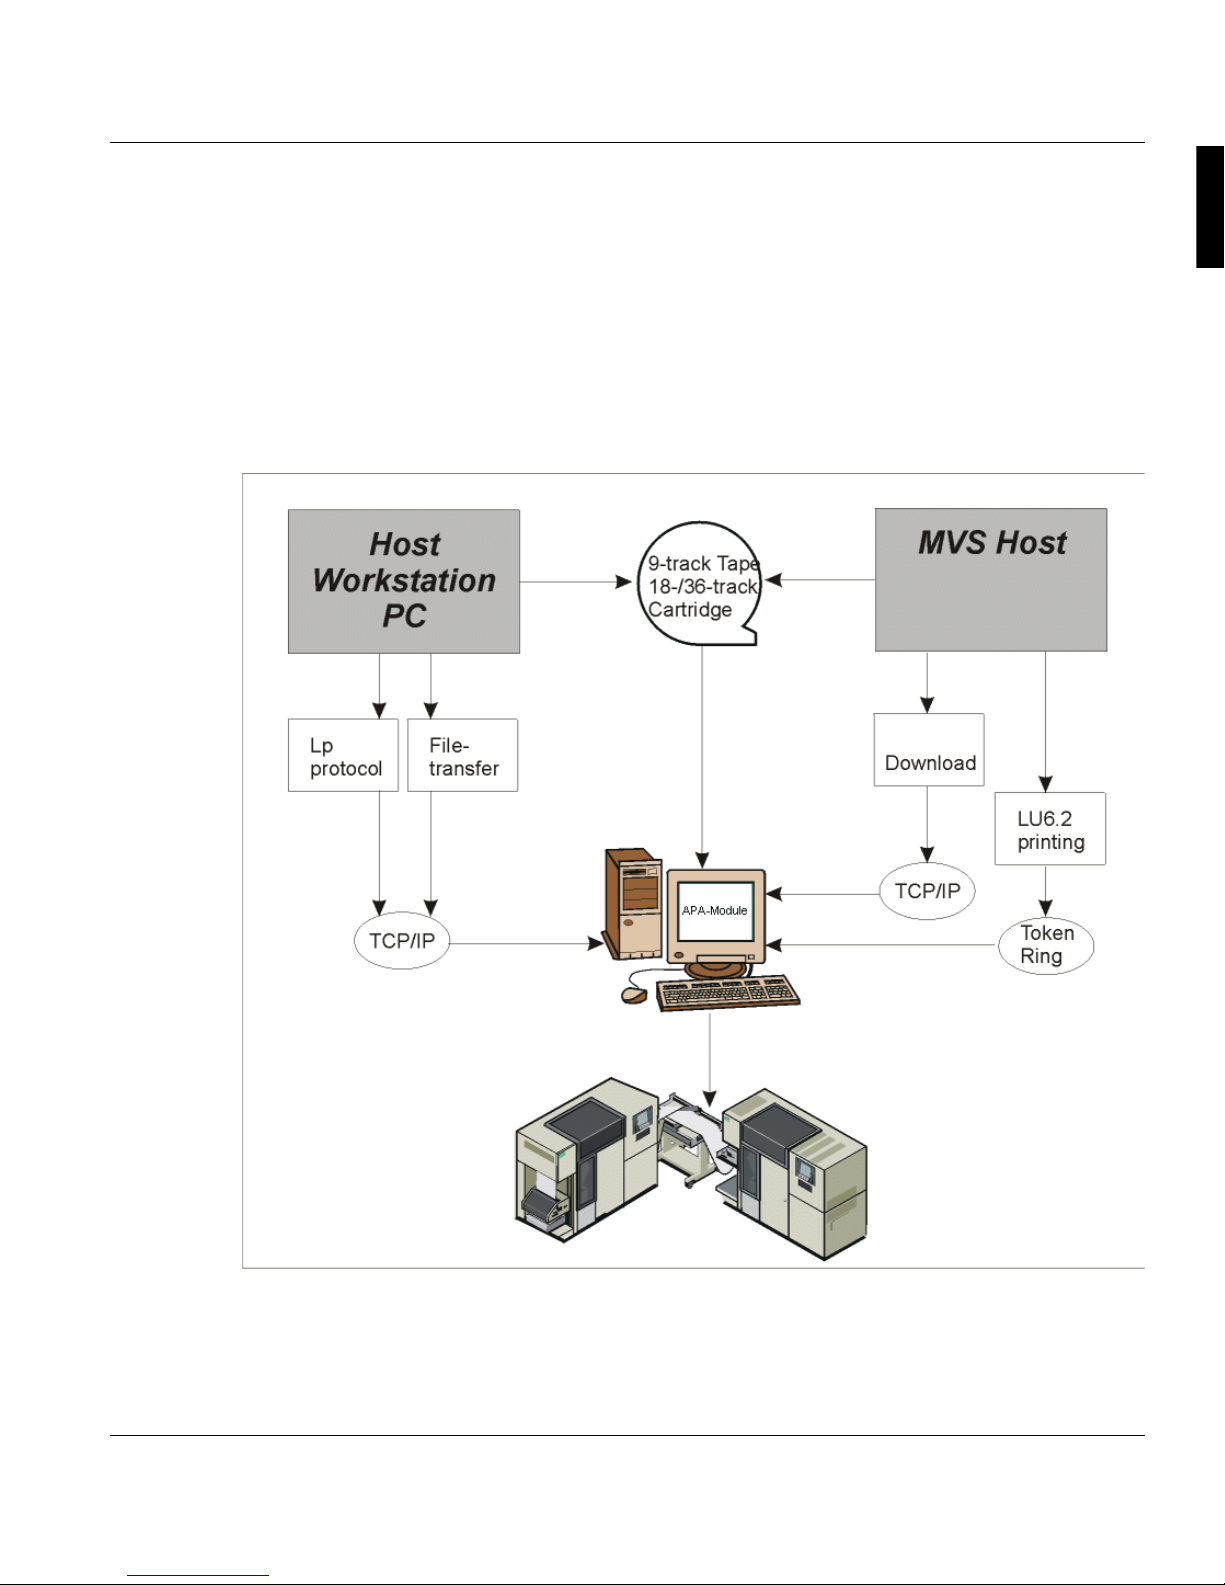
1.2 Introduction to the APA-Module
The APA-Module provides full compatibility to the IBM AFP world. The connection to the
AFP hostsystem is realized via MVS Router Download (or alternatively via MVS Do wnload
by IBM) or the Token Ring connection LU6. 2. The LU6.2 protocol is also supported for connection to an AS/400 system. Print data ca n also be re ad from 9-track t ape or 18-/36- track
cartridge (IEBGENER). Tape and cartridge input supports multifile/multivolume ANSI-labeled media. Existing IPDS resources are transferred via IEBCOPY to the PRISMAproduction system.
The data to be printed is in the form ats AFPDS (Advanced Function Printing Data Stream),
SPDS (Siemens Nixdorf Printing Data Stream) or simple line data. It is sent to the print server station by file transfer via Ethernet or Token Ring with the TCP/IP protocol.
A29247-X2-X-8-7670 3
Page 16

Introduction to the APA-Module Introduction
The standard network interfaces SNMP (for remote spool control and administration) and
lp (for remote job submission) are integrate d as common components for all language modules.
The APA-Module can be combined with other PRISMAproduction products (e.g. the PODModule, the LCDS-Module and the OLDS-Module) to enhance t he print server s' capability
to handle different input datastreams.
This user manual describes the work with the APA-Module under the operating system
Caldera LINUX.
4 A29247-X2-X-8-7670
Page 17

User ID’s and Access Rights
2 User ID’s and Access Rights
All PRISMAproduction print servers have the PRISMAproduction UI with its distinct look
and feel. To reflect the different roles of users accessing the print server, four different users
with different access rights are automatically installed. These are:
Printer Operator operator
Application Engineer applic
System Administrator admin
Service Engineer service
You can use these user roles as a basis for indiviually con figuring the user administrat ion
in PRISMAoroduction (see chapter "User Administration" on page 140).
The Printer Operator has the most rest ricted access right s and has n o access to the UNIX
operating system. The Service Engineer has ac cess to everything, including t he operat ing
system.
The user "operator” can:
• Enable and disable printers
• Interrupt and cancel print jobs
• Assign priority rights to print jobs
• Change job queues
• Display all messages and logs
• Shut down the system
• Submit predefined print jobs without modifying the print parameters
• Import print data from 9-track-tape and 18/36-track cartridge
• Enable and disable Host Download
• Enable and disable the LU6.2 host connection
• Execute shellscripts and progra ms made available by the administ rator in a ”userscript”
director
• Change his/her own password
A29247-X2-X-8-7670 5
Page 18

User ID’s and Access Rights
The user "applic” has access to the same features as "opera tor”, and can additionally perform the following actions:
• Submit print jobs without restrictions
• Edit, load and save print job parameter s
• Load print resources from tape/cartridge or floppy
• Administrate print resources via GUI
The user "admin” has access to the same features as "applic”, and can also perform the
following actions:
• Configure the spool paramete rs
• Enable and disable the spool
• Enable and disable the JCF spool
• Configure printers
• Configure the LU6.2 parameters
• Have full access to the operating system features for administra tive tasks
• Work with diagnostic tools like analyze, catest and tapman
• Work with the License Manager to modify, enter and delete PRISMApr od ucti on licenses.
The user "service” has access to all PRISMAproduction features and to the operating system. This includes additional diagnostic tools and the license manager to modify, enter or
delete PRISMAproduction licenses.
6 A29247-X2-X-8-7670
Page 19
User ID’s and Access Rights
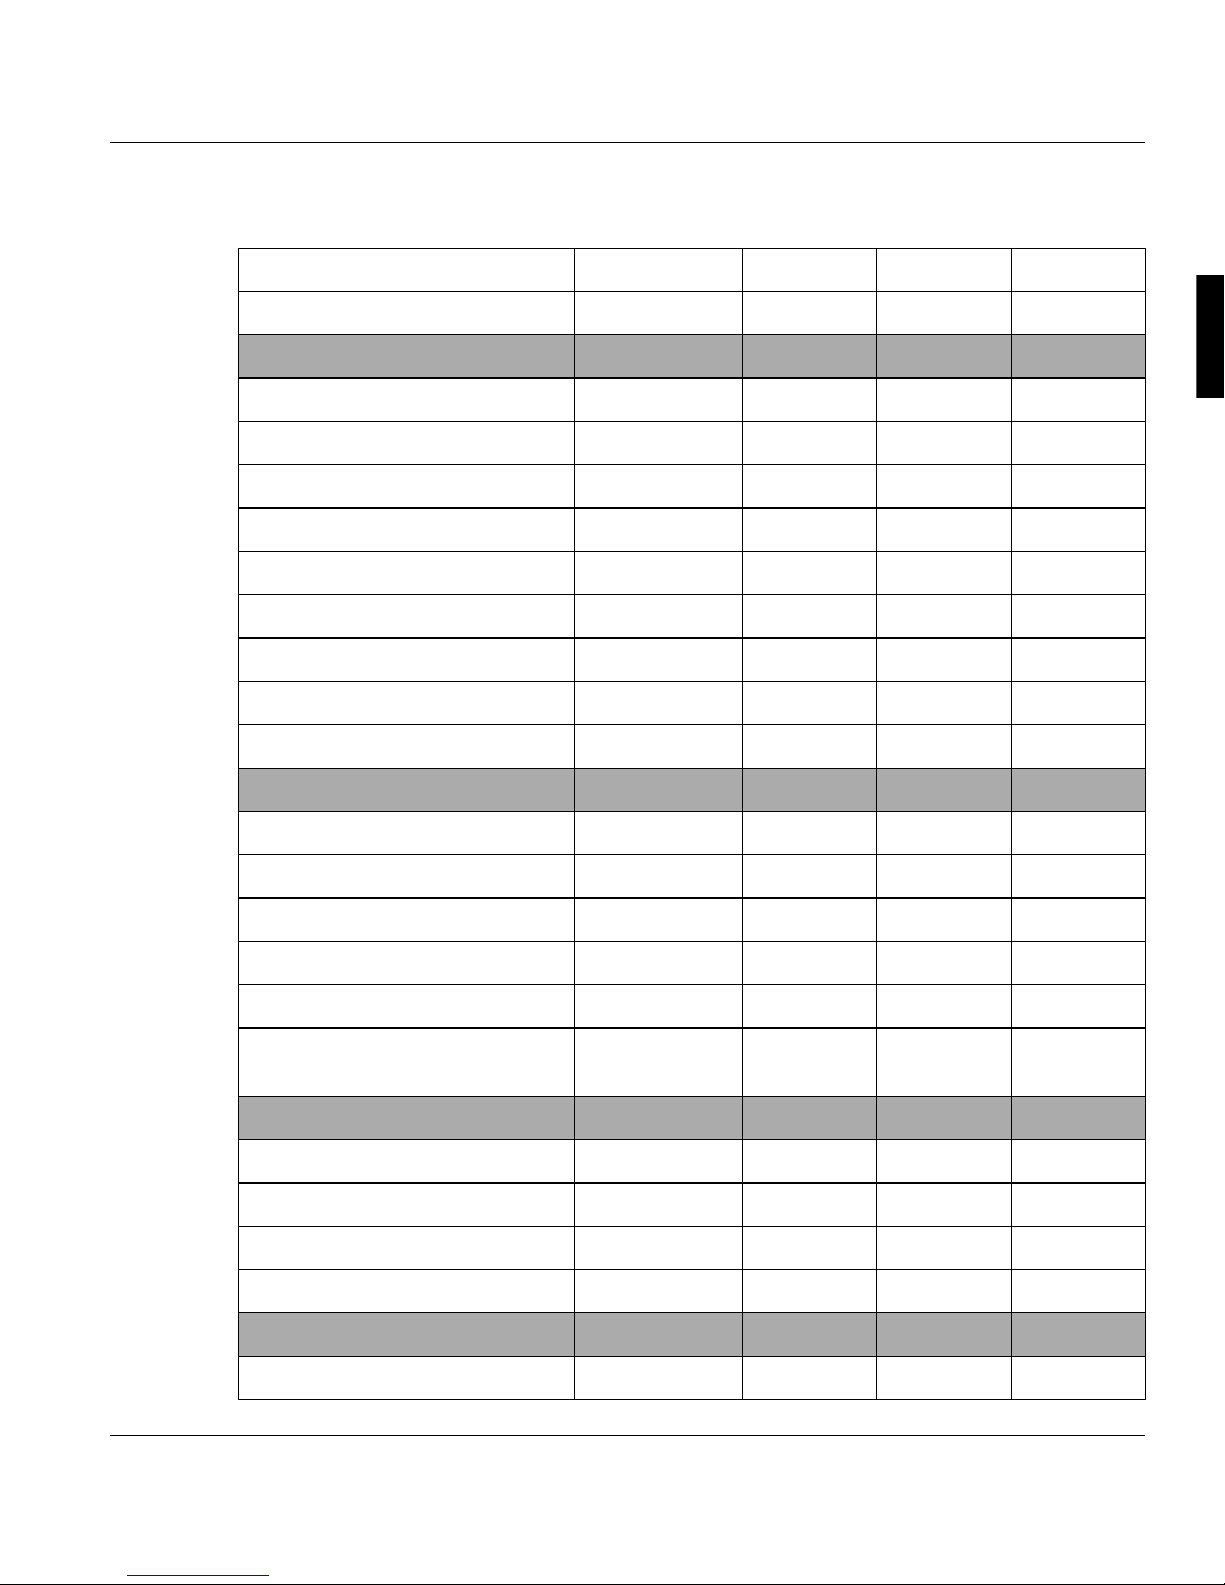
Complete overview o f the access rights: (x = full access, - = no access, o = read on ly)
login as → OPERATOR APPLIC ADMIN SERVICE
access rights ↓
Utilities:
Tapman -- -- x x
Catest -- -- x x
Account (master only) -- -- -- -Account delete -- -- x x
Analyze -- -- x x
Calculator x x x x
Show Messages -- -- -- x
Test jobs x xxx
Terminal -- -- x x
Explorer
Licenses (change) o o x x
Printer (change) o o x x
Download (license dependent) -- -- x x
LP-In, LP-Out, HotDir -- -- x x
GCI LCDS -- xxx
PJM Production
xxx
mode only
APA-Module:
APA Sample x x x x
APA Test jobs x x x x
Import AFP Data x x x x
Convert AFP Resource -- x x x
LCDS-Module x x x x
LCDS Tools (collect) - - - x
A29247-X2-X-8-7670 7
Page 20

User ID’s and Access Rights
login as → OPERATOR APPLIC ADMIN SERVICE
access rights ↓
LCDS Copy x x x x
LCDS Convert x x x x
LCDS Sample x x x x
LCDS Samplef x x x x
LCDS Compile x x x x
LCDS CMD x xxx
LCDS Save/Restore x x x x
LCDS Print x xxx
LCDS Resources x x x x
PRISMA+LCDS Test Jobs x x x x
PRISMA+LCDS Demo Jobs x x x x
Stockset Configuration x x x x
System x x x x
Reset x xxx
Set default window settings x x x x
Shutdown x x x x
Info x x x x
JCF Spool -- -- x x
Line Data (license dependent) -- x x x
Messages (delete) -- -- x x
Message (view) x x x x
Printer Administration x x x x
8 A29247-X2-X-8-7670
Page 21
The PRISMAproduction Desktop Login
3 The PRISMAproduction Desktop
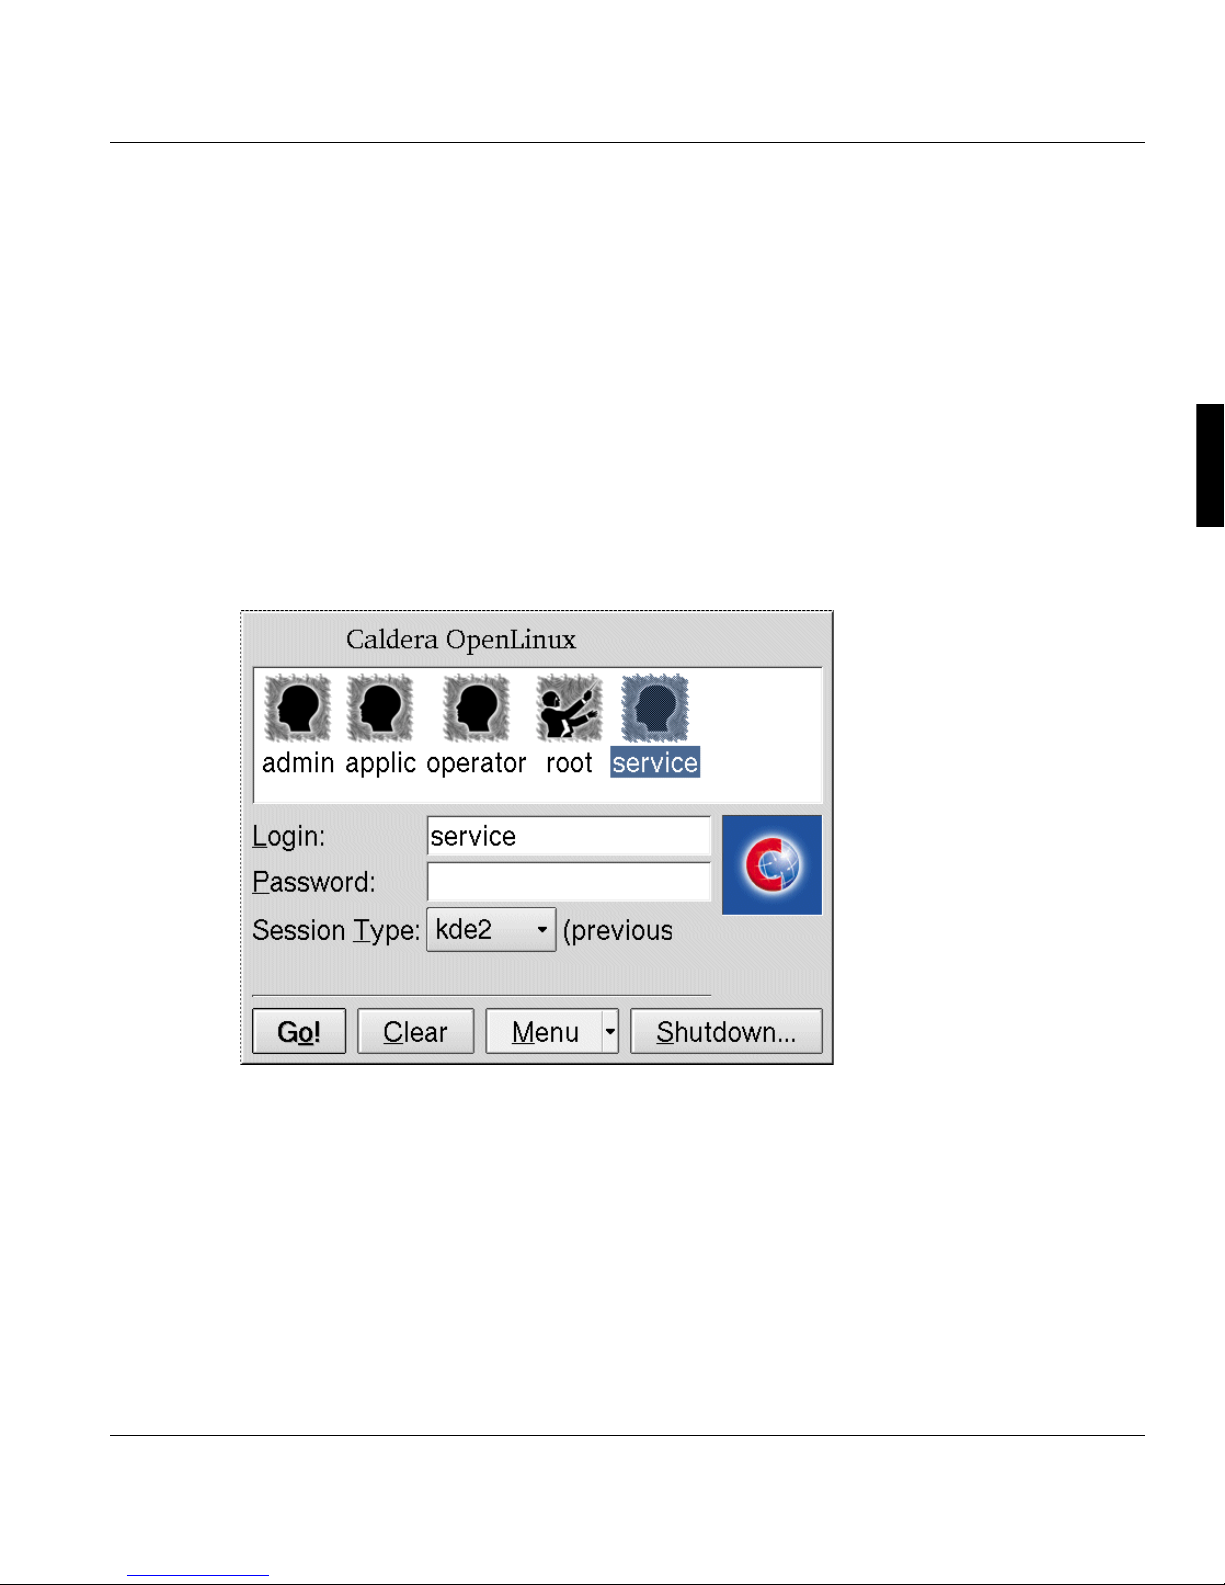
3.1 Login
When you power on the print server, on a Linu x system the login screen is displayed.
You can log in as the user "operator", "applic", "a dmin"or "service".
A29247-X2-X-8-7670 9
Page 22
Main Pop Up Menu The PRISMAproduction Desktop
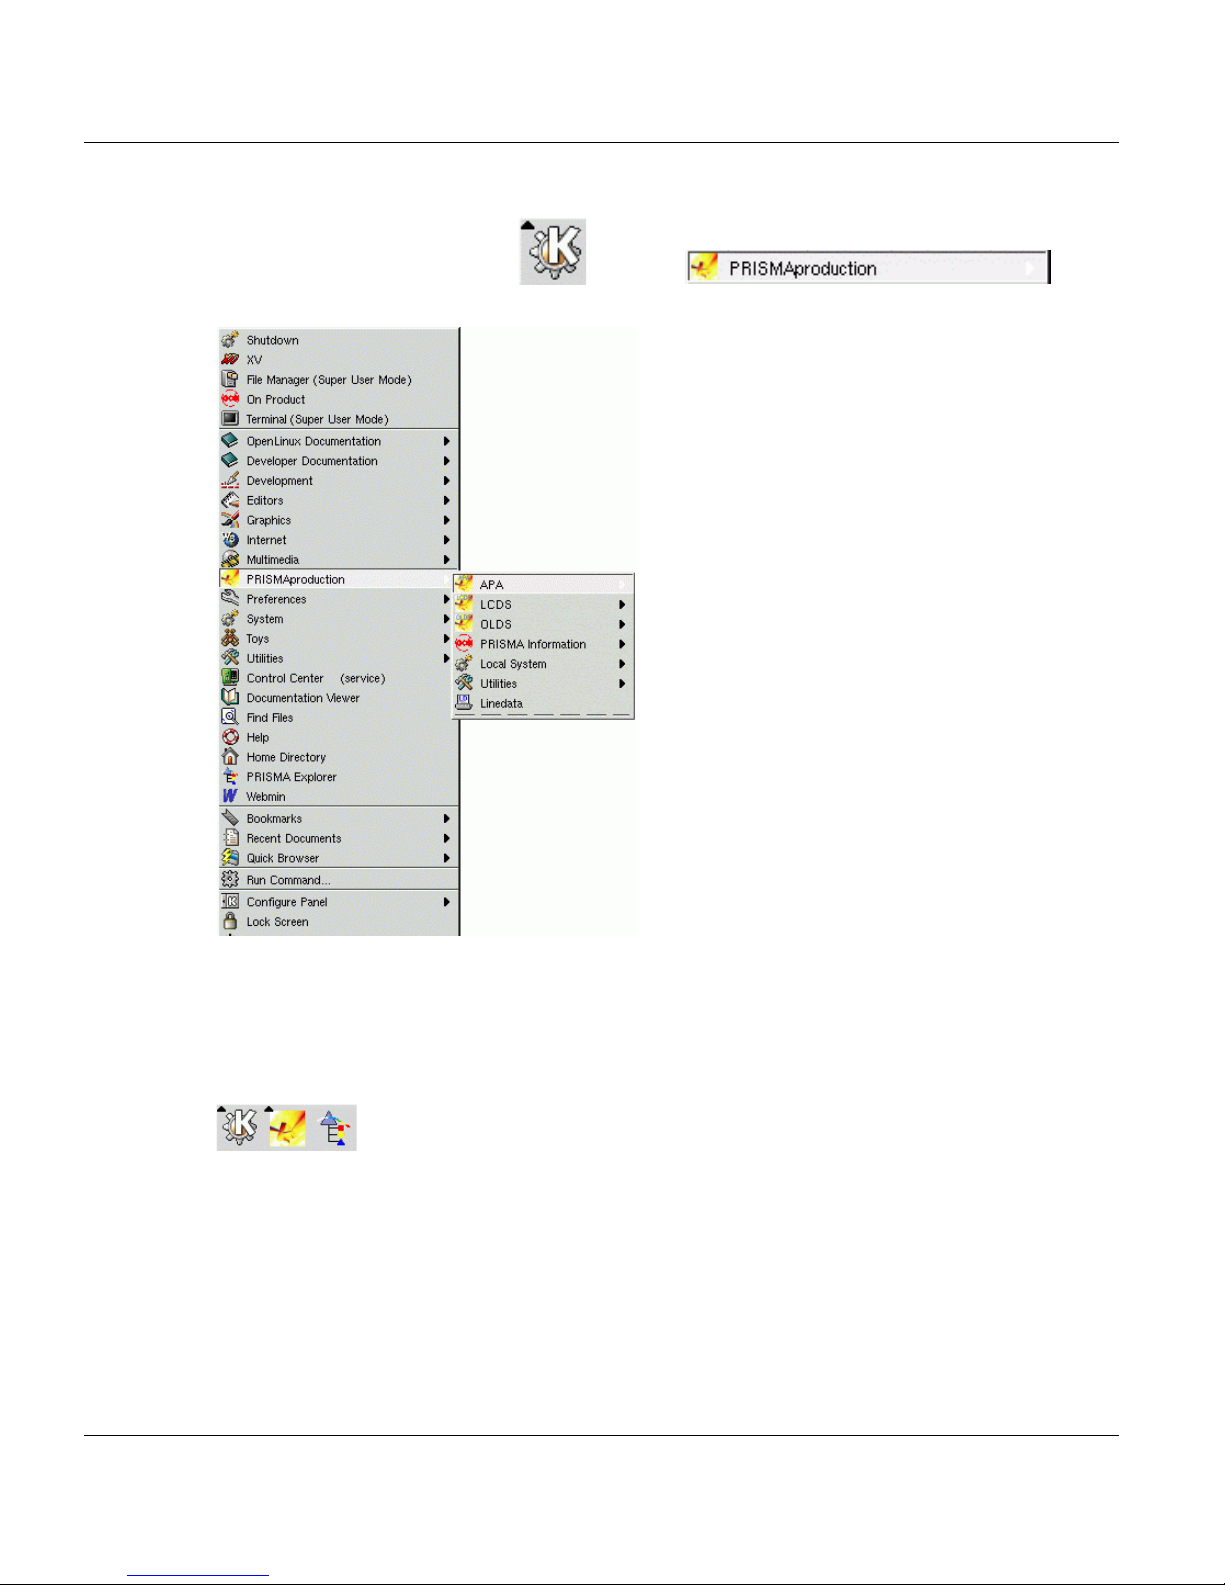
3.2 Main Pop Up Menu
Clicking the Linux KDE button and then gives
you access to all PRISMAproduction menues.
If you double click an entry in the m enu the respecti ve progrm is executed. Additionally t he
entry will be added to the top of the menu for easier access of often used programs.
You can place every icon of these menus on the bottom bar of the linux desktop for easy
access. Simply click on the icon and hold the left mouse button. Drag the icon to the bottom
bar and release the button. The icon is then copied to the bottom bar:
10 A29247-X2-X-8-7670
Page 23
The PRISMAproduction Desktop Main Pop Up Menu
3.2.1 Applications Used by More than One Module
PRISMA Information ’On Product’: Displays a list of installed PRISMAproduction pack-
ages and their version numbers.
’On Version’: Displays the PRISMAproduction version and copy-
right message.
Local System Allows you to shut down or reboot the system as well as to reset
certain processes. See chapter "'System' menu" on page 13.
Utilities A variety of test utilities for the different modules are accessible via
this entry. See chapter "The 'Utilities' Menu" on page 14.
Linedata This button opens the Linedata window. It is used to generate print
jobs for ASCII text data from hard disk.
('applic', 'admin' and 'service' only)
PRISMAproduction Explorer Central tool to configure, modify and monitor almo st all of the
PRISMAproduction processes. See chapter "PRISMAproduction
Explorer" on page 57 for a description of the window.
A29247-X2-X-8-7670 11
Page 24
Main Pop Up Menu The PRISMAproduction Desktop
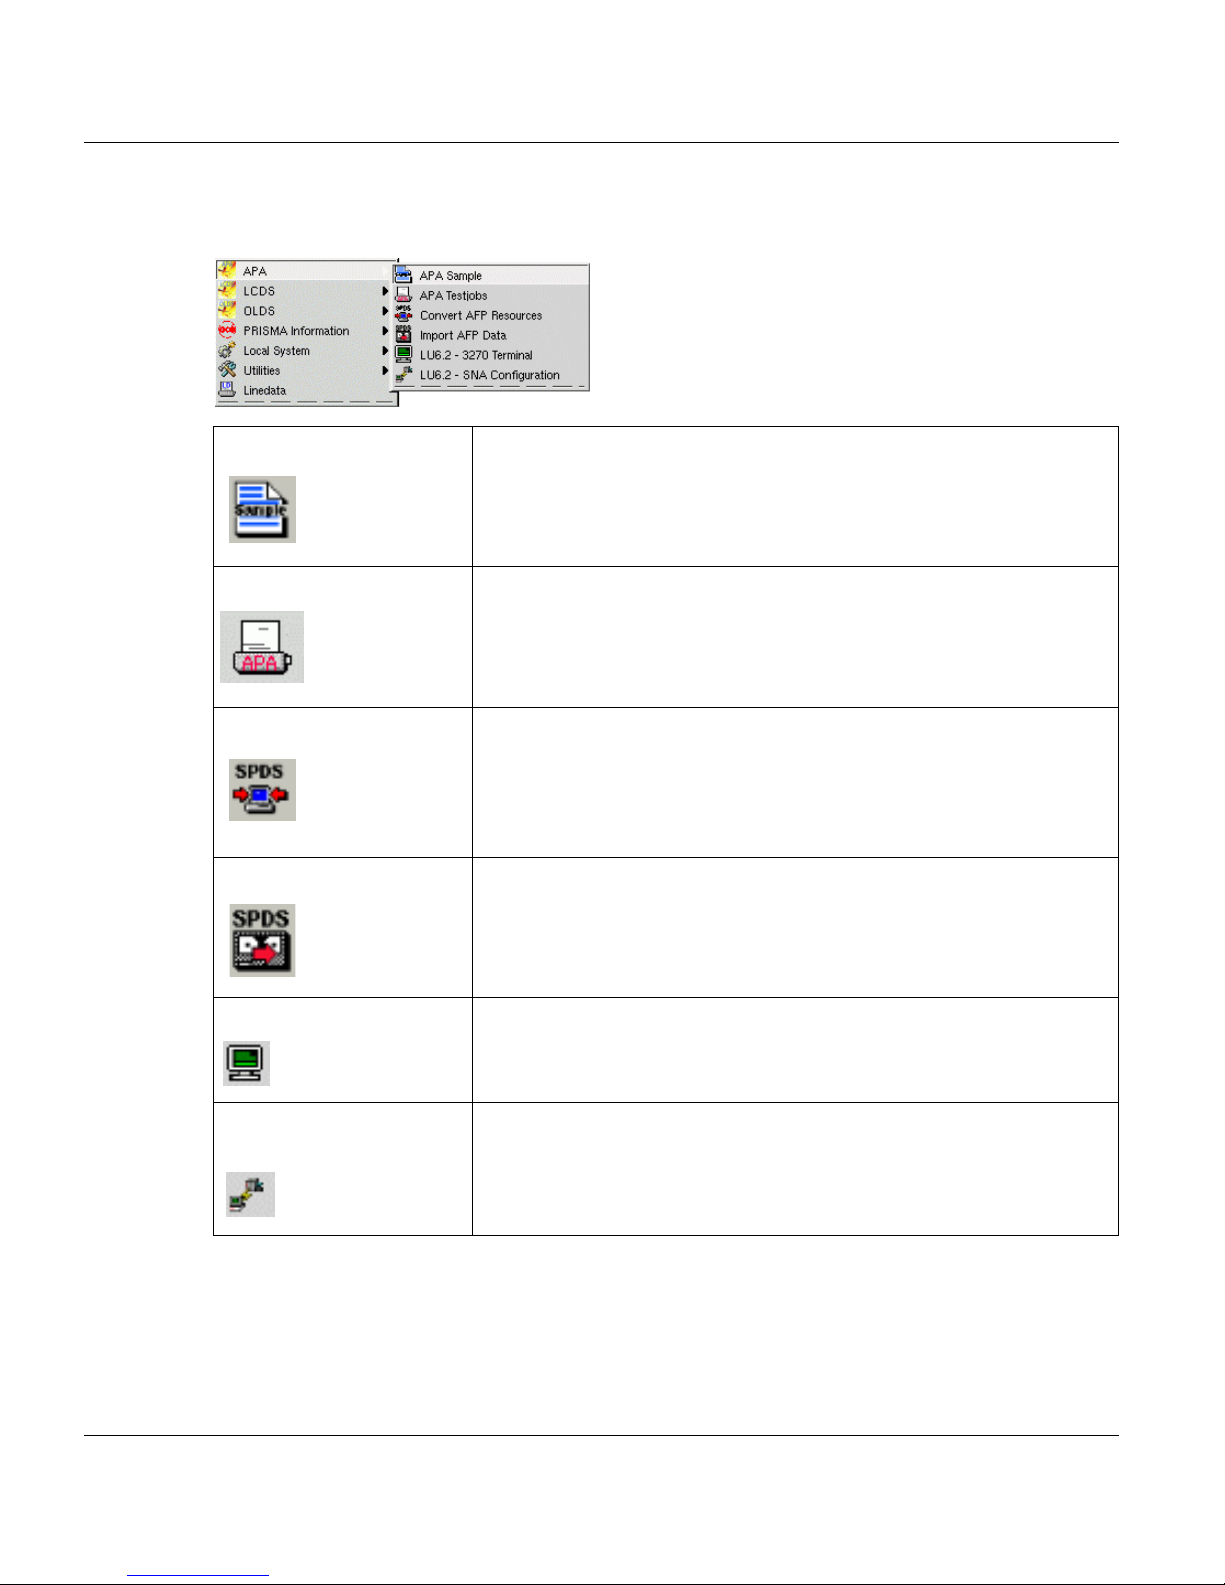
3.2.2 Available Applications for the APA-Module Functions
APA Sample This button opens the APA Sample window, which is described in
chapter "APA-Module Sample Window" on page 18. This window
generate printouts of fonts, overlays or page segments.
APA Testjobs Opens a window with predefined test jobs which can be printed for
equipment tests.
Convert AFP Resources This button opens the Resource Import window for importing SPDS
resources in binary format from hard disk, tape, cartridge or 3.5” floppy. The window is described in chapter "Convert AFP Resources" on
page 22.
('applic', 'admin' and 'service' only)
Import AFP Data This button opens the window for importing print data from 9-track-
tape and 18-/36-track cartridge. The imported data can later be printed using the Print window (see below).See chapter "Import AFP Data
Window" on page 20 for a description of the window.
LU6.2 - 3270 Terminal Opens a terminal window, which allows you to communicate with a
host connected to PRISMAproduction via LU6.2.
LU6.2 - SNA Configuration
Opens a tool, which allows you to set up and manage LU6.2 connections to a mainframe.
12 A29247-X2-X-8-7670
Page 25
The PRISMAproduction Desktop Main Pop Up Menu
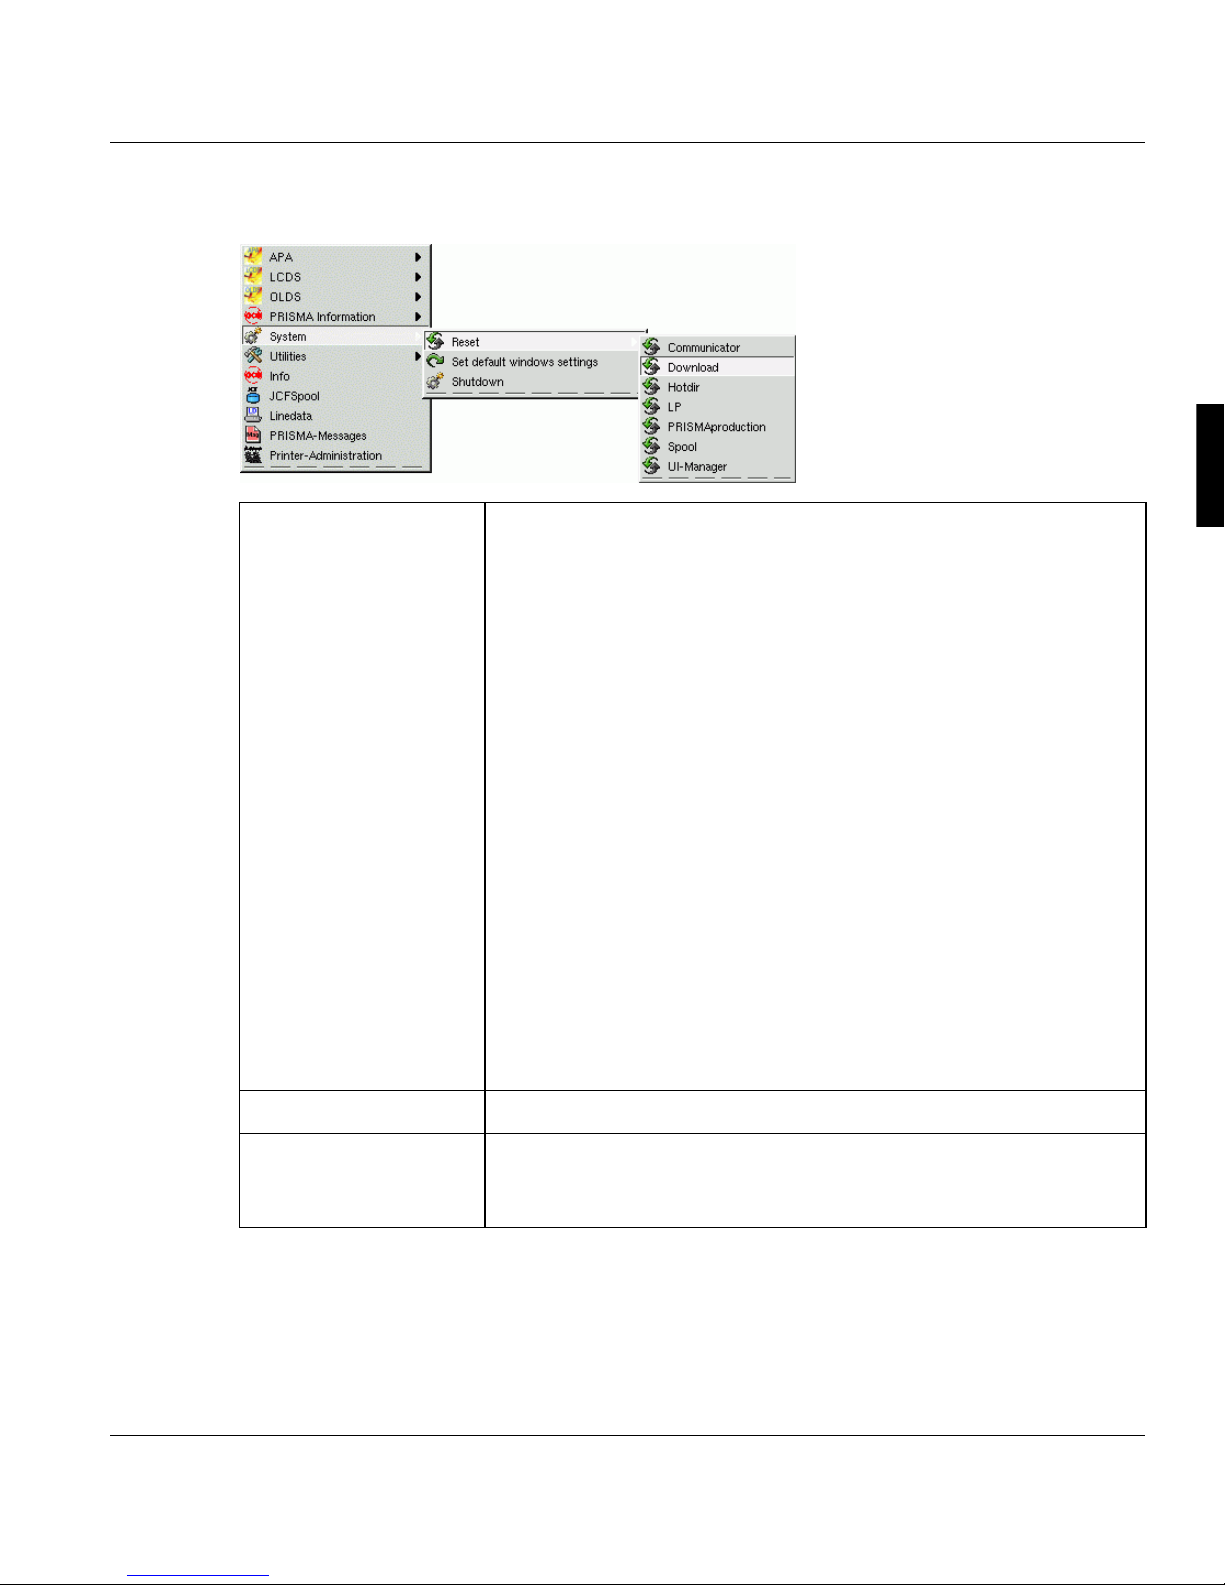
3.2.3 'System' menu
Reset Communicator
This command is used to reset the internal communication of the print
server. It should only be used in the event that the system hangs up
due to an unrecoverable error. In this case, you can reset the system
instead of shutting down and rebooting the server. This button should
not be used in normal operation.
Download, Hotdir, LP
Works only if these items are configured. Resets the configured con-
nections.
PRISMAproduction
This feature stops and restarts the communicator and all server processes (daemons, services) on the local system.
Every time a saving or restoring of the PRISMA configuration was performed, a ’Reset PRISMAproduction’ has to be executed on all servers,
starting with the master system. Please close explorer window before
executing ’Reset PRISMAproduction’.
Spool
Terminates and starts the spool again.
UI Manager
Exits and resets the UI manager processes.
Set UI Standard Restores the default window settings.
Shutdown This command opens a dialog box to confirm or cancel the system
A29247-X2-X-8-7670 13
shutdown. The system must always be shut down properly before the
print server is powered off!
Page 26

Main Pop Up Menu The PRISMAproduction Desktop
3.2.4 The 'Utilities' Menu
Tapman
(for Detais see chapter ’Hints and Helpful Information’ in the PRISMAproduction Administrator
Guide)
’Tapman Cartridge’ Service tool for troubleshooting and analyzing problems with SCSI
connected 18/36 track cartridge drives.
’Tapman Tape’ Service tool for troubleshooting and analyzing problems with SCSI
connected 9-track tape drives.
’Tapman QIC’ Service tool for troubleshooting and analyzing problems with QIC
tape drives.
User Utilities
’Create/Delete menue
entries’
Allows you to create/delete menue entries within this submenu. You
can select any program to be launched by this new entry.
14 A29247-X2-X-8-7670
Page 27

The PRISMAproduction Desktop Main Pop Up Menu
’Userscripts’ Use this command to select and execute customized programs or
shellscripts without direct access to the operating system.
These scripts are stored in /u/prismapro/cfg/userscripts.
The scripts/programs under the ’Standard’ tab are available for all us-
ers. These scripts are stored in /u/prismapro/cfg/user-
scripts/user.
Depending on the log in ID, the second tab is labeled with the respective Userid name. It provides scripts/programs only accessible for this
userid. These scripts are stored /u/prismapro/cfg/user-
scipts/admin ... service.
Click on the folder button to select a user script, for example " monthly
report“.
If you start the file by clicking the traffic light, a script file is called up,
for example:
#This is a script file which should be executed only
in June!
spsprt -class 3 -formdef F10101 -pagedef P1STD3 /u/
pismapro/job/report
’Catest’ Tests the connection between the linux server and the printer (for De-
tais see chapter ’Hints and Helpful Information’ in the PRISMAproduction Administrator Guide).
’Account Files’ Opens a window for exporting accounting files to a DOS-forma tted
floppy:
Users 'admin' and 'service' can delete account files. For further information on accounting see the respective chapter in the PRISMAproduction Server Administrators Guide.
A29247-X2-X-8-7670 15
Page 28

Main Pop Up Menu The PRISMAproduction Desktop
’Analyze’ Tool for analyzing data.
’Calculator’ Opens a scientific calculator.
’Shell’ Allows you to access the operating system via command line ('admin'
and 'service' only).
’Test Jobs’ Opens a window with predefined test jobs which can be printed for
equipment tests.
16 A29247-X2-X-8-7670
Page 29
APA-Module Components Introduction to the APA Processes
4 APA-Module Components
4.1 Introduction to the APA Processes
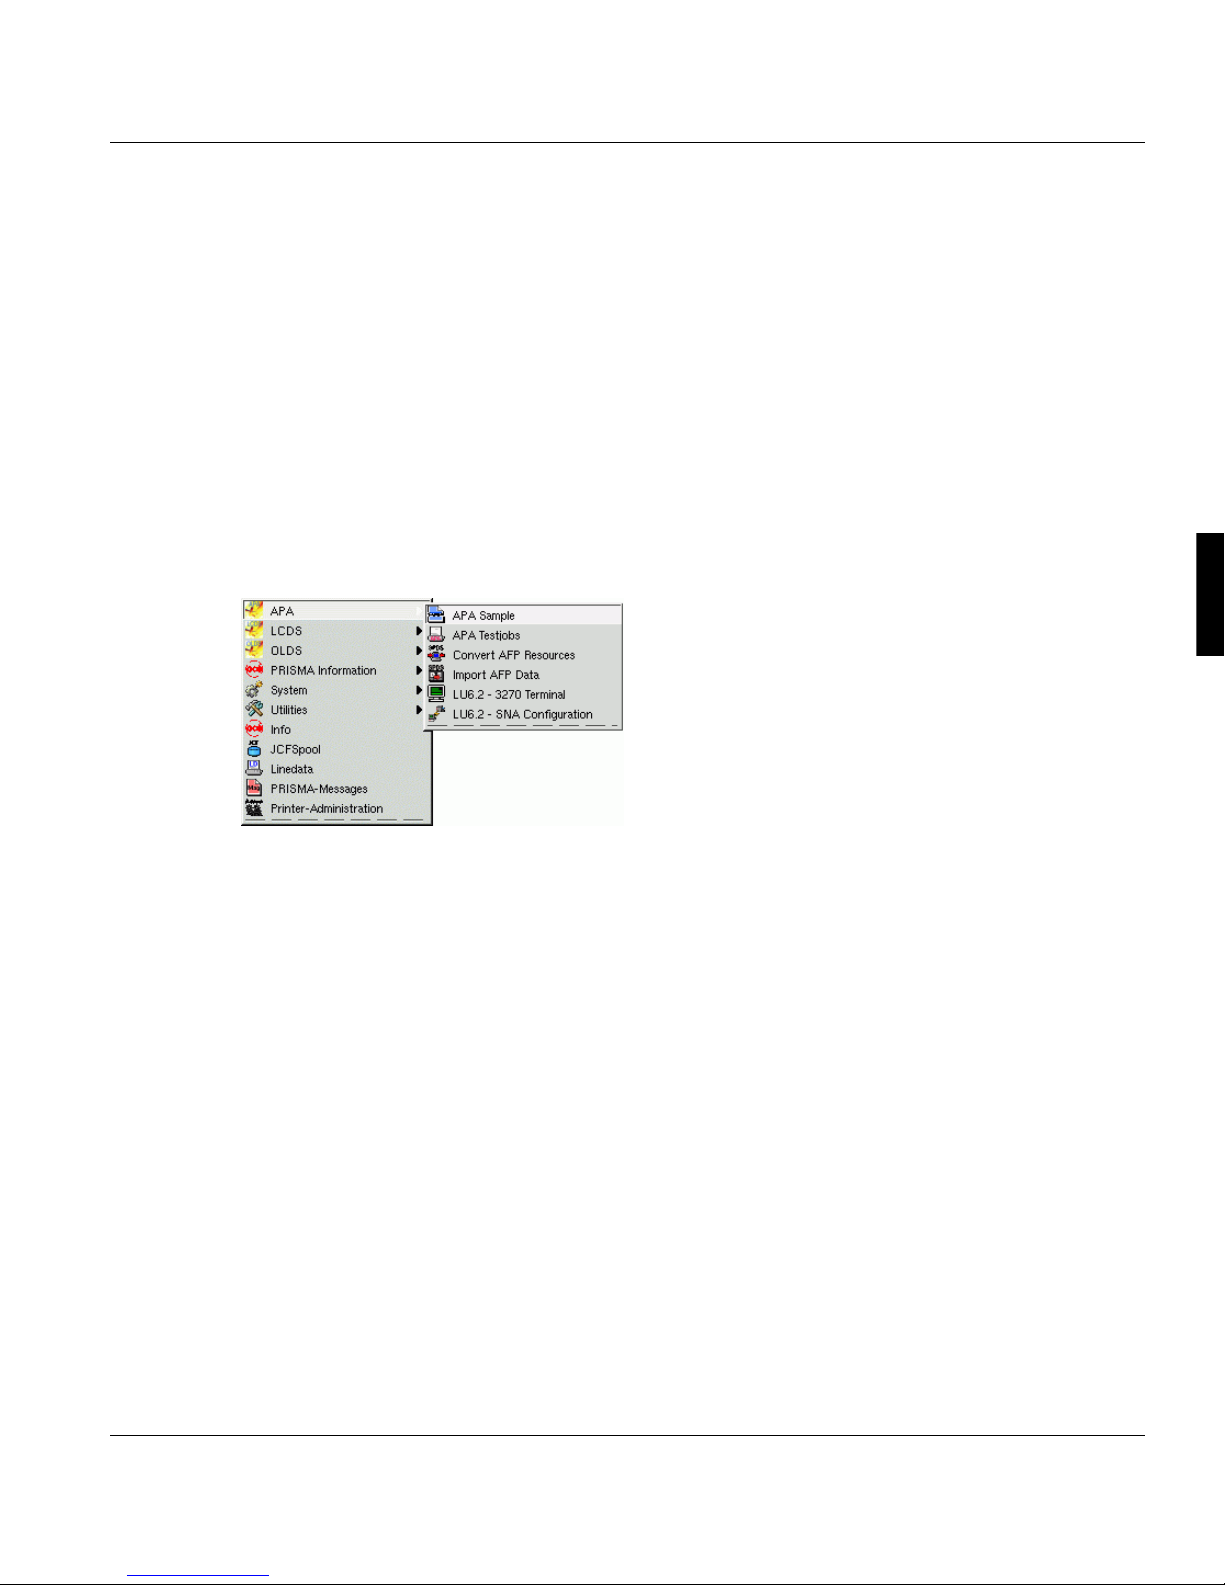
You access the APA processes via the UI manager by clicking the Linux KDE 'Start Applications' icon and then the PRISMAproduction entry:
Clicking the 'APA' entry you can access the components described in the following chapters.
A29247-X2-X-8-7670 17
Page 30
APA-Module Sample Window APA-Module Components
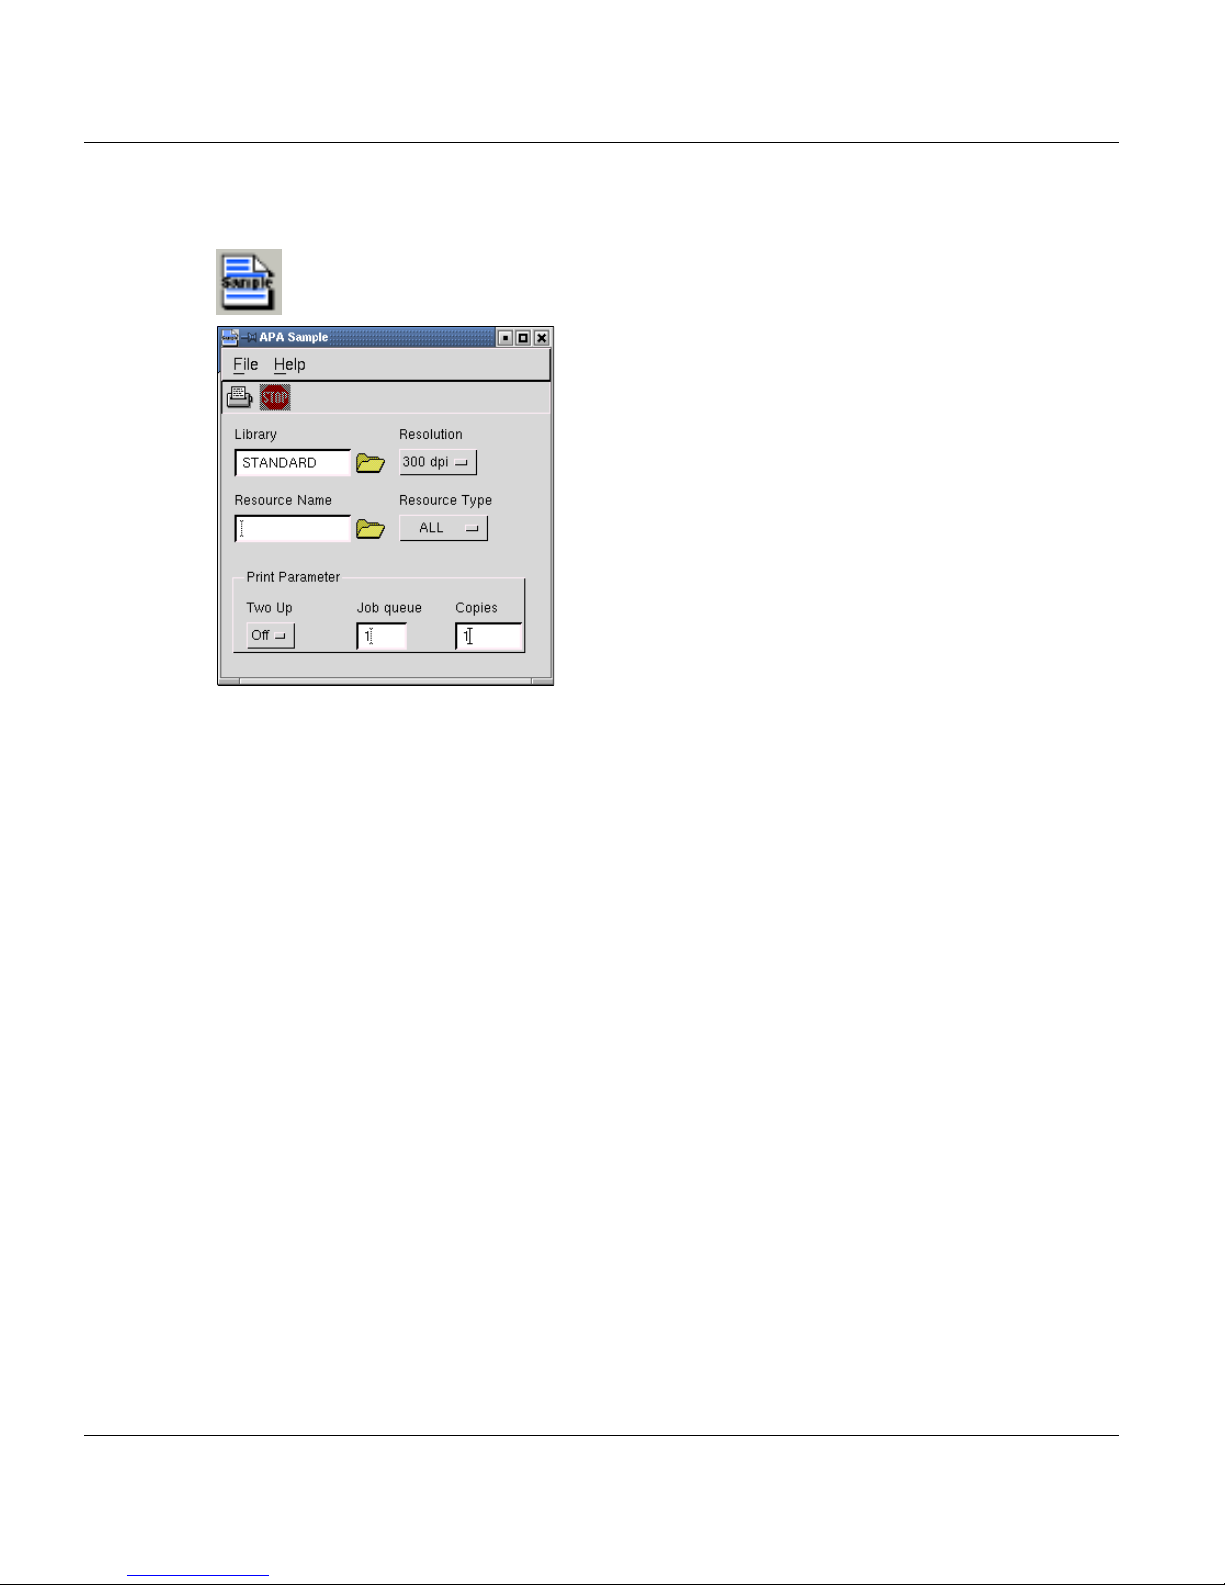
4.2 APA-Module Sample Window
Use this window to generate sample printouts of print resources of the types fonts, overlays
and page segments. The handling is straightforward: choose a resolution, click the "Library"
folder button and choose a library na me from the list that is disp layed. Then select the type
of resource you want to sample (either Font, Overlay/Pagesegment or All) and the name of
the resource(s). The resource name may contain one wildcard character, the asterisk (*).
You can only sample resources which have been imported into the internal libraries using
the 'SPDS Resources' window. If you want to sample resources which are located in simple
directories instead of internal libraries, you can ea sily im port these f iles into a tempo rary library (i.e. called 'sample') before creating the actual sample printout.
18 A29247-X2-X-8-7670
Page 31

APA-Module Components APA-Module Sample Window
The 'File' Menu
'Start' Starts the sample process. During processing you will see log messages displayed
in the System Messages window.
'Stop' Terminates all activities in the sample process.
'Exit' This will close the window.
Required Input:
'Library' Enter the name of the resource library with the selected resolution (240dpi,
300dpi or 600dpi).
'Resource Name' Enter the AFP resource name to be sampled (use 1 to 8 alpha/numeric char-
acters as the resource). Use the asterisk '*' to transfer via wildcarding. i.e.
"O1MYOVL", "O1MY*", "*".
By clicking the LIST-button you get a sorted list of all resources with the selected type (ALL, Font, Ovl/Pseg). You can select a resource from this list.
'Resolution' Select the resolution of the resource to be sampled. (240dpi, 300dpi or
600dpi)
'Resource Type' Select the kind of resource to be sampled from drop down menu. Supported
resources are "ALL", "Font", "Ovl/Pseg".
'Two Up' Choose between printing in One-Up (Off) or Two-Up mode (On).
'Job queue' The queue of the printer you wish to send the output to (1-999). The default
is class 1.
'Copies' Enter the number of copies for this job. The default is 1 copy; the maximum
number of copies is 32767.
'Help'
Opens a java help window.
A29247-X2-X-8-7670 19
Page 32

APA Testjobs APA-Module Components
4.3 APA Testjobs
Opens a window with predefined test jobs which can be printed for equipment tests.
4.4 Import AFP Data Window
Import Print data from Tape or Cartridge
This window is used to import print data from 9-track tape, 18-/36-track cartridge or QIC.
Data tapes and cartridges must be ANSI-label ed or can be NONE-labeled tapes (tape with
no labels).
The ANSI-labeled includes the common MVS (IBMDOS, IBMOS) and BS2000 label for-
mats which are ANSI-compliant. When NONE-labeled tapes are used, additional data format parameters are needed, these can be specified using the 'Import Data Structure Settings' which is described below. Default setting is the ANSI-labeled tape.
Supported data formats are:
• AFPDS files (variable or fixed blocked)
• Line data (variable or fixed blocked)
• Mixed data (variable or fixed blocked)
Besides using a filename in the filename field (wildcards are also allowed), you can addi-
tionally use the File Sequence number to select the file on tape.
Examples: '1:' to select the first file, '2:' to select the second file.
You have to enter the target directory where the imported data will be saved under the original file names proceeded by the file sequence number separated with a dot ('.').
20 A29247-X2-X-8-7670
Page 33

APA-Module Components Import AFP Data Window
The 'folder' button after the filename field displays a list of files on the selected input medium
(cartridge, tape or QIC). These also show the File Sequence Number followed by a dot ('.')
and then the magnetic tape filen ame. This button helps you if you do not know the exact file
name(s) on the tape. Depending on the tape content, this may take several minutes.
You can print the imported data later using the standard Print Job Manager.
Import Data Structure Se tti n gs Me nu
The Import Data Structure Settings Menu allows you to specify, if the t ape is ANSI-labeled
(DEFAULT) or if it is a None-labeled tape together wit h the additionally needed parameters.
The Data structure selection list allows you to select t he tape type as well as the data st ructure on the tape.
Options Description
Default (ANSI/IBMDOS/IBMOS Labeled) Used when reading ANSI-Labeled tapes, no addi-
tional parameters needed. DEFAULT
None Labeled; Fixed Length None-Labeled tape with fixed record length. Record
Length parameter must be specified.
None Labeled; Variable Length (IBM
RDW)
None Labeled; variable Length, Blocked
(IBM BDW, RDW)
None-Labeled tape with variable length records
where the length field has the binary IBM format. No
additional parameters are needed.
None-Labeled tape with variable length blocks and
records where the length fields have the binary IBM
format. No additional parameters are needed.
A29247-X2-X-8-7670 21
Page 34

Convert AFP Resources APA-Module Components
None Labeled, Undefined Length None-Labeled tape with record delimiter. The Record
Delimiter parameter has to be defined in hexadecimal (preceding with 0x) or octal (preceding with 0)
format.
4.5 Convert AFP Resources
This window is used to import print resources (such as fonts and overlays) into the internal
resource library (RDS subcatalog). The resources can be read fr om hard disk, DOS-formatted floppy, 9-track tape, 18-/36-t rack cartridge or QIC tape. When you are importing from
hard disk, you can choose either to keep the original resources or delete them after they
have been imported. The default setting is "Keep".
Input Device Description
Cartridge (18-/36-track)
QIC
Tape (9-track)
Floppy 3½” DOS format floppy - Each resource is in a separate file.
IEBCOPY-Cartridge (18-/36-track)
IEBCOPY-QIC
IEBCOPY-Tape (9-track)
ANSI-labeled IEBGENER format – Each resource is in a
separate file.
ANSI- or NONE-labeled IEBCOPY format – One or more
libraries where each library have one or more resource
files.
The resource files must be in binary format. Use the 'Data Structure Settings' button to select tape and data format. See description below for more details. Default setting is 'Default
(ANSI/IBMDOS/IBMOS labeled)'.
The "folder” button next to the file name field disp lays a list of the files on the selected input
medium (floppy, tape, cartridge or QIC).
22 A29247-X2-X-8-7670
Page 35

APA-Module Components Convert AFP Resources
You have to select the print resolution (240, 300 or 600 dpi) for which the resources were
generated, and specify the name of a library to receive the resources. You can either use
an existing library by clicking the folder button or create a new one by entering a new nam e.
Data Structure Settings
The Data structure selection list allows the user to select the harddisk data structure as well
as the tape type and data structure on the tape.
Options Device type Description
Default (ANSI/IBMDOS/IBMOS Labeled)
Fixed Length Harddisk only Used when resources have fixed length
HD Mixed Data Harddisk only Used when resources have CR/LF as record
None Labeled; variable
Length, Blocked (IBM BDW,
RDW)
Undefined Length Harddisk only Used when resources have record delimiter.
Variable Length (IBM RDW) Harddisk only Used when resources have variable length
Variable Length, Blocked
(IBM BDW, RDW)
Tape only Used when reading ANSI-Labeled tapes, no
additional parameters needed. DEFAULT
records
delimiters. No additional parameters are needed.
Tape only Used when a None-labeled IEBCOPY format
resource tape is used. No additiona l p ara me ters are needed.
The Record Delimiter parameter has to be defined in hexadecimal (preceding with 0x) or octal (preceding with 0) format.
records where the length field has the binary
IBM format. No additional parameters are
needed.
Harddisk only Used when resources have variable length
blocks and records where the length fields
have the binary IBM format. No additional parameters are needed.
A29247-X2-X-8-7670 23
Page 36

The APA-Module LU 6.2 Connection APA-Module Components
4.6 The APA-Module LU 6.2 Connection
4.6.1 Introduction
PRISMAproduction LU 6.2 requires PRISMAproduction with APA and SNAP-IX to be installed. The APA-Module LU 6.2 enables you to print on an OPS printing system from a
mainframe (MVS) running SPS or PSF via an SNA network.
The APA-Module LU 6.2 buffers the data on a hard di sk and then pr ints it. A terminal emulation can run via the SNA network connection at the same time, meaning that the MVS
SPOOL can be displayed under the APA-Module LU 6.2.
The figure on the next page illustrates an LU 6.2 connection between the MVS host and the
APA-Module print server via an SNA network. The figure also shows a screenshot of the
MVS mainframe operator console.
In the 3270 terminal window, you can submit MVS pr int jobs and transfer them t o the spool
system of the PRISMAproduction server via an SNA networ k (repr esented in the fi gure by
"Token Ring LU 6.2").
The display component, LU62 Status, keeps you informed on the pr ogress of the data
transfer.
24 A29247-X2-X-8-7670
Page 37

APA-Module Components The APA-Module LU 6.2 Connection
Mainframe MVS OP’ERATOR Console
PRISMA+APA Print Server
Token-Ring LU 6.2
SNAP-IX - LU 6.2 connection user interfaces (LU62Status)
A29247-X2-X-8-7670 25
Page 38

The APA-Module LU 6.2 Connection APA-Module Components
4.6.2 Components of APA-Module LU 6.2
The software package for printing via APA LU 6.2 consists of four components.
The table below briefly explains the functions of each component:
Component Description
LU6.2 Status Window
LU6.2 Configuration Manager
SNA2TCP Using the communication services provided by SNAP-IX, SNA2TCP estab-
SPS-ID This component receives the data from sna2tcp via a TCP port. This enables
LU62Status is a graphical display component. Its purpose is to inform you of
the current status of the connection between the host and Linux workstation.
Configuration Module for setting Printer Name, Destination, Resolution,
Type and Special Settings
lishes the link between the IBM host and the APA-Module print server applications.
this port to run on several servers. It converts the incoming IPDS data to an
internal format and creates a spool entry for each job.
4.6.3 LU6.2 Connection Status
The LU 6.2 Status display component is access ible via the Explorer tree and informs users
of the current status of the connection with the MVS host (f rom which the print jobs originate) and the APA-Module (which receives the print jobs for further processing).
It can be activated by opening the PRISMAprod uction Explorer and double-clicking ’LU6.2’.
An applet is opened, containing a menu bar, a toolbar and all defined LU6.2 printers in your
cluster:
LU6.2 Status display component
26 A29247-X2-X-8-7670
Page 39

APA-Module Components The APA-Module LU 6.2 Connection
LU62Status Display Area
The LU62Status display informs you of the current stat us of all defined MVS System / APAModule transfer channels in a table. Each line stan ds for a host LU. A double click on a line
opens a detailed window of the selected connection with all possible information. The list
below explains the attributes shown in the status display and their possible values.
Status This attrib ute informs you of the status of the APA-Module ID Server
component, which receives the p rint data from the MVS system and directs it to the APA-Module spool system.
The attribute can have the following values:
closed No print data is being transferred to the APA-Module
print server. No ID Server task exists.
inactive The MVS host has requested a connection with the
APA-Module system. The ID Server task has been
started, but is not yet active and the connection has
not yet been established.
init The ID Server task has initialized correctly and the
connection to the host has been established.
waitstream The ID Server task is waiting for print job data from
the MVS system
or active The ID Server task has a connection with the MVS
host.
If the printer symbol is shown, it’s receiving print data.
wait ps The ID Server task has received print job data from
the MVS system and is now waiting for it to be processed by the PS system.
error The ID Server task has an error condition.
halted The ID Server task was unable to perform error recov-
ery and restart. The task is awaiting termination.
reset Reset ID Spool is active
A29247-X2-X-8-7670 27
Page 40

The APA-Module LU 6.2 Connection APA-Module Components
deleted This connection could not be found in the SNAP-IX
database, e.g. it was deleted, renamed or it was created by snafile2tcp.
Note: Since the state transitions occur within a very short space of
time, users will generally only see the two underlined entries: closed
and active.
Display Name The name is to Identify the LU6.2 Connection
Server Name The name of the PRISMA Server where th e Connection is configured
ID The PRISMAproduction Number of the Connection
Local LU The name of the local LU (logical unit) via which the connection with the
MVS system was established.
Partner LU The name of the partner LU of the MVS-System which is connected to
PRISMAproduction.
Pages Specifies the total number of pages sent via the MVS-SIEPRIS commu-
nications channel. Note that this number does not necessarily corre-
spond with the current print page number.
MVS Job Name The name of the print job currently being transferred from the MVS sys-
tem.
Bytes This attribute indicates the number of bytes transferred via the MVS-
SIEPRIS channel (not including resources).
MVS Form This attribute states which FORMDEF is used in the print job currently
being transferred.
MVS Job Number This is the MVS identifier for the print job currently bein g transferred.
MVS Out Queue The name of the MVS job class from which the current print job was tak-
en.
Destination The name of the Destination Printer, the Job should be printed on
28 A29247-X2-X-8-7670
Page 41

APA-Module Components The APA-Module LU 6.2 Connection
The 'Options' Menu
The 'Options' menu contains commands for enabling/disabling columns, save opt ion, refresh and clean interval, reset to the default settings and reset each id-spool.
’Reset ID’ Starts a procedure for the selected LU to check and repair the ID spool.
Unspooled/lost print files will also be found and you have the possibility
to create a print job or delete the unused file.
In this case the LU with the Instance 2 has been reset.
The first part checks the status of the id-spool. If the status is not ok, the
spool will be checked.
Next the database in the id-spool will be updated, this means, unused
files will be deleted.
A29247-X2-X-8-7670 29
Page 42

The APA-Module LU 6.2 Connection APA-Module Components
After that, the jobs in the spool-id will be compared to the jobs in the
spool queue. Now a list with all lost jobs will be created.
In the case displayed, the job KRY1 with the JOBID JOB00073 and 33
pages was detected. The user can select all job to be spooled. All other
jobs with no mark will be deleted.
If there are jobs in the queue, but already deleted in the id-spool, the
printjobs also will be deleted.
Note: The Lost Jobs dialog will not be shown, if no lost Job was detect-
ed.
30 A29247-X2-X-8-7670
In the end you will get a summary of the actions.
Page 43

APA-Module Components The APA-Module LU 6.2 Connection
’Details’ Opens a window with detailed information on the selected connection:
You will get the same window by double-clicking an entry in the list.
Help Menu
'About': Displays a info window about the LU6.2 Status version.
4.6.4 The LU 6.2Config Module
This Module allows you to configure logical printer settings of the LUs of yo ur system . For
details have a look in the Administrator's Guide to Chapter LU6.2 Configu r at io n .
4.6.5 The SNA2TCP Communications Module
The SNA2TCP communications module is the interface between you r MVS system and the
PRISMAproduction server. SNA2TCP is started automat ically by the MVS system when a
print request is received, and closed once the job is complete. In normal operation,
SNA2TCP needs no intervention from the user.
However, in special situations (e.g. when debugging is necessary, or for setting a special
configuration), you can make changes to the module's conf iguration file manually; step logging can be activated. For further deta ils on this subject, please consult the relevant section
of the appendix to this manual.
A29247-X2-X-8-7670 31
Page 44

The APA-Module LU 6.2 Connection APA-Module Components
4.6.6 SNAP-IX - General Summary
SNAP-IX SNAP-IX provides SNA and LU 6.2 support for systems running the
Caldera Open Linux system with PRISMAproduction. SNA stands for
"Systems Network Architecture", developed by IBM. It serves as t he
framework in which the Linux workstation communicates with various
hosts.
SNAP-IX has Motif and character-based user interfaces for configuring and running the
system.
The SNAP-IX software package enables you to att ach an PRISMAproduction system to an
SNA network via Token Ring.
This chapter describes the main functions and fe atures of the application and specifies system requirements:
Functionality:
Modify job status
3270 Terminal and File Transfer
SNA Protocol support via LU 6.2 Token Ring
Motif and character-based user i nterface for configuring and running the application
The SNAP-IX User Interface allows configuration of the connection and can be activated by
selecting ’APA’ -> ’LU 6.2 SNA configuration’ in the PRISMAproduction main menu .
The 3270 Session can be activated with this icon:
System Requirements:
SNAP-IX requires an APA-Module system with the Madge PCI Driver V3.09.
Line commands and shell scripts must be in Bourne Shell or Korn Shell syntax.
Hardware Requirements:
In addition to the hardware required t o run the APA-Module, the SNAP-IX software requires
a Token Ring adapter (Madge PCI architecture).
For full details of the SNAP-IX configuration inter face please refer to the PRISMAproduction
Administrator Guide.
32 A29247-X2-X-8-7670
Page 45

APA-Module Components The APA-Module LU 6.2 Connection
4.6.7 Application/ Example
It is assumed that users are already familiar with the PRISMAproduction system and that
PRISMAproduction is already installed and configured.
One point should be mentioned: a (remote) printer has to be set up on the MVS side; this
is the printer to which you submit the jobs that are to be transferred to the APA-Module system.
The example in this chapter illustrates how a print job is submitted from the MVS host to the
APA-Module for printing.
The first step in the transfer is to output the print job 'BIBLEH' to an MVS (remote) printer
using the MVS 'sub' command.
The print application, like the print resources, are on the MVS host in our example.
Once the Sub command has been submitted, the MVS host spool system combines t he re-
quired print resources and application, and generates an IPDS data st ream. This is routed
to the SNA2TCP component via Token Ring.
This print job definition is shown in the figure below:
//BIBLEH JOB 'SPSTEST',NOTIFY=ULL1, 00010000
// MSGCLASS=Z,MSGLEVEL=(1,1) 00020000
//********************************************************************
//* TEST JOB TO PRODUCE AN OUTPUT TO BE PRINTED BY S P S *
//* ==> BIBLE HARD PSEG *
//******************************************************GED/PEV5713***
//**** MIT 'HARD' PAGE SEGMENTS (FILE BIBLEH): *****
//**** MIT 'MPS' STRUCTURED FIELDS *****
//**** DUPLEX MODE (FORMDEF DUP12) *****
//*
//OUT1 OUTPUT DEFAULT=YES,
// PAGEDEF=STD3,
//* FORMDEF=BIBLES
// FORMDEF=DBIBLE
//S1 EXEC PGM=IEBGENER
//SYSUT1 DD DSN=DR55.SCRIPT.TEXT.NDY(BIBLEH),DISP=SHR
//SYSUT2 DD SYSOUT=Q,DEST=P22,
// OUTPUT=(*.OUT1),COPIES=1,
// DCB=(RECFM=VBM,LRECL=8205,BLKSIZE=8209)
//SYSPRINT DD SYSOUT=*
//SYSIN DD DUMMY
If the MVS system is unable to process the print job correctly (or when er rors are encountered), a message to this effect is entered in the MVS JOB LOG.
A29247-X2-X-8-7670 33
Page 46

The APA-Module LU 6.2 Connection APA-Module Components
Log of print job
This JOB LOG is in the queue defined with the attribute MSG-CLASS (here 'Z') in the print
job file.
You can display the LOG file in MVS SDSF to find out the status of the printo ut.
You can view the contents of the queue with th e com m a nd 'OZ', fo r exa m ple , an d dis pla y
the contents of the log file with the command 's'. A COND CODE 0000 tells you that the
transfer was completed correctly.
The LU62Status display component also has functions for monitoring the data transfer directly. You can also log on to the MVS host with the SNAP-IX terminal emulation software,
which prevents you having to switch constantly between LINUX and MVS.
The following figure shows our example application:
The MVS operator has submitted the print job BIBLEH to printer PRT24, which is supplied
with data by queue 'Q'. Printer PRT24 was previously activated using the SDSF menu.
Once the transfer is initiated by the MVS system, the ID server status changes to "active"
and the job name BIBLEH is displayed.
When the APA-Module has received the print application in full - and not before - a new en-
try is added to the print queue. The jobs spool entry contains additionally to the usual job
the MVS name and Job ID in the Userinfo column and the number of received pages in the
pages column.
Important:Job queues are of special significance in printing with the LU 6.2 software: all
print jobs received by means of LU 6. 2 are assigned the job queue 1 by default.
In addition, printer 3 is configured as a special "network printer" to receive the MVS print
jobs and route them to a physical printing syste m .
34 A29247-X2-X-8-7670
Page 47

APA-Module Components The APA-Module LU 6.2 Connection
The print job is then processed in the same way as a job that is generated locally.
For further information on job proces sing, please consult the description of the Explorer and
APA-Module componenets in this manual.
The example above assumes that the SNAP-IX daemon prog ram is started automatically
when you boot your LINUX host. In a standard SNAP-IX installation an entry is added automatically to your rc files to start the daemon when the system is booted.
If the entry was not made in the file, you can add it manually by entering the following line
to start the modules: /opt/sna/bin/snaldmod
The daemons are started with the following command:/opt/sna/bin/sna start
The daemon may be stopped with: /opt/sna/bin/sna stop
The connection may be activated with the command: /opt/sna/bin/snaadmin
init_node
Further Information on Printing via LU 6.2
File names containing "@" characters are not transferred by the SNAP-IX file transfer utility,
since these characters are used by the IBM interface "Ind$file" as start and stop bytes for
the file name (non-displayable characters).
4.6.8 Terminal Emulation
The SNAP-IX software can be started in two different terminal modes: graphics-oriented
mode (shown in the screenshots in previous chapters of this manual) and line-oriented
mode, which uses just text characters for screen display, making it useful for characterbased LINUX terminals (e.g. telnet sessions). No te that you must have a standard keyboard
to use this mode. The keyboard must have th e minimum character set without function keys
or special keys.
It is recommended that the Graphical mode is used, this is started with the 3270 terminal
icon.
Full instructions for using SNAP-IX in this and the character mode can be found in the documentation directory on your SNAP-IX CD.
A29247-X2-X-8-7670 35
Page 48

The APA-Module LU 6.2 Connection APA-Module Components
The Terminal Window
After making your settings in the 'Preference' menus, you can start MVS sessions.
3270 terminal emulation
The figure depicts the terminal window as shown in graphical operating mode.
Keyboard commands are entered as given in the second column of t he table in the previous
section.
There are two possible key combinations for the Reset command: <Ctr l><F12> (press and
hold the Crtl key and press F12) and the <ESC> key.
For further information on the termin al window, i n particular abou t the men u bar fu nctions,
please refer to the SNAP-IX user documentation on the installation CD.
Important: Each user can log on to the MVS system only once und er a given I D, meanin g
it is not possible to log on again with the same ID in order to cancel the MVS
dialog begun previously.
An MVS user is regarded as logged on until he or she has logged off properly
from the system. There is no proper logoff, however, when you close your terminal window in an ongoing MVS session by double-clicking the symbol. You
will not be able to log on to the MVS system again without operator intervention.
However, users do have some means (though restricted) of solving this problem themselves. The method is described below.
36 A29247-X2-X-8-7670
Page 49

APA-Module Components The APA-Module LU 6.2 Connection
You can resume the irregularly terminated MVS session by log ging on as usual under MVS
and entering s for Select at the Reconnect it em. As a r ule , this is po ssible on ly via the system via which the session was previously terminated.
The figure below shows the 3270 terminal window in character mode:
Menu Utilities Compilers Options Status Help
ISPF Primary Option Menu
Option ===>
0 Settings Terminal and user parameters User ID . : ST22
1 View Display source data or listings Time. . . : 11:43
2 Edit Create or change source data Terminal. : 3278
3 Utilities Perform utility functions Screen. . : 1
4 Foreground Interactive language processing Language. : ENGLISH
5 Batch Submit job for language processing Appl ID . : ISR
6 Command Enter TSO or Workstation commands TSO logon : $M
7 Dialog Test Perform dialog testing TSO prefix: **NONE**
8 LM Facility Library administrator functions System ID : IPO1
9 IBM Products IBM program development products MVS acct. :
B0030700
10 SCLM SW Configuration Library Manager Release . : ISPF 4.1
P PP Perform Program Product Application
H HCD Hardware Configuration Definition
S SDSF System Display and Search Facility
SMP SMP/E CO SMP/E Release 8 Console
Enter X to Terminate using log/list defaults
PLU A 4 X TIME LTT=:00.0
Note the differences in the keyboard map ping in th is op erat ing mod e. A t ermina l r eset , f or
example, is performed with <Esc>ar, and not with <Ctrl><F12> as in the graphical operating mode.
Generating a LINUX Shell Script
You can now generate a LINUX shell script from the list of all members of a PO file. The
script controls the transfer of the files from the MVS sys tem.
Various interactive editors offer macro functions for converting the list into an execu table
procedure. However, you can also use LINUX pro cedures such as AWK or the St ream Editor SED to generate the shell script. Of course, you can also develop a C program fo r th e
purpose.
Transferring a member file entails the following steps:
A29247-X2-X-8-7670 37
Page 50

The APA-Module LU 6.2 Connection APA-Module Components
1. Transferring the file with the RECEIVE command.
2. Checking the file's integrity with an appropriate procedure. If errors are encountered,
these should be logged.
3. Immediate compression of the received file ( and the corrected version, if ne cessary) to
save space on the hard disk.
Important: If a transfer goes wrong, so will the one following it. This behavior has to be
taken into account in a shell script.
38 A29247-X2-X-8-7670
Page 51

APA-Module Components Web Client
4.7 Web Client
4.7.1 Introduction
Although it is much easier and much more comfortable to access the full functionality of
PRISMAproduction from outside via Java Web Start (see Administrators Gu ide), the older
Web Client is still supported in this version.
The Web Client represents the network version of the Print Job Manager (PJM). It allows
you to access the PRISMAproduction server via a web browser.
Note: The Web Client for PRISMAproduction V3.02 has been tested and released for
the browsers Netscape Navigator (version 4.x, 7.0) and Microsoft Internet Explorer (version 4.01, 5.0 and 6.0) on Windows plat forms. The functionalit y with newer version of the browsers will be tested along with the further development of
PRISMAproduction. The release notes will always reflect the current situation.
The Web Client has different user levels:
• QuickPrint - 'Easy': Printing without the possibility of storing data.
• QuickPrint - 'Advanced': Printing with the possibility of storing data and access to Print
File Libraries.
• PJM Web: Functionality as PJM under Linux except web conditional restrictions.
• APA Print: Special user interface to submit APA print jobs.
The Web Client offers functions to generate and manage job tickets and to start and monitor
the print process. Because the browser does not depend on a special plat form, the same
Web Clienet can be used on all systems, which support the browser.
Design of the Web Client
The design of QuickPrint - 'Easy' and of QuickP rint - 'Advanced' diff ers completely from the
design of the PJM. Main target was to offer an easy web based handling. These user levels
are implemented in HTML, Java Script and Java . As a res ult th e po sess ele m en ts wh ich
are not part of the Linux-PJM (like tables , HTML input fields a nd HTML buttons). If you are
used to working with browsers you will be familiar with these elements.
The PJM web client differs from the Linux version in the following key points:
• No application software is installed on users workstat ions. The PJM is installed only on
the web server, and communicates with PRIMSAproduction only from this serv er.
• Data (job tickets and print data) is stored only on the web server.
A29247-X2-X-8-7670 39
Page 52

Web Client APA-Module Components
Access to the Web Client
The functionality of the PJM web client can be accessed by launching the browser via the
URL http://<web-server>/pjm.html.
To run the PJM web client in administrator m ode, laun ch the bro wse r via th e URL http://
<web-server>/pjmadmin.html. Provided you have administrator's access rights, you can
then access functions for managing the web ser ver and for granting access ri ghts to users.
Every user gets the login screen fist. After a successfull login, the user gets an introduct ion
screen with a short overview of how to use the Web Client. The available functions are displayed on the left part of the screen. These depend on the availble licenses on the server
side and the user ID you use as login.
Web Client Main Window
The main page consists of three fixed-size frames with predefined functionality:
• Contents frame (left). This corresponds roug hly to the menu bar in a conventional application.
• Information and message frame (top), which correspo nds to the stat us bar in a conventional application.
• Main frame, with the application logic proper.
The Introduction Screen
The introduction screen displays on a successful login of the user. I t describes the functions
(dependend on your user ID):
• About us: provides general info rmation about PRISMAproduction; this is the platform
for communicating with users.
• Register: user registration – required for accessing the full set of functions.
• Login: login for accessing the print server. A guest login is also possible, but this has
restricted functionality.
• QuickPrint - 'Easy': for loading (and viewing) data and printing without saving. The job
is deleted after printing.
• QuickPrint - 'Advanced': for loading data and printing/saving in one of the virtual
paths. You can also print data from archives. Uploaded data are stored on the server.
• PJM: Access to the Java PJM under Linux. Except f or web condition al restrictions you
can use the full functionality of the Java PJM.
40 A29247-X2-X-8-7670
Page 53

APA-Module Components Web Client
• APA Print: Print mode t o print uploaded ARA files on the basis of prede fined job tickets,
which can be partly modified on the screen. This menu item is only available if a valid
APA license is installed on the server.
• Administrator: access level for dealing with regist rations an d ch anging t he Prin tShop
interfaces. The administrator controls here, if a user has access to the Print File Library,
which amount of data he is allowed to upload and which user levels he can use.
• Help: displays help on the current window.
Language Selection
You define the language on the log in screen. In case you change the langua ge, you have
to login again.
4.7.2 Login
In the login screen you can:
• Login as guest by typing in 'guest' as user identification. In this case you don't need
either password or cost center. As guest you have restricted acce ss to the functionality
of the Web Client. You can use the QuickPrint 'Easy' and 'Advanced' mode, but you
cannot submit print jobs.
To get a user identification, you have to register.
• Login with an existing user identification and a matching password. You have to type in
a cost center only, if you are assigned to cost center.
• Modify the language of the user interface. After this you have togin again.
A29247-X2-X-8-7670 41
Page 54

Web Client APA-Module Components
4.7.3 Login as Administrator
In the login screen you can:
• Login with an existing administrator idetification and a matching password. You have
to type in a cost center only, if you are assigned to cost center.
• Login with the predefined login 'admin'. The corresponding password is 'ops'.
You have to register to get an own user identification.
Warning: For safety reasons the predefined password should be modified immediately.
• Modify the language of the user interface. After this you have to login again.
The following chapte describes the possibilities of the print shop adminitration.
42 A29247-X2-X-8-7670
Page 55

APA-Module Components Web Client
4.7.4 Administration
If you type the address http://<web-server>/pjmadmin.html various functions for the ad-
ministration of the Web Client are available.
Release registration requests
’Release registration requests’ Press the ’Request’ button, select the desired request and
’Delete registration requests’ Press the ’Request’ button, select the desired request and
’Update existing accounts’ Equal to 'Release registration requests' but press the Account
’Delete existing accounts’ Equal to 'Delete registration requests' but press the Account
and/or update existing accounts
click for ’Release’ to display the request.
Note: The list of requests is only updated if you click the ’Request’ button.
The request is displayed and you can modify the entries and
finally send it to the PRISMAproduction server.
click Delete.
Note: The list of requests is only updated if you click the ’Request’ button.
button instead of the Request button.
button instead of the Request button.
Modify account confirmation text
Modify the text displayed according to your preferences and sent it to the server.
A29247-X2-X-8-7670 43
Page 56

Web Client APA-Module Components
Set Print Shop configuration
Companysettings
’Company Name’ Apears on top of the window in 'Welcome to <company
name> printshop'.
’Company Logo’ To be selectable, the logo has to be stored as GIF or JPG file
in the web directory htdocs/PS-docs/images/logos.
Printer Settings
’Class’ You can select the job queue which is to be used in QuickPrint
Easy/Advanced. With 'Default' a standard job queue is used.
’Printer’ You can select the printer which is to be used in QuickPrint
Easy/Advanced. With 'Default' the system decides which
printer is to be used.
Viewer
’Type’ You can select the viewer to be used. Available are the Pro-
fessional Document Viewer and (with a TIFF plug-in) a TIFF
viewer. The setting 'user' means that the viewer is used which
was defined with the registration request.
’Thumbnails to display’ You can define the size of the thumbnail section. Defaut are
16 displayed thumbnails on one screen.
Colorset
’Colorset’ Select 'ocean' (blue shades), 'daylight' (yellow/brown shades)
44 A29247-X2-X-8-7670
or 'vanilla' (yellow/green shades).
Page 57

APA-Module Components Web Client
Making Impositioning Schemes available
Impositioning schemes which should be used in QuickPrint Easy/Advanced mode have to
be stored in the public section of the $WEBIMPSETS directory (e.g. using the composer).
To display a corresponding description, the impset must contain this coment.
The administrator of the Web Client is able to customize impositioning schemes in the
$WEBIMPSETS directory. He ca add, delete and modify schemes.
4.7.5 QickPrint Easy
In ’QuickPrint Easy’ mode, you can print on the server but you cannot save your da ta. You
do not have access to the Print File Library or to any other direct ory for saving the job ticket. The data are deleted from the server immediately after printing.
Every user, also the user 'guest', have access to the standard set tings in this mode (the
user 'guest' is not allowed to submit print jobs).
The QuickPrint Easy mode is recommended if you wa nt to p rint only on e file wh ich you do
not want to save on the server.
Proceed as follows in the main window:
1. Set up the parameters for the file to be printed. This has to be done before the file is
selected!
2. Press ’Select printfile’. The functions for the file selection will be displayed.
3. Choose the file and click ’Upload and Prepare’.
If the document is prepared, you can vie w it, print it or cancel the process. This ta kes place
in the information section of the window.
A29247-X2-X-8-7670 45
Page 58

Web Client APA-Module Components
The current status of the job is displayed on top of the window. The basic processing steps
are:
’submitted...’ The file has been transmitted and the print job is being pre-
pared.
’work...’ The print job is being processed.
’Document prepared:...’ The job has been finished and you can:
- print the document
- view the document (and eventually print it later)
- cancel the operation, i.e.delete the print file from the server.
If the status unknown occurs the reason could b e that finished print job are deleted fr om the
PRISMAproduction server immediately. The administrator is able to set the time how long
print jobs are being kept on the system in ’Configuration’ -> ’System Parameters’ - 'Saving
finished jobs'.
Description of the Fields
1. Parameters for Printing
’Jobname’ (pjmadmin only) Name of the job.
’Copies’ Number of copies to be printed. You can insert numbers be-
tween 1 and 31767
’Format’ Select the input format from the list. Dependet on the avail-
able licenses, the following formats are offered:
IOCA, PSunity, TIFF, PDFunity, PCL.
’Paper Size’ Select the size of the (physical) paper. Make sure that the
page you want to print fits on the selected paper.
’Page Layout’ Define how the converter should place the pages on the phys-
ical Paper:
Simplex: one sided printout
Duplex: double sided printout. Flip over the long edge.
Tumble: double sided printout. Flip over the short edge.
These settings do not modify files in the IOCA format.
’Printer’ Define the printer for the job. Default is the printer which was
defined by the administrator. If the administrator sets the de-
fault value himself, the system controls selection of the print-
er. Up to 14 characters of the printername can be displayed.
You cannot adress cluster with this selection.
46 A29247-X2-X-8-7670
Page 59

APA-Module Components Web Client
’Impositioning Set’ To print the desired format, you can select an im po si ti o nin g
scheme. This can be a standard or a user defined scheme.
Note: Only these standard schemes are displayed, which can
be processed by the selected printer.
’Details’ Shows detailed information on the selected impositioning
scheme.
2. Select Print File
Press the printfile button to disp lay the fields which allow the selection of the print file.
3. Select Local Print File
’Search’ Standard HTML window to select files.
’Upload and Prepare’ The file is loaded on the server and prepared. After the pro-
cess is finished you can select in the information section of the
windowv if the file should be viewed, printed or deleted.
All entries and selected list items are saved in a cookie. This causes the settings to be restored automatically after a new call of the Web Client, if the browser allows cookies.
If you want to save the original file on the server , then t o convert the file and to finally save
the ready-to-print document, it is recommended to use the ’QuickPrint Advanced’ function,
which is described in the next chapter.
A29247-X2-X-8-7670 47
Page 60

Web Client APA-Module Components
4.7.6 QuickPrint Advanced
The ’QuickPrint’ Advanced mode offers more possibilities than the QuickPrint Easy mode.
You cannot only print files but also save them to a Print File Library (archive). Saved documents can be controlled in a viewer. You can choose one or more files of the same type
and either print them or save them to a Print File Library. Additionall you can select readyto-print documents from the PFL and print them again.
You can also use the QuickPrint Advanced mode as a 'guest' user, but you canno t upload
or print files with this user identification.
To get access to this mode you have to activate the correspondin g entr y on registra tion. If
you want to save documents you also have to activate the entry 'store documents in libraries' during the registration procedure.
The QuickPrint Advanced mode is recommended if you want to save files on the PRISMAproduction server or if you want to print files from print file libraries or if you want to store
ready-to-print data in print file libraries.
Main Window
The main area of the window is divided into three sections:
’Source’ The left section lists all files which can be processed. If you select uploaded, all
uploaded files are shown. If you select Archive all files in the archive (selected un-
der Target) are displayed.
’Description’ The middle section of the window takes all the parameters for the job and the file.
’Target’ The right section describes the target i.e. the printer and the print file library. The
print file library represents the archive in which you store the data, if you select
Store, and from which the data is taken, if you specify Target = Archive.
48 A29247-X2-X-8-7670
Page 61

APA-Module Components Web Client
You can select ’Store’, ’Print’ or ’Store/Print’.
After every action the current status of the job will be displayed on top of the window. The
basic processing steps are:
’submitted...’ The file has been transmitted and the print job is being prepared.
’work...’ The print job is being processed.
’finished/stored’ The print job has been finished and has been transferred to the print queue or
print file library
Description of the fields
Source
’List of files/print jobs’ 'Source = uploaded': Lists all files uploaded to the server.
'Source = Archive': Lists all files in the print file library selected under ’Target’.
’upload/view’ 'Source = uploaded': press the ’upload’ button to activate the fields for se-
lecting and uploading files. It is also possible to upload a Zip file. The contents of this file will be available in the Web Client for further processing.
The size of the unpacked Zip file will be extracted to check the upload limit.
Warning: Invalid file names in the Zip file will be adjusted automatically.
'Source = Archive': Press the ’View’ button to view a selected document in
the print file library.
’Ren’ You can rename the selected file.
’Del’ You can delete the selected files.
Description
’Job Name’ Job name which should be valid for the print job in PRISMAproduction. Al-
phanumeric strings with underscores are allowed.
’Copies’ Number of copies to be printed. You can insert numbers between 1 and
31767
’Format’ Select the input format from the list. Dependet on the available licenses, the
following formats are offered:
IOCA, PSunity, TIFF, PDFunity, PCL.
’Paper Size’ Select the size of the (physical) paper. Make sure that the page you want to
print fits on the selected paper.
A29247-X2-X-8-7670 49
Page 62

Web Client APA-Module Components
’Page Layout’ Define how the converter should place the pages on the physical Paper:
Simplex: one sided printout
Duplex: double sided printout. Flip over the long edge.
Tumble: double sided printout. Flip over the short edge.
These settings do not modify files in the IOCA format.
’Printer’ Define the printer for the job. Default is the printer which was defined by the
administrator. If the administrator sets the default value himself, the system
controls selection of the printer. Up to 14 characters of the printername can
be displayed. You cannot adress cluster with this selection.
’Impositioning Set’ To print the desired format, you can select an impositioning scheme. This
can be a standard or a user defined scheme.
Note: Only these standard schemes are displayed, which can be processed
by the selected printer.
’Details’ Shows detailed information on the selected impositioning scheme.
Target
’Printer’ Define the printer for the job. Default is the printer which was defined by the
administrator. If the administrator sets the default value himself, the system
controls selection of the printer. Up to 14 characters of the printername can
be displayed. You cannot adress cluster with this selection.
’PFL’ List of all Print File Libraries. You can store the ready-to-print document in
the selected PFL or you select file from the PFL if 'Source = Archive'.
’Priv/Publ’ Indicate if the file should be stored in the private or public part of the PFL.
’Store’ Stores the ready-to-print document in the selected PFL specified under ’Tar-
get’. The name of the document in the print file is either:
- username.jobname with the option 'publ' or
- username/jobname with the option 'priv'.
You now have the possibility to view the prepared documents.
’Print’ Prints on the selected printer.
’Store/Print’ Combination of printing and saving. You don't have the possibility to view
the prepared documents.
All entries and selected list items are saved in a cookie. This causes the settings to be restored automatically after a new call of the Web Client, if the browser allows cookies.
If you only want to print one file and not to stor e it on the PRISMA server, you can also use
the ’QuickPrint Easy mode’ (see chapter before).
50 A29247-X2-X-8-7670
Page 63

APA-Module Components Web Client
4.7.7 APA Print
The program is only availlable if you obtain a valid APA licence on the PRISMAproduction
server.
APA print has a different approach to submitting print jobs. The uploaded file is printed in
connection with a saved ticket, whose settings can be partly modified directly on the scr een.
An APA ticket is loaded and the settings of this ticket are displayed on the screen. You can
modify these settings for the current print job. If you do so the saved ticket will not be modified.
The information section on top of the window informs you, if a submitted print job has been
accepted by the server or if an error occurred. If th e print job has been accepted, no fu rther
information on the status of the job will be displayed. In case of an error the system tries to
return corresponding information.
’Ticket’ Select a predefined ticket for the basic settings of t print job.
The tickets available are stored in the library $APATICKET
which represents the physical path
/u/prismapro/data/web/apa/tickets
on the PRISMAproduction server. If the checkbox load ticket
settings on change is aktivated, all fields match the settings of
the ticket.
To view the properties of the ticket, click the properties button
(a corresponding description has to be part of the ticket).
A29247-X2-X-8-7670 51
Page 64

Web Client APA-Module Components
’File’ Select the file ton be printed. You can only select one file per
print job. If you want to upload further file s, you have to press
the properties button: to open the upload dialog.
Upload file
Select a file clicking the Browse/Durchsuchen button. Press
Upload file to upload the file. Use a ZIP file to upload more
than one file.
Warning: The file names within the ZIP file will be modified on
the server, if they contain special characters which are not allowed on the Linux system. Sometimes existing files may be
overwritten.
Delete
Deleting of files is not implemented yet. Please use QuickPrint Advanced.
’Job Name’ Insert a name for the print job. By default the name of the se-
lected tickert is used.
’Pagedef’ You can modify the pagedef giiven by the selected ticket.
’Formdef’ You can modify the formdef given by the selected ticket.
’Form’ You can add a form to the print job. This form will be issued in
the job list, e.g. as a message for the operator (see documen-
tation for PRISMAproduction 'PJM' -> 'Job attributes' -> 'Print-
er'.
’Printstyle’ 1st Parameter: Pagesequence, defines the placement of the
pages on the print sheet (see APA File properties - Options).
2nd Parameter: Printmode, sets the hardware mode on the
printer.
’CC-Byte’ Carriage control character with line data (see APA File prop-
erties - Options).
’TRC-Byte’ Interpretation of the table reference character (see APA File
properties - Options).
’Copies’ Number of job copies.
’load ticket settings on change’ You can choose wether the settings displayed are overwritten
or not if you select another ticket.
52 A29247-X2-X-8-7670
Page 65

APA-Module Components Web Client
4.7.8 PJM in the Web
Requirements for Access
To accesss the PJM within the Web Client, you have make some settings:
• Include the PRISMAproduction sever in the 'hosts' file of the local computer.
• Make the local computer known as 'Trusted host' to the PRISMApro duction server.
• Grant Java rights on the local computer using the 'java.policy' file.
Include the PRISMAproduction sever in the 'hosts' file of the local computer
The connection between the java applet run by the web browser and the PRISMAproduction server is based on the symbolic name of the PRISMAproduction server (i.e. "wien") and
it's domain (i.e. "ops.de"). You can display this name in a terminal window on the PRISMAproduction server by typing the command 'hostname' or you ask your administrator for
the name:
To enable the operating system on which the web browser runs to resolve the hostname
and to address the corresponding se rver , th is host name h as to be a dded t o th e 'hosts' f ile
of the local computer. Depending on the operating system, this file is located in different
paths. The easyest way to find it is to use the search dialog.
In most cases you should find the file in the following path:
Windows NT 4/2000: <systemdrive>:\winnt\system32\drivers\etc\hosts bzw.
Windows 98: <systemdrive>:\windows\system32\drivers\etc\hosts.
The following example shows how the entry should look like:
A29247-X2-X-8-7670 53
Page 66

Web Client APA-Module Components
Make the local computer known as 'Trusted host' to the PRISMAproduction server
The system administrator of the PRISMAproduction server has to insert the IP address of
the local computer in the ’Trusted Hosts’ list of the print server. T herefore he opens the Sys-
tem application in the Explorer ’Configuration’ and enters the IP address in the text fie ld
next to ’Tusted Hosts [TCP/IP] and finally saves the new configuratio n.
54 A29247-X2-X-8-7670
Page 67

APA-Module Components Web Client
Grant Java rights on the local comput er using the 'java.policy' file
For safety reasons vitual machines (VM), which ar e r equir ed e.g. by java ap plet s in a web
browser, have very restricted rights on the local computer. You have to grant rights to the
java VM in order to access the local filesystem via the PJM in the Web. You can grant these
rights using the file 'java.policy' in the home directory:
Win9x: <Systemdrive>:\windows\profiles\<username> bzw.
WinNT 4: <Systemdrive>:\winnt\profiles\<useneame> bzw.
Win 2000: <Systemdrive>:\documents and settings\<Username>
Minimal rights necessary for the server are documented in the following example of a ja-
va.policy file:
-----------------------------------------------------------------------------------------------------------------------
grant codeBase "http://160.120.20.112/explorer/codebase/pjm.jar" {
permission java.lang.RuntimePermission "modifyThread";
permission java.lang.RuntimePermission "shutdownHooks";
};
grant codeBase "http://160.120.20.112/explorer/codebase/ppBase.jar" {
permission java.lang.RuntimePermission "shutdownHooks";
};
grant codeBase "http://160.120.20.112/explorer/ppExplorer.jar" {
permission java.lang.RuntimePermission "shutdownHooks";
};
----------------------------------------------------------------------------------------------------------------------The IP address 160.120.20.112 has to be replace d by the address of the server. If this co n-
tents is placed as 'java.policy' in the home directo ry of the user, all browser processes have
to be stopped. The new rules are only accepted after a restart.
Another possibility to grant these rights is to use the program 'policytools', which is a free
tool provided by Sun Microsystems™. The use of this tool is not described here.
For safety reasons it is not recommended to grant access rights to the local file system via
the 'java.policy' file.
Java Runtime System
The Java Runtime Environment 1.3.1 is required f or t he Web PJM. It is off er ed fo r insta llation after the first start of the Web PJM.
A29247-X2-X-8-7670 55
Page 68

Web Client APA-Module Components
Differences of the PJM in the web and the PJM under windows
Fileselection via the upload function of the Web Client
Press ’Search/Durchsuchen’ to select a local file. If you click submit the file will be placed
in the list of files of the PJM. It is stored on the server in the $WEBFILES library.
It is also possible to select a ZIP archive. It is extracted and th e single files are placed in the
file list of the PJM. Filenames which are not valid are changed automatically.
Fileselection via the Fileselection Box of the PJM
The selection of local files using this function is only possible if the rights of the 'java.policy'
allow the access of the local filesystem (which is not recommended). The file remains on
the local computer.
With this function you can access the public part of the virtual libraries (e.g. $TARGET).
Restrictions
Due to the different system there are some restrictions for the Web PJM compared with the
Linux PJM. Generally you have a limited access to the filesystem of the server. Th is has
the following consequences:
Only virtual directories are accessible ($OUTPUT, $TARGET,...)
Access to the helpsystem on the server is not possible.
56 A29247-X2-X-8-7670
Page 69

PRISMAproduction Explorer Introduction
5 PRISMAproduction Explorer
5.1 Introduction
The PRISMAproduction Explorer provides full functionality for monitoring and administration of the PRISMAproduction system. The tree stru cture makes it easy to access functions.
This structure is only available when the connection to the server has successfully been
performed and all the data have been tra nsferred. Due to the system’s performance this
may take a while.
PRISMA Explorer and Windows
The support for installing the Explorer client locally on a WINDOWS desktop is still provided. To run the PRISMA Explorer on Desktops Java Web Start is now a more flexible and
comfortable tool. No PRISMA component must be installed locally any more.
For more details see chapter ’Using PRISMA Explorer with Java Web Start’ in the PRISMAproduction Administrator Guide.
Note: Under Java Web Start control the Explorer runs in the Sandbox Model, i.e. with no
specific rights on the local machine. One of the consequences is that the user language cannot be set as stated in the PRISMA User Management. Hence the user
language on a desktop is always the operating system language.
A29247-X3-X-6-7670 57
Page 70

Introduction PRISMAproduction Explorer
In detail the Explorer is devided in the following sections:
• Setting up Workspaces (See chapter "Task related Workspaces" on page 65)
• Configuration (See chapter "Configuration" on page 137)
• Connections (See chapter "Connections" on page 67)
• All Jobs (See chapter "Job Lists" on page 71)
• Servers (See chapter "Servers" on page 88)
• Services (See chapter "Services" on page 90)
• Messages (See chapter "Messages" on page 91)
• Archives (See chapter "Archives" on page 69)
• Vario PJM (See chapter "Vario PJM" on page 105)
• Print Job Manager (PJM) (See chapter "Print Job Manager" on page 231)
• Printer Pool (See chapter "Printer Pool" on page 116)
• LCDS Cannel (See chapter "LCDS Channel" on page 127)
• LCDS Resources Import (See chapter "LCDS Resources Import" on page 128)
• LCDS Resources Export (See chapter "LCDS Resources Export" on page 129)
• Print File Manager (See chapter "Print File Manager" on page 131)
• LU6.2 (See chapter "LU6.2" on page 131)
• Professional Document Composer (PDC) (See the "Professional Document Composer" User Guide)
• OLDS-Services (See chapter "OLDS-Services" on page 131)
• Directory Viewer (See chapter "Directory Viewer" on page 132)
58 A29247-X3-X-6-7670
Page 71

PRISMAproduction Explorer Using the Eplorer
5.2 Using the Eplorer
PRISMAproduction Explorer represents a frame, which provides access to all java based
PRISMAproduction components.
To open the ‘Explorer’ window click the icon in the bottom bar of the Linux d esktop. The tree
structure of the server node is only available if the connection to the explorerserver has
been successful and if all data have been transferred. This might take some seconds.
Menu bar
Applications selected from the Explorer Tree
Active Application
Tool bar
Application Area
Explorer Tree
A29247-X3-X-6-7670 59
Status bar
Page 72

Using the Eplorer PRISMAproduction Explorer
The left section of the window shows the Explorer tree: the structure of the system.
The right section shows the active application. The applications that have been launched
are each presented by a tab. The tab belonging to the active application is shown in a different colour. You activate an application by clicking its tab.
5.2.1 Explorer Tree
Nodes
Clicking a node opens it or closes it again. When a node opens, you are shown the substructure it contains; the substructure is closed again when you close the node.
Launching an application from the Ex plorer tree
Right-click the name of an application in the Explorer tree to show a short cut menu of functions for opening the application, e.g. open in a separate window.
Choose the function you want to use. Th e application is then opened and mad e active, i.e.
its interface is shown on the Explorer application workspace. Double-clicking the name of
the application in the Explorer tree has the same effect as choosin g the function from the
shortcut menu.
Shortcut menus in the Explorer tree
Right-click an application in the Explorer tree to open a context-sensitive shortcut menu
(which functions are shown will depend on the current working context). The menu also
contains functions for opening and activating applications. All these functions can also be
accessed via the application menus.
5.2.2 Application area
The right section of the Explorer window sh ows the open applications. There is a separate
tab for each one. The tab gives the name of the application and a number if th er e are multiple sessions of the same application running simultaneously. The active application is
shown with its own interface, and its tab is highlighted in a different colour.
60 A29247-X3-X-6-7670
Page 73

PRISMAproduction Explorer Using the Eplorer
Open applications
Click the tab to make an open application the active one. The interface belonging to this
application is then shown.
Another way of doing this is to choose 'Show existing' from the shortcut menu that is displayed when you right-click the name of the application in the Explorer tree.
Active application
The interface of the active application is disp layed on the screen. The application fu nctions
can be accessed via the menus. There are also icons available for most functions, enabling
rapid access to the functions in question.
The menus of the active application are shown in the menu bar.
Close application
When you right-click the tab of an open application, you are shown a menu of options for
closing the application.
Shortcut menus on tabs
When you right-click on a tab, you are shown a shor tcut menu with functions for altering t he
presentation on the tab, plus a function for closin g the display:
Pop up Menu
Clicking a tab with the right mouse button opens a pop up menu providing the following
functions:
‘Close’ Close the selecte d application.
‘Close all’ Close all applications in the left window pane.
‘Move to new window’ Displays the selected application in a separate window
which can be placed anywher e on the sc re en .
‘Tab placement’ Places the tab oft the selected application on the selec-
ted position.
A29247-X3-X-6-7670 61
Page 74

Using the Eplorer PRISMAproduction Explorer
Right mouse button in an active application
In table views you can activate functions for viewing the columns by right clicking the column title. Right clicking the column conte nts ofers a pop up me nu with fun ctions which ar e
also accesible via the menu- and toolba r.
5.2.3 Menu bar
At the top of the Explorer window is the menu bar. You ope n a menu of functions by clicking
the menu title. You then select a function by clicking the relevant entry in the menu.
The leftmost entry in the menu bar is always t he Explorer menu itself; the r ightmost entry is
always the Explorer help menu. Which other menus are available depends on the application. For example, when the PJM is open, you are sh own the PJM menus (Edit, Ticket, etc.).
5.2.4 Menu ’Help’
The first entry in the ’Help’ menu always leads to the Explorer help topics. All othe r entries
refer to the application, which is currently active.
If you want to print help pages, a local printer must be installed.
5.2.5 Toolbar
The toolbar icons each launch a particular func tion. Not all the functions are available for
every context – the ones that are unavailable at a particular time are shown in grey. Most
toolbar functions can also be accessed via the menus.
5.2.6 Status bar
The active application displays status information in the status bar.
62 A29247-X3-X-6-7670
Page 75

PRISMAproduction Explorer Using the Eplorer
5.2.7 The ‘Explorer’ Menu
’Open Workspace’ Allows you select a workspace which is configured for special user
tasks. See"Task related Workspaces" on page 65.
‘Look and feel’ Use this option to select the look and feel of the interface:
Metal: Java default. This option is recommended for the Linux platform. The toolbar in 'Metal' mode contains a dotted area that you
can click to move the bar to a position of your choice.
Windows: Simulates a Microsoft Windows environment.
PRISMAMotif: This look matches the former Unix versions of
PRISMAproduction.
'Cancel operation' Cancels the current operation. You might need to do this if the ope-
ration is taking an inordinate amount of time.
‘Save window settings’ Saves the actual setting of the window.
‘Exit’ Exits the program. The last settings of the explorer will automatical-
ly be saved. If you restart the program all windows will be rebuilt.
5.2.8 Customising the Explorer window
There are several ways of altering the Explor er window to fit your requirements. Settings
such as the choice of open applications or column width s are save d and re stored the ne xt
time you launch the Explorer:
Presentation in one window
By clicking one of the two arrows in the column separating the two sections of the window,
you can display either just the Explorer tree or just the application area.
A29247-X3-X-6-7670 63
Page 76

Using the Eplorer PRISMAproduction Explorer
Altering the window size
Drag the separator column between the windows to adjust th e width of the workspace an d
Explorer tree panels to your requirements.
Positioning the active application
Right-click the tab to display a menu o f functions for positioning the active application: Move
to new window: position the tab (without the title) in a new window outside the workspaceTab placement: position all tab titles along the top, bottom, left or right sides of the workspace.
Customising tables inside applications
You can make settings that affect how lists ar e displayed. Some settings can by changed
simply using the mouse; for others you choose the function from a shortcut menu opened
when you click the name of the column.
Sorting lines by columns
You can sort the entries in most lists in either ascending or descending order. To change
the sort order, left-click the column title. An arrow is then shown (the sort symbol). Click the
arrow to change the sort order.
You cancel the sorting via the shortcut menu or by clicking the arrow until it disappears.
Customising the columns
You can change column widths using the mouse. The Reset to default function resto res the
columns to their default widths.
Hide Column suppresses the display of a column; Sho w Column makes the hidden colmn s
visible again.
64 A29247-X3-X-6-7670
Page 77

PRISMAproduction Explorer Task related Workspaces
Positioning the toolbar
You can choose where to position the toolbars. Toolbars in “Metal” display mode have a
dotted area. Left-click this area and drag the to olbar to the position you want.
This can be either inside or outside the PRISMApro Explorer. For example, you might
choose to place the toolbar along the left edge of the workspace.
To move a toolbar in “Motif” or “Windows” display mode, click an unused part of the to olbar
and drag it to the position of your choice.
5.3 Task related Workspaces
The PRISMAproduction user interface is based on a technical co ncept, which allows to easily add new applications to the user interface.
However users may have differnent requireme nts for a user interface of a system. The standard UI of the Explorer provide s a mighty and structured too l for the user who wants to wor k
with the full range of functionality of the system and who is familiar with the navigation in
hierarchially structured trees.
On the other hand it might be beneficial for user s who have defined tasks and only deal with
parts of the system to have a restricted access to only these parts of the system which they
are actually using.
To acheive a simplification of the Explorer UI you can u se so calle d workspaces with this
version, which provide a simplified view of the user inter face. Only these applications are
open which the user needs f or his special ta sk. Additionally t he applications are already arranged in an expedient way.
The following workspaces are provided:
• Basic Operator: Simple workspace for the operator.
• Operator with Job Submission: Provides additionally the possibility to submit jobs.
• Job Submission: Workspace which allows the submission and control of jobs.
• Vario PJM: Workspace for the users of the Vario PJM.
The Default-Workspace provides the classical Explorer UI.
Task related workspaces can be described by the following features:
• Only these applications are active which are required for the task.
• Applications with belong together are combined in one frame .
A29247-X3-X-6-7670 65
Page 78

Task related Workspaces PRISMAproduction Explorer
• The selection and arrangement of applications within a workspace cannot be modified,
but you can change the size of the applications or hide them completely.
• Changing to another workspace or to the default UI is always possible.
• The full functionality of an application in a workspace is not restricted (e.g. clicking on
a job ticker opens the PJM).
• Like on the classical Explorer UI the current settings are saved and will be restored if
you open the explorer again.
You can select the workspaces from the menu ’Explorer’ -> ’Open Workspace’.
Note: By default the menus for the single applications are hidden. You can bring them u p,
if you move over the title bar of the respective application. The menus have their
usual functionality.
5.3.1 Workspace 'Basic Operator'
This workapace is meant for the operat or. It combines the most imp ortant tasks of this user:
• Monitoring of the jobs
• Control of the printers
• Monitoring of the print process
5.3.2 Workspace 'Operator with Job Submission'
This workspace is an extention of the ’Basic Operator’ workspace. It additionally provides
the possibility to submit jobs. Only these files are visible which are stored in the $TARGET/
user directory. If you click on a ti cket file, the PJM opens automatically and the job can be
submitted. Modification of the job tickes depends on the user rights. I f the de fault user ’operator’ is logged on, the PJM runs in ’Product ion’ mode which does not allow essential modification of the job ticket.
5.3.3 Workspace ’Job Submission’
This workspace allows the user to create and monitor jobs. It contain s the PJM and the Job
list.
66 A29247-X3-X-6-7670
Page 79

PRISMAproduction Explorer Configuration
5.4 Configuration
(See chapter "Configuration" on page 137)
5.5 Connections
Expanding the connection node displays all server connections.
With the default settings, the user groups syst em, admin and service are authorised to view
connections. The operator does not have this right.
Clicking the Connections node in the PRISMA Eplorer tree view displays all the Java servers in the system. A server provides a particular service that can be requested by clients.
When a client submits a request for a service, an application is launched on the client system in order to deliver the service in que stion. The connection between th is application and
the server is shown in the Connections window.
A29247-X3-X-6-7670 67
Page 80

Connections PRISMAproduction Explorer
When you double-click a particular server, you are shown the conn ections viewer with a list
of the connections that exist with the server in question. This data is intended for administrators, the purpose being to provide an overview of the connections that are currently in
operation in the PRISMA network.
Services, which are started incorrectely are marked with a special icon. A tooltip provides
further details.
Column Titles
Id Serial number of the connection
Client Host Client system on which the application runs, which has connected itself to the
server. The entry consists of the symbolic name or the IP address.
User name Linux login name of the application or the user, who started the application.
Application Applications which are currently connected to the server.
Login time Date of the login to the server.
68 A29247-X3-X-6-7670
Page 81

PRISMAproduction Explorer Server Files
5.6 Server Files
Via this node you have access to the files in the following directories on all computers of
the PRISMAproduction network. Here you can also compare files and directories (see also
"Directory Viewer" on page 132):
5.6.1 Libraries
This node gives you access to logical library paths and their contents on the system. To
configure user defined libraries select Configuration -> Library paths. When selecting
files in the PJM List of Files section you can select files from these libraries.
Depending on the language module you can select files from different libraries:
POD
Select original files in their native format from $TARGET.
$OUTPUT saves files in the TIFF, PS and PDF format which ha ve been re conver ted fr om
IOCA.
5.6.2 Devices
The input devices for the APA-, LCDS- and OLDS-Module are collected under this node.
Devices are configured under: Configuration -> Devices.
APA
Select files from the different input devices (CARTRIDGE, QIC, TAPE) wihch are collected
under the $DEVICE library.
LCDS
For LCDS resources select input devices presented under $DEVICE (XFLOPPY_35,
XFLOPPY_525, XRES_CARTRIDGE, XRES_QIC, XRES_TAPE). For LCDS print data
you can select cartridge, channel or t ape under the $XDATA_DEVICE library. You can a lso
select JSLs and resources directly from the jsl and XRESOURCE library.
5.6.3 Archives
Lists the archives for printing and organizing POD data files:
A29247-X3-X-6-7670 69
Page 82

Server Files PRISMAproduction Explorer
• $PFL (Print File Library) contains archives with jobs ready t o print.
• $PREPRINTS contains archives with jobs which still have to be modified.
Not all actions are allowed in the archive viewer, because this will disturb the internal ad-
ministration of the Print File Library (PFL).
It is allowed to change and update directories and to delete files.
The following actions lead to error messages: Creating and deleting of directories, select-
ing, copying and pasting of files.
Operations dealing with files shoud be performed via the Print Job Manager (PJM) or the
Print File Manager (PFM).
The PFM allows renaming and deleting of files.
You create and modify archives under:
Configuration -> Print File Library.
5.6.4 GCI/LCDS
Here you have direct access to all resource s created for the LCDS-Module. You can easily
copy or move files.
70 A29247-X3-X-6-7670
Page 83

PRISMAproduction Explorer Job Lists
5.7 Job Lists
5.7.1 General
PRISMAproduction keeps a list of all the jobs in the system, together with their attributes.
This list is presented in an easy-to-und erstand manner. The job list can easily be quite extensive, so users can apply filters to display only jobs that match particular criteria. The
standard filtered lists are the list of active jobs, completed jobs a nd jobs with errors. List columns for which a filter has been defined are shown in colour. The job list is changed continually while processing is underway.
In Configuration -> System you can define, how long finished jobs are kept in the list.All
other jobs remain in the list until they are explicitely dele te d
You can execute specific functions from the li st.E.g. you can interrupt or continue a job. The
availability of functions depends on the status of the job. Functions, which are currently not
available, are displayed as grey icons. Some modifications of jobs can only be executed
with special rights (see "Configuration Permissions" on page 149.
You can present the following job lists in the Explorer:
• All Jobs: this list contains all the jobs on the system. If the scope of the list has been
restricted, the suffix “filtered” is shown to indicate this.
• Active Jobs: the standard filter for a ll processing and waiting sta tes and for t he states
“exception service error” and “exception print error”
• Exception Jobs: standard filter for all exception states. Exception Jobs require an interaction of the operator.
• Print Queue: all jobs whose state has something to do with printi ng. These states are:
exception-hold /-print error/- printing interrupted, pro cessing-being interrupted/-print ing,
waiting -in output control/-rea dy to print finished-locked,
• Finished Jobs: standard filter for the finished states
• Job lists for which you have defined a custom filter
You can restrict the scope of each job list by defining filters.
A29247-X3-X-6-7670 71
Page 84

Job Lists PRISMAproduction Explorer
It is advisable to adjust the display of the list according to your own needs. You can for instance hide columns, adjust the column width etc. To do this, you can use the general Explorer functions as described at the beginning of the Explorer chapter.
5.7.2 Authorisations for jobs
jobs.view.all
Users with "jobs.view.all" authorisation are shown all the jobs; users without this authorisation are shown only their own jobs.
With the default settings, the users applic, admin , service and operator ha ve this authorisation.
jobs.modify all
Only users with this authorisation can modify the properties of jobs they do not own. Jobs
are modified with the Edit Job Properties button:
With the default settings, the users applic, admin , service and operator ha ve this authorisation.
jobs.control.all
Only users with this authorisation can submit commands to change the state of jobs they
do not own. These statements are Interrupt, Halt, Continue
With the default settings, the users applic, admin , service and operator ha ve this authorisation.
5.7.3 Icons for short Information
Job is working
Job is finished
There is a message for this job
Job is an exception status
72 A29247-X3-X-6-7670
Page 85

PRISMAproduction Explorer Job Lists
5.7.4 Column Titles
Job id Job identification number. This is assigned by the ODS
Owner The login name under which this job was started
Job name The job name assigned by the owner
Express/Prio Indicates whether or not the job has been prioritised (i.e. given express rights).
The express right influences the process order of the job. Once set, the express right causes that the job is moved to the beginning of the queue. If the
requested services are available, the job is processed before all other jobs. If
you set express rights for other jobs these will be moved to top of the processing.
If the job list is sorted by the Express/Prio column in descending order, all jobs
are on top, which will be processed next.
Print jobs in PRISMAproduction have a priority and a time stamp. The priority
is shown in the print queue column "Express". Print jobs are put in the print
queue with priority '128'. Job with Express rights have priority '0' and a serial
number. The priority is also shown via "Tool Tip". The priority can be changed
with the Job properties dialog-window. You can modify the priority of the job via
the job properties. 0 represents the highest priority and 255 the lowest.
Steps States the current processing step (step x of y). A bar indicates the progress.
Job queue Queue of this job
Pages States the number of pages printed (n-th page of total). A bar indicates the pro-
gress.
Print range The range of pages to be printed.
Printer The printer on which the job is being (or will be) printed.
Form The form used for the job (STD or string defined in the PJM)
Type The type of data stream (AFP, PCL, PDF, PS or RAW).
Color If the job is to be printed with highlight colour, this column states the colour ve-
rification ID.
Resolution The resolution in dpi.
Copies The number of copies of the job. Once printing of the job is underway, the entry
in this column states how many copies of the total (x copies of y) have already
been printed. A bar indicates the progress.
Warning: If you define 'Copies=per Job' (not copies per file) in the PJM and
additionally print headerpages and ticketpages, the number of job copies is
only indicated in the job details window. The Job List will always display Co-
pies=1 in this case. Be careful when modifying the number of copies via the job
properties button.
Status The status of the current processing step. The states are explained below.
Queue name Name of the printing queue.
A29247-X3-X-6-7670 73
Page 86

Job Lists PRISMAproduction Explorer
The following columns are only visible, if they are activated via the pop up menu entry ’Show column’ (right click in the column head):
Accepted Date and time of the job acceptance.
Started Date and time of jobstart.
Modified Date and time of job modification.
Printihg started Date and time of start of printing.
Printing finished Date and time of end of printing.
Printing time Duration of printing.
74 A29247-X3-X-6-7670
Page 87

PRISMAproduction Explorer Job Lists
5.7.5 Job States
processing...
...service active A service is being executed, e.g. conversion
...transferring data Data is being transferred
...printing Data is being transferred to the printer while the printer is printing
...being interrupted An interruption has been requested and the print of the current copy is
being completed
...in output control All the data has been sent to the printer. The pages are being stacked.
Single Fanfold: everything has been printed, but not yet stacked.
Twin only: recto pages have been printed, verso have not yet been printed
waiting...
...for event The job is awaiting the occurr en ce of an event (see Config u ration events
and PJM job attributes)
...for service Th e job is waiting for the requested service to be available
...for time to run The job is waiting until a time/date event occurs (see PJM Job attributes)
...ready to print The job is waiting for a free printer or was started with the system parame-
ter 'operator confirmation’
finished...
...complete The job has been printed in its entirety. All the sheets have been stacked.
A completed job remains in the job list for the time specified in the system
parameters ('Hold finished jobs')
...locked The status when a job is assigned to a job class for which the entry !!’Lock
Jobs after printing' is defined in the system parameters
exeption...
...hold The job was cancelled with (interrupt job immediately) at 'ready to
print' status
...print error The printer has reported an error
...printing interrupted Status following the interrupt command ( )
...service error Error caused by a service, e.g. error during conversion
...service interrupted Status following the halt command ( ) or interrupt command
( ) when the job has not yet been printed or was at 'ready to print' sta-
tus
...waiting for release The job was submitted in the PJM with the option ' Hold job until confirma-
tion'
A29247-X3-X-6-7670 75
Page 88

Job Lists PRISMAproduction Explorer
5.7.6 Menu Functions
All menu item can also be accessed via the toolbar.
Cancel current operation Use this functio n to cancel the current ODS operation.
Edit Filter See chapter "Filters" on page 80.
Job Menu
This menu contains functions which apply to the selected job. You can also display the Job
menu functions by right-clicking an entry in the list:
’Show message...’ This icon changes colour when a message is pending for the se-
lected job. This might
happen when an error is encountered in the job, for instance. Cli-
cking the icon opens
an additional window showing the text of the message.
Open messages... Opens the PRISMA messages window. The display is filtered, so
that only entries are visible, which are related to the marked job.
Write messages Opens a window, which allows you to write a message for this
job. The message is sent to the messages module and can be
read there (e.g. from the job list via ’Open messages...’).
’Show details’ This icon opens a tab with details about the selected job (see Job
details).
76 A29247-X3-X-6-7670
Page 89

PRISMAproduction Explorer Job Lists
’Open Job Ticket’ This icon opens the Print Job Manager with all the data belonging
to the selected job. The job is opened in either modification or viewing mode, depending on its status.
’View Job’ The print file is displayed; if it’s stored in an archive or as resour-
ce. The viewing program, wh ich is configured in the PJM, is used.
If there is no application defined for IOCA files, the PDV3 will be
used.
’Edit properties...’ You can change certain of the parameters of a job while the job
is in the queue awaiting printing (i.e. before the job’s state changes to waiting -ready to print).
You can change the printer, job queue, form definition, copy
count, priority and page range. You can also add the file numner
before the respective page range (e.g.:1:5-9; 3:6-10):
Warning: If you define 'Copies=per Job' (not copies per file) in
the PJM and additionally print headerpages and ticketpages, unwanted multiple printouts may occur, if you modify the number of
copies. This is, because the number of copies refers to the whole
job as indicated in the job details.
’Reposition...’ You can reposition a job while it is in the process of being printed.
See "Job Positioning" on page 85.
A29247-X3-X-6-7670 77
Page 90

Job Lists PRISMAproduction Explorer
’Search in print file...’ You can search for strings (EBCIDIC or ASCII) within an AFP file.
The system returns the page numbers, on which the string was
found.
Search_afp does not work, if conditional processing/formatting is
used with line data/mixed data. Additionally the pagedef and the
resource library, which contains this pagedef, must be defined in
the job ticket for each print file. The function does not work, if the
pagedef and libraries are defined in the printer defaults only. If the
Carriage Control Character (parameter Pdscc) is not defined in
the job ticket, the default (ASA) is used.
You can define the job ticket parameters with the PJM interface
(select every print file and add the information via APA Settings
subwindow) or by generating an appropriate default ticket for the
automated input processes (LP, HotDir, Download), where the
required information is added to the "[filedefaults]" section.
’Delete...’ When you choose this function, you are prompted to confirm that
you really want to delete the job. This prevents jobs from being
inadvertently selected and deleted. If the job is in the ’printing’
state or in ’output control’, it cannot be deleted. The button appears greyed out.
’Interrupt...’ This function cancels the current processing step of the selected
job. You are prompted to confirm the operation; the job is then immediately interrupted. If the job state is “printing” or “output control”, a dialog box is opened for you to specify exactly how you
want to interrupt the job (see Interrupt printing job).
’Halt’ The system completes the current processing step of the selec-
ted job and then halts the job.
’Continue’ This function reactivates a selected job. You can use the function
to resume processing of jobs which were interrupted or which encountered errors.
’Express right’ The job with express rights is processed as soon as the required
services are available. The position in the list is not altered.
Remove
Express right
Removes the express right assigned to the job.
78 A29247-X3-X-6-7670
Page 91

PRISMAproduction Explorer Job Lists
Filter menu
You can define and store filters to restrict the sco pe of the list to jobs matching given criteria.
See chapter “Filters” below.
Edit menu
’Select all’ Selects all the jobs.
’Deselect all’ Deselects all the jobs.
View menu
’Update’ The view of the job list is updated permanently.
’Freeze’ The current status of the job list is frozen to make modifications
more comfortable.
’Weak command locking’ This setting has an influence on the availability of functions of the
menu- and toolbar, if more than one job is marked. If it is switched
off, a command in the menu- or toolbar must be possible for all
marked job to be active. If ’Weak command locking’ is switched on,
a command must be excutable for only one of the marked jobs to
be active.
You can also enable a weak command locking if you press the shift
key.
Tooltip of a job
If you position the mouse pointer on a job, a tooltip pops up giving information on the job
(e.g. starttime).
A29247-X3-X-6-7670 79
Page 92

Job Lists PRISMAproduction Explorer
5.7.7 Filters
You can apply filters to restrict the content of job lists to entries that match par ticular criteria.
You can define various types of filters and sto re the m for us e ag ain at a la te r date .
Filters you have saved are presented in the Explorer tree; you can delete them by way of
the shortcut menu opened with the right mouse button.
The functions for creating and editing job filters are launched in a job list, eit her via the Filter
menu or via the Filter icon:
You can filter most of the columns of the job list. These columns are offered under ’Filterable columns’.
Columns which should be part of the filter have to be moved from left part of th e window to
the right, using the arrow buttons. The right part of the filter window displays a tab for every
column. On this tabs you define the filter conditions, which should be valid for column. All
filter conditions for the different columns have to be valid at the same time to display the job
using this filter.
The possibilities to assign conditions depend on the data type of the column..
Filterable columns
Job id The list includes only jobs belongng to the selected Job ids.
Owner The list includes only jobs belonging to the selected users.
Job name The list includes only the selected jobs.
Express/Prio The list includes only jobs of a specified range of prios. You can
also specify to view all jobs with or without express rights.
80 A29247-X3-X-6-7670
Page 93

PRISMAproduction Explorer Job Lists
Queue The list includes only jobs with the selected job queue.
Print range The list includes only jobs belonging to a selected print range.
Printer The list includes only jobs for the selected printer.
Form The list includes only jobs with the selected paper format.
Type The list includes only jobs with the selected data stream.
Color The list includes only jobs of the selected color id.
Resolution The list includes only jobs with the selected resolution.
Copies The list includes only jobs with the selected number of copies.
Status The list includes only jobs with the selected status. For a descripti-
on of the states, see the !!Introduction.
Accepted The list includes only jobs, which have been accepted in the speci-
fied period of time.
Started The list includes only jobs, which have been started in the specified
period of time.
Modified The list includes only jobs, which have been modified in the speci-
fied period of time.
Printing started The list includes only jobs, which began printing in the specified pe-
riod of time.
Printing finished The list includes only jobs, which finished printing in the specifie d
period of time.
Buttons
All Activates the visability of all criteria of the filter category.
None Cancels all selections.
Invert Cancels all selected criteria and sets all unselected criteria.
A29247-X3-X-6-7670 81
Page 94

Job Lists PRISMAproduction Explorer
Examples:
Marking with a cross: Only jobs of the marked owner are displayed.
Setting a range: Only jobs of the indicated range of ID’s are displayed.
Setting a pattern: Only jobs with the job name ending with ’cluster’ are displayed.
The conventions for patterns are displayed as a to oltip.
Setting a range of time: Only jobs which are started in the range of tim e indicated are dis-
played:
The shortcut menu that you can open for column headin gs also includes an 'Edit Filter' function. When you choose the f unction via th e short cut me nu, you are shown the r elevant tab
for the column heading in question.
82 A29247-X3-X-6-7670
Page 95

PRISMAproduction Explorer Job Lists
Filter menu
’New...’ Opens the filter dialog box to create a new, empty filter which you can
edit.
’Save as...’ Opens a dialog allowing you to save the filter settings under a freeform
Name, which appeares in the Eplorer tree view.
You can also add a Description of the filter, which appeares as tooltip
for the filter name in the tree view.
Check Save for public access if you wish the filter to be made available to every user in the ODS network. If you leave the box unchecked,
the filter will only be available in the local Explorer tree.
If you check the box Open in new window by default, clicking the
name of the filter in the tree view of the Explorer will open the job queue
with the filter settings in a separate window.
Click 'Ok' to create a new entry under The node 'All Jobs' in the tree
view of the Explorer.
’Create default filters...’ Resets all modifications you have made on the default filters.
’Edit Filter...’ Opens a dialog box with 8 tabs to make your individual filter settings.
To select the filter criteria for each category, you have to check the box
'Display only selected icons'. Unchecked items are not visible in the job
list.
Click 'Ok' to apply the filter setting to the opened job list. If there are al-
ready settings defined in a filtered job list, they will be displayed when
opening the edit window using this menu entry (in contrast to 'New...').
Note: By saving an empty filter, you can permanently save the column settings without re-
stricting the actual content of the job list.
A29247-X3-X-6-7670 83
Page 96

Job Lists PRISMAproduction Explorer
5.7.8 Interrupt Printing
This dialog appeares, if a job is to be interrupted in the ’processing-printing’ state. It then
gets the state ’exeption-hold’. You can define, which interrupt action has to be performed
(Action...) and on which position the interruption is to be executed.
Action for currently printing jobs
• interrupt to continue at current position
After interruption, the job can be continued at the position of the interruption
• cancel and hold
The job is interrupted and held for reprinting.
• cancel and delete
The job is interrupted and deleted. It cannsot be continued.
Boundary for currently printing jobs
• immediately
The job will be interrupted immediately
• file copy boundary
The interruption is performed, if the current copy of the file is printed.
• job copy boundary
The interruption is performed, if the current copy of the job is printed.
84 A29247-X3-X-6-7670
Page 97

PRISMAproduction Explorer Job Lists
5.7.9 Job Positioning
This dialog box is opened when you select the Reposition Job icon. The icon is available
for selection when a job is printing (states 'processing - printing' and 'processin g - in output
control').
Relative position
For relative positioning, specify a number of pages before or after the current page or last checkpoint. Printing resumes at the specified position. Be sure to enter the correct page value.
’Pages (+/-)’ According to the indicated page numbers in this text field the job is positioned for-
ward or backwards.
from current Page: The starting point of the relative positioning is the current pa-
ge.
from last checkpoint: The starting point of the relative positioning is last check-
point.
’Boundary’ The boundary of the current document is only taken into consideration if it is indi-
cated. If you allow positioning beyond document boundaries, in some cases printing may resume in a different document.
immediately: The job is repositioned immediately.
after current file copy: The job is repositioned after printing the current file copy.
after current job copy: The job is repositioned after printing the current job copy
(containing more than one file).
Absolute position
Positions to a particular page when you restart a print job. For absolute positioning, specify a page
number in the document and the document copy at which printing is to resume. Be sure to enter
the correct page and copy values.
Page Indicate the page in the file.
A29247-X3-X-6-7670 85
Page 98

Job Lists PRISMAproduction Explorer
File Copy Indicate the number of the file copy.
File Number Indicate the file number as diaplayed in the 'Job details' or 'List of files' in the PJM.
Job Copy Indicate the number of the job copy.
5.7.10 Detailed status of a job
You can display a detailed view of the processing status of any marked job by clicking on
the above icon. You can also call up this function by double clicking a job or by selcti ng the
respective entry from the pop up menu or the 'Job' menu.
This opens a tab with a list of all the processing st eps of the selected job. The list is modified
continually.
The toolbar and job menu functions are described under All Jobs.
The columns of the list have the following meaning:
File/step The sequence number of the file within the job, and the number of
the processing step.
Name/service The fully qualified file name and the service that is assigned to the
step.
Host The name of the host on which the service was executed
Status The status of the processing step. See Introduction to jobs.
Columns in the lower half of the window (if expanded):
# Number of the file. E.g. needed for absolute positioning or for set-
ting a printing range in PJM.
File name Name of the print file
Copies The number of copies of the job. Once printing of th e job is under-
way, the entry in this column states how many copies of the total (x
copies of y) have already been printed.
Formdef Form definiti on valid for the job
Pagedef Page definition valid for the job
Size Size of the print file in kbytes
Pages States the number of pages printed (n-th page of total)
86 A29247-X3-X-6-7670
Page 99

PRISMAproduction Explorer Job Lists
Toolbar/Job Menu
Cancel current
Operation
Delete job The job is only deleted after you confirm a warning message.
Halt job after currently running
steps
Interrupt... The job is halted immediately after the confirmation of a dialog box.
Continue executi-onReactivates the job. This button enables you to restart interrupted
Set express right Jobs with express rights are executed as soon as the services nee-
’Remove Ex-
press right’
Lower half of the window
’Save changes to
the server’
Cancels the current ODS operation.
The job is halted after the currently running steps have been finished.
If the job is in the
’processing-printing’ state, a dialog allows
you to select different opti ons for the interrup tion of the printout (see page
jobs or jobs with an error.
ded are ready. The position of the job in the list will not be changed.
Removes the express right assigned to the job.
Saves the modification of the copy number..
84).
’Reload data
from server’
’Edit the selected
entry’
A29247-X3-X-6-7670 87
Reloads the data from the server and thus restores the previous
state, if nothing has been saved yet.
If the entry ’Copies’ is marked, you can modify the number of copies using this button.
Page 100

Servers PRISMAproduction Explorer
5.8 Servers
Clicking the “Servers” node, all the computers available in the system are listed. Each of
these computers also has its own shortcut menu with administration functions.
Double-clicking the node opens a tab with a list of all the computers.
When you select a computer, a toolbar is activated which allows you to enable or disable
the computer. These functions are also accessible via the ’Server’ menu.
At the bottom of the tab the status of the ODS network is displayed.
Toolbar and ’Server’ Menu (with marked server name)
This menu offers different functions dep ending on what type of host you have selected (e. g.
print server). The same functions can also be accessed via the Hosts tab.
The Host menu functions are also offered in th e shortcut menu that appears when you r ightclick the name of the host in the Explorer tree.
’Cancel current operation’ This function cancels the current ODS operation.
’Disable Server’ Switches an active host to inactive state. No further jobs
are then accepted for this host.
’Enable Server’ Switches an inactive host to active state. Jobs are then
accepted for this host again.
88 A29247-X3-X-6-7670
 Loading...