

Page 1
Operation guide
Océ PlotWave 340/360
Page 2

Copyright
© 2014, Océ
All rights reserved. No part of this work may be reproduced, copied, adapted, or transmitted in
any form or by any means without written permission from Océ.
Océ makes no representation or warranties with respect to the contents hereof and specifically
disclaims any implied warranties of merchantability or fitness for any particular purpose.
Further, Océ reserves the right to revise this publication and to make changes from time to time
in the content hereof without obligation to notify any person of such revision or changes.
Edition 2014-12
GB
Page 3

Trademarks
Océ, Océ PlotWave 340/360, Océ Express WebTools, Océ Publisher Express, Océ Publisher
Mobile, and Océ Mobile WebTools are registered trademarks of Océ.
Adobe®, Acrobat® and Reader® are registered trademarks of Adobe® Systems Incorporated.
Microsoft®, Windows®, Windows XP®, Windows Server 2003®, Windows Vista® , Windows Server
2008® and Windows 7® are either registered trademarks or trademarks of Microsoft® Corporation
in the United States and/or other countries.
Mozilla ® and Firefox® are registered trademarks of Mozilla® Systems Incorporated.
PostScript® 3™ is a registered trademark of Adobe® Systems Incorporated.
'QR Code' is registered trademark of DENSO WAVE INCORPORATED.
PlanWell® Collaborate is a registered trademark of ARC™ Document Solutions.
Products in this publication are referred to by their general trade names. In most, if not all cases,
these designations are claimed as trademarks or registered trademarks of their respective
companies.
Page 4

Page 5

Contents
Contents
Chapter 1
Introduction.......................................................................................................................11
Notes for the reader....................................................................................................................................... 12
Available documentation...............................................................................................................................14
Chapter 2
Get to Know the Printing System................................................................................... 17
Introduction.....................................................................................................................................................18
The Océ PlotWave 340/360......................................................................................................................18
The key concepts......................................................................................................................................19
Connect your Printing System...................................................................................................................... 22
Working area [Footprint]......................................................................................................................... 22
Connect the mains supply cable and the network cable...................................................................... 23
Switch on the printing system................................................................................................................ 24
The Hardware................................................................................................................................................. 25
The components of the printer (front)....................................................................................................25
The components of the printer (left side).............................................................................................. 27
The components of the printer (back).................................................................................................... 28
The media drawer.................................................................................................................................... 29
The user panel: Océ ClearConnect......................................................................................................... 30
The output delivery..................................................................................................................................31
The components of the scanner (optional)............................................................................................33
The front original tray (optional)............................................................................................................ 34
The folder (optional)................................................................................................................................ 36
The printing system consumables......................................................................................................... 37
Océ ClearConnect: the multi-touch user panel............................................................................................ 38
Introduction to Océ ClearConnect.......................................................................................................... 38
The home screen......................................................................................................................................40
The Smart Access ................................................................................................................................... 42
Presets and advanced settings............................................................................................................... 44
The settings concept................................................................................................................................45
The locations............................................................................................................................................ 47
Job preview.............................................................................................................................................. 49
The job queue and the system menu.....................................................................................................50
Quick Start: default jobs.................................................................................................................................52
The Smart Inbox process for copy, scan, and print jobs...................................................................... 52
Do a default copy job ..............................................................................................................................54
Do a default scan job .............................................................................................................................. 56
Do a default print job .............................................................................................................................. 58
The cloud.................................................................................................................................................. 60
Chapter 3
Define your Workflow with Océ Express WebTools..................................................... 63
Introduction.....................................................................................................................................................64
Océ Express WebTools............................................................................................................................64
Set the security settings for Microsoft Internet Explorer .....................................................................65
Set the security settings for Mozilla Firefox.......................................................................................... 66
The Jobs tab............................................................................................................................................. 67
The Smart Inbox.......................................................................................................................................69
5
Page 6

Contents
The job states........................................................................................................................................... 70
The System tab........................................................................................................................................ 71
The system monitor.................................................................................................................................72
The Preferences tab................................................................................................................................. 74
The Configuration tab..............................................................................................................................75
The Support tab....................................................................................................................................... 76
Define your Printing System Default Settings ............................................................................................ 77
About the default settings in Océ Express WebTools...........................................................................77
Set another language for Océ Express WebTools................................................................................ 78
Change the language settings in Internet Explorer...............................................................................79
Change the language settings in Google Chrome................................................................................ 80
Change the language settings in Mozilla Firefox.................................................................................. 81
How to edit a setting................................................................................................................................82
View and check the settings ...................................................................................................................83
Save the settings in a file ....................................................................................................................... 84
Load the settings from a file .................................................................................................................. 85
Restore the factory defaults ................................................................................................................... 86
Set the print job default settings............................................................................................................ 87
Set the copy job default settings............................................................................................................ 90
Set the scan job default settings.............................................................................................................91
Manage Jobs on your Printing System........................................................................................................ 93
The Smart Inbox and the queue concept...............................................................................................93
The Smart Inbox and the queue functionality....................................................................................... 95
Use Smart Inboxes in a multiple-user environment............................................................................. 97
Use Smart Inboxes in a repro environment.......................................................................................... 98
Use Smart Inboxes in a multiple-user and repro environment........................................................... 99
Create and open a Smart Inbox for print jobs (Smart Inbox section)............................................... 100
Create and open a Smart Inbox for print jobs (Publisher Express)................................................... 101
Create and open a Smart Inbox for scan jobs..................................................................................... 102
Store print, copy, and scan jobs in the Smart Inbox...........................................................................103
Set the expiration time-out for Smart Inbox jobs............................................................................... 104
Close or delete a Smart Inbox...............................................................................................................105
Configure your Network and Security Settings......................................................................................... 106
Configure the network settings in Océ Express WebTools................................................................ 106
User roles and authorisations...............................................................................................................107
Log in as an authorised user.................................................................................................................108
Log out after your session.....................................................................................................................109
Change the password for authorised users.........................................................................................110
Shut down or restart the system.......................................................................................................... 111
Define the IP type................................................................................................................................... 112
Enable Access control ...........................................................................................................................113
Access control and IPsec settings.........................................................................................................114
Enable or disable the e-shredding function.........................................................................................115
Select the e-shredding algorithm......................................................................................................... 116
Specify the number of overwrite passes............................................................................................. 117
Remote security..................................................................................................................................... 118
Generate a new CA-signed certificate.................................................................................................. 119
Import a CA-signed certificate: import the root certificate ................................................................ 121
Import a CA-signed certificate: Import the intermediate certificate.................................................. 122
Import the CA-signed certificate........................................................................................................... 123
Import a CA-signed certificate: Check and import the root certificate.............................................. 124
Configure the Presets and Stamping..........................................................................................................125
What you need to know about presets ............................................................................................... 125
Set the default print preset ...................................................................................................................126
Configure the custom print preset .......................................................................................................127
Set the default copy preset .................................................................................................................. 128
Configure the custom copy preset ...................................................................................................... 129
Set the default scan preset ...................................................................................................................130
Configure the custom scan preset........................................................................................................131
Create a stamp....................................................................................................................................... 132
6
Page 7

Contents
Configure External Locations...................................................................................................................... 133
Configure your locations....................................................................................................................... 133
Enable or disable USB........................................................................................................................... 134
Enable PlanWell Collaborate (optional)............................................................................................... 135
Create an external location................................................................................................................... 136
Set a default external location.............................................................................................................. 138
Set a default print destination...............................................................................................................139
Set a default scan destination...............................................................................................................140
Troubleshoot the creation of an FTP external location (after an error message).............................141
Troubleshoot the creation of an SMB external location (after an error message)...........................144
Troubleshoot the creation of a WebDAV external location (after an error message)......................146
Configure the Printer Settings.....................................................................................................................147
Configure the regional settings ........................................................................................................... 147
Configure the user session time-out.................................................................................................... 148
Configure the working hours................................................................................................................ 149
Configure the sleep mode..................................................................................................................... 150
Configure the media request time-out ................................................................................................ 151
Configure the media sizes..................................................................................................................... 152
Configure the pen settings.................................................................................................................... 153
Optimise your Print Quality and Print Productivity................................................................................... 154
Set transparency flattening for PDF..................................................................................................... 154
Set the wipeout correction for PDF...................................................................................................... 155
Set the long plot mode.......................................................................................................................... 156
Set the automatic roll switch................................................................................................................ 157
Set the spool threshold......................................................................................................................... 158
Set the rotation mode............................................................................................................................159
Set the alignment mode ....................................................................................................................... 160
Set the link speed and duplex mode.................................................................................................... 161
Configure Mobile Printing and Scanning................................................................................................... 162
Océ Mobile WebTools........................................................................................................................... 162
Configure Océ Express WebTools settings for a mobile connection................................................ 164
Generate the Quick Response Card......................................................................................................165
Connect your mobile device to Océ Mobile WebTools ..................................................................... 166
Chapter 4
Use the Printing System................................................................................................ 167
What you need to know before you start a job..........................................................................................168
How to feed an original................................................................................................................................169
How to auto-feed an original.......................................................................................................................170
How to use the carrier sheet........................................................................................................................171
Print Jobs - Job submission tools...............................................................................................................172
Use Océ Publisher Express to send a print job................................................................................... 172
Use the Smart Inbox to send a print job.............................................................................................. 174
Use Océ Publisher Select to send a print job...................................................................................... 175
Use the Océ Wide format Printer Driver for Microsoft® Windows® to send a print job.................177
Use the Océ PostScript® 3 Driver to send a print job.........................................................................179
Use Océ Publisher Mobile to send a print job..................................................................................... 180
Print from your mobile device.............................................................................................................. 182
Use FTP to send a print job................................................................................................................... 183
Use LPR to send a print job...................................................................................................................184
Use the cloud to send a print job..........................................................................................................185
Troubleshoot print job submission...................................................................................................... 186
Basic Print Jobs - Default.............................................................................................................................187
Do a default print job ............................................................................................................................ 187
Direct print ............................................................................................................................................. 189
Print from a USB key............................................................................................................................. 190
Extended Print Jobs - Presets......................................................................................................................191
Print presets on the user panel............................................................................................................. 191
Extended Print Jobs - Advanced Settings.................................................................................................. 192
7
Page 8

Contents
Advanced settings for print jobs...........................................................................................................192
Basic Copy Jobs - Default............................................................................................................................ 196
Advised settings for copy jobs..............................................................................................................196
Do a default copy job ............................................................................................................................197
Extended Copy Jobs - Presets.....................................................................................................................199
Copy presets on the user panel............................................................................................................ 199
Make a half size copy.............................................................................................................................200
Copy by set............................................................................................................................................. 201
Extended Copy Jobs - Advanced Settings................................................................................................. 202
Advanced settings for copy jobs.......................................................................................................... 202
Make a copy and add a strip................................................................................................................. 209
Make a copy and remove a strip...........................................................................................................210
Make a copy of a specific area of an original...................................................................................... 211
Make a copy and remove a specific area of an original..................................................................... 212
Make a copy and scale to another size.................................................................................................213
Make a copy of a dark original (Diazo)................................................................................................. 214
Make a copy of an original with highlighted colours..........................................................................215
Make a copy on a cut sheet...................................................................................................................216
Make a copy with a stamp.....................................................................................................................218
Basic Scan Jobs - Default............................................................................................................................ 219
Advised settings for scan jobs.............................................................................................................. 219
Do a default scan job ............................................................................................................................ 221
Extended Scan Jobs - Locations and Presets............................................................................................ 223
Scan presets on the user panel.............................................................................................................223
Scan a photo to JPEG format................................................................................................................224
Scan CAD colour to TIFF format........................................................................................................... 225
Scan to a USB key..................................................................................................................................226
Scan to an external location..................................................................................................................227
Scan to a Smart Inbox and collect your file in Océ Express WebTools............................................ 228
Save a scanned document on your mobile device............................................................................. 229
Change the name of a scan job on the user panel..............................................................................230
Extended Scan Jobs - Advanced Settings..................................................................................................231
Available settings for scan jobs............................................................................................................ 231
File type...................................................................................................................................................236
Make a scan and remove a strip........................................................................................................... 238
Pause, resume, or stop an active job..........................................................................................................239
Clear the system........................................................................................................................................... 240
Chapter 5
Maintain the Printing System........................................................................................241
Update your System.................................................................................................................................... 242
Update the software.............................................................................................................................. 242
Update the system software on the user panel...................................................................................243
Update the system software in Océ Express WebTools.....................................................................244
Install the system patches in Océ Express WebTools.........................................................................245
Move the Printing System........................................................................................................................... 246
Switch the printing system off..............................................................................................................246
Disconnect the network cable and the mains supply cable............................................................... 248
Move and re-adjust the printing system.............................................................................................. 249
Connect the mains supply cable and the network cable.................................................................... 255
Switch on the printing system.............................................................................................................. 256
Replace the Media........................................................................................................................................ 257
The media drawer.................................................................................................................................. 257
Remove a media roll..............................................................................................................................258
Unpack the media roll............................................................................................................................261
Load a media roll (position 1)............................................................................................................... 263
Load a media roll (position 2)............................................................................................................... 267
Change the media type and media size............................................................................................... 271
Media types............................................................................................................................................ 272
8
Page 9

Contents
Media sizes............................................................................................................................................. 273
.......................................................................................................................................................... 0
Refill the Toner............................................................................................................................................. 275
Refill the toner........................................................................................................................................ 275
Replace the residual toner container....................................................................................................278
Maintain the Scanner................................................................................................................................... 280
Clean the scanner...................................................................................................................................280
Calibrate the scanner............................................................................................................................. 283
Chapter 6
License Management..................................................................................................... 285
Introduction to license management..........................................................................................................286
Check your licenses......................................................................................................................................287
Save the currently active licenses...............................................................................................................288
Get a new license file................................................................................................................................... 289
Upload a new license................................................................................................................................... 290
Chapter 7
Account Management.................................................................................................... 291
An overview of Océ Account Center...........................................................................................................292
Océ Account Console ®............................................................................................................................... 293
Introduction to Océ Account Console.................................................................................................. 293
Summary of Océ Account Console...................................................................................................... 294
Enable account management in Océ Express WebTools................................................................... 296
Accounting workflow.............................................................................................................................297
Workflow on the printer..................................................................................................................297
Chapter 8
Support............................................................................................................................ 299
Counter history............................................................................................................................................. 300
View events and maintenance.................................................................................................................... 301
Event messages............................................................................................................................................302
Audit log........................................................................................................................................................305
Remote Service: configure the proxy......................................................................................................... 306
Remote Service: check the connection.......................................................................................................307
Remote Service: allow remote assistance..................................................................................................308
Remote Service: download log files........................................................................................................... 309
Solve Problems.............................................................................................................................................310
How to solve problems with jobs......................................................................................................... 310
Clear an original jam in the scanner.....................................................................................................311
Clear a media jam in the heater section...............................................................................................312
Clear a media jam in the media bypass section..................................................................................314
Clear a media jam in the roll feed section........................................................................................... 316
Print a demo print.................................................................................................................................. 317
Print a test print......................................................................................................................................318
Print the print density chart...................................................................................................................319
Chapter 9
Contact.............................................................................................................................321
Downloads and support for your product..................................................................................................322
Reader's comment sheet ............................................................................................................................ 323
Index.................................................................................................................................325
9
Page 10

Contents
10
Page 11

Chapter 1 Introduction
Page 12
Notes for the reader
Notes for the reader
Introduction
This manual helps you to use the Océ PlotWave 340/360. The manual contains a description of
the product and guidelines to use and operate the Océ PlotWave 340/360.
Definition
Attention Getters
Parts of this manual require your special attention. These parts can provide the following:
• Additional general information, for example information that is useful when you perform a
task.
• Information to prevent personal injuries or property damage.
Symbols used in this manual
The following symbols are used in this manual to explain procedures, restrictions, handling
precautions, and instructions that should be observed for safety.
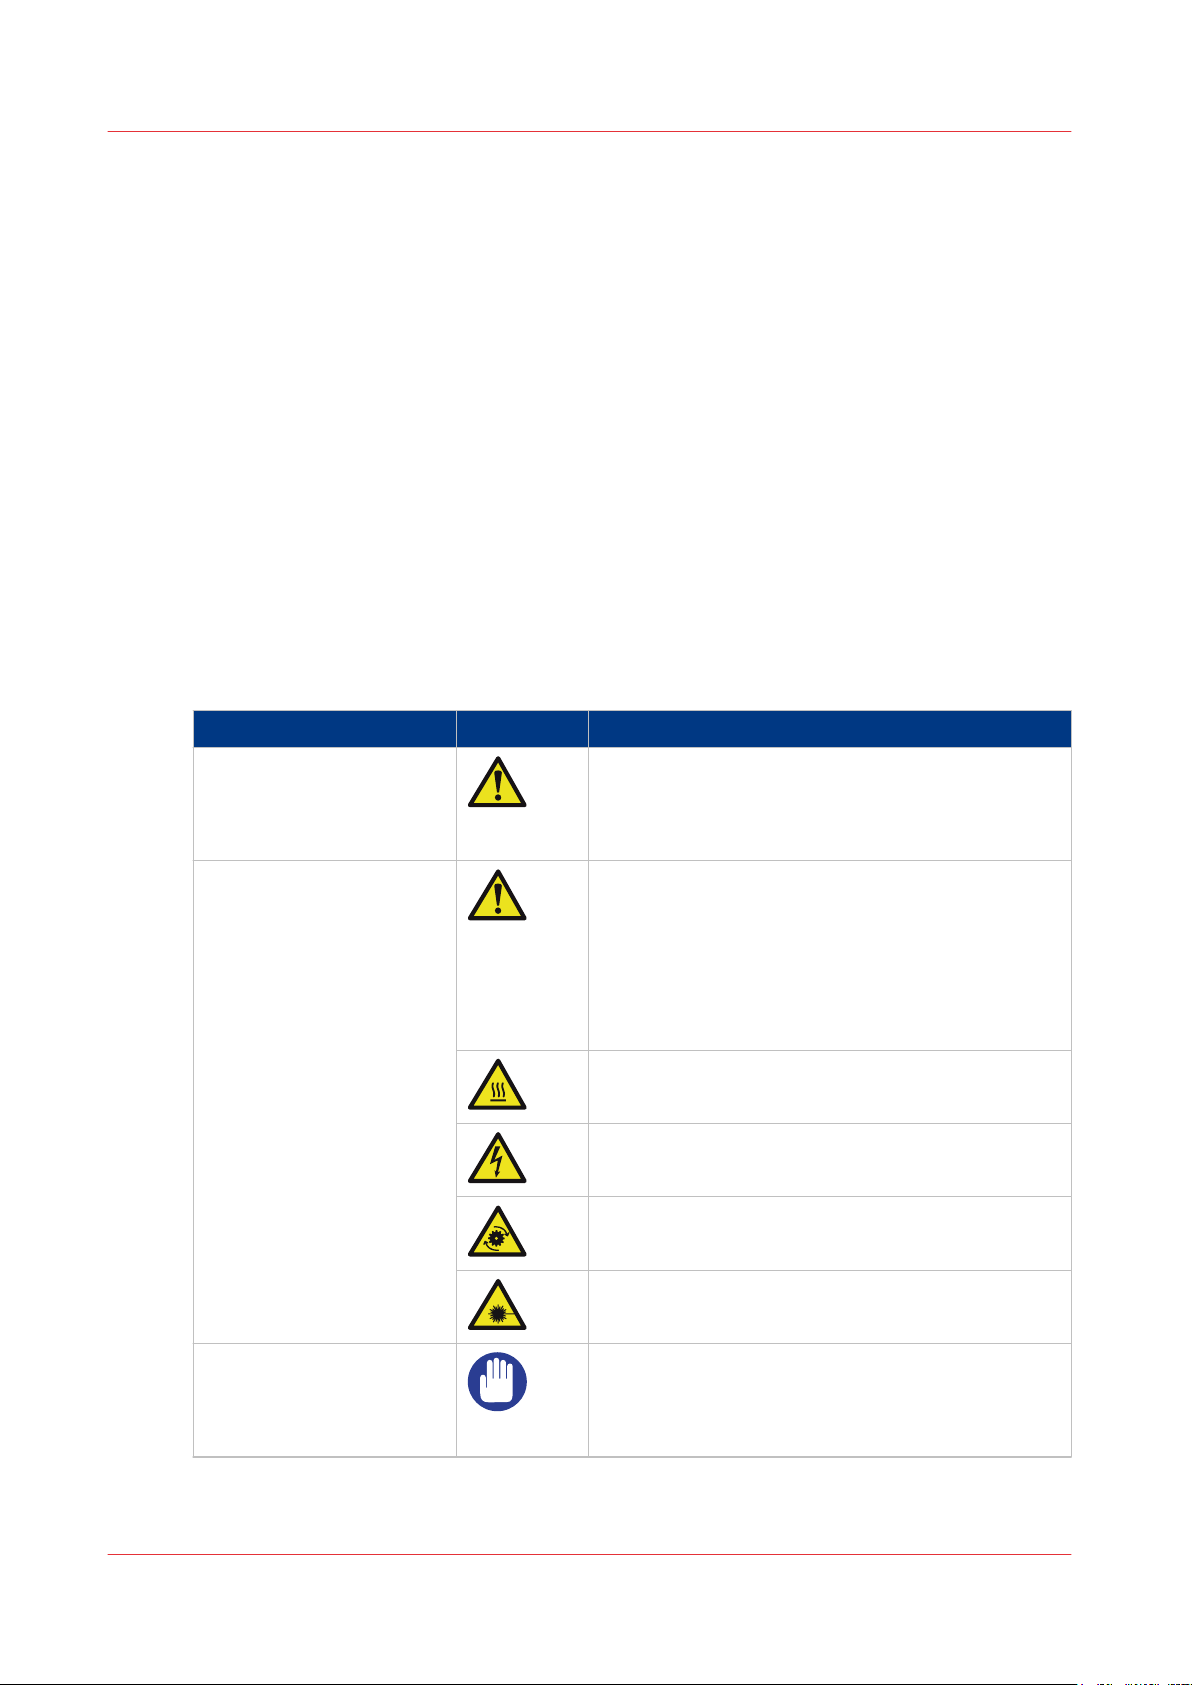
Overview of the attention getters
Word Icon Indicates
WARNING
CAUTION
Indicates a warning concerning operations that may
lead to death or injury to persons if not performed
correctly. To use the machine safely, always pay attention to these warnings.
General hazard
Indicates a caution concerning operations that may
lead to injury to persons if not performed correctly.
To use the machine safely, always pay attention to
these cautions.
This indication has several icons that warn against
various hazards. The icons are shown below.
Hot surface
Electric shock
Moving parts
IMPORTANT
Chapter 1 - Introduction
12
Laser beam
Indicates operational requirements and restrictions.
Be sure to read these items carefully to operate the
machine correctly, and avoid damage to the machine or property.
4
Page 13

Word Icon Indicates
Notes for the reader
NOTE
Indicates an operation that must not be performed.
The use of heat-resistant gloves is mandatory when
Safety information
Before using this Océ product, make sure that you read and understand the safety information
which is part of the user documentation. You can download the safety information via
downloads.oce.com"
together with the machine or obtain the safety information from your local Océ representative. To
avoid potential hazards, maintenance is strictly preserved to properly qualified and trained
service technicians.
Indicates a clarification of an operation, or contains
additional explanations for a procedure. Reading
these notes is highly recommended.
Read these items carefully, and make sure not to
perform the described operations.
you carry out the actions concerned.
"http://
or, if applicable, find it on the user documentation CD/DVD that is delivered
Chapter 1 - Introduction
13
Page 14

Available documentation
Available documentation
Introduction
This manual is part of a complete documentation set. The following table shows a complete
overview of the available documentation.
NOTE
For up-to-date documentation, visit the Océ downloads page on the internet and find all the
information for your printer.
Available documentation
Documentation Availability
User Manual - Operation guide • On the download website under the product
Online Help - Océ Express WebTools • Embedded in the application
name (
Available as a PDF file in multiple languages.
Available in multiple languages.
"http://downloads.oce.com"
).
User manual - Safety guide • On the download website under the product
Quick Reference Guide for the use of Océ
Mobile WebTools
Océ Large Format Systems Connectivity Administration guide
Océ Large Format Systems Security - Administration guide
name (
Available as a PDF file (multilingual).
• On the download website under the product
name (
Available as a PDF file.
• On the download website under the product
name (
Available as a PDF file in English only.
• On the download website under the product
name (
Available as a PDF file in English only.
"http://downloads.oce.com"
"http://downloads.oce.com"
"http://downloads.oce.com"
"http://downloads.oce.com"
Available documentation Océ Wide format Printer Driver for Microsoft ® Windows
Documentation Availability
User guide • On the download website under the product
name (
Available as a PDF file in multiple languages.
Online Help • On the download website under the product
name (
Available in multiple languages.
"http://downloads.oce.com"
"http://downloads.oce.com"
).
).
).
).
®
).
).
Chapter 1 - Introduction
14
Page 15

Available documentation Océ PostScript® 3 Driver
Documentation Availability
Installation guide • On the download website under the product
Online Help • Embedded in the application
Available documentation Océ Publisher Select
Documentation Availability
User guide - Océ Publisher Select • On the download website under the product
Online Help • Embedded in the application
Available documentation
name (
"http://downloads.oce.com"
).
Available as a PDF file in multiple languages.
Available in multiple languages.
name (
"http://downloads.oce.com"
).
Available as a PDF file in multiple languages.
Available in multiple languages.
Chapter 1 - Introduction
15
Page 16

Available documentation
Chapter 1 - Introduction
16
Page 17

Chapter 2 Get to Know the Printing System
Page 18
Introduction
Introduction
The Océ PlotWave 340/360
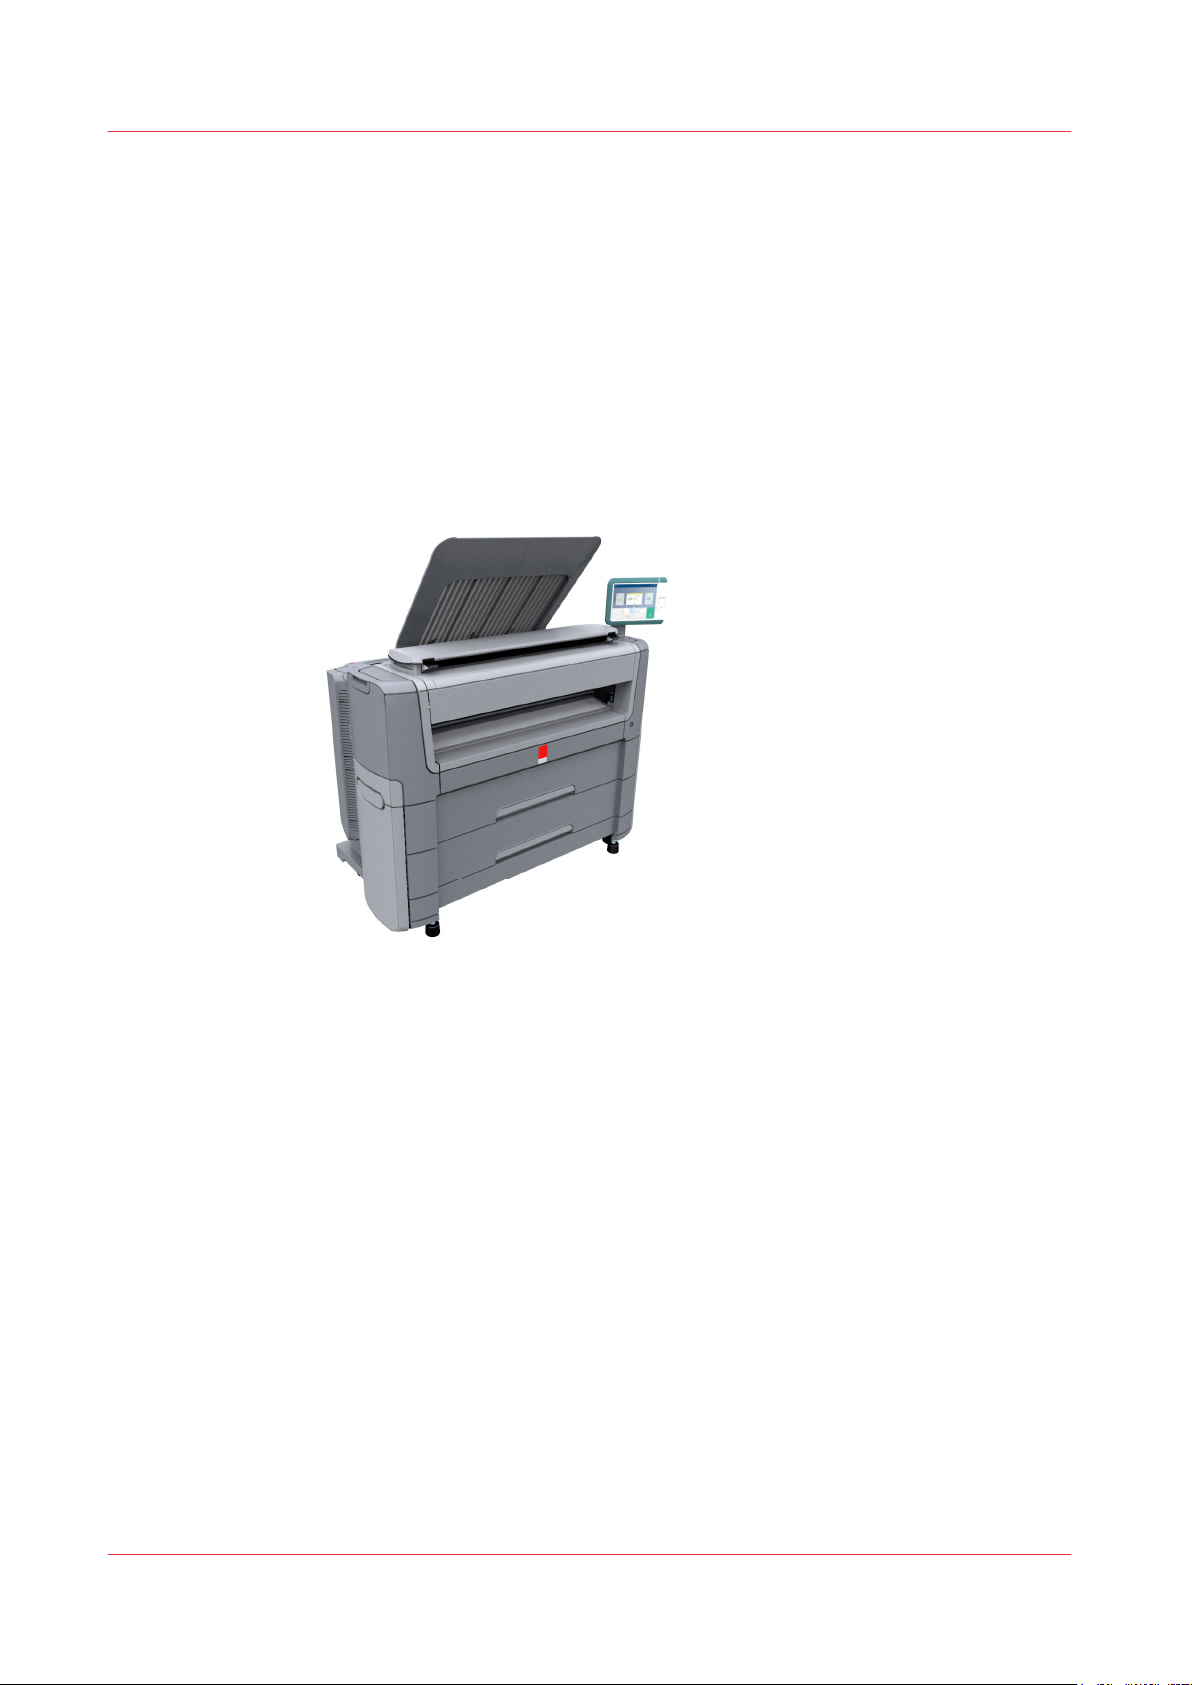
Introduction
The Océ PlotWave 340/360 is a black and white, all-in-one wide format print, copy, and scan
system with a multi-touch user panel and an optional colour scanner.
Illustration
Chapter 2 - Get to Know the Printing System
18
Page 19

The key concepts
Introduction
The Océ PlotWave 340/360 features several concepts that make the printer unique.
An understanding of these main concepts is key to optimally profit from your PlotWave system.
Printer configuration
The Océ PlotWave 340/360 printer has 1 or 2 media rolls. The [Océ Scanner Express], the front
original tray, the Océ 2400 fanfold or Océ 4311 fullfold are optional.
Automatic paper feed
The Océ PlotWave 340/360 offers a fully automated paper feed function. Place the roll on the
media drawer's roll loading station, and the paper is fed into the printer, cut, and sized
completely automatically.
The original feed of the scanner is also automated. Feed the paper in the scanner between the
marker lines. The scanner takes the original and aligns it properly to make sure the scan is
correct. The Smart Access displays the detected width, and gives a live scan view of the scanning
process.
The key concepts
Océ Radiant Fusing technology
With the Océ Radiant Fusing technology the printer instantly wakes up and uses half the energy
of comparable systems. When in idle mode, the system is cold and requires minimal energy.
With the wake-up button on the user panel, the user can activate the printer and the system is up
and running within several minutes.
Océ ClearConnect
The Océ ClearConnect is the multi-touch user panel of the Océ PlotWave 340/360 that is used like
a tablet. It gives easy access to all your copy, scan, or print jobs and offers instant feedback on
the system. The breadcrumbs show the navigation of your job, and with the home button you can
always return to the home screen.
Features such as the Smart Inbox, the Smart Access, presets, and access to the cloud make the
Océ ClearConnect unique.
Print functionality
The Océ PlotWave 340/360 supports printing from various applications and drivers. Create and
send jobs from optional drivers or mobile devices. Feel free to start multiple jobs at a time, as the
Océ PlotWave 340/360 allows neatly collated and stacked documents of up to 50 A0/E-size plots
on the [Top Delivery Tray] due to the special air separation technology.
Copy functionality
With the Océ PlotWave 340/360 and the integrated [Océ Scanner Express] a large number of copy
activities can be performed. A wide variety of settings are supported. You can specify the copy
job's layout, media, finishing, image, and quality enhancement options from the user panel.
Chapter 2 - Get to Know the Printing System
19
Page 20

The key concepts
Scan functionality
The [Océ Scanner Express] offers full hybrid performance with its scan-to-file functionality.
Documents are scanned and copied and then stored digitally. Users can send their files, via SMB,
FTP, LPR, WebDAV, to various locations such as local drives, personal Smart Inboxes, or the
cloud application of your choice. Insert a USB device into the USB port on the multi-touch user
panel to scan to USB, or use Océ Mobile WebTools and Océ Publisher Mobile to scan to your
mobile device.
Live view and preview
The Océ ClearConnect supports a job by offering a live scan view of the scanning process. The
user can see if the document is scanned accordingly. In the preview window the user can also
view the jobs. Swipe between several jobs and pan to view the image in detail.
Mobility and the cloud
The Océ PlotWave 340/360 makes it possible to print from and scan to the cloud application of
your choice. Together with mobile applications such as Océ Mobile WebTools, Océ Publisher
Mobile the printer can be easily accessed and used from any location.
Green button principle
The Océ PlotWave 340/360 is a user-friendly system. Default jobs can be performed by simply
tapping the green button in the Smart Access of the user panel. When you want to change
settings, you can easily switch the presets and tap the green button.
Presets
Predefined settings: presets, listed on the user panel help to edit the job settings for copy, scan,
and print jobs. Presets give easy access to change the most common used settings. To start a job
with different settings you simply select a job tile, select the preferred presets, and tap the green
button. Presets can be predefined in Océ Express WebTools.
Integrated Océ Express WebTools controller application
The Océ Express WebTools controller application supports a centralised workflow.
The application has an intuitive layout from which you can perform many tasks based on user
role defined access. Separate work spaces give you a complete overview and full control over
print and scan job management.
Tasks you can manage are:
• Settings and configuration management
• Network connectivity management
• Queue management
• License management
• System monitoring
• Scan retrieval
• Print job submission
You can access the integrated Océ Express WebTools controller application from any
networked workstation.
Chapter 2 - Get to Know the Printing System
20
Page 21

Adobe® PostScript® 3™/PDF
The Océ PlotWave 340/360 fully supports Adobe® PostScript® 3™. For Japanese, Chinese, and
Korean language extra fonts are optional. They can be enabled with a license in the Océ Express
WebTools.
Processing sets
The Océ PlotWave 340/360 supports the processing of sets. This means that a job can consist of
several files or originals. You can print or scan these files or originals multiple times and sort
them by page or by set.
Spool memory
The Océ PlotWave 340/360 contains a spool memory which provides a queuing system for
documents you want to print or copy. The spool memory allows multiple users to send print and
copy jobs to the Océ PlotWave 340/360 at the same time. The print and copy jobs are then placed
in the print queue where they wait to be printed. The job that is put first into the queue is printed
first. The system can be set up to give priority to either print or copy jobs.
The key concepts
Chapter 2 - Get to Know the Printing System
21
Page 22
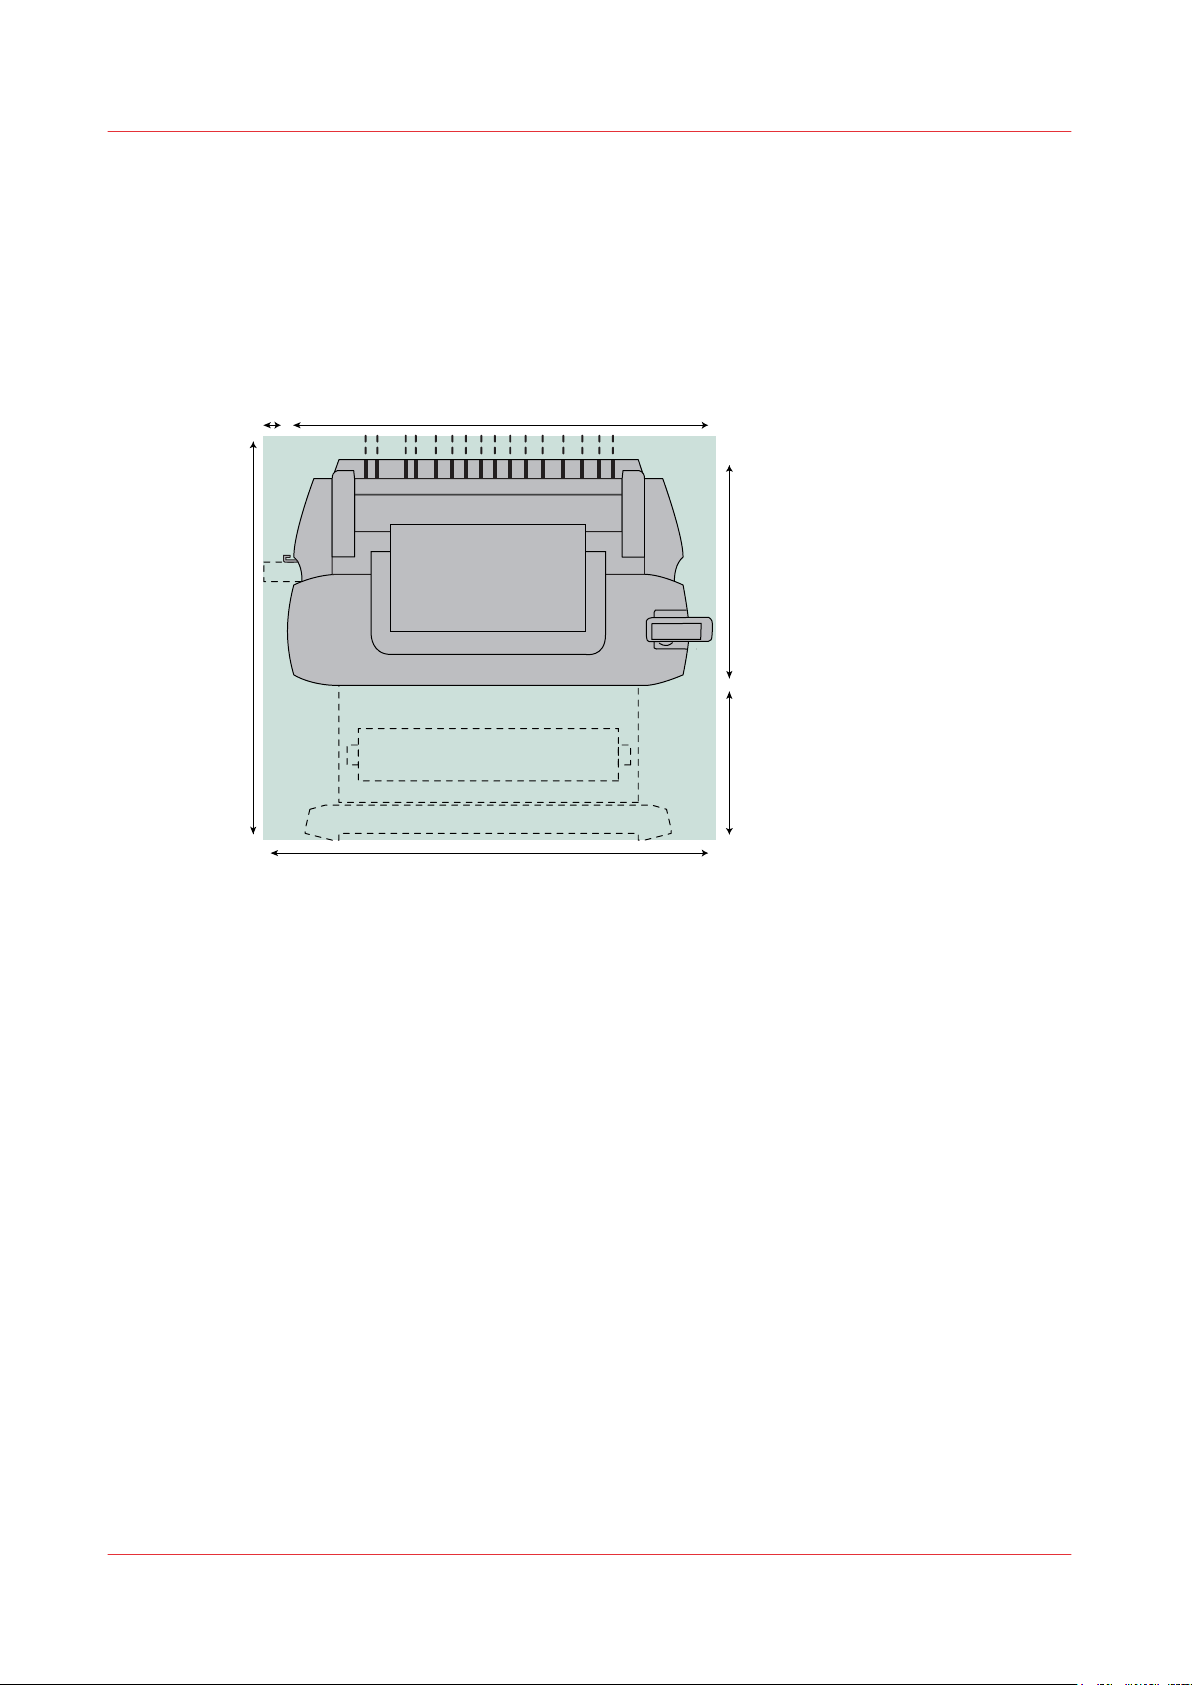
1560mm
61.4”
1620mm
63.8”
1403mm
55.2”
60mm
2.4”
600mm
23.6”
803mm
31.6”
Connect your Printing System
Connect your Printing System
Working area [Footprint]
The printing system (with or without the optional [Océ Scanner Express]) requires a specific floor
space / working area as indicated in the illustration below.
Chapter 2 - Get to Know the Printing System
22
Page 23
A
B
C
Connect the mains supply cable and the network cable
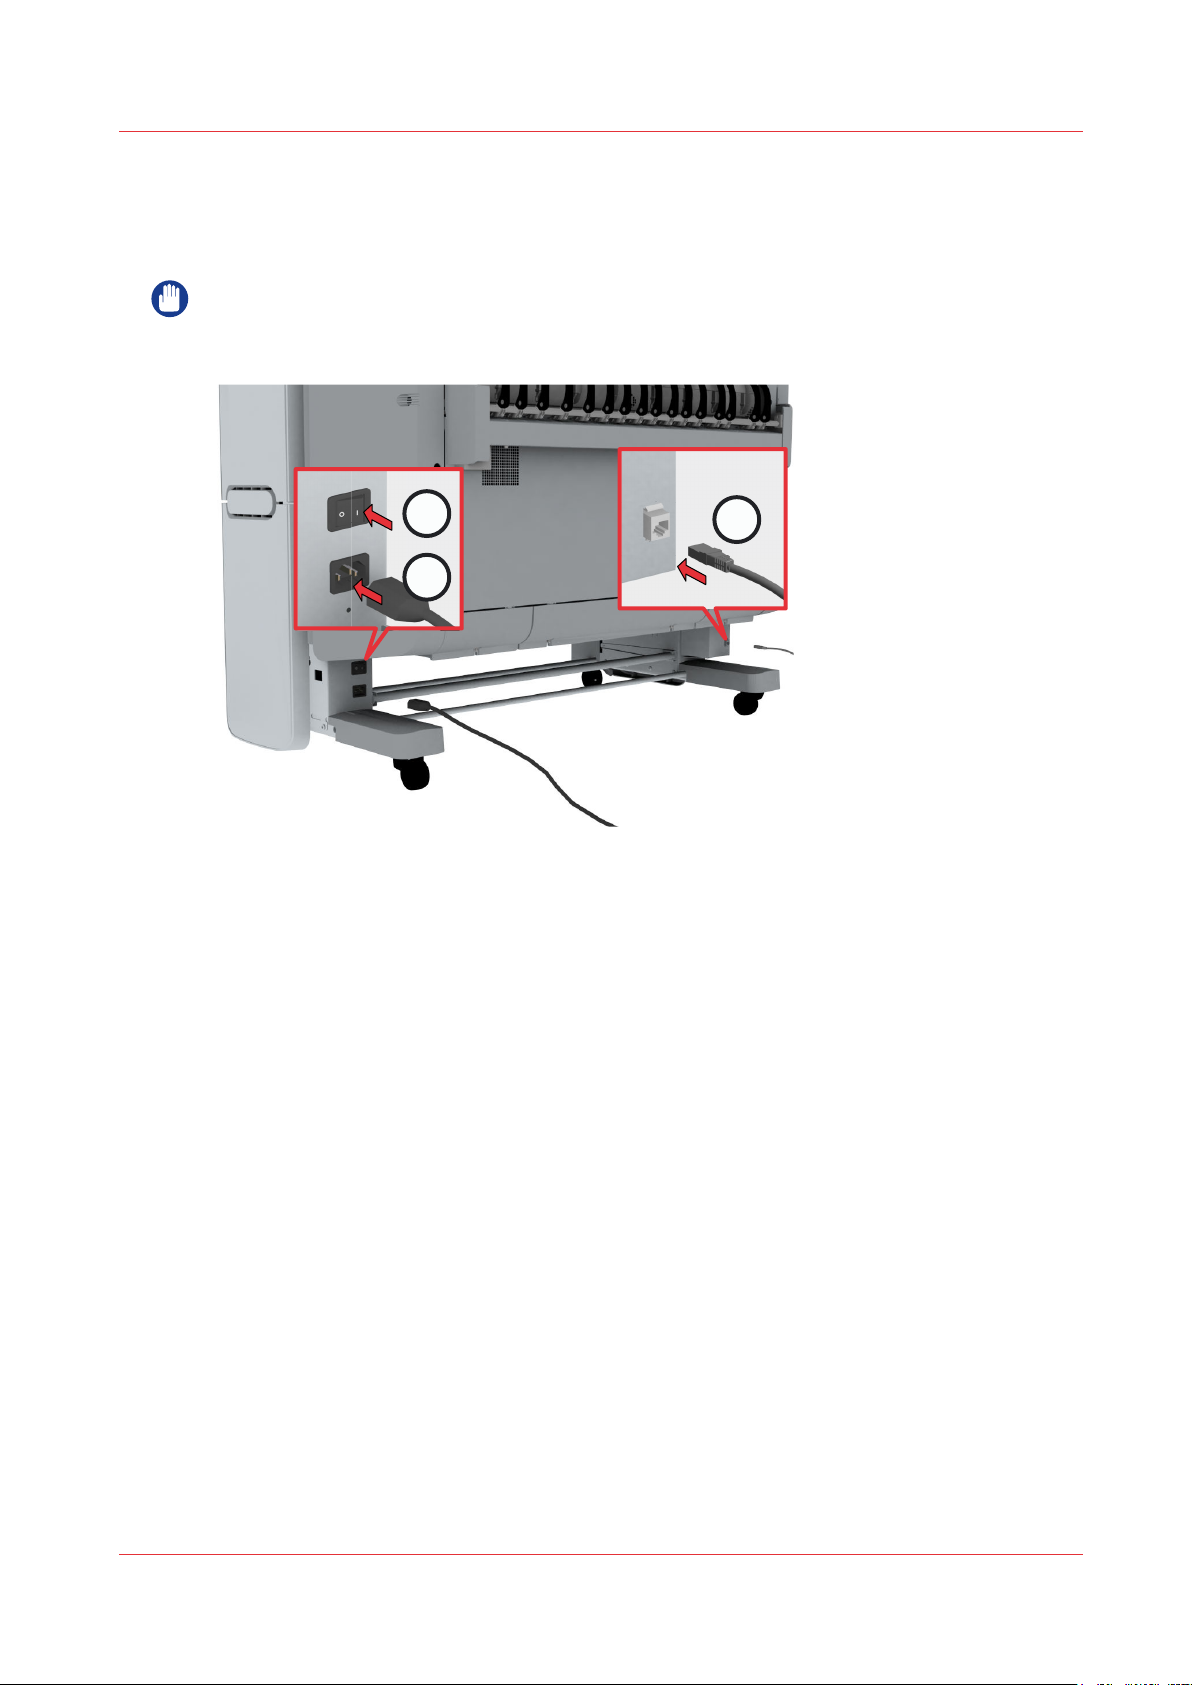
Connect the mains supply cable and the network cable
Procedure
IMPORTANT
Make sure the power switch (B) is in 'off' position.
Plug the mains supply cable into the power connection at the left back of the printer (A).
1.
Plug the other side of the mains supply cable into the wall socket.
2.
Plug the network cable into the network connection at the right back of the printer (C), to connect
3.
the printer to your company network.
Chapter 2 - Get to Know the Printing System
23
Page 24
A
B
C
Switch on the printing system
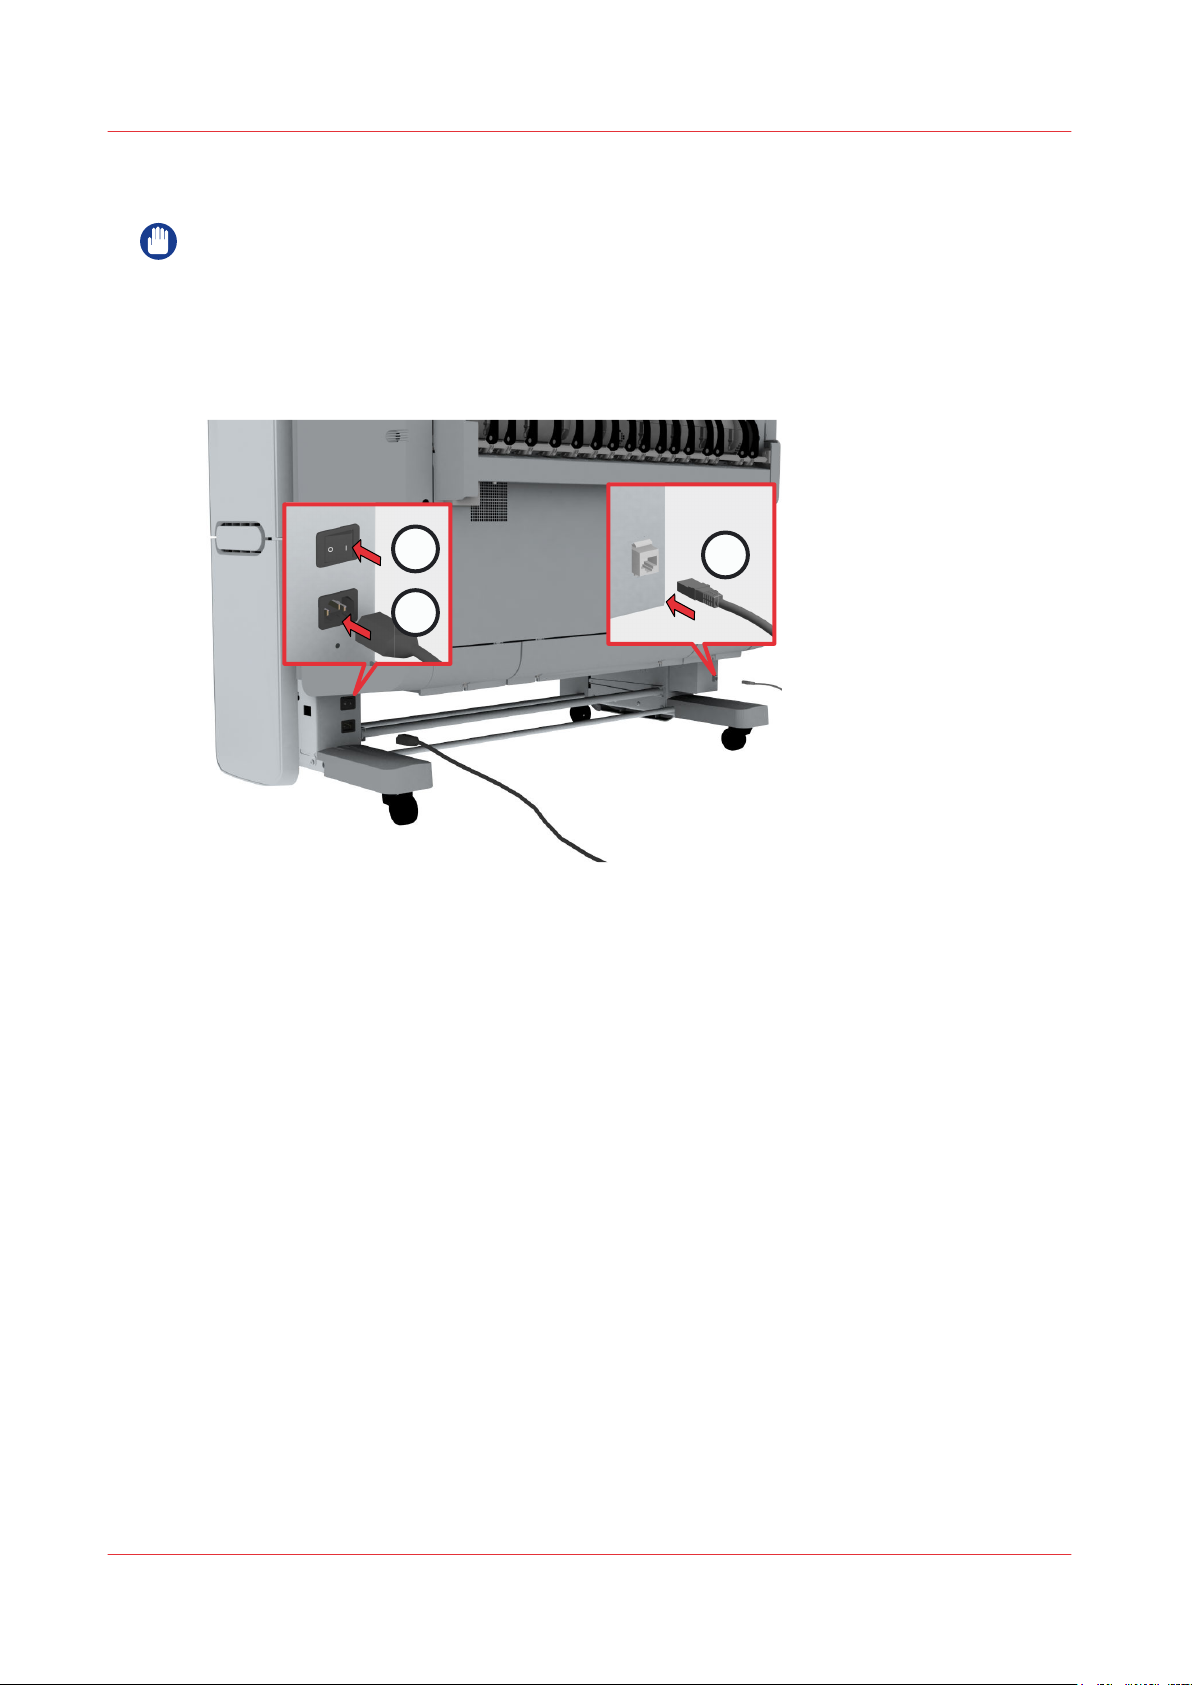
Switch on the printing system
IMPORTANT
• Make sure the mains supply cable (A) is plugged in.
• Make sure the network cable (C) is plugged in.
Procedure
Switch on the power switch at the left back of the printer (B).
1.
Press the on/off button at the front of the printer to start the system. The button lights up.
2.
Chapter 2 - Get to Know the Printing System
24
Page 25
The Hardware
8
7
1
2
3
4
9
10
11
12
65
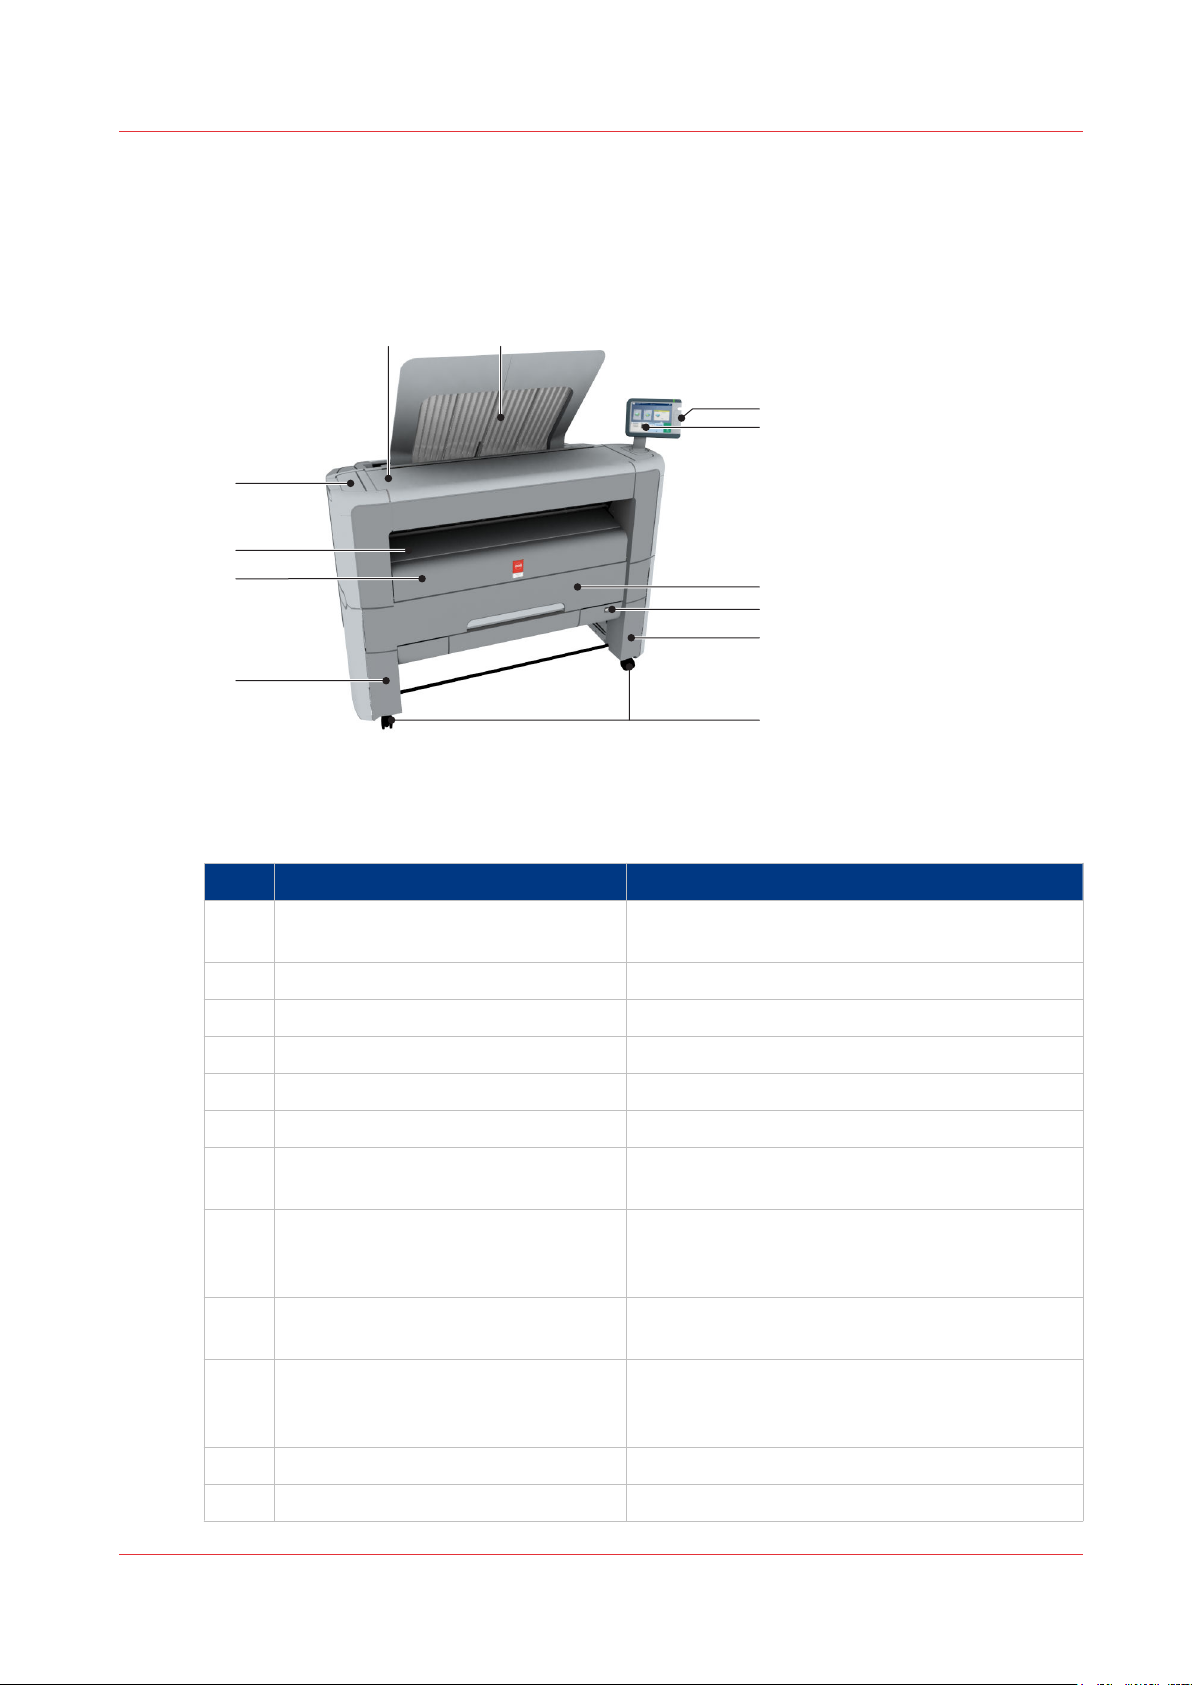
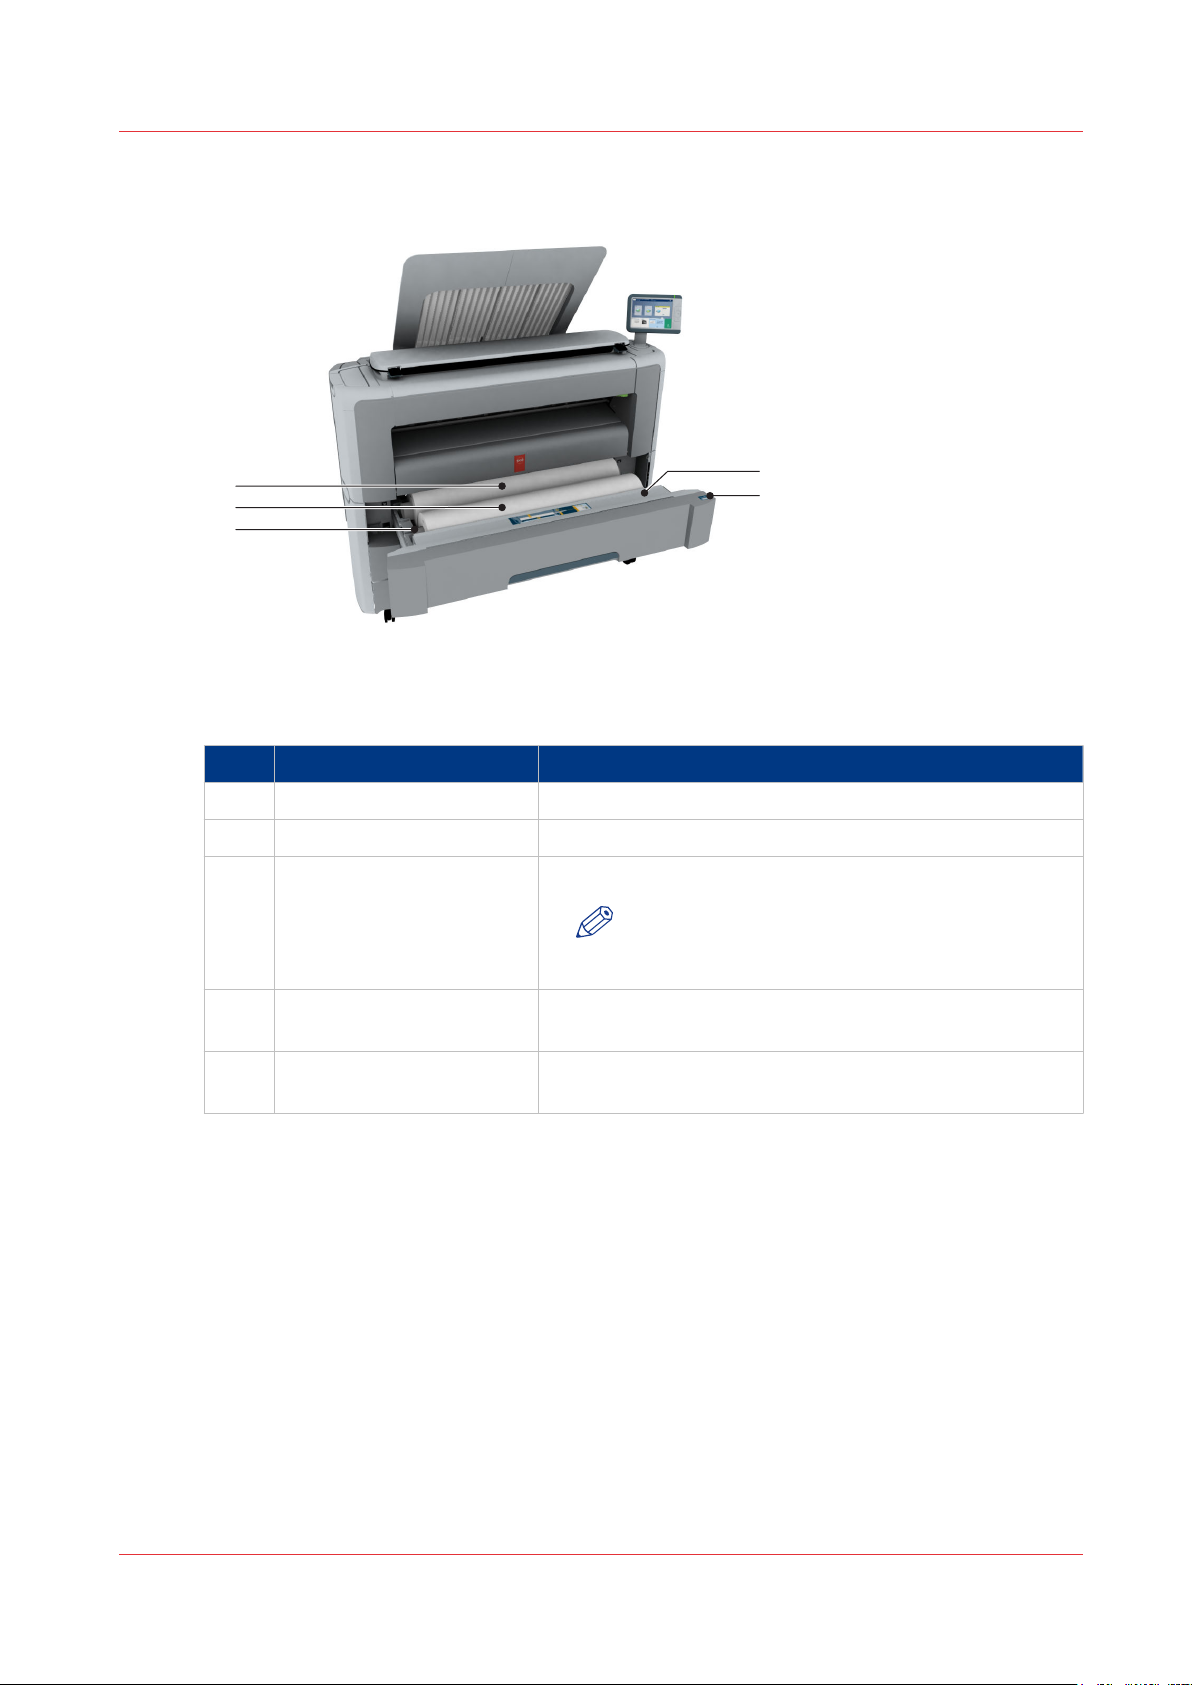
The components of the printer (front)
The Hardware
Component - function table
Nr Component Description / Function
1 [lower left front cover] Remove this cover when you want to move the
printer.
2 [lower front cover] Located at the front, used for error recovery.
3 [media bypass] To manually feed cut-sheets up to 36" width.
4 [toner compartment] Compartment to refill toner.
5 [printer top cover] Only available in printer-only version.
6 [top delivery tray] Delivery tray that collects the printed sheets.
7 USB port USB connector to use a USB mass storage de-
vice to print from or to scan to.
8 Océ ClearConnect: multi-touch [user
panel]
9 [media drawer] Media drawer that contains the media roll 1
10 [on / off button] Button to start or shut down the printer.
The Océ ClearConnect user panel allows the user
to start copy, scan, or print jobs, and to monitor
the system and the job status.
and/or 2.
This button is equivalent to the [Shut down] button in Océ Express WebTools.
11 [lower right front cover] Located at the front, used to level the printer.
12 [wheel] Swivel wheel with brakes.
Chapter 2 - Get to Know the Printing System
25
Page 26

The components of the printer (front)
Chapter 2 - Get to Know the Printing System
26
Page 27
The components of the printer (left side)
1
Illustration
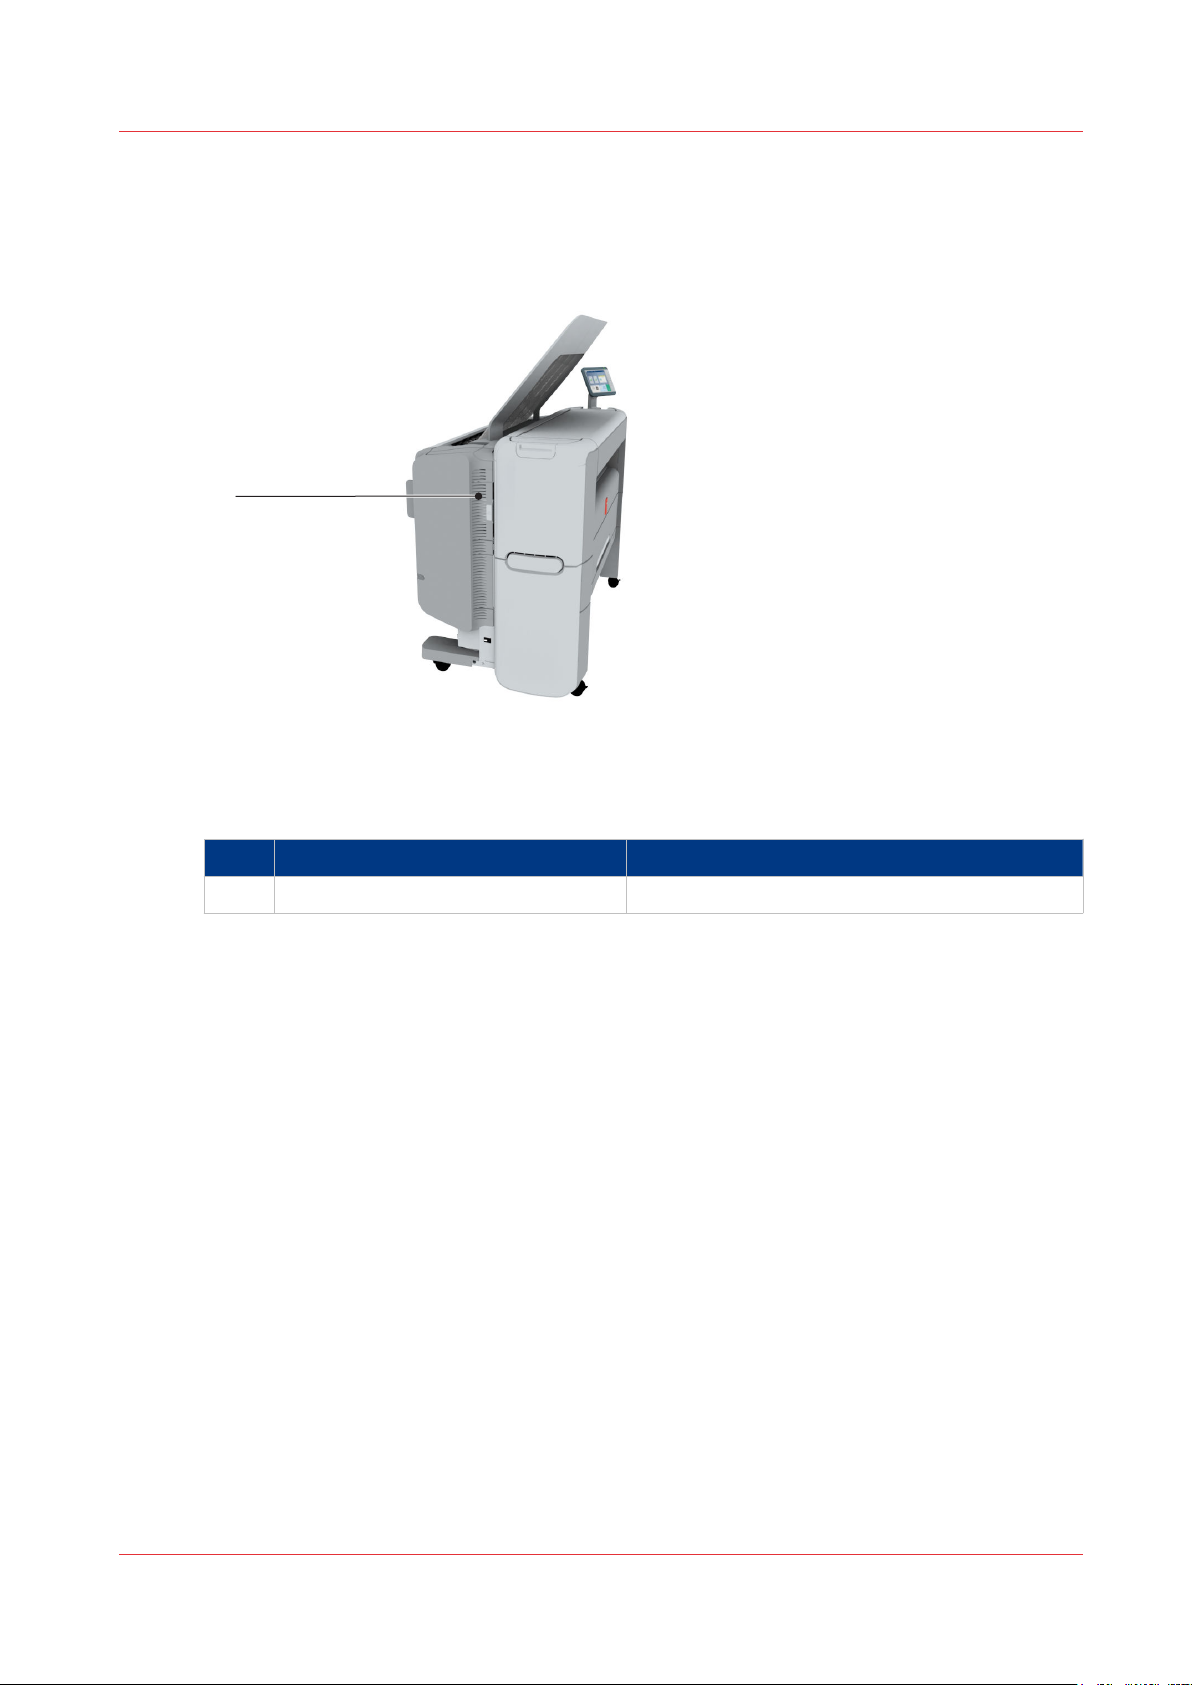
The components of the printer (left side)
Component - function table
Nr Component Description / Function
1 [residual toner compartment] Gives access to the residual toner container.
Chapter 2 - Get to Know the Printing System
27
Page 28

3
1
2
The components of the printer (back)
The components of the printer (back)
Component - function table
Nr Component Description / Function
1 [power switch] Switch the main power supply on or off.
2 [upper back cover] Open the [upper back cover] with the [media jam
3 [media jam clearance handle] Use this handle to access the paper in case of a
You can find the serial number of the printer on
the sticker above the power switch.
clearance handle], when you want to access the
heater section in case of a media jam.
paper jam in the heater section.
Chapter 2 - Get to Know the Printing System
28
Page 29
The [media drawer]
1
2
3
5
4
The [media drawer]
Component - function table
Nr Component Description / Function
1 [roll holder] Carries the media roll
2 [media roll 1] Media placed on roll holder in first position.
3 [media roll 2 (optional)] Media placed on roll holder in second position.
4 [roll loading station] Groove integrated behind the front cover of the media
5 [clean cut button] Button used to trim a strip of a new or damaged media
NOTE
The scanner calibration sheet is located at the
back of roll 2.
drawer, on which the media can be easily loaded.
roll.
Chapter 2 - Get to Know the Printing System
29
Page 30
1
4
2
3
5
6
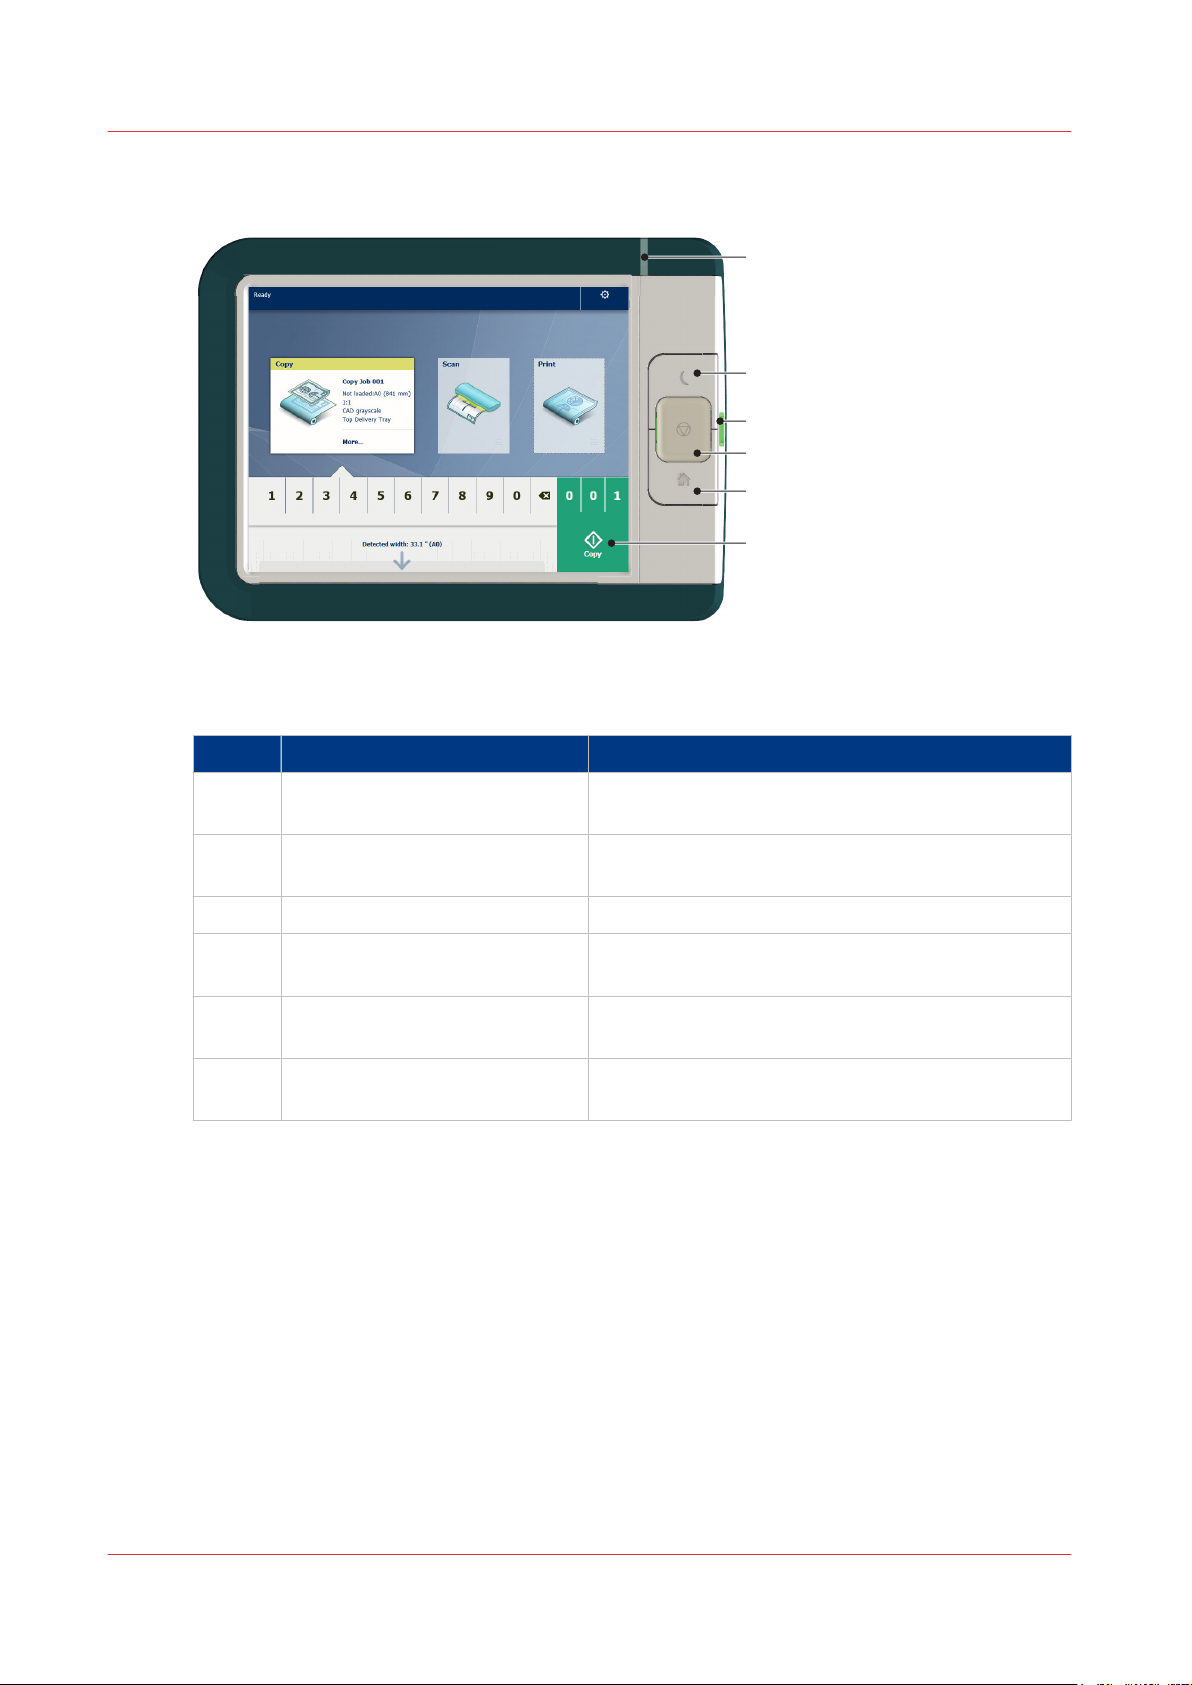
The user panel: Océ ClearConnect
The user panel: Océ ClearConnect
Components of the Océ ClearConnect
Nr Component Description / Function
1 [status light] Light that gives feedback on the status of the print-
2 [wake-up button] Button that allows the operator to get the printer
3 [USB port] Port to insert a USB mass storage device into.
4 [stop button] Button that allows the operator to stop the printer
5 [home button] Button to return to the home screen on the user
6 [green button] (touch) Dynamic tile on the user panel display that allows
er.
out of sleep mode.
and scanner.
panel display.
the operator to start a scan, print, or copy job.
Chapter 2 - Get to Know the Printing System
30
Page 31

The output delivery
Introduction
The printer is equipped with a top delivery tray to collect your printed output.
The output delivery
How to define the output delivery
In Océ Express WebTools and under [All settings] on the user panel you can define the default
sheet delivery for your printed output.
• When you select [Top Delivery Tray] and you use plain or transparent paper, your printed
output is by default delivered in the standard top delivery tray.
Your printed output is delivered face-down.
When you use a different media type, the printed output is always delivered at the back of the
printer.
• When you select [Back output] your printed output is by default delivered at the back of the
printer.
Your printed output is delivered face-up.
Media compatibility with the [Top Delivery Tray] and [Back output]
Paper media
Media name Compatible with the [Top Delivery Tray]
Paper 60 g Yes
[Paper 64 g] Yes
[Paper 75 g] Yes
[Paper 75-80 g] Yes
[Recycled pap. 80 g] Yes
[Paper 90-110 g] Yes
[Transp. 75 g] Yes
[Transp. 90 g] Yes
[Transp. 110 g] Yes
Chapter 2 - Get to Know the Printing System
31
Page 32

The output delivery
Other media
Media name Compatible with the [Top Delivery Tray]
[Film 3.5 mil] No, delivered to the [Back output]
[Film 4.5 mil] No, delivered to the [Back output]
[Translucent] No, delivered to the [Back output]
[Vellum] No, delivered to the [Back output]
Chapter 2 - Get to Know the Printing System
32
Page 33

The components of the scanner (optional)
1
4
3
2
5
NOTE
The scanner calibration sheet for the [Océ Scanner Express] is located in the media drawer, at
the back of roll 2.
The components of the scanner (optional)
The components of the scanner
Component Description / Function
1 [scanner top cover] Closes off the scanner.
2 [original feeding table] Use the [original feeding table] to feed the origi-
nal into the scanner (face up).
3 [scanner open levers] Use the [scanner open levers] to open the [scan-
ner top cover].
4 [originals exit] Exit for the scanned original.
5 [Output refeed protector] Prevents that your output is not refed into the
scanner.
Chapter 2 - Get to Know the Printing System
33
Page 34

The front original tray (optional)
The front original tray (optional)
Introduction
The printer can be delivered with a front original tray to hold and collect your originals.
When you want to scan multiple originals the tray can hold your originals. It also makes sure that
your originals do not fall on the floor or get damaged when the scanner releases your originals.
Illustration
[1] Position 1 - Holds and collects the originals
[2] Position 2 - Access the media drawer
Chapter 2 - Get to Know the Printing System
34
Page 35

Position of the front original tray
Position Description / Function
1 In this position the front original tray holds and receives originals.
2 In this position you can access the media drawer. You can lower the front origi-
nal tray easily when you push it down.
The front original tray (optional)
Chapter 2 - Get to Know the Printing System
35
Page 36

The folder (optional)
The folder (optional)
Introduction
The printer can be delivered with an external folder. The Océ PlotWave 340 is compatible with the
Océ 2400 fanfold. The Océ PlotWave 360 is compatible with the Océ 2400 fanfold and the Océ
4311 fullfold.
NOTE
• A technician is required to install the folder and configure the system.
• For more information on folders, visit
Media compatibility with the folder
Media name Compatible with the folder
Paper 60 g Yes
[Paper 64 g] Yes
[Paper 75 g] Yes
[Paper 75-80 g] Yes
http://downloads.oce.com/
and select your product.
[Recycled pap. 80 g] Yes
[Paper 90-110 g] Yes
NOTE
For folding speed reasons, outputs longer than 1.2m must be printed one sheet at a time.
Chapter 2 - Get to Know the Printing System
36
Page 37

The printing system consumables
Consumable Consumable part Description
Media [roll] The roll consists of a core and the media. The
The printing system consumables
media should be placed loose on its core.
There are many different compatible media
types and sizes. For more information, see
dia types
The core of the media roll is the cardboard inner part of the roll. A roll has a 3" core.
on page 272.
Me-
Océ PlotWave 340/360
toner
[toner bottle] Bottle with black toner, specifically used for
your PlotWave printer.
[residual toner container]
Container for residual toner.
Chapter 2 - Get to Know the Printing System
37
Page 38

1
4
2
3
5
6
Océ ClearConnect: the multi-touch user panel
Océ ClearConnect: the multi-touch user panel
Introduction to Océ ClearConnect
Introduction
The Océ ClearConnect is a multi-touch user panel, with dynamic tiles for print, copy, and scan
jobs.
The Océ ClearConnect
Component Function
1. [status light] Light that gives feedback on the status of the printer.
• A green light indicates that the printer is ready.
• A green blinking light indicates that the printer is busy.
• A red light indicates that an error occurred.
2. [wake-up button] The button that allows the operator to do the following:
• Get the printer out of sleep mode.
• Wake the printer up to full functionality.
3. [USB port] You can insert a USB mass storage device to:
• Print a file directly from the USB mass storage device.
• Scan an original and save it directly on the USB device.
The green light that illuminates the port starts to blink during data
transfer.
4. [stop button] The button with a red light that allows the operator to do the following:
• Immediately interrupt a scan job.
• Stop a print job after the page that is being printed.
5. [home button] The button that allows the operator to do the following:
• Return to the home screen on the user panel display.
• Reset settings to default, by pressing the button twice.
4
Chapter 2 - Get to Know the Printing System
38
Page 39

Component Function
Introduction to Océ ClearConnect
6. [ green button]
(touch)
Dynamic tile on the user panel display that allows the operator to do
the following:
• Start a scan job, a print job, or a copy job on the user panel.
Chapter 2 - Get to Know the Printing System
39
Page 40

1
4
3
5
6
2
The home screen
The home screen
Introduction
The default screen of the Océ ClearConnect is the home screen.
From the home screen you can manage jobs and enter the system menu.
The home screen
Nr Component Function
1. [active job] In the dynamic bar you can see the system states (warming-up,
cleaning etc.) and the active job when present.
• When you tap the active job the job queue appears with the list
of waiting jobs.
• When you tap the active job the pause tile appears, with which
you can pause the printing process.
2. [system menu] In the dynamic bar you can access the system menu.
• When you tap the system menu thumbnail, a new window
opens with a dynamic view of the system and printer setup settings.
3. [Copy tile]
[Scan tile]
[Print tile]
These dynamic tiles help you to perform copy, scan, and print
jobs. Select the correct tile for your job:
• When you tap one of the tiles and then use the Smart Access,
you can start your job immediately.
• As default the print tile is selected, but when you insert an origi-
nal into the scanner the copy tile is selected. When you insert
an original and a USB key the scan tile is selected.
• When you want to make more settings you can tap the tile
twice, and a new window with presets and settings opens.
4
Chapter 2 - Get to Know the Printing System
40
Page 41

The home screen
Nr Component Function
4. Smart Access The dynamic Smart Access helps you to quickly start a job.
NOTE
For more information on the Smart Access, see
Smart Access
on page 42.
The
5. [live scan view] The live scan view appears in the Smart Access.
The view shows the width and alignment of your document, while
it slides through the Smart Access.
6. [green button] The green button is dynamic and appears on all screens in the
bottom right corner of the display.
• When the button is green the printer is ready to process your
job.
• When the button is grey the printer is not ready to process your
job.
Chapter 2 - Get to Know the Printing System
41
Page 42

The Smart Access
The Smart Access
Introduction
The Océ ClearConnect gives easy access to your print, copy, and scan jobs and supports the
green button approach via the Smart Access.
The Smart Access is the dynamic lower section of the user panel. The Smart Access enables you
to quickly start your job without the need to make additional settings.
To start a job, you only have to:
1. Insert an original for scan and copy jobs, or select a print job from one of the locations in the
Smart Access (for example the public Smart Inbox).
2. In the Smart Access select the number of copies when applicable, and tap the green button
Smart Access to start the job.
The Smart Access is dynamic and its functionality changes when you select the copy, scan, or
print tile.
NOTE
For more information on the workflow of basic copy, scan, and print jobs see,
job
on page 54,
Do a default scan job
on page 56, and
Do a default print job
Do a default copy
on page 58.
The Copy Smart Access
Tap the copy tile on the user panel to view the copy Smart Access. The Smart Access has the
following functionalities:
Component Function
1. numeric panel Select the number of copies.
2. [live scan view] Check how your document is being scanned by the printer.
3. [green button] Tap the green button to start the job.
The Scan Smart Access
Tap the scan tile on the user panel to view the scan Smart Access. The Smart Access has the
following functionalities:
You can check the width and alignment of the original to ensure best
performance.
Chapter 2 - Get to Know the Printing System
42
Page 43

The Smart Access
Component Function
1. locations Select the location you want to send your scanned file to.
You can swipe through the list of various locations, from Smart Inboxes, USB, to cloud locations.
For more information on how to configure the locations, see
and open a Smart Inbox for scan jobs and print jobs
Create an external location
on page 136.
on page 102 and
2. [live scan view] Check how your document is being scanned by the printer.
You can check the width and alignment of the original to ensure best
performance.
3. [green button] Tap the green button to start the job.
Create
The Print Smart Access
Tap the print tile on the user panel to view the print Smart Access. The Smart Access has the
following functionalities:
Component Function
1. locations Select the location you want to retrieve your unprinted job from. You
2. [green button] Tap the green button to start the job.
can swipe through the list of various locations, from Smart Inboxes,
USB, or cloud locations.
Chapter 2 - Get to Know the Printing System
43
Page 44

3
2
1
Presets and advanced settings
Presets and advanced settings
Introduction
Presets give you easy access to change the most common used settings. Advanced settings help
you to fine tune the settings of your job, and give access to all settings.
When you tap the copy tile or scan tile in the home screen, a window with copy or scan presets
and advanced settings opens. When you tap the print tile and tap the settings of a listed job, the
window with print presets and advanced settings opens.
Nr Component Function
1. [preset tiles] The preset tiles show the default settings for your job.
• The presets are divided into categories, such as [Media], [Layout] etc.
• When you tap a preset tile, it gives quick access to a short list of
other presets you can choose.
2. [job pane] The [job pane] helps to manage jobs.
• Information is given on your job.
• Make sets.
• Delete a job.
• Tap a tile to switch between the presets/settings window and a
window with a preview of the document (only for Smart Inbox
jobs).
• Start a job with the green button.
3. [All settings]
(Advanced settings)
When you tap on [All settings] a list with all the advanced settings
opens.
• The advanced settings are categorised and presented as tiles.
• When you tap a tile you can fine tune the settings.
Chapter 2 - Get to Know the Printing System
44
Page 45

The settings concept
Introduction
The multi-touch user panel offers the possibility to make settings for your job locally. There are
two levels when you want to change settings on the user panel:
•
Presets: a combination of settings that are used often. It takes only a few steps to make new
settings. Presets give you easy access to change the most common used settings.
•
Advanced settings: all settings. It takes more steps to make new settings. With the advanced
settings you can fine tune each setting individually.
NOTE
You can decide which settings are listed as presets on the user panel. You can make settings in
Océ Express WebTools, for more information see
the default scan preset
have to make the settings once, and they will be visible on the user panel as presets.
The Preset concept
Description Illustration
• When you tap the copy or scan tile on the multitouch user panel, a new window with presets opens.
on page 130, and
Set the default copy preset
Set the default print preset
The settings concept
on page 128,
on page 126. You only
Set
• When you tap the print tile and tap the settings of a
listed job, a new window with the print presets
opens.
Presets:
• The copy, scan, and print menus, each have their
own categories of presets.
• [Media], [Layout], [Image], and [Finishing] are the
categories for copy and print.
• [File type], [Colour mode], and [Image] are the categories for scan.
4
Chapter 2 - Get to Know the Printing System
45
Page 46

The settings concept
Description Illustration
• Per preset category, the default setting is visible in
the preset tile. When you tap the tile, a short list with
the other preset is shown.
Advanced settings:
• In the same window, under the list of presets, a line
with [All settings] is displayed.
• When you tap on [All settings] a list of tiles with all
the available job settings opens.
• When you tap a tile you can change and edit your
settings.
Sometimes a dialogue box appears to help you make
the settings.
Chapter 2 - Get to Know the Printing System
46
Page 47

The locations
Introduction
When you tap the print tile on the user panel twice a window with locations opens. When you tap
the scan tile, the locations are shown in the Smart Access. Location tiles can be:
•
The Smart Inboxes location.
Default and always presented. When you tap the Smart Inboxes tile a window with all Smart
Inboxes opens. So when you create a personal Smart Inbox you can find it under the general
Smart Inboxes tile.
•
A USB location.
Presented when you insert a USB device
•
Remote locations via [FTP] or [SMB].
Presented when you create an external location via [FTP] or [SMB].
•
A cloud location via [WebDAV].
Presented when you create an external location via [WebDAV].
•
PlanWell Collaborate Arc document solution application.
Presented when you create an external location via [PlanWell® Collaborate].
When you tap one of these locations, a window with a list of the location's folders and files
opens. You can select a file and tap the green button to print your file.
The locations
NOTE
For more information on how to configure and create an external location see,
locations
1. Locations
on page 133 and
Create an external location
Configure your
on page 136.
Function
The external locations are presented as Smart Inboxes, USB, or as the remote locations you created in Océ Express WebTools.
Chapter 2 - Get to Know the Printing System
47
Page 48

The locations
2. Preview thumbnail
Function
When you open a location folder, a window opens with
files listed as jobs. The print jobs have a preview thumbnail.
Tap the preview thumbnail to open a large preview window of your job.
NOTE
This is only possible for jobs in the Smart Inboxes.
3. Job settings
Function
When you open a location folder, a window opens with
files listed as jobs. The jobs are listed with the job settings.
Tap the job settings to open the window with presets
and advanced settings. You can make changes here, before you print the job.
Chapter 2 - Get to Know the Printing System
48
Page 49

Job preview
Introduction
The multi-touch user panel offers a detailed preview of your job. Touch the preview thumbnail to
access the preview window.
Job preview
Job preview
Component Function
Job [preview] You can pan the image to see it in more detail.
You can shift between the various job files that are part of one location.
Swipe left or right to view the other job files.
Tap the Edit tile in the job pane to open the preset window.
In the preset window, tap the View tile to go back to the preview window.
NOTE
When you have a multi-page job you can only view the first
page.
Chapter 2 - Get to Know the Printing System
49
Page 50

3
2
1
The job queue and the system menu
The job queue and the system menu
Introduction
The dynamic bar is located in the upper part of the home screen on the user panel display. The
dynamic bar consists of the active job with the job queue, and the system menu.
The active job and the job queue
Nr Component Function
1. [active job] Job information of the active job and the printer status is dis-
played.
2. [system menu] Tap the system thumbnail to access the system menu.
3. job queue Tap on the active job to open the job queue window.
• See all the listed jobs, and access them when you tap the job
settings.
• Move the listed jobs up or down the list.
Chapter 2 - Get to Know the Printing System
50
Page 51

System menu
2
1
Nr Component Function
The job queue and the system menu
1. Printing system
and media
• The loaded media in the printer is displayed.
• Tap the drawer to change the media settings.
• Wizards appear, to help you change media or refill toner.
2. [setup menu] The [setup menu] gives general information on the printer. In the
list you can get access to:
• [Test prints]
• [Network settings]
• [Security]
• [Print density]
• [Clear system]
• [System update]
• [Install additional hardware]
• [Scanner calibration]
Chapter 2 - Get to Know the Printing System
51
Page 52

Quick Start: default jobs
Quick Start: default jobs
The Smart Inbox process for copy, scan, and print jobs
Introduction
Use the Smart Inbox to manage and store your jobs. Define one or more Smart Inbox names that
allow you to easily organise and access your jobs.
With the Océ PlotWave 340/360:
• The Smart Inbox cannot only be used in Océ Express WebTools, but also on the Océ
ClearConnect multi-touch user panel.
• The Smart Inbox offers a range of possibilities for print, copy, and scan jobs. The functionality
of the Smart Inbox differs with the various jobs.
Context:
• For more information on the Smart Inbox concept in Océ Express WebTools see,
Inbox and the queue concept
• For more information on how to create Smart Inboxes see,
print jobs (Smart Inbox section)
on page 102
Copy jobs and the Smart Inbox
Function Location
1
Store a copy job in the Smart Inbox temporarily
Enable the functionality in Océ Express WebTools, to store copy jobs in
the Smart Inbox temporarily.
This way you can manage and reprint jobs on the system.
Scan jobs and the Smart Inbox
Function Location
1
Scan a job to a Smart Inbox
Scan a document on the printer, the public Smart Inbox is the default
location you scan to.
Choose another Smart Inbox as your location in the Smart Access of
the user panel.
on page 93
on page 100 and
The Smart
Create and open a Smart Inbox for
Create and open a Smart Inbox for scan jobs
Océ Express
WebTools / User
panel
User panel
2
View the scan job
Open the Smart Inbox location on the user panel, tap the scan job and
view the image of the file.
3
Collect the scan job
When you have sent the file to a Smart Inbox, the scan job can be collected in Océ Express WebTools.
Via the [Jobs] tab you can open the preferred Smart Inbox and select
the job you want to save locally.
Chapter 2 - Get to Know the Printing System
52
User panel
Océ Express
WebTools
4
Page 53

The Smart Inbox process for copy, scan, and print jobs
Function Location
You can also choose to collect your scan job via Océ Mobile WebTools.
Open Océ Mobile WebTools on your mobile device, select and open
your Smart Inbox. Select the scan job and save it locally.
Print jobs and the Smart Inbox
Function Location
1
Send a print job from a Smart Inbox
From your preferred Smart Inbox in Océ Express WebTools, send a
print job to the queue.
From your preferred job submitter, send a print job to the queue. Select
via which Smart Inbox you want to submit the job to the queue.
2
Print a print job on the printer
When you have sent the job, go to the printer and find your job in the
Smart Inbox.
Change the settings, and tap the green button to print your job.
Via the Smart Access in the home screen you can also view all the other unprinted jobs. Select a job and tap the green button to print.
NOTE
This procedure applies, when you have not made settings to
enable direct print. With direct print, the job will be printed
immediately. For more information, see
page 189.
Direct print
Mobile device
Océ Express
WebTools
Job submitter
User panel
on
Chapter 2 - Get to Know the Printing System
53
Page 54

Do a default copy job
Do a default copy job
Introduction
When you want to copy an original and you do not make any settings the default presets are
used. You only use the Smart Access to submit your job.
You can see the presets that are used in the job settings section of your job.
Procedure
Feed the original face up and centred on the original feeding table.
1.
The Copy tile with the copy Smart Access is automatically selected on the user panel.
Select the number of copies and tap the green button.
2.
Chapter 2 - Get to Know the Printing System
54
Page 55

Do a default copy job
NOTE
Tap on [Release the original] under the Smart Access, to release your original from the scanner.
Chapter 2 - Get to Know the Printing System
55
Page 56

Do a default scan job
Do a default scan job
Introduction
When you want to scan an original and you do not make any settings the default presets are
used. You only use the Smart Access to submit your job.
You can see the presets that are used in the job settings section of your job.
Procedure
Feed the original face up and centred on the original feeding table.
1.
Select the Scan tile on the user panel. The scan Smart Access is visible.
2.
Select the preferred location in the Smart Access and tap the green button.
3.
When you do not select a location the file is sent to the public Smart Inbox.
Chapter 2 - Get to Know the Printing System
56
Page 57

Result
Do a default scan job
NOTE
Tap on [Release the original] under the Smart Access, to release your original from the scanner.
A scan to file is made, and sent to your preferred location. Default you can find your file in the
public Smart Inbox in Océ Express WebTools.
You can also see the job in your location on the user panel. Open it to view or print the file.
Chapter 2 - Get to Know the Printing System
57
Page 58

Do a default print job
Do a default print job
Introduction
When you want to print a job and you do not make any settings the default presets are used. You
only use the Smart Access to start your job.
You can see the presets that are used in the job settings section of your job.
Before you begin
Make sure you submit a job via one of the job submitter applications:
• Océ Publisher Express -
• Océ Publisher Select -
•
Océ Wide format Printer Driver for Microsoft® Windows® -
Driver for Microsoft® Windows® to send a print job
• Océ Postscript Driver -
• Océ Publisher Mobile -
• Océ Mobile WebTools -
Or submit a job via
• LPR -
• FTP -
• The cloud (WebDAV) -
• PlanWell Collaborate, or USB.
Use LPR to send a print job
Use FTP to send a print job
Use Océ Publisher Express to send a print job
Use Océ Publisher Select to send a print job
on page 172
on page 175
Use the Océ Wide format Printer
on page 177
Use the Océ PostScript® 3 Driver to send a print job
Use Océ Publisher Mobile to send a print job
Print from your mobile device
on page 184
on page 183
Use the cloud to send a print job
on page 182
on page 185
on page 180
on page 179
NOTE
This following procedure applies, when you have not made settings to enable direct print. With
direct print, the job will be printed immediately. For more information, see
page 189.
Procedure
After you have submitted a job to the printer, tap the [Print tile] on the user panel to open the list
1.
of locations.
Select the location of your job. Default, the public Smart Inbox.
2.
Direct print
on
Chapter 2 - Get to Know the Printing System
58
Page 59

The jobs are listed in a new window.
Select your job from the list.
3.
Tap the [green button], next to the job settings.
4.
Do a default print job
Chapter 2 - Get to Know the Printing System
59
Page 60

The cloud
The cloud
Introduction
The multi-touch user panel gives the user the opportunity to print from and scan to various
locations. One of these locations is the cloud.
You can enter the cloud via WebDAV and use it as a network drive. This way the cloud application
of your choice is accessible.
NOTE
• For more information on how to configure the cloud as an external location, see
external location
• Note that WebDAV is the type selected when creating a cloud location. For more information
on how to use the cloud for print jobs, see
on page 136.
Use the cloud to send a print job
Create an
on page 185.
Concept of the cloud
The cloud can be seen as a virtual network drive you use to send files to, but also to save and
share files on.
There are general cloud applications, such as SharePoint or applications via a HTTP URL, but
companies can also use their own private and internal clouds.
Working with the cloud on the Océ PlotWave 340/360 is very easy:
Procedure
Connection
Chapter 2 - Get to Know the Printing System
60
Description Via
Make a connection between your preferred cloud application and the printer.
To do this create an external location in Océ Express
WebTools via WebDAV .
Océ Express
WebTools
4
Page 61

Procedure Description Via
The cloud
For print jobs:
For scan jobs:
Open the cloud application locally. PC or mobile de-
vice
Add and save the file you want to print, in the cloud. Or
send your file to the printer, in the cloud.
Open your cloud application as location, in the Smart
PC or mobile device
user panel
Access of the Print tile.
Select the file you want to print. user panel
Tap the green button. user panel
Insert the original and select the preferred settings. user panel
Select your cloud application as location, in the Smart
user panel
Access of the Scan tile.
Tap the green button. user panel
Open the cloud application on your PC or mobile device,
and find the scanned file there.
PC or mobile device
Chapter 2 - Get to Know the Printing System
61
Page 62

The cloud
Chapter 2 - Get to Know the Printing System
62
Page 63

Chapter 3 Define your Workflow with Océ Express WebTools
Page 64

Introduction
Introduction
Océ Express WebTools
Introduction
Océ Express WebTools is an application that runs embedded on your printer. You can use an
Internet browser (Microsoft® Internet Explorer or Mozilla Firefox) to open the homepage of Océ
Express WebTools on your computer or mobile device.
Definition
You can use Océ Express WebTools to:
• Send print jobs to the printer with Océ Publisher Express.
• Access the settings to manage the configuration and preferences of the printing system.
When you want to change settings in Océ Express WebTools, you must log in with one of three
predefined user roles. For more information, see
• Monitor the status of the printing system.
User roles and authorisations
on page 107.
How to access Océ Express WebTools
To access Océ Express WebTools:
• Enter the product name of the printer as a Hostname, for example http://PlotWave3XX, in the
workstation web browser.
or
• Enter the printer's IP address, for example http://123.123.23.123, in the workstation web
browser.
NOTE
When Océ Express WebTools does not appear, contact the network administrator to check the
network parameters. Check if the printer's network settings have been registered in the network
infrastructure.
Chapter 3 - Define your Workflow with Océ Express WebTools
64
Page 65

Set the security settings for Microsoft Internet Explorer
Set the security settings for Microsoft Internet Explorer
Introduction
You can use an internet browser to open the homepage of Océ Express WebTools. Depending on
the internet browser you use, set the required minimum browser security settings as indicated
below.
NOTE
You must enable cookies.
Step Action Value
1 Select Tools / Internet Options / Security / Local intranet / Custom Level
2
3
4
5
ActiveX controls and plug-ins
Binary and script behaviours Enable
Downloads:
File download Enable
Miscellaneous
Allow META REFRESH Enable
Launching applications and unsafe files Enable
Use Pop-up blocker Disable
Scripting
Active scripting Enable
Chapter 3 - Define your Workflow with Océ Express WebTools
65
Page 66

Set the security settings for Mozilla Firefox
Set the security settings for Mozilla Firefox
Introduction
You can use an internet browser to open the homepage of Océ Express WebTools. Depending on
the internet browser you use, set the required minimum browser security settings as indicated
below.
NOTE
You must enable cookies.
Step Action Value
1 Select Firefox / Options / Options
2
Block pop-up windows Disable
Enable Javascript Enable
Content
Chapter 3 - Define your Workflow with Océ Express WebTools
66
Page 67

The Jobs tab
The Jobs tab
The Jobs tab
Create a new job in the Océ Publisher Express section.
• When you want to submit a new job, click [Create new job]. A new window opens, here you
can define some basic job settings and browse the file you want to print. For more information,
see
Monitor jobs in the Queue section.
• In the job queue and scan queue you get an overview of the jobs waiting to be printed, or
scans waiting to be sent. The options listed above the Queue section allow you to move a
selected job to the top of the queue or to delete the job. When you click [Delete all] all jobs are
deleted from the queue. For more information, see
page 93.
Control your jobs in the Smart Inbox section.
• When you click [Open Smart Inbox] and enter a name, the new Smart Inbox immediately
appears in the Smart Inbox overview. This Smart Inbox is used for print jobs, and is only
visible on your local browser. When you send a print job via the Smart Inbox, the Smart Inbox
is also shown on the user panel. For more information, see
print jobs (Smart Inbox section)
You can also create a Smart Inbox for scan jobs under the [Preferences] tab. For more
information, see
• You can get an overview of all the Smart Inboxes on your system. When you select a print job
in the Smart Inbox you can use the options listed above the Smart Inbox section to print, edit,
or delete the jobs.
• You can get an overview of all scan jobs. All scan jobs are placed in the Scans Smart Inbox.
When you select a scan job you can use the options listed above the Scans Smart Inbox
section to print, save, or delete the scan job.
• Get an overview of all jobs on the system. When you enable the [Preferences] - [System
defaults] - [Job management] - [Display a view on all Smart Inbox jobs] setting, all jobs are
displayed.
Use Océ Publisher Express to send a print job
on page 100.
on page 172.
Create and open a Smart Inbox for scan jobs
The Smart Inbox and the queue concept
on
Create and open a Smart Inbox for
on page 102.
Chapter 3 - Define your Workflow with Océ Express WebTools
67
Page 68

The Jobs tab
Chapter 3 - Define your Workflow with Océ Express WebTools
68
Page 69

The Smart Inbox
A Smart Inbox helps you to manage customised jobs. You get an overview of the Smart Inboxes
when you open the [Jobs] tab in Océ Express WebTools.
The Jobs tab
The Smart Inbox
Jobs in a Smart Inbox
You can use the Smart Inbox to manage your jobs. Define one or more Smart Inbox names that
allow you to easily organise and access your jobs.
The following jobs are placed in a Smart Inbox:
•
Print jobs, sent via printer drivers, applications, or Océ Publisher Express.
In the printer driver, application, or job submitter you can select the Smart Inbox you want to
print to.
•
Scan jobs, when you select the Smart Inbox as your location.
When you make a scan on the printer, and you select the Smart Inbox as the external location
you send your job to, you can collect the job from the selected Smart Inbox in Océ Express
WebTools. Under the Jobs tab, you can select the job in the Smart Inbox and save it locally.
•
Copy jobs
The [Preferences] - [System defaults] - [Job management] - [Keep a copy of copy jobs in the
Smart Inbox] - setting enables you to keep copy jobs that have been printed in the Smart Inbox
for reprint.
NOTE
For more information on the Smart Inbox, see
page 93.
The Smart Inbox and the queue concept
on
Chapter 3 - Define your Workflow with Océ Express WebTools
69
Page 70

The job states
The job states
Introduction
When a job is placed in a Smart Inbox or in the job queue, the icon in front of the job name gives
information about the status of the job.
Overview of the job states in the Smart Inbox
State Icon Description
Receiving Indicates that the Smart Inbox is receiving the job data.
New Indicates that a new job is available in the Smart Inbox.
Queued Indicates that the job is copied to the queue and waiting
Printed Indicates that the job has been printed.
to be printed.
Attention needed General error message.
Account data missing State when the account data for the job is missing.
Overview of the job states in the Job queue
State Icon Description
Receiving Indicates that the Queue is receiving the job data.
Processing Indicates that the Queue is processing the job data.
Ready to print Indicates that the job is ready for printing.
Scheduled Indicates that the job is waiting to be printed.
Printing Indicates that the job is currently being printed.
Attention needed General error message.
Chapter 3 - Define your Workflow with Océ Express WebTools
70
Page 71

The System tab
The System tab
Your remote view on the system.
This tab can be accessed by any user.
The System tab is visible on all pages at the bottom of the page. When you click on the System
tab in the lower left corner of the screen, the system monitor pops up.
You can monitor:
• The toner status
• The available media on the printer
• The system status (for example [Printer paused], [Ready to print], [Sleeping...])
• The active job
The System tab
Chapter 3 - Define your Workflow with Océ Express WebTools
71
Page 72

The system monitor
The system monitor
Introduction
You can open the system monitor to get an overview of the current status of the printing system.
When you click on the system tab in the lower left corner of the screen, the system monitor
opens.
The system state (for example: [Printing:]) is displayed in the upper right corner of the system
monitor section of the Océ Express WebTools.
Overview of the system states
State Icon Description
[User intervention required]
[System memory is full] Status message when printer does not print because the
[Out of toner] Status message when printer does not print because the
[Sleeping...] Energy saving state: State when not all functionality is
[Warming up...] State when not all functionality is available due to print-
[Initialising...] State when the system software is initialising.
[Printer paused] The system pauses the print queue but keeps access to
[Processing...] The system is receiving or processing data.
[Ready to print] State when there is no active job and no waiting job.
The user is requested to go to the printer and follow the
instructions displayed on the operator panel.
system memory is full.
printer is out of toner.
available due to printer sleeping.
er warming up.
all other functionality.
When a job arrives, no user intervention is needed to
start printing.
[Printing:] <job-name> State when a print job is active.
[Processing:] <job-name> The system is processing the job data.
[Receiving:] <job-name> The system is receiving the job data.
[Optimising print quality,
please wait...]
'Media indication' Roll media and roll width indication for each roll.
Chapter 3 - Define your Workflow with Océ Express WebTools
72
The system is making settings to optimise the print quality.
Page 73

The scanner states
State Icon Description
The system monitor
[User intervention re-
General error message.
quired]
[Scanner is busy] The scanner is active.
[Scanner is ready] The scanner is ready to start a scan job.
The toner states
Icon Description
Toner OK
Toner low, or empty.
The Remote Service States
Icon Description
no icon [Remote Service] is either disabled or enabled and connected to Océ.
[Remote Service] is enabled, but could not connect to Océ.
Remote assistance to the system is enabled and currently accepting a connection.
The E-shredding states
Icon Description
no icon E-shredding is disabled.
E-shredding is enabled or busy.
A tooltip is available with extra information.
Chapter 3 - Define your Workflow with Océ Express WebTools
73
Page 74

The Preferences tab
The Preferences tab
The Preferences tab
NOTE
Before you can edit a setting or a settings group, you must log in as a Key operator or a Power
user. For more information, see
With the Preferences tab, you can fine-tune the system to fit your company's workflow and
processes.
Tasks:
• [Overview]
Summary of the settings organised in different groups:
• [System defaults]: make settings for the printing system.
• [Print job defaults]: make settings for print jobs.
• [Copy job defaults]: make settings for copy jobs.
• [Scan job defaults]: make settings for scan jobs.
• [Stamping]: make settings to create a stamp.
User roles and authorisations
on page 107.
Chapter 3 - Define your Workflow with Océ Express WebTools
74
Page 75

The Configuration tab
The Configuration tab
The Configuration tab
NOTE
Before you can edit a setting or a settings group, you must log in as a System administrator or a
Power user. For more information, see
The Configuration tab will help you install the system in your infrastructure, according to your
standards.
Tasks:
• [Overview]
Summary of the settings organised in different groups:
• [Connectivity]: make settings for your printer's network, security, and connections.
• [Printer setup]; make settings for the printer's languages, media, and finishing configuration.
• [External locations]: make settings to create, delete, and view external locations.
• [Smart Inbox]: make settings for a Smart Inbox for scan jobs. It is a permanent location on the
user panel you can send scan jobs to.
• [Remote security]: make settings to create certificates and secure your network configuration.
User roles and authorisations
on page 107.
Chapter 3 - Define your Workflow with Océ Express WebTools
75
Page 76

The Support tab
The Support tab
The Support tab
NOTE
Log in as System administrator or a Power user. For more information, see
authorisations
The Support tab consists of the sections:
• [About]: find general information about the system and generate the Quick Response Card.
• [Counter history]: view, save, or print counter information on all jobs.
• [Media]: manage all media on the printing system.
• [Update]: view and install the security and system patches, and new software packages.
• [Licenses]: view, and update the licenses on the printing system.
• [Remote Service]: make a connection with remote service to check and control your system.
• [Audit log]: download a comma-separated values (CSV) file with audit events, or clear the audit
events.
• [Maintenance]: download a zip file containing all job data sent to the printer.
on page 107.
User roles and
Chapter 3 - Define your Workflow with Océ Express WebTools
76
Page 77

Define your Printing System Default Settings
Define your Printing System Default Settings
About the default settings in Océ Express WebTools
Definition
Before you send jobs to the printer, remember the following:
The values defined in Océ Express WebTools are default values for the general system behaviour.
You can define a number of job settings in the Océ printer drivers or the Océ job submission
tools. The settings defined in the printer drivers or the job submission tools, always overrule the
settings defined in Océ Express WebTools.
Chapter 3 - Define your Workflow with Océ Express WebTools
77
Page 78

Set another language for Océ Express WebTools
Set another language for Océ Express WebTools
Introduction
The language setting of the internet browser you use defines the language of Océ Express
WebTools.
The following languages are supported: Dutch, UK English, German, French, US English,
Spanish, Danish, Italian, Swedish, Norwegian, Finnish, Portuguese, Polish, Hungarian, Czech,
Japanese, Simplified Chinese, Traditional Chinese, Russian, and Korean.
NOTE
• This language setting does not influence the language on the user panel. On the user panel
you can choose between the [First language] and the [Second language]. You can define the
values for the [First language] and the [Second language] in the regional settings of Océ
Express WebTools.
• When the selected language cannot be supported, the default language for Océ Express
WebTools is US English.
Chapter 3 - Define your Workflow with Océ Express WebTools
78
Page 79

Change the language settings in Internet Explorer
Change the language settings in Internet Explorer
Introduction
You can change the language settings for Océ Express WebTools in your preferred browser.
NOTE
It is possible that the internet options are put under a different menu, depending on the
Microsoft Internet Explorer version you use.
Procedure
Open Microsoft Internet Explorer.
1.
Click on the [Tools] icon next to the browser toolbar.
2.
Click on [Internet options]. The internet options window open.
3.
Click on the [General] tab.
4.
Click on the [Languages] button at the bottom of the window. Another window opens.
5.
Select the preferred language. Click the [Add] button, when you need to add a new language to
6.
the list.
Click [Move up] to move the language to the top of the list.
7.
Click [OK] to confirm or [Cancel] to reject, in both windows.
8.
Click on the [Refresh] icon in the toolbar. Océ Express WebTools is displayed in your preferred
9.
language.
Chapter 3 - Define your Workflow with Océ Express WebTools
79
Page 80

Change the language settings in Google Chrome
Change the language settings in Google Chrome
Introduction
You can change the language settings for Océ Express WebTools in your preferred browser.
When to do
NOTE
It is possible that the internet options are put under a different menu, depending on the Google
Chrome version you use.
Procedure
Open Google Chrome.
1.
Click on the three-lined [Menu] icon next to the browser toolbar.
2.
Click on [Settings].
3.
Click on [Show advanced settings].
4.
Click on [Language and input settings...]. The languages window opens.
5.
Select the preferred language. Click on the [Add] button, when you need to add a new language
6.
to the list.
Click on the preferred language and drag it to the top of the list.
7.
Click on [Done] to confirm your entry.
8.
Click on the [Refresh] icon in the toolbar. Océ Express WebTools is displayed in your preferred
9.
language.
Chapter 3 - Define your Workflow with Océ Express WebTools
80
Page 81

Change the language settings in Mozilla Firefox
Change the language settings in Mozilla Firefox
Introduction
You can change the language settings for Océ Express WebTools in your preferred browser.
NOTE
It is possible that the options menu is put under a different menu, depending on the Mozilla
Firefox version you use.
Procedure
Open Mozilla Firefox.
1.
Click on [Firefox] in the upper left hand corner of the window.
2.
Click on [Options] - [Options]. The Options window opens.
3.
Click on the [Content] tab.
4.
In the [Languages] section click on the [Choose...] button. The languages window opens.
5.
Select the preferred language. Click the [Add] button, when you need to add a new language to
6.
the list.
Click [Move up] to move the language to the top of the list.
7.
Click [OK] to confirm or [Cancel] to reject, in both windows.
8.
Click on the [Reload] icon in the toolbar. Océ Express WebTools is displayed in your preferred
9.
language.
Chapter 3 - Define your Workflow with Océ Express WebTools
81
Page 82

How to edit a setting
How to edit a setting
Introduction
In Océ Express WebTools you can make settings to personalise your printing system.
Procedure
Browse to the settings group you want to edit, for example [Preferences] - [System defaults] -
1.
[Regional settings].
Click directly on the value of a setting, when you want to edit a single setting
2.
or
click [Edit] in the settings group bar to access a window with all settings, when you want to edit
more settings in the group.
NOTE
Before you can edit a setting or a settings group, you must log in as an authorised user.
Modify the settings.
3.
Click [Ok] to confirm, or [Cancel] to reject your entries.
4.
Chapter 3 - Define your Workflow with Océ Express WebTools
82
Page 83

View and check the settings
Introduction
In Océ Express WebTools you can view and check your settings. You can also check which
settings are no longer set to the factory default value.
Procedure
Open the [Configuration] tab or the [Preferences] tab.
1.
Click [View configuration] in the upper right hand corner of the screen. A window opens.
2.
Scroll through the list of settings. The first column displays the setting and the second column
3.
displays the values. A "*" indicates that the value of the setting is different from the original
factory default value.
NOTE
You can print the information with the standard print function of your browser.
View and check the settings
Chapter 3 - Define your Workflow with Océ Express WebTools
83
Page 84

Save the settings in a file
Save the settings in a file
Introduction
Save the settings and the values that you configured in Océ Express WebTools in a file.
Save the settings in a file to duplicate the settings very easily to another printer of the same type.
NOTE
Not all settings are stored in the settings file. The network settings are excluded from the file
because the network settings can not be transferred to another printer. The passwords for
authorised users and the passwords for external locations are excluded from the file for security
reasons. License information is not included in the file either.
Procedure
Open the [Configuration] tab or the [Preferences] tab.
1.
Click on [Save configuration] in the upper right hand corner of the screen. A window opens.
2.
Navigate to a location on the network to store the file.
3.
Save the settings<hostname of printer><date>.xml file. The file name is not fixed. You can
4.
change the name if required.
Click [Ok] to confirm, or [Cancel] to close the window without storing the file.
5.
Chapter 3 - Define your Workflow with Océ Express WebTools
84
Page 85

Load the settings from a file
Introduction
Load the settings and the values for Océ Express WebTools from a file. Load the settings from a
file to duplicate them to another printer of the same type.
NOTE
• Not all settings are stored in the settings file. The network settings are excluded from the file
because the network settings can not be transferred to another printer. The passwords for
authorised users and the passwords for external locations are excluded from the file for
security reasons. License information is not included in the file either.
• For this procedure, you need to log in as a Key operator, System administrator, or Power user.
The loaded settings depend on the login profile. Only the settings corresponding to the user
login are loaded.
Procedure
Open the [Configuration] tab, or the [Preferences] tab.
1.
Click [Restore configuration] in the upper right hand corner of the screen. A window opens.
2.
Navigate to a location on the network and select the settings file.
3.
Click [Ok] to load the settings file, or [Cancel] to close the window without loading the settings
4.
file.
In some cases a reboot dialogue appears.
Load the settings from a file
Result
The values of the settings in the settings file overwrite the current values. The network
configuration settings of the system and the passwords are not loaded to prevent connectivity
problems and to guarantee the integrity of the passwords.
Chapter 3 - Define your Workflow with Océ Express WebTools
85
Page 86

Restore the factory defaults
Restore the factory defaults
Introduction
Sometimes you want to go back to the initial settings. You can restore the factory default settings
in Océ Express WebTools.
NOTE
Log in as a Key Operator to only restore the Key Operator settings. Log in as a System
Administrator to only restore the System Administrator settings. To restore all the factory
default settings you must log in as a Power User.
Procedure
Open the [Configuration] tab, or the [Preferences] tab.
1.
Click [Restore defaults] in the upper right hand corner of the screen. A window opens.
2.
Click [Ok] to restore the factory default settings, or [Cancel] to close the window without restoring
3.
the factory defaults.
Chapter 3 - Define your Workflow with Océ Express WebTools
86
Page 87

Set the print job default settings
Definition
In Océ Express WebTools you can configure the default values for the print job settings. When
you optimise the print job default settings for your document, you get the best results.
The print job settings are grouped under the [Preferences] - [Print job defaults] tab. You can find a
short explanation of the most important print job default settings below. Under the print job
default settings you can also define the print presets that are visible on the user panel.
NOTE
• When you define print job settings in the printer drivers or the job submission tools, these
values always overrule the default values defined in Océ Express WebTools.
• Under the [Preferences] - [Print job defaults] tab, you can also make settings for the print
presets. Only the settings you make for the presets are visible on the multi-touch user panel,
under the Print tile. For more information on the print presets, see
on page 126.
Overview of the [Print job defaults] - [Basic] settings
Open the [Preferences] - [Print job defaults] tab. Go to [Basic] and click edit in the upper right
hand corner.
Set the print job default settings
Set the default print preset
Setting Description
[Number of sets] Enter the default value for the number of times you want your jobs
to be printed.
[Collate] • Select [On (sort by set)] to sort your output by set (123 - 123).
• Select [Off (sort by page)] to sort your output by page (11 - 22 -
33).
[Print delivery] • Select [Top Delivery Tray (TDT)] to default deliver your output
in the Top delivery tray.
• Select [Back output] to default deliver your output at the back of
the printer. Also select this option when you use the optional receiving rack or a folder.
Overview of the [Print job defaults] - [Sheet] settings
Open the [Preferences] - [Print job defaults] tab. Go to [Sheet] and click edit in the upper right
hand corner.
Chapter 3 - Define your Workflow with Océ Express WebTools
87
Page 88

Set the print job default settings
Setting Description
[Media source] Select the default output material and format for the media used
[Media selection policy] • Select [Automatic next larger] to allow the printer to use a me-
on the printer.
• Select [Automatic], to automatically select the media.
• Select [Manual feed] to insert a cut sheet.
• Select the specific roll number of the media you want to use by
default.
The system screen on the printer user panel displays the loaded
rolls.
NOTE
You can only configure the Media selection policy setting, when Media source is set to [Automatic].
dia roll larger than the size of the print, when the exact size is
not available.
• Select [Automatic exact fit] to only allow the printer to use a
media roll that has the exact media size of the print. When the
media roll with the exact media size is not available a media request appears.
[Cut method] • Select [Standard] to cut the print at a standard media size (DIN,
ANSI etc.).
• Select [Synchro] to cut the print at the end of the image.
• Select [Custom] (numeric) to cut the print at a specific length.
[Custom print length] Enter the cut length of your print job.
[Add leading strip] When you enter a value, the printer adds a blank strip of the speci-
fied length at the top of the output.
[Add trailing strip] When you enter a value, the printer adds a blank strip of the speci-
fied length at the bottom of the output.
Overview of the [Print job defaults] - [Layout] settings
Open the [Preferences] - [Print job defaults] tab. Go to [Layout] and click edit in the upper right
hand corner.
Setting Description
[Scale] • Select [Automatic scale to the media size] to scale the image to
the media.
• Select [Automatic scale down when image is larger than media]
to scale down the image one format smaller than the original.
• Select [Custom scale factor] to enter your own scale percentage, with 100 percent as no scaling.
[Mirror] Select [On] to mirror the image along the vertical axis - the media
transport direction.
Chapter 3 - Define your Workflow with Océ Express WebTools
88
4
Page 89

Setting Description
[Rotation] Select any option to rotate the image counter-clockwise.
When you want to print faster, select [Auto rotate landscape]. You
can print faster due to less media transport.
Select [Auto rotate media saving] to use the media in the most efficient way.
For more information, see
[Alignment] Select any of the options to define where to align the image on the
media.
For more information, see
[Horizontal shift] Define how much you want the image to shift horizontally, in the
chosen alignment position.
[Vertical shift] Define how much you want the image to shift vertically, in the
chosen alignment position.
Overview of the [Print job defaults] - [Image] settings
Open the [Preferences] - [Print job defaults] tab. Go to [Image] and click edit in the upper right
hand corner.
Set the print job default settings
Set the rotation mode
on page 159.
Set the alignment mode
on page 160.
Setting Description
[Print quality] • [Standard] is the default value.
• Select [Lines/text] for line drawings. The lines are sharpened.
• Select [Photo] for large photos. The printed output is optimised for
large grey areas.
Chapter 3 - Define your Workflow with Océ Express WebTools
89
Page 90

Set the copy job default settings
Set the copy job default settings
In Océ Express WebTools you can configure the default values for the copy job settings. When
you optimise the copy job default settings for your document, you get the best results.
The copy job settings are grouped under the [Preferences] - [Copy job defaults] tab. You can find
a short explanation of the General copy job settings below.
NOTE
Under the [Preferences] - [Copy job defaults] tab, you can also make settings for the copy
presets. Only the settings you make for the presets are visible on the multi-touch user panel,
under the Copy tile. For more information on the copy presets, see
on page 128.
Overview of the [Copy job defaults] - [General copy job settings]
Open the [Preferences] - [Copy job defaults] settings tab. Click edit in the upper right hand corner
of the [General copy job settings].
Setting Description
Set the default copy preset
[Productivity mode for
copy ('Lines/text' only)]
[Media selection policy] • Select [Next larger], to continue printing with a larger size me-
[Start value for ### in the
copy job name]
[File name for copy to
Smart Inbox]
• Select [Standard] for default speed.
• Select [Productive] for optimised speed: narrow originals are
scanned faster.
dia.
• Select [Exact size], to only continue printing when the specified
media size is available.
Fill in the number that replaces the # hashes in the name of copy
files. The number increases.
Fill in the copy filename used to save the copy in the Smart Inbox.
When the copy file name contains one or more # hashes, the #
hashes are replaced by ascending numbers.
Chapter 3 - Define your Workflow with Océ Express WebTools
90
Page 91

Set the scan job default settings
In Océ Express WebTools you can configure the default values for the scan job settings. When
you optimise the scan job default settings for your document, you get the best results.
The scan job settings are grouped under the [Preferences] - [Scan job defaults] tab. You can find a
short explanation of the General scan job settings below.
NOTE
• Under the [Preferences] - [Scan job defaults] tab, you can also make settings for the scan
presets. Only the settings you make for the presets are visible on the multi-touch user panel,
under the scan tile. For more information on the scan presets, see
on page 130.
• The file extensions that are defined in Scan job defaults, cannot be changed via the Smart
Inbox.
Overview of the [Scan job defaults] - [General scan job settings]
Open the [Preferences] - [Scan job defaults] tab. Click edit in the upper right hand corner of the
[General scan job settings] section.
Set the scan job default settings
Set the default scan preset
Setting Description
[File extension for scan to
PDF]
[File extension for scan to
TIFF]
[File extension for scan to
JPEG]
[File extension for scan to
CALS]
[Default destination for
scan jobs]
Enter any text string. The string is the file extension for scan-toPDF (default: pdf).
Enter any text string. The string is the file extension for scan-toTIFF (default: tif).
Enter any text string. The string is the file extension for scan-toJPEG (default: jpg).
Enter any text string. The string is the file extension for scan-toCALS (default: cal).
• Select [Default Smart Inbox] to send the jobs to the Smart Inbox
that has been set as default.
• Select [Default external location] to send the jobs to the external
location that has been set as default.
NOTE
When you select [Default external location] and the enabled functionalities are set to [Print from only] or [None],
the scan job cannot be sent to the external location and
is sent to the [Default Smart Inbox]. For more information, see
[Scan delivery retry interval]
When a scan is delivered to a remote location and scan delivery
fails, the printer retries after the time you set here.
Set a default external location
on page 138.
[Start value for ### in the
scan file name]
Fill in the number that replaces the # hashes in the name of scans
to the Smart Inbox. The number increases after each scan.
Chapter 3 - Define your Workflow with Océ Express WebTools
4
91
Page 92

Set the scan job default settings
Setting Description
[File name for scan to
Smart Inbox]
Fill in the scan file name used for scans to the Smart Inbox. When
the scan file name contains one or more # hashes, the # hashes
are replaced by ascending numbers.
NOTE
Note that you can always change the file name on the
user panel. Touch the name on the screen before you
start the scan, and fill in the new name.
Chapter 3 - Define your Workflow with Océ Express WebTools
92
Page 93

Manage Jobs on your Printing System
The Smart Inbox and the queue concept
Definition
You can use the Smart Inbox for customised job management. A Smart Inbox works as a
personal mailbox in which you can store jobs and where you can scan jobs to. Jobs that are
waiting to be processed are visible in the Queue.
Concept The Job queue The Smart Inbox
Metaphor Production belt Personal mailboxes
Manage Jobs on your Printing System
User intention • get the job printed as soon as pos-
Used to • get feedback of printer progress
Jobs in a Smart Inbox
You can use Smart Inboxes to manage your jobs. When you open the Jobs tab in Océ Express
WebTools the Smart Inbox section displays an overview of the Smart Inboxes. Define one or
more Smart Inbox names that allow you to easily organise and access your jobs.
Different kinds of Smart Inboxes can be created in Océ Express WebTools:
• You can create Smart Inboxes for print jobs. You create these Smart Inboxes in Océ Express
WebTools under the Jobs tab. When you create a Smart Inbox for print jobs, it is only visible
on your local browser. When you send a print job to the printer, the user panel will also display
the Smart Inbox.
• An operator can create Smart Inboxes for scan jobs. The operator can create these Smart
Inboxes in Océ Express WebTools under the Configuration tab. The Smart Inbox for scan jobs
is visible on your local browser, and on the user panel. This way the operator can organise the
Smart Inboxes for scan jobs for departmental, project, or personal use.
sible
• cancel requests
• change priority (local)
• send jobs to the system
• organise jobs
• keep together sets of documents
from various origin
• organise documents over various
Smart Inboxes, to easily retrieve
jobs
• reprint jobs or change settings of
jobs that are already sent to the
printer
In the printer driver application or job submitter you can select the specific Smart Inbox you want
to print to. Under the [Preferences] - [System defaults] - [Job management] - [Override
destination of print jobs] setting you determine whether a job is also sent to the Job queue. When
Chapter 3 - Define your Workflow with Océ Express WebTools
93
Page 94

The Smart Inbox and the queue concept
a print job is kept in the Smart Inbox, you can start the print job manually on the user panel or in
Océ Express WebTools.
Chapter 3 - Define your Workflow with Océ Express WebTools
94
Page 95

The Smart Inbox and the queue functionality
The Smart Inbox and the queue functionality
Introduction
All print jobs sent via printer drivers, applications or one of the Océ Publisher job submitters are
placed in a Smart Inbox. You can select the Smart Inbox as an external location. When jobs are
being processed, they are visible in the Job queue or Scan queue.
Smart Inbox functionality
You can view and manage your jobs under the Jobs tab of Océ Express WebTools. The Smart
Inbox section and the queue section have various functionalities that help you control your jobs.
Functionality Description
[View] To view the image itself and show more job information click on the
job name in the Smart Inbox. You can also change the job name here.
[Delete] To delete a job from the Smart Inbox select the job and click [Delete].
[Edit] To edit the job settings of a job select the job and click [Edit]. A window
opens where you can change a limited number of job settings.
[Print] To print a job select the job and click [Print]. The job is copied into the
Job queue. The job remains in the Smart Inbox.
NOTE
The [Preferences] - [System defaults] - [Job management] [Keep completed jobs in the Smart Inbox] setting determines
whether jobs that have been printed will be kept in the Smart
Inbox for reprint or not.
[Save] You can select a scan job and save it on a location on the PC.
NOTE
Only one user at a time can save a scan job. When more
users save a scan job, the downloads will take place one after
the other. If a dialogue to select the save location is still open,
the download will not start.
[Send to...] You can select a scan job and send it to a predefined external location.
[Delete] When you click [Delete] the selected jobs are deleted the Smart Inbox.
NOTE
The View all Smart Inbox is only available when you enable the [Preferences] - [System defaults]
- [Job management] - [Display a view on all Smart Inbox jobs].
Job queue functionality
The print jobs in line waiting to be printed are listed in the Job queue.
Functionality
[Top] To increase the print priority of a job in the queue, you can select the
[Delete] To delete a job from the queue, select the job and click [Delete].
[Delete all] To empty the queue completely, click the [Delete all] button.
Description
job and click [Top] to place the job on top of the queue.
Chapter 3 - Define your Workflow with Océ Express WebTools
95
Page 96

The Smart Inbox and the queue functionality
Scan queue functionality
The scan jobs in line waiting to be sent to the right location are listed in the Scan queue. When a
job is succesfully sent, the job is removed from the queue.
Functionality Description
[Delete] To delete a job from the queue, select the job and click [Delete].
[Retry] To retry to send a job, select the job and click [Retry].
[Send to...] To send a job to a new destination, select the job and click [Send to...].
Then select the destination.
Chapter 3 - Define your Workflow with Océ Express WebTools
96
Page 97

Use Smart Inboxes in a multiple-user environment
Use Smart Inboxes in a multiple-user environment
Introduction
A multiple-user environment is a working environment in which users directly send jobs to the
printer and collect their own prints. In this environment it is important for a user to have easy
access to personal jobs.
Illustration
Procedure
Open the [Preferences] - [System defaults] tab.
1.
Select [Edit] in [Job management].
2.
Enter the following values (example):
3.
Setting Value
[Publisher Express] [Disabled]
[Restrict remote actions on jobs to the Key Operator] [Disabled]
[Display Smart Inboxes in Express WebTools] [Disabled]
[Display a view on all Smart Inbox jobs] [No]
[Override destination of print jobs] [No, as specified in the job tick-
et]
[Keep completed jobs in the Smart Inbox] [Yes]
[Keep a copy of local print jobs in the Smart Inbox] [Disabled]
[Default destination of print jobs] [Only Smart Inbox]
[Remove completed jobs from the Smart Inbox after ] For example: 48 hours
[Expiration time-out for Smart Inbox copy and scan jobs] For example: 48 hours
[Default Smart Inbox] [Public]
Chapter 3 - Define your Workflow with Océ Express WebTools
97
Page 98

Use Smart Inboxes in a repro environment
Use Smart Inboxes in a repro environment
Introduction
A repro environment is a working environment in which a repro operator handles all the jobs. In
this environment the repro operator can use the Smart Inbox to organise his daily work.
Illustration
Procedure
Open the [Preferences] - [System defaults] tab.
1.
Select [Edit] in [Job management].
2.
Enter the following values (example):
3.
Setting Value
[Publisher Express] [Yes]
[Restrict remote actions on jobs to the Key Operator] [Yes]
[Display Smart Inboxes in Express WebTools] [Yes]
[Display a view on all Smart Inbox jobs] [Yes]
[Override destination of print jobs] [No, as specified in the job tick-
et]
[Keep completed jobs in the Smart Inbox] [Yes]
[Keep a copy of local print jobs in the Smart Inbox] [Yes]
[Default destination of print jobs] [Both queue and Smart Inbox]
[Remove completed jobs from the Smart Inbox after ] For example: 48 hours
[Expiration time-out for Smart Inbox copy and scan jobs] For example: 8 hours
[Default Smart Inbox] [Public]
Chapter 3 - Define your Workflow with Océ Express WebTools
98
Page 99

Use Smart Inboxes in a multiple-user and repro environment
Use Smart Inboxes in a multiple-user and repro environment
Introduction
A multiple-user and repro environment is a working environment in which both users directly
send jobs and collect their own prints at the printer. The system is also used by a repro operator.
In this environment it is important for a user to have easy access to his personal jobs, but it is
also important for the repro operator to have an overview of all jobs. To make this process more
easy, the operator can create personal Smart Inboxes for his users. This way the users can
manage their own jobs and the operator can manage control. For more information on how to do
this, see
Illustration
Create and open a Smart Inbox for scan jobs
on page 102
Procedure
Open the [Preferences] - [System defaults] tab.
1.
Select [Edit] in [Job management].
2.
Enter the following values (example):
3.
Setting Value
[Publisher Express] [Yes]
[Restrict remote actions on jobs to the Key Operator] [Yes]
[Display Smart Inboxes in Express WebTools] [Yes]
Depends on customer requirements
[Display a view on all Smart Inbox jobs] [Yes]
[Override destination of print jobs] [No, as specified in the job tick-
et]
[Keep completed jobs in the Smart Inbox] [Yes]
[Keep a copy of local print jobs in the Smart Inbox] [Disabled]
[Default destination of print jobs] [Only Smart Inbox]
[Remove completed jobs from the Smart Inbox after ] For example: 48 hours
[Expiration time-out for Smart Inbox copy and scan jobs] For example: 8 hours
[Default Smart Inbox] [Public]
Chapter 3 - Define your Workflow with Océ Express WebTools
99
Page 100

Create and open a Smart Inbox for print jobs (Smart Inbox section)
Create and open a Smart Inbox for print jobs (Smart Inbox section)
Introduction
There are two ways to create and open a Smart Inbox for print jobs in Océ Express WebTools:
• In the Smart Inbox section under the [Jobs] tab.
• In Publisher Express.
NOTE
• Note that the Smart Inboxes for print jobs created in the Smart Inbox section and Publisher
Express are only visible on your personal browser. When you send a print job to the specific
Smart Inbox, that Smart Inbox also becomes visible on the user panel.
• Note that the Smart Inboxes or print jobs created in the Smart Inbox section and Publisher
Express are not permanent. Once the Smart Inbox is empty, it will disappear.
Procedure
Select the [Jobs] tab.
1.
Click on [Open Smart Inbox].
2.
Click on the blank field to open a drop-down list with the Smart Inboxes available on your system.
3.
You can open an existing Smart Inbox from the list or you can type the name of a new Smart
Inbox.
Enter the name of the new Smart Inbox and press Enter, or select the desired Smart Inbox from
4.
the list.
The Smart Inbox is now displayed in the Smart Inbox section.
Chapter 3 - Define your Workflow with Océ Express WebTools
100
 Loading...