

Page 1
1.1.1.
Océ OP1018
Printing System
Advanced Operations Guide
Education Services
Océ
Operations Guide
English version
Page 2

The KM-1820 model is applicable to USA, Canada, and the Asia
Pacific region.
The FS-1118MFP model is applicable to Europe and Australasia.
Page 3

ADVANCED OPERATION GUIDE iii
Contents
Introduction
Guides included . . . . . . . . . . . . . . . . . . . . . . . . . . . . . . . . . . . . . . . . . . . . . . . . . . . . . . . . . . . . . . . v
Conventions . . . . . . . . . . . . . . . . . . . . . . . . . . . . . . . . . . . . . . . . . . . . . . . . . . . . . . . . . . . . . . . . . . vi
Accessing Menu Items . . . . . . . . . . . . . . . . . . . . . . . . . . . . . . . . . . . . . . . . . . . . . . . . . . . . . . . . . vii
1 Copying Functions
Selecting the Paper Source . . . . . . . . . . . . . . . . . . . . . . . . . . . . . . . . . . . . . . . . . . . . . . . . . . . . 1-1
Selecting the Original Size for Copying. . . . . . . . . . . . . . . . . . . . . . . . . . . . . . . . . . . . . . . . . . . . 1-1
Selecting Original Quality Mode . . . . . . . . . . . . . . . . . . . . . . . . . . . . . . . . . . . . . . . . . . . . . . . . . 1-2
Adjusting Copy Exposure . . . . . . . . . . . . . . . . . . . . . . . . . . . . . . . . . . . . . . . . . . . . . . . . . . . . . . 1-2
Selecting the Number of Copies . . . . . . . . . . . . . . . . . . . . . . . . . . . . . . . . . . . . . . . . . . . . . . . . . 1-3
Zoom Copying. . . . . . . . . . . . . . . . . . . . . . . . . . . . . . . . . . . . . . . . . . . . . . . . . . . . . . . . . . . . . . . 1-3
Selecting Original Placement . . . . . . . . . . . . . . . . . . . . . . . . . . . . . . . . . . . . . . . . . . . . . . . . . . . 1-4
Using Collate Mode. . . . . . . . . . . . . . . . . . . . . . . . . . . . . . . . . . . . . . . . . . . . . . . . . . . . . . . . . . . 1-5
Using Combine Mode . . . . . . . . . . . . . . . . . . . . . . . . . . . . . . . . . . . . . . . . . . . . . . . . . . . . . . . . . 1-5
Continuous Copying . . . . . . . . . . . . . . . . . . . . . . . . . . . . . . . . . . . . . . . . . . . . . . . . . . . . . . . . . . 1-9
EcoPrint Mode. . . . . . . . . . . . . . . . . . . . . . . . . . . . . . . . . . . . . . . . . . . . . . . . . . . . . . . . . . . . . . 1-10
Print Override Mode . . . . . . . . . . . . . . . . . . . . . . . . . . . . . . . . . . . . . . . . . . . . . . . . . . . . . . . . . 1-11
File Name Entry . . . . . . . . . . . . . . . . . . . . . . . . . . . . . . . . . . . . . . . . . . . . . . . . . . . . . . . . . . . . 1-11
Sending the Job End Report . . . . . . . . . . . . . . . . . . . . . . . . . . . . . . . . . . . . . . . . . . . . . . . . . . . 1-13
2 Scanning Functions
Using the Scanning Function . . . . . . . . . . . . . . . . . . . . . . . . . . . . . . . . . . . . . . . . . . . . . . . . . . . 2-1
Scanning Documents . . . . . . . . . . . . . . . . . . . . . . . . . . . . . . . . . . . . . . . . . . . . . . . . . . . . . . . . . 2-2
Using the Address Book . . . . . . . . . . . . . . . . . . . . . . . . . . . . . . . . . . . . . . . . . . . . . . . . . . . . . . . 2-4
Selecting Color Scan Mode. . . . . . . . . . . . . . . . . . . . . . . . . . . . . . . . . . . . . . . . . . . . . . . . . . . . . 2-5
Selecting the Original Quality for Scanning. . . . . . . . . . . . . . . . . . . . . . . . . . . . . . . . . . . . . . . . . 2-5
Selecting the Scanning Resolution . . . . . . . . . . . . . . . . . . . . . . . . . . . . . . . . . . . . . . . . . . . . . . . 2-6
Adjusting the Exposure for Scanning . . . . . . . . . . . . . . . . . . . . . . . . . . . . . . . . . . . . . . . . . . . . . 2-6
Selecting the Original Size for Scanning. . . . . . . . . . . . . . . . . . . . . . . . . . . . . . . . . . . . . . . . . . . 2-7
Selecting the Send Size . . . . . . . . . . . . . . . . . . . . . . . . . . . . . . . . . . . . . . . . . . . . . . . . . . . . . . . 2-7
Zoom Scanning . . . . . . . . . . . . . . . . . . . . . . . . . . . . . . . . . . . . . . . . . . . . . . . . . . . . . . . . . . . . . . 2-8
Selecting the Original Placement for Scanning. . . . . . . . . . . . . . . . . . . . . . . . . . . . . . . . . . . . . . 2-8
Continuous Scanning . . . . . . . . . . . . . . . . . . . . . . . . . . . . . . . . . . . . . . . . . . . . . . . . . . . . . . . . . 2-9
Selecting the Image File Format . . . . . . . . . . . . . . . . . . . . . . . . . . . . . . . . . . . . . . . . . . . . . . . . 2-10
Entering the Name of send job . . . . . . . . . . . . . . . . . . . . . . . . . . . . . . . . . . . . . . . . . . . . . . . . . 2-10
Entering the Subject and Body Message of the E-Mail. . . . . . . . . . . . . . . . . . . . . . . . . . . . . . . 2-11
Reporting the End of Scanning . . . . . . . . . . . . . . . . . . . . . . . . . . . . . . . . . . . . . . . . . . . . . . . . . 2-12
Scanning with TWAIN . . . . . . . . . . . . . . . . . . . . . . . . . . . . . . . . . . . . . . . . . . . . . . . . . . . . . . . . 2-13
3 Printer Settings
Parallel Setting . . . . . . . . . . . . . . . . . . . . . . . . . . . . . . . . . . . . . . . . . . . . . . . . . . . . . . . . . . . . . . 3-1
Network Settings . . . . . . . . . . . . . . . . . . . . . . . . . . . . . . . . . . . . . . . . . . . . . . . . . . . . . . . . . . . . . 3-2
Setting the Emulation Mode . . . . . . . . . . . . . . . . . . . . . . . . . . . . . . . . . . . . . . . . . . . . . . . . . . . . 3-6
4 Operation Status
Status Screen . . . . . . . . . . . . . . . . . . . . . . . . . . . . . . . . . . . . . . . . . . . . . . . . . . . . . . . . . . . . . . . 4-1
Checking Jobs Status . . . . . . . . . . . . . . . . . . . . . . . . . . . . . . . . . . . . . . . . . . . . . . . . . . . . . . . . . 4-2
Verifying Job Log. . . . . . . . . . . . . . . . . . . . . . . . . . . . . . . . . . . . . . . . . . . . . . . . . . . . . . . . . . . . . 4-2
Pausing Jobs. . . . . . . . . . . . . . . . . . . . . . . . . . . . . . . . . . . . . . . . . . . . . . . . . . . . . . . . . . . . . . . . 4-2
Page 4

ADVANCED OPERATION GUIDE iv
Canceling Jobs . . . . . . . . . . . . . . . . . . . . . . . . . . . . . . . . . . . . . . . . . . . . . . . . . . . . . . . . . . . . . . 4-3
Verifying Scanner Status . . . . . . . . . . . . . . . . . . . . . . . . . . . . . . . . . . . . . . . . . . . . . . . . . . . . . . . 4-4
Verifying Printer Status . . . . . . . . . . . . . . . . . . . . . . . . . . . . . . . . . . . . . . . . . . . . . . . . . . . . . . . . 4-4
Verifying the Toner Status . . . . . . . . . . . . . . . . . . . . . . . . . . . . . . . . . . . . . . . . . . . . . . . . . . . . . . 4-4
Verifying Settings for the Cassettes and MP Tray. . . . . . . . . . . . . . . . . . . . . . . . . . . . . . . . . . . . 4-5
Printing Reports . . . . . . . . . . . . . . . . . . . . . . . . . . . . . . . . . . . . . . . . . . . . . . . . . . . . . . . . . . . . . 4-5
Verifying Total Number of Prints and Scans . . . . . . . . . . . . . . . . . . . . . . . . . . . . . . . . . . . . . . . . 4-6
5 System Settings
Display Settings . . . . . . . . . . . . . . . . . . . . . . . . . . . . . . . . . . . . . . . . . . . . . . . . . . . . . . . . . . . . . 5-1
Print Quality Settings. . . . . . . . . . . . . . . . . . . . . . . . . . . . . . . . . . . . . . . . . . . . . . . . . . . . . . . . . . 5-3
Machine Settings. . . . . . . . . . . . . . . . . . . . . . . . . . . . . . . . . . . . . . . . . . . . . . . . . . . . . . . . . . . . . 5-5
Timer Settings . . . . . . . . . . . . . . . . . . . . . . . . . . . . . . . . . . . . . . . . . . . . . . . . . . . . . . . . . . . . . . 5-11
Size Settings . . . . . . . . . . . . . . . . . . . . . . . . . . . . . . . . . . . . . . . . . . . . . . . . . . . . . . . . . . . . . . . 5-16
Editing the Address Book . . . . . . . . . . . . . . . . . . . . . . . . . . . . . . . . . . . . . . . . . . . . . . . . . . . . . 5-21
Printing the Service Pages . . . . . . . . . . . . . . . . . . . . . . . . . . . . . . . . . . . . . . . . . . . . . . . . . . . . 5-24
6 User Login Management
Entering User Login . . . . . . . . . . . . . . . . . . . . . . . . . . . . . . . . . . . . . . . . . . . . . . . . . . . . . . . . . . 6-1
ID management. . . . . . . . . . . . . . . . . . . . . . . . . . . . . . . . . . . . . . . . . . . . . . . . . . . . . . . . . . . . . . 6-1
7 Job Accounting
Managing Accounts. . . . . . . . . . . . . . . . . . . . . . . . . . . . . . . . . . . . . . . . . . . . . . . . . . . . . . . . . . . 7-2
Setting Limitation of Use . . . . . . . . . . . . . . . . . . . . . . . . . . . . . . . . . . . . . . . . . . . . . . . . . . . . . . . 7-2
Deleting an Account . . . . . . . . . . . . . . . . . . . . . . . . . . . . . . . . . . . . . . . . . . . . . . . . . . . . . . . . . . 7-4
Changing Limitation of Use . . . . . . . . . . . . . . . . . . . . . . . . . . . . . . . . . . . . . . . . . . . . . . . . . . . . . 7-4
All Account Management . . . . . . . . . . . . . . . . . . . . . . . . . . . . . . . . . . . . . . . . . . . . . . . . . . . . . . 7-4
Individual Account Management . . . . . . . . . . . . . . . . . . . . . . . . . . . . . . . . . . . . . . . . . . . . . . . . . 7-5
Default Settings. . . . . . . . . . . . . . . . . . . . . . . . . . . . . . . . . . . . . . . . . . . . . . . . . . . . . . . . . . . . . . 7-7
Using Job Accounting . . . . . . . . . . . . . . . . . . . . . . . . . . . . . . . . . . . . . . . . . . . . . . . . . . . . . . . . . 7-8
8 Using COMMAND CENTER
System Requirements. . . . . . . . . . . . . . . . . . . . . . . . . . . . . . . . . . . . . . . . . . . . . . . . . . . . . . . . . 8-1
Accessing COMMAND CENTER . . . . . . . . . . . . . . . . . . . . . . . . . . . . . . . . . . . . . . . . . . . . . . . . 8-2
COMMAND CENTER Pages . . . . . . . . . . . . . . . . . . . . . . . . . . . . . . . . . . . . . . . . . . . . . . . . . . . 8-3
Start Page . . . . . . . . . . . . . . . . . . . . . . . . . . . . . . . . . . . . . . . . . . . . . . . . . . . . . . . . . . . . . . . . . . 8-4
Basic Page . . . . . . . . . . . . . . . . . . . . . . . . . . . . . . . . . . . . . . . . . . . . . . . . . . . . . . . . . . . . . . . . . 8-6
Printer Page . . . . . . . . . . . . . . . . . . . . . . . . . . . . . . . . . . . . . . . . . . . . . . . . . . . . . . . . . . . . . . . 8-11
Scanner Page . . . . . . . . . . . . . . . . . . . . . . . . . . . . . . . . . . . . . . . . . . . . . . . . . . . . . . . . . . . . . . 8-12
FAX Page . . . . . . . . . . . . . . . . . . . . . . . . . . . . . . . . . . . . . . . . . . . . . . . . . . . . . . . . . . . . . . . . . 8-14
Jobs Page . . . . . . . . . . . . . . . . . . . . . . . . . . . . . . . . . . . . . . . . . . . . . . . . . . . . . . . . . . . . . . . . . 8-17
Advanced Page. . . . . . . . . . . . . . . . . . . . . . . . . . . . . . . . . . . . . . . . . . . . . . . . . . . . . . . . . . . . . 8-18
9 Optional Equipment
Available Options . . . . . . . . . . . . . . . . . . . . . . . . . . . . . . . . . . . . . . . . . . . . . . . . . . . . . . . . . . . . 9-1
Document Processor. . . . . . . . . . . . . . . . . . . . . . . . . . . . . . . . . . . . . . . . . . . . . . . . . . . . . . . . . . 9-2
Paper Feeder . . . . . . . . . . . . . . . . . . . . . . . . . . . . . . . . . . . . . . . . . . . . . . . . . . . . . . . . . . . . . . . 9-4
Expansion Memory . . . . . . . . . . . . . . . . . . . . . . . . . . . . . . . . . . . . . . . . . . . . . . . . . . . . . . . . . . . 9-4
FAX System . . . . . . . . . . . . . . . . . . . . . . . . . . . . . . . . . . . . . . . . . . . . . . . . . . . . . . . . . . . . . . . . 9-5
Appendix
Paper Selection. . . . . . . . . . . . . . . . . . . . . . . . . . . . . . . . . . . . . . . . . . . . . . . . . . . . . . . .Appendix-1
Function Combination Tables . . . . . . . . . . . . . . . . . . . . . . . . . . . . . . . . . . . . . . . . . . . .Appendix-10
Glossary
Index
Page 5

ADVANCED OPERATION GUIDE v
Introduction
Guides included
The following guides are included with this machine. Refer to the guide that
corresponds to your particular objective.
Installation Guide
This Guide contains instructions for assembling and installing the machine.
Operation Guide
This Operation Guide contains explanations on the initial installation and set-up of
this machine, the procedure to connect it to a computer, and the basic procedures
for using this machine as a copier, printer, and scanner as well as for resolving
problems if trouble occurs.
Advanced Operation Guide (This guide)
The Advanced Operation Guide contains explanations on copier, printer, and
scanner functions as well as default settings that can be adjusted on this machine.
This guide is stored on the CD-ROM as a PDF document.
Kyocera Extended Driver (KX Driver) User Guide
Describes how to install and set the printer driver. This guide is stored on the CDROM as a PDF document.
Network FAX Driver Operation Guide
Describes how to use the Network FAX Driver to send documents created on a
network computer directly from that computer to the other FAX System. This guide
is stored on the CD-ROM as a PDF document.
PRESCRIBE Technical Reference
PRESCRIBE is the native language of the Kyocera Mita printers. This Technical
Reference contains the information about how the printing is performed using the
PRESCRIBE commands as well as the font and emulation description. This guide is
stored on the CD-ROM as a PDF document.
PRESCRIBE Command Reference
Gives a detailed explanation of the PRESCRIBE command syntax and parameters
with the aid of print examples. This guide is stored on the CD-ROM as a PDF
document.
KM-NET for Clients Operation Guide
KM-NET for Clients is a network printing utility intended to monitor and configure the
printing system. This guide describes how to install and operate KM-NET for Clients.
This guide is stored on the CD-ROM as a PDF document.
Page 6

Introduction
vi ADVANCED OPERATION GUIDE
KM-NET for Direct Printing Operation Guide
KM-NET for Direct Printing is a utility that allows you to directly print PDF files without
starting Adobe Acrobat by directly sending a PDF file through the Windows spooler.
This guide describes how to install and operate KM-NET for Direct Printing. This
guide is stored on the CD-ROM as a PDF document.
Conventions
This manual uses the following conventions.
Convention Description Example
Italic Typeface Used to emphasise a key word,
phrase or message. In addition,
references to other publications
are displayed in italic typeface.
The screen shows Completed and returns
to the Basic screen.
Notes Used to provide additional or
useful information about a function
or feature. Can also contain
references to other publications.
NOTE: For information about storing the
pin, refer to step 10.
Important Used to provide important
information.
IMPORTANT: Ensure paper is not folded,
curled, or damaged.
Caution Cautions are statements that
suggest mechanical damage as a
result of an action.
CAUTION: Do not pull the cassette out
when holding the front of the machine.
Warning Used to alert users to the
possibility of personal injury.
WARNING: High voltage is present in
the charger section.
Page 7

Introduction
ADVANCED OPERATION GUIDE vii
Accessing Menu Items
When you configure the machine, you do so by accessing a menu item and making
your setting from there. Each configuration instruction in this guide tells you to
access the menu item and provides a route map to direct you to that item. An
example of a route map and its significance is shown below.
.
System Menu/
Counter
This represents the control panel button to be pressed.
S or T
Press the up or down button until System Setting is displayed.
System Setting
Enter
S or T
Press the up or down button until Network Setting is displayed.
Network Setting
Enter
S or T
Press the up or down button until TCP/IP Setting is displayed.
TCP/IP Setting
Enter
S or T
Press the up or down button until IP Address is displayed.
IP Address
Enter
Page 8

Introduction
viii ADVANCED OPERATION GUIDE
Page 9

ADVANCED OPERATION GUIDE 1-1
1 Copying Functions
Selecting the Paper Source
1
Press Copy. The basic screen is displayed.
2
Press Paper Select.
3
Press S or T to select the required cassette or the MP Tray and press Enter.
For a cassette, the display shows Completed and returns to the basic screen.
For the MP tray, the MP Tray Size screen is displayed. Proceed to the next step.
4
Press S or T to select the paper size required and press Enter. The MP Tray Type
screen is displayed.
If the paper size is not shown, select Others and press Enter then select from the
Others screen.
5
Press S or T to select the media type required and press Enter. The display shows
Completed and returns to the basic screen.
Selecting the Original Size for Copying
1
Press Copy. The basic screen is displayed.
2
Press Original Size.
3
Press S or T to select the size of the original or, if the size of the original is not
shown in the display select Others and press Enter.
For a standard size, the display shows Completed and returns to the basic screen.
For Others proceed to the next step.
4
Press S or T to select the size of the original and press Enter. The display shows
Completed and returns to the basic screen.
Mode Description
Auto Automatically selects and feeds paper from the cassette
or the MP tray, whichever holds the paper size to be
used.
Cassette1 Feeds paper from cassette 1.
Cassette2 Feeds paper from the optional cassette 2 if it is
installed.
MP Tray Feeds paper from the MP tray if the paper size and type
has been registered.
Page 10
Copying Functions
1-2 ADVANCED OPERATION GUIDE
Selecting Original Quality Mode
The original quality mode selects the copy quality according to the type of originals.
1
Press Copy. The basic screen is displayed.
2
Press Original Quality.
3
PressS or T to select the mode and press Enter. The display shows Completed and
returns to the basic screen.
Adjusting Copy Exposure
The default exposure is Manual.
1
Press Copy. The basic screen is displayed.
2
Press Exposure.
3
Press S or T to select Manual and press Enter.
If you selected Auto, the display shows Completed and returns to the basic screen.
If you selected Manual, the Manual screen is displayed. Proceed to the next step.
4
Press S or T to adjust the required value for the exposure. Press Enter. The display
shows Completed and returns to the basic screen.
Mode Description
Text + Ph oto Select this mode when the original contains a mixture of
both text and photographs.
Photo Select this mode when the original contains mostly
photographs.
Text Select this mode when the original contains mostly text.
Mode Description
Auto The machine automatically selects the optimal
exposure setting for the original being copied.
Manual The copy exposure setting is selected manually. There
are 7 exposure levels available.
Page 11

Copying Functions
ADVANCED OPERATION GUIDE 1-3
Selecting the Number of Copies
Leaving more than approximately 30 sheets of standard paper or one sheet of
special paper in the face-up tray and more than approximately 150 sheets of
standard paper in the output tray may damage the machine.
1
Press Copy. The basic screen is displayed.
2
Use the numeric keys to change the number of copies to be made from 1 to 999.
3
To cancel the number of copies entered, press Stop/Clear. The display will be set to
1.
Zoom Copying
The following modes are available for zooming.
1
Press Copy. The basic screen is displayed.
2
Press left Select.
3
Press S or T to select the zoom type required and press Enter. You can choose
100%, Auto, Standard Zoom or Zoom Entry.
For 100% and Auto, the display shows Completed and returns to the basic screen.
The original will be copied on the selected paper size.
For Standard Zoom, press S or T to select the zoom ratio. Press Enter. The display
shows Completed and returns to the basic screen.
Mode Description
100% Makes copies of the same size as the original.
Auto Adjusts the zoom ratio so that the copied image fits
onto the selected copy size.
Standard Zoom Makes copies at one of the fixed zoom ratios. The
following ratios are available:
200%
141% (A5 >> A4)
129% (Statement >> Letter)
115% (B5 >> A4)
100%
90% (Folio >> A4)
86% (A4 >> B5)
78% (Legal >> Letter)
70% (A4 >> A5)
64% (Letter >> Statement)
50%
Zoom Entry Sets the zoom ratio between 50% and 200% in 1%
increment.
Page 12
Copying Functions
1-4 ADVANCED OPERATION GUIDE
For Zoom Entry, press S or T or use the numeric keys to change the ratio in 1%
increments. Press Enter. The display shows Completed and returns to the basic
screen.
Selecting Original Placement
1
Press Copy. The basic screen is displayed.
2
Press Function.
3
Press S or T to select Orig. Placement and press Enter. The Orig. Placement
screen is displayed.
4
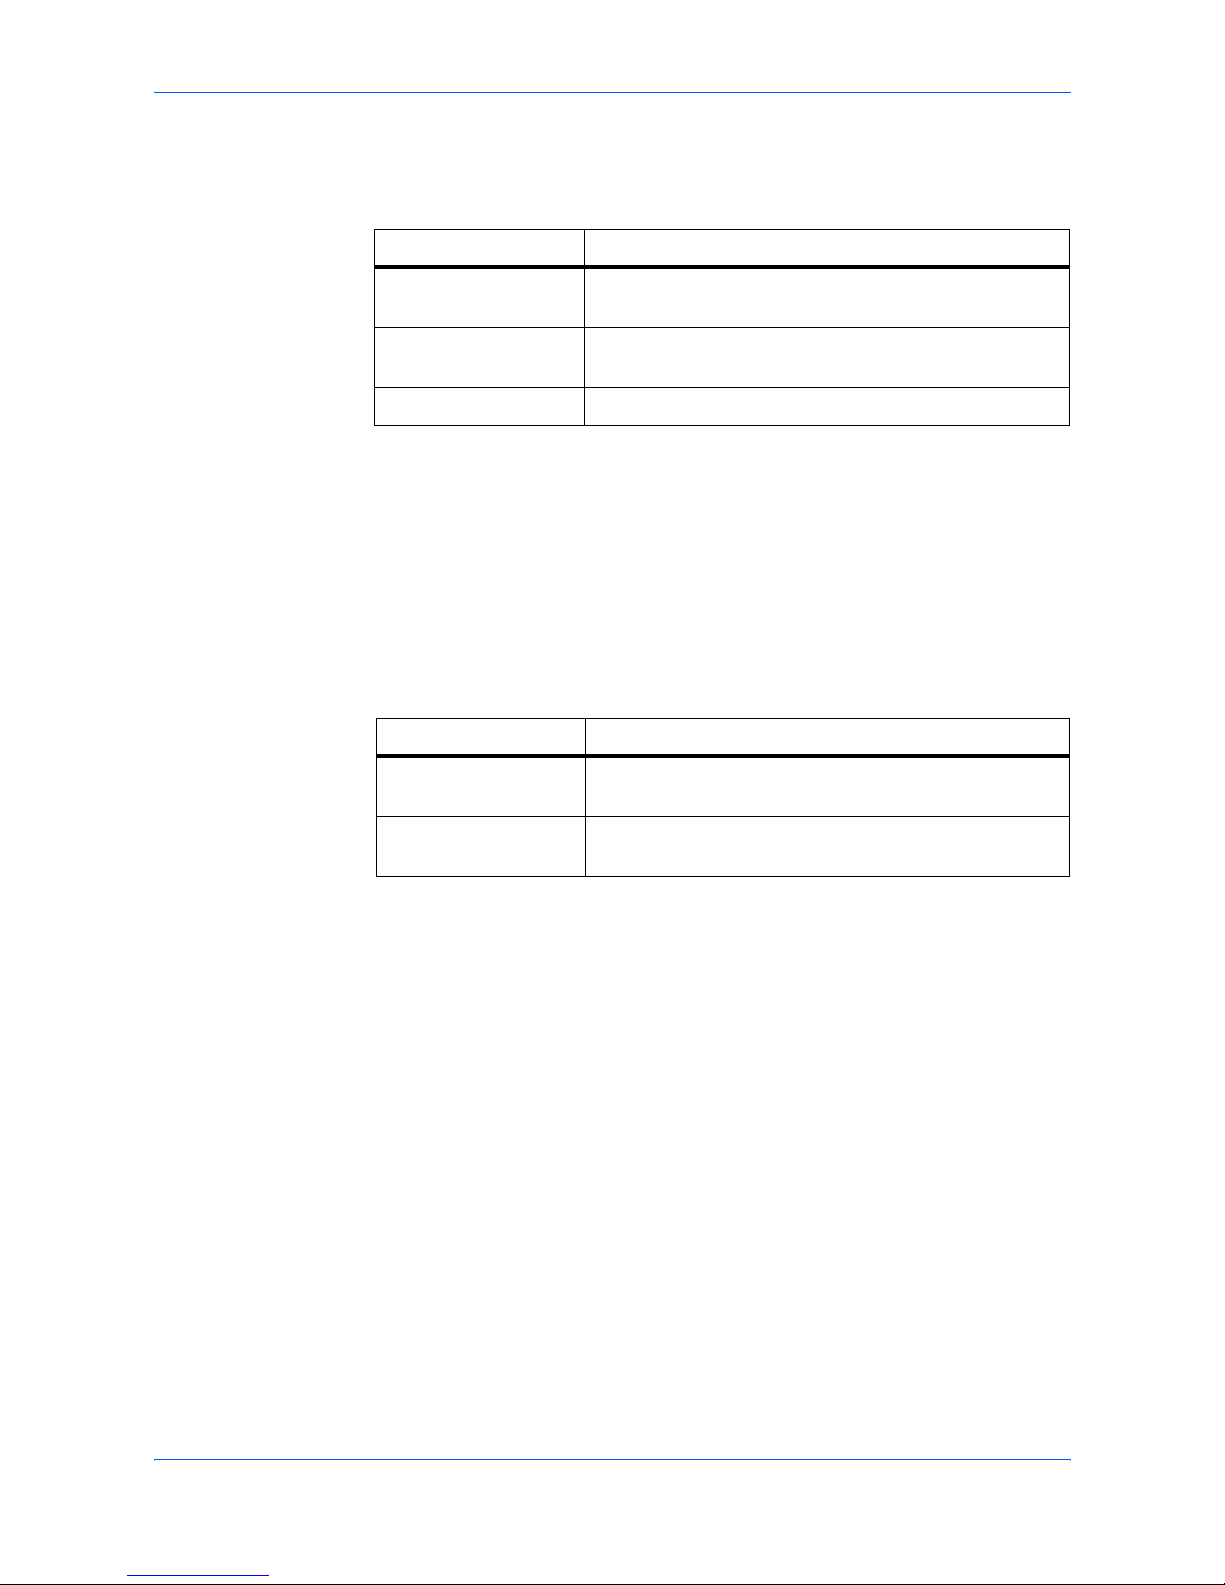
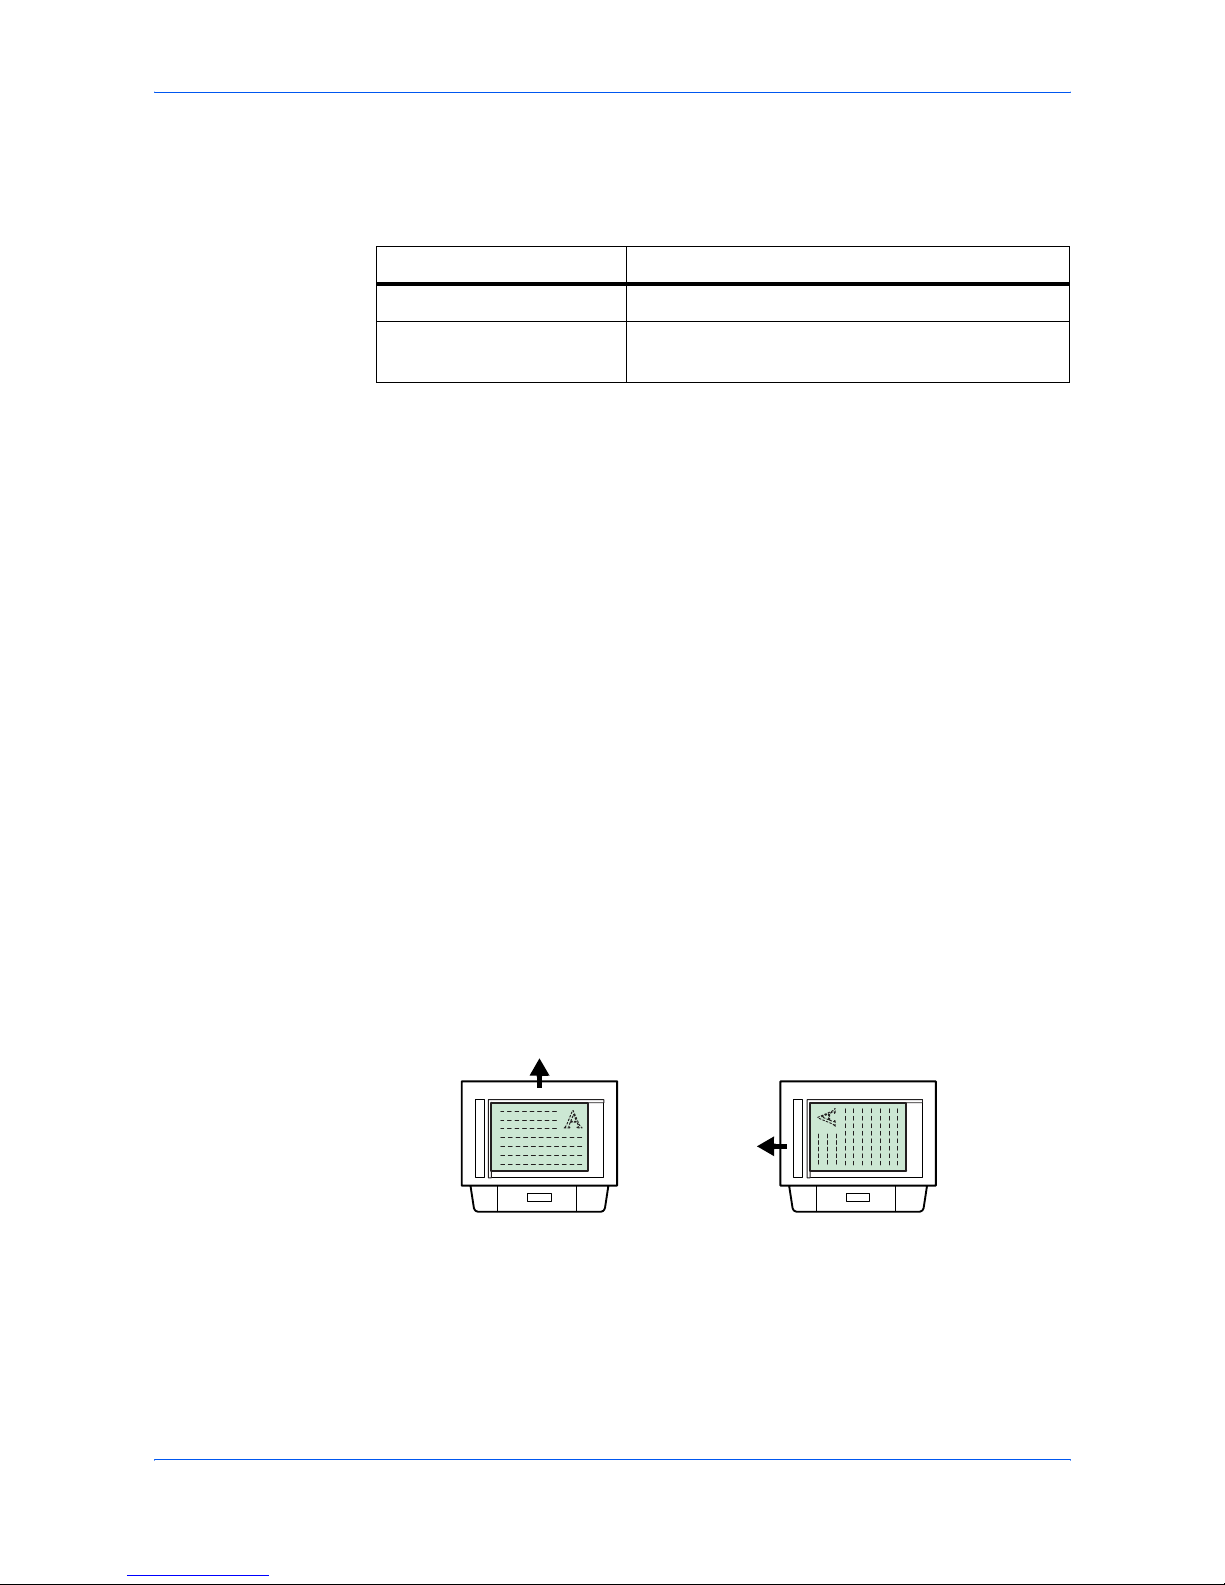
Press S or T to select either Top Edge to Rear or Top Edge to Left and press Enter.
The display shows Completed and returns to the Function screen.
Using the Platen
Using the Document Processor
5
Press right Select. The display returns to the basic screen.
Left
Top Edge to Rear Top Edge to Left
Rear
Top Edge to Rear Top Edge to Left
Rear
Left
Page 13

Copying Functions
ADVANCED OPERATION GUIDE 1-5
Using Collate Mode
Multiple originals can be scanned into memory in a single operation and the number
of copy sets created.
1
Press Copy. The basic screen is displayed.
2
Press Function.
3
Press S or T to select Collate and press Enter. The Collate screen is displayed.
4
Press S or T to select either On or Off and press Enter. The display shows
Completed and returns to the Function screen.
5
Press right Select. The display returns to the basic screen.
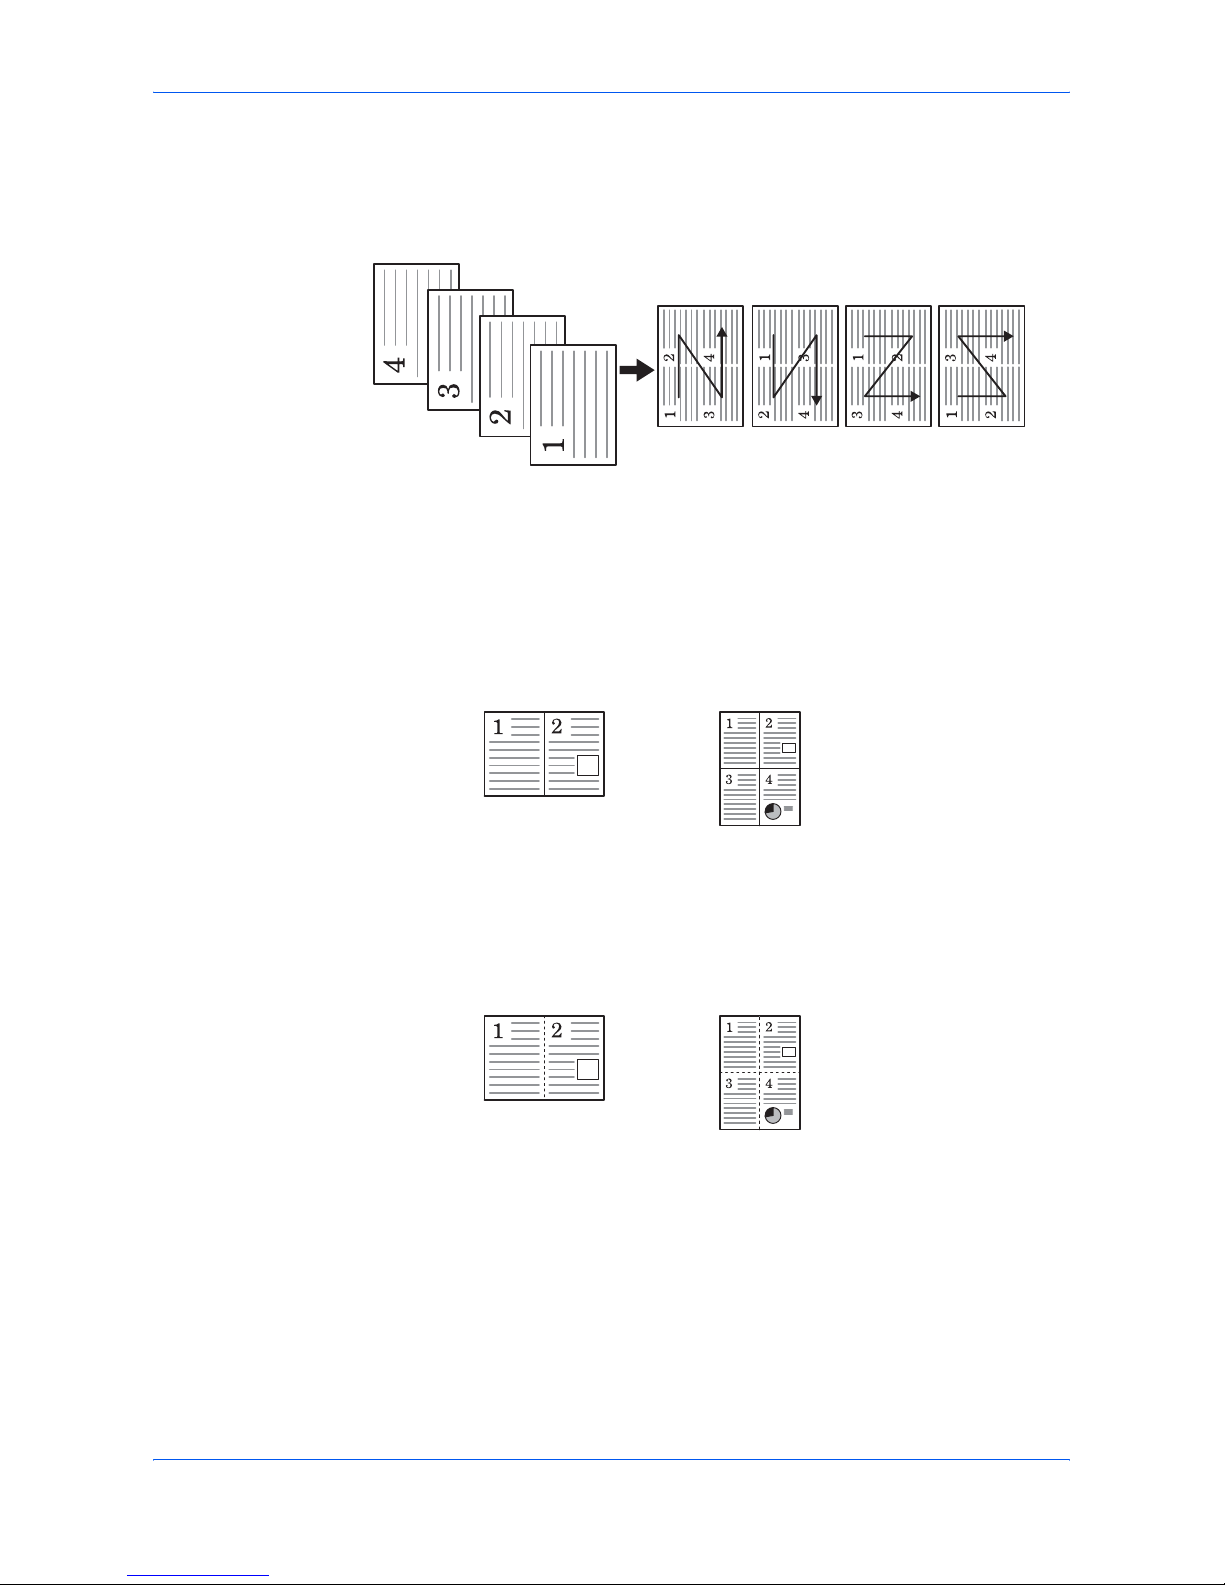
Using Combine Mode
The images from either 2 or 4 originals can be reduced and combined onto a single
copy. The borderline of each original can also be marked with a solid line or a dotted
line.
1
Press Copy. The basic screen is displayed.
2
Press Function.
3
Press S or T to select Combine and press Enter. The Combine screen is displayed.
4
Press S or T to select either 2 in 1 or 4 in 1 and press Enter. The Layout screen is
displayed.
5
Press S or T to select the direction of the layout and press Enter. The Border Line
screen is displayed.
Original Collate: OnCollate: Off
Mode Description
2 in 1 Copies two originals onto one sheet.
4 in 1 Copies four originals onto one sheet.
Page 14
Copying Functions
1-6 ADVANCED OPERATION GUIDE
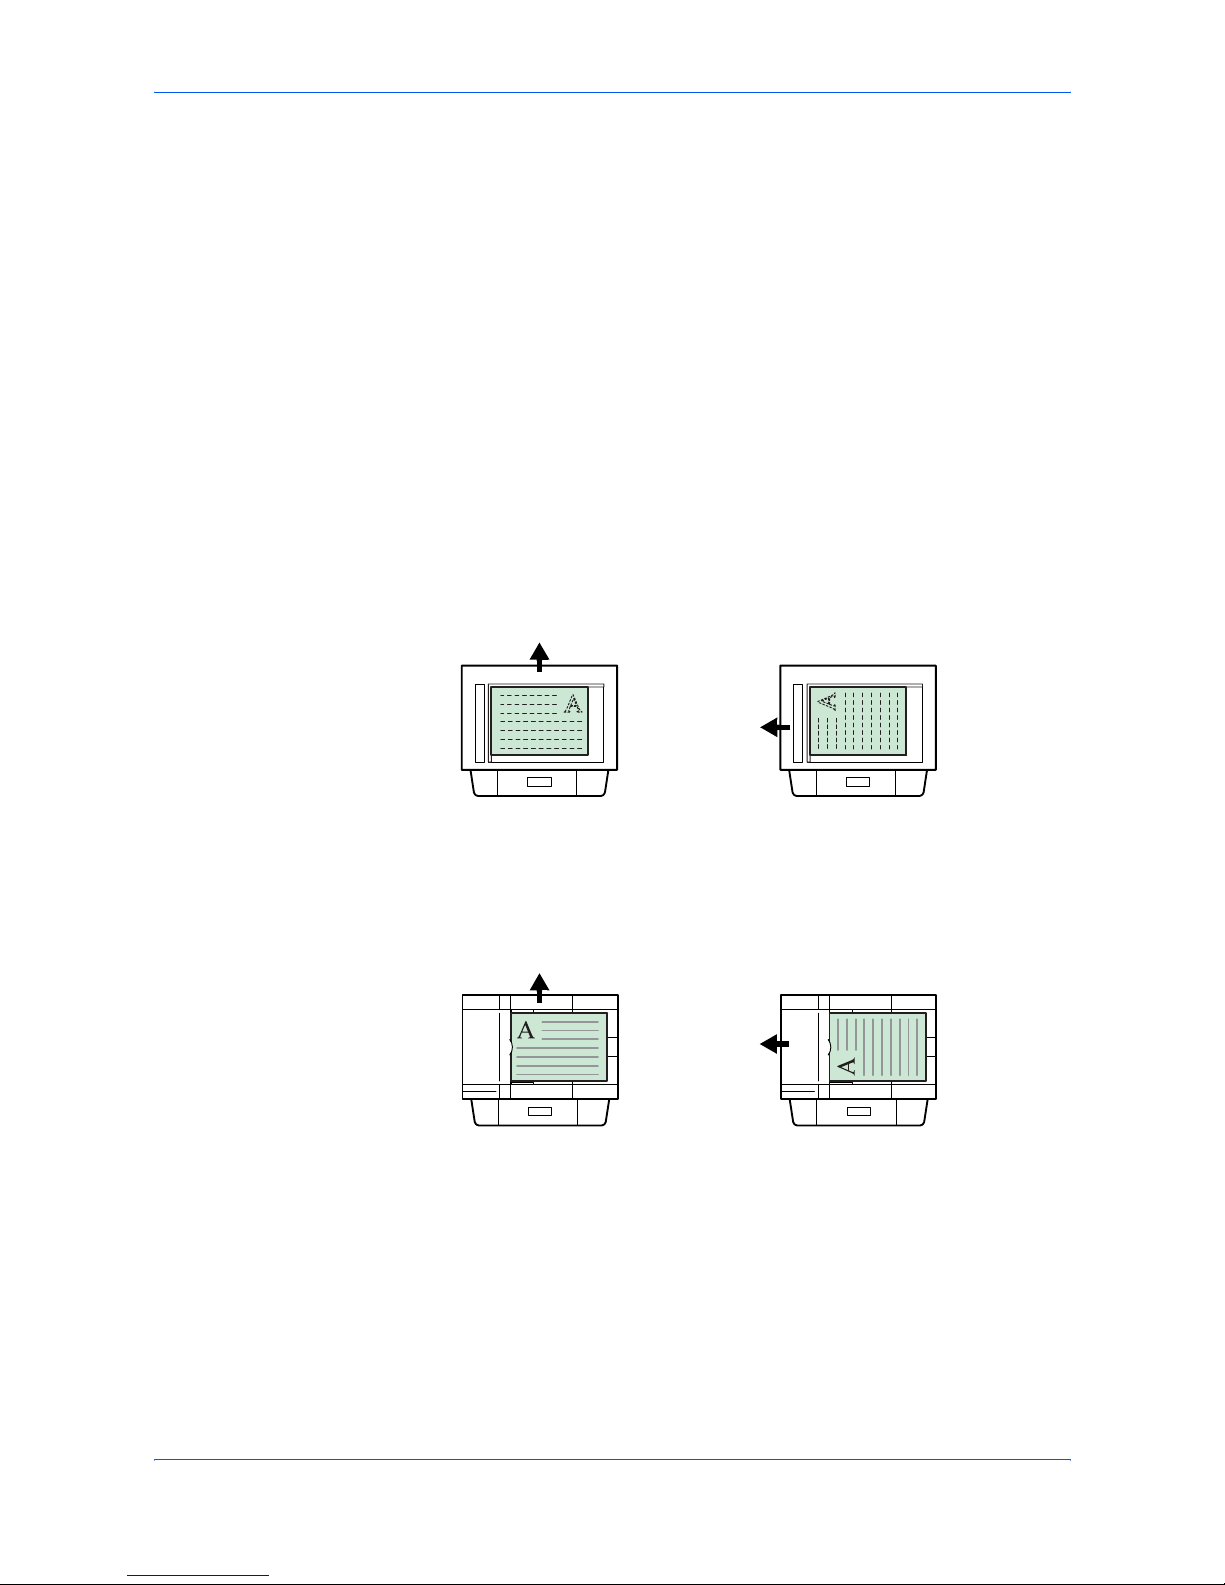
The following illustrations indicate the effects of each direction and layout setting:
2 in 1 > Top Edge to Rear.
2 in 1 > Top Edge to Left
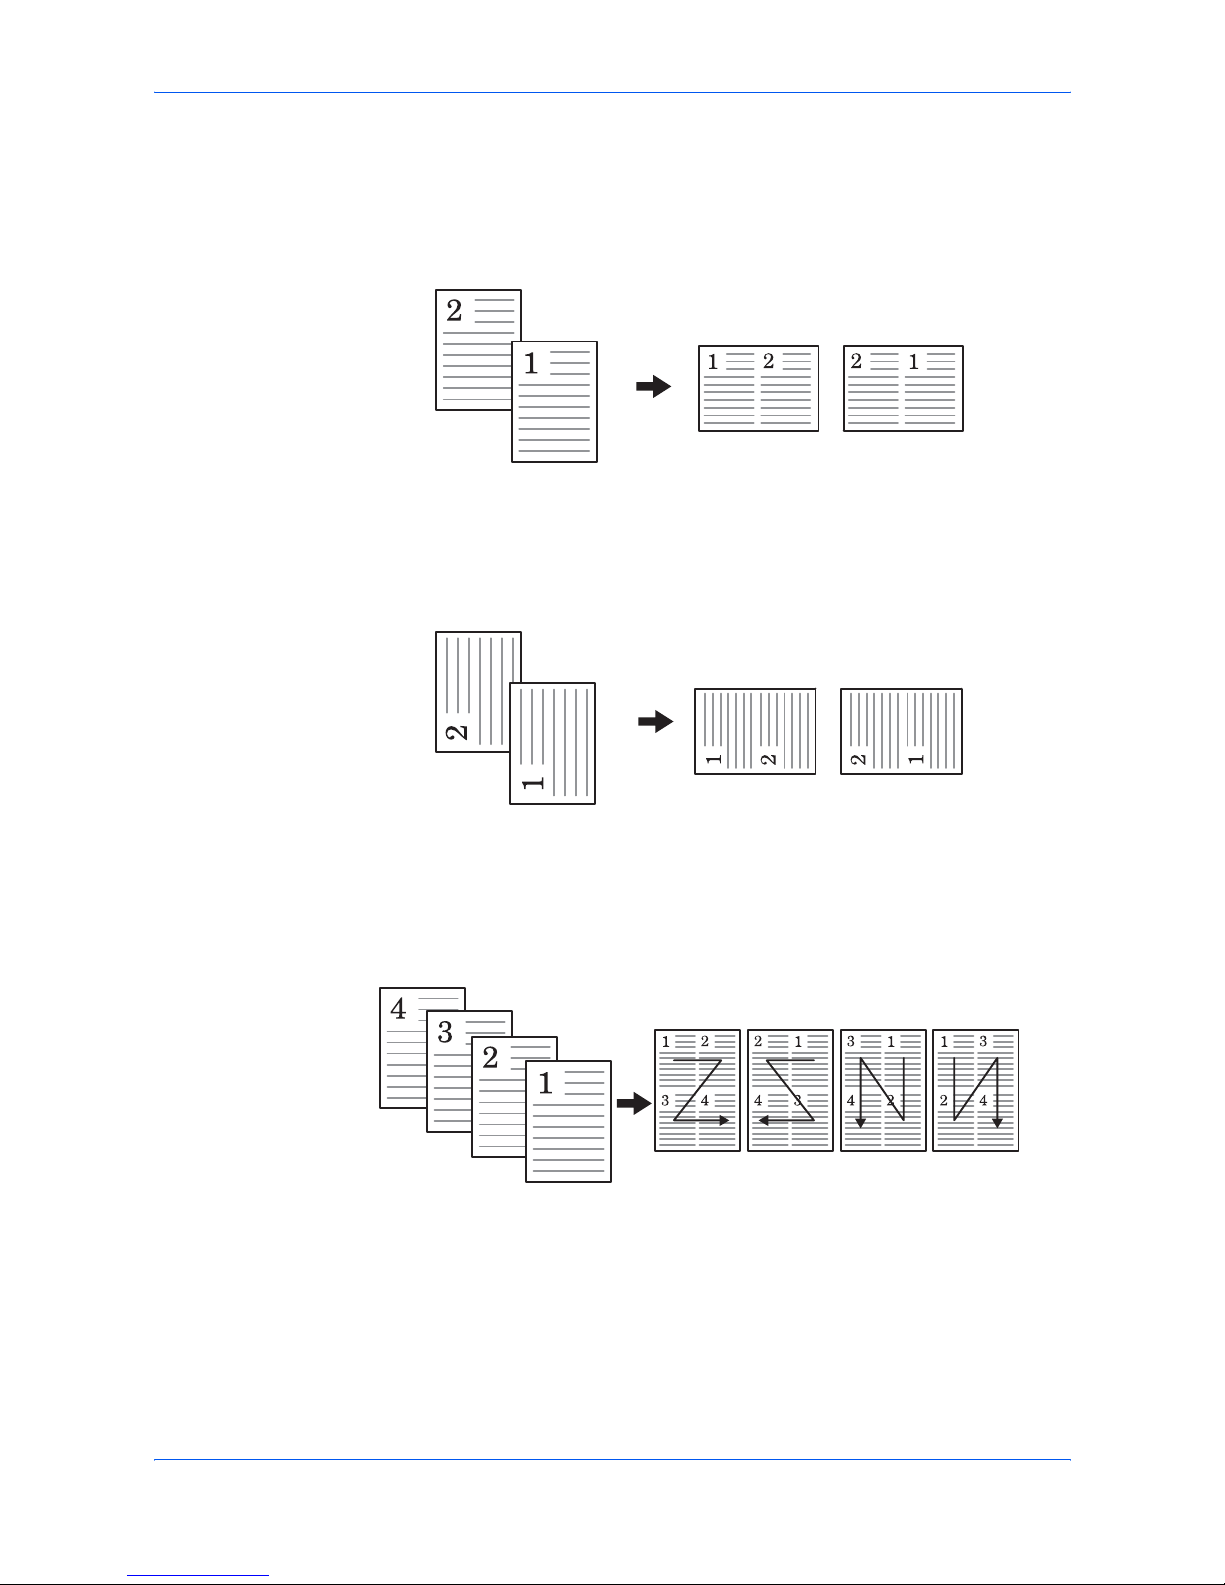
4 in 1 > Top Edge to Rear
Original Copied Image
Left to Right/Top to
Bottom
Right to Left
Original Copied Image
Left to Right/Top to
Bottom
Right to Left
Original Copied image
Top to
Bottom to
Right
Top to
Bottom to
Left
Right to
Left to
Bottom
Left to
Right to
Bottom
Page 15
Copying Functions
ADVANCED OPERATION GUIDE 1-7
4 in 1 > Top Edge to Left
6
Press S or T to select the type of the borderline and press Enter. The Orig.
Placement screen is displayed. The following illustrations indicate the effects of each
borderline setting
Solid Line
Dotted Line
Original Copied Image
Top to
Bottom to
Right
Top to
Bottom to
Left
Right to
Left to
Bottom
Left to
Right to
Bottom
Copied Image
4 in 1
2 in 1
Copied Image
4 in 12 in 1
Page 16
Copying Functions
1-8 ADVANCED OPERATION GUIDE
Positioning Mark
7
Press S or T to select the original placement and press Enter. The display shows
Completed and returns to the Function screen.
8
Press right Select. The display returns to the basic screen.
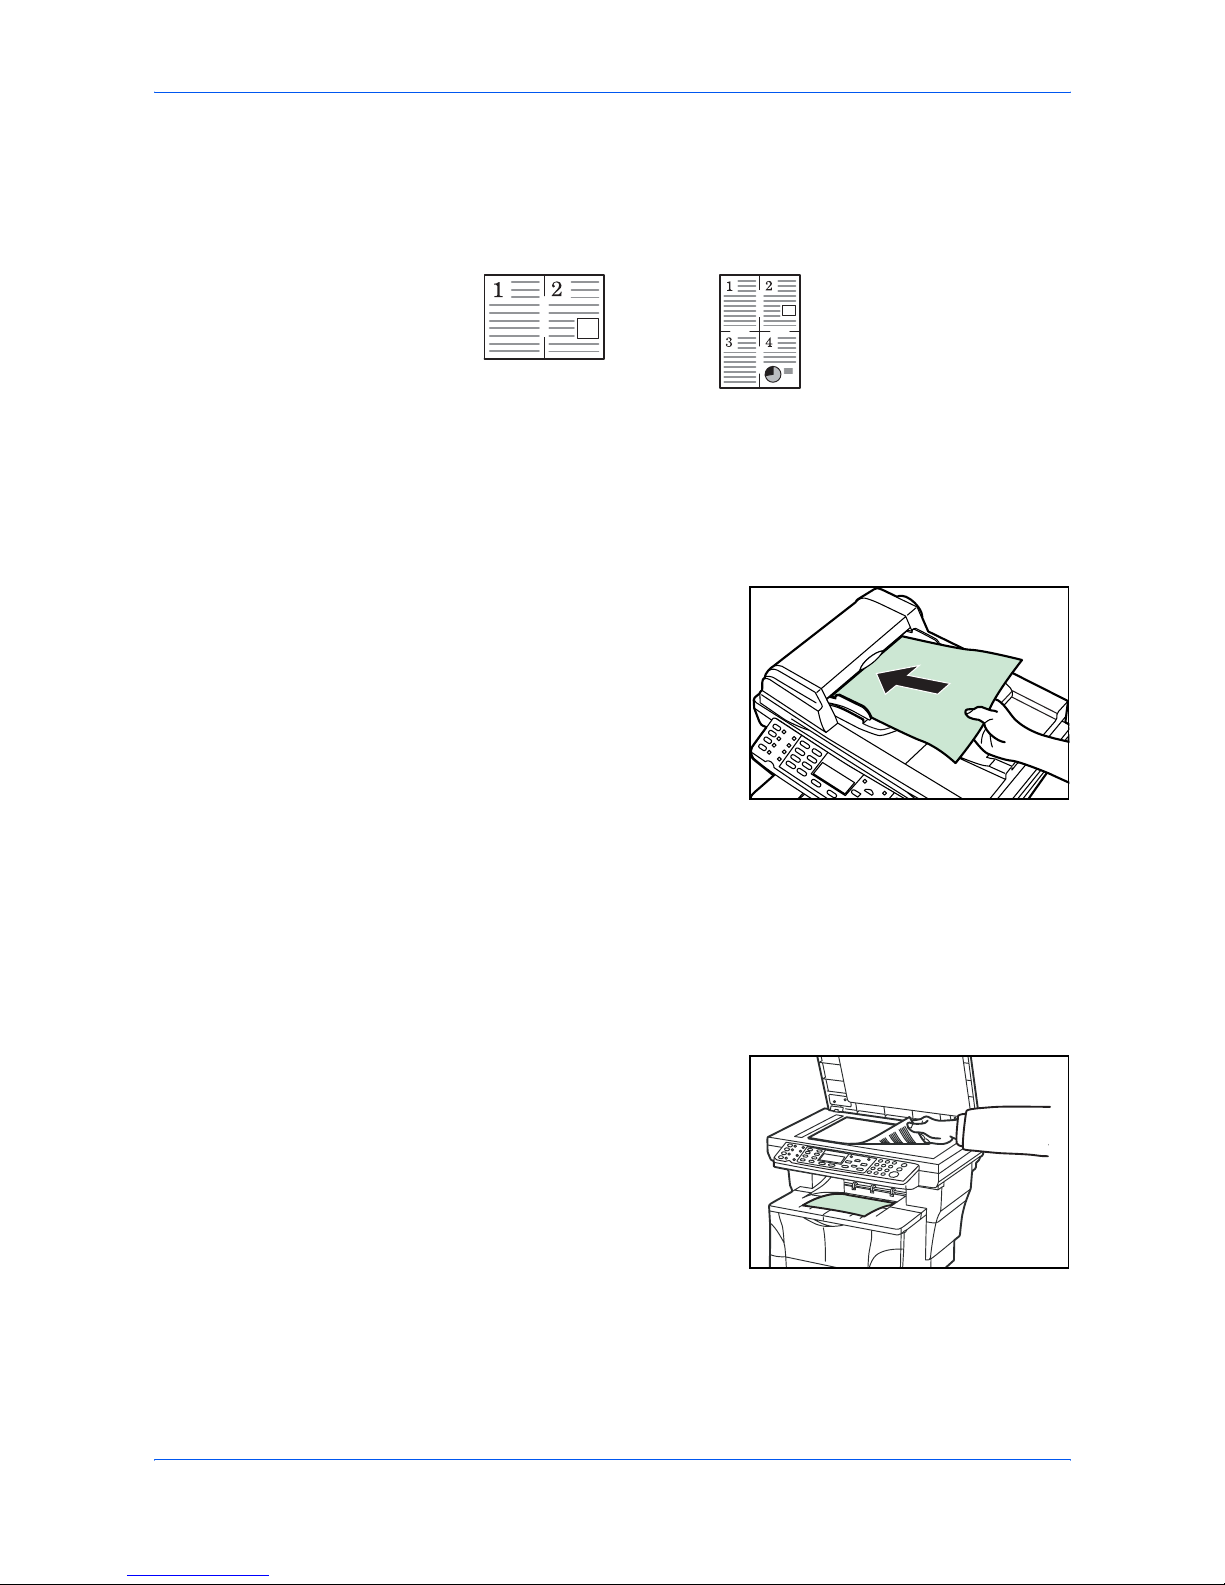
Using the Document Processor with Combine Mode
1
Place the originals in the document
processor.
2
Press Copy. The basic screen is displayed.
3
Select the combine mode. For more information, refer to Using Combine Mode on
page 1-5.
4
Press Start. The originals are scanned automatically and copying in the combine
mode will begin.
Using the Platen with Combine Mode
1
Place the first original to be copied onto the
platen.
2
Press Copy. The basic screen is displayed.
3
Select the combine mode. For more information, refer to Using Combine Mode on
page 1-5.
Copied Image
4 in 12 in 1
Page 17

Copying Functions
ADVANCED OPERATION GUIDE 1-9
4
Press Start. The original is scanned.
Once the scanning operation is completed, Set original and press Start key is
displayed.
5
Place the next original on the Platen ready for scanning and press Start. The next
original is scanned.
6
Repeat step 5 until all the originals have been scanned.
7
When all the originals have been scanned, press right Select. Accepted will appear
and copying commences.
Continuous Copying
Use Continuous Copying to scan originals into memory in individual sections.The
machine then groups the sections together to form a single job. The copies are then
produced in one batch, as a single job.
Selecting Continuous Copying
1
Press Copy. The basic screen is displayed.
2
Press Function.
3
Press S or T to select Continuous Scan and press Enter. The Continuous Scan
screen is displayed.
4
Press S or T to select On and press Enter. The display shows Completed and
returns to the Function screen.
5
Press right Select. The display returns to the basic screen.
Using Continuous Copying
The maximum number of originals to scan depends on the available memory in the
machine. Number of scannable originals (Letter, 5%, Text+Photo mode) are as
follows:
• 96 MB (standard): Approximately 70 sheets
• 128 MB: Approximately 115 sheets
• 192 MB: Approximately 380 sheets
• 320 MB: Approximately 535 sheets
Page 18

Copying Functions
1-10 ADVANCED OPERATION GUIDE
1
Place the original on the platen.
2
Press Copy. The basic screen is displayed.
3
Press Start. The first original is scanned.
4
Once the scanning operation is completed, Set original and press Start key is
displayed. Position the next original on the platen and press Start. The next original
is scanned.
5
Repeat step 4 until all originals have been scanned.
6
When all originals have been scanned, press right Select. Accepted will appear and
copying commences.
EcoPrint Mode
EcoPrint enables the machine to consume less toner for a page to save your printing
costs. This will cause images to be printed lighter than normal without affecting print
speed. When EcoPrint mode setting is On, the printing image becomes lighter, but
readable.
1
Press Copy. The basic screen is displayed.
2
Press Function.
3
Press S or T to select EcoPrint and press Enter. The EcoPint screen is displayed.
4
Press S or T to select On and press Enter. The display shows Completed and
returns to the Function screen.
5
Press right Select. The display returns to the basic screen.
Page 19

Copying Functions
ADVANCED OPERATION GUIDE 1-11
Print Override Mode
The print override mode allows the current job to be interrupted in order to make
copies of a more urgent job. After the print override processing is completed, the
interrupted job will be resumed.
1
Press Copy. The basic screen is displayed.
2
Press Function.
3
Press S or T to select Print Override and press Enter. The Print Override screen is
displayed.
4
Press S or T to select On and press Enter. The display shows Completed and
returns to Function screen.
5
Press right Select. The basic screen is displayed.
6
Program the functions as required and use the numeric keys to enter the number of
copies required.
7
Place the original on the platen or in the document processor.
8
Press Start. Copying begins immediately and completed copies are delivered to the
output tray.
9
When the job is completed, perform the steps 1 through 4 to select Print Override
mode Off.
File Name Entry
The file name is used for an e-mail report that notifies the end of copying (refer to
Sending the Job End Report on page 1-13). It is also listed in the Status menu for
administration. The file name contains the time stamp or job number.
1
Press Copy. The basic screen is displayed.
2
Press Function.
3
Press S or T to select File Name Entry. Press Enter. The File Name Entry screen
is displayed.
4
Enter the file name between one and 30 characters using the numeric keys (refer to
Character Entry in the Operation Guide) and press Enter. The Additional Info screen
is displayed. The factory default setting for the file name is doc.
Page 20

Copying Functions
1-12 ADVANCED OPERATION GUIDE
5
Press S or T to select the information that is added to the file name. The following
table shows how the file name is constructed.
6
Press Enter. The display shows Completed and returns to the Function screen.
7
Press right Select. The display returns to the basic screen.
8
After copying is completed, it is stored as a file name. The file name can be
monitored in the Status menu. Refer to Checking Jobs Status on page 4-2.
Selected Item File Name Example Description
Date and Time doc04272005145608 Adds the date and time
to the File Name. The
example shows how a
copying job created at
14:56:08 on April 27,
2005 would be named.
The display sequence of
Month, Day, Year can be
changed, refer to Date
Format on page 5-11.
Job No. doc0586 A job number is added to
the file name.
Page 21

Copying Functions
ADVANCED OPERATION GUIDE 1-13
Sending the Job End Report
Once the appropriate e-mail settings have been made, this function notifies you by
e-mail when copying is complete.
The following is an example of the information that is sent by e-mail.
1
Press Copy. The basic screen is displayed.
2
Press Function.
3
Press S or T to select Job End Report and press Enter. The Job End Report screen
is displayed.
4
Press S or T to select On. Press Enter. The Destination screen is displayed.
5
Press S or T to select Address Book or Address Entry. Press Enter.
When Selecting an Address Book
1
Press S or T to select the contact address required and press Enter. A contact
address screen is displayed.
2
Press Enter. The display shows Completed and returns to the Function screen.
3
Press right Select. The display returns to the basic screen.
When there is no address to send, press left Select and return to the Function
screen.
To :
h_pttr@owl-net.net
Subject:
1234 Job end report mail
Job No.:
0002
Result:
OK
End Time:
Wed 27 Apr 2005 14:56:08
File Name:
doc27042005145608
Job Type:
Copy
------------------------------------------------
1234
[00:c0:ee:d0:01:14]
------------------------------------------------
Page 22

Copying Functions
1-14 ADVANCED OPERATION GUIDE
When Selecting an Address Entry (Entering an E-mail Address)
1
Enter the e-mail address to which you want the report to be sent. For details on using
the numeric keys to enter characters, refer to Character Entry in the Operation
Guide.
Press Enter. The display shows Completed and returns to the Function screen.
2
Press right Select. The display returns to the basic screen.
Page 23

ADVANCED OPERATION GUIDE 2-1
2 Scanning Functions
Using the Scanning Function
This machine can send a scanned image as an attachment to an e-mail message or
to a PC linked to the network. In order to do this, it is necessary to register the sender
and destination (recipient) address on the network.
A network environment which enables the machine to connect to a mail server is
required. It is recommended that a Local Area Network (LAN) is used to assist with
transmission speed and security issues.
To use the Scanning Function perform the following steps:
• Program the settings, including the e-mail setting on the machine.
• Use COMMAND CENTER (the internal HTML web page) to register the IP
address, the host name of the SMTP server, and the recipient.
• Register the destination in the Address Book or One Touch keys.
• When the PC Folder (SMB/FTP) is selected, it is necessary to share the
destination folder. For setting-up the PC Folder, contact your Network
Administrator.
The Sender, a default subject and body message for the e-mail will be registered
under the e-mail template setting in COMMAND CENTER.
Page 24

Scanning Functions
2-2 ADVANCED OPERATION GUIDE
Scanning Documents
1
Press Send. The basic screen is displayed.
2
Register the destination using W, a One Touch Key or the Address Book - refer to
Using the Address Book on page 2-4. The destination is displayed.
3
Repeat this procedure for all other addresses (if you are sending to a PC, only one
destination is possible).
4
Program the settings as required to use additional functions which are explained on
page 2-5 to page 2-11.
5
Press Start. The Scanning screen is displayed and the scanning will begin.
6
If Continuous Scan was selected, the message Set original and press Start key is
displayed when scanning is completed. Refer to Continuous Scanning on page 2-9.
To scan another original, replace the original and change the settings as required.
Press Start. When all the originals have been scanned, press right Select.
Entering the E-mail Address Using the Operation Panel
1
Press Send. The basic screen is displayed.
2
Press W. The Destination screen is displayed.
3
Press S or T to select E-mail and press Enter. The Address Entry screen is
displayed.
4
Enter the e-mail address.
5
Press Enter. The display shows Completed and returns to the basic screen.
Entering the PC Folder Address Using the Operation Panel
1
Press Send. The basic screen is displayed.
2
Press W. The Destination screen is displayed.
3
Press S or T to select PC Folder and press Enter.
4
Press S or T to select SMB or FTP and press Enter. The Address Entry screen is
displayed.
5
Enter the host name, path, login user name, and login password when requested.
6
Press Enter. The display shows Completed and returns to the basic screen.
Page 25

Scanning Functions
ADVANCED OPERATION GUIDE 2-3
Changing a Destination
1
With the corresponding destination selected, press W. The Destination screen is
displayed.
2
Press S or T to select Dest. Confirm and press Enter. The Dest. Confirm screen is
displayed.
3
Press S or T to select the destination required and press Enter. The destination
screen is displayed.
4
Press S or T to select Edit and press Enter. The Address Entry screen is displayed.
5
Enter the new destination.
6
Press Enter. The display shows Completed and returns to the Dest. Confirm screen.
7
Press Send. The display returns to the basic screen.
Deleting a Destination
1
With the corresponding destination selected, press W. The Destination screen is
displayed.
2
Press S or T to select Dest. Confirm and press Enter. The Dest. Confirm screen is
displayed.
3
Press S or T to select the destination required and press Enter. The destination
screen is displayed.
4
Press S or T to select Delete and press Enter. Delete. Are you sure? is displayed.
5
To delete the destination, press left Select. The display shows Deleted and returns
to the Dest. Confirm screen.
6
Press Send. The display returns to the basic screen.
Page 26

Scanning Functions
2-4 ADVANCED OPERATION GUIDE
Using the Address Book
This machine has an address book function and can also access an external address
book (LDAP). When an e-mail address, the path of PC folder, and FTP server's path
are registered in the address book, it can transmit directly from the operation panel.
This section explains how to enter the destination from the address book.
Entering the Destination from Address Book
1
Press Send. The basic screen is displayed.
2
Press X. Select Addr Book is displayed.
3
Press S or T to select Address Book or Ext Address Book and press Enter. The
Address Book or Ext Address Book screen is displayed. You can use the search
feature to find an address - refer to Searching Address Name on page 2-4.
4
Press S or T to select the address required and press Enter.
When a group address is selected and the destination is registered, the display
shows Completed and returns to the basic screen. When a contact address is
selected, the contact address book is displayed. Proceed with the next step.
5
Press S or T to select the destination required or, if the PC Folder is selected, enter
the login user name and login password and press Enter. The display shows
Completed and returns to the basic screen.
Searching Address Name
1
Display the Address Book screen required.
2
Press right Select. The Menu screen is displayed.
3
Press S or T to select Search(Name) and press Enter. The Search(Name) screen
is displayed.
4
Enter the Address name or portion of address name and press Enter.
For example. in order to search for New York. Enter New. Address names are casesensitive.
5
Press S or T to select the address required and press Enter. The address is
selected.
Mode Description
Address Book You can use an address which is registered from the
panel or through COMMAND CENTER.
To register the address, refer to Editing the Address
Book on page 5-21 or Basic > Address Book on page 8-
9.
Ext Address Book In order to use the Ext Address Book, set LDAP in
COMMAND CENTER. For more information about LDAP,
refer to Advanced > Management > LDAP on page 8-25.
Page 27
Scanning Functions
ADVANCED OPERATION GUIDE 2-5
Selecting Color Scan Mode
The following color modes are available for scanning:
1
Press Send. The basic screen is displayed.
2
Press Scan Color Select.
3
Press S or T to select the mode and press Enter. The display shows Completed
and returns to the basic screen.
4
Press Start to start scanning.
Selecting the Original Quality for Scanning
The original quality mode is used to optimize scanning quality according to the type
of originals. This mode will be available when you have selected monochrome in the
color scan mode.
1
Press Send. The basic screen is displayed.
2
Press Original Quality.
3
Press S or T to select the mode required and press Enter. The display shows
Completed and returns to the basic screen.
Mode Description
Full Color The original will be scanned in full color. The
scanning exposure will be set to Manual.
Grayscale The shading of the original will be reproduced. The
scanning exposure will be set to Manual.
Monochrome The original will be scanned in monochrome. The
resulting file size for the scan data will be smaller
in comparison with the other color modes.
Mode Description
Text+Photo Select this mode when the original contains a
mixture of both text and photographs.
Photo Select this mode when the original mostly contains
photographs. To send photo images with a 200 dpi
resolution for smoother images, it is recommended
to use Full Color or Grayscale mode.
Text Select this when the original mostly contains text.
OCR This mode will be available when you select
monochrome in the Scan Color mode. Use this
mode if the image data is to be converted into text
using Optical Character Recognition software.
Page 28

Scanning Functions
2-6 ADVANCED OPERATION GUIDE
Selecting the Scanning Resolution
The higher the resolution value is, the finer the image will be. A higher resolution
results in a larger file size and longer scanning time.
The maximum resolution using full color or gray scale modes without optional
expansion memory is 300 dpi. Refer to Expansion Memory on page 9-4.
1
Press Send. The basic screen is displayed.
2
Press Scan Resolution.
3
Press S or T to select the scanning resolution and press Enter. The display shows
Completed and returns to the basic screen.
Adjusting the Exposure for Scanning
The default exposure is Manual.
1
Press Send. The basic screen is displayed.
2
Press Exposure.
3
Press S or T to select the exposure mode and press Enter.
If Auto is selected, the display shows Completed and returns to the basic screen.
If Manual is selected, the Manual screen is displayed. Proceed to the next step.
4
Press S or T to adjust the value for the exposure and press Enter. The display
shows Completed and returns to the basic screen.
Mode Description
Auto Use this mode to enable the machine to automatically
select the optimal exposure setting for the original. This
mode will be available when you have selected
Monochrome in the Scan Color mode.
Manual Use this mode to adjust the scan exposure manually.
There are seven exposure levels available.
Page 29

Scanning Functions
ADVANCED OPERATION GUIDE 2-7
Selecting the Original Size for Scanning
The original size defines the area to be scanned and must be identical to the physical
size of the original.
1
Press Send. The basic screen is displayed.
2
Press Original Size.
3
Press S or T to select the original size and press Enter. The display shows
Completed and returns to the basic screen.
If the original size required is not shown, select Others and press Enter. The Others
screen is displayed.
4
Press S or T to select the original size required and press Enter. The display shows
Completed and returns to the basic screen.
Selecting the Send Size
The send size defines the size of the image attached and received. This does not
apply if Full Color or Grayscale is selected, when the images are sent at the same
size as their originals.
1
Press Send. The basic screen is displayed.
2
Press Function.
3
Press S or T to select Send Size and press Enter. The Send Size screen is
displayed.
4
Press S or T to select the send size required and press Enter.The display shows
Completed and returns to the Function screen.
If the required send size is not shown, select Others and press Enter.
5
Press S or T to select the send size required and press Enter.The display shows
Completed and returns to the Function screen.
Page 30
Scanning Functions
2-8 ADVANCED OPERATION GUIDE
Zoom Scanning
This section explains how to scan documents to an enlarged or reduced size. The
following modes are available for zooming.
Auto Zoom
1
Press Send. The basic screen is displayed.
2
Press Function.
3
Press S or T to select Zoom and press Enter. The Zoom screen is displayed.
4
Press S or T to select Auto and press Enter. The display shows Completed and
returns to the Function screen. The original is scanned so that it fits onto the selected
send size.
Selecting the Original Placement for Scanning
1
Press Send. The basic screen is displayed.
2
Press left Select.
3
Press S or T to select the original placement required and press Enter. The display
shows Completed and returns to the basic screen.
Using the Platen
Mode Description
100% Scan documents at the same size as the original.
Auto Adjusts the zoom ratio so that the scanned image
fits onto the selected send size.
Top Edge to Rear Top Edge to Left
Rear
Left
Page 31

Scanning Functions
ADVANCED OPERATION GUIDE 2-9
Using the Document Processor
Continuous Scanning
Use Continuous Scan to scan originals into memory in individual sections. The
machine groups the sections to form a single job.
1
Press Send. The basic screen is displayed.
2
Press Function.
3
Press S or T to select Continuous Scan and press Enter. The Continuous Scan
screen is displayed.
4
Press S or T to select On and press Enter. The display shows Completed and
returns to the Function screen.
5
Press right Select. The display returns to the basic screen.
Using Continuous Scanning
1
Place the first original on the platen.
2
Press Send. The basic screen is displayed.
3
Enter the destination of the intended recipient from the one-touch keys, Address
Book or W.
To register one-touch keys refer to Registering One-Touch Keys on page 5-6. To use
the address book refer to Using the Address Book on page 2-4.
4
Program the features as required.
5
Press Start. The first original is scanned.
6
Once the scanning operation is completed, Set original and press Start key is
displayed. Place the next original on the platen and press Start. The next original is
scanned.
7
Repeat step 6 until all originals have been scanned.
Top Edge to Rear Top Edge to Left
Rear
Left
Page 32

Scanning Functions
2-10 ADVANCED OPERATION GUIDE
8
When all originals have been scanned, press right Select. The display shows
Accepted and returns to the basic screen.
Selecting the Image File Format
The image file formats available will differ depending upon the Scan Color setting.
The following indicates the file formats that are selectable under each setting.
When JPEG is selected, the Original Placement setting will become invalid. Refer to
Selecting the Original Placement for Scanning on page 2-8.
1
Press Send. The basic screen is displayed.
2
Press Function.
3
Press S or T to select File Format and press Enter. The File Format screen is
displayed.
4
Press S or T to select the file format and press Enter. The Image Quality screen is
displayed.
If Full Color or Grayscale has been selected under Selecting Color Scan Mode on
page 2-5, the Image Quality screen is displayed.
5
Press S or T to select the image quality level and press Enter. The display returns
to the Function screen.
6
Press right Select. The display returns to the basic screen.
7
Press Start to start scanning. When scanning is completed, the machine
automatically sends to the destination.
Entering the Name of send job
The scanning job is named depending on the time stamp or serial number. Settings
for name will be applied to all send jobs.
1
Press Send. The basic screen is displayed.
2
Press Function.
3
Press S or T to select File Name Entry and press Enter. The File Name Entry
screen is displayed.
Color Scan Mode Selectable File Formats Compression
Level
Full Color PDF, JPEG 5
Grayscale PDF, JPEG 5
Monochrome PDF, TIFF None
Page 33

Scanning Functions
ADVANCED OPERATION GUIDE 2-11
4
Enter a file name between one and 30 characters using the numeric keys (refer to
Character Entry in the Operation Guide) and press Enter. The Additional Info screen
is displayed. The factory default setting for the file name is doc.
5
Press S or T to select the information that will be added to the file name and press
Enter. The following table shows how the file name is constructed. The display
shows Completed and returns to the Function screen.
6
Press right Select. The display returns to the basic screen.
Entering the Subject and Body Message of the E-Mail
The subject and body message of the e-mail to which the scanned image is attached
can be edited according to preference. Change the subject and the message
manually as necessary. On is displayed on the basic screen when any characters
are entered in the Subject or the Message, and Off is displayed when nothing is
entered.
1
Press Send. The basic screen is displayed.
2
Press right Select. The Subject Entry screen is displayed.
3
Enter the subject (60 characters maximum).
4
Once the subject has been entered, press Enter. The Message Entry screen is
displayed.
5
Enter the message (60 characters maximum).
6
Once the message has been entered, press Enter. The display shows Completed
and returns to the basic screen.
Selected
Item
File Name Example Description
Date and
Time
doc04272005145608.tif Adds the date and time to the
default file name. The example
shows the scanning job stored at
14:56:08 on April 27, 2005. The
display sequence of Year, Month,
and Day can be changed, refer
to Date Format on page 5-11.
Job No. doc0023_001.jpg
doc0023_002.jpg
Adds the job number to the
default file name. This is
displayed as a four-digit number
between 0001 and 9999.
Page 34

Scanning Functions
2-12 ADVANCED OPERATION GUIDE
Reporting the End of Scanning
This function notifies you by e-mail when scanning is complete.
1
Press Send. The basic screen is displayed.
2
Press Function.
3
Press S or T to select Job End Report and press Enter. The Job End Report screen
is displayed.
4
Press S or T to select On. Press Enter. The Destination screen is displayed.
5
Press S or T to select Address Book or Address Entry. Press Enter.
When Selecting an Address Book
1
Press S or T to select the contact address required and press Enter. A contact
address screen is displayed.
2
Press Enter. The display shows Completed and returns to the Function screen.
3
Press right Select. The display returns to the basic screen.
When there is no address to send, press left Select to return to the Function screen.
When Selecting an Address Entry (Entering the E-mail Address)
1
Enter the e-mail address where the report is to be sent.
2
Press Enter. The display shows Completed and returns to the Function screen.
3
Press right Select. The display returns to the basic screen.
Page 35

Scanning Functions
ADVANCED OPERATION GUIDE 2-13
Scanning with TWAIN
TWAIN driver controls the scanning operation with a TWAIN-compatible application
and displays the scanned image in the application. TWAIN drivers meet the standard
universal protocol for communicating between scanners and software applications.
Required operating systems (OS) for using the TWAIN Driver are Microsoft Windows
98SE/Me/2000 and Microsoft Windows XP.
Installing the TWAIN driver
1
Connect your PC to the machine using a USB cable before installing the driver. If the
Plug and Play screen appears, click Cancel.
2
Install the TWAIN Driver from the CD-ROM on your PC. Follow the Wizard
instructions to continue the installation procedure.
3
From the Start menu, select All Programs > Kyocera >TWAIN Driver setting. The
Scanner List dialog box will be displayed.
4
Click Add to access the TWAIN Driver setting dialog box.
5
Enter the registration name in the Name box.
6
Select the Model from the drop down listbox.
7
Select the settings for Image Compression and Unit, as necessary.
8
Click OK. The Scanner List dialog box will be displayed.
9
Confirm Name and Model. Click Close.
Page 36

Scanning Functions
2-14 ADVANCED OPERATION GUIDE
Using TWAIN
1
Connect your PC to the machine using a USB cable.
2
Place the original on the platen.
3
Use the TWAIN-compatible application to scan from your PC.
4
Choose the appropriate settings and click Scan. The scanned data will be sent to
your PC.
Page 37

ADVANCED OPERATION GUIDE 3-1
3 Printer Settings
This chapter explains the procedures required to use the printer functions of the
machine.
The settings needed to use the machine as a network printer can be made from the
operation panel or using COMMAND CENTER. The procedures in this chapter only
explain how to make the settings from the operation panel. To make settings using
COMMAND CENTER, refer to Using COMMAND CENTER on page 8-1.
Parallel Setting
The parallel interface supports a bi-directional/high-speed mode according to IEEE
standards. Use a parallel printer cable that complies with the IEEE1284 standard.
Four modes are available.
1 Access Parallel Setting.
If you are unsure how to use this route map refer to Accessing Menu Items on
page vii.
2 Press S or T to select the parallel interface mode setting and press Enter.
The display shows Completed and returns to the System Setting screen.
Item Description
Auto (default) The machine automatically changes its communication
mode to that of the host computer. Ordinarily, you should
leave this setting unchanged.
Normal The machine uses the standard communication method
prescribed for Centronics interfaces.
High speed This mode enables faster data transmission between the
machine and the host computer. (Select this mode if
printing problems occur when the machine is connected
to a workstation.)
Nibble(high) High speed data communication is used in compliance
with the IEEE 1284 standard.
System Menu/
Counter
S or T
System Setting
Enter
S or T
Parallel Setting
Enter
Page 38

Printer Settings
3-2 ADVANCED OPERATION GUIDE
Network Settings
The procedure to use this machine as a network printer is accomplished in
accordance with the following flow.
Network settings must be made in order to enable network printing as well as to send
e-mail. This section explains the settings required in order to use the network
functions of this machine.
AppleTalk Setting
Turn this setting On when this machine is connected to an Apple Macintosh
computer.
1 Access AppleTalk Set.
If you are unsure how to use this route map refer to Accessing Menu Items on
page vii.
2 If you want to use AppleTalk, select On and press Enter. The display shows
Completed and returns to the Network Setting screen.
Enter IP addresses, etc. for a network connection (see your network administrator)
È
Connect the network cable
(Refer to Connecting the Cables in the Operation Guide)
È
Perform the following procedures on the operation panel or COMMAND CENTER.
Make the network settings (Network Settings on page 3-2)
Restart the machine
Select the emulation mode (Setting the Emulation Mode on page 3-6)
Set the number of prints and select the original placement
Select the original quality mode
Register the paper sizes for the cassette(s) and MP tray
È
Install and set-up the printer driver
(Refer to the Kyocera Extended Driver (KX Driver) User Guide).
È
Print out from the application
System Menu/
Counter
S or T
System Setting
Enter
S or T
Network Setting
Enter
S or T
AppleTalk Set
Enter
Page 39

Printer Settings
ADVANCED OPERATION GUIDE 3-3
TCP/IP Setting
Turn this setting On when this machine is connected to a Windows network, etc.,
using TCP/IP.
1 Access TCP/IP.
If you are unsure how to use this route map refer to Accessing Menu Items on
page vii.
2 To use TCP/IP, select On and press Enter. The display shows Completed and
returns to the TCP/IP Setting screen.
DHCP Setting
DHCP (Dynamic Host Configuration Protocol) provides a mechanism for delivering
IP configuration parameters, including IP address, Subnet Mask, etc. to devices on
an IP network. DHCP alleviates the administrative burden of managing individual IP
addresses.
Turn this setting On when DHCP is to be used.
1 Access DHCP.
If you are unsure how to use this route map refer to Accessing Menu Items on
page vii.
2 To use DHCP, select On and press Enter. The display shows Completed and
returns to the TCP/IP Setting screen.
System Menu/
Counter
S or T
System Setting
Enter
S or T
Network Setting
Enter
S or T
TCP/IP Setting
Enter
S or T
TCP/IP
Enter
System Menu/
Counter
S or T
System Setting
Enter
S or T
Network Setting
Enter
S or T
TCP/IP Setting
Enter
S or T
DHCP
Enter
Page 40

Printer Settings
3-4 ADVANCED OPERATION GUIDE
IP Address Setting
The IP address that should be registered here will differ depending upon your
network environment. Check with your network administrator before performing this
setting. Be sure that DHCP is Off and TCP/IP is On.
1 Access IP Address.
If you are unsure how to use this route map refer to Accessing Menu Items on
page vii.
2 Use the numeric keys to enter each segment of the IP address in turn,
pressing
X or [*.] to move between segments.
3 Press Enter on completion. The display shows Completed and returns to the
TCP/IP Setting screen.
If you make an error in entering a portion of the IP address, press
W to return to
the previous block of digits and re-enter the correct number.
4 Register the Subnet Mask. Refer to Subnet Mask Setting on page 3-5.
System Menu/
Counter
S or T
System Setting
Enter
S or T
Network Setting
Enter
S or T
TCP/IP Setting
Enter
S or T
IP Address
Enter
Page 41

Printer Settings
ADVANCED OPERATION GUIDE 3-5
Subnet Mask Setting
Specifies the Subnet Mask configured on the printing system network component. If
the printing system does not automatically assign a usable default value and the first
number in the IP address above is from 192 to 254, then use 255.255.255.0 as the
Subnet Mask.
If you are not sure of the appropriate Subnet Mask address, contact your network
administrator.
1 Access Subnet Mask.
If you are unsure how to use this route map refer to Accessing Menu Items on
page vii.
2 Use the numeric keys to enter each segment of the Subnet mask in turn,
pressing
X or [*.] to move between segments.
3 Press Enter on completion. The display shows Completed and returns to the
TCP/IP Setting screen.
If you make an error in entering a portion of the subnet mask, press
W to return
to the previous block of digits and re-enter the correct number.
4 Register the Default Gateway. Refer to Default Gateway Setting on page 3-5.
Default Gateway Setting
If you are not sure of the appropriate Default Gateway address, contact your network
administrator.
1 Access Default Gateway.
If you are unsure how to use this route map refer to Accessing Menu Items on
page vii.
2 Use the numeric keys to enter each segment of the Default Gateway in turn,
pressing
X or [*.] to move between segments.
3 Press Enter on completion. The display shows Completed and returns to the
TCP/IP Setting screen.
If you make an error in entering a portion of the default gateway, press
W to
return to the previous block of digits and re-enter the correct number.
System Menu/
Counter
S or T
System Setting
Enter
S or T
Network Setting
Enter
S or T
TCP/IP Setting
Enter
S or T
Subnet Mask
Enter
System Menu/
Counter
S or T
System Setting
Enter
S or T
Network Setting
Enter
S or T
TCP/IP Setting
Enter
S or T
Default Gateway
Enter
Page 42

Printer Settings
3-6 ADVANCED OPERATION GUIDE
Setting the Emulation Mode
Available emulations are: Line Printer, IBM Proprinter, DIABLO 630, EPSON LQ850, PCL6, KPDL, and KPDL (AUTO).
If KPDL (AUTO) emulation is selected, the machine will automatically switch from
KPDL to a alternative emulation mode in accordance with the data to be printed. If
KPDL emulation is selected, you can select whether or not to have a report printed
out automatically whenever a KPDL error occurs during printing.
1 Access Emulation.
If you are unsure how to use this route map refer to Accessing Menu Items on
page vii.
2 Press S or T to select the required emulation mode.
If you selected Line Printer, IBM Proprinter, DIABLO 630, EPSON LQ-850, or
PCL6, the display shows Completed and returns to the Printer Setting screen.
If you selected KPDL, the KPDL Err Rep screen is displayed. Select whether
or not a report is to be printed out upon a KPDL error.
3 Press S or T to select either On or Off and press Enter. The display shows
Completed and returns to the Printer Setting screen.
If you selected KPDL(AUTO), the Alt. Emulation screen is displayed.
The asterisk (*) indicates the currently selected alternative emulation mode.
4 Press S or T to select the alternative mode, and press Enter. The KPDL Err
Rep screen is displayed.
5 Select whether or not a report is to be printed out upon a KPDL error, and
press Enter. The display shows Completed and returns to the Printer Setting
screen.
System Menu/
Counter
S or T
Printer Setting
Enter
S or T
Emulation
Enter
Page 43

ADVANCED OPERATION GUIDE 4-1
4 Operation Status
This chapter contains explanations on the aspects of this machine for which the
current operation status can be verified.
Some of the procedures shown in this chapter can also be accomplished using
COMMAND CENTER - refer to Using COMMAND CENTER on page 8-1.
Status Screen
The following table explains the meaning of the icons displayed on the Status screen.
Meaning of the icons
Job Type Icon Copy job.
Print job.
E-mail sending job.
Folder sending job.
TWAIN job.
FAX sending job (Option).
Report print job.
Job Status Icon The job is being processed.
Processing of the job has been paused.
The job has been successfully completed.
The job could not be successfully completed or has
been canceled.
Address Icon Group destination.
Contact destination
Page 44

Operation Status
4-2 ADVANCED OPERATION GUIDE
Checking Jobs Status
1 Access Print Job Status.
If you are unsure how to use this route map refer to Accessing Menu Items on
page vii.
2 Press S or T to select the job whose status you want to check and press
Enter. The Detail screen is displayed.
If the job list is not displayed in the Print Job Status screen, there are no jobs
currently processed. Press right Select.
3 Check the displayed information for that job. You can also switch the screen to
display other information for that print job by pressing S or T.
4 Once you have completed verifying the information for that job, press Enter.
The display returns to the Print Job Status screen.
Verifying Job Log
All information on the history of print jobs and send jobs are deleted when the
machine is turned off.
1 Access Print Job Log.
If you are unsure how to use this route map refer to Accessing Menu Items on
page vii.
2 Press S or T to select the job whose status you want to check and press
Enter. The Detail screen is displayed.
If the job log is not displayed in the Print Job Log screen, there is no available
information on job history. Press right Select.
3 Check the displayed information for that job. You can also switch the screen to
display other job log information for that print job by pressing S or T.
4 Once you have completed verifying the information for that log, press Enter.
The display returns to the Print Job Log screen.
Pausing Jobs
You can temporarily pause the processing of the jobs. You can also cancel jobs while
processing is paused.
When you want to stop the copying jobs, press Stop/Clear. All jobs are stopped and
the Pausing Job List screen is displayed.
1
Press Status/Job Cancel. The Status Menu screen is displayed.
2
Press left Select. The Pausing Job List screen, which shows a list of the jobs being
processed, is displayed. Processing of jobs is paused, refer to Resuming Jobs on
page 4-3.
To cancel a job, refer to Canceling Jobs During Pausing on page 4-3.
Status/Job Cancel
S or T
Status Menu
Enter
S or T
Print Job Status
Enter
Status/Job Cancel
S or T
Status Menu
Enter
S or T
Print Job Log
Enter
Page 45

Operation Status
ADVANCED OPERATION GUIDE 4-3
Canceling Jobs During Pausing
Jobs can also be canceled from the Print Job Status or Send Job Status screens. For
more information, refer to Canceling Jobs on page 4-3.
1
Press S or T to select the job to cancel. Press left Select. The display indicates
Cancel Job. Are you sure?.
2
Press left Select.
If you do not want to cancel that job, press right Select.
3
Canceling appears in the display and the process to cancel the job will begin.
4
The display returns to the Pausing Job List screen and the canceled job is deleted
from the list of jobs being processed.
Resuming Jobs
To resume processing of the jobs, press right Select. The Status Menu screen is
displayed and processing of the jobs is resumed.
Canceling Jobs
Canceling a print job is carried out from the Print Job Status screen and canceling a
send job from the Send Job Status screen.
1 Access Print Job Status or Send Job Status.
If you are unsure how to use this route map refer to Accessing Menu Items on
page vii.
2 Press S or T to select the job you want to cancel and press left Select. Are
you sure? is displayed.
If all jobs have already been processed, no jobs will be shown in the list. Press
right Select.
3 To cancel that job, press left Select.
Canceling appears in the display and the process to cancel the job will begin.
4 The display returns to the Print Job Status or Send Job Status screen and the
canceled job is deleted from the list of jobs being processed.
Status/Job Cancel
S or T
Status Menu
Enter
S or T
Print Job Status
or
Send Job Status
Enter
Page 46

Operation Status
4-4 ADVANCED OPERATION GUIDE
Verifying Scanner Status
1 Access Scanner.
If you are unsure how to use this route map refer to Accessing Menu Items on
page vii.
2 Check the status of scanning operations. The current status will be one of the
following:
- The machine is ready to scan.
- The machine is currently scanning.
- The machine is preparing to scan.
3 Once you have completed verifying the status of scanning operations, press
Enter. The display returns to the Status Menu screen.
Verifying Printer Status
1 Access Printer.
If you are unsure how to use this route map refer to Accessing Menu Items on
page vii.
2 Check the status of printing operations. The current status will be one of the
following:
- The machine is ready to print.
- The machine is currently printing.
- The machine is preparing to print.
3 Once you have completed verifying the status of printing operations, press
Enter. The display returns to the Status Menu screen.
Verifying the Toner Status
The amount of remaining toner is indicated with a 10-level indicator scale. Use this
scale as a guide to determine when to replace the toner container.
1 Access Toner Status.
If you are unsure how to use this route map refer to Accessing Menu Items on
page vii.
2 Once you have completed verifying the amount of remaining toner, press
Enter. The display returns to the Status Menu screen.
Status/Job Cancel
S or T
Status Menu
Enter
S or T
Scanner
Enter
Status/Job Cancel
S or T
Status Menu
Enter
S or T
Printer
Enter
Status/Job Cancel
S or T
Status Menu
Enter
S or T
Toner Status
Enter
Page 47

Operation Status
ADVANCED OPERATION GUIDE 4-5
Verifying Settings for the Cassettes and MP Tray
1 Access Paper Input.
If you are unsure how to use this route map refer to Accessing Menu Items on
page vii.
2 Verify the paper size and type settings currently selected for cassette 1. You
can also switch the screen to display the settings for cassette 2 and the MP
tray by pressing S or T.
3 Once you have completed verifying the settings, press Enter. The display
returns to the Status Menu screen.
Printing Reports
The following shows the reports that are available for printing.
Procedure to Print Reports
1 Access Report Print.
If you are unsure how to use this route map refer to Accessing Menu Items on
page vii.
2 Press S or T to select the report that you want to print out and press Enter.
Are you sure? is displayed.
3 Press left Select.
4 Accepted is displayed and printing of the report will begin. After the report is
printed, the display returns to the Report Print screen.
Status/Job Cancel
S or T
Status Menu
Enter
S or T
Paper Input
Enter
Report
Name
Description
Menu Map The machine prints a full list of the menu selection system. Note
that menus shown in the list may vary depending on the optional
units installed in the machine.
Status Page You can check the machine’s current status, including available
memory space and option settings by printing a status page.
Font List To help you decide in selecting a font, you can print out lists of
the internal fonts or the optional fonts including downloaded
fonts.
System Menu/
Counter
S or T
Report
Enter
S or T
Report Print
Enter
Page 48

Operation Status
4-6 ADVANCED OPERATION GUIDE
Result Report Setting
The result report can be printed out for checking whether a transmission was
accomplished correctly or not.
• Off - The report is not printed.
• On - The report is printed.
• On(Conditions) - When error occurs, the report is printed.
1 Access Send Result.
If you are unsure how to use this route map refer to Accessing Menu Items on
page vii.
2 Press S or T to select required result report and press Enter.
The display shows Completed and returns to the Report screen.
Verifying Total Number of Prints and Scans
1 Access Counter.
If you are unsure how to use this route map refer to Accessing Menu Items on
page vii.
2 To check the total number of print made, press S or T to select Printed Pages
and press Enter.
To check the total number of scans made, press S or T to select Scanned
Pages and press Enter. The corresponding Total Counter screen is displayed.
3 When S or T is pressed, it is possible to change between the functions of the
counter as shown below:
4 When you have verified the counter, press Enter. The Counter screen is
displayed.
System Menu/
Counter
S or T
Report
Enter
S or T
Result Rep Set
Enter
S or T
Send Result
Enter
System Menu/
Counter
S or T
Counter
Enter
Item Function
Printed Pages Copier, FAX (option), Printer, Total
Scanned Pages Copier, Other, Total
Page 49

ADVANCED OPERATION GUIDE 5-1
5 System Settings
This chapter explains the procedures to make the various settings that are required
in relation to the overall operation of this machine.
Some of the procedures shown in this chapter can also be accomplished using
COMMAND CENTER refer to Using COMMAND CENTER on page 8-1.
Display Settings
Adjusting the Contrast of the display screen
1 Access LCD Contrast.
If you are unsure how to use this route map refer to Accessing Menu Items on
page vii.
2 Press S or T to select the contrast and press Enter. The display shows
Completed and returns to the Adjust screen. There are seven available levels.
Message Language
You can select the language of the message display from English, Français,
Deutsch, Italiano, Nederlands, Español, Português, and optionally download
messages in other languages. Contact your dealer for information.
1 Access Language.
If you are unsure how to use this route map refer to Accessing Menu Items on
page vii.
2 Press S or T to select the language to be used in the display and press Enter.
The display changes to the selected language then shows Completed and
returns to the Common Setting screen.
System Menu/
Counter
S or T
Adjust
Enter
S or T
LCD Contrast
Enter
Available Settings Contrast
Darker -3
Darker -2
Darker -1
Normal
Lighter +1
Lighter +2
Lighter +3
Darker
K
K
Normal
L
L
Brighter
System Menu/
Counter
S or T
Common Setting
Enter
S or T
Language
Enter
Page 50

System Settings
5-2 ADVANCED OPERATION GUIDE
Default Operation Mode
The default operation mode will determine whether the operation mode that appears
after power is turned on to the machine will be the copy operation mode, the send
operation mode or the status operation mode.
1 Access Default Operat.
If you are unsure how to use this route map refer to Accessing Menu Items on
page vii.
2 Press S or T to select the default operation mode and press Enter. The
display shows Completed and returns to the Common Setting screen.
Default Send Operation Mode
The default send operation mode will determine whether the send operation mode
displayed when the machine is powered on will be e-mail, SMB, FTP, or FAX. It is
recommended you select the most commonly used mode as the default.
1 Access Default Dest.
If you are unsure how to use this route map refer to Accessing Menu Items on
page vii.
2 Press S or T to select the default operation mode required and press Enter.
The display shows Completed and returns to the Common Setting screen.
Unit of Measurement
The unit of measurement selected will be used in the custom original size and
custom paper size settings.
1 Access Measurement.
If you are unsure how to use this route map refer to Accessing Menu Items on
page vii.
2 Press S or T to select either Inch or mm and press Enter. The display shows
Completed and returns to the Common Setting screen.
System Menu/
Counter
S or T
Common Setting
Enter
S or T
Default Operat
Enter
System Menu/
Counter
S or T
Send Setting
Enter
S or T
Default Dest
Enter
System Menu/
Counter
S or T
Common Setting
Enter
S or T
Measurement
Enter
Page 51

System Settings
ADVANCED OPERATION GUIDE 5-3
Print Quality Settings
Adjusting Copy Exposure
You can adjust the copy exposure for each original quality mode (Auto Exposure
Mode, Text + Photo Mode, Text Mode and Photo Mode) to any one of the seven
available levels.
1 Access Copy Expo. Adj.
If you are unsure how to use this route map refer to Accessing Menu Items on
page vii.
2 Press S or T to select the original quality mode whose copy exposure you
want to adjust and press Enter.
3 Press S or T to adjust the copy exposure and press Enter. The display shows
Completed and returns to the Copy Expo. Adj screen.
Turning Scan Noise Reduction On and Off
Scan noise reduction is used to reduce the appearance of black lines which can
appear on copy and send jobs when using the document processor.
1 Access Scan Noise Redu.
If you are unsure how to use this route map refer to Accessing Menu Items on
page vii.
2 Press S or T to select either On or Off. Press Enter. The display shows
Completed and returns to the Adjust screen.
Available Settings Exposure
Lighter -3
Lighter -2
Lighter -1
Normal
Darker +1
Darker +2
Darker +3
Brighter
K
K
Normal
L
L
Darker
System Menu/
Counter
S or T
Adjust
Enter
S or T
Copy Expo. Adj
Enter
System Menu/
Counter
S or T
Adjust
Enter
S or T
Scan Noise Redu.
Enter
Page 52

System Settings
5-4 ADVANCED OPERATION GUIDE
Photo Processing Method
1 Access Photo Processing.
If you are unsure how to use this route map refer to Accessing Menu Items on
page vii.
2 Press S or T to select the processing method and press Enter. The display
shows Completed and returns to the Copy Setting screen.
Resetting Toner Status
To ensure the correct information is displayed for the toner status, the toner gauge
must be reset after replacing the toner container.
To ensure the correct toner status is displayed, do not perform this procedure unless
you have replaced the toner container.
1 Access Toner Setting.
If you are unsure how to use this route map refer to Accessing Menu Items on
page vii.
2 Press S or T to select Toner Gauge Rset and press Enter. Are you sure? is
displayed.
Press left Select. The display shows Completed and returns to the Ton er
Setting screen.
System Menu/
Counter
S or T
Copy Setting
Enter
S or T
Photo Processing
Enter
Item Description
Error diffusion This is the standard method that should be used
and is the factory default setting. Copies are
clearer if using originals with both text and photos.
Dithering Use this method for originals containing mainly
photos. When using the scanning or printing
functions, image processing is accomplished using
the Dithering setting.
Setting Menu Description
Toner Gauge Rset (Toner
Gauge Reset)
The toner counter is reset and the amount of toner
remaining will be printed out on the Status Page as
100%.
System Menu/
Counter
S or T
Common Setting
Enter
S or T
Toner Setting
Enter
Page 53

System Settings
ADVANCED OPERATION GUIDE 5-5
Machine Settings
Changing Function Defaults
For functions that you use often, changing the default value to the setting will
minimize the time required to make that setting each time the corresponding function
is used. The following table shows the functions for which the default values can be
changed and their available settings. The factory default settings are shown with an
asterisk (*).
1 Access Function Default.
If you are unsure how to use this route map refer to Accessing Menu Items on
page vii.
2 Press S or T to select the default setting that you want to change and press
Enter. The screen for the selected default setting is displayed.
3 Press S or T to select the new default setting and press Enter. The display
shows Completed and returns to the Function Default screen.
Function Available Settings Reference
Scan Color Select
*
Full Color
Grayscale
Monochrome
page 2-5
Scan Resolution
*
200 x 100 Normal
200 x 200 Fine
200 x 400 Sup Fine
300 x 300 dpi
400 x 400 Ult Fine
600 x 600 dpi
page 2-6
Original Quality * Text + Photo
Photo
Te xt
page 1-2, page 25
Exposure
*
Auto
Manual
page 1-2, page 26
Zoom
*
Auto
100%
page 1-3, page 28
Collate
*
Off
On
page 1-5
Orig. Placement
*
Top Edge to Rear
Top Edge to Left
page 1-4, page 28
File Name Entry doc page 1-11, page
2-10
File Name Entry/Additional
Info.
*
None
Date and Time
Job No.
-
System Menu/
Counter
S or T
Function Default
Enter
Page 54

System Settings
5-6 ADVANCED OPERATION GUIDE
4 Press Copy or Send. The basic screen is displayed.
5 Press Reset. The default values will be activated.
Registering One-Touch Keys
Use the following procedure to register a destination (e-mail, PC folder, FAX) or a
combination (copy or send) for the one-touch keys.
Selecting One-Touch Keys
1 Access One Touch Set.
If you are unsure how to use this route map refer to Accessing Menu Items on
page vii.
2 Press S or T to select Program or Destination and press Enter. The display
shows Completed and returns to the One Touch Set screen.
Registering Destinations
To use this function, the destination must be registered in the Address book - refer
to Editing the Address Book on page 5-21. The destination cannot be registered from
the Ext Address Book.
1 Access One Touch Keys.
If you are unsure how to use this route map refer to Accessing Menu Items on
page vii.
2 Press S or T to select the one touch key number to register the destination
and press Enter. When ------ is displayed, the destination is not registered. A
register screen is displayed.
3 Press S or T to select Address Book and press Enter. The Address Book
screen is displayed.
4 Press S or T to select the destination required and press Enter.
When Group Address is selected, the destination is registered, Registered is
displayed and the One Touch Keys screen returns.
When Contact Address is selected, the Contact Address book is displayed.
5 Press S or T to select the send type required and press Enter. The
destination is registered. Registered is displayed and the One Touch Keys
screen returns.
To change an address that is already registered, press Enter. When the
message Overwrite Are you sure? is displayed press left Select.
System Menu/
Counter
S or T
Common Setting
Enter
S or T
One Touch Set
Enter
System Menu/
Counter
S or T
Common Setting
Enter
S or T
One Touch Keys
Enter
Page 55

System Settings
ADVANCED OPERATION GUIDE 5-7
Verifying or Deleting One Touch Keys
1 Access One Touch Keys.
If you are unsure how to use this route map refer to Accessing Menu Items on
page vii.
2 Press S or T to select the one touch key number required and press right
Select. The Menu screen is displayed.
3 Press S or T to select Detail or Delete and press Enter. When Delete is
selected, Delete Are you sure? is displayed.
4 Use the following procedure to register destination (e-mail, PC folder, FAX) or
combination (copy or send) under the one-touch keys and press Enter. The
display shows Completed and returns to the One Touch Keys screen.
5 When Detail is selected, you can verify the destination which is registered.
Registering Program Functions
Up to eight combinations of copy or send option modes and functions displayed on
the operation panel can be registered as a single program.
Registering a Program
1 Select the copy or send options to be registered (for example: 5 copies,
Original size A4, Cassette 1).
2 Access Program Setting.
If you are unsure how to use this route map refer to Accessing Menu Items on
page vii.
3 Press S or T to select the program number required (1 to 8) and press right
Select.
4 Press S or T to select Register and press Enter. A register screen is
displayed.
5 Press S or T to select Copy or Send program and press Enter. The Register
copy (send) set. Are you sure? is displayed.
To change a program that is already registered, press Enter. When the
message Overwrite copy (send) set. Are you sure? is displayed, press left
Select.
6 Press left Select. The program is registered. The display shows Registered
and returns to the Program Setting screen.
System Menu/
Counter
S or T
Common Setting
Enter
S or T
One Touch Keys
Enter
System Menu/
Counter
S or T
Program Setting
Enter
Page 56

System Settings
5-8 ADVANCED OPERATION GUIDE
Using a Program
1
Press Program. The Program Call screen is displayed.
2
Press S or T to select the program number required and press Enter. The display
shows Called and the Program is loaded.
When the destination of a PC folder is registered, the User Login Name and Login
Password must be input.
3
Position the originals and press Start.
Copy jobs or, send jobs are produced using the settings registered in the program.
If the program is called from a one-touch key, it is necessary to register the one-touch
key - refer to Registering One-Touch Keys on page 5-6.
Restarting the Machine
You must restart the machine after you have changed any network settings.
1 Access Restart.
If you are unsure how to use this route map refer to Accessing Menu Items on
page vii.
2 To restart the machine, press left Select.
System Menu/
Counter
S or T
System Setting
Enter
S or T
Restart
Enter
Page 57

System Settings
ADVANCED OPERATION GUIDE 5-9
Adjusting Alarms
The following shows the various alarms and the available volume settings.
Item Available
Settings
Description
Volume 0 Off
1 Minimum
2
3 Middle
4
5 Maximum
Adjust the volume of the alarms. To make all alarm sounds inaudible,
select the Off setting. The larger the setting value, the larger the
volume.
Key Conf. Buzzer Off
On
Indicates that the machine has accepted the key operation that was
performed by the user.
Key Fail Buzzer Off
On
Indicates that for some reason the machine is unable to accept the key
operation that was performed by the user.
Reset Buzzer Off
On
Indicates that Reset/Power was pressed in order to reset the current
settings.
Job End Buzzer Off
On
Indicates that a corresponding copy, print, or send job was completed
or that the machine has returned to an operation-ready state.
Ready Buzzer Off
On
Indicates that the machine is in an operation-ready state.
Warning Buzzer Off
On
Indicates that in its current state the machine is unable to perform the
corresponding job.
This setting applies when one of the following messages appears on
the display.
Close Document Processor.
Insert Cassette 1.
KPDL error. Job is ended.
Load Paper in Cassette1 (Cassette2, MP Tray, or Document
Processor).
Memory overflow. Part of the job end is printed.
Place original and press Start key.
Print overrun. This page isn’t complete.
Remove original from Document Processor.
Send error.
Toner low.
Page 58

System Settings
5-10 ADVANCED OPERATION GUIDE
1 Access Volume.
If you are unsure how to use this route map refer to Accessing Menu Items on
page vii.
2 Press S or T to select the volume for the alarms and press Enter. The display
shows Completed and returns to the Buzzer screen.
3 Press S or T to select the alarm and press Enter. The screen to turn the
corresponding alarm on and off is displayed.
4 Press S or T to select either On or Off and press Enter. The display shows
Completed and returns to the Buzzer screen.
Error Buzzer Off
On
Indicates that for some reason the corresponding operation has been
terminated/paused or that user-intervention is required.
This setting applies when one of the following messages appears on
the display.
Close Top (or Document Processor) Cover.
Error occurred Call service person.
Paper Jam at Casssete1 (Casssete2, MP Tray, or Document
Processor).
Paper Jam in printer.
Replace Toner.
Item Available
Settings
Description
System Menu/
Counter
S or T
Common Setting
Enter
S or T
Sound Setting
Enter
S or T
Buzzer
Enter
S or T
Volume
Enter
Page 59

System Settings
ADVANCED OPERATION GUIDE 5-11
Timer Settings
Date and Time
NOTE: Periodically check the time that is shown in the message display and adjust
as necessary to match the current time.
1 Access Year/Time.
If you are unsure how to use this route map refer to Accessing Menu Items on
page vii.
2 Press S or T to register the current year and press X.
3 Press S or T to register the current month and press X.
4 Press S or T to register the current day.
5 Press Enter. The Time Setting screen (hour/minute/second) is displayed.
6 Press S or T to register the current hour and press X.
7 Press S or T to register the current minute and press X.
8 Press S or T to register the current second.
9 Press Enter. The display shows Completed and returns to the Date/Timer Set
screen.
Date Format
The display sequence of the date which is displayed at the operating panel can be
changed to Month/Day/Year, Day/Month/Year or Year/Month/Day.
1 Access Date Format.
If you are unsure how to use this route map refer to Accessing Menu Items on
page vii.
2 Press S or T to select the format that you require and press Enter. The
display shows Completed and returns to the Date/Timer Set screen.
System Menu/
Counter
S or T
Date/Timer Set
Enter
S or T
Year/Time
Enter
System Menu/
Counter
S or T
Date/Timer Set
Enter
S or T
Date Format
Enter
Page 60

System Settings
5-12 ADVANCED OPERATION GUIDE
Time Zone
This setting indicates the difference in time between your time zone and Greenwich
Mean Time. (Example: The setting for Eastern Standard Time is -05:00 Estn Time).
This setting is especially useful when sending e-mail.
1 Access Time Zone.
If you are unsure how to use this route map refer to Accessing Menu Items on
page vii.
2 Press S or T to select the time zone that you are in and press Enter. The
display shows Completed and returns to the Date/Timer Set screen.
Summer Time
This setting is valid only in those areas where summer time is observed.
1 Access Summer Time.
If you are unsure how to use this route map refer to Accessing Menu Items on
page vii.
2 Press S or T to select either On or Off. Press Enter. The display shows
Completed and returns to the Date/Timer Set screen.
Auto Panel Reset
The Auto Panel Reset function automatically returns the machine to the default
settings when no operation has been performed on the machine or operation panel
for a pre-set period of between 5 and 495 seconds. The factory default setting for this
period is 90 seconds. The exception is that the current exposure mode and the
original quality mode settings will not change.
Enabling Auto Panel Reset
1 Access Auto Panel Reset.
If you are unsure how to use this route map refer to Accessing Menu Items on
page vii.
2 Press S or T to select either On or Off. Press Enter. The display shows
Completed and returns to the Date/Timer Set screen.
System Menu/
Counter
S or T
Date/Timer Set
Enter
S or T
Time Zone
Enter
System Menu/
Counter
S or T
Date/Timer Set
Enter
S or T
Summer Time
Enter
System Menu/
Counter
S or T
Date/Timer Set
Enter
S or T
Auto Panel Reset
Enter
Page 61

System Settings
ADVANCED OPERATION GUIDE 5-13
Reset Timer
1 Access Reset Timer.
If you are unsure how to use this route map refer to Accessing Menu Items on
page vii.
2 Press S or T to select Reset Timer and press Enter. The Reset Timer screen
is displayed.
3 Press S or T or use the numeric keys to register the current Reset Timer.
Press Enter. The display shows Completed and returns to the Date/Timer Set
screen.
Low Power Timer
The machine has a Low Power Timer that is used to conserve power when it is not
operating. You can adjust this time to between 1 minute and 240 minutes before the
machine enters low power mode. The factory default time is 5 minutes.
The machine wakes from low power mode whenever any one of the keys on the
operation panel is pressed, an original is placed in the document processor, the
cassettes or MP tray are opened or closed, or a print job is received.
1 Access Low Power Timer.
If you are unsure how to use this route map refer to Accessing Menu Items on
page vii.
2 Press S or T or use the numeric keys to select the time for the Low Power
Timer to engage and press Enter. The display shows Completed and returns
to the Date/Timer Set screen.
Auto Sleep Timer
The machine has an Auto Sleep Timer that is used to conserve power when it is not
operating. You can adjust this time to between 1 minute and 240 minutes before the
machine enters sleep mode. The factory default time is 30 minutes.
To engage auto sleep manually, press and hold Reset/Power for at least three
seconds. Auto sleep will engage immediately. The machine wakes from auto sleep
whenever you press Reset/Power.
System Menu/
Counter
S or T
Date/Timer Set
Enter
S or T
Reset Timer
Enter
System Menu/
Counter
S or T
Date/Timer Set
Enter
S or T
Low Power Timer
Enter
Page 62

System Settings
5-14 ADVANCED OPERATION GUIDE
Enabling Auto Sleep
1 Access Auto Sleep.
If you are unsure how to use this route map refer to Accessing Menu Items on
page vii.
2 Press S or T to select Auto Sleep and press Enter. The Auto Sleep screen is
displayed.
3 Press S or T to select either On or Off. Press Enter. The display shows
Completed and returns to the Date/Timer Set screen.
Sleep Timer
1 Access Sleep Timer.
If you are unsure how to use this route map refer to Accessing Menu Items on
page vii.
2 Press S or T or use the numeric keys to select the time for the Sleep Timer to
engage and press Enter. The display shows Completed and returns to the
Date/Timer Set screen.
Auto Error Clear
If a printing error occurs that still allows printing to continue, setting Auto Error Clear
to On enables the next job to be printed after a set recovery period (Error Clear Time)
has elapsed. The factory default setting for Auto Error Clear is Off. The Error Clear
Time period can be set between 5 and 495 seconds. The factory default time is 30
seconds.
Enabling Auto Error Clear
1 Access Auto Err. Clear.
If you are unsure how to use this route map refer to Accessing Menu Items on
page vii.
2 Press S or T to select either On or Off and press Enter. The display shows
Completed and returns to the Date/Timer Set screen.
System Menu/
Counter
S or T
Date/Timer Set
Enter
S or T
Auto Sleep
Enter
System Menu/
Counter
S or T
Date/Timer Set
Enter
S or T
Sleep Timer
Enter
System Menu/
Counter
S or T
Date/Timer Set
Enter
S or T
Auto Err. Clear
Enter
Page 63

System Settings
ADVANCED OPERATION GUIDE 5-15
Error Clear Time
1 Access Err. Clear Timer.
If you are unsure how to use this route map refer to Accessing Menu Items on
page vii.
2 Press S or T or use the numeric keys to select the recovery time and press
Enter. The display shows Completed and returns to the Date/Timer Set
screen.
System Menu/
Counter
S or T
Date/Timer Set
Enter
S or T
Err. Clear Timer
Enter
Page 64

System Settings
5-16 ADVANCED OPERATION GUIDE
Size Settings
Registering Custom Original Size
If you normally copy or scan from an original size that is not registered in this
machine (non-standard size), it is convenient to register that size in advance. You
can register a custom original size within the following ranges:
1 Access Custom Orig.Size.
If you are unsure how to use this route map refer to Accessing Menu Items on
page vii.
2 Press S or T to select Custom and press Enter. The Size Entry(Y) screen is
displayed.
3 Use the numeric keys to enter the Y dimension (width) of the original to be
registered.
Once the width is displayed, press Enter. The Size Entry(X) screen is
displayed.
4 Use the numeric keys to enter the X dimension (height) of the original to be
registered.
Once the height is displayed, press Enter. The display shows Registered and
returns to the Orig. /Paper Set screen.
Measurement X Range Y Range
Inch specifications 5.83 to 14.02 inches 3.15 to 8.50 inches
Metric specifications 148 to 356 mm 80 to 216 mm
System Menu/
Counter
S or T
Common Setting
Enter
S or T
Orig. /Paper Set
Enter
S or T
Custom Orig.Size
Enter
Page 65

System Settings
ADVANCED OPERATION GUIDE 5-17
Registering Custom Paper Size
If you normally copy or print onto a paper size that is not registered in this machine
(non-standard size), it is convenient to register that size in advance. It is possible to
register a custom paper size within the following ranges:
1 Access Custom PaperSize.
If you are unsure how to use this route map refer to Accessing Menu Items on
page vii.
2 Press S or T to select Custom and press Enter. The Size Entry(Y) screen is
displayed.
3 Use the numeric keys to enter the Y dimension (height) of the print paper to be
registered.
Once the height is displayed, press Enter. The Size Entry(X) screen is
displayed.
4 Use the numeric keys to enter the X dimension (width) of the print paper to be
registered.
Once the width is displayed, press Enter. The display shows Registered and
returns to the Orig./Paper Set screen.
Measurement X Range Y Range
Inch specifications 3.15 to 8.50 inches 5.83 to 14.02 inches
Metric specifications 80 to 216 mm 148 to 356 mm
System Menu/
Counter
S or T
Common Setting
Enter
S or T
Orig./Paper Set
Enter
S or T
Custom PaperSize
Enter
Page 66

System Settings
5-18 ADVANCED OPERATION GUIDE
Default Original Size
You can change the default original size to a more frequently used one.
1 Access Def. Orig. Size.
If you are unsure how to use this route map refer to Accessing Menu Items on
page vii.
2 Press S or T to select the size of the original and press Enter. The display
shows Completed and returns to the Orig./Paper Set screen.
Selecting Paper Size and Media Type
From the operation panel, you can select the default paper source from which the
machine feeds paper. If an optional paper feeder(s) is installed, it is also available for
the default paper source.
Cassettes
1 Access Cassette# Size.
Where # is the cassette number.
If you are unsure how to use this route map refer to Accessing Menu Items on
page vii.
2 Press S or T to select the paper size to be used in that cassette and press
Enter. The display shows Completed and returns to the Cassette# Set screen.
3 Press S or T to select Cassette# Type and press Enter. The Cassette# Type
screen is displayed.
4 Press S or T to select the media type to be used in that cassette and press
Enter. The display shows Completed and returns to the Cassette1 Set screen.
5 Press S to select Back and press Enter. The display returns to the Orig./Paper
Set screen.
System Menu/
Counter
S or T
Common Setting
Enter
S or T
Orig./Paper Set
Enter
S or T
Def. Orig. Size
Enter
System Menu/
Counter
S or T
Common Setting
Enter
S or T
Orig./Paper Set
Enter
S or T
Cassette# Set
Enter
S or T
Cassette# Size
Enter
Page 67

System Settings
ADVANCED OPERATION GUIDE 5-19
MP Tray
1 Access MP Tray Size.
If you are unsure how to use this route map refer to Accessing Menu Items on
page vii.
2 Press S or T to select the paper size to be used on the MP tray and press
Enter. The display shows Completed and returns to the MP Tray Set screen.
3 Press S or T to select MP Tray Type and press Enter. The MP Tray Type
screen is displayed.
4 Press S or T to select the media type to be used on the MP tray and press
Enter. The display shows Completed and returns to the MP Tray Set screen.
5 Press S to select Back and press Enter. The display returns to the Orig./Paper
Set screen.
Registering Custom Media Type
It is possible to use this procedure to register and select names for custom media
types (1 through 8).
1 Access Media Type Adj.
If you are unsure how to use this route map refer to Accessing Menu Items on
page vii.
2 Press S or T to select the media type whose registered paper weight and
printing exposure you want to change, or select one of the custom settings and
press Enter. The Media Weight screen is displayed.
If you selected Custom as the media type, the Media Name Entry screen is
displayed. Enter the name (15 characters maximum) and press Enter.
3 Press S or T to select the media weight and press Enter. The Print Density
screen is displayed.
4 Press S or T to select the print density and press Enter. The display shows
Completed and returns to the Media Type Adj screen.
System Menu/
Counter
S or T
Common Setting
Enter
S or T
Orig./Paper Set
Enter
S or T
MP Tray Set
Enter
S or T
MP Tray Size
Enter
System Menu/
Counter
S or T
Common Setting
Enter
S or T
Orig./Paper Set
Enter
S or T
Media Type Adj
Enter
Page 68

System Settings
5-20 ADVANCED OPERATION GUIDE
Selecting the Paper Feed Source
If an optional paper feeder is installed, it is also available for the default paper source.
1 Access Def. Paper Input.
If you are unsure how to use this route map refer to Accessing Menu Items on
page vii.
2 Press S or T to select the paper feed location that you want to be used as the
default setting and press Enter. The display shows Completed and returns to
the Orig./Paper Set screen.
Selecting the APS (Auto Paper Selection) Media Type
Use the following procedure to designate the type of paper that will be used when
the Auto setting is selected for the paper source.
1 Access APS Media Type.
If you are unsure how to use this route map refer to Accessing Menu Items on
page vii.
2 Press S or T to select the media type that will be used in the APS (Auto
Paper Selection) mode. Press Enter. The display shows Completed and
returns to the Copy Setting screen.
System Menu/
Counter
S or T
Common Setting
Enter
S or T
Orig./Paper Set
Enter
S or T
Def. Paper Input
Enter
System Menu/
Counter
S or T
Copy Setting
Enter
S or T
APS Media Type
Enter
Page 69

System Settings
ADVANCED OPERATION GUIDE 5-21
Editing the Address Book
This section explains how to register contact address and group address.
The maximum number that can be registered is:
Registration of e-mail address, PC folder (SMB and FTP), and fax number is also
possible from an Internet Web browser as well as by using COMMAND CENTER.
Registering Contact Address
The destination which can be registered to the contact address is FAX Number, Email Address, Folder (SMB), and Folder (FTP).
1 Access Contact.
If you are unsure how to use this route map refer to Accessing Menu Items on
page vii.
2 Press right Select. The Contact Name screen is displayed.
3 Enter the contact name and press Enter. The Detail screen is displayed.
4 PressS or T to select the destination registering. The Detail (FAX Number, E-
mail Address, Folder (SMB), or Folder (FTP)) screen is displayed.
5 Press right Select. A register screen is displayed.
6 Enter the destination and press Enter. The Detail screen returns.
When completed, press Enter. The display shows Registered and returns to
the Edit Addressbook screen.
Address Maximum number
Contact Address 100
Group Address 20 (One group of 100)
System Menu/
Counter
S or T
Edit Addressbook
Enter
right Select
Menu
S or T
Add Address
Enter
S or T
Contact
Enter
Page 70

System Settings
5-22 ADVANCED OPERATION GUIDE
Registering Group Address
The destination of PC folder can only register one group to one destination.
1 Access Group.
If you are unsure how to use this route map refer to Accessing Menu Items on
page vii.
2 Press right Select. The Group Name screen is displayed.
3 Enter the group name and press Enter. The Detail Group Name screen is
displayed.
4 Press S or T to select Detail Group member and press right Select. The
Group Member screen is displayed.
5 Press right Select. The Menu screen is displayed.
6 Press S or T to select Add Member and press Enter. The Contacts screen is
displayed.
7 Press S or T to select the address required and press Enter. A contact
address screen is displayed.
8 Press S or T to select the FAX Number, E-mail Address, Folder (SMB), or
Folder (FTP). The display shows Registered and returns to the Group Member
screen.
9 When the member is added, repeat steps 5 through 8 to add further members.
10 When the register is completed, press left Select. The Detail Group Member
screen is displayed.
11 Press Enter. The display shows Registered and returns to the Edit
Addressbook screen.
System Menu/
Counter
S or T
Edit Addressbook
Enter
right Select
Menu
S or T
Add Address
Enter
S or T
Group
Enter
Page 71

System Settings
ADVANCED OPERATION GUIDE 5-23
Edit Address
1 Access Edit Addressbook.
If you are unsure how to use this route map refer to Accessing Menu Items on
page vii.
2 Press S or T to select the address required and press right Select. The Menu
screen is displayed.
3 Press S or T to select Detail/Edit and press Enter. The Detail screen is
displayed.
When the contact address is edited in this screen, it is also edited inside a
group address.
4 Press S or T to select the destination. The Other Detail screen is displayed.
You can verify the address which is registered.
When register contents are modified, press right Select. An edit screen is
displayed.
5 Edit the information and press Enter. The Detail screen display returns.
When verification and modification of the address are completed, press Enter.
The display shows Registered and returns to the Edit Addressbook screen.
Delete Address
1 Access Edit Addressbook.
If you are unsure how to use this route map refer to Accessing Menu Items on
page vii.
2 Press S or T to select the address required and press right Select. The Menu
screen is displayed.
3 Press S or T to select Delete and press Enter. Delete Are you sure? is
displayed.
When the contact address is deleted on this screen, it is also deleted inside
group address.
4 Press Enter. Deleted is displayed and the address is deleted. The display
returns to the Edit Addressbook screen.
System Menu/
Counter
S or T
Edit Addressbook
Enter
System Menu/
Counter
S or T
Edit Addressbook
Enter
Page 72

System Settings
5-24 ADVANCED OPERATION GUIDE
Printing the Service Pages
The following table shows the reports that are available for printing.
CAUTION: The Service Setting menu includes items to be performed by service
personnel. Do not attempt to change settings other than those explained below.
1 Access Service Setting.
If you are unsure how to use this route map refer to Accessing Menu Items on
page vii.
2 Press S or T to select either Ser.Status Page or NW Status Page and press
Enter. Print Are you sure? is displayed.
3 Press left Select.
4 Accepted is displayed and printing of the report will begin. The display returns
to the Service Setting screen.
Item Description
Ser. Status Page
(Service Status Page)
Lists information on the settings and environments of
use for this machine.
NW Status Page
(Network Status Page)
Lists information on the network settings.
System Menu/
Counter
S or T
Service Setting
Enter
Page 73

ADVANCED OPERATION GUIDE 6-1
6 User Login Management
When User ID is indicated on this machine, the administrator has enabled the User
Login function and you will need to enter your User ID in order to use the machine.
Additionally, the administrator may have set a password which you will also need to
enter.
The factory default User ID and Password is 1118.
Entering User Login
If the message display prompts you to login, follow the instructions below:
1
Use the numeric keys to enter the User ID.
2
When the password has been set, press T to select Password, use the numeric keys
to enter the Password and press Enter. The basic screen is displayed.
If the administrator has not set the password, press Enter. The basic screen is
displayed.
3
On completion, press Log Out.
ID management
User Login must be enabled by the administrator before it can be used.
Enabling User Login
Use to switch the User Login function On or Off.
1 Access User Login.
If you are unsure how to use this route map refer to Accessing Menu Items on
page vii.
If the User Login setting is enabled you will need to enter an administrator's
User ID, press T and enter an administrator's Password and press Enter
before the User/Job Account screen is displayed.
2 Press S or T to select On or Off and press Enter. The display shows
Completed and returns to the User Login Set screen.
System Menu/
Counter
S or T
User/Job Account
Enter
S or T
User Login Set
Enter
S or T
User Login
Enter
Page 74

User Login Management
6-2 ADVANCED OPERATION GUIDE
Registering a User
Up to 20 users, including the administrator can be registered.
1 Access User List.
If you are unsure how to use this route map refer to Accessing Menu Items on
page vii.
If the User Login setting is enabled you will need to enter an administrator's
User ID, press T and enter an administrator's Password and press Enter
before the User/Job Account screen is displayed.
2 Press right Select. The Menu screen is displayed.
3 Press S or T to select Add User and press Enter. The User Name screen is
displayed.
4 Enter the user name and press Enter. The User ID screen is displayed.
5 Enter the user ID and press Enter. The display shows Registered and returns
to a login user screen.
6 Press S or T to select Detail and press Enter.
7 Enter the password of the login user, e-mail address, access level and
account.
8 Press Enter. The User List screen returns.
System Menu/
Counter
S or T
User/Job Account
Enter
S or T
User Login Set
Enter
S or T
User List
Enter
Page 75

User Login Management
ADVANCED OPERATION GUIDE 6-3
Editing User Details
The following details can be edited.
• User Name - maximum 16 characters.
• User ID - maximum 16 characters.
• Password - maximum 16 characters.
When you enter the password, you will need to enter password again to
confirm it.
• Mail Address - maximum 128 characters.
• Access Level - Administrator or User.
Administrator: All operations are permitted.
User: Cannot access Sys Menu/Counter. The Counter and User Property
function are excluded.
• Account Name - if no name is entered, it will show Other.
1 Access User List.
If you are unsure how to use this route map refer to Accessing Menu Items on
page vii.
If User Login setting is enabled you will need to enter an administrator’s User
ID, press T and enter an administrator’s Password and press Enter before the
User/Job Account screen is displayed.
2 Press S or T to select the user name required and press Enter. The Detail
screen is displayed.
3 Press S or T to select the user login information registering.
4 When contents are to be modified, press right Select. An edit screen is
displayed.
5 Edit the information and press Enter. The Detail screen display returns.
6 On completion, press Enter. The display shows Registered and returns to a
User List screen.
System Menu/
Counter
S or T
User/Job Account
Enter
S or T
User Login Set
Enter
S or T
User List
Enter
Page 76

User Login Management
6-4 ADVANCED OPERATION GUIDE
Deleting a User
1 Access User List.
If you are unsure how to use this route map refer to Accessing Menu Items on
page vii.
If User Login setting is enabled you will need to enter an administrator’s User
ID, press T and enter an administrator’s Password and press Enter before the
User/Job Account screen is displayed.
2 Press S or T to select the user name required and press right Select. The
Menu screen is displayed.
3 Press S or T to select Delete and press Enter. Delete Are you sure? is
displayed.
4 Press left Select. The display shows Deleted, the user is deleted and the User
List screen returns.
User Property
You can verify the information of the login user. However, modification of User Name
and Password is possible. When User Login is set to Off, The User Property screen
is not displayed.
1 Access User Property.
If you are unsure how to use this route map refer to Accessing Menu Items on
page vii.
2 Press S or T to select the user. The User Property (1/6 to 6/6) screen is
displayed.
3 When register contents are to be modified, press right Select. An edit screen is
displayed.
4 Edit the property and press Enter. The User Property screen display returns.
5 On completion, press Enter. The display shows Registered and the Sys.
Menu/Counter screen returns.
System Menu/
Counter
S or T
User/Job Account
Enter
S or T
User Login Set
Enter
S or T
User List
Enter
System Menu/
Counter
S or T
User Property
Enter
Page 77

User Login Management
ADVANCED OPERATION GUIDE 6-5
Unknown ID Job
The manager can permit or prohibit a print job from user ID that is not registered.
1 Access Unknown ID Job.
If you are unsure how to use this route map refer to Accessing Menu Items on
page vii.
If User Login setting is enabled you will need to enter an administrator’s User
ID, press T and enter an administrator’s Password and press Enter before the
User/Job Account screen is displayed.
2 Press S or T to select Reject or Permit and press Enter. The display shows
Completed and the User/Job Account screen returns.
System Menu/
Counter
S or T
User/Job Account
Enter
S or T
Unknown ID Job
Enter
Page 78

User Login Management
6-6 ADVANCED OPERATION GUIDE
Page 79

ADVANCED OPERATION GUIDE 7-1
7 Job Accounting
Job accounting is used to control the total number of copies and prints by setting an
ID-code for each account. When enabled, job accounting has the following features.
You should also refer to the Kyocera Extended Driver (KX Driver) User Guide for
computer settings required for using job accounting for printer functions
Enabling Job Accounting
1 Access Job Account.
If you are unsure how to use this route map refer to Accessing Menu Items on
page vii.
2 Press S or T to select Off or On and press Enter.
3 Press right Select. The display returns to the basic screen.
Job Accounting Function Description
Enabling job accounting Turn job accounting function On or Off.
Managing accounts • Registers ID-codes and limitation of use.
• Deletes registered accounts.
• Changes the limitation of use for each
account.
All account management Confirms the total count, job accounting report
output, and counter clear for all accounts.
Individual account
management
Shows the total count and counter clear for
individual accounts.
Job Accounting Report Prints the job accounting report.
Default settings Adjusts the default settings for the job accounting
mode.
System Menu/
Counter
S or T
User/Job Account
Enter
S or T
Job Account. Set
Enter
S or T
Job Account.
Enter
Page 80

Job Accounting
7-2 ADVANCED OPERATION GUIDE
Managing Accounts
Registering a New Account
1 Access Account. List.
If you are unsure how to use this route map refer to Accessing Menu Items on
page vii.
2 Press right Select.
3 Press S or T to select Add Account and press Enter.
4 Enter the account name up to 16 characters and press Enter.
5 Enter the account ID up to 8 digits and press Enter.
6 Press S or T to select Detail and press Enter.
7 Press left Select to set the limitation of use - refer to Setting Limitation of Use
on page 7-2.
8 Press left Select twice. The display returns to the basic screen.
Setting Limitation of Use
You can change the management method so that you can set the limitation of count
for copying and printing respectively.
Copying Limitation
This item is displayed if Copy/Print Count setting is set to Split.
1 Access Account. List.
If you are unsure how to use this route map refer to Accessing Menu Items on
page vii.
2 Press S or T to select the account to set the limitation and press Enter.
3 Press S or T to select Print Limit.: Copier and press right Select.
4 Press S or T to select On and press Enter.
5 Enter the maximum pages and press Enter.
6 Press left Select twice. The display returns to the basic screen.
System Menu/
Counter
S or T
User/Job Account
Enter
S or T
Job Account. Set
Enter
S or T
Account. List
Enter
System Menu/
Counter
S or T
User/Job Account
Enter
S or T
Job Account. Set
Enter
S or T
Account. List
Enter
Page 81

Job Accounting
ADVANCED OPERATION GUIDE 7-3
Printing Limitation
1 Access Account. List.
If you are unsure how to use this route map refer to Accessing Menu Items on
page vii.
2 Press S or T to select the account to set the limitation and press Enter.
3 Press S or T to select Print Limit.: Printer and press right Select.
4 Press S or T to select On and press Enter.
5 Enter the maximum pages and press Enter.
6 Press left Select twice. The display returns to the basic screen.
Scanning Limitation
1 Access Account. List.
If you are unsure how to use this route map refer to Accessing Menu Items on
page vii.
2 Press S or T to select the account to set the limitation and press Enter.
3 Press S or T to select Scan Limit and press right Select.
4 Press S or T to select On and press Enter.
5 Enter the maximum pages and press Enter.
6 Press left Select twice. The display returns to the basic screen.
Fax Transmission Limitation
1 Access Account. List.
If you are unsure how to use this route map refer to Accessing Menu Items on
page vii.
2 Press S or T to select the account to set the limitation and press Enter.
3 Press S or T to select FAX TX Limit and press right Select.
4 Press S or T to select On and press Enter.
5 Enter the maximum pages and press Enter.
6 Press left Select twice. The display returns to the basic screen.
System Menu/
Counter
S or T
User/Job Account
Enter
S or T
Job Account. Set
Enter
S or T
Account. List
Enter
System Menu/
Counter
S or T
User/Job Account
Enter
S or T
Job Account. Set
Enter
S or T
Account. List
Enter
System Menu/
Counter
S or T
User/Job Account
Enter
S or T
Job Account. Set
Enter
S or T
Account. List
Enter
Page 82

Job Accounting
7-4 ADVANCED OPERATION GUIDE
Deleting an Account
1 Access Account. List.
If you are unsure how to use this route map refer to Accessing Menu Items on
page vii.
2 Press S or T to select the account to be deleted and press right Select.
3 Press S or T to select Delete and press Enter. Delete Are you sure? is
displayed.
4 Press left Select. The display shows Deleted and returns to the Account List
screen.
5 Repeat steps 2 to 4 to delete another account.
6 Press left Select. The display returns to the basic screen.
Changing Limitation of Use
1 Access Account. List.
If you are unsure how to use this route map refer to Accessing Menu Items on
page vii.
2 Press S or T to select the account to change the limitation and press Enter.
3 Change the limitation of use - refer to Setting Limitation of Use on page 7-2.
4 On completion, press left Select twice. The display returns to the basic screen.
All Account Management
Confirming the counter
1 Access Job Account. Set.
If you are unsure how to use this route map refer to Accessing Menu Items on
page vii.
2 Press S or T to select All Accounts and press Enter.
3 Press S or T to confirm the counters for printed pages, scanned pages, FAX
TX pages and FAX TX time and press Enter.
System Menu/
Counter
S or T
User/Job Account
Enter
S or T
Job Account. Set
Enter
S or T
Account. List
Enter
System Menu/
Counter
S or T
User/Job Account
Enter
S or T
Job Account. Set
Enter
S or T
Account. List
Enter
System Menu/
Counter
S or T
User/Job Account
Enter
S or T
Job Account. Set
Enter
Page 83

Job Accounting
ADVANCED OPERATION GUIDE 7-5
Resetting the counter
1 Access Job Account. Set.
If you are unsure how to use this route map refer to Accessing Menu Items on
page vii.
2 Press S or T to select All Accounts and press Enter.
3 Press S or T to select Counter Reset and press Enter. Counter Reset Are
you sure? is displayed.
4 Press left Select. The display shows Cleared and returns to the All Accounts
screen.
5 Press right Select. The display returns to the basic screen.
Individual Account Management
Confirming the counter
1 Access Job Account. Set.
If you are unsure how to use this route map refer to Accessing Menu Items on
page vii.
2 Press S or T to select Split Account and press Enter.
3 Press S or T to select the account and press Enter.
4 Press S or T to confirm the counters for printed pages, scanned pages, FAX
TX pages and FAX TX time and press Enter.
Resetting the counter
1 Access Job Account. Set.
If you are unsure how to use this route map refer to Accessing Menu Items on
page vii.
2 Press S or T to select Split Account and press Enter.
3 Press S or T to select the account and press Enter.
4 Press S or T to select Counter Reset and press Enter. Counter Reset Are
you sure? is displayed.
5 Press left Select. The display shows Cleared and returns to the Split Account
screen.
6 Press right Select. The display returns to the basic screen.
System Menu/
Counter
S or T
User/Job Account
Enter
S or T
Job Account. Set
Enter
System Menu/
Counter
S or T
User/Job Account
Enter
S or T
Job Account. Set
Enter
System Menu/
Counter
S or T
User/Job Account
Enter
S or T
Job Account. Set
Enter
Page 84

Job Accounting
7-6 ADVANCED OPERATION GUIDE
Job Accounting Report
1 Access Job Account. Set.
If you are unsure how to use this route map refer to Accessing Menu Items on
page vii.
2 Press S or T to select Account. Report and press Enter. Print Are you sure?
is displayed.
3 Press left Select. The job accounting report is printed.
4 Press right Select. The display returns to the basic screen.
System Menu/
Counter
S or T
User/Job Account
Enter
S or T
Job Account. Set
Enter
Page 85

Job Accounting
ADVANCED OPERATION GUIDE 7-7
Default Settings
Action when Limitations are Exceeded
You can select whether to prohibit use of the machine immediately, from the next job
or to display a warning message when the count limitation is exceeded.
1 Access Job Account. Set.
If you are unsure how to use this route map refer to Accessing Menu Items on
page vii.
2 Press S or T to select Default Setting and press Enter.
3 Press S or T to select Apply Limit and press Enter.
4 Press S or T to select Immediately or Subsequently and press Enter. The
display shows Registered and returns to the Default Setting screen.
5 Press right Select. The display returns to the basic screen.
Adding Copying Counter to Printing Counter
You can select whether to add the copying counter to the printing counter or not.
1 Access Job Account. Set.
If you are unsure how to use this route map refer to Accessing Menu Items on
page vii.
2 Press S or T to select Default Setting and press Enter.
3 Press S or T to select Copy/Print Count and press Enter.
4 Press S or T to select Tot al or Split and press Enter. The display shows
Registered and returns to the Default Setting screen.
5 Press right Select. The display returns to the basic screen.
System Menu/
Counter
S or T
User/Job Account
Enter
S or T
Job Account. Set
Enter
System Menu/
Counter
S or T
User/Job Account
Enter
S or T
Job Account. Set
Enter
Page 86

Job Accounting
7-8 ADVANCED OPERATION GUIDE
Using Job Accounting
Copier or Send Operation
Under job accounting, you can only perform copier and send operations after
inputting your ID-code.
When User Login is set, the message display prompts you to enter the user ID and
password. The job is then added to the account of the user with that ID. For details,
refer to Editing User Details on page 6-3.
1
Input your ID-code using the numeric keys and press Enter. The basic screen is
displayed.
If you enter an incorrect code, press Stop/Clear and re-enter the code.
2
Perform normal copier or send operations.
3
On completion, press Log Out.
Printer Operation
With job accounting enabled, operation on the computer is required for printing. For
details, contact your system administrator.
Page 87

ADVANCED OPERATION GUIDE 8-1
8 Using COMMAND CENTER
COMMAND CENTER refers to the web home page that is installed in the machine
from which you can verify the operating status of the machine and make settings
related to security, network printing, e-mail transmission and advanced networking.
System Requirements
If the machine is used on a TCP/IP network and has a valid IP address, it may be
managed from any web browser. The browser allows configuration of all machine
settings, however, unlike the AdminManager, the browser cannot create NetWare
print objects. If a browser is used for NetWare configuration, then NWAdmin must
also be used to create the NetWare print objects.
The COMMAND CENTER home page can only be accessed from a PC if the TCP/
IP protocol is installed on the PC and the IP address has been configured for the
machine.
Required operating systems (OS) for using COMMAND CENTER:
• Microsoft Windows 98SE/ME/2000/XP and Microsoft Windows NT 4.0
• Apple Macintosh OS X 10.x
The COMMAND CENTER web page has been tested with the following web
browsers.
OS Web Browser
Microsoft Windows Microsoft Internet Explorer 5.5 and 6.0
Netscape 6.2 and 7.1
Opera 7
Mozilla 1.5
Apple Macintosh
Microsoft Internet Explorer 5.2
†
†. Due to the Macintosh Internet Explorer display restriction, some or all of
the elements in the drop down list may appear in English.
Netscape 7.1
Safari 1 (OS X 10.2 and later)
Page 88

Using COMMAND CENTER
8-2 ADVANCED OPERATION GUIDE
Accessing COMMAND CENTER
1
Run the web browser.
2
In Address or Location, enter the machine IP address as the URL, e.g. http://
10.183.51.33/. The home page displays basic information about the machine and
COMMAND CENTER as well as the current status of the machine.
3
Select a category from the navigation bar on the left to view and set values for that
category.
4
When trying to access any screens other than the home page when a COMMAND
CENTER Admin password has been set, enter a user name and password.
The administrator password may be defined on the Basic page. If prompted to enter
User name and Password, any value may be entered for User Name (including
leaving it blank). For Password, enter COMMAND CENTER Admin password.
Page 89

Using COMMAND CENTER
ADVANCED OPERATION GUIDE 8-3
COMMAND CENTER Pages
The COMMAND CENTER home page divides the seven functions onto separate
pages. The following is an outline of each page accessed.
Advanced Page
Scanner Page
Printer Page
Basic Page
Start Page
Fax Page
Job Page
Page Description
Start page This page allows you to verify this machine’s operating status and current settings.
Basic page This page includes settings that apply to the entire machine, such as Device Defaults,
Security, and Basic Networking.
Printer page This page includes settings that apply to the printing function of the machine, such as
Default Print Resolution and Copy Count.
Scanner page This page includes settings that apply to the scanning function of the machine, such as
Default Scan Resolution and Original Placement.
Page 90

Using COMMAND CENTER
8-4 ADVANCED OPERATION GUIDE
Start Page
The following operations are possible from the Start page.
• Verifying the machine’s operating status
• Changing the language that COMMAND CENTER is displayed in
• Verifying various settings (machine, printing, scanning, network and e-mail)
• Verifying the number of scanned pages and the number of prints made on the
machine
• Access linked home pages
All users will have access to the Start page.
To return from any other page to this home page, click on T Start.
Start > Start
This page allows you to verify the machine’s operating status. This will be the first
screen that appears after COMMAND CENTER has been started up.
Fax page This page includes settings that apply to the FAX function of the device, such as FAX
transmit and receive settings.
Jobs page This page includes information on all device jobs including job status, scheduled job and
job log.
Advanced
page
This page includes advanced settings that apply to the entire machine and is comprised
primarily of advanced network settings.
Page Description
Item Description
Select Language Appears if COMMAND CENTER pages support multiple languages. Supported
languages may also be selected through language preference settings in your
browser.
To change COMMAND CENTER language:
- Open the Select Language drop down list by clicking it.
- Select the appropriate language.
If you attempt to view COMMAND CENTER with a character set other than the
language that is used on the operation panel’s display, some characters may be
illegible.
Operation Panel This indicates the machine’s operating status as displayed on the operation
panel. To update the display to the most recent status, click the Refresh button.
Toner Level This shows the approximate level of remaining toner. When the value is 100%,
the toner container is full. The closer to 0%, the smaller the amount of remaining
toner.
General Information This allows you to verify the following information: IP Address, Host Name, MAC
Address, System Firmware, Engine Firmware, Serial Number, and Asset
Number.
Media Input This shows paper size and media type for cassettes and MP tray.
Page 91

Using COMMAND CENTER
ADVANCED OPERATION GUIDE 8-5
Start > Status
These pages allow you to verify the various settings (machine, printing, scanning,
network and e-mail) that were made on the operation panel or using COMMAND
CENTER.
Item Description
Network > General This allows you to verify the settings made under SNMP, LDAP, TCP/IP, IPP
(Internet Printing Protocol), AppleTalk, and NetBEUI in the Advanced Page. For
more information on SNMP, refer to Advanced > Management > SNMP on page
8-25. For more information on other items, refer to Advanced > Protocols > TCP/
IP > General on page 8-18.
Network > IP Filters This displays the list of IP addresses and subnet masks that have access
permissions as set on the IP Filters page of the Advanced Page. If no IP
addresses have been designated, then access permission will be granted to all
addresses.
For more information, refer to Advanced > Protocols > TCP/IP > IP Filters on
page 8-19.
Network > POP3/
SMTP
This allows you to verify the e-mail-related settings made on POP3 and SMTP
pages of the Advanced Page.
For more information on POP3, refer to Advanced > E-mail > POP3 > General on
page 8-23.
For more information on SMTP, refer to Advanced > E-mail > SMTP > General on
page 8-22.
Network > Logical
Printer
This allows you to verify the settings made on the Logical Printers page of the
Advanced Page.
For more information, refer to Advanced > Protocols > TCP/IP > Logical
Printers on page 8-19.
Network > Netware This allows you to verify the settings made on the Netware page of the
Advanced Page.
For more information, refer to Advanced > Protocols > Netware on page 8-20.
Device/Printer This allows you to verify the settings made on the Basic and the Printer pages.
For more information, refer to Basic Page on page 8-6 and Basic > Address
Book on page 8-9.
Scanner This allows you to verify the settings made on the Scanner Page.
For more information, refer to Scanner Page on page 8-12.
Fax This allows you to verify the settings made on the Fax Page.
For more information, refer to FAX Page on page 8-14.
Jobs > Print Job Log This allows you to confirm the log of the jobs in each operation. For more
information, refer to Jobs Page on page 8-17.
Jobs > Send Job Log
Jobs > Store Job Log
Counters > by
Function
This allows you to verify the number of printed pages and scanned pages.
Counters > by Paper
Size
This allows you to verify the number of printed pages in each paper size.
Usage Counters This allows you to verify the number of scanned pages and the number of prints
made on the machine.
Page 92

Using COMMAND CENTER
8-6 ADVANCED OPERATION GUIDE
Start > Information
This page provides information about the Address Book, User Login, the model
number of the machine and version of COMMAND CENTER.
Start > Links
Visit the following web site for more information and downloads.
Basic Page
This section includes settings that apply to the machine, such as Device Defaults,
Security, and basic Networking. If the Admin password has been set, pages in this
section are available only to the Administrator.
Setting the Administrator password is highly recommended. See the Security section
for other security options. Function specific settings are found under their respective
sections.
Basic > Security > Account Settings
The Administrator (Admin) account is the master access account. It controls access
to the printer and networking configuration from all setup and management utilities
including the HTML web pages.
The factory default for COMMAND CENTER has no password. Setting the Admin
password is highly recommended to prevent unauthorized changes to the machine
and networking configuration.
To change the password:
1
Enter the Old Password.
2
Enter the password you want to set in New Password. This can be up to 30
character long.
3
Enter the same password in Confirm New Password.
4
Click the Submit button.
Item Description
Address Book This shows the status of Contacts and Groups in the Address Book. For more
information on other items, refer to FAX Page on page 8-14.
User Login This shows the status of User Logins. For more information on other items, refer
to Jobs Page on page 8-17.
About This shows details of the machine and COMMAND CENTER.
Item Description
Download Drivers http://kyoceramita.com/download/index.html
Kyocera Mita Online http://www.kyoceramita.com
Page 93

Using COMMAND CENTER
ADVANCED OPERATION GUIDE 8-7
Basic > Security > Device
COMMAND CENTER provides the ability to restrict the type of access that can be
accomplished from the operation panel. This can be done by selecting one of the
available settings: Lock, Partial Lock, or Unlock.
• Network access to the machine can be restricted using IP address
designations and/or SNMP settings.
• Network access to the machine can be restricted to allow only specific network
addresses. Refer to Advanced > Protocols > TCP/IP > IP Filters on page 8-19.
• The SNMP Read and Write Community settings function as passwords to
control read and write access to the machine using SNMP. Refer to Advanced
> Management > SNMP on page 8-25.
Basic > Security > User Login
This page lets you add, edit or remove User Logins.
Adding a New User Login
1
Open the User Login page.
2
Click Add and enter the information of the user to be used for the User Login.
3
Click Submit.
Editing the User Login
1
Open the User Login page.
2
Click the desired number or name to edit the user and modify their information.
3
Click Submit.
Deleting the User Login
1
Open the User Login page.
2
Check the desired user. If you check ID, all users will be checked.
3
Click Delete.
4
Click Delete.
Item Description
Lock Prohibits use of System Menu/Counter and prohibits canceling of jobs from the
Status Menu.
Partial Lock Prohibits use of System Menu/Counter.
Unlock The operation panel is fully operable.
Page 94

Using COMMAND CENTER
8-8 ADVANCED OPERATION GUIDE
Basic > Network
This page allows you to make the settings that are required for network printing and
sending e-mail. For more information, refer to Advanced > Protocols > TCP/IP >
General on page 8-18.
You must restart this machine after you have completed these settings in order to
properly register the content of those settings in the machine. Refer to Basic >
Reset on page 8-9.
Basic > Time
The current time can be set from the machine’s operation panel and, if a time server
is used to synchronize the time as well, the current time can be adjusted regularly
and easily. Enter the IP address of the time server and click the Synchronize button
to synchronize the time.
To set a time difference, click the drop down list for Local Time Adjustment and select
your region.
Item Description
Host Name Specifies a name for the printing system network component. This name is also
used as the NetBEUI Printer Name and the SNMP sysName object.
IP Address Assigns the Internet Protocol address on the printing system network component.
Format of the IP Address is four-byte (32-bit) numbers separated by dots, e.g.
192.168.110.171.
Subnet Mask Specifies the subnet mask configured on the printing system network component.
If the printing system does not automatically assign a usable default value and
the first number in the IP address above is from 192 to 254, then use
255.255.255.0 as the subnet mask.
Default Gateway The IP address of the gateway router for the local network.
DHCP/BOOTP Identifies how the machine obtains its IP configuration: DHCP/BOOTP: automatic
configuration via a BOOTP server or a DHCP server.
Item Description
Current Local Time Displays the time that is currently set in the machine.
Current Universal
Time (UTC/GMT)
Displays the Greenwich Mean Time that is currently set in the machine.
Time Zone Sets a time difference. Click the drop down list and select your region.
Summer Time Switches the Summer Time setting On and Off. Select On in order to have the
Summer Time function applied when the time is synchronized automatically with
a time server.
Time Server Enter the IP address of the time server you want to synchronize the time with.
Synchronize with
Time Server now
Click the Synchronize button to synchronize the registered time with the
designated timer server.
Synchronization
Status
Displays the results of the synchronization operation with the time server.
Page 95

Using COMMAND CENTER
ADVANCED OPERATION GUIDE 8-9
Basic > Reset
This page allows you to restart the machine in order to make all settings in the
machine valid. It is also possible to select to have all settings returned to their factory
default values.
Basic > Device Defaults
This page allows you to change the language that is used in the display, as well as
to turn the Auto Sleep Mode On or Off.
Basic > Address Book
This page allows you to add, edit or delete Contacts or Groups.
Adding a New Contact
1
Open the Address Book Contacts page.
2
Click Add Contact and enter the information for the contact.
3
Enter the information for the contact to be registered. You can specify a fax number
even if the FAX System is not installed.
4
Click Submit.
Item Description
Restart entire device When clicking the Restart button, the machine restarts.
Always restart the machine after you have changed any settings for the Basic >
Network Page or the Advanced Page.
Reset entire device to
factory default
When clicking the Reset button, the machine returns to the factory default
settings.
Item Description
Operation Panel
Language
You can select the language of the messages on the display by following the
procedure given below. The following languages are available for selection in the
drop down list:
English, Français, Deutsch, Italiano, Nederlands, Español, Português, and the
downloaded languages
You can optionally download messages in other languages. Contact your dealer
for information.
Low Power Timer Adjusts the low power time between 1 to 240 minutes. The default setting is 30
minutes.
Sleep Timer Adjusts the sleep time between 1 to 240 minutes.The default setting is On.
To turn the sleep timer on or off:
Click Advanced which is in the right side of the drop down list.
Switches Sleep Mode On or Off.
Click the Submit button.
Page 96

Using COMMAND CENTER
8-10 ADVANCED OPERATION GUIDE
Editing a Contact
1
Open the Address Book Contacts page.
2
Click the Number or Name of the contact to edit.
3
Modify the information of the contact.
4
Click Submit.
Deleting the Contact
1
Open the Address Book Contacts page.
2
Check the desired contact. If you check Number, all contacts displayed on the page
will be checked.
3
Click Delete Contact.
4
Click Delete.
Adding a New Group
1
Open the Address Book Groups page.
2
Click Add Group and enter the information of the user to be used for the User Login.
3
Enter the number and name of the group.
4
Click Submit.
Editing the Group
1
Open the Address Book Groups page.
2
Click desired number or name to edit the group.
3
Click Add Members to add the contacts to the group or click Delete Members to
delete the contacts from the group.
The maximum number that you can add the SMB or FTP address to the group is one.
4
Click Submit.
Deleting the Group
1
Open the Address Book Groups page.
2
Check the desired group. If you check the Number, all groups displayed on the page
will be checked.
3
Click Delete Group.
4
Click Delete.
Page 97

Using COMMAND CENTER
ADVANCED OPERATION GUIDE 8-11
Printer Page
This section includes settings that apply to the printing function of the machine, such
as default print resolution or copy count. If the Admin password has been set, pages
in this section are available only to the Administrator.
Default printer settings will be overridden by the printer driver settings. Settings that
affect the machine, such as locking the operation panel, are found under Basic
page.
Printer > Defaults > System
The table below provides a summary of the items displayed on the Printer System
page.
Printer > Media Input
The Media Input page lets you configure paper trays by type and size. You can load
different paper in the input trays and specify the type or size using COMMAND
CENTER.
You can also configure the input trays at the machine’s operation panel. Refer to
Selecting the Paper Source on page 1-1.
To configure an input tray, click the Size drop down list and select the size which
matches the paper you will use in the input tray. Click the Type drop down list and
select the type which matches the paper. To specify the default input tray, click the
appropriate radio button under Default. Click the Submit button to take settings in
effect.
Item Description
Form Feed Timeout Adjusts the timeout between 1 and 495 seconds, after which a form feed will
occur in the absence of data. The default setting is 30 seconds.
Copies Sets the number of copies to print.
Page Orientation Switches portrait or landscape page orientation.
KIR Mode Switches KIR smoothing On or Off.
EcoPrint Mode Switches EcoPrint On or Off to reduce the amount of toner used. The default
setting is Off.
Resolution Changes the printing resolution from 300 dpi, 600 dpi, and Fast1200. The default
setting is 600 dpi.
Item Description
Default Determines the default tray to feed paper from.
Tray Displays the trays including those provided by option.
Size Sets the size for the input tray. For a full list of available sizes, refer to Paper
Selection.
Type Sets the type for the input tray. For a full list of available types, refer to Paper
Selection.
Page 98

Using COMMAND CENTER
8-12 ADVANCED OPERATION GUIDE
Scanner Page
This section includes settings that apply to the scanning function of the machine,
such as default scan resolution or original placement.
In order to attach scanned data file to an e-mail and send it, the SMTP settings on
the Advanced page must be completed.
Scanner > Defaults
The table below provides a summary of the items displayed on the Scanner Default
Settings page.
Scanner > FTP
The table below provides a summary of the items displayed on the Scanner FTP
page.
Scanner > SMB
The table below provides a summary of the items displayed on the Scanner SMB
page.
Item Description
Scan Color/Exposure Switches the scanning resolution and exposure mode from Full Color/Manual,
Gray Scale/Manual, Monochrome/Manual, and Monochrome/Auto.
Scan Resolution Switches the scanning resolution between 200 × 200, 300 × 300, 400 × 400, and
600 × 600 (dpi). The maximum resolution using full color or gray scale modes is
300 dpi. To scan in full color or gray scale with 400 dpi or 600 dpi resolution,
expansion of the internal memory is required. Refer to Expansion Memory on
page 9-4.
Optimize for: The original quality is selected according to the type of original.
Switches the original quality between Te x t , Photo, and Text+Photo.
Zoom Switches the zoom ratio between Auto and 100%. The default setting is 100%.
Original Placement Switches between Top Edge to Rear and Top Edge to Left.
File Name You can change the file name for the scan data. The default file name is doc.
You can also have the time or the job number added to the file name that you
designate here. Refer to Entering the Name of send job on page 2-10.
Additional Information You can add a Job Number or the Data and Time to the File Name.
Item Description
FTP Switches FTP on or off.
FTP Port Number You can enter the port number to be used by FTP.
Item Description
SMB Protocol Switches the SMB Protocol on or off.
SMB Port Number You can enter the port number to be used by SMB.
Page 99

Using COMMAND CENTER
ADVANCED OPERATION GUIDE 8-13
Scanner > E-mail
The table below provides a summary of the items displayed on the Scanner Default
Settings page.
Item Description
Subject You can enter the information that you want to appear in the subject field of the e-
mail. the subject can include the printer model, serial number, MAC address and
equipment ID by entering any of the following conversion strings:
- %printer = Model
- %serial = Serial Number
- %etheraddr = MAC Address
- %equipid = Equipment ID
Body You can enter the information that you want to appear in the body of the e-mail.
Page 100

Using COMMAND CENTER
8-14 ADVANCED OPERATION GUIDE
FAX Page
This section includes settings, such as FAX transmission and reception settings, that
apply to the FAX function of the device.
FAX > Defaults
The table below provides a summary of the items displayed on the FAX Default
Settings page.
FAX > Transmit
The table below provides a summary of the items displayed on the FAX transmission
page.
Item Description
Local FAX Name Specifies your FAX system name.
Local FAX Number Specifies your FAX system number.
Local FAX ID Specifies your FAX system ID.
FAX Line Sets the type of phone line to correspond to the type of telephone service that
you are using. Be sure that the type of phone line you select is correct because, if
the setting is incorrect, dialing will be impossible. The choices are Tone (DPMF)
or Pulse (10pps).
FAX Media Type Sets the media type for printing the received documents. Refer to Paper
Specifications.
Speaker Volume Sets the volume of the internal speaker that allows you to listen to conditions on
the telephone line when the On-Hook key was pressed. The choices are Off and
levels 1, 2 or 3.
Monitor Volume Sets the volume of the internal speaker that allows you to listen to conditions on
the telephone line when the On-Hook key was not pressed. The choices are Off
and levels 1, 2 or 3.
Item Description
TTI Selects On or Off whether to send the TTI (Transmit Terminal Identifier)
information to other party.
TTI Position Selects the TTI position to be printed on the transmitted documents.
 Loading...