

Page 1
For Océ and Imagistics Models
Océ
User’s Guide
[POD Administrator’s Reference]
im9220
Page 2

Thank you for selecting an Océ solution for your document production and
management needs. The following information will help you get the most
productive and reliable use out of your system.
Océ brand supplies are designed for Océ copiers, printers and fax machines
to ensure maximum product performance and quality. Substituting other
supplies may result in inferior image quality and machine malfunction.
To order supplies call the Océ Supply Line:
1-866-472-7876 (US)
1-866-462-4478 (CAN)
01277 846 146 (UK)
Should your system develop a problem that cannot be remedied by using the
maintenance or troubleshooting procedures outlined in this manual, please
contact the Océ Customer Support Center by calling:
1-800-243-5556 (US)
1-866-462-4478 (CAN)
08708 500 749 (UK)
For faster service, please have your machine model and serial number
available before calling.
Serial Number:
This product was first introduced by Imagistics International Inc. and is now a
part of the Océ product line. Please be aware that while some components
may still carry the Imagistics name and markings, they are fully compatible
with the Océ brand system.
www.oce.com
Page 3

FEDERAL OR STATE STATUTES MAY PROHIBIT THE COPYING OF CERTAIN DOCUMENTS OR INFORMATION, RESULTING IN FINES OR IMPRISONMENT FOR VIOLATORS.
ACKNOWLEDGEMENTS:
- Océ and the Océ Logo are registered trademarks or trademarks
of Océ N.V.
- Microsoft, MS, Windows and MS-DOS are registered trademarks or
trademarks of Microsoft Corporation in the United States and / or other
countries.
- IBM is a registered trademarks of the IBM Corporation.
- Macintosh and PowerMac are registered trademarks or trademarks of
Apple Computer, Inc. in the United States and / or other countries.
- Adobe, Adobe Logo, Acrobat, Acrobat Logo, PostScript and PostScript
Logo are registered trademarks or trademarks of Adobe Systems, Inc.
- RC4 ® is a registered trademark or trademark of RSA Security Inc. in the
United States and/or other countries.
- Other company names and product names used in this manual are the
registered trademarks or trademarks of their respective companies.
Copyright © 2007 Océ N.V.
Copyright © 2006 GoAhead Software, Inc. All rights Reversed.
EXEMPTION
- No part of this manual may be used or duplicated without permission.
- Manufacturer and Sales Company will have no liability for any influences
caused by using the printing system and this User's Guide.
- The information written in this User’s Guide is subject to change without
prior notice.
Page 4

Composition of User’s Guide
This machine is provided with the following user’s guides as printed matters.
*Océ im9220 User’s Guide - Copier
This guide describes an outline of the machine and copy operations.
Please refer to this guide for safety information, turning on/off the machine,
paper supply, dealing with machine trouble such as paper jam, and copy operation available on the machine.
* Océ im9220 User’s Guide - POD Administrator’s Reference (This book)
This guide provides you with detailed information about the machine management and how to customize the machine according to your daily use.
Please refer to this guide for a setup and management of the machine including paper setting, tray setting, and a network setup.
* Océ im9220 User’s Guide - Network Scanner
This guide describes the operation of the network scanner function equipped
for the machine as standard.
Please refer to this guide for full information on storing data (Scan to HDD,
Scan to E-Mail, Scan to FTP, Scan to SMB) or reading data.
* Océ im9220 User’s Guide - Security
This guide describes the security functions.
Please refer to this guide for how to use the Enhanced Security mode, and
for detailed machine operation in Enhanced Security mode.
To operate safely, be sure to read “Section 1 Safety Information” in “Océ
im9220 User’s Guide - Copier” before using the machine.
Page 5

Page 6

Contents
1 Paper Setting
1.1 Paper Setting Outlines ......................................................................1-2
1.1.1 Setting Items in Paper Setting ........................................................1-2
1.1.2 Paper Type Specifications ..............................................................1-3
1.1.3 Recommended Setting of Tray .......................................................1-6
1.2 Change Tray Setting ..........................................................................1-7
1.3 Change Size Setting ........................................................................1-12
2 Controller Setting
2.1 Function Overview .............................................................................2-2
2.2 01 Report Type ...................................................................................2-7
2.3 02 Printer Setting ...............................................................................2-8
2.4 03 Select Printer Setting .................................................................2-14
2.5 04 Spool ............................................................................................2-16
2.6 05 Interface Setting .........................................................................2-17
3 Utility <User Setting>
3.1 User Setting Outlines ........................................................................3-2
3.2 List of the User Setting .....................................................................3-3
3.3 1 System Setting ................................................................................3-8
3.3.1 1 Language Setting .........................................................................3-8
3.3.2 2 Buzzer Setting>1 Buzzer On/Off, Volume Setting .......................3-9
3.3.3 2 Buzzer Setting>2 Buzzer for Job Stop Setting ..........................3-10
3.3.4 3 1 SHOT Indication Time .............................................................3-12
3.3.5 4 Panel Reset Timer Setting .........................................................3-13
3.3.6 5 Sub Area Display On/Off ............................................................3-14
3.3.7 6 Key Response Time ...................................................................3-15
3.3.8 7 Change User Password .............................................................3-16
3.3.9 8 Warm Up Screen On/Off ............................................................3-19
3.4 2 Function Setting ...........................................................................3-21
3.4.1 1 Feed Tray Setting>1 Feed Tray Auto Selection .........................3-21
3.4.2 1 Feed Tray Setting>2 ATS Permission ........................................3-23
3.4.3 1 Feed Tray Setting>3 Auto Paper Type Selection .......................3-24
Page 7

3.4.4 2 Each Function Setting>Fine Adjust Margin ...............................3-26
3.4.5 2 Each Function Setting>Print Prohibit Timer ..............................3-27
3.4.6 2 Each Function Setting>Offset Auto Select ................................3-29
3.4.7 3 Density Setting>1 Density Shift for Original Image Type ...........3-30
3.4.8 3 Density Setting>2 User Density Setting .....................................3-32
3.4.9 3 Density Setting>3 Photo Mode Density Setting ........................3-35
3.4.10 3 Density Setting>4 Image Density Selection ...............................3-36
3.4.11 4 Preset Zoom ..............................................................................3-38
3.4.12 5 Tandem Setting>1 Tandem Sub Machine One Time Data Read ...339
3.4.13 5 Tandem Setting>2 Tandem Sub Machine Wait/Proof ...............3-41
3.4.14 5 Tandem Setting>3 Tandem Sub Machine Shift Data Setting ....3-43
3.4.15 5 Tandem Setting>4 Tandem Selection after JOB Completion ...3-45
3.4.16 5 Tandem Setting>5 Distribution Recovery ..................................3-47
3.5 3 Copier Setting ...............................................................................3-49
3.5.1 1 Reset Setting>1 Initial Setting ...................................................3-49
3.5.2 1 Reset Setting>2 Reset Function Setting ....................................3-51
3.5.3 1 Reset Setting>3 Initial by Key Counter Insert ............................3-53
3.5.4 2 Each Function Setting ................................................................3-55
3.6 4 Scanner Setting ............................................................................3-58
3.6.1 1 Default Address Setting .............................................................3-58
3.6.2 2 Each Function Setting ................................................................3-59
3.7 5 Touch Panel Adjust ......................................................................3-63
4 Utility <Administrator Setting>
4.1 Administrator Setting Outlines .........................................................4-2
4.2 List of the Administrator Setting ......................................................4-5
4.3 1 System Setting ..............................................................................4-12
4.3.1 1 Power Save Setting ...................................................................4-12
4.3.2 2 Date/Time Setting ......................................................................4-14
4.3.3 3 Weekly Timer Setting .................................................................4-16
4.3.4 3 Weekly Timer Setting>1 Weekly Timer On/Off Setting ..............4-16
4.3.5 3 Weekly Timer Setting>2 Time Setting ........................................4-18
4.3.6 3 Weekly Timer Setting>3 Date Setting ........................................4-21
4.3.7 3 Weekly Timer Setting>4 Select Time for Power Save ...............4-23
Page 8

4.3.8 3 Weekly Timer Setting>5 Password for Non-Business Hours Setting
4-25
4.3.9 4 Print Management List .............................................................. 4-27
4.3.10 5 Prohibit User Operation ............................................................ 4-32
4.3.11 6 Expert Adjustment>Non Image Area Erase Setting .................. 4-35
4.3.12 6 Expert Adjustment>ADF Frame Erasure Setting ....................... 4-38
4.3.13 6 Expert Adjustment>Finisher Adjust ........................................... 4-40
4.3.14 6 Expert Adjustment>Timing Adjustment .................................... 4-44
4.3.15 6 Expert Adjustment>Centering Adjustment ............................... 4-47
4.3.16 7 Size Setting ............................................................................... 4-50
4.3.17 8 Paper Setting>1 Tray Setting .................................................... 4-52
4.3.18 8 Paper Setting>2 PI Setting ........................................................ 4-52
4.3.19 9 LCD Backlight Setting ............................................................... 4-55
4.3.20 10 Annotation Setting .................................................................. 4-56
4.4 2 Administrator/Machine Register ................................................ 4-64
4.4.1 1 Administrator Registration ........................................................ 4-64
4.5 3 User Authentication/Account Track .......................................... 4-66
4.5.1 1 General Settings>1 User Authentication ................................... 4-66
4.5.2 1 General Settings>2 Account Track ........................................... 4-69
4.5.3 2 Account Track Setting .............................................................. 4-72
4.5.4 3 User Authentication Setting ...................................................... 4-80
4.5.5 4 Non Register/Output Setting ..................................................... 4-89
4.6 4 Network Setting ........................................................................... 4-91
4.6.1 1 Machine NIC Setting ................................................................. 4-91
4.6.2 List of IP NIC Setting .................................................................... 4-93
4.6.3 2 IP NIC Setting>1 TCP/IP ......................................................... 4-108
4.6.4 2 IP NIC Setting>2 NetWare ...................................................... 4-112
4.6.5 2 IP NIC Setting>3 IPP ............................................................... 4-115
4.6.6 2 IP NIC Setting>4 FTP .............................................................. 4-118
4.6.7 2 IP NIC Setting>5 SNMP .......................................................... 4-121
4.6.8 2 IP NIC Setting>6 SMB ............................................................ 4-123
4.6.9 2 IP NIC Setting>7 AppleTalk .................................................... 4-125
4.6.10 2 IP NIC Setting>8 E-Mail .......................................................... 4-127
4.6.11 2 IP NIC Setting>9 HDD ............................................................. 4-134
Page 9

4.6.12 2 IP NIC Setting>10 Alert Mail ....................................................4-136
4.6.13 2 IP NIC Setting>11 CSRC .........................................................4-138
4.6.14 2 IP NIC Setting>12 AP I/F .........................................................4-144
4.6.15 2 IP NIC Setting>13 PSWC .........................................................4-146
4.6.16 2 IP NIC Setting>14 Network Setting Clear ................................4-149
4.6.17 2 IP NIC Setting>15 LDAP ..........................................................4-151
4.6.18 2 IP NIC Setting>16 SNMP Trap ................................................4-156
4.7 5 Copier/Printer Setting ................................................................4-161
4.7.1 Job Offset Mode .........................................................................4-161
4.7.2 Continuous Print (Print) ...............................................................4-162
4.7.3 Change Page Number Print Pos (Booklet) ..................................4-163
4.7.4 Fixing Prerotation Set .................................................................4-164
4.7.5 Auto Image Rotation ...................................................................4-165
4.7.6 Suspend Interruption ..................................................................4-166
4.7.7 Reserve Copy Function ..............................................................4-168
4.7.8 Suspend Scanning when Tray is pulled ......................................4-169
4.7.9 Continuous Print (Copy) ..............................................................4-171
4.7.10 Face Up/Down for 1 Sheet .........................................................4-172
4.7.11 Single Feed Auto Setting ............................................................4-173
4.8 6 System Connection ....................................................................4-174
4.8.1 6 System Connection>1 Call Service Center .............................4-174
4.9 7 Security Setting ..........................................................................4-176
4.9.1 1 Administrator Password ..........................................................4-176
4.9.2 2 HDD Manage Setting>1 Details/Delete ...................................4-178
4.9.3 2 HDD Manage Setting>2 Data Auto Delete ...............................4-182
4.9.4 2 HDD Manage Setting>3 HDD Lock Password Changing ........4-184
4.9.5 3 Enhance Security Mode ...........................................................4-188
4.10 8 Scanner Destination Storage ....................................................4-190
Page 10

4.10.1 1 Destination Address Change/Delete ....................................... 4-190
5 Web Utilities Setting
5.1 Web Utilities Outlines ....................................................................... 5-2
5.2 Setting Account Track Data ............................................................ 5-4
5.2.1 Adding Account Track ................................................................... 5-4
5.2.2 Editing Account Track Data ........................................................... 5-7
5.3 Remote Panel Setting ..................................................................... 5-17
5.4 Setting Scan Transmission Function ............................................ 5-20
5.5 Transmitting Machine Setting File ................................................ 5-26
5.6 Box Edit ........................................................................................... 5-34
6 Web Connection Setting
6.1 Web Connection Outlines ................................................................ 6-2
6.2 Access ............................................................................................... 6-4
6.3 Screen Configuration ....................................................................... 6-5
6.3.1 Logging in Using Administrator Mode ........................................... 6-6
6.4 Administrator Mode .......................................................................... 6-8
6.4.1 System Tab .................................................................................... 6-8
6.4.2 Print Tab ....................................................................................... 6-16
6.4.3 Scan Tab ...................................................................................... 6-20
6.4.4 Network Tab ................................................................................. 6-24
7 Appendix
7.1 How to Input Characters .................................................................. 7-2
7.2 Setting Data for Import/Export ........................................................ 7-3
7.3 Configuration Setting ....................................................................... 7-6
7.4 Demo Page ...................................................................................... 7-10
7.5 PCL Font List ................................................................................... 7-18
7.6 Symbol Set ...................................................................................... 7-21
7.7 Glossary ........................................................................................... 7-27
8Index
Page 11

Page 12

1
Paper Setting Chapter 1
Paper Setting
Page 13

1
Paper Setting
1-2 Océ im9220
Paper Setting Chapter 1
1 Paper Setting
1.1 Paper Setting Outlines
This machine provides the optimum print result according to each characteristics of copy paper by specifying paper size and paper type for each tray.
The paper size and paper type for each tray can be displayed on the Machine
Status Screen.
This section describes the details of setting and changing paper settings.
!
Detail
For the details of setting the bypass tray, see “User’s Guide – Copier”.
1.1.1 Setting Items in Paper Setting
Paper Setting includes two setting items: size setting and tray setting.
Select one of the following four items as size setting.
- Standard Size
- Custom Size
- Wide Size Paper
- Tab Paper
Set paper type by specifying the following four items as tray setting.
- Type
Select one of the following 23 types.
- (blank), Normal, Fine, Thick 1, Thick 2, Thin paper, Recycled, Exclusive
A to M, Seal, User, Blank Insert
!
Detail
See page 1-4 for details of paper type specifications and relation between paper type and weight.
- Colored Paper
Select one of the following six types.
- (blank), White, Clear, Yellow, Pink, Blue, Green
- Hole-Punch
Select either condition.
With Punch Hole or No Punch Hole
- Both Sides Adjust
Specify the Vertical zoom, Horizontal zoom, Up/Down shift amount, and
Right/Left shift amount for both front and back pages.
Page 14

Paper Setting
1
Océ im9220 1-3
Paper Setting Chapter 1
Vertical: -9% to +9% (in 0.1% increments)
Horizontal: -9% to +9% (in 0.05% increments)
Up/Down: -99mm to +99mm (in 0.1mm increments)
Right/Left: -99mm to +99mm (in 0.1mm increments)
1.1.2 Paper Type Specifications
The following four paper types are provided according to the plainness of paper.
Smooth, Fine, Normal, Embossed
Set paper type details as referring to the specifications listed in the table on
the following page. Any paper type other than these four will be require special settings.
Fine
The Fine paper is a non-coated paper generally used for offset printing. The
fine paper has a high degree of whiteness and used for various purposes.
Normal
The Normal paper is used for copying in general and is called “PPC paper”.
The normal paper is usually not a recycled paper.
Embossed
The Embossed paper has a non-smooth surface on which a toner is hard to
be fixed. Fine paper types such as book paper and cotton paper are included
in this category.
Blank Insert
Blank Insert is not a category of the paper type. This is only fed without being
printed. When the Cover With Blank Sheet, Blank Insert, or OHP interleave
blank function is used, specify [Blank Insert] to a tray to which a paper already printed and not copied by this machine is loaded, or a blank paper only
to be fed is loaded.
User
When a paper type other than that of which can be specified on this machine
is used, use this function. For the details, contact your service representative.
OHP
Transparent film cannot be loaded on the main body tray and Large Capacity
Unit. Specify [OHP] to a Bypass tray.
Page 15
1
Paper Setting
1-4 Océ im9220
Paper Setting Chapter 1
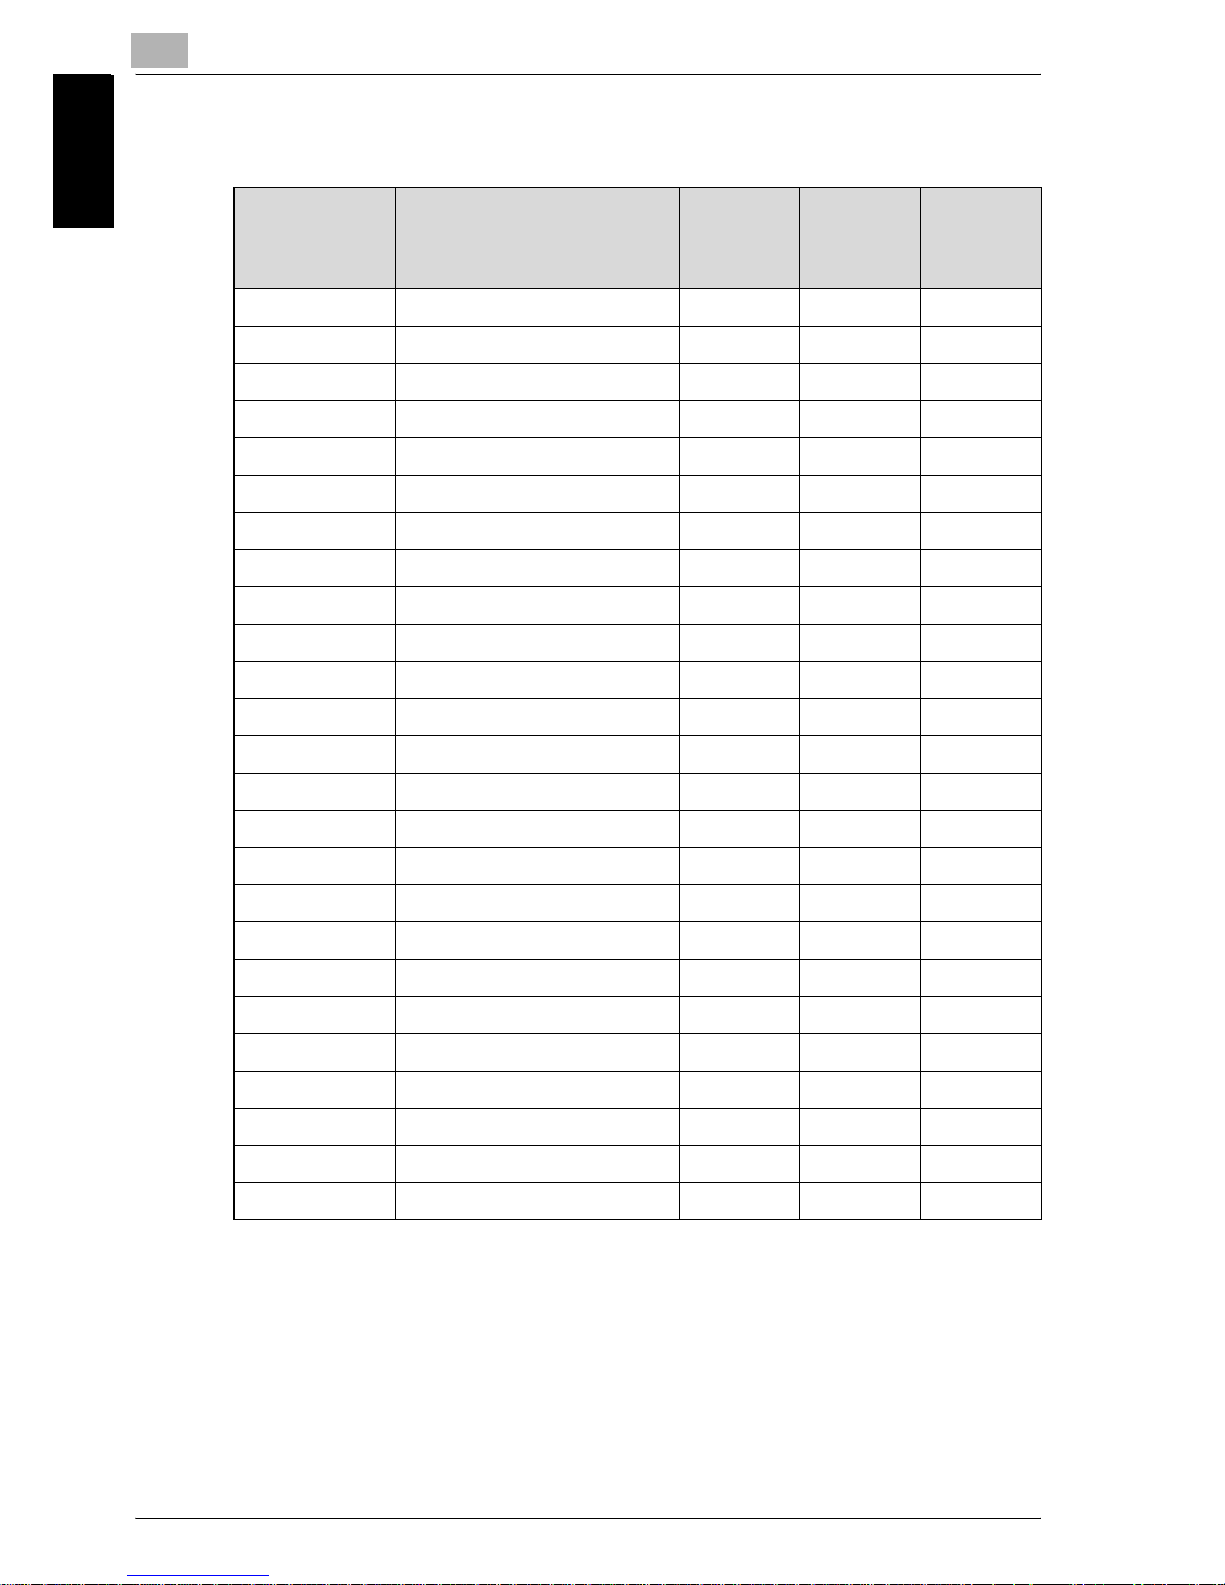
Paper Type and Weight
Copying speed 1: Printing speed is 92 sheets per minute when printing A4/
8.5×11 in the simplex print mode.
Copying speed 2: Printing speed is 59 sheets per minute when printing A4/
8.5×11 in the simplex print mode.
*1: The tray setting is required by your service representative.
Paper Type Paper Main body
tray/Large
capacity
unit tray
Bypass
tray
Copying
speed
- (blank) PPC paper 72~90g/m² 00 1
Normal PPC paper 72~90g/m² 00 1
Fine Fine paper 72~90g/m² 0 1
Thick 1 PPC paper 91~161g/m² 0 1
Thick 2 PPC paper 162~200g/m² 00 2
Thin PPC paper 50~61g/m² 00 1
Recycled Fine paper 62~71g/m² 0 1
Exclusive A Smooth paper 62~71g/m² 0 1
Exclusive B Smooth paper 72~90g/m² 0 1
Exclusive C Smooth paper 91~161g/m² 0 1
Exclusive D Smooth paper 162~200g/m² 0 1
Exclusive E Fine paper 50~61g/m² 0 1
Exclusive F PPC paper 72~90g/m² 0 1
Exclusive G Fine paper 91~161g/m² 0 1
Exclusive H Fine paper 162~200g/m² 0 1
Exclusive I PPC paper 62~71g/m² 0 1
Exclusive J Embossed paper 62~71g/m² 0 1
Exclusive K Embossed paper 72~90g/m² 0 1
Exclusive L Embossed paper 91~161g/m² 0 2
Exclusive M Embossed paper 162~200g/m² 0 2
Seal Plain paper 62~71g/m² 0 1
OHP Fine paper 91~162g/m² 0 1
Trace Embossed paper 62~71g/m² 0 1
User *1 00 1
Blank Insert Non-printed paper 0 1
Page 16
Paper Setting
1
Océ im9220 1-5
Paper Setting Chapter 1
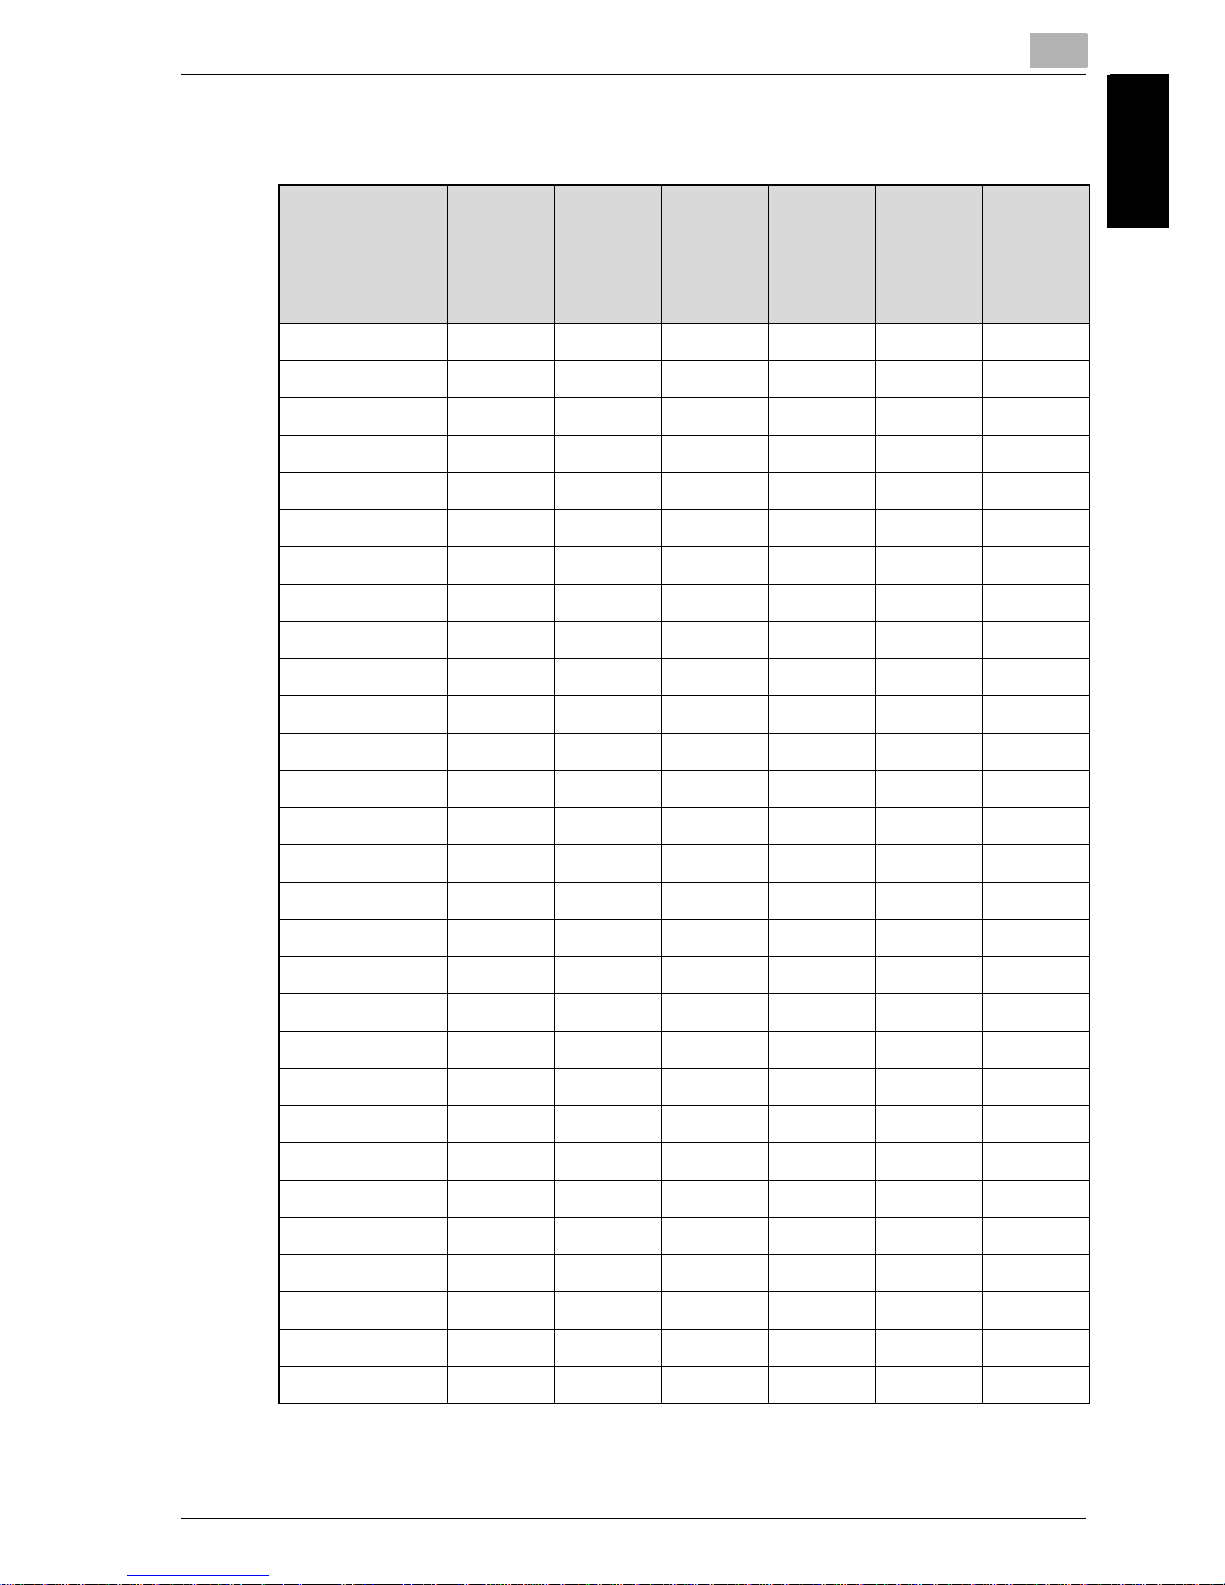
Paper Weight Conversion Chart
Paper type
Basic size
Bond
17×22
432×559
Cover
20×26
508×660
Index
25.5×30.5
648×775
Bristol
22.5×28.5
572×724
Tag
24×36
610×914
Book
25×38
635×965
Paper
weight
(g/m²)
g/m² lb lb lb lb lb lb
50.0 13.3 18.5 27.7 22.8 30.8 33.8
52.3 13.9 19.4 29.0 23.9 32.2 35.4
54.2 14.4 20.1 30.0 24.7 33.3 36.7
60.2 16.0 22.3 33.3 27.5 37.0 40.7
64.0 17.0 23.7 35.4 29.2 39.4 43.3
66.3 17.7 24.6 36.7 30.3 40.8 44.9
68.7 18.3 25.4 38.0 31.4 42.3 46.5
72.3 19.3 26.8 40.0 33.0 44.5 48.9
75.9 20.2 28.1 42.0 34.7 46.7 51.3
80.0 21.3 29.6 44.3 36.5 49.2 54.1
83.7 22.3 31.0 46.4 38.2 51.5 56.6
88.0 23.4 32.6 48.7 40.2 54.1 59.5
90.0 24.0 33.3 49.8 41.1 55.4 60.9
98.3 26.2 36.4 54.4 44.9 60.5 66.5
100.0 26.6 37.0 55.4 45.7 61.5 67.6
104.7 27.9 38.8 58.0 47.8 64.4 70.8
108.0 28.8 40.0 59.8 49.3 66.4 73.1
110.0 29.3 40.7 60.9 50.2 67.7 74.4
120.0 32.0 44.4 66.5 54.8 73.8 81.2
127.9 34.1 47.4 70.8 58.4 78.7 86.5
130.0 34.6 48.1 72.0 59.4 80.0 87.9
140.0 37.3 51.8 77.5 63.9 86.1 94.7
150.0 39.9 55.5 83.1 68.5 92.3 101.5
160.0 42.6 59.2 88.6 73.1 98.4 108.2
170.0 45.3 62.9 94.2 77.6 104.6 115.0
180.0 47.9 66.7 99.7 82.2 110.7 121.8
190.0 50.6 70.4 105.2 86.8 116.9 128.5
200.0 53.3 74.1 110.8 91.3 123.1 135.3
Page 17

1
Paper Setting
1-6 Océ im9220
Paper Setting Chapter 1
1.1.3 Recommended Setting of Tray
It is recommended that paper type should be set for each paper to be used,
so that the setting change can be made according to the environment (temperature, humidity, paper condition, etc.) on the basis of settings for each
tray.
Recommended Setting PrOcédure
1. Specify the paper size and type for each tray.
2. Make setting change on the paper type for each tray, as required, according to the environment and paper condition. If the changes made are
considered to be a new standard, make change in setting or make it a
new setting.
!
Detail
Service representative can make adjustments for all trays at the same
time. Contact your service representative, if desired.
Page 18
Paper Setting
1
Océ im9220 1-7
Paper Setting Chapter 1
1.2 Change Tray Setting
Set this function especially when special paper is used on a regular basis and
is always placed in a specific paper tray.
!
Detail
Service can set the machine to display the Tray Setting and PI Setting
keys on the Utility Screen. In this case, the Paper Setting key on the System Setting Screen will be grayed out to show inactivity. Contact your
service representative, if desired.
For the details of how to set the paper size of an upper/lower tray for PI,
see page 4-52.
See page 1-4 for details of the paper types.
PrOcédure
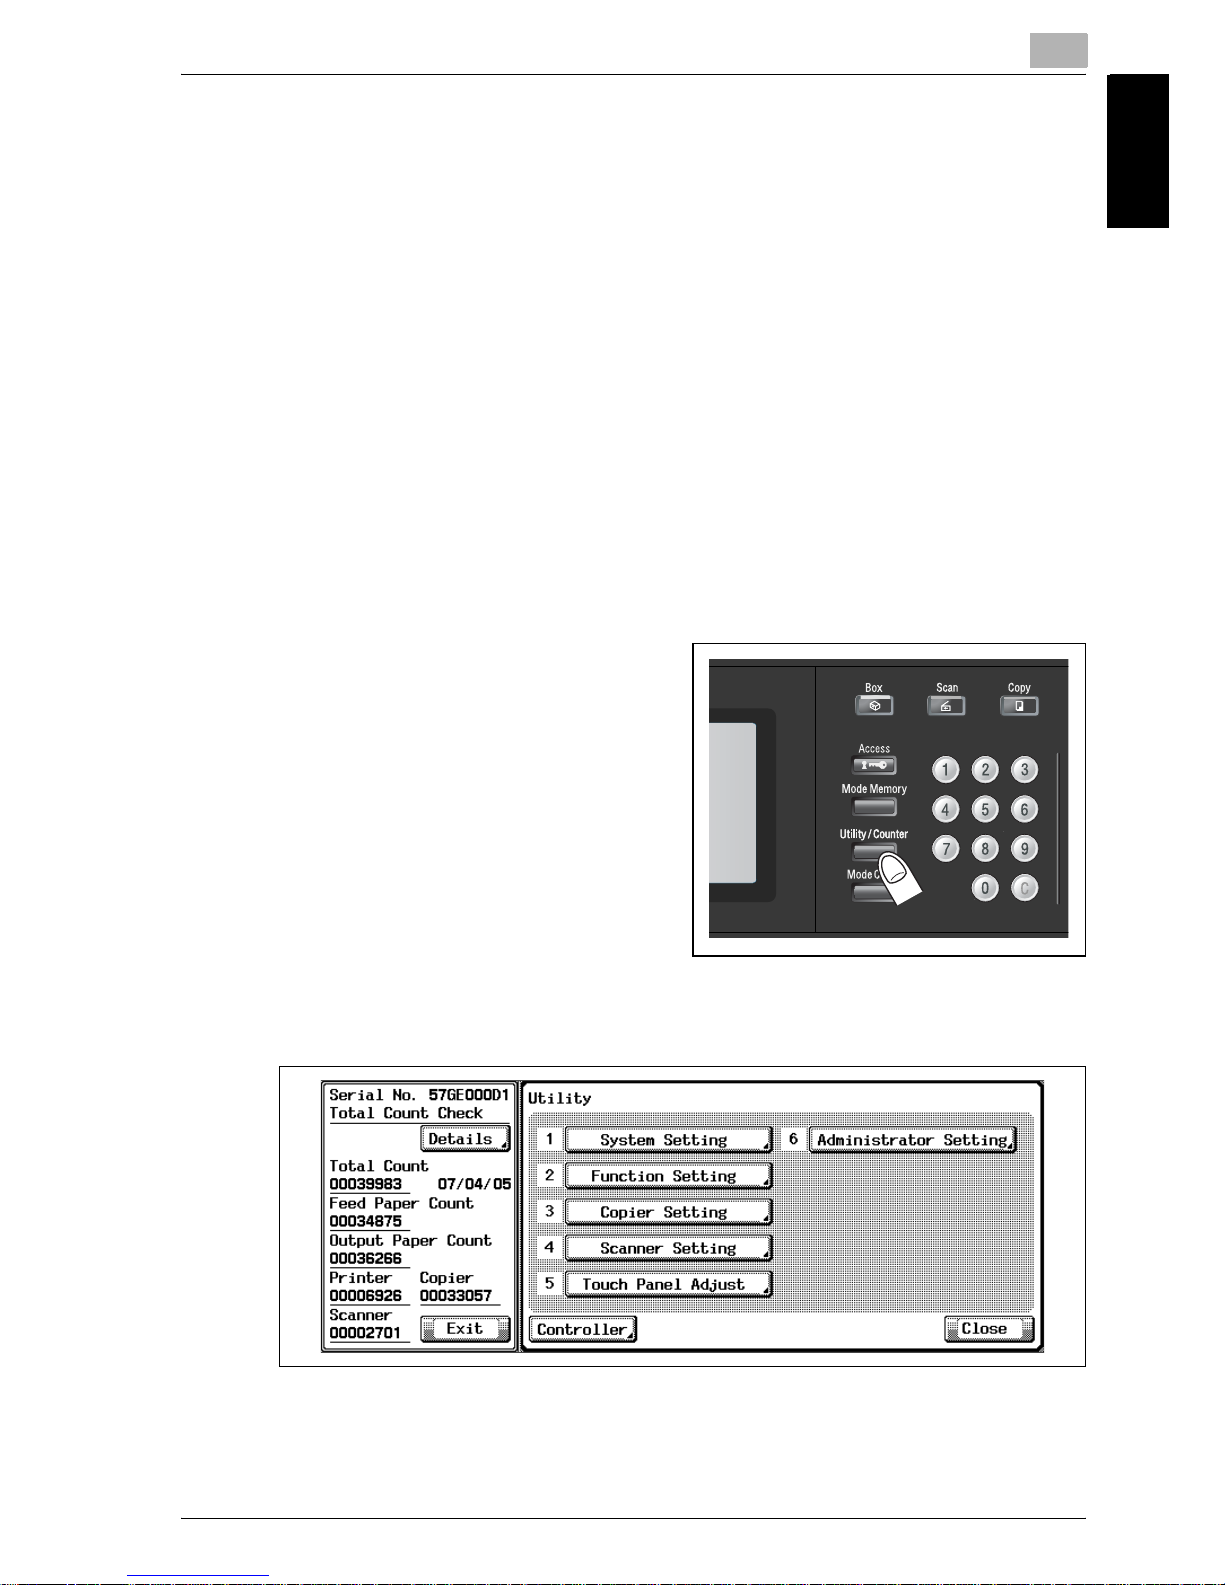
1 Press the [Utility/Counter] on
the control panel.The Utility
Screen will be displayed.
2 Touch [6 Administrator Setting].
The Password Input Screen will be displayed.
When the Password Input Screen is not displayed, prOcéed to step 4.
Page 19
1
Paper Setting
1-8 Océ im9220
Paper Setting Chapter 1
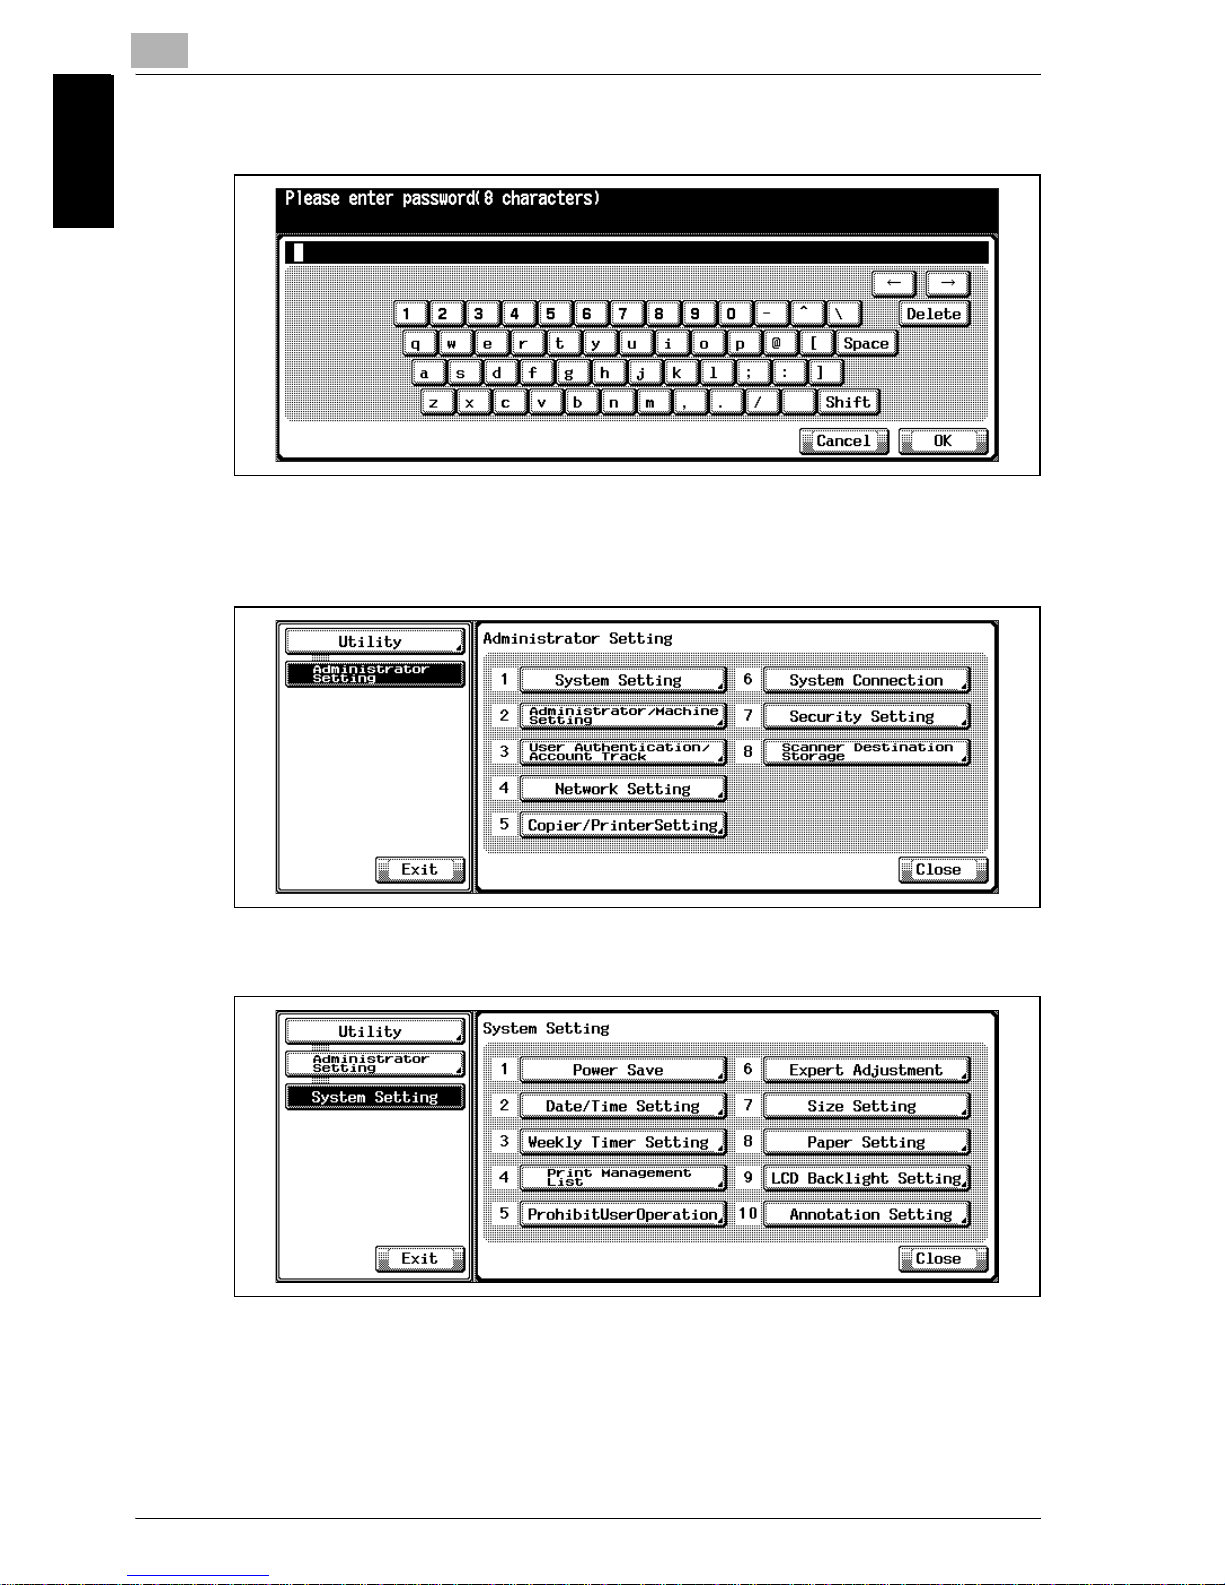
3 Enter the eight-digit administrator password, and then touch [OK].
The Administrator Setting Screen will be displayed.
4 Touch [1 System Setting].
5 Touch [8 Paper Setting].
Page 20
Paper Setting
1
Océ im9220 1-9
Paper Setting Chapter 1
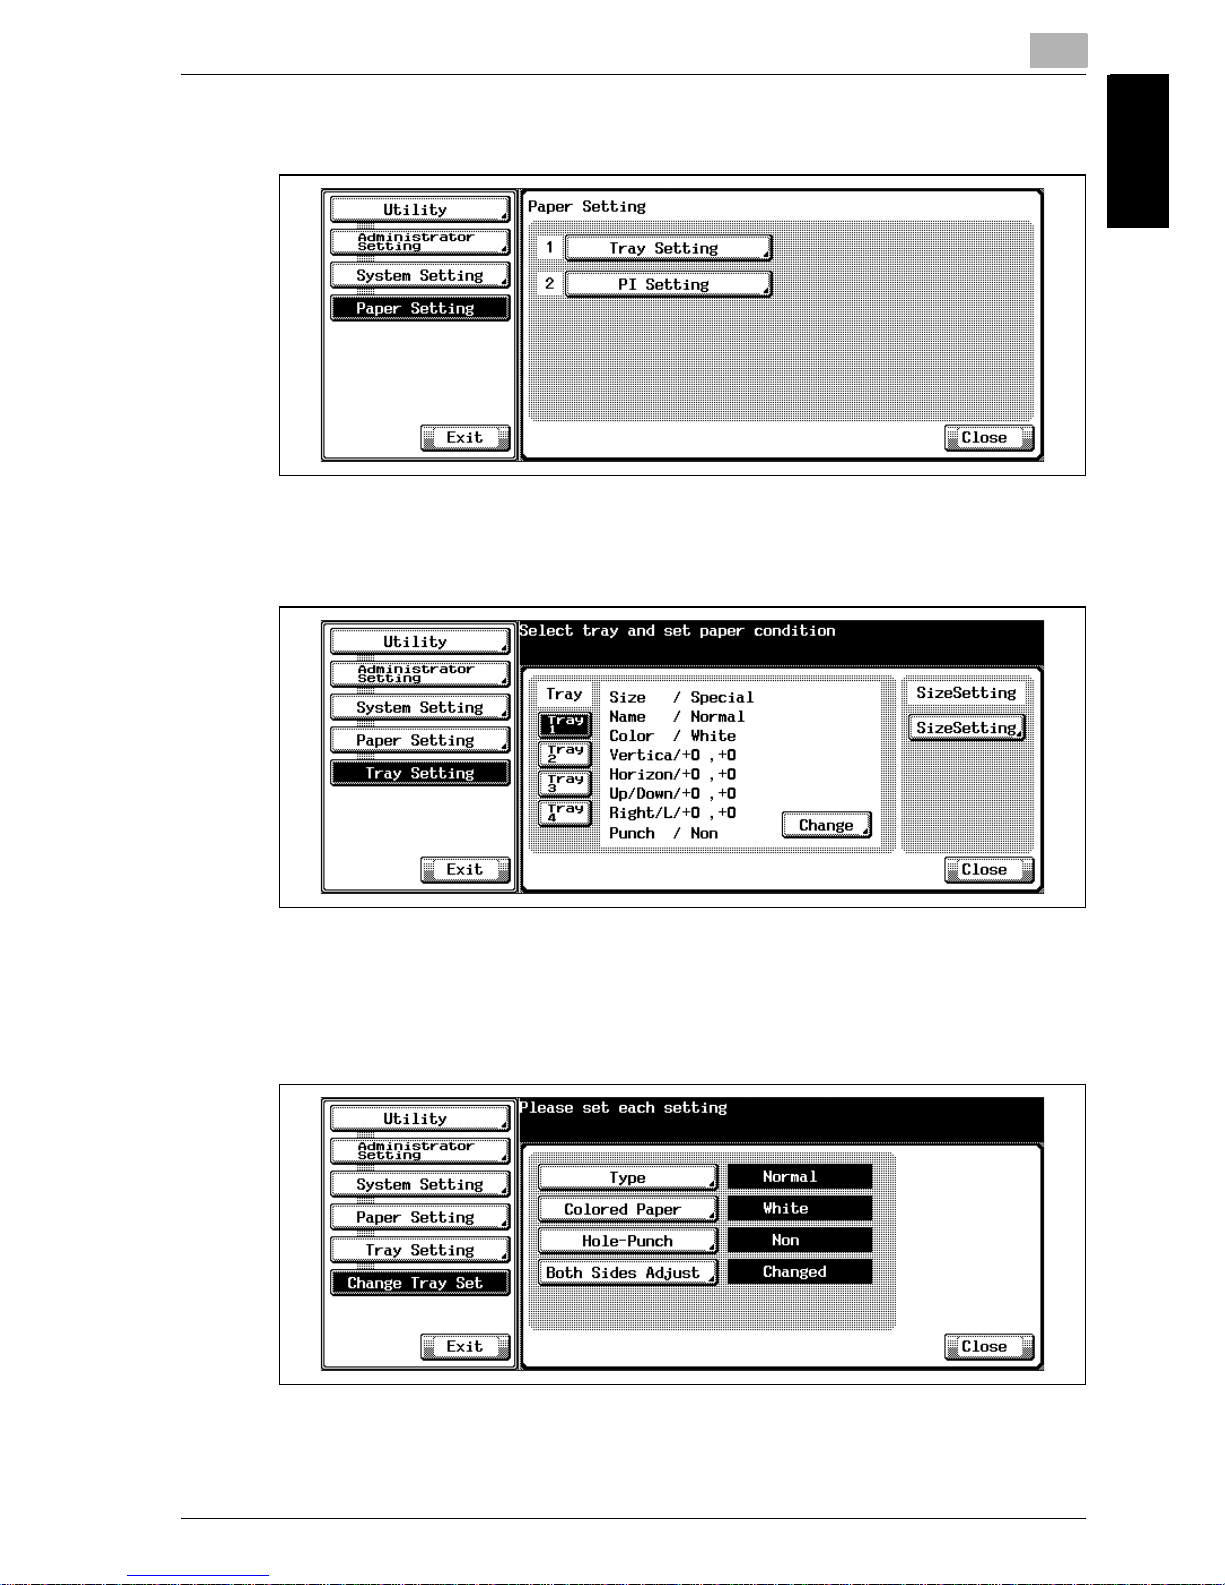
6 Touch [1 Tray Setting].
The Tray Setting Screen will be displayed.
7 Touch a desired tray key to highlight it.
8 Touch [Change] to change a tray setting.
The Tray Setting Menu Screen will be displayed.
9 Touch Type.
The Change Paper Type Screen will be displayed.
Page 21
1
Paper Setting
1-10 Océ im9220
Paper Setting Chapter 1
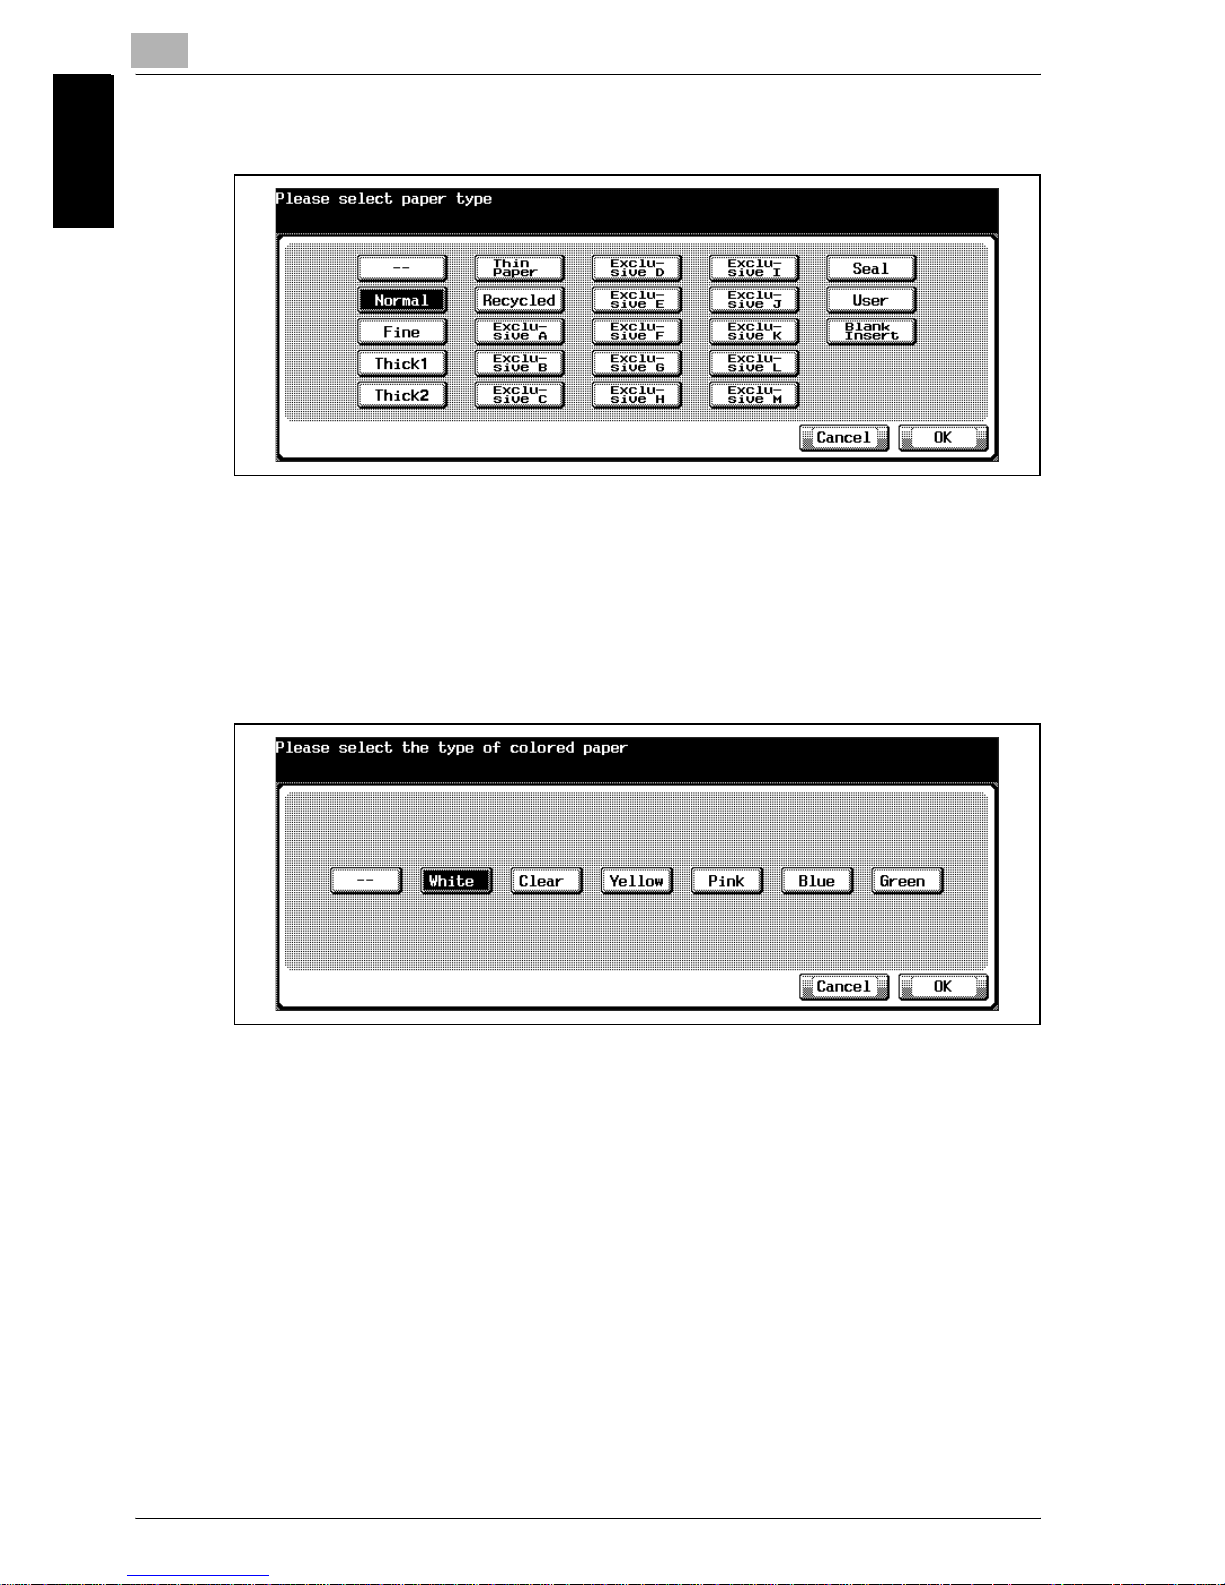
10 Select a desired paper type.
Touch [OK] to complete the setting and return to the Tray Setting Menu
Screen.
11 Touch [Colored Paper].
The Colored Paper Setting Screen will be displayed.
12 Select a desired paper color.
Touch [OK] to complete the setting and return to the Tray Setting Menu
screen.
13 Touch [Hole-Punch].
The Hole-Punch Setting Screen will be displayed.
Page 22
Paper Setting
1
Océ im9220 1-11
Paper Setting Chapter 1
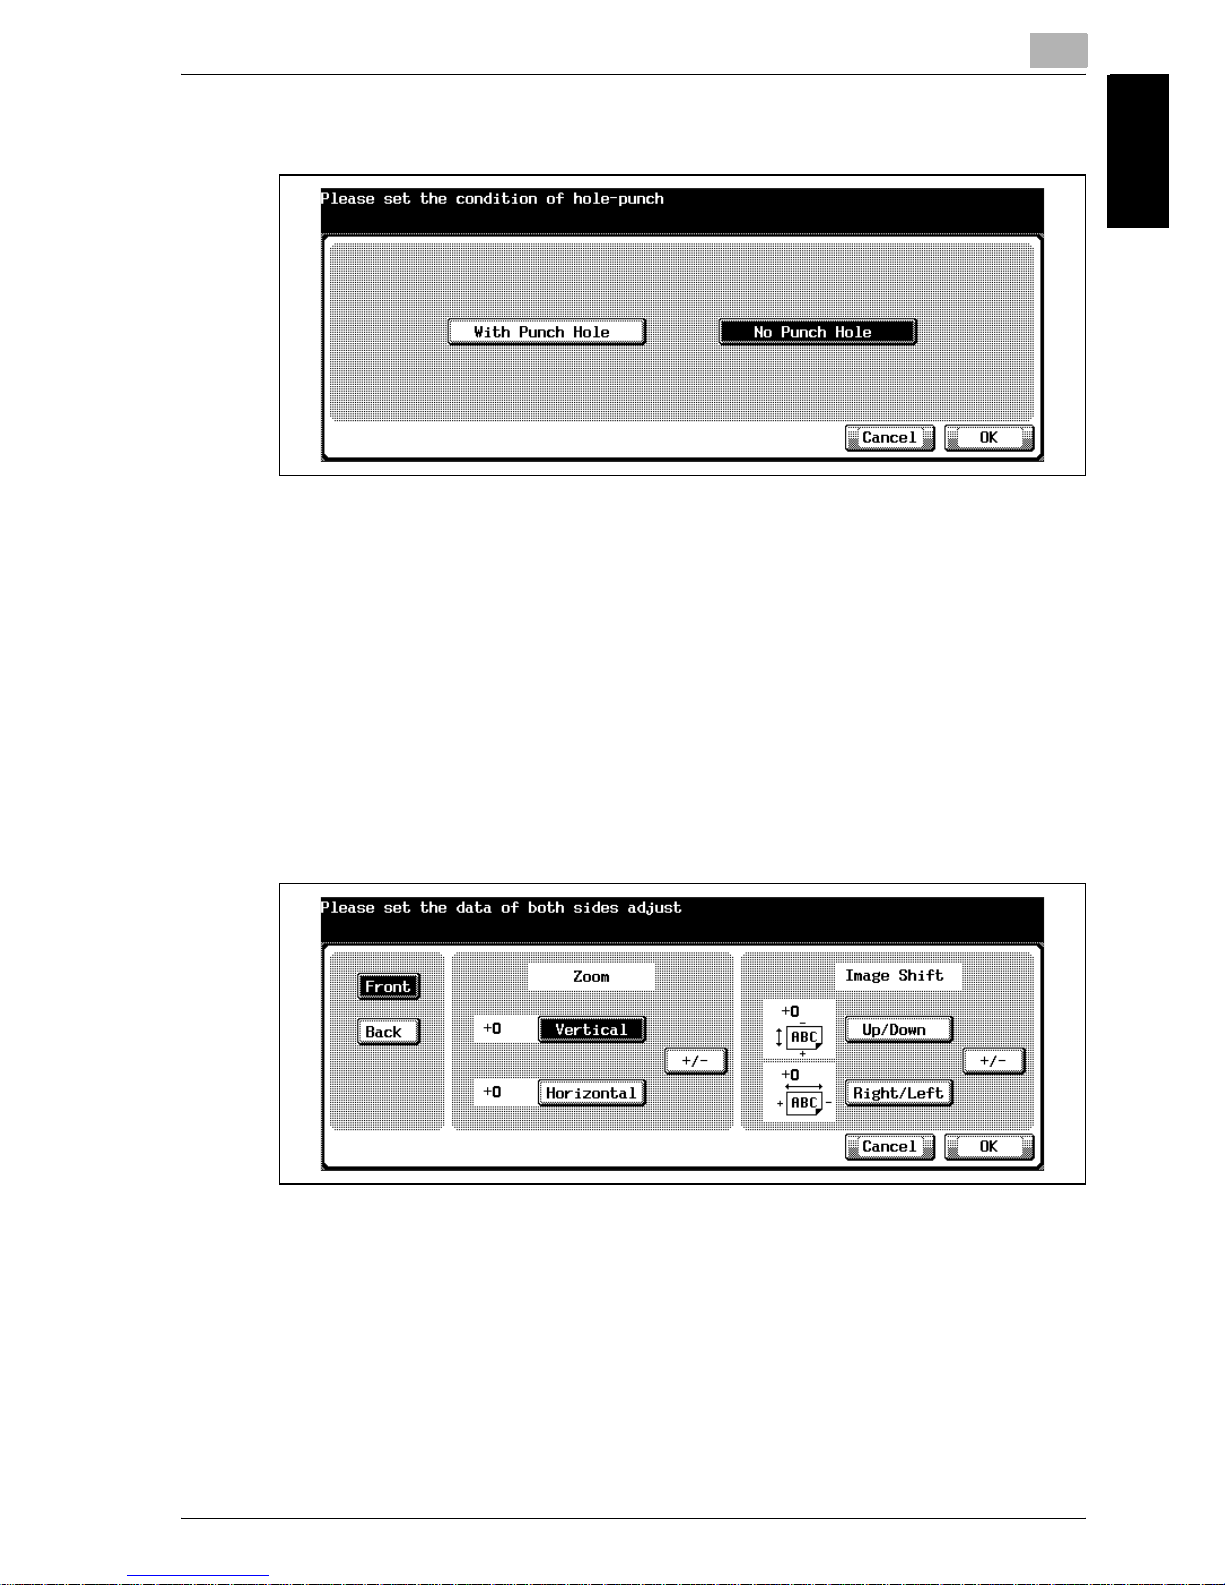
14 Touch [With Punch Hole] or [No Punch Hole].
Touch [OK] to complete the setting and return to the Tray Setting Menu
Screen.
15 Touch [Both Sides Adjust].
The both sides adjust setting screen will be displayed.
16 Enter the adjustment values as follows.
– Touch [Front] or [Back] to select the printed side.
– Select the adjustment item ([Vertical], [Horizontal], [Up/Down], and
[Right/Left]).
– Enter the desired adjustment value using the control panel keypad.
– Touch [+/-] to adjust the value to be positive or negative.
Touch [OK] to complete the setting and return to the Tray Setting
Screen.
17 Touch [Close] to return to the Paper setting screen.
Page 23
1
Paper Setting
1-12 Océ im9220
Paper Setting Chapter 1
1.3 Change Size Setting
Use this function to change paper settings according to a specified paper
type.
!
Detail
To change the paper size of the Tray 4 (Large Capacity Unit), contact your
service representative.
When setting wide size, be sure to specify the precise dimensions of paper to be used.
Service can set the machine to display the Tray Setting key on the Utility
Screen. Contact your service representative, if desired.
PrOcédure
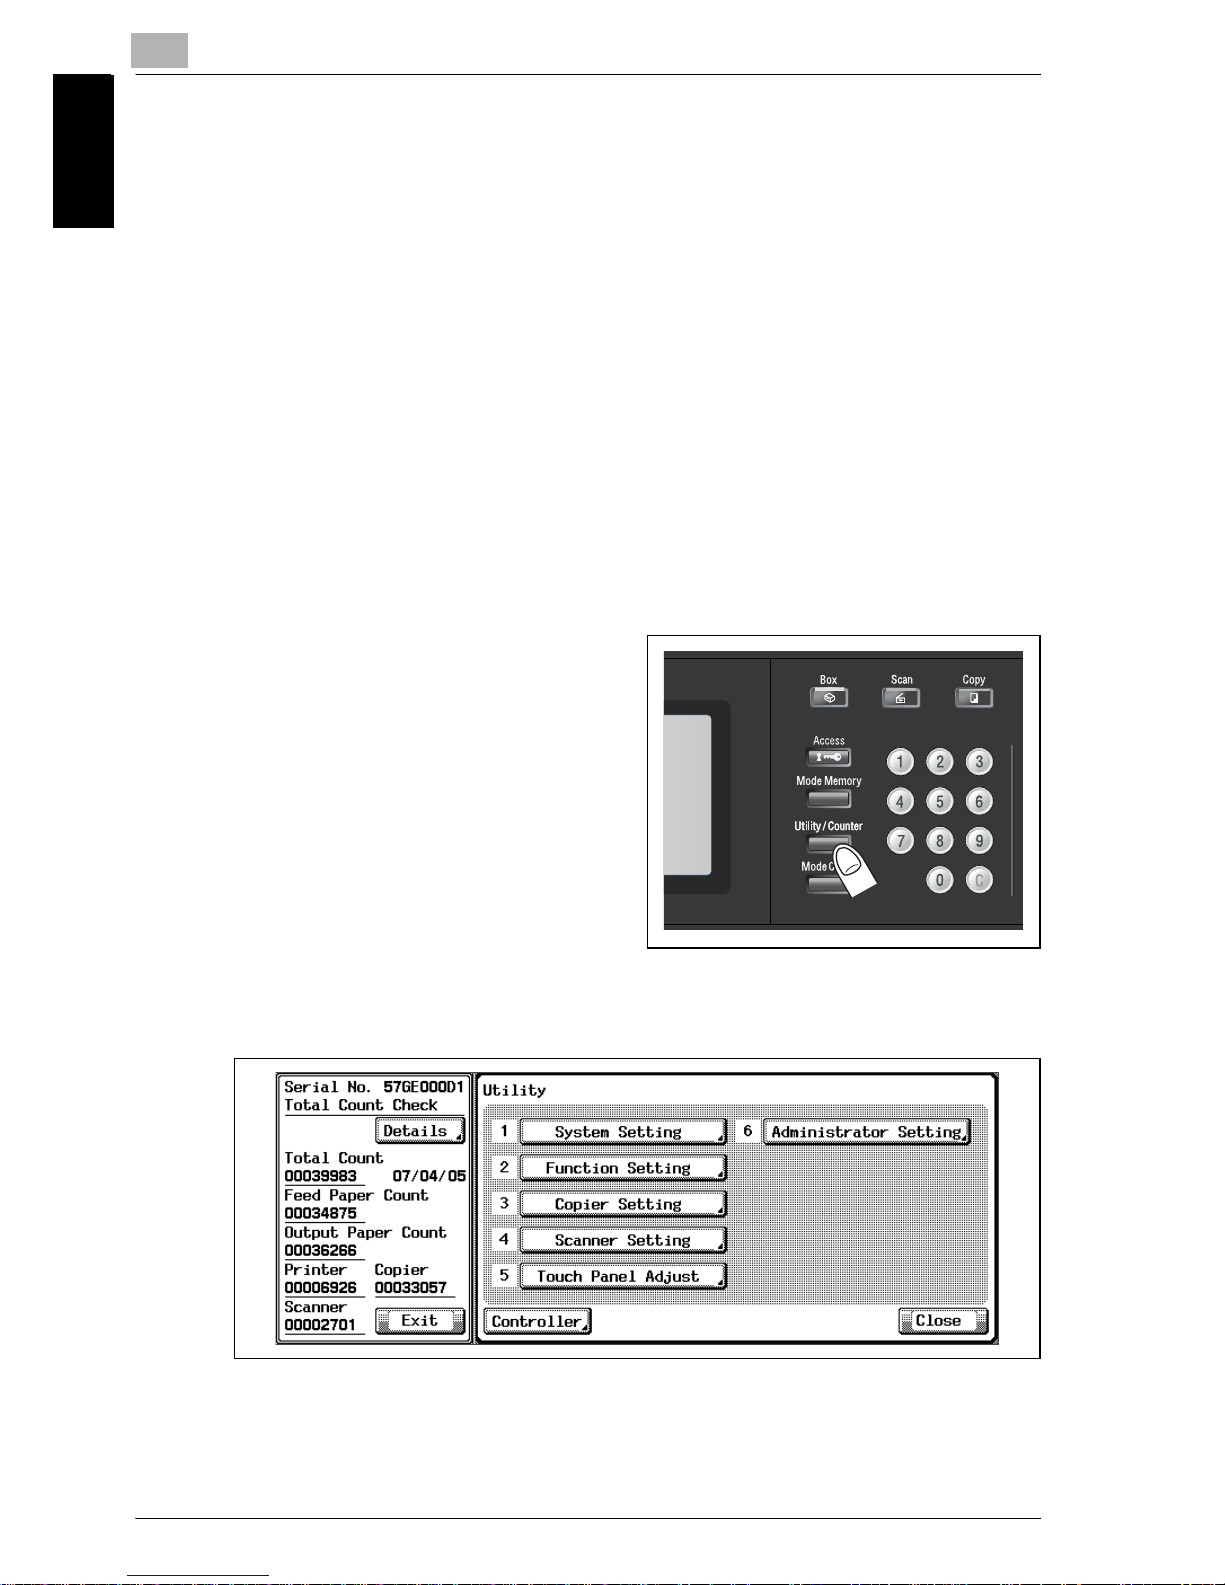
1 Press the [Utility/Counter] on
the control panel.
The Utility Screen will be displayed.
2 Touch [6 Administrator Setting].
The Password Input Screen will be displayed.
When the Password Input Screen is not displayed, prOcéed to step 4.
Page 24
Paper Setting
1
Océ im9220 1-13
Paper Setting Chapter 1
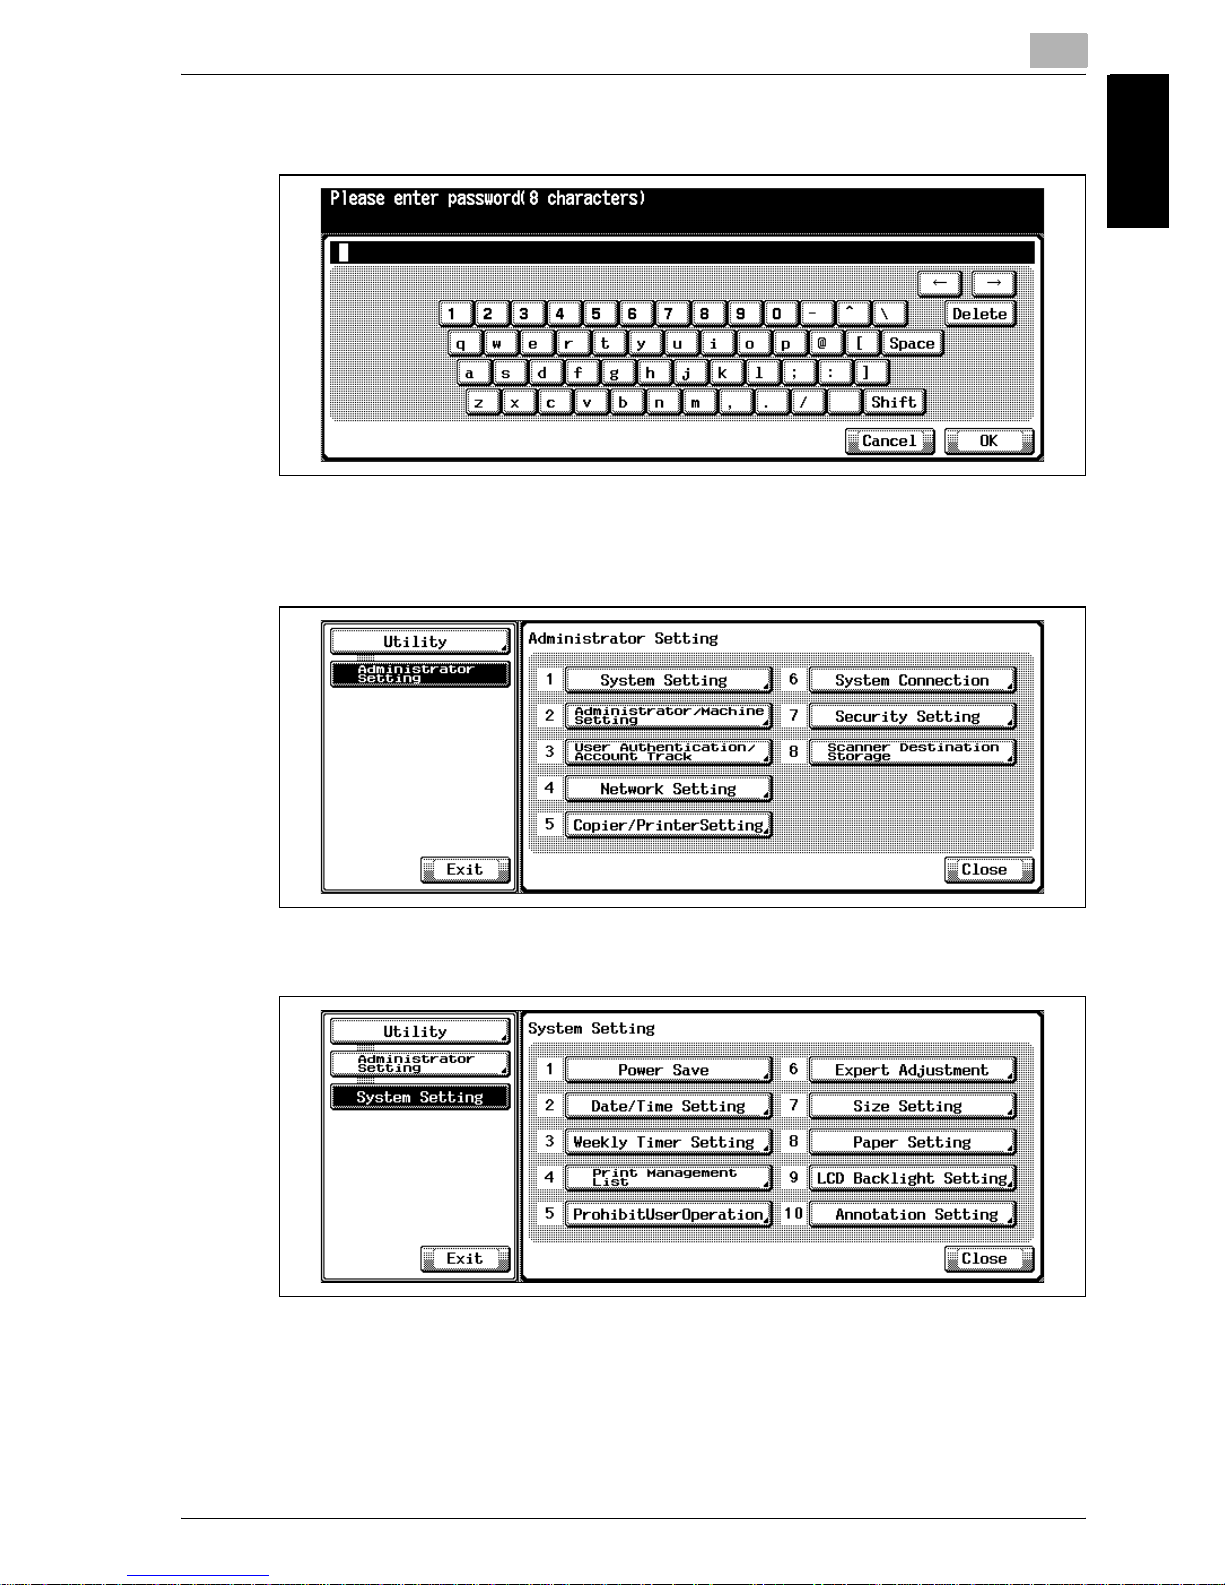
3 Enter the eight-digit administrator password, and then touch [OK].
The Administrator Setting Screen will be displayed.
4 Touch [1 System Setting].
5 Touch [8 Paper Setting].
Page 25
1
Paper Setting
1-14 Océ im9220
Paper Setting Chapter 1
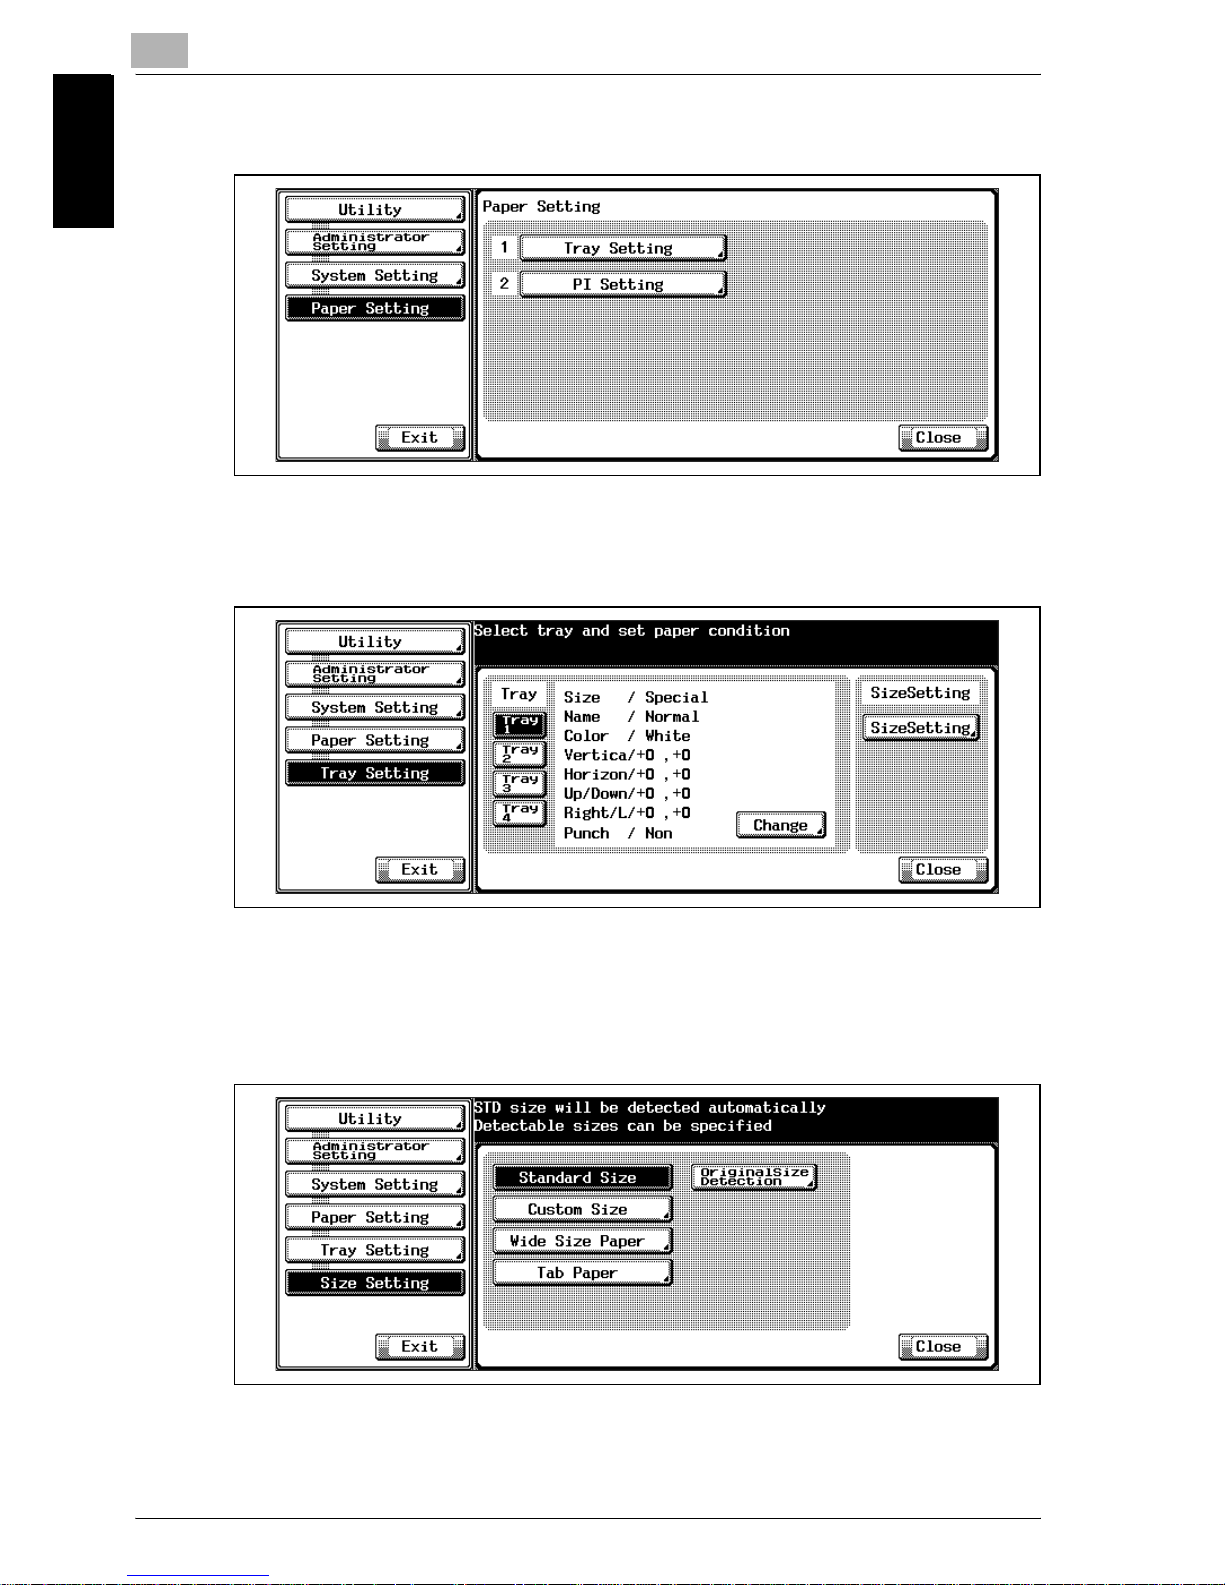
6 Touch [1 Tray Setting].
The tray setting screen will be displayed.
7 Touch a desired tray key to highlight it.
8 Touch [Size Setting] to change a tray setting.
The Size Setting Screen will be displayed.
9 Touch the desired key to specify the detectable size.
10 Select Standard size when loading the standard size of paper in the
specified tray.
Page 26
Paper Setting
1
Océ im9220 1-15
Paper Setting Chapter 1
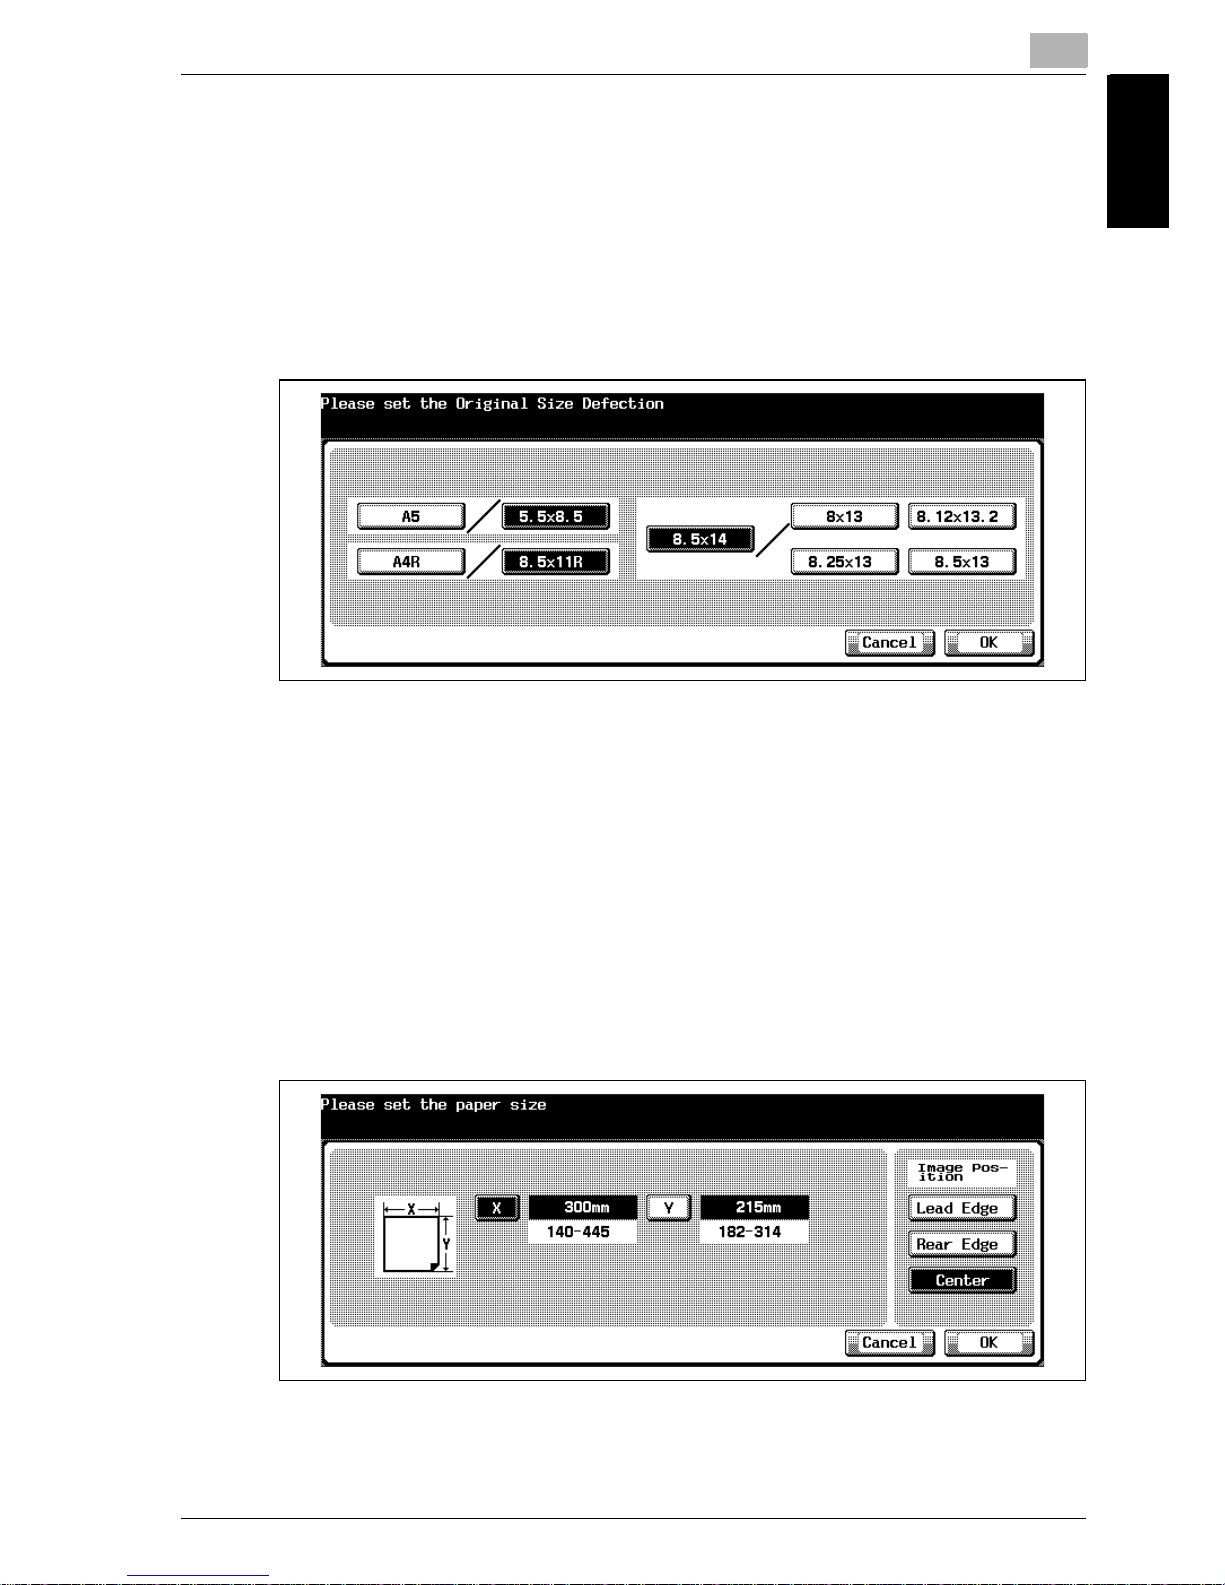
– Touch [Standard Size] to highlight it.
– If selected tray will be loaded with one of the following sizes, touch
[Original Size Detection] to display the Original Size Detection
Screen, and then touch the desired size key.
If 5.5×8.5 is selected on the Original Size Detection Screen, the ma-
chine will automatically detect 5.5×8.5 instead of A5. Similarly,
8.5×11R will be detected instead of A4R, 8.5×14 will be detected
instead of 8.5×13.
Touch [OK] to complete the setting and return to the Size Setting
Screen.
11 Select [Custom Size] when setting loading the custom size of paper in
the specified tray.
– Touch Custom Size to display the custom Size Setting Screen.
– Touch [X] indicating the horizontal size, then enter the desired size
using the control panel keypad. Similarly, touch [Y] indicating the
vertical size, then enter the desired size. From the minimum size of
140×182 mm to the maximum size of 314×445 mm can be set.
– Touch [Lead Edge], [Rear Edge], or [Center] to specify the desired
image position.
Touch [OK] to complete the setting and return to the Size Setting
Screen.
Page 27
1
Paper Setting
1-16 Océ im9220
Paper Setting Chapter 1
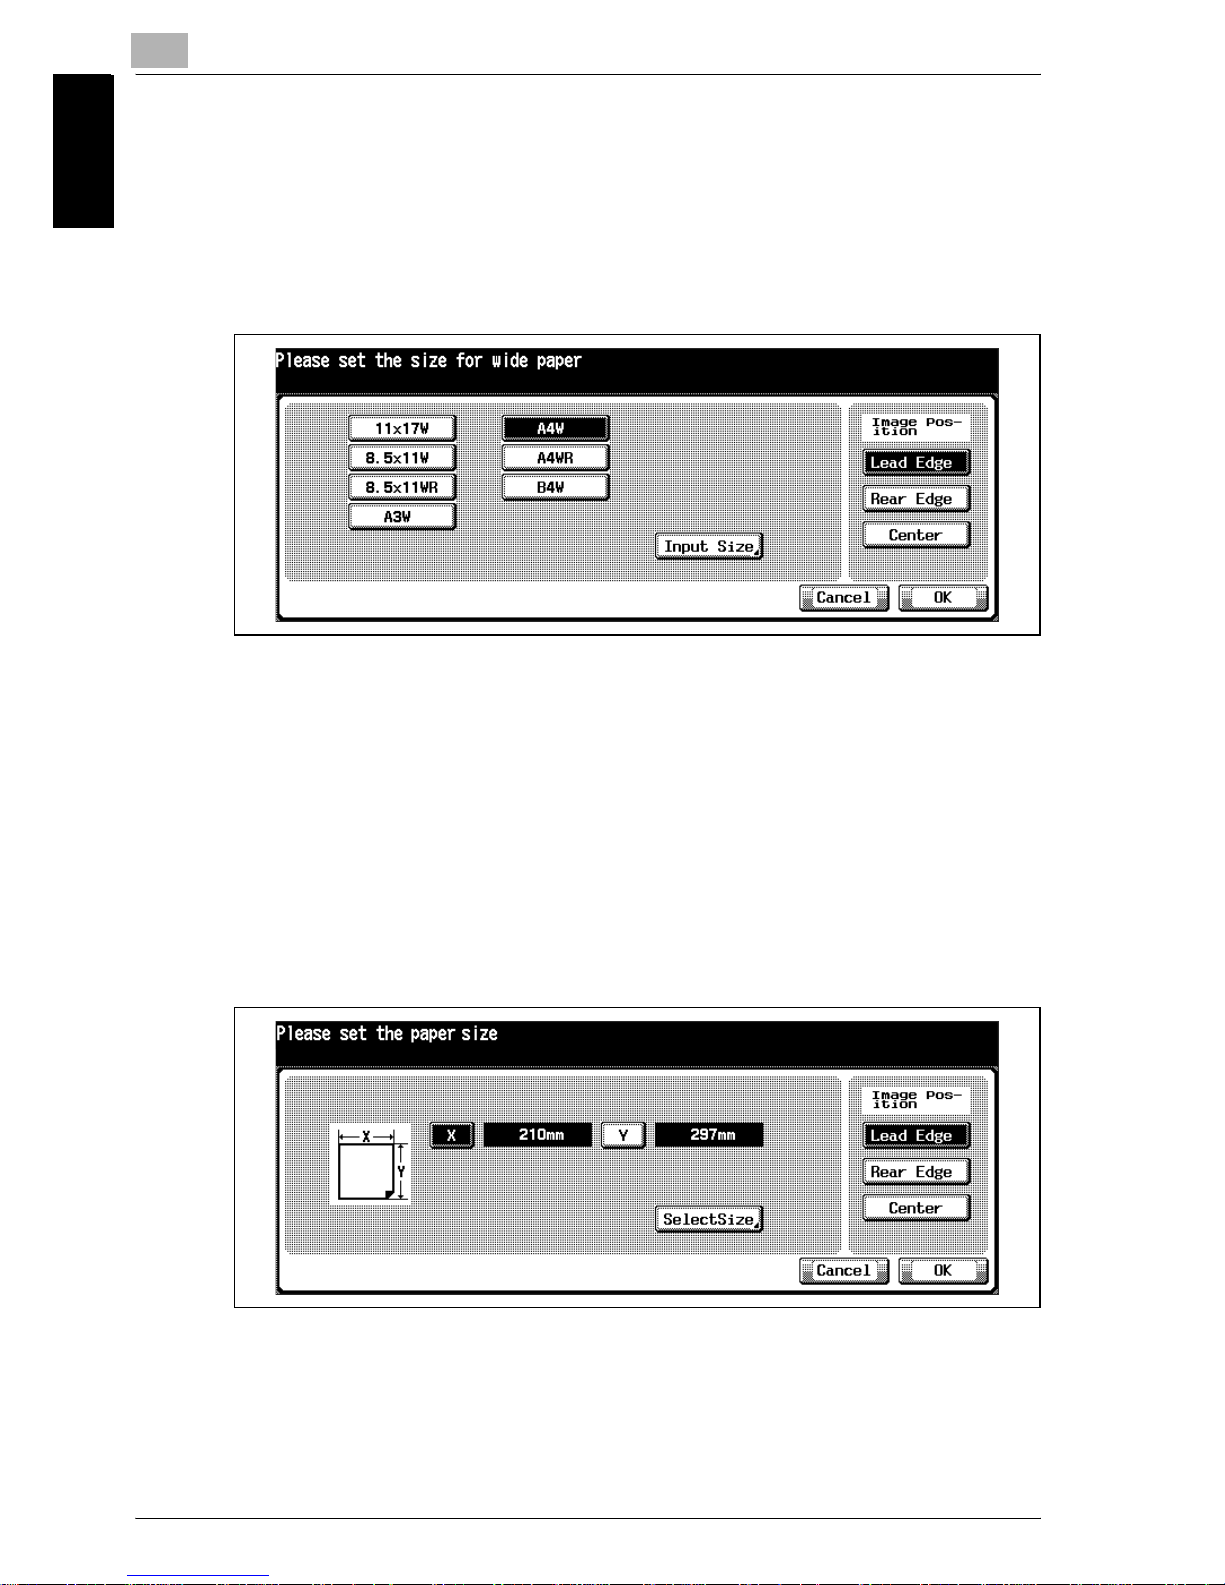
12 Select Wide Size Paper when loading the wide size of paper in the
specified tray.
– Touch [Wide Size Paper] to display the Wide Size Selection Screen.
– Touch the desired wide size key to highlight it.
– Touch [Lead Edge], [Rear Edge], or [Center] to specify the desired
image position.
– Touch [Input Size] to display the Wide Size Input Screen.
– Touch [X] indicating the horizontal size, then enter the desired size
using the control panel keypad. The value should fall within the
range from the horizontal size of the standard wide size paper to a
maximum of 445mm can be set. Similarly, touch [Y] indicating the
vertical size, then enter the desired size. The value should fall within
the range from the vertical size of the standard wide size paper to
a maximum of 314mm.
When using the 9265, the maximum size will be 223mm; when using the 9267, the maximum size will be 460mm.
– Touch [Select Size] to return to the Select Size Screen.
Touch [OK] to complete the setting and return to the Size Setting
Screen.
Page 28
Paper Setting
1
Océ im9220 1-17
Paper Setting Chapter 1
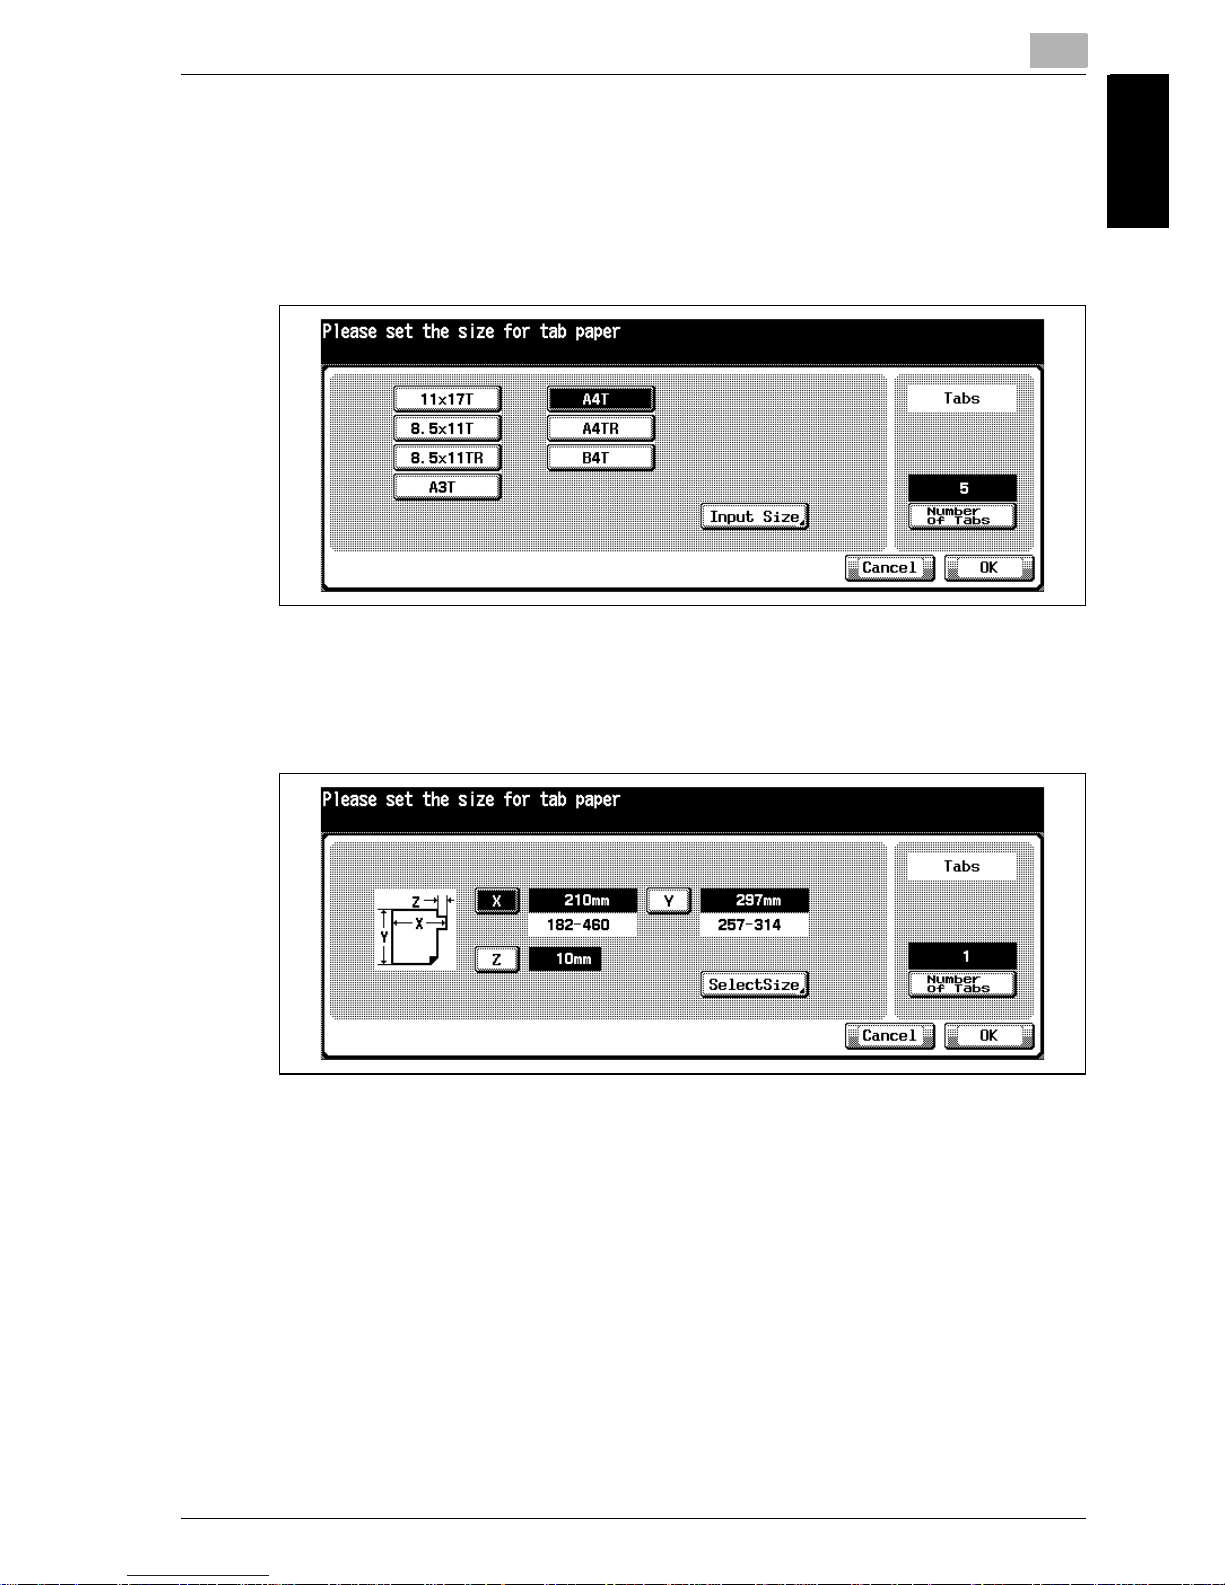
13 Select Tab Paper when loading tab paper in the specified tray.
– Touch [Tab Paper] to display Tab Paper Size Selection Screen.
– Touch the desired tabbed paper size key to highlight it.
– Touch [Number of Tabs], then enter the number of tabs using the
control panel keypad. Setting range is from 1 to 5.
– Touch [Input Size] to set the desired size.
– Touch [X], [Y], or [Z], indicating the vertical, horizontal or index size,
then enter the desired size using the control panel keypad.
– The value to be specified for X and Y will be the minimum size of
140×182mm to the maximum size of 314×445mm. The value to be
specified for Z will be 0 to 99mm.
– Touch [Select Size] to return to the Select Size Screen.
Touch [OK] to complete the setting and return to the Tray Setting
Screen.
Page 29

Page 30

2
Controller Setting Chapter 2
Controller Setting
Page 31
2
Controller Setting
2-2 Océ im9220
Controller Setting Chapter 2
2 Controller Setting
2.1 Function Overview
Setting change concerning the printer
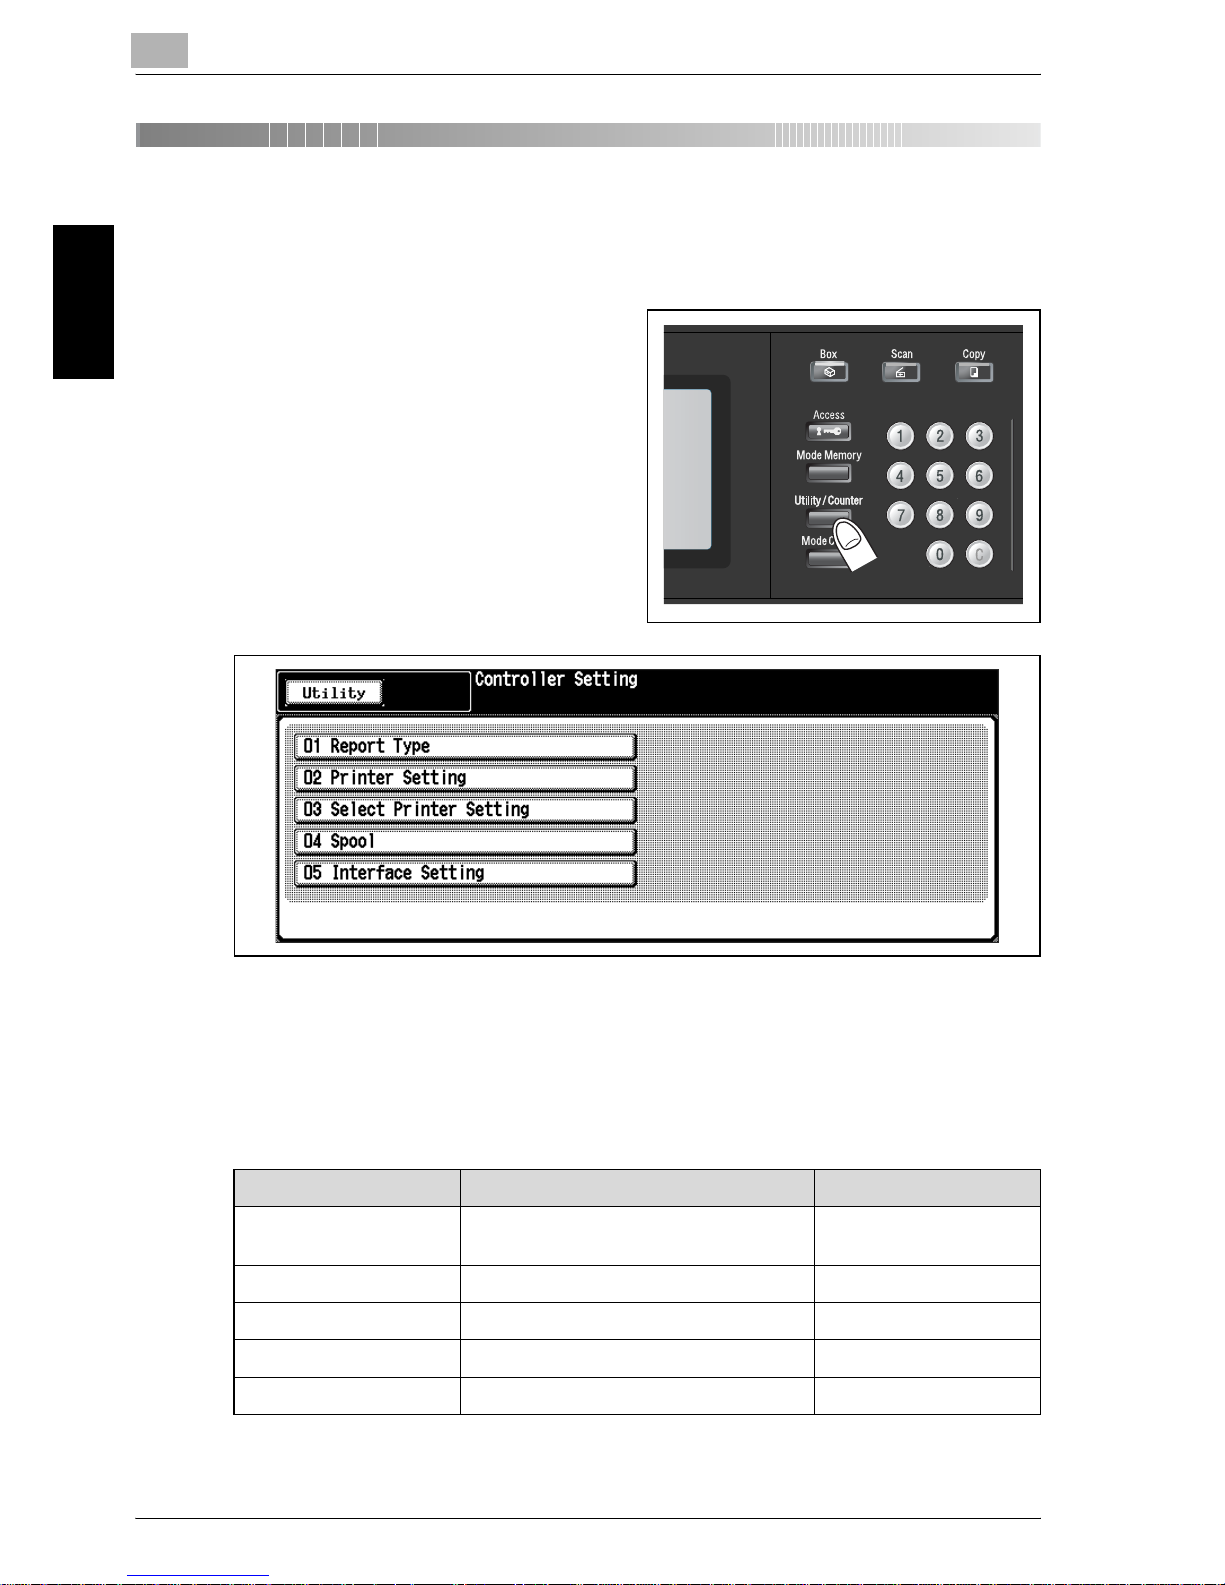
controller is available from the Controller Setting Screen.
Press [Utility/Counter] to display the
Utility Screen, and then touch [Controller] on the Utility Screen. The Controller Setting Screen will be
displayed.
The menu comprises the following settings.
01 Report Type
Use the function to print out the report type selected from the screen. See
page 2-7.
*: Available with option.
Menu Items Description Setting Options
Configuration Page Print Print the configuration page to check the
firmware version and network settings.
---
PCL Demo Page Print Print the PCL demo page. ---
PS Demo Page Print* Print the PS demo page. ---
PCL Font List Print the PCL font list. ---
PS Font List* Print the PS font list. ---
Page 32
Controller Setting
2
Océ im9220 2-3
Controller Setting Chapter 2
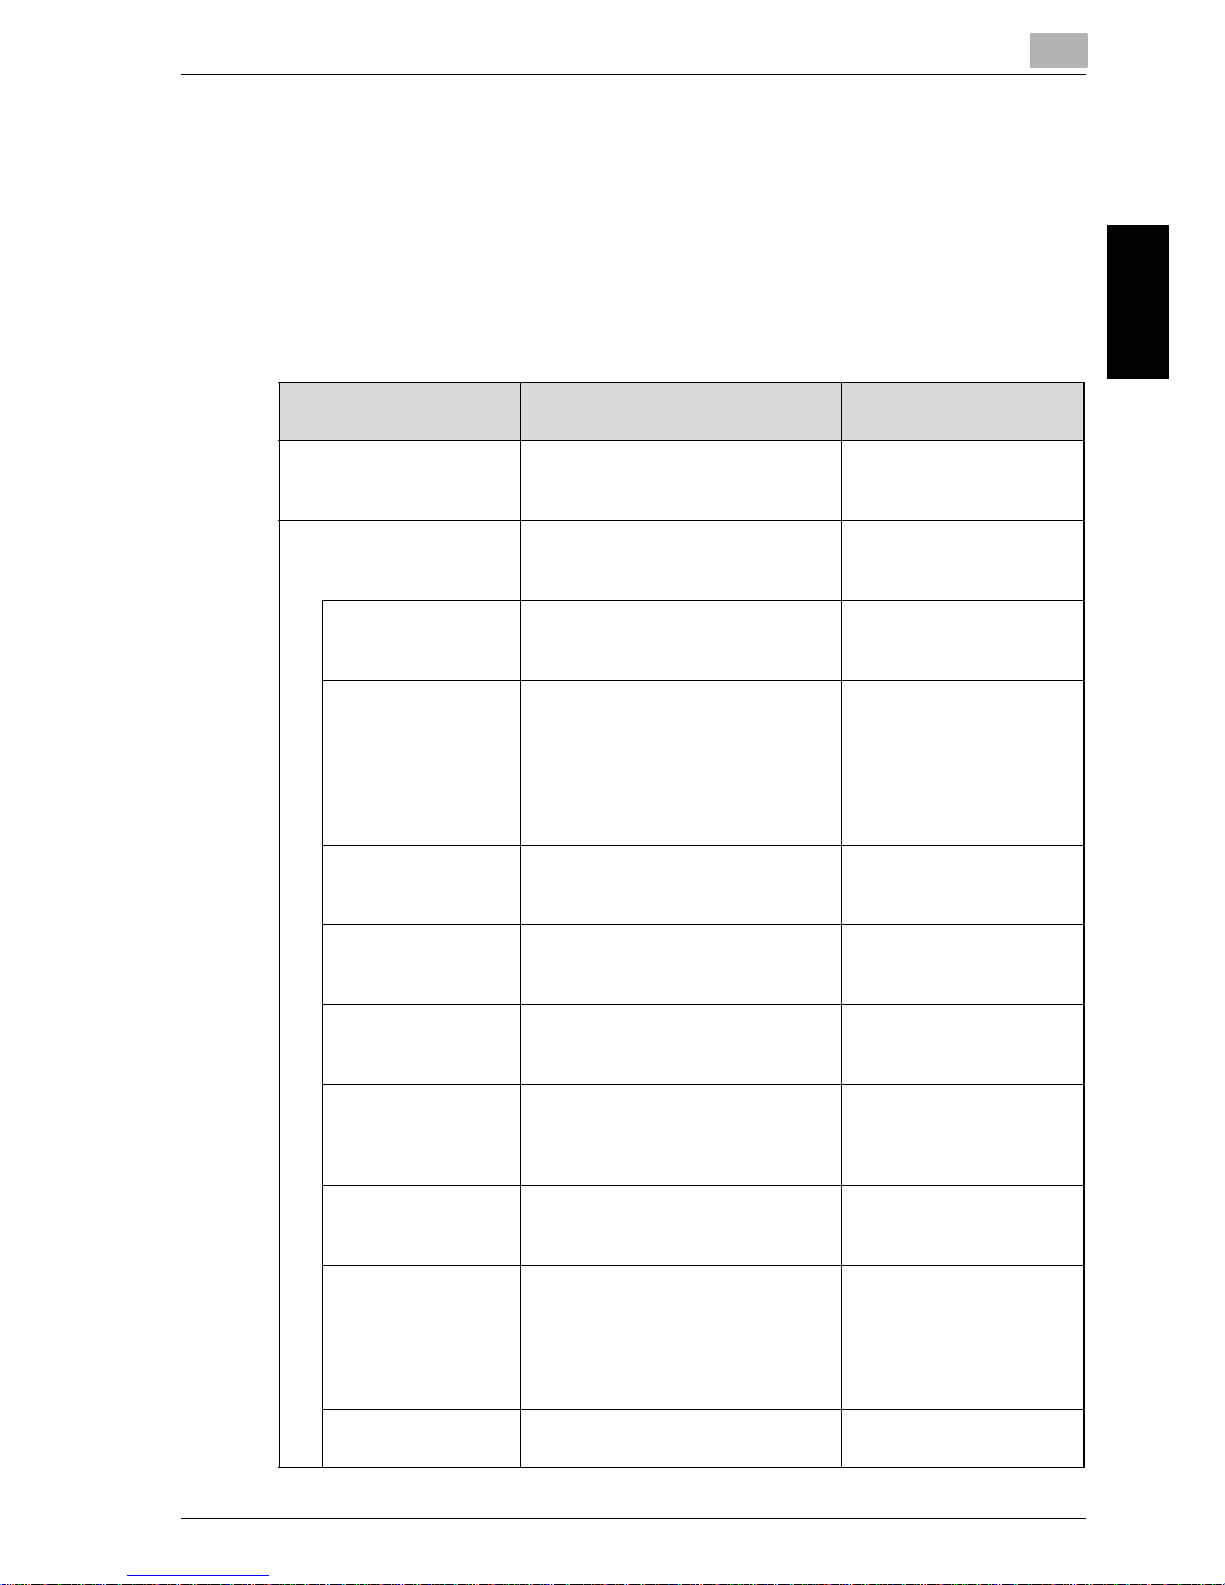
02 Printer Setting
Various printer settings are available from this screen. See page 2-8.
!
Detail
It may not operate properly depending upon the combination of settings
selected.
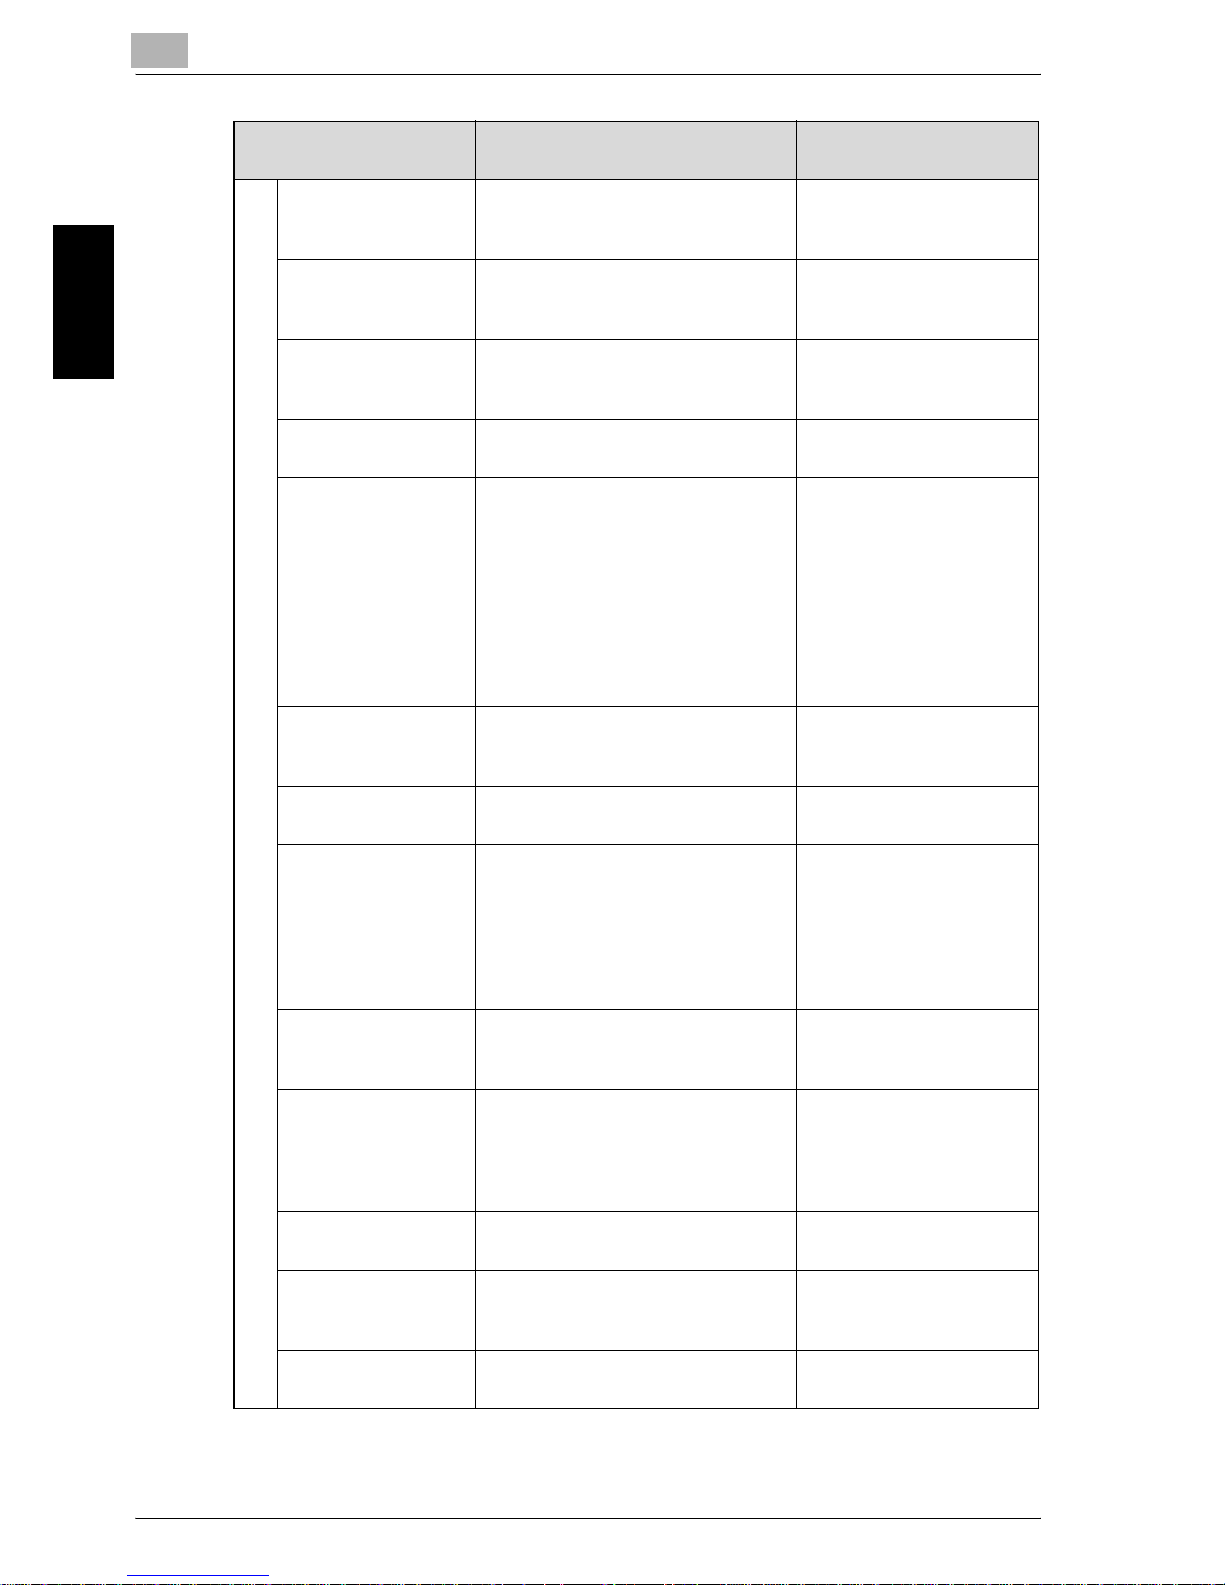
Menu Items Description Default
No. Specify the default output setting for
each number.
1-6
1
1 Basic Setting The following default settings are
used unless otherwise specified by
the printer driver.
1 PDL Select the page description lan-
guage to be initially used.
Auto, PCL, PS, TIFF
Auto
2 Paper Feed Tray Select the paper feed tray to be ini-
tially used.
The selectable items vary depending
upon the configuration of installed
options.
Auto, Tray 1, Tray 2, Tray 3, LCT, Bypass
Auto
3 Output Tray Select the exit tray to be initially
used.
Auto, Main Tray, Sub Tray
Auto
4 Duplex Select to allow double-sided print-
ing.
Off, On
Off
5 Binding Select the binding position to be ini-
tially used.
Top, Left, Right
Left
6 Staple Select the staple position to be ini-
tially used.
Off, 1 Staple (Left), 1 Staple (Right),
2 Staple
Off
7 Punch Select the punch position to be ini-
tially used.
Off, 2 Holes, 3 Holes
Off
8 Fold/ Trimming Select the initial setting for each
function.
Off, Z-fold (A3/B4/11×17/8K), Z-fold
(8.5×14), Fold & Staple, Fold & Staple/Trim, half fold, Letter fold IN, Letter fold OUT
Off
9 Offset Select to use the offset function.
On, Off
Off
Page 33
2
Controller Setting
2-4 Océ im9220
Controller Setting Chapter 2
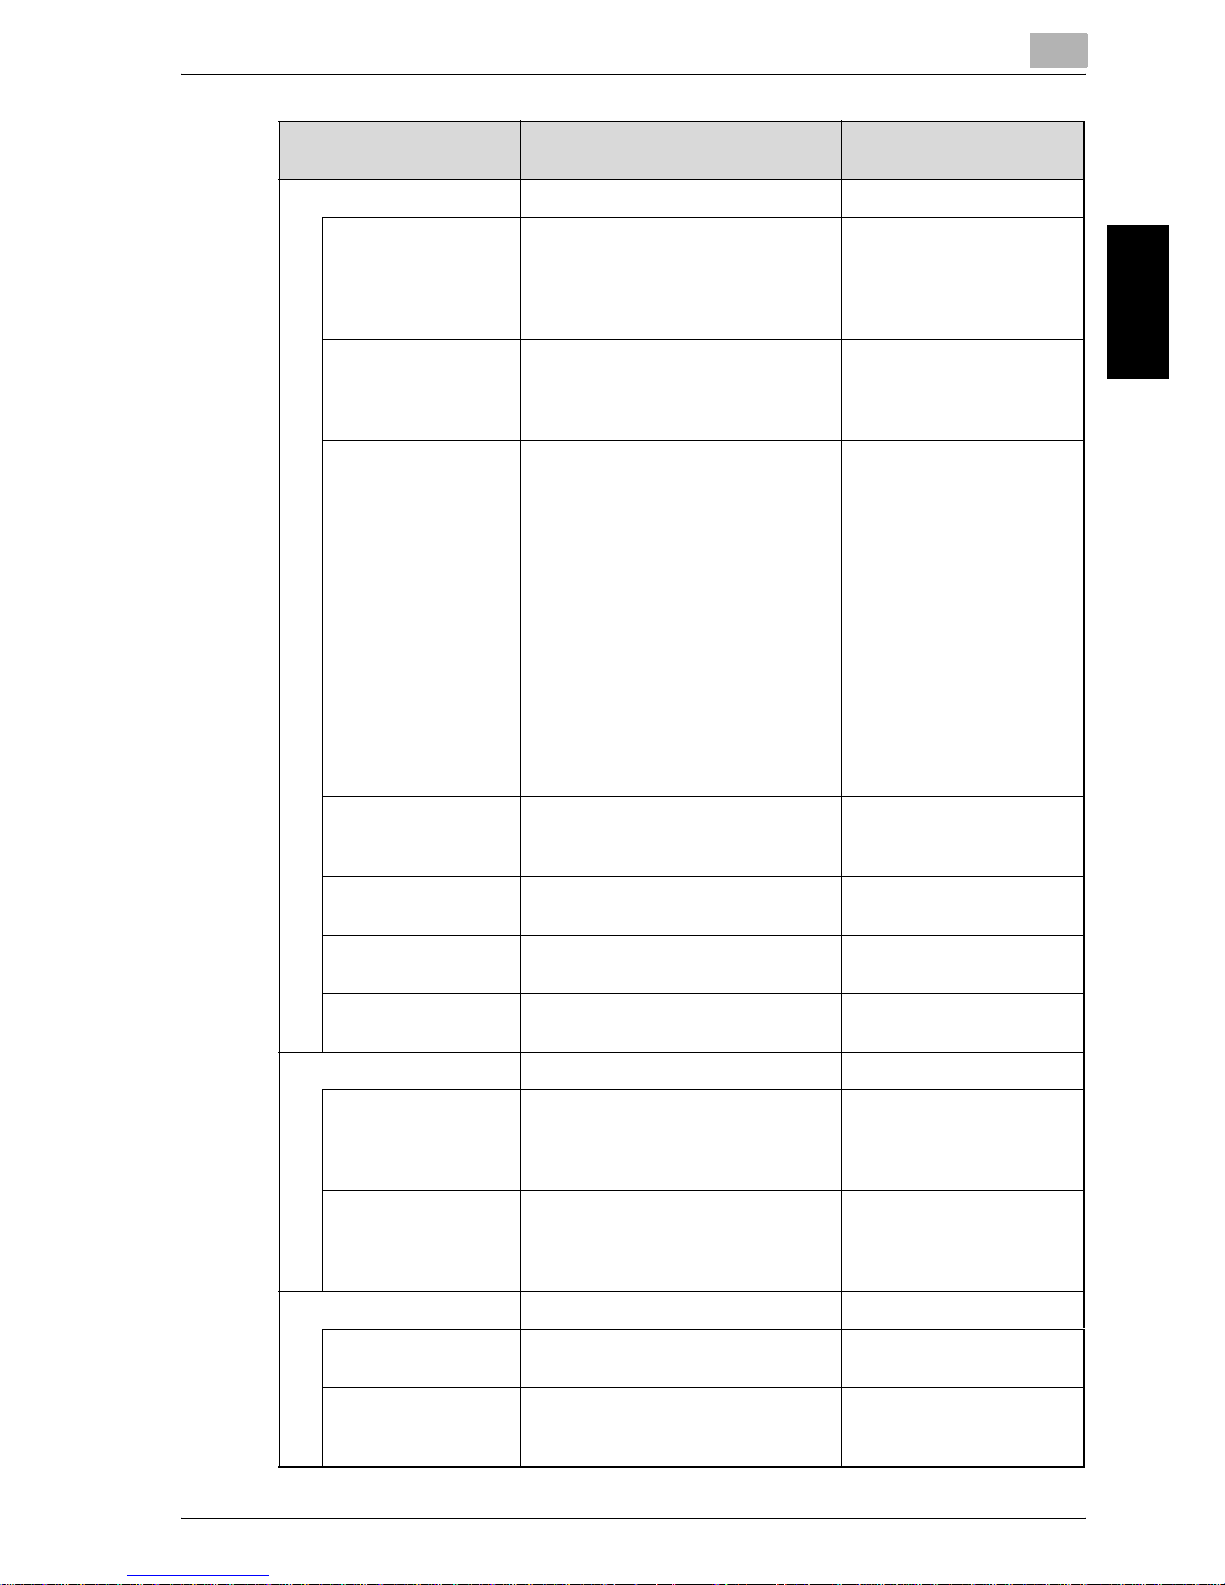
10 Output Order Select to exit face up or face down in
initial state.
Face Down, Face Up
Face Down
11 Image Order Select the print page order in initial
state.
1 to N, N to 1
1 to N
12 Print Number Specify the print quantity in initial
state.
1 to 9999
1
13 Sort Select to use the finishing mode.
Collated, Uncollated
Collated
14 Paper Size Select the paper size to be initially
used.
When specifying tabs, select the
number of tabs as well.
A3, B4, A4, B5, A5, B6, 8×13,
8.25×13, 8.125×13, 11×17, 8.5×14,
8.5×13, 8.5×11, 5.5×8.5, A3W, B4W,
A4W, B5W, 11×17W, 8.5×14W,
8.5×11W, 5.5×8.5W, 8.5×11Tab,
A4Tab
A4
15 Orientation Select the orientation of the image
printed on copy paper.
Portrait, Landscape
Portrait
16 Banner Option Select to print the banner page.
Off, On
Off
17 Banner Tray Select the paper feed tray for print-
ing banner page.
The selectable items vary depending
upon the configuration of installed
options.
Auto, Tray 1, Tray 2, Tray 3, LCT, Bypass
Auto
18 Convert Paper
Size
Select to change the paper size.
Off, 8.5×11/11×17 to A4/A3, A4/A3
to 8.5×11/11×17
Off
19 Combination Specify the desired combination
function.
Off, 2 in 1, 2 repeat, 2 repeat-reversal(L), 2 repeat-reversal(R), 2 repeatreversal(U), 2 repeat-reversal(D)
Off
20 Booklet Select to use the Booklet function.
Off, On
Off
21 Adhesive Binding Select to use the Adhesive binding
mode.
Off, On
Off
22 Print Position Select the initial print position.
Rear Edge, Center, Lead Edge
Rear Edge
Menu Items Description Default
Page 34
Controller Setting
2
Océ im9220 2-5
Controller Setting Chapter 2
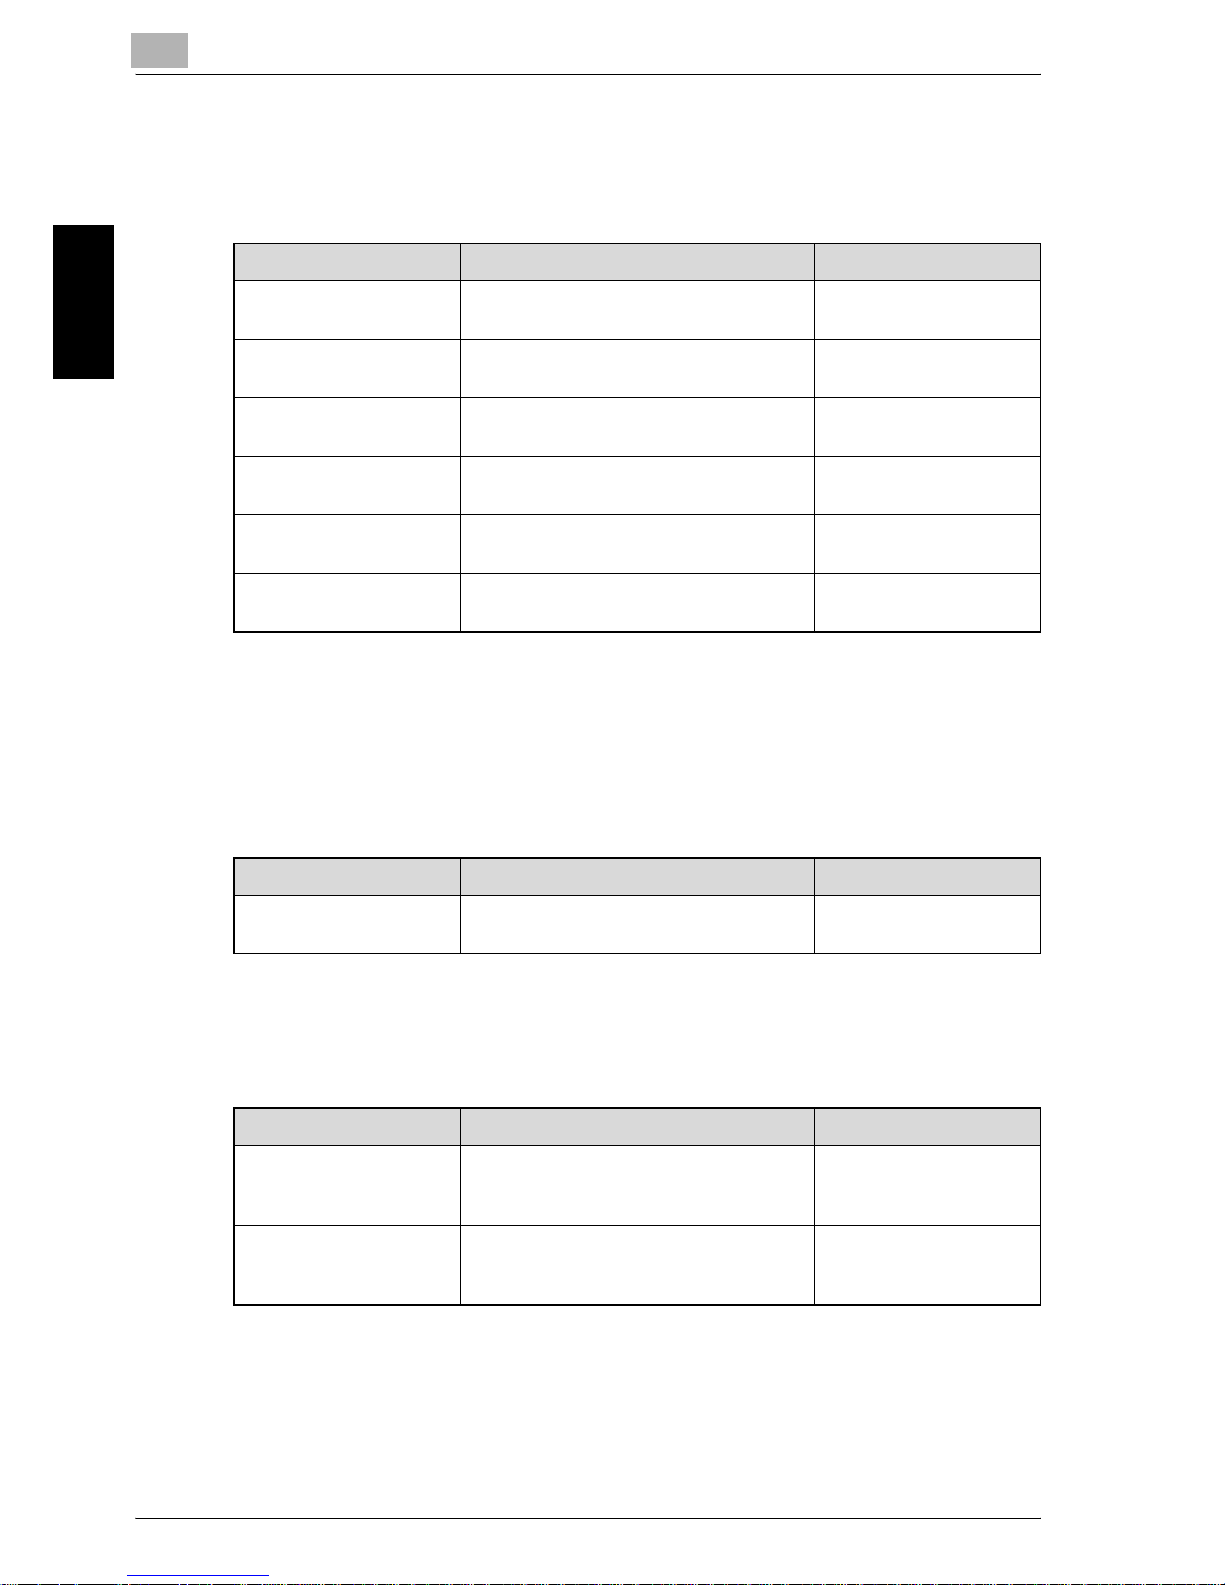
* For the details of the symbol set, see the appendix.
2 PCL Setting
1 Font Source Select the medium of font source.
Internal: Standard font
Disk: Downloaded font
Soft: Software font
Internal, Disk, Soft
Internal
2 Font Number Specify the area of available font
number according to the font
source.
0 to 999
0
3 Symbol Set Specify the symbol set.*
DESKTOP, ISO4, ISO6, ISO11,
ISO15, ISO17, ISO21, ISO60, ISO69,
ISO 8859/Latin 1, ISO 8859/Latin 2,
ISO 8859/9 Latin 5, ISO8859/10 Latin 6, ISO 8859/15/Latin 9, Legal,
Math-8, MC Text, Microsoft Publishing, PC-75, PC-8 Code Page 437,
PC-850 Multilingual, PC-852 Latin 2,
PC-858 Multilingual. PC-8 Turkish,
PC-8 Danish/Norwegian, PC-1004,
PI Font, PS Math, PS Text, Roman8, Windows 3.0 Latin 1, Windows
Baltic, Windows 3.1 Latin 1, Windows 3.1 Latin 2, Windows 3.1 Latin
5, PC-866 Ukraine
Roman-8
4 Form lines Specify the number of lines per
page.
5 to 128
64
5 Font point size Specify the font size by point.
0.44 to 99.75
12.00
6 Font pitch Specify the font pitch.
0.44 to 99.95
10.00
7 CR/LF Mapping Select the line feed code.
Off, CR, LF, CRLF
Off
3 PS Setting (Option)
1 Print to PS Error Select to print the error report when
an error occurs while rasterizing
PostScript data.
Off, On
On
2 PDF -> PS Conversion error control
Select to print the error pages produced by the memory overflow
when printing a PDF file.
Off, On
Off
4 TIFF Setting
1 Auto Paper Select Select to use APS function.
Off, On
On
2 Image Position Select the image position to be print-
ed on a page.
Left, Center
Left
Menu Items Description Default
Page 35
2
Controller Setting
2-6 Océ im9220
Controller Setting Chapter 2
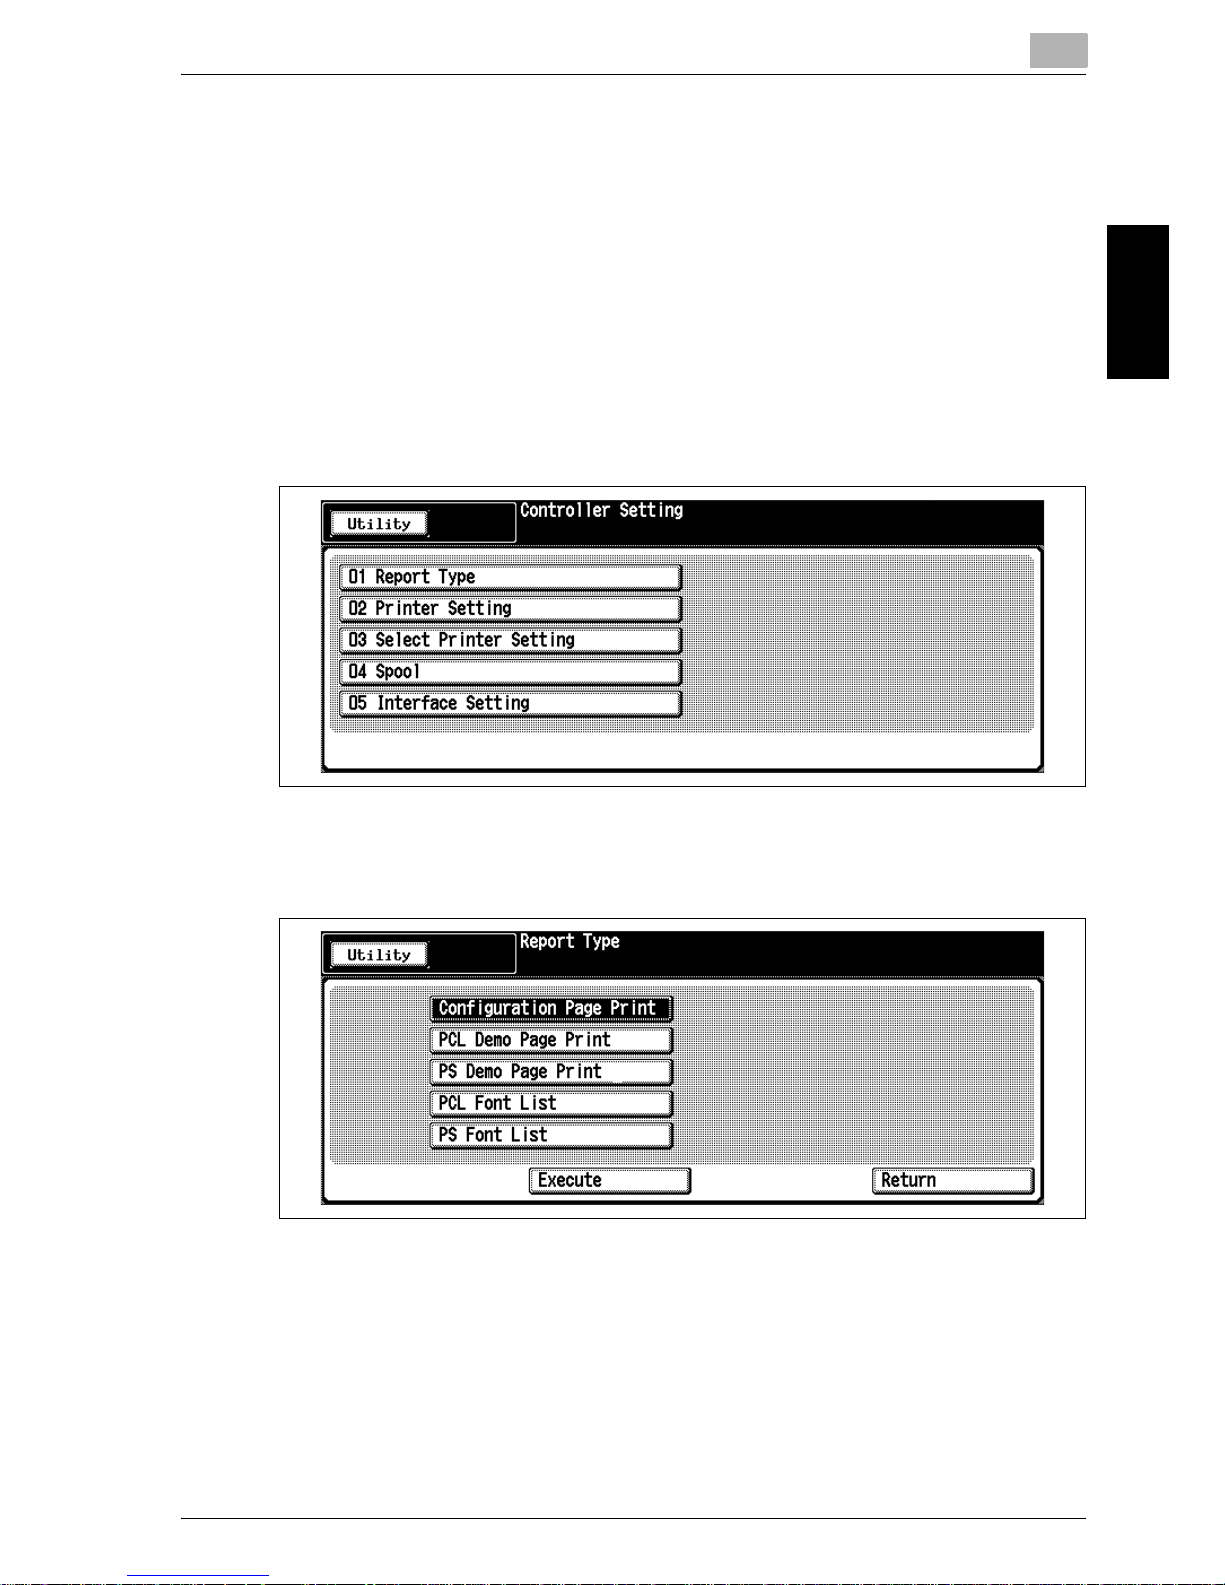
03 Select Printer Setting
Select the default port number, and specify the output format for each port.
See page 2-14.
*1: Port No. (9100, etc.) is the initial setting. To change the setting, see
page 2-14.
04 Spool
Select to spool the job to HDD. See page 2-16.
05 Interface Setting
Set the timer to terminate the interface. See page 2-17.
Menu Items Description Default
Default (9100)*1 Select the default port number.
1 to 6
1
Port 2 (9112)*1 Select the number for Port 2.
1 to 6
1
Port 3 (9113)*1 Select the number for Port 3.
1 to 6
1
Port 4 (9114)*1 Select the number for Port 4.
1 to 6
1
Port 5 (9115)*1 Select the number for Port 5.
1 to 6
1
Port 6 (9116)*1 Select the number for Port 6.
1 to 6
1
Menu Items Description Default
Spool Select to spool the job to HDD.
Auto, Enable, Disable
Disable
Menu Items Description Default
Parallel Timeout Set the timer to terminate the parallel
port.
10 to 300 seconds
60
Network Timeout Set the timer to terminate the network
port.
10 to 300 seconds
60
Page 36
Controller Setting
2
Océ im9220 2-7
Controller Setting Chapter 2
2.2 01 Report Type
Use this function to print out the report type selected from the screen.
PrOcédure
1 Press the [Utility/Counter] to display the Utility Screen.
2 Touch [Controller].
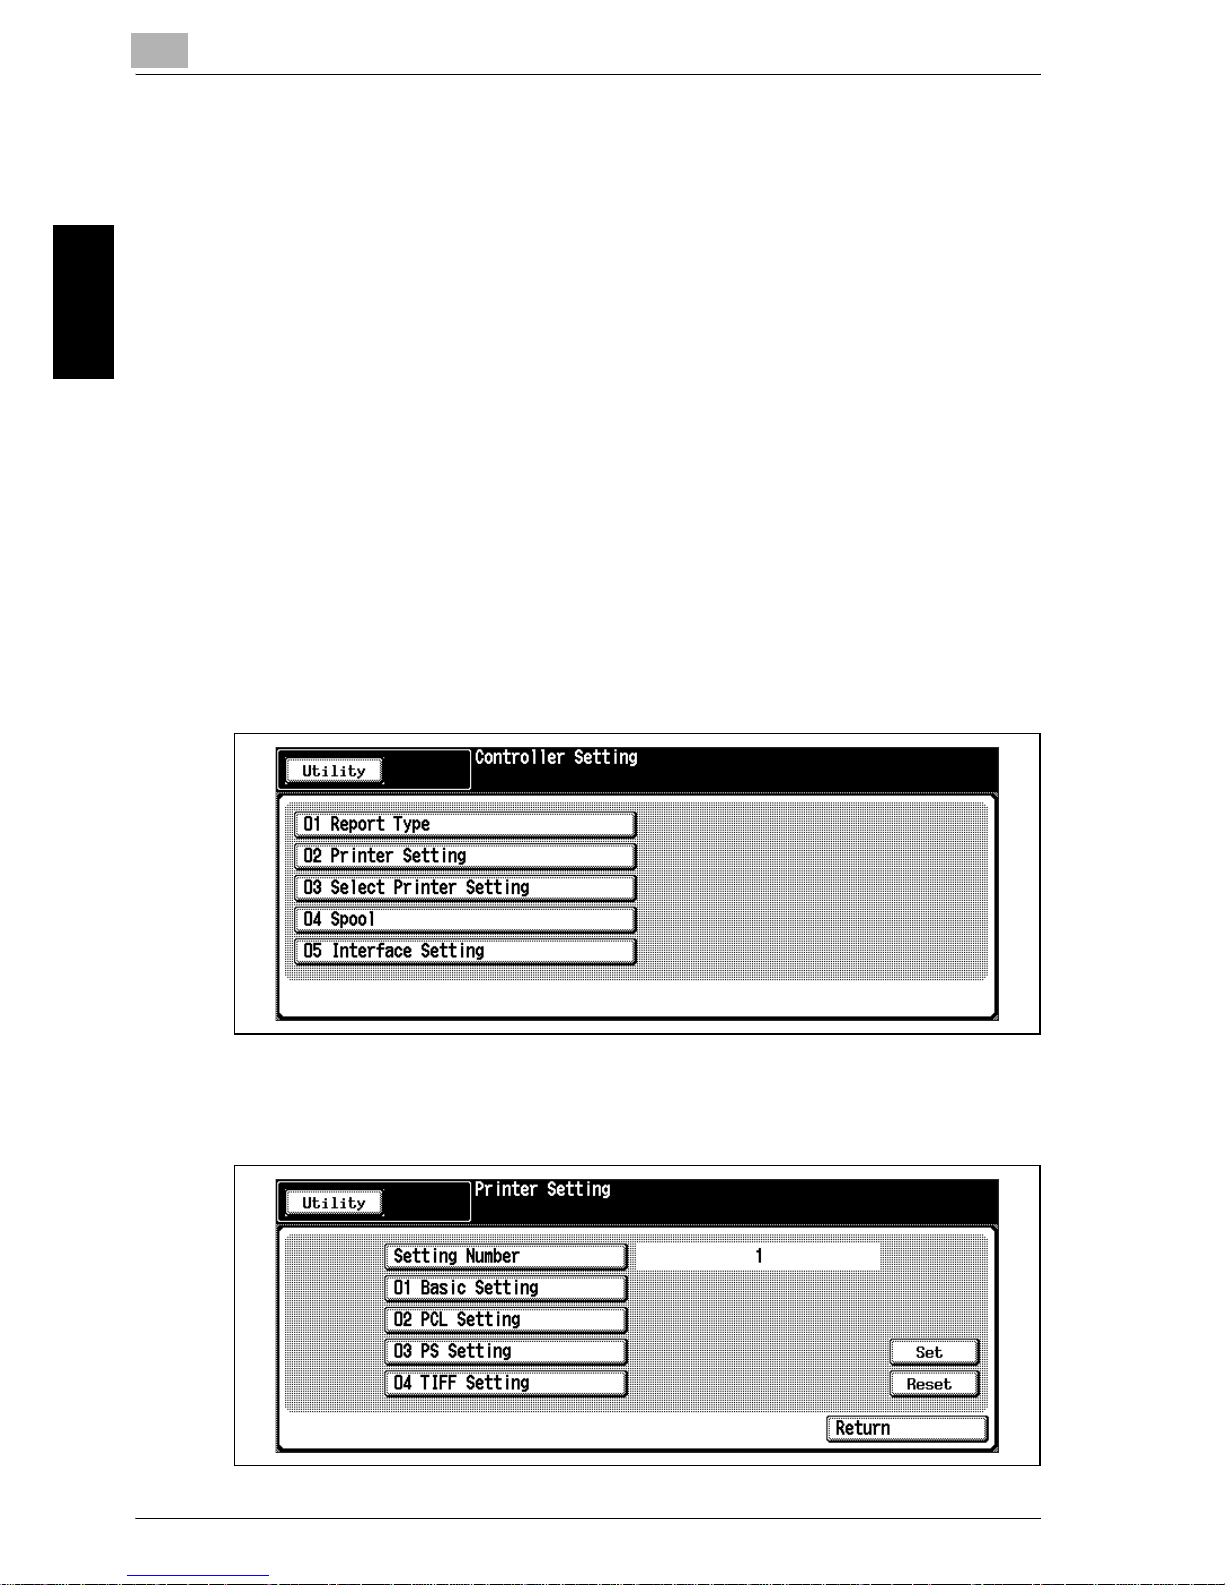
The Controller Setting Screen will be displayed.
3 Touch [01 Report Type].
The Report Type Selection Screen will be displayed.
4 Touch the desired report type key to select it.
5 Touch [Execute].
The Controller Setting Screen will be restored, and the Data LED on the
control panel blinks to indicate that the printing operation is in
progress.
To return to the previous screen, touch [Return].
6 If further changes are required, touch the desired key.
Touch [Utility] to complete the setting and restore the Utility Screen.
Page 37
2
Controller Setting
2-8 Océ im9220
Controller Setting Chapter 2
2.3 02 Printer Setting
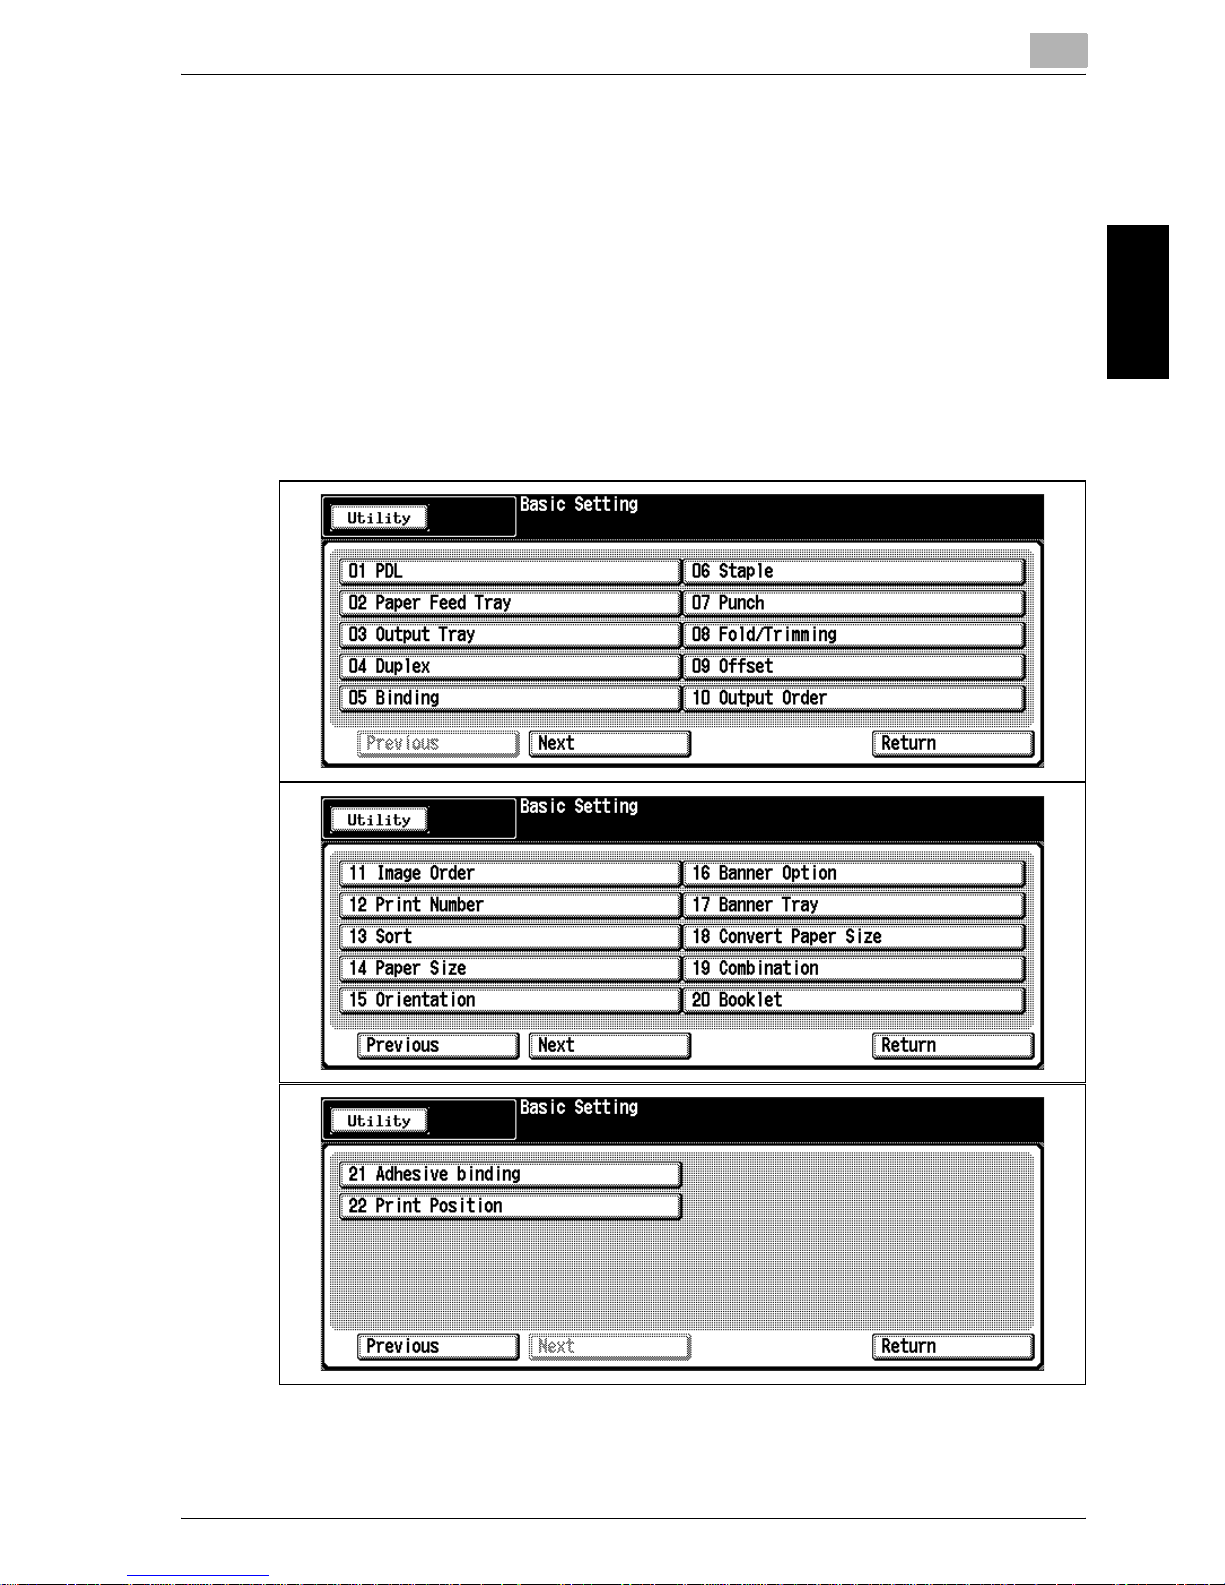
Use this function to register the desired output form. Six types can be specified at maximum.
Specify the setting number (1 to 6) first, then specify the following four printer
settings for that number.
- 01 Basic Setting specifies basic settings for printer.
- 02 PCL Setting specifies the settings concerning printer protocol.
- 03 PS Setting allows the machine to output the PS error print.
- 04 TIFF Setting specifies the settings concerning TIFF image.
PrOcédure
1 Press the [Utility/Counter] to display the Utility Screen.
2 Touch [Controller].
The Controller Setting Screen will be displayed.
3 Touch [02 Printer Setting].
The Printer Setting Screen will be displayed.
4 Specify the setting number.
Page 38
Controller Setting
2
Océ im9220 2-9
Controller Setting Chapter 2
– Use the control panel keypad to enter the setting number for your
setting.
Available range is from 1 to 6.
– Touch Set to complete the setting. If wrong number is entered,
touch [Reset] to re-enter the correct number.
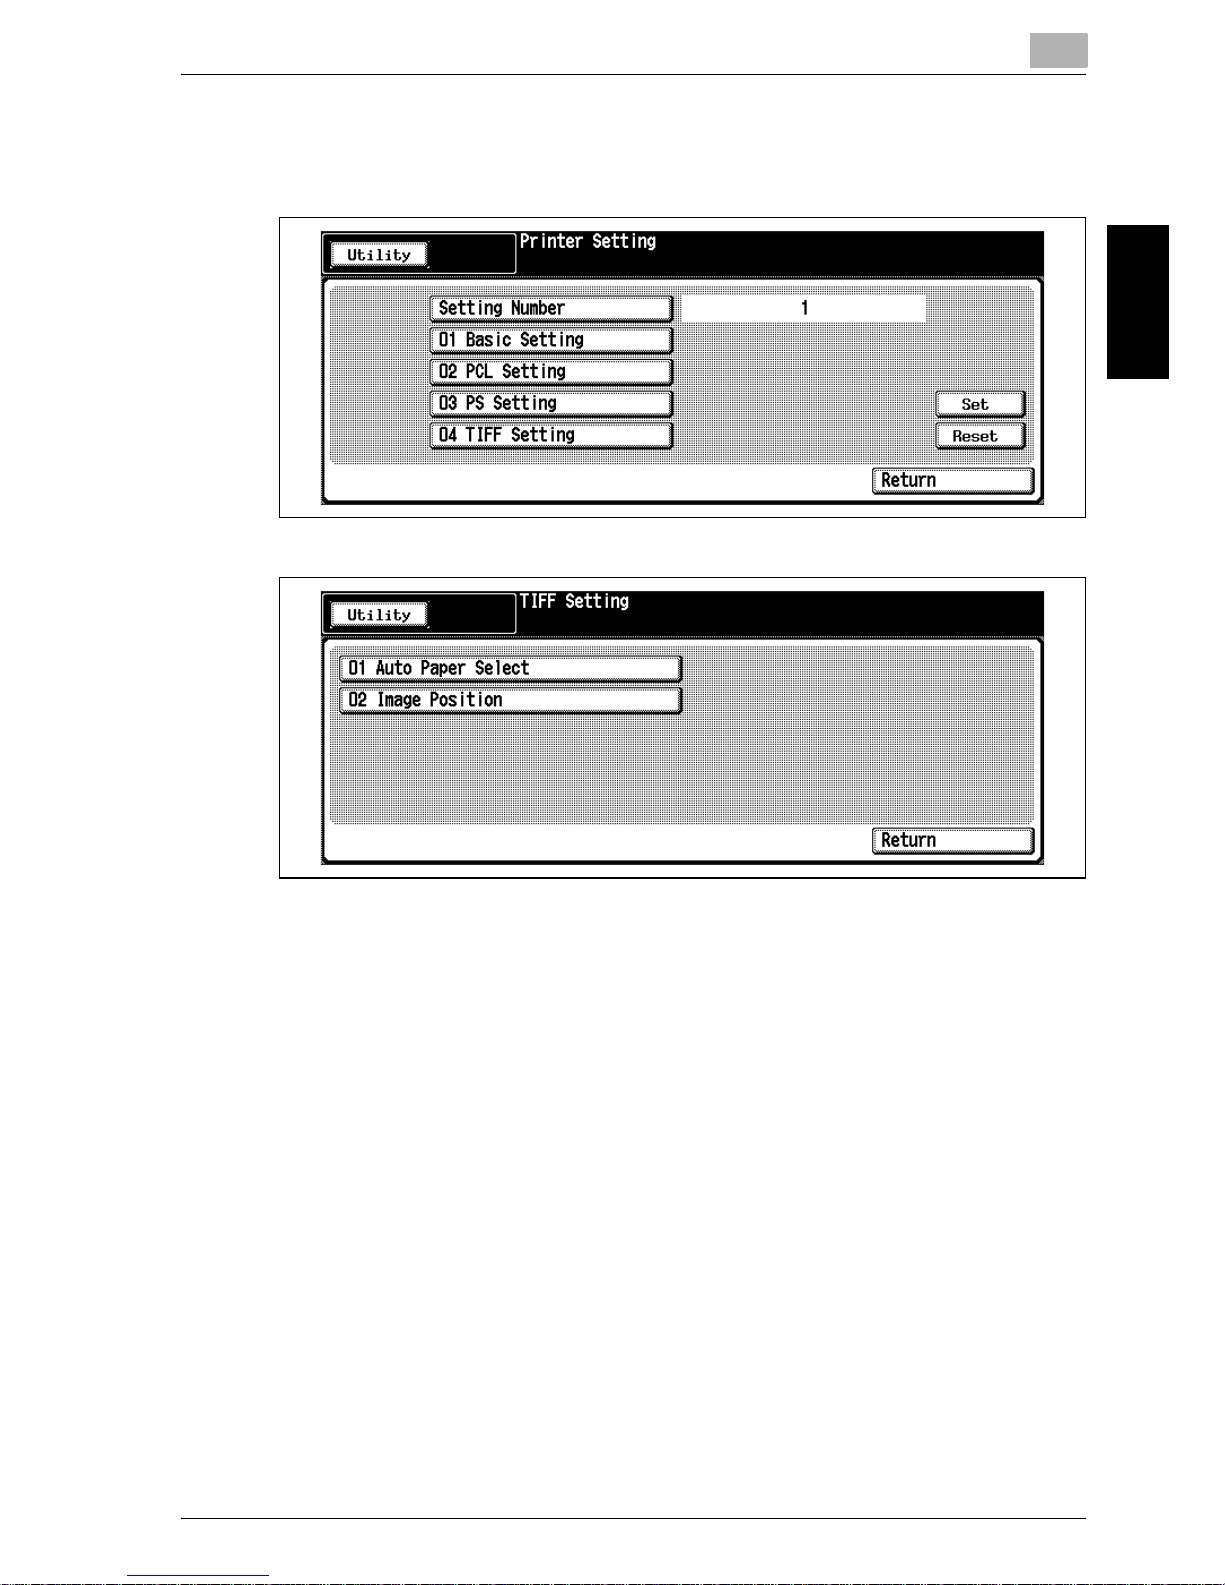
5 Perform the Basic Setting.
– Touch [01 Basic Setting]. The Basic Setting Screen will be dis-
played.
– Make the desired setting. Touch [Next] or [Previous] to scroll to the
desired item.
– The following settings are used unless otherwise specified by the
printer driver.
Page 39

2
Controller Setting
2-10 Océ im9220
Controller Setting Chapter 2
01 PDL: Select the page description language to be initially used.
02 Paper Feed Tray: Select the paper feed tray to be initially used.
03 Output Tray: Select the exit tray to be initially used.
04 Duplex: Select to allow double-sided printing.
05 Binding: Select the binding position to be initially used in doublesided printing.
06 Staple: Select the staple position to be initially used.
07 Punch: Select the punch position to be initially used.
08 Fold/Trimming: Select the initial setting for each function.
09 Offset: Select to use the offset function.
10 Output Order: Select to exit face up or face down in initial state.
11 Image Order: Select the print page order in initial state.
12 Print Number: Specify the print quantity in initial state.
13 Sort: Select to use the Sort mode.
14 Paper Size: Select the paper size to be initially used.
15 Orientation: Select the orientation of the image printed on copy
paper.
16 Banner Option: Select to print the banner page.
17 Banner Tray: Select the paper feed tray for printing banner page.
18 Convert Paper Size: Select to change the paper size.
19 Combination: Specify the desired combination function.
20 Booklet: Select to use the Booklet function.
21 Adhesive Binding: Select to use the Adhesive binding mode.
22 Print Position: Select the initial print position.
– Touch [Return] to complete the setting and restore the Printer Set-
ting Screen.
Page 40
Controller Setting
2
Océ im9220 2-11
Controller Setting Chapter 2
6 Perform the PCL Setting.
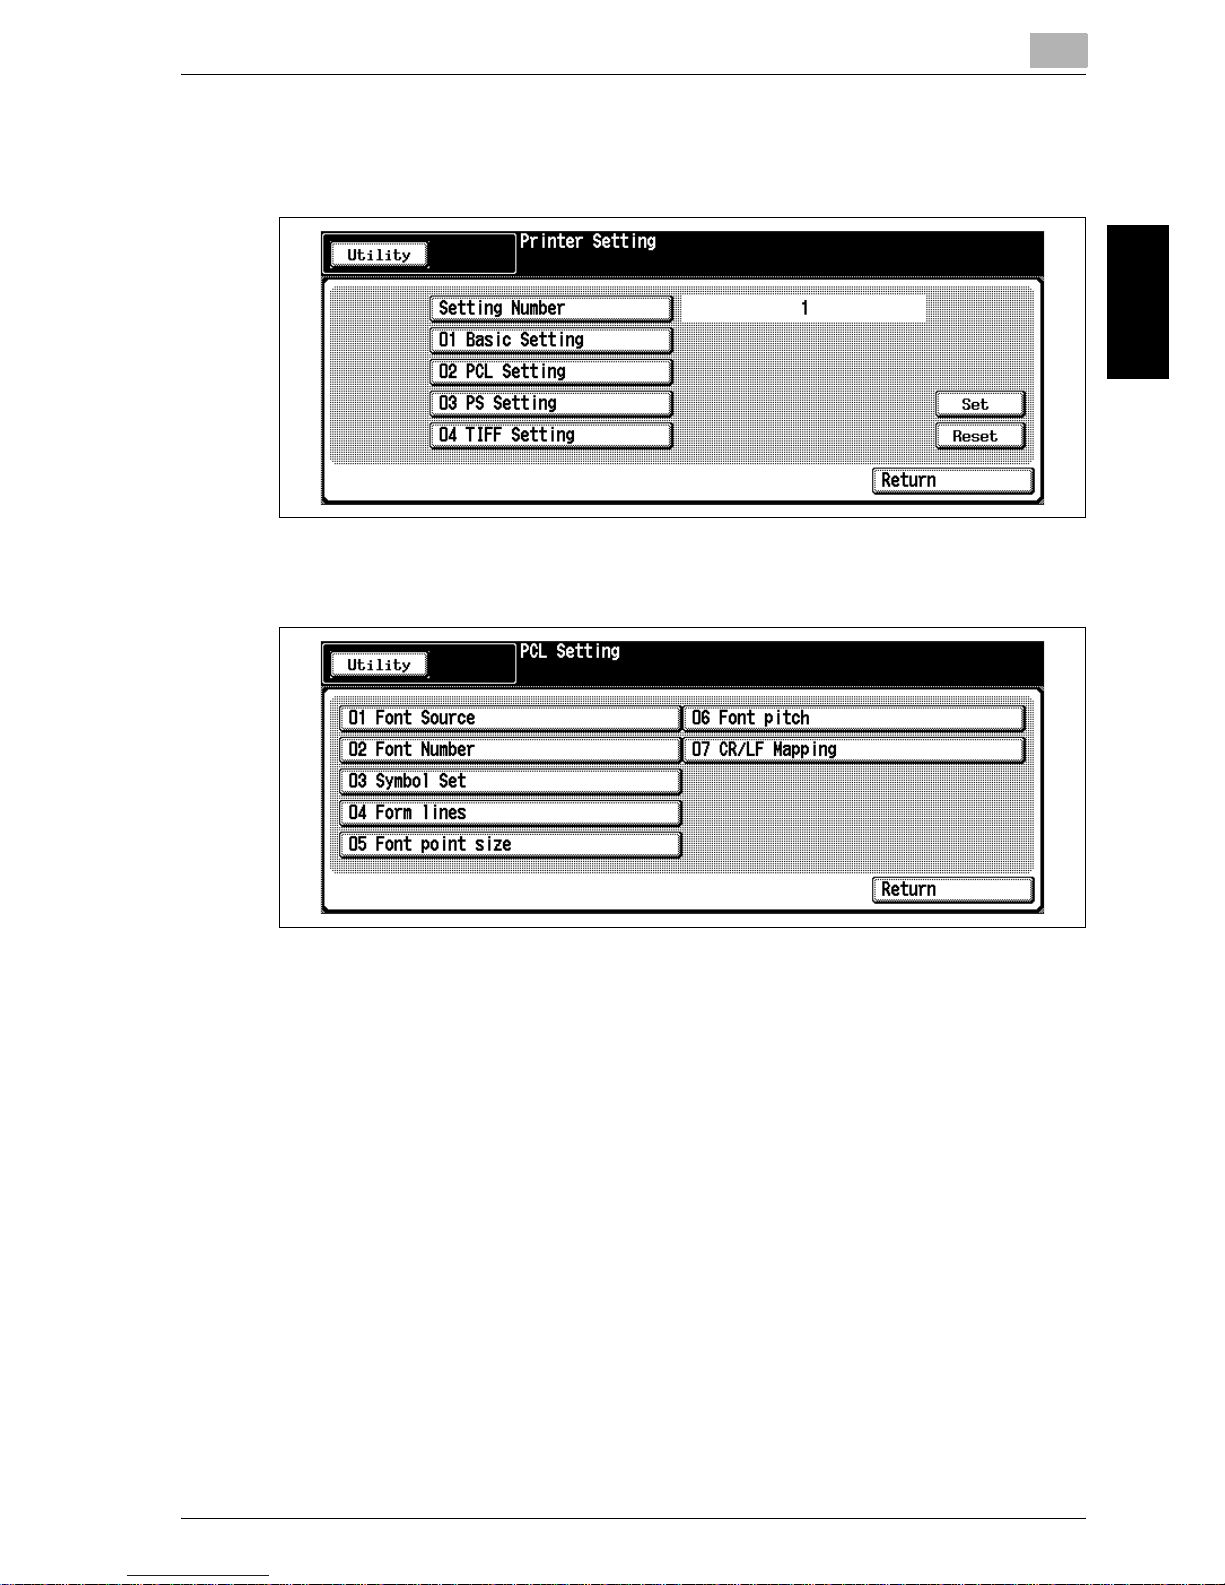
– Touch [02 PCL Setting]. The PCL Setting Screen will be displayed.
– Make the desired setting.
01 Font Source: Select the medium of font source.
02 Font Number: Specify the font number available from the font
source.
03 Symbol Set: Specify the symbol set.
04 Form lines: Specify the number of lines per page.
05 Font point size: Specify the font size by point.
06 Font pitch: Specify the font pitch.
07 CR/LF Mapping: Select the line feed code.
– Touch [Return] to complete the setting and restore the Printer Set-
ting Screen.
Page 41
2
Controller Setting
2-12 Océ im9220
Controller Setting Chapter 2
7 Perform the PS Setting (option).
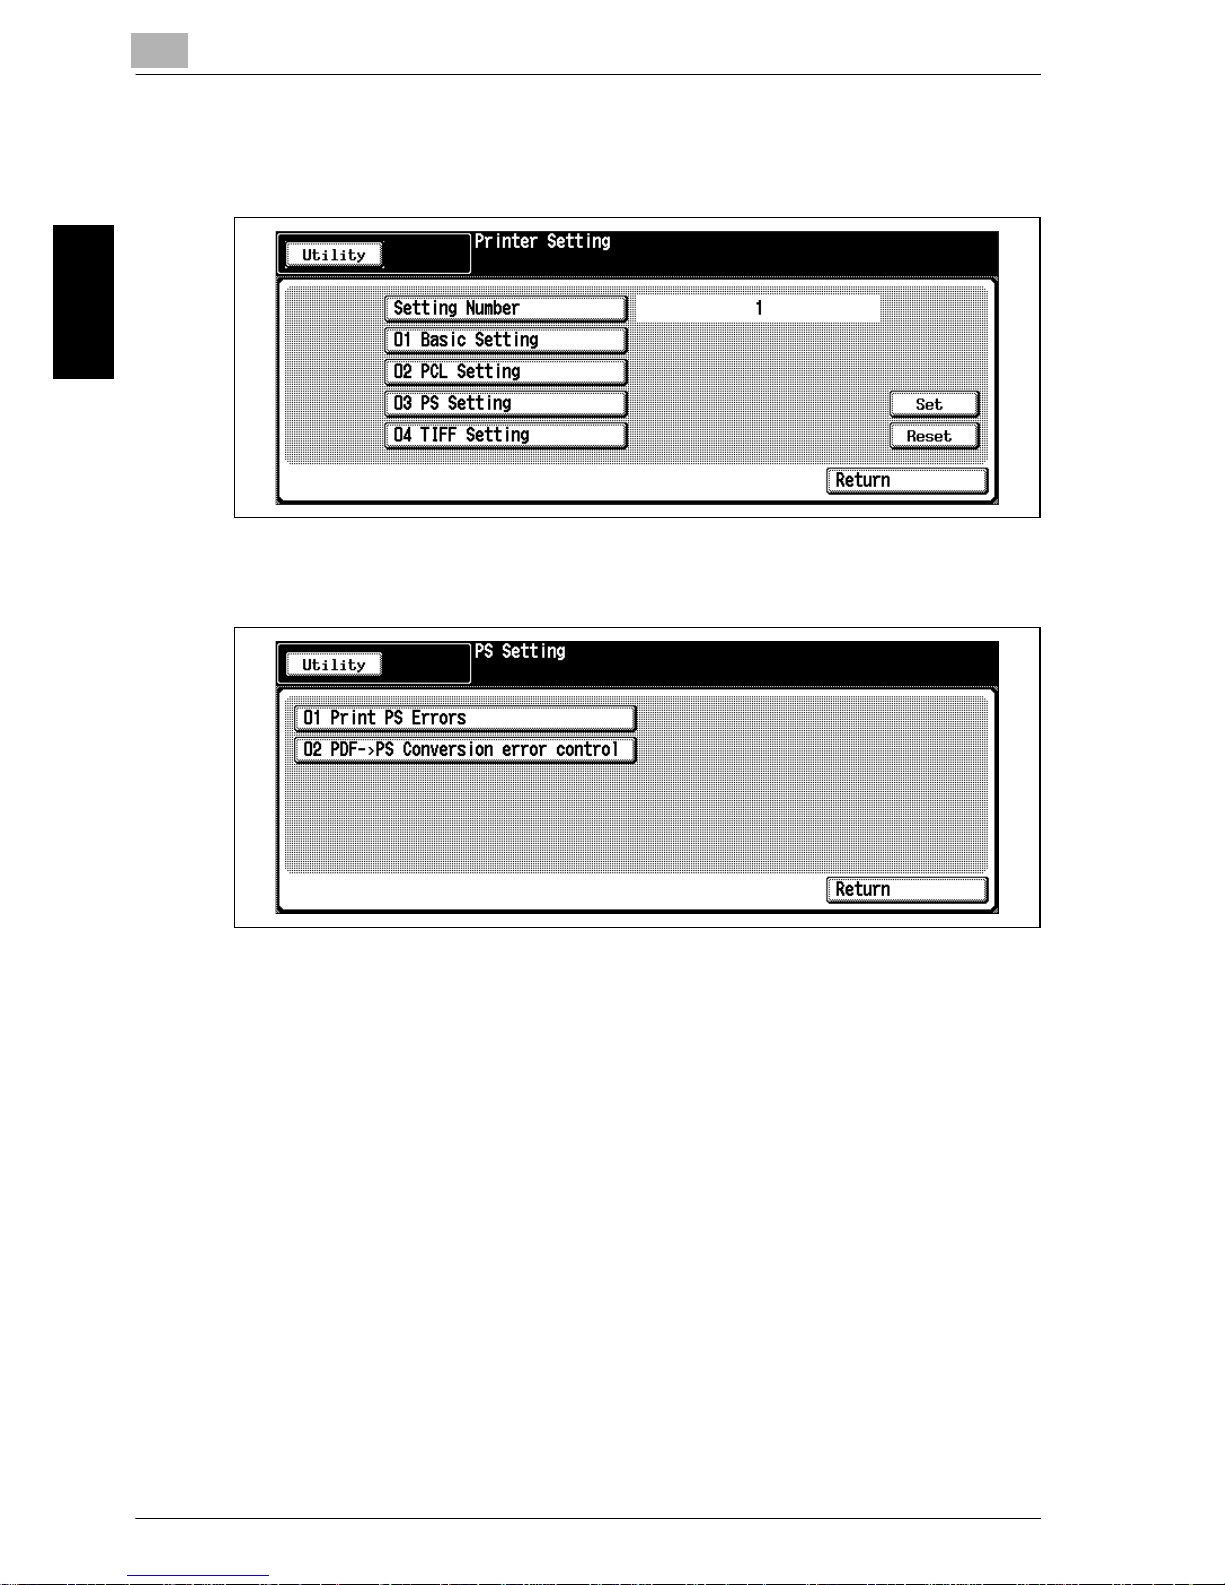
– Touch [03 PS Setting]. The PS Setting Screen will be displayed.
– Make the desired setting.
01 Print to PS error: Select On to print the error report when an error
occurs while rasterizing PostScript data.
02 PDF -> PS Conversion error control: Select On to stop printing
error pages resulted from the memory overflow.
– Touch [OK] to complete the setting. The PS Setting Screen will be
restored.
– Touch [Return] to complete the setting and restore the Printer Set-
ting Screen.
Page 42
Controller Setting
2
Océ im9220 2-13
Controller Setting Chapter 2
8 Perform the TIFF Setting.
– Touch [04 TIFF Setting]. The TIFF Setting Screen will be displayed.
– Make the desired setting.
01 Auto Paper Select: Select to use APS function.
02 Image Position: Select the image position to be printed on a
page.
– Touch [OK] to complete the setting. The TIFF Setting Screen will be
restored.
– Touch Return to complete the setting and restore the Printer Set-
ting Screen.
9 Touch [Return] on the Printer Setting Screen. The Controller Setting
Screen will be restored.
10 If further changes are required, touch the desired key.
Touch [Utility] to complete the setting and restore the Utility Screen.
Page 43
2
Controller Setting
2-14 Océ im9220
Controller Setting Chapter 2
2.4 03 Select Printer Setting
Select the default port number, and specify the output format for each port.
PrOcédure
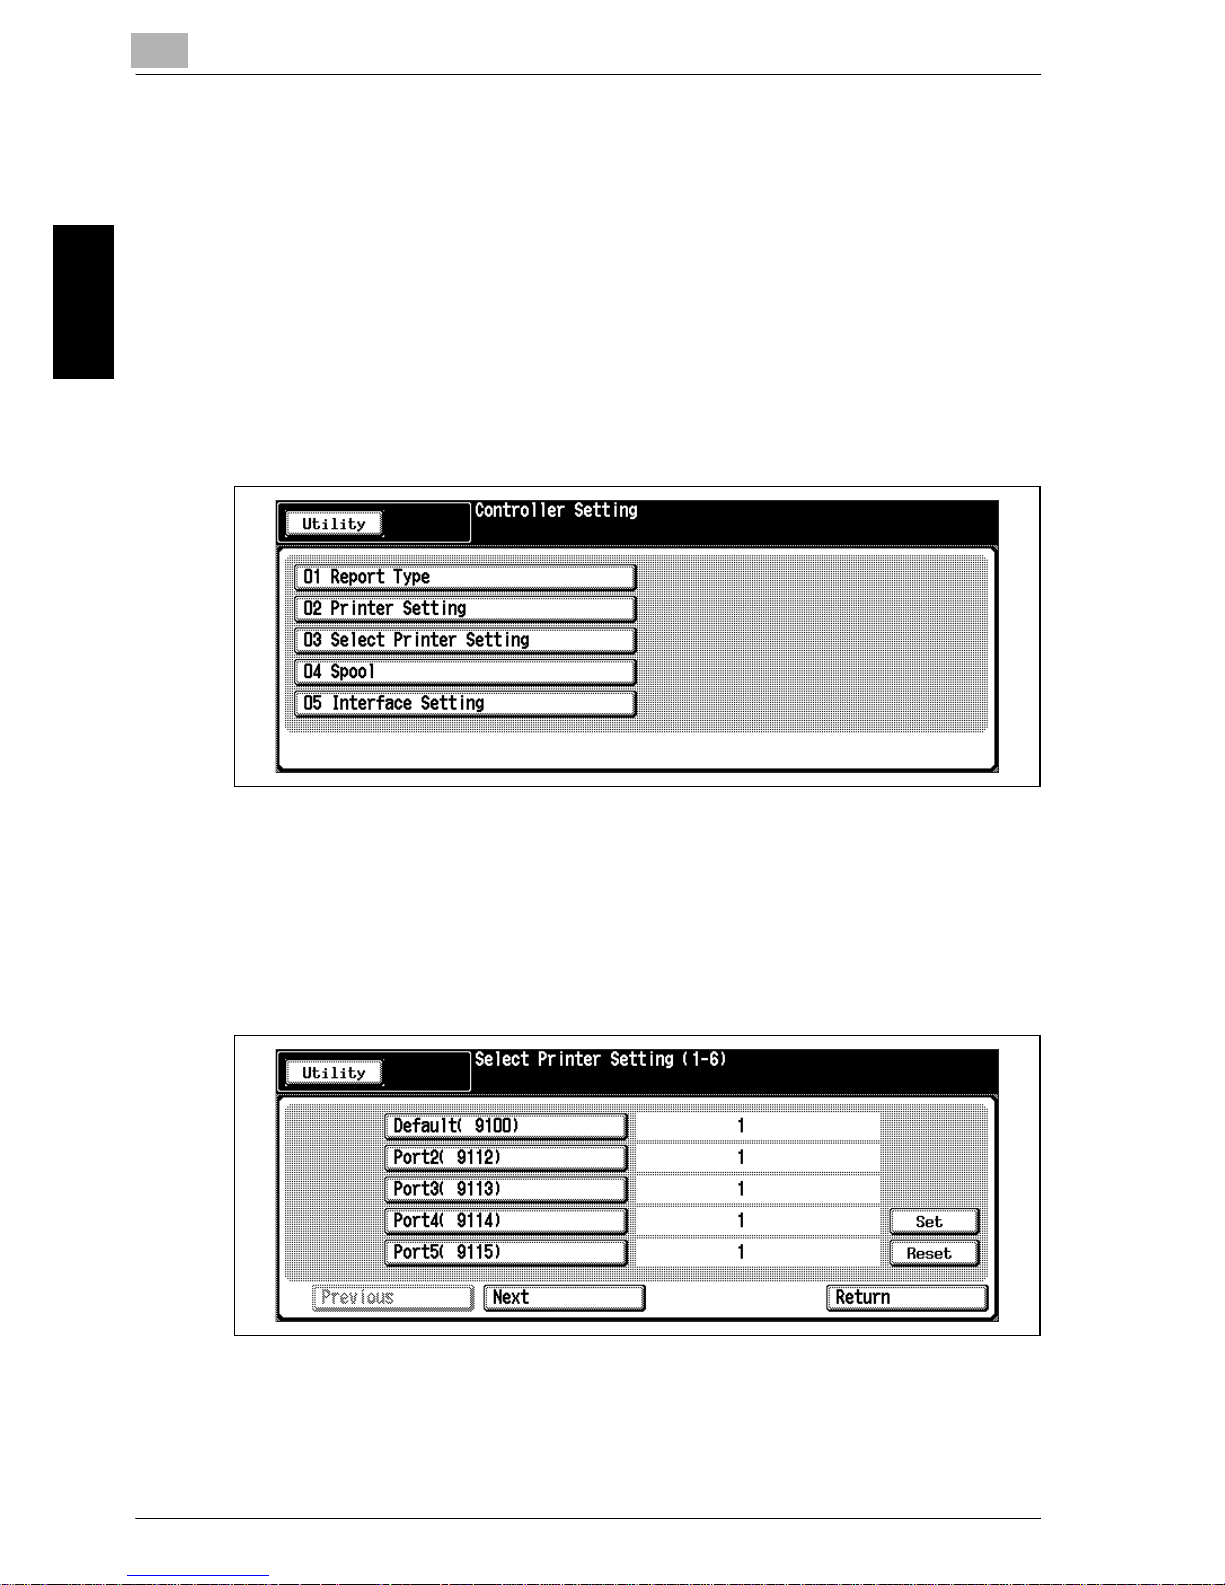
1 Press the [Utility/Counter] to display the Utility Screen.
2 Touch [Controller].
The Controller Setting Screen will be displayed.
3 Touch [03 Select Printer Setting].
The Select Printer Setting Screen will be displayed.
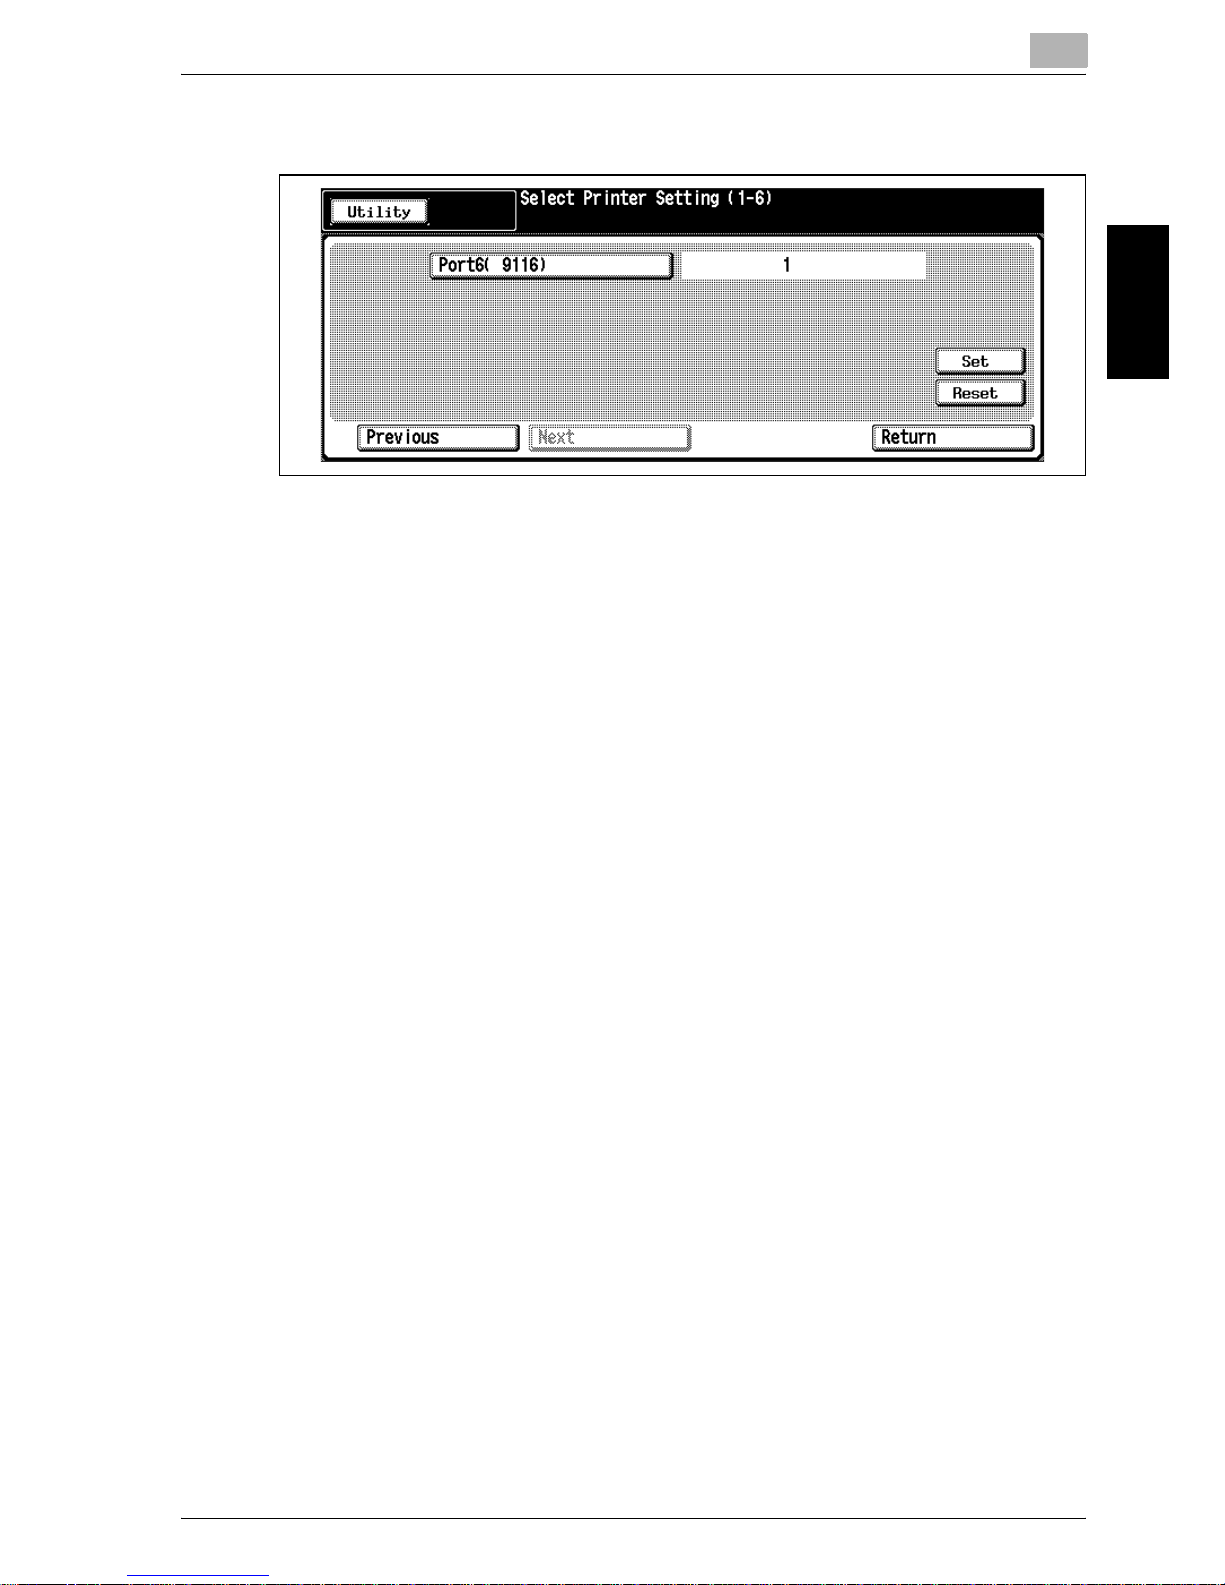
4 Touch the key to be specified.
Touch [Next] or [Previous] to scroll to the desired item. To designate
the port number, enter the number (1-6) already specified in “2 Printer
Setting”, using the control panel keypad.
The “Default” (9100) is the port designated for printing the list.
Page 44
Controller Setting
2
Océ im9220 2-15
Controller Setting Chapter 2
5 Touch [Set] to complete the setting. If wrong number is entered before
touching Set, touch [Reset] to re-enter the correct number.
6 Touch [Return]. The Controller Setting Screen will be restored.
7 If further changes are required, touch the desired key.
Touch [Utility] to complete the setting and restore the Utility Screen.
Page 45
2
Controller Setting
2-16 Océ im9220
Controller Setting Chapter 2
2.5 04 Spool
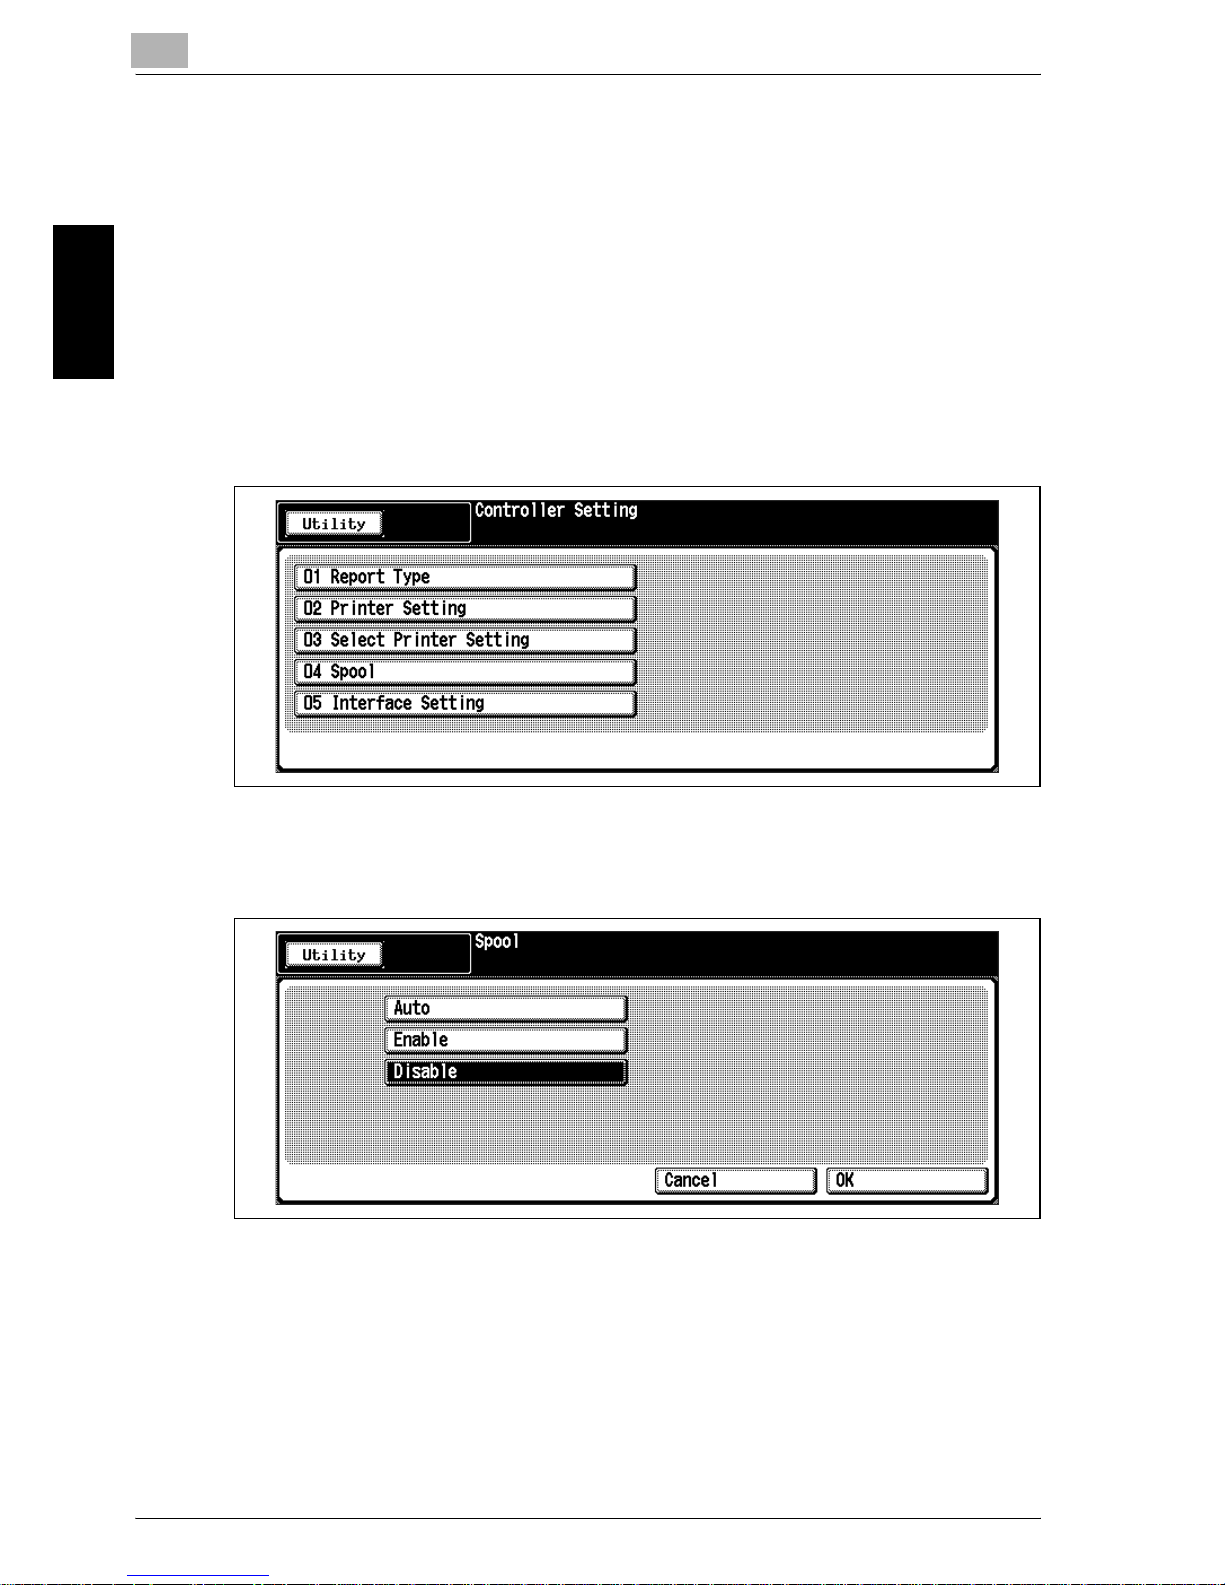
Select to enable, disable, or automatically perform the spool function.
PrOcédure
1 Press the [Utility/Counter] to display the Utility Screen.
2 Touch [Controller].
The Controller Setting Screen will be displayed.
3 Touch [04 Spool].
The Spool Selection Screen will be displayed.
4 Touch the desired key to select it.
5 Touch [OK] to complete the setting. The Controller Setting Screen will
be restored.
6 If further changes are required, touch the desired key.
Touch [Utility] to complete the setting and restore the Utility Screen.
Page 46
Controller Setting
2
Océ im9220 2-17
Controller Setting Chapter 2
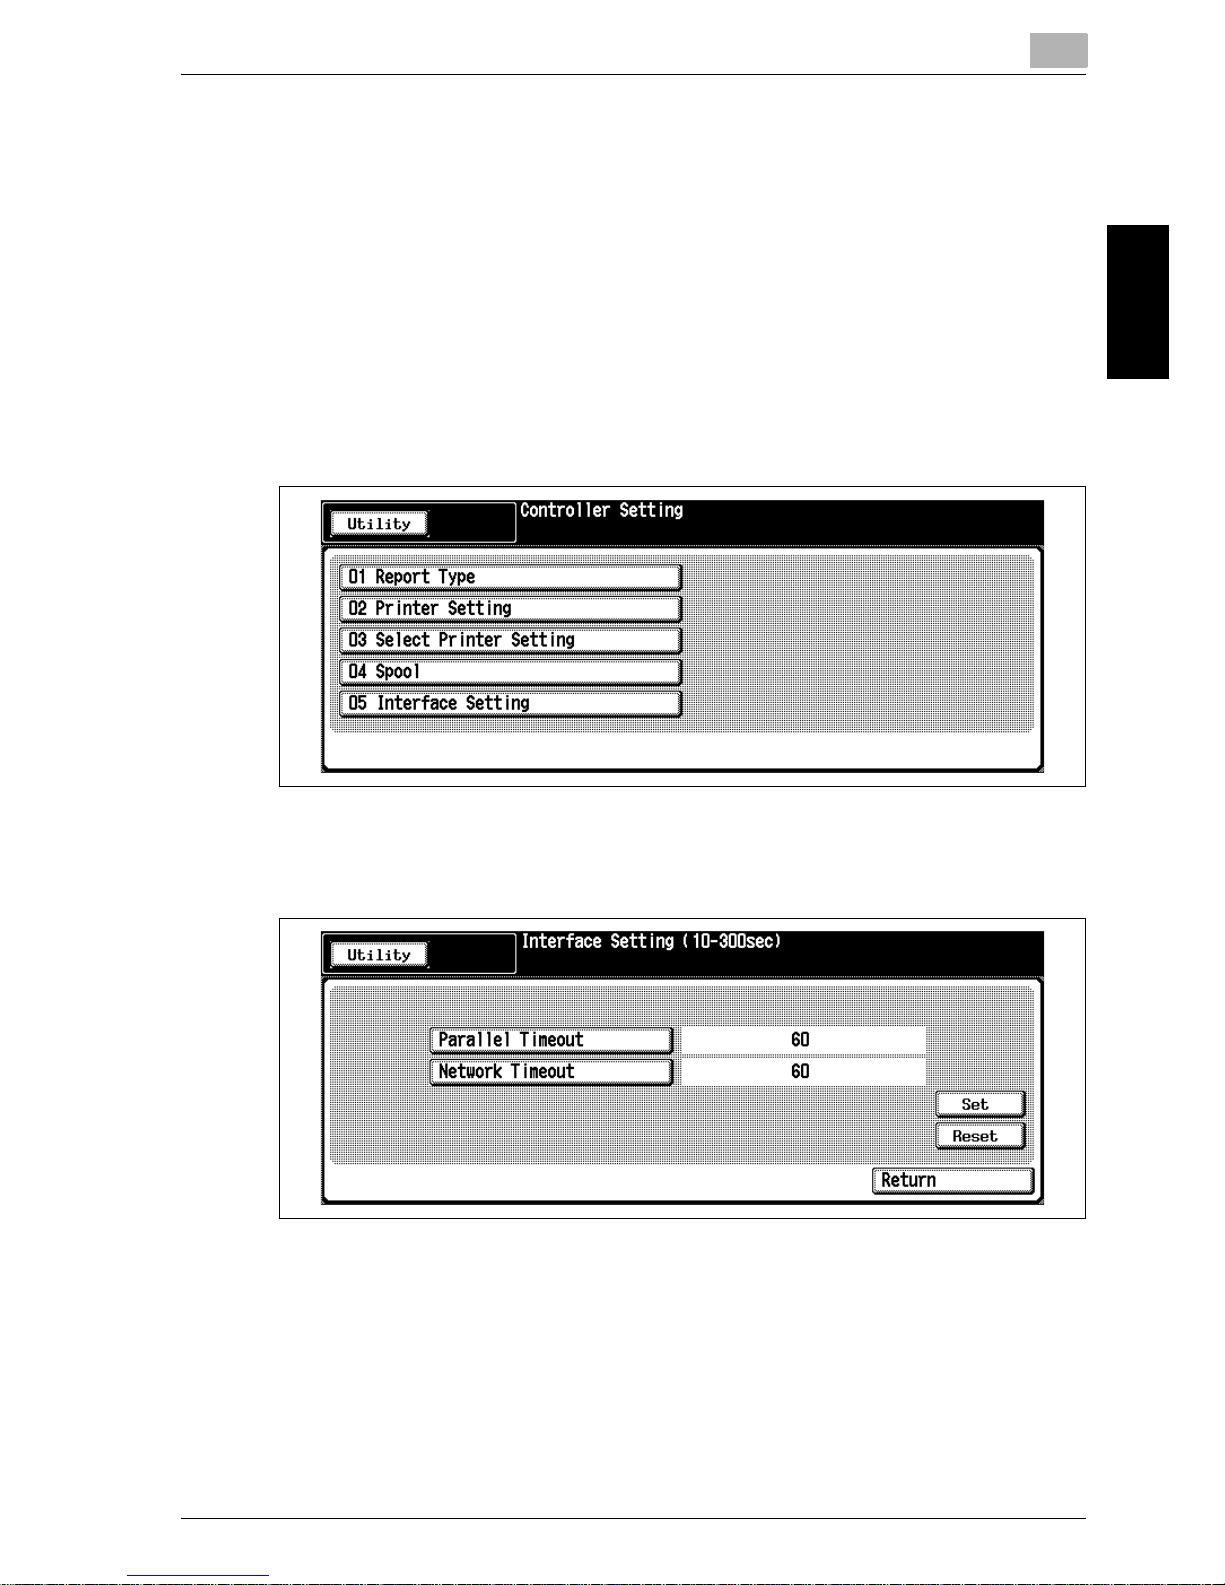
2.6 05 Interface Setting
Set the time for Parallel Timeout and Network Timeout.
PrOcédure
1 Press the [Utility/Counter] to display the Utility Screen.
2 Touch [Controller].
The Controller Setting Screen will be displayed.
3 Touch [05 Interface Setting].
The Interface Setting Screen will be displayed.
4 Touch [Parallel Timeout] or [Network Timeout].
5 Use the control panel keypad to enter the time, then touch [Set].
The available range is from 10 to 300. When the time outside this range
is entered as touching Set, the time initially entered is designated.
If the wrong number is entered before touching [Set], touch [Reset] to
re-enter the correct number.
6 Touch [Return]. The Controller Setting Screen will be restored.
Page 47

2
Controller Setting
2-18 Océ im9220
Controller Setting Chapter 2
7 If further changes are required, touch the desired key.
Touch the [Utility] to complete the setting and restore the Utility Screen.
Page 48

3
Utility <User Setting> Chapter 3
Utility <User Setting>
Page 49
3
Utility <User Setting>
3-2 Océ im9220
Utility <User Setting> Chapter 3
3 Utility <User Setting>
3.1 User Setting Outlines
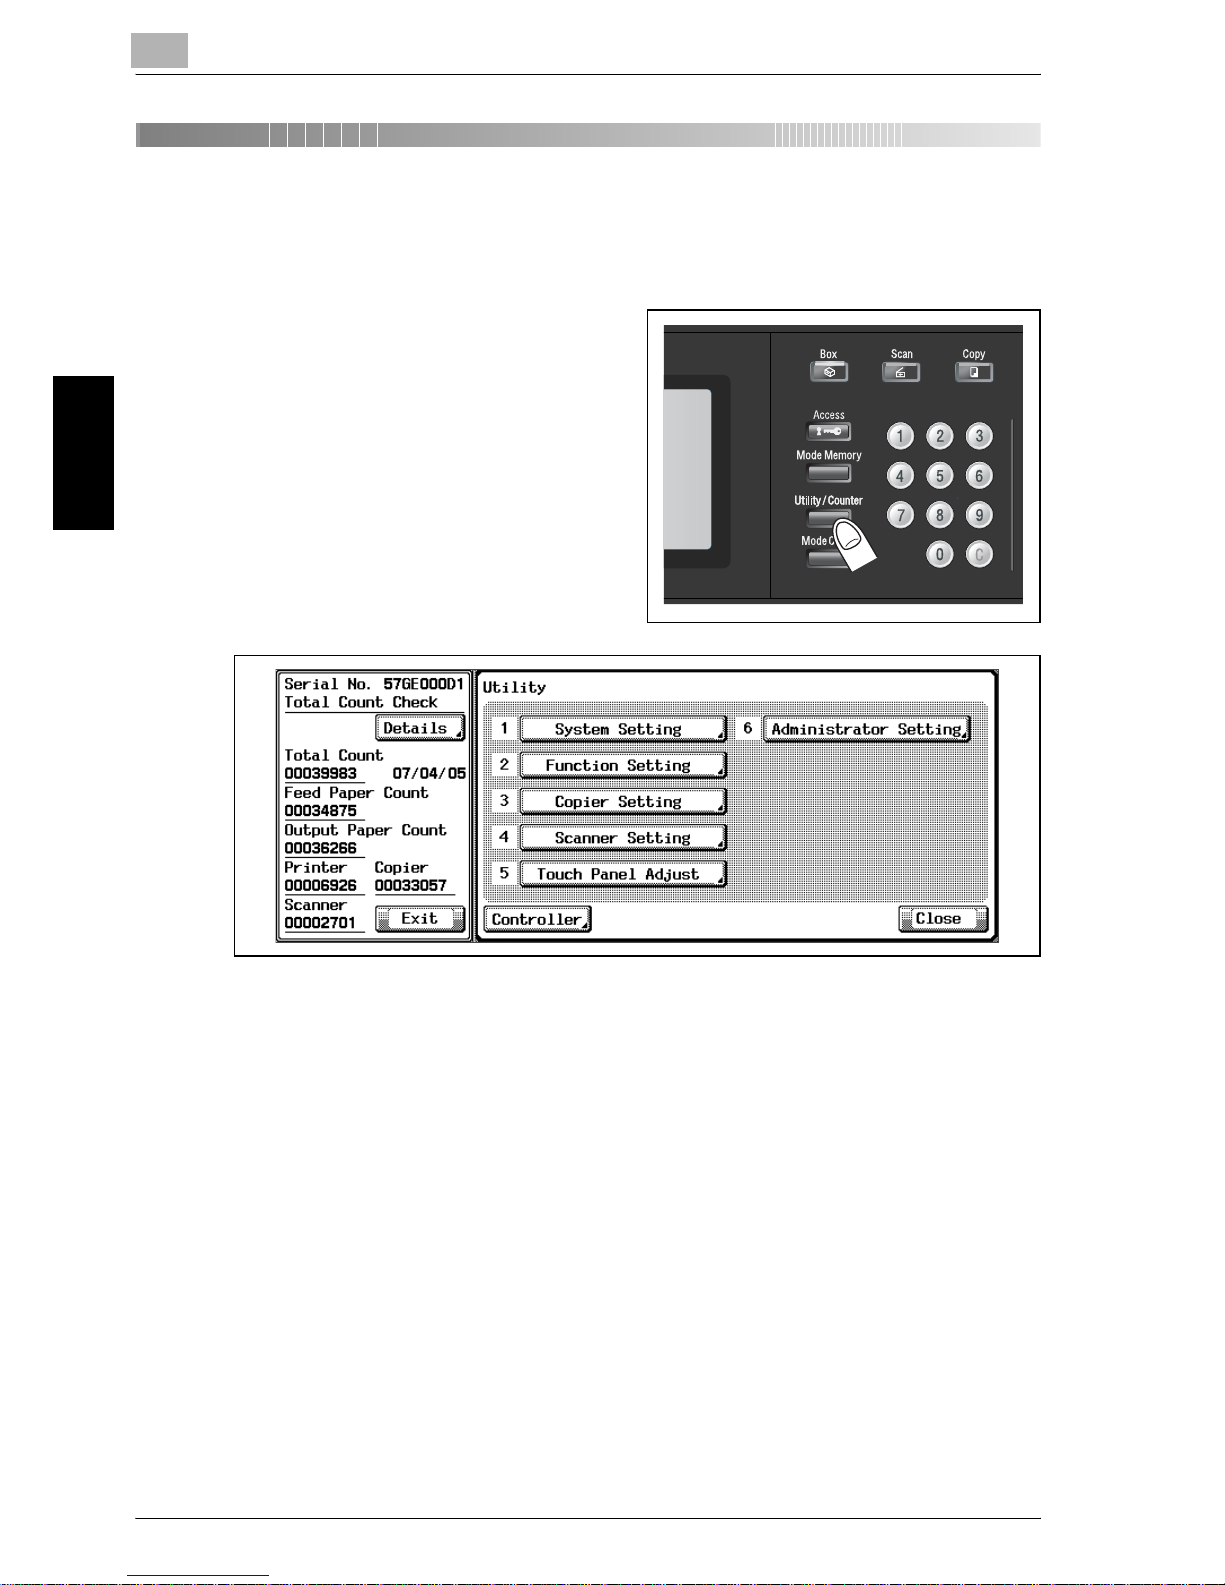
Press the [Utility/Counter] on the control panel to display the Utility Screen.
The Utility Screen includes two types of setting items: one in which a user
can set and the other in which an administrator is required to enter a password.
This section describes the user setting.
Page 50
Utility <User Setting>
3
Océ im9220 3-3
Utility <User Setting> Chapter 3
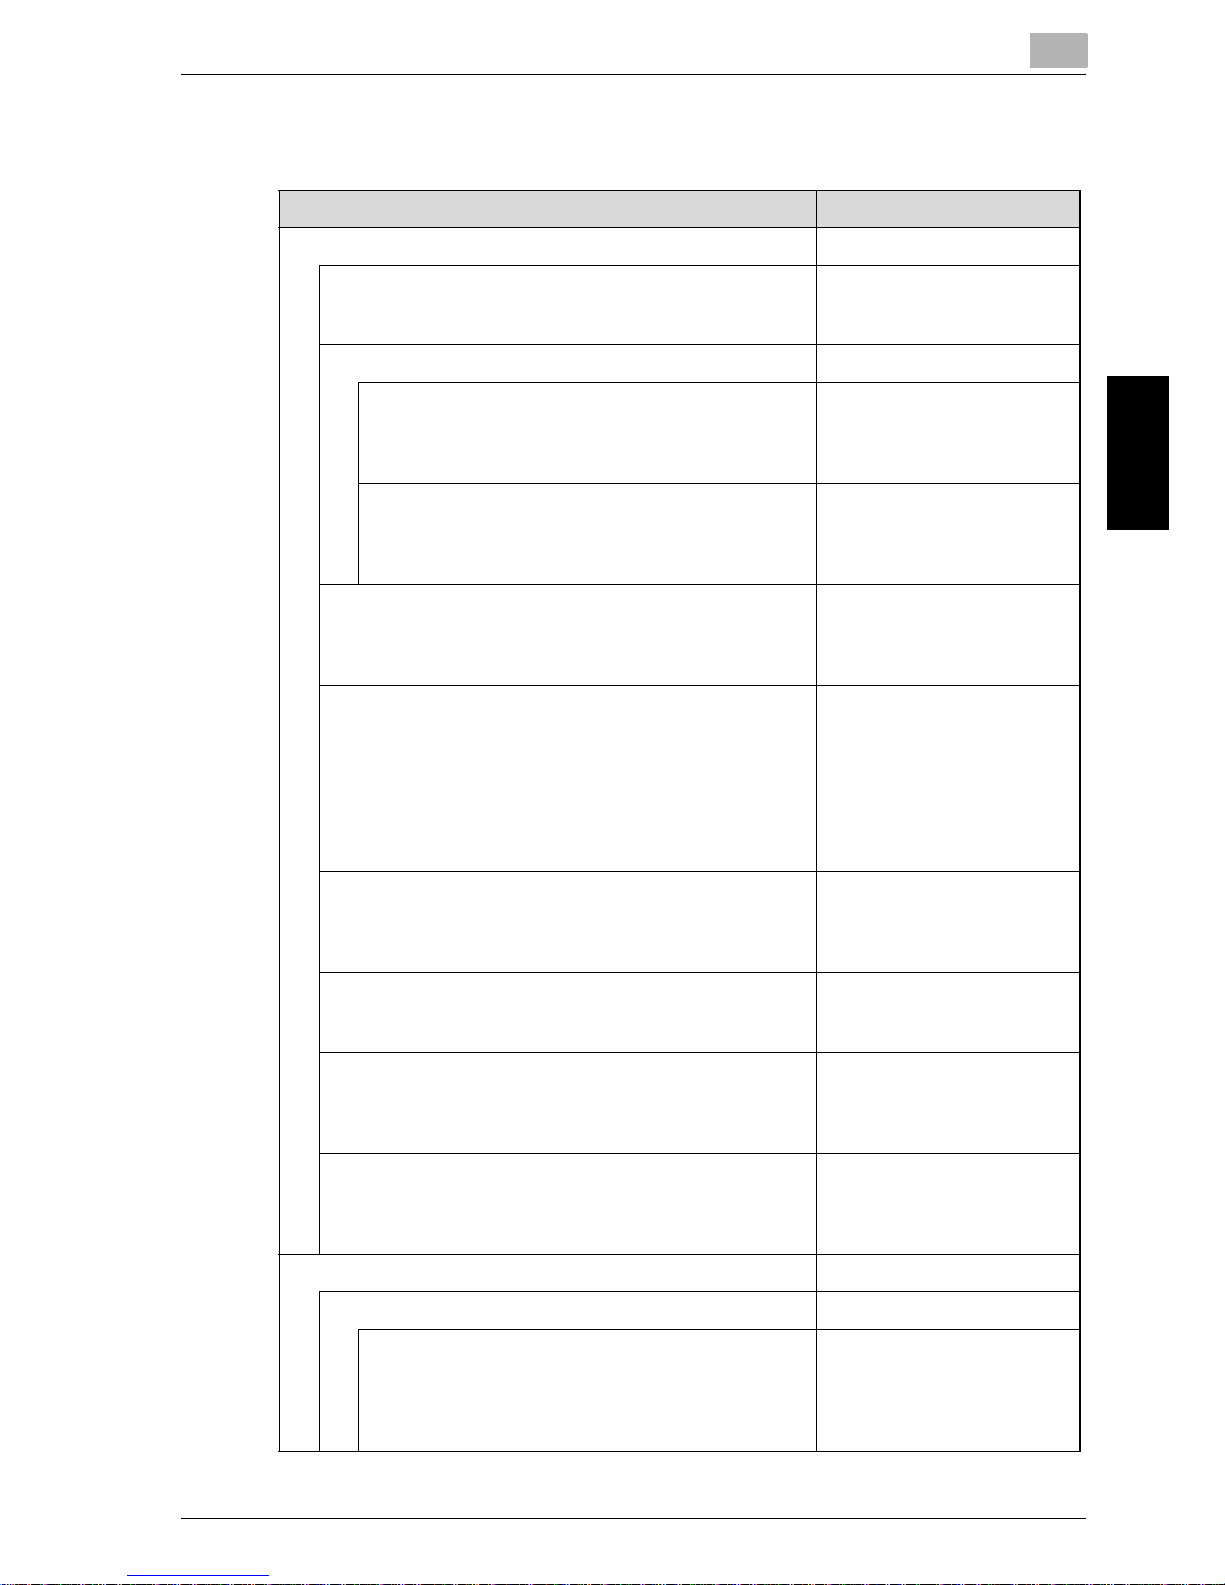
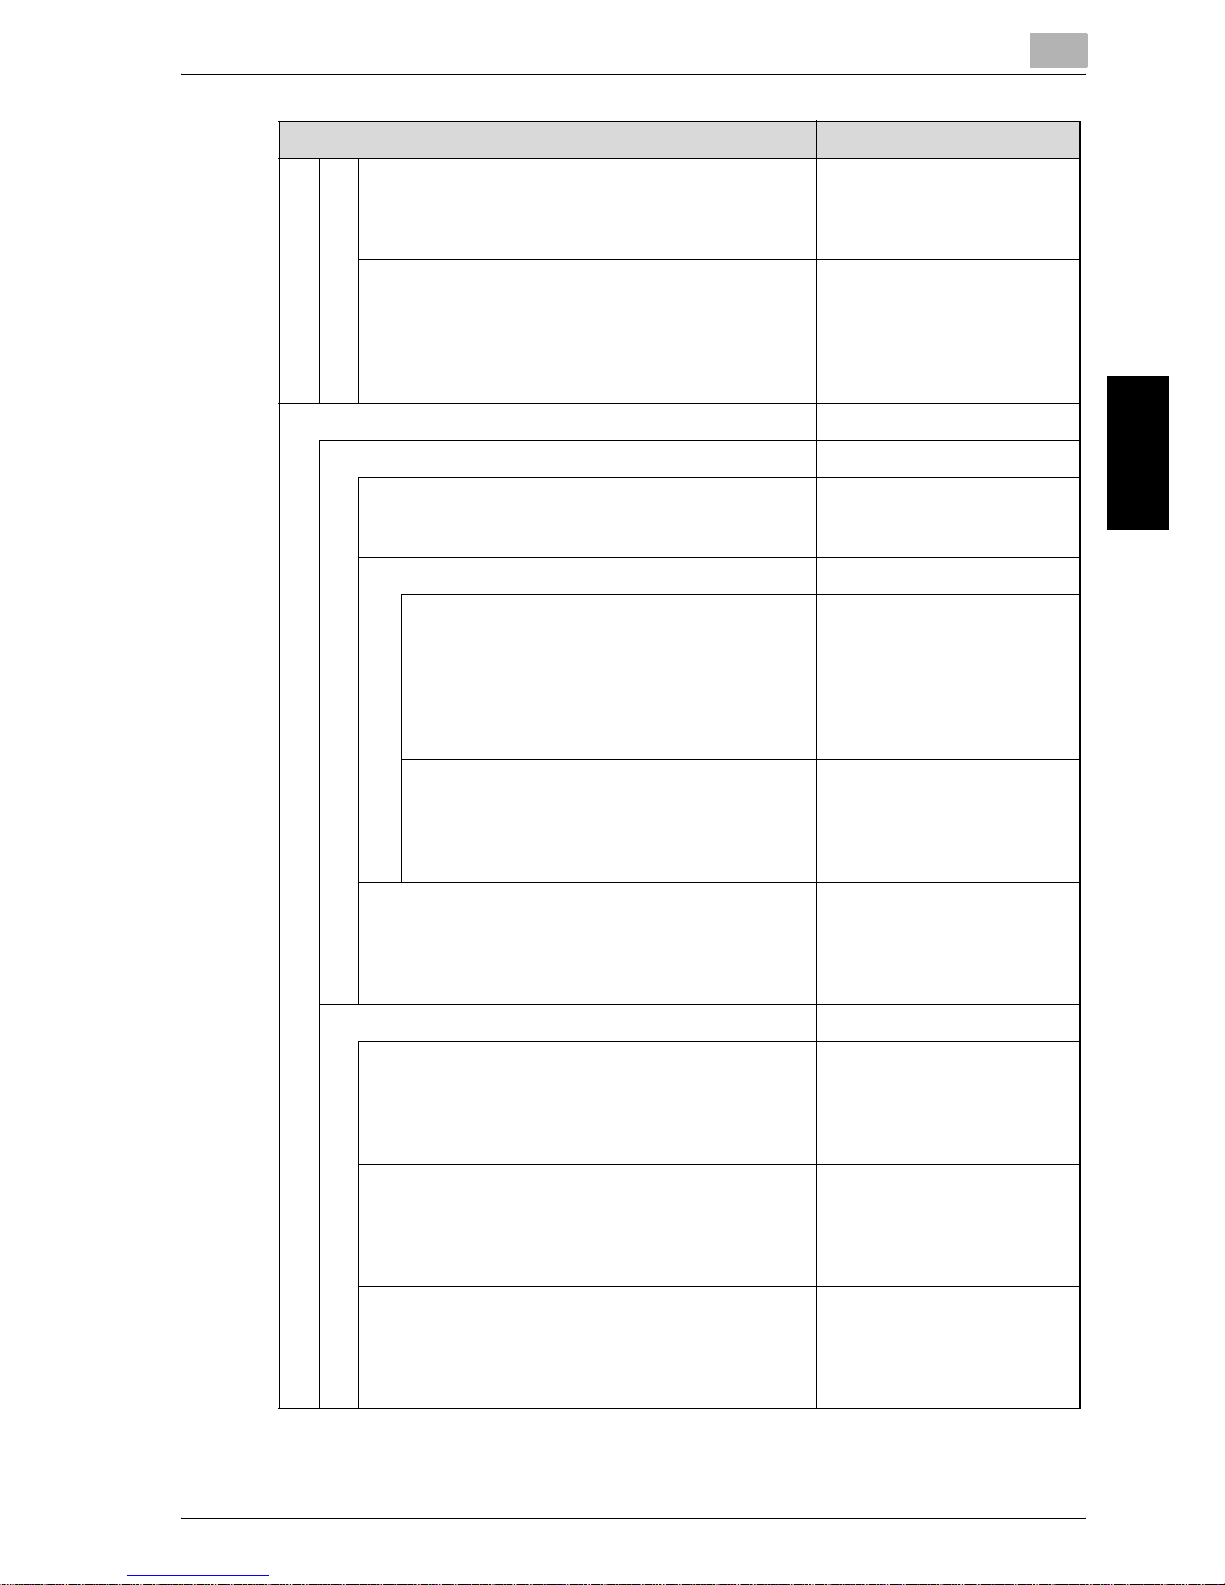
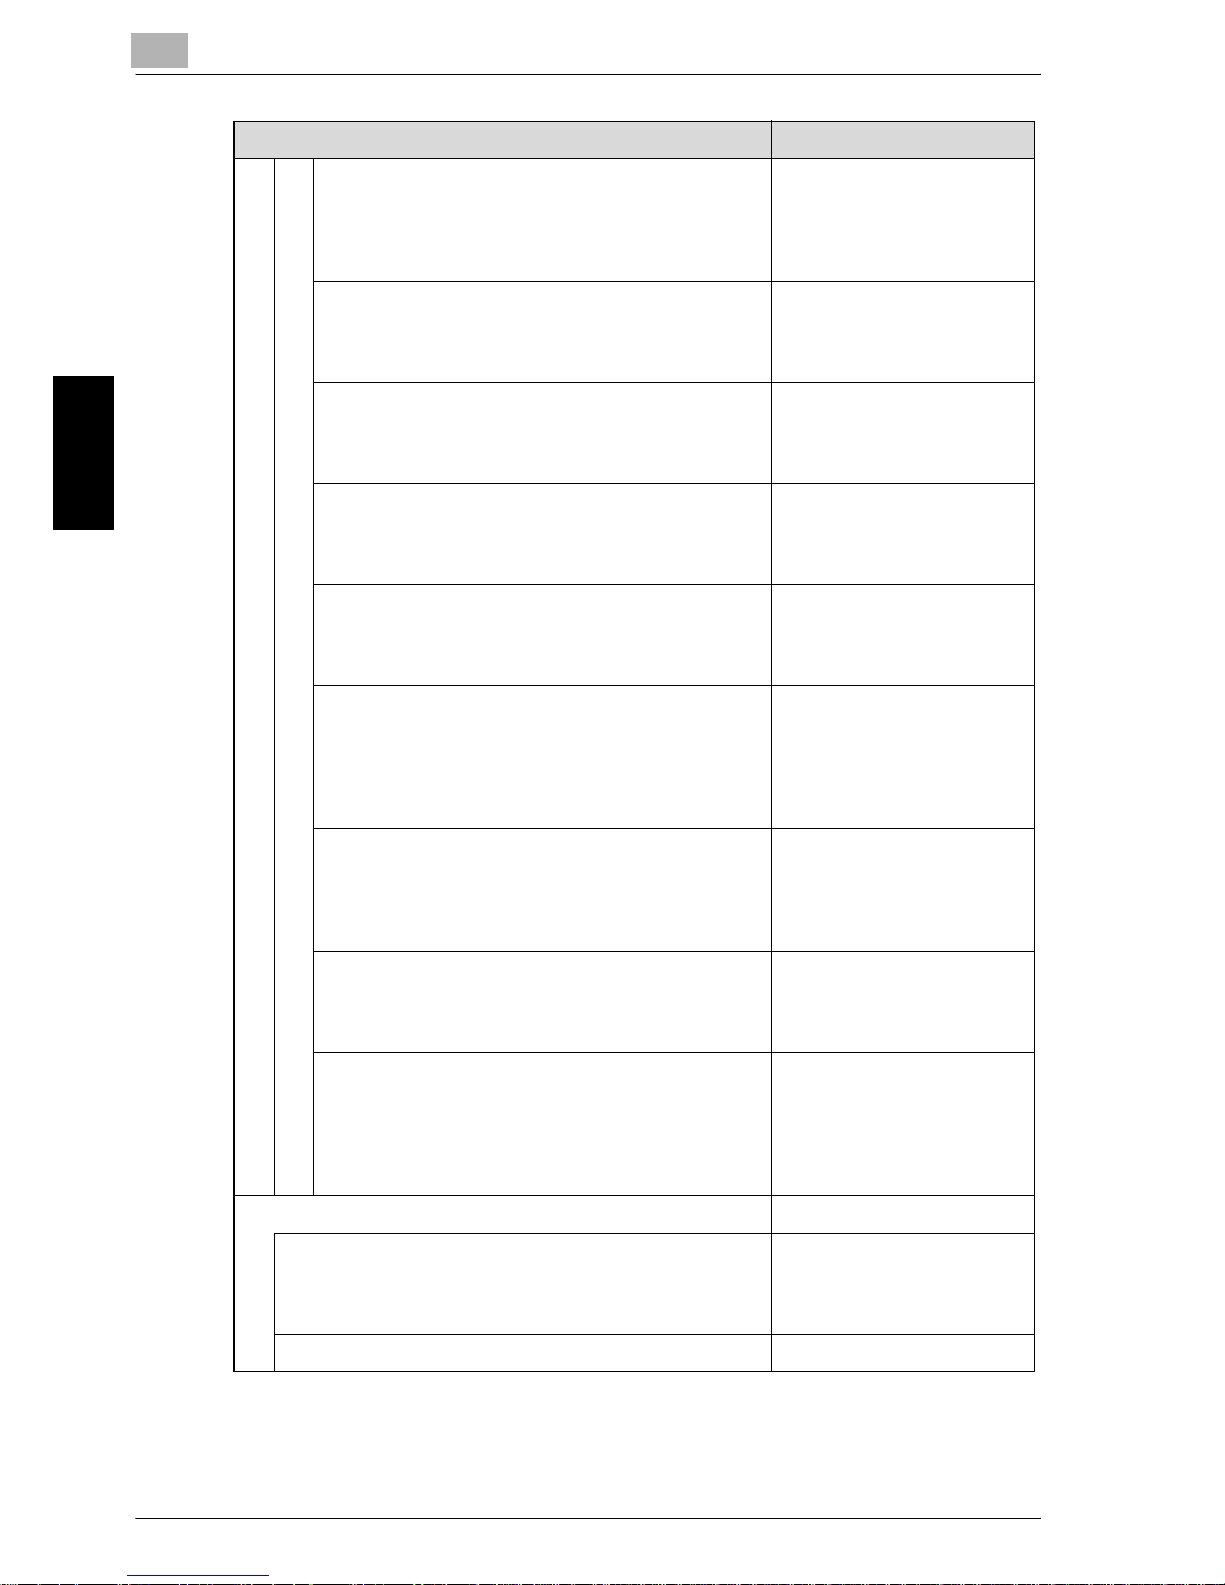
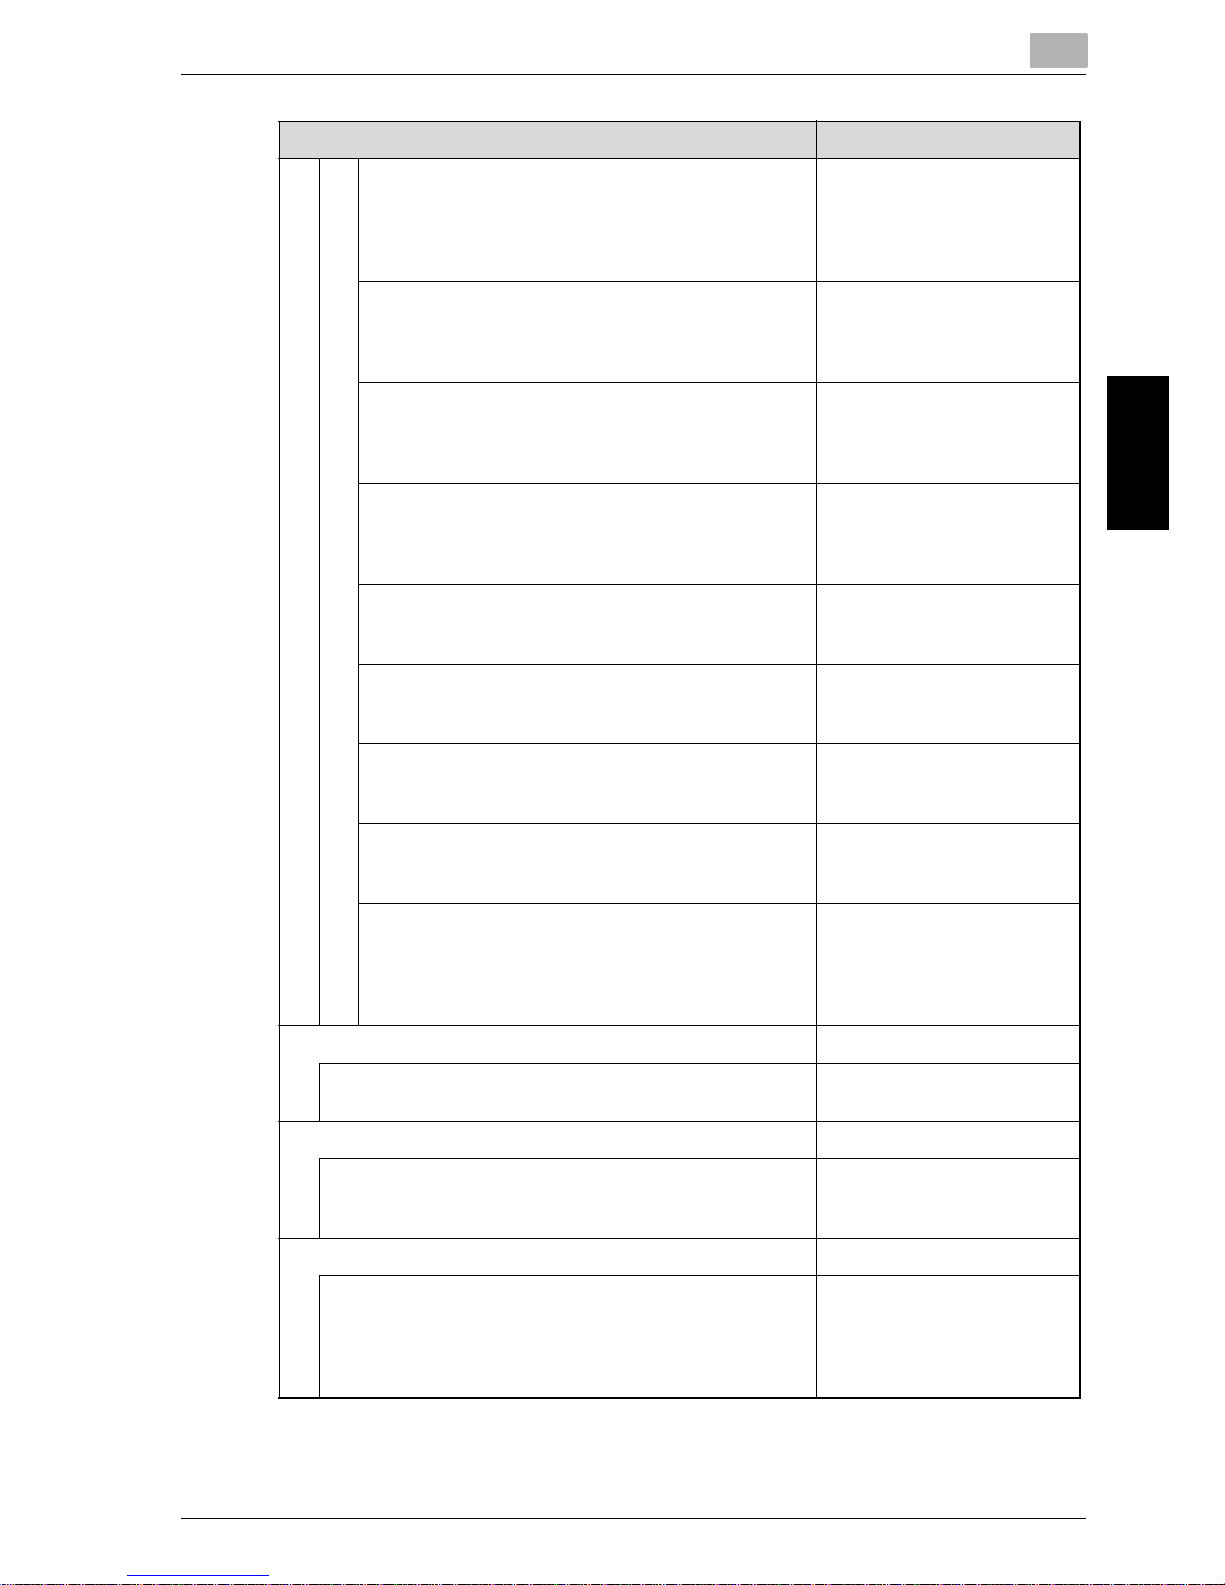
3.2 List of the User Setting
Specific setting and Description Default
1 System Setting
1 Language Setting
Select the language used in the LCD.
English
English
2 Buzzer Setting
1 Buzzer On/Off, Volume Setting
Set the buzzer sound (the touch key sound) as touching the screen.
On/Off, High/Low
Off
2 Buzzer for Job Stop Setting
Select the duration of the buzzer sound when the machine stops due to no paper and mishandled paper.
Off/3 seconds/5 seconds/10 seconds
Off
3 1SHOT Indication Time
Select the SHOT indication time to be displayed in the
message indication area of the touch panel.
3 seconds/5 seconds
3 seconds
4 Panel Reset Timer Setting
Set the reset interval starting from the completion of a
copying job until the machine returns to the initial condition, without selecting any key on the touch panel or the
control panel.
Off/60 seconds/120 seconds/180 seconds/240 seconds/
300 seconds/360 seconds/420 seconds/480 seconds/
540 seconds
60 seconds
5 Sub Area Display On/Off
Select the display on the sub area of the Basic Setting
Screen.
Setting Value/Job List
Setting Value
6 Key Response Time
Select the key response time.
Normal/0.5 seconds/1 seconds/2seconds/3 seconds
Normal
7 Change User Password
Change a user password which the user has registered for
user authentication.
Enter new password
- - -
8 Warm Up Screen On/Off
Select On/Off to display the Warm Up Screen when the
power switch is turned ON.
On/Off
Off
2 Function Setting
1 Feed Tray Setting
1 Feed Tray Auto Selection
Select ATS for each tray and the priority of the detection when ATS functions.
ATS/APS Switch (Trays 1 to 4,Bypass Tray): Off, Tray
Priority: Tray4/Tray3/Tray1/Tray2/Bypass Tray
ATS/APS Switch (Trays 1 to
4,Bypass Tray): Off
Page 51
3
Utility <User Setting>
3-4 Océ im9220
Utility <User Setting> Chapter 3
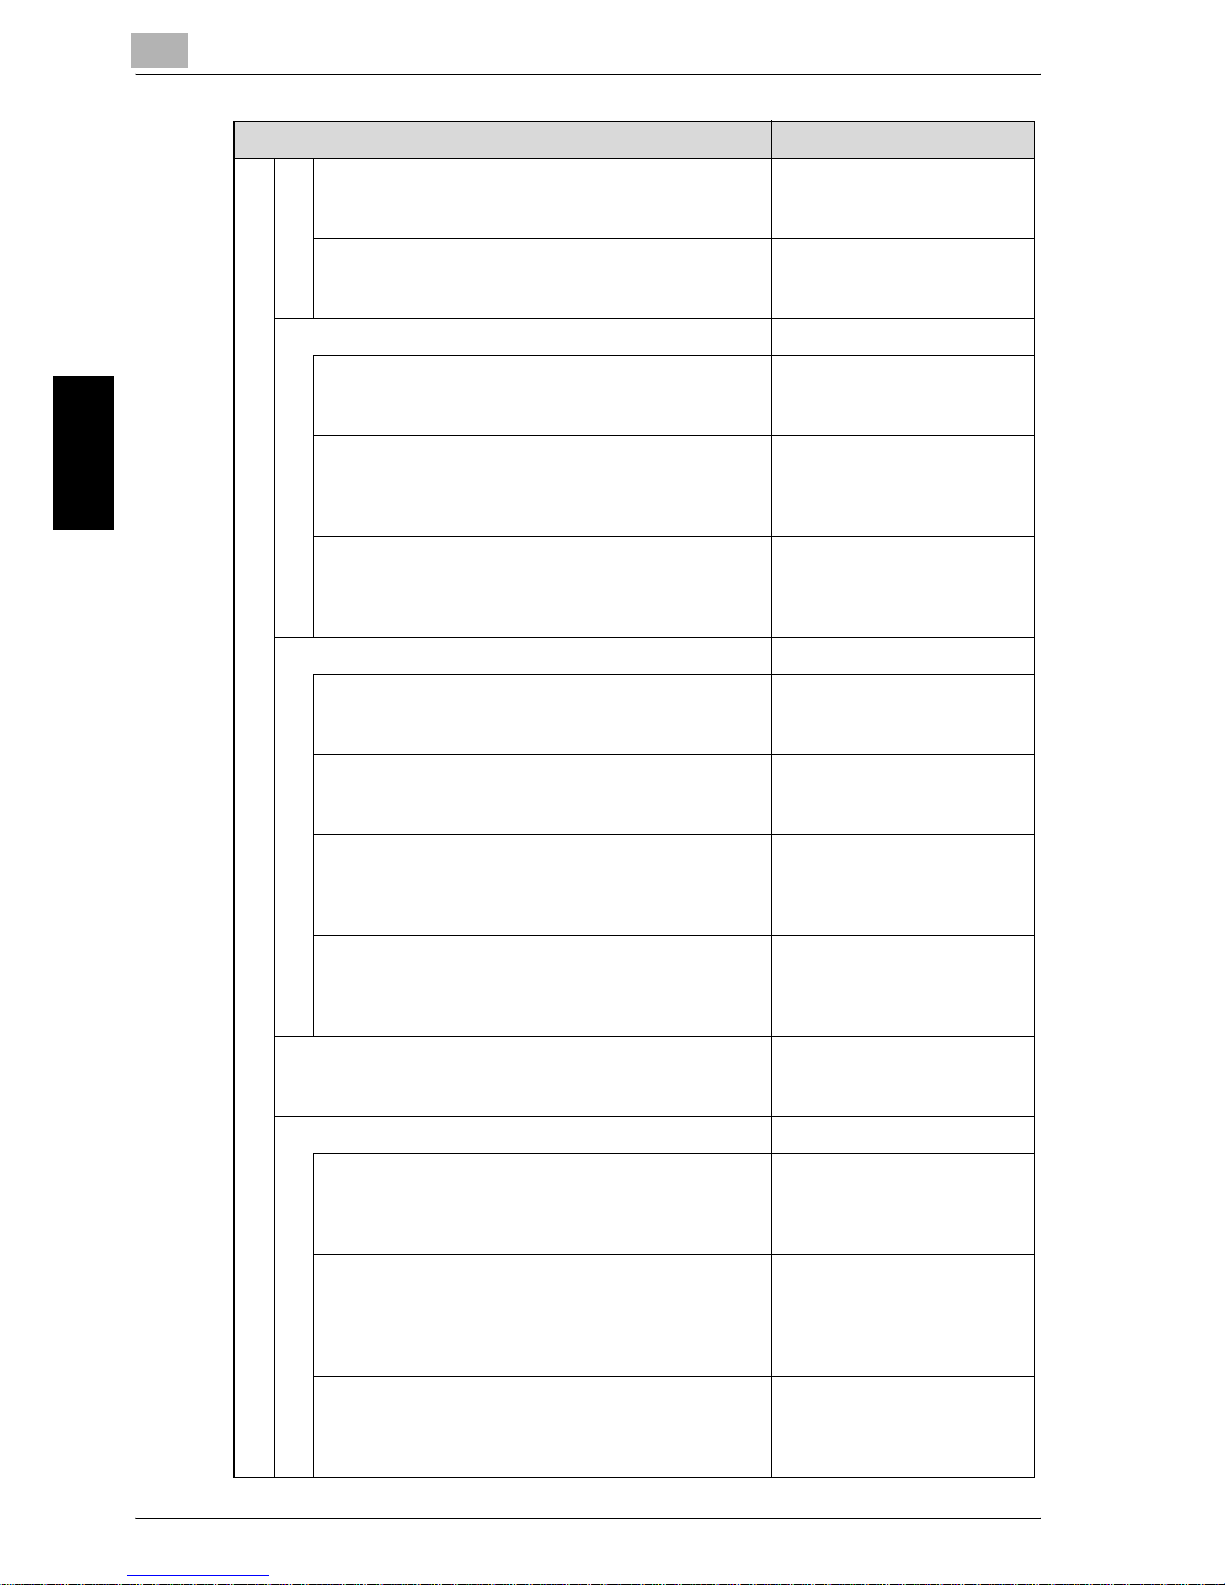
2 ATS Permission selection
Set ATS On or Off.
On/Off
Off
3 Auto Paper Type Selection
Set the paper type to be selected when ATS functions.
Paper Type ( - )/Colored Paper ( - )/Hole-Punch (No HolePunch)
2 Each Function Setting
Fine Adjust Margin
Select On/Off to enter a decimal point for image shift.
Decimal On/Decimal Off
Decimal Off
Printer Prohibit Timer
Select the interval time that printing via PC is prohibited after touching the touch keys.
Off/15 seconds/30 seconds/60 seconds/90 seconds
30 seconds
Offset Auto Select
Set the machine to select Offset automatically when
Sort or Group is selected.
On/Off
Off
3 Density Setting
1 Density Shift for Original Image Type
Select the default density setting for each Original Image Type.
6 levels (Text & Photo:+3,
Low Contrast:+4, Photo:+3,
Text:+3)
2 User Density Setting
Preset the density level which is frequently used.
Two levels
Preset1: lightest
Preset2: darkest
3 Photo Mode Density Setting
Select the density level set in EE (Auto Density Setting) when the Photo Mode is selected.
Lighter/Standard/Darker
Standard
4 Image Density Selection
Set the image density lighter or set the maximum
dark level darker, without degrading the image quality
+1 - -5 (7 levels)
Standard
4 Preset Zoom
Preset the magnification ratio which is frequently used.
Three types
Set Zoom 1: 4.000
Set Zoom 2: 2.000
Set Zoom 3: 0.500
5 Tandem Setting
1 Tandem Sub Machine One Time Data Read
Set the sub machine to receive all the data transmitted from the master machine before starting to print.
On/Off
Off
2 Tandem Sub Machine Wait/Proof
Set the master machine to transmit the data to the
sub machine at the time when the master machine
starts scanning the data for proof copying.
Permit/Prohibit
Permit
3 Tandem Sub Machine Shift Data Setting
Set the sub machine to use the same shift value used
on the master machine.
Master Machine Shift data/Sub Machine Shift data
Master Machine Shift data
Specific setting and Description Default
Page 52
Utility <User Setting>
3
Océ im9220 3-5
Utility <User Setting> Chapter 3
4 Tandem Selection after JOB completion
Select to continue or release the tandem mode after
the current tandem job is completed.
Continue/Release
Release
5 Distribution Recovery
Set the tandem-connected machines to perform the
job distribution again for print quantity remaining on
one machine when the other has already finished with
its assignment.
On/Off
On
3 Copier Setting
1 Reset Setting
1 Initial Setting
Set the initial setting when the machine is reset.
Current Setting/Factory Default
Factory Default
2 Reset Function Setting
AUTO RESET Key Setting
Set the on-screen indication which is displayed
when pressing [Reset].
The factory default setting is [Full Auto], and the
initial setting is the settings defined in “1 Initial
Setting”.
Full auto/Initial Setting
Full-auto
Finisher Mode by Full-auto
Select the Finisher mode when Full Auto is selected as pressing [Reset].
Group/Sort/Staple/Fold & Staple/Half Fold/Face
UP/Face Down
Sort
3 Initial by Key Counter Insert
Select to reset the copying conditions to the initial
setting when inserting the key counter and the copy
card.
On/Off
On
2 Each Function Setting
Booklet Copy Auto Select
Set the machine to automatically select the Booklet
mode when Fold & Staple or Half Fold mode is selected.
Auto Select/Not Auto Select
Auto Select
Original Glass AMS
Set the machine to detect the size of the original and
select the appropriate magnification ratio to correspond to the selected paper size.
On/Off
On
ADF AMS
Set the machine to automatically select an appropriate ratio for copying when detecting the original size
placed on the ADF.
On/Off
On
Specific setting and Description Default
Page 53
3
Utility <User Setting>
3-6 Océ im9220
Utility <User Setting> Chapter 3
Original Glass APS
Set the machine to automatically select the same size
of copy paper as the original placed on the original
glass.
On/Off
On
Auto Detect Orig. Size in ADF
Set the machine to automatically select the same size
of copy paper as the original placed on the ADF.
On/Off
On
Choose Default Tray when APS Off
Select the tray to be automatically selected when
APS is released.
APS Tray/Tray1/Tray2/Tray3/Tray4/Bypass Tray
APS Tray
Org./Out Bind Direction Set
Set the machine to conform the binding direction of
the originals and printed sets each other.
On/Off
On
Staple Auto Reset
Set the stapling setting On or Off when pressing [Reset].
On/Off
Off
Original Set/Bind Direction
Select to reset or save the original direction setting
made on the Special Original Screen and the bind position setting made on the Output Mode Screen after
completion of each copying job.
Do Not Release/Release Per JOB
Release Per JOB
Status Hold When Auto Reset
When Auto Reset functions, select to reset the Platen/RADF mode to the initial setting, or save the previous setting.
Hold/Not Hold
Not Hold
Annotation at JOB completion
Set the machine to automatically select Annotation
after a copying job has been made.
Select/Not Select
Not Select
Original Glass Auto Copy Reserve
Set the machine to automatically display the Job Reserve Screen when the current job has completed
scanning originals from the original glass and started
printing.
On/Off
Off
4 Scanner Setting
1 Default Address Setting
Select the default destination to be displayed when selecting the Scanner Screen.
E-Mail/HDD/FTP/SMB
E-Mail
2 Each Function Setting
Specific setting and Description Default
Page 54
Utility <User Setting>
3
Océ im9220 3-7
Utility <User Setting> Chapter 3
For detailed setting description of Tray Setting, See page 1-7.
For detailed setting description of PI Setting, See page 4-52.
File Form Setting (E-Mail)
Select the default file form when transmitting in EMail.
Multi Page PDF/Single Page PDF/Multi Page TIFF/
Single Page TIFF
Multi Page PDF
File Form Setting (HDD)
Select the default file form when saving in HDD.
Multi Page PDF/Single Page PDF/Multi Page TIFF/
Single Page TIFF
Multi Page PDF
File Form Setting (FTP)
Select the default file form when transmitting to FTP.
Multi Page PDF/Single Page PDF/Multi Page TIFF/
Single Page TIFF
Multi Page PDF
File Form Setting (SMB)
Select the default file form when transmitting in SMB.
Multi Page PDF/Single Page PDF/Multi Page TIFF/
Single Page TIFF
Multi Page PDF
Default Resolution Setting
Select the default scanning quality
600dpi/400dpi/300dpi/200dpi
400dpi
Default Original Image Type Setting
Select the default original type.
Text/ Photo/ Text/Photo/ Dot Matrix
Text/Photo
Default Density Setting
Select the default density level.
Lighter - Darker (9 levels), Auto
Auto
Default Special Original Setting
Select the default special original type.
Normal/ Mixed Original/ Z-Folded/ Single Feed
Normal
Default Scan Size Setting
Select the default scanning size.
A3/ B4/ A4/ A4R/ B5/ B5R/ A5/ A5R/ B6R/ 8K/ 16K/
11x17/ 8.5x14/ 8.5x11/ 8.5x11R/ 5.5x8.5/ 5.5x8.5R/
8.12x13.25/ 8.5x13/ 8.25x13/ 8x13/ Full Area/ Auto
Auto
5 Touch Panel Adjust
Check the touch panel and realign the position of the
touch sensor that may have shifted.
- - -
6 Tray Setting
Change the Size Setting, Type, Colored Paper, HolePunch, and Both Sides Adjust settings made each for tray
1 to 4.
7 PI Setting
Change the paper size to be detected in the upper/lower
tray of the Post Inserter 9262 option.
Upper Tray Search Size: A5/5.5x8.5, A4R/8.5x11R
Lower Tray Search Size: A5/5.5x8.5, A4R/8.5x11R,
8.5x14/8x13/8.12x13.2/8.25x13/8.5x13
Upper Tray Search Size:
A5, A4R
Lower Tray Search Size:
A5, A4R, 8.5x14
Specific setting and Description Default
Page 55
3
Utility <User Setting>
3-8 Océ im9220
Utility <User Setting> Chapter 3
3.3 1 System Setting
3.3.1 1 Language Setting
Select the language used in the touch panel.
The initial setting is English.
PrOcédure
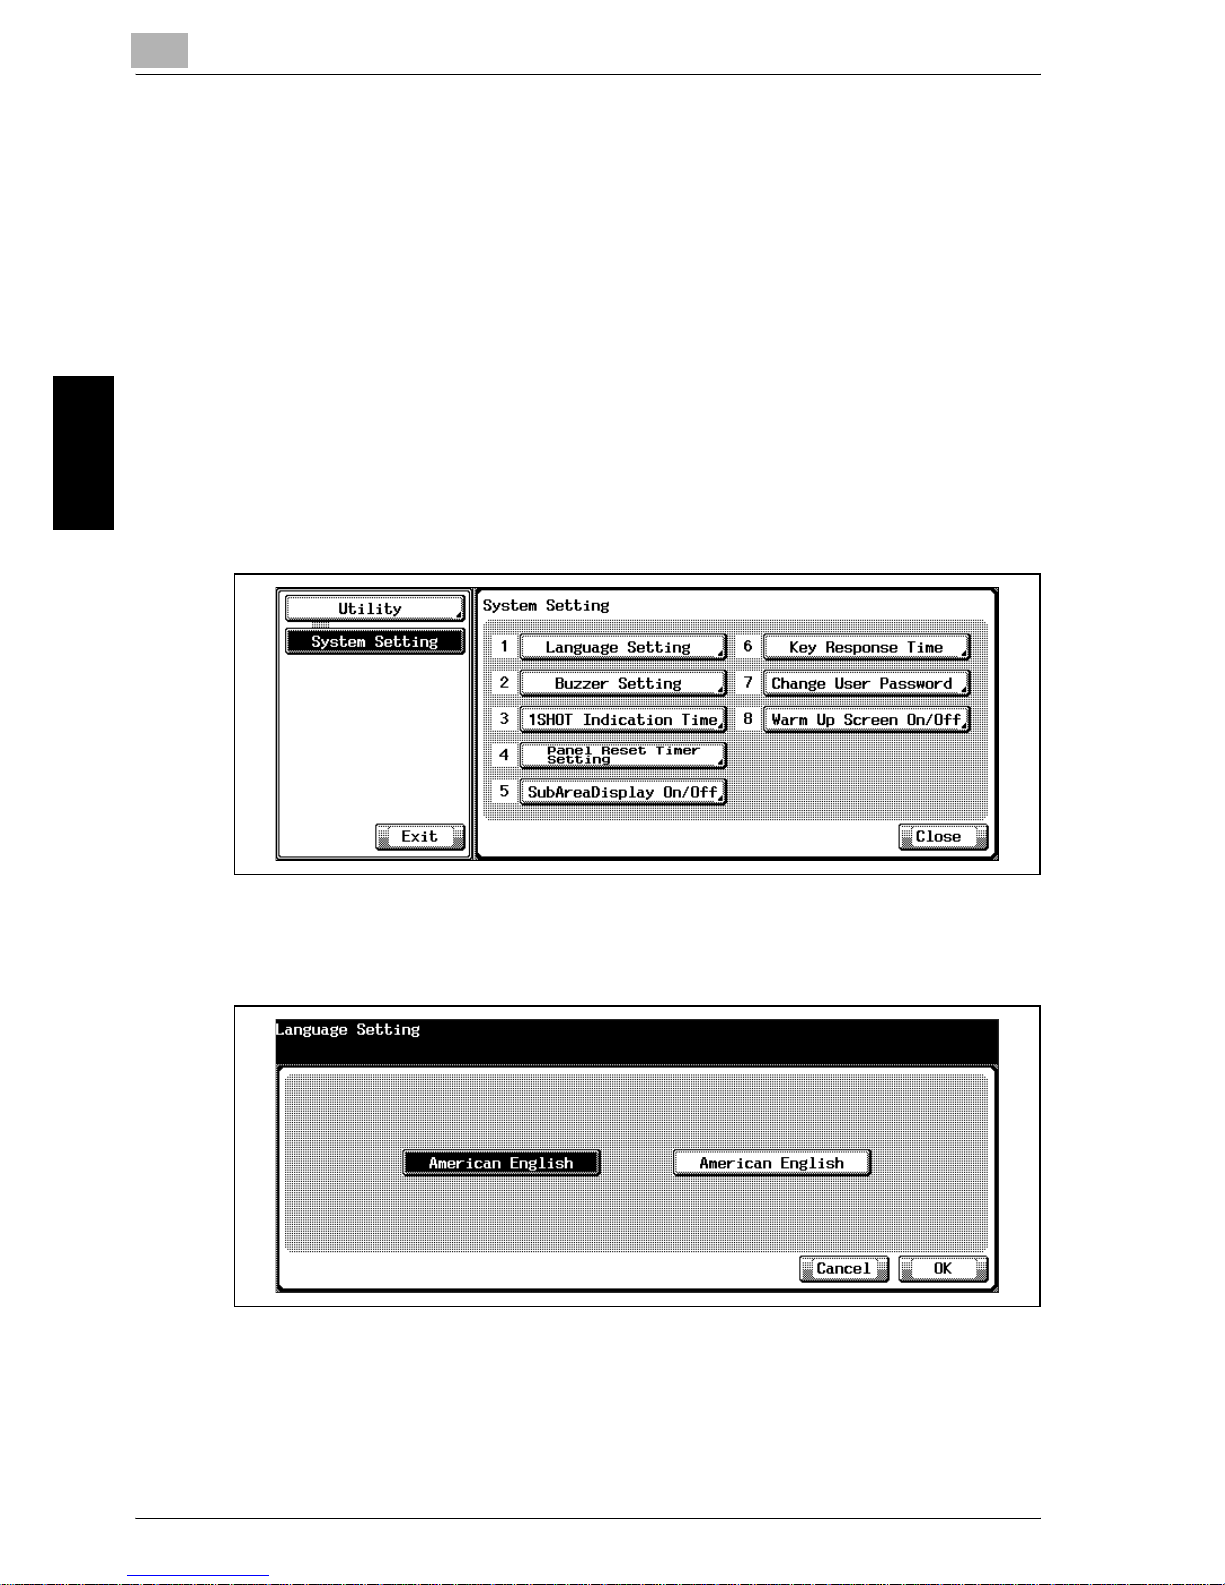
1 Press the [Utility/Counter] to display the Utility Screen.
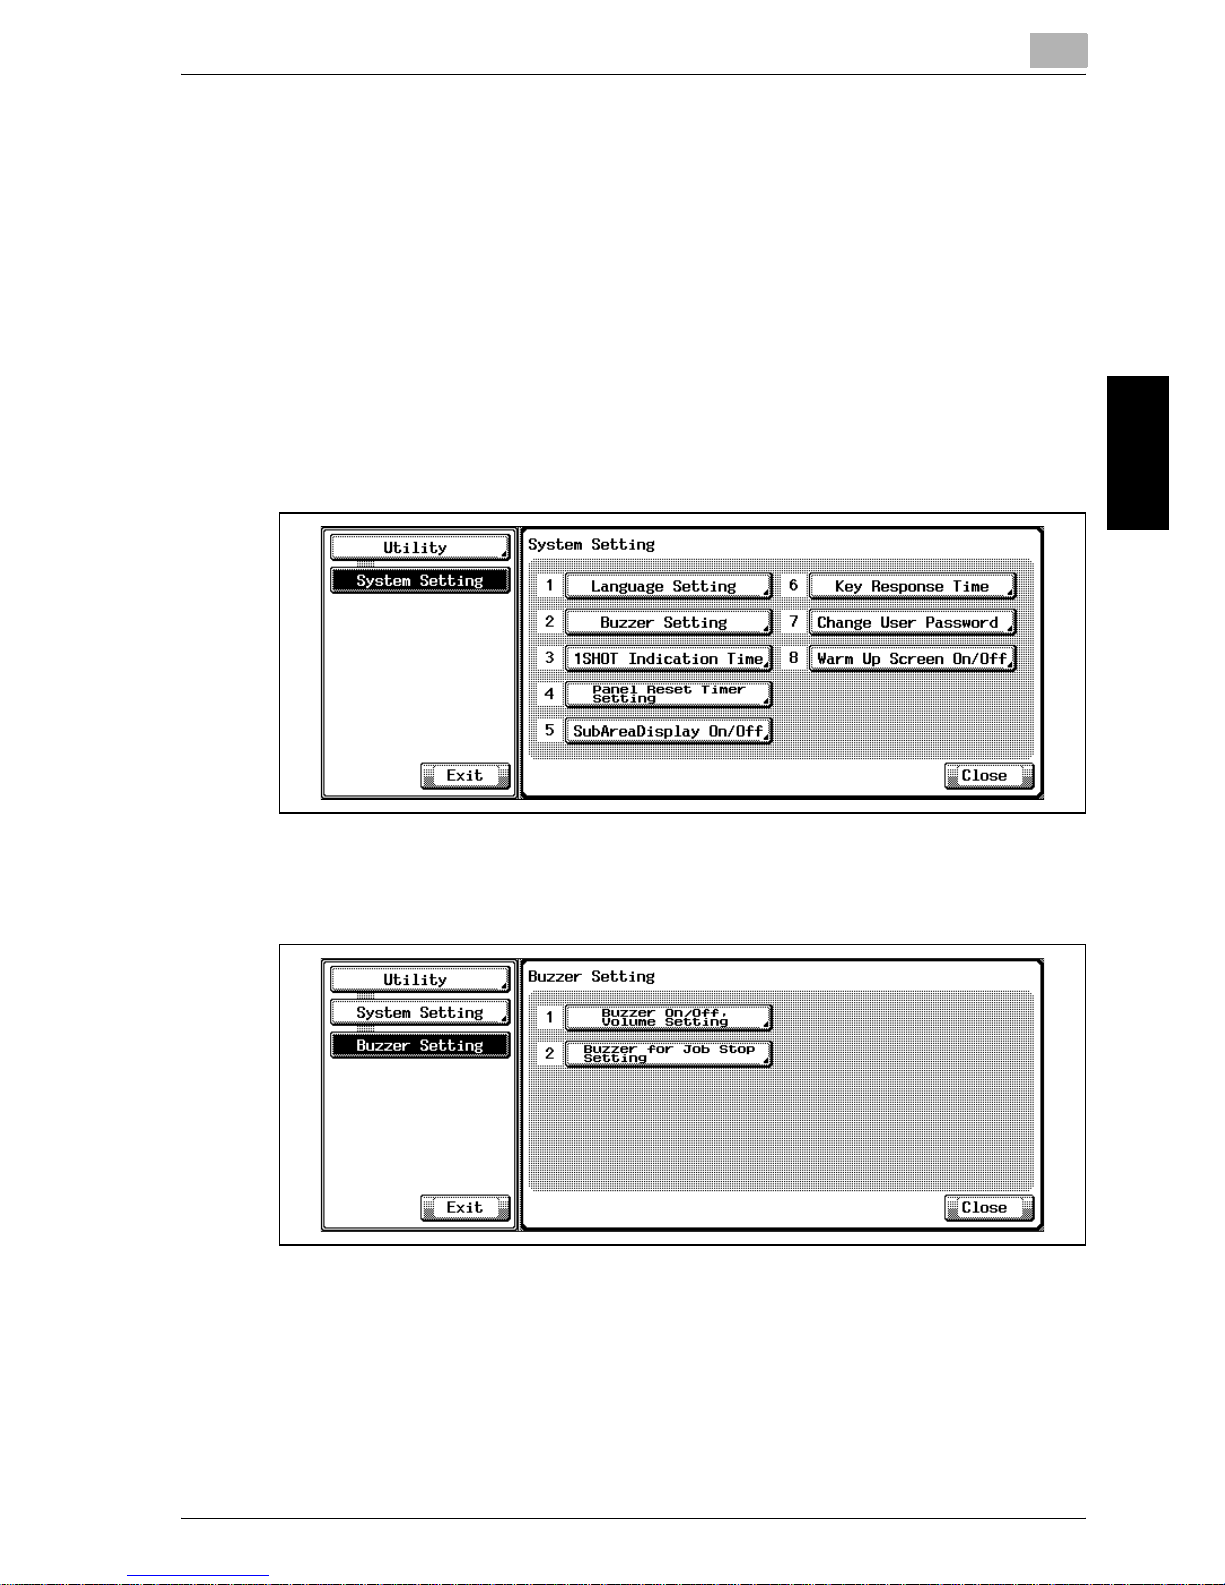
2 Touch [1 System Setting].
The System Setting Screen will be displayed.
3 Touch [1 Language Setting].
The Language Setting Screen will be displayed.
4 Select the desired mode.
5 Touch [OK] to complete the setting and return to the System Setting
Screen.
6 If further changes are required, touch the desired key.
Touch Utility to restore the Utility Screen.
Page 56
Utility <User Setting>
3
Océ im9220 3-9
Utility <User Setting> Chapter 3
3.3.2 2 Buzzer Setting>1 Buzzer On/Off, Volume Setting
Set the buzzer sound (the touch key sound) as touching the screen, and also
select the buzzer volume.
PrOcédure
1 Press the [Utility/Counter] to display the Utility Screen.
2 Touch [1 System Setting].
The System Setting Screen will be displayed.
3 Touch [2 Buzzer Setting].
The Buzzer Setting Screen will be displayed.
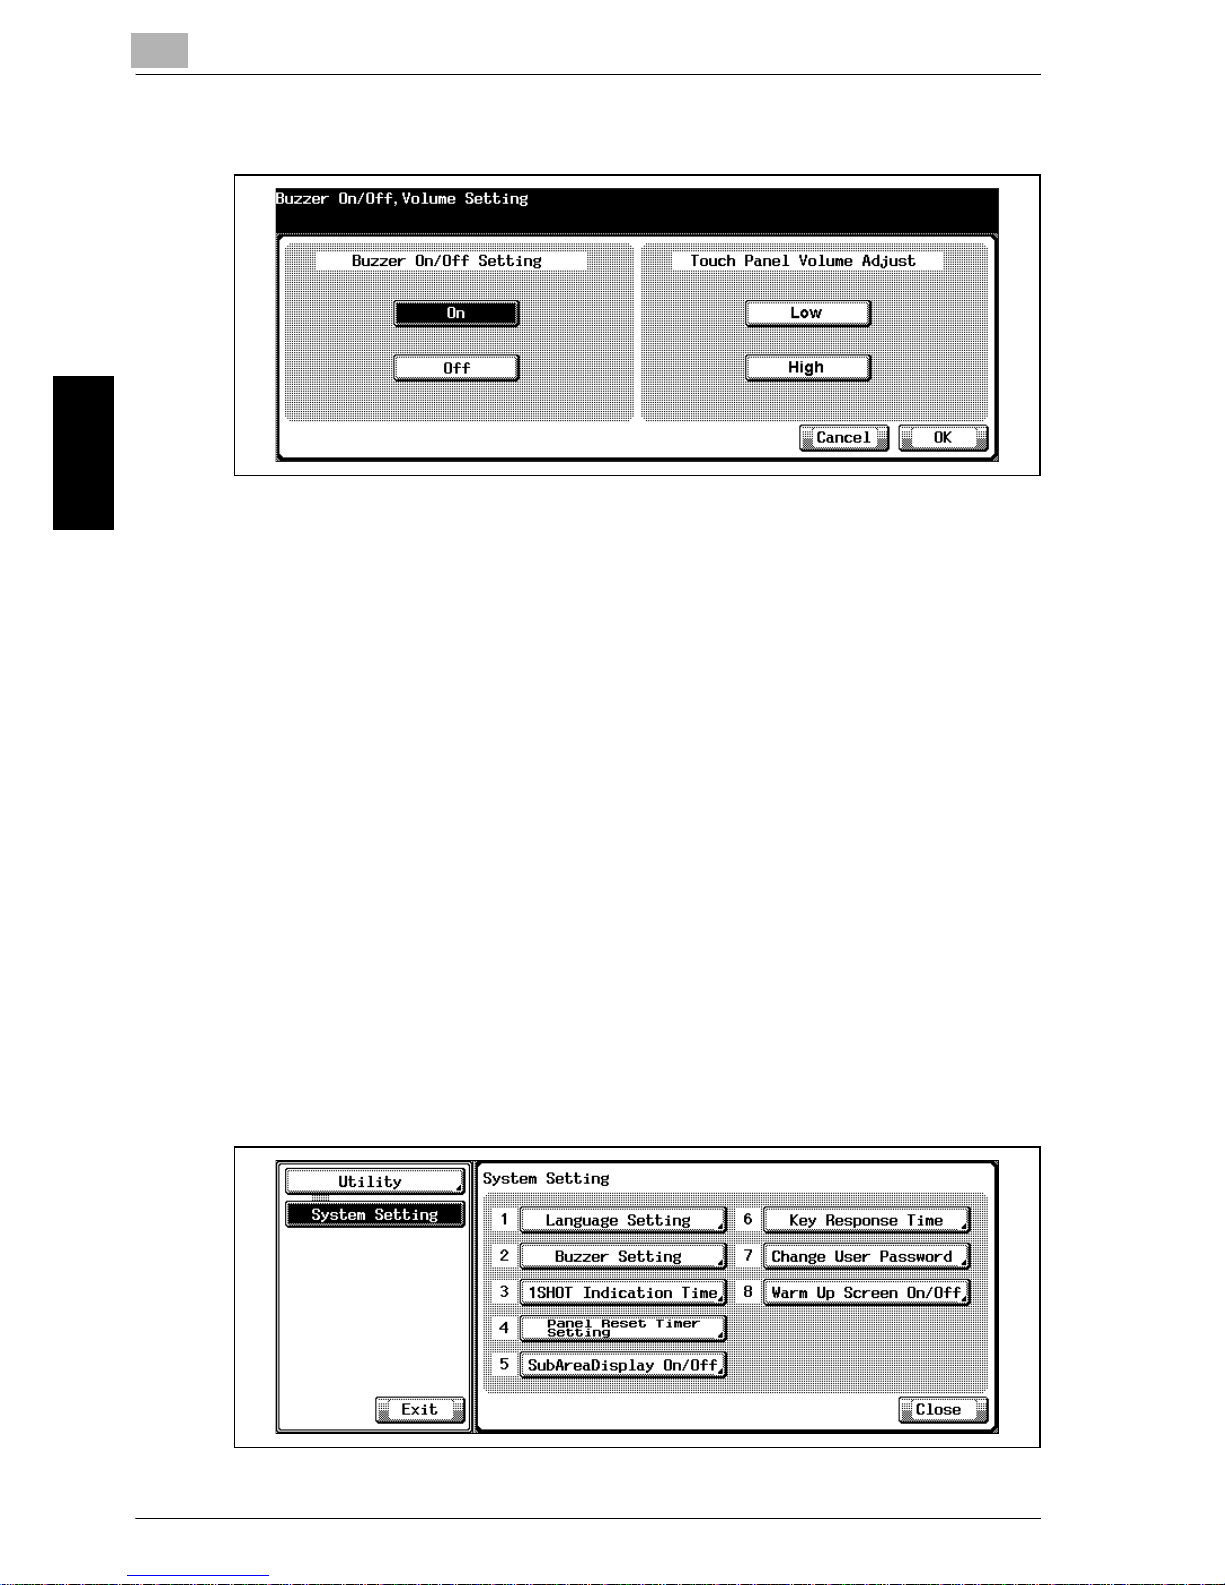
4 Touch [1 Buzzer On/Off, Volume Setting].
The Buzzer On/Off, Volume Setting Screen will be displayed.
Page 57
3
Utility <User Setting>
3-10 Océ im9220
Utility <User Setting> Chapter 3
5 Touch the desired Key.
Touch [On] to highlight it. Adjust the Buzzer volume, as desired. Touch
[Low] or [High] to regulate the buzzer volume of the touch keys.
Touch [Off] to highlight it. The buzzer will go off.
6 Touch [OK] to complete the setting and return to the Buzzer Setting
Screen.
7 If further changes are required, touch the desired key.
Touch [Utility] to restore the Utility Screen.
3.3.3 2 Buzzer Setting>2 Buzzer for Job Stop Setting
Select the duration of the buzzer sound when the machine stops.
PrOcédure
1 Press the [Utility/Counter] to display the Utility Screen.
2 Touch [1 System Setting].
The System Setting Screen will be displayed.
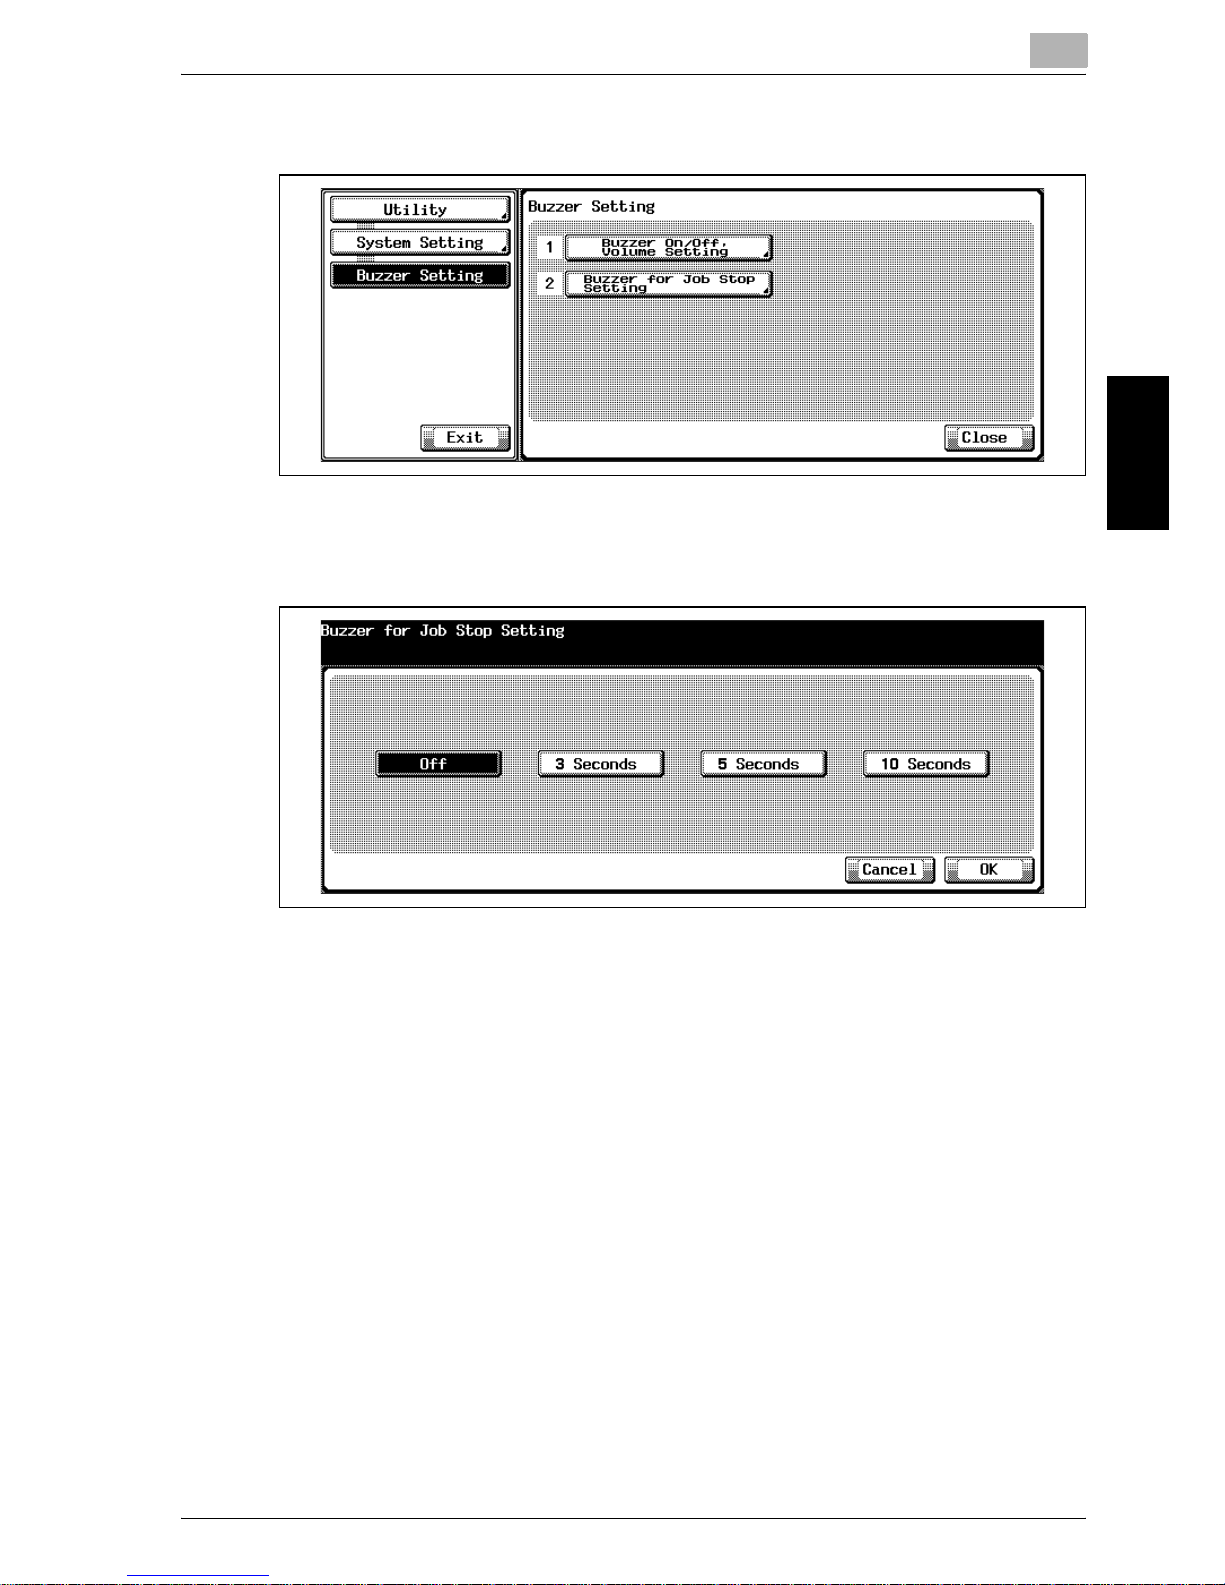
3 Touch [2 Buzzer Setting].
The Buzzer Setting Screen will be displayed.
Page 58
Utility <User Setting>
3
Océ im9220 3-11
Utility <User Setting> Chapter 3
4 Touch [2 Buzzer for Job Stop Setting].
The Buzzer for Job Stop Setting Screen will be displayed.
5 Select the desired time to highlight it.
6 Touch [OK] to complete the setting and return to the Buzzer Setting
Screen.
7 If further changes are required, touch the desired key.
Touch [Utility] to restore the Utility Screen.
Page 59
3
Utility <User Setting>
3-12 Océ im9220
Utility <User Setting> Chapter 3
3.3.4 3 1 SHOT Indication Time
Select the SHOT indication time to be displayed in the message indication
area of the touch panel, such as “Original size A4”.
PrOcédure
1 Press the [Utility/Counter] to display the Utility Screen.
2 Touch [1 System Setting].
The System Setting Screen will be displayed.
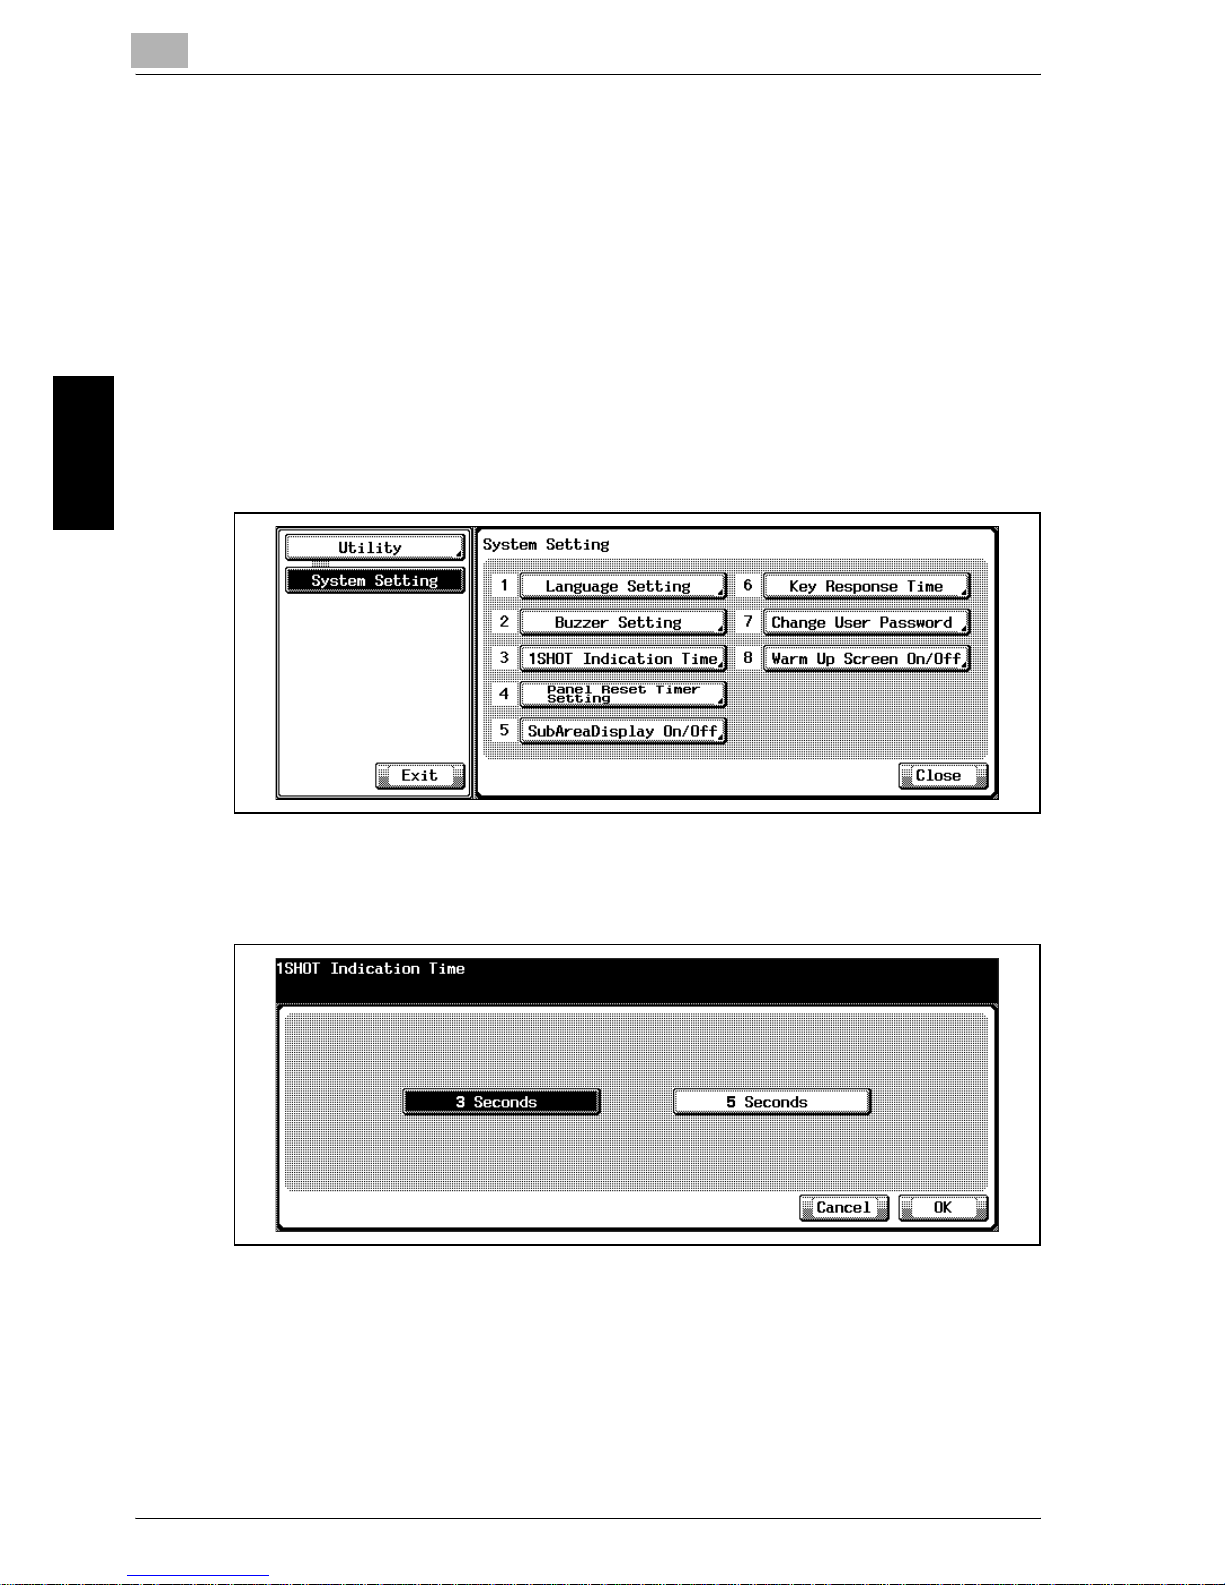
3 Touch [3 1 SHOT Indication Time].
The 1 SHOT Indication Time Screen will be displayed.
4 Touch [3 seconds] or [5 seconds] to highlight it.
5 Touch [OK] to complete the setting and return to the System Setting
Screen.
6 If further changes are required, touch the desired key.
Touch [Utility] to restore the Utility Screen.
Page 60
Utility <User Setting>
3
Océ im9220 3-13
Utility <User Setting> Chapter 3
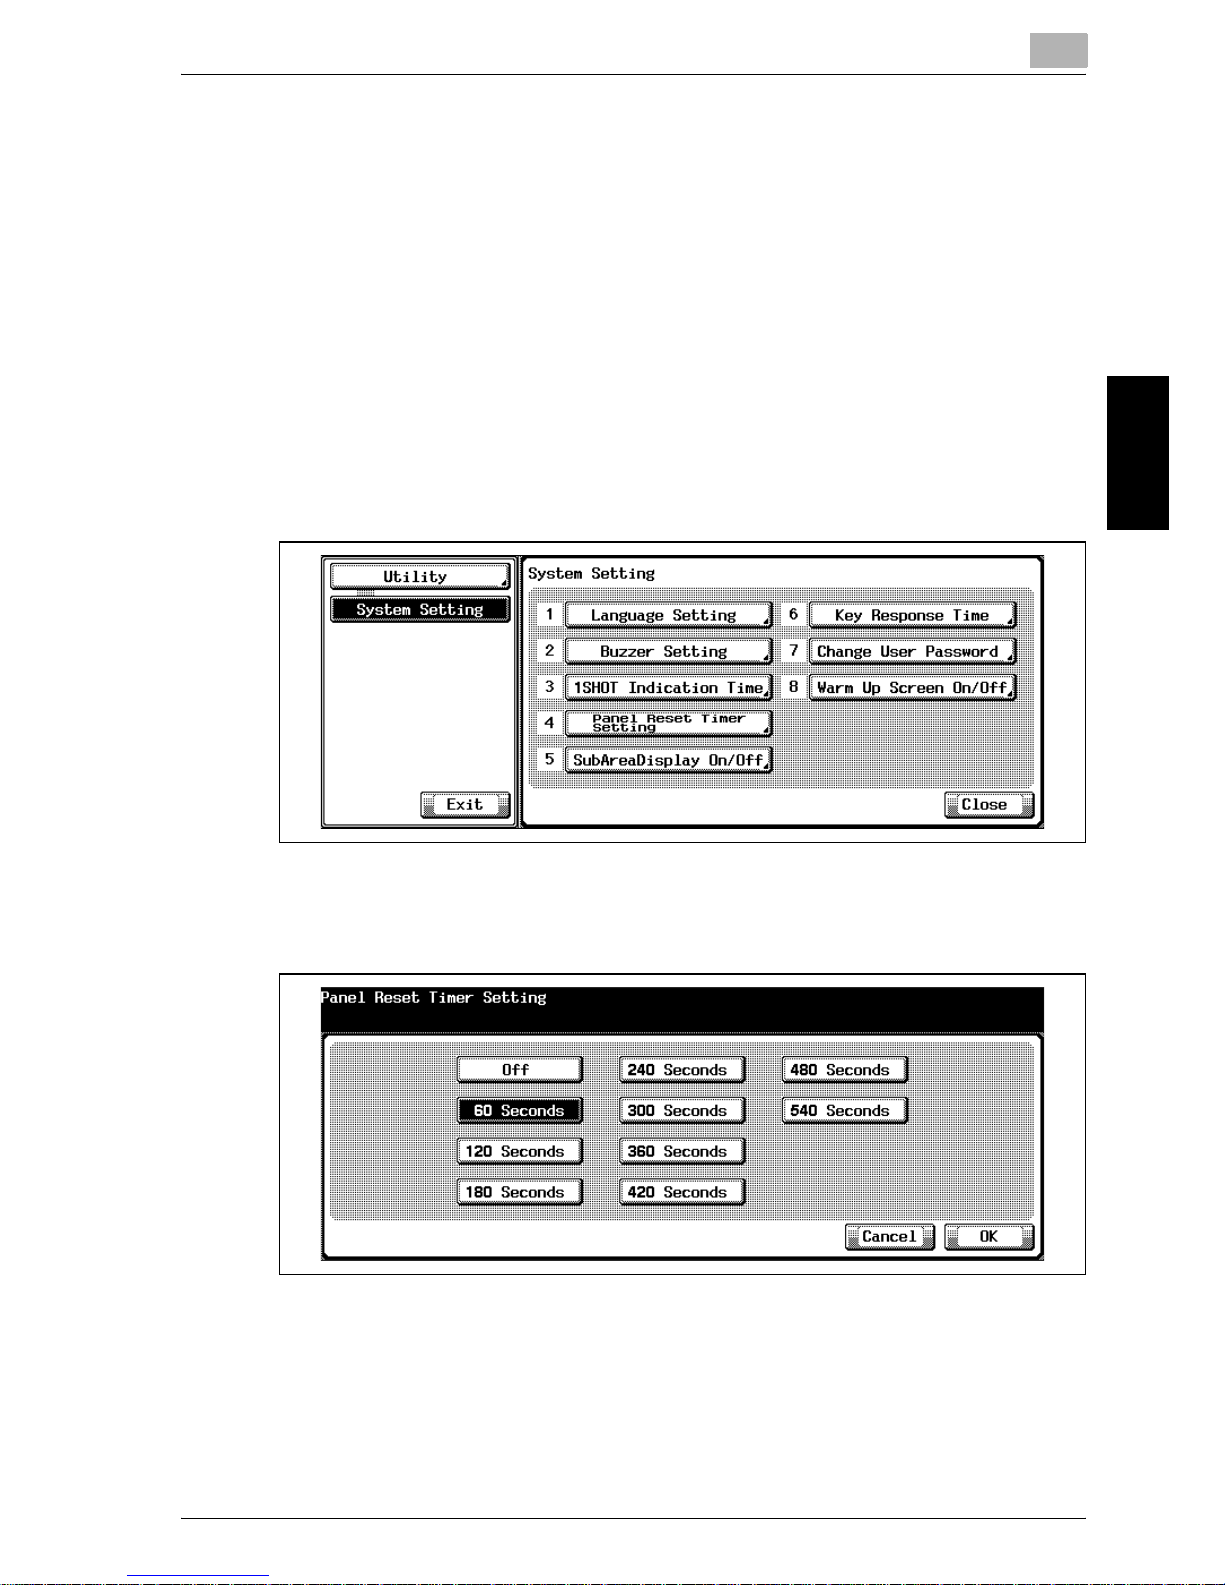
3.3.5 4 Panel Reset Timer Setting
Set the reset interval starting from the completion of a copying job until the
machine returns to the initial screen, without selecting any key on the touch
panel or the control panel.
PrOcédure
1 Press the [Utility/Counter] to display the Utility Screen.
2 Touch [1 System Setting].
The System Setting Screen will be displayed.
3 Touch [4 Panel Reset Timer Setting].
The Panel Reset Timer Setting Screen will be displayed.
4 Select the desired time to highlight it.
5 Touch [OK] to complete the setting and return to the Utility Screen.
6 If further changes are required, touch the desired key.
Touch [Utility] to restore the Utility Screen.
Page 61
3
Utility <User Setting>
3-14 Océ im9220
Utility <User Setting> Chapter 3
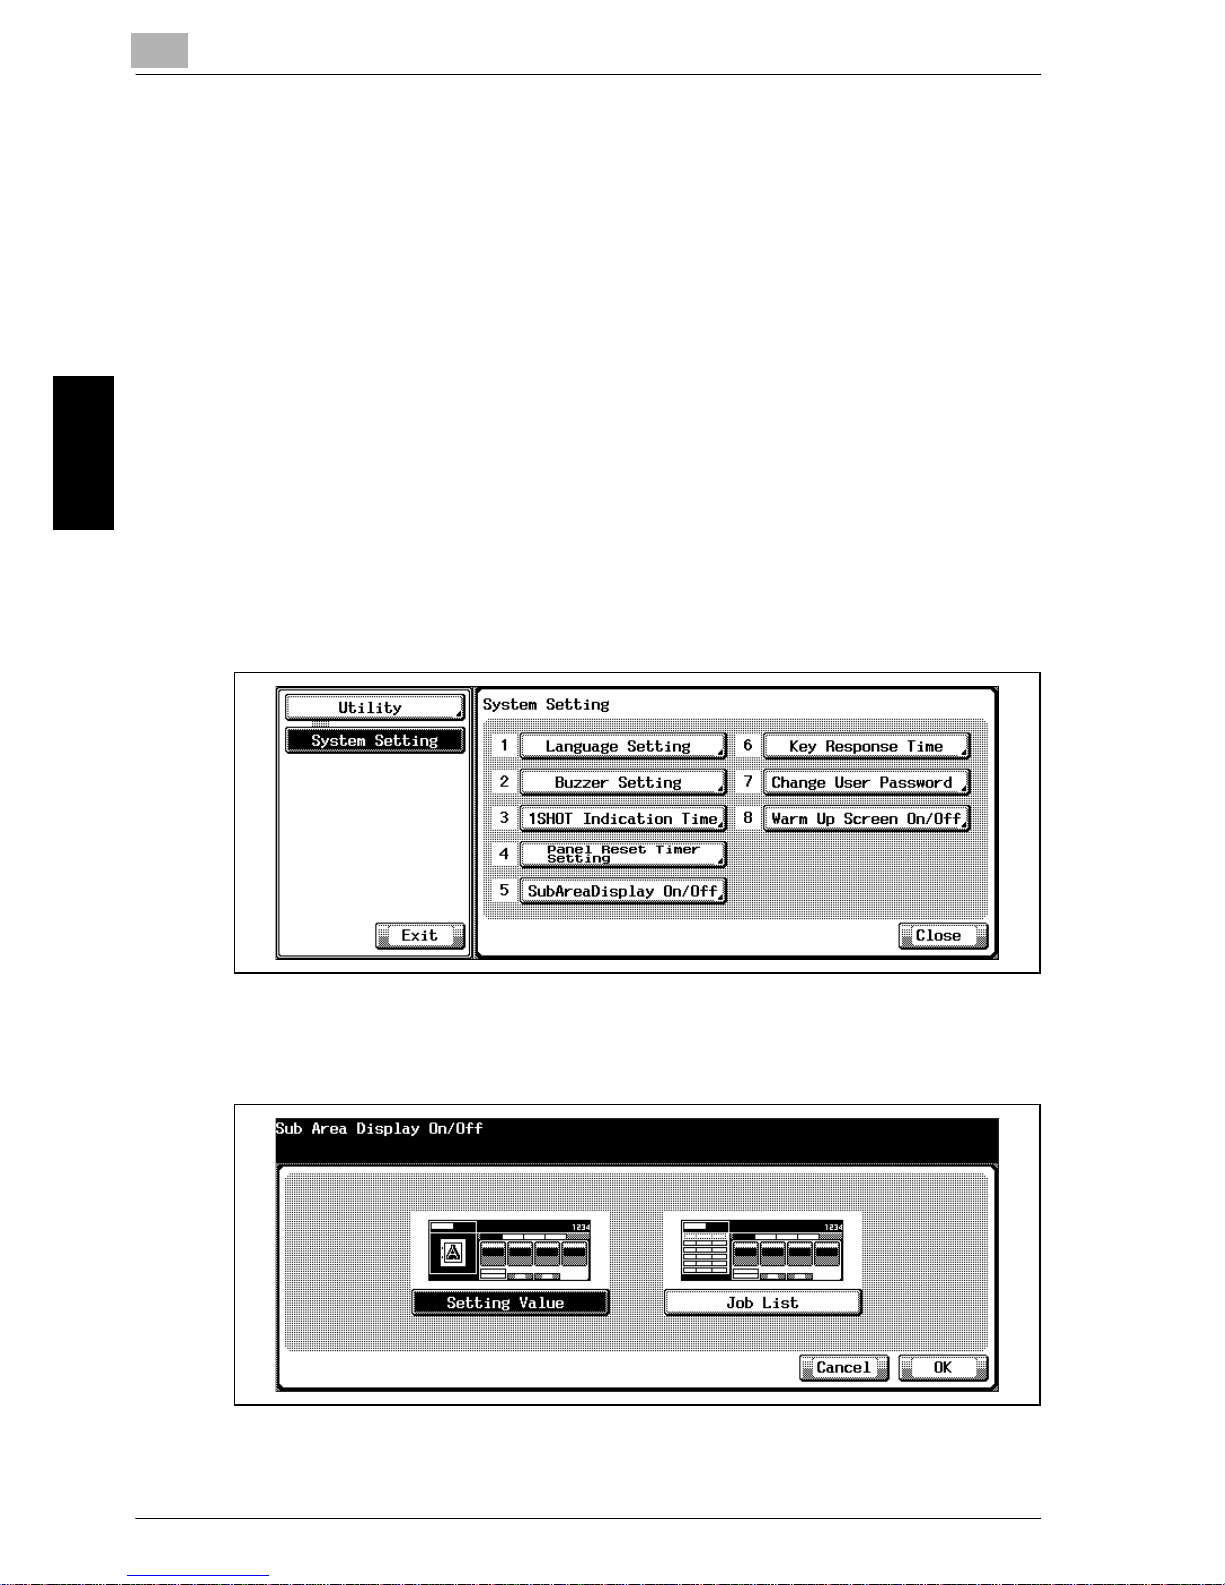
3.3.6 5 Sub Area Display On/Off
Select the sub area display in the left side of the initial screen.
Setting options: Setting value/Job list
!
Detail
If the direct selection screen is specified as the Basic Screen, the [5 Sub
Area Display On/Off] key will be grayed out to show unavailability.
PrOcédure
1 Press the [Utility/Counter] to display the Utility Screen.
2 Touch [1 System Setting].
The System Setting Screen will be displayed.
3 Touch [5 Sub Area Display On/Off].
The Sub Area Display On/Off Screen will be displayed.
4 Select the desired sub screen to highlight it.
5 Touch [OK] to complete the setting and return to the Utility Screen.
Page 62
Utility <User Setting>
3
Océ im9220 3-15
Utility <User Setting> Chapter 3
6 If further changes are required, touch the desired key.
Touch [Utility] to restore the Utility Screen.
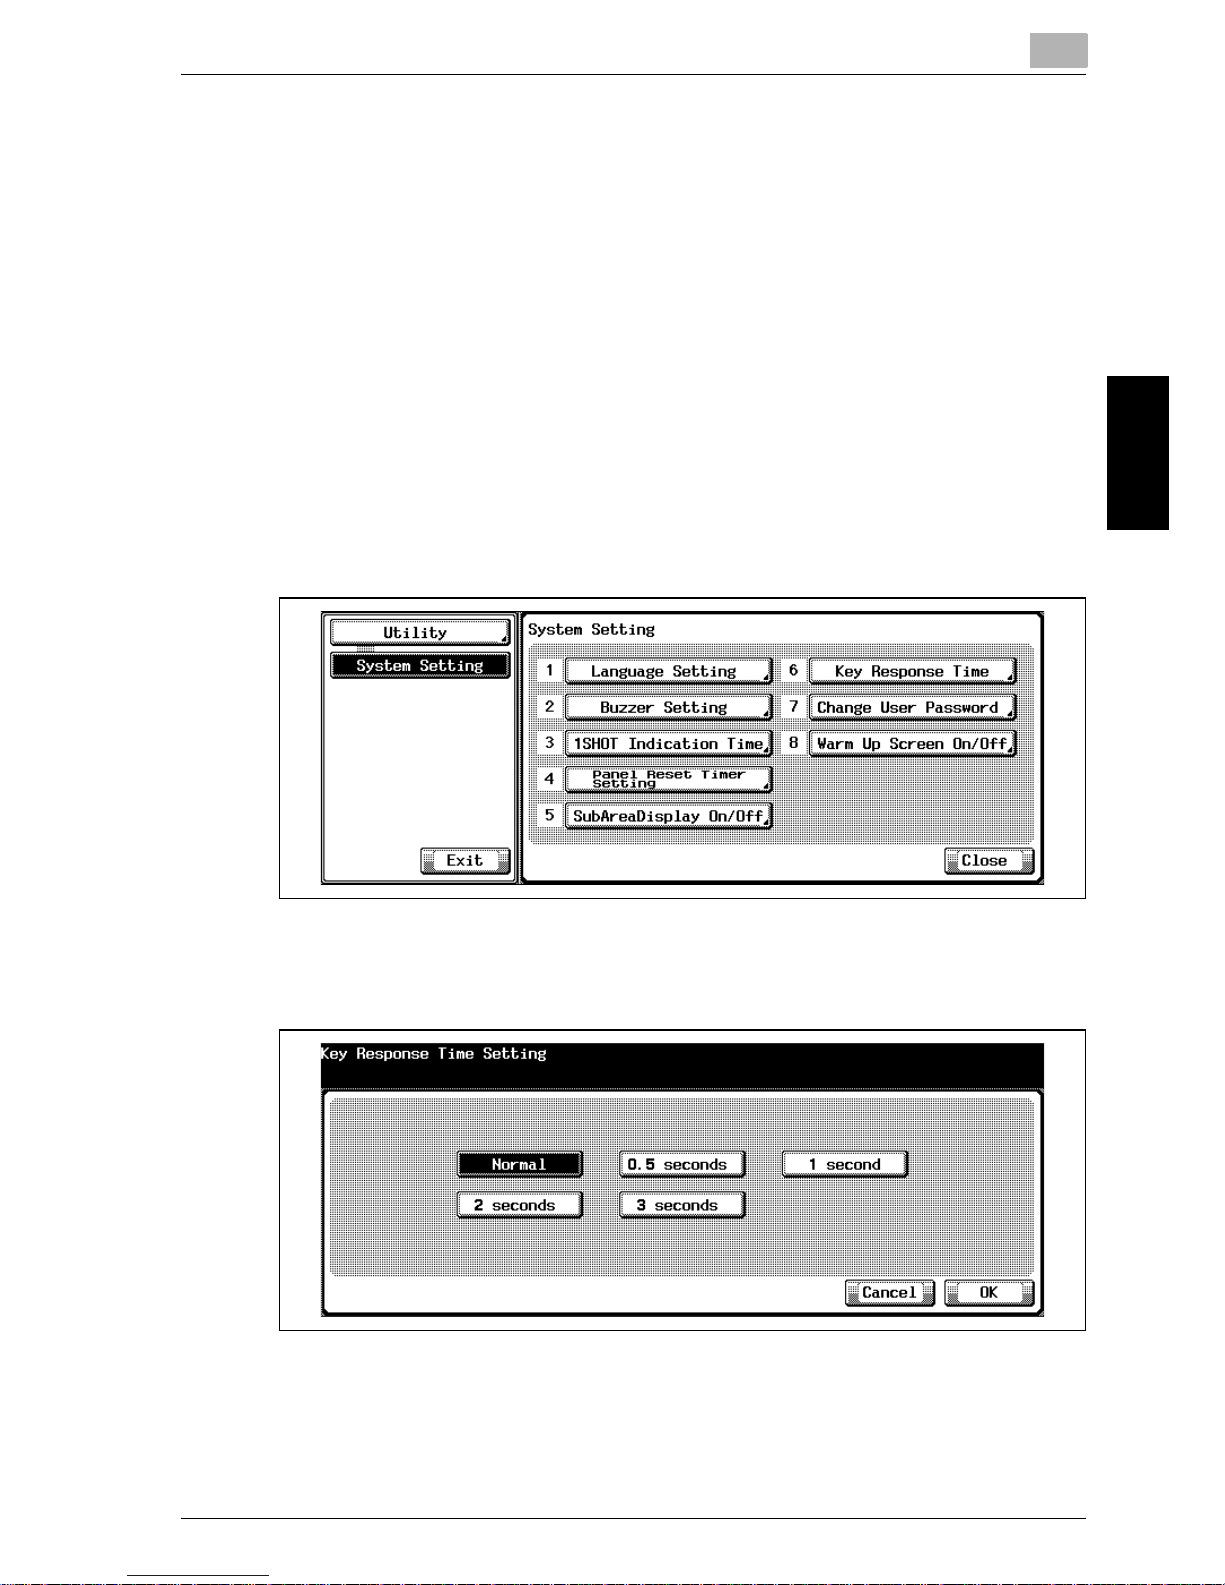
3.3.7 6 Key Response Time
Select the response time between touching the key and the machine responses to it.
PrOcédure
1 Press the [Utility/Counter] to display the Utility Screen.
2 Touch [1 System Setting].
The System Setting Screen will be displayed.
3 Touch [6 Key Response Time].
The Key Response Time Screen will be displayed.
4 Select the desired time to highlight it.
5 Touch [OK] to complete the setting and return to the Utility Screen.
6 If further changes are required, touch the desired key.
Touch [Utility] to restore the Utility Screen.
Page 63
3
Utility <User Setting>
3-16 Océ im9220
Utility <User Setting> Chapter 3
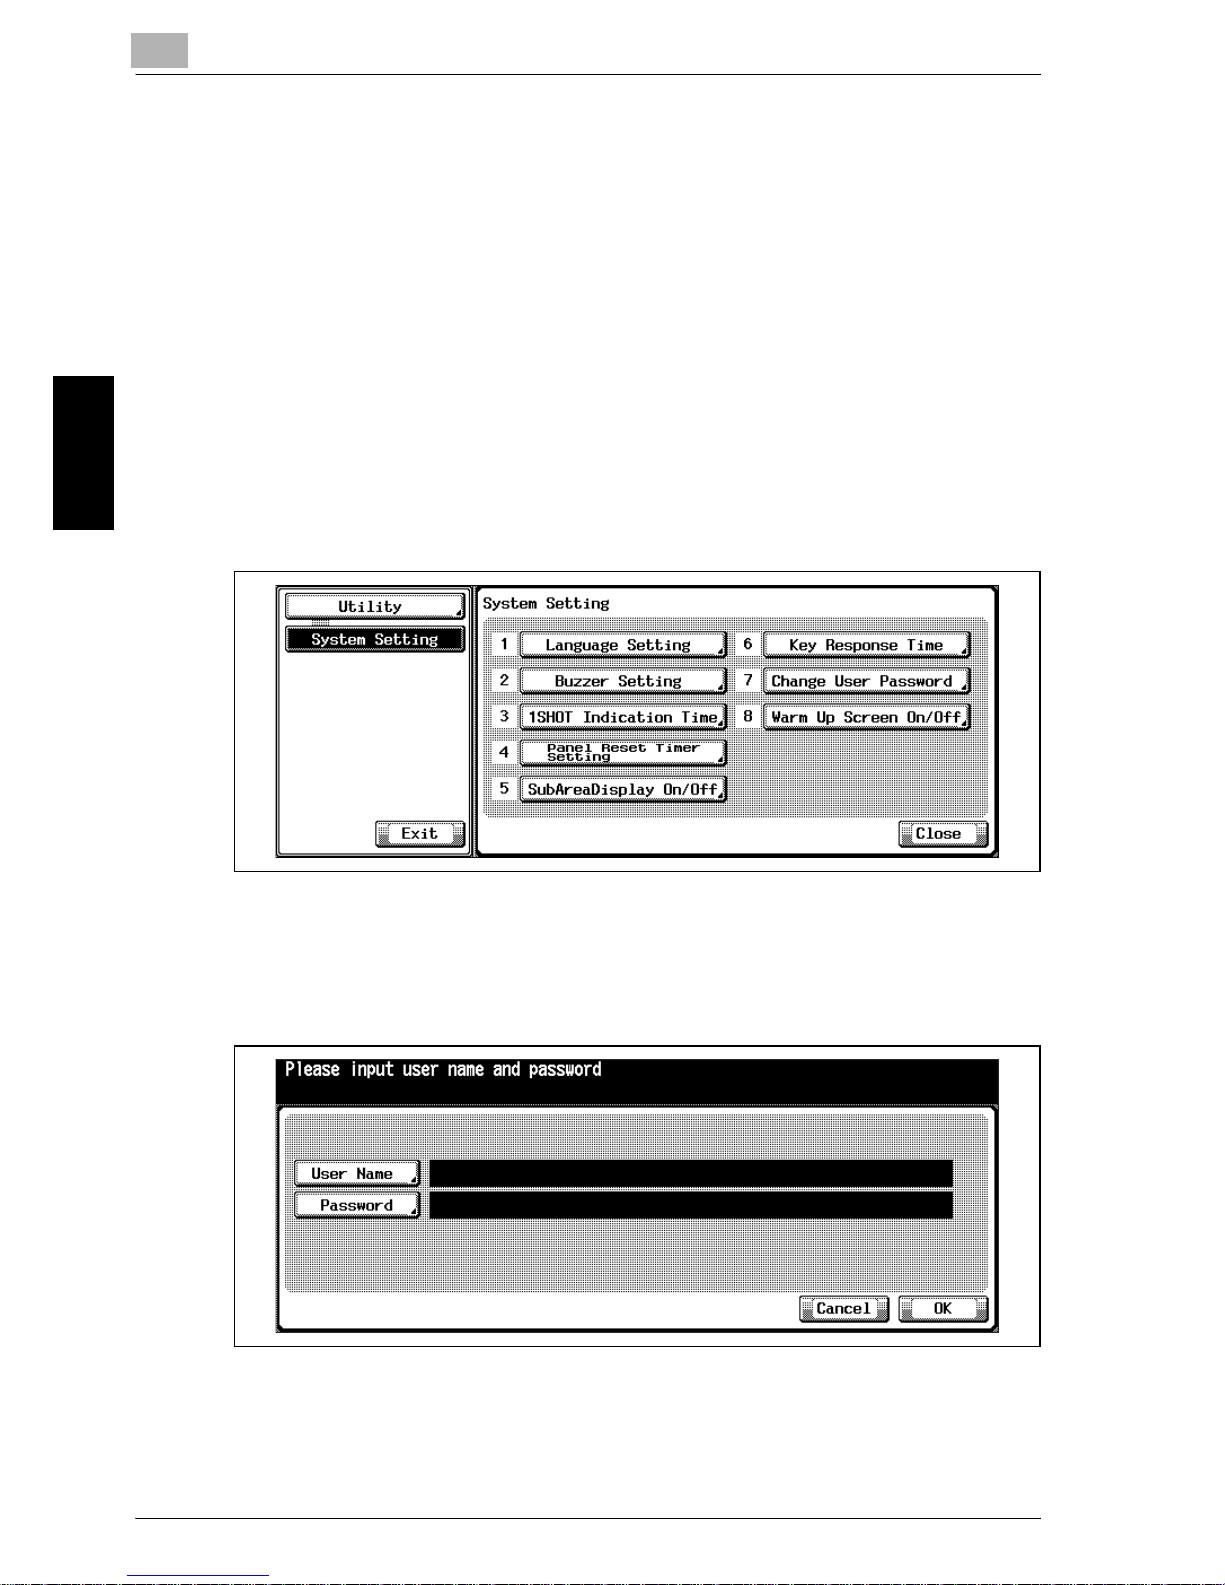
3.3.8 7 Change User Password
Change a user password which the user has registered for user authentication.
The changed password is reflected to the user authentication setting description.
PrOcédure
1 Press the [Utility/Counter] to display the Utility Screen.
2 Touch [1 System Setting].
The System Setting Screen will be displayed.
3 Touch [7 Change User Password].
The User Authentication Screen will be displayed.
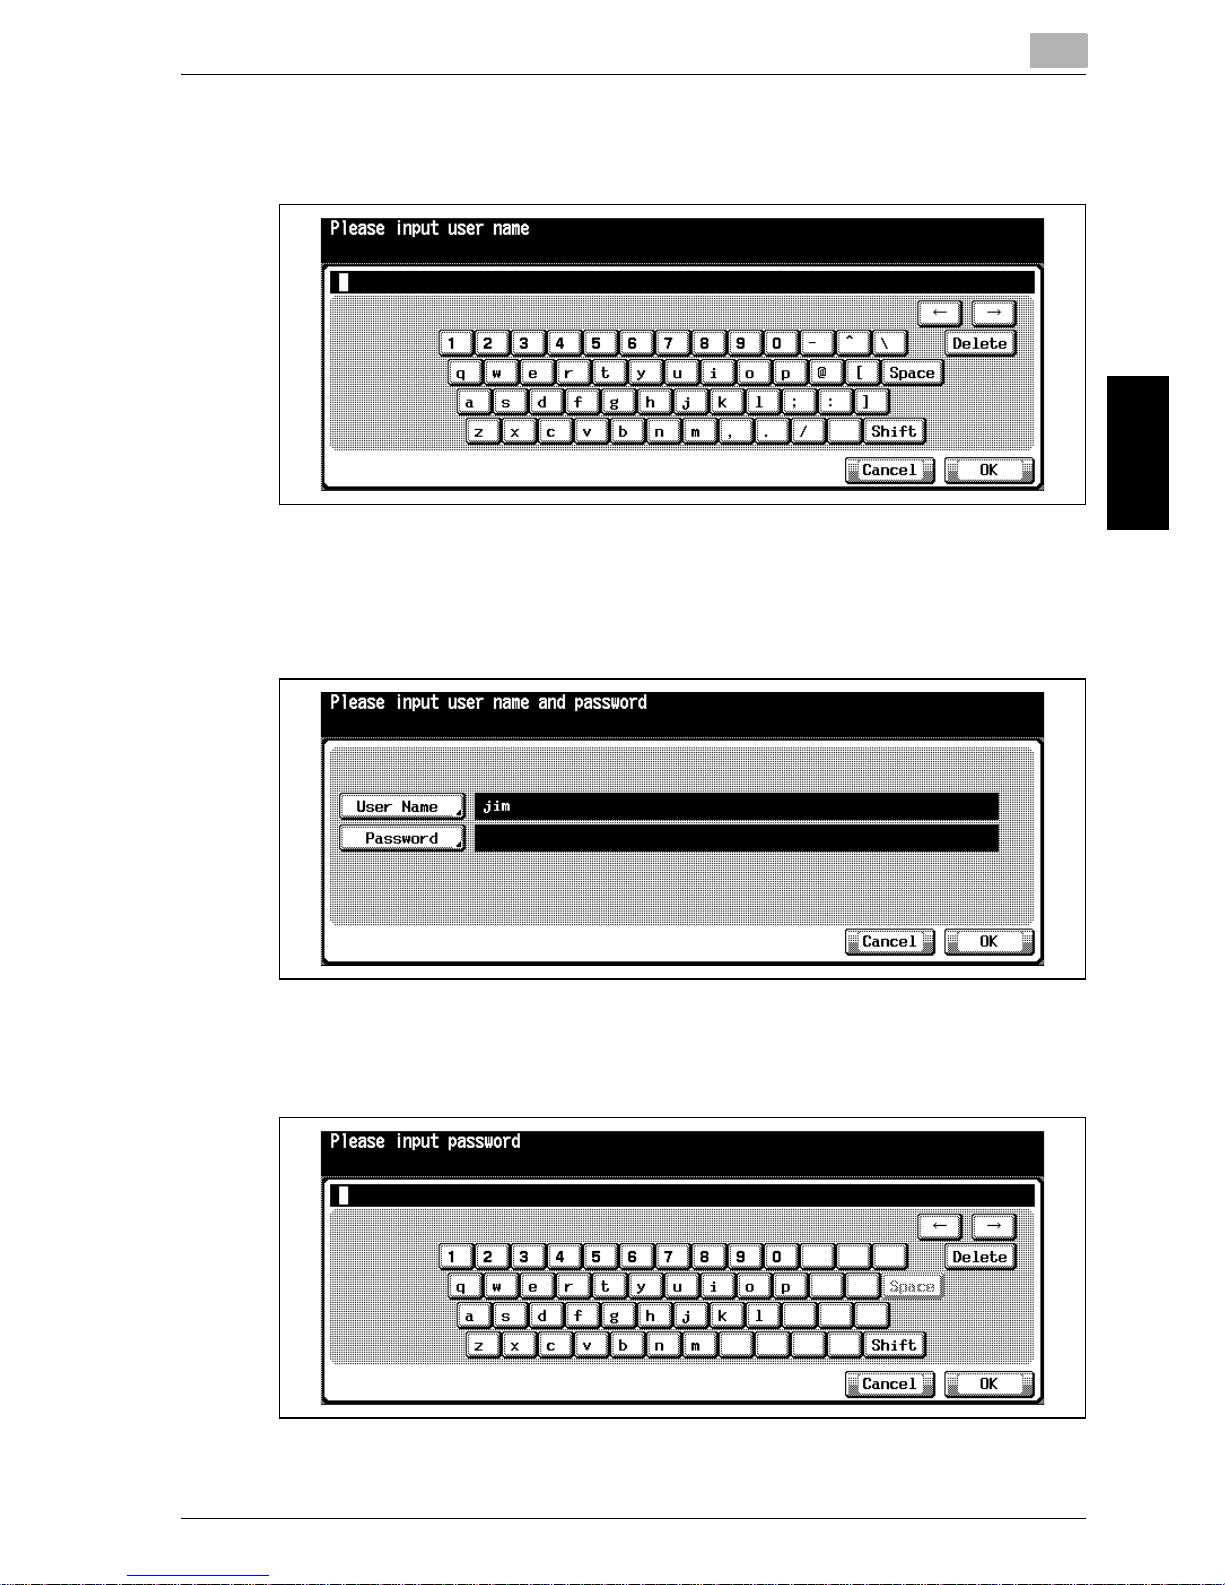
4 Enter the user name.
– Touch [User Name] to display the Input User Name Screen.
Page 64
Utility <User Setting>
3
Océ im9220 3-17
Utility <User Setting> Chapter 3
– Enter the user name, then touch [OK] to return to the User Authen-
tication Screen.
The entered name will be displayed on the screen.
5 Enter the current password.
– Touch [Password] to display the Input User Password Screen.
– Enter the current password. The entered password will appear as
asterisks (********) on the screen. Then touch [OK].
The Change User Password Screen will be displayed.
Page 65
3
Utility <User Setting>
3-18 Océ im9220
Utility <User Setting> Chapter 3
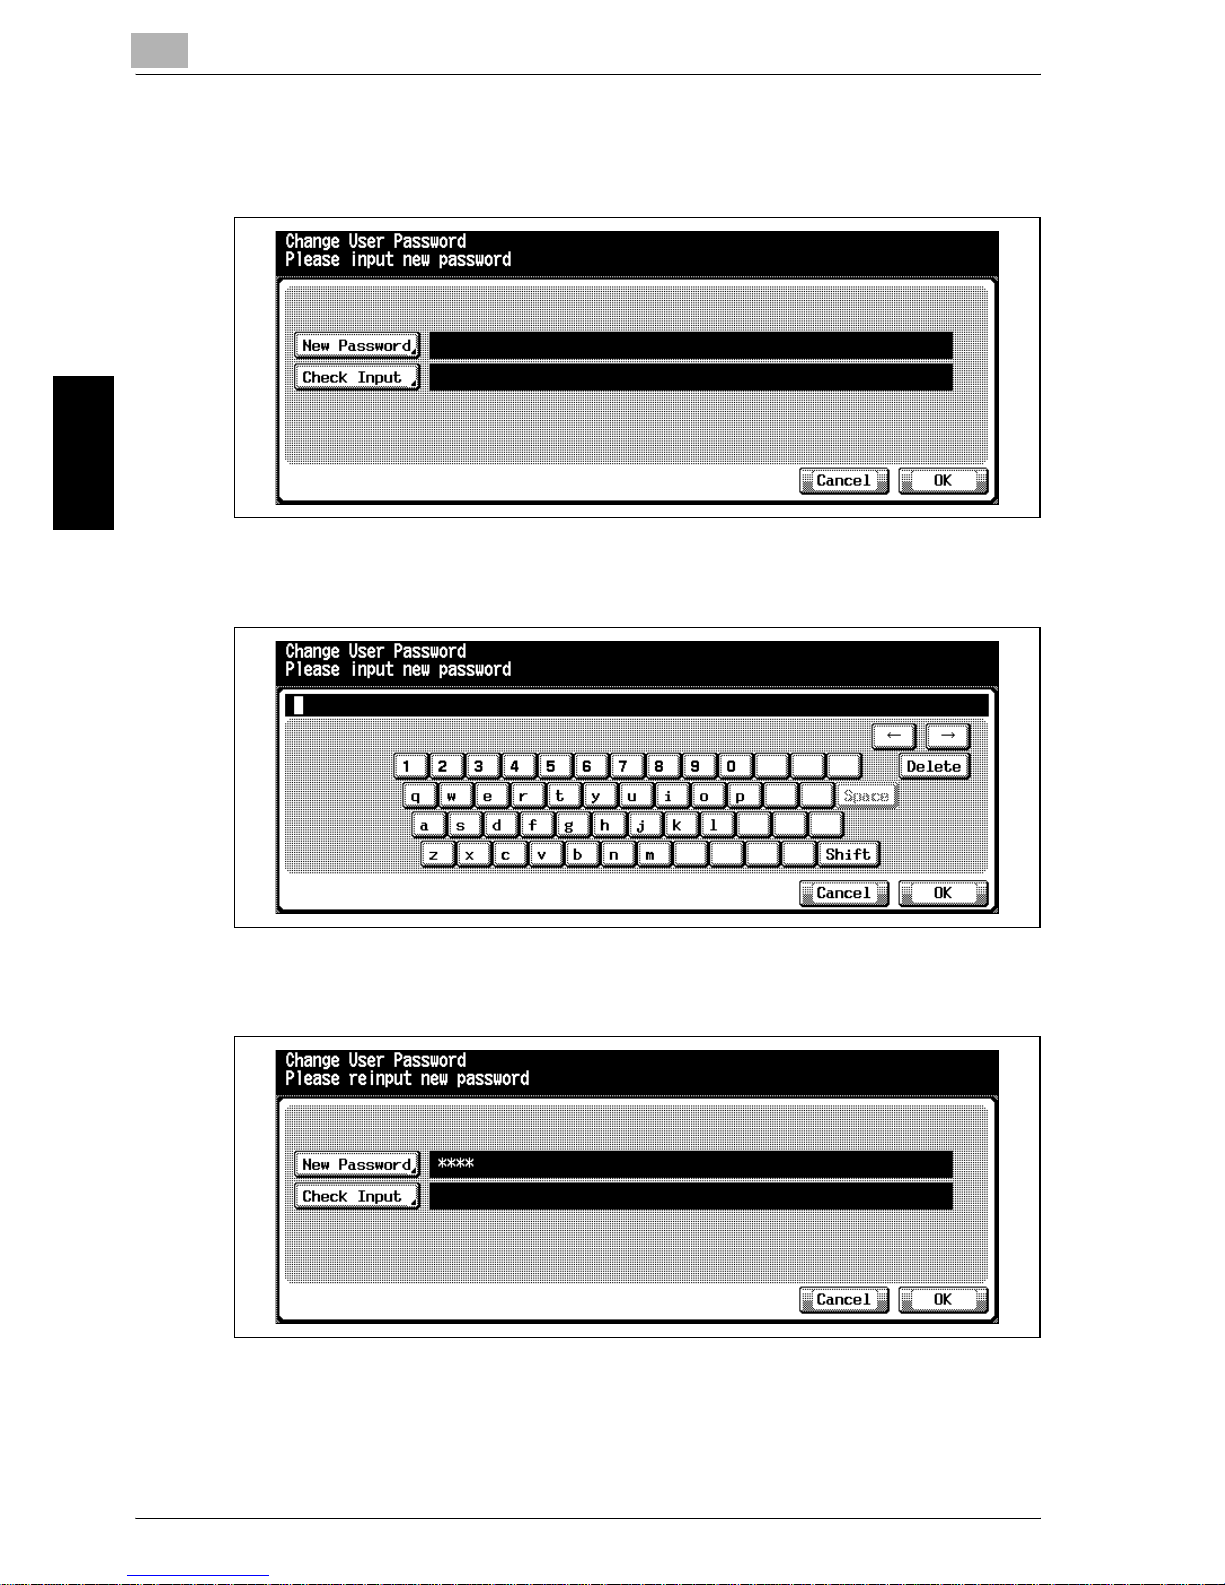
6 Enter a new user password.
– Touch [New Password] to display the Input New Password Screen.
– Enter a new password, the touch [OK].
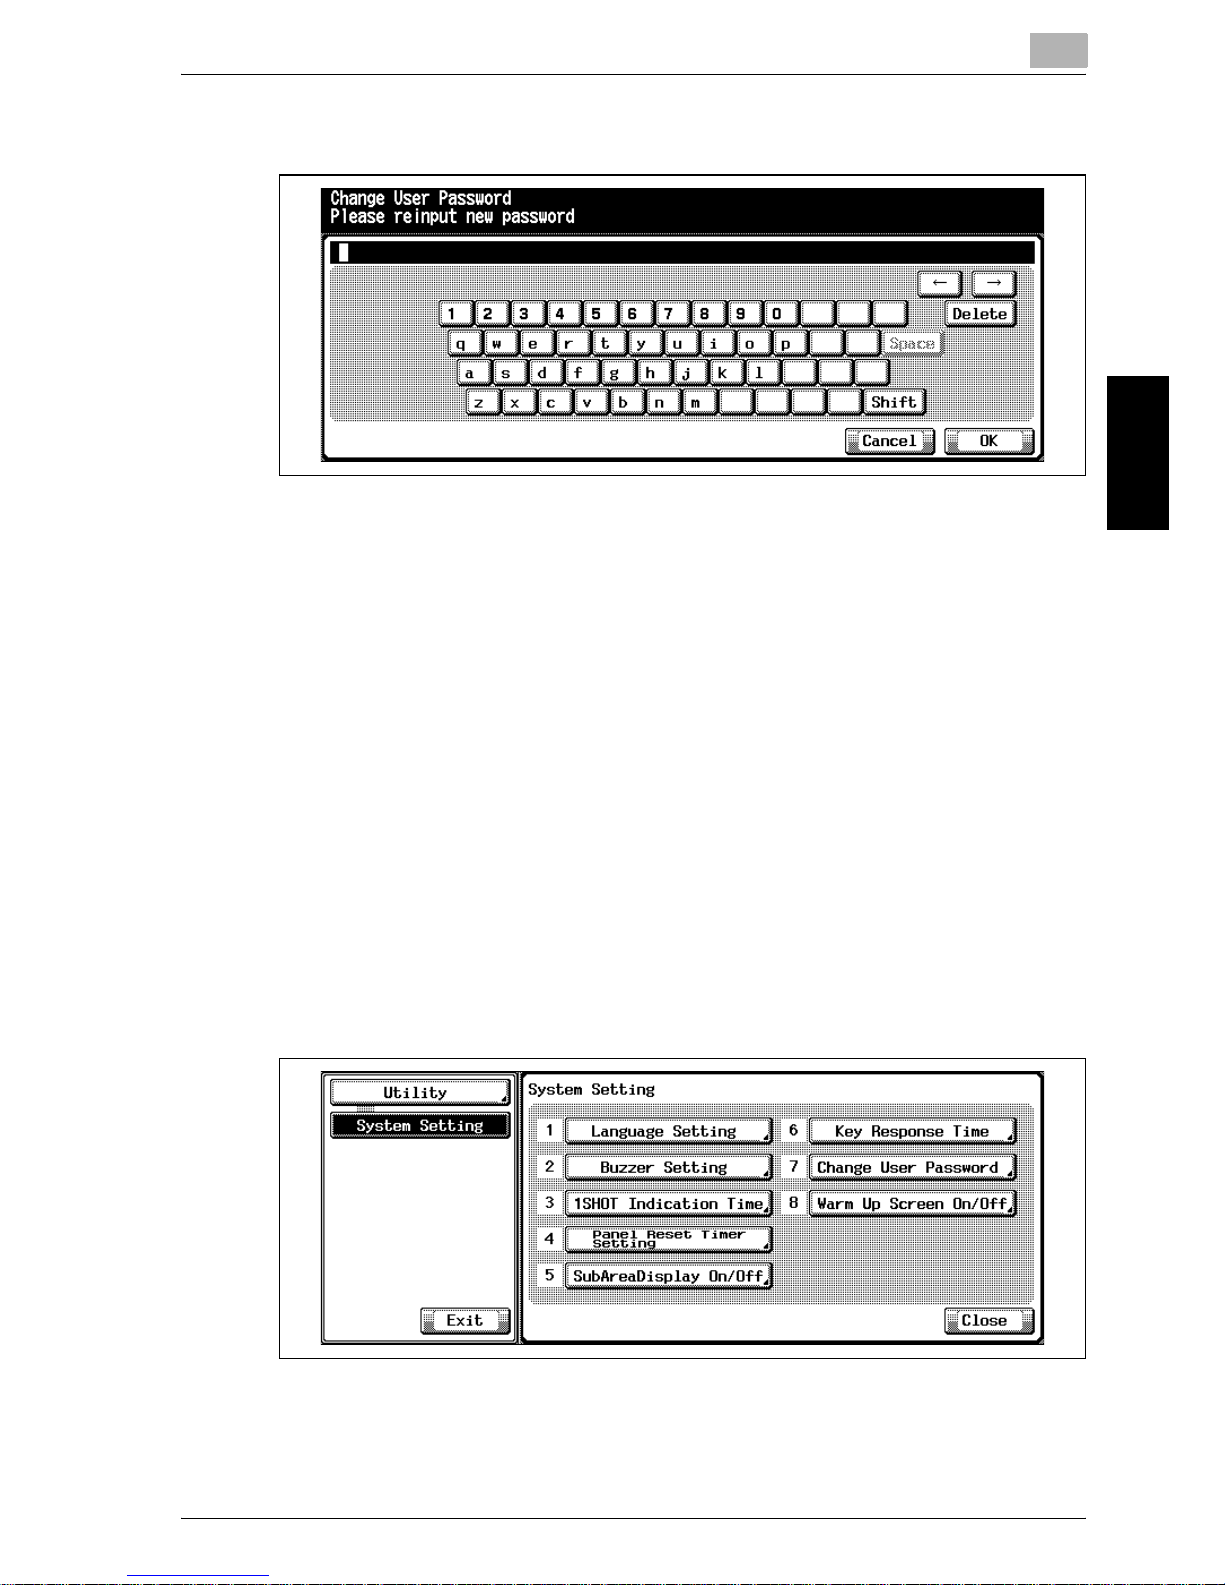
– Touch [Check Input] to display the Re-input New Password Screen.
Page 66
Utility <User Setting>
3
Océ im9220 3-19
Utility <User Setting> Chapter 3
– Enter a new password once more for confirmation, then touch [OK].
The Change User Password Screen will be restored.
7 Touch [OK] to complete the setting and return to the Utility Screen.
8 If further changes are required, touch the desired key.
Touch [Utility] to restore the Utility Screen.
3.3.9 8 Warm Up Screen On/Off
PrOcédure
1 Press the [Utility/Counter] to display the Utility Screen.
2 Touch [1 System Setting].
The System Setting Screen will be displayed.
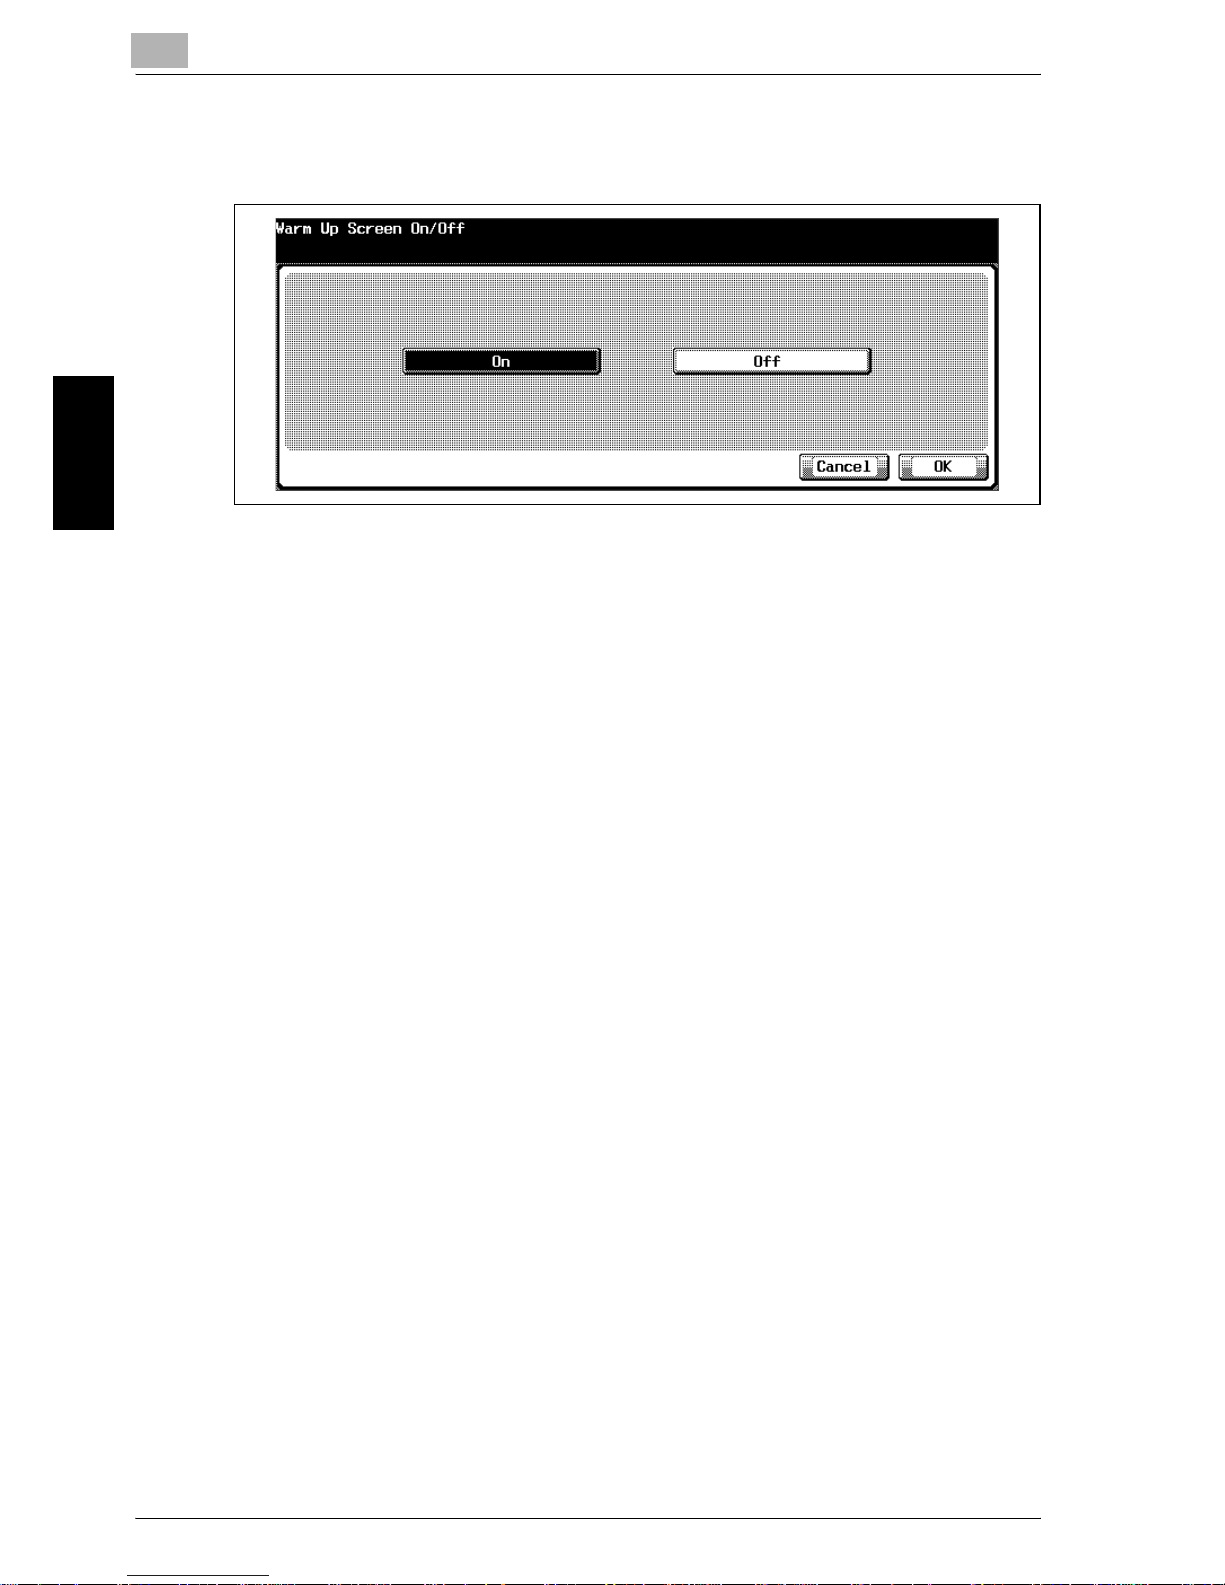
3 Touch [8 Warm Up Screen On/Off].
The Warm Up Screen On/Off Screen will be displayed.
Page 67
3
Utility <User Setting>
3-20 Océ im9220
Utility <User Setting> Chapter 3
4 Select [On] when Warm Up Screen is displayed, and [Off] when Warm
Up Screen is not displayed.
5 Touch [OK] to complete the setting and return to the Utility Screen.
6 If further changes are required, touch the desired key.
Touch [Utility] to restore the Utility Screen.
Page 68
Utility <User Setting>
3
Océ im9220 3-21
Utility <User Setting> Chapter 3
3.4 2 Function Setting
3.4.1 1 Feed Tray Setting>1 Feed Tray Auto Selection
Select the tray size setting to be detected when ATS functions. You may also
select the priority of the detection for each tray.
PrOcédure
1 Press the [Utility/Counter] to display the Utility Screen.
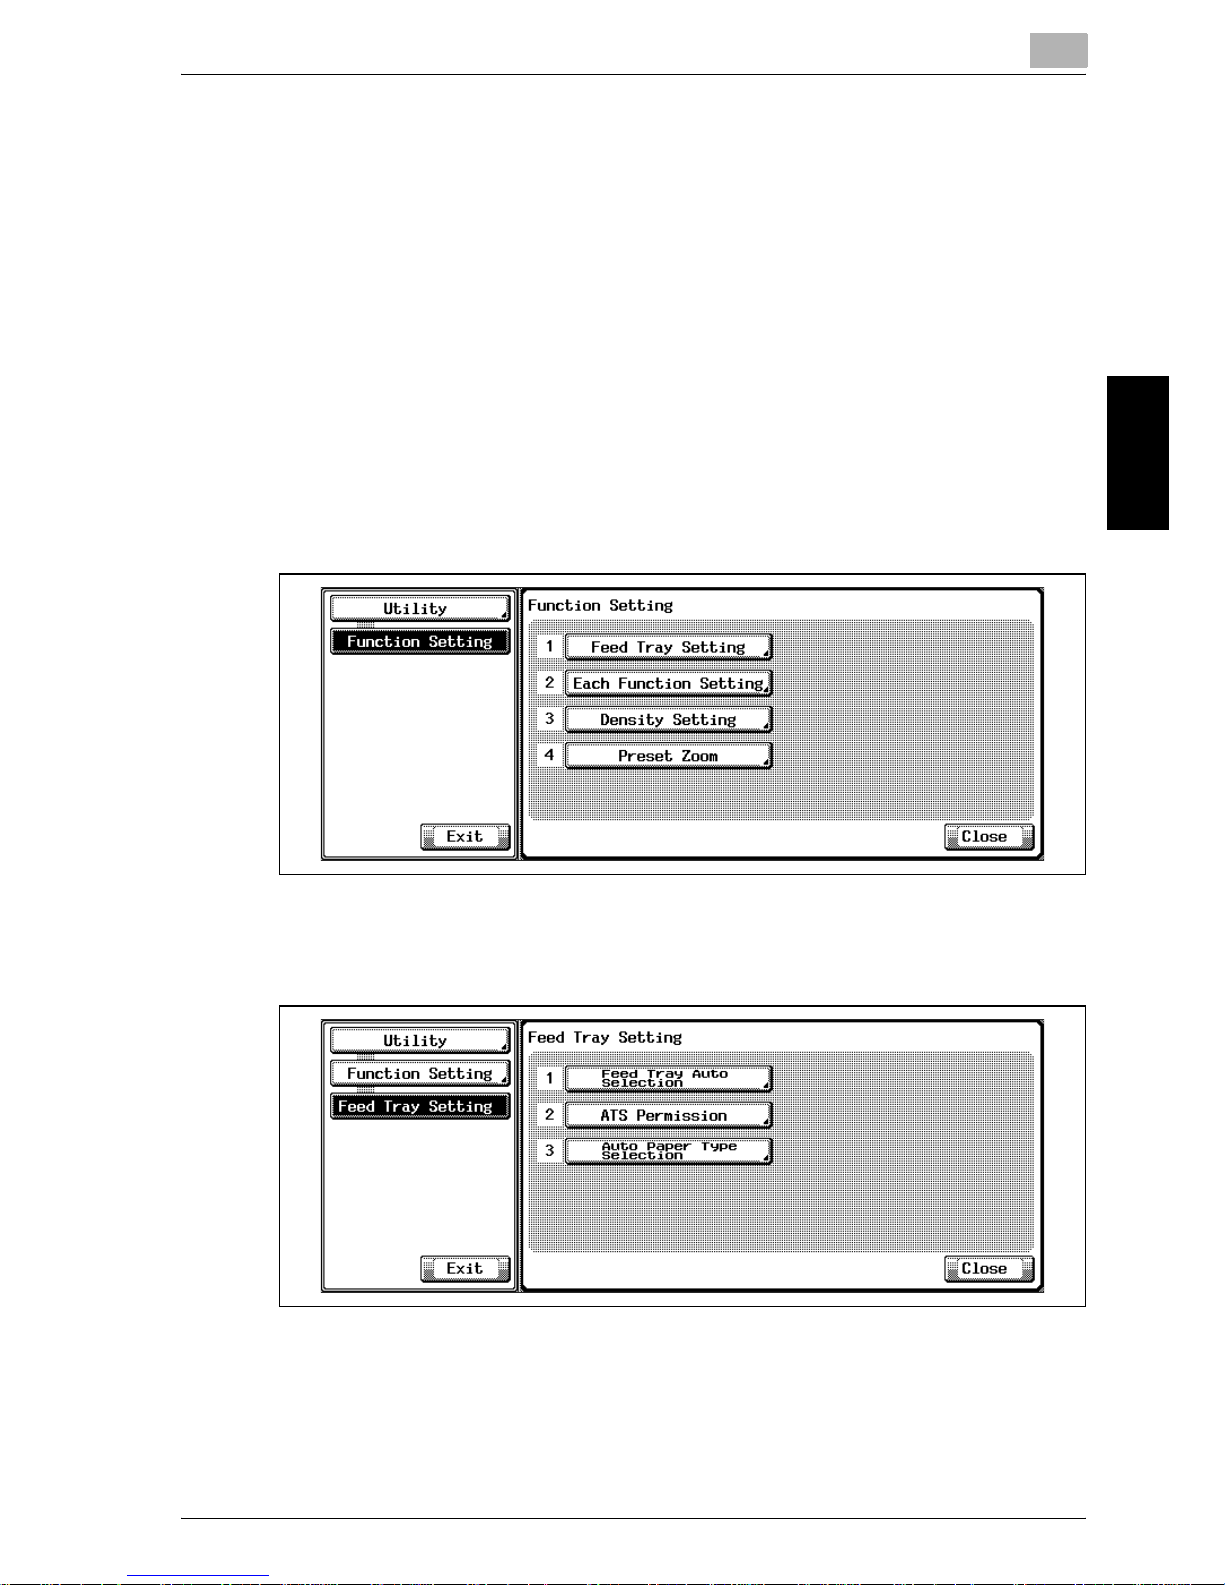
2 Touch [2 Function Setting].
The Function Setting Screen will be displayed.
3 Touch [1 Feed Tray Setting].
The Feed Tray Setting Screen will be displayed.
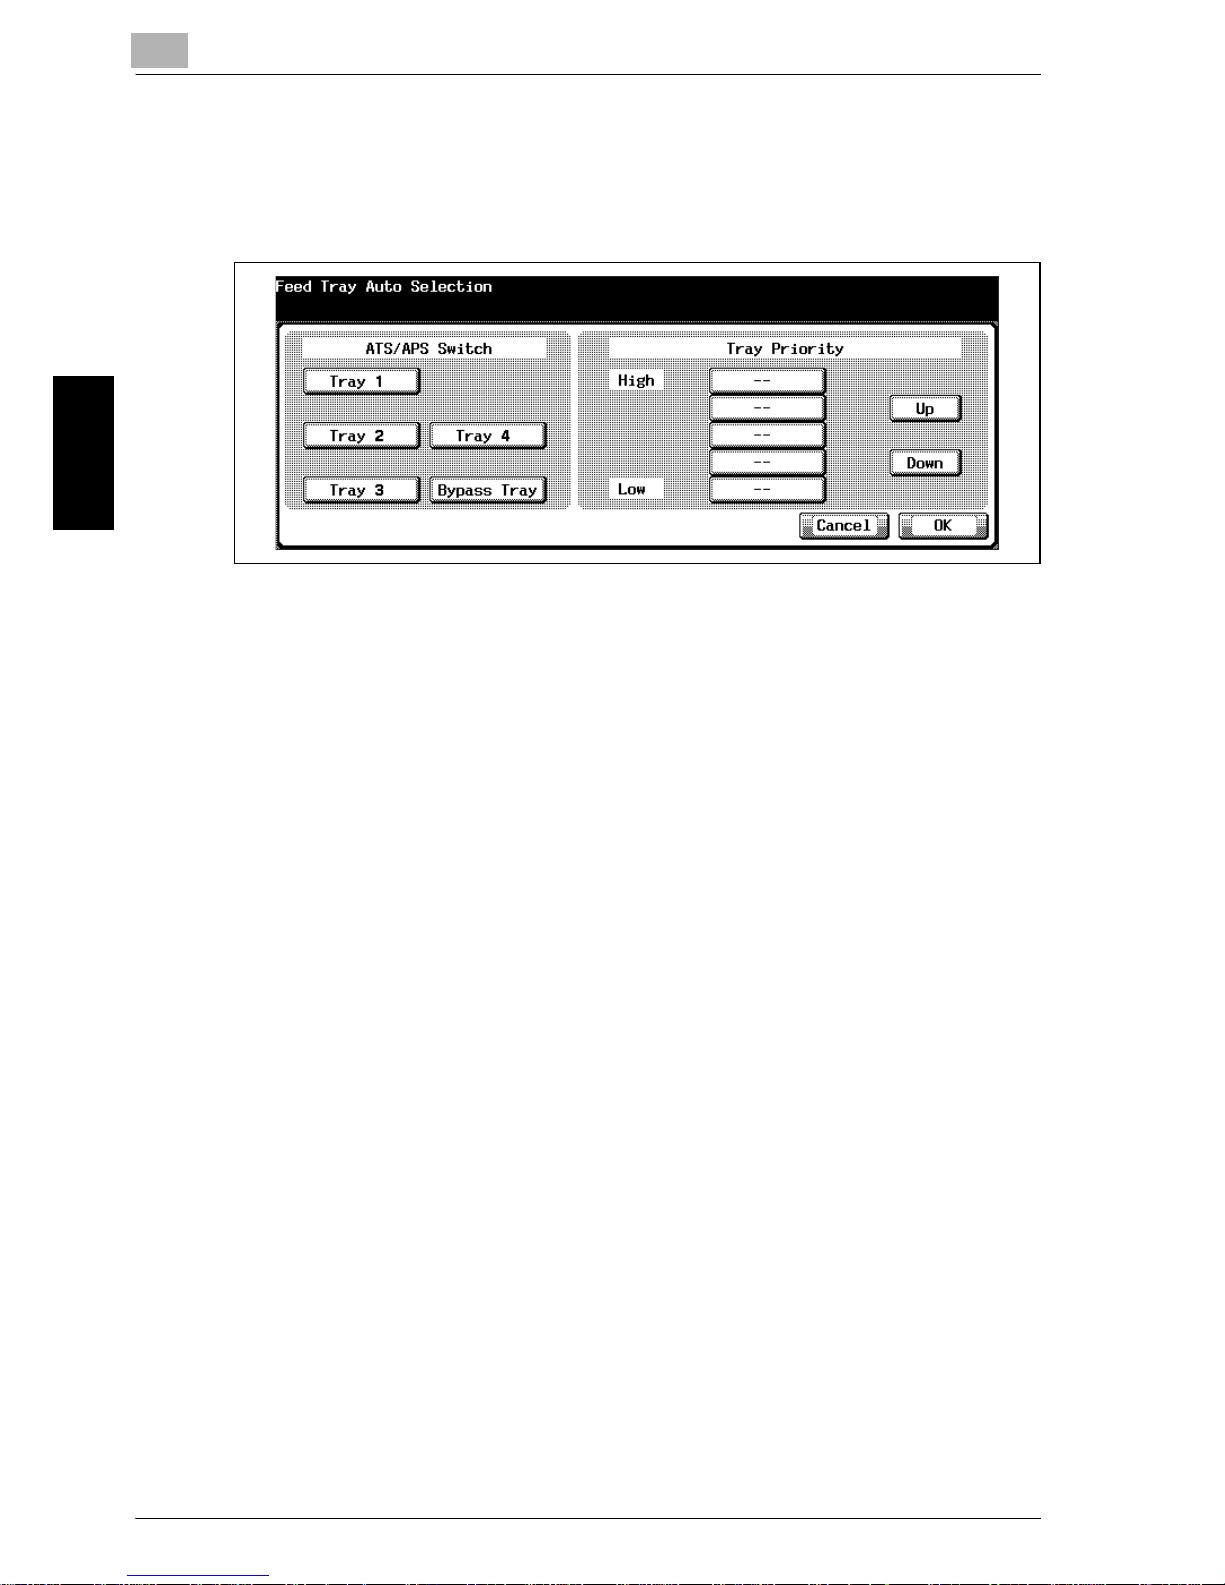
4 Touch [1 Feed Tray Auto Selection].
The Feed Tray Auto Selection Screen will be displayed.
Page 69
3
Utility <User Setting>
3-22 Océ im9220
Utility <User Setting> Chapter 3
5 Touch to highlight the desired tray key under ATS/APS Switch.
The selected tray is automatically detected when ATS functions. The
trays not selected will not be detected even when ATS functions.
The selected tray will be displayed under Tray Priority as the tray key.
6 Touch to highlight the desired tray key under Tray Priority, then change
its priority by using [Up] and [Down].
7 Touch [OK] to complete the setting and return to the Feed Tray Setting
Screen.
8 If further changes are required, touch the desired key.
Touch [Utility] to restore the Utility Screen.
Page 70
Utility <User Setting>
3
Océ im9220 3-23
Utility <User Setting> Chapter 3
3.4.2 1 Feed Tray Setting>2 ATS Permission
Set ATS (Automatic Tray Selection) On or Off.
PrOcédure
1 Press the [Utility/Counter] to display the Utility Screen.
2 Touch [2 Function Setting].
The Function Setting Screen will be displayed.
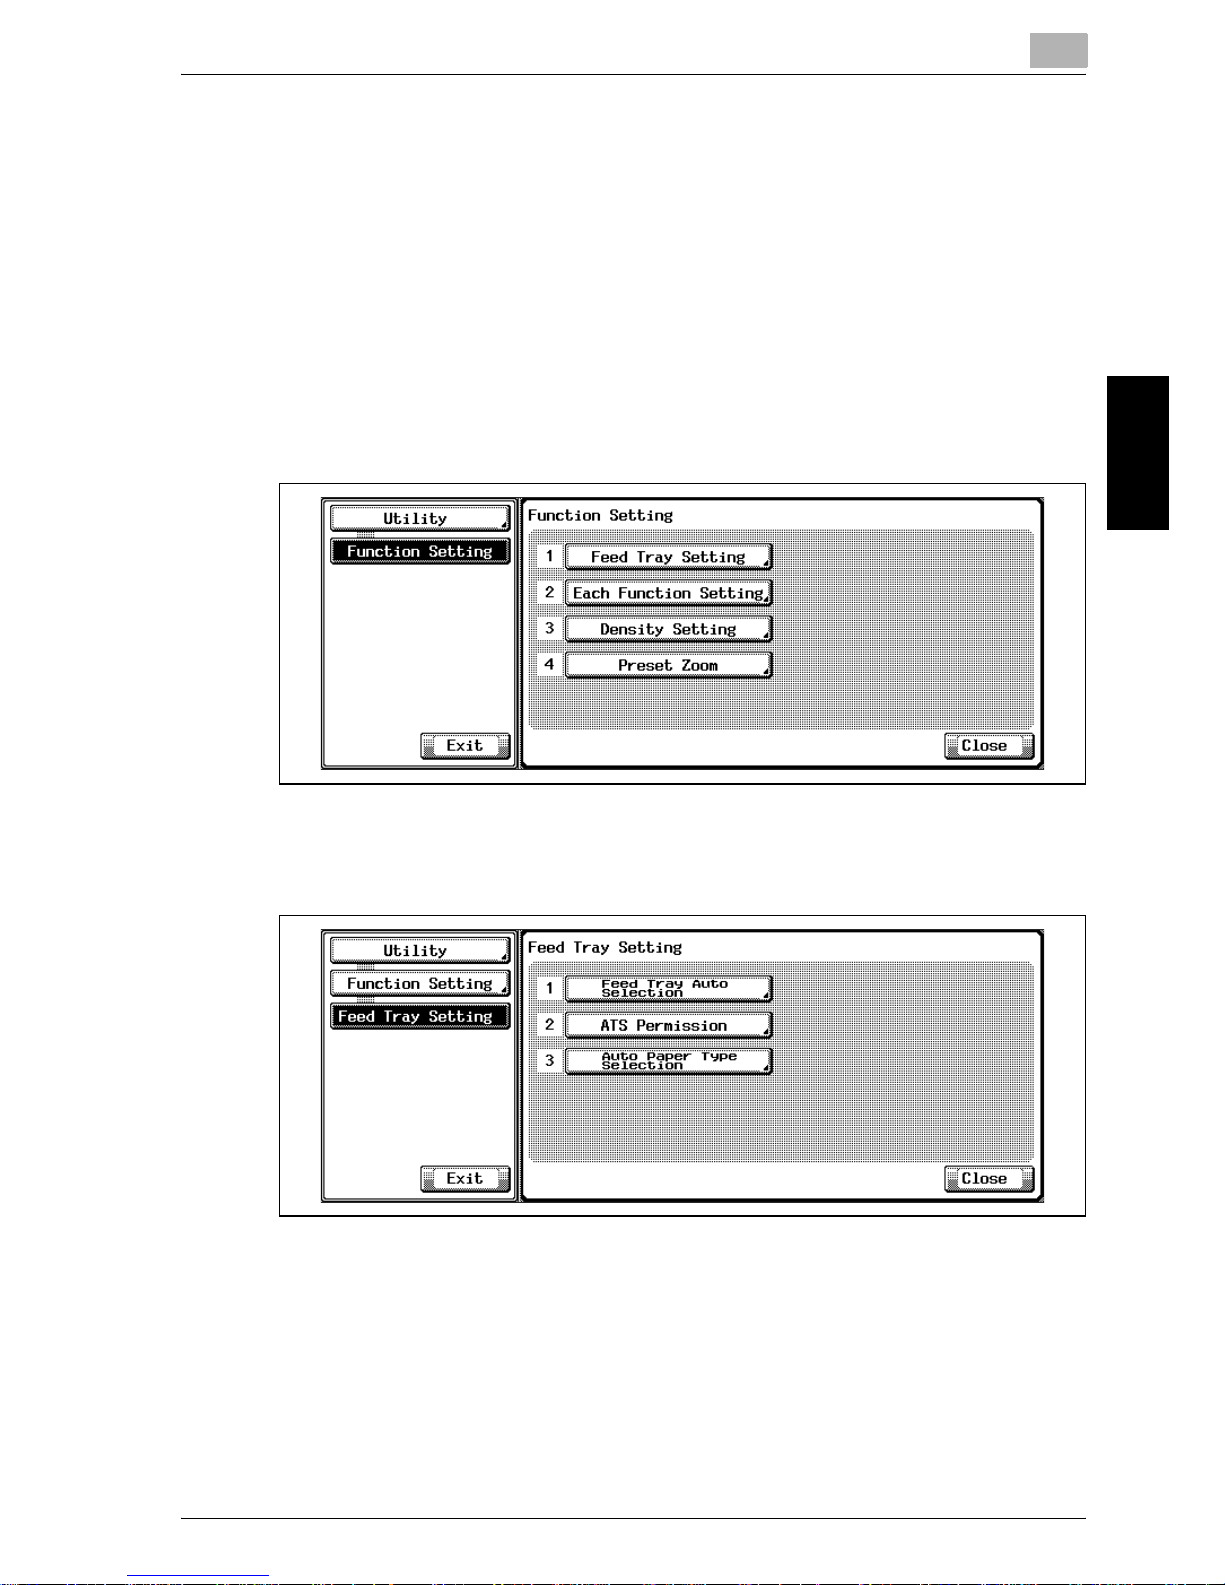
3 Touch [1 Feed Tray Setting].
The Feed Tray Setting Screen will be displayed.
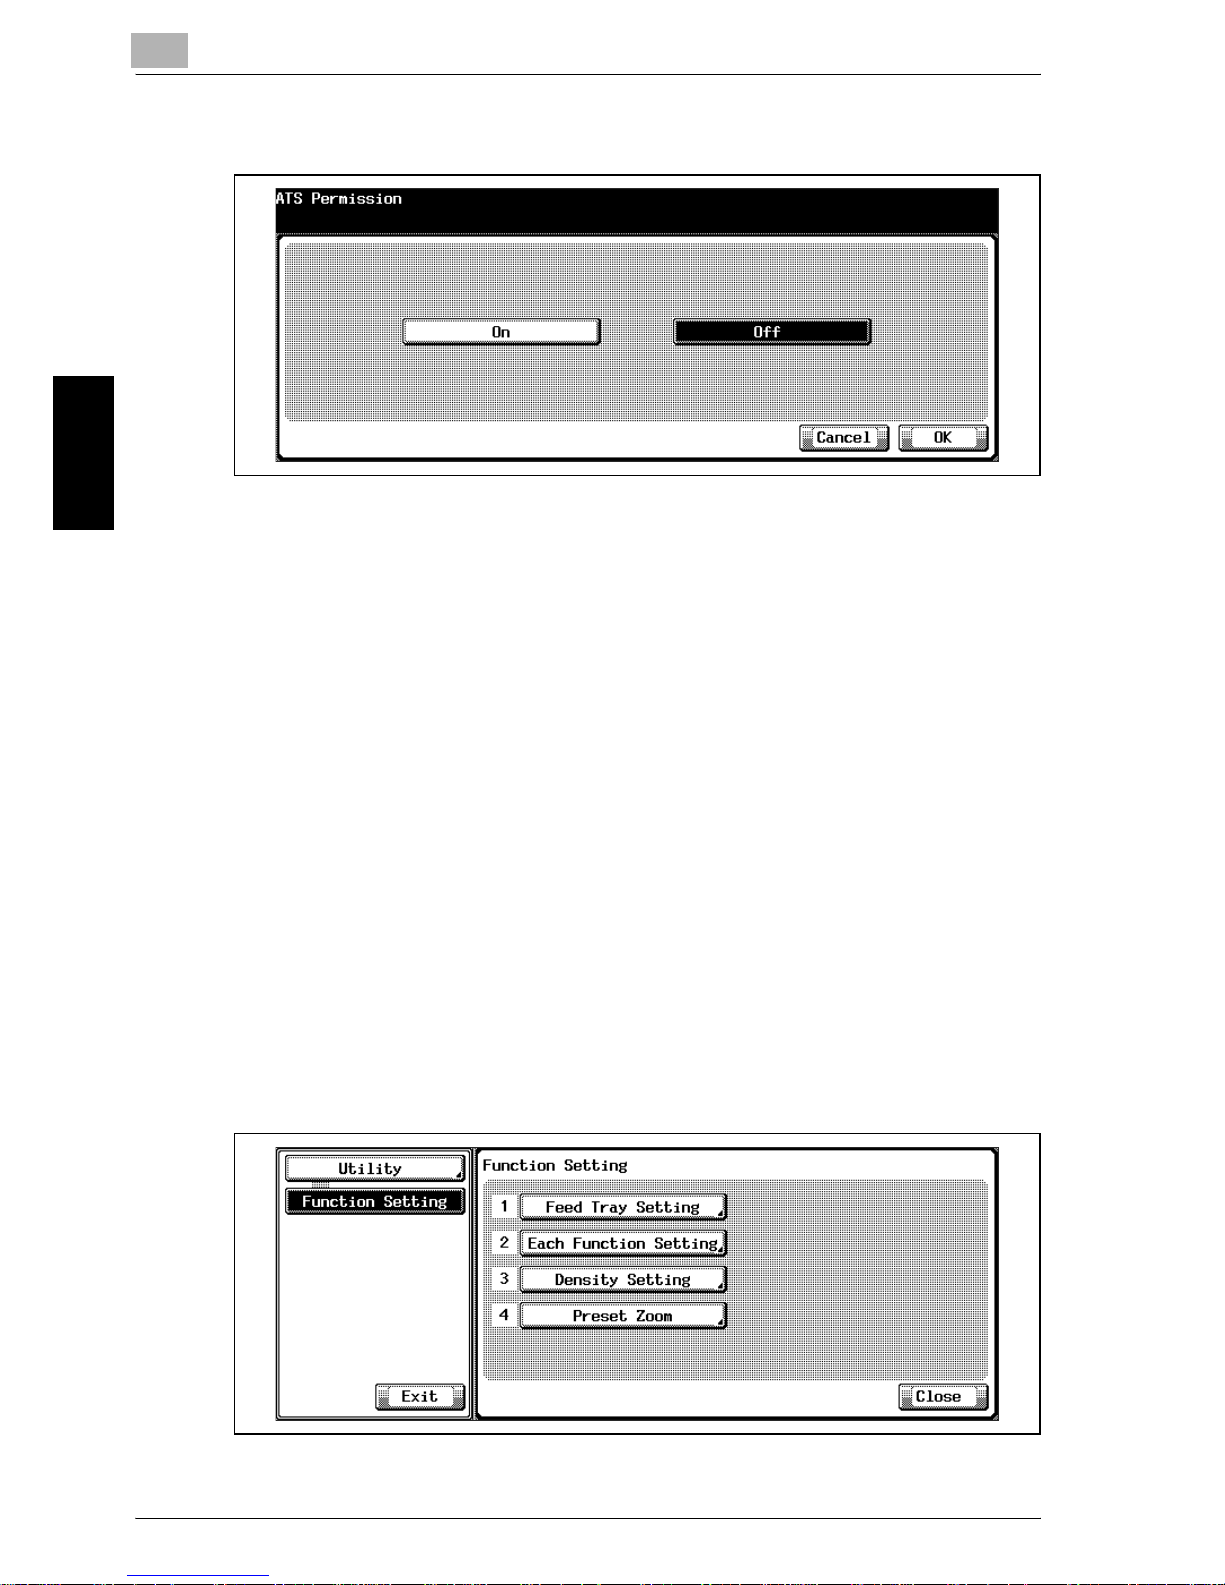
4 Touch [2 ATS Permission].
The ATS Permission Screen will be displayed.
Page 71
3
Utility <User Setting>
3-24 Océ im9220
Utility <User Setting> Chapter 3
5 Select [On] when ATS is used, and [Off] when ATS is not used.
6 Touch [OK] to complete the setting and return to the Feed Tray Setting
Screen.
7 If further changes are required, touch the desired key.
Touch [Utility] to restore the Utility Screen.
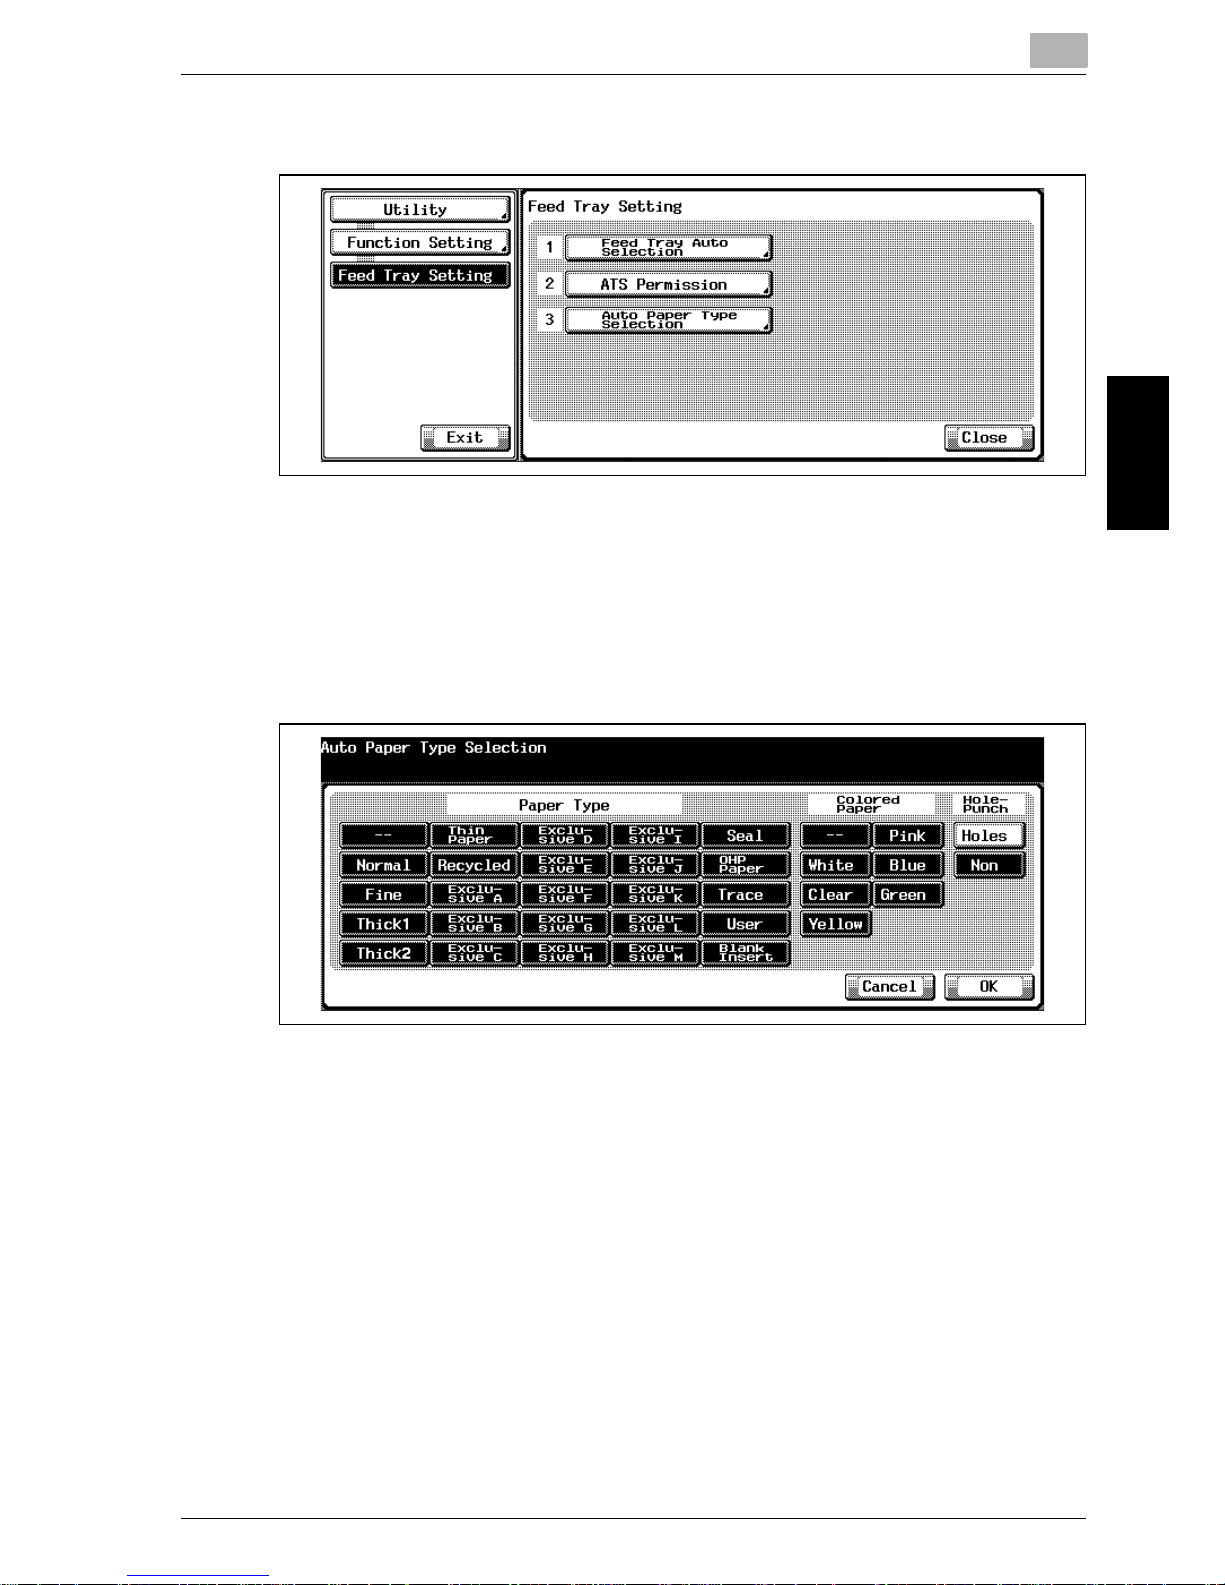
3.4.3 1 Feed Tray Setting>3 Auto Paper Type Selection
Select the paper type setting of the tray which is automatically selected when
ATS functions. When the paper type that is not specified with this function is
designated to the tray that is automatically selected by ATS, the machine indicates the paper type unmatched.
PrOcédure
1 Press the [Utility/Counter] to display the Utility Screen.
2 Touch [2 Function Setting].
The Function Setting Screen will be displayed.
3 Touch [1 Feed Tray Setting].
The Feed Tray Setting Screen will be displayed.
Page 72
Utility <User Setting>
3
Océ im9220 3-25
Utility <User Setting> Chapter 3
4 Touch [3 Auto Paper Type Selection].
The Auto Paper Type Selection Screen will be displayed.
5 Select the paper type of the tray which is automatically selected when
ATS functions.
Touch to highlight the desired type of keys under Paper Type, Weight,
Colored Paper, and Hole-Punch. You may choose more than one key
for each item.
6 Touch [OK] to complete the setting and return to the Feed Tray Setting
Screen.
7 If further changes are required, touch the desired key.
Touch [Utility] to restore the Utility Screen.
Page 73
3
Utility <User Setting>
3-26 Océ im9220
Utility <User Setting> Chapter 3
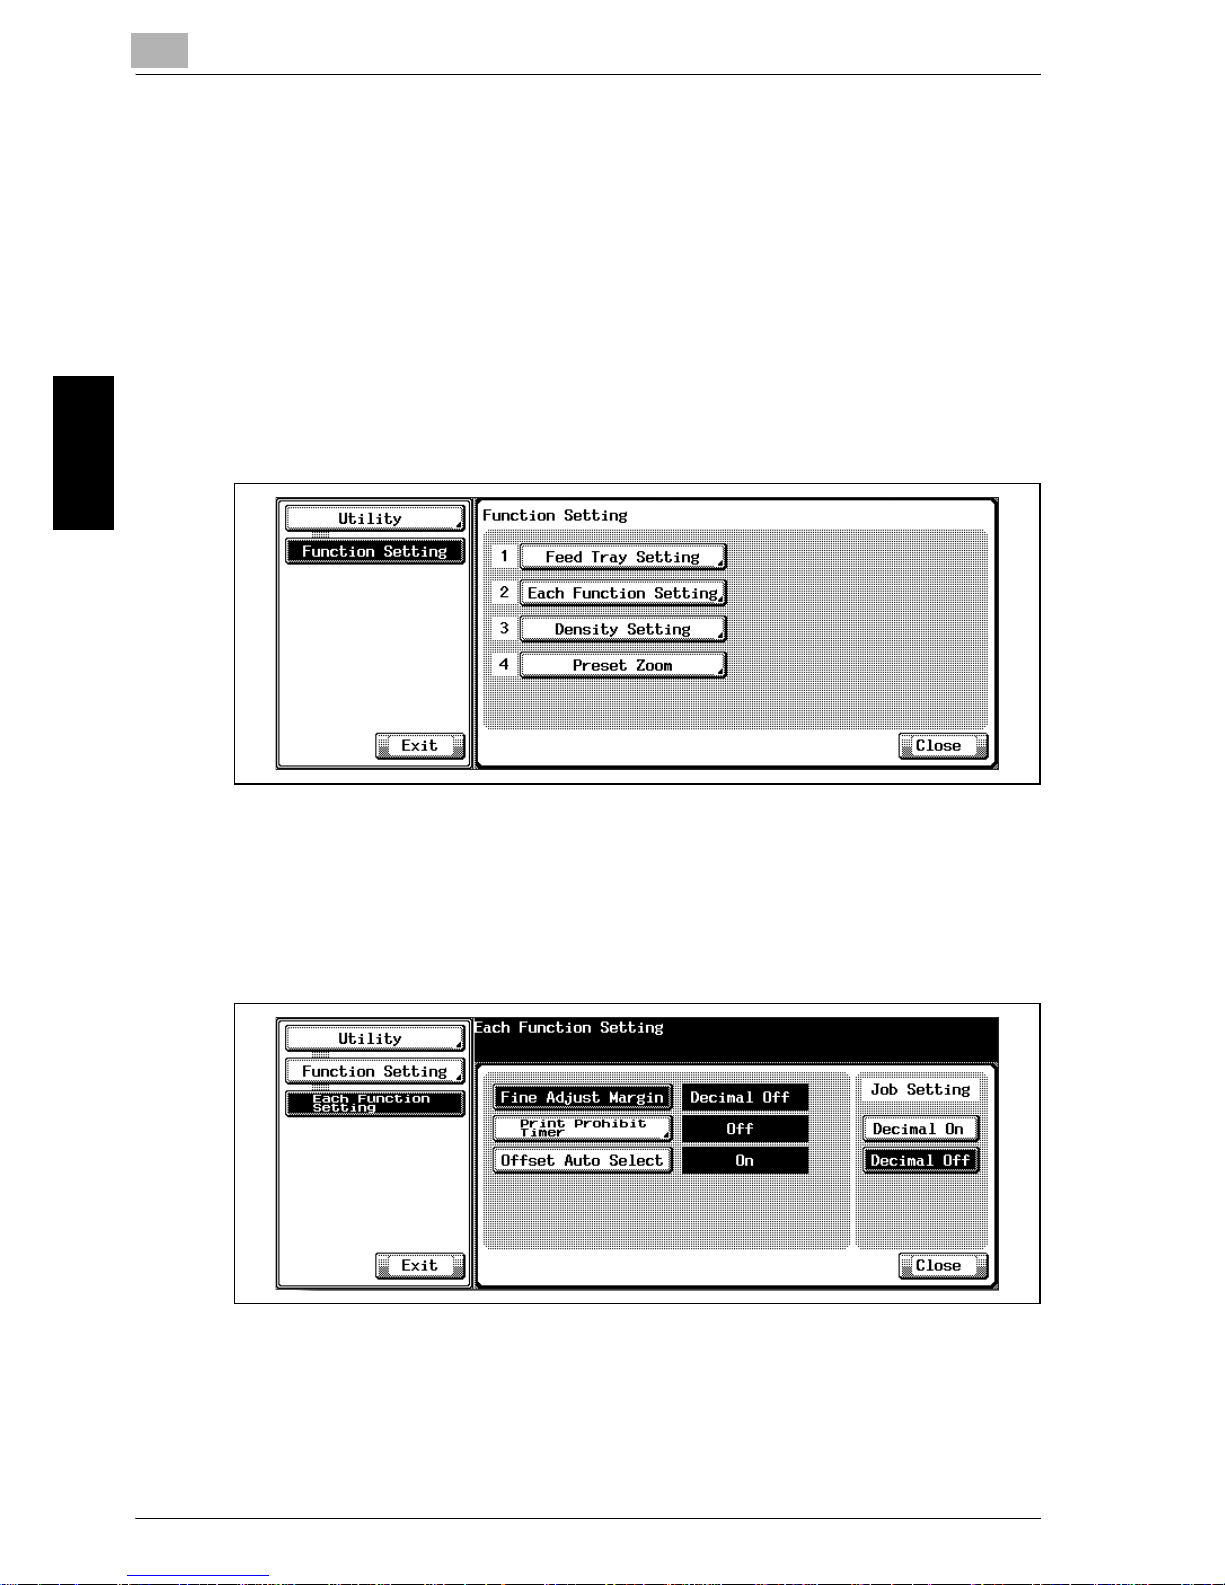
3.4.4 2 Each Function Setting>Fine Adjust Margin
Select to enter a decimal point for image shift.
PrOcédure
1 Press the [Utility/Counter] to display the Utility Screen.
2 Touch [2 Function Setting].
The Function Setting Screen will be displayed.
3 Touch [2 Each Function Setting].
The Each Function Setting Screen will be displayed.
4 Touch [Fine Adjust Margin] to display the selection keys.
5 Touch [Decimal On] or [Decimal Off] to specify image shift in decimal
point or not.
6 If further changes are required, touch the desired key.
Touch [Utility] to restore the Utility Screen.
Page 74
Utility <User Setting>
3
Océ im9220 3-27
Utility <User Setting> Chapter 3
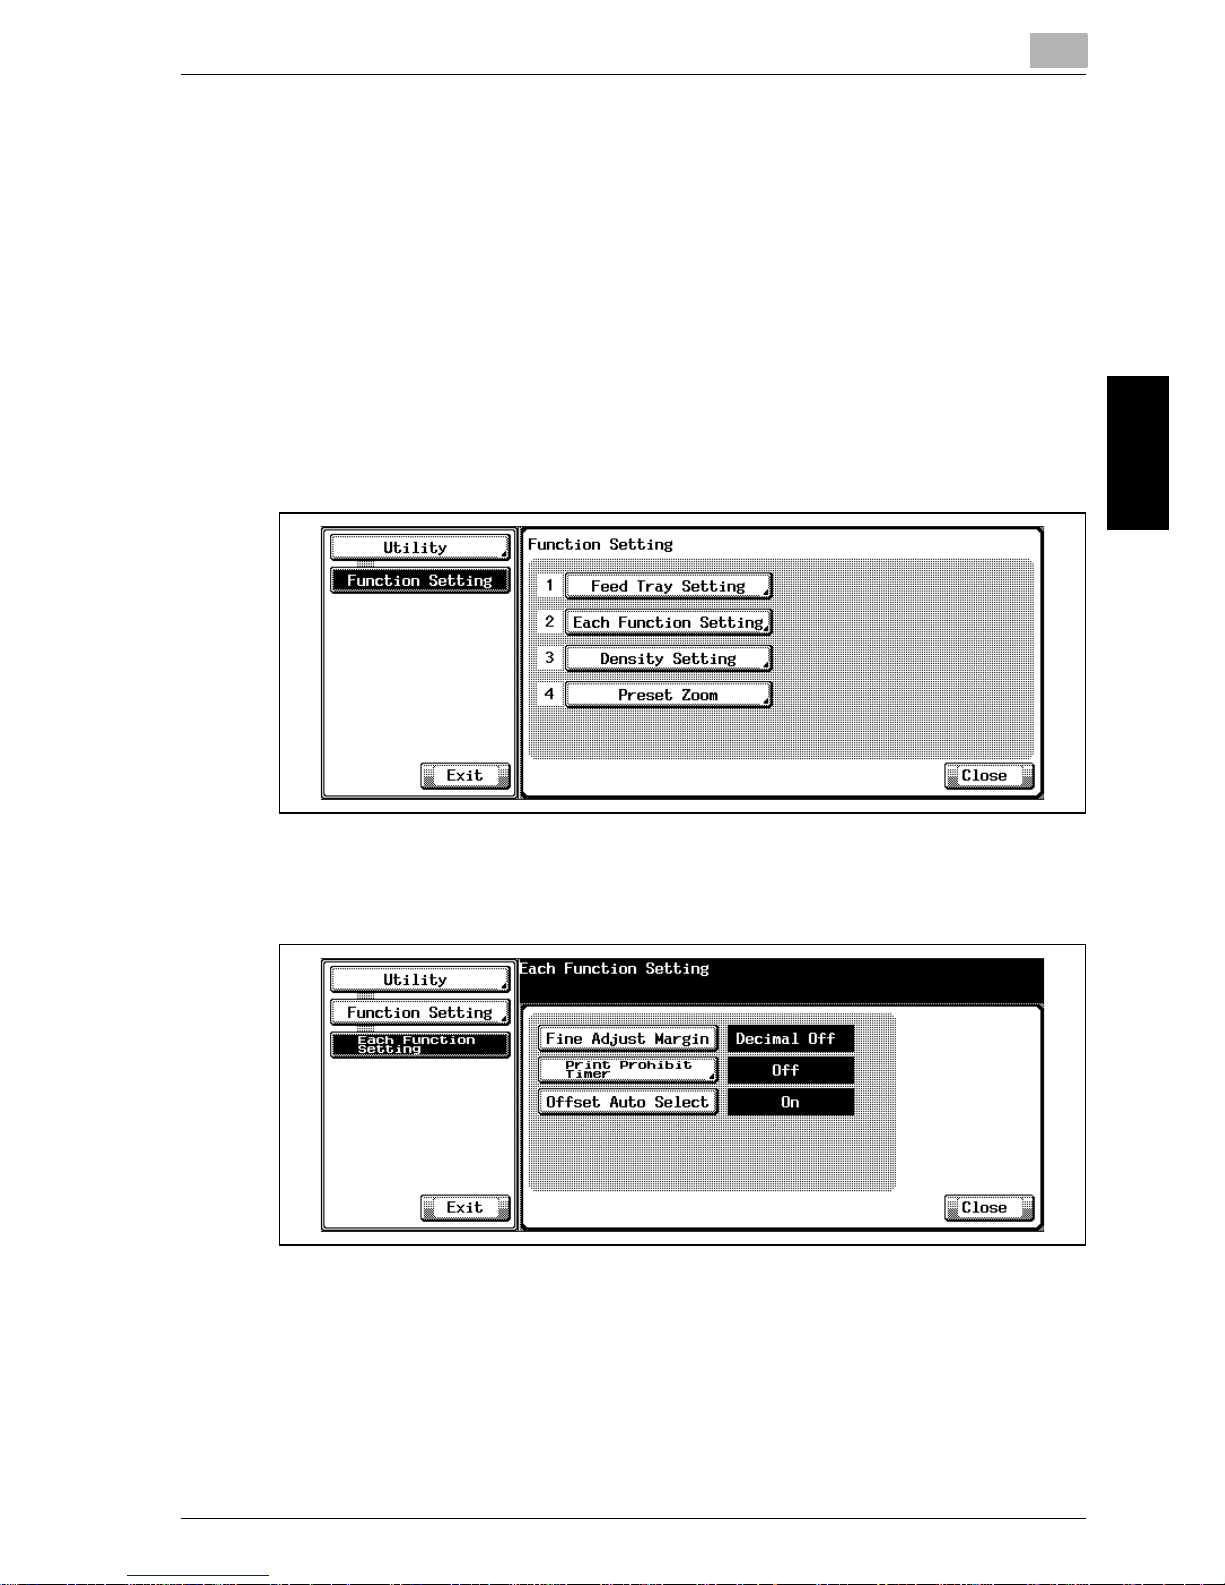
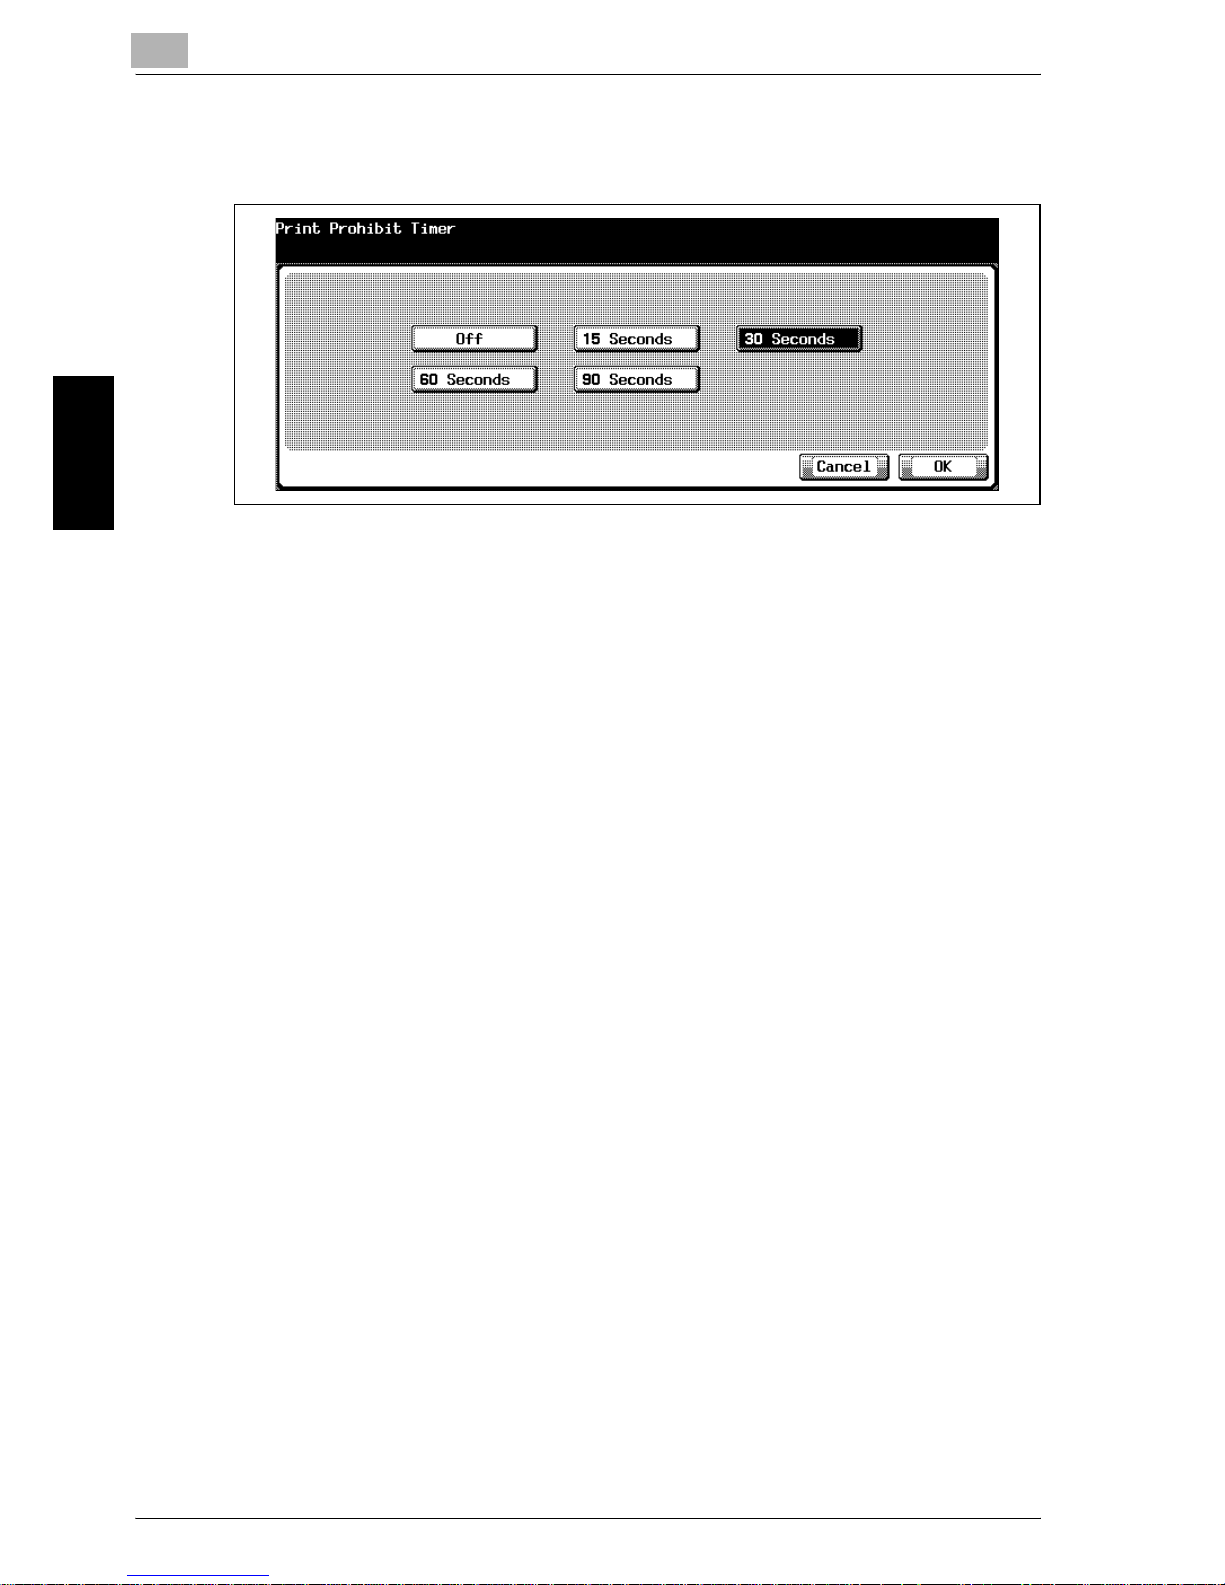
3.4.5 2 Each Function Setting>Print Prohibit Timer
Select the interval time that printing via PC is prohibited after touching a
touch key on the touch panel.
PrOcédure
1 Press the [Utility/Counter] to display the Utility Screen.
2 Touch [2 Function Setting].
The Function Setting Screen will be displayed.
3 Touch [2 Each Function Setting].
The Each Function Setting Screen will be displayed.
4 Touch [Print Prohibit Timer] to display the Print Prohibit Timer Screen.
Page 75
3
Utility <User Setting>
3-28 Océ im9220
Utility <User Setting> Chapter 3
5 Select the desired interval time key to set the timer, and then touch
[OK] to return to the Each Function Setting Screen.
6 If further changes are required, touch the desired key.
Touch [Utility] to restore the Utility Screen.
Page 76
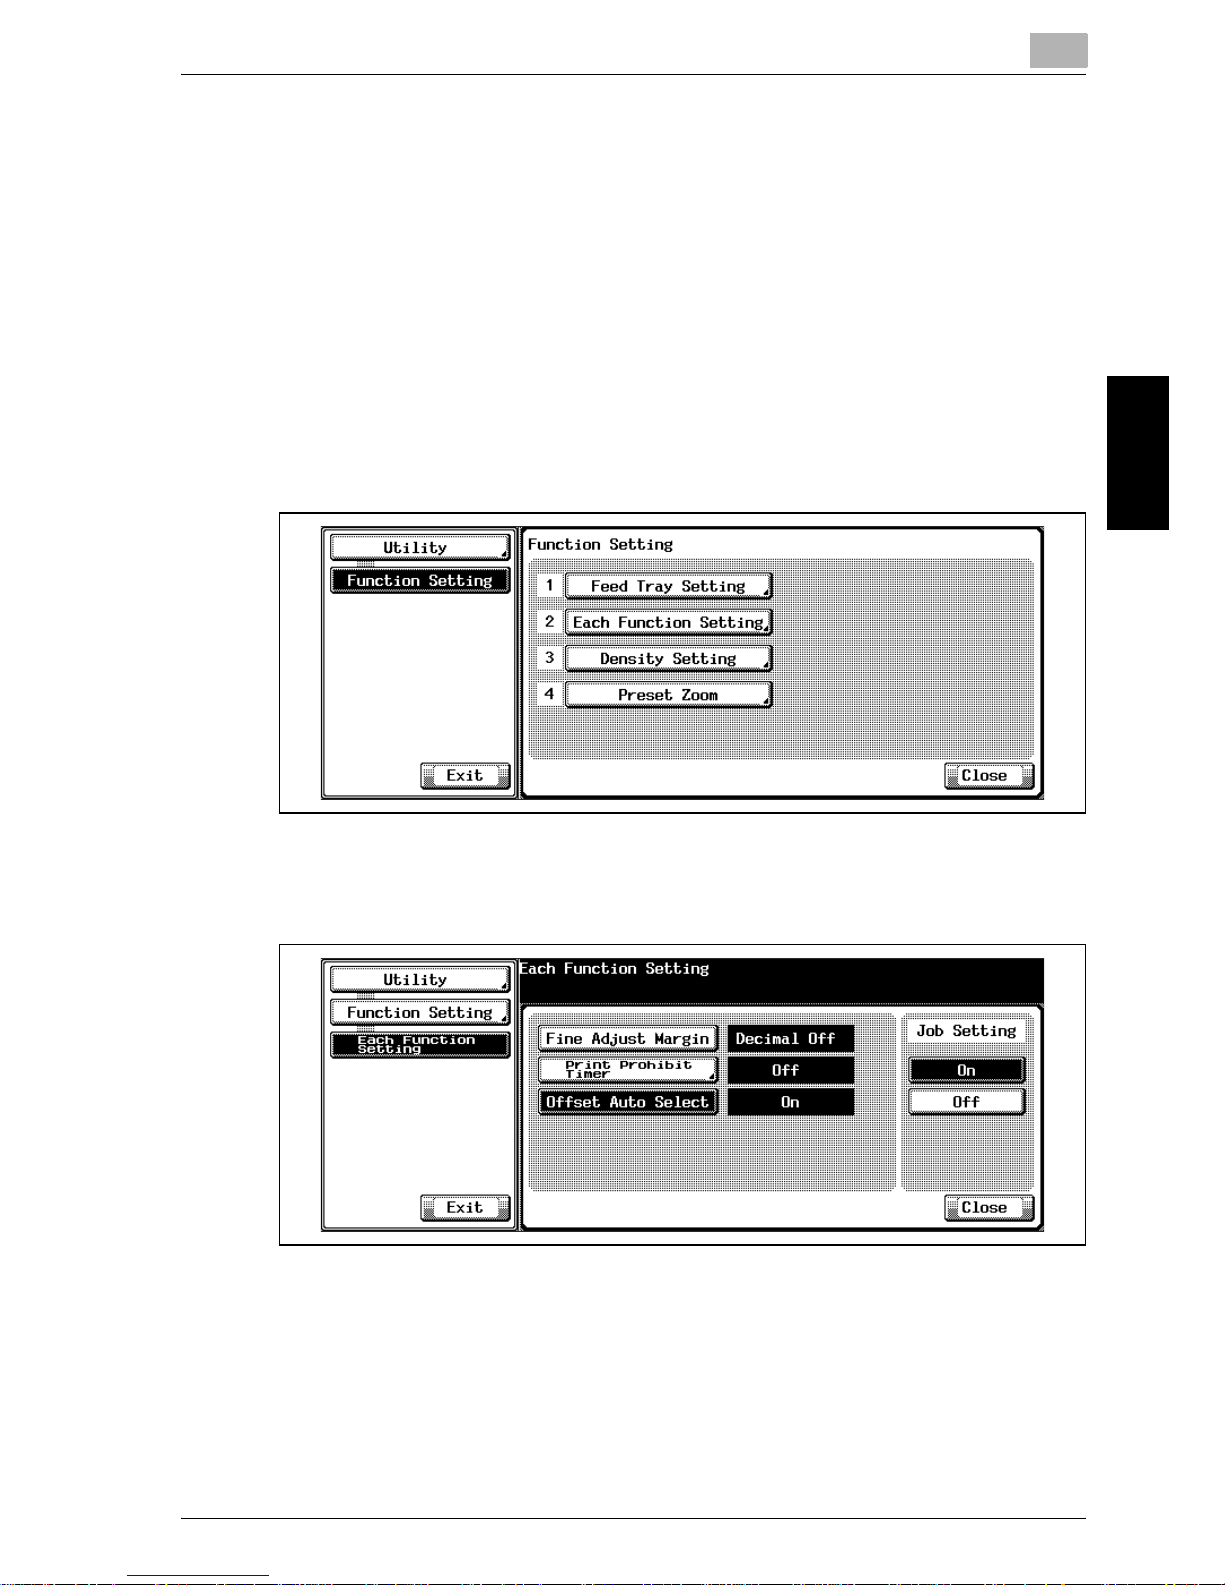
Utility <User Setting>
3
Océ im9220 3-29
Utility <User Setting> Chapter 3
3.4.6 2 Each Function Setting>Offset Auto Select
Specify whether or not to select Offset automatically when Sort or Group is
selected.
PrOcédure
1 Press the [Utility/Counter] to display the Utility Screen.
2 Touch [2 Function Setting].
The Function Setting Screen will be displayed.
3 Touch [2 Each Function Setting].
The Each Function Setting Screen will be displayed.
4 Touch [Offset Auto Select] to display the selection keys.
5 Touch [On] to select Offset automatically, or [Off] to leave it deselected.
6 If further changes are required, touch the desired key.
Touch [Utility] to restore the Utility Screen.
Page 77
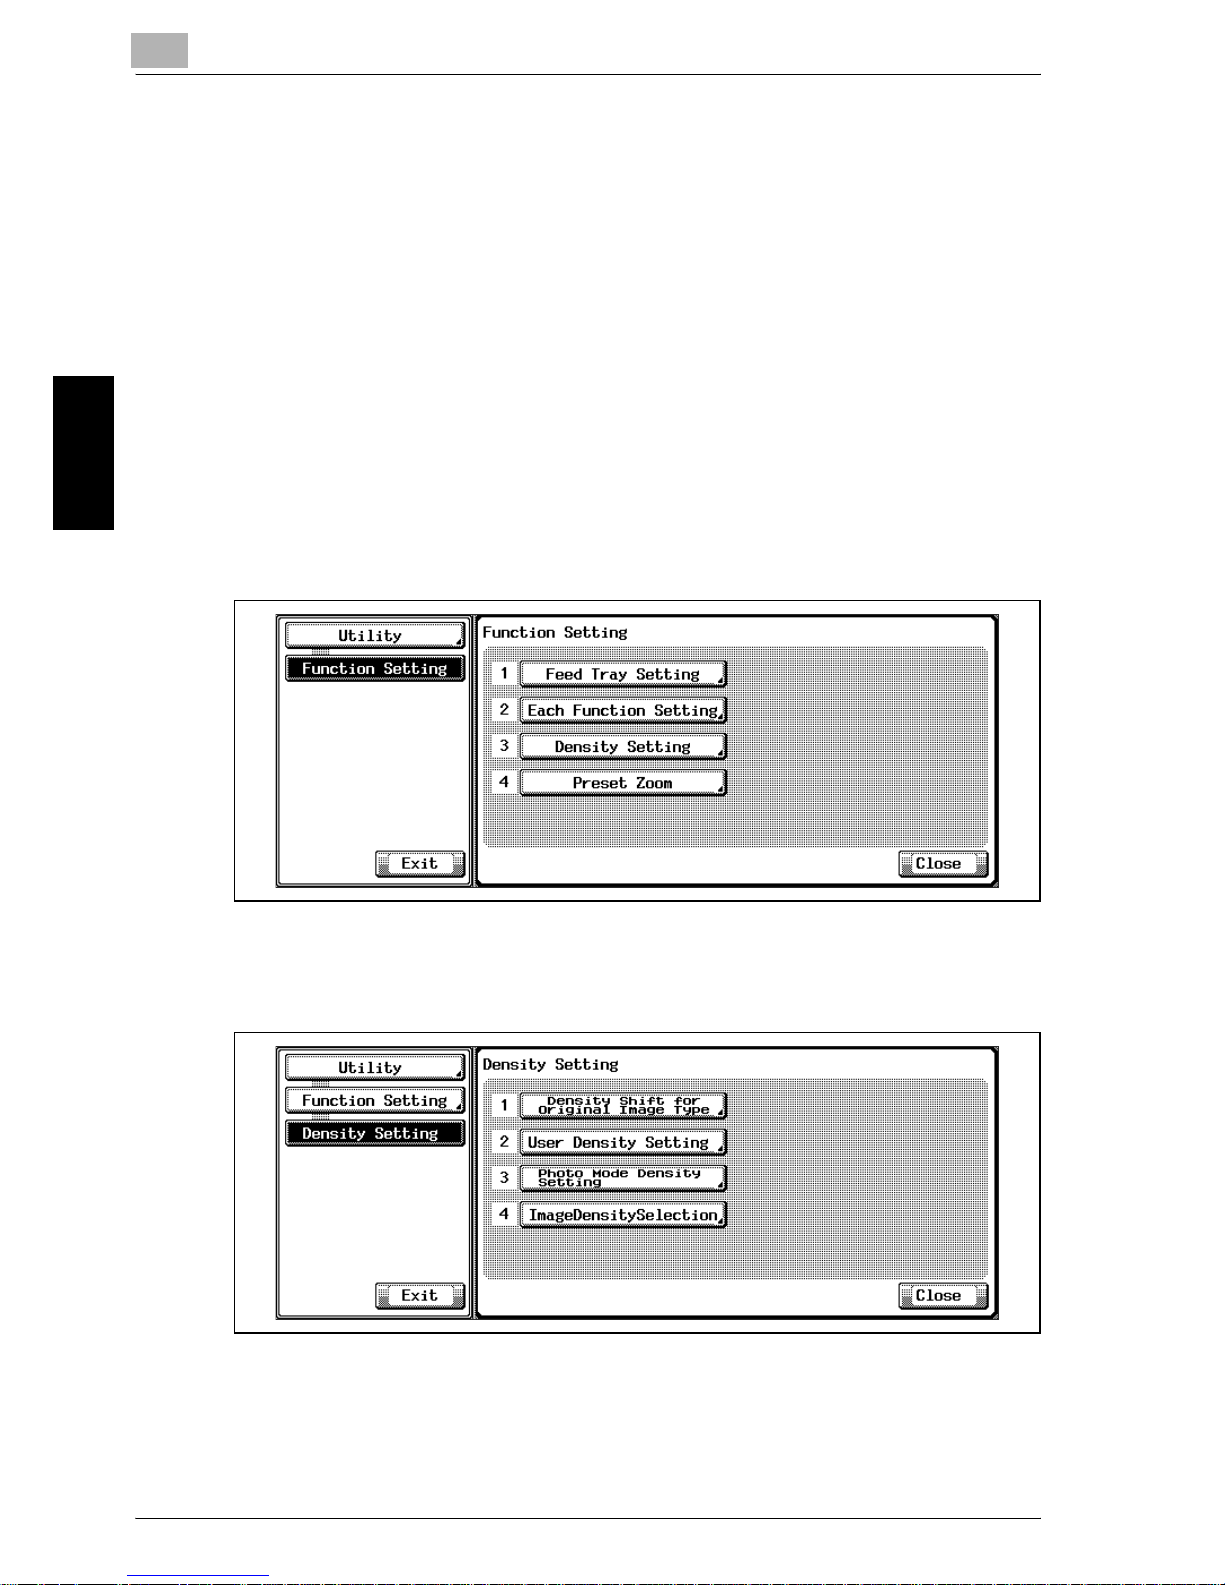
3
Utility <User Setting>
3-30 Océ im9220
Utility <User Setting> Chapter 3
3.4.7 3 Density Setting>1 Density Shift for Original Image Type
Select the desired copy density level manually from nine levels on the Copy
Screen, and also shift each of nine density levels to three levels lighter or
three levels darker.
Density shift can be applied to each Original Image Type: Auto (Text/photo),
Low Contrast, Photo, and Text.
PrOcédure
1 Press the [Utility/Counter] to display the Utility Screen.
2 Touch [2 Function Setting].
The Function Setting Screen will be displayed.
3 Touch [3 Density Setting].
The Density Setting Screen will be displayed.
4 Touch [1 Density Shift for Original Image Type].
The Density Shift for Original Image Type Screen will be displayed.
Page 78
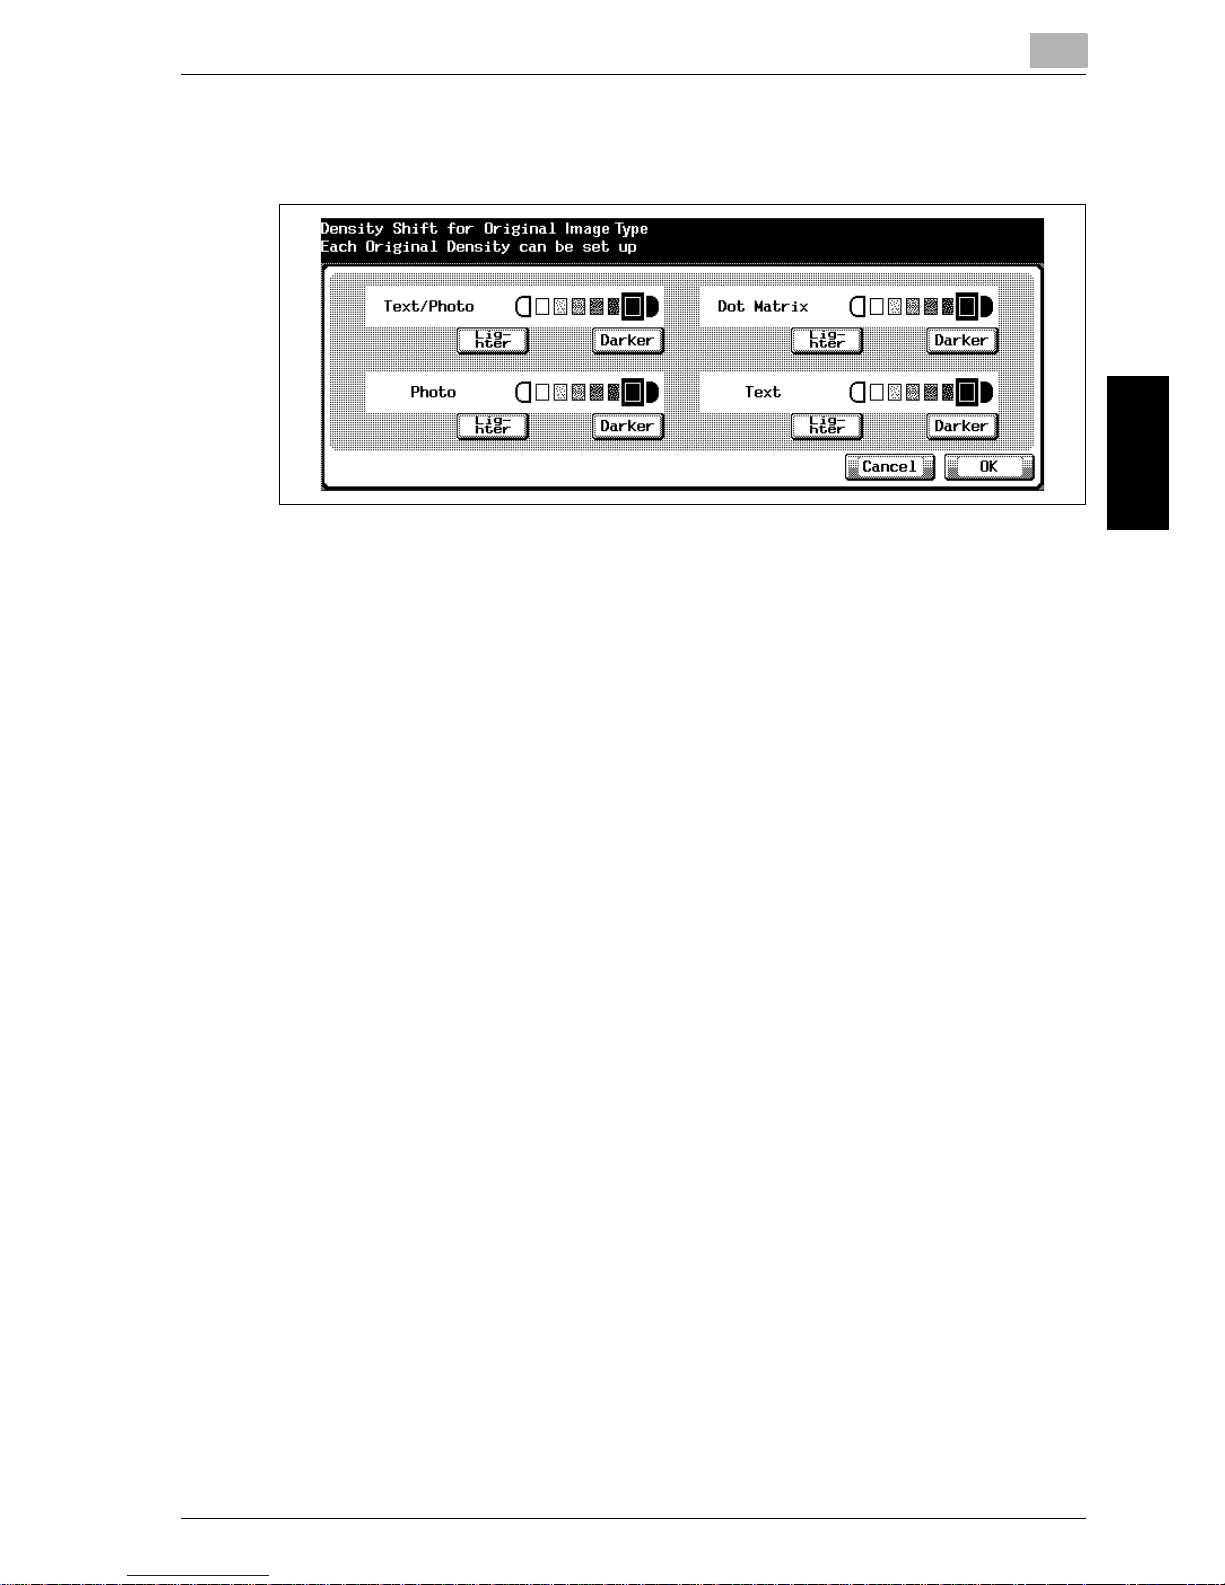
Utility <User Setting>
3
Océ im9220 3-31
Utility <User Setting> Chapter 3
5 Touch [Lighter] or [Darker] to specify the desired Density shift for each
Original Image Type.
6 Touch [OK] to complete the setting and return to the Density Setting
Screen.
7 If further changes are required, touch the desired key.
Touch [Utility] to restore the Utility Screen.
Page 79
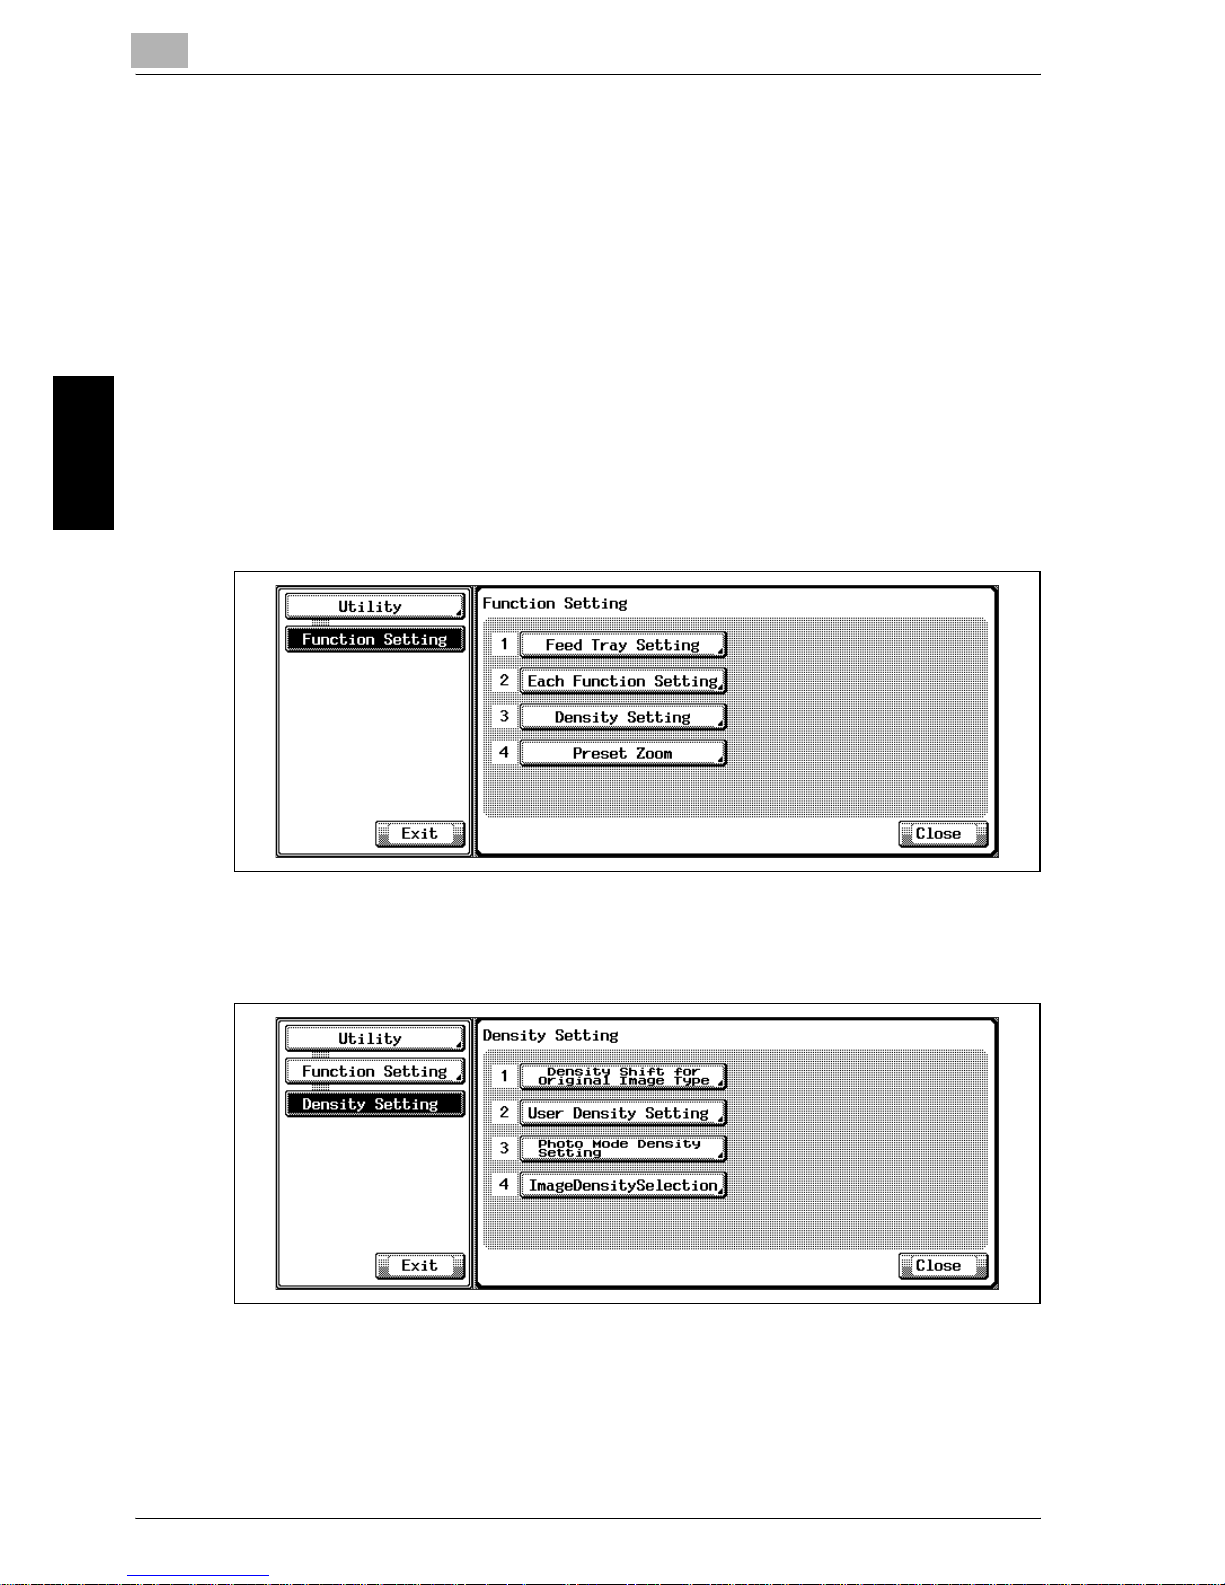
3
Utility <User Setting>
3-32 Océ im9220
Utility <User Setting> Chapter 3
3.4.8 3 Density Setting>2 User Density Setting
The copy density level is divided into 16 levels between Darker and Normal,
and between Normal and Lighter, respectively. Select and preset two levels
from the 32 levels. The preset density level setting can be recalled from Special Image on the Copy Screen.
PrOcédure
1 Press the [Utility/Counter] to display the Utility Screen.
2 Touch [2 Function Setting].
The Function Setting Screen will be displayed.
3 Touch [3 Density Setting].
The Density Setting Screen will be displayed.
4 Touch [2 User Density Setting].
The User Density Setting Screen Menu will be displayed.
Page 80
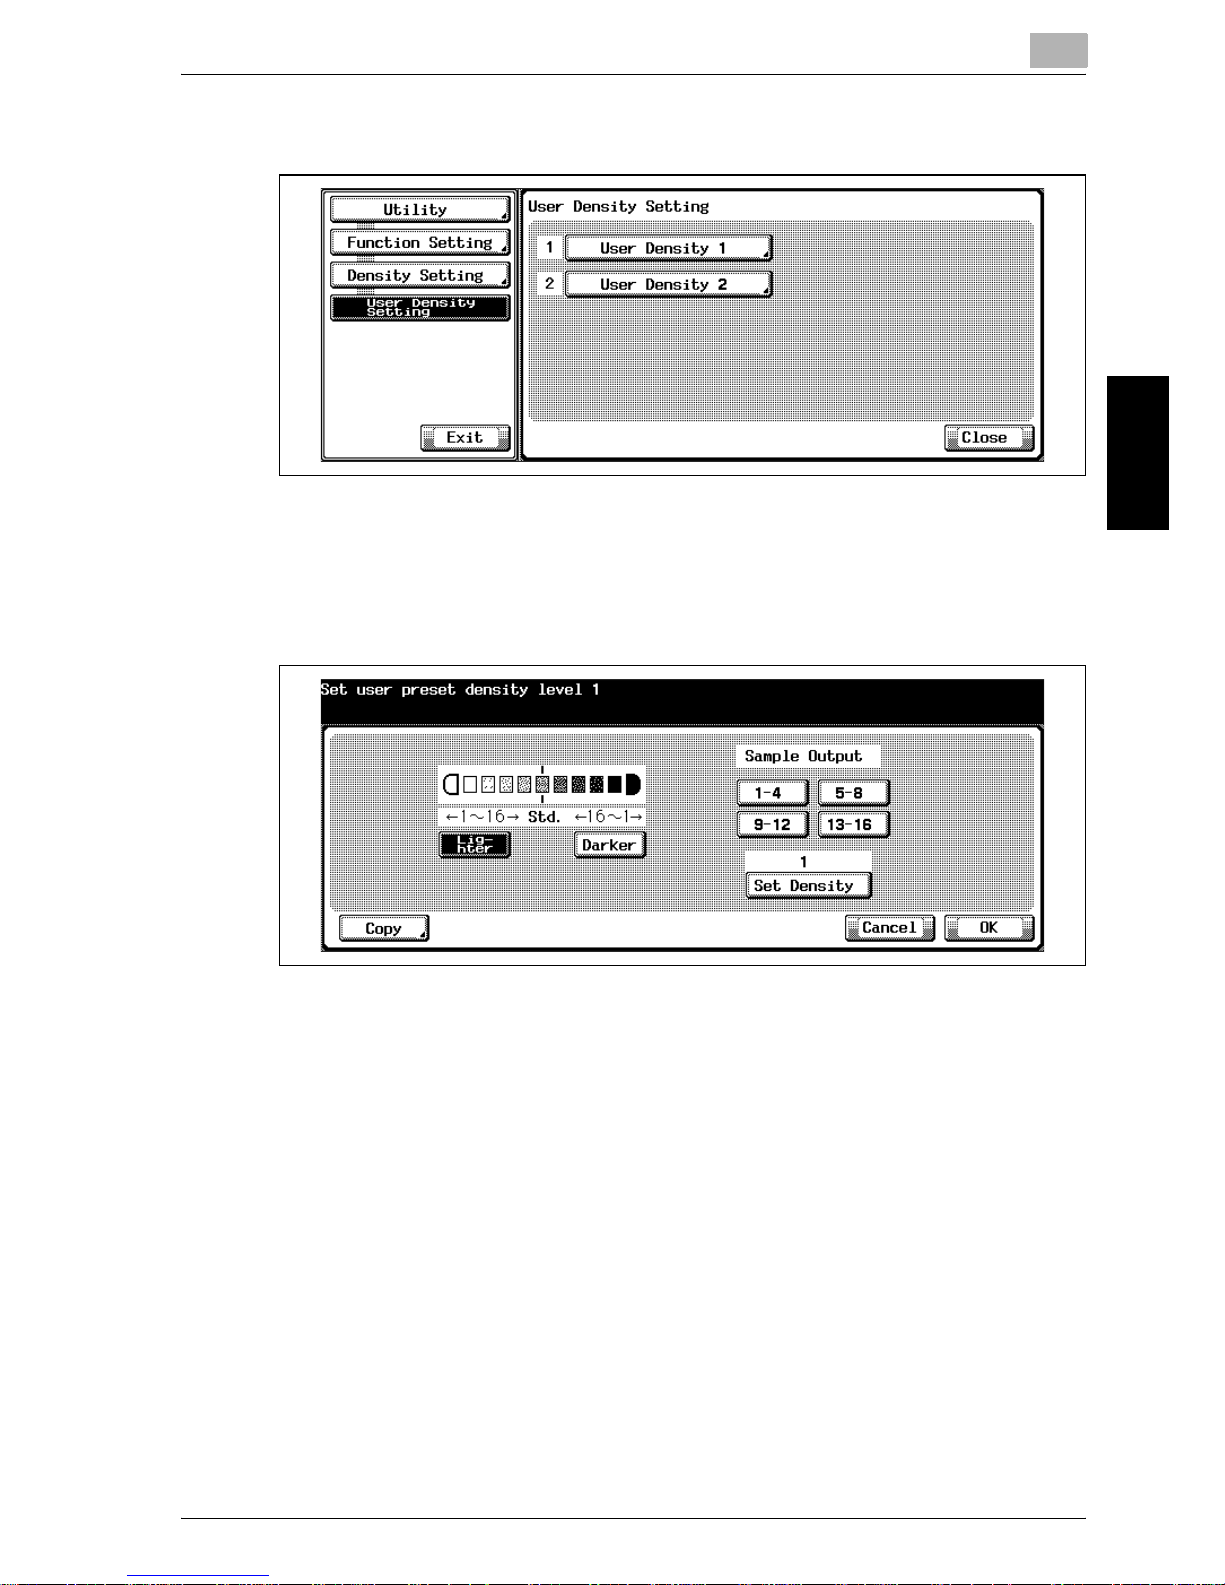
Utility <User Setting>
3
Océ im9220 3-33
Utility <User Setting> Chapter 3
5 Touch [User Density 1] or [User Density 2].
The Set User Preset Density Level Screen will be displayed.
6 Touch [Darker] or [Lighter] to select the desired density level to preset
either between the darkest and normal or between normal and the
lightest.
7 Output density level sample sheet.
Select the sample sheet from each sample output level of [1-4], [5-8],
[9-12], and [13-16], and touch [Copy]. Place the original on the original
glass, and press the [Start] on the control panel.
Page 81
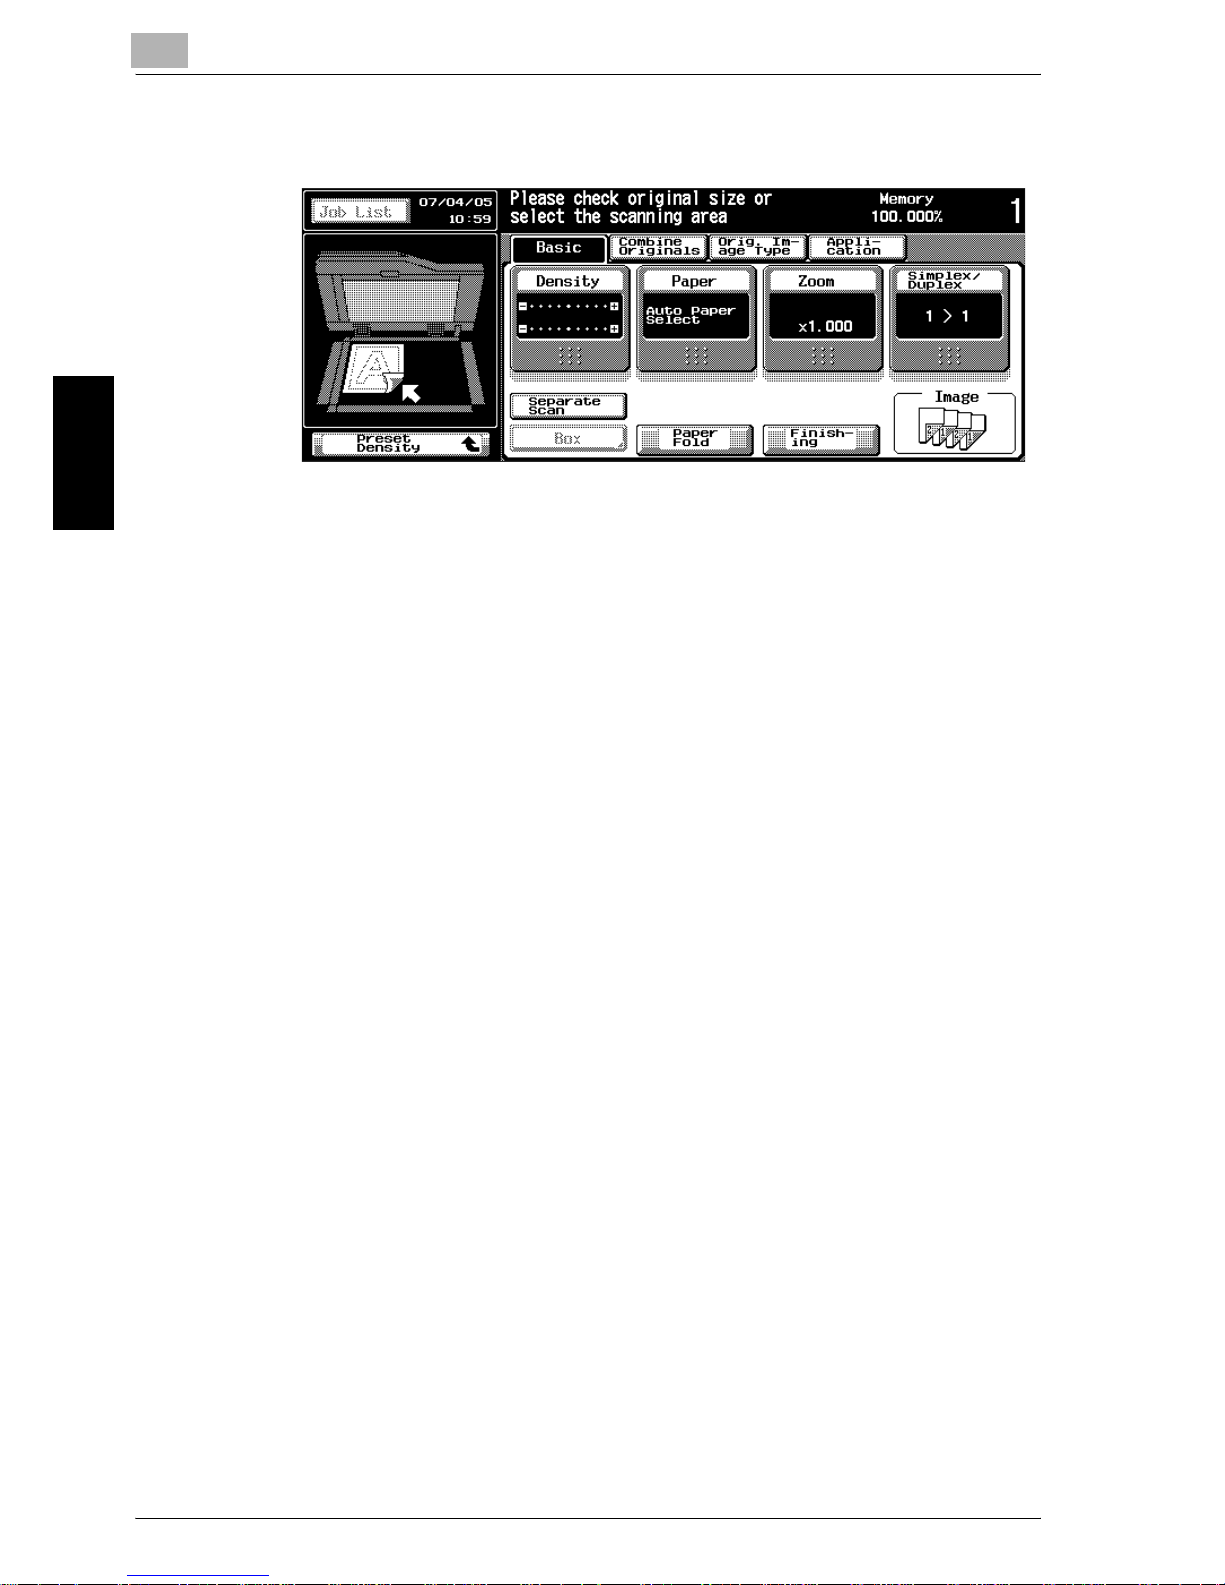
3
Utility <User Setting>
3-34 Océ im9220
Utility <User Setting> Chapter 3
8 Touch [User Density] on the Basic Screen to restore the Set User Pre-
set Density Level Screen.
9 Repeat step 6 to 8 when outputting more than one sample sheet for
each level.
10 Check the sample sheet and enter the desired density level using the
control panel keypad.
The number entered will be displayed in the box above Set Density.
– To output the sample sheet of the specified density level, touch [Set
Density] then touch the [Copy]. Place the original on the original
glass, and press the [Start] on the control panel.
11 Touch [OK] to complete the setting and return to the User Density Set-
ting Screen.
12 If further changes are required, touch the desired key.
Touch [Utility] to restore the Utility Screen.
Page 82
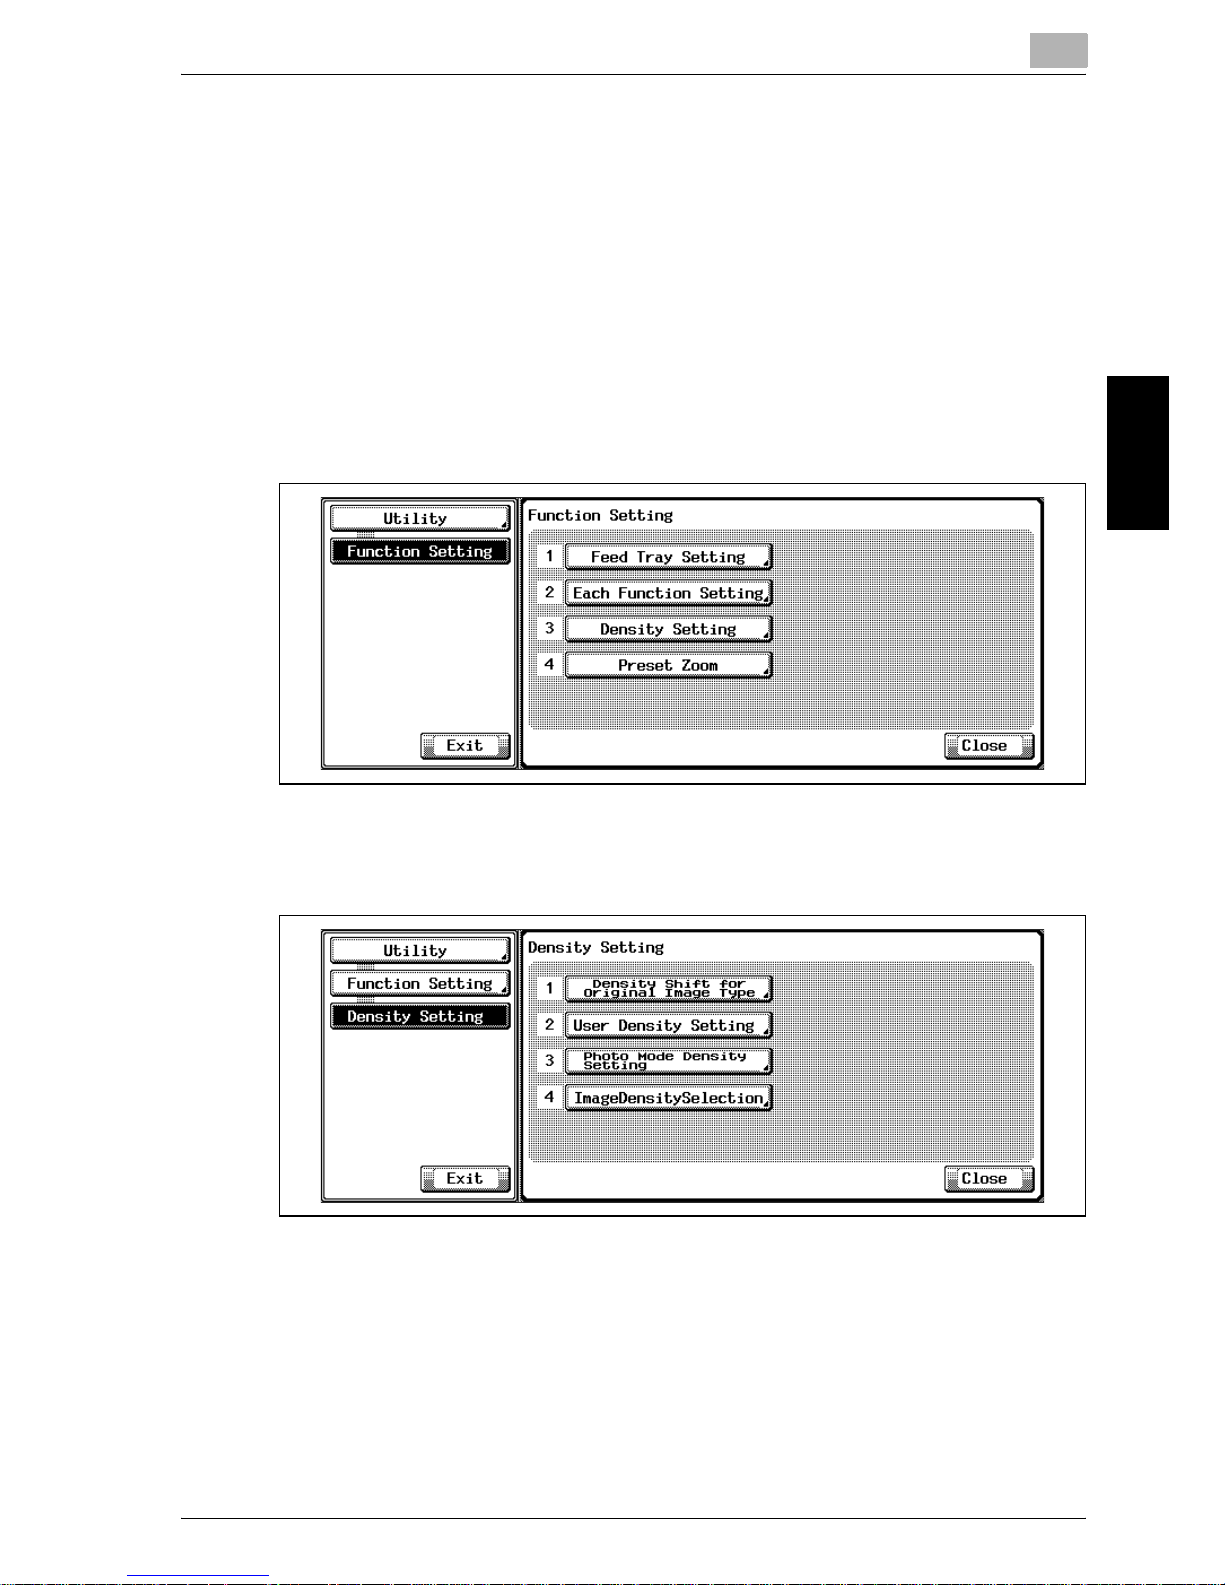
Utility <User Setting>
3
Océ im9220 3-35
Utility <User Setting> Chapter 3
3.4.9 3 Density Setting>3 Photo Mode Density Setting
Set the density level of Photo Mode to be specified in AES.
PrOcédure
1 Press the [Utility/Counter] to display the Utility Screen.
2 Touch [2 Function Setting].
The Function Setting Screen will be displayed.
3 Touch [3 Density Setting].
The Density Setting Screen will be displayed.
4 Touch [3 Photo Mode Density Setting].
The Photo Mode Density Setting Screen will be displayed.
Page 83
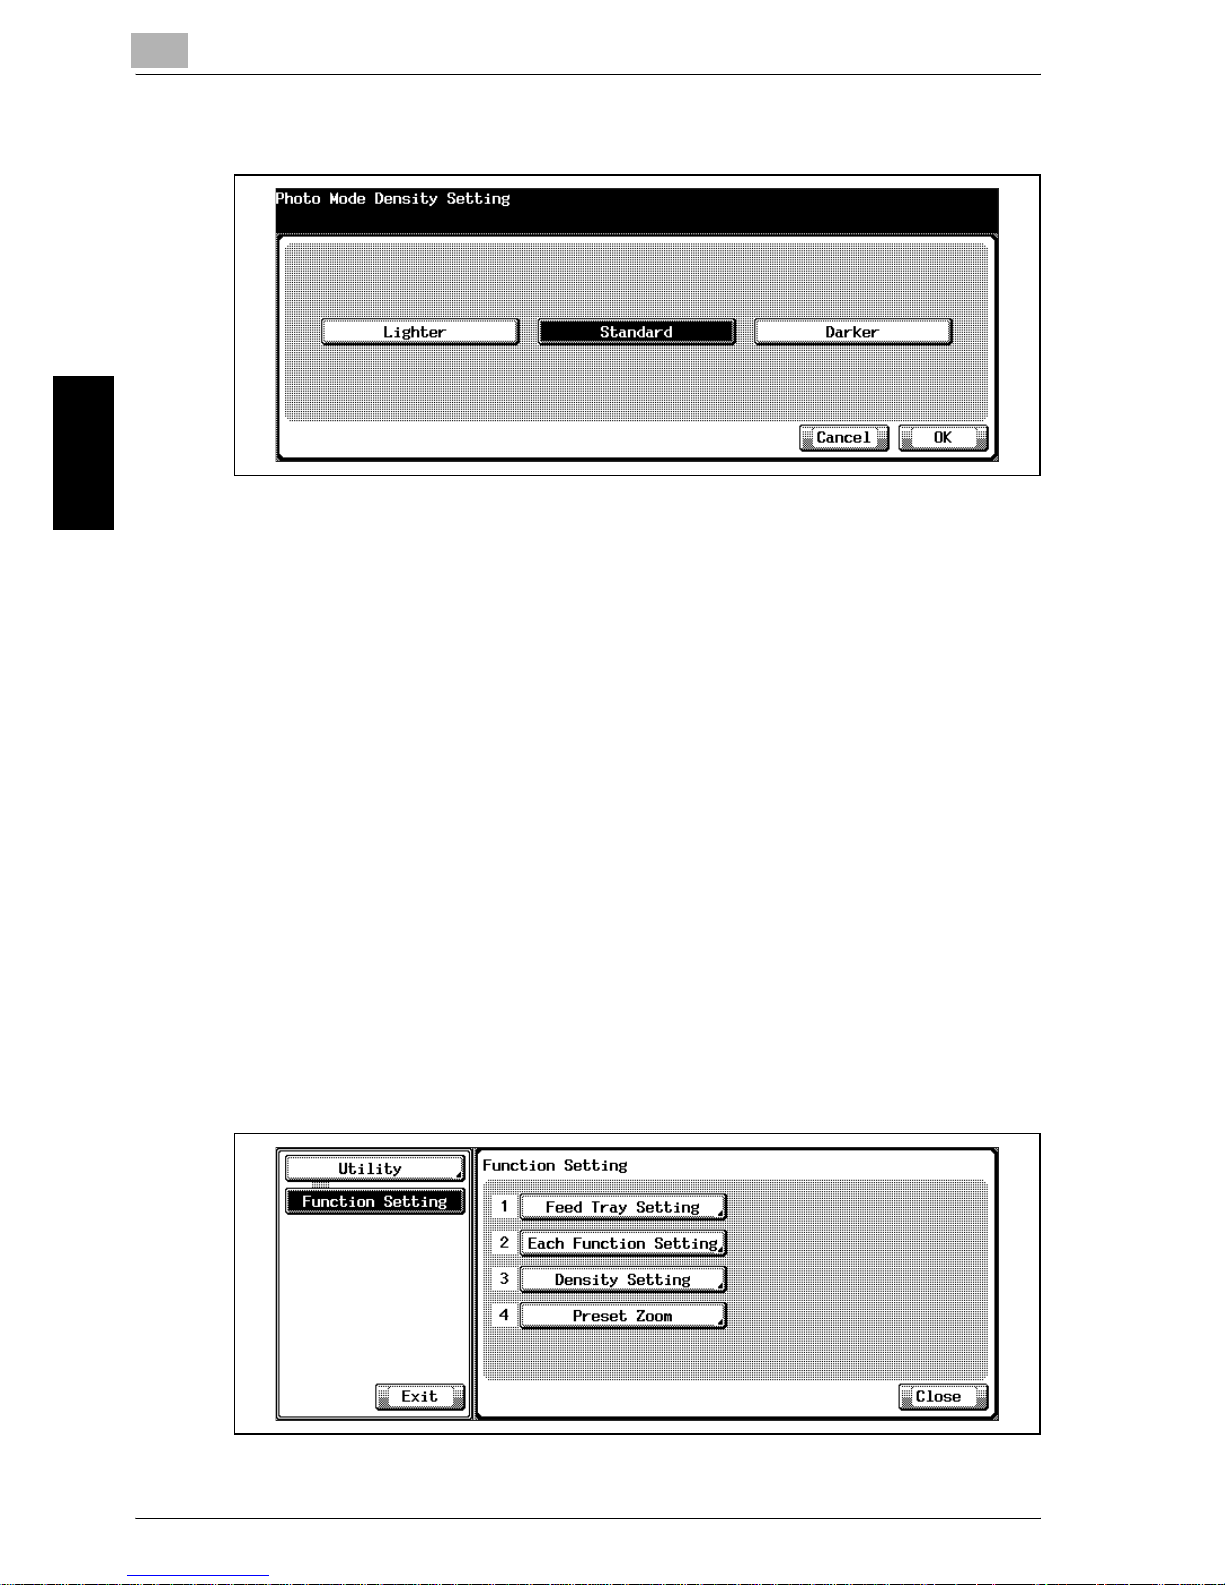
3
Utility <User Setting>
3-36 Océ im9220
Utility <User Setting> Chapter 3
5 Select the desired density key from [Lighter], [Standard] and [Darker].
6 Touch [OK] to complete the setting and return to the Density Setting
Screen.
7 If further changes are required, touch the desired key.
Touch [Utility] to restore the Utility Screen.
3.4.10 3 Density Setting>4 Image Density Selection
Change the Image density of the darkest shadow part. Adjust the image density of any dark part of the original to darker (maximum dark) or lighter, just
like offset printing. Similar to printing materials such as books, this feature is
useful to make texts lighter in order to ease the eye strain.
PrOcédure
1 Press the [Utility/Counter] to display the Utility Screen.
2 Touch [2 Function Setting].
The Function Setting Screen will be displayed.
3 Touch [3 Density Setting].
The Density Setting Screen will be displayed.
Page 84
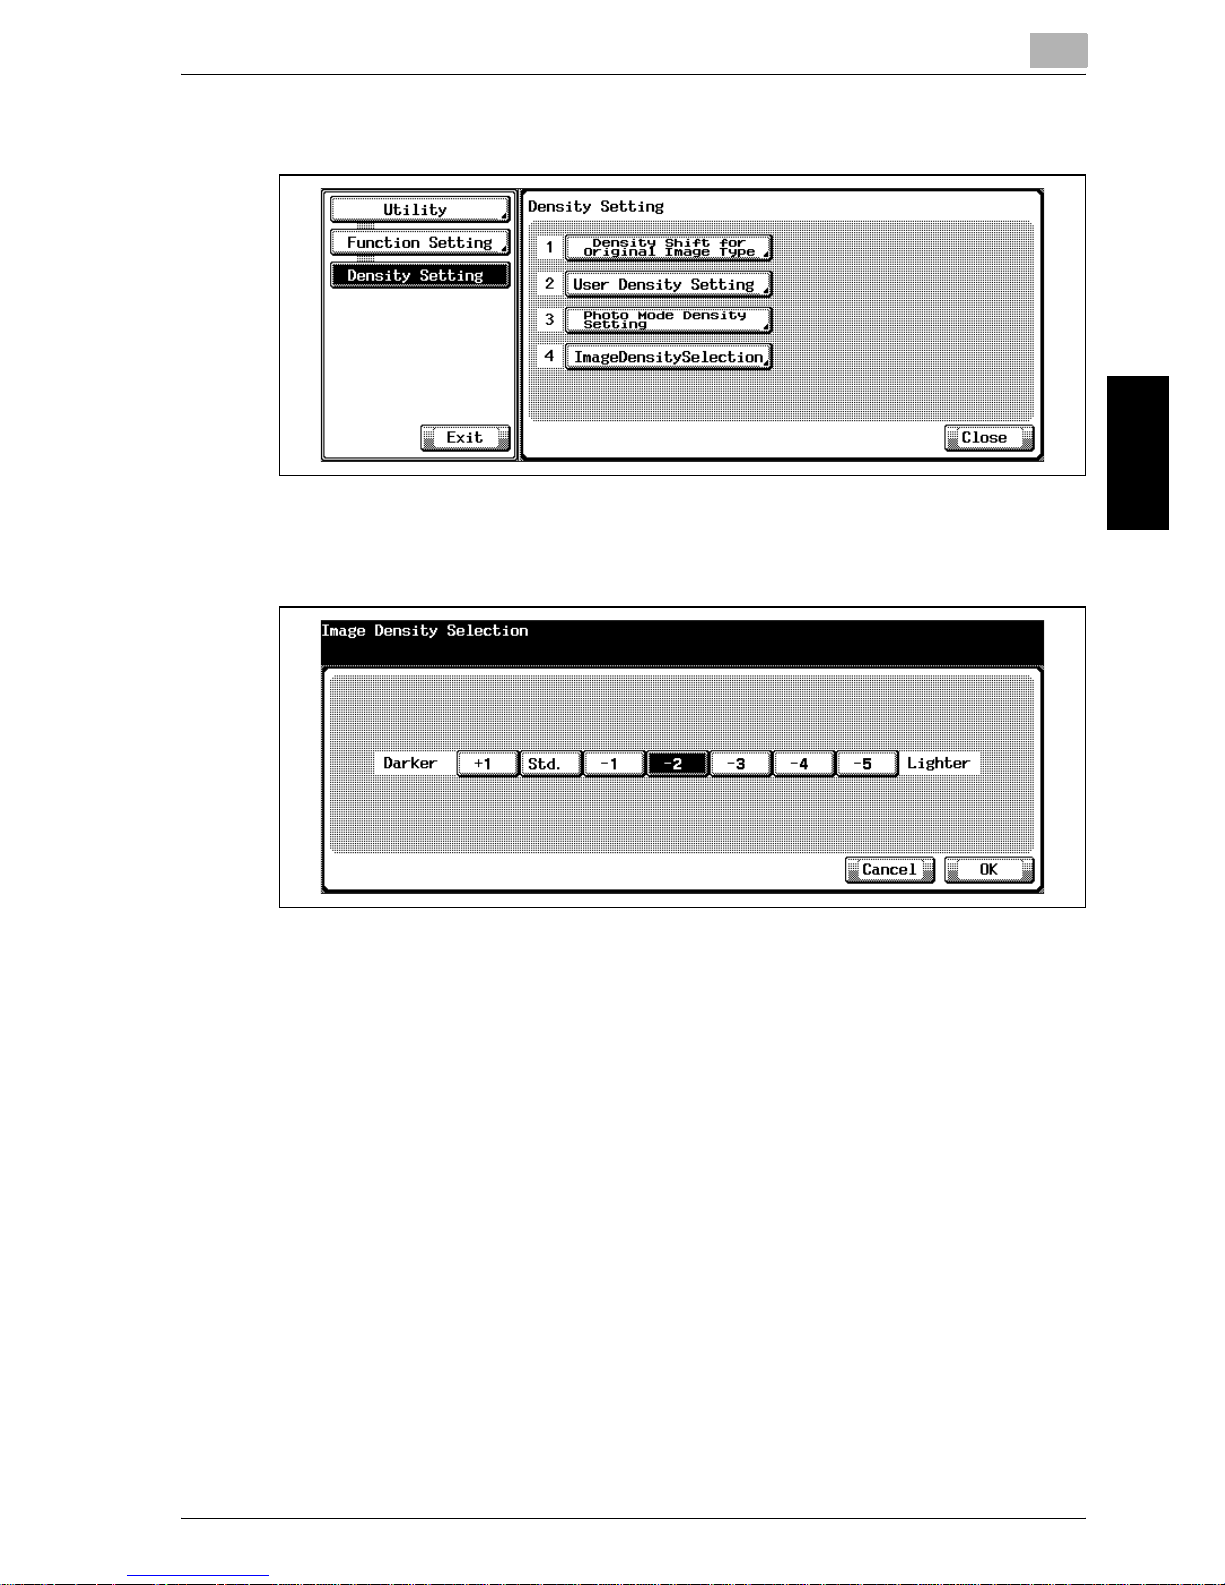
Utility <User Setting>
3
Océ im9220 3-37
Utility <User Setting> Chapter 3
4 Touch [4 Image Density Selection].
The Image Density Selection Screen will be displayed.
5 Touch the desired density key to highlight it.
6 Touch [OK] to complete the setting and return to the Density Setting
Screen.
7 If further changes are required, touch the desired key.
Touch [Utility] to restore the Utility Screen.
Page 85
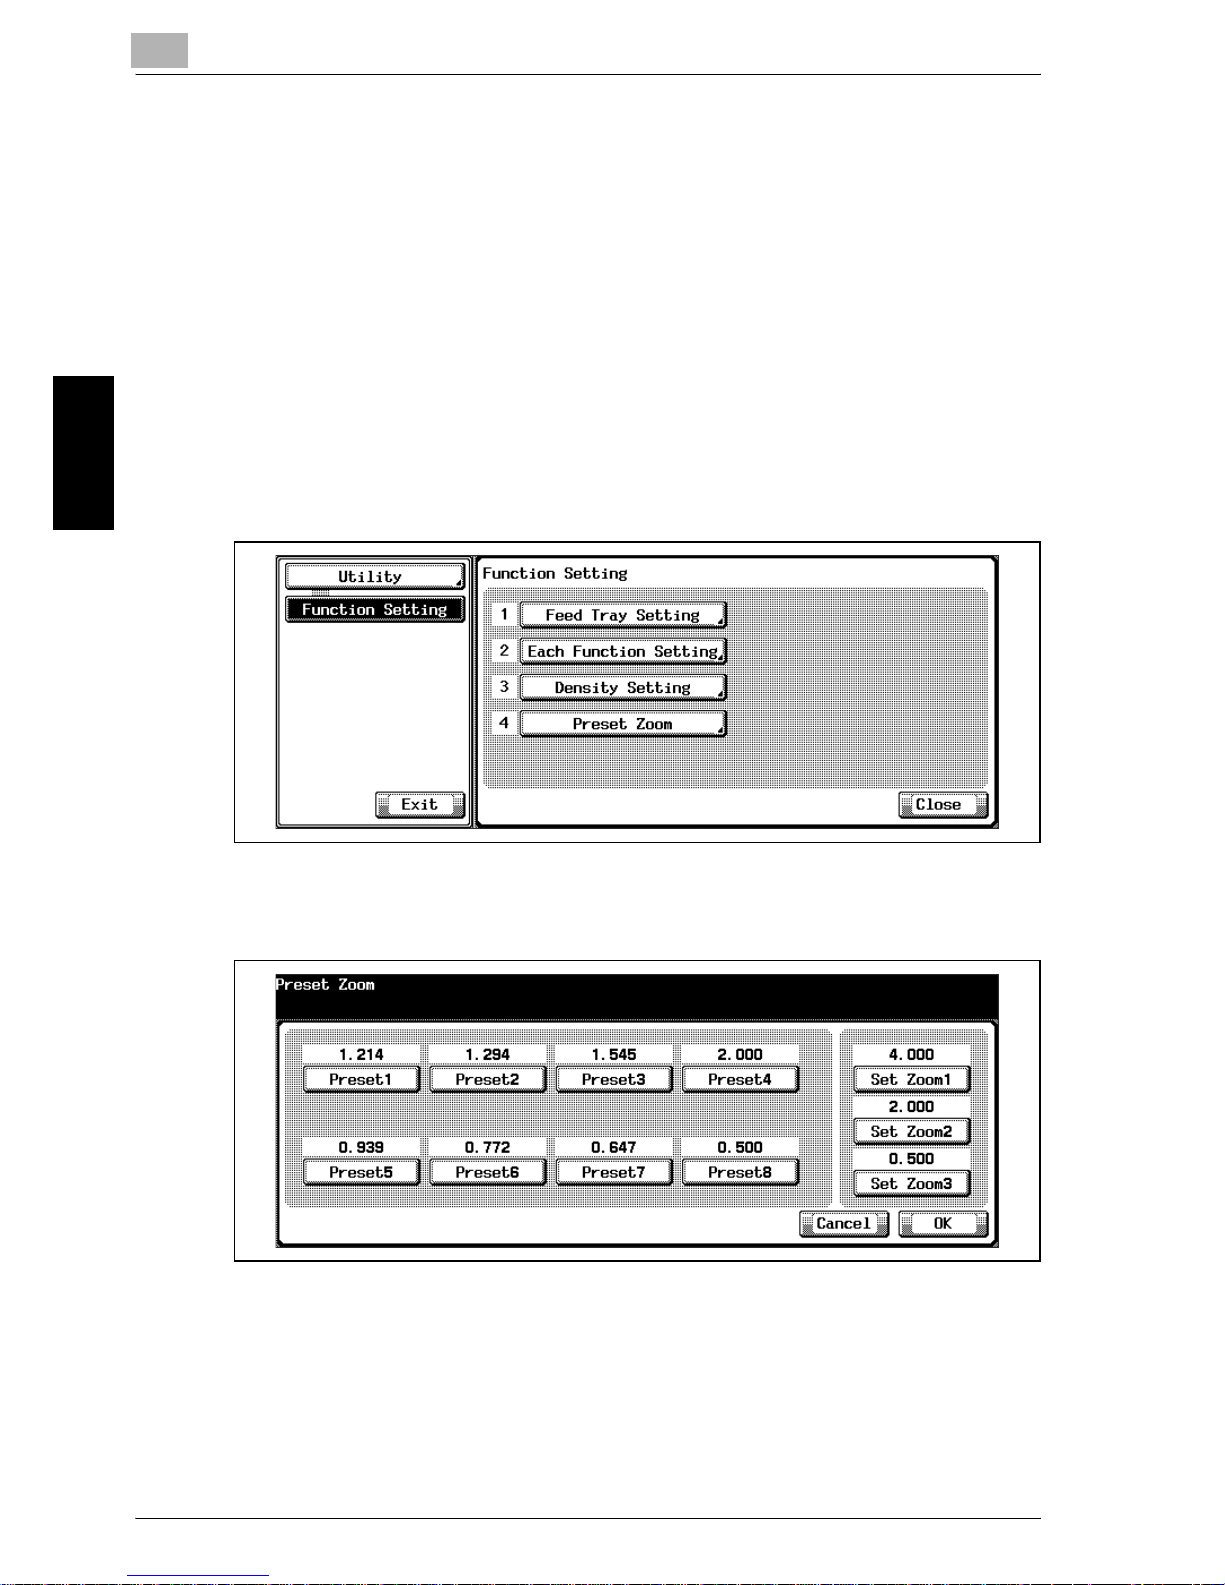
3
Utility <User Setting>
3-38 Océ im9220
Utility <User Setting> Chapter 3
3.4.11 4 Preset Zoom
Set three types of the preset zoom on the Preset Zoom Screen. The initial
setting for Preset Zoom1 is 4.000, Preset Zoom2 is 2.000, and Preset Zoom3
is 0.500.
PrOcédure
1 Press the [Utility/Counter] to display the Utility Screen.
2 Touch [2 Function Setting].
The Function Setting Screen will be displayed.
3 Touch [4 Preset Zoom].
4 Touch the desired preset key (from 1 to 3) and display the desired
zoom ratio on the right side of the keys using the control panel keypad.
5 Touch [OK] to complete the setting and return to the Function Setting
Screen.
6 If further changes are required, touch the desired key.
Touch [Utility] to restore the Utility Screen.
Page 86
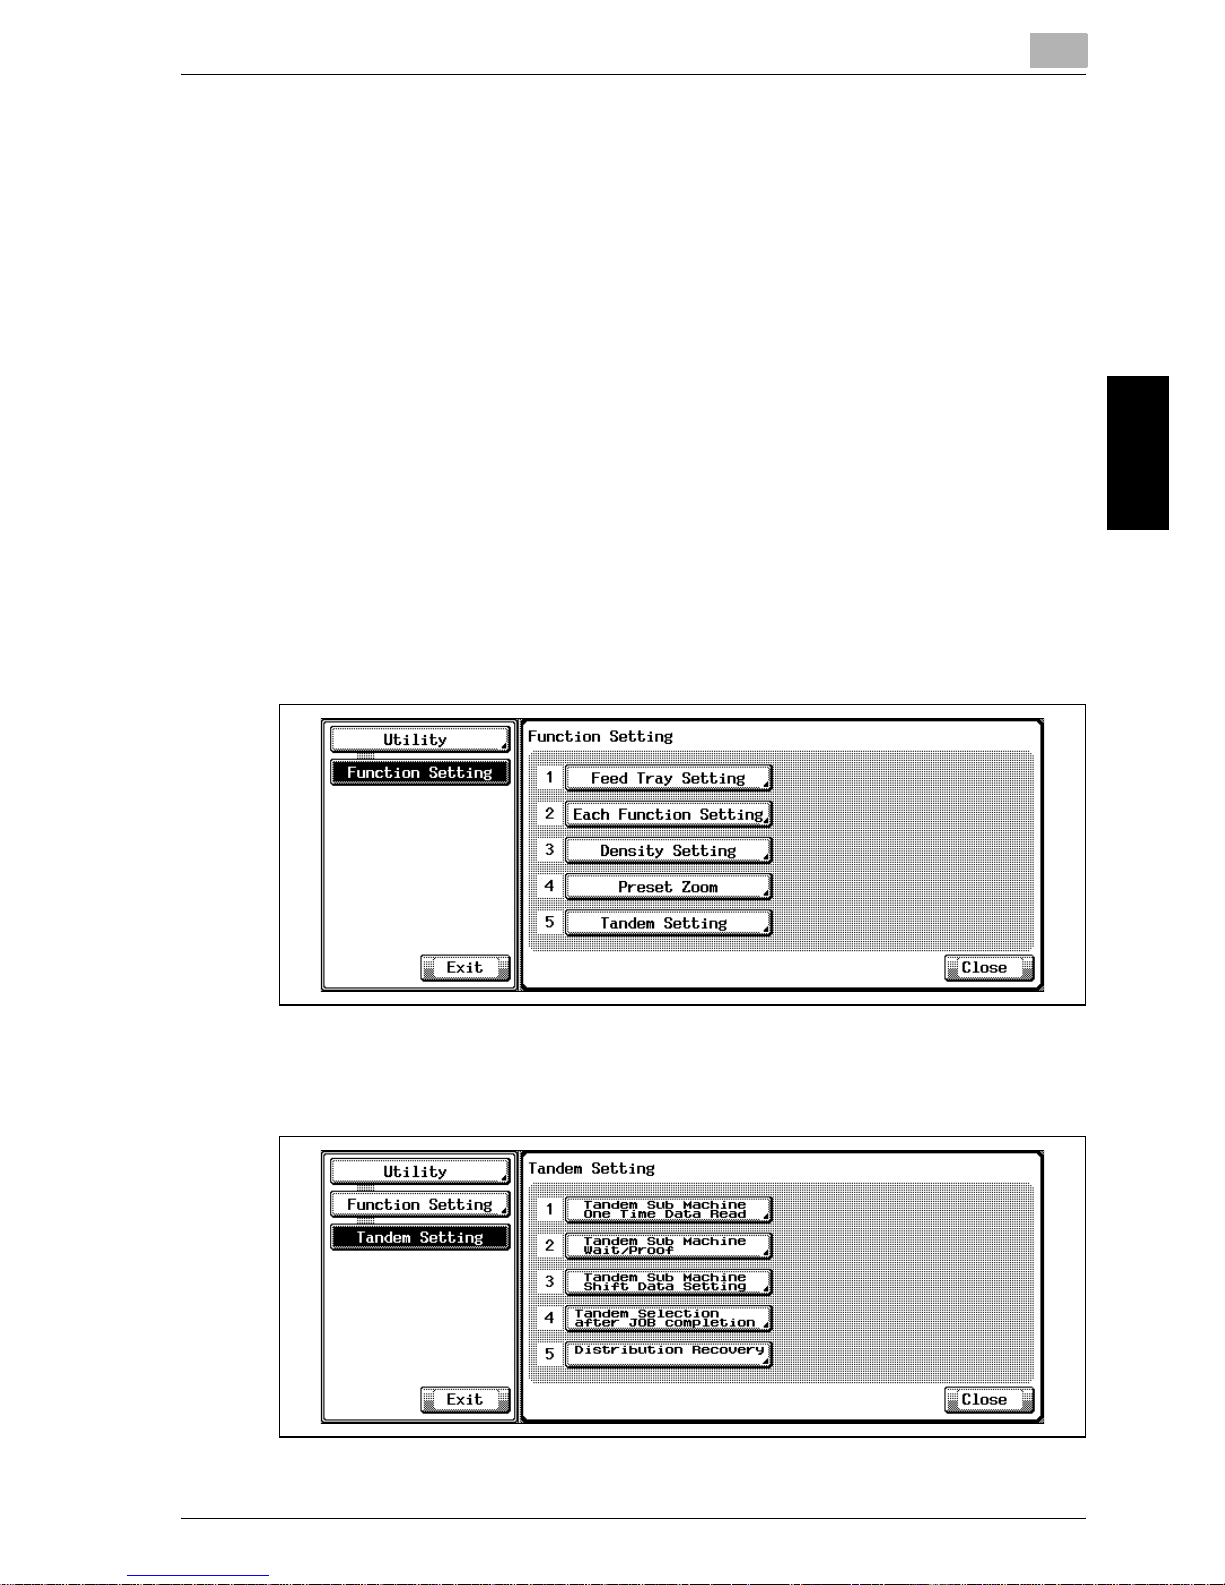
Utility <User Setting>
3
Océ im9220 3-39
Utility <User Setting> Chapter 3
3.4.12 5 Tandem Setting>1 Tandem Sub Machine One Time Data
Read
Set the sub machine to receive all the data transmitted from the master machine before starting to print.
!
Detail
By default, the Tandem Setting key is not displayed. Contact your service
representative.
PrOcédure
1 Press the [Utility/Counter] to display the Utility Screen.
2 Touch [2 Function Setting].
The Function Setting Screen will be displayed.
3 Touch [5 Tandem Setting].
The Tandem Setting Screen will be displayed.
4 Touch [1 Tandem Sub Machine One Time Data Read].
Page 87
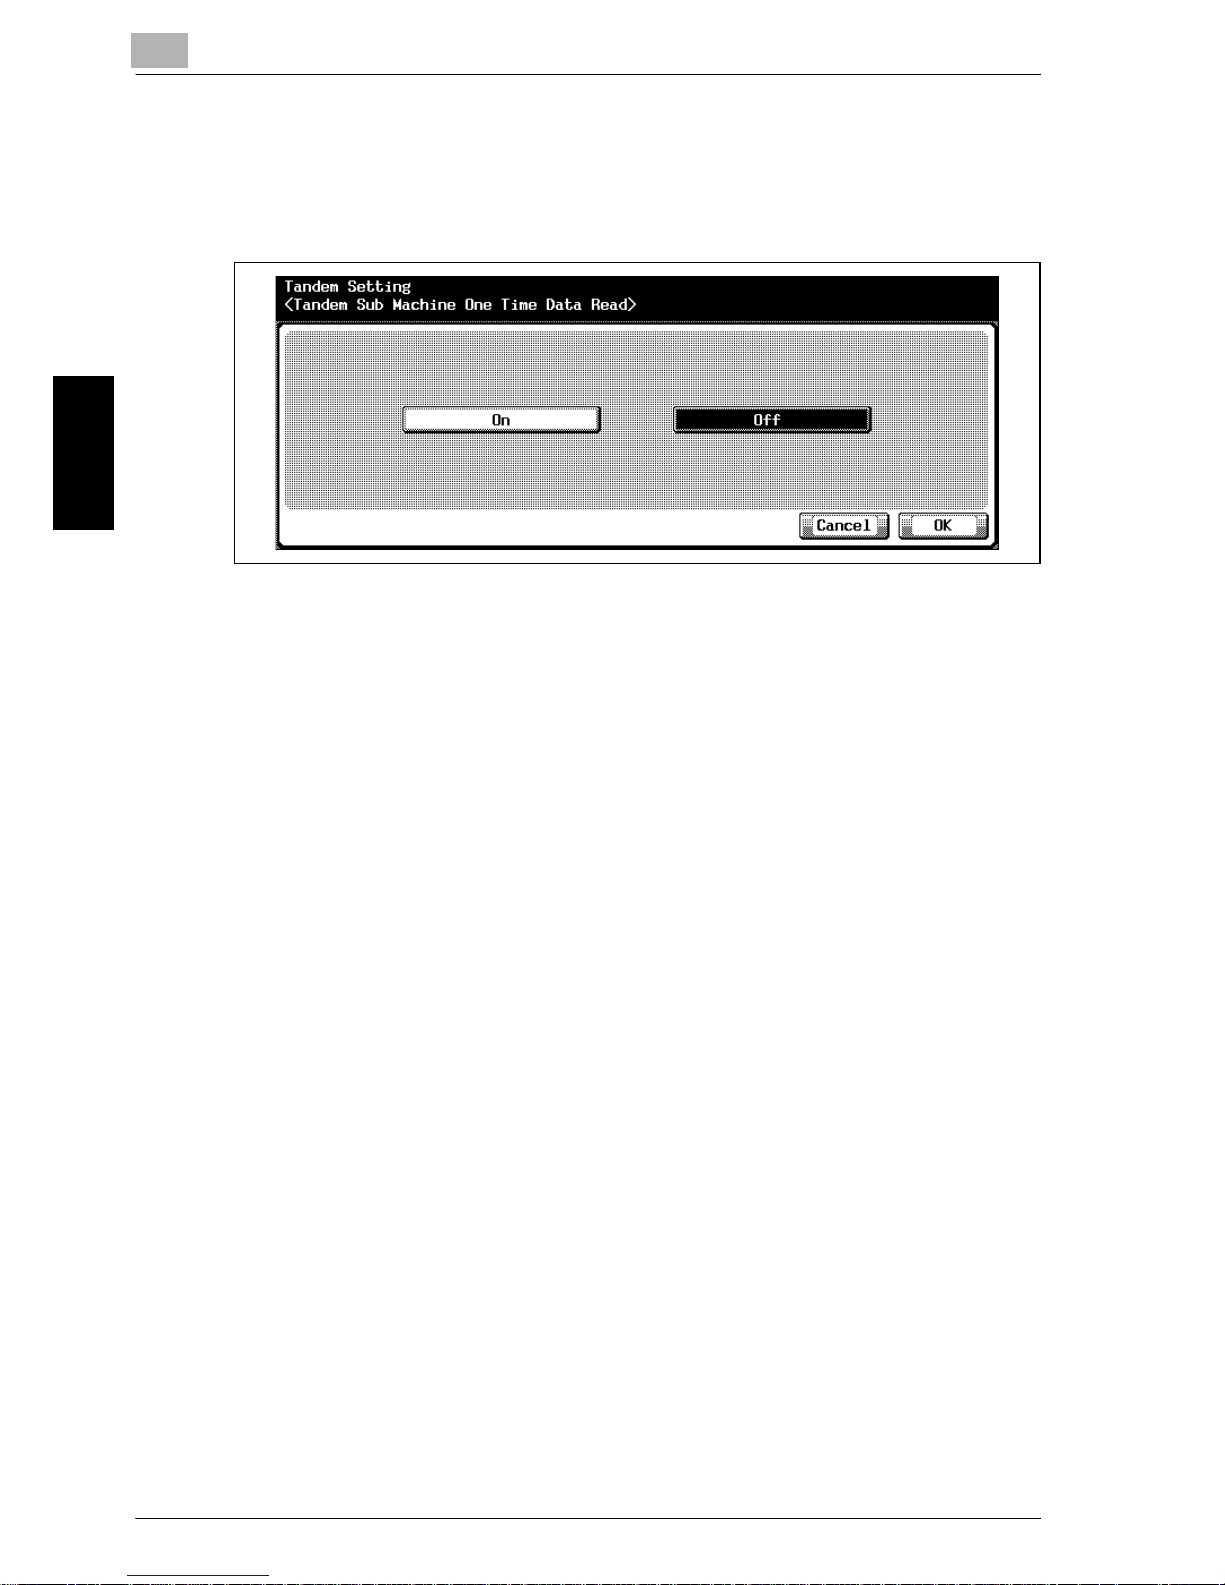
3
Utility <User Setting>
3-40 Océ im9220
Utility <User Setting> Chapter 3
The Tandem Sub Machine One Time Data Read Screen will be displayed.
5 Touch [On] or [Off] to highlight it.
– With [On] selected, the master machine immediately starts printing
with scanning on the run, while the sub machine waits for all the
data to be transmitted then starts printing.
– With [Off] selected, printing job starts on both master and sub ma-
chines while the master machine continues scanning the originals.
6 Touch [OK] to complete the setting and return to the Tandem Setting
Screen.
7 If further changes are required, touch the desired key.
Touch [Utility] to restore the Utility Screen.
Page 88
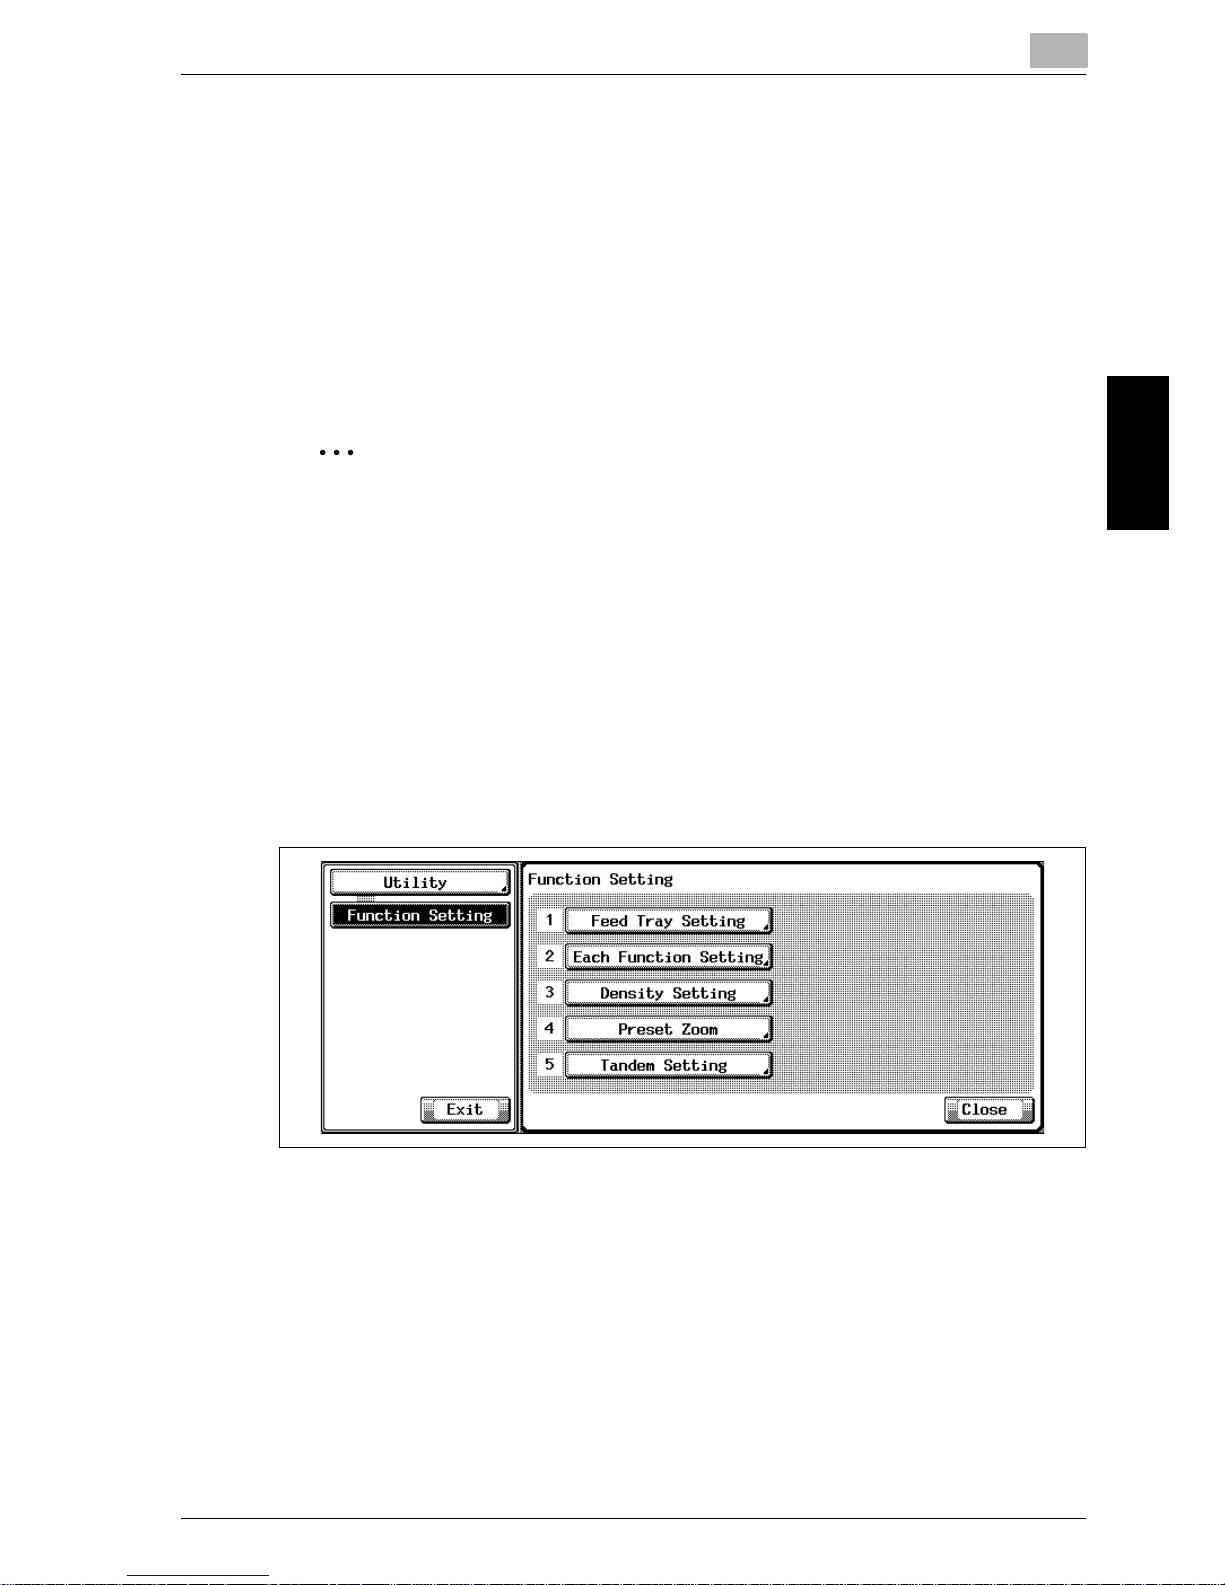
Utility <User Setting>
3
Océ im9220 3-41
Utility <User Setting> Chapter 3
3.4.13 5 Tandem Setting>2 Tandem Sub Machine Wait/Proof
Set the master machine to transmit the scanned data to the sub machine for
making a proof copy on both master and sub machines.
!
Detail
By default, the Tandem Setting key is not displayed. Contact your service
representative.
2
Note
[Permit] cannot be selected if the setting 5 Distribution Recovery is turned
On.
PrOcédure
1 Press the [Utility/Counter] to display the Utility Screen.
2 Touch [2 Function Setting].
The Function Setting Screen will be displayed.
3 Touch [5 Tandem Setting].
The Tandem Setting Screen will be displayed.
Page 89
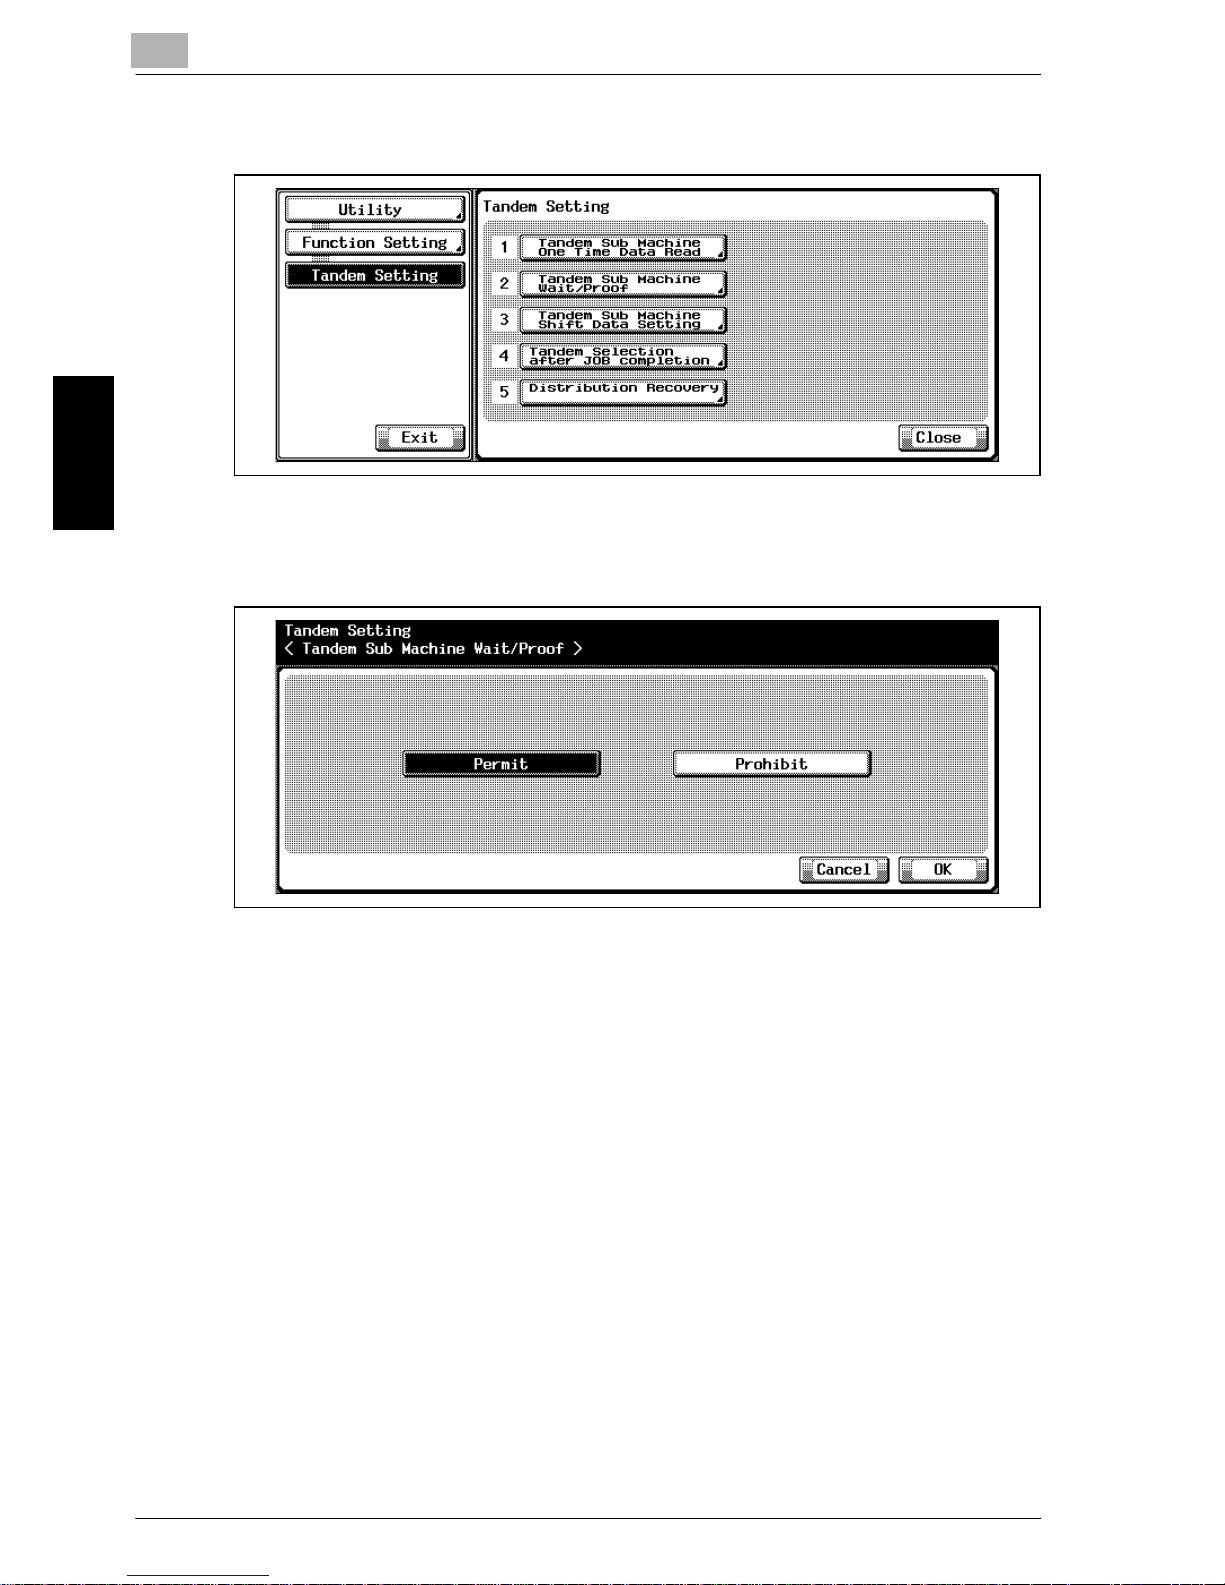
3
Utility <User Setting>
3-42 Océ im9220
Utility <User Setting> Chapter 3
4 Touch [2 Tandem Sub Machine Wait/Proof].
The Tandem Sub Machine Wait/Proof Screen will be displayed.
5 Touch [Permit] or [Prohibit] to highlight it.
– With [Permit] selected, the master machine transmits the image
data to sub machine and a proof copy will be made on both master
and sub machines.
– With [Prohibit] selected, a proof copy can be made on the master
machine only. Sub machine will receive the image data normally at
the time when printing job starts.
6 Touch [OK] to complete the setting and return to the Tandem Setting
Screen.
7 If further changes are required, touch the desired key.
Touch [Utility] to restore the Utility Screen.
Page 90
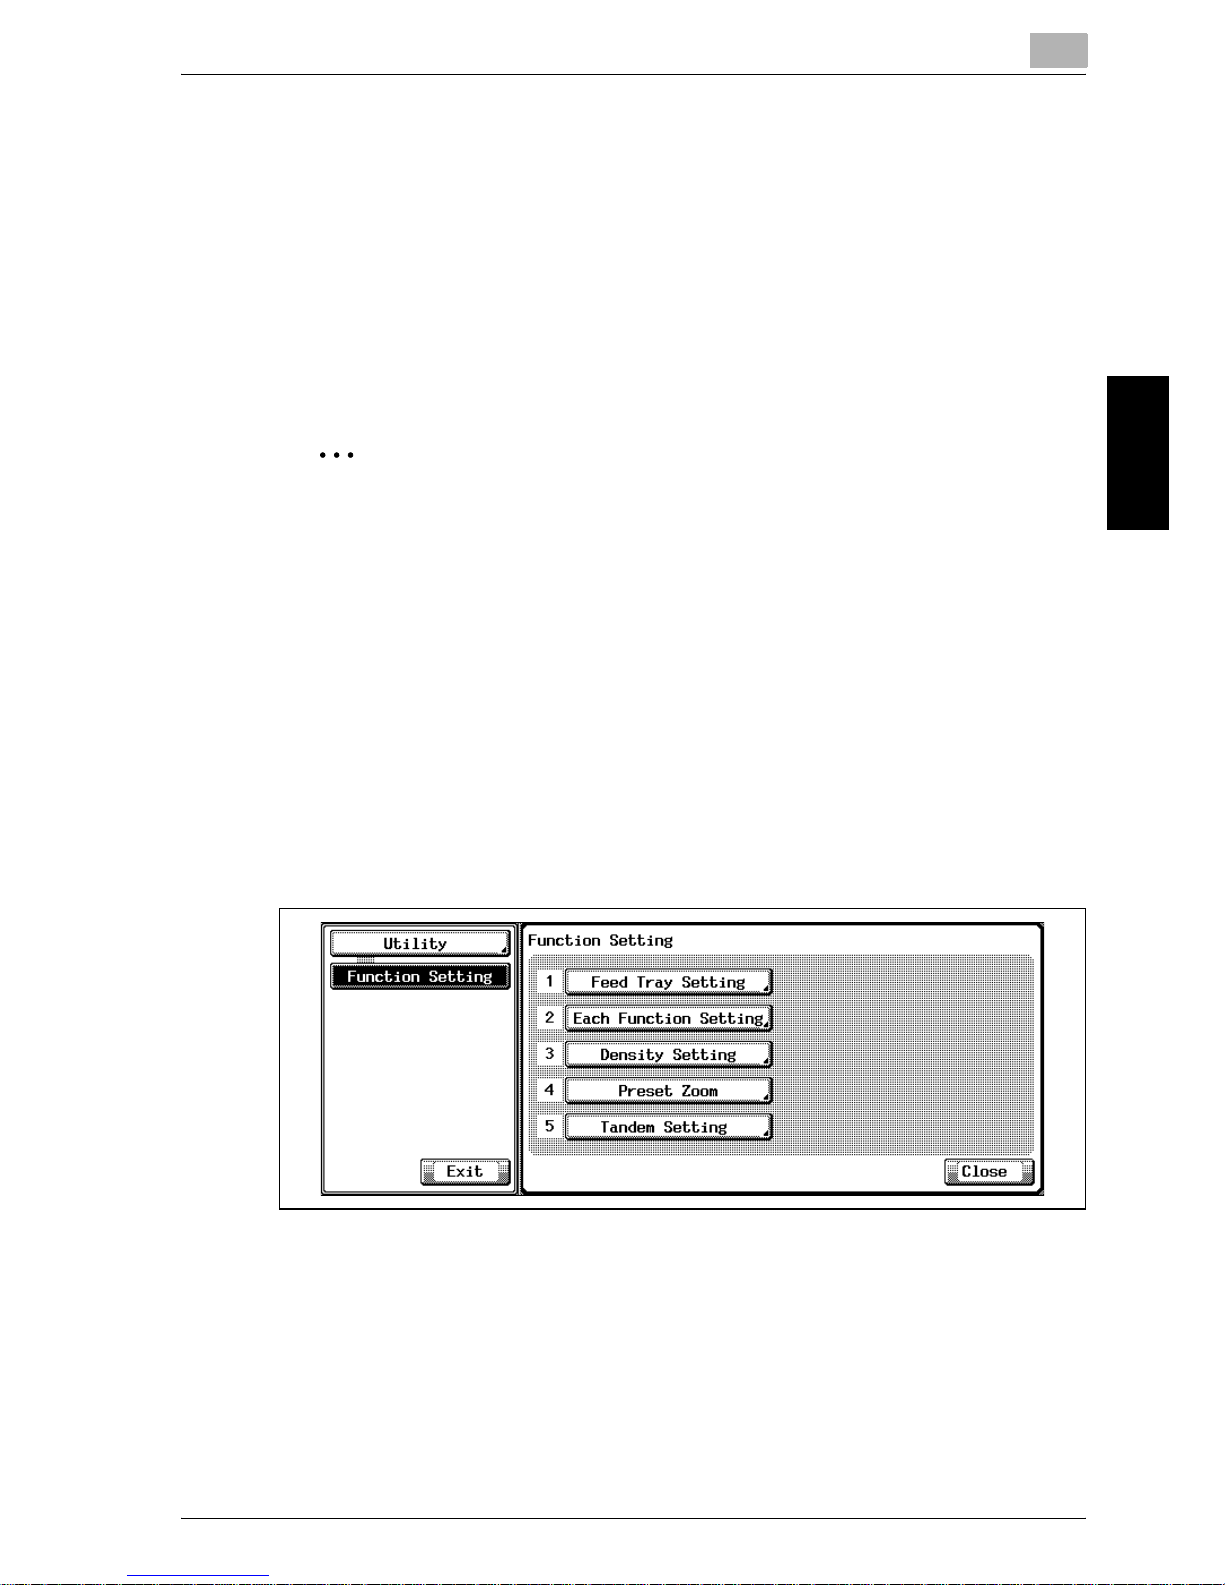
Utility <User Setting>
3
Océ im9220 3-43
Utility <User Setting> Chapter 3
3.4.14 5 Tandem Setting>3 Tandem Sub Machine Shift Data Setting
Set the sub machine to use the same shift value used on the master machine.
!
Detail
By default, the Tandem Setting key is not displayed. Contact your service
representative.
2
Note
If the setting 2 Tandem Sub Machine Wait/Proof is set to [Prohibit], the
shift value previously specified for the sub machine cannot be used because the transmitted image data already reflect the shift value specified
for the master machine.
PrOcédure
1 Press the [Utility/Counter] to display the Utility Screen.
2 Touch [2 Function Setting].
The Function Setting Screen will be displayed.
3 Touch [5 Tandem Setting].
The Tandem Setting Screen will be displayed.
Page 91
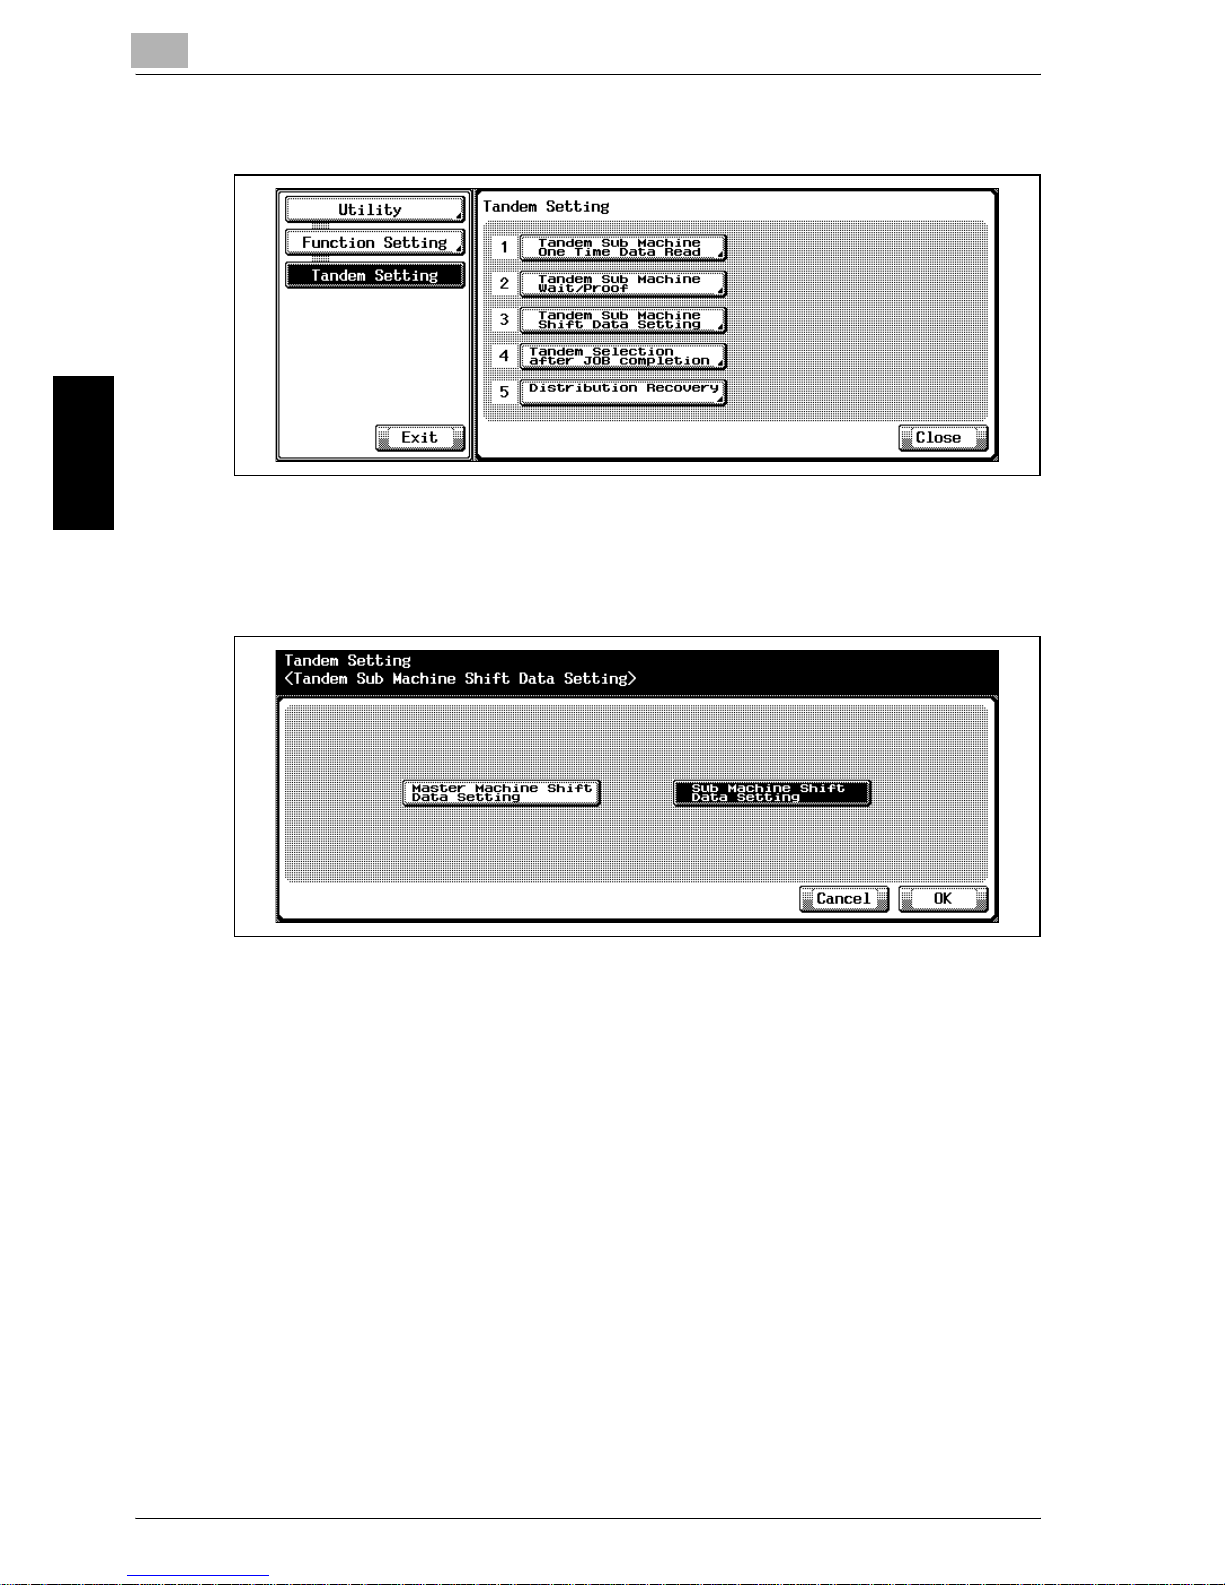
3
Utility <User Setting>
3-44 Océ im9220
Utility <User Setting> Chapter 3
4 Touch [3 Tandem Sub Machine Shift Data Setting].
The Tandem Sub Machine Shift Data Setting Screen will be displayed.
5 Touch [Master Machine Shift Data Setting] or [Sub Machine Shift Data
Setting] to highlight it.
– With [Master Machine Shift Data Setting] selected, the shift value
specified for the master machine will be used on the sub machine.
– With [Sub Machine Shift Data Setting] selected, the shift value
specified for the sub machine will be used irrespective of the value
of master machine.
6 Touch [OK] to complete the setting and return to the Tandem Setting
Screen.
7 If further changes are required, touch the desired key.
Touch [Utility] to restore the Utility Screen.
Page 92
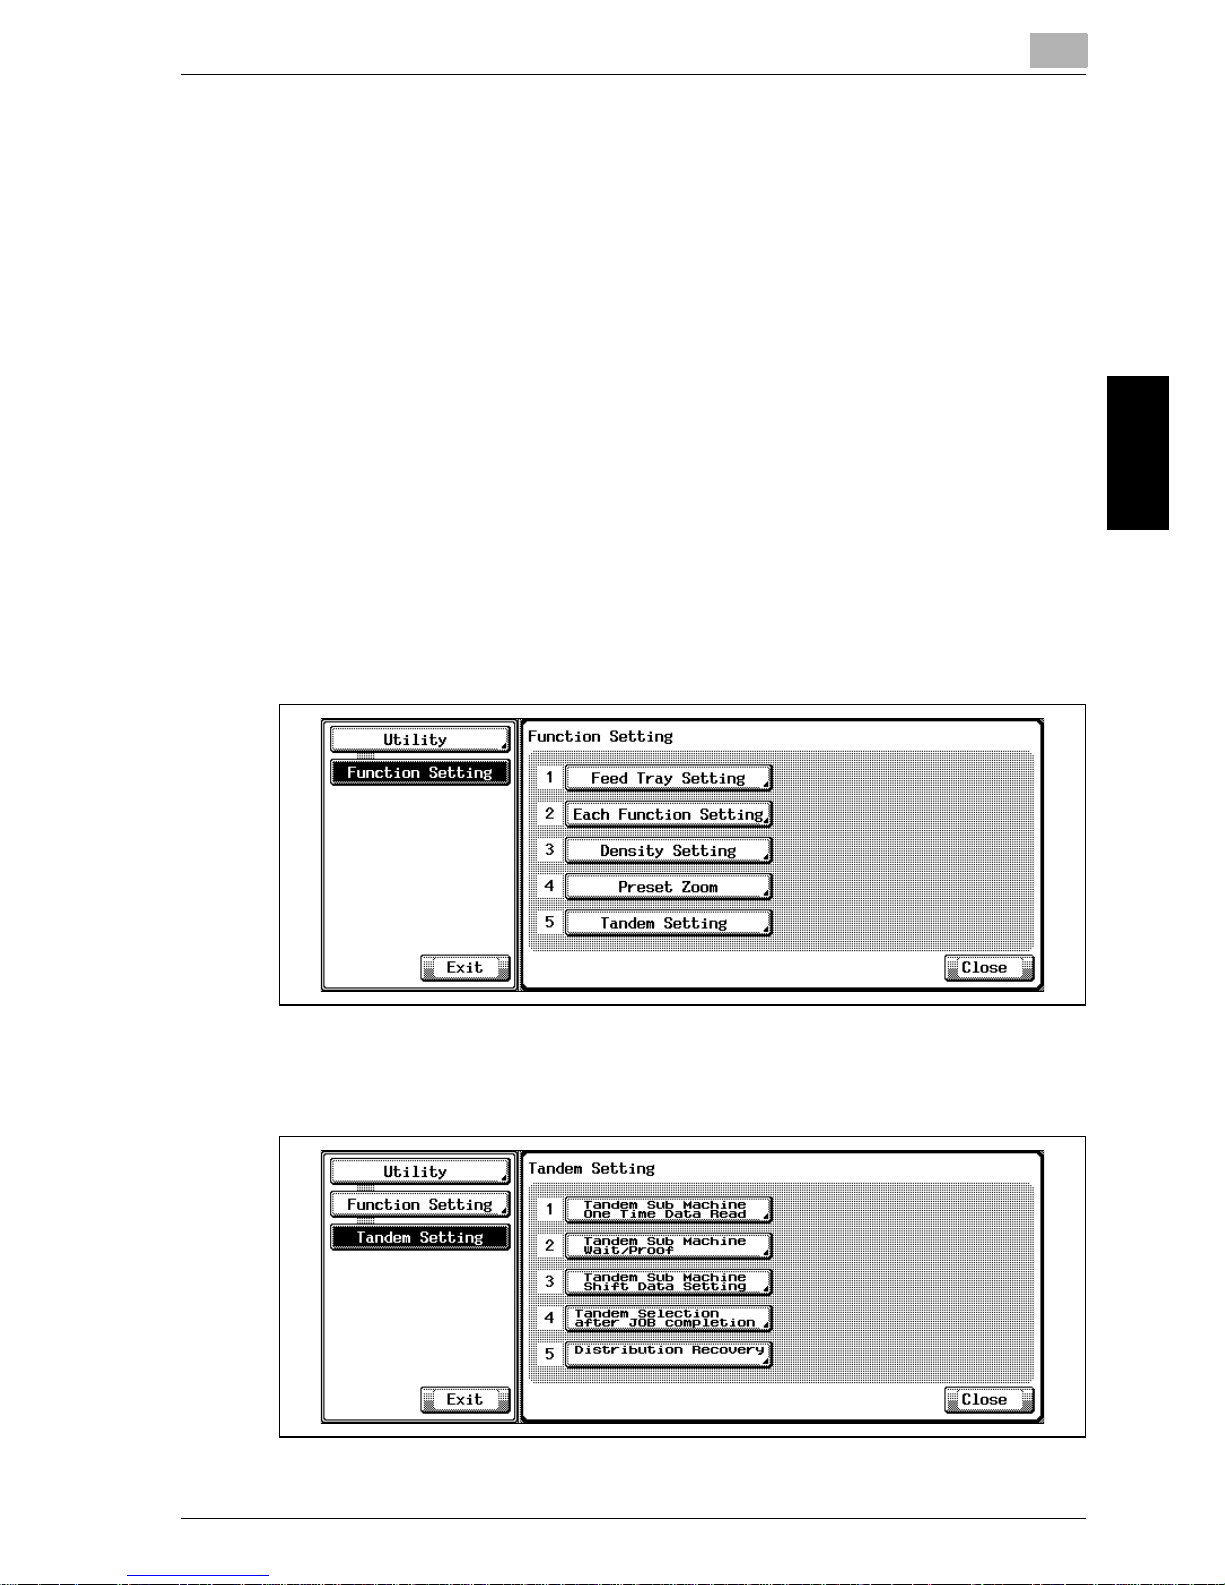
Utility <User Setting>
3
Océ im9220 3-45
Utility <User Setting> Chapter 3
3.4.15 5 Tandem Setting>4 Tandem Selection after JOB Completion
Select to continue or release the tandem mode after the current tandem job
is completed.
!
Detail
By default, the Tandem Setting key is not displayed. Contact your service
representative.
PrOcédure
1 Press the [Utility/Counter] to display the Utility Screen.
2 Touch [2 Function Setting].
The Function Setting Screen will be displayed.
3 Touch [5 Tandem Setting].
The Tandem Setting Screen will be displayed.
4 Touch [4 Tandem Selection after JOB completion].
The Tandem Selection after Job Completion Screen will be displayed.
Page 93
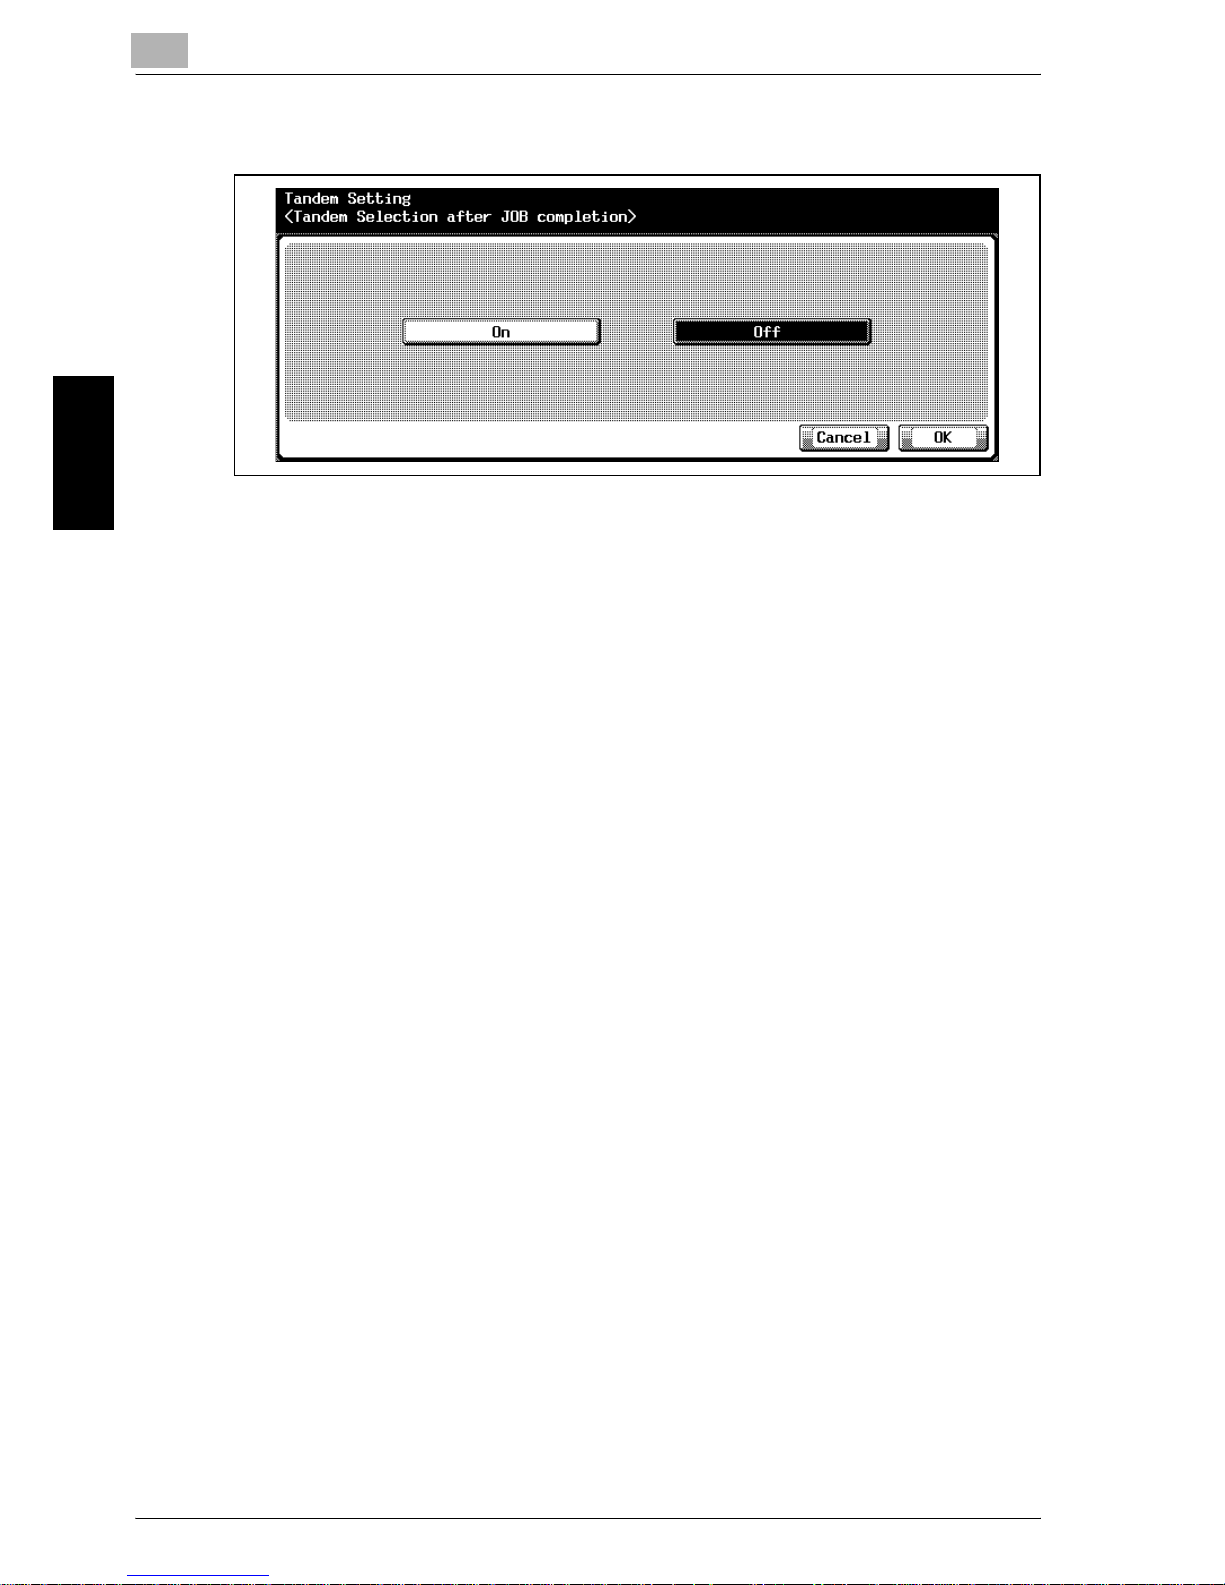
3
Utility <User Setting>
3-46 Océ im9220
Utility <User Setting> Chapter 3
5 Touch [On] or [Off] to highlight it.
– With [On] selected, the two machines will continue to work in tan-
dem after completion of the tandem job.
– With [Off] selected, the tandem mode will be released after comple-
tion of the tandem job.
6 Touch [OK] to complete the setting and return to the Tandem Setting
Screen.
7 If further changes are required, touch the desired key.
Touch [Utility] to restore the Utility Screen.
Page 94
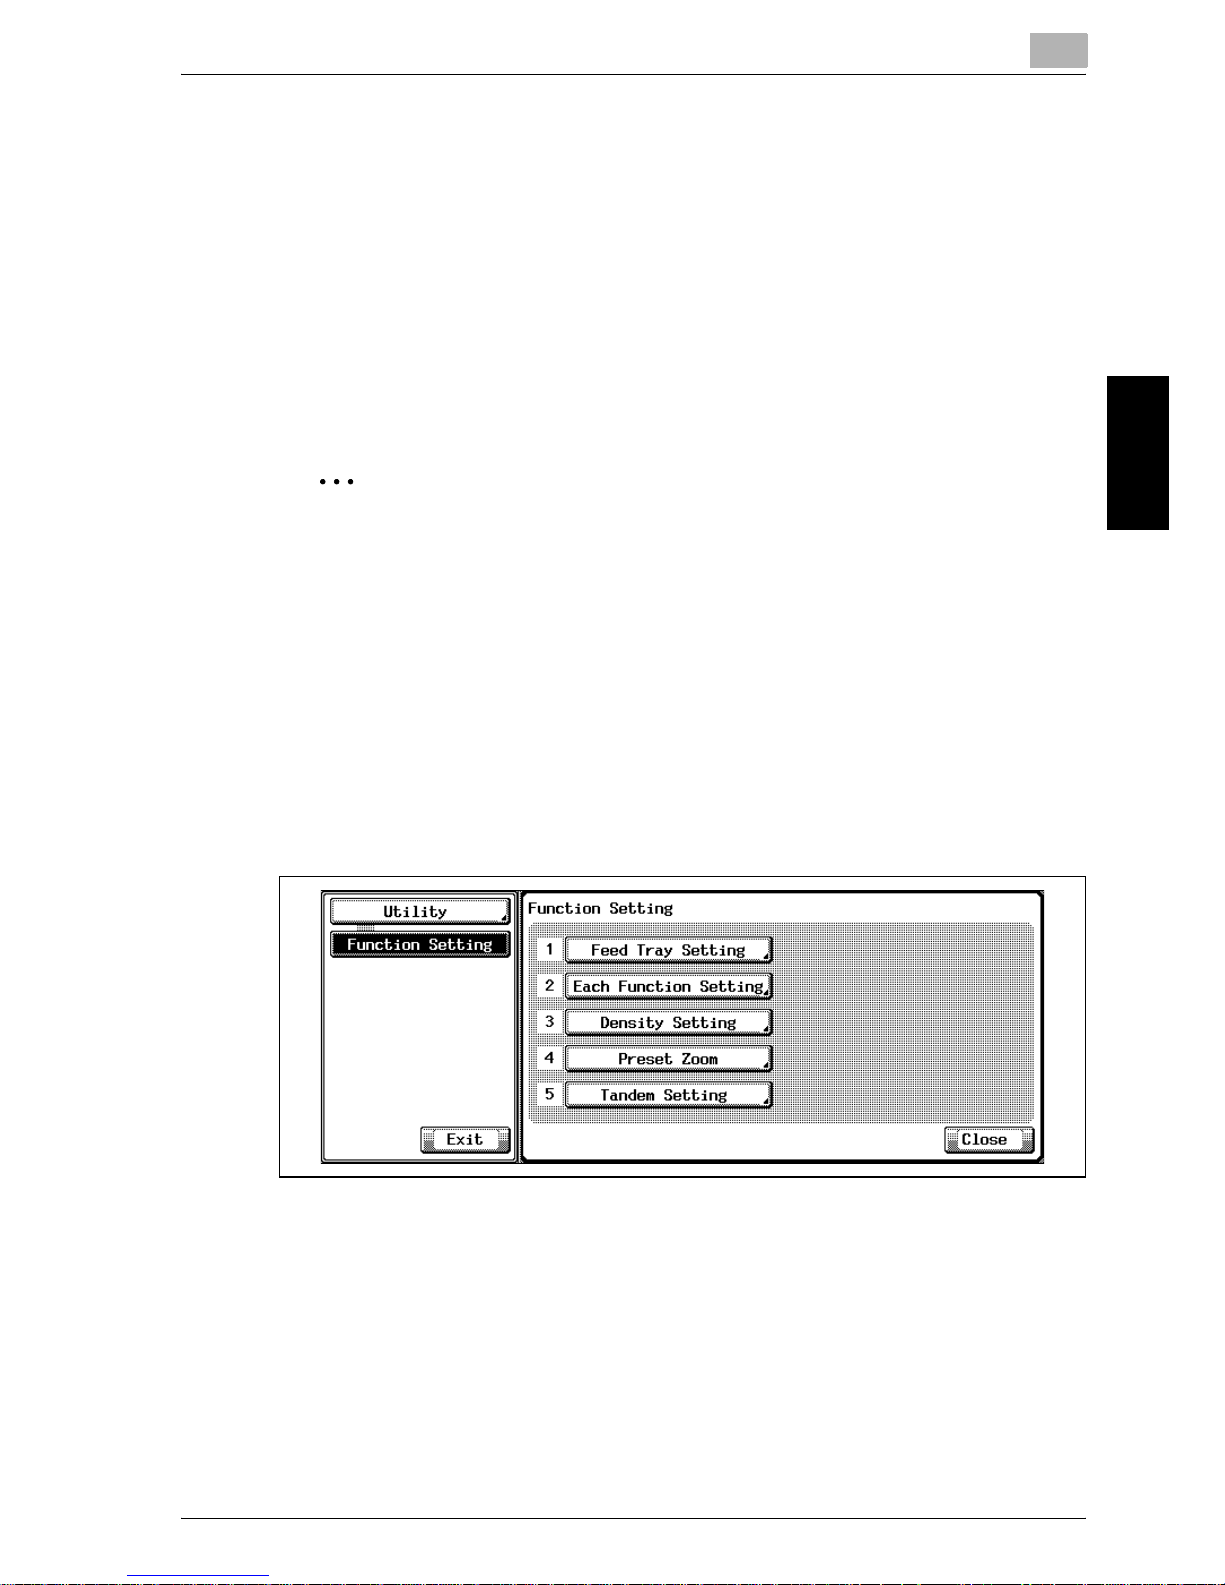
Utility <User Setting>
3
Océ im9220 3-47
Utility <User Setting> Chapter 3
3.4.16 5 Tandem Setting>5 Distribution Recovery
Set the tandem-connected machines to perform the job distribution again for
print quantity remaining on one machine when the other has already finished
with its assignment.
!
Detail
By default, the Tandem Setting key is not displayed. Contact your service
representative.
2
Note
This function cannot be turned On if the setting 2 Tandem Sub Machine
Wait/Proof is set to [Permit].
PrOcédure
1 Press the [Utility/Counter] to display the Utility Screen.
2 Touch [2 Function Setting].
The Function Setting Screen will be displayed.
3 Touch [5 Tandem Setting].
The Tandem Setting Screen will be displayed.
Page 95
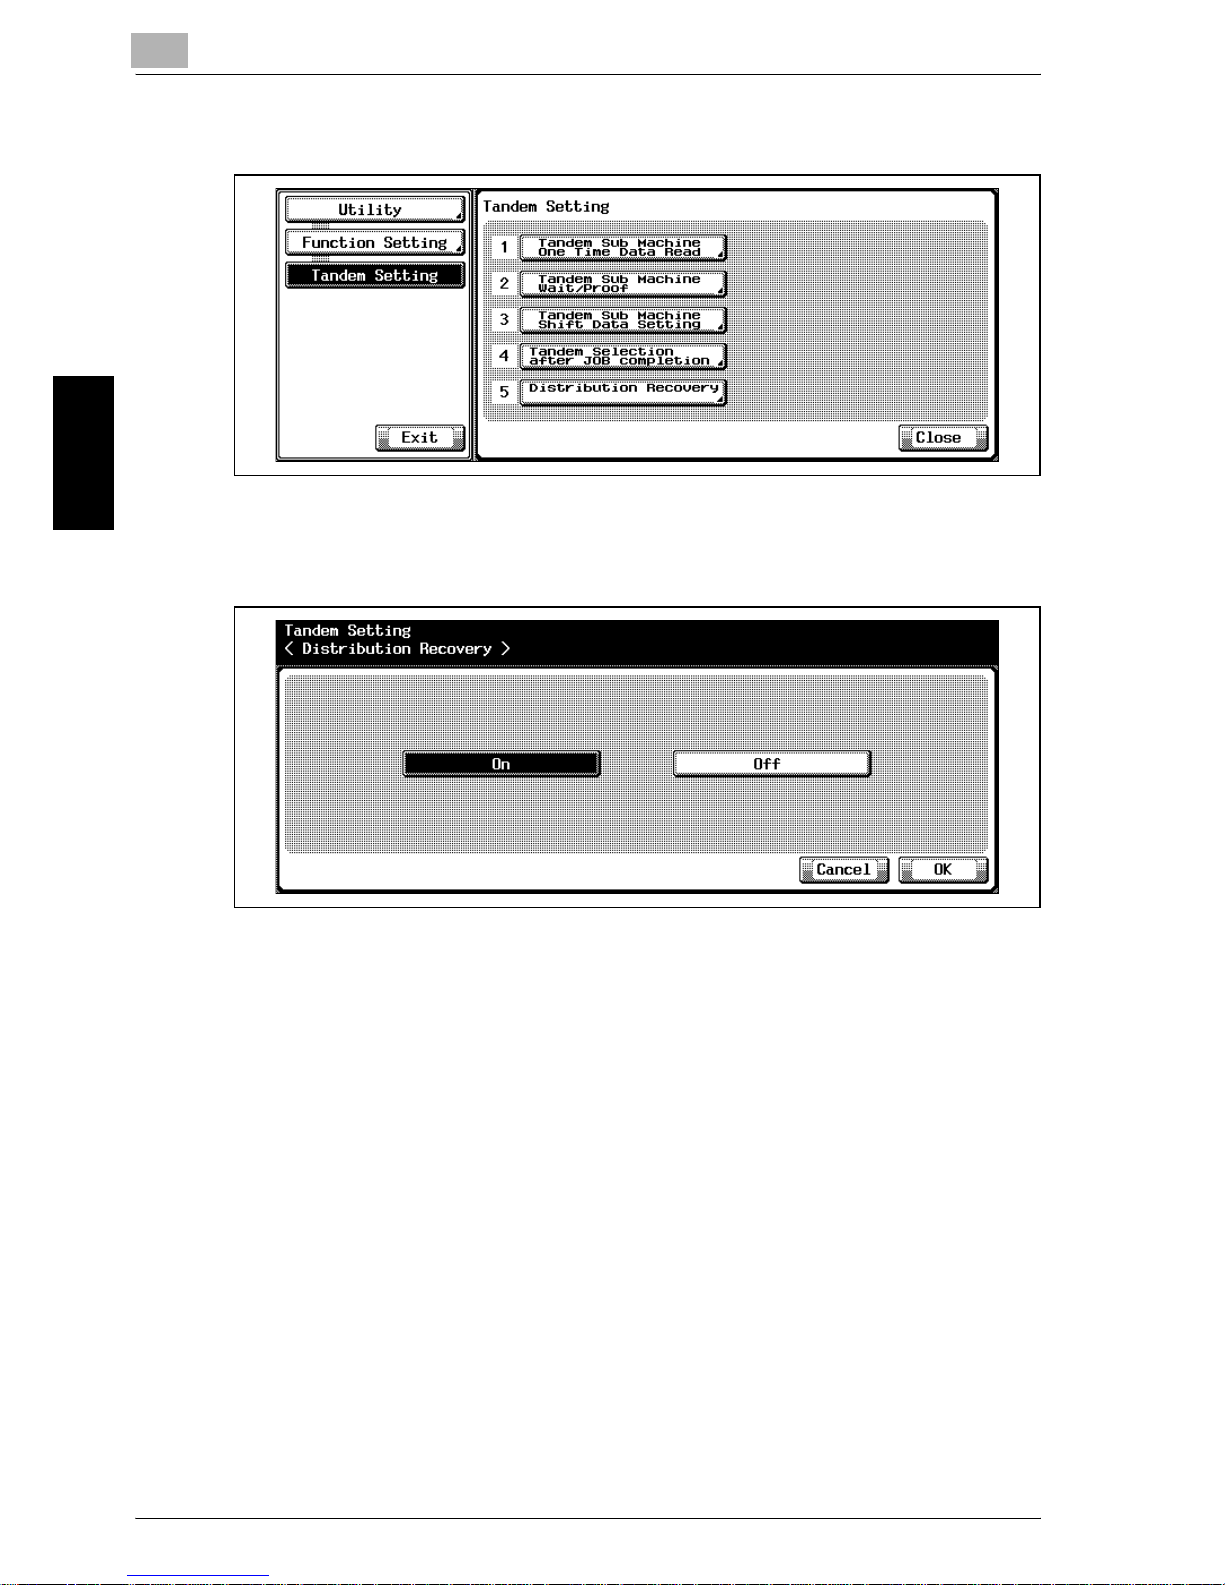
3
Utility <User Setting>
3-48 Océ im9220
Utility <User Setting> Chapter 3
4 Touch [5 Distribution Recovery].
The Distribution Recovery Screen will be displayed.
5 Touch [On] or [Off] to highlight it.
– With [On] selected, the tandem-connected machines perform the
distribution recovery.
– With [Off] selected, each machine completes the tandem job when
finishing its first distributed quantity.
6 Touch [OK] to complete the setting and return to the Tandem Setting
Screen.
7 If further changes are required, touch the desired key.
Touch [Utility] to restore the Utility Screen.
Page 96
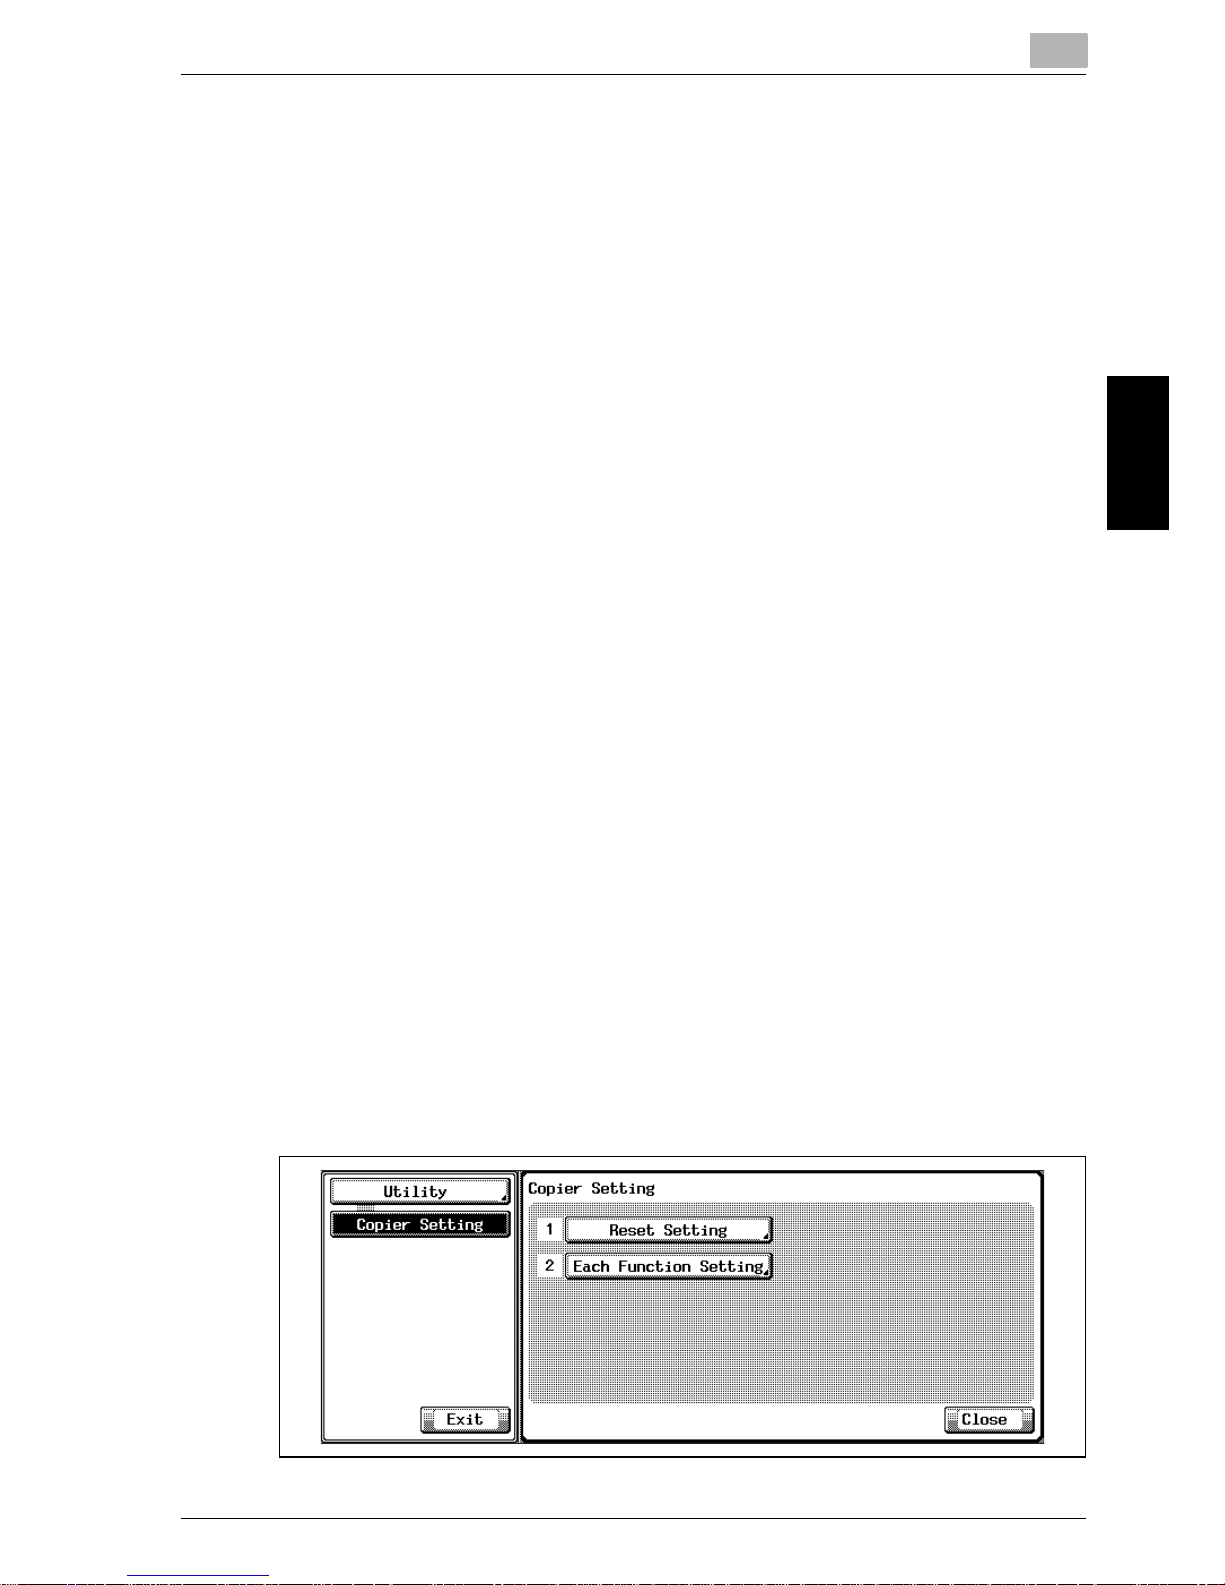
Utility <User Setting>
3
Océ im9220 3-49
Utility <User Setting> Chapter 3
3.5 3 Copier Setting
3.5.1 1 Reset Setting>1 Initial Setting
Besides the factory default setting (Full Auto), you may set the copying condition as the initial setting as desired.
Resetting the machine:
- when the power is turned off
- when Panel Reset is on
- when Power Save is on
- when copying becomes available by entering the password when User
Authentication/Account Authentication is on
- when a key counter or a copy card is inserted
- when pressing the [Reset] on the control panel
Full Auto copying condition:
- Basic Setting: Copy set; 0001, Simplex/Duplex; 1>1, ADF; ON, Density;
AES, Zoom; 1.000, Auto Paper Select; ON
- Finishing: Set by “2 Reset Function Setting”
- Combine Original: Combine Originals; OFF, Original Direction; Normal,
Bind; Right & Left Bind, Special Original; Normal, Original Size; Standard
Size
- Orig. Image Type: Text/Photo
- Application: OFF
PrOcédure
1 Set the desired copy condition as the initial setting.
2 Press the [Utility/Counter] to display the Utility Screen.
3 Touch [3 Copier Setting].
The Copier Setting Screen will be displayed.
4 Touch [1 Reset Setting].
Page 97
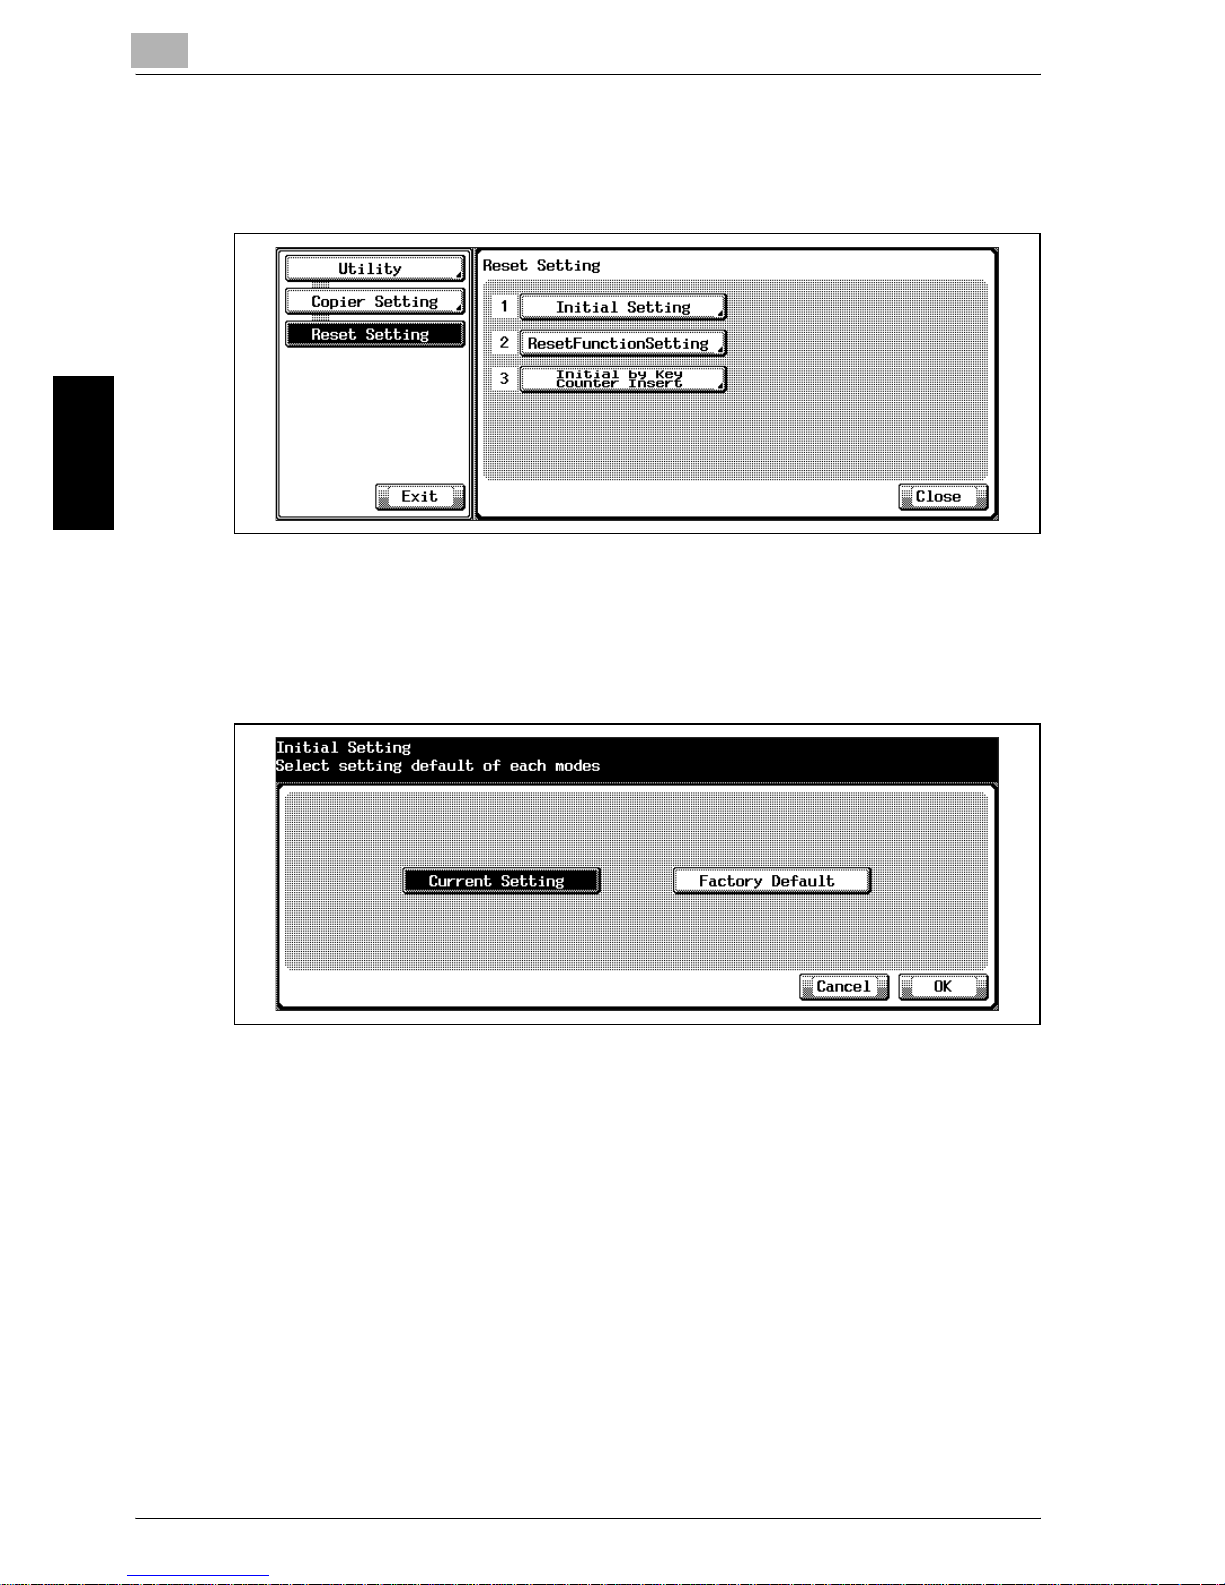
3
Utility <User Setting>
3-50 Océ im9220
Utility <User Setting> Chapter 3
The Reset Setting Screen will be displayed.
5 Touch [1 Initial Setting].
The Initial Setting Screen will be displayed.
6 Touch [Current Setting] to select the copy condition set by step 1 as
the initial setting.
Touch [Factory Default] to return to the full auto setting.
7 Touch [OK] to complete the setting and return to the Reset Setting
Screen.
8 If further changes are required, touch the desired key.
Touch [Utility] to restore the Utility Screen.
Page 98
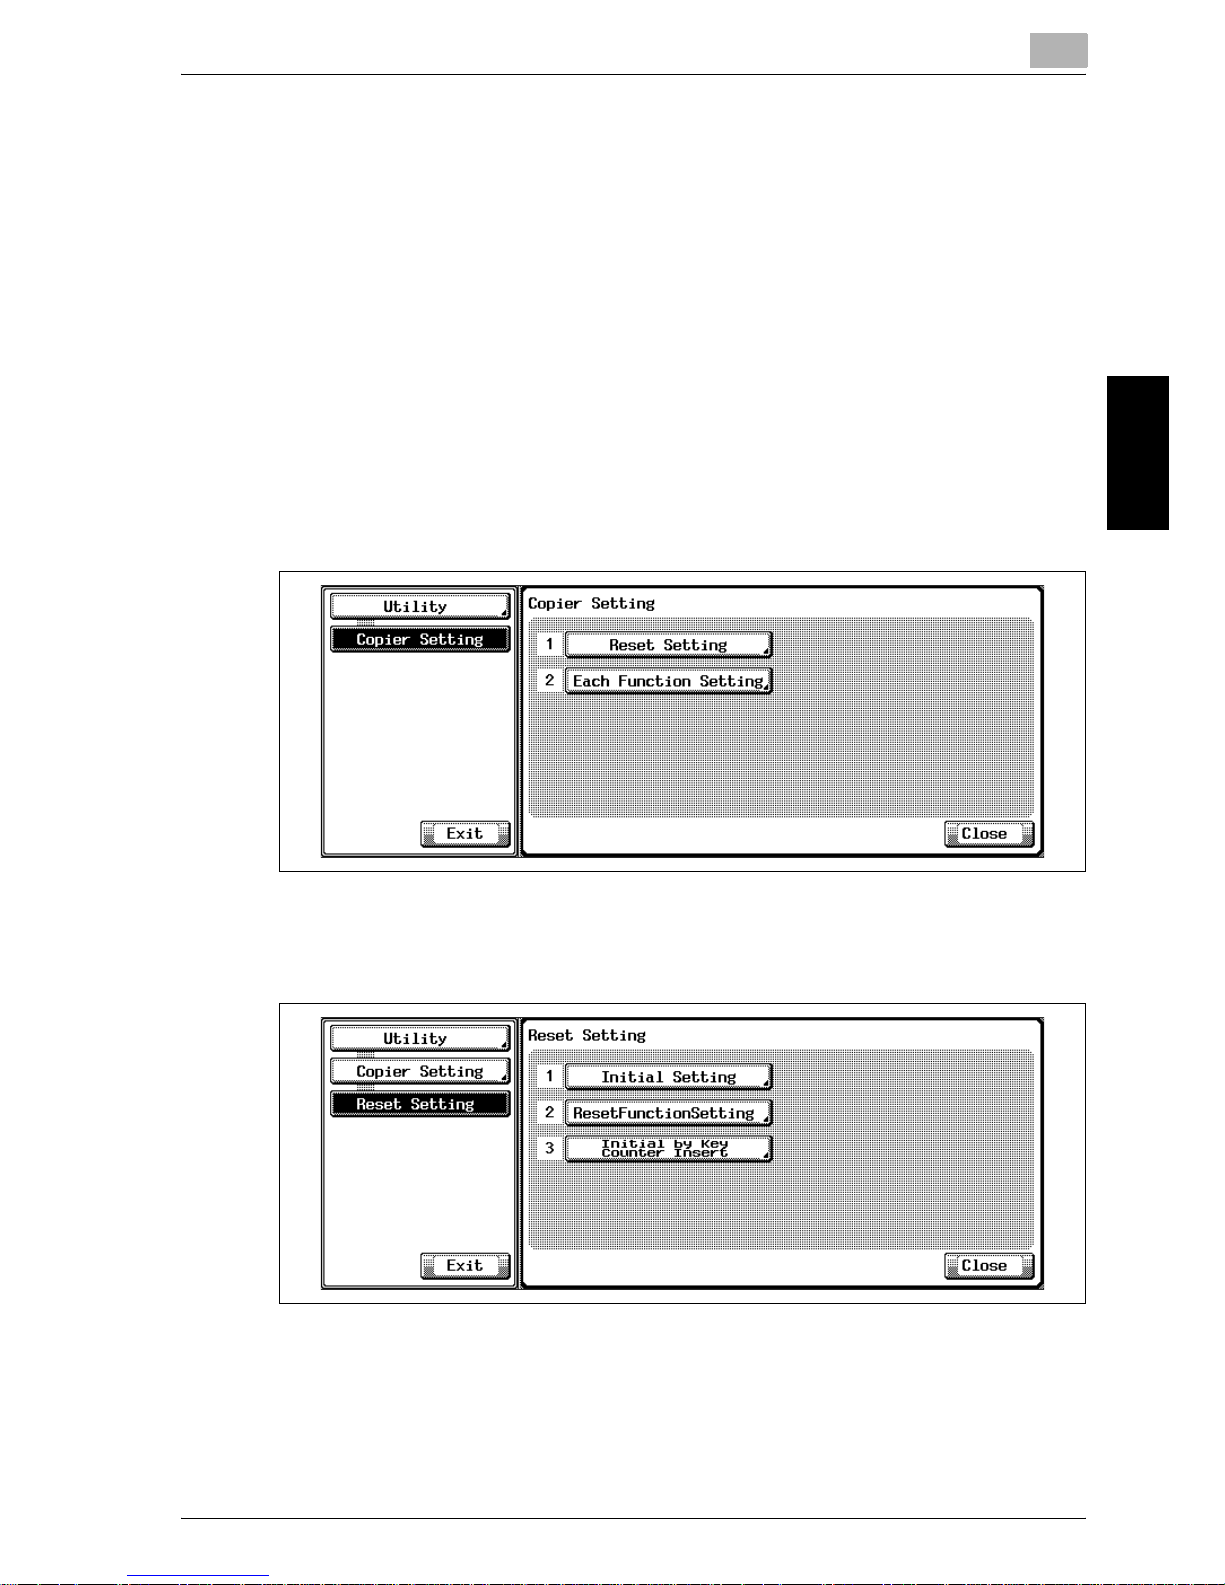
Utility <User Setting>
3
Océ im9220 3-51
Utility <User Setting> Chapter 3
3.5.2 1 Reset Setting>2 Reset Function Setting
When the machine is reset, select the copying conditions from the factory
default setting (Full Auto), or Initial Set which is set at “3 Copier Setting>1 Reset Setting>1 Initial Setting”.
In addition, alter Finishing of Full Auto as desired.
PrOcédure
1 Press the [Utility/Counter] to display the Utility Screen.
2 Touch [3 Copier Setting].
The Copier Setting Screen will be displayed.
3 Touch [1 Reset Setting].
The Reset Setting Screen will be displayed.
4 Touch [2 Reset Function Setting].
The Reset Function Setting Screen will be displayed.
Page 99
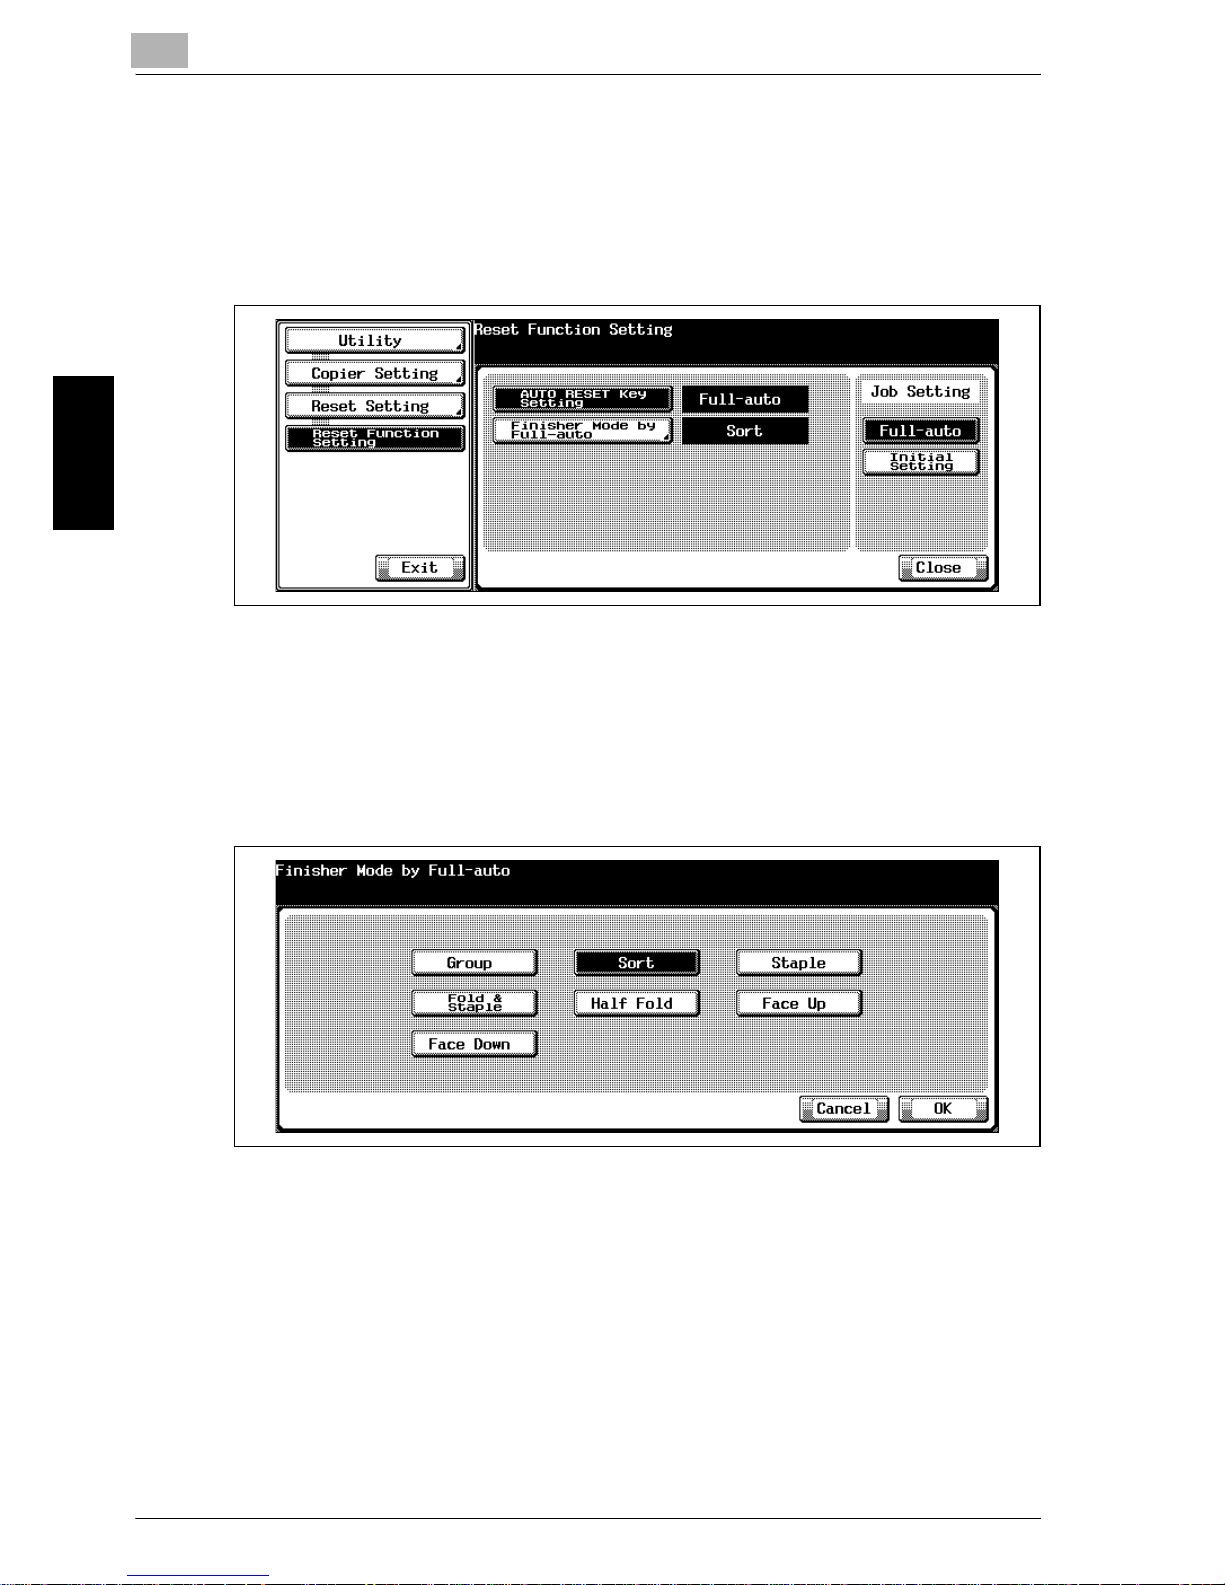
3
Utility <User Setting>
3-52 Océ im9220
Utility <User Setting> Chapter 3
5 Select the copying conditions when resetting the machine.
Touch [AUTO RESET Key Setting] to display the job setting keys.
– Touch [Full-auto] to set to the factory default setting.
– Touch [Initial Setting] to set as “3 Copier Setting >1 Reset Setting
>1 Initial Setting”.
When [Initial Setting] is selected for [AUTO RESET Key Setting], Each
Reset Setting becomes enabled.
6 Select the finishing conditions when resetting the machine.
Touch [Finisher Mode by Full-auto].
Touch any key on the screen for Full Auto, and then touch [OK].
The Reset Function Setting Screen will be restored.
7 If further changes are required, touch the desired key.
Touch [Utility] to restore the Utility Screen.
Page 100
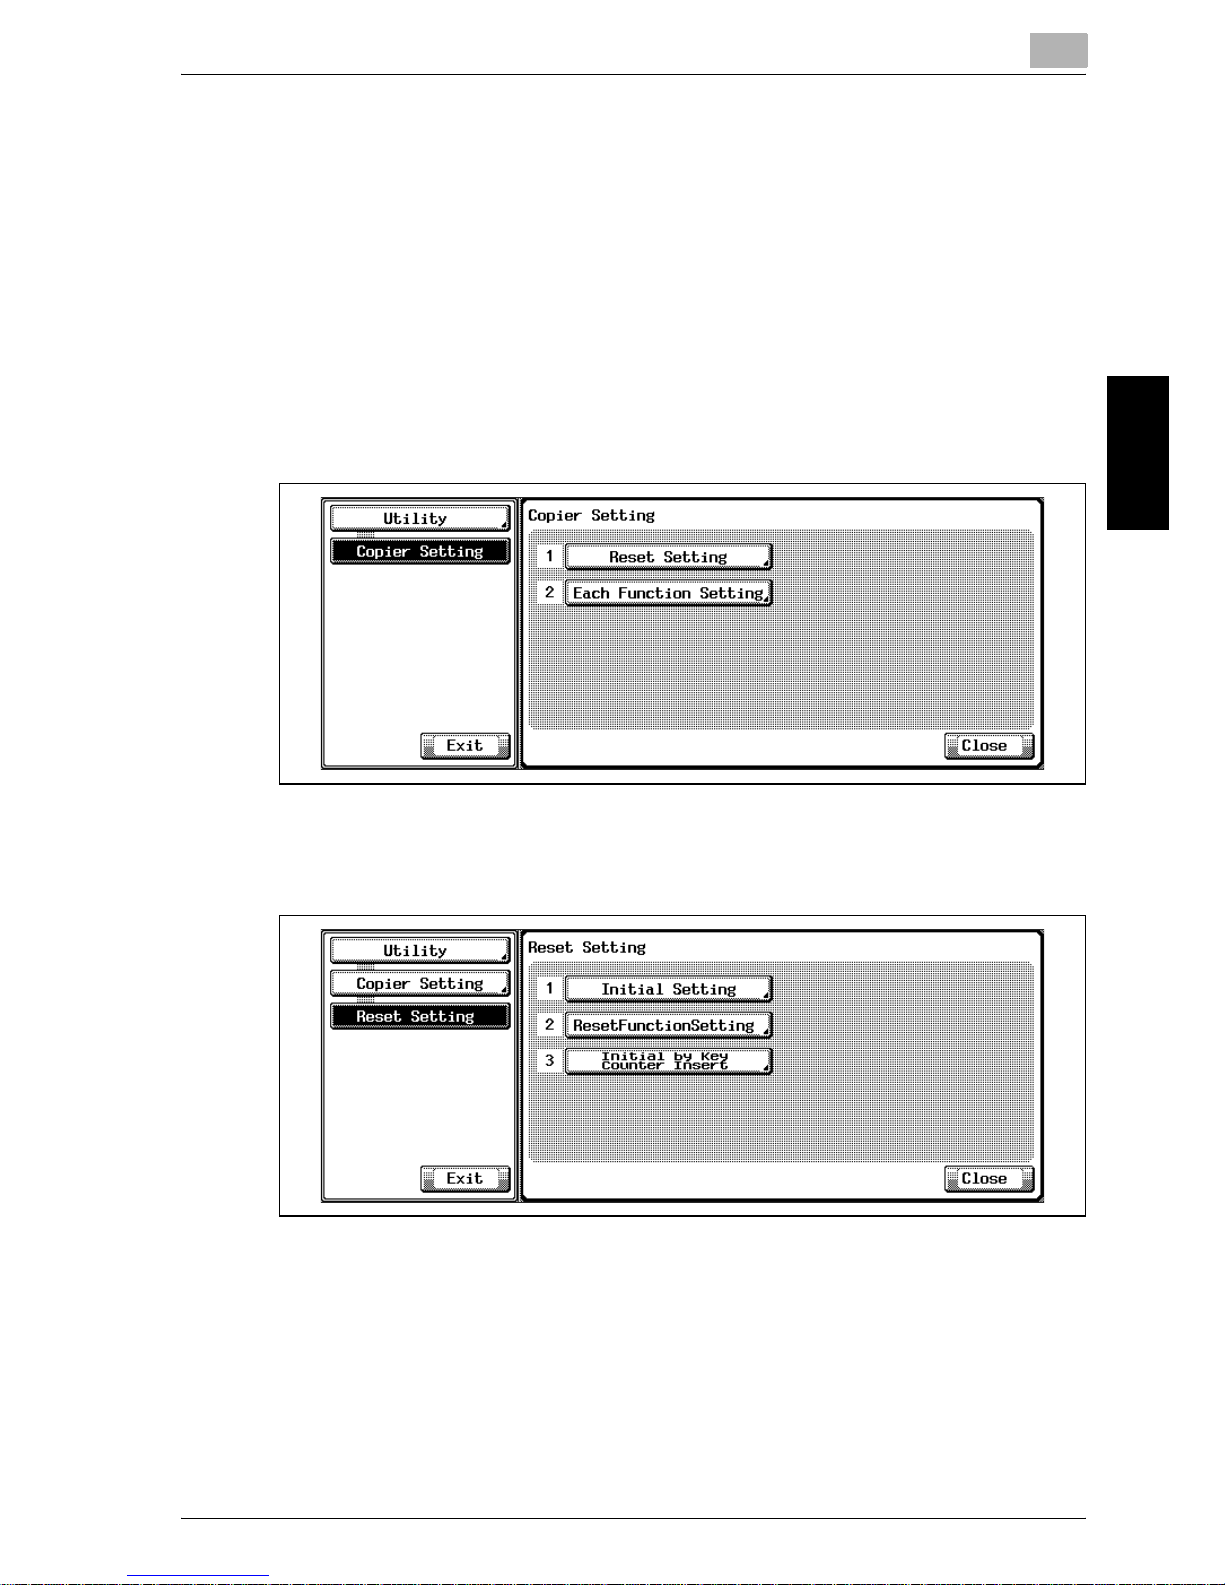
Utility <User Setting>
3
Océ im9220 3-53
Utility <User Setting> Chapter 3
3.5.3 1 Reset Setting>3 Initial by Key Counter Insert
Select to reset or not when inserting the key counter and the copy card.
PrOcédure
1 Press the [Utility/Counter] to display the Utility Screen.
2 Touch [3 Copier Setting].
The Copier Setting Screen will be displayed.
3 Touch [1 Reset Setting].
The Reset Setting Screen will be displayed.
4 Touch [3 Initial by Key Counter Insert].
The Initial by Key Counter Insert Screen will be displayed.
 Loading...