

Page 1
BE Series
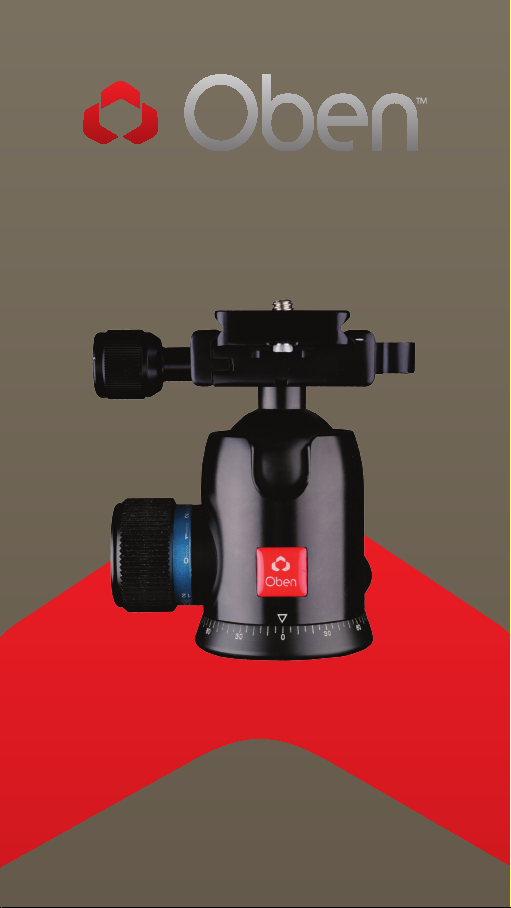
Dual Action Ballhead
You’re on steady ground
1
™
Page 2

IntroductIon
Thank You for choosing Oben!
This st ur dy Oben BE Series Du al-A ct ion ballhe ad
provid es sm oot h, e or tless operation. T wo locks
provid e independent adjus tment a nd locking of
the b al l and the panora mic base. A sn ap-i n qu ickrelease plate is i ncluded for q uick, s imple mounting/
dismount ing of the cam era .
An i ntegrated bu bble level ensu res accurate
align ment of the ca mera with th e hor izon. T he
pan ora mic base of th e ballhead allows for f ul l 360 °
pan ning—idea l for s hoo ting pa nor am ic ph otos.
Please read through this entire manual before using the
BE series ballhead.
Note: Images are for illustrative purposes only. Actual
product may vary.
2
Page 3

tABLE oF contEntS
Key Features 4
Mount Ballhead To Tripod 5
Converting Mounting Thread 5
Main Locking Knob Operation 5
Mount Quick-Release Plate 6
Mount Camera 7
Panoramic Base 7
Warnings 7
3
Page 4

KEY FEAturES
C
B
A
D
F
G
H
A
Quick-Release Plate
B
Bubble Level
C
1/4”-20 UNC Mounting Screw
D
Quick-Release Knob
E
Main Locking Knob
F
Locking Index Scale
G
Pan Knob
H
Panoramic Base With 360° Markings
I
90° Groove
4
E
I
Page 5

oPErAtIon
1. Mount Ballhead To Tripod
To mo unt t he ballhe ad on t he
tripod , first ti ghte n al l of the
knobs on t he head . Then, being
car ef ul to prop erly a lign the
tripod stud a nd the ba ll head hole
to avoid damagi ng them , rot ate
the b al lhead clockwise onto the
tripod , and tighten it by ha nd .
2. Converting Mounting Thread
For tripods w ith a 1 /4″ th rea ded
mou nting stud: in sert th e
supplied Reduce r Bushi ng into
the t hread ed mo unt ing hole of th e
head to en able a proper fi t.
3. Main Locking Knob Operation
The single Locking K nob locks
and unlocks th e ballhead, wh ich
allow s you t o chang e the position
of th e camera. W hen c ha nging
cam era p osition usi ng th e Loc ki ng
Knob, a lways keep one hand
on th e camera. T ur n the kno b
cou nterclock wi se to u nlock the
head and cloc kw ise to loc k it.
Ensur e that th e knob is fi rm ly
tighten ed before letting go of t he
camera.
5
Page 6

oPErAtIon
4. Mount Quick-Release Plate
Rem ove the q uick-release
plate fr om th e ballhead by
turning t he quick-release
knob cou ntercl ock wise. T hi s
loos ens t he quick-release
cla mp, a llowing you to remo ve
the q uick-re lea se pl ate. Mou nt
the q uick-re lea se pl ate to the
threaded hole on the base of
you r ca mer a. Use the s upplied
hex k ey to t ighten the screw.
The plat e uti li zes a 1 /4″20 screw t hat w il l fit most
cam era s.
Warning: Some manufacturer’s plates do not meet our
specifications and may not lock your eq uipment securely
in the Oben q uick-release clamp. Please test all camera
and lens plates made by manufacturers other than Oben
to ensure compatibility.
5. Mount Camera
Af ter mou nting t he quick-re lease
plate to your c amera , ensure
that al l knobs e xcept for the
qu ick-rele ase kno b are tig htened
on th e ball head. L oosen th e
qu ick-rele ase kno b by tur ning it
cou ntercl ockwise u ntil it stops .
Mou nt the ca mera to t he ballhe ad
by sl iding one ed ge of the q uickrelease plate into th e ballhea d,
the n lower t he othe r side until t he
qu ick-rele ase plate is ly ing flat in
the q uick-release clamp. T urn the
qu ick-rele ase kno b clock wise to
lock the p late.
6
Page 7

oPErAtIon
Warning: A lways use one han d to secure th e camera while
adjusting t he ballhead, a nd ensure that the lock i s engaged
before lett ing go of the camera.
6. Panoramic Base
The base o f the bal lh ead c an
be independently rotated
360°. The base is controll ed by
loos ening t he pa n knob. T hi s is
the s ma llest k nob , at the base
of th e hea d. T wi st the kn ob
cou nterclock wi se to u nlock
the b ase , rot ate t he ba se to
the d esi red p osition, and lock
the b ase b y tu rn ing the k nob
clockwise. Degree marki ngs
on th e bas e of th e ballhead can
be used to ac curate ly set up
panoramic shots.
Warnings:
• Do not exceed the ballhead’s maximum
!
load capacity (see packaging for details).
• Ensure that all appropriate locks are
engaged when necessary.
• Ballhead should only be used in
temperatures ranging between -22° and
140° F. Do not operate in saltwater. Dry
ballhead if it becomes wet.
• Remove the camera from the ballhead
during setup or transport.
• Keep out of reach of children .
Visit our website at ObenSupports.com
for more Oben products.
7
Page 8

© Copyright 2013 The Gradus Group
All other trademarks are the property of their respective owners
www.obensupports.com
8
 Loading...