

Oasis BLF1CTHS(Y) Installation Manual

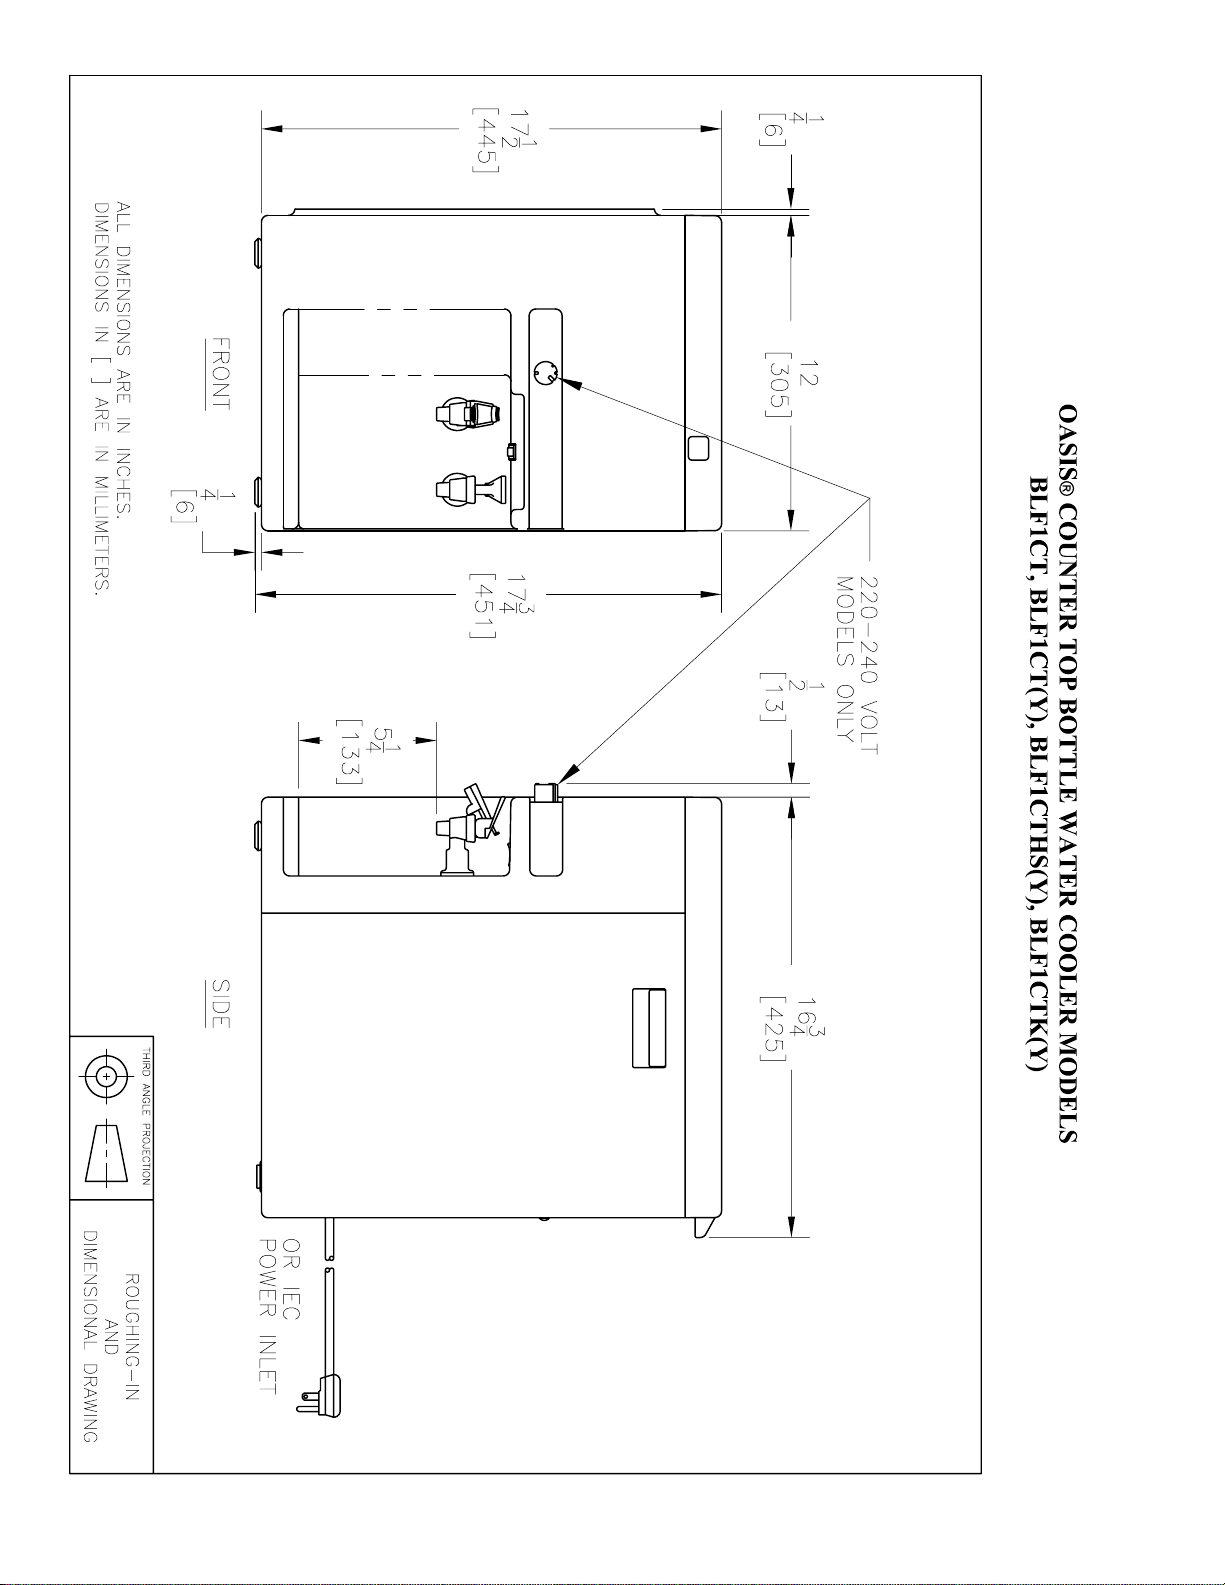
OASIS® COUNTER TOP BOTTLE WATER COOLER MODELS
BLFCT, BLF1CT(Y), BLF1CTHS(Y), BLF1CTK(Y)
INSTRUCTIONS
A. INSPECTION
Inspect the carton and water cooler for evidence of rough handling and concealed damage. Damage claims should be filed with the carrier. Handholds
are available on the sides of the unit to facilitate removal from the carton.
B. MAINTENANCE
Periodically remove dirt and lint from the condenser. Disconnect the power supply cord, then clean the condenser with the small stiff non-wire brush
when required. Observance of this procedure will insure adequate air circulation through the condenser so operation is efficient and economical.
C. OVERLOAD PROTECTION
The compressor motor is equipped with an automatic reset protector which will disconnect the motor from the line in case of an overload.
D. LUBRICATION
This unit is equipped with a hermetically sealed compressor and requires no additional lubrication.
E. TO PUT WATER COOLER INTO SERVICE
1) Remove the top by pulling up on the two tabs at the rear. Remove all inside packing and wipe the inside of the reservoir with a clean cloth to
remove any packing residue. Note: The foam filter around the perimeter of the reservoir is not packing, but a feature to help keep dust and dirt
out. Remove the piece of soft plastic packing wedged between the wire water level indicator and the front so that the float is free to move.
2) Replace the top by first hooking in the rear tabs and then by pressing down at the front until it snaps into place.
3) Check the available power supply against the water cooler data plate to assure correct electrical service. For IEC power inlet models, insert female
portion of approved power cordset into IEC inlet and rout cord through strain relief on back of cooler. Plug service cord into receptacle. Make
sure the hot tank switch at the front is not on (unlit on 220-240 volt models) if you have a hot and cold model.
4) Fill the reservoir through the top opening until the water level indicator at the front points to the + position. If a bottle is used on the unit, the
reservoir will fill only to the end of the bottle neck, about 1-1/2" (38mm) from the bottom of the reservoir and the indicator will not point to the +
position.
5) If you have a hot and cold model, run water out of the hot tank faucet to vent air trapped in the tank. This will make certain the hot water tank
contains water. Then place the hot water tank heater switch to the "ON" position (switch lights on 220-240 volt models). DANGER: WATER
DISPENSED FROM HOT FAUCET CAN SCALD.
6) The polymer material used on parts of the unit can withstand long term temperatures up to 150°F (66°C) before deforming. Do not subject the unit
to greater temperatures by placing it in areas that will exceed a 150°F (66°C) ambient temperature.
7) In operation, an ice ring will form in the area beneath the polymer baffle in the reservoir. This is normal. A cold control has been pre-set at the
factory. If colder water is desired, the control setting may be moved clockwise and for warmer water, counterclockwise in quarter turn
adjustments. On 110 volt models, the control is located on the back and requires a small bladed screwdriver to rotate the shaft using quarter turn
adjustments. The 220-240 volt models have a control knob on the front of the unit..
F. TO DISCONTINUE USE OF WATER COOLER
1) Disconnect power supply cord.
2) On hot and cold model, place the hot water tank heater switch in the "OFF" position.
3) Remove water bottle from cooler.
4) Provide container to catch water. Drain through faucet(s) and, if a hot and cold model, by removing drain plug on the bottom of the unit.
5) ALWAYS DRAIN ALL WATER WHEN FREEZING TEMPERATURES ARE ANTICIPATED OR BEFORE SHIPPING THE WATER
COOLER.
G. SANITIZING
If sanitizing is required, a solution can be made by adding ½ teaspoonful of household bleach to one (1) gallon of water or 2 ml of household bleach to 3
L of water. DO NOT use a stronger sanitizing solution. Wash the cooling tank and baffle in the solution. Rinse immediately. DO NOT allow
sanitizing solution to remain in the reservoir more than 5 minutes. On hot models, DO NOT allow sanitizing solution to enter hot tank; plug inlet to hot
tank using a tapered cork with ½” (13mm) mean diameter. Dispense solution through cold faucet and cook faucet, if so equipped. Rinse through
faucet(s) with clean water. Remove plug from hot tank water inlet. Rinse hot tank thoroughly through hot faucet and through hot tank drain.
H. CLEANING
In order to preserve the surface finish, do not use abrasive cleaning agents or solutions over 150°F (66°C). It is recommended that a non-caustic
detergent solution and warm water be used. Do not use solvents.
I. SERVICE
This unit should be serviced only by qualified service personnel.
WARNING
The warranty and the Underwriters' Laboratories listing for this machine are automatically voided if this machine is altered, modified, or combined with any
other machine or device. Alteration or modification of this machine may cause serious flooding and/or hazardous electrical shock or fire.
EXCEPT AS SET FORTH HEREIN, THE MANUFACTURER MAKES NO OTHER WARRANTY, GUARANTEE OR AGREEMENT EXPRESSED,
IMPLIED OR STATUTORY, INCLUDING ANY IMPLIED WARRANTY OR MERCHANTABILITY OR FITNESS FOR A PARTICULAR PURPOSE.
222 East Campus View Blvd. • Columbus, OH 43235 U.S.A.
is a trademark of Oasis International © 2009 Oasis International
®
OASIS
is a registered trademark of Oasis International 030099-055 Rev F
1-800-950-3226
www.oasiscoolers.com
 Loading...