

Page 1
ProMax Pressure 6000/8
Pressure Pressure Pressure Pressure Pressure
Automatic
ProMax Pressure Well 6000/8
Automatic
Page 2

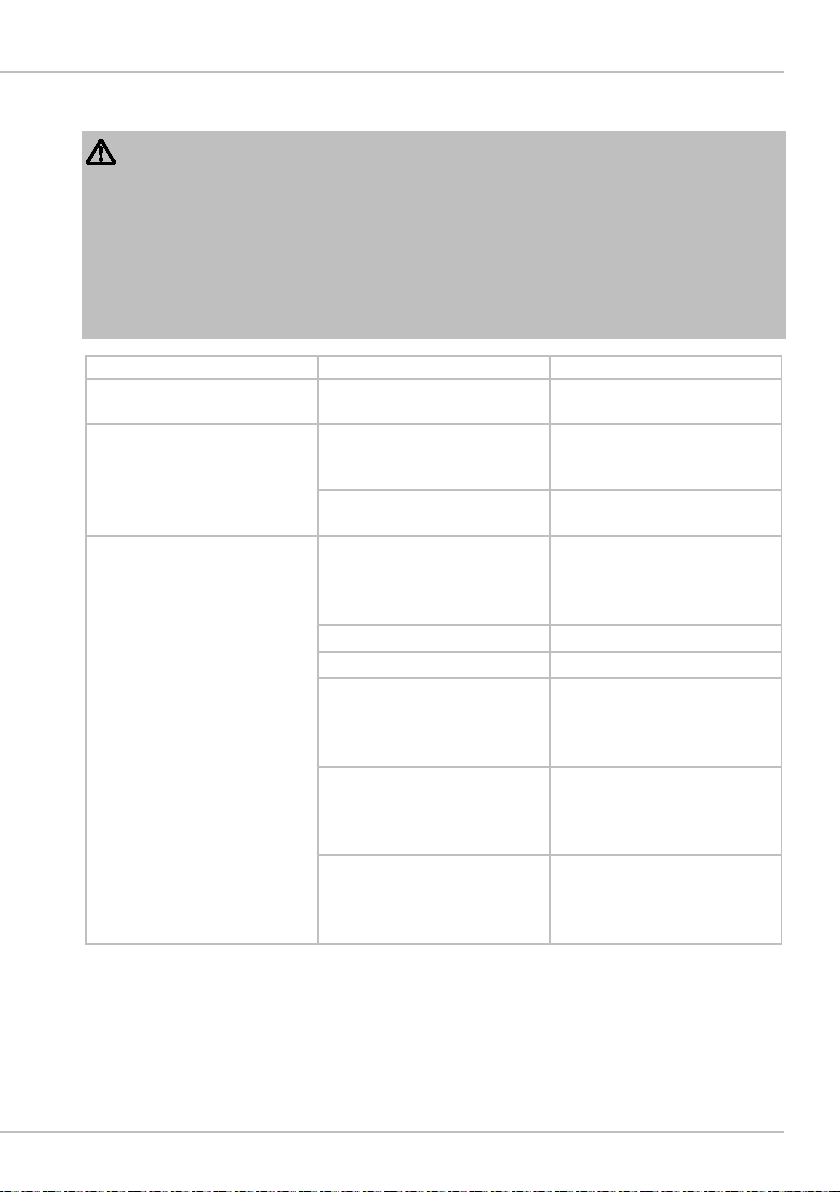
A B
POX0020
POX0023
2 ProMax Pressure Automatic 6000/8, Pressure Well Automatic 6000/8
Page 3
C D
POX0024
POX0021
E
POX0022
3
Page 4

Original Gebrauchsanleitung
WARNUNG
• Dieses Gerät kann von Kindern ab 8 Jahren und darüber
sowie von Personen mit verringerten physischen, sensorischen oder mentalen Fähigkeiten oder Mangel an Erfahrung und Wissen benutzt werden, wenn sie beaufsichtigt
oder bezüglich des sicheren
Gebrauchs des Gerätes unterwiesen wurden und die
daraus resultierenden Gefahren verstehen.
• Kinder dürfen nicht mit dem
Gerät spielen.
• Reinigung und Benutzerwartung dürfen nicht von Kindern
ohne Beaufsichtigung durchgeführt werden.
• Das Gerät muss über eine
Fehlerstrom-Schutzeinrichtung mit einem Bemessungsfehlerstrom von maximal
30 mA abgesichert sein.
• Gerät nur anschließen, wenn
die elektrischen Daten von
Gerät und Stromversorgung
übereinstimmen. Die Gerätedaten befinden sich auf dem
Typenschild am Gerät, auf
der Verpackung oder in dieser Anleitung.
• Tod oder schwere Verletzungen durch Stromschlag sind
möglich! Bevor Sie ins Wasser greifen, Geräte im Wasser
mit einer Spannung >12 V AC
oder >30 V DC vom Stromnetz trennen.
• Gerät nur betreiben, wenn
sich keine Personen im Wasser aufhalten.
• Eine beschädigte Netzanschlussleitung sofort durch
OASE, einen autorisierten
Kundendienst oder eine qualifizierte Elektrofachkraft ersetzen lassen, um Gefahren
durch Stromschlag zu vermeiden.
SICHERHEITSHINWEISE
Elektrischer Anschluss
• Verlängerungsleitungen und Stromverteiler (z. B. Steckdosenleisten) müssen
für die Verwendung im Freien geeignet
sein (spritzwassergeschützt).
• Steckerverbindungen vor Feuchtigkeit
schützen.
• Gerät nur an einer vorschriftsmäßig installierten Steckdose anschließen.
Sicherer Betrieb
• Bei defektem Gehäuse darf das Gerät
nicht betrieben werden.
• Bei defekter elektrischer Leitung darf
das Gerät nicht betrieben werden.
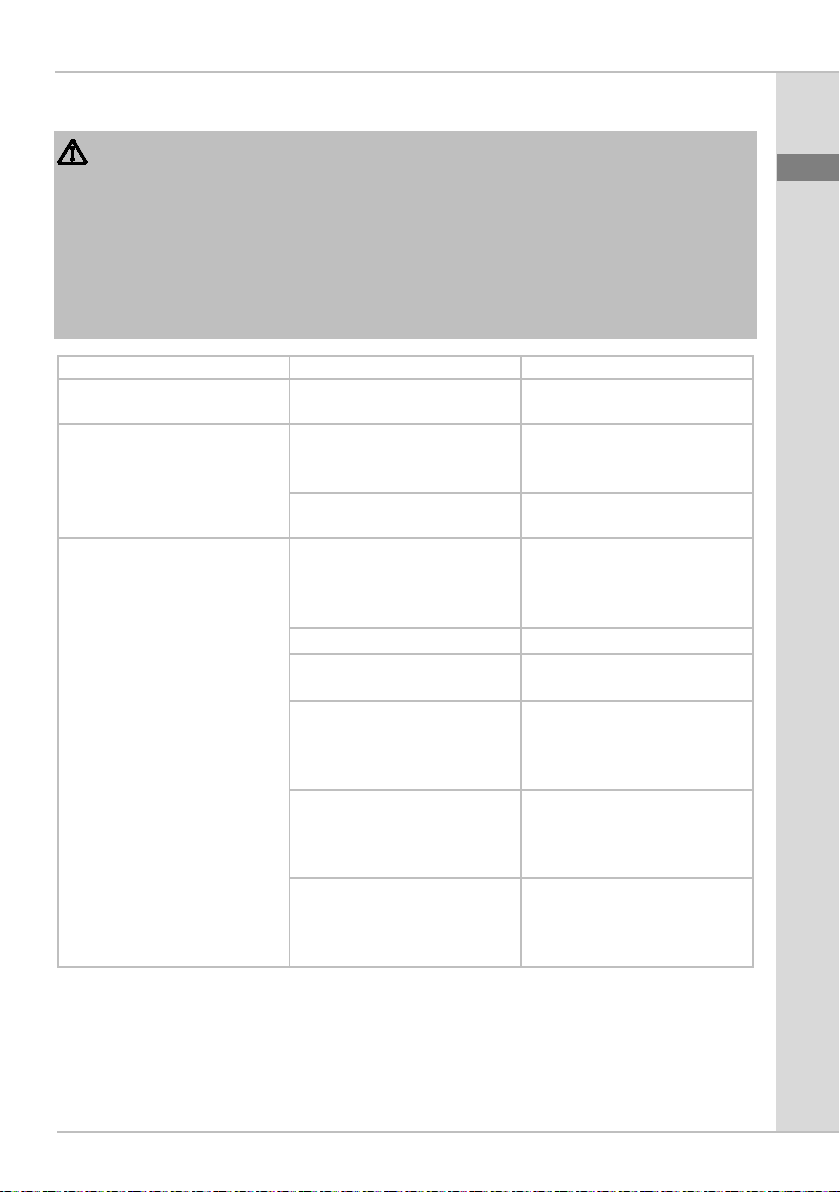
4 ProMax Pressure Automatic 6000/8, Pressure Well Automatic 6000/8
Page 5
A
ProMax
Automatic
6000/8
Well
1
Befesti-
Seil
•
•
2
Anschluss
30,9 mm (1")
•
•
3
Netzanschlussleitung
•
•
4
Sieb Saugseite
•
•
5
Pumpenfuß
•
•
6
Standfuß
•
–
7
Aufstellfüße
•
–
8
Gummipuffer
Pumpe bei
Aufstellung
•
–
9
Befestigungsseil, 20 m
•
•
• Gerät nicht an der elektrischen Leitung
tragen oder ziehen.
• Leitungen geschützt vor Beschädigungen verlegen und darauf achten, dass
niemand darüber fallen kann.
• Niemals technische Änderungen am
Gerät vornehmen.
• Nur die Arbeiten am Gerät durchführen,
die in dieser Anleitung beschrieben
sind. Wenn sich Probleme nicht beheben lassen, eine autorisierte Kundendienststelle oder im Zweifelsfall den
Hersteller kontaktieren.
• Nur Original-Ersatzteile und -Zubehör
für das Gerät verwenden.
ÜBER DIESE GEBRAUCHSANLEITUNG
Willkommen bei OASE Living Water. Mit
dem Kauf des Produkts ProMax Pres-
sure Automatic 6000/8, Pressure Well
Automatic 6000/8 haben Sie eine gute
Wahl getroffen.
Lesen Sie vor der ersten Benutzung des
Gerätes die Anleitung sorgfältig und machen Sie sich mit dem Gerät vertraut. Alle
Arbeiten an und mit diesem Gerät dürfen
nur gemäß der vorliegenden Anleitung
durchgeführt werden.
Beachten Sie unbedingt die Sicherheitshinweise für den richtigen und sicheren
Gebrauch.
Bewahren Sie diese Anleitung sorgfältig
auf. Bei Besitzerwechsel geben Sie bitte
die Anleitung weiter.
Symbole in dieser Anleitung
Warnhinweise
Die Warnhinweise in dieser Anleitung sind
durch Signalworte klassifiziert, die das
Ausmaß der Gefährdung anzeigen.
WARNUNG
• Bezeichnet eine möglicherweise
gefährliche Situation.
• Bei Nichtbeachtung kann Tod oder
schwerste Verletzung die Folge sein.
HINWEIS
Informationen, die zum besseren Verständnis oder der Vorbeugung möglicher
Sach- oder Umweltschäden dienen.
Weitere Hinweise
A Verweis auf eine Abbildung, z. B.
Abbildung A.
→ Verweis auf ein anderes Kapitel.
PRODUKTBESCHREIBUNG
Übersicht
Pressure
gungsösen für
Druckseite
zur Lagerung
der
horizontaler
6000/8
DE
EN
FR
NL
ES
PT
IT
DA
NO
SV
FI
HU
PL
CS
SK
SL
HR
RO
BG
UK
RU
CN
5
Page 6

Bestimmungsgemäße Verwendung
ProMax Pressure Automatic 6000/8,
Pressure Well Automatic 6000/8, "Gerät"
genannt, darf ausschließlich wie folgt verwendet werden:
• Fördern von klarem Wasser oder Regenwasser.
• Bewässern und Gießen.
• Wasserentnahme aus Regentonnen
oder Zisternen.
• Betrieb unter Einhaltung der technischen Daten.
Möglicher Fehlgebrauch
Für das Gerät gelten folgende Einschränkungen:
• Nicht geeignet für Salzwasser.
• Nicht geeignet für Trinkwasser.
• Nicht im Langzeitbetrieb (z. B. Dauer-
umwälzbetrieb im Teich) verwenden.
• Nicht für gewerbliche oder industrielle
Zwecke verwenden.
• Nicht in Verbindung mit Chemikalien,
Lebensmitteln, leicht brennbaren oder
explosiven Stoffen einsetzen.
• Nicht an die Trinkwasserversorgung anschließen.
AUFSTELLEN UND ANSCHLIEßEN
Druckschlauch anschließen
Die Förderleistung ist optimal bei einem
Schlauchinnendurchmesser von 25 mm
(1").
So gehen Sie vor:
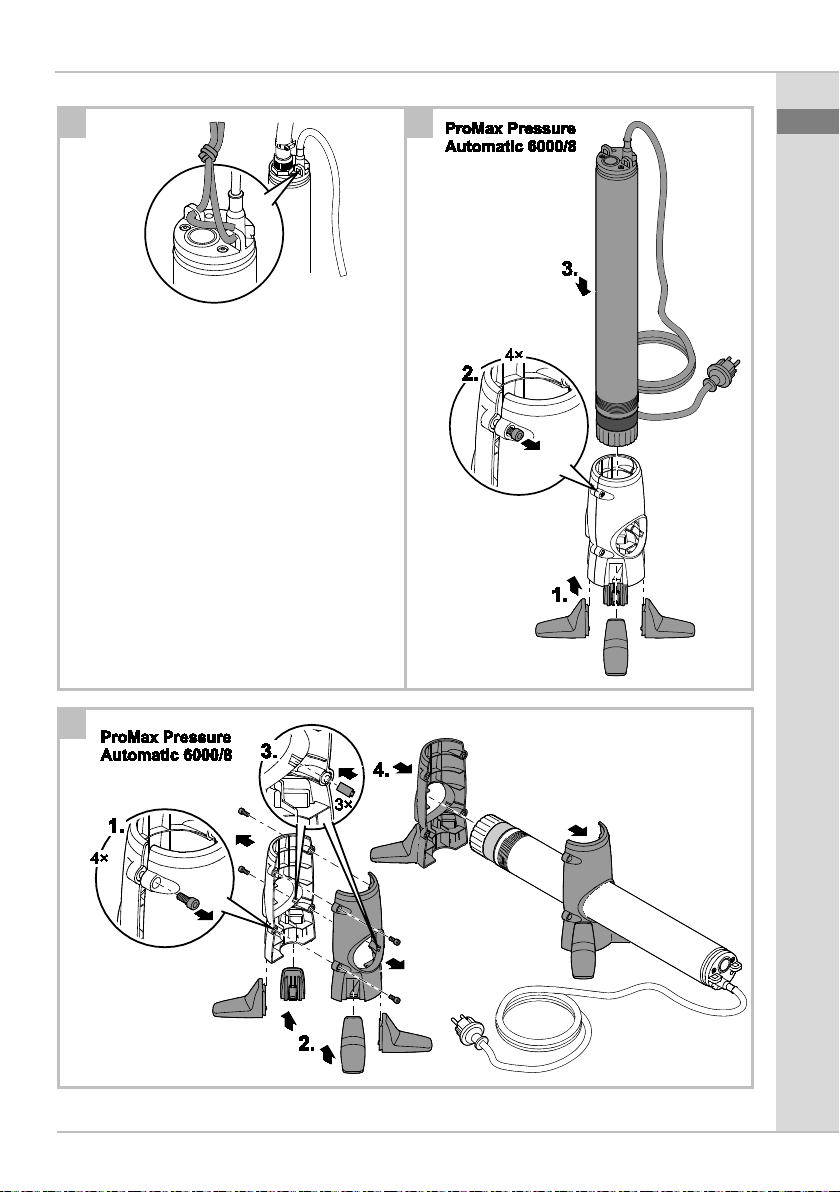
B
1. Schutzkappe abziehen.
2. Druckschlauch mit dem Anschluss
Druckseite verbinden.
– Empfehlung: Schnellkupplung ver-
wenden.
Pumpe in Bohrbrunnen oder Schacht aufstellen
C
• Befestigungsseil mit doppeltem Knoten
an den Ösen befestigen und die Pumpe
in den Bohrbrunnen oder Schacht herablassen.
• Die Pumpe mit einem Abstand von mindestens 1 m zum Grund mit dem Befestigungsseil fixieren.
– Dadurch wird das Ansaugen von
Schmutzpartikeln vermieden.
• Das Sieb der Saugseite muss mindestens 150 mm unter dem Wasserspiegel liegen.
• Nicht an der Netzanschlussleitung tragen.
• Ab 5 m Bohrbrunnen- oder Schachttiefe
die Netzanschlussleitung im Abstand
von 5 m am Befestigungsseil fixieren
(Zugentlastung).
Pumpe mit Standfuß vertikal aufstellen
(nur ProMax Pressure Automatic 6000/8)
Im Tank oder Brunnen kann die Pumpe
mit dem Standfuß vertikal aufgestellt werden.
• Das Sieb der Saugseite muss minde-
stens 150 mm unter dem Wasserspie-
gel liegen.
• Das zu fördernde Wasser darf maximal
3
50 g Sand pro m
Wasser enthalten.
So gehen Sie vor:
D
1. Aufstellfüße auf den Standfuß schieben.
2. Innensechskantschrauben soweit lösen, dass der Standfuß die Pumpe aufnehmen kann.
3. Pumpe in den Standfuß schieben.
4. Innensechskantschrauben festziehen,
bis die Pumpe im Standfuß fixiert ist.
6 ProMax Pressure Automatic 6000/8, Pressure Well Automatic 6000/8
Page 7
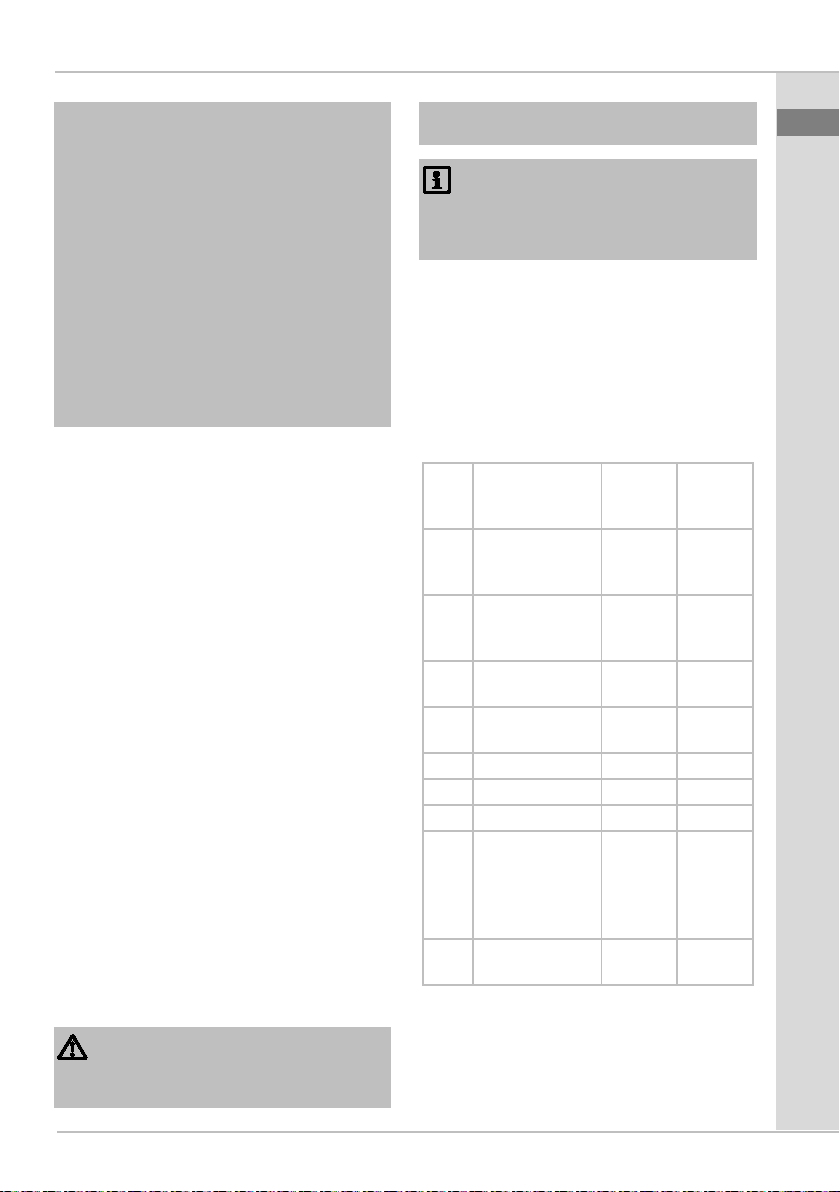
Pumpe mit Standfuß horizontal aufstellen
(nur ProMax Pressure Automatic 6000/8)
Im flachen Tank oder Brunnen kann die
Pumpe mit dem Standfuß horizontal aufgestellt werden.
• Die Pumpe muss exakt waagerecht
ausgerichtet sein.
• Das zu fördernde Wasser darf keinen
Sand enthalten.
So gehen Sie vor:
E
1. Innensechskantschrauben entfernen.
– Der Standfuß ist zweigeteilt.
2. Zwei Aufstellfüße auf jeden Standfuß
schieben.
3. Drei Gummipuffer jeweils in die Nuten
der Durchführungsöffnung schieben.
– Gummipuffer an beiden Standfüßen
anbringen.
4. Beide Standfüße auf die Pumpe schieben.
– Der Abstand zwischen den Standfü-
ßen muss möglichst groß sein, damit
die Pumpe sicher steht.
BETRIEB
Die Pumpensteuerung (flow control) misst
den Durchfluss und schaltet die Pumpe
bei fehlendem Durchfluss aus.
• Die Pumpe schaltet bei Wassermangel
aus und ist dadurch vor Schäden durch
Trockenlauf geschützt.
• Beim automatischen Betrieb übernimmt
die Pumpensteuerung das Ein- und
Ausschalten der Pumpe.
Das integrierte Rückschlagventil verhindert, dass nach dem Ausschalten Wasser
aus dem Druckschlauch in die Pumpe zurückfließt. Des Weiteren schützt das
Rückschlagventil die Pumpe vor Beschädigungen durch Druckstöße.
Automatischer Betrieb
Die Pumpe schaltet automatisch aus,
wenn kein Wasser mehr entnommen wird
und der maximale Druck in der Druckleitung erreicht ist.
Die Pumpe schaltet automatisch ein,
wenn Wasser entnommen wird und der
Druck in der Druckleitung unter 3,5 bar
fällt.
WARNUNG
Gefährliche elektrische Spannung!
Tod oder schwere Verletzungen durch
Stromschlag.
• Die Pumpe im Wasser erst mit dem
Stromnetz verbinden, wenn keine Personen im Wasser stehen oder ins Wasser greifen.
• Vor dem Betreten des Wassers oder
dem Hineinfassen die Netzspannung aller im Wasser befindlichen Geräte abschalten.
Gerät einschalten
• Netzstecker in die Steckdose stecken.
– Die Pumpe ist betriebsbereit.
Gerät ausschalten
• Netzstecker ziehen.
– Nach dem Ausschalten kann das
Restwasser im Schlauch zurückfließen und durch die Ansaugöffnung der
Pumpe austreten.
DE
EN
FR
NL
ES
PT
IT
DA
NO
SV
FI
HU
PL
CS
SK
SL
HR
RO
BG
UK
RU
CN
7
Page 8
Störung
Ursache
Abhilfe
Pumpe läuft nicht an
Stromversorgung unterbrochen
Sicherung und elektrische
Steckverbindungen prüfen
Pumpe schaltet nach kur-
Überlastschutz hat die
abgeschaltet
• Ansaugöffnung reinigen
Brunnen ist trocken
Warten bis der Brunnen
ausreichend Wasser hat
Pumpe läuft, fördert aber
Druckschlauch verschlos-
• Druckschlauch knickfrei
reinigen
Ansaugöffnung verstopft
• Ansaugöffnung reinigen
Luft im Druckschlauch
• Druckschlauch entlüften
Falls vorhanden:
• Rückschlagklappe rich-
gen
Laufrad defekt oder ver-
OASE kontaktieren.
setzt werden.
Laufrad ist durch Sand
OASE kontaktieren.
setzt werden.
STÖRUNGSBESEITIGUNG
WARNUNG
Gefährliche elektrische Spannung!
Tod oder schwere Verletzungen durch Stromschlag.
Vor Beginn der Arbeiten:
• Gerät ausschalten, Netzstecker ziehen und Gerät vor dem Einschalten sichern.
• Vor dem Betreten des Wassers oder dem Hineinfassen die Netzspannung aller im
Wasser befindlichen Geräte abschalten.
Nach Abschluss der Arbeiten:
• Alle Voraussetzungen für die Inbetriebnahme wieder herstellen.
zer Laufzeit ab
nicht oder fördert ungenügend
Pumpe wegen Überhitzung
sen
Rückschlagklappe im
Druckschlauch falsch eingebaut oder verstopft
schlissen
blockiert
• Pumpe abkühlen lassen
verlegen
• Auslauf prüfen und ggf.
tig einbauen
• Rückschlagklappe reini-
• Das Laufrad darf nur
vom Oase-Service er-
• Das Laufrad darf nur
vom Oase-Service er-
8 ProMax Pressure Automatic 6000/8, Pressure Well Automatic 6000/8
Page 9
REINIGUNG UND WARTUNG
WARNUNG
Gefährliche elektrische Spannung!
Tod oder schwere Verletzungen durch
Stromschlag.
• Bevor Sie ins Wasser greifen, Netzspannung von allen Geräten im Wasser
abschalten.
• Vor Arbeiten am Gerät Netzspannung
abschalten.
HINWEIS
Empfehlung zur regelmäßigen Reinigung:
• Das Gerät nach Bedarf, aber mindestens 2 × jährlich, reinigen.
• Keine aggressiven Reinigungsmittel
oder chemische Lösungen verwenden,
da sie das Gehäuse beschädigen oder
die Funktion des Geräts beeinträchtigen
können.
• Empfohlene Reinigungsmittel bei hartnäckigen Verkalkungen:
– Pumpenreiniger PumpClean von
OASE.
– Essig- und chlorfreien Haushaltsreini-
ger.
• Nach dem Reinigen alle Teile mit klarem Wasser gründlich abspülen.
VERSCHLEIßTEILE
Folgende Komponenten sind Verschleißteile und dürfen nur vom OASE-Service
ersetzt werden:
• Laufrad
LAGERN/ÜBERWINTERN
Das Gerät ist nicht frostsicher. Bei frostsicherer Aufstellung muss das Gerät nicht
deinstalliert werden. Andernfalls muss
das Gerät bei zu erwartendem Frost deinstalliert und eingelagert werden.
So lagern Sie das Gerät richtig:
• Gerät so weit wie möglich entleeren,
eine gründliche Reinigung durchführen
und auf Schäden überprüfen.
• Sämtliche Schläuche, Rohrleitungen
und Anschlüsse soweit wie möglich entleeren.
• Gerät gründlich reinigen, auf Beschädigungen prüfen, beschädigte Teile ersetzen.
• Gerät trocken und frostfrei lagern.
• Offene Steckverbindungen vor Feuch-
tigkeit und Verschmutzung schützen.
ENTSORGUNG
Dieses Gerät darf nicht als Hausmüll entsorgt werden! Nutzen Sie bitte das dafür
vorgesehene Rücknahmesystem. Machen Sie das Gerät vorher durch Abschneiden der Kabel unbrauchbar.
DE
EN
FR
NL
ES
PT
IT
DA
NO
SV
FI
HU
PL
CS
SK
SL
HR
RO
BG
UK
RU
CN
9
Page 10

Mit Originalteilen von OASE bleibt das Gerät
sicher und arbeitet weiterhin zuverlässig.
Ersatzteilzeichnungen und Ersatzteile finden Sie auf unserer Internetseite.
www.oase-livingwater.com/ersatzteile-di
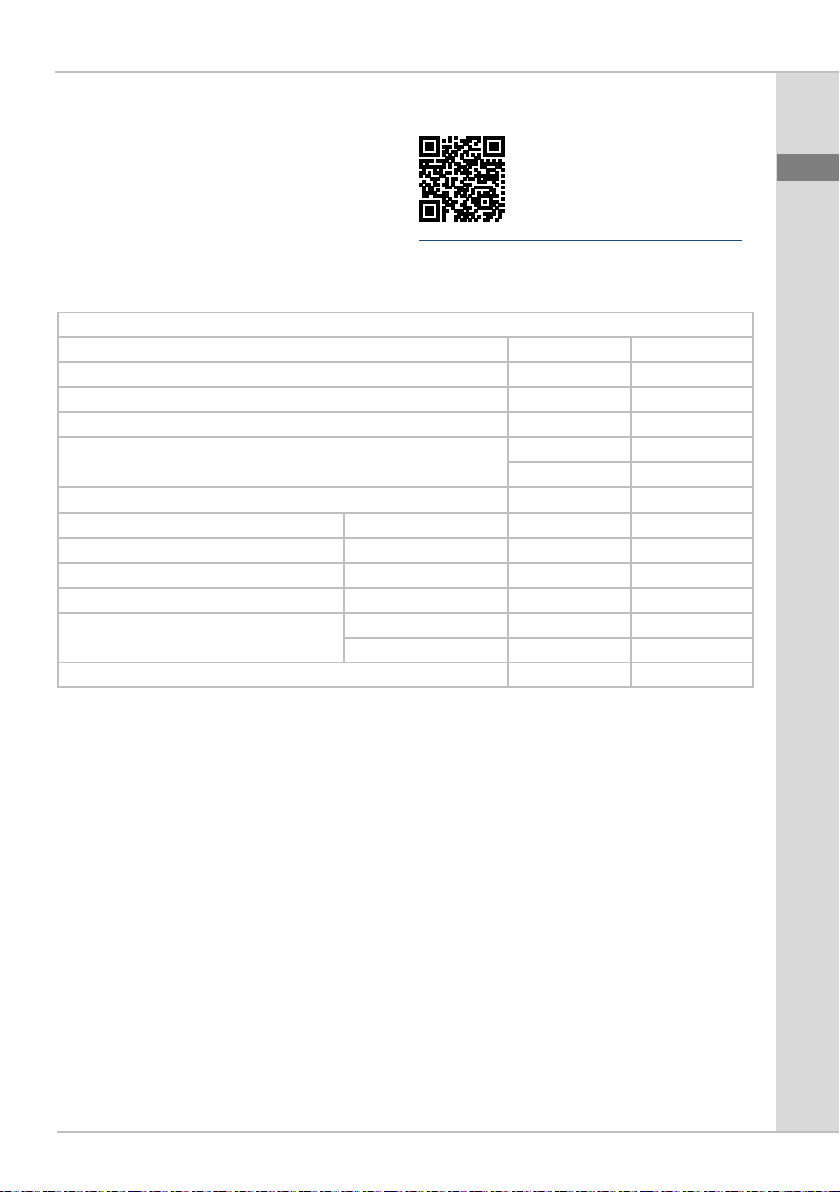
ProMax Pressure Automatic 6000/8, Pressure Well Automatic 6000/8
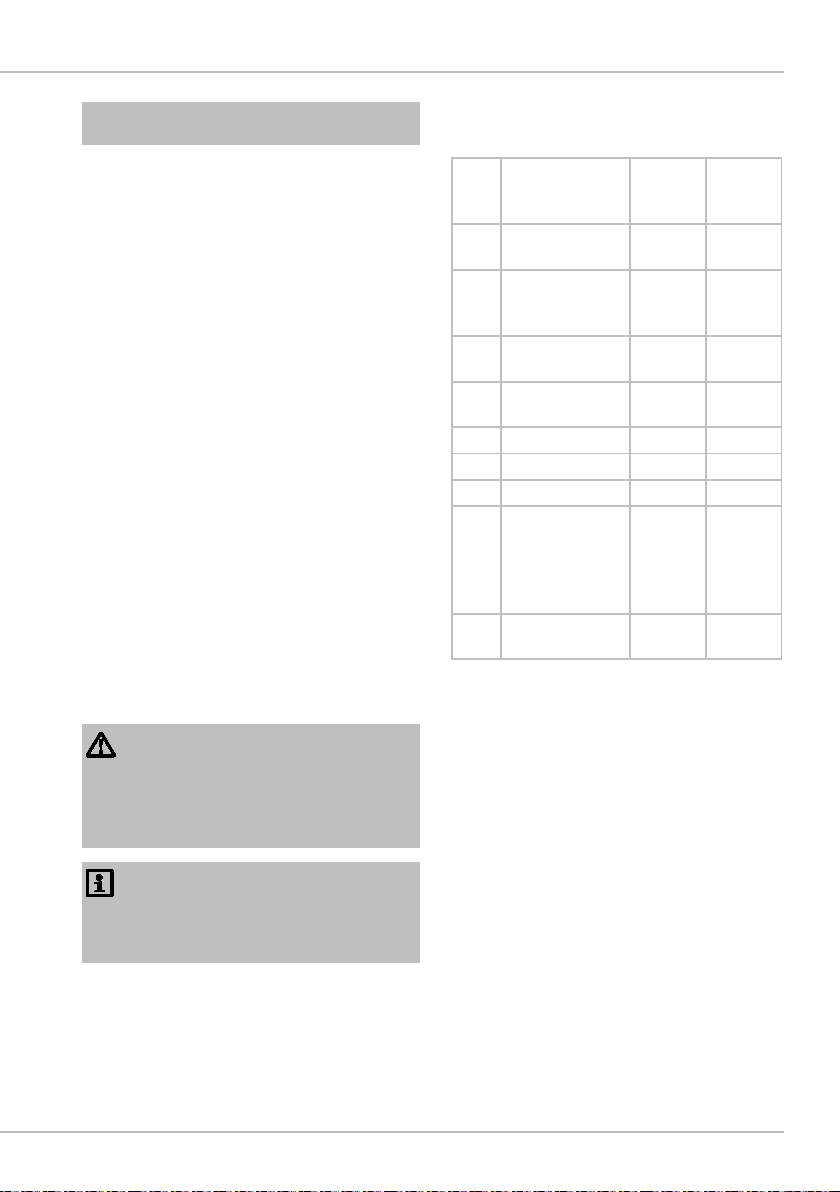
Bemessungsspannung
V AC
230
Bemessungsfrequenz
Hz
50
Bemessungsleistung
W
1100
Schutzart
IPX8
Anschluss Druckstutzen
mm
30,9
"
1
Mindesteffizienzindex (MEI) 1)
–
≥0,40
Fördermenge
maximal
l/h
6000
Förderhöhe
maximal m 57
Tauchtiefe
maximal m 20
Netzanschlussleitung
Länge m 30
Abmessungen
Durchmesser
mm
98
Höhe
mm
814
Gewicht
kg
11,8
pumpen mit dem besten Wirkungsgrad ist der Referenzwert MEI ≥0,70.
ERSATZTEILE
TECHNISCHE DATEN
1)
Dimensionslose Größe für den hydraulischen Pumpenwirkungsgrad im Bestpunkt sowie bei Teil- und Überlast. Für Wasser-
10 ProMax Pressure Automatic 6000/8, Pressure Well Automatic 6000/8
Page 11

Translation of the original Operating
Instructions
WARNING
• This unit can be used by children aged 8 and above and
by persons with reduced
physical, sensory or mental
capabilities or lack of experience and knowledge if they
are supervised or have been
instructed on how to use the
unit in a safe way and they understand the hazards involved.
• Do not allow children to play
with the unit.
• Only allow children to carry
out cleaning and user maintenance under supervision.
• Ensure that the unit is fused
for a rated fault current of
max. 30 mA by means of a
fault current protection device.
• Only connect the unit if the
electrical data of the unit and
the power supply correspond.
The unit data is to be found on
the unit type plate, on the
packaging or in this manual.
• Possible death or severe injury from electrocution! Before reaching into the water,
always disconnect all units in
the water that have a voltage
of >12 V AC or >30 V DC
from the power supply.
• Only operate the unit if no persons are in the water.
• If a power connection cable is
damaged, have it immediately
replaced by OASE, an authorised customer service or a
qualified electrician to prevent
electric shock.
SAFETY INFORMATION
Electrical connection
• Extension cables and power distributors
(e.g. outlet strips) must be suitable for
outdoor use (splash-proof).
• Protect the plug connection from moisture.
• Only connect the unit to a correctly fitted
socket.
Safe operation
• Never operate the unit if the housing is
defective!
• Never operate the unit if an electrical cable is defective!
• Never carry or pull the unit by the electrical cable.
• Route cables such that they are protected from damage and do not present
a tripping hazard.
• Never carry out technical changes to the
unit.
• Only carry out work on the unit that is
described in this manual. If problems
cannot be overcome, please contact an
authorised customer service point or, if
in doubt, the manufacturer.
DE
EN
FR
NL
ES
PT
IT
DA
NO
SV
FI
HU
PL
CS
SK
SL
HR
RO
BG
UK
RU
CN
11
Page 12
A
ProMax
Automatic
6000/8
Well
1
Fastening lugs
for the rope
•
•
2
Connection,
30.9 mm (1")
•
•
3
Power connection cable
•
•
4
Screen,
suction side
•
•
5
Pump base
•
•
6
Stand • –
7
Mounting feet
•
–
8
Rubber pads
stallation
•
–
9
Fixing rope,
20 m
•
•
• Only use original spare parts and acces-
sories for the unit.
INFORMATION ABOUT THIS OPERATING MANUAL
Welcome to OASE Living Water. You
made a good choice with the purchase of
this product ProMax Pressure Auto-
matic 6000/8, Pressure Well Automatic
6000/8.
Prior to commissioning the unit, please
read the instructions of use carefully and
fully familiarise yourself with the unit. Ensure that all work on and with this unit is
only carried out in accordance with these
instructions.
Adhere to the safety information for the
correct and safe use of the unit.
Keep these instructions in a safe place!
Please also hand over the instructions
when passing the unit on to a new owner.
Symbols used in these instructions
Warnings
The warning information is categorised by
signal words, which indicate the extent of
the hazard.
PRODUCT DESCRIPTION
Overview
Pressure
pressure side
for supporting
the pump for
horizontal in-
6000/8
• Indicates a possibly hazardous situation.
• Non-observance may lead to death or
serious injuries.
Information for the purpose of clarification
or for preventing possible damage to assets or to the environment.
Additional information
A Reference to a figure, e.g. Fig. A.
→ Reference to another section.
12 ProMax Pressure Automatic 6000/8, Pressure Well Automatic 6000/8
WARNING
NOTE
Page 13

Intended use
ProMax Pressure Automatic 6000/8,
Pressure Well Automatic 6000/8, referred
to as "unit", may only be used as specified
in the following:
• For pumping clear water or rain water.
• For irrigating and watering.
• For pumping the water out of water
butts/rain barrels or cisterns.
• Operate in accordance with instructions.
Possible incorrect use
The following restrictions apply to the unit:
• Not suitable for salt water.
• Not suitable for drinking water.
• Do not use for long-term operation (e.g.
continuous recirculation of the water in
a pond).
• Do not use for commercial or industrial
purposes.
• Do not use in conjunction with chemicals, foodstuff, easily flammable or explosive substances.
• Do not connect to the drinking water
supply.
INSTALLATION AND CONNECTION
Connecting the pressure hose
An optimum flow rate is achieved with a
hose inside diameter of 25 mm (1").
How to proceed:
B
1. Remove the protection cap.
2. Connect the pressure hose to the connection on the pressure side.
– Recommendation: Use a quick-re-
lease coupling.
Installing the pump in a bored well or shaft
C
• Attach the fixing rope with a double knot
to the lugs and lower the pump into the
bored well or shaft.
• Use the fixing rope to fix the pump at a
height of at least 1 m above the bottom
of the well or shaft.
– This prevents it from drawing in dirt
particles.
• Ensure that the screen on the suction
side is at least 150 mm below the surface of the water.
• Do not carry the pump by its power connection cable.
• From a well or shaft depth of 5 m, fix the
power connection cable to the fixing
rope at a distance of 5 m from the pump
(strain relief).
Vertical installation of the pump with the stand
(Only ProMax Pressure Automatic
6000/8)
The pump can be vertically installed with
the stand in a tank or well.
• Ensure that the screen on the suction
side is at least 150 mm below the sur-
face of the water.
• Ensure that the water to be pumped
does not contain more than 50 g sand
3
water.
per m
How to proceed:
D
1. Push the mounting feet onto the stand.
2. Undo the Allen screws until the opening
of the stand is wide enough to fit onto
the pump.
3. Push the pump into the stand.
4. Tighten the Allen screws until the pump
is fixed in the stand.
DE
EN
FR
NL
ES
PT
IT
DA
NO
SV
FI
HU
PL
CS
SK
SL
HR
RO
BG
UK
RU
CN
13
Page 14
Horizontal installation of the pump with the stand
(Only ProMax Pressure Automatic
6000/8)
The pump can be horizontally installed
with the stand in a shallow tank or well.
• The pump has to be aligned exactly horizontally.
• Ensure that the water to be pumped
does not contain any sand.
How to proceed:
E
1. Remove the Allen screws.
– The stand consists of two sections.
2. Push two mounting feet onto each stand
section.
3. Push three rubber pads each into the
grooves of the opening of the stand sections.
– Fit rubber pads to both stand sec-
tions.
4. Push both stand sections onto the
pump.
– The stand sections should be spaced
as far apart as possible to ensure the
stability of the pump.
OPERATION
The pump control system (flow control)
measures the flow and switches the pump
off if the water flow stops.
• The pump switches off when there is insufficient water, protecting it from being
damaged by running dry.
• In automatic mode, the pump control
system switches the pump on and off.
The integrated non-return valve prevents
water from flowing back into the pump
from the pressure hose when it is switched
off. The non-return valve also prevents
damage to the pump resulting from water
hammer.
Automatic mode
The pump switches off automatically
when no more water is used and the maximum pressure in the pressure line is
reached.
The pump switches on automatically
when water is used and the pressure in
the pressure line falls below 3.5 bar.
WARNING
Dangerous electrical voltage!
Death or severe injury from electrocution.
• Only connect the pump to the power
supply when there are no persons in or
reaching into the water.
• Before stepping into or reaching into the
water, switch off all units located in the
water.
Switching on the unit
• Insert the power plug into the socket.
– The pump is ready for operation.
Switching off the unit
• Disconnect the power plug.
– When the pump is switched off, resid-
ual water in the hose may flow back
and out of the pump intake.
14 ProMax Pressure Automatic 6000/8, Pressure Well Automatic 6000/8
Page 15
Malfunction
Cause
Remedy
Pump does not start.
Power supply interrupted
Check the fuse and electrical plug connections.
Pump switches off after a
Overload protection has
• Clean the intake
down.
The well has run dry.
Wait until there is sufficient
water in the well.
The pump is running but is
Pressure hose blocked
• Route the pressure hose
clean if necessary
Intake blocked
• Clean the intake
Air in the pressure hose
• Expel the air from the
pressure hose.
If applicable:
or clogged
• Correctly fit the non-re-
valve.
Impeller defective or worn
Contact OASE
OASE Service.
The impeller is clogged
Contact OASE
OASE Service.
REMEDY OF FAULTS
DE
WARNING
Dangerous electrical voltage!
Death or severe injury from electrocution.
Prior to starting work:
• Switch off the unit, disconnect the power plug and secure the unit from being switched
on again.
• Before stepping into or reaching into the water, switch off all units located in the water.
On completion of the work:
• Restore all the prerequisites for start-up.
short running period.
not delivering, or the delivered quantity is insufficient
switched the pump off due
to overheating.
Non-return valve incorrectly
fitted in the pressure hose
• Allow the pump to cool
without kinks
• Check the outlet and
turn valve
• Clean the non-return
• The impeller may only
be replaced by the
EN
FR
NL
ES
PT
IT
DA
NO
SV
FI
HU
PL
CS
SK
SL
HR
with sand.
• The impeller may only
be replaced by the
RO
BG
UK
RU
CN
15
Page 16
MAINTENANCE AND CLEANING
WARNING
Dangerous electrical voltage!
Death or severe injury from electrocution.
• Before reaching into the water, switch
off the mains voltage of all units in the
water.
• Isolate the unit (disconnect from the
power supply) before carrying out any
work on it.
NOTE
Recommendation on regular cleaning:
• Clean the unit as required but at least
twice per year.
• Do not use aggressive cleaning agents
or chemical solutions as they could attack the housing or impair the function
of the unit.
• Recommended cleaning agent for removing stubborn limescale deposits:
– Pump cleaning agent PumpClean
from OASE.
– Vinegar- and chlorine-free household
cleaning agent.
• After cleaning, thoroughly rinse all parts
in clean water.
WEAR PARTS
The following components are wear parts
and may only be replaced by the OASE
Service.
• Impeller
STORAGE/OVERWINTERING
The unit is not frost proof. If the unit is installed in a frost-protected place, it does
not need to be removed in case of minus
temperatures. If the unit is not installed in
a frost-protected place, it must be removed and stored if minus temperatures
are expected.
How to correctly store the unit:
• Drain the unit as far as possible, clean
thoroughly and check for damage.
• Empty all hoses, pipes and connections
as far as possible.
• Thoroughly clean the unit, check it for
damage and replace any damaged
parts.
• Store the unit in a dry and frost-free
place.
• Protect open plug connections from
moisture and dirt.
DISPOSAL
Do not dispose of this unit with domestic
waste! For disposal purposes, please use
the return system provided. Render the
unit unusable beforehand by cutting the
cables.
16 ProMax Pressure Automatic 6000/8, Pressure Well Automatic 6000/8
Page 17
The use of original parts from OASE ensures continued safe and reliable operation
of the unit.
Please visit our website for spare parts
drawings and spare parts.
www.oase-livingwater.com/spareparts-di
ProMax Pressure Automatic 6000/8 / Pressure Well Automatic 6000/8
Rated voltage
V AC
230
Rated frequency
Hz
50
Rated power
W
1100
Protection type
IPX8
Connection, pressure socket
mm
30.9
"
1
Minimum Efficiency Index (MEI) 1)
–
≥0.40
Flow rate
Max.
l/h
6000
Head height
Max. m 57
Immersion depth
Max. m 20
Power connection cable
Length m 30
Dimensions
Diameter
mm
98
Height
mm
814
Weight
kg
11.8
with the best efficiency the benchmark is MEI ≥0.70.
SPARE PARTS
DE
TECHNICAL DATA
1)
Dimensionless scale unit for hydraulic pump efficiency at best efficiency point in part load and overload. For water pumps
EN
FR
NL
ES
PT
IT
DA
NO
SV
FI
HU
PL
CS
SK
SL
HR
RO
BG
UK
RU
CN
17
Page 18

Traduction de la notice d'emploi originale
AVERTISSEMENT
• Attention :
Dans le cas où cet appareil
serait utilisé par des mineurs
de moins de 8 ans ainsi que
par des personnes souffrant
d'un handicap mental ou plus
généralement par des personnes manquant d'expérience, un adulte averti devra
être présent, qui renseignera
le mineur ou la personne fragilisée concernée sur le bon
emploi de ce matériel. Les enfants ne doivent pas jouer
avec cet appareil. Ne pas laisser un enfant sans surveillance pour le nettoyage ou
l'entretien.
• Veiller à ce que l'appareil soit
absolument protégé par fusible par le biais d’une protection différentielle avec un courant assigné de 30 mA maximum.
• Ne brancher l'appareil que
lorsque les caractéristiques
électriques de l'appareil et de
l'alimentation électrique correspondent. Les caractéristiques de l'appareil sont indiquées sur la plaque signalé-
tique de l'appareil, sur l'emballage ou dans cette notice
d'emploi.
• La mort ou des blessures
graves par choc électrique
sont possibles ! Avant de
mettre les mains dans l'eau,
débranchez les appareils
dans l'eau d'une tension
>12 V CA ou >30 V CC.
• Utiliser l'appareil uniquement
lorsque personne ne se
trouve dans l'eau.
• Faire remplacer immédiatement un câble d'alimentation
électrique endommagé, par
OASE, un service d'assistance agréé, ou par un électricien qualifié afin d'éviter tout
risque d'électrocution.
CONSIGNES DE SÉCURITÉ
Raccordement électrique
• Les câbles de rallonge et le distributeur
de courant (p. ex. blocs multiprises) doivent être conçus pour une utilisation en
extérieur (protégé contre les projections
d'eau).
• Protéger les raccordements à fiche
contre l'humidité.
• Raccorder l'appareil uniquement à une
prise installée de manière réglementaire.
Exploitation sécurisée
• Ne pas utiliser l'appareil avec un boîtier
défectueux.
18 ProMax Pressure Automatic 6000/8, Pressure Well Automatic 6000/8
Page 19
A
ProMax
Automatic
6000/8
Well
1
Anneaux de
câble
•
•
2
Raccord côté
30,9 mm (1")
•
•
3
Câble d'ali-
électrique
•
•
4
Tamis côté
aspiration
•
•
5
Pied de la
pompe
•
•
6
Pied-support
•
–
7
Pieds de montage
•
–
8
Tampons en
tionnement de
•
–
• Il est interdit d'utiliser l'appareil si le
câble électrique est défectueux.
• Ne pas porter ou tirer l'appareil par les
câbles électriques.
• Poser les câbles de manière à ce qu'ils
soient protégés contre d'éventuels endommagements et veiller à ce que personne ne puisse trébucher.
• Ne jamais procéder à des modifications
techniques sur l’appareil.
• Exécuter des travaux sur l'appareil uniquement si ces derniers sont décrits
dans la notice d'emploi. S'il est impossible de remédier aux problèmes, contacter le SAV agréé ou en cas de doute
le constructeur.
• N’utiliser que des pièces de rechange et
des accessoires d’origine pour l’appareil.
EN CE QUI CONCERNE CETTE NOTICE D'EMPLOI
Bienvenue chez OASE Living Water.
Avec l'acquisition du produit, ProMax
Pressure Automatic 6000/8, Pressure
Well Automatic 6000/8 vous avez fait le
bon choix.
Avant la première utilisation de l'appareil,
lire attentivement cette notice d'emploi et
se familiariser avec l'appareil. Tous les
travaux effectués avec et sur cet appareil
devront être exécutés conformément aux
directives ci-jointes.
Respecter impérativement les consignes
de sécurité relatives à une utilisation correcte et en toute sécurité.
Conserver soigneusement cette notice
d'emploi. Lors d'un changement de propriétaire, prière de transmettre également
cette notice d'emploi.
Symboles dans cette notice d'emploi
Avertissements
Dans cette notice, les avertissements sont
classés par mots de signalisation qui indiquent l'ampleur du risque.
AVERTISSEMENT
• signale une situation éventuellement
dangereuse.
• Le non-respect risque d'entraîner la
mort ou des blessures graves.
REMARQUE
Informations permettant d’assurer une
meilleure compréhension et d’éviter des
dommages matériels ou environnementaux.
Autres remarques
A Renvoi à l'illustration, p. ex. Figure
A.
→ Renvoi à un autre chapitre.
DESCRIPTION DU PRODUIT
Vue d'ensemble
Pressure
fixation pour
refoulement
mentation
caoutchouc
pour le posi-
6000/8
19
DE
EN
FR
NL
ES
PT
IT
DA
NO
SV
FI
HU
PL
CS
SK
SL
HR
RO
BG
UK
RU
CN
Page 20

la pompe à
l'horizontale
9
Câble de fixation, 20 m
•
•
Utilisation conforme à la finalité
ProMax Pressure Automatic 6000/8,
Pressure Well Automatic 6000/8, appelé
par la suite «appareil», doit être utilisé exclusivement comme suit :
• Refoulement d'eau claire ou d'eau de
pluie.
• Irrigation et arrosage.
• Prise d'eau dans des tonneaux de pluie
ou des citernes.
• Exploitation dans le respect des données techniques.
Éventuelle utilisation incorrecte
Les restrictions suivantes sont valables
pour l'appareil :
• Non compatible à l'eau salée.
• Non approprié pour l'eau potable.
• A ne pas utiliser pour une exploitation à
long terme (p. ex. fonctionnement de
circulation permanent dans une pièce
d'eau).
• Ne pas utiliser à des fins commerciales
ou industrielles.
• Ne pas utiliser en relation avec des produits chimiques, des produits alimentaires, des matériaux facilement inflammables ou explosifs.
• A ne pas raccorder à l'alimentation en
eau potable.
MISE EN PLACE ET RACCORDEMENT
Branchement du tuyau de refoulement
Le refoulement est optimal pour un tuyau
avec un diamètre intérieur de 25 mm (1").
Voici comment procéder :
B
1. Enlever le capuchon.
2. Brancher le tuyau de refoulement au
raccord côté refoulement.
– Conseil : utiliser un coupleur rapide.
Installer la pompe dans un forage ou un puits
C
• Fixer un câble de fixation à double
nœud sur l'anneau et faire descendre la
pompe dans le forage ou le puits.
• A une distance de 1 m du fond, fixer la
pompe au moyen du câble de fixation.
– Cette méthode permet d'éviter l'aspi-
ration de particules de salissures.
• Le tamis du côté aspiration doit se trouver au moins à 150 mm en-dessous du
niveau de l'eau.
• Ne pas porter l'appareil par le câble
d'alimentation électrique.
• A partir d'une profondeur de forage ou
de puits de 5 m, fixer le câble d'alimentation électrique au câble de fixation à
une distance de 5 m ( fixation anti-traction).
Installer la pompe à la verticale au moyen du pied-support
(uniquement ProMax Pressure Automatic
6000/8)
Une installation à la verticale de la pompe
est possible dans la cuve ou le puits au
moyen du pied-support.
• Le tamis du côté aspiration doit se trouver au moins à 150 mm en-dessous du
niveau de l'eau.
• La teneur en sable de l'eau à refouler ne
doit pas dépasser 50 g de sable par m
d'eau.
3
Voici comment procéder :
D
1. Faire glisser les pieds de montage sous
le pied-support.
2. Desserrer les vis six pans jusqu'à ce
que le pied-support réceptionne la
pompe.
20 ProMax Pressure Automatic 6000/8, Pressure Well Automatic 6000/8
Page 21
3. Faire glisser la pompe dans le pied-support.
4. Resserrer les vis six pans jusqu'à ce
que la pompe soit fixée dans le piedsupport.
Installer la pompe à l'horizontale au moyen du pied-support
(uniquement ProMax Pressure Automatic
6000/8)
Une installation à l'horizontale de la
pompe au moyen du pied-support est possible dans une cuve plate ou un puits plat.
• Absolument veiller à un alignement horizontal exact de la pompe.
• Il ne doit pas y avoir de sable dans l'eau
à refouler.
Voici comment procéder :
E
1. Enlever les vis six pans.
– Le pied-support est en deux parties.
2. Faire glisser deux pieds de montage sur
chaque pied-support.
3. Respectivement faire glisser trois tampons en caoutchouc dans les gorges de
l'ouverture de traversée.
– Installer les tampons en caoutchouc
sur les deux pieds-supports.
4. Faire glisser les deux pieds-supports
sur la pompe.
– La distance entre les pieds-supports
doit être la plus grande possible pour
que la pompe installée soit stable.
EXPLOITATION
La commande de la pompe (flow control)
mesure le débit et déconnecte la pompe
en cas de débit manquant.
• La pompe s'arrête en cas de manque
d'eau et est protégée contre tout endommagement par la marche à sec.
• Lors du mode automatique, la commande de la pompe se charge de la
mise en marche et de l'arrêt de la
pompe.
Le clapet anti-retour intégré empêche que
de l'eau en provenance du tuyau de refoulement ne soit refoulée dans la pompe
après l'arrêt de la pompe. De plus, le clapet anti-retour protège la pompe contre
tout endommagement découlant de coups
de bélier.
Mode automatique
La pompe s'arrête automatiquement lorsqu'il n'y a plus de prise d'eau et que la
pression maximale est atteinte dans le
conduit de refoulement.
La pompe se met automatiquement en
marche lorsqu'il y a prise d'eau et que la
pression tombe en -dessous de 3,5 bars
dans le conduit de refoulement.
AVERTISSEMENT
Tension électrique dangereuse !
Mort ou blessures graves par choc
électrique.
• Ne raccorder la pompe qui se trouve
dans l'eau au réseau électrique que
lorsque plus personne ne se trouve
dans l'eau ou ni met les mains.
• Avant d'entrer dans l'eau ou avant d'y
mettre les mains, toujours couper la tension de réseau de tous les appareils se
trouvant dans l'eau.
Mettre l'appareil en circuit
• Brancher la fiche secteur dans la prise.
– La pompe est opérationnelle.
Déconnexion de l'appareil
• Débrancher la prise secteur.
– Après la mise hors circuit, de l'eau ré-
siduelle risque d'être refoulée dans le
tuyau et de s'écouler par l'orifice
d'aspiration de la pompe.
DE
EN
FR
NL
ES
PT
IT
DA
NO
SV
FI
HU
PL
CS
SK
SL
HR
RO
BG
UK
RU
CN
21
Page 22

Défaut
Cause
Remède
La pompe ne démarre pas
Alimentation en courant
Contrôler le fusible et les
triques
La pompe s'arrête après
Le dispositif de sécurité
cause de surchauffe
• Nettoyer l'orifice d'aspi-
pompe
Le puits est sec
Attendre que suffisamment
d'eau soit dans le puits
La pompe fonctionne, mais
Tuyau de refoulement
• Poser le tuyau de refou-
soin, le nettoyer
Orifice d'aspiration bouché
• Nettoyer l'orifice d'aspiration
Présence d'air dans le
tuyau de refoulement
• Purger le tuyau de refoulement
Si faisant partie de l'équi-
ment monté ou bouché
• correctement monter le
Turbine défectueuse ou
Contacter OASE.
Oase.
Du sable bloque la turbine.
Contacter OASE.
Oase.
DEPANNAGE
AVERTISSEMENT
Tension électrique dangereuse !
Mort ou blessures graves par choc électrique.
Avant d'entamer les travaux :
• Couper l'appareil, tirer la prise et protéger l'appareil contre toute remise en circuit.
• Avant d'entrer dans l'eau ou avant d'y mettre les mains, toujours couper la tension de
réseau de tous les appareils se trouvant dans l'eau.
Après l'achèvement des travaux :
• rétablir tous les prérequis de mise en circuit.
une courte période de
marche
ne refoule pas ou le débit
de la pompe est insuffisant
coupée
contre les surcharges a déconnecté la pompe pour
fermé
pement :
clapet anti-retour du tuyau
de refoulement incorrecte-
usée
raccords à fiches élec-
ration
• Laisser refroidir la
lement sans le plier
• Contrôler le conduit
d'écoulement et, si be-
clapet anti-retour
• nettoyer le clapet antiretour
• Le remplacement de la
turbine est exclusivement réservé au SAV
22 ProMax Pressure Automatic 6000/8, Pressure Well Automatic 6000/8
• Le remplacement de la
turbine est exclusivement réservé au SAV
Page 23
NETTOYAGE ET ENTRETIEN
AVERTISSEMENT
Tension électrique dangereuse !
Mort ou blessures graves par choc
électrique.
• Avant de mettre les mains dans l'eau,
couper la tension de réseau de tous les
appareils se trouvant dans l'eau.
• Couper la tension secteur avant toute
exécution de travaux sur l'appareil.
REMARQUE
Recommandations pour un nettoyage régulier :
• Nettoyer l'appareil en fonction du besoin, néanmoins 2 fois par an au moins.
• N'utiliser ni des produits de nettoyage
agressifs, ni des solutions chimiques
qui risqueraient d'attaquer le corps ou
d'entraver le fonctionnement de l'appareil.
• Produits de nettoyage recommandés en
cas d'entartrages tenaces :
– Nettoyant pour pompe PumpClean de
OASE.
– Détergents ménagers exempts de vi-
naigre et de chlore.
• Après le nettoyage, rincer méticuleusement toutes les pièces à l'eau claire.
PIECES D'USURE
Ci-après, les composants qui sont des
pièces d'usure et dont le remplacement
est exclusivement réservé au SAV Oase :
• Turbine
STOCKAGE / ENTREPOSAGE POUR L'HIVER
L’appareil n’est pas résistant au gel. Il
n'est pas nécessaire de désinstaller l'appareil lorsque l'installation est existante au
gel. S'il en est autrement, absolument désinstaller et entreposer l'appareil à l'annonce du gel.
Ci-après, la méthode optimale pour entreposer l'appareil :
• Vidanger l'appareil autant qu'il est possible de le faire, procéder à un nettoyage soigneux et vérifier l'absence de
dommages.
• Vider l'ensemble des tuyaux, conduites
et raccordements autant que possible.
• Nettoyer méticuleusement l'appareil,
l'inspecter pour déceler toute présence
éventuelle de dommages, absolument
remplacer toute pièce endommagée.
• Stocker la pompe au sec et à l'abri du
gel.
• Protéger les fiches ouvertes contre l'humidité et les salissures.
RECYCLAGE
Ne pas éliminer cet appareil avec les ordures ménagères ! Prière d'utiliser le système de reprise prévu à cet effet. Rendre
l'appareil inutilisable en sectionnant auparavant le câble.
DE
EN
FR
NL
ES
PT
IT
DA
NO
SV
FI
HU
PL
CS
SK
SL
HR
RO
BG
UK
RU
CN
23
Page 24
L'appareil continue de fonctionner de manière fiable et sécurisée avec des pièces originales d'OASE.
Vous trouverez nos pièces de rechange et
leurs schémas sur notre site internet.
www.oase
tachees-di
ProMax Pressure Automatic 6000/8 / Pressure Well Automatic 6000/8
Tension de réseau
V AC
230
Fréquence de réseau
Hz
50
Puissance de réseau
W
1100
Indice de protection
IPX8
Raccord buse d’aspiration
mm
30,9
"
1
Indice de rendement minimal (IRM) 1)
–
≥0,40
Débit de la pompe
maximal
l/h
6000
Hauteur de refoulement
maximal m 57
Profondeur d'immersion
maximal m 20
Câble d'alimentation électrique.
Longueur m 30
Dimensions
Diamètre
mm
98
Hauteur
mm
814
Poids
kg
11,8
charge partielle et de surcharge. Le critère de référence le plus efficace pour les pompes à eau est le IRM ≥0,70.
PIECES DE RECHANGE
CARACTERISTIQUES TECHNIQUES
-livingwater.com/piecesde-
1)
unité d'échelle sans dimension du rendement hydraulique de la pompe au point de rendement maximal ainsi que lors de
24 ProMax Pressure Automatic 6000/8, Pressure Well Automatic 6000/8
Page 25

Vertaling van de oorspronkelijke gebruiksaanwijzing
WAARSCHUWING
• Dit apparaat kan worden gebruikt door kinderen vanaf
8 jaar en daarnaast door personen met verminderde fysieke, sensorische of mentale
vermogens of een gebrek aan
ervaring en kennis, mits zij
onder toezicht staan of geïnstrueerd werden over het veilige gebruik van het apparaat
en de gevaren begrijpen, die
hiermee samenhangen.
• Kinderen mogen niet met het
apparaat spelen.
• Reiniging en onderhoud door
de gebruiker mogen niet worden uitgevoerd door kinderen,
die niet onder toezicht staan.
• Het apparaat moet beveiligd
zijn via een aardlekschakelaar met een vastgestelde
lekstroom van maximaal 30
mA.
• Apparaat alleen aansluiten
als de elektrische specificaties van het apparaat en de
voeding overeenstemmen.
De specificaties staan op het
typeplaatje van het apparaat,
op de verpakking, of in deze
handleiding vermeld.
• Dodelijk of ernstig lichamelijk
letsel is mogelijk door elektrische schokken! Voor u in het
water grijpt, moet u apparaten
met een spanning >12 V AC
of >30 V DC van het elektriciteitsnet scheiden.
• Apparaat alleen toepassen
wanneer er zich geen personen in het water ophouden.
• Een beschadigde netaansluitkabel direct door OASE, een
geautoriseerde servicedienst
of een gekwalificeerde elektrotechnicus laten vervangen
om gevaar door elektrocutie
te vermijden.
VEILIGHEIDSINSTRUCTIES
Elektrische aansluiting
• Verlengkabels en stroomverdelers (bijv.
stekkerdelen) moeten voor het gebruik
buitenshuis geschikt zijn (spatwaterbestendig).
• Stekkerverbindingen tegen vocht beschermen.
• Apparaat alleen op een volgens de
voorschriften geïnstalleerde wandcontactdoos aansluiten.
Veilig gebruik
• Als de behuizing defect is, mag het apparaat niet worden gebruikt.
• Bij defecte elektrische kabel mag het
apparaat niet worden gebruikt.
• Apparaat niet aan het elektrische snoer
dragen of trekken.
DE
EN
FR
NL
ES
PT
IT
DA
NO
SV
FI
HU
PL
CS
SK
SL
HR
RO
BG
UK
RU
CN
25
Page 26
A
ProMax
Automatic
6000/8
Well
1
Bevestigings-
bel
•
•
2
Aansluiting
30,9 mm (1")
•
•
3
Netaansluitkabel
•
•
4
Zeef zuigzijde
•
•
5
Pompvoet
•
•
6
Voet • –
7
Opstelvoet
•
–
8
Rubberen buf-
opstelling
•
–
9
Bevesti-
20 m
•
•
• Snoeren beschermd tegen beschadi-
gingen aanleggen en erop letten dat
niemand erover kan struikelen.
• Het apparaat nooit aan technische modificaties onderwerpen.
• Alleen werkzaamheden aan het apparaat uitvoeren die in deze handleiding
beschreven staan. Als problemen zich
niet laten verhelpen contact opnemen
met een klantenservice of in geval van
twijfel met de fabrikant.
• Alleen originele vervangingsonderdelen
en -toebehoren voor het apparaat toepassen.
OVER DEZE GEBRUIKSAANWIJZING
Welkom bij OASE Living Water. Met de
aanschaf van het product ProMax Pres-
sure Automatic 6000/8, Pressure Well
Automatic 6000/8 heeft u een goede
keuze gemaakt.
Voordat u het apparaat in gebruik neemt
dient u de gebruiksaanwijzing zorgvuldig
door te lezen en zich met het apparaat
vertrouwd te maken. Alle werkzaamheden
aan en met dit apparaat mogen uitsluitend
verricht worden als ze conform de onderhavige handleiding zijn.
Houdt u zich voor een juist en veilig gebruik stipt aan de veiligheidsvoorschriften.
Bewaar deze gebruiksaanwijzing zorgvuldig. Geef de gebruiksaanwijzing aan de
nieuwe eigenaar wanneer het apparaat
van eigenaar verwisselt.
Symbolen in deze handleiding
Waarschuwingen
De waarschuwingen in deze handleiding
zijn met signaalwoorden gemarkeerd, die
de mate van gevaar aangeven.
• Betekent een mogelijk gevaarlijke situatie.
WAARSCHUWING
• Bij niet aanhouden van de instructie kan
dodelijk of ernstig lichamelijk letsel het
gevolg zijn.
OPMERKING
Informatie, die voor een beter begrip of
preventie van mogelijke materiële of milieuschade is bedoeld.
Overige instructies
A Verwijst naar een afbeelding, bij-
voorbeeld afbeelding A.
→ Verwijst naar een ander hoofdstuk.
PRODUCTBESCHRIJVING
Overzicht
Pressure
6000/8
ogen voor ka-
drukzijde
fer voor het
plaatsen van
de pomp bij
horizontale
gingskabel
26 ProMax Pressure Automatic 6000/8, Pressure Well Automatic 6000/8
Page 27

Beoogd gebruik
ProMax Pressure Automatic 6000/8,
Pressure Well Automatic 6000/8, verder
"apparaat" genoemd, mag alleen als volgt
worden gebruikt:
• Transporteren van schoon water of regenwater.
• Irrigeren en besproeien.
• Waterafname uit regentonnen of stort-
bakken.
• Gebruik onder naleving van de technische gegevens.
Mogelijk verkeerd gebruik
De volgende inperkingen gelden voor het
apparaat:
• Niet geschikt voor zoutwater.
• Niet geschikt voor drinkwater.
• Niet toepassen voor continu bedrijf (bij-
voorbeeld continu circuleren in een vijver).
• Niet gebruiken voor commerciële of industriële doeleinden.
• Niet gebruiken in combinatie met chemicaliën, levensmiddelen, licht brandbare of explosieve stoffen.
• Niet aansluiten op de drinkwatervoorziening.
PLAATSEN EN AANSLUITEN
Drukslang aansluiten
De capaciteit is optimaal bij een slangbinnendiameter van 25 mm (1").
Zo gaat u te werk:
B
1. Beschermkap verwijderen.
2. Drukslang met de aansluiting aan de
perszijde verbinden.
– Advies: Snelkoppeling gebruiken.
Pomp in boorbron of schacht opstellen
C
• Bevestigingskabel met dubbele knoop
aan de ogen bevestigen en de pomp in
de boorbron of de schacht neerlaten.
• De pomp op een afstand van minimaal
1 m tot de bodem met de bevestigingskabel vastzetten.
– Daardoor wordt het aanzuigen van
vuildeeltjes voorkomen.
• De zeef aan de zuigzijde moet minimaal
150 mm onder het wateroppervlak liggen.
• Niet aan de netaansluitkabel dragen.
• Vanaf 5 m boorbron- of schachtdiepte
de netaansluitkabel op een afstand van
5 m aan de bevestigingskabel vastmaken (trekontlasting).
Pomp met standvoet verticaal opstellen
(alleen ProMax Pressure Automatic
6000/8)
In de tank of de bron kan de pomp met de
standvoet verticaal worden opgesteld.
• De zeef aan de zuigzijde moet minimaal
150 mm onder het wateroppervlak liggen.
• Het te transporteren water mag maximaal 50 g zand per m3 water bevatten.
Zo gaat u te werk:
D
1. Opstelvoet op de standvoet schuiven.
2. Inbusbouten zover losmaken, dat de
pomp op de standvoet kan worden geplaatst.
3. Pomp in de standvoet schuiven.
4. Inbusbouten vastdraaien, tot de pomp
in de standvoet is vastgezet.
DE
EN
FR
NL
ES
PT
IT
DA
NO
SV
FI
HU
PL
CS
SK
SL
HR
RO
BG
UK
RU
CN
27
Page 28
Pomp met standvoet horizontaal opstellen
(alleen ProMax Pressure Automatic
6000/8)
In een vlakke tank of bron kan de pomp
met de standvoet horizontaal worden opgesteld.
• De pomp moet exact horizontaal zijn uitgelijnd.
• Het te transporteren water mag geen
zand bevatten.
Zo gaat u te werk:
E
1. Inbusbouten verwijderen.
– De standvoet is in twee gedeeld.
2. Twee opstelvoeten op de standvoet
schuiven.
3. Drie rubberen buffers in de groeven an
de doorvoeropening schuiven.
– Rubberen buffer aan de beide stand-
voeten aanbrengen.
4. De beide standvoeten op de pomp
schuiven.
– De afstand tussen de standvoeten
moet zo groot mogelijk zijn, zodat de
pomp stevig staat.
WERKING
De pompregeling (flow control) meet het
debiet en schakelt de pomp bij ontbrekend
debiet uit.
• De pomp schakelt bij watergebrek uit en
is daardoor tegen beschadiging en
drooglopen beveiligd.
• Bij automatisch bedrijf neemt de pompregeling het in- en uitschakelen van de
pomp over.
De geïntegreerde terugslagklep voorkomt, dat na het uitschakelen water uit de
drukslang in de pomp terugstroomt. Bovendien beschermt de terugslagklep de
pomp tegen beschadiging door drukstoten.
Automatisch bedrijf
De pomp schakelt automatisch uit, wanneer geen water meer wordt afgenomen
en de maximale druk in de persleiding is
bereikt.
De pomp schakelt automatisch in, wanneer water wordt afgenomen en de druk in
de persleiding tot onder 3,5 bar afneemt.
WAARSCHUWING
Gevaarlijke elektrische spanning!
Ernstig letsel of zelfs overlijden, door
elektrische schokken.
• Verbind de pomp in het water pas met
het spanningsnet, wanneer geen personen meer in het water staan of daarin
grijpen.
• Voor het betreden van het water of
daarin grijpen de netspanning van alle
apparaten die zich in het water bevinden uitschakelen.
Apparaat inschakelen
• Plaats de netstekker in de contactdoos.
– De pomp is gebruiksklaar.
Apparaat uitschakelen
• Trek de netstekker uit de contactdoos.
– Na het uitschakelen kan het restwater
in de slang terugstromen en door de
aanzuigopening van de pomp naar
buiten komen.
28 ProMax Pressure Automatic 6000/8, Pressure Well Automatic 6000/8
Page 29
Storing
Oorzaak
Oplossing
Pomp start niet
Voeding onderbroken
Zekering en elektrische
troleren
Pomp schakelt na korte
Overbelastingsbeveiliging
keld
• Aanzuigopening reini-
Bron is droog
Wacht tot de bron voldoende water heeft
Pomp draait, maar trans-
Drukslang gesloten
• Drukslang installeren
eventueel reinigen
Aanzuigopening verstopt
• Aanzuigopening reinigen
Lucht in drukslang
• Drukslang ontluchten
Indien aanwezig:
stopt
• Terugslagklep correct
terugslagklep
Schoepenrad defect of
Neem contact op met
gen.
Schoepenrad is door zand
Neem contact op met
gen.
STORING VERHELPEN
DE
WAARSCHUWING
Gevaarlijke elektrische spanning!
Ernstig letsel of zelfs overlijden, door elektrische schokken.
Voor aanvang van de werkzaamheden:
• Schakel het apparaat uit en zorg ervoor dat deze niet per ongeluk kan worden ingeschakeld.
• Voor het betreden van het water of daarin grijpen de netspanning van alle apparaten
die zich in het water bevinden uitschakelen.
Na afronden van de werkzaamheden:
• Waarborg dat weer aan alle voorwaarden voor de inbedrijfstelling wordt voldaan.
stekkerverbindingen con-
looptijd uit
porteert niet of onvoldoende
heeft de pomp vanwege
oververhitting uitgescha-
gen
• Pomp laten afkoelen
zonder knikken
• Uitlaat controleren en
EN
FR
NL
ES
PT
IT
DA
NO
SV
FI
HU
PL
CS
Terugslagklep in drukslang
verkeerd ingebouwd of ver-
versleten
geblokkeerd
installeren
• Schoonmaken van de
OASE.
• Het schoepenrad mag
uitsluitend door Oaseservice worden vervan-
OASE.
• Het schoepenrad mag
uitsluitend door Oaseservice worden vervan-
SK
SL
HR
RO
BG
UK
RU
CN
29
Page 30
REINIGING EN ONDERHOUD
W AARSCHUWING
Gevaarlijke elektrische spanning!
Ernstig letsel of zelfs overlijden, door
elektrische schokken.
• Voordat u in het water grijpt, de netspanning van alle apparaten die zich in
het water bevinden uitschakelen.
• De netspanning uitschakelen voordat er
aan het apparaat mag worden gewerkt.
OPMERKING
Aanbeveling voor regelmatige reiniging:
• Het apparaat indien nodig, maar minstens 2 x per jaar reinigen.
• Gebruik geen agressieve reinigingsmiddelen of chemische oplossingen omdat
daardoor de behuizing of de werking
kan worden aangetast.
• Aanbevolen reinigingsmiddelen bij
hardnekkige kalkaanslag:
– Pompreiniger PumpClean van OASE.
– Azijn- en chloorvrije huishoudreiniger.
• Na het reinigen alle delen met schoon
water afspoelen.
SLIJTAGEDELEN
De volgende componenten zijn slijtageonderdelen en mogen alleen door de OASEservice worden vervangen:
• Schoepenrad
OPSLAG/OVERWINTEREN
Het apparaat is niet vorstbestendig. Bij
een vorstveilige opstelling hoeft het apparaat niet gedeïnstalleerd te worden. Anders moet het apparaat bij verwachte
vorst gedemonteerd en opgeslagen worden.
Zo slaat u het apparaat correct op:
• Maak het apparaat zo goed mogelijk
leeg, reinig het grondig en controleer of
het beschadigd is.
• Maak alle slangen, buizen en aansluitingen zo goed mogelijk leeg.
• Apparaat grondig reinigen, op beschadigingen controleren, beschadigde onderdelen vervangen.
• Sla het apparaat droog en vorstvrij op.
• Open connectoren beschermen tegen
vocht en vuil.
AFVOER VAN HET AFGEDANKTE APPARAAT
Dit apparaat niet met het huishoudelijk afval afvoeren! Gebruik voor de verwijdering
a.u.b. het hiervoor bedoelde retournagesysteem. Maak het apparaat eerst, door
30 ProMax Pressure Automatic 6000/8, Pressure Well Automatic 6000/8
het afsnijden van de kabels, onbruikbaar.
Page 31

Met originele onderdelen van OASE blijft het
app
baar.
Onderdelentekeningen en reserveonderdelen vindt u op onze website.
w
www.oase-livingwater.com/onderdelen-di
ProMax Pressure Automatic 6000/8 / Pressure Well Automatic 6000/8
Nominale spanning
V~
230
Nominale frequentie
Hz
50
Nominaal vermogen
W
1100
Beschermingsgraad
IPX8
Aansluiting persaansluitingen
mm
30,9
"
1
Minimale efficiency-index (MEI) 1)
–
≥0,40
Pompcapaciteit
maximaal
l/h
6000
Pomphoogte
maximaal m 57
Dompeldiepte
maximaal m 20
Netaansluitkabel
Lengte m 30
Afmetingen
Diameter
mm
98
Hoogte
mm
814
Massa
kg
11,8
waterpompen met het beste rendement is de referentiewaarde MEI ≥0,70.
RESERVEONDERDELEN
DE
araat veilig en werkt het weer betrouw-
TECHNISCHE GEGEVENS
1)
Gedimensioneerde grootheid voor het hydraulische pomprendement op het beste punt en bij deel- en overbelasting. Voor
EN
FR
NL
ES
PT
IT
DA
NO
SV
FI
HU
PL
CS
SK
SL
HR
RO
BG
UK
RU
CN
31
Page 32

Traducción de las instrucciones de
uso originales
ADVERTENCIA
• Este equipo puede ser utilizado por niños a partir de
8 años y mayores así como
por personas con capacidades físicas, sensoriales o
mentales reducidas o que no
dispongan de la experiencia y
conocimientos necesarios,
cuando sean supervisados o
hayan sido instruidos en el
uso seguro del equipo y los
posibles peligros resultantes.
• Los niños no deben jugar con
el equipo.
• Está prohibido que los niños
ejecuten la limpieza y el mantenimiento sin supervisión.
• El equipo tiene que estar protegido con un dispositivo de
protección contra corriente de
fuga máxima de 30 mA.
• Conecte el equipo sólo
cuando los datos eléctricos
del equipo coinciden con los
datos de la alimentación de
corriente. Los datos del
equipo se encuentran en la
placa de datos técnicos en el
equipo, en el embalaje o en
estas instrucciones.
• Son posibles la muerte o lesiones graves por choque
eléctrico. Antes de tocar el
agua, separe de la red de corriente los equipos con una
tensión >12 V CA o >30 V CC
que se encuentran en el
agua.
• Opere el equipo sólo cuando
no se encuentren personas
en el agua.
• Encargue de inmediato a
OASE, un servicio postventa
autorizado o un electricista
cualificado la sustitución de la
línea de conexión de red dañada para evitar evitar peligros por electrocución.
INDICACIONES DE SEGURIDAD
Conexión eléctrica
• Las líneas de prolongación y distribuidores de corriente (p. ej. enchufes múltiples) deben ser apropiados para el
empleo a la intemperie (protegido contra salpicaduras de agua).
• Proteja las conexiones de enchufe contra humedad.
• Conecte el equipo sólo a un tomacorriente instalado conforme a lo prescrito.
Funcionamiento seguro
• Está prohibido operar el equipo si la
caja está defectuosa.
• Está prohibido operar el equipo si la línea eléctrica está defectuosa.
32 ProMax Pressure Automatic 6000/8, Pressure Well Automatic 6000/8
Page 33

A
ProMax
Automatic
6000/8
Well
1
Orejetas de fi-
cable
•
•
2
Conexión lado
30,9 mm (1")
•
•
3
Línea de conexión de red
•
•
4
Criba lado de
aspiración
•
•
5
Pie de la
bomba
•
•
6
Pie • –
7
Pies de
zamiento
•
–
8
Topes de
zontal
•
–
9
Cable de fijación, 20 m
•
•
• No transporte ni tire el equipo por la lí-
nea eléctrica.
• Tienda las líneas con protección contra
daños y garantice que ninguna persona
tropiece con ellas.
• No realice nunca modificaciones técnicas en el equipo.
• Ejecute en el equipo sólo los trabajos
descritos en estas instrucciones. Si no
es posible eliminar determinados problemas diríjase a una oficina de atención a los clientes o en caso de dudas
al fabricante.
• Emplee para el equipo sólo piezas de
recambio y accesorios originales.
SOBRE ESTAS INSTRUCCIONES DE USO
Bienvenido a OASE Living Water. La compra del producto ProMax Pressure Auto-
matic 6000/8, Pressure Well Automatic
6000/8 es una buena decisión.
Lea minuciosamente las instrucciones y
familiarícese con el equipo antes de usar
el mismo por primera vez. Todos los trabajos en y con este equipo sólo se deben
ejecutar conforme a estas instrucciones.
Tenga necesariamente en cuenta las indicaciones de seguridad para garantizar un
uso correcto y seguro del equipo.
Guarde cuidadosamente estas instrucciones. Entregue estas instrucciones al
nuevo propietario en caso de cambio de
propietario.
• En caso de incumplimiento, la consecuencia puede ser la muerta o una lesión muy grave.
INDICACIÓN
Informaciones que sirven para una mejor
comprensión o la prevención de posibles
daños materiales o medioambientales.
Otras indicaciones
A Referencia a una ilustración, p. ej.
ilustración A.
→ Referencia a otro capítulo.
DESCRIPCIÓN DEL PRODUCTO
Vista sumaria
Pressure
jación para el
de presión
empla-
6000/8
DE
EN
FR
NL
ES
PT
IT
DA
NO
SV
FI
HU
PL
CS
SK
SL
HR
Símbolos en estas instrucciones
Indicaciones de advertencia
Las indicaciones de advertencia contenidas en estas instrucciones están clasificadas mediante palabras de advertencia
que muestran la dimensión del peligro.
ADVERTENCIA
• Denomina una situación posiblemente
peligrosa.
goma para soportar la
bomba en
caso de un
emplazamiento hori-
RO
BG
UK
RU
CN
33
Page 34

Uso conforme a lo prescrito
ProMax Pressure Automatic 6000/8,
Pressure Well Automatic 6000/8, denominado "equipo", se puede utilizar sólo de
la forma siguiente:
• Transporte de agua clara o agua de lluvia.
• Rociado y regado.
• Toma de agua de tanques de agua de
lluvia o cisternas.
• Operación observando los datos técnicos.
Posible uso erróneo
Para el equipo son válidas las siguientes
limitaciones:
• No apropiado para agua salada.
• No apropiado para agua potable.
• No emplear para el servicio de larga du-
ración (p. ej. servicio de circulación continua en el estanque).
• No emplee el equipo para fines industriales.
• No emplee el equipo en combinación
con productos químicos, alimentos y
sustancias fácilmente inflamables o explosivas.
• No conecte el equipo a la línea de alimentación de agua potable.
EMPLAZAMIENTO Y CONEXIÓN
Conexión de la manguera de presión
La capacidad de transporte es óptima en
caso de un diámetro interior de la manguera de 25 mm (1").
Proceda de la forma siguiente:
B
1. Quite la tapa de protección.
2. Conecte la manguera de presión con la
conexión en el lado de presión.
– Recomendación: Emplee el acopla-
miento rápido.
Emplazamiento de la bomba en pozos perforados o pozos
C
• Fije el cable de fijación con un nudo doble en las argollas y baje la bomba al
pozo perforado o pozo.
• Fije la bomba a una distancia mínima de
1 m al fondo con el cable de fijación.
– De esta forma se evita la aspiración
de partículas de suciedad.
• La criba del lado de aspiración tiene que
estar como mínimo 150 mm por debajo
del nivel de agua.
• No transporte la bomba agarrando la línea de conexión de red.
• A partir de una profundidad del pozo
perforado o pozo de 5 m, fije la línea de
conexión de red a una distancia de 5 m
en el cable de fijación (descarga de
tracción).
Emplazamiento vertical de la bomba con la base
(sólo ProMax Pressure Automatic 6000/8)
La bomba se puede emplazar vertical-
mente en el tanque o pozo.
• La criba del lado de aspiración tiene que
estar como mínimo 150 mm por debajo
del nivel de agua.
• El agua a transportar debe contener
3
como máximo 50 g de arena por m
agua.
de
Proceda de la forma siguiente:
D
1. Desplace los pies de emplazamiento en
la base.
2. Suelte los tornillos de hexágono interior
para que la base pueda recepcionar la
bomba.
3. Desplace la bomba en la base.
4. Apriete los tornillos de hexágono interior hasta que la bomba esté fija en la
base.
34 ProMax Pressure Automatic 6000/8, Pressure Well Automatic 6000/8
Page 35

Emplazamiento horizontal de la bomba con la base
(sólo ProMax Pressure Automatic 6000/8)
La bomba se puede emplazar horizontal-
mente con la base en el tanque o pozo
plano.
• La bomba tiene que estar exactamente
alineada en la horizontal.
• El agua a transportar no debe contener
arena.
Proceda de la forma siguiente:
E
1. Quite los tornillos de hexágono interior.
– La base está dividida en dos partes.
2. Desplace dos pies de emplazamiento
en cada base.
3. Desplace tres topes de goma en cada
ranura del orificio de paso.
– Coloque los topes de goma en las dos
bases.
4. Desplace las dos bases en la bomba.
– La distancia entre las bases tiene que
ser lo más grande posible para que la
bomba esté estable.
FUNCIONAMIENTO
El control de la bomba (flow control) mide
el flujo y desconecta la bomba cuando no
hay flujo.
• La bomba se desconecta cuando falta
agua y está protegida de esta forma
contra daños por marcha en seco.
• Durante el funcionamiento automático,
el control de la bomba asume la conexión y desconexión de la bomba.
La válvula de retención integrada evita
que retorne agua de la manguera de pre-
sión a la bomba después de la desconexión. La válvula de retención protege además la bomba contra daños por picos de
presión.
Funcionamiento automático
La bomba se desconecta automáticamente cuando ya no se toma agua y se
alcanza la presión máxima en la tubería
de presión.
La bomba se conecta automáticamente
cuando se toma agua y la presión en la
tubería de presión baja por debajo de 3,5
bar.
ADVERTENCIA
Tensión eléctrica peligrosa.
La muerte o lesiones graves por choque eléctrico.
• Conecte la bomba en el agua sólo con
la red de corriente cuando no haya ninguna persona en el agua o ninguna persona toque en el agua.
• Desconecte la tensión de alimentación
de todos los equipos que se encuentran
en el agua antes de entrar en el agua o
tocar el agua.
Conexión del equipo
• Enchufe la clavija de red en el tomacorriente.
– La bomba está lista para el servicio.
Desconexión del equipo
• Saque la clavija de la red.
– Después de la desconexión, el agua
residual en la manguera puede retornar y salir por el orificio de aspiración
de la bomba.
DE
EN
FR
NL
ES
PT
IT
DA
NO
SV
FI
HU
PL
CS
SK
SL
HR
RO
BG
UK
RU
CN
35
Page 36

Fallo
Causa
Acción correctora
La bomba no ar-
Alimentación de corriente interrum-
Comprobar el fusible y las
eléctricas
La bomba se des-
La protección contra sobrecarga
lentamiento
• Limpiar el orificio de as-
• Dejar enfriar la bomba
El pozo está seco
Esperar hasta que el pozo
tenga suficiente agua
La bomba marcha,
Manguera de presión cerrada
• Tender la manguera de
rio
Orificio de aspiración obstruido
• Limpiar el orificio de aspiración
Aire en la manguera de presión
• Desairear la manguera
de presión
En caso de existir:
forma errónea o está obstruida.
• Monte correctamente la
tención
Rueda de rodadura defectuosa o
Póngase en contacto con
dadura.
La rueda de rodadura está blo-
Póngase en contacto con
dadura.
ELIMINACIÓN DE FALLOS
ADVERTENCIA
Tensión eléctrica peligrosa.
La muerte o lesiones graves por choque eléctrico.
Antes de comenzar con los trabajos:
• Desconecte el equipo, saque la clavija de la red y asegure el equipo contra una conexión.
• Desconecte la tensión de alimentación de todos los equipos que se encuentran en el
agua antes de entrar en el agua o tocar el agua.
Después de terminar los trabajos:
• Restablezca todas las condiciones para la puesta en marcha.
ranca
conecta después
de un corto tiempo
de funcionamiento
pero no transporta
o transporta insuficientemente
pida
desconectó la bomba por sobreca-
La clapeta de retención en la manguera de presión está montada de
desgastada
conexiones de enchufe
piración
presión sin dobleces
• Comprobar la salida y
limpiar si fuera necesa-
clapeta de retención.
• Limpiar la clapeta de re-
OASE.
• Sólo el personal de servicio de Oase puede
sustituir la rueda de ro-
queada por la arena.
36 ProMax Pressure Automatic 6000/8, Pressure Well Automatic 6000/8
OASE.
• Sólo el personal de servicio de Oase puede
sustituir la rueda de ro-
Page 37

LIMPIEZA Y MANTENIMIENTO
ADVERTENCIA
Tensión eléctrica peligrosa.
La muerte o lesiones graves por choque eléctrico.
• Antes de tocar el agua, desconecte la
tensión de alimentación de todos los
equipos que se encuentran en el agua.
• Antes de realizar trabajos en el equipo
desconecte la tensión de alimentación.
INDICACIÓN
Recomendación para la limpieza regular:
• Limpie el equipo según necesidad, pero
como mínimo 2 veces al año.
• No emplee productos de limpieza o soluciones químicas agresivas, porque se
puede dañar la caja o mermar el funcionamiento del equipo.
• Productos de limpieza recomendados
en caso de calcificaciones persistentes:
– Producto de limpieza para bombas
PumpClean de OASE.
– Productos de limpieza domésticos sin
vinagre y cloro.
• Después de la limpieza enjuague minuciosamente todas las piezas con agua
clara.
PIEZAS DE DESGASTE
Los siguientes componentes son piezas
de desgaste y sólo se pueden sustituir por
el personal de servicio de OASE.
• Rueda de rodadura
ALMACENAMIENTO / CONSERVACIÓN DURANTE EL INVIERNO
El equipo no está protegido contra heladas. El equipo no se necesita desmontar
en caso de un emplazamiento en un lugar
protegido contra heladas. En otro caso, el
equipo se tiene que desmontar y almacenar cuando se esperen heladas.
Almacenamiento correcto del equipo de la
forma siguiente:
• Vacíe el equipo en la medida posible,
límpielo minuciosamente y compruebe
si está dañado.
• Vacíe en la medida posible todas las
mangueras, tuberías y conexiones.
• Limpie minuciosamente el equipo, compruebe si presenta daños y sustituya las
partes dañadas.
• Almacene el equipo en un lugar seco y
protegido contra heladas.
• Proteja las conexiones de enchufe
abiertas contra la humedad y la suciedad.
DE
EN
FR
NL
ES
PT
IT
DA
NO
SV
FI
HU
PL
CS
SK
DESECHO
¡Está prohibido desechar este equipo en
la basura doméstica! Deseche el equipo
sólo a través del sistema de recogida previsto. Corte los cables para inutilizar el
equipo.
SL
HR
RO
BG
UK
RU
CN
37
Page 38

El equipo se mantiene seguro y trabaja de
forma fiable con las piezas originales de
OASE.
Consulte los dibujos de piezas de recambio
y las piezas de recambio en nuestra página
web.
www.oase
puesto-di
ProMax Pressure Automatic 6000/8 / Pressure Well Automatic 6000/8
Tensión de referencia
V CA
230
Frecuencia de referencia
Hz
50
Potencia de referencia
W
1100
Categoría de protección
IPX8
Conexión tubuladura de presión
mm
30,9
"
1
Índice de eficiencia mínimo (MEI) 1)
–
≥0,40
Caudal
máxima
l/h
6000
Altura de transporte
máxima m 57
Profundidad de inmersión
máxima m 20
Línea de conexión de red
Longitud m 30
Dimensiones
Diámetro
mm
98
Altura
mm
814
Peso
kg
11,8
sobrecarga Para las bombas de agua con el mejor rendimiento es el valor de referencia MEI ≥0,70.
PIEZAS DE RECAMBIO
DATOS TÉCNICOS
-livingwater.com/piezasdere-
1)
Magnitud adimensional para el rendimiento hidráulico de la bomba en el mejor punto así como en caso de carga parcial y
38 ProMax Pressure Automatic 6000/8, Pressure Well Automatic 6000/8
Page 39

Tradução das instruções de uso originais
AVISO
• O aparelho pode ser utilizado
por crianças com idade igual
ou superior a 8 anos e pessoas com capacidades físicas, sensoriais ou mentais reduzidas ou com falta de experiência ou conhecimentos,
enquanto vigiadas por adultos ou quando foram informadas sobre o uso seguro do
aparelho e entenderam os riscos remanescentes.
• Crianças não podem brincar
com o aparelho.
• A limpeza e a manutenção
não podem ser realizadas por
crianças sem que sejam vigiadas por adultos.
• O disjuntor de corrente de
avaria deve proteger o aparelho com o valor máximo de 30
mA - rated leakage current.
• Antes de conectar o aparelho,
controlar que as características eléctricas do aparelho
correspondem às da rede
eléctrica. As características
do aparelho estão indicadas
na etiqueta de identificação,
sobre a embalagem ou nestas instruções de uso.
• Morte ou graves lesões por
electrocussão! Antes de meter a mão na água, desligue
todos os aparelhos com uma
tensão eléctrica >12 V AC ou
>30 V DC que se encontram
na água.
• Operar o aparelho só quando
não estão pessoas na água.
• Fazer um fio de alimentação
defeituoso substituir imediatamente por OASE, um Serviço de assistência autorizado ou um electricista qualificado para impedir riscos por
choque eléctrico.
INSTRUÇÕES DE SEGURANÇA
Conexão eléctrica
• Os fios de extensão e distribuidores
eléctricos (por exemplo, conjunto de várias tomadas) devem ser autorizados
para a utilização fora da casa (protecção contra salpicos de água).
• Proteger a ficha contra a penetração de
água.
• Conectar o aparelho só com uma tomada instalada de acordo com as normas vigentes.
Operação segura
• Em caso de carcaça defeituosa, o aparelho não pode ser posto em funcionamento.
• Com o fio eléctrico defeituoso, o aparelho não pode ser operado.
• Não transportar ou puxar o aparelho
pelo cabo eléctrico.
DE
EN
FR
NL
ES
PT
IT
DA
NO
SV
FI
HU
PL
CS
SK
SL
HR
RO
BG
UK
RU
CN
39
Page 40

A
ProMax
Automatic
6000/8
Well
1
Ilhós de fixa-
corda
•
•
2
Ponto de co-
(1")
•
•
3
Cabo de ali-
eléctrica
•
•
4
Crivo lado de
aspiração
•
•
5
Pé da bomba
•
•
6
Pé • –
7
Pés de colocação
•
–
8
Calço elástico
tal
•
–
9
Corda de fixação, 20 m
•
•
• Instalar os cabos e fios de forma que
estejam protegidos contra danificação e
ninguém possa tropeçar.
• Nunca proceda a modificações técnicas
do aparelho.
• Fazer só os trabalhos, no aparelho,
descritos nestas instruções de uso. Recomendamos que se dirija a um centro
de serviço ou, em caso de dúvida, ao
fabricante, caso não consiga eliminar
os problemas.
• Utilizar exclusivamente peças e acessório originais para o aparelho.
INFORMAÇÃO RELATIVA A ESTAS INSTRUÇÕES DE USO
Bem-vindo a OASE Living Water. Com a
aquisição do produto ProMax Pressure
Automatic 6000/8, Pressure Well Automatic 6000/8 tomou uma boa decisão.
Antes de utilizar pela primeira vez o aparelho, leia atentamente as instruções de
uso e familiarize-se com a operação. Todos os trabalhos com este aparelho poderão ser realizados exclusivamente conforme as presentes instruções.
Observe estritamente as instruções de
segurança com respeito ao uso correcto e
seguro do aparelho.
Guarde estas instruções de uso em local
seguro. Se ceder o aparelho a outra pessoa, entregue-lhe as instruções de uso.
NOTA
Informações que servem para compreender melhor ou prevenir eventuais danos
materiais ou ecológicos.
Outras instruções
A Faz referência a uma figura, p. ex.,
figura A
→ Nota remissiva a outro capítulo
DESCRIÇÃO DO PRODUTO
Descrição geral
Pressure
6000/8
ção para a
nexão lado de
pressão 30,9 mm
mentação
Símbolos usados nestas instruções
Instruções de advertência
As instruções de advertência estão classificadas por palavras-sinal que informam
sobre o grau do perigo.
• Refere-se a uma situação eventualmente perigosa.
• A não observação pode provocar a
morte ou lesões muito graves.
40 ProMax Pressure Automatic 6000/8, Pressure Well Automatic 6000/8
para colocar a
bomba em posição horizon-
ADVERTÊNCIA
Page 41

Emprego conforme o fim de utilização acordado
ProMax Pressure Automatic 6000/8,
Pressure Well Automatic 6000/8, doravante designado aparelho", só pode ser
utilizado conforme descrito abaixo:
• Transportar água limpa ou águas pluviais
• Irrigar e regar.
• Tirada de águas pluviais de depósitos
colectores e cisternas.
• Operação, sendo observadas as características técnicas.
Uso incorrecto
O aparelho está sujeito a estas restrições:
• Não pode ser utilizada em água salgada.
• Não pode ser utilizada para água potável.
• Não pode ser utilizada para a operação
contínua (p. ex. circulação permanente
de água num tanque de jardim).
• Não serve para utilizações industriais.
• Não utilizar em contacto com produtos
químicos, géneros alimentícios, combustíveis ou substâncias explosivas.
• Não ligar à rede de água potável.
POSICIONAR E CONECTAR
Conectar o tubo flexível de pressão
A capacidade de transporte é óptima com
um diâmetro interior de 25 mm (1") da
mangueira.
Proceder conforme descrito abaixo:
B
1. Tirar a tampa de protecção.
2. Ligar o tubo flexível de pressão com o
ponto de conexão do lado de pressão.
– Recomendação: Utilizar acoplamento
rápido.
Colocar a bomba do poço
C
• Atar mediante nó duplo a corda de fixação aos ilhós e baixar a bomba no poço.
• Fixar, por meio da corda de fixação, a
bomba com pelo menos 1 m de distância ao solo.
– Assim se pode evitar a aspiração de
sujidade.
• O crivo do lado de aspiração deve situar-se pelo menos 150 mm debaixo da
superfície de água.
• Não transportar a bomba pelo cabo de
alimentação eléctrica.
• A partir de 5 m de profundidade do
poço, fixar o cabo de alimentação eléctrica com a distância de 5 m à corda de
fixação (alívio de tracção).
Posicionar a bomba mediante o pé central, em posição vertical
(só ProMax Pressure Automatic 6000/8)
No tanque ou poço, a bomba pode ser po-
sicionada em posição vertical, por meio
do pé central.
• O crivo do lado de aspiração deve situar-se pelo menos 150 mm debaixo da
superfície de água.
• A água a ser transportada pela bomba
não pode conter mais de 50 g de areia
3
de água.
por m
Proceder conforme descrito abaixo:
D
1. Instalar os pés de colocação ao pé central.
2. Desapertar os parafusos com sextavado interno até que o pé central possa
receber a bomba.
3. Introduzir a bomba no pé central.
4. Apertar os parafusos com sextavado interno até que a bomba esteja fixada no
pé central
DE
EN
FR
NL
ES
PT
IT
DA
NO
SV
FI
HU
PL
CS
SK
SL
HR
RO
BG
UK
RU
CN
41
Page 42

Posicionar a bomba mediante o pé central, em posição horizontal
(só ProMax Pressure Automatic 6000/8)
No tanque ou poço pouco profundo, a
bomba pode ser posicionada em posição
horizontal, por meio do pé central.
• A posição da bomba deve ser totalmente horizontal.
• A água a ser transportada pela bomba
não pode conter areia.
Proceder conforme descrito abaixo:
E
1. Afastar os parafusos com sextavado interno.
– O pé central abrange duas partes.
2. Instalar dois pés de colocação a cada
pé central.
3. Colocar três calços elásticos em cada
ranhura das aberturas de passagem.
– Ligar os calços elásticos a ambos os
pés centrais.
4. Ligar ambos os pés centrais com a
bomba.
– A distância entre os pés centrais deve
ser o maior possível para que a
bomba tenha uma boa estabilidade.
OPERAÇÃO
O controlador da bomba (flow control)
mede o caudal, desactivando a bomba
em caso de líquido insuficiente.
• Em caso de falta de água, a bomba desliga, ficando assim protegida contra danos provocados por operação sem líquido.
• No modo automático, o controlador da
bomba governa a activação e desactivação.
A válvula de retenção impede que após
desactivação possa refluir água à bomba,
através do tubo flexível de pressão. Adicionalmente, a válvula de retenção protege
a bomba contra danos por golpes de aríete.
Modo automático
A bomba desliga automaticamente
quando o consumo de água pára e, no
tubo flexível, existe a pressão máxima
permitida.
A bomba liga automaticamente quando o
consumo de água continua e, no tubo flexível, a pressão desceu a um valor abaixo
de 3,5 bar.
ADVERTÊNCIA
Tensão eléctrica perigosa!
Morte ou graves lesões por electrocussão.
• Antes de conectar a bomba à rede eléctrica, todas as pessoas devem ter abandonado a água e ninguém pode meter
a mão na água.
• Antes de entrar na água ou meter a mão
nela, desligar a alimentação eléctrica a
todos os aparelhos que se encontram
na água.
Ligar o aparelho
• Conectar a ficha à tomada.
– A bomba pode ser posta a operar.
Desligar o aparelho
• Desconectar a ficha eléctrica.
– Após a desligação, o resto de água
pode retornar, na mangueira, e sair
da abertura de sucção da bomba.
42 ProMax Pressure Automatic 6000/8, Pressure Well Automatic 6000/8
Page 43

Avaria/Falha
Causa
Remédio
Bomba não arranca
Alimentação eléctrica está inter-
Controlar o fusível e os
trica
Bomba desliga após
A protecção contra sobrecarga
• Limpar a abertura de
cer
Poço sem água
Esperar até que se tenha
ência no poço
A bomba opera, mas
Tubo flexível de pressão está en-
• Colocar o tubo flexível
par
Abertura de sucção está entupida
• Limpar a abertura de
sucção
Presença de ar no tubo flexível
de pressão
• Purgar o tubo flexível de
pressão
Caso exista:
• Corrigir a montagem da
tenção
Rotor defeituoso ou gasto
Contactar a OASE.
OASE
O rotor está bloqueado por areia
Contactar a OASE.
OASE
ELIMINAÇÃO DE FALHAS
DE
ADVERTÊNCIA
Tensão eléctrica perigosa!
Morte ou graves lesões por electrocussão.
Antes do início dos trabalhos:
• Desligar o aparelho, desconectar a ficha eléctrica e proteger o aparelho contra ligação
acidental.
• Antes de entrar na água ou meter a mão nela, desligar a alimentação eléctrica a todos
os aparelhos que se encontram na água.
Depois dos trabalhos:
• Restabelecer todas as condições para a operação normal.
alguns minutos
não transporta água
ou não aspira água
suficiente
rompida.
desligou a bomba após excesso
de calor
tupido
pontos de conexão eléc-
sucção
• Deixar a bomba arrefe-
acumulada água em sufici-
de pressão de forma
que não fique dobrada
• Controlar a abertura de
saída e, se preciso, lim-
EN
FR
NL
ES
PT
IT
DA
NO
SV
FI
HU
PL
CS
Válvula de retenção incorrectamente instalada ou entupida no
tubo flexível de pressão
válvula de retenção
• Limpar a válvula de re-
• O rotor pode ser substi-
tuído só por técnicos da
• O rotor pode ser substituído só por técnicos da
SK
SL
HR
RO
BG
UK
RU
CN
43
Page 44

LIMPEZA E MANUTENÇÃO
ADVERTÊNCIA
Tensão eléctrica perigosa!
Morte ou graves lesões por electrocussão.
• Antes de meter a mão na água, desligar
a alimentação eléctrica de todos os
aparelhos que se encontram na água.
• Antes de trabalhar no aparelho, desligar
a alimentação eléctrica.
NOTA
Recomendação relativa à limpeza regular:
• Limpar o aparelho conforme necessário
ou, pelo menos, 2 vezes por ano.
• Não utilizar detergentes agressivos ou
solventes químicos, passíveis de destruir a carcaça ou influenciar negativamente o funcionamento.
• Solventes de limpeza adequados para
remover aderências calcificadas resistentes:
– Solvente PumpClean para limpar
bombas, fabricante: OASE.
– Detergente doméstico, desprovido de
vinagre e cloro.
• Após a limpeza, lavar todas as peças
em abundante água limpa.
PEÇAS DE DESGASTE
Estes componentes estão sujeitos a desgaste permanente e podem ser substituídos só por técnicos da OASE:
• Rotor
ARMAZENAR/INVERNAR
O aparelho não resiste aos efeitos de geada. Em caso de posicionamento resistente aos efeitos de geada, o aparelho
deve ser desinstalado. De contrário, o
aparelho deve ser desinstalado e guardado em recinto seguro.
Armazenagem correcta do aparelho:
• Esvaziar tanto quanto possível o aparelho, fazer limpeza cuidadosa e controlar
se existem efeitos.
• Esvaziar, tanto quanto possível, as
mangueiras, os tubos e os bocais de ligação.
• Limpar bem o aparelho, verificar se há
defeitos e substituir as peças defeituosas.
• Guardar o aparelho em recinto seco e à
prova de geada.
• Proteger os pontos de conexão eléctrica contra humidade e sujidade.
DESCARTAR O APARELHO USADO
O aparelho não poderá ser eliminado com
o lixo doméstico! Deverá ser entregue ao
sistema de recolha selectiva de lixo. Corte
anteriormente o cabo de alimentação o
que torna o aparelho inutilizável.
44 ProMax Pressure Automatic 6000/8, Pressure Well Automatic 6000/8
Page 45

Com peças de reposição originais da OASE,
o aparelho permanece seguro e opera perfeitamente.
Os desenhos e mones das peças de reposição podem ser vistos na nossa website
www.oase
ternational-di
ProMax Pressure Automatic 6000/8 / Pressure Well Automatic 6000/8
Rated voltage
V AC
230
Rated frequency
Hz
50
Rated power
W
1100
Tipo de protecção
IPX8
Ponto de conexão bocal de pressão
mm
30,9
"
1
Índice de eficiência mínima (MEI) 1)
–
≥0,40
Caudal
máximo
l/h
6000
Altura de elevação
máximo m 57
Profundidade de imersão
máximo m 20
Cabo de alimentação eléctrica
Comprimento
m
30
Dimensões
Diâmetro
mm
98
Altura
mm
814
Peso
kg
11,8
bas de água com a melhor eficiência têm o valor de referência MEI ≥0,70.
PEÇAS DE REPOSIÇÃO
DE
.
DADOS TÉCNICOS
1)
Tamanho sem dimensão para a eficiência hidráulica da bomba no melhor ponto e com carga parcial e sobrecarga. As bom-
-livingwater.com/spareparts_in-
EN
FR
NL
ES
PT
IT
DA
NO
SV
FI
HU
PL
CS
SK
SL
HR
RO
BG
UK
RU
CN
45
Page 46

Traduzione delle istruzioni d'uso originali
AVVISO
• Questo apparecchio può essere utilizzato da bambini di
età superiore a 8 anni e da
persone con capacità fisiche,
sensoriali o mentali ridotte, se
sono supervisionate o se
sono state istruite sull'uso sicuro dell'apparecchio e che
sono in grado di comprendere
i pericoli che ne possono derivare.
• Ai bambini è vietato giocare
con l'apparecchio.
• La pulizia e la manutenzione
utente non devono essere effettuate da bambini senza opportuna supervisione.
• L'apparecchio deve essere
protetto con un dispositivo di
protezione per correnti di guasto con una corrente di taratura di max. 30 mA.
• Collegare l'apparecchio solo
se i dati elettrici dell'apparecchio e dell'alimentazione elettrica coincidono. I dati sono riportati sulla targhetta di identificazione dell'apparecchio,
sulla confezione, oppure nelle
presenti istruzioni d'uso.
• Possibilità di morte o di gravi
lesioni dovute a folgorazione!
Prima di infilare le mani
nell'acqua, scollegare dalla
tensione elettrica gli apparecchi in acqua funzionanti con
una tensione >12 V AC o
>30 V DC.
• Far funzionare l'apparecchio
solo se non ci sono persone in
acqua.
• Per evitare i pericoli dovuti
alle scosse elettriche, far sostituire una linea di allacciamento alla rete dall'azienda
OASE, da un servizio assistenza autorizzato oppure da
un elettricista specializzato.
AVVERTENZE DI SICUREZZA
Allacciamento elettrico
• I cavi di prolungamento e distributori di
corrente (ad es. prese multiple) devono
essere adatti per l'impiego all'aperto
(protetti contro gli spruzzi d'acqua).
• Proteggere i connettori dall'infiltrazione
di umidità.
• Collegare l'apparecchio solo ad una
presa installata secondo le norme.
Funzionamento sicuro
• L'apparecchio non deve venire usato in
caso di scatola difettosa.
• Se il cavo elettrico è difettoso, l'apparecchio non deve essere fatto funzionare.
• Non trasportare né tirare l'apparecchio
per il cavo elettrico.
46 ProMax Pressure Automatic 6000/8, Pressure Well Automatic 6000/8
Page 47

A
ProMax Pres-
tic
6000/8
Well
1
Anelli di fis-
fune
•
•
2
Attacco lato
(1")
•
•
3
Potenza di al-
rete
•
•
4
Vaglio lato aspirazione
•
•
5
Piede della
pompa
•
•
6
piede di supporto
•
–
7
Piedi di appoggio
•
–
8
Tampone di
pompa in caso
zontale
•
–
9
Fune di fissaggio, 20 m
•
•
• Posare i cavi in modo che siano protetti
contro i danni e assicurarsi che nessuno
possa cadervi sopra.
• Non apportare mai modifiche tecniche
all'apparecchio.
• Eseguire sull'apparecchio solo le operazioni descritte in queste istruzioni. In
caso di mancata risoluzione dei problemi, rivolgersi ad un centro d'assistenza autorizzato o in caso di dubbio al
produttore.
• Impiegare per l'apparecchio solo parti di
ricambio ed accessori originali.
SULLE PRESENTI ISTRUZIONI D'USO
Benvenuti all'OASE Living Water. Avete
fatto un'ottima scelta acquistando il prodotto ProMax Pressure Automatic
6000/8, Pressure Well Automatic
6000/8.
Prima della messa in servizio leggere attentamente le istruzioni d'uso e familiarizzare con l'apparecchio. Eseguire tutte le
operazioni su e con questo apparecchio
osservando sempre le presenti istruzioni.
Osservare attentamente le norme di sicurezza al fine di garantire un impiego corretto e sicuro dell'apparecchio.
Conservare accuratamente queste istruzioni d'uso. Consegnarle al nuovo acquirente in caso di cambio di proprietà.
Simboli utilizzati in queste istruzioni
Avvertenze
Le avvertenze contenute in queste istruzioni sono contrassegnate da parole segnaletiche che indicano l'entità del rischio.
AVVISO
• Definisce una situazione possibilmente
pericolosa.
• In caso di inosservanza ne possono
conseguire la morte o serie lesioni.
NOTA
Informazioni destinate ad una migliore
comprensione o alla prevenzione di possibili danni materiali o all'ambiente.
Altre avvertenze
A Riferimento ad un'illustrazione, ad
es. illustrazione A.
→ Rimando ad un altro capitolo.
DESCRIZIONE DEL PRODOTTO
Prospetto
sure Automa-
saggio per
man-
data 30,9 mm
lacciamento a
gomma per la
posa della
di posa oriz-
6000/8
DE
EN
FR
NL
ES
PT
IT
DA
NO
SV
FI
HU
PL
CS
SK
SL
HR
RO
BG
UK
RU
CN
47
Page 48

Impiego ammesso
Il ProMax Pressure Automatic 6000/8,
Pressure Well Automatic 6000/8, chiamato "apparecchio", può essere utilizzato
solo nel modo seguente:
• Convogliamento di acqua limpida o di
acqua piovana.
• Irrorazione ed annaffiatura
• Prelievo di acqua da recipienti o ci-
sterne di acqua piovana.
• Funzionamento in conformità alle caratteristiche tecniche.
Possibili errori d'uso
Per l'apparecchio valgono le seguenti restrizioni:
• Non idoneo all'acqua salata.
• Non idoneo per acqua potabile.
• Non usare in funzionamento continuato
(ad es. per il ricircolo di acqua in stagni).
• Non utilizzarlo per scopi commerciali o
industriali.
• Non utilizzarlo unitamente a prodotti
chimici, generi alimentari, sostanze facilmente infiammabili o esplosive.
• Non allacciare all'impianto di acqua potabile.
INSTALLAZIONE E ALLACCIAMENTO
Collegamento del tubo di mandata
La portata è ottimale con un diametro interno del tubo flessibile di 25 mm (1").
Procedere nel modo seguente:
B
1. Sfilare il cappuccio.
2. Collegare il tubo flessibile all'attacco del
lato di mandata.
– Consiglio: utilizzare un giunto rapido.
Posa della pompa nel pozzo o nel pozzetto
C
• Applicare una fune di fissaggio con doppio nodo alle asole e far scendere la
pompa nel pozzo o nel pozzetto.
• Fissare la pompa ad una distanza minima di 1 m dal fondo mediante la fune
di fissaggio.
– Ciò permette di evitare l'aspirazione
di particelle di sporco.
• Il vaglio del lato aspirazione deve trovarsi almeno 150 mm sotto allo specchio dell'acqua.
• Non trasportare la pompa per il cavo di
alimentazione.
• A partire da una profondità del pozzo o
del pozzetto di 5 metri, fissare il cavo di
alimentazione elettrica alla distanza di
5 m alla fune di fissaggio (sgravio di trazione).
Posa verticale della pompa con piede di appoggio
(solo ProMax Pressure Automatic 6000/8)
Nel serbatoio o nel pozzo la pompa può
essere posata con il piede in direzione
verticale.
• Il vaglio del lato aspirazione deve trovarsi almeno 150 mm sotto allo specchio dell'acqua.
• L'acqua da convogliare deve contenere
3
al massimo 50 g di sabbia per m
.
Procedere nel modo seguente:
D
1. Spingere i piedi di posa sul piede di appoggio.
2. Allentare le viti a brugola esagonali sino
a che il piede di appoggio può ospitare
la pompa.
3. Inserire la pompa nel piede di appoggio.
4. Stringere le viti esagonali a brugola sino
a che la pompa è fissata nel piede di appoggio.
48 ProMax Pressure Automatic 6000/8, Pressure Well Automatic 6000/8
Page 49

Posa orizzontale della pompa con piede di appoggio
(solo ProMax Pressure Automatic 6000/8)
Nel serbatoio piatto o nel pozzo la pompa
può essere posata con il piede in direzione orizzontale.
• La pompa deve essere orientata in
senso perfettamente orizzontale.
• L'acqua da convogliare non deve contenere sabbia.
Procedere nel modo seguente:
E
1. Rimuovere le viti a brugola esagonali.
– Il piede di appoggio è diviso in due
pezzi.
2. Spingere due piedi di posa su ogni
piede di appoggio.
3. Spingere tre tamponi di gomma nelle
scanalature dell'apertura di passaggio.
– Applicare tamponi di gomma ad en-
trambi i piedi di appoggio.
4. Spingere entrambi i piedi di appoggio
sulla pompa.
– La distanza fra i piedi di appoggio
deve essere il più possibile grande, in
maniera che la pompa poggi in maniera stabile.
FUNZIONAMENTO
Il comando della pompa (flow control) misura la portata e commuta la pompa in
caso di portata assente.
• In caso di assenza di acqua, la pompa
si spegne e viene dunque protetta da
danneggiamento totale causato da marcia a secco.
• Durante il funzionamento automatico, il
comando della pompa si prende carico
dell'accensione e dello spegnimento
della pompa.
La valvola di non ritorno integrata evita
che dopo lo spegnimento l'acqua refluisca
nella pompa dal tubo flessibile di mandata. Inoltre, la valvola di non ritorno protegge la pompa da danni causati da colpi
di pressione.
Funzionamento automatico
La pompa si spegne automaticamente se
non viene prelevata più acqua e se nella
tubazione di mandata viene raggiunta la
pressione massima.
La pompa si accende automaticamente
se viene prelevata acqua e se la pressione nella tubazione scende sotto a 3,5
bar.
AVVISO
Tensione elettrica pericolosa!
Pericolo di morte o di gravi lesioni per
folgorazione.
• Collegare la pompa in acqua all'alimentazione di corrente solamente se nessuno si trova in acqua o ha le mani immerse nell'acqua.
• Prima di entrare in acqua o di infilarvi le
mani, scollegare dalla tensione elettrica
tutti gli apparecchi che si trovano in acqua.
Avviare l'apparecchio
• Innestare la spina elettrica nella presa.
– La pompa è operativa.
Spegnimento dell'apparecchio
• Staccare la spina elettrica.
– Dopo lo spegnimento è possibile che
dell'acqua residua refluisca nel tubo
flessibile e che fuoriesca dall'apertura
di aspirazione della pompa.
DE
EN
FR
NL
ES
PT
IT
DA
NO
SV
FI
HU
PL
CS
SK
SL
HR
RO
BG
UK
RU
CN
49
Page 50

Anomalia
Causa
Intervento
La pompa non si avvia
Alimentazione elettrica interrotta
Controllare il fusibile e i collegamenti elettrici a spina.
La pompa si arresta dopo
La protezione da sovracca-
• Pulire l'apertura di aspi-
pompa.
Il pozzo è vuoto.
Attendere sino a che il
sufficienza.
La pompa è accesa ma
Tubo flessibile di mandata
• Posare il tubo flessibile
lirla
Apertura di aspirazione intasata
• Pulire l'apertura di aspirazione.
Aria nel tubo flessibile di
mandata
• Sfiatare il tubo flessibile
di mandata
Se presente:
montata male o intasata
• Montare correttamente
ritorno.
Girante bloccata o usurata
Contattare la OASE.
zio di assistenza OASE.
La girante della pompa è
Contattare la OASE.
zio di assistenza OASE.
ELIMINAZIONE DI ANOMALIE
AVVISO
Tensione elettrica pericolosa!
Pericolo di morte o di gravi lesioni per folgorazione.
Prima di iniziare il lavoro:
• Spegnere l'apparecchio, sfilare la spina elettrica e proteggere l'apparecchio da riaccensione accidentale.
• Prima di entrare in acqua o di infilarvi le mani, scollegare dalla tensione elettrica tutti
gli apparecchi che si trovano in acqua.
Al termine del lavoro:
• ripristinare tutte le condizioni per la messa in funzione.
un breve tempo di funzionamento.
non convoglia o la portata
non è sufficiente.
50 ProMax Pressure Automatic 6000/8, Pressure Well Automatic 6000/8
rico ha spento la pompa
per surriscaldamento.
otturato
valvola di non ritorno nel
tubo flessibile di mandata
bloccata a causa di sabbia.
razione.
• Lasciar raffreddare la
pozzo possiede acqua a
di mandata senza piegature
• Controllare l'uscita e pu-
la valvola di non ritorno.
• Pulire la valvola di non
• La girante deve essere
sostituita solo dal servi-
• La girante deve essere
sostituita solo dal servi-
Page 51

PULIZIA E MANUTENZIONE
AVVISO
Tensione elettrica pericolosa!
Pericolo di morte o di gravi lesioni per
folgorazione.
• Prima di mettere le mani nell'acqua,
scollegare dalla tensione elettrica tutti
gli apparecchi che si trovano in acqua.
• Disinserire la tensione di rete prima di
intervenire sull'apparecchio.
NOTA
Consiglio per la pulizia periodica:
• Pulire l'apparecchio quando necessario, ma almeno 2 volte all'anno.
• Non utilizzare mai detergenti aggressivi
o soluzioni chimiche per non corrodere
il corpo o compromettere il funzionamento dell'apparecchio.
• Detergenti consigliati per calcificazioni
resistenti:
– Detergente PumpClean OASE.
– Detergente per uso domestico senza
aceto e cloro.
• Una volta puliti tutti i componenti, risciacquare accuratamente con acqua
limpida.
PEZZI SOGGETTI A USURA
I seguenti componenti sono pezzi di consumo e devono essere sostituiti esclusivamente dal servizio di assistenza OASE:
• Girante
IMMAGAZZINAGGIO/INVERNAGGIO
L'apparecchio non è resistente al gelo. In
caso di assenza di gelo, l'apparecchio non
deve essere disinstallato. In caso di gelo
l'apparecchio deve essere smontato e immagazzinato.
Immagazzinare correttamente l'apparecchio procedendo nel modo seguente:
• Svuotare il più possibile l'apparecchio,
eseguire una pulizia accurata e controllare se è danneggiato.
• Svuotare il più possibile tubi flessibili, tubazioni e attacchi.
• Pulire accuratamente l'apparecchio,
controllare se sono presenti dei danni,
sostituire i componenti danneggiati.
• Immagazzinare l'apparecchio in un
luogo asciutto e al riparo dal gelo.
• Proteggere i collegamenti elettrici aperti
contro l'umidità e lo sporco.
SMALTIMENTO
Non smaltire questo apparecchio gettandolo nei rifiuti domestici! Utilizzare l'apposito sistema di ritiro. Rendere inutilizzabile
l'apparecchio tagliando i cavi.
DE
EN
FR
NL
ES
PT
IT
DA
NO
SV
FI
HU
PL
CS
SK
SL
HR
RO
BG
UK
RU
CN
51
Page 52

Con ricambi originali OASE l'apparecchio rimane sicuro e funzionerà sempre regolarmente.
Per i disegni dei ricambi e per i ricambi
stess
www.oase
ternational-di
ProMax Pressure Automatic 6000/8 / Pressure Well Automatic 6000/8
Tensione di taratura
V CA
230
Frequenza di dimensionamento
Hz
50
Potenza di dimensionamento
W
1100
Grado di protezione
IPX8
Attacco tubo di mandata
mm
30,9
"
1
Indice minimo di efficienza (MEI) 1)
–
≥0,40
Portata
massima
l/h
6000
Prevalenza
massima m 57
Profondità d'immersione
massima m 20
Potenza di allacciamento a rete
lunghezza
m
30
Dimensioni
Diametro
mm
98
Altezza
mm
814
Peso
kg
11,8
o di sovraccarico. Per pompe per acqua con il rendimento migliore, il valore di riferimento MEI è ≥0,70.
PARTI DI RICAMBIO
i, vedere al nostro sito Internet.
DATI TECNICI
-livingwater.com/spareparts_in-
1)
Grandezza adimensionale per il rendimento idraulico di pompaggio nel punto ottimale come anche in caso di carico parziale
52 ProMax Pressure Automatic 6000/8, Pressure Well Automatic 6000/8
Page 53

Oversættelse af den originale brugsanvisning
ADVARSEL
• Dette apparat kan bruges af
børn fra 8 år og derover og
personer med nedsatte fysiske, sensoriske eller mentale
evner eller manglende erfaring og viden, når de er under
opsyn eller får instruktion i sikker brug af apparatet og forstår de dermed forbundne risici.
• Børn må ikke lege med apparatet.
• Rengøring og vedligeholdelse
må ikke udføres af børn uden
opsyn.
• Apparatet skal afsikres med
lækageafbryder indstillet til en
nominel fejlstrøm på maksimalt 30 mA.
• Enheden må kun tilsluttes,
hvis de elektriske data for enheden og strømforsyningen
stemmer overens. Enhedens
data findes på enhedens typeskilt, på emballagen eller i
denne brugsanvisning.
• Der kan opstå død eller svære
kvæstelser pga. elektrisk
stød! Før du rækker ned i vandet, skal apparater med en
spænding >12 V AC eller
>30 V DC kobles fra strømnet-
tet.
• Apparatet må kun anvendes,
når der ikke er personer i vandet.
• En beskadiget nettilslutningsledning skal straks udskiftes
af OASE, en autoriseret kundeservice eller en kvalificeret
elinstallatør for at undgå farer
på grund af stød.
SIKKERHEDSANVISNINGER
El-tilslutning
• Forlængerledning og strømfordeler
(f.eks. strømskinne) skal være egnet til
udendørs brug (stænktæt).
• Beskyt stikforbindelser mod fugt.
• Tilslut kun apparatet i en forskriftsmæs-
sigt installeret stikkontakt.
Sikker drift
• Hvis huset er defekt, må apparatet ikke
anvendes.
• Hvis den elektriske ledning er defekt,
må apparatet ikke tages i brug.
• Apparatet må ikke bæres eller trækkes
i den elektriske ledning.
• Læg kablerne, så de er beskyttet mod
skader, og sørg for, at ingen kan snuble
over dem.
• Foretag aldrig tekniske ændringer på
apparatet.
• Der må kun gennemføres arbejde på
apparatet, som er beskrevet i denne vejledning. Henvend dig til et autoriseret
serviceværksted eller i tvivlstilfælde til
producenten, hvis det ikke er muligt at
afhjælpe problemerne.
DE
EN
FR
NL
ES
PT
IT
DA
NO
SV
FI
HU
PL
CS
SK
SL
HR
RO
BG
UK
RU
CN
53
Page 54

A
ProMax
Automatic
6000/8
Well
1
Fast-
til wire
•
•
2
Tilslutning på
30,9 mm (1")
•
•
3
Nettilslutningsledning
•
•
4
Sigte, sugeside
•
•
5
Pumpefod
•
•
6
Fod • –
7
Fødder • –
8
Gummibuffer
ling
•
–
9
Fastgøringswire, 20 m
•
•
• Brug kun originale reservedele og origi-
nalt tilbehør til apparatet.
OM DENNE BRUGSANVISNING
Velkommen til OASE Living Water. Med
dit køb af ProMax Pressure Automatic
6000/8, Pressure Well Automatic
6000/8 har du truffet et godt valg.
Inden du bruger apparatet første gang, er
det vigtigt, at du læser brugsanvisningen
grundigt igennem og gør dig fortrolig med
apparatet. Alle arbejder på og med dette
apparat må kun udføres iht. foreliggende
vejledning.
Sikkerhedshenvisningerne skal ubetinget
overholdes for korrekt og sikker anvendelse.
Opbevar denne brugsanvisning omhyggeligt. Ved ejerskifte, videregiv venligst
brugsanvisningen.
Symboler i denne vejledning
Advarsler
Advarslerne i denne vejledning er klassificeret med signalord, der angiver farens
omfang.
PRODUKTBESKRIVELSE
Oversigt
Pressure
gøringsøsken
tryksiden
til lejring af
pumpen ved
vandret opstil-
6000/8
• Betegner en muligvis farlig situation.
• Manglende overholdelse kan medføre
Oplysninger der medvirker til bedre forståelse eller til forebyggelse af mulige
materielle skader eller miljøskader.
Yderligere anvisninger
A Henvisning til en figur, f.eks. figur
→ Henvisning til et andet kapitel.
54 ProMax Pressure Automatic 6000/8, Pressure Well Automatic 6000/8
ADVARSEL
død eller alvorlige kvæstelser.
OBS!
A.
Page 55

Anvendelse i henhold til bestemmelser
ProMax Pressure Automatic 6000/8,
Pressure Well Automatic 6000/8, kaldet
"enheden", må udelukkende anvendes på
følgende måde:
• Transport af rent vand eller regnvand.
• Vanding og gødning.
• Vandhentning fra regntønder eller ci-
sterner.
• Drift ved overholdelse af de tekniske
data.
Mulig forkert brug
Der gælder følgende restriktioner for apparatet:
• Ikke egnet til saltvand.
• Ikke egnet til drikkevand.
• Må ikke anvendes til kontinuerlig drift
(f.eks. kontinuerlig cirkulation i bassinet).
• Må ikke anvendes til erhvervs- eller industrimæssige formål.
• Må ikke sættes i forbindelse med kemikalier, levnedsmidler, let brændbare eller eksplosive stoffer.
• Må ikke sluttes til drikkevandsforsyningen.
OPSTILLING OG TILSLUTNING
Tilslutning af trykslange
Fødeeffekten er optimal ved en indvendig
slangediameter på 25 mm (1").
Sådan gør du:
B
1. Træk beskyttelseshætten af.
2. Forbind trykslangen med tilslutningen
på tryksiden.
– Anbefaling: Anvend lynkobling.
Opstil pumpen i boring eller skakt
C
• Anbring rebet i øjerne med en dobbeltknude, og sænk pumpen ned i brønden
eller skakten.
• Pumpen skal fastgøres med fastgøringswiren i en afstand på mindst 1 m til
bunden.
– Derved undgås opsugning af smuds-
partikler.
• Sigten på sugesiden skal ligge mindst
150 mm under vandoverfladen.
• Må ikke bæres i nettilslutningsledningen.
• Fra en brønd- eller skaktdybde fra 5 m
skal nettilslutningsledningen fastgøres
til rebet i en afstand på 5 m (trækaflastning).
Lodret opstilling af pumpe med sokkel
(kun ProMax Pressure Automatic 6000/8)
I en tank eller brønd kan pumpen opstilles
lodret med soklen.
• Sigten på sugesiden skal ligge mindst
150 mm under vandoverfladen.
• Vandet, der skal transporteres, må
maksimalt indeholde 50 g sand pr. m
vand.
Sådan gør du:
D
1. Skub fødderne på soklen.
2. Løsn unbrakoskruerne, så soklen har
plads til pumpen.
3. Skub pumpen ind i soklen.
4. Spænd unbrakoskruerne, indtil pumpen
sidder fast i soklen.
Vandret opstilling af pumpe med sokkel
(kun ProMax Pressure Automatic 6000/8)
I en flad tank eller brønd kan pumpen op-
stilles vandret med soklen.
• Pumpen skal være placeret nøjagtig
vandret.
3
DE
EN
FR
NL
ES
PT
IT
DA
NO
SV
FI
HU
PL
CS
SK
SL
HR
RO
BG
UK
RU
CN
55
Page 56

• Vandet, der skal transporteres, må ikke
indeholde sand.
Sådan gør du:
E
1. Fjern unbrakoskruerne.
– Soklen er delt i to.
2. Skub to fødder på hver sokkel.
3. Skub tre gummibuffere ind i rillerne i
gennemføringsåbningen.
– Sæt gummibuffere på begge sokler.
4. Skub begge sokler på pumpen.
– Afstanden mellem soklerne skal være
så stor som muligt, så pumpen står
sikkert.
DRIFT
Pumpestyringen (flow control) måler flowet og slukker for pumpen, hvis der ikke
er noget flow.
• Pumpens slukkes, hvis der mangler
vand, og er således beskyttet mod skader ved tørløb.
• I automatisk drift tændes og slukkes
pumpen af pumpestyringen.
Den integrerede kontraventil forhindrer, at
der løber vand ud af trykslangen og ind i
pumpen, efter den er slukket. Derudover
beskytter kontraventilen pumpen mod
skader som følge af trykstød.
Automatisk drift
Pumpen slukker automatisk, hvis der ikke
længere suges vand op, og det maksimale
tryk i trykledningen er nået.
Pumpen tænder automatisk, hvis der suges vand op, og trykket i trykledningen falder til under 3,5 bar.
ADVARSEL
Farlig elektrisk spænding!
Død eller svære kvæstelser pga. elektrisk stød.
• Pumpen i vandet må først forbindes
med strømnettet, når ingen personer
står i vandet eller stikker hånden ned i
vandet.
• Netspændingen til alle apparater, der
befinder sig i vandet, skal frakobles, inden personer træder ned i eller stikker
hånden ned i vandet.
Tilkobling af apparatet
• Anbring netstikket i stikdåsen.
– Pumpen er klar til brug.
Slukning af apparatet
• Træk netstikket ud.
– Efter frakoblingen kan restvandet i
slangen løbe tilbage og komme ud
igennem pumpens indsugningsåbning.
56 ProMax Pressure Automatic 6000/8, Pressure Well Automatic 6000/8
Page 57

Fejl
Årsag
Udbedring
Pumpen går ikke i gang
Strømforsyning er afbrudt
Kontroller sikring og elektriske stikforbindelser
Pumpen slår fra efter kort
Overbelastningssikringen
grund af overophedning
• Rengør indsugningsåb-
• Lad pumpen køle af
Brønden er tør
Vent, indtil der er tilstrækkeligt vand i brønden
Pumpen kører, men trans-
Trykslangen er lukket
• Læg trykslangen uden
digt
Indsugningsåbningen er
tilstoppet
• Rengør indsugningsåbningen
Luft i trykslangen
• Udluft trykslangen
Hvis den forefindes:
tilstoppet
• Monter kontraventilen
Løbehjul defekt eller slidt
Kontakt OASE.
skiftes af Oase-service.
Løbehjul er blokeret af
Kontakt OASE.
skiftes af Oase-service.
FEJLAFHJÆLPNING
DE
ADVARSEL
Farlig elektrisk spænding!
Død eller svære kvæstelser pga. elektrisk stød.
Før arbejdet påbegyndes:
• Sluk apparatet, træk netstikket ud, og sørg for, at apparatet ikke kan tændes ved en
fejl.
• Netspændingen til alle apparater, der befinder sig i vandet, skal frakobles, inden personer træder ned i eller stikker hånden ned i vandet.
Efter arbejdet er afsluttet:
• Genskab alle forudsætninger for idrifttagning.
tids drift
porterer ikke eller ikke tilstrækkeligt
har frakoblet pumpen på
ningen
knæk
• Kontroller udløbet, og
rengør det om nødven-
EN
FR
NL
ES
PT
IT
DA
NO
SV
FI
HU
PL
CS
Kontraventilen i trykslangen forkert monteret eller
sand
rigtigt
• Rengør kontraventilen
• Løbehjulet må kun ud-
• Løbehjulet må kun ud-
SK
SL
HR
RO
BG
UK
RU
CN
57
Page 58

RENGØRING OG VEDLIGEHOLDELSE
ADVARSEL
Farlig elektrisk spænding!
Død eller svære kvæstelser pga. elektrisk stød.
• Sluk for strømtilførslen til alle apparater
i vandet, før du stikker hånden ned i
vandet.
• Sluk for apparatet før du arbejder på
det.
OBS!
Anbefaling vedrørende regelmæssig rengøring:
• Rengør enheden efter behov, dog
mindst 2 gange om året.
• Brug ingen aggressive rengøringsmidler eller opløsningsmidler, da disse kan
beskadige huset eller forringe apparatets funktion.
• Anbefalede rengøringsmidler ved genstridige tilkalkninger:
– Pumperens PumpClean fra OASE.
– Eddike- og klorfrit husholdnings-
rengøringsmiddel.
• Skyl alle dele med rent vand efter rengøring.
LUKKEDELE
Følgende komponenter er sliddele og må
kun udskiftes af OASE-service:
• Løbehjul
OPBEVARING/OVERVINTRING
Apparatet er ikke frostsikkert. Ved frostsikker opstilling skal apparatet ikke afmonteres. Ellers skal apparatet afmonteres og sættes til opbevaring, hvis der ventes frostvejr.
Sådan opbevares apparatet korrekt:
• Tøm apparatet så godt som muligt, rengør det grundigt og kontroller for skader.
• Tøm så vidt muligt alle slanger, rørledninger og tilslutninger.
• Rengør apparatet grundigt, kontrollér
for beskadigelser, og udskift beskadigede dele.
• Opbevar apparatet tørt og frostfrit.
• Beskyt åbne stikforbindelser mod fugt
og snavs.
BORTSKAFFELSE
Dette apparat må ikke bortskaffes som
husholdningsaffald! Benyt venligst det
dertil indrettede tilbagetagelsessystem.
Gør apparatet ubrugeligt først ved at
skære kablet af.
58 ProMax Pressure Automatic 6000/8, Pressure Well Automatic 6000/8
Page 59

Med originale reservedele fra OASE forbliver apparatet sikkert og fortsætter med at arbejde pålideli
Reservedelstegninger og reservedele findes
på vores hjemmeside.
www.oase
ternational-di
ProMax Pressure Automatic 6000/8 / Pressure Well Automatic 6000/8
Nominel spænding
V AC
230
Nominel frekvens
Hz
50
Nominel effekt
W
1100
Beskyttelsesgrad
IPX8
Tilslutning af trykstuds
mm
30,9
"
1
Minimumseffektivitetsindeks (MEI) 1)
–
≥0,40
Pumpemængde
maksimum
l/t
6000
Pumpehøjde
maksimum
m
57
Neddykningsdybde
maksimum
m
20
Nettilslutningsledning
Længde m 30
Dimensioner
Diameter
mm
98
Højde
mm
814
Vægt
kg
11,8
overbelastning. For vandpumper med den bedste virkningsgrad er referenceværdien MEI ≥0,70.
RESERVEDELE
DE
gt.
TEKNISKE DATA
1)
Dimensionsfri størrelse for den hydrauliske pumpevirkningsgrad i punktet med den bedste virkningsgrad samt ved del- og
-livingwater.com/spareparts_in-
EN
FR
NL
ES
PT
IT
DA
NO
SV
FI
HU
PL
CS
SK
SL
HR
RO
BG
UK
RU
CN
59
Page 60

Oversettelse av den originale bruksanvisningen
ADVARSEL
• Dette apparatet kan brukes
av barn som er 8 år eller
eldre, samt av personer med
reduserte fysiske, sensoriske
eller mentale begrensninger,
eller som mangler erfaring og
kunnskap, hvis de er under
oppsikt eller har fått opplæring i riktig bruk av apparatet, og forstår farene forbundet med å bruke dette.
• Barn må ikke leke med apparatet.
• Rengjøring eller brukervedlikehold må ikke utføres av
barn uten at de er under
oppsikt.
• Apparatet må være sikret
gjennom en jordfeilbryter med
en utløserstrøm på maksimalt
30 mA.
• Koble apparatet bare til dersom de elektriske dataene til
apparatet og strømforsyningen stemmer overens. Du finner apparatdataene på typeskiltet på apparatet, på forpakningen og i denne
bruksanvisningen.
• Strømstøt kan føre til død eller alvorlige personskader!
Før du griper ned i vannet må
apparatene i vannet med en
spenning >12 V AC eller
>30 V DC kobles fra strømnet-
tet.
• Apparatet skal kun brukes
hvis det ikke oppholder seg
personer i vannet.
• En skadet nettilkoblingsledning må straks byttes ut av
OASE, en autorisert kundeservice eller en kvalifisert
elektriker, får å unngå fare for
strømstøt.
SIKKERHETSANVISNINGER
Elektrisk tilkobling
• Skjøteledninger og strømfordelere (f.
eks. stikkontaktlister) må være beregnet
for utendørs bruk (beskyttet mot vannsprut).
• Beskytt pluggforbindelser mot fuktighet.
• Apparatet må bare kobles til en for-
skriftsmessig installert stikkontakt.
Sikker drift
• Ved defekt hus, skal apparatet ikke brukes.
• Hvis den elektriske ledningen er defekt,
må apparatet ikke brukes.
• Ikke bær eller trekk apparatet etter den
elektriske ledningen.
• Legg ledningene slik at de er beskyttet
mot skader, og pass på at ingen kan
snuble i dem.
• Utfør aldri tekniske endringer på apparatet.
• Utfør kun arbeid på apparatet som er
beskrevet i denne bruksanvisningen.
60 ProMax Pressure Automatic 6000/8, Pressure Well Automatic 6000/8
Page 61

A
ProMax
Automatic
6000/8
Well
1
Festehull for
snor
•
•
2
Tilkobling på
30,9 mm (1")
•
•
3
Strømledning
•
•
4
Sil på sugesiden
•
•
5
Pumpefot
•
•
6
Fot • –
7
Oppstillingsføtter
•
–
8
Gummibuffer
oppstilling
•
–
9
Festesnor,
20 m
•
•
Kontakt autorisert kundeservice eller
produsenten ved tvil eller hvis problemet ikke kan utbedres.
• Bruk kun originale reservedeler og originalt tilbehør for apparatet.
PRODUKTBESKRIVELSE
Oversikt
Pressure
DE
EN
6000/8
FR
OM DENNE BRUKSANVISNINGEN:
Velkommen til Oase Living Water. Med
kjøpet av produktet ProMax Pressure
Automatic 6000/8, Pressure Well Automatic 6000/8 har du gjort et godt valg.
Les denne bruksanvisningen nøye og gjør
deg kjent med apparatet før du tar det i
bruk første gang. Alt arbeid på og med
dette apparatet skal gjennomføres etter
de anvisninger som foreligger.
Ta hensyn til sikkerhetsanvisningene for
riktig og sikker bruk av apparatet.
Ta godt vare på denne bruksanvisningen.
Hvis apparatet selges skal bruksanvisningen følge med.
Symboler i denne bruksanvisningen
Advarsler
Advarslene i denne bruksanvisningen er
klassifisert med signalord som antyder
graden av fare.
ADVARSEL
• Betegner en potensielt farlig situasjon.
• Å ignorere advarselen kan føre til død
eller alvorlig personskade.
MERK
Informasjon som skal gi bedre forståelse
eller som skal bidra til å forebygge eventuelle materielle skader eller miljøødeleggelser.
Andre merknader
A Viser til en illustrasjon, f.eks. Illust-
rasjon A.
→ Viser til et annet kapittel.
trykksiden
for lagring av
pumpen ved
horisontal
NL
ES
PT
IT
DA
NO
SV
FI
HU
PL
CS
SK
SL
HR
RO
BG
UK
RU
CN
61
Page 62

Tilsiktet bruk
ProMax Pressure Automatic 6000/8,
Pressure Well Automatic 6000/8, kalt "utstyret", må kun brukes på følgende måte:
• Pumping av rent vann eller regnvann.
• Vanning.
• Tømming av regntønner eller sisterner.
• Drift ved overholdelse av tekniske data.
Mulig feilbruk
Følgende restriksjoner gjelder for apparatet:
• Ikke egnet for saltvann.
• Ikke egnet for drikkevann.
• Skal ikke brukes kontinuerlig (f.eks.
Som sirkulasjonspumpe).
• Skal ikke brukes for nærings- eller industriformål.
• Skal ikke brukes i forbindelse med kjemikalier, næringsmidler, lett brennbare
eller eksplosive stoffer.
• Skal ikke koble til drikkevannsforsyningen.
INSTALLASJON OG TILKOBLING
Koble til trykkslangen
Pumpeeffekten er optimal ved en innvendig slangediameter på 25 mm (1").
Slik går du frem:
B
1. Trekk av beskyttelseskappen.
2. Koble trykkslangen til tilkoblingen på
trykksiden.
– Anbefaling: Bruk hurtigkobling.
Still opp pumpen i borebrønnen eller sjakten
C
• Fest festesnoren med dobbeltknute i
øyene, og senk pumpen ned i borebrønnen eller sjakten.
• Fest festesnoren slik at pumpen har en
avstand til bunnen på minst 1 m.
– Det forhindrer innsuging av smuss-
partikler.
• Silen på sugesiden må ligge minst 150
mm under vannspeilet.
• Pumpen må ikke henge i strømledningen.
• Fra en borebrønn eller sjaktdybde på 5
m må strømledningen festes til
festesnoren i en avstand på 5 m (trekkavlastning).
Still opp pumpen vertikalt med stativet
(bare ProMax Pressure Automatic
6000/8)
I tank eller brønn kan pumpen stilles opp
vertikalt med stativet.
• Silen på sugesiden må ligge minst 150
mm under vannspeilet.
• Vannet som skal pumpes må maksimalt
inneholde 50 g sand per m3 vann.
Slik går du frem:
D
1. Skyv oppstillingsføttene inn på stativet.
2. Løsne unbracoskruen så mye at pumpen kan skyves inn på stativet.
3. Skyv pumpen inn på stativet.
4. Trekk til unbracoskruen slik at pumpen
festes til stativet.
Still opp pumpen horisontalt med stativet
(bare ProMax Pressure Automatic
6000/8)
I flate tanker eller brønner kan pumpen
stilles opp vertikalt med stativet.
62 ProMax Pressure Automatic 6000/8, Pressure Well Automatic 6000/8
Page 63

• Pumpen må være plassert eksakt vannrett.
• Vannet som skal pumpes må ikke inneholde sand.
Slik går du frem:
E
1. Skru ut unbracoskruen.
– Stativet er todelt.
2. Skyv to oppstillingsføtter inn på hver
stativfot.
3. Skyv tre gummibuffere inn i hver av falsene på gjennomføringsåpningen.
– Plasser gummibuffere på begge sta-
tivene.
4. Skyv begge stativene inn på pumpen.
– Avstanden mellom stativene må være
så stor som mulig for at pumpen skal
stå støtt.
DRIFT
Pumpestyringen (flow control) måler gjennomstrømningen og slår av pumpen når
det ikke er gjennomstrømning.
• Pumpen slår seg av ved vannmangel,
og er dermed beskyttet mot skader på
grunn av tørrkjøring.
• Ved automatisk drift slår pumpestyringen pumpen av og på.
Den integrerte tilbakeslagsventilen forhindrer at vannet renner tilbake i pumpen
fra trykkslangen når pumpen slås av. Videre beskytter tilbakeslagsventilen pumpen mot skader på grunn av trykkstøt.
Automatisk drift
Pumpen slås av automatisk når det ikke
tas opp mer vann og det maksimale trykket i trykkledningen er nådd.
Pumpen slås automatisk på når det tas
opp vann og trykket i trykkledningen faller
under 3,5 bar.
ADVARSEL
Farlig elektrisk spenning!
Død eller alvorlige personskader på
grunn av strømstøt.
• Pumpen i vannet må bare kobles til
strømnettet når det ikke er mennesker i
vannet og ingen griper ned i vannet.
• Før du berører vannet må strømstøpslene for alle apparater som befinner seg
i vannet alltid trekkes ut.
Slå på apparatet
• Sett støpslet i stikkontakten.
– Pumpen er driftsklar.
Slå av apparatet
• Trekk ut kontakten.
– Etter utkobling kan restvannet
strømme tilbake i sluket og ut gjennom innsugingsåpningen på pumpen.
DE
EN
FR
NL
ES
PT
IT
DA
NO
SV
FI
HU
PL
CS
SK
SL
HR
RO
BG
UK
RU
CN
63
Page 64

Feil
Årsak
Utbedring
Pumpen starter ikke
Strømtilførselen er brutt
Kontroller sikringen og den
elektriske stikkforbindelsen
Pumpen slår seg av etter
Overbelastningsvernet har
• Rengjør
• La pumpen bli avkjølt
Brønnen er tørr
Vent til det er nok vann i
brønnen
Pumpen går, men pumper
Trykkslangen er tett
• Legg trykkslangen uten
jør det om nødvendig
Innsugingsåpningen til
tilstoppet
• Rengjør
innsugingsåpningen
Luft i trykkslangen
• Luft ut trykkslangen
Hvis montert:
eller tilstoppet
• Monter tilbakeslagsven-
lagsventilen
Løpehjulet er defekt eller
Kontakt OASE.
tes av Oase-teknikere.
Løpehjulet er blokkert av
Kontakt OASE.
tes av Oase-teknikere.
UTBEDREFEIL
ADVARSEL
Farlig elektrisk spenning!
Død eller alvorlige personskader på grunn av strømstøt.
Før arbeidet tar til:
• Slå av apparatet, trekk ut strømstøpselet og sikre apparatet mot innkobling.
• Før du berører vannet må strømstøpslene for alle apparater som befinner seg i vannet
alltid trekkes ut.
Når arbeidet er avsluttet:
• Gjenopprett alle forutsetninger for drift.
kort brukstid
ikke eller pumper for dårlig
slått av pumpen på grunn
av overoppheting
Tilbakeslagsventilen i
trykkslangen er feilmontert
slitt
sand
innsugingsåpningen
knekk
• Kontroller avløpet, reng-
tilen riktig
• Rengjør tilbakes-
• Løpehjulet skal bare byt-
• Løpehjulet skal bare byt-
64 ProMax Pressure Automatic 6000/8, Pressure Well Automatic 6000/8
Page 65

RENGJØRING OG VEDLIKEHOLD
ADVARSEL
Farlig elektrisk spenning!
Død eller alvorlige personskader på
grunn av strømstøt.
• Før du berører vannet, må nettstøpslene for alle apparater som befinner seg
i vannet trekkes ut.
• For du starter arbeidet må du skru av
nettspenningen.
MERK
Anbefalinger for regelmessig rengjøring:
• Rengjør apparatet ved behov og minst
2 ganger årlig.
• Du må ikke under noen omstendigheter
bruke aggressive rengjøringsmidler eller kjemiske løsemidler, da dette kan
angripe huset eller svekke apparatets
funksjoner.
• Anbefalt rengjøringsmiddel ved hårdnakkede forkalkninger:
– Pumperengjøringsmiddel Pump-
Clean fra OASE.
– Eddik- og klorfritt husholdningsreng-
jøringsmiddel.
• Skyll av alle deler grundig med klart
vann etter rengjøring.
SLITEDELER
Følgende komponenter er slitedeler og
må bare byttes av OASE-teknikere:
• Løpehjul
LAGRING/OVERVINTRING
Apparatet er ikke frostsikkert. Ved
frostsikker oppstilling er det ikke nødvendig å avinstallere apparatet. Ellers må apparatet avinstalleres og oppbevares dersom man forventer frost.
Slik oppbevarer du apparatet riktig:
• Tøm apparatet så langt det er mulig,
gjennomfør en grundig rengjøring og
kontroller for skader.
• Samtlige slanger, rørledninger og
tilkoblinger må tømmes så godt det er
mulig.
• Rengjør apparatet grundig, kontroller
om det er skadet, skift ut ødelagte deler.
• Oppbevar apparatet tørt og frostfritt.
• Beskytt åpne pluggforbindelser mot fuk-
tighet og smuss.
KASSERING
Dette apparatet må ikke kastes i vanlig
husholdningsavfall! Må leveres inn til godkjent avfallshåndteringsfirma. Gjør først
apparatet ubrukelig ved å klippe over kablene.
DE
EN
FR
NL
ES
PT
IT
DA
NO
SV
FI
HU
PL
CS
SK
SL
HR
RO
BG
UK
RU
CN
65
Page 66

Med originaldeler fra OASE forblir apparatet
sikkert og fortsetter å arbeie pålitelig.
Reservedeltegninger og reservedeler finner
du på vår internettside.
www.oase
ternational-di
ProMax Pressure Automatic 6000/8 / Pressure Well Automatic 6000/8
Merkespenning
V AC
230
Nominell frekvens
Hz
50
Nominell effekt
W
1100
Beskyttelsestype
IPX8
Tilkobling trykkstuss
mm
30,9
"
1
Minimumseffektivitetsindeks (MEI) 1)
–
≥0,40
Kapasitet
maks
l/t
6000
Pumpehøyde
maks m 57
Nedsenkingsdybde
maks m 20
Strømledning
Lengde m 30
Dimensjoner
Diameter
mm
98
Høyde
mm
814
Vekt
kg
11,8
best virkningsgrad er referanseverdien MEI ≥0,70.
RESERVEDELER
-livingwater.com/spareparts_in-
TEKNISKE DATA
1)
Dimensjonsløs størrelse for hydraulikkpumpens virkningsgrad ved såvel del- som overbelastning. For vannpumper med
66 ProMax Pressure Automatic 6000/8, Pressure Well Automatic 6000/8
Page 67

Översättning av originalbruksanvisningen
VARNING
• Denna apparat kan användas
av barn som är 8 år eller
äldre samt av personer med
sänkt fysisk, sensorisk eller
mental förmåga eller brist på
erfarenhet och kunskap förutsatt att de hålls under uppsikt
eller instrueras i hur de använder apparaten säkert samt
de risker som kan uppstå.
• Barn får inte leka med apparaten.
• Rengöring och användarunderhåll får inte utföras av barn
utan uppsikt.
• Apparaten ska vara ansluten
till en jordfelsbrytare vars dimensionerade felström uppgår till max. 30 mA.
• Apparaten får endast anslutas om de elektriska data som
gäller för apparaten stämmer
överens med strömförsörjningen. Apparatens data
anges på typskylten på apparaten, på förpackningen eller i
denna bruksanvisning.
• Risk för dödsolyckor eller allvarliga personskador av
elektriska slag. Innan du griper in i vattnet måste du se till
att apparaterna har kopplats
ifrån spänningsförsörjningen
>12 V AC eller >30 V DC.
• Använd inte apparaten om
personer befinner sig i vattnet.
• En skadad nätkabel ska genast bytas ut av OASE, en behörig kundtjänstverkstad eller
en behörig elinstallatör för att
undvika risk för elektriska
slag.
SÄKERHETSANVISNINGAR
Elanslutning
• Förlängningskablar och strömfördelare
(t ex grenuttag) ska vara godkända för
användning utomhus (dropptäta).
• Skydda stickanslutningarna mot fukt.
• Anslut endast apparaten till ett väggut-
tag som installerats enligt gällande föreskrifter.
Säker drift
• Apparaten får inte användas om kåpan
är defekt.
• Apparaten får inte användas om elkabeln är defekt.
• Bär inte och dra inte apparaten i elkabeln.
• Dra kablarna så att de är skyddade och
inte kan skadas, och se till att ingen kan
snava över dem.
• Gör aldrig några tekniska ändringar på
apparaten.
• Genomför endast sådana arbeten på
apparaten som beskrivs i denna bruksanvisning. Kontakta en behörig kundtjänstverkstad, eller ev. tillverkaren, om
problem inte kan åtgärdas.
DE
EN
FR
NL
ES
PT
IT
DA
NO
SV
FI
HU
PL
CS
SK
SL
HR
RO
BG
UK
RU
CN
67
Page 68

A
ProMax
Automatic
6000/8
Well
1
Fästögla för
lina
•
•
2
Anslutning på
30,9 mm (1")
•
•
3
Nätkabel
•
•
4
Sil på sugsidan
•
•
5
Pumpfot
•
•
6
Uppställningsfot
•
–
7
Installationsfot
•
–
8
Gummibuffert
ation
•
–
9
Fästlina, 20 m
•
•
• Använd endast originalreservdelar och -
tillbehör till apparaten.
OM DENNA BRUKSANVISNING
Välkommen till OASE Living Water. Med
din nya produkt ProMax Pressure Auto-
matic 6000/8, Pressure Well Automatic
6000/8 har du gjort ett bra val.
Läs igenom bruksanvisningen noggrant
före första användningstillfället och ta
reda på hur apparaten fungerar. Alla slags
arbeten som utförs på denna apparat får
endast genomföras enligt föreliggande instruktioner.
Beakta noga säkerhetsanvisningarna, de
är en förutsättning för korrekt och säker
användning.
Förvara denna bruksanvisning på ett säkert ställe. Om apparaten byter ägare
måste även bruksanvisningen följa med.
Symboler i denna bruksanvisning
Varningsanvisningar
Varningsanvisningarna i denna bruksanvisning är indelade med signalord som visar omfattningen av faran.
PRODUKTBESKRIVNING
Översikt
Pressure
trycksidan
för lagring av
pump vid horisontal install-
6000/8
• Beskriver en möjligtvis farlig situation.
• Om detta inte beaktas kan detta leda till
dödsolyckor eller allvarliga personskador.
Information som ska ge bättre förståelse
eller förebygga ev. sak- eller miljöskador.
Andra anvisningar
A Referens till en bild, t ex bild A.
→ Referens till ett annat kapitel.
68 ProMax Pressure Automatic 6000/8, Pressure Well Automatic 6000/8
VARNING
ANVISNING
Page 69

Ändamålsenlig användning
ProMax Pressure Automatic 6000/8,
Pressure Well Automatic 6000/8, som här
betecknas som apparat, får endast användas på följande sätt:
• Pumpning av klart vatten eller regnvatten.
• Påfyllning och bevattning.
• Vattenuttag från regnvattentunnor eller
cisterner.
• Drift under iakttagande av tekniska
data.
Möjlig felaktig användning
För apparaten gäller följande begränsningar:
• Inte lämplig för saltvatten.
• Inte lämplig för dricksvatten.
• Får inte användas i långtidsdrift (t ex för
kontinuerlig cirkulation i dammar).
• Använd inte för kommersiella eller industriella ändamål.
• Använd inte kombination med kemikalier, livsmedel eller lättantändliga eller
explosiva ämnen.
• Får inte anslutas till dricksvattennätet.
INSTALLATION OCH ANSLUTNING
Ansluta tryckslangen
Matningsprestandan är optimal när slangens innerdiameter uppgår till 25 mm (1").
Gör så här:
B
1. Dra av skyddslocket.
2. Anslut tryckslangen till anslutningen på
trycksidan.
– Rekommendation: Använd
snabbkoppling.
Installera pumpen i borrad brunn eller schakt
C
• Bind fast fästlinan vid öglorna med dub-
• Fixera pumpen minst 1 m över botten
• Silen på sugsidan ska befinna sig minst
• Bär inte apparaten i nätkabeln.
• Om den borrade brunnens resp. schak-
Installera pumpen vertikalt med uppställningsfot
(endast ProMax Pressure Automatic
6000/8)
I en tank eller en brunn kan pumpen ställas upp vertikalt med uppställningsfoten.
• Silen på sugsidan ska befinna sig minst
• Vattnet som ska pumpas får inte inne-
Gör så här:
D
1. Skjut installationsfötterna på uppställ-
2. Lossa insexskruvarna så pass mycket
3. Skjut in pumpen i uppställningsfoten.
4. Dra åt insexskruvarna tills pumpen är
Installera pumpen horisontalt med uppställningsfot
(endast ProMax Pressure Automatic
6000/8)
belknut och sänk ned pumpen i den borrade brunnen eller schaktet.
med fästlinan.
– Därmed kan man undvika att
smutspartiklar sugs in.
150 mm under vattenytan.
tets djup överstiger 5 m ska nätkabeln
fixeras vid fästlinan var 5:e m (dragavlastning).
150 mm under vattenytan.
3
hålla mer än 50 g sand per m
ningsfoten.
att pumpen kan monteras på uppställningsfoten.
fixerad i uppställningsfoten.
vatten.
DE
EN
FR
NL
ES
PT
IT
DA
NO
SV
FI
HU
PL
CS
SK
SL
HR
RO
BG
UK
RU
CN
69
Page 70

I en flat tank eller en brunn kan pumpen
ställas upp horisontalt med uppställningsfoten.
• Pumpen måste justeras in exakt
vågrätt.
• Vattnet som ska pumpas får inte någon
sand.
Gör så här:
E
1. Ta bort insexskruvarna.
– Uppställningsfoten består av två de-
lar.
2. Skjut två installationsfötter på varje uppställningsfot.
3. Skjut in tre gummibuffertar i varje spår i
genomföringsöppningen.
– Montera gummibuffertarna vid båda
uppställningsfötter.
4. Skjut båda uppställningsfötter på pumpen.
– Avståndet mellan båda uppställnings-
fötter ska vara så stort som möjligt så
att pumpen står stabilt.
ANVÄNDNING
Pumpstyrningen (flow control) mäter upp
flödet och slår ifrån pumpen om flödet saknas.
• Pumpen slås ifrån vid vattenbrist och är
därmed skyddad mot skador av torrkörning.
• Vid automatisk drift övertar pumpstyrningen till- och frånslagningen av pumpen.
Den integrerade backventilen förhindrar
att vatten rinner tillbaka till pumpen genom
tryckslangen efter att pumpen har slagits
ifrån. Dessutom skyddar backventilen
pumpen mot skador av tryckstötar.
Automatisk drift
Pumpen slås ifrån automatiskt när inget
vatten längre pumpas upp och maximalt
tryck har nåtts i tryckledningen.
Pumpen slås till automatiskt när vatten
pumpas upp och trycket i tryckledningen
har sjunkit under 3,5 bar.
VARNING
Farlig elektrisk spänning!
Dödsolyckor eller allvarliga personskador av elektriska slag.
• När pumpen befinner sig i vattnet får
den inte anslutas till elnätet förrän det
har säkerställts att inga personer står i
vattnet eller griper ned i vattnet.
• Koppla ifrån strömförsörjningen till alla
apparater i vattnet innan du stiger ned
eller griper ned i vattnet.
Slå på apparaten
• Anslut stickkontakten till stickuttaget.
– Pumpen är driftklar.
Slå ifrån apparaten
• Dra ut stickkontakten.
– Efter att apparaten har slagits ifrån
kan restvattnet i slangen rinna tillbaka
och lämna pumpen genom insugningsöppningen.
70 ProMax Pressure Automatic 6000/8, Pressure Well Automatic 6000/8
Page 71

Störning
Orsak
Åtgärd
Pumpen startar inte
Strömförsörjningen har
Kontrollera säkringen och
lingarna
Pumpen slår ifrån efter kort
Överlastskyddet har slagit
ning
• Rengör insugnings-
• Låt pumpen svalna
Brunnen är torr
Vänta tills brunnen innehåller tillräcklig mängd vatten
Pumpen kör, men matar
Tryckslangen är tilltäppt
• Lägg tryckslangen utan
rengör vid behov
Insugningsöppningen är tilltäppt
• Rengör insugningsöppningen
Luft i tryckslangen
• Avlufta tryckslangen
Om förhanden:
är tilltäppt
• Montera in backventilen
Pumphjulet är defekt eller
Kontakta OASE.
vice.
Pumphjulet är blockerat av
Kontakta OASE.
vice.
FELAVHJÄLPNING
DE
VARNING
Farlig elektrisk spänning!
Dödsolyckor eller allvarliga personskador av elektriska slag.
Innan arbetet påbörjas:
• Slå ifrån apparaten, dra ut stickkontakten och spärra apparaten så att den inte kan slås
på.
• Koppla ifrån strömförsörjningen till alla apparater i vattnet innan du stiger ned eller
griper ned i vattnet.
Efter att arbetet har avslutats:
• Återupprätta alla förutsättningar för att ta apparaten i drift.
tids drift
inte eller har otillräcklig kapacitet
brutits
ifrån pumpen pga överhett-
de elektriska skarvkopp-
öppningen
veck
• Kontrollera utloppet,
EN
FR
NL
ES
PT
IT
DA
NO
SV
FI
HU
PL
CS
Backventilen i tryckslangen
har monterats felaktigt eller
slitet
sand
rätt
• Rengör backventilen
• Pumphjulet får endast
bytas ut av OASE-ser-
• Pumphjulet får endast
bytas ut av OASE-ser-
SK
SL
HR
RO
BG
UK
RU
CN
71
Page 72

RENGÖRING OCH UNDERHÅLL
VARNING
Farlig elektrisk spänning!
Dödsolyckor eller allvarliga personskador av elektriska slag.
• Slå ifrån strömförsörjningen till alla apparater i vattnet innan du griper ned i
vattnet.
• Slå ifrån nätspänningen innan arbeten
utförs på apparaten.
ANVISNING!
Rekommendation för regelbunden rengöring:
• Rengör apparaten vid behov, men minst
2 ggr/år.
• Använd inga aggressiva rengöringsmedel eller kemiska lösningar då dessa
kan angripa apparatens kåpa eller leda
till att apparatens funktion försämras.
• Rekommenderade rengöringsmedel vid
svåra kalkavlagringar:
– Pumprengöringsmedel PumpClean
från OASE.
– Ättiks- och klorfritt hushållsren-
göringsmedel.
• Efter rengöringen ska alla delar sköljas
av noggrant med klart vatten.
SLITAGEDELAR
Följande komponenter är slitagedelar och
får endast bytas ut av OASE-service:
• Pumphjul
FÖRVARING / LAGRING UNDER VINTERN
Apparaten är inte frosttålig. Vid frostsäker
installation behöver apparaten inte avinstalleras. I annat fall ska apparaten avinstalleras om frost förväntas och därefter
läggas undan för förvaring.
Förvara apparaten så här:
• Töm enheten så gott som möjligt, rengör den noggrant och kontrollera om
den har skadats.
• Töm samtliga slangar, rörledningar och
anslutningar så gott som möjligt.
• Rengör apparaten noggrant, kontrollera
om den har skadats och byt ut skadade
delar vid behov.
• Förvara apparaten torrt och frostfritt.
• Skydda öppna kontaktdon mot fukt och
smuts.
AVFALLSHANTERING
Denna apparat får inte kastas i hushållssoporna! Följ föreskrifterna för avfallshantering. Klipp av kabeln så att apparaten
inte längre kan tas i drift.
72 ProMax Pressure Automatic 6000/8, Pressure Well Automatic 6000/8
Page 73

Apparaten arbetar säkert med originaldelar
från OAS
Reservdelsritningar och reservdelar finns på
vår intenetsida.
www.oase
ternational-di
ProMax Pressure Automatic 6000/8 / Pressure Well Automatic 6000/8
Märkspänning
V AC
230
Märkfrekvens
Hz
50
Märkeffekt
W
1100
Kapslingsklass
IPX8
Anslutning tryckrör
mm
30,9
"
1
Min. effektivitetsindex (MEI) 1)
–
≥0,40
Kapacitet
högst
l/tim
6000
Uppfordringshöjd
högst m 57
Doppningsdjup
högst m 20
Nätkabel
Längd m 30
Mått
Diameter
mm
98
Höjd
mm
814
Vikt
kg
11,8
bästa verkningsgrad är referensvärdet MEI ≥0,70.
RESERVDELAR
DE
E.
TEKNISKA DATA
1)
Dimensionslös storlek för hydraulisk pumpverkningsgrad i optimal punkt samt vid del- och överlast. För vattenpumpen med
-livingwater.com/spareparts_in-
EN
FR
NL
ES
PT
IT
DA
NO
SV
FI
HU
PL
CS
SK
SL
HR
RO
BG
UK
RU
CN
73
Page 74

Alkuperäisen käyttöohjeen käännös
VAROITUS
• Tätä laitetta saavat käyttää yli
8 -vuotiaat lapset, sekä henkilöt, joiden fyysiset, aistimelliset tai henkiset kyvyt ovat vähentyneet tai joilla ei ole tarvittavaa kokemusta ja tietoa,
vain valvonnan alaisina ja kun
heille on annettu opastusta
laitteen turvallisesta käytöstä
ja kun he ymmärtävät laitteen
käytöstä mahdollisesti seuraavat vaarat.
• Lapset eivät saa leikkiä laitteella.
• Puhdistus ja käyttäjän suorittama huolto eivät saa tapahtua lasten toimesta ilman valvontaa.
• Laite on varmistettava vikavirtasuojalaitteella, jonka nimellisvikavirta on enintään 30
mA.
• Laitteen saa yhdistää vain silloin, kun laitteen ja virransyötön tiedot vastaavat toisiaan. Laitetiedot ovat tyyppikilvessä laitteessa, pakkauksessa tai tässä käyttöohjeessa.
• Sähköisku voi johtaa kuolemaan tai vakaviin vammoihin!
Ennen veteen käsin koskettamista on vedessä olevat jännitteellä >12 V AC tai
>30 V DC varustetut laitteet ir-
rotettava virtaverkosta.
• Laitetta saa käyttää vain silloin, kun vedessä ei ole ketään ihmisiä.
• Jos verkkoliitäntäjohto on
vaurioitunut, tilaa sen vaihto
välittömästi OASElta, valtuutetusta asiakaspalvelusta tai
sähköasentajalta. Viallinen
johto on sähköiskuriski.
TURVAOHJEET
Sähköliitäntä
• Pidennysjohtojen ja virranjakajien
(esim. pistorasiarimojen) on oltava ulkokäyttöön sopivia (roiskevedeltä suojattuja).
• Pistoliitännät on suojattava kosteudelta.
• Laitteen saa yhdistää vain määräysten
mukaisesti asennettuun pistorasiaan.
Turvallinen käyttö
• Jos kotelo on viallinen, laitetta ei saa
käyttää.
• Laitetta ei saa käyttää, jos sähköjohto
on viallinen.
• Laitetta ei saa kantaa tai vetää sähköjohdosta.
• Johdot on asennettava suojattuina vaurioitumiselta ja kiinnitettävä huomiota
siihen, että kukaan ei kompastu niihin.
• Laitteeseen ei koskaan saa tehdä teknisiä muutoksia.
74 ProMax Pressure Automatic 6000/8, Pressure Well Automatic 6000/8
Page 75

A
ProMax
Automatic
6000/8
Well
1
Kiinnityssilmu-
ten
•
•
2
Liitäntä paine-
(1")
•
•
3
Verkkoliitäntäjohto
•
•
4
Sihti imupuoli
•
•
5
Pumppujalusta
•
•
6
Jalusta • –
7
Tukijalat
•
–
8
Kumipuskuri
sessa
•
–
9
Kiinnitysköysi,
20 m
•
•
• Laitteelle saa suorittaa vain sellaisia
töitä, kuin tässä käyttöohjeessa on kuvattu. Jos ongelmia ei voi poistaa, on
käännyttävä valtuutetun asiakaspalvelupisteen tai epäselvässä tapauksessa
valmistajan puoleen.
• Laitteessa saa käyttää vain sille tarkoitettuja alkuperäisvaraosia ja -lisävarusteita.
TÄTÄ KÄYTTÖOHJETTA KOSKEVIA TIETOJA
Tervetuloa OASE Living Water -yritykseen. Tällä ostoksella ProMax Pressure
Automatic 6000/8, Pressure Well Automatic 6000/8 olette tehnyt hyvän valin-
nan.
Lukekaa tämä käyttöohje huolellisesti läpi
ennen laitteen ensimmäistä käyttöä ja tutustukaa laitteeseen. Kaikki tätä laitetta
koskevat työt ja työt tällä laitteella saa
suorittaa vain kyseessä olevan ohjeen
mukaan.
Noudattakaa ehdottomasti oikean ja turvallisen käytön ohjeita.
Säilyttäkää tämä käyttöohje huolellisesti!
Jos laite vaihtaa omistajaa, antakaa käyttöohje eteenpäin.
OHJE
Tietoja, jotka auttavat ymmärtämään tai
ennaltaehkäisemään mahdolliset aineelliset tai ympäristövahingot.
Muita ohjeita
A Viittaus johonkin kuvaan esim.
Kuva A.
→ Viittaus johonkin toiseen lukuun.
TUOTEKUVAUS
Yleiskatsaus
Pressure
kat köyttä var-
puoli 30,9 mm
6000/8
DE
EN
FR
NL
ES
PT
IT
DA
NO
SV
FI
HU
PL
CS
Tämän ohjeen symbolit
Varoitusohjeita
Tämän käyttöohjeen varoitusohjeet on
luokiteltu merkkisanojen mukaan, jotka ilmoittavat vaaran vakavuuden.
VAROITUS
• Tarkoittaa mahdollisesti vaarallista
tilannetta.
• Noudattamatta jättäminen voi johtaa
kuolemaan tai hyvin vakaviin vammoihin.
pumpun laakerointia varten pystysuorassa sijoituk-
SK
SL
HR
RO
BG
UK
RU
CN
75
Page 76

Määräystenmukainen käyttö
ProMax Pressure Automatic 6000/8,
Pressure Well Automatic 6000/8, jota seuraavassa nimitetään "laitteeksi", saa käyttää ainoastaan seuraavasti:
• Puhtaan veden tai sadeveden pumppaus.
• Kastelu.
• Veden otto sadevesitynnyreistä tai säili-
öistä.
• Teknisten tietojen käyttö ja noudattaminen.
Mahdollinen virheellinen käyttö
Laitteelle ovat voimassa seuraavat rajoitukset:
• Ei sovellu merivedelle.
• Ei sovellu juomavedelle.
• Ei sovellu pitkäaikaiskäyttöön (esim.
lammikon veden jatkuva kierrätys).
• Ei ammattimaiseen tai teolliseen käyttöön.
• Ei käyttöön kemikaalien, elintarvikkeiden, helposti palavien tai räjähtävien aineiden yhteydessä.
• Ei saa yhdistää käyttöveden syöttöön.
PAIKOILLEEN ASETTAMINEN JA YHDISTÄMINEN
Painejohdon yhdistäminen
Pumppausteho on optimaalinen letkun sisähalkaisijan ollessa 25 mm (1").
Toimit näin:
B
1. Irrota suojakorkki.
2. Yhdistä painejohto liitäntään painepuolella.
– Suositus: Käytä pikaliitintä.
Pumpun sijoitus porakaivoon tai kuiluun
C
• Kiinnitä kiinnitysköysi kaksinkertaisella
solmulla rengasniittiin ja laske pumppu
alas porakaivoon tai kuiluun.
• Kiinnitä pumppu kiinnitysköydellä, etäisyys pohjaan vähintään 1 m.
– Näin vältetään likahiukkasten si-
säänimeminen.
• Imupuolen sihdin täytyy olla vähintään
150 mm vedenpinnan alapuolella.
• Älä kanna laitetta verkkoliitäntäjohdosta.
• Alkaen porakaivon tai kuilun syvyydestä
5 m täytyy verkkoliitäntäjohto kiinnittää
5 m etäisyydelle kiinnitysköyteen (vedonesto).
Pumpun sijoitus jalustan avulla pystysuoraan
(vain ProMax Pressure Automatic 6000/8)
Säiliössä tai kaivossa voidaan pumppu si-
joittaa jalustan avulla pystysuoraan.
• Imupuolen sihdin täytyy olla vähintään
150 mm vedenpinnan alapuolella.
• Pumpattava vesi saa sisältää enintään
50 g hiekkaa/m3 vettä.
Toimit näin:
D
1. Työnnä tukijalat jalustaan.
2. Avaa kuusioruuveja niin paljon, että
pumppu mahtuu jalustaan.
3. Työnnä pumppu jalustaan.
4. Kiristä kuusioruuveja, kunnes pumppu
on kiinnittynyt jalustaan.
Pumpun sijoitus jalustan avulla vaakasuoraan
(vain ProMax Pressure Automatic 6000/8)
Matalassa säiliössä tai kaivossa voidaan
pumppu sijoittaa jalustan avulla vaakasuoraan.
76 ProMax Pressure Automatic 6000/8, Pressure Well Automatic 6000/8
Page 77

• Pumpun täytyy olla tarkalleen vaakasuoraan kohdistettu.
• Pumpattava vesi ei saa sisältää hiekkaa.
Toimit näin:
E
1. Poista kuusioruuvit.
– Jalusta on kaksiosainen.
2. Työnnä kaksi tukijalkaa kumpaankin jalustaan.
3. Työnnä kolme kumipuskuria vastaaviin
läpivientiaukon uriin.
– Kiinnitä kumipuskuri molempiin
jalustoihin.
4. Työnnä molemmat jalustat pumppuun.
– Jalustojen etäisyyden täytyy olla
mahdollisimman suuri, jotta pumppu
seisoo tukevasti paikoillaan.
KÄYTTÖ
Pumppuohjaus (flow control) mittaa läpivirtauksen ja kytkee pumpun pois päältä,
jos läpivirtausta ei ole.
• Jos vettä ei tule, pumppu kytkeytyy pois
päältä ja näin se on suojattu kuivakäynnin aiheuttamilta vaurioilta.
• Automaattisessa käytössä pumppuohjaus huolehtii pumpun päälle- ja poiskytkennästä.
Integroitu takaiskuventtiili estää sen, että
poiskytkennän jälkeen vettä virtaa paineletkusta takaisin pumppuun. Tämän lisäksi takaiskuventtiili suojaa pumppua
paineiskujen aiheuttamilta vaurioilta.
Automaattinen käyttö
Pumppu kytkeytyy automaattisesti pois
päältä, jos vettä ei enää tule ja maksimaalinen paine on saavutettu painejohdossa.
Pumppu kytkeytyy automaattisesti päälle,
kun vettä taas tulee ja paine on laskenut
painejohdossa alle arvon 3,5 bar.
VAROITUS
Vaarallinen sähköjännite!
Sähköisku voi aiheuttaa kuoleman tai
vakavia vammoja.
• Yhdistä pumppu vedessä verkkovirtaan
vasta sen jälkeen, kun vedessä ei ole
ihmisiä tai kukaan ei voi koskettaa veteen.
• Ennen veteen menemistä tai veteen
koskettamista on kaikkien vedessä olevien laitteiden verkkojännite kytkettävä
pois päältä.
Laitteen kytkeminen päälle
• Työnnä verkkopistoke pistorasiaan.
– Pumppu on käyttövalmis.
Laitteen kytkeminen pois päältä
• Vedä verkkopistoke irti.
– Poiskytkennän jälkeen voi jäämävesi
valua takaisin letkuun ja tulla ulos
pumpun sisäänimuaukosta.
DE
EN
FR
NL
ES
PT
IT
DA
NO
SV
FI
HU
PL
CS
SK
SL
HR
RO
BG
UK
RU
CN
77
Page 78

Häiriö
Syy
Korjaus
Pumppu ei käynnisty
Virransyöttö katkennut
Tarkasta sulake ja sähköpistoliittimet
Pumppu kytkeytyy lyhyen
Ylikuormitussuoja on kytke-
• Puhdista sisäänimu-
• Anna pumpun jäähtyä
Kaivo on kuiva
Odota, kunnes kaivossa on
riittävästi vettä
Pumppu käy, mutta ei
Paineletku suljettu
• Asenna paineletku ilman
dista tarvittaessa
Sisäänimuaukko tukkeutunut
• Puhdista sisäänimuaukko
Ilmaa paineletkussa
• Poista paineletkusta
ilma
Jos on varustuksessa:
tukkeutunut
• Asenna takaiskuventtiili
Juoksupyörä viallinen tai
Ota yhteyttä OASE-edu-
taa vain Oase-huolto.
Hiekka on jumiuttanut ju-
Ota yhteyttä OASE-edu-
taa vain Oase-huolto.
HÄIRIÖIDEN KORJAAMINEN
VAROITUS
Vaarallinen sähköjännite!
Sähköisku voi aiheuttaa kuoleman tai vakavia vammoja.
Ennen töiden aloittamista:
• Kytke laite pois päältä, irrota verkkopistoke ja varmista laite päällekytkentää vastaan.
• Ennen veteen menemistä tai veteen koskettamista on kaikkien vedessä olevien laittei-
den verkkojännite kytkettävä pois päältä.
Töiden lopettamisen jälkeen:
• Palauta kaikki käyttöönoton edellytykset alkuperäiseen tilaan takaisin.
käyntiajan jälkeen pois
päältä
pumppaa tai ei riittävästi
nyt pumpun pois päältä ylikuumenemisen takia
Takaiskuventtiili paineletkussa väärin asennettu tai
kulunut
oksupyörän
aukko
taittokohtia
• Tarkasta poisto ja puh-
oikein
• Puhdista takaiskuventtiili
stajaan.
• Juoksupyörän saa vaih-
stajaan.
• Juoksupyörän saa vaih-
78 ProMax Pressure Automatic 6000/8, Pressure Well Automatic 6000/8
Page 79

PUHDISTUS JA HUOLTO
VAROITUS
Vaarallinen sähköjännite!
Sähköisku voi aiheuttaa kuoleman tai
vakavia vammoja.
• Ennen kuin kosketat veteen, kytke kaikkien vedessä olevien laitteiden verkkojännite pois päältä.
• Kytke verkkojännite pois päältä ennen
töitä laitteelle.
OHJE
Suositus säännöllistä puhdistusta varten:
• Laite on puhdistettava tarvittaessa,
mutta kuitenkin vähintään 2 kertaa vuodessa.
• Älä käytä mitään syövyttäviä puhdistusaineita tai kemiallisia liuottimia, koska
ne voivat vaurioittaa koteloa tai aiheuttaa laitteeseen toimintahäiriöitä.
• Pinttyneisiin kalkkijäämiin suositeltu
puhdistusaine:
– Pumpun puhdistusaine PumpClean,
valmistaja OASE.
– Yleispuhdistusaineet, jotka eivät si-
sällä etikkaa tai klooria.
• Huuhtele kaikki puhdistetut osat huolellisesti puhtaalla vedellä.
KULUVAT OSAT
Seuraavat komponentit ovat kuluvia osia,
ja ne saa vaihtaa vain OASE-huolto:
• juoksupyörä
VARASTOINTI/SÄILYTYS TALVEN YLI
Laite ei kestä pakkasta. Jos laite kestää
pakkasta, sitä ei tarvitse poistaa. Muussa
tapauksessa se on poistettava ja varastoitava, jos pakkasta on odotettavissa.
Näin varastoit laitteen oikein:
• Tyhjennä laite mahdollisimman hyvin,
puhdista se perusteellisesti ja tarkasta
mahdolliset vauriot.
• Tyhjennä kaikki letkut, putkijohdot ja liitännät niin hyvin kuin mahdollista.
• Puhdista laite huolellisesti, tarkasta
onko siinä vaurioita ja vaihda vaurioituneet osat.
• Laite on varastoitava kuivassa ja jäätymiseltä suojatussa paikassa.
• Suojaa avoimet pistoliitännät kosteudelta ja lialta.
HÄVITTÄMINEN
Tätä laitetta ei saa hävittää talousjätteiden
mukana! Käytä sitä varten olemassaolevaa palautusjärjestelmää. Tee laitteesta
tätä ennen käyttökelvoton leikkaamalla
kaapelit poikki.
DE
EN
FR
NL
ES
PT
IT
DA
NO
SV
FI
HU
PL
CS
SK
SL
HR
RO
BG
UK
RU
CN
79
Page 80

OASEn alkuperäisosia käyttämällä laite on
aina turvallinen ja toimii edelleen luotettavasti.
Varaosapiirroksia ja varaosia löytyy verkkosivustostamme.
www.oase
ternational-di
ProMax Pressure Automatic 6000/8 / Pressure Well Automatic 6000/8
Nimellisjännite
V AC
230
Nimellistaajuus
Hz
50
Nimellisteho
W
1100
Kotelointiluokka
IPX8
Liitäntä paineyhde
mm
30,9
"
1
Minimihyötysuhdeindeksi (MEI) 1)
–
≥0,40
Pumppausmäärä
enintään
l/h
6000
Pumppauskorkeus
enintään m 57
Upotussyvyys
enintään m 20
Verkkoliitäntäjohto
Pituus m 30
Mitat
Halkaisija
mm
98
Korkeus
mm
814
Paino
kg
11,8
puille parhaalla hyötysuhteella on vertailuarvo MEI ≥0,70.
VARAOSAT
TEKNISET TIEDOT
-livingwater.com/spareparts_in-
1)
Mitoitukseton suure hydrauliselle pumpun hyötysuhteelle parhaassa kohdassa sekä osa- ja ylikuormituksessa. Vesipum-
80 ProMax Pressure Automatic 6000/8, Pressure Well Automatic 6000/8
Page 81

Az eredeti használati útmutató
fordítása
FIGYELMEZTETÉS
• A jelen készüléket 8 évesnél
idősebb gyermekek, valamint
csökkent fizikai, érzékszervi
vagy mentális képességű, ill.
hiányos tapasztalattal és
megfelelő tudással rendelkező személyek akkor kezel-
hetik, ha felügyelet alatt állnak, vagy a készülék
biztonságos használata
vonatkozásában eligazításban részesültek, és megér-
tették az ebből eredő ves-
zélyeket.
• Gyermekek nem játszhatnak
a készülékkel.
• Tisztítást és a felhasználó
által végzendő karbantartási
munkákat nem végezhetnek
olyan gyermekek, akik nem
állnak felügyelet alatt.
• A készüléket maximum 30
mA névleges áramerősségű
hibaáram-védelemmel kell
ellátni.
• Csak akkor csatlakoztassa a
készüléket, ha a készülék és
az áramellátás elektromos
adatai megegyeznek. A készülék adatai a típustáblán, a
csomagoláson vagy ebben az
DE
útmutatóban találhatóak meg.
• Áramütés okozta halálos
vagy súlyos sérülések le-
EN
FR
hetségesek! Mielőtt vízbe
nyúlnak, a 12 V AC -t vagy
NL
30 V DC-t meghaladó fes-
zültséggel üzemelő készü-
lékeket le kell választani az
ES
PT
elektromos hálózatról.
• A készüléket csak akkor
szabad használni, ha nem
IT
DA
tartózkodnak személyek a
vízben.
• Az áramütés veszélyének el-
NO
SV
kerülésére a sérült hálózati
csatlakozó vezetéket az
FI
OASE-val, arra feljogosított
ügyfélszolgálattal vagy szakképzett villamossági
HU
PL
szakemberrel azonnal ki kell
cseréltetni.
CS
SK
BIZTONSÁGI ÚTMUTATÁSOK
SL
Elektromos csatlakoztatás
• A hosszabbító vezetékeknek és
elosztóknak (pl. elosztósáv) alkalmas-
nak kell lenniük szabadban történő használatra (fröccsenő víz elleni védelem).
• Óvja a dugós csatlakozókat a nedves-
ségtől.
• A készüléket csak előírásszerűen tele-
pített dugaszolóaljzatra csatlakoztassa.
Biztonságos üzemeltetés
• Sérült ház esetén a készüléket nem
szabad használni.
HR
RO
BG
UK
RU
CN
81
Page 82

A
ProMax
Automatic
6000/8
Well
1
Rögzítő sze-
mek kötélhez
•
•
2
Nyomóoldali
30,9 mm (1")
•
•
3
Hálózati csat-
ték
•
•
4
Szívóoldali
szűrő
•
•
5
Szivattyúlábazat
•
•
6
Lábazat
•
–
7
Felállító lábak
•
–
• Sérült elektromos vezeték esetén a készüléket tilos használni.
• A készüléket nem szabad az elektromos vezetéknél fogva hordozni vagy
húzni.
• A vezetékeket sérülésektől védetten
fektesse le és ügyeljen arra, hogy senki
ne eshessen el bennük.
• Soha ne hajtson végre műszaki válto-
ztatásokat a készüléken.
• Csak olyan munkálatokat végezzen a
készüléken, amelyek a jelen útmutatóban ismertetve vannak. Ha az
adott probléma nem szüntethető meg,
forduljon felhatalmazott ügyfélszolgálati
ponthoz vagy kétség esetén a
gyártóhoz.
• A készülékhez csak eredeti
pótalkatrészeket és tartozékokat használjon.
A JELEN HASZNÁLATI ÚTMUTATÓRÓL:
Üdvözöljük az OASE Living Water nevében. Ön ezen termék ProMax Pres-
sure Automatic 6000/8, Pressure Well
Automatic 6000/8 megvásárlásával jó
döntést hozott.
Az első használatba vétel előtt olvassa el
gondosan a használati útmutatót és ismerkedjen meg a készülékkel. Az készülékkel, vagy a készüléken végzett bármilyen munka esetén tartsa be a jelen útmutatóban leírtakat.
A készülék helyes és biztonságos haszálata érdekében feltétlenül vegye
figyelembe a biztonsági előírásokat.
Őrizze meg gondosan a jelen használati
útmutatót. Ha másnak adja a készüléket,
adja oda ezt a használati útmutatót is.
A jelen útmutatóban használt szimbólumok
Figyelmeztetések
A jelen útmutatóban található figyelmezte-
tések jelzőszavak segítségével vannak
csoportosítva, amelyek jelzik a veszély
mértékét.
FIGYELMEZTETÉS
• Lehetséges veszélyes helyzetet jelöl.
• A figyelmeztetés figyelmen kívül
hagyása halált vagy rendkívül súlyos
sérüléseket okozhat.
ÚTMUTATÁS
A jobb megértést vagy a lehetséges anyagi és környezeti károk megelőzésére
szolgáló információk.
További útmutatások
A Hivatkozás ábrára, pl. A ábra.
→ Hivatkozás egy másik fejezetre.
TERMÉKLEÍRÁS
Áttekintés
Pressure
6000/8
csatlakozó,
lakozó veze-
82 ProMax Pressure Automatic 6000/8, Pressure Well Automatic 6000/8
Page 83

8
Gumipuffer a
esetén
•
–
9
20 m-es
rögzítő kötél
•
•
szivattyúhoz
függőleges
felállítás
Rendeltetésszerű használat
ProMax Pressure Automatic 6000/8,
Pressure Well Automatic 6000/8, a továbbiakban: „készülék”, kizárólag csak a következőképpen használható:
• Tiszta víz vagy esővíz szállítása.
• Vízzel történő ellátás és öntözés.
• Víz vételezése esővíz tárolókból vagy
ciszternákból.
• Üzemeltetés a műszaki adatok be-
tartása mellett.
Lehetséges nem megfelelő használat
A készülékre a következő korlátozások
érvényesek:
• Sós vízhez nem alkalmas.
• Ivóvízhez nem alkalmas.
• A készülék nem való tartós üzemelésre
(pl. tartós keringtető üzemelés tóban).
• Nem szabad kisipari- vagy ipari célokra
használni.
• Nem szabad vegyszerekkel, élelmiszerekkel, gyúlékony vagy robbanékony
anyagokkal együtt alkalmazni.
• Nem szabad ivóvíz-ellátásra csatlakoztatni.
FELÁLLÍTÁS ÉS CSATLAKOZTATÁS A nyomótömlő csatlakoztatása
A szállítási teljesítmény 25 mm-es (1")
belső tömlő átmérőnél optimális.
Ez az alábbiak szerint végezhető el:
B
1. Húzza le a védősapkát.
2. Kösse össze a nyomótömlőt a
nyomóoldali csatlakozóval.
– Javaslat: Használjon gyorscsatla-
kozót.
A szivattyú felállítása fúrt kutakban vagy aknában
C
• Dupla csomóval erősítse a rögzítő köte-
let a fülekhez, és engedje le a szivattyút
a fúrt kútba vagy aknába.
• A szivattyút a kút/akna aljától legalább 1
m-es távolságban rögzítse a rögzítő
kötéllel.
– Így elkerülhető a szennyrészecskék
felszívása.
• A szívóoldali szűrőnek legalább 150
mm-rel a vízszint alatt kell lennie.
• A készüléket tilos a hálózati csatlakozó
vezetéknél fogva hordozni.
• Ha a fúrt kút vagy az akna mélysége
nagyobb 5 m-nél, akkor a hálózati csatlakozó vezetéket 5 m-es távolságban a
rögzítő kötélhez kell erősíteni (húzás-
mentesítés céljából).
A szivattyú függőleges felállítása
tartólábbal
(csak ProMax Pressure Automatic
6000/8)
A tartályban vagy a kútban a szivattyú a
lábazat segítségével felállítható függőlegesen.
• A szívóoldali szűrőnek legalább 150
mm-rel a vízszint alatt kell lennie.
• A szállítandó víznek m
mum 50 g homokot szabad tartalmaznia.
Ez az alábbiak szerint végezhető el:
D
1. Tolja a felállító lábakat a lábazatra.
2. Oldja ki az imbuszcsavarokat annyira,
hogy a szivattyú a lábazatba helyezhető
legyen.
3. Tolja a szivattyút a lábazatba.
3
-enként maxi-
DE
EN
FR
NL
ES
PT
IT
DA
NO
SV
FI
HU
PL
CS
SK
SL
HR
RO
BG
UK
RU
CN
83
Page 84

4. Húzza meg az imbuszcsavarokat annyira, hogy a szivattyú rögzítve legyen a
lábazatban.
A szivattyú vízszintes felállítása tartólábbal
(csak ProMax Pressure Automatic
6000/8)
Lapos tartályban vagy a kútban a
szivattyú a lábazat segítségével felállítható vízszintesen.
• A szivattyúnak pontosan vízszintesen
kell elhelyezkednie.
• A szállítandó víznek nem szabad homokot tartalmaznia.
Ez az alábbiak szerint végezhető el:
E
1. Távolítsa el az imbuszcsavarokat.
– A lábazat két részre van szerelve.
2. Tolja a két-két felállító lábat minden
lábazatra.
3. Toljon egyenként három gumipuffert az
átvezető nyílás hornyaiba.
– Szerelje fel a gumipuffereket a két
lábazatra.
4. Tolja a két lábazatot a szivattyúra.
– A két lábazat közötti távolságnak le-
hetőleg nagynak kell lennie, hogy szi-
vattyú stabilan álljon.
ÜZEM
A szivattyúvezérlés (flow control) méri az
átfolyást, és hiányzó átfolyás esetén lekapcsolja a szivattyút.
• A szivattyú vízhiány esetén kikapcsol,
és így védve van a szárazon futás ellen.
• Automata üzemmódnál a szivattyúvezérlés átveszi a szivattyú beés kikapcsolását.
Az integrált visszacsapó szelep megakadályozza, hogy kikapcsolás után víz
folyjon vissza a nyomótömlőből a szi-
vattyúba. Továbbá a visszacsapó szelep
megóvja a szivattyút a nyomáslökések
miatti károsodásoktól.
Automata üzemmód
A szivattyú automatikusan kikapcsol, ha
nem történik további vízvételezés, és a
nyomás elérte a maximális értéket a
nyomóvezetékben.
A szivattyú automatikusan bekapcsol, ha
nem vízvételezés történik, és a nyomás
értéke 3,5 bar alá csökken a nyomóvezetékben,
FIGYELMEZTETÉS
Veszélyes elektromos feszültség!
Áramütés okozta halálos vagy súlyos
sérülések.
• A vízben lévő szivattyút csak akkor
csatlakoztassa villamos hálózatra, ha
nincsenek személyek a vízben vagy
nem nyúlnak a vízbe.
• A vízbe lépés vagy vízbe nyúlás előtt a
vízben lévő valamennyi eszközt fes-
zültségmentesíteni kell.
A készülék bekapcsolása
• Csatlakoztassa a hálózati csatlakozódugaszt az aljzathoz.
– A szivattyú üzemkész.
A készülék kikapcsolása
• Húzza ki a hálózati csatlakozódugaszt.
– Kikapcsolás után a maradék víz viss-
zafolyhat a tömlőben és kifolyhat a
szívónyíláson keresztül.
84 ProMax Pressure Automatic 6000/8, Pressure Well Automatic 6000/8
Page 85

Hiba
Ok
Megoldás
A szivattyú nem in-
Az áramellátás megszakítva.
Ellenőrizze a biztosítékot és
csatlakozásokat.
A szivattyú rövid
A túlterhelés elleni védelem
szivattyút.
• Tisztítsa ki a szívónyílást.
vattyút.
A kút száraz.
Várjon, hogy a kút elegendő
vízzel rendelkezzen.
A szivattyú üzemel,
A nyomótömlő elzáródott.
• A nyomótömlőt
ben tisztítsa ki a kifolyót.
A szívónyílás eldugult.
• Tisztítsa ki a szívónyílást.
Levegő van a nyomótömlőben.
• Légtelenítse a
nyomótömlőt.
Ha van:
van beszerelve vagy eldugult.
• Szerelje be megfelelően a
zacsapó szelepet.
A járókerék meghibásodott vagy
Vegye fel a kapcsolatot az
ki.
A szivattyú járókereke homok
Vegye fel a kapcsolatot az
ki.
HIBAELHÁRÍTÁS
DE
FIGYELMEZTETÉS
Veszélyes elektromos feszültség!
Áramütés okozta halálos vagy súlyos sérülések.
A munkálatok megkezdése előtt:
• Kapcsolja ki a készüléket, húzza ki a hálózati csatlakozódugaszt, és biztosítsa a készüléket bekapcsolás ellen.
• A vízbe lépés vagy vízbe nyúlás előtt a vízben lévő valamennyi eszközt feszültség-
mentesíteni kell.
A munkálatok befejezése után:
• Állítsa helyre az üzembe helyezés feltételeit.
dul el.
működés után le-
kapcsol.
azonban nem
szállít, vagy elégtelen a szállított mennyiség.
túlmelegedés miatt lekapcsolta a
az elektromos dugaszos
• Hagyja lehűlni a szi-
megtörésektől mentesen
vezesse el.
• Ellenőrizze, és adott eset-
EN
FR
NL
ES
PT
IT
DA
NO
SV
FI
HU
PL
CS
A visszacsapó szelep a
nyomótömlőben nem megfelelően
elkopott.
miatt megakadt.
visszacsapó szelepet.
• Tisztítsa meg a viss-
OASE-val.
• A járókereket csak az
OASE szerviz cserélheti
OASE-val.
• A járókereket csak az
OASE szerviz cserélheti
SK
SL
HR
RO
BG
UK
RU
CN
85
Page 86

TISZTÍTÁS ÉS KARBANTARTÁS
FIGYELMEZTETÉS
Veszélyes elektromos feszültség!
Áramütés okozta halálos vagy súlyos
sérülések.
• Mielőtt a vízbe nyúlna, feszültségmen-
tesítse az összes vízben lévő készü-
léket.
• A készüléken végzendő munka
megkezdése előtt kapcsolja le a
hálózati feszültséget.
ÚTMUTATÁS
A rendszeres tisztításra vonatkozó
ajánlás:
• A készüléket szükség szerint, de legalább évente 2 × tisztítsa meg.
• Agresszív tisztítószerek vagy vegyszeroldatok használata tilos, mivel ezek károsíthatják a burkolatot, vagy
károsan befolyásolhatják a készülék
működését.
• Ajánlott tisztítószerek makacs vízkövesedés esetén:
– OASE PumpClean szivattyútisztító.
– Ecet- és klórmentes háztartási
tisztító.
• A tisztítás után tiszta vízzel alaposan
tisztítsa meg az összes alkatrészt.
KOPÓALKATRÉSZEK
A következő komponensek
kopóalkatrészek, és azokat csak az
OASE szerviz cserélheti:
• járókerék
TÁROLÁS/TELELÉS
A készülék nem fagyálló. Fagybiztos
felállítás esetén a készüléket nem kell les-
zerelni. Ellenkező esetben a készüléket
várható fagy esetén le kell szerelni és
megfelelően el kell tárolni.
Így tárolja helyesen a készüléket:
• Ürítse ki a készüléket amennyire csak
lehet, végezzen alapos tisztítást és ellenőrizze a készülék sérüléseit.
• Az összes tömlőt, csővezetéket és csat-
lakozást amennyire csak lehet, ki kell
üríteni.
• Alaposan tisztítsa meg a készüléket, el-
lenőrizze az épségét, és cserélje ki a
sérült alkatrészeket.
• A szivattyút szárazon, fagymentes
helyen kell tárolni.
• A nyitott dugaszos csatlakozásokat óvni
kell a nedvességtől és a szennyeződéstől.
MEGSEMMISÍTÉS
A készüléket nem szabad háztartási hulladékként ártalmatlanítani! Ehhez az erre
kijelölt visszavételi helyeket használja.
Előtte a kábel levágásával tegye has-
ználhatatlanná a készüléket.
86 ProMax Pressure Automatic 6000/8, Pressure Well Automatic 6000/8
Page 87

Az OASE eredeti alkatrészeivel a készülék
biztonságos marad és továbbra is
megbízhatóan működik.
Alkatrészrajzokat és alkatrészeket internetes oldalunkon talál.
www.oase-livingwater.com/alkatreszek-di
ProMax Pressure Automatic 6000/8 / Pressure Well Automatic 6000/8
Méretezési feszültség
V AC
230
Méretezési frekvencia
Hz
50
Méretezési teljesítmény
W
1100
Védettségi fokozat
IPX8
Nyomócsonk csatlakozó
mm
30,9
"
1
Minimális energiahatékonysági index (MEI) 1)
–
≥0,40
Szállított mennyiség
maximum
l/ó
6000
Szállítási magasság
maximum m 57
Merülési mélység
maximum m 20
Hálózati csatlakozó vezeték
Hossz m 30
Méretek
Átmérő
mm
98
Magasság
mm
814
Súly
kg
11,8
helésnél. A legjobb hatásfokú vízszivattyúkhoz az MEI referencia értéke ≥0,70.
PÓTALKATRÉSZEK
DE
MŰSZAKI ADATOK
1)
a szivattyú hatékonysági fokára vonatkozó dimenzió nélküli mennyiség az optimális munkapontban, valamint rész- és túlter-
EN
FR
NL
ES
PT
IT
DA
NO
SV
FI
HU
PL
CS
SK
SL
HR
RO
BG
UK
RU
CN
87
Page 88

Tłumaczenie oryginalnej instrukcji
użytkowania
OSTRZEŻENIE
• Urządzenie może być uży-
wane przez dzieci od 8 lat i
ponadto przez osoby o ograniczonych fizycznych i umy-
słowych zdolnościach, albo
nie posiadających niezbędnego doświadczenia i wiedzy,
gdy będą one pod nadzorem
osoby odpowiedzialnej za
bezpieczeństwo użytkowania
tego urządzenia lub zostaną
odpowiednio przez nią poin-
struowane i poinformowane o
wynikających stąd zagroże-
niach.
• Dzieciom zabrania się za-
bawy z tym urządzeniem.
• Czyszczenie ani czynności
serwisowe użytkownika nie
mogą być wykonywane przez
dzieci bez nadzoru osoby dorosłej.
• Urządzenie musi być zabez-
pieczone wyłącznikiem różnicowoprądowym, ze znamionowym prądem upływowym
wynoszącym maksymalnie 30
mA.
• Urządzenie podłączyć tylko
wtedy, gdy parametry elektryczne urządzenia i zasilania
energią są zgodne. Dane
urządzenia znajdują się na tabliczce znamionowej na urzą-
dzeniu; na opakowaniu lub w
niniejszej instrukcji.
• Śmierć lub ciężkie obrażenia
przez porażenie prądem są
możliwe! Przed włożeniem
rąk do wody należy odłączyć
od sieci prądowej urządzenia
będące pod napięciem
>12 V AC lub >30 V DC.
• Urządzenie użytkować tylko
wtedy, gdy nikt nie przebywa
w wodzie.
• Wymianę uszkodzonego
przewodu sieciowego należy
niezwłocznie zlecić firmie
OASE, autoryzowanemu
punktowi serwisowemu bądź
wykwalifikowanemu elektry-
kowi, żeby zapobiec porażeniu prądem elektrycznym.
PRZEPISY BEZPIECZEŃSTWA
Przyłącze elektryczne
• Przedłużacze przewodów i rozdzielacze
prądu (np. listwy z gniazdkami) muszą
być przeznaczone do użytkowania na
wolnym powietrzu (zabezpieczone
przed rozpryskami wody).
• Chronić złącza wtykowe przed wilgocią.
• Urządzenie podłączyć tylko do prawi-
dłowo zainstalowanego gniazdka.
88 ProMax Pressure Automatic 6000/8, Pressure Well Automatic 6000/8
Page 89

A
ProMax
Automatic
6000/8
Well
1
Oczko do zaczepienia linki
•
•
2
Przyłącze
(1 ")
•
•
3
Sieciowy prze-
niowy
•
•
4
Sito strona
ssania
•
•
Bezpieczna eksploatacja
• Eksploatacja urządzenia z uszkodzoną
obudową jest zabroniona.
• W przypadku uszkodzonego przewodu
elektrycznego nie wolno użytkować
urządzenia.
• Nie przenosić ani ciągnąć urządzenia
chwytając za przewód elektryczny.
• Przewody należy układać w sposób
chroniony przed uszkodzeniami i tak,
żeby nie stanowiły niebezpieczeństwa
potknięcia się.
• Nie dokonywać żadnych przeróbek
technicznych urządzenia.
• Przy urządzeniu należy wykonywać
tylko te prace, które są opisane w niniejszej instrukcji. Jeśli nie da się usunąć
problemu we własnym zakresie, to należy zwrócić się do autoryzowanego
punktu serwisowego lub w razie wątpliwości do producenta.
• Używać tylko oryginalnych części za-
miennych i oryginalnego wyposażenia
dodatkowego.
INFORMACJE DOTYCZĄCE INSTRUKCJI UŻYTKOWANIA
Witamy w OASE Living Water. Kupując
ProMax Pressure Automatic 6000/8,
Pressure Well Automatic 6000/8, doko-
nali Państwo dobrego wyboru.
Przed pierwszym uruchomieniem urzą-
dzenia należy uważnie przeczytać instrukcję użytkowania i zapoznać się z zasadą
działania urządzenia. Wszystkie prace do-
tyczące tego urządzenia mogą być wyko-
nywane tylko zgodnie z zaleceniami dostarczonej instrukcji.
Bezwzględnie przestrzegać przepisów
bezpieczeństwa pracy w odniesieniu do
prawidłowego i bezpiecznego użytkowa-
nia.
Instrukcję użytkowania należy przechowywać w bezpiecznym miejscu. W przypadku sprzedaży urządzenia nowemu
właścicielowi należy przekazać również
instrukcję użytkowania.
Symbole w niniejszej instrukcji Ostrzeżenia
Ostrzeżenia w niniejszej instrukcji są klasyfikowane przez hasła ostrzegawcze,
które określają wielkość zagrożenia.
OSTRZEŻENIE
• Określa możliwą niebezpieczną
sytuację.
• W razie lekceważenia może dojść do
wypadku z ciężkimi lub śmiertelnymi obrażeniami.
WSKAZÓWKA
Informacje przyczyniające się do lep-
szego zrozumienia i do zapobiegania
możliwym szkodom materialnym lub w
środowisku naturalnym.
Dalsze wskazówki
A Odnośnik do rysunku, np. rysunek
A.
→ Odnośnik do innego rozdziału.
OPIS PRODUKTU Przegląd
Pressure
strona ciśnie-
nia 30,9 mm
wód podłącze-
6000/8
89
DE
EN
FR
NL
ES
PT
IT
DA
NO
SV
FI
HU
PL
CS
SK
SL
HR
RO
BG
UK
RU
CN
Page 90

5
Podstawka
pompy
•
•
6
Podstawka
•
–
7
Nóżki do ust-
awienia
•
–
8
Bufor gumowy
mym
•
–
9
Linka do za-
20 m
•
•
Zastosowanie zgodne z przeznaczeniem
ProMax Pressure Automatic 6000/8,
Pressure Well Automatic 6000/8, zwany
dalej "Urządzeniem", może być używany
wyłącznie w następujący sposób:
• Pompowanie czystej wody lub wody
deszczowej.
• Nawadnianie i podlewanie.
• Pobieranie wody ze zbiorników desz-
czówki lub cystern.
• Eksploatacja w warunkach zgodnych z
danymi technicznymi.
Możliwe błędne użytkowanie
W stosunku do tego urządzenia obowiązują następujące ograniczenia:
• Nie nadaje się do słonej wody.
• Nie nadaje się do wody pitnej.
• Nie użytkować w trybie pracy ciągłej
(np. do ciągłej cyrkulacji wody w sta-
wie).
• Nie nadaje się do celów rzemieślni-
czych ani przemysłowych.
• Nie użytkować połączeniu z chemika-
liami, artykułami spożywczymi, substancjami łatwopalnymi lub wybucho-
wymi.
• Nie podłączać do instalacji z wodą
pitną.
do ustawienia
pompy w położeniu pozio-
wieszenia,
USTAWIENIE I PODŁĄCZENIE Podłączenie węża ciśnieniowego
Wydajność tłoczenia jest optymalna przy
średnicy wewnętrznej węża 25 mm (1").
Należy postępować w sposób następujący:
B
1. Ściągnąć kołpak ochronny.
2. Połączyć przewód ciśnieniowy z przyłą-
czem na stronie ciśnienia.
– Zalecenie: Zastosować
szybkozłącze.
Ustawienie pompy w studni wierconej lub wykopie
C
• Linkę zamocować do uchwytu podwój-
nym węzłem i spuścić pompę do stu-
dzienki lub wykopu.
• Pompę zawiesić na lince na wysokości
co najmniej 1 m powyżej dna.
– W ten sposób zapobiec można zasy-
saniu większych cząstek zabrudzeń.
• Filtr siatkowy po stronie ssania musi
znajdować się co najmniej 150 mm pod
lustrem wody.
• Nie przenosić pompy za przewód sie-
ciowy.
• W przypadku studzienek wierconych i
wykopów o głębokości większej niż 5 m
przewód zasilania należy zamocować
trwale do linki w odległości co 5 m (mo-
cowanie odciążające przewodu).
Ustawienie pionowe pompy z podstawką
(tylko ProMax Pressure Automatic
6000/8)
W zbiorniku lub studni można ustawić
pompę pionowo na podstawce.
• Sito na stronie ssania musi znajdować
się co najmniej 150 mm pod lustrem
wody.
• Pompowana woda może zawierać mak-
3
symalnie 50 g piasku na m
wody.
90 ProMax Pressure Automatic 6000/8, Pressure Well Automatic 6000/8
Page 91

Należy postępować w sposób następujący:
D
1. Nasunąć nóżki na podstawkę.
2. Śruby imbusowe odkręcić tak, żeby
pompę można było oprzeć na pod-
stawce.
3. Wsunąć pompę do podstawki.
4. Dokręcać śruby imbusowe, aż pompa
będzie przymocowana do podstawki.
Ustawienie poziome pompy z podstawką
(tylko ProMax Pressure Automatic
6000/8)
W płaskim zbiorniku lub studni można
ustawić pompę poziomo na podstawce.
• Pompa musi być dokładnie wypoziomo-
wana.
• Pompowana woda nie może zawierać
żadnego piasku.
Należy postępować w sposób następujący:
E
1. Wykręcić śruby imbusowe.
– Podstawka jest podzielona na dwie
części.
2. Dwie nóżki nasunąć na jedną pod-
stawkę.
3. Trzy bufory gumowe wsunąć do rowków
otworów przelotowych.
– Bufory gumowe przymocować do obu
podstawek.
4. Obie podstawki nasunąć na pompę.
– Odstęp między podstawkami musi
być możliwie duży, żeby pompa była
stabilnie ustawiona.
EKSPLOATACJA
Sterownik pompy (flow control) mierzy na-
tężenie przepływu i wyłącza pompę przy
braku przepływu.
• Pompa wyłącza się, gdy zabraknie
wody i w ten sposób jest chroniona
przed uszkodzeniem w wyniku suchobiegu.
• Sterownik pompy przy automatycznym
trybie pracy przejmuje funkcję włączania i wyłączania pompy.
Zintegrowany zawór przeciwzwrotny zapobiega przepływowi powrotnemu wody z
węża ciśnieniowego do pompy po jej wyłączeniu. Ponadto zawór przeciwzwrotny
chroni pompę przed uszkodzeniem w ra-
zie udaru wodnego.
Tryb automatyczny
Pompa wyłącza się automatycznie po zaprzestaniu pobierania wody i osiągnięciu
maksymalnego ciśnienia w przewodzie ciśnieniowym.
Pompa włącza się automatycznie, gdy
woda jest pobierana i ciśnienie w przewo-
dzie ciśnieniowym spadnie poniżej
3,5 bar.
OSTRZEŻENIE
Niebezpieczne napięcie elektryczne!
Śmierć lub ciężkie obrażenia przez porażenie prądem.
• Pompę zanurzoną w wodzie podłączyć
do sieci prądowej dopiero wtedy, gdy
nikt już nie przebywa w wodzie ani nie
wkłada rąk do wody.
• Przed wejściem do wody lub włożeniem
rąk do wody odłączyć napięcie sieciowe
wszystkich urządzeń znajdujących się
w wodzie.
Włączanie urządzenia
• Włożyć wtyczkę sieciową do gniazdka.
– Pompa jest gotowa do eksploatacji.
Wyłączanie urządzenia
• Wyciągnąć wtyczkę sieciową.
– Po wyłączeniu może spłynąć z po-
wrotem reszta wody znajdująca się w
wężu i wypłynąć przez otwór ssania
pompy.
DE
EN
FR
NL
ES
PT
IT
DA
NO
SV
FI
HU
PL
CS
SK
SL
HR
RO
BG
UK
RU
CN
91
Page 92

Usterka
Przyczyna
Środki zaradcze
Pompa nie uruchamia się
Przerwane zasilanie
Sprawdzić bezpiecznik i
kowe
Pompa wyłącza się po krót-
Zabezpieczenie przeciąże-
powodu przegrzania
• Oczyścić otwór ssania
ulegnie ochłodzeniu
Brak wody w studni
Poczekać, aż dostatecznie
studnia napełni się
Pompa pracuje, ale nie tło-
Zamknięty wąż ciśnieniowy
• Wąż ciśnieniowy ułożyć
zie potrzeby oczyścić
Zatkany otwór ssania
• Oczyścić otwór ssania
Powietrze w wężu
ciśnieniowym
• Odpowietrzyć wąż
ciśnieniowy
O ile występuje:
wym
• Prawidłowo zainstalo-
zwrotny
Wadliwy lub zużyty wirnik
Skontaktować się z OASE.
cie serwisowym OASE.
Wirnik pompy zablokowany
Skontaktować się z OASE.
cie serwisowym OASE.
USUWANIE USTEREK
OSTRZEŻENIE
Niebezpieczne napięcie elektryczne!
Śmierć lub ciężkie obrażenia przez porażenie prądem.
Przed przystąpieniem do pracy:
• Wyłączyć urządzenie, wyciągnąć wtyczkę sieciową i zabezpieczyć urządzenie przed
ponownym włączeniem.
• Przed wejściem do wody lub włożeniem rąk do wody odłączyć napięcie sieciowe
wszystkich urządzeń znajdujących się w wodzie.
Po zakończeniu pracy:
• Zapewnić, żeby były znów spełnione wszystkie warunki do uruchomienia.
kim czasie pracy
czy lub niedostateczna wy-
dajność tłoczenia
prądowe
niowe wyłączyło pompę z
Błędnie zainstalowany lub
zatkany zawór przeciw-
zwrotny w wężu ciśnienio-
przez piasek
elektryczne połączenia wty-
• Poczekać, aż pompa
bez załamań
• Sprawdzić wylot i w ra-
wać zawór prze-
ciwzwrotny
• Wyczyścić zawór
• Wymiana wirnika jest
dozwolona tylko w punk-
• Wymiana wirnika jest
dozwolona tylko w punk-
92 ProMax Pressure Automatic 6000/8, Pressure Well Automatic 6000/8
Page 93

CZYSZCZENIE I KONSERWACJA
OSTRZEŻENIE
Niebezpieczne napięcie elektryczne!
Śmierć lub ciężkie obrażenia przez porażenie prądem.
• Przed włożeniem rąk do wody należy
odłączyć napięcie sieciowe wszystkich
znajdujących się w wodzie urządzeń.
• Przed rozpoczęciem prac przy urządze-
niu należy odłączyć napięcie sieciowe.
WSKAZÓWKA
Zalecenia dotyczące regularnego czysz-
czenia:
• Urządzenie czyścić nie tylko w razie po-
trzeby, lecz co najmniej 2 razy w roku.
• Nie stosować żadnych agresywnych
środków czyszczących ani rozpuszczalników chemicznych, ponieważ może to
spowodować uszkodzenie obudowy lub
wywołać zakłócenie działania urządze-
nia.
• W przypadku trudnych do usunięcia
osadów wapna zaleca się stosowanie
następujących środków czyszczących:
– Środek czyszczący PumpClean marki
OASE.
– Środek czyszczący dla gospodarstwa
domowego nie zawierający octu ani
chloru.
• Po oczyszczeniu starannie spłukać
wszystkie części czystą wodą.
CZĘŚCI ULEGAJĄCE ZUŻYCIU
Niżej wymienione podzespoły to części
ulegające zużyciu i ich wymiana jest do-
zwolona tylko serwisowi OASE:
• Wirnik
MAGAZYNOWANIE / PRZECHOWYWANIE W OKRESIE ZIMOWYM
Urządzenie nie jest odporne na działanie
mrozu. W przypadku ustawienia urządzenia w miejscu nie zagrożonym mrozem,
urządzenie nie musi zostać zdemontowane. W przeciwnym razie urządzenie
musi zostać wymontowane najpóźniej
przed zapowiadanym mrozem i przechowywane w bezpiecznym miejscu.
Prawidłowe przechowywanie urządzenia:
• Opróżnić urządzenie na tyle, na ile jest
to możliwe, przeprowadzić gruntowne
czyszczenie i skontrolować je pod
względem uszkodzeń.
• Wszystkie węże, rurociągi i przyłącza
opróżnić na tyle, na ile jest to możliwe.
• Gruntownie oczyścić urządzenie, skon-
trolować stan pod względem uszkodzeń, wymienić wadliwe części.
• Urządzenie należy przechowywać w
miejscu suchym i nienarażonym na
działanie mrozu.
• Otwarte połączenia wtykowe chronić
przed wilgocią i zanieczyszczeniem.
USUWANIE ODPADÓW
Urządzenia nie wolno wyrzucać do pojemnika na odpady komunalne! Urządzenia
należy utylizować tylko poprzez przewi-
dziany do tego system zwrotów. Przed
przystąpieniem do utylizacji należy odciąć
przewód zasilający urządzenia.
DE
EN
FR
NL
ES
PT
IT
DA
NO
SV
FI
HU
PL
CS
SK
SL
HR
RO
BG
UK
RU
CN
93
Page 94

Dzięki oryginalnym częściom zamiennym
OASE urządzenie pozostaje bezpieczne i
będzie nadal niezawodnie działać.
Rysunki i wykazy części zamiennych znajdują się na naszej s
www.oase
enne-di
ProMax Pressure Automatic 6000/8 / Pressure Well Automatic 6000/8
Napięcie znamionowe
V AC
230
Częstotliwość znamionowa
Hz
50
Moc zwymiarowana
W
1100
Stopień ochrony
IPX8
Przyłącze króciec ciśnieniowy
mm
30,9
"
1
Wskaźnik minimalnej energochłonności (MEI) 1)
–
≥0,40
Wydajność tłoczenia
maksymalna
l/h
6000
Wysokość tłoczenia
maksymalna
m
57
Głębokość zanurzenia
maksymalna
m
20
Sieciowy przewód podłączeniowy
Długość m 30
Wymiary
Średnica
mm
98
Wysokość
mm
814
Masa
kg
11,8
obciążeniu i przeciążeniu. Dla pomp wody z najlepszym wskaźnikiem sprawności wartość referencyjna MEI wynosi ≥0,70.
CZĘŚCI ZAMIENNE
tronie internetowej.
DANE TECHNICZNE
-livingwater.com/czescizami-
1)
Wielkość bezwymiarowa dla wskaźnika sprawności hydraulicznej pomp w warunkach optymalnych oraz przy częściowym
94 ProMax Pressure Automatic 6000/8, Pressure Well Automatic 6000/8
Page 95

Překlad originálu Návodu k použití.
VAROVÁNÍ
• Tento přístroj nesmí být
používaný dětmi do 8 let a
kromě toho i osobami se
sníženými fyzickými,
senzorickými nebo mentálními schopnostmi nebo nedostatkem zkušeností a
vědomostí, pokud nejsou pod
dohledem nebo nebyly
poučeny o bezpečném
používání přístroje a mohou z
tohoto důvodu vzniknout nebezpečí.
• Děti si nesmí s přístrojem
hrát.
• Čištění a uživatelská údržba
nesmí být prováděna dětmi
bez dozoru.
• Přístroj musí být zajištěn
pomocí ochranného zařízení
chybného proudu s jmenovitým poruchovým proudem
maximálně 30 mA.
• Přístroj zapojujte pouze
tehdy, shodují-li se elektrické
údaje přístroje s údaji elektrického napájení. Údaje o
přístroji se nachází na typovém štítku přístroje, na obalu
nebo v tomto návodu.
• Může dojít ke smrti nebo
těžkým zraněním elektrickým
proudem! Dříve, než sáhnete
do vody, odpojte ze sítě
přístroje ve vodě s napětím
>12 V AC nebo >30 V DC.
• Přístroj provozujte pouze
tehdy, pokud se vodě
nezdržují žádné osoby.
• Poškozený kabel síťového
připojení je nutné okamžitě
nechat vyměnit společností
OASE, autorizovaným zákaznickým servisem nebo kvali-
fikovaným elektrikářem, aby
se předešlo nebezpečím
zásahem elektrickým proudem.
BEZPEČNOSTNÍ POKYNY
Elektrická přípojka
• Prodlužovací vedení a elektrický ro-
zvaděč (např. zásuvkový systém) musí
být určeny k užití ve venkovním
prostředí (odstřikující voda).
• Chraňte konektorové spoje před vlh-
kostí.
• Připojujte přístroj pouze ke správně in-
stalované zásuvce.
Bezpečný provoz
• V případě poškození krytu nesmíte
přístroj používat.
• Při vadném vedení nesmí být přístroj
provozován.
• Nepřenášejte přístroj za elektrické
vodiče ani jej za ně netahejte.
• Vodiče instalujte tak, aby byly chráněné
před poškozením a pamatujte, že o ně
nesmí nikdo zakopnout.
DE
EN
FR
NL
ES
PT
IT
DA
NO
SV
FI
HU
PL
CS
SK
SL
HR
RO
BG
UK
RU
CN
95
Page 96

A
ProMax
Automatic
6000/8
Well
1
Upevňovací
oko pro lano
•
•
2
Přípojka
30,9 mm (1 ")
•
•
3
Přípojné ve-
dení
•
•
4
Síto strana
nasávání
•
•
5
Patka čer-
padla
•
•
6
Patka • –
7
Patky • –
8
Gumový
loze
•
–
9
Upevňovací
lano, 20 m
•
•
• Nikdy neprovádějte technické změny na
zařízení.
• Provádějte na přístroji pouze takové
práce, které jsou popsané v tomto
návodu. Pokud nelze problémy odstranit, kontaktujte autorizovaný zákaznický
servis nebo v případě pochybností
výrobce.
• Pro přístroj používejte pouze originální
náhradní díly a příslušenství.
O TOMTO NÁVODU K OBSLUZE
Vítejte u OASE Living Water. Koupě
tohoto výrobku ProMax Pressure Automatic 6000/8, Pressure Well Automatic
6000/8 byla dobrou volbou.
Ještě před prvním použitím tohoto
zařízení si pečlivě pročtěte návod k použití
a dobře se s vaším novým zařízením se-
znamte. Veškeré práce na tomto a s tímto
přístrojem mohou být prováděny jen podle
přiloženého návodu.
Bezpodmínečně dodržujte bezpečnostní
pokyny pro správné a bezpečné
používání.
Tento návod k použití pečlivě uschovejte.
Při změnì vlastníka předejte i návod k
použití.
UPOZORNĚNÍ
Informace, které slouží pro lepší pochopení nebo předcházení možným materiálním škodám nebo škodám na životním prostředí.
Další pokyny
A Odkaz na jeden z obrázků., např.
obrázek A.
→ Odkaz k jiné kapitole.
POPIS VÝROBKU Přehled
Pressure
6000/8
strana tlaku
Symboly použité v tomto návodu Varovné pokyny
Varovné pokyny v tomto návodě jsou
klasifikovány pomocí signálních slov,
které označují míru nebezpečí.
• Označuje možnou nebezpečnou si-
tuaci.
• Při nedodržení můžou být důsledkem
smrt nebo těžká zranění.
96 ProMax Pressure Automatic 6000/8, Pressure Well Automatic 6000/8
VAROVÁNÍ
nárazník pro
skladování
čerpadla v ho-
rizontální po-
Page 97

Použití v souladu s určeným účelem
ProMax Pressure Automatic 6000/8,
Pressure Well Automatic 6000/8, dále jen
„přístroj“, se smí používat výhradně podle
níže uvedených pokynů:
• Čerpání čisté vody nebo dešťové vody.
• Zavlažování a zalévání.
• Odběr vody z nádrží na dešťovou vodu
nebo z cisteren.
• Provoz při dodržení technických údajů.
Možné chybné použití
Pro přístroj platí následující omezení:
• Není vhodné pro slanou vodu.
• Nevhodné pro pitnou vodu.
• Nepoužívat v dlouhodobém provozu
(např. trvalý cirkulační provoz v jezírku).
• Nepoužívat pro komerční nebo
průmyslové účely.
• Nepoužívat ve spojení s chemikáliemi,
potravinami, lehce zápalnými nebo
výbušnými látkami.
• Nenapojujte na domácí zásobování pitnou vodou.
INSTALACE A PŘIPOJENÍ Připojte tlakovou hadici
Čerpací výkon je optimální při vnitřním
průměru hadice 25 mm (1").
Postupujte následovně:
B
1. Sejměte ochranný klobouček.
2. Tlakovou hadici spojte s přípojkou na
straně tlaku.
– Doporučení: Použijte rychloupínák.
Čerpadlo postavte do vrtané studny
nebo do šachty
C
• Upevňovací lano připevněte dvojitým
uzlem k okům a spusťte čerpadlo do
vrtné studny nebo šachty.
• Čerpadlo upevněte pomocí upe-
vňovacího lana minimálně ve
vzdálenosti 1 m od dna.
– Zabráníte tím nasátí nečistot.
• Síto strany nasávání se musí nacházet
minimálně 150 mm pod hladinou.
• Nenoste za přípojné vedení.
• Od hloubky vrtné studny nebo šachty
upevněte přípojné vedení v odstupu 5 m
k upevňovacímu lanu (odlehčení tahu).
Čerpadlo postavte s patkou ve verti-
kální poloze
(pouze ProMax Pressure Automatic
6000/8)
V nádrži nebo ve studni je možné postavit
čerpadlo pomocí patky vertikálně.
• Síto strany nasávání se musí nacházet
minimálně 150 mm pod hladinou.
• Čerpaná voda smí obsahovat maxi-
málně 50 g písku na
Postupujte následovně:
D
1. Nožky nasuňte na patku.
2. Šrouby s vnitřním šestihranem uvolněte
tak, aby mohla patka čerpadlo přijmout.
3. Nasuňte čerpadlo na patku.
4. Utáhněte šrouby s vnitřním šestihranem
tak, aby bylo čerpadlo zafixováno k
patce.
Čerpadlo postavte s patkou v horizon-
tální poloze
(pouze ProMax Pressure Automatic
6000/8)
V ploché nádrži nebo ve studni je možné
postavit čerpadlo pomocí patky horizontálně.
• Čerpadlo musí být vyrovnáno přesně
vodorovně.
• Čerpaná voda nesmí obsahovat písek.
3
vody.
DE
EN
FR
NL
ES
PT
IT
DA
NO
SV
FI
HU
PL
CS
SK
SL
HR
RO
BG
UK
RU
CN
97
Page 98

Postupujte následovně:
E
1. Odstraňte šrouby s vnitřním šestihra-
nem.
– Patka je rozdělená na dvě části.
2. Na každou patku nasuňte dvě nohy.
3. Tři gumové nárazníky vsuňte vždy do
vroubku průchodky.
– Upevněte gumové nárazníky na obě
patky.
4. Obě patky nasuňte na čerpadlo.
– Vzdálenost mezi patkami musí být co
možná největší, aby stálo čerpadlo
stabilně.
PROVOZ
Řízení čerpadla (flow control) měří průtok
a v případě chybějícího průtoku čerpadlo
vypne.
• V případě nedostatku vody se čerpadlo
vypne a je tak chráněno před škodami v
důsledku chodu na sucho.
• Při automatickém provozu přebírá ří-
zení čerpadla funkci zapnutí a vypnutí
čerpadla.
Zpětný ventil zabraňuje, aby po vypnutí
natekla voda z tlakové hadice zpět do
čerpadla. Zpětný ventil dále chrání
čerpadlo před poškozením tlakovými rázy.
Automatický provoz
Čerpadlo se automaticky vypne, když již
není možné odebírat vodu a je dosaženo
maximálního tlaku v tlakovém vedení.
Čerpadlo se automaticky zapne, když je
možné odebírat vodu a tlak v tlakovém vedení klesne pod 3,5 barů.
VAROVÁNÍ
Nebezpečné elektrické napětí!
Smrt nebo těžká zranění elektrickým
proudem.
• Čerpadlo ve vodě zapojte do elektrické
sítě, až když nikdo nestojí ve vodě, ani
do ní nesahá.
• Před vstupem nebo před sáhnutím do
vody vždy odpojte všechny přístroje nacházející se ve vodě od síťového napětí.
Zapnutí přístroje
• Zasuňte zástrčku do zásuvky.
– Čerpadlo je připraveno k provozu.
Vypnutí přístroje
• Vytáhněte zástrčku ze zásuvky.
– Po vypnutí je možné nechat vytéct
zbytkovou vodu z hadice a z
nasávacího otvoru čerpadla.
98 ProMax Pressure Automatic 6000/8, Pressure Well Automatic 6000/8
Page 99

Porucha
Příčina
Náprava
Čerpadlo se nerozbíhá
Napájení proudem je
přerušeno
Zkontrolujte pojistky a elek-
trické zástrčky
Čerpadlo po krátké době
Jištění před přetížením čer-
• Vyčistěte nasávací otvor
dit.
Studna je suchá
Počkejte, až bude studna
obsahovat dostatek vody
Čerpadlo běží ale nečerpá
Tlaková hadice ucpaná
• Veďte tlakovou hadici
případně jej vyčistěte
Nasávací otvor je ucpaný
• Vyčistěte nasávací otvor
Vzduch v tlakové hadici
• Odvzdušněte tlakovou
hadici
Pokud k dispozici:
vaná nebo je ucpaná
• Namontujte správně
Oběhové kolo je defektní
Kontaktujte OASE.
pouze servis Oase.
Oběžné kolo čerpadla je
Kontaktujte OASE.
pouze servis Oase.
ODSTRAŇOVÁNÍ PORUCH
DE
VAROVÁNÍ
Nebezpečné elektrické napětí!
Smrt nebo těžká zranění elektrickým proudem.
Před začátkem prací:
• Přístroj vypněte, vytáhněte zástrčku a přístroj zajistěte proti zapnutí.
• Před vstupem nebo před sáhnutím do vody vždy odpojte všechny přístroje nacházející
se ve vodě od síťového napětí.
Po ukončení prací:
• Zabezpečte všechny předpoklady pro obětovné uvedení do provozu.
chodu vypne
nebo čerpá nedostatečně
padlo vypnulo kvůli přehřátí
Zpětná klapka v tlakové
hadici je chybně namonto-
• Nechte čerpadlo ochla-
bez zalomení
• Zkontrolujte výtok a
zpětnou klapku
• Čištění zpětné klapky
EN
FR
NL
ES
PT
IT
DA
NO
SV
FI
HU
PL
CS
SK
nebo opotřebované
blokované pískem
• Oběžné kolo smí měnit
• Oběžné kolo smí měnit
SL
HR
RO
BG
UK
RU
CN
99
Page 100

ČIŠTĚNÍ A ÚDRŽBA
VAROVÁNÍ
Nebezpečné elektrické napětí!
Smrt nebo těžká zranění elektrickým
proudem.
• Dříve než budete sahat do vody,
odpojte všechny přístroje nacházející
se ve vodě od síťového napětí.
• Než začnete pracovat se zařízením, vy-
pojte síťová napětí.
UPOZORNĚNÍ
Doporučení k pravidelnému čištění:
• Přístroj čistěte podle potřeby, mini-
málně však 2 x ročně.
• Nepoužívejte agresivní čisticí
prostředky ani chemická ředidla, neboť
by mohly poškodit plášť, nebo negativně ovlivnit funkce přístroje.
• Doporučené čisticí prostředky při
obtížně odstranitelném zvápenatění:
– Čistič čerpadel PumpClean od OASE.
– Domácí čističe bez obsahu octa a
chlóru.
• Po čištění důkladně opláchněte
všechny díly čistou vodou.
SÚČASTI PODLIEHAJÚCE OPOTREBENIU
Následující komponenty jsou součásti,
které podléhají opotřebení a které smí
vyměnit pouze servis OASE:
• Oběžné kolo
ULOŽENÍ/ZAZIMOVÁNÍ
Přístroj není mrazuvzdorný. Při instalaci v
místě kde nemrzne není nutné přístroj
odinstalovat. V opačném případě je nutné
přístroj při očekávaném mrazu odinstalo-
vat a uskladnit.
Správné uskladnění přístroje:
• Vypusťte přístroj, jak jen je to možné, a
proveďte důkladné čištění a zkontro-
lujte, zda nevykazuje škody.
• Veškeré hadice, potrubí a přípojky vy-
prazdňujte tak dlouho, jak jen je to
možné.
• Přístroj důkladně vyčistěte,zkontrolujte,
zda není poškozený a poškozené části
vyměňte.
• Přístroj osušte a uskladněte chráněný
před mrazem.
• Chraňte otevřené přípojky před vlhkostí
a znečištěním.
LIKVIDACE
Toto zařízení nesmí být likvidováno
společně s komunálním odpadem!
Využijte k tomu prosím určený systém
odběru. Předtím znemožněte další použi-
100 ProMax Pressure Automatic 6000/8, Pressure Well Automatic 6000/8
telnost zařízení odříznutím kabelů.
 Loading...