

Oase ProMax Garden Automatic 6000/5, ProMax Garden Automatic Series, ProMax Garden Automatic 5000, ProMax Garden Automatic 4000, ProMax Garden Automatic 3500 Operating Instructions Manual
Page 1
ProMax Garden Automatic 3500 | 4000 | 5000 | 6000/5
Page 2
ProMax Garden Automatic 3500/4000/5000/6000
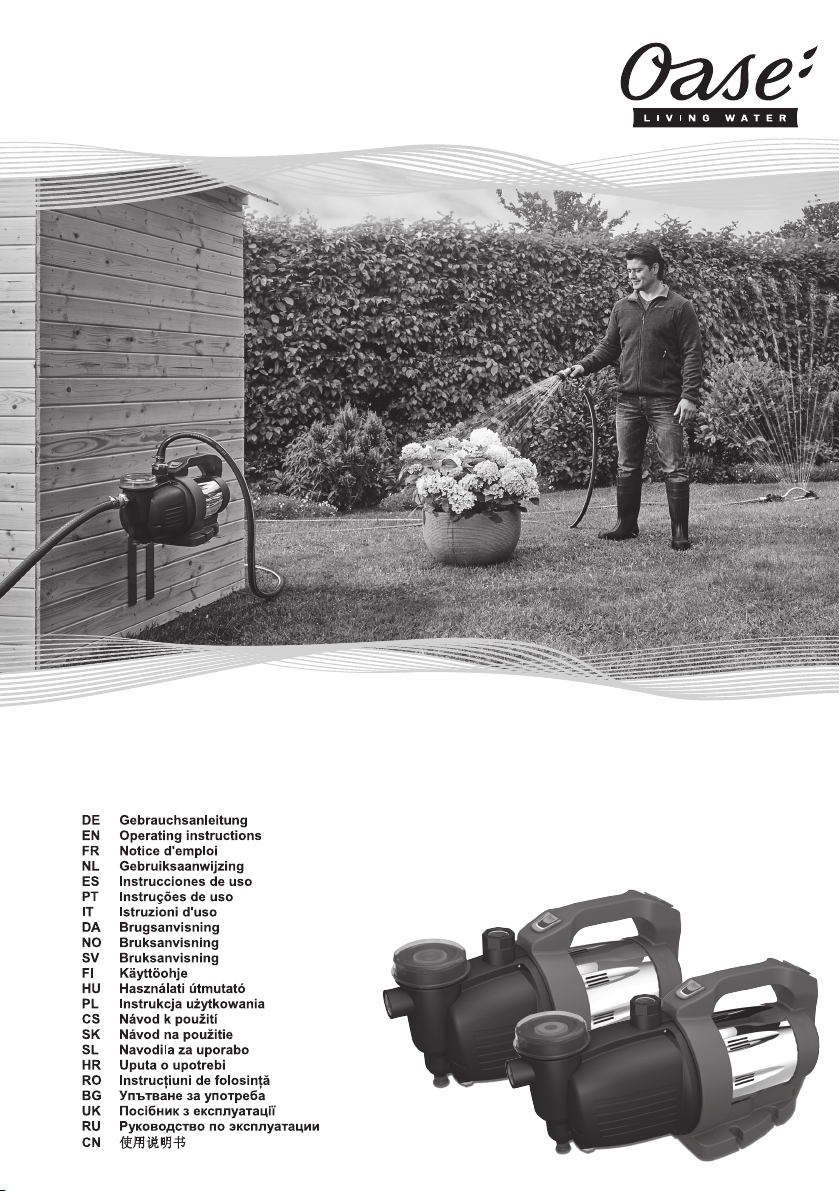
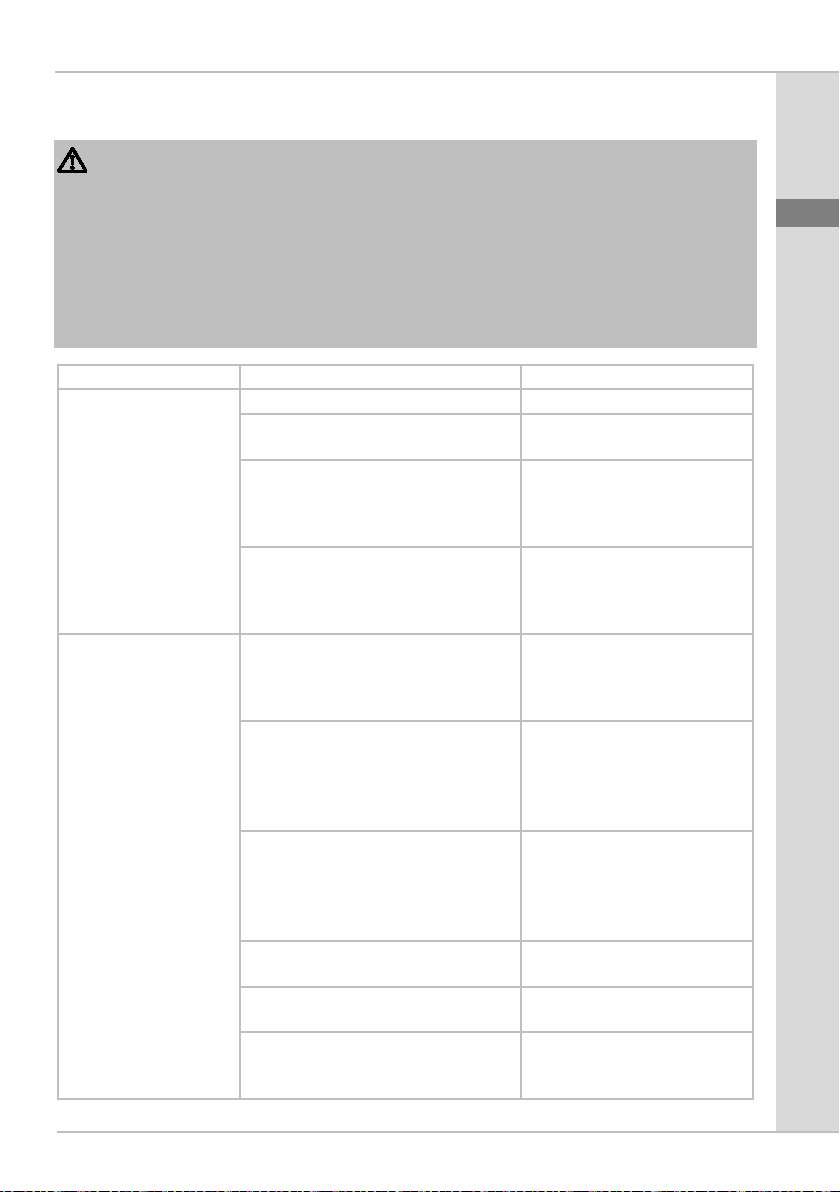
A
POX0032
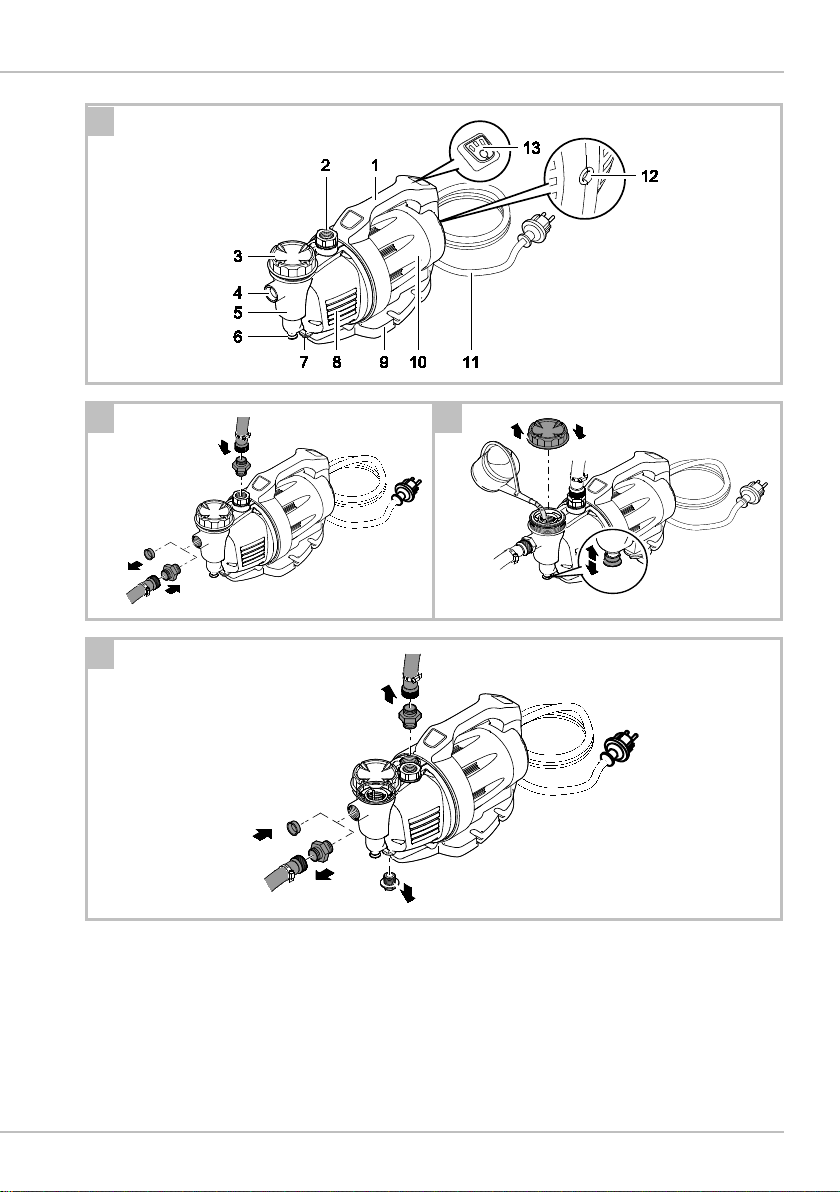
B
C
POX0026
POX0027
D
POX0043
2
Page 3
E
POX0028
3
Page 4

ProMax Garden Automatic 3500/4000/5000/6000
A
ProMax Garden Automatic 3500
/ 5000 / 6000/5
1
Tragegriff mit Ein-/Aus-Taste (13)
2
Anschluss Druckseite
3
Deckel Vorfilter
4
Anschluss Saugseite
5
Vorfiltergehäuse
6
Rückschlagventilöffner
7
Wasserablass-Schraube
8
Pumpengehäuse
9
Pumpenfuß
10
Motorgehäuse
11
Netzanschlussleitung
12
Serviceloch
13
Ein-/Aus-Taste mit LED Statusanzeige
Original Gebrauchsanleitung
ÜBER DIESE GEBRAUCHSANLEITUNG
Willkommen bei OASE Living Water. Mit
dem Kauf des Produkts ProMax Garden
Automatic 3500/4000/5000/6000 haben
Sie eine gute Wahl getroffen.
Lesen Sie vor der ersten Benutzung des
Gerätes die Anleitung sorgfältig und machen Sie sich mit dem Gerät vertraut. Alle
Arbeiten an und mit diesem Gerät dürfen
nur gemäß der vorliegenden Anleitung
durchgeführt werden.
Beachten Sie unbedingt die Sicherheitshinweise für den richtigen und sicheren
Gebrauch.
Bewahren Sie diese Anleitung sorgfältig
auf. Bei Besitzerwechsel geben Sie bitte
die Anleitung weiter.
PRODUKTBESCHREIBUNG
Übersicht
Symbole in dieser Anleitung
Warnhinweise
Die Warnhinweise in dieser Anleitung sind
durch Signalworte klassifiziert, die das
Ausmaß der Gefährdung anzeigen.
WARNUNG
• Bezeichnet eine möglicherweise
gefährliche Situation.
• Bei Nichtbeachtung kann Tod oder
schwerste Verletzung die Folge sein.
HINWEIS
Informationen, die zum besseren Verständnis dienen.
Weitere Hinweise
A Verweis auf eine Abbildung, z. B.
Abbildung A.
→ Verweis auf ein anderes Kapitel.
4
Bestimmungsgemäße Verwendung
ProMax Garden Automatic
3500/4000/5000/6000, im weiteren "Gerät" genannt, darf ausschließlich wie folgt
verwendet werden:
• Um- und Auspumpen von Behältern
oder Becken.
• Bewässern und gießen.
• Fördern von klarem Wasser oder Re-
genwasser.
• Wasserentnahme aus Brunnen.
– Nur zum Bewässern und Gießen!
• Wasserentnahme aus Regentonnen
oder Zisternen.
– Korngröße von Partikeln im Wasser:
max. 2 mm.
• Betrieb unter Einhaltung der technischen Daten.
Page 5

Möglicher Fehlgebrauch
Für das Gerät gelten folgende Einschränkungen:
• Nicht im Langzeitbetrieb (z. B. Dauer-
umwälzbetrieb am Teich) verwenden.
• Nicht geeignet für Salzwasser.
• Niemals Schmutzwasser fördern.
• Nicht an die Hauswasserversorgung
anschließen.
• Nicht geeignet für Trinkwasser.
• Nicht für gewerbliche oder industrielle
Zwecke verwenden.
• Nicht in Verbindung mit Chemikalien,
Lebensmitteln, leicht brennbaren oder
explosiven Stoffen einsetzen.
SICHERHEITSHINWEISE
Dieses Gerät kann von Kindern
ab 8 Jahren und darüber sowie
von Personen mit verringerten
physischen, sensorischen oder
mentalen Fähigkeiten oder
Mangel an Erfahrung und Wissen benutzt werden, wenn sie
beaufsichtigt oder bezüglich
des sicheren Gebrauchs des
Gerätes unterwiesen wurden
und die daraus resultierenden
Gefahren verstehen.
Kinder dürfen nicht mit dem
Gerät spielen.
Reinigung und Benutzerwartung dürfen nicht von Kindern
ohne Beaufsichtigung durchgeführt werden.
Elektrischer Anschluss
Das Gerät muss über eine Fehlerstrom-Schutzeinrichtung mit
einem Bemessungsfehlerstrom
von maximal 30 mA abgesi-
chert sein.
• Schließen Sie das Gerät nur an, wenn
die elektrischen Daten von Gerät und
Stromversorgung übereinstimmen. Die
Gerätedaten befinden sich auf dem Typenschild am Gerät, auf der Verpakkung oder in dieser Anleitung.
• Verlängerungsleitungen und Stromver-
teiler (z. B. Steckdosenleisten) müssen
für die Verwendung im Freien geeignet
sein (spritzwassergeschützt).
• Schützen Sie Steckerverbindungen vor
Feuchtigkeit.
• Schließen Sie das Gerät nur an einer
vorschriftsmäßig installierten Steckdose
an.
Sicherer Betrieb
Eine beschädigte Netzanschlussleitung sofort durch
OASE, einem autorisierten
Kundendienst oder einer qualifizierten Elektrofachkraft ersetzen lassen, um Gefahren durch
Stromschlag zu vermeiden.
• Der Sicherheitsabstand des Gerätes
zum Wasser muss mindestens 2 m betragen.
• Pumpe nicht dem Regen aussetzen und
nicht in nasser oder feuchter Umgebung
verwenden.
• Bei defekten elektrischen Leitungen
oder defektem Gehäuse darf das Gerät
nicht betrieben werden.
• Tragen oder ziehen Sie das Gerät nicht
an der elektrischen Leitung.
DE
EN
FR
NL
ES
PT
IT
DA
NO
SV
FI
HU
PL
CS
SK
SL
HR
RO
BG
UK
RU
CN
5
Page 6

ProMax Garden Automatic 3500/4000/5000/6000
• Verlegen Sie Leitungen geschützt vor
Beschädigungen und achten Sie darauf, dass niemand darüber fallen kann.
• Öffnen Sie das Gehäuse des Gerätes
oder zugehöriger Teile nur, wenn Sie
dazu in der Anleitung ausdrücklich aufgefordert werden.
• Führen Sie nur Arbeiten am Gerät
durch, die in dieser Anleitung beschrieben sind. Wenden Sie sich an eine autorisierte Kundendienststelle oder im
Zweifelsfall an den Hersteller, wenn
sich Probleme nicht beheben lassen.
• Verwenden Sie nur Original-Ersatzteile
und -Zubehör für das Gerät.
• Nehmen Sie niemals technische Änderungen am Gerät vor.
AUFSTELLEN UND ANSCHLIESSEN
HINWEIS
Um Geräusche der Pumpe zu reduzieren, die Pumpe bei einer Festinstallation
über flexible druckfeste Schlauchleitungen mit dem Rohrnetz verbinden.
• Pumpe waagerecht und standsicher im
Trockenen aufstellen.
– Bei Festinstallation darauf achten,
dass zum Entleeren der Pumpe ein
entsprechend großes Auffanggefäß
unter die Ablass-Schraube gebracht
werden kann.
• Pumpe nach Möglichkeit höher aufstellen als das Wasserreservoir, aus dem
gepumpt werden soll. Andernfalls zwischen Pumpe und Saugschlauch ein
druckfestes Ventil montieren.
• Nur saugfeste Vakuumschläuche auf
der Druckseite und auf der Saugseite
verwenden.
HINWEIS
OASE empfiehlt: Saugschlauch zusätz-
lich befestigen (z. B. an einen Holzpflock
binden), um die Pumpe von seinem Gewicht zu entlasten.
B
• Saug- bzw. Druckschlauch mit 25,0mm-Innendurchmesser (1") an Anschlüsse schrauben.
BETRIEB
Inbetriebnahme des Gerätes
Vor der erstmaligen Verwendung muss
die Pumpe befüllt werden und die Saugleitung entlüftet werden. Das Entlüften der
Saugleitung kann einige Minuten dauern.
So gehen Sie vor:
C
1. Filterdeckel abschrauben. Als Drehhilfe
kann ein Schraubendreher von der
Seite her in eine der Aussparungen im
Deckel eingesetzt werden.
2. Absperrung der Druckleitung öffnen.
3. In die Einfüllöffnung im Vorfilter Wasser
bis zum Überlaufen füllen. Dabei den
Rückschlagventilöffner so lange öffnen,
bis das Wasser die im Filter eventuell
noch vorhandene Luft verdrängt hat.
4. Filterdeckel wieder aufschrauben.
5. Netzstecker in die Steckdose stecken.
– Die Pumpe ist betriebsbereit.
6. Pumpe einschalten. (→ Bedienung)
– Die Pumpe beginnt sofort zu fördern.
Im austretenden Wasser befindet sich
noch Luft.
HINWEIS
Sollte nach 5 Minuten noch kein Wasser
angesaugt werden, beginnt die Pumpe
den Trockenlaufschutz.
7. Absperrung der Druckleitung schließen,
sobald sich im austretenden Wasser
keine Luft mehr befindet. Die Saugleitung ist jetzt entlüftet.
6
Page 7
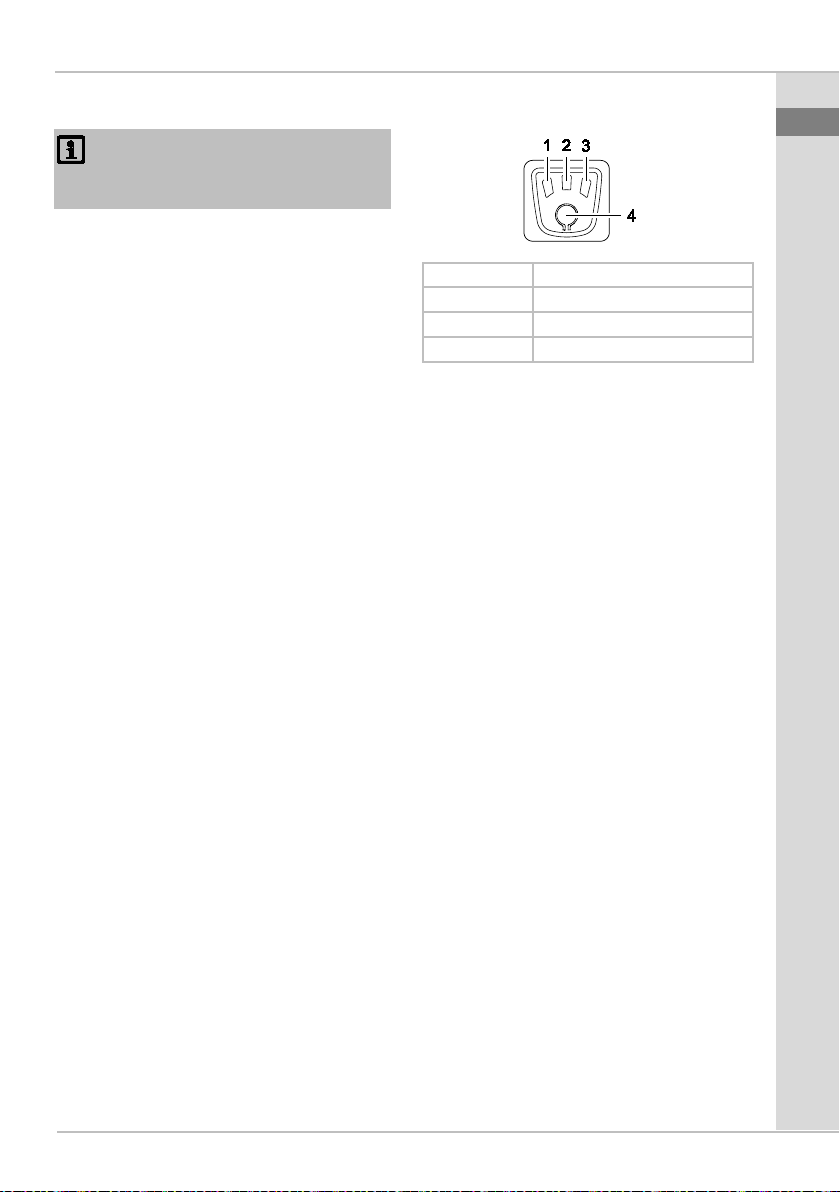
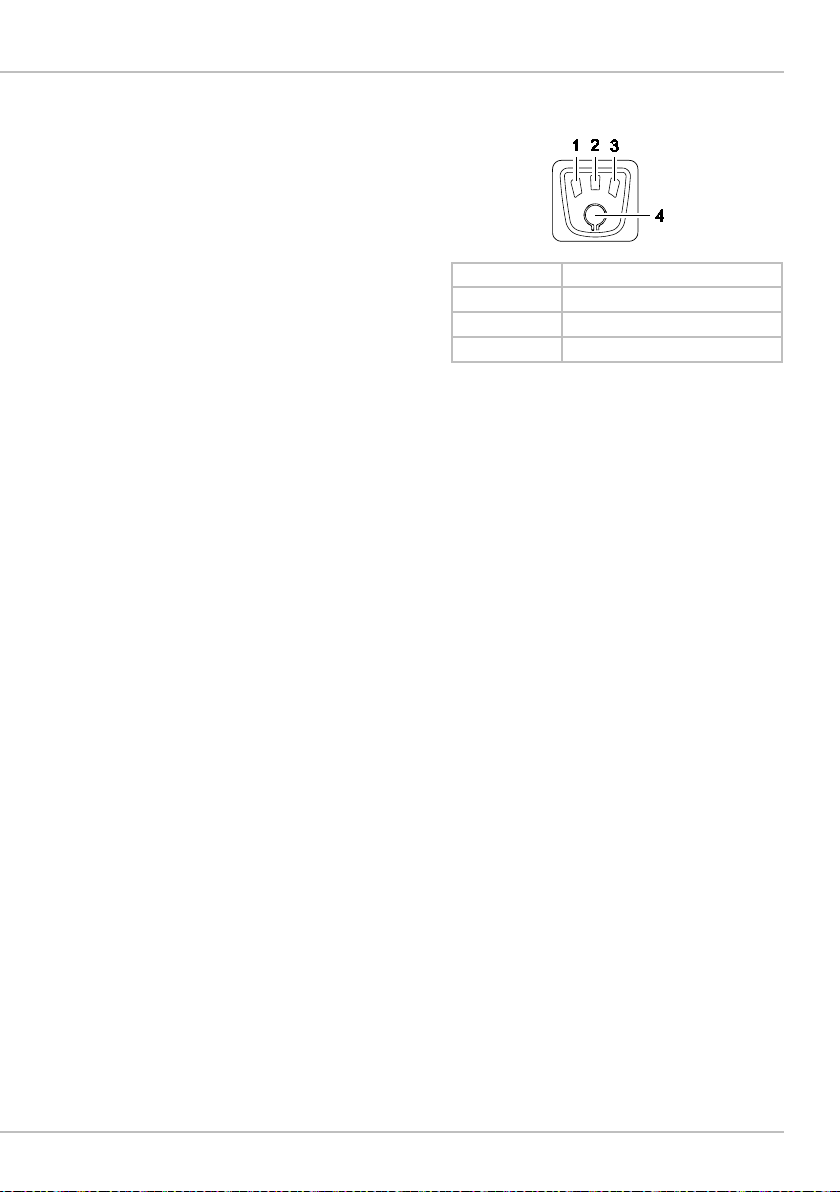
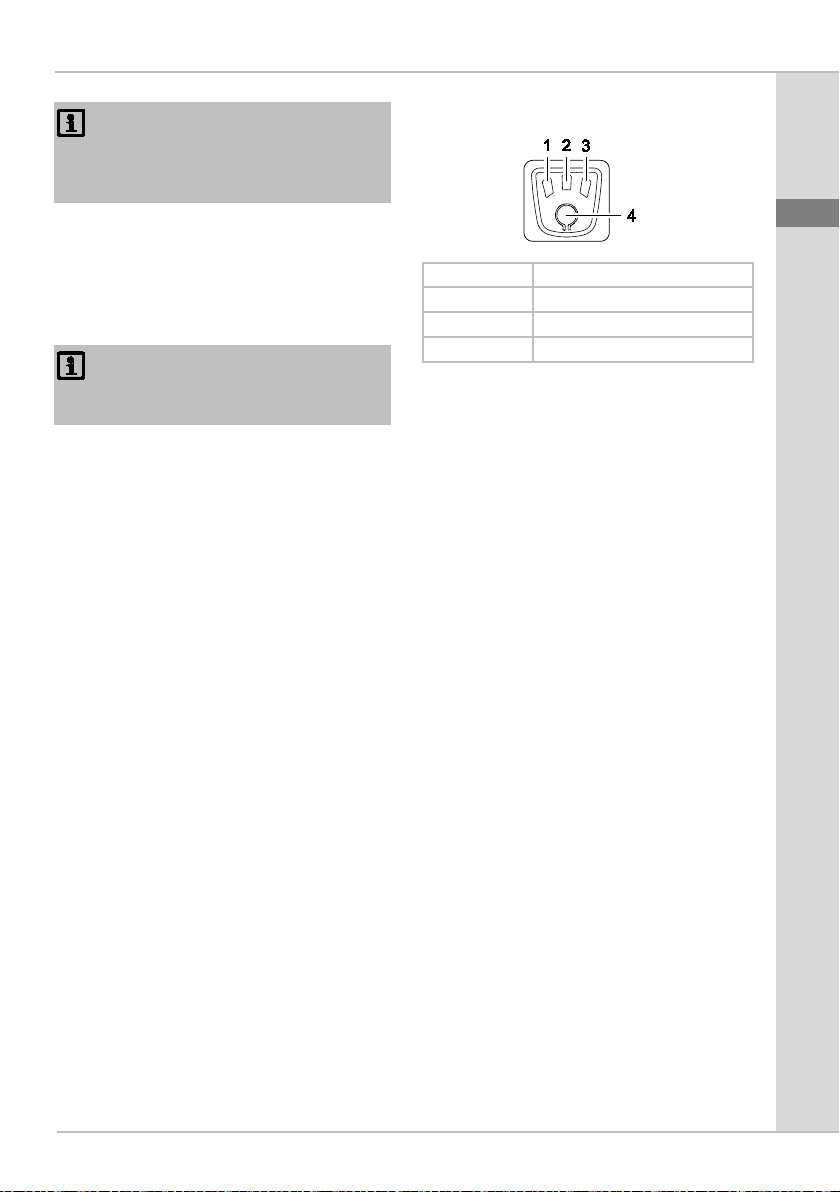
POX0041
1
LED blau
2
LED gelb
3
LED rot
4
Ein-/Aus-Taste
Außerbetriebnahme des Geräts
HINWEIS
Nach dem Einsatz die Pumpe mit klarem
Wasser durchspülen.
So gehen Sie vor:
1. Pumpe ausschalten
2. Netzstecker ziehen.
3. Druckleitung durch Öffnen von Entnahmestellen drucklos machen.
4. Zusätzlich in die Saugleitung eingebaute Rückschlagventile öffnen.
– Nach dem Ausschalten kann das
Restwasser im Schlauch zurückfließen und durch die Ansaugöffnung der
Pumpe austreten.
Falls die Pumpe vollständig abgebaut
wird:
D
5. Angeschlossene Schläuche druck- und
saugseitig entfernen.
6. Wasserablass-Schraube ausdrehen
und Restwasser durch Neigen der
Pumpe herausfließen lassen.
7. Wasserablass-Schraube wieder eindrehen.
BEDIENUNG
DE
EN
FR
NL
ES
• Zyklus: Sensoren überwachen den
Wasserfluss und den Wasserdruck und
schalten nach einer bestimmten Zeit die
Pumpe an, ab oder in Stand-by, wenn
die Pumpe kein Wasser ansaugen kann
oder die Druckleitung verschlossen ist.
• Die LEDs in der Ein-/Aus-Taste signalisieren durch Leuchten oder Blinken den
jeweiligen Betriebszustand.
(→ Betriebszustand und zugehörige
LED-Anzeigen)
Betriebsbereitschaft herstellen: Pumpe
mit dem Stromnetz verbinden.
• Die Pumpe ist betriebsbereit.
• Alle LEDs leuchten.
Ein- und Ausschalten der Pumpe: Ein/Aus-Taste weniger als 3 s gedrückt hal-
ten.
• Nach dem Einschalten übernimmt die
Automatik die Pumpensteuerung: Sensoren prüfen wiederholt, ob der Wasserdurchfluss unter der minimalen Förderleistung liegt oder der Wasserdruck
unter 1,5 bar liegt. Je nach Ergebnis
wird die Pumpe geschützt vor Trockenlauf betrieben oder sie wird von der Automatik wieder in Stand-by gesetzt.
Reset der Automatik durchführen: Ein/Aus-Taste mindestens 3 s gedrückt halten.
PT
IT
DA
NO
SV
FI
HU
PL
CS
SK
SL
HR
RO
BG
UK
RU
CN
7
Page 8

ProMax Garden Automatic 3500/4000/5000/6000
LED
Betriebszustand
Benutzer
blau
gelb
rot
Blinkfrequenz
–
Pumpe betriebsbereit
Pumpe einschalten
–
Fehlerfrei, Pumpe läuft
4×/Sekunde
Fehlerfrei, Pumpe wechselt
gleich in Stand-by
–
Fehlerfrei, Pumpe ist im
Stand-by
–
Pumpe saugt kein Wasser-
1. Stufe Trockenlaufschutz
Warten
1×/Sekunde
Pumpe saugt kein Wasser
schutz
Warten
2×/Sekunde
Pumpe saugt kein Wasser
Modus
Warten
3×/Sekunde,
4. Stufe Trockenlaufschutz.
noch 2×
Warten oder Ur-
–
Störung, Pumpe hat Zyklus
Netzstecker zie-
stecken
1×/Sekunde
Prüfzyklus. Leckageschutz
Zyklen
Warten
–
Störung, 18 erfolglose Start-
Netzstecker zie-
stecken
LED ein
LED aus
LED blinkt
Betriebszustand und zugehörige LED-Anzeigen
• 2. Stufe Trockenlauf-
• 3. Stufe Trockenlauf-
schutz
• In der 4. Stufe schaltet
die Pumpe in den Warte-
8
jede LED im
Wechsel
Pumpe ist im Warte-Modus
sache suchen
für 120 s, danach beginnt
der Zyklus erneut, maximal
3× durchlaufen
hen, Saugseite
prüfen, Netzstek-
ker wieder ein-
beginnt nach 60 min, max. 2
versuche
hen, Druckseite
prüfen, Netzstek-
ker wieder ein-
Page 9
Störung
Ursache
Abhilfe
Pumpe läuft nicht an
Pumpe ist ausgeschaltet
Pumpe einschalten
Stromversorgung unterbrochen
Elektrische Steckverbindungen prüfen
Fehlerstrom-Schutzeinrichtung
Pumpe ausschalten und
OASE-Service kontaktieren
Pumpe war längere Zeit außer
Schraubendreher durch
Laufrad lösen.
Pumpe fördert nicht
Pumpe nicht ausreichend mit
Pumpe befüllen und si-
die Druckseite abfließt
Druckleitung verschlossen
• Entnahmestelle auf der
verlegen
Saugleitung verschlossen
• Anschluss Saugseite
verlegen
Undichtheit auf Saugseite
Undichtheit auf Saugseite
beseitigen
Filterdeckel-Dichtung defekt
Filterdeckel-Dichtung ersetzen
Filtereinsatz der Pumpe verstopft
Filter und Filterdeckel reinigen oder ersetzen
Filtereinsatz der Pumpe zu
Externen, größeren Vorfil-
Zubehör)
STÖRUNGSBESEITIGUNG
DE
WARNUNG
Gefährliche elektrische Spannung!
Tod oder schwere Verletzungen durch Stromschlag.
Vor Beginn der Arbeiten:
• Gerät ausschalten, Netzstecker ziehen und Gerät vor dem Einschalten sichern.
• Vor dem Betreten des Wassers oder dem Hineinfassen die Netzspannung aller im
Wasser befindlichen Geräte abschalten.
Nach Abschluss der Arbeiten:
• Alle Voraussetzungen für die Inbetriebnahme wieder herstellen.
oder fördert ungenügend
hat ausgelöst
Betrieb (z.B. Winterpause). Das
Laufrad sitzt fest
Wasser befüllt
Netzstecker ziehen. Dann
hinteres Serviceloch führen, drehen und so das
cherstellen, dass das eingefüllte Wasser nicht über
Druckseite öffnen
• Druckschlauch knickfrei
EN
FR
NL
ES
PT
IT
DA
NO
SV
FI
HU
PL
CS
SK
schnell verstopft
und Saugleitung reinigen
• Saugschlauch knickfrei
ter installieren (optionales
SL
HR
RO
BG
UK
RU
CN
9
Page 10

ProMax Garden Automatic 3500/4000/5000/6000
Störung
Ursache
Abhilfe
Pumpe schaltet nach
Überlastschutz hat die Pumpe
• Anschluss Saugseite
• Pumpe abkühlen lassen
Trockenlaufschutz hat die Pumpe
abgeschaltet
Ansaugöffnung und Saugleitung reinigen
Saugseitige Verstopfung
Ansaugöffnung und Saugleitung reinigen
Rückschlagventil defekt
• OASE-Service kontaktieren
kurzer Laufzeit ab
REINIGUNG UND WARTUNG
WARNUNG
Gefährliche elektrische Spannung!
Tod oder schwere Verletzungen durch
Stromschlag.
Vor Beginn der Arbeiten:
• Gerät ausschalten, Netzstecker ziehen
und Gerät vor dem Einschalten sichern.
• Vor dem Betreten des Wassers oder
dem Hineinfassen die Netzspannung aller im Wasser befindlichen Geräte abschalten.
Nach Abschluss der Arbeiten:
• Alle Voraussetzungen für die Inbetriebnahme wieder herstellen.
WARNUNG
Verletzungsgefahr durch heißes Wasser!
Verbrennung von Körperteilen.
• Bei defekter Elektronik oder fehlender
saugseitiger Wasserzufuhr kann das
noch in der Pumpe vorhandene Wasser
stark erhitzt sein.
• Vor Arbeiten am Gerät Netzspannung
abschalten.
• Pumpe über die Haussicherung vom
Netz trennen oder Stecker ziehen und
Wasser abkühlen lassen.
wegen Überhitzung abgeschaltet
HINWEIS
Empfehlung zur regelmäßigen Reinigung:
• Das Gerät nach Bedarf, aber mindestens 2 × jährlich, reinigen.
• Keine aggressiven Reinigungsmittel
oder chemische Lösungen verwenden,
da sie das Gehäuse beschädigen oder
die Funktion des Geräts beeinträchtigen
können.
• Nach dem Reinigen alle Teile mit klarem Wasser gründlich abspülen.
Filter reinigen
So gehen Sie vor:
E
1. Pumpe ausschalten.
2. Netzstecker ziehen.
3. Gegebenenfalls alle Absperreinrichtungen auf der Saugseite schließen.
4. Deckel der Filterkammer aufschrauben
und abnehmen.
5. Filtereinsatz herausziehen.
6. Filtereinsatz und Filterdeckel unter fließendem Wasser mit einer Bürste reinigen.
7. Filter in umgekehrter Reihenfolge wieder montieren.
und Saugleitung reinigen
10
Page 11

– Darauf achten, dass die Filterdeckel-
Dichtung vorhanden und unbeschädigt ist. Andernfalls ersetzen.
– Darauf achten, dass der Filterdeckel
wieder ordnungsgemäß aufgeschraubt ist.
8. Gerät in umgekehrter Reihenfolge zusammenbauen.
LAGERN/ÜBERWINTERN
Das Gerät ist nicht frostsicher und muss
bei zu erwartendem Frost deinstalliert und
eingelagert werden.
So lagern Sie das Gerät richtig:
• Gerät so weit wie möglich entleeren,
eine gründliche Reinigung durchführen
und auf Schäden überprüfen.
• Sämtliche Schläuche, Rohrleitungen
und Anschlüsse soweit wie möglich entleeren.
• Gerät gründlich reinigen, auf Beschädigungen prüfen, beschädigte Teile ersetzen.
• Gerät trocken und frostfrei lagern.
• Stecker nicht ins Wasser tauchen.
VERSCHLEIßTEILE
Folgende Komponenten sind Verschleißteile und unterliegen nicht der Gewährleistung:
• Filtereinsatz
• Laufrad
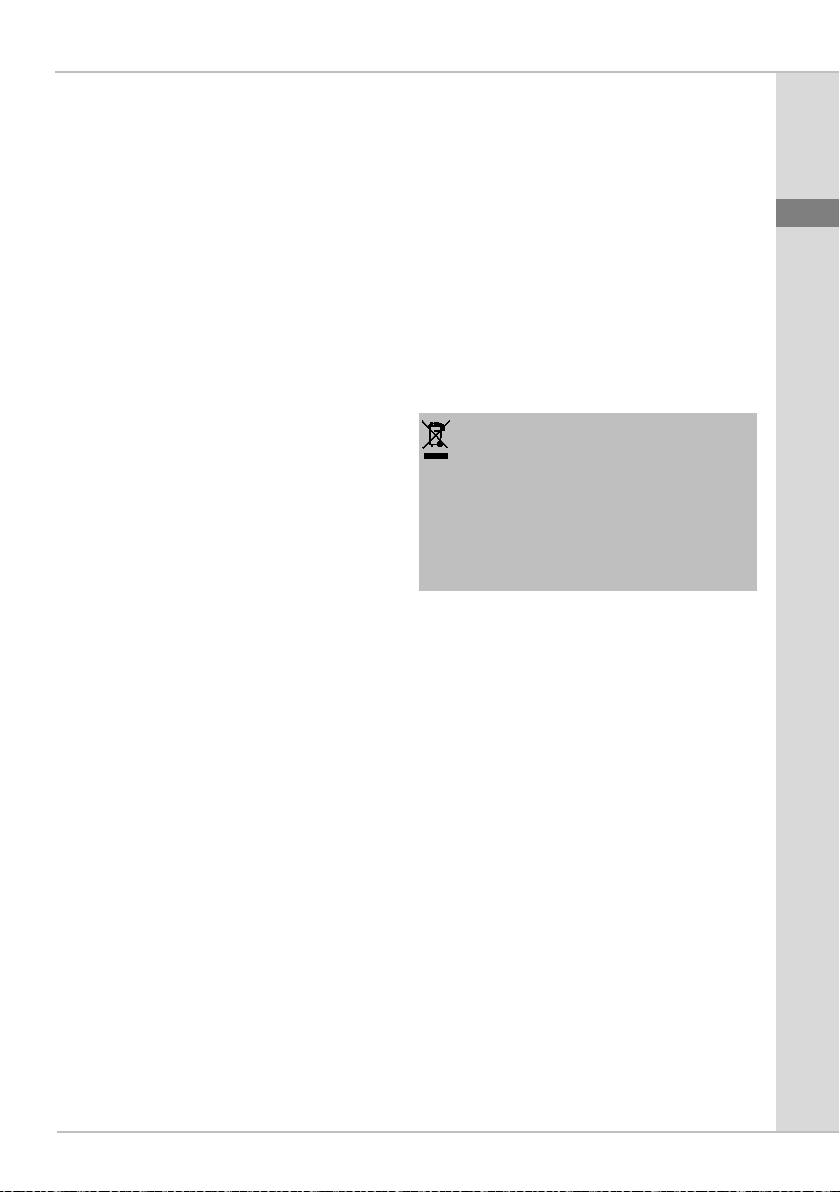
ENTSORGUNG
HINWEIS
Dieses Gerät darf nicht als Hausmüll entsorgt werden.
• Gerät durch Abschneiden der Kabel unbrauchbar machen und über das dafür
vorgesehene Rücknahmesystem entsorgen.
DE
EN
FR
NL
ES
PT
IT
DA
NO
SV
FI
HU
PL
CS
SK
SL
HR
RO
BG
UK
RU
CN
11
Page 12

ProMax Garden Automatic 3500/4000/5000/6000
ProMax Garden Automatic
3500
4000
5000
6000/5
Bemessungsspannung
V AC
230
230
230
230
Bemessungsfrequenz
Hz
50
50
50
50
Bemessungsleistung
maximal
W
900
1100
1200
1300
Schutzart
IPX4
IPX4
IPX4
IPX4
Luftschallemission
dB(A)
78
78
78
73
Anschluss Saug-/Druckseite
mm
G1
G1
G1
G1
Druck bar 4 4,5 5 5,8
Fördermenge
maximal
l/h
3500
4000
4700
5800
Förderhöhe
maximal
m
40
45
50
58
Ansaughöhe
maximal
m 8 8 8 8
Pumpenlaufwerk
Jet 1-stufig
1-stufig
1-stufig
5-stufig
Einschalten/Ausschalten
Taste
• • •
•
LED-Statusanzeige
• • •
•
Trockenlaufschutz
Sensor
Sensor
Sensor
Sensor
Korngröße
maximal
mm 2 2 2 2
Netzanschlussleitung
Länge m 1,5
1,5
1,5
1,5
Abmessungen
Länge
mm
543
543
543
591
Breite
mm
234
234
234
234
Höhe
mm
304
304
304
304
Gewicht
kg
11
11,2
11,4
14,3
TECHNISCHE DATEN
Innengewinde
12
Page 13
A
ProMax Garden Automatic 3500
/ 5000 / 6000/5
1
Transport handle with ON/OFF
button (13)
2
Connection, pressure side
3
Pre-filter cover
4
Connection, suction side
5
Pre-filter housing
6
Non-return valve opener
7
Water drain screw
8
Pump casing
9
Pump base
10
Motor housing
11
Power connection cable
12
Service hole
13
ON/OFF button with LED status
display
Translation of the original Operating
Instructions
INFORMATION ABOUT THIS OPERATING MANUAL
Welcome to OASE Living Water. You
made a good choice with the purchase of
this product ProMax Garden Automatic
3500/4000/5000/6000.
Prior to commissioning the unit, please
read the instructions of use carefully and
fully familiarise yourself with the unit. Ensure that all work on and with this unit is
only carried out in accordance with these
instructions.
Adhere to the safety information for the
correct and safe use of the unit.
Keep these instructions in a safe place!
Please also hand over the instructions
when passing the unit on to a new owner.
Symbols used in these instructions
Warnings
The warning information is categorised by
signal words, which indicate the extent of
the hazard.
WARNING
• Indicates a possibly hazardous situation.
• Non-observance may lead to death or
serious injuries.
NOTE
Indicates information intended to give the
user a better understanding.
Additional information
A Reference to a figure, e.g. Fig. A.
→ Reference to another section.
PRODUCT DESCRIPTION
Overview
Intended use
ProMax Garden Automatic
3500/4000/5000/6000, referred to in the
following as "unit", may only be used as
specified in the following:
• For transferring water from and draining
basins or ponds/pools.
• For irrigating and watering.
• For pumping clear water or rain water.
• Extraction of water from a well.
– Only for irrigation and watering pur-
poses!
• For pumping the water out of water
butts/rain barrels or cisterns.
– Size of the particles in the water: max.
2 mm.
• Operation under observance of the
technical data.
DE
EN
FR
NL
ES
PT
IT
DA
NO
SV
FI
HU
PL
CS
SK
SL
HR
RO
BG
UK
RU
CN
13
Page 14

ProMax Garden Automatic 3500/4000/5000/6000
Possible incorrect use
The following restrictions apply to the unit:
• Do not use for long-term operation (e.g.
continuous recirculation of the water in
a pond).
• Not suitable for salt water.
• Never use for pumping dirty wa-
ter/waste water.
• Do not connect to the domestic water
supply.
• Not suitable for drinking water.
• Do not use for commercial or industrial
purposes.
• Do not use in conjunction with chemicals, foodstuff, easily flammable or explosive substances.
SAFETY INFORMATION
This unit can be used by children aged 8 and above and by
persons with reduced physical,
sensory or mental capabilities
or lack of experience and
knowledge if they are supervised or have been instructed
on how to use the unit in a safe
way and they understand the
hazards involved.
Do not allow children to play
with the unit.
Only allow children to carry out
cleaning and user maintenance
under supervision.
Electrical connection
Ensure that the unit is fused for
a rated fault current of max.
30 mA by means of a fault current protection device.
• Only connect the unit if the electrical
data of the unit and the power supply
coincide. The unit data is to be found on
the unit type plate, on the packaging or
in this manual.
• Extension cables and power distributors
(e.g. outlet strips) must be suitable for
outdoor use (splash-proof).
• Protect the plug connections from moisture.
• Only plug the unit into a correctly fitted
socket.
Safe operation
If a power connection cable is
damaged, have it immediately
replaced by OASE, an authorised customer service or a
qualified electrician to prevent
electric shock.
• Minimum safety distance between the
unit and the water: 2 m.
• Do not expose the pump to rain or use
it in a wet or damp environment.
• Never operate the unit if either the electrical cables or the housing are defective!
• Do not carry or pull the unit by its electrical cable.
• Route cables/hoses such that they are
protected from damage and do not present a tripping hazard.
• Only open the unit housing or its attendant components, when this is explicitly required in the operating instructions.
• Only carry out work on the unit that is
described in this manual. If problems
cannot be overcome, please contact an
authorised customer service point or,
when in doubt, the manufacturer.
• Only use original spare parts and accessories for the unit.
14
Page 15
• Never carry out technical modifications
to the unit.
INSTALLATION AND CONNECTION
NOTE
For permanent installation of the pump,
use flexible compression-proof hoses to
connect it to the pipe network to reduce
the noise of the pump.
• Install the pump in a horizontal and stable position in a dry place.
– For permanent installation of the
pump, ensure that a sufficiently large
collecting basin can be positioned underneath the discharge screw for
emptying the pump.
• If possible, install the pump in a higher
position than the container/reservoir
from which the water is to be pumped. If
this is not possible, a pressure-proof
valve must be fitted between the pump
and the suction hose.
• Only use vacuum-proof pressure hoses
on the pressure and suction side.
NOTE
OASE recommends: Additionally fasten
the suction hose (e.g. by tying it to a
wooden stake) to relieve the weight of
the hose on the pump.
B
• Screw a suction and pressure hose with
25.0 mm internal diameter (1") onto the
connections.
OPERATION
Start-up of the device
It is necessary to fill the pump and expel
the air from the suction line before using it
for the first time. It can take several
minutes to expel air from the suction line.
How to proceed:
C
1. Unscrew the filter cover. A screwdriver
can be inserted from the side into the recesses of the cover to aid unscrewing.
2. Open the shut-off device in the pressure
line.
3. Pour water into the infill opening of the
pre-filter until it overflows. At the same
time, keep the non-return valve opener
open until the water has expelled any
remaining air from the filter.
4. Screw the filter cover back on.
5. Insert the power plug into the socket.
– The pump is ready for operation.
6. Switch on the pump. (→ Operation)
– The pump starts pumping immedi-
ately. The emerging water still contains some air.
NOTE
If no water is taken in after 5 minutes, the
dry run protection of the pump is activated.
7. Close the shut-off device of the pressure line as soon as there is no more air
in the emerging water. Air has now been
expelled from the suction line.
Shutting down the pump
NOTE
Rinse out the pump with clean water after
use.
How to proceed:
1. Switch off the pump
2. Disconnect the power plug.
3. Depressurise the pressure line by opening the water withdrawal points.
4. Also open any non-return valves fitted in
the suction line.
– When the pump is switched off, resid-
ual water in the hose may flow back
and out of the pump intake.
If the pump is to be completely removed:
D
DE
EN
FR
NL
ES
PT
IT
DA
NO
SV
FI
HU
PL
CS
SK
SL
HR
RO
BG
UK
RU
CN
15
Page 16
ProMax Garden Automatic 3500/4000/5000/6000
POX0041
1
Blue LED
2
Yellow LED
3
Red LED
4
ON/OFF button
5. Remove the connected hoses on the
pressure and suction side.
6. Undo the water drain screw and tip the
pump to allow the residual water to drain
out.
7. Screw in the water drain screw again.
OPERATION
• Cycle: Sensors monitor the water flow
and the water pressure, and switch the
pump on, off or into standby after a certain time when the pump cannot extract
any more water or the pressure line is
closed.
• The lit or flashing LEDs in the ON/OFF
button indicate the respective operating
status. (→ Operating status and attendant LED displays)
Establishing operational readiness:
Connect the pump to the power supply.
• The pump is ready for operation.
• All LEDs are lit.
For switching the pump on and off:
Press the ON/OFF button for less than 3 s.
• Once it is switched on, the automatic
mode takes control of the pump: Sensors repeatedly monitor whether the
water flow is below the minimum flow
rate or the water pressure below 1.5 bar.
Depending on the result, the pump is either operated with dry-run protection or
is switched back into standby by automatic mode.
Resetting automatic mode: Press the
ON/OFF button for at least 3 s.
16
Page 17

LED
Operating status
User
Blue
Yellow
Red
Flashing frequency
–
Pump is operational.
Switch on the
pump.
–
No malfunctions, pump is
running.
4× per second
No malfunctions, the pump
will soon switch to standby.
–
No malfunctions, the pump
is in standby.
–
Pump is not taking in water.
tion
Wait
1× per second
Pump is not taking in water
tection
Wait
2× per second
Pump is not taking in water.
mode.
Wait
3× per sec-
4th stage - dry run protec-
cle starts again, max. 2×
Wait or find the
–
Malfunction, pump has run
Disconnect the
the power plug.
1× per second
Test cycle. Leakage protec-
2 cycles.
Wait
–
Malfunction, 18 un-
Disconnect the
plug.
LED on
LED off
LED flashing
Operating status and attendant LED displays
DE
EN
FR
NL
ES
PT
IT
ond, each
LED alternately
1st stage - dry run protec-
• 2nd stage - dry run pro-
• 3rd stage - dry run pro-
tection
• In the 4th stage the pump
switches into waiting
tion.
The pump is in waiting
mode for 120 s, then the cy-
through cycle 3×
tion starts after 60 min, max.
successful start attempts
cause.
power plug,
check the suction
side, reconnect
power plug,
check the pressure side, reconnect the power
DA
NO
SV
FI
HU
PL
CS
SK
SL
HR
RO
BG
UK
RU
CN
17
Page 18
ProMax Garden Automatic 3500/4000/5000/6000
Malfunction
Cause
Remedy
Pump does not start.
The pump is switched off.
Switch on the pump.
Power supply interrupted
Check the electrical plug
connections.
The fault current protection de-
Switch off the pump and
Service.
The pump has been out of ser-
stuck.
Insert a screwdriver
peller.
The pump is not de-
The pump is not sufficiently filled
Fill the pump and ensure
that the water does not flow
out on the pressure side.
Pressure line blocked
• Open the water with-
without kinks.
Suction line blocked
• Clean the connection on
without kinks
Leak on the suction side
Eliminate leak on the suction side
Filter cover seal defective.
Replace the filter cover
seal.
Filter cartridge of the pump
clogged.
Clean or replace the filter
and filter cover.
REMEDY OF FAULTS
WARNING
Dangerous electrical voltage!
Death or severe injury from electrocution.
Prior to starting work:
• Switch off the unit, disconnect the power plug and secure the unit from being switched
on again.
• Before stepping into or reaching into the water, switch off all units located in the water.
On completion of the work:
• Restore all the prerequisites for start-up.
livering, or the delivered quantity is insufficient.
vice has tripped.
vice for a prolonged time (e.g.
during the winter). The impeller is
with water.
disconnect the power plug.
Then contact the OASE
through the rear service
hole, turn to release the im-
drawal point on the
pressure side.
• Route the pressure hose
the suction side and the
suction line
• Route the suction hose
18
Page 19
Malfunction
Cause
Remedy
Filter cartridge of the pump be-
Install an external, larger
sory).
Pump switches off
Overload protection has switched
• Clean the connection on
down.
Dry run protection has switched
off the pump.
Clean the intake and suction line.
Blockage on the suction side
Clean the intake and suction line.
Non-return valve defective.
• Contact the OASE service.
DE
comes clogged too soon.
after a short running
period.
MAINTENANCE AND CLEANING
WARNING
Dangerous electrical voltage!
Death or severe injury from electrocution.
Prior to starting work:
• Switch off the unit, disconnect the power
plug and secure the unit from being
switched on again.
• Before stepping into or reaching into the
water, switch off all units located in the
water.
On completion of the work:
• Restore all the prerequisites for startup.
WARNING
Risk of injury due to hot water!
Burns to parts of the body.
• Water remaining in the pump may be
heated to a high temperature in the
event of defective electronics or lack of
water supply on the suction side.
• Isolate the unit (disconnect from the
power supply) before carrying out any
work on it.
the pump off due to overheating.
pre-filter (optional acces-
the suction side and the
suction line.
• Allow the pump to cool
• Disconnect the pump from the mains at
the main circuit breaker or pull the
power plug, and allow the water to cool
down.
NOTE
Recommendation on regular cleaning:
• Clean the unit as required but at least
twice per year.
• Do not use aggressive cleaning agents
or chemical solutions as they could attack the housing or impair the function
of the unit.
• After cleaning, thoroughly rinse all parts
in clean water.
Cleanfilter
How to proceed:
E
1. Switch off the pump.
2. Disconnect the power plug.
3. Close all shut-off devices on the suction
side if applicable.
4. Unscrew the cover of the filter chamber
and remove.
5. Pull out the filter cartridge.
EN
FR
NL
ES
PT
IT
DA
NO
SV
FI
HU
PL
CS
SK
SL
HR
RO
BG
UK
RU
CN
19
Page 20

ProMax Garden Automatic 3500/4000/5000/6000
6. Clean the filter cartridge and filter cover
under running water using a brush.
7. Reassemble the filter in the reverse order.
– Ensure that the filter cover seal is in
place and undamaged. Otherwise replace it.
– Ensure that the filter cover is correctly
screwed on.
8. Reassemble the unit in the reverse order.
• Store the unit in a dry and frost-free
place.
• Do not immerse plugs in water.
WEAR PARTS
The following components are wear parts
and are excluded from the warranty:
• Filter cartridge.
• Impeller
STORAGE/OVER-WINTERING
The unit is not frost-proof and has to be
removed and put into storage if minus
temperatures are expected.
How to correctly store the unit:
• Drain the unit as far as possible, clean
thoroughly and check for damage.
• Empty all hoses, pipes and connections
as far as possible.
• Thoroughly clean the unit, check it for
damage and replace any damaged
parts.
DISPOSAL
NOTE
Do not dispose of this unit with domestic
waste.
• Render the unit unusable beforehand
by cutting the cables and dispose of the
unit via the return system provided for
this purpose.
20
Page 21
ProMax Garden Automatic
3500
4000
5000
6000/5
Rated voltage
V AC
230
230
230
230
Rated frequency
Hz
50
50
50
50
Rated power
Max. W 900
1100
1200
1300
Protection type
IPX4
IPX4
IPX4
IPX4
Airborne noise emitted
dB(A)
78
78
78
73
Connection, suction/pressure
internal thread
mm
G1
G1
G1
G1
Pressure
bar 4 4.5 5 5.8
Flow rate
Max.
l/h
3500
4000
4700
5800
Head height
Max. m 40
45
50
58
Suction head
Max. m 8 8 8
8
Pump mechanism
Jet 1-stage
1-stage
1-stage
5-stage
Switching
ON/switching OFF
Button
• • •
•
LED status display
• • •
•
Dry run protection
Sensor
Sensor
Sensor
Sensor
Particle size
Max.
mm 2 2 2 2
Power connection
cable
Length m 1.5
1.5
1.5
1.5
Dimensions
Length
mm
543
543
543
591
Width
mm
234
234
234
234
Height
mm
304
304
304
304
Weight
kg
11
11.2
11.4
14.3
TECHNICAL DATA
DE
EN
FR
NL
side
ES
PT
IT
DA
NO
SV
FI
HU
PL
CS
SK
SL
HR
RO
BG
UK
RU
CN
21
Page 22

ProMax Garden Automatic 3500/4000/5000/6000
A
ProMax Garden Automatic 3500
/ 5000 / 6000/5
1
Poignée avec touche Marche/Arrêt
(13)
2
Raccord côté refoulement
3
Couvercle pré-filtre
4
Raccordement côté aspiration
5
Corps du pré-filtre
6
Contact de repos du clapet anti-retour
7
Vis de vidange d'eau
8
Corps de pompe
9
Pied de la pompe
10
Carter du moteur
11
Câble d'alimentation électrique.
12
Trou de maintenance
13
Touche Marche/Arrêt avec affichage de statut par DEL
Traduction de la notice d'emploi originale
DESCRIPTION DU PRODUIT
Vue d'ensemble
EN CE QUI CONCERNE CETTE NOTICE D'EMPLOI
Bienvenue chez OASE Living Water.
Avec l'acquisition du produit, ProMax
Garden Automatic
3500/4000/5000/6000 vous avez fait le
bon choix.
Avant la première utilisation de l'appareil,
lire attentivement cette notice d'emploi et
se familiariser avec l'appareil. Tous les
travaux effectués avec et sur cet appareil
devront être exécutés conformément aux
directives ci-jointes.
Respecter impérativement les consignes
de sécurité relatives à une utilisation correcte et en toute sécurité.
Conserver soigneusement cette notice
d'emploi. Lors d'un changement de propriétaire, prière de transmettre également
cette notice d'emploi.
Utilisation conforme à la finalité
Symboles dans cette notice d'emploi
Avertissements
Dans cette notice, les avertissements sont
classés par mots de signalisation qui indiquent l'ampleur du risque.
AVERTISSEMENT
• signale une situation éventuellement
dangereuse.
• Le non-respect risque d'entraîner la
mort ou des blessures graves.
REMARQUE
Informations favorisant une meilleure
compréhension.
Autres remarques
A Renvoi à l'illustration, p. ex. Figure
ProMax Garden Automatic
3500/4000/5000/6000, appelé par la suite
«appareil», doit être utilisé exclusivement
comme suit :
• Remise en circulation et vidage par
pompage des réservoirs ou des bassins.
• Irrigation et arrosage.
• Refoulement d'eau claire ou d'eau de
pluie.
• Prise d'eau dans le puits.
– Uniquement pour irriguer et arroser !
• Prise d'eau dans des tonneaux de pluie
ou des citernes.
– Taille de grain des particules dans
l'eau : max. 2 mm.
• Exploitation dans le respect des données techniques.
A.
→ Renvoi à un autre chapitre.
22
Page 23

Éventuelle utilisation incorrecte
Les restrictions suivantes sont valables
pour l'appareil :
• A ne pas utiliser pour une exploitation à
long terme (p. ex mode de recirculation
en continu au point d'eau).
• Non compatible à l'eau salée.
• Ne jamais refouler d'eau polluée.
• A ne pas raccorder à l'alimentation en
eau potable.
• Non approprié pour l'eau potable.
• Ne pas utiliser à des fins commerciales
ou industrielles.
• Ne pas utiliser en relation avec des produits chimiques, des produits alimentaires, des matériaux facilement inflammables ou explosifs.
CONSIGNES DE SECURITE
Attention :
Dans le cas où cet appareil serait utilisé par des mineurs de
moins de 8 ans ainsi que par
des personnes souffrant d'un
handicap mental ou plus généralement par des personnes
manquant d'expérience, un
adulte averti devra être présent, qui renseignera le mineur
ou la personne fragilisée concernée sur le bon emploi de ce
matériel. Les enfants ne doivent pas jouer avec cet appareil. Ne pas laisser un enfant
sans surveillance pour le nettoyage ou l'entretien.
Raccordement électrique
Veiller à ce que l'appareil soit
absolument protégé par fusible
par le biais d’une protection différentielle avec un courant assigné de 30 mA maximum.
• Ne brancher l'appareil que lorsque les
caractéristiques électriques de l'appareil et de l'alimentation électrique correspondent. Les caractéristiques de
l'appareil sont indiquées sur la plaque
signalétique de l'appareil, sur l'emballage ou dans cette notice d'emploi.
• Les câbles de rallonge et le distributeur
de courant (p. ex. blocs multiprises) doivent être conçus pour une utilisation en
extérieur (protégé contre les projections
d'eau).
• Protéger les raccordements à fiche
contre l'humidité.
• Raccorder l'appareil uniquement à une
prise installée de manière réglementaire.
Exploitation sécurisée
Faire remplacer immédiatement un câble d'alimentation
électrique endommagé, par
OASE, un service d'assistance
agréé, ou par un électricien
qualifié afin d'éviter tout risque
d'électrocution.
• La distance de sécurité entre l'appareil
et la pièce d'eau doit être d'au moins
2 m.
• Ne pas exposer la pompe à la pluie et
ne pas l'utiliser dans un environnement
mouillé ou humide.
• En cas de lignes électriques défectueuses ou de corps défectueux, il est
interdit d'exploiter l'appareil.
• Ni porter, ni tirer l'appareil par le câble
électrique.
DE
EN
FR
NL
ES
PT
IT
DA
NO
SV
FI
HU
PL
CS
SK
SL
HR
RO
BG
UK
RU
CN
23
Page 24

ProMax Garden Automatic 3500/4000/5000/6000
• Poser les câbles de manière à ce qu'ils
soient protégés contre d'éventuels endommagements et veiller à ce que personne ne puisse trébucher.
• N'ouvrir le corps de l'appareil ou des
éléments s'y rapportant que si cela est
expressément sollicité dans la notice
d'emploi.
• Exécuter des travaux sur l'appareil uniquement si ces derniers sont décrits
dans la notice d'emploi. S'il est impossible de remédier aux problèmes, contacter le SAV agréé ou en cas de doute
le constructeur.
• N'utiliser que des pièces de rechange et
des accessoires d'origine pour l'appareil.
• Ne jamais procéder à des modifications
techniques sur l'appareil.
MISE EN PLACE ET RACCORDEMENT
REMARQUE
Pour réduire les bruits de pompe, en cas
d'installation stationnaire brancher la
pompe à la tuyauterie par le biais de
tuyaux flexibles résistants à la pression.
• Installer la pompe à l'horizontale et en
position stable au sec.
– En cas d'installation stationnaire, ab-
solument veiller à placer un récipient
collecteur de taille adéquate sous la
vis de vidange pour vider la pompe.
• Selon la possibilité, placer la pompe
plus haut que le réservoir à eau dans lequel l'eau est pompée. Sinon, monter
une vanne résistant à la pression entre
la pompe et le tuyau d'aspiration.
• Uniquement utiliser des tuyaux à vide
résistant à l'aspiration sur les côtés refoulement et aspiration.
REMARQUE
OASE préconise : Veiller à une fixation
supplémentaire du tuyau d'aspiration
(p. ex. l'attacher à un piquet en bois),
pour décharger la pompe de son poids.
B
• Visser le tuyau d'aspiration voire de refoulement d'un diamètre intérieur de
25,0 mm (1") aux raccords.
EXPLOITATION
Mise en service de l'appareil.
Avant d'utiliser la pompe pour la première
fois, remplir la pompe et purger le conduit
d'aspiration. La purge du conduit d'aspiration peut prendre quelques minutes.
Voici comment procéder :
C
1. Dévisser et enlever le couvercle du
filtre. Pour dévisser, il est possible d'utiliser un tournevis qui, en passant par le
côté, se place dans l'une des encoches
se trouvant sur le couvercle.
2. Ouvrir l'organe d'arrêt du conduit de refoulement.
3. Remplir d'eau par l'orifice de remplissage dans le pré-filtre jusqu'à ce qu'elle
déborde. En l'occurrence ouvrir le contact de repos du clapet anti-retour jusqu'à ce que l'eau ait évacuée l'air encore éventuellement présent dans le
filtre.
4. Remettre le couvercle du filtre en place
et le visser.
5. Brancher la fiche secteur dans la prise.
– La pompe est opérationnelle.
6. Connecter la pompe. (→ Utilisation)
– La pompe commence immédiatement
à refouler. L'eau qui s'écoule contient
encore de l'air.
24
Page 25
POX0041
1
LED bleue
2
DEL jaune
3
DEL rouge
4
Touche Marche/Arrêt
REMARQUE
Si, après 5 minutes, de l'eau n'est toujours pas aspirée, la pompe entame la
protection contre la marche à sec.
7. Fermer l'organe d'arrêt du conduit de refoulement dès que l'eau qui s'écoule est
exempte d'air. Le conduit d'aspiration
est maintenant purgé.
Mise hors circuit de l'appareil.
REMARQUE
Après son utilisation, bien rincer la
pompe à l'eau claire.
Voici comment procéder :
1. Déconnecter la pompe
2. Débrancher la prise secteur.
3. Réduire la pression du conduit de refoulement à zéro en ouvrant les prises
(points de prélèvement).
4. Ouvrir les clapets anti-retour intégrés en
plus dans le conduit aspiration.
– Après la mise hors circuit, de l'eau ré-
siduelle risque d'être refoulée dans le
tuyau et de s'écouler par l'orifice
d'aspiration de la pompe.
En cas de démontage complet de la
pompe :
D
5. enlever les tuyaux branchés côté refoulement et aspiration.
6. Dévisser la vis de vidange d'eau et laisser l'eau restante s'écouler en inclinant
la pompe.
7. Revisser la vis de vidange d'eau.
UTILISATION
• Cycle : des capteurs surveillent le flux
d'eau et la pression de l'eau et, après
une durée déterminée, ils connectent,
déconnectent la pompe ou la mettent en
veille lorsque la pompe n'est pas en mesure d'aspirer de l'eau ou lorsque le
conduit de refoulement est fermé.
• Les DEL dans la touche Marche/Arrêt
signalent l'état de fonctionnement soit
en s'allumant, soit en clignotant. (→ État
de fonctionnement et affichages DEL
s'y rapportant)
Établir la disponibilité : Brancher la
pompe sur le secteur.
• La pompe est opérationnelle.
• Toutes les DEL sont allumées.
Connexion et déconnexion de la
pompe Maintenir la touche Marche/Arrêt
appuyée pendant moins de 3 secondes.
• Après la mise en circuit, la commande
de la pompe est prise en charge par le
système automatique : des capteurs
contrôlent périodiquement si le débit
d'eau est inférieur au débit minimal ou
si la pression d'eau est inférieure à
1,5 bar. Selon le résultat, soit la pompe
fonctionne avec le dispositif de protection contre la marche à sec, soit elle est
repassée en veille par le système automatique.
Exécution de la réinitialisation du système automatique : Maintenir la touche
Marche/Arrêt appuyée pendant au moins
3 secondes.
DE
EN
FR
NL
ES
PT
IT
DA
NO
SV
FI
HU
PL
CS
SK
SL
HR
RO
BG
UK
RU
CN
25
Page 26

ProMax Garden Automatic 3500/4000/5000/6000
DEL
État de fonctionnement
Utilisateur
bleu
jaune
rouge Fréquence de
clignotement
–
Pompe opérationnelle
Connecter la
pompe
–
Pas de défaut, la pompe
fonctionne
4 fois par seconde
Pas de défaut, la pompe
passe aussitôt en veille
–
Pas de défaut, la pompe est
en veille
–
La pompe n'aspire pas d’air
la marche à sec
Attendre
1 fois par se-
La pompe n'aspire pas d'eau
contre la marche à sec
Attendre
2 fois par se-
La pompe n'aspire pas d'eau
passe au mode Attente
Attendre
3 fois par se-
4e niveau protection contre
mum encore 2 fois
Attendre ou iden-
–
Défaut, la pompe a effectué
Débrancher la
secteur
1 fois par se-
Cycle d'essai. La protection
60 min, au max. 2 cycles
Attendre
–
Défaut, 18 tentatives de dé-
Débrancher la
secteur
DEL allumée
DEL éteinte
DEL clignote
État de fonctionnement et affichages DEL s'y rapportant
1er niveau protection contre
conde
conde
conde,
chaque DEL
en alternance
conde
• 2e niveau protection
• 3e niveau protection
contre la marche à sec
• Au 4e niveau, la pompe
la marche à sec
La pompe est en mode Attente pour 120 s, puis le
cycle redémarre, au maxi-
3 fois le cycle
anti-fuite commence après
marrage échouées
tifier la cause
fiche secteur,
contrôler le côté
aspiration, rebrancher la fiche
fiche secteur,
contrôler le côté
refoulement, rebrancher la fiche
26
Page 27
Défaut
Cause
Remède
La pompe ne dé-
La pompe est hors circuit
Mise en circuit de la pompe
Alimentation en courant coupée
Vérifier les raccords à
fiches électriques
Le fusible pour courant de fuite a
Couper la pompe et dé-
OASE
La pompe est restée déconnectée pendant une longue durée (p.
est bloquée.
Introduire le tournevis dans
bloquer ainsi la turbine.
La pompe ne refoule
Le remplissage d'eau de la
Remplir la pompe et
refoulement
Conduit de refoulement fermé
• Ouvrir la prise (point de
lement sans le plier
Conduit d'aspiration fermé
• Nettoyer le raccord côté
tion sans le plier
Fuite sur le côté aspiration
Remédier à la fuite sur le
côté aspiration
Joint du couvercle du filtre défectueux
Remplacer le joint du couvercle du filtre
Cartouche filtrante de la pompe
Nettoyer le filtre et le cou-
placer
ÉLIMINATION DES DERANGEMENTS
DE
AVERTISSEMENT
Tension électrique dangereuse !
Mort ou blessures graves par choc électrique.
Avant d'entamer les travaux :
• Couper l'appareil, tirer la prise et protéger l'appareil contre toute remise en circuit.
• Avant d'entrer dans l'eau ou avant d'y mettre les mains, toujours couper la tension de
réseau de tous les appareils se trouvant dans l'eau.
Après l'achèvement des travaux :
• rétablir tous les prérequis de mise en circuit.
marre pas
pas ou ne refoule
pas assez
sauté
ex. pause hivernale). La turbine
pompe est insuffisant
brancher la prise de courant. Puis contacter le SAV
le trou de maintenance,
tourner le tournevis et dé-
s'assurer que l'eau remplie
ne s'écoule pas par le côté
prélèvement) sur le côté
refoulement
• Poser le tuyau de refou-
EN
FR
NL
ES
PT
IT
DA
NO
SV
FI
HU
PL
CS
SK
SL
colmatée
aspiration et le conduit
d'aspiration
• Poser le tuyau d'aspira-
vercle du filtre ou les rem-
HR
RO
BG
UK
RU
CN
27
Page 28
ProMax Garden Automatic 3500/4000/5000/6000
Défaut
Cause
Remède
Cartouche filtrante trop vite col-
Installer un pré-filtre ex-
soire en option)
La pompe s'arrête
Le dispositif de sécurité contre
• Nettoyer le raccord côté
pompe
Le dispositif de protection contre
pompe
Nettoyer l'orifice d'aspira-
tion
Colmatage/engorgement côté as-
Nettoyer l'orifice d'aspira-
tion
Clapet anti-retour défectueux
• Contacter le SAV OASE
(déclenchement)
après une courte période de marche
NETTOYAGE ET ENTRETIEN
AVERTISSEMENT
Tension électrique dangereuse !
Mort ou blessures graves par choc
électrique.
Avant d'entamer les travaux :
• Couper l'appareil, tirer la prise et protéger l'appareil contre toute remise en circuit.
• Avant d'entrer dans l'eau ou avant d'y
mettre les mains, toujours couper la tension de réseau de tous les appareils se
trouvant dans l'eau.
Après l'achèvement des travaux :
• rétablir tous les prérequis de mise en
circuit.
AVERTISSEMENT
Risque de blessure par l'eau brûlante !
Brûlures sur des parties du corps.
• En cas d'électronique défectueuse ou
d'alimentation en eau manquante côté
aspiration, l'eau encore contenue dans
la pompe risque de chauffer avec excès.
• Couper la tension secteur avant toute
exécution de travaux sur l'appareil.
matée
les surcharges a arrêté la pompe
pour cause de surchauffe
la marche à sec a coupé la
piration
• Couper la pompe du secteur par le biais
du fusible principal ou débrancher la
fiche mâle et laisser l'eau s'écouler.
REMARQUE
Recommandations pour un nettoyage régulier :
• Nettoyer l'appareil en fonction du besoin, néanmoins 2 fois par an au moins.
• N'utiliser ni des produits de nettoyage
agressifs, ni des solutions chimiques
qui risqueraient d'attaquer le corps ou
d'entraver le fonctionnement de l'appareil.
• Après le nettoyage, rincer méticuleusement toutes les pièces à l'eau claire.
Nettoyer le filtre
Voici comment procéder :
E
1. Déconnecter la pompe.
2. Débrancher la prise secteur.
3. Le cas échéant, fermer tous les dispositifs d'arrêt sur le côté aspiration.
4. Dévisser le couvercle de la chambre de
filtration et l'enlever.
terne, plus grand (acces-
aspiration et le conduit
d'aspiration
• Laisser refroidir la
tion et le conduit d'aspira-
tion et le conduit d'aspira-
28
Page 29
5. Sortir la cartouche filtrante.
6. Nettoyer la cartouche filtrante et le couvercle du filtre avec une brosse, sous
l'eau courante.
7. Remonter le filtre en suivant l'ordre inverse.
– Veiller à ce que le joint du couvercle
du filtre soit présent et non endommagé. Sinon le remplacer.
– Veiller à ce que le couvercle du filtre
soit réglementairement remis en
place et vissé.
8. Remonter l'appareil en suivant l'ordre
inverse.
• Stocker la pompe au sec et à l'abri du
gel.
• Ne pas immerger la prise dans l'eau !
PIECES D'USURE
Les composants suivants sont des pièces
d'usure et ne sont pas couverts par la garantie.
• Cartouche filtrante
• Turbine
RECYCLAGE
DE
EN
FR
NL
ES
PT
IT
STOCKAGE/ENTREPOSAGE POUR L'HIVER
L'appareil n'est pas résistant au gel et doit
absolument être désinstallé et entreposé
lorsque du gel est prévu.
Ci-après, la méthode optimale pour entreposer l'appareil :
• Vidanger l'appareil autant qu'il est possible de le faire, procéder à un nettoyage soigneux et vérifier l'absence de
dommages.
• Vider l'ensemble des tuyaux, conduites
et raccordements autant que possible.
• Nettoyer méticuleusement l'appareil,
l'inspecter pour déceler toute présence
éventuelle de dommages, absolument
remplacer toute pièce endommagée.
REMARQUE
Il est interdit de mettre cet appareil au rebut en l'évacuant vers la gestion des ordures ménagères.
• Rendre l'appareil inutilisable en coupant
le câble et le mettre au rebut en utilisant
le système de retour prévu à cet effet.
DA
NO
SV
FI
HU
PL
CS
SK
SL
HR
RO
BG
UK
RU
CN
29
Page 30

ProMax Garden Automatic 3500/4000/5000/6000
ProMax Garden Automatic
3500
4000
5000
6000/5
Tension assignée
V AC
230
230
230
230
Fréquence de réseau
Hz
50
50
50
50
Puissance de réseau
maximal
W
900
1100
1200
1300
Indice de protection
IPX4
IPX4
IPX4
IPX4
Bruit aérien
dB(A)
78
78
78
73
Raccord côté aspiration/refoule-
filet femelle
mm
G1
G1
G1
G1
Pression
bar 4 4,5 5 5,8
Débit de la pompe
maximal
l/h
3500
4000
4700
5800
Hauteur de refoulement
maximal
m
40
45
50
58
Hauteur d'aspiration
maximal
m 8 8 8 8
Mécanisme de pompage
Jet 1 niveau
1 niveau
1 niveau
5 niveau
Enclenchement (mar-
(arrêt)
Touche
• • •
•
Affichage de statut par
DEL
• • •
•
Dispositif de protection
contre la marche à sec
Capteur
Capteur
Capteur
Capteur
Dimension du grain
maximal
mm 2 2 2 2
Câble d'alimentation
électrique.
Longueur
m
1,5
1,5
1,5
1,5
Dimensions
Longueur
mm
543
543
543
591
Largeur
mm
234
234
234
234
Hauteur
mm
304
304
304
304
Poids
kg
11
11,2
11,4
14,3
CARACTERISTIQUES TECHNIQUES
ment
che) / Déclenchement
30
Page 31

A
ProMax Garden Automatic 3500
/ 5000 / 6000/5
1
Draaggreep met aan/uit-toets (13)
2
Aansluiting drukzijde
3
Deksel voorfilter
4
Aansluiting zuigzijde
5
Voorfilterhuis
6
Terugslagventielopener
7
Wateraftapschroef
8
Pompbehuizing
9
Pompvoet
10
Motorbehuizing
11
Netaansluitkabel
12
Serviceopening
13
Aan-/uit-toets met LEDstatusindicatie
Vertaling van de oorspronkelijke gebruiksaanwijzing
OVER DEZE GEBRUIKSAANWIJZING
Welkom bij OASE Living Water. Met de
aanschaf van het product ProMax Gar-
den Automatic 3500/4000/5000/6000
heeft u een goede keuze gemaakt.
Voordat u het apparaat in gebruik neemt
dient u de gebruiksaanwijzing zorgvuldig
door te lezen en zich met het apparaat
vertrouwd te maken. Alle werkzaamheden
aan en met dit apparaat mogen uitsluitend
verricht worden als ze conform de onderhavige handleiding zijn.
Houdt u zich voor een juist en veilig gebruik stipt aan de veiligheidsvoorschriften.
Bewaar deze gebruiksaanwijzing zorgvuldig. Geef de gebruiksaanwijzing aan de
nieuwe eigenaar wanneer het apparaat
van eigenaar verwisselt.
Symbolen in deze handleiding
Waarschuwingen
De waarschuwingen in deze handleiding
zijn met signaalwoorden gemarkeerd, die
de mate van gevaar aangeven.
WAARSCHUWING
• Betekent een mogelijk gevaarlijke situatie.
• Bij niet aanhouden van de instructie kan
dodelijk of ernstig lichamelijk letsel het
gevolg zijn.
OPMERKING
Informatie, die is bedoeld voor een beter
begrip.
Overige instructies
A Verwijst naar een afbeelding, bij-
voorbeeld afbeelding A.
→ Verwijst naar een ander hoofdstuk.
PRODUCTBESCHRIJVING
Overzicht
DE
EN
FR
NL
ES
PT
IT
DA
NO
Beoogd gebruik
ProMax Garden Automatic
3500/4000/5000/6000, verder "apparaat"
genoemd, mag alleen als volgt worden
gebruikt:
• Ompompen en leegpompen van reservoirs of bassins.
• Irrigeren en besproeien.
• Transporteren van schoon water of re-
genwater.
• Waterafname uit bronnen.
– Alleen voor sproeien en gieten!
• Waterafname uit regentonnen of stortbakken.
– Korrelgrootte van deeltjes In water
maximaal 2 mm.
• Gebruik onder naleving van de technische gegevens.
SV
FI
HU
PL
CS
SK
SL
HR
RO
BG
UK
RU
CN
31
Page 32

ProMax Garden Automatic 3500/4000/5000/6000
Mogelijk verkeerd gebruik
De volgende inperkingen gelden voor het
apparaat:
• Niet toepassen voor continu bedrijf (bijvoorbeeld constant circuleren in een vijver).
• Niet geschikt voor zoutwater.
• Nooit vervuild water verpompen.
• Niet op de drinkwatervoorziening aan-
sluiten.
• Niet geschikt voor drinkwater.
• Niet gebruiken voor commerciële of in-
dustriële doeleinden.
• Niet gebruiken in combinatie met chemicaliën, levensmiddelen, licht brandbare of explosieve stoffen.
VEILIGHEIDSINSTRUCTIES
Dit apparaat kan worden gebruikt door kinderen vanaf
8 jaar en daarnaast door personen met verminderde fysieke, sensorische of mentale
vermogens of een gebrek aan
ervaring en kennis, mits zij onder toezicht staan of geïnstrueerd werden over het veilige
gebruik van het apparaat en de
gevaren begrijpen, die hiermee
samenhangen.
Kinderen mogen niet met het
apparaat spelen.
Reiniging en onderhoud door
de gebruiker mogen niet worden uitgevoerd door kinderen,
die niet onder toezicht staan.
Elektrische aansluiting
Het apparaat moet beveiligd
zijn via een aardlekschakelaar
met een vastgestelde lekstroom van maximaal 30 mA.
• Sluit het apparaat alleen aan, wanneer
de elektrische gegevens van het apparaat en de voeding overeenkomen. De
apparatuurgegevens bevinden zich op
het typeplaatje op het apparaat, op de
verpakking, of in deze handleiding.
• Verlengkabels en stroomverdelers (bijv.
stekkerdelen) moeten voor het gebruik
buitenshuis geschikt zijn (spatwaterbestendig).
• Bescherm de stekkerverbindingen tegen vochtigheid.
• Gebruik het apparaat uitsluitend op een
volgens de voorschriften geïnstalleerde
contactdoos.
Veilig gebruik
Een beschadigde netaansluitkabel direct door OASE, een
geautoriseerde servicedienst of
een gekwalificeerde elektrotechnicus laten vervangen om
gevaar door elektrocutie te vermijden.
• De veiligheidsafstand tussen het apparaat en het water moet minstens 2 m bedragen.
• Pomp niet blootstellen aan regen en
niet in een natte of vochtige omgeving
gebruiken.
• Gebruik het apparaat niet als er sprake
is van defecte elektrische kabels of een
defecte behuizing.
• Het apparaat niet aan de elektrische leiding dragen of aan de leiding trekken.
• Installeer de leidingen zodat deze tegen
beschadigingen zijn beschermd en let
32
Page 33

erop, dat er niemand over kan struikelen.
• Maak de behuizing van het apparaat of
onderdelen ervan alleen open als daar
in de gebruiksaanwijzing uitdrukkelijk
om gevraagd wordt.
• Voer alleen werkzaamheden aan het
apparaat uit, die in deze gebruiksaanwijzing zijn beschreven. Neem contact
op met een erkende serviceafdeling of
bij twijfel met de fabrikant, in het geval
dat problemen niet kunnen worden verholpen.
• Gebruik alleen originele vervangingsonderdelen en -toebehoren voor het apparaat.
• Breng nooit technische veranderingen
aan het apparaat aan.
PLAATSEN EN AANSLUITEN
OPMERKING
Om de geluiden van de pomp te reduceren, de pomp bij een vaste installatie via
flexibele, drukvaste slangleidingen met
het leidingnet verbinden.
• Pomp horizontaal en standvastig, droog
opstellen.
– Let erop bij een vaste installatie, dat
voor het aftappen van de pomp een
voldoende grote opvangbak onder de
aftapschroef kan worden geplaatst.
• Pomp zo mogelijk hoger opstellen dan
het waterreservoir, waaruit moet worden gepompt. Anders tussen de pomp
en de zuigslang een drukvast ventiel
monteren.
• Alleen zuigvaste vacuümslangen aan
de perszijde en de zuigzijde gebruiken.
OPMERKING
OASE adviseert: Zuigslang extra bevestigen (bijvoorbeeld aan een houten blok
bevestigen), om de pomp van het eigengewicht te ontlasten.
B
• Zuig- resp. drukslang met 25,0 mm binnendiameter (1") op de aansluitingen
schroeven.
WERKING
Inbedrijfstelling van het apparaat
Voor het eerste gebruik moet de pomp
worden gevuld en moet de zuigleiding
worden ontlucht. Het ontluchten van de
zuigleiding kan enkele minuten duren.
Zo gaat u te werk:
C
1. Filterdeksel afschroeven. Als draaihulp
kan een schroevendraaier vanaf de zijkant in een van de uitsparingen in het
deksel worden geplaatst.
2. Afsluiting van de persleiding openen.
3. In de vulopening in het voorfilter water
vullen tot deze overstroomt. Daarbij de
terugslagklepopener net zolang openen, tot het water de in het filter eventueel nog aanwezig lucht heeft verdrongen.
4. Filterdeksel weer opschroeven.
5. Plaats de netstekker in de contactdoos.
– De pomp is gebruiksklaar.
6. Pomp aanzetten. (→ Bediening)
– De pomp begint direct te pompen. In
het naar buiten komende water zit
nog lucht.
OPMERKING
Wanneer na 5 minuten nog geen water
wordt aangezogen, start de pomp de
droogloopbeveiliging.
7. Afsluiting van de persleiding sluiten, zodra in het ontsnappende water geen
lucht meer aanwezig is. De zuigleiding
is nu ontlucht.
DE
EN
FR
NL
ES
PT
IT
DA
NO
SV
FI
HU
PL
CS
SK
SL
HR
RO
BG
UK
RU
CN
33
Page 34

ProMax Garden Automatic 3500/4000/5000/6000
POX0041
1
LED blauw
2
LED geel
3
LED rood
4
Aan-/uit-toets
Buitenbedrijfstelling van het apparaat
OPMERKING
Na het gebruik de pomp met schoon water doorspoelen.
Zo gaat u te werk:
1. Pomp uitschakelen
2. Trek de netstekker uit de contactdoos.
3. Drukleiding door openen van de aftapplaatsen drukloos maken.
4. Bovendien in de zuigleiding ingebouwde terugslagkleppen openen.
– Na het uitschakelen kan het restwater
in de slang terugstromen en door de
aanzuigopening van de pomp naar
buiten komen.
De pomp volledig gedemonteerd wordt:
D
5. Aangesloten slangen aan de pers- en
zuigzijde verwijderen.
6. Wateraftapschroef uitdraaien en resterende water door kantelen van de pomp
laten uitstromen.
7. Wateraftapschroef weer inschroeven.
BEDIENING
• Cyclus Sensoren bewaken de water-
doorstroming en de waterdruk en schakelen na een bepaalde tijd de pomp uit
of in standby, wanneer de pomp geen
water kan aanzuigen of de persleiding
verstopt zit.
• De LED´s in de aan-/uit-toets signaleren
door branden of knipperen de actuele
bedrijfstoestand. (→ Bedrijfstoestand
en bijbehorende LED-indicatie)
Gereed voor gebruik maken: Pomp met
stroomnet verbinden.
• De pomp is gebruiksklaar.
• Alle LED's branden:
In- en uitschakelen van de pomp: Aan/uit-toets minder dan 3 s ingedrukt houden:
• Na het inschakelen neemt de automaat
de pompregeling over. Sensoren controleren herhaaldelijk, of de waterdoorstroming onder de minimale capaciteit
ligt en of de waterdruk onder 1,5 bar ligt.
Afhankelijk van het resultaat wordt de
pomp beveiligd tegen drooglopen of
wordt deze door de automaat weer in
standby geschakeld.
Reset van de automaat uitvoeren: Aan/uit-toets minimaal 3 s ingedrukt houden.
34
Page 35

LED
Bedrijfstoestand
Gebruiker
blauw geel
rood
Knipperfrequentie
–
Pomp gebruiksklaar
Pomp inschakelen
–
Storingsvrij, pomp draait
4×/seconde
Storingsvrij, pomp gaat direct in standby
–
Storingsvrij, pomp is in
standby
–
Pomp zuigt geen water aan
ging
Wachten
1×/seconde
Pomp zuigt geen water aan
veiliging
Wachten
2×/seconde
Pomp zuigt geen water aan
dus
Wachten
3×/seconde,
4e niveau droogloopbeveili-
nieuw, maximaal 2×
Wachten of
–
Storing, de pomp heeft de
Netstekker los-
sluiten.
1×/seconde
Testcyclus Lekkagebeveili-
maal 2 cycli
Wachten
–
Storing, 18 mislukte startpo-
Netstekker los-
sluiten.
LED aan
LED uit
LED knippert
Bedrijfstoestand en bijbehorende LED-indicatie
DE
EN
FR
NL
ES
PT
elke LED afwisselend
1e niveau droogloopbeveili-
• 2e niveau droogloopbe-
• 3e niveau droogloopbe-
veiliging
• In het 4e niveau schakelt
de pomp in de wachtmo-
ging.
Pomp staat in de wachtmodus gedurende 120 s,
daarna begint de cyclus op-
cyclus 3× doorlopen.
ging begint na 60 min, maxi-
oorzaak zoeken
trekken, zuigzijde
controleren, netstekker weer aan-
IT
DA
NO
SV
FI
HU
PL
CS
SK
SL
HR
RO
BG
gingen
trekken, perszijde
controleren, netstekker weer aan-
UK
RU
CN
35
Page 36

ProMax Garden Automatic 3500/4000/5000/6000
Storing
Oorzaak
Oplossing
Pomp start niet
Pomp is uitgeschakeld
Pomp inschakelen
Voeding onderbroken
Controleer de elektrische
stekkers
Aardlekschakelaar is geactiveerd
Pomp uitschakelen en net-
OASE-service
Pomp was langere tijd buiten be-
Schroevendraaier door de
maken.
Pomp pompt niet of
Pomp niet voldoende met water
Pomp vullen en waarbor-
stroomt
Persleiding afgesloten
• Aftap aan de perszijde
zonder knikken
Zuigleiding afgesloten
• Aansluiting zuigzijde en
zonder knikken
Lekkage aan de zuigzijde
Lekkage aan de zuigzijde
oplossen
Afdichting filterdeksel defect
Afdichting filterdeksel vervangen
Filterelement van de pomp verstopt
Filter en filterdeksel reinigen of vervangen.
Filterelement van de pomp te
snel verstopt
Extern, groot voorfilter installeren (optie)
STORINGEN VERHELPEN
WAARSCHUWING
Gevaarlijke elektrische spanning!
Ernstig letsel of zelfs overlijden, door elektrische schokken.
Voor aanvang van de werkzaamheden:
• Schakel het apparaat uit en zorg ervoor dat deze niet per ongeluk kan worden ingeschakeld.
• ?Voor het betreden van het water of daarin grijpen de netspanning van alle apparaten
die zich in het water bevinden uitschakelen.
Na afronden van de werkzaamheden:
• Waarborg dat weer aan alle voorwaarden voor de inbedrijfstelling wordt voldaan.
stekker loskoppelen. Contact opnemen met de
onvoldoende
36
drijf (bijvoorbeeld winterpauze).
De rotor zit vast
gevuld
achterste service-opening
plaatsen en zo de rotor los-
gen, dat het gevulde water
niet via de perszijde weg-
openen
• Drukslang installeren
zuigleiding reinigen
• Zuigslang installeren
Page 37

Storing
Oorzaak
Oplossing
Pomp schakelt na
Overbelastingsbeveiliging heeft
• Aansluiting zuigzijde en
• Pomp laten afkoelen
Droogloopbeveiliging heeft de
pomp uitgeschakeld
Aanzuigopening en zuigleiding reinigen
Verstopping aan zuigzijde
Aanzuigopening en zuigleiding reinigen
Terugslagklep defect
• Contact opnemen met
OASE-service
DE
korte looptijd uit
REINIGING EN ONDERHOUD
WAARSCHUWING
Gevaarlijke elektrische spanning!
Ernstig letsel of zelfs overlijden, door
elektrische schokken.
Voor aanvang van de werkzaamheden:
• Schakel het apparaat uit en zorg ervoor
dat deze niet per ongeluk kan worden
ingeschakeld.
• ?Voor het betreden van het water of
daarin grijpen de netspanning van alle
apparaten die zich in het water bevinden uitschakelen.
Na afronden van de werkzaamheden:
• Waarborg dat weer aan alle voorwaarden voor de inbedrijfstelling wordt voldaan.
WAARSCHUWING
Gevaar voor lichamelijk letsel door heet
water!
Verbranding van lichaamsdelen.
• Bij defecte elektronica of ontbrekende
watertoevoer aan de zuigzijde kan het
nog in de pomp aanwezige water sterk
verhit raken.
• De netspanning uitschakelen voordat er
aan het apparaat mag worden gewerkt.
• Scheid de pomp via de huiszekering
van het net of trek de stekker los en laat
het water afkoelen.
de pomp vanwege oververhitting
uitgeschakeld
zuigleiding reinigen
OPMERKING
Aanbeveling voor regelmatige reiniging:
• Het apparaat indien nodig, maar minstens 2 x per jaar reinigen.
• Gebruik geen agressieve reinigingsmiddelen of chemische oplossingen omdat
daardoor de behuizing of de werking
kan worden aangetast.
• Na het reinigen alle delen met schoon
water afspoelen.
Filter reinigen
Zo gaat u te werk:
E
1. Pomp uitzetten.
2. Trek de netstekker uit de contactdoos.
3. Eventueel alle afsluiters aan de zuigzijde sluiten.
4. Deksel van de filterkamer afschroeven
en wegnemen.
5. Filterelement eruit trekken.
6. Reinig het filterelement en het filterdeksel met een borstel onder stromend water.
7. Filter in omgekeerde volgorde weer
monteren.
– Let erop, dat de afdichting van het fil-
terdeksel aanwezig en onbeschadigd
is. Anders vervangen.
– Let erop, dat het filterdeksel weer cor-
rect is opgeschroefd.
EN
FR
NL
ES
PT
IT
DA
NO
SV
FI
HU
PL
CS
SK
SL
HR
RO
BG
UK
RU
CN
37
Page 38

ProMax Garden Automatic 3500/4000/5000/6000
8. Bouw het apparaat in omgekeerde volgorde samen.
• Sla het apparaat droog en vorstvrij op.
• Steker niet in het water dompelen.
OPSLAG EN OVERWINTERING
Het apparaat is niet bestand tegen vorst
en moet bij verwachte vorst gedemonteerd en opgeslagen worden.
Zo slaat u het apparaat correct op:
• Maak het apparaat zo goed mogelijk
leeg, reinig het grondig en controleer of
het beschadigd is.
• Maak alle slangen, buizen en aansluitingen zo goed mogelijk leeg.
• Apparaat grondig reinigen, op beschadigingen controleren, beschadigde onderdelen vervangen.
SLIJTAGEDELEN
De volgende componenten zijn slijtageonderdelen en vallen niet onder de garantie:
• Filterelement
• Schoepenrad
AFVOER VAN HET AFGEDANKTE APPARAAT
OPMERKING
Dit apparaat niet met het huishoudelijk
afval afvoeren!
• Apparaat door afknippen van de netvoedingskabel onbruikbar maken en via
het daarvoor bedoelde innamesysteem
afvoeren.
38
Page 39

ProMax Garden Automatic
3500
4000
5000
6000/5
Nominale spanning
V~
230
230
230
230
Nominale frequentie
Hz
50
50
50
50
Nominaal vermogen
maximaal
W
900
1100
1200
1300
Beschermingsgraad
IPX4
IPX4
IPX4
IPX4
Geluidsemissie
dB(A)
78
78
78
73
Aansluiting zuig-/perszijde
mm
G1
G1
G1
G1
Druk bar 4 4,5 5 5,8
Pompcapaciteit
maximaal
l/h
3500
4000
4700
5800
Pomphoogte
maximaal
m
40
45
50
58
Aanzuighoogte
maximaal
m 8 8 8 8
Pompbinnenwerk
Jet 1-traps
1-traps
1-traps
5-traps
Inschakelen/uitschakelen
Toets
• • •
•
LED-statusindicatie
• • •
•
Droogloopbeveiliging
Sensor
Sensor
Sensor
Sensor
Korrelgrootte
maximaal
mm 2 2 2 2
Netaansluitkabel
Lengte m 1,5
1,5
1,5
1,5
Afmetingen
Lengte
mm
543
543
543
591
Breedte
mm
234
234
234
234
Hoogte
mm
304
304
304
304
Massa
kg
11
11,2
11,4
14,3
TECHNISCHE GEGEVENS
binnendraad
DE
EN
FR
NL
ES
PT
IT
DA
NO
SV
FI
HU
PL
CS
SK
SL
HR
RO
BG
UK
RU
CN
39
Page 40

ProMax Garden Automatic 3500/4000/5000/6000
A
ProMax Garden Automatic 3500
/ 5000 / 6000/5
1
Asa de transporte con tecla
ON/OFF (13)
2
Conexión lado de presión
3
Tapa filtro previo
4
Conexión lado de aspiración
5
Carcasa del filtro previo
6
Abridor de la válvula de retención
7
Tornillo de purga de agua
8
Carcasa de la bomba
9
Pie de la bomba
10
Carcasa del motor
11
Línea de conexión de red
12
Agujero de servicio
13
Tecla ON/OFF con LED de indicación del estado
Traducción de las instrucciones de
uso originales
SOBRE ESTAS INSTRUCCIONES DE USO
Bienvenido a OASE Living Water. La compra del producto ProMax Garden Auto-
matic 3500/4000/5000/6000 es una
buena decisión.
Lea minuciosamente las instrucciones y
familiarícese con el equipo antes de usar
el mismo por primera vez. Todos los trabajos en y con este equipo sólo se deben
ejecutar conforme a estas instrucciones.
Tenga necesariamente en cuenta las indicaciones de seguridad para garantizar un
uso correcto y seguro del equipo.
Guarde cuidadosamente estas instrucciones. Entregue estas instrucciones al
nuevo propietario en caso de cambio de
propietario.
DESCRIPCIÓN DEL PRODUCTO
Vista sumaria
Símbolos en estas instrucciones
Indicaciones de advertencia
Las indicaciones de advertencia contenidas en estas instrucciones están clasificadas mediante palabras de advertencia
que muestran la dimensión del peligro.
ADVERTENCIA
• Denomina una situación posiblemente
peligrosa.
• En caso de incumplimiento, la consecuencia puede ser la muerta o una lesión muy grave.
INDICACIÓN
Informaciones para un mejor comprendimiento.
Otras indicaciones
A Referencia a una ilustración, p. ej.
ilustración A.
→ Referencia a otro capítulo.
40
Uso conforme a lo prescrito
ProMax Garden Automatic
3500/4000/5000/6000en lo sucesivo, "el
equipo", solo puede utilizarse de la siguiente manera:
• Trasvase y vaciado de depósitos o
piscinas.
• Rociado y regado.
• Transporte de agua clara o agua de llu-
via.
• Toma del agua del pozo.
– Sólo para regar.
• Toma de agua de tanques de agua de
lluvia o cisternas.
– Granulometría de las partículas en el
agua: máx. 2 mm.
• Operación observando los datos técnicos.
Page 41

Posible uso erróneo
Para el equipo son válidas las siguientes
limitaciones:
• No emplear para el servicio de larga duración (p. ej. servicio de circulación continua en el estanque).
• No apropiado para agua salada.
• No transportar nunca agua sucia.
• No conectar a la línea de alimentación
de agua potable.
• No apropiado para agua potable.
• No emplee el equipo para fines indus-
triales.
• No emplee el equipo en combinación
con productos químicos, alimentos y
sustancias fácilmente inflamables o explosivas.
INDICACIONES DE SEGURIDAD
Este equipo puede ser utilizado
por niños a partir de 8 años y
mayores así como por personas con capacidades físicas,
sensoriales o mentales reducidas o que no dispongan de la
experiencia y conocimientos
necesarios, cuando sean supervisados o hayan sido instruidos en el uso seguro del equipo
y los posibles peligros resultantes.
Los niños no deben jugar con el
equipo.
Está prohibido que los niños
ejecuten la limpieza y el mantenimiento sin supervisión.
Conexión eléctrica
El equipo tiene que estar protegido con un dispositivo de protección contra corriente de fuga
máxima de 30 mA.
• Conecte el equipo sólo cuando los datos eléctricos del equipo coinciden con
los datos de la alimentación de corriente. Los datos del equipo se encuentran en la placa de datos técnicos en el
equipo, en el embalaje o en estas instrucciones.
• Las líneas de prolongación y distribuidores de corriente (p. ej. enchufes múltiples) deben ser apropiados para el
empleo a la intemperie (protegido contra salpicaduras de agua).
• Proteja las conexiones de enchufe contra la humedad.
• Conecte el equipo sólo a una caja de
enchufe instalada conforme a las normas vigentes.
Funcionamiento seguro
Encargue de inmediato a
OASE, un servicio postventa
autorizado o un electricista
cualificado la sustitución de la
línea de conexión de red dañada para evitar evitar peligros
por electrocución.
• La distancia de seguridad del equipo al
agua tiene que ser como mínimo de
2 m.
• No exponga la bomba a la lluvia ni emplee la bomba en un lugar mojado o húmedo.
• Está prohibido operar el equipo con líneas eléctricas defectuosas o si la caja
está defectuosa.
• No transporte ni tire el equipo por la línea eléctrica.
DE
EN
FR
NL
ES
PT
IT
DA
NO
SV
FI
HU
PL
CS
SK
SL
HR
RO
BG
UK
RU
CN
41
Page 42

ProMax Garden Automatic 3500/4000/5000/6000
• Tienda las líneas con protección contra
daños y garantice que ninguna persona
tropiece con ellas.
• Abra la caja del equipo o las partes del
equipo, sólo si esto se indica expresamente en las instrucciones.
• Ejecute en el equipo sólo los trabajos
descritos en estas instrucciones. Si no
es posible solucionar los problemas diríjase a una oficina de atención a los
clientes o en caso de dudas al fabricante.
• Emplee sólo piezas de recambio y accesorios originales para el equipo.
• No realice nunca modificaciones técnicas en el equipo.
EMPLAZAMIENTO Y CONEXIÓN
INDICACIÓN
Para reducir los ruidos de la bomba, una
la bomba con la red de tuberías a través
de mangueras flexibles resistentes a la
presión en caso de una instalación fija.
• Emplace la bomba horizontal y en una
posición estable en lugar seco.
– Garantice en caso de una instalación
fija, que un recipiente colector de suficiente tamaño se pueda colocar debajo del tornillo de purga para el vaciado de la bomba.
• Si es posible, emplace la bomba a un
nivel más elevado que el depósito de
agua del que se debe bombear el agua.
En otro caso, monte un válvula resistente a la presión entre la bomba y la
manguera de aspiración.
• Utilice sólo mangueras de vacío resistentes a la aspiración en el lado de presión y en el lado de aspiración.
INDICACIÓN
OASE recomienda: Fije adicionalmente
la manguera de aspiración (p. ej. en una
estaca de manguera) para descargar la
bomba de su peso.
B
• Enrosque la manguera de aspiración
y/o presión con un diámetro interior de
25,0 mm (1") en las conexiones.
FUNCIONAMIENTO
Puesta en marcha del equipo
Antes del primer uso, la bomba se tiene
que llenar y la tubería de aspiración se
tiene que desairear. La desaireación de la
tubería de aspiración puede durar algunos minutos.
Proceda de la forma siguiente:
C
1. Desatornille la tapa del filtro. Como
ayuda de giro se puede colocar un destornillador desde un lado en uno de los
orificios en la tapa.
2. Abra el bloqueo de la tubería de presión.
3. Llene agua por el orificio de llenado en
el filtro previo hasta que rebose. Abra el
abridor de la válvula de retención hasta
que el agua haya expulsadoe el aire todavía existente en el filtro.
4. Atornille de nuevo la tapa del filtro.
5. Enchufe la clavija de red en el tomacorriente.
– La bomba está lista para el servicio.
6. Conecte la bomba. (→ Operación)
– La bomba comienza de inmediato a
transportar. En el agua que purga todavía hay aire.
INDICACIÓN
La bomba comienza con la protección
contra marcha en seco si no se ha aspirado agua después de 5 minutos.
7. Cierre el bloqueo de la tubería de presión cuando ya no haya aire en el agua
que purga. La tubería de aspiración
está ahora desaireada.
42
Page 43

POX0041
1
LED azul
2
LED amarillo
3
LED rojo
4
Tecla ON/OFF
Puesta fuera de servicio del equipo
INDICACIÓN
Después del uso de la bomba enjuáguela
con agua clara.
Proceda de la forma siguiente:
1. Desconexión de la bomba
2. Saque la clavija de la red.
3. Despresurice la tubería de presión
abriendo los puntos de toma.
4. Abra adicionalmente las válvulas de retención montadas en la tubería de aspiración.
– Después de la desconexión, el agua
residual en la manguera puede retornar y salir por el orificio de aspiración
de la bomba.
En caso que se desmonte completamente
la bomba:
D
5. Quite las mangueras conectadas en el
lado de presión y de aspiración.
6. Desenrosque el tornillo de purga de
agua y deje que el agua residual salga
inclinando la bomba.
7. Enrosque de nuevo el tornillo de purga
de agua.
OPERACIÓN
• Ciclo: Sensores supervisan el flujo de
agua y la presión de agua y conectan o
desconectan la bomba después de un
determinado tiempo o la ponen en
standby cuando la bomba no puede aspirar agua o la tubería de presión está
cerrada.
• Los LEDs en la tecla ON/OFF señalizan
el estado de funcionamiento correspondiente mediante iluminación o parpadeo. (→ Estado de funcionamiento e indicaciones LED correspondientes)
Establecer la disponibiidad para el servicio: Conecte la bomba con la red de co-
rriente.
• La bomba está lista para el servicio.
• Todos los LEDs se iluminan.
Conexión y desconexión de la bomba:
Mantenga pulsada la tecla ON/OFF menos de 3 s.
• El sistema automático asume el control
de la bomba después de la conexión:
Los sensores comprueban repetidamente si el flujo de agua se encuentra
por debajo del rendimiento de transporte mínimo o si la presión del agua
está por debajo de 1,5 bar. Según el resultado, la bomba se opera de forma
protegida contra la marcha en seco o se
pone de nuevo en standby por el sistema automático.
Ejecutar Reset del sistema automático:
Mantenga pulsada la tecla ON/OFF como
mínimo 3 s.
DE
EN
FR
NL
ES
PT
IT
DA
NO
SV
FI
HU
PL
CS
SK
SL
HR
RO
BG
UK
RU
CN
43
Page 44

ProMax Garden Automatic 3500/4000/5000/6000
LED
Estado de funcionamiento
Usuario
azul
amarillo
rojo
Frecuencia
del parpadeo
– Bomba lista para el servicio
Conectar la
bomba
– Sin error, la bomba funciona
4 veces/segundo
Sin error, la bomba cambia
inmediatamente a standby
– Sin error, la bomba está en
standby
– La bomba no aspira agua
tra marcha en seco
Esperar
1 vez/se-
La bomba no aspira agua
contra marcha en seco
Esperar
2 veces/se-
La bomba no aspira agua
de espera
Esperar
3 veces/se-
Cuarto nivel protección con-
ciclo, como máximo 2 veces
Esperar o lo-
– Fallo, la bomba pasó el ciclo
Saque la clavija
clavija de red
1 vez/se-
Ciclo de comprobación. La
nutos, máximo 2 ciclos
Esperar
– Fallo, 18 intentos de arran-
Saque la clavija
vija de red
LED ON
LED OFF
LED parpadea
Estado de funcionamiento e indicaciones LED correspondientes
Primer nivel protección con-
44
gundo
gundo
gundo, cada
LED alternando
gundo
• Segundo nivel protección
• Tercer nivel protección
contra marcha en seco
• En el cuarto nivel, la
bomba conmuta al modo
tra marcha en seco.
calizar la causa
La bomba está en el modo
de espera por 120 s, después comienza de nuevo el
3 veces
de red, com-
pruebe el lado de
aspiración, co-
necte de nuevo la
protección contra fugas comienza después de 60 mi-
que sin éxito
de red, com-
pruebe el lado de
presión, conecte
de nuevo la cla-
Page 45

Fallo
Causa
Acción correctora
La bomba no arranca
La bomba está desconectada
Conectar la bomba
Alimentación de corriente interrumpida
Comprobar las conexiones
de enchufe eléctricas
El dispositivo de protección con-
Desconectar la bomba y
OASE
La bomba estuvo largo tiempo
está bloqueada
Introducir el destornillador
rueda de rodadura
La bomba no trans-
La bomba no está suficiente-
Llenar la bomba y asegurar
de presión.
Tubería de presión cerrada
• Abrir el punto de toma
presión sin dobleces
Tubería de aspiración cerrada
• Limpiar la conexión del
aspiración sin dobleces
Fuga en el lado de aspiración
Eliminar la fuga en el lado
de aspiración
Junta de la tapa del filtro defectuosa
Sustituir la junta de la tapa
del filtro
Elemento filtrante de la bomba
obstruido
Limpiar o sustituir el filtro y
la tapa del filtro
ELIMINACIÓN DE FALLOS
DE
ADVERTENCIA
Tensión eléctrica peligrosa.
La muerte o lesiones graves por choque eléctrico.
Antes de comenzar con los trabajos:
• Desconecte el equipo, saque la clavija de la red y asegure el equipo contra una conexión.
• Desconecte la tensión de alimentación de todos los equipos que se encuentran en el
agua antes de entrar en el agua o tocar el agua.
Después de terminar los trabajos:
• Restablezca todas las condiciones para la puesta en marcha.
porta o transporta insuficientemente
tra corriente de fuga se activó
fuera de servicio (p. ej. pausa de
invierno). La rueda de rodadura
mente llena con agua.
sacar la clavija de la red.
Ponerse en contacto con el
personal de servicio de
por el agujero de servicio
trasero, girarlo y soltar la
que el agua llenada no
fluya por encima del lado
en el lado de presión
• Tender la manguera de
EN
FR
NL
ES
PT
IT
DA
NO
SV
FI
HU
PL
CS
SK
SL
HR
lado de aspiración y la
tubería de aspiración.
• Tender la manguera de
RO
BG
UK
RU
CN
45
Page 46

ProMax Garden Automatic 3500/4000/5000/6000
Fallo
Causa
Acción correctora
Elemento filtrante de la bomba se
Instalar un filtro previo ex-
rio opcional)
La bomba se desco-
La protección contra sobrecarga
• Limpiar la conexión del
• Dejar enfriar la bomba
El dispositivo protector contra
bomba.
Limpiar el orificio de aspira-
ción.
Obturación en el lado de aspira-
Limpiar el orificio de aspira-
ción.
Válvula de retención defectuosa
• Ponerse en contacto
cio de OASE
necta después de un
corto tiempo de funcionamiento
LIMPIEZA Y MANTENIMIENTO
ADVERTENCIA
Tensión eléctrica peligrosa.
La muerte o lesiones graves por choque eléctrico.
Antes de comenzar con los trabajos:
• Desconecte el equipo, saque la clavija
de la red y asegure el equipo contra una
conexión.
• Desconecte la tensión de alimentación
de todos los equipos que se encuentran
en el agua antes de entrar en el agua o
tocar el agua.
Después de terminar los trabajos:
• Restablezca todas las condiciones para
la puesta en marcha.
ADVERTENCIA
Peligro de lesión por agua caliente.
Quemadura de partes del cuerpo.
• En caso que la electrónica esté defectuosa o falte la alimentación de agua
por el lado de aspiración, el agua que
todavía está en la bomba puede estar
muy caliente.
obstruye muy rápido
desconectó la bomba por sobrecalentamiento.
marcha en seco desconectó la
ción
• Antes de realizar trabajos en el equipo
desconecte la tensión de alimentación.
• Separe la bomba de la red mediante el
fusible doméstico o saque la clavija de
enchufe y deje enfriar el agua.
INDICACIÓN
Recomendación para la limpieza regular:
• Limpie el equipo según necesidad, pero
como mínimo 2 veces al año.
• No emplee productos de limpieza o soluciones químicas agresivas, porque se
puede dañar la caja o mermar el funcionamiento del equipo.
• Después de la limpieza enjuague minuciosamente todas las piezas con agua
clara.
Limpieza del filtro
Proceda de la forma siguiente:
E
1. Desconecte la bomba.
2. Saque la clavija de la red.
terno más grande (acceso-
lado de aspiración y la
tubería de aspiración.
ción y la tubería de aspira-
ción y la tubería de aspira-
con el personal de servi-
46
Page 47

3. Cierre todos los dispositivos de bloqueo
en el lado de aspiración si fuera necesario.
4. Desatornille la tapa de la cámara del filtro y quítela.
5. Saque el elemento filtrante.
6. Limpie el elemento filtrante y la tapa del
filtro bajo agua corriente con un cepillo.
7. Monte de nuevo el filtro en secuencia
contraria.
– Garantice que la junta de la tapa del
filtro esté disponible y no dañada. De
lo contrario sustitúyala.
– Garantice que la tapa del filtro se ator-
nille correctamente.
8. Monte el equipo en secuencia contraria.
ALMACENAMIENTO / CONSERVACIÓN DURANTE EL INVIERNO
El equipo no está protegido contra heladas y se tiene que desmontar y almacenar
cuando se esperen heladas.
Almacenamiento correcto del equipo de la
forma siguiente:
• Vacíe el equipo en la medida posible,
límpielo minuciosamente y compruebe
si está dañado.
• Vacíe en la medida posible todas las
mangueras, tuberías y conexiones.
• Limpie minuciosamente el equipo, compruebe si presenta daños y sustituya las
partes dañadas.
• Almacene el equipo en un lugar seco y
protegido contra heladas.
• No sumerja la clavija en el agua.
PIEZAS DE DESGASTE
Los siguientes componentes son piezas
de desgaste y no entran en la prestación
de garantía:
• Elemento filtrante
• Rueda de rodadura
DESECHO
INDICACIÓN
Está prohibido desechar este equipo en
la basura doméstica.
• Inutilice el equipo cortando el cable y
entréguelo al sistema de recogida previsto.
DE
EN
FR
NL
ES
PT
IT
DA
NO
SV
FI
HU
PL
CS
SK
SL
HR
RO
BG
UK
RU
CN
47
Page 48

ProMax Garden Automatic 3500/4000/5000/6000
ProMax Garden Automatic
3500
4000
5000
6000/5
Tensión de referencia
V CA
230
230
230
230
Frecuencia de referencia
Hz
50
50
50
50
Potencia de referencia
máxima
W
900
1100
1200
1300
Categoría de protección
IPX4
IPX4
IPX4
IPX4
Emisión de ruido aéreo
dB(A)
78
78
78
73
Conexión lado de aspiración/ pre-
Rosca interior
mm
G1
G1
G1
G1
Presión
bar 4 4,5 5 5,8
Caudal
máximo
l/h
3500
4000
4700
5800
Altura de transporte
máxima
m
40
45
50
58
Altura de aspiración
máxima m 8 8 8
8
Mecanismo de marcha
de la bomba
Juego
de 1 ni-
vel
de 1 ni-
vel
de 1 ni-
vel
de 5 ni-
veles
Conexión / desconexión
Tecla
• • •
•
LED de indicación del
estado
• • •
•
Dispositivo protector
seco.
Sensor
Sensor
Sensor
Sensor
Granulometría
máxima
mm 2 2 2 2
Línea de conexión de
red
Longitud
m
1,5
1,5
1,5
1,5
Dimensiones
Longitud
mm
543
543
543
591
Anchura
mm
234
234
234
234
Altura
mm
304
304
304
304
Peso
kg
11
11,2
11,4
14,3
DATOS TÉCNICOS
sión
contra marcha en
48
Page 49

A
ProMax Garden Automatic 3500
/ 5000 / 6000/5
1
Pega com tecla ON/OFF (13)
2
Conexão lado de pressão
3
Tampa pré-filtro
4
Conexão lado de aspiração
5
Caixa pré-filtro
6
Abre-válvula de retenção
7
Parafuso para descarregar água
8
Caixa da bomba
9
Pé da bomba
10
Caixa do motor
11
Cabo de alimentação eléctrica
12
Abertura de serviço
13
Tecla ON/OFF com lâmpada indicadora LED do status
Tradução das instruções de uso originais
INFORMAÇÃO RELATIVA A ESTAS INSTRUÇÕES DE USO
Bem-vindo a OASE Living Water. Com a
aquisição do produto ProMax Garden
Automatic 3500/4000/5000/6000 tomou
uma boa decisão.
Antes de utilizar pela primeira vez o aparelho, leia atentamente as instruções de
uso e familiarize-se com a operação. Todos os trabalhos com este aparelho poderão ser realizados exclusivamente conforme as presentes instruções.
Observe estritamente as instruções de
segurança com respeito ao uso correcto e
seguro do aparelho.
Guarde estas instruções de uso em local
seguro. Se ceder o aparelho a outra pessoa, entregue-lhe as instruções de uso.
Símbolos usados nestas instruções
Instruções de advertência
As instruções de advertência estão classificadas por palavras-sinal que informam
sobre o grau do perigo.
ADVERTÊNCIA
• Refere-se a uma situação eventualmente perigosa.
• A não observação pode provocar a
morte ou lesões muito graves.
NOTA
Informações que facilitam a compreensão.
Outras instruções
A Faz referência a uma figura, p. ex.,
figura A
→ Nota remissiva a outro capítulo
DESCRIÇÃO DO PRODUTO
Descrição geral
DE
EN
FR
NL
ES
PT
IT
DA
NO
Emprego conforme o fim de utilização acordado
ProMax Garden Automatic
3500/4000/5000/6000, doravante designado "aparelho", só pode ser utilizado do
seguinte modo:
• Esvaziar e trasfegar reservatórios ou
recipientes.
• Irrigar e regar.
• Transportar água limpa ou águas pluvi-
ais
• Tirada de água de um poço.
– Utilizar só para regar e irrigar!
• Tirada de águas pluviais de depósitos
colectores e cisternas.
– Tamanho máximo de partículas, na
água: 2 mm.
• Operação, sendo observadas as características técnicas.
SV
FI
HU
PL
CS
SK
SL
HR
RO
BG
UK
RU
CN
49
Page 50

ProMax Garden Automatic 3500/4000/5000/6000
Uso incorrecto
O aparelho está sujeito a estas restrições:
• Não utilizar para a operação contínua
(por exemplo, circulação permanente
da água de um lago ou tanque de jardim).
• Não pode ser utilizada em água salgada.
• Nunca transportar água suja.
• Não ligar ao abastecimento de água po-
tável.
• Não pode ser utilizada para água potável.
• Não serve para utilizações industriais.
• Não utilizar em contacto com produtos
químicos, géneros alimentícios, combustíveis ou substâncias explosivas.
INSTRUÇÕES DE SEGURANÇA
O aparelho pode ser utilizado
por crianças com idade igual ou
superior a 8 anos e pessoas
com capacidades físicas, sensoriais ou mentais reduzidas ou
com falta de experiência ou conhecimentos, enquanto vigiadas por adultos ou quando foram informadas sobre o uso seguro do aparelho e entenderam
os riscos remanescentes.
Crianças não podem brincar
com o aparelho.
A limpeza e a manutenção não
podem ser realizadas por crianças sem que sejam vigiadas
por adultos.
Conexão eléctrica
O disjuntor de corrente de avaria deve proteger o aparelho
com o valor máximo de 30 mA
- rated leakage current.
• Antes de conectar o aparelho, verifique
que as características do aparelho correspondem às da rede eléctrica. As características do aparelho estão indicadas na chapa de identificação, sobre a
embalagem ou nestas instruções de
uso.
• Os fios de extensão e distribuidores
eléctricos (por exemplo, conjunto de várias tomadas) devem ser autorizados
para a utilização fora da casa (protecção contra salpicos de água).
• Proteja os conectores contra humidade.
• Ligue o aparelho só com uma tomada
instalada de acordo com as normas vigentes.
Operação segura
Fazer um fio de alimentação
defeituoso substituir imediatamente por OASE, um Serviço
de assistência autorizado ou
um electricista qualificado para
impedir riscos por choque eléctrico.
• Entre o aparelho e a água deve ser observada uma distância mínima de 2 m.
• Não expor a bomba à chuva nem utilizar
em ambiente molhado ou húmido.
• Em caso de fios eléctricos defeituosos
ou carcaça defeituosa, o aparelho não
pode ser posto em funcionamento!
• Não transporte nem puxe o aparelho
pelo cabo eléctrico.
• Instale os cabos de forma que estejam
protegidos contra danificação e ninguém possa tropeçar.
50
Page 51

• Não abra a carcaça do aparelho ou os
componentes do mesmo, a menos que
as instruções de uso autorizem expressamente tal intervenção.
• Faça só os trabalhos, no aparelho, descritos nestas instruções de uso. Dirijase a um centro de serviço ou, em caso
de dúvida, ao fabricante, caso não consiga eliminar os problemas.
• Utilize só peças de reposição originais
e acessório original por serem compatíveis com o aparelho.
• Não efectue modificações técnicas do
aparelho.
POSICIONAR E CONECTAR
NOTA
A fim de reduzir o ruído produzido pela
bomba, ligar a mesma, em caso de instalação fixa, com a rede de tubagem, através de tubos flexíveis adequados.
• Posicionar a bomba em posição horizontal e de forma estável, fora da água
– Para a instalação fixa é necessário
que, para vazar a bomba, possa ser
colocado um recipiente com a capacidade adequada debaixo do parafuso de descarga.
• Se possível, colocar a bomba em lugar
mais alto que o reservatório de água.
De contrário, inserir uma válvula resistente à pressão entre bomba e mangueira de aspiração.
• Utilizar só mangueiras de vácuo resistentes à aspiração no lado de pressão e
lado de aspiração.
NOTA
A OASE recomenda: Estabelecer uma fixação adicional (por exemplo, atar a uma
cavilha de madeira) para aliviar a bomba
do peso da mangueira.
B
• Ligar a mangueira de aspiração e pressão de 25,0 mm de diâmetro interior
(1") aos bocais de conexão.
OPERAÇÃO
Pôr o aparelho em operação
Anteriormente à primeira operação, deitar
água na bomba e purgar a mangueira de
aspiração. A purga da mangueira de aspiração pode durar alguns minutos.
Proceder conforme descrito abaixo:
C
1. Retirar a tampa do filtro. Para facilitar a
desmontagem, introduzir lateralmente
uma chave de fendas num dos rebaixes
da tampa.
2. Abrir o tubo de pressão.
3. Deitar água na abertura do pré-filtro até
que transborde. Para o feito, abrir o
abre-válvula de retenção até que a
água tenha deslocado o ar ainda existente no filtro.
4. Enroscar a tampa do filtro.
5. Conectar a ficha à tomada.
– A bomba pode ser posta a operar.
6. Ligar a bomba. (→ Operação)
– A bomba arranca imediatamente. Na
água que sai há ainda inclusões de
ar.
NOTA
Caso depois de 5 minutos ainda não seja
aspirada água, a bomba activa a protecção contra funcionamento a seco.
7. Fechar a válvula do tubo de pressão,
quando na água que sai já no há bolhas
de ar. Depois o tubo de aspiração está
purgado.
Pôr o aparelho fora de operação
NOTA
Após a utilização, lavar bomba em água
limpa.
DE
EN
FR
NL
ES
PT
IT
DA
NO
SV
FI
HU
PL
CS
SK
SL
HR
RO
BG
UK
RU
CN
51
Page 52

ProMax Garden Automatic 3500/4000/5000/6000
POX0041
1
LED azul
2
LED amarela
3
LED vermelha
4
Tecla ON/OFF
Proceder conforme descrito abaixo:
1. Desligar a bomba.
2. Desconectar a ficha eléctrica.
3. Abrir os pontos de tirada de líquido para
retirar a pressão do tubo flexível de
pressão.
4. Abrir as válvula de retenção inseridas
adicionalmente na mangueira de aspiração.
– Após a desligação, o resto de água
pode retornar, na mangueira, e sair
da abertura de sucção da bomba.
Caso a bomba seja retirada totalmente:
D
5. Retirar todas as mangueiras do lado de
pressão e aspiração.
6. Afastar o parafuso de descarga de água
e deixar escorrer o resto de água, inclinando a bomba.
7. Enroscar o parafuso de descarga de
água.
OPERAÇÃO
• Ciclo: Sensores controlam a corrente
de água e a pressão de água e, no fim
de determinado tempo programado, ligam ou desligam a bomba ou activam o
modo stand-by, quando a bomba não
pode aspirar água ou o tubo de pressão
está fechado.
• A luz contínua ou intermitente das lâmpadas LED da tecla ON/OFF sinaliza o
estado operacional actual. (→ Estado
operacional e lâmpadas LED)
Estabelecer a operacionalidade: Ligar a
bomba à rede eléctrica.
• A bomba pode ser posta a operar.
• Todas as lâmpadas LED estão acesas:.
Ligar e desligar a bomba: Manter a tecla
ON/OFF pressionada menos de 3 s.
• Após a ligação, o modo automático controla a bomba. Os sensores verificam
repetidamente, se o caudal de água se
encontra abaixo do valor mínimo ou se
a pressão de água está abaixo de
1,5 bar. Conforme o resultado, a bomba
opera com protecção contra funcionamento a seco ou o modo automático recoloca-a no modo stand-by.
Fazer o reset do modo automático:
Manter a tecla ON/OFF pressionada pelo
menos 3 s.
52
Page 53

LED
Estado operacional
Utilizador
azul
ama-
ver-
o
Frequência
tente
– Bomba ready
Ligar a bomba.
– A bomba funciona perfeita-
mente
4×/segundos
A bomba funciona perfeita-
dar para o modo stand-by
–
A bomba funciona perfeita-
stand-by
–
A bomba não aspira água
funcionamento a seco
Esperar
1×/segundo
A bomba não aspira água
tra funcionamento a seco
Esperar
2×/segundo
A bomba não aspira água
espera
Esperar
3×/segundo,
4° estágio protecção contra
mais de 2 vezes
Esperar ou locali – Falha, bomba passou 3 ve-
Desconectar a fi-
nectar a ficha
1×/segundo
Ciclo de inspecção A pro-
cuta não mais de 2 ciclos
Esperar
– Falha, 18 tentativas frustra-
Desconectar a fi-
nectar a ficha
LED ligado
LED desligado
LED intermitente
Estado operacional e lâmpadas LED
relo
melh
da luz intermi-
DE
EN
FR
NL
ES
mente e está a ponto de mu-
PT
cada LED alternadamente
mente e está no modo
1° estágio protecção contra
• 2° estágio protecção con-
• 3° estágio protecção con-
tra funcionamento a seco
• No 4° estágio, a bomba
muda para o modo de
funcionamento a seco
A bomba está 120 s no
modo de espera, depois recomeça o ciclo, porém não
zes o ciclo
tecção contra fugas é activada depois de 60 min, exe-
zar a causa
cha eléctrica,
controlar o lado
de aspiração, co-
IT
DA
NO
SV
FI
HU
PL
CS
SK
SL
HR
RO
BG
das de arranque
cha eléctrica,
controlar o lado
de pressão, co-
UK
RU
CN
53
Page 54

ProMax Garden Automatic 3500/4000/5000/6000
Avaria/Falha
Causa
Remédio
Bomba não arranca
A bomba está desligada
Ligar a bomba.
Alimentação eléctrica está interrompida
Controlar os pontos de conexão eléctrica
Residual current device respon-
Desligar a bomba e desco-
pois contactar a OASE
A bomba não estava em opera-
rotor fica emperrado
Passar uma chave de fen-
que o rotor gire bem.
A bomba não opera
A bomba não apresenta a carga
Deitar água na bomba e
aspiração
Tubo flexível de pressão está fe-
• Abrir o ponto de tirada
que não fique dobrado
Tubo de aspiração está fechado
• Limpar os pontos de co-
não fique dobrada
Fuga no lado de aspiração
Vedar a fuga no lado de
aspiração
Elemento de vedação defeituoso
na tampa do filtro
Substituir o elemento de
vedação
ELIMINAÇÃO DE ANOMALIAS
ADVERTÊNCIA
Tensão eléctrica perigosa!
Morte ou graves lesões por electrocussão.
Antes do início dos trabalhos:
• Desligar o aparelho, desconectar a ficha eléctrica e proteger o aparelho contra ligação
acidental.
• Antes de entrar na água ou meter a mão nela, desligar a alimentação eléctrica a todos
os aparelhos que se encontram na água.
Depois dos trabalhos:
• Restabelecer todas as condições para a operação normal.
ou caudal insuficiente
deu
ção por muito tempo (p. ex., não
operou no período invernal). O
necessária de água
chado
nectar a ficha eléctrica. De-
das pela abertura de serviço traseiro e rodar até
controlar que o líquido não
vaza através do lado de
de água no lado de
pressão
• Colocar o tubo flexível
de pressão de forma
nexão no lado de aspiração e lado de pressão.
• Colocar a mangueira de
aspiração de forma que
54
Page 55

Avaria/Falha
Causa
Remédio
Filtro entupido bomba
Limpar ou substituir o filtro
e a sua tampa
Filtro da bomba entope depressa
Instalar pré-filtro externo,
(acessório opcional)
Bomba desliga após
A protecção contra sobrecarga
• Limpar os pontos de co-
cer
A protecção contra funciona-
Limpar a abertura de aspi-
ção.
Entupimento do lado de aspira-
Limpar a abertura de aspi-
ção.
Válvula de retenção tem defeito
• Contactar a OASE
DE
EN
alguns minutos
LIMPEZA E MANUTENÇÃO
ADVERTÊNCIA
Tensão eléctrica perigosa!
Morte ou graves lesões por electrocussão.
Antes do início dos trabalhos:
• Desligar o aparelho, desconectar a ficha eléctrica e proteger o aparelho contra ligação acidental.
• Antes de entrar na água ou meter a mão
nela, desligar a alimentação eléctrica a
todos os aparelhos que se encontram
na água.
Depois dos trabalhos:
• Restabelecer todas as condições para
a operação normal.
desligou a bomba após sobreaquecimento
mento a seco desligou a lâmpada
ção
de capacidade maior
nexão no lado de aspiração e lado de pressão.
• Deixar a bomba arrefe-
ração e o tubo de aspira-
ração e o tubo de aspira-
AVISO
Risco de ferimentos por água quente!
Queimadura de membros do corpo.
• O sistema electrónico defeituoso o a
falta de alimentação de água no lado de
aspiração pode fazer com que a água
que ainda existe na bomba se aqueça
muito.
• Antes de trabalhar no aparelho, desligar
a alimentação eléctrica.
• Desligar o fusível doméstico ou desconectar a ficha e deixar arrefecer a água.
NOTA
Recomendação relativa à limpeza regular:
• Limpar o aparelho conforme necessário
ou, pelo menos, 2 vezes por ano.
• Não utilizar detergentes agressivos ou
solventes químicos, passíveis de destruir a carcaça ou influenciar negativamente o funcionamento.
• Após a limpeza, lavar todas as peças
em abundante água limpa.
FR
NL
ES
PT
IT
DA
NO
SV
FI
HU
PL
CS
SK
SL
HR
RO
BG
UK
RU
CN
55
Page 56

ProMax Garden Automatic 3500/4000/5000/6000
Limpar o filtro
Proceder conforme descrito abaixo:
E
1. Desligar a bomba.
2. Desconectar a ficha eléctrica.
3. Se necessário, fechar todas as válvulas
do lado de aspiração.
4. Abrir a tampa do filtro e retirar.
5. Retirar o elemento filtrante.
6. Limpar o elemento filtrante e a tampa
mediante água corrente e uma escova.
7. Montar o filtro na ordem inversa à desmontagem.
– Controlar que o elemento de vedação
da tampa existe e não tem defeitos.
Caso contrário, substituir.
– Controlar que a tampa do filtro se en-
contra correctamente posicionada e
enroscada.
8. Montar o aparelho na ordem inversa à
desmontagem.
GUARDAR/INVERNAR O APARELHO
O aparelho não está protegido contra os
efeitos de geada; em caso de geada deve
ser desinstalado e guardado em recinto
seguro.
Armazenagem correcta do aparelho:
• Esvaziar tanto quanto possível o aparelho, fazer limpeza cuidadosa e controlar
se existem efeitos.
• Esvaziar, tanto quanto possível, as
mangueiras, os tubos e os bocais de ligação.
• Limpar bem o aparelho, verificar se há
defeitos e substituir as peças defeituosas.
• Guardar o aparelho em recinto seco e à
prova de geada.
• Nunca mergulhar a ficha eléctrica na
água!
PEÇAS DE DESGASTE
Estes componentes estão sujeitas a desgaste permanente, não sendo abrangidos
pela garantia legal:
• Elemento filtrante
• Rotor
DESCARTAR O APARELHO USADO
NOTA
O aparelho não poderá ser eliminado
com o lixo doméstico.
• Tornar o aparelho inutilizável pela separação dos fios eléctricos e entregar ao
sistema de recolha selectiva.
56
Page 57

ProMax Garden Automatic
3500
4000
5000
6000/5
Rated voltage
V AC
230
230
230
230
Rated frequency
Hz
50
50
50
50
Rated power
máximo
W
900
1100
1200
1300
Tipo de protecção
IPX4
IPX4
IPX4
IPX4
Emissão sonora
dB(A)
78
78
78
73
Conexão lado de aspiração/pres-
rosca fêmea
mm
G1
G1
G1
G1
Pressão
bar 4 4,5 5 5,8
Caudal
máximo
l/h
3500
4000
4700
5800
Altura de elevação
máximo
m
40
45
50
58
Altura de aspiração
máximo m 8 8 8
8
Mecanismo da bomba
Jet 1 estágio
1 estágio
1 estágio
5 estágio
s
Ligar/Desligar
Tecla
• • •
•
Lâmpada LED que indica o status
• • •
•
Protecção contra o
funcionamento a seco
Sensor
Sensor
Sensor
Sensor
Tamanho do grão
máximo
mm 2 2 2 2
Cabo de alimentação
eléctrica
Comprimento
m
1,5
1,5
1,5
1,5
Dimensões
Comprimento
mm
543
543
543
591
Largura
mm
234
234
234
234
Altura
mm
304
304
304
304
Peso
kg
11
11,2
11,4
14,3
DADOS TÉCNICOS
DE
EN
FR
NL
são
ES
PT
IT
DA
NO
SV
FI
HU
PL
CS
SK
SL
HR
RO
BG
UK
RU
CN
57
Page 58

ProMax Garden Automatic 3500/4000/5000/6000
A
ProMax Garden Automatic 3500
/ 5000 / 6000/5
1
Maniglia di trasporto con tasto
ON/OFF (13)
2
Collegamento lato mandata
3
Coperchio prefiltro
4
Allacciamento lato aspirazione
5
Alloggiamento prefiltro
6
Apertura valvola di controritorno
7
Vite di scarico acqua
8
Corpo della pompa
9
Piede della pompa
10
Carter del motore
11
Cavo di alimentazione elettrica
12
Foro di servizio
13
Tasto ON/OFF con indicatore di
stato LED
Traduzione delle istruzioni d'uso originali
SULLE PRESENTI ISTRUZIONI D'USO
Benvenuti all'OASE Living Water. Avete
fatto un'ottima scelta acquistando il prodotto ProMax Garden Automatic
3500/4000/5000/6000.
Prima della messa in servizio leggere attentamente le istruzioni d'uso e familiarizzare con l'apparecchio. Eseguire tutte le
operazioni su e con questo apparecchio
osservando sempre le presenti istruzioni.
Osservare attentamente le norme di sicurezza al fine di garantire un impiego corretto e sicuro dell'apparecchio.
Conservare accuratamente queste istruzioni d'uso. Consegnarle al nuovo acquirente in caso di cambio di proprietà.
Simboli utilizzati in queste istruzioni
Avvertenze
Le avvertenze contenute in queste istruzioni sono contrassegnate da parole segnaletiche che indicano l'entità del rischio.
AVVISO
• Definisce una situazione possibilmente
pericolosa.
• In caso di inosservanza ne possono
conseguire la morte o serie lesioni.
NOTA
Informazioni che servono ad una migliore
comprensione.
Altre avvertenze
A Riferimento ad un'illustrazione, ad
es. illustrazione A.
→ Rimando ad un altro capitolo.
DESCRIZIONE DEL PRODOTTO
Prospetto
Impiego ammesso
ProMax Garden Automatic
3500/4000/5000/6000, chiamato "apparecchio" qui di seguito, può essere utilizzato solo nel modo seguente:
• Travaso e svuotamento di recipienti o
vasche.
• Irrorazione ed annaffiatura
• Convogliamento di acqua limpida o di
acqua piovana.
• Prelievo di acqua dal pozzo.
– Solo per irrorazione ed annaffiatura!
• Prelievo di acqua da recipienti o cisterne di acqua piovana.
– Grandezza di grano delle particelle
nell'acqua: max. 2 mm.
• Funzionamento in conformità alle caratteristiche tecniche.
58
Page 59

Possibili errori d'uso
Per l'apparecchio valgono le seguenti restrizioni:
• Non utilizzare in funzionamento continuato (ad es. per ricircolare l'acqua di
stagni).
• Non idoneo all'acqua salata.
• Non convogliare mai acqua sporca.
• Non allacciare all'impianto di acqua a
uso domestico.
• Non idoneo per acqua potabile.
• Non utilizzarlo per scopi commerciali o
industriali.
• Non utilizzarlo unitamente a prodotti
chimici, generi alimentari, sostanze facilmente infiammabili o esplosive.
AVVERTENZE DI SICUREZZA
Questo apparecchio può essere utilizzato da bambini di età
superiore a 8 anni e da persone con capacità fisiche, sensoriali o mentali ridotte, se sono
supervisionate o se sono state
istruite sull'uso sicuro dell'apparecchio e che sono in grado
di comprendere i pericoli che
ne possono derivare.
Ai bambini è vietato giocare
con l'apparecchio.
La pulizia e la manutenzione
utente non devono essere effettuate da bambini senza opportuna supervisione.
Allacciamento elettrico
L'apparecchio deve essere protetto con un dispositivo di protezione per correnti di guasto
con una corrente di taratura di
max. 30 mA.
• Eseguire l'allacciamento solo se i dati
elettrici dell'apparecchio e dell'alimentazione elettrica coincidono. I dati sono riportati sulla targhetta di identificazione
dell'apparecchio, sulla confezione, oppure nelle presenti istruzioni d'uso.
• I cavi di prolungamento e distributori di
corrente (ad es. prese multiple) devono
essere adatti per l'impiego all'aperto
(protetti contro gli spruzzi d'acqua).
• Proteggere le connessioni a spina contro l'umidità.
• Collegare l'apparecchio solo ad una
presa installata secondo le norme.
Funzionamento sicuro
Per evitare i pericoli dovuti alle
scosse elettriche, far sostituire
una linea di allacciamento alla
rete dall'azienda OASE, da un
servizio assistenza autorizzato
oppure da un elettricista specializzato.
• La distanza di sicurezza fra apparecchio e acqua deve essere minimo 2 m.
• Non esporre la pompa alla pioggia e
non utilizzarla in ambiente bagnato o
umido.
• Non utilizzare l'apparecchio se i cavi
elettrici o il corpo dell'apparecchio sono
difettosi.
• Non portare o trascinare l'apparecchio
afferrando i cavi elettrici.
• Installare i cavi in modo che siano protetti contro i danni e assicurarsi che nessuno possa cadervi sopra.
• Aprire l'alloggiamento dell'apparecchio
o delle relative componenti solo se ciò è
espressamente indicato nelle istruzioni
d'uso.
DE
EN
FR
NL
ES
PT
IT
DA
NO
SV
FI
HU
PL
CS
SK
SL
HR
RO
BG
UK
RU
CN
59
Page 60

ProMax Garden Automatic 3500/4000/5000/6000
• Utilizzate l'apparecchio solo per operazioni descritte in questo libretto d'istruzioni. Rivolgersi ad un centro d'assistenza autorizzato o in caso di dubbio al
produttore, in caso di mancata risoluzione dei problemi.
• Utilizzare solo parti di ricambio e accessori originali per l'apparecchio.
• Non apportate mai modifiche tecniche
all'apparecchio.
INSTALLAZIONE E ALLACCIAMENTO
NOTA
Per ridurre i rumori prodotti dalla pompa,
in caso di installazione fissa collegare la
pompa alla rete delle tubazioni attraverso tubazioni flessibili resistenti alla
pressione.
• Posare la pompa in posizione orizzontale e stabile in un luogo asciutto.
– In caso di installazione fissa, osser-
vare che per lo svuotamento della
pompa deve essere posizionato sotto
alla vite di scarico un grande recipiente di raccolta.
• Se possibile, posare la pompa più in alto
rispetto al bacino di acqua da cui si intende pompare. In caso contrario, montare fra la pompa e il tubo di aspirazione
una valvola resistente alla pressione.
• Utilizzare sul lato di mandata e di aspirazione solo tubi a vuoto resistenti all'aspirazione.
NOTA
OASE consiglia: Fissare inoltre il tubo
flessibile di aspirazione (ad es. ad un picchetto di legno) per sgravare la pompa
dal suo peso.
B
• Avvitare il tubo flessibile di aspirazione
o di mandata con diametro interno da
25,0 mm (1") agli attacchi.
FUNZIONAMENTO
Messa in funzione dell'apparecchio
Prima del primo uso, la pompa deve essere riempita e la tubazione di sfiato deve
essere sfiatata. Lo sfiato della tubazione
di aspirazione può durare alcuni minuti.
Procedere nel modo seguente:
C
1. Svitare il coperchio del filtro. Come dispositivo ausiliario di rotazione può essere usato un cacciavite, inserendolo in
uno degli incavi nel coperchio.
2. Aprire lo sbarramento della tubazione di
mandata.
3. Riempire acqua nell'apertura di riempimento del prefiltro sino a che l'acqua
non tracima. Durante tale operazione,
aprire il dispositivo di apertura della valvola di controritorno sino a che l'acqua
ha espulso l'aria ancora eventualmente
presente nel filtro.
4. Avvitare di nuovo il coperchio del filtro.
5. Innestare la spina elettrica nella presa.
– La pompa è operativa.
6. Avviare la pompa. (→ Impiego)
– La pompa inizia immediatamente a
convogliare. Nell'acqua fuoriuscente
c'è ancora aria.
NOTA
Se dopo 5 minuti non venisse ancora
aspirata acqua, la pompa inserisce la
protezione contro la marcia a secco.
7. Chiudere lo sbarramento della tubazione di mandata non appena nell'acqua che fuoriesce non vi è più aria. La
tubazione di aspirazione è ora sfiatata.
Messa fuori funzione dell'apparecchio
NOTA
Dopo l'uso, risciacquare la pompa con
acqua limpida.
Procedere nel modo seguente:
60
Page 61

POX0041
1
LED blu
2
LED giallo
3
LED rosso
4
Tasto ON/OFF
1. Spegnimento della pompa
2. Staccare la spina elettrica.
3. Togliere la pressione dalla tubazione
aprendo i punti di prelievo.
4. Aprire inoltre le valvole di non ritorno
montante nella tubazione di aspirazione.
– Dopo lo spegnimento è possibile che
dell'acqua residua refluisca nel tubo
flessibile e che fuoriesca dall'apertura
di aspirazione della pompa.
Se la pompa viene completamente smontata:
D
5. rimuovere tutti i tubo collegati dal lato
mandata che aspirazione.
6. Svitare la vite di scarico acqua e lasciare fuoriuscire l'acqua residua inclinando la pompa.
7. Riavvitare la vite di scarico acqua.
IMPIEGO
• Ciclo: I sensori monitorano la portata e
la pressione dell'acqua e dopo un determinato tempo accendono, spengono o
portano in stand-by la pompa, se essa
non è in grado di aspirare acqua oppure
se la tubazione di mandata è chiusa.
• I LED integrati nel tasto ON/OFF segnalano, accendendosi o lampeggiando, il
rispettivo stato di esercizio. (→ Stato di
esercizio e rispettivi indicatori LED)
Creazione della condizione di operatività: Collegare la pompa alla rete elet-
trica.
• La pompa è operativa.
• Tutti i LED si accendono.
Accensione e spegnimento della
pompa: Tenere premuto il tasto ON/OFF
per meno di 3 secondi.
• Dopo l'accensione, la modalità automatica si prende carico del comando della
pompa: Dei sensori verificano ripetutamente se la portata dell'acqua è inferiore al valore minimo oppure se la pressione dell'acqua è inferiore a 1,5 bar. A
seconda del risultato, la pompa viene
fatta funzionare protetta dalla marcia a
secco oppure viene di nuovo commutata su stand-by dalla modalità automatica.
Resettaggio della modalità automatica:
Tenere premuto il tasto ON/OFF per almeno 3 secondi.
DE
EN
FR
NL
ES
PT
IT
DA
NO
SV
FI
HU
PL
CS
SK
SL
HR
RO
BG
UK
RU
CN
61
Page 62

ProMax Garden Automatic 3500/4000/5000/6000
LED
Stato di esercizio
Utilizzatore
blu
giallo
rosso
Frequenza di
lampeggio
–
Pompa operativa
Avviamento della
pompa
–
Senza errori, pompa in funzione
4 volte al secondo
Senza errori, la pompa commuta subito in stand-by
–
Senza errori, la pompa si
trova in stand-by
–
La pompa non aspira acqua.
cia a secco
Attendere
1 volta al se-
La pompa non aspira acqua.
marcia a secco
Attendere
2 volta al se-
La pompa non aspira acqua.
attesa.
Attendere
3 volte al se-
4. Stadio protezione da mar-
al massimo ancora 2 volte.
Attendere o cer
–
Disturbo, la pompa ha ese-
Estrarre la spina
di rete, controllare
il lato aspirazione,
spina.
1 volta al se-
Ciclo di controllo La prote-
dopo 60 minuti, max 2 cicli.
Attendere
–
Disturbo, 18 tentativi di av-
Estrarre la spina
di rete, controllare
spina.
LED acceso
LED spento
LED lampeggia
Stato di esercizio e rispettivi indicatori LED
1. Stadio protezione da mar-
62
condo
condo
condo, ogni
LED in maniera alternata
condo
• 2. Stadio protezione da
• 3. Stadio protezione da
marcia a secco
• Nel 4° stadio la pompa
commuta in modalità di
cia a secco
care la causa
La pompa si trova in modalità di attesa per 120 secondi, poi il ciclo ricomincia,
guito il ciclo 3 volte.
reinserire la
zione contro perdite inizia
viamento falliti.
il lato mandata,
reinserire la
Page 63

Anomalia
Causa
Intervento
La pompa non si av-
La pompa è spenta.
Avviamento della pompa
Alimentazione elettrica interrotta
Controllare i collegamenti
elettrici.
Il salvamotore è scattato.
Spegnere la pompa e poi
assistenza OASE.
La pompa è stata ferma per un
inceppata.
Inserire il cacciavite attra-
così la girante.
La pompa non con-
La pompa non è riempita a suffi-
Riempire la pompa e verifi-
lato di pressione.
Tubazione di pressione chiusa.
• Aprire il punto di pre-
ture
Tubazione di mandata chiusa
• Pulire gli attacchi lato
senza piegature
Anermeticità sul lato aspirazione
Eliminare l'anermeticità sul
lato aspirazione
Guarnizione del coperchio filtro
difettosa
Sostituire la guarnizione
del coperchio filtro.
ELIMINAZIONE DI GUASTI
DE
AVVISO
Tensione elettrica pericolosa!
Pericolo di morte o di gravi lesioni per folgorazione.
Prima di iniziare il lavoro:
• Spegnere l'apparecchio, sfilare la spina elettrica e proteggere l'apparecchio da riaccensione accidentale.
• Prima di entrare in acqua o di infilarvi le mani, scollegare dalla tensione elettrica tutti
gli apparecchi che si trovano in acqua.
Al termine del lavoro:
• ripristinare tutte le condizioni per la messa in funzione.
via
estrarre la spina elettrica.
Contattare poi il servizio di
voglia o la portata
non è sufficiente
periodo prolungato (ad es. per la
pausa invernale). La girante è
cienza con acqua.
verso il foro di servizio posteriore, ruotare e mollare
care che l'acqua riempita
non refluisca attraverso il
EN
FR
NL
ES
PT
IT
DA
NO
SV
FI
HU
PL
CS
lievo sul lato di mandata
• Posare il tubo flessibile
di mandata senza piega-
aspirazione e lato mandata.
• Posare il tubo di aspirazione in modo che sia
SK
SL
HR
RO
BG
UK
RU
CN
63
Page 64

ProMax Garden Automatic 3500/4000/5000/6000
Anomalia
Causa
Intervento
Inserto filtrante della pompa intasato
Pulire il filtro ed il coperchio
del filtro o sostituirlo.
Inserto del filtro della pompa inta-
Installare un prefiltro
sorio opzionale)
La pompa si arresta
dopo un breve tempo
La protezione da sovraccarico ha
• Pulire gli attacchi lato
pompa.
Il dispositivo di protezione da
pompa.
Pulire l'apertura di aspira-
mandata.
Intasamento lato aspirazione
Pulire l'apertura di aspira-
mandata.
Valvola di contro ritorno difettosa
• Contattare il servizio di
assistenza OASE.
di funzionamento.
PULIZIA E MANUTENZIONE
AVVISO
Tensione elettrica pericolosa!
Pericolo di morte o di gravi lesioni per
folgorazione.
Prima di iniziare il lavoro:
• Spegnere l'apparecchio, sfilare la spina
elettrica e proteggere l'apparecchio da
riaccensione accidentale.
• Prima di entrare in acqua o di infilarvi le
mani, scollegare dalla tensione elettrica
tutti gli apparecchi che si trovano in acqua.
Al termine del lavoro:
• ripristinare tutte le condizioni per la
messa in funzione.
sato troppo velocemente
spento la pompa per surriscaldamento.
marcia a secco ha spento la
AVVISO
Pericolo di lesioni dovuto ad acqua calda!
Ustione di parti corporee.
• In caso di elettronica difettosa o di mancanza di alimentazione d'acqua sul lato
aspirazione, l'acqua ancora presente
nella pompa può essere molto surriscaldata.
• Disinserire la tensione di rete prima di
intervenire sull'apparecchio.
• Scollegare la pompa dalla tensione elettrica agendo sull'interruttore di circuito o
sfilare la spina elettrica lasciando raffreddare l'acqua al suo interno.
NOTA
Consiglio per la pulizia periodica:
• Pulire l'apparecchio quando necessario, ma almeno 2 volte all'anno.
• Non utilizzare mai detergenti aggressivi
o soluzioni chimiche per non corrodere
il corpo o compromettere il funzionamento dell'apparecchio.
esterno più grande (acces-
aspirazione e lato mandata.
• Lasciare raffreddare la
zione e la tubazione di
zione e la tubazione di
64
Page 65

• Una volta puliti tutti i componenti, risciacquare accuratamente con acqua
limpida.
Pulire il filtro
Procedere nel modo seguente:
E
1. Spegnere pompa.
2. Staccare la spina elettrica.
3. Eventualmente, chiudere tutti i dispositivi di sbarramento sul lato di aspirazione.
4. Svitare il coperchio della camera del filtro e staccarlo.
5. Estrarre l'inserto del filtro.
6. Pulire l'inserto del filtro e il coperchio del
filtro sotto acqua corrente utilizzando
una spazzola.
7. Rimontare il filtro seguendo l'ordine inverso.
– Assicurarsi che la guarnizione del co-
perchio del filtro sia presente e che
sia integra. In caso contrario, sostituirla.
– Assicurarsi che il coperchio del filtro
sia di nuovo avvitato correttamente.
8. Montare l'apparecchio seguendo l'ordine inverso.
MAGAZZINAGGIO/MESSA AL RIPARO PER L'INVERNO
L'apparecchio non è a prova di gelo e
quindi deve essere smontato e immagazzinato se si prevede l'arrivo del gelo.
Immagazzinare correttamente l'apparecchio procedendo nel modo seguente:
• Svuotare il più possibile l'apparecchio,
eseguire una pulizia accurata e controllare se è danneggiato.
• Svuotare il più possibile tubi flessibili, tubazioni e attacchi.
• Pulire accuratamente l'apparecchio,
controllare se sono presenti dei danni,
sostituire i componenti danneggiati.
• Immagazzinare l'apparecchio in un
luogo asciutto e al riparo dal gelo.
• Non immergere nell'acqua i connettori.
PEZZI SOGGETTI A USURA
I seguenti componenti sono soggetti a
usura e quindi non sono coperti da garanzia:
• Inserto filtro
• Girante
SMALTIMENTO
NOTA
Non smaltire questo apparecchio gettandolo nei rifiuti domestici!
• Rendere inutilizzabile l'apparecchio tagliando i cavi e poi smaltirlo attraverso
l'apposito sistema di ritiro.
DE
EN
FR
NL
ES
PT
IT
DA
NO
SV
FI
HU
PL
CS
SK
SL
HR
RO
BG
UK
RU
CN
65
Page 66

ProMax Garden Automatic 3500/4000/5000/6000
ProMax Garden Automatic
3500
4000
5000
6000/5
Tensione di taratura
V CA
230
230
230
230
Frequenza di dimensionamento
Hz
50
50
50
50
Potenza di dimensionamento
massima
W
900
1100
1200
1300
Grado di protezione
IPX4
IPX4
IPX4
IPX4
Emissione di suono nell'aria
dB(A)
78
78
78
73
Attacco lato aspirazione/mandata
mm
G1
G1
G1
G1
Pressione
bar 4 4,5 5 5,8
Portata
massima
l/h
3500
4000
4700
5800
Prevalenza
massima
m
40
45
50
58
Prevalenza
massima
m 8 8 8 8
Gruppo pompa
Jet 1 stadio
1 stadio
1 stadio
5 stadi
Avviamento / Spegnimento
Tasto
• • •
•
Indicatore di stato LED
• • •
•
Protezione contro il
funzionamento a secco
Sensore
Sensore
Sensore
Sensore
Grandezza di grano
massima
mm 2 2 2 2
Cavo di alimentazione
elettrica
lunghezza
m
1,5
1,5
1,5
1,5
Dimensioni
lunghezza
mm
543
543
543
591
Larghezza
mm
234
234
234
234
Altezza
mm
304
304
304
304
Peso
kg
11
11,2
11,4
14,3
DATI TECNICI
filetto interno
66
Page 67

A
ProMax Garden Automatic 3500
/ 5000 / 6000/5
1
Bærehåndtag med tænd-/slukknap
(13)
2
Tilslutning, trykside
3
Dæksel forfilter
4
Tilslutning, sugeside
5
Forfilterhus
6
Kontraventilåbner
7
Vandaftapningsskrue
8
Pumpehus
9
Pumpefod
10
Motorhus
11
Nettilslutningsledning
12
Servicehul
13
Tænd-/slukknap med LEDstatusvisning
Oversættelse af den originale
brugsanvisning
OM DENNE BRUGSANVISNING
Velkommen til OASE Living Water. Med
dit køb af ProMax Garden Automatic
3500/4000/5000/6000 har du truffet et
godt valg.
Inden du bruger apparatet første gang, er
det vigtigt, at du læser brugsanvisningen
grundigt igennem og gør dig fortrolig med
apparatet. Alle arbejder på og med dette
apparat må kun udføres iht. foreliggende
vejledning.
Sikkerhedshenvisningerne skal ubetinget
overholdes for korrekt og sikker anvendelse.
Opbevar denne brugsanvisning omhyggeligt. Ved ejerskifte, videregiv venligst
brugsanvisningen.
Symboler i denne vejledning
Advarsler
Advarslerne i denne vejledning er klassificeret med signalord, der angiver farens
omfang.
ADVARSEL
• Betegner en muligvis farlig situation.
• Manglende overholdelse kan medføre
død eller alvorlige kvæstelser.
OBS!
Oplysninger, der medvirker til bedre forståelse.
Yderligere anvisninger
A Henvisning til en figur, f.eks. figur
A.
→ Henvisning til et andet kapitel.
PRODUKTBESKRIVELSE
Oversigt
DE
EN
FR
NL
ES
PT
IT
DA
NO
SV
Anvendelse i henhold til bestemmelser
ProMax Garden Automatic
3500/4000/5000/6000, herefter kaldet
"enheden", må udelukkende anvendes på
følgende måde:
• Recirkulationspumpning og tømning af
beholdere eller bassiner.
• Vanding og gødning.
• Transport af rent vand eller regnvand.
• Vandoptagelse fra brønde.
– Kun til vanding og gødning!
• Vandhentning fra regntønder eller cisterner.
– Kornstørrelse på partikler i vandet:
maks. 2 mm.
• Drift ved overholdelse af de tekniske
data.
FI
HU
PL
CS
SK
SL
HR
RO
BG
UK
RU
CN
67
Page 68

ProMax Garden Automatic 3500/4000/5000/6000
Mulig forkert brug
Der gælder følgende restriktioner for apparatet:
• Må ikke anvendes til kontinuerlig drift
(f.eks. kontinuerlig cirkulation ved bassinet).
• Ikke egnet til saltvand.
• Må ikke anvendes til transport af spilde-
vand.
• Tilslut ikke til husets vandforsyning.
• Ikke egnet til drikkevand.
• Må ikke anvendes til erhvervs- eller in-
dustrimæssige formål.
• Må ikke sættes i forbindelse med kemikalier, levnedsmidler, let brændbare eller eksplosive stoffer.
SIKKERHEDSANVISNINGER
Dette apparat kan bruges af
børn fra 8 år og derover og personer med nedsatte fysiske,
sensoriske eller mentale evner
eller manglende erfaring og viden, når de er under opsyn eller
får instruktion i sikker brug af
apparatet og forstår de dermed
forbundne risici.
Børn må ikke lege med apparatet.
Rengøring og vedligeholdelse
må ikke udføres af børn uden
opsyn.
El-tilslutning
Apparatet skal afsikres med lækageafbryder indstillet til en nominel fejlstrøm på maksimalt 30
mA.
• Enheden må kun tilsluttes, hvis de elektriske data for enheden og strømforsyningen stemmer overens. Enhedens
data findes på enhedens typeskilt, på
emballagen eller i denne brugsanvisning.
• Forlængerledning og strømfordeler
(f.eks. strømskinne) skal være egnet til
udendørs brug (stænktæt).
• Beskyt stikforbindelserne mod fugtighed.
• Tilslut kun apparatet til en forskriftsmæssigt installeret stikdåse.
Sikker drift
En beskadiget nettilslutningsledning skal straks udskiftes af
OASE, en autoriseret kundeservice eller en kvalificeret elinstallatør for at undgå farer på
grund af stød.
• Sikkerhedsafstanden fra enheden til
bassinet skal være på mindst 2 m.
• Pumpen må ikke udsættes for regn og
ikke anvendes i våde eller fugtige omgivelser.
• Ved defekte elektriske ledninger eller
defekt kabinet må apparatet ikke anvendes.
• Bær eller træk ikke apparatet i den elektriske ledning.
• Læg kablerne, så de er beskyttet mod
skader, og sørg for, at ingen kan snuble
over dem.
• Apparatets kabinet eller tilhørende dele
må kun åbnes, hvis du udtrykkeligt bliver opfordret til det i vejledningen.
• Der må kun gennemføres arbejde på
apparatet, som er beskrevet i denne vejledning. Henvend dig til et autoriseret
serviceværksted eller i tvivlstilfælde til
producenten, hvis det ikke er muligt at
afhjælpe problemerne.
68
Page 69

• Anvend kun originale reservedele og
originalt tilbehør til apparatet.
• Foretag aldrig tekniske ændringer på
apparatet.
OPSTILLING OG TILSLUTNING
BEMÆRK
Ved en fast installation forbindes pumpen
med rørnettet med fleksible slanger for at
mindske støj fra pumpen.
• Opstil pumpen vandret og stabilt på et
tørt sted.
– Sørg ved fast installation for, at der er
plads til at stille et tilstrækkelig stort
opsamlingskar under aftapningsskruen til tømning af pumpen.
• Opstil om muligt pumpen højere end det
vandreservoir, der skal pumpes fra. Ellers skal der monteres en trykfast ventil
mellem pumpe og sugeslange.
• Anvend kun sugefaste vakuumslanger
på tryksiden og sugesiden.
OBS!
OASE anbefaler: Fastgør også sugeslangen (f.eks. til en træpløk) for at aflaste
vægten.
B
• Skru suge- og trykslange med 25,0 mm
indvendig diameter (1") på tilslutningerne.
DRIFT
Idrifttagning af apparatet
Før første brug skal pumpen fyldes og sugeledningen udluftes. Udluftning af sugeledningen kan tage nogle minutter.
Sådan gør du:
C
1. Skru filterdækslet af. Du kan lettere
skrue dækslet løs med en skruetrækker, som du sætter i en af udsparingerne i dækslet.
2. Åbn spærrehanen til trykledningen.
3. Hæld vand i påfyldningsåbningen i forfilteret, til vandet løber over. Åbn kontraventilen, indtil vandet har fortrængt al
luft i filteret.
4. Skru filterdækslet på igen.
5. Anbring netstikket i stikdåsen.
– Pumpen er klar til brug.
6. Tænd pumpe. (→ Betjening)
– Pumpen begynder at arbejde med det
samme. Der er stadig luft i vandet, der
kommer ud.
HENVISNING
Hvis der efter 5 minutter stadig ikke suges vand ind, starter pumpen tørløbsbeskyttelsen.
7. Luk spærrehanen til trykledningen, når
der ikke længere er luft i vandet, der løber ud. Sugeledningen er nu udluftet.
Afmontering af apparatet
OBS!
Skyl pumpen godt igennem med rent
vand efter brug.
Sådan gør du:
1. Frakobling af pumpen
2. Træk netstikket ud.
3. Fjern trykket i trykledningen ved at åbne
vandindtagene.
4. Åbn også kontraventiler indbygget i sugeledningen.
– Efter frakoblingen kan restvandet i
slangen løbe tilbage og komme ud
igennem pumpens indsugningsåbning.
DE
EN
FR
NL
ES
PT
IT
DA
NO
SV
FI
HU
PL
CS
SK
SL
HR
RO
BG
UK
RU
CN
69
Page 70

ProMax Garden Automatic 3500/4000/5000/6000
POX0041
1
LED blå
2
LED gul
3
LED rød
4
Tænd-/slukknap
Hvis pumpen adskilles helt:
D
5. Fjern tilsluttede slanger på tryk- og sugesiden.
6. Skru vandaftapningsskruen ud, og lad
restvandet løbe ud ved at hælde pumpen.
7. Skru vandaftapningsskruen i igen.
BETJENING
• Cyklus: Sensorer overvåger vandflo-
wet og vandtrykket og slår pumpen til,
fra eller på standby, når der er gået en
bestemt tid, hvis pumpen ikke kan suge
vand, eller hvis trykledningen er spærret.
• Dioderne i tænd-/slukknappen viser den
pågældende driftstilstand ved at lyse eller blinke. (→ Driftstilstand og tilførende
diodevisning)
Oprettelse af driftsberedskab: Forbind
pumpen med el-nettet.
• Pumpen er klar til brug.
• Alle lysdioder lyser.
Til- og frakobling af pumpen: Hold
tænd-/slukknappen inde i mindre end
3 sekunder.
• Når pumpen er tændt, overtager automatikken pumpestyringen: Sensorer
kontrollerer gentagne gange, om vandflowet ligger under mindste transportydelse, eller om vandtrykket ligger under 1,5 bar. Alt efter resultat drives pumpen beskyttet mod tørløb, eller automatikken indstiller den igen på standby.
Nulstilling af automatikken: Hold tænd/slukknappen inde i mindst 3 sekunder.
70
Page 71

LED
Driftstilstand
Bruger
blå
gul
rød
Blinkfrekvens
–
Pumpe klar til drift
Tilkobling af pumpen
–
Fejlfri, pumpen er i gang
4×/sekund
Fejlfri, pumpen skifter straks
til standby
–
Fejlfri, pumpen er i standby
–
Pumpen suger ikke vand
1. trin i tørløbsbeskyttelsen
Vent
1×/sekund
Pumpen suger ikke vand
sen
Vent
2×/sekund
Pumpen suger ikke vand
ventemodus
Vent
3×/sekund,
4. trin i tørløbsbeskyttelsen.
maksimalt 2×
Vent, eller søg ef
–
Fejl, pumpen har gennemlø-
Træk netstikket
netstikket i igen
1×/sekund
Kontrolcyklus. Lækagebe-
60 minutter, maks. 2 cykler
Vent
–
Fejl, 18 startforsøg uden re-
Træk netstikket
tikket i igen
LED tændt
LED slukket
LED blinker
Driftstilstand og tilførende diodevisning
• 2. trin i tørløbsbeskyttel-
DE
EN
FR
NL
ES
PT
IT
DA
• 3. trin i tørløbsbeskyttelsen
• I 4. trin skifter pumpen til
NO
SV
FI
hver enkelt diode lyser skiftevis
Pumpen er i ventemodus i
120 sekunder, derefter begynder cyklussen igen, dog
ter årsagen
HU
PL
bet cyklussen 3×
ud, kontroller sugesiden, sæt
CS
SK
skyttelsen begynder efter
sultat
ud, kontroller tryksiden, sæt nets-
SL
HR
RO
BG
UK
RU
CN
71
Page 72

ProMax Garden Automatic 3500/4000/5000/6000
Fejl
Årsag
Udbedring
Pumpen starter ikke
Pumpen er slået fra
Tilkobling af pumpen
Strømforsyning er afbrudt
Kontroller de elektriske
stikforbindelser
Fejlstrømrelæ er udløst
Sluk for pumpen, og træk
OASE-service
Pumpen har været ude af drift
Stik en skruetrækker gen-
nes.
Pumpen pumper ikke
Pumpen er ikke tilstrækkelig fyldt
Fyld pumpen og sørg for,
ber ud via tryksiden
Trykledning lukket
• Åbn udtagningsstedet
knæk
Sugeledning lukket
• Rengør tilslutningen på
knæk
Utæthed på sugesiden
Afhjælp utæthed på sugesiden
Filterdækseltætning defekt
Udskift filterdækseltætning
Pumpens filterindsats er tilstoppet
Rengør eller udskift filteret
og filterdækslet
Pumpens filterindsats stopper for
hurtigt til
Installer ekstern, større forfilter (ekstraudstyr)
AFHJÆLPNING AF FEJL
ADVARSEL
Farlig elektrisk spænding!
Død eller svære kvæstelser pga. elektrisk stød.
Før arbejdet påbegyndes:
• Sluk apparatet, træk netstikket ud, og sørg for, at apparatet ikke kan tændes ved en
fejl.
• Netspændingen til alle apparater, der befinder sig i vandet, skal frakobles, inden personer træder ned i eller stikker hånden ned i vandet.
Efter arbejdet er afsluttet:
• Genskab alle forudsætninger for idrifttagning.
netstikket ud. Kontakt
eller med utilstrækkelig kapacitet
72
gennem længere tid (f.eks. vinterpause). Løbehjulet sidder fast
med vand
nem bageste servicehul,
drej den, så løbehjulet løs-
at det påfyldte vand ikke lø-
på tryksiden
• Læg trykslangen uden
sugesiden og sugeledningen
• Læg sugeslangen uden
Page 73

Fejl
Årsag
Udbedring
Pumpen slår fra efter
Overbelastningssikringen har fra-
• Rengør tilslutningen på
• Lad pumpen køle af
Tørløbsbeskyttelsen har slået
pumpen fra
Rengør indsugningsåbning
og sugeledning
Tilstopning på sugesiden
Rengør indsugningsåbning
og sugeledning
Kontraventil defekt
• Kontakt OASE-service
DE
kort tids drift
RENGØRING OG VEDLIGEHOLDELSE
ADVARSEL
Farlig elektrisk spænding!
Død eller svære kvæstelser pga. elektrisk stød.
Før arbejdet påbegyndes:
• Sluk apparatet, træk netstikket ud, og
sørg for, at apparatet ikke kan tændes
ved en fejl.
• Netspændingen til alle apparater, der
befinder sig i vandet, skal frakobles, inden personer træder ned i eller stikker
hånden ned i vandet.
Efter arbejdet er afsluttet:
• Genskab alle forudsætninger for idrifttagning.
ADVARSEL
Risiko for kvæstelser op grund af varmt
vand!
Forbrænding af legemsdele.
• Ved defekt elektronik eller manglende
vandtilførsel på sugesiden kan vandet i
pumpen blive kraftigt opvarmet.
• Sluk for apparatet før du arbejder på
det.
• Afbryd pumpens forbindelse til nettet
med sikringen, eller træk stikket ud, og
lad vandet køle af.
koblet pumpen på grund af overophedning
sugesiden og sugeledningen
OBS!
Anbefaling vedrørende regelmæssig rengøring:
• Rengør enheden efter behov, dog
mindst 2 gange om året.
• Brug ingen aggressive rengøringsmidler eller opløsningsmidler, da disse kan
beskadige huset eller forringe apparatets funktion.
• Skyl alle dele med rent vand efter rengøring.
Rens filteret
Sådan gør du:
E
1. Sluk pumpen.
2. Træk netstikket ud.
3. Luk evt. alle spærreanordninger på sugesiden.
4. Skru dækslet til filterkammeret af.
5. Træk filterindsatsen ud.
6. Rengør filterindsats og filterdæksel under rindende vand med en børste.
7. Monter filteret igen i omvendt rækkefølge.
– Sørg for, at tætningen til filterdækslet
er sat i, og at den er ubeskadiget. Hvis
ikke, skal den udskiftes.
– Sørg for, at filterdækslet skrues rigtigt
på igen.
EN
FR
NL
ES
PT
IT
DA
NO
SV
FI
HU
PL
CS
SK
SL
HR
RO
BG
UK
RU
CN
73
Page 74

ProMax Garden Automatic 3500/4000/5000/6000
8. Sæt apparatet sammen i omvendt rækkefølge.
• Opbevar apparatet tørt og frostfrit.
• Stikket må ikke sænkes ned i vand.
OPBEVARING/OVERVINTRING
Apparatet er ikke frostsikkert og skal afmonteres og sættes til opbevaring, hvis
der ventes frostvejr.
Sådan opbevares apparatet korrekt:
• Tøm apparatet så godt som muligt, rengør det grundigt og kontroller for skader.
• Tøm så vidt muligt alle slanger, rørledninger og tilslutninger.
• Rengør apparatet grundigt, kontrollér
for beskadigelser, og udskift beskadigede dele.
LUKKEDELE
Følgende komponenter er sliddele og er
ikke omfattet af garantien:
• Filterindsats
• Løbehjul
BORTSKAFFELSE
OBS!
Dette apparat må ikke bortskaffes som
husholdningsaffald.
• Apparatet gøres ubrugeligt ved at
skære kablet af og bortskaffes via det
dertil beregnede genbrugssystem.
74
Page 75

ProMax Garden Automatic
3500
4000
5000
6000/5
Nominel spænding
V AC
230
230
230
230
Nominel frekvens
Hz
50
50
50
50
Nominel effekt
maksimum
W
900
1100
1200
1300
Beskyttelsesgrad
IPX4
IPX4
IPX4
IPX4
Luftstøjudslip
dB(A)
78
78
78
73
Tilslutning suge-/trykside
mm
G1
G1
G1
G1
Tryk bar 4 4,5 5 5,8
Pumpemængde
maksimum
l/t
3500
4000
4700
5800
Pumpehøjde
maksimum
m
40
45
50
58
Opsugningshøjde
maksimum
m 8 8 8 8
Pumpens løbeværk
Jet 1-trins
1-trins
1-trins
5-trins
Tænd/Sluk
Tryk på
• • •
•
LED-statusvisning
• • •
•
Tørløbssikring
Sensor
Sensor
Sensor
Sensor
Kornstørrelse
maksimum
mm 2 2 2 2
Nettilslutningsledning
Længde
m
1,5
1,5
1,5
1,5
Dimensioner
Længde
mm
543
543
543
591
Bredde
mm
234
234
234
234
Højde
mm
304
304
304
304
Vægt
kg
11
11,2
11,4
14,3
TEKNISKE DATA
indvendigt gevind
DE
EN
FR
NL
ES
PT
IT
DA
NO
SV
FI
HU
PL
CS
SK
SL
HR
RO
BG
UK
RU
CN
75
Page 76

ProMax Garden Automatic 3500/4000/5000/6000
A
ProMax Garden Automatic 3500
/ 5000 / 6000/5
1
Bærehåndtak med av/på-knapp
(13)
2
Tilkobling trykkside
3
Deksel forfilter
4
Tilkobling sugeside
5
Forfilterhus
6
Tilbakeslagsventilåpner
7
Vanntømmeskrue
8
Pumpehus
9
Pumpefot
10
Motorkabinett
11
Strømledning
12
Servicehull
13
Av/på-knapp med LED statusindikering
Oversettelse av den originale bruksanvisningen
OM DENNE BRUKSANVISNINGEN:
Velkommen til Oase Living Water. Med
kjøpet av produktet ProMax Garden Au-
tomatic 3500/4000/5000/6000 har du
gjort et godt valg.
Les denne bruksanvisningen nøye og gjør
deg kjent med apparatet før du tar det i
bruk første gang. Alt arbeid på og med
dette apparatet skal gjennomføres etter
de anvisninger som foreligger.
Ta hensyn til sikkerhetsanvisningene for
riktig og sikker bruk av apparatet.
Ta godt vare på denne bruksanvisningen.
Hvis apparatet selges skal bruksanvisningen følge med.
PRODUKTBESKRIVELSE
Oversikt
Symboler i denne bruksanvisningen
Advarsler
Advarslene i denne bruksanvisningen er
klassifisert med signalord som antyder
graden av fare.
ADVARSEL
• Betegner en potensielt farlig situasjon.
• Å ignorere advarselen kan føre til død
eller alvorlig personskade.
MERK
Informasjon for bedre forståelse.
Andre merknader
A Viser til en illustrasjon, f.eks. Illust-
rasjon A.
→ Viser til et annet kapittel.
Tilsiktet bruk
ProMax Garden Automatic
3500/4000/5000/6000, i fortsettelsen kalt
"utstyret", må kun brukes på følgende
måte:
• Ompumping og tømming av beholdere
eller bassenger.
• Vanning.
• Pumping av rent vann eller regnvann.
• Pumping av vann fra brønner.
– Bare for vanning.
• Tømming av regntønner eller sisterner.
– Størrelse på partikler i vannet: maks.
2 mm.
• Drift ved overholdelse av tekniske data.
76
Page 77

Mulig feilbruk
Følgende restriksjoner gjelder for apparatet:
• Skal ikke brukes over lengre tid (f.eks.
som sirkulasjonspumpe for basseng).
• Ikke egnet for saltvann.
• Pump aldri sølevann.
• Ikke koble til husets vannforsyning.
• Ikke egnet for drikkevann.
• Skal ikke brukes for nærings- eller indu-
striformål.
• Skal ikke brukes i forbindelse med kjemikalier, næringsmidler, lett brennbare
eller eksplosive stoffer.
SIKKERHETSANVISNINGER
Dette apparatet kan brukes av
barn som er 8 år eller eldre,
samt av personer med reduserte fysiske, sensoriske eller
mentale begrensninger, eller
som mangler erfaring og kunnskap, hvis de er under oppsikt
eller har fått opplæring i riktig
bruk av apparatet, og forstår farene forbundet med å bruke
dette.
Barn må ikke leke med apparatet.
Rengjøring eller brukervedlikehold må ikke utføres av barn
uten at de er under oppsikt.
Elektrisk tilkobling
Apparatet må være sikret gjennom en jordfeilbryter med en
utløserstrøm på maksimalt 30
mA.
• Apparatet skal bare kobles til dersom de
elektriske dataene til apparatet og
strømforsyningen stemmer overens. Du
finner apparatdataene på typeskiltet på
apparatet, på forpakningen og i denne
bruksanvisningen.
• Skjøteledninger og strømfordelere (f.
eks. stikkontaktlister) må være beregnet
for utendørs bruk (beskyttet mot vannsprut).
• Beskytt kontakter og koblinger mot fuktighet.
• Apparatet må bare kobles til en forskriftsmessig installert stikkontakt.
Sikker drift
En skadet nettilkoblingsledning
må straks byttes ut av OASE,
en autorisert kundeservice eller
en kvalifisert elektriker, får å
unngå fare for strømstøt.
• Sikkerhetsavstanden fra apparatet til
vannet må være minst 2 m.
• Pumpen må ikke stå ute i regnet og ikke
brukes i våte eller fuktige omgivelser.
• Ved defekte elektriske ledninger eller
hus, må ikke apparatet brukes.
• Aldri bær eller dra apparatet etter ledningen.
• Legg ledningene slik at de er beskyttet
mot skader, og slik at ingen kan snuble
i dem.
• Åpne huset på apparatet eller tilhørende deler kun hvis det uttrykkelig blir
sagt i bruksanvisningen at man skal
gjøre det.
• Utfør kun arbeid på dette apparatet som
er beskrevet i denne bruksanvisningen.
Kontakt autorisert kundeservice eller
produsenten ved tvil hvis problemet ikke
kan utbedres.
• Bruk kun originale reservedeler og tilbehør for apparatet.
DE
EN
FR
NL
ES
PT
IT
DA
NO
SV
FI
HU
PL
CS
SK
SL
HR
RO
BG
UK
RU
CN
77
Page 78

ProMax Garden Automatic 3500/4000/5000/6000
• Foreta aldri tekniske endringer på apparatet.
INSTALLASJON OG TILKOBLING
MERK
For å redusere støy fra pumpen kan
pumpen på faste installasjoner kobles til
ledningsnettet via trykkbestandige
slangeforbindelser.
• Plasser pumpen vannrett og stabilt på et
tørt sted.
– Ved faste installasjoner må man
sørge for at en tilstrekkelig stor
oppsamlingsbeholder til å tømme
pumpen kan plasseres under
tømmeskruen.
• Still om mulig pumpen opp høyere enn
vannreservoaret det skal pumpes ut av.
Hvis ikke må man montere en trykkfast
ventil mellom pumpen og sugeslangen.
• Bruk bare sugefaste vakuumslanger på
trykksiden og sugesiden.
MERK
OASE anbefaler: I tillegg må sugeslangen feste (f.eks. bindes til en trepinne) for
å avlaste vekten av pumpen.
B
• Skru suge- og trykkledningen til tilkoblingene med 25,0 mm innvendig diameter (1”).
DRIFT
Å ta apparatet i bruk
Før første gangs bruk må pumpen fylles
og sugeledningen luftes ut. Utlufting av
sugeledningen kan ta noen minutter.
Slik går du frem:
C
1. Skru av filterdekselet. Som skruehjelp
kan en skrutrekker settes inn fra siden i
en av utsparingene i dekselet.
2. Åpne stengningen på trykkledningen.
3. Fyll på vann gjennom påfyllingsåpningen i forfilteret til det renner over.
Hold tilbakeslagsventilen åpen når du
gjør det til vannet har fortrengt luften
som eventuelt er igjen i filteret.
4. Skru på igjen filterdekselet.
5. Sett støpslet i stikkontakten.
– Pumpen er driftsklar.
6. Slå på pumpen. (→ Bruk)
– Pumpen begynner straks å pumpe.
Det er fortsatt luft i vannet som kommer ut.
MERK
Hvis det fortsatt ikke suges inn vann etter
5 minutter, starter pumpen beskyttelse
mot tørrkjøring.
7. Lukk avstengingen av trykkledningen
straks det ikke lenger er luft i vannet
som kommer ut. Nå er sugeledningen
luftet.
Å ta apparatet ut av drift
MERK
Skyll gjennom apparatet med rent vann
etter bruk.
Slik går du frem:
1. Slå av pumpen
2. Trekk ut kontakten.
3. Gjør trykkledningen trykkløs ved å åpne
inntaksstedene.
4. Åpne dessuten tilbakeslagsventilene i
sugeledningen.
– Etter utkobling kan restvannet
strømme tilbake i sluket og ut gjennom innsugingsåpningen på pumpen.
Dersom pumpen skal avmonteres fullstendig:
D
5. Ta av de tilkoblede slangene på trykkog sugesiden.
78
Page 79

POX0041
1
LED blå
2
LED gul
3
LED rød
4
Av/på-knapp
6. Skru ut vanntappeskruen og tøm ut
restvannet ved å vippe pumpen.
7. Skru vanntappeskruen på igjen.
BRUK
• Syklus: Sensorer overvåker
vannstrømmen og vanntrykket, og slår
etter en bestemt tid pumpen på, av eller
til standby når pumpen ikke kan suge
inn vann eller trykkledningen er låst.
• Lysdiodene i av/på-knappen signaliserer den aktuelle driftstilstanden ved å
lyse eller blinke. (→ Driftstilstand og tilhørende LED-visninger)
Opprette driftsberedskap: Koble pumpen til strømnettet.
• Pumpen er driftsklar.
• Alle lysdioden lyser.
Slå pumpen av og på: Hold av/på-knappen inne mindre enn 3 s.
• Når den er slått på, overtar automatikken pumpestyringen: Sensorene kontrollerer gjentatte ganger om vanngjennomstrømningen ligger under minimum
pumpeeffekt eller om vanntrykket ligger
under 1,5 bar. Avhengig av resultatet,
drives pumpen slik at den er beskyttet
mot tørrkjøring eller automatikken setter
den i standby igjen.
Nullstilling av automatikken: Hold
av/på-knappen inne i minst 3 s.
DE
EN
FR
NL
ES
PT
IT
DA
NO
SV
FI
HU
PL
CS
SK
SL
HR
RO
BG
UK
RU
CN
79
Page 80

ProMax Garden Automatic 3500/4000/5000/6000
LED
Driftstilstand
Bruker
blå
gul
rød
blinkefrekven
s
–
Pumpen er klar til bruk
Slå på pumpen
–
Feilfri, pumpen går
4×/sekund
Feilfri, pumpen skifter til
standby
–
Feilfri, pumpen befinner seg
i standby
–
Pumpen suger ikke vann-
rkjøring
Vent
1×/sekund
Pumpen suger ikke vann
tørrkjøring
Vent
2×/sekund
Pumpen suger ikke vann
pumpen til ventemodus
Vent
3×/sekund,
4. trinn beskyttelse mot tørr-
s, deretter
maks. 2×
Vent eller finn
–
Feil, pumpe har gjennomført
Trekk ut støpslet,
støpslet igjen
1×/sekund
Testsyklus. Lekkasjebeskyt-
min.,
maks. 2 sykluser
Vent
–
Feil, 18 mislykkede start-
Trekk ut støpslet,
støpslet igjen
LED på
LED av
LED blinker
Driftstilstand og tilhørende LED-visninger
1. trinn beskyttelse mot tør-
• 2. trinn beskyttelse mot
• 3. trinn beskyttelse mot
tørrkjøring
• I det 4. trinnet skifter
80
hver lysdiode
vekselvis
kjøring.
årsaken
Pumpen befinner seg i
ventemodus i 120
begynner syklusen på nytt,
3× sykluser
kontroller sugesi-
den, plugg inn
telse begynner etter 60
forsøk
kontroller trykk-
siden, plugg inn
Page 81

Feil
Årsak
Utbedring
Pumpen starter ikke
Pumpen er slått av
Slå på pumpen
Strømtilførselen er brutt
Kontroller de elektriske tilkoblingene
Jordfeilbryteren er utløst
Slå av pumpen og trekk ut
takt med OASE-Service
Pumpen har vært ute av drift i
Før en skrutrekker gjen-
å dreie den.
Pumpen pumper ikke
Pumpen er ikke tilstrekkelig fylt
Fyll pumpen og forsikre
den
Trykkledningen er tett
• Åpne uttaksstedet på
knekk
Sugeledningen er tett
• Rengjør sugeledningen
knekk
Lekkasje på sugesiden
Fjern lekkasjen på sugesiden
Filterdekseltetning defekt
Skift filterdekseltetning
Filterinnsats i pumpen tilstoppet
Rengjør eller skift filteret og
filterdekslet
Filterinnsats i pumpen tilstoppet
for raskt
Installer eksternt, større
forfilter (valgfritt tilbehør)
FEILRETTING
DE
ADVARSEL
Farlig elektrisk spenning!
Død eller alvorlige personskader på grunn av strømstøt.
Før arbeidet tar til:
• Slå av apparatet, trekk ut strømstøpselet og sikre apparatet mot innkobling.
• Før du berører vannet må strømstøpslene for alle apparater som befinner seg i vannet
alltid trekkes ut.
Når arbeidet er avsluttet:
• Gjenopprett alle forutsetninger for drift.
støpslet. Ta deretter kon-
eller pumper ikke tilstrekkelig
lengre tid (f.eks. vinterpause).
Løpehjulet sitter fast
med vann
nom det bakre servicehullet, og løsne løpehjulet ved
deg om at det påfylte vannet ikke flyter ut på trykksi-
trykksiden
• Legg trykkslangen uten
EN
FR
NL
ES
PT
IT
DA
NO
SV
FI
HU
PL
CS
SK
og tilkoblingen på sugesiden
• Legg sugeslangen uten
SL
HR
RO
BG
UK
RU
CN
81
Page 82

ProMax Garden Automatic 3500/4000/5000/6000
Feil
Årsak
Utbedring
Pumpen slår seg av
Overbelastningssikringen kar
• Rengjør sugeledningen
• La pumpen bli avkjølt
Beskyttelse mot tørrkjøring har
slått av pumpen
Rengjør sugeledningen og
innsugingsåpningen
Tilstopping på sugesiden
Rengjør sugeledningen og
innsugingsåpningen
Tilbakeslagsventil defekt
• Ta kontakt med OASEService
etter kort brukstid
RENGJØRING OG VEDLIKEHOLD
ADVARSEL
Farlig elektrisk spenning!
Død eller alvorlige personskader på
grunn av strømstøt.
Før arbeidet tar til:
• Slå av apparatet, trekk ut strømstøpselet og sikre apparatet mot innkobling.
• Før du berører vannet må strømstøpslene for alle apparater som befinner seg
i vannet alltid trekkes ut.
Når arbeidet er avsluttet:
• Gjenopprett alle forutsetninger for drift.
ADVARSEL
Fare for personskader pga. varmt vann!
Fare for forbrenning av kroppsdeler.
• Dersom elektronikken er defekt eller
vanntilførsel på sugesiden uteblir, kan
vannet som ennå befinner seg i pumpen
være sterkt opphetet.
• For du starter arbeidet må du skru av
nettspenningen.
• Skill pumpen fra strømnettet ved å slå
av hussikringen eller trekke ut støpselet, og la pumpen bli avkjølt.
MERK
Anbefalinger for regelmessig rengjøring:
• Rengjør apparatet ved behov og minst
2 ganger årlig.
slått av pumpen på grunn av
overoppheting
• Du må ikke under noen omstendigheter
bruke aggressive rengjøringsmidler eller kjemiske løsemidler, da dette kan
angripe huset eller svekke apparatets
funksjoner.
• Skyll av alle deler grundig med klart
vann etter rengjøring.
Rengjøre filter
Slik går du frem:
E
1. Slå av pumpen.
2. Trekk ut kontakten.
3. Lukk eventuelt alle sperreinnretninger
på sugesiden.
4. Skru opp og ta av dekselet til filterkammeret.
5. Trekk ut filterinnsatsen.
6. Rengjør filterinnsatsen og filterdekslet
med en børste under rennende vann .
7. Monter filteret igjen i motsatt rekkefølge.
– Pass på at filterdekseltetningen er til
stede og uskadet. Erstatt den hvis
ikke.
– Pass på at filterdekselet er skrudd på
igjen på riktig måte.
8. Sett apparatet sammen igjen i omvendt
rekkefølge.
og tilkoblingen på sugesiden
82
Page 83

LAGRING/OVERVINTRING
Apparatet er ikke frostsikkert og må demonteres og lagres innendørs hvis man
forventer frost.
Slik lagrer du apparatet riktig:
• Tøm apparatet så langt det er mulig,
gjennomfør en grundig rengjøring og
kontroller for skader.
• Samtlige slanger, rørledninger og
tilkoblinger må tømmes så godt det er
mulig.
• Rengjør apparatet grundig, kontroller
om det er skadet, skift ut ødelagte deler.
• Oppbevar apparatet tørt og frostfritt.
• Støpslet må ikke dyppes i vannet.
SLITEDELER
Følgende komponenter er slitedeler og
omfattes ikke av garantien:
• Filterinnsats.
• Løpehjul
KASSERING
MERK
Dette apparatet må ikke kastes i vanlig
husholdningsavfall.
• Gjør apparatet ubrukelig ved å kutte av
kablene og avhend det i retursystemet.
DE
EN
FR
NL
ES
PT
IT
DA
NO
SV
FI
HU
PL
CS
SK
SL
HR
RO
BG
UK
RU
CN
83
Page 84

ProMax Garden Automatic 3500/4000/5000/6000
ProMax Garden Automatic
3500
4000
5000
6000/5
Merkespenning
V AC
230
230
230
230
Nominell frekvens
Hz
50
50
50
50
Nominell effekt
maks W 900
1100
1200
1300
Beskyttelsestype
IPX4
IPX4
IPX4
IPX4
Luftstøyutslipp
dB(A)
78
78
78
73
Tilkobling suge-/trykkside
mm
G1
G1
G1
G1
Trykk bar 4 4,5 5 5,8
Kapasitet
maks
l/t
3500
4000
4700
5800
Pumpehøyde
maks m 40
45
50
58
Sugehøyde
maks m 8 8 8
8
Pumpeløpeverk
Jet 1-trinns
1-trinns
1-trinns
5-trinns
Slå av/på
Knapp
• • •
•
LED-statusindikering
• • •
•
Beskyttelse mot tørrkjøring
Sensor
Sensor
Sensor
Sensor
Partikkelstørrelse
maks
mm 2 2 2 2
Strømledning
Lengde
m
1,5
1,5
1,5
1,5
Dimensjoner
Lengde
mm
543
543
543
591
Bredde
mm
234
234
234
234
Høyde
mm
304
304
304
304
Vekt
kg
11
11,2
11,4
14,3
TEKNISKE DATA
innvendige gjenger
84
Page 85

A
ProMax Garden Automatic 3500
/ 5000 / 6000/5
1
Bärhandtag med strömbrytare (13)
2
Anslutning på trycksidan
3
Lock till förfilter
4
Anslutning på sugsidan
5
Förfilterhus
6
Backventilöppnare
7
Vattenavtappningsskruv
8
Pumphus
9
Pumpfot
10
Motorkåpa
11
Nätkabel
12
Serviceöppning
13
Strömbrytare med LEDstatusindikering
Översättning av originalbruksanvisningen
OM DENNA BRUKSANVISNING
Välkommen till OASE Living Water. Med
din nya produkt ProMax Garden Auto-
matic 3500/4000/5000/6000 har du gjort
ett bra val.
Läs igenom bruksanvisningen noggrant
före första användningstillfället och ta
reda på hur apparaten fungerar. Alla slags
arbeten som utförs på denna apparat får
endast genomföras enligt föreliggande instruktioner.
Beakta noga säkerhetsanvisningarna, de
är en förutsättning för korrekt och säker
användning.
Förvara denna bruksanvisning på ett säkert ställe. Om apparaten byter ägare
måste även bruksanvisningen följa med.
Symboler i denna bruksanvisning
Varningsanvisningar
Varningsanvisningarna i denna bruksanvisning är indelade med signalord som visar omfattningen av faran.
VARNING
• Beskriver en möjligtvis farlig situation.
• Om detta inte beaktas kan detta leda till
dödsolyckor eller allvarliga personskador.
ANVISNING!
Information som ska ge bättre förståelse
för apparaten.
Andra anvisningar
A Referens till en bild, t ex bild A.
→ Referens till ett annat kapitel.
PRODUKTBESKRIVNING
Översikt
DE
EN
FR
NL
ES
PT
IT
DA
NO
Ändamålsenlig användning
ProMax Garden Automatic
3500/4000/5000/6000, som i denna dokumentation betecknas som apparat, får
endast användas på följande sätt:
• Om- och utpumpning av behållare eller
bassänger.
• Påfyllning och bevattning.
• Pumpning av klart vatten eller regnvat-
ten.
• Vattenuttag från brunnar
– Endast för bevattning!
• Vattenuttag från regnvattentunnor eller
cisterner.
– Kornstorlek för partiklar i vattnet: max.
2 mm.
• Drift under iakttagande av tekniska
data.
SV
FI
HU
PL
CS
SK
SL
HR
RO
BG
UK
RU
CN
85
Page 86

ProMax Garden Automatic 3500/4000/5000/6000
Möjlig felaktig användning
För apparaten gäller följande begränsningar:
• Får inte användas i långtidsdrift (t ex för
kontinuerlig cirkulation i dammar).
• Inte lämplig för saltvatten.
• Pumpa aldrig smutsvatten.
• Anslut den inte till husets vattentilled-
ning.
• Inte lämplig för dricksvatten.
• Använd inte för kommersiella eller in-
dustriella ändamål.
• Använd inte kombination med kemikalier, livsmedel eller lättantändliga eller
explosiva ämnen.
SÄKERHETSANVISNINGAR
Denna apparat kan användas
av barn som är 8 år eller äldre
samt av personer med sänkt fysisk, sensorisk eller mental förmåga eller brist på erfarenhet
och kunskap förutsatt att de
hålls under uppsikt eller instrueras i hur de använder apparaten säkert samt de risker
som kan uppstå.
Barn får inte leka med apparaten.
Rengöring och användarunderhåll får inte utföras av barn utan
uppsikt.
Elanslutning
Apparaten ska vara ansluten till
en jordfelsbrytare vars dimensionerade felström uppgår till
max. 30 mA.
• Apparaten får endast anslutas om de
elektriska data som gäller för apparaten
stämmer överens med strömförsörjningen. Apparatens data anges på typskylten på apparaten, på förpackningen
eller i denna bruksanvisning.
• Förlängningskablar och strömfördelare
(t ex grenuttag) ska vara godkända för
användning utomhus (dropptäta).
• Skydda stickkontakter från fukt.
• Anslut endast apparaten till ett väggut-
tag som installerats enligt gällande föreskrifter.
Säker drift
En skadad nätkabel ska genast
bytas ut av OASE, en behörig
kundtjänstverkstad eller en behörig elinstallatör för att undvika risk för elektriska slag.
• Säkerhetsavståndet från apparaten till
vattnet måste uppgå till minst 2 m.
• Utsätt inte pumpen för regn och använd
den inte i våt eller fuktig omgivning.
• Apparaten får inte användas om elkablarna eller kåpan är defekta.
• Bär inte och dra inte apparaten i elkabeln.
• Dra kablarna så att de är skyddade och
inte kan skadas, och att ingen kan
snava över dem.
• Öppna apparatens kåpa eller tillhörande delar endast när du uttryckligen
uppmanas till detta i bruksanvisningen.
• Genomför endast arbeten på apparaten, som beskrivs i denna anvisning.
Kontakta en behörig kundtjänstverkstad, eller ev. tillverkaren, om vissa problem inte kan åtgärdas.
• Använd endast original reservdelar och
tillbehör till apparaten.
• Genomför inte tekniska ändringar på
apparaten.
86
Page 87

INSTALLATION OCH ANSLUTNING
ANVISNING!
För att reducera bullret från en fast installerad pump ska denna anslutas till rörnätet via flexibla tryckfasta slangledningar.
• Placera pumpen vågrätt och stabilt på
en torr plats.
– Beakta vid en fast installation att en
tillräcklig stor behållare kan ställas in
under avtappningsskruven när pumpen ska tömmas.
• Placera pumpen om möjligt högre än
vattenreservoaren varifrån vattnet ska
pumpas. I annat fall ska en tryckfast
ventil monteras mellan pump och
sugslang.
• Använd endast sugfasta vakuumslangar på trycksidan och sugsidan.
ANVISNING!
OASE rekommenderar: Fäst dessutom
sugslangen (kan t ex bindas fast vid en
träpåle) så att pumpen avlastas från
denna vikt.
B
• Skruva fast sug- resp. tryckslangen
med 25,0-mm-innerdiameter (1") på anslutningarna.
ANVÄNDNING
Ta apparaten i drift
Innan pumpen används för första gången
ska den fyllas på och sugledningen avluftas. Avluftningen av sugledningen kan ta
några minuter.
Gör så här:
C
1. Skruva av filterlocket. För att underlätta
när locket skruvas av kan en skruvmejsel sättas in i en av öppningarna i locket.
2. Öppna avspärrningen i tryckledningen.
3. Fyll på vatten i förfiltrets påfyllningsöppning tills det rinner över. Håll backventilen öppen tills vattnet har trängt undan
ev. luft som finns fortfarande finns i filtret.
4. Skruva på filterlocket igen.
5. Anslut stickkontakten till stickuttaget.
– Pumpen är driftklar.
6. Slå på pumpen. (→ Användning)
– Pumpen börjar genast pumpa. Det
finns fortfarande luft i vattnet som
pumpas ut.
ANVISNING!
Om inget vatten har sugits in inom 5 minuter, kommer pumpens torrkörningsskydd att starta.
7. Stäng avspärrningen i tryckledningen
när ingen luft längre finns i vattnet som
rinner ut. Sugledningen har nu avluftats.
Ta apparaten ur drift
ANVISNING!
Spola igenom pumpen med klart vatten
efter att den har använts.
Gör så här:
1. Slå ifrån pumpen
2. Dra ut stickkontakten.
3. Töm tryckledningen på tryck innan uttagsställena öppnas.
4. Öppna dessutom backventilerna som
monterats in i sugledningen.
– Efter att apparaten har slagits ifrån
kan restvattnet i slangen rinna tillbaka
och lämna pumpen genom insugningsöppningen.
Om pumpen ska demonteras komplett:
D
5. Ta bort anslutna slangar på tryck- och
sugsidan.
6. Skruva ut vattenavtappningsskruven
och låt restvattnet rinna ut genom att
tippa pumpen.
DE
EN
FR
NL
ES
PT
IT
DA
NO
SV
FI
HU
PL
CS
SK
SL
HR
RO
BG
UK
RU
CN
87
Page 88

ProMax Garden Automatic 3500/4000/5000/6000
POX0041
1
Lysdiod blå
2
Lysdiod gul
3
Lysdioden röd
4
Strömbrytare
7. Skruva in vattenavtappningsskruven
igen.
ANVÄNDNING
• Förlopp: Sensorerna som övervakar
vattenflödet och vattentrycket slår på eller ifrån pumpen efter en viss tid, eller
ställer den i standby om den inte kan
suga upp något vatten eller om tryckledningen är stängd.
• Lysdioderna i strömbrytaren som antingen lyser kontinuerligt eller blinkar indikerar aktuell driftstatus. (→ Driftstatus
och tillhörande LED-indikeringar)
Upprätta driftberedskap: Anslut pumpen
till elnätet.
• Pumpen är driftklar.
• Alla lysdioder lyser.
Slå på och ifrån pumpen: Håll strömbrytaren intryckt kortare än 3 s.
• Efter att pumpen har slagits på övertar
automatikfunktionen pumpstyrningen:
Sensorerna kontrollerar ständigt om
vattenflödet ligger under den minimala
matningsprestandan eller om vattentrycket underskrider 1,5 bar. Beroende
på resultat kommer pumpen att skyddas
mot torrkörning under drift, eller kommer att skifta till standby av automatikfunktionen.
Genomföra reset av automatik: Håll
strömbrytaren intryckt i minst 3 s.
88
Page 89

LED
Driftstatus
Användare
Blå
Gul
Röd
Blinkfrekvens
–
Pumpen driftklar
Slå på pumpen
–
Felfri, pumpen kör
4 ggr/sekund
Felfri, pumpen skiftar strax
till standby
–
Felfri, pumpen är i standby
–
Pumpen suger inget vatten 1:a nivå torrkörningsskydd
Vänta
1 gång/se-
Pumpen suger inget vatten
skydd
Vänta
2 ggr/sekund
Pumpen suger inget vatten
pen till väntläge
Vänta
3 ggr/sekund,
4:e nivå torrkörningsskydd.
2 ggr
Vänta eller loka-
–
Störning, pumpen hör kört
Dra ut stickkon-
kontrollera
igen
1 gång/se-
Testförlopp. Läckskydd bör-
lopp
Vänta
–
Störning, 18 misslyckade
Dra ut stickkontakten, kontrollera
igen
Lysdiod TILL
Lysdiod FRÅN
Lysdiod blinkar
Driftstatus och tillhörande LED-indikeringar
DE
EN
FR
NL
ES
PT
kund
• 2:a. nivå torrkörnings-
IT
DA
• 3:e nivå torrkörningsskydd
• På 4:e nivån skiftar pum-
NO
SV
varje lysdiod
omväxlande
Pumpen står i väntläge i
120 s, därefter börjar förloppet på nytt, max. ytterligare
lisera orsaken
FI
HU
PL
igenom förloppet 3 ggr
takten,
sugsidan, anslut
stickkontakten
CS
SK
kund
jar efter 60 min, max. 2 för-
startförsök
trycksidan, anslut
stickkontakten
SL
HR
RO
BG
UK
RU
CN
89
Page 90

ProMax Garden Automatic 3500/4000/5000/6000
Störning
Orsak
Åtgärd
Pumpen startar inte
Pumpen har slagits ifrån
Slå på pumpen
Strömförsörjningen har brutits
Kontrollera kontaktdonen
Jordfelsbrytaren har löst ut
Slå ifrån pumpen och dra
därefter OASE-service
Pumpen har inte använts under
För in skruvmejseln i den
pumphjulet.
Pumpen matar inte
Pumpen är inte tillräckligt fylld
Fyll på pumpen och se till
rinner ut på trycksidan
Tryckledningen är tilltäppt
• Öppna uttagsstället på
veck
Sugledningen är tilltäppt
• Rengör anslutningen på
veck
Otäthet på sugsidan
Åtgärda otätheten på sugsidan
Packningen i filterlocket är defekt
Byt ut packningen i filterlocket
Filterinsatsen i pumpen är tilltäppt
Rengör eller byt ut filtret
och filterlocket
Filterinsatsen i pumpen täpps
snabbt till
Installera ett externt, större
förfilter (optionalt tillbehör)
STÖRNINGSÅTGÄRDER
VARNING
Farlig elektrisk spänning!
Dödsolyckor eller allvarliga personskador av elektriska slag.
Innan arbetet påbörjas:
• Slå ifrån apparaten, dra ut stickkontakten och spärra apparaten så att den inte kan slås
på.
• Koppla ifrån strömförsörjningen till alla apparater i vattnet innan du stiger ned eller
griper ned i vattnet.
Efter att arbetet har avslutats:
• Återupprätta alla förutsättningar för att ta apparaten i drift.
ut stickkontakten. Kontakta
eller har otillräcklig
kapacitet
90
längre tid (t ex vinteruppehåll).
Pumphjulet sitter fast
med vatten.
bakre serviceöppningen,
vrid runt och lossa på
att det påfyllda vattnet inte
trycksidan
• Lägg tryckslangen utan
sugsidan samt sugledningen
• Lägg sugslangen utan
Page 91

Störning
Orsak
Åtgärd
Pumpen slår ifrån ef-
Överlastskyddet har slagit ifrån
• Rengör anslutningen på
• Låt pumpen svalna
Torrkörningsskyddet har slagit
ifrån pumpen
Rengör insugningsöppningen och sugledningen
Blockering på sugsidan
Rengör insugningsöppningen och sugledningen
Backventilen är defekt
• Kontakta OASE-service
DE
ter kort tids drift
RENGÖRING OCH UNDERHÅLL
VARNING
Farlig elektrisk spänning!
Dödsolyckor eller allvarliga personskador av elektriska slag.
Innan arbetet påbörjas:
• Slå ifrån apparaten, dra ut stickkontakten och spärra apparaten så att den inte
kan slås på.
• Koppla ifrån strömförsörjningen till alla
apparater i vattnet innan du stiger ned
eller griper ned i vattnet.
Efter att arbetet har avslutats:
• Återupprätta alla förutsättningar för att
ta apparaten i drift.
VARNING
Risk för skållskador av hett vatten.
Brännskador på kroppsdelar
• Om elektroniken är defekt eller vattenmatning saknas på sugsidan är det möjligt att vattnet som fortfarande finns i
pumpen är mycket hett.
• Innan man utför arbeten på apparaten
ska nätspänningen kopplas ur.
• Koppla loss pumpen från elnätet med
hjälp av byggnadens säkring, eller dra
ut stickkontakten, och låt därefter vattnet svalna.
pumpen pga överhettning
sugsidan samt sugledningen
ANVISNING!
Rekommendation för regelbunden rengöring:
• Rengör apparaten vid behov, men minst
2 ggr/år.
• Använd inga aggressiva rengöringsmedel eller kemiska lösningar då dessa
kan angripa apparatens kåpa eller leda
till att apparatens funktion försämras.
• Efter rengöringen ska alla delar sköljas
av noggrant med klart vatten.
Rengöra filter
Gör så här:
E
1. Slå ifrån pumpen.
2. Dra ut stickkontakten.
3. Stäng ev. alla avspärrningar på sugsidan.
4. Skruva loss locket filterkammaren och
ta sedan av.
5. Dra ut filterinsatsen.
6. Rengör filterinsatsen och filterlocket
med en borste under rinnande vatten.
7. Montera filtret i omvänd ordningsföljd.
– Se till att packningen ligger i filter-
locket och att den är intakt. I annat fall
ska den bytas ut.
– Se till att filterlocket har skruvats fast
på avsett vis.
EN
FR
NL
ES
PT
IT
DA
NO
SV
FI
HU
PL
CS
SK
SL
HR
RO
BG
UK
RU
CN
91
Page 92

ProMax Garden Automatic 3500/4000/5000/6000
8. Sätt ihop apparaten i omvänd ordningsföljd.
• Förvara apparaten torrt och frostfritt.
• Doppa inte ned stickkontakten i vatten.
FÖRVARING / LAGRING UNDER VINTERN
Apparaten är inte frostsäker och ska avinstalleras och läggas undan för förvaring
om frost förväntas.
Förvara apparaten så här:
• Töm enheten så gott som möjligt, rengör den noggrant och kontrollera om
den har skadats.
• Töm samtliga slangar, rörledningar och
anslutningar så gott som möjligt.
• Rengör apparaten noggrant, kontrollera
om den har skadats och byt ut skadade
delar vid behov.
SLITAGEDELAR
Följande komponenter är slitagedelar och
ingår inte i garantin:
• Filterinsats
• Pumphjul
AVFALLSHANTERING
ANVISNING!
Denna apparat får inte kastas i hushållssoporna!
• Gör apparaten obrukbar genom att
klippa av kablarna och lämna därefter in
den till en återvinningscentral.
92
Page 93

ProMax Garden Automatic
3500
4000
5000
6000/5
Märkspänning
V AC
230
230
230
230
Märkfrekvens
Hz
50
50
50
50
Märkeffekt
högst W 900
1100
1200
1300
Kapslingsklass
IPX4
IPX4
IPX4
IPX4
Luftburet buller
dB(A)
78
78
78
73
Anslutning sug-/trycksida
mm
G1
G1
G1
G1
Tryck bar 4 4,5 5 5,8
Kapacitet
maximal
l/tim
3500
4000
4700
5800
Uppfordringshöjd
maximal
m
40
45
50
58
Sughöjd
högst m 8 8 8
8
Pump
Jet 1-stegs
1-stegs
1-stegs
5-stegs
Slå på/slå ifrån
Knapp
• • •
•
LED-statusindikering
• • •
•
Torrkörningsskydd
Sensor
Sensor
Sensor
Sensor
Kornstorlek
maximal
mm 2 2 2 2
Nätkabel
Längd m 1,5
1,5
1,5
1,5
Mått
Längd
mm
543
543
543
591
Bredd
mm
234
234
234
234
Höjd
mm
304
304
304
304
Vikt
kg
11
11,2
11,4
14,3
TEKNISKA DATA
DE
EN
FR
NL
innergänga
ES
PT
IT
DA
NO
SV
FI
HU
PL
CS
SK
SL
HR
RO
BG
UK
RU
CN
93
Page 94

ProMax Garden Automatic 3500/4000/5000/6000
A
ProMax Garden Automatic
3500/5000/6000/5
1
Kantokahva päälle/pois-painikkeella (13)
2
Painepuolen liitäntä
3
Esisuodattimen kansi
4
Imupuolen liitäntä
5
Esisuodattimen kotelo
6
Takaiskuventtiilin avaaja
7
Vedenpoistoruuvi
8
Pumppukotelo
9
Pumppujalusta
10
Moottorin kotelo
11
Verkkoliitäntäjohto
12
Huoltoaukko
13
Päälle/pois-painike LEDtilanäytöllä
Alkuperäisen käyttöohjeen käännös
TÄTÄ KÄYTTÖOHJETTA KOSKEVIA TIETOJA
Tervetuloa OASE Living Water -yritykseen. Tällä ostoksella ProMax Garden
Automatic 3500/4000/5000/6000 olette
tehnyt hyvän valinnan.
Lukekaa tämä käyttöohje huolellisesti läpi
ennen laitteen ensimmäistä käyttöä ja tutustukaa laitteeseen. Kaikki tätä laitetta
koskevat työt ja työt tällä laitteella saa
suorittaa vain kyseessä olevan ohjeen
mukaan.
Noudattakaa ehdottomasti oikean ja turvallisen käytön ohjeita.
Säilyttäkää tämä käyttöohje huolellisesti!
Jos laite vaihtaa omistajaa, antakaa käyttöohje eteenpäin.
Tämän ohjeen symbolit
Varoitusohjeita
Tämän käyttöohjeen varoitusohjeet on
luokiteltu merkkisanojen mukaan, jotka ilmoittavat vaaran vakavuuden.
VAROITUS
• Tarkoittaa mahdollisesti vaarallista
tilannetta.
• Noudattamatta jättäminen voi johtaa
kuolemaan tai hyvin vakaviin vammoihin.
OHJE
Tietoja asioiden ymmärtämiseksi paremmin.
Muita ohjeita
A Viittaus johonkin kuvaan esim.
Kuva A.
→ Viittaus johonkin toiseen lukuun.
TUOTEKUVAUS
Yleiskatsaus
Määräystenmukainen käyttö
ProMax Garden Automatic
3500/4000/5000/6000, jota seuraavassa
nimitetään "laitteeksi", saa käyttää ainoastaan seuraavasti:
• Säiliöiden tai altaiden siirto- ja tyhjennyspumppaus.
• Kastelu.
• Puhtaan veden tai sadeveden pump-
paus.
• Vedenotto kaivoista.
– Vain kastelutarkoituksiin!
• Veden otto sadevesitynnyreistä tai säiliöistä.
– Hiukkasten jyväkoko vedessä: enint.
2 mm.
• Teknisten tietojen käyttö ja noudattaminen.
94
Page 95

Mahdollinen virheellinen käyttö
Laitteelle ovat voimassa seuraavat rajoitukset:
• Ei sovellu pitkäaikaiskäyttöön (esim.
lammikon veden jatkuvaan kierrätykseen).
• Ei sovellu merivedelle.
• Likavettä ei koskaan saa pumpata.
• Ei saa yhdistää talousveden syöttöön.
• Ei sovellu juomavedelle.
• Ei ammattimaiseen tai teolliseen käyt-
töön.
• Ei käyttöön kemikaalien, elintarvikkeiden, helposti palavien tai räjähtävien aineiden yhteydessä.
TURVAOHJEET
Tätä laitetta saavat käyttää yli
8 -vuotiaat lapset, sekä henkilöt, joiden fyysiset, aistimelliset
tai henkiset kyvyt ovat vähentyneet tai joilla ei ole tarvittavaa
kokemusta ja tietoa, vain valvonnan alaisina ja kun heille on
annettu opastusta laitteen turvallisesta käytöstä ja kun he
ymmärtävät laitteen käytöstä
mahdollisesti seuraavat vaarat.
Lapset eivät saa leikkiä laitteella.
Puhdistus ja käyttäjän suorittama huolto eivät saa tapahtua
lasten toimesta ilman valvontaa.
Sähköliitäntä
Laite on varmistettava vikavirtasuojalaitteella, jonka nimellisvikavirta on enintään 30 mA.
• Laitteen saa yhdistää vain silloin, kun
laitteen ja virransyötön tiedot vastaavat
toisiaan. Laitetiedot ovat tyyppikilvessä
itse laitteessa, pakkauksessa tai tässä
käyttöohjeessa.
• Pidennysjohtojen ja virranjakajien
(esim. pistorasiarimojen) on oltava ulkokäyttöön sopivia (roiskevedeltä suojattuja).
• Pistokeliitännät on suojattava kosteudelta.
• Laitteen saa yhdistää vain määräysten
mukaisesti asennettuun pistorasiaan.
Turvallinen käyttö
Jos verkkoliitäntäjohto on vaurioitunut, tilaa sen vaihto välittömästi OASElta, valtuutetusta
asiakaspalvelusta tai sähköasentajalta. Viallinen johto on
sähköiskuriski.
• Laitteen turvaetäisyyden veteen on oltava vähintään 2 m.
• Pumppua ei saa altistaa sateelle tai
käyttää kosteassa ympäristössä.
• Jos sähköjohdot tai kotelo ovat viallisia,
ei laitetta saa käyttää.
• Laitetta ei saa kantaa tai vetää sähköjohdosta.
• Johdot on asennettava niin, että ne eivät pääse vaurioitumaan ja että kukaan
ei kompastu niihin.
• Laitteen kotelon tai siihen kuuluvat osat
saa avata vain silloin, kun käyttöohjeessa nimenomaisesti kehotetaan näin
tekemään.
• Laitteelle saa suorittaa vain sellaisia
töitä, kuin tässä käyttöohjeessa on kuvattu. Jos ongelmia ei voi ratkaista, on
DE
EN
FR
NL
ES
PT
IT
DA
NO
SV
FI
HU
PL
CS
SK
SL
HR
RO
BG
UK
RU
CN
95
Page 96

ProMax Garden Automatic 3500/4000/5000/6000
käännyttävä valtuutetun asiakaspalvelupisteen tai epäselvässä tapauksessa
valmistajan puoleen.
• Laitteessa saa käyttää vain alkuperäisiä
varaosia ja lisätarvikkeita.
• Laitteeseen ei koskaan saa tehdä teknisiä muutoksia.
PAIKOILLEEN ASETTAMINEN JA YHDISTÄMINEN
OHJE
Pumpun äänien vähentämiseksi voidaan
pumppu kiinteässä asennuksessa yhdistää joustavien paineenkestävien letkujohtojen kautta putkistoverkkoon.
• Aseta pumppu vaakasuoraan ja tukevasti kuivaan paikkaan.
– Kiinteässä asennuksessa on kiinnitet-
tävä huomiota siihen, että pumpun
tyhjentämistä varten voidaan poistoruuvin alle asettaa riittävän suuri keräysastia.
• Pumppu on mahdollisuuksien mukaan
asetettava korkeammalle kuin se vesisäiliö, josta pumpataan. Muussa tapauksessa voidaan pumpun ja imuletkun väliin asentaa paineenkestävä
venttiili.
• Painepuolella ja imupuolella saa käyttää vain imunkestäviä tyhjiöletkuja.
OHJE
OASE suosittelee: Kiinnitä lisäksi imuletku (sido se esim. puupaaluun) pumpun
painon keventämiseksi.
B
• Kierrä 25,0 mm sisähalkaisijalla (1") varustettu imu- ja paineletku liitäntöihin.
KÄYTTÖ
Laitteen käyttöönotto
Ennen ensimmäistä käyttöä pumppu on
täytettävä ja ilma poistettava imujohdosta.
Ilman poistaminen imujohdosta voi kestää
muutamia minuutteja.
Toimit näin:
C
1. Kierrä suodatinkansi irti. Kiertoapuna
voi käyttää ruuvitalttaa asettamalla sen
sivulta päin johonkin kannessa olevaan
aukkoon.
2. Avaa painejohdon sulkulaite.
3. Täytä vettä esisuodattimen täyttöaukkoon sen ylivuotamiseen saakka. Avaa
samalla takaiskuventtiilin avaajaa niin
kauan, kunnes vesi on syrjäyttänyt suodattimessa vielä mahdollisesti olevan ilman.
4. Kierrä suodatinkansi takaisin kiinni.
5. Työnnä verkkopistoke pistorasiaan.
– Pumppu on käyttövalmis.
6. Kytke pumppu päälle. (→ Käyttö)
– Pumppu alkaa heti pumpata. Ulosva-
luvassa vedessä on vielä ilmaa.
OHJE
Jos 5 minuutin kuluessa ei vielä vettä ole
imetty, pumppu aloittaa kuivakäyntisuojan.
7. Sulje sulkulaite painejohdossa, kun
ulosvaluvassa vedessä ei enää ole ilmaa. Imujohto on nyt ilmattu.
Laitteen poistaminen käytöstä
OHJE
Huuhtele pumppu käytön jälkeen puhtaalla vedellä.
Toimit näin:
1. Pumpun kytkeminen pois päältä
2. Vedä verkkopistoke irti.
3. Poista painejohdosta paine avaamalla
ottopaikat.
4. Avaa lisäksi imujohtoon asennetut takaiskuventtiilit.
96
Page 97

POX0041
1
LED sininen
2
LED keltainen
3
LED punainen
4
Päälle/pois-painike
– Poiskytkennän jälkeen voi jäämävesi
valua takaisin letkuun ja tulla ulos
pumpun sisäänimuaukosta.
Jos pumppu poistetaan kokonaan:
D
5. Irrota yhdistetyt letkut paine- ja imupuolelta.
6. Kierrä vedenpoistoruuvi irti ja anna jäljellä olevan veden valua pois pumppua
kallistamalla.
7. Kierrä vedenpoistoruuvi takaisin
paikoilleen.
KÄYTTÖ
• Jakso: Anturit valvovat veden virtausta
ja veden painetta ja kytkevät pumpun
tietyn ajan kuluttua päälle, pois päältä
tai valmiustilaan, jos pumppu ei voi imeä
vettä tai jos painejohto on suljettu.
• Päälle/pois-painikkeen LEDit ilmaisevat
palamalla tai vilkkumalla vastaavan
käyttötilan. (→ Käyttötilat ja niihin
kuuluvat LED-näytöt)
Käyttövalmiuden luominen: Yhdistä
pumppu virtaverkkoon.
• Pumppu on käyttövalmis.
• Kaikki LEDit palavat.
Pumpun päälle- ja poiskytkentä: Pidä
päälle/pois-painiketta alle 3 s painettuna.
• Päällekytkennän jälkeen automatiikka
huolehtii pumpun ohjauksesta: Anturit
tarkastavat toistuvasti, onko veden läpivirtaus alle minimaalisen pumppaustehon vai onko veden paine alle 1,5 bar.
Tuloksesta riipppuen pumppua käytetään suojattuna kuivakäynniltä tai automatiikka asettaa sen uudelleen valmiustilaan.
Automatiikan nollauksen suorittaminen: Pidä päälle/pois-painiketta vähin-
tään 3 s painettuna.
DE
EN
FR
NL
ES
PT
IT
DA
NO
SV
FI
HU
PL
CS
SK
SL
HR
RO
BG
UK
RU
CN
97
Page 98

ProMax Garden Automatic 3500/4000/5000/6000
LED
Käyttötila
Käyttäjä
sini-
kel-
nen
punai
Vilkkumi
–
Pumppu käyttövalmis
Kytke pumppu
päälle
–
Virheetön, pumppu käy
4×/sekunti
Virheetön, pumppu siirtyy
heti valmiustilaan
–
Virheetön, pumppu on
valmiustilassa
–
Pumppu ei ime vettä-
1. kuivakäyntisuojan taso
Odota
1×/sekunti
Pumppu ei ime vettä
• 2. kuivakäyntisuojan taso
Odota
2×/sekunti
Pumppu ei ime vettä
keytyy odotustilaan
Odota
3×/sekunti,
4. kuivakäyntisuojan taso.
vielä 2×
Odota tai etsi syy
–
Häiriö, pumppu on käynyt
Irrota verkkopis-
delleen
1×/sekunti
Tarkastusjakso. Vuotosuoja
2 jaksoa
Odota
–
Häiriö, 18 tuloksetonta käyn-
Irrota verkkopis-
delleen
LED palaa
LED ei pala
LED vilkkuu
Käyttötilat ja niihin kuuluvat LED-näytöt
nen
tai-
nen
stiheys
• 3. kuivakäyntisuojan taso
• 4. tasolla pumppu kyt-
98
jokainen LED
vuorotellen
Pumppu on odotustilassa
120 s, sen jälkeen jakso alkaa uudelleen, enintään
jakson läpi 3×
toke, tarkasta
imupuoli, yhdistä
verkkopistoke uu-
alkaa 60 min. jälkeen, enint.
nistysyritystä
toke, tarkasta painepuoli, yhdistä
verkkopistoke uu-
Page 99

Häiriö
Syy
Korjaus
Pumppu ei käynnisty
Pumppu on kytketty pois päältä
Kytke pumppu päälle
Virransyöttö katkennut
Tarkasta sähköpistoliittimet
Vikavirtasuojakytkin on lauennut
Kytke pumppu pois päältä
huoltoon
Pumppu oli ollut pitemmän aikaa
Juoksupyörä on juuttunut
Vie ruuvitaltta takimmaisen
huoltoaukon läpi, käännä ja
irrota siten juoksupyörä.
Pumppu ei pumppaa
Pumppua ei ole riittävästi täytetty
Täytä pumppu ja varmista,
pois painepuolen kautta
Painejohto suljettu
• Avaa ottopaikka paine-
taittokohtia
Imujohto suljettu
• Puhdista imupuolen
taittokohtia
Vuoto imupuolella
Poista vuoto imupuolella
Suodatinkannen tiiviste viallinen
Vaihda suodatinkannen tiiviste
Pumpun suodatinpanos tukossa
Puhdista suodatin ja suodatinkansi tai vaihda
Pumpun suodatinpanos liian no-
Asenna ulkoinen, suurempi
sätarvike)
Pumppu kytkeytyy ly-
Ylikuormitussuoja on kytkenyt
• Puhdista imupuolen
Anna pumpun jäähtyä
HÄIRIÖNPOISTO
DE
VAROITUS
Vaarallinen sähköjännite!
Sähköisku voi aiheuttaa kuoleman tai vakavia vammoja.
Ennen töiden aloittamista:
• Kytke laite pois päältä, irrota verkkopistoke ja varmista laite päällekytkentää vastaan.
• Ennen veteen menemistä tai veteen koskettamista on kaikkien vedessä olevien laittei-
den verkkojännite kytkettävä pois päältä.
Töiden lopettamisen jälkeen:
• Palauta kaikki käyttöönoton edellytykset alkuperäiseen tilaan takaisin.
ja irrota verkkopistoke. Ota
sen jälkeen yhteyttä OASE-
pois käytöstä (esim. talvitauko).
ollenkaan tai ei tarpeeksi
vedellä
että täytetty vesi ei valu
puolella
• Asenna paineletku ilman
EN
FR
NL
ES
PT
IT
DA
NO
SV
FI
HU
PL
CS
hyen käyntiajan jälkeen pois päältä
peasti tukossa
pumpun pois päältä ylikuumenemisen takia
liitäntä ja imujohto
• Asenna imuletku ilman
esisuodatin (valinnainen li-
liitäntä ja imujohto
•
SK
SL
HR
RO
BG
UK
RU
CN
99
Page 100

ProMax Garden Automatic 3500/4000/5000/6000
Häiriö
Syy
Korjaus
Kuivakäyntisuoja on kytkenyt
pumpun pois päältä
Puhdista sisäänimuaukko
ja imujohto
Tukos imupuolella
Puhdista sisäänimuaukko
ja imujohto
Takaiskuventtiili viallinen
• Ota yhteyttä OASEhuoltoon
PUHDISTUS JA HUOLTO
VAROITUS
Vaarallinen sähköjännite!
Sähköisku voi aiheuttaa kuoleman tai
vakavia vammoja.
Ennen töiden aloittamista:
• Kytke laite pois päältä, irrota verkkopistoke ja varmista laite päällekytkentää
vastaan.
• Ennen veteen menemistä tai veteen
koskettamista on kaikkien vedessä olevien laitteiden verkkojännite kytkettävä
pois päältä.
Töiden lopettamisen jälkeen:
• Palauta kaikki käyttöönoton edellytykset
alkuperäiseen tilaan takaisin.
VAROITUS
Kuuma vesi aiheuttaa loukkaantumisvaaran!
Palovammojen vaara ruumiinosissa.
• Jos elektroniikka on viallinen tai imupuolella veden syöttö puuttuu, voi vielä
pumpussa oleva vesi kuumentua voimakkaasti.
• Kytke verkkojännite pois päältä ennen
töitä laitteelle.
• Kytke pumppu irti sähköverkosta talon
sulakkeella tai irrota pistoke ja anna veden jäähtyä.
OHJE
Suositus säännöllistä puhdistusta varten:
• Laite on puhdistettava tarvittaessa,
mutta kuitenkin vähintään 2 kertaa vuodessa.
• Älä käytä mitään syövyttäviä puhdistusaineita tai kemiallisia liuottimia, koska
ne voivat vaurioittaa koteloa tai aiheuttaa laitteeseen toimintahäiriöitä.
• Huuhtele kaikki puhdistetut osat huolellisesti puhtaalla vedellä.
Suodattimen puhdistus
Toimit näin:
E
1. Kytke pumppu pois päältä.
2. Vedä verkkopistoke irti.
3. Sulje tarvittaessa sulkulaitteet imupuolella.
4. Kierrä suodatinkammion kansi auki ja
poista se.
5. Vedä suodatinpanos ulos.
6. Puhdista suodatinpanos ja suodatinkansi harjalla juoksevan veden alla.
7. Asenna suojatin takaisin päinvastaisessa järjestyksessä.
– Kiinnitä huomiota siihen, että suoda-
tinkannen tiiviste on paikoillaan ja vahingoittumaton. Muussa tapauksessa
vaihda se.
– Kiinnitä huomiota siihen, että suoda-
tinkansi on taas asianmukaisesti kiinnitetty.
8. Kokoa laite päinvastaisessa järjestyksessä.
100
 Loading...