

Page 1
DE Gebrauchsanleitung und Garantie
EN Operating instructions and Guarantee
FR Notice d‘emploi et Garantie
NL Gebruiksaanwijzing en Garantie
ES Instrucciones de uso y Garantía
PT Instruções de uso e Garantia
IT Istruzioni d‘uso e Garanzia
DA Brugsanvisning og Garanti
NO Bruksanvisning og Garanti
SV Bruksanvisning och Garanti
FI Käyttöohje ja Takuu
HU Használati útmutató és Garancia
PL Instrukcja użytkowania i Gwarancja
CS Návod k použití a Záruka
SK Návod na použitie a Záruka
SL Navodila za uporabo in Garancija
HR Uputa o upotrebi i Jamstvo
RO Instrucţiuni de folosinţă şi Garanţie
BG Упътване за употреба и Гаранция
UK Посібник з експлуатації та Гарантія
RU Руководство по эксплуатации и Гарантия
CN 使用说明书 和 保用证书
OptiMax 2000/3000/4000/5000
43025_Gebrauchsanleitung_Garantie_OptiMax.indd 1 23.11.15 12:06
Page 2
2 OptiMax 2000/3000/4000/5000
A
OIX0008
Page 3
3
B
OIX0010
Page 4

4 OptiMax 2000/3000/4000/5000
C
OIX0013
Page 5
5
D
OIX0009
Page 6
6 OptiMax 2000/3000/4000/5000
E
OIX0012
Page 7

- EN -
12 OptiMax 2000/3000/4000/5000
Ansprüche aus der Garantie können nur gegenüber der OASE GmbH, Tecklenburger Straße 161,
D-48477 Hörstel, Deutschland, dadurch geltend
gemacht werden, dass Sie an uns frachtfrei und
auf Ihr Transportrisiko das beanstandete Gerät
oder Geräteteil mit einer Kopie des Originalverkaufsbelegs des OASE-Fachhändlers, dieser Garantieurkunde sowie der schriftlichen Angabe
des beanstandeten Fehlers senden.
- EN -
Translation of the original Operating Instructions
SAFETY INFORMATION
This unit can be used by children aged 8 and above and
by persons with reduced
physical, sensory or mental
capabilities or lack of experience and knowledge if they
are supervised or have been
instructed on how to use the
unit in a safe way and they
understand the hazards involved.
Do not allow children to play
with the unit.
Only allow children to carry
out cleaning and user
maintenance under supervision.
Safe operation
• Switch off all units in the aquarium or
disconnect the power plugs of all units
before reaching into the water.
• Never operate the unit if either the elec-
trical cables or the housing are defective!
• Do not carry or pull the unit by its elec-
trical cable.
• Route cables/hoses such that they are
protected from damage and do not present a tripping hazard.
• Only open the unit housing or its at-
tendant components, when this is explicitly required in the operating instructions.
• Only carry out work on the unit that is
described in this manual. If problems
Page 8

- EN -
13
cannot be overcome, please contact an
authorised customer service point or,
when in doubt, the manufacturer.
• Only use original spare parts and acces-
sories for the unit.
• Never carry out technical modifications
to the unit.
• Power connection cables cannot be re-
placed. If a cable is damaged, dispose of
the respective unit or components.
• The impeller unit in the pump contains
a magnet with a strong magnetic field
that may affect the operation of pacemakers or implantable cardioverter defibrillators (ICDs). Always keep magnets
at least 0.2 m away from implanted devices.
Electrical connection
• Only connect the unit if the electrical
data of the unit and the power supply
coincide. The unit data is to be found on
the unit type plate, on the packaging or
in this manual.
• Protect the plug connections from mois-
ture.
• Only plug the unit into a correctly fitted
socket.
Symbols used in these instructions
NOTE
Indicates information intended to give the
user a better understanding.
Additional information
A Reference to a figure, e.g. Fig. A.
PRODUCT DESCRIPTION
OptiMax 2000/3000/4000/5000, referred to in
the following as "unit", may only be used as specified in the following:
• For maintaining the water circulation in an
aquarium.
• Operation under observance of the technical
data.
The following restrictions apply to the unit:
• Only use indoors and for aquaristic purposes
in the home (not for commercial use).
• Only operate with water at a water tempera-
ture of +4 °C to +35 °C.
INSTALLATION AND CONNECTION
NOTE
Ensure that the pump never runs dry!
Page 9

- EN -
14 OptiMax 2000/3000/4000/5000
Possible consequences: The pump will be
destroyed.
Protective measure: Regularly check the
water level in the aquarium.
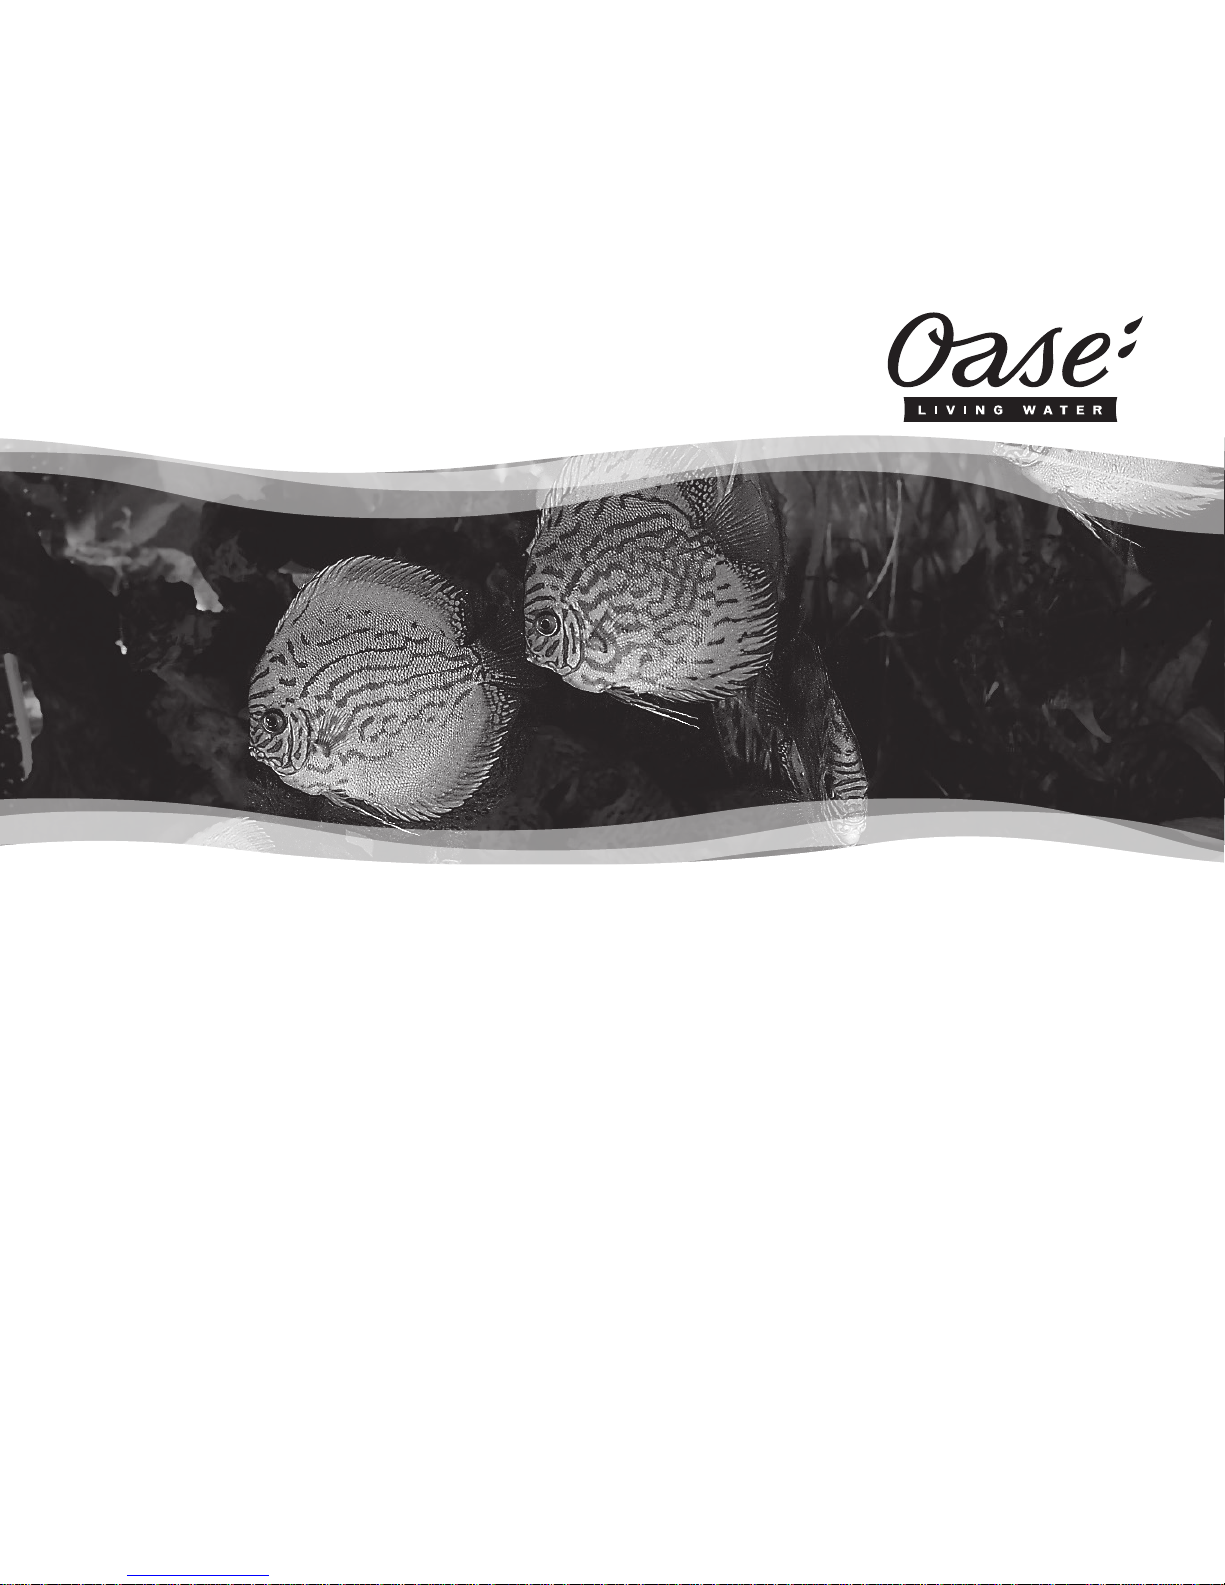
A
• Fit the supplied suction cups with a twisting
movement.
– The suction cups adhere to clean, smooth
surfaces.
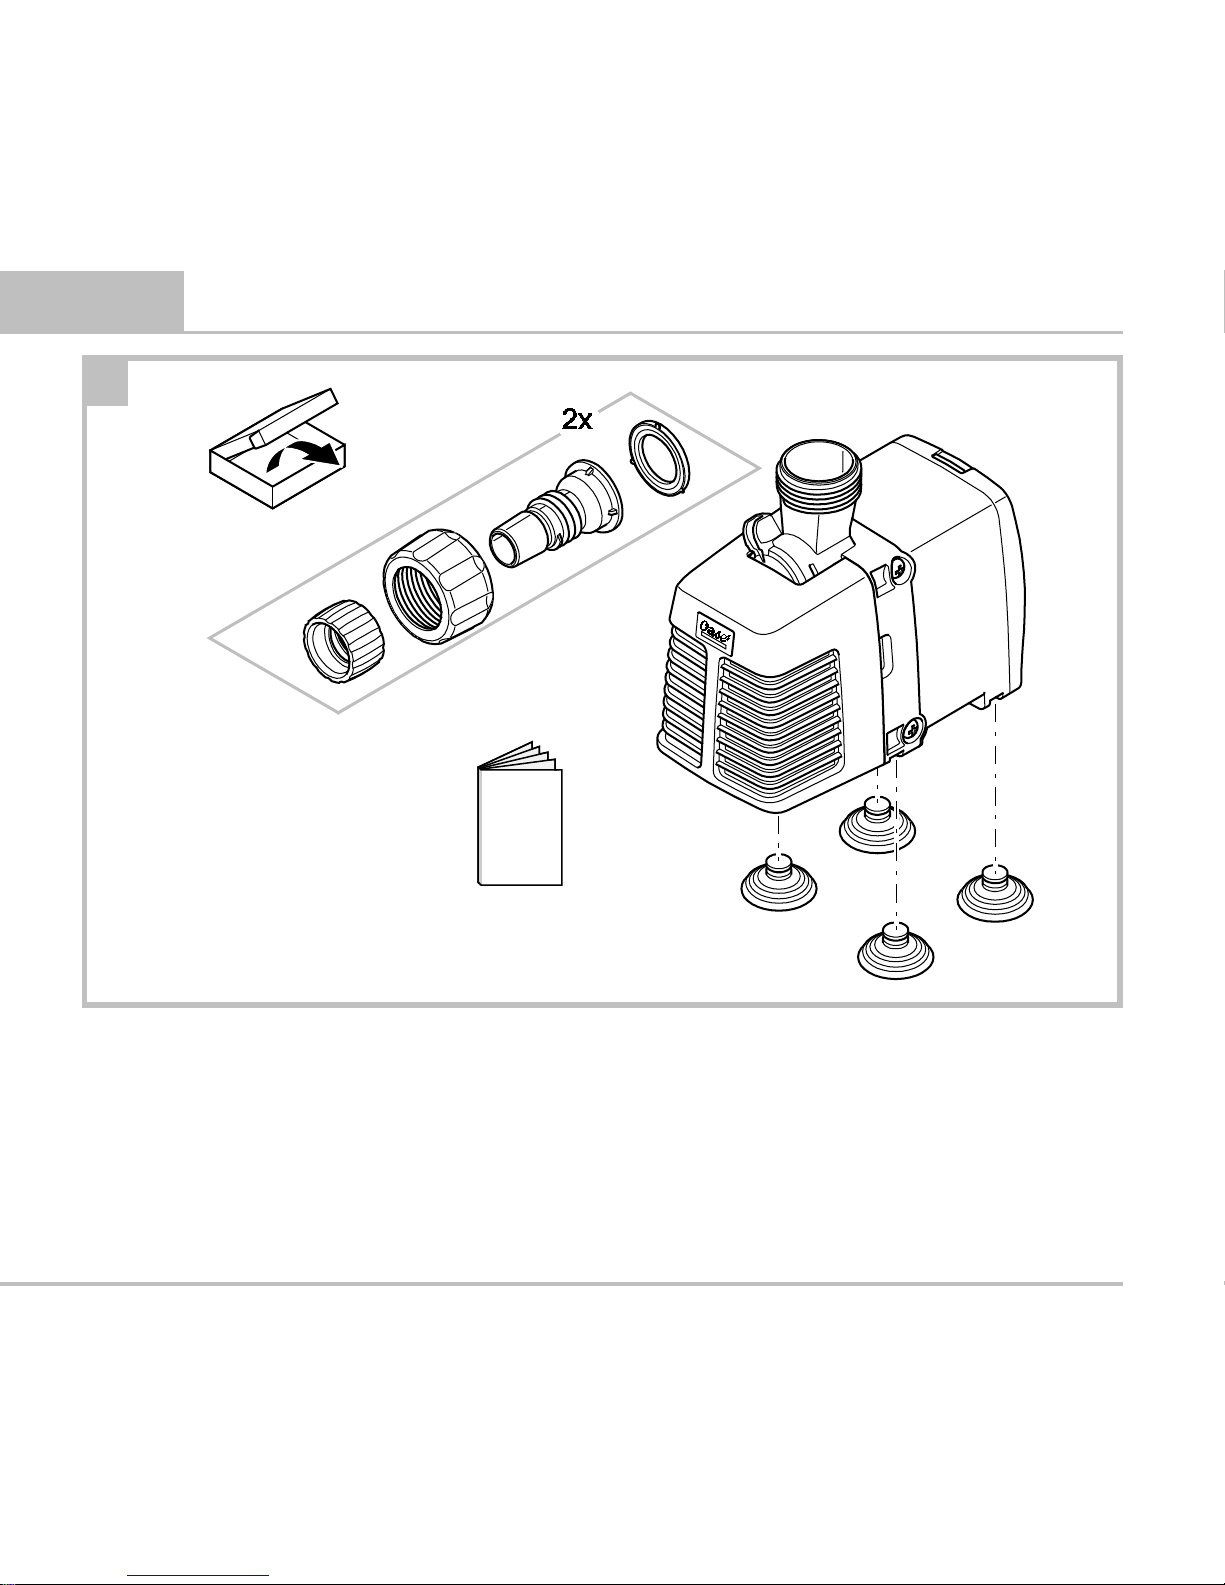
Submerged installation of the pump
B, C
• Fit the hose connector as required and con-
nect to a suitable hose. (→ Technical data)
• Adjust the flow at the flow regulator.
– To reduce the flow: Move the flow regula-
tor in the direction -.
– To increase the flow: Move the flow regu-
lator in the direction +.
• Install the device in the aquarium.
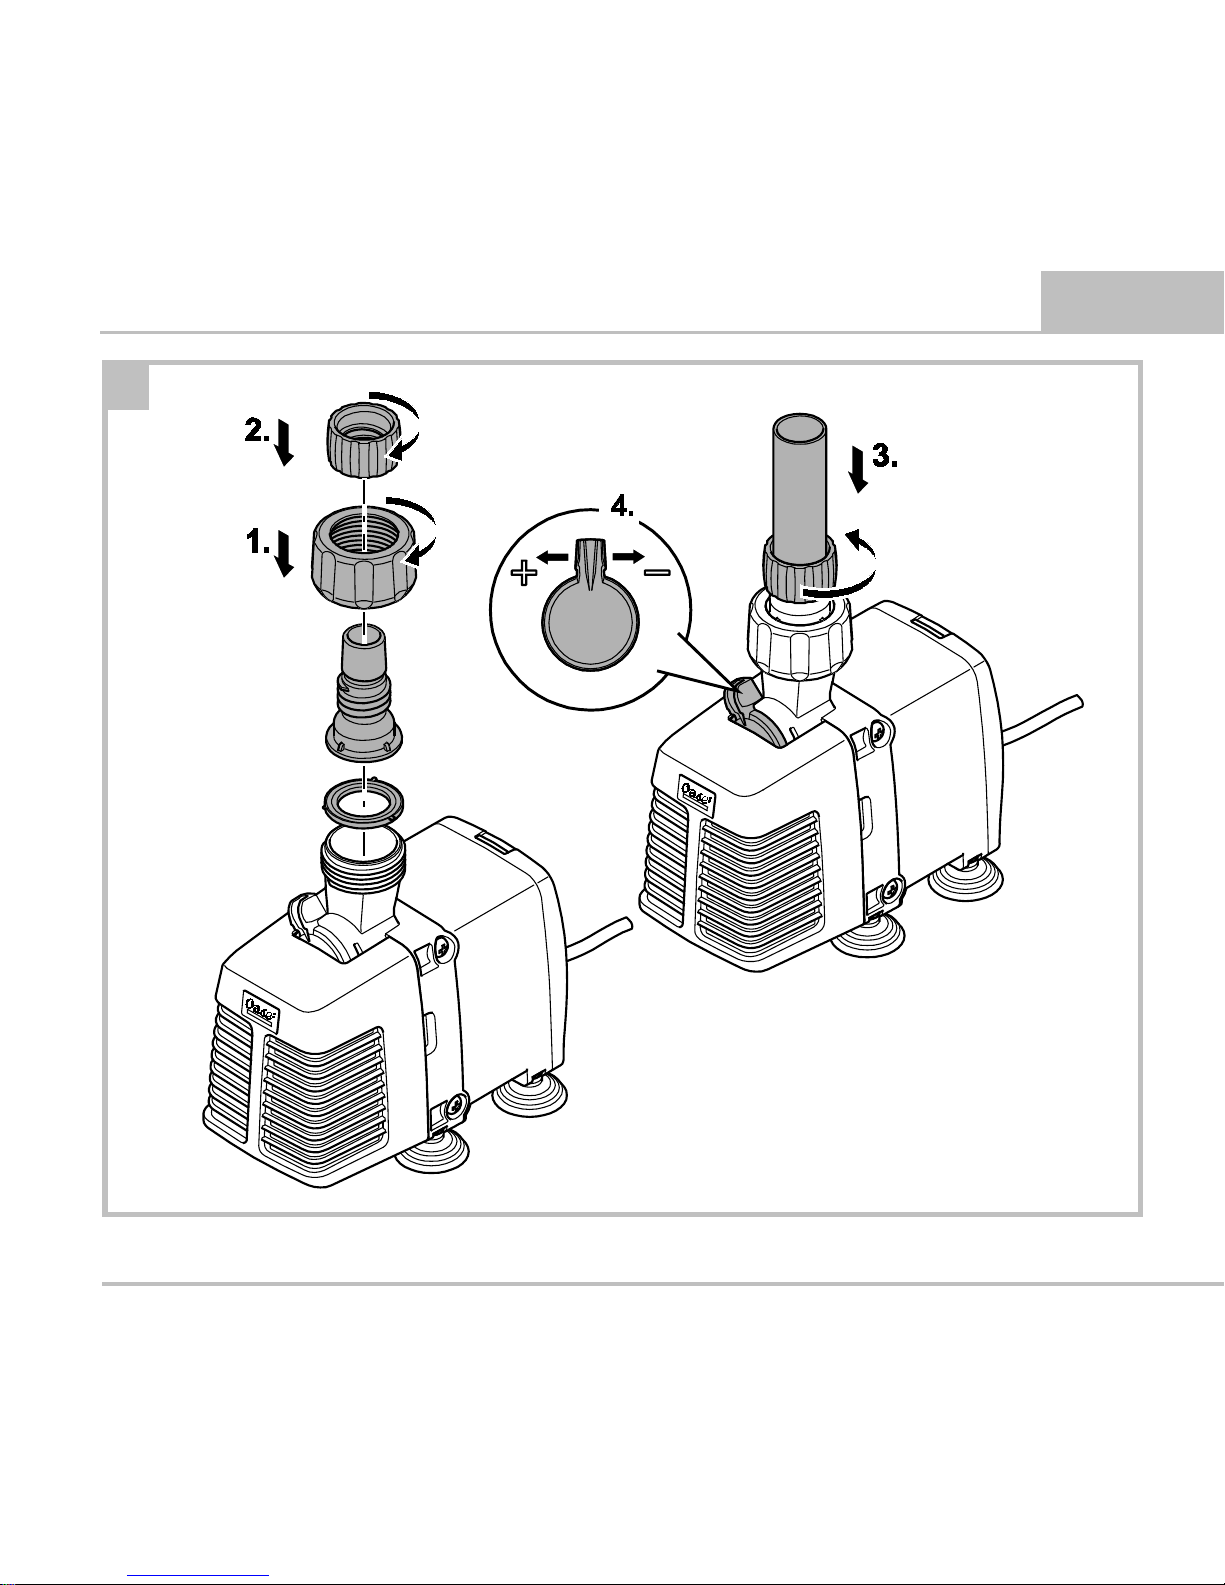
Dry installation
NOTE
The pump is not self-priming and must
be installed below the level of the water.
How to proceed:
D
• Pull off the filter housing.
• Fit the hose connector as required and con-
nect to a suitable hose. (→ Technical data)
• Adjust the flow at the flow regulator.
– To reduce the flow: Move the flow regula-
tor in the direction -.
– To increase the flow: Move the flow regu-
lator in the direction +.
• Install the device outside of the aquarium.
COMMISSIONING/START-UP
C
• Route the power connection cable such that
it forms a drip loop!
• Switching on: Connect the unit to the mains.
The unit switches on immediately.
• Switching off: Disconnect the unit from the
mains.
MAINTENANCE AND CLEANING
If necessary, clean the unit with clear water using
a soft brush.
• Do not use cleaning agents or chemical solu-
tions. We recommend using OASE PumpClean
for removing calcium deposits.
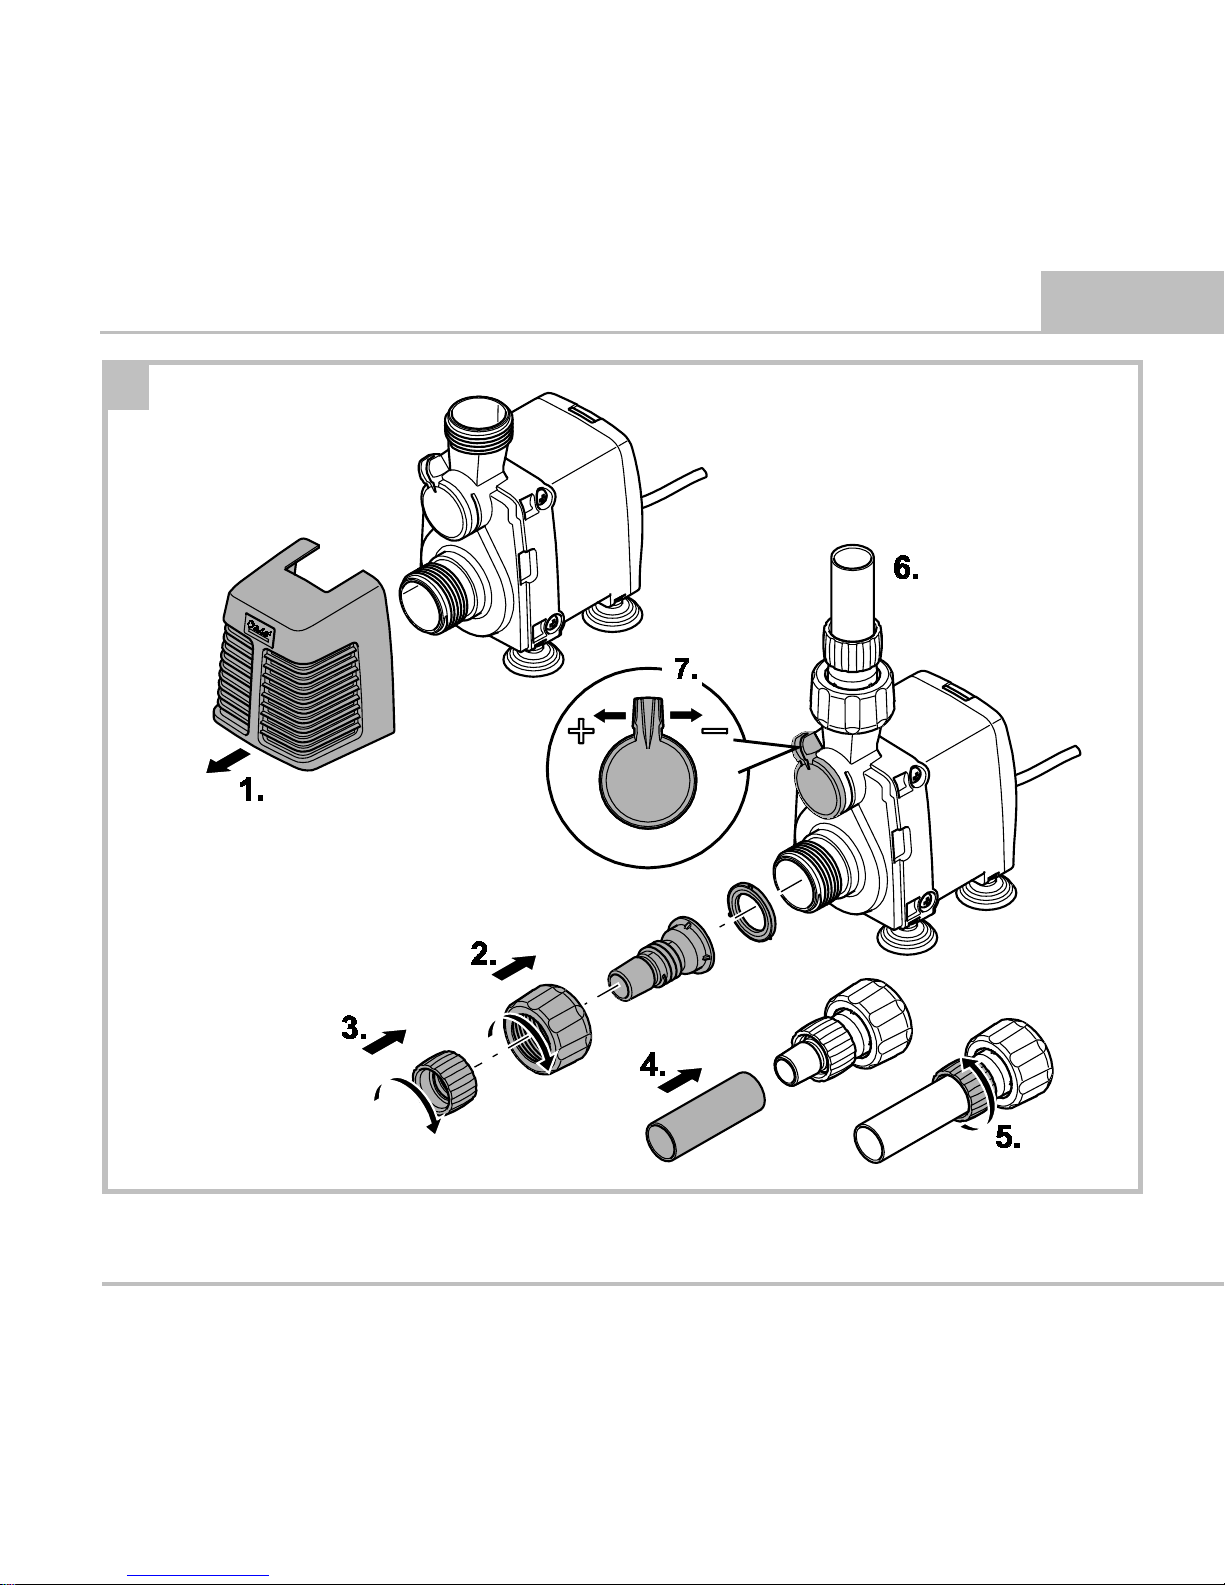
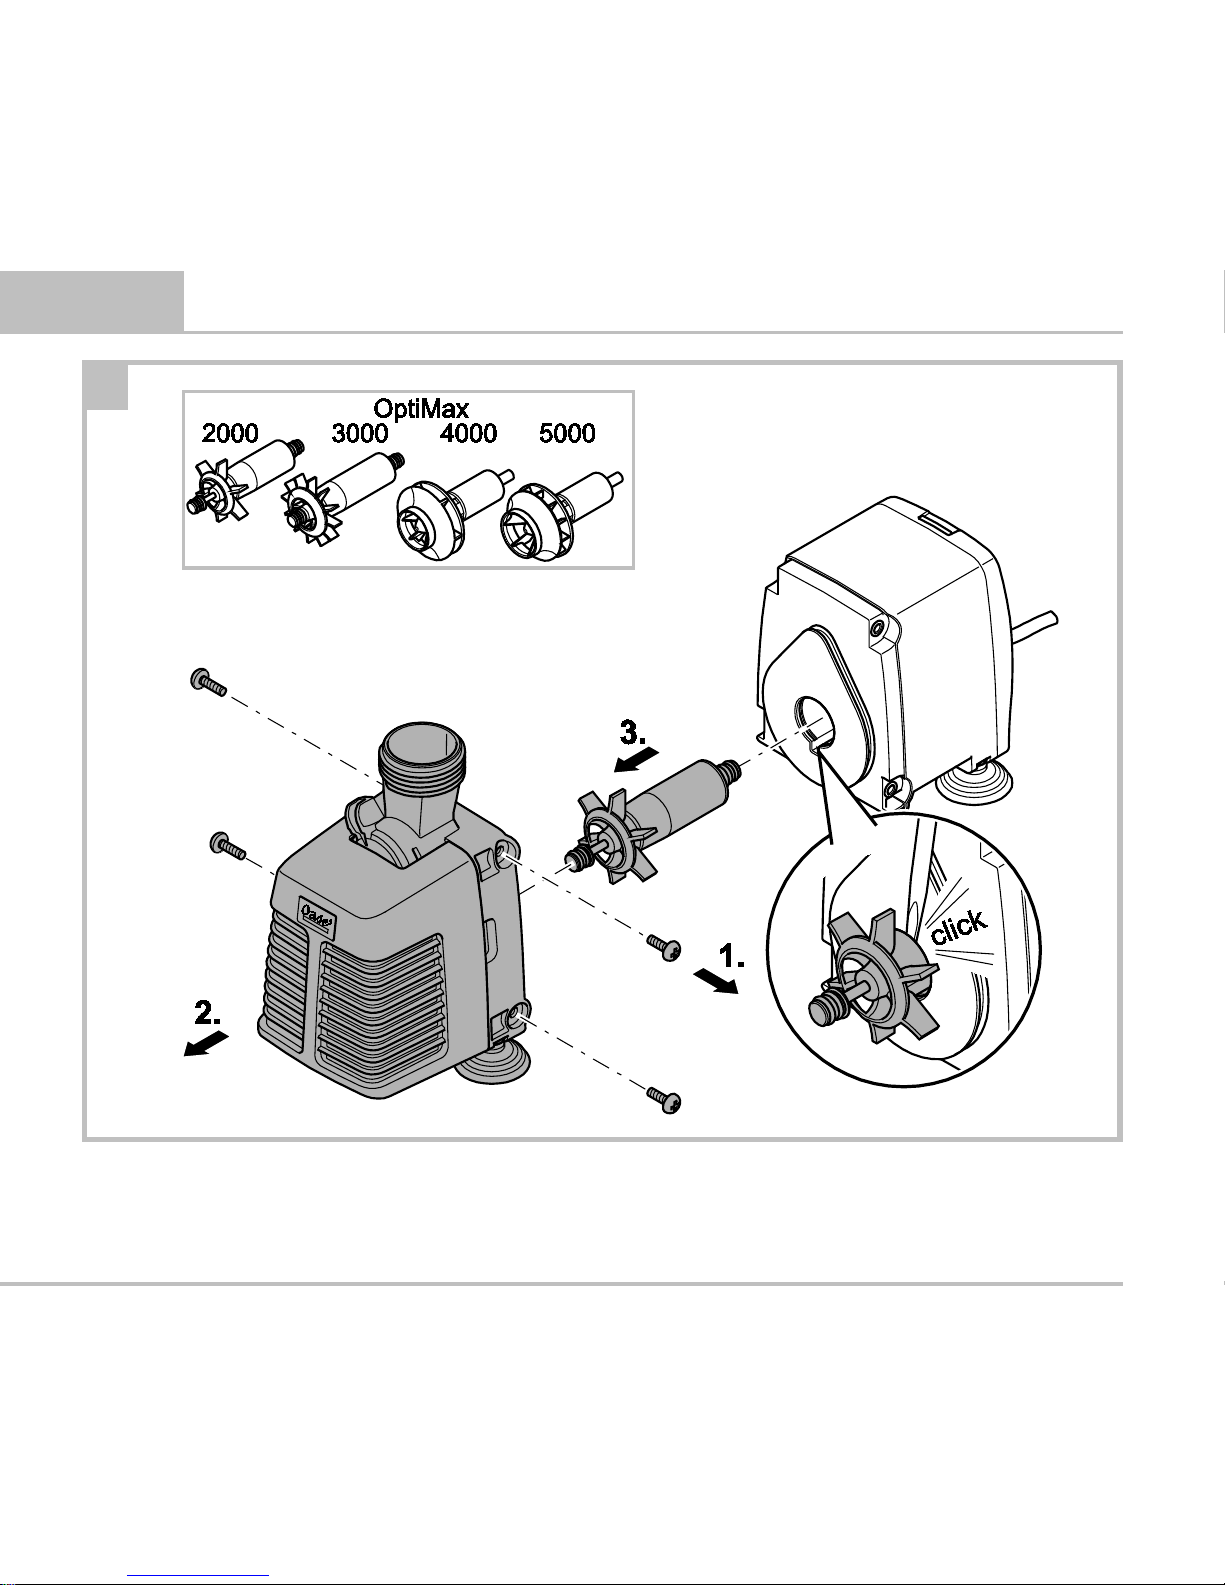
Replacing the impeller unit
E
How to proceed:
Page 10

- EN -
15
1. Loosen and remove the screws at the side of
the pump lid.
2. Remove the pump lid.
3. Remove the impeller unit.
– If necessary, use a wide-blade screwdriver
to lever the impeller unit out of its position in the motor housing. For this, insert
the screwdriver blade into the groove between the impeller unit and motor hous-
ing, and firmly turn the screwdriver in order to dislodge the impeller from its position.
– Proceed carefully so as not to damage the
motor housing or O ring.
4. Clean or replace the impeller unit and subsequently reassemble the pump in the reverse
order.
– OptiMax 4000/5000: Firmly push the im-
peller unit into position in the motor
housing.
REMEDY OF FAULTS
Malfunction
Cause
Remedy
The unit does not start up
No mains voltage
Check the mains voltage.
Impeller unit blocked
Clean
Water flow insufficient
Position of the flow regulator
Readjust the flow regulator.
Filter housing or impeller unit
soiled, hose blocked
Clean
Hose defective
Replace
Hose kinked
Route hose in a straight line
Impeller unit worn
Replace impeller unit
Only submersed during installation
Filter housing clogged
Clean the filter housing.
WEAR PARTS
The following components are wear parts and
are excluded from the warranty:
• Suction cups, impeller unit
REPAIR
A damaged unit cannot be repaired and must be
put out of operation. Dispose of the unit in accordance with the regulations.
Page 11

- EN -
16 OptiMax 2000/3000/4000/5000
DISPOSAL
Do not dispose of this unit with domestic waste!
For disposal purposes, please use the return system provided. Render the unit unusable beforehand by cutting the cables.
GUARANTEE
For this OASE unit purchased by you, OASE
GmbH assumes a 36 month manufacturer's
guarantee in accordance with the guarantee
conditions laid down in the following. The guar-
antee period starts with the first purchase from
an OASE specialist dealer. In other words, in the
event of a resale, the guarantee period will not
start again. If services are provided under the
terms of this guarantee, this does not lead to extension or renewal of the guarantee period. Your
legal rights as a purchaser, especially those ensuing from the warranty, persist. They are not restricted by this guarantee.
Guarantee conditions
OASE GmbH guarantees impeccable, purposerelated properties and workmanship, expert assembly and proper functionality. Subject to our
discretion, the guarantee refers to free-ofcharge repair or free-of-charge supply of spare
parts or of a replacement unit respectively.
Should the unit type concerned no longer be
manufactured, we reserve the right, at our discretion, to supply a replacement unit from our
range that is closest to the type subject to complaint. Claims, the origin of which can be traced
back to installation and operating faults as well
as lack of care, e.g. the use of unsuitable cleaning
materials or negligent maintenance, use other
than that intended, damage due to accidents,
falls, impact, effect of frost, cutting plugs, shortening cables, calcium deposits or improper attempts to repair the unit, are not covered by our
guarantee. We hereby refer to the proper use as
specified in the instructions of use that form an
integral part of the guarantee. Wear parts such
as bulbs etc. are exempted from the guarantee.
The refund of costs for removal and installation,
checks, claims for lost profit and damages are exempted from the guarantee together with further reaching claims for damages and loss of
whatever nature caused by the unit or its use.
The guarantee is only valid in the country in
which the unit was purchased from an OASE
dealer. This guarantee is governed by German
law under the exclusion of the agreement of the
United Nations covering contracts governing the
international sale of goods (CISG) regulations.
Guarantee claims can only be brought forward
by presenting the sales receipt to us, OASE
GmbH, Tecklenburger Straße 161 in D-48477
Hörstel, Germany by returning to us the unit or
part of the unit subject to complaint, freight free,
at your own risk, accompanied by a copy of the
Page 12

122 OptiMax 2000/3000/4000/5000
OptiMax
2000
230 V AC, 50 Hz
31.5 W
≤ 2000 l/h
2.4 mWs
16 mm (1")
3000
230 V AC, 50 Hz
55 W
≤ 2800 l/h
3 mWs
16 mm (1")
4000
230 V AC, 50 Hz
80 W
≤ 4400 l/h
3.3 mWs
16 mm (1")
5000
230 V AC, 50 Hz
82 W
≤ 5000 l/h
3.0 mWs
16 mm (1")
DE
Typ
Bemessungsspannung
Leistungsauf-
nahme
Förderleistung
Wassersäule
∅ Schlauch
EN
Type
Rated voltage
Power con-
sumption
Flow rate
Head height
∅ Hose
FR
Type
Tension de mesure
Consommation
Capacité de re-
foulement
Colonne
d'eau
∅ Tuyau
NL
Type
Dimensioneringsspan-
ning
Stroomverbruik
Pompcapaciteit
Waterkolom
∅ Slang
ES
Tipo
Tensión asignada
Consumo de po-
tencia
Capacidad de
elevación
Columna de
agua
∅ Manguera
PT
Tipo
Voltagem considerada
Consumo de po-
tência
Débito
Coluna de
água
Mangueira
de ∅
IT
Tipo
Tensione nominale
Potenza assor-
bita
Portata
Colonna
d'acqua
∅ Tubo
flessibile
DK
Type
Nominel spænding
Strømforbrug
Transportkapaci-
tet
Vandsøjle
∅ Slange
NO Type
Merkespenning
Inngangseffekt
Kapasitet
Vannsøyle
∅ Slange
SE
Typ
övre märkspänning
Effekt
Matningspre-
standa
Vattenpelare
∅ Slang
FI
Tyyppi
mitoitusjännite
Ottoteho
Syöttöteho
Vesipylväs
∅ Letku
HU
Típus
mért feszültség
Teljesítményfel-
vétel
Szállítási tel-
jesítmény
Vízoszlop
∅ Tömlő
PL
Typ
napięcie znamionowe
Pobór mocy
Wydajność pom-
powania
Słup wody
∅ Wąż
Page 13

123
OptiMax
2000
230 V AC, 50 Hz
31.5 W
≤ 2000 l/h
2.4 mWs
16 mm (1")
3000
230 V AC, 50 Hz
55 W
≤ 2800 l/h
3 mWs
16 mm (1")
4000
230 V AC, 50 Hz
80 W
≤ 4400 l/h
3.3 mWs
16 mm (1")
5000
230 V AC, 50 Hz
82 W
≤ 5000 l/h
3.0 mWs
16 mm (1")
CZ
Typ
domezovací napětí
Příkon
Dopravní výkon
Vodní slou-
pec
∅ Hadice
SK
Typ
dimenzačné napätie
Príkon
Dopravný výkon
Vodný stĺpec
∅ Hadica
SI
Tip
dimenzionirana nape-
tost
Nazivna moč
Črplana zmoglji-
vost
Vodni steber
∅ Cev
HR
Tip
gornji nazivni napon
Prijemna snaga
Protočni kapaci-
tet
Vodeni stup
∅ crijeva
RO
Tip
tensiunea măsurată
Putere consu-
mată
Debit de pom-
pare
Coloană de
apă
∅ Furtun
BG
Тип
номинално
напрежение
Консумирана
мощност
Дебит
Воден стълб
∅ на маркуч
UA
Тип
розрахункова напруга
Споживана по-
тужність
Продуктивність
Водяний
стовп
∅ Шланг
RU
Тип
расчетное
напряжение
Потребляемая
мощность
Производи-
тельность
Водяной
столб
∅ Шланг
CN 设计电压
功耗
输送能力
水柱
∅ 软管
Page 14

124 OptiMax 2000/3000/4000/5000
DE
Staubdicht.
Wasserdicht
bis 1 m Tiefe.
Vor direkter
Sonnenein-
strahlung
schützen.
Mögliche Ge-
fahren für Personen mit
Herzschrittma-
chern!
Im Innenraum
verwenden.
Nicht mit nor-
malem Haus-
müll entsor-
gen!
Lesen Sie die
Gebrauchsan-
leitung
EN
Dust tight.
Submersible
to 1 m depth.
Protect
from direct
sun radia-
tion.
Possible hazard for persons
wearing pace
makers!
For indoor use.
Do not dispose
of together
with house-
hold waste!
Read the ope-
rating in-
structions.
FR
Imperméable
aux poussières.
Etanche à
l'eau jusqu'à
une profon-
deur de 1 m.
Protéger
contre les
rayons di-
rects du so-
leil.
Dangers possibles pour des
personnes
ayant des stimulateurs cardiaques !
Pour utilisation
à l'intérieur.
Ne pas recycler
dans les or-
dures ména-
gères !
Lire la notice
d'emploi.
NL
Stofdicht. Wa-
terdicht tot
een diepte van
1 m.
Bescher-
men tegen
direct zon-
licht.
Mogelijke ge-
varen voor
mensen met
een pacema-
ker!
In interne in-
zetstuk gebrui-
ken.
Niet met het
normale huisvuil afvoeren!
Lees de ge-
bruiksaan-
wijzing.
Page 15

125
ES
A prueba de
polvo. Impermeable al
agua hasta
1 m de pro-
fundidad.
Protéjase
contra la ra-
diación di-
recta del
sol.
Posibles peli-
gros para las
personas con
marcapasos.
Para empleo
interior.
¡No deseche el
equipo en la
basura domés-
tica!
Lea las instruc-
ciones de uso.
PT
À prova de pó.
À prova de
água até 1 m
de profundi-
dade.
Proteger
contra radi-
ação solar
directa.
Eventuais peri-
gos para pessoas com pacemakers!
Utilizar em in-
teriores.
Não deitar ao
lixo doméstico!
Leia as instru-
ções de utiliza-
ção.
IT
A tenuta di
polvere. Impermeabile
all'acqua fino
a 1 m di pro-
fondità.
Proteggere
contro i
raggi solari
diretti.
Possibili peri-
coli per persone con pacemaker!
Utilizzare
nell'inseri-
mento interno
Non smaltire
con normali ri-
fiuti domestici!
Leggere le
istruzioni
d´uso!
DK
Støvtæt.
Vandtæt ned
til 1 m dybde.
Beskyt mod
direkte sol-
lys.
Mulig fare for
personer med
pacemaker
Anvendesin-
dendørs.
Må ikke bort-
skaffes med
det almindelige hushold-
ningsaffald!
Læs brugsan-
visningen.
NO
Støvtett.
Vanntett ned
til 1 m dyp.
Beskytt mot
direkte sol-
lys.
Kan være farlig
for personer
med pacema-
ker!
Bruknin-
nendørs.
Ikke kast i
alminnelig
husholdnings-
avfall!
Les bruksanvis-
ningen.
Page 16

126 OptiMax 2000/3000/4000/5000
SE
Dammtät. Vat-
tentät till 1 m
djup.
Skydda mot
direkt solst-
rålning.
Möjlig risk för
personer med
pacemaker!
Ska använda-
sinomhus.
Får inte kastas
i hushållsso-
porna!
Läs igenom
bruksanvisnin-
gen.
FI
Pölytiivis. Vesi-
tiivis 1 m syvyyteen asti
Suojattava
suoralta au-
ringonva-
lolta.
Mahdollinen
vaara sydä-
mentahdistinta
käyttäville
henkilöille!
Sisällääto-
imivana
käytettäväksi.
Älä hävitä lai-
tetta
tavallisen
kotitalousjät-
teen mukana!
Lue käyt-
töohje.
HU
Portömített.
Vízálló 1 m-es
mélységig.
Óvja köz-
vetlen nap-
sugárzástól.
A készülék ves-
zélyes lehet
szívritmusszabályozóval
rendelkező
személyekre!
Beltéri has-
ználatra.
A készüléket
nem a normál
háztartási
szeméttel
együtt kell
megsem-
misíteni!
Olvassa el a
használati
útmutatót.
PL
Pyłoszczelny.
Wodoszczelny
do 1 m głębo-
kości.
Chronić
przed be-
zpośrednim
nasłoneczni
eniem.
Możliwość wy-
stąpienia zagrożeń dla
osób ze stymu-
latorami
Do zastosowa-
nia we
wnętrzu.
Nie wyrzucać
wraz ze śmie-
ciami domo-
wymi!
Przeczytać in-
strukcję
użytkowania!
CZ
Prachotěsný.
Vodotěsný do
hloubky 1 m.
Chránit
před
přímým
slunečním
zářením.
Možná nebe-
zpečí pro
osoby s kardiostimulátory!
Používejte
uvnitř.
Nelikvidovat v
normálním ko-
munálním
odpadu!
Přečtěte
Návod
k použití!
Page 17

127
SK
Prachotesný.
Vodotesný do
hĺbky 1 m.
Chránit’
pred pri-
amym
slnečným
žiarením.
Možné nebezpečenstvo pre
osoby s kardiostimulá-
tormi!
Používajte v in-
teriéri.
Nelikvidovať v
normálnom
komunálnom
odpade!
Prečítajte si
Návod
na použitie.
SI
Ne prepušča
prahu. Ne pre-
pušča vode do
globinen 1 m.
Zaščitite
pred nepos-
rednimi
sončnimi
žarki.
Obstaja nevar-
nost za ljudi s
srčnim spod-
bujevalnikom!
Za notranjo
uporabo.
Ne zavrzite
skupaj z gospo-
dinjskimi od-
padki!
Preberite na-
vodila za
uporabo!
HR
Ne propušta
prašinu. Ne
propušta vodu
do 1 m du-
bine.
Zaštitite od
izravnog
sunčevog
zračenja.
Moguće opas-
nosti za nositelje elektrostimulatora!
Upotreblja-
vajte u zat-
vorenom pro-
storu.
Ne bacati u
običan kućni
otpad!
Pročitajte
upute za upot-
rebu!
RO
Etanş la praf.
Etanş la apă,
până la o
adâncime de
1 m.
Protejaţi
împotriva
razelor di-
recte ale
soarelui.
Posibile peri-
cole pentru
persoane cu
by-
pass cardiac
!
Utilizaţi în inte-
rior.
Nu aruncaţi în
gunoiul
menajer !
Citiţi in-
strucţiunile de
utilizare !
BG
Защитено от
прах. Водоустойчив до
дълбочина
1 м.
Да се пази
от слън-
чеви лъчи.
Възможен
риск за хора с
пейсмейкъри!
Използвайте
на закрито.
Не изхвър-
ляйте заедно
с обикнове-
ния домакин-
ски боклук!
Прочетете
упътването.
Page 18

128 OptiMax 2000/3000/4000/5000
UA
Пилонепрони
кний.
Водонепрони
кний до 1 м.
Пристрій
повинен
бути захищений від
прямого
сонячного
ви-
промінюва
ння.
Небезпека
для осіб з
кардіостимулятором
Використовув
ати всередині
приміщень.
Не викидайте
з побутовим
сміттям!
Читайте
інструкцію.
RU
Пыленепро-
ниц. Водонепрониц. на
глубине до
1 м.
Защищать
от прямого
воздей-
ствия сол-
нечных лу-
чей.
Возможная
опасность для
лиц с кардиостимулятором!
Применять
только внутри
помещения.
Не утилизиро-
вать вместе с
домашним
мусором!
Прочитайте
инструкцию
по
использовани
ю.
CN
防尘。防水水
深至 1 米
防止阳光直射
。
可能对带有心
脏起搏器人员
有危险!
在室内使用。
不要与普通的
家庭
垃圾一起处
理!
请阅读使用说
明书。!
Page 19

129
OIX0004
Page 20

43025/01
-16
 Loading...