

Oase AquaMax Eco Titanium 50000, AquaMax Eco Expert 21000, AquaMax Eco Expert 26000 Operating Instructions Manual
Page 1

AquaMax Eco Titanium 50000
Page 2

- -
A
B
AMX0045
C
AMX0038
AMX0035
2
Page 3
- -
D
E
AMX0037
AMX0042
3
Page 4
- -
F
G
AMX0040
AMX0043
4
Page 5
- -
H
AMX0041
5
Page 6

- EN -
- EN -
Translation of the original Operating Instructions
Information about these operating instructions
Welcome to OASE Living Water. You made a good choice with the purchase of this product AquaMax Eco Titanium
50000.
Prior to commissioning the unit, please read the instructions of use carefully and fully familiarise yourself with the unit.
Ensure that all work on and with this unit is only carried out in accordance with these instructions.
Adhere to the safety information for the correct and safe use of the unit.
Keep these instructions in a safe place! Please also hand over the instructions when passing the unit on to a new owner.
Symbols used in these instructions
GB
The symbols used in this operating manual have the following meanings:
Risk of injury to persons due to dangerous electrical voltage
This symbol indicates an imminent danger, which can lead to death or severe injuries if the appropriate
measures are not taken.
Risk of personal injury caused by a general source of danger
This symbol indicates an imminent danger, which can lead to death or severe injuries if the appropriate
measures are not taken.
Important information for trouble-free operation.
A Reference to one or more figures. In this example: Reference to Fig. A.
Reference to another section.
Scope of delivery
A
AquaMax Eco Titanium 50000
1 Pump
2 AquaMax Eco Control
3 Retaining frame for fastening the device to the wall, or for fitting it to the ground stake or holding clip
4 Ground stake
5 Holding clip for fastening the device to the pump handle
6 Instructions for Use AquaMax Eco Control
7 Protection cap
Protects against serious injury when the pump is running and there are no pipes connected to the inlet or outlet.
Product Description
Keep the protection caps in a safe place and always fit them as soon as connected pipes are removed.
B
AquaMax Eco Titanium 50000
1 Pump casing
The position of the outlet can be changed by fitting the pump casing rotated through 90°.
2 DMX line connection
The pump can be (optionally) controlled via DMX/RDM with AquaMax Eco Control or InScenio FM-Master WLAN.
This manual does not contain a description of the connection and operation of DMX/RDM. For information please contact your specia-
list dealer or OASE.
Important: Moisture at the connections can damage the pump.
Only remove the protection caps for connecting the DMX lines.
Ensure that the rubber seals are clean and fit exactly.
Replace damaged rubber seals.
3 Stand
Ensures secure and stable positioning of the pump.
Can be firmly bolted to the ground.
4 Outlet (pressure socket)
75 mm (3")
5 Inlet (suction socket)
75 mm (3")
13
Page 7

- EN -
Properties
Recommended for OASE ProfiClear Premium and ProfiClear Classic filter systems.
Excellent delivery rates meeting the requirements of demanding filter systems and large water courses and water-
falls.
Can deal with coarse debris with a particle size of up to 6 mm.
Ergonomic handle for safe transport.
Suitable for immersed or dry installation.
Suitable for swimming ponds and natural swimming pools (installed in an external pump chamber).
The formation of a thin layer of rust is normal and does not negatively affect the function of the pump.
Seasonal Flow Control (SFC)
With the SFC function activated, the pump automatically optimises and reduces the amount of water and the delivery
head by up to 50%. Thanks to the SFC function the pump adapts to the individual pond ecology throughout the year
and supports the pond biology through temperature-dependent circulation (winter mode, transition mode and summer
mode).
The SFC function is switched on and off via the AquaMax Eco Control. The SFC function reduces the power consumption of the pump; without SFC, the pump permanently operates at maximum throughput. The seasonal flow control
does not function when the pump is installed on land (dry installation). If a skimmer, satellite filter or Oase InScenio
control unit is used, we recommend deactivating the SFC depending on the unit.
Intended use
AquaMax Eco Titanium 50000, referred to in the following as "unit", may only be used as specified in the following:
For pumping normal pond water for filters, waterfalls and water courses.
Operation under observance of the technical data.
Operation under observance of the recommended water quality.
The following restrictions apply to the unit:
Do not use in swimming ponds.
Never use the unit to convey fluids other than water.
Never run the unit without water.
Do not use for commercial or industrial purposes.
Do not use in conjunction with chemicals, foodstuff, easily flammable or explosive substances.
Do not connect to the domestic water supply.
Safety information
Hazards to persons and assets may emanate from this unit if it is used in an improper manner or not in accordance
with its intended use, or if the safety instructions are ignored.
This unit can be used by children from the age of 8 and by persons
with physical, sensory or mental impairments or lack of experience
and knowledge, as long as they are supervised or instructed on how
to use the unit safely and are able to understand the potential hazards. Do not allow children to play with the unit. Do not allow children
to clean or maintain the unit without close supervision.
Hazards encountered by the combination of water and electricity
The combination of water and electricity can lead to death or severe injury from electrocution, if the unit is incorrectly
connected or misused.
Prior to reaching into the water, always switch off the mains voltage to all units used in the water.
14
Page 8

- EN -
Correct electrical installation
Electrical installations must meet the national regulations and may only be carried out by a qualified electrician.
A person is regarded as a qualified electrician if, due to his/her vocational education, knowledge and experience, he
or she is capable of and authorised to judge and carry out the work commissioned to him/her. This also includes the
recognition of possible hazards and the adherence to the pertinent regional and national standards, rules and regulations.
For your own safety, please consult a qualified electrician.
The device may only be connected if the electrical data of the device and the power supply coincide. The device
data is to be found on the device type plate, on the packaging or in this manual.
Ensure that the unit is fused for a rated fault current of max. 30 mA by means of a fault current protection device.
Extension cables and power distributors (e. g. outlet strips) must be suitable for outdoor use.
Protect the plug connections from moisture.
Only plug the unit into a correctly fitted socket.
Safe operation
The impeller unit in the pump contains a magnet with a strong magnetic field that may affect the operation of pace-
makers or implantable cardioverter defibrillators (ICDs). Always keep magnets at least 20 cm away from implanted
devices.
Never operate the unit if either the electrical cables or the housing are defective!
Do not carry or pull the unit by its electrical cable.
Route cords/hoses/lines in a way that they are protected against damage, and ensure that they do not present a
tripping obstacle.
Only open the unit housing or its attendant components, when this is explicitly required in the operating instructions.
Only execute work on the unit that is described in this manual. If problems cannot be overcome, please contact an
authorised customer service point or, when in doubt, the manufacturer.
Only use original spare parts and accessories for the unit.
Never carry out technical modifications to the unit.
The power connection cables cannot be replaced. When the cable is damaged, the unit or the component needs to
be disposed of.
Only operate the unit if no persons are in the water!
Keep the socket and power plug dry.
Installation and connection
Attention! Dangerous electrical voltage.
Possible consequences: Death or severe injury.
Protective measures:
Electrical units and installations with a rated voltage of U > 12 V AC or U >30 V DC located in the water:
Isolate the units and installations (switch off and disconnect from the power supply) before reaching into
the water.
Isolate the unit before starting any work.
Secure the unit to prevent unintentional switching on.
15
Page 9

- EN -
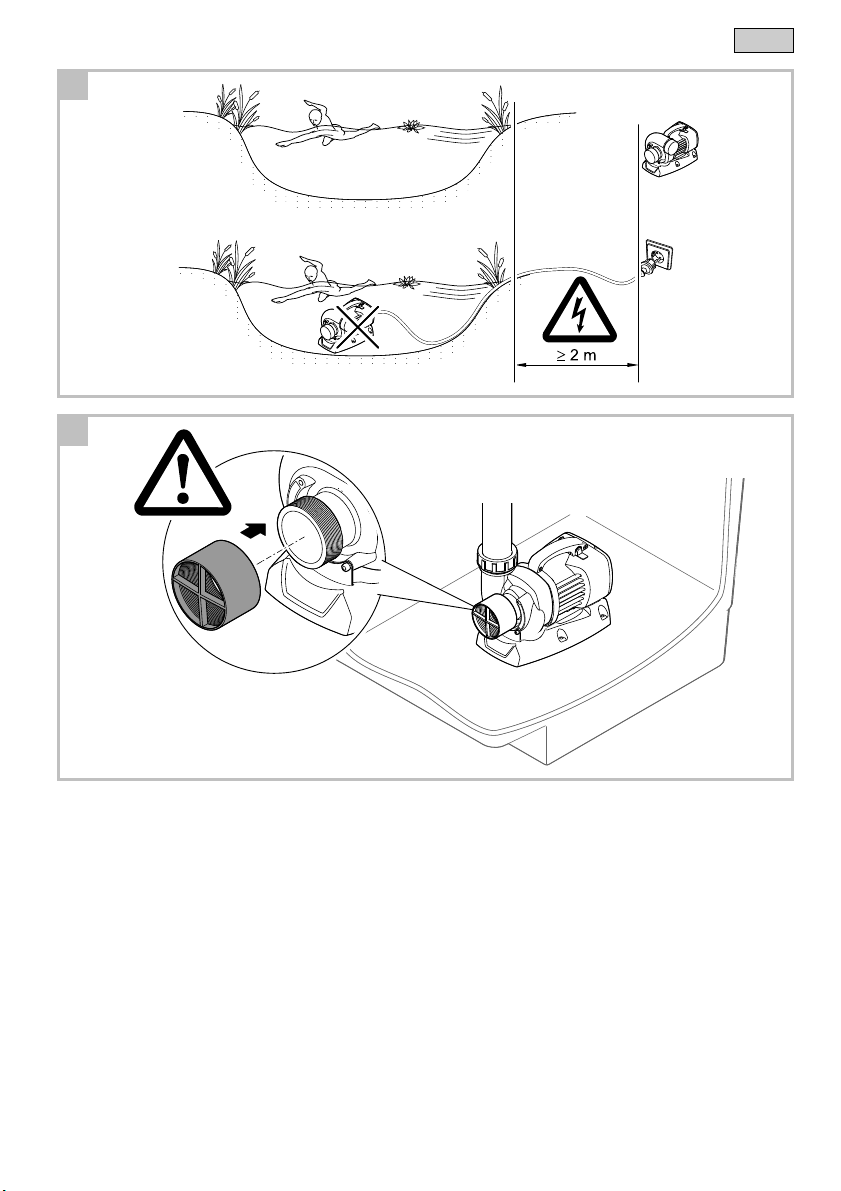
Submerged installation of the pump
Attention! Rapidly rotating impeller unit.
Possible consequences: Severe injuries due to amputation of limbs.
Protective measures:
Place the pump in a pump chamber and screw the contact guard (accessory, article No. 43329) onto the
suction socket.
Place the pump in a pump chamber and protect the pump chamber against unauthorised access (use a
D, E
Never operate the pump in a swimming pond.
Swimming pond or pool that may be accessed by people.
Only operate the pump when it is below the water surface level.
Place the pump with stand in a horizontal position on a suitable base. Bolt the stand to the base.
Screw a DN 75 pipe onto the outlet.
Protect the pump inlet against unforeseeable reaching in:
The position of the pump outlet can be changed. The pump casing has to be turned to achieve a different position.
Install the unit at a dry place
D, F
Swimming pond or pool that may be accessed by people.
Do not expose the unit to direct sunlight.
Place the pump in a horizontal position on a suitable base and bolt down.
Screw a DN 75 pipe onto the inlet and outlet.
The position of the pump outlet can be changed. The pump casing has to be turned to achieve a different position.
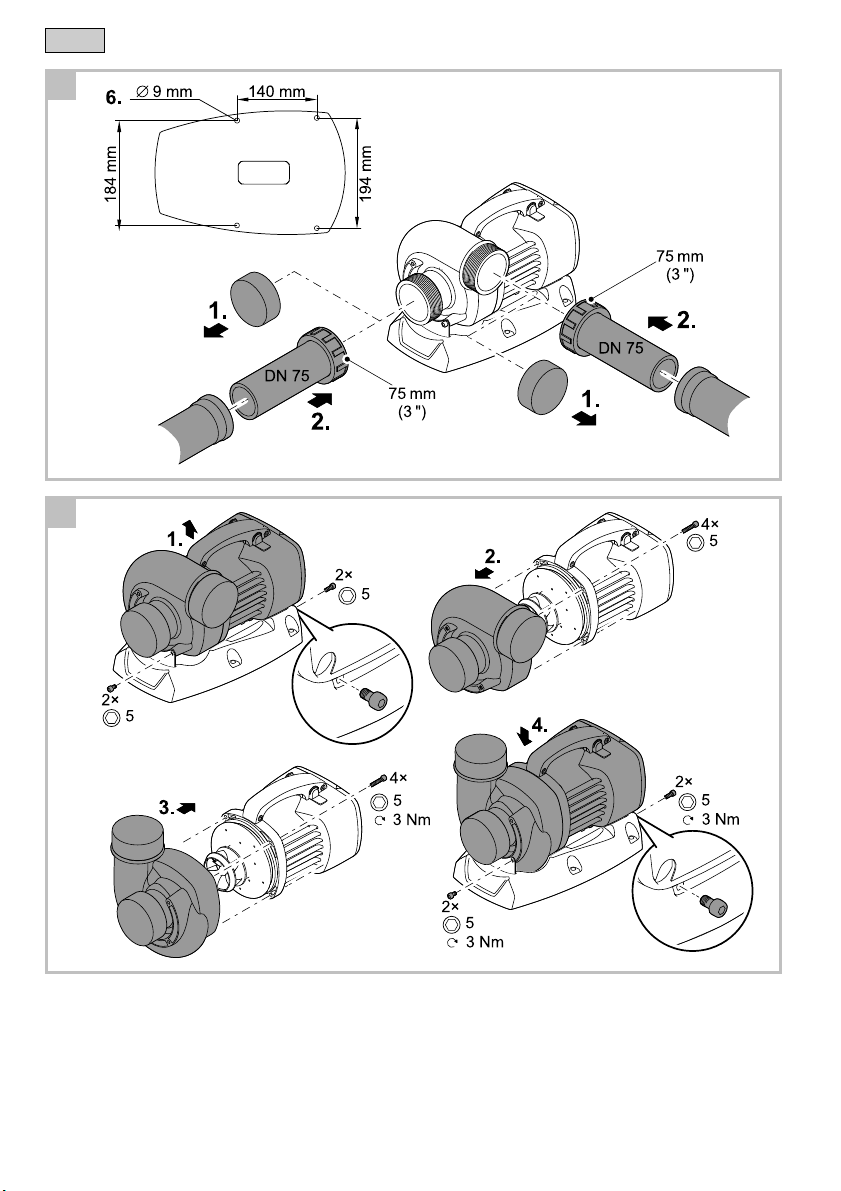
Fitting connections
How to proceed:
F
Remove the protection cap.
Fit DN 75 pipes.
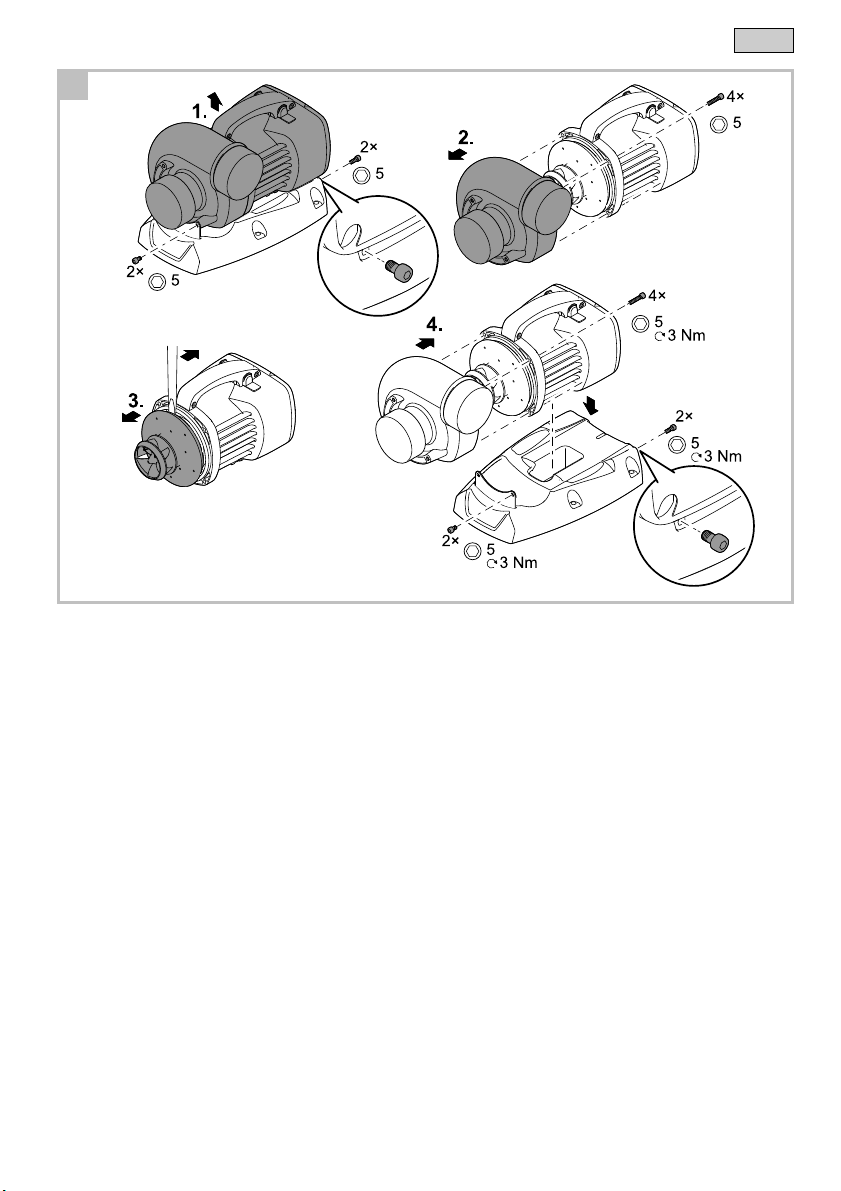
Turning the pump casing to achieve a different position
How to proceed:
G
Remove the screws and remove the pump from the stand.
Remove the four screws and take off the pump casing.
Turn the pump casing, place it onto the motor and fasten with the four screws.
Place the pump on the stand and fasten with the screws.
padlock or screws to secure the access).
– Install the unit at least 2 m away from the water.
– Screw a contact guard (accessory, article No. 43329) onto the inlet or
– protect the pump chamber against unauthorised access (use a padlock or screws to secure the access).
– Install the unit at least 2 m away from the water.
16
Page 10

- EN -
Connecting the DMX connection cable
How to proceed:
B, C
Remove the protection cap from the unit.
Fit the connector of the connection cable and secure with the two screws (max. 2.0 Nm).
– Ensure that the rubber seal is clean and fits exactly.
– Replace the rubber seal if damaged.
– Only connect the plug to the left-hand DMX/RDM socket.
Start-up
Sensitive electrical components.
Possible consequences: The device will be destroyed.
Protective measure: Do not connect the unit to a dimmable power supply.
When started up, the pump automatically performs a pre-programmed self-test of approx. two minutes length (Environmental Function Control (EFC)). The pump detects if it is running dry / blocked or submerged. The pump
switches off automatically after approx. 90 seconds if it runs dry (is blocked). In the event of a malfunction, disconnect
the power supply and flood the pump or remove the obstacle. Following this, the unit can be restarted.
Switching on the pump
Connect the unit to the power supply.
Switch on the pump with AquaMax Eco Control.
– The unit switches on as soon as the power connection is established.
Switching off the pump
Switch off the unit with the AquaMax Eco Control.
Disconnect the unit from the power supply
Remedy of faults
Malfunction Cause Remedy
Pump does not start No mains voltage
Pump does not deliver. Excessively soiled water
Insufficient delivered quantity Impeller unit is running sluggishly
Pump switches off after a short running period. Excessively soiled water
Note!
The device will be destroyed if water penetrates the DMX/RDM sockets.
Ensure that the DMX/RDM sockets are closed off by the DMX/RDM plug or protection
AMX0034
cap.
The impeller unit is blocked
Excessive loss in the supply lines
Water temperature too high
The impeller unit is blocked
Pump has run dry.
Check the mains voltage.
Check supply lines.
Clean the pump. The pump automatically
switches on again once the motor has cooled
down.
Disconnect the power supply and remove
obstacle. Then switch the pump on again.
Clean
Select larger hose diameter
Reduce hose length to reduce frictional loss
Avoid unnecessary connection elements
Clean the pump. The pump automatically
switches on again once the motor has cooled
down.
Note maximum water temperature of +35°C.
The pump automatically switches on again
once the motor has cooled down.
Disconnect the power supply and remove
obstacle. Then switch the pump on again.
Flood the pump. Fully submerge the pump
for operation in the pond.
17
Page 11

- EN -
Maintenance and cleaning
Attention! Dangerous electrical voltage.
Possible consequences: Death or severe injury.
Protective measures:
Electrical units and installations with a rated voltage of U > 12 V AC or U >30 V DC located in the water:
Isolate the units and installations (switch off and disconnect from the power supply) before reaching into
the water.
Isolate the unit before starting any work.
Secure the unit to prevent unintentional switching on.
Cleaning the unit
Note!
Recommendation on regular cleaning:
Clean the pump as required but at least twice a year.
Never use aggressive cleaning agents or chemical solutions. These could attack the housing surface or impair the
function.
Recommended cleaning agent for removing stubborn limescale deposits:
– Pump cleaning agent PumpClean from OASE.
– Vinegar- and chlorine-free household cleaning agent.
Clean the outside of the pump.
– Use a soft brush as an aid.
– The formation of a thin layer of rust is normal and does not negatively affect the function.
After cleaning, thoroughly rinse all parts in clean water.
Replacing impeller unit
Note!
The impeller unit is guided in the motor block by a bearing. This bearing is a wear part and should be changed at the same time as the impeller unit.
Changing the bearing requires specialist knowledge and tools. Have the bearing changed by your OASE
Prerequisite:
The pipes at the inlet and outlet are removed.
Protection against injury: The protection caps are fitted to the inlet and outlet.
How to proceed:
H
Remove the screws and remove the pump from the stand.
Remove the four screws and take off the pump casing.
Pull out the impeller unit and replace if necessary.
Reassemble the unit in the reverse order.
specialist dealer or send the pump to OASE.
Note!
The impeller unit contains strong magnets that attract magnetic particles (e.g. iron filings).
All particles must be removed from the impeller unit before reassembly. Any remaining particles can cause
irreparable damage to the impeller unit and motor block.
– Use a wide-blade screwdriver to carefully lever out the impeller unit if necessary.
18
Page 12

Wear parts
The following components are wear parts and are excluded from the warranty:
Impeller unit
Bearing in the motor block
Storage/Over-wintering
The unit is not frost-proof and has to be removed and put into storage if minus temperatures are expected.
How to correctly store the unit:
Thoroughly clean the unit, check it for damage and replace any damaged parts.
Protect electrical connections from moisture and dirt.
Store the pump submerged and in a frost-free environment.
Do not immerse plugs in water.
Repair
Repair is not possible in the following cases. The pump has to be replaced.
If there is no replacement part approved by OASE for a defective component.
If an electric cable permanently connected to the pump becomes damaged.
Disposal
Do not dispose of this unit with domestic waste! For disposal purposes, please use the return system provided.
Disable the unit beforehand by cutting off the cables.
- EN -
19
Page 13

A
V
K
Тегло
K
16.5 kg
Dimensions Poids
câble
Longueur de
arrivée sortie
mersion
Colonne d'eau Profondeur d'im-
ment
Capacité de refoule-
Dimensões Peso
Dimensiones Peso
cabo
cable
Longitud del
Lunghezza cavo Dimensioni Peso
Comprimento do
entrata uscita
Entrada Saída
Entrada Salida
sione
imersão
inmersión
Profundidad de
Profundidade de
Profondità d'immer-
qua
agua
água
Columna de
elevación
Capacidad de
Kabellengde Mål Vekt
Kábelhossz Méretek Súly
inngang utgang
e
Długość kabla Wymiary Ciężar
wlot wylot
bemenet kimenet
Słup wody Głębokość
Размери
Розміри Вага
mm
350 × 220 × 245
кабелю
Довжина
кабелите
Duljina kabela Dimenzije Masa
izlaz
prilagodnih
prilagodnih
zanurzenia
Дължина на
Lungime cablu Dimensiuni Masă
crijeva
priključaka
Вхід вихід
вход изход
Intrare ieşire
crijeva
priključaka
sie
Глибина
потапяне
занурення
10 m
Длина кабеля Размеры Вес
вход, выход
75 mm (3") 75 mm (3")
Глубина
погружения
Adâncime de imer-
apă
стовп
столб
pompowania
Дебит Воден стълб дълбочина на
Продуктивність Водяний
Производительность Водяной
bée
potencia
Teljesítményfelvétel Szállítási teljesítmény Vízoszlop Merülési mélység
Mains voltage Power consumption Flow rate Head height Immersion depth Sinput output Cable length Dimensions Weight
Aansluitspanning Vermogensopname Pompcapaciteit W aterkolom Dompeldiepte input output Kabellengte Afmetingen Gewicht
NL
Tensión de conexión Consumo de
ES
Tensão de conexão Potência absorvida Débito Coluna de
PT
Anschlussspannung Leistungsaufname Förderleistung Wassersäule Tauchtiefe Eingang Ausgang Kabellänge Abmessungen Gewicht
Tension de raccordement Puissance absor-
DE
EN
FR
Tensione di attacco Potenza assorbita Portata Colonna d'ac-
IT
Nettspenning Effektopptak Kapasitet Vannsøyle Nedsenkningsdybd
Tilslutningsspænding Effektforbrug Transportkapacitet Vandsøjle Bassindybde indgang udgang Ledningslængde Dimensioner Vægt
D
NO
Verkkojännite Ottoteho Syöttöteho Vesipylväs Upotussyvyys Sisääntulo Ulostulo Kaapelin pituus Mitat Paino
Anslutningsspänning Effekt Matningsprestanda Vattenpelare Doppningsdjup ingång utgång Kabellängd Mått Vikt
S
FI
Csatlakoztatási fes-
HU
zültség
Napięcie przyłączeniowe Pobór mocy Wydajność
PL
Napájacie napätie Príkon Dopravný výkon Vodný stĺpec Hĺbka ponorenia Vstup Výstup Dĺžka kábla Rozmery Hmotnost’
Připojovací napětí Příkon Dopravní výkon Vodní sloupec Hloubka ponoření Vstup Výstup Délka kabelu Rozměry Hmotnost
CS
S
Priključna napetost Poraba moči Črplana zmogljivost Vodni steber Potopna globina vstop iztok Dolžina kabla Dimenzije Teža
SL
Priključni napon Potrošnja energije Protočni kapacitet Vodeni stup Dubina uranjanja Ulaz
HR
Tensiune de conexiune Putere consumată Debit de pompare Coloană de
RO
Потребявана
Напрежение в точката
BG
мощност
мощности
Споживання
електроенергії
живлення
на свързване
Напруга мережі
70 … 320 W ≤48000 l/h ≤4 m ≤ 4 m
Потребление
сети
50/60 Hz
输入电压 功耗 输送能力 水柱 潜水深度 入口 出口 电缆长度 尺寸 重量
220 … 240 V AC,
Напряжение питающей
U
RU
CN
AquaMax
Eco Titanium
160
Page 14

DE
Staubdicht. Wasserdicht bis 4 m
EN
Dust tight. Submersible to 4 m
FR
Imperméable aux poussières.
Etanche à l'eau jusqu'à une pro-
NL
Stofdicht. Waterdicht tot een
ES
A prueba de polvo. Impermeable
PT
À prova de pó. À prova de água
até 4 m de profundidade.
IT
A tenuta di polvere. Impermea-
bile all'acqua fino a 4 m di pro-
DA
Støvtæt. Vandtæt ned til 4 m
NO
Støvtett. Vanntett ned til 4 m dyp Beskytt mot direkte sollys. Ikke kast i alminnelig
SV
Dammtät. Vattentät till 4 m djup Skydda mot direkt solstrålning. Får inte kastas i
FI
HU
Portömített. Vízálló 4 m-es
PL
Pyłoszczelny. Wodoszczelny do
CS
Prachotěsný. Vodotěsný do
SK
Prachotesný. Vodotesný do
SL
Ne prepušča prahu. Vodotesno
HR
propušta vodu do 4 m dubine.
RO
Etanş la praf. Etanş la apă până
BG
Водоустойчив до дълбочина 4
UK
Водонепроникний до 4 м
RU
водонепроницаемый на
CN
Tiefe
depth.
Vor direkter Sonneneinstrahlung
Protect from direct sun radiation. Do not dispose of together with
Protéger contre les rayons di-
fondeur de 4 m
diepte van 4 m
al agua hasta 4 m de
profundidad
Beschermen tegen direct zon-
Protéjase contra la radiación di-
Proteger contra radiação solar
Proteggere contro i raggi solari
fondità.
dybde
Pölytiivis. Vesitiivis 4 m
syvyyteen asti.
mélységig
4 m głębokości.
hloubky 4 m
hĺbky 4 m
do globine 4 m.
Ne propušta prašinu. Ne
la o adâncime de 4 m.
Защитено от прах.
Beskyt mod direkte sollys. Må ikke bortskaffes med det
Suojattava suoralta auringonva-
Óvja közvetlen napsugárzástól. A készüléket nem a normál ház-
Chronić przed bezpośrednim
nasłonecznieniem.
Chránit před přímým slunečním
Chránit’ pred priamym slnečným
Zaščitite pred neposrednimi
Zaštitite od izravnog sunčevog
Protejaţi împotriva razelor di-
recte ale soarelui.
Да се пази от слънчеви лъчи. Не изхвърляйте заедно с
м
Пилонепроникний.
Пыленепроницаемый,
глубине до 4 м
Пристрій повинен бути
захищений від прямого
сонячного випромінювання.
Защищать от прямого
воздействия солнечных лучей.
防尘。防水水深至 4 米 防止阳光直射。 不要同普通的家庭垃圾一起丢弃! 注意!
schützen.
rects du soleil.
licht.
recta del sol.
directa.
diretti.
Nicht mit normalem Hausmüll
Ne pas recycler dans les or-
Niet bij het normale huisvuil
¡No deseche el equipo en la
Não deitar ao lixo doméstico! Atenção!
Non smaltire con normali rifiuti
almindelige husholdningsaffald
lolta.
Älä hävitä laitetta tavallisen
tartási szeméttel együtt kell
Nie wyrzucać wraz ze śmieciami
zářením.
žiarením.
Nelikvidovat v normálním
Nelikvidovať v normálnom
sončnimi žarki.
zračenja.
Nemojte ga bacati u običan
Nu aruncaţi în gunoiul menajer ! Atenţie !
обикновения домакински
Не утилизировать вместе с
entsorgen!
household waste!
dures ménagères !
doen!
basura doméstica!
domestici!
husholdningsavfall!
hushållssoporna!
talousjätteen kanssa!
megsemmisíteni!
domowymi!
komunálním odpadu!
komunálnom odpade!
Ne zavrzite skupaj z
gospodinjskimi odpadki!
kućni otpad!
боклук!
Не викидайте разом із
побутовим сміттям!
домашним мусором!
Achtung!
Lesen Sie die Gebrauchsanlei-
Read the operating instructions
tung
Attention!
Attention !
Lire la notice d'emploi
Let op!
Lees de gebruiksaanwijzing
¡Atención!
Lea las instrucciones de uso
Leia as instruções de utilização
Attenzione!
Leggete le istruzioni d'uso!
OBS!
Læs brugsanvisningen
NB!
Les bruksanvisningen
Varning!
Läs igenom bruksanvisningen
Huomio!
Lue käyttöohje
Figyelem!
Olvassa el a használati út-
mutatót
Uwaga!
Przeczytać instrukcję
użytkowania!
Pozor!
Přečtěte Návod k použití!
Pozor!
Prečítajte si Návod na použitie
Pozor!
Preberite navodila za uporabo!
Pažnja!
Pročitajte upute za upotrebu!
Citiţi instrucţiunile de utilizare !
Внимание!
Прочетете упътването
Увага!
Читайте інструкцію.
Внимание!
Прочитайте инструкцию по
использованию
请阅读使用说明书。
161
Page 15

DE
EN
FR
NL
ES
PT
IT
DA
NO
SV
FI
HU
PL
CS
SK
SL
HR
RO
BG
UK
RU
CN
Empfohlene Wasserwerte pH-Wert Gesamthärte Temperatur
Recommended water quality pH value Total hardness Temperature
Valeurs d'eau recommandées Valeur pH Dureté totale Température
Aanbevolen waterwaarden Valor pH Totale hardheid Temperatura
Valores recomendados del agua Valor pH Dureza total Temperatura
Valores recomendados para a água Valor pH Dureza total Temperatura
Valori dell'acqua consigliati Valore pH Durezza totale Temperatura
Anbefalede vandværdier pH-værdi Samlet hårdhed Temperatur
Anbefalte vannverdier pH-verdi Samlet hardhet Temperatur
Rekommenderade vattenvärden pH-värde Total hårdhet Temperatur
Suositellut vesiarvot pH-arvo Kokonaiskovuus Lämpötila
A vízre vonatkozó ajánlott értékek pH-érték Teljes keménység Hőmérséklet
Zalecane parametry wody Wartość pH Twardość ogólna Temperatura
Doporučené hodnoty vody Hodnota pH Celková tvrdost Teplota
Odporúčané hodnoty vody Hodnota pH Celková tvrdosť Teplota
Priporočene vrednosti za vodo pH vrednost Skupna trdota vode Temperatura
Preporučene vrijednosti vode pH vrijednost Ukupna tvrdoća Temperatura
Valori recomandate pentru apă Valoare pH Duritate totală Temperatură
Препоръчани стойности на водата pH-стойност Обща твърдост Температура
Рекомендований вміст води pH-показник Загальна жорсткість (води) Температура
Рекомендуемые значения воды Значение pH Общая жесткость воды Температура
建议水当量值 pH 值 总硬度 温度
6.8 … 7.6 8 … 15 °dH ≤ 35 °C
162
Page 16

AMX0044
163
 Loading...