

Page 1
Pond Pump 280 / 420 / 575
Operating instructions
Notice d’emploi
Instrucciones de uso
Page 2
- English -
REMINDER
CALL 1-866-627-3435
BEFORE RETURNING TO STORE.
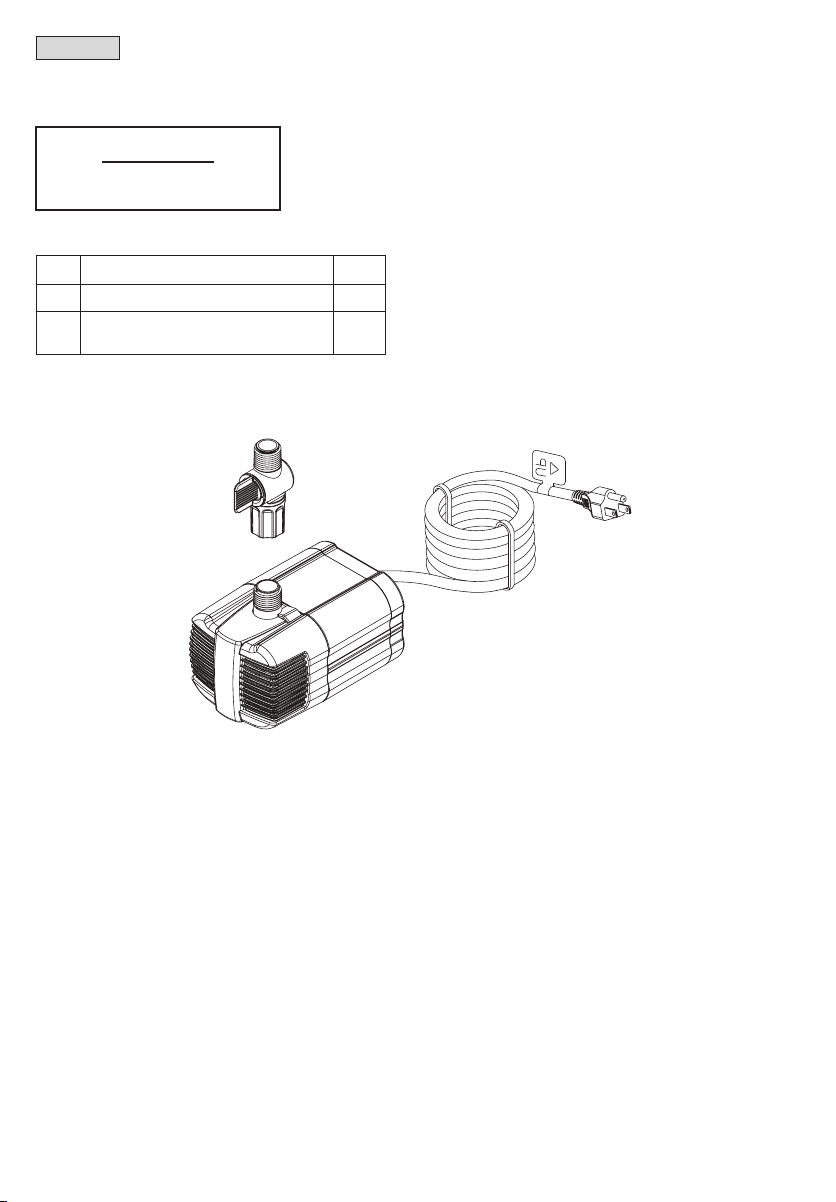
Part
A Pump 1
3/4 in. ID tubing adapter with ow
B
control
Description
B.
A.
QTY
1
Information about these operating instructions
Welcome to OASE Living Water. You made a great choice with the purchase of this product Pond Pump 280 / 420 /
575. Prior to operating the unit, please read the instructions of use carefully and fully familiarize yourself with the unit.
Ensure that all work on and with this unit is only carried out in accordance with these instructions. Please strictly follow the
enclosed instructions to ensure safe and correct handling of the product. Keep these instructions in a safe place. Please
also hand over the instructions when passing the unit on to a new owner.
2
Page 3

- English -
WARNINGS AND CAUTIONS SYMBOLS
Symbols used in these instructions
The symbols used in this operating manual have the following meanings:
Risk of injury to persons due to dangerous electrical voltage.
This symbol indicates an imminent danger, which can lead to death or severe injuries if the appropriate measures are
not taken.
Risk of personal injury caused by a general source of danger.
!
This symbol indicates an imminent danger, which can lead to death or severe injuries if the appropriate measures are
not taken.
Important! The unit is equipped with a permanent magnet. The magnetic eld may affect the function of pacemakers.
!
Important information for trouble-free operation.
Intended use
Pond Pump 280 / 420 / 575, referred to in the following as “unit”, may only be used as specied in the following:
• For circulating and pumping normal pond water for lters and additional water features.
• Operation under observance of the technical data.
The following restrictions apply to the unit:
• Do not use in swimming pools.
• CAUTION - this pump has been evaluated for use with water only.
• Never run the unit without water.
• Do not use for commercial or industrial purposes.
• Do not use in conjunction with chemicals, food products, easily ammable or explosive substances.
• Do not connect to the domestic water supply.
• Do not exceed the voltage shown on the pump.
• Do not remove the grounding pin from the power cord plug.
• Inspect the power cord for damage before installation and maintenance.
Use other than that intended
This unit can be dangerous and cause harm if not used in accordance with these instructions. Any use not in accordance
with these instructions or modication(s) to the unit will void the limited warranty.
Questions, problems, missing parts?
Before returning to your retailer, call us at 1-866-627-3435, 8 a.m.-6 p.m., EST, Monday-Friday, or email
us at customercare@oase-livingwater.com. Or visit our website at www.oase-livingwater.com
3
Page 4
- English -
Installation
WARNING
Risk of electric shock – This pump is supplied with a grounding conductor and grounding-type attachment plug. To
reduce the risk of electric shock, be certain that it is connected only to a properly grounded, grounding-type
receptacle.
Important:
● Always place the unit below water level.
● It is recommened to place the unit horizontally on the ground ensuring its stable position.
● Do not lift the pump by its power cord.
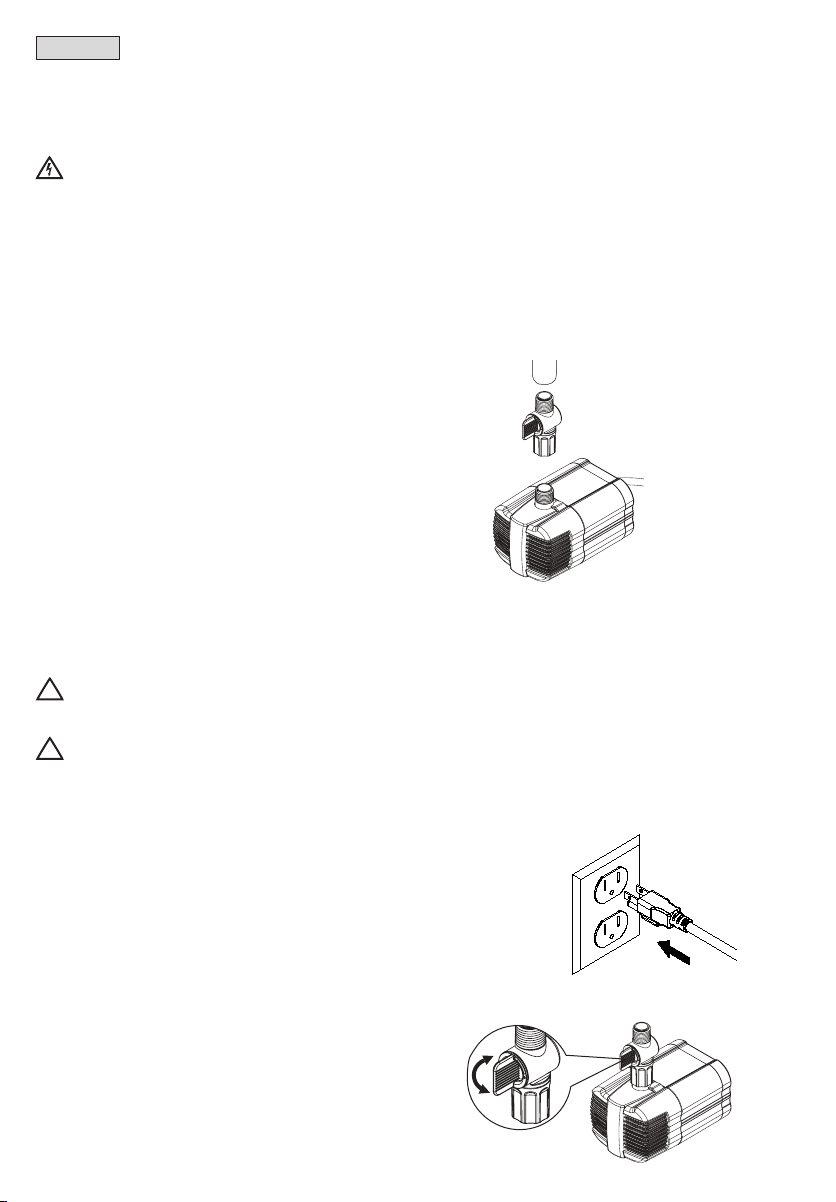
1. Attach the adapter to the pump rst, then connect tubing
1.
to the adapter.
NOTE: Tubing is NOT INCLUDED.
2. Attach the other end of the tubing to desired water
feature or UV clarier.
Tubing
Adapter
Pump
Start-up
Attention! The pump must never run dry.
!
Possible consequences: The pump will be destroyed.
Protective measures: Check the water level at regular intervals. Always place the unit below water level.
Attention! The installed temperature sensor automatically turns the pump off, if it is overloaded. The pump
!
automatically switches on again once the motor has cooled down. Risk of accident!
Install the unit so that it is not exposed to direct sun radiation (max. 104 ºF - 40 ºC).
Important:
● The unit switches on automatically when power connection
is established.
1. Switching on: Connect power plug to the socket.
1.
2. Adjust the ow control to the preferred setting.
3. Switching off: Disconnect the power plug.
2.
+
-
4
Page 5

- English -
Maintenance and cleaning
Attention! Dangerous electrical voltage.
Possible consequences: Death or serious injuries.
Protective measures:
• Electrical units and installations with a rated voltage of U > 12 V AC or U >30 V DC located in the water: Isolate the
units and installations (switch off and disconnect from the power supply) before reaching into the water.
• Isolate the unit before starting any work.
• Secure the unit to prevent unintentional switching on.
WARNING
!
This pump uses a very strong magnet to achieve superior performance. When removing the impeller assembly there
will be considerable magnetic force resisting the extraction of the impeller assembly. This is normal. Likewise when
replacing the impeller assembly there will be a strong magnetic force pulling the assembly into the pump to potentially
cause injury to ngers and in rare cases damaging the ceramic shaft or rear bearing. Use thick gloves when replacing
the impeller assembly.
Cleaning the unit
● Regular cleaning of the pump may be necessary depending
upon the environment in which it is operated. Clean the pump
when it is visibly soiled or when a drop in performance is
detected. Clean the unit with warm water using a soft brush.
● Never use aggressive cleaning agents or chemical solutions.
These could attack the housing surface or impair the function.
● In the event of stubborn furring (calcium deposits), a common
household cleaner free from vinegar and chlorine can be used.
Subsequently, clean the pump thoroughly using warm water.
Cleaning the pump
1.
1. Disconnect the pump from the power source.
○ Disconnect the tubing.
2. Remove the screen and disassemble the impeller
housing to expose the impeller assembly.
3. For Pond Pump 280 / 420, remove the impeller
assembly by gently pulling on the impeller blades.
For Pond Pump 575 remove the impeller assembly by
pulling on the back round plate behind the impeller.
2.
280 / 420 575
3.
4. Use a soft cloth or brush to clean the impeller assembly
and the inside of the impeller housing.
● Check parts for damages such as cracked rotor, shaft or
bearing, cracks in the magnet, and broken plastics.
Replace parts if necessary.
5. Reassemble in the reverse order.
Questions, problems, missing parts?
Before returning to your retailer, call us at 1-866-627-3435, 8 a.m.-6 p.m., EST, Monday-Friday, or email
us at customercare@oase-livingwater.com. Or visit our website at www.oase-livingwater.com
4.
5
Page 6

- English -
Storage/Winterization
● Put the unit out of operation at water temperatures below 46 °F (8 °C) or, at the latest, when freezing temperatures are
to be expected.
● Thoroughly clean the unit, check for damage.
● Ensure that the storage place is inaccessible to children.
Wear parts
The impeller unit is a wear part and is excluded from the warranty.
Disposal
Do not dispose of this unit with domestic waste! Disable the unit beforehand by cutting off the cables. Further
information about the recycling of this product can be obtained from your local municipal authority.
Troubleshooting
Issue Cause Solution
The unit is not
performing its
suction function
Insufcient ow Flow control closed too far Adjust ow control
Unit switches
off after a short
running period
Power supply not connected Connect pump power supply, check the supply lines to make sure
Impeller blocked, shaft broken Remove the inlet screen and/or pump cover, and impeller
Pump is not completely
submerged
Screen clogged Clean
Tubing blocked Clean or replace tubing
Tubing kinked Eliminate kink, replace tubing if it is damaged
Excessive ow loss in the
tubing due to friction
Pump is not completely submerged Completely submerge pump in the water
Pump overload. The ow is
automatically stopped to protect
the pump.
Impeller worn Replace impeller assembly
Excessive soiled water Clean impeller housing, bearing and impeller assembly
Impeller blocked, shaft broken Remove the inlet screen and/or pump cover, and impeller
Water temperature too high Maximum water temperature: +95° F (+35 °C)
the voltage is correct
housing to expose the impeller. Turn the impeller to ensure that it
is not broken or jammed by debris. Also check to make sure that
the ceramic shaft or bearings are not broken.
Completely submerge pump in the water
Reduce tubing length to reduce frictional loss
○ Clean the pump housing and impeller assembly
○ Reduce the ambient temperature (e.g. ensure that the specied
water temperature is adhered to, avoid direct sunlight)
housing to expose the impeller. Turn the impeller to ensure that it
is not broken or jammed by debris. Also check to make sure that
the ceramic shaft or bearings are not broken.
6
Page 7
- English -
Pond Pump
Rated
voltage
120V /
60 Hz
Model Model No.
280 45418
420 45419 0.8 A / 42 W 420 GPH 11.5 ft.
Pond Pump
575 45420 1.2 A / 68 W 575 GPH 13.5 ft. 5.82 x 4 x 6.5 in.
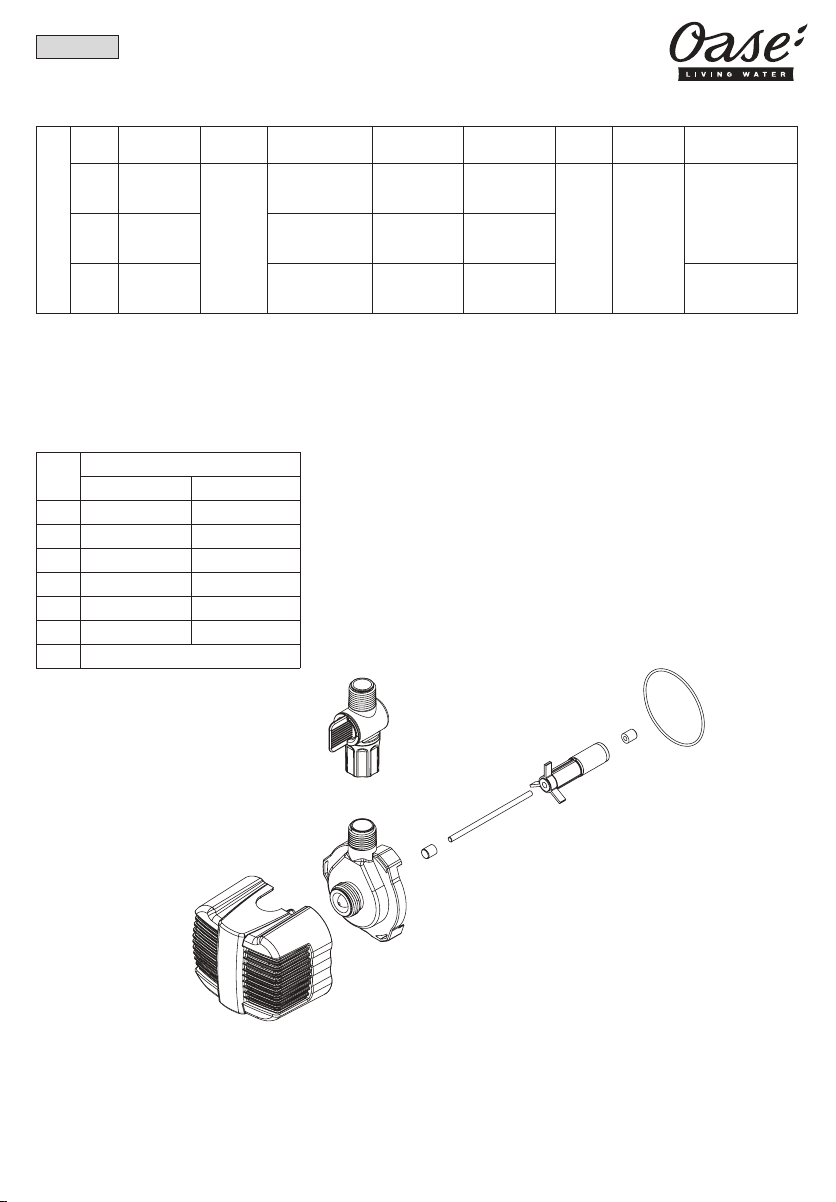
Pos.
1 Pump screen Pump screen
2 Impeller housing Impeller housing
3 Shaft support Shaft support
4 Shaft Shaft
5 Impeller assembly Impeller assembly
6 O-ring O-ring
7 3/4 in. ID tubing adapter with ow control
280 420
Power
consumption
0.45 A / 27 W 280 GPH 7.8 ft.
Max. ow rate
Max. head
height
cord
connection
length
for hoses
16 ft. 3/4″
6
7
3
5
Dimensions
5.82 x 4 x 6.41 in.
4
2 3
1
Questions, problems, missing parts?
Before returning to your retailer, call us at 1-866-627-3435, 8 a.m.-6 p.m., EST, Monday-Friday, or email
us at customercare@oase-livingwater.com. Or visit our website at www.oase-livingwater.com
7
Page 8

- English -
Pond Pump
Pos.
1 Pump screen
2 Impeller housing
3 Impeller assembly
4 O-ring
5
575
3/4 in. ID tubing
adapter with ow
control
5
4
3
2
1
8
Page 9

- Français -
RAPPEL
APPELEZ LE 1-866-627-3435
AVANT DE RETOURNER AU MAGASIN.
Pièce
A Pompe 1
Adaptateur pour tuyau de 19 mm
B
dotée d’un contrôle de débit
Description
B.
A.
Quant.
1
Informations sur le mode d’emploi
Bienvenue à OASE Living Water. L’achat de votre pompe de bassin 280 / 420 / 575 constitue un excellent choix. Avant
d’utiliser la pompe, lisez les instructions attentivement et familiarisez-vous parfaitement avec l’appareil. Assurez-vous que
tout travail effectué sur cet appareil et toute utilisation est conforme aux instructions qui suivent. Suivez ces instructions à
la lettre an de vous assurer d’une manutention de l’appareil adéquate et sans risque. Conservez ces instructions dans un
endroit sûr et remettez-les au nouveau propriétaire si vous transmettez l’appareil.
Questions, problèmes, pièces manquantes ?
Avant de retourner chez votre détaillant, appelez au 1 866 627-3435, entre 8 h et 18 h, heure de l’Est, ou encore envoyez-nous un
courriel à l’adresse customercare@oase-livingwater.com. Vous pouvez aussi consulter notre site web au www.oase-livingwater.com
9
Page 10

- Français -
PICTOGRAMMES DE PRÉCAUTIONS ET MISES EN GARDE
Pictogrammes utilisés dans ces instructions
Les pictogrammes utilisés dans ce manuel d’utilisation ont les signications suivantes :
Risque de blessures aux personnes en raison de la tension électrique dangereuse.
Ce pictogramme indique un danger imminent pouvant entraîner la mort ou des blessures graves si les mesures
appropriées ne sont pas prises.
Situation dangereuse pour les personnes en raison d’un danger d’ordre général.
!
Ce pictogramme indique un danger imminent pouvant entraîner la mort ou des blessures graves si les mesures
appropriées ne sont pas prises.
!
Important ! L’appareil est doté d’un aimant permanent. Le champ magnétique peut inuencer le fonctionnement des
stimulateurs cardiaques.
Renseignements importants pour un bon fonctionnement.
Utilisation prévue
Pompe de bassin 280 / 420 et 575, désignées ci-après comme « l’appareil », peuvent être utilisées seulement comme
indiqué dans les points suivants :
• Pour la circulation et le pompage de l’eau d’un bassin normal, pour les ltres et les pièces d’eau additionnelles.
• Fonctionnement en respect avec les données techniques.
Les restrictions suivantes s’appliquent à l’appareil :
• Ne pas utiliser dans une piscine.
• Attention - Cette pompe a été évaluée pour une utilisation avec de l’eau seulement.
• Ne jamais faire fonctionner l’appareil sans eau.
• Ne pas utiliser à des ns commerciales ou industrielles.
• Ne pas utiliser avec des produits chimiques, des aliments ou des substances facilement inammables ou explosives.
• Ne pas relier au système d’approvisionnement en eau domestique.
• Ne pas dépasser le voltage indiqué sur la pompe.
• Avant l’installation ou l’entretien, inspectez le cordon d’alimentation pour vous assurer qu’il n’est pas endommagé.
• Ne pas retirer la broche de terre de la che du cordon d’alimentation.
Utilisation non conforme
Cet appareil peut être dangereux et causer des dommages s’il n’est pas utilisé conformément aux instructions qui suivent.
Toute utilisation non conforme à ces instructions ou toute modication à l’appareil annulera la garantie.
10
Page 11

- Français -
Installation
AVERTISSEMENT
Risque de décharge électrique. Cette pompe est fournie avec un conducteur de terre et une che de terre. An de
réduire le risque de décharge électrique, assurez-vous qu’elle est uniquement connectée à une prise avec mise à la
terre, bien mise à la terre.
Important :
● Toujours placer l’appareil sous le niveau de l’eau.
● Il est recommandé de placer l’appareil horizontalement sur le sol an d’assurer sa stabilité.
● Ne soulevez pas la pompe par son cordon d’alimentation.
1. Reliez d’abord l’adaptateur à la pompe, puis le tuyau à
1.
l’adaptateur.
REMARQUE : le tuyau n’est PAS INCLUS.
2. Fixez l’autre extrémité du tuyau à la pièce d’eau ou au
claricateur UV désiré.
Tuyau
Adaptateur
Pompe
Démarrage
Attention ! La pompe ne doit jamais fonctionner à sec.
!
Conséquences possibles : la pompe sera détruite.
Mesures de protection : Vérifiez le niveau d’eau à intervalles réguliers. Placez toujours l’appareil sous le niveau de l’eau.
Attention ! Le capteur de température arrête automatiquement la pompe si elle est surchargée. La pompe repartira
!
automatiquement lorsque le moteur sera refroidi. Risque d’accident !
Installez l’appareil de façon à ce qu’il ne soit pas exposé directement aux rayons du soleil (max. 40 °C — 104 °F).
Important :
● L’appareil se met en marche automatiquement lorsque la
connexion électrique est établie.
1. Mise en marche : branchez la che dans la prise de
courant.
1.
2. Ajustez le débit d’eau selon vos préférences.
2.
+
3. mise hors circuit : retirez la che de la prise de courant.
Questions, problèmes, pièces manquantes ?
Avant de retourner chez votre détaillant, appelez au 1 866 627-3435, entre 8 h et 18 h, heure de l’Est, ou encore envoyez-nous un
courriel à l’adresse customercare@oase-livingwater.com. Vous pouvez aussi consulter notre site web au www.oase-livingwater.com
-
11
Page 12

- Français -
Entretien et nettoyage
Attention ! Tension électrique dangereuse.
Conséquences possibles : mort ou risque de blessures.
Mesures de protection :
• Les appareils et équipements électriques situés dans l’eau dont la tension nominale est U > 12 V AC ou U >30 V
DC : isolez les appareils et équipements électriques (mettez hors circuit et retirez la fiche de la prise électrique)
avant de pénétrer dans l’eau.
• Isolez l’appareil avant d’y effectuer tout travail.
• Sécurisez l’appareil dans le but d’empêcher une mise en marche involontaire.
AVERTISSEMENT
!
Cette pompe utilise un aimant très puissant pour atteindre un rendement supérieur. Le retrait de l’ensemble rotor
entraînera une force magnétique considérable. C’est normal. De même, lorsque vous replacerez l’ensemble rotor,
une forte force magnétique tirera l’ensemble dans la pompe, causant potentiellement des blessures aux doigts et
même, dans de rares cas, des dommages à l’arbre en céramique ou au roulement arrière.
Nettoyage de l’appareil
● Un nettoyage régulier de la pompe peut être nécessaire en fonction de
l’environnement dans lequel elle est utilisée. Nettoyez la pompe lorsque
la saleté est visible ou que vous notez une baisse de performance.
Utilisez une brosse douce et de l’eau claire pour nettoyer l’appareil.
● N’utilisez jamais de produits nettoyants corrosifs ou de solutions
chimiques, qui pourraient endommager la surface du boîtier ou nuire à
la fonction de l’appareil.
● En cas d’entartrage tenace (dépôts de calcium), vous pouvez utiliser un
nettoyant domestique sans vinaigre ni chlore.
Ensuite, nettoyez la pompe à fond avec de l’eau claire.
1.
Nettoyage de la pompe
1. Débranchez la pompe de la source d’alimentation.
○ Débranchez le tuyau.
2. Démontez le ltre et retirez le boîtier du rotor pour
exposer l’ensemble rotor.
3. Pour les pompes de bassin 280/420, retirez l’ensemble
rotor en tirant doucement sur les ailettes.
Pour les pompes 575, retirez l’ensemble rotor en tirant
sur la base ronde derrière le rotor.
4. Utilisez une brosse ou un chiffon doux pour nettoyer
l’ensemble rotor et l’intérieur du boîtier du rotor.
● Vériez que des pièces, telles que le rotor, l’arbre,
l’aimant ou le roulement ne sont pas fêlés, et que les
pièces de plastique ne sont pas brisées.
Remplacez les pièces au besoin.
5. Remontez dans l’ordre inverse.
2.
280 / 420 575
3.
4.
12
Page 13

- Français -
Entreposage/hivernage
● Cessez le fonctionnement de l’appareil lorsque la température de l’eau atteint 8 °C (46 °F) ou, au plus tard, lorsque des
températures sous le point de congélation sont prévues.
● Nettoyez l’appareil à fond et vériez s’il présente des dommages.
● Assurez-vous que l’endroit où l’appareil sera entreposé est hors d’atteinte des enfants.
Pièces d’usure
L’ensemble rotor est une pièce d’usure et est exclu de la garantie.
Élimination
Ne jetez pas cet appareil avec les déchets domestiques ! Désactivez préalablement l’appareil en coupant les câbles.
Vous pouvez obtenir plus d’informations sur le recyclage de ce produit auprès des autorités municipales.
Dépannage
Problème Cause Solution
L’appareil ne
remplit pas
sa fonction
d’aspiration
Débit
insufsant
L’appareil
s’éteint après
une courte
période de
fonctionnement
Le cordon d’alimentation n’est
pas branché
Le rotor est bloqué, Rupture
de l’arbre
La pompe n’est pas
complètement immergée
Contrôle de débit trop fermé Ajustez le contrôle du débit
Filtre bouché Nettoyez
Tuyau bouché Nettoyez ou remplacez le tuyau
Tuyau plié Éliminez la pliure, remplacez le tuyau s’il est endommagé
Perte de débit excessive dans
le tuyau à cause de la friction
La pompe n’est pas
complètement immergée
Pompe surchargée. Le débit
s’arrête automatiquement pour
protéger la pompe
Le rotor est usé Remplacez le assemblage du rotor
Trop de l’eau souillée Nettoyez le carter du rotor, le roulement et le rotor.
Le rotor est bloqué, Rupture
de l’arbre
Température de l’eau trop
élevée
Branchez le cordon d’alimentation, Vérier les conduites
d’alimentation pour s’assurer que la tension est correcte
Retirez le ltre d’entrée et/ou le couvercle de la pompe, de même
que le boîtier du rotor pour exposer le rotor. Tournez le rotor pour
vous assurer qu’il n’est pas brisé ou bouché par des débris. De
plus, assurez-vous que l’arbre de céramique ou les roulements ne
sont pas brisés .
Immergez complètement la pompe dans l’eau
Réduisez la longueur du tuyau pour réduire la perte par friction
Immergez complètement la pompe dans l’eau
○ Nettoyez le carter du rotor, le roulement et le rotor.
○ Réduisez la température ambiante (assurez-vous que la
température de l’eau recommandée est respectée; évitez les
rayons de soleil direct)
Retirez le ltre d’entrée et/ou le couvercle de la pompe, de même
que le boîtier du rotor pour exposer le rotor. Tournez le rotor pour
vous assurer qu’il n’est pas brisé ou bouché par des débris. De
plus, assurez-vous que l’arbre de céramique ou les roulements ne
sont pas brisés .
Température maximale de l’eau : +35 °C (+95 °F)
Questions, problèmes, pièces manquantes ?
Avant de retourner chez votre détaillant, appelez au 1 866 627-3435, entre 8 h et 18 h, heure de l’Est, ou encore envoyez-nous un
courriel à l’adresse customercare@oase-livingwater.com. Vous pouvez aussi consulter notre site web au www.oase-livingwater.com
13
Page 14

- Français -
Numéro
Modèle
de modèle
280 45418
420 45419 0.8 A / 42 W 1590 LPH 3.5 m
pompe de bassin
575 45420 1.2 A / 68 W 2176 LPH 4.1 m 148 x 101.6 x 165 mm
Pos.
1 Couvercle Couvercle
2 Boîtier du rotor Boîtier du rotor
3 Support d’arbre Support d’arbre
4 Arbre Arbre
5
6 Joint torique Joint torique
7
280 420
Assemblage du
rotor
Adaptateur pour tuyau de 19 mm dotée
d’un contrôle de débit
Tension
nominale
120V /
60 Hz
pompe de bassin
Assemblage du
Consommation
électrique
0.45 A / 27 W 1060 LPH 2.4 m
rotor
Capacité
de débit
Hauteur maximale
de la tête
Longueur
du cordon
Branchement
pour exibles
5 m 19 mm
Dimension
148 x 101.6 x 163 mm
6
7
3
5
4
2 3
1
14
Page 15

- Français -
pompe de bassin
Pos.
1 Couvercle
2 Boîtier du rotor
3 Assemblage du rotor
4 Joint torique
Adaptateur pour tuyau de 19 mm dotée
5
d’un contrôle de débit
575
5
4
3
2
1
Questions, problèmes, pièces manquantes ?
Avant de retourner chez votre détaillant, appelez au 1 866 627-3435, entre 8 h et 18 h, heure de l’Est, ou encore envoyez-nous un
courriel à l’adresse customercare@oase-livingwater.com. Vous pouvez aussi consulter notre site web au www.oase-livingwater.com
15
Page 16

- Español -
RECORDATORIO
LLAME AL 1-866-627-3435
ANTES DE REGRESAR A LA TIENDA.
Parte
A Bomba 1
Adaptador de tubería DI con control
B
de ujo 19 mm
Descripción
B.
A.
Cant.
1
Información sobre estas instrucciones de operación
Bienvenido a Agua Viva de OASE. Hizo una excelente decisión al comprar este producto de Estanque Bomba 280 / 420 /
575. Antes de poner la unidad en operación, por favor lea las instrucciones de uso cuidadosamente y completamente para
conocer la unidad. Asegúrese que cualquier trabajo en y con esta unidad esté en concordancia con estas instrucciones.
Por favor, sigue estrictamente las instrucciones incluidas para lograr manejo seguro y adecuado del producto. Mantenga
estas instrucciones en un lugar seguro. Por favor, incluye las instrucciones al pasar la unidad a un dueño nuevo.
16
Page 17

- Español -
SÍMBOLOS DE ADVERTENCIA Y PRECAUCIÓN
Símbolos utilizados en estas instrucciones
Los símbolos usados en este manual de operación tienen los siguientes signicados:
Riesgo de lesión en personas a razón de voltaje eléctrico peligroso.
Este símbolo indica un peligro inminente, el cual puede llevar a la muerte o lesiones graves en caso de no tomar las
medidas apropiadas.
Riesgo de lesión personal causado por una fuente general de peligro.
!
Este símbolo indica un peligro inminente, el cual puede llevar a la muerte o lesiones graves en caso de no tomar las
medidas apropiadas.
¡Importante! La unidad está equipada con un imán permanente. El campo magnético puede afectar el
!
funcionamiento de marcapasos cardíacos.
Información importante para garantizar operación sin problemas.
Uso previsto
Estanque Bomba 280 / 420 / 575 llamada a continuación “unidad”, se puede usar solamente según lo especicado a
continuación:
• Para circular y bombear agua de estanque normal en ltros y fuentes arquitectónicas adicionales.
• Para operar en cumplimiento de datos técnicos.
Aplican las siguientes restricciones de uso de la unidad:
• No usar en piscinas.
• Precaución: esta bomba ha sido evaluado para su uso sólo con agua.
• No correr la unidad sin agua.
• No usar para propósitos comerciales o industriales.
• No usar en conjunto con químicos, comestibles, sustancias inamables o explosivas.
• No conectar al suministro de agua doméstica.
• No exceder el voltaje indicado en la bomba.
• Inspeccionar si el cable de corriente está dañado antes de instalar y mantener la unidad.
• No remover la clavija de puesta a tierra del enchufe del cable eléctrico.
Uso diferente del uso previsto
Esta unidad puede ser peligrosa y causar daños si no se usa en concordancia con estas instrucciones. Cualquier uso que
no esté en concordancia con estas instrucciones o modicaciones de la unidad anulará la garantía limitada.
¿Preguntas, problemas, partes faltantes?
Antes de regresar con su vendedor, llame al 1-866-627-3435 de 8 am a 6 pm, hora del este, de lunes a viernes, o envíenos
un correo electrónico a customercare@oase-livingwater.com. O visite nuestra página web www.oase-livingwater.com
17
Page 18

- Español -
Instalación
PRECAUCIÓN
Riesgo de descarga eléctrica - Esta bomba está equipada con un conductor de puesta a tierra y un enchufe con
descarga a tierra. Para reducir el riesgo de descarga eléctrica, asegúrese de conectar la unidad a una base del
enchufe con conexión a tierra.
Importante:
● Siempre coloque la unidad debajo del nivel de agua.
● Se recomienda colocar la unidad en posición horizontal en el piso para lograr posicionamiento estable.
● No alce la bomba con el cable eléctrico.
1. Adjunte el adaptador a la bomba primero, luego conecte
1.
la tubería al adaptador.
NOTA: La tubería NO ESTÁ INCLUIDA.
2. Adjunte el otro lado de la tubería a la fuente
arquitectónica deseada o un claricador UV
Tubería
Adaptador
Bomba
Inicio
¡Atención! La bomba nunca debe operar en seco.
!
Posibles consecuencias: La bomba será destruida.
Medidas de protección: Revise el nivel de agua regularmente. Siempre coloque la bomba debajo del nivel de agua.
¡Atención! ! El sensor de temperatura instalado apaga la bomba automáticamente si se sobrecarga. La bomba se
!
prende automáticamente de nuevo una vez se enfría el motor. ¡Riesgo de accidente!
Instale la unidad de tal forma que no quede expuesta a la radiación directa del sol (máx. 104º F - 40º C).
Importante:
● La unidad se prende automáticamente al establecer
conexión a la corriente.
1. Para encender: Conecte el cable eléctrico en el enchufe.
1.
2. Ajuste el control de ujo al nivel preferido.
3. Para apagar: Desenchufe el cable eléctrico.
2.
+
-
18
Page 19

- Español -
Mantenimiento y Limpieza
¡Atención! Voltaje eléctrico peligroso.
Posibles consecuencias: Muerte o lesiones graves.
Medidas de protección:
• Unidades eléctricas e instalaciones con tensión nominal de U > 12 V AC o U >30 V DC ubicadas en el agua: Aísle
las unidades e instalaciones (apague o desconecte del suministro de la corriente) antes de meter la mano en el agua.
• Aísle la unidad antes de iniciar cualquier tipo de trabajo.
• Proteja la unidad previniendo que se encienda por error.
PRECAUCIÓN
!
Esta bomba usa un imán muy fuerte para lograr un desempeño superior. Al remover el montaje del impulsor
notará una fuerza magnética considerable que estará resistiendo la extracción del montaje del impulsor. Esto es
normal. Asimismo, al colocar el montaje del impulsor devuelta habrá fuerza magnética fuerte que estará jalando
el montaje hacia dentro de la bomba. Esto podría causar heridas a los dedos y en casos aislados podría dañar la
varilla cerámica o el soporte trasero. Utilice guantes gruesos al reemplazar el montaje del impulsor
Limpieza de la unidad
● Podría ser necesario realizar limpieza regular de la bomba, dependiendo
del ambiente en el cual está operando. Limpie la bomba cuando está
visiblemente sucia o cuando detecta pérdida de desempeño. Limpie la
unidad con agua limpia y un cepillo suave.
● Nunca use productos de limpieza fuertes o soluciones químicas.
Estos podrían atacar la supercie del alojamiento o afectar el funcionamiento.
● En el caso de incrustaciones de sarro persistentes (depósitos de calcio)
puede usar un producto de limpieza de hogar común, libre de vinagre y cloro.
Luego, limpie la bomba cuidadosamente con agua limpia.
Limpieza de la bomba
1.
1. Desconecte la bomba del suministro de la corriente.
○ Desconecte la tubería.
2. Desarme la unidad hasta poder revisar y remover
el alojamiento del impulsor para exponer el montaje del
impulsor.
3. En caso de Bomba de estanque 280 / 420, remueva
el montaje impulsor al jalar suavemente las paletas
impulsoras. En caso de Bomba de estanque 575
remueva el montaje impulsor a la placa trasera circular
detrás del impulsor
2.
280 / 420 575
3.
4. Use un trapo o cepillo suave para limpiar el montaje del
impulsor y el interior del alojamiento del impulsor.
● Revise los componentes para ver si no hay daños, tales
como rotor agrietado, grietas en el imán y plástico roto.
Reemplace los componentes según sea necesario.
4.
5. Arme la unidad en orden reverso.
¿Preguntas, problemas, partes faltantes?
Antes de regresar con su vendedor, llame al 1-866-627-3435 de 8 am a 6 pm, hora del este, de lunes a viernes, o envíenos
un correo electrónico a customercare@oase-livingwater.com. O visite nuestra página web www.oase-livingwater.com
19
Page 20

- Español -
Almacenamiento/Acondicionamiento para el invierno
● Deje de operar la unidad cuando la temperatura del agua baja a menos de 46 °F (8 °C) o, a más tardar cuando se
esperan temperaturas bajo cero.
● Limpie la unidad completamente, revise si hay daños.
● Asegúrese que el lugar de almacenamiento no esté accesible por niños.
Componentes de desgaste
La unidad del impulsor es un componente de desgaste y está excluido de la garantía.
Desecho
¡No deseche esta unidad en conjunto con la basura doméstica! Primero deshabilite la unidad al cortar los cables.
Puede obtener información adicional sobre el reciclaje de este producto de su autoridad municipal local.
Resolución de problemas
Problema Causa Solución
La unidad
no hace la
función de
succión
Flujo
insuciente
La unidad
se apaga
después
de un corto
periodo de
operación
El suministro de la corriente no está
conectado
Impulsor está bloqueado, la varilla
roto
La bomba no está completamente
sumergida
Control de ujo demasiado cerrado Ajuste el control de ujo
La pantalla está obstruida Limpie
Las tuberías están bloqueadas Limpie o reemplace la tubería
Hay un pliegue en la tubería Elimine el pliegue, reemplace la tubería de ser necesario
Pérdida de ujo excesivo en la
tubería causada por fricción
La bomba no está completamente
sumergida
Sobrecarga de la bomba. El ujo
será detenido automáticamente
para proteger la bomba
Impulsor desgastado Reemplace el montaje del impulsor
Excesivo de agua sucia Limpie el alojamiento de la bomba y alojamiento del impulsor
Impulsor está bloqueado, la varilla
roto
La temperatura del agua está
demasiado alta
Conecte la bomba al suministro de la corriente, Vericar las
líneas de alimentación para asegurarse de que la tensión es
correcta
Remueva la malla de entrada y/o el cobertor de la bomba y
el alojamiento del impulsor para exponer el impulsor. Gire
el impulsor para ver si está roto o atascado por residuos.
Asegúrese también que la varilla cerámica y los soportes no
están quebrados.
Sumerge la bomba completamente en el agua
Reduzca el largo de la tubería para reducir pérdida de fricción
Sumerge la bomba completamente en el agua
○ Limpie el alojamiento de la bomba y alojamiento del impulsor
○ Reduzca la temperatura del ambiente (p.ej., asegúrese que
está cumpliendo con las especificaciones de la temperatura del
agua, evite la exposición a la luz del sol directa)
Remueva la malla de entrada y/o el cobertor de la bomba y
el alojamiento del impulsor para exponer el impulsor. Gire
el impulsor para ver si está roto o atascado por residuos.
Asegúrese también que la varilla cerámica y los soportes no
están quebrados.
Temperatura del agua máxima: +95 F° (+35 °C)
20
Page 21

- Español -
Modelo
280 45418
420 45419 0.8 A / 42 W 1590 LPH 3.5 m
Estanque Bomba
575 45420 1.2 A / 68 W 2176 LPH 4.1 m 148 x 101.6 x 165 mm
Pos.
1 Pantalla Pantalla
2 Alojamiento del impulsor Alojamiento del impulsor
3 Soporte de varilla Soporte de varilla
4 Varilla Varilla
5 Montaje del impulsor Montaje del impulsor
6 Junta Tórica Junta Tórica
7 Adaptador de tubería DI con control de ujo 19 mm
No. de
modelo
280 420
Tensión
nominal
120V /
60 Hz
Estanque Bomba
Consumo
eléctrico
0.45 A / 27 W 1060 LPH 2.4 m
Tasa de ujo
máxima
Columna
de agua
Longitud
de cable
Conexiones
para tubería
5 m 19 mm
Dimensiones
148 x 101.6 x 163 mm
6
7
3
5
4
2 3
1
¿Preguntas, problemas, partes faltantes?
Antes de regresar con su vendedor, llame al 1-866-627-3435 de 8 am a 6 pm, hora del este, de lunes a viernes, o envíenos
un correo electrónico a customercare@oase-livingwater.com. O visite nuestra página web www.oase-livingwater.com
21
Page 22

- Español -
Estanque Bomba
Pos.
1 Pantalla
2 Alojamiento del impulsor
3 Montaje del impulsor
4 Junta Tórica
5
575
Adaptador de tubería DI
con control de ujo 19 mm
5
4
3
2
1
22
Page 23

OASE North America INC. · www.oase-livingwater.com
46615/09-16
 Loading...