

Page 1
FiltoClear 12000/16000/20000/30000
Page 2

- -
2
Page 3
- -
3
Page 4
- -
4
Page 5
- -
5
Page 6
- -
6
Page 7

- -
7
Page 8

- -
8
Page 9

- EN -
Translation of the original Operating Instructions
WARNING
• This unit can be used by children aged 8 and above and by per-
sons with reduced physical, sensory or mental capabilities or lack
of experience and knowledge if they are supervised or have been
instructed on how to use the unit in a safe way and they understand
the hazards involved.
• Do not allow children to play with the unit.
• Only allow children to carry out cleaning and user maintenance un-
- EN -
der supervision.
• Ensure that the unit is fused for a rated fault current of max. 30 mA
by means of a fault current protection device.
• Only connect the unit if the electrical data of the unit and the power
supply correspond. The unit data is to be found on the unit type plate,
on the packaging or in this manual.
• Possible death or severe injury from electrocution! Before reaching
into the water, always disconnect all units in the water that have a
voltage of >12 V AC or >30 V DC from the power supply.
• Do not use the unit if electrical cables or housings are damaged.
• Only operate the unit if no persons are in the water.
Safety information
Electrical connection
• Electrical installations must meet the national regulations and may only be carried out by a qualified electrician.
• A person is regarded as a qualified electrician if, due to his/her vocational education, knowledge and experience, he
or she is capable of and authorised to judge and carry out the work commissioned to him/her. This also includes the
recognition of possible hazards and the adherence to the pertinent regional and national standards, rules and regulations.
• For your own safety, please consult a qualified electrician.
• Extension cables and power distributors (e.g. outlet strips) must be suitable for outdoor use (splash-proof).
• The unit, the connections and plugs are not water-proof and must not be routed or installed in water.
• Protect the plug connection from moisture.
• Only connect the unit to a correctly fitted socket.
19
Page 10

- EN -
Safe operation
• Minimum safety distance between the unit and the water: 2 m.
• Never carry or pull the unit by the electrical cable.
• Route cables such that they are protected from damage and do not present a tripping hazard.
• Only open the unit housing or its attendant components if this is explicitly specified in the operating instructions.
• Only carry out work on the unit that is described in this manual. If problems cannot be overcome, please contact an
authorised customer service point or, if in doubt, the manufacturer.
• Only use original spare parts and accessories for the unit.
• Never carry out technical changes to the unit.
Information about this operating manual
Welcome to OASE Living Water. You made a good choice with the purchase of this product FiltoClear
12000/16000/20000/30000.
Prior to commissioning the unit, please read the instructions of use carefully and fully familiarise yourself with the unit.
Ensure that all work on and with this unit is only carried out in accordance with these instructions.
Adhere to the safety information for the correct and safe use of the unit.
Keep these instructions in a safe place! Please also hand over the instructions when passing the unit on to a new
owner.
Symbols used in these instructions
Warnings
The warning information is categorised by signal words, which indicate the extent of the hazard.
WARNING
• Indicates a possibly hazardous situation.
• Non-observance may lead to death or serious injuries.
CAUTION
• Indicates a possibly hazardous situation.
• Non-observance may lead to slight or minor injuries.
NOTE
Information for the purpose of clarification or for preventing possible damage to assets or to the environment.
Additional information
A Reference to a figure, e.g. Fig. A.
→ Reference to another section.
20
Page 11

Figure
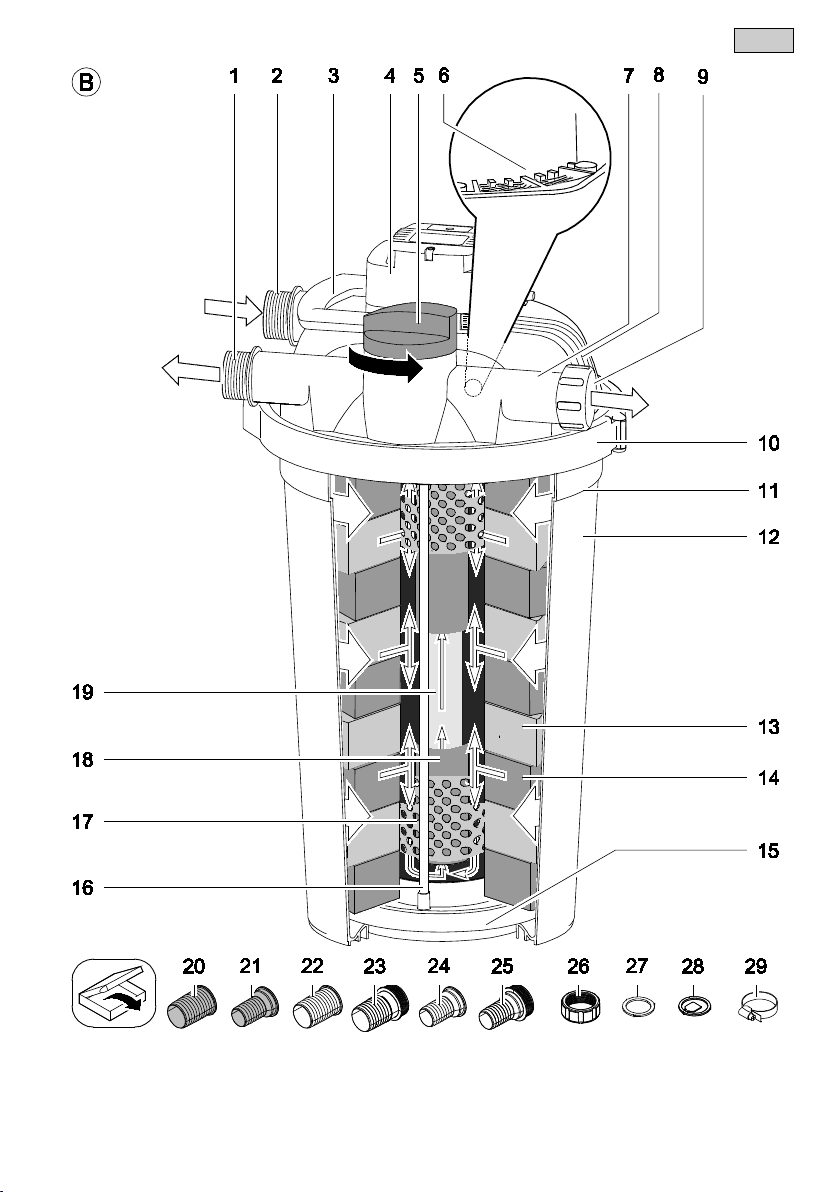
(B)
Object
1 Water return socket, for the return of filtered pond water
2 Water inlet socket, for the inlet of soiled pond water
3
Cleaning handle, the foam filters are compressed by pulling the handle up
4
UVC unit head with temperature monitor, holder and control window for UV-C lamp. The UV-C lamp switches off automatically when
overheated and on again once cooled down.
5
Function switch to reverse the water flow. Turn counter-clockwise. 3 positions are available.
I: Water filtering and radiation
II: Foam cleaning („Easy-Clean Technology“)
III: Flushing the UVC unit and the UVC water housing
6
Bypass, optimises the UVC radiation effect at a high flow rate
7 Soiled water drain socket, to drain the soiled water
8
Filter lid
9
Cover cap, with black flat sealing ring inserted
10
Clamping ring to hold filter lid and container together
11
Step, marking the maximum installation depth
12
Container, pressurised when the unit is in operation (max. 0.2 bar)
13
Fine foam filter for nitrification and denitrification
14
Coarse foam filter for nitrification
15
Fixing disk, holding foam filters on cleaning rods
16
Cleaning rod, connecting cleaning handle and filter disk
17
Meshed tube, maintaining the foam filter spacing to the UVC water housing
18
UVC water housing, conveying water to the UVC unit
19
Quartz glass tube with UV-C lamp
Coarse foam filters (blue)
Fine foam filters (red)
high flow rate
low flow rate
Bacteria for nitrification
Bacteria for nitrification and denitrification
Ammonia -> nitrite -> nitrate reaction
Nitrate -> nitrogen reaction
Unit configuration and function description
Unit configuration
- EN -
Function description
A
A filter pump (only contained as a set in the scope of delivery) presses the water into a pressure-tight container, where
it passes several cleaning stages before returned into the pond. The soiled water resulting from cleaning the unit can
be used to fertilise the garden.
B
Cleaning stage "filtering": The water flows through the foam filters. Mechanical soiling is retained by the foam filters.
Suspended matter and bio sludge settle on the container bottom. Usseful bacteria settle on the foam filters, cleaning
the water biologically. Their effect starts at a water temperature of + 10 °C.
Cleaning stage "radiation": The water is radiated with the ultra-violet light from a UV-C lamp. Green algae die, pathogenic agents are killed.
Bypass: A bypass ensures that only part of the returning water (approx. 25 %) is radiated. In this manner a sufficient
radiation duration is obtained even at a high circulation rate.
Filter starter: The unit only reaches its full biological cleaning effect after a few weeks. The formation of a bacterial
community on the foam filters can be notably accelerated by adding filter starter bacteria.
21
Page 12

- EN -
Figure (B)
Quantity
Description 1
FiltoClear Pressure filter with UVC unit
1 Connection material
20 2 Hose connector, transparent, 2“
21 2 Hose connector, transparent, 1 ½“
22 1 Hose connector, black, 2“
23 1 Hose connector, black, 2“, with thread
24 1 Hose connector, black, 1 ½“
25 1 Hose connector, black, 1 ½“, with thread
26 3 Union nut
27 1 Flat sealing ring, black
28 2 Flow indicator flap, green
29 4 Hose clip
OASE recommend:
– as a filter starter: OASE BioKick.
– as a reference value for the fish population in the pond: approx. 60 cm fish length in 1 m³ pond water.
– as a pond pump for FiltoClear 12000: Aquamax Eco 8000.
– as a pond pump for FiltoClear 16000: Aquamax Eco 10000.
– as a pond pump for FiltoClear 20000: Aquamax Eco 12000.
– as a pond pump for FiltoClear 30000: Aquamax Eco 16000.
Scope of delivery
Intended use
FiltoClear 12000/16000/20000/30000, referred to as "unit", may only be used as specified in the following:
• For mechanical and biological cleaning of garden ponds
• Operate in accordance with instructions.
The following restrictions apply to the unit:
• Never use the unit to filter fluids other than water.
• Never run the unit without water.
• Do not use for commercial or industrial purposes.
• Do not use in conjunction with chemicals, foodstuff, easily flammable or explosive substances.
Installation
A
To be taken into consideration for planning:
– Spacing between unit and water: min. 2 m (safety spacing!).
– Do not expose the unit to direct sun radiation.
– Water return point. OASE recommend: Route the return hose such that the clean water is indirectly returned to
the pond, e.g. through a water course. In this manner it will be additionally enriched with oxygen.
– Height difference between filter lid and water return point: max. 2 m.
Installation possibility 1: Bury close to the pond.
Dig a hole close to the pond and place the container into the hole up to the mark (B 11).
Installation possibility 2: Placement close to the pond.
Place the unit close to the pond where it is flood protected (e.g. hidden behind shrubs). The ground must be firm and
level.
Connecting a filter pump
A filter pump is required to operate the pressure filter (only contained as a set in the scope of delivery). Only connect to
the pump by means of pressure hoses approved for at least 0.2 bar or the maximum pump pressure.
Hoses with an internal diameter of 1 1/2" or 2" can be connected to the unit.
22
Page 13

Note!
- EN -
Installation
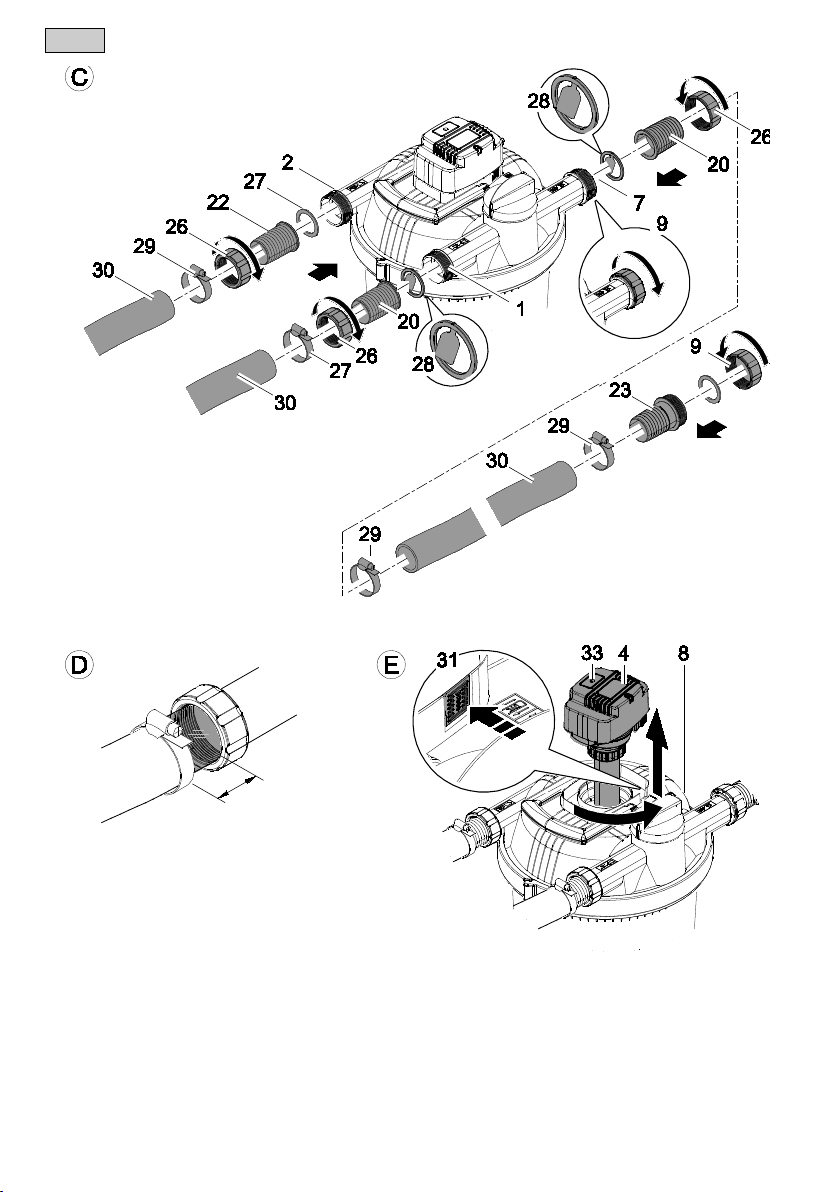
C
1 ½" hoses or 2" hoses can be connected to the unit. The respective hose connectors are part of our scope of delivery.
Recommendation: Use 2" hoses to convey the water through the lines at a minimum pressure loss.
If you use a filter starter, fill the product into the container prior to carrying out the following installation steps (Com-
missioning/Start-up).
Fitting the water inlet
How to proceed:
• Push the union nut (26) over the black hose connector (22).
• Insert the flat sealing ring (27) in the union nut (26).
• Screw tighten the hose connector to the water inlet socket (2) using the union nut.
• Push the hose clip (29) over the hose (30).
• Push the hose over the hose connector (up to the stop) and secure using the hose clip.
Fitting the water return
How to proceed:
• Push the union nut (26) over the transparent hose connector (20).
• Place the flow indicator flap (28) into the union nut.
• Screw tighten the hose connector to the water return socket (1) using the union nut.
• Push the hose clip (29) over the hose (30).
• Push the hose over the hose connector and secure with the hose clip. Leave the last segment free for use as a window
to control flow and soiling (D).
Fitting the soiled water drain
The soiled water resulting from cleaning the unit can be used for fertilisation purposes. Recommendation: Connect and
route a drain hose (not included in our scope of delivery) up to a suitable point (e.g. plant bed).
How to proceed:
• Unscrew the cover cap (9) from the soiled water drain socket (7).
• Push the union nut (26) over the transparent hose connector (20).
• Place the flow indicator flap (28) into the union nut.
• Screw tighten the hose connector to the socket using the union nut.
• Push the hose clip (29) over the hose (30).
• Push the hose over the hose connector and secure with the hose clip. Leave the last segment free for use as a window
to control flow and soiling (D).
Closing the soiled water drain
During filter operation, ensure that the soiled water socket (7) or a drain hose (30) connected to it is
always closed with a cover cap (9) with the flat sealing ring inserted. This prevents unintended
emptying of the pond.
How to proceed:
• Push the hose clip (29) over the hose (30).
• Push the hose connector (23) into the hose and secure with the hose clip.
• Close the hose connector using the cover cap with the flat sealing ring (9) inserted.
23
Page 14

- EN -
Malfunction
Cause
Remedy
No water flow through the re-
− Filter pump not switched on.
− Switch on the filter pump
− Supply lines blocked.
− Check supply lines
− Function switch not turned to "Filter water"
− Turn function switch to „Filter water“
UVC lamp display is not lit
− Connection defective or has not been made.
− Check connection (power plug, power fuse)
− Temperature monitor has switched off the UVC
lamp
− Allow the UVC lamp to cool down
− UVC lamp defective
− Replace UVC lamp
− Quartz glass tube not fitted
− Fit quartz glass tube
Filtering performance not satis-
− Function switch not turned to "Filter water"
− Turn function switch to „Filter water“
− Unit has not been in operation long enough
− Wait a few days/weeks
− Water extremely soiled
− Excessive fish and animal population
− Adhere to the reference value
− Foam filters clogged
− Clean foam filters
− Quartz glass tube soiled
− Cleaning the quartz glass tube
− UVC lamp is in operation for more than 8000
hours
− Replace UVC lamp
Commissioning/start-up
NOTE
Sensitive electrical components. Incorrect connection will destroy the unit.
• Do not connect the unit to a dimmable power supply.
OASE recommends the use of BioKick (OASE filter starter bacteria):
– For the initial start-up
– After manual cleaning of the foam filters
– After fitting new foam filters
– When recommissioning following a storage period/over-wintering
Prior to using filter starter bacteria ("Filter starter"), operate the unit for approx. 24 hours without switching on the UVC
unit. If you do not use filter starter bacteria, commissioning can start directly with the "Fitting connections" step.
How to proceed:
• Open the container (Cleaning and maintenance\Opening the container).
• Fill the filter starter bacteria (adhere to the attendant instructions for use!).
• Close the container (Cleaning and maintenance\Closing the container).
• Fit the connections ( Assembly).
• Check the firm seating of hoses, cover cap for soiled water drain, clamping ring with safety latch.
• Turn the function switch (J 5) to water filtering (40), if it is not already in this position.
• Switch on the pond pump.
• Only switch on the UVC unit when water is flowing through it. You may have to wait for 24 hours.
Connect power plug to the socket. The UVC unit switches on immediately, the blue LED (J 33) is lit.
Operation
The unit is no longer biologically active at water temperatures below 10 °C. Take the unit out of operation at water temperatures below 8 °C or, at the latest, when freezing temperatures are to be expected.
Normal operating condition: The UVC unit is switched on. The UV-C lamp must be replaced after approx. 8000 operating hours.
Remedy of faults
turn socket.
factory
24
Page 15

Note!
ring when it must be replaced (e.g. when the O ring is porous).
Wear parts
• Foam filters
• UVC lamp, quartz glass and O ring for quartz glass
Maintenance and cleaning
Removing/inserting the UVC unit head
WARNING
Possible death or severe injury from hazardous electrical voltage!
• Prior to reaching into the water, isolate (switch off and disconnect) all units/devices used in the water.
• Isolate the device (disconnect from the power supply) before carrying out any work on it.
Removing the UVC unit head
E
How to proceed:
• Press the blue "Press" button (31) at the UVC unit head (4).
• Slightly turn the UVC unit head counter-clockwise.
• Carefully pull the UVC unit head out of the filter lid (8).
Inserting the UVC unit head
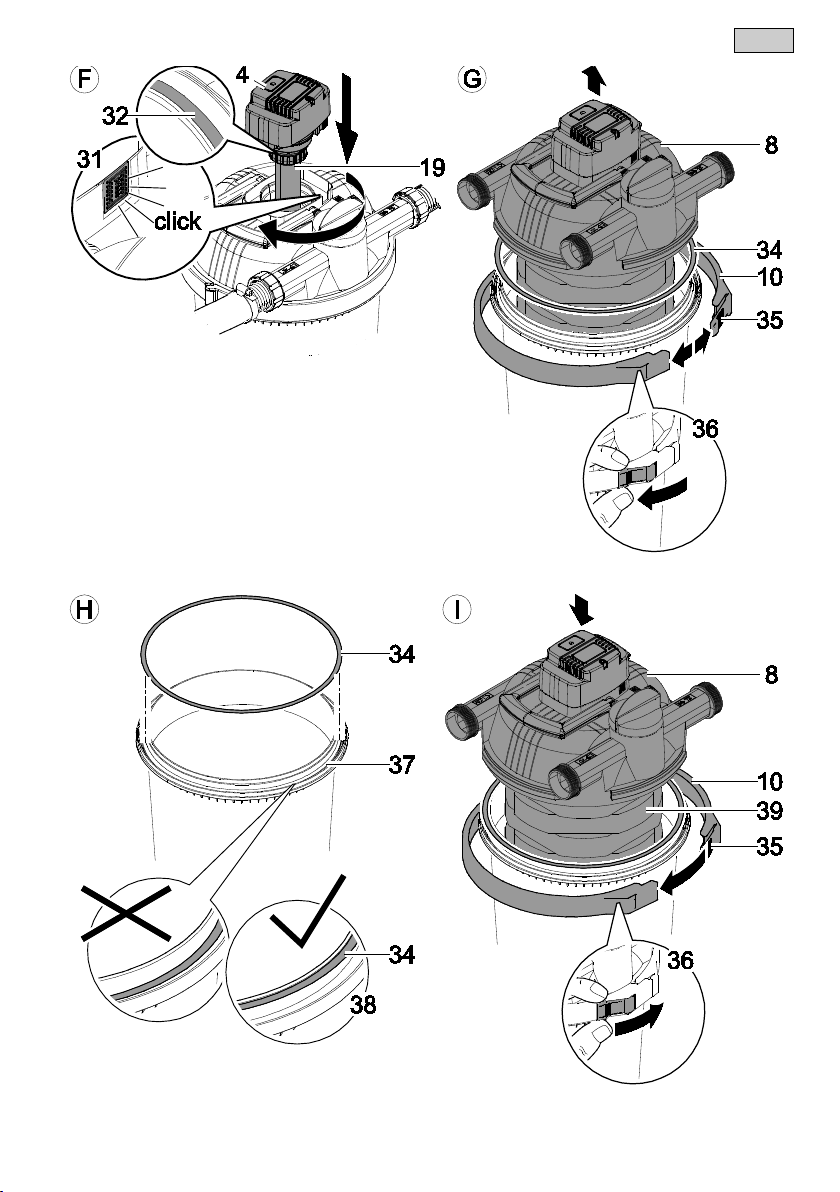
F
How to proceed:
The O ring (32) on the closure of the UVC water housing (4) is firmly clamped on. Only remove the O
• Carefully insert the UVC unit head (4) into the filter lid.
• Turn the UVC unit head clockwise up to the stop.
The blue "Press" button engages (31).
Opening/ closing the container
- EN -
WARNING
Possible death or severe injury from hazardous electrical voltage!
• Prior to reaching into the water, isolate (switch off and disconnect) all units/devices used in the water.
• Isolate the device (disconnect from the power supply) before carrying out any work on it.
Opening the container
G
How to proceed:
• Push back safety latch (36).
• Press the closing hook (35) inwards.
• Open and remove the clamping ring (10).
25
Page 16

- EN -
Closing the container
H, I
How to proceed:
• Clean the channel (H 37) around the container rim.
• Grease the lid sealing ring (34) and place flush around the container (38) top edge.
• Press the filter lid (I 8) including the stack of foam filters on the container, if necessary, assist with your own body
weight.
• Place the clamping ring (10) around the container top edge (do not pinch the power cable) and assemble.
• Engage the closing hook (35).
• Push in the safety latch (36).
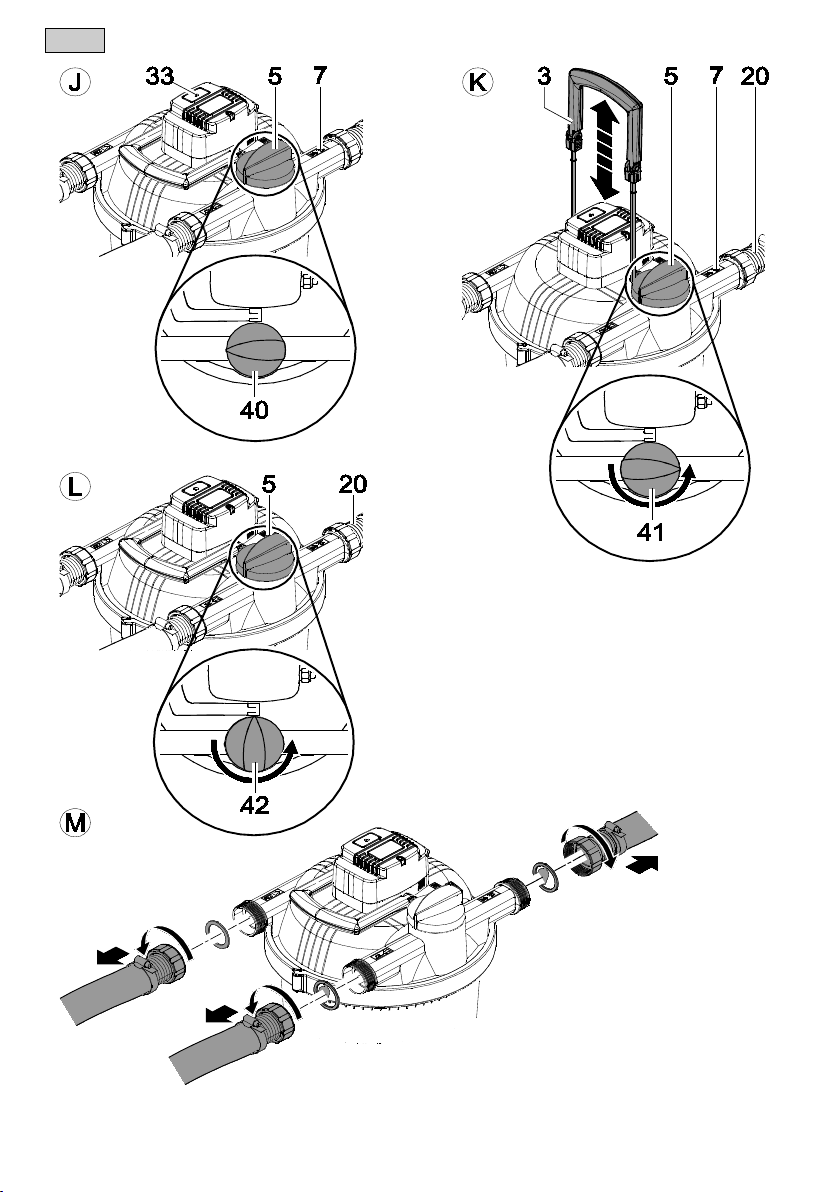
Cleaning the foam filters
The Easy-Clean function (actuate the cleaning handle and flush with water) allows easy cleaning of foam filters, UVC
unit and UVC water housing.
J, K, L
How to proceed:
• Remove the closing cap from the drain hose or the dirty water drain socket (K 7). Attention: Do not lose the sealing
ring in the cap!
• Turn the function switch (5) counter-clockwise to "Cleaning foam filters" (41).
• Vigurously pull up the cleaning handle (3) several times, then push the handle down against the stop ("pumping"
action).
The foam filters will be rinsed by this action.
• As soon as only clean water appears in the transparent hose connector (20), turn the function switch (5) counterclockwise to "Cleaning UVC" (L 42).
The UVC unit and the UVC water housing are flushed.
• As soon as only clean water appears in the transparent hose connector (20), turn the function switch (5) counterclockwise to "Filter water" (J 40).
The unit filters the pond water.
• Close the drain hose or the soiled water drain socket (7) using the closing cap (insert sealing ring!) (C 9).
Cleaning the quartz glass tube manually
E, F
WARNING
Possible death or severe injury from hazardous electrical voltage!
• Prior to reaching into the water, isolate (switch off and disconnect) all units/devices used in the water.
• Isolate the device (disconnect from the power supply) before carrying out any work on it.
How to proceed:
• Switch off the filter pump.
• Remove the UVC unit head (Cleaning and maintenance\Removing/inserting the UVC unit head).
• Check the quartz glass tube (F 19) and O ring (32) for damage. Replace, if necessary.
• Clean the quartz glass tube externally using a moist cloth.
• Insert the UVC unit head (Cleaning and maintenance\Removing/inserting the UVC unit head).
• Switch on the filter pump.
• Switch on the UVC unit.
26
Page 17

- EN -
ignation and rating of which match the information on the type plate.
Cleaning the unit and washing or replacing the foam filters
Wear of the foam filters is caused by mechanical stress and normal ageing. OASE recommend: Replace old foam fil-
ters with new ones at the beginning of the new season.
M, N, O
WARNING
Possible death or severe injury from hazardous electrical voltage!
• Prior to reaching into the water, isolate (switch off and disconnect) all units/devices used in the water.
• Isolate the device (disconnect from the power supply) before carrying out any work on it.
How to proceed:
• Switch off the filter pump.
• Remove all hoses, hose connections (M).
• Remove the UVC unit head (4) (Cleaning and maintenance\Removing/inserting the UVC unit head).
• Open the container (Cleaning and maintenance\Opening the container).
• Remove the lid including the stack of foam filters (N 39) and place on a soft clean surface such that the fixing disk
(15) of the stack of foam filters faces upward.
Disassembling the foam filters
• Check the foam filters, and either wash or replace.
• Remove the filter disk (N 15) after loosening and removing the two screws (43).
• Pull off the foam filters.
Cleaning the parts
Figure B
• Clean the container, clamping ring, lid (remove UVC unit head!) including UVC water housing (18) and the meshed
tube (17) from all anlges with a strong water jet.
• If necessary, wash the foam filters individually by vigurously compressing and releasing the filters under running water.
Assembling the foam filters:
Figure (P, Q)
• Alternately push the blue (14) and then the red (13) foam filter onto the cleaning rods (16), so that the cleaning rods
rest in the two cut-outs.
• Place the fixing disk (15) on the last foam filter such that the end collar (44) points to the foam filters.
• Fasten the fixing disk on the cleaning rods using the two screws (Q 43).
• Reinstate all connections ( Assembly).
Replacing the UVC lamp
WARNING
Possible death or severe injury from hazardous electrical voltage!
• Prior to reaching into the water, isolate (switch off and disconnect) all units/devices used in the water.
• Isolate the device (disconnect from the power supply) before carrying out any work on it.
CAUTION
Quartz glass and UVC lamp can break and cause cut injuries.
• Handle the quartz glass and UVC lamp with care.
Note!
• Condensate forms in the quartz glass tube. This condensate cannot be avoided, however, it does
not impair function and safety.
• The quartz glass tube can become scratched or blind over time. In this case, sufficient cleaning per-
formance of the UVC lamp is no longer guaranteed. The quartz glass tube must be replaced.
• The UVC lamp must be replaced after approx. 8000 operating hours. Only use UVC lamps the des-
27
Page 18

- EN -
The use of original parts from OASE ensures continued
safe and reliable operation of the unit.
Please visit our website for spare parts drawings and spare
parts.
www.oase-livingwater.com/spareparts
Use our return system for disposal. Always make electrical
Disposal with the household waste:
UVC unit (electronics!)
Packaging
UVC lamp (mercury!)
Worn foam filters, sealing rings
Filter container
R, S, T, U, V
How to proceed:
• Remove the UVC unit head (Removing/inserting the UVC unit head).
• Clean the quartz glass tube (R 19) externally using a moist cloth.
• Undo the fastening screw (46) from the retaining ring (45), and unscrew the retaining ring.
• Remove the quartz glass tube including the O ring (S 47).
• Pull the UVC lamp (T 49) out of the lamp base.
• Pull the transport securing elements (48 and 50) from the UVC lamp and push over the new UVC lamp.
• Insert the new UVC lamp.
• Place the quartz glass tube (U 19) over the UVC lamp (49) again.
• Push the O ring (47) and the retaining ring (45) over the quartz glass tube.
• Tighten the retaining ring by turning it up against the stop (51).
• Tighten the fastening screw (46) for the retaining ring (V).
• Reinsert the UVC unit head (Removing/inserting the UVC unit head).
• Switch on the pond pump.
• Connect the power plug of the UVC unit.
Decommissioning/Storage/Over-wintering
• Empty/drain the container, hoses and connections as much as possible.
• Clean thoroughly and check the unit for damage.
• Remove, clean, and store the filter lid with the UVC unit and all filter elements in a dry and frost-free place.
• Ensure that the storage place is inaccessible to children.
• Secure the installation place of the buried container such that it does not pose any risk of accident for persons or
animals.
Spare parts
Disposal
Support us in our endeavour to keep our environment intact, and adhere to the following disposal information!
units unusable by cutting the cables!
28
Page 19

DE
Typ
Abmessungen
Gewicht
Bemessungsspannung
Leistungsaufnahme
Kabellänge
Anschlüsse
Filtervolumen
UVC-Lampe
max. Teichvolumen
Wassertemperatur
EN
Type
Dimensions
Weight
Rated voltage
Power consumption
Cable length
Connections
Filter volume
UVC lamp
max. pond volume
Water temperature
FR
Type
Dimensions
Poids
Tension de mesure
Puissance absorbée
Longueur de
câble
Raccordements
Volume de filtration
Lampe UVC
Volume max. de
l'étang.
Température de
l’eau
NL
Type
Afmetingen
Gewicht
Dimensioneringsspan-
ning
Vermogensopname
Kabellengte
Aansluitingen
Filtervolume
UVC-lamp
max. vijvervolume
Watertemperatuur
ES
Tipo
Dimensiones
Peso
Tensión asignad
Consumo de potencia
Longitud del
cable
Conexiones
Volumen de filtro
Lámpara UVC
Volumen máximo
del estanque
Temperatura del
agua
PT
Tipo
Dimensões
Peso
Voltagem considerada
Potência absorvida
Compri-
cabo
Conexões
Volume do filtro
Lâmpada UVC
Volume máximo do
Temperatura da
IT
Tipo
Dimensioni
Peso
Tensione di taratura
Potenza assorbita
Lunghezza
cavo
Allacciamenti
Volume di filtraggio
Lampada UVC
Volume max. del
laghetto
Temperatura
dell'acqua
DA
Type
Dimensioner
Vægt
Nominel spænding
Effektforbrug
Lednings-
længde
Tilslutninger
Filtervolumen
UVC-lampe
maks. damvolumen
Vandtemperaturen
NO
Type
Mål
Vekt
Merkespenning
Effektopptak
Kabellengde
Tilkoblinger
Filtervolum
UV-lampe
maks. damvolum
Vanntemperatur
SV
Typ
Mått
Vikt
övre märkspänning
Effekt
Kabellängd
Anslutningar
Filtervolym
UVC-lampa
max. dammvolym
Vattentemperatur
FI
Tyyppi
Mitat
Paino
mitoitusjännite
Tehonotto
Kaapelin
pituus
Liitännät
Suodatustilavuus
UVC-lamppu
Altaan max. tila-
vuus
Veden lämpötila
HU
Típus
Méretek
Súly
mért feszültség
Teljesítményfelvétel
Kábelhossz
Csatlakozók
Szűrési térfogat
UVC-lámpa
max. tótérfogat
Vízhőmérséklet
PL
Typ
Wym iary
Ciężar
napięcie znamionowe
Pobór mocy
Długość
kabla
Przyłąc za
Objętość filtra
Lampa ultrafio-
letowa
maks. pojemność
stawu
Temperatura wody
CS
Typ
Rozměry
Hmot-
nost
domezovací napětí
Příkon
Délka kabelu
Přípojky
Objem filtru
UVC zářivka
max. objem jezírka
Teplota vody
SK
Typ
Rozmery
Hmot-
nost’
dimenzačné napätie
Príkon
Dĺžka kábla
Prípojky
Objem filtra
UVC žiarivka
max. objem záhrad-
nej nádrže
Teplota vody
SL
Tip
Dimenzije
Teža
dimenzionirana napetost
Poraba moči
Dolžina
kabla
Priključki
Volumen filtra
UVC-žarnica
maks. prostornina
ribnika
Temperatura vode
HR
Tip
Dimenzije
Masa
gornji nazivni napon
Potrošnja energije
Duljina
kabela
Priključci
Zapremnina filtra
UVC žarulja
maks. obujam je-
zerca
Temperatura vode
RO
Tip
Dimensiuni
Masă
tensiunea măsurată
Putere consumată
Lungime
cablu
Conexiuni
Volumul filtrului
Lampă cu ultravio-
lete
max. volum iaz
Temperatura apei
BG
Тип
Размери
Тегло
номинално напрежение
Потребявана
мощност
Дължина на
кабелите
Връзки
обем на филтъра
Ултравиолетова
лампа
макс. обем на езе-
рото
Температурата на
водата
UK
Тип
Розміри
Вага
розрахункова напруга
Споживання
електроенергії
Довжина ка-
белю
Підключення
Об'єм фільтра
UVC-лампа
макс. об’єми
ставка
Температура води
RU
Тип
Размеры
Вес
расчетное напряжение
Потребление
мощности
Длина ка-
беля
Соединения
Объем фильтра
Коротковолновая
УФ-лампа
макс. объем пруда
Температура воды
CN
12000
380 × 510 mm
6.9 kg
18 W
13,5 l
18 W TC-L(UV-C)
12 m
3
16000
380 × 630 mm
7.6 kg
24 W
18,9 l
24 W TC-L(UV-C)
16 m
3
20000
36 W
36 W TC-L(UV-C)
20 m3
30000
55 W
55 W TC-L(UV-C)
30 m3
Technische Daten
FiltoClear
型号
380 × 750 mm 8.5 kg
尺寸 重量
设计电压
~ 220 - 240 V, 50/60 Hz
mento do
耗用功率 电缆长度
5 m
1½’’- 2”
过滤体积 紫外线灯
24,3 l
lago de jardim
最大池塘容量
água
水温
min. +8 °C
max. +35 °C
229
Page 20

DE
Schutz gegen das Berühren von
geschützt
Achtung!
Vor direkter Sonneneinstrahlung
Bei Frost, das Gerät deinstallieren!
Nicht mit normalem Hausmüll ent-
Achtung!
EN
Protection to prevent touching dan-
ter protected
Attention!
Protect from direct sun light.
Remove the unit at temperatures
Do not dispose of together with
Attention!
FR
Protection contre le contact de
les projections d'eau
Attention !
A protéger du rayonnementsolaire
Retirer l’appareil en cas de gel
Ne pas recycler dans les ordures
Attention !
NL
Beveiliging tegen het aanraken van
schermd
Let op!
Beschermen tegen rechtstreeks
Bij vorst het apparaat deïnstalleren!
Niet bij het normale huisvuil doen!
Let op!
ES
Protección contra contacto con las
picaduras
¡Atención!
Protéjase contra la radiación di-
Desinstale el equipo en caso de he-
¡No deseche el equipo en la basura
¡Atención!
PT
Protecção contra contacto com
de respingos de água
Atenção!
Proteger contra radiaçãosolar di-
Em caso de geada, desinstalar o
Não deitar ao lixo doméstico!
Atenção!
IT
Protezione contro il contat-to con
spruzzi d'acqua
Attenzione!
Proteggere contro radiazione solare
In caso di gelo disinstalllare l'appa-
Non smaltire con normali rifiuti do-
Attenzione!
DA
Beskyttelse mod berøring af farlige
dele. Stænkvandsbeskyttet
Fare!
Farlig UVC-stråling!
Beskyt mod direkte solindstråling.
Afmonter apparatet ved frostvejr!
Må ikke bortskaffes med det almindelige husholdningsaffald!
OBS!
Læs brugsanvisningen
NO
Beskyttelse mot berøring av farlige
deler. Beskyttet mot vannsprut
NB!
Farlig UV-stråling!
Beskytt mot direkte solstråling.
Ved frost, demonter apparatet!
Ikke kast i alminnelig husholdningsavfall!
NB!
Les bruksanvisningen
SV
Skydd mot beröring av farliga delar.
Dropptät
Varning!
Farlig UVC-strålning!
Skyddas mot direkt solstrålning.
Demontera apparaten innan första
frosten!
Får inte kastas i hushållssoporna!
Varning!
Läs igenom bruksanvisningen
FI
Vaarallisten osien kosketussuoja.
Suojattu roiskevedeltä
Huomio!
Vaarallinen UVC-sät eily!
Suojattava suoralta auringonvalolta.
Laite on purettava ennen pakkasia.
Ei saa hävittää tavallisen kotitalousjätteen mukana!
Huomio!
Lue käyttöohje
HU
A veszélyes alkatrészek me-
Figyelem!
Óvni kell a közvetlen nap-
Fagy esetén a készüléket le kell
A készüléket nem a normál ház-
megsemmisíteni!
Figyelem!
PL
Zabezpieczenie przed dotknięciem
na spryskanie wodą
Uwaga!
ultrafioletowe!
Chronić przed bezpośrednim dzia-
W razie mrozu zdeinstalować urzą-
Nie wyrzucać wraz ze śmieciami
Uwaga!
CS
Ochrana proti dotyku nebe-
stříkající vodě
Pozor!
Chránit před přímým slunečním
Při mrazu přístroj odinstalovat!
Nelikvidovat v normálním ko-
Pozor!
SK
Ochrana proti dotyku nebezpeč-
júcej vode
Pozor!
Chránit’ pred priamym slnečným
Pri mraze prístroj odinštalovať!
Nelikvidovať v normálnom komunál-
Pozor!
SL
Zašita pred dotikom nevarnih delov.
Zašita pred brizgi vode
Pozor!
Nevarno UVC-sevanje!
Pred direktnimi sonnimi -žarki- zašitite.
Ob zmrzali demontirajte napravo!
Ne zavrzite skupaj z gospodinjskim i
odpadki!
Pozor!
Preberite navodila za uporabo!
HR
Zaštita od dodira opasnih dijelova
vode
Pažnja!
Zaštititi od izravnogsunčevog
U slučaju mraza deinstalirajte
Nemojte ga bacati u običan kućni
Pažnja!
RO
Protecţie în cazul atingerii compo-
tra stropirii
Atenţie!
Protejaţi de razele directe ale soa-
În perioadele cu îngheţ dezinstalaţi
Nu aruncaţi în gunoiul menajer !
Atenţie !
gefährlichen Teilen. Spritzwasser-
gerous components. Splashing wa-
pièces dangereuses.Protégé contre
gevaarlijke delen. Spatwaterbe-
partes peligrosas. A prueba de sal-
componentes perigo-sos. À prova
parti pericolose. Protetto contro gli
gérintése elleni védő. Vízpermetálló
niebezpiecznych części. Odporny
zpečných částí. Ochrana proti
ných častí. Ochrana proti strieka-
Gefährliche UVC-Strahlung!
Dangerous UVC radiation!
Rayonnement UVC dangereux !
Gevaarlijke UVC-straling!
Radiación UVC peligrosa.
Radiação UVC perigosa!
Pericolosa radiazione UVC!
Veszélyes UVC-sugárzás!
Niebezpieczne promieniowanie
Nebezpečné ultrafialové záření.
Nebezpečné ultrafialové žiarenie.
schützen.
direct.
zonlicht.
recta del sol
recta.
diretta.
sugárzástól.
łaniem promieni słonecznych.
zářením.
žiarením.
below zero (centigrade).
ladas.
aparelho!
recchio!
szerelni!
dzenie!
sorgen!
household waste!
ménagères !
doméstica!
mestici!
tartási szeméttel együtt kell
domowymi!
munálním odpadu!
nom odpade!
Lesen Sie die Gebrauchsanleitung
Read the operating instructions
Lire la notice d'emploi
Lees de gebruiksaanwijzing
Lea las instrucciones de uso
Leia as instruções de utilização
Leggete le istruzioni d'uso!
Olvassa el a használati útmutatót
Przeczytać instrukcję użytkowania!
Přečtěte Návod k použití!
Prečítajte si Návod na použitie
prstima. Zaštićeno od prskanja
nentelor periculoase. Protecţie con-
230
Opasno UVC zračenje!
Radiaţii ultraviolete periculoase!
zračenja.
relui.
uređaj!
aparatul !
otpad!
Pročitajte upute za upotrebu!
Citiţi instrucţiunile de utilizare !
Page 21

BG
Защита срещу досег с опасни ча-
вода
Внимание!
Предпазвайте от директнопопа-
При опасност от измръз ване деинс-
Не изхвърляйте заедно с обикно-
Внимание!
UK
Захист від контакту з небезпеч-
водяних бризг
Увага!
промінювання!
Охороняти від прямого сонячного
Перед морозами пристрій необхі-
Не викидайте разом із побутовим
Увага!
RU
Защита от соприкосновения с
дяных брызг
Внимание!
УФ-излучение!
Защищать от прямого воздей-
При наступлении морозов прибор
Не утилизировать вместе с до-
Внимание!
пользованию
CN
!
!
!
!
сти. Защита от напръскване с
ними деталями. Захищений від
опасными частями. Защита от во-
防止接触危险部件。防止喷水。 注意
Опасно ултравиолетово лъчение!
Небезпечне ультрафіолетове ви-
Опасное коротковолновое
危险的紫外线照射
дане на слънчеви лъчи.
випромінювання.
ствия солнечных лучей.
防止阳光直射。
талирайте уреда!
дно демонтувати
демонтировать!
霜冻时,拆卸设备
вения домакински боклук!
сміттям!
машним мусором!
不要同普通的家庭垃圾一起处理! 注意
Прочетете упътването
Читайте інструкцію.
Прочитайте инструкцию по ис-
请阅读使用说明书。
231
Page 22

21525/10
-17
 Loading...