

Oakton 35701-00 Instruction Manual
OPERATING INSTRUCTIONS
OAKTON 35701-00
Economical Minidrum
Hygrothermograph
R0 1/01
www.4oakton.com
1. Introduction
Thank you for selecting the OAKTON economical minidrum hygrothermograph 35701-00. This precision instrument is useful for monitoring
temperature and relative humidity conditions over time. It creates a
permanent chart recording of these measurements for your records.
Features include:
• 7 day rotation chart
• quartz-controlled drive that maintains consistent drum speed even
when batteries are weak
• Built-in digital clock with date and time
Typical applications include general weather measurements, agriculture,
horticulture, test laboratories, humidity chambers, computer rooms,
machinery rooms, food storage facilities, warehouses, museums, bank
vaults, film and book storage facilities.
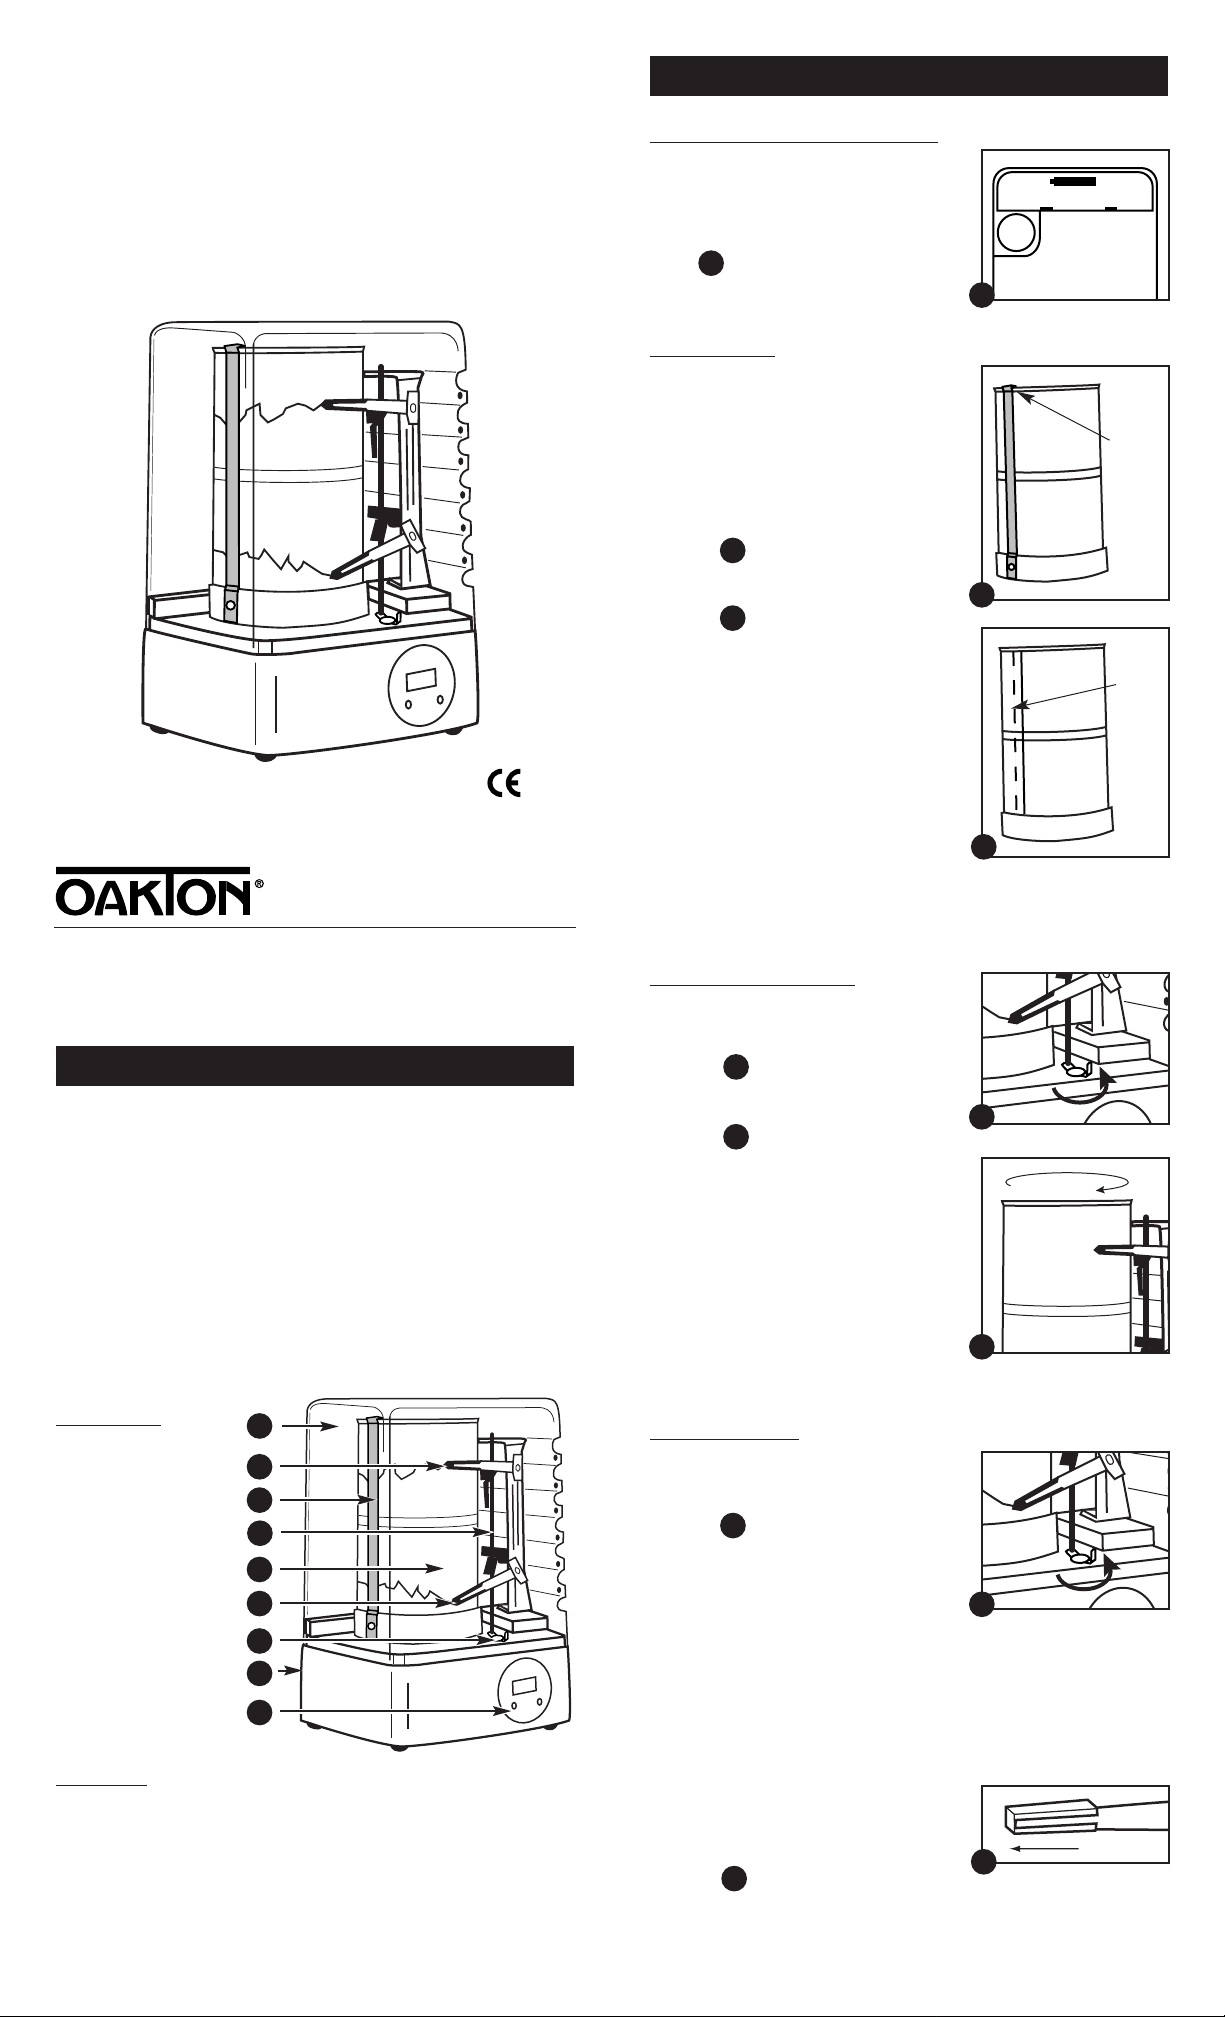
Components
2. Hygrothermograph Set Up
2
1. Protective cover
2. Pen arm and pen tip
for temperature
3. Paper holder
4. Pen guide
5. Cylinder drum with
quartz clock
6. Pen arm and pen tip
for humidity
7. Pen lift lever
8. Mounting brackets
(located on back)
9. Digital clock
3
4
6
7
8
9
5
1
+
–
2.1 Inserting cylinder drum battery
Gently turn the hygrothermograph base on
its side. Load the AA battery in the battery
compartment at the bottom of the hygrothermograph base. Note polarity as shown
inside the battery compartment and in
figure at right.
We recommend that you replace the AA
battery every six months.
2.2 Chart paper
Make sure to write the recording start date
on top of the chart before replacing the
chart paper.
To replace chart paper:
1. Gently lift the cylinder drum straight up
to remove it from the cylinder shaft.
2. Release paper holder by pushing up the
top of the holder with your thumb.
See figure
3. Wrap the new chart onto the cylinder so
that the two ends of the paper overlap.
See figure
4. Snap the paper holder back into place to
secure this overlapping section.
5. Make sure the markings on the paper
line up where the overlap occurs.
6. Push the cylinder drum down onto the
cylinder shaft until the groove in the
cylinder shaft appears above the cylinder drum. Set chart time (see below).
NOTE: The cylinder drum comes with one
sheet of 7-day chart paper already attached,
plus 55 additional sheets of chart paper.
The graduations on the chart are specific to
this unit, so you need to use replacement
chart paper intended for this model. See
“Accessories” to order extra chart paper.
2.3 Setting the chart time
1.
Push the pen lift lever away from you
to move the temperature and humidity
pens to their resting position.
See figure
2. Turn the cylinder drum one full
rotation clockwise.
See figure
3. Turn the cylinder drum counterclock-
wise until the pen tips align with the
correct time of day or night. Numbers
indicating time are located at the center
of the chart paper.
4. Pull the pen lift lever towards you to
return the temperature and humidity
pens to their ready position.
NOTE: Make sure that the numbers on the
graph are right side up. Change the chart
paper when the cylinder has completed
one rotation.
2.4 Cartridge Pens
To operate the pens:
1. Push the pen lift lever away from you to
move the pens to their resting position.
See figure
2. Gently pull off the pen caps.
3. Pull the pen lift lever towards you until
the pens are touching the paper on the
cylinder drum.
A
A
paper
overlap
push
paper
holder
up here
with
thumb
to
release
Unpacking
Hygrothermograph includes: 55 sheets of 7-day, °C chart paper, one AA
battery, and one LR41 button cell battery.
1. Remove all components from the packing material.
2. Carefully lift up and remove the acrylic protective cover.
3. Remove the air pack from the cylinder.
4. Push the pen lift lever away from you to pull the temperature and
humidity pens to their resting position.
NOTE: Do not touch the pen tips, because skin oils will prevent the ink
from flowing smoothly.
To replace the pens:
The pen tips can be used for up to a year, but we recommend that you
replace them at least every six months. Conditions such as high temperature or low humidity may shorten pen life to three months. See
“Accessories” to order extra pens.
1. Hold the pen arm in your right hand
and pull the pen cartridge off with your
left hand. If it is difficult to pull off, use
a small pliers.
See figure
2. To attach the replacement cartridge pen, insert it over the arm until it
is fully attached.
C
C
B
D
D
E
E
F
F
G
G
B
3. Digital Clock
3.1 Viewing the date
1.
Press Display key once to briefly view
the date. Quickly push the Display key
again to view seconds. Push Display
again to return to clock mode.
2. Press Set key once to alternately
display the date and time.
3.2 Setting the clock
1.
Press Set key twice to display the “months” place.
Press Display key repeatedly to select the correct month.
2. Press Set key to confirm month and display the “days” place.
Press Display key repeatedly to select the correct day.
3. Press Set key to confirm day and display the “hours” place.
“A” indicates A.M. time and “P” indicates P.M. time.
Press Display key repeatedly to select the correct hour.
4. Press Set key to confirm day and display the “minutes” place.
Press Display key repeatedly to select the correct minute.
5. Press Set key again to return to clock mode. The colon (:) should be
flashing, and you should view the correct time.
DISPLAY
SET
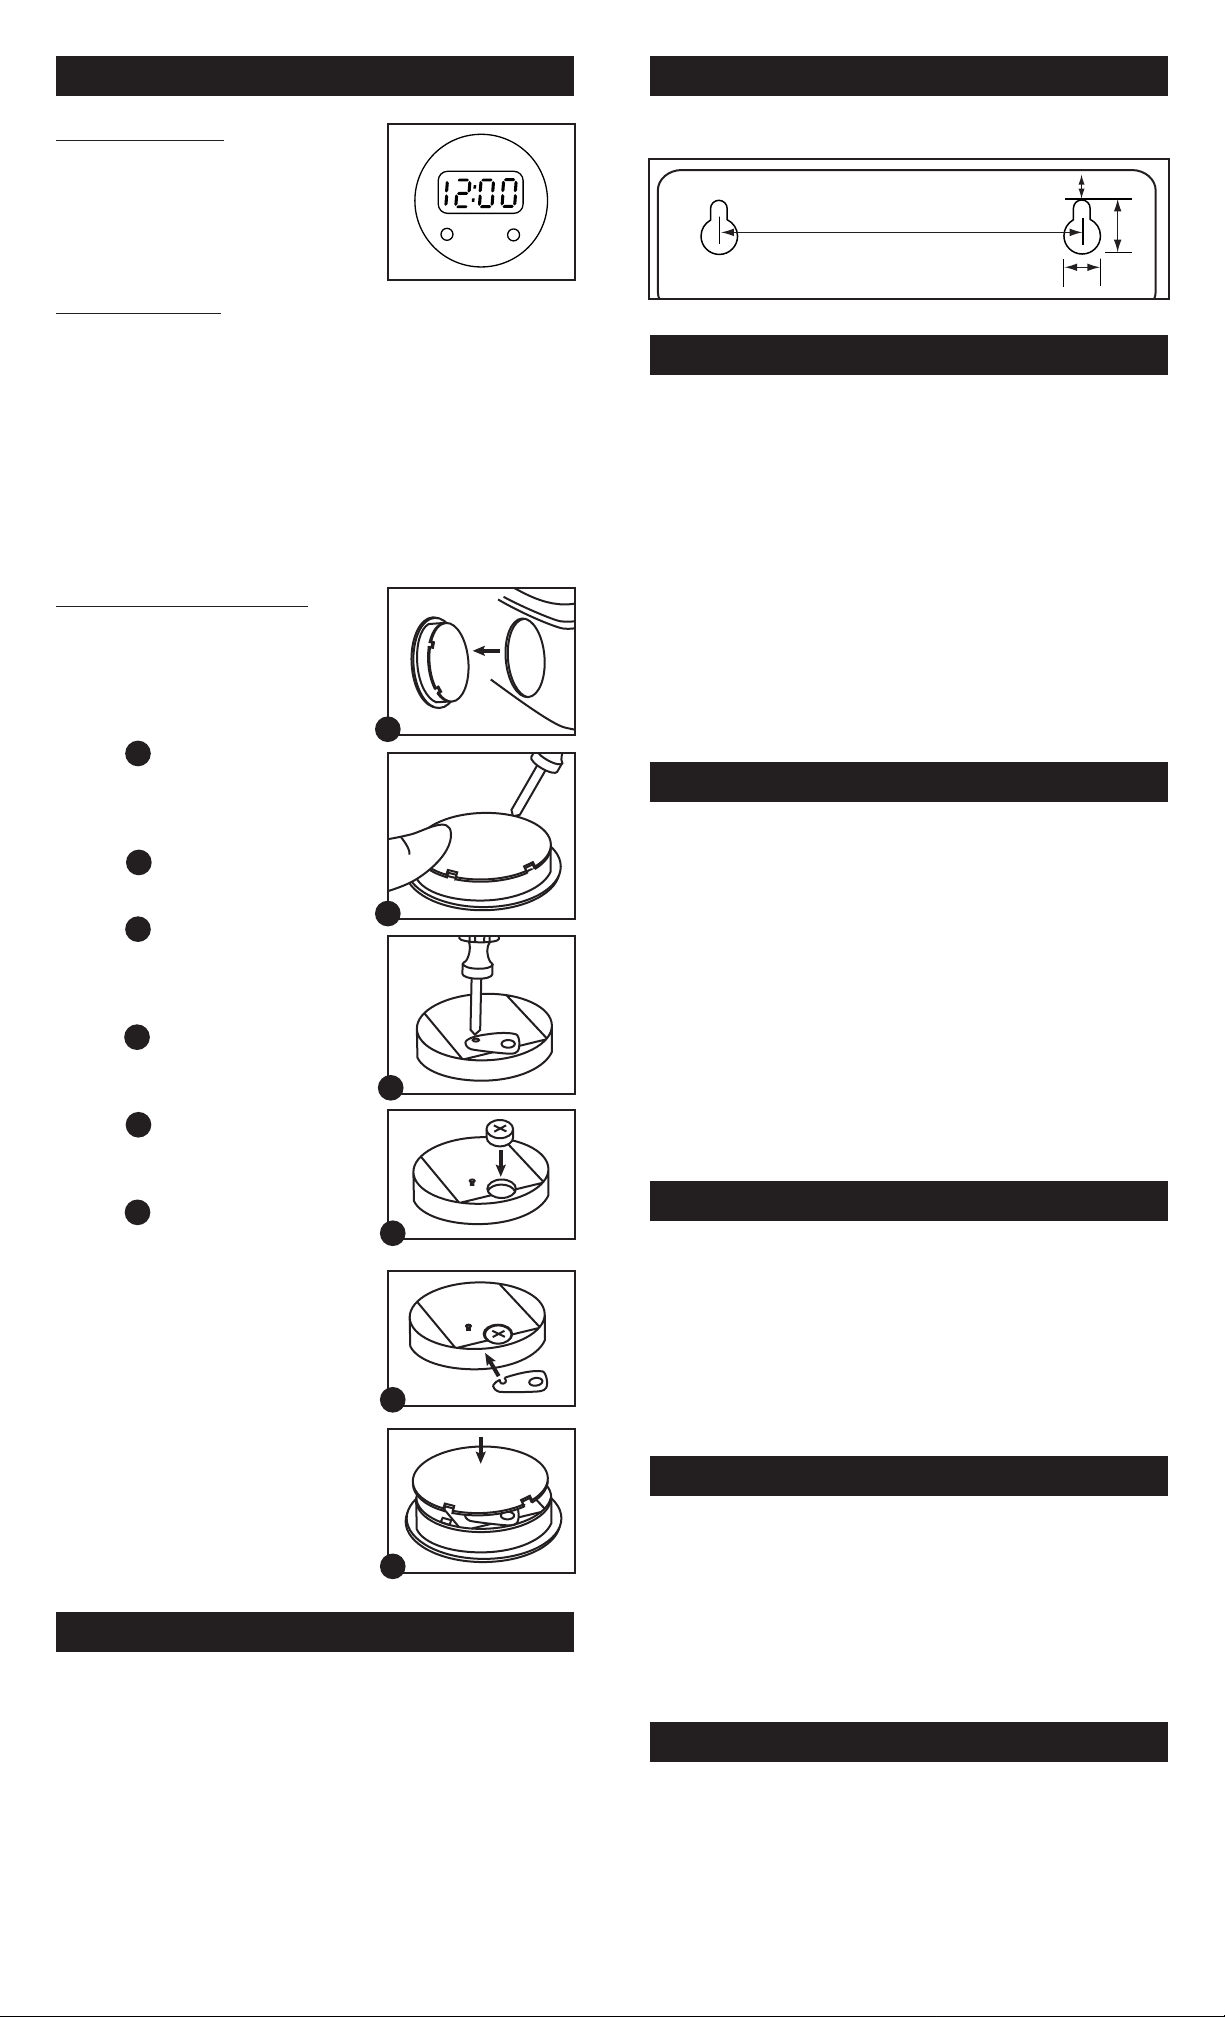
3.3 Replacing the clock battery
If the clock slows or the display dims,
replace the batteries:
1. Lift the hygrothermograph, grip the
digital clock with the thumb and
index finger, and push the clock
towards the front panel.
See figure
2. Insert a small blade screwdriver into
the groove on the underside of the
casing. Remove the cover by slowly
pushing up.
See figure
3. Using a Phillips screwdriver, loosen
the metal battery terminal cover.
See figure
4. Remove the old battery, and replace
with a new one (battery model LR-41,
1.5 V alkali button) with the positive
terminal facing up.
See figure
5. Replace the metal battery terminal
cover and fasten with the Phillips
screwdriver.
See figure
6. Align the groove on the back casing
with the main housing, and close the
cover.
See figure
7. Replace the clock in the hygrothermo-
graph base.
5. Wall mounting
To wall mount your instrument, simply hang up the hygrothermograph
from the holes on the back of your instrument’s base.
6. Precautions
1. Do not use your hygrothermograph:
• in direct sunlight
• in temperatures below –20°C or above 50°C
• near ovens, stoves, or other heating equipment
• near harsh chemicals such as paint thinner or ammonia
• in dusty, drafty or wet environments
• within magnetic fields
• in areas with strong vibrations, such as loudspeakers or motors
2. For best results, use only the pens and chart paper listed under the
“Accessories” section of this manual. We cannot guarantee results
with other pens and other paper.
3. Do not repair the instrument yourself. Should repairs be necessary,
please return the instrument to place of purchase. See Warranty and
Return of Items.
4. If your instrument will not be used for long periods of time, make
sure to replace the pen caps and remove the battery.
7. Specifications
Relative Humidity
Range 10 to 100% RH
Accuracy: ±5% from 30 to 90% RH / 18 to 28°C; ±7% outside this range
Sensor: humidity sensing coil
Chart graduations: 5% RH
Temperature:
Range: –15 to 50°C / –27 to 122°F
Accuracy: ±2°C / ±3.6°F
Sensor: bimetallic strip
Chart graduations: 2°C / 2°F
Chart rotation: 7 day (172 hr)
Chart rotation accuracy: less than 2 hours per 7 days
Power: One AA battery (included)
Dimensions: 4.9"W x 7.3"H x 4.3"D
Shipping weight: 3 lbs
8. Accessories
35701-00 Economical mini-drum hygrothermograph
35701-50 Replacement chart paper, 5 to 122°F / 10 to 100% RH.
7-day rotation, 2-hour increments. 3.6"H x 8.1"L. Pack of 55
35701-52 Replacement chart paper, –5 to 50°C / 10 to 100% RH.
7-day rotation, 2-hour increments. 3.6"H x 8.1"L. Pack of 55
08368-75 Blue felt-tip pens. Pack of 6
08368-80 Red felt-tip pens. Pack of 6
09376-01 Replacement batteries, 1.5 V AA. Pack of four
9. Warranty
OAKTON warrants this instrument to be free from significant deviations
in material and workmanship for a period of one year from date of purchase. If repair or adjustment is necessary and has not been the result of
abuse or misuse within the warrantied time period, please return—
freight prepaid—and correction will be made without charge. OAKTON
alone will determine if the product problem is due to deviations or customer misuse.
Out-of-warranty products will be repaired on a charge basis.
10. Return of items
Authorization must be obtained from our Customer Service Department
before returning items for any reason. When applying for authorization,
please include data regarding the reason the items are to be returned.
For your protection, items must be carefully packed to prevent damage
in shipment and insured against possible damage or loss. We will not be
responsible for damage resulting from careless or insufficient packing.
A restocking charge will be made on all unauthorized returns.
NOTE: We reserve the right to make improvements in design,
construction, and appearance of products without notice.
4. Hygrothermograph operation
1. Lift off the acrylic cover.
2. Push the pen lift lever away from you to move the temperature and
humidity pens to their resting position.
3. Lift up and remove the cylinder drum from the cylinder shaft.
4. Replace the chart paper (see section 2.2).
5. Push the cylinder drum down onto the cylinder shaft until the
groove in the cylinder shaft appears above the cylinder drum.
6. Set the chart time (see section 2.3).
7. Remove pen caps. Pull the pen lift lever towards you until the pens
are touching the paper on the cylinder drum.
8. Replace the acrylic cover with the vents facing to the right.
The hygrothermograph will record temperature and humidity for one
week (7 days).
5
/
16"
1
/
2"
7
/
8"
3
1
/
2"
not to scale
H
H
I
I
J
J
K
K
L
L
M
M
 Loading...