

Page 1
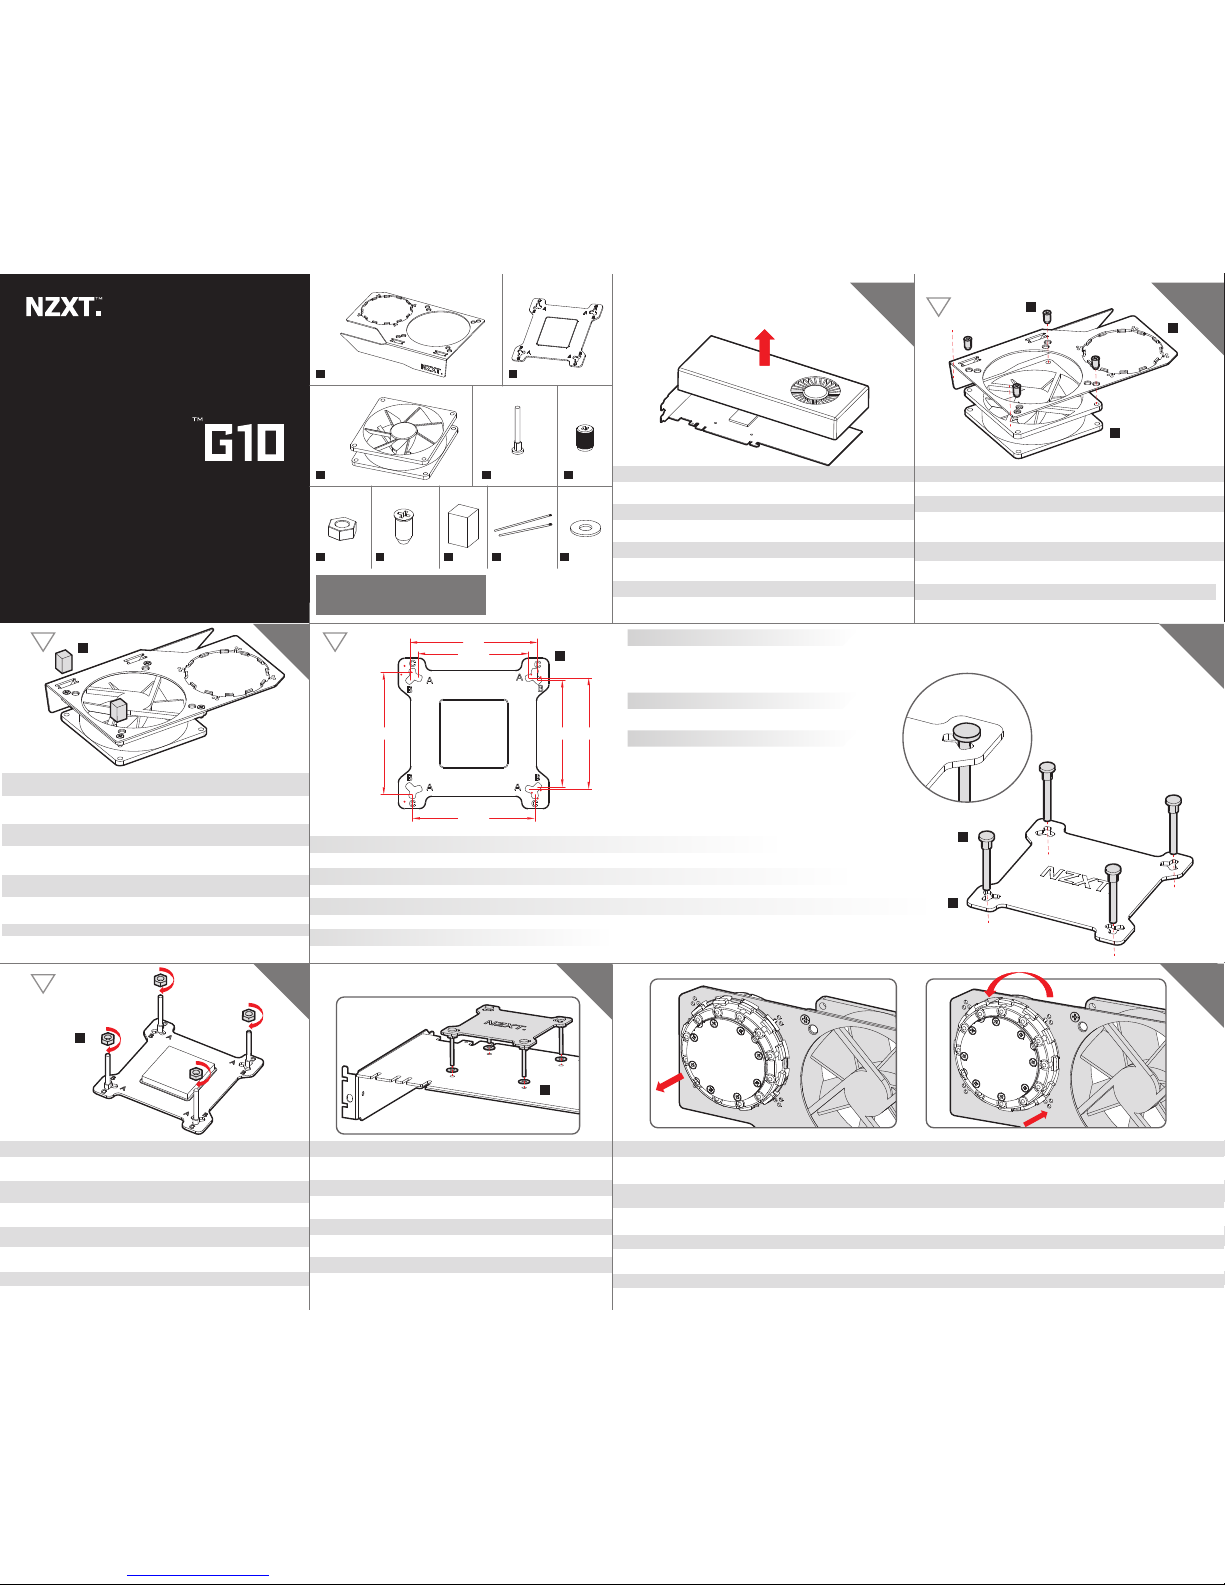
KRAKEN
LIQUID COOLED GPU MOUNTING KIT
No thermal paste included. Please prepare
the thermal paste before installation.
The backplate should be readable
from the top of the card.
Remove the original cooling module from the graphics card.
Retirez le module de refroidissement présent de la carte graphique.
Entfernen Sie das Originalkühlungsmodul von der Grakkarte.
Remova o módulo de refrigeração original da placa gráca.
Снимите оригинальный модуль охлаждения с графической карты.
Quite el módulo de refrigeración original de la tarjeta gráca.
从显卡取下原始散热模组。
グラフィックカードの付属の冷却モジュールを取外して下さい。
I. Use the fan screws to fasten the fan onto the GPU bracket.
I. Utilisez les vis du ventilateur pour xer le ventilateur sur le support GPU.
I. Fixieren Sie den Lüfter mit den Lüfterschrauben an der GPU-Halterung.
I. Utilize os parafusos da ventoinha para xar a ventoinha ao
suporte da GPU.
I. Используйте винты фиксации вентилятора для его крепления
на кронштейне графического процессора.
I. Utilice los tornillos del ventilador para sujetar este en el soporte de la
GPU.
I. 使用风扇螺丝将风扇拧紧到 GPU 支架。
I.ファン用ネジを使ってGPUブラケットの内側にファンを取付けてください。
II. Apply the 2 foam blocks to the inside of the GPU bracket to ease
installation.
II. Appliquez les 2 blocs en mousse sur l'intérieur du support du
GPU pour faciliter l'installation.
II. Setzen Sie die beiden Schaumstoffblöcke zur einfacheren
Installation in die GPU-Halterung ein.
II. Aplique os 2 blocos de espuma à parte interior do suporte da GPU
para uma instalação mais fácil.
II. Приложите пенопластовый блок с внутренней стороны
кронштейна графического процессора для упрощения установки.
II. Aplique los 2 bloques de protección en el interior del soporte de la
GPU para facilitar la instalación.
II.在 GPU 支架内加入 2 个海绵以方便安装。
II.装着を容易にするために、2個の発泡スチロール”H”をGPUブラ
ケットの内側に付けて下さい。
II. Use the spacer to secure the GPU screws to the interior of the backplate.
II. Utilisez la bague d'écartement pour serrer les vis du GPU à
l'intérieur de la plaque arrière.
II. Fixieren Sie die GPU-Schrauben über das Distanzstück an der
Innenseite der Rückplatte.
II. Utilize o espaçador para xar os parafusos da placa GPU à parte
interna da placa posterior.
II. Втулка используется для закрепления винтов ЦП на внешней
стороне задней стенки.
II. Utilice los separadores para jar los tornillos de la GPU en el
interior de la placa posterior.
II. 使用垫圈将
GPU 螺丝固定到背板内部。
II.バックプレート内部にGPUネジを固定するため、スペーサーを使用します。
組み立てられたバックプレートをグラフィックカードの上に装着して
下さい。
ブラケットを通して 液体 クーラー ポンプ 嵌 めこみま す。ブ ラケットの歯と 並列 にな るまで 回して下 さい。そしてブラ ケットに対してポ ンプを 引き 込 みます。
Install the assembled backplate onto the graphics card.
Installez la plaque arrière assemblée la carte graphique.
Setzen Sie die montierte Rückplatte auf die Grakkarte.
Instale a placa posterior montada na placa gráca.
Установите собранную заднюю стенку на графическую карту.
Instale la placa posterior en la tarjeta gráca.
将组装好的背板安装到显卡。
使液体散热器泵穿过支架。 旋转泵直到它对准支架齿牙,然后顶住支架拉泵。
Pass the liquid cooler pump through the bracket. Rotate the pump until it aligns with the bracket teeth,then pull the pump against the bracket.
Passez la pompe du refroidisseur liquide par le support. Tournez la pompe de manière à l'aligner aux crans du support et tirez-la ensuite contre
le support.
Führen Sie die Flüssigkühlpumpe durch die Halterung. Drehen Sie die Pumpe, bis sie an den Zähnen der Halterung anliegt, ziehen Sie die
Pumpe dann an die Halterung.
Passe a bomba do sistema de refrigeração a água através do suporte. Rode a bomba até esta car alinhada com os dentes do suporte e puxe
a bomba contra o suporte.
Вставьте насос жидкостного кулера в кронштейн. Поверните насос для его совмещения с зубом кронштейна, затем прижмите насос к кронштейну.
Pase la bomba del refrigerador por líquido a través del soporte. Gire la bomba hasta que esté alineada con los dientes del soporte y, a
continuación, tire de ella contra este.
1 2
2
3 4 5
GPU Bracket
A
A
Fan
x1
I
I
II
II
x1
x4x2
x4
x4 x4 x6
x4
x1
C
C
Spacers
F
F
J
Fan Screws
G
G
Foam
H
H
Zip TiesIWashers
J
GPU ScrewsDNuts
E
Backplate
B
B
B
Extra requirements before installation
I. Compatible Liquid Cooler
II. Thermal Paste
unit: mm
A
53.2 mm x 53.2 mm
61 mm x 51 mm
58.4 mm x 58.4 mm
B
C
AMD R9 290X, 290, 280X*, 280*, 270X, 270,
HD7970*, 7950*, 7870, 7850, 6970, 6950,
6870, 6850, 6790, 6770, 5870, 5850, 5830
Nvidia GTX 560Ti, 560, 560SE
Nvidia GTX 780 Ti, 780, 770, 760,
Titan, 680, 670, 660Ti, 660, 580, 570
The compatibility list is based on AMD Radeon and NVIDIA's
reference board layout, screw spacing and die height only. Please
check the height restriction before purchase.
* Some variations in AMD die height may require the use of a shim.
3
D
61
51
53.2
53.258.4
58.4
I. Fully insert GPU screws through the applicable holes from the exterior of the backplate.
I. Insérez complètement les vis du GPU dans les trous correspondants depuis l'extérieur de la plaque arrière.
I. Führen Sie die GPU-Schrauben von der Außenseite der Rückplatte vollständig durch die passenden Öffnungen.
I. Insira completamente os parafusos da GPU através dos orifícios correspondentes a partir do exterior da placa posterior.
I. В завершение вставьте винты графического процессора в соответствующие отверстия с внешней стороны задней стенки.
I. Inserte completamente los tornillos de la GPU a través de los oricios aplicables desde el exterior de la placa posterior.
I. 将 GPU 螺丝完全插入到背板外部中的相应孔内。
I.バックプレートの適合する正しい穴を通してGPUネジをしっかり差し込んで下さい。
Exterior
Interior
Page 2
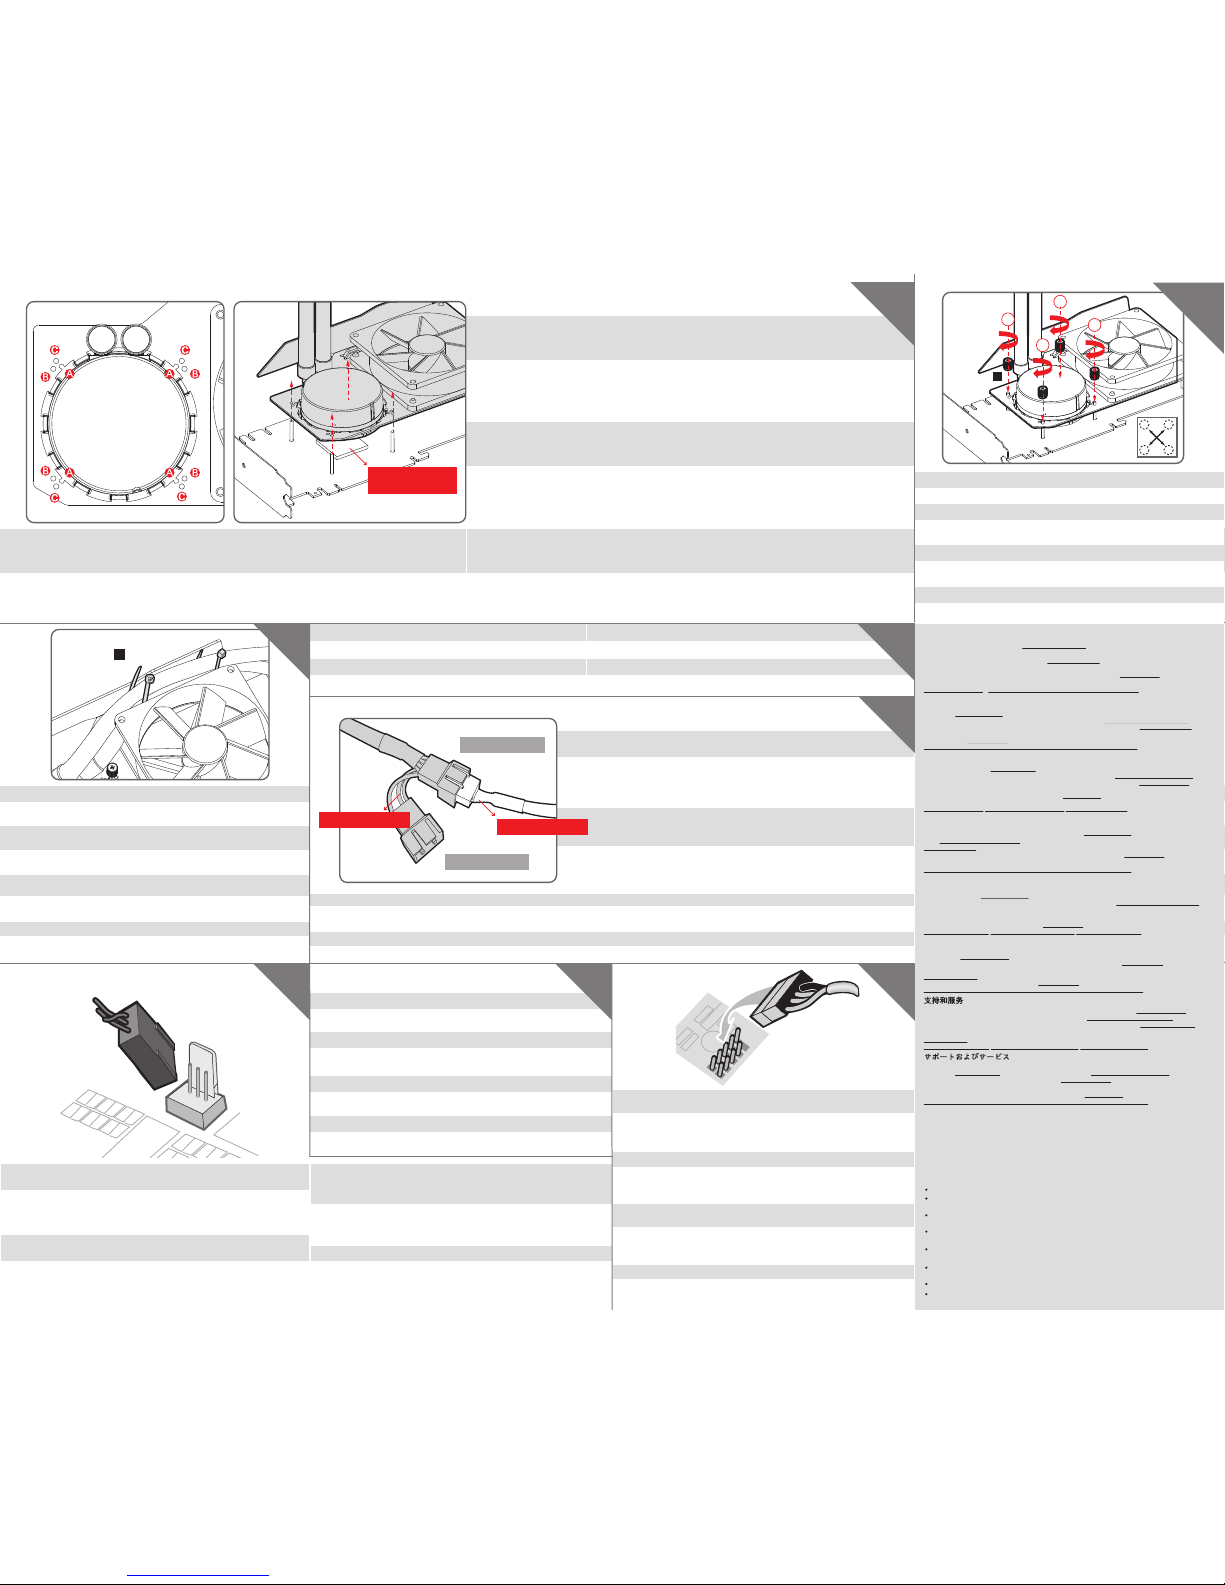
Tighten the nuts down by hand in an X formation as shown above.
Serrez les écrous à la main selon un modèle en X (voir ci-dessus).
Ziehen Sie die Muttern wie oben gezeigt von Hand über Kreuz an.
Aperte as porcas manualmente numa formação em X tal como
ilustrado acima.
Крест-накрест затяните от руки гайки, как показано на рисунке выше.
Apriete las tuercas con la mano formando una X, tal y como se
muestra anteriormente.
以上面所示的 X 方式用手拧紧螺母。
上記のようにナットをX形式(クロスを描く順序)で締め付けて下さい。
Use the included zipties to manage your pump's tubes and power cables.
Utilisez les attaches en plastique incluses pour organiser les tubes de
pompage et les câbles d'alimentation.
Verlegen Sie die Schläuche und Stromkabel mit Hilfe der mitgeliefer-
ten Kabelbinder.
Utilize as braçadeira incluídas para gerir os tubos e cabos de
alimentação da bomba.
Используйте прилагающиеся кабельные хомуты для фиксации труб
насоса и кабеля питания.
Utilice las bridas incluidas para administrar los tubos y los cables de
alimentación de la bomba.
使用附带的束線帶将泵的管子和电源线捆扎在一起。
付属の結束バンドでポンプのチューブとパワーケーブルを束ねて下さ
い。(図参照)
ポンプの3ピンパワーケーブルをマザーボード上の4ピン又は3
ピンのファンコネクタに接続して下さい。
詳細な手順につきましては、付属の説明書に従ってください。
KrakenG10のファンと液体クーラーのファンを液体クーラーファンのパワーコネクタ、又はマザーボード上のコネクタに接続して下さい。
ケースの中のほど良い場所にラディエーターを設置して下さい。
組み立てられたグラフィックカードをケース内に装着して下さい。
将泵的 3 针电源线连接到主板上的 4 针或 3 针风扇接口。
Install the assembled graphics card into the case.
Установите собранную графическую карту в корпус.
Instale la tarjeta gráca ensamblada en la carcasa.
将组装好的显卡安装到机箱。
Installez la carte graphique assemblée dans le boîtier.
Installieren Sie die komplette montierte Grakkarte im Gehäuse.
Instale a placa gráca montada na caixa.
Mount the radiator into a nearby location in the case. Установите радиатор где-нибудь поблизости в корпусе.
Instale el radiador en una ubicación cercana en la carcasa.
将机箱散热器安装到机箱内的邻近适当位置。
Installez le radiateur à proximité dans le boîtier.
Bringen Sie den Radiator in der Nähe am Gehäuse an.
Instale o radiador numa área próxima no interior da caixa.
6
8
9
10
11 12
13
I
a. Place the graphics card on top of the interior of the assembled backplate.
b. Lower the Kraken G10 and pump assembly on to the graphics card, aligning the bracket holes with the
GPU screws.
a. Coloque a placa gráca na parte de cima do interior da placa posterior montada.
b. Baixe a estrutura do Kraken G10 e da bomba até à placa gráca, alinhando os orifícios do suporte
com os parafusos da GPU.
a. Установите графическую карту сверху внутренней поверхности собранной задней стенки.
b. Опустите Kraken G10 и блок насоса на графическую ка рту, чтобы отверстия в кронштейне
совпали с винтами графического процессора.
a. Coloque la tarjeta gráca en la parte superior del interior de la placa posterior montada.
b. Baje el Kraken G10 y el ensamblaje de la bomba en la tarjeta gráca, alineando los oricios de
soporte con los tornillos de la GPU.
a. 将显卡放到组装好背板的内部上面。
b. 将 Kraken G10 和泵组件放入到显卡上,将支架孔对准 GPU 螺丝。
a.組み立てられたバックプレートの内側のトップの位置にグラフィックカードを置きます。
b.KrakenG10とポンプの組み立て品をグラフィックカード上にはめ込み、GPUネジをブラケットの穴に
合わせます。
a. Placez la carte graphique sur le dessus de l'intérieur de la plaque arrière assemblée.
b. Abaissez la Kraken G10 ainsi que la pompe sur la carte graphique en prenant soin d'aligner les trous du
support aux vis du GPU.
a. Platzieren Sie die Grakkarte auf der Innenseite der montierte Rückplatte.
b. Senken Sie die Kombination aus Kraken G10 und Pumpe so auf die Grakkarte, dass die Öffnungen
in der Halterung genau über den GPU-Schrauben liegen.
Thermal paste should
be pre-applied
Connector-1
Connector-2
Connect the Kraken G10 fan and the liquid cooler's fan to liquid cooler's
fan power connector or mainboard's connectors.
Connectez le ventilateur Kraken G10 et celui du refroidisseur liquide au
connecteur d'alimentation du ventilateur du refroidisseur liquide ou aux
connecteurs de la carte principale.
Schließen Sie den Kraken G10-Lüfter und den Flüssigkühlerlüfter an die
Flüssigkühlungslüfter-Stromversorgung oder an die Anschlüsse am
Motherboard an.
Ligue a ventoinha do Kraken G10 e a ventoinha do sistema de refrigeração
a água ao conetor de alimentação da ventoinha do sistema de refrigeração
a água ou aos conetores da placa principal.
Подключите вентилятор Kraken G10 и вентилятор жидкостного кулера к разъему питания жидкостного кулера или разъемам системной платы.
Conecte el ventilador Kraken G10 y el ventilador del refrigerador por líquido al conector de alimentación de dicho ventilador o a los conectores
de la placa base.
将 Kraken G10 风扇和液体散热器风扇连接到液体散热器风扇的电源接口或主板的接口。
Connect the pump 3-pin power cable to the motherboard's 4-Pin
or 3-Pin fan connector on motherboard.
Connectez le câble d'alimentation à 3 broches de la pompe au
connecteur du ventilateur à 4 ou 3 broches sur la carte mère.
Schließen Sie das dreipolige Pumpenstromkabel an den drei- oder
vierpoligen Lüfteranschluss am Motherboard an.
Ligue o cabo de alimentação de 3 pinos da bomba ao conetor de
ventoinha de 4 ou 3 pinos na placa principal.
Conecte el cable de alimentación de 3 contactos de la bomba al
conector del ventilador de 4 o 3 contactos de la placa base.
Подключите 3-контактный разъем кабеля питания к
4-контактному разъему материнской платы или 3-контактному
разъему вентилятора на материнской плате.
For further instructions please follow the included instructions included
with the liquid cooler.
Pour de plus amples informations, voir les instructions incluses avec le
refroidisseur liquide.
Weitere Hinweise nden Sie in der mit dem Flüssigkühler gelieferten Anleitung.
Para obter mais indicações, siga as instruções fornecidas com o sistema
de refrigeração a água.
Для выполнения последующей работы следуйте инструкциям,
прилагающимся к жидкостному кулеру.
Para obtener más instrucciones, siga las indicaciones incluidas con el
refrigerador por líquido.
有关详情说明,请参照随液体散热器附带的说明书。
Kraken G10's fan
Liquid cooler's fan
Example : NZXT Kraken X40
Example : NZXT Kraken X40
B
L
A
C
K
E
4
3
1
2
1
4
2
3
7
Visit store.nzxt.com/returns.asp for information on warranty coverage and service
Informationen zu Geltungsbereich und Service der Garantie nden Sie unter
store.nzxt.com/returns.asp
Visite el sitio Web store.nzxt.com/returns.asp para obtener información sobre la
cobertura y el servicio de la garantía.
Visitez store.nzxt.com/returns.asp pour les informations de la couverture de la garantie
et du service.
Visite store.nzxt.com/returns.asp para obter informações sobre a cobertura da garantia
e assistência
Подробную информацию об условиях гарантийного обслуживания см. на веб-сайте
store.nzxt.com/returns.asp
请访问 store.nzxt.com/returns.asp 了解保修范围和服务的信息
保証範囲およびサービスに関する情報については、store.nzxt.com/returns.aspに
アクセスしてください。
Warranty terms for all NZXT products sold to Australia.
Our goods come with guarantees that cannot be excluded under the Australian Consumer
Law. You are entitled to a replacement or refund for a major failure and or compensation
for any other reasonably foreseeable loss or damage. You are also entitled to have the
goods repaired or replaced if the goods fail to be of acceptable quality and the failure does
not amount to a major failure' (NZXT Corporation, 13164 E. Temple Ave., City of Industry,
CA 91746, USA TEL: +1-800-228-9395) Please contact the shop you purchased from to
receive prompt service. If the dealer refuses to offer the service, please contact us at directly
at www.nzxt.com/support
Soporte y servicio
Служба поддержки и обслуживания
Si tiene preguntas o problemas con el producto NZXT que usted compró, no dure en ponerse en
contacto con service@nzxt.com y suministrar una explicación detallada de su problema así como su
prueba de compra. Puede hacer consultas sobre piezas de repuesto en rma@nzxt.com. Para
comentarios y sugerencias, escriba un mensaje de correo electrónico a nuestro equipo de diseño:
designer@nzxt.com. Gracias por comprar un producto NZXT. Para más información acerca de NZXT,
visítenos en línea. Página web de NZXT: www.nzxt.com Subscríbase a las comunidades NZXT:
www.nzxt.com/forum , www.facebook.com/nzxtcorp , www.reddit.com/r/nzxt
支持和服务
如果有任何疑问或者在使用NZXT产品的过程中遇到任何问题,欢迎联络 service@nzxt.com,联
络时请提供关于问题的详细说明及购买凭证。您可以向 http://www.nzxt.com/support 查询更换
部件。如有任何意见或建议,欢迎致信我们的设计团队,电子邮件地址是 designer@nzxt.com。
感谢您购买NZXT产品。有关NZXT 的更多信息,请访问我们的在线网站。NZXT 网站:
www.nzxt.com 加入NZXT社区:
www.nzxt.com/forum , www.facebook.com/nzxtcorp , www.reddit.com/r/nzxt
サポートおよびサービス
購入されました
NZXT
の製品に関するご質問または問題は、問題の詳細および購入の証明を添えて、
ご遠慮なくservice@nzxt.comまでご連絡ください。交換部品はhttp://www.nzxt.com/support までお尋ねく
ださい。ご意見およびご提案は弊社設計チーム、designer@nzxt.comまでメールを送信してください。
NZXT
製品をご購入いただきましてありがとうございます。
NZXT
に関する詳細は、インターネット
上のウェブサイトをご覧ください。
NZXT
ウェブサイト: www.nzxt.com NZXTコミュニティへの参加:
www.nzxt.com/forum , www.facebook.com/nzxtcorp , www.reddit.com/r/nzxt
В случае возникновения вопросов или неисправностей в приобретенных вами продуктах NZXT
обращайтесь по адресу: service@nzxt.com с подробным описанием проблемы и подтверждением
покупки. О наличии запчастей можно узнать, обратившись по адресу: http://www.nzxt.com/support.
Замечания и предложения отправляйте в адрес нашей группы разработчиков: designer@nzxt.com.
Благодарим вас за покупку продукта NZXT. Более подробная информация о компании NZXT
представлена на наших веб-сайтах. Веб-сайт NZXT: www.nzxt.com. Для участия в сообществах NZXT
посетите веб-сайт:
www.nzxt.com/forum , www.facebook.com/nzxtcorp , www.reddit.com/r/nzxt
Kundendienst und service
Falls Fragen oder Probleme bezüglich Ihres NZXT-Produktes auftreten, wenden Sie sich bitte mit einer
detaillierten Problembeschreibung und Ihrem Kaufbeleg an service@nzxt.com. Ersatzteile können Sie
unter http://www.nzxt.com/support anfragen. Kommentare und Anregungen senden Sie bitte per
designer@nzxt.com an unser Designteam. Vielen Dank, dass Sie ein NZXT-Produkt erworben haben.
Weitere Informationen über NZXT erhalten Sie im Internet. NZXT-Webseite: www.nzxt.com Treten Sie
unseren NZXT-Communities bei:
www.nzxt.com/forum , www.facebook.com/nzxtcorp , www.reddit.com/r/nzxt
Support et service
Support and service
Si vous avez des questions ou des problèmes avec le produit NZXT que vous avez acheté, n’hésitez pas
à contacter service@nzxt.com avec une description détaillée de votre problème et votre preuve d’achat.
Vous pouvez aussi commander des pièces de remplacement auprès http://www.nzxt.com/support. Pour
les commentaires et les suggestions, envoyez un email à notre équipe de design, designer@nzxt.com.
Merci d'avoir acheté ce produit de NZXT. Pour plus d'informations sur NZXT, visitez notre site Web. Site
Web de NZXT : www.nzxt.com Joignez la communauté de NZXT :
www.nzxt.com/forum , www.facebook.com/nzxtcorp , www.reddit.com/r/nzxt
If you have any questions or problems with the NZXT product you purchased, please don’t hesitate to
contact us using our support system. www.nzxt.com/support
Please include a detailed explanation of your problem and your proof of purchase. For comments and
suggestions, you can e-mail our design team, designer@nzxt.com. Lastly we would like to thank you for
your support by purchasing this product.
For more information about NZXT, please visit us online. NZXT Website: www.nzxt.com
Join the NZXT communities:
www.nzxt.com/forum , www.facebook.com/nzxtcorp , www.reddit.com/r/nzxt
Assistência e manutenção
Caso tenha questões ou problemas com o produto NZXT adquirido, não hesite em contactar-nos
através do endereço service@nzxt.com fornecendo a explicação detalhada do seu problema e a prova
de compra. Poderá solicitar peças de substituição através do endereço http://www.nzxt.com/support.
Para comentários e sugestões, contacte a nossa equipa de design através do endereço de e-mail,
designer@nzxt.com. Obrigado por ter adquirido um produto NZXT. Para mais informações acerca da
NZXT, visite-nos online. Web site da NZXT: www.nzxt.com Junte-se às comunidades da NZXT:
www.nzxt.com/forum , www.facebook.com/nzxtcorp , www.reddit.com/r/nzxt
 Loading...