

Nyco e.Mix DSP-7077 Installation Manual
DSP-7077
Package Should Contain:
1. Proportioner unit .
2. Discharge tube(s).
3. Hose hook --3.5 GPM eductor only.
4. Mounting hardware.
DILUTION CONTROL SYSTEM
THANK YOU FOR YOUR INTEREST IN OUR PRODUCTS
Please use this equipment carefully and observe all warnings and cautions.
*******************************************************NOTE ********************************************
5. Water inlet hose.
6. Instruction sheet.
WEAR
ALWAYS
ALWAYS
ALWAYS
KEEP
WEAR
ALWAYS
ATTACH
NOTE
Installation & Operation:
protective clothing and eyewear when dispensing chemicals or other materials.
observe safety and handling instructions of the chemical manufacturers.
direct discharge away from you or other persons or into approved containers.
dispense cleaners and chemicals in accordance with manufacturer's instructions.
Exercise CAUTION when maintaining your equipment.
equipment clean to maintain proper operation.
protective clothing and eyewear when working in the vicinity of all chemicals, filling or
emptying equipment or changing metering tips.
re-assemble equipment according to instruction procedures. Be sure all components
are firmly screwed or latched into position.
only to tap water outlets (85 PSI maximum).
If the unit is used to fill a sink or the discharge hose can be placed into a sink, the unit
must be mounted so that the bottom of the cabinet is above the overflow rim of the sink.
s
s
s
s
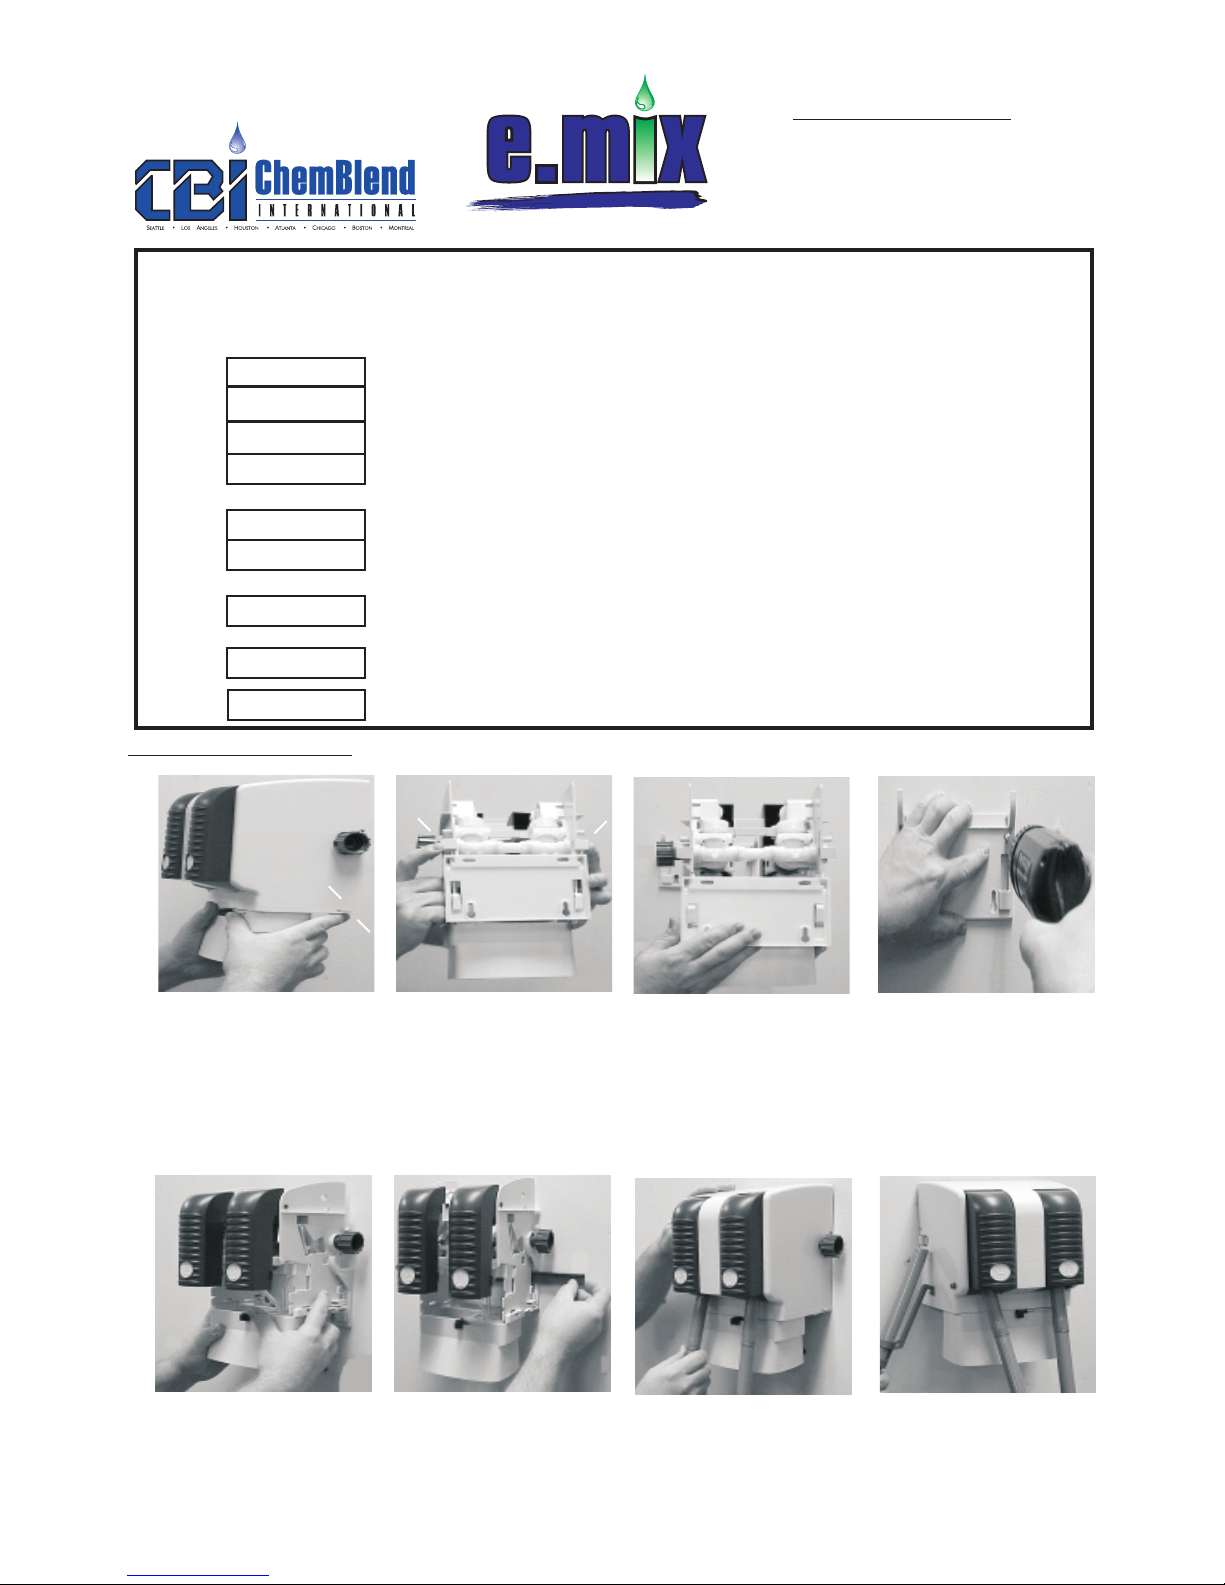
1. Remove cover by pressing tabs under cover.
4. Place dispenser on
bracket.
2a.
2a.Remove unit mounting bracket from back of dispenser
by depressing the tabs.
2b. Slide bracket down.
5. Secure dispenser to
bracket by sliding locking bar through back of
unit. Replace cover.
2b.
6. Attach short discharge
tube on 1 GPM (grey)
eductor, then attach
longer discharge tube
on 3.5 GPM (yellow)
eductor.
3. Drill holes for four wall
anchors with a 5/16"
drill bit. Use the mounting bracket as a template for proper spacing
of the mounting screws.
Install anchors, and then
screw into anchors.
7. Place hose hook on end
of 3.5 GPM discharge
tube. Hang on dispenser
when not in use.
Continued..Next Page

Installation & Operation Continued:
8. Connect water supply
hose of at least 1/2" ID
to water inlet swivel. Min.
25 PSI pressure is required for proper operation. Connect opposite end of hose to water
supply.
Turn water supply on.
10a.
9. Insert product container into shroud until it locks into
place.
s
10b.
10a. Push button to start flow of desired c oncentrate
solution; release button to stop flow of solution.
To lock the High Flow button in the "on" position:
press button until it "locks" into place.
10b. To unlock, press button release lever on left side
of cabinet .
11. To remove chemical concentrate container, place
hand securely under the empty product, slide release
lever to the right and pull concentrate container out.
DescriptionPart No.Key
1 238100 Strainer washer
2 10082801 Swivel stem (molded)
3 10082830 Swivel collar (molded))
4 10075925 Pipe plug
5 10075980 Valve parts kit
a. diaphragm
b. armature
c. spring
d. valve bonnet
6 10079010 Spring
7 10079000 Magnet
8a 10084231 1.0 GPM flow control kit
b 10084232 3.5 GPM flow control kit
9a 10089941 Eductor lock left
b 10089937 Eductor lock right
10 10089938 Vent seal
11 10089983 Magnet pusher kit (*includes 9 & 10)
12a 290SMP 1.0 GPM eductor assembly
b 291SMP 3.5GPM eductor assembly
13 10089927 Hose barb*
*Included in eductor assembly
14 a 10089981 Tubing replacement kit (1.0 GPM)
b 10089982 Tubing replacement kit (3.5 GPM)
15 a 90081017 1.0 GPM discharge tube
with flooding ring (10")
b 90080288 3.5 GPM discharge tube
with flooding ring (6')
16 10080730 Hose hook, dark grey
17 10089923 Cabinet front
18 a 90082464 Button, Bottle
b 90082463 Button, Bucket
19 10089916 Bottle release ring
20 90082469 Locking button release
21 10089931 Mounting bracket
22 10089976 Locking bar
Not Shown:
10091920 Water inlet hose, 3/8" x 6'
 Loading...