

Page 1
Page 2
1.Live
2.Guide
3. My Content
4. Settings
5. Features
6. Diagnostics
8
8
8
9
11
12
14
8
7
Page 3
This user's guide covers the installation Skyworth C3700 set-top box which includes step by
step configuration of all features available
Information captured in this document is subject to change. Skyworth reserves the right, to
carry out changes in the product design and specifications in line with engineering and
technology advancements.
Support for 7 days Electronic Program Guide (EPG)
256 colors on screen display
Channel editing function e.g. favorite , lock
Over The Air software upgrade
Support for PVR function
Page 4
1. Read, follow and keep these instructions safely.
2. Heed all warnings.
1. Do not use this apparatus near water.
2. Clean only with dry cloth.
3. Do not block any ventilation openings. Install in accordance with the manufacturer’s
instructions.
4. Do not install near any heat sources such as radiators, heat registers, stoves, or other
apparatus (including amplifiers) that produce heat.
5. The parameter of the using power source should be accordance with that indicated on the
rear panel; otherwise the machine will work improperly and can be damaged.
6. Protect the power cord from being walked on or pinched, particularly at plug points,
convenience receptacles, and the point where they exit from the apparatus.
7. Only use attachments/accessories specified by the manufacturer.
8. To prolong the useful life of this machine, please do not keep pressing buttons for prolonged
periods.
9. Use only those parts specified by the manufacturer, or sold with the apparatus.
10. Unplug this apparatus during lightning storms or when unused for long periods of time.
11. Refer all servicing to qualified service personnel and authorised service centres. Servicing
is required when the apparatus has been damaged in any way, including damage to powersupply cord or plug is damaged, liquid has been spilled or objects/liquid have fallen into the
apparatus, the apparatus has been exposed to rain or moisture, does not operate normally, or
has been dropped.
12. Warning: This unit should only be serviced by an authorized and properly trained
technician or service centre. Opening the cover or other attempts by the user to service this
unit may result in serious injury or death from electrical shock, and may increase the risk of fire
and will void the warranty.
13. Please switch off the MAINS electricity before disconnecting the device.
14. The signal cable must be earthed to the system.
15. No naked flame sources, such as lighted candles, should be placed on or near the
apparatus.
Note: All the on-screen display messages and illustrations in this manual may be somewhat
different from those on the actual apparatus.
WARNING: To reduce the risk of fire or electric shock, do not expose this product to rain or
moisture. Apparatus must not be exposed to dripping or splashing. Ensure that it is not placed
under any objects filled with liquids, such as vases. Refer to the identification/rating label
located on the back panel of your product for its proper operating voltage.
Batteries must not be exposed to excessive heat such as direct sunlight, fire or other heat
source. For applicable power supply details, see information contained in this User Manual.
Page 5
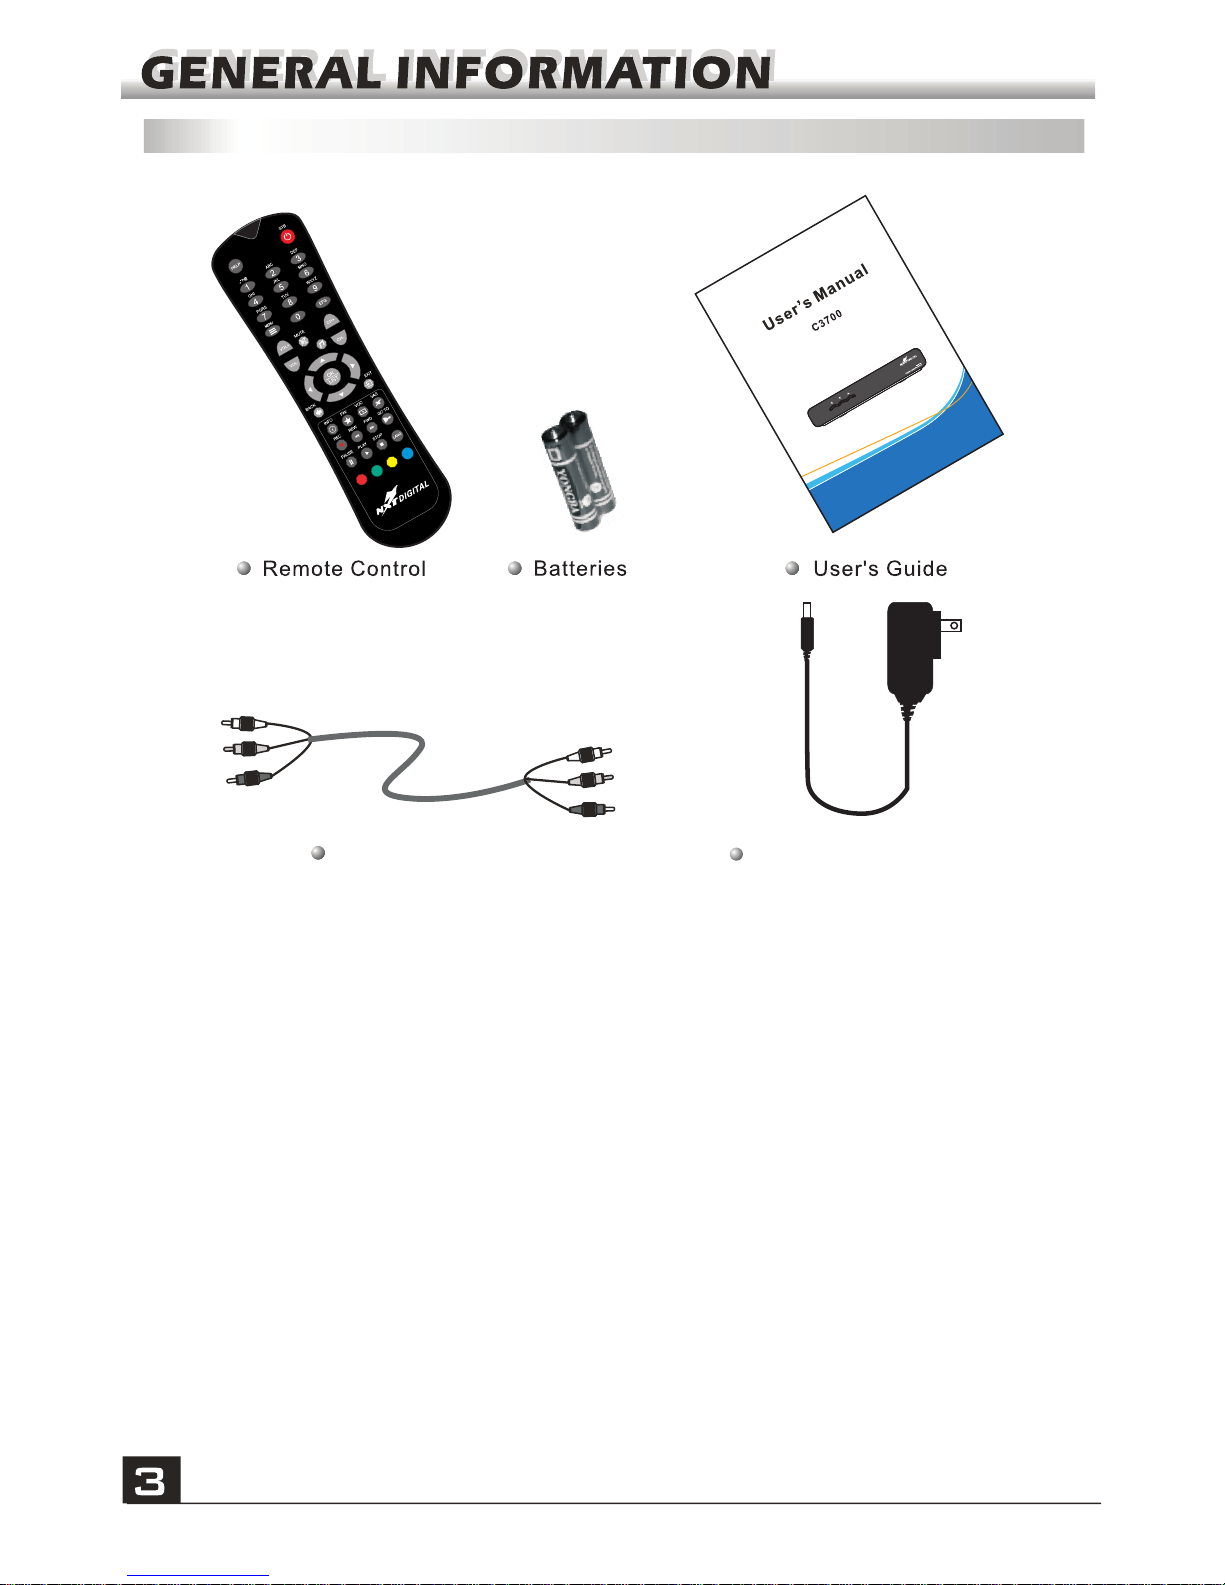
External Power supply
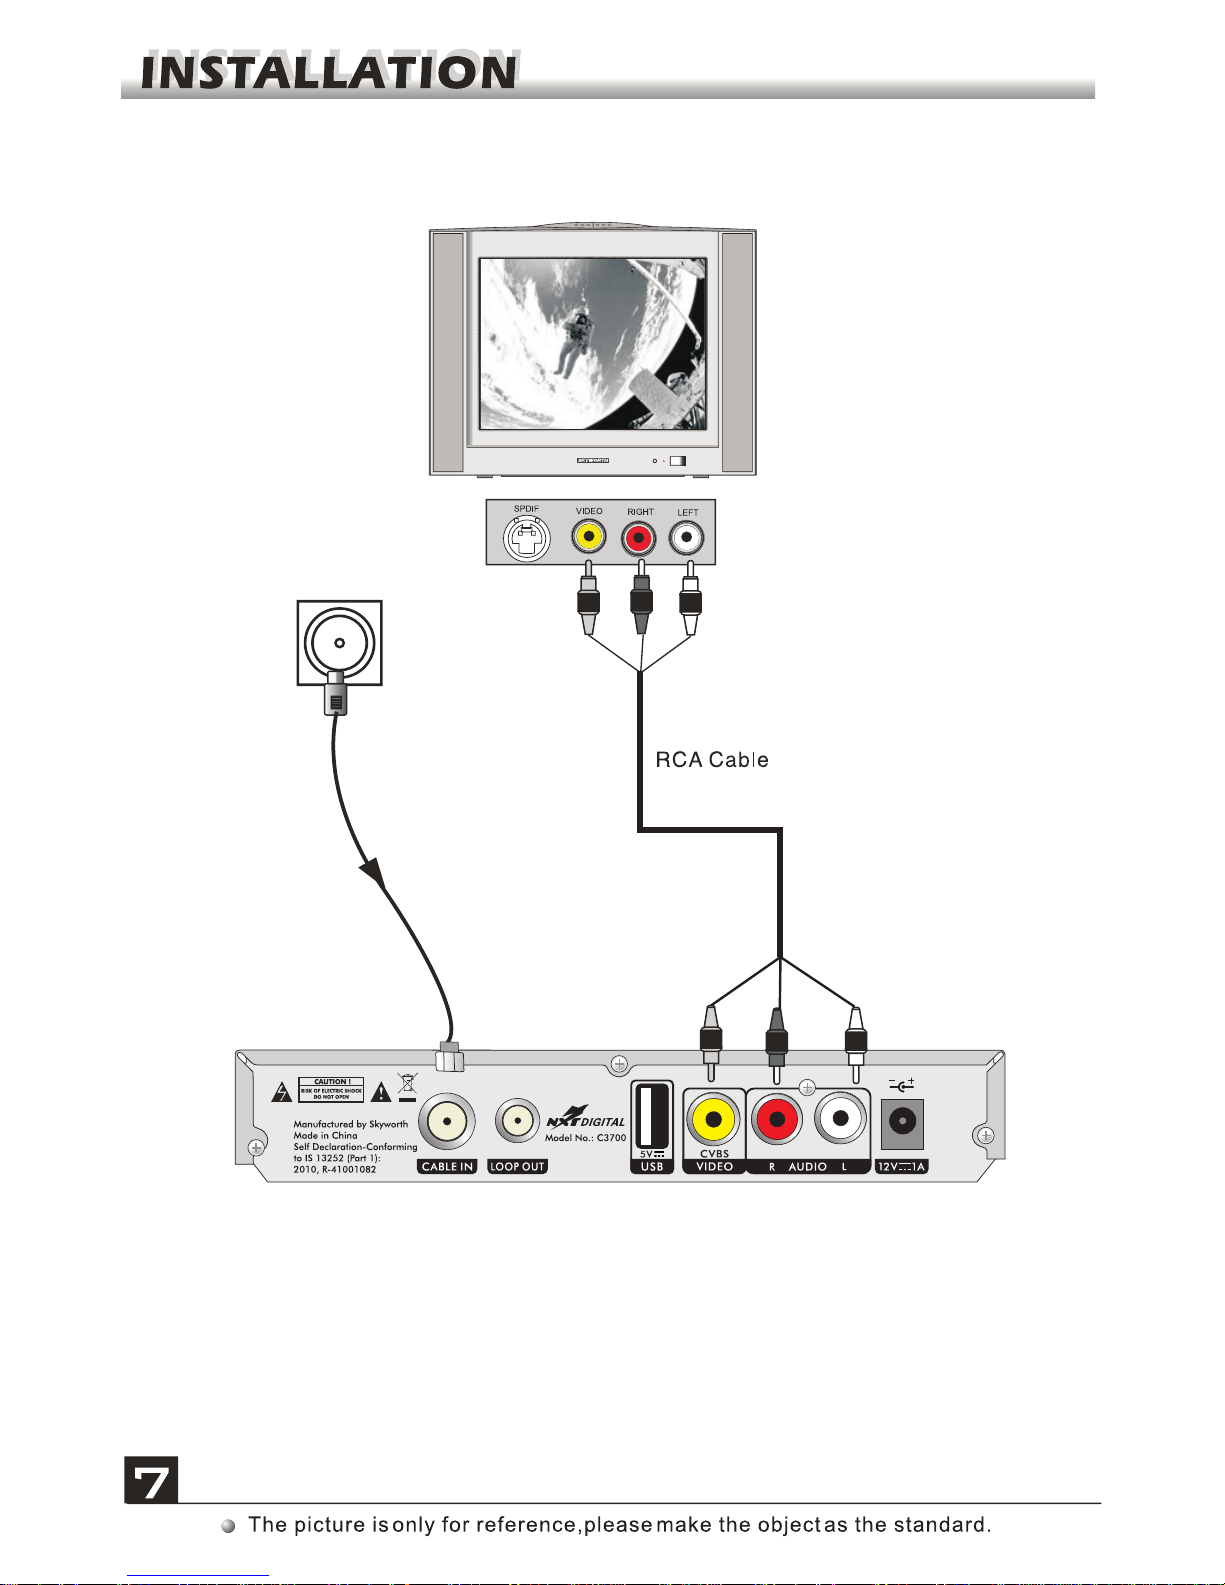
RCA cable
Packing items
Page 6
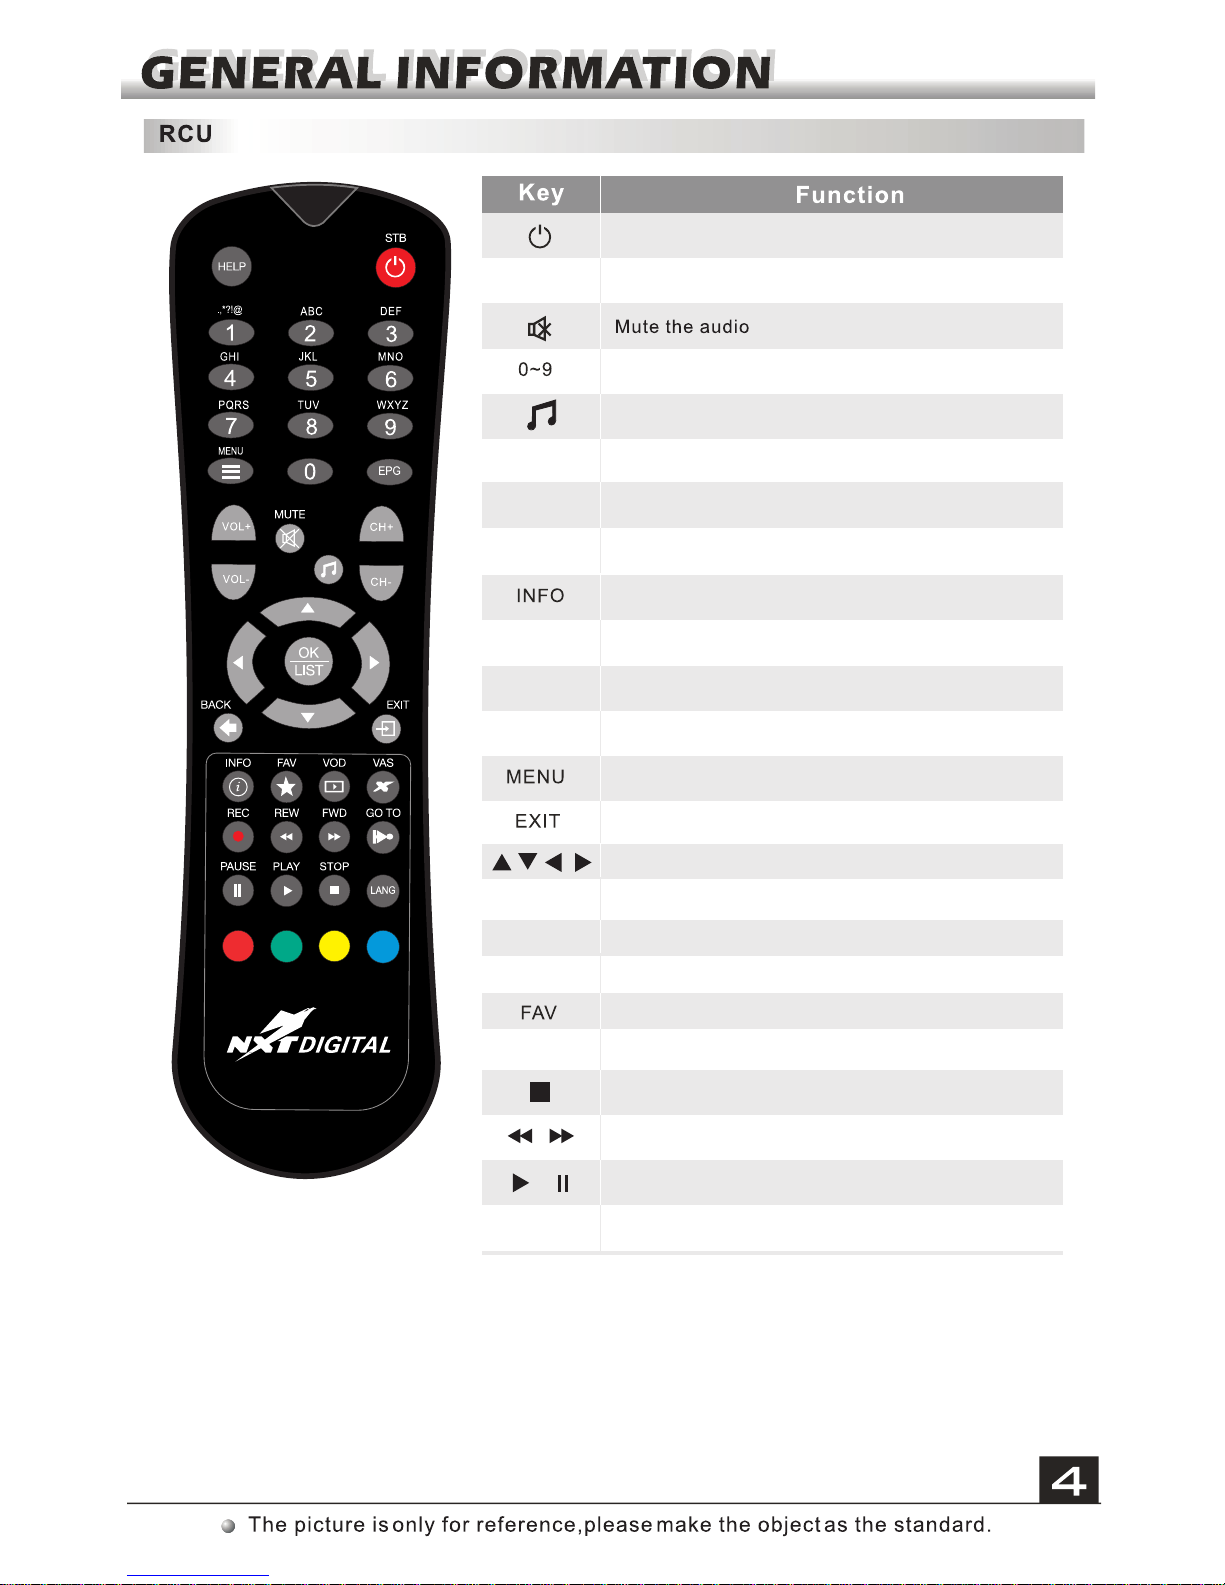
OK/LIST
EPG
Surf up/down ch annel list
Adjust volume
To confirm the choi ce/List the c hannels
Switches back t o previous ch annel or menu
CH+,CH-
BACK
Switch betwee n TV and Radi o mode
REC
VOL+,VOL-
LANG
Start program recording
Stop recording or play back of program recorded
Play or pause program recorded
Rewind or fast forward program recorded
Up, down, left, right button
HELP
Display help an d diagnostic information
VOD
VAS
GO TO
Open the person al video reco rder mode
Video on De mand service( reserved)
Next digital value-added service(reserved)
COLOR KEYS
Feature buttons
Stand by mode or program watching state
Number pad to enter menu item or to select a
channel
Displays EPG me nu
Select langua ge for audio ch annels
Display progr am synopsis i nformation of t he
current chann el
Display the mai n menu
Go to watching st ate or exit any s pecific menu
Display favorite channel list
Page 7
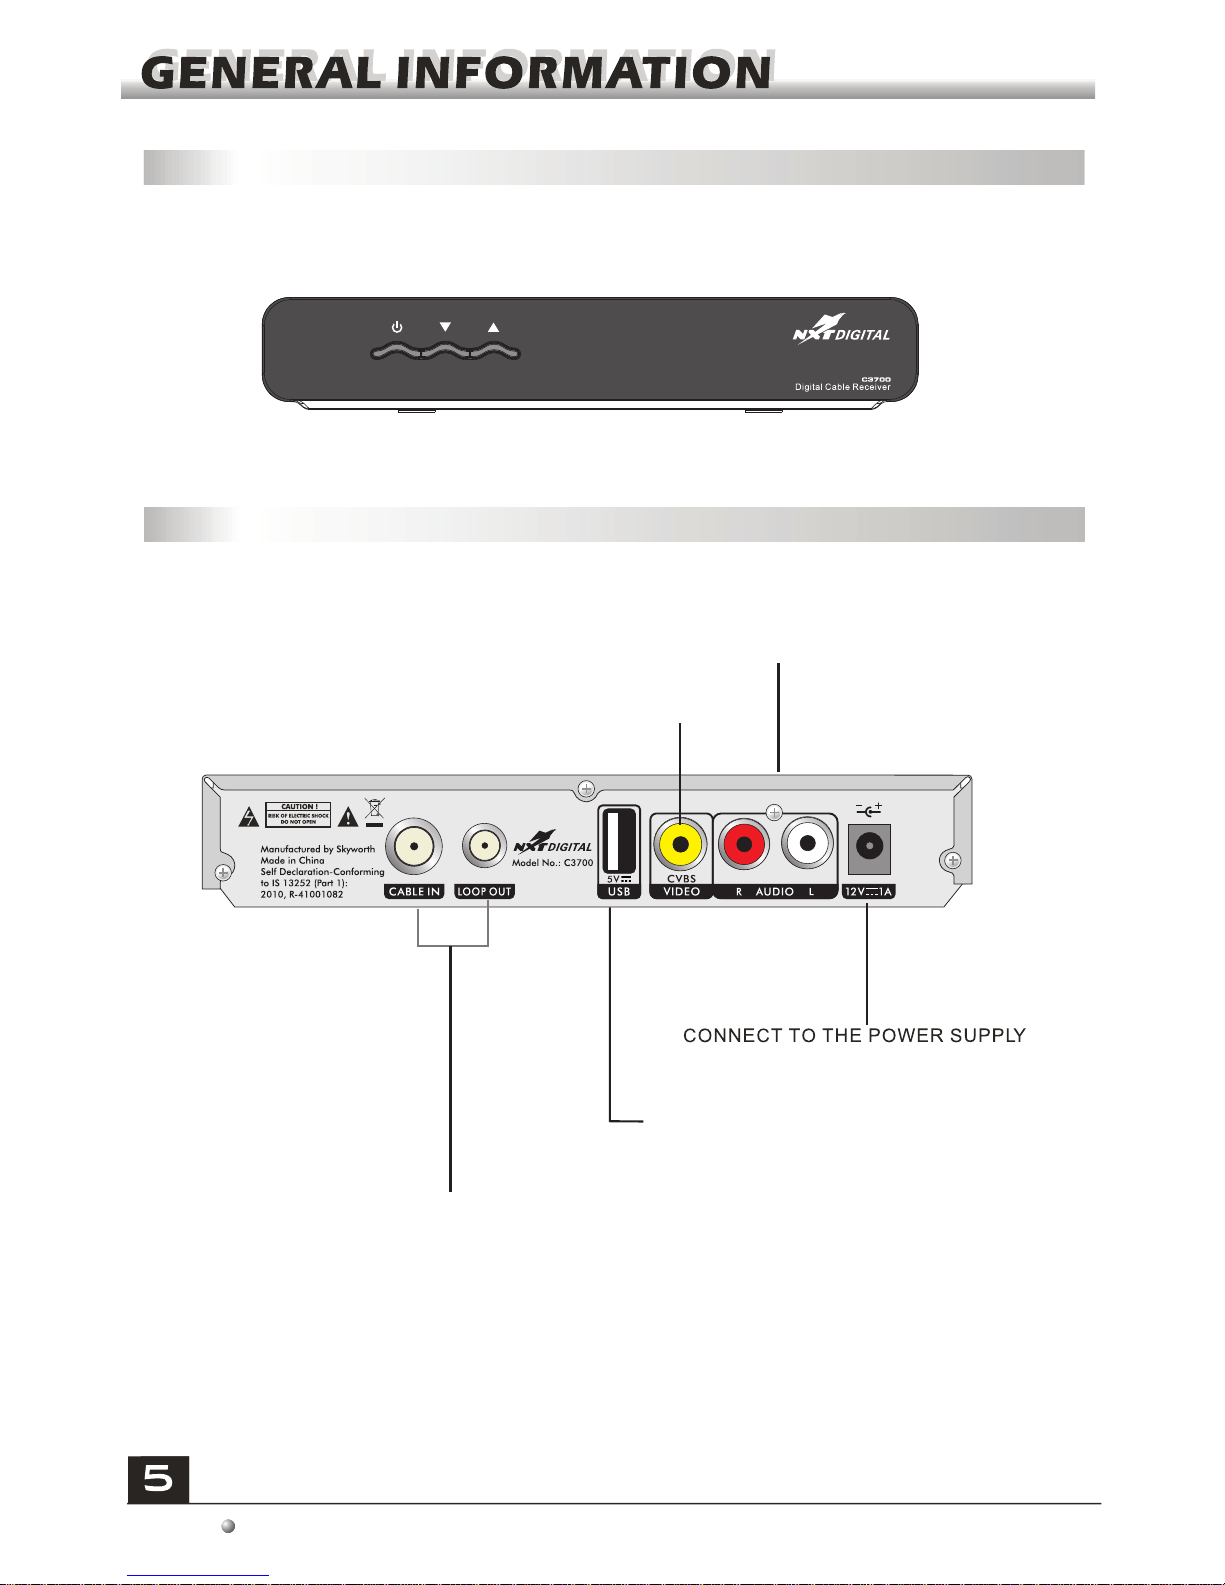
Front Panel
Rear Panel
CONNECT TO USB DEVICE
COMPOSITE VIDEO BROADCAS T SIGNAL
CONNECT TO AUDIO R/L TO TV OR AUDIO TU NER
CABLE IN: CONNECT TO CABLE SIGN AL
LOOP OUT: CON NECT TO ANOTHER REC EIVER
The picture is for reference only. Your equipment may be configured differently.
Page 8
PREPARATION OF REMOTE CONTROL
1. Open the battery cover.
2. Insert the batteries in the correct direction. Please ensure that the anode and cathode ends of
the battery are corresponding to the polarity indicated in the remote control.
3. Replace the battery cover.
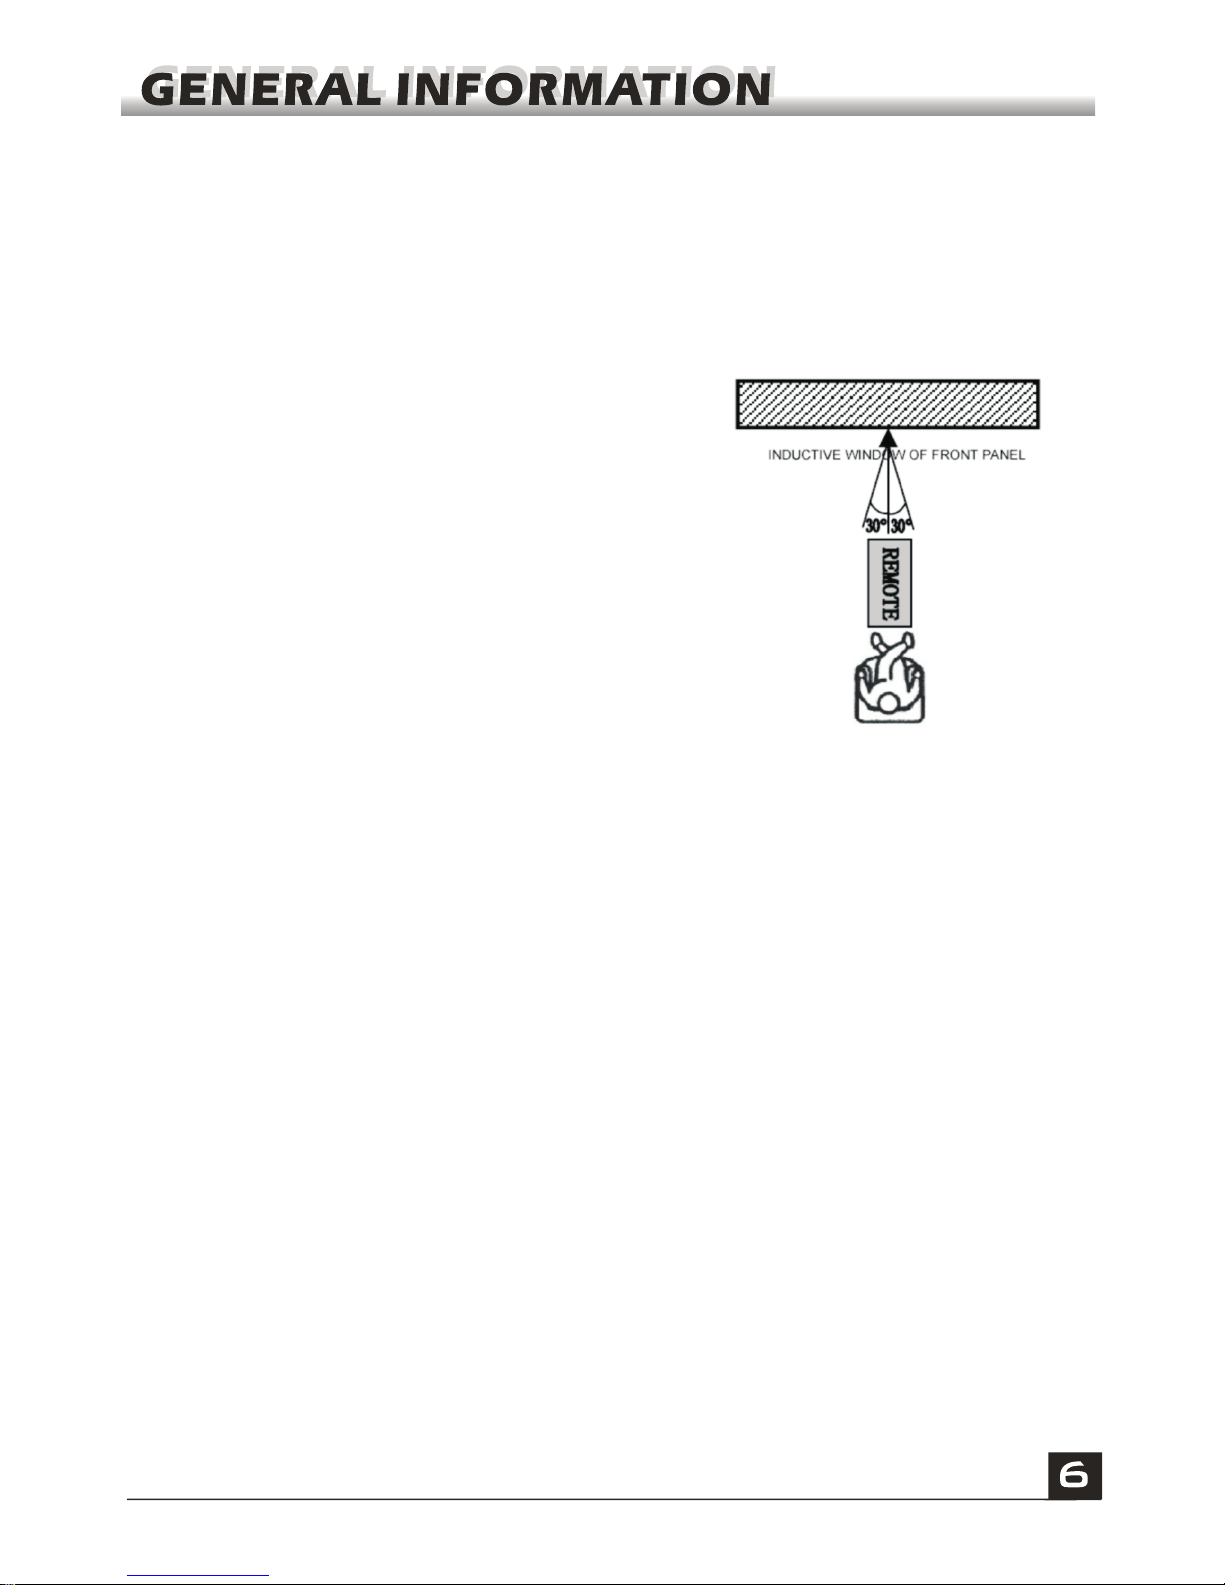
OPERATION SCOPE OF THE REMOTE
CONTROL
Point the remote control towards the Set Top Box in order
to control the apparatus, ensuring that the Set Top Box is
not obstructed in any way.
1. Distance: the remote control will work up to seven
meters from the SetTop Box.
2. Angle: The remote control will work up to 30 degrees
right or left of the Set Top Box panel.
PRECAUTIONS ABOUT BATTERIES
Improper use of batteries may cause corrosion or fluid leakage. Please observe the following
instructions for the safe use of batteries.
1. Insert the batteries taking care to ensure that they are facing the correct way.
2. Never leave dead batteries in the remote control.
3. Remove batteries from the remote controller if it is not going to be used for an extended
period of time
4. Do not attempt to disassemble, short-circuit, heat, recharge or throw the batteries into any fire
source if even if they are not working.
5. Do not use new batteries and old ones together. Use batteries of the same type together.
6. Wipe away any electrolyte fluid that may have leaked into the remote controller before
inserting new batteries.
Page 9
Page 10
- Live
- Guide
- My Content
- Settings
- Features
- Diagnostics
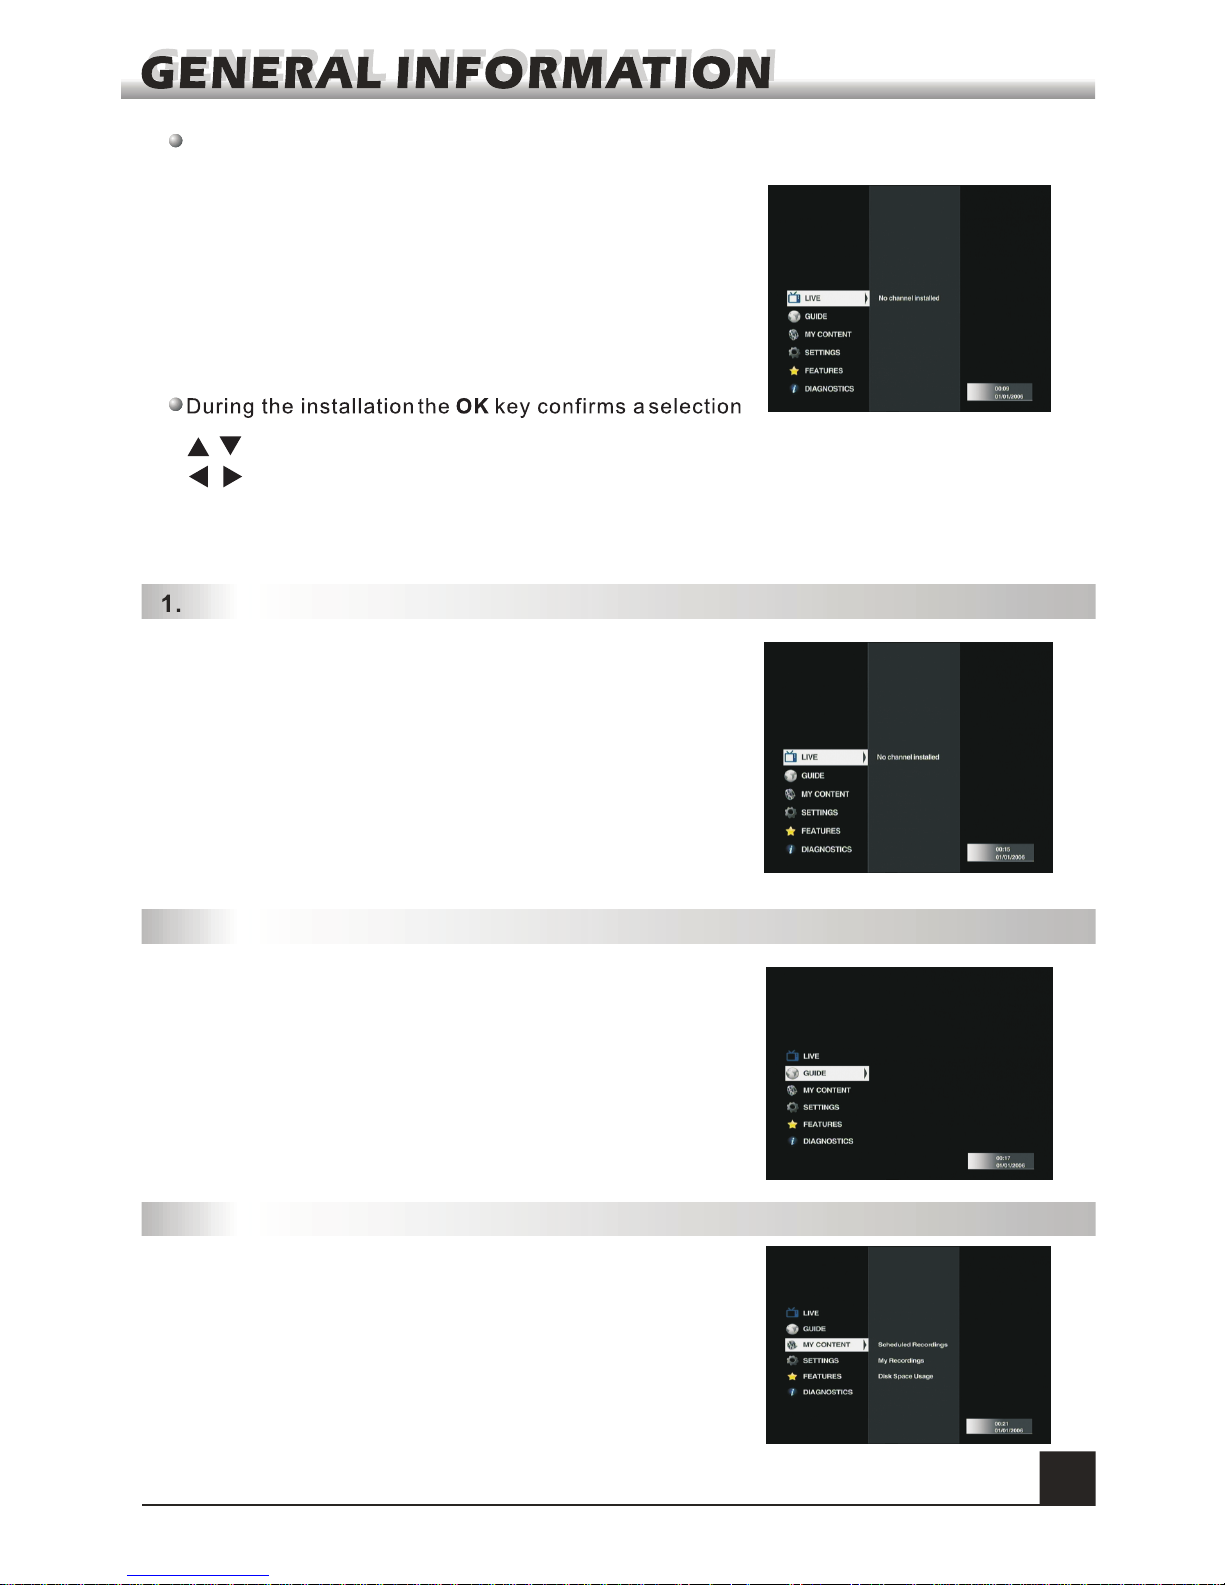
Live
Once you have installed and powered on the Set Top Box the main menu list will be
displayed as follows:
Use these keys to navigate up/down and select required options
Use these keys to navigate main menu and left /right to select the required options.
At any point of time press EXIT key to go back to the previous menu
8
All channels will be listed on the right side of the menu.
2. Guide
3. My Content
Following sub-menus will be displayed when you select the
“ ” menu:
- Scheduled Recordings
- My Recordings
- Disk Space Usage
My Content
Show TV Guide information.
Page 11
4. Settings
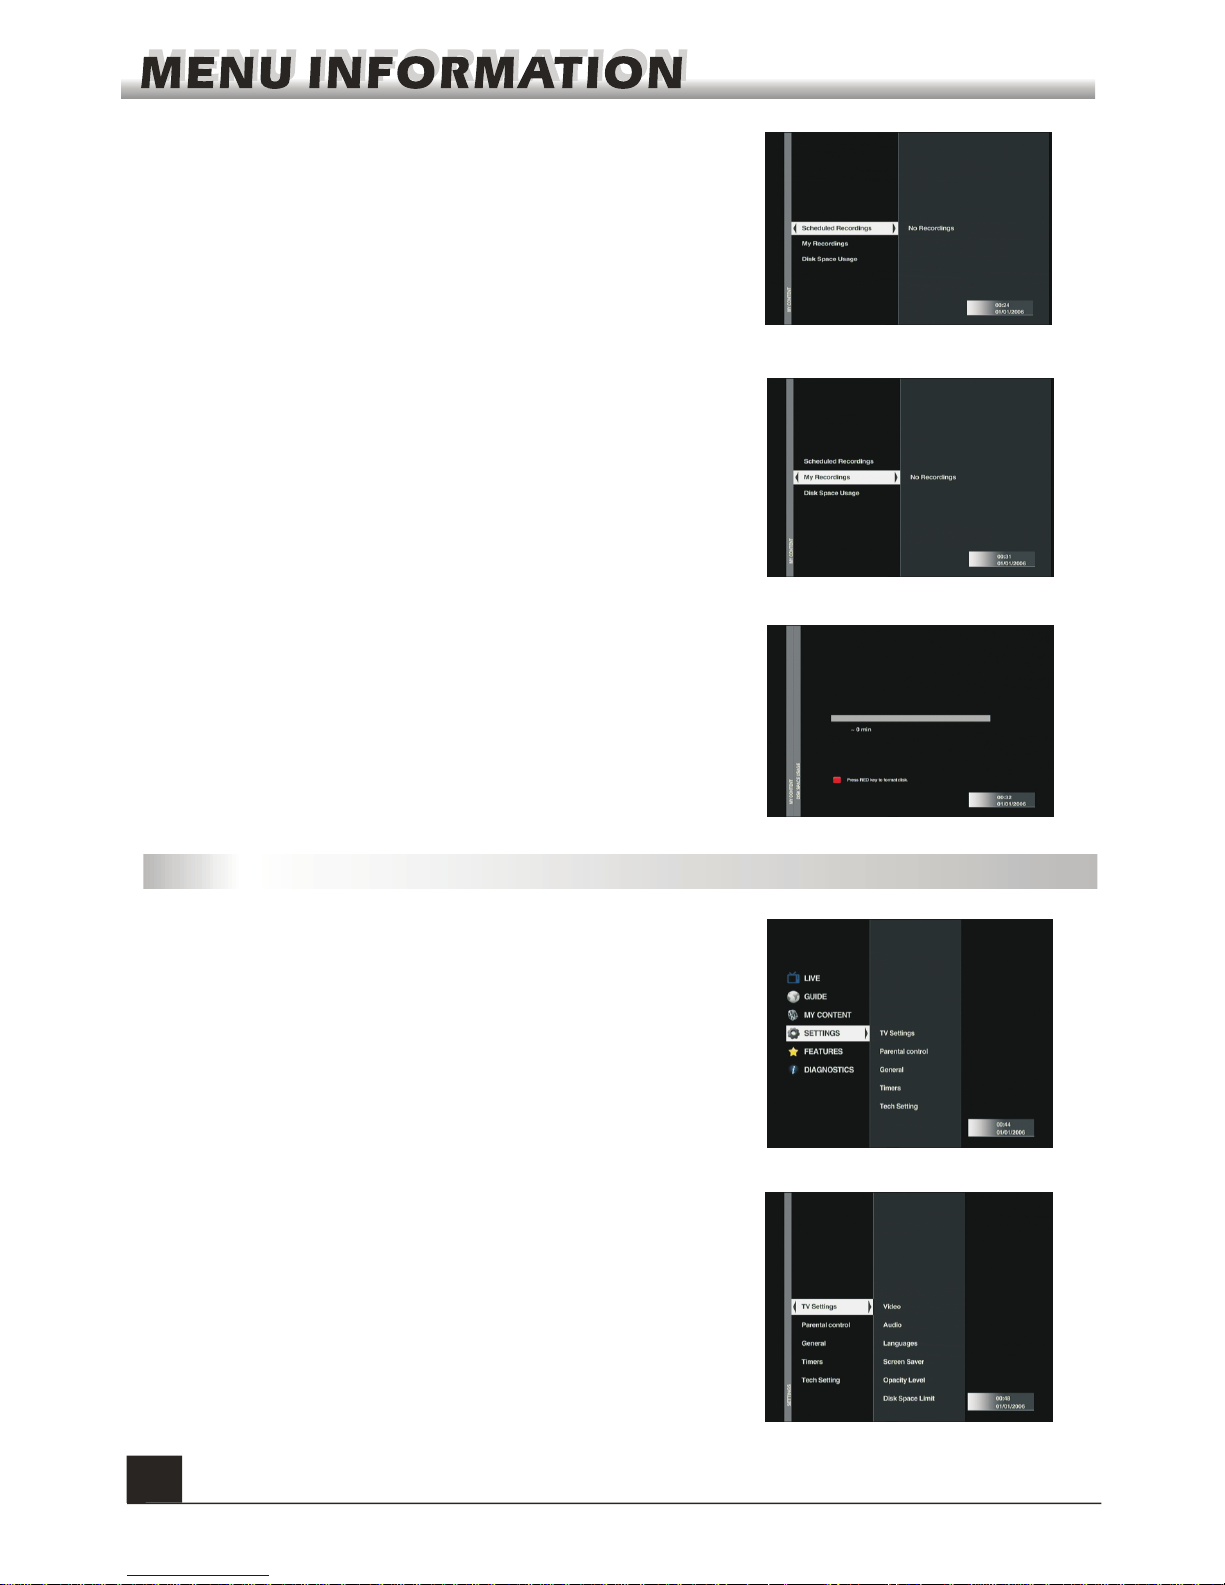
Following sub-menus will be displayed when you select the
“Settings” menu:
- TV Settings
- Parental Control
- General
- Times
- Tech Setting
9
3.1 Scheduled Recordings
3.2 My Recordings
All shows you record will be listed in this menu. You can
see the recorded shows on the right side of the screen.
3.3 Disk Space Usage
This displays how much disk space you have already used.
To re-format the harddisk press the red key on your remote
control unit.
4.1 TV Settings
This menu allows you to select from different aspect
ratios for display on your television screen.
4.1.1 Video
This menu allows you to edit the audio mode and volume.
4.1.2 Audio
Show scheduled recordings.
Page 12
10
4.2 Parental Control
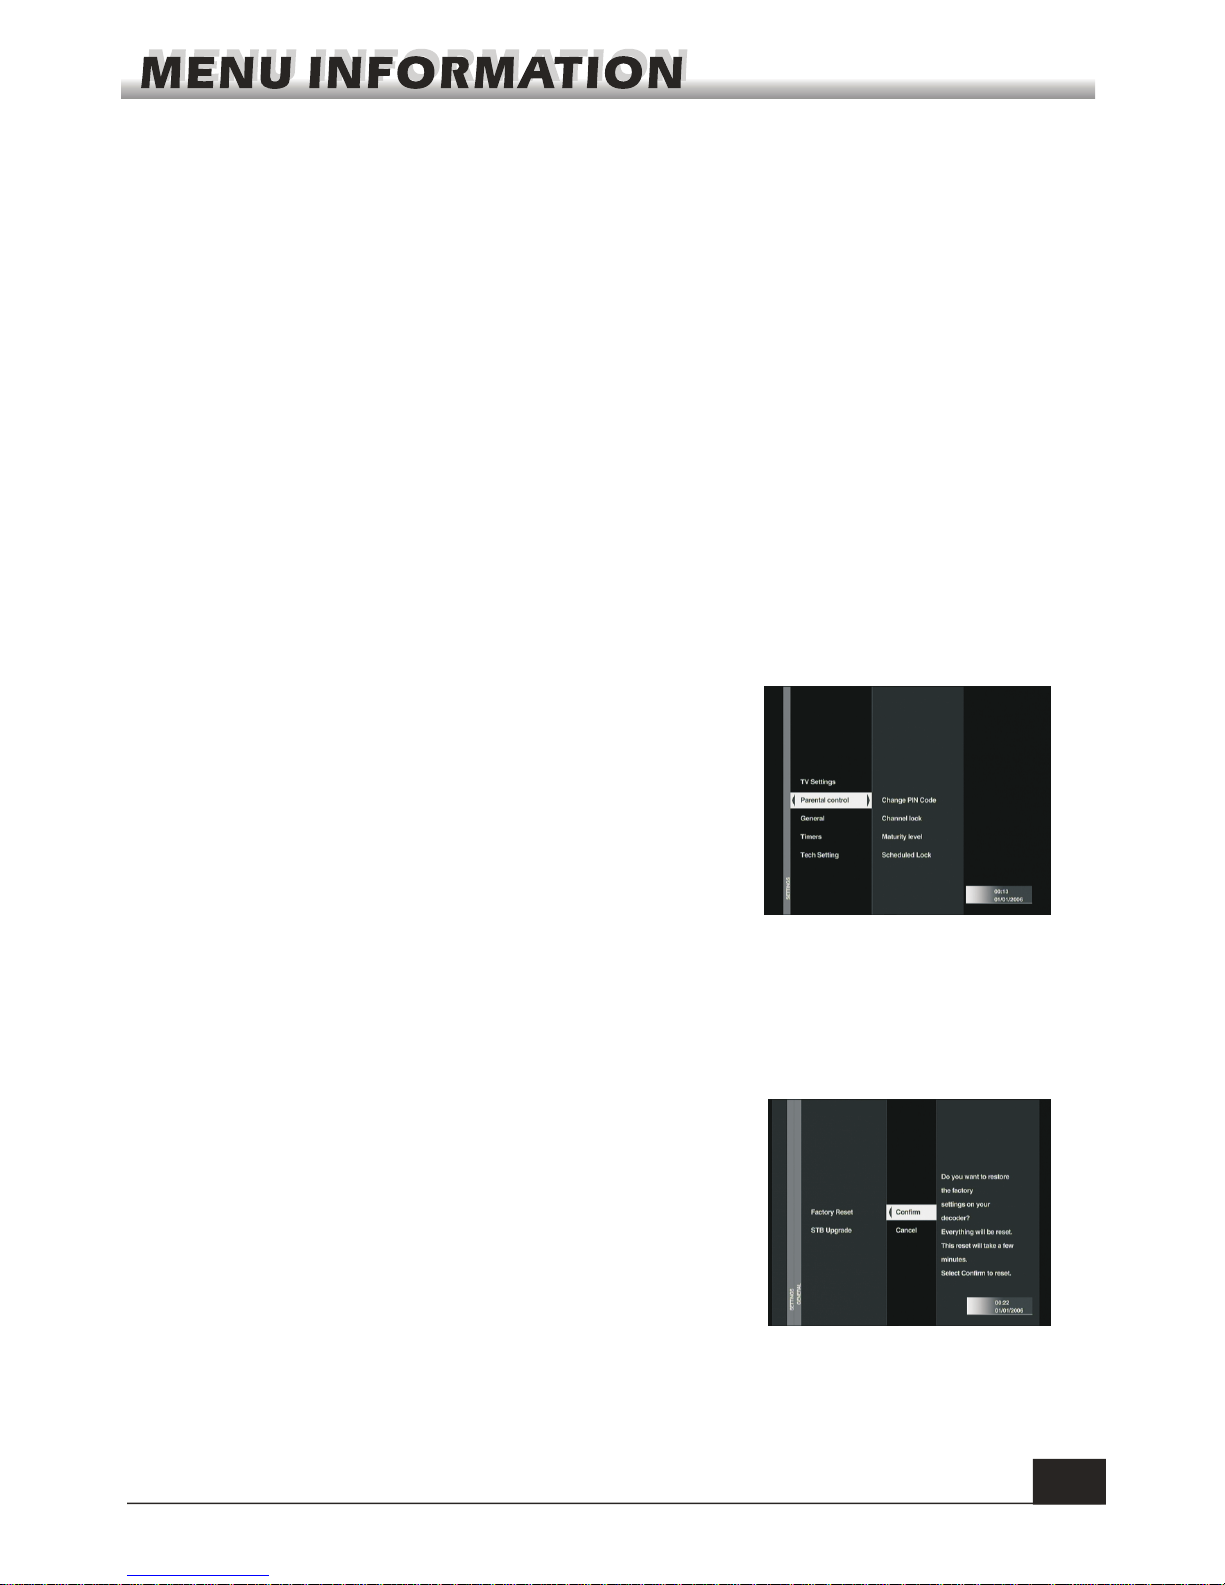
a. Change PIN Code select this option in order to
change the PIN code for this STB.
b. Channel Lock: select this option for selecting
channels to be under PIN control.
c. Maturity Level: select this option for selecting
channels to be under PIN control based on their rating.
d. Scheduled Lock: select this option to schedule
start and end times during which PIN is required for
viewing television channels.
:
4.3 General
4.3.1 Factory Reset
This option will reset the set top box to factory default
settings. On pressing this option, a warning message will
appear and prompt for confirmation. Select “CONFIRM”
in order to factory reset the set top box.
4.3.2 STB Upgrade
This menu option allows you to upgrade the software on the set top box (STB).
4.1.3 Language
4.1.4 Screen Saver
4.1.5 Opacity Level
4.1.6 Disk space limit
This menu allows you to select when screensavers should come on the set top box.
This menu allows you to select how transparent the menus should be on screen.
This menu allows you to select the maximum amount of space to be used on the
hard disk for recordings.
This menu allows you to select from different languages (if available) for display
menus and different audio tracks.
Page 13
11
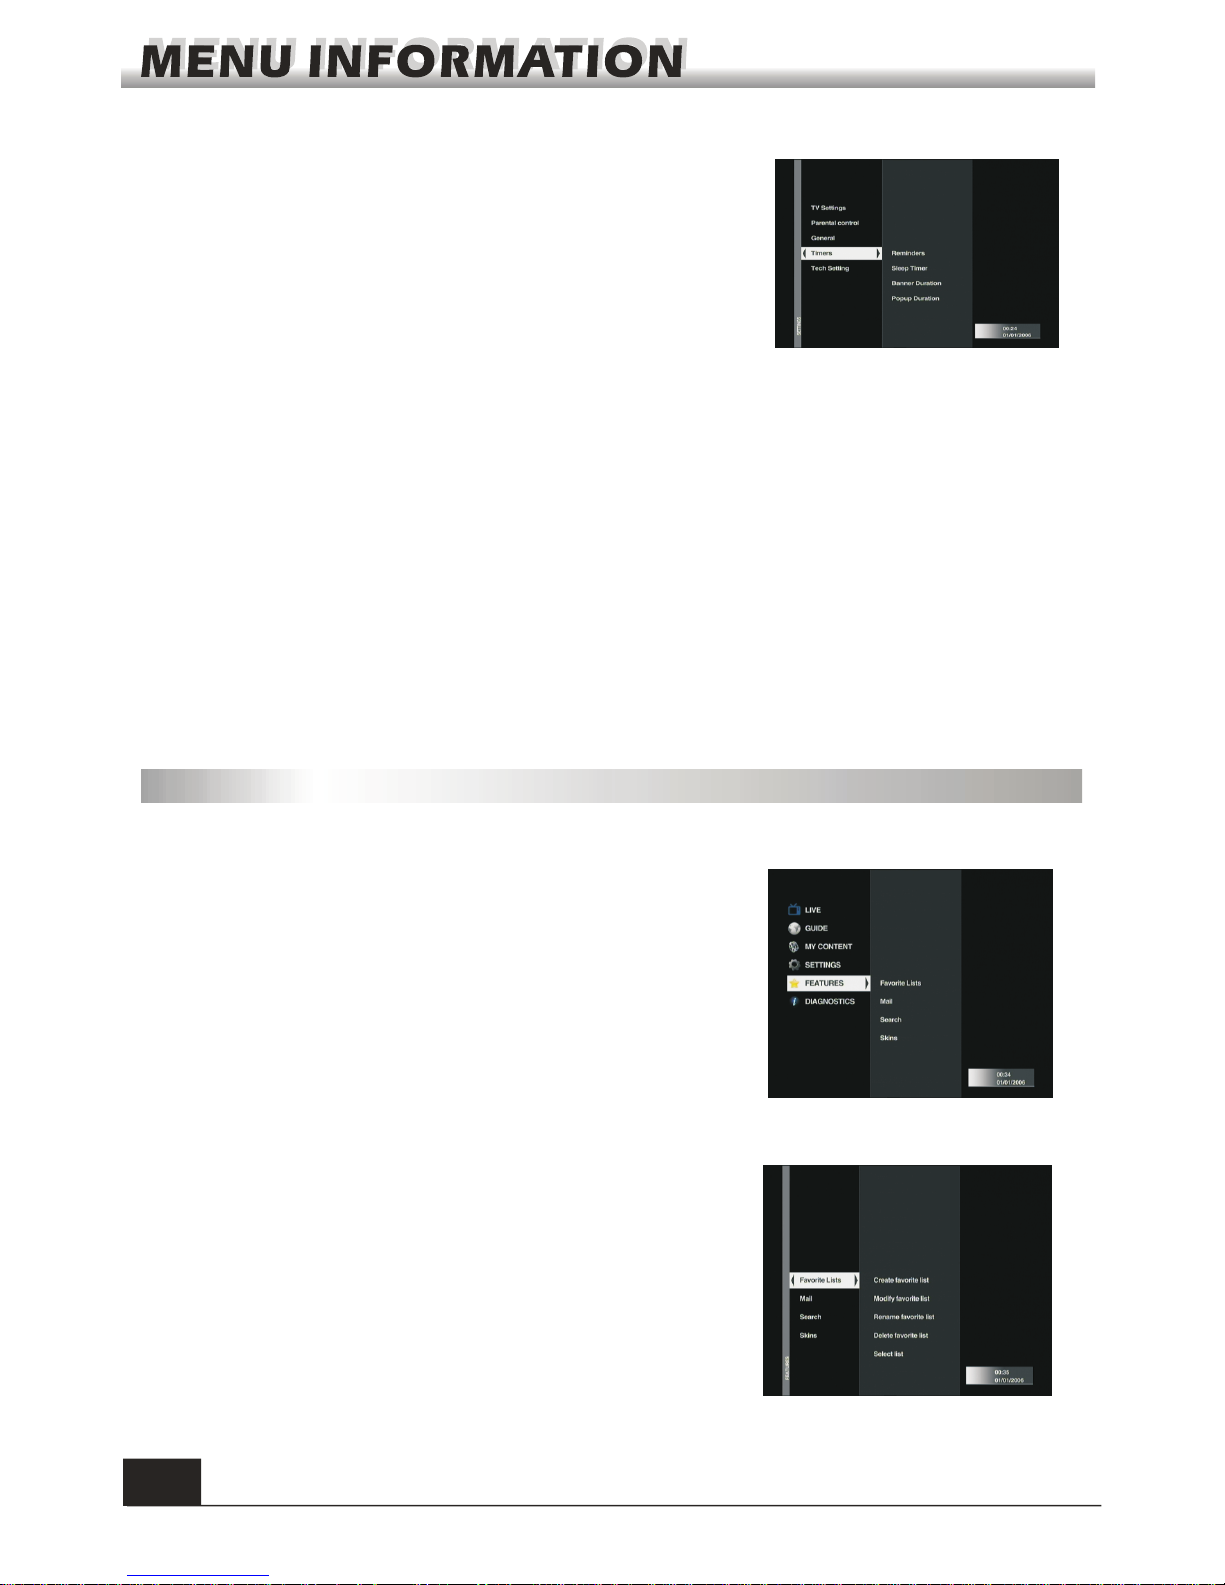
4.4 Timers
a. Reminders: These are notifications for shows that you
want to be reminded about. This menu allows you to
customise how reminders are set and when notifications
should appear.
b. Notification: Select when notifications should appear
on the set top box
c. Duration: Select how long each notification should last
on the set top box
d. Sleep timer: Select how long the set top box should
wait before going into sleep mode
e. Banner/Popup Duration: Select how long the volume
banner or popup should remain visible on screen after
you have selected it.
4.5 Tech Setting
This feature is only for technical staff.
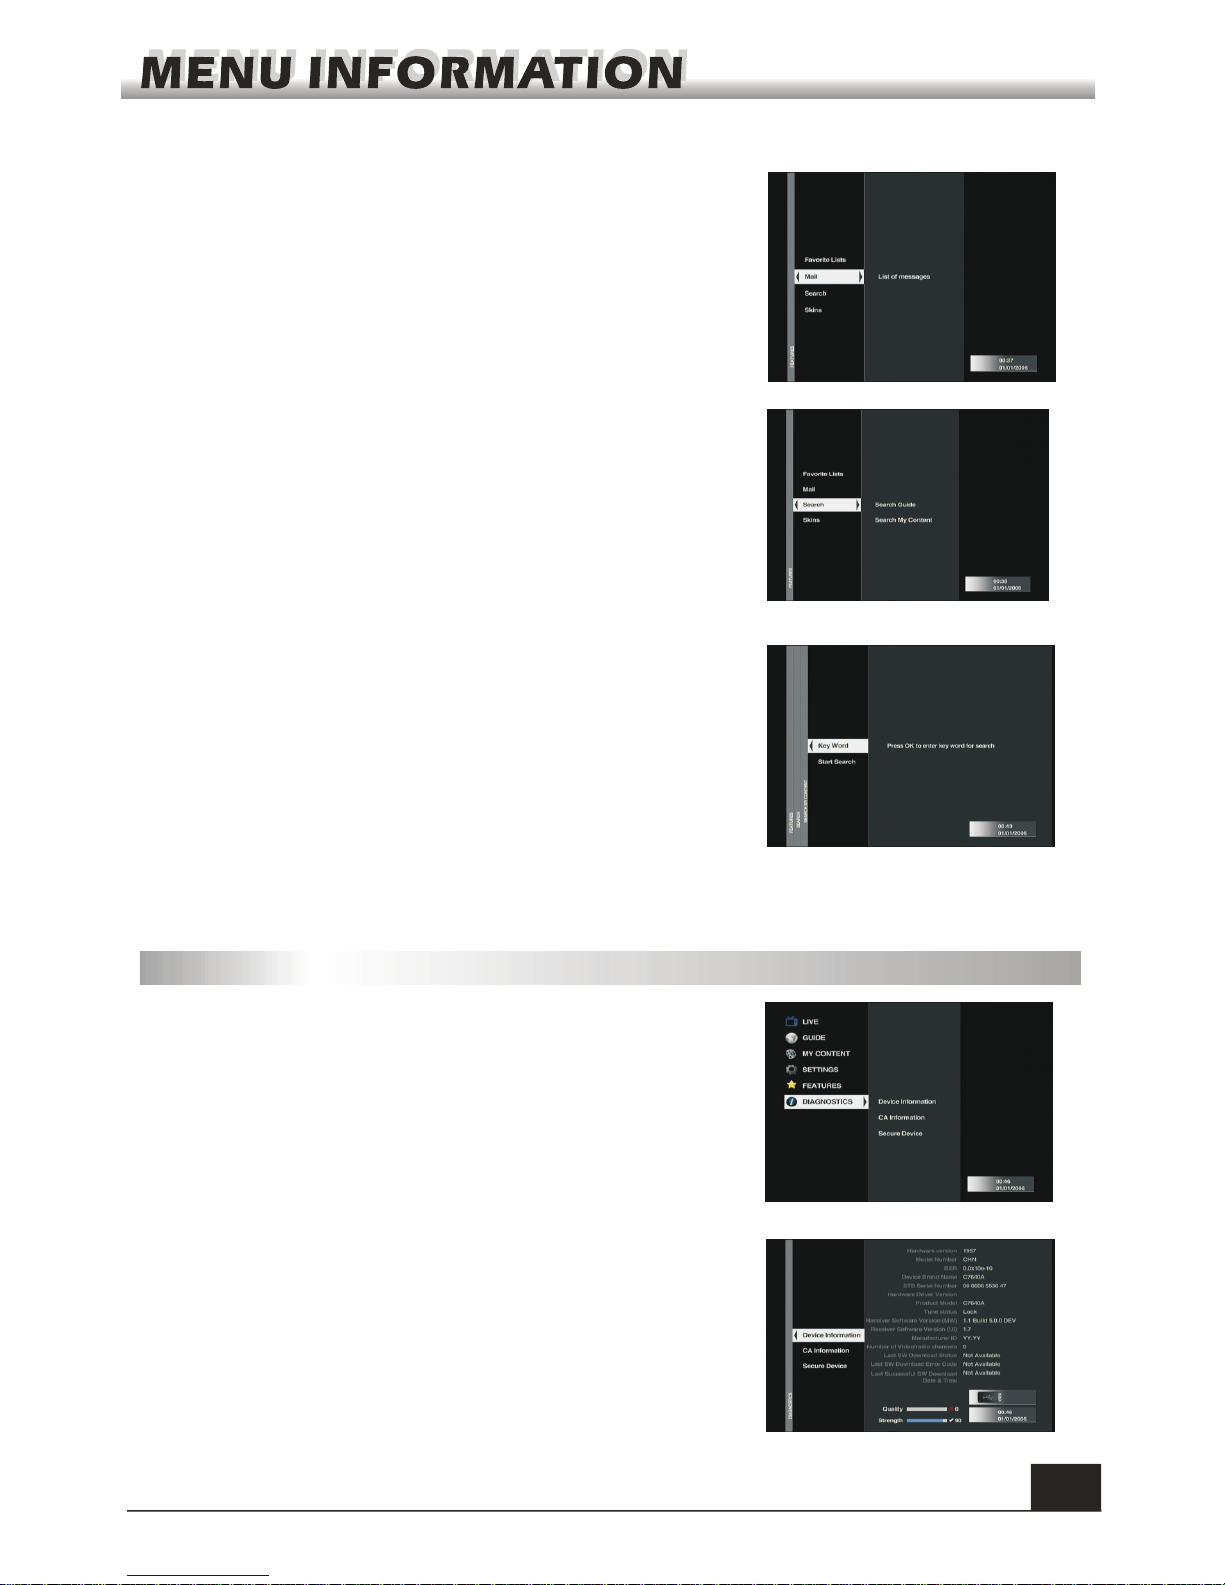
5. Features
- Favorite List
- Mail
- Search
- Skins
Following sub-menus will be displayed when you select the “ ” menu :Features
5.1 Favorite List
In this menu, you can create favorite list, modify favorite
list, rename favorite list, delete favorite list and select list.
Page 14
12
5.2 Mail
Select this menu in order to see messages that have
been sent to you by NXT Digital.
5.3 Search
5.3.1 Search Guide
5.3.2 Search my content
Select this menu in order to search for specific
programmes or information on your Set Top Box.
Select this menu in order to search for specific
programmes or information only on your recorded content.
5.4 Skin
Select this menu to change the colour of the menus on
your set top box.
6. Diagnostic
Following sub-menus will be displayed when you select the
“ menu:
- Device Information
- CA Information
- Secure Device
Diagnostic”
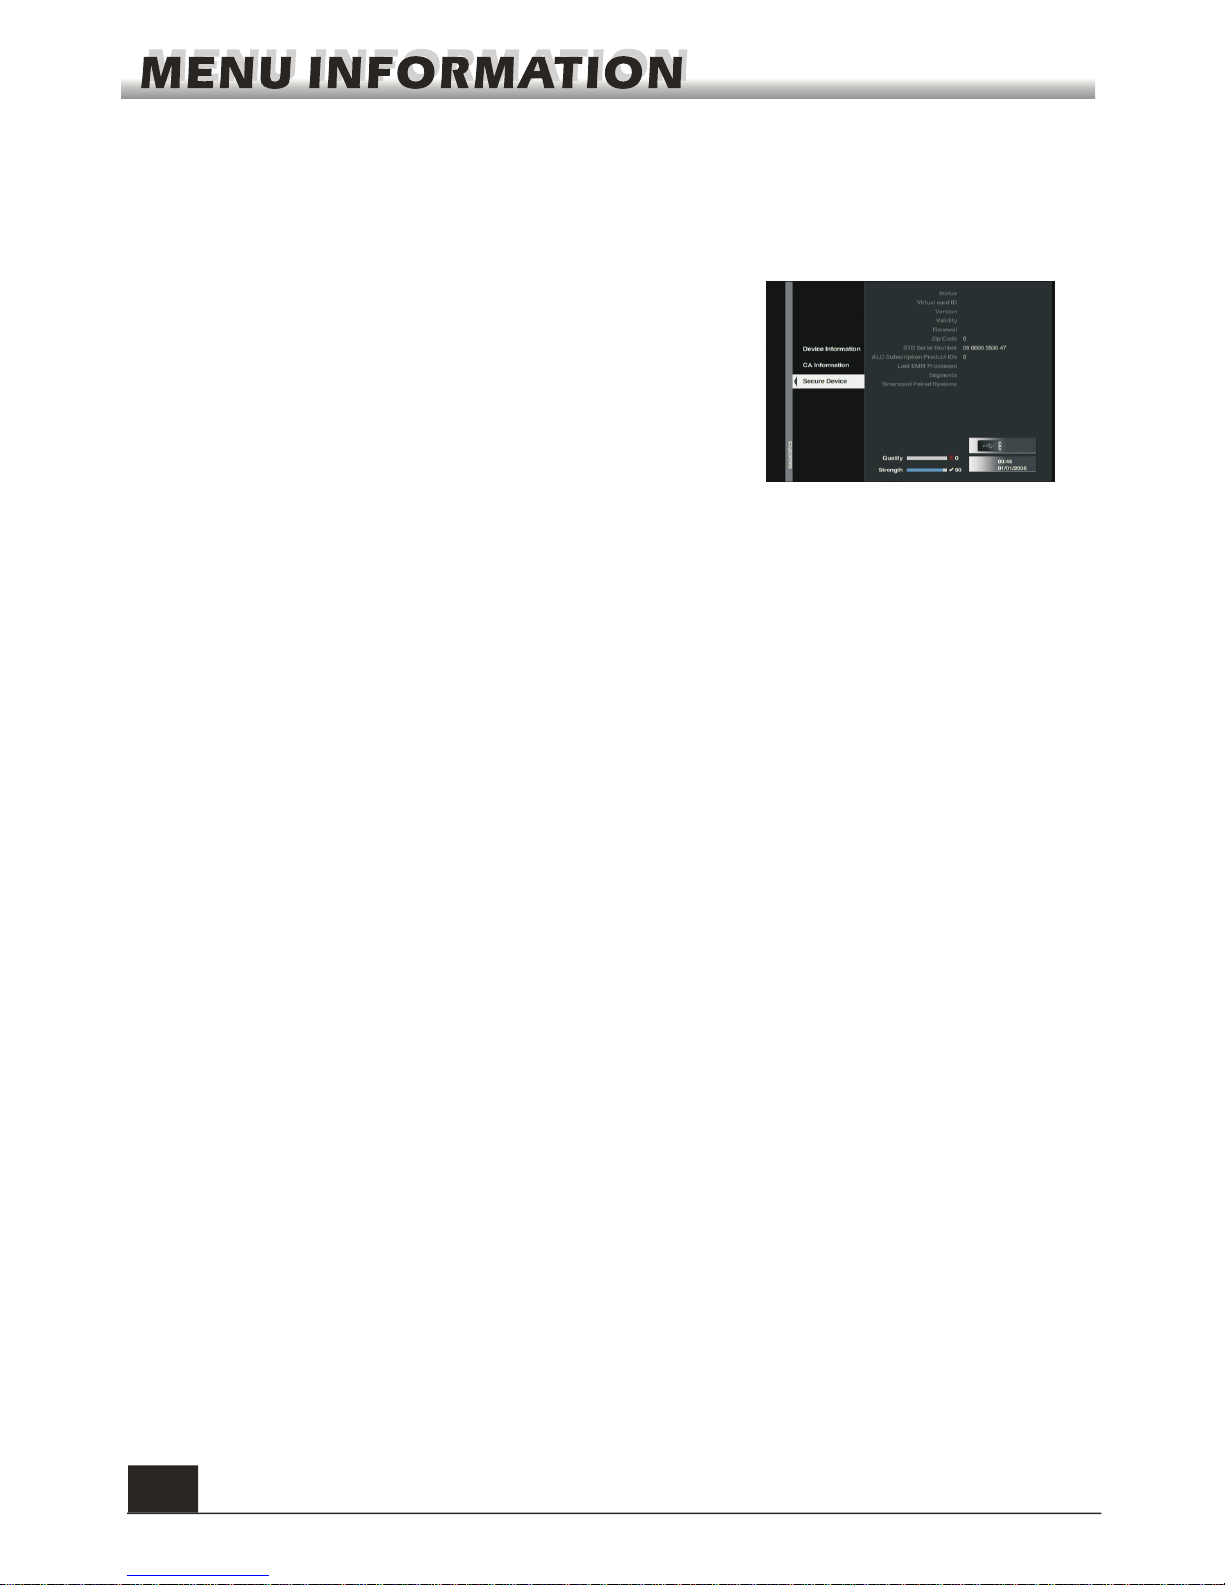
6.1 Device Information
Select this menu to show all device information. It is
recommended that you go to this page when calling the call
centre for any help.
Page 15
13
6.2 CA Information
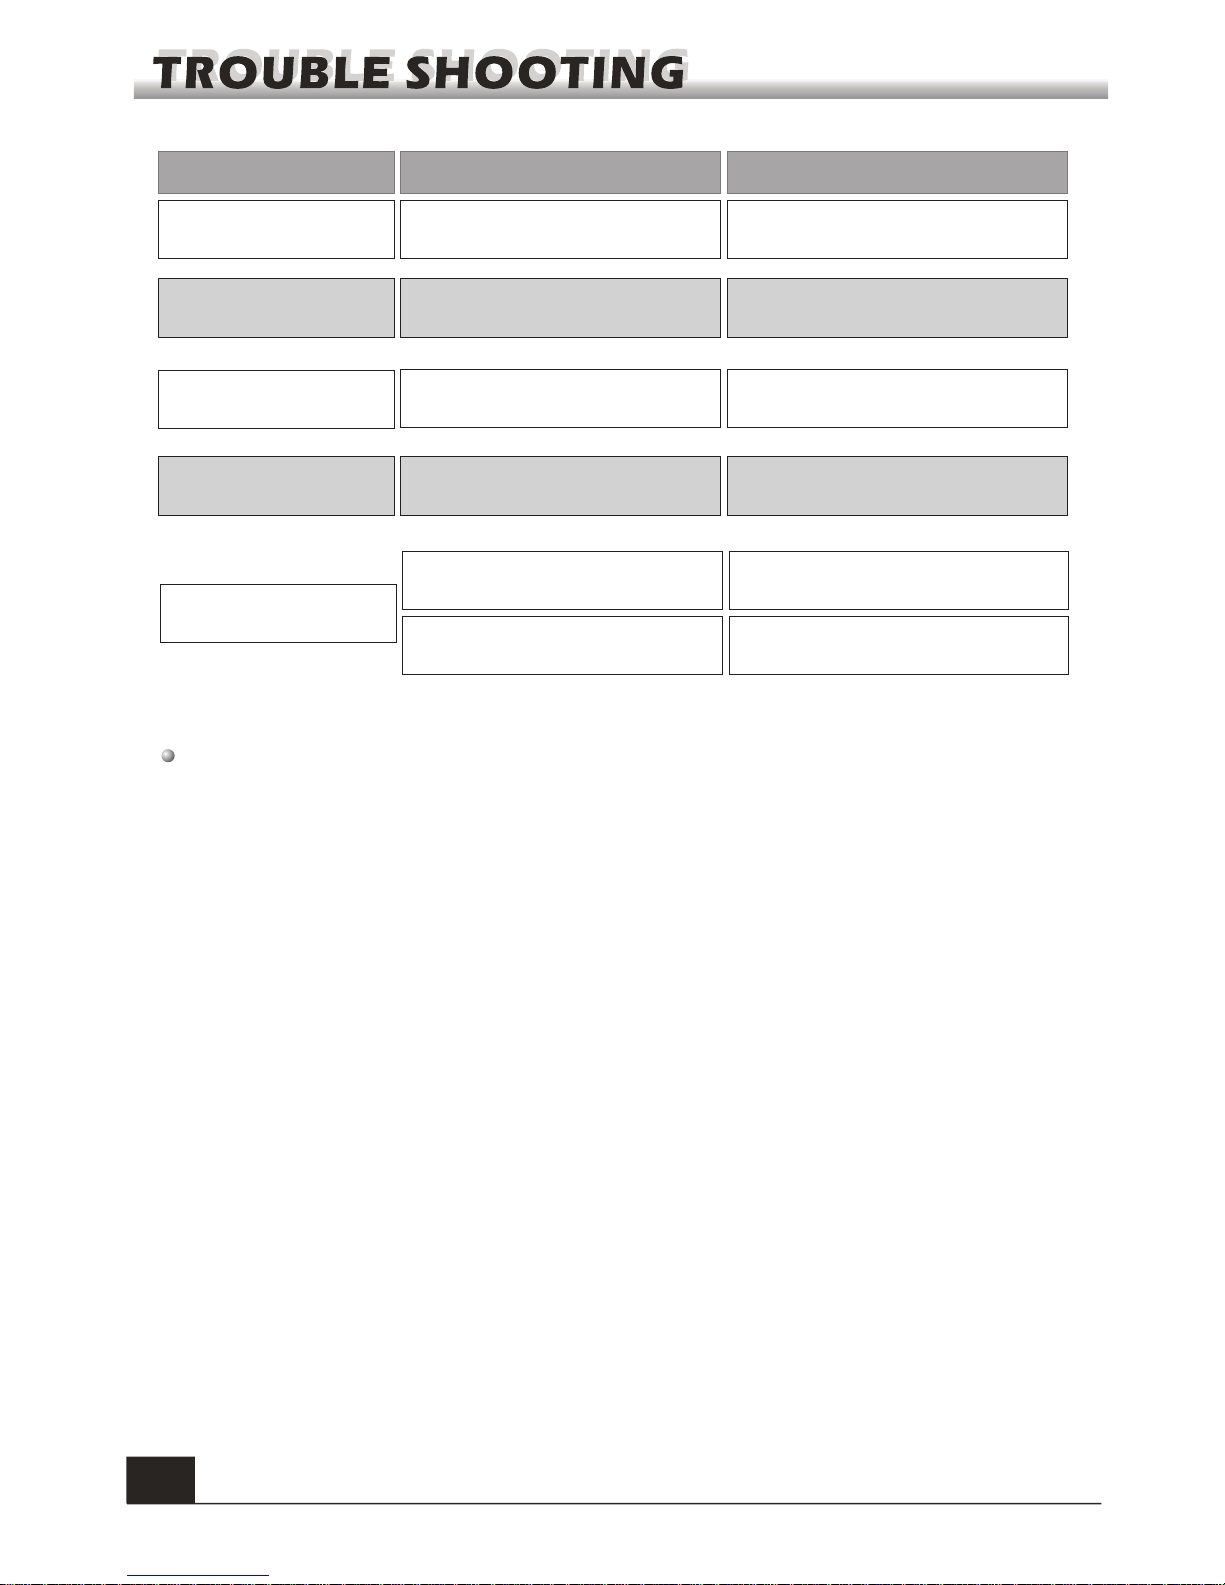
5.3 Secure Device
Select this menu to show device security information.
Select this menu to show all conditional access information relating to this set top box.
Page 16
14
Problem Possible causes What to do
The dis play on t he fron t
panel d oes not l ight up .
No soun d or pict ure, bu t the
front p anel sh ows red l ight.
Mains cable is not properly connected
or faulty.
The is in standby mode.receiver
Check that the main cable is plugged into
the power socket.
Press the standby button on the remote
control unit
No sound and picture.
The connection between the cable and
the set top box may be faulty or there is
no signal.
Check the connection between the set top
box and the cable.
Bad picture / blocking
error.
Cable signal is too weak.
Adjust the strength of signal.
The RCU is not working.
Battery exhausted.
Change the batteries.
RCU is incorrectly aimed.
Aim RCU at the , or check that
nothing blocks the front panel.
receiver
Note: If the problem still persists after you have tried the actions suggested above,
please contact your dealer or service provider.
 Loading...