

Page 1
KTFRDMHB2001FEVMUG
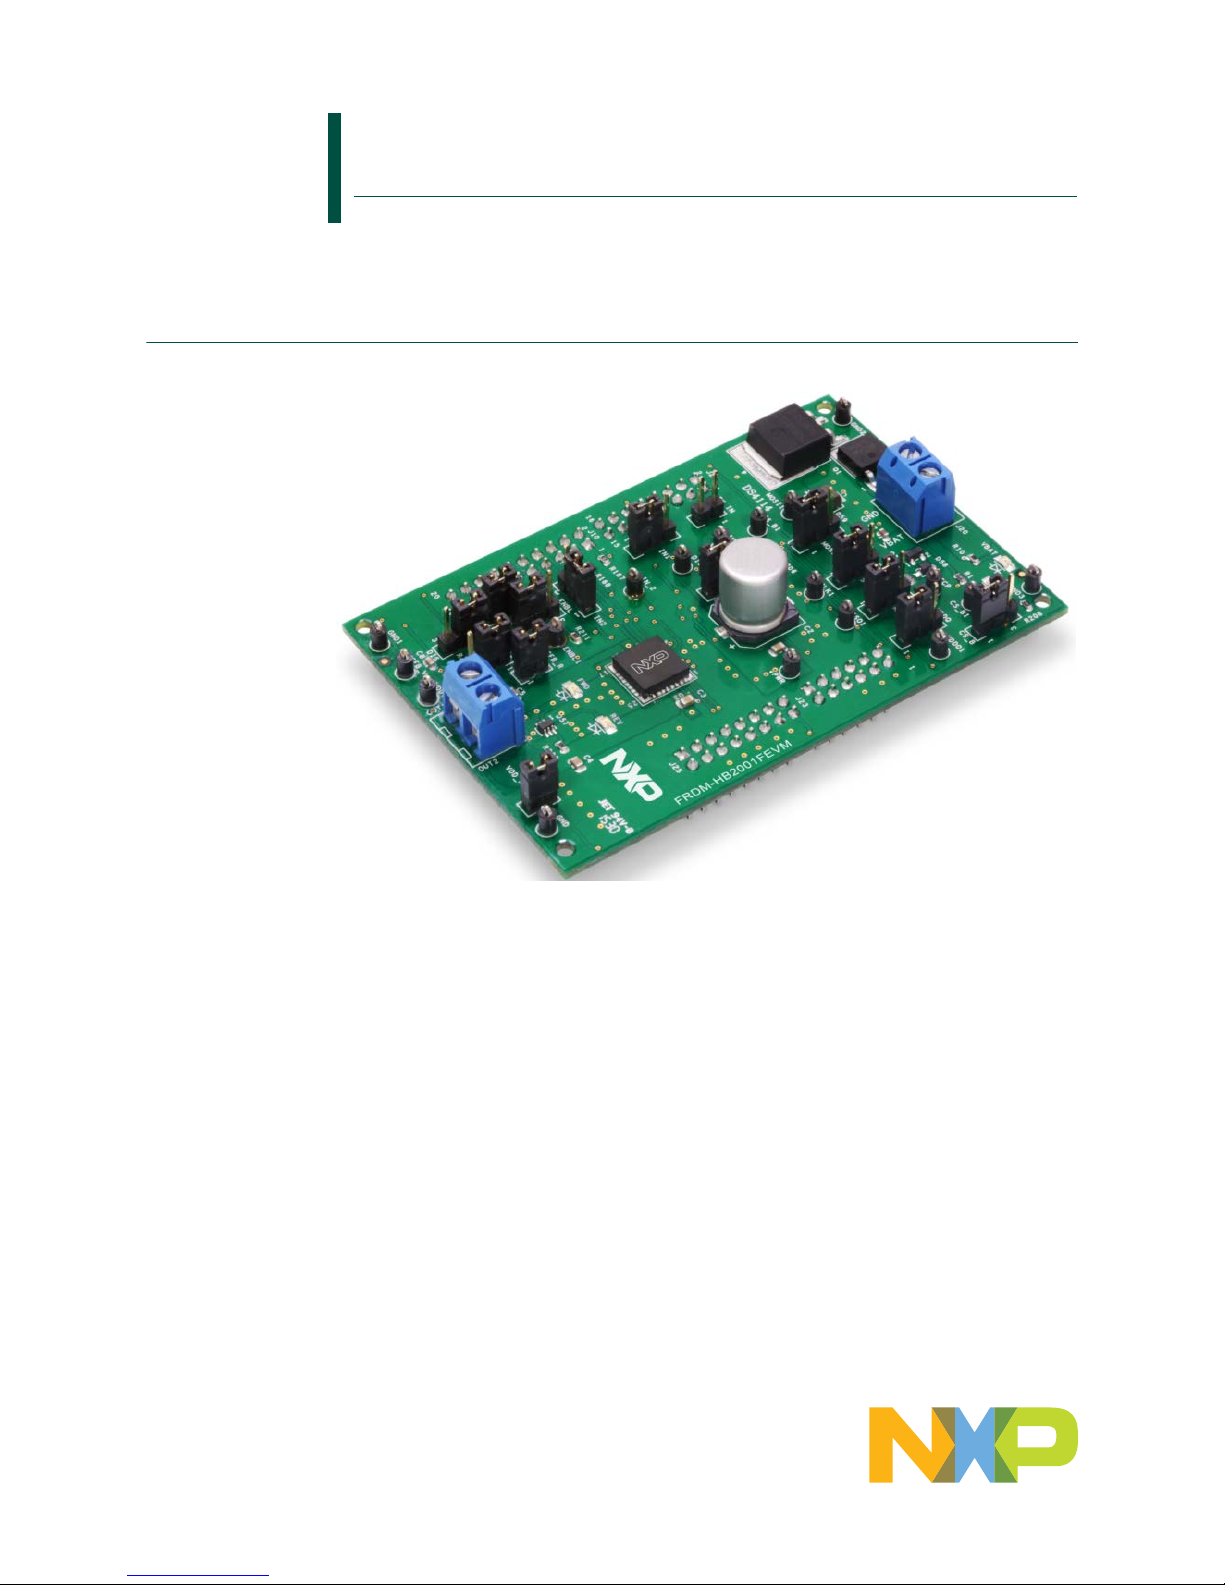
FRDM-HB2001FEVM evaluation board
Rev. 1.0 — 25 May 2016 User guide
1 FRDM-HB2001FEVM
Page 2

NXP Semiconductors
KTFRDMHB2001FEVMUG
FRDM-HB2001FEVM evaluation board
KTFRDMHB2001FEVMUG All information provided in this document is subject to legal disclaimers. © NXP B.V. 2016. All rights reserved
User guide Rev. 1.0 — 25 May 2016
2 / 35
2 Important notice
NXP provides the enclosed product(s) under the following conditions:
This evaluation kit is intended for use of ENGINEERING DEVELOPMENT OR
EVALUATION PURPOSES ONLY. It is provided as a sample IC pre-soldered to a
printed circuit board to make it easier to access inputs, outputs, and supply terminals.
This evaluation board may be used with any development system or other source of
I/O signals by simply connecting it to the host MCU or computer board via off-theshelf cables. This evaluation board is not a Reference Design and is not intended to
represent a final design recommendation for any particular application. Final device in
an application will be heavily dependent on proper printed circuit board layout and heat
sinking design as well as attention to supply filtering, transient suppression, and I/O
signal quality.
The goods provided may not be complete in terms of required design, marketing, and
or manufacturing related protective considerations, including product safety measures
typically found in the end product incorporating the goods. Due to the open construction
of the product, it is the user's responsibility to take any and all appropriate precautions
with regard to electrostatic discharge. In order to minimize risks associated with the
customers applications, adequate design and operating safeguards must be provided
by the customer to minimize inherent or procedural hazards. For any safety concerns,
contact NXP sales and technical support services.
Should this evaluation kit not meet the specifications indicated in the kit, it may be
returned within 30 days from the date of delivery and will be replaced by a new kit.
NXP reserves the right to make changes without further notice to any products herein.
NXP makes no warranty, representation or guarantee regarding the suitability of its
products for any particular purpose, nor does NXP assume any liability arising out of the
application or use of any product or circuit, and specifically disclaims any and all liability,
including without limitation consequential or incidental damages. “Typical” parameters
can and do vary in different applications and actual performance may vary over time.
All operating parameters, including “Typical”, must be validated for each customer
application by customer’s technical experts.
NXP does not convey any license under its patent rights nor the rights of others. NXP
products are not designed, intended, or authorized for use as components in systems
intended for surgical implant into the body, or other applications intended to support or
sustain life, or for any other application in which the failure of the NXP product could
create a situation where personal injury or death may occur.
Should the Buyer purchase or use NXP products for any such unintended or
unauthorized application, the Buyer shall indemnify and hold NXP and its officers,
employees, subsidiaries, affiliates, and distributors harmless against all claims, costs,
damages, and expenses, and reasonable attorney fees arising out of, directly or
indirectly, any claim of personal injury or death associated with such unintended or
unauthorized use, even if such claim alleges NXP was negligent regarding the design
or manufacture of the part. NXP and the NXP logo are trademarks of NXP B.V. All other
product or service names are the property of their respective owners. © 2016 NXP B.V.
Page 3

NXP Semiconductors
KTFRDMHB2001FEVMUG
FRDM-HB2001FEVM evaluation board
KTFRDMHB2001FEVMUG All information provided in this document is subject to legal disclaimers. © NXP B.V. 2016. All rights reserved
User guide Rev. 1.0 — 25 May 2016
3 / 35
3 Getting started
3.1 Kit contents/packing list
The FRDM-HB2001FEVM contents includes:
• Assembled and tested evaluation board/module in anti-static bag
• FRDM-KL25Z
• Quick start guide
3.2 Jump start
NXP’s analog product development boards provide an easy-to-use platform for
evaluating NXP products. The boards support a range of analog, mixed-signal and power
solutions. They incorporate monolithic ICs and system-in-package devices that use
proven high-volume SMARTMOS technology. NXP products offer longer battery life, a
smaller form factor, reduced component counts, lower cost and improved performance in
powering state of the art systems.
1. Go to www.nxp.com/FRDM-HB2001FEVM.
2. Review your Tools Summary Page.
3. Locate and click:
4. Download the documents, software and other information.
Once the files are downloaded, review the user guide in the bundle. The user guide
includes setup instructions, BOM and schematics. Jump start bundles are available on
each tool summary page with the most relevant and current information. The information
includes everything needed for design.
3.3 Required equipment
This kit requires the following items:
• 3/16” blade screwdriver for connecting the cables
• DC Power supply: 5.0 V to 40 V with up to 20 A current handling capability, depending
on motor requirements
• USB Standard A (male) to mini-B (male) cable
• Typical loads (brushed DC motor, power resistors or inductive load with up to 5.0 A and
28 V operation)
• Function generator (optional)
• FRDM-KL25Z Freedom Development Platform for SPI communication (included in KIT)
• SPIGen software (for using FRDM-KL25Z based SPI Dongle)
3.4 System requirements
The kit requires the following to function properly with the software:
• USB enabled computer with Windows XP or newer
Page 4

NXP Semiconductors
KTFRDMHB2001FEVMUG
FRDM-HB2001FEVM evaluation board
KTFRDMHB2001FEVMUG All information provided in this document is subject to legal disclaimers. © NXP B.V. 2016. All rights reserved
User guide Rev. 1.0 — 25 May 2016
4 / 35
4 Getting to know the hardware
4.1 Board overview
The FRDM-HB2001FEVM evaluation kit exercises all the functions of the MC33HB2001
H-Bridge device. The parallel input can be easily controlled by lab equipment or any
MCU with GPIOs.
The board can be used in conjunction with a FRDM-KL25Z board connected to a PC’s
USB port. Configure, control and monitor the status of MC33HB2001 by using the
board’s SPI communication capabilities.
4.2 Board features
The FRDM-HB2001FEVM board evaluates the NXP part MC33HB2001, including all
functions. The board features the following:
• Built-in reverse battery protection
• Test points allows probing its signals
• Built-in voltage regulator to supply logic level circuitry
• LEDs to indicate the supply status and the direction of the motor
• Low Equivalent Series Resistance (ESR) capacitor to reduce ripple in the power supply
• Transient voltage suppressor to handle system level transients
Page 5
NXP Semiconductors
KTFRDMHB2001FEVMUG
FRDM-HB2001FEVM evaluation board
KTFRDMHB2001FEVMUG All information provided in this document is subject to legal disclaimers. © NXP B.V. 2016. All rights reserved
User guide Rev. 1.0 — 25 May 2016
5 / 35
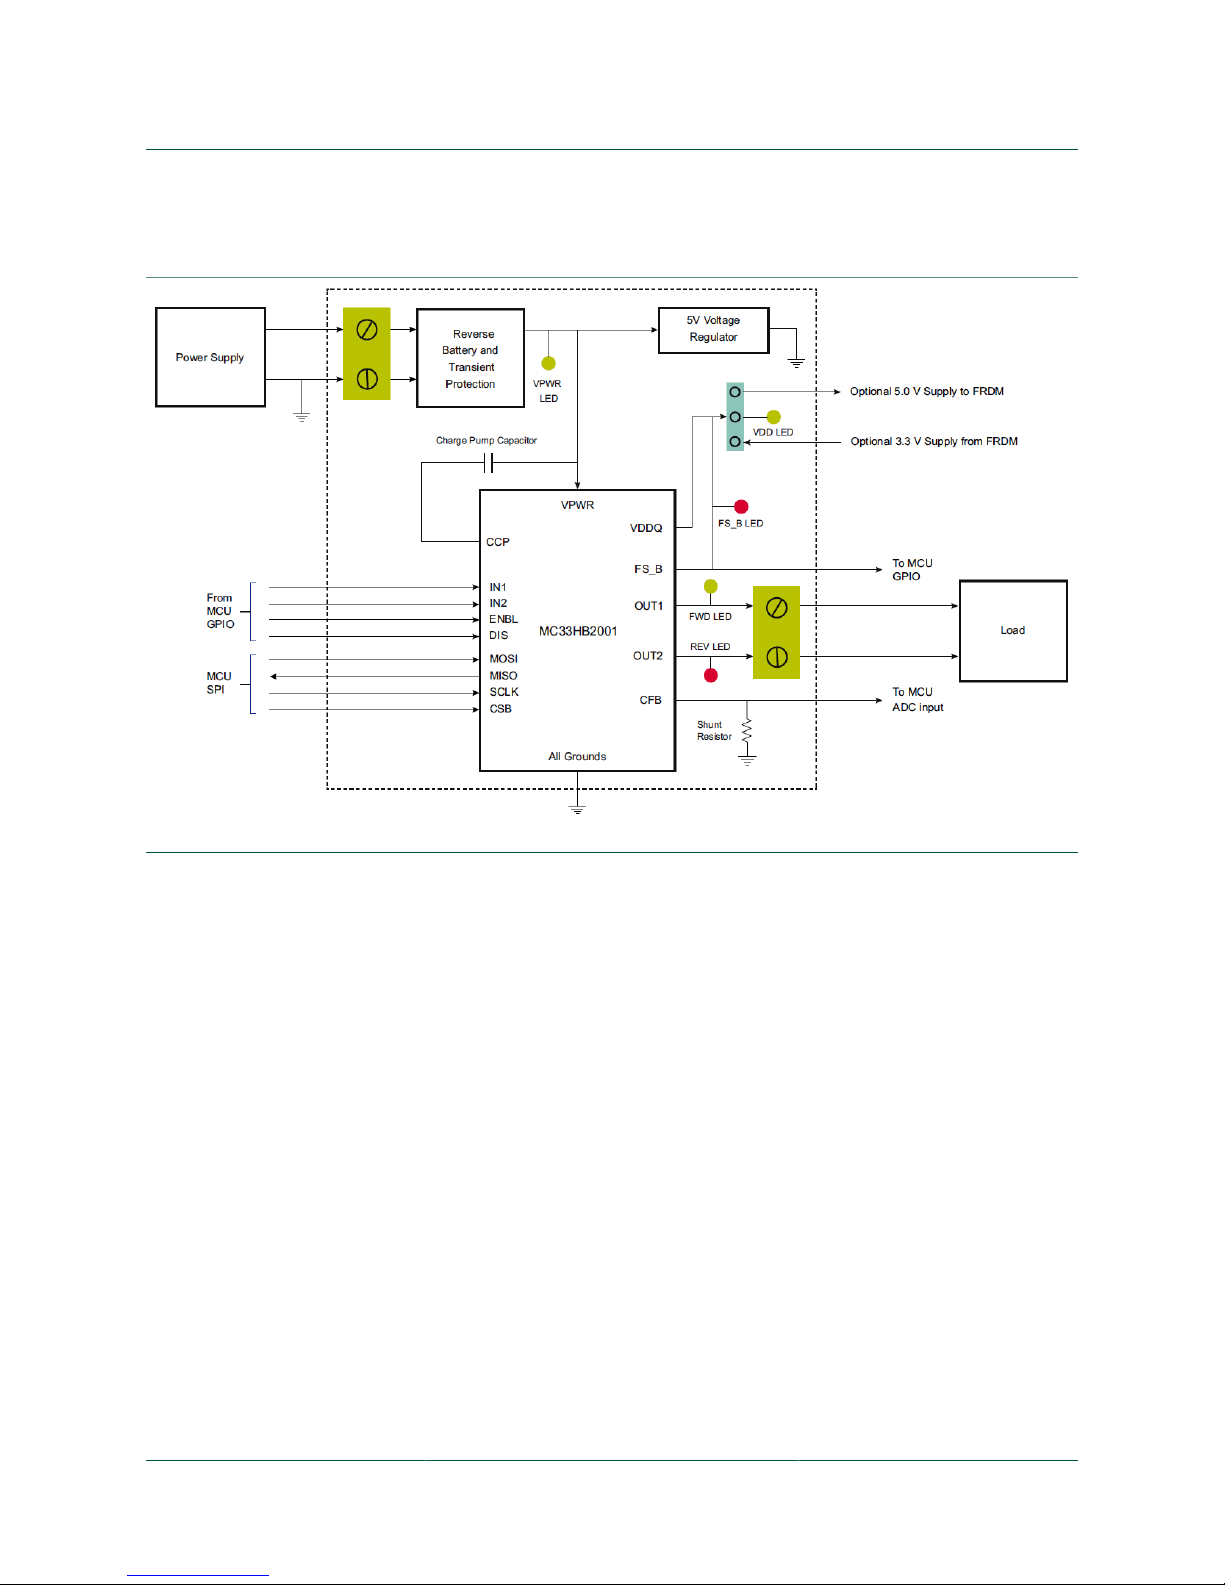
4.3 Block diagram
Figure 1. Block diagram
4.3.1 Device features
This evaluation board features the following NXP product:
Page 6
NXP Semiconductors
KTFRDMHB2001FEVMUG
FRDM-HB2001FEVM evaluation board
KTFRDMHB2001FEVMUG All information provided in this document is subject to legal disclaimers. © NXP B.V. 2016. All rights reserved
User guide Rev. 1.0 — 25 May 2016
6 / 35
Table 1. Device features
Device Description Features
MC33HB2001 The 33HB2001 is a monolithic H-Bridge
Power IC, enhanced with SPI configurability
and diagnostic capabilities.
• Advanced diagnostic reporting via a serial peripheral
interface (SPI): charge pump undervoltage on VPWR,
short to ground and short to VPWR for each output,
open load, temperature warning and overtemperature
shutdown
• Thermal management: excellent thermal resistance of
< 1.0 °C/W between junction and case (exposed pad)
• Eight selectable slew rates via the SPI: 0.25 V/μs to
more than 16 V/μs for EMI and thermal performance
optimization
• Four selectable current limits via the SPI:
5.4/7.0/8.8/10.7 A, covering a wide range of
applications
• Can be operated without the SPI with a default slew
rate of 2.0 V/μs and a 7.0 A current limit threshold
• Highly accurate real-time current feedback through a
current mirror output signal with less than 5.0 % error
• Drives inductive loads in a full H-Bridge or Half-bridge
configuration
• Overvoltage protection places the load in high-side
recirculation (braking) mode with notification in HBridge mode
• Wide operating range: 5.0 V to 28 V operation
• Low R
DS(on)
integrated MOSFETs: Maximum of 125
mΩ (TJ = 150 °C) for each MOSFET
• Internal protection for overtemperature, undervoltage
and short-circuit by signaling the error condition and
disabling the outputs
• I/0 pins can withstand up to 36 V
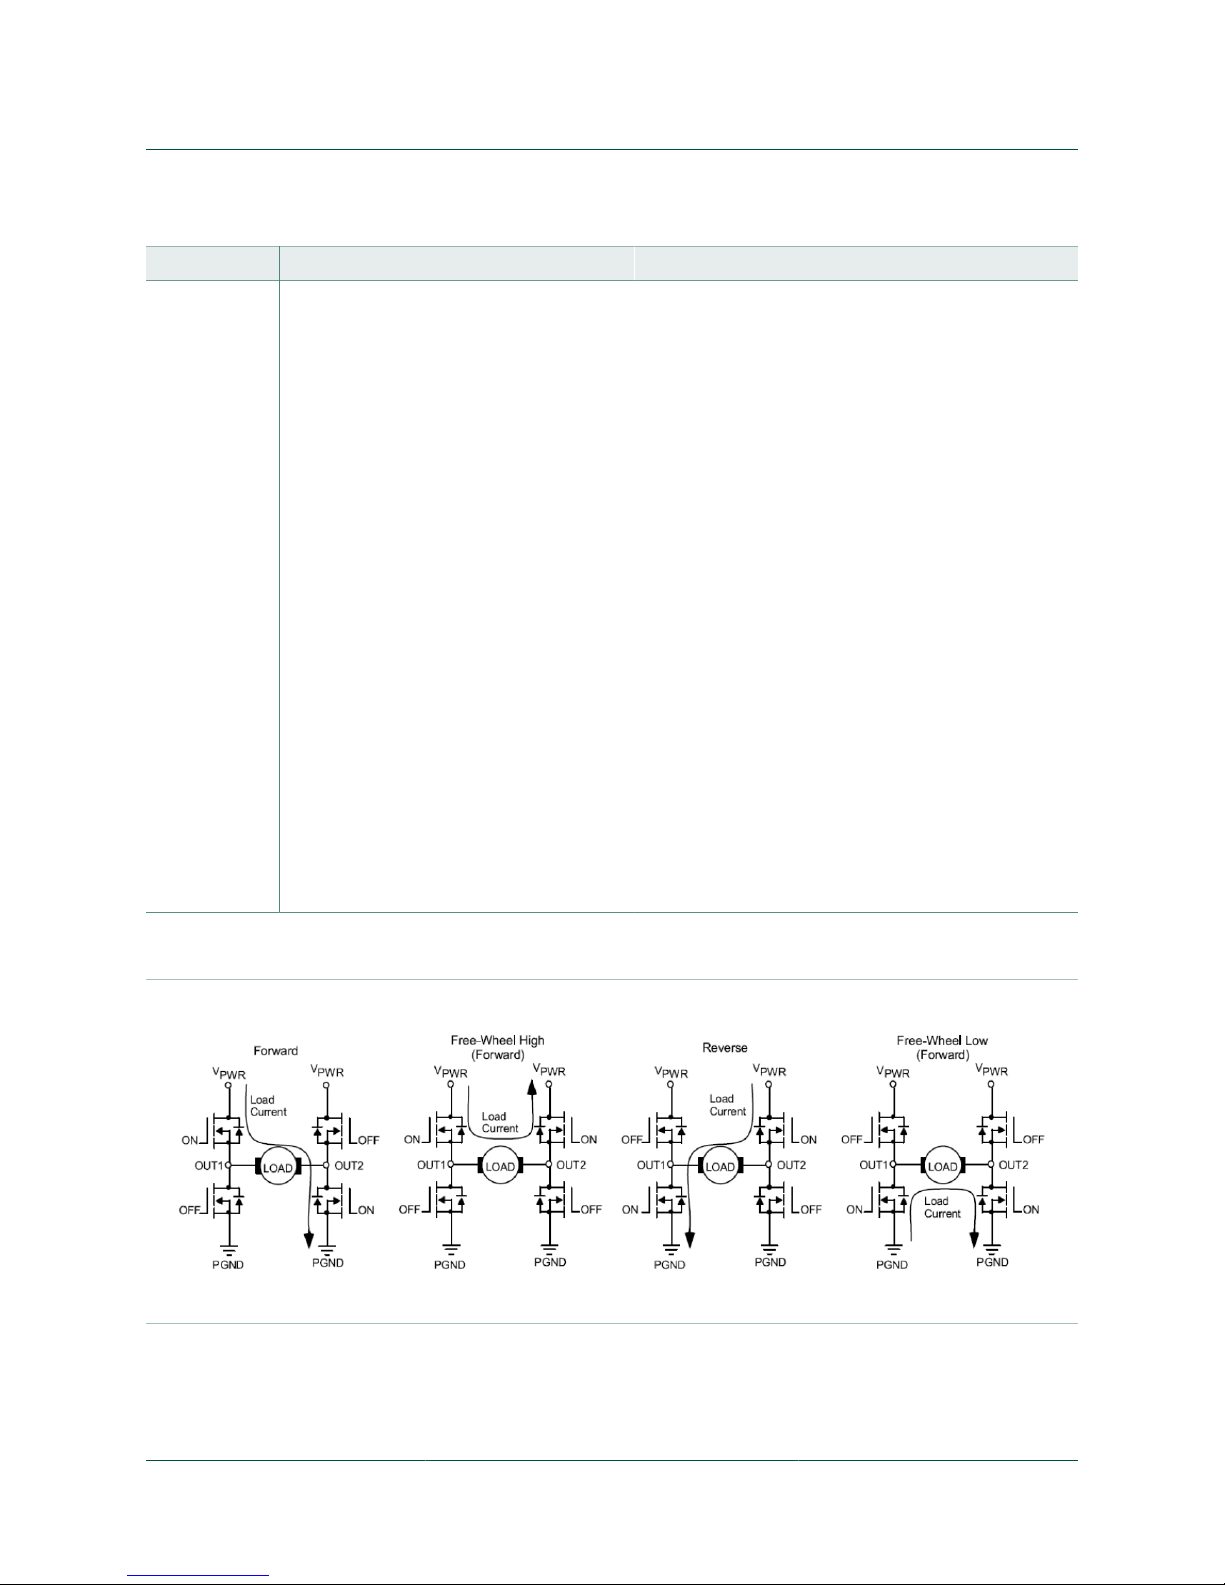
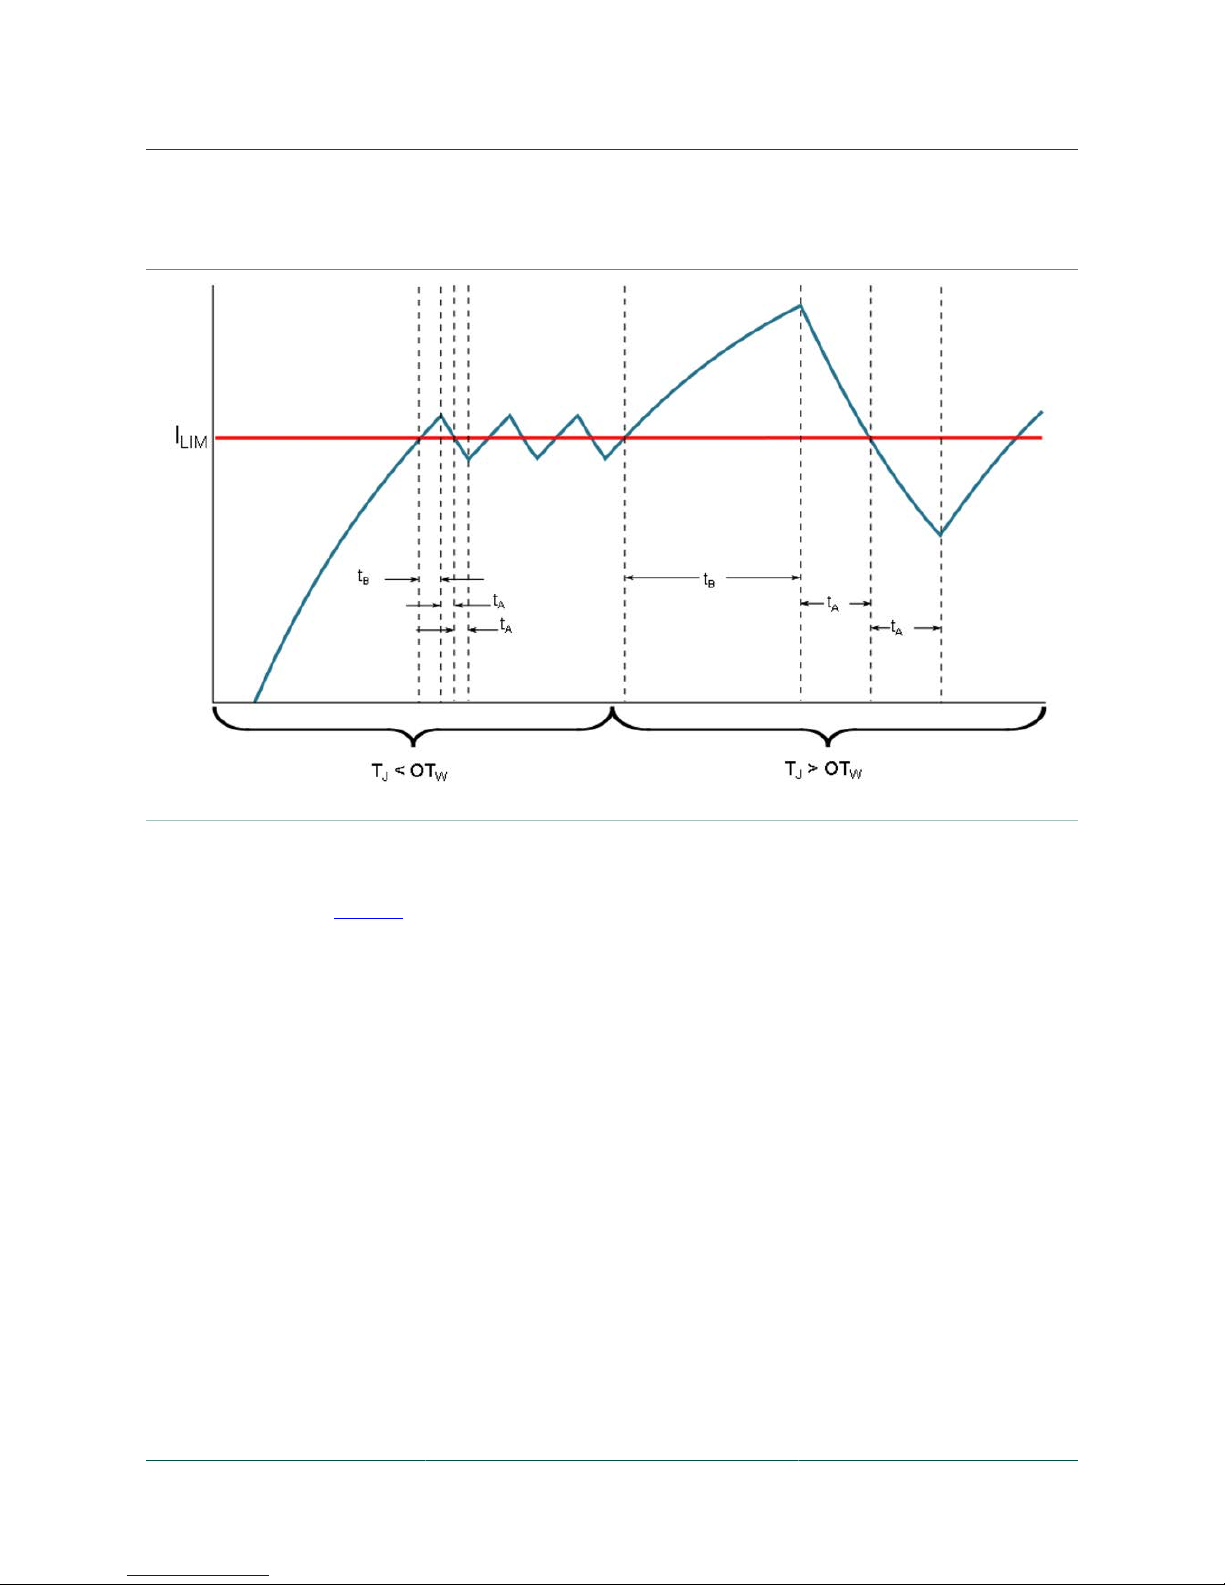
4.3.2 Modes of operation
Figure 2. Modes of operation
Page 7
NXP Semiconductors
KTFRDMHB2001FEVMUG
FRDM-HB2001FEVM evaluation board
KTFRDMHB2001FEVMUG All information provided in this document is subject to legal disclaimers. © NXP B.V. 2016. All rights reserved
User guide Rev. 1.0 — 25 May 2016
7 / 35
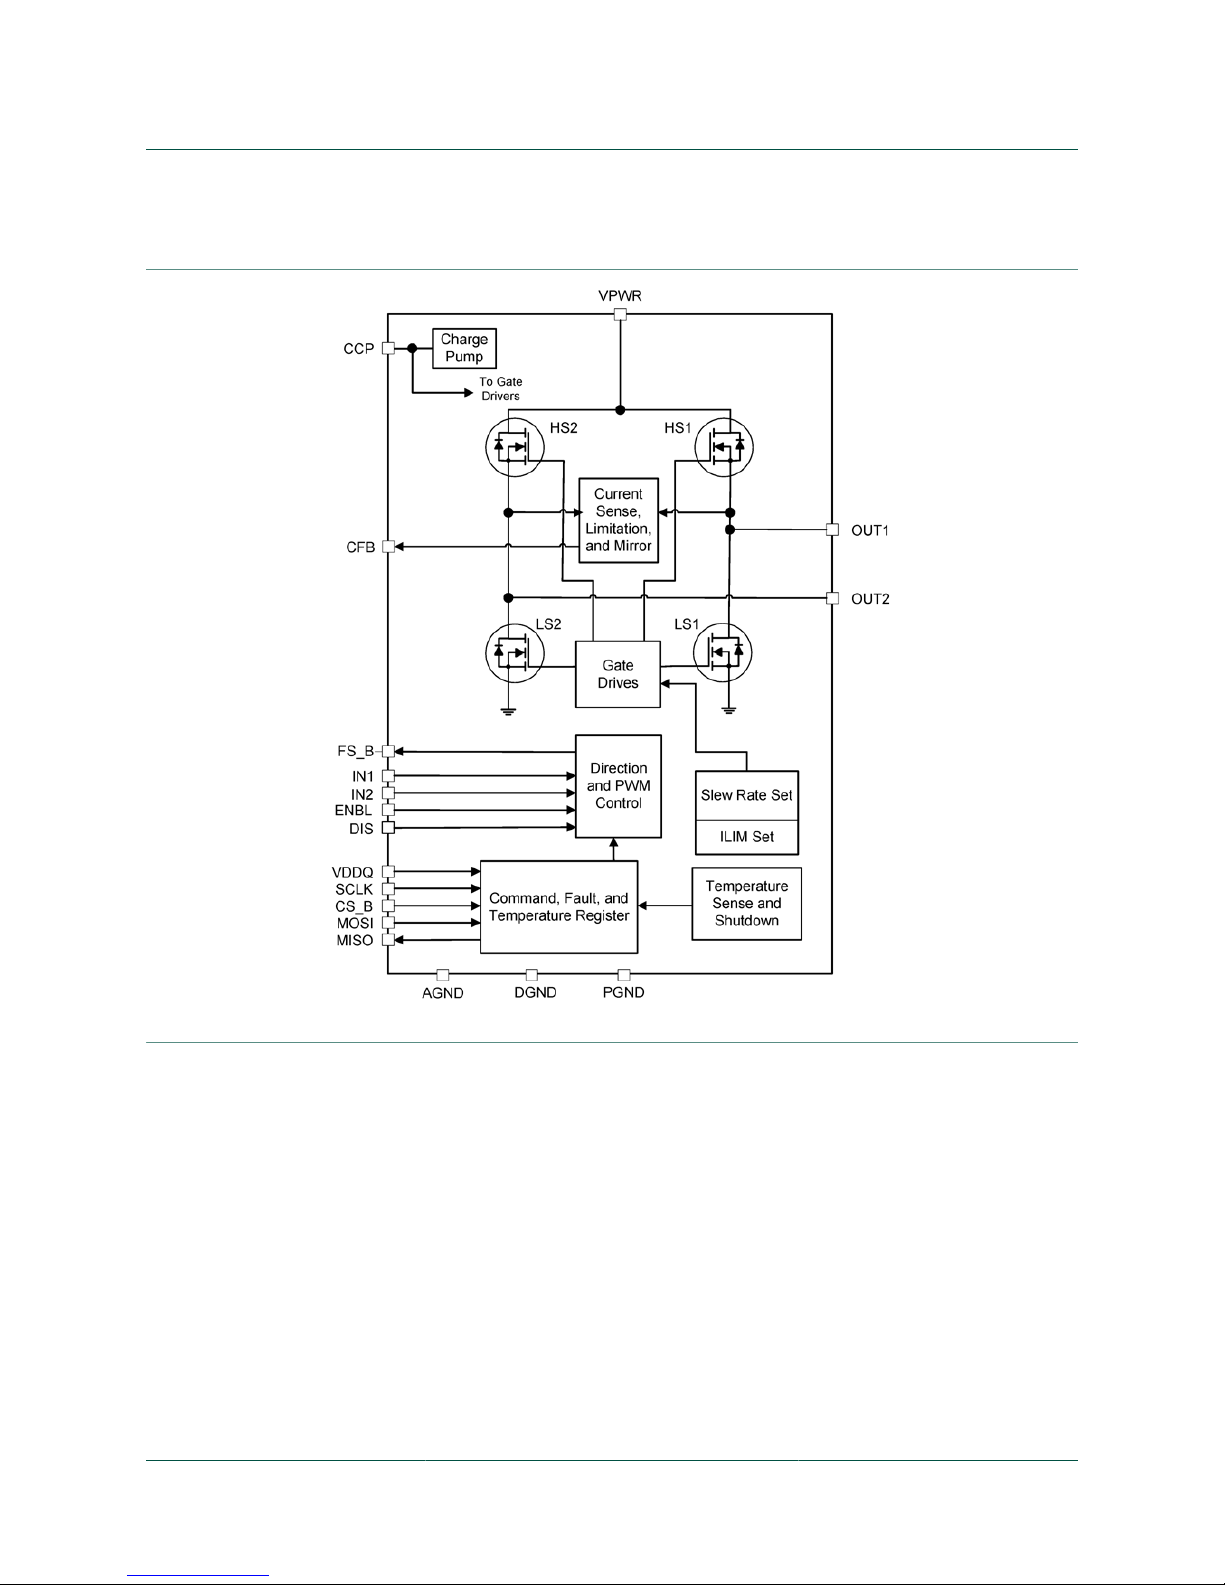
4.3.3 Architecture
Figure 3. Architecture
Page 8
NXP Semiconductors
KTFRDMHB2001FEVMUG
FRDM-HB2001FEVM evaluation board
KTFRDMHB2001FEVMUG All information provided in this document is subject to legal disclaimers. © NXP B.V. 2016. All rights reserved
User guide Rev. 1.0 — 25 May 2016
8 / 35
4.3.4 Thermal management
Figure 4. Thermal management
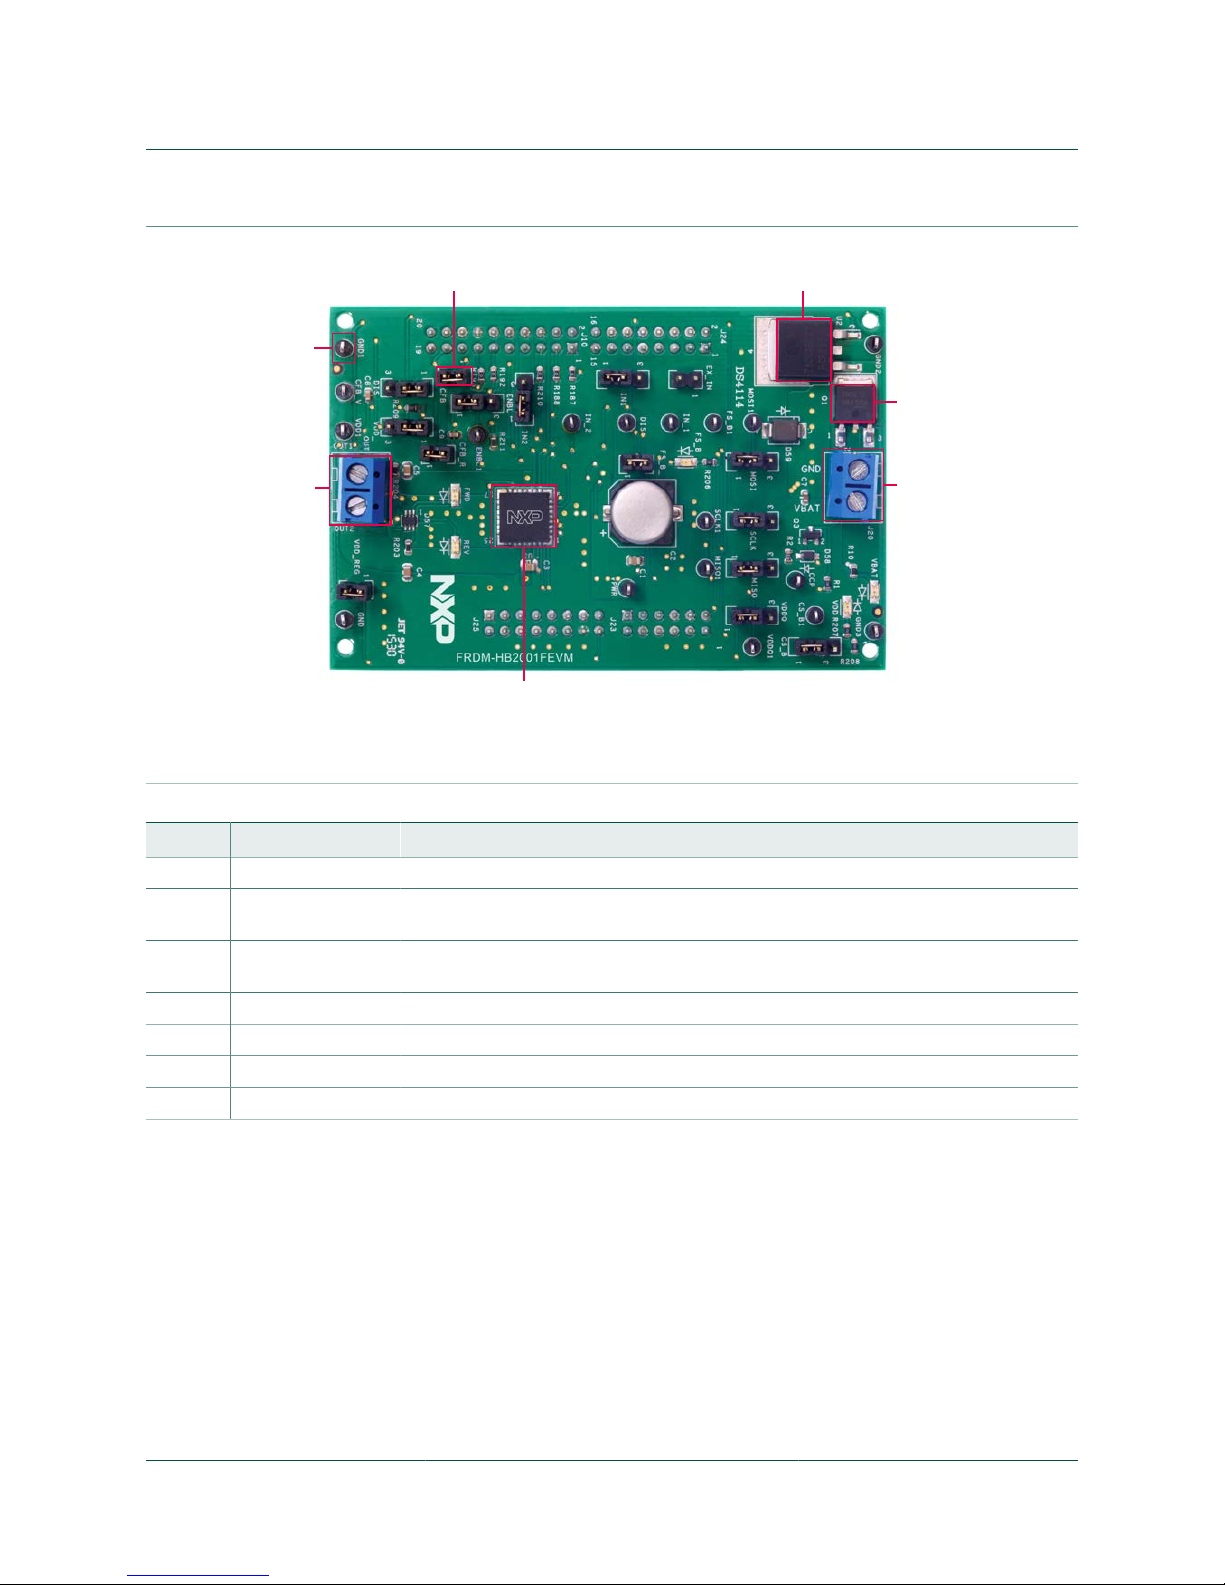
4.4 Board description
Figure 5 describes the main elements on the FRDM-HB2001FEVM.
Page 9
NXP Semiconductors
KTFRDMHB2001FEVMUG
FRDM-HB2001FEVM evaluation board
KTFRDMHB2001FEVMUG All information provided in this document is subject to legal disclaimers. © NXP B.V. 2016. All rights reserved
User guide Rev. 1.0 — 25 May 2016
9 / 35
1
4
7
6
3
2
5
Figure 5. Board description
Table 2. Board description
Number Name Descrioption
1 MC33HB2001 Monolithic H-Bridge Power IC in a robust thermally enhanced 32 lead PQFN package
2 Power and ground
inputs
Power supply terminal to connect the battery/power supply with the board
3 Reverse battery
protection
MOSFET for protecting MC33HB2001 in reverse battery condition
4 5.0 V regulator 5.0 V regulator for VDD and supply
5 Jumpers Jumpers for configuring the board for different modes of operation
6 Test points Test points to probe different signals
7 Output terminal Output connector to connect a load to the MC33HB2001 output
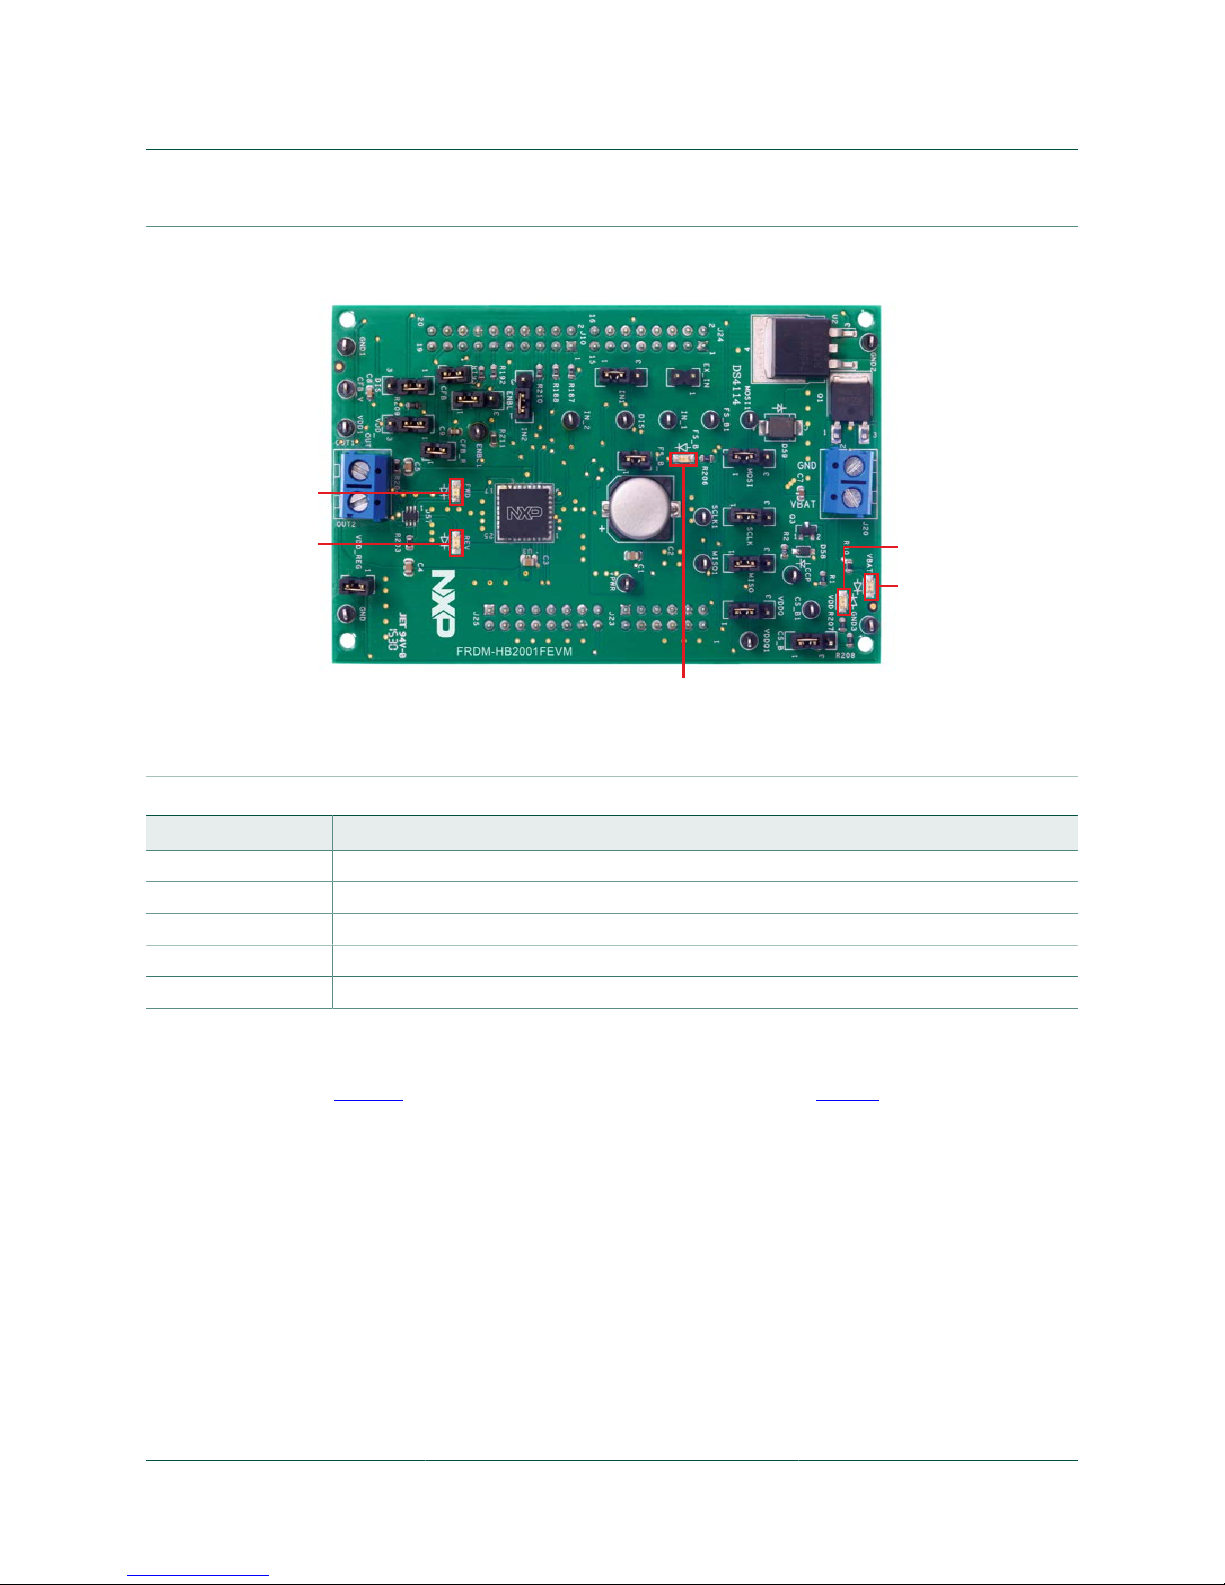
4.4.1 LED display
The following LEDs serve as visual output devices for the evaluation board:
Page 10
NXP Semiconductors
KTFRDMHB2001FEVMUG
FRDM-HB2001FEVM evaluation board
KTFRDMHB2001FEVMUG All information provided in this document is subject to legal disclaimers. © NXP B.V. 2016. All rights reserved
User guide Rev. 1.0 — 25 May 2016
10 / 35
FWD
VDD
REV
FS_B
VBAT
Figure 6. LED locations
Table 3. LED locations
LED ID Description
VBAT Green LED, indicates when main/battery supply is connected
VDD Green LED, indicates when +5.0 V supply is connected
FS_B Red LED, illuminates when the H-Bridge detects a fault
FWD Green LED, indicates current flowing in forward direction
REV Red LED, indicates current flowing in reverse direction
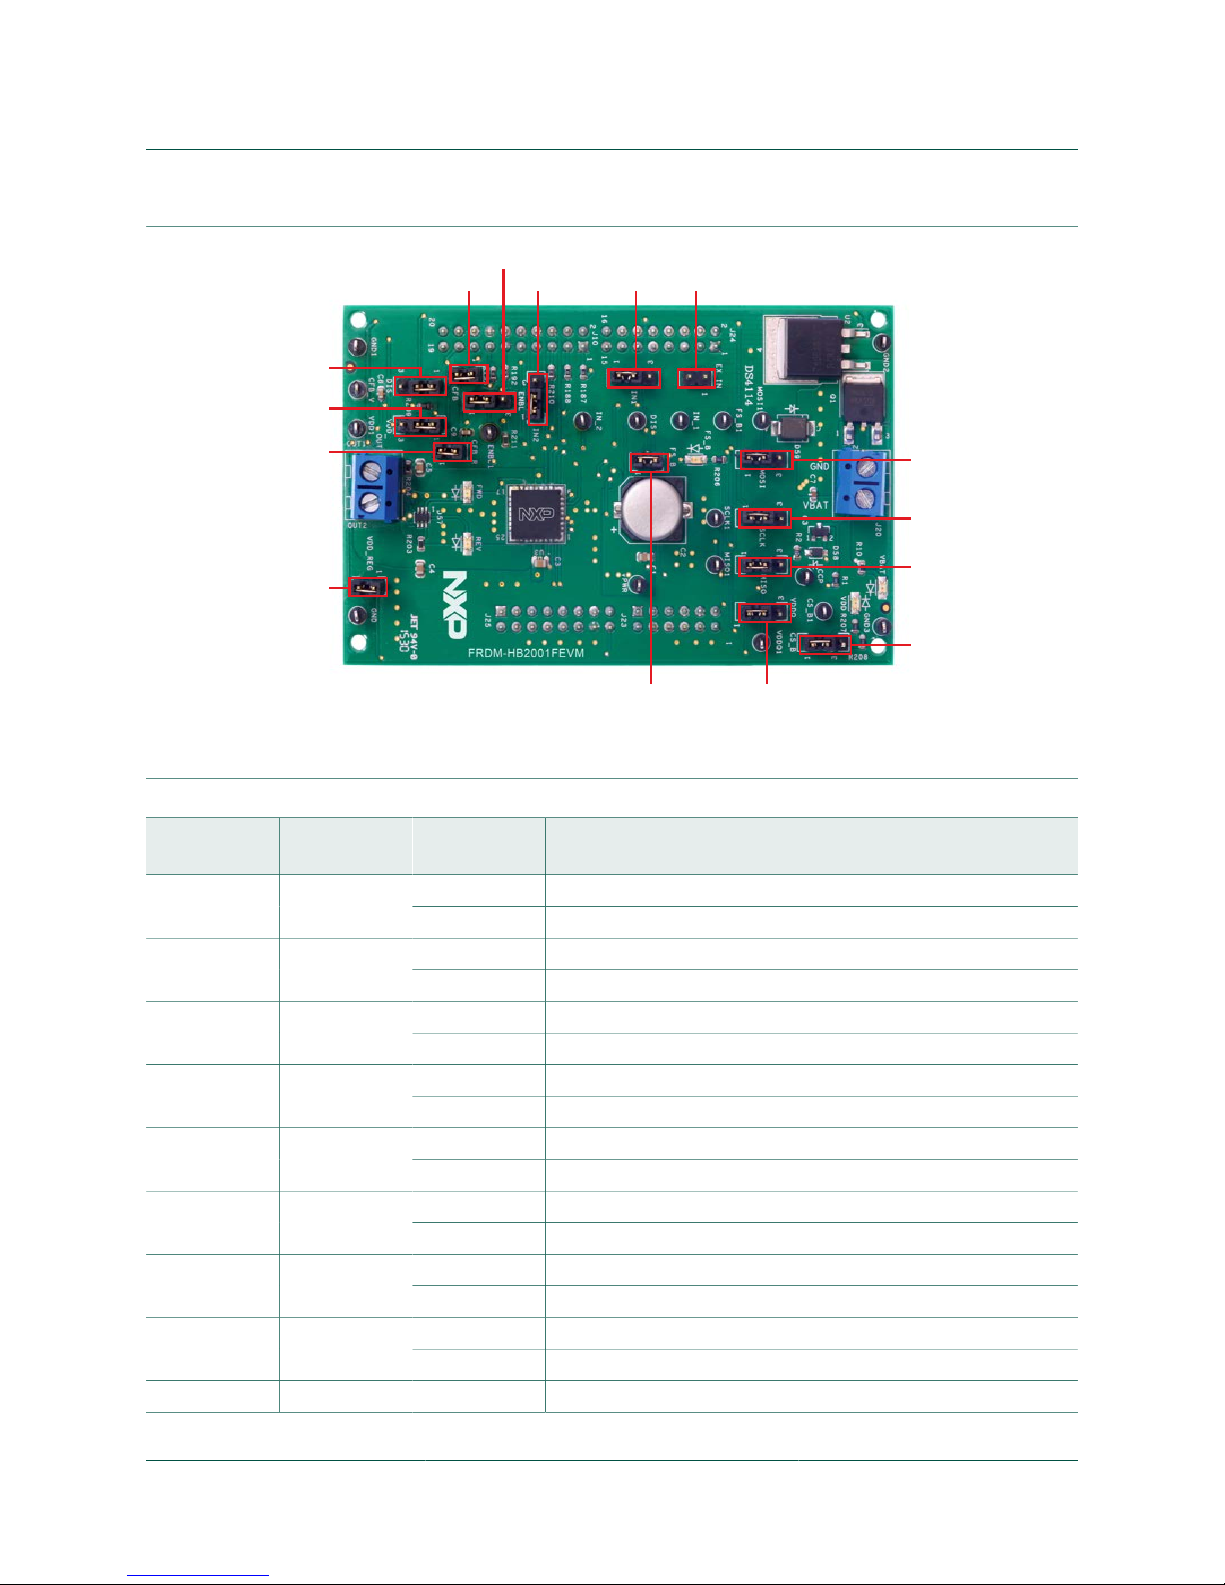
4.4.2 Jumper definitions
Figure 7 illustrates the evaluation board jumper locations. Table 4 explains the function
of each position. Blue fonts in the jumper position column indicate the default settings for
use with the FRDM-KL25Z.
Page 11
NXP Semiconductors
KTFRDMHB2001FEVMUG
FRDM-HB2001FEVM evaluation board
KTFRDMHB2001FEVMUG All information provided in this document is subject to legal disclaimers. © NXP B.V. 2016. All rights reserved
User guide Rev. 1.0 — 25 May 2016
11 / 35
DIS
VDD
CFB
ENBL
IN2 IN1 EX_IN
CFB_R
VDD_REG
MOSI
SCLK
MISO
CS_B
VDDQFS_B
Figure 7. Jumper definitions
Table 4. Jumper locations
Name Signal Jumper
position
Connection
1−2 IN1 control through MCU parallel output on J10 Pin 1 (DATA0)
J1 IN1
2−3 IN1 control through MCU parallel output on J10 Pin 1 (DATA0)
1−2 DIS control through MCU parallel output on J10 Pin 13 (CTRL1)
J2 DIS
2−3 DIS connected to GND to keep the outputs enabled
1−2 IN2 control through MCU parallel output on J10 Pin 3 (DATA1)
J3 IN2
2−3 IN2 control through external input on J15 Pin 2
1−2 CS_B control through MCU SPI output J10 Pin 6 (SPI_CS_B)
J4 CS_B
2−3 CS_B pulled up to VDD for operation without SPI
1−2 ENBL control through MCU parallel output J10 Pin 11 (CTRL0)
J5 ENBL
2−3 ENBL pulled up to VDD to keep the outputs enabled
1−2 SPI clock SCLK from MCU J10 Pin 12 (SPI_SCLK)
J6 SCLK
2−3 SCLK connected to GND for operation without SPI
1−2 MOSI control through MCU SPI output J10 Pin 8 (SPI_MOSI)
J7 MOSI
2−3 MOSI connected to GND for operation without SPI
1−2 MISO control through MCU SPI output J10 Pin 10 (SPI_MISO)
J8 MISO
2−3 MISO not connected for operation without SPI
J11 CFB 1−2 CFB connected to 200 Ω resistor
Page 12

NXP Semiconductors
KTFRDMHB2001FEVMUG
FRDM-HB2001FEVM evaluation board
KTFRDMHB2001FEVMUG All information provided in this document is subject to legal disclaimers. © NXP B.V. 2016. All rights reserved
User guide Rev. 1.0 — 25 May 2016
12 / 35
Name Signal Jumper
position
Connection
1−2 VDD connected to VDDQ
J14 VDDQ
2−3 VDDQ not connected
1−2 VDD supply from regulator U2
J17 VDD
2−3 VDD supply from FRDM board
J18 CFB_R 1−2 CFB connected to MCU ADC input J10 Pin 17 (CFB_READ)
J19 FS_B 1−2 FS_B connected to the pull-up resistor
J26 VDD_REG 1−2 VDD to FRDM board
J15 EX_IN Open IN1 and IN2 external inputs
The FRDM-HB2001FEVM, in conjunction with a FRDM-KL25Z board (shipped with the
kit), can evaluate the design by means of a GUI, any MCU with GPIO or with simple lab
equipment. A FRDM-KL25Z-compatible GUI and MCU program are available online at
the following link: http://www.nxp.com/FRDM-HB2001FEVM.
The FRDM-HB2001FEVM is compatible with any Arduino™ platform board. However, if
a board other than the FRDM-KL25Z is used, MCU code must be written to work with the
board.
4.4.3 Input signal definitions
The following input signals control the outputs or functions inside the circuit.
Table 5. Input signal definitions
Input name Description
DIS Disable signal to tri-state the outputs
ENBL Disable signal to tri-state the output and put the part in Sleep mode
IN1 Logic input to control OUT1
IN2 Logic input to control OUT2
MOSI Master out slave input for the SPI
CS_B Chip select bar input for the SPI
SCLK Clock for the SPI
4.4.4 Output signal definitions
The FRDM-HB2001-FEVM uses the following output signals to drive a load such as
a brushed DC motor. The board provides an analog output for real time load current
monitoring. This signal allows closed loop control of the load.
Table 6. Output signal definitions
Output name Description
OUT1 Output 1 of H-Bridge
OUT2 Output 2 of H-Bridge
FS_B Open drain Active Low status flag output to indicate fault
Page 13

NXP Semiconductors
KTFRDMHB2001FEVMUG
FRDM-HB2001FEVM evaluation board
KTFRDMHB2001FEVMUG All information provided in this document is subject to legal disclaimers. © NXP B.V. 2016. All rights reserved
User guide Rev. 1.0 — 25 May 2016
13 / 35
Output name Description
CFB Current mirror output for real time load current monitoring
MISO Master input slave output for SPI
4.4.5 Test point definitions
The following test points provide access to various signals to and from the board.
GND1
ENBL1
CCP
MISO1
CFB_V
VDD1
GND
IN_2 DIS1 IN_1
FS_B1
MOSI1
VPWR
SCLK1
GND2
CS_B1
GND3
VDDQ1
Figure 8. Test point locations
Table 7. Test point definitions
Test point name Signal name Description
CFB_V CFB_READ CFB pin voltage going to ADC
CCP CCP Charge pump voltage
ENBL1 ENBL Enable/disable signal to activate/tri-
state the outputs and put the device to
Sleep mode
DIS1 DIS Enable/disable signal to activate/tri-
state the outputs
IN_1 IN1 Direction control in H-Bridge mode and
OUT1 control in Half-Bridge mode
IN_2 IN2 PWM control in H-Bridge mode and
OUT2 control in Half-Bridge mode
VPWR VPWR System voltage
VDDQ1 VDDQ VDDQ digital output supply voltage
Page 14

NXP Semiconductors
KTFRDMHB2001FEVMUG
FRDM-HB2001FEVM evaluation board
KTFRDMHB2001FEVMUG All information provided in this document is subject to legal disclaimers. © NXP B.V. 2016. All rights reserved
User guide Rev. 1.0 — 25 May 2016
14 / 35
Test point name Signal name Description
FSB1 FSB Fault status monitoring pin
VDD1 VDD VDD supply for the part
CS_B1 CS_B Chip select bar
SCLK1 SCLK Clock for SPI
MOSI1 MOSI Master output slave input signal
MISO1 MISO Master input slave output signal
GND GND Ground signal
GND1 GND Ground signal
GND2 GND Ground signal
GND3 GND Ground signal
4.4.6 Screw terminal connections
The board has the following screw terminal connections to connect the power supply and
the load.
J21
J20
Figure 9. Screw terminal locations
Table 8. Screw terminal connections
Screw
terminal name
Description
J20 Power supply connector for the MC33HB2001
J21 Output connector to connect load
Page 15

NXP Semiconductors
KTFRDMHB2001FEVMUG
FRDM-HB2001FEVM evaluation board
KTFRDMHB2001FEVMUG All information provided in this document is subject to legal disclaimers. © NXP B.V. 2016. All rights reserved
User guide Rev. 1.0 — 25 May 2016
15 / 35
5 FRDM-KL25Z Freedom SPI dongle
The NXP Freedom development platform is a set of software and hardware tools
supporting evaluation and development. It is ideal for rapid prototyping of microcontrollerbased applications. The NXP Freedom KL25Z hardware, FRDM-KL25Z, is a simple,
yet sophisticated design featuring a Kinetis L Series microcontroller, the industry's first
microcontroller built on the ARM® Cortex™-M0+ core.
Figure 10. FRDM-KL25Z
Page 16

NXP Semiconductors
KTFRDMHB2001FEVMUG
FRDM-HB2001FEVM evaluation board
KTFRDMHB2001FEVMUG All information provided in this document is subject to legal disclaimers. © NXP B.V. 2016. All rights reserved
User guide Rev. 1.0 — 25 May 2016
16 / 35
5.1 Connecting the FRDM-KL25Z to the board
The FRDM-KL25Z evaluation board was chosen specifically to work with the FRDMHB2001FEVM kit because of its low cost and features. The FRDM-KL25Z board makes
use of the USB, built in LEDs and I/O ports available with NXP’s Kinetis KL2x family of
microcontrollers.
The FRDM-KL25Z connects to a PC through a USB port, which permits the user
to control a DC brushed motor and to drive the evaluation board inputs in order to
operate the motor via the GPIOs and SPI pins. The FRDM-KL25Z also monitors the SPI
registers, thereby facilitating the use of safety and advanced diagnostic functions.
The FRDM-HB2001FEVM connects to the FRDM-KL25Z using the four dual row
Arduino™ R3 connectors on the bottom of the board (see Table 9, Figure 11 and Figure
12).
Figure 11. Connecting the FRDM-HB2001FEVM to the FRDM-KL25Z
Page 17

NXP Semiconductors
KTFRDMHB2001FEVMUG
FRDM-HB2001FEVM evaluation board
KTFRDMHB2001FEVMUG All information provided in this document is subject to legal disclaimers. © NXP B.V. 2016. All rights reserved
User guide Rev. 1.0 — 25 May 2016
17 / 35
Figure 12. FRDM-KL25Z to FRDM-HB2001FEVM connections
Table 9. FRDM-HB2001FEVM to FRDM-KL25Z connections
FRDM-HB2001FEVM FRDM-KL25Z Pin hardware name
Header Pin Header Pin FRDM-HB2001FEVM FRDM-KL25Z
Description
J24 1 J1 1 N/C PTC7 No Connection
J24 2 J1 2 N/C PTA1 No Connection
J24 3 J1 3 N/C PTC0 No Connection
J24 4 J1 4 N/C PTA2 No Connection
J24 5 J1 5 N/C PTC3 No Connection
J24 6 J1 6 N/C PTD4 No Connection
J24 7 J1 7 N/C PTC4 No Connection
J24 8 J1 8 N/C PTA12 No Connection
J24 9 J1 9 N/C PTC5 No Connection
J24 10 J1 10 N/C PTA4 No Connection
J24 11 J1 11 N/C PTC6 No Connection
J24 12 J1 12 N/C PTA5 No Connection
Page 18

NXP Semiconductors
KTFRDMHB2001FEVMUG
FRDM-HB2001FEVM evaluation board
KTFRDMHB2001FEVMUG All information provided in this document is subject to legal disclaimers. © NXP B.V. 2016. All rights reserved
User guide Rev. 1.0 — 25 May 2016
18 / 35
FRDM-HB2001FEVM FRDM-KL25Z Pin hardware name
Header Pin Header Pin FRDM-HB2001FEVM FRDM-KL25Z
Description
J24 13 J1 13 N/C PTC10 Not Connected
J24 14 J1 14 N/C PTC8 No Connection
J24 15 J1 15 N/C PTC11 Not Connected
J24 16 J1 16 N/C PTC9 No Connection
J10 1 J2 1 DATA0/IN1 PTC12 IN1 signal for the H-
Bridge
J10 2 J2 2 N/C PTA13 No Connection
J10 3 J2 3 DATA1/IN2 PTC13 IN2 signal for the H-
Bridge
J10 4 J2 4 N/C PTD5 No Connection
J10 5 J2 5 FS_B PTC16 Fault status pin to
report fault
J10 6 J2 6 CS_B PTD0 Chip select bar pin
J10 7 J2 7 N/C PTC17 No Connection
J10 8 J2 8 MOSI PTD2 Master output serial
input
J10 9 J2 9 N/C PTA16 No Connection
J10 10 J2 10 MISO PTD3 Master input serial
output
J10 11 J2 11 N/C PTA17 No Connection
J10 12 J2 12 SCLK PTD1 Clock for SPI
J10 13 J2 13 N/C PTE31 No Connection
J10 14 J2 14 GND GND No Connection
J10 15 J2 15 N/C N/C No Connection
J10 16 J2 16 N/C VREFH No Connection
J10 17 J2 17 CFB_READ PTD6 ADC input for
monitoring the CFB
pin
J10 18 J2 18 N/C PTE0 Disable signal to tri-
state the output and
put the part in Sleep
mode (Active Low)
J10 19 J2 19 N/C PTD7 No Connection
J10 20 J2 20 FRDM_VDD PTE1 No Connection
J23 1 J10 1 N/C PTE20 No Connection
J23 2 J10 2 N/C PTB0 No Connection
J23 3 J10 3 N/C PTE21 No Connection
J23 4 J10 4 N/C PTB1 No Connection
J23 5 J10 5 N/C PTE22 No Connection
J23 6 J10 6 N/C PTB2 No Connection
J23 7 J10 7 N/C PTE23 No Connection
J23 8 J10 8 N/C PTB3 No Connection
J23 9 J10 9 N/C PTE29 No Connection
J23 10 J10 10 N/C PTC2 No Connection
J23 11 J10 11 N/C PTE30 No Connection
J23 12 J10 12 N/C PTC1 No Connection
J25 1 J9 1 N/C PTB8 No Connection
J25 2 J9 2 N/C SDA_PTD5 No Connection
J25 3 J9 3 N/C PTB9 No Connection
Page 19

NXP Semiconductors
KTFRDMHB2001FEVMUG
FRDM-HB2001FEVM evaluation board
KTFRDMHB2001FEVMUG All information provided in this document is subject to legal disclaimers. © NXP B.V. 2016. All rights reserved
User guide Rev. 1.0 — 25 May 2016
19 / 35
FRDM-HB2001FEVM FRDM-KL25Z Pin hardware name
Header Pin Header Pin FRDM-HB2001FEVM FRDM-KL25Z
Description
J25 4 J9 4 N/C P3V3 No Connection
J25 5 J9 5 N/C PTB10 No Connection
J25 6 J9 6 N/C RESET/PTA20 No Connection
J25 7 J9 7 N/C PTB11 No Connection
J25 8 J9 8 N/C P3V3 No Connection
J25 9 J9 9 N/C PTE2 No Connection
J25 10 J9 10 N/C P5V_USB No Connection
J25 11 J9 11 N/C PTE3 No Connection
J25 12 J9 12 GND GND Ground
J25 13 J9 13 N/C PTE4 No Connection
J25 14 J9 14 GND GND No Connection
J25 15 J9 15 N/C PTE5 No Connection
J25 16 J9 16 VDD_REG P5-9V_VIN 5.0 V logic input
to FRDM-KL25Z
board from FRDMHB2001FEVM
6 Installing the software and setting up the hardware
6.1 Configuring the hardware
The FRDM-HB2001FEVM consists of an H-Bridge, a parallel and SPI interface, power
conditioning circuitry and an FRDM-KL25Z board. The board can be configured for use in
conjunction with a FRDM-KL25Z board or a function generator.
Caution
When using the FRDM-HB2001FEVM, make sure that the maximum motor supply voltage (VPWR) stays
within the 5.0 V to 40 V range. Operating outside this range may cause damage to the board.
6.1.1 Step-by-step instructions for setting up the hardware for use with a FRDMKL25Z
To configure the FRDM-HB2001FEVM for use with the FRDM-KL25Z do the following:
1. Connect the FRDM-HB2001FEVM to the FRDM-KL25Z using the Arduino
™
connectors on each board.
2. Connect the USB cable (not supplied with the kit) between the PC and the KL25Z
USB port on the FRDM-KL25Z board.
3. With the power switched off, attach the DC power supply to the VBAT and GND screw
connector terminal (J20) on the evaluation board.
4. Connect the load to the screw terminal (J21).
Figure 13 illustrates the hardware configuration using a FRDM-KL25Z.
Page 20

NXP Semiconductors
KTFRDMHB2001FEVMUG
FRDM-HB2001FEVM evaluation board
KTFRDMHB2001FEVMUG All information provided in this document is subject to legal disclaimers. © NXP B.V. 2016. All rights reserved
User guide Rev. 1.0 — 25 May 2016
20 / 35
FRDM-KL25Z Board
FRDM-HB2001FEVM
Brushed DC Motor
5 - 40 V Power Supply, 20 A
Workstation
Standard A to Mini-B
USB Cable
USB
Figure 13. FRDM-HB2001FEVM configured for use with an FRDM-KL25Z board
6.1.2 Step-by-step instructions for setting up the hardware for use with a
function generator
This section describes how to configure the FRDM-HB2001FEVM for use with a function
generator. The same connections apply if the board is connected to a microcontroller
instead of a function generator. See the board description (Section 4.4 "Board
description"), the schematic (Section 7 "Schematic") and the MC33HB2001 datasheet, to
configure the board for use in a specific environment.
1. Connect the function generator to the EX_IN jumper, with one channel attached to
each pin.
2. Change the board jumper connections, as shown in Figure 14.
3. With the power switched off, attach the DC power supply to the VBAT and GND screw
connector terminal (J20) on the evaluation board.
4. Connect the load to the screw terminal (J21).
Figure 14 illustrates the hardware configuration.
Page 21

NXP Semiconductors
KTFRDMHB2001FEVMUG
FRDM-HB2001FEVM evaluation board
KTFRDMHB2001FEVMUG All information provided in this document is subject to legal disclaimers. © NXP B.V. 2016. All rights reserved
User guide Rev. 1.0 — 25 May 2016
21 / 35
Figure 14. FRDM-HB2001FEVM configured for use with a Function Generator
6.2 Installing and using SPIGen
The latest version of SPIGen supports the MC33HB2001 and is designed to run on any
Windows 8, Windows 7, Vista, or XP-based operating system. To install the software, do
the following:
1. Go to www.nxp.com/SPIGen and click Download.
2. When the SPIGEN: SPI Generator (SPIGen) Software page appears, go to the
Device Drivers section and click Download associated with the description of the
selected environment. A wizard guides the user through the process.
3. If instructed for the SPIGen wizard to create a shortcut, a SPIGen icon appears on
the desktop. By default, the SPIGen executable file is installed at C:Program Files
\SPIGen.
Installing the device drivers overwrites any previous SPIGen installation and replaces
it with a current version containing the MC33HB2001 drivers. However, configuration
files (.spi) from the previous version remain intact.
4. Launch SPIGen. The HB2000/HB2001 device appears in the Device View panel.
Page 22

NXP Semiconductors
KTFRDMHB2001FEVMUG
FRDM-HB2001FEVM evaluation board
KTFRDMHB2001FEVMUG All information provided in this document is subject to legal disclaimers. © NXP B.V. 2016. All rights reserved
User guide Rev. 1.0 — 25 May 2016
22 / 35
5. To access the HB2000/HB2001 tab in the SPIGen window, expand the HB2000/
HB2001 folder in the Device View. Then click Registers icon.
Page 23

NXP Semiconductors
KTFRDMHB2001FEVMUG
FRDM-HB2001FEVM evaluation board
KTFRDMHB2001FEVMUG All information provided in this document is subject to legal disclaimers. © NXP B.V. 2016. All rights reserved
User guide Rev. 1.0 — 25 May 2016
23 / 35
If the pre-programmed code on FRDM-KL25Z is accidentally erased, download
"UsbSpiDongleKL25Z_SPIDrive_v512.srec" from the following link: www.nxp.com/
Usb-Spi-Dongle-firmware-KL25Z-HB2000-1.
6. Reading all the SPI Registers displays the following default status.
Page 24

NXP Semiconductors
KTFRDMHB2001FEVMUG
FRDM-HB2001FEVM evaluation board
KTFRDMHB2001FEVMUG All information provided in this document is subject to legal disclaimers. © NXP B.V. 2016. All rights reserved
User guide Rev. 1.0 — 25 May 2016
24 / 35
6.2.1 SPI control
Figure 15. SPI control description
Table 10. SPI control description
Name Description
Read
Click the read button on top of each register to read the
content of each register.
Write
Click individual bits of any register and then press the
corresponding write button to write into the register.
SPI Control
This section is designed for ease of use. Each dropdown
menu sets or resets appropriate bits in the registers for
a selected configuration. However, after configuration
selection, press the write button of the corresponding
register to be able to configure the part.
Page 25

NXP Semiconductors
KTFRDMHB2001FEVMUG
FRDM-HB2001FEVM evaluation board
KTFRDMHB2001FEVMUG All information provided in this document is subject to legal disclaimers. © NXP B.V. 2016. All rights reserved
User guide Rev. 1.0 — 25 May 2016
25 / 35
6.2.2 Parallel control
Figure 16. Parallel control description
Direction:
• Forward: Current flowing through OUT1 to OUT2
• Reverse: Current flowing through OUT2 to OUT1
Recirculation:
• High-side: Freewheel-High (both high-side FETs turned on) during PWMing
• Low-side: Freewheel-Low (both low-side FETs turned on) during PWMing (only valid
for Half-Bridge mode)
ENBL:
• Yes: ENBL is logic HIGH, the H-Bridge is operational
• No: ENBL is logic LOW, the H-Bridge outputs are tri-stated and placed in Sleep mode
DIS:
• DIS is logic HIGH, both OUT1 and OUT2 are tri-stated
• DIS is logic LOW, both OUT1 and OUT2 are enabled
PWM Freq:
• Enter PWM frequency up to 20000 Hz
Duty Cycle:
• Select PWM duty cycle from 10 to 90 %
Start:
• After selection of parallel control configuration, press Start to activate the outputs
Page 26

NXP Semiconductors
KTFRDMHB2001FEVMUG
FRDM-HB2001FEVM evaluation board
KTFRDMHB2001FEVMUG All information provided in this document is subject to legal disclaimers. © NXP B.V. 2016. All rights reserved
User guide Rev. 1.0 — 25 May 2016
26 / 35
Stop:
• Press Stop to deactivate the outputs
Current Feedback:
• Shows current through the high-side FET using the current recopy feature
Status Fault:
• Shows any fault condition in Sleep mode
Table 11. Logic behind direction control with High-side versus Low-side recirculation
Half-Bridge Mode
Forward - High-side Recirculation
1
IN1 = 1
IN2 = PWM signal with selected duty cycle and frequency
Reverse - High-side Recirculation
2
IN1 = PWM signal with selected duty cycle and frequency
IN2 = 1
Forward - Low-side Recirculation
3
IN1 = PWM signal with selected duty cycle and frequency
IN2 = 0
Reverse - Low-side Recirculation4
IN1 = 0
IN2 = PWM signal with selected duty cycle and frequency
H-Bridge Mode
Forward - High-side Recirculation
1
IN1 = 1
IN2 = PWM signal with selected duty cycle and frequency
Reverse - High-side Recirculation
2
IN1 = 0
IN2 = PWM signal with selected duty cycle and frequency
Page 27

NXP Semiconductors
KTFRDMHB2001FEVMUG
FRDM-HB2001FEVM evaluation board
KTFRDMHB2001FEVMUG All information provided in this document is subject to legal disclaimers. © NXP B.V. 2016. All rights reserved
User guide Rev. 1.0 — 25 May 2016
27 / 35
7 Schematic
5
5
4
4
3
3
2
2
1
1
D
D
C
C
B
B
A
A
Power Supply
Jumpers
Main Circuit
Main Signal Test Points
Outputs
FRDM connectors
IN1 (Option for
input with and
without SPI)
IN2 (Option for
input with and
without SPI)
ENBL (Option for
input with and
without SPI)
DIS (Option for
input with and
without SPI)
CS_B (Option for
input with and
without SPI)
SCLK (Option for
input with and
without SPI)
MOSI (Option for
input with and
without SPI)
MISO (Option for
input with and
without SPI)
IN1 and IN2
External Inputs
VDDQ Supply
from the
regulator
Current Feedback
FRDM_VDD
provides 3.3V
instead of 5V
All settings jumper position
1-2 for operation with MCU and
2-3 for manual operation.
Jumper setting 1-2 for VDD
through regulator and 2-3
for VDD supply through
FRDM board.
FRDM-HB2001FEVM
VPWR
VPWR
VPWR
VDD
VDD
VDD
VDD
VDD
VPWR
Drawing Title:
Size Document Numb er Rev
Date: Sh eet
of
Page Title:
ICAP Classification: CP: IUO: PUBI:
SCH-28929 PD F: SPF-28929 A
FRDM-HB2001FEVM
C
Thursday, April 28, 2 016
Board Schematic
1 1
___ ___
X
Drawing Title:
Size Document Numb er Rev
Date: Sh eet
of
Page Title:
ICAP Classification: CP: IUO: PUBI:
SCH-28929 PD F: SPF-28929 A
FRDM-HB2001FEVM
C
Thursday, April 28, 2 016
Board Schematic
1 1
___ ___
X
Drawing Title:
Size Document Numb er Rev
Date: Sh eet
of
Page Title:
ICAP Classification: CP: IUO: PUBI:
SCH-28929 PD F: SPF-28929 A
FRDM-HB2001FEVM
C
Thursday, April 28, 2 016
Board Schematic
1 1
___ ___
X
CFB_R
HDR_1X2
1
2
VBAT
GREEN
A
C
FWD
GREEN
A
C
EX_IN
HDR_1X2
1
2
R207
4.70K
Q3
SMMBTA06LT1G
2
3
1
C1
0.1 UF
OUT
CON 1X2 TB TH
1
2
SCLK1
J10
HDR_10X2
123
4
6
5
78910111213141516171819
20
GND3
C3
0.1 UF
IN1
HDR_1X3
123
DIS
HDR_1X3
123
0
R192
VDD
GREEN
A
C
R203
1K
D58
1N4148WS
A
C
R204
1K
CFB_V
IN2
HDR_1X3
123
R210 0
GND1
J25
HDR_2X8
123
4
6
5
789
10111213141516
CCP
D57
BAS70TW-7-F
213
456
CS_B
HDR_1X3
123
C5
0.033UF
ENBL
HDR_1X3
123
ENBL1
IN_1
VDDQ1
R211
200
U2
MC7805ABD2TG
OUT
3
IN
1
GND
4
VDD_REG
HDR_1X2
1
2
SCLK
HDR_1X3
123
J24
HDR_2X8
123
4
6
5
789101112131415
16
MOSI1
R209
4.70K
C9
0.047UF
MOSI
HDR_1X3
123
MISO
HDR_1X3
123
R206
4.70K
FS_B_
1
2
J20
CON 1X2 TB TH
1
2
IN_2
Q1
IPD30N06S2-1 5
1
3
4
VPWR
R2
47K
CFB
HDR_1X2
1
2
CS_B1
R10
10K
GND2
R1
1M
VDD_
HDR_1X3
1
2
3
FS_B1
R208
4.70K
REV
RED
A
C
C8
0.1uF
J23
HDR_2X6
123
4
6
5
789
101112
D59
SMBJ40
A
C
DIS1
U3
MC33HB2001F K
AGND1
6
ENBL7DIS8IN29IN1
10
CFB
11FS18
VPWR1
12
VPWR2
13
OUT1_1014OUT1_11
15
NC_1216NC_1317NC_14
19
PGND1
20
PGND2
21
PGND3
22
PGND4
23
AGND2
24
NC_2025NC_21
26
OUT2_2227OUT2_23
28
VPWR3
29
VPWR4
30
CCP
31
CS
32
VDDQ
1
MISO2SCLK3MOSI
4
DGND
5
EP
33
C7
0.33UF
VDDQ
HDR_1X3
123
GND
R193 0
+
C2
100UF
R187 0
FS_B
RED
A
C
VDD1
MISO1
C4
0.033UF
R188 0
ENBL
IN2
IN1
VPWR
VDDQ
GND
GND
GND
GND
VBATT
FS_B
VDD_REG
VDD
DATA0
IN1
EX_IN1
SPI_CS_B
SPI_MOSI
SPI_MISO
SPI_SCLK
DATA1
IN2
EX_IN2
CTRL0
ENBL
DATA0
DATA1
CTRL0
CTRL1
CTRL1
DIS
CS_B
SPI_CS_B
SPI_SCLK
SCLK
SPI_MOSI
MOSI
SPI_MISO
MISO
CFB
OUT1
OUT2
VDDQ
EX_IN1
EX_IN2
CFB_READ
FRDM_VDD
FRDM_VDD
CFB_READ
DIS
VDD_REG
CCP
CFB_READ
FS_B
CCP
CFB
OUT1
OUT2
CCP
VPWR
FS_B
CS_B
DIS
ENBL
SCLK
MOSI
MISO
VDDQ
IN2
IN1
Figure 17. Evaluation board schematic
Page 28

NXP Semiconductors
KTFRDMHB2001FEVMUG
FRDM-HB2001FEVM evaluation board
KTFRDMHB2001FEVMUG All information provided in this document is subject to legal disclaimers. © NXP B.V. 2016. All rights reserved
User guide Rev. 1.0 — 25 May 2016
28 / 35
8 Board layout
Figure 18. Silkscreen
Page 29

NXP Semiconductors
KTFRDMHB2001FEVMUG
FRDM-HB2001FEVM evaluation board
KTFRDMHB2001FEVMUG All information provided in this document is subject to legal disclaimers. © NXP B.V. 2016. All rights reserved
User guide Rev. 1.0 — 25 May 2016
29 / 35
9 Bill of materials
Table 12. Bill of materials
Item Qty Schematic
label
Value Description Part number Assy opt
Active components
[1]
1 1 U1 IC DRV H-BRIDGE MOTOR 3.0 A 5.0 to 28 V
SOIC32 – NXP
MC33HB2001FK
[2]
2 1 U2 IC VREG 5.0 V 1.0 A 5.0 to 18 V D2PAK – ON
Semiconductor
MC7805ABD2TG
[2]
Diodes
[1]
3 1 D2 24 V DIODE TVS UNIDIR 600 W 24 V AEC–Q101
SMB
SMBJ24AHE3/52
4 1 D57 70 V DIODE SCH TRIPLE 70 mA 70 V / 200 MW
SOT363
BAS70TW-7-F
5 1 D58 75 V DIODE SW 150 mA 75 V SOD–323 1N4148WS-7-F
6 2 D59, D64 150 mA LED RED SGL 25 mA 0805 598-8110-107F
7 3 D60, D61,
D63
25 mA LED RED SGL 25 mA 0805 598-8110-107F
Capacitors
[1]
8 2 C1, C13 0.1 µF CAP CER 0.1 μF 50 V 10 % X7R 0805 C0805C104K5RAC
9 1 C2 100 µF CAP ALEL 100 μF 50 V 20 % AEC–Q200
RADIAL SMT
MAL214699104E3
10 2 C4, C5 0.033µFCAP CER 0.033 μF 50 V 10 % X7R 0805 08055C333KAT2A
11 1 C7 0.33 µF CAP CER 0.33 μF 50 V 10 % X7R 0603 C1608X7R1H334K080AC
12 1 C8 0.1 µF CAP CER 0.1 μF 16 V 10 % X7R AEC–Q200
0603
GCM188R71C104KA37D
13 1 C9 0.047µFCAP CER 0.047 μF 25 V 10 % X7R 0603 C0603X7R250-473KNE
Resistors
[1]
14 1 R1 1.0 MΩ RES 1 MΩ 1/4 W 1 % AEC–Q200 0603 CRCW06031M00FKEAHP
15 1 R2 47 kΩ RES MF 47 kΩ 1/10 W 1.0 % AEC–Q200
0603
CRCW060347K0FKEA
16 1 R10 10 kΩ RES MF 10 kΩ 1/10 W 5 % AEC–Q200 0603 ERJ-3GEYJ103V
17 4 R18, R188,
R192, R193
0 Ω RES MF 0 Ω 1/10 W – 0603 CRCW06030000Z0EA
18 1 R211 200 Ω RES MF 200 Ω 1/10 W 1 % 0603 RK73H1JTTD2000F
19 2 R203, R204 1.0 kΩ RES MF 1.0 KΩ 1/10 W 1 % 0603 AR03FTNX1001
20 4 R206, R207,
R208, R209
4.70 kΩ RES MF 4.70 KΩ 1/10 W 1 % 0603 RK73H1JTTD4701F
Switches, connectors, jumpers and test points
[1]
Page 30

NXP Semiconductors
KTFRDMHB2001FEVMUG
FRDM-HB2001FEVM evaluation board
KTFRDMHB2001FEVMUG All information provided in this document is subject to legal disclaimers. © NXP B.V. 2016. All rights reserved
User guide Rev. 1.0 — 25 May 2016
30 / 35
Item Qty Schematic
label
Value Description Part number Assy opt
21 16 IN1,
GND1,IN2,
GND2, GND3,
VPWR,
VDDQ, VDD,
SCLK, MOSI,
MISO, GND,
FS_B, ENBL,
DIS, CS_B
TEST POINT BLACK 40 MIL DRILL 180 MIL
TH 109L
5001
22 11 J1, J2, J3, J4,
J5, J6, J7, J8,
J14, J17
HDR 1X3 TH 100 MIL SP 374H AU 826629-3
23 1 J10 HDR 2X10 TH 100 MIL CTR 330H AU 100L TSW-110-07-S-D
24 4 J11, J15, J18,
J19, J26
HDR 1X2 TH 100 MIL SP 378H AU 130L 826629-2
25 2 J20, J21 CON 1X2 TB TH 5.08 MM 543H SN 138L 20020316-H021B01LF
26 1 J23 HDR 2X6 TH 100 MIL CTR 330H AU TSW-106-07-S-D
27 2 J24, J25 HDR 2X8 TH 100 MIL CTR 330H AU TSW-108-07-G-D
28 1 Q1 TRAN NMOS PWR 30 A 55 V AEC-Q101
TO252
IPD30N06S2-15
29 1 Q3 TRAN NPN DRIVER 500 mA 80 V AEC-Q101
SOT23
SMMBTA06LT1G
[1] NXP does not assume liability, endorse, or warrant components from external manufacturers are referenced in circuit drawings or tables. While NXP
offers component recommendations in this configuration, it is the customer’s responsibility to validate their application.
[2] Critical components. For critical components, it is vital to use the manufacturer listed.
10 Accessory item bill of materials
Table 13. Accessory item bill of materials
Item Qty Part Number Description
1 1 FRDM-KL25Z
[1]
NXP Freedom Development
Platform for Kinetis
KL14/15/24/25 MCUs
[1] NXP does not assume liability, endorse, or warrant components from external manufacturers are referenced in circuit drawings or tables. While NXP
offers component recommendations in this configuration, it is the customer’s responsibility to validate their application.
11 References
Following are URLs where you can obtain information on related NXP products and
application solutions:
NXP.com support pages Description URL
FRDM-HB2001FEVM Tool summary page http://www.nxp.com/FRDM-
HB2001FEVM
MC33HB2001 Product summary page http://www.nxp.com/MC33HB2001
FRDM-KL25Z Tool summary page http://www.nxp.com/FRDM-KL25Z
SPIGen SPI generator software http://www.nxp.com/SPIGEN
Page 31

NXP Semiconductors
KTFRDMHB2001FEVMUG
FRDM-HB2001FEVM evaluation board
KTFRDMHB2001FEVMUG All information provided in this document is subject to legal disclaimers. © NXP B.V. 2016. All rights reserved
User guide Rev. 1.0 — 25 May 2016
31 / 35
12 Revision history
Revision Date Description of changes
1.0 5/2016 Initial release
13 Contact information
Visit http://www.nxp.com/support for a list of phone numbers within your region.
Visit http://www.nxp.com/warranty to submit a request for tool warranty.
Page 32

NXP Semiconductors
KTFRDMHB2001FEVMUG
FRDM-HB2001FEVM evaluation board
KTFRDMHB2001FEVMUG All information provided in this document is subject to legal disclaimers. © NXP B.V. 2016. All rights reserved
User guide Rev. 1.0 — 25 May 2016
32 / 35
14 Legal information
14.1 Definitions
Draft — The document is a draft version only. The content is still under
internal review and subject to formal approval, which may result in
modifications or additions. NXP Semiconductors does not give any
representations or warranties as to the accuracy or completeness of
information included herein and shall have no liability for the consequences
of use of such information.
14.2 Disclaimers
Information in this document is provided solely to enable system and
software implementers to use NXP products. There are no express or
implied copyright licenses granted hereunder to design or fabricate any
integrated circuits based on the information in this document. NXP reserves
the right to make changes without further notice to any products herein.
NXP makes no warranty, representation, or guarantee regarding the
suitability of its products for any particular purpose, nor does NXP assume
any liability arising out of the application or use of any product or circuit,
and specifically disclaims any and all liability, including without limitation
consequential or incidental damages. “Typical” parameters that may be
provided in NXP data sheets and/ or specifications can and do vary in
different applications, and actual performance may vary over time. All
operating parameters, including “typicals,” must be validated for each
customer application by customer's technical experts. NXP does not
convey any license under its patent rights nor the rights of others. NXP sells
products pursuant to standard terms and conditions of sale, which can be
found at the following address: nxp.com/salestermsandconditions.
14.3 Trademarks
Notice: All referenced brands, product names, service names and
trademarks are the property of their respective owners.
NXP — is a trademark of NXP B.V.
the NXP logo — is a trademark of NXP B.V.
Freescale — is a trademark of NXP B.V.
the Freescale logo — is a trademark of NXP B.V.
SMARTMOS — is a trademark of NXP B.V.
Page 33

NXP Semiconductors
KTFRDMHB2001FEVMUG
FRDM-HB2001FEVM evaluation board
KTFRDMHB2001FEVMUG All information provided in this document is subject to legal disclaimers. © NXP B.V. 2016. All rights reserved
User guide Rev. 1.0 — 25 May 2016
33 / 35
Tables
Tab. 1. Device features ................................................. 6
Tab. 2. Board description .............................................. 9
Tab. 3. LED locations .................................................. 10
Tab. 4. Jumper locations ............................................. 11
Tab. 5. Input signal definitions .....................................12
Tab. 6. Output signal definitions ..................................12
Tab. 7. Test point definitions ....................................... 13
Tab. 8. Screw terminal connections ............................ 14
Tab. 9. FRDM-HB2001FEVM to FRDM-KL25Z
connections ..................................................... 17
Tab. 10. SPI control description .................................... 24
Tab. 11. Logic behind direction control with High-side
versus Low-side recirculation .......................... 26
Tab. 12. Bill of materials ................................................29
Tab. 13. Accessory item bill of materials .......................30
Page 34

NXP Semiconductors
KTFRDMHB2001FEVMUG
FRDM-HB2001FEVM evaluation board
KTFRDMHB2001FEVMUG All information provided in this document is subject to legal disclaimers. © NXP B.V. 2016. All rights reserved
User guide Rev. 1.0 — 25 May 2016
34 / 35
Figures
Fig. 1. Block diagram ................................................... 5
Fig. 2. Modes of operation ........................................... 6
Fig. 3. Architecture ....................................................... 7
Fig. 4. Thermal management ....................................... 8
Fig. 5. Board description .............................................. 9
Fig. 6. LED locations .................................................. 10
Fig. 7. Jumper definitions ........................................... 11
Fig. 8. Test point locations ......................................... 13
Fig. 9. Screw terminal locations ................................. 14
Fig. 10. FRDM-KL25Z .................................................. 15
Fig. 11. Connecting the FRDM-HB2001FEVM to the
FRDM-KL25Z .................................................. 16
Fig. 12. FRDM-KL25Z to FRDM-HB2001FEVM
connections ..................................................... 17
Fig. 13. FRDM-HB2001FEVM configured for use
with an FRDM-KL25Z board ........................... 20
Fig. 14. FRDM-HB2001FEVM configured for use
with a Function Generator ...............................21
Fig. 15. SPI control description .................................... 24
Fig. 16. Parallel control description .............................. 25
Fig. 17. Evaluation board schematic ............................ 27
Fig. 18. Silkscreen ........................................................ 28
Page 35

NXP Semiconductors
KTFRDMHB2001FEVMUG
FRDM-HB2001FEVM evaluation board
Contents
1 FRDM-HB2001FEVM ............................................1
2 Important notice .................................................. 2
3 Getting started .................................................... 3
3.1 Kit contents/packing list ..................................... 3
3.2 Jump start ..........................................................3
3.3 Required equipment .......................................... 3
3.4 System requirements ......................................... 3
4 Getting to know the hardware ........................... 4
4.1 Board overview ..................................................4
4.2 Board features ................................................... 4
4.3 Block diagram ....................................................5
4.3.1 Device features ..................................................5
4.3.2 Modes of operation ............................................6
4.3.3 Architecture ........................................................7
4.3.4 Thermal management ........................................8
4.4 Board description ...............................................8
4.4.1 LED display ....................................................... 9
4.4.2 Jumper definitions ............................................10
4.4.3 Input signal definitions ..................................... 12
4.4.4 Output signal definitions .................................. 12
4.4.5 Test point definitions ........................................13
4.4.6 Screw terminal connections ............................. 14
5 FRDM-KL25Z Freedom SPI dongle .................. 15
5.1 Connecting the FRDM-KL25Z to the board ......16
6 Installing the software and setting up the
hardware ............................................................ 19
6.1 Configuring the hardware ................................ 19
6.1.1 Step-by-step instructions for setting up the
hardware for use with a FRDM-KL25Z ............ 19
6.1.2 Step-by-step instructions for setting up the
hardware for use with a function generator ......20
6.2 Installing and using SPIGen ............................ 21
6.2.1 SPI control ....................................................... 24
6.2.2 Parallel control .................................................25
7 Schematic .......................................................... 27
8 Board layout ...................................................... 28
9 Bill of materials ................................................. 29
10 Accessory item bill of materials ...................... 30
11 References .........................................................30
12 Revision history ................................................ 31
13 Contact information .......................................... 31
14 Legal information .............................................. 32
© NXP B.V. 2016. All rights reserved
For more information, please visit: http://www.nxp.com
For sales office addresses, please send an email to: salesaddresses@nxp.com
Released on 25 May 2016
Page 36

Mouser Electronics
Authorized Distributor
Click to View Pricing, Inventory, Delivery & Lifecycle Information:
NXP:
FRDM-HB2001FEVM
 Loading...