

Model NV-EC1701
EoC Ethernet over Coax Transceiver
with PoE, PoE+, or High Power PoE
IMPORTANT SAFETY INSTRUCTIONS
Complete Installation Guide
1) Read these instructions.
2) Keep these instructions.
3) Heed all warnings.
4) Follow all instructions.
5) Do not use this apparatus near water.
6) Clean only with a dry cloth.
7) Install in accordance with the manufacturer’s instructions.
8) Do not install near any heat sources such as radiators, heat registers, stoves or other apparatus (including DVRs) that produce heat.
9) Do not defeat the safety purpose of the polarized or grounding-type
plug. A polarized plug has two blades with one wider than the other.
A grounding type plug has two blades and a third grounding prong.
The wider blade or the third prong are provided for your safety. If the
provided plug does not fit into your outlet, consult an electrician for
replacement of the obsolete outlet.
10) Protect the power cord from being walked on or pinched particularly at plugs, convenience receptacles, and the point where they exit
from the apparatus.
11) Only use attachments/accessories specified by the manufacturer.
12) Refer all servicing to qualified service personnel. Servicing is
required when the apparatus has been damaged in any way, such as
a power supply cord or plug is damaged, liquid has been spilled, or
objects have fallen into the apparatus, the apparatus has been
exposed to rain or moisture, does not operate normally, or has been
dropped. This installation should be made by a qualified service person and should conform to all local codes.
13) BNC Connection: the installation shall be in accordance with the
applicable provisions of the National Electrical Code ANSI/NFPA 70,
Article 800.90 and Canadial Electrical Code Part 1, Section 60-504.
14) RJ45 PoE connection: to be connected only to networks or circuits
that are not routed to outside plant or building.
TO REDUCE THE RISK OF ELECTRICAL SHOCK, DO NOT REMOVE COVER OR
BACK. NO USER SERVICEABLE PARTS INSIDE. REFER SERVICING TO QUALIFIED
SERVICE PERSONNEL.
WARNING: TO REDUCE THE RISK OF ELECTRICAL SHOCK, DO NOT EXPOSE THIS
APPARATUS TO RAIN OR MOISTURE.
This installation should be made by a qualified service person and
should conform to all local codes.
WARNING - Do not install the unit in an environment where the
operating ambient temperature exceeds 185° F (85° C). The ventilation should not be impeded by covering the unit with items, such as
newspapers, table-cloths, curtains, etc. No naked flame sources, such
as lighted candles should be placed on the apparatus.
WARNING - Do not interconnect multiple outputs. Never
use more than two power supplies within a network system.
WARNING - The apparatus shall not be exposed to dripping or
splashing and no objects filled with liquids, such as vases, shall be
placed on the apparatus.
WARNING - Use only a Certified power cord and plug (coupler /
mains) assemblies for location installed.
WARNING - Power cord is regarded as main disconnect.
WARNING - The appliance coupler (power cord/mains) shall
remain readily operable.
WARNING - For safety, never put NVT signals in the same conduit as high-voltage wiring.
This product is intended to be supplied by a certified power source
marked “Class 2” or “LPS” and rated 48-56 VDC, minimum 840mA,
which may or may not be provided with the product.
Power supplies, when provided, are external inline, with an IEC380C14 power inlet and 6 ft (1.8 m) line-cord. Input Voltage is 100 ~240
VAC 50-60 Hz. A molded P1J 5.5 mm barrel connector provides a
Class 2 (SELV) 48-56 VDC regulated output. Line cord UL approved
type SPT-2, SVT, or SJT, 18/3 AWG Min. 300VAC, 60° C Max. 15ft
(4.5m) long. One end with IEC380-C13 appliance coupler and the
other end with NEMA 1015P or equivalent for country.
Page 1 of 14
Model NV-EC1701
EoC Ethernet over Coax Transceiver
with PoE, PoE+, or High Power PoE
PRODUCT OVERVIEW
Features:
• Transmit 10/100 BaseT Full Duplex Ethernet up to 8,000ft (2,500m) or more over RG-59*
• Powers PoE entry stations (or other PoE, PoE+, or High Power devices), up to 60 watts *
• 48 or 56 VDC is distributed over the coax to all connected equipment. Powers PoE, PoE+, or High
Power PoE cameras (or other PoE devices), up to 60 watts*
• One EoC transceiver at the network-end can support multiple remote transceivers/IP cameras
using the NV-EC4BNC adaptor/splitter
• Up to four transceivers can be rack mounted on an NV-RMEC16 Rack Mount Tray Kit,
connecting up to 16 cameras
• Easy configuration, no PC required
• Transparently supports all networking protocols (UDP, TCP/IP, HTTP, Multicast etc.)
• Advanced 128-bit AES encrypted transmission and PoE+ power technology
• Built-in transient protection; Industrial temperature range
• Available in 1-4 Camera System Kits
• Limited lifetime warranty
The NVT Model NV-EC1701 Ethernet over Coax EoC Transceiver is a compact media converter
that allows 10/100 BaseT Ethernet and PoE+ power to be transmitted using coax cable. These devices
are often used in legacy installations where existing cable is re-deployed as part of an upgrade to IP
cameras. 48 or 56 VDC class 2 power is delivered to one transceiver, which distributes it to up to four
remote transceivers, and their PoE or PoE+ or High Power PoE cameras*.
These transceivers are extremely simple to use, with no IP or MAC addressing required. Status LEDs
indicate power and link connectivity/activity for RJ45 and BNC ports. They are backed by NVT’s award
winning customer support and limited lifetime warranty.
*Distance and number of devices supported will often be lower due to power delivery voltage-drop on the wire. See Wire Distance Chart on pages 8 & 9.
Page 2 of 14
CONFIGURATION INSTRUCTIONS
NV-EC1701 EoC transceivers transmit high bandwidth encrypted Ethernet signals over conventional coax cables. To provide utmost signal integrity and security, the
NV-EC1701 transceivers must be configured to communicate exclusively with other transceivers within their Network Group. This group typically consists of one
NV-EC1701 located at the control room (usually connected to an ethernet switch or router), and up to four remote NV-EC1701 transceivers (usually connected to IP cameras).
Before connecting to the network, each NV-EC1701 must learn which other NV-EC1701 transceivers are to be part of that group. This simple process is
called Joining. It is recommended that transceivers in each Network Group be configured prior to deployment using these instructions:
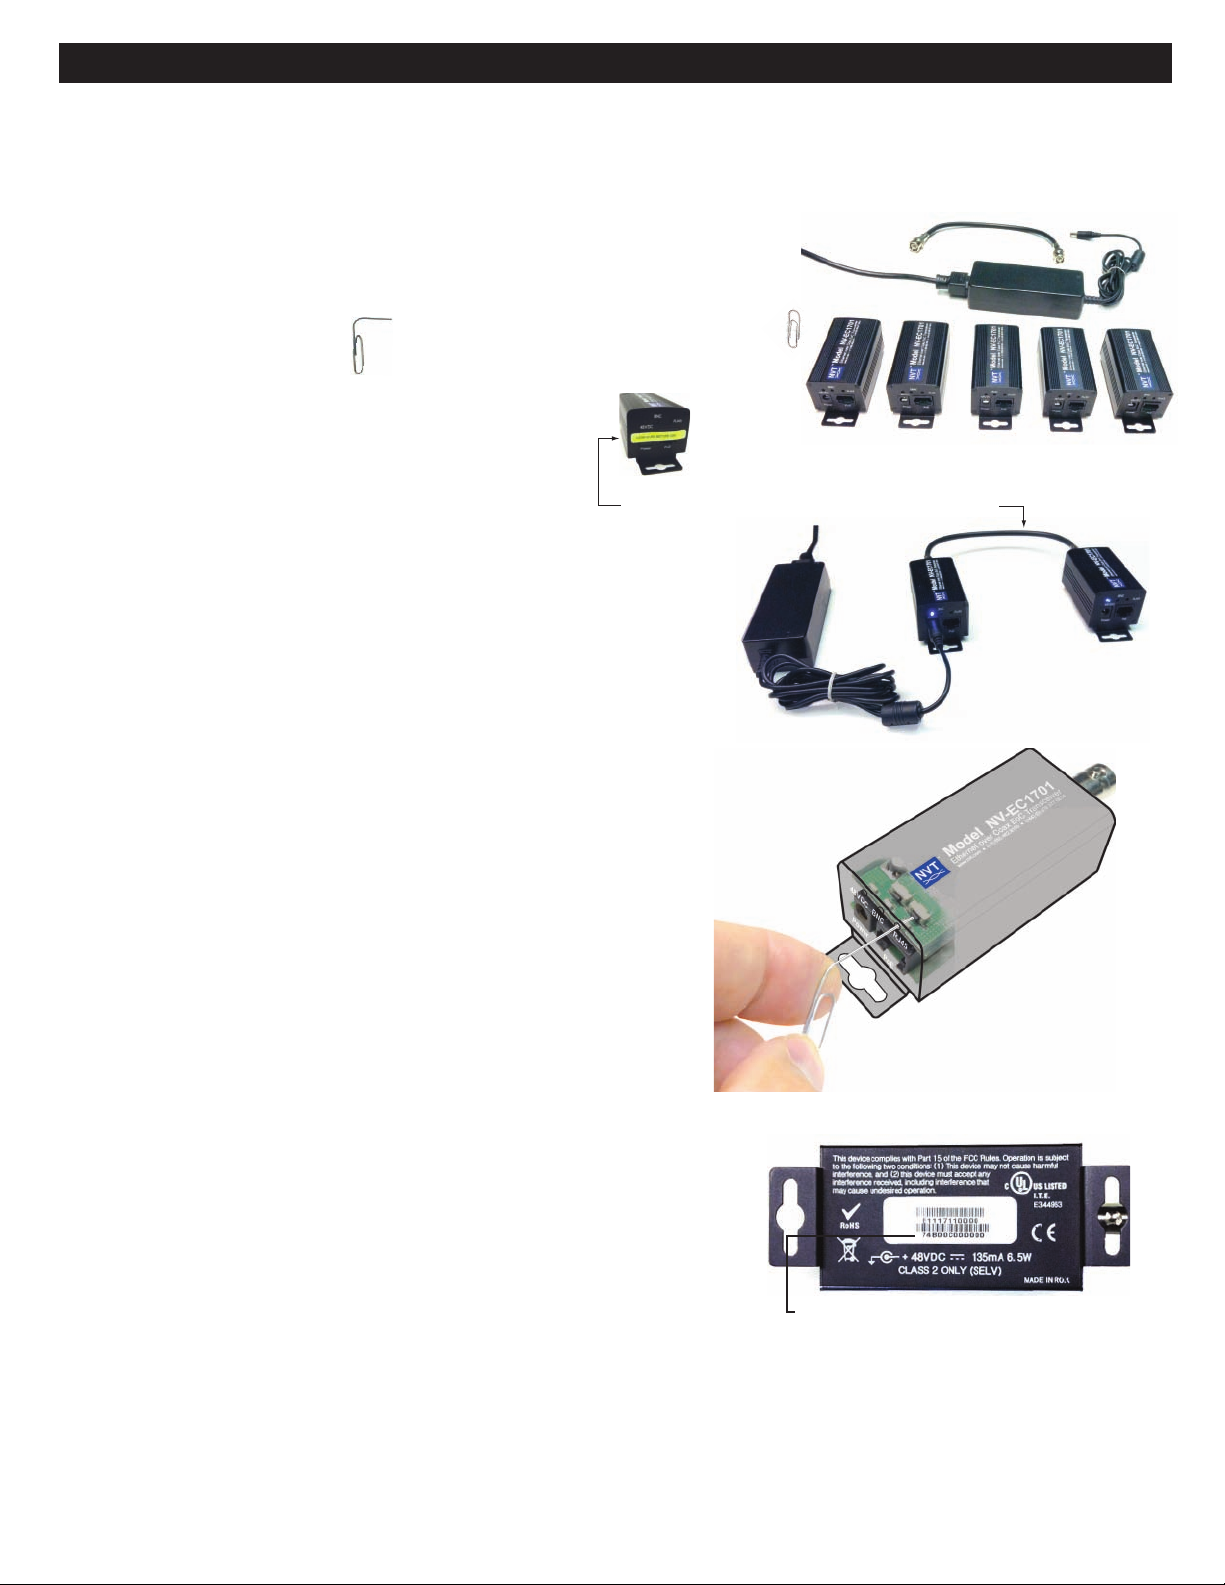
Step One: Gather Materials
• NV-EC1701 transceivers
• 48VDC power supply & line-cord (NV-PS48-60W)
• Coax jumper
• Small paper-clip, partially straightened
• Device labels
• IP Network Documentation Log
Step Two: Connect Hardware
• Remove and discard the “Configure Before Use” labels.
• Connect two NV-EC1701 transceivers using a coax jumper.
• Connect a 48-56V power supply to transceiver #1; Apply power.
• Verify that the blue POWER LED on each transceiver illuminates.
• After 20 seconds, verify that the green BNC LED on each transceiver is off. If a BNC LED is on, the
transceiver has been previously joined. Perform the un-joining process below before proceeding.
Step Three: Joining
• On transceiver #1, using the straightened paper-clip, momentarily depress the small push-button
located behind and slightly above the RJ45 LED. The blue Power LED will begin blinking.
• Depress the same push-button on the transceiver #2.
• Both transceivers have now entered Join Mode.They will find each other and establish encrypted
communication. In about 10 seconds, the blue Power LEDs on both transceivers will return to a steady
on condition, indicating a successful Join.
Step Four: Adding Transceivers (if required)
• Disconnect transceiver #2 and replace it with a new un-joined transceiver (#3, or #4, or #5).
• Repeat steps two and three to add additional transceivers to the same Network Group.
Step Five: Documentation
• Label the configured transceivers with a unique Network Group ID of your choice.
This will help you identify them after they have been deployed.
• Record this Network Group information in your IP Network Documentation Log.
This log may include essential documentation which will help you identify all
system devices during and after deployment:
• Camera Number • Camera-end NVT Transceiver MAC Address
• Camera Position/Location • NVT Transceiver Network Group Name
• Camera Make & Model • Control Room NVT Transceiver MAC Address
• Camera MAC & IP Address • Control Room Router Port Number
• Camera Login & Password
Un-Joining a Transceiver
If you need to move a transceiver from one Network Group to another, it must first un-learn its previous
Network Group and be returned to an un-joined state. Do this by:
• Connect a 48-56 VDC power supply to a transceiver to be un-joined.
• Wait until its green BNC LED is lit.
• Using the straightened paper-clip, momentarily depress the small push-button located behind
and slightly above the RJ45 LED until the green BNC LED goes off. The RJ45 LED should remain off.
• Release the paperclip.
• Observe that the BNC and RJ45 LEDs flash.
• Observe that the BNC and RJ45 LEDs turn off.
• Observe that the BNC goes on solid.
• Un-joining is now complete.
If you are not sure that un-joining has been successful, remove and then re-apply power, and repeat.
Step One: Gather Materials
Step Two: Remove Label
Step Three: Transparent
view of push-button location
Step Five: Transceiver MAC address
Connect
Hardware
Page 3 of 13
Model NV-EC1701 EoC Ethernet over Coax Transceiver
NV-EC1701
NV-EC1701
M
odel NV-EC1701
w
ww.nvt.com ● (+1) 650.462.8100 ● (+44) (0) 208 977 6614
E
thernet over Coax Transceiver
M
odel NV-EC1701
w
ww.nvt.com ● (+1) 650.462.8100 ● (+44) (0) 208 977 6614
E
thernet over Coax Transceiver
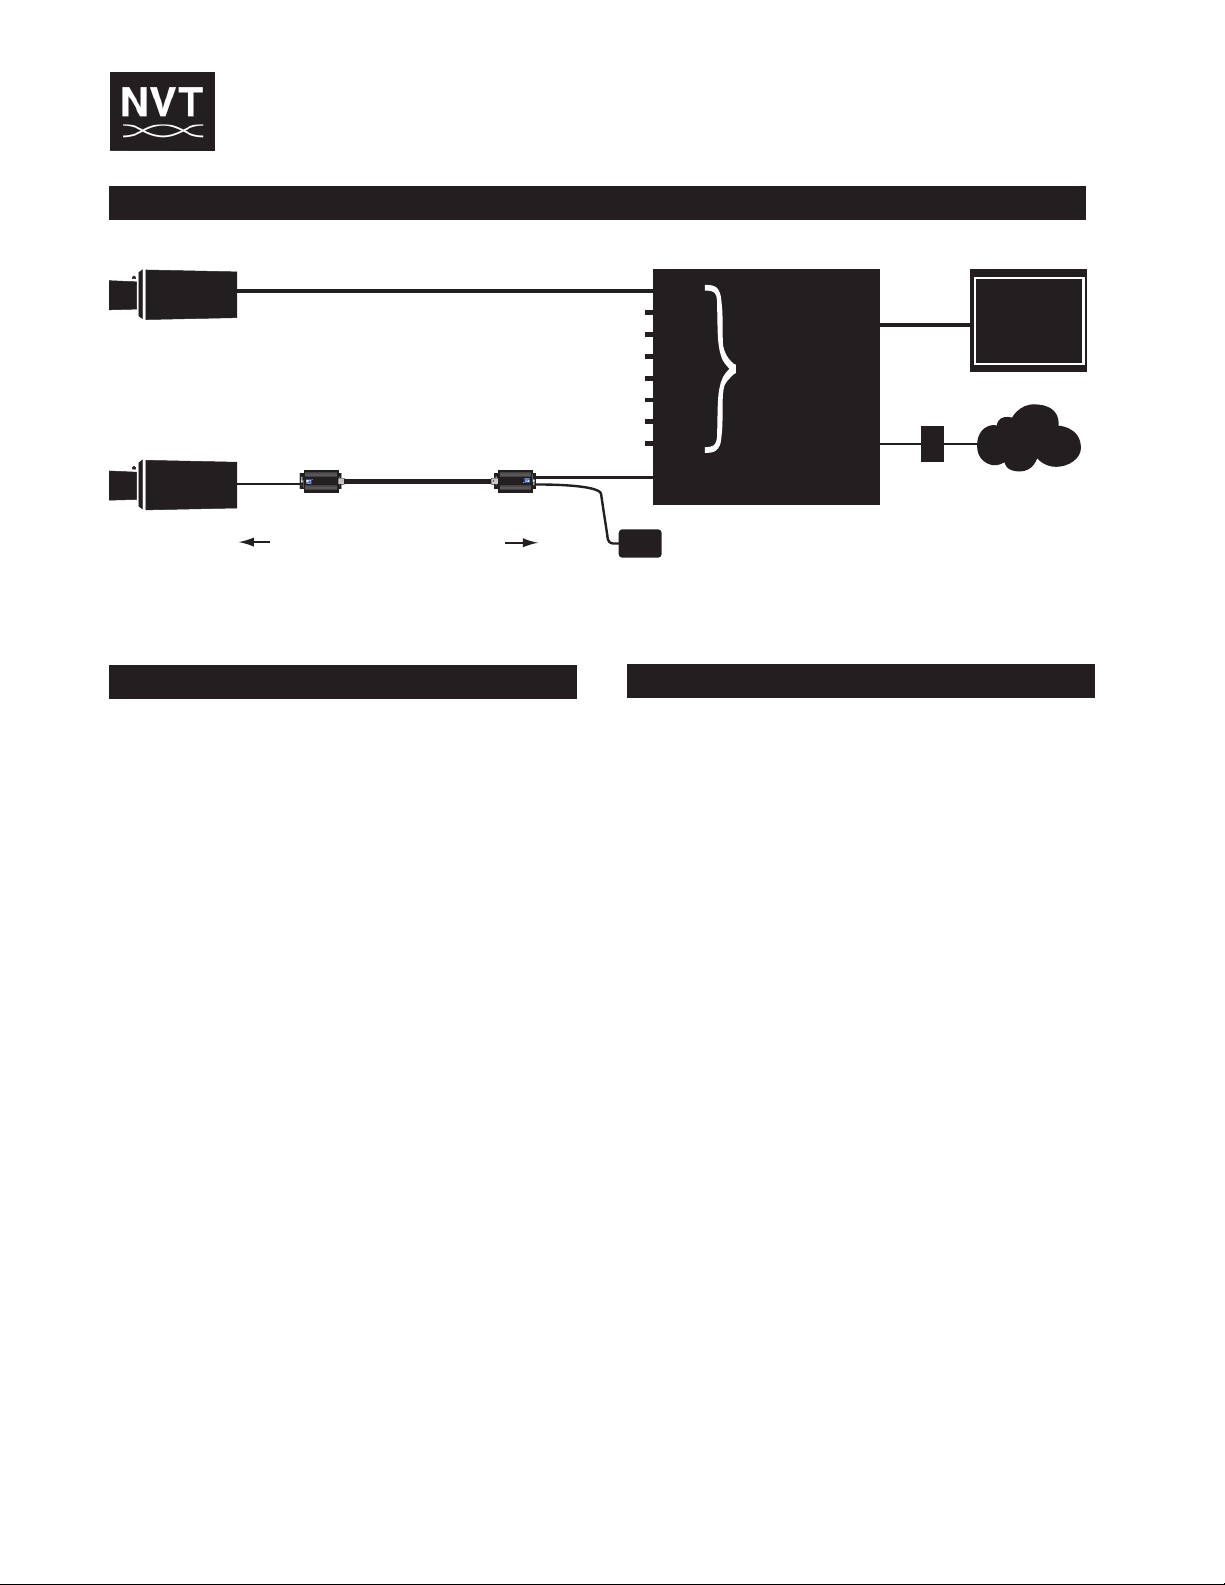
DVR / NVR
Hybrid DVR or NVR
Monitor
LAN/WAN
48VDC Power Supply
IP Camera
6
Watt
≤ 1,850 ft (560 m) with a 48V power supply
≤ 4,800 ft (1,4600 m) with a 56V power supply
See wire distance charts on pages 8 & 9
or IP Distance Calculator available from www.nvt.com
RG 59/U 20AWG
Cat5
≤328ft
(≤100m)
≤328ft
(≤100m)
Cat5
with PoE, PoE+, or High Power PoE
INSTALLATION INSTRUCTIONS
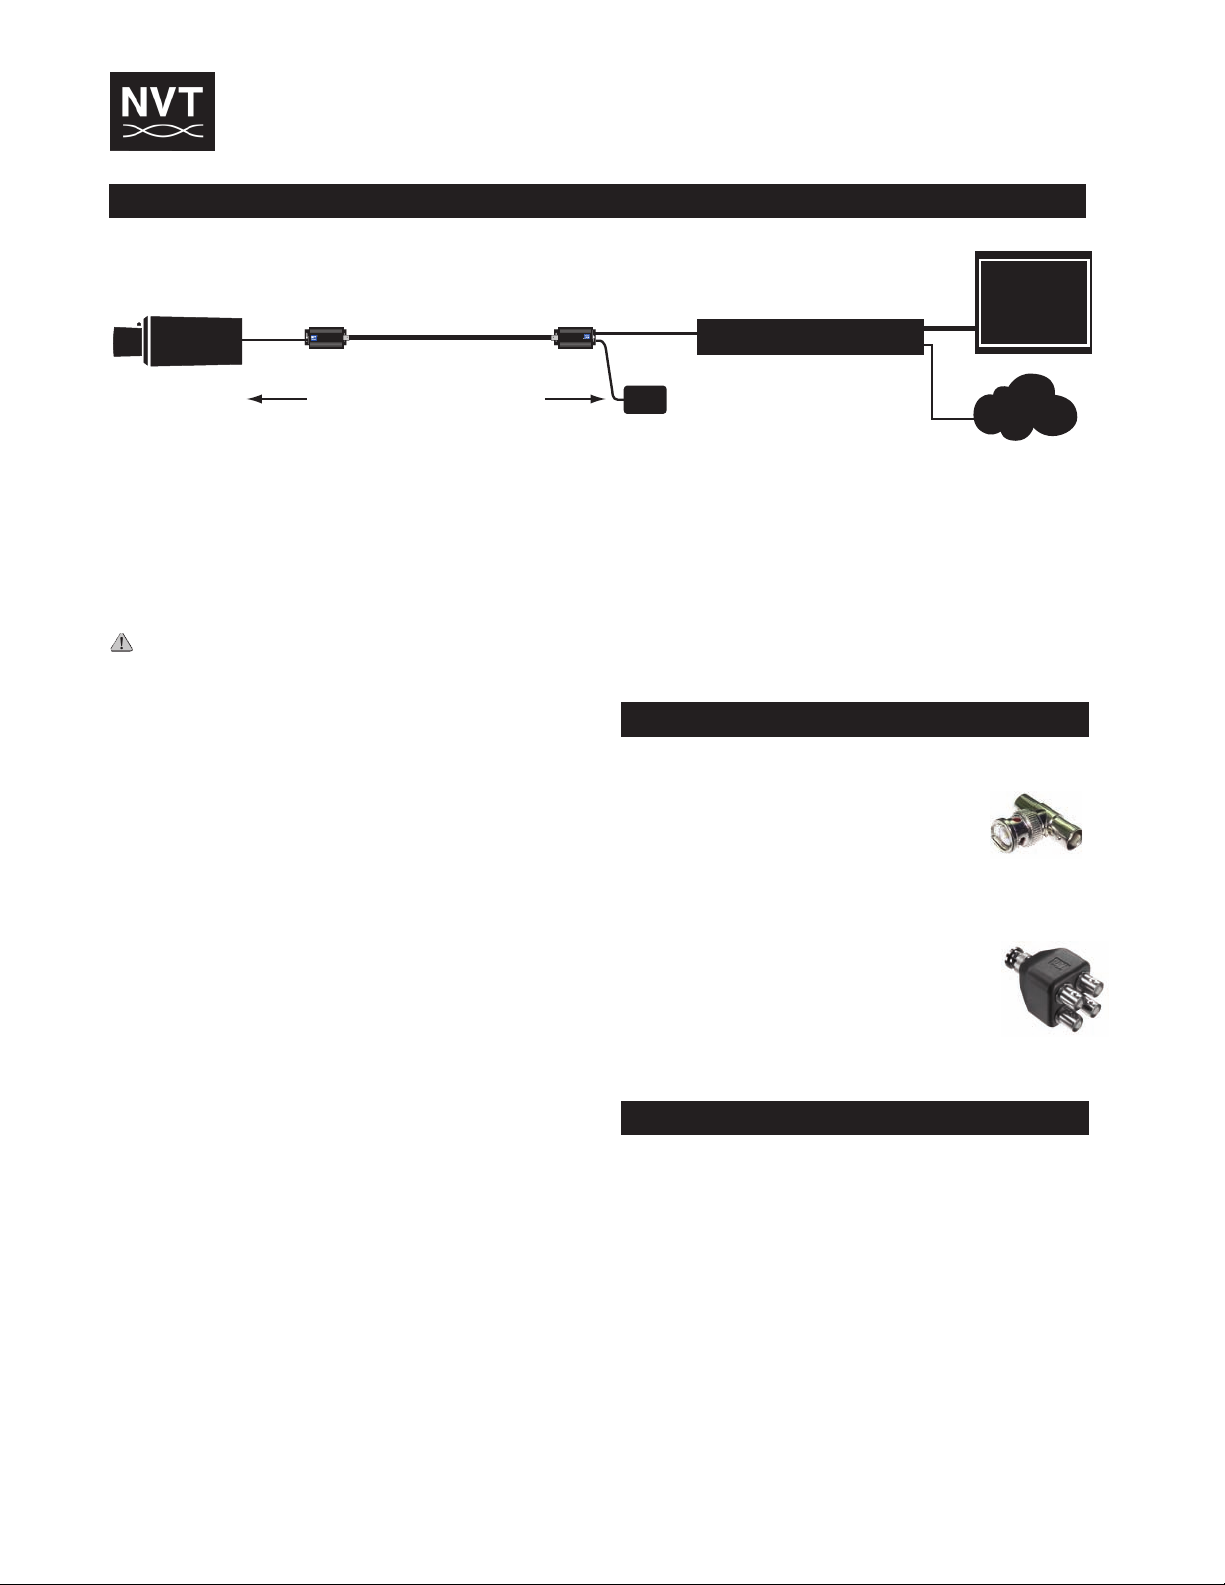
Figure 1 - Typical Installation
Most installations that use the NV-EC1701 transceiver involve
the replacement of an analog camera with an IP camera, while
reusing the installed coax cable. Since most IP cameras support
PoE (Power over Ethernet), the legacy 24VAC distribution may no
longer be needed.
installing the IP equipment. The NV-EC1701 uses the coax
to deliver 48 or 56VDC. To prevent damage, never connect
analog cameras or analog control-room equipment to an
NV-EC1701.
Transceiver Configuration
NVT EoC transceivers must be configured to communicate
exclusively with other transceivers within their Network Group.
The configuration process is described on page 3.
Connecting the Camera End
Install the new IP camera. Mount the NV-EC1701 nearby.
Connect an RJ45 patch cable between the network connector
(PoE) of the camera and the RJ45 jack on the NV-EC1701.
Connect the coax to the BNC jack on the NV-EC1701.
For most installations, the IP camera power will be low enough,
and the coax distance short enough, so that the IP camera and
its NV-EC1701 can receive power through the coax. In most
cases, a power supply will not be needed at this end. For additional details, see “High Power Extended Distance
Considerations” on page 7.
Connecting the Control-room End
Install a second NV-EC1701 at the control-room end of the coax
cable.
If rack-mounting is desired, use the NV-RMEC16 tray, which
supports up to four NV-EC1701 transceivers, which together can
support up to 16 cameras.
Connect the coax cable to the BNC jack on the NV-EC1701.
Connect a class 2 (SELV) 48V or 56VDC power supply to the
power jack on the NV-EC1701. This will provide power to the
entire system, including the cameras. The Blue “Power” LEDs
will illuminate on both transceivers.
Disconnect all analog equipment from the coax before
Connect an RJ45 patch-cord between the RJ45 jack on the
NV-EC1701 and either: 1) an IP camera video input on a Hybrid
DVR, or 2) an Ethernet switch allocated for video. See “Hybrid
DVR Considerations” on page 5, or “NVR Considerations” on
page 6.
The Green LEDs will illuminate when a network link is established, and will blink when data traffic is present.
MULTIPLE CAMERAS
The NV-EC1701 communicates via the coax using
a bus-architecture. This means that up to four
remote camera-end NV-EC1701s may be
connected together to a fifth NV-EC1701 at the
control-room. The coax cables are connected
together using BNC splitters, available from NVT,
or elsewhere. If you purchase BNC “T” connectors
from another supplier, please purchase high
quality connectors. Low cost connectors have
been found to have intermittent shield connections.
Multiple IP cameras draw more current. To ensure
adequate power, see “High Power Extended
Distance Considerations” on page 7.
PoE CONSIDERATIONS
The NV-EC1701 transceiver has been recently updated to
support full PoE, PoE+, or High-Power cameras, as well as nonpowered legacy devices.
Unlike conventional PoE, voltage-drop and load current must be
confirmed by the installer. See “High Power Extended Distance
Considerations” on page 7.
NVT’s Class 2 current limiting ensures safety of the installation
during fault conditions, while delivering higher power (up to 90
watts) with more efficient allocation amongst loads. Up to two
power supplies may be used within a network group.
Page 4 of 14
NV-BNCT
NV-EC4BNCT
Model NV-EC1701 EoC Ethernet over Coax Transceiver
NV-EC1701 NV-EC1701
M
odel NV-EC1701
w
ww.nvt.com ● (+1) 650.462.8100 ● (+44) (0) 208 977 6614
E
thernet over Coax Transceiver
M
odel NV-EC1701
w
ww.nvt.com ● (+1) 650.462.8100 ● (+44) (0) 208 977 6614
Ethernet over Coax Transceiver
DVR / NVR
Analog
Camera
Ports
BNC
BNC
B
NC
BNC
BNC
BNC
BNC
BNC
RJ45 IP Camera Port
LAN Port
Monitor
LAN/WAN
Power Supply
Firewall
Hybrid DVR
IP Camera
6 Watt
≤
1,850 ft (560 m) with a 48V power supply
≤ 4,800 ft (1,460 m) with a 56V power supply
RG 59/U 20 AWG
Camera
Analog
Coax
Cat5
≤328ft
(≤100m)
≤328ft
(≤100m)
Cat5
with PoE, PoE+, or High Power PoE
HYBRID DVR CONSIDERATIONS
Figure 2 - Hybrid DVR Installation
TRANSCEIVER-TO-TRANSCEIVER
The NV-EC1701 transceivers provide transparent end-to-end 10baseT or 100-BaseT connectivity with auto detection and autocrossover. This means that IP cameras or other devices may be
installed at one end, and their data is transparently delivered to
the other end. Before installing, transceivers must be configured
per the instructions on page 3.
Long coax distances are supported, although local power may be
required for extended distances. See pages 7 - 9.
The NV-EC1701 supports TCP/IP, UDP, HTTP, Multi-cast, and other
standard protocols. This allows for the transmission of other
network traffic besides streaming video.
HYBRID DVR ARCHITECTURE
The NV-EC1701 is network transparent, and operates in virtually
every network environment, including support for Hybrid DVRs.
These DVRs have some BNC ports for analog cameras, and some
RJ45 ports for IP cameras. The RJ45 “video in” port is the connection point for the NV-EC1701. See figure 2.
By deploying a Hybrid DVR, with its dedicated IP camera port(s),
the network is robust and secure, with none of the traffic, hacking, or virus vulnerabilities associated with PC-like hardware on
an open LAN.
Depending on the Hybrid DVR, more than one camera may be
connected to its IP camera port. Check the Hybrid DVR manual for
details.
Page 5 of 14

Model NV-EC1701 EoC Ethernet over Coax Transceiver
LAN/WAN
E
thernet
S
witch
IP Camera
6 Watt PoE
Cat5
≤328ft
(≤100m)
NV-EC1701 NV-EC1701
M
odel NV-EC1701
w
ww.nvt.com ● (+1) 650.462.8100 ● (+44) (0) 208 977 6614
E
thernet over Coax Transceiver
M
odel NV-EC1701
w
ww.nvt.com ● (+1) 650.462.8100 ● (+44) (0) 208 977 6614
E
thernet over Coax Transceiver
Power Supply
IP Camera
≤1,540ft (470m) with a 48V power supply
≤4,550ft (1,388m) with a 56V power supply
RG-59/U 20 AWG
Cat5
≤328ft
(≤100m)
Cat5
≤328ft
(≤100m)
≤328ft
(≤100m)
Network
Video
Recorder
Firewall
Cat5
with PoE, PoE+, or High Power PoE
NVR CONSIDERATIONS
Figure 3 - NVR Installation
TRANSCEIVER-TO-TRANSCEIVER
The NV-EC1701 transceivers provide transparent end-to-end 10-baseT
or 100-BaseT connectivity with auto detection and auto-crossover. This
means that IP cameras or other devices may be installed at one end,
and their data is transparently delivered to the other end. Please read
configuration instructions on page 3 before installing.
Long coax distances are supported, although local power may be
required for extended distances. See pages 7 - 9.
The NV-EC1701 supports TCP/IP, UDP, HTTP, Multi-cast, and other standard protocols. This allows for the transmission of other network traffic
besides streaming video.
Page 6 of 14
NETWORK ARCHITECTURE
For IP-based CCTV applications, there are some network configurations
that are robust, and others that are not recommended. In general, it
is best to deploy a separate LAN exclusively for video traffic.
Although it is possible to place IP cameras onto the end-user’s
“Enterprise LAN”, there are several disadvantages in doing so. These
include:
Traffic Management Considerations
When sharing the resources of a LAN, the nature of the traffic must
be well understood for it to operate efficiently. For most end-users,
the business use of their LAN is constantly changing, critical for their
day-to-day operations, and not managed by the same group that
manages their security. IP video can often consume large amounts of
bandwidth, which may or may not be compatible with existing IT traffic.
Security Considerations
Most surveillance systems are installed specifically to protect against
breaches in security. A shared LAN provides potential opportunities
for unauthorized access to security assets. Sniffing IP addresses can
result in the unintended disclosure of IP cameras or network vulnerabilities. Spoofing IP addresses could result in the disruption of
recording.
If you must pass IP camera video through “public” LANs, ensure
that video is recorded prior to leaving the secure LAN. Then
encrypt it by using a Virtual Private Network (VPN) so that neither
the video, nor its addressing is readable on the LAN. Many lowcost routers support VPNs.

Model NV-EC1701 EoC Ethernet over Coax Transceiver
BNC “T”
Figure 4 - Alternate Power Supply Location
Power Supply
NV-EC1701
NV-EC1701
M
odel NV-EC1701
www.nvt.com ● (+1) 650.462.8100 ● (+44) (0) 208 977 6614
E
thernet over Coax Transceiver
M
odel NV-EC1701
www.nvt.com ● (+1) 650.462.8100 ● (+44) (0) 208 977 6614
E
thernet over Coax Transceiver
NVR
LAN/WAN
IP Camera,
Door Access,
or other IP device
50 Watt
Cat5
≤285ft
(≤ 85m)
C
at5
≤328ft
(≤100m)
Power Supply
NV-EC1701
Model NV-EC1701
w
ww.nvt.com ● (+1) 650.462.8100 ● (+44) (0) 208 977 6614
E
thernet over Coax Transceiver
IP Camera,
Door Access,
or other IP device
50 Watt
Cat5
≤285ft
(
≤85m)
≤
5,500ft (1,800m) RG59/U 20 AWG
See Wire Distance Chart on page 9
or IP Distance Calculator at www.nvt.com
with PoE, PoE+, or High Power PoE
HIGH POWER EXTENDED DISTANCE CONSIDERATIONS
The NV-EC1701 has a power inlet connector that receives 48 or 56 volts from an external Class 2 SELV desk-style power supply.
Power is distributed to:
1) the transceiver’s internal electronics;
2) the RJ45, provided the connected camera or other device provides the appropriate 27K ohm PoE ‘discovery signature’.
+48V (or +56V) power is provided on pins 1&2 and 5&4, while 3&6 and 7&8 are at 0 V. The use of all four wire-pairs ensures
maximum distance, even for high-power loads, such as P/T/Z cameras.
3) the coax cable, where it is used by the control-room NV-EC1701.
For fault/safety, never use more than two power supplies within a network.
Page 7 of 13

Model NV-EC1701 EoC Ethernet over Coax Transceiver
3.0 W
0 W
Wire Distance
Wire Distance
4.0 W
5.0 W
6.0 W
8.0 W
10 W
12 W
15 W
18 W
20 W
25 W
30 W
40 W
50 W
10m1
2
m
1
5
m
1
8
m
20 m
25
m30m
40 m
50 m
60m80 m
100
m
1
20
m
1
50 m180 m
200m250m300m400m500m600m800m1,000 m
1
,200
m
1
,500
m
1
,800
m
2,000 m
33 ft
40 ft
49 ft
59 ft
66 ft
82 ft
98 ft
131 ft
164 ft
197 ft
262 ft
328 ft
397 ft
492 ft
590 ft
656 ft
820 ft
984 ft
1,312 ft
1,640 ft
1,968 ft
2,624 ft
3,280 ft
3,936 ft
4,920 ft
5,904 ft
6,560 ft
Camera Wattage
2,500
m
3,000
m
4,000
m
5,000
m
8,200 ft
9,840 ft
13,120 ft
16,400 ft
2.0 W
2.5 W
24 Ω
38 Ω
23 Ω
21 Ω
19 Ω
16 Ω
14 Ω
12 Ω
11 Ω
9 Ω
7 Ω
6 Ω
4 Ω
3 Ω
28 Ω
P
R
G
1
1
1
4
A
W
G
R
G
6
1
8
A
W
G
R
G
5
9
/
U
2
0
A
W
G
R
G
5
9
/
U
2
2
A
W
G
R
G
5
9
/
U
2
3
A
W
G
C
A
T
V
2
0
A
W
G
C
A
T
V
2
2
A
W
G
C
A
T
V
2
3
A
W
G
with PoE, PoE+, or High Power PoE
WIRE DISTANCE CHARTS
The distance capability of wire is dependant on its ability to deliver DC power, and separately, to deliver high-frequency
data signals.
The graph below shows maximum power delivery when using a 48V power supply. If you are using a 56V power supply,
your distances will be 2.6 times those shown in figure 4. If you are not delivering power to your camera (or other remote
device), then this graph does not apply. Figure 5 shows the maximum network data rate.
A Distance Calculator can be found at www.nvt.com.
PoE devices require a minimum of 43V to operate. With a 48V supply, we have 5V of allowable voltage drop on the wire.
With a 56V supply, we have 13V of allowable voltage drop on the wire.
The voltage will dip in proportion to the remote (camera) load. The graph below shows what distances are supported for
various loads and wire types.
● Start with the camera wattage at the left. Sometimes IP cameras are listed as to their PoE Class rather than
wattage. If this is the case, use the colored classes instead.
● Now read over to the right until you find your kind of wire. Then look up (feet) or down (meters) to find your
maximum wire distance.
● If your wire is not among the examples, simply measure its total resistance and find that value on the right side of
the graph. The maximum supported wattage is on the left.
Figure 5 - Power Distance Chart
Page 8 of 14

Model NV-EC1701 EoC Ethernet over Coax Transceiver
Wire Distance
Wire Distance
100 Mbps
90 Mbps
80 Mbps
70 Mbps
60 Mbps
50 Mbps
40 Mbps
30 Mbps
20 Mbps
10 Mbps
0 Mbps
10m1
2 m
15 m
1
8 m
20m25
m30m40m
50 m
60m80
m
100m1
20
m
1
50
m
1
80
m
200
m
250
m
300m400m500 m
600
m
800
m
1,000m1
,200
m
1
,500
m
1
,800 m
2,000
m
33 ft
40 ft
49 ft
59 ft
66 ft
82 ft
98 ft
131 ft
164 ft
197 ft
262 ft
328 ft
397 ft
492 ft
590 ft
656 ft
820 ft
984 ft
1,312 ft
1,640 ft
1,968 ft
2,624 ft
3,280 ft
3,936 ft
4,920 ft
5,904 ft
6,560 ft
2,500m3,000m4,000
m
5,000
m
8,200 ft
9,840 ft
13,120 ft
16,400 ft
Ethernet Aggregate Data Throughput
W
U
2
G6
18
G
1
G
C
A
TV
W
ire
RG
59
/U
20
A
WG
R
G6
18
A
WG
R
G
1
1
1
4
A
W
G
with PoE, PoE+, or High Power PoE
WIRE DISTANCE CHARTS
Wire type and Data Distance Capability
There are a wide variety of wire qualities, from copper-plated steel at the low end (CATV wire) to high
performance low-loss pure copper. The graph below will help you determine your data throughput as a
function of wire type and distance.
A Distance Calculator can be found at www.nvt.com.
Figure 6 - Data Distance Chart
Page 9 of 14

Model NV-EC1701 EoC Ethernet over Coax Transceiver
RoHS
with PoE, PoE+, or High Power PoE
TECHNICAL SPECIFICATIONS
R J 4 5 ET H E R N E T I N TE R F A C E
Connectivity: RJ45, auto-crossover
Wire type: 4-pair Cat5 or better
Distance: up to 328ft (100m)
Speed: 10/100 Base T, half/full duplex, auto-negotiation
auto MDI/MDIX cross-over
Latency: 3mS
Data throughput:
85Mbps ±10% useable bandwidth per network
Example: Four megapixel cameras, all sharing one
coax network, each sending 20Mbps video stream(s).
Power Output:
This Power Sourcing Equipment (PSE) supports
Powered Devices (PDs) that are compatible with
IEEE 802.3af/at, or PDs that draw up to 60 watts*.
For maximum power/distance, 48 to 56 VDC appears on
all eight RJ45 pins, and are current-protected
and transient-protected.
P O W E R C O N S U M P T I O N
Consumption per transceiver: 3.0 W @ 10 to 56VDC
Total system consumption: = total consumption of transceivers
+ total consumption of PDs (entry station)
+ total power dissipated in the wire
M E C H A N I C AL / EN V I R O N M E NT A L
Transceiver body dimensions: 5.1 in (131mm) long
(excluding connectors) 1.3 in (33mm) high
Transceiver weight: 5.1oz (145g)
Operating and storage temperature: -40°F to 185°F (-40°C to +85°C)
20 to 85% RH non-condensing
Transient Immunity: 5x20µS 3000A, 6000V
1.5 in (38mm) wide
ESD 20KV, 200pF
P O W E R S U P P LY
Power supplies are external inline, with an IEC380-C14 power inlet
and 6ft (1.8m) line-cord. Input voltage is 100 ~240VAC 50-60Hz.
A molded P1J 5.5mm barrel connector provides Class 2 (SELV)
regulated output with one of these three ratings:
Use only the power cord provided with the
unit or equivalent UL approved type SPT-2,
SVT, or SJT, 18/3 AWG 100~240VAC, 1A
60°C Max. 15ft (4.5m) long. One end with
IEC380-C13 appliance coupler and the
other end with NEMA 1015P or equivalent
for your country.
60W power supply body dimensions: 4.90 in (125mm) long
60W power supply weight: 10.6oz (300g)
+48 VDC 60W
+56VDC 60W
+56VDC 90W
1.25 in (32mm) high
2.00 in (50mm) wide
C O A X BU I L D I N G WI R I N G IN T E R F A CE
Connectivity: BNC, RG-59/U or similar
One control room EoC transceiver may support
multiple* remote EoC transceivers
Impedance: 25 to 100Ω
Distance: see pages 8-9
Transmission technology: OFDM, 128-bit AES encryption
* I M P O R T A NT N O T E :
Distance will often be shorter due to power supply capacity and
wire voltage-drop. See Maximum Per-Camera Wire Distance Chart
on page 8. For fault /safety protection, never use more than
two power supplies within a network system.
L E D STA T U S I N D I CA T O R S
Power: Blue “Power On”
BNC Interface: Green “Link”
RJ45 Interface: Green “Link”
90W power supply body dimensions: 5.70 in (145mm) long
1.25 in (32mm) high
2.36 in (60mm) wide
90W power supply weight: 1 lb (450g)
Power supply operating temperature: -22°F to 122°F (-30°C to +50°C)
20 to 85% RH non-condensing
Power supply storage temperature: -40°F to 185°F (-40°C to +85°C)
0 to 95% RH non-condensing
Transient Immunity: 5x20µS 3000A, 6000V
ESD 20KV, 200pF
Power cord weight: 5.5oz (156g)
R E G U L AT O R Y
UL Listed to IEC/UL 60950-1 Complies with FCC part 15B limits
Specifications subject to change without notice.
Page 10 of 14

Model NV-EC1701 EoC Ethernet over Coax Transceiver
with PoE, PoE+, or High Power PoE
Product
NV-EC1701: Single transceiver only, no power supply
Accessories
MODEL NUMBERS
NV-PS48-60W: 48VDC power supply, 60 watts
NV-PS56-60W: 56VDC power supply, 60 watts
NV-PS56-60W: 56VDC power supply, 90 watts
NV-BNCT: BNC “T” adaptor
NV-EC4BNC: 1:4 BNC splitter adaptor
with IEC line cord
with IEC line cord
with IEC line cord
NV-PC4PR: RJ45 Patch Cord, 4-pair 3’ (1m) Grey
NV-DPSC4: Detachable Power Supply
Cord Splitter 1:4 2ft
NV-RMEC16: Rack mounting chassis, 19” x 1U
holds up to 4 NV-EC1701 transceivers
plus power supplies. Includes NV-DPSC4
Power Cord Splitter (NV-EC1701 and
NV-PS48-60W not included)
Page 11 of 14

Model NV-EC1701 EoC Ethernet over Coax Transceiver
with PoE, PoE+, or High Power PoE
TRANSCEIVER KITS
Model NV-EC1701
EoC Ethernet over Coax Transceiver Kits
Product Kits
Single EoC Transmission System
NV-EC1701-KIT1:2NV-EC1701 Transceivers
1 NV-PS48-60W Power Supply
with IEC line cord
2 NV-PC4PR patch-cord
Dual EoC Transmission System
NV-EC1701-KIT2:3NV-EC1701 Transceivers
1 NV-PS48-60W Power Supply
with IEC line cord
1 NV-BNCT BNC “T” Adaptor
3 NV-PC4PR patch-cord
Triple EoC Transmission System
NV-EC1701-KIT3:4NV-EC1701 Transceivers
1 NV-PS48-60W Power Supply
with IEC line cord
1 NV-EC4BNC 1:4 BNC
splitter adaptor
4 NV-PC4PR patch-cord
Quadruple EoC Transmission System
NV-EC1701-KIT4:5NV-EC1701 Transceivers
1 NV-PS48-60W Power Supply
with IEC line cord
1 NV-EC4BNC 1:4 BNC
splitter adaptor
5 NV-PC4PR patch-cord
Page 12 of 14

MULTICAST PACKET SUPPORT
LAN/WAN
Ethernet Switch
Enbedded
IGMP
Network
Host
IP Camera
Cat5
NV-EC1701U NV-EC1701U
Model NV-EC1701
w
ww.nvt.com ● (+1) 650.462.8100 ● (+44) (0) 208 977 6614
E
thernet over Coax Transceiver
M
odel NV-EC1701
w
ww.nvt.com ● (+1) 650.462.8100 ● (+44) (0) 208 977 6614
E
thernet over Coax Transceiver
Power Supply
Figure 6 - Multicast Network
N
etwork
Video
Recorder
Firewall
Cat5
2- wire Cable
On rare occasions, a customer will experience a problem where
a camera sending unicast packets performs flawlessly, but the
NV-EC1701s fail to deliver multicast streams.
To understand this, we need to delve a little deeper into how
multicast networking works. To do this, we will first explore
unicast packet transmission.
With unicast packets, there is a source (the camera) and a destination (the NVR). Packets are generated by the source and
directed to a single destination. The first time a packet is sent, the
switch has never heard of the destination address. So it sends a
broadcast transmission to ALL destinations. The correct recipient
acknowledges the packet. The switch snoops in on that response
and memorizes which port is associated with that transmission.
Subsequent transmissions are directed ONLY to the recipient's
port, thereby reducing bandwidth on other parts of the network.
With multicast packets, the same bandwidth considerations
apply. Switches and routers do not routinely deliver multicast
traffic to all destinations. Instead they rely on a special control
protocol to identify and report which multicast traffic should go
where.
That protocol is called Internet Group Management Protocol
(IGMP). IGMP is a shared “querier” control resource that is implemented on a host, such as a switch or router, within the network.
Virtually all routers and most switches are equipped with an IGMP
querier.
That host is responsible for sending IGMP queries to multicast
devices, and for generating an IGMP Report. That report is monitored by switches and routers within the network. That monitoring
is called IGMP Snooping. These switches and routers keep a
state table and use it to determine to which ports to deliver each
multicast stream.
In practice, a multicast source (camera) sends its data not to the
destination, but to a fictitious “Group IP Address.” Destination
devices (the NVR) send a request to the IGMP host asking to be
included as a destination for that group.
Switches and routers allow these multicast packets through so
they can be received by those interested devices (NVR) and block
them from being delivered elsewhere. It would be inappropri-
ate for the switch to send a multicast stream everywhere, as
it would clog the network.
The NV-EC1701s are not point-to-point devices. They join
together to function as a switch. Like a switch, they listen for
IGMP reports and block unknown multicast packets. This is
particularly important in a multi-camera environment, as we do
not want the stream from one camera being delivered to all other
cameras. That could generate too much traffic.
On rare occasions an installation will be created without the
required IGMP querier. If the switches are not equipped with IGMP
snooping then they just deliver all multicast traffic everywhere.
If the NV-EC1701s do not receive IGMP reports, then they will
BLOCK UNKNOWN MULTICAST PACKETS, and the video will not
pass through.
An investigation can be performed as necessary using a Packet
Sniffer, such as WireShark.
The bottom line is that an IGMP querier is required for a properly
configured multicast network. Contact NVT for further information.
Page 13 of 14

Model NV-EC1701 EoC Ethernet over Coax Transceiver
with PoE, PoE+, or High Power PoE
TROUBLESHOOTING
Confirm that the NVT transceivers have been configured to communicate with each-other, per instructions on page 3.
If you are experiencing problems, attempt to simplify your setup. Test
each cable segment separately. For example, test the IP camera
directly at the ethernet switch without other equipment. Then add in the
NVT transceivers, back-to-back. Test each segment of a long cable-run
independently. Attempt to isolate the problem.
Most IP camera installation problems involve configuring the IP camera
and the recorder to recognize each other. If in doubt, connect the
camera directly to the Ethernet switch, bypassing the transceivers.
Consult the IP camera and/or recorder installation manuals for configuration instructions, or contact the camera or recorder manufacturer.
NETWORK DIAGNOSTIC TOOLS
NVT has developed a Console Utility that can be downloaded from
www.nvt.com. Once installed on any Windows PC, the applicationscours the network for NVT devices, and reports each of their MAC
addresses, as well as the MAC addresses of any other NVT devices
within its joined group.
Additional network tools, such as Packet Sniffers or Traffic generators
are available from other sources such as LAN Shark, LANTraffic, etc.
LIMITED LIFETIME WARRANTY
NVT warrants that the product conforms to NVT’s applicable published
specifications and is free of defects for the life of the product. There
shall be no other warranties, express, statuatory, or otherwise, including any implied warranty of merchantability, of fitness, or any other
obligation on the part of NVT with respect to any of the products.In the
event that any of the products is damaged, altered, or modified without
the express written consent of NVT, any warranty for those products
will cease and NVT will have no further liability as it pertains to those
products.
NVT assumes no responsibility for damages or penalties incurred
resulting from the use of this product in a manner or location other than
for which it is intended.
NVT’s liability under any warranties shall be discharged by replacing or
repairing any part or parts which do not conform to the applicable warranty under normal and proper use. NVT’s liability with respect to any
product shall not exceed a refund of the price received by NVT for that
product, and in no event shall NVT have any liability for any incidental,
consequential, special, or indirect damages.
Some states do not allow the exclusion or limitation of special, incidental, or consequential damages, so the above limitations or exclusions
may not apply to you. This warranty gives you specific legal rights, and
you may also have other rights which vary from state to state.
CUSTOMER SUPPORT
NVT customer support is available for consultation from 8:00 AM to
5:30 PM PST Monday through Friday. In addition, emergency afterhours callback support is available.
USA Office: (+1) (650) 462-8100
USA Fax: (+1) (650) 326-1940
UK Office: (+44) (0)20 8977 6614
UK Fax: (+44) (0)20 8973 1855
Email USA: www.nvt.com/email/info
Email UK: www.nvt.com/email/eusales
Web home page: www.nvt.com
PRODUCT RETURNS
Please call before returning units to NVT. Returned materials must have
a “Returned Materials Authorization” (RMA) number from NVT marked
on the outside of the shipping carton.
Network Video Technologies
4005 Bohannon Drive • Menlo Park, CA 94025 • USA
(+1) 650.462.8100 • FAX (+1) 650.326.1940
nvt.com • www.nvt.com/email
Page 14 of 14
FCC USER INFORMATION
This equipment has been tested and found to comply with the limits for
a Class B digital device, pursuant to part 15 of the FCC Rules. These
limits are designed to provide reasonable protection against harmful
interference in a residential installation. This equipment generates,
uses, and can radiate radio frequency energy and, if not installed and
used in accordance with the instructions, may cause harmful interference to radio communications. However, there is no guarantee that
interference will not occur in a particular installation. If this equipment
does cause harmful interference to radio or television reception, which
can be determined by turning the equipment off and on, the user is
encouraged to try to correct the interference by one or more of the
following measures:
- Reorient or relocate the receiving antenna.
- Increase the separation between the equipment and the receiver.
- Connect the equipment into an outlet on a circuit different from
that to which the receiver is connected.
- Consult the dealer or an experienced radio/TV technician for help.
WARNING
Changes or modifications not expressly approved by the manufacturer
could void the user’s authority to operate the equipment.
Copyright © 2013 NVT, Inc.
453-1701-1-E
 Loading...