

Page 1

RTX BLADE SERVER
DU-09559-001 _v01 | July 2019
Service Manual
Page 2

TABLE OF CONTENTS
Chapter 1. Introduction.........................................................................................1
1.1.NVIDIA Enterprise Support Portal...................................................................... 3
1.2.NVIDIA Enterprise Support Email.......................................................................3
1.3.NVIDIA Enterprise Support - Local Time Zone Phone Numbers.................................... 3
Chapter2.Fan Module Replacement........................................................................ 4
2.1.Fan Module Replacement Overview................................................................... 4
2.2.Replacing the Faulty Fan Module...................................................................... 4
Chapter3.Blade Replacement................................................................................7
3.1.Blade Replacement Overview...........................................................................7
3.2.Replacing the Faulty Blade............................................................................. 7
Chapter4.Chassis Monitoring Module Replacement....................................................12
4.1.Chassis Monitoring Module Replacement Overview................................................ 12
4.2.Replacing the Chassis Monitoring Module........................................................... 12
Chapter5.Switch Module Replacement...................................................................16
5.1.Switch Module Replacement Overview.............................................................. 16
5.2.Replacing the Switch Module..........................................................................16
Chapter6.Power Supply Replacement.................................................................... 21
6.1.Power Supply Replacement Overview................................................................21
6.2.Replacing the Power Supply...........................................................................21
www.nvidia.com
RTX Blade Server DU-09559-001 _v01|ii
Page 3

LIST OF FIGURES
Figure1 Front System Components ........................................................................... 2
Figure2 Rear System Components ............................................................................2
www.nvidia.com
RTX Blade Server DU-09559-001 _v01|iii
Page 4

www.nvidia.com
RTX Blade Server DU-09559-001 _v01|iv
Page 5

Chapter1.
INTRODUCTION
This document contains instructions for replacing NVIDIA® RTX™ Blade Server
components. Be sure to familiarize yourself with the NVIDIA Terms & Conditions
documents before attempting to perform any modification or repair to the RTX Blade
Server System. These Terms & Conditions for the RTX Blade Server System can be found
through the NVIDIA DGX Systems Support page.
Contact NVIDIA Enterprise Support to obtain an RMA number for any system or
component that needs to be returned for repair or replacement. When replacing a
component, use only the replacement supplied to you by NVIDIA.
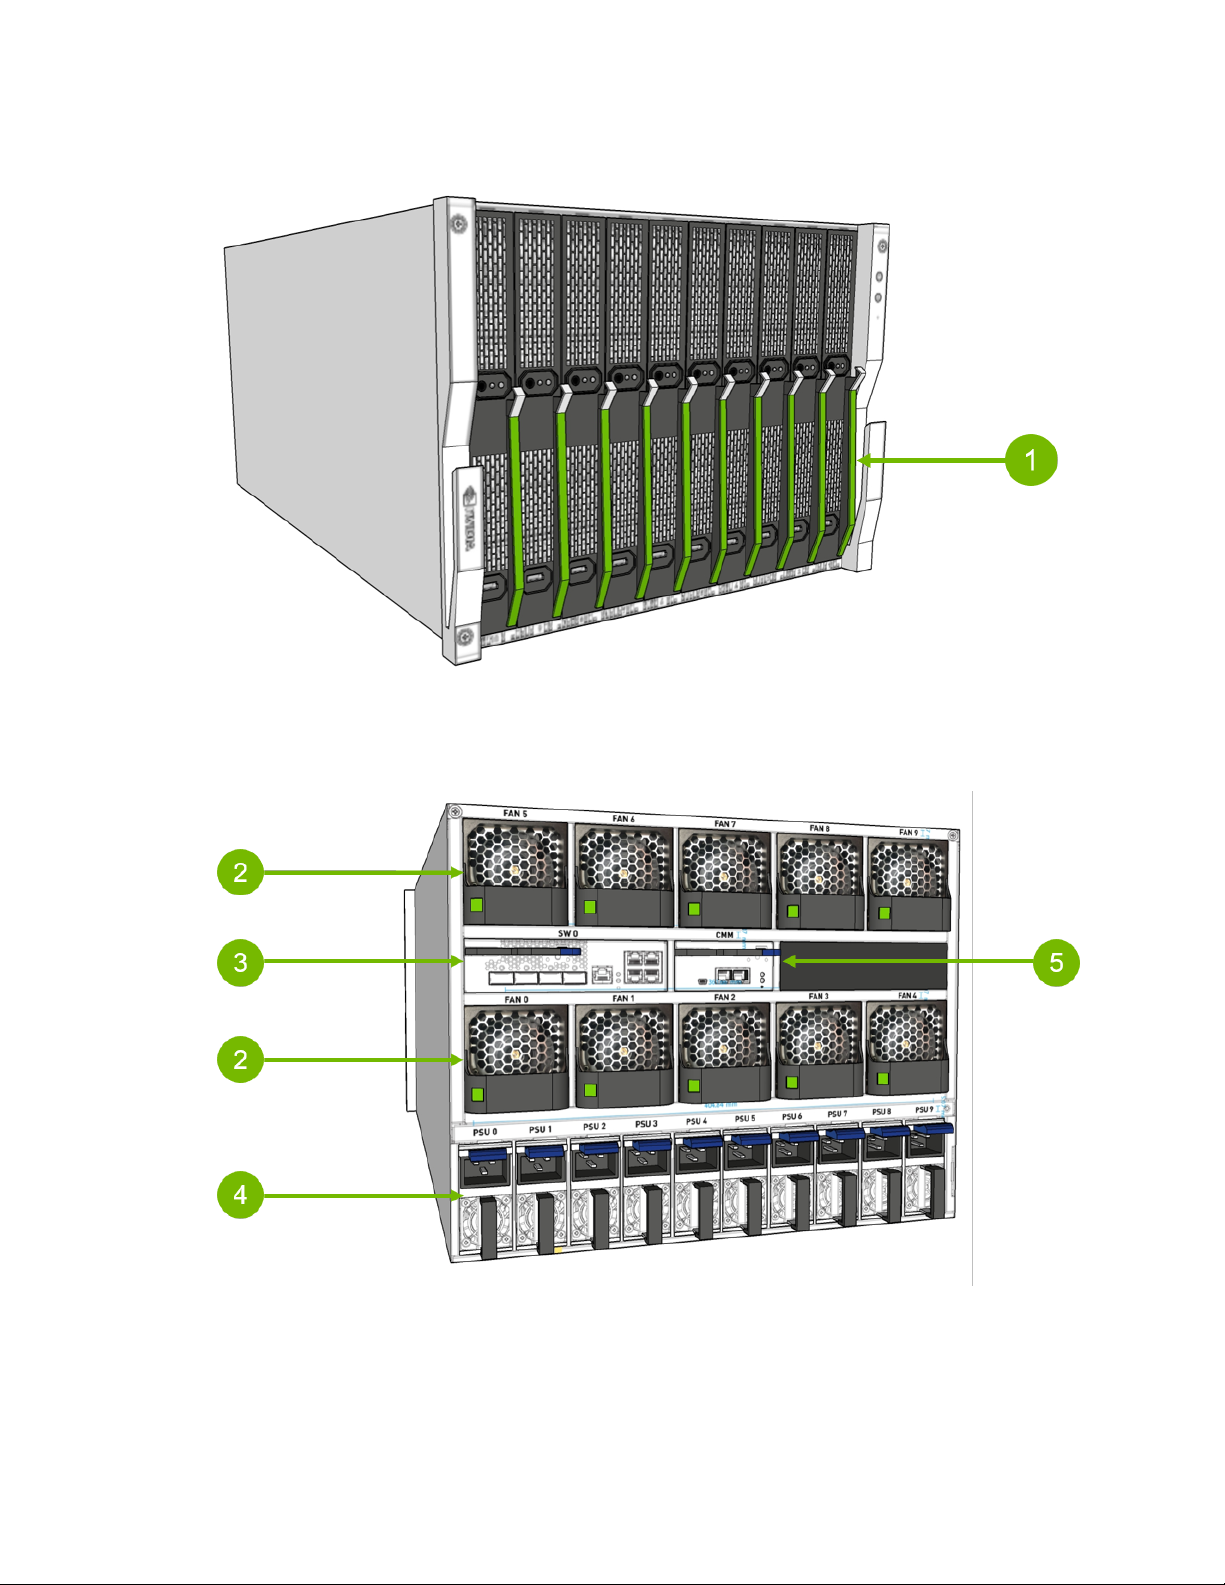
You can obtain the following components for replacement in your data center.
Item Component
1 Blades
2 Fan Modules
3 Switch Module
4 Power Supply Units
5 Chassis Monitoring Module
www.nvidia.com
RTX Blade Server DU-09559-001 _v01|1
Page 6
Introduction
Figure1 Front System Components
Figure2 Rear System Components
Contact NVIDIA Enterprise Support for replacement instructions and guidance for
components that are not included in this document.
www.nvidia.com
RTX Blade Server DU-09559-001 _v01|2
Page 7

Introduction
1.1.NVIDIA Enterprise Support Portal
The best way to file an incident is to log on to the NVIDIA Enterprise Support portal.
1.2.NVIDIA Enterprise Support Email
You can also send an email to enterprisesupport@nvidia.com.
1.3.NVIDIA Enterprise Support - Local Time Zone
Phone Numbers
Visit NVIDIA Enterprise Support (http://www.nvidia.com/en-us/support/enterprise/)
www.nvidia.com
RTX Blade Server DU-09559-001 _v01|3
Page 8

Chapter2.
FAN MODULE REPLACEMENT
The RTX Blade Server fan modules can be replaced while power is applied to the system
and the system is running.
2.1.Fan Module Replacement Overview
This is a high-level overview of the steps needed to replace the fan modules.
1.
Identify fan module to be replaced by locating the illuminated amber fault light and
the number silkscreened directly above the fan module.
2.
Press the green tab to release the module, pull it out from the chassis and set aside.
Caution The fan module should be replaced within 30 seconds after removal.
3.
Identify the slot where the new fan will be installed.
4.
Insert the fan until an audible click is heard from the latch on the handle.
5.
Confirm that the fault light does not light up.
2.2.Replacing the Faulty Fan Module
The fan modules can be replaced without turning off the RTC Blade Server.
Caution The fan module should be replaced within 30 seconds after removal to
prevent overheating of system components.
1.
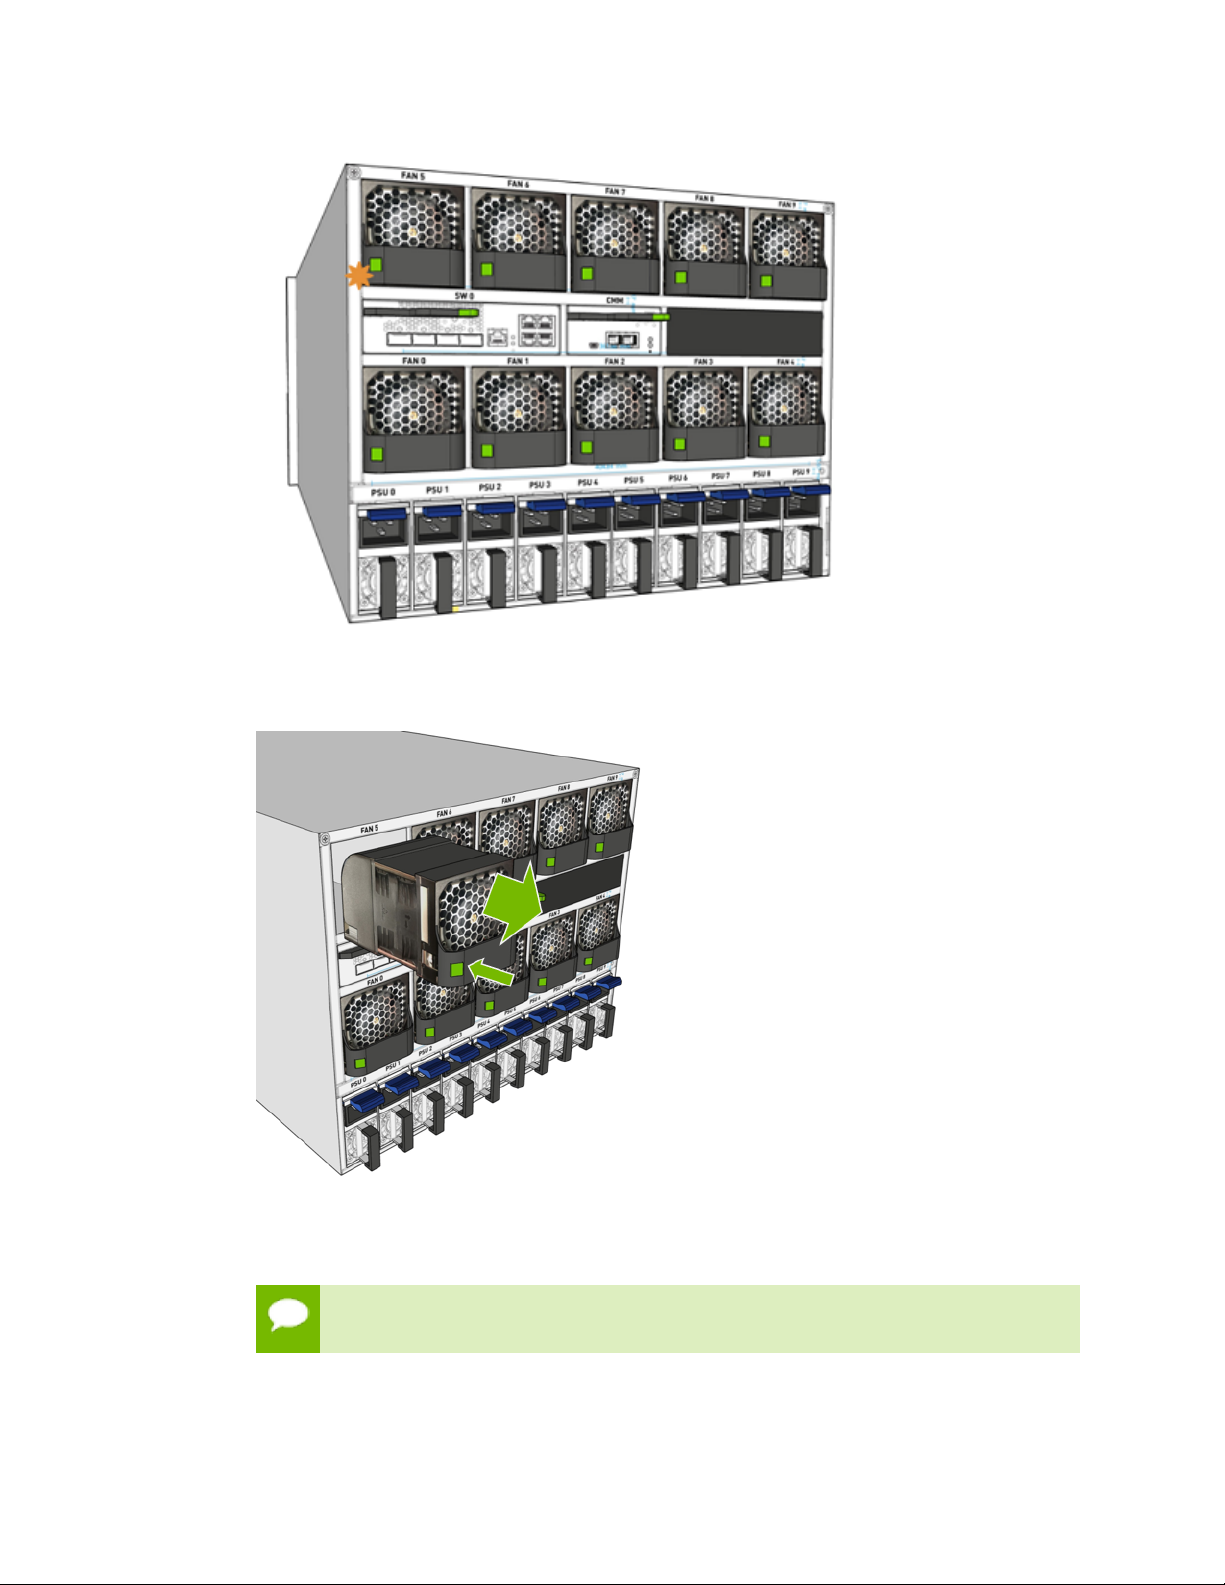
Identify the fan module to be replaced by the illuminated amber fault light and by
the number silkscreened directly above the fan module.
www.nvidia.com
RTX Blade Server DU-09559-001 _v01|4
Page 9
Fan Module Replacement
2.
Press the green tab to release the module, then pull the module out from the chassis
and set aside.
3.
Quickly insert the new fan module into the empty slot, and continue pushing into
the slot until an audible click occurs from the latch on the handle.
Caution Replace the fan module within 30 seconds to prevent overheating of the
system components.
www.nvidia.com
RTX Blade Server DU-09559-001 _v01|5
Page 10

4.
Confirm that the amber fault light does not light up.
Fan Module Replacement
www.nvidia.com
RTX Blade Server DU-09559-001 _v01|6
Page 11

Chapter3.
BLADE REPLACEMENT
A faulty RTX Blade Server blade can be replaced while power is applied to the system
and the system is running.
3.1.Blade Replacement Overview
This is a high-level overview of the steps needed to replace the blades.
1.
Identify the blade that needs to be replaced in the rack / chassis.
2.
Confirm that the Blade ID LED is lit.
3.
Release the ejector lever locking clip.
4.
Use the lever to eject the blade from the chassis.
5.
Install the new blade in the slot.
6.
Use the lever to fully engage the connectors.
7.
Make sure the clip locks into place.
3.2.Replacing the Faulty Blade
Caution The blade should be replaced within 30 seconds after removal to prevent
overheating of system components.
1.
Identify blade to be replaced.
a) To locate the RTX Blade Server with the faulty blade, look for an illuminated ID
LED.
www.nvidia.com
RTX Blade Server DU-09559-001 _v01|7
Page 12

Blade Replacement
b) Once you locate the RTX Blade Server with the faulty blade, identify the blade to
be replaced by the flashing blue and green LEDs.
2.
On the faulty blade, push the release latch up to unlock the blade ejector lever.
www.nvidia.com
RTX Blade Server DU-09559-001 _v01|8
Page 13

Blade Replacement
3.
Pull on the ejector lever away from the blade so the connectors are released from the
midplane.
4.
Pull the blade out of the system.
Important Do not carry the blade by the lever as this could cause the lever to
break.
Expect the sudden souind of the door to the slot shutting as you remove the
blade. The slot door shuts to divert airflow from the empty slot.
www.nvidia.com
RTX Blade Server DU-09559-001 _v01|9
Page 14

Blade Replacement
Caution The blade should be replaced within 30 seconds after removal to prevent
overheating of system components.
5.
Insert the blade in the corresponding slot, making sure the lever is fully open and
that it won’t block the insertion process.
Caution Keep fingers out of the way of the lever as you insert the blade.
6.
When the blade meets the midplane connectors in the back, raise the lever back into
position to ensure the blade connects with the midplane connectors.
www.nvidia.com
RTX Blade Server DU-09559-001 _v01|10
Page 15

Blade Replacement
Make sure you can hear or feel the click as the lever locks into place to finalize the
insertion.
7.
Press the power button on the blade.
www.nvidia.com
RTX Blade Server DU-09559-001 _v01|11
Page 16

Chapter4.
CHASSIS MONITORING MODULE
REPLACEMENT
The RTX Blade Server blades must be shut down before replacing the chassis monitoring
module.
4.1.Chassis Monitoring Module Replacement
Overview
This is a high-level overview of the steps needed to replace the chassis monitoring
modules (CMM).
1.
Confirm that all the blades in the chassis are powered off.
2.
From the back of the chassis use the ejector lever to pull the Chassis Monitoring
Module out.
3.
Install the new CMM and use the lever to confirm it fully engages with the
connectors.
4.
Confirm the module locks into place.
4.2.Replacing the Chassis Monitoring Module
A faulty chassis monitoring module is indicated by the amber light.
www.nvidia.com
RTX Blade Server DU-09559-001 _v01|12
Page 17

Chassis Monitoring Module Replacement
1.
Confirm that all blades are powered off by checking that the green LEDs on the front
of the chassis are not lit.
2.
Unplug the Ethernet cables from the CMM and label them if not labeled already.
3.
Remove the faulty CMM.
a) Release the locking tab and pull on the ejector lever away from the CMM so the
connectors are released from the midplane.
b) Pull the CMM out of the system.
Expect the sudden souind of the door to the CMM bay shutting as you remove
the CMM. The bay door shuts to divert airflow from the empty bay.
www.nvidia.com
RTX Blade Server DU-09559-001 _v01|13
Page 18

Chassis Monitoring Module Replacement
4.
Install the new CMM.
a) Confirm all blades are powered off by checking the green LEDs in the front of the
chassis are not lit.
b) Insert the new CMM into the slot.
c) Close the lever to make sure the connectors engage with the midplane and the
locking tab clicks into place.
www.nvidia.com
RTX Blade Server DU-09559-001 _v01|14
Page 19

Chassis Monitoring Module Replacement
5.
Confirm that the fault light is not lit and that the green light comes up and presents
a heartbeat (flashing).
6.
Connect the remote management RJ45 cables.
www.nvidia.com
RTX Blade Server DU-09559-001 _v01|15
Page 20

Chapter5.
SWITCH MODULE REPLACEMENT
The RTX Blade Server switch module can be replaced while power is applied to the
system, but the blades must not be active.
5.1.Switch Module Replacement Overview
This is a high-level overview of the steps needed to replace the switch modules.
1.
Confirm blades in the chassis are not being used as all network connectivity will be
lost.
2.
Label all cables in case they are not already labeled.
3.
Unplug all cables.
4.
Eject switch module from chassis.
5.
Install replacement switch module.
6.
Plug in all cables following the labels.
5.2.Replacing the Switch Module
1.
Confirm that all blades are powered off by checking that the green LEDs on the front
of the chassis are not lit.
2.
Unplug the Ethernet cables from the switch module and label them if not labeled
already.
3.
Remove the faulty switch module.
a) Release the locking tab and pull on the ejector lever away from the switch module
so the connectors are released from the midplane.
www.nvidia.com
RTX Blade Server DU-09559-001 _v01|16
Page 21

Switch Module Replacement
b) Pull the switch module out of the system.
Expect the sudden souind of the door to the switch bay shutting as you
remove the switch. The bay door shuts to divert airflow from the empty bay.
www.nvidia.com
RTX Blade Server DU-09559-001 _v01|17
Page 22

Switch Module Replacement
4.
Install the new switch module.
a) Confirm all blades are powered off by checking the green LEDs in the front of the
chassis are not lit.
b) Insert the new switch module into the slot.
www.nvidia.com
RTX Blade Server DU-09559-001 _v01|18
Page 23

Switch Module Replacement
c) Close the lever to make sure the connectors engage with the midplane and the
locking tab clicks into place.
5.
Confirm that the fault light is not lit and that the green light comes up and presents
a heartbeat (flashing).
www.nvidia.com
RTX Blade Server DU-09559-001 _v01|19
Page 24

Switch Module Replacement
6.
Connect the remote management RJ45 cables.
www.nvidia.com
RTX Blade Server DU-09559-001 _v01|20
Page 25

Chapter6.
POWER SUPPLY REPLACEMENT
An RTX Blade Server power supply unit (PSU) can be replaced while power is applied to
the system and the system is running.
6.1.Power Supply Replacement Overview
This is a high-level overview of the steps needed to replace a power supply.
1.
Identify failed power supply with the amber LED.
2.
Confirm that at least 5 power supplies are energized and have green LEDs.
3.
Remove power cord from failed power supply.
4.
Press down on the latch to release the power supply.
5.
Remove power supply by pulling it out of the chassis.
6.
Install new power supply in the empty slot.
7.
Plug in the power cord.
6.2.Replacing the Power Supply
1.
Identify the failed power supply by the amber LED.
www.nvidia.com
RTX Blade Server DU-09559-001 _v01|21
Page 26

Power Supply Replacement
2.
Determine whether you need to shut down the system.
If the five remaining PSUs are working and energized, then you do not need to
‣
shut down power to the RTX Blade Server System..
If fewer than five PSUs are working and energized, then you do need to shut
‣
down power to the RTX Blade Server System.
3.
Unplug the power cable from the faulty power supply.
You may need to dislodge the power cord from the retaining clip.
4.
Remove the faulty power supply.
a) Press down on the release latch and at the same time pull the black handle to
release the PSU from the rear connectors..
www.nvidia.com
RTX Blade Server DU-09559-001 _v01|22
Page 27

Power Supply Replacement
b) Continue using the black handle to pull the power supply out of the system.
5.
Install the new power supply.
a) Insert power supply to the chassis and confirm its fully inserted with the audible
click that the latch makes.
www.nvidia.com
RTX Blade Server DU-09559-001 _v01|23
Page 28

Power Supply Replacement
b) Install the power cord and confirm that the LED turns green.
c) If needed, power on the system.
www.nvidia.com
RTX Blade Server DU-09559-001 _v01|24
Page 29

Notice
THE INFORMATION IN THIS GUIDE AND ALL OTHER INFORMATION CONTAINED IN NVIDIA DOCUMENTATION
REFERENCED IN THIS GUIDE IS PROVIDED “AS IS.” NVIDIA MAKES NO WARRANTIES, EXPRESSED, IMPLIED,
STATUTORY, OR OTHERWISE WITH RESPECT TO THE INFORMATION FOR THE PRODUCT, AND EXPRESSLY
DISCLAIMS ALL IMPLIED WARRANTIES OF NONINFRINGEMENT, MERCHANTABILITY, AND FITNESS FOR A
PARTICULAR PURPOSE. Notwithstanding any damages that customer might incur for any reason whatsoever,
NVIDIA’s aggregate and cumulative liability towards customer for the product described in this guide shall
be limited in accordance with the NVIDIA terms and conditions of sale for the product.
THE NVIDIA PRODUCT DESCRIBED IN THIS GUIDE IS NOT FAULT TOLERANT AND IS NOT DESIGNED,
MANUFACTURED OR INTENDED FOR USE IN CONNECTION WITH THE DESIGN, CONSTRUCTION, MAINTENANCE,
AND/OR OPERATION OF ANY SYSTEM WHERE THE USE OR A FAILURE OF SUCH SYSTEM COULD RESULT IN A
SITUATION THAT THREATENS THE SAFETY OF HUMAN LIFE OR SEVERE PHYSICAL HARM OR PROPERTY DAMAGE
(INCLUDING, FOR EXAMPLE, USE IN CONNECTION WITH ANY NUCLEAR, AVIONICS, LIFE SUPPORT OR OTHER
LIFE CRITICAL APPLICATION). NVIDIA EXPRESSLY DISCLAIMS ANY EXPRESS OR IMPLIED WARRANTY OF FITNESS
FOR SUCH HIGH RISK USES. NVIDIA SHALL NOT BE LIABLE TO CUSTOMER OR ANY THIRD PARTY, IN WHOLE OR
IN PART, FOR ANY CLAIMS OR DAMAGES ARISING FROM SUCH HIGH RISK USES.
NVIDIA makes no representation or warranty that the product described in this guide will be suitable for
any specified use without further testing or modification. Testing of all parameters of each product is not
necessarily performed by NVIDIA. It is customer’s sole responsibility to ensure the product is suitable and
fit for the application planned by customer and to do the necessary testing for the application in order
to avoid a default of the application or the product. Weaknesses in customer’s product designs may affect
the quality and reliability of the NVIDIA product and may result in additional or different conditions and/
or requirements beyond those contained in this guide. NVIDIA does not accept any liability related to any
default, damage, costs or problem which may be based on or attributable to: (i) the use of the NVIDIA
product in any manner that is contrary to this guide, or (ii) customer product designs.
Other than the right for customer to use the information in this guide with the product, no other license,
either expressed or implied, is hereby granted by NVIDIA under this guide. Reproduction of information
in this guide is permissible only if reproduction is approved by NVIDIA in writing, is reproduced without
alteration, and is accompanied by all associated conditions, limitations, and notices.
Trademarks
NVIDIA and the NVIDIA logo are trademarks and/or registered trademarks of NVIDIA Corporation in the
Unites States and other countries. Other company and product names may be trademarks of the respective
companies with which they are associated.
Copyright
©
2019 NVIDIA Corporation. All rights reserved.
www.nvidia.com
 Loading...