

Page 1
D VISION PRO™
USER GUIDE
USER GUIDE
Page 2

ii
Page 3

TABL E OF CONTE NTS
iii
TABLE OF CONTENTS
CONTENTS
Table of Contents iii
Welcome 1
About this Guide 1
System Requirements 2
Safety Requirements 2
Epilepsy 4
Unpacking Equipment 5
Equipment 5
3D Vision Pro Glasses 6
Charging the Glasses 6
Using the Glasses 7
Changing the Nose Piece 7
3D Vision Pro Hub 8
Installation and Setup 9
Installation 9
Connecting the Display 9
Installing the Drivers - Windows Vista and Window 7 12
Installing the Drivers - Windows XP 13
Page 4

iv
TABL E OF CONTE NTS
Configure OpenGL Stereo (Quadro Only) 15
Configure DirectX Stereo 16
working with 3D VIsion Pro 19
Accessing the 3D Vision Pro Control Panel 19
Pairing Glasses to the Hub 20
Pairing with the Control Panel 20
Pairing with the Buttons 21
DirectX 3D Stereopscopic Driver 22
Accessing the NVIDIA Control Panel 22
Set Up DirectX Stereoscopic 3D Driver 23
Adjusting the Depth 23
Stereoscopic 3D Display Type 24
Change 3D Laser Sight 24
Set Keyboard Shortcuts 26
Hide Stereoscopic 3D Effects When Game Starts 29
Test Stereoscopic 3D 29
Advanced Information 32
Preset Configurations 32
Setting Your Own Shortcut Keys 33
Application Configuration Guidelines 34
Viewing Practices 34
Tips and Troubleshooting 36
Stereoscopic 3D is not Working 36
Image is not Clear 37
Eyestrain/Headache 38
Compliance and Certifications 40
US Federal Communications Commission Compliance 41
Canada Compliance 41
Australia and New Zealand Compliance 41
European Union Compliance 42
UL, CUL Compliance 42
CB Scheme 42
Important Safety Information 44
Important Safety Information 45
General Precautions 47
Precautions for Installation, Maintaining and Servicing 49
Installation: 49
Maintaining and Servicing: 49
Power Rating 49
Precaution for Communication Cable 50
Page 5

WEL COME
WELCOME
Congratulations on your purchase of NVIDIA® 3D Vision
Pro, a professioanl grade active shutter based
stereoscopic solutioin. The glasses and hub that make up
3D Vision Pro are both designed to give years of reliable
service.
Note: It is important to register your NVIDIA product in
order to receive NVIDIA Customer Care online and phone
support. You can register at www.nvidia.com/3dvision/
register using the serial number found on the Welcome
card in your package.
About this Guide
This guide discusses the installation and operation of the NVIDIA 3D
Vision Pro hardware and software. There is a full section containing
usage tips and troubleshooting guidelines.
Please read through the safety precautions and recommended
viewing guidelines given on pages 3 and 4 under
Safety Requirements
.
Page 6

NV IDI A 3D V ISION USE R GUI DE
System Requirements
Visit www.nvidia.com/3dvpro for a full list of supported graphics
boards, applications, and 3D Vision Ready displays or projectors.
Safety Requirements
Do not wear the wireless glasses in any situations that require
unimpaired visual perception. Do not use the glasses as sunglasses.
Under normal conditions, stereoscopic 3D viewing is safe for any
duration that you would normally view your display. However, some
people may experience discomfort. To minimise the potential for
experiencing visual problems or any adverse symptoms:
>> Take the stereoscopic 3D medical test to verify your ability so see
stereoscopic 3D images.
>> Maintain a distance no closer than 2 to 2.5 feet away from the
display. Viewing from too close a distance can strain your eyes.
>> Take regular breaks, at least 5 minutes after every hour of
stereoscopic 3D viewing.
>> Start with the depth at the default of 15%. As you get more
comfortable viewing stereoscopic 3D, you can increase the
depth amount.
>> If you experience any of the following symptoms:
•
nausea, dizziness, or queasiness,
•
headache, or eyestrain,
•
blurry vision,
•
double vision that lasts longer than a few seconds,
Do not engage in any potentially hazardous activity (for example,
driving a vehicle) until your symptoms have completely gone away.
If symptoms persist, discontinue use and do not resume
stereoscopic 3D viewing without discussing your symptoms
with a doctor.
Page 7

WEL COME
Page 8

NV IDI A 3D V ISION USE R GUI DE
Epilepsy
WARNING!
IF YOU OR ANY MEMBER OF YOUR FAMILY HAS A HISTORY OF
EPILEPSY, CONSULT A DOCTOR BEFORE USING COMPUTER
GAME PRODUCTS.
A small percentage of the population may experience
epileptic seizures when viewing certain types of TV images
or video games that contain flashing patterns of light.
The following people should consult a doctor before viewing
in stereoscopic 3D:
> Children under 5 years of age
> Anyone with a history of epilepsy, or who has a family
member with a history of epilepsy
> Anyone who has ever experienced epileptic seizures or
sensory disturbances triggered by flashing light effects.
WARNING!
SOME LIGHT PATTERNS MAY INDUCE SEIZURES IN PERSONS WITH
NO PRIOR HISTORY OF EPILEPSY. DISCONTINUE STEREOSCOPIC
3D USE IF YOU EXPERIENCE ANY OF THE FOLLOWING SYMPTOMS
WHILE VIEWING STEREOSCOPIC 3D IMAGES.
> Involuntary movements, eye or muscle twitching
> Muscle cramps
> Nausea, dizziness, or queasiness
> Convulsions
> Disorientation, confusion, or loss of awareness of
your surroundings
Do not engage in any potentially hazardous activity (for
example, driving a vehicle) until your symptoms have
completely gone away.
Do not resume stereoscopic 3D viewing without discussing
the symptoms with your doctor.
Page 9
UNPA CKING E QUIPME NT
UNPACKING EQUIPMENT
Prior to unpacking your new NVIDIA 3D Vision Pro solution, it is a
good idea to visit www.nvidia.com/3dvpro to download the current
drivers you'll need during installtion.
Be sure to inspect each piece of equipment shipped in the packing
box. If anything is missing or damaged, contact your reseller.
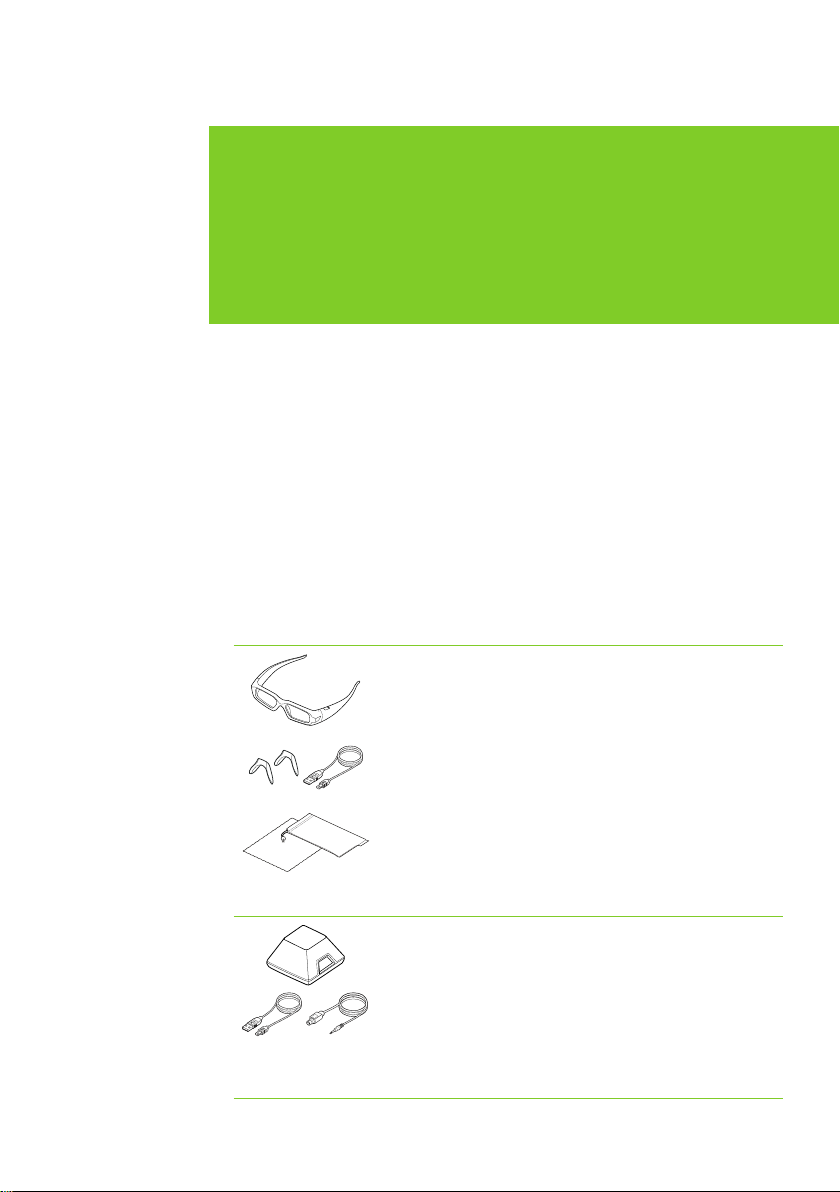
Equipment
The following parts and assemblies are included in the NVIDIA
3D Vision Pro boxes.
3D Vision Pro Glasses
These glasses are used to view stereoscopic
3D content .
The included USB cable is used to charge
the glasses. Connect the cable either to your
computer or an external USB power adator.
The glasses come with various nose pieces to
customise them for your comfort.
You also receive a pouch for your glasses and
a special cleaning cloth. It is recommended to
always keep your glasses in the pouch when
not in use.
3D Vision Pro Hub
The hub connects to your computer and controls the glasses.
Connect the USB cable to the computer. If
your Quadro board, projector or TV provide a
VESA stereo connector connect the included
VESA stereo cable from that conenctor to the
3D Sync input on the 3D Vision Pro Hub
Page 10

NV IDI A 3D V ISION USE R GUI DE
3D Vision Pro Glasses
Charging the Glasses
Note: We recommended that you fully charge your glasses
now since it will take approximately three hours to complete.
The wireless glasses hold approximately 40-hours of gaming
per full charge.
The wireless glasses require periodic charging. To charge the
glasses, use the USB cables that came with the glasses. Plug one
end into the glasses and the other to any USB port on your system.
You can also use a USB wall adapter to charge your glasses. Charge
your glasses until the Amber charge light goes out. You can use
wireless glasses while they are being charged.
Control button
Indicator Light: To check the battery
life, press the Control button.
If the indicator light is:
Green: Up to 40 hours of battery life.
Red: Flashing red indicates two hours
or less battery life
Amber LED: Light flashes amber
when charging. Solid amber when
fully charged.
USB connection to charge glasses
If you are charging the wireless glasses by connecting them to your
PC using a USB cable, make sure your PC does not go into power
save mode. When your PC goes into power save mode, the wireless
glasses are no longer charging. To fix this, disable any power saving
options on your PC under the Windows Control Panel. Alternatively,
you can use a USB wall charging device to charge the glasses directly
from your wall power outlet without connecting to the PC. You can
use your glasses while they are charging.
Page 11
UNPA CKING E QUIPME NT
Using the Glasses
It is a good idea to keep the glasses in the protective pouch when
you are not using them. The glasses will turn on automatically with
motion, but if they are fully powereed down you will need to press
and release the control button to turn them on. The glasses turn off
automatically when there is no activity.
For transport, or any other time the glasses radio needs to be turned
completly off, press and hold the control button until the lenses blink
twice and then open. The glasses are now completely powered down
and will not turn on with motion. To turn them on, press and release
the control button.
Caution: The wireless glasses are not prescription eye wear,
sunglasses, nor a protective goggle. Do not use the glasses
for any general eye wear purposes (e.g., driving, reading,
protection from sunlight or ultraviolet light, etc.) as such use
may result in injury.
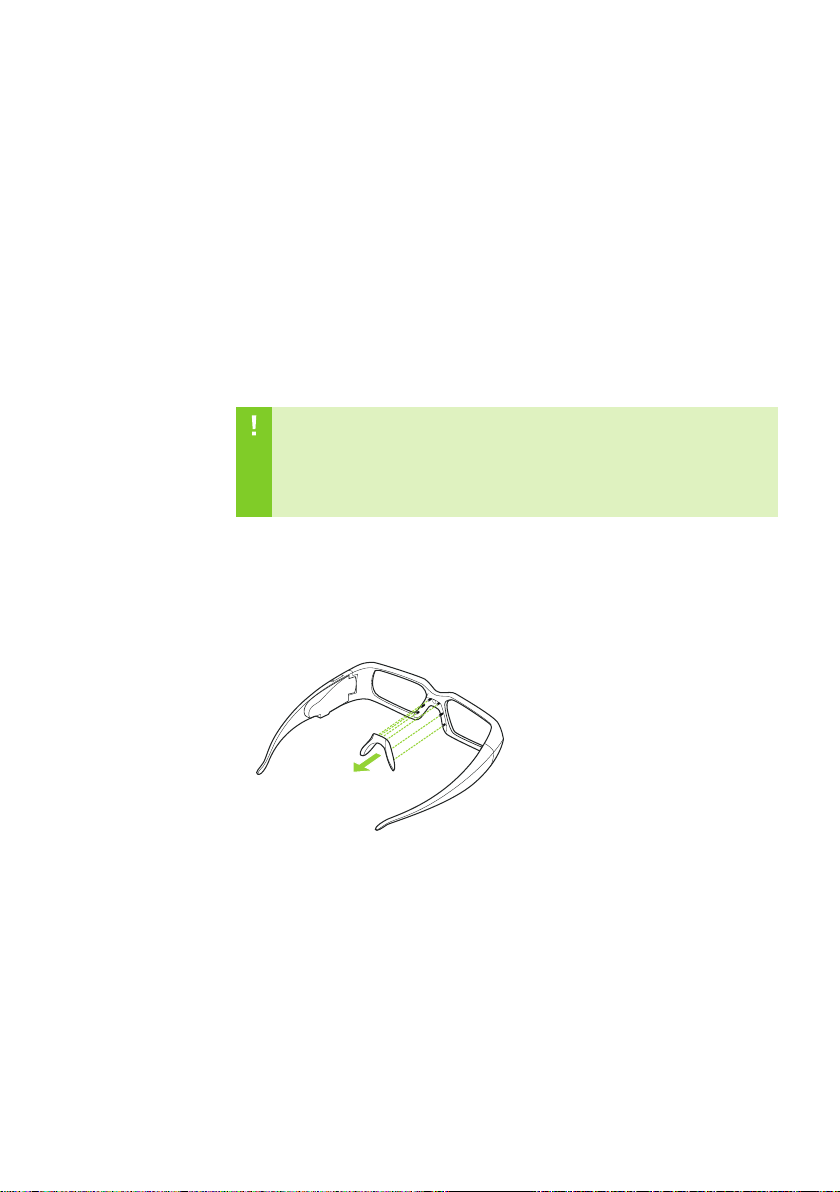
Changing the Nose Piece
Your wireless glasses come with three interchangeable nose pieces
to give you a comfortable fit. Simply pull out the current nose piece
and insert the one that fits you best.
Pull the nose piece out as shown and
snap another nose piece in place
Page 12

NV IDI A 3D V ISION USE R GUI DE
3D Vision Pro Hub
The 3D Vision Pro Hub connects to your system with the included USB
cable. The Emitter has a back-lit button on the front that can be used
to control the pairing with the glasses. The indicator brightens when
stereoscopic 3D is on.
There is a thumbwheel on the back of the emitter that can be used to
increase/decrease depth in some Direct3D based applications.
Hub Control button and light
dim green: stand by
bright green: operational
....flashing light blue/green: pairing
Thumbwheel to adjust stereoscopic
depth in-games
VESA stereo sync connection
Power/Sync status indicator light
green: power on
blue: VESA stereo sync active
USB connection to your computer
Note: USB Extenders and VESA sync extenders have been
tested and qualified for use with the 3D Vision Pro Hub. Contact NVIDIA or your reseller for the list of qualified adaptors.
Page 13

INS TALLATIO N AN D SE TUP
INSTALLATION AND SETUP
Installing the hardware and software to your computer
system is pretty straightforward. However, there is a
specific order you must follow. The 3D Vision Pro Hub
must be connected AFTER the USB drivers have been
installed.
Note: Before beginning the installation, make sure your
glasses are fully charged. See Charging the Glasses on page 6.
Installation
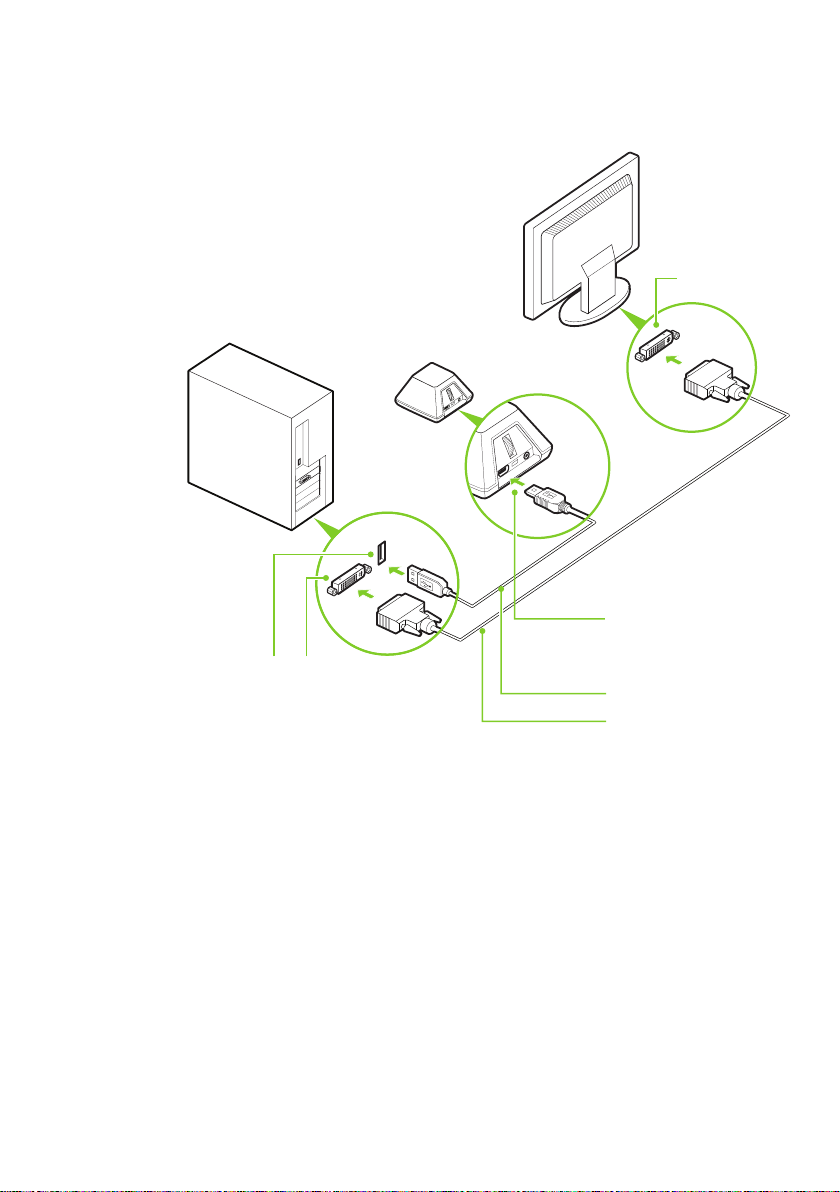
Connecting the Display
Use the following procedure to install and setup your system for 3D
Vision Pro.
1. Connect your display or projector to your supported
NVIDIA graphics card.
For 3D Vision Ready LCDs use the dual-link DVI cable supplied
with the display.
Note: NVIDIA Quadro graphics boards can support multiple
stereo and non-stereo displays
Note: Make sure to select a display refresh rate of 100Hz or
more from the NVIDIA or OS control panel..
See the following pages for connection diagrams.
Page 14
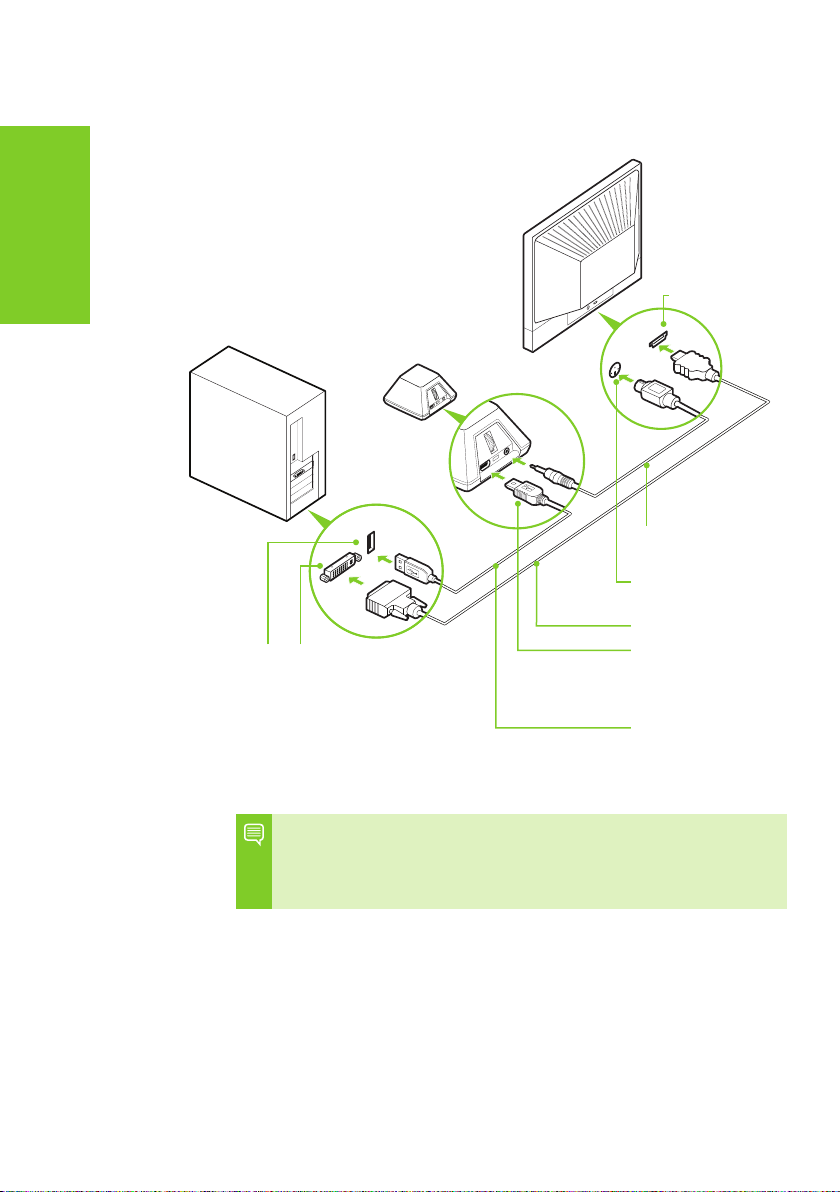
NV IDI A 3D V ISION USE R GUI DE
PC
USB DVI
DLP
HDMI Port
Hub
VESA 3-pin
stereo cable
3D Glasses
Emitter Port
DVI-to-HDMI Cable
DO NOT MAKE THIS
CONNECTION UNTIL
TOLD TO DO SO BY THE
INSTALL WIZARD
USB Cable
DLP HDTV Connection Diagram
Note: Check your DLP’s user manual to see if there is a specifi c
HDMI port used to connect a PC to your HDTV. In addition, change
the input mode on the TV’s menu to be PC or Computer to ensure
the TV can process the video signal correctly.
Page 15
INS TALLATIO N AN D SE TUP
120 Hz LCD Connection Diagram
PC
Hub
USB DVI
LCD
DVI
DO NOT MAKE THIS
CONNECTION UNTIL TOLD
TO DO SO BY THE INSTALL
WIZARD
USB Cable
Dual Link DVI cable
(supplied with the display)
Page 16
NV IDI A 3D V ISION USE R GUI DE
Installing the Drivers - Windows Vista and Window 7
1. Download the most recent 3D Vision Controller driver
and display driver from www.nvidia.com/3dvpro
2. Install the display driver.
Follow the wizard and reboot if ncessary.
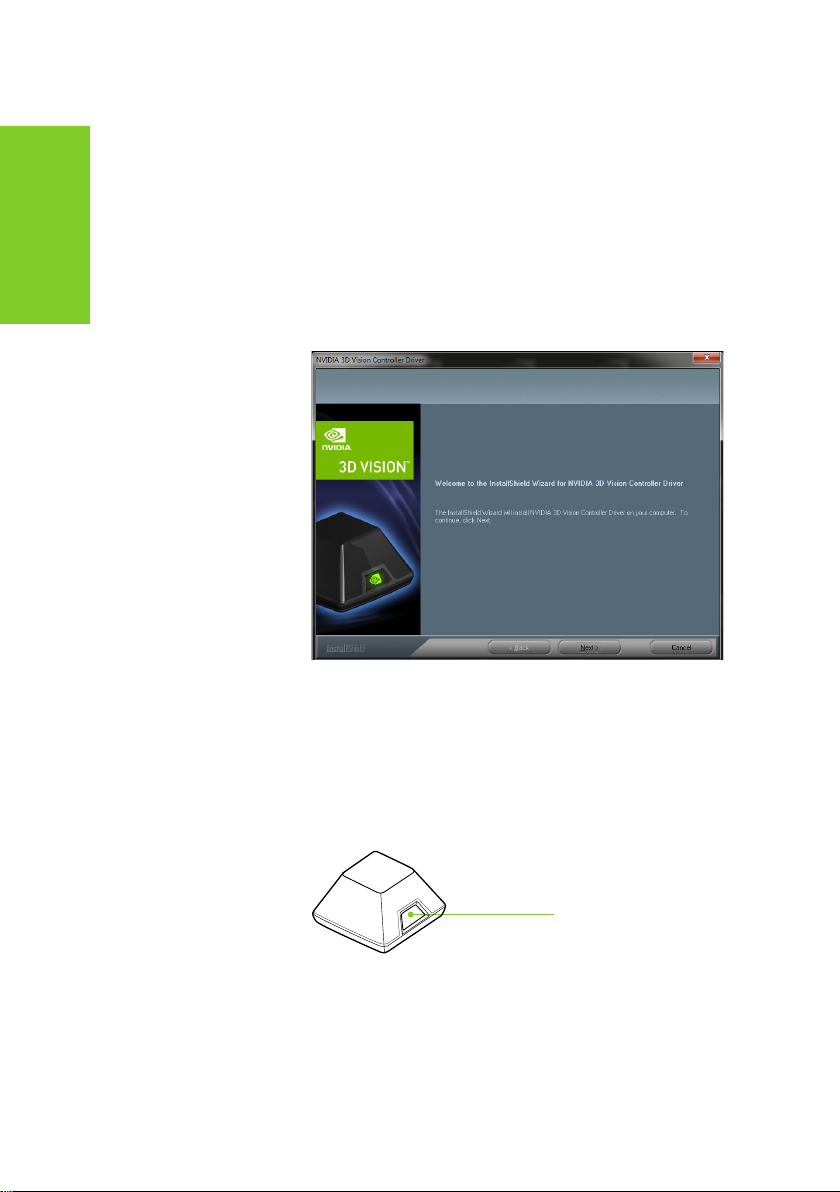
3. Install the 3D Vision Controller driver.
Follow the steps in the wizard.
4. Plug in the 3D Vision Pro Hub to the USB cable.
If the OS prompts you to install the device, click install.
5. Verify Hub Button glows dim green
After a successful installation, the button on the Hub will glow a
dim green
dim green logo
Page 17
INS TALLATIO N AN D SE TUP
Installing the Drivers - Windows XP
1. Download the most recent 3D Vision Controller driver
and display driver from www.nvidia.com/3dvpro
2. Install the display driver.
Follow the wizard and reboot if ncessary.
3. Install the 3D Vision Controller driver.
Follow the steps in the wizard.
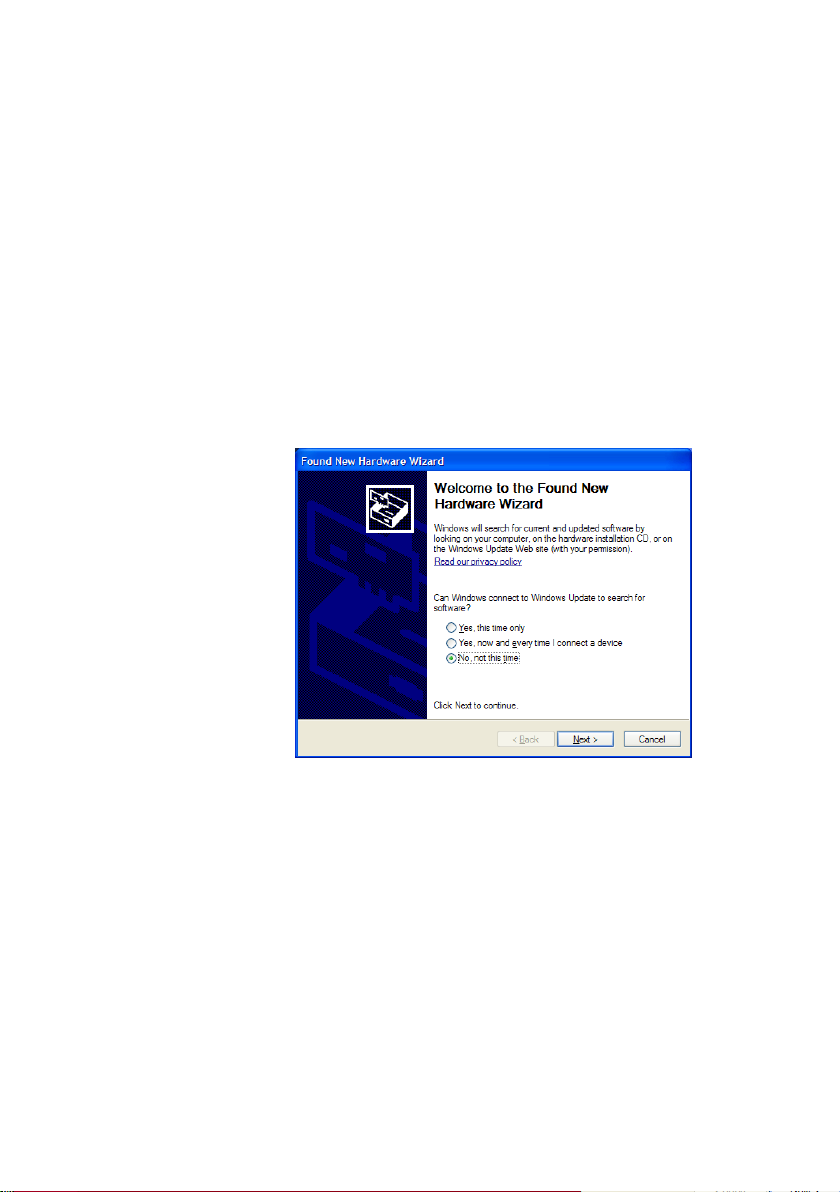
4. Plug in the 3D Vision Pro Hub to the USB cable.
Plugging in the Hub will start the Windows Found New Hardware
Wizard
5. Select "No, not at this time" when prompted about connecting to
Windows update.
Installing the driver in the previous steps installed the necessary
files
Page 18

NV IDI A 3D V ISION USE R GUI DE
6. Select and install the recommended drivers.
The wizard will find the files need automatically
7. Finish the Wizard.
Upon completing the wizard the logo on the front button of the hub
will be glowing a dim green.
dim green logo
Page 19

INS TALLATIO N AN D SE TUP
Confi gure OpenGL Stereo (Quadro Only)
1. Verify that the display refresh rate
Unless your display device is designed to supoprt stereo at a lower
refresh rate, make sure to select a refresh rate of 100Hz or higher.
Depending on the lighting in your environment you may experience
a pulsing of the image when looking through the glasses. If you
notice this, you can adjust the refresh rate to an align on an even
multiple with your lighting refresh rate (e.g 60Hz lighting -> 120Hz
display refresh, 50Hz lighting -> 100Hz display refresh).
Page 20

NV IDI A 3D V ISION USE R GUI DE
2. Select the Stereo Output Format in Manage 3D Settings
Select the cortrect output format for your device
LCD Panels or Single Channe; Projectors:
On-Board DIN Connector (with NVIDIA Hub) or
Active Stereo (with NVIDIA Hub)
Dual Pipe / Clone Mode: nView Clone Mode (with NVIDIA...
Real Projection DLP TV's: 3D DLP display (with NVIDIA Hub)
3. Enable Stereo
Turn on stereo for supported applications
Confi gure DirectX Stereo
Page 21

INS TALLATIO N AN D SE TUP
The DirectX Stereo driver does not need to be enabled. When
enabled it will enable compatible applications including games, 3D
BluRay players and many professional applications.
There is more information on the DirectX Stereosctopic drvier in
DirectX Stereiscopic Driver section of this manual
1. Run the Configuration Wizard
Launch the Setup Wuzard from the 3D Stereoscopic entry in the
NVIDIA Control Panel
Page 22

NV IDI A 3D V ISION USE R GUI DE
Page 23

NV IDI A CONTR OL PANE L
WORKING WITH D VISION PRO
3D Vison Pro operates on radio so the glasses need to be
connected with the hub. You can connect multiple glasses
to a single hub and multiple hubs can operate in range of
each other.
Accessing the 3D Vision Pro Control Panel
To open the NVIDIA Control Panel, right click on the desktop
and select the NVIDIA Control Panel. You can also go to
Start
NVIDIA CorporationNVIDIA Control Panel.
Select Manage 3D Vision Pro from the topics in the left window pane.
You may need to click on the + in front of Stereoscopic 3D to
expand the topics.
Page 24

NV IDI A 3D V ISION USE R GUI DE
Pairing Glasses to the Hub
You can pair the glasses to the hub through the control panel or with
just the buttons on the hub and glasses. Either version of pairing can
be done while stereo applications are runing or not. You can add pair
additional glasses without distrupting already paired glasses.
Pairing with the Control Panel
1. Open the 3D Vision Pro Control Panel
Navigate to the 3D Vision Pro control panel entry in the NVIDIA
control panel
2. Press the Add Glasses Button
3. Press and hold the button on the glasses until the light next to
the button blinks green
Holding the button on the glasses until it blinks green, and then
releasing the button, places the glasses into their pairing mode.
You can pair multiple glasses at one time.
4. Glasses name and battery level appear and glasses start to
operate
Pairing is usually a very quick operation and the light on the
glasses will turn solid green when paired. If a stereo application is
running the glasses will start operating as well.
Page 25

NV IDI A CONTR OL PANE L
Pairing with the Buttons
1. Press and Relase the button on the Hub
The light on the hub will start alternating between green and cyan
press and release
2. Press and hold the button on the glasses until the light next to
the button blinks green
Holding the button on the glasses until it blinks green, and then
releasing the button, places the glasses into their pairing mode.
3. Light on the glasses will turn solid green, and hub will return to
solid green
Pairing is usually a very quick operation and the light on the
glasses will turn solid green when paired. If a stereo application is
running the glasses will start operating as well.
Note: Adding glasses with the button also adds the glasses to the
control panel. If you wish to pair many glasses at once, press the
button on the hub twice, then pair the glasses. Glasses paired
this way will not appear in the control panel but will operate.
Page 26

NV IDI A CONTR OL PANE L
DIRECTX D STEREOPSCOPIC
DRIVER
NVIDIA has provided tools for you to customise your
3D Vision experience for DirectX based applications. To
access the tool menus, go to the NVIDIA Control Panel.
Accessing the NVIDIA Control Panel
To open the NVIDIA Control Panel, right click on the desktop
and select the NVIDIA Control Panel. You can also go to
Start
NVIDIA CorporationNVIDIA Control Panel.
Select Stereoscopic 3D from the topics in the left window pane.
You may need to click on the + in front of Stereoscopic 3D to
Page 27

NV IDI A 3D V ISION USE R GUI DE
Set Up DirectX Stereoscopic 3D Driver
This section of the NVIDIA Control Panel provides all the
adjustments needed to enhance your gaming experience.
Each of the adjustments on this screen is discussed.
Adjusting the Depth
The depth amount in a game is the depth that the farthest object is
placed in a scene. When 3D Vision is first installed on your system,
the Depth is set at the default of 15%. If you are new to 3D gaming,
15% is a good point to start with. Viewing depth at a higher setting
can be uncomfortable to some users. As you use 3D Vision, your
eyes will become more accustomed to viewing stereoscopic 3D and
you can incrementally increase the depth amount without eye strain.
On the Set Up Stereoscopic 3D screen, you adjust the depth amount
by adjusting the slider to the desired amount. The depth setting
on this slider indicates the depth amount for all games when they
are launched.
Page 28

NV IDI A CONTR OL PANE L
You can also change the depth amount by adjusting the thumbwheel
on the back of the Hub. Any adjustments you make on the
thumbwheel is reflected on the Depth slider in the NVIDIA
Control Panel.
Another way to change depth while in a game or supported
applicationis to use the keyboard shortcut keys:
Thumbwheel to adjust
depth while in a
supported application
>> To decrease depth, use Ctrl+F3 (default shortcut keys)
>> To increase depth, use Ctrl+F4 (default shortcut keys)
Any adjustments you make using keyboard shortcuts is
reflected on the Depth slider in the NVIDIA Control Panel.
Stereoscopic 3D Display Type
The Stereoscopic 3D display type is a drop-down list of all 3D Vision
Ready displays that were found by the Setup Wizard. This list is
populated by the Wizard. If you had more than one 3D Vision-Ready
display attached during Setup, they will be reflected in the list.
Change 3D Laser Sight
The cross-hair sight in a first-person shooter (FPS) game is usually
positioned at screen depth when viewed in stereoscopic 3D, making it
difficult to aim. In some games, NVIDIA has created a configuration
that puts the in-game laser sight at the correct depth. For those
games, no user configuration is required. For all other FPS games,
NVIDIA provides a selection of 3D laser sights that appear on the
Page 29

NV IDI A 3D V ISION USE R GUI DE
targeted object. The laser sights work in properly configured
first-person shooter games with screen-centered sights.
To change the laser sight from the Set Up Stereoscopic 3D screen, click
on the Change 3D Laser Sight button to display a list of possible laser
sights.
Different laser sights are displayed as you scroll down.
To use your selected laser sight, check the Enable laser
sight for configured game check box. If you would rather
use the game’s laser sight, uncheck the box.
You can define the amount of transparency for the selected
laser sight by using the Transparency slider. A setting of 0%
is a solid laser sight and a setting of 100% is see-through. A
recommended laser sight transparency is 25%. You can also
use the keyboard shortcut keys, Ctrl+F12 (default setting)
to toggle the laser sight on and off while in a game.
The laser sight displays when stereoscopic 3D is turned
on during a game. To avoid confusion, disable the aiming
crosshair provided by the game whenever possible.
Page 30

NV IDI A CONTR OL PANE L
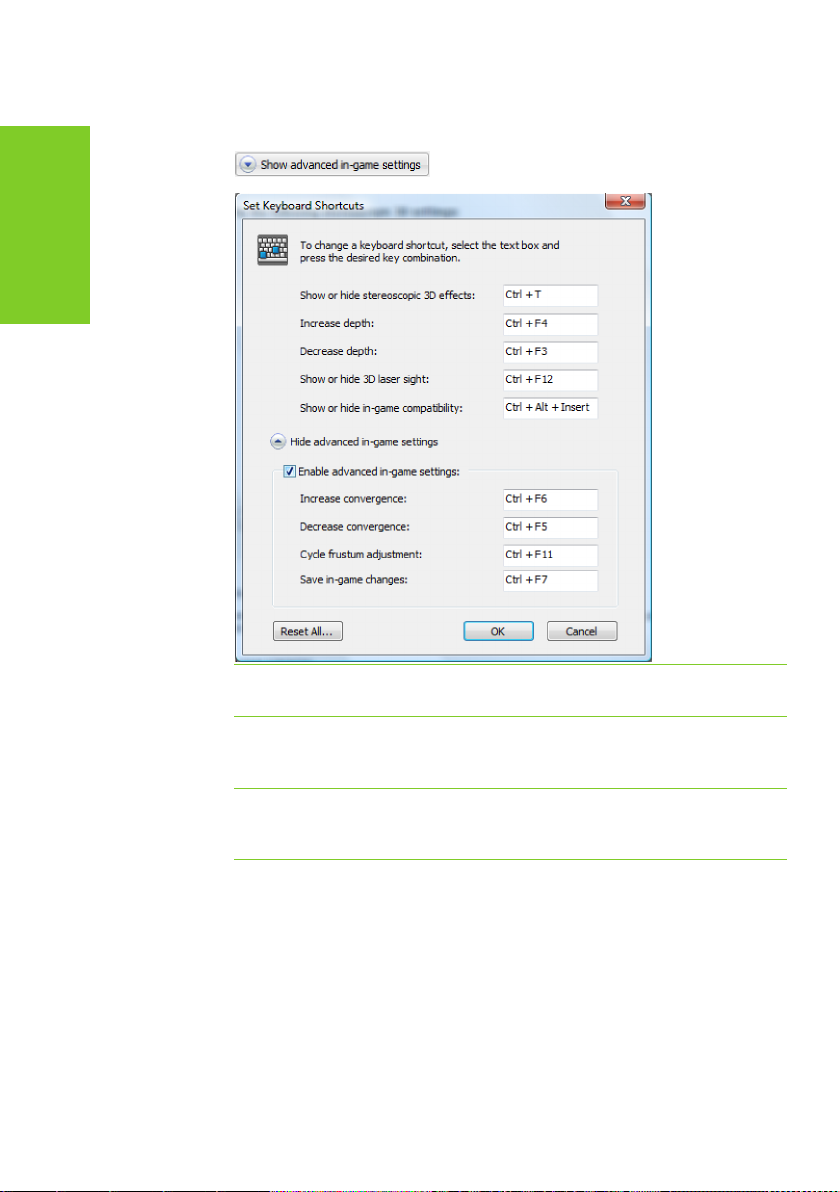
Set Keyboard Shortcuts
The keyboard shortcuts are in-game hot keys that
can be used to perform a variety of actions.
To view or change the keyboard shortcut keys from the Set Up
Stereoscopic 3D screen in the NVIDIA Control Panel, click on the Set
Keyboard Shortcuts button.
To see the advanced in-game settings, click on
This expands the Set Keyboard Shortcuts screen.
To enable the use of advanced shortcut keys in-game, you must
check the Enable advanced in-game settings check box. The
standard shortcut keys (shown in the upper portion of the window)
are always enabled.
Table 1 on the following page lists all the shortcut key functions.
Table 1. Keyboard Shortcut Keys
Keys Description Action
Page 31
NV IDI A 3D V ISION USE R GUI DE
Shown with
default values
Ctrl+T Show/Hide stereo-
scopic 3D effects
Ctrl+F4 Increase depth Increases the depth amount real-
Ctrl+F3 Decrease depth Decreases the depth amount real-
Turns 3D Vision off and on.
time in the current game. Change is
reflected on the NVIDIA Control Panel.
time in the current game. Change is
reflected on the NVIDIA Control Panel
Page 32

NV IDI A CONTR OL PANE L
Ctrl+Alt+
Insert
Show/Hide in-game
compatibility
Displays the settings recommended
by NVIDIA for the current game in the
lower corner of your display.
Ctrl+F6 Increase conver-
gence
Moves objects towards you. Maximum
convergence places all objects in front
of the scene, in user space. Used to
place the laser sight. (Advanced)
Ctrl+F5 Decrease conver-
gence
Moves objects away from you.
Minimum convergence places all
objects “behind” the scene, in CRT
space. Used to place the laser sight.
(Advanced)
Ctrl+F11 Cycle frustum
adjustment
Cycles between three different modes
of displaying the 3D image in the
viewer: Off, Stretch to fill, Clip sides.
(Advanced)
Ctrl+F7 Save in-game set-
tings
(Advanced) To enable the use of advanced shortcut keys in-game, you must check the Enable advanced
in-game settings check box on the Set keyboard Shortcuts screen.
Saves the current game setting to the
registers for later use. (Advanced)
Page 33

NV IDI A 3D V ISION USE R GUI DE
Hide Stereoscopic 3D Effects When Game Starts
There are some games that do not launch very well when stereoscopic
3D effects are enabled at startup. To avoid this, check the box on
the Set Up Stereoscopic 3D screen in the NVIDIA Control Panel.
The stereoscopic 3D effects remain enabled, it is just hidden at
startup. Once the game has loaded, you can show stereoscopic
3D effects by either using the shortcut keys Ctrl+T or by
pressing the Stereoscopic 3D ON/OFF button on the hub.
Stereoscopic 3D ON/OFF
Test Stereoscopic 3D
The Test Stereoscopic 3D button and drop-down list on the Set Up
Stereoscopic 3D screen in the NVIDIA Control Panel provides the ability
to test stereoscopic 3D viewing and the ability to run the Setup
Wizard and the Medical Image Test.
Test Stereoscopic 3D Option
Clicking on the Test Stereoscopic 3D... button
displays a test application that allows you
to adjust stereoscopic 3D effects so that
watching 3D Vision is comfortable to you.
Click Launch Test Application after you select the display settings.
Page 34

ADVANC ED CONF IGURATIONS
The image displays in full-screen if you have the correct
resolution set for you monitor. With your wireless glasses on,
you are able to see in stereoscopic 3D. Use the shortcut keys
and the depth wheel on the Hub to make adjustments.
Note: Any changes made using the shortcut keys or the Hub depth
wheel is reflected on the Set Up Stereoscopic 3D screen..
When you have finished any adjustments, press the
Esc key to exit the stereoscopic 3D test screen.
Run Setup Wizard Option
Clicking on the dropdown menu icon displays the Run Setup
Wizard and Run Medical Image Test options. Selecting the
Run Setup Wizard option launches the Wizard so that you
can make changes to your configuration or add displays.
Run Medical Image Test Option
The Medical Test Image is run during the install Wizard (see Step 20
on page 22). However, you can run the test independent of the
Wizard by selecting the Run Medical Image Test option.
Attention: NVIDIA recommends that every new stereoscopic
3D user run the Medical Image Test to verify their ability to
view stereoscopic 3D-rendered images. If you can not see the
image, do not use 3D Vision (see step 20 on page 22).
Page 35

NV IDI A 3D V ISION USE R GUI DE
Page 36

ADVANC ED INFORMAT ION
ADVANCED INFORMATION
The NVIDIA 3D Vision Driver takes certain 3D information
contained in the game and uses it to generate the
stereoscopic 3D display. Since most games are not
designed with stereoscopic 3D in mind, the resulting
display quality varies from game to game. In some cases,
the game is not viewable at all in stereoscopic 3D without
making adjustments based on observation.
Optimum stereoscopic 3D is achieved when the application display
consists of the following:
>> Meaningful range of depth, or distance between the nearest and
farthest objects.
>> Nearest objects which are not too close for comfortable viewing.
>> Heads up displays (HUD) that are positioned so as not to interfere
with the stereoscopic 3D experience. Ideally, HUDs should be at
screen depth.
Preset Configurations
For most games, NVIDIA has established settings that adjust the
display to achieve high quality stereoscopic 3D, based on the needs of
each game.
You can view the list of these games on the View compatibility with
games task located on the NVIDIA Control Panel. This menu also
shows a list of comments pertaining to that game. These comments
may include suggested settings or adjustments and comments on the
construction of the game. These instructions can also be overlaid on
the opening screen of the game using Ctrl+Alt+Insert.
Be sure to view these comments before you begin your game.
Page 37

NV IDI A 3D V ISION USE R GUI DE
Setting Your Own Shortcut Keys
To configure a game in real-time you must be familiar with the
keyboard shortcut keys. You can use the default setting or you can
change the shortcut keys to suit your particular liking.
To see the default keyboard shortcut key settings, go to the NVIDIA
Control Panel and select the Set up stereoscopic 3D task in the left
window pane. Click on the click on the Set Keyboard Shortcuts button.
Shown with
default values
See Table 1 on page 31 for more information on the shortcuts.
To change a shortcut key combination, select an action and click
in the adjacent box displaying the shortcut. Press your desired key
combination. The keystrokes are displayed in the box. Click OK to
save your settings and exit the menu. The driver saves the settings
in the registry.
Page 38

ADVANC ED INFORMAT ION
Application Configuration Guidelines
The following table lists some adjustment guidelines to use for
specific issues when you are in a game.
Table 2. Application Configuration Guidelines
Issue Suggestion
Object are too close Decrease Convergence
Side borders are blurred,
not clear, not visible
Convergence settings not
good for all parts of the
game
Stereoscopic 3D unclear,
not sure what needs to be
adjusted
Once you are happy with the way the game looks in stereoscopic 3D,
press Ctrl-F7 to save these settings to the register. The settings
are associated with this game only (based on the name of the game
executable file).
[Ctrl+F5]
Cycle frustum adjustments
until borders are clear
[Ctrl+F11]
Increase/decrease convergence [Ctrl+F6/Ctrl+F5]
See Tips and Troubleshooting
on page 39
Viewing Practices
>> Depth Amount: The recommended starting point for Depth
Amount is 15%, but always adjust the depth to a comfortable level.
You can increase it over time as your eyes get used to stereoscopic
3D viewing.
>> Viewing Distance: Maintain a distance no closer than 2 to
2.5 feet away from the monitor. Viewing from too close a
distance can cause too much strain on your eyes, and can reduce
stereoscopic quality.
>> Viewing Angle: Keep your eyes parallel to the screen. The imagi-
nary line connecting your eyes should be parallel to the horizontal
level of the screen. The stereoscopic 3D effect is based on sideto-side or horizontal—displacement of each image. If you tilt your
head, your eyes no longer see the displacement as horizontal, and
the stereoscopic 3D effect is diminished or even eliminated. While
your brain may adjust to this viewing, it must work harder, resulting in eye strain and fatigue.
Page 39

NV IDI A 3D V ISION USE R GUI DE
>> Viewing Time: Take regular breaks. As with any time spent look-
ing at a computer screen, it is good practice to give your eyes a
rest after a period of time. At a minimum, rest for five (5) minutes
after every hour of stereoscopic 3D viewing.
>> Viewing with Prescription Glasses: If you normally wear glasses
when viewing a computer screen, keep them on and put the wireless glasses over your eye wear. The sharper the image on the
screen, the better the quality.
>> Game Cursor/Cross-hair Sights: If you are using the NVIDIA 3D
laser sights, be sure to turn off the sight that the game provides.
The game sight is usually positioned at screen-depth, and interferes with useful viewing of the NVIDIA laser sight.
>> Display Lighting: The amount of light reaching each eye is cut in
half, and causes the screen to appear darker under stereoscopic
3D viewing. Adjusting the brightness and contrast settings of your
game can also reduce screen persistence and improve stereoscopic 3D quality.
>> Ambient Lighting: The intensity of surrounding lighting can affect
stereoscopic 3D quality and comfort. Lighting conditions that improve stereoscopic 3D viewing vary from one person to the next,
so experiment with brighter or darker room lighting to find what
works best for you. See Tips and Troubleshooting on page 39.
Page 40

TIP S AND T ROU BLE SHOOT ING
TIPS AND TROUBLESHOOTING
NVIDIA provides an online knowledgebase system with
answers to most common questions available 24x7x365.
You can also use it to submit questions online to our
technical support staff. .
Stereoscopic 3D is not Working
>> Make sure you have activated the hub. Press the green ON/OFF
button on the front of the emitter. The emitter is on when the
button is bright green.
>> Check and make sure that stereoscopic 3D is enabled. Go to the
NVIDIA Control Panel Set Up Stereoscopic 3D screen.
>> Run the Setup Wizard to verify your hardware is operating
properly. Go to the NVIDIA Control Panel (right click on the
desktop). Select Set Up Stereoscopic 3D. Then select Run Setup
Wizard from Test Stereoscopic 3D drop down menu.
>> Ensure your glasses are fully charged.
You can check the battery level of your glasses by pressing
the ON button.
•
If the light next to the button is green, you have up to 40 hours
of battery life remaining. Actual battery life is dependent on the
recharge time.
•
If the light is red, you have less than two hours remaining and it
is recommended that you recharged your glasses.
•
If the light does not turn on, the battery is drained and the
glasses must be recharged.
Page 41

NV IDI A 3D V ISION USE R GUI DE
>> If you are charging the wireless glasses by connecting them to
your PC using a USB cable, make sure your PC does not go into
power save mode. When your PC goes into power save mode,
the wireless glasses are no longer charging. To fix this, disable
any power saving options on your PC under the Windows Control
Panel. Alternatively, you can use a USB wall charging device to
charge the glasses directly from your wall power outlet without
connecting to the PC.
>> Make sure you have used the DVI cable that was shipped with
your 3D Ready 120Hz LCD display. This is a dual-link cable and
3D Vision will not operate without it.
Image is not Clear
Your Eyes are not Adjusted
Your eyes may take some time to adjust to viewing stereoscopic 3D
effects. If you are new to gaming, make sure you start your depth
amount at the default of 15%. As your eyes adjust, you can increase
the depth amount.
Depth Needs Adjusting
Adjust depth amount using the slider on the NVIDIA Control Panel
Setup screen. If you are in a game, use the thumb wheel on the
back of the Hub or the shortcut keys Ctrl+F3 to decrease depth and
Ctrl+F4 to increase depth.
Excessive Flickering
Flicker in your peripheral vision can be caused by differences in
frequencies at which 3D Vision operates and the lighting in your
room. This type of flicker can be avoided by turning off the lights or
changing the stereoscopic 3D refresh rate. To see the refresh rates,
run the Setup Wizard from the NVIDIA Control Panel. When
you get to the page asking about flicker, select Yes. You can then
select from the following refresh rates:
>> 120 Hz refresh rate for use in North America when lights are on
>> 110 Hz refresh rate for daytime and when lights are off
>> 100 Hz refresh rate for countries with 50 Hz lighting and when
lights are on
Once you have selected a refresh rate on the Setup Wizard screen,
click the Test with this refresh rate button to verify the new refresh
rate helps to reduce flicker. Once you have found the best setting,
select Next to continue (see step 17 on page 18 for the procedure on
how to reset the refresh rate).
Page 42

TIP S AND T ROU BLE SHOOT ING
Eyestrain/Headache
If you are experiencing eyestrain or headaches, it
could be due to excessive depth amount. Change
the depth in one of the following ways:
>> In-game adjustment, use the shortcut keys Ctrl+F3 to decrease
the depth amount.
>> Use the thumb wheel on the back of the Hub to adjust the depth
amount. If you are new to gaming, start at the default 15%.
>> Use your mouse to adjust depth amount on the slider in the
NVIDIA Control Panel Set Up Stereoscopic 3D screen.
If you are new to gaming, start at the default (15%).
Warning: If eyestrain and headaches persist, discontinue
viewing in stereoscopic 3D and consult a doctor.
Page 43

NV IDI A 3D V ISION USE R GUI DE
Page 44

COM PLI ANCE A ND CERTIF ICAT IONS
COMPLIANCE AND CERTIFICATIONS
The NVIDIA 3D Vision Pro system:
3D Vision Pro Hub, P753
3D Vision Pro Glasses, P703
Is compliant with the following regulations:
>> Australian Communications and Media Authority (C-Tick)
>> Conformité Européenne (CE)
>> Federal Communications Commission (FCC)
>> IECEE CB Scheme (CB)
>> Industry Cananda (ICE, ICES)
>> Underwriters Laboratories (UL, cUL)
Page 45

NV IDI A 3D V ISION USE R GUI DE
US Federal Communications Commission
Compliance
FCC – Federal Communications Commission
3D Vision Pro Hub, P753 FCC ID: VOB-P753A
3D Vision Pro Glasses, P703 FCC ID: VOB-P703A
This part complies with Part 15 of the FCC rules.
Operation is subject to the following two conditions:
(1) This device may not cause harmful interference, and (2) this
device must accept any interference received, including interference
that may cause undesired operation.
Warning: Changes or modifications not expressly approved by the
party responsible for compliance could void the user’s authority to
operate the equipment.
Canada Compliance
IC (Industry Canada)
3D Vision Pro Hub, P753 IC: 7361A–P753A
3D Vision Pro Glasses, P703 IC: 7361A–P703A
This Class B digital apparatus complies with Canadian ICES-003.
Operation is subject to the following two conditions: (1) this device
may not cause interference, and (2) this device must accept any
interference, including interference that may cause undesired
operation of the device.
Australia and New Zealand Compliance
C-Tick (The Australian Communications and Media
Authority)
Page 46

COM PLI ANCE A ND CERTIF ICAT IONS
European Union Compliance
CE: European Conformity (Conformité Européenne)
3D Vision Pro Hub, P753
3D Vision Pro Glasses, P703
Receiver Category 3
UL, CUL Compliance
UL– Underwriters Laboratories
>> For use only with UL Listed I.T.E.
CB Scheme
CB–IECEE CB Scheme
Page 47

NV IDI A 3D V ISION USE R GUI DE
Page 48

IMP ORTA NT SA FE TY INFO RMATION
IMPORTANT SAFETY INFORMATION
NVIDIA products are designed to operate safely when installed
and used according to the product instructions and general safety practices. The guidelines included in this document explain the
potential risks associated with equipment operation and provide
important safety practices designed to minimise these risks. By
carefully following the information contained in this document,
and the specific instructions provided with your product, you can
protect yourself from hazards and create a safer environment.
The product is designed and tested to meet IEC-60950-1, the
Standard for the Safety of Information Technology Equipment.
This also covers the national implementation of IEC-60950-1
based safety standards around the world e.g. UL-60950-1. These
standards reduce the risk of injury from the following hazards:
>> Electric shock: Hazardous voltage levels
contained in parts of the product
>> Fire: Overload, temperature, material flammability
>> Mechanical: Sharp edges, moving parts, instability
>> Energy: Circuits with high energy levels (240 volt
amperes) or potential as burn hazards
>> Heat: Accessible parts of the product at high temperatures
>> Chemical: Chemical fumes and vapors
>> Radiation: Noise, ionising, laser, ultrasonic waves
Page 49

NV IDI A 3D V ISION USE R GUI DE
Retain and follow all product safety and operating instructions.
Always refer to the documentation supplied with your equipment.
Observe all warnings on the product and in the operating instructions.
Note: Read all safety information below and operating instruc-
tions before using 3D Vision Pro to avoid injury .
Note: Keep this features guide for 3D Vision Pro handy for
future reference.
WARNING: Failure to follow these safety instructions could
result in fire, electric shock or other injury or damage
WARNING: Electrical equipment can be hazardous if misused.
Operation of this product, or similar products, must always
be supervised by an adult. Do not allow children access to the
interior of any electrical product and do not permit them to
handle any cables
.
.
Important Safety Information
To reduce the risk of bodily injury, electric shock, fire, and damage to
the equipment, observe the safety labels included on the equipment.
Symbols on Equipment
Sign Meaning
This symbol in conjunction with any of the following
symbols indicates the presence of a potential hazard.
The potential for injury exists if warnings are not observed. Consult your documentation for specific details.
This symbol indicates the presence of hazardous energy circuits or electric shock hazards. Refer all servicing
to qualified personnel.
WARNING: To reduce the risk of injury from electric
shock hazards, do not open this enclosure. Refer all
maintenance, upgrades, and servicing to qualified
personnel.
Page 50

IMP ORTA NT SA FE TY INFO RMATION
This symbol indicates the presence of electric shock
hazards. The area contains no user or field serviceable
parts. Do not open for any reason.
WARNING: To reduce risk of injury from electric shock
hazards, do not open this enclosure.
Page 51

NV IDI A 3D V ISION USE R GUI DE
General Precautions
To reduce the risk of personal injury or damage to the equipment:
>> Follow all cautions and instructions marked on the equipment.
Do not attempt to defeat safety interlocks (where provided).
>> Do not bend, drop, crush, puncture,incinerate,
or open glasses or hub.
>> Shut down product before installation
>> Do not connect or disconnect any cables when
perform installation, maintenance, or reconfiguration
of this product during an electrical storm
>> Do not use 3D Vision Pro in rain or near sink, or other wet
locations. Take care not to spill any food or liquid into stereo
glasses system. In case 3D Vision Pro gets wet, unplug
all cables and turn 3D Vision Pro off before cleaning, and
allow it to dry thoroughly before turning it on again.
>> Never turn on any equipment when there is
evidence of fire, water, or structural damage.
>> Place the product away from radiators, heat registers,
stoves, amplifiers, or other appliances that produce heat.
>> Operate 3D Vision Pro in a place where the temperature
is always between 0 and 45C (32 to 113F).
>> Store 3D Vision Pro in a place where the temperature
is always between -20o and 45oC (-4o to 113oF). Don’t
leave 3D Vision Pro in your car, because temperatures
in parked cars can exceed this range.
>> When you’re using 3D Vision Pro or charging the battery,
it is normal for 3D Vision Pro to get warm. The exterior of
stereo glasses functions as a cooling surface that transfers
heat from inside the unit to the cooler air outside
>> If you use the USB Power Adapter to charge stereo glasses,
read the specification of the power adapter carefully at first,
make sure the output port of power adapter meets the USB port
specification, make sure the power adapter is fully assembled
before you plug it into a power outlet. Then insert the USB
Power Adapter firmly into the power outlet. Do not connect
or disconnect the USB Power Adapter with wet hands.
Page 52

IMP ORTA NT SA FE TY INFO RMATION
>> Never force a connector into a port. Check for obstructions
on the port. If the connector and port don’t join with
reasonable ease, they probably don’t match. Make sure
that the connector matches the port and that you have
positioned the connector correctly in relation to the port
>> Do not use conductive tools that could bridge live parts
>> Do not make mechanical or electrical
modifications to the equipment.
>> Use the product only with approved equipmen.
>> There is a lithium battery in your wireless glasses. You can
recharge the battery whenever it is convenient. Like all lithium
batteries, it will slowly age. After a while it will lose the capability
to be charged to it's full capacity. The degradation is slow and
will vary depending on your use and recharging habits.
>> If the product sustains damage requiring service,
disconnect the product from the AC electrical outlet and
refer servicing to an NVIDIA authorized service provider.
Examples of damage requiring service include:
•
The power cord, extension cord or plug has been damaged.
•
Liquid has been spilled on the product or an object has fallen
into the product.
•
The product has been exposed to rain or water.
•
The product has been dropped or damaged.
•
There are noticeable signs of overheating.
•
The product does not operate normally when ou follow the
operating instructions
>>
WARNING: Your stereo glasses contain sensitive components includ-
ing a rechargeable battery. Prevent damage by making sure you do not
drop, bend, or crush your stereo glasses or drop into fire.
Page 53

NV IDI A 3D V ISION USE R GUI DE
Precautions for Installation, Maintaining and
Servicing
To reduce the risk of electric shock or damage to the equipment when
installing maintaining, or servicing products, observe the following
precautions:
Installation:
>> Follow the Pre/Post-installation procedures in other part of the
manual.
>> Follow the Installing and Configure Instruction in the manual.
Maintaining and Servicing:
>> Never attempt to repair 3D Vision Pro yourself. 3D Vision Pro does
not contain any user-serviceable parts. Do not attempt to open
your stereo glasses and the emitter box, disassemble them, or
remove the battery. You run the risk of electric shock and voiding
the limited warranty.
>> To clean stereo glasses system, turn stereo glasses off. Then
use a soft, slightly damp, lint-free cloth. Avoid getting moisture
in openings. Don’t use window cleaners, household cleaners,
aerosol sprays, solvents, alcohol, ammonia, or abrasives to clean
stereo glasses system. Disposing of 3D Vision Pro properly
>> Upon completion of any service or repairs to the product, have
your authorized service provider perform any safety checks required by the repair procedure or by local codes to determine that
the product is in proper operating condition.
>>
Power Rating
>> 3D Vision Pro Hub, P753: 5V DC, 200mA
>> 3D Vision Pro Glasses, P703: 5V DC, 100mA
Page 54

Precaution for Communication Cable
To reduce the risk of exposure to shock hazard from communication cable:
>> Do not connect communication cable during a lightning storm.
There may be a remote risk of electric shock from lightning.
>> Do not connect or use communication cable in a wet location.
>> Disconnect the communication cable before opening a product
enclosure, touching or installing internal components.
Notice
ALL NVIDIA DESIGN SPECIFICATIONS, REFERENCE BOARDS, FILES, DRAWINGS, DIAGNOSTICS,
LISTS, AND OTHER DOCUMENTS (TOGETHER AND SEPARATELY, “MATERIALS”) ARE BEING PROVIDED “AS IS.” NVIDIA MAKES NO WARRANTIES, EXPRESSED, IMPLIED, STATUTORY, OR OTHERWISE
WITH RESPECT TO THE MATERIALS, AND EXPRESSLY DISCLAIMS ALL IMPLIED WARR ANTIE S OF
NON INFRINGEMENT, MERCHANTABILITY, AND FITNE SS FOR A PARTICULAR PURPOSE.
Information furnished is believed to be accurate and reliable. However, NVIDIA Corpor ation assumes
no responsibility for the consequences of use of such information or for any infringement of patents or
other rights of third par ties that may result from its use. No license is granted by implic ation or otherwise under any patent or patent rights of NVIDIA Corporation. Specifications mentioned in this publication are subject to change without notice. This publication supers edes and replaces all information
previously supplied. NVIDIA Corpor ation products are not authorised for use as critical component s
in life support dev ices or systems without express wr itten approv al of NVIDIA Corporation.
WEEE Warning Message
Symbol for Separate Collection in European Countries. This symbol indicates that this
product is to be collected separately.
The following apply only to users in European countries:
•
This product is designated for separate collection at an appropr iate collection point.
Do not dispose of as household waste.
•
For more information, contact the retailer or the local authorities in charge of waste
management.
Trademarks
NVIDIA, the NVIDIA logo, GeForce, and nForce are trademarks or registered trademarks of NVIDIA
Corpor ation. Other company and product names may be trademarks of the respec tive companies with
which they are associated.
Copyright
© 2008, 2009, 2010 NVIDIA Corpor ation. All rights reserved.
Page 55

www.nvidia.com
 Loading...