

Page 1

User’s Guide
NVIDIA DualTV MCE
March 2006
DU-01848-001_v06
For Microsoft Windows XP
Media Center Edition (MCE)
Page 2

NVIDIA DualTV MCE Dual-Tuner Card User’s Guide
This page intentionally left blank.
ii DU-01848-001_v06
03/28/06
Page 3

Table of Contents
Introduction ...................................................................................................................1
About This Guide.............................................................................................................. 1
Overview.........................................................................................................................1
Features and Benefits.......................................................................................................3
Product Specifications.......................................................................................................3
Functions..................................................................................................................... 3
Connectors on Bracket ..................................................................................................4
Minimum System Requirements .....................................................................................4
Compliance and Certifications ........................................................................................ 5
Microsoft Windows XP Media Center Edition (MCE) Environment........................................... 5
Unpacking Your NVIDIA DualTV Tuner Card..................................................................7
Unpacking........................................................................................................................7
Hardware Installation and Connections......................................................................11
Safety Instructions ......................................................................................................... 11
Before You Begin............................................................................................................ 11
Installing the Hardware................................................................................................... 12
Connecting a Set-Top Box or Other Video Equipment ........................................................ 14
A/V Cable Connections................................................................................................ 14
MCE Remote Control and Receiver ............................................................................... 15
Connection Diagrams...................................................................................................... 16
Connecting Analog TV Cable or Off-Air Antenna............................................................. 16
Connecting One Set-Top Box via Direct A/V Input.......................................................... 17
Connecting Two Set-Top Boxes via Direct A/V Inputs..................................................... 18
Software Installation ...................................................................................................19
Installing Software and Registering Your NVIDIA DualTV Card............................................ 19
Abnormal Termination................................................................................................. 36
Installing an MCE Remote Control and Receiver .........................................................37
Setting Up the MCE Remote Control and Receiver............................................................. 37
Connection Diagrams with MCE Remote ........................................................................... 39
Connecting Analog TV Cable or Off-Air Antenna............................................................. 39
Connecting One Set-Top Box via Direct A/V Input.......................................................... 40
DU-01848-001_v06 iii
03/28/06
Page 4

NVIDIA DualTV MCE Dual-Tuner Card User’s Guide
Connecting Two Set-Top Boxes via Direct A/V Inputs..................................................... 41
Configuring NVIDIA DualTV in Windows XP Media Center Edition..............................43
Configuring MCE to Work with NVIDIA DualTV.................................................................. 43
Configuring MCE Automatically for Antenna or Analog Cable TV...................................... 44
Configuring MCE Manually for Antenna or Analog Cable TV............................................. 50
Configuring MCE for Use with Set-Top Box.................................................................... 56
Setting Up the Radio....................................................................................................... 68
Optimizing the Audio and Video Experience ................................................................71
Overview....................................................................................................................... 71
Antenna/Cable TV Signal Strength ................................................................................... 74
Low Signal Level......................................................................................................... 74
High Signal Level........................................................................................................ 74
Adjusting LCD Panels...................................................................................................... 75
Adjusting Your Monitor or TV........................................................................................... 75
Centering the Picture on Your Screen ........................................................................... 78
Adjusting the Aspect Ratio........................................................................................... 79
Adjusting the Brightness: Picture Too Dark ................................................................... 80
Adjusting the Contrast: Picture Too Light...................................................................... 82
Adjusting the Color Balance......................................................................................... 84
Adjusting Display Settings............................................................................................... 86
Gamma...................................................................................................................... 87
Position...................................................................................................................... 88
Digital Vibrance .......................................................................................................... 88
Adjusting TV Capture Settings ......................................................................................... 88
Picture Mode.............................................................................................................. 90
Color Separation......................................................................................................... 90
Noise Reduction.......................................................................................................... 91
VCR Input Timing ....................................................................................................... 91
Adjusting A/V Playback Settings....................................................................................... 92
Color and Brightness Control........................................................................................ 94
De-Interlacing Control................................................................................................. 94
Frequently Asked Questions (FAQs).............................................................................95
Getting Driver Updates.................................................................................................... 95
General Questions.......................................................................................................... 95
FAQs Specific to Microsoft Windows XP MCE....................................................................103
iv DU-01848-001_v06
03/28/06
Page 5

Registration, Support, and Warranty.........................................................................107
Registering Your NVIDIA DualTV.....................................................................................107
Warranty and Support....................................................................................................107
Index ..........................................................................................................................109
DU-01848-001_v06 v
03/28/06
Page 6

NVIDIA DualTV MCE Dual-Tuner Card User’s Guide
List of Figures
Figure 1. NVIDIA DualTV Tuner Card, NTSC Version..........................................................8
Figure 2. NVIDIA DualTV Tuner Card, PAL Version............................................................ 9
Figure 3. NTSC and PAL Card Connections ...................................................................... 13
Figure 4. A/V Connections with a Set-Top Box................................................................. 15
Figure 5. Connecting Analog TV Cable or Off-Air Antenna................................................. 16
Figure 6. Connecting One Set-Top Box via Direct A/V Input.............................................. 17
Figure 7. Connecting Two Set-Top Boxes with Direct A/V Inputs....................................... 18
Figure 8. Connection Analog TV Cable or Off-Air Antenna, with Remote............................. 39
Figure 9. Connecting One Set-Top Box via Direct A/V Input, with Remote.......................... 40
Figure 10. Connecting Two Set-Top Boxes with Direct A/V Inputs, with Remote................... 41
Figure 11. Low Signal Level ............................................................................................. 74
Figure 12. High Signal Level............................................................................................. 74
List of Tables
Table 1. Tools for Optimizing Your Audio and Video Experience ...................................... 73
Table 2. Application Support for MediaSqueeze.............................................................102
vi DU-01848-001_v06
03/28/06
Page 7

Introduction
Control your TV experience—watch what you want, when you want, from wherever
you want! The NVIDIA
analog TV on a Microsoft
About This Guide
This User’s Guide provides setup and operation instructions for the NVIDIA
DualTV on a PC equipped with Microsoft Windows XP Media Center Edition
(MCE). For more information about Microsoft Windows XP Media Center Edition,
please visit:
http://www.microsoft.com/windowsxp/mediacenter/default.mspx
Overview
Watch Your Favorite TV Programs When and Where You Want
The NVIDIA DualTV analog tuner card lets you schedule recordings of your
favorite TV shows and watch them when you want. You are no longer limited to
watching the same program you are recording; with NVIDIA DualTV you can
watch one channel and record another, or record two channels simultaneously. And
with time shift capabilities you can easily pause and rewind your favorite shows to
watch at your leisure.
®
DualTV tuner card allows you to enjoy dual-channel
®
Windows
®
XP Media Center Edition® (MCE) PC.
Best of all, you can watch your programs in your home or on the go. With NVIDIA
DualTV you can easily record your favorite programs and then transfer, stream, or
copy them to different devices to watch in various locations. NVIDIA
MediaSqueeze
™ technology allows you to record and save your favorite programs
using less disk space than other solutions. In addition, you can watch your NVIDIA
DualTV from anywhere in the world over the Internet by utilizing software from
Orb Networks.
Watch your favorite shows anywhere with:
An Apple iPod with video
A Sony PSP™ (PlayStation
A Microsoft XBOX 360™ or Media Center Extender
A DVD player
A notebook computer
Orb Networks software
DU-01848-001_v06 1
03/28/06
®
Portable)
Page 8

NVIDIA DualTV MCE User’s Guide
Refer to the NVIDIA DualTV Web site for additional information on these usage
scenarios.
Enjoy Unmatched Television Picture Quality
With the power of NVIDIA PureVideo™ technology, NVIDIA DualTV delivers a
home-theater experience through your PC, ensuring that the picture is clear and that
the colors are vibrant and lifelike. Experience crisp and vivid TV with PureVideo’s
advanced 3D noise reduction and 3D comb filter technology. Multistream hardware
MPEG-2 encoding lets you record a sharp TV picture while freeing the CPU for
other applications. The included NVIDIA PureVideo Decoder provides unmatched
picture fidelity and rich surround-sound audio when you’re watching DVDs, videos,
or TV shows. And Imaging Science Foundation (ISF) certification guarantees the
highest level of picture quality.
Install and Use Within Minutes
Installing NVIDIA DualTV is simple. The easy-to-install, rock-solid NVIDIA
ForceWare® drivers will have you watching and recording your favorite TV
programs in no time. The “Designed for Windows Media Center Edition”
certification ensures that NVIDIA DualTV meets the standards for Window’s
compatibility.
Capture, Edit, and Archive Your Home Movies with Ease
NVIDIA DualTV lets you easily connect your camcorder to instantly capture your
home movies. Combine NVIDIA DualTV with Microsoft Windows Movie Maker
to edit your movies and share with friends and family.
Turns Any Media Center PC into a Home-Entertainment Center
NVIDIA DualTV MCE delivers a superior TV experience on Media Center Edition
(MCE) PCs, giving you flexibility in your TV viewing and recording options.
Quickly start watching high-quality TV by clicking the “MyTV” button from the
MCE display menu. NVIDIA DualTV MCE lets you take full advantage of MCE’s
dual tuner and personal video recording capabilities, including recording two
channels at once or watching one channel while recording another. You can even
distribute two separate programs throughout your home with Media Center
Extenders, so others can watch their favorite shows on their own TV.
The NVIDIA DualTV tuner card is available in two versions—NTSC (for North
America and Korea) and PAL (for Europe and part of Asia). The PAL version also
supports SECAM.
2 DU-01848-001_v06
03/28/06
Page 9

Features and Benefits
Simultaneous Watch and Record. Record two TV channels, or watch one TV
channel while recording another—the perfect solution for Windows MCE.
Helpful Wizards and Simple Quick Start Guide. NVIDIA DualTV’s easy-install
features mean you’ll be watching and recording your favorite programs in no time.
NVIDIA PureVideo™ Technology. NVIDIA PureVideo delivers a crystal-clear
television picture with 3D noise reduction, advanced 3D comb filtering, and signal
amplification.
NVIDIA MediaSqueeze™ Technology. NVIDIA MediaSqueeze lets you store more
of your favorite TV programs or home video on your hard disk or a DVD.
NVIDIA PureVideo Decoder. The NVIDIA PureVideo Decoder combines the
industry’s highest quality DVD and MPEG-2 playback with rich surround-sound audio,
and provides the best movie experience with Microsoft Windows Media Player and
Windows XP Media Center Edition.
Multistream Hardware MPEG-2 MP@ML Encode. Record a sharp, crisp TV
picture while freeing the CPU for other applications.
Introduction
Multiple Inputs. Accepts TV and audio input from cable, set-top boxes, and off-the-
air antennas. An internal splitter allows a single cable or antenna connection to supply
two different channels simultaneously.
NVIDIA ForceWare
unleash the full power and features of NVIDIA’s DualTV experience. The added
benefits powered by the Media Center extensions deliver an unmatched Media Center
experience.
FM Tuner. FM tuner allows you to pause, rewind, and record your favorite FM radio
programs.
Product Specifications
Functions
Dual-channel TV reception and A/V capture
¾ Source type: Analog terrestrial broadcast, analog cable broadcast, and analog
A/V signal from set-top boxes or other A/V equipment
¾ Signal type: Radio frequency (RF from antenna, cable TV, output of set-top
boxes) or baseband (S-video or composite video)
¾ TV standards:
¾ NTSC board: NTSC M/N
¾ PAL/SECAM board: PAL I, B/G, D/K, SECAM D/K, L/L’
Dual-stream MPEG-2 A/V encode with MediaSqueeze technology
®
Drivers. Use the rock-solid NVIDIA ForceWare drivers to
¾ Video: MPEG-2 MP@ML, 720 × 480 (standard definition)
¾ Audio: MPEG1L2
DU-01848-001_v06 3
03/28/06
Page 10

NVIDIA DualTV MCE User’s Guide
Uncompressed A/V capture
¾ Video: 720 × 480 (standard definition)
¾ Audio: PCM (16-24 bit per sample, up to 48 KHz)
FM radio tuner
Internal splitter for RF with in-line signal amplifier; only a single RF input is needed for
the two internal tuners
3D comb filter and 3D noise reduction with PureVideo technology
Connectors on Bracket
RF (radio frequency) TV antenna or cable TV: F-connector (NTSC) or IEC-connector
(PAL/SECAM)
RF FM radio antenna: F-connector (NTSC) or IEC-connector (PAL)
Direct A/V inputs (2 sets) **
¾ S-video (or composite video via included adapter): 4-pin DIN
¾ Line-level stereo audio: stereo minijack
** 2-sets of onboard A/V inputs (1x5 for video and 1x4 for audio) are also available for front-panel (drive bay)
or back-panel connection; requires wafer connector cables and connector mounts (not included).
Minimum System Requirements
Microsoft Windows XP Media Center Edition 2005 (including Update Roll-up 2)
1.6 GHz Intel
CPU (2.4 GHz CPU recommended)
256 MB system memory (512MB highly recommended)
Available PCI slot
Graphics with 64 MB DDR, DXVA (motion-compensation), and Microsoft
9.0 support (128 MB DDR recommended)
20 GB free space on Ultra DMA (ATA/66) hard disk (40 GB or more recommended)
DirectSound-compatible sound card or integrated audio
CD-ROM drive (DVD-ROM or DVD recorder drive recommended)
Microsoft DirectX 9.0 or later. If this is not already installed on your MCE system,
download from the Microsoft Web site at:
http://www.microsoft.com/downloads/search.aspx?displaylang=en&categoryid=2
Microsoft Windows XP Media Center Edition 2005 or later with latest service pack
Note: For MCE-specific system requirements such as CPU speed, graphics
requirements, or Internet access, refer to the MCE documentation on
http://www.microsoft.com/windowsxp/mediacenter/default.mspx
®
Pentium®4, Celeron®, or equivalent AMD® Athlon™ or Sempron™
®
DirectX®
4 DU-01848-001_v06
03/28/06
Page 11

Compliance and Certifications
Designed for Microsoft® Windows® XP Media Center Edition, 2005 (including
Update Roll-up 2)
Imaging Science Research Labs/Imaging Science Foundation
FCC, CE, UL/CUL, CTICK, MIC, VCCI, BSMI
Microsoft Windows XP Media
Center Edition (MCE)
Environment
When you are using a Microsoft Windows XP Media Center Edition 2005 PC
system, the NVIDIA DualTV tuner card provides direct connections with the
following for reception of TV broadcast:
An antenna or cable TV feed or RF feed from a set-top box
Up to two set-top boxes (receiver/decoder units for reception of digital cable, satellite,
or terrestrial broadcast TV) using direct A/V input ports
Introduction
An FM antenna connection
The MCE application gives you access to an onscreen program guide. With this you
can program TV recordings days or even weeks in advance. You can use an MCEcompatible remote control to navigate within the MCE application.
The NVIDIA DualTV CD provides the following software to support your MCE
environment:
NVIDIA PureVideo Decoder (MCE-certified MPEG-2 decoder)
NVIDIA MCE Extensions
NVIDIA DualTV Windows Driver Model (WDM) Driver
The NVIDIA DualTV tuner card is compliant with the following logo program to
provide you the best MCE experience:
Designed for Microsoft Windows (Microsoft Windows Hardware Quality Labs)
Designed for Microsoft Windows XP Media Center Edition
Imaging Science Foundation (ISRL/ISF)
DU-01848-001_v06 5
03/28/06
Page 12

NVIDIA DualTV MCE User’s Guide
Note: If you intend to use your set-top box with the NVIDIA DualTV, you need to have
an MCE-compatible IR remote control/receiver with IR blaster(s). The IR receiver
unit controls up to two set-top boxes to change channels. An MCE-compatible IR
remote control/receiver with IR blasters is available as part of an NVIDIA DualTV
and MCE remote control bundle from the NVIDIA online store. You may also buy
an MCE remote control kit from several popular online retailers.
Note: At the time of publication of this document, the MCE application itself does not
support video capture from a non-broadcast source. For example, MCE allows
you to receive TV programming from a terrestrial, satellite, or digital cable settop box, but does not directly support video capture and archiving from a
camcorder or a VCR. For video capture and archiving, you can use Microsoft
Movie Maker (included in the MCE build) in conjunction with DualTV’s A/V input
capabilities.
6 DU-01848-001_v06
03/28/06
Page 13
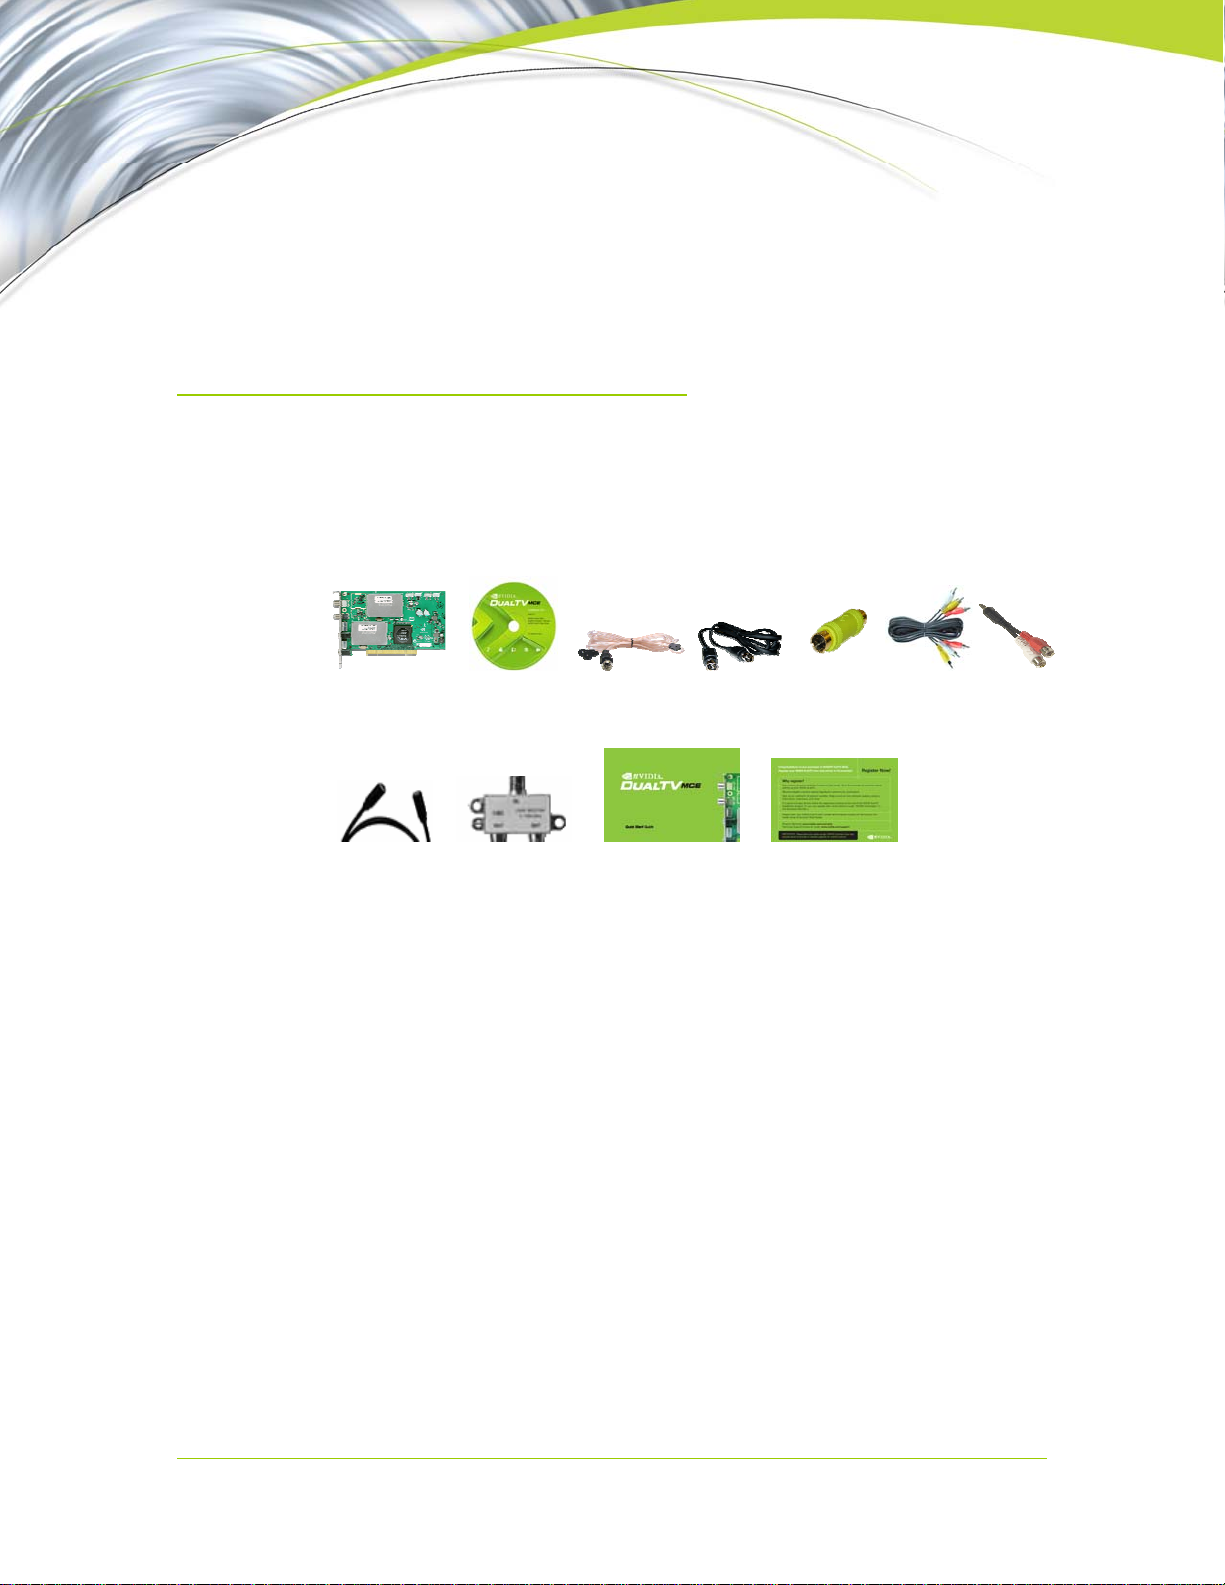
Unpacking
The NVIDIA DualTV MCE is available in NTSC and PAL versions. Figures 1 and
2 show the NTSC and PAL NVIDIA DualTV tuner cards, respectively. The
following is a list of the product package contents. Note that certain items are
included in retail packages only.
Unpacking Your
NVIDIA DualTV Tuner Card
1 2 3 4 5 6 7
8
1. NVIDIA DualTV tuner card. Available in NTSC and PAL/SECAM versions.
2. NVIDIA DualTV Installation CD with NVIDIA PureVideo decoder, NVIDIA Driver,
and User’s Guide (a PDF of this document).
3. FM antenna cable. Connects to FM antenna input on the NVIDIA DualTV tuner card.
4. S-video cable*. Connects to set-top box or other video equipment.
5. Composite video (RCA to 4-pin DIN) adapter. Allows composite video cable to
connect to the NVIDIA DualTV tuner card.
6. Composite video and stereo audio RCA cable*. Connects to set-top box or other
video equipment.
7. Minijack to dual RCA audio cable. Allows stereo RCA cable to connect to the
NVIDIA DualTV tuner card.
8. Coaxial cable*. Connects to cable TV service.
9. Coaxial cable splitter*. Connects to cable TV service coaxial cable, CATV input on
the NVIDIA DualTV card, and to another device utilizing the cable signal.
10. NVIDIA DualTV Quick Start Guide
11. NVIDIA DualTV Registration Reminder Card
* Included in retail packages only
9 10 11
DU-01848-001_v06 7
03/28/06
Page 14
NVIDIA DualTV MCE User’s Guide
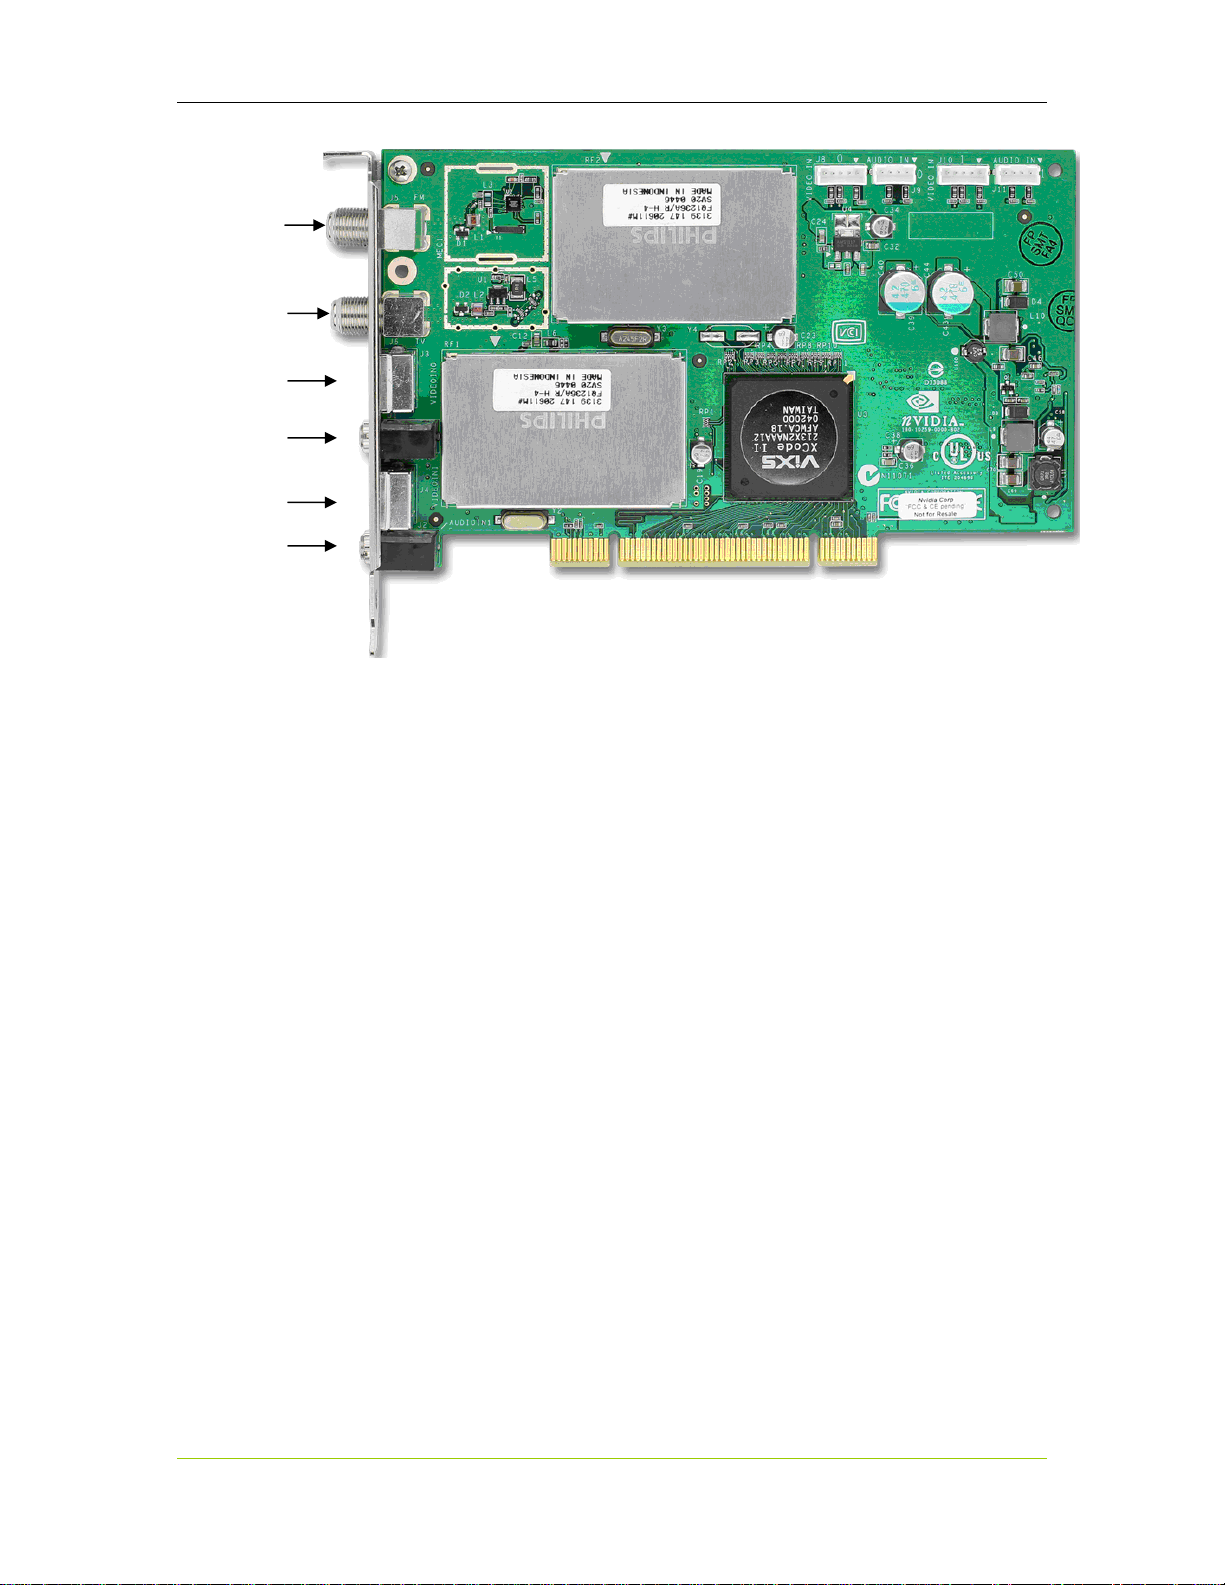
FM Antenna In
Tuner In
(TV cable or
antenna feed)
Video 1 In
Audio 1 In
Video 2 In
Audio 2 In
Figure 1. NVIDIA DualTV Tuner Card, NTSC Version
8 DU-01848-001_v06
03/28/06
Page 15
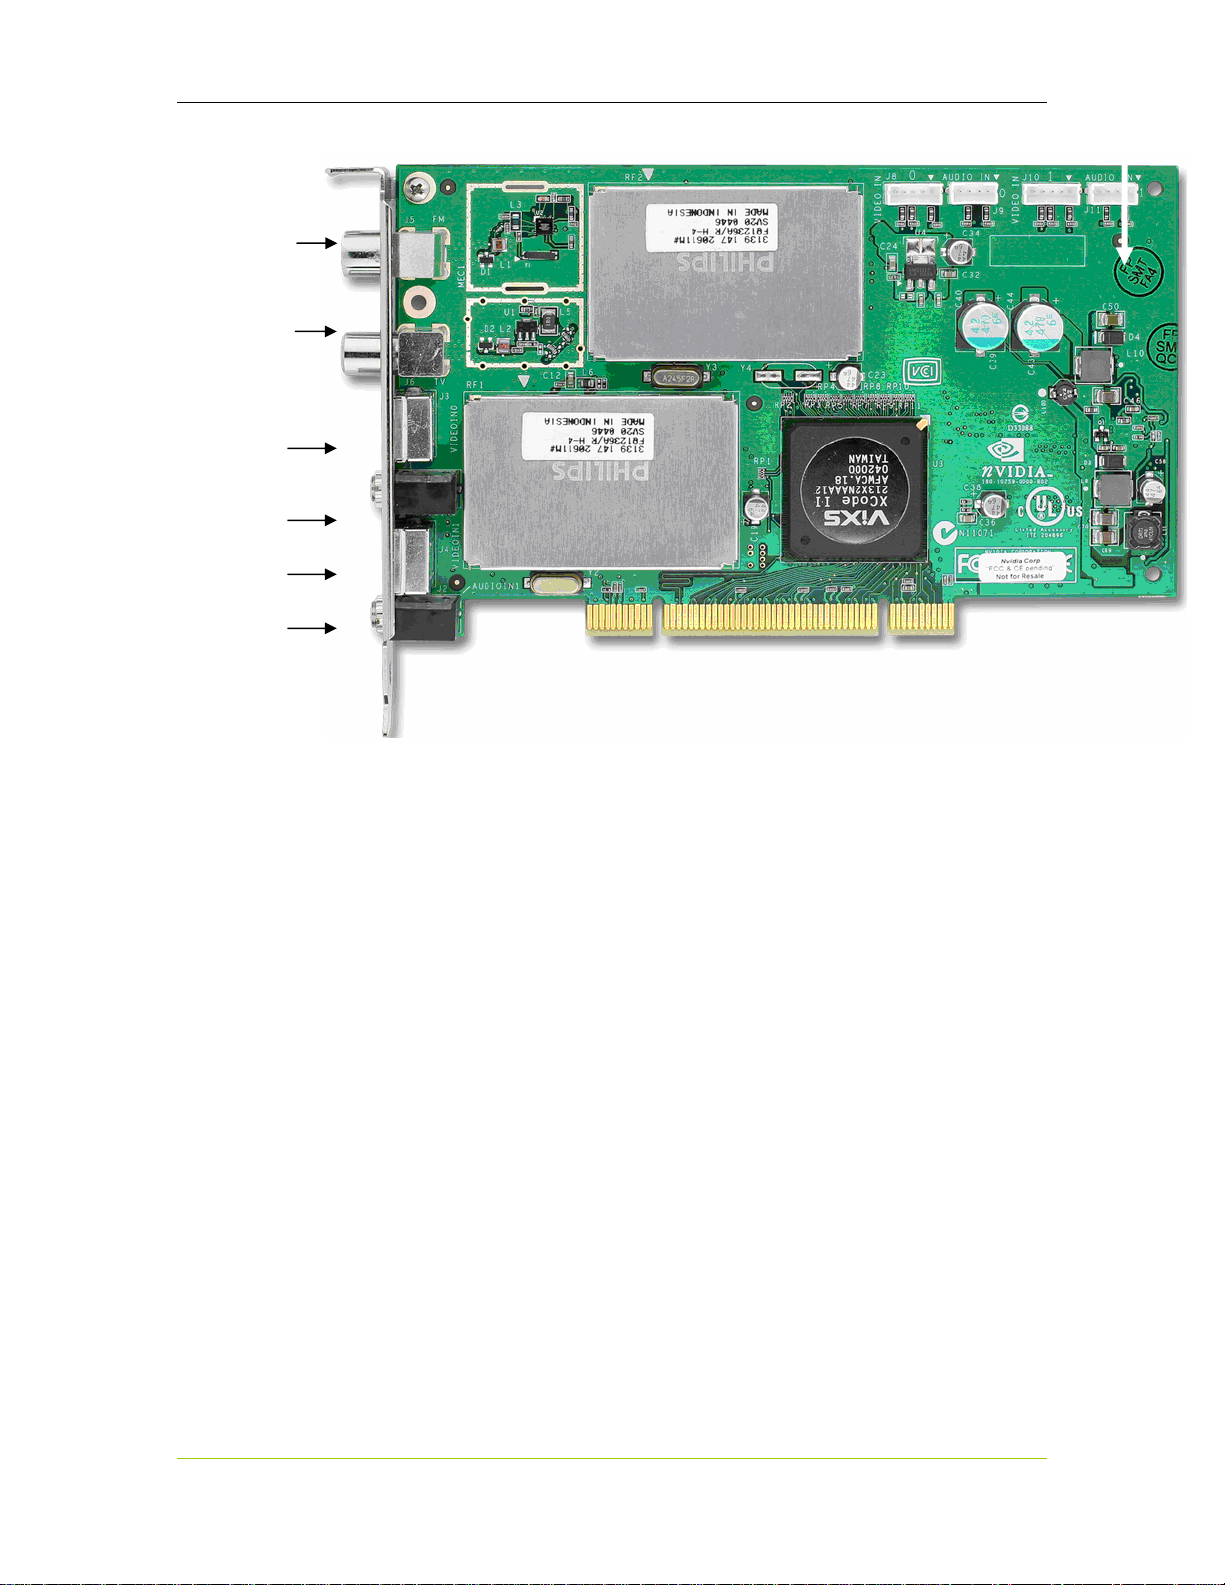
FM Antenna In
Tuner In
(TV cable or
antenna feed)
Video 1 In
Audio 1 In
Video 2 In
Audio 2 In
Unpacking the NVTV Dual-Tuner Card
Figure 2. NVIDIA DualTV Tuner Card, PAL Version
DU-01848-001_v06 9
03/28/06
Page 16

NVIDIA DualTV MCE User’s Guide
This page intentionally left blank.
10 DU-01848-001_v06
03/28/06
Page 17

Installing the NVIDIA DualTV tuner card hardware requires opening your
computer. Please follow all of the safety instructions provided here to ensure that
there is no damage to you, your computer, or the tuner card.
Safety Instructions
To reduce the risk of fire, electric shock, and injury, always follow basic safety
precautions.
Hardware Installation and
Connections
Remember to remove power from your computer by disconnecting the AC main
source before installing any equipment into the computer chassis.
Before You Begin
IMPORTANT: Any previous analog tuner card drivers must be
conflicts. NVIDIA recommends that you uninstall these drivers prior to removing
the old hardware and installing the NVIDIA DualTV tuner card. If you have any
existing DVD decoders other than NVIDIA PureVideo decoders, it is highly
recommended that these software programs be completely removed.
Your computer may already have an analog tuner card installed. If so, you
need to uninstall it and replace it with the NVIDIA DualTV tuner card.
You also need to uninstall any other Windows Driver Model (WDM)
Drivers for TV tuner cards. Go to
Remove Programs
Add/Remove. This will uninstall all files associated with the drivers you have
selected.
Use this same procedure to remove any existing DVD decoders.
completely
Start¾Control Panel¾Add or
. Select the installed analog TV card drivers and click
removed to avoid
DU-01848-001_v06 11
03/28/06
Page 18

NVIDIA DualTV MCE User’s Guide
Installing the Hardware
Note: All hardware must be installed prior to installation of the software.
Use the following procedure to install the NVIDIA DualTV tuner card into your
computer system. Use Figure 3 on the next page as a guide to connecting cables
to your NVIDIA DualTV tuner card.
1. Turn off the computer, monitor, and any peripheral equipment and
disconnect the power cord to the PC.
2. Open your computer; refer to your computer documentation for assistance.
3. Remove any metal plate that covers the PCI slot you selected on the
motherboard so the tuner card connectors are accessible from the back of the
computer (you will use the screws to secure the card).
4. Install the NVIDIA DualTV tuner card into the selected PCI slot.
5. Secure the tuner card using any hardware (screws) removed when you
removed the metal plate or an existing analog tuner card.
6. Reinstall the cover on your computer and reconnect any cables removed earlier.
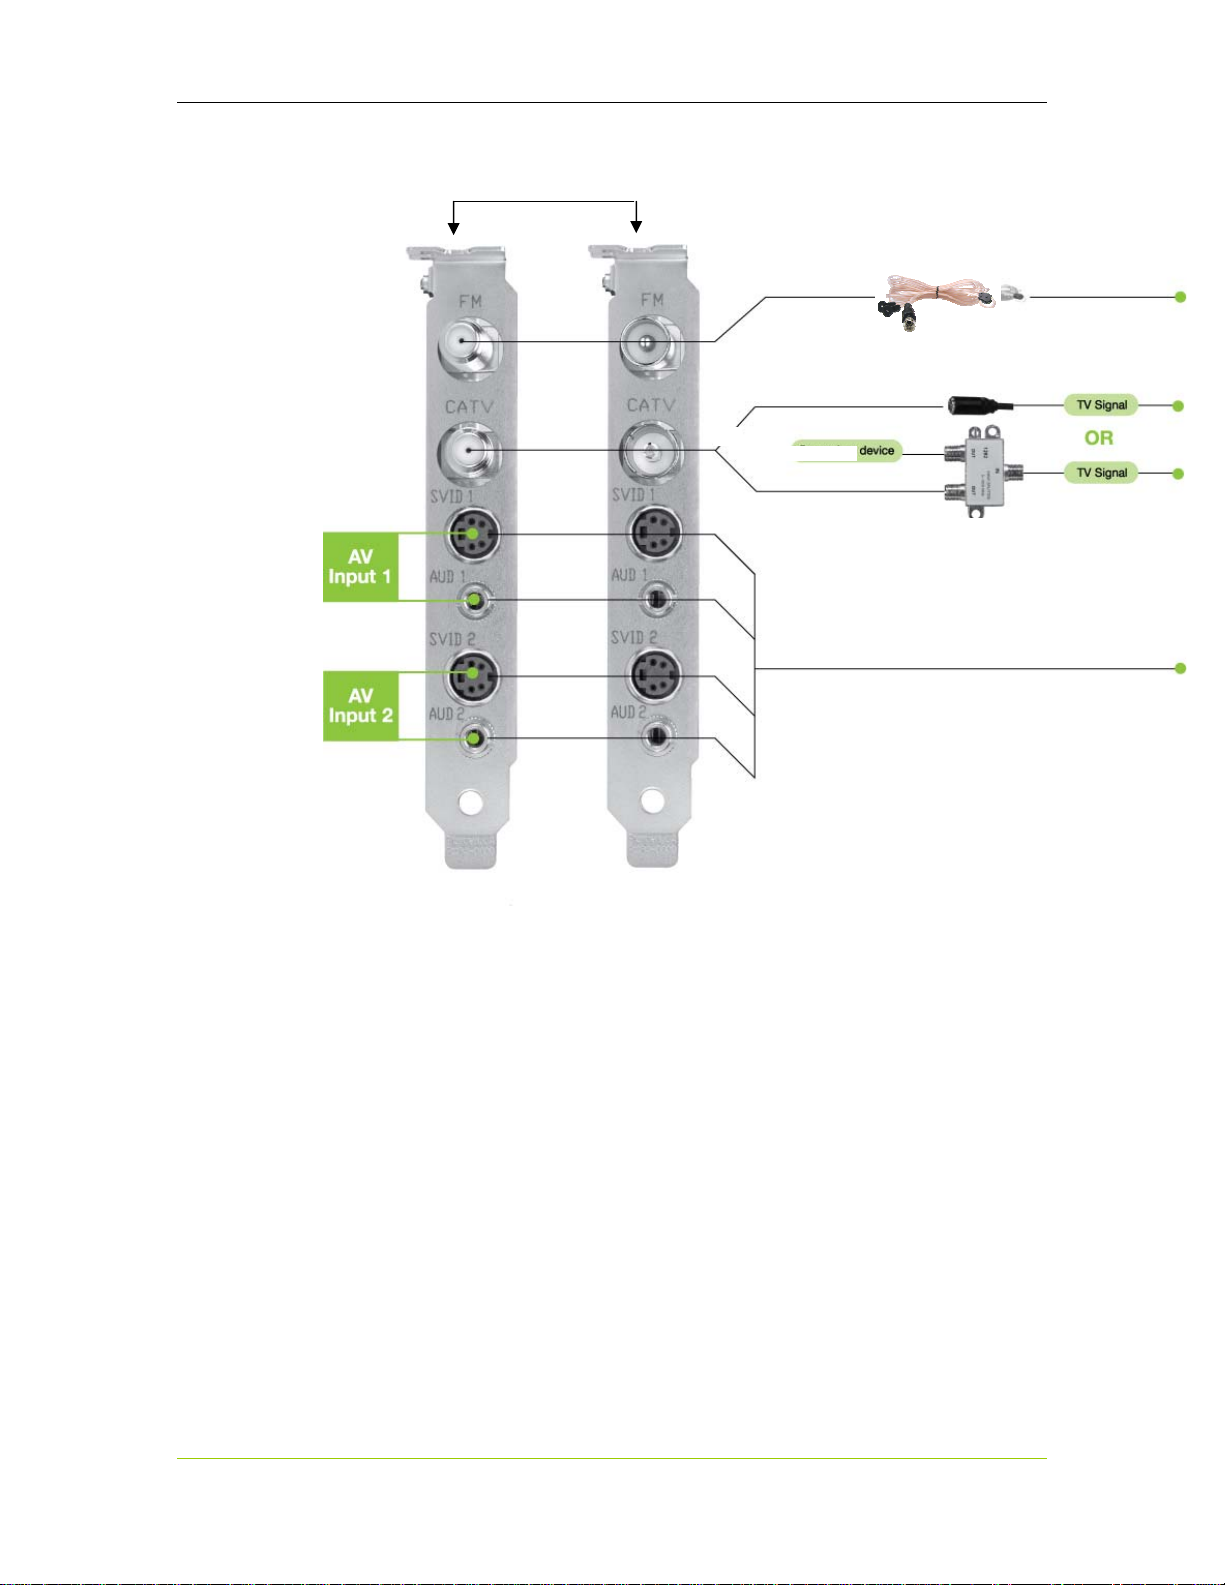
7. Connect the cables to your NVIDIA DualTV tuner card (see Figure 3). If a TV
antenna or TV cable is used, attach the signal source (directly or via the included
coaxial cable splitter) to the
set-top box, see Connecting a Set-Top Box or Other Video Equipment on page 14.
CATV connector on the card. If you are connecting a
Note: The A/V cable connection for capturing analog video output from a
camcorder or VCR is the same as that for a set-top box (see Figure 4).
Note: If you have an MCE-compatible IR remote control/receiver but have not
connected the USB IR receiver to the MCE system, please plug that in
only after the NVIDIA DualTV software installation (next chapter).
8. Reconnect the power cord to your system.
9. Power on the computer.
12 DU-01848-001_v06
03/28/06
Page 19
Hardware Installation
(
)
Secure to system chassis using
any hardware removed in step 3.
2
if exist
Use the splitter
only if needed
3
NTSC
Version
PAL
Version
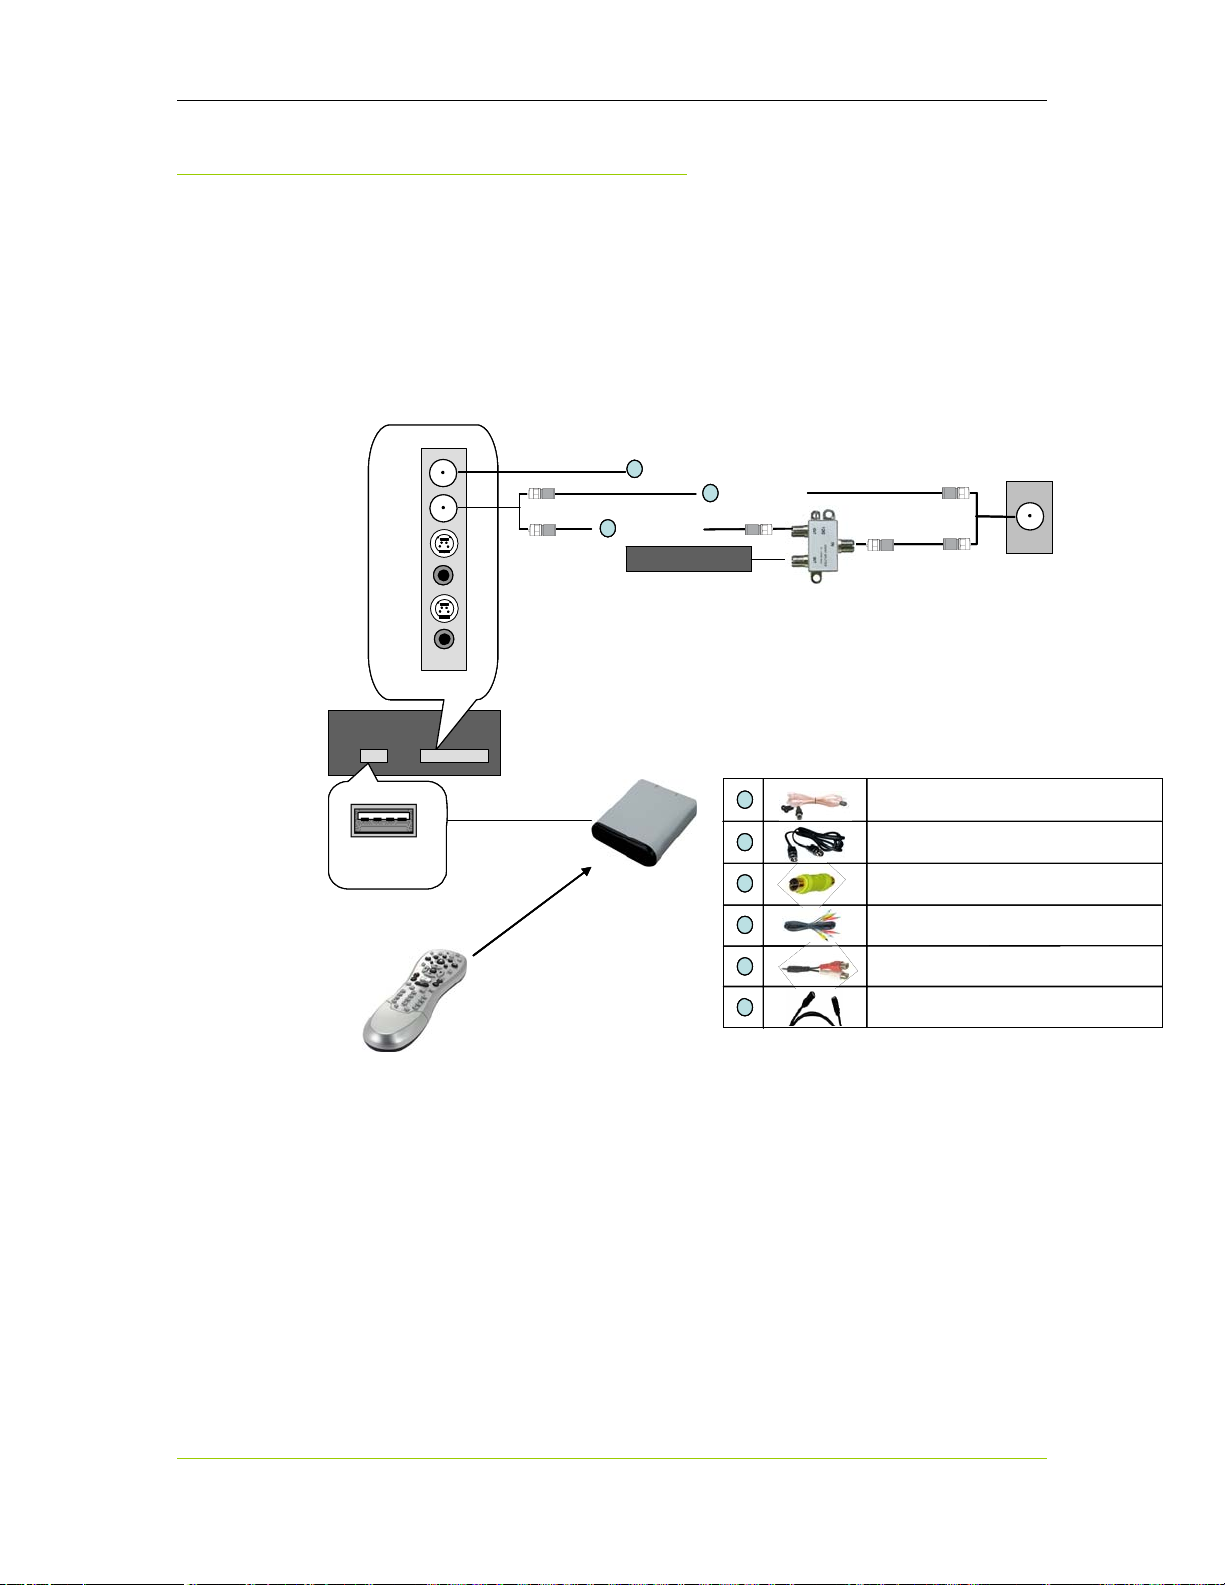
1 Connect FM antenna cable.
2 Connect TV antenna or TV cable (this connection supplies the TV signal to both tuners on the card).
If your cable is already connected to another A/V device, you can us e the included “splitter” as shown
to send the cable signal to both the NVIDIA DualTV and your other device.
Connect the TV signal directly to CATV connector on the NVIDIA DualTV if you do not have a secondary
A/V device. Do not use the splitter in this case.
NVIDIA DOES NOT recommend that you connect an amplifier or active amplifier/splitter with high
gain to the TV cable input. Doing so could cause excessive noise on the signal resulting in distortion of
the TV picture.
3 For connections to set-top boxes or other A/V equipment. See next page.
Figure 3. NTSC and PAL Card Connections
DU-01848-001_v06 13
03/28/06
Page 20
NVIDIA DualTV MCE User’s Guide
Connecting a Set-Top Box or
Other Video Equipment
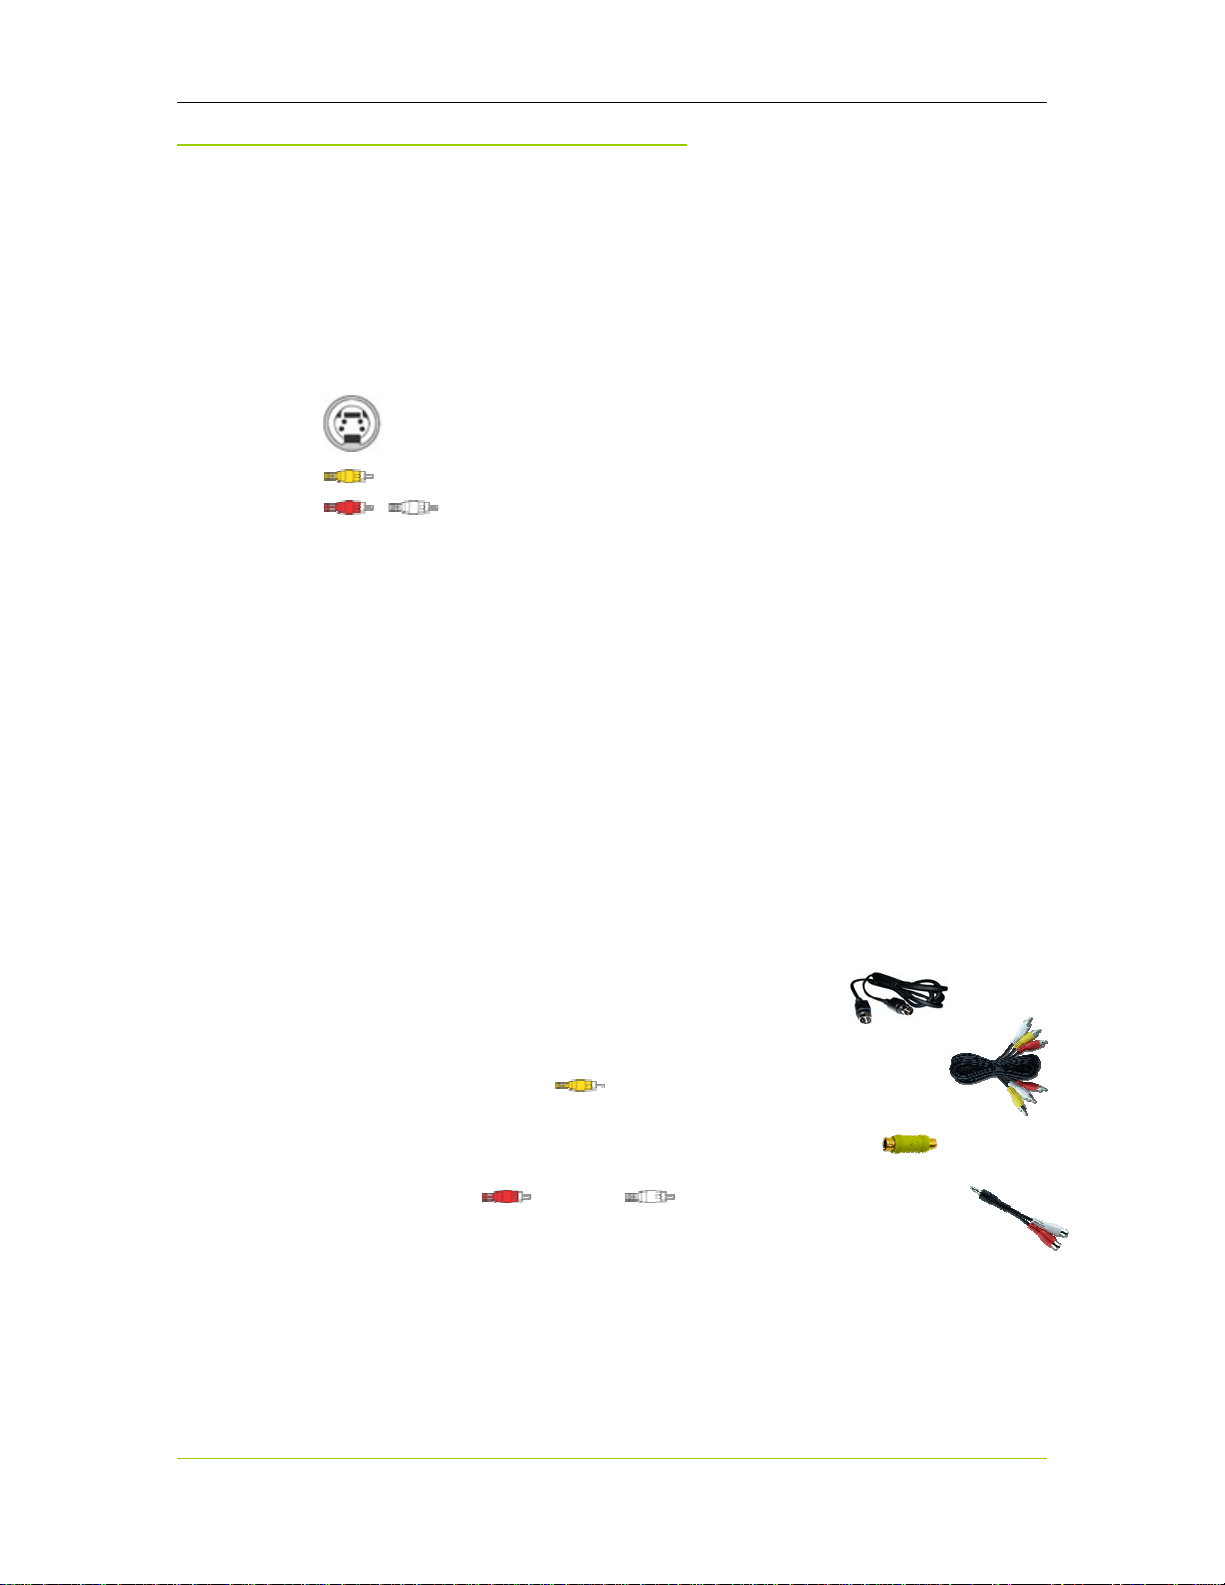
Most VCRs and set-top boxes have both an RF (radio frequency, using coaxial
cable) output and at least one direct (non-RF) A/V output. The latter consists of
either an S-video (4-pin DIN) or a composite video (yellow RCA jack) connection
or both, plus an audio-out (red and white RCA jacks). Analog camcorders often
have one direct A/V output.
4-pin DIN
Yellow RCA jack
Red and white RCA jacks
For best results, NVIDIA recommends that you use an S-video connection to bring
in the video to the NVIDIA DualTV, or use a composite video connection if Svideo output is not available on your set-top box or other equipment.
The instructions below assume the use of a direct (non-RF) A/V connection. The
A/V cable connections for capturing analog video output from a camcorder or
VCR are the same as that for a set-top box.
If you are using one or two set-top boxes with MCE, you also need an MCEcompatible remote control and receiver with IR blaster(s). The section after the next
one describes the procedures for setting up the IR remote control and receiver.
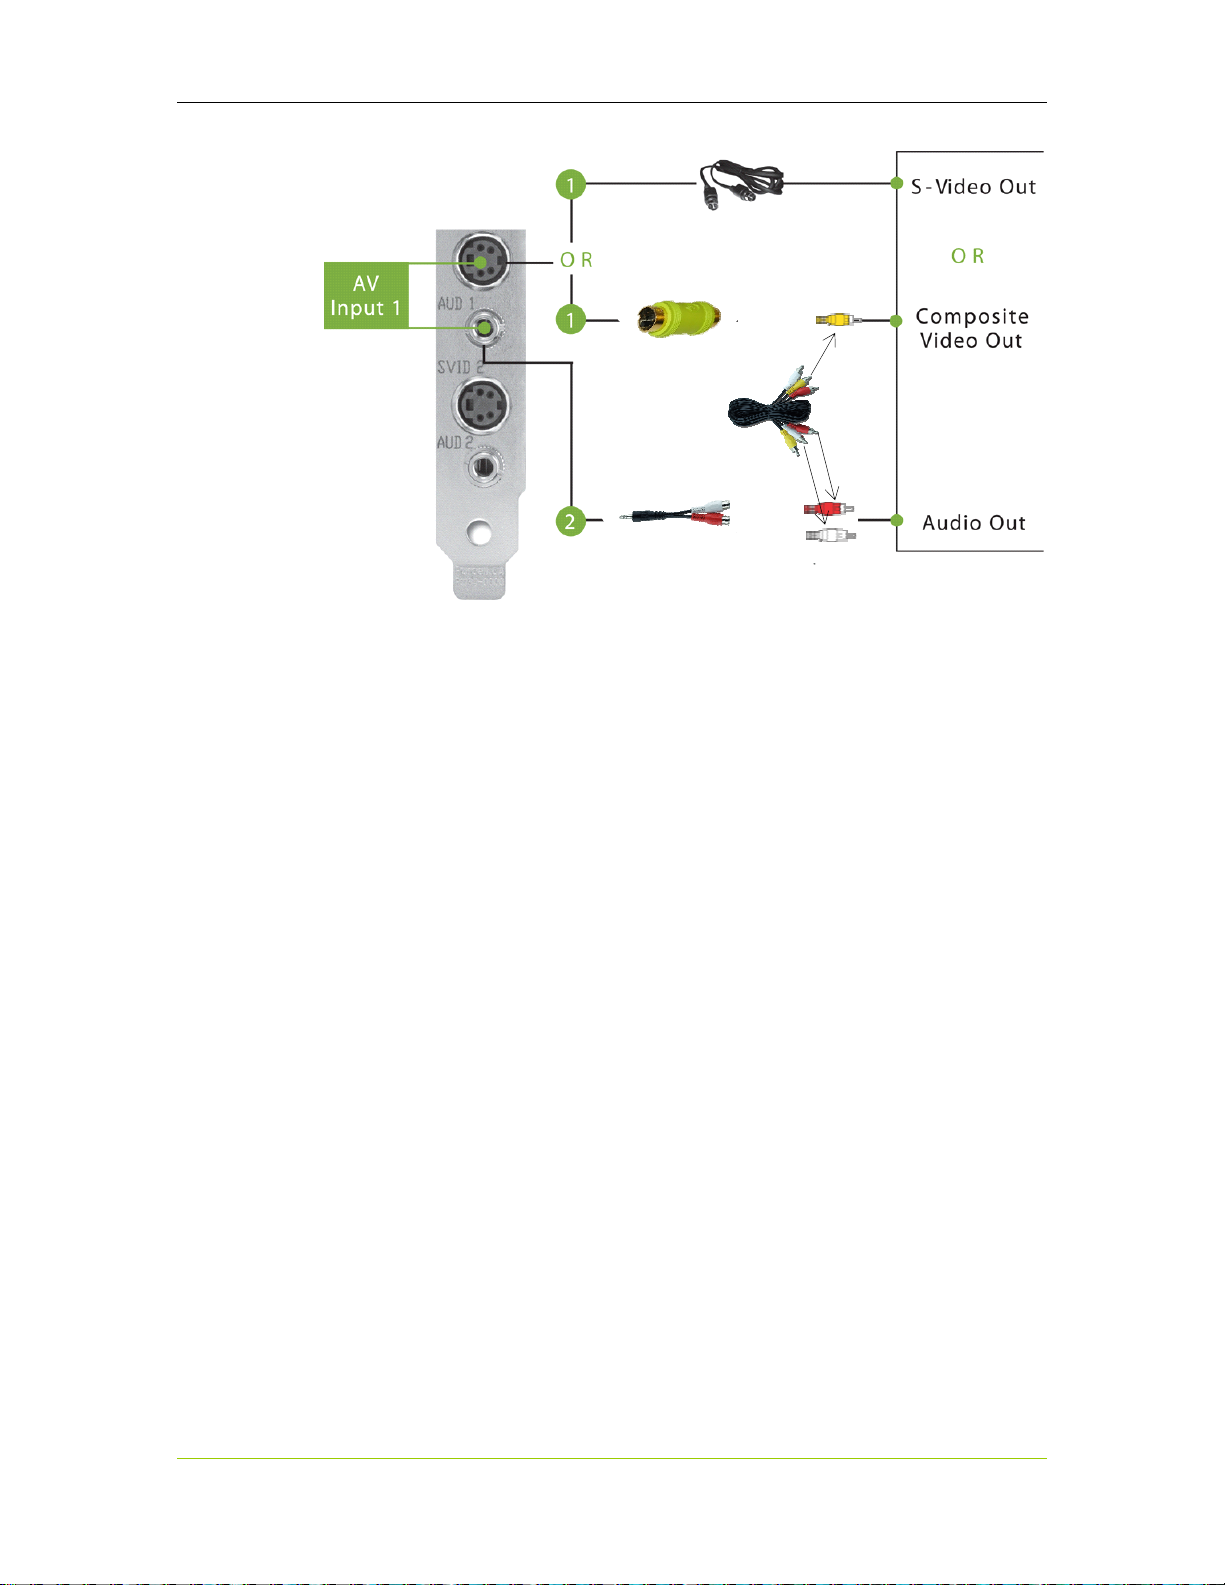
A/V Cable Connections
When connecting one set-top box, use the SVID1/AUD1 connectors. Use the
SVID2/AUD2 connectors for a second set-top box. Always use the SVID1/AUD1
connectors first.
Use the following procedure to connect a set-top box.
1. Use the S-video cable to connect from S-video-out
on the set-top box to
DualTV card.
Or
Use the yellow wire
composite video-out on the set-top box to the composite video
adapter, and then connect the composite video adapter
to
SVID 1 on the NVIDIA DualTV card.
2. Use the red
connect to the right and left audio-out respectively on the set-top box.
Connect the other end of the red and white wires of the RCA cable to the
minijack-to-RCA cable. Finally, connect the minijack-to-RCA cable to
on the NVIDIA DualTV card.
Repeat this procedure using
SVID 1 on the NVIDIA
of the RCA cable to connect
and white wires of the RCA cable to
AUD 1
SVID2 and AUD2 to connect to a second set-top box.
14 DU-01848-001_v06
03/28/06
Page 21
Hardware Installation
NVIDIA
DualTV Card
Set-Top Box
Figure 4. A/V Connections with a Set-Top Box
MCE Remote Control and Receiver
An MCE remote control and receiver with IR blaster is needed for the MCE PC
and the NVIDIA DualTV to work with a set-top box. However, NVIDIA
recommends that you install the MCE remote control and receiver (see Installing an
MCE Remote Control and Receiver on p.37) only after you install NVIDIA DualTV
software (p. 19) and before configuring the tuners for MCE (p. 43).
DU-01848-001_v06 15
03/28/06
Page 22

NVIDIA DualTV MCE User’s Guide
Connection Diagrams
The following figures depict the connections for three configuration scenarios.
The cabling for the MCE remote receiver (if available and used) is depicted on page
39.
Connecting Analog TV Cable or Off-Air Antenna
The “analog TV cable” referenced below is the typical cable TV feed that runs in
the house of a cable TV service subscriber.
1
1
1
FM Antenna
FM Antenna
FM Antenna
6
6
6
Coaxial Cable
Coaxial Cable
Coaxial Cable
Secondary Device
Secondary Device
6
6
6
Coaxial Cable
Coaxial Cable
Coaxial Cable
Splitter
Splitter
(use only if necessary )
(use only if necessary )
FM Antenna
FM Antenna
1
1
1
2
2
2
FM Antenna
S-Video Cable (4-pin DIN)
S-Video Cable (4-pin DIN)
S-Video Cable (4-pin DIN)
PC
PC
FM
FM
FM
CATV
CATV
CATV
SVID1
SVID1
SVID1
AUD1
AUD1
AUD1
SVID2
SVID2
SVID2
AUD2
AUD2
AUD2
NVIDIA
NVIDIA
DualTV
DualTV
or
or
or
or
RF Signal Source
TV Antenna or Analog TV Cable (Cable TV Feed)
TV Antenna or Analog TV Cable (Cable TV Feed)
RF Signal Source
Wall Socket or Coaxial Cabl e
Wall Socket or Coaxial Cabl e
Composite Video Adapter (RCA to 4-pin DIN)
Composite Video Adapter (RCA to 4-pin DIN)
3
3
3
4
4
4
5
5
5
6
6
6
Composite Video Adapter (RCA to 4-pin DIN)
Composite Video & Stereo Audio RCA Cable
Composite Video & Stereo Audio RCA Cable
Composite Video & Stereo Audio RCA Cable
Minijack to Dual RCA Cable
Minijack to Dual RCA Cable
Minijack to Dual RCA Cable
Coaxial Cable
Coaxial Cable
Coaxial Cable
Figure 5. Connecting Analog TV Cable or Off-Air Antenna
16 DU-01848-001_v06
03/28/06
Page 23
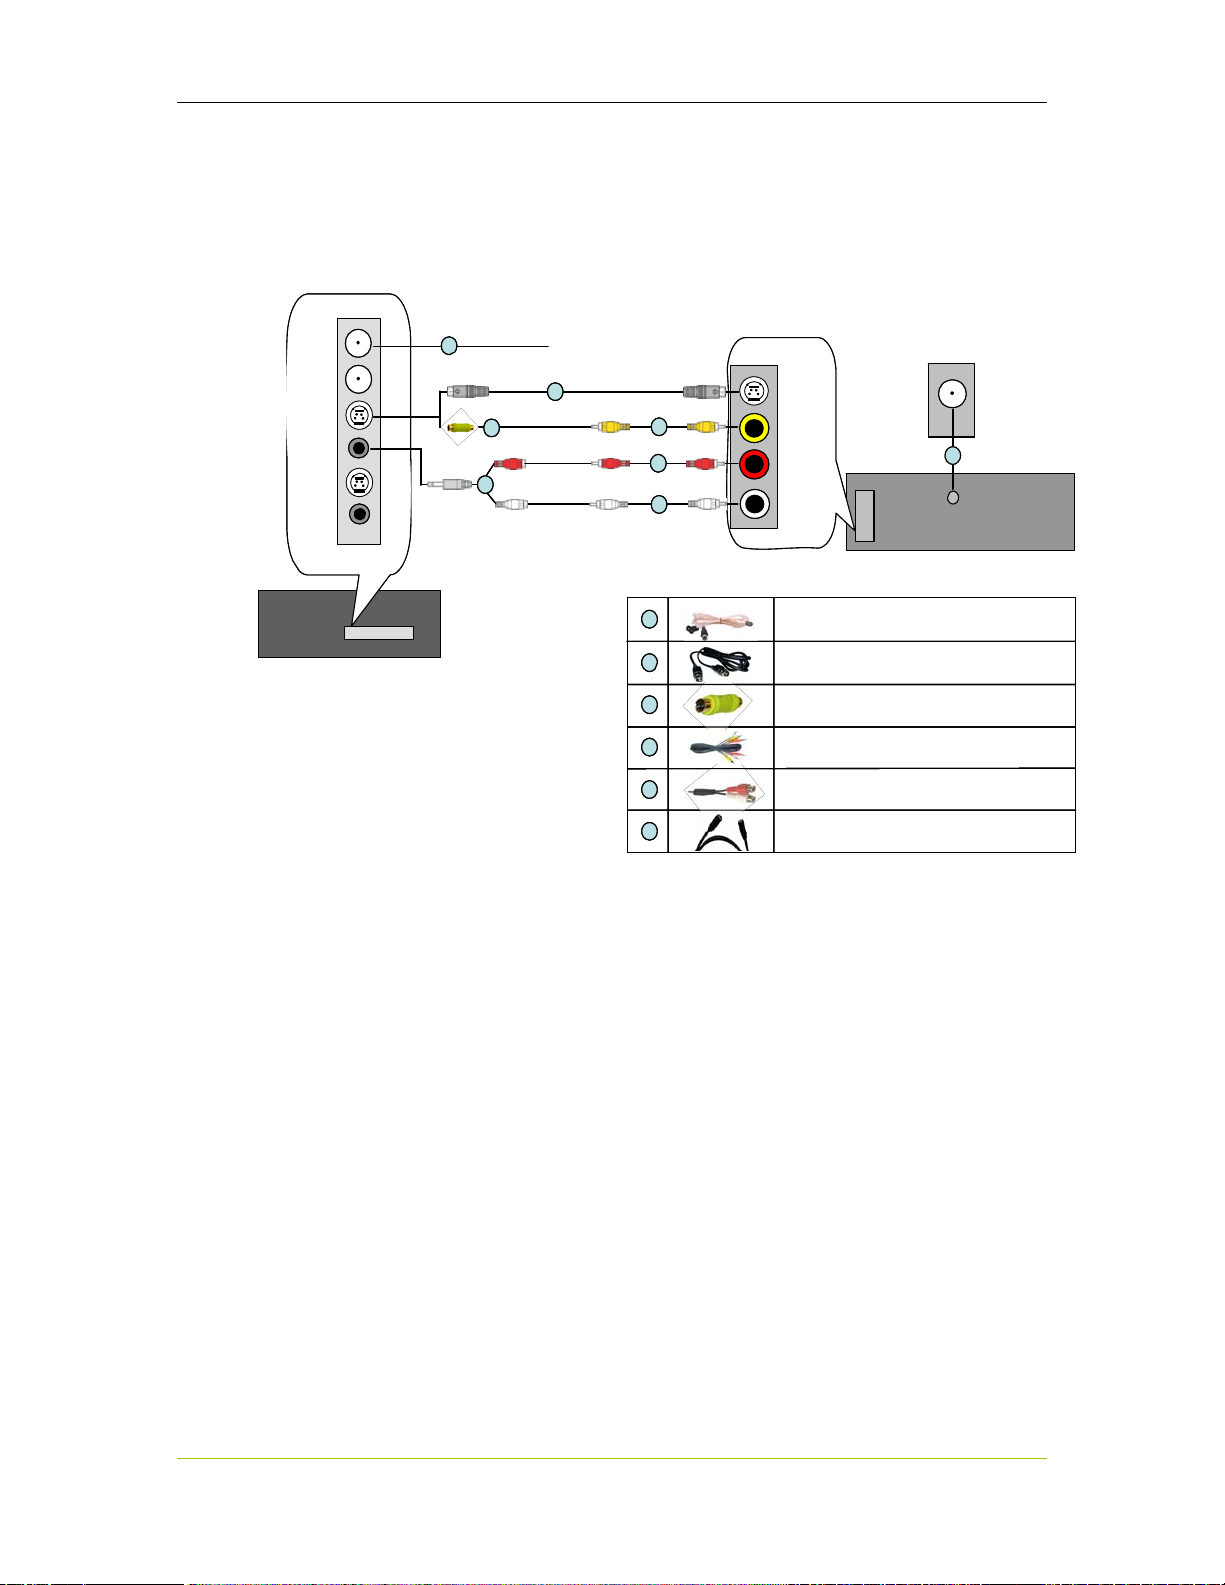
Connecting One Set-Top Box via Direct A/V Input
From Satellite LNB (Dish Antenna) or Digital TV Cable
From Satellite LNB (Dish Antenna) or Digital TV Cable
S-Video
S-Video
S-Video
Composite
Composite
Composite
Audio
Audio
Audio
Left/Right
Left/Right
Left/Right
FM Antenna
FM Antenna
FM Antenna
S-Video Cable (4-pin DIN)
S-Video Cable (4-pin DIN)
S-Video Cable (4-pin DIN)
PC
PC
FM
FM
FM
CATV
CATV
CATV
SVID1
SVID1
SVID1
AUD1
AUD1
AUD1
SVID2
SVID2
SVID2
AUD2
AUD2
AUD2
NVIDIA
NVIDIA
NVIDIA
DualTV
DualTV
DualTV
FM Antenna
FM Antenna
FM Antenna
1
1
1
or
or
or
2
2
2
3
3
3
5
5
5
or
or
4
4
4
4
4
4
4
4
4
1
1
1
2
2
2
Hardware Installation
RF Signal Source
RF Signal Source
Wall Socket or Co axial Cable
Wall Socket or Co axial Cable
Coaxial Cable
Coaxial Cable
6
6
Set-Top Box
Set-Top Box
(Back)
A/V
A/V
Out
Out
RF
RF
(Back)
Set-Top Box
Set-Top Box
(Front)
(Front)
Composite Video Adapter (RCA to 4-pin DIN)
Composite Video Adapter (RCA to 4-pin DIN)
3
3
3
4
4
4
5
5
5
6
6
6
Composite Video Adapter (RCA to 4-pin DIN)
Composite Video & Stereo Audio RCA Cable
Composite Video & Stereo Audio RCA Cable
Composite Video & Stereo Audio RCA Cable
Minijack to Dual RCA Cable
Minijack to Dual RCA Cable
Minijack to Dual RCA Cable
Coaxial Cable
Coaxial Cable
Coaxial Cable
Figure 6. Connecting One Set-Top Box via Direct A/V Input
DU-01848-001_v06 17
03/28/06
Page 24
NVIDIA DualTV MCE User’s Guide
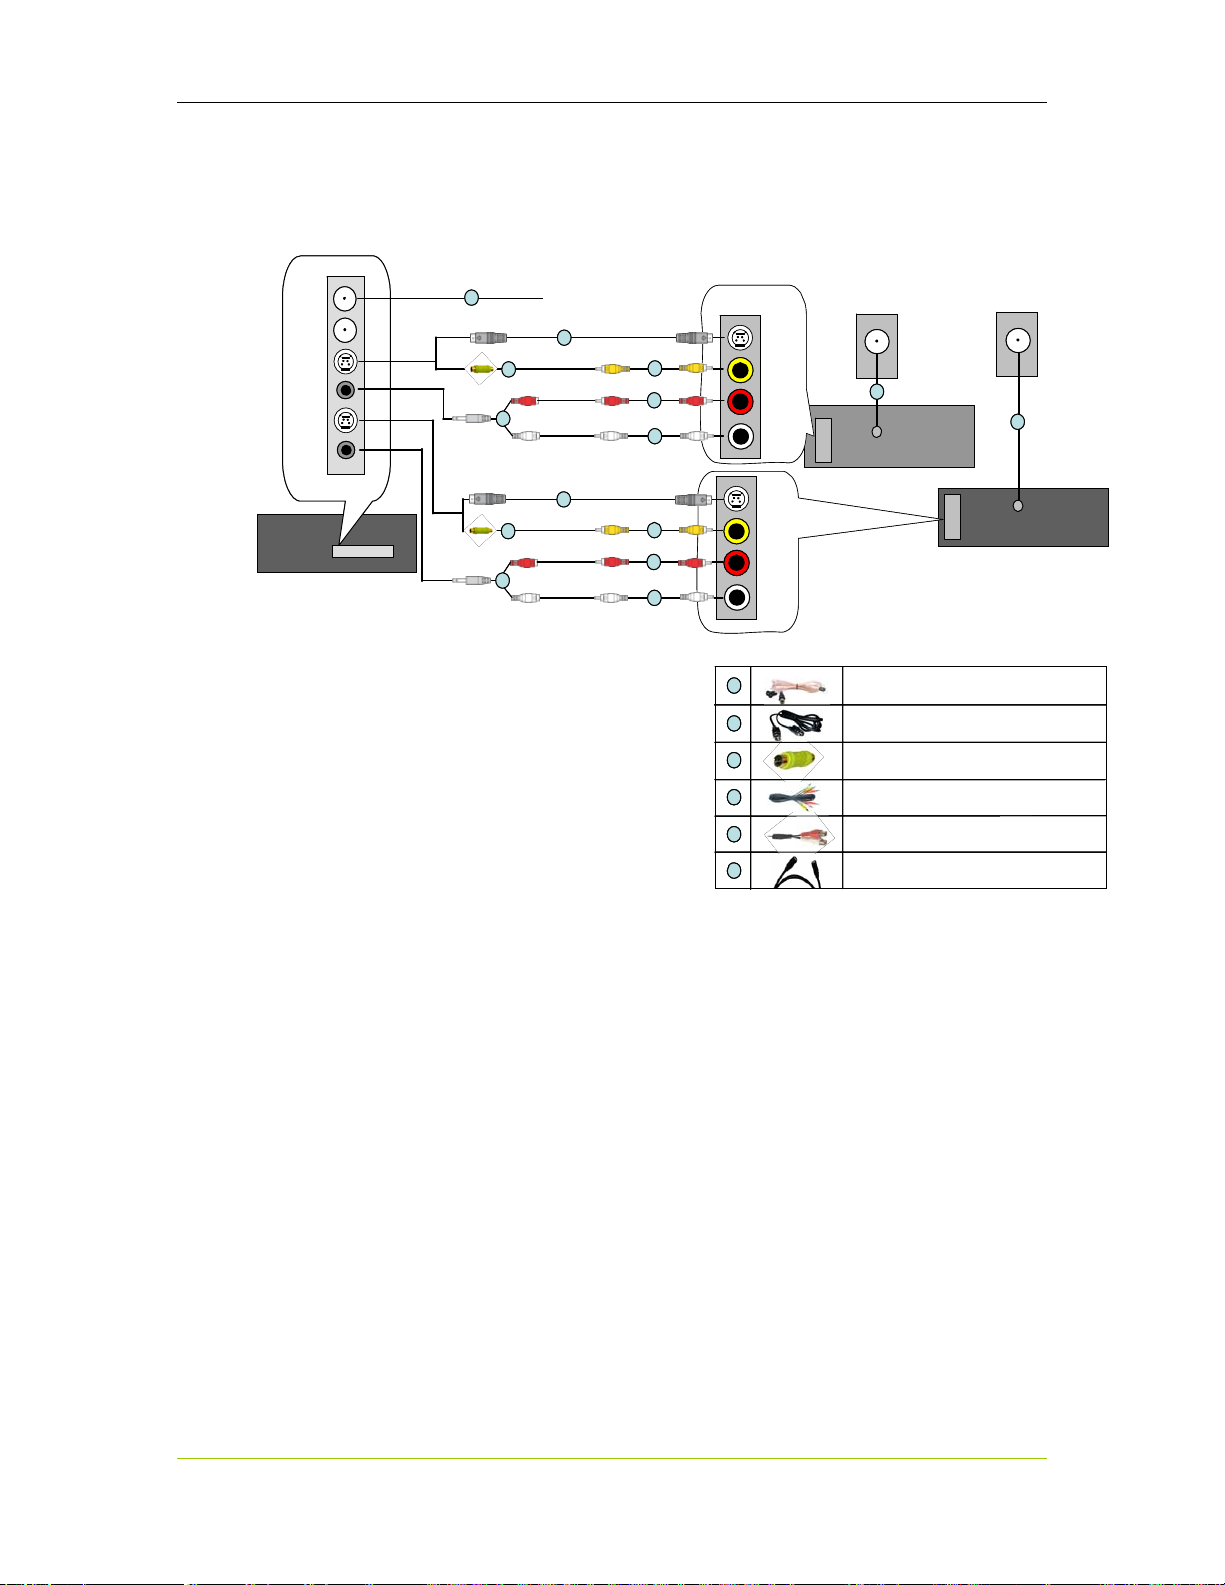
Connecting Two Set-Top Boxes via Direct A/V Inputs
RF Signal Sources
FM Antenna
FM
FM
FM
CATV
CATV
CATV
SVID1
SVID1
SVID1
AUD1
AUD1
AUD1
SVID2
SVID2
SVID2
AUD2
AUD2
AUD2
NVIDIA
NVIDIA
NVIDIA
DualTV
DualTV
DualTV
PC
PC
FM Antenna
1
1
or
or
or
or
2
2
3
3
5
5
2
2
3
3
5
5
IR
IR
Receiver
Receiver
or
or
4
4
4
4
4
4
or
or
4
4
4
4
4
4
S-Video
S-Video
S-Video
Composite
Composite
Composite
Audio
Audio
Audio
Left/Right
Left/Right
Left/Right
S-Video
S-Video
S-Video
Composite
Composite
Composite
Audio
Audio
Audio
Left/Right
Left/Right
Left/Right
1
1
1
2
2
2
3
3
3
From Satellite LNB (Dish A ntenna) or Digital TV Cable
From Satellite LNB (Dish A ntenna) or Digital TV Cable
A/V
A/V
A/V
Out
Out
Out
RF Signal Sources
Wall Sockets or Coaxial Cables
Wall Sockets or Coaxial Cables
6
6
Set-Top Box 1
Set-Top Box 1
Set-Top Box 1
RF
RF
RF
Set-Top Box 1
Set-Top Box 1
(Front)
(Front)
FM Antenna
FM Antenna
FM Antenna
S-Video Cable (4-pin DIN)
S-Video Cable (4-pin DIN)
S-Video Cable (4-pin DIN)
Composite Video Adapter (RCA to 4-pin DIN)
Composite Video Adapter (RCA to 4-pin DIN)
Composite Video Adapter (RCA to 4-pin DIN)
(Back)
(Back)
(Back)
A/V
A/V
Out
Out
6
6
RF
RF
Set-Top Box 2
Set-Top Box 2
Set-Top Box 2
Set-Top Box 2
(Back)
(Back)
(Front)
(Front)
Composite Video & St ere o A ud i o RCA Cab l e
Composite Video & St ere o A ud i o RCA Cab l e
4
4
4
5
5
5
6
6
6
Composite Video & St ere o A ud i o RCA Cab l e
Minijack to Dual RCA Cable
Minijack to Dual RCA Cable
Minijack to Dual RCA Cable
Coaxial Cable
Coaxial Cable
Coaxial Cable
Figure 7. Connecting Two Set-Top Boxes with Direct A/V Inputs
18 DU-01848-001_v06
03/28/06
Page 25

Software Installation
The CD that has been shipped with your NVIDIA DualTV MCE contains the
following software:
NVIDIA PureVideo Decoder software
NVIDIA MCE Extensions
NVIDIA DualTV WDM Driver
Note: All the NVIDIA DualTV hardware must be installed prior to installation of the
software. See Hardware Installation on page 11 if you have not installed the
hardware.
If you have an MCE remote control/receiver and it is not already connected to
the MCE PC, plug it in only after the software installation (this chapter) and
before setting up the TV signal in MCE (see next chapter).
When you see the “Found New Hardware” (detecting new tuner hardware)
screen after you have inserted the NVIDIA DualTV tuner card and powered up
the system, click Cancel. Then insert the CD and run the software installation
program.
If the “Found New Hardware” (detects WDM drivers) screen is displayed after
software installation and system restart, click Next, and then Finish.
After the software installation, you need to configure the tuners (NVIDIA DualTV
provides 2 tuners on a single card) in MCE (see next chapter).
Installing Software and
Registering Your NVIDIA
DualTV Card
Installing the NVIDIA DualTV software and registering your NVIDIA DualTV
card consists of the following procedures:
Power up the system.
Verify the environment—check PC for MCE, NVIDIA DualTV card, administrator
privileges.
Select components, install path, and check for existing analog tuner cards.
Check for software updates.
Install the NVIDIA PureVideo Decoder—requires activation key.
Install the NVIDIA DualTV WDM driver, User’s Guide(s), and shortcuts.
DU-01848-001_v06 19
03/28/06
Page 26

NVIDIA DualTV MCE User’s Guide
Register the NVIDIA DualTV product.
Restart the system—you will then need to configure your tuner in MCE.
The procedures are explained in the following steps.
1. Power up your computer.
It is always a good idea to disable any antivirus software before installing new
software.
2. Click
Cancel if the “Found New Hardware” screen (shown below) is
displayed. Use the NVIDIA DualTV installation program instead.
3. Insert the NVIDIA DualTV CD into your CD drive.
The NVIDIA DualTV installation wizard is launched. If the wizard does not
run automatically, select
Browse, locate and double-click the CD icon, locate and select Setup,
click
and then click
OK.
Run from the Start menu on Windows desktop,
20 DU-01848-001_v06
03/28/06
Page 27
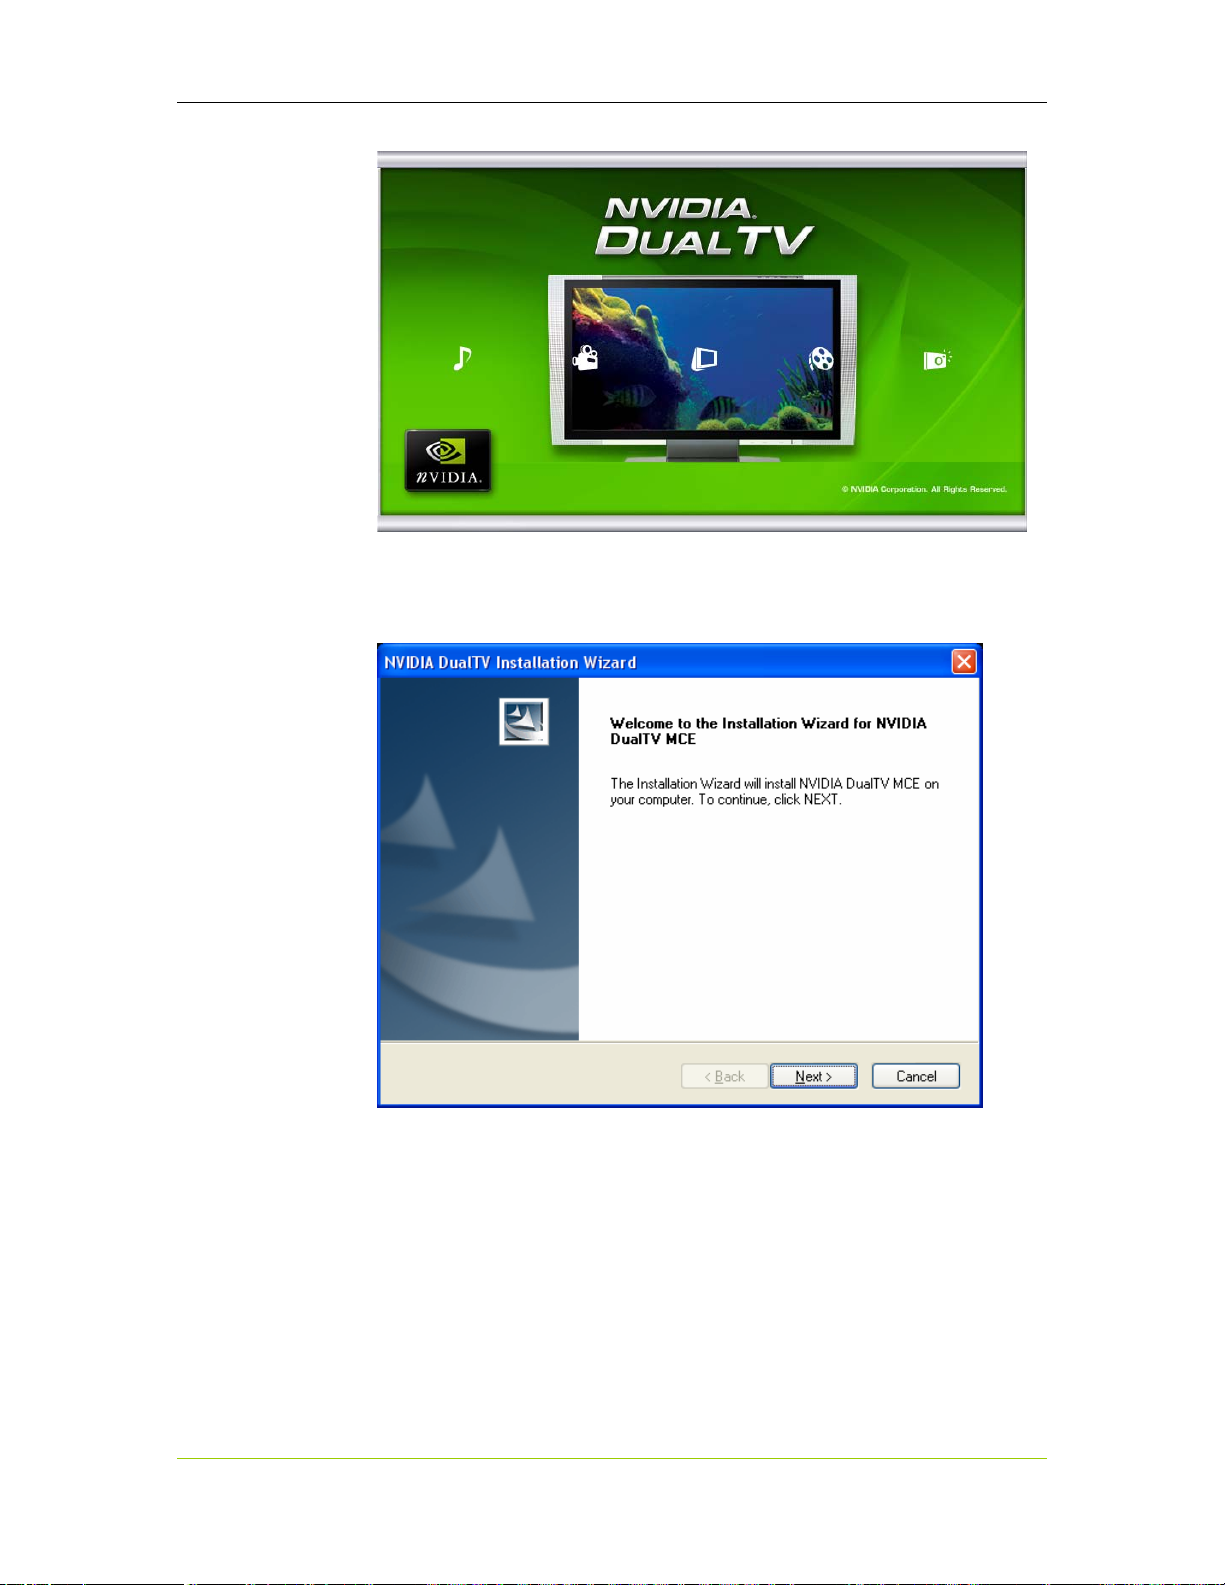
4. Click Next from the Welcome screen.
Software Installation
The following events may occur after you press Next.
If the user ID with which you logged on to Windows does not have
Windows “administrator” privileges, the following screen will be
displayed. Press
OK to exit the software installation and log on again with
an administrator ID.
DU-01848-001_v06 21
03/28/06
Page 28
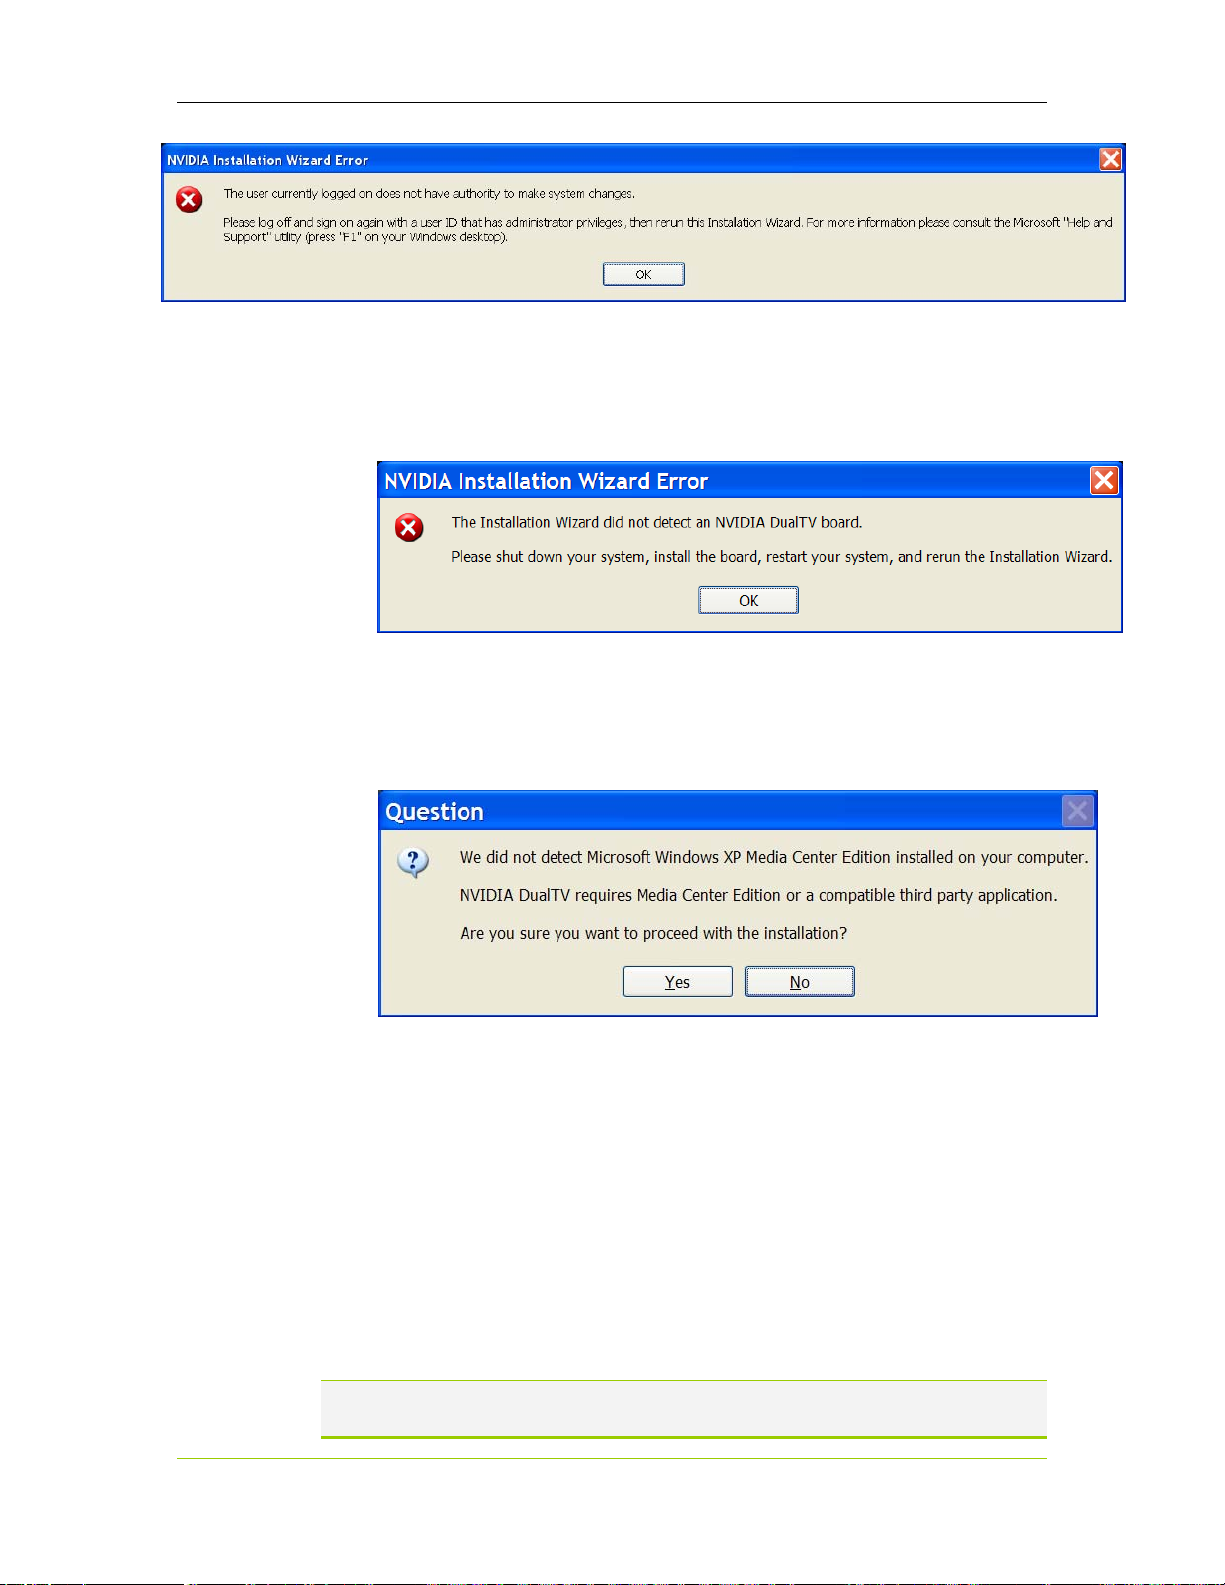
NVIDIA DualTV MCE User’s Guide
If the wizard does not detect an NVIDIA DualTV card in the system, the
following message will be displayed. Press
instructions.
OK, and follow the
The NVIDIA DualTV MCE is designed to work with MCE. If your
system does not have the MCE operating system installed, the following
screen will be displayed.
If you intend to use NVIDIA DualTV MCE with MCE, click No, power
down the system, and move the NVIDIA DualTV board to an MCE system.
5. Select the components you wish to install. On an initial NVIDIA DualTV
install, you should select all components listed, and optionally specify the path
for the NVIDIA PureVideo Decoder and User’s Guide (a PDF file). The
exception to this is if you already have the Gold or Platinum version of the
NVIDIA PureVideo Decoder installed on your MCE system. In this case,
NVIDIA recommends that you skip the installation of the NVIDIA
PureVideo Decoder.
The NVIDIA DualTV software package includes the Bronze version of the
NVIDIA PureVideo Decoder.
Note: The screen (see below) displays “NVIDIA DualTV User’s Guides” as a component
to install.
22 DU-01848-001_v06
03/28/06
Page 29

Software Installation
When you click Browse the following screen is displayed for you to select
the install path for the NVIDIA PureVideo Decoder and NVIDIA
DualTV User’s Guide(s).
DU-01848-001_v06 23
03/28/06
Page 30
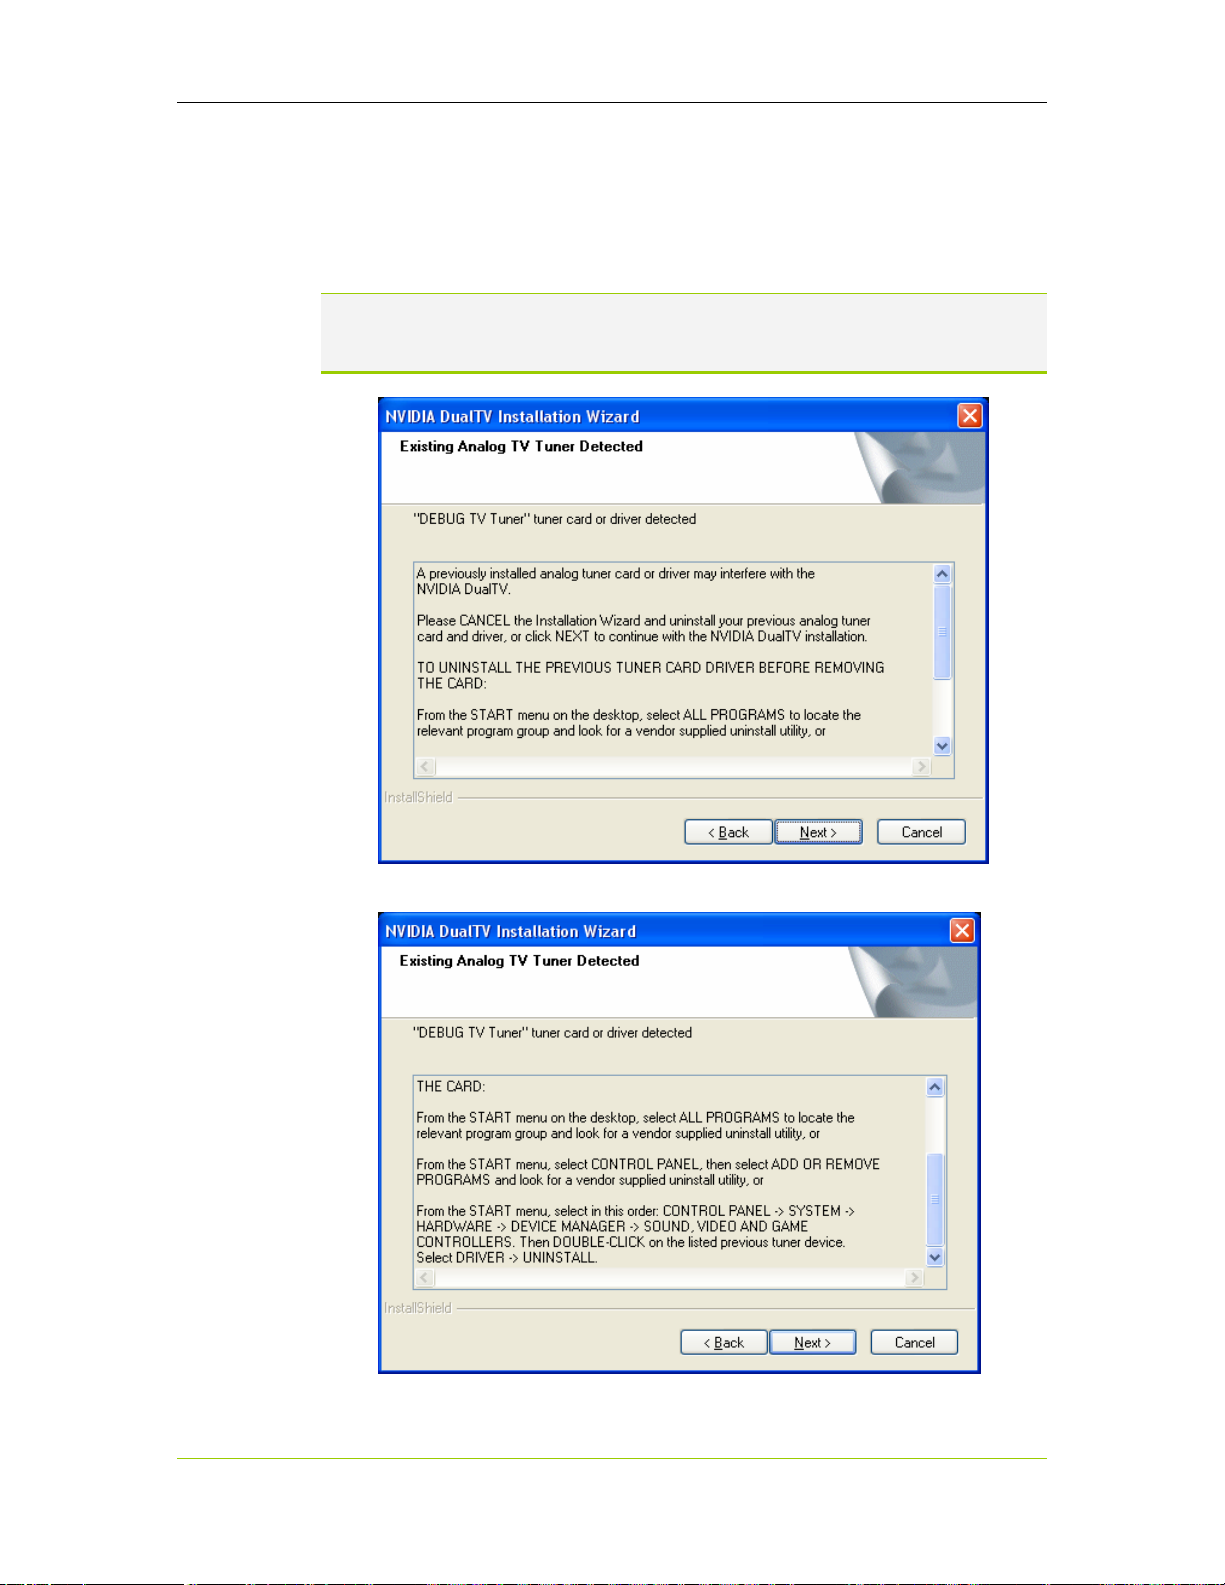
NVIDIA DualTV MCE User’s Guide
If “NVIDIA DualTV WDM Driver” is selected and the installation
wizard detects the presence of a third-party analog tuner card, the
following screen will be displayed. NVIDIA recommends that you
uninstall the driver for the third-party tuner card before physically
removing the card from the system. The next two screens are displayed:
Note: The example tuner called out in the following screen message is called “DEBUG
TV Tuner” for documentation purposes. In your installation, you will see the
name of your third-party tuner.
The following will be displayed if you scroll down in the previous screen.
24 DU-01848-001_v06
03/28/06
Page 31

Software Installation
6. The following screen is displayed automatically. Select the option to check for
availability of updated software from NVIDIA. This option requires that you
have an Internet connection.
DU-01848-001_v06 25
03/28/06
Page 32
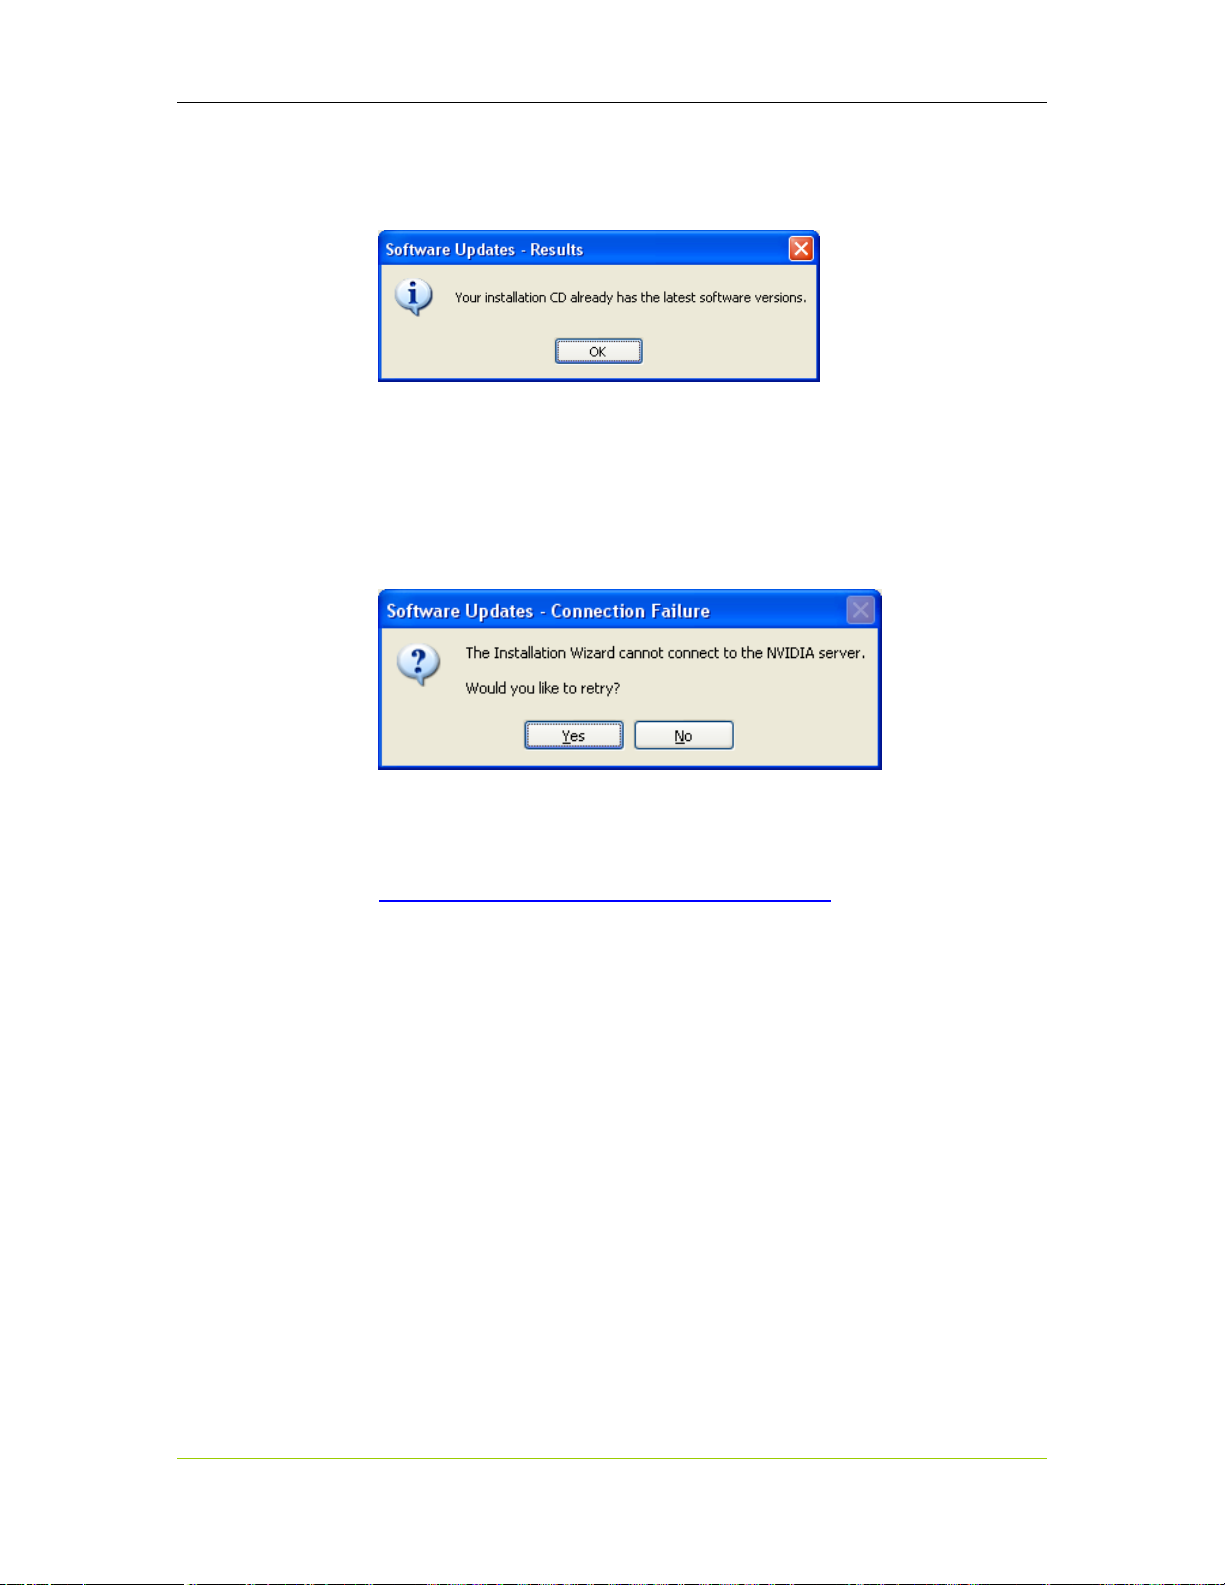
NVIDIA DualTV MCE User’s Guide
If the NVIDIA server detects that your NVIDIA DualTV CD already
has the latest software versions, the following message is displayed.
The following message is displayed if your Internet link is down or if the
NVIDIA server is unavailable.
Click
Yes to retry the connection to the NVIDIA server or No to skip the
retry.
If your system fails to link to the NVIDIA server, you can download driver
updates later by visiting:
http://www.nvidia.com/content/drivers/drivers.asp
Either the newly retrieved software version or the version on the NVIDIA
DualTV CD will be used for the rest of the installation.
26 DU-01848-001_v06
03/28/06
Page 33

Software Installation
7. Read and accept the NVIDIA PureVideo Decoder License Agreement as
displayed. The following screen is displayed if you have selected
Decoder
you click
in the selection of components to install. Click Yes to proceed. If
No, you are terminating the software installation.
PureVideo
Enter the Product Code and the Activation Key for the NVIDIA
PureVideo Decoder. The information is on the label on the back of the
CD sleeve. Note that the key consists only of the letters A–F (not casesensitive) and the numerals 0–9. There is no letter O (oh). You do not
have to type in the hyphens (“–”).
DU-01848-001_v06 27
03/28/06
Page 34

NVIDIA DualTV MCE User’s Guide
The wizard completes the installation of the NVIDIA PureVideo
Decoder.
28 DU-01848-001_v06
03/28/06
Page 35

Software Installation
8. The other components are installed depending on your selection. The
following screens appear.
Depending on the NVIDIA DualTV package, multiple language versions of
the NVIDIA DualTV User’s Guide will be copied to your hard disk.
9. Click Yes to register your NVIDIA DualTV product via the Internet or a
direct dial-up line.
Note: This prompt is not displayed if you have already run the installation wizard
and completed the registration process before.
DU-01848-001_v06 29
03/28/06
Page 36

NVIDIA DualTV MCE User’s Guide
Note: If you click Cancel during the registration process, only the product
Fill in your contact information.
registration is cancelled. The software installation remains intact.
Fill in the information relevant to your NVIDIA DualTV purchase. The
product part number and serial number can be found on the inside cover
of the NVIDIA DualTV MCE Quick Start Guide. NVIDIA
recommends that you stay current by signing up for the auto-notification
service about products, promotions, and software updates.
30 DU-01848-001_v06
03/28/06
Page 37

Complete the survey.
Software Installation
Complete the second page of the survey.
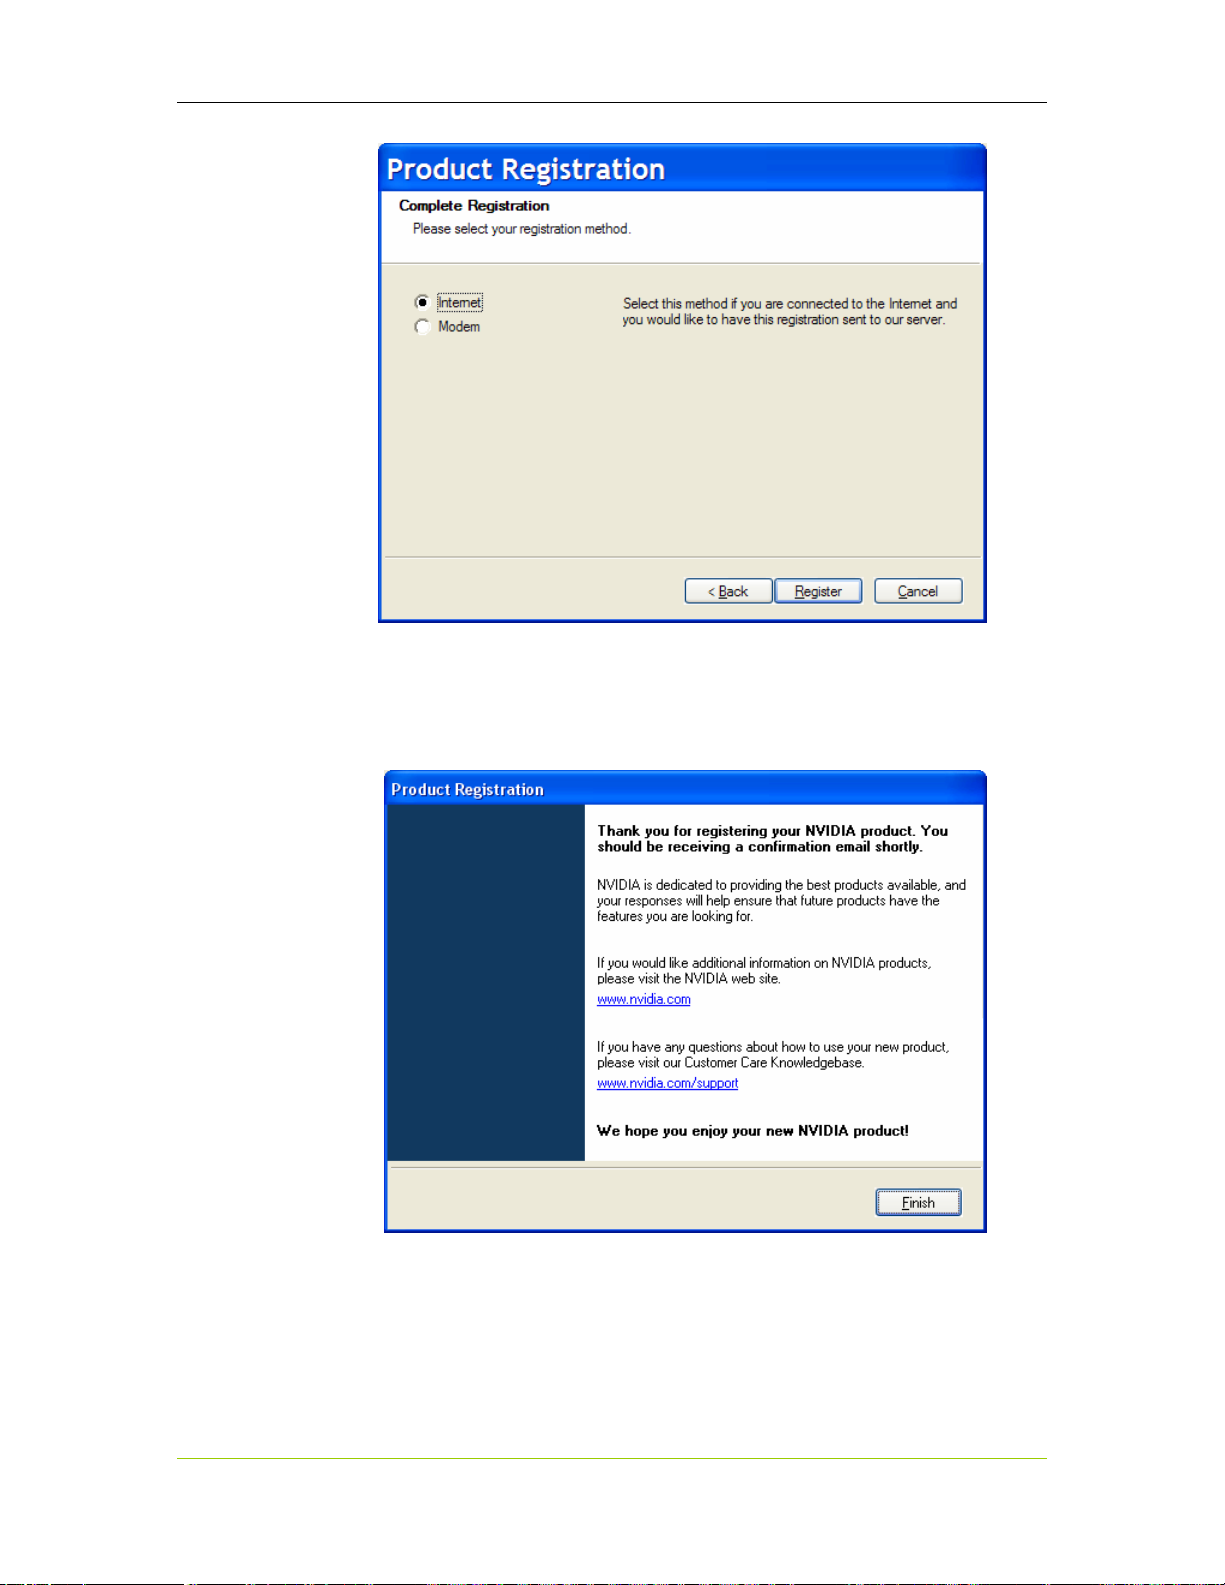
Select the method to transmit the registration data to NVIDIA, and click
Register. For the Internet option, an active Internet connection is
required. For
Modem, a direct dial-up line using a toll-free number to the
NVIDIA server is used.
DU-01848-001_v06 31
03/28/06
Page 38
NVIDIA DualTV MCE User’s Guide
If the data transmission is successful, the following normal completion
screen is displayed. You will receive a confirmation e-mail containing
logon information for your NVIDIA Customer Care account and
information on accessing NVIDIA Customer Care.
32 DU-01848-001_v06
03/28/06
Page 39

Software Installation
If you click Cancel during the registration process, the following screen is
displayed. Canceling the registration does not roll back the software
installed in earlier steps. If you select
registration wizard will return to the
(where you select the option among
select either
Exit registration or Remind me in 14 days, the wizard goes
Register Now in this screen the
Complete Registration screen
Internet/E-mail/Modem). If you
to the normal registration completion screen.
10. Respond to the screen that comes up next. One of the following Installation
Wizard Complete
screens is displayed whether you have completed the
registration process or not. A program group is created in the Windows
START menu with shortcuts and uninstall utilities.
The screen that is displayed depends on (1) whether you selected the
NVIDIA DualTV WDM driver as one of the components, and (2) whether
you are using an MCE system.
.
DU-01848-001_v06 33
03/28/06
Page 40

NVIDIA DualTV MCE User’s Guide
.
After restarting your MCE PC, the following window is displayed. After
reviewing the reminder message there, you can close the window by clicking
anywhere on the screen. The window will be removed automatically within 10
seconds.
34 DU-01848-001_v06
03/28/06
Page 41

Note: For a full install on an MCE system, the software installation is fully
complete only after the PC is restarted. After restarting your PC, install an
MCE remote control (if applicable) and configure your tuner in MCE as
described in the next chapters if you are using MCE.
Software Installation
DU-01848-001_v06 35
03/28/06
Page 42

NVIDIA DualTV MCE User’s Guide
Abnormal Termination
If you click Cancel at any time during the software installation before the
registration step, or
screen, the following screen is displayed.
No in the NVIDIA PureVideo Decoder License Agreement
If you click
Yes, the installation wizard exits with the following screen. The software
installed in prior steps is uninstalled.
36 DU-01848-001_v06
03/28/06
Page 43

Installing an MCE Remote Control and
Receiver
MCE requires an MCE-compatible remote control/receiver with IR blaster(s) to
control set-top boxes (up to two). An MCE remote control and receiver kit is
included in the package if you have received an NVIDIA DualTV MCE with
Remote Control bundle. Otherwise, you may purchase an MCE remote control and
receiver kit from one of many online PC retailers.
If you do not intend to use a set-top box as a TV signal source for your NVIDIA
DualTV, or you do not have an MCE remote control and receiver kit, please skip to
the next chapter.
This section provides generic instructions only. Refer to the documentation that
comes with your MCE remote control and receiver kit for details. If you received an
NVIDIA DualTV MCE with Remote Control bundle, please also consult the
NVIDIA MCE Remote Control Quick Start Guide (hard copy) and the NVIDIA
MCE Remote Control User’s Guide (available on the NVIDIA DualTV Installation
CD, and copied onto your PC if you selected the respective option during NVIDIA
DualTV software installation).
Note: If your remote receiver is not already connected to the MCE PC, please plug that
in only after the NVIDIA DualTV software installation (last chapter) but before
setting up the TV signal in MCE (next chapter).
Setting Up the MCE Remote
Control and Receiver
1. Install batteries into the remote control unit. Make sure the battery terminals are
oriented properly (often the “+” and “-” markings are available in the
compartment). Close the compartment cover.
2. Place the USB IR receiver unit at a convenient location with a line-of-sight to
(without obstruction), and within an effective range of where you will be using
the remote control.
3. Set up the IR blaster (emitter).
a. Connect the IR blaster cable to a port on the back of the IR receiver
unit.
b. Locate the remote control (IR) sensor window on your set-top box.
This window is usually located at the front of the equipment. Refer to
the set-top box manual if needed.
DU-01848-001_v06 37
03/28/06
Page 44

NVIDIA DualTV MCE User’s Guide
c. Remove the paper sticker from the red plastic emitter LED of the IR
blaster. Place the sticky side of the red emitter LED directly on the settop box IR sensor window. Do not totally block the window.
4. Connect the IR receiver unit’s USB cable to your MCE PC. If your remote
receiver has a detachable USB cable, make sure the USB cable is plugged
securely into the back of the IR receiver unit.
5. When the PC is powered on, insert the plug of the USB cable into an available
USB port on your PC. Windows will recognize and configure the device
automatically.
USB cable connector for PC side USB s ocket on the PC chassis
38 DU-01848-001_v06
03/28/06
Page 45
Installing an MCE Remote Control and Receiver
Connection Diagrams with MCE
Remote
The following diagrams depict the connections for various configuration scenarios.
Connecting Analog TV Cable or Off-Air Antenna
1
1
1
FM Antenna
FM Antenna
FM
FM
FM
CATV
CATV
CATV
SVID1
SVID1
SVID1
AUD1
AUD1
AUD1
SVID2
SVID2
SVID2
AUD2
AUD2
AUD2
NVIDIA
NVIDIA
DualTV
DualTV
or
or
FM Antenna
6
6
6
Coaxial Cable
Coaxial Cable
Coaxial Cable
Secondary Device
Secondary Device
6
6
6
Coaxial Cable
Coaxial Cable
Coaxial Cable
Splitter
Splitter
(use only if necessary)
(use only if necessary)
or
or
RF Signal Source
TV Antenna or Analog TV Cable (Cable TV Feed)
TV Antenna or Analog TV Cable (Cable TV Feed)
RF Signal Source
Wall Socket or Coaxial Cable
Wall Socket or Coaxial Cable
PC
PC
FM Antenna
FM Antenna
FM Antenna
S-Video Cable (4-pin DIN)
S-Video Cable (4-pin DIN)
S-Video Cable (4-pin DIN)
Composite Video Adapt er (RCA t o 4-pi n DIN)
Composite Video Adapt er (RCA t o 4-pi n DIN)
Composite Video Adapt er (RCA t o 4-pi n DIN)
Composite Video & Stereo Audio RCA Cable
Composite Video & Stereo Audio RCA Cable
Composite Video & Stereo Audio RCA Cable
Minijack to Dual RCA Cable
Minijack to Dual RCA Cable
Minijack to Dual RCA Cable
Coaxial Cable
Coaxial Cable
Coaxial Cable
USB-A Female
USB-A Female
USB-A Female
(Chassis Mount)
(Chassis Mount)
(Chassis Mount)
MCE IR
MCE IR
Remote
Remote
Control
Control
USB Cable
USB Cable
IR Signal
IR Signal
IR
IR
Receiver
Receiver
IR Sensor
IR Sensor
Window
Window
1
1
1
2
2
2
3
3
3
4
4
4
5
5
5
6
6
6
Figure 8. Connection Analog TV Cable or Off-Air Antenna, with
Remote
DU-01848-001_v06 39
03/28/06
Page 46

NVIDIA DualTV MCE User’s Guide
Connecting One Set-Top Box via Direct A/V Input
From Satellite LNB (Dish Antenna) or Digital TV Cable
FM
FM
FM
CATV
CATV
CATV
SVID1
SVID1
SVID1
AUD1
AUD1
AUD1
SVID2
SVID2
SVID2
AUD2
AUD2
AUD2
NVIDIA
NVIDIA
NVIDIA
DualTV
DualTV
DualTV
PC
PC
USB-A Female
USB-A Female
USB-A Female
(Chassis Mount)
(Chassis Mount)
(Chassis Mount)
FM Antenna
FM Antenna
FM Antenna
1
1
1
or
or
or
USB Cable
USB Cable
IR Signal
IR Signal
2
2
2
3
3
3
5
5
5
IR
IR
Receiver
Receiver
IR Sensor
IR Sensor
Window
Window
or
or
4
4
4
4
4
4
4
4
4
IR Blaster (Emitter)
IR Blaster (Emitter)
Cable
Cable
1
1
1
2
2
2
From Satellite LNB (Dish Antenna) or Digital TV Cable
S-Video
S-Video
S-Video
Composite
Composite
Composite
Audio
Audio
Audio
Left/Right
Left/Right
Left/Right
(Stick this onto the set-top box
(Stick this onto the set-top box
FM Antenna
FM Antenna
FM Antenna
S-Video Cable (4-pin DIN)
S-Video Cable (4-pin DIN)
S-Video Cable (4-pin DIN)
RF Signal Source
RF Signal Source
Wall Socket or Coaxial Cable
Wall Socket or Coaxial Cable
Coaxial Cable
Coaxial Cable
6
6
Set-Top Box
Set-Top Box
(Back)
A/V
A/V
Out
Out
from IR Blaster Cable
from IR Blaster Cable
RF
RF
Emitter LED
Emitter LED
sensor window)
sensor window)
(Back)
Set-Top Box
Set-Top Box
(Front)
(Front)
IR Sensor
IR Sensor
Window
Window
Composite Video Adapter (RCA to 4-pin DIN)
Composite Video Adapter (RCA to 4-pin DIN)
MCE IR
MCE IR
Remote
Remote
Control
Control
3
3
3
4
4
4
5
5
5
6
6
6
Composite Video Adapter (RCA to 4-pin DIN)
Composite Video & St ere o A ud io RCA Cable
Composite Video & St ere o A ud io RCA Cable
Composite Video & St ere o A ud io RCA Cable
Minijack to Dual RCA Cable
Minijack to Dual RCA Cable
Minijack to Dual RCA Cable
Coaxial Cable
Coaxial Cable
Coaxial Cable
Figure 9. Connecting One Set-Top Box via Direct A/V Input, with
Remote
40 DU-01848-001_v06
03/28/06
Page 47

Installing an MCE Remote Control and Receiver
Connecting Two Set-Top Boxes via Direct A/V Inputs
RF Signal Sources
RF Signal Sources
Wall Sockets or Coaxial Cables
Wall Sockets or Coaxial Cables
6
6
Set-Top Box 1
Set-Top Box 1
Set-Top Box 1
RF
RF
RF
Set-Top Box 1
Set-Top Box 1
(Front)
(Front)
IR Sensor
IR Sensor
Windows
Windows
Emitter LED
Emitter LED
from IR Blaster Cable
from IR Blaster Cable
FM Antenna
FM Antenna
FM Antenna
FM
FM
FM
CATV
CATV
CATV
SVID1
SVID1
SVID1
AUD1
AUD1
AUD1
SVID2
SVID2
SVID2
AUD2
AUD2
AUD2
NVIDIA
NVIDIA
NVIDIA
DualTV
DualTV
DualTV
PC
PC
USB-A Female
USB-A Female
(Chassis Mount)
(Chassis Mount)
USB Cable
USB Cable
1
1
IR Signal
IR Signal
FM Antenna
FM Antenna
or
or
3
3
5
5
or
or
3
3
5
5
2
2
2
2
IR
IR
Receiver
Receiver
From Satellite LNB (Dish Antenna) or Digital TV Cable
From Satellite LNB (Dish Antenna) or Digital TV Cable
S-Video
S-Video
or
or
4
4
4
4
4
4
or
or
4
4
4
4
4
4
S-Video
Composite
Composite
Composite
Audio
Audio
Audio
Left/Right
Left/Right
Left/Right
S-Video
S-Video
S-Video
Composite
Composite
Composite
Audio
Audio
Audio
Left/Right
Left/Right
Left/Right
IR Blaster (Emitter)
IR Blaster (Emitter)
Cables
Cables
(Stick this onto the set-top box sensor window)
(Stick this onto the set-top box sensor window)
1
1
1
A/V
A/V
A/V
Out
Out
Out
(Back)
(Back)
(Back)
A/V
A/V
Out
Out
6
6
RF
RF
Set-Top Box 2
Set-Top Box 2
Set-Top Box 2
Set-Top Box 2
(Back)
(Back)
(Front)
(Front)
MCE IR
MCE IR
Remote
Remote
Control
Control
IR Sensor
IR Sensor
Window
Window
2
2
2
3
3
3
4
4
4
5
5
5
6
6
6
S-Video Cable (4-pin DIN)
S-Video Cable (4-pin DIN)
S-Video Cable (4-pin DIN)
Composite Video Adapter (RCA to 4-pin DI N)
Composite Video Adapter (RCA to 4-pin DI N)
Composite Video Adapter (RCA to 4-pin DI N)
Composite Video & Stereo Audio RCA Cable
Composite Video & Stereo Audio RCA Cable
Composite Video & Stereo Audio RCA Cable
Minijack to Dual RCA Cable
Minijack to Dual RCA Cable
Minijack to Dual RCA Cable
Coaxial Cable
Coaxial Cable
Coaxial Cable
Figure 10. Connecting Two Set-Top Boxes with Direct A/V Inputs, with
Remote
DU-01848-001_v06 41
03/28/06
Page 48

NVIDIA DualTV MCE User’s Guide
This page intentionally left blank.
42 DU-01848-001_v06
03/28/06
Page 49

Configuring NVIDIA DualTV in
Windows XP Media Center Edition
If you have any problems with MCE, please consult the documentation associated
with MCE. For more information on configuring or using Microsoft Windows XP
Media Center Edition, please visit
http://www.microsoft.com/windowsxp/mediacenter/default.mspx.
Configuring MCE to Work with
NVIDIA DualTV
With the hardware and software installed, you need to configure MCE and the
NVIDIA DualTV to receive the TV signals in your area.
The sections below describe the separate procedures for configuring MCE for use
with:
Off-air antenna or TV cable (analog cable TV service)–see page 44 for automatic
configuration, and page 50 for manual configuration.
One or two set-top boxes (cable or satellite receivers)–see page 56.
Note: If you intend to use your set-top box with MCE, you need to have an MCE-compatible
remote control and receiver kit with IR blaster(s). The blaster(s) control the set-top box
to change channels. You need to plug in the remote receiver to your MCE PC before you
configure NVIDIA DualTV in MCE. See
and
Connecting Two-Set-Top Boxes via Direct A/V Inputs
Connecting One Set-Top Box via Direct A/V Input
.
DU-01848-001_v06 43
03/28/06
Page 50

NVIDIA DualTV MCE User’s Guide
Configuring MCE Automatically for Antenna or Analog Cable
TV
To get started, power up your PC. Upon initial power-on, the MCE application
may launch automatically. If it does, begin with Step 2. If it does not launch, begin
with Step 1.
1. Go to
Start and select Media Center to launch the application. If the MCE
setup wizard comes up, go straight to Step 4.
2. Select
Settings.
3. Select TV.
44 DU-01848-001_v06
03/28/06
Page 51

Configuring NVIDIA DualTV in Windows XP MCE
4. Select
Set-up TV Signal and then click Next.
5. Confirm your region to configure for local television service.
DU-01848-001_v06 45
03/28/06
Page 52

NVIDIA DualTV MCE User’s Guide
6. At this point, you can automatically configure your TV signals or manually
configure them. It is recommended to automatically configure the signals. Make
a selection and click
Note: Go to the MCE Web site for information on whether automatic configuration is
available for your country.
Click
Next.
Next.
46 DU-01848-001_v06
03/28/06
Page 53

Configuring NVIDIA DualTV in Windows XP MCE
7. Click Yes to continue. MCE has determined your system configuration and asks
if you want to continue to configure the TV signal using the results it found.
8. You are done with the TV signal portion of the setup. Select Set Up Guide
Listing
to set up the TV station guide and then click Next.
9. Select
I Agree
.
Yes to view the guide privacy statement and accept the agreement. Select
and click Next.
DU-01848-001_v06 47
03/28/06
Page 54

NVIDIA DualTV MCE User’s Guide
10. Enter your postal or ZIP code so the proper guide information for your area
can be downloaded, and click
Next.
11. Click
Next again after seeing “Download Complete.”
12. Select your provider from the list displayed.
MCE will then download the program guide.
48 DU-01848-001_v06
03/28/06
Page 55

Configuring NVIDIA DualTV in Windows XP MCE
13.
You Are Done! Select Finish to complete the configuration.
DU-01848-001_v06 49
03/28/06
Page 56

NVIDIA DualTV MCE User’s Guide
Configuring MCE Manually for Antenna or Analog Cable TV
MCE allows you to manually configure all settings associated with your NVIDIA
DualTV tuners. To manually configure MCE, perform the following procedure.
Otherwise, you can configure the tuners automatically (see page 44).
To get started, power up the PC. Upon initial power-on, the MCE application may
launch automatically. If it does, begin with Step 2. If it does not launch, begin with
Step 1.
1. Go to
Start and select Media Center to launch
the application. Cancel the MCE setup wizard if
it comes up.
2. Select
3. Select
Settings.
TV.
4. Select Set Up TV Signal.
5. Click
Next to begin setting up your signal.
50 DU-01848-001_v06
03/28/06
Page 57

Configuring NVIDIA DualTV in Windows XP MCE
6. Confirm the region that you will be receiving the TV signal. MCE determines
the region and asks for your confirmation.
7. Select I will manually configure my TV signal and click Next.
.
8. Select your TV signal type and click
Next.
DU-01848-001_v06 51
03/28/06
Page 58
NVIDIA DualTV MCE User’s Guide
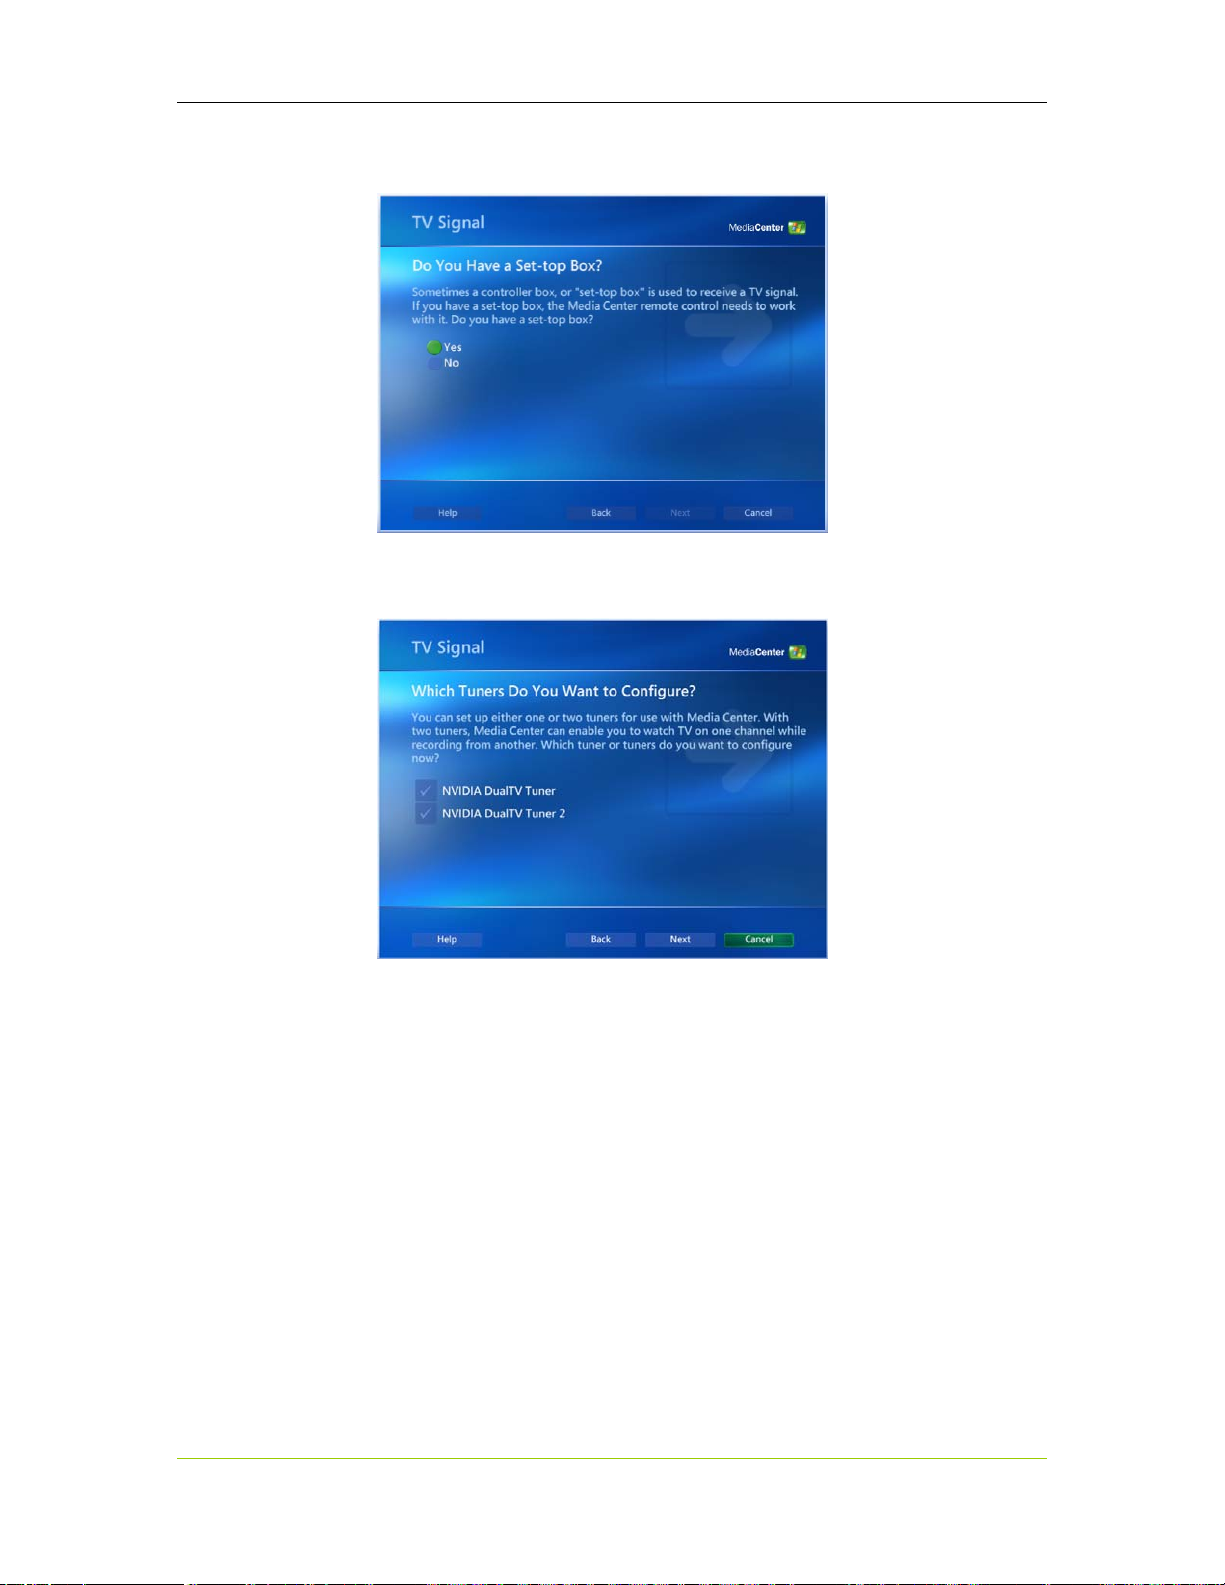
9. Specify if you have a set-top box that you will be connecting to your MCE
computer. Click
10. Select the tuner(s) to be configured.
With the NVIDIA DualTV tuner card, you have two tuners. You want to
configure both tuners. Make sure both tuners are checked.
Next.
Next.
Click
52 DU-01848-001_v06
03/28/06
Page 59

Configuring NVIDIA DualTV in Windows XP MCE
11. Select Set Up Guide Listing to manually set up your online TV Guide and
Next.
click
Click
Next again to continue.
12. Select
Yes to continue to use the guide and click Next to continue.
13. Read and accept the terms by selecting
DU-01848-001_v06 53
03/28/06
I Agree and click Next to continue.
Page 60

NVIDIA DualTV MCE User’s Guide
14. Enter your postal/ZIP code and click
information.
Next to download provider
Next to continue.
Click
15. Select a provider that best fits your location.
54 DU-01848-001_v06
03/28/06
Page 61

Configuring NVIDIA DualTV in Windows XP MCE
16. Click Next to download your TV Program Guide information.
Next to continue.
Click
Click
Next to continue.
Congratulations, you have successfully downloaded the online TV
programming guide. Click
Finish to complete the process.
This completes the tuner configuration in MCE.
DU-01848-001_v06 55
03/28/06
Page 62

NVIDIA DualTV MCE User’s Guide
Configuring MCE for Use with Set-Top Box
To get started, power up the PC. Upon initial power-on, the MCE application may
launch automatically. If it does, begin with Step 2. If it does not launch, begin with
Step 1.
1. Go to
Start and select Media Center to launch the
application. Cancel the MCE setup wizard if it
comes up.
2. Select Settings.
3. On the Settings page, select TV and then select Set Up TV Signal.
4. TV Signal Setup screen pops up. Select Yes to continue.
56 DU-01848-001_v06
03/28/06
Page 63

Configuring NVIDIA DualTV in Windows XP MCE
5. Click Next to continue TV signal setup.
6. Select country where you reside and click Next.
7. Media Center tries to detect the TV captured by NVIDIA DualTV. Select
Configure my TV signal automatically and click Next.
DU-01848-001_v06 57
03/28/06
Page 64

NVIDIA DualTV MCE User’s Guide
8. Media Center then tries to determine the type of signal received through
NVIDIA DualTV by doing an input scan.
9. Media Center then reports the type of signal detected. The number of
connections should be two if you have two set-top boxes connected to the
NVIDIA DualTV. Click Yes to continue if the detected result is correct.
58 DU-01848-001_v06
03/28/06
Page 65

Configuring NVIDIA DualTV in Windows XP MCE
10. Select the type of provider: Cable or Satellite. Then click Next to continue.
11. Media Center will then set up the MCE remote control and receiver to work
with Set-Top Box A. Please make sure all the items shown on the screen have
been checked.
12. Select the appropriate TV signal. Video from the set-top box is displayed in the
preview window if the right signal is chosen.
DU-01848-001_v06 59
03/28/06
Page 66

NVIDIA DualTV MCE User’s Guide
13. If you have previously configured your system, you are prompted for either
modifying channel change settings or reconfiguring all set-top box settings.
Select Reconfigure all set-top box settings.
14. To identify the first set-top box (Cable Box A as referenced in the wizard, as
shown below), use the controls on the set-top box itself to change the
channel, and check whether the video changes to another program in the
MCE preview window. Try the other set-top box if the channel does not
change in the Media Center window.
60 DU-01848-001_v06
03/28/06
Page 67

Configuring NVIDIA DualTV in Windows XP MCE
15. If your set-top box comes with an IR remote control, select Yes, and Media
Center can identify the correct settings (semi-) automatically. (If you do not
have a remote control for your set-top box, select No and a list of set-top box
manufacturers will be displayed. Select each code set until you find the correct
one). If automatic identification fails (in the next few steps), select Back and
use manual identification. Do not select
Cancel
.
16. Check that your set-top box remote is set to control your set-top box before
selecting Next.
DU-01848-001_v06 61
03/28/06
Page 68

NVIDIA DualTV MCE User’s Guide
17. When prompted, press and hold the “0” button (or whatever is displayed) on
the set-top box remote (not the Media Center remote control). Then Media
Center prompts you to press and hold the “Enter” button. If you’re too close to
the IR receiver, you may have a problem with the signal being recognized
.
18. Put down the set-top box remote and pick up the Media Center remote control.
Then select the number of digits corresponding to the highest channel you
received.
62 DU-01848-001_v06
03/28/06
Page 69

Configuring NVIDIA DualTV in Windows XP MCE
19. Respond whether your set-top box remote needs to press the “Enter” or “OK”
key to change channels.
20. Use the Media Center remote control to enter a channel number that you know
you can receive. If the channel does not change, select Try next IR control
cable button.
DU-01848-001_v06 63
03/28/06
Page 70

NVIDIA DualTV MCE User’s Guide
21. Help Media Center determine the optimal IR signal speed by pressing the
“Channel Up” or “Channel Down” keys on the Media Center remote six times
or more. Media Center attempts Fast, Medium, and then Slow speed as you step
through this process. When channel change is successful and robust, click The
channel changed correctly.
22. Media Center confirms the IR signal speed.
64 DU-01848-001_v06
03/28/06
Page 71

Configuring NVIDIA DualTV in Windows XP MCE
23. Next, the wizard assists you in configuring the second TV tuner. To identify the
second set-top box (Cable Box B in the wizard), use the controls on the second
set-top box itself (not the remote) to change the channel up or down. Since the
remote that is provided with most set-top boxes would change the channel on
both at the same time, you should not use the set-top remote for this step.
24. The wizard guides you through to configure the second set-top box, repeating
the previous steps 15-22 above.
25. The final step is to download the Program Guide. Select Yes to use the guide
and accept the Guide Terms of Service. Enter your ZIP code, and TV signal
providers in your area will be shown. Select your provider. Media Center then
downloads the guide for 14 days. You will be notified when it is completed.
DU-01848-001_v06 65
03/28/06
Page 72

NVIDIA DualTV MCE User’s Guide
66 DU-01848-001_v06
03/28/06
Page 73

Configuring NVIDIA DualTV in Windows XP MCE
DU-01848-001_v06 67
03/28/06
Page 74

NVIDIA DualTV MCE User’s Guide
Setting Up the Radio
Note: The TV must be set up prior to setting up the radio.
Be sure you have the FM antenna cable connected to the FM connector on your
NVIDIA DualTV tuner card.
1. Go to
Start and select Media Center to launch
the application.
FM Antenna Cable (included in the kit).
Note: Actual cable may vary from picture shown.
2. Select
3. Select
Settings.
Radio.
4. Configure your favorite station to load the FM radio presets.
68 DU-01848-001_v06
03/28/06
Page 75

Configuring NVIDIA DualTV in Windows XP MCE
If you do not see the Radio menu item in the MCE main menu, do the following
after you have closed the MCE application/menu:
1. From the
then
2. Click
3. Select
Center Radio.
START menu on the Windows desktop, select ALL Programs, and
Set Program Access and Defaults.
Custom, and then the down arrow button.
Choose a Default Media Player, and click the checkbox for Media
4. Click the checkbox for
Enable Access to This Program for Media Center
Radio.
Note: During this procedure, if the checkbox for Enable Access to This Program for
Media Center Radio is already checked (i.e. this option is already enabled), de-
select this checkbox, close the control panel, then go through the above steps
for Set Program Access and Defaults again.
DU-01848-001_v06 69
03/28/06
Page 76

NVIDIA DualTV MCE User’s Guide
This page intentionally left blank.
70 DU-01848-001_v06
03/28/06
Page 77

Overview
Optimizing the Audio and
Video Experience
This chapter contains information on common video problems with instructions on
how to correct and repair these problems. In addition, there are settings that help
you optimize the audio and video experience, taking full advantage of both MCE
and NVIDIA tools.
After the discussion on dealing with different signal strength, you will find several
sections that cover adjustments for video. NVIDIA recommends that you make the
adjustments in the following order (see table below for summary):
1. Adjust the display device settings in MCE for your lighting condition and
display type.
¾ See Adjusting LCD Panels on 75 and Adjusting Your Monitor or TV on 75.
¾ From MCE main menu, go to Settings¾Configure your TV and Monitor.
¾ This tool guides you on centering the picture and adjusting aspect ratio,
brightness, contrast, and color balance via the control (knob or buttons) on
the monitor device itself. This is a calibrating
and video are used; thus it does not depend on user preferences.
¾ Usually this adjustment needs to be done only once, unless the environmental
condition (e.g. lighting) or the display device is changed.
¾ The adjustments affect the whole display screen, not just the video window.
2. Adjust the display settings via NVIDIA MCE display extensions (if
needed and if available).
¾ See Adjusting Display Settings section on 86.
¾ If an NVIDIA GPU board is installed in the MCE PC, and an appropriate
NVIDIA MCE display driver is used, an “Advanced Display Settings” tool is
available.
¾ From MCE main menu, go to More Programs¾NVIDIA Settings¾
Advanced Display Settings.
¾ This tool provides a convenient way to quickly adjust gamma (correct pictures
that are bleached out, too bright, or too dark), digital vibrance (intensity
control that compensates for the lighting conditions to achieve accurate,
bright image), and picture positioning, based on your own preference.
¾ The best gamma control setting is content-dependent in general. Digital
vibrance control is often an optimization for the lighting condition.
¾ The adjustments affect the whole display screen, not just the video window.
process where reference pictures
DU-01848-001_v06 71
03/28/06
Page 78

NVIDIA DualTV MCE User’s Guide
3. Adjust the NVIDIA DualTV television picture settings (on the input
source as they are captured).
¾ See Adjusting TV Capture Settings section on 88.
¾ From MCE main menu, go to More Programs¾NVIDIA DualTV.
¾ This tool provides picture mode presets and adjustments for color separation,
noise reduction, and VCR input timing tolerance. The picture mode presets
(Professional, Cinema, Home Theater, Normal, or Vivid) are specific
combinations of brightness, contrast, color saturation, and sharpness levels.
¾ Picture mode preset selections are usually made based on the exact program
content (e.g. drama vs. newscast); you can select the preset based on your
own preference. Noise reduction settings may depend on quality of the signal
feed or the individual channel.
¾ The adjustments affect the video window only, except for full-screen media
viewing.
4. Adjust PureVideo Decoder A/V playback settings based on the media
content.
¾ See Adjusting A/V Playback Settings section on 92.
¾ Available only if the NVIDIA PureVideo Decoder is installed (for example,
by selecting this decoder at the component selection screen of the NVIDIA
DualTV installation program).
¾ From MCE main menu, go to More Programs¾NVIDIA Settings¾Audio
Video Playback Settings¾De-interlacing Control, or More Programs¾
NVIDIA Settings¾Audio Video Playback Settings¾Brightness and
Contrast Control.
¾ De-interlacing Control includes the following choices: auto, film, video, and
smart (with inverse 3:2 pull-down adjustment).
¾ Brightness and Contrast Control includes adjustments on hue (tint),
brightness, contrast, and color saturation. You change the setting based on
your own preference.
¾ This facility allows optimization for particular media content (e.g. a specific
DVD, MPEG, or WMV movies downloaded from the Internet, or live TV
programs, or programs recorded with NVIDIA DualTV).
¾ The adjustments affect the video window only, except for full-screen media
viewing.
72 DU-01848-001_v06
03/28/06
Page 79

Table 1 summarizes the tools just described.
Optimizing the Audio and Video Experience
Tool Adjustment Descriptions
Tool Availability
Display
Device
Settings in
MCE
Display
Settings via
NVIDIA MCE
Display
Extensions
NVIDIA
DualTV
TV/Video
Capture
Settings
NVIDIA
PureVideo
Decoder
Playback
Settings
Built-in with
MCE
NVIDIA GPU
with
appropriate
MCE driver
Comes with
NVIDIA
DualTV
Installation
CD
Comes with
NVIDIA
DualTV
Installation
CD or
PureVideo
Decoder
Aspects
Adjusted
Aspect ratio,
brightness,
contrast, and
color balance
Gamma
(corrects
overly bright
or dark
pictures),
digital
vibrance
(intensity
control),
picture
positioning
One-click
profiles
(brightness,
contrast,
saturation,
sharpness),
3D color
separation,
noise
reduction,
VCR timing
Deinterlacing
control,
brightness
and contrast
Display
Area
Affected
Whole
display
screen
Whole
display
screen
Video
window
only (also
with fullscreen
viewing)
Video
window
only (also
with fullscreen
viewing)
When to
Adjust
Initial
setup, or
when
lighting or
display
device
changes
Initial
setup, or
when
lighting or
display
device
changes,
or per
content
Per
content
Per
content
Adjustment
Process
Nature Criteria
Using
knob or
buttons
on
display
device
Using
onscreen
buttons
Using
onscreen
buttons
Using
onscreen
buttons
Calibrating
with
reference
picture
Based on
your
preference
(preview
window
shows
effect)
Based on
your
preference
(preview
window
shows
effect)
Based on
your
preference
(preview
window
shows
effect)
References Access in MCE
Section
Name
“
Adjusting
Your
Monitor or
TV
”
“Adjusting
Display
Settings”
“Adjusting
TV Capture
Settings”
“Adjusting
A/V
Playback
Settings”
Table 1. Tools for Optimizing Your Audio and Video Experience
Section
Page
page 75
page 86
page 88
page 92
MCE Menu
Item
Settings ->
Configure
your TV and
Monitor
More
Programs ->
NVIDIA
Settings ->
Advanced
Display
Settings
More
Programs ->
NVIDIA
DualTV
More
Programs ->
NVIDIA
Settings ->
Audio Video
Playback
Settings
DU-01848-001_v06 73
03/28/06
Page 80

NVIDIA DualTV MCE User’s Guide
Antenna/Cable TV Signal Strength
Low Signal Level
In general, NVIDIA does not recommend connecting an additional amplifier or active
amplifier/splitter with high gain to the TV cable input.
However, if low signal levels are evident on all channels, check cable/antenna
connections and remove any unnecessary splitter devices. If the problem persists, add
a powered external amplifier with 5–10 dB of gain (consult a local electronics store).
Note the grainy picture and
appearance of colored dots
where there should be none.
Figure 11. Low Signal Level
High Signal Level
If high signal levels are evident on some or all channels, remove any amplifier
devices or reduce their gain. The addition of an amplifier or active amplifier/splitter
with high gain to the TV cable input causes excessive noise on the signal resulting in
distortion in the TV picture. If the problem persists, add a series RF attenuator
(consult your local electronics store).
Note the diagonal lines and
horizontal color distortion.
Figure 12. High Signal Level
74 DU-01848-001_v06
03/28/06
Page 81

Adjusting LCD Panels
LCD panels pose special setup challenges for TV viewing. The range of settings for
brightness is not as varied compared with a CRT monitor or TV, and the color
temperature is usually lower. This can result in imperfect settings even after running
the Media Center calibration.
Each LCD panel is different. What works for one panel may not work for another.
Factory defaults are a reasonably reliable way of achieving adequate results, but the
best method is trial-and-error by the user for the best individual results.
Go through the process given under Adjusting Your Monitor or TV (next section).
Make all the necessary adjustments until you are satisfied with the results.
Adjusting Your Monitor or TV
TV or monitor settings play a large part in the overall viewing experience. To
achieve the best picture possible, you should run the complete Media Center
monitor setup utility. Use the following procedure to set up your monitor or TV.
Optimizing the Audio and Video Experience
1. Go to
2. Select
Start and select Media Center to launch the application.
Settings.
3. Select
TV.
4. Select
Configure Your TV or Monitor.
The following screen displays explain how the wizard works.
DU-01848-001_v06 75
03/28/06
Page 82

NVIDIA DualTV MCE User’s Guide
Next to continue.
Click
5.
Select your display type and click Next to continue.
6. Select the type of connection on your monitor or TV and click
Next.
76 DU-01848-001_v06
03/28/06
Page 83

Optimizing the Audio and Video Experience
7. Select Adjust Display Controls and click Next. Click Next again to make adjustments.
8. Select the adjustments you wish to make and follow the instructions given.
See the following sections to make adjustments to you monitor.
Centering the Picture on Your Screen
Adjusting the Aspect Ratio
Adjusting the Brightness (Black & Shadow)
Adjusting the Contrast (White)
Adjusting the Color Balance
DU-01848-001_v06 77
03/28/06
Page 84

NVIDIA DualTV MCE User’s Guide
Centering the Picture on Your Screen
Onscreen Centering and Sizing
On a computer monitor,
these controls are
normally along the bottom
of the screen. Consult the
user documents for your
monitor or TV to locate
the controls.
Click Next to continue.
Click Watch Video.
The objective is to center
the larger picture on your
screen so that you see all
the edges as shown in the
smaller inset picture. Use
your monitor or TV
adjustment controls to
center the picture.
When you are satisfied,
click on the MCE Back
button to return to the
previous menu. Click
Next on that menu to go
back to the Display
Calibration menu.
78 DU-01848-001_v06
03/28/06
Page 85

Adjusting the Aspect Ratio
Optimizing the Audio and Video Experience
Aspect Ratio
Select Aspect Ratio
(Shape).
If you need to change your
screen resolution, click
Change Screen
Resolution to display the
Display Properties window.
Adjust the resolution per
your computer
documentation.
Locate the adjustment
controls for your TV or
monitor and click Next to
continue.
To adjust the Aspect Ratio,
click Watch Video and
adjust the controls as
necessary.
Make sure the cube of chalk
is square and the billiard
balls look round.
When you are satisfied,
click on the MCE Back
button to return to the
previous menu. Click Next
on that menu to go back to
the Display Calibration
menu.
DU-01848-001_v06 79
03/28/06
Page 86

NVIDIA DualTV MCE User’s Guide
Adjusting the Brightness: Picture Too Dark
If your picture is too dark, you need to adjust the Brightness (Black & Shadow).
Brightness controls the dark and shadowed areas of the screen. Incorrect settings
may cause a black screen to look gray or lose detail in shadowy areas of the screen.
To adjust the brightness, go to
Settings¾ TV¾ Configure Your TV or Monitor.
Select your monitor type and connection (see Adjusting Your Monitor or TV on page
75). From the Display Calibration menu, select
Brightness (Black & Shadow).
From the Display Calibration
window, select Brightness
(Black & Shadow).
Click Next to continue.
Locate the brightness controls
for your monitor or TV. Click
Next to continue.
To adjust the Brightness, click
Watch Video and adjust the
controls as necessary.
80 DU-01848-001_v06
03/28/06
Page 87

Optimizing the Audio and Video Experience
Too dark: Suit, shirt, and background blend
Correct: Blacks can be distinguished
Make sure you can distinguish
the black shirt from the black
background.
When you are satisfied, click on
the MCE Back button to return
to the previous menu. Click
Next on that menu to go back
to the Display Calibration
menu.
Note that, if you are reading
this document on a display, you
have to set your display
properly to see the subtle
separation of the black shirt
and black background from the
illustrations on the left.
Depending on your printer and
printer settings, you may or
may not be able to see the
separation from a printout of
this document.
DU-01848-001_v06 81
03/28/06
Page 88

NVIDIA DualTV MCE User’s Guide
Adjusting the Contrast: Picture Too Light
If your picture is too light, you need to adjust the Contrast (White). Contrast
controls the intensity of the white signal of your display. If the contrast is set
incorrectly, it can cause the picture to appear faded and lose detail in brighter areas
of the screen.
To adjust the contrast, go to
Settings¾ TV¾ Configure Your TV or Monitor. Select
your monitor type and connection (see Adjusting Your Monitor or TV on page 75).
From the Display Calibration menu, select
Contrast (White).
From the Display Calibration
window, select Contrast
(White). Click Next to
continue.
Locate the contrast controls
for your monitor or TV. Click
Next to continue.
To adjust the contrast, click
Watch Video and adjust the
controls as necessary.
When you are satisfied, click
on the MCE Back button to
return to the previous menu.
Click Next on that menu to
go back to the Display
Calibration menu.
82 DU-01848-001_v06
03/28/06
Page 89

Optimizing the Audio and Video Experience
Contrast too high. Buttons and wrinkles are not
sharp
Correct contrast. Buttons and wrinkles are visible
Adjust the contrast as high as
possible without losing the
wrinkles and buttons on the
shirt.
When you are satisfied, click
on the MCE Back button to
return to the previous menu.
Click Next on that menu to
go back to the Display
Calibration menu.
Note that, if you are reading
this document on a display,
you have to set your display
properly to see the subtle
separation of the black shirt
and black background from
the illustrations on the left.
Depending on your printer
and printer settings, you may
or may not be able to see the
separation from a printout of
this document.
DU-01848-001_v06 83
03/28/06
Page 90

NVIDIA DualTV MCE User’s Guide
Adjusting the Color Balance
Incorrect adjustment of color temperature can cause unwanted color information to
appear in black and white pictures or leave the picture with a skewed tint.
To adjust the color balance, go to
Settings¾ TV¾ Configure Your TV or Monitor.
Select your monitor type and connection (see Adjusting Your Monitor or TV on page
75). From the Display Calibration menu, select
RGB Color Balance.
From the Display Calibration
window, select
Balance
continue.
. Click Next to
RGB Color
Locate the color controls for your
monitor or TV. If there is a color
temperature control setting, set
it to 6500 k. Select Back and go
to the next adjustment.
Click Next to continue.
To adjust the RGB Color
Balance, click Watch Video and
adjust the controls as necessary.
84 DU-01848-001_v06
03/28/06
Page 91

Color temperature too low
Correct color balance
Optimizing the Audio and Video Experience
The billiard scene is shown and
pans in on the gray panels in the
background.
Adjust the color so that the gray
panels have no tinge of red,
green, or blue.
It may be necessary to fine-tune
brightness and contrast after
adjusting the color balance.
When you are satisfied, click on
the MCE Back button to return
to the previous menu. Click
Next on that menu to go back
to the Display Calibration menu.
DU-01848-001_v06 85
03/28/06
Page 92
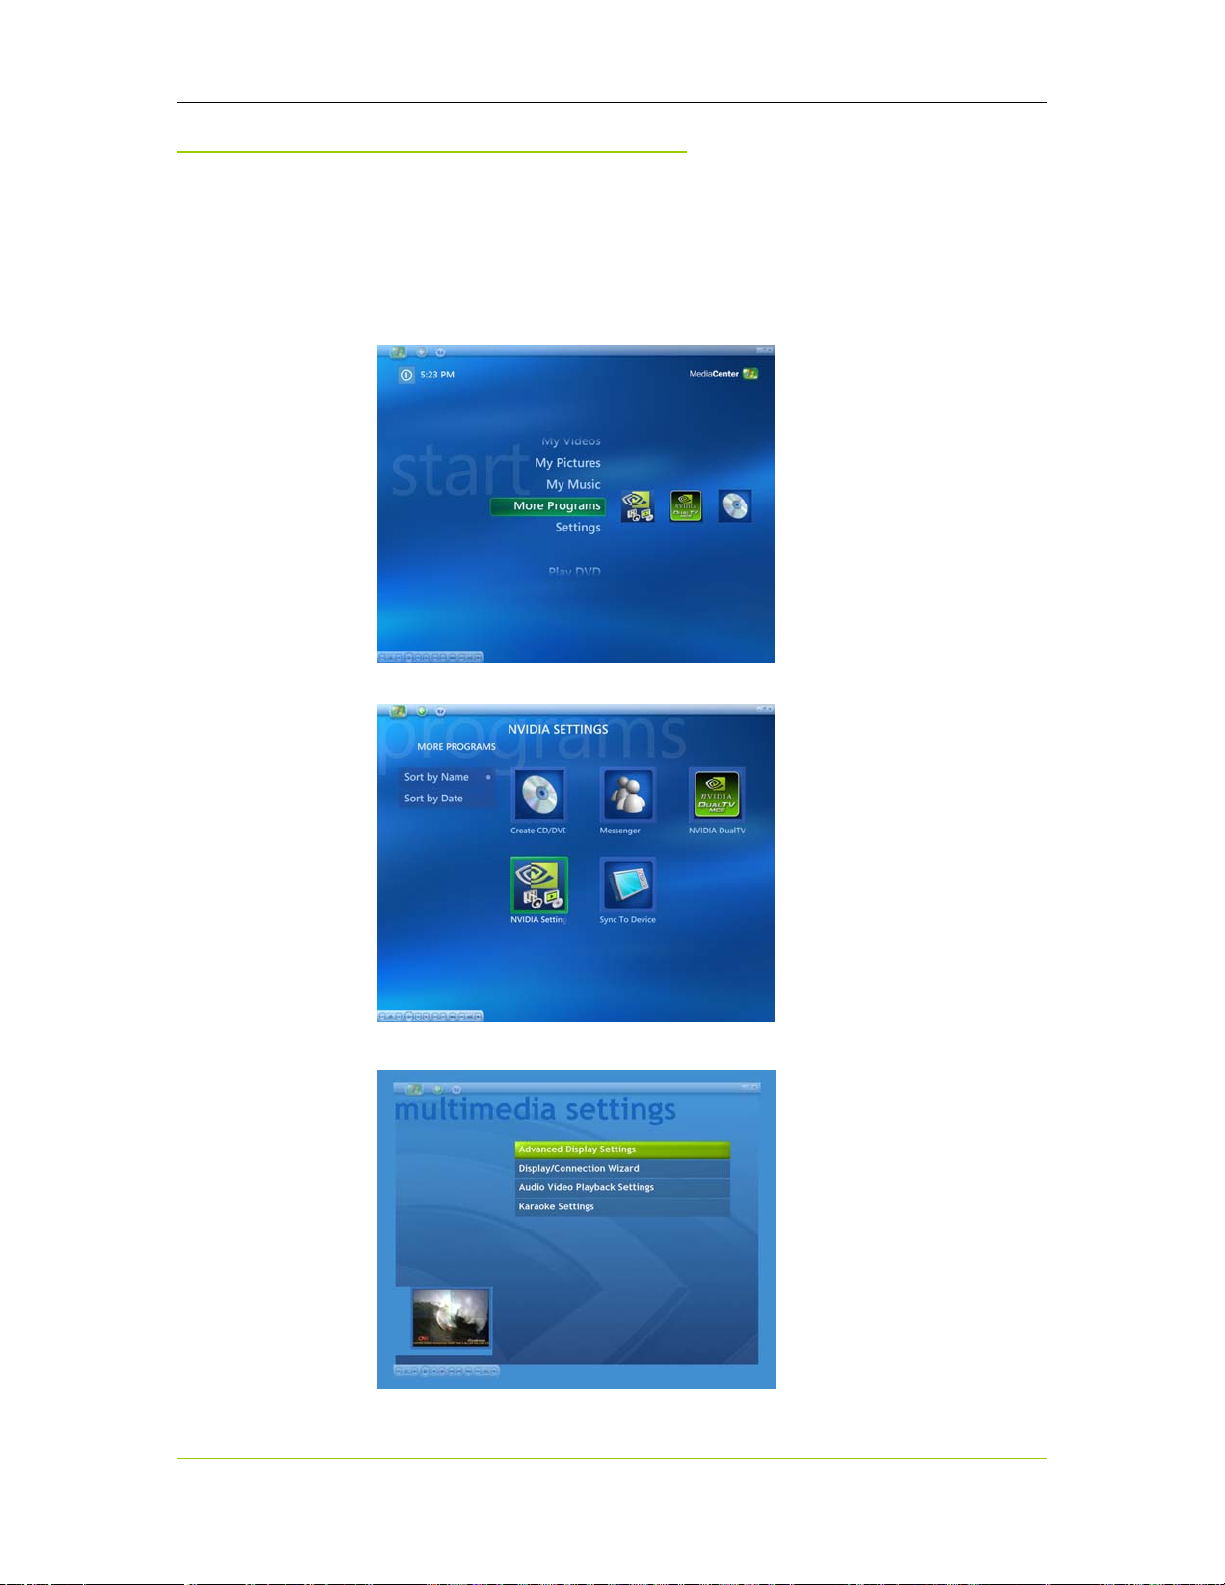
NVIDIA DualTV MCE User’s Guide
Adjusting Display Settings
This section describes the “NVIDIA Display Extensions” and is applicable only if
you are using an NVIDIA GPU board with an NVIDIA ForceWare display driver.
The whole display is affected by the adjustments, not just the video window.
1. From the
Media Center main menu, select More Programs.
2. Select “NVIDIA Settings.”
3.
Select “Advanced Display Settings.”
86 DU-01848-001_v06
03/28/06
Page 93

Gamma
Optimizing the Audio and Video Experience
4. Make the adjustments (see below) according to your preferences. You can see
the effect of the change instantly; the adjustment affects the whole display
screen.
simulated
Gamma is the nonlinear
relationship between pixel
value and display intensity,
thus the brightness.
Gamma Correction can
improve the pictures that are
bleached out, too bright, or
too dark.
Vary the amount of gamma
correction to change both the
brightness and the ratios of
red to green to blue.
DU-01848-001_v06 87
03/28/06
Page 94

NVIDIA DualTV MCE User’s Guide
Position
This control allows you to
adjust the position of the
picture on the glass screen of
your display device.
Digital Vibrance
Digital Vibrance Control
allows you to digitally
control the intensity and
color separation of the
picture through a simple
control panel, in order to
optimize the viewing
experience based on the
lighting condition.
With proper adjustment you
will see richer color, and
brighter, cleaner, more
ergonomically pleasing
pictures.
Adjusting TV Capture Settings
This section describes the settings with which TV broadcast or direct video input
are captured by the NVIDIA DualTV for viewing or recording. The adjustments
affect only the video content captured.
1. From the
88 DU-01848-001_v06
03/28/06
Media Center main menu, select More Programs.
Page 95

2. Select “NVIDIA DualTV.”
Optimizing the Audio and Video Experience
3. Make the adjustments according to your preference (see the following
sections). Live TV must be playing before you can adjust these settings. You
can see the effect of the change almost instantly (please wait as the picture is
adjusted) in the preview window. The adjustment affects only the video
window but not the whole screen.
DU-01848-001_v06 89
03/28/06
Page 96

NVIDIA DualTV MCE User’s Guide
Picture Mode
Each preset in this tool
translates to a certain
brightness, contrast,
saturation, and sharpness
level.
In general, the brightness is
increased for each preset in
this sequence: Profession-
al, Cinema, Home
Theater*, Normal, Vivid.
The default setting is
Normal.
* Imaging Science
Foundation (ISF) certified
Color Separation
Turn 3D comb filtering
(3DYC) On or Off.
3D comb filtering reduces
color artifacts (e.g. “rainbow
swirls”) during video
capture, and provides better
color definition.
NVIDIA recommends that
you leave this setting On
(the default).
90 DU-01848-001_v06
03/28/06
Page 97

Noise Reduction
Optimizing the Audio and Video Experience
Adjust the level of 3D noise
reduction among Off, Low,
Medium, and High.
3D noise reduction reduces
“shimmering” transmission
noise often present,
especially in terrestrial (offair) broadcast.
In general, a High setting
may reduce the clarity
(crispness) of the picture,
resulting in a less noisy but
slightly blurred picture.
A Medium setting should
work for most situations.
VCR Input Timing
This tool toggles timing
tolerance for VCR input
signals ON or OFF.
ON prevents picture- tearing
artifacts when video footage
from a low-end VCR is
captured by the tuner board
via an RF feed. This “fast
locking” setting helps to
correct timing problems with
VCR head switching and lowcost RF modulators.
Leave the setting OFF (the
default) if you are not
capturing video from a lowend VCR.
DU-01848-001_v06 91
03/28/06
Page 98

NVIDIA DualTV MCE User’s Guide
Adjusting A/V Playback
Settings
This section describes adjustments controlling media playback and live TV viewing.
This set of tools is unavailable if you use a third-party decoder instead of the
included Pure Video Decoder. The adjustments affect only the video content being
played in the video window, unless the playback is in full-screen mode.
1. From the
2. Select “NVIDIA Settings.”
Media Center main menu, select More Programs.
92 DU-01848-001_v06
03/28/06
Page 99

Optimizing the Audio and Video Experience
3. Select “Audio Video Playback Settings.”
4. Select the tool to make adjustments based on your preference.
DU-01848-001_v06 93
03/28/06
Page 100

NVIDIA DualTV MCE User’s Guide
Color and Brightness Control
This tool allows you to
adjust picture hue (tint),
brightness, contrast, and
color saturation
independently, according to
your preference for the
display content.
De-Interlacing Control
The following modes are
available for the De-
interlace control:
Automatic (Default) -
NVIDIA DVD Decoder reads
the source type and
automatically selects video
or film mode, depending on
the source.
Smart - This option lets the
decoder pick the best deinterlacing method to use
and is the only technique to
do inverse telecine (3:2 pulldown) and bad edit detection. The performance of
Smart De-interlacing varies
with the content being
viewed; if the result of this
mode is undesirable, try
“Automatic” instead.
Film - Forces film mode and
does not apply deinterlacing.
Video - Forces video mode
and applies de-interlacing.
Choose this option if you
see combing or feathering
artifacts in the video.
94 DU-01848-001_v06
03/28/06
 Loading...