

Page 1

Drivers for Windows
NVIDIA Display Properties
Desktop User’s Guide
Driver Version: Release 40
4th Edition
NVIDIA Corporation
May 2003
Page 2

NVIDIA Display Properties User’s Guide
Published by
NVIDIA Corporation
2701 San Tomas Expressway
Santa Clara, CA 95050
Copyright © 2003 NVIDIA Corporation. All rights reserved.
This software may not, in whole or in part, be copied through any means, mechanical, electromechanical, or
otherwise, without the express permission of NVIDIA Corporation.
Information furnished is believed to be accurate and reliable. However, NVIDIA assumes no responsibility for the
consequences of use of such information nor for any infringement of patents or other rights of third parties, which
may result from its use. No License is granted by implication or otherwise under any patent or patent rights of
NVIDIA Corporation.
Specifications mentioned in the software are subject to change without notice.
NVIDIA Corporation products are not authorized for use as critical components in life support devices or systems
without express written approval of NVIDIA Corporation.
NVIDIA, the NVIDIA logo, Accuview Antialiasing, Detonator, Digital Vibrance Control, GeForce, nForce, nView,
NVKeystone, PowerMizer, Quadro, RIVA, TNT, TNT2, TwinView, and Vanta are registered trademarks or
trademarks of NVIDIA Corporation in the United States and/or other countries.
Intel and Pentium are registered trademarks of Intel. DirectX, Microsoft, Microsoft Internet Explorer logo, Outlook,
PowerPoint, Windows, Windows logo, Windows NT, and/or other Microsoft products referenced in this guide are
either registered trademarks or trademarks of Microsoft Corporation in the U.S. and/or other countries. OpenGL is a
registered trademark of Silicon Graphics Inc. Other company and product names may be trademarks or registered
trademarks of the respective owners with which they are associated.
NVIDIA Corporation
Page 3

NVIDIA Display Properties User’s Guide
Table of Contents
1. Introduction
About this Guide . . . . . . . . . . . . . . . . . . . 1
Other Related Documentation . . . . . . . . . 1
Online Help . . . . . . . . . . . . . . . . . . . . . . 2
nView vs. NVIDIA Display Properties . . . . . . . 2
nView . . . . . . . . . . . . . . . . . . . . . . . 2
nView Desktop Manager . . . . . . . . . . . 2
NVIDIA Display Properties . . . . . . . . . . . 3
Key Terms and Concepts . . . . . . . . . . . . . . 3
analog display . . . . . . . . . . . . . . . . . 3
application . . . . . . . . . . . . . . . . . . . 3
Control Panel . . . . . . . . . . . . . . . . . 3
digital display . . . . . . . . . . . . . . . . . 3
desktop. . . . . . . . . . . . . . . . . . . . . 3
dual-card configuration . . . . . . . . . . . . 4
GPU . . . . . . . . . . . . . . . . . . . . . . 4
modal dialog box . . . . . . . . . . . . . . . 4
modeless dialog box . . . . . . . . . . . . . 4
multi-card configuration . . . . . . . . . . . 4
multi-display configuration . . . . . . . . . . 4
single-display configuration . . . . . . . . . 4
nView Display Mode . . . . . . . . . . . . . 5
window . . . . . . . . . . . . . . . . . . . . . 5
New Features in this Driver Release . . . . . . . 5
Enhanced Display Driver, DirectX, and Video
Capabilities . . . . . . . . . . . . . . . . . . . 5
Windows XP SP1 . . . . . . . . . . . . . . . 6
Temperature Settings . . . . . . . . . . . . . 6
Direct 3D Vertical Sync Options. . . . . . . 6
NVRotate. . . . . . . . . . . . . . . . . . . . 6
DirectX 9 Support . . . . . . . . . . . . . . . 6
Video Enhancements. . . . . . . . . . . . . 7
TV Screen Size Support . . . . . . . . . . . 7
Additional Enhancements . . . . . . . . . . 7
NVIDIA Display Properties: New User Interface7
New Display Properties Panel. . . . . . . . 7
Using the Media Center Menu. . . . . . . . 7
Media Center Tray Application . . . . . . . 12
nView Desktop Manager: Enhancements and
New Features . . . . . . . . . . . . . . . . . . 12
Feature Enhancements . . . . . . . . . . . 12
New Features . . . . . . . . . . . . . . . . . 12
OpenGL Enhancements . . . . . . . . . . . . . 13
OpenGL 1.4 ICD with NVIDIA Extensions .13
Additional OpenGL Enhancements . . . . . 13
2. System Requirements
System Requirements and Support. . . . . . . . 17
Operating Systems . . . . . . . . . . . . . . . 17
Minimum Hard Disk Space . . . . . . . . . . . 18
Software: NVIDIA Display Driver . . . . . . . 19
Hardware: Supported NVIDIA Products . . . 19
Supported Languages . . . . . . . . . . . . . 21
Notes on Feature and Configuration Support . . 21
Feature Support . . . . . . . . . . . . . . . . . 21
Multi-Display Setup: Tips and Requirements. 22
Examples in this Guide . . . . . . . . . . . . . . . 22
3. NVIDIA Driver Feature History
Driver Release History . . . . . . . . . . . . . . . 23
Release 35 Enhancements . . . . . . . . . . . . 24
Release 25 Enhancements . . . . . . . . . . . . 24
Release 20 Enhancements . . . . . . . . . . . . 25
Release 10 Enhancements . . . . . . . . . . . . 26
Release 6 Enhancements . . . . . . . . . . . . . 26
TwinView . . . . . . . . . . . . . . . . . . . . . 26
Virtual Desktop . . . . . . . . . . . . . . . . 27
Video Mirror. . . . . . . . . . . . . . . . . . 27
Desktop Manager . . . . . . . . . . . . . . 27
Digital Vibrance Control. . . . . . . . . . . . . 27
OpenGL. . . . . . . . . . . . . . . . . . . . . . 27
Direct3D . . . . . . . . . . . . . . . . . . . . . 28
Cursor Trails Support . . . . . . . . . . . . . . 28
Display Properties – Settings – Advanced Tabs .
28
Release 5 Enhancements . . . . . . . . . . . . . 28
OpenGL. . . . . . . . . . . . . . . . . . . . . . 28
OpenGL 1.2 Core . . . . . . . . . . . . . . 28
OpenGL Extensions . . . . . . . . . . . . . 29
OpenGL Performance Enhancements . . 29
Direct3D . . . . . . . . . . . . . . . . . . . . . 30
Display Properties – Settings – Advanced Tabs .
30
4. About Installing and Uninstalling
NVIDIA Drivers
Before You Begin . . . . . . . . . . . . . . . . . . 31
About the NVIDIA Display Driver Installation . . 32
File Locations . . . . . . . . . . . . . . . . . . 32
Preserving Desktop Manager Settings Before
Upgrading Your Software . . . . . . . . . . . 32
NVIDIA Corporation i
Page 4

User’s Guide Table of Contents
Uninstalling the NVIDIA Display Driver Software .33
5. Using nView Multi-Display
Modes:
Dualview vs. Span/Clone
nView Dualview vs. Span and Clone Modes . . . 34
nView Dualview Mode . . . . . . . . . . . . . . . . 37
Key Features of nView Dualview Mode . . . . 37
Enabling nView Dualview Mode for the First
Time: Windows 2000 . . . . . . . . . . . . . . 39
Enabling nView Dualview Mode After Initial
Session: Windows 2000 . . . . . . . . . . . . 44
Activating nView Dualview Mode: Windows XP
44
Activating nView Dualview Mode: Windows 9x
47
nView Span and Clone Modes . . . . . . . . . . . 51
Key Features of nView Span Mode. . . . . . . 51
Enabling nView Span/Clone Modes . . . . . . 53
Enabling nView Span/Clone Modes:
Windows 2000. . . . . . . . . . . . . . . . . 53
Enabling nView Span/Clone Modes: Windows
XP . . . . . . . . . . . . . . . . . . . . . . . . 56
Enabling nView Clone Mode: Windows 9x . . 58
Enabling nView Modes: Windows NT 4.0 . . . . . 61
nView Multiview Mode: Windows NT 4.0. . 61
nView Span/Clone Modes . . . . . . . . . . 61
Multi-Display Mode: Arranging Displays on the
Windows Display Properties Settings Panel . . 61
6. nView Applications
nView Multi-Display Options . . . . . . . . . . . . 65
About nView Display Modes . . . . . . . . . . . . 66
nView Applications . . . . . . . . . . . . . . . . . . 67
7. nView Display Mode Basics
Notes Before You Begin. . . . . . . . . . . . . . . 69
nView Display Mode Panel Options . . . . . . . . 70
Accessing nView Clone and Span Modes. . . . . 71
Standard (Dualview) Mode . . . . . . . . . . . . . 72
Accessing the Configuration Options . . . . . . . 74
Options Available for nView Clone and Span
Modes . . . . . . . . . . . . . . . . . . . . . . 74
Clone Mode . . . . . . . . . . . . . . . . . . . . . . 74
Change Resolution: Clone Mode (Virtual
Desktop) . . . . . . . . . . . . . . . . . . . . . 81
Horizontal & Vertical Span Modes . . . . . . . . . 83
Other Configuration Options . . . . . . . . . . . . 86
8. Device Selection And
Configuration
Switching Displays in nView Span, Clone, or
Standard (Dualview) Mode . . . . . . . . . . . . 87
Switching Secondary to Primary Display: nView
Clone or Span Mode. . . . . . . . . . . . . . 88
Switching Displays in Dualview Mode . . . . . . 92
Device Adjustments: Analog Display (CRT) . . . 96
Screen Adjustment . . . . . . . . . . . . . . . 96
Display Timing . . . . . . . . . . . . . . . . . . 97
Device Adjustments: Flat Panel . . . . . . . . . . 98
Flat Panel Display . . . . . . . . . . . . . . . . 98
Monitor Settings (Refresh Frequency):
Secondary Display. . . . . . . . . . . . . . . 100
TV Settings . . . . . . . . . . . . . . . . . . . . . 101
Accessing the TV Option . . . . . . . . . . . . 101
Video Output Format . . . . . . . . . . . . . .102
Change Format: Regional Settings . . . . . .103
Device Adjustments: TV Output . . . . . . . .103
9. Additional Features and
Enhancements
Desktop Utilities Panel . . . . . . . . . . . . . . .106
Enabling Desktop Manager . . . . . . . . . .107
Enabling the Media Center Icon . . . . . . . .109
Using the Media Center Icon . . . . . . . .109
Enabling Dualview Mode for Windows 2000 .111
Color Correction Panel . . . . . . . . . . . . . . . 112
Description of Color Correction Settings . . . 113
Digital Vibrance . . . . . . . . . . . . . . . 113
Active Color Channel . . . . . . . . . . . .113
Brightness, Contrast, and Gamma Controls .
114
Image Sharpening . . . . . . . . . . . . . . 114
Diagonal Line/Curve . . . . . . . . . . . . . 114
Custom Color Settings . . . . . . . . . . . 114
Other Settings . . . . . . . . . . . . . . . .114
Performance and Quality Settings Panel. . . . . 115
Image Settings . . . . . . . . . . . . . . . .115
Antialiasing . . . . . . . . . . . . . . . . . . 116
Tips on Setting Antialiasing Modes . . . . 116
Anisotropic Filtering . . . . . . . . . . . . . 117
Texture Sharpening . . . . . . . . . . . . . 117
Direct3D Settings Panel . . . . . . . . . . . . . . 117
Performance & Compatibility Options . . . . . 117
Other Direct3D Options . . . . . . . . . . . . . 118
Mipmap Detail Level . . . . . . . . . . . . . 118
PCI Texture Memory Size . . . . . . . . . . 118
Custom Direct3D Settings . . . . . . . . . 119
ii NVIDIA Corporation
Page 5

User’s Guide Table of Contents
Save As . . . . . . . . . . . . . . . . . . . 119
Apply . . . . . . . . . . . . . . . . . . . . . 119
Delete . . . . . . . . . . . . . . . . . . . . 119
Restore Defaults . . . . . . . . . . . . . . 119
More Direct3D . . . . . . . . . . . . . . . . 119
More Direct3D Options . . . . . . . . . . . . 119
Texel Alignment . . . . . . . . . . . . . . . 120
Vertical Sync Mode . . . . . . . . . . . . . 120
Direct3D Settings: Refresh Rate Overrides . 121
Applications control refresh rates . . . . . 122
Override refresh rates . . . . . . . . . . . 123
OpenGL Settings Panel . . . . . . . . . . . . . . 124
Performance and Compatibility Options . . . 125
Other OpenGL Options . . . . . . . . . . . . 126
Multi-Display Hardware Acceleration . . . 126
Default Color Depth for Textures . . . . . 128
Buffer Flipping Mode . . . . . . . . . . . . 128
Vertical Sync. . . . . . . . . . . . . . . . . 128
Using System Memory for Textures in PCI
Mode . . . . . . . . . . . . . . . . . . . . . 128
Custom OpenGL Settings . . . . . . . . . 128
Save As . . . . . . . . . . . . . . . . . . . 129
Delete . . . . . . . . . . . . . . . . . . . . 129
Restore Defaults . . . . . . . . . . . . . . 129
Custom OpenGL Application Settings 129
Overlay Controls Panel . . . . . . . . . . . . . . 129
Description of Overlay Settings . . . . . . . . 130
Full-Screen Video Mirroring Options . . . 130
Other Overlay and Video Mirror Settings. 133
NVRotate Panel . . . . . . . . . . . . . . . . . . 133
Enabling NVRotate . . . . . . . . . . . . . . . 134
Notes and Known Issues . . . . . . . . . . . 136
Temperature Settings Panel . . . . . . . . . . . 136
Description of Temperature Settings . . . . . 137
PowerMizer Settings Panel (Mobile computers
only) . . . . . . . . . . . . . . . . . . . . . . . . 138
Description of PowerMizer Settings . . . . . 139
A. Using Multiple NVIDIA GPU-
Based Cards
Before You Begin . . . . . . . . . . . . . . . . . 140
Setting Up the NVIDIA GPU-Based Cards . . . 141
GeForce4 Ti 4200 Panels: nView Span/Clone Mode
142
GeForce2 MX Panels: Standard (Dualview) Mode
145
Viewing Multiple GPU Configurations From the
Media Center Icon . . . . . . . . . . . . . . . . 147
NVIDIA Corporation iii
Page 6

NVIDIA Display Properties User’s Guide
List of Tables
Table 2.1 Operating System Requirements. . . . . . . . . . . . . . . . . . . . . . . . . . . . . . . . . . . 17
Table 2.2 Hard Disk Space Requirements — English . . . . . . . . . . . . . . . . . . . . . . . . . . . . . 18
Table 2.3 Hard Disk Space Requirements — Non-English Languages . . . . . . . . . . . . . . . . . . . 18
Table 2.5 Supported NVIDIA Products . . . . . . . . . . . . . . . . . . . . . . . . . . . . . . . . . . . . . 19
Table 2.4 Hard Disk Space Requirements — Full International Package . . . . . . . . . . . . . . . . . . 19
Table 8.1 TV Encoders and Supported TV Adjustment Features . . . . . . . . . . . . . . . . . . . . . .104
NVIDIA Corporation iv
Page 7

NVIDIA Quadro Workstation User’s Guide
List of Figures
Figure 1.1 NVIDIA GPU Tab . . . . . . . . . . . . . . . . . . . . . . . . . . . . . . . . . . . . . . . . . . . . 9
Figure 1.2 NVIDIA Display Properties: Media Center Menu (nView Display Mode) . . . . . . . . . . . . . . . 9
Figure 1.3 NVIDIA Display Properties: Media Center Menu (nView Dualview Mode) . . . . . . . . . . . . . 10
Figure 1.4 NVIDIA GPU Panel with Media Center Menu (Collapsed) . . . . . . . . . . . . . . . . . . . . . . 10
Figure 1.5 nView Display Mode Panel with Media Center Menu . . . . . . . . . . . . . . . . . . . . . . . . . 11
Figure 1.6 nView Display Mode Panel with Media Center Menu Collapsed. . . . . . . . . . . . . . . . . . . . 11
Figure 5.1 NVIDIA Media Center Menu: nView Display Mode Enabled . . . . . . . . . . . . . . . . . . . . . 35
Figure 5.2 NVIDIA Media Center Menu: Dualview Mode Enabled . . . . . . . . . . . . . . . . . . . . . . . . 35
Figure 5.3 nView Span/Cone Modes Available: Windows XP (2000) . . . . . . . . . . . . . . . . . . . . . . . 36
Figure 5.4 Multiple Display Devices in nView Dualview Mode . . . . . . . . . . . . . . . . . . . . . . . . . . 37
Figure 5.5 NVIDIA Desktop Utilities Panel: Enabling Dualview in Windows 2000 . . . . . . . . . . . . . . . 40
Figure 5.6 Restart Now Message: Enabling Dualview in Windows 2000 . . . . . . . . . . . . . . . . . . . . . 40
Figure 5.7 Dualview Installation Messages: Windows 2000 . . . . . . . . . . . . . . . . . . . . . . . . . . . . 41
Figure 5.8 Display Properties Settings: Dualview Mode (Windows 2000). . . . . . . . . . . . . . . . . . . . . 42
Figure 5.9 First Appearance of the NVIDIA GPU Tab: Windows 2000 . . . . . . . . . . . . . . . . . . . . . . 43
Figure 5.10 First Appearance of the Media Center Menu: Windows 2000 (Dualview) . . . . . . . . . . . . . . 43
Figure 5.11 Windows 2000 Display Settings: Dualview Mode (Display 2 attached) . . . . . . . . . . . . . . . 44
Figure 5.12 Windows XP Display Settings in Dualview Mode . . . . . . . . . . . . . . . . . . . . . . . . . . 45
Figure 5.13 Windows XP Display Settings in Dualview Mode (Display 2 attached) . . . . . . . . . . . . . . . 46
Figure 5.14 First Appearance of the NVIDIA GPU tab . . . . . . . . . . . . . . . . . . . . . . . . . . . . . . 46
Figure 5.15 nView Span/Clone Options Disabled in Dualview Mode: Windows XP . . . . . . . . . . . . . . . 47
Figure 5.16 Display Settings: Windows 98 . . . . . . . . . . . . . . . . . . . . . . . . . . . . . . . . . . . . . 48
Figure 5.17 Enabling Dualview (1): Windows 9x . . . . . . . . . . . . . . . . . . . . . . . . . . . . . . . . . 49
Figure 5.18 Enabling Dualview (2): Windows 9x . . . . . . . . . . . . . . . . . . . . . . . . . . . . . . . . . 50
Figure 5.19 First Appearance of the NVIDIA GPU Tab: Windows 9x . . . . . . . . . . . . . . . . . . . . . . . 50
Figure 5.20 NVIDIA Media Center Menu in Dualview Mode: Windows 98. . . . . . . . . . . . . . . . . . . . 51
Figure 5.21 Multiple Displays in nView Horizontal Span Mode . . . . . . . . . . . . . . . . . . . . . . . . . . 52
Figure 5.22 Windows 2000 Display Properties Settings in nView Span/Clone Mode (Dualview disabled) . . . 54
Figure 5.23 First Appearance of the NVIDIA GPU Tab: Windows 2000 . . . . . . . . . . . . . . . . . . . . . 54
Figure 5.24 NVIDIA Media Center Menu: Windows 2000 . . . . . . . . . . . . . . . . . . . . . . . . . . . . 55
Figure 5.25 nView Clone/Span Modes Available: Windows 2000 . . . . . . . . . . . . . . . . . . . . . . . . . 55
Figure 5.26 Disabling Dualview Mode: Windows XP . . . . . . . . . . . . . . . . . . . . . . . . . . . . . . . 56
Figure 5.27 First Appearance of the NVIDIA GPU tab: Windows XP (2000) . . . . . . . . . . . . . . . . . . . 57
Figure 5.28 NVIDIA Media Center Menu: Windows XP (2000) . . . . . . . . . . . . . . . . . . . . . . . . . 57
Figure 5.29 nView Clone/Span Modes Available: Windows XP (2000) . . . . . . . . . . . . . . . . . . . . . . 58
Figure 5.30 Disabling Dualview: Windows 9x . . . . . . . . . . . . . . . . . . . . . . . . . . . . . . . . . . . 59
NVIDIA Corporation v
Page 8

NVIDIA Quadro Workstation User’s Guide
Figure 5.31 First Appearance of the NVIDIA GPU tab: Windows 9x . . . . . . . . . . . . . . . . . . . . . . . 59
Figure 5.32 NVIDIA Media Center Menu: Windows 9x . . . . . . . . . . . . . . . . . . . . . . . . . . . . . . 60
Figure 5.33 nView Clone Mode Available: Windows 9x . . . . . . . . . . . . . . . . . . . . . . . . . . . . . . 60
Figure 5.34 Display Settings (Horizontal) . . . . . . . . . . . . . . . . . . . . . . . . . . . . . . . . . . . . . 62
Figure 5.35 Display Settings (Vertical) . . . . . . . . . . . . . . . . . . . . . . . . . . . . . . . . . . . . . . . 63
Figure 5.36 Display Settings (Diagonal) . . . . . . . . . . . . . . . . . . . . . . . . . . . . . . . . . . . . . . 64
Figure 7.1 NVIDIA GPU Tab and Panel with Media Center Menu . . . . . . . . . . . . . . . . . . . . . . . . 72
Figure 7.2 nView Standard (Dualview) Mode with Menu: Windows 98 . . . . . . . . . . . . . . . . . . . . . . 73
Figure 7.3 nView Standard (Dualview) Mode Menu: Windows XP (2000) . . . . . . . . . . . . . . . . . . . . 73
Figure 7.4 nView Clone Mode Menu (Display 1= Analog Display): Windows 98. . . . . . . . . . . . . . . . . 76
Figure 7.5 nView Clone Mode Menu (Display 2 = Digital Display): Windows 98 . . . . . . . . . . . . . . . . 76
Figure 7.6 nView Clone Mode (Display 1= Analog Display): Windows XP. . . . . . . . . . . . . . . . . . . . 77
Figure 7.7 nView Device Selection Panel (Display 1= Analog Display) . . . . . . . . . . . . . . . . . . . . . . 77
Figure 7.8 nView Clone Mode Menu (Display 2 = Digital Display): Win 2000 (XP) . . . . . . . . . . . . . . . 78
Figure 7.9 nView Device Selection Panel (Display 2 = Digital Display) . . . . . . . . . . . . . . . . . . . . . 78
Figure 7.10 nView Clone Mode Menu (Display 2 = TV): Windows 2000 (XP) . . . . . . . . . . . . . . . . . . 79
Figure 7.11 nView Device Selection Panel (Display 2 = TV) . . . . . . . . . . . . . . . . . . . . . . . . . . . 79
Figure 7.12 nView Clone Mode (Display 1 = Digital Display): Windows XP . . . . . . . . . . . . . . . . . . . 80
Figure 7.13 nView Clone Mode (Display 2 = Analog Display): Windows 2000. . . . . . . . . . . . . . . . . . 80
Figure 7.14 nView Clone Mode Menu (Display 2 = Digital Display): Win 2000 (XP) . . . . . . . . . . . . . . 81
Figure 7.15 nView Clone Mode Device Configuration . . . . . . . . . . . . . . . . . . . . . . . . . . . . . . . 82
Figure 7.16 nView Horizontal Span Mode (Display 1= Analog Display): Windows XP . . . . . . . . . . . . . 84
Figure 7.17 nView Horizontal Span (Display 2 = Digital Display) Windows XP . . . . . . . . . . . . . . . . . 84
Figure 7.18 nView Clone & Horizontal Span Modes: Primary Displays (Windows XP) . . . . . . . . . . . . . 85
Figure 7.19 nView Vertical Span Mode (Display 2 = Digital Display): Windows XP . . . . . . . . . . . . . . . 85
Figure 8.1 Display Settings Message . . . . . . . . . . . . . . . . . . . . . . . . . . . . . . . . . . . . . . . . 88
Figure 8.2 Confirm Display Settings Message . . . . . . . . . . . . . . . . . . . . . . . . . . . . . . . . . . . 88
Figure 8.3 nView Clone Mode (Display 2 = Digital Display): Windows XP. . . . . . . . . . . . . . . . . . . . 88
Figure 8.4 nView Clone Mode (Display 1 = Digital Display) Windows XP . . . . . . . . . . . . . . . . . . . . 89
Figure 8.5 nView Vertical Span (Display 2 = Analog Display): Windows XP . . . . . . . . . . . . . . . . . . . 89
Figure 8.6 nView Horizontal Span/Clone Modes (Primary Displays): Windows XP . . . . . . . . . . . . . . . 90
Figure 8.7 nView Vertical Span (Display 2 = Digital Display): Windows XP . . . . . . . . . . . . . . . . . . . 90
Figure 8.8 Device Selection: Analog or Digital Display as Primary Display . . . . . . . . . . . . . . . . . . . 91
Figure 8.9 Device Selection: nView Standard (Dualview) Mode (1) . . . . . . . . . . . . . . . . . . . . . . . . 91
Figure 8.10 Device Selection: nView Standard (Dualview) Mode (2) . . . . . . . . . . . . . . . . . . . . . . . 92
Figure 8.11 Display Settings Dualview Mode: Windows XP. . . . . . . . . . . . . . . . . . . . . . . . . . . . 93
Figure 8.12 Display Settings Dualview Mode: Windows 2000. . . . . . . . . . . . . . . . . . . . . . . . . . . 93
Figure 8.13 Display Settings Dualview Mode: Windows 98 . . . . . . . . . . . . . . . . . . . . . . . . . . . . 94
Figure 8.14 Device Selection: Analog Display and TV (Dualview mode) . . . . . . . . . . . . . . . . . . . . . 95
vi NVIDIA Corporation
Page 9

User’s Guide List of Figures
Figure 8.15 Device Selection: Digital Display and TV (Dualview mode) . . . . . . . . . . . . . . . . . . . . . 95
Figure 8.16 Screen Adjustment Settings: Analog Display . . . . . . . . . . . . . . . . . . . . . . . . . . . . . 96
Figure 8.17 Display Timing Settings: Analog Display . . . . . . . . . . . . . . . . . . . . . . . . . . . . . . . 97
Figure 8.18 Flat Panel Display Settings: Digital Display = 1 (Primary display) . . . . . . . . . . . . . . . . . . 98
Figure 8.19 Flat Panel Display Settings: Digital Display = 2 (Secondary display). . . . . . . . . . . . . . . . . 99
Figure 8.20 Flat Panel Display Settings: Centered Output . . . . . . . . . . . . . . . . . . . . . . . . . . . . . 99
Figure 8.21 Monitor Setting: Digital Display = Display 2 . . . . . . . . . . . . . . . . . . . . . . . . . . . . .101
Figure 8.22 Device Selection with TV Enabled . . . . . . . . . . . . . . . . . . . . . . . . . . . . . . . . . .102
Figure 8.23 Change TV Format: TV Regional Settings . . . . . . . . . . . . . . . . . . . . . . . . . . . . . . 103
Figure 8.24 Device Adjustments: TV Output Panel . . . . . . . . . . . . . . . . . . . . . . . . . . . . . . . .104
Figure 9.1 Desktop Utilities: Desktop Manager (Windows XP) . . . . . . . . . . . . . . . . . . . . . . . . . .107
Figure 9.2 Desktop Manager Enabled: nView Properties on Desktop Menu . . . . . . . . . . . . . . . . . . .108
Figure 9.3 nView Desktop Manager Properties Panel . . . . . . . . . . . . . . . . . . . . . . . . . . . . . . . 108
Figure 9.4 NVIDIA Media Center Icon . . . . . . . . . . . . . . . . . . . . . . . . . . . . . . . . . . . . . . . 110
Figure 9.5 NVIDIA Media Center Icon: nView Desktop Manager Settings . . . . . . . . . . . . . . . . . . . . 110
Figure 9.6 NVIDIA Media Center Icon: 3D Antialiasing Settings . . . . . . . . . . . . . . . . . . . . . . . . . 110
Figure 9.7 NVIDIA Media Center Icon: NVRotate Settings . . . . . . . . . . . . . . . . . . . . . . . . . . . . 110
Figure 9.8 Desktop Utilities: Enabling Dualview (Windows 2000) . . . . . . . . . . . . . . . . . . . . . . . . 111
Figure 9.9 Color Correction Settings: Dualview Mode . . . . . . . . . . . . . . . . . . . . . . . . . . . . . . . 112
Figure 9.10 Color Correction Settings: nView Display Mode . . . . . . . . . . . . . . . . . . . . . . . . . . . 113
Figure 9.11 Performance and Quality Settings Panel . . . . . . . . . . . . . . . . . . . . . . . . . . . . . . . 115
Figure 9.12 Direct3D Settings Panel . . . . . . . . . . . . . . . . . . . . . . . . . . . . . . . . . . . . . . . . 118
Figure 9.13 More Direct3D Settings: Texel Alignment (applies to older NVIDIA GPUs) . . . . . . . . . . . .120
Figure 9.14 More Direct3D Settings: Vertical Sync (applies to certain NVIDIA GPUs) . . . . . . . . . . . . . 121
Figure 9.15 Direct3D Refresh Rates: Applications control refresh rates . . . . . . . . . . . . . . . . . . . . . .122
Figure 9.16 Direct3D Refresh Rate Overrides . . . . . . . . . . . . . . . . . . . . . . . . . . . . . . . . . . . 123
Figure 9.17 Direct3D Refresh Rates: Override refresh rates (menu) . . . . . . . . . . . . . . . . . . . . . . . .124
Figure 9.18 OpenGL Settings: Single-Display Hardware Acceleration . . . . . . . . . . . . . . . . . . . . . .125
Figure 9.19 OpenGL Settings: nView Span/Clone Mode Hardware Acceleration . . . . . . . . . . . . . . . . .126
Figure 9.20 OpenGL Settings: Dualview Mode Hardware Acceleration Options . . . . . . . . . . . . . . . . .127
Figure 9.21 Overlay Controls Panel: nView Clone Mode . . . . . . . . . . . . . . . . . . . . . . . . . . . . .130
Figure 9.22 Overlay Controls Panel: Dualview Mode . . . . . . . . . . . . . . . . . . . . . . . . . . . . . . .131
Figure 9.23 Overlay Controls Panel: Zoom Control . . . . . . . . . . . . . . . . . . . . . . . . . . . . . . . . 132
Figure 9.24 Overlay Controls Panel: TV Tuner Option (Windows 98). . . . . . . . . . . . . . . . . . . . . . .132
Figure 9.25 NVRotate Settings Panel: Landscape Mode . . . . . . . . . . . . . . . . . . . . . . . . . . . . . .135
Figure 9.26 NVRotate Settings Panel: Portrait Mode . . . . . . . . . . . . . . . . . . . . . . . . . . . . . . . . 135
Figure 9.27 NVRotate Settings Panel: Inverted Landscape & Inverted Portrait Modes . . . . . . . . . . . . . .136
Figure 9.28 Temperature Settings Panel . . . . . . . . . . . . . . . . . . . . . . . . . . . . . . . . . . . . . .137
Figure 9.29 .PowerMizer Settings Panel (for mobile computers). . . . . . . . . . . . . . . . . . . . . . . . . . 138
NVIDIA Corporation vii
Page 10

NVIDIA Quadro Workstation User’s Guide
Figure A.1 Display Properties Settings: Display 1 (Digital Display) nView Span/Clone Mode . . . . . . . . . . 142
Figure A.2 Display Properties Settings: Display 3 (TV) in nView Span/Clone Mode . . . . . . . . . . . . . . .143
Figure A.3 NVIDIA GeForce4 Ti 4200 Tab . . . . . . . . . . . . . . . . . . . . . . . . . . . . . . . . . . . .143
Figure A.4 NVIDIA GeForce4 Ti 4200 Menu . . . . . . . . . . . . . . . . . . . . . . . . . . . . . . . . . . .144
Figure A.5 NVIDIA GeForce4 Ti 4200 nView Span and Clone Modes are Accessible . . . . . . . . . . . . . .144
Figure A.6 Display Properties Settings: Display 2 (CRT) Dualview mode. . . . . . . . . . . . . . . . . . . . .145
Figure A.7 NVIDIA GeForce2 MX/MX 400 Tab . . . . . . . . . . . . . . . . . . . . . . . . . . . . . . . . .145
Figure A.8 NVIDIA GeForce2 MX/MX 400 Menu . . . . . . . . . . . . . . . . . . . . . . . . . . . . . . . .146
Figure A.9 NVIDIA GeForce2 MX Standard (Dualview) Mode . . . . . . . . . . . . . . . . . . . . . . . . . 146
Figure A.10 NVIDIA Media Center Icon Menu Displaying GeForce4 Ti 4200 and GeForce2 MX GPUs . . . .147
viii NVIDIA Corporation
Page 11

NVIDIA Display Properties User’s Guide
C HAPTER
I
NTRODUCTION
This chapter contains the following major sections:
• “About this Guide” on page 1
• “Online Help” on page 2
• “nView vs. NVIDIA Display Properties” on page 2
• “Key Terms and Concepts” on page 3
• “New Features in this Driver Release” on page 5
About this Guide
This User’s Guide is addressed to users of NVIDIA® Display Properties, which
is the NVIDIA Windows Control Panel-based user interface accessible from the
Windows Display Properties Settings > Advanced option.
This guide focuses on the NVIDIA desktop products, i.e, graphics cards based
on NVIDIA desktop GPUs (graphics processing units) listed in Table 2.5,
“Supported NVIDIA Products” on page 19.
For technical details on the features and benefits of the NVIDIA Display Driver,
refer to the NVIDIA web page: www.nvidia.com.
Other Related Documentation
• If you are primarily using the NVIDIA workstation products, i.e., graphics
cards based on the Quadro through Quadro4 series of processors, see the
“Quadro Workstation Display Properties User’s Guide”.
NVIDIA Corporation 1
Page 12

Chapter 1 Introduction
• For details on using the nView™ Desktop Manager application component
of the NVIDIA display drivers, see the NVIDIA nView Desktop Manager 2.0
User’s Guide.
• The document titled “NVIDIA Drivers for Windows: Release 40 Notes”
enables add-in-card (AIC) producers and original equipment manufacturers
(OEMs) to monitor performance improvements and bug fixes in the driver.
Online Help
You can obtain context help for any of the options on the NVIDIA control-panel
based user interface by using any one of these methods:
• Select or move your mouse pointer to the option for which you want help.
Then press F1.
or
• Click the “?” icon located on the top right corner of the NVIDIA panel
(window) you have open, move the “?” icon over the option for which you
want help, then click your mouse again to display the help.
nView vs. NVIDIA Display Properties
nView
nView represents a collection of multi-display technologies encompassing
driver support, multi-display GPU architecture, and desktop management
support.
nView Desktop Manager
The primary nView component is the Desktop Manager, which is a user-level
application utility that focuses on making you more productive when working
on your Windows desktop. Desktop Manager was originally created for multidisplay graphics cards but has grown to enhance single-display user desktops as
well. Desktop Manager supports both single-display and multi-display
configurations running with single-display, multi-display, or multiple graphics
cards based on NVIDIA GPUs.
Note: nView Desktop Manager has been further enhanced in terms of new
features for the Release 40 NVIDIA drivers. For details, see “New
Features in this Driver Release” on page 5 and the NVIDIA nView
Desktop Manager 2.0 User’s Guide.
2 NVIDIA Corporation
Page 13

NVIDIA Display Properties User’s Guide
NVIDIA Display Properties
NVIDIA Display Properties, the topic of this User’s Guide, refers to the
NVIDIA Windows Control Panel-based user interface, which you can access
from the Windows Display Properties > Settings > Advanced option. Once
you click the NVIDIA GPU tab name that your are using, a Media Center menu
appears (Figure 1.2) from which you can configure the advanced display
properties of the current release of the NVIDIA Windows Display Driver
software.
Note: The NVIDIA Display Properties has a completely new and efficient user
interface. For details, see “NVIDIA Display Properties: New User
Interface” on page 7 later in this chapter.
Key Terms and Concepts
analog display
Analog display refers to your CRT display device, in general. The terms CRT
and analog display may be used interchangeably in this guide.
application
An application (or program) can have any number of windows. Some
applications have only a single window such as Calculator or Notepad. Other
applications can have many windows such as Outlook where you can open
several E-mail windows, have your Inbox open, open calendars, etc.
Control Panel
Refers to the Windows Control Panel group, which you can access by clicking
Start > Settings > Control Panel from the Windows taskbar.
digital display
A digital display device can be a digital flat panel (DFP) or, for example, a
mobile computer (laptop) LVDS internal panel.
desktop
Desktop is the on-screen work area on which windows, icons, menus, and
dialog boxes appear.
dialog box
Dialog boxes are user-input windows that contain command button and various
kinds of options through which you can carry out a particular command or task.
For example, in a Windows application “Save As” dialog box, you must
NVIDIA Corporation 3
Page 14

Chapter 1 Introduction
indicate the folder to contain the document to be saved and the name of that
document when saving it.
Also see the definition of “modal dialog box” and “modeless dialog box” on this
page.
dual-card configuration
A setup where two or more display devices (such as a monitor, flat panel, or
TV) are connected to two NVIDIA GPU-based graphics cards installed in the
computer.
GPU
Graphics Processing Unit (GPU). NVIDIA graphics chip products are called
GPUs. Supported NVIDIA GPUs are listed in “Hardware: Supported NVIDIA
Products” on page 19. The graphics card you are using is based on an NVIDIA
GPU.
modal dialog box
A dialog box that puts you in the state or “mode” of being able to work only in
the dialog box. You cannot move a modal dialog box; it can be removed only by
clicking its buttons.
modeless dialog box
A dialog box that resembles a document window without a collapse box. You
can move a modeless dialog box, make it inactive and active again, and close it
like a document window.
multi-card configuration
A setup where two or more display devices (such as a monitor, flat panel, TV,
and so on) are connected to two (or more) NVIDIA GPU-based graphics cards
installed in the computer.
multi-display configuration
A setup where two or more display devices are connected to either a
• multi-display NVIDIA GPU-based graphics card; or
• two (or more) NVIDIA GPU-based graphics cards.
single-display configuration
A setup where only one display device is connected to the NVIDIA GPU-based
graphics card in your computer.
4 NVIDIA Corporation
Page 15

NVIDIA Display Properties User’s Guide
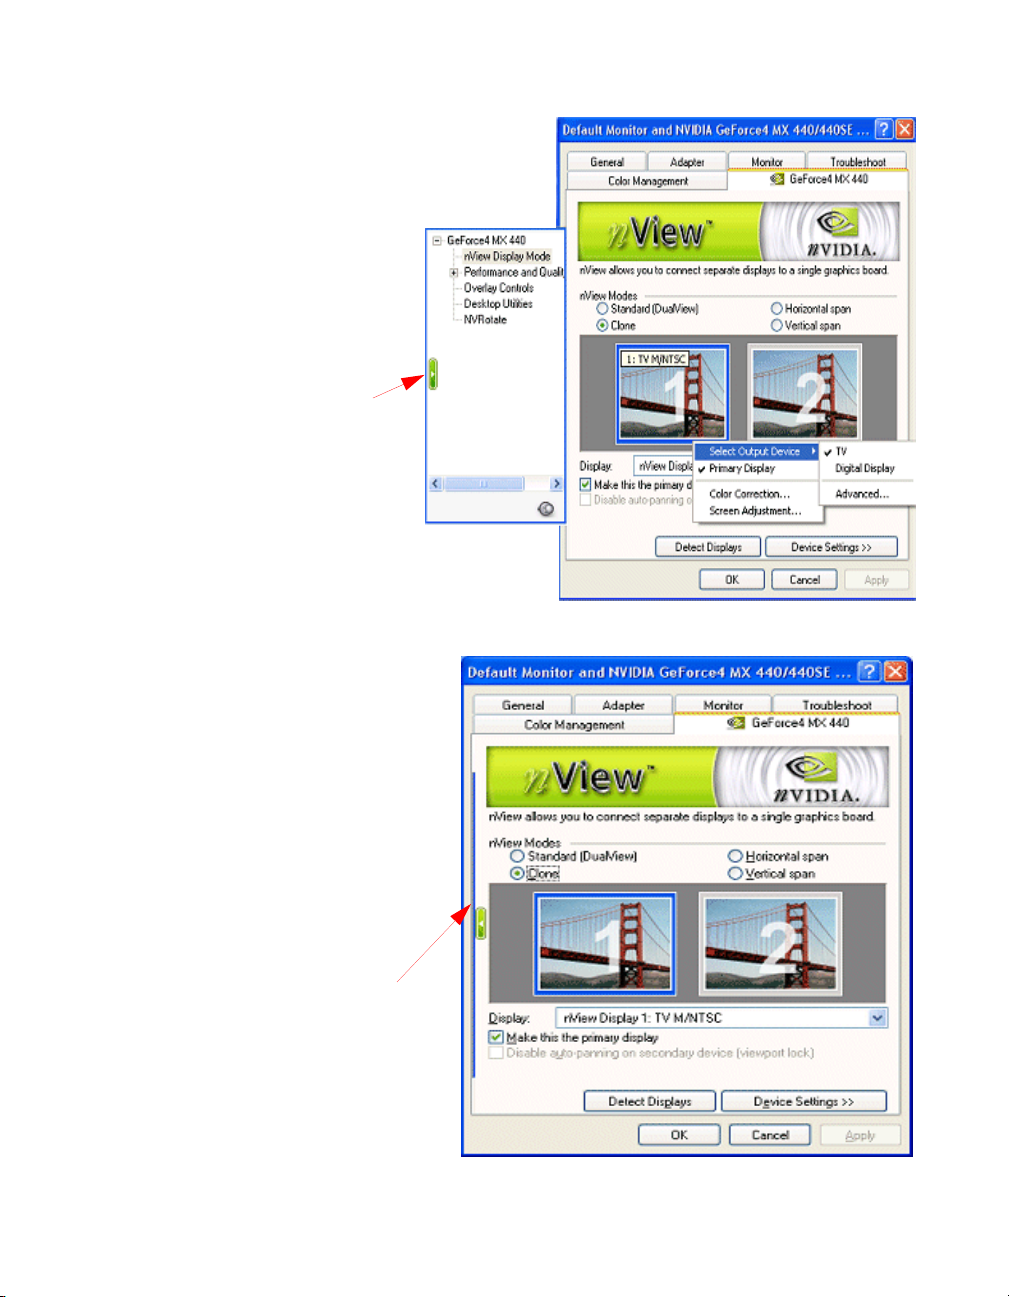
nView Display Mode
nView Span and Clone mode display options are available when you click the
nView Display Mode option from the Media Center menu
window
A window is any independent window on your desktop. Applications such as
Outlook or Explorer may have several windows which are all part of the same
application. Windows can be dragged around the screen, opened and closed, and
resized.
The nView Desktop Manager application (described in the NVIDIA nView
Desktop Manager 2.0 User’s Guide) allows you to do even more with windows
such as make them transparent or force them always to be on top of other
windows.
New Features in this Driver Release
This section provides a summary of the new features and enhancements provided with the NVIDIA Release 40 drivers for Windows. In addition to overall
performance and stability improvements, the following are the specific areas
that have undergone significant changes:
• “Enhanced Display Driver, DirectX, and Video Capabilities” on page 5
• “NVIDIA Display Properties: New User Interface” on page 7
• “nView Desktop Manager: Enhancements and New Features” on page 12
• “OpenGL Enhancements” on page 13
Enhanced Display Driver, DirectX, and Video Capabilities
• “Windows XP SP1” on page 6
• “Temperature Settings” on page 6
• “Direct 3D Vertical Sync Options” on page 6
• “NVRotate” on page 6
• “DirectX 9 Support” on page 6
• “Video Enhancements” on page 7
• “TV Screen Size Support” on page 7
• “Additional Enhancements” on page 7
NVIDIA Corporation 5
Page 16

Chapter 1 Introduction
Windows XP SP1
• Release 40 driver software supports Windows XP SP1, including support for
Windows XP Tablet PC and eHome technology.
• Release 40 driver software provides support for bugcheck EA callbacks,
enabling OCA EA failures to be resolved more quickly while assisting to
identify failure causes such as those due to chip instability or overclocking.
Temperature Settings
Note: This option is available with GeForce FX and later NVIDIA GPUs and
on certain older NVIDIA GPUs if the option has been enabled in the
registry settings of your computer.
Temperature settings let you adjust the temperature of the selected NVIDIA
GPU on your computer. See “Temperature Settings Panel” on page 136 for
details.
Direct 3D Vertical Sync Options
Vertical Sync Mode options for Direct3D specify how Vertical Sync is handled
in Direct3D application. For details, see “Other Direct3D Options” on page 118.
NVRotate
NVRotate is a desktop rotation feature that lets you rotate the desktop by 90,
180, or 270 degrees.
For further details, see “Enabling NVRotate” on page 134.
•Controls: Desktop rotation is controlled through the NVIDIA Display
Properties panel, or integrated seamlessly with Windows XP Tablet PC.
• Graphics API Support: NVRotate includes support for windowed and fullscreen applications in all rotation modes for Direct3D and OpenGL
application.
• Hardware Platforms: Rotation functionality is supported on desktop,
mobile, and Tablet PCs.
1
DirectX 9 Support
When Microsoft releases DirectX 9 runtime, Release 40 will provide support for
DirectX 9, which includes the new vertex shaders, antialiasing modes, and
multi-display device support.
1. Rotation is not supported on graphics cards based on the NVIDIA TNT, TNT2 or Vanta
product families.
6 NVIDIA Corporation
Page 17

NVIDIA Display Properties User’s Guide
Video Enhancements
Changes in the video driver include:
• Flip Sync functionality support
• Support for multiple Macrovision clients
• Simplified Video Mirror feature controls
TV Screen Size Support
Depending on the TV encoder used, Release 40 supports the adjustment of the
TV screen up to a DVD-optimal mode. This option is accessible through the
NVIDIA display properties control panel.
For further details, see “Device Adjustments: TV Output” on page 103.
Additional Enhancements
• Improved support for wide-aspect ratio screen resolutions.
• Improved memory management support for Dualview.
• Improved memory management support for OpenGL.
NVIDIA Display Properties: New User Interface
New Display Properties Panel
The NVIDIA display properties panels (accessed through the Windows Display
Properties Settings Advanced option) have been redesigned to improve control
over the display adapter settings and make navigation easier.
Some of the new features include the following:
• A Media Center menu in the form of a “slider tray” that allows all pages to be
available from the top level page. See Using the Media Center Menu below
for details on using this interface.
• Dynamic tracking allows the pages to adapt to the state of the driver, and user
interface controls are modified, or even created, accordingly.
• Driver configuration changes are maintained across driver installations.
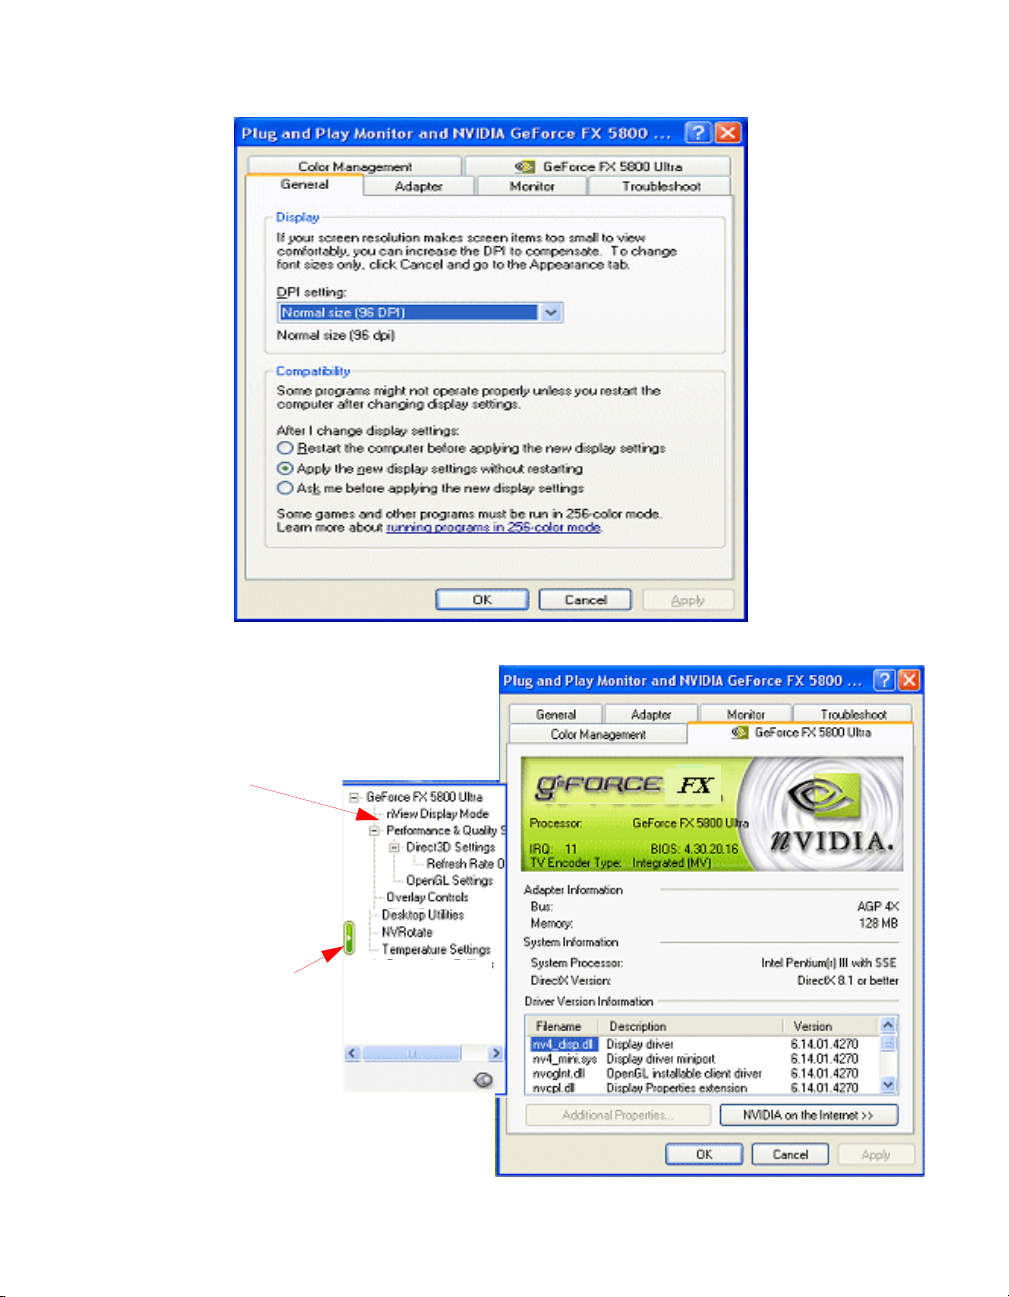
Using the Media Center Menu
Once your NVIDIA display driver software is installed, you can access the
NVIDIA display driver features that are available on the Media Center menu by
using the procedures that are explained and illustrated in this section.
NVIDIA Corporation 7
Page 18

Chapter 1 Introduction
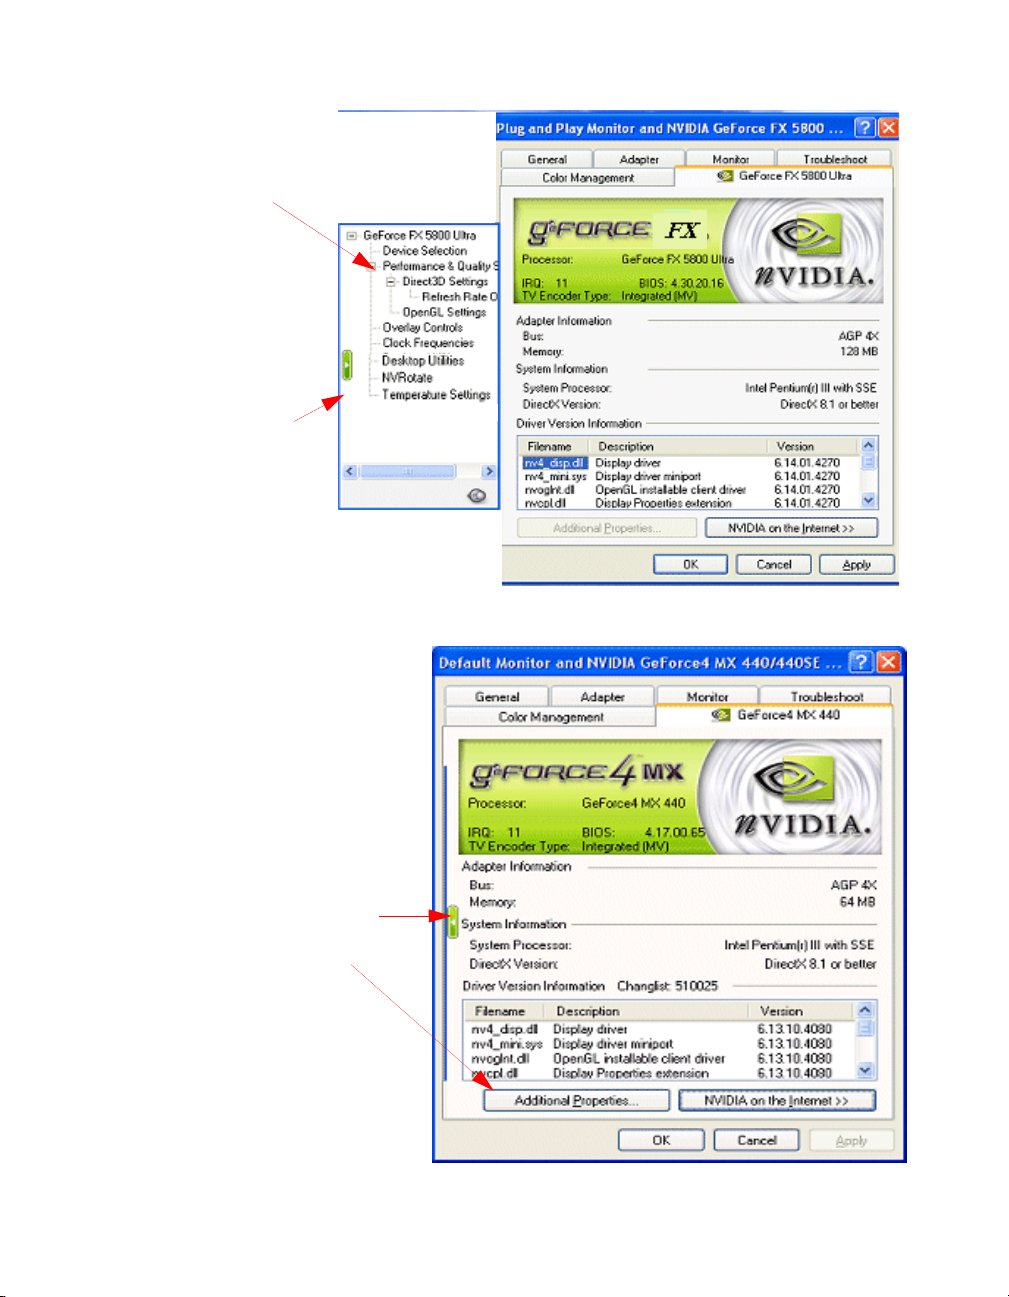
1 From your Windows desktop, right click to display the pop-up menu and
click Properties > the Settings tab and then Advanced. You will see the
name of your NVIDIA GPU on a tab (Figure 1.1).
2 Click the NVIDIA GPU tab, which displays the name of the NVIDIA GPU-
based graphics card that is installed on your computer.
The NVIDIA Media Center menu appears (Figure 1.2 and Figure 1.3). From
this menu, you can access all the NVIDIA properties panels where you can
configure the following NVIDIA Display Driver features.
• nView Display (Span/Clone) Mode options are available when Dualview
is disabled, as shown in Figure 1.2. In this case, you can also access the
Color Correction and Device Selection panels.
• Device Selection. This option appears when Dualview mode is enabled, as
shown in Figure 1.3. When Dualview mode is disabled (nView Span/
Clone mode enabled), this option doesn’t appear because it is accessible
from the nView Display Mode panel.
• Performance and Quality Settings
• Direct3D Settings
• Refresh Rate Overrides
• OpenGL Settings
• Overlay Controls
• Desktop Utilities
• NVRotate
• Temperature Settings (available only with the GeForce FX GPU and
only if the feature is enabled on GPUs that are older than the GeForce GX)
3 Click the green button on the Media Center menu to toggle between hiding/
displaying the Media Center menu, as shown in Figure 1.4 through Figure
1.6.
8 NVIDIA Corporation
Page 19
NVIDIA Display Properties User’s Guide
Figure 1.1
Figure 1.2
NVIDIA GPU Tab
NVIDIA Display Properties: Media Center Menu (nView Display Mode)
Media Center
menu with
nView Display
Mode Option
Click this
button
to collapse
the Media
Center menu.
NVIDIA Corporation 9
Page 20
Chapter 1 Introduction
Figure 1.3
Media Center
in nView
Dualview mode.
NVIDIA Display Properties: Media Center Menu (nView Dualview Mode)
Click this
button
to collapse
the Media
Center menu.
Figure 1.4
NVIDIA GPU Panel with Media Center Menu (Collapsed)
Click this button
or click Additional
Properties to
display the
Media Center
menu.
10 NVIDIA Corporation
Page 21
NVIDIA Display Properties User’s Guide
Figure 1.5
nView Display Mode Panel with Media Center Menu
Click this button
to collapse the
Media Center menu.
Figure 1.6
nView Display Mode Panel with Media Center Menu Collapsed
Click this button
to display the
Media Center menu.
NVIDIA Corporation 11
Page 22

Chapter 1 Introduction
Media Center Tray Application
The Media Center Tray is a new application that can be used in place of the
Media Center menu described earlier. The Media Center tray is accessible by
clicking the “Media Center icon”, which you can optionally add to the Windows
taskbar. The Media Center tray contains menu items that provide access to the
same display settings that the Media Center menu contains, in additional to
direct access to certain application-specific options such as those for nView
Desktop Manager, OpenGL and Direct3D customized settings, and others.
For details on enabling the Media Center icon, see “Enabling the Media Center
Icon” on page 109.
nView Desktop Manager: Enhancements and New Features
Feature Enhancements
The following features have been enhanced in the new version of NVIDIA
nView Desktop Manager:
• Operating System Support includes Windows NT 4.0, Windows 98/Me,
and Windows 2000/XP.
• Profile Feature: Display Modes are now saved to and loaded from each
profile. (This feature is not available in Windows NT 4.0.)
• Multiple Desktop Support additions include:
• Support for multi-display wallpaper selection
• Graphical display in explorer shell extension
• Support for icons to represent desktops
• Support for arbitrary positioning of windows on the desktops
• Zoom Support includes new “Fixed-Frame zoom” and “Bi-Directional”
zoom editing capability
New Features
The following features are new to the current version of the nView Desktop
Manager:
• Task Switcher. When enabled, nView Desktop Manager adds a desktop
switcher in addition to the standard application tab switcher. By default, this
additional “switch desktop” functionality is accessed through a Alt-~
keystroke combination which you can change through options in the Desktop
Manager Hot Keys panel.
12 NVIDIA Corporation
Page 23

NVIDIA Display Properties User’s Guide
• Color Keyed Windows allows the user to color key windows for easy
identification when activating them on the desktop.
• NVKeystone™ allows real-time image correction on portable projectors and
heads-up displays.
2
For example, NVKeystone can be set to compensate for
keystoning effects on your windows display, allowing you to fix distorted
projection images. This feature is primarily for laptop (mobile) computers.
• Taskbar and Menu Transparency
• New window actions, such as Collapse
• New applications settings, including a full set of application launch and
disable settings.
OpenGL Enhancements
OpenGL 1.4 ICD with NVIDIA Extensions
• New extension includes ARB_vertex_program, which co-exists with
NV_vertex_program
• Meets new conformance tests
Additional OpenGL Enhancements
• Multi-Monitor Improvements
New accelerated spanning mode is enabled by default.
• Reduced Power Consumption: Release 40 utilizes CPU cycles more
efficiently, resulting in reduced power consumption without sacrificing
performance.
• Dynamic AGP/Video Memory Management
• Accommodates multiple applications open at the same time
• Dynamic Memory Resizing
Allowance for additional memory tuning
2
NVKeystone is not supported on graphics cards based on the TNT, TNT2 or Vanta product
families.
NVIDIA Corporation 13
Page 24

Chapter 2 System Requirements
C HAPTER
S
YSTEM
This chapter contains the following major sections:
• “System Requirements and Support” on page 17
• “Notes on Feature and Configuration Support” on page 21
• “Examples in this Guide” on page 22
R
EQUIREMENTS
System Requirements and Support
This section contains the following topics:
• “Operating Systems” on page 17
• “Minimum Hard Disk Space” on page 18
• “Software: NVIDIA Display Driver” on page 19
• “Hardware: Supported NVIDIA Products” on page 19
• “Supported Languages” on page 21
Operating Systems
This release of the NVIDIA Display Properties driver is designed for the
Microsoft
Table 2.1
Operating System Minimum Requirements
Windows XP Home and Professional Editions
Windows 2000
17 NVIDIA Corporation
operating systems listed in Table 2.1:
Operating System Requirements
Page 25

NVIDIA Display Properties User’s Guide
Table 2.1
Operating System Requirements (continued)
Operating System Minimum Requirements
Windows NT 4.0 Service Pack 4
Windows Millennium Edition (Me)
Windows 98 Microsoft DirectX 5
Windows 95 OSR2 (OEM Service Release 2) with USB supplement
for full AGP support
Microsoft
Microsoft DirectX 5
OPENGL32.DLL
Note: Windows 95, 98, and Me are collectively called Windows 9x in this
guide.
Minimum Hard Disk Space
The minimum hard disk space requirements for each operating system are listed
in Table 2.2, Table 2.3, and Table 2.4.
Table 2.2
Operating System Minimum Disk Space Required
Windows XP 16.3 MB
Windows 2000 16.3 MB
Windows NT 14.0 MB
Windows Me 15.4 MB
Windows 98 15.4 MB
Windows 95 15.4 MB
Hard Disk Space Requirements — English
Table 2.3
Hard Disk Space Requirements — Non-English Languages
Operating System Minimum Requirements
Windows XP 16.8 MB
Windows 2000 16.8 MB
Windows NT 14.5 MB
Windows Me 16.0 MB
Windows 98 16.0 MB
Windows 95 16.0 MB
NVIDIA Corporation 18
Page 26

Chapter 2 System Requirements
Table 2.4
Hard Disk Space Requirements — Full International Package
Operating System Minimum Requirements
Windows XP 37.8 MB
Windows 2000 37.8 MB
Windows NT 36.6 MB
Windows Me 36.6 MB
Windows 98 36.6 MB
Windows 95 36.6 MB
Software: NVIDIA Display Driver
Make sure the current version of the NVIDIA Display Driver software for your
Windows operating system has been installed on your computer.
Consult your System Administrator if you are unsure about the version that is
installed.
Hardware: Supported NVIDIA Products
Table 2.5 lists the NVIDIA products supported by the NVIDIA Display Driver
software and the number of displays the GPU-based card supports.
Table 2.5
NVIDIA Desktop
Products
nForce™2 S
nForce2 ST
nForce2 G
nForce2
nForce
nForce 220/220D
GeForce™ FX 5800
GeForce
GeForce FX 5200
GeForce FX Ultra
GeForce FX Mobile
GeForce
GeForce4 4200 Go Quadro4 700 GoGL 2 — applies to all GPUs
19 NVIDIA Corporation
Supported NVIDIA Products
NVIDIA Workstation
Products
420/420D
®
FX 2000
FX 5600
Quadro
Quadro FX 1000
4 Ti 4200 AGP 8X Quadro4 980 XGL
Quadro4 780 XGL
Number of Displays
Supported Per Card
2— applies to all GPUs
in this category.
1— applies to all GPUs
in this category.
2 — applies to all GPUs
in this category.
2 — applies to all GPUs
in this category.
in this category.
Page 27

NVIDIA Display Properties User’s Guide
Table 2.5
NVIDIA Desktop
Products
GeForce4 Ti 4600
GeForce4 Ti 4400
GeForce4 Ti 4200
GeForce3 Ti 500
GeForce3 Ti 200
GeForce3
GeForce4 MX 460
GeForce4 MX 440
GeForce4 MX 420 SDR
GeForce4 460 Go
GeForce4 440 Go
GeForce4 440 Go 64M
GeForce4 420 Go
GeForce4 420 Go 32M
GeForce4 410 Go 16M
GeForce2 Ultra
GeForce2 Ti
GeForce2 GTS/Pro
GeForce2 MX 400
GeForce2 MX 200
GeForce2 MX
GeForce2 Go Quadro2 Go 2 — applies to all GPUs
GeForce
GeForce 256
RIVA TNT™2 family
RIVA TNT2 Ultra
RIVA TNT2 Pro
RIVA TNT2
RIVA TNT2 M64
NVIDIA Vanta
NVIDIA Vanta LT
RIVA TNT
Supported NVIDIA Products (continued)
NVIDIA Workstation
Products
Quadro4 900 XGL
Quadro4 750 XGL
Quadro4 700 XGL
Quadro DCC 1 — applies to all GPUs
Quadro4 550 XGL
Quadro4 500 XGL
Quadro NVS 200 (AGP)
Quadro NVS 200 (PCI)
Quadro NVS 400 (PCI) 4 — applies to all GPUs
Quadro4 500 Go GL 2 — applies to all GPUs
Quadro2 Pro 1 — applies to all GPUs
Quadro2 MXR 2 — applies to all GPUs
Quadro2 EX 1 — applies to all GPUs
DDR
Quadro 1 — applies to all GPUs
--- 1 — applies to all GPUs
™
™
--- 1
Number of Displays
Supported Per Card
2 — applies to all GPUs
in this category.
in this category.
2 — applies to all GPUs
in this category.
in this category.
in this category.
in this category.
in this category.
in this category.
in this category.
in this category.
in this category.
NVIDIA Corporation 20
Page 28

Chapter 2 System Requirements
Supported Languages
The following languages are supported in the NVIDIA panels that are
accessible from the Windows Display Properties > Settings > Advanced
option.
English (USA) French (Canada) Portuguese (Brazil)
English (UK) German Portuguese (Euro/Iberian)
Arabic Greek Russian
Chinese (Simplified) Hebrew Slovak
Chinese (Traditional) Hungarian Slovenian
Czech Italian Spanish
Danish Japanese Spanish (Latin America)
Dutch Korean Swedish
Finnish Norwegian Thai
French Polish Turkish
Notes on Feature and Configuration Support
• “Feature Support” on page 21
• “Multi-Display Setup: Tips and Requirements” on page 22
Feature Support
• To access NVIDIA nView-based features using the NVIDIA Display
Properties driver, you need
• a multi-display graphics card based on any of the NVIDIA GPUs that
support multiple displays on a single card, as indicated in Table 2.1, and
• at least two display devices connected to the card.
• Other non-nView features are supported by either single-display or multidisplay NVIDIA GPU-based cards; i.e., you can connect only one display
device, such as a monitor, and access these features, provided the NVIDIA
GPU supports these features.
• The options shown in the NVIDIA properties panels may vary depending on
the specific NVIDIA GPU you are using. For example, one or more options
that are available for a specific GPU-based card, such as a GeForce4 Ti or
GeForce4 MX, may not be available on a GeForce2 Pro or other types of
products.
21 NVIDIA Corporation
Page 29

NVIDIA Display Properties User’s Guide
Multi-Display Setup: Tips and Requirements
• When using a multi-display setup under Windows 2000/XP, running
Windows in “Dualview” mode is strongly recommended.
• When running Windows with multiple cards (i.e., two or more NVIDIA
GPU-based graphics card are installed in your computer), note the following:
• Using cards based on the same NVIDIA GPU is strongly recommended.
• The same NVIDIA driver (version) must be installed for each card.
• For a detailed discussion of using multi-display modes, see “Using nView
Multi-Display Modes: Dualview vs. Span/Clone” on page 34.
Examples in this Guide
• For example purposes, most of the NVIDIA panels shown in this guide
feature NVIDIA GeForce4-based and the GeForce FX-based GPUs. You
may be using a different NVIDIA GPU, in which case you will see the exact
name of the GPU you are using reflected in the NVIDIA GPU tab.
• The Windows 2000 and Windows XP panels shown in this document are
interchangeable, unless noted otherwise.
NVIDIA Corporation 22
Page 30

Chapter 3 NVIDIA Driver Feature History
C HAPTER
NVIDIA D
This chapter provides release history of the NVIDIA Display Driver for
Windows and summarizes the features and enhancements that have been
introduced in each release. It contains these sections:
• “Driver Release History” on page 23
• “Release 35 Enhancements” on page 24
• “Release 25 Enhancements” on page 24
• “Release 20 Enhancements” on page 25
• “Release 10 Enhancements” on page 26
• “Release 6 Enhancements” on page 26
• “Release 5 Enhancements” on page 28
Driver Release History
Release 40 is the latest NVIDIA Display Driver software for Windows. Table
3.1 contains a summary of previous driver releases and the versions associated
with them.
Note: Some versions listed may not have been released outside of NVIDIA.
RIVER
F
EATURE
H
ISTORY
Table 3.1
Driver Name Versions Comments
Release 40 Detonator™ FX 44.03 – 44.xx Releases ongoing
Release 40 Detonator 40 40.xx – 44.02 Releases ongoing
Release 35 35.xx – 36.xx Releases ongoing
23 NVIDIA Corporation
NVIDIA Display Drivers for Windows
Page 31

NVIDIA Display Properites User’s Guide
Table 3.1
Driver Name Versions Comments
Release 25 Detonator XP 26.00 – 29.42 Releases ongoing
Release 20 Detonator XP v2x.xx 21.83 – 23.xx
Release 10 Detonator 3 v1x..xx 10.00 – 17.xx
Release 6 Detonator 3 6.09 – 8.xx
Release 5 Detonator 2 5.00 – 5.xx
Release 4 Detonator 3.00 – 3.xx
Release 3 Detonator 1.83 – 2.42
Release 2 1.05 – 1.31
NVIDIA Display Drivers for Windows (continued)
Release 35 Enhancements
The Release 35 driver offers new features not found in previous releases of the
NVIDIA Display Driver.
• NVRotate
The NVRotate feature lets you view your Windows desktop in Landscape or
Portrait mode. You can rotate desktop by 90, 180 and 270 degrees.
For details on using this feature, see “Enabling NVRotate” on page 134.
• Improved and expanded NVIDIA nView Desktop Manager application
nView Desktop Manager has now been redesigned with a convenient user
interface and many new features and utilities designed to solve specific
problems for users. Utilities such as anti-keystoning support and flat panel
monitor calibration screens and utilities have been designed to improve
windows multi-display usability.
For example, NVKeystone can be set to compensate for keystoning effects
on your windows display, allowing you to fix distorted projection images.
This feature is primarily for laptop (mobile) computers.
Release 25 Enhancements
The Release 25 driver offers new features not found in previous releases of the
NVIDIA Display Driver for Windows. These features are:
• nView, the next-generation of the former “TwinView” feature, is the latest
multi-display technology encompassing driver support, multi-display GPU
architecture, and desktop management support.
NVIDIA Corporation 24
Page 32

Chapter 3 NVIDIA Driver Feature History
• nView Desktop Manager is a desktop management engine for application
window management, extension of application functions, and support of
multiple desktops.
Note: Desktop Manager has been significantly redesigned from its previous
TwinView version. nView Desktop Manager is now a separate item on
the Windows Control Panel group. You can click this item to access
the Desktop Manager configuration tabs and windows.
• NVIDIA Display Properties (the topic of this guide) now offers improved
features for multi-display functionality, including Clone modes and
Horizontal and Vertical Span modes.
• Dualview support for Windows 2000
• Improved DirectX Video Acceleration (DXVA)
• Special support for NVIDIA products in the GeForce4 family:
• IDCT support for DirectX VA
• Improved antialiasing compatibility and performance
• Enhanced 3D Stereo functionality
• Support for lenticular lenses on LCDs (Liquid Crystal Displays)
• Stereo DIN connector support
• VSYNC Off with 3D Stereo
• Stereo API for developers
• OpenGL enhancement
• New
render_to_texture
Release 20 Enhancements
The Release 20 driver offered new features not found in previous releases of the
NVIDIA Display Driver for Windows.
• OpenGL 1.3 ICD with NVIDIA extensions
• OpenGL performance optimizations
• Optimized DirectX pipeline with NVIDIA Pixel and Vertex Shaders
• Full support for Windows XP, including:
• full hardware acceleration for Windows XP user interface features and
• accelerated Windows XP 3D performance through the NVIDIA XPress
Link technology.
extension
25 NVIDIA Corporation
Page 33

NVIDIA Display Properites User’s Guide
Release 10 Enhancements
The Release 10 driver offered new features not found in previous releases of the
NVIDIA Display Driver for Windows.
• Support for Microsoft DirectX 8
• Support for Microsoft DirectX VA 1.0
• NVIDIA 3D Stereo (requires installation of the optional Stereoscopic driver).
The driver provides stereoscopic viewing capabilities for games and still
images.
• Special support for the following NVIDIA GeForce3 capabilities:
• Pixel and Vertex Shader support for DirectX 8 and OpenGL.
• Quincunx antialiasing option for enhanced image quality and
performance.
• AMD Athlon Processor and Intel Pentium 4 Processor optimizations
• Improved TwinView interface
Release 6 Enhancements
The Release 6 driver offered new features not found in previous releases of the
NVIDIA Display Driver for Windows.
• “TwinView” on page 26
• “Digital Vibrance Control” on page 27
• “OpenGL” on page 27
• “Direct3D” on page 28
• “Cursor Trails Support” on page 28
• “Display Properties – Settings – Advanced Tabs” on page 28
TwinView
TwinView is a Release 6 and later feature that supports connecting dual
displays using an NVIDIA GPU-based multi-display card.
TwinView includes major features such as the Virtual Desktop, Video Mirror,
and Desktop Manager.
NVIDIA Corporation 26
Page 34

Chapter 3 NVIDIA Driver Feature History
TwinView supports a variety of display options, such as digital flat panels, redgreen-blue (RGB) monitors, TVs, and analog flat panels and display modes; i.e.,
Standard, Clone, and Span.
Virtual Desktop
Virtual Desktop is a TwinView feature that is useful for flat panels and monitors
with limited resolution. Virtual Desktop is used to set a larger than viewable
area on the second display, which supports full pan-and-scan of the entire
desktop area. Currently, Virtual Desktop functionality is available under the
following operating systems and modes:
• Windows NT 4.0 and Windows 2000 in TwinView Standard or Clone mode
•Windows 9x in TwinView Clone mode
Video Mirror
Video Mirror is a TwinView feature that allows a video or DVD application to
mirror its playback in full-screen mode on any one of the connected display
devices. In other words, Video Mirror allows video data that’s displayed on a
hardware overlay to be displayed at full-screen on a secondary display.
Currently, Video Mirror functionality is available under
• Windows 2000 in TwinView Clone mode
•Windows 9x in TwinView Clone or Span mode
• Windows 95 in TwinView Clone mode
Desktop Manager
See description of “nView vs. NVIDIA Display Properties” on page 2
Digital Vibrance Control
Digital Vibrance Control™ (DVC), a mechanism for controlling color
separation and intensity, boosts the color saturation of an image. DVC is
supported by the GeForce2 MX family and later series of NVIDIA GPUs.
OpenGL
The NVIDIA OpenGL Settings panel contains the following changes:
• Improved full-scene antialiasing methods
• Additional options for Windows 2000 and Windows NT 4.0
• Force 16-bit Depth Buffer
27 NVIDIA Corporation
Page 35

NVIDIA Display Properites User’s Guide
• Enable Advanced Multiple Monitors
Direct3D
The NVIDIA Direct3D Settings panel contains the following changes:
• Improved full-scene antialiasing methods not previously available
• Removed certain obsolete options
Cursor Trails Support
Release 6 for Windows provides support for cursor trails in Windows 9x.
Display Properties – Settings – Advanced Tabs
TwinView, Digital Vibrance Control, OpenGL, and Direct3D features have
associated NVIDIA-specific tabs from which the above-mentioned features can
be configured.
Release 5 Enhancements
The Release 5 driver offered new features that were not found in previous
releases of the NVIDIA Display Driver for Windows.
• “OpenGL” on page 28
• “Direct3D” on page 30
• “Display Properties – Settings – Advanced Tabs” on page 30
OpenGL
Changes have been made to the core, extensions, performance, and available
features of OpenGL.
OpenGL 1.2 Core
Release 5 adds all the features that constitute the OpenGL 1.2 core capabilities:
• BGRA pixel formats
• packed pixel formats (plus R5_G6_B5 formats and reversed formats)
• rescaling vertex normals
• specular highlights after texturing
NVIDIA Corporation 28
Page 36

Chapter 3 NVIDIA Driver Feature History
• level-of-detail control for mipmapped textures (supported in software on
TNT2)
• texture coordinate edge clamping
• 3D textures (performed in software on all platforms)
• vertex array subranges for optimizing vertex array processing
(
glDrawRangeElements()
retains the performance of
glDrawElements()
)
OpenGL Extensions
The OpenGL extensions in Table 3.2 were added or changed in Release 5.
Table 3.2
OpenGL Extensions Modified in Release 5
Extension Status Comment
ARB_texture_cube_map
ARB_texture_env_add
ARB_transpose_matrix
GL_ARB_texture_compression
NV_blend_square
S3_s3tc
EXT_clip_volume_hint
EXT_cull_vertex
GL_NV_light_max_exponent
New Same as
New Same as
New
New (5.16) To replace
New
New Deprecated
Removed
Removed
Renamed Was
EXT_texture_cube_map
EXT_texture_env_add
GL_EXT_light_max_exponent
S3_s3tc
OpenGL Performance Enhancements
A number of features are significantly improved in Release 5.
• For RIVA TNT and TNT2, polygon offset is faster.
• For GeForce 256, a number of improvements have been made:
•
glDrawPixels()
• Display lists use AGP memory for better performance.
• Large texture sets are handled more efficiently by the texture manager.
• Vertex arrays with two-sided lighting are faster.
and
glReadPixels()
have been made faster
• Compiled vertex arrays are faster for primitives that use multi-textured
TexCoord2f+Color4ub+Vertex3f.
• Vertex array range extension is fully functional.
•Windows Display Properties > Settings > Advanced tabs enables
accelerated full-scene antialiasing (GeForce, GeForce2)
• Multi-monitor hardware is accelerated on Windows 2000.
29 NVIDIA Corporation
Page 37

NVIDIA Display Properites User’s Guide
•
GL_WGL_swap_interval
extension can change Vsync behavior.
• Vsync is on by default. (Default behavior is selectable from the NVIDIA
OpenGL properties tab.)
• Default anisotropic filtering can be triggered by checking the anisotropic
filtering box on the NVIDIA OpenGL properties tab.
• Enabling
GL_POLYGON_SMOOTH
no longer forces software rendering, resulting in
much better performance at some cost in visual quality.
Direct3D
Release 5 contains the following Direct3D changes:
• Accelerated full-scene antialiasing is enabled (GeForce, GeForce2).
• Limited three-stage setup is now possible.
•
D3DVTXPCAPS_MATERIALSOURCE7
driver with DirectX 6 material source capabilities)
The following Registry keys are useful for applications that do not blit
correctly:
•
FLUSHAFTERBLITENABLE
condition when the
(Default is
DISABLED
is a new Registry key that controls the wait-after-blit
DDBLT_WAIT
—do not wait.)
Note: This Registry key was formerly named
•
FORCEBLITWAITFLAGENABLE
flag to be set for all blits, which prevents applications that do not check the
return value from unexpectedly losing blits.
(Default is
DISABLED
.)
capability bit is now disabled (leaving the
flag is set.
WAITAFTERBLITENABLE.
is a new Registry key that forces the
DDBLT_WAIT
•
LIMITMAXQUEUEDFBBLITSENABLE
is a new Registry key that limits the maximum
number of queued blits to the front buffer to a value set by the
PRERENDERLIMIT
(Default is
Registry key, which is 3 by default.
DISABLED
.)
Display Properties – Settings – Advanced Tabs
NVIDIA now provides tabs (Display Properties >Settings > Advanced) for
Windows NT 4.0 and Windows 2000.
NVIDIA Corporation 30
Page 38

Chapter 4 About Installing and Uninstalling NVIDIA Drivers
C HAPTER
A
BOUT INSTALLING AND
U
NINSTALLING
This chapter contains the following major sections:
• “Before You Begin” on page 31
• “About the NVIDIA Display Driver Installation” on page 32
• “Uninstalling the NVIDIA Display Driver Software” on page 33
Before You Begin
In order to access the NVIDIA Display Properties tabs, the latest version of the
NVIDIA Display Drivers software for your Windows operating system must be
installed on your computer.
• If you do not have System Administrator access privileges, it is assumed that
the appropriate person with System Administrator access in your
organization will set up and install the NVIDIA Display Driver software on
your computer.
• This chapter discusses the installation process but does not provide step-bystep instructions on how to perform an actual installation.
• For details on configuring and using the nView Desktop Manager application
component of the NVIDIA Display Driver, see the NVIDIA nView Desktop
Manager 2.0 User’s Guide.
NVIDIA D
RIVERS
31 NVIDIA Corporation
Page 39

NVIDIA Display Properites User’s Guide
About the NVIDIA Display Driver Installation
NVIDIA Driver Installation provides both an
method and an InstallShield Wizard-based installation method.
.inf
file-based installation
File Locations
• The installation process copies all necessary files for operation into the
appropriate directories.
• The nView system files are copied to your
• nView Desktop Manager “profile” (
nView
directory.
• As part of the installation process, an uninstall is registered in your system.
• Under Windows Me and Windows XP, the NVIDIA driver is installed in
“Dualview” display mode. However, note that the second display is not
activated (turned on) by default. You need to enable it. For details on
enabling Dualview mode, see
Span/Clone” on page 34
• Under Windows 2000, the NVIDIA Display Driver is installed in Span
mode.
.
.tvp
“Using nView Multi-Display Modes: Dualview vs.
Windows\System
) files are saved in the
directory.
Windows\
Preserving Desktop Manager Settings Before Upgrading Your Software
You can preserve your Desktop Manager settings by using profiles when you
upgrade your software.
Follow the steps below and/or refer to the NVIDIA nView Desktop Manager 2.0
User’s Guide for details.
1 Before uninstalling or installing software, save your current nView Desktop
Manager settings to a new profile.
For example, name this profile “
2 Open the
You should see your new profile
Settings.tvp
3 You can copy this file to a disk in your A: drive or to a different directory on
your hard drive.
NVIDIA Corporation 32
Windows\nView
.
My Settings
directory.
.tvp
”.
file in this directory; for example,
My
Page 40

Chapter 4 About Installing and Uninstalling NVIDIA Drivers
4 Uninstall the currently installed NVIDIA Display Driver software on your
system. See “Uninstalling the NVIDIA Display Driver Software” on page 33.
5 Install the new version of the NVIDIA Display Driver software.
6 Copy your profile
7 Start nView Desktop Manager and load your profile.
.tvp
file back into the
Windows\nView
When you load this profile, all your nView Desktop Manager settings,
including Individual Settings you may have set up for applications, are
restored.
Uninstalling the NVIDIA Display Driver Software
Note: It is highly recommended that you follow the steps in this section to
completely uninstall the NVIDIA Display Driver software before
installing a new version of the software.
To uninstall the NVIDIA Display Driver software, follow these steps:
1 From the Windows taskbar, click Start > Settings > Control Panel to open
the Control Panel windows.
2 Double click the Add/Remove Programs item.
3 Click the NVIDIA Windows Display Drivers item from the list.
4 Click Change/Remove.
5 Click Yes to continue.
Note: A prompt appears asking whether you want to delete all of the saved
nView profiles.
directory.
If you click Yes, all of the nView software and all of your saved
profiles will be deleted.
If you click No, the nView software is removed, but the profile files
are saved in the
Windows\nView
directory on your hard disk.
Your system now restarts.
33 NVIDIA Corporation
Page 41

NVIDIA Display Properties Release 40 User’s Guide
C HAPTER
U
SING NVIEW
This chapter contains the following major sections:
• “nView Dualview vs. Span and Clone Modes” on page 34
• “nView Dualview Mode” on page 37
M
ULTI
D
UALVIEW VS
-D
ISPLAY
. S
M
PAN
ODES
/C
LONE
:
• “nView Span and Clone Modes” on page 51
• “Enabling nView Modes: Windows NT 4.0” on page 61
• “Multi-Display Mode: Arranging Displays on the Windows Display
Properties Settings Panel” on page 61
nView Dualview vs. Span and Clone Modes
When using NVIDIA products that are multi-display capable, there are three
ways to run multi-display configurations under most operating system;
Dualview, Span, or Clone mode.
• nView Dualview and Span/Clone modes are mutually exclusive. This
means that you cannot access nView Span or Clone Mode if you have
Dualview mode enabled. Conversely, you cannot access Dualview mode if
you have nView Span or Clone Mode enabled.
Note: As explained in Chapter 1, the nView Display Mode option in the
Media Center menu will always be visible when you are not in
Dualview mode (Figure 5.1). When you are in Dualview mode, the
nView Display Mode option is replaced by the Device Selection option
(Figure 5.2).
NVIDIA Corporation 34
Page 42

Chapter 5 Using nView Multi-Display Modes: Dualview vs. Span/Clone
Figure 5.1
NVIDIA Media Center Menu: nView Display Mode Enabled
nView Display
Mode option
appears when
Dualview is
disabled.
.
Figure 5.2
NVIDIA Media Center Menu: Dualview Mode Enabled
nView Display
Mode is
unavailable
when Dualview
mode is enabled.
.
35 NVIDIA Corporation
Page 43

NVIDIA Display Properties Release 40 User’s Guide
Figure 5.3
nView Span/Cone Modes Available: Windows XP (2000)
.
nView Span and
Clone modes
are accessible
when Dualview
mode is disabled.
.
• nView Dualview Mode has no special “nView multi-display mode” user
interface because Dualview support conforms to the standard Microsoft user
interface. The “Standard” mode in the panel shown in Figure 5.2 can be
thought of as Dualview in that it is not Span or Clone mode.
Note: When you start Windows 9x or Windows XP using multiple displays,
Windows is pre-configured for Dualview mode. This is not the case for
Windows 2000. NVIDIA provides a special feature to “Enable
Dualview” in Windows 2000.
For details on using Dualview mode, see the following sections:
• “Key Features of nView Dualview Mode” on page 37
• “Enabling nView Dualview Mode for the First Time: Windows 2000” on
page 39
• “Enabling nView Dualview Mode After Initial Session: Windows 2000”
on page 44
• “Activating nView Dualview Mode: Windows XP” on page 44
• “Activating nView Dualview Mode: Windows 9x” on page 47
NVIDIA Corporation 36
Page 44

Chapter 5 Using nView Multi-Display Modes: Dualview vs. Span/Clone
• nView Span and Clone Modes: You can access Span or Clone modes
(Figure 5.3) through the Advanced option on the Windows Display
Properties Settings panel. (Windows 9x offers Clone mode only.)
For details on using nView Span/Clone modes, see the following sections:
• “Key Features of nView Span Mode” on page 51
• “Enabling nView Span/Clone Modes” on page 53
• “Enabling nView Span/Clone Modes: Windows XP” on page 56
• “Enabling nView Clone Mode: Windows 9x” on page 58
nView Dualview Mode
Key Features of nView Dualview Mode
Dualview mode is sometimes called “native mode” as it is the native mode
supported by Windows multi-display configurations; i.e. it is the “Microsoft”
defined multi-display mode supported by Microsoft Windows operating
systems.
Figure 5.4
Multiple Display Devices in nView Dualview Mode
Display 1: (resolution = 1280 x 768) Display 2: (resolution = 1024 x 768)
Taskbar
is not stretched across displays.
Background
is not stretched across displays
.
Dualview support and functionality include the following:
37 NVIDIA Corporation
Page 45

NVIDIA Display Properties Release 40 User’s Guide
• nView Dualview, Span, and Clone modes support advanced NVIDIA
features such as Video Mirroring. See “Full-Screen Video Mirroring
Options” on page 130.
Note: Windows NT 4.0 in Multiview mode does not support Video
Mirroring.
• Windows places the taskbar on only a single display.
• Windows replicates (rather than stretches) the background on each display.
• When you maximize an application, it maximizes only to the single display,
and so on.
Figure 5.4 shows an example of a Dualview system where the left display is
running at 1280x1024 and the right display is running at 1024x768. Notice
that the background is not stretched across the displays and the taskbar
appears on a single display instead of being stretched across displays.
• You can set different color depths per display.
• You can arrange your multi-display desktop to be any shape; it does not have
to be limited to “rectangular” as in Span modes.
• When you run a DirectX or OpenGL application in Dualview mode, it is
accelerated as long as the window does not span more than one display. If the
window spans two displays, drawing is not accelerated in the window.
Note: In Span mode, drawing is always accelerated.
• Dualview mode works for any display connected to your NVIDIA multidisplay graphics card:
• PC monitor with an analog connector
• Flat Panel with a DVI connector
• TV with an S-Video connector.
For example, you can have a system with the primary display as an analog
PC monitor that supports up to 1600 x 1200 at 100 Hz refresh rate, while the
secondary display is connected to an NTSC TV that is limited to 800 x 600 at
60 Hz refresh rate. The TV has less resolution and refresh rate than the
monitor since the TV encoder on the graphics chip has fewer capabilities
than the analog PC monitor.
NVIDIA Corporation 38
Page 46

Chapter 5 Using nView Multi-Display Modes: Dualview vs. Span/Clone
Enabling nView Dualview Mode for the First Time: Windows 2000
Note: When you start Windows 2000 with an NVIDIA GPU-based multi-
display graphics card (or multiple NVIDIA GPU-based graphics cards),
you are not yet in “Dualview” mode*. You can confirm this when you
view the Windows Display Properties Settings panel and see only one
monitor image in the display.
The NVIDIA Desktop Utilities settings panel contains an option that lets you
enable “Dualview” mode under Windows 2000. Follow these steps to enable
Dualview.
1 Make sure you have a multi-display NVIDIA GPU-based graphics card, or
dual graphics cards, properly installed in your computer and securely
connected to your display devices.
2 Ensure that you have more than one display device attached to your multi-
display graphics card and that the display devices are turned on.
3 Confirm that the NVIDIA Display Driver software (including the nView
Desktop Manager component) has been installed on your system.
4 Start up Windows.
5 From your desktop, right click to view the properties menu.
6 Click Properties > Settings (tab) > Advanced > the NVIDIA GPU tab >
Desktop Utilities option from the Media Center menu to display the
NVIDIA Desktop Utilities panel.
7 Click the Enable Dualview (Treat multiple outputs . . . ) option to enable it
(Figure 5.5).and click Apply. The prompt in Figure 5.6 appears.
39 NVIDIA Corporation
Page 47

NVIDIA Display Properties Release 40 User’s Guide
Figure 5.5
NVIDIA Desktop Utilities Panel: Enabling Dualview in Windows 2000
Figure 5.6
Click Restart Now. When the system starts up, you may see a series of
8
Restart Now Message: Enabling Dualview in Windows 2000
Dualview installation prompts as shown in Figure 5.7.
Note: It may take up to one minute for the first Dualview prompt to appear.
NVIDIA Corporation 40
Page 48

Chapter 5 Using nView Multi-Display Modes: Dualview vs. Span/Clone
Figure 5.7
Dualview Installation Messages: Windows 2000
Click Yes, Finish, and Yes to follow through and then restart your computer
9
as prompted.
After the system starts up, if the NVIDIA nView Desktop Manager Setup
Wizard appears, run through the Wizard. (See the NVIDIA nView Desktop
Manager 2.0 User’s Guide for details.)
10From your desktop, right click to view the properties menu, then click
Properties and the Settings tab.
41 NVIDIA Corporation
Page 49

NVIDIA Display Properties Release 40 User’s Guide
You’ll notice that at least two monitor images appear on the Settings panel
now, as shown in Figure 5.8. This is Dualview mode. However you will need
to enable this mode, as explained in later steps.
Figure 5.8
Display Properties Settings: Dualview Mode (Windows 2000)
11
Be sure to click the display image 1 so that it is the selected display.
12Click Advanced to display the NVIDIA GPU tab, as shown in Figure 5.9.
13Click the NVIDIA GPU tab to display the associated panel and the Media
Center menu, as shown in Figure 5.10.
Note: The nView Display Mode option on the Media Center menu is replaced
by the Device Selection option because your are in Dualview mode.
14Click OK to return to the Display Properties Settings panel.
Note: The following steps let you enable (turn on) your secondary display.
15From the Display Properties Settings panel, right click monitor image
numbered 2 to display a pop-up properties menu.
16Click Attached and click Apply.
17You will notice that the Extend my Windows desktop onto this monitor . .
option becomes checked and your secondary display is enabled (Figure 5.11).
NVIDIA Corporation 42
Page 50

Chapter 5 Using nView Multi-Display Modes: Dualview vs. Span/Clone
Figure 5.9
Figure 5.10
First Appearance of the NVIDIA GPU Tab: Windows 2000
NVIDIA GPU tab
First Appearance of the Media Center Menu: Windows 2000 (Dualview)
Media Center
menu
43 NVIDIA Corporation
Page 51

NVIDIA Display Properties Release 40 User’s Guide
Figure 5.11
Windows 2000 Display Settings: Dualview Mode (Display 2 attached)
Enabling nView Dualview Mode After Initial Session: Windows 2000
Switching back and forth from Dualview to Span/Clones mode under Windows
2000 is much faster after the initial Dualview enable session.On subsequent
Dualview enabling sessions, you can use fewer steps, as follows:
1 Follow the basic steps in “Enabling nView Dualview Mode for the First
Time: Windows 2000” on page 39 through step 9.
2 After your computer restarts, Dualview enabling is complete. You will not
see any further Dualview messages and do not need to follow the remaining
steps.
Activating nView Dualview Mode: Windows XP
When you start Windows XP in multi-display configuration, Windows starts in
“Dualview” mode. You may only need to do an “attach” procedure to enable the
secondary display device. Follow these steps:
1 Make sure you have an NVIDIA GPU-based multi-display graphics card
installed in your computer.
NVIDIA Corporation 44
Page 52

Chapter 5 Using nView Multi-Display Modes: Dualview vs. Span/Clone
2 Confirm that all your display devices are securely connected to your
computer and turned on!
3 Confirm that the NVIDIA Display Driver software (including the nView
Desktop Manager component) has been installed on your system.
4 Start Windows.
5 From your desktop, right click to open the properties menu, then click
Properties and the Settings (tab). You’ll notice that two monitor images
appear on the Settings panel, indicating that you are in Dualview mode.
Figure 5.12
Windows XP Display Settings in Dualview Mode
6
Now right click the monitor image that you need to attach. A pop-up
properties menu appears.
Note: You may not need to do the next step if the secondary display device is
already attached.
7 Click Attached and Apply.
You will notice that the Extend my Windows desktop onto this monitor
option becomes checked and your secondary display device is enabled.
8 Click Advanced. The NVIDIA GPU tab appears (Figure 5.14).
45 NVIDIA Corporation
Page 53

NVIDIA Display Properties Release 40 User’s Guide
9 Click the NVIDIA GPU tab. Notice that although you are in Dualview mode,
you can see the nView Display Mode option in the Media Center menu.
Figure 5.13
Windows XP Display Settings in Dualview Mode (Display 2 attached)
Figure 5.14
NVIDIA Corporation 46
First Appearance of the NVIDIA GPU tab
NVIDIA GPU tab
Page 54

Chapter 5 Using nView Multi-Display Modes: Dualview vs. Span/Clone
10Click nView Display Mode to display the associated properties panel.
Notice that the nView Span/Clone mode options are disabled because you are
in nView Dualview mode. (Figure 5.15)
Figure 5.15
nView Span/Clone Options Disabled in Dualview Mode: Windows XP
.
Activating nView Dualview Mode: Windows 9x
Notes:
When you start Windows 9x in multi-display configuration, Windows starts in
“Dualview” mode. You may only need to do an “attach” procedure to enable the
secondary display device. Follow these steps
47 NVIDIA Corporation
• Dualview mode is not supported under Windows 95.
• Under Dualview mode, when you switch to a full-screen
Microsoft DOS window or boot to a DOS prompt, the display is
limited to the primary display device.
• Under Dualview mode, OpenGL-based applications will only
run using Microsoft’s software rendering implementation of
OpenGL. This is due to a design limitation within Windows.
Page 55

NVIDIA Display Properties Release 40 User’s Guide
1 Make sure you have an NVIDIA GPU-based multi-display graphics card
installed in your computer and all your display devices are securely
connected to your computer and turned on!
2 Confirm that the current version of the NVIDIA Display Driver software
(including the nView Desktop Manager application) has been installed on
your system.
3 Start Windows.
4 From your desktop, right click to open the properties menu, then click
Properties and Settings (tab). You’ll notice that (at least) two monitor
images appear on the Settings panel (Figure 5.16). This is Dualview mode.
Figure 5.16
Display Settings: Windows 98
Note: If you are using an NVIDIA multi-display graphics card (such as a
GeForce4 MX) but have only one display device connected (such as a
CRT), you will see two monitor images on the Settings panel even
though only one display device is connected. You cannot enable the
second display until you physically connect a second display device to
the graphics card.
5 To turn on (enable) the secondary display (monitor image 2), go to the next
step.
NVIDIA Corporation 48
Page 56

Chapter 5 Using nView Multi-Display Modes: Dualview vs. Span/Clone
6 Right click monitor image 2 (Figure 5.17) and click Enabled to check the
option. Notice that the Extend my Windows desktop onto this monitor
option becomes checked (Figure 5.18).
Note: If you get a Compatibility Warning message, read the message
carefully and then click OK.
Figure 5.17
Enabling Dualview (1): Windows 9x
7
Click Apply.
8 Be sure to click the display image 1 so that it is the selected display.
9 Click Advanced and then click the NVIDIA GPU tab (Figure 5.19) to
display the window in Figure 5.20.
Under Windows 9x, the nView Display Mode option does not appear at all in
the Media Center menu because you are in Dualview mode.
49 NVIDIA Corporation
Page 57

NVIDIA Display Properties Release 40 User’s Guide
Figure 5.18
Figure 5.19
Enabling Dualview (2): Windows 9x
First Appearance of the NVIDIA GPU Tab: Windows 9x
NVIDIA GPU tab
NVIDIA Corporation 50
Page 58

Chapter 5 Using nView Multi-Display Modes: Dualview vs. Span/Clone
Figure 5.20
Media Center
menu
nView Display
Mode option
is unavailable
in Dualview
mode.
NVIDIA Media Center Menu in Dualview Mode: Windows 98
nView Span and Clone Modes
nView Span, Clone, and Dualview modes support advanced NVIDIA features
such as Video Mirroring. (See “Overlay Controls Panel” on page 129.)
Note: Windows NT 4.0 Multiview mode does not support Video Mirroring.
Key Features of nView Span Mode
Span mode support and functionality include the following:
• DirectX or OpenGL applications in Span mode are fully accelerated.
• In nView Span mode, your Windows desktop is “stretched” or “spans” all of
your displays. In Span mode, as far as Windows is concerned, you only have
a single “logical” display device connected to your computer – the real
“physical” displays are combined together to give you this “logical” display.
51 NVIDIA Corporation
Page 59

NVIDIA Display Properties Release 40 User’s Guide
Figure 5.21
Display 1 Display 2
Taskbar
across displays
.
Multiple Displays in nView Horizontal Span Mode
is stretched.
Background
across displays.
is stretched
.
Figure 5.21 shows an example of running Span mode under Windows XP
with both of the two displays set to 1280x1024 resolution. In this
configuration, Windows recognizes only a single display running at
2x1280x1024 or 2560x1024.
• The key to remember when running nView Span mode is that Windows does
not detect that you have two displays connected – as far as it is concerned,
you have an oversized display. This is the reason that you cannot use
different bit depths or resolutions per display.
Note: This also results in Span mode being slightly faster than Dualview
mode because Windows only has to manage one display device instead
of two.
• Under nView Span mode, Windows “stretches” the background wallpaper
out to cover your large “logical” display and it stretches the taskbar out to fill
your large “logical” display, as shown in Figure 5.21. If you maximize an
application, the application will be maximized to fill the large “logical”
display screen – i.e., both displays.
• Using the current Release 40 drivers under Windows XP and Windows 2000,
you can run nView Span mode with more than two displays. For example, if
NVIDIA Corporation 52
Page 60

Chapter 5 Using nView Multi-Display Modes: Dualview vs. Span/Clone
are using an NVIDIA GPU-based card to which you have connected four
displays, you can have two sets of two spanned displays.
Enabling nView Span/Clone Modes
Enabling nView Span/Clone Modes: Windows 2000
Note: Under Windows 2000, switching between nView Span/Clone and
Dualview modes requires restarting your computer.
To disable Dualview mode and, therefore, make nView Span and Clone modes
accessible, follow these steps:
1 Click Properties > Settings tab.
2 Be sure to click the display image 1 so that it is the selected display.
3 Click Advanced to display the NVIDIA GPU tab.
4 Click the NVIDIA GPU tab and then the Desktop Utilities option from the
Media Center menu.
5 Click to uncheck the option Enable Dualview (Treat multiple outputs . . . ).
6 Click Apply and restart your computer.
After the system starts up, if the NVIDIA nView Desktop Manager Setup
Wizard appears, run through the Wizard. (See the NVIDIA nView Desktop
Manager 2.0 User’s Guide for details.)
7 Right click to display the properties menu, then select Properties > Settings
tab.
When you are in Windows 2000 (non-Dualview) nView Span or Clone
mode, your Windows Display Properties Settings panel shows only one
monitor image (Figure 5.22).
8 Click Advanced to display the NVIDIA GPU tab (Figure 5.23).
9 Click the NVIDIA GPU tab. The Media Center menu appears (Figure 5.24).
10Click nView Display Mode to display the associated properties panel with
the Span and Clone mode options available. (Figure 5.25).
53 NVIDIA Corporation
Page 61

NVIDIA Display Properties Release 40 User’s Guide
Figure 5.22
Figure 5.23
Windows 2000 Display Properties Settings in nView Span/Clone Mode
(Dualview disabled)
First Appearance of the NVIDIA GPU Tab: Windows 2000
NVIDIA GPU tab
NVIDIA Corporation 54
Page 62

Chapter 5 Using nView Multi-Display Modes: Dualview vs. Span/Clone
Figure 5.24
Media Center
menu
Figure 5.25
NVIDIA Media Center Menu: Windows 2000
nView Clone/Span Modes Available: Windows 2000
.
nView Span/Clone modes are available because
nView Standard (Dualview) mode is disabled.
55 NVIDIA Corporation
Page 63

NVIDIA Display Properties Release 40 User’s Guide
Enabling nView Span/Clone Modes: Windows XP
Note: Under Windows XP, you do not need to restart your computer to switch
between nView Span/Clone Mode and Dualview mode.
When you are in Windows XP Span or Clone mode, your Windows Display
Properties Settings panel shows at least “two” monitor images, unlike Windows
2000, which shows only one monitor image.
To disable Dualview mode and, therefore, make nView Span and Clone modes
accessible, follow these steps:
1 Open the Windows Display Properties Settings panel.
2 Right click the monitor image 2 and click Attached so that the option
becomes unchecked.
3 Click Apply (Figure 5.26). This turns off your secondary display. (To access
nView Span and Clone modes, only one monitor needs to be enabled on the
Display Settings panel.)
4 Be sure to click the display image 1 so that it is the selected display.
Figure 5.26
Disabling Dualview Mode: Windows XP
5
Click Advanced to display the NVIDIA GPU tab shown in Figure 5.27.
6 Click the NVIDIA GPU tab to display the nView Display Mode option in
the Media Center menu, as shown in Figure 5.28.
NVIDIA Corporation 56
Page 64

Chapter 5 Using nView Multi-Display Modes: Dualview vs. Span/Clone
7 Click nView Display Mode to display the associated panel with the Span/
Clone mode options available (Figure 5.29).
Figure 5.27
First Appearance of the NVIDIA GPU tab: Windows XP (2000)
NVIDIA
GPU tab
Figure 5.28
NVIDIA Media Center Menu: Windows XP (2000)
Media Center
menu
.
57 NVIDIA Corporation
Page 65

NVIDIA Display Properties Release 40 User’s Guide
Figure 5.29
nView Clone/Span Modes Available: Windows XP (2000)
.
Enabling nView Clone Mode: Windows 9x
nView Span and
Clone modes
are available
when Dualview
mode is disabled.
.
.
Note: Under Windows 9x, Clone mode is available. Also, you do not need to
restart your computer to switch between nView Clone mode and
Dualview mode.
When you are in Windows 9x Clone mode, your Windows Display Properties
Settings panel shows at least “two” monitor images, which indicates that you
are in Dualview mode.
To disable Dualview mode and, therefore, make nView Clone mode
accessible, follow these steps:
1 Open the Windows Display Properties Settings panel.
2 Right click on the monitor image number 2 and click Enabled so that the
option becomes unchecked and click Apply (Figure 5.30). This turns off your
secondary display. (To access nView Span and Clone modes, only one
monitor needs to be enabled on the Display Settings panel.)
3 Be sure to click the display image 1 so that it is the selected display.
4 Click Advanced to display the NVIDIA GPU tab shown in Figure 5.31.
5 Click the NVIDIA GPU tab to display the Media Center menu (Figure 5.32)
NVIDIA Corporation 58
Page 66

Chapter 5 Using nView Multi-Display Modes: Dualview vs. Span/Clone
6 From the Media Center menu, click nView Display Mode to display the
associated properties panel (Figure 5.33).
Figure 5.30
Disabling Dualview: Windows 9x
Figure 5.31
First Appearance of the NVIDIA GPU tab: Windows 9x
NVIDIA GPU tab
59 NVIDIA Corporation
Page 67

NVIDIA Display Properties Release 40 User’s Guide
Figure 5.32
Media Center
menu
Figure 5.33
NVIDIA Media Center Menu: Windows 9x
nView Clone Mode Available: Windows 9x
nView Clone
mode is available.
when Dualview
mode is disabled.
.
NVIDIA Corporation 60
Page 68

Chapter 5 Using nView Multi-Display Modes: Dualview vs. Span/Clone
Note: The nView Clone mode option is available, indicating that Dualview is
disabled. (Under Windows 9x, Span mode does not appear.)
Enabling nView Modes: Windows NT 4.0
For details on enabling nView Multiview and nView Span/Clone modes under
Windows NT 4.0, refer to the Application Note titled “Configuring Multiple
Display Devices With Quadro NVS Cards”.
nView Multiview Mode: Windows NT 4.0
Note the following about running nView Multiview mode under Windows NT
4.0:
• Under Windows NT 4.0, nView Multiview mode is only available with the
NVIDIA Quadro NVS GPU-based series of graphics cards.
• If you want to enable more than two display devices under Windows NT
4, you must be running in Multiview mode, which supports up to sixteen
(16) displays.
• Multiview mode does not support hardware accelerated OpenGL.
nView Span/Clone Modes
Under Windows NT 4.0, Span mode allows you to use up to a maximum of two
display devices. If you want to enable more than two display devices under
Windows NT 4, you must change modes to nView Multiview mode, which
supports up to sixteen (16) displays.
Multi-Display Mode: Arranging Displays on the Windows Display Properties Settings Panel
Note: The examples shown in Figure 5.34 through Figure 5.36 are Windows
XP, but the procedure explained below applies to all Windows operating
systems.
When using multiple displays, the desktop can be extended horizontally and
vertically, as well as at other angles by repositioning the desktop monitor
images in the Windows Display Properties Settings panel. You can drag the
images to the positions that represent how you want to move items between
your display devices.
• For example, if you’re using two monitors and you want to move items from
one monitor to the other by dragging left and right, position the images
side-by-side (Figure 5.34).
61 NVIDIA Corporation
Page 69

NVIDIA Display Properties Release 40 User’s Guide
• To move items between monitors by dragging up and down, position the
images one above the other (Figure 5.35).
• To move items between monitors by dragging at an angle, position the
images diagonally (Figure 5.36). The positions of the images don’t have to
correspond to the physical positions of your monitors. That is, you can
position the images one above the other even though your monitors are sideby-side.
Figure 5.34
Display Settings (Horizontal)
NVIDIA Corporation 62
Page 70

Chapter 5 Using nView Multi-Display Modes: Dualview vs. Span/Clone
Figure 5.35
Display Settings (Vertical)
63 NVIDIA Corporation
Page 71

NVIDIA Display Properties Release 40 User’s Guide
Figure 5.36
Display Settings (Diagonal)
NVIDIA Corporation 64
Page 72

Chapter 6 nView Applications
C HAPTER
This chapter contains the following sections:
• “nView Multi-Display Options” on page 65
• “About nView Display Modes” on page 66
• “nView Applications” on page 67
nView Multi-Display Options
nView offers tremendous flexibility in how multiple display devices are used.
The following are sample display combinations:
• Two RGB monitors with second RAMDAC (
• Two analog flat panels
• Two digital flat panels (DFPs)
• One digital flat panel and one analog flat panel
• One digital flat panel and one RGB monitor
• One RGB monitor and one TV
NVIEW
digital-to-analog converter)
A
PPLICATIONS
• One RGB monitor and one analog flat panel (with second RAMDAC)
• One analog flat panel and one TV
Note: Actual combinations supported on a given card will vary.
Setting up a multi-display graphics card involves installing the card on a PC,
attaching the two display devices to the PC, and installing the current version of
65 NVIDIA Corporation
Page 73

NVIDIA Display Properites User’s Guide
the NVIDIA Display Driver software. After rebooting the PC, the multiple
display modes of the graphics cards installed are fully functional.
For detailed information on using and configuring nView options, see “nView
Display Mode Basics” on page 69.
About nView Display Modes
The nView Display Mode panel provides several display modes for your
multi-display configuration.
• nView Span mode: In this mode, the desktop area is spread across both
displays, however the operating system treats both displays as one large
display. Because of this the refresh rate, color depth, and resolution on both
displays will be identical, and cannot be changed independently.
The desktop may be “stretched” horizontally or “stacked” vertically,
depending on your needs, as explained in “Horizontal & Vertical Span
Modes” on page 83.
Note: nView Span modes do not apply under Windows 9x operating systems.
For further details on configuring multiple displays, see Chapter 4, “Using
nView Multi-Display Modes: Dualview vs. Span/Clone” on page 34.
nView Span mode supports the Video Mirror feature, where you may want
to dedicate an application to one of the two displays or run the application
across both displays. Examples include entertainment applications, digital
video editing, and DVD playback. For details, see “Overlay Controls Panel”
on page 129.
• nView Clone mode: Two displays may show exactly the same output, which
is useful for presentations. The presenter may have a small monitor or other
display device on the podium while a projector or presentation quality
display shows the larger image to the audience. (See “Clone Mode” on
page 74.)
Virtual desktop: Full support for virtual desktops is available for panels and
monitors with limited resolution. Virtual desktops, with full pan-and-scan
mode, can be configured for one or both displays. (See “Change Resolution:
Clone Mode (Virtual Desktop)” on page 81.)
Application zoom mode: In this mode, part of the image from the primary
monitor is shown on the secondary display, but zoomed in. This mode can be
used for image editing, close-up work in modeling or CAD applications, or
image processing and mapping applications.
nView Clone mode supports the Video Mirror feature, where you may want
to dedicate an application to one of the two displays or run the application
NVIDIA Corporation 66
Page 74

Chapter 6 nView Applications
across both displays. Examples include entertainment applications, digital
video editing, and DVD playback. For details, see “Overlay Controls Panel”
on page 129.
nView Applications
Note: For extensive information on nView applications, refer to the Products
tab on the NVIDIA Web site: www.nvidia.com
• Engineering or mechanical CAD applications can use multiple displays
for different directional views of an object or a building, such as a front or
side view or even a wireframe model on one screen and a textured version of
the same model on another. Many professional applications offer extensive
graphical user interfaces, which can be left fully enabled and visible on one
display, while the second display remains unobstructed for viewing the actual
work.
• Training and Presentation: nView Clone mode, where two monitors
display identical images, is useful for presentations. A presenter may use the
smaller monitor on the podium, while a projector monitor reflects the
presentation to the audience. In training applications, the instructor can see
what the student is doing under nView Clone mode. The ability to see the
presentation while it's being projected can be especially useful in mobile
PCs.Virtual Desktop, a sub-feature of nView Clone Mode, is useful for flat
panels and monitors with limited resolution and is used to set a larger than
viewable area on the second display, which supports full pan-and-scan of the
entire desktop area.
• Digital content creation applications can use one display for toolbars and
palettes and the other for rendered output. Additionally, many real-time or
game development environments allow the authoring tools or game engine
code to be visible on one display, while showing the art or game engine in a
full screen, game play-like mode on the second display.
• Graphics Artists can have common applications such as Adobe Photoshop
or 3D Studio Max
open with the palettes and menus on one monitor and the
other monitor dedicated to workspace. Writers can use one monitor for
research and the other for writing.
• Financial applications, such as stock trading applications, can use a pair of
large digital flat panels. This would allow you to watch real-time stock data
on one screen and use the other screen for trading activity.
• Video editing applications would use one large PC display and one NTSC
monitor. Since nView technology allows decoupling of refresh rates, the PC
(editing) display could be a high-resolution RGB monitor for running the
application (Adobe Premiere, for example), while the second display device
67 NVIDIA Corporation
Page 75

NVIDIA Display Properites User’s Guide
can be an NTSC or S-Video display for checking the video output for proper
color balance and quality.
• Entertainment applications can use multiple display support in several
ways. Game titles, such as Microsoft’s Flight Simulator 2000, support
multiple displays out of the box. With nView Clone mode, game play can be
sent to a big screen TV or even to a VCR.
• Home theater systems can take advantage of the DVD capabilities of your
PC. Simply hook up a large screen television as your second display device
and you can watch DVDs -- without buying a dedicated DVD player. See
“Overlay Controls Panel” on page 129.
• Television and Movies: Using the nView Video Mirror feature, you can
watch TV and any other video while you work. See “Overlay Controls Panel”
on page 129.
NVIDIA Corporation 68
Page 76

Chapter 7 nView Display Mode Basics
C HAPTER
NVIEW
This chapter contain the following major sections:
• “Notes Before You Begin” on page 69
• “Accessing nView Clone and Span Modes” on page 71
• “Standard (Dualview) Mode” on page 72
• “Accessing the Configuration Options” on page 74
• “Clone Mode” on page 74
• “Horizontal & Vertical Span Modes” on page 83
• “Other Configuration Options” on page 86
Notes Before You Begin
• To use nView features, you need a graphics card based on a multi-display
NVIDIA GPU. See Table 2.1 in Chapter 1 for NVIDIA GPU support
information.
• This chapter assumes you have an analog display (CRT) and either a digital
display and/or a TV attached to your multi-display NVIDIA GPU-based
graphics card. Follow the appropriate examples, depending on the display
device(s) attached to your computer.
D
ISPLAY
M
ODE
B
ASICS
• The nView Display Mode panel offers the following display modes under
Windows:
• “Standard (Dualview) Mode” on page 72
• “Clone Mode” on page 74
69 NVIDIA Corporation
Page 77

NVIDIA Display Properites User’s Guide
• “Horizontal & Vertical Span Modes” on page 83 (only for Windows XP/
2000/NT 4.0)
Note: This chapter discusses the features accessible from the nView Display
Mode panel. For details on using Dualview (nView Display Mode tab is
disabled) vs. Span/Clone modes (nView Display mode tab is enabled) see
the chapter on “Using nView Multi-Display Modes: Dualview vs. Span/
Clone” on page 34.
nView Display Mode Panel Options
The monitor images display a graphical representation of your nView display
configuration.
• Click a monitor image to select it as the current display.
• When you right click the monitor image, a pop-up menu appears from which
you can make adjustments to the associated display devices and access the
Color Correction tab.
nView Standard (Dualview) Mode can be a single-display mode or a dualdisplay mode if your secondary monitor is “attached” or “enabled” on the
Settings panel.
nView Standard mode disables the nView Span or Clone modes and features
that depend on these modes.
However, you can access specific features that are not multi-display, such as
those described in “Additional Features and Enhancements” on page 106.
nView Horizontal Span Mode allows you to extend the Windows desktop
across two display devices horizontally. In this mode the two displays combine
to form a wide, spanned display surface, which is useful when viewing items
that are wider then a single display.
nView Vertical Span Mode allows you to extend the Windows desktop across
two display devices vertically. In this mode the two displays combine to form a
tall, spanned display surface, which is useful when viewing items that are taller
then a single display.
nView Clone Mode outputs an exact copy of the primary display on the
secondary device.
Display: Displays all current nView displays. If more than one device is
connected and you have switched to a mode other than Standard, you can select
which display is the current display by clicking the “down arrow” to display the
drop-down menu.
NVIDIA Corporation 70
Page 78

Chapter 7 nView Display Mode Basics
You can also click on the monitor graphic in the control directly above to select
it as the current display.
Make this primary: Click this option to select which display contains the top
left corner of the desktop. The most obvious effect of this option is that it swaps
the positions of the monitor images.
Disable Auto-panning: Click to lock the current pan position on the secondary
Clone mode display. This lets you effectively freeze the virtual desktop at a
certain position, which is useful for presentations or fine-detail work in
applications.
Detect Displays: Click to detect all displays connected to the graphics card.
Note Use this feature if you have plugged in any displays after the control panel
was opened.
Device Settings: Click to set up or change settings related to the output device
used for the current display.
Accessing nView Clone and Span Modes
To access the nView Clone and Span modes, follow these steps:
1 For multi-display functionality, be sure you have at least two display devices,
such as an analog display (CRT) and a digital display or TV connected to
your NVIDIA multi-display card.
2 Make sure the cable connections for your devices are well secured from the
device to the graphics card installed on your computer.If you are connecting
a TV, be sure you have the proper cables and connectors that apply to your
TV.
3 If Dualview mode is enabled, you have to disable it. (See the procedure in
“nView Span and Clone Modes” on page 51.)
4 From the Windows Display Properties Settings panel, click Advanced.
5 Click the NVIDIA GPU tab to display basic information about your display
adapter, system, and the NVIDIA driver files you installed. Figure 7.1 shows
an example.
6 Click the nView Display Mode option from the Media Center menu to
display and access the nView Span and Clone modes.
The following sections explain how to use these modes:
• Standard (Dualview) Mode
• Accessing the Configuration Options
• Clone Mode
71 NVIDIA Corporation
Page 79

NVIDIA Display Properites User’s Guide
• Horizontal & Vertical Span Modes
• Other Configuration Options
Note: If you are not using multiple displays and therefore have only one display
device connected to your computer, the Clone and Span mode options
will be disabled (grayed out) on your nView Display Mode panel.
Note: Under Windows 9x, only Standard (Dualview) and Clone modes are
available.
Figure 7.1
Media Center
menu
NVIDIA GPU Tab and Panel with Media Center Menu
Standard (Dualview) Mode
The Standard (Dualview) mode option in the nView Display Mode panel
allows viewing in only one display.
Note: If you have only one display device connected to your computer, the
Clone and Span mode options will be disabled (grayed out) on your
nView Display Mode panel.
Figure 7.2 and Figure 7.3 show the default Standard (Dualview) Mode.
Figure 7.3 shows the nView Display Mode panel in Standard (Dualview) mode
showing three types of display devices: analog display, digital display, and TV.
NVIDIA Corporation 72
Page 80
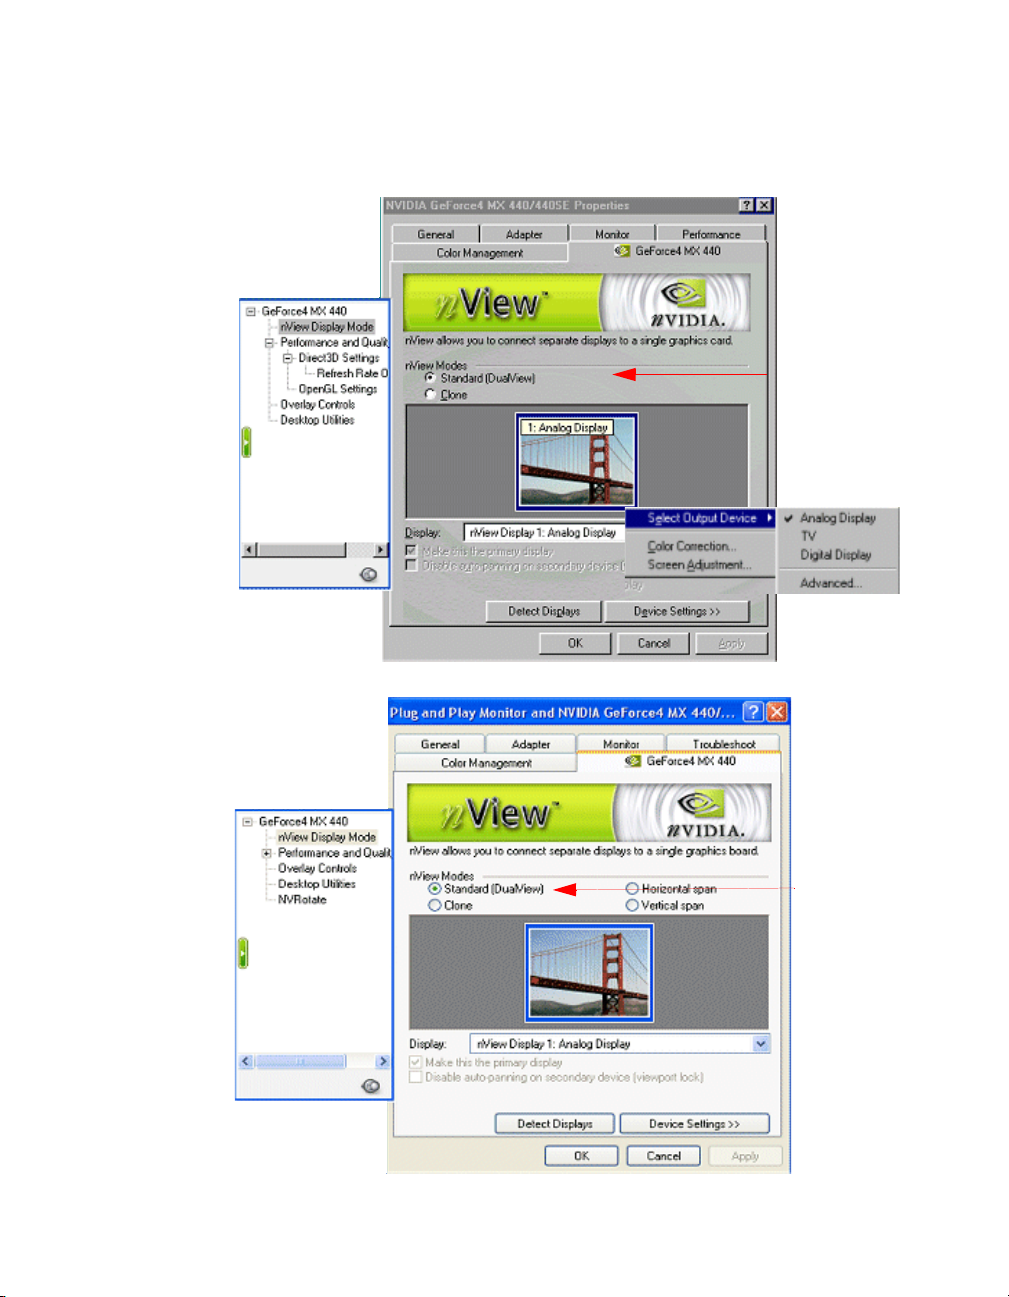
Chapter 7 nView Display Mode Basics
To switch display devices from analog display (CRT) to either a digital display
or a TV display device, or variations on this combination, see “Device Selection
And Configuration” on page 87.
Figure 7.2
nView Standard (Dualview) Mode with Menu: Windows 98
Standard (Dualview)
mode
Figure 7.3
73 NVIDIA Corporation
nView Standard (Dualview) Mode Menu: Windows XP (2000)
Standard
(Dualview) mode
Page 81

NVIDIA Display Properites User’s Guide
Accessing the Configuration Options
On the nView Display Mode panel, the monitor image numbered 1 represents
the primary display device.
In Standard (Dualview) mode, only one monitor image appears.
In Clone and Span modes, the monitor image numbered 1 represents the
primary display device and the monitor image numbered 2 represents the
secondary display device.
To access nView configuration options, use any one of these procedures:
• Right click the monitor image (1 or 2) to display a pop-up menu, and than
click the option you want.
• Click the down arrow in the Display field to select the display device (i.e.,
nView Display 1 or nView Display 2) you want to configure. Then click
Device Settings to display a menu of options and choose the option you
want.
Options Available for nView Clone and Span Modes
Make this the primary display: Use this option to select the display that
contains the top left corner of the desktop. The most obvious effect of this
option is that it swaps the positions of the monitor images.
Note: This option is also available as the Primary Display option on the pop-
up menu that appears when you right click the monitor image on the
nView Display Mode panel in Clone and Span modes.
Force detection of a monitor. . If this option appears on your nView Display
Mode panel, click to check it only if you have a monitor connected to the
secondary display connector that is not being detected. This is useful for older
monitors or monitors with BNC connectors.
Clone Mode
Note: Clone Mode does not work if you have only one display device attached.
In Clone mode, two monitors display identical images, which is useful for
presentations. A presenter may use the smaller monitor on the podium, while a
projector monitor reflects the presentation to the audience.
The example in this section starts with the analog display (CRT) as the primary
display and TV or digital display as the secondary display.
NVIDIA Corporation 74
Page 82

Chapter 7 nView Display Mode Basics
• Be sure your display devices are turned on before you access the nView
Display Mode tab.
• If you turn on the devices after you have opened the nView Display Mode
panel, click Detect Displays to enable the devices.
To access nView Clone mode, follow these steps:
1 Click the Clone mode option on the nView Display Mode panel and click
Apply.
2 Click OK and Yes when the status messages appear. Your current screen is
duplicated on the clone display.
3 If necessary, click Detect Displays to enable devices. Figure 7.4 shows the
nView Clone mode setting.
4 Right click monitor image 1 to view the pop-up menu for the primary
display, which is CRT (analog display) in this example.
5 From the menu, click Select Output Device to open the Device Selection
panel. Figure 7.7 correctly shows analog display as the selected output device
for display 1.
6 Click OK to return to the nView Display Mode panel.
7 Right click monitor image 2, then Select Output Device to view the display
device that is enabled (checked) as your secondary device. Figure 7.5 shows
Digital Display as the secondary display.
8 Then click Advanced . .to display the Device Selection panel, which
confirms that the Digital Display option is enabled.
9 To switch to another device, such as TV, you simply click the TV option and
click Apply.
Figure 7.11 shows TV as the secondary display. For information on
configuring your TV display, see “TV Settings” on page 101.
10Then click Advanced . . to display the Device Selection panel, which
confirms that the TV option is enabled.
75 NVIDIA Corporation
Page 83

NVIDIA Display Properites User’s Guide
d
Figure 7.4
Figure 7.5
nView Clone Mode Menu (Display 1= Analog Display): Windows 98
Two monitor
images appear in
Clone mode
when you have
two display
devices connecte
to your computer.
Select a monitor
image and right
click on it to
display the pop-up
menu of options.
nView Clone Mode Menu (Display 2 = Digital Display): Windows 98
Right click on
monitor image
2 to see the
pop-up menu
for your
secondary
display device.
NVIDIA Corporation 76
Page 84

Chapter 7 nView Display Mode Basics
Figure 7.6
Figure 7.7
nView Clone Mode (Display 1= Analog Display): Windows XP
nView Device Selection Panel (Display 1= Analog Display)
77 NVIDIA Corporation
Page 85

NVIDIA Display Properites User’s Guide
Figure 7.8
Figure 7.9
nView Clone Mode Menu (Display 2 = Digital Display): Win 2000 (XP)
nView Device Selection Panel (Display 2 = Digital Display)
NVIDIA Corporation 78
Page 86

Chapter 7 nView Display Mode Basics
Figure 7.10
Figure 7.11
nView Clone Mode Menu (Display 2 = TV): Windows 2000 (XP)
nView Device Selection Panel (Display 2 = TV)
79 NVIDIA Corporation
Page 87

NVIDIA Display Properites User’s Guide
Figure 7.12
Figure 7.13
nView Clone Mode (Display 1 = Digital Display): Windows XP
nView Clone Mode (Display 2 = Analog Display): Windows 2000
NVIDIA Corporation 80
Page 88

Chapter 7 nView Display Mode Basics
Change Resolution: Clone Mode (Virtual Desktop)
You can use the Change Resolution option to modify Screen Resolution and
Refresh Rate for the secondary display, which allows you to enable Virtual
Desktop, a useful feature for flat panels and monitors with limited resolution.
This feature lets you pan-and-scan the entire desktop area on the secondary
display when its resolution is set to less than the value set on the primary
display.
Figure 7.14 shows the pop-up menu (right click the monitor image to display
the menu) for the secondary display, which is a digital display in this example.
Note: Notice that the Lock Pan Position option is enabled on this menu. This is
the same option as the Disable auto-panning on the secondary device
(viewport lock) check box at the bottom of the nView Display Mode
panel, which is also enabled. This feature locks the current pan position
on the secondary clone display, letting you effectively freeze the virtual
desktop at a certain position, which is useful for presentations or finedetail work in applications.
Figure 7.14
nView Clone Mode Menu (Display 2 = Digital Display): Win 2000 (XP)
Note: If the maximum resolution of the secondary display is less than the
current resolution of the primary display, once you enable Clone mode
from the nView Display Mode panel, Virtual Desktop will already be
enabled. However, you still may want to adjust the resolutions of the
81 NVIDIA Corporation
Page 89

NVIDIA Display Properites User’s Guide
primary and/or secondary device by using the Device Configuration
dialog box shown below for the secondary display or the Windows
Settings tab of your primary display.
Follow these steps to enable Virtual Desktop:
1 From the nView Display Mode panel, right click monitor image 2 (secondary
display) to display the pop-up menu and select Change Resolution to
display the Device Configuration dialog box.
Note: If you do not see the Change Resolution option on the display 2 pop-up
menu, adjust (increase) the resolution on the primary display until the
Change Resolution option becomes available from the display 2 popup menu.
Figure 7.15
nView Clone Mode Device Configuration
Use the slider (Figure 7.15) to set the Screen Resolution at a value that is not
2
equal to the Screen Resolution on the Windows Display Properties Settings
panel of your primary display.
Note: If you set the same Screen Resolution value for both primary and
secondary displays, you cannot pan/scan the desktop area on the
secondary display; both displays will remain static.
3 Optional: If you want, you can select a refresh rate from the list box
4 Click Apply and OK. Notice that the resolution of your secondary display
changes and you can use your mouse to pan and scan the desktop on this
secondary display.
NVIDIA Corporation 82
Page 90

Chapter 7 nView Display Mode Basics
Horizontal & Vertical Span Modes
Note: Span modes do not work if you have only one display device attached.
In Span mode, the Windows desktop area is spread across both display devices.
This mode can be set for multiple categories of displays, although display
limitations may override the capabilities of your NVIDIA multi-display
graphics card. For example, if the second display is an NTSC TV monitor,
depending on the TV encoder on the graphics card, the resolution may not be set
above 800 x 600 and the refresh rate cannot be set above 60 Hz. However, the
PC monitor in such a configuration may have its refresh rate and resolution set
much higher. The desktop may be “stretched” horizontally or “stacked”
vertically, depending on user needs.
Due to operating system differences between Windows 9x and Windows NT
4.0/Windows 2000, the latter does not currently offer true multi-monitor
support for Span mode using one NVIDIA multi-display graphics card
result, the size of the actual desktop is limited to twice the smaller size of the
two displays.
Note: The desktop can be extended either horizontally (Figure 7.16 through
Figure 7.18) or vertically (Figure 7.18 and Figure 7.19).
To access the nView Span modes, follow these steps:
1
. As a
1 Click the Horizontal or Vertical Span mode option on the nView Display
Mode panel and click Apply.
2 Click OK and Yes when the messages appear.
• If you just switched from Standard (Dualview) to one of the Span modes,
your digital display or TV display will be activated. If needed, click
Detect Displays to enable the display devices.
• If you just switched from Clone to one of the Span modes, the Windows
display on the Clone device will be removed.
3 Depending on whether you have Horizontal or Vertical Span mode enabled,
you can drag your active windows, images, or icons horizontally or vertically
to move them to the secondary display.
1. If two graphics cards are installed, the Windows 2000 operating system does detect two devices
83 NVIDIA Corporation
Page 91

NVIDIA Display Properites User’s Guide
Figure 7.16
Figure 7.17
nView Horizontal Span Mode (Display 1= Analog Display): Windows XP
Two monitor
images appear in
Span mode
when you have
two display
devices connected
to your computer.
Select the monitor
image and right
click on it to display
the pop-up menu
of options.
nView Horizontal Span (Display 2 = Digital Display) Windows XP
NVIDIA Corporation 84
Page 92

Chapter 7 nView Display Mode Basics
Figure 7.18
Figure 7.19
nView Clone & Horizontal Span Modes: Primary Displays (Windows XP)
nView Vertical Span Mode (Display 2 = Digital Display): Windows XP
85 NVIDIA Corporation
Page 93

NVIDIA Display Properites User’s Guide
Other Configuration Options
For details on configuring display devices, such as a TV, see “Device Selection
And Configuration” on page 87.
For details on configuring additional features, see “Additional Features and
Enhancements” on page 106.
NVIDIA Corporation 86
Page 94

Chapter 8 Device Selection And Configuration
C HAPTER
D
EVICE
This chapter contains the following major sections:
• “Switching Displays in nView Span, Clone, or Standard (Dualview) Mode”
on page 87
• “Switching Displays in Dualview Mode” on page 92
• “Device Adjustments: Analog Display (CRT)” on page 96
S
ELECTION
A
ND
C
ONFIGURATION
• “Device Adjustments: Flat Panel” on page 98
• “TV Settings” on page 101
Switching Displays in nView Span, Clone, or Standard (Dualview) Mode
If you have the nView Display Mode (Standard (Dualview), Span, or Clone)
enabled and have multiple display devices connected to your computer, you can
easily switch between the displays by following these steps:
1 Right click on the monitor image of the secondary display device (2) if you
are in Span or Clone mode; or, if you are in Standard (Dualview) mode,
simply right click on the single monitor image that appears.
2 Click Select Output Device.
3 Then click the display device you want to switch to.
Select the output display device (monitor, digital flat panel, or TV)
depending on the devices your graphics processor supports.
87 NVIDIA Corporation
Page 95

NVIDIA Display Properites User’s Guide
4 When you see the messages in Figure 8.1 and Figure 8.2, click OK and Yes
to continue.
Figure 8.1
Display Settings Message
Figure 8.2
Confirm Display Settings Message
Switching Secondary to Primary Display: nView Clone or Span Mode
The examples in this section show a variety of changes to the monitor images in
the nView Display Mode panel as you are switching devices between two
secondary displays or switching from primary to secondary device or vice versa.
Figure 8.3
nView Clone Mode (Display 2 = Digital Display): Windows XP
NVIDIA Corporation 88
Page 96

Chapter 8 Device Selection And Configuration
Figure 8.4
Figure 8.5
nView Clone Mode (Display 1 = Digital Display) Windows XP
nView Vertical Span (Display 2 = Analog Display): Windows XP
89 NVIDIA Corporation
Page 97

NVIDIA Display Properites User’s Guide
Figure 8.6
Figure 8.7
nView Horizontal Span/Clone Modes (Primary Displays): Windows XP
nView Vertical Span (Display 2 = Digital Display): Windows XP
NVIDIA Corporation 90
Page 98

Chapter 8 Device Selection And Configuration
Figure 8.8
Figure 8.9
Device Selection: Analog or Digital Display as Primary Display
Device Selection: nView Standard (Dualview) Mode (1)
91 NVIDIA Corporation
Page 99

NVIDIA Display Properites User’s Guide
Figure 8.10
Device Selection: nView Standard (Dualview) Mode (2)
Switching Displays in Dualview Mode
Note: It is assumed that you have you have at least two display devices
connected to your graphics card. You can use the basic procedure
described here to switch between any devices that are connected.
When you are in Dualview mode (not in nView Stands, Clone, or Span Mode),
you can use the following procedure to switch displays.
1 Right click from your Windows desktop and click Properties and the
Settings tab to display the Settings panel in “Dualview” mode (Figure 8.11
through Figure 8.13).
2 Click either monitor image 1 or 2, depending on the display you want to work
with and click Apply, if needed.
3 Click Advanced and then the NVIDIA GPU tab.
4 Click the Device Selection option from the Media Center menu to display the
Device Selection panel. Figure 8.14 and Figure 8.15 show examples of
Device Selection panels with different devices selected.
NVIDIA Corporation 92
Page 100

Chapter 8 Device Selection And Configuration
5 Click Detect Displays if you want to detect all display devices connected to
the output device (analog display, digital display, or TV) that is enabled on
the Device Selection panel.
Figure 8.11
Display Settings Dualview Mode: Windows XP
Figure 8.12
93 NVIDIA Corporation
Display Settings Dualview Mode: Windows 2000
 Loading...