

Page 1

DU-07635-001_v01 | May 2015
User Guide
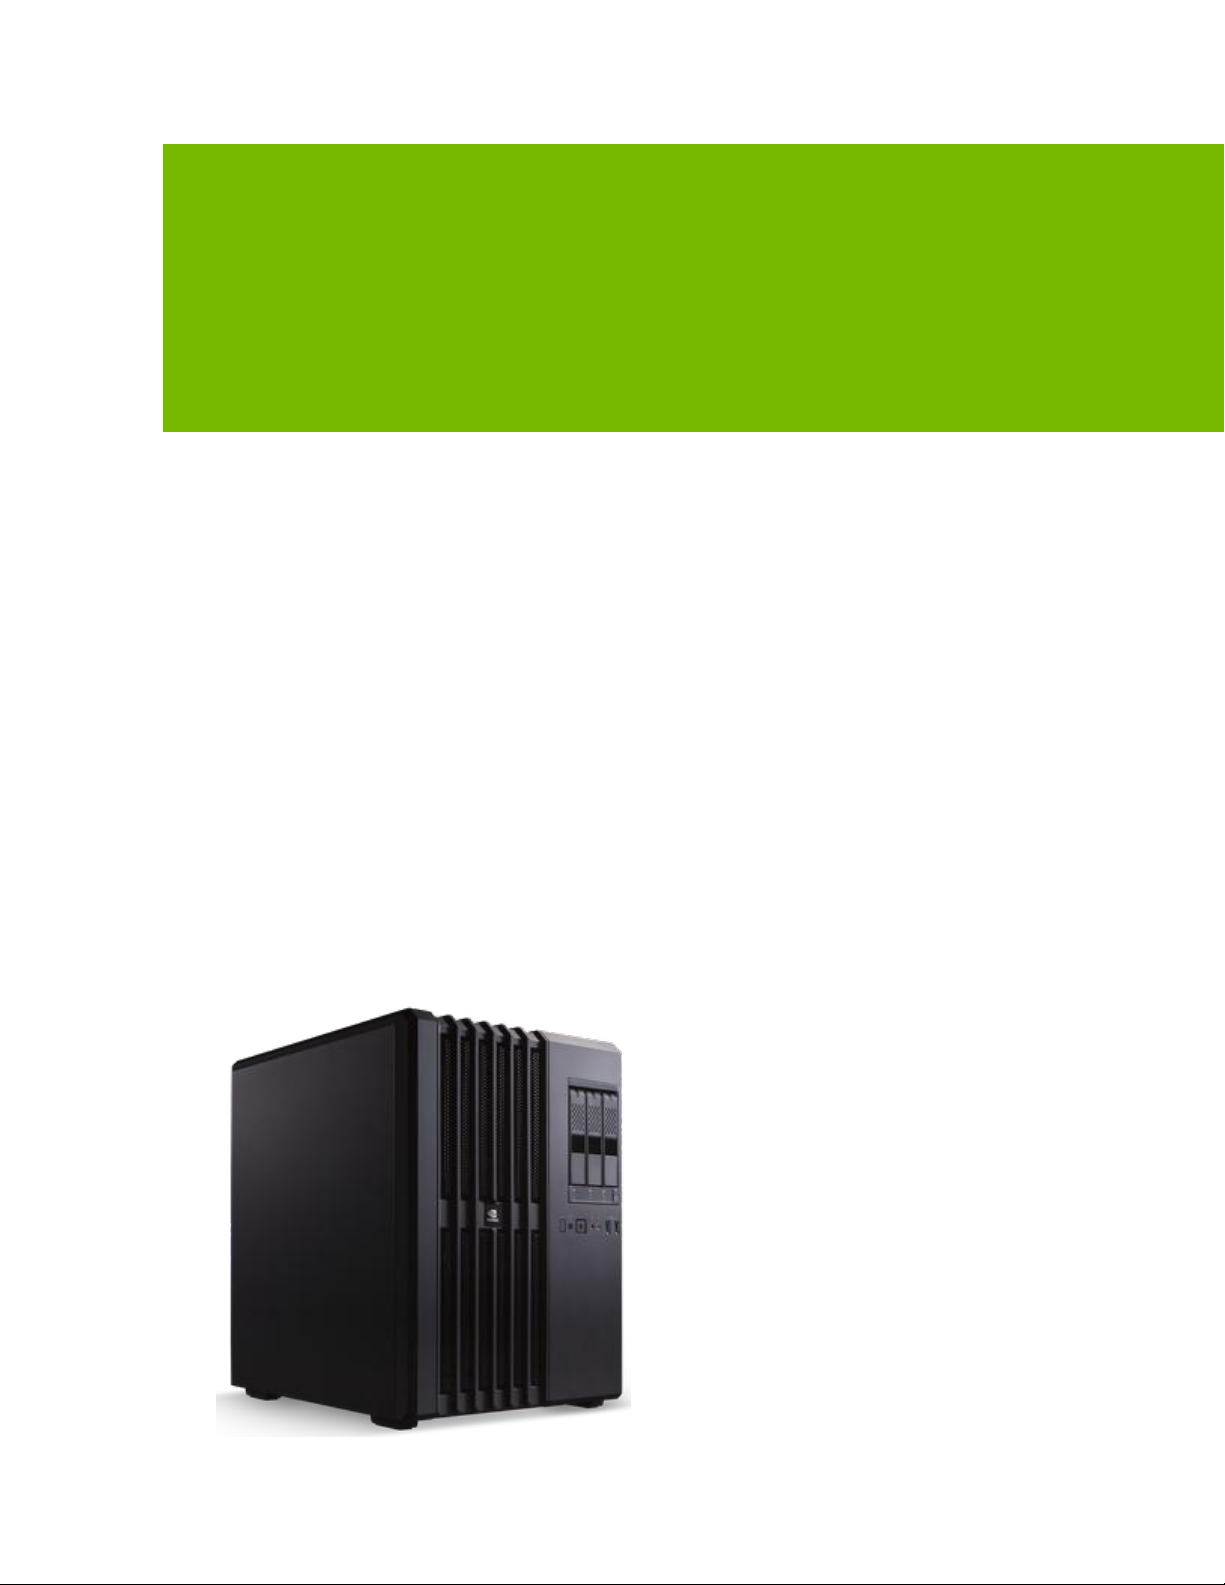
DIGITS DEVBOX
Page 2

TABLE OF CONTENTS
Introduction to NVIDIA DIGITS DevBox ................................................. 4
Background .................................................................................................... 4
DIGITS DevBox Overview ................................................................................... 5
DIGITS DevBox Specification ................................................................ 6
Features and Architecture Summary ...................................................................... 6
Component Specifications ................................................................................... 7
Components ................................................................................................ 7
Mechanical .................................................................................................. 7
Power ........................................................................................................ 7
Connections ................................................................................................ 8
Setup and Maintenance ...................................................................... 10
Setting Up the DIGITS DevBox ............................................................................ 11
What’s in the Box ......................................................................................... 11
QuickStart Setup .......................................................................................... 11
Software Updates ............................................................................................ 16
Configuring Multiple Displays .............................................................................. 17
Accessing DIGITS Remotely ............................................................................... 18
Performing a Factory Reset ................................................................................ 18
Rebuilding the RAID 5 Array ............................................................................... 19
Safety ............................................................................................. 25
Preface ........................................................................................................ 25
Important Safety Information ............................................................................. 27
Symbols on Equipment .................................................................................. 27
General Precautions ...................................................................................... 28
Precautions for Power Connection ..................................................................... 29
Precaution for Communication Cable .................................................................. 30
Power Rating of NVIDIA DIGITS DevBoxTM .......................................................... 30
Compliance ...................................................................................... 31
UNITED STATES .......................................................................................... 31
CANADA .................................................................................................... 32
EUROPEAN UNION ....................................................................................... 32
DIGITS DevBox ii
Page 3

!
CAUTION: Indicates information that must be observed to avoid bodily injury.
Note: Indicates additional helpful information.
1. Numbered steps are used to indicate the order in which instructions are to be
followed.
Bulleted items are used to indicate a list of items in no particular order.
Bold text indicates names of software files, controls, and buttons – especially where
some action upon them is indicated.
Italic text is used for labels, such as names of windows, dialog boxes, or tabs.
CONVENTIONS USED IN THIS DOCUMENT
This document uses the following conventions:
DIGITS DevBox iii
Page 4
INTRODUCTION TO NVIDIA DIGITS DEVBOX
BACKGROUND
Deep learning is one of the fastest growing segments in the machine learning/artificial
intelligence field. It uses algorithms to model high-level abstractions of data in order to
gain meaningful insight for practical application. Such data manipulation has
application in various fields, such as computer vision, speech recognition and language
processing, and audio recognition.
It takes tremendous processing power to efficiently process such huge amounts of data
using deep learning algorithms. To that end, NVIDIA has developed an all-in-one,
powerful, energy-efficient, cool, and quiet deskside solution, called the NVIDIA®
DIGITSTM DevBox.
DIGITS DevBox 4
Page 5

DIGITS DevBox Specification
DIGITS DEVBOX OVERVIEW
The DIGITS DevBox combines the world’s best hardware, software, and systems
engineering for deep learning in a powerful solution that can fit under your desk. It is a
single deskside machine comprised of:
Four NVIDIA GeForce TITAN X GPUs
NVIDIA DIGITS software: Interactive Deep Learning GPU Training System
Pre-installed Ubuntu 14.04.2 LTS
Pre-installed deep learning frameworks – Caffe, Torch, Theano, and BIDMach
NVIDIA CUDA Deep Learning Neural Network library (cuDNN) v2
NVIDIA CUDA Toolkit 7.0
DIGITS DevBox 5
Page 6

DIGITS DEVBOX SPECIFICATION
FEATURES AND ARCHITECTURE SUMMARY
CPU
Intel Core i7 processor on an ASUS x99E-WS motherboard with 64 GB DDR4 memory
GPU
Four NVIDIA GeForce TITAN X GPUs, installed with NVIDIA qualified drivers
Operating System and Software
The system comes with the following software and OS pre-installed on the SATA3 SSD:
Ubuntu 14.04.2 LTS
NVIDIA DIGITS® Software
Caffe, Torch, Theano, and BIDMach deep learning frameworks
NVIDIA CUDA Toolkit 7.0, including the CUDA Deep Learning Neural Network
library (cuDNN) v2.
Storage
3x3 TB RAID 5 hard disk drives with separate PCIe SSD cache
DIGITS DevBox 6
Page 7
COMPONENT SPECIFICATIONS
Component
Qty
Description
Motherboard
1
ASUS X99-E WS
4xPCIe x16 slots
For the full motherboard spec, see
http://dlcdnet.asus.com/pub/ASUS/server/e9552_x99_e_ws_ug_
for_web_only.pdf
CPU
1
Intel 6-core i7-5930K
RAM
2
2x32 GB DDR4 (Vengeance LPX 32GB (4x8GB) DDR4 DRAM
2133MHz)
GPU
4
GeForce TITAN X, featuring
- 7 teraflops of single-precision computing power,
- 336.5 GB/s of memory bandwidth, and
- 12 GB of memory
RAID 5 Storage
(Data)
3
Western Digital RE 3TB 7200 RPM 64MB Cache SATA 6.0Gb/s 3.5"
Storage (cache)
1
SSD M.2 SATA MODULE SAMSUNG XP941 M.2 512GB PCI EXPRESS
Storage (OS)
1
Samsung 850 EVO 250GB 2.5in SATA III Internal SSD
Power Supply
1
EVGA SuperNOVA 1600 T2 Power Supply
Component
Description
Height
18” (458mm)
Width
13” (332mm)
Depth
16.3” (415mm)
Gross Weight
48 lbs
Input
Comments
115 - 240 VAC, 17-10A,
(50 - 60 Hz)
The DIGITS DevBox power consumption can reach 1350W (ambient
temperature 30◦ C) with all system resources under a heavy load.
Be aware of your electrical source’s power capability to avoid
overloading the circuit.
Components
DIGITS DevBox Specification
Mechanical
Power
DIGITS DevBox 7
Page 8
Connections
Type
Qty
Description
DisplayPort
4
1 per GeForce TITAN X card
HDMI
4
1 per GeForce TITAN X card
Ethernet
2
RJ45 LAN port- 1 Gbps
Audio
5
Mini stereo jack audio output
Audio
1
Optical S/PDIF output
USB
10
USB 3.0
eSATA
2
6 Gbps eSATA port
Port Color
2-channel
4-channel
6-channel
8-channel
Light Blue
Line In
Line In
Line In
Side Speaker
Lime Green
Line Out
Front
Speaker
Front
Speaker
Front
Speaker
Pink
Mic In
Mic In
Mic In
Mic In
Orange
N/A
N.A
Center/
Subwoofer
Center/
Subwoofer
Black
N/A
Rear Speaker
Rear Speaker
Rear Speaker
Ports
DIGITS DevBox Specification
Audio Port Definitions
DIGITS DevBox 8
Page 9
DIGITS DevBox Specification
Activity/Link LED
Status
Description
Off
No link
Orange
Linked
Orange (blinking)
Data activity
Orange (blinking
then steady)
Ready to wake
Speed LED
Status
Description
Off
10 Mbps connection
Orange
100 Mbps connection
Green
1 Gbps connection
LAN Port Indicator
LEDs on each ethernet port indicate the connection status as described in the following
tables.
DIGITS DevBox 9
Page 10

SETUP AND MAINTENANCE
This section explains how to set up and maintain the DIGITS Devbox. It contains the
following topics:
Setting Up the DIGITS DevBox
Software Updates
Configuring Multiple Displays
Connecting Remotely
Performing a Factory Reset
Rebuilding the RAID 5 Array
DIGITS DevBox 10
Page 11

Setup and Maintenance
NVIDIA DIGITS DevBox
Power Cable
Three (3) hard disk drives
DisplayPort-to-DVI adapter
Welcome Card
SETTING UP THE DIGITS DEVBOX
What’s in the Box
Be sure to inspect each piece of equipment shipped in the packing box. If anything is
missing or damaged, contact NVIDIA.
What’s included with your NVIDIA DIGITS DevBox:
QuickStart Setup
The three hard disk drives are packaged separately from the system.
You must install all three hard disk drives into the system prior to powering up the
DIGITS DevBox.
Installing the Hard Disks
1. Flip open the three latches on the front of the DevBox.
2. Insert the three hard disk drives into the slots.
DIGITS DevBox 11
Page 12

Setup and Maintenance
3. Close the latches to secure.
To ensure that the hard disks are seated properly,
a) Lower the latches just to the point where you need to push them closed.
b) Push the hard disks to make sure they are securely seated.
c) Push the latches down all the way until they snap in place.
The DevBox is now ready to power up.
DIGITS DevBox 12
Page 13

Setup and Maintenance
Powering Up the DIGITS DevBox
1. Connect the power cable supplied to the power connector of the DIGITS DevBox.
2. Plug the power adapter into an appropriately rated electrical outlet.
The DIGITS DevBox power consumption can reach 1350W under a heavy, multiGPU workload. Be sure the DevBox is connected to an adequately rated circuit to
avoid overloading the circuit.
3. Connect the keyboard and mouse (not included).
4. Connect the monitor (not included).
Depending on your monitor, connect it to either the DisplayPort or HDMI connector
of the graphics card located at the “top” position in the DevBox.
5. Connect a network cable.
6. Press and release the power button on the DIGITS DevBox.
DIGITS DevBox 13
Page 14
Setup and Maintenance
Initial Setup
The first time you power on the DevBox and enter Ubuntu, there are a few system setup
steps to go through, such as agreeing to the NVIDIA cuDNN and CUDA software
licenses agreements, specifying your time zone, and setting up your system user name
and password. After that, the Welcome screen appears while the system processes the
initialization. This may take a few minutes. Wait for this step to complete, and then you
can log in to the system and start using the DevBox.
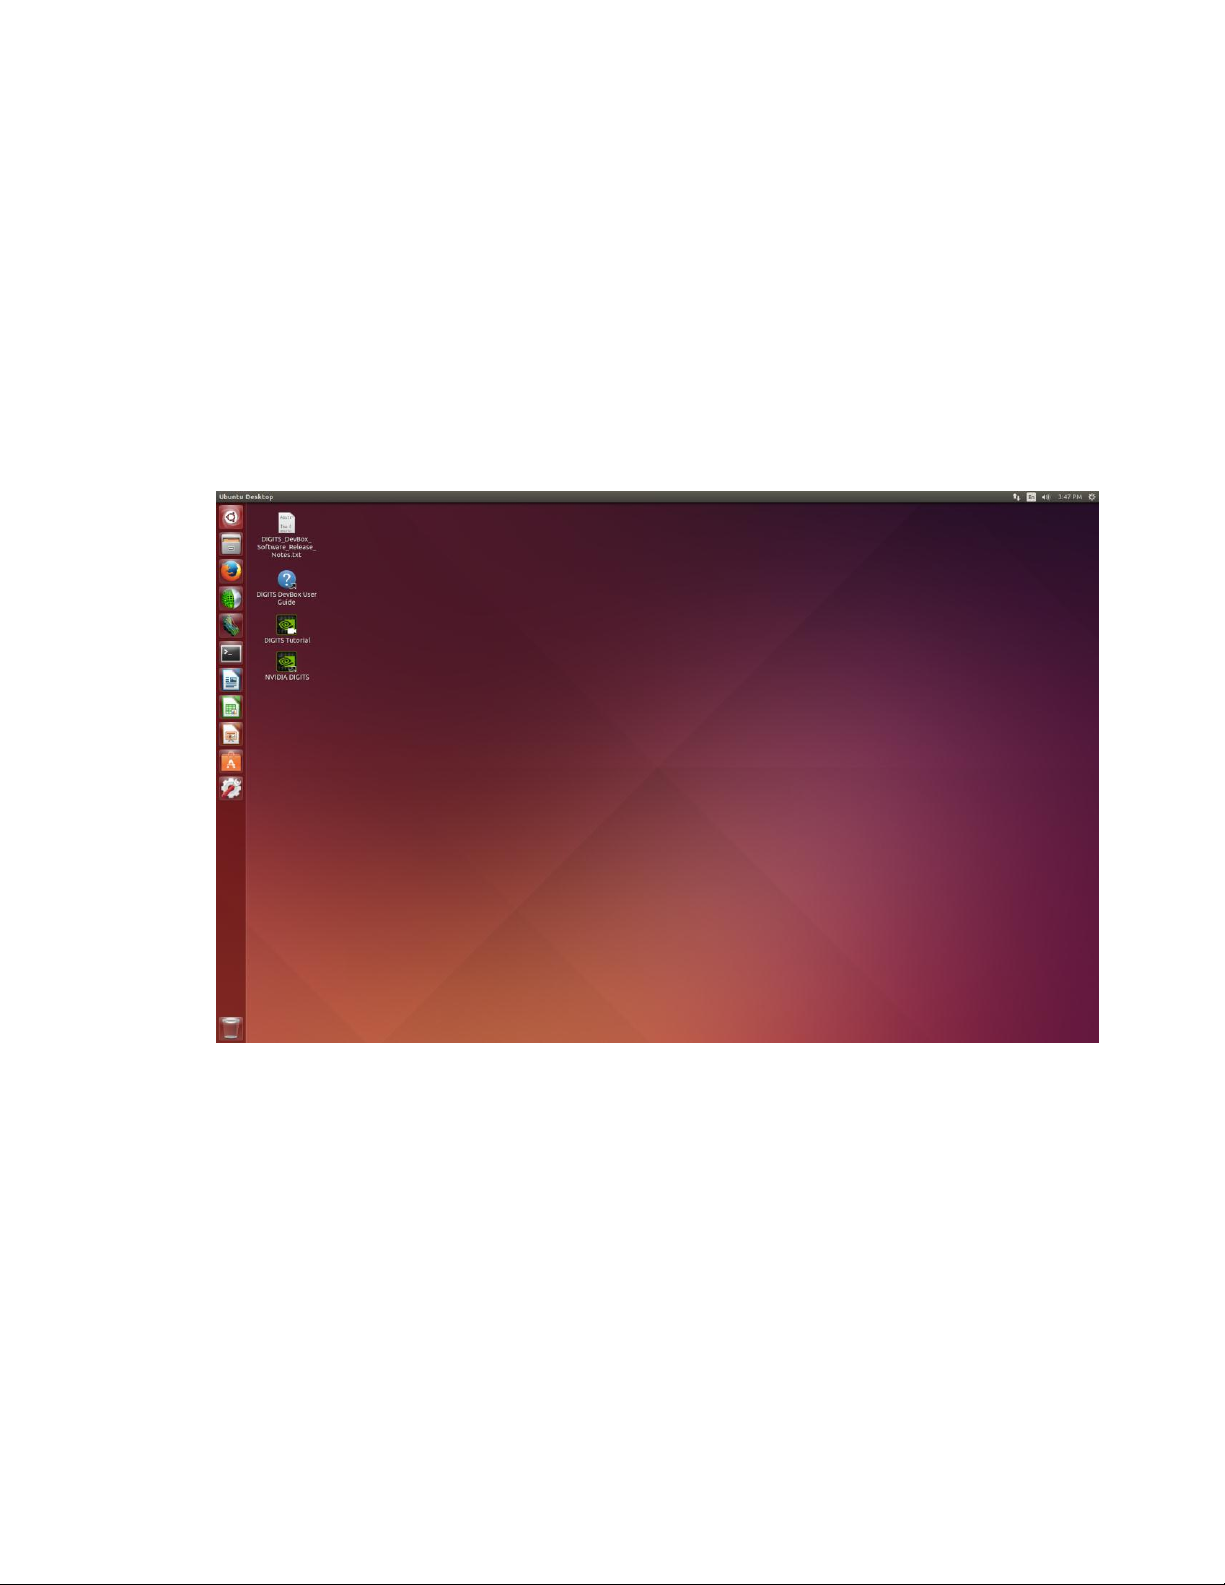
After logging in, the Ubuntu desktop appears and contains shortcuts to DIGITS DevBox
Software Release Notes, the DIGITS DevBox User Guide, DIGITS Tutorial, and the
NVIDIA DIGITS software.
DIGITS DevBox 14
Page 15

Using the Software
Double-click the NVIDIA DIGITS icon to launch the software.
The DIGITS software opens to the Home screen.
Setup and Maintenance
For an explanation of the software, double-click the DIGITS Tutorial icon to launch the
tutorial video.
DIGITS DevBox 15
Page 16
Setup and Maintenance
SOFTWARE UPDATES
Automatic Updates
You will be notified automatically of software updates when they are available. Click
the notification balloon and follow the prompts to update the software.
Manual Updates
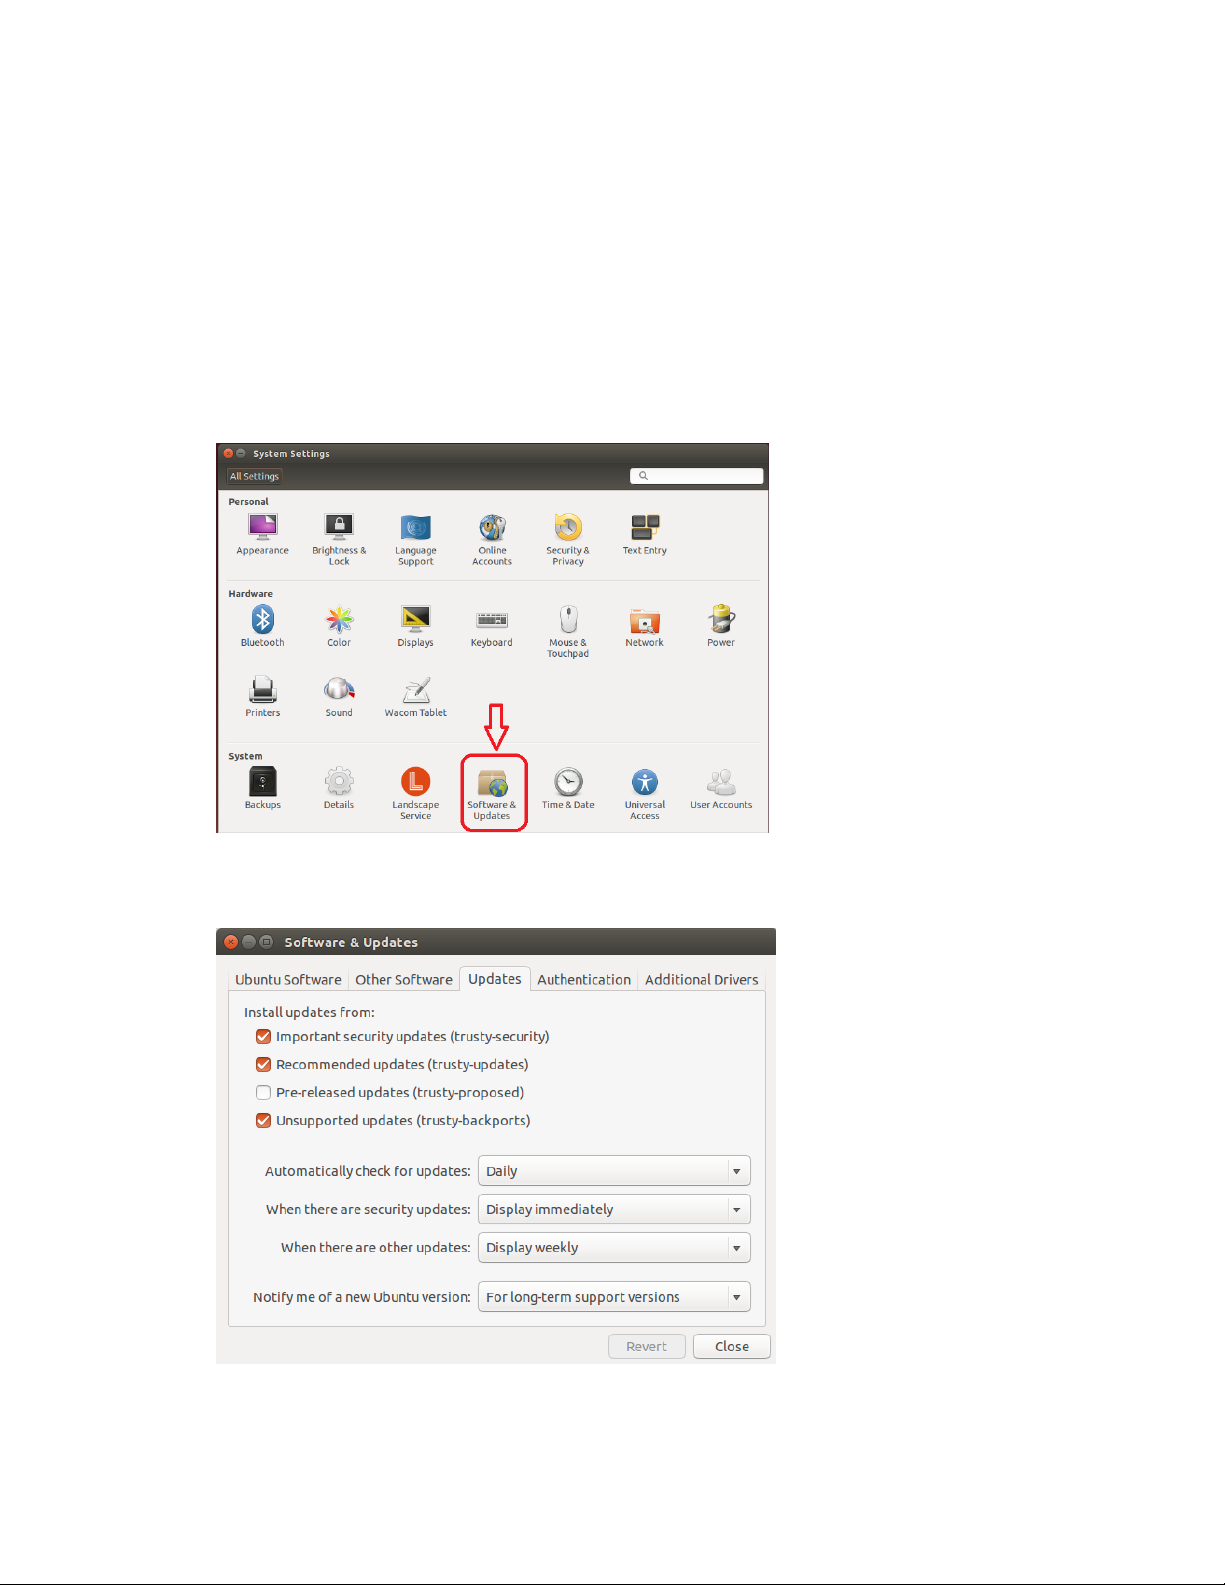
You can also check for updates yourself by opening the System Settings window.
Double-click Software & Updates to open the corresponding dialog where you can set
up your update schedule or check for updates immediately.
DIGITS DevBox 16
Page 17
Setup and Maintenance
CONFIGURING MULTIPLE DISPLAYS
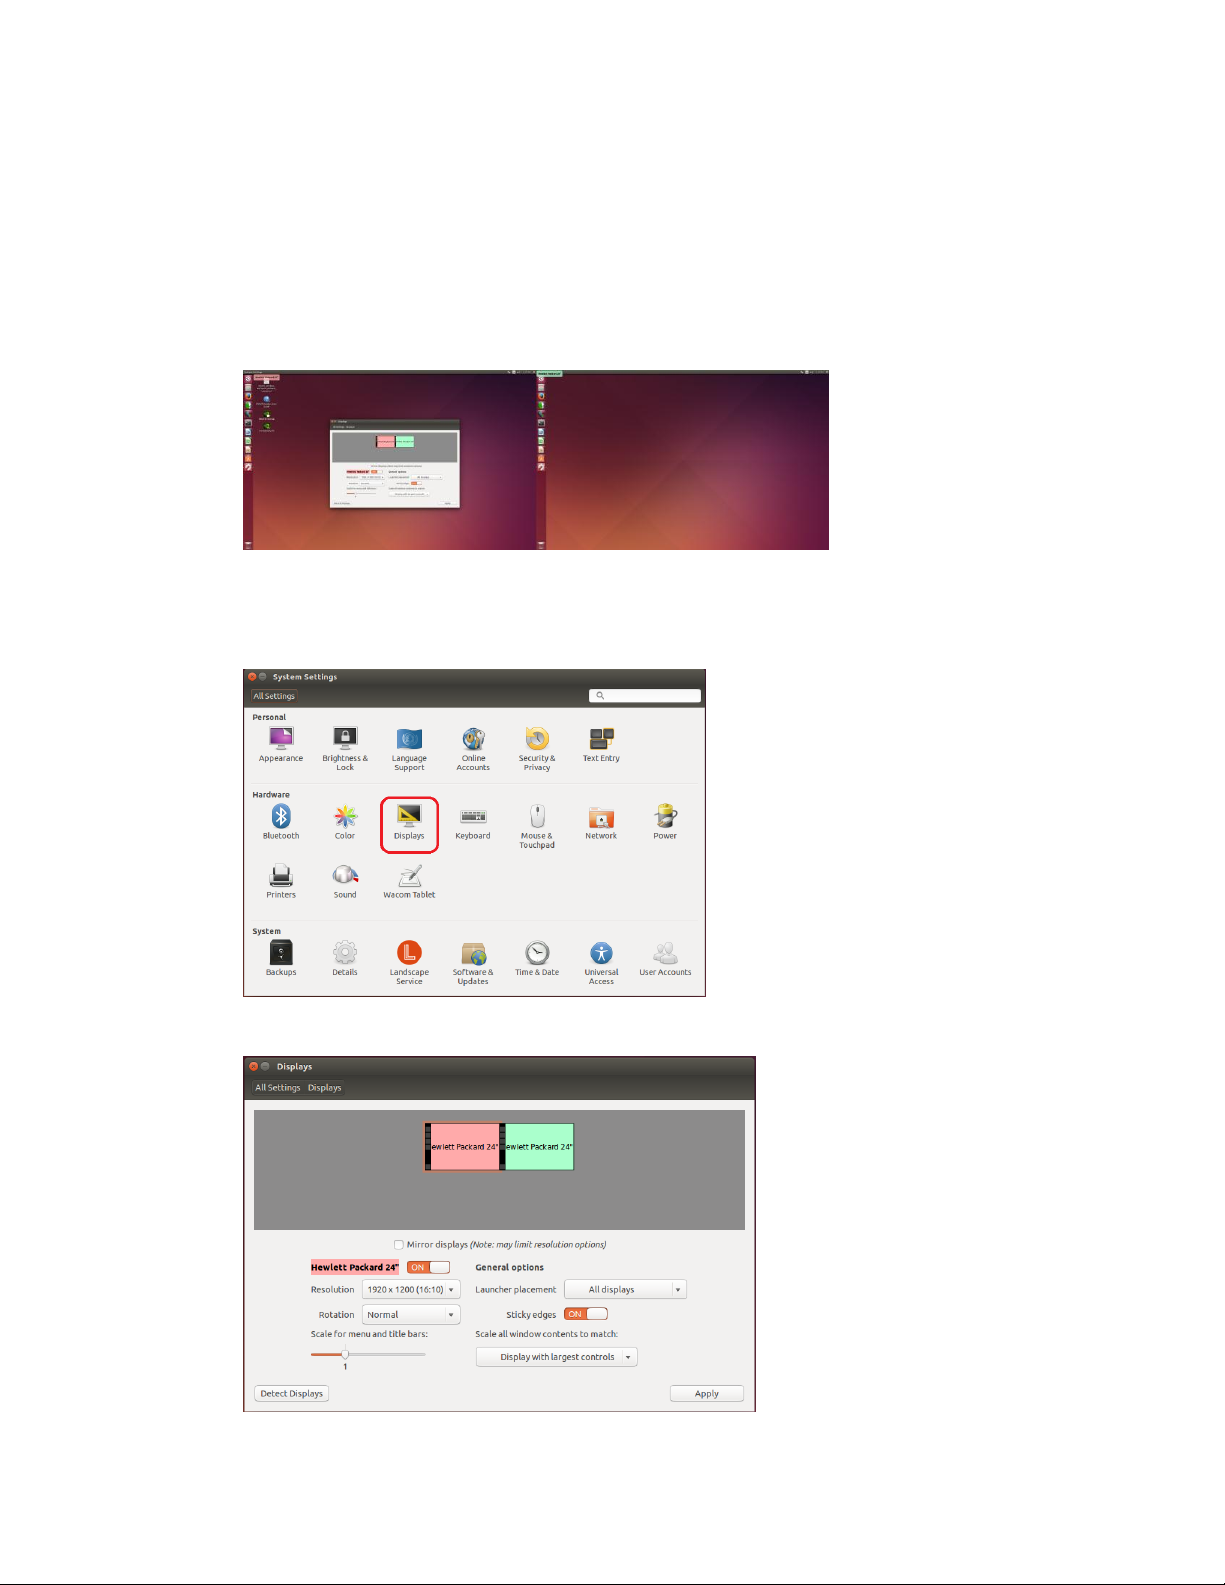
To use two displays,
1. Connect both displays to the GPU in the top position of the DevBox.
2. Turn on the Devbox and log in.
The two displays will be activated automatically.
The desktop controls appear on the primary display.
3. To adjust the display configuration, such as switching primary displays or changing
monitor positions, open the System Settings window, then double-click Displays.
The Displays window opens where you can make your display changes.
DIGITS DevBox 17
Page 18

Setup and Maintenance
ACCESSING DIGITS REMOTELY
You can easily connect to the DIGITS DevBox and run the DIGITS software over your
network by opening a browser and entering “http://<host name>“ (where <host name> is
the host name for your DevBox) or the IP address for your DevBox.
PERFORMING A FACTORY RESET
Contact your NVIDIA support group if you need to re-image the OS on the DevBox.
DIGITS DevBox 18
Page 19

Setup and Maintenance
REBUILDING THE RAID 5 ARRAY
If one of the disk drives from the RAID 5 array fails, you need to replace the failed drive
with a new one and then rebuild the array to re-generate the lost data on the newly
added drive.
The LEDs for each disk drive in the array indicate the general state of the corresponding
disk.
A blue light indicates the disk is powered up properly, while a blank LED indicates the
disk is not working.
You can also verify the health of the array by clicking the Ubuntu search icon and then
entering “disks” in the search bar.
The Disks window shows the degraded state of the array.
DIGITS DevBox 19
Page 20

Setup and Maintenance
How to Replace One of the RAID 5 Hard Disks
To replace one of the RAID 5 hard disk, do the following:
1. Power down the DevBox.
2. On the front of the DevBox, flip open the latch for the hard disk that you want to
replace.
Opening the latch is a two-step process.
a) First pull down on the tab to unlock the latch,
b) Then swing the latch up.
As you swing the latch all the way up, the hard disk unseats.
DIGITS DevBox 20
Page 21

3. Grab the hard disk and pull it straight out.
4. Insert the replacement hard disk into the slot.
Setup and Maintenance
5. Close the latch to secure.
To ensure that the hard disk is inserted properly,
a) Lower the latch just to the point where you need to push it closed.
b) Push the hard disk to make sure it is securely seated.
c) Push the latch down all the way until it snaps in place.
You can now power up your DevBox and rebuild the array as described in the
following section.
DIGITS DevBox 21
Page 22

Setup and Maintenance
How to Rebuild the RAID 5 Array with the New Drive
After you have replaced the degraded or failing RAID 5 disk with a new one, turn on the
DevBox and then rebuild the array as follows:
1. At the Ubuntu window, click the search icon and then enter “disks” in the search
bar.
The Disks window shows the status of the array.
2. Click the Settings icon and then click RAID Disks from the menu.
DIGITS DevBox 22
Page 23

3. From the RAID Disks window, select the disk to add from the list.
Setup and Maintenance
4. Click Add when asked if you are sure you want to add the disk to the array.
5. At the Authenticate dialog, enter the password and then click Authenticate.
DIGITS DevBox 23
Page 24

The Disks page show the recovery progress of the array.
When completed, the Disks page shows the state of the working array.
Setup and Maintenance
DIGITS DevBox 24
Page 25

SAFETY
PREFACE
NVIDIA products are designed to operate safely when installed and used according to
the product instructions and general safety practices. The guidelines included in this
document explain the potential risks associated with computer operation and provide
important safety practices designed to minimize these risks. By carefully following the
information contained in this document and the specific instructions provided with your
product, you can protect yourself from hazards and create a safer computer work
environment.
The product is designed and tested to meet IEC 60950-1, the Standard for the Safety of
Information Technology Equipment. This also covers the national implementation of
IEC 60950-1 based safety standards around the world e.g. UL 60950-1. These standards
reduce the risk of injury from the following hazards:
Electric shock: Hazardous voltage levels contained in parts of the product
Fire: Overload, temperature, material flammability
Mechanical: Sharp edges, moving parts, instability
Energy: Circuits with high energy levels (240 volt amperes) or potential as burn
hazards
Heat: Accessible parts of the product at high temperatures
Chemical: Chemical fumes and vapors
Radiation: Noise, ionizing, laser, ultrasonic waves
Retain and follow all product safety and operating instructions. Always refer to the
documentation supplied with your equipment. Observe all warnings on the product and
in the operating instructions.
DIGITS DevBox 25
Page 26

Safety
Read all safety information below and operating instructions before using NVIDIA®
DIGITS DevBox™ to avoid injury.
WARNING: FAILURE TO FOLLOW THESE SAFETY INSTRUCTIONS COULD
RESULT IN FIRE, ELECTRIC SHOCK OR OTHER INJURY OR DAMAGE. ELECTRICAL
EQUIPMENT CAN BE HAZARDOUS IF MISUSED. OPERATION OF THIS PRODUCT, OR
SIMILAR PRODUCTS, MUST ALWAYS BE SUPERVISED BY AN ADULT. DO NOT
ALLOW CHILDREN ACCESS TO THE INTERIOR OF ANY ELECTRICAL PRODUCT
AND DO NOT PERMIT THEM TO HANDLE ANY CABLES.
DIGITS DevBox 26
Page 27

Symbol
Meaning
This symbol in conjunction with any of the following symbols indicates the
presence of a potential hazard. The potential for injury exists if warnings are not
observed. Consult your documentation for specific details.
This symbol indicates the presence of hazardous energy circuits or electric shock
hazards. Refer all servicing to qualified personnel.
WARNING: To reduce the risk of injury from electric shock hazards, do not open
this enclosure. Refer all maintenance, upgrades, and servicing to qualified
personnel.
This symbol indicates the presence of electric shock hazards. The area contains no
user or field serviceable parts. Do not open for any reason.
WARNING: To reduce risk of injury from electric shock hazards, do not open this
enclosure.
This symbol indicates the presence of a hot surface or hot component. If this
surface is contacted, the potential for injury exists.
WARNING: To reduce the risk of injury from a hot component, allow the surface
to cool before touching.
This symbol indicates that the component exceeds the recommended weight for
one individual to handle safely.
WARNING: To reduce the risk of personal injury or damage to the equipment,
observe local occupational health and safety require and guidelines for manual
material handling.
The symbol indicates the presence of a sharp edge or object that can cause cuts
or other bodily injury.
IMPORTANT SAFETY INFORMATION
To reduce the risk of bodily injury, electric shock, fire and damage to the equipment,
observe all precautions included in this guide.
Symbols on Equipment
Safety
DIGITS DevBox 27
Page 28

Safety
Symbol
Meaning
WARNING: To prevent cuts or other bodily injury, do not contact sharp edge or
object.
These symbols indicate the presence of mechanical parts that can result in
pinching, crushing or other bodily injury.
WARNING: To avoid risk of bodily injury, keep away from moving parts.
This symbol indicates the presence of a potential tip over hazard that can result in
bodily injury.
WARNING: To avoid risk of bodily injury, follow all instructions for maintaining
stability of the equipment during transport, installation and maintenance.
General Precautions
To reduce the risk of personal injury or damage to the equipment:
● Shut down the product and disconnect all AC power cords and cables before
installation.
● Do not connect or disconnect any cables when perform installation, maintenance,
or reconfiguration of this product during an electrical storm.
● Never turn on any equipment when there is evidence of fire, water, or structural
damage.
● Place the product away from radiators, heat registers, stoves, amplifiers, or other
products that produce heat.
● Never use the product in a wet location.
● Avoid inserting foreign objects through openings in the product.
● Do not use conductive tools that could bridge live parts.
● Do not make mechanical or electrical modifications to the equipment.
● Use the product only with approved equipment.
● Follow all cautions and instructions marked on the equipment. Do not attempt to
defeat safety interlocks (where provided).
● Operate DIGITS DevBox™ in a place where the temperature is always between 5
and 30°C (41 to 86°F).
DIGITS DevBox 28
Page 29

Safety
Precautions for Power Connection
Power Cords
To reduce the risk of electric shock or damage to the equipment:
Use power cables provided with this product.
If you have to change the power cords for any reason, use an approved power cord. .
You must use a power cord rated for your product and for the voltage and current
marked on the electrical ratings label of the product. The voltage and current rating of
the cord must be greater than the voltage and current rating marked on the product. .
Make sure that the total ampere rating of all products plugged into an extension cord
or power strip does not exceed 80 percent of the ampere ratings limit for the
extension cord or power strip.
The product is equipped with a three-wire electrical grounding-type plug which has a
third pin for ground. This plug only fits into a grounded electrical power outlet.
Plug the power cord into a grounded (earthed) electrical outlet that is easily
accessible at all times.
Do not disable the power cord grounding plug. The grounding plug is an important
safety feature.
Do not place objects on AC power cords or cables. Arrange them so that no one may
accidentally step on or trip over them.
Do not pull on a cord or cable. When unplugging from the electrical outlet, grasp the
cord by the plug.
When possible, use one hand only to connect or disconnect cables.
Do not modify power cables or plugs. Consult a licensed electrician or your power
company for site modifications.
Power Supply
Ensure that the voltage and frequency of your power source match the voltage and
frequency inscribed on the equipment’s electrical rating label. If you have the
question about the type of power source to use, contact your authorized service.
Connect to a properly wired and grounded electrical outlet, always follow your
local/national wiring rules.
The socket-outlet shall be installed near the equipment and shall be easily accessible.
If want to help protect your system from sudden, transient increases and decreases in
electrical power, a surge suppressor, line conditioner and so on could be used.
Never force a connector into a port. Check for obstructions on the port. If the
connector and port don’t join with reasonable ease, they probably don’t match. Make
DIGITS DevBox 29
Page 30

Safety
sure that the connector matches the port and that you have positioned the connector
correctly in relation to the port.
Precaution for Communication Cable
To reduce the risk of exposure to shock hazard from communication cable:
Do not connect communication cable during a lightning storm. There may be a
remote risk of electric shock from lightning.
Do not connect or use communication cable in a wet location.
Disconnect the communication cable before opening a product enclosure, touching or
installing internal components.
Power Rating of NVIDIA DIGITS DevBoxTM
Rating input: 115-240VAC, 17-10A, 50/60Hz.
DIGITS DevBox 30
Page 31

COMPLIANCE
The NVIDIA DIGITS DevBox is compliant with the regulations listed in this section.
UNITED STATES
Federal Communications Commission (FCC)
This device complies with part 15 of the FCC Rules. Operation is subject to the following two
conditions: (1) this device may not cause harmful interference, and (2) this device must accept
any interference received, including any interference that may cause undesired operation of the
device.
NOTE: This equipment has been tested and found to comply with the limits for a Class A digital
device, pursuant to part 15 of the FCC Rules. These limits are designed to provide reasonable
protection against harmful interference when the equipment is operated in a commercial
environment. This equipment generates, uses, and can radiate radio frequency energy and, if
not installed and used in accordance with the instruction manual, may cause harmful
interference to radio communications. Operation of this equipment in a residential area is likely
to cause harmful interference in which case the user will be required to correct the interference
at his own expense.
Underwriters Laboratories (UL)
DIGITS DevBox 31
Page 32

CANADA
Industry Canada (IC)
CAN ICES-3(A)/NMB-3(A)
EUROPEAN UNION
European Conformity; Conformité Européenne (CE)
Compliance
This device complies with the following Directives:
EMC Directive for Class A, I.T.E equipment.
Low Voltage Directive for electrical safety
RoHS Directive for hazardous substances
A copy of the Declaration of Conformity to the essential requirements may be obtained directly
from NVIDIA GmbH (Floessergasse 2, 81369 Munich, Germany).
DIGITS DevBox 32
Page 33

Notice
The information provided in this specification is believed to be accurate and reliable as of the date provided. However, NVIDIA
Corporation (“NVIDIA”) does not give any representations or warranties, expressed or implied, as to the accuracy or
completeness of such information. NVIDIA shall have no liability for the consequences or use of such information or for any
infringement of patents or other rights of third parties that may result from its use. This publication supersedes and replaces
all other specifications for the product that may have been previously supplied.
NVIDIA reserves the right to make corrections, modifications, enhancements, improvements, and other changes to this
specification, at any time and/or to discontinue any product or service without notice. Customer should obtain the latest
relevant specification before placing orders and should verify that such information is current and complete.
NVIDIA products are sold subject to the NVIDIA standard terms and conditions of sale supplied at the time of order
acknowledgement, unless otherwise agreed in an individual sales agreement signed by authorized representatives of NVIDIA
and customer. NVIDIA hereby expressly objects to applying any customer general terms and conditions with regard to the
purchase of the NVIDIA product referenced in this specification.
NVIDIA products are not designed, authorized or warranted to be suitable for use in medical, military, aircraft, space or life
support equipment, nor in applications where failure or malfunction of the NVIDIA product can reasonably be expected to
result in personal injury, death or property or environmental damage. NVIDIA accepts no liability for inclusion and/or use of
NVIDIA products in such equipment or applications and therefore such inclusion and/or use is at customer’s own risk.
NVIDIA makes no representation or warranty that products based on these specifications will be suitable for any specified use
without further testing or modification. Testing of all parameters of each product is not necessarily performed by NVIDIA. It is
customer’s sole responsibility to ensure the product is suitable and fit for the application planned by customer and to do the
necessary testing for the application in order to avoid a default of the application or the product. Weaknesses in customer’s
product designs may affect the quality and reliability of the NVIDIA product and may result in additional or different conditions
and/or requirements beyond those contained in this specification. NVIDIA does not accept any liability related to any default,
damage, costs or problem which may be based on or attributable to: (i) the use of the NVIDIA product in any manner that is
contrary to this specification, or (ii) customer product designs.
No license, either expressed or implied, is granted under any NVIDIA patent right, copyright, or other NVIDIA intellectual
property right under this specification. Information published by NVIDIA regarding third-party products or services does not
constitute a license from NVIDIA to use such products or services or a warranty or endorsement thereof. Use of such
information may require a license from a third party under the patents or other intellectual property rights of the third party,
or a license from NVIDIA under the patents or other intellectual property rights of NVIDIA. Reproduction of information in this
specification is permissible only if reproduction is approved by NVIDIA in writing, is reproduced without alteration, and is
accompanied by all associated conditions, limitations, and notices.
ALL NVIDIA DESIGN SPECIFICATIONS, REFERENCE BOARDS, FILES, DRAWINGS, DIAGNOSTICS, LISTS, AND OTHER DOCUMENTS
(TOGETHER AND SEPARATELY, “MATERIALS”) ARE BEING PROVIDED “AS IS.” NVIDIA MAKES NO WARRANTIES, EXPRESSED,
IMPLIED, STATUTORY, OR OTHERWISE WITH RESPECT TO THE MATERIALS, AND EXPRESSLY DISCLAIMS ALL IMPLIED WARRANTIES
OF NONINFRINGEMENT, MERCHANTABILITY, AND FITNESS FOR A PARTICULAR PURPOSE. Notwithstanding any damages that
customer might incur for any reason whatsoever, NVIDIA’s aggregate and cumulative liability towards customer for the
products described herein shall be limited in accordance with the NVIDIA terms and conditions of sale for the product..
Trademarks
NVIDIA, the NVIDIA logo, GeForce, and DIGITS are trademarks and/or registered trademarks of NVIDIA Corporation in the U.S.
and other countries. Other company and product names may be trademarks of the respective companies with which they are
associated.
Copyright
© 2015 NVIDIA Corporation. All rights reserved.
www.nvidia.com
 Loading...