

Page 1

NVIDIA DGX-1
DU-08033-001 _v13.1 | December 2017
User Guide
Page 2

TABLE OF CONTENTS
Chapter1.Introduction to the NVIDIA DGX-1 Deep Learning System................................. 1
1.1.Using the DGX-1: Overview............................................................................. 1
1.2.Hardware Specifications................................................................................. 2
1.2.1. Components.......................................................................................... 2
1.2.2. Mechanical............................................................................................ 2
1.2.3.Power Requirements................................................................................ 3
1.2.4.Connections and Controls.......................................................................... 3
1.2.5.Rear Panel Power Controls.........................................................................4
1.2.6. LAN LEDs.............................................................................................. 5
1.2.7.IPMI Port LEDs....................................................................................... 5
1.2.8.Hard Disk Indicators................................................................................ 6
1.2.9.Power Supply Unit (PSU) LED..................................................................... 6
Chapter2. Installation and Setup............................................................................ 8
2.1.Registering Your DGX-1.................................................................................. 8
2.2.Obtaining Software and Software Updates........................................................... 8
2.3.Choosing a Setup Location / Site Preparation....................................................... 9
2.4.Unpacking the DGX-1................................................................................... 10
2.5.What's In the Box....................................................................................... 11
2.6.Installing the DGX-1 Into a Rack..................................................................... 11
2.6.1.Installing the Rails................................................................................. 12
2.6.2.Mounting the DGX-1............................................................................... 12
2.7.Attaching the Bezel.....................................................................................13
2.8.Connecting the Power Cables......................................................................... 14
2.9.Connecting the Network Cables...................................................................... 15
2.10.Setting Up the DGX-1................................................................................. 16
2.11.Post Setup Instructions for DGX OS Server Software Version 2.x and Earlier................. 18
Chapter3.Preparing for Using Docker Containers......................................................20
3.1.Installing Docker and NVIDIA Docker on DGX OS Server Software 2.x or Earlier...............20
3.2.Configuring Docker IP Addresses......................................................................21
3.2.1.Configuring Docker IP Addresses for DGX OS Server Software Version 2.x and Earlier...22
3.2.2.Configuring Docker IP Addresses for DGX OS Server Software Version 3.1.1 and Later.. 22
3.3.Letting Users Issue Docker Commands...............................................................23
3.3.1.Checking if a User is in the Docker Group.................................................... 24
3.3.2.Creating a User.....................................................................................24
3.3.3.Adding a User to the Docker Group............................................................ 24
3.4.Configuring a System Proxy............................................................................24
3.5.Configuring NFS Mount and Cache................................................................... 25
Chapter4.Configuring and Managing the DGX-1........................................................ 27
4.1. Using the BMC........................................................................................... 27
4.1.1.Creating a Unique BMC Password for Remote Access........................................ 28
www.nvidia.com
NVIDIA DGX-1 DU-08033-001 _v13.1|ii
Page 3

4.1.2.Viewing System Information......................................................................29
4.1.3.Submitting BMC Log Files.........................................................................29
4.1.4.Determining Total Power Consumption.........................................................29
4.1.5.Accessing the DGX-1 Console.................................................................... 30
4.1.6.Powering Off / Power Cycling the System Remotely.........................................30
4.1.6.1.From the DGX-1 Console Window..........................................................30
4.1.6.2.From the BMC UI............................................................................. 30
4.2.Configuring a Static IP Address for the BMC........................................................31
4.2.1.Configuring a BMC Static IP Address Using ipmitool..........................................31
4.2.2.Configuring a BMC Static IP Address Using the System BIOS................................ 32
4.2.3.Configuring a BMC Static IP Address Using the BMC Dashboard............................ 36
4.3.Configuring Static IP Addresses for the Network Ports............................................37
4.4.Obtaining MAC Addresses.............................................................................. 38
Chapter5. Maintaining and Servicing the NVIDIA DGX-1............................................... 42
5.1.Problem Resolution and Customer Care............................................................. 42
5.2.Restoring the DGX-1 Software Image................................................................ 42
5.2.1.Obtaining the DGX-1 Software ISO Image and Checksum File.............................. 43
5.2.2.Re-Imaging the System Remotely............................................................... 43
5.2.3.Creating a Bootable Installation Medium...................................................... 46
5.2.3.1.Creating a Bootable USB Flash Drive by Using the dd Command......................46
5.2.3.2.Creating a Bootable USB Flash Drive by Using Akeo Rufus............................. 47
5.2.4.Re-Imaging the System From a USB Flash Drive.............................................. 49
5.2.5.Retaining the RAID Partition While Installing the OS.........................................49
5.3.Updating the System BIOS............................................................................. 50
5.4.Updating the BMC....................................................................................... 53
5.5.Replacing the System and Components..............................................................55
5.5.1.Replacing the System............................................................................. 56
5.5.2.Replacing an SSD................................................................................... 56
5.5.3.Recreating the Virtual Drives.................................................................... 57
5.5.3.1.Access the BIOS Setup Utility.............................................................. 57
5.5.3.2.Clear the Drive Group Configuration...................................................... 60
5.5.3.3.Recreate the OS Virtual Drive.............................................................. 64
5.5.3.4.Recreate the RAID0 Virtual Drive.......................................................... 72
5.5.4.Recreating the RAID 0 Array..................................................................... 84
5.5.5.Replacing the Power Supplies....................................................................85
5.5.6.Replacing the Fan Module........................................................................ 86
5.5.7.Replacing the DIMMs...............................................................................86
5.5.8.Replacing the InfiniBand Cards.................................................................. 91
5.5.9.Setting Up the InfiniBand Cards................................................................. 95
Chapter6.Installing Software on Air-Gapped NVIDIA DGX-1 Systems............................... 99
6.1.Installing NVIDIA DGX-1 Software.....................................................................99
6.1.1.Re-Imaging the System............................................................................99
6.1.2.Creating a Local Mirror of the NVIDIA and Canonical Repositories....................... 100
www.nvidia.com
NVIDIA DGX-1 DU-08033-001 _v13.1|iii
Page 4

6.2.Installing Docker Containers......................................................................... 100
Chapter7. Customer Support for the NVIDIA DGX-1.................................................. 102
Chapter 8. Safety............................................................................................. 103
8.1.Safety Warnings and Cautions....................................................................... 103
8.2.Intended Application Uses............................................................................104
8.3. Site Selection........................................................................................... 104
8.4.Equipment Handling Practices....................................................................... 105
8.5.Electrical Precautions................................................................................. 105
8.6.System Access Warnings.............................................................................. 106
8.7.Rack Mount Warnings..................................................................................106
8.8.Electrostatic Discharge................................................................................107
8.9.Other Hazards.......................................................................................... 108
Chapter9. Compliance.......................................................................................110
9.1. United States........................................................................................... 110
9.2.United States / Canada...............................................................................110
9.3. Canada................................................................................................... 111
9.4. CE......................................................................................................... 111
9.5. Japan.....................................................................................................111
9.6. Australia................................................................................................. 112
9.7. China..................................................................................................... 112
9.8. Israel..................................................................................................... 114
9.9. South Korea............................................................................................. 114
9.10. India.................................................................................................... 115
www.nvidia.com
NVIDIA DGX-1 DU-08033-001 _v13.1|iv
Page 5
Chapter1.
INTRODUCTION TO THE NVIDIA DGX-1
DEEP LEARNING SYSTEM
The NVIDIA® DGX-1™ Deep Learning System is the world’s first purpose-built system
for deep learning with fully integrated hardware and software that can be deployed
quickly and easily.
1.1.Using the DGX-1: Overview
The NVIDIA DGX-1 comes with a base operating system consisting of an Ubuntu OS,
Docker, Docker Engine Utility for NVIDIA GPUs, and NVIDIA drivers. Ths system is
designed to run a number of NVIDIA-optimized deep learning framework applications
packaged in Docker containers. You can use your own scheduling and management
software to run jobs, and also build and run your own applications on the DGX-1.
www.nvidia.com
NVIDIA DGX-1 DU-08033-001 _v13.1|1
Page 6
Introduction to the NVIDIA DGX-1 Deep Learning System
1.2.Hardware Specifications
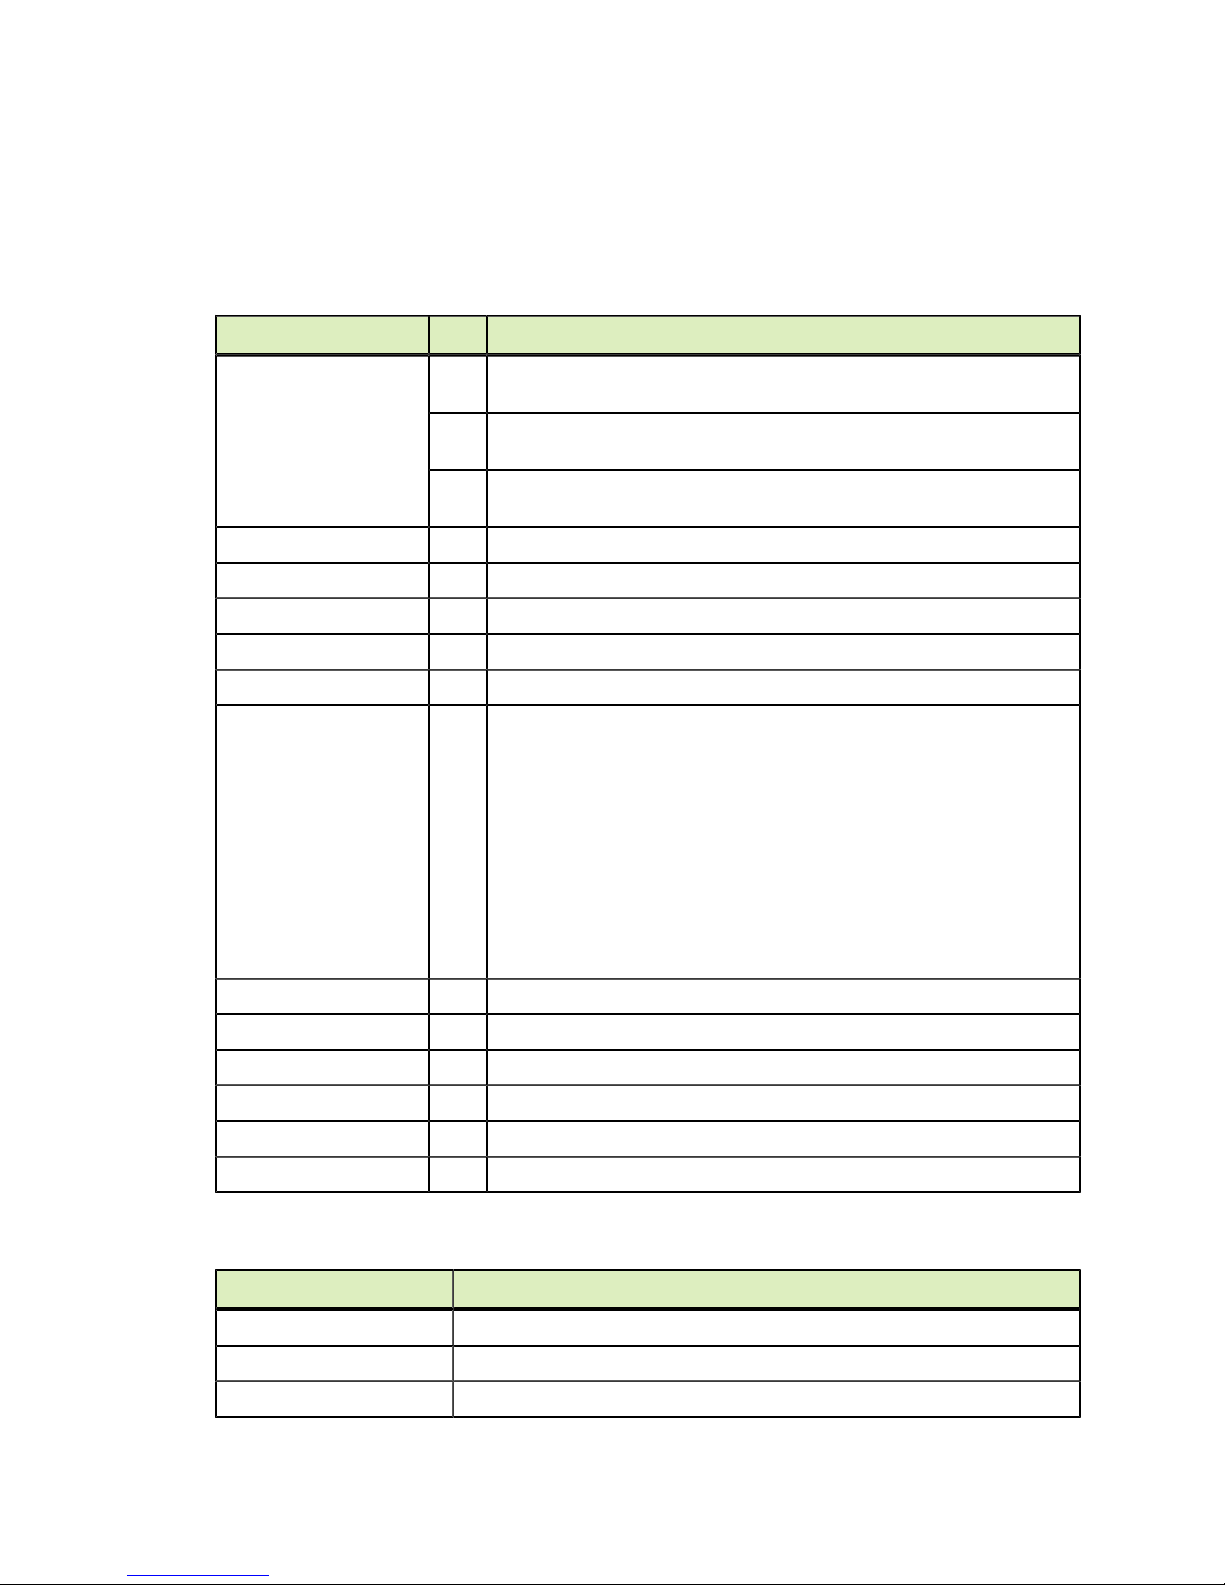
1.2.1.Components
Component Qty Description
Base Server
Power Supply 4 1600 W each.
CPU 2 Intel® Xeon® E5-2698 v4, 20-core, 2.2GHz, 135W
GPU 8 (Option 1) Tesla P100, featuring
1 Dual Intel® Xeon® CPU motherboard with x2 9.6 GT/s QPI, 8 Channel
with 2 DPC DDR4, Intel®X99 Chipset, AST2400 BMC
1 GPU Baseboard supporting 8 SXM2 modules (Cube Mesh) and 4 PCIE x16
slots for InfiniBand NICs
1 Chassis with 3+1 1600W Power supply and support for up to five 2.5
inch drives
1 10/100BASE-T IPMI Port
1 RS232 Serial Port
2 USB 3.0 Ports
‣
170 teraflops, FP16
‣
16 GB memory per GPU
‣
28,672 NVIDIA CUDA® Cores
(Option 2) Tesla V100, featuring
‣
960 teraflops, FP16
‣
16 GB memory per GPU
‣
40,960 NVIDIA CUDA® Cores
‣
5120 NVIDIA Tensor Cores
System Memory 16 32 GB DDR4 LRDIMM (512 GB total)
SAS Raid Controller 1 8 port LSI SAS 3108 RAID Mezzanine
Storage (RAID 0) (Data) 4 1.92 TB, 6 Gb/s, SATA 3.0 SSD
Storage (OS) 1 480 GB, 6 Gb/s, SATA 3.0 SSD
10 GbE NIC 1 Dual port, 10GBASE-T, network adapter Mezzanine
InfiniBand EDR NIC 4 Single port, x16 PCIe, Mellanox ConnectX-4 VPI MCX455A-ECAT
1.2.2.Mechanical
Feature Description
Form Factor 3U Rackmount
Height 5.16” (13.1 cm)
Width 17.5" (44.4 cm)
www.nvidia.com
NVIDIA DGX-1 DU-08033-001 _v13.1|2
Page 7
Introduction to the NVIDIA DGX-1 Deep Learning System
Feature Description
Depth 34.1" (86.6 cm)
Gross Weight 134 lbs (61 kg)
1.2.3.Power Requirements
Specification for
Input
Each Power Supply Comments
200-240 V (ac) 3500 W max.
1600 W @ 200-240 V,
8 A, 50-60 Hz
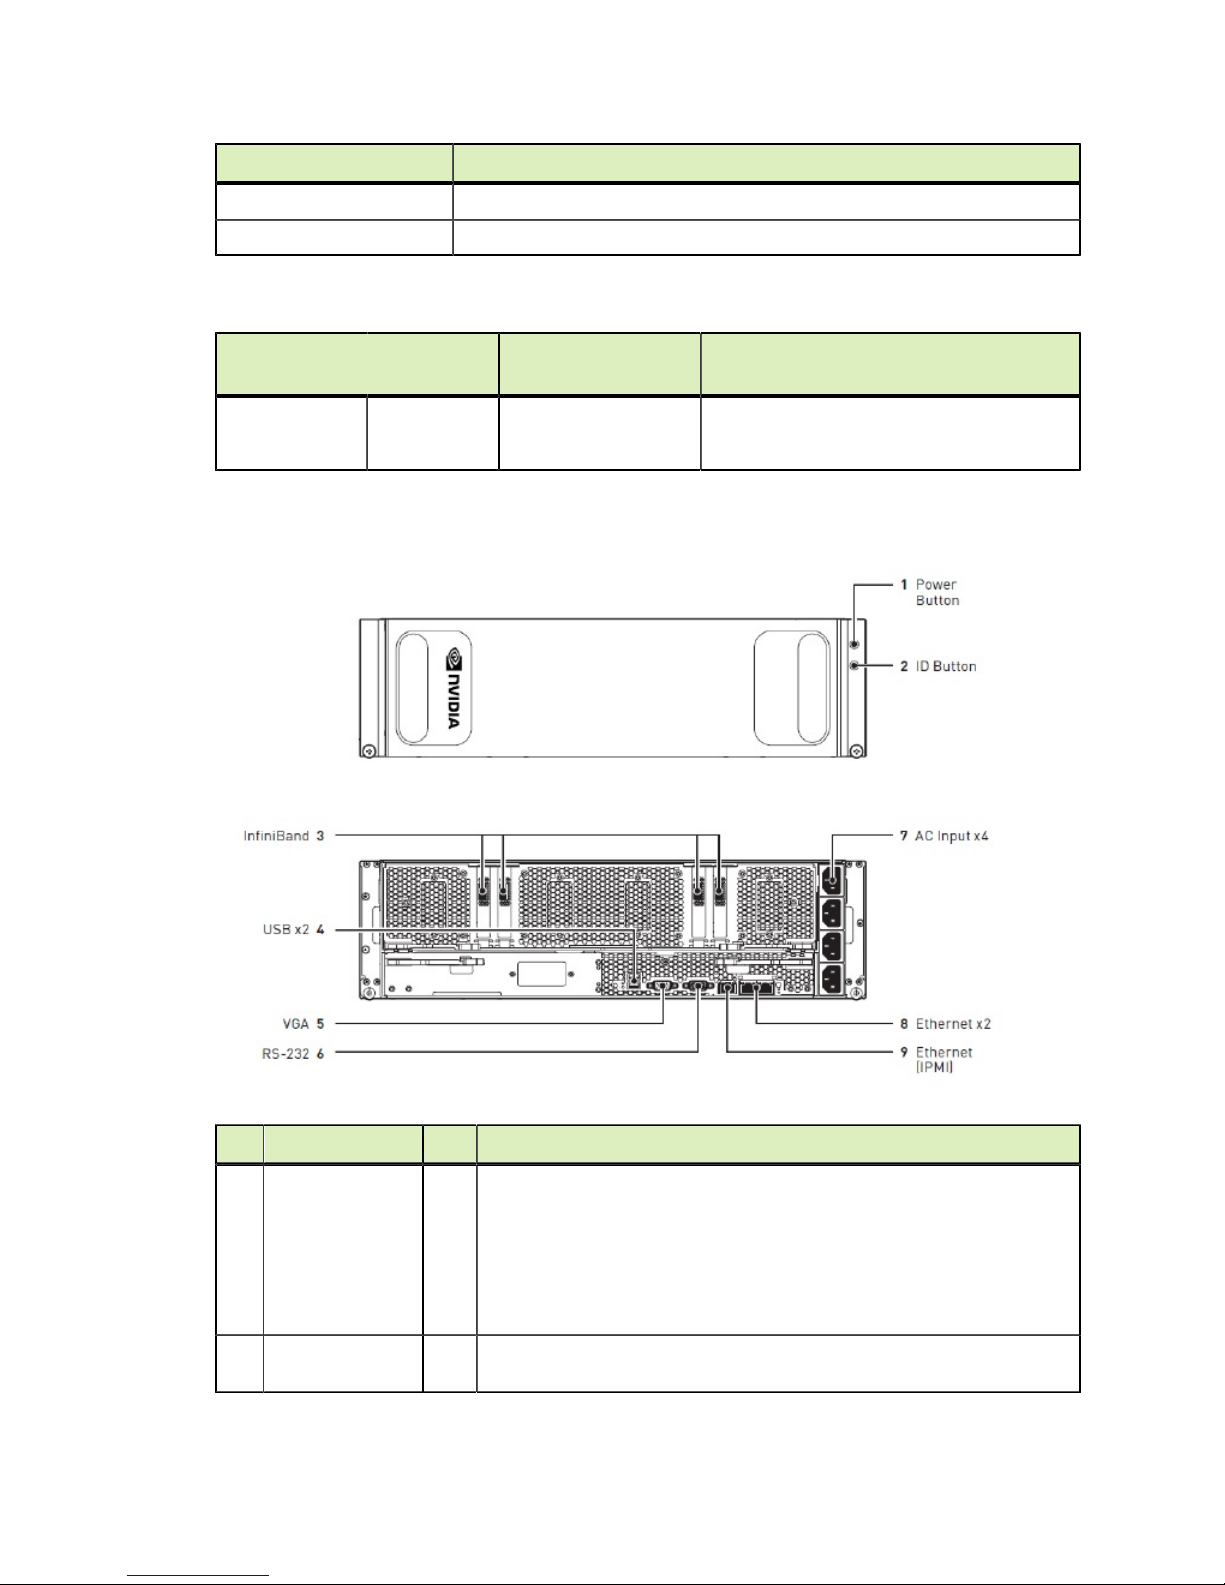
1.2.4.Connections and Controls
The DGX-1 contains four load-balancing
power supplies, with 3+1 redundancy.
ID Type Qty Description
1 Power button 1
2 ID button 1 Press to cause an LED on the back of the unit to flash as an identifier
www.nvidia.com
NVIDIA DGX-1 DU-08033-001 _v13.1|3
Press to turn the DGX-1 on or off.
Blue: System power on
Off: System power off
Amber (blinking): DC Off and fault
Amber and blue (blinking): DC On and fault
during servicing.
Page 8
Introduction to the NVIDIA DGX-1 Deep Learning System
ID Type Qty Description
3 InfiniBand 4 QSFP28 port; Mellanox ConnectX-4 VPI MCX455A-ECAT, EDR IB (100Gb),
x16 PCIe
4 USB 2 USB 3.0 ports are available to connect a keyboard.
5 VGA 1 The VGA port connects to a VGA capable monitor for local viewing of
the DGX-1 setup console or base OS.
6 DB9 1 RS232 serial port for internal debugging
7 AC input 4 Power supply inputs
8 Ethernet (RJ45) 2 10GBASE-T dual port network adapter Mezzanine
9
IPMI (RJ45)
1 10/100BASE-T Intelligent Platform Management Interface (IPMI) port
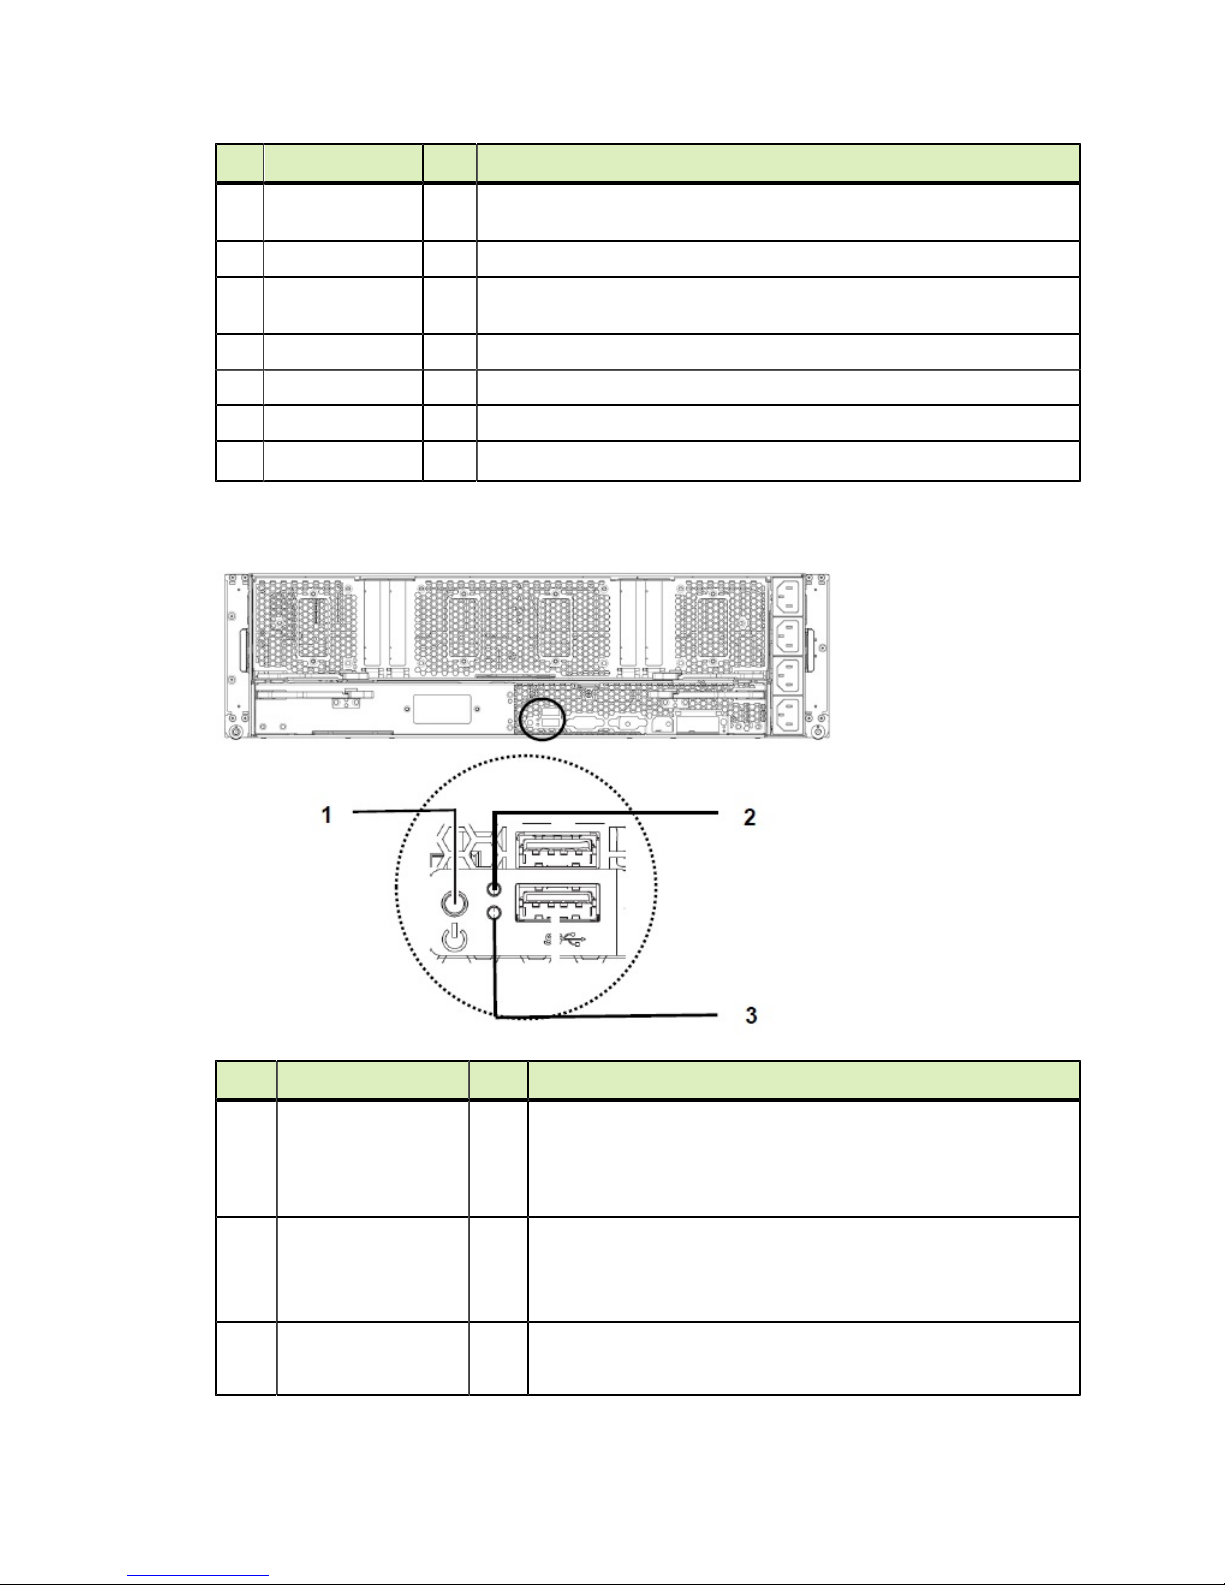
1.2.5.Rear Panel Power Controls
ID Type Qty Description
1 Power button 1
2 Power LED 1
3 Main Board Status
LED
www.nvidia.com
NVIDIA DGX-1 DU-08033-001 _v13.1|4
Press and immediately release the power button for a graceful
shutdown of the host OS.
Press and hold the power button for at least four seconds to shut
down the system immediately. The BMC remains live.
Off: Power off
Blue (steady): Power on
Blue (blinking): BMC reports system health fault.
1
Off: Normal
Amber (blinking): BMC reports system health fault.
Page 9
Introduction to the NVIDIA DGX-1 Deep Learning System
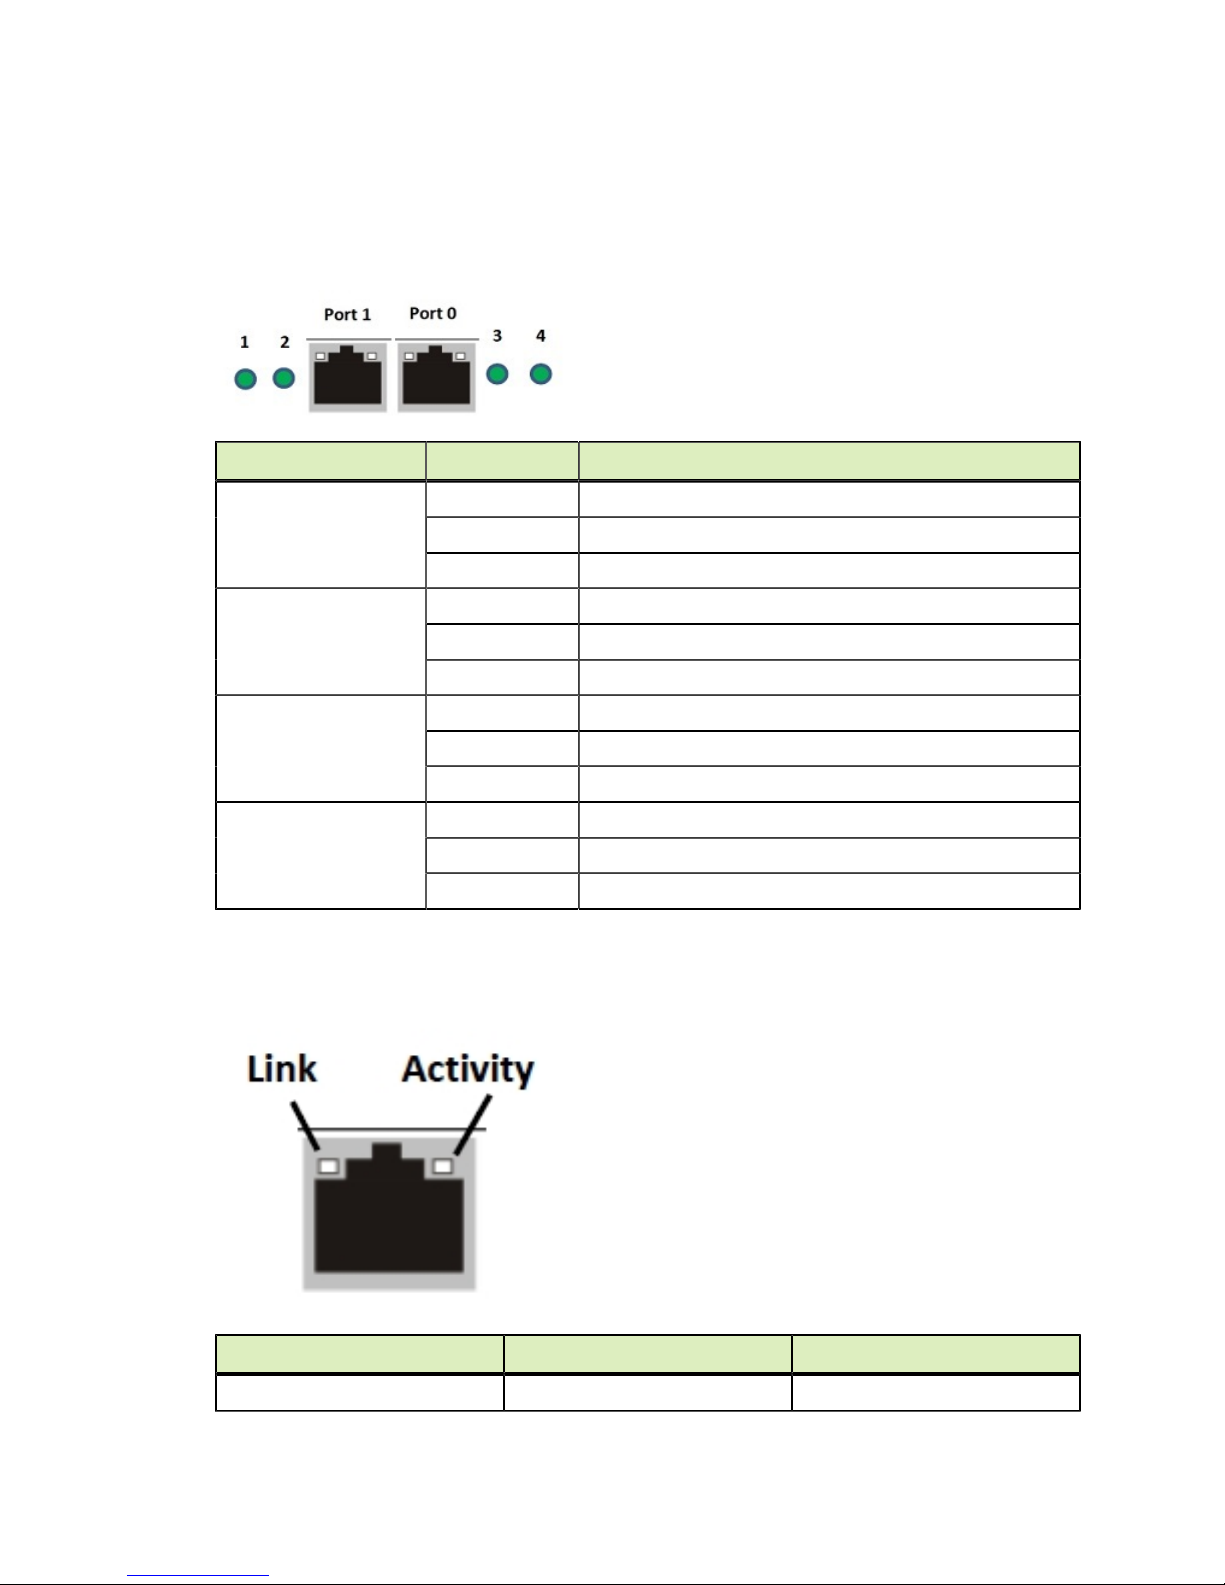
1.2.6.LAN LEDs
LEDs next to each Ethernet port indicate the connection status as described in the table
below:
LED Status Description
1
(Port 1 Link/Activity)
2
(Port 1 Speed)
3
(Port 0 Link/Activity)
4
(Port 0 Speed)
Amber (steady) LAN link
Amber (blinking) LAN access (off when there is traffic)
Off Disconnected
Green 10 Gb/s
Amber 1 Gb/s
Off 100 Mb/s
Amber (steady) LAN link
Amber (blinking) LAN access (off when there is traffic)
Off Disconnected
Green 10 Gb/s
Amber 1 Gb/s
Off 100 Mb/s
1.2.7.IPMI Port LEDs
LEDs on the IPMI port indicate the connection status as described in the table below:
Link Activity Description
Off Off Unplugged
www.nvidia.com
NVIDIA DGX-1 DU-08033-001 _v13.1|5
Page 10
Introduction to the NVIDIA DGX-1 Deep Learning System
Link Activity Description
Green (steady) Green (blinking) 100M active link
Off Green (blinking) 10M active link
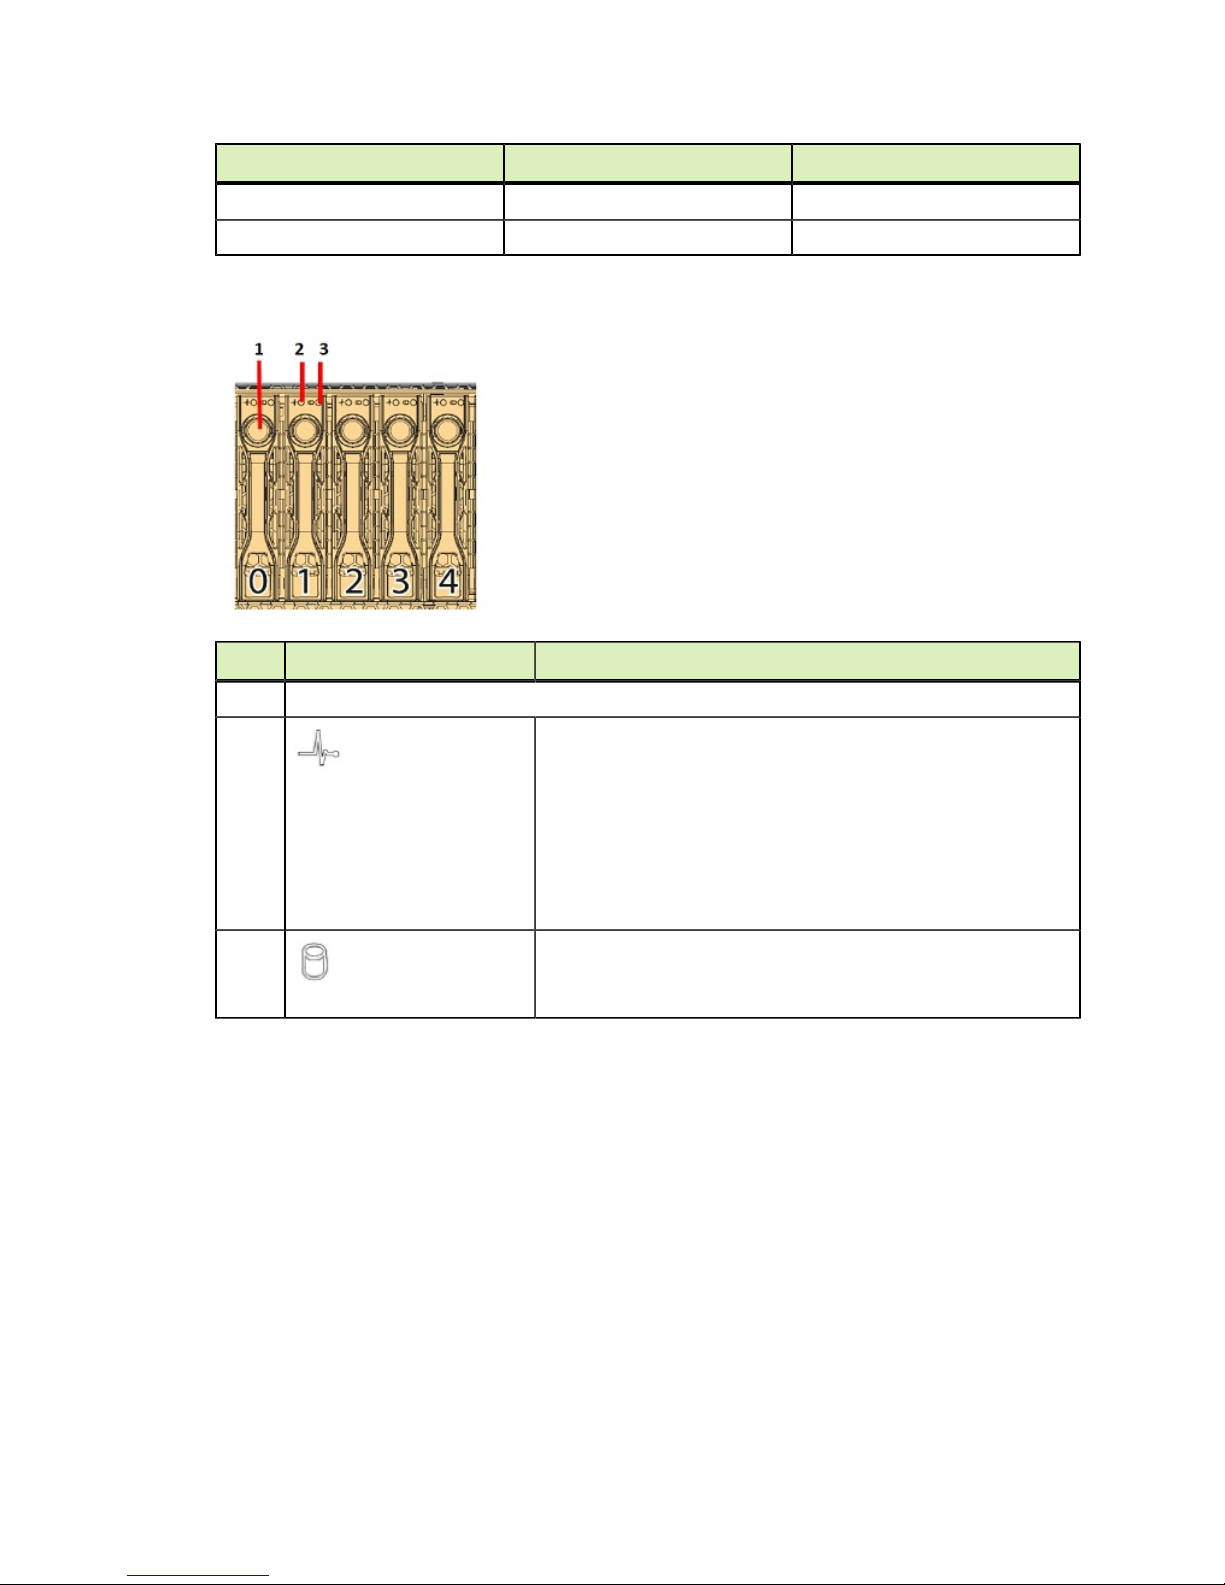
1.2.8.Hard Disk Indicators
ID Feature Description
1 Button and release lever for removing the HDD
2
HDD present LED
3
HDD activity LED
Blue (Steady): Drive present
Blue (Blinking twice/sec): Identification (such as when
initializing or locating through the SBIOS)
Blue (Blinking once/sec): Rebuilding (such as when creating a
RAID array)
Amber (Steady): Warning/failure
Off: Slot empty
Blue: Access
1.2.9.Power Supply Unit (PSU) LED
The PSU LED indicates the operation status of the PSU as described in the table below:
www.nvidia.com
NVIDIA DGX-1 DU-08033-001 _v13.1|6
Page 11
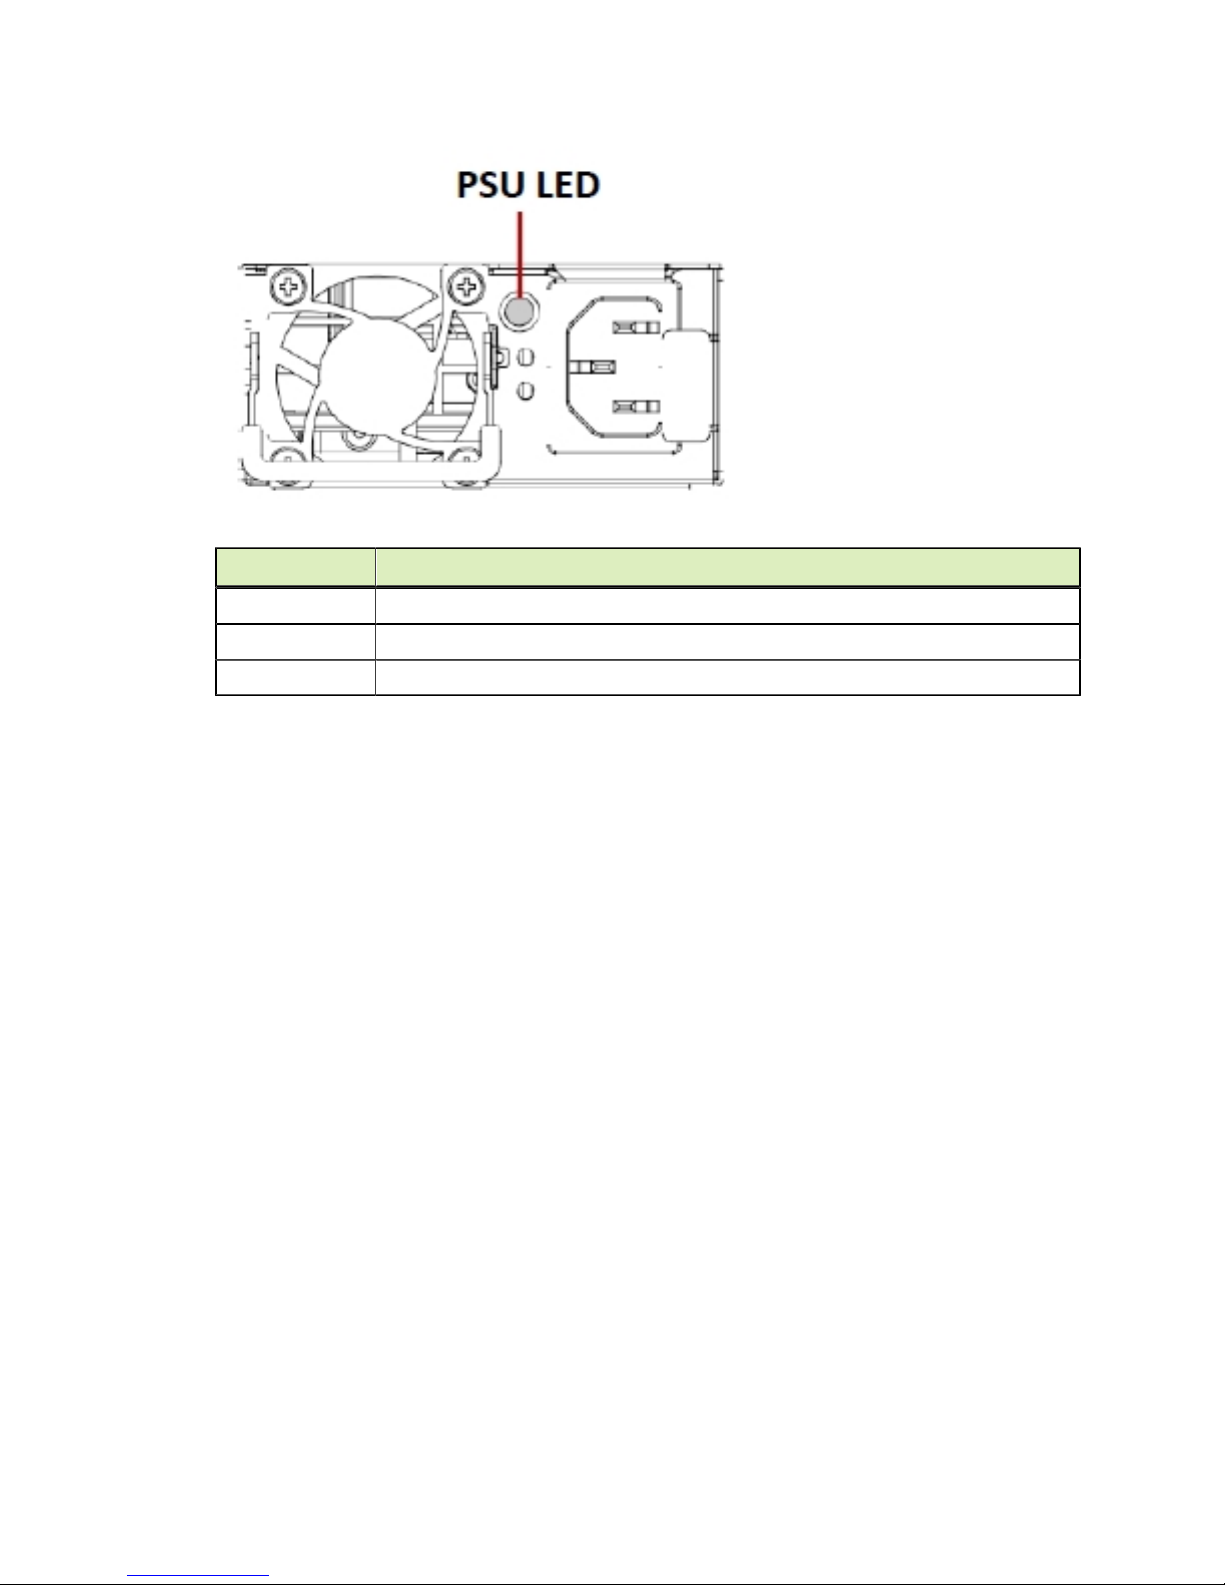
Activity Description
Green Normal operation
Introduction to the NVIDIA DGX-1 Deep Learning System
Amber (blinking) Power off; Fault
Green (blinking) Power on; Standby mode
www.nvidia.com
NVIDIA DGX-1 DU-08033-001 _v13.1|7
Page 12

Chapter2.
INSTALLATION AND SETUP
This chapter provides the basic instructions for installing and setting up the NVIDIA
DGX-1.
2.1.Registering Your DGX-1
Be sure to register your DGX-1 with NVIDIA as soon as you receive your purchase
confirmation e-mail. Registration enables your hardware warranty and allows you to set
up an NVIDIA DGX Container Registry account.
To register your DGX-1, you will need information provided in your purchase
confirmation e-mail. If you do not have the information, send an e-mail to NVIDIA
Enterprise Support at enterprisesupport@nvidia.com.
1.
From a browser, go to the NVIDIA DGX Product Registration (http://
www.nvidia.com/object/dgx-product-registration) page.
2.
Enter all required information and then click SUBMIT to complete the registration
process and receive all warranty entitlements and, if applicable, DGX-1 support
services entitlements.
Refer to the Customer Support chapter for customer support contact information.
2.2.Obtaining Software and Software Updates
You must register your DGX-1 in order to receive software updates. Once registered,
you will receive an email notification whenever a new software update is available.
You can access software update instructions as well as software downloads through the
Enterprise Support site as follows:
From your browser, go to NVIDIA Enterprise Services (https://nvid.nvidia.com/
‣
enterpriselogin/), and log in.
Click the Announcements tab, which contains download links and supplemental
‣
documentation.
www.nvidia.com
NVIDIA DGX-1 DU-08033-001 _v13.1|8
Page 13

Installation and Setup
Refer to the DGX OS Server Software Release Notes for instructions on how to perform
‣
a software update.
2.3.Choosing a Setup Location / Site Preparation
Decide on a suitable location for setting up and operating the DGX-1. The location
should be clean, dust-free, and well ventilated.
General Conditions
Prepare a sufficiently wide aisle to accommodate the unboxed chassis (chassis
‣
dimensions - 5.16”H x 17.5"W x 34.1"D).
The rack must accommodate a 134 lb, 3U rack mount system (chassis dimensions -
‣
5.16”H x 17.5"W x 34.1"D).
The rack must have square mounting holes.
‣
Leave enough clearance in front of the rack (36" (91.4 cm)) to enable you to install
‣
the unit into the rack.
Leave approximately 30" (76.2cm) of clearance in the back of the rack to allow for
‣
sufficient airflow and ease in servicing.
Always make sure the rack is secured and stable before adding or removing the
‣
appliance or any other component.
Prepare adequate sound-proofing: The equipment fans can generate 72-100 dBA.
‣
Environmental Conditions
Operating environment
‣
Temperature: 5 ◦ C to 35 ◦ C (41 ◦ F to 95 ◦ F)
‣
Relative humidity: 20% to 85% noncondensing
‣
Air flow
‣
The chassis fans can produce a maximum of 340 CFM of air flow.
‣
Do not block the ventilation areas at the front and rear of the chassis.
‣
Minimize any restrictions on air flow around the chassis.
‣
Connections
Power:
‣
The DGX-1 is powered through four 1600W power supply units, each rated at
‣
200-240VAC, 8A, 50/60 Hz. Total system power requirement: 3500W
C13/C14 cables provided for each power supply to connect to a compatible
‣
PDU.
IMPORTANT: Use only the supplied power cables and do not use the cables
with any other product or for any other purpose.
www.nvidia.com
NVIDIA DGX-1 DU-08033-001 _v13.1|9
Page 14

Installation and Setup
Network: Dual 10GBASE-T RJ45 connection
‣
Use industry standard CAT6 Ethernet cables for connecting to the network ports.
(Cables not included.)
IPMI: 10/100BASE-T RJ45 connection
‣
Use industry standard CAT6 Ethernet cables for connecting to the network ports.
(Cables not included.)
InfiniBand: Qty 4 - QSFP28 ports, InfiniBand and Ethernet compliant
‣
Use Mellanox-compliant InfiniBand cables for connecting to the InfiniBand ports.
(Cables not included.)
Preparing for Network Access
The IPMI port and Ethernet ports can be connected to your local LAN.
‣
These ports are configured for DHCP by default.
To use DHCP, connect the port to a local DHCP server which should provide an
‣
IP address and assign a DNS configuration to the DGX-1.
If DHCP is not available, then you will need to set up a static IP for each
‣
Ethernet port.
NVIDIA recommends that customers follow best security practices for BMC
‣
management (IPMI port). These include, but are not limited to, such measures as:
Restricting the DGX-1 IPMI port to an isolated, dedicated, management network
‣
Using a separate, firewalled subnet
‣
Configuring a separate VLAN for BMC traffic if a dedicated network is not
‣
available
Make sure your network can connect to the following:
‣
http://us.archive.ubuntu.com/ubuntu/
‣
http://security.ubuntu.com/ubuntu
‣
http://international.download.nvidia.com/dgx1/repos/ (Base OS Software 2.x or
‣
earlier)
http://international.download.nvidia.com/dgx/repos/ (Base OS Software 3.1 or
‣
later)
https://apt.dockerproject.org/repo
‣
If access to those URLs requires use of a proxy, refer to Setting Up a System Proxy
for setup instructions.
2.4.Unpacking the DGX-1
1.
Remove the shrinkwrap.
www.nvidia.com
NVIDIA DGX-1 DU-08033-001 _v13.1|10
Page 15
Installation and Setup
2.
Collapse the yellow "Do not stack" cone, if included.
3.
Open the main DGX-1 box, then remove the accessory and rail kit boxes.
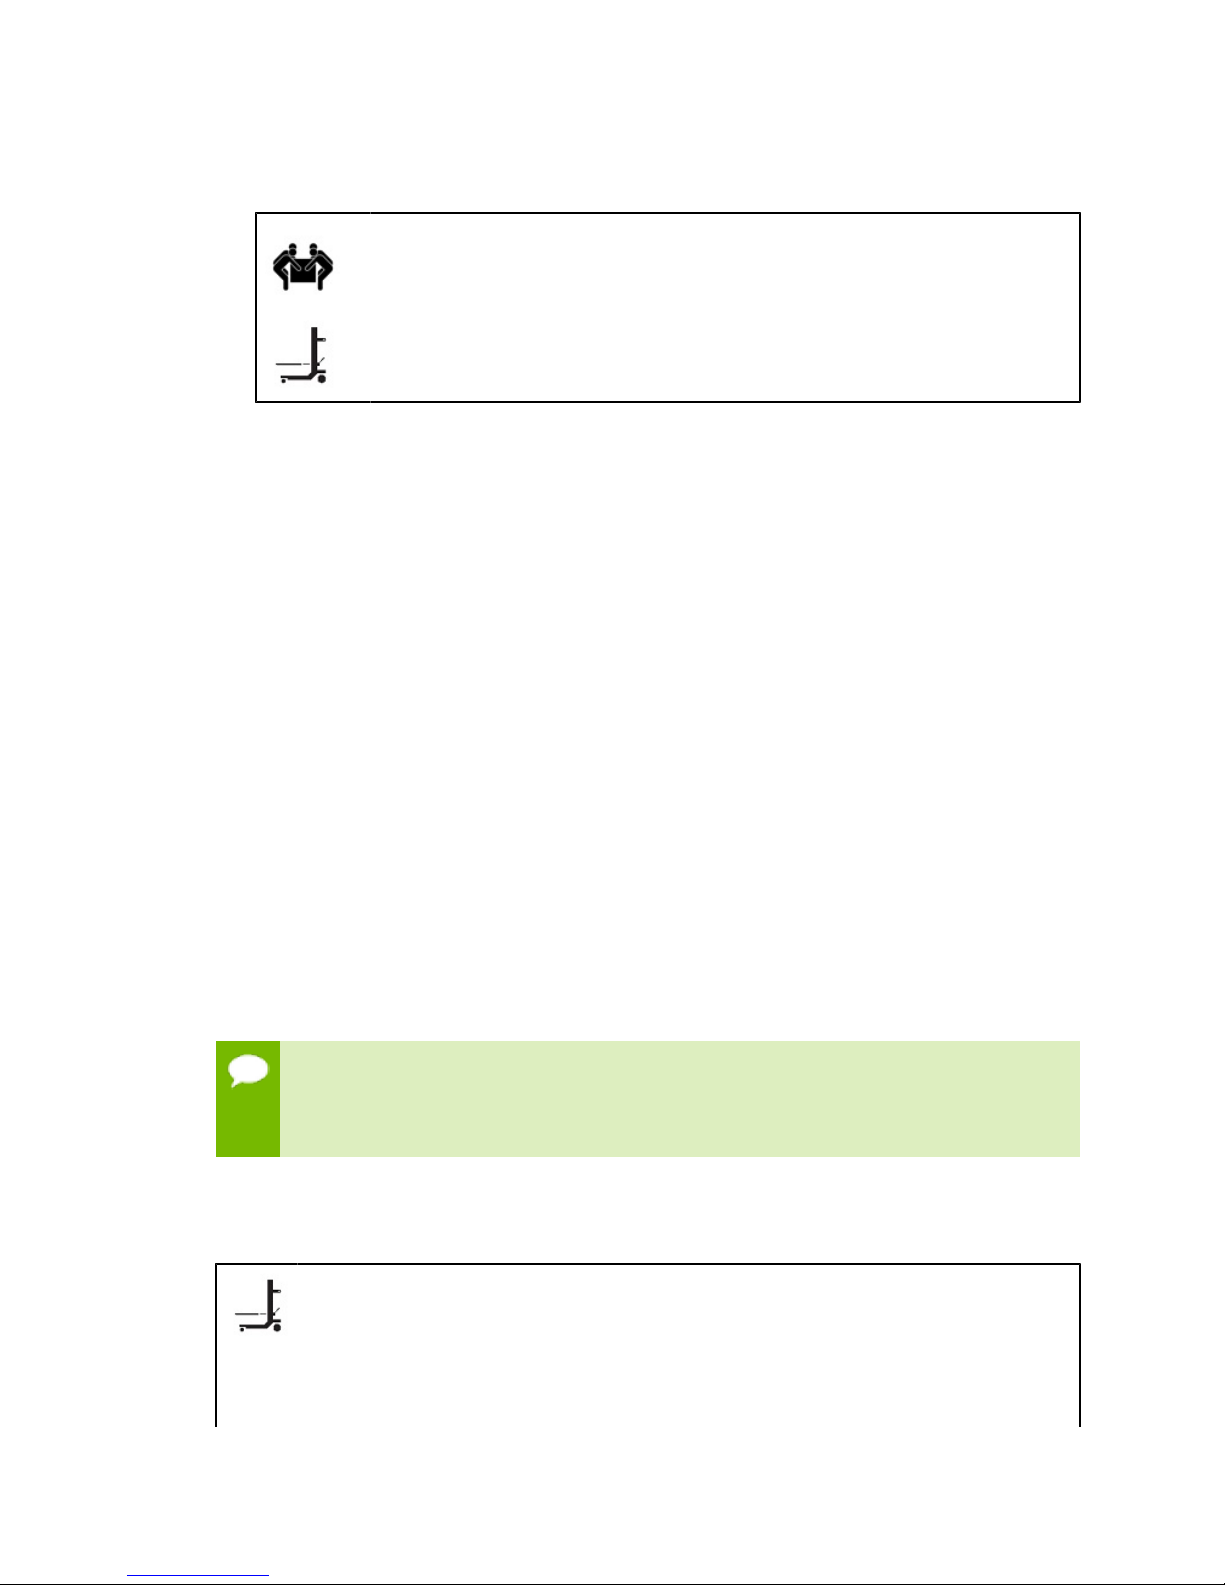
CAUTION: At least four people, or a mechanical assist, are required to remove
the DGX-1 from the box. To reduce the risk of personal injury or damage to the
equipment, always observe local occupational health and safety requirements and
guidelines for material handling.
DO NOT use the handles at the front of the DGX-1 to lift the unit. The handles are
designed for sliding the unit out of a rack, and not for carrying the full weight of the
DGX-1.
4.
Remove the protective plastic sheet from the top of the DGX-1.
5.
Preserve and retain packaging.
6.
Be sure to inspect each piece of equipment shipped in the packing box. If anything is
missing or damaged, contact your supplier.
2.5.What's In the Box
The NVIDIA DGX-1 shipping box includes the following:
NVIDIA DGX-1
‣
Bezel
‣
Rail hardware kit
‣
Accessory Box
‣
AC Power Cables (qty 4 – IEC 60320 C13/14, compatible with data center PDUs)
‣
IMPORTANT: Use only the supplied power cables and do not use the cables
with any other product or for any other purpose.
Hard disk bay screws
‣
Toxic Substance Notice & Safety Instructions
‣
Quick Start Guide
‣
DVD containing source files for open source software
‣
The four power cables included in the box are not optional. All power cables are
necessary and must be plugged into individual 10 A capable sockets for optimal DGX-1
operation. Failure to do so can result in a reduction in power redundancy, a reduction
in performance, or a complete system failure.
2.6.Installing the DGX-1 Into a Rack
CAUTION: To prevent bodily injury when mounting or servicing the DGX-1 in a rack, you must
take special precautions to ensure that the system remains stable. The following guidelines
are provided to ensure your safety.
• The DGX-1 should be mounted at the bottom of the rack if it is the only unit in the rack.
• When mounting the DGX-1 in a partially filled rack, load the rack from the bottom to the
top with the heaviest component at the bottom of the rack.
www.nvidia.com
NVIDIA DGX-1 DU-08033-001 _v13.1|11
Page 16
Installation and Setup
• If the rack is provided with stabilizing devices, install the stabilizers before mounting or
servicing the DGX-1 in the rack.
• The DGX-1 weighs approximately 134 lbs, so an equipment lift is required to safely lift the
unit and then accurately align the chassis rails with the rack rails.
• DO NOT use the handles at the front of the DGX-1 to lift the unit. The handles are designed
for sliding the unit out of a rack, and not for carrying the full weight of the DGX-1.
2.6.1.Installing the Rails
The rail assemblies shipped with the appliance fit into a standard 19” rack between
26-inches and 33.5-inches deep (66 cm to 85 cm). The outer rail is adjustable from
approximately 23.5” to 34” (59.7 cm to 86.4 cm)
Refer to the instructions in the rail packaging for details on installing the rails onto the
rack and chassis.
The following are supplemental instructions:
1.
Use a Phillips screwdriver to assist in mounting the rails to the rack.
2.
If necessary, detach the inner rails from the outer slide rails.
3.
Follow any designations on the inner rail (or its outer rail mate) to determine the
proper orientation and positioning to connect to the chassis, then secure to the
chassis.
IMPORTANT: Make sure that the reinforced hole at the front end of the rail is
positioned on the bottom side of the rail, and that it aligns with the thumbscrew on
the front of the DGX-1. If the hole is positioned on the top side, then the rail is on the
wrong side of the DGX-1 and the DGX-1 will not fit properly in the rack.
4.
Follow any designations on the outer slide rail to determine front/back and left-side/
right-side positioning against the rack.
5.
Secure the back of one of the slide rails to the rack, then extend the rail until it fits
securely to the front of the rack.
6.
Secure the slide rail to the front of the rack.
7.
Repeat steps 4-6 for the other slide rail.
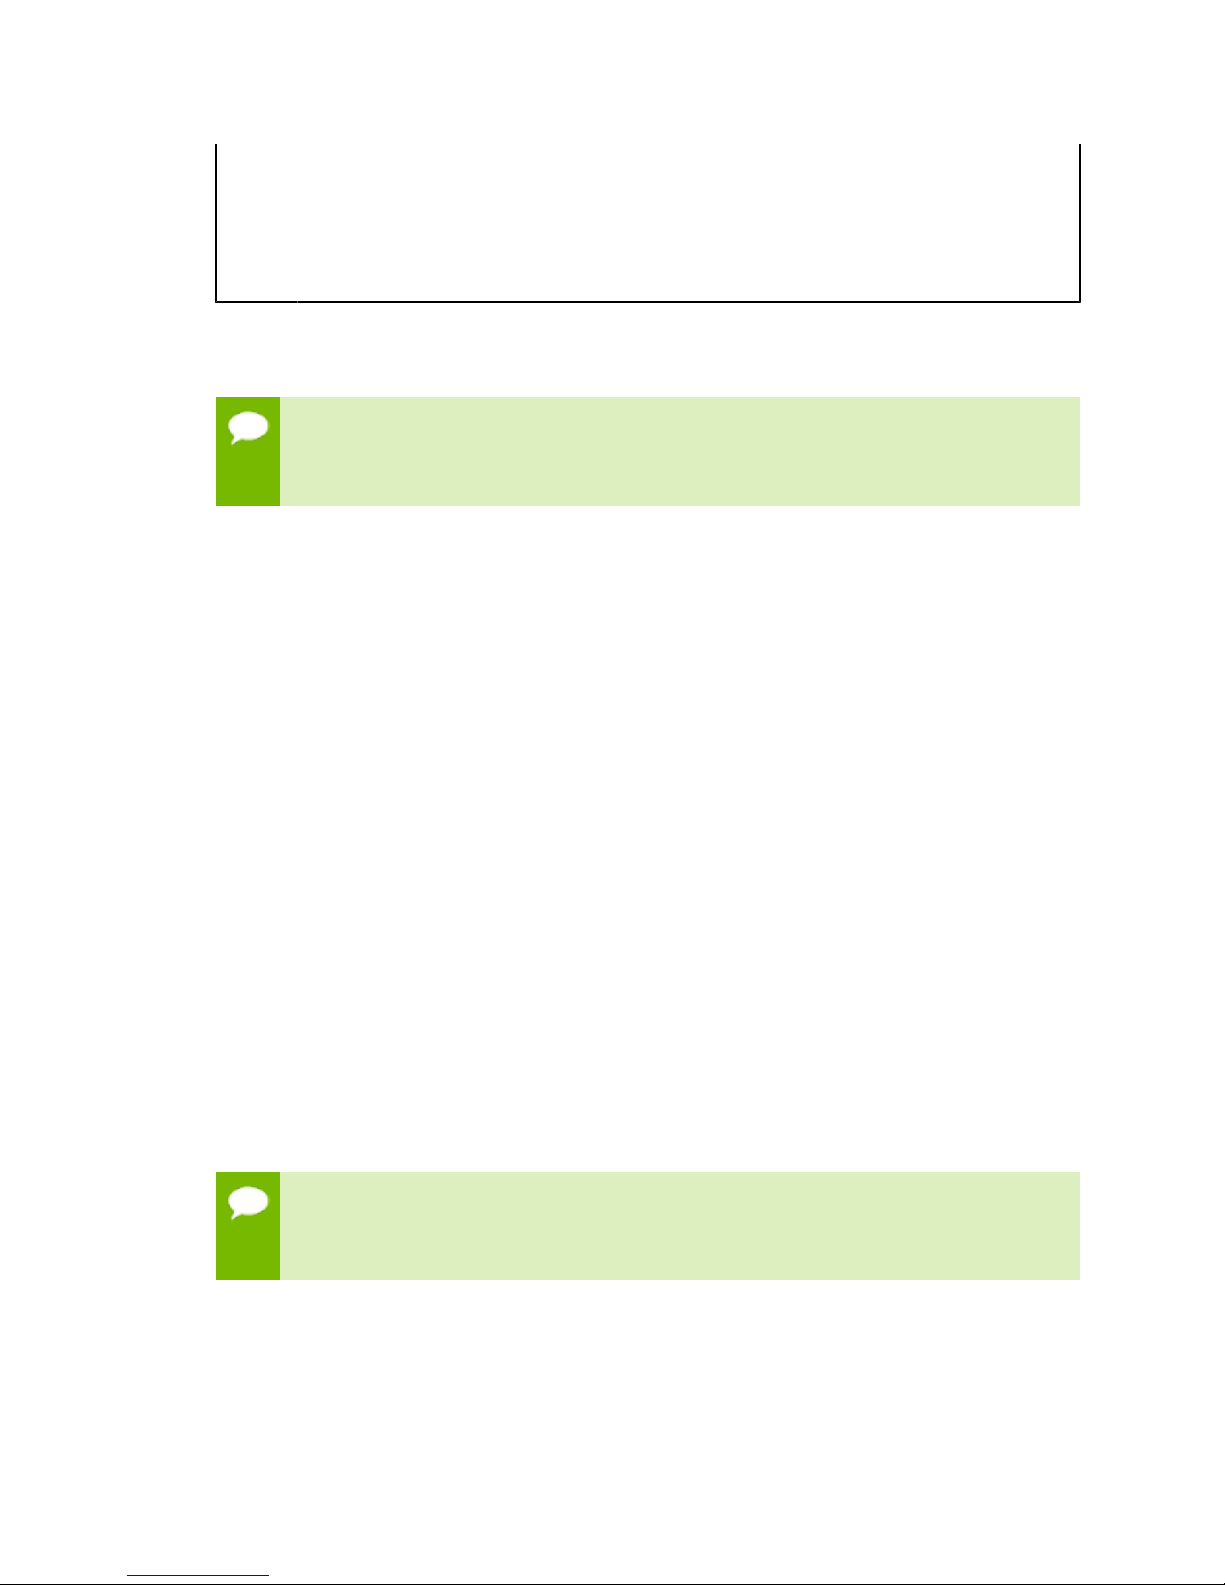
2.6.2.Mounting the DGX-1
CAUTION: Stability hazard — The rack stabilizing mechanism must be in place, or the
rack must be bolted to the floor before you slide the DGX-1 out for servicing. Failure
to stabilize the rack can cause the rack to tip over.
1.
Confirm that the DGX-1 has the inner rails attached and that you have already
mounted the outer rails into the rack.
2.
With the front of the unit facing away from the rack, use an equipment lift to assist
in sliding the unit into the rack as follows:
www.nvidia.com
NVIDIA DGX-1 DU-08033-001 _v13.1|12
Page 17
Installation and Setup
CAUTION: The DGX-1 weighs approximately 134 lbs, so an equipment lift is required to
safely lift the unit and then accurately align the chassis rails with the rack rails.
a) Align the inner chassis rails with the front of the outer rack rails.
b) Slide the inner rails into the outer rails, keeping the pressure even on both sides
(you may have to depress the locking tabs when inserting).
When the DGX-1 has been pushed completely into the rack, you should hear the
locking tabs "click" into the locked position.
3.
Lock the unit in place using the thumb screws located on the front of the unit.
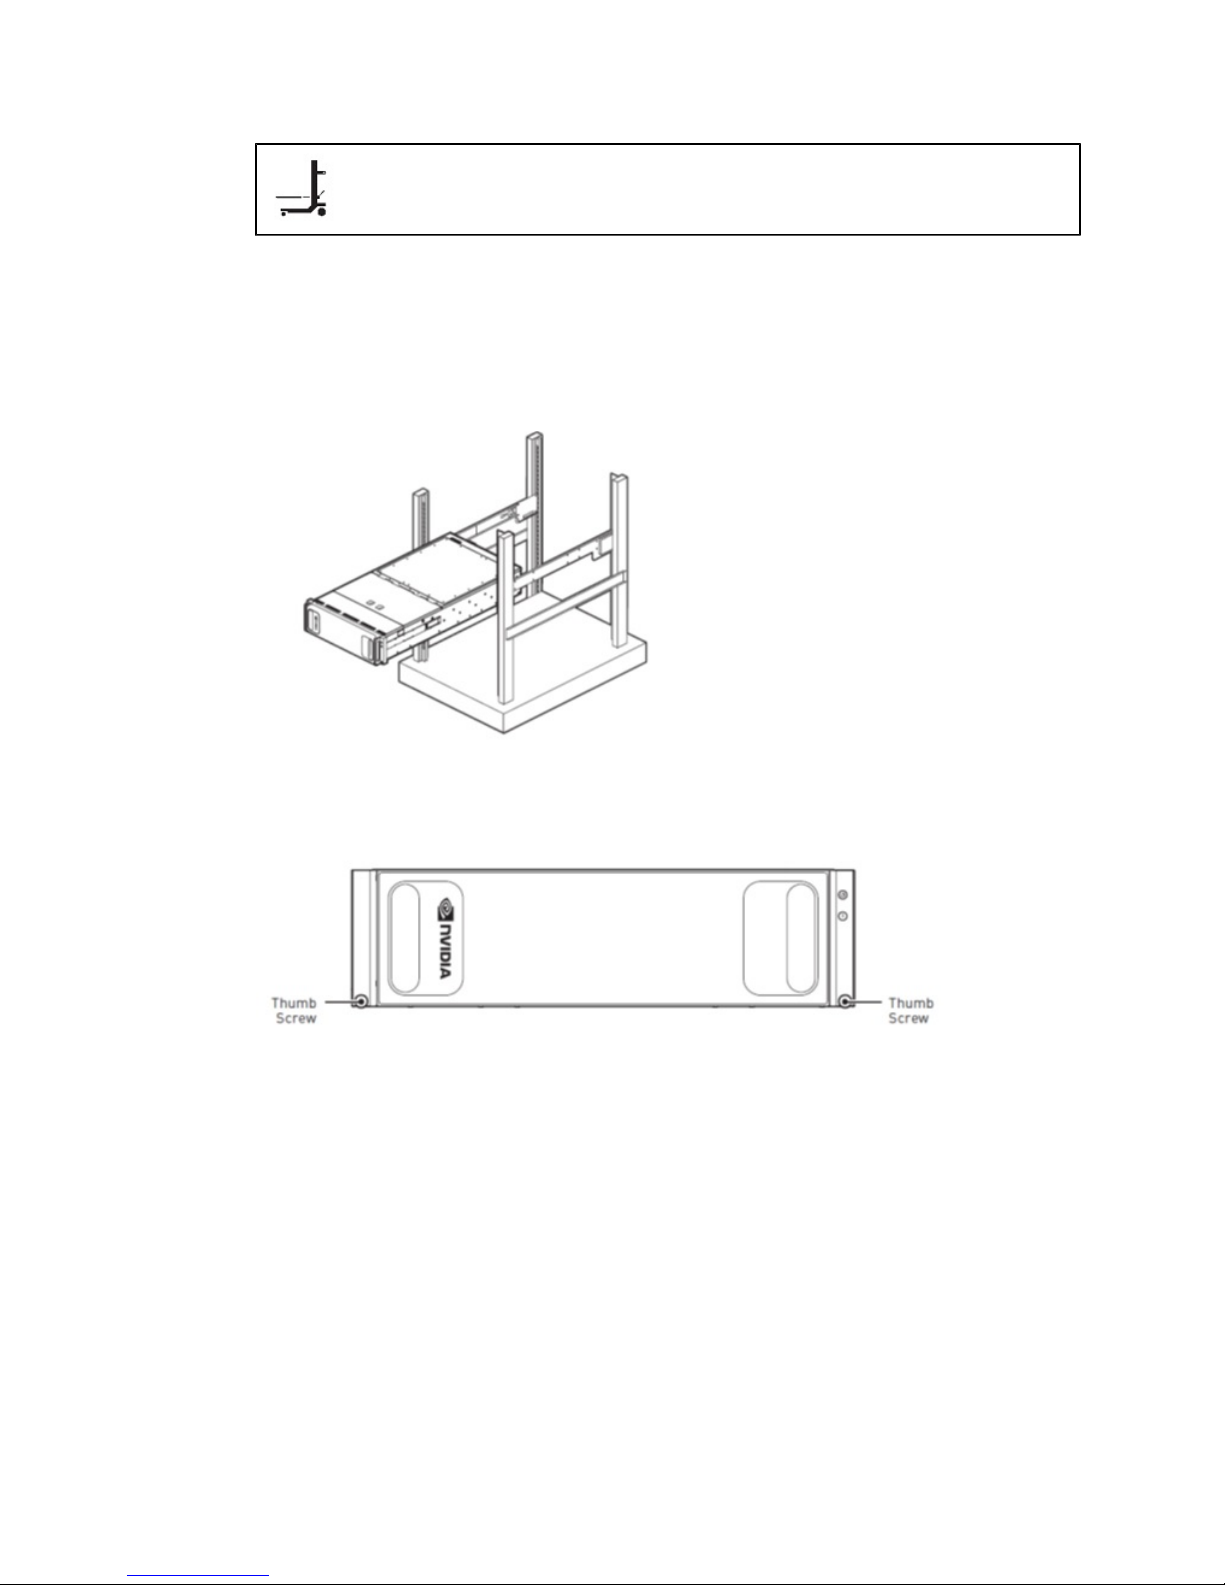
2.7.Attaching the Bezel
The bezel is designed to attach easily to the front of the DGX-1.
1.
Prepare the DGX-1 by making sure that the power supply handles (located at the
power supply fans) are flipped up.
www.nvidia.com
NVIDIA DGX-1 DU-08033-001 _v13.1|13
Page 18
Installation and Setup
2.
Move any other obstructions, such as cable ties, away from the outer edge of the
DGX-1.
3.
With the bezel positioned so that the NVIDIA logo is visible from the front and is on
the left hand side, line up the pins near the corners of the DGX-1 with the holes in
back of the bezel, then gently press the bezel against the DGX-1.
CAUTION: Be careful not to accidentally press the power button that is on the
right edge of the DGX-1 when removing or installing the bezel.
The bezel is held in place magnetically .
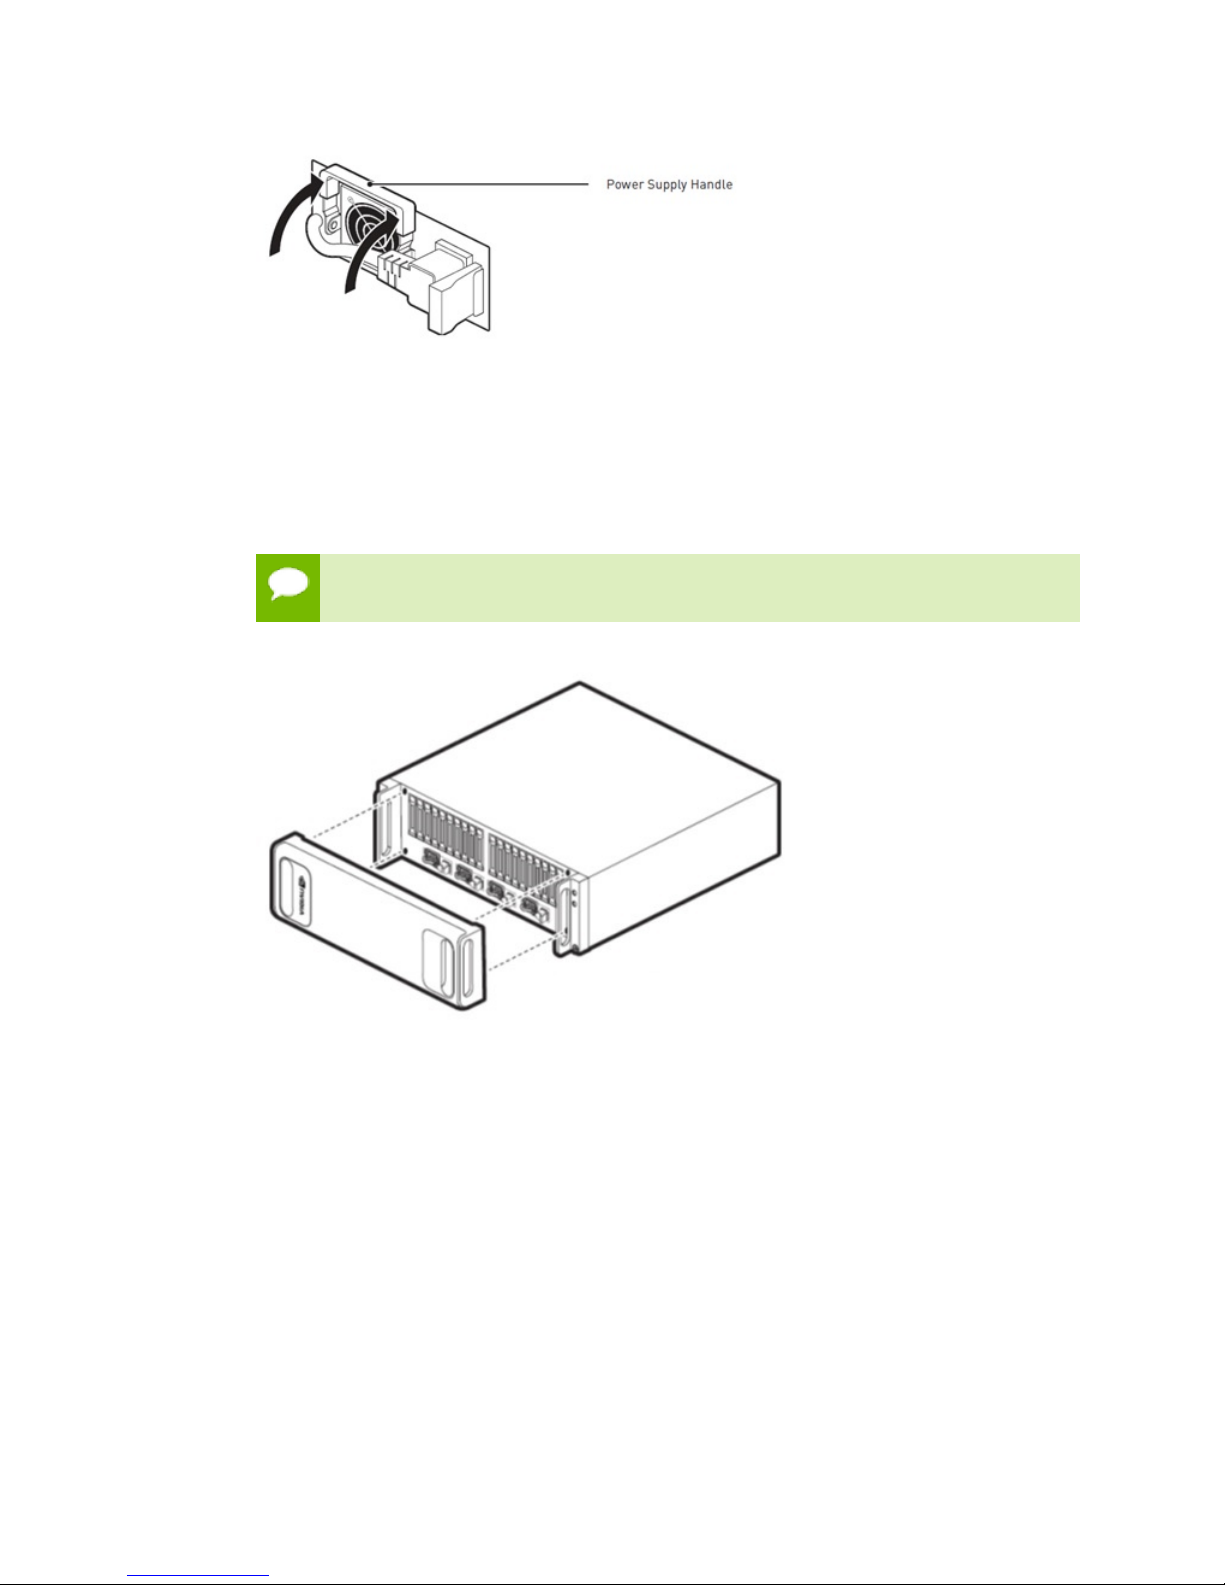
2.8.Connecting the Power Cables
1.
Open the accessory box and remove the four C13/C14 power cables.
2.
Use the cables to connect each of the four plugs at the right-rear of the DGX-1 to a
PDU.
www.nvidia.com
NVIDIA DGX-1 DU-08033-001 _v13.1|14
Page 19
Installation and Setup
a) Secure each cable to the DGX-1, using the power cable retention clips attached to
the power plugs.
b) Connect each cable to the PDU.
Ensure that the cables are distributed over at least two circuits and, if using 3phase PDUs, they are balanced across all phases as much as possible. Ideally,
each cable should connect to a different PDU.
c) Verify that each cable is firmly inserted into the PDU.
There is usually a click to indicate full insertion.
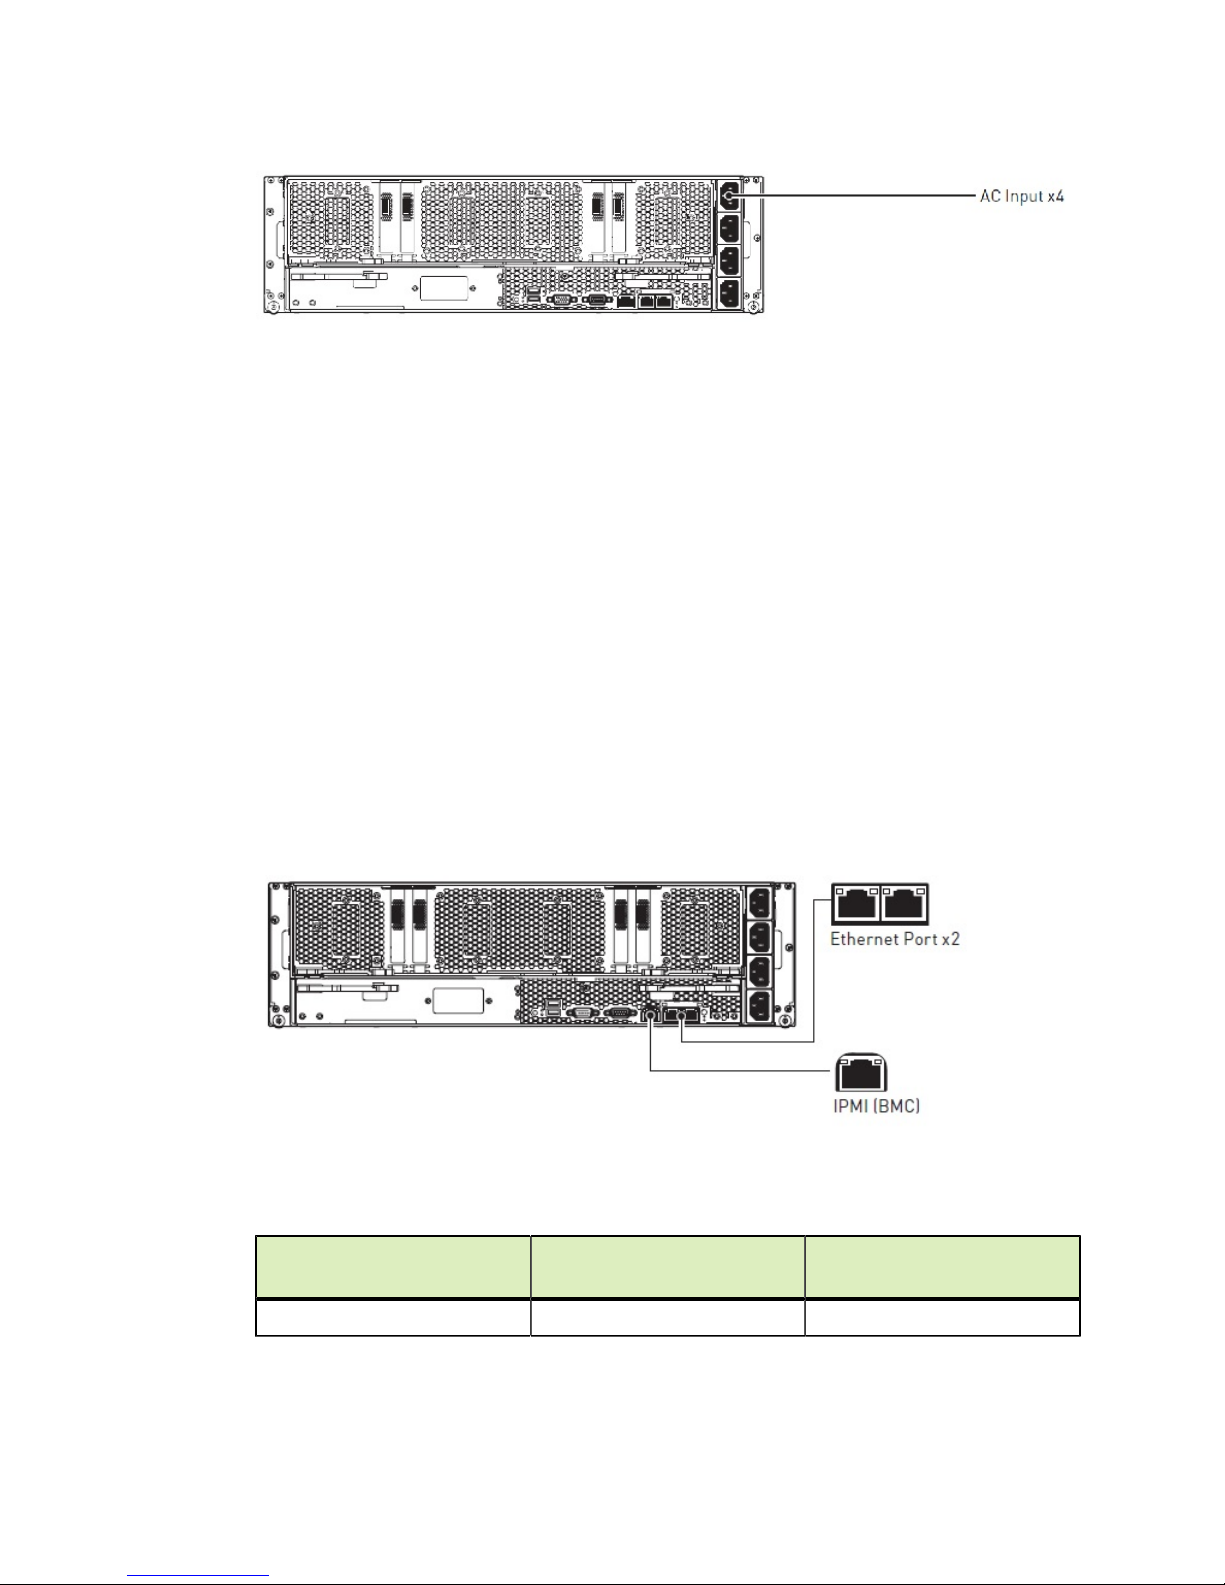
2.9.Connecting the Network Cables
1.
Using an Ethernet cable, connect one of the dual Ethernet ports (em1 or em2) to your
LAN for internet access to the NVIDIA Cloud Portal, remote access to launched
application containers on the DGX-1, or to connect to the DGX-1 using SSH.
The left-side/right-side ethernet port designation depends on the Base OS software
version installed on the DGX-1 as listed in the table below.
Ethernet Port Position
Port Designation: Base OS
Software 2.x and earlier
Port Designation: Base OS
Software 3.x and later
Right Side em1 enp1s0f0
www.nvidia.com
NVIDIA DGX-1 DU-08033-001 _v13.1|15
Page 20
Installation and Setup
Port Designation: Base OS
Ethernet Port Position
Left Side em2 enp1s0f1
NVIDIA recommends connecting only one of the Ethernet ports to your LAN. If
you are connecting both Ethernet ports, they must each be connected to separate
networks, The DGX-1 is not configured from the factory to have multiple Ethernet
interfaces on the same network.
2.
Using an Ethernet cable, connect the IPMI (BMC) port to your LAN for remote
Software 2.x and earlier
Port Designation: Base OS
Software 3.x and later
access to the base management controllerr (BMC).
Vefiy that all network cables are firmly inserted into the DGX-1 and the associated
network switch.
2.10.Setting Up the DGX-1
These instructions describe the setup process that occurs the first time the DGX-1 is
powered on after delivery. Be prepared to accept all EULAs and to set up your username
and password.
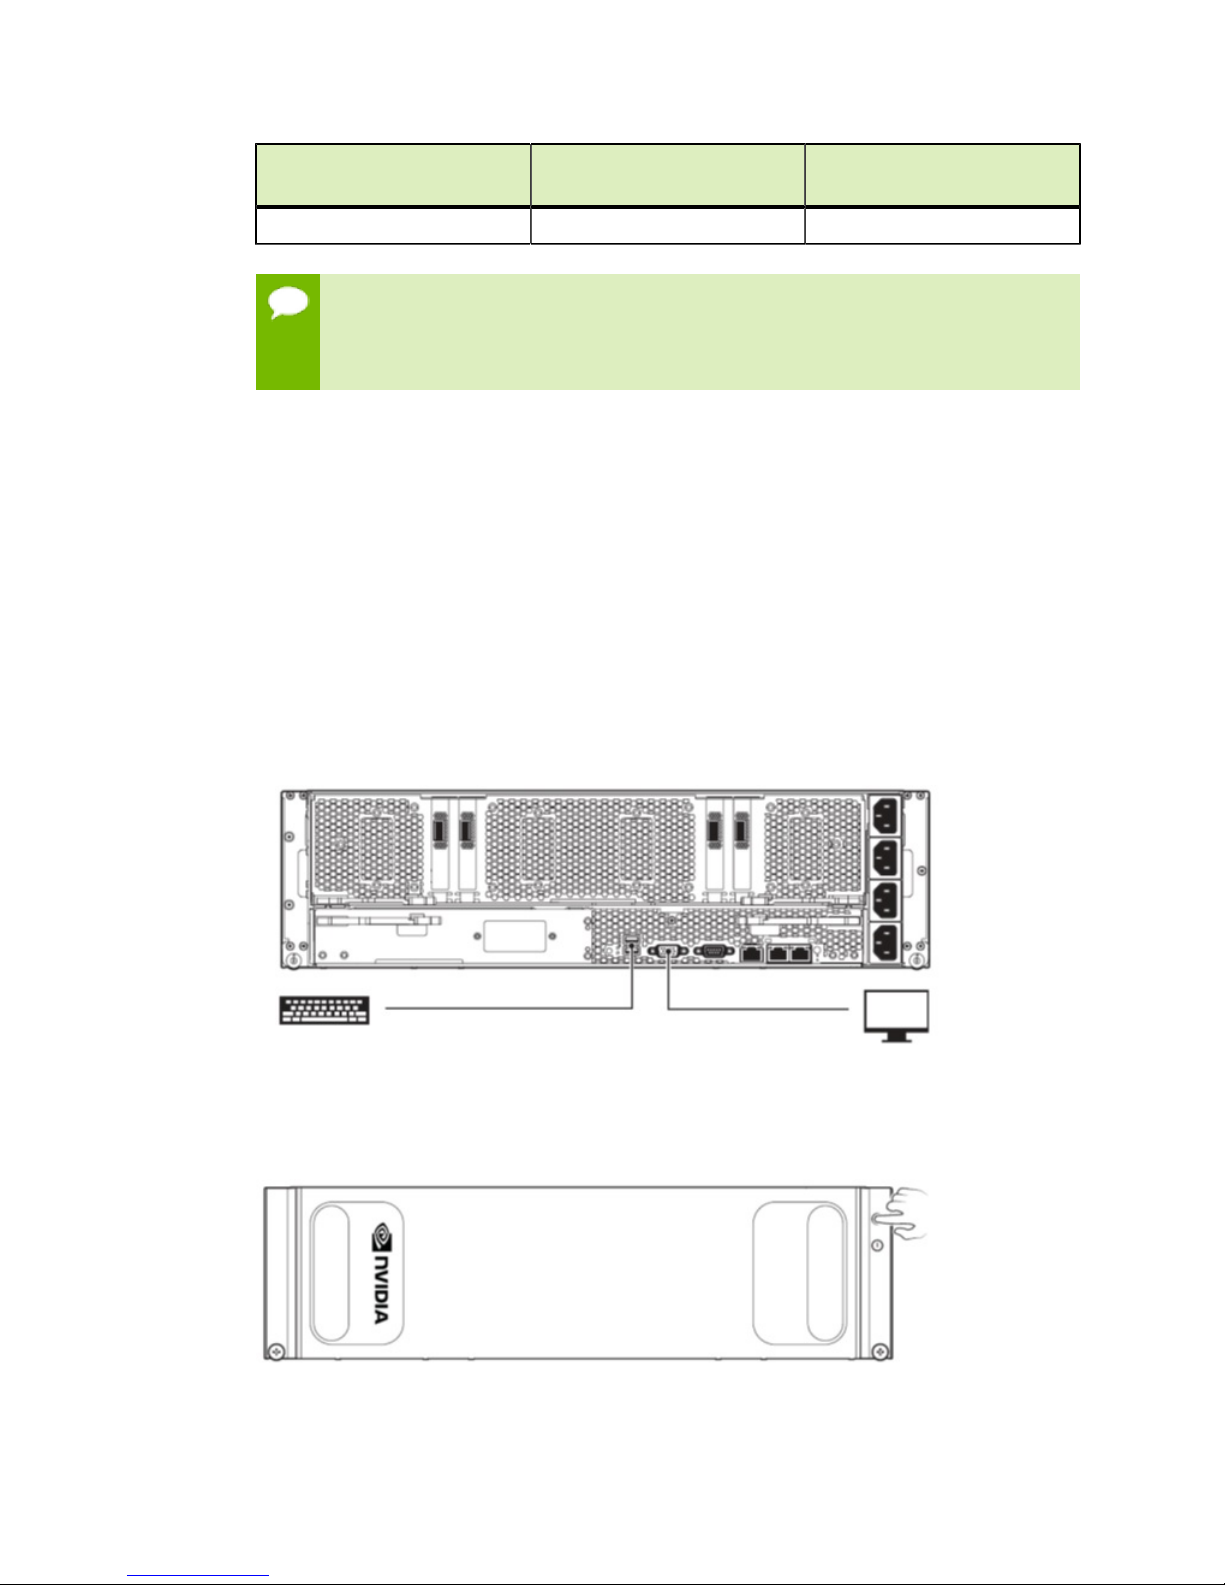
1.
Connect a display to the VGA connector, and a keyboard to any of the USB ports.
For best display results, use a monitor with a native resolution of 1024x768 or lower.
2.
Power on the DGX-1.
www.nvidia.com
NVIDIA DGX-1 DU-08033-001 _v13.1|16
Page 21

Installation and Setup
The system will take a few minutes to boot.
You may be presented with end user license agreements (EULAs) for the NVIDIA
software at this point in the setup, depending on the DGX-1 software version.
Accept all EULAs to proceed with the installation.
You are prompted to configure the DGX-1 software.
3.
Perform the steps to configure the DGX-1 software.
Select your time zone and keyboard layout.
‣
Create a user account with your name, username, and password.
‣
You will need these credentials to log in to the DGX-1 as well as to log in to the
BMC remotely. When logging in to the BMC, enter your username for both the
User ID as well as the password. Be sure to create a unique BMC password at
the first opportunity.
The BMC software will not accept "sysadmin" for a user name. If you create
this user name for the system log in, "sysadmin" will not be available for
logging in to the BMC.
Choose a primary network interface for the DGX-1.
‣
After you select the primary network interface, the system attempts to
configure the interface for DHCP and then asks you to enter a hostname for
the system. If DHCP is not available, you will have the option to configure
the network manually. If you need to configure a static IP address on a
network interface connected to a DHCP network, select Cancel at the
Network configuration – Please enter the hostname for the system screen.
The system will then present a screen with the option to configure the
network manually.
Choose a host name for the DGX-1.
‣
Choose to install predefined software.
‣
Press the space bar to select or deselect the software to install.
By default, the DGX-1 installs only minimal software packages necessary
to ensure system functionality. You can deselect the OpenSSH package;
however, NVIDIA recommends that you keep this package selected, and
uninstall it only if required by your IT security policy.
4.
Select OK to continue.
You may be presented with end user license agreements (EULAs) for the NVIDIA
software at this point in the setup, depending on the DGX-1 software version.
Accept all EULAs to complete the installation.
The system completes the installation, reboots, then presents the system login
prompt:
<hostname> login:
Password:
5.
Log in.
www.nvidia.com
NVIDIA DGX-1 DU-08033-001 _v13.1|17
Page 22

Installation and Setup
Refer to the DGX OS Server release notes for information on available over-the-network
software updates.
2.11.Post Setup Instructions for DGX OS Server
Software Version 2.x and Earlier
These instructions apply if your DGX-1 is installed with software version 2.x or earlier.
To determine the DGX OS Server software version on your system, enter the following
command.
$ grep VERSION /etc/dgx-release
DGX_SWBUILD_VERSION="3.1.1"
1.
If your network is configured for DHCP, then make sure that dynamic DNS updates
are enabled.
Check whether /etc/resolv.conf is a link to /run/resolvconf/resolv.conf.
$ ls -l /etc/resolv.conf
Expected output:
lrwxrwxrwx 1 root root 29 Dec 1 21:19 /etc/resolv.conf ->
../run/resolvconf/resolv.conf
If the expected output appears, then skip to step 2.
‣
If this does not appear, then enable dynamic DNS updates as follows:
‣
a) Launch the Resolvconf Reconfigure package.
$ sudo dpkg-reconfigure resolvconf
The Configuring resolvconf screen appears.
b)
Select <Yes>when asked whether to prepare /etc/resolv.conf for dynamic updates.
c)
Select <No> when asked whether to append original file to dynamic file.
d)
Select <OK> at the Reboot recommended screen.
You do not need to reboot.
You are returned to the command line.
e) Bring down the interface, where <network interface> is em1 or em2, whichever
you have set up as your primary network interface.
$ sudo ifdown <network interface>
Expected output:
ifdown: interface <network interface> not configured
f) Bring up the interface, where <network interface> is em1 or em2, whichever you
have set up as your primary network interface.
$ sudo ifup <network interface>
Expected output (last line):
www.nvidia.com
NVIDIA DGX-1 DU-08033-001 _v13.1|18
Page 23

Installation and Setup
…
bound to <IP address> -- renewal in …
g) Repeat step 1 to confirm that /etc/resolv.conf is a link to /run/resolvconf/
resolv.conf.
2.
Make sure that the nvidia-peer-memory module is installed.
$ lsmod | grep nv_peer_mem
If the following output appears, then your DGX-1 setup is complete and you do not
need to perform the next steps.
nv_peer_mem 16384 0
nvidia 11911168 30
nv_peer_mem,nvidia_modeset,nvidia_uv
mib_core 143360 13
rdma_cm,ib_cm,ib_sa,iw_cm,nv_peer_mem,mlx4_ib,mlx5_ib,
ib_mad,ib_ucm,ib_umad,ib_uverbs,rdma_ucm,ib_ipoib
3.
If there is no output to the lsmod command, then build and install the nvidia-peermemory module.
a) Get and install the module.
$ sudo apt-get update
$ sudo apt-get install --reinstall mlnx-ofed-kernel-dkms nvidia-peer-
memory-dkms
Expected output.
DKMS: install completed.
Processing triggers for initramfs-tools (0.103ubuntu4.2) ...
update-initramfs: Generating /boot/initrd.img-4.4.0-45-generic
b) Add the module to the Linux kernel.
$ sudo modprobe nv_peer_mem
There is no expected output for this command.
c) Repeat step 2 to confirm that the nvidia-peer-memory module has been added.
www.nvidia.com
NVIDIA DGX-1 DU-08033-001 _v13.1|19
Page 24

Chapter3.
PREPARING FOR USING DOCKER
CONTAINERS
This chapter presents an overview of the prerequisites for accessing NVIDIA Docker
containers from the Docker command line for use on the NVIDIA® DGX-1™ in base
OS mode. These containers include NVIDIA DGX-1 specific software to ensure the
best performance for your applications. Using these containers as a basis for your
applications should provide the best single-GPU performance and multi-GPU scaling.
Installing Docker and NVIDIA Docker on DGX OS Server Software 2.x or Earlier
‣
Configuring Docker IP Addresses
‣
Letting Users Issue Docker Commands
‣
Configuring a System Proxy
‣
Configuring NFS Mount and Cache
‣
3.1.Installing Docker and NVIDIA Docker on DGX
OS Server Software 2.x or Earlier
To enable portability in Docker images that leverage GPUs, NVIDIA® developed
nvidia-docker, an open-source project that provides a command line tool to mount
the user mode components of the NVIDIA driver and the GPUs into the Docker
container at launch.
As of DGX OS Server software version 3.1.1 and later, Docker and nvidia-docker are part
of the base software installation and you do not need to perform the steps in this section.
However, if your DGX-1 is installed with software version 2.x or earlier, then follow
these instructions to install Docker and nvidia-docker on the system.
To determine the DGX OS Server software version on your system, enter the following
command.
$ grep VERSION /etc/dgx-release
DGX_SWBUILD_VERSION="3.1.1"
www.nvidia.com
NVIDIA DGX-1 DU-08033-001 _v13.1|20
Page 25

Preparing for Using Docker Containers
Ensure your environment meets the prerequisites before installing Docker. For more
information, see Getting Started with Docker.
1.
Install Docker.
$ sudo apt-key adv --keyserver
hkp://p80.pool.sks-keyservers.net:80 --recv-keys
58118E89F3A912897C070ADBF76221572C52609D
$ echo deb https://apt.dockerproject.org/repo ubuntu-trusty main
| sudo tee /etc/apt/sources.list.d/docker.list
$ sudo apt-get update
$ sudo apt-get -y install docker-engine=1.12.6-0~ubuntu-trusty
2.
Edit the /etc/default/docker file to use the Overlay2 storage driver.
a) Open the /etc/default/docker file for editing.
$ sudo vi /etc/default/docker
b) Add the following line:
DOCKER_OPTS="--storage-driver=overlay2"
If there is already a DOCKER_OPTS line, then add the parameters (text between
the quote marks) to the DOCKER_OPTS environment variable.
c) Save and close the /etc/default/docker file when done.
d) Restart Docker with the new configuration.
$ sudo service docker restart
3.
Install NVIDIA Docker.
The following example installs both nvidia-docker and the nvidia-docker-plugin.
$ wget -P /tmp
https://github.com/NVIDIA/nvidia-docker/releases/download/v1.0.1/nvidiadocker_1.0.1-1_amd64.deb
$ sudo dpkg -i /tmp/nvidia-docker*.deb && rm
/tmp/nvidia-docker*.deb
3.2.Configuring Docker IP Addresses
To ensure that the DGX-1 can access the network interfaces for nvidia-docker containers,
the nvidia-docker containers should be configured to use a subnet distinct from other
network resources used by the DGX-1.
By default, Docker uses the 172.17.0.0/16 subnet. Consult your network
administrator to find out which IP addresses are used by your network. If your network
does not conflict with the default Docker IP address range, then no changes are needed
and you can skip this section.
However, ff your network uses the addresses within this range for the DGX-1,
you should change the default nvidia-docker network addresses. The method for
accomplishing this depends on the Base OS software version installed on the DGX-1.
www.nvidia.com
NVIDIA DGX-1 DU-08033-001 _v13.1|21
Page 26

Preparing for Using Docker Containers
1.
If you don't know the Base OS software version installed on the DGX-1, then enter
the following and inspect the VERSION entry.
$ cat /etc/dgx-release
DGX_NAME="DGX Server"
DGX_PRETTY_NAME="NVIDIA DGX Server"
DGX_SWBUILD_DATE="2017-08-02"
DGX_SWBUILD_VERSION="3.1.1"
DGX_COMMIT_ID="0a0a8ec9e08836c5e99144dd19ae61690f2d9484"
DGX_SERIAL_NUMBER=QTFCOU7080017
2.
Follow the instructions in the section appropriate for the software version installed.
Configuring Docker IP Addresses for DGX OS Server Software Version 2.x and
‣
Earlier
Configuring Docker IP Addresses for DGX OS Server Software Version 3.1.1 and
‣
Later
3.2.1.Configuring Docker IP Addresses for DGX OS
Server Software Version 2.x and Earlier
1.
Open the /etc/default/docker file for editing.
$ sudo vi /etc/default/docker
2.
Modify the /etc/default/docker file, specifying the correct bridge IP address
and IP address ranges for your network. Consult your IT administrator for the
correct addresses.
For example, if your DNS server exists at IP address 10.10.254.254, and the
192.168.0.0/24 subnet is not otherwise needed by the DGX-1, you can add the
following line to the /etc/default/docker file:
DOCKER_OPTS=”--dns 10.10.254.254 --bip=192.168.0.1/24 -fixedcidr=192.168.0.0/24”
If there is already a DOCKER_OPTS line, then add the parameters (text between the
quote marks) to the DOCKER_OPTS environment variable.
3.
Save and close the /etc/default/docker file when done.
4.
Restart Docker with the new configuration.
$ sudo service docker restart
3.2.2.Configuring Docker IP Addresses for DGX OS
Server Software Version 3.1.1 and Later
You can change the default Docker network addresses by either modifying the /
etc/docker/daemon.json file or modifying the /etc/systemd/ system/
docker.service.d/docker-override.conf file. These instructions provide an
example of modifying the /etc/systemd/system/docker.service.d/docker-
override.conf to override the default nvidia-docker network addresses.
www.nvidia.com
NVIDIA DGX-1 DU-08033-001 _v13.1|22
Page 27

Preparing for Using Docker Containers
1.
Open the docker-override.conf file for editing.
$ sudo vi /etc/systemd/system/docker.service.d/docker-override.conf
[Service]
ExecStart=
ExecStart=/usr/bin/dockerd -H fd:// -s overlay2 --disable-legacyregistry=false
LimitMEMLOCK=infinity
LimitSTACK=67108864
2.
Make the changes indicated in bold below, setting the correct bridge IP address and
IP address ranges for your network. Consult your IT administrator for the correct
addresses.
[Service]
ExecStart=
ExecStart=/usr/bin/dockerd -H fd:// -s overlay2 --bip=192.168.127.1/24
--fixed-cidr=192.168.127.128/25
--disable-legacy-registry=false
LimitMEMLOCK=infinity
LimitSTACK=67108864
Save and close the /etc/systemd/system/docker.service.d/docker-
override.conf file when done.
3.
Reload the systemctl daemon.
$ sudo systemctl daemon-reload
4.
Restart Docker.
$ sudo systemctl restart docker
3.3.Letting Users Issue Docker Commands
To prevent the docker daemon from running without protection against escalation of
privileges, the NVIDIA Docker software requires sudo privileges to run containers.
You can grant the required privileges to users who will run containers on the DGX-1 in
one of the following ways:
Add each user as an administrator user with sudo privileges.
‣
Add each user as a standard user without sudo privileges and then add the user to
‣
the docker group.
This section provides instructions for adding users to the docker group.
WARNING: Only add users to the docker group whom you would trust with root
privilege. These instructions make it more convenient for users to access Docker
containers; however, the resulting docker group is equivalent to the root user,
because once a user is able to send commands to the Docker engine, they are able to
escalate privilege and run root level operations. This may violate your organization's
security policies. See the Docker Daemon Attack Surface for information on how this
www.nvidia.com
NVIDIA DGX-1 DU-08033-001 _v13.1|23
Page 28

Preparing for Using Docker Containers
can impact security in your system. Always consult your IT department to make sure
the installation is in accordance with the security policies of your data center.
The commands in this section require sudo access, and should be performed by a
system administrator.
3.3.1.Checking if a User is in the Docker Group
To check whether a user is already part of the docker group, enter the following:
$ groups username
The output shows all the groups of which that user is a member. If docker is not listed,
then add that user.
3.3.2.Creating a User
To create a new user in order to add them to the docker group, perform the following:
1.
Add the user.
$ sudo useradd username
2.
Set up the password.
$ sudo passwd username
Enter a password at the prompts:
Enter new UNIX password:
Retype new UNIX password:
passwd: password updated successfully
3.3.3.Adding a User to the Docker Group
For each user you want to add to the docker group, enter the following command:
$ sudo usermod -a -G docker username
3.4.Configuring a System Proxy
If you will be using the DGX-1 in base OS mode, and your network requires use of a
proxy, then edit the file /etc/apt/apt.conf.d/proxy.conf and make sure the following lines
are present, using the parameters that apply to your network:
Acquire::http::proxy "http://<username>:<password>@<host>:<port>/";
Acquire::ftp::proxy "ftp://<username>:<password>@<host>:<port>/";
Acquire::https::proxy "https://<username>:<password>@<host>:<port>/";
www.nvidia.com
NVIDIA DGX-1 DU-08033-001 _v13.1|24
Page 29

Preparing for Using Docker Containers
This is to ensure that Docker is able to access the DGX-1 Container Registry through the
proxy. For best practice recommendations on configuring proxies for Docker, see https://
docs.docker.com/engine/admin/systemd/#http-proxy.
3.5.Configuring NFS Mount and Cache
The DGX-1 includes four SSDs in a RAID 0 configuration. These SSDs are intended for
application caching, so you must set up your own NFS drives for long term data storage.
The following instructions describe how to mount the NFS onto the DGX-1, and how to
cache the NFS using the DGX-1 SSDs for improved performance.
Make sure your DGX-1 is set up in Base OS mode, that you have an NFS server with one
or more exports with data to be accessed by the DGX-1, and that there is network access
between the DGX-1 and the NFS server.
Skip this section if you are going to use the DGX-1 in cloud-managed mode. The
DGX-1 Cloud Services software will set up the NFS cache for you as part of the cloudmanaged mode configuration. Similarly, in cloud-managed mode, the person setting
up the job will specify any NFS mount requirements for the job at that time.
1.
Check if the cache daemon is installed and configured.
$ service cachefilesd status
If the output indicates that cachefilesd is disabled, continue with the following steps.
Otherwise, skip to step 7.
2.
Install the cache daemon.
$ sudo apt-get install cachefilesd
3.
Edit the cache daemon startup file.
$ sudo vi /etc/default/cachefilesd
Uncomment the "RUN=yes" line in the startup file and then save the file.
4.
Configure the cache daemon for the DGX-1.
a) Open the cache daemon configuration file.
$ sudo vi /etc/cachefilesd.conf
b) Edit the contents to match the following, then save the file.
dir /raid
tag dgx1cache
brun 25%
bcull 15%
bstop 5%
frun 10%
fcull 7%
fstop 3%
These settings are optimized for Deep Learning workloads, and provide the best
throughput for training from large datasets.
5.
Start the cache daemon.
$ service cachefilesd start
www.nvidia.com
NVIDIA DGX-1 DU-08033-001 _v13.1|25
Page 30

Preparing for Using Docker Containers
6.
Verify the cache daemon started properly.
$ service cachefilesd status
Expected output.
Checking status of FilesCache daemon cachefilesd
7.
Configure an NFS mount for the DGX-1.
a) Edit the filesystem tables configuration.
sudo vi /etc/fstab
b) Add a new line for the NFS mount, using the local mount point of /mnt.
<nfs_server>:<export_path> /mnt nfs
rw,noatime,rsize=32768,wsize=32768,nolock,tcp,intr,fsc,nofail 0 0
/mnt is used here as an example mount point.
‣
Consult your Network Administrator for the correct values for <nfs_server>
‣
and <export_path>.
The nfs arguments presented here are a list of recommended values based on
‣
typical use cases. However, "fsc" must always be included as that argument
specifies use of FS-Cache.
c) Save the changes.
8.
Verify the NFS server is reachable.
ping <nfs_server>
Use the server IP address or the server name provided by your network
administrator.
9.
Mount the NFS export.
sudo mount /mnt
/mnt is the example mount point used in step 7.
10.
Verify caching is enabled.
cat /proc/fs/nfsfs/volumes
Look for the text FSC=yes in the output.
Upon rebooting, the NFS should be mounted and cached on the DGX-1.
www.nvidia.com
NVIDIA DGX-1 DU-08033-001 _v13.1|26
Page 31

Chapter4.
CONFIGURING AND MANAGING THE DGX-1
This chapter describes the following DGX-1 configuration and management tasks:
Using the BMC
‣
Configuring a Static IP Address for the BMC
‣
Configuring Static IP Addresses for the Network Ports
‣
Obtaining MAC Addresses
‣
4.1.Using the BMC
The DGX-1 includes a baseboard management controller (BMC) that lets you manage
and monitor the DGX-1 independently of the CPU or operating system. You can access
the BMC remotely through the Ethernet connection to the IPMI port.
This section describes how to access the BMC, and describes a few common tasks that
you can accomplish through the BMC. It is not meant to be a comprehensive description
of all the BMC capabilities.
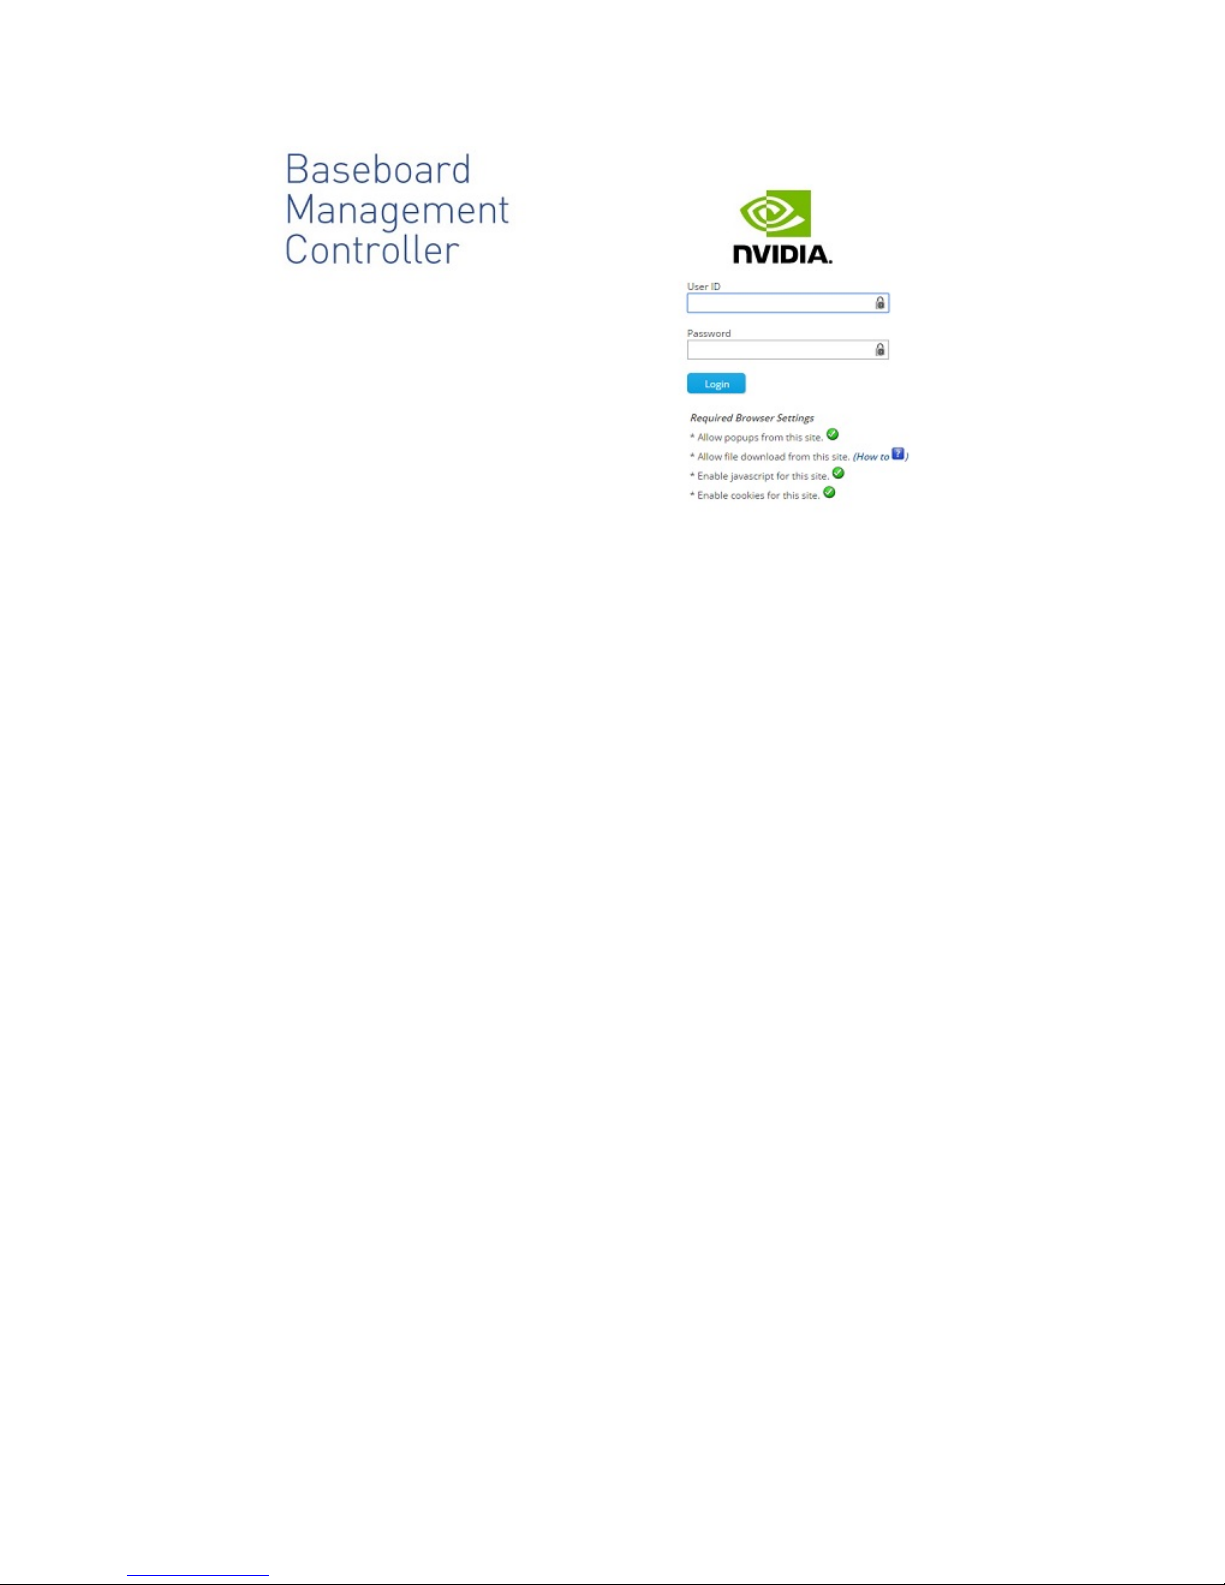
To access the BMC remotely:
1.
Make sure you have connected the IPMI port on the DGX-1 to your LAN.
2.
Open a Java-enabled browser within your LAN and go to http://<IPMI IP Address>/.
Use Firefox or Internet Explorer. Google Chrome is not officially supported by the
BMC.
www.nvidia.com
NVIDIA DGX-1 DU-08033-001 _v13.1|27
Page 32
Configuring and Managing the DGX-1
3.
Log in.
Your initial log in credentials are based on the ones you created when you first set
up the DGX-1. Enter your username for both the User ID as well as the Password.
User ID: <your username>
Password: <your username>.
4.
Be sure to change your password immediately to ensure the security of the BMC.
See the next section for instructions on how to change your BMC password.
4.1.1.Creating a Unique BMC Password for Remote
Access
When you set up the DGX-1 upon powering it on for the first time, you set up a
username and password for the system. These credentials are also used to log in to the
BMC remotely, except that the BMC password is the username.
It is strongly recommended that you create a unique password as soon as possible.
Create a unique BMC password as follows:
1.
Open a Java-enabled web browser within your LAN and go to http://<IPMI IP
address>/.
Use Firefox or Internet Explorer. Google Chrome is not officially supported by the
BMC.
2.
Log in with the username that you created when you first set up the DGX-1.
Enter your username for both the User ID as well as the password:
User ID: <your username>
Password: <your username>.
3.
From the top menu, click Configuration and then select User.
4.
Select your usename and then click Modify User.
www.nvidia.com
NVIDIA DGX-1 DU-08033-001 _v13.1|28
Page 33
Configuring and Managing the DGX-1
5.
In the Modify User dialog, select Change Password, and then enter your new
password in the Password and Confirm Password boxes.
The BMC software will not accept "sysadmin" for the user name.
6.
Click Modify when finished.
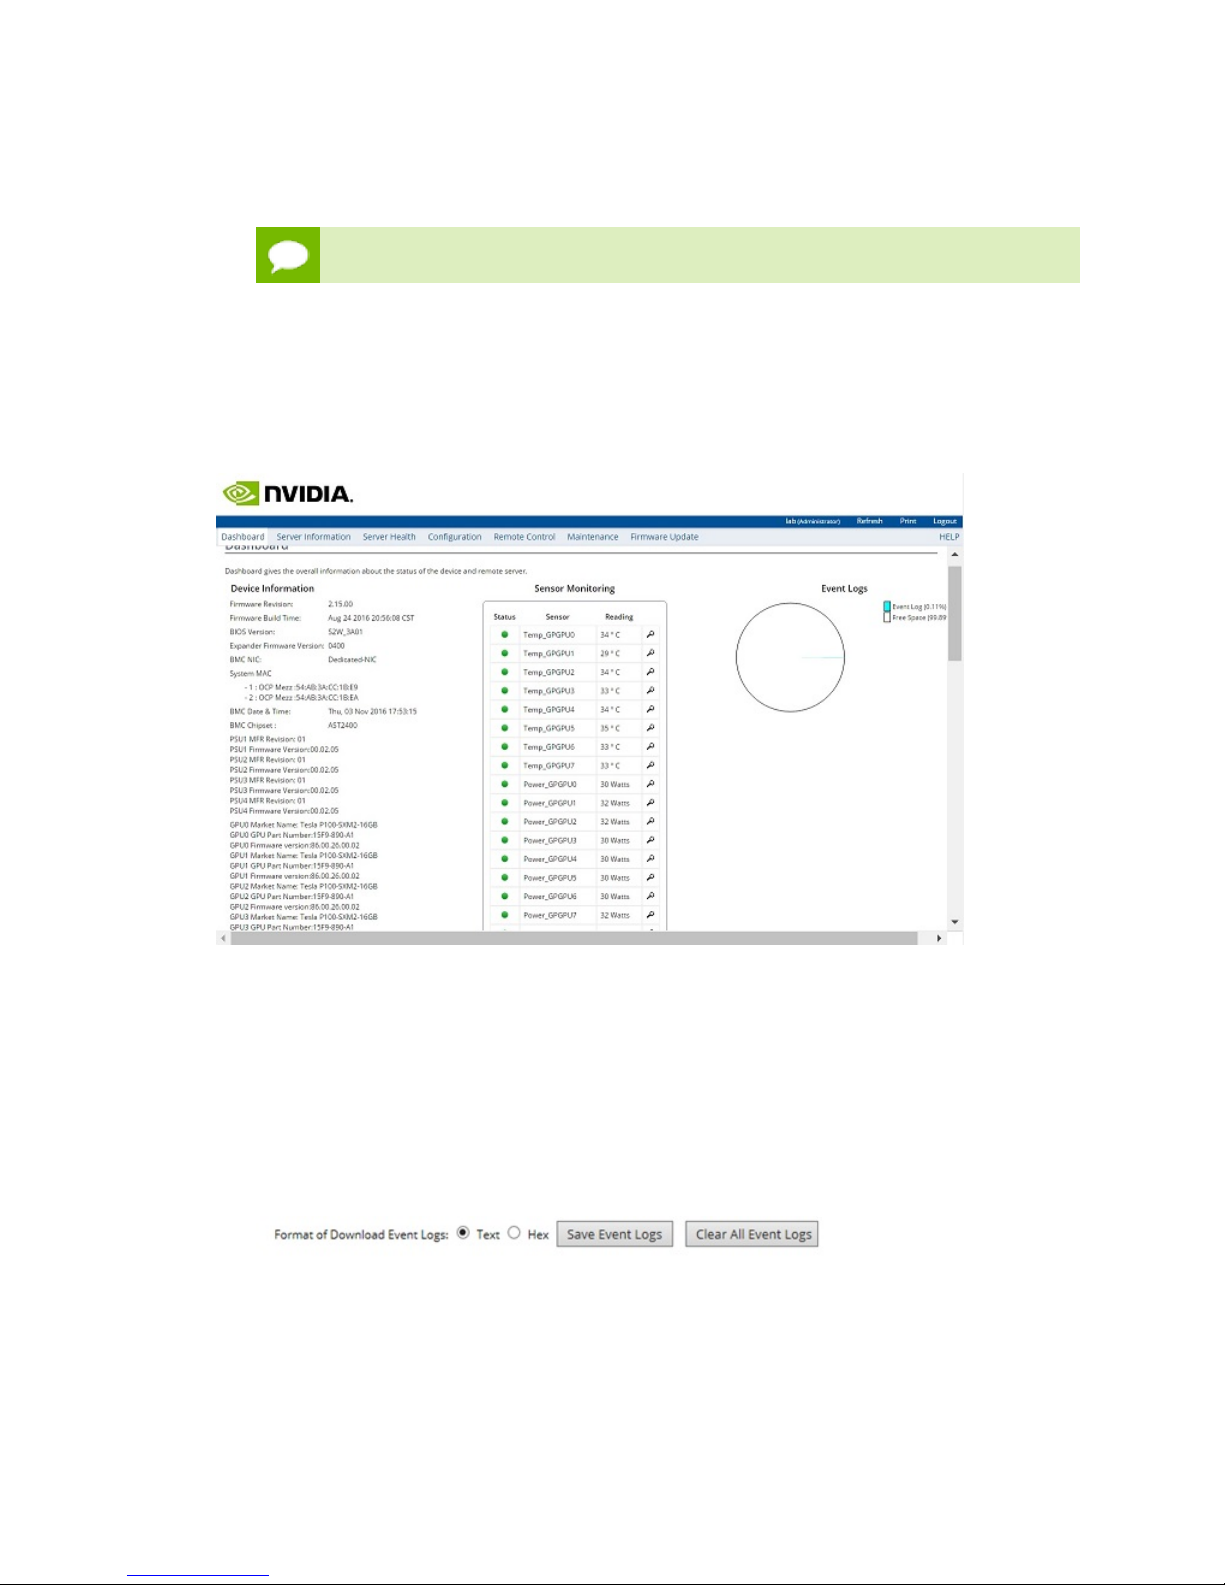
4.1.2.Viewing System Information
The BMC opens to the dashboard, which shows information about the system and
system components, such as temperatures and voltages.
4.1.3.Submitting BMC Log Files
The BMC provides automatic logging of system activities and status. The NVIDIA
Enterprise Support team uses the log files to assist in troubleshooting. Follow these
instructions to obtain the log files to send to NVIDIA Enterprise Support.
1.
Log into the BMC, then click Server Health from the top menu and select Event Log.
2.
Make sure that Text is selected at Format of Download Event Logs.
3.
Click Save Event Logs to download the event logs.
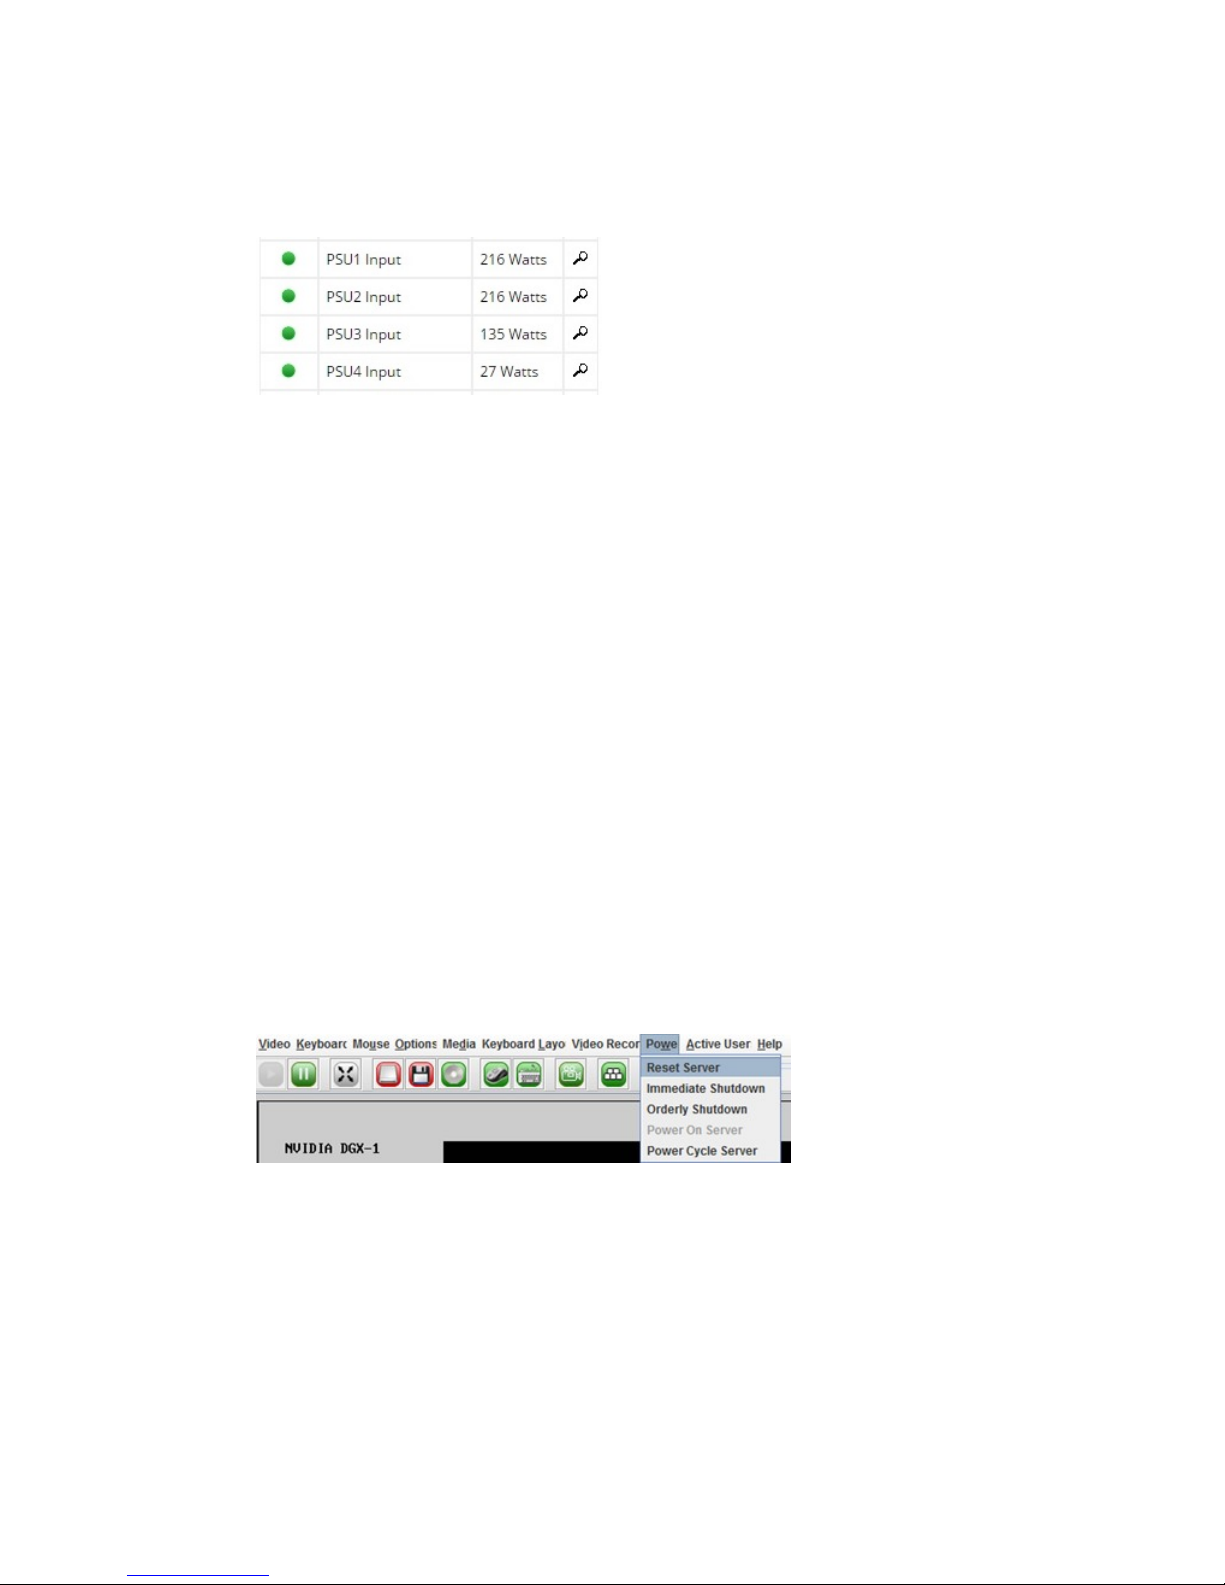
4.1.4.Determining Total Power Consumption
You can use the BMC dashboard to determine total power consumption of the DGX-1 as
follows:
www.nvidia.com
NVIDIA DGX-1 DU-08033-001 _v13.1|29
Page 34
Configuring and Managing the DGX-1
1.
Log into the BMC.
2.
From the BMC dashboard, locate the Sensor Monitoring area and then scroll down
the page until you see the PSU Input rows.
3.
Add the values for all the PSUs.
In this example, the total power consumption would be 216+216+135+27 = 594 watts.
4.1.5.Accessing the DGX-1 Console
1.
Log into the BMC.
2.
From the top menu, click Remote Control and then select Console Redirection.
3.
Click Java Console to open the popup window.
The window provides interactive control of the DGX-1 console.
4.1.6.Powering Off / Power Cycling the System
Remotely
4.1.6.1.From the DGX-1 Console Window
If you have opened the Java Viewer (Remote Control->Console Redirection) to view the
console window, then you can power cycle, reset, or shutdown the DGX-1 as follows:
1.
From the JViewer top menu, click Power and then select from the available options,
depending on what you want to do.
2.
Click Yes and then OK at the Power Control dialog, then wait for the system to
perform the intended action.
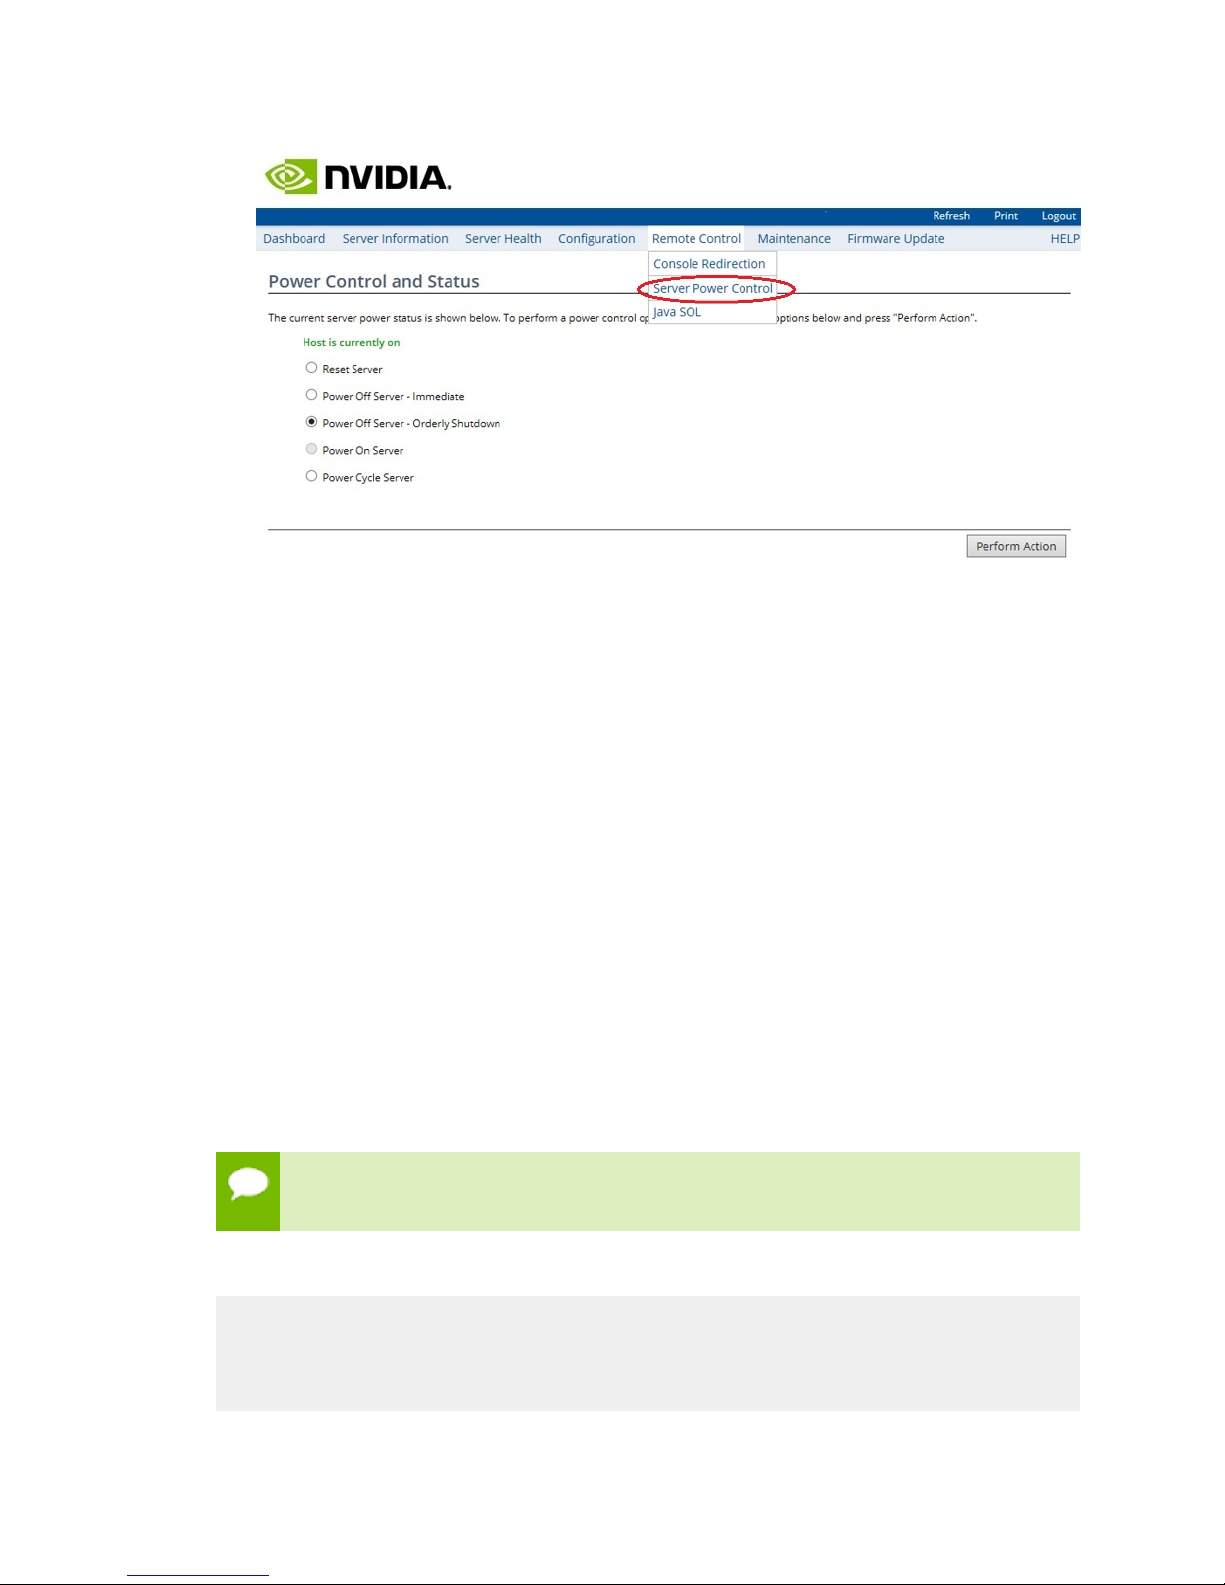
4.1.6.2.From the BMC UI
1.
Log into the BMC.
2.
From the top menu, click Remote Control and then select Server Power Control.
www.nvidia.com
NVIDIA DGX-1 DU-08033-001 _v13.1|30
Page 35
Configuring and Managing the DGX-1
3.
Select from the available options according to what you want the system to do, then
click Perform Action.
4.2.Configuring a Static IP Address for the BMC
This section explains how to set a static IP address for the BMC. You will need to do this
if your network does not support DHCP.
Use one of the methods described in the following sections:
Configuring a BMC Static IP Address Using the System BIOS
‣
Configuring the BMC Static IP Address Using ipmitool
‣
Configuring the BMC Static IP Address Using the BMC User Interface
‣
4.2.1.Configuring a BMC Static IP Address Using
ipmitool
This section describes how to set a static IP address for the BMC from the Ubuntu
command line.
If you cannot access the DGX-1 remotely, then connect a display (1024x768 or lower
resolution) and keyboard directly to the DGX-1.
To view the current settings, enter the following command.
$ sudo ipmitool lan print 1
Set in Progress : Set Complete
Auth Type Support : MD5
Auth Type Enable : Callback : MD5
: User : MD5
: Operator : MD5
www.nvidia.com
NVIDIA DGX-1 DU-08033-001 _v13.1|31
Page 36

Configuring and Managing the DGX-1
: Admin : MD5
: OEM : MD5
IP Address Source : DHCP Address
IP Address : 10.31.241.190
Subnet Mask : 255.255.255.0
MAC Address : 54:ab:3a:72:08:a9
SNMP Community String : Quanta
IP Header : TTL=0x40 Flags=0x40 Precedence=0x00 TOS=0x10
BMC ARP Control : ARP Responses Enabled, Gratuitous ARP Disabled
Gratituous ARP Intrvl : 0.0 seconds
Default Gateway IP : 10.31.241.1
Default Gateway MAC : 00:00:00:00:00:00
Backup Gateway IP : 0.0.0.0
Backup Gateway MAC : 00:00:00:00:00:00
802.1q VLAN ID : Disabled
802.1q VLAN Priority : 0RMCP+ Cipher Suites : 0,1,2,3,6,7,8,11,12,15,16,17
Cipher Suite Priv Max : XaaaaaaaaaaaXXX
: X=Cipher Suite Unused
: c=CALLBACK
: u=USER
: o=OPERATOR
: a=ADMIN
: O=OEM
To set a static IP address for the BMC, do the following.
1.
Set the IP address source to static.
$ sudo ipmitool lan set 1 ipsrc static
2.
Set the appropriate address information.
To set the IP address (“Station IP address” in the BIOS settings), enter the
‣
following and replace the italicized text with your information.
$ sudo ipmitool lan set 1 ipaddr 10.31.241.190
To set the subnet mask, enter the following and replace the italicized text with
‣
your information.
$ sudo ipmitool lan set 1 netmask 255.255.255.0
To set the default gateway IP (“Router IP address” in the BIOS settings), enter the
‣
following and replace the italicized text with your information.
$ sudo ipmitool lan set 1 defgw ipaddr 10.31.241.1
4.2.2.Configuring a BMC Static IP Address Using the
System BIOS
This section describes how to set a static IP address for the BMC when you cannot access
the DGX-1 remotely. This process involves setting the BMC IP address during system
boot.
1.
Connect a keyboard and display (1024x768 or lower resolution) to the DGX-1, then
turn on the DGX-1.
2.
When you see the NVIDIA logo, press Del to enter the BIOS Utility Setup Screen.
www.nvidia.com
NVIDIA DGX-1 DU-08033-001 _v13.1|32
Page 37

Configuring and Managing the DGX-1
3.
At the BIOS Setup Utility screen, navigate to the Server Mgmt tab on the top menu,
then scroll to BMC network configuration and press Enter.
www.nvidia.com
NVIDIA DGX-1 DU-08033-001 _v13.1|33
Page 38

Configuring and Managing the DGX-1
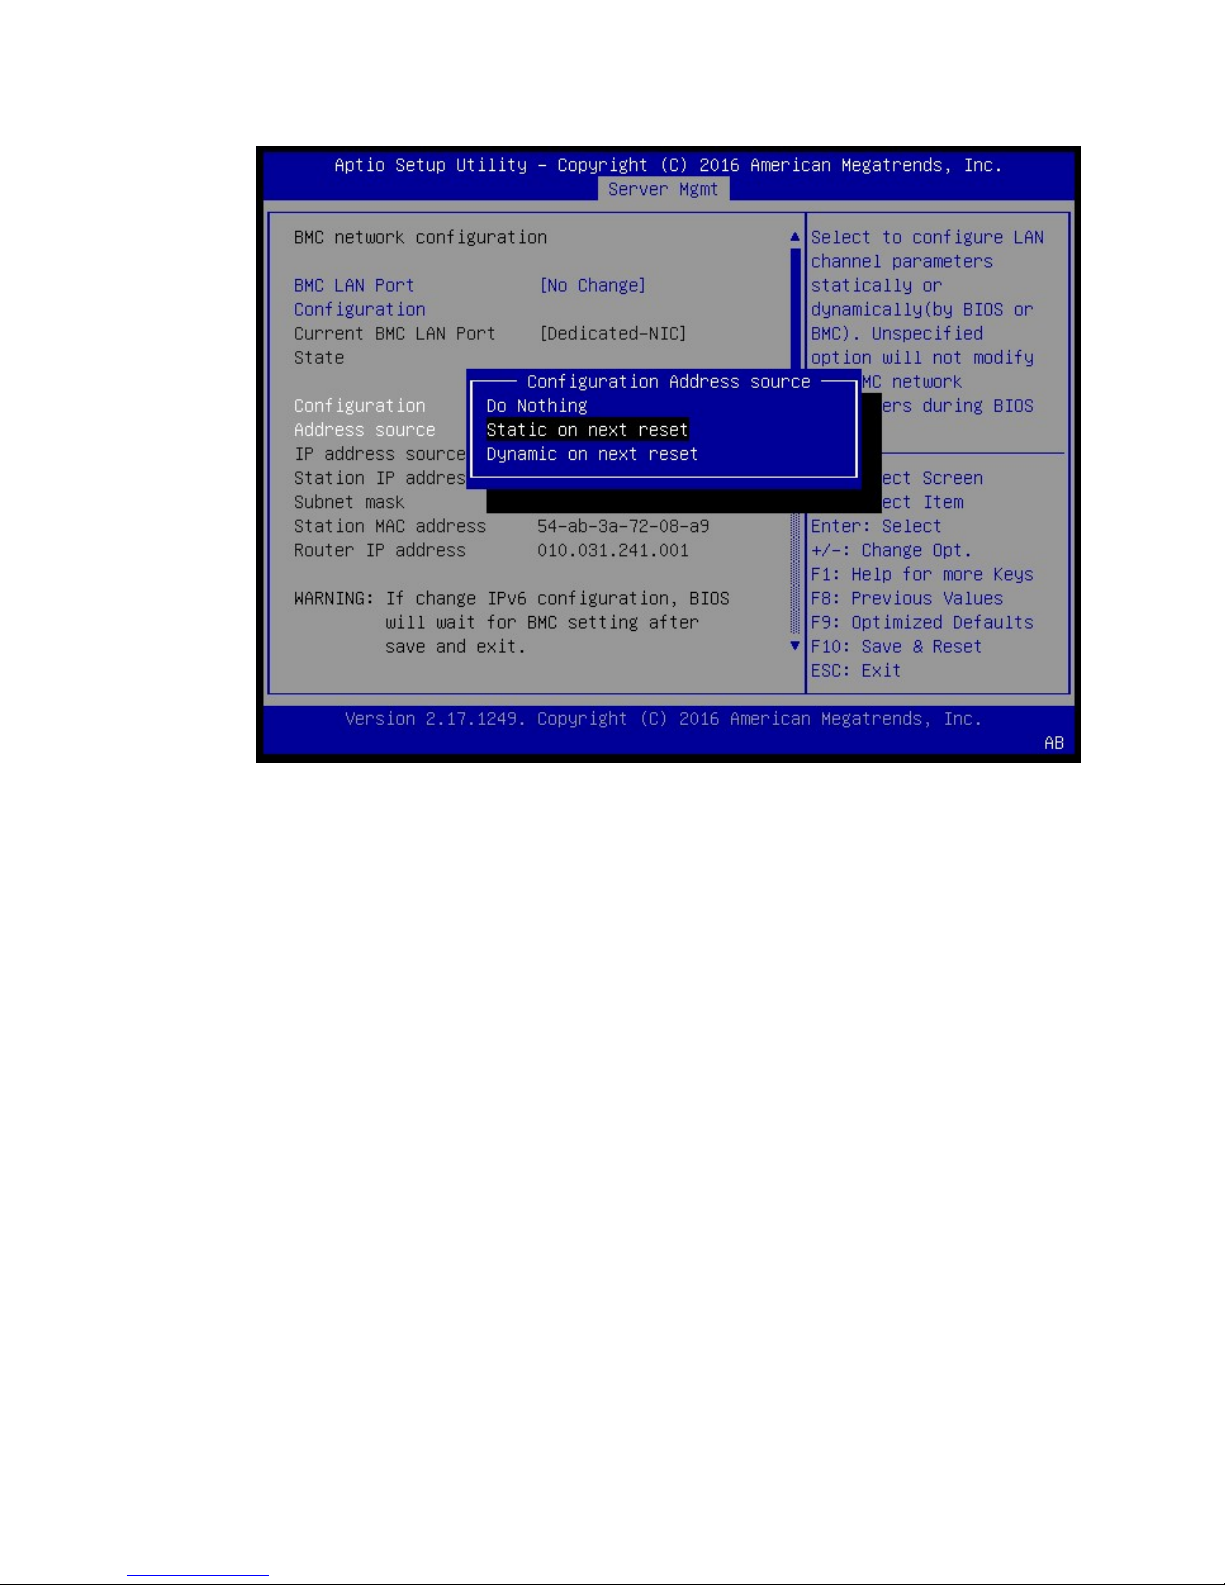
4.
Scroll to Configuration Address Source and press Enter , then at the Configuration
Address source pop-up, select Static on next reset and then press Enter.
www.nvidia.com
NVIDIA DGX-1 DU-08033-001 _v13.1|34
Page 39
Configuring and Managing the DGX-1
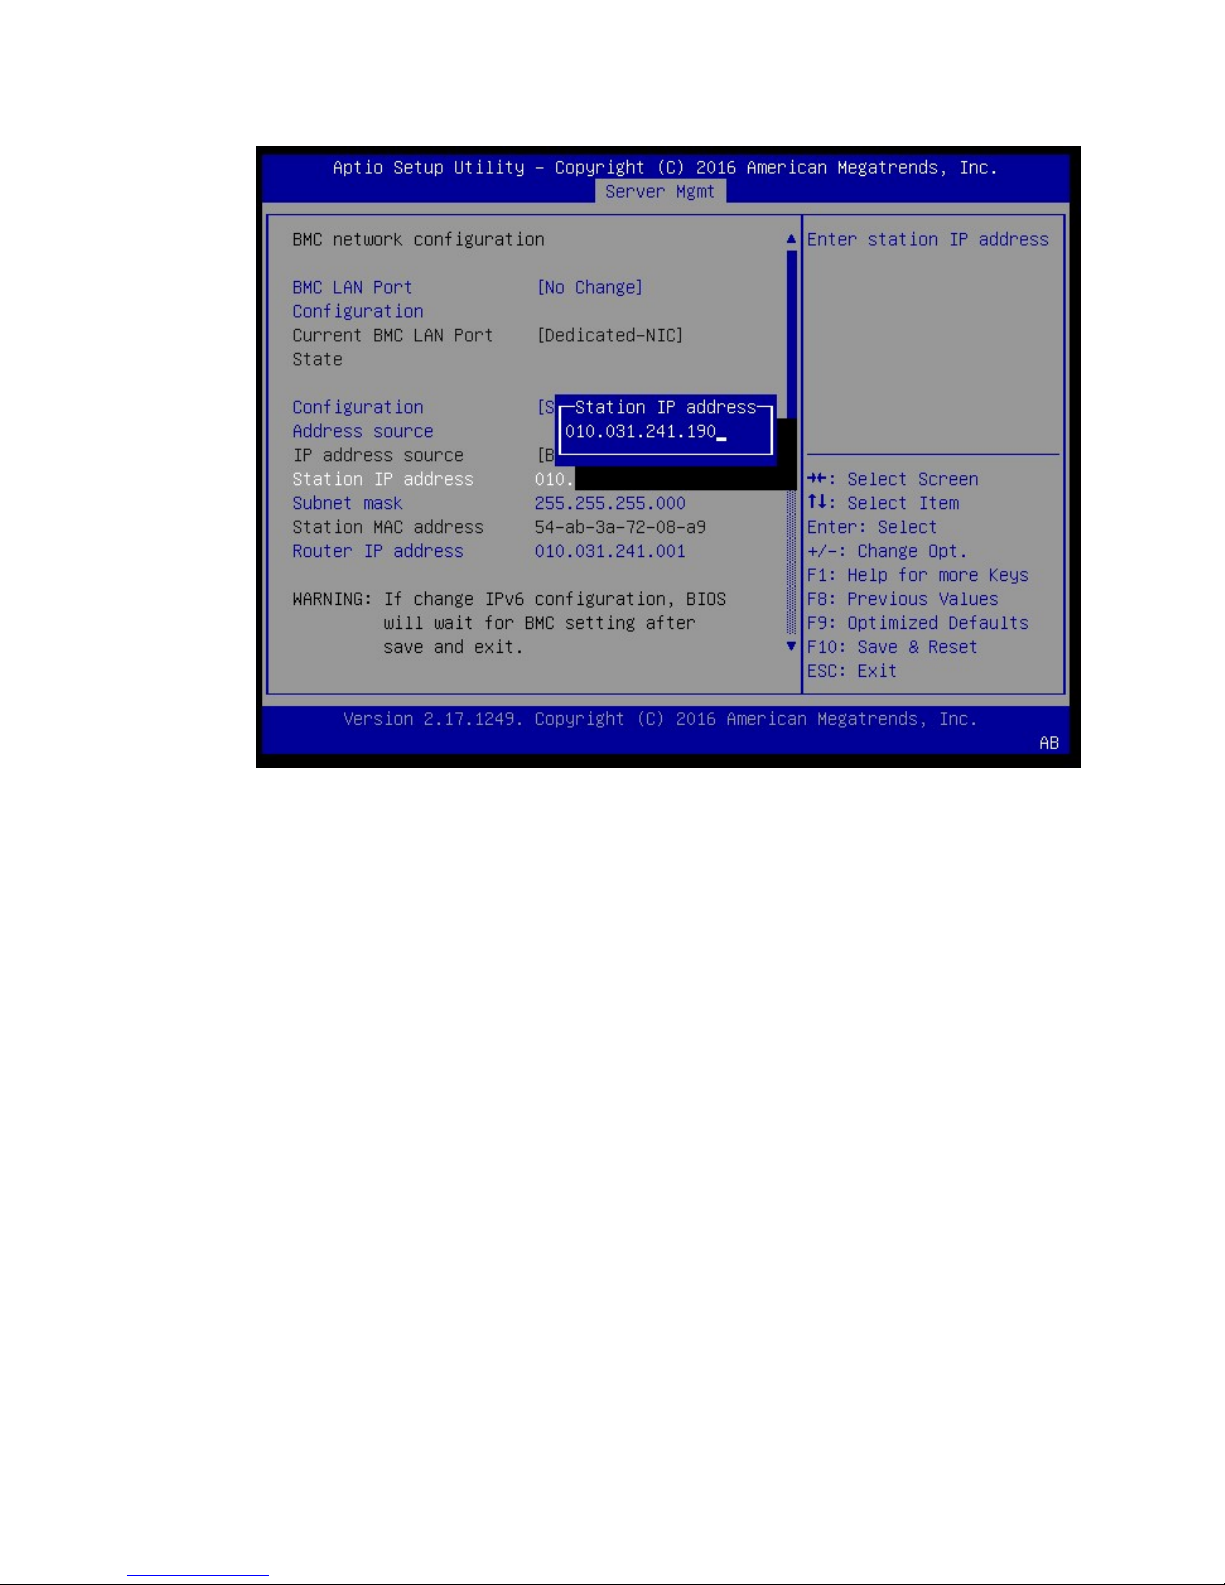
5.
Set the addresses for the Station IP address, Subnet mask, and Router IP address as
needed by performing the following for each:
a)
Scroll to the specific item and press Enter.
b) Enter the appropriate information at the pop-up, then press Enter.
www.nvidia.com
NVIDIA DGX-1 DU-08033-001 _v13.1|35
Page 40
Configuring and Managing the DGX-1
6.
When finished making all your changes, press F10 to Save & Reset, then select Yes at
the confirmation pop-up and press Enter.
You can now access the BMC over the network.
4.2.3.Configuring a BMC Static IP Address Using the
BMC Dashboard
1.
Log into the BMC, then click Configuration from the top menu and select Network
Settings.
2.
In the IPv4 Configuration section of the Network Settings page, clear the Use DHCP
check box, and then enter the appropriate values for the IPv4 Address , Subnet
Mask , and Default Gateway fields.
www.nvidia.com
NVIDIA DGX-1 DU-08033-001 _v13.1|36
Page 41

Configuring and Managing the DGX-1
3.
Click Save when done.
4.3.Configuring Static IP Addresses for the
Network Ports
During the initial boot setup process for the DGX-1, you had an opportunity to configure
static IP addresses for the network ports. If you did not set this up at that time, you
can configure the static IP addresses from the Ubuntu command line according to the
following instructions.
If you cannot access the DGX-1 remotely, then connect a display (1024x768 or lower
resolution) and keyboard directly to the DGX-1.
1.
Determine the port designation that you want to configure, based on the physical
ethernet port that you have connected to your network.
www.nvidia.com
NVIDIA DGX-1 DU-08033-001 _v13.1|37
Page 42

Configuring and Managing the DGX-1
Use the following port designations according to the DGX-1 Base OS software
version installed on the DGX-1:
Port Designation: Base OS
Ethernet Port Position
Right Side em1 enp1s0f0
Left Side em2 enp1s0f1
2.
Edit the interfaces file.
$ sudo vi /etc/network/interfaces
## Configure a static IP
auto em1
iface em1 inet static
address 192.168.1.14
gateway 192.168.1.1
netmask 255.255.255.0
network 192.168.1.0
broadcast 192.168.1.255
Software 2.x and earlier
Port Designation: Base OS
Software 3.x and later
Consult your network adiminstrator for the appropriate addresses for your network,
and use the port designations that you determined in step 1.
3.
When finished with your edits, press ESC to switch to command mode, then save
the file to the disk and exit the editor.
:wq
4.
Restart the network services to put the changes into effect.
$ sudo /etc/init.d/networking restart
4.4.Obtaining MAC Addresses
These instructions explain how to determine the MAC addresses for the IPMI port
(BMC) as well as both ethernet ports of the DGX-1.
www.nvidia.com
NVIDIA DGX-1 DU-08033-001 _v13.1|38
Page 43

Configuring and Managing the DGX-1
The ports are, from left to right, IPMI (BMC), em2 (or enp1s0f1), em1 (or enp1s0f0).
1.
Connect a display (1024x768 or lower resolution) and keyboard to the DGX-1.
2.
Turn the DGX-1 on or reboot.
3.
At the NVIDIA logo boot screen, press [F2] or [Del] to enter the BIOS setup screen.
4.
Select the Advanced tab from the top menu, then scroll down to view the two
Quanta Dual Port 10G BASE-T Mezzanine items.
www.nvidia.com
NVIDIA DGX-1 DU-08033-001 _v13.1|39
Page 44

Configuring and Managing the DGX-1
The first item shows the MAC address for ethernet port em1, and the second item
shows the MAC address for em2.
5.
Navigate to and select Server Mgmt from the top menu, then scroll down to and
select BMC network configuration.
6.
Scroll down to view the Station MAC address.
www.nvidia.com
NVIDIA DGX-1 DU-08033-001 _v13.1|40
Page 45

This shows the MAC address for the BMC.
Configuring and Managing the DGX-1
www.nvidia.com
NVIDIA DGX-1 DU-08033-001 _v13.1|41
Page 46

Chapter5.
MAINTAINING AND SERVICING THE NVIDIA
DGX-1
Be sure to familiarize yourself with the NVIDIA Terms & Conditions documents
before attempting to perform any modification or repair to the DGX-1. These Terms &
Conditions for the DGX-1 can be found through the NVIDIA DGX Systems Support
(http://www.nvidia.com/object/dgxsystems-support.html) page.
5.1.Problem Resolution and Customer Care
Log on to the NVIDIA Enterprise Services (https://nvid.nvidia.com/enterpriselogin/) site
for assistance with troubleshooting, diagnostics, or to report problems with your DGX-1.
Refer to the Customer Support chapter for additional contact information.
Refer to Submitting BMC Log Files for instructions on how to obtain the BMC log files to
assist in troubleshooting.
5.2.Restoring the DGX-1 Software Image
If the DGX-1 software image becomes corrupted or the OS SSD was replaced after a
failure, restore the DGX-1 software image to its original factory condition from a pristine
copy of the image.
The process for restoring the DGX-1 software image is as follows:
1.
Obtain an ISO file that contains the image from NVIDIA Support Enterprise Services
as explained in Obtaining the DGX-1 Software ISO Image and Checksum File.
2.
Restore the DGX-1 software image from this file either remotely through the BMC or
locally from a bootable USB flash drive.
If you are restoring the image remotely, follow the instructions in Re-Imaging
‣
the System Remotely.
www.nvidia.com
NVIDIA DGX-1 DU-08033-001 _v13.1|42
Page 47

Maintaining and Servicing the NVIDIA DGX-1
If you are restoring the image locally, prepare a bootable USB flash drive and
‣
restore the image from the USB flash drive as explained in the following topics:
Creating a Bootable Installation Medium
‣
Re-Imaging the System From a USB Flash Drive
‣
5.2.1.Obtaining the DGX-1 Software ISO Image and
Checksum File
To ensure that you restore the current version of the DGX-1 software image, obtain the
correct ISO image file from NVIDIA Support Enterprise Services. A checksum file is
provided for the image to enable you to verify the bootable installation medium that you
create from the image file.
1.
Log on to the NVIDIA Enterprise Services (https://nvid.nvidia.com/enterpriselogin/)
site.
2.
Click the Announcements tab to locate the download links for the DGX-1 software
image.
3.
Download the ISO image and its checksum file and save them to your local disk.
The ISO image is also available in an archive file. If you download the archive file, be
sure to extract the ISO image before proceeding.
5.2.2.Re-Imaging the System Remotely
These instructions describe how to re-image the system remotely through the BMC. For
information about how to restore the system locally, see Re-Imaging the System From a
USB Flash Drive.
Before re-imaging the system remotely, ensure that the correct DGX-1 software image is
saved to your local disk. For more information, see Obtaining the DGX-1 Software ISO
Image and Checksum File.
1.
Connect to the BMC and change user privileges.
a) Open a Java-enabled web browser within your LAN and go to http://IPMI-
IP-address/, then log in.
Use Firefox or Internet Explorer. Google Chrome is not officially supported by the
BMC.
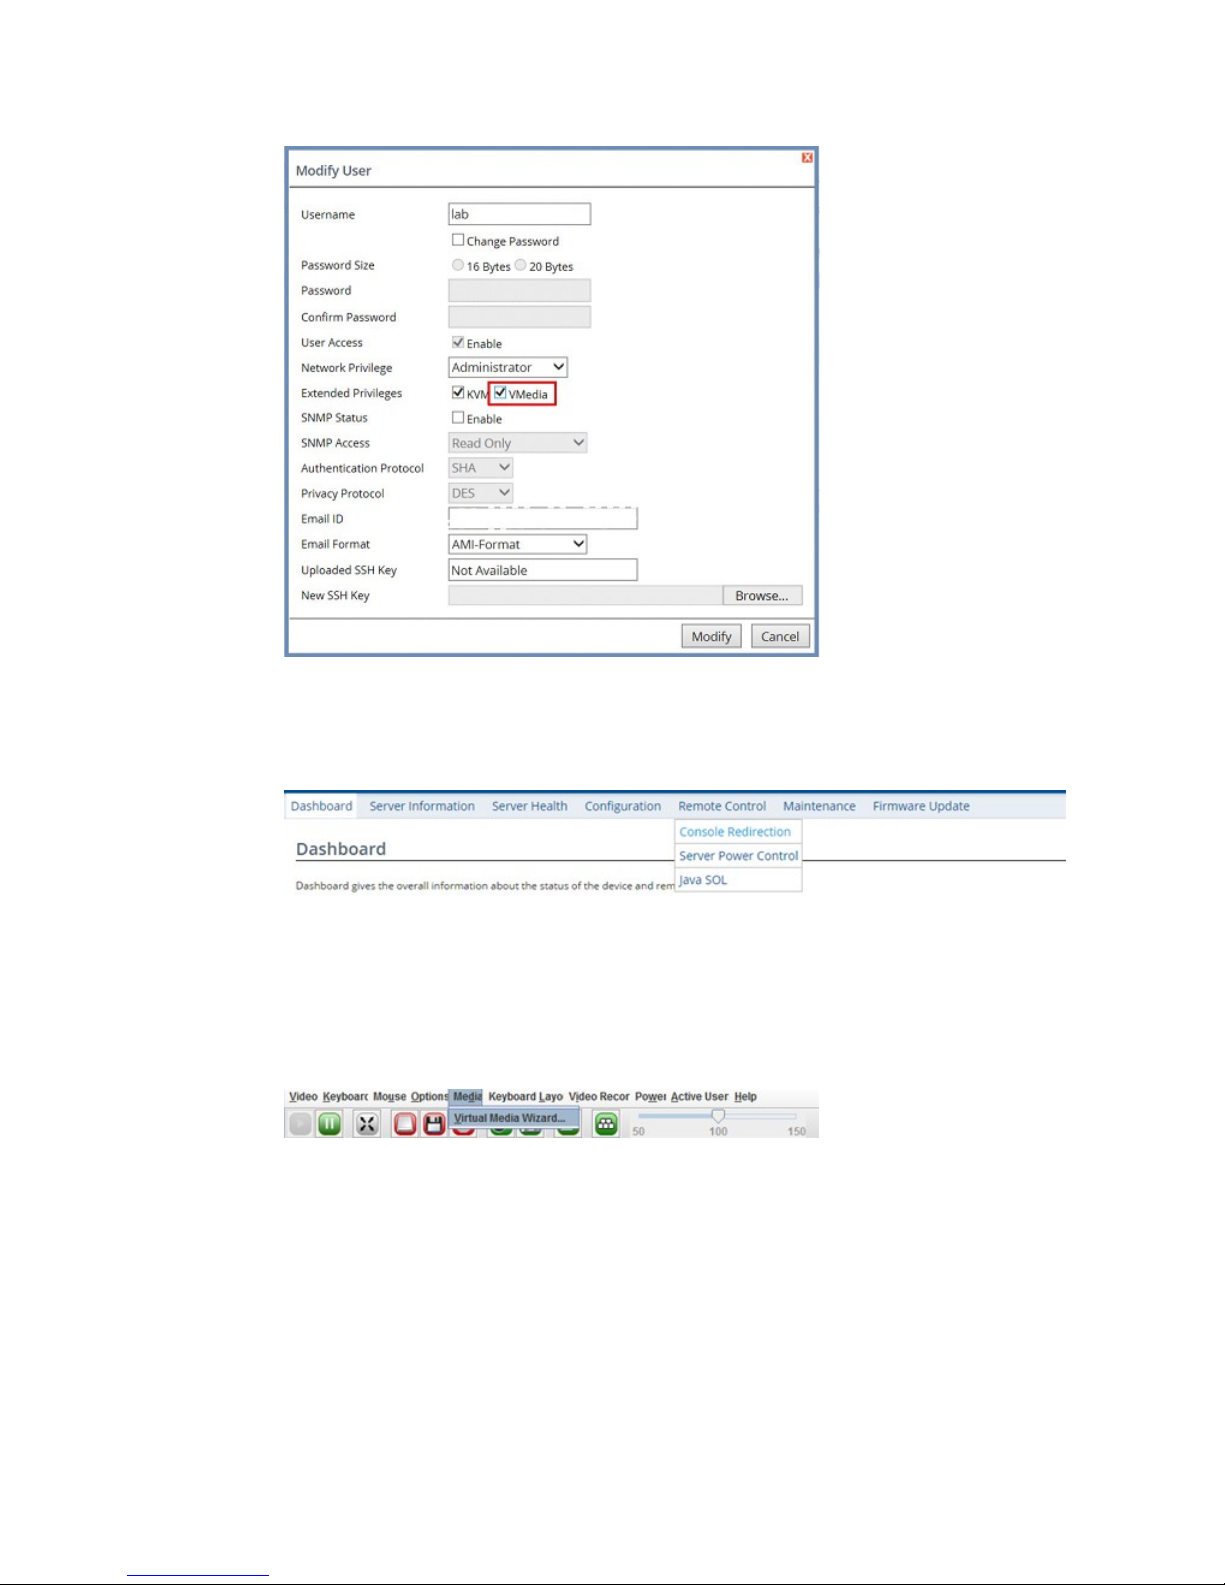
b)
From the top menu, click Configuration and then select User Management.
c)
Select the user name that you created for the BMC, then click Modify User.
d)
In the Modify User dialog, select the VMedia check box to add it to the extended
privileges for the user, then click Modify.
www.nvidia.com
NVIDIA DGX-1 DU-08033-001 _v13.1|43
Page 48
Maintaining and Servicing the NVIDIA DGX-1
2.
Set up the ISO image as virtual media.
a)
From the top menu, click Remote Control and select Console Redirection.
b)
Click Java Console to open the remote JViewer window.
Make sure pop-up blockers are disabled for this site.
c)
From the JViewer top menu bar, click Media and then select Virtual Media
Wizard.
d)
From the CD/DVD Media: I section of the Virtual Media dialog, click Browse
and then locate the re-image ISO file and click Open.
You can ignore the device redirection warning at the bottom of the Virtual Media
wizard as it does not affect the ability to re-image the system.
e)
Click Connect CD/DVD, then click OK at the Information dialog.
The Virtual Media window shows that the ISO image is connected.
www.nvidia.com
NVIDIA DGX-1 DU-08033-001 _v13.1|44
Page 49

Maintaining and Servicing the NVIDIA DGX-1
f) Close the window.
The CD ROM icon in the menu bar turns green to indicate that the ISO image is
attached.
3.
Reboot, install the image, and complete the DGX-1 setup.
a)
From the top menu, click Power and then select Reset Server.
b)
Click Yes and then OK at the Power Control dialogs, then wait for the system to
power down and then come back online.
c)
At the boot selection screen, select Install DGX-1 OS and then press [Enter].
If you are an advanced user who is not using the RAID disks as cache and
want to keep data on the RAID disks, then select Install DGX Server without
www.nvidia.com
NVIDIA DGX-1 DU-08033-001 _v13.1|45
Page 50

Maintaining and Servicing the NVIDIA DGX-1
formatting RAID. See the section Retaining the RAID Partition While Installing
the OS for more information.
The DGX-1 will reboot from CDROM0 1.00, and proceed to install the image. This
can take approximately 15 minutes.
The Mellanox InfiniBand driver installation may take up to 10 minutes.
After the installation is completed, the system ejects the virtual CD and then
reboots into the OS.
Refer to Setting Up the DGX-1 for the steps to take when booting up the DGX-1 for the
first time after a fresh installation.
5.2.3.Creating a Bootable Installation Medium
After obtaining an ISO file that contains the software image from NVIDIA Support
Enterprise Services, create a bootable installation medium, such as a USB flash drive or
DVD-ROM, that contains the image.
If you are restoring the software image remotely through the BMC, you do not need a
bootable installation medium and you can omit this task.
If you are creating a bootable USB flash drive, follow the instructions for the
‣
platform that you are using:
On Linux, see Creating a Bootable USB Flash Drive by Using the dd Command.
‣
On Windows, see Creating a Bootable USB Flash Drive by Using Akeo Rufus.
‣
If you are creating a bootable DVD-ROM, you can use any of the methods
‣
described in Burning the ISO on to a DVD (https://help.ubuntu.com/community/
BurningIsoHowto#Burning_the_ISO_on_to_a_DVD) on the Ubuntu Community
Help Wiki.
5.2.3.1.Creating a Bootable USB Flash Drive by Using the dd
Command
On a Linux system, you can use the dd (http://manpages.ubuntu.com/manpages/xenial/
en/man1/dd.1.html) command to create a bootable USB flash drive that contains the
DGX-1 software image.
Because the image is a hybrid ISO image, you must convert and copy the image to
perform a device bit copy of the image. You cannot perform a simple file copy of the
image.
Ensure that the following prerequisites are met:
www.nvidia.com
NVIDIA DGX-1 DU-08033-001 _v13.1|46
Page 51

Maintaining and Servicing the NVIDIA DGX-1
The correct DGX-1 software image is saved to your local disk. For more information,
‣
see Obtaining the DGX-1 Software ISO Image and Checksum File.
The USB flash drive meets these requirements:
‣
The USB flash drive has a capacity of at least 4 GB.
‣
The partition scheme on the USB flash drive is a GPT partition scheme for UEFI.
‣
1.
Plug the USB flash drive into one of the USB ports of your Linux system.
2.
Obtain the device name of the USB flash drive by running the lsblk (http://
manpages.ubuntu.com/manpages/xenial/man8/lsblk.8.html) command.
lsblk
You can identify the USB flash drive from its size, which is much smaller than the
size of the SSDs in the DGX-1, and from the mount points of any partitions on the
drive, which are under /media.
In the following example, the device name of the USB flash drive is sde.
~$ lsblk
NAME MAJ:MIN RM SIZE RO TYPE MOUNTPOINT
sda 8:0 0 1.8T 0 disk
|_sda1 8:1 0 121M 0 part /boot/efi
|_sda2 8:2 0 1.8T 0 part /
sdb 8:16 0 1.8T 0 disk
|_sdb1 8:17 0 1.8T 0 part
sdc 8:32 0 1.8T 0 disk
sdd 8:48 0 1.8T 0 disk
sde 8:64 1 7.6G 0 disk
|_sde1 8:65 1 7.6G 0 part /media/deeplearner/DGXSTATION
~$
3.
As root, convert and copy the image to the USB flash drive.
sudo dd if=path-to-software-image bs=2048 of=usb-drive-device-name
Caution The dd command erases all data on the device that you specify in the of
option of the command. To avoid losing data, ensure that you specify the correct
path to the USB flash drive.
5.2.3.2.Creating a Bootable USB Flash Drive by Using Akeo Rufus
On a Windows system, you can use the Akeo Reliable USB Formatting Utility (Rufus)
(https://rufus.akeo.ie/) to create a bootable USB flash drive that contains the DGX-1
software image.
Ensure that the following prerequisites are met:
The correct DGX-1 software image is saved to your local disk. For more information,
‣
see Obtaining the DGX-1 Software ISO Image and Checksum File.
The USB flash drive has a capacity of at least 4 GB.
‣
1.
Plug the USB flash drive into one of the USB ports of your Windows system.
www.nvidia.com
NVIDIA DGX-1 DU-08033-001 _v13.1|47
Page 52
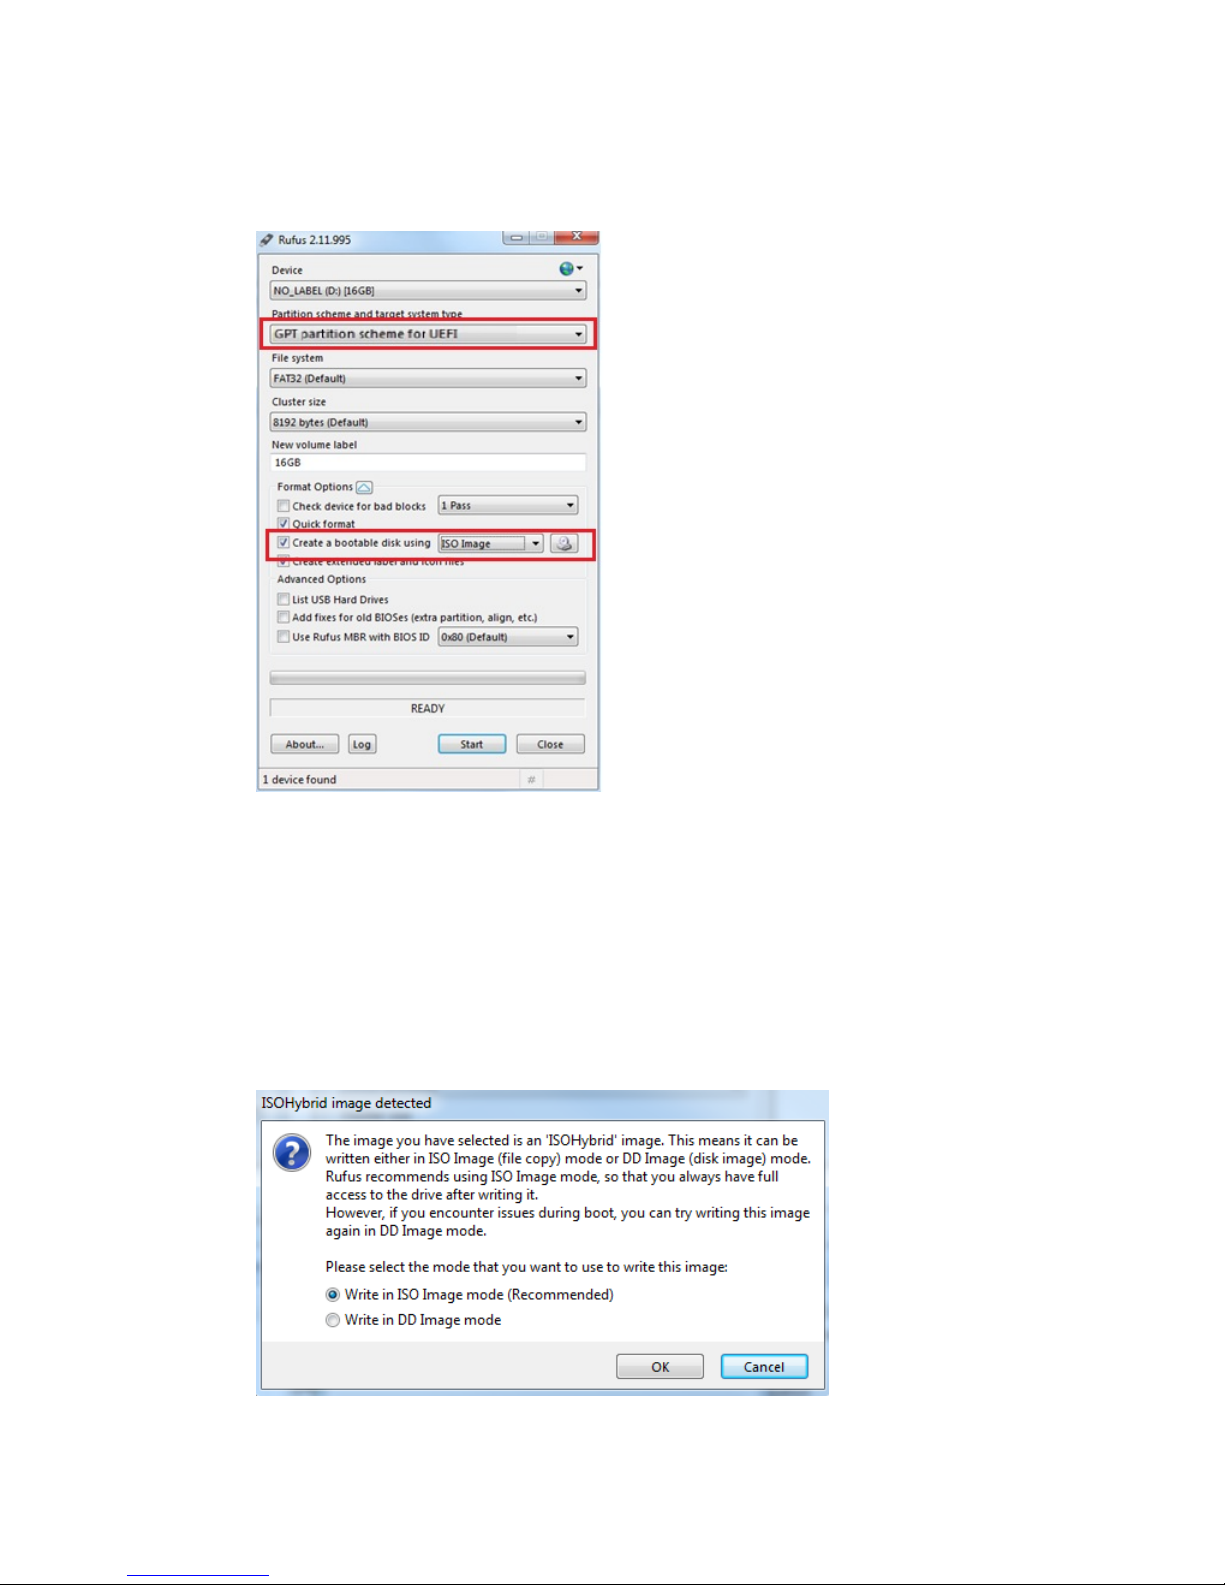
Maintaining and Servicing the NVIDIA DGX-1
2.
Download and launch the Akeo Reliable USB Formatting Utility (Rufus) (https://
rufus.akeo.ie/).
3.
Under Partition scheme and target system type, select GPT partition scheme for
UEFI.
4.
Select the Create a bootable disk using option and from the dropdown menu, select
ISO image.
5.
Click the optical drive icon and open the DGX-1 software ISO image.
6.
Click Start.
Because the image is a hybrid ISO file, you are prompted to select whether to write
the image in ISO Image (file copy) mode or DD Image (disk image) mode.
www.nvidia.com
NVIDIA DGX-1 DU-08033-001 _v13.1|48
Page 53

Maintaining and Servicing the NVIDIA DGX-1
7.
Select Write in ISO Image mode and click OK.
5.2.4.Re-Imaging the System From a USB Flash Drive
These instructions describe how to re-image the system from a USB flash drive. For
information about how to restore the system remotely, see Re-Imaging the System
Remotely.
Before re-imaging the system from a USB flash drive, ensure that you have a bootable
USB flash drive that contains the current DGX-1 software image.
1.
Plug the USB flash drive containing the OS image into the DGX-1.
2.
Connect a monitor and keyboard directly to the DGX-1.
3.
Boot the system and press F11 when the NVIDIA logo appears to get to the boot
menu.
4.
Select the USB volume name that corresponds to the inserted USB flash drive, and
boot the system from it.
5.
When the system boots up, select Install DGX-1 OS on the startup screen and then
press Enter.
If you are an advanced user who is not using the RAID disks as cache and want to
keep data on the RAID disks, then select Install DGX Server without formatting
RAID. See the section Retaining the RAID Partition While Installing the OS for more
information.
The DGX-1 will reboot and proceed to install the image. This can take more than 15
minutes.
The Mellanox InfiniBand driver installation may take up to 10 minutes.
After the installation is completed, the system then reboots into the OS.
Refer to Setting Up the DGX-1 for the steps to take when booting up the DGX-1 for the
first time after a fresh installation.
5.2.5.Retaining the RAID Partition While Installing the
OS
This information describes an installation option that is available starting with DGX OS
Server 3.1.1.
The re-imaging process creates a fresh installation of the DGX OS. During the OS
installation or re-image process, you are presented with a boot menu when booting the
installer image. The default selection is Install DGX Software. The installation process
then repartitions all the SSDs, including the OS SSD as well as the RAID SSDs, and the
RAID array is mounted as /raid. This overwrites any data or file systems that may exist
on the OS disk as well as the RAID disks.
www.nvidia.com
NVIDIA DGX-1 DU-08033-001 _v13.1|49
Page 54

Maintaining and Servicing the NVIDIA DGX-1
Since the RAID array on the DGX-1 is intended to be used as a cache and not for longterm data storage, this should not be disruptive. However, if you are an advanced user
and have set up the disks for a non-cache purpose and want to keep the data on those
drives, then select the Install DGX Server without formatting RAID option at the
boot menu during the boot installation. This option retains data on the RAID disks and
performs the following:
Installs the cache daemon but leaves it disabled by commenting out the RUN=yes
‣
line in /etc/default/cachefilesd.
Creates a /raid directory, leaves it out of the file system table by commenting out
‣
the entry containing “/raid” in /etc/fstab.
Does not format the RAID disks.
‣
When the installation is completed, you can repeat any configurations steps that you had
performed to use the RAID disks as other than cache disks.
You can always choose to use the RAID disks as cache disks at a later time by enabling
cachefilesd and adding /raid to the file system table as follows:
1.
Uncomment the #RUN=yes line in /etc/default/cachefiled.
2.
Uncomment the /raid line in etc/fstab.
3.
Run the following:
a) Mount /raid.
sudo mount /raid
b) Reload the systemd manager configuration.
systemctl daemon-reload
c) Start the cache daemon.
systemctl start cachefilesd.server
These changes are preserved across system reboots.
5.3.Updating the System BIOS
You can update the system BIOS remotely through the BMC. Before updating the system
BIOS, the system must be turned off through the BMC according to the instructions in
this section.
1.
Obtain the BIOS image.
a) Log on to NVIDIA Enterprise Services (https://nvid.nvidia.com/enterpriselogin/)
and click the Announcements tab to locate the DGX-1 software image archive.
b) Download the image archive and then extract the .bin file.
2.
Log on to the BMC and shut down the DGX-1.
a) Open a Java-enabled web browser within your LAN and go to http:\\<IPMI IP
address>\, then log in.
www.nvidia.com
NVIDIA DGX-1 DU-08033-001 _v13.1|50
Page 55
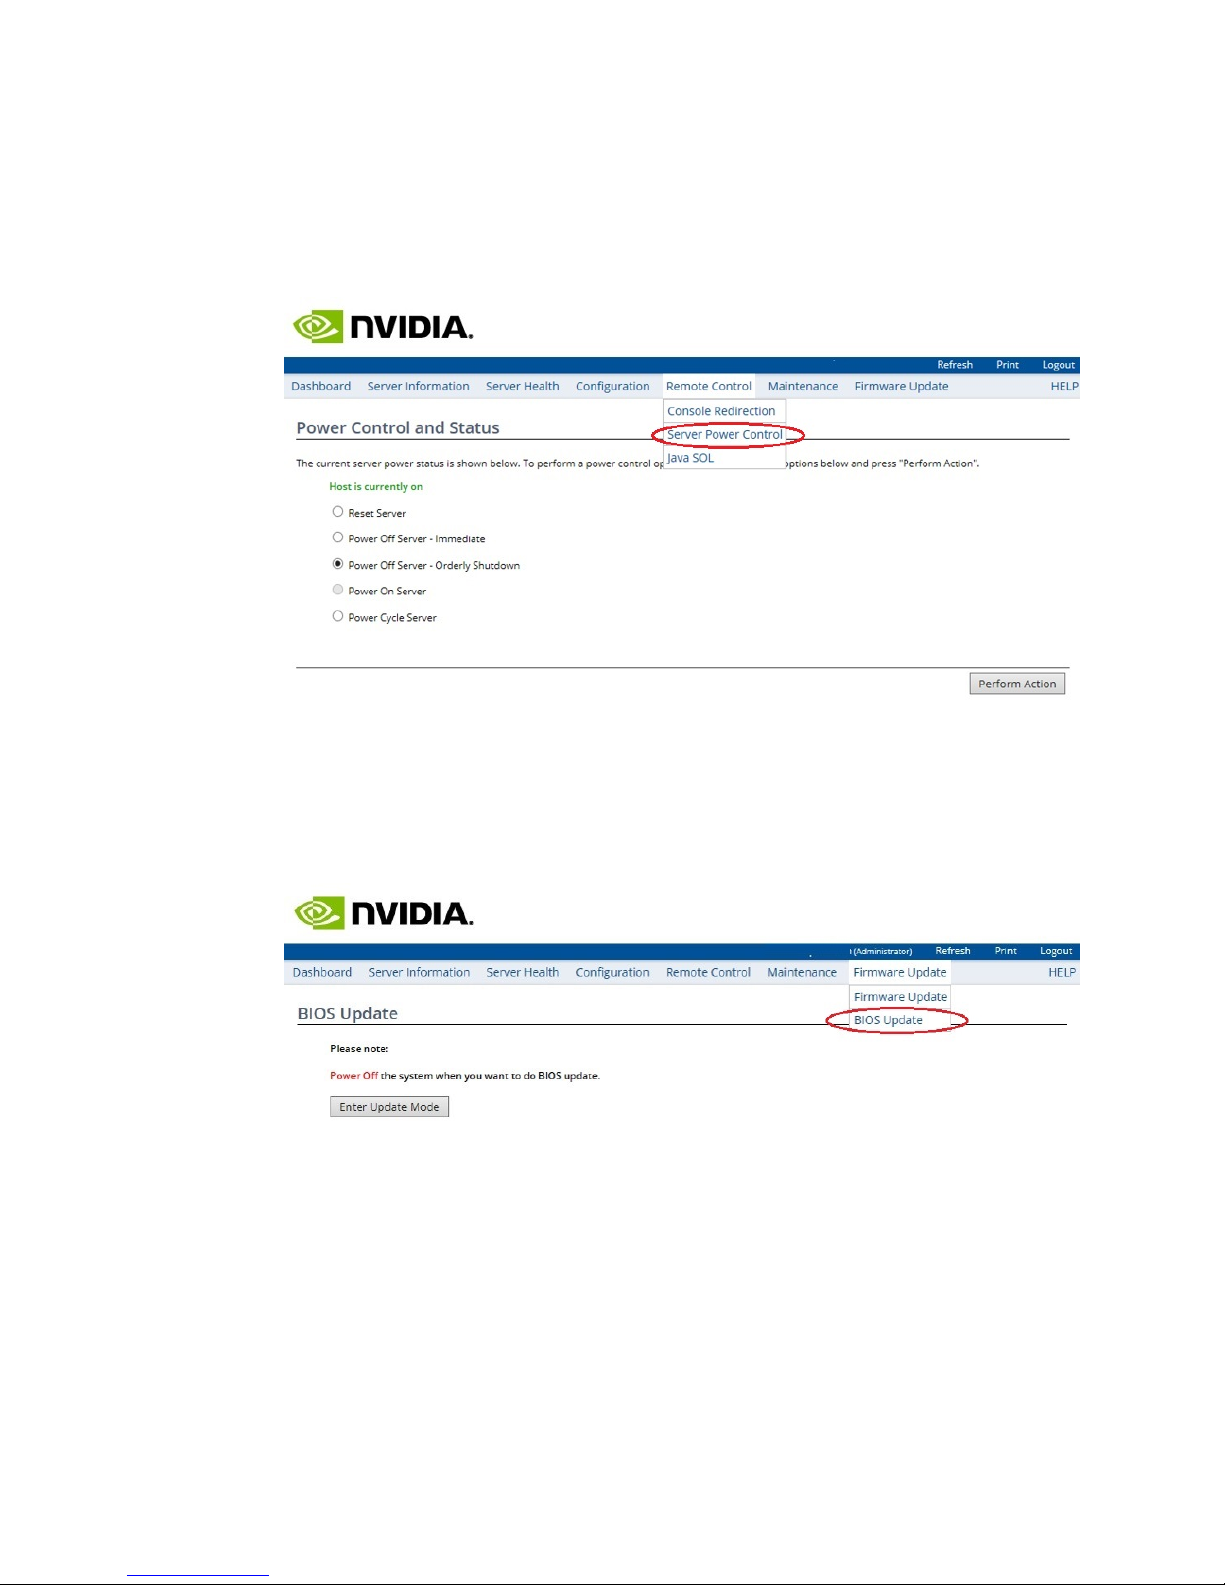
Maintaining and Servicing the NVIDIA DGX-1
Use Firefox or Internet Explorer. Google Chrome is not officially supported by the
BMC.
b)
From the top menu, click Remote Control and then select Server Power Control.
c)
At the Power Control and Status screen, select the Power Off Server - Orderly
Shutdown option, then click Perform Action.
You can verify that the DGX-1 is shut down by noting that all the Power Control
and Status options are grayed out except for the Power On Server option.
3.
Update the system BIOS.
a)
From the top menu, click Firmware Update, select BIOS Update, and then click
Enter Update Mode.
b)
Click OK at the Are you sure to enter update mode? dialog.
c)
From the BIOS Upload screen, click Browse at the Select Firmware to Upload step,
then navigate the explorer windows to locate the file you downloaded and select
it.
www.nvidia.com
NVIDIA DGX-1 DU-08033-001 _v13.1|51
Page 56
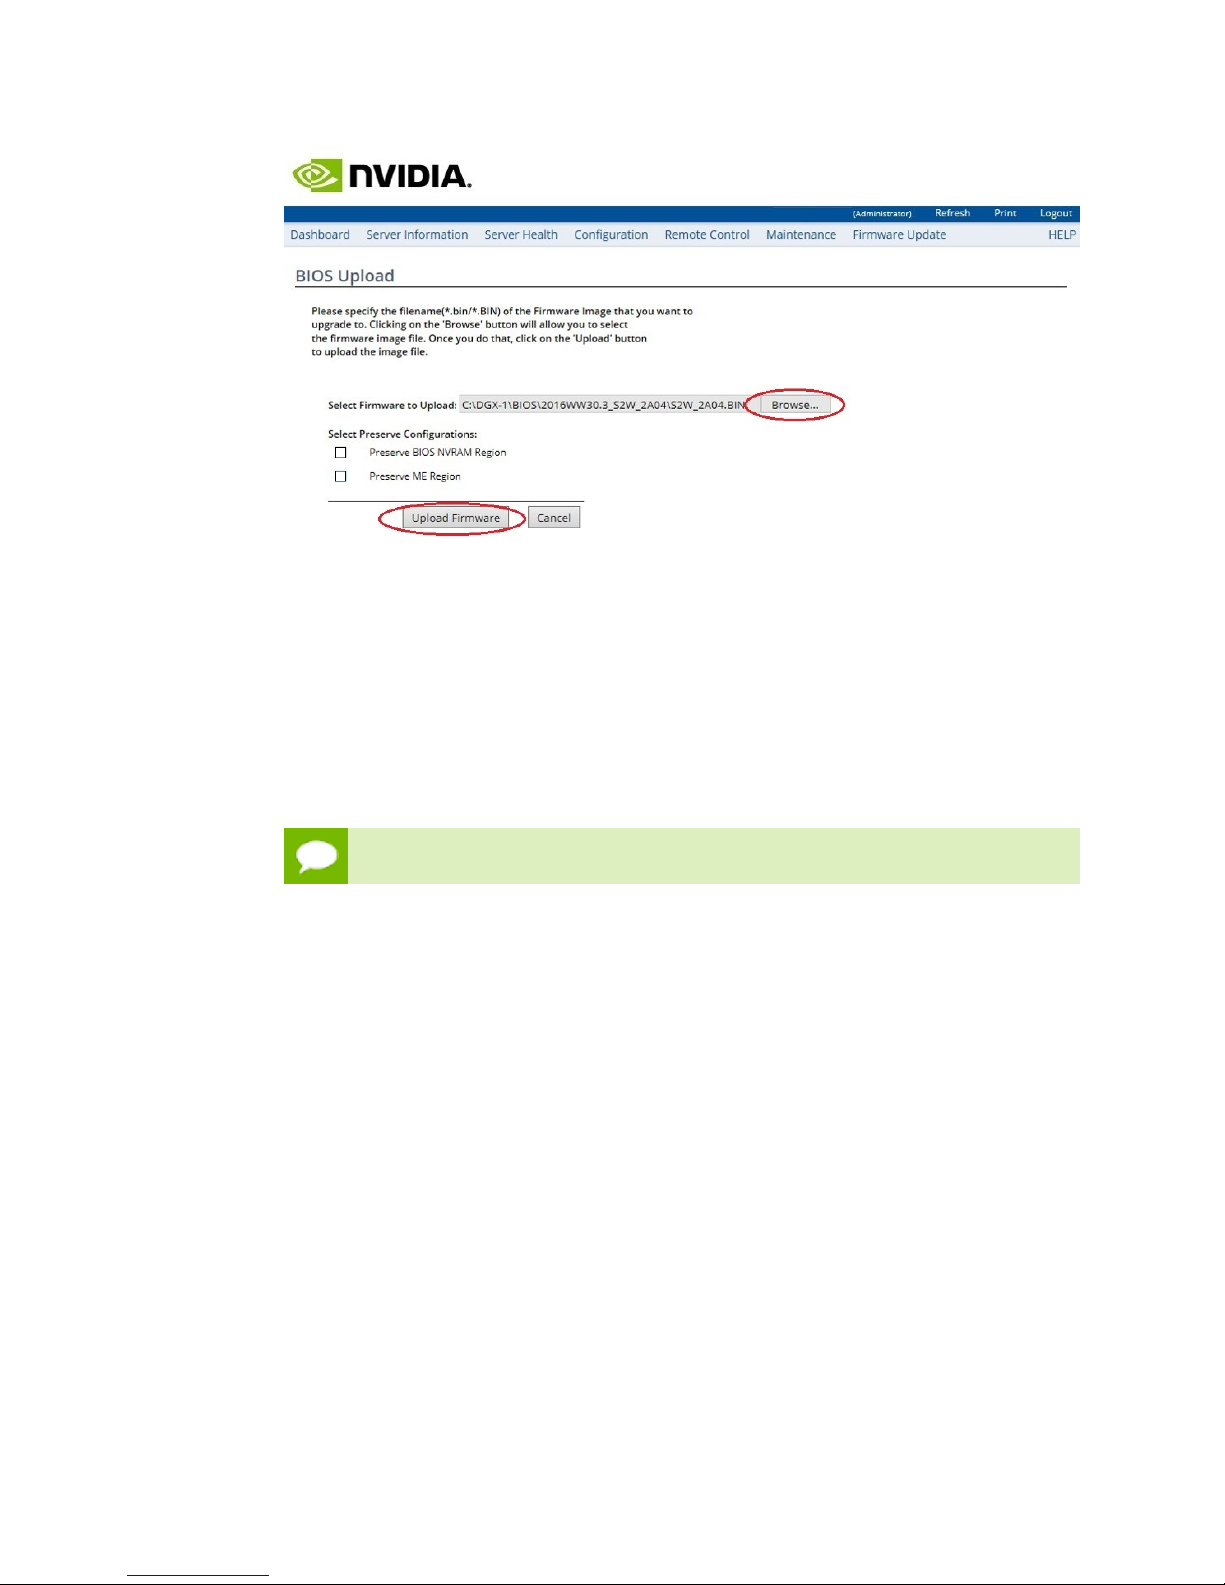
Maintaining and Servicing the NVIDIA DGX-1
d) Be sure all the check boxes under Select Preserve Configuration are cleared.
This ensures that the BIOS reverts to its fail-safe default settings for a reliable
update.
e)
Click Upload Firmware to start the process of installing the updated BIOS.
You are asked to wait while the image is verified.
f)
Click OK at the Proceed? dialog to start the actual upgrade process.
The BIOS Flash Status screen shows the upgrade progress, which should take a
couple of minutes to complete.
Do not interrupt the upgrade process once it has started.
4.
After the upgrade process has completed, you can use the top menu to turn the
system back on.
a)
From the top menu, click Remote Control and then select Server Power Control.
b)
Select the Power On Server option, and then click Perform Action.
5.
To verify that the BIOS was updated with the proper file, press [F2] or [Del] to enter
the BIOS setup screen when the system reboots, then compare the Project Version
with the update filename.
www.nvidia.com
NVIDIA DGX-1 DU-08033-001 _v13.1|52
Page 57

5.4.Updating the BMC
Maintaining and Servicing the NVIDIA DGX-1
You can update the BMC remotely using the IPMI port. Applications can be left running.
Power must be left on.
1.
Obtain the BMC image.
a) Log on to NVIDIA Enterprise Services (https://nvid.nvidia.com/enterpriselogin/)
and click the Announcements tab to locate the DGX-1 software image archive.
b) Download the image file.
2.
Open a Java-enabled web browser within your LAN and go to http://<IPMI IP
address>/, then log in to the BMC.
Use Firefox or Internet Explorer. Google Chrome is not officially supported by the
BMC.
3.
If you’re using DHCP and choose not to preserve the network configuration, then
obtain the MAC address for the BMC.
If the BMC is connected to a network via DHCP, the IP address could change after
the update. Follow these substeps to obtain the MAC address in order to connect to
the BMC after the update, in case the IP address changes. You can skip these steps if
a static IP is used.
a)
From the top menu, click Configuration and then select Network.
b) Note the MAC address.
4.
From the top menu, click Firmware Update and then select Firmware Update from
the drop-down menu.
5.
Click Enter Preserve Configuration, then set the IPMI Preserve Status to Preserve
and all others to Overwrite.
www.nvidia.com
NVIDIA DGX-1 DU-08033-001 _v13.1|53
Page 58

Maintaining and Servicing the NVIDIA DGX-1
Be sure to set IPMI to Preserve in order to preserve your BMC login credentials.
If you fail to do this, the BMC username/password will be set to qct.admin/
qct.admin. If this happens, then be sure to enter the BMC dashboard and go
to Configuration->Users to add a new user account and disable the qct.admin
account after updating the BMC.
6.
If necessary, click Firmware Update again from the top menu and then select
Firmware Update from the drop-down menu to return to the Firmware Update
page.
7.
Click Enter Update Mode, then click OK at the confirmation dialog.
After entering Update Mode, aborting the operation or even resizing the browser
windows will terminate the session and reset the BMC. If this happens, you will
need to close and then reopen the browser to initiate a new session. You may need to
wait several minutes for the BMC to reset.
8.
At the Upload Firmware prompt, click Browse to locate and select the firmware image
file.
Select the encrypted file (the file with the "_enc" suffix on the file extension), as the
BMC requires the firmware image to be encrypted.
9.
Click Upload to transfer the image to the BMC.
www.nvidia.com
NVIDIA DGX-1 DU-08033-001 _v13.1|54
Page 59
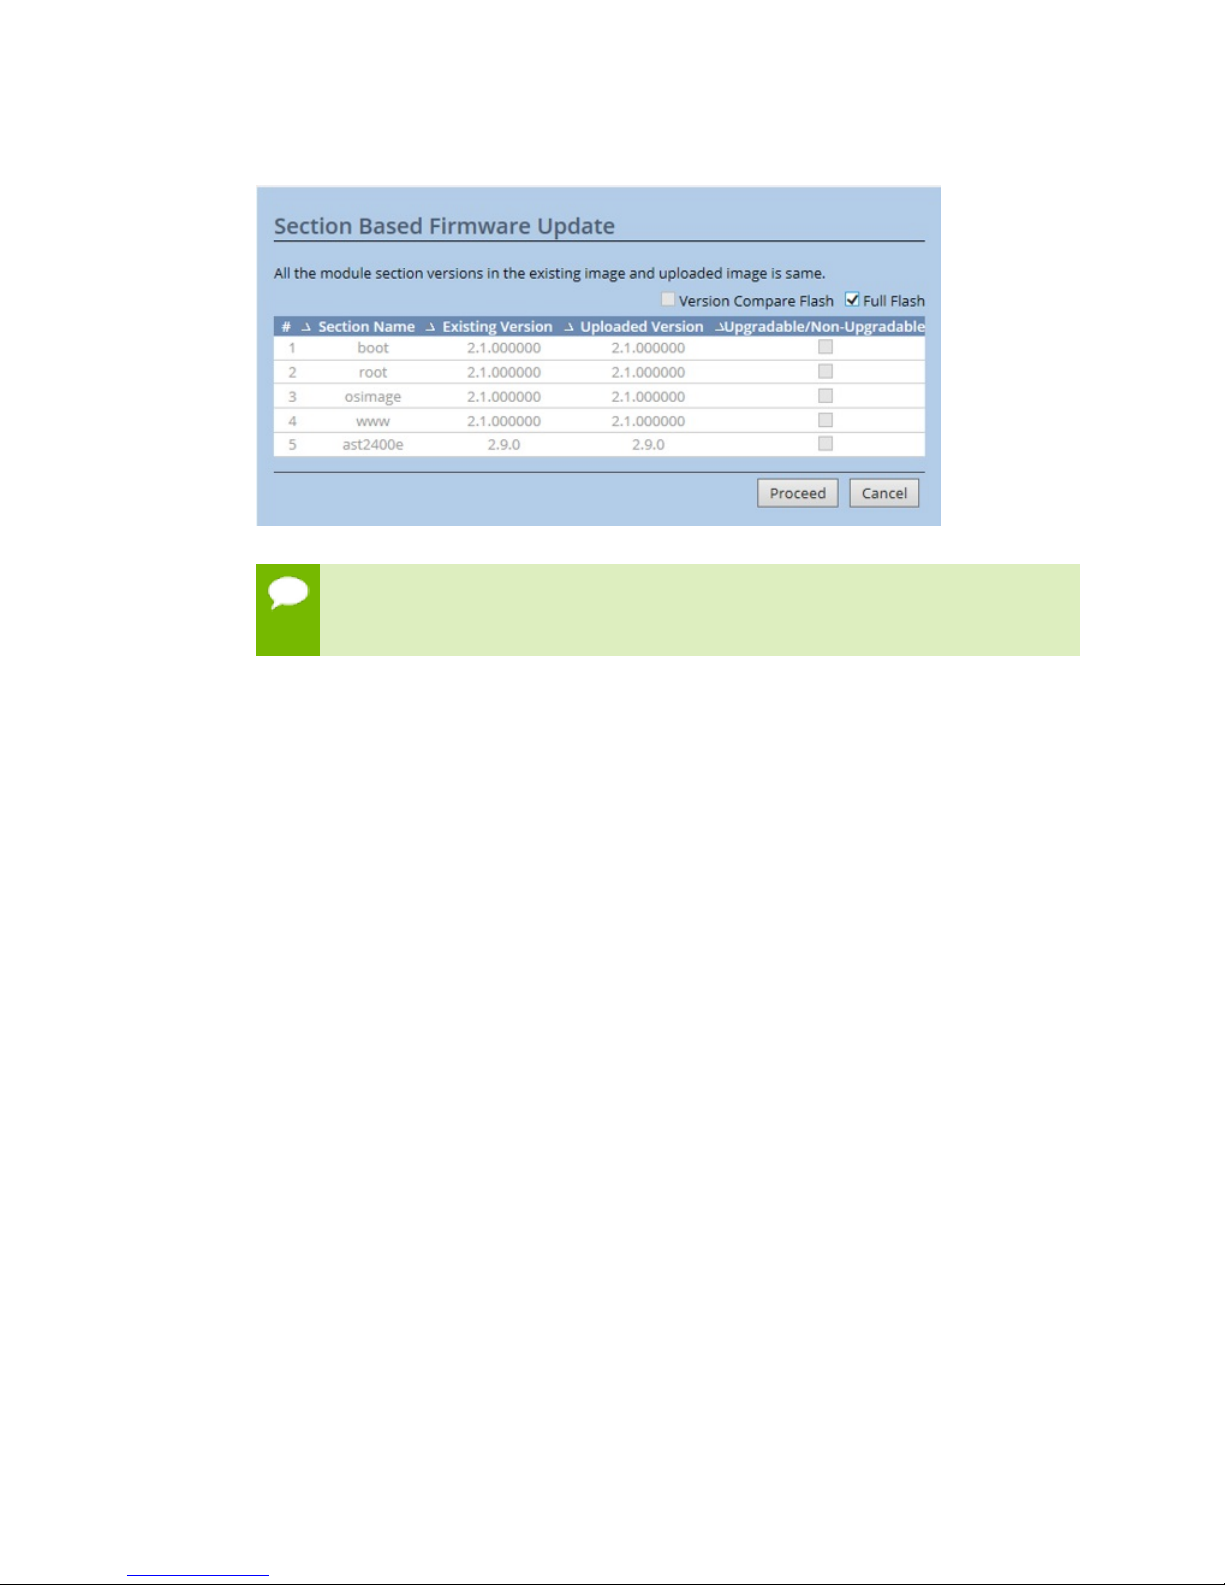
Maintaining and Servicing the NVIDIA DGX-1
10.
At the Select Based Firmware Update prompt. select Full Flash and then click Proceed.
IMPORTANT: Do not shut off power to the DGX-1 while updating the BMC. If the
BMC update fails, keep the DGX-1 powered on and booted, and then contact
NVIDIA Enterprise Support.
When the BMC firmware update is completed, the BMC resets and the remote
‣
session terminates.
To initiate a new BMC session, close and then reopen the browser.
‣
The BMC can take as much as 10 minutes to reset itself. During this time, the BMC
‣
will be unresponsive.
5.5.Replacing the System and Components
Be sure to familiarize yourself with the NVIDIA Terms & Conditions documents
before attempting to perform any modification or repair to the DGX-1. These Terms &
Conditions for the DGX-1 can be found through the NVIDIA DGX Systems Support
(http://www.nvidia.com/object/dgxsystems-support.html) page.
Contact NVIDIA Enterprise Customer support to obtain an RMA number for any
system or component that needs to be returned for repair or replacement.
The following components are customer-replaceable:
Solid State Drives (SSDs)
‣
Power Supplies
‣
Fan Modules
‣
DIMMs
‣
Return the failed components to NVIDIA. Low-cost items such as power supplies and
fans do not need to be returned.
www.nvidia.com
NVIDIA DGX-1 DU-08033-001 _v13.1|55
Page 60

Maintaining and Servicing the NVIDIA DGX-1
5.5.1.Replacing the System
When returning a DGX-1 under RMA, consider the following points.
SSDs
If necessary, you can remove and keep the SSDs prior to shipping the system back for
replacement. If you already received a replacement system and you want to keep the
original SSDs, install the new SSDs into the defective system when shipping it back.
Bezel
Be sure to include the bezel when returning the system.
5.5.2.Replacing an SSD
Access the SSDs from the front of the DGX-1. You can hot swap the SSDs as follows:
1.
If not already removed, remove the bezel by grasping the bezel by the side handles
and then pulling the bezel straight off the front of the DGX-1.
CAUTION: Be careful not to accidentally press the power button that is on the
right edge of the DGX-1 when removing or installing the bezel.
2.
Locate the SDD that you want to replace, then press the round button at the top
edge to release the latch.
3.
Pull the latch down and then out to unseat the SSD assembly.
4.
Continue pulling the SSD assembly to completely remove it from the unit.
5.
Using a phillips screwdriver, remove the four screws attaching the SSD to the hotswap tray.
www.nvidia.com
NVIDIA DGX-1 DU-08033-001 _v13.1|56
Page 61

Maintaining and Servicing the NVIDIA DGX-1
6.
Save the screws for the replacement.
7.
Mount the replacement SSD to the hot-swap tray using the four screws.
Make sure that the connector is on the open edge side of the tray.
8.
With the round button at the top, insert the assembly into the appropriate bay, then
push the assembly all the way in.
9.
Press the latch against the assembly to completely seat the assembly.
10.
Reattach the bezel.
With the bezel positioned so that the NVIDIA logo is visible from the front and is on
the left-hand side, line up the pins near the corners of the DGX-1 with the holes in
back of the bezel, then gently press the bezel against the DGX-1. The bezel is held in
place magnetically.
CAUTION: Be careful not to accidentally press the power button that is on the
right edge of the DGX-1 when removing or installing the bezel.
5.5.3.Recreating the Virtual Drives
After you have replaced the OS SSD, with or without any of the cache SSDs, you need
to recreate the virtual drives and then re-image the system in order to recreate the
partitions on all the virtual drives.
The following is an overview of the process:
1.
Clear the drive group configuration
2.
Recreate the OS Virtual Drive
3.
Recreate the Cache Virtual Drive
4.
Re-image the System
These instructions apply only if you have replaced the OS SSD, with or without one or
more of the cache SSDs. If you have replaced only one or more of the cache SSDs, and
not the OS SSD, then follow the instructions in the section Recreating the RAID 0 Array
5.5.3.1.Access the BIOS Setup Utility
RAID configuration is accomplished through the BIOS setup utility.
1.
Connect a display (1024x768 or lower resolution) and keyboard to the DGX-1.
2.
Turn the DGX-1 on or reboot.
www.nvidia.com
NVIDIA DGX-1 DU-08033-001 _v13.1|57
Page 62
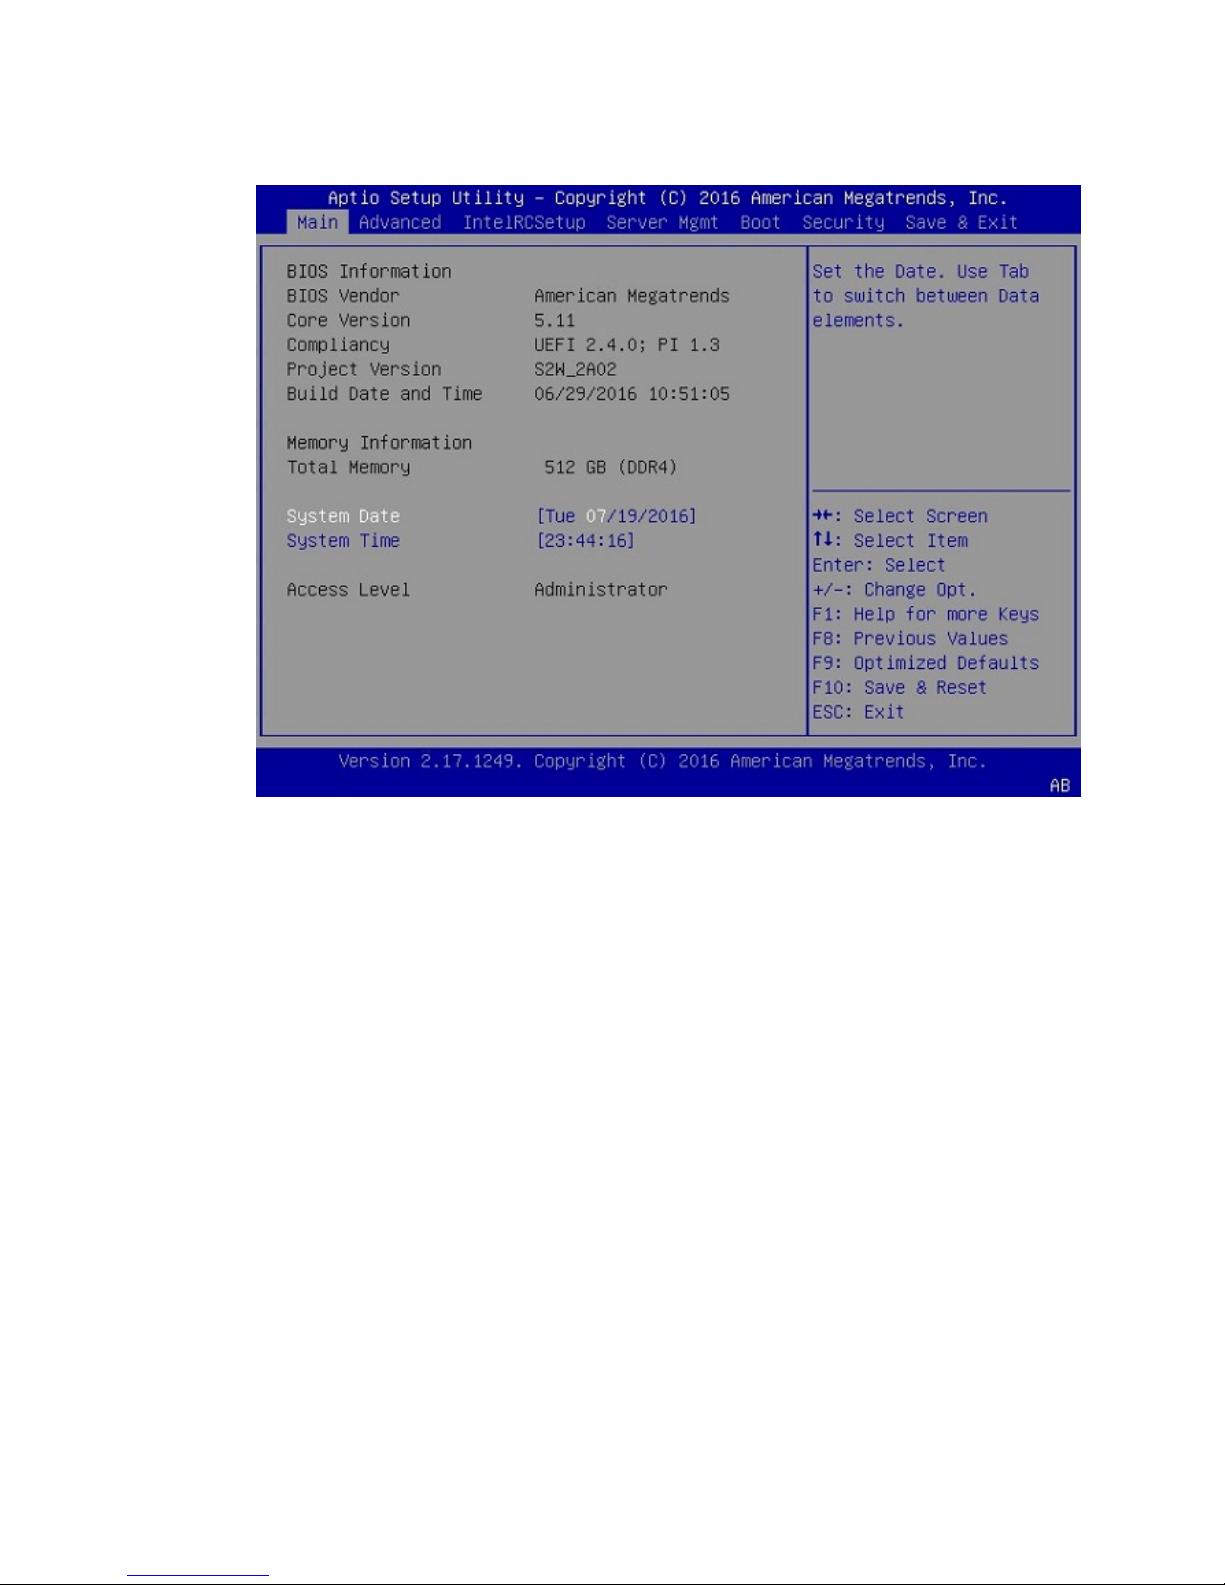
Maintaining and Servicing the NVIDIA DGX-1
3.
At the NVIDIA logo boot screen, press [F2] or [Del] to enter the BIOS setup screen.
4.
Select the Advanced tab from the top menu and then Scroll down and select the
MegaRAID Configuration Utility.
www.nvidia.com
NVIDIA DGX-1 DU-08033-001 _v13.1|58
Page 63
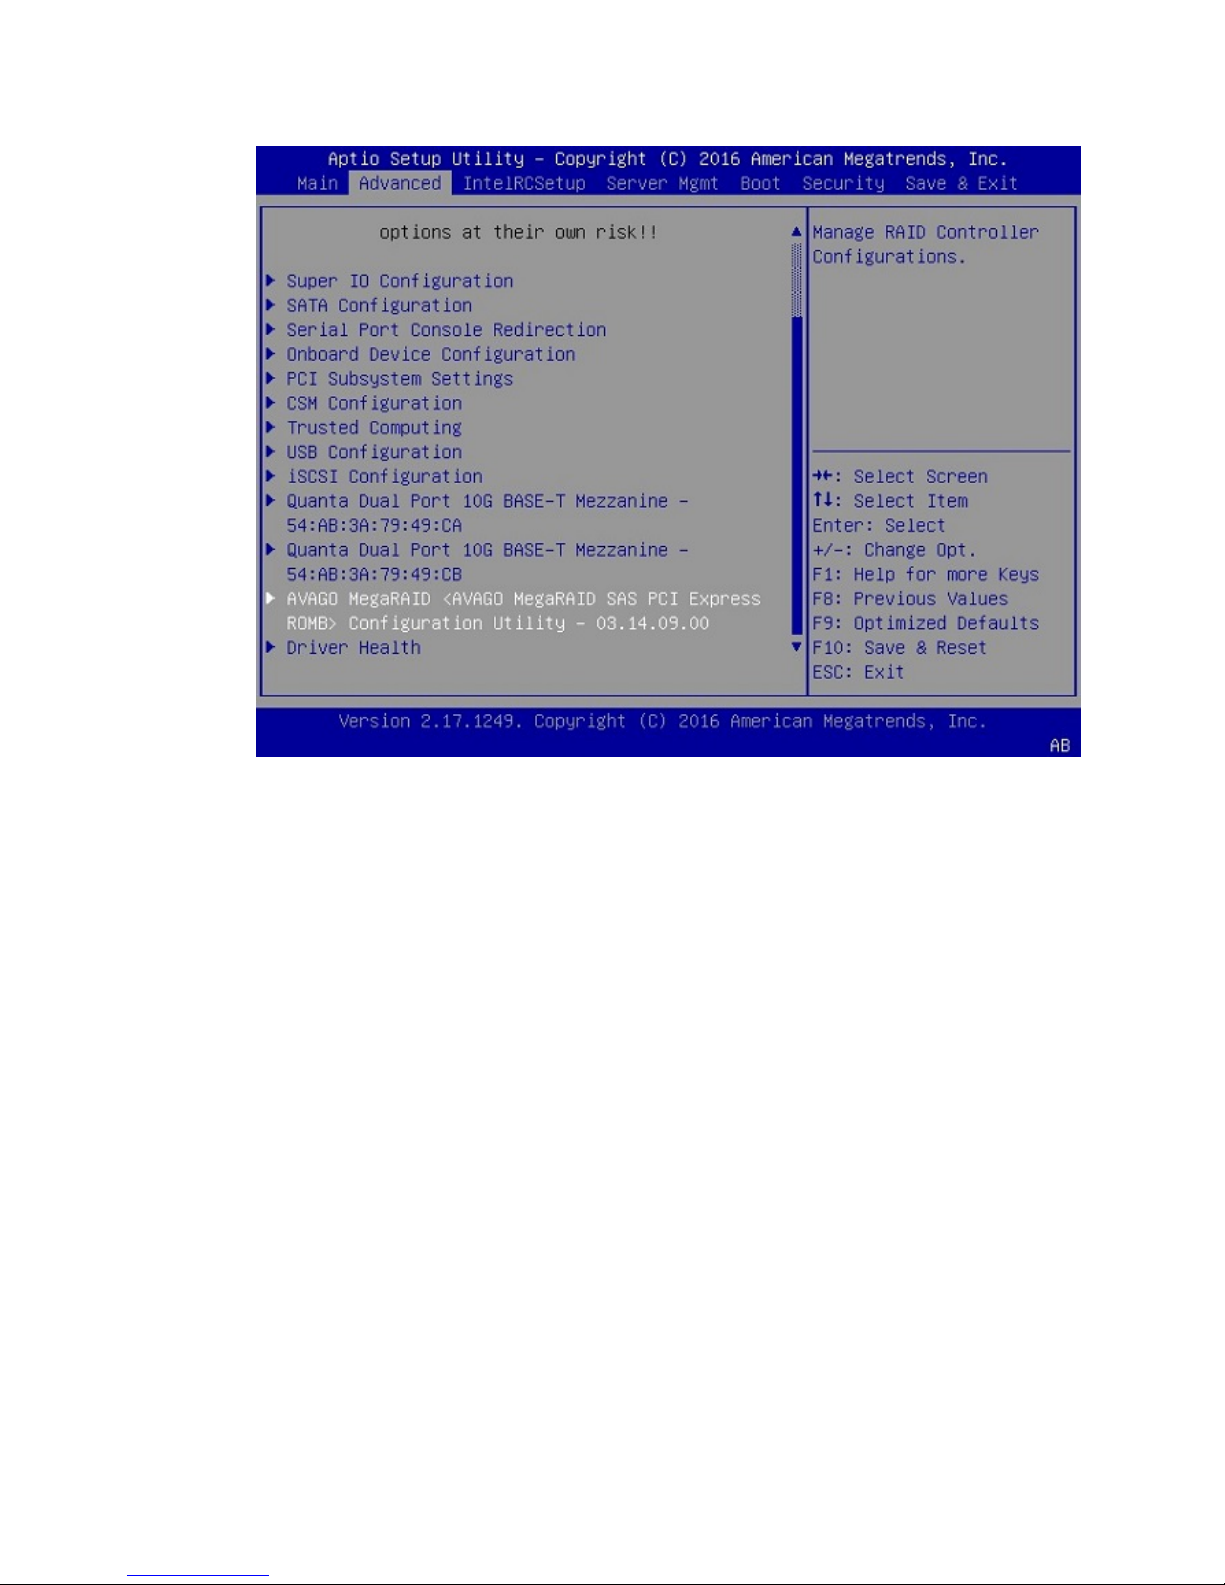
Maintaining and Servicing the NVIDIA DGX-1
The RAID Configuration menu appears.
www.nvidia.com
NVIDIA DGX-1 DU-08033-001 _v13.1|59
Page 64
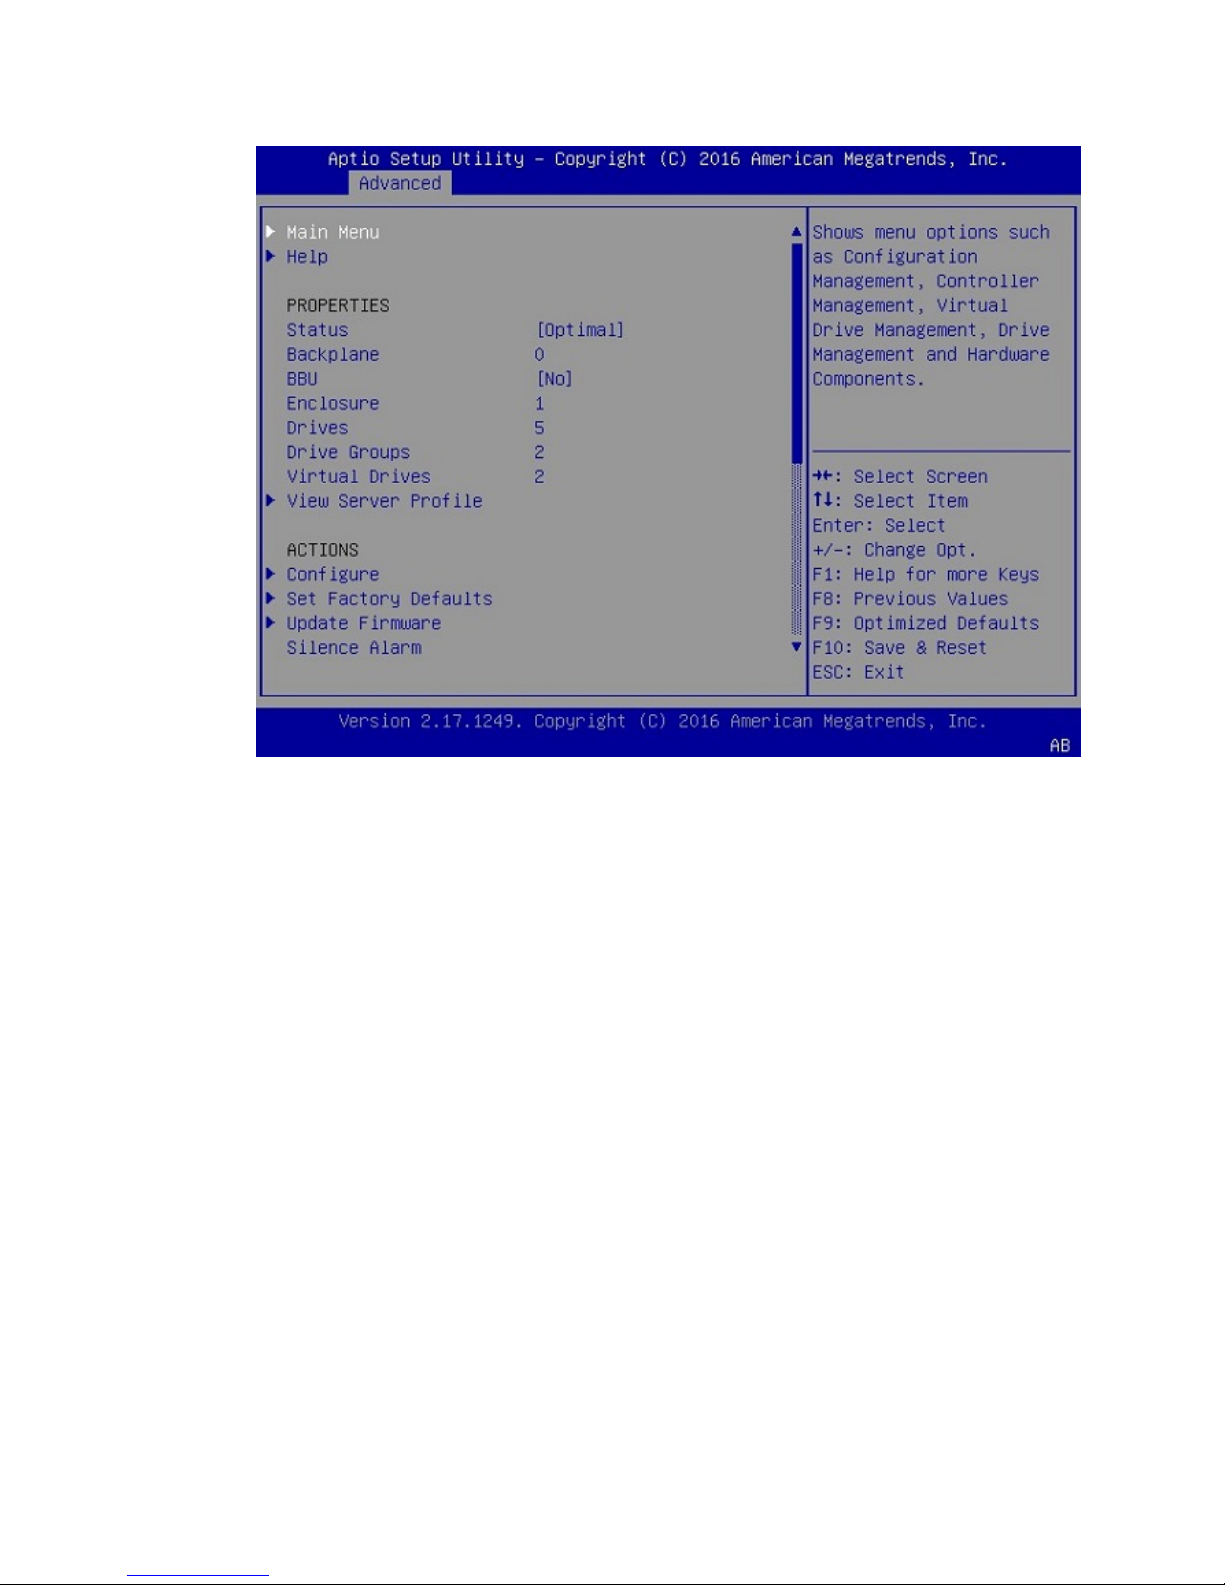
Maintaining and Servicing the NVIDIA DGX-1
If you replaced the OS drive, follow the instructions in the section Clear the Drive Group
Configuration .
5.5.3.2.Clear the Drive Group Configuration
These instructions apply when you have replaced the OS drive.
1.
Select Main Menu, then select Configuration Management.
www.nvidia.com
NVIDIA DGX-1 DU-08033-001 _v13.1|60
Page 65

Maintaining and Servicing the NVIDIA DGX-1
2.
Select Clear Configuration.
www.nvidia.com
NVIDIA DGX-1 DU-08033-001 _v13.1|61
Page 66
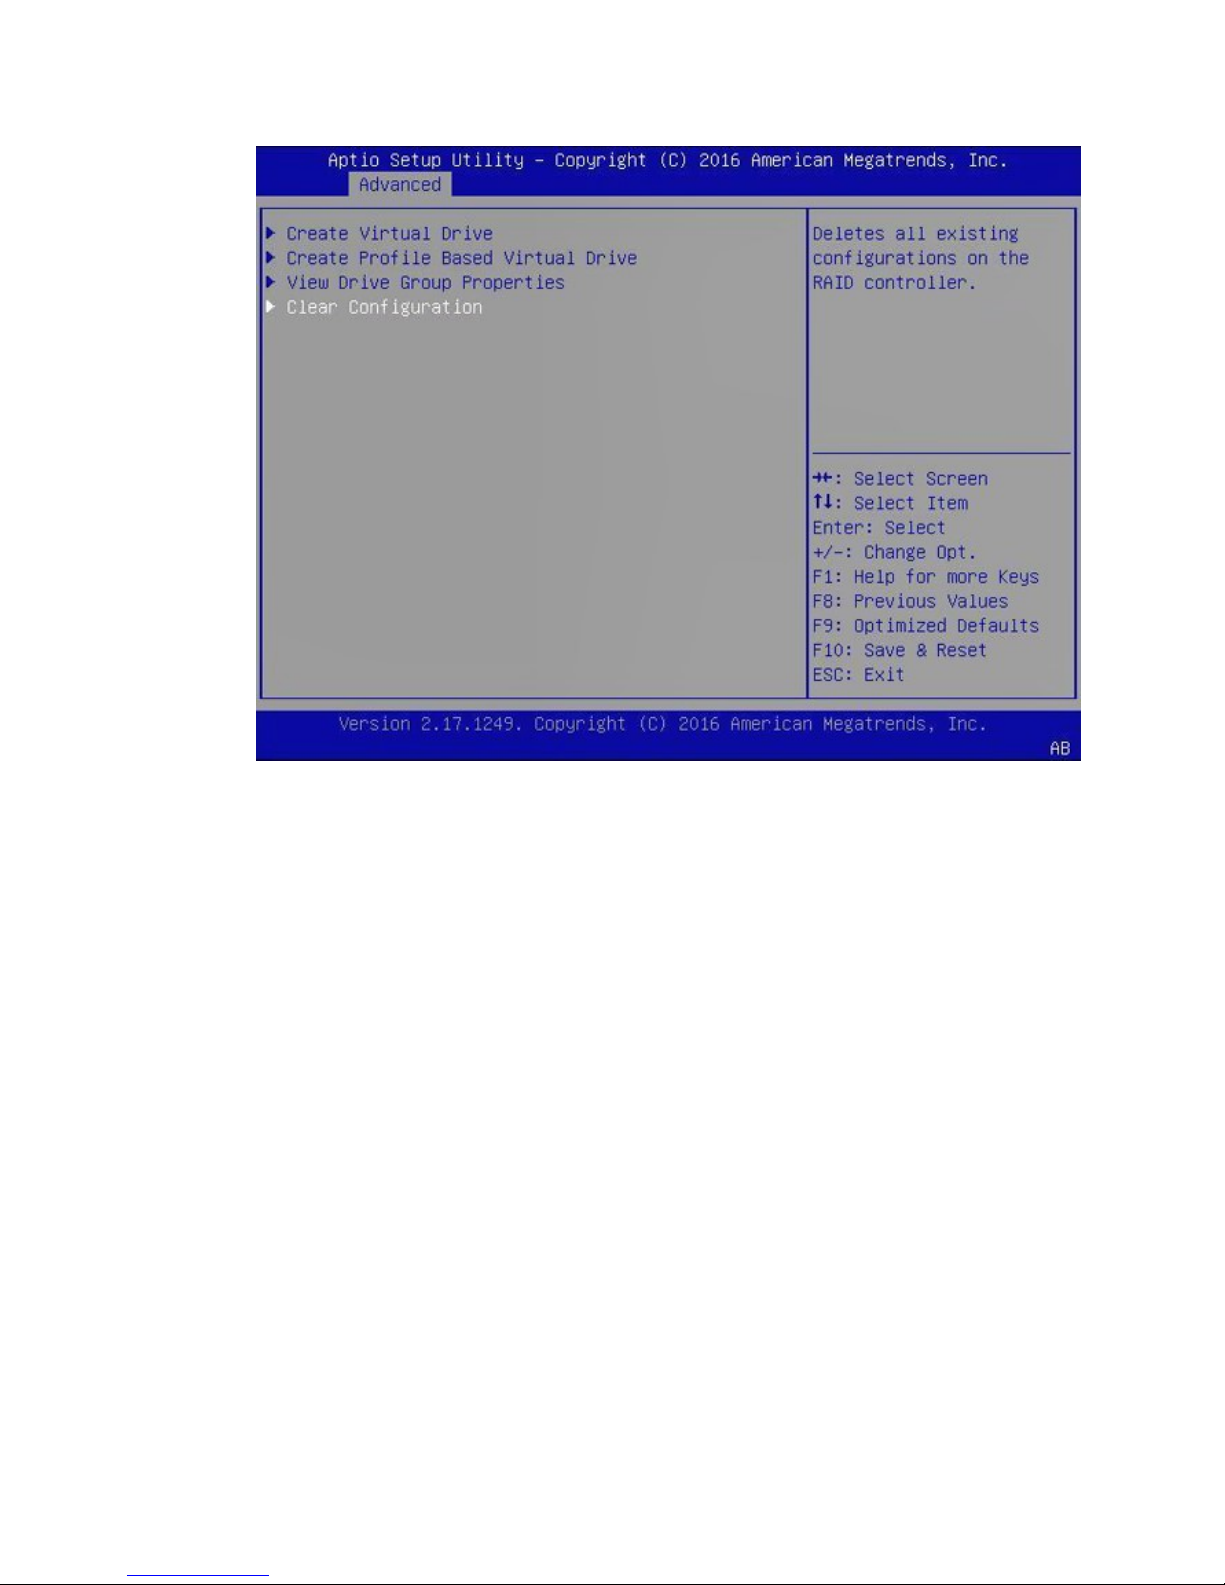
Maintaining and Servicing the NVIDIA DGX-1
3.
Select Confirm [Disabled] and then select Enabled at the confirmation popup.
www.nvidia.com
NVIDIA DGX-1 DU-08033-001 _v13.1|62
Page 67
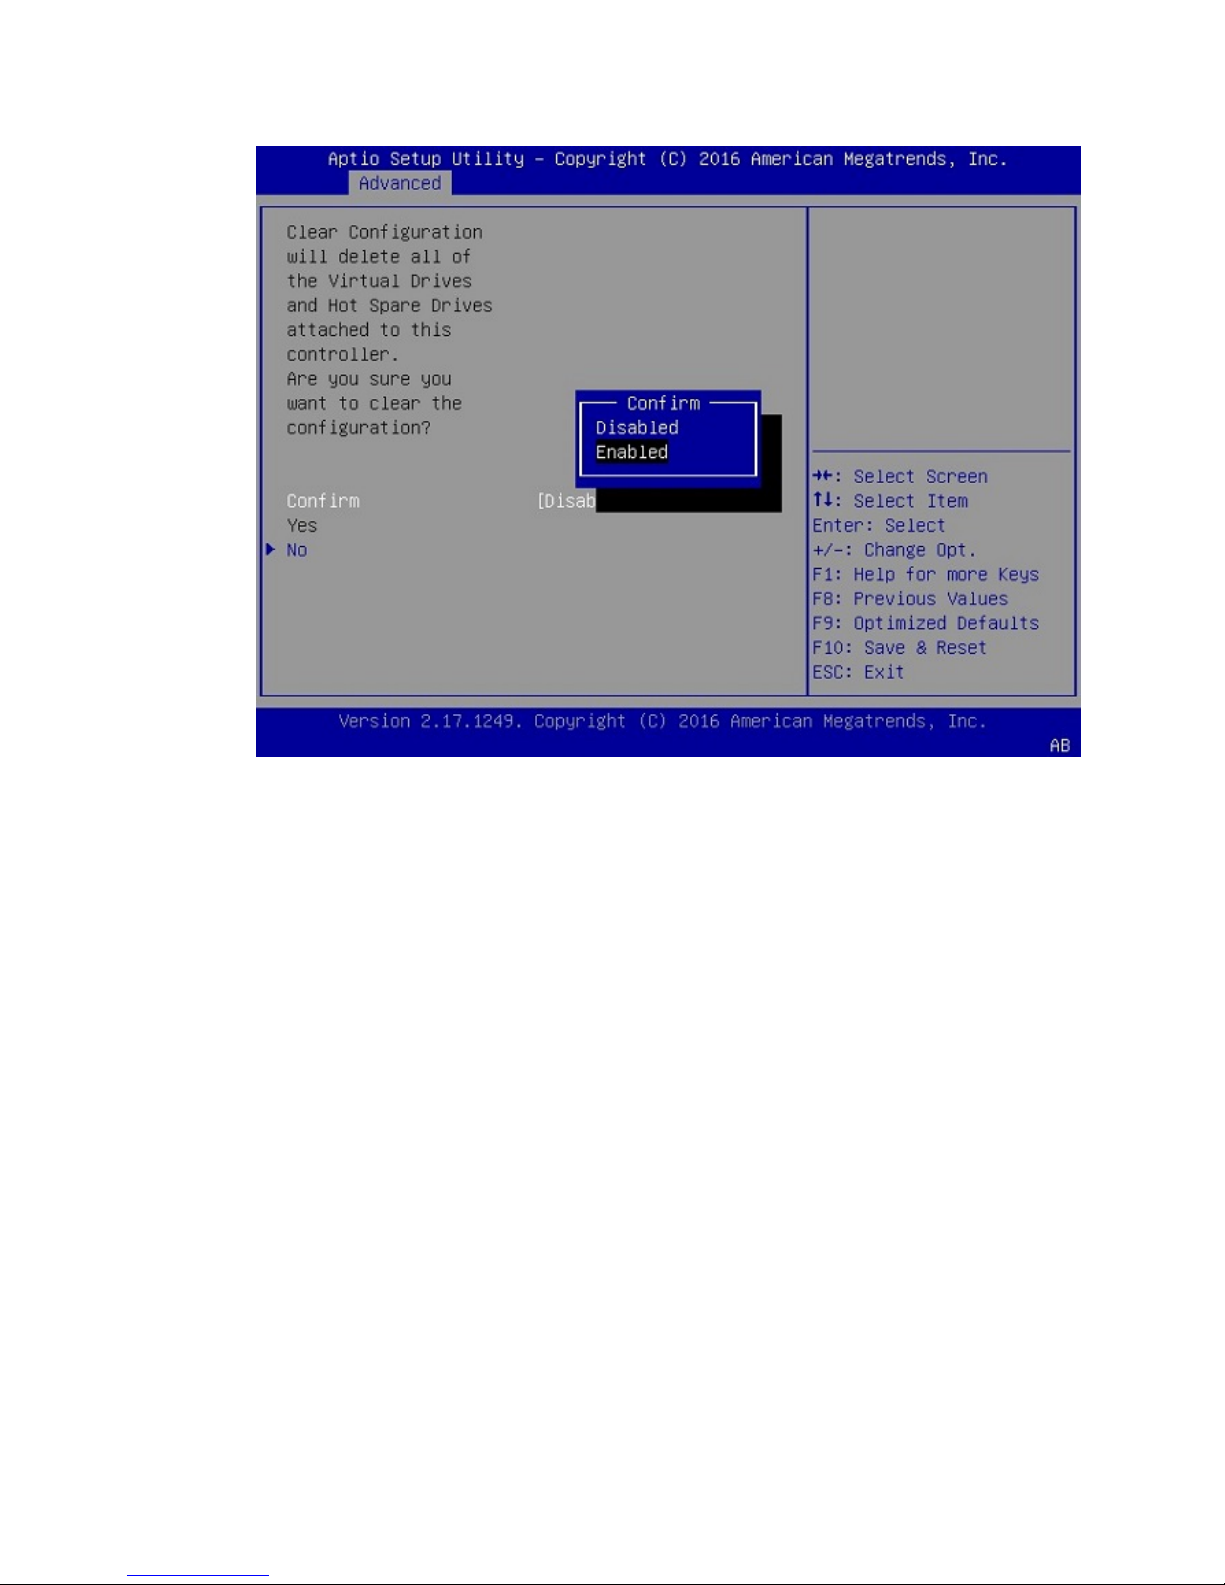
Maintaining and Servicing the NVIDIA DGX-1
4.
Select Yes, then select OK at the success screen.
www.nvidia.com
NVIDIA DGX-1 DU-08033-001 _v13.1|63
Page 68
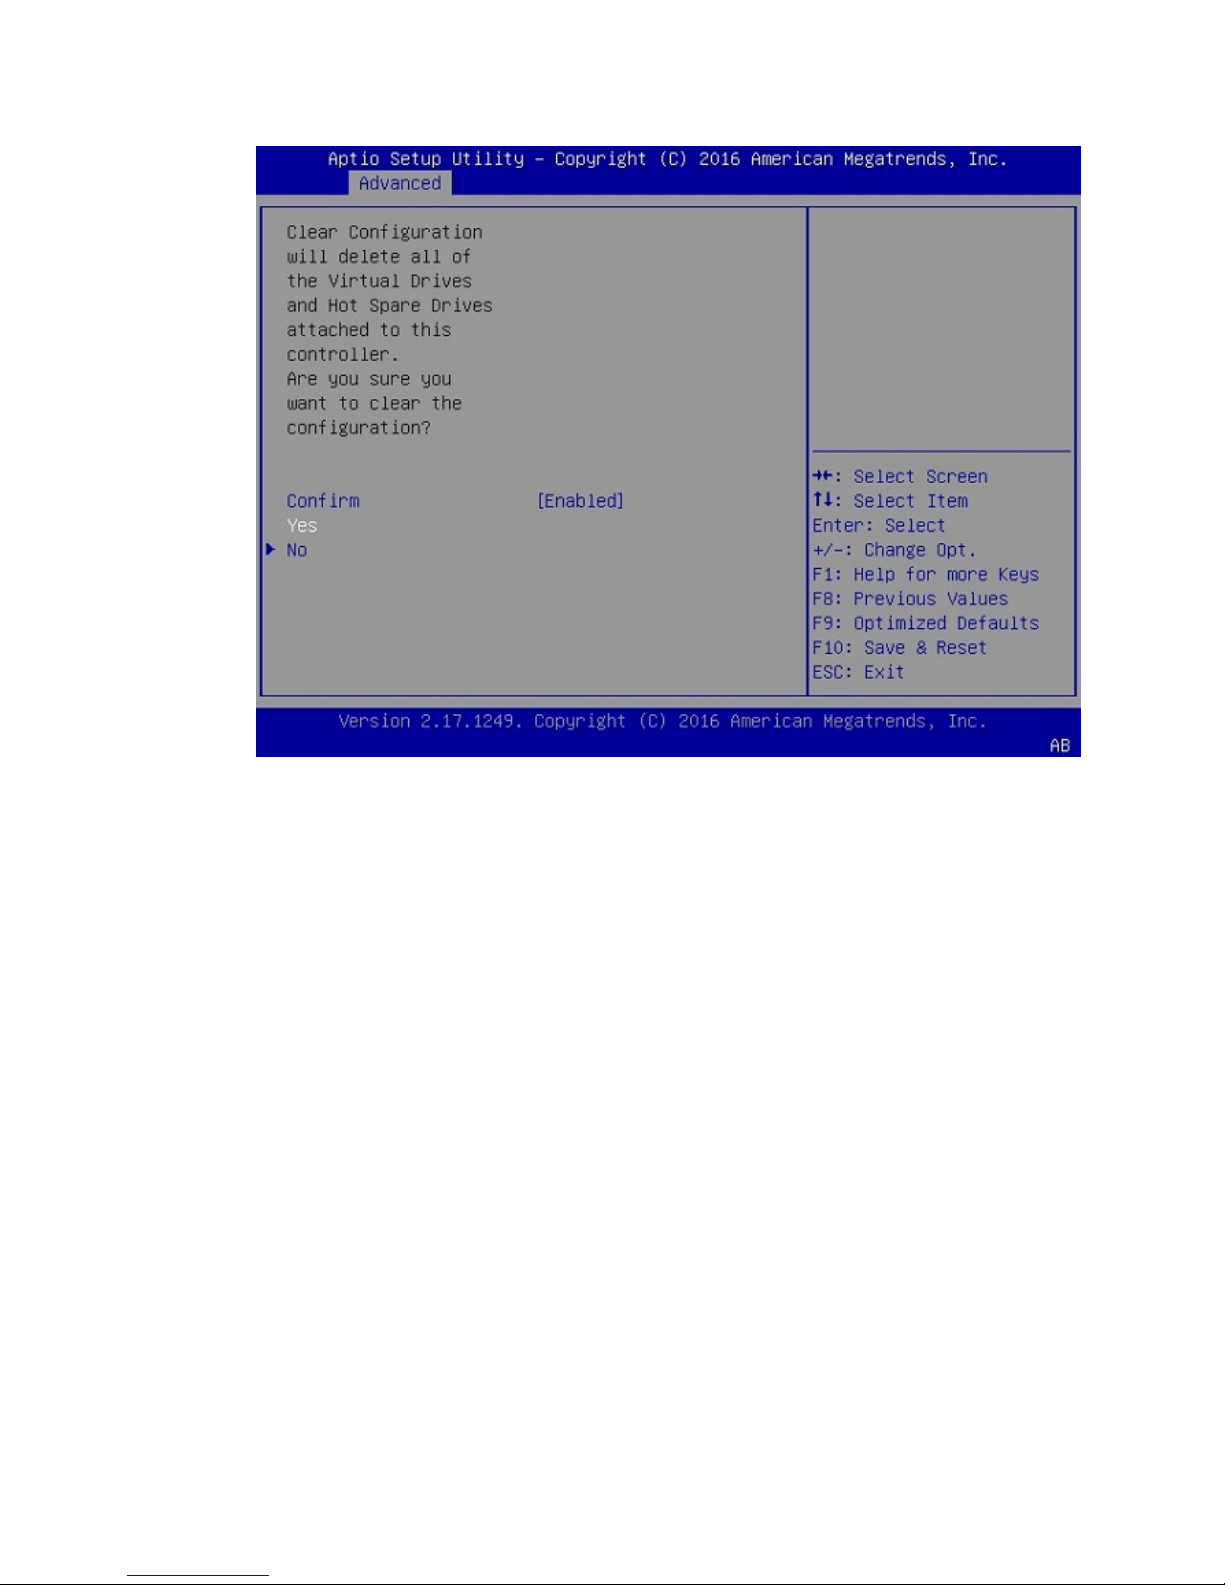
Maintaining and Servicing the NVIDIA DGX-1
5.
Follow the instructions in the sections Recreate the OS Virtual Drive and then
Recreate the RAID0 Virtual Drive .
5.5.3.3.Recreate the OS Virtual Drive
These instructions apply when you have replaced the OS drive. Be sure to first complete
the instructions in the section Clear the Drive Group Configuration.
1.
Navigate to the RAID Utility Main Menu, then under Actions, select Configure, then
select Configuration Management.
www.nvidia.com
NVIDIA DGX-1 DU-08033-001 _v13.1|64
Page 69

Maintaining and Servicing the NVIDIA DGX-1
2.
Select Create Virtual Drive, then select Select Drives at the next screen.
Leave all other options at their default settings as shown below.
www.nvidia.com
NVIDIA DGX-1 DU-08033-001 _v13.1|65
Page 70
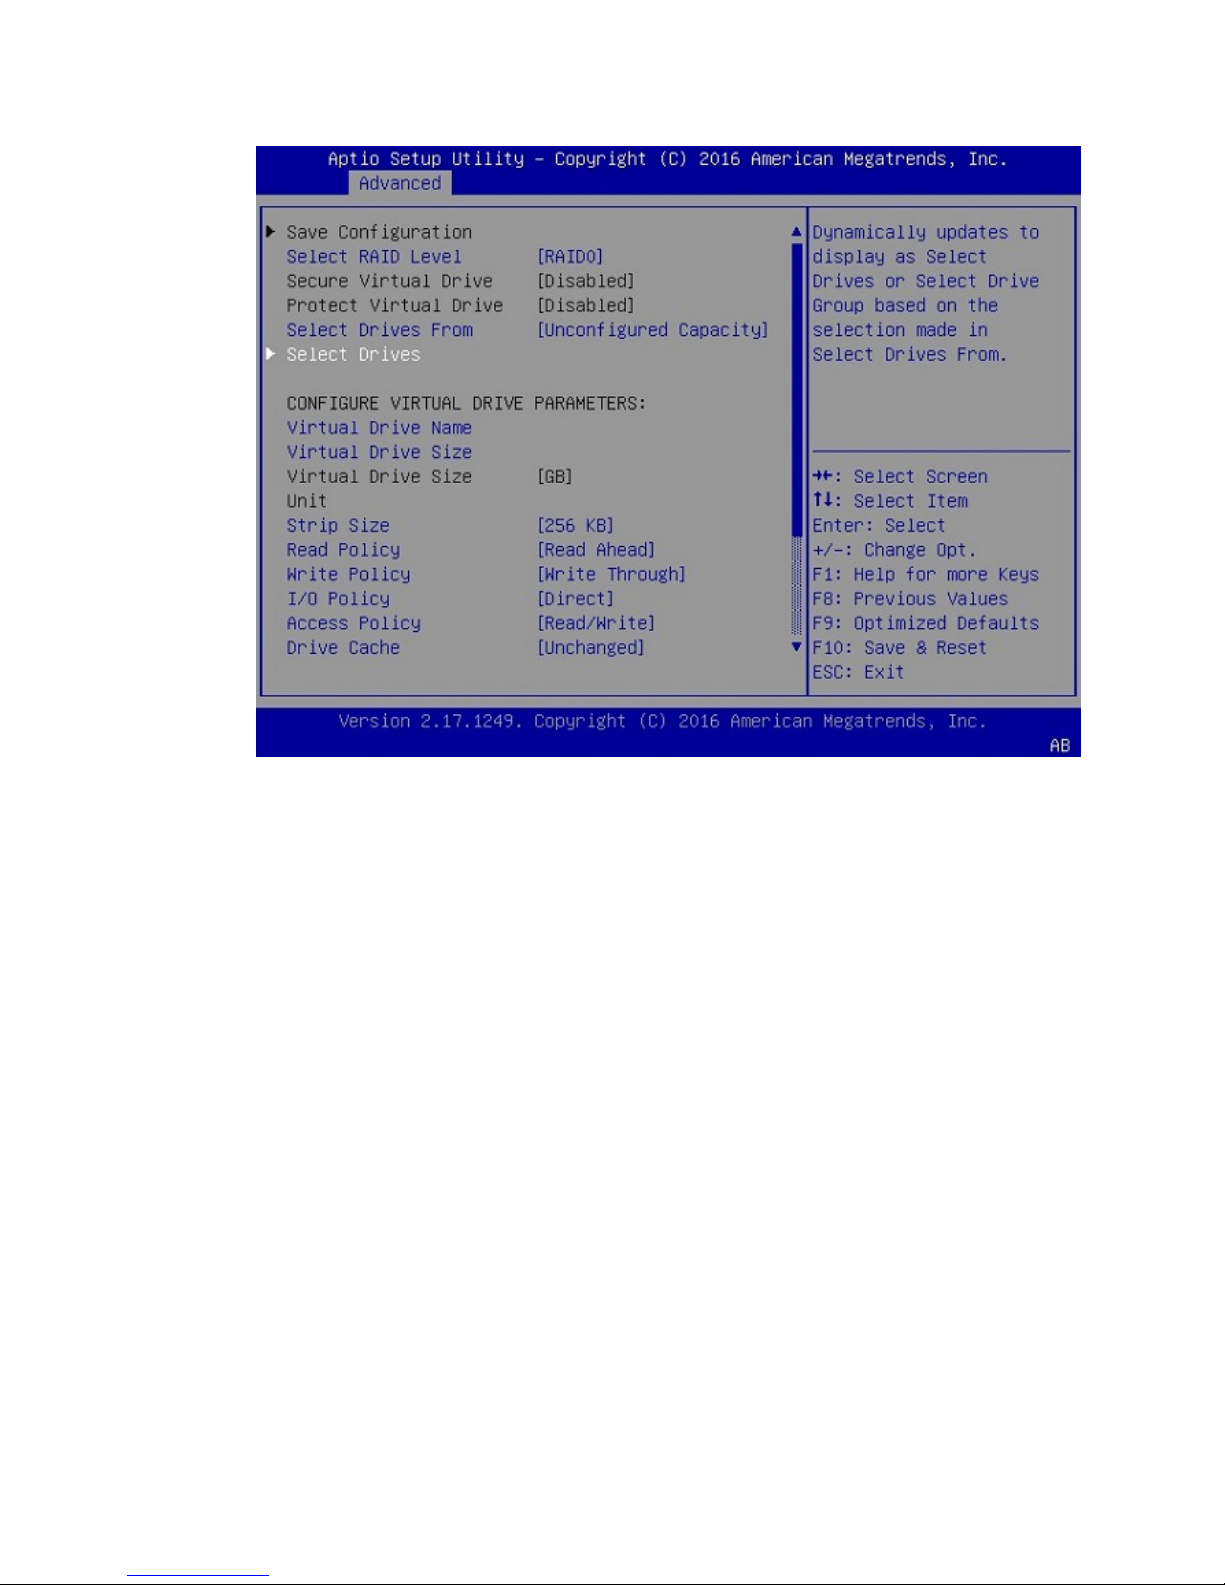
Maintaining and Servicing the NVIDIA DGX-1
The list of drives under CHOOSE UNCONFIGURED DRIVES will initially be
empty.
3.
To view the available drives, select Select Media Type [HDD], then change to
[SSD].
www.nvidia.com
NVIDIA DGX-1 DU-08033-001 _v13.1|66
Page 71

Maintaining and Servicing the NVIDIA DGX-1
4.
Under CHOOSE UNCONFIGURED DRIVES, select the 446 GB drive, then change
to [Enabled] at the pop-up dialog.
www.nvidia.com
NVIDIA DGX-1 DU-08033-001 _v13.1|67
Page 72

Maintaining and Servicing the NVIDIA DGX-1
5.
Confirm that only the first drive at Drive Port 0 - 3:01:00 displays as [Enabled].
www.nvidia.com
NVIDIA DGX-1 DU-08033-001 _v13.1|68
Page 73

Maintaining and Servicing the NVIDIA DGX-1
6.
Scroll up and select Apply Changes.
www.nvidia.com
NVIDIA DGX-1 DU-08033-001 _v13.1|69
Page 74

Maintaining and Servicing the NVIDIA DGX-1
7.
Select OK at the success screen.
www.nvidia.com
NVIDIA DGX-1 DU-08033-001 _v13.1|70
Page 75

Maintaining and Servicing the NVIDIA DGX-1
The virtual drive creation page now displays a summary of your selection. The
Virtual Drive Size should be approximately 446 GB.
8.
Select Save Configuration at the top of the menu.
9.
Change the Confirm [Disabled] field to [Enabled] and then select [Yes].
www.nvidia.com
NVIDIA DGX-1 DU-08033-001 _v13.1|71
Page 76

Maintaining and Servicing the NVIDIA DGX-1
10.
Select [OK] at the success screen.
You have successfully re-created Virtual Drive 0, where the OS will be installed.
11.
Follow the instructions in the section Recreate the RAID0 Virtual Drive
5.5.3.4.Recreate the RAID0 Virtual Drive
These instructions apply when you have replaced the OS drive and cleared the drive
group configuration.
1.
Navigate to the RAID Utility Main Menu, then under Action, select Configure, then
select Configuration Management.
www.nvidia.com
NVIDIA DGX-1 DU-08033-001 _v13.1|72
Page 77

Maintaining and Servicing the NVIDIA DGX-1
2.
Select Create Virtual Drive.
www.nvidia.com
NVIDIA DGX-1 DU-08033-001 _v13.1|73
Page 78

Maintaining and Servicing the NVIDIA DGX-1
3.
Scroll to Select RAID Level and switch to [RAID0], if not already set.
www.nvidia.com
NVIDIA DGX-1 DU-08033-001 _v13.1|74
Page 79

Maintaining and Servicing the NVIDIA DGX-1
4.
Scroll to Select Media Type and switch to [SSD].
www.nvidia.com
NVIDIA DGX-1 DU-08033-001 _v13.1|75
Page 80

Maintaining and Servicing the NVIDIA DGX-1
5.
Select Select Drives.
www.nvidia.com
NVIDIA DGX-1 DU-08033-001 _v13.1|76
Page 81

Maintaining and Servicing the NVIDIA DGX-1
6.
Switch all unconfigured 1TB drives to [Enabled].
www.nvidia.com
NVIDIA DGX-1 DU-08033-001 _v13.1|77
Page 82

Maintaining and Servicing the NVIDIA DGX-1
7.
Select Apply Changes.
www.nvidia.com
NVIDIA DGX-1 DU-08033-001 _v13.1|78
Page 83
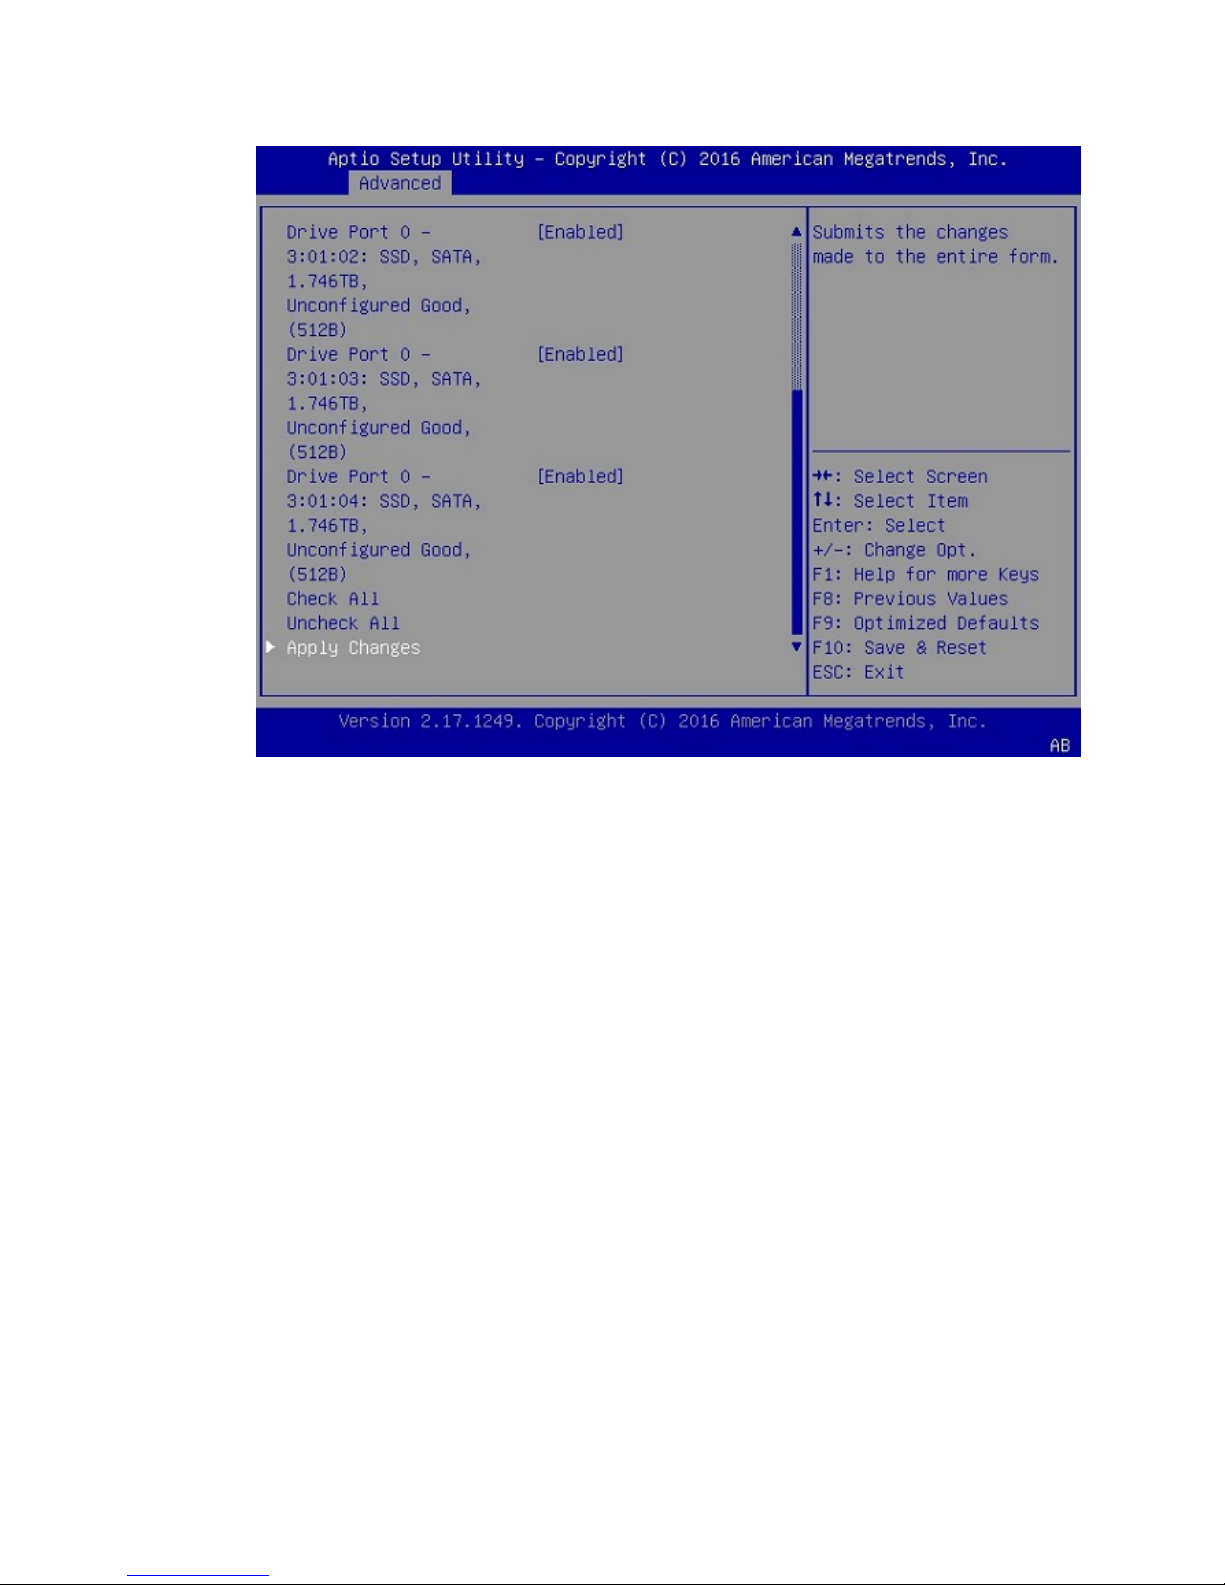
Maintaining and Servicing the NVIDIA DGX-1
8.
Change Confirm to [Enabled], then select Yes.
9.
Select OK at the success screen.
The Create Virtual Drive screen displays a summary of your selection.
10.
Verify that the summary matches your selection, then select Save Configuration.
www.nvidia.com
NVIDIA DGX-1 DU-08033-001 _v13.1|79
Page 84

Maintaining and Servicing the NVIDIA DGX-1
11.
Make sure Confirm is set to [Enabled], then select Yes to confirm the change.
www.nvidia.com
NVIDIA DGX-1 DU-08033-001 _v13.1|80
Page 85

Maintaining and Servicing the NVIDIA DGX-1
12.
Select OK at the success screen.
13.
Confirm and exit.
a)
Select View Drive Group Properties to confirm the configuration.
www.nvidia.com
NVIDIA DGX-1 DU-08033-001 _v13.1|81
Page 86
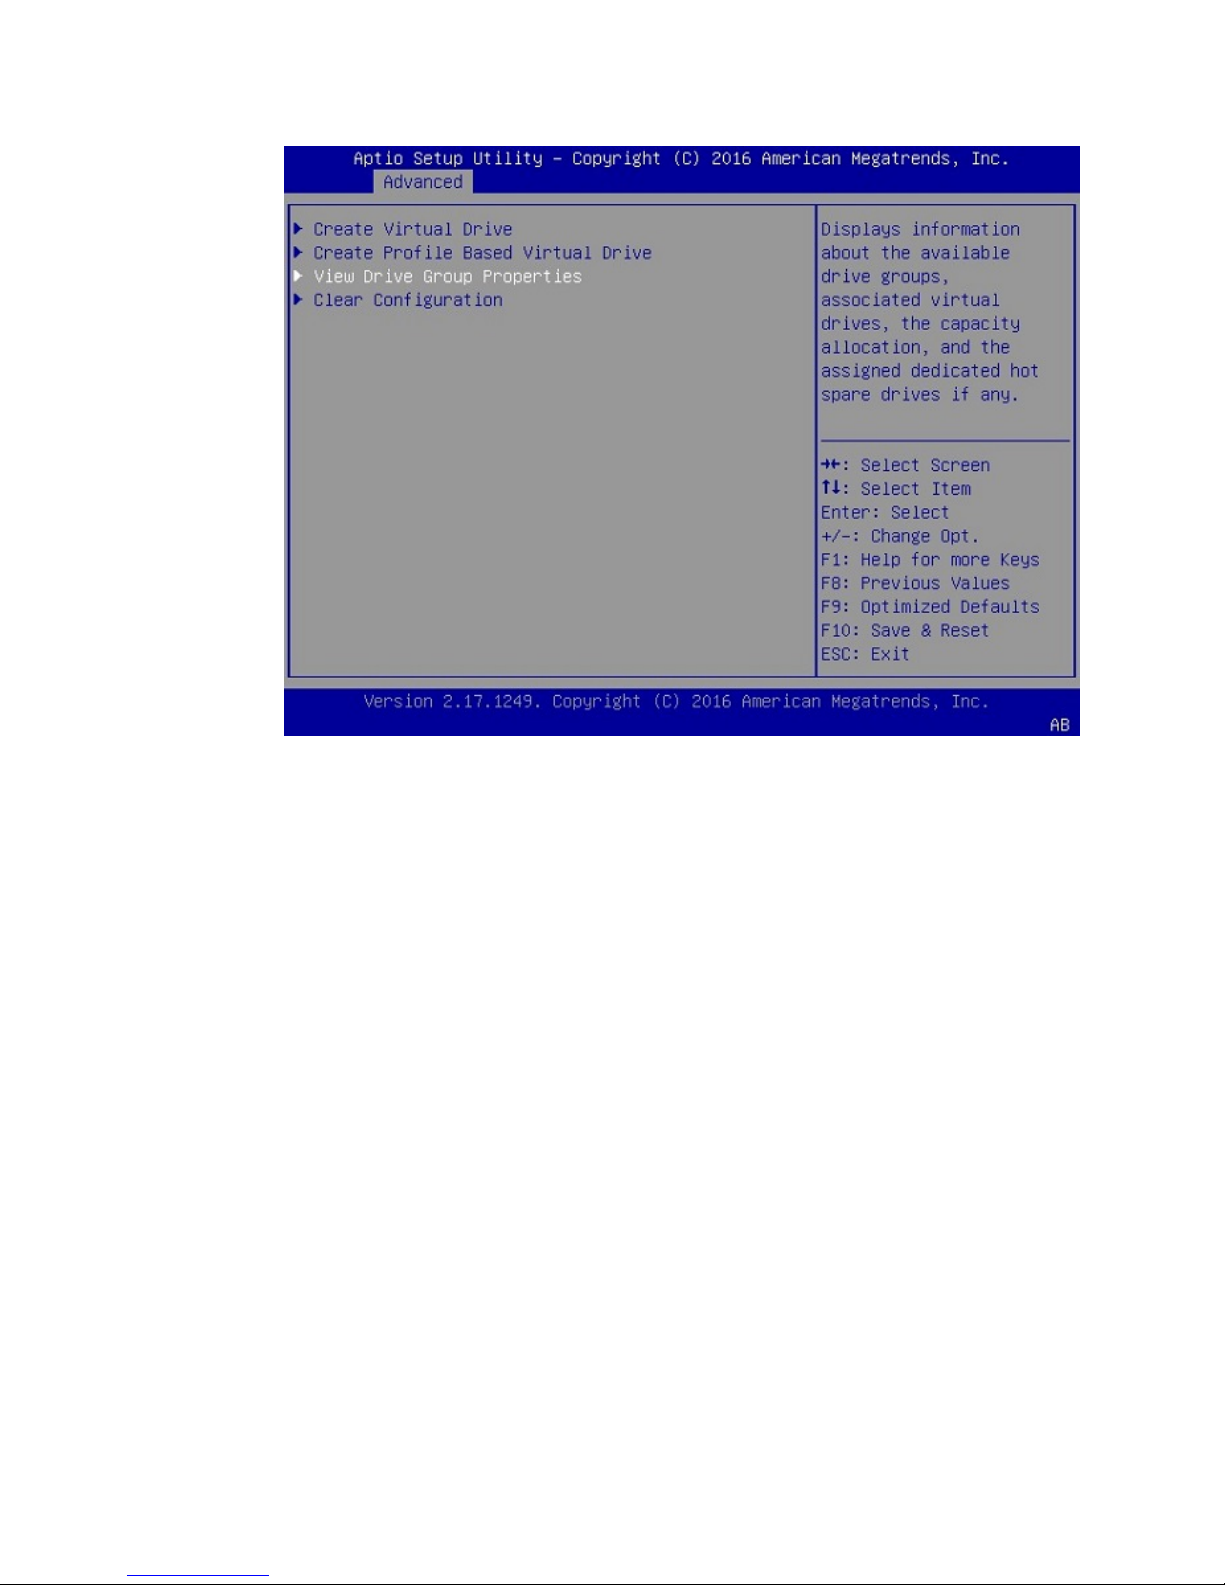
Maintaining and Servicing the NVIDIA DGX-1
b) Verify that your configuration screen shows that you have two virtual drives with
the following properties:
Virtual Drive 0 of size 446 GB (or very similar)
Virtual Drive 1 of size 7 TB (or very similar).
www.nvidia.com
NVIDIA DGX-1 DU-08033-001 _v13.1|82
Page 87

Maintaining and Servicing the NVIDIA DGX-1
c)
If your Drive Groups match the above, press [F10] to save these settings and reset
the system.
d)
Select Save Changes and Reset, then select Yes at the confirmation prompt.
www.nvidia.com
NVIDIA DGX-1 DU-08033-001 _v13.1|83
Page 88

Maintaining and Servicing the NVIDIA DGX-1
14.
Follow the instructions in the section Restoring the DGX-1 Software Image to create
the partitions.
5.5.4.Recreating the RAID 0 Array
After replacing one of the RAID 0 cache SSDs, you need to recreate the RAID 0 array.
If you replaced only the cache and not the operating system SSD, then you can use a
convenient script to recreate the RAID array. The script is part of the DGX-1 software as
of version 2.0.4.
To use the script, you need to get and install the StorCLI utility. For instructions, see the
document Using StorCLI to Recreate the NVIDIA DGX-1 RAID 0 Array, available from the
Enterprise Services site.
Connect a display (1024x768 or lower resolution) and keyboard to the DGX-1 when
booting the DGX-1 before recreating the RAID array. This is because the system may
halt at the BIOS screen alerting you that the RAID array needs to be configured. Press
C (or whichever key allows you to continue) to complete the boot process. You will
be able to do this only if you are operating the DGX-1 through a direct display and
keyboard connection.
1.
If you have installed the StorCLI utility, run the script by entering the following on
the command line:
www.nvidia.com
NVIDIA DGX-1 DU-08033-001 _v13.1|84
Page 89

Maintaining and Servicing the NVIDIA DGX-1
$ sudo python /usr/local/bin/configure_raid_array.py -c -f
2.
After the script has finished recreating the RAID 0 array, reboot the DGX-1 to verify
that /raid is mounted and usable.
Refer to the document Using StorCLI to Recreate the NVIDIA DGX-1 RAID 0 Array for
more information.
5.5.5.Replacing the Power Supplies
Access the power supplies from the front of the DGX-1. You can hot-swap the power
supplies as follows:
1.
If not already removed, remove the bezel by grasping the bezel by the side handles
and then pulling the bezel straight off the front of the DGX-1.
CAUTION: Be careful not to accidentally press the power button that is on the
right edge of the DGX-1 when removing or installing the bezel.
2.
Unplug the power cord from the power connector on the fan assembly.
3.
Flip the power supply handle out.
4.
Push the green release lever to the left and simultaneously use the power supply
handle to pull out the power supply.
5.
Slide the replacement power supply into the bay and push until seated.
6.
Flip the power supply handle up against the power supply.
7.
Reconnect the power cord.
IMPORTANT: Make sure that the end of the power cord cable tie is not
inserted into the power supply fan. The cable tie can interfere with normal
operation of the fan, resulting in failure of the power supply.
8.
Reattach the bezel.
With the bezel positioned so that the NVIDIA logo is visible from the front and is on
the left-hand side, line up the pins near the corners of the DGX-1 with the holes in
www.nvidia.com
NVIDIA DGX-1 DU-08033-001 _v13.1|85
Page 90

Maintaining and Servicing the NVIDIA DGX-1
back of the bezel, then gently press the bezel against the DGX-1. The bezel is held in
place magnetically.
CAUTION: Be careful not to accidentally press the power button that is on the
right edge of the DGX-1 when removing or installing the bezel.
5.5.6.Replacing the Fan Module
CAUTION: To avoid overheating the system, the fan module should be replaced within
25 seconds after removal.
1.
Unscrew the thumbscrews at the front of the DGX-1, then slide the DGX-1 about half
way out from the rack.
2.
Squeeze together the latches at the square access openings on the top of the chassis,
then flip open the top of the chassis to expose the fan modules.
3.
Squeeze the release tabs on the outer edge of the fan module you want to replace,
then pull up to lift the fan module out of the unit.
4.
Replace with a new fan module using the reverse steps.
5.5.7.Replacing the DIMMs
Before attempting to replace any of the dual inline memory modules (DIMMs), make
sure that you know the location of the faulty DIMM needing replacment. The location ID
is an alpha-numeric designator, such as A0, A1, B0, B1, etc., and is reported in the BMC
log files.
www.nvidia.com
NVIDIA DGX-1 DU-08033-001 _v13.1|86
Page 91
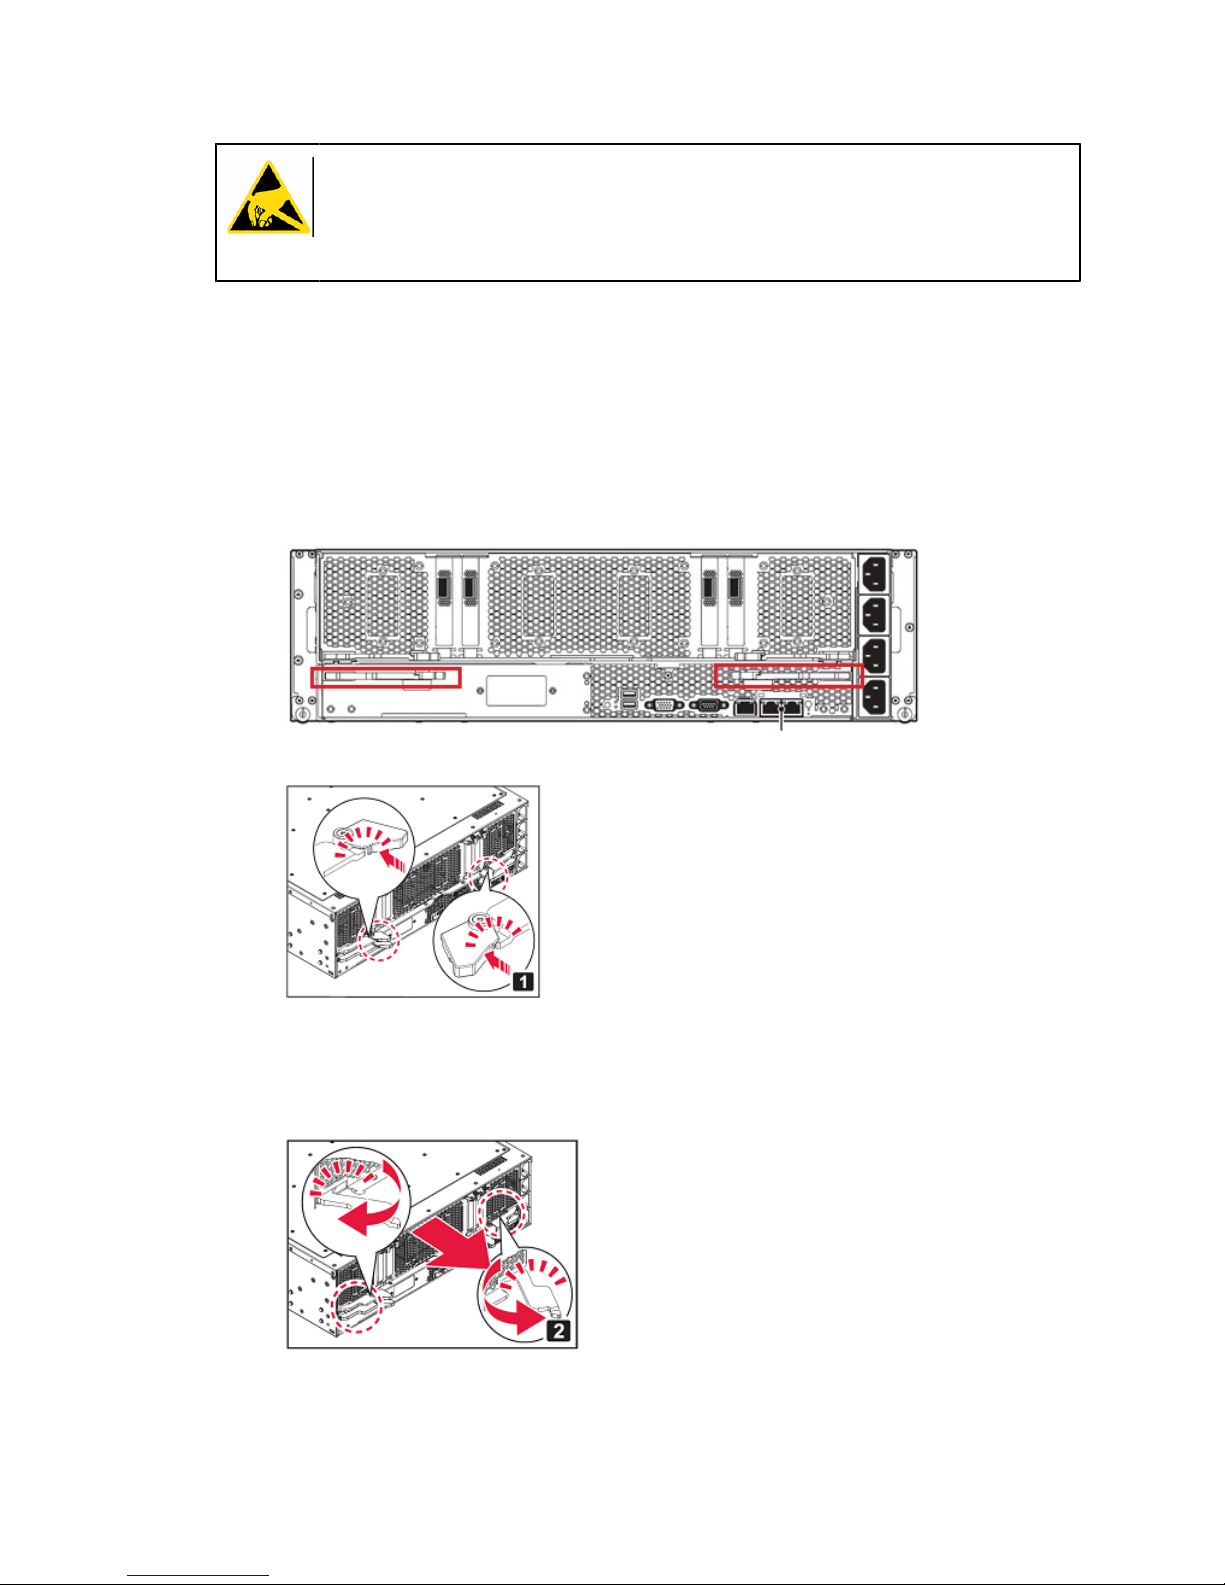
Maintaining and Servicing the NVIDIA DGX-1
CAUTION: Static Sensitive Devices: - Be sure to observe best practices for electrostatic
discharge (ESD) protection. This includes making sure personnel and equipment are
connected to a common ground, such as by wearing a wrist strap connected to the chassis
ground, and placing components on static-free work surfaces.
The DIMMs are located on the motherboard tray, which is accessible from the rear of the
DGX-1.
1.
Turn off the DGX-1 and disconnect all network and power cabling.
2.
Remove the motherboard tray.
a) Locate the locking levers for the motherboard tray at the rear of the DGX-1.
There are two sets of locking levers. The locking levers for the motherboard are
the bottom set.
b) Rotate the retention clasps inward towards the center of the unit.
The retention clasps hold the locking levers in place. Rotating the clasps inward
releases the locking levers.
c) Swing the locking levers out and then use them to pull the motherboard tray out
of the unit.
Do not pull the unit by the blue retention clasps; they may break.
www.nvidia.com
NVIDIA DGX-1 DU-08033-001 _v13.1|87
Page 92

Maintaining and Servicing the NVIDIA DGX-1
d) Set the motherboard tray on a clean work surface, and position it so that the
locking levers are at the top as you look down on the tray.
The DIMMs are on a printed circuit board on the left side of the tray.
3.
Using the figure below as a guide, locate the DIMM corresponding to the ID of the
faulty DIMM as reported in the BMC log.
www.nvidia.com
NVIDIA DGX-1 DU-08033-001 _v13.1|88
Page 93

Maintaining and Servicing the NVIDIA DGX-1
4.
Remove the DIMM.
www.nvidia.com
NVIDIA DGX-1 DU-08033-001 _v13.1|89
Page 94

Maintaining and Servicing the NVIDIA DGX-1
a) Press down on the side latches at both ends of the DIMM socket to push them
away from the DIMM.
This should unseat the DIMM from the socket.
b) Pull the DIMM straight up to remove it from the socket.
5.
Carefully insert the replacement DIMM.
www.nvidia.com
NVIDIA DGX-1 DU-08033-001 _v13.1|90
Page 95

Maintaining and Servicing the NVIDIA DGX-1
a) Make sure the socket latches are open.
b) Positon the DIMM over the socket, making sure that the notch on the DIMM lines
up with the key in the slot, then press the DIMM down into the socket until the
side latches click in place.
c) Make sure that the latches are up and locked in place.
6.
Carefully insert the motherboard tray back into the unit, then swing the locking
levers flat against the tray and secure them in place with the retention clasps.
5.5.8.Replacing the InfiniBand Cards
The InfiniBand cards are located on the GPU tray which is accessible from the rear of the
DGX-1. Be sure you have identified the faulty InfiniBand card needing to be replaced.
The slots are identified as indicated in the following image.
www.nvidia.com
NVIDIA DGX-1 DU-08033-001 _v13.1|91
Page 96

Maintaining and Servicing the NVIDIA DGX-1
CAUTION: Static Sensitive Devices: - Be sure to observe best practices for electrostatic
discharge (ESD) protection. This includes making sure personnel and equipment are
connected to a common ground, such as by wearing a wrist strap connected to the chassis
ground, and placing components on static-free work surfaces.
1.
Turn off the DGX-1 and disconnect all network and power cabling.
2.
Remove the GPU tray.
a) Locate the locking levers for the GPU tray at the rear of the DGX-1.
There are two sets of locking levers. The locking levers for the GPU tray are the
top set.
b) Rotate the retention clasps inward towards the center of the unit.
The retention clasps hold the locking levers in place. Rotating the clasps inward
releases the locking levers.
www.nvidia.com
NVIDIA DGX-1 DU-08033-001 _v13.1|92
Page 97

Maintaining and Servicing the NVIDIA DGX-1
c) Swing the locking levers out and then use then to pull the GPU tray out of the
unit.
Do not pull the unit by the blue retention clasps; they may break.
3.
Set the GPU tray on a clean work surface.
WARNING: Do not attempt to move or lift the GPU tray by grabbing the U-bolts.
To properly move the GPU tray, grab the tray by the outer edges of the assembly
and support it from underneath, taking care not to damage any components.
4.
At the top edge of the bracket for the InfiniBand card that you want to replace, rotate
the retention clasp to free the bracket.
www.nvidia.com
NVIDIA DGX-1 DU-08033-001 _v13.1|93
Page 98
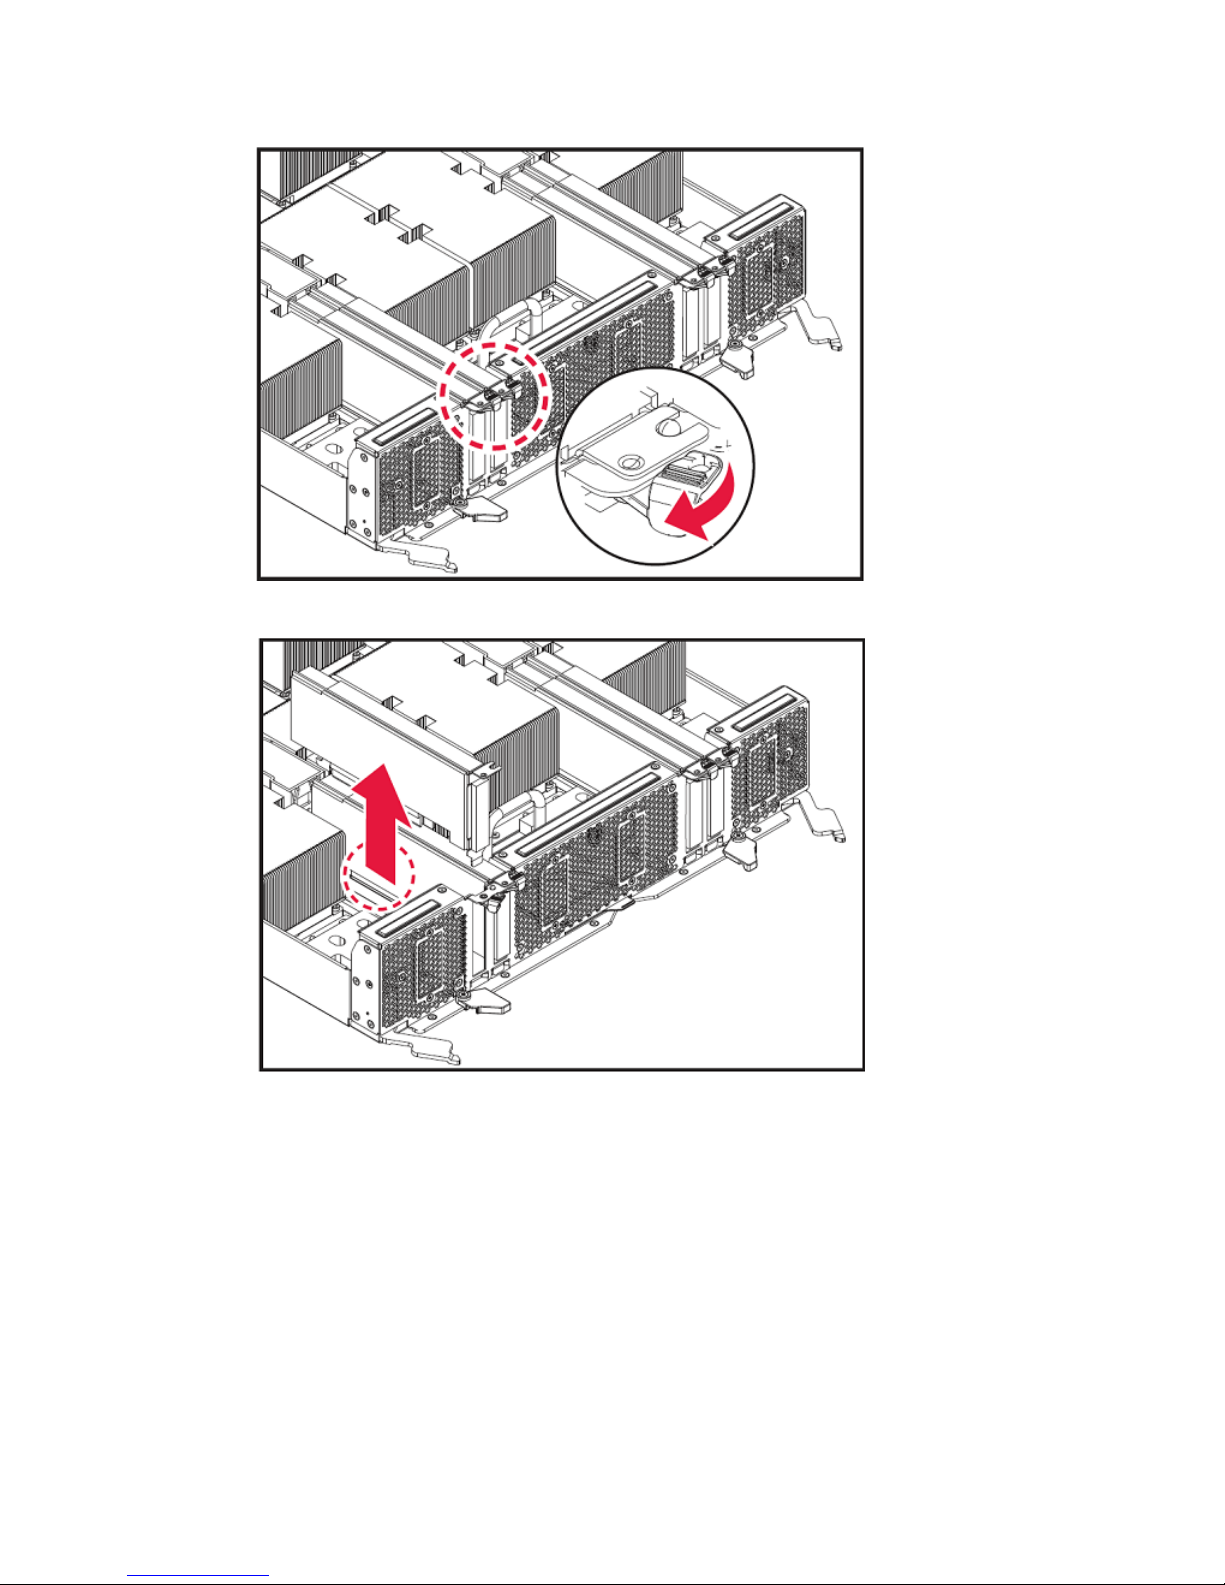
Maintaining and Servicing the NVIDIA DGX-1
5.
Firmly grasp the InfiniBand card and lift it straight up out of the PCIe slot.
6.
Position the replacement InfiniBand card over the empty PCIe slot and insert it into
the slot.
7.
Swing the retention clasp over the bracket to secure the bracket in place.
www.nvidia.com
NVIDIA DGX-1 DU-08033-001 _v13.1|94
Page 99

Maintaining and Servicing the NVIDIA DGX-1
8.
Carefully insert the GPU tray back into the unit, then swing the locking levers flat
against the tray and secure them in place with the retention clasps.
9.
Reconnect all connectors, boot the system, then perform the verification and setup
steps described in the next section.
5.5.9.Setting Up the InfiniBand Cards
This section describes the steps needed to verify that the InfiniBand card has been
replaced correctly.
1.
With the DGX-1 turned on, verify that the card was installed correctly and is
recognized by the system.
$ lspci | grep -i mellanox
The output should show all four InfiniBand cards.
Example:
05:00.0 Infiniband controller: Mellanox Technologies MT27700 Family
[ConnectX-4]
0c:00.0 Infiniband controller: Mellanox Technologies MT27700 Family
[ConnectX-4]
84:00.0 Infiniband controller: Mellanox Technologies MT27700 Family
[ConnectX-4]
8b:00.0 Infiniband controller: Mellanox Technologies MT27700 Family
[ConnectX-4]
If all four cards are not reported, then the card was not installed properly and
should be reseated.
If a card other than the officially supported Mellanox family of adapters appears,
contact NVIDIA Enterprise Support.
2.
Verify that the InfiniBand drivers are present.
$ lsmod | grep -i ib_
www.nvidia.com
NVIDIA DGX-1 DU-08033-001 _v13.1|95
Page 100

Maintaining and Servicing the NVIDIA DGX-1
The output should be a list of lb_ and mlx_ driver components.
Example:
ib_ucm 20480 0
ib_ipoib 131072 0
ib_cm 45056 3 rdma_cm,ib_ucm,ib_ipoib
ib_uverbs 73728 2 ib_ucm,rdma_ucm
ib_umad 24576 0
mlx5_ib 192512 0
mlx4_ib 192512 0
ib_sa 36864 5 rdma_cm,ib_cm,mlx4_ib,rdma_ucm,ib_ipoib
ib_mad 57344 4 ib_cm,ib_sa,mlx4_ib,ib_umad
ib_core 143360 13
rdma_cm,ib_cm,ib_sa,iw_cm,nv_peer_mem,mlx4_ib,mlx5_ib,ib_mad,ib_ucm,ib_umad,ib_uverbs,rdma_ucm,ib_ipoib
ib_addr 20480 3 rdma_cm,ib_core,rdma_ucm
ib_netlink 16384 3 rdma_cm,iw_cm,ib_addr
mlx4_core 344064 2 mlx4_en,mlx4_ib
mlx5_core 524288 1 mlx5_ib
mlx_compat 16384 18
rdma_cm,ib_cm,ib_sa,iw_cm,mlx4_en,mlx4_ib,mlx5_ib,ib_mad,ib_ucm,ib_netlink,ib_addr,ib_core,ib_umad,ib_uverbs,mlx4_core,mlx5_core,rdma_ucm,ib_ipoib
3.
Verify that the OFED software was installed correctly.
$ modinfo mlx5_core | grep -i version | head -1
Example output:
Version : 3.4-1.0.0
DGX-1 OS release 1.0 should have OFED software 3.2.
DGX-1 OS release 2.0 should have OFED software 3.4.
4.
Restart the InfiniBand services so that the new card is recognized.
a) Restart the InfiniBand service.
$ sudo service openibd restart
b) Restart the Service Manager service.
$ sudo service opensmd restart
c) Verify that the service has started.
$ service openibd status
openibd start/running
$ service opensmd status
OpenSM is running...
d) If the services do not start, verify
That the drivers are loaded according to step 3.
‣
That the associated cables are connected to the InfiniBand ports.
‣
The state of ibstat (refer to step 7)
‣
Whether errors are reported in /var/log/syslog.
‣
If these steps do not indicate a problem and yet the services still do not start,
contact NVIDIA Enterprise Support and obtain an RMA for the card.
5.
Verify the firmware version.
$ cat /sys/class/infiniband/mlx5*/fw_ver
Example output:
www.nvidia.com
NVIDIA DGX-1 DU-08033-001 _v13.1|96
 Loading...