

Page 1

The Intelligent Surveillance Solution
NuFace
User Manual
Ver. 1.0.0.151015.00
Page 2

Table of Content
1. Introduction: .................................................................................................. 3
1-1 Function ............................................................................................. 3
2. Requirement: ................................................................................................. 3
2-1 Minimum Hardware Requirement ........................................................... 3
2-2 Tested Capture Device: ............................................................................ 4
2-3 OS Requirement: ...................................................................................... 4
2-4 Application Spec ...................................................................................... 5
2-5 Other Requirement .................................................................................. 5
3. Interface and Operation: ................................................................................ 6
3-1 Application UI .......................................................................................... 6
3-2 License Activation .................................................................................... 7
3-3 Video Devices ........................................................................................... 7
3-4 Registering Faces ...................................................................................... 9
3-5 Advance Setting ..................................................................................... 13
4. Metadata connection guide (Mainconsole) ................................................. 19
5. Metadata Connecting Guide (Crystal ) ......................................................... 24
Page 3

1. Introduction:
CPU
(CPU) Intel® Core™ i3 2.4GHz and above
OS
Windows XP, Windows 7, Windows Embedded
RAM
2GB
Storage size
20 GB
NuFace is a windows-based application aiming to provide advance face
recognition analysis service to users with simplicity configuration and
accurate result.
This application should be compatible with NUUO all product line with
TCP/IP metadata connection:
NUUO Mainconsole v6.1 and above
NUUO Crystal v3.1 and above
1-1 Function
Nuface is a portable application which shall provide below functions:
- Get video streaming from WebCam or IPcam.
- Register faces as profile for recognition
- Face recognition analysis for profiled face
- Send recognition results(metadata) to NUUO product (via TCP/IP
client)
2. Requirement:
2-1 Minimum Hardware Requirement
※ Turn off UAC is required when installing/executing application
※ Administrator privilege is required
Page 4

Model
Logitech HD Webcam C910 and
C920, Logitech Quickcam Pro 9000, Microsoft LifeCam
Series
Environment
Indoor with bright light
Distance of Face
7 meters in 640x480 resolution
Brand
Axis, Vivotech, D-link, Basler
Environment
Indoor with bright light
Distance of Face
7 meters in 800x600 resolution
2-2 Tested Capture Device:
Web Cam
IP Cam
2-3 OS Requirement:
Windows 7:
Microsoft.NET Framework 4.0 or above
Microsoft Visual C++ 2010 (x86)
Windows XP:
Microsoft.NET Framework 3.5 and 4.0
Microsoft Visual C++ 2010 (x86)
Page 5

2-4 Application Spec
Features
Face recognition
Black list
Distance detection
Gender detection
Age detection
Face Scramble
Specification
Supported Video Source
Web Cam/USB Cam
IP CAM (via CGI or RTSP)
Recommended Codec for analysis
MJPEG over HTTP
MJPEG over RTSP
Max. analyzed channels per server
16 (depends on server and video quality)
The maximum quantity of faces to be
detected per video source
64
The recommended quantity of faces to
get recognition analyzed
8
Recommended pixel of face for
recognition
100x100
Minimum pixel of face to be detected
20x20
Recommended angle for recognition
Within 15 degree
Recommended pixel for recognition
Minimum 100x100
Maximum album of faces
6,000
Maximum registered images in the
profile
60,000
Face enrollment methods
Live capture
History images
2-5 Other Requirement
- If project requires extreme accuracy; the recognition environment
shall be setup. For example, object shall not wear glasses, hat or
significant wearing; object shall stand in a predefined zone which
the lighting and view angle is preset for recognition.
Page 6
3. Interface and Operation:
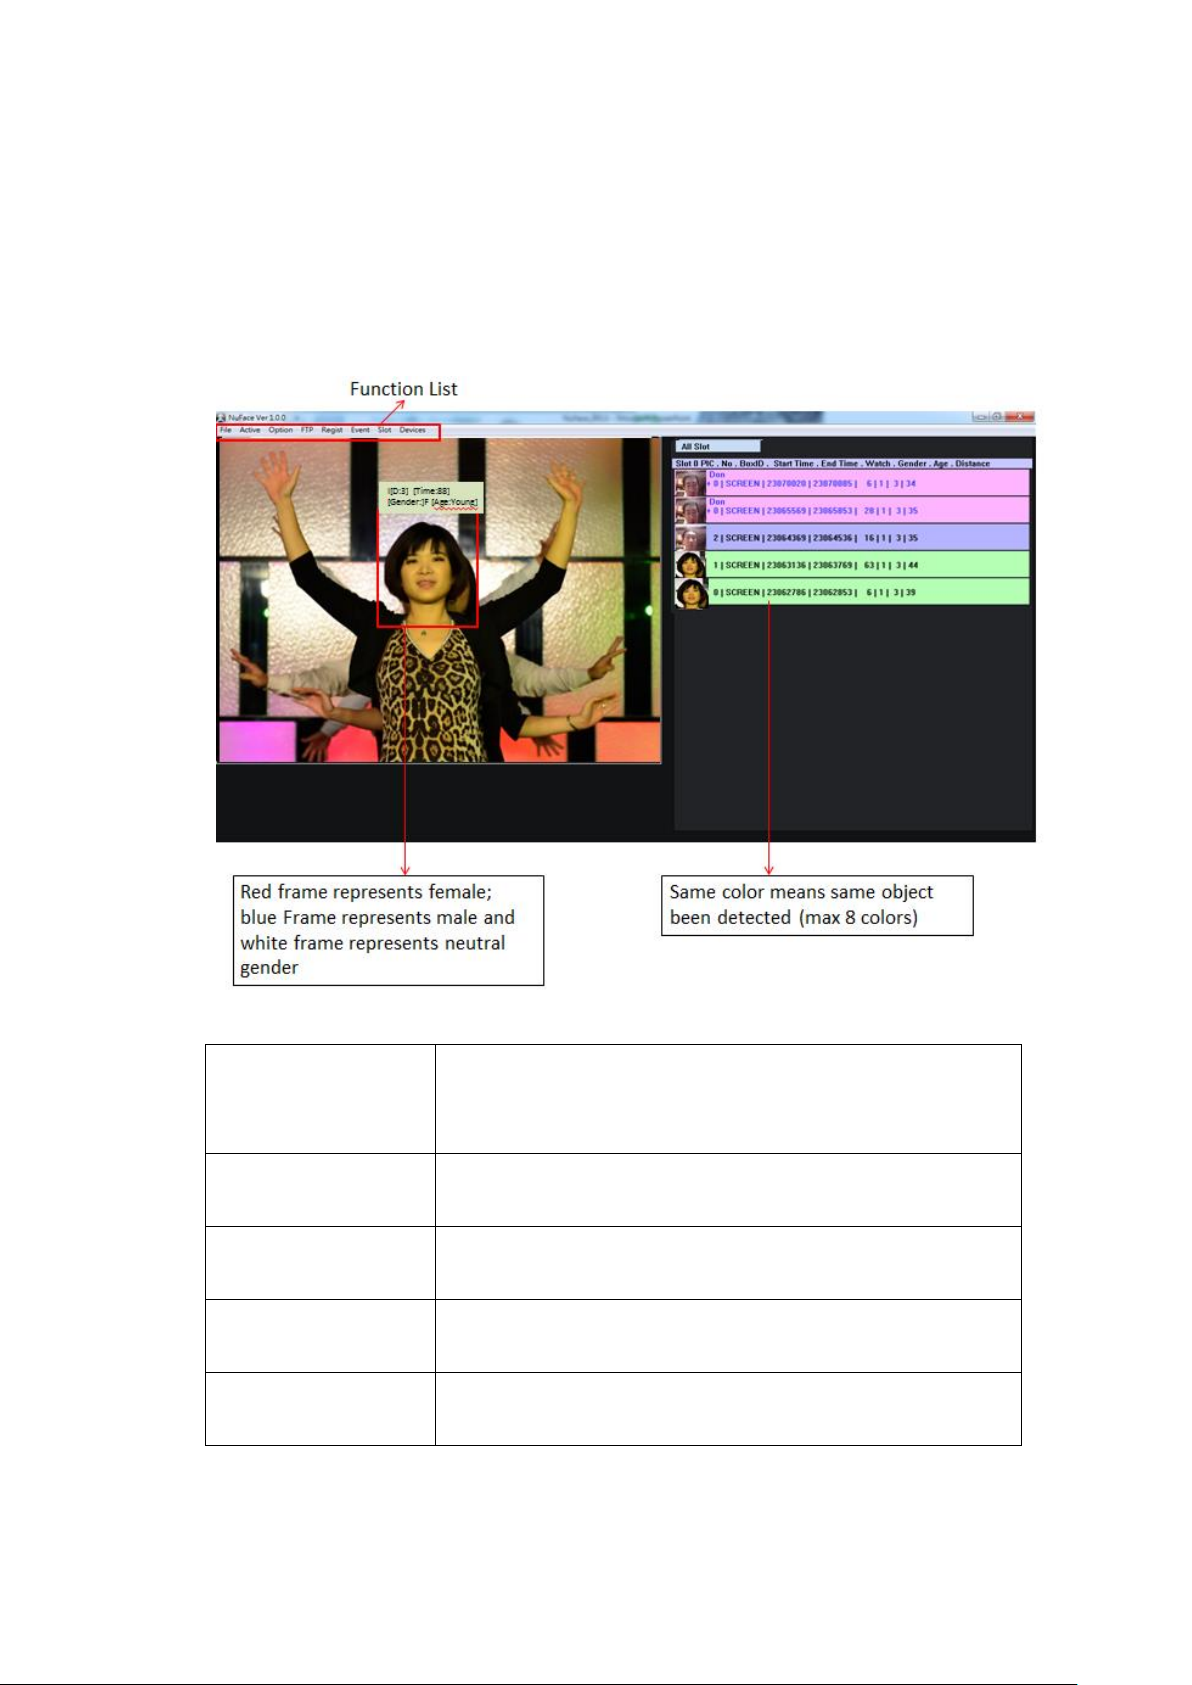
Face detection and
counting
Uses pattern detection to log and analyze the
demographics of the people who see the visual
messaging.
Age estimation
Counts and reports the age and age ranges of
detected persons.
Gender estimation
Counts and reports the gender of detected
persons.
Attention time
Detects how long each detected viewer looks at a
message.
Viewer distance
Detects and estimates the distance between each
detected viewer and the camera. (cm)
3-1 Application UI
Feature Definition
Page 7
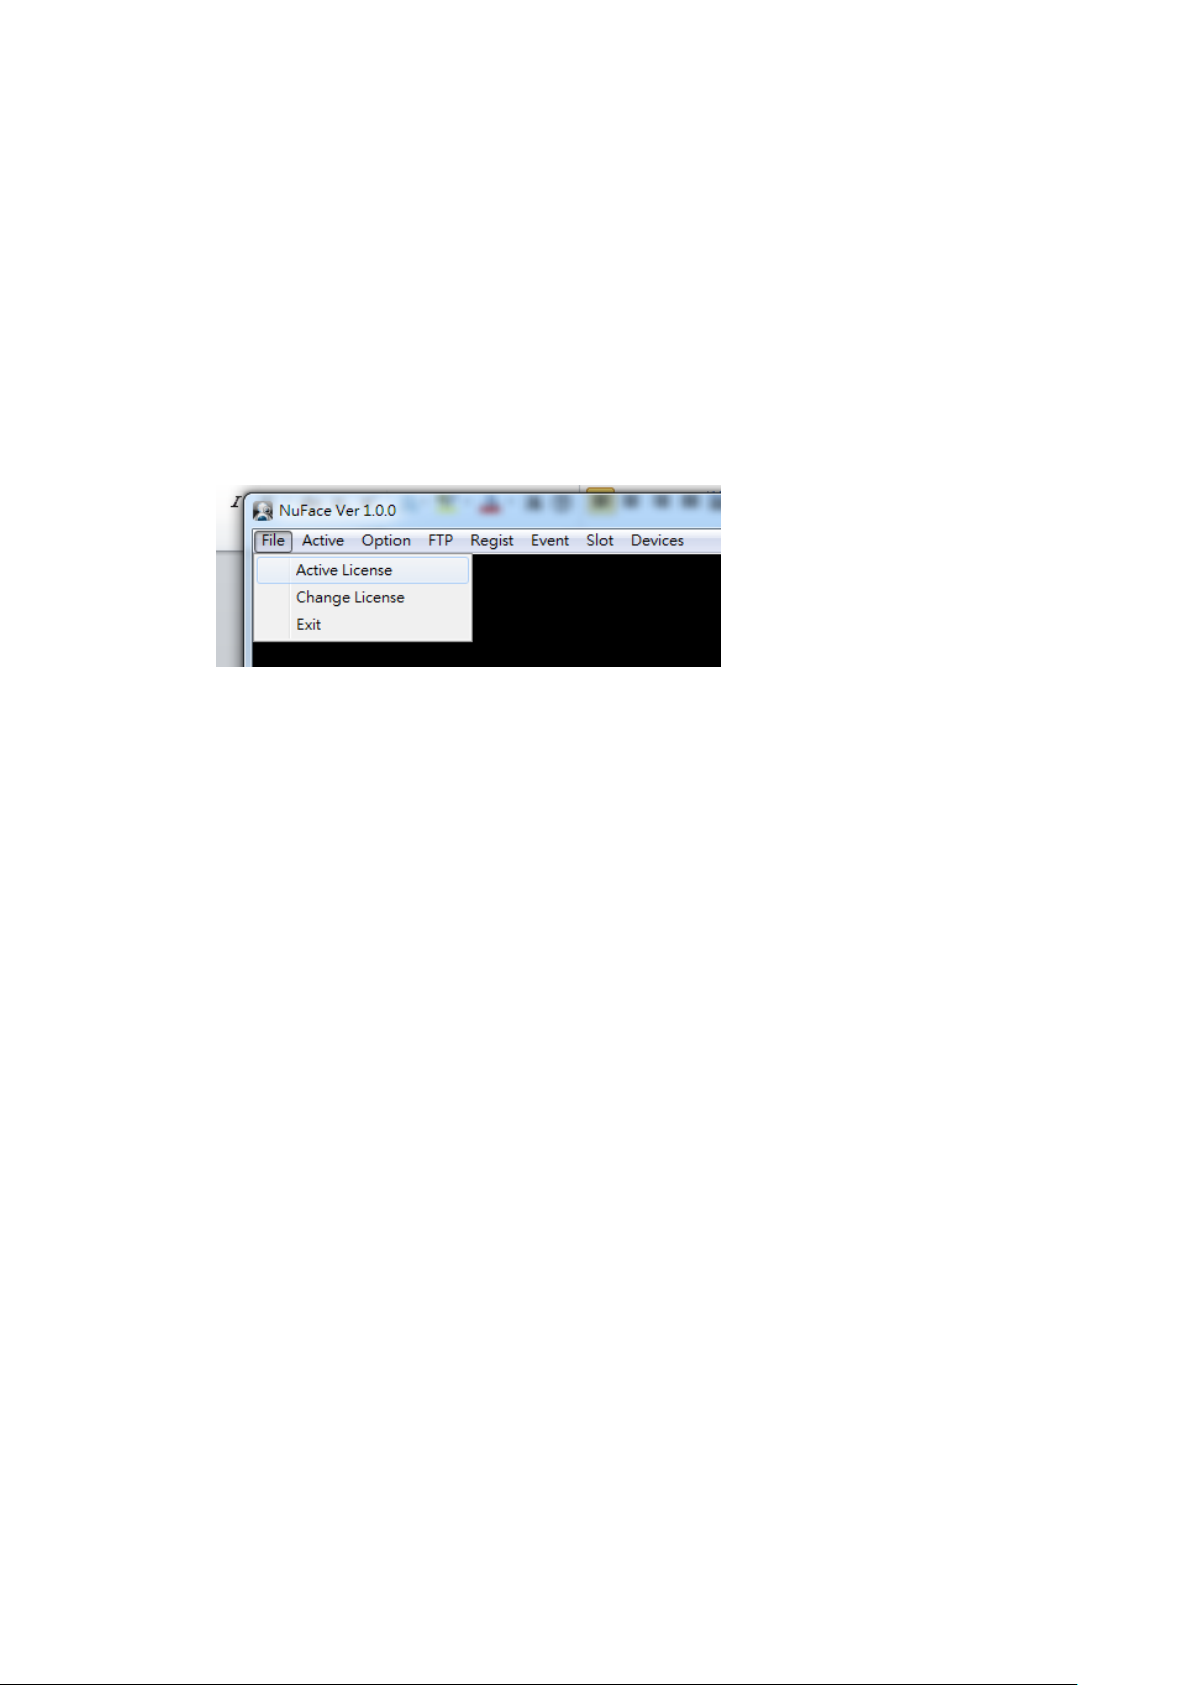
3-2 License Activation
NuFace is portable application.
How to activate license:
a. Open License.ini
b. Type in license serial number (42 digits) in License.ini
c. Close license.ini
d. Open NuFace.exe
e. File Tab – Click Activate License
3-2-1 Notes of License activation
- First time Activate license or Change license requires WAN
environment for license server.
- Only one license number is accepted in license.ini
- There is no transfer license feature in NuFace
- If server had 1ch license activated; and user want to use 4ch in
this server. User has to put 4ch license serial number in license.ini
and then click on Change license.
- The server time has to be accurate, if there is more than 15 mins
difference between server time and standard time, the activation
would fail.
3-3 Video Devices
Click Devices on the function list to select webcam or IP cam and
choose the resolution.
Page 8
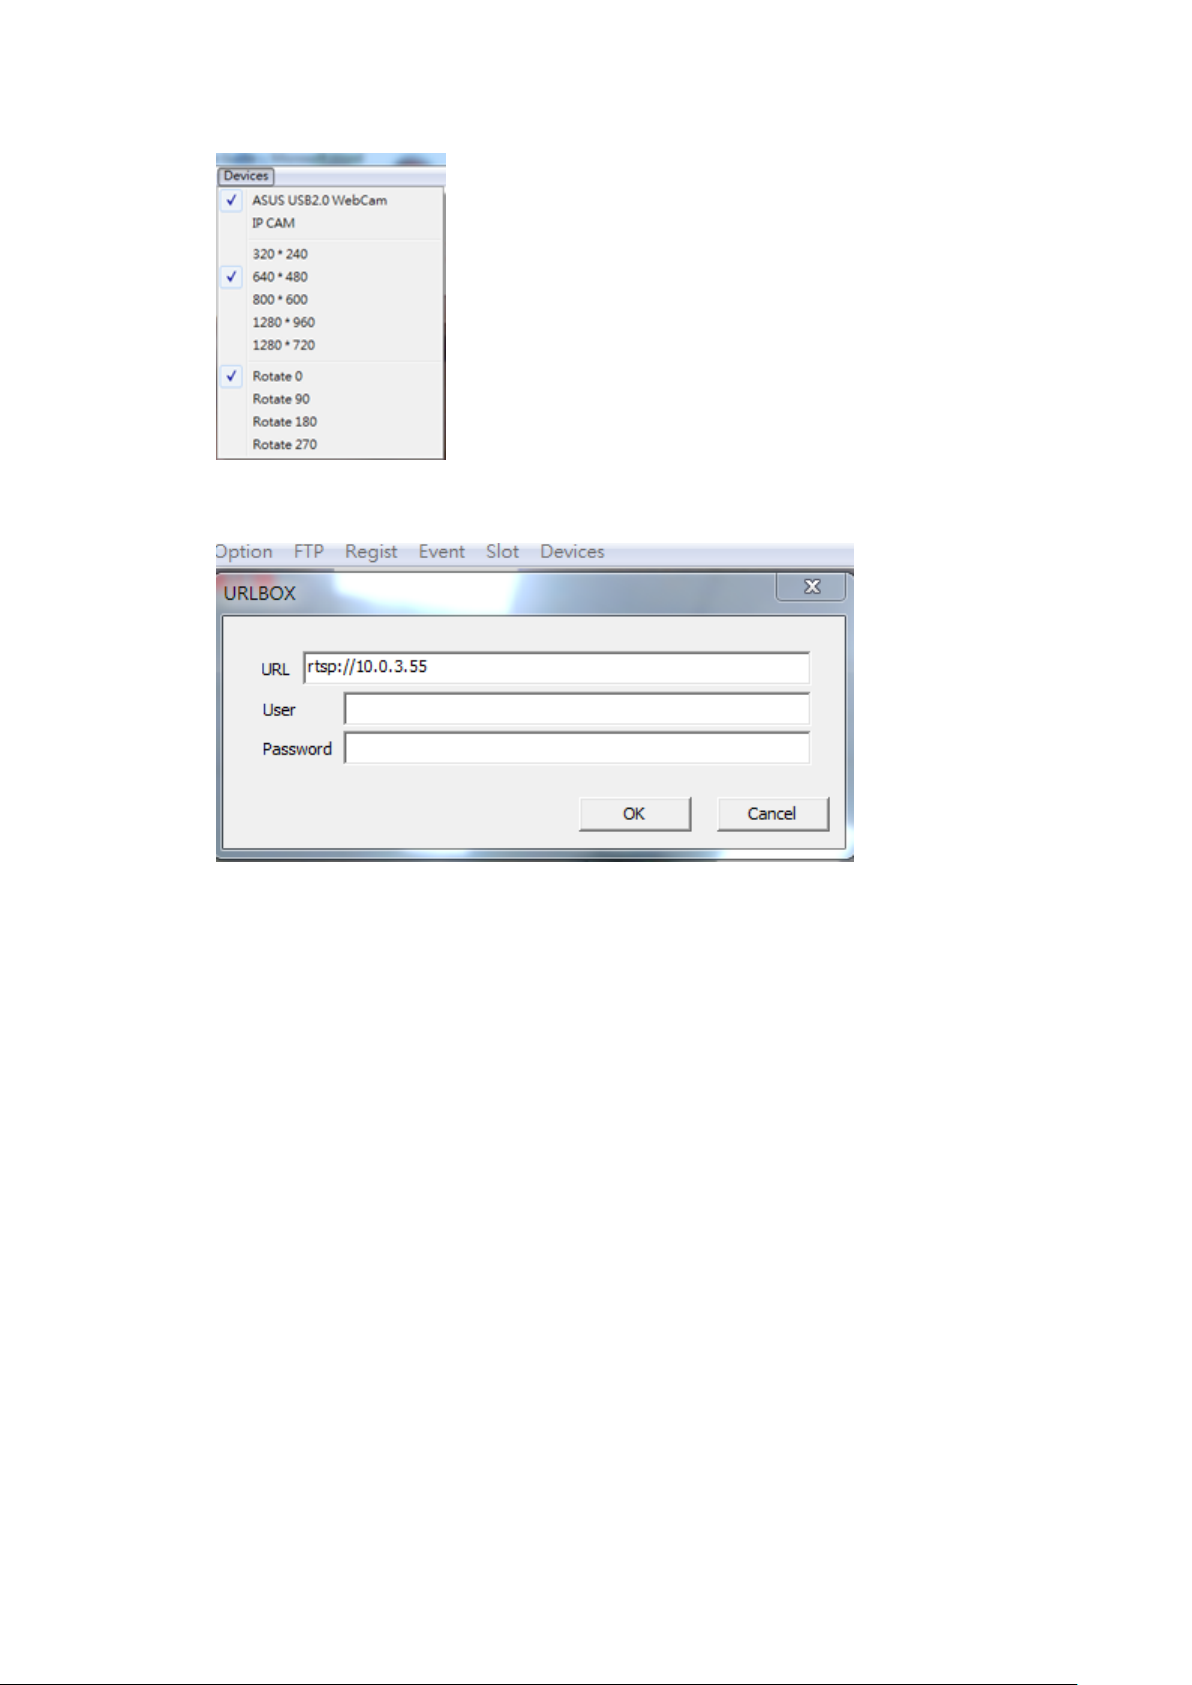
If IP CAM is selected, the setting window will pop-up.
Go to Slot/Slot option
Change Image source
Page 9
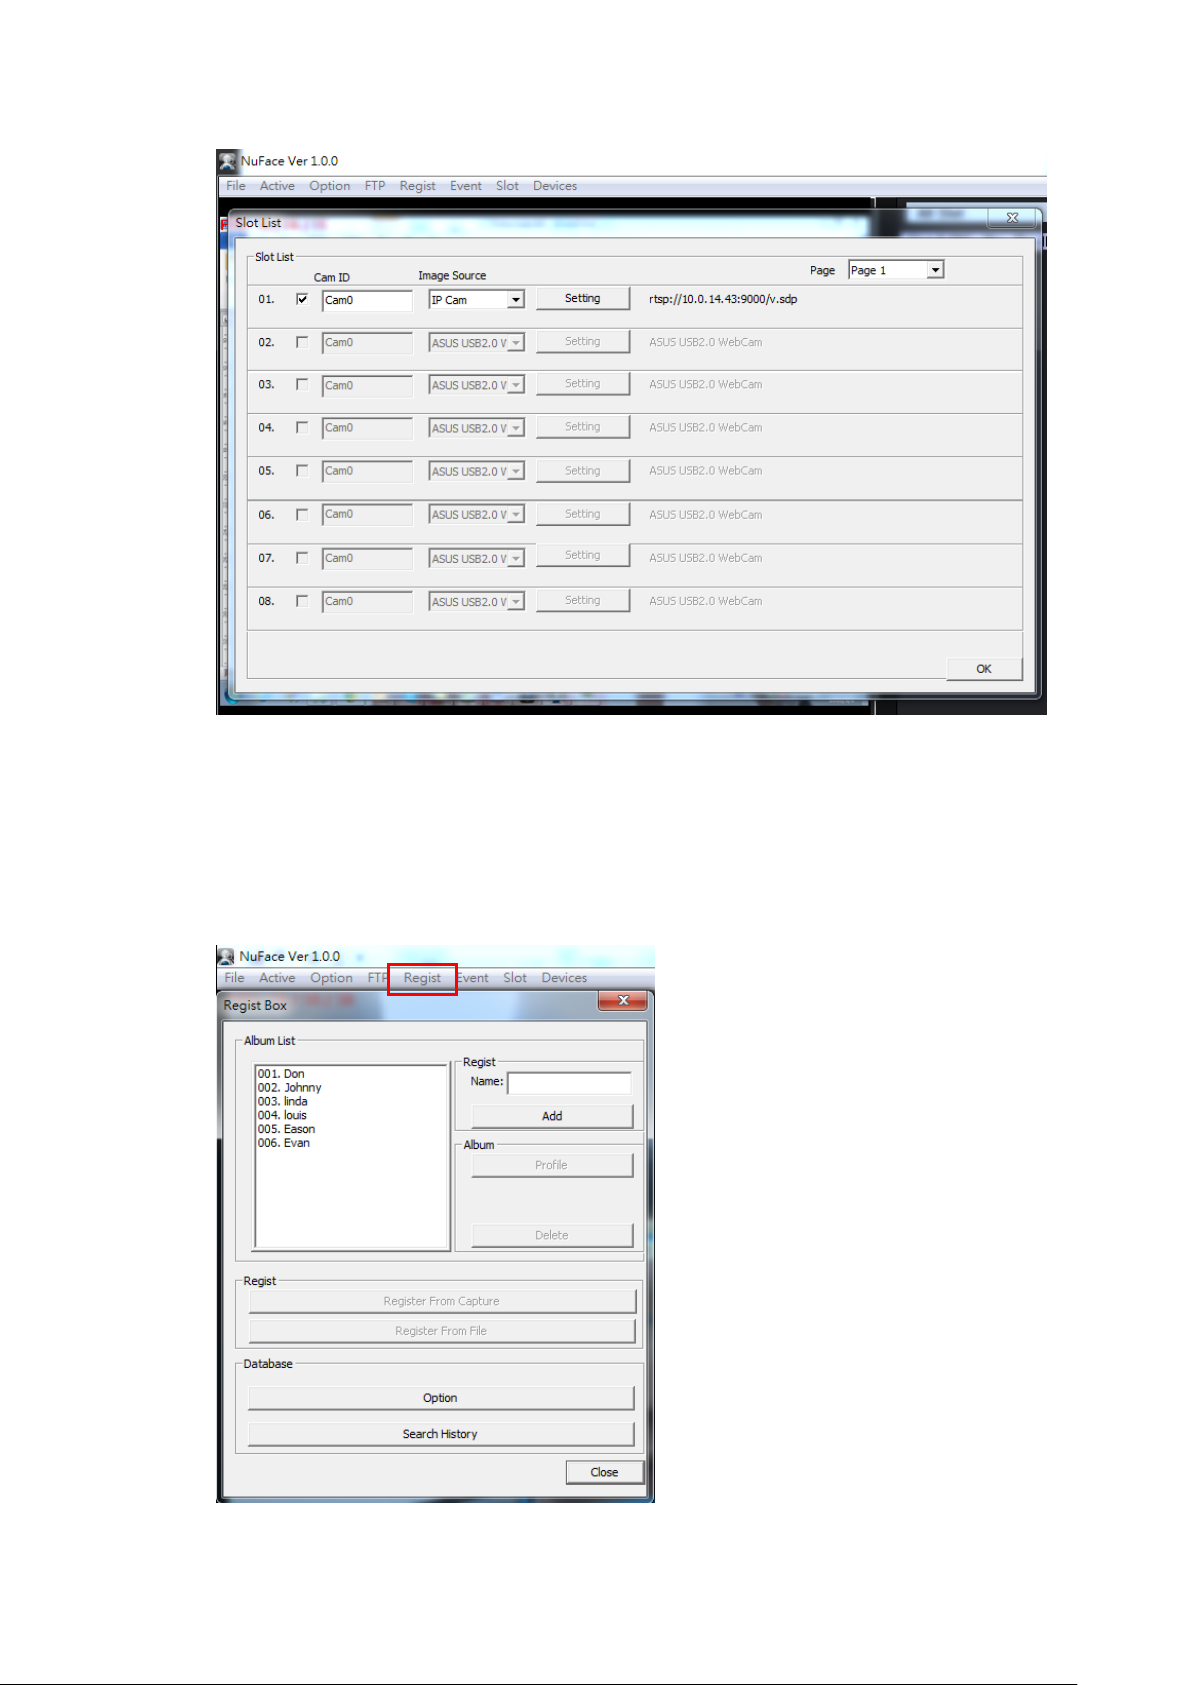
3-4 Registering Faces
-Adding face profile – Regist
Page 10

1. Click ”Regist” on the menu bar -> The Regist Box pops up
2. Enter “Name” for the ID -> Click “Add”
3. ID should be added to the Album List
There are two ways to add album files
3-1 Register From Capture – directly capture face image from video device.
3-2 Register From File – add face image from existing picture.
4. Adding faces with different angles for better performance
5. Click “close” when you finish the registration process
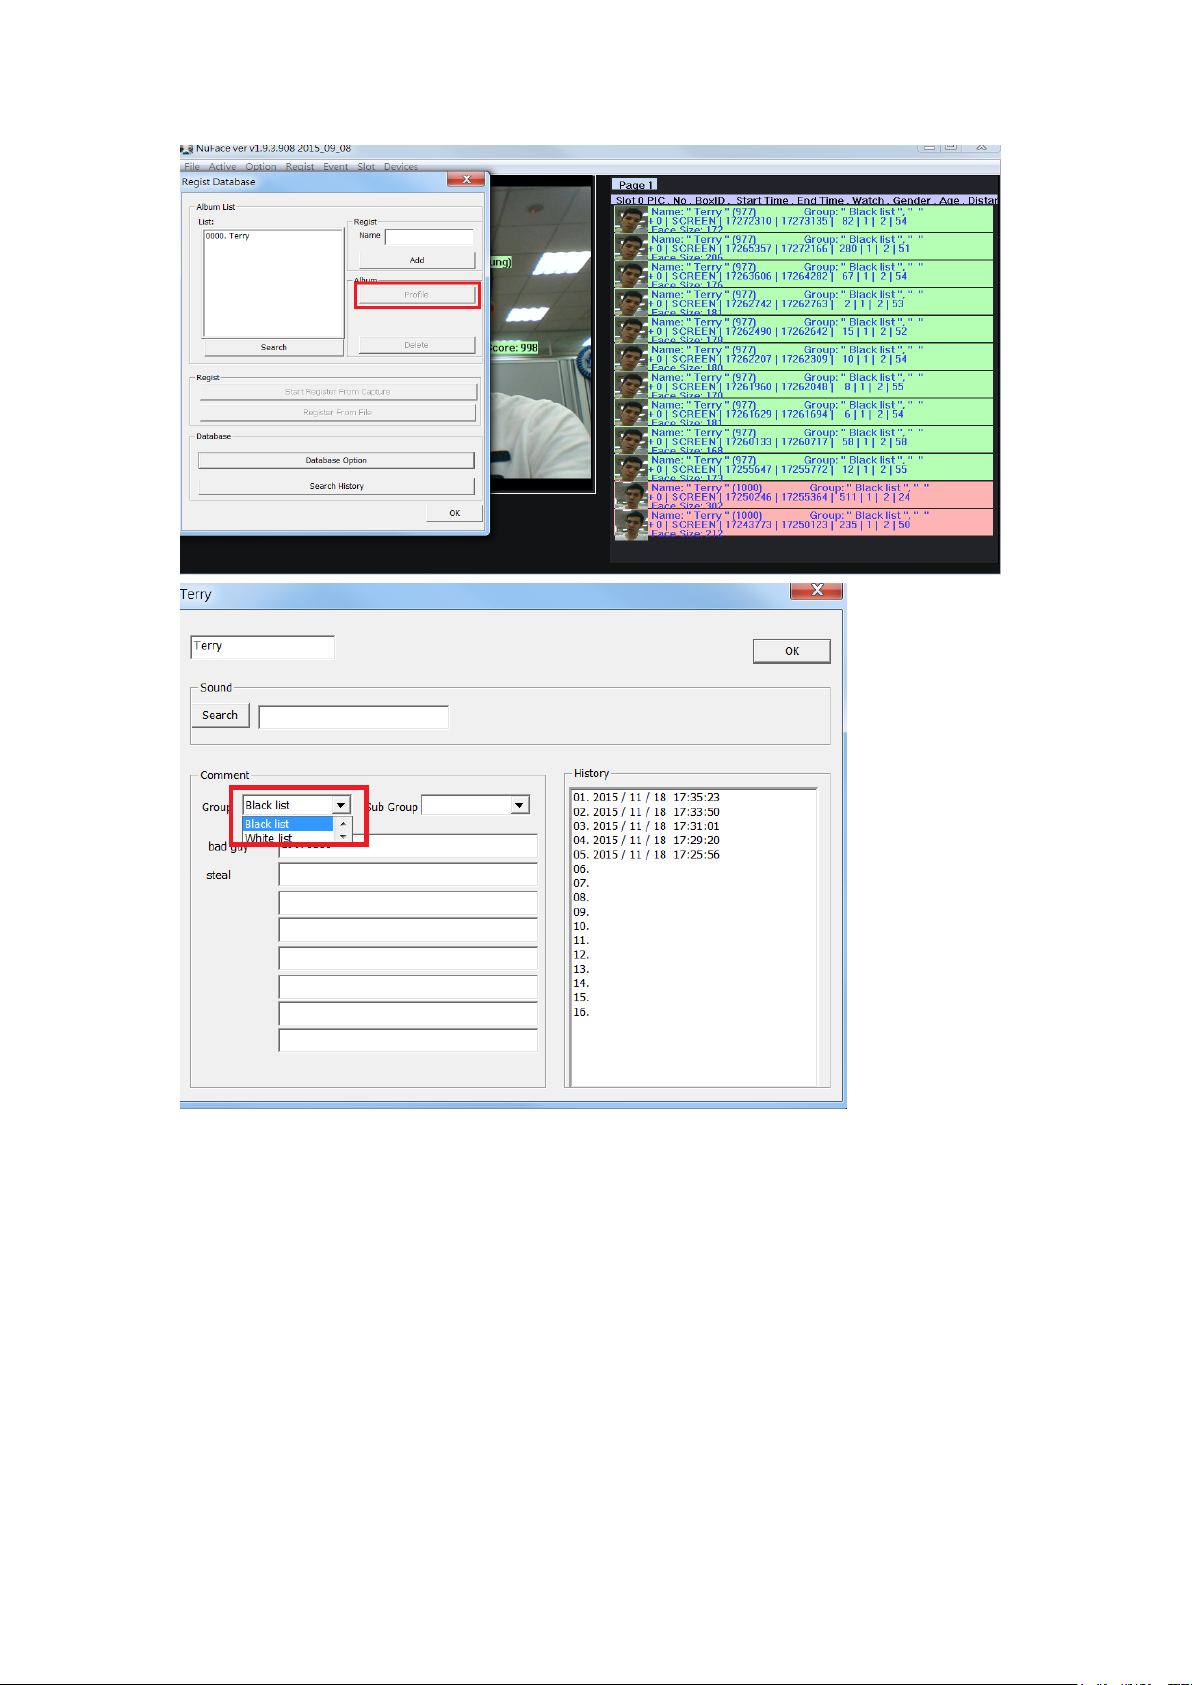
-Add group as Black and White list
1.Regist a group from database option, you can make members in black
group or white group .
Page 11

2. You can press the Album and assign the person to the group of black
or white list .
Page 12
3. You can set up the event/action for the group which in the black list
Page 13

3-5 Advance Setting
3-5-1 Mimimum Application
Click “Start Minimum” in the list of “Option” functions, NuFace will be
minimized to the toolbar when running.
3-5-2 Feature Enable/Disable
Click “Active” on the function list and enable/disable the feature.
Page 14

Feature
Action
Start Capture
Starts the camera capture
Face Detect
Detects faces shown on the screen
Estimate
Estimate age and gender
Output log
Export log file
Output Face Image
Export face image
Face Filter
Mosaic the faces shown on the screen
Default setting: “Start Capture”, “Face Detect”, “Estimate”, “Output
Log” are enabled.
3-5-3 Face Filter
Click “Active” on the function list and enable “Face Filter”, the face
will be scrambled.
Page 15

3-5-4 Detection Setting
Click “Option” on the function list and select “Detect Option”
The parameter setting will be shown as below:
Page 16

Parameter
Definition and Description
Scale
Default
Face Size
The minimum face resolution
to be detected.
20-100
20
Face Interval
The allowed tolerance of
distance between viewers. The
smaller the value, the closer
the distance between two faces
that can be detected and vice
versa.
0-2
0
Frame Detect
Interval
The parameter is to set the
number of frames between
each identification. The default
setting of “5” means 5 frames
between each identification.
The larger the value, the lower
the loading time, but with a
slower refresh on screen.
1-10
5
OTS Count
(1/10
seconds)
Determines the
opportunity-to-see by setting
up a minimum viewing time
0-999
5
Viewer Count
(1/10seconds)
Determines a qualified viewer
by setting up a minimum
viewing time.
0-999
5
Attention
Discard
(1/10
seconds)
The allowable time
determining a non-view
0-999
5
Page 17
1 OTS stands for opportunity-to-see. OTS is used for defining the audience that has been
Age
Bracket Name
0-17
Child
18-30
Young
detected with/without age/gender estimation.
2 Viewer is used for defining the audience whose age/gender has been estimated and viewing
time is sufficient.
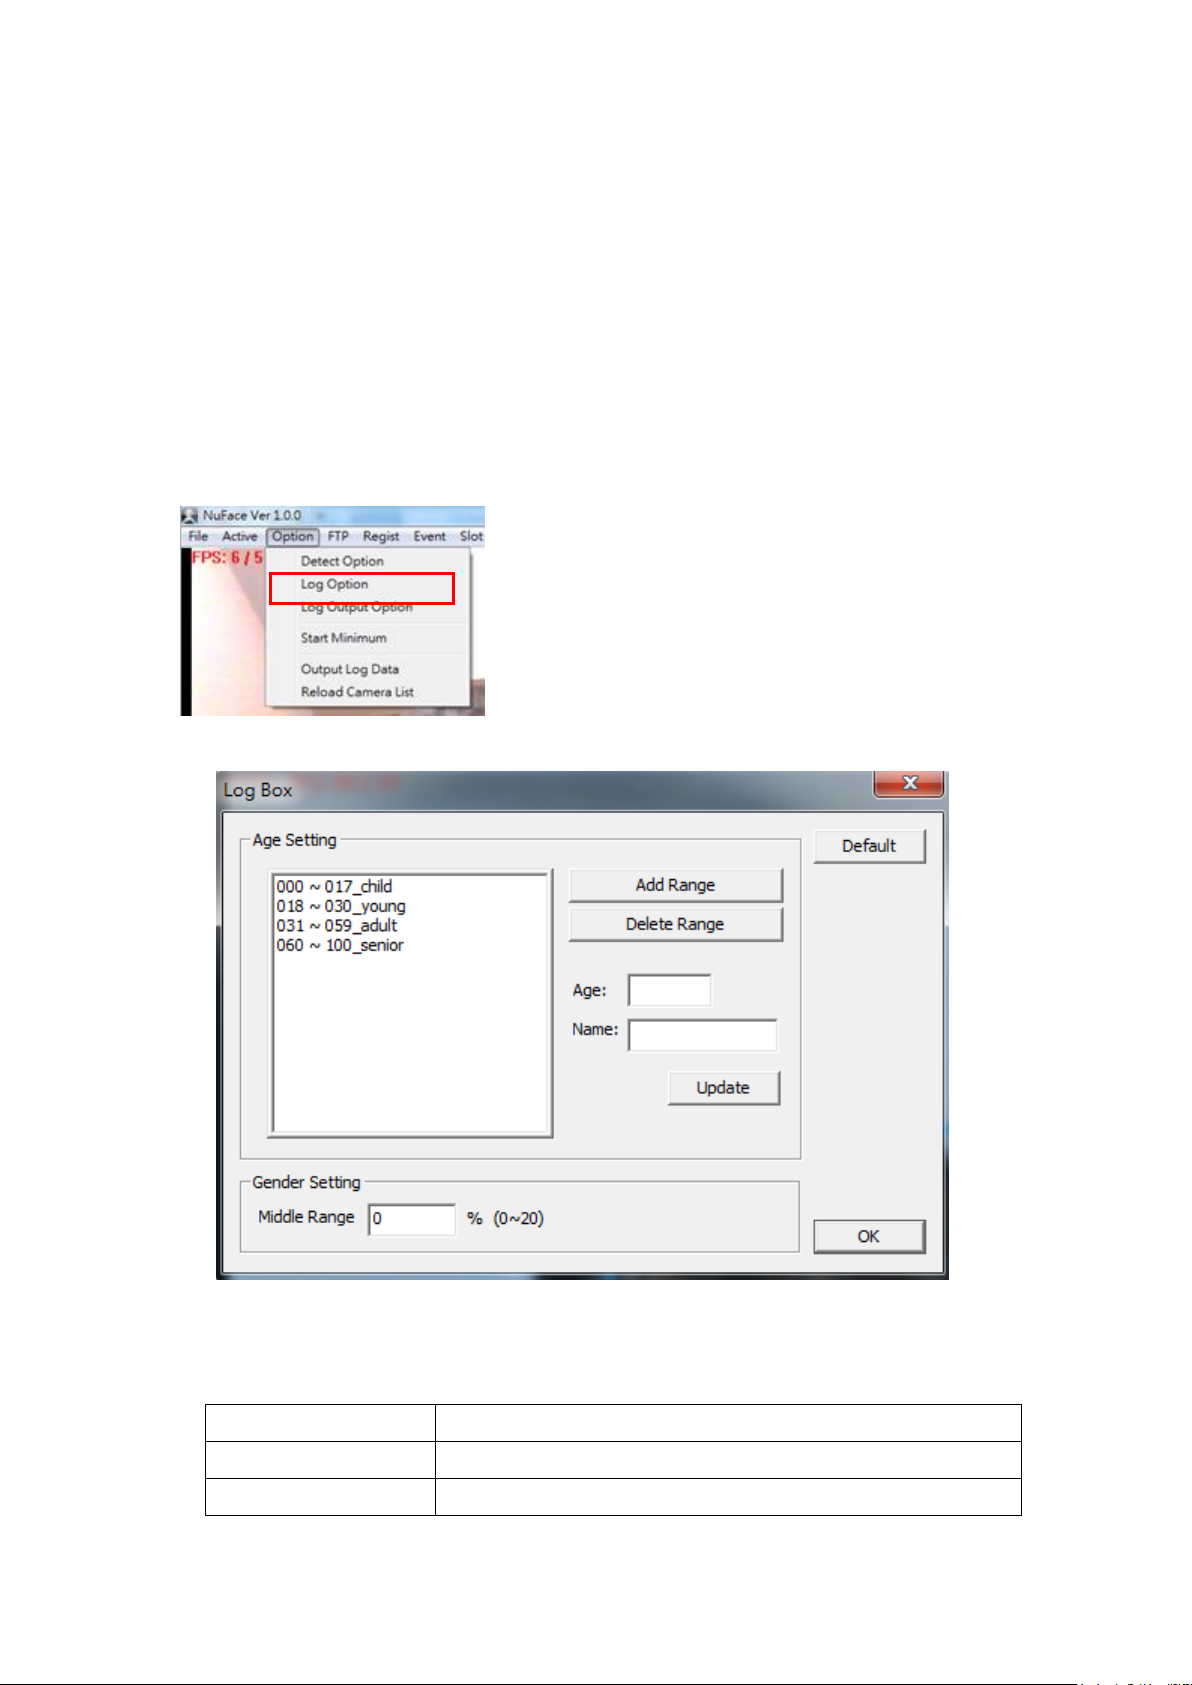
3-5-5 Age Range Setting
Click “Option” on the function list and select “Log Option” to set the range of
age.
Click Default to restore te default system settings.
Default Age Setting
Page 18

31-59
Adult
60-100
Senior
Parameter
Definition and Description
Scale
Default
Middle Range
Neutral gender range: the higher
the scale, the greater the range for
neutral gender allowance.
0-20
0
Parameter
Page 19

4. Metadata connection guide (Mainconsole)
1. Open NUUO Main Console, go to General Setting> Metadata
Application
2. Click on “Insert” to add new source; the Metadata type is
Nu-connection, the source type should be Nuface, the port for
NuFace is “4097”.
Page 20

3. Test connection
4. Go to Metadata Source Setting page and enter the Channel ID
correspond to the related Camera
Page 21
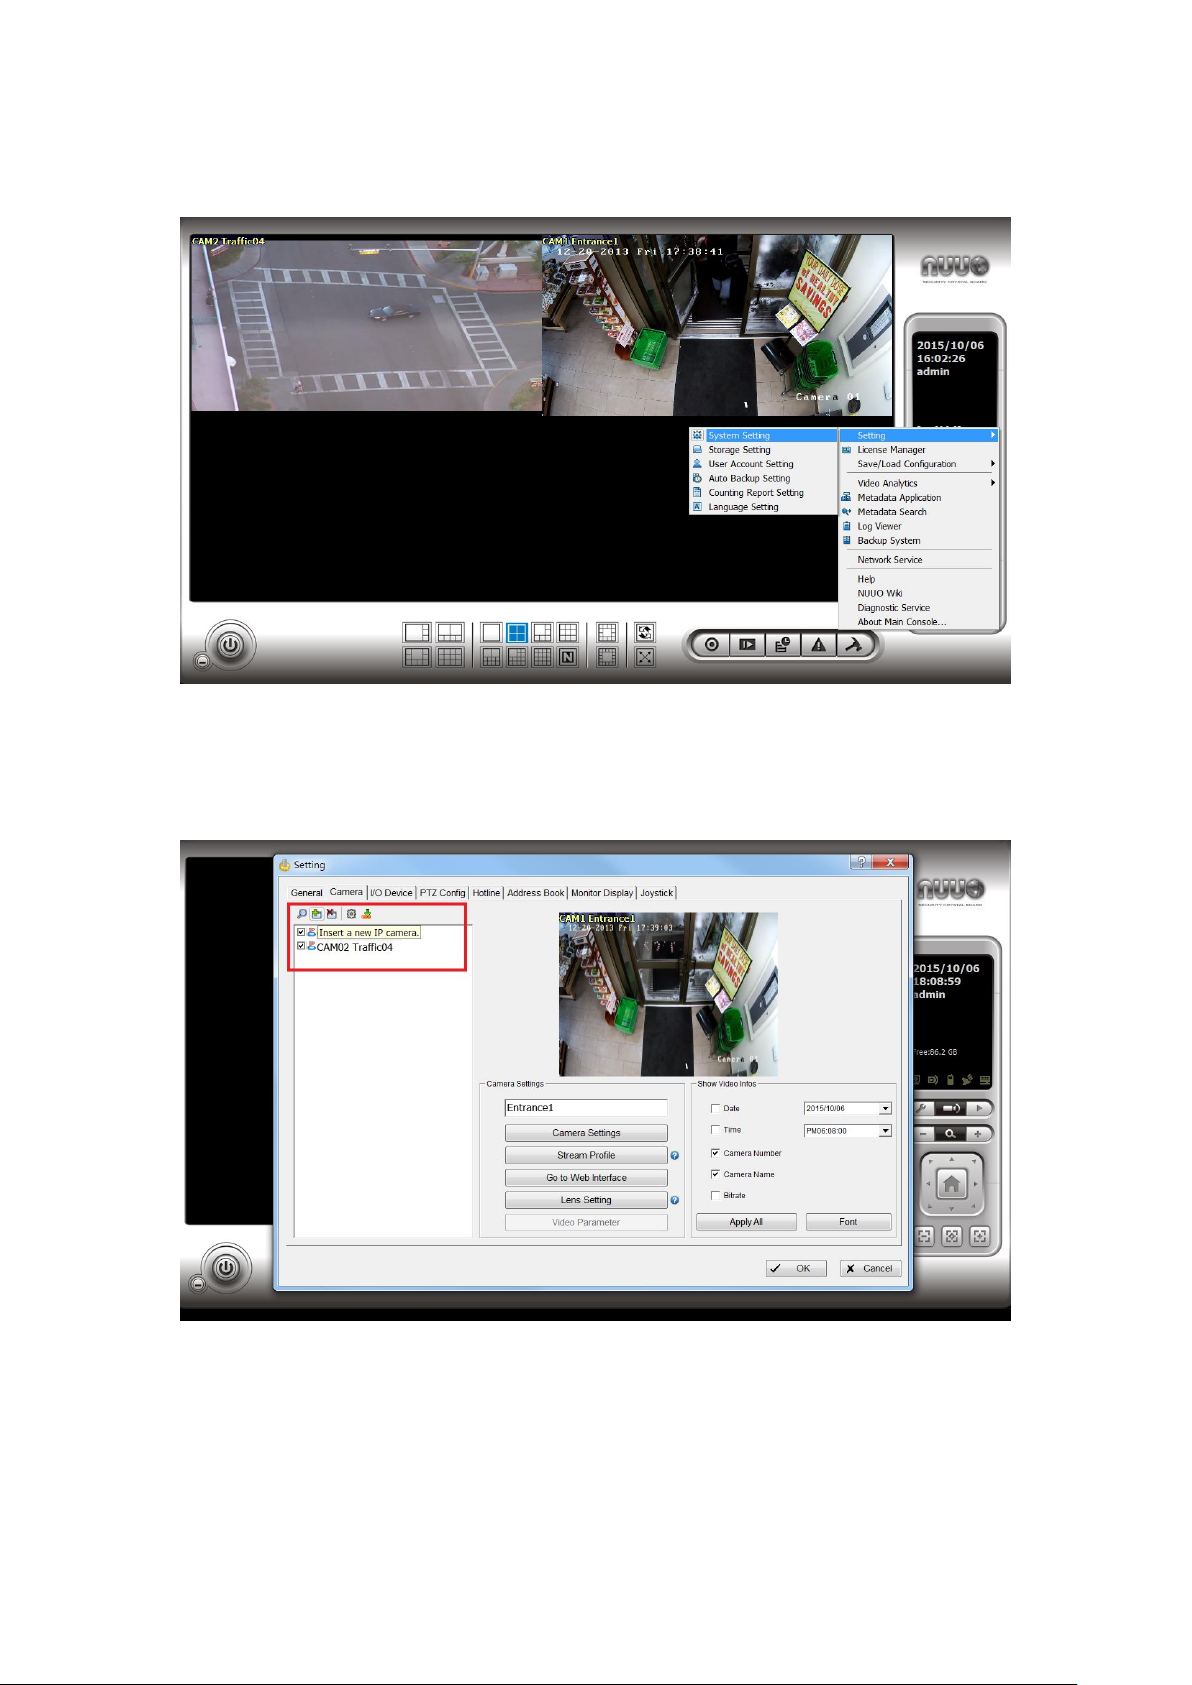
5. Back to Main page,Go to General Setting > Setting > System Setting
6. Select Camera > Insert a new IP camera
Page 22
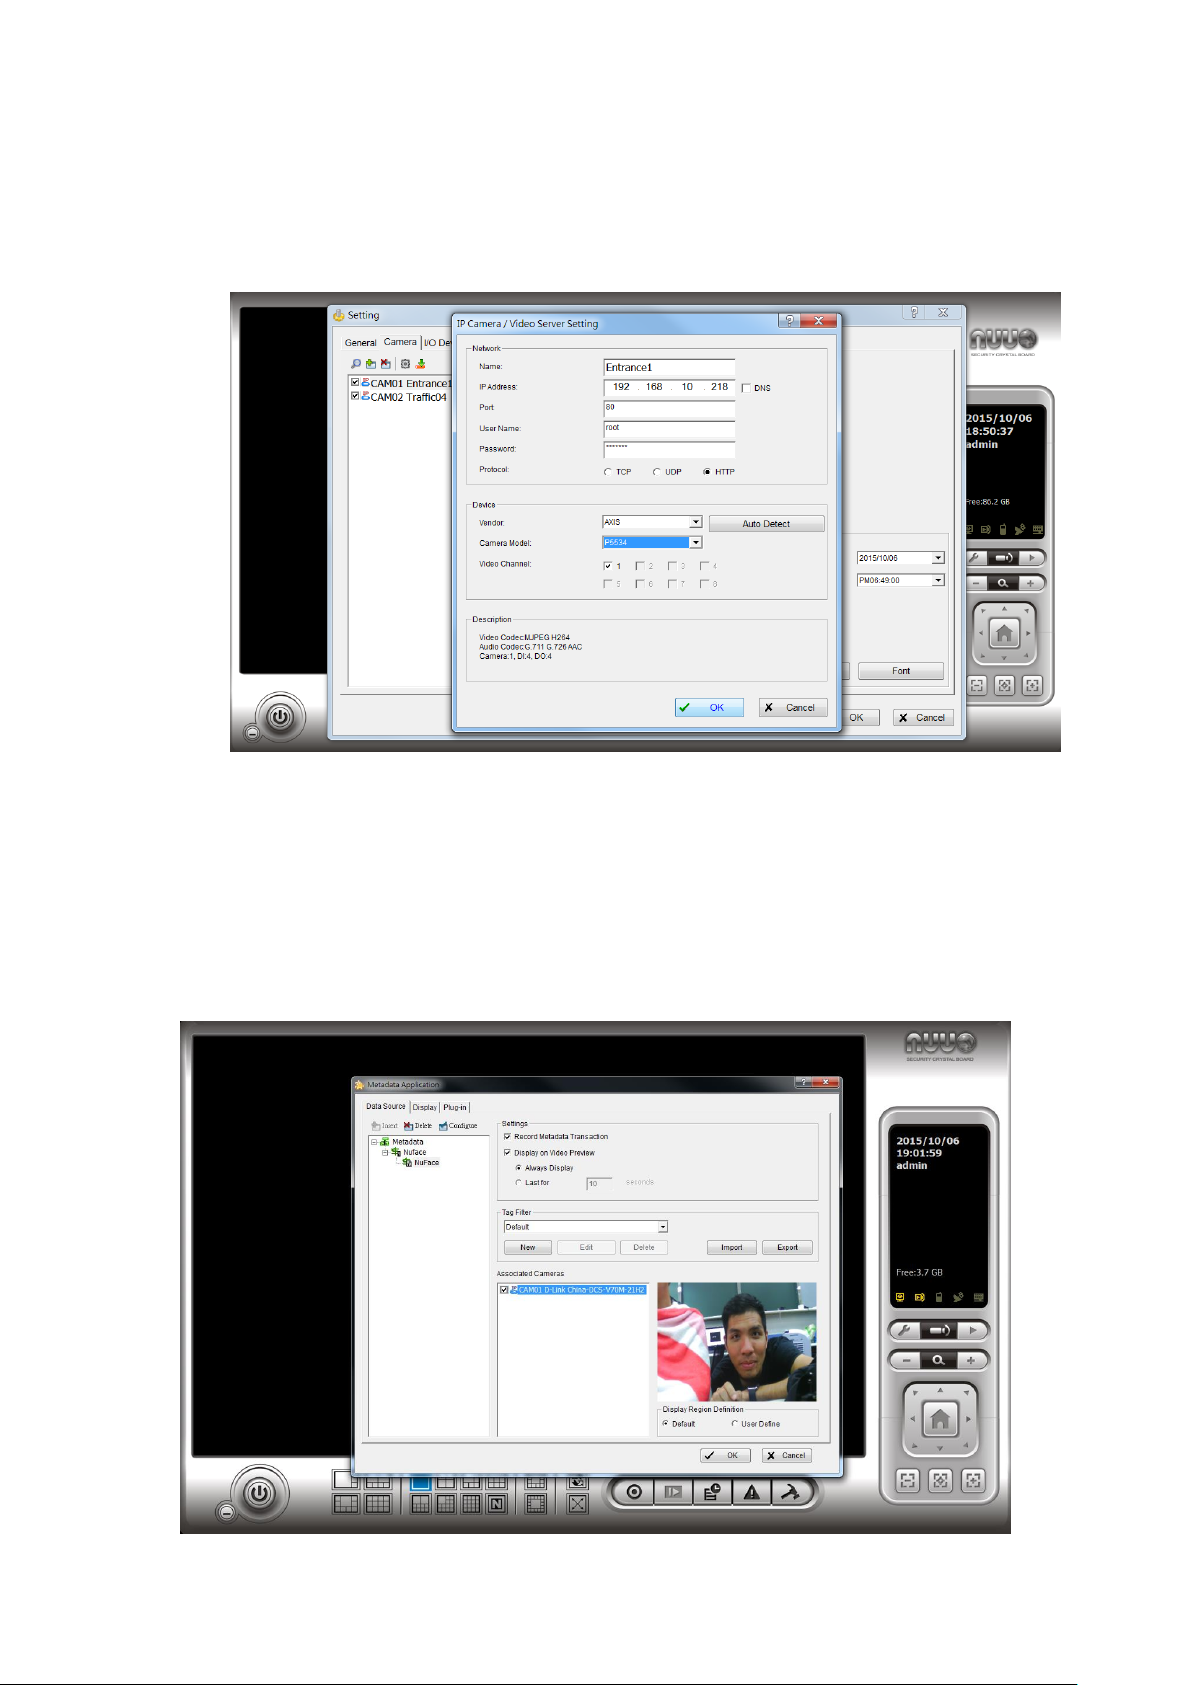
7. Enter IP Cam’s IP address、port、user account、password,customize
name, please also select the IP CAM’s manufacturer and model
name .
8. Go back to Metadata application page,select the IP camera you just
added and choose the Nuface Filter accordingly .
Page 23
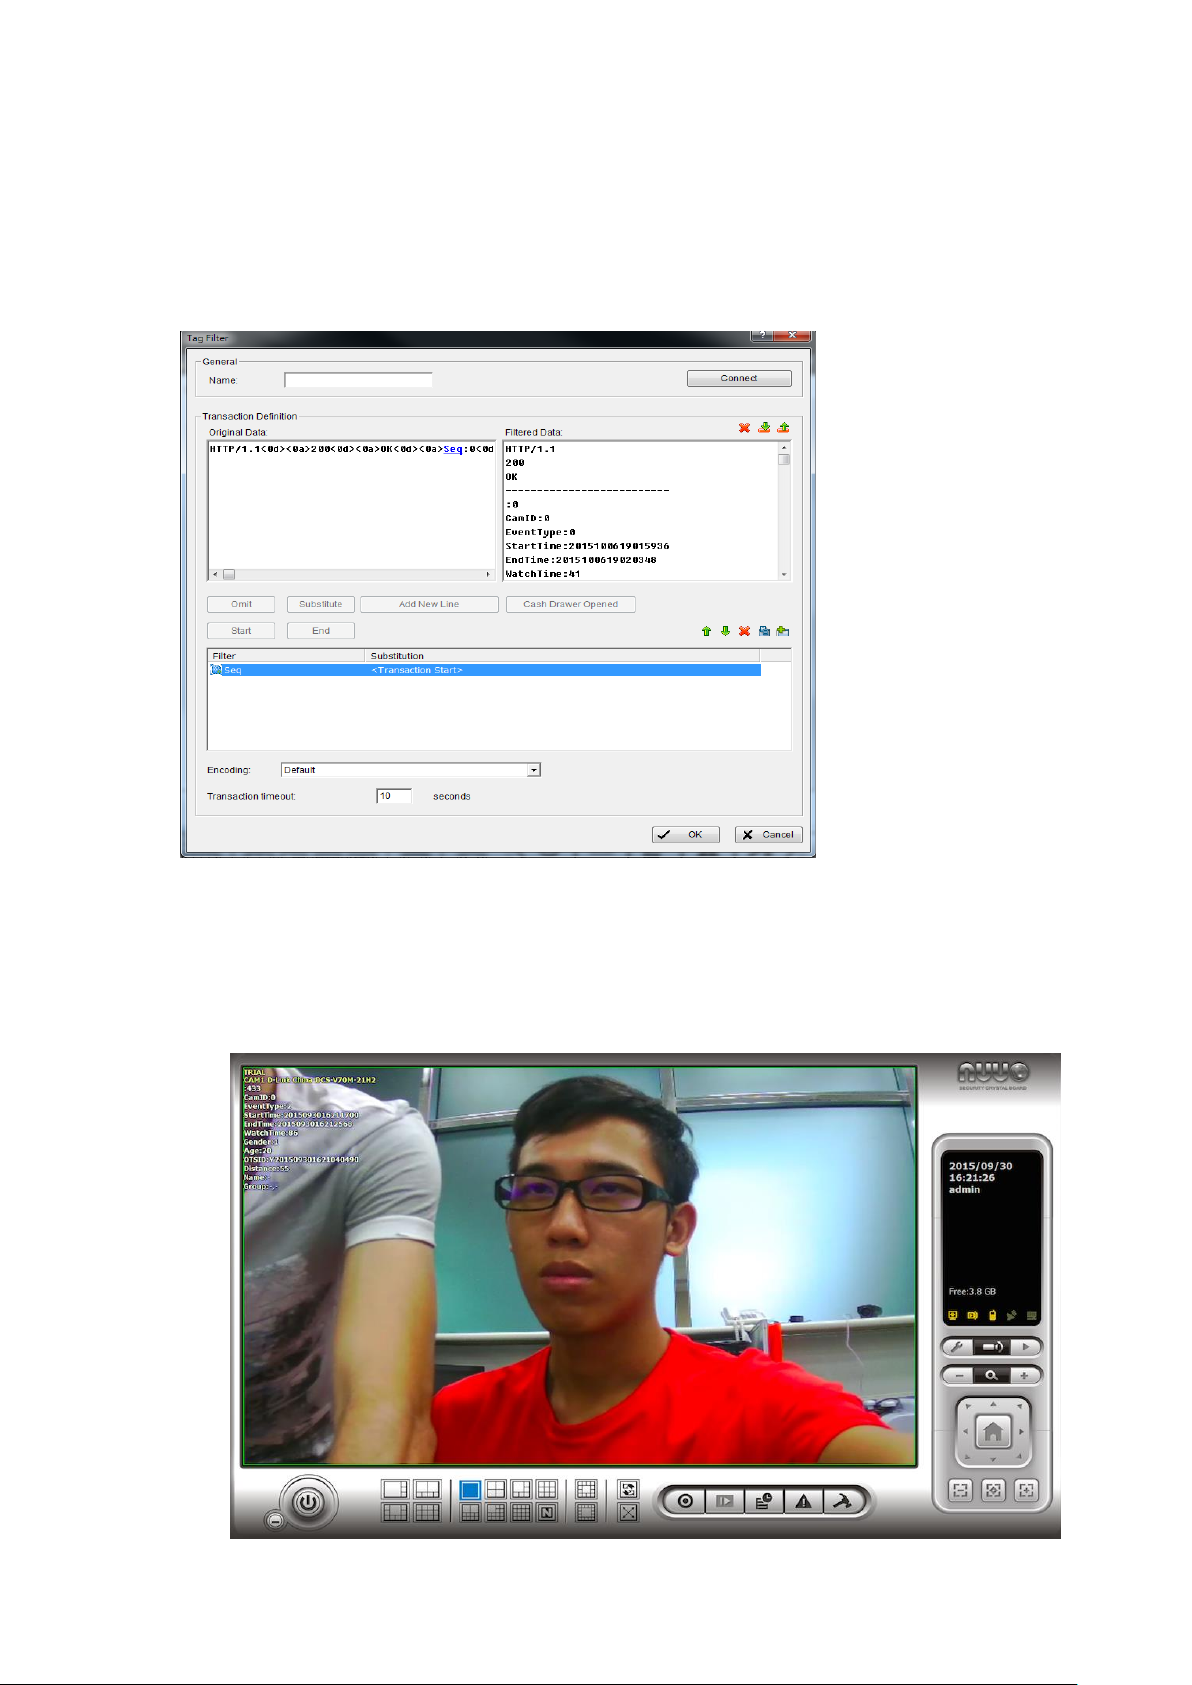
9. Enter a customize name for Nuface,press “ OK” and choose the new
build data filter in the metadata filter list .
10. Go back to Main Page, the Nuface Metadata will show up in the
screen if the link is successful.
Page 24

5. Metadata Connecting Guide (Crystal )
1. Download “NUUO_Nuface_Plugin.zip” from NUUO Website.
2. Upload “NUUO_Nuface_Plugin.zip” to Metadata Server.
3. Click on “Add NuFace” to add new source
4. Go to metadata source > Properties, enter Server IP ( Nuface
software’s IP address ) , the port for NuFace is “4097”, then press
“Connection test” to make sure the connection is alive.
Page 25
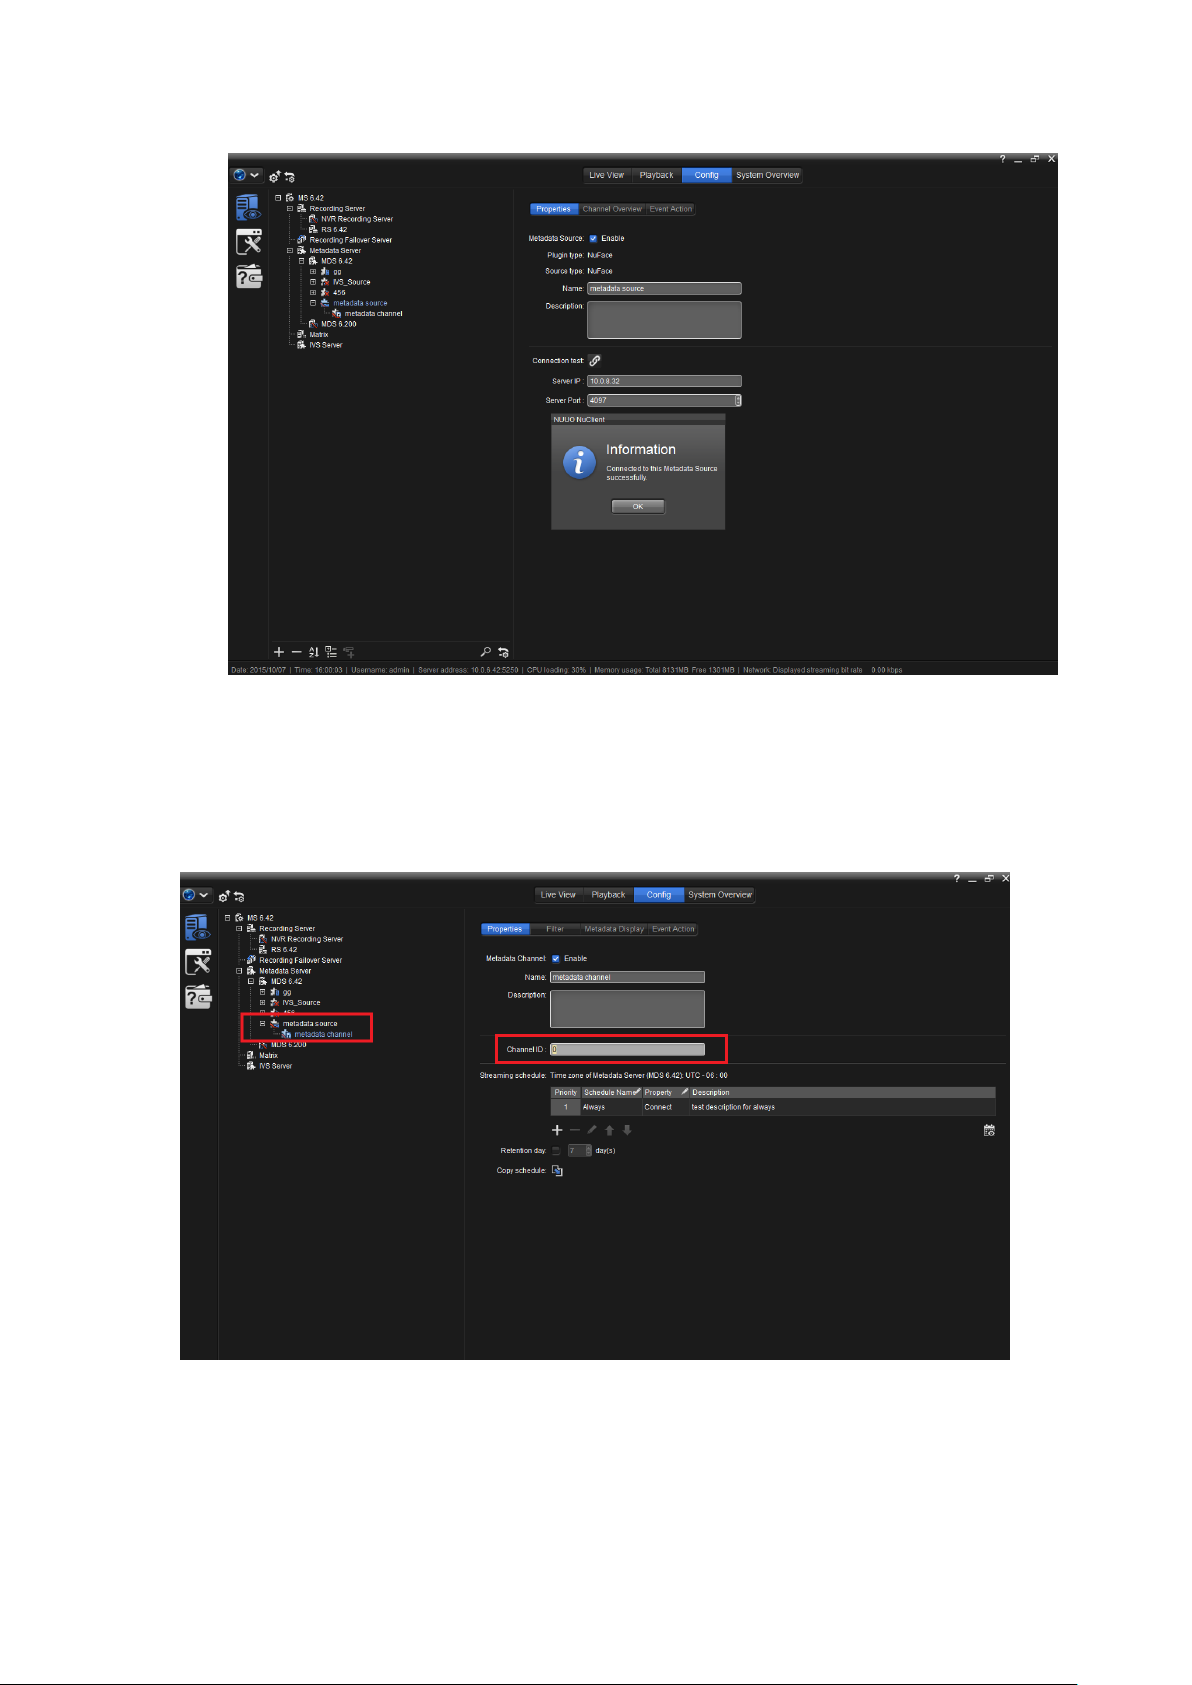
5. Add metadata channel, go to properties and enter Channel ID
accordingly. (Ex : First will be 0 , second will be 1, etc … )
6. Select Camera > Enter IP Cam’s IP address、port、user account、
Page 26

password,customize name, please also select the IP CAM’s
manufacturer and model name .
7. Go back to Metadata application page > Metadata Display,select the
IP camera you just added related to the metadata .
8. Enter a customize name for Nuface,press “ OK” and choose the new
Page 27

build data filter in the metadata filter list .
9. Go back to Main Page, the Nuface Metadata will show up in the
screen if the link is successful.
 Loading...