

User Manual
1

Contents
Welcome to the NUU Mobile X1!
Installing the SIM Card and Powering Up
Controls & Using The Touchscreen
Those Three Buttons
Common Onscreen Buttons
How Do I...?
Initial Configuration
Find An App, Move Apps, Add Widgets
Power On/Off, Wake Up, Unlock, Go To Sleep
Make A Phone Call
Browse The Web
Send Text Messages
Take Pictures
Notifications
FM Radio
Clock
4
5
5
7
8
9
9
11
13
14
15
16
17
18
19
20
Gallery & Photos
People
Bluetooth
Music
The Settings Menu
USB Connections
21
23
24
25
26
31
2
X1 Overview
3

Welcome to the NUU Mobile X1!
Thank you for purchasing a NUU smartphone! We’re proud to have you as a customer
and we think you’ll get a lot of enjoyment and usefulness out of our smartphone.
Your X1 is a carrier-unlocked Android smartphone. Like all smartphones, you can use it
to call, e-mail, video chat, text, use popular apps, and that’s just for starters. Since your
phone is carrier-unlocked, you can use it with any compatiable carrier.
Before you get started using your X1, please keep in mind the following safety tips.
First of all, do not text and drive!
It is unsafe as well as against the law.
Emergency Calls: To make an emergency call, Press the Power button on the top of
the phone and tap “Emergency call” located at the bottom of the screen. Then dial the
emergency number and press the phone-shaped button below the keypad.
Airplane Use: Please follow all instructions from airline staff. Some airlines will allow
phone usage and some will not and it is up to you to listen and learn which.
In Hospitals: Do not use your phone around medical equipment as it may interfere with
sensitive electronics. If in doubt, turn off your phone and ask hospital staff where it is safe
to use your phone.
Chemical Safety: Do not use your phone around chemical fumes, as this may present
a fire or explosion hazard.
Demolitions and Other Explosives: If you encounter a sign that says “Turn off all
radios, explosives in use!”, then you should turn off the phone. Don’t put it to sleep, turn
it off. To be completely safe, remove the battery as well.
Water: Don’t let your phone go for a swim! It’s not waterproof.
NUU Mobile Accessories Only, Please!: If you need a replacement battery or
accessory, please use only NUU Mobile-brand items.
Written Backup: We strongly recommend that you keep a written record of all
important information (eg: your Google credentials and so on) and that you store the
record in a safe, secure place.
4

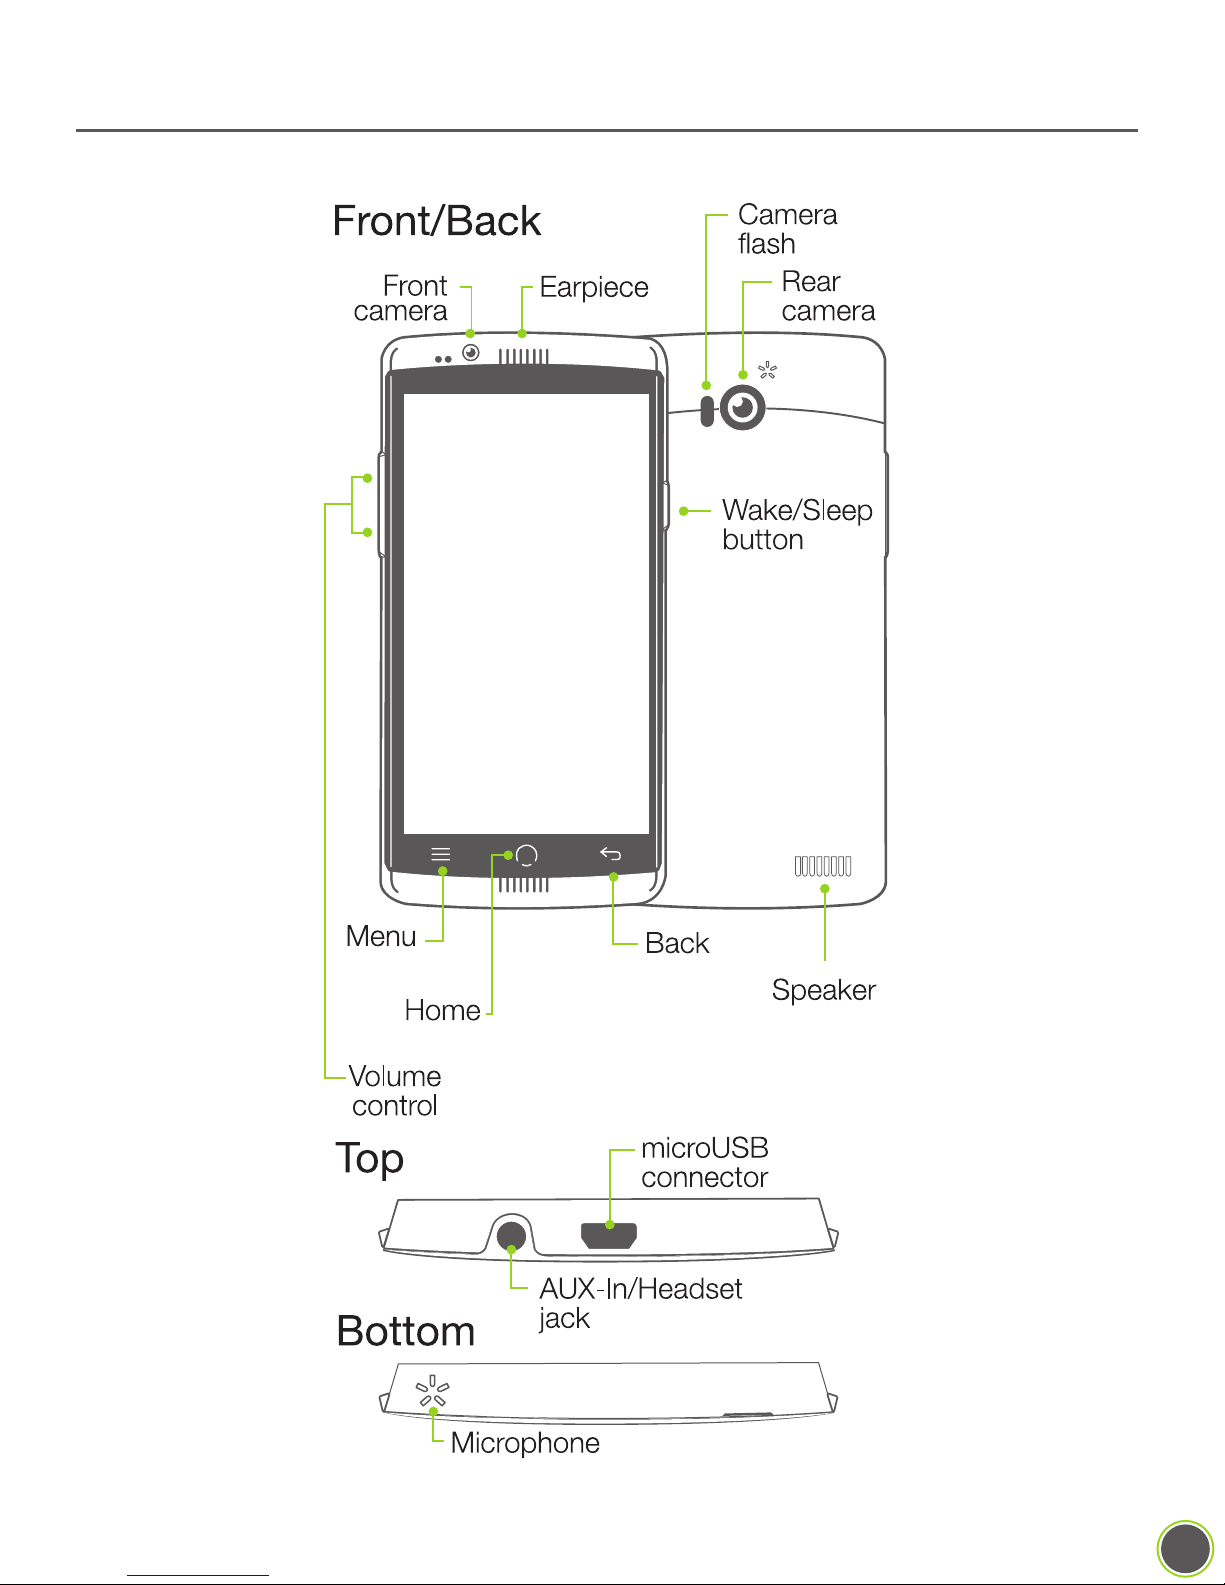
Installing the SIM Card and Powering Up
SIM Card Safety Note: SIM cards are small enough to become a choking hazard,
so please keep them away from children. SIM cards are also quite delicate. Please be
careful when handling your card, and if you need to store the card, we recommend using
a small bottle or a dedicated card-carrier to keep your card safe. (Old film canisters and
empty prescription bottles work well.)
You must insert your SIM card before using your phone!
Power On, Power Off: Inserting or removing a SIM card requires that your phone be
completely off. Here’s how to power your phone on or off.
On: Hold down the power button for a few seconds.
(This is sometimes known as a “long-press”, see Contols & Using The Touchscreen)
Off: Hold down the power button for a few seconds. When you see the menu pop up,
tap the “Power Off” option. Confirm the choice to power off the phone.
Installation:
1: Power off your phone fully.
2: Remove the rear cover and battery.
3: Insert SIM card according to the diagram inside the phone.
4: Re-insert the battery and close the rear cover.
5: Power on your phone.
Controls & Using The Touchscreen
While your X1 smartphone certainly has a number of buttons you can push, you will
control it primarily by using the touchscreen. You may wonder just how many different
ways one can touch a screen, and as it turns out there are a few of them! You’ll find a
handy list of the most common ones below, which includes the name for the gesture and
a description how to perform it.
Important!:
Your phone’s touchscreen is NOT pressure-sensitive, as it instead works
by sensing tiny electrical currents. This means that when you touch the
screen, you only need to make contact, you do not need to apply
pressure. If your fingertips are heavily callused (or if you are wearing
5

non-conductive gloves), the screen may not “hear” you or register your
touches properly. In that case, try a different fingertip or a patch of bare skin.
“Tap”: In some documentation, this may also be referred to as a “touch” or even a
“click”. It’s almost exactly like tapping your finger on a table; aim a single fingertip, touch
it to the screen, and pull it away from the screen. You can have your finger in contact with
the screen for quite a bit before the phone registers it as a “long-press”, so don’t feel like
you have to pull away instantly.
“Double-tap”: Two taps in rapid succession, almost exactly like double-clicking a
mouse, but with your fingertip. Used for different things in different apps, so make sure to
consult the help for that app!
“Long-press”: Sometimes referred to as “hold” or “tap-and-hold” or “touch-and-hold”.
Place your finger on the screen and keep it there. After about a full second, the phone
will recognize this as a long-press and give you some kind of feedback: a menu might
appear, an icon might start shaking, or some element of the interface will change to
indicate that you have the phone’s complete attention.
What makes the long-press a little difficult is that in some apps, removing your finger from
the screen makes your next selection, and in other apps, you’re expected to make a
separate “tap” to select the thing you want after a long-press. This behavior isn’t
constant across all apps so you’ll need to experiment a little with your apps.
“Drag-and-drop”: Sometimes shortened to “drag-n-drop”, “drag”, or “touch, hold, and
drag”. First you long-press something, then once you’ve gotten the visual feedback that
shows that the phone interpreted your long-press, you keep your finger on the screen as
you move it around. When you remove your finger from the screen, you “drop” the item in
question.
The usual example is moving your app icons around. First you long-press the icon in
question until you see it get “picked up” or highlighted somehow, then (keeping your
finger on the screen) you “drag” the icon to its new spot. When you let go, you’ve
“dropped” it. The key part is that a drag-and-drop always starts with a long-press.
“Slide”: Closely related to the drag-and-drop. While a drag-and-drop requires a
long-press at the beginning, a slide does not. Unlocking the phone, answering a call, and
bringing up Google Now all require slide motions, where you slide an on-screen button in
a straight line, with no pause or delay after touching the button.
“Swipe”: A swipe is a gesture that’s just like sliding a playing card across a smooth felt
table. There’s no pause at either end, just a smooth motion. The tricky part of swiping is
what is meant by the term “swipe left” or “swipe right”.
6
In NUU documentation (and Google’s) the direction refers to the way your fingertip goes.
So “swipe left” means your fingertip starts on the right side of the screen and goes to
the left. That swiping left results in the app “jumping to the right” is where the potential
confusion comes from. When in doubt, follow your fingertip!
Swiping is normally used to bring a menu onto the screen, switch between windows, or
other large-scale actions that involve most or all of the screen.
“Two-finger swipe”: Just like a regular swipe, but with two fingertips instead of just
one. Sometimes you’ll even see apps that ask for a three-finger swipe, but this is pretty
rare.
“Pinch”: Sometimes simply referred to as “zoom” and the two terms are often combined into “pinch-to-zoom”. Google sometimes calls it “scale”. This refers to placing two
fingertips on the screen and either pinching them together or spreading them apart to
change the size of something, usually a picture or a web page. Note that you can often
rotate an image with this gesture as well as zoom.
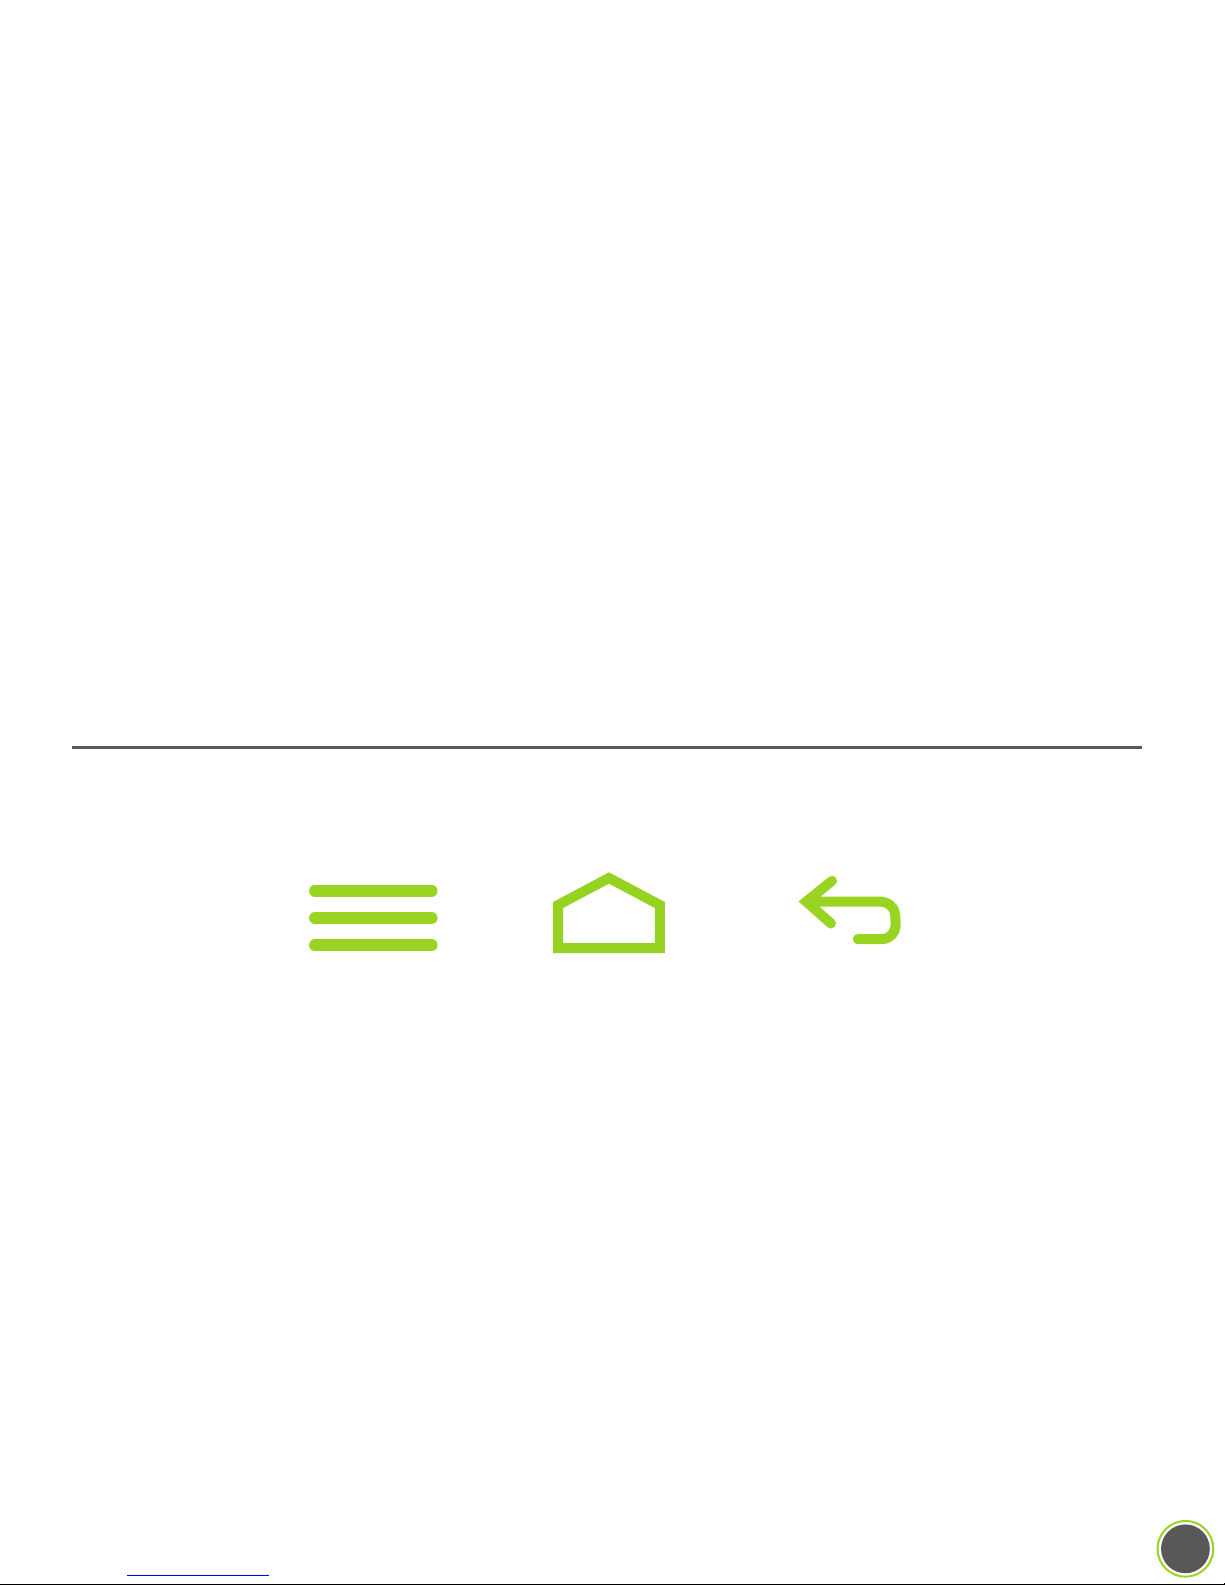
Those Three Buttons
At the bottom of the screen you’ll find three buttons (consult the Button Layout diagram
for their location).
Menu
Here’s what they do.
Menu: As the name suggests, tapping this button brings up a menu. This menu is
context-sensitive, which means that it will do different things depending on what app you
have loaded. At the basic Home screen, it will let you do things like manage your apps,
change your system settings, select a wallpaper, or place widgets. In another app,
Pandora as an example, pressing Menu lets you change stations or share your current
song. It’s different for every app. Don’t be afraid to experiment, as Menu will often bring
up helpful settings that aren’t immediately obvious!
BackHome
Home: The Home button has two main functions. Tapping the Home button will always
take you back to your Home screen, the “center” screen in the pages of icons you can
have on your phone. If you’re lost, tap Home and you’ll be taken back to familiar territory!
7

Long-pressing the Home button, however, brings up the “Recent Apps” menu. This is
a vertical list of apps that are currently active. You can slide the list up and down to see
the whole list. Slide an app’s picture off the screen (left or right works) to make it inactive.
This is often referred to as “killing” or “force-quitting” an app, and it’s a useful thing to
know as doing so can solve many problems with a misbehaving app!
Back: This does exactly what its name suggests; it takes you back one step. If you
called up a sub-menu, for example, and wanted to go back to the previous menu, just
tap the Back button one time to do that. If you tap Back enough times, you will eventually work all the way to your Home screen, so this is another way of getting back to familiar
territory if you’re lost.
Common Onscreen Buttons
“Drawer”: This button is used to access a general menu in a particular app. In
Google Maps, for example, it lets you switch between map and satellite view,
among other things. In GMail, the Drawer allows you to switch between folders. If
your app has a Drawer button, you should familiarize yourself with the options it
presents. Sometimes the Drawer is also referred to as: “options” or “hamburger”
or, confusingly, “menu”.
“Share”: Pressing “Share” allows you to send the content of your current app
to someone else. For example, when looking at the details for an app in the
Play Store, using the Share button allows you to send a link to that app by e-mail,
Bluetooth, MMS, or in a variety of other ways. The same thing can be done in the
Contacts app and other places. Sometimes this button is referred to as: “Send” or
“Send Using...”.
“Overflow”: The official name is both “Menu” and “Overflow”, but NUU
documentation uses “Overflow” to avoid confusion. Sometimes also known as
“options” or “the stoplight”. Whatever its name, this button brings up options
relevant to the current screen. If you were looking at a Contact card, for example,
“Overflow” would allow you to edit, delete, share, or set the ringtone for that
contact only. “Overflow” provides access to your bookmarks and other settings in
the Google Chrome app.
8
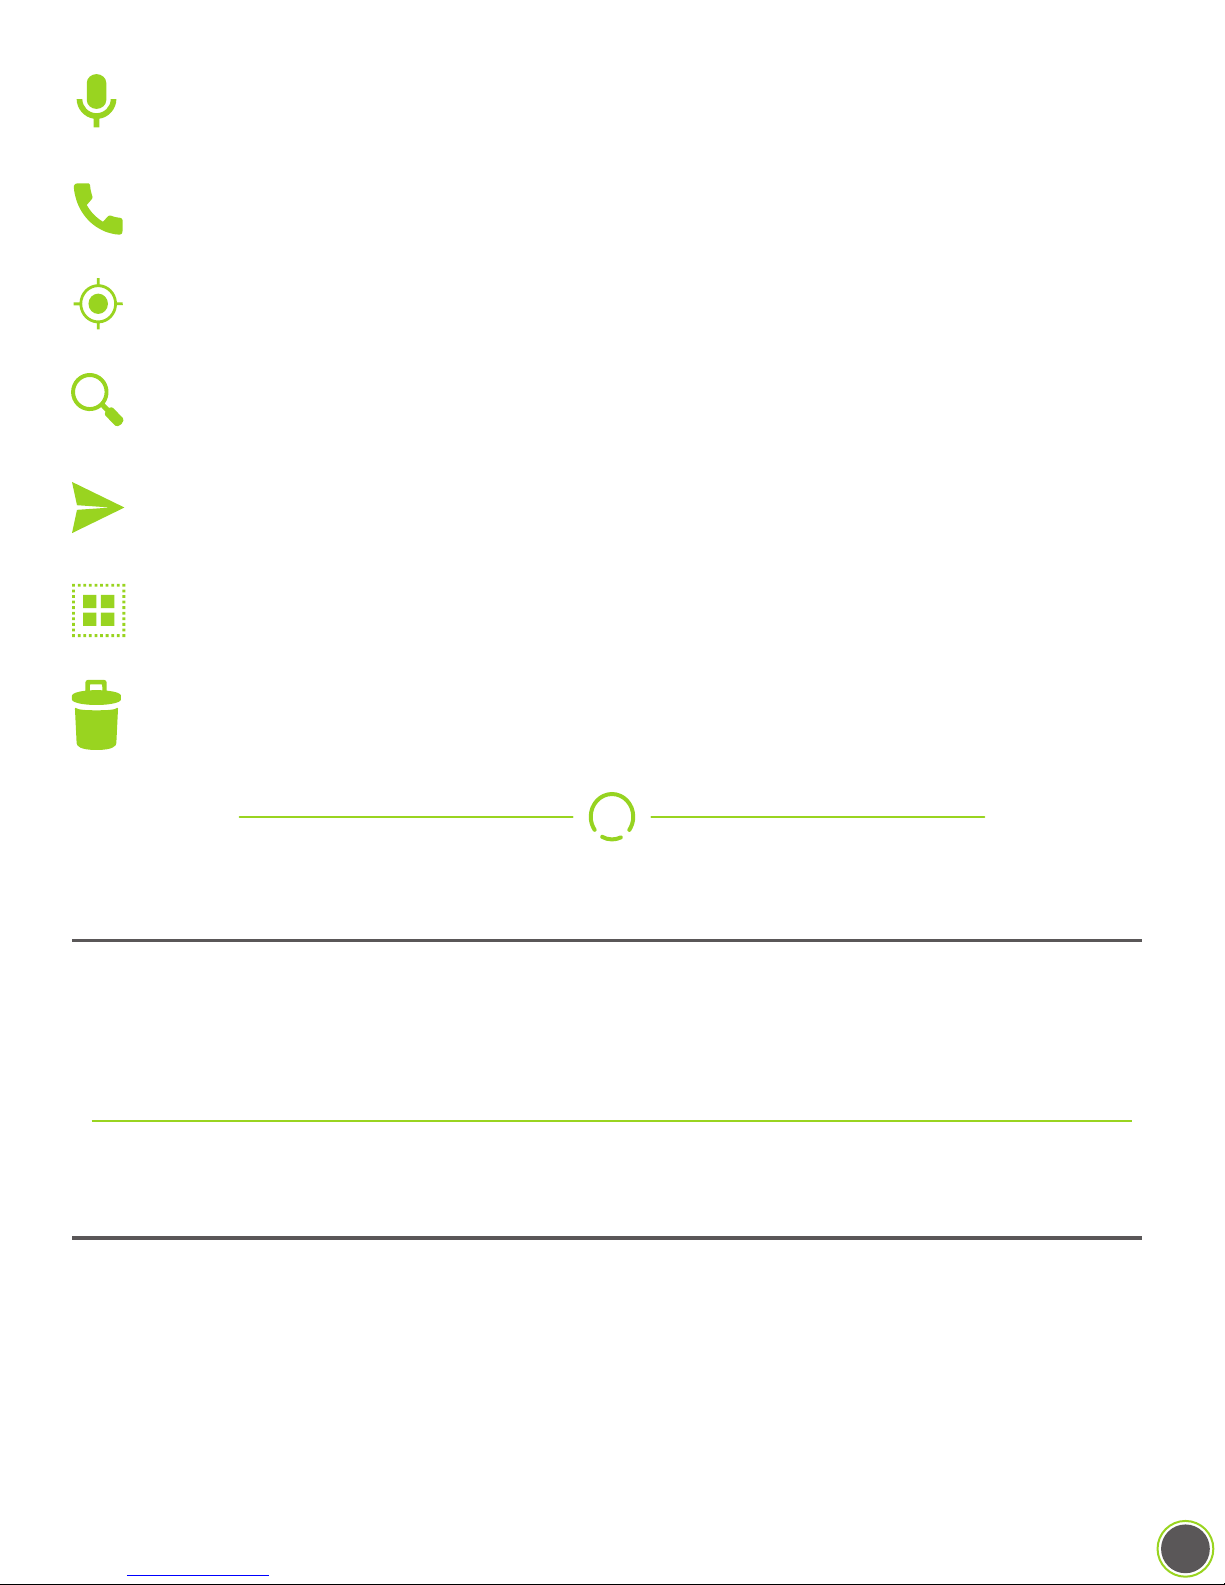
“Microphone”: Used for Google Now, OK Google, and voice-recognition. Tap
the microphone and then speak when prompted.
“Call”: Dials the number entered on the keypad, or if you are looking at a contact
page, dials the preferred number for that contact.
“Locate”: Most often found in mapping software, tapping this centers the map
on your location if it was not already.
“Search”: This magnifying-glass icon, when tapped, activates the search function
for whatever app you are using.
“Send”: Most often seen in e-mail apps, this sends the current message to its
recipient.
“Select All”: Not encountered often, but rarely labeled. Selects every single item
in a checklist.
“Trash”: Destroys the currently-selected item. There is usually no un-delete, so
be careful!
How Do I...?
In the following pages you’ll find short introductions to the things you can do with a
smartphone. These are not as in-depth as you’d find in the official Android User Guide
from Google, as they’re meant to get you started.
Initial Configuration
The very first time you power on your phone, you’ll have to go through the initial setup.
It’s not too difficult, but you will have a fair amount of account information to enter, namely
your Google credentials. Here is the general order of events:
9
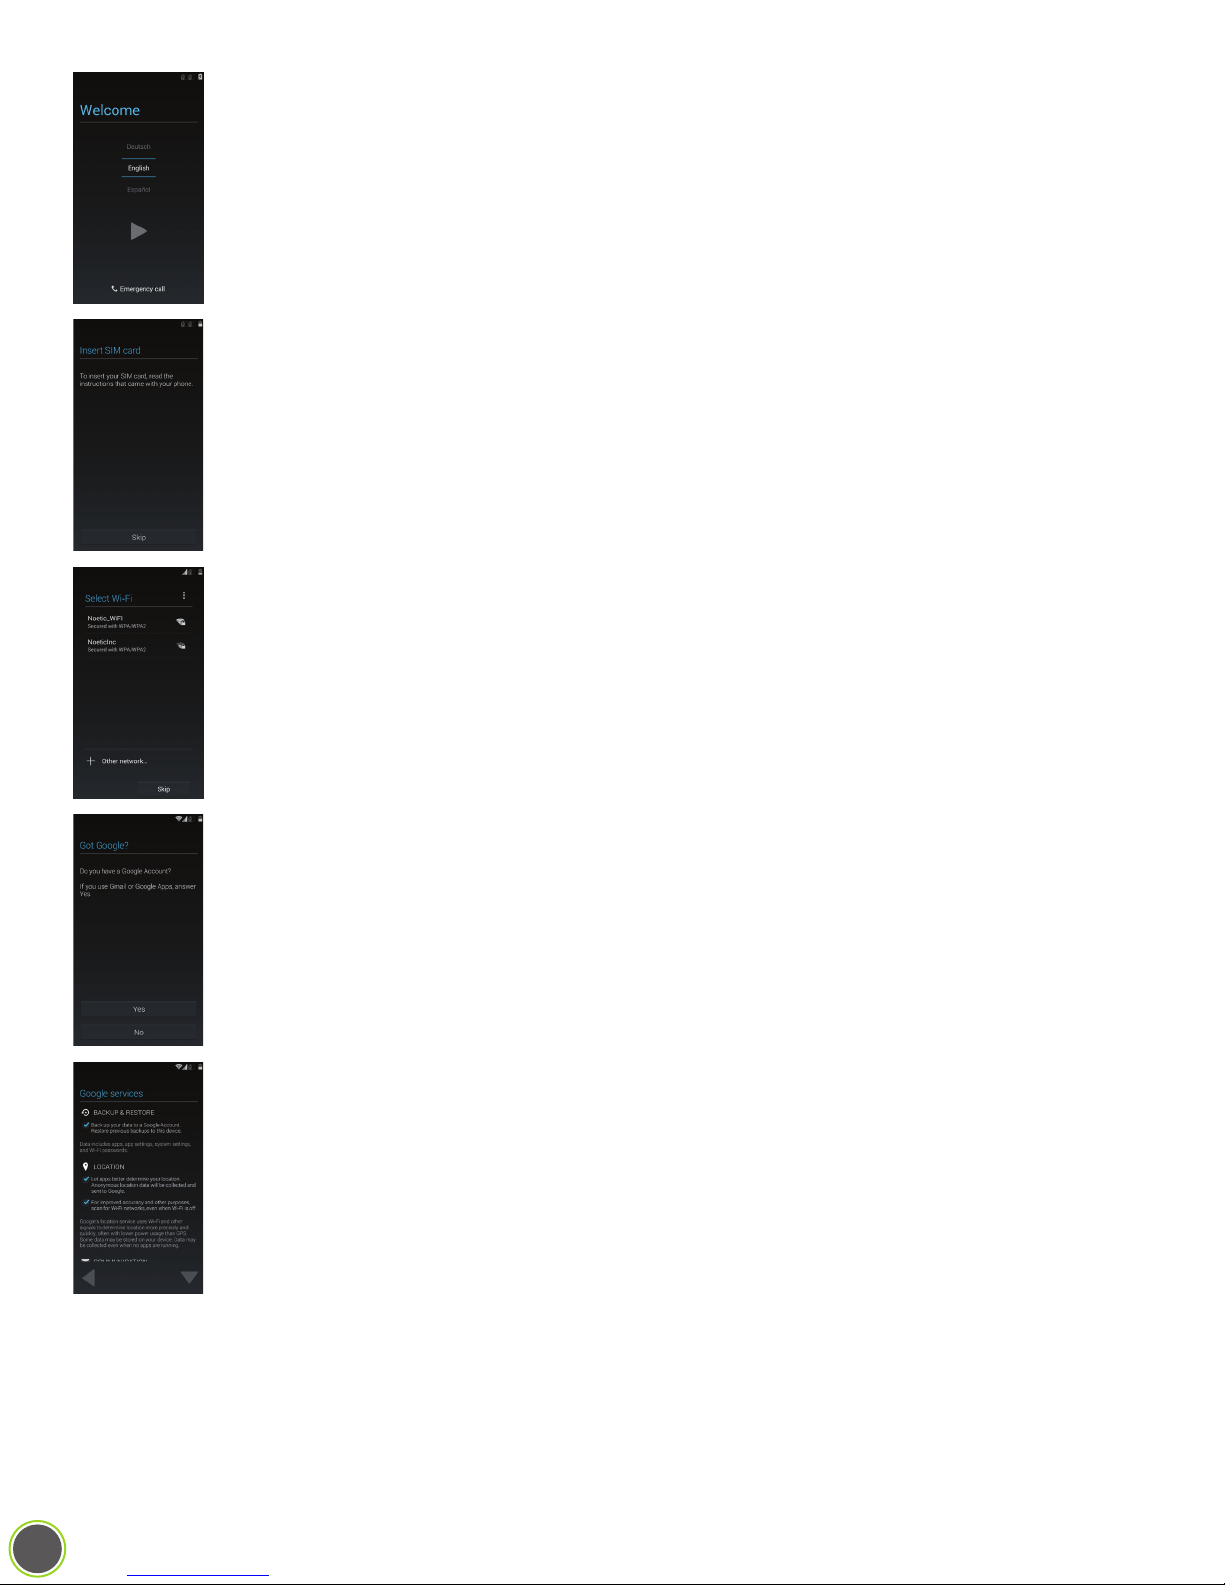
Welcome Screen: Pick your language by swiping up and down and
pressing the > (or START) button.
Insert SIM Card: Pops up if there’s no SIM installed. You can skip this
screen.
Connect to WiFi: If you’re in range of a trusted Wi-Fi hotspot, configure
it and connect to it here.
Google Account: In these next screens, you have the option of skipping
them entirely or filling out your Google account credentials, or even making
a new Google account if you’ve never had one. Regardless you will at
some point need a Google account, as they are necessary to use the
Play Store and get apps and app updates.
If you sign in or create a Google account here, you will also be presented
with a list of checkboxes to check or uncheck. These concern how
Google backs up your data, how it determines your location, and whether
or not you receive e-mail from them.
Generally it is best to leave these all checked to provide a smooth
experience.
10
 Loading...