

Page 1
USER GUIDE
PUREPOWER SERIES
CENTRAL VACUUM
POWER UNITS
PP5501, PP6501 & PP7001
AB0039
! !
FOR RESIDENTIAL USE ONLY
BROAN-NUTONE LLC; HARTFORD, WISCONSIN
.NUTONE.COM 1-888-336-3948
WWW
REGISTER YOUR PRODUCT ONLINE AT: WWW.NUTONE.COM/REGISTER
MODELS SFDB-DQ, SFDB-DR AND SFDB-DS
24011 rev. B
Page 2

IMPORTANT SAFETY INSTRUCTIONS
SAVE THESE INSTRUCTIONS
READ ALL INSTRUCTIONS BEFORE USING THIS APPLIANCE
When using an electrical appliance, basic precautions should always be
followed, including the following:
WARNING
!
To reduce the risk of fire, electric
shock or injury:
1. Do not use on wet surfaces or outdoors.
2. Do not vacuum liquids or fine powders
(such as drywall dust).
3. Do not use to pick up flammable or
combustible liquids such as gasoline or
use in areas where they may be present.
4. Do not pick up anything that is burning or
smoking, such as cigarettes, matches, or
hot ashes.
5. Do not allow to be used as a toy. Close
attention is necessary when used by or
near children.
6. Use only as described in this manual.
Use only manufacturer's recommended
attachments.
7. Keep hair, loose clothing, fingers and all
parts of body away from openings and
moving parts.
8. Turn off all controls before unplugging.
9. Use extra care when cleaning on stairs.
10. Do not handle plug or appliance with wet
hands.
11. Do not use with damaged cord or plug.
If appliance is not working as it should,
if it has been dropped, damaged, left
outdoors, or dropped into water, return it
to a Service Center.
12. Keep your work area well lighted.
13. Connect to a properly grounded outlet
only. See grounding instructions shown
on page 3.
TABLE OF CONTENTS
14. When performing installation, servicing
or cleaning the unit, it is recommended
to wear safety glasses and gloves.
CAUTION
1. Do not put any object into openings. Do
not use with any opening blocked; keep
free of dust, lint, hair and anything that
may reduce air flow.
2. Ensure air flows freely and exhausts
unobstructed from top or side outlet.
3. Do not use without filter (or filters,
according to the model) in place.
4. Do not use to blow leaves or debris.
5. Do not place any object on top of the unit.
6. Do not install the unit horizontally.
7. Do not use the pail as a wash bucket.
8. Do not use the pail as a stool.
9. Avoid picking up sharp objects.
10. This appliance is for use on a standard
120 VAC, dedicated 20-amp minimum
branch circuit.
11. Do not unplug the unit by pulling on cord.
To unplug, grasp the plug, not the cord.
12. Store your vacuum cleaner indoors in
a clean, dry area, away from extreme
temperatures.
13. Any servicing other than that
recommended in this manual should
be performed by an authorized service
facility.
14. We recommend that your unit be
inspected by a specialized technician
once a year.
GROUNDING INSTRUCTIONS . . . . 3
OPERATION & MAINTENANCE . .4-7
WHEN TO CHANGE BAG
OR EMPTY DEBRIS PAIL . . . . . . . . . . . . . . . 4
HOW TO EMPTY DEBRIS PAIL (PP6501 AND
PP7001 POWER UNITS ONLY) . . . . . . . . . . 4
DISPOSABLE BAG REPLACEMENT
(MODEL 395) . . . . . . . . . . . . . . . . . . . . . 4
SEALED HEPA PERMANENT FILTER
(PP6501 AND PP7001 POWER UNITS ONLY) 5
R
EMOVAL & INSTALLATION OF PERMANENT FILTER
(PP6501 & PP7001 POWER UNITS ONLY) . 5
MOTOR FOAM FILTER (ALL UNITS) . . . . . . . . 6
REMOVAL & INSTALLATION OF SECONDARY
HEPA FILTER (PP7001 POWER UNIT ONLY) 7
SERVICE PARTS . . . . . . . . . . . . . .8-9
TROUBLESHOOTING GUIDE . . 10-11
WARRANTY . . . . . . . . . . . . . . . . . . 12
2
Page 3
GROUNDING INSTRUCTIONS
!
WARNING
Improper connection of the equipment-grounding conductor can result in
a risk of electric shock. Check with a qualified electrician or service person
if you are in doubt as to whether the outlet is properly grounded. Do not
modify the plug provided with the appliance – if it will not fit the outlet, have
a proper outlet installed by a qualified electrician.
Grounding Instructions – This appliance must be grounded. If it should malfunction or break
down, grounding provides a path of least resistance for electric current, to reduce the risk
of electric shock. This appliance is equipped with a cord having an equipment-grounding
conductor and grounding plug. The plug must be plugged into an appropriate outlet that is
properly installed and grounded in accordance with all local codes and ordinances.
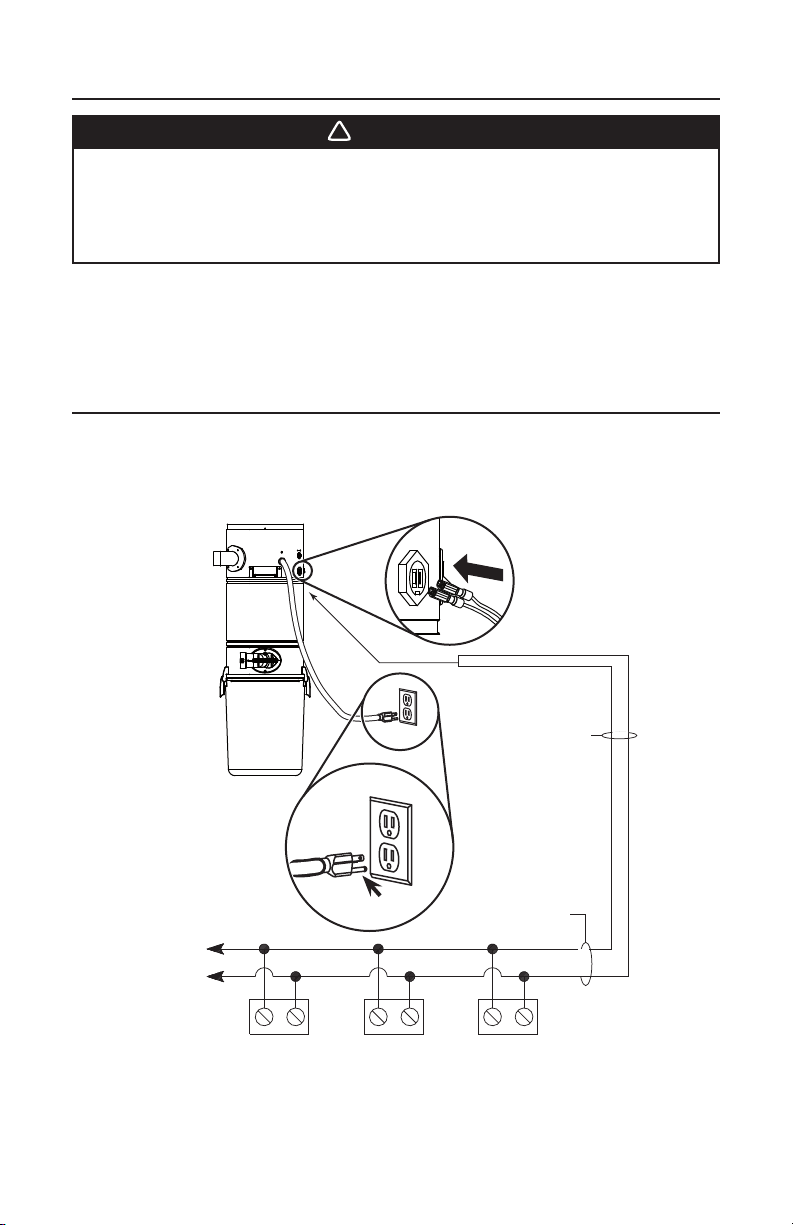
WIRING
This appliance is for use on a standard 120 VAC, minimum dedicated 20-amp branch circuit
with a NEMA 5-15R receptacle. Make sure that the power unit is connected to an outlet
and has a grounding attachment plug that looks like the plug shown in illustration below. No
adapter should be used with this power unit.
CRIMP
CONNECTORS TO
BE CONNECTED
IN LOW VO LTAG E
TABS
GROUNDED OUTLETS
INLET LEADS
GROUNDING PIN
TO
OTHER
INLETS
AE0044
INLET
NOTE: Inlet leads to be connected to power unit low voltage tabs using crimp connectors
(included in parts bag) and low voltage harness.
INLET INLET
3
MODEL 376-UL
(18/2) LOW VO LTAGE
WIRE
Page 4
OPERATION AND MAINTENANCE
Open the inlet cover and insert the end of the hose into the inlet to turn on the vacuum.
For non-switched hoses, inserting the hose automatically turns on the power unit; removing
the hose shuts off the power unit. Some hoses have switches which can be used to activate
power unit. Unless using the utility valve (PP7001 unit only) the ON/OFF switch located on
the power unit needs to be kept in the OFF position.
As you vacuum, dirt and dust are carried to the power unit where they remain in a bag or in
the debris pail (according to the power unit model).
Use the cleaning tools as you would for any other vacuum cleaner. Avoid picking up very large
debris or lengthy as these kinds of objects may become lodged in the hose or tubing.
WHEN TO CHANGE BAG OR EMPTY DEBRIS PAIL
With a 6 U.S. gallons capacity, under normal conditions the bag/debris pail requires changing/
emptying approximately twice a year. If the bag/debris pail is full, you will notice a reduced
suction from the system. Unless this loss of suction is caused by a blockage in the system,
changing the bag or emptying the debris pail will solve the problem.
NOTE: Even if not filled to capacity, if the bag seems tightly stretched when removing the
debris pail, changing the bag will prevent it from tearing.
HOW TO EMPTY DEBRIS PAIL
(PP6501 AND PP7001 POWER UNITS ONLY)
To empty the debris pail, release both latches on sides of the unit by pulling out and then
pushing up. Holding the pail by the latches, lower it from unit. Carry pail to trash receptacle
and dispose of debris. Put the pail back in its place.
DISPOSABLE BAG REPLACEMENT (MODEL 391)
To remove the disposable bag, release both latches on sides of the unit by pulling out and
then pushing up. Remove the pail from unit. Grasp the edges of the bag collar and pull
down. The bag will slide off easily. Do not pull on the bag.
Unfold the new bag.
Grasp collar where indicated on the new bag and insert over bag adapter. Be careful not
to tear the bag. Ensure the collar is positioned between the taper ring and the bag stopper
on the bag adapter (see illustration below). Put the pail back in its place.
TAPER RING
DISPOSABLE BAG
MODEL 391
AO0081
BAG STOPPER
4
Page 5
OPERATION AND MAINTENANCE (CONT’D)
SEALED HEPA PERMANENT FILTER
(PP6501 AND PP7001 POWER UNITS ONLY)
This filter protects the motor and stops small particles from escaping to the outside of the
power unit without the need to replace it. The filter cleans itself by moving up when the power
unit starts, and dropping down when the unit is turned off. Under normal use, there is no need
to maintain this filter. It is possible to remove it to inspect the foam motor filter, or to replace it
if ever it has been damaged (by sharp debris, for example).
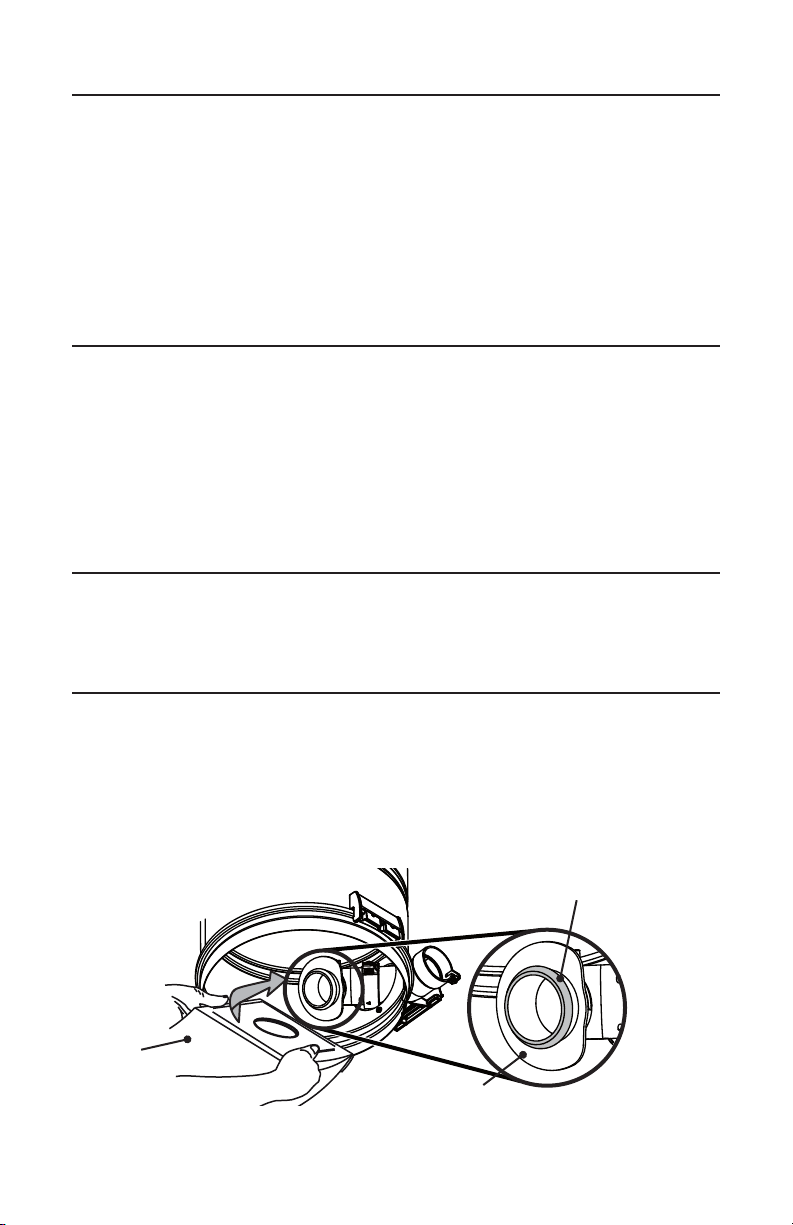
REMOVAL AND INSTALLATION OF SEALED HEPA PERMANENT
FILTER (PP6501 AND PP7001 POWER UNITS ONLY)
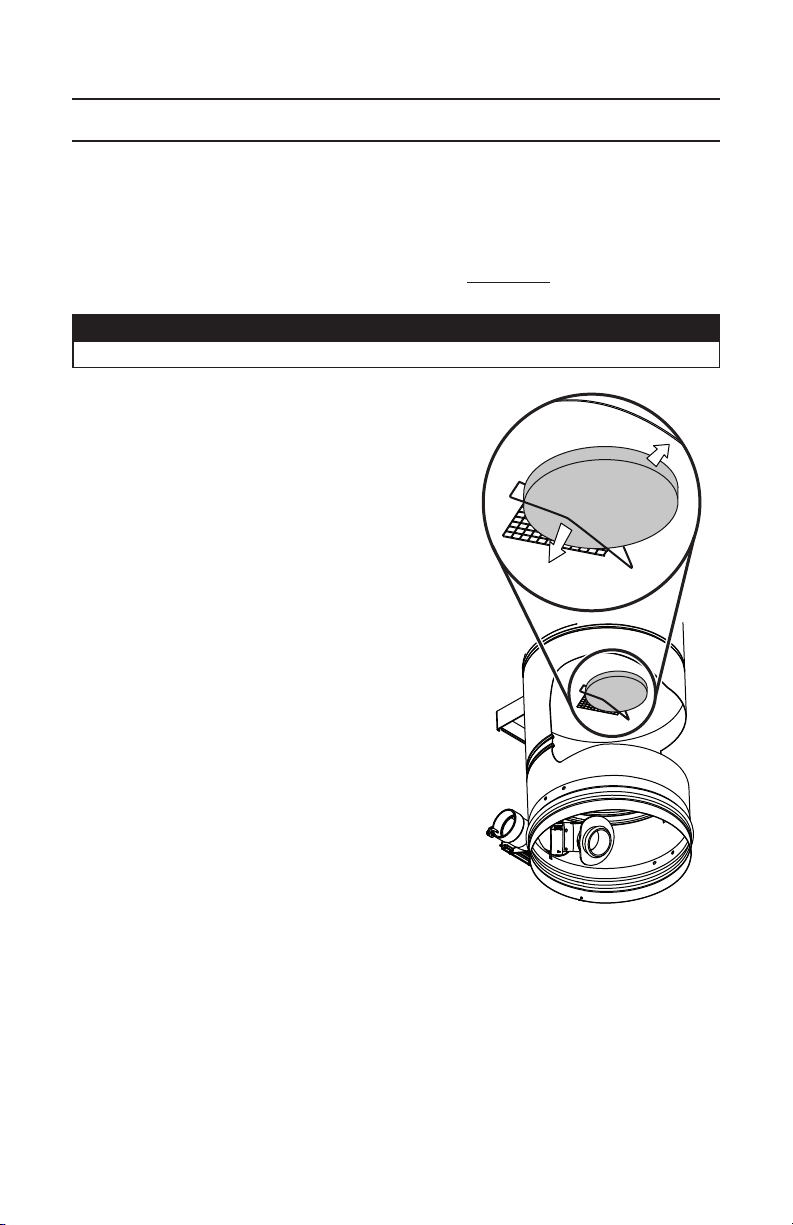
To remove:
Remove the pail from the unit. To remove the
permanent filter, use pull tab (A) located on edge of
filter to pull and loosen filter from inlet chamber wall.
Squeeze from both sides of the filter to the center of
the housing (see illustration at right). Then, carefully
remove it from the unit.
AD0084
To reinstall:
Squeeze the filter in order to move it past the inlet
opening (B) (see illustration at right). Let the filter bear
against the unit wall by releasing the pressure. Make
sure to place the rigid ring in its groove to ensure
proper sealing.
A
B
AD0085
NOTE: Make sure the filter is installed so that the
pull tab (A) is accessible for future filter removal.
A
AA0005
CAUTION
Be sure to reinstall filter properly. Appropriate location is critical to insure
proper protection of the motor.
5
Page 6
OPERATION AND MAINTENANCE (CONT’D)
FOAM MOTOR FILTER (ALL UNITS)
A foam motor safety filter, located at the top of the vacuum chamber provides protection
against dirt being pulled into the motor if the disposable bag or sealed HEPA permanent filter
should accidentally be torn. This filter should be checked and cleaned if necessary when
replacement bag is installed, or when sealed HEPA permanent filter is removed (PP6501 and
PP7001 units only). Simply brush filter clean. If the filter is excessively soiled, hand wash in
a water and mild detergent solution, rinse and let it dry completely on a flat surface before
reinstalling.
CAUTION
Operating the power unit without the foam motor filter will void the warranty.
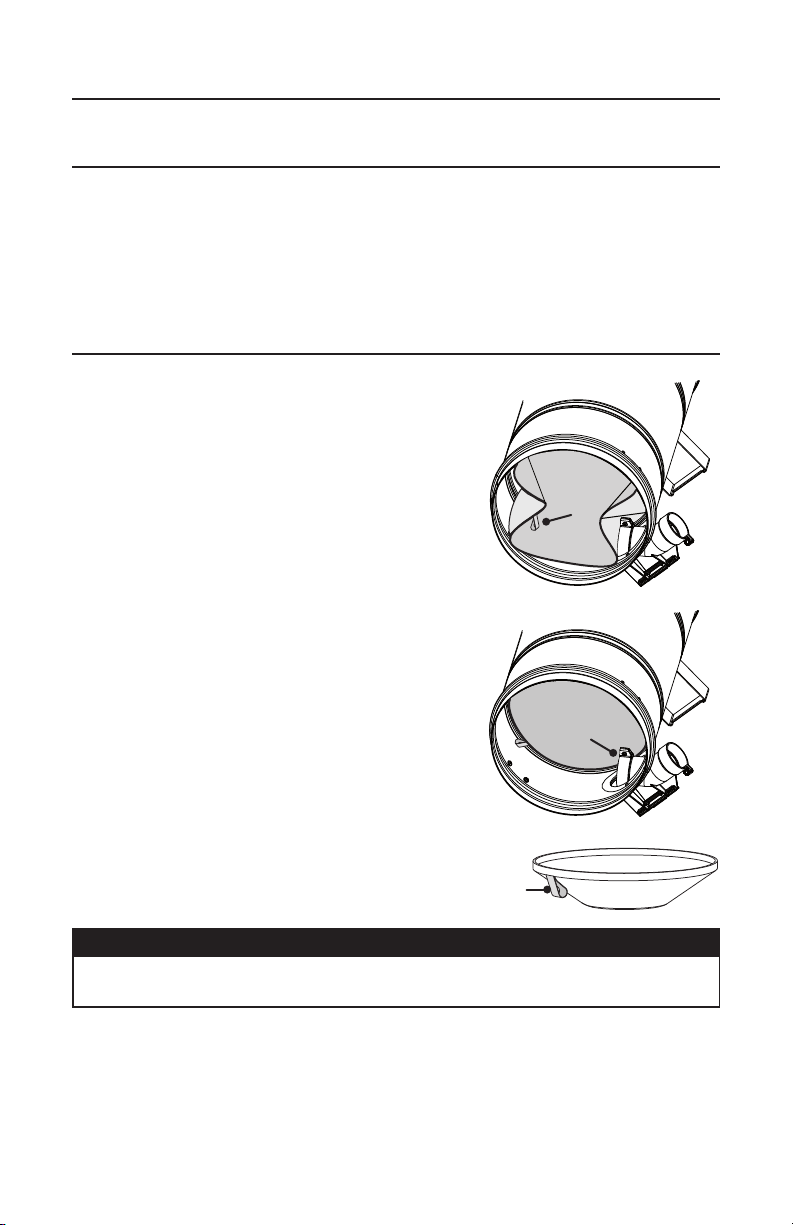
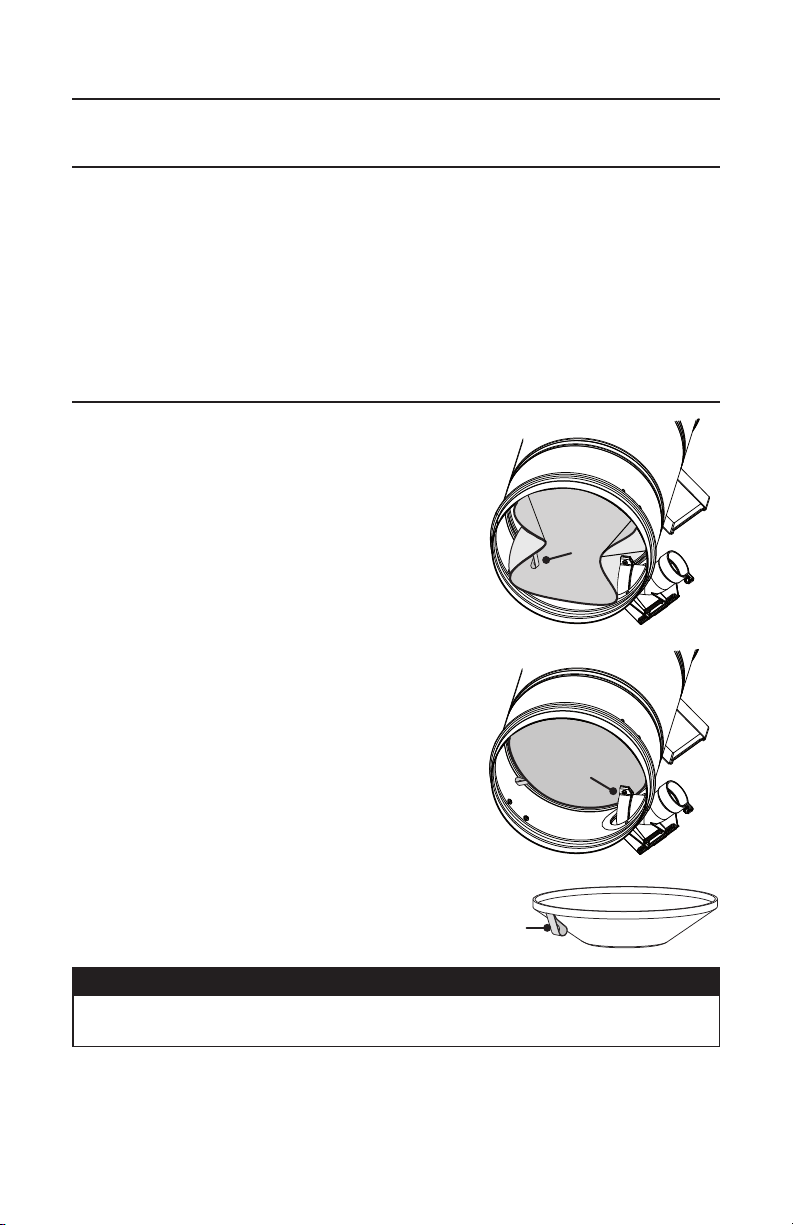
REMOVING FOAM MOTOR FILTER
Remove the debris pail and disposable bag or
permanent filter. Lift the center of the wire retaining the
foam motor filter and slide the filter out of its location.
REINSTALLING FOAM MOTOR FILTER
To reinstall the foam motor filter, reverse the steps
described above.
6
AD0086
Page 7
OPERATION AND MAINTENANCE (CONT’D)
!
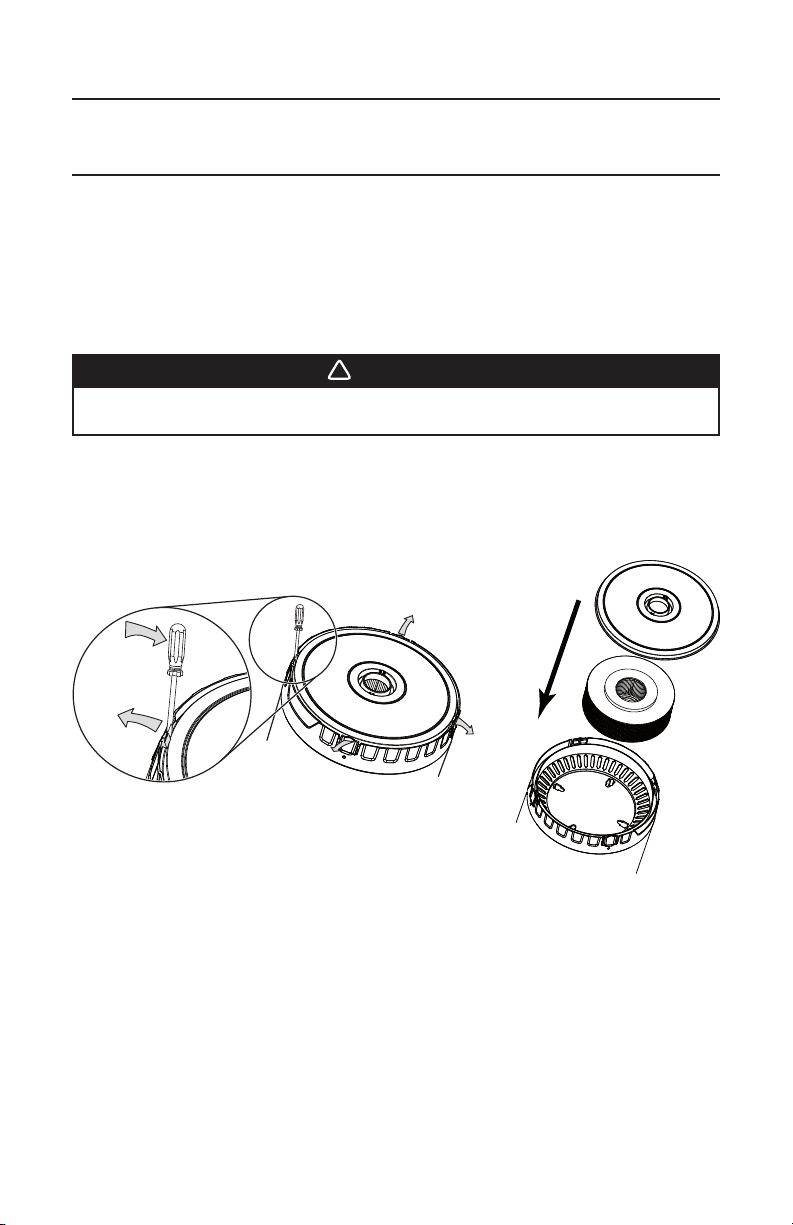
REMOVAL AND INSTALLATION OF SECONDARY HEPA FILTER
(PP7001 POWER UNIT ONLY)
NOTE: This is a disposable HEPA filter; do not attempt to wash it since this will damage it.
This HEPA filter should be replaced every 5 years. Proceed as follow:
If installed, detach the exhaust line from the top of the unit.
Disassemble upper part from lower part top cap assembly by pushing on the 4 retaining
tabs (one by one) located on the lower part and pulling on upper part to disengage it.
NOTE: A small flat blade screwdriver can also be used to pry on the 4 retaining tabs, as
shown in illustration A at the bottom of the page.
WARNING
Risk of warm surfaces and sharp edges. It is recommended to wear safety
gloves while handling this HEPA filter.
Discard the used filter and replace with a new one (part no. S10941416). Be sure to install
it with the gasket on top as shown in illustration B (at the bottom of the page), then snap in
place the upper part of the top cap. If need be, reconnect the exhaust line to the top cap.
AB
4 X
AR0053
7
Page 8
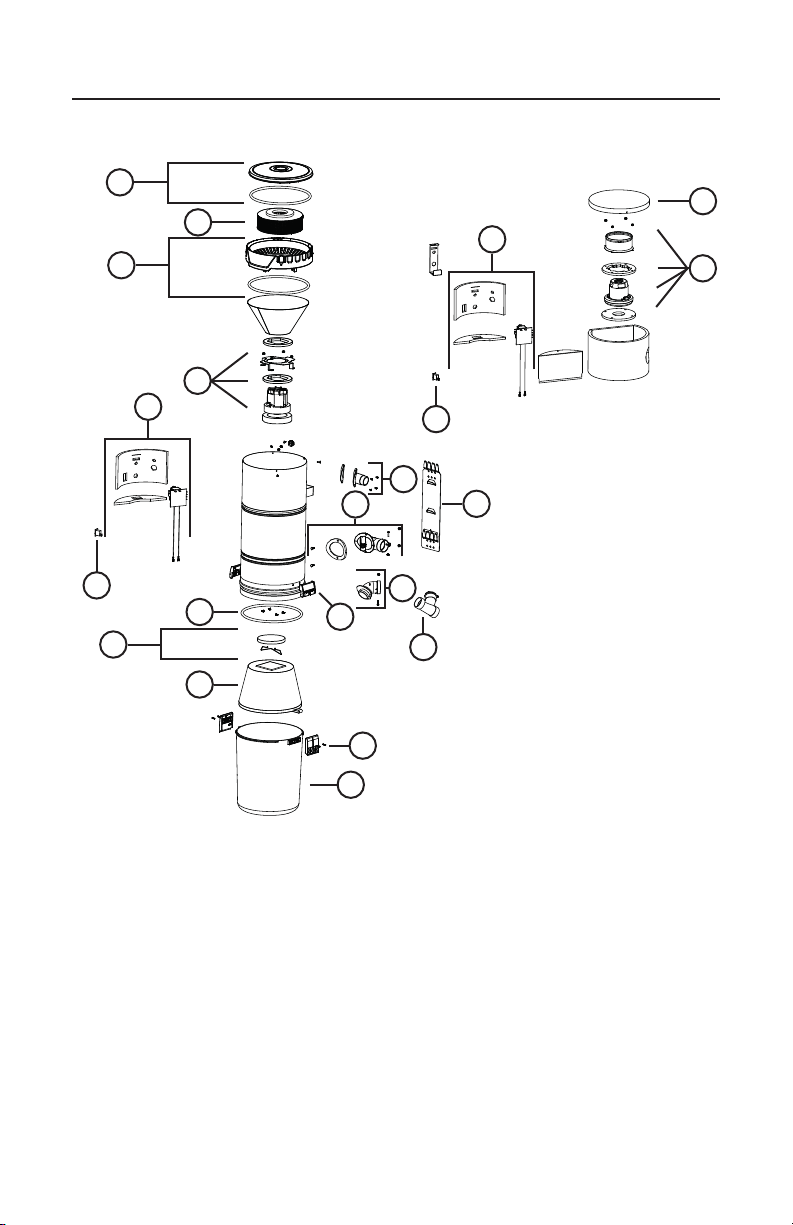
SERVICE PARTS
PP7001 UNIT PP5501 AND
1
2
3
4
5
15
PP6501 UNITS
1
5
4
6
16
17
6
8
12
7
13
14
9
11
10
AL0026
8
Page 9

SERVICE PARTS (CONT’D)
REPLACEMENT PARTS AND REPAIRS
In order to ensure your unit remains in good working
condition, you must use NuTone genuine replacement
parts only. NuTone genuine replacement parts are specially
designed for each unit and are manufactured to comply
with all the applicable certification standards and maintain
a high standard of safety. Any third party replacement part
used may cause serious damage and drastically reduce
the performance level of your unit, which will result in
premature failing. NuTone also recommends to contact a
NuTone authorized service center for all replacement parts
and repairs.
KEY NO.PART NO.DESCRIPTION
S10941409
1
S10941424
PP7001 T
(INCLUDING ITEM 5) (UPPER PAR T )
PP5501 & PP6501 TOP CAP
ASSEMBLY
2 S10941416 PP7001 EXHAUST HEPA FILTER 1
3 S10941413
66368
S10941418
4
S10941419
5 S10941420
PP7001 TOP CAP ASSEMBLY
(INCLUDING ITEM 5) (LOWER PAR T)
M
FOAMS AND NUTS
MOTOR WITH UPPER AND LOWER
FOAMS AND NUTS
MOTOR WITH UPPER AND LOWER
FOAMS AND NUTS
ELECTRONIC BOARD WITH BOTTOM
AND SIDE FOAMS
6 S99670649 ROCKER SWITCH 111
7 66369 MOTOR FOAM FILTER WITH FASTENER 111
8 S10941400 GASKET 113
9 S10941415 SEALED HEPA PERMANENT FILTER 11
10 S99670648 DEBRIS PAIL (INCLUDING KEY NO. 11) 1 1 1
11 S10941199 L
ATCH AND SCREWS 222
12 S10941404 LATCH KEEPER WITH SCREWS 222
13 S10941405 BAG ADAPTER WITH NUT AND SCREW 111
14 S10941408 UTILITY VALVE 111
15 S10941406
16 S99670650
INTAKE ELBOW WITH GASKET,
SCREWS, AND NUTS
EXHAUST PORT WITH GASKET AND
SCREWS
17 S30390555 UNIT SUPPORT BRACKET 111
* 391 DISPOSABLE BAG (SET OF 3) 1 1 1
*
ITEM NOT SHOWN
NOTE: Order service parts by “Part No.” — not by “Key No.”
OP CAP ASSEMBLY
OTOR WITH UPPER AND LOWER
9
PP5501 PP6501 PP7001
11
1
1
111
111
11
1
1
1
Page 10

TROUBLESHOOTING GUIDE
PROBLEMS POSSIBLE CAUSES POSSIBLE REMEDY
1. Loss or
decrease
of suction
occurs.
• Debris pail or disposable
bag is completely full.
• Debris pail gasket
damaged or missing.
• Obstruction in the hose.
A blockage in the hose
can be determined by
inserting the hose into
any wall inlet and, while
power unit is running,
check each additional
inlet for normal suction by
holding the palm of your
hand over the open inlet.
If normal suction is felt at
all other inlets, insert the
hose into a second inlet.
If the blockage still exists
it is located in the hose.
However, if the blockage
does not occur when
the hose is changed,
the blockage is probably
located in the tubing
system leading to the
original inlet.
• Obstruction in the tubing
system inside the walls.
• Sealed HEPA permanent
filter or disposable bag torn.
• Wall inlet cover not
properly sealed.
• Exhaust tubing or vent
clogged.
• Change the disposable bag or empty
debris pail as described on page 5.
• Replace the debris pail gasket.
• Disconnect the hose from the wall inlet
and insert a blunt instrument into the hose
— slightly smaller in diameter — such as
a flexible garden hose. Push the garden
hose through the cleaning system hose
until the obstruction has been cleared.
• Insert hose end into any inlet to make
power unit running, then place the palm
of your hand over the opposite end of
the hose. When you can feel the suction
increase, hold your hand over the hose
end for a few seconds and then quickly
remove your hand. This procedure
repeated several times should clear the
obstruction. If the blockage is not cleared,
contact your nearest Service Center.
• Clean the interior or the unit and install a
new permanent filter (or disposable bag).
• Check all wall inlet covers to be sure they
are closed and sealed tightly.
• Inspect and remove any blockages.
10
Page 11

TROUBLESHOOTING GUIDE (CONT’D)
PROBLEMS POSSIBLE CAUSES POSSIBLE REMEDY
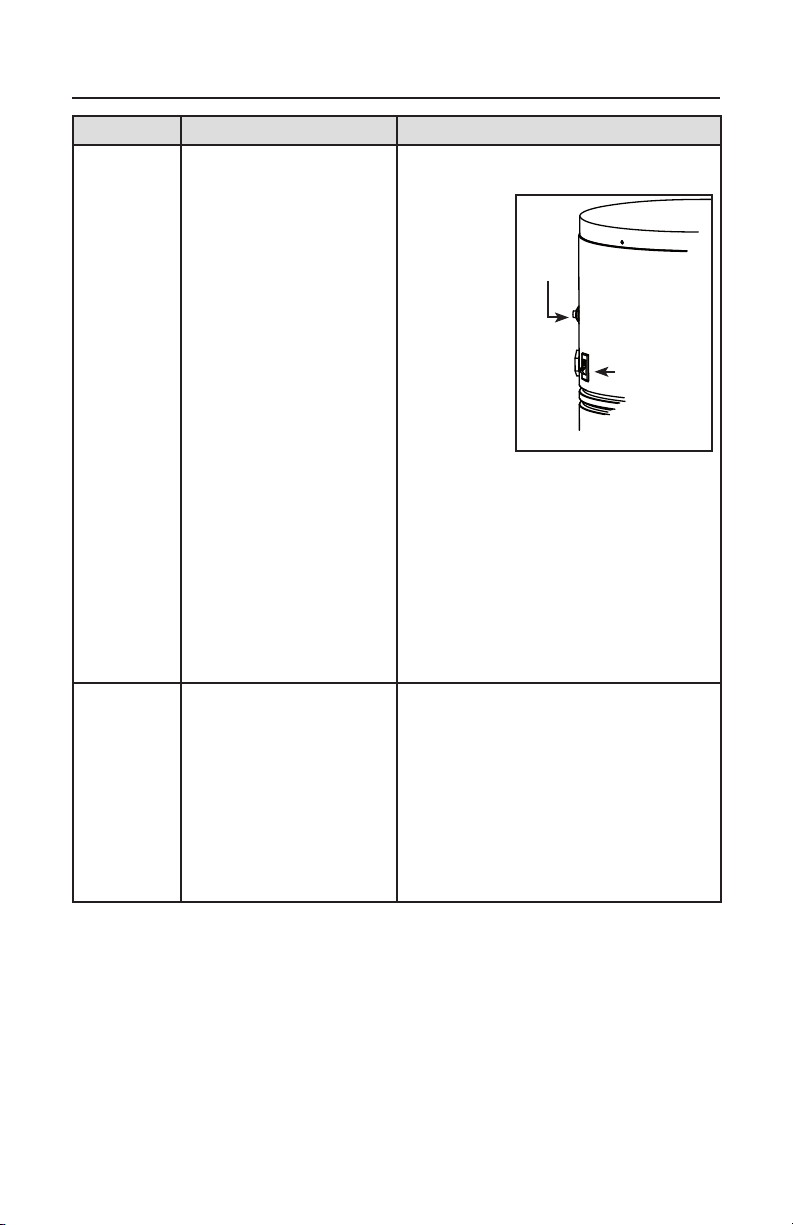
2. Power
unit does
not start
or stops
suddenly.
3. Power
unit runs
continuously
when the
hose is
removed.
• Defective inlet. Check
other wall inlets.
• Power unit internal
circuit breaker has been
activated (the reset button
is popped up).
• Blown fuse or tripped
circuit breaker on house
electrical panel.
• Defective hose.
• Power unit overcurrent
protector has been
activated.
• The unit power switch is in
ON position.
• An electrical short has
occured somewhere in the
system.
• Replace defective wall inlet.
• Push on
the circuit
breaker
reset button
located on
the left side
of the power
unit. If this
button pops
up again,
contact your
authorized
Service
Center.
• Replace fuse or reset circuit breaker on
house electrical panel.
• Replace hose as required.
• Unplug the power unit, wait at least 15
minutes and plug back the power unit.
• Set the unit power switch to OFF position.
• Perform a complete check of all wall inlets
and power unit low voltage control leads
connections. Contact your authorized
Service Center.
RESET
BUTTON
POWER
SWITCH
AC0003
11
Page 12

WARRANTY
CENTRAL VACUUM POWER UNIT LIMITED WARRANTY
NUTONE
NuTone warrants to the original consumer purchaser that its central vacuum power unit
will be free from defects in materials and workmanship for five (5) years for PP5501 units,
eight (8) years for PP6501 units and ten (10) years for PP7001 units. This warranty covers
the parts and labor in an authorized service center for the first three (3) years of the
warranty for PP5501 units, the first five (5) years of the warranty for PP6501 units, the first
six (6) years of the warranty for PP7001 units. After these time periods, the parts only will
be covered under this warranty.THERE ARE NO OTHER WARRANTIES, EXPRESSED
OR IMPLIED, INCLUDING, BUT NOT LIMITED TO, IMPLIED WARRANTIES OF
MERCHANTABILITY OR FITNESS FOR A PARTICULAR PURPOSE.
During these time periods, NuTone will, at its option, repair or replace the power unit
or part without charge, which is found to be defective under normal use and service.
THIS WARRANTY DOES NOT APPLY TO THE INSTALLATION OR THE PARTS USED
IN THE INSTALLED TUBING SYSTEM. All central vacuum hoses, electric or air-driven
brushes, filters, attachments and accessories are warranted for one (1) year from the
original purchase date with the exception to consumables such as light bulbs and belts. We
invite you to register your product on line at www.nutone.com/register. NuTone reserves
the right to limit this warranty if the product is not registered.
This warranty does not cover (a) normal maintenance and service or (b) any products or
parts which have been subject to misuse, negligence, accident, improper maintenance
or repair (other than by NuTone or an authorized representative), faulty installation or
installation contrary to recommended installation instructions.
The duration of any implied warranty is limited to the period as specified for the express warranty.
NUTONE’S OBLIGATION TO REPAIR OR REPLACE, AT NUTONE’S OPTION, SHALL
BE THE PURCHASER'S SOLE AND EXCLUSIVE REMEDY UNDER THIS WARRANTY.
NUTONE SHALL NOT BE LIABLE FOR INCIDENTAL, CONSEQUENTIAL OR SPECIAL
DAMAGES ARISING OUT OF OR IN CONNECTION WITH PRODUCT USE OR
PERFORMANCE. Please do not return your unit to place of purchase. Please visit www.
nutone.com for your closest service center. You may also call 1-888-336-3948 for the name
of an authorized representative in your area. This warranty supersedes all prior warranties.
Warranty service is to be completed by an authorized Service Center designated by
NuTone. Where applicable, in home service will be made available only in areas where a
contracted service provider offers service during the first three (3) years of the warranty
for PP5501 units, during the first five (5) years of the warranty for PP6501 units and during
the first six (6) years of the warranty for PP7001 units. If in home service is not available,
the product will be repaired or replaced, at NuTone’s discretion, by the nearest authorized
service provider. The unit removal and reinstallation works are under the customer
responsibility, and NuTone cannot be charged for them.
To qualify for warranty service, you must notify NuTone at the address or telephone
number stated below. We will then forward you the authorized service center in your area.
You will be required to present evidence of the original purchase date.
Date of Installation Builder or Installer
Model Number and Product Description
For the location of your nearest NuTone Independant Authorized Service Center:
Residents of the contiguous United States, dial toll free: 1-888-336-3948
Product model number • Date and proof of purchase • The nature of the difficulty
Residents of Alaska or Hawaï should write to: NuTone Inc. Attn: Department of National
Field Service, 926 West State Street, Hartford, WI 53027
Product specifications subject to change without notice. Printed in Canada.
IF YOU NEED ASSISTANCE OR SERVICE
Please be prepared to provide:
12
Page 13

GUÍA DEL USUARIO
SERIE PUREPOWER
UNIDADES DE
ASPIRACIÓN CENTRAL
PP5501, PP6501 Y PP7001
AB0039
! !
ÚNICAMENTE PARA USO RESIDENCIAL
BROAN-NUTONE LLC; HARTFORD, WISCONSIN WWW.NUTONE.COM
1-888-336-3948
REGISTRE SU PRODUCTO EN LÍNEA EN: WWW.NUTONE.COM/REGISTER
MODELOS SFDB-DQ, SFDB-DR Y SFDB-DS
24011 rev. B
Page 14

IMPORTANTES INSTRUCCIONES DE SEGURIDAD
GUARDE ESTAS INSTRUCCIONES LEA TODAS LAS INSTRUCCIONES
ANTES DE USAR ESTE APARATO.
Cuando use un aparato electrodoméstico, siempre deben tomarse precauciones
básicas, incluidas las siguientes:
ADVERTENCIA
!
Para reducir el riesgo de incendio,
choque eléctrico o lesiones:
1. No se use en superficies húmedas
ni en exteriores.
2. No aspire líquidos ni polvos finos (tales como
polvo de tablarroca).
3. No se use para recoger líquidos inflamables o
combustibles tales como gasolina ni se use en
áreas donde puedan estar presentes.
4. No recoja nada que se esté quemando
o emitiendo humo, por ejemplo, cigarrillos,
cerillos o cenizas encendidas.
5. No permita que se use como juguete. Ponga
mucha atención cuando se use junto o cerca
de los niños.
6. Úsese únicamente como se indica en este
manual. Use únicamente los aditamentos
recomendados por el fabricante.
7. Mantenga el cabello, ropas sueltas, los
dedos y todas las partes del cuerpo
alejadas de las aberturas y piezas
en movimiento.
8. Apague todos los controles antes
de desenchufar el aparato.
9. Tenga mucho cuidado cuando limpie escaleras.
10. NO maneje el enchufe ni el aparato con las
manos húmedas.
11. NO se use con el cable o enchufe dañados.
Si el aparato no está funcionando como debe
ser, si ha sufrido caídas, daños, se ha dejado
en exteriores o se ha caído en agua, lleve el
aparato a un Centro de servicio técnico.
12. Mantenga su área de trabajo
bien iluminada.
13. Conecte únicamente a un tomacorriente
conectado a tierra correctamente. Consulte las
instrucciones de conexión a tierra mostradas
en la página 3.
14. Cuando lleve a cabo la instalación, reparación
o limpieza de la unidad, se recomienda usar
gafas y guantes de seguridad.
PRECAUCIÓN
1. No ponga ningún objeto en las aberturas.
No se use con ninguna abertura bloqueada,
manténgase libre de polvo, pelusa, cabellos
y cualquier cosa que pueda reducir el flujo de aire.
2. Asegúrese de que el aire fluya libremente
y escape sin obstrucciones por la salida
superior o lateral.
3. NO se use sin tener el filtro (o filtros, de
acuerdo con el modelo) instalado.
4. NO se use para soplar hojas o basura.
5. NO se coloque ningún objeto encima
de la unidad.
6. NO instale la unidad horizontalmente.
7. NO use la bandeja como cubeta de lavar.
8. NO use la bandeja como banquillo.
9. Evite recoger objetos afilados.
10. Este aparato es para usarse en un circuito
de derivación estándar de 120 VCA, 20A
mínimo dedicado.
11. No desenchufe la unidad jalando por el cable.
Para desenchufar, agarre el enchufe, no el cable.
12. Guarde su aspiradora en interiores en
un área limpia y seca alejada de las
temperaturas extremas.
13. Cualquier reparación de servicio distinta a las
recomendadas en este manual debe realizarse
en instalaciones de servicio autorizadas.
14. Recomendamos que su unidad sea revisada
por un técnico especializado una vez al año.
CONTENIDO
INSTRUCCIONES DE CONEXIÓN
A TIERRA . . . . . . . . . . . . . . . . . . . . . 3
OPERACIÓN Y
MANTENIMIENTO . . . . . . . . . . . . .4-7
CUÁNDO CAMBIAR LA BOLSA
O VACIAR LA BANDEJA DE DESECHOS . . . . . . 4
CÓMO VACIAR LA BANDEJA DE DESECHOS (SOLO
UNIDADES DE POTENCIA PP6501 Y PP7001) . 4
REEMPLAZO DE LA BOLSA DESECHABLE
(MODELO 395) . . . . . . . . . . . . . . . . . . . . 4
ILTRO PERMANENTE HEPA SELLADO
F
(SOLO UNIDADES DE POTENCIA PP6501
Y PP7001) . . . . . . . . . . . . . . . . . . . . . . 5
EMOCIÓN E INSTALACIÓN DEL FILTRO PERMANENTE
R
(SOLO UNIDADES DE POTENCIA
PP6501 Y PP7001) . . . . . . . . . . . . . . . 5
FILTRO DE ESPUMA PARA EL MOTOR
(TODAS LAS UNIDADES) . . . . . . . . . . . . . . . . .6
REMOCIÓN E INSTALACIÓN DEL FILTRO HEPA
SECUNDARIO (SOLO LA UNIDAD DE
POTENCIA PP7001) . . . . . . . . . . . . . . . . 7
PIEZAS DE SERVICIO . . . . . . . . . .8-9
GUÍA DE LOCALIZACIÓN Y SOLUCIÓN
DE PROBLEMAS . . . . . . . . . . . . 10-11
GARANTÍA . . . . . . . . . . . . . . . . . . . 12
2
Page 15

INSTRUCCIONES DE CONEXIÓN A TIERRA
!
ADVERTENCIA
Si este equipo no se conecta a tierra correctamente puede resultar en
riesgo de choque eléctrico. Verifique con un electricista calificado o técnico
de servicio si no está seguro de que el tomacorriente está conectado
correctamente a tierra. No modifique el enchufe proporcionado con el
aparato, si no encaja en el tomacorriente, solicite a un electricista calificado
que instale un tomacorriente adecuado.
Instrucciones de conexión a tierra – Este aparato debe ser conectado a tierra. En caso de
que ocurra una falla o descompostura, la conexión a tierra proporciona una vía de menor
resistencia para la corriente eléctrica, para reducir el riesgo de choque eléctrico. Este aparato
está equipado con un cable que tiene conductor y enchufe de conexión a tierra para el
equipo. El enchufe debe enchufarse en un tomacorriente adecuado que esté instalado
y conectado a tierra correctamente de conformidad con los códigos y leyes locales.
CABLEADO
Este aparato es para usarse en un circuito de derivación estándar dedicado mínimo de 120 VCA,
20 A con un receptáculo NEMA 5-15R. Asegúrese de que la unidad de potencia esté conectada
a un tomacorriente que tenga enchufe con conexión a tierra con la apariencia del enchufe
mostrado en la ilustración a continuación. No use adaptadores con esta unidad de potencia.
CONECTORES DE
ENGARCE PAR A
CONECTARSE EN
LAS OREJETAS
DE CONEXIÓN DE
BAJO VOLTAJE
TOMACORRIENTES
CONECTADOS A TIERRA
ERMINALES DE TOMA
T
CABLE DE BAJO
VOLTAJE MODELO 376-
UL (18/2)
A
OTRAS
TOMAS
AE0044
TOMA
CLAVIJA DE CONEXIÓN
A TIERRA
TOMA TOMA
NOTA: Las terminales de toma deben conectarse en las orejetas de conexión de bajo
voltaje de la unidad de potencia usando los conectores de engarce (incluidos en la
bolsa de las piezas) y el arnés de bajo voltaje.
3
Page 16

OPERACIÓN Y MANTENIMIENTO
Abra la tapa de la toma e inserte el extremo de la manguera en la toma para encender la aspiradora.
Para las mangueras sin interruptor, al insertar la manguera se enciende automáticamente
la unidad de potencia; al quitar la manguera se apaga la unidad de potencia. Algunas
mangueras tienen interruptor que pueden ser usados para activar la unidad de potencia.
Excepto cuando use la válvula de servicio (solo para la unidad de potencia PP7001) el
interruptor de encendido/apagado ubicado en la unidad de potencia necesita mantenerse
en posición de apagado.
Mientras aspira, el polvo y la suciedad son llevados a la unidad de potencia donde permanecen
en una bolsa o en la bandeja de desechos (conforme al modelo de unidad de potencia).
Use las herramientas de limpieza como las usaría para cualquier otra aspiradora. Evite
recoger basura grande o alargada ya que este tipo de objetos puede quedar atorado en la
manguera o tubería.
CUÁNDO CAMBIAR LA BOLSA O LA BANDEJA DE DESECHOS
Con una capacidad de 6 galones EE.UU., en condiciones normales la bolsa/bandeja de
desechos debe cambiarse/vaciarse aproximadamente dos veces al año. Si la bolsa/bandeja
de desechos se llena, notará una disminución en la capacidad de aspiración del sistema.
Excepto cuando está disminución es causada por una obstrucción en el sistema, al cambiar
la bolsa o vaciar la bandeja de desechos resolverá el problema.
NOTA: Aun cuando no se haya llenado a su máxima capacidad, si la bolsa se parece estar
CÓMO VACIAR LA BANDEJA DE DESECHOS
(SOLO PARA UNIDADES DE POTENCIA PP6501 Y PP7001)
Para vaciar la bandeja de desechos, desbloquee ambos seguros en los lados de la unidad
de potencia jalando hacia afuera y luego empujando hacia arriba. Sujete la bandeja por los
seguros, y bájela de la unidad de potencia. Lleve la bandeja al contenedor de basura y tire
los desechos. Ponga la bandeja nuevamente en su lugar.
demasiado estirada al momento de quitar la bandeja de desechos, al cambiar la
bolsa evitará que se rompa.
REEMPLAZO DE LA BOLSA DESECHABLE (MODELO 391)
Para quitar la bolsa desechable, desbloquee ambos seguros en los lados de la unidad
de potencia jalando hacia afuera y luego empujando hacia arriba. Quite la bandeja de
la unidad. Agarre los bordes del collarín de la bolsa y jale hacia abajo. La bolsa debe
deslizarse fácilmente. No jale la bolsa.
Desdoble la nueva bolsa.
Agarre el collarín donde se indica en la nueva bolsa e inserte en el adaptador para
bolsa. Tenga cuidado de no romper la bolsa. Asegúrese de que el collarín esté colocado
entre el anillo cónico y el tope de bolsa en el adaptador para bolsa (ver la ilustración a
continuación). Ponga la bandeja nuevamente en su lugar.
ANILLO CÓNICO
BOLSA DESECHABLE
MODELO 391
AO0081
TOPE DE LA BOLSA
4
Page 17
OPERACIÓN Y MANTENIMIENTO (CONT.)
FILTRO PERMANENTE SELLADO HEPA
(SOLO PARA UNIDADES DE POTENCIA PP6501 Y PP7001)
Este filtro protege el motor y evita que las pequeñas partículas escapen hacia el exterior de
la unidad de potencia sin necesidad de reemplazarlo. El filtro se limpia automáticamente
moviéndose hacia arriba cuando la unidad de potencia enciende y bajando cuando la unidad
de potencia se apaga. Bajo uso normal, no hay necesidad de dar mantenimiento a este filtro.
Se puede desmontar para revisar el filtro de espuma del motor, o para reemplazarlo en caso
de que se llegue a dañar (por desechos afilados, por ejemplo).
REMOCIÓN E INSTALACIÓN DEL FILTRO PERMANENTE
SELLADO HEPA (SOLO PARA UNIDADES DE POTENCIA
PP6501 Y PP7001)
Para quitarlo:
Quite la bandeja de la unidad. Para quitar el filtro
permanente, use la lengüeta (A) ubicada en el borde
del filtro para jalar y libere el filtro de la cámara de
toma de pared. Apriete en ambos lados del filtro hacia
el centro de la carcasa (ver ilustración de la derecha).
Luego, quítelo cuidadosamente de la unidad.
AD0084
Para reinstalar:
A
Comprima el filtro para poder moverlo y que pase
de la abertura de la toma (B) (ver ilustración de la
derecha). Deje que el filtro se apoye contra la pared
de la unidad liberando la presión. Asegúrese de poner
el anillo rígido en su ranura asegurándose de que
asiente correctamente.
NOTA: Asegúrese de que el filtro quede instalado de
modo que la lengüeta (A) esté accesible para
remoción futura del filtro.
AD0085
A
B
AA0005
PRECAUCIÓN
Asegúrese de reinstalar el filtro correctamente. La ubicación correcta es
crítica para asegurar la protección adecuada del motor.
5
Page 18

OPERACIÓN Y MANTENIMIENTO (CONT.)
FILTRO DE ESPUMA DEL MOTOR (TODAS LAS UNIDADES)
Un filtro de espuma para la seguridad del motor, ubicado en la parte superior de la cámara
de aspiración proporciona protección contra la suciedad aspirada hacia el motor en caso de
que la bolsa desechable o el filtro permanente sellado HEPA se rompa accidentalmente. Este
filtro debe ser revisado y limpiado si es necesario cuando se instala la bolsa de repuesto,
o cuando se quita el filtro permanente sellado HEPA (solo unidades PP6501 y PP7001).
Simplemente limpie el filtro cepillándolo. Si el filtro está excesivamente humedecido, lave
a mano con una solución de agua y detergente suave, enjuague y deje secar completamente
sobre una superficie plana antes de volver a instalarlo.
PRECAUCIÓN
Al operar la unidad de potencia sin el filtro de espuma del motor anulará
la garantía.
REMOCIÓN DEL FILTRO DE ESPUMA
DEL MOTOR
Quite la bandeja de desechos y la bolsa desechable
o el filtro permanente. Levante el centro del cable que
retiene el filtro de espuma del motor y deslice el filtro
hacia afuera de su lugar.
REINSTALACIÓN DEL FILTRO DE
ESPUMA DEL MOTOR
Para reinstalar el filtro de espuma del motor, siga en
orden inverso los pasos antes descritos.
6
AD0086
Page 19

OPERACIÓN Y MANTENIMIENTO (CONT.)
!
REMOCIÓN E INSTALACIÓN DEL FILTRO SECUNDARIO HEPA
(SOLO PARA LA UNIDAD DE POTENCIA PP7001)
NOTA: Este es un filtro HEPA desechable; no intente lavarlo porque se dañará si lo hace.
Este filtro HEPA debe ser reemplazado cada 5 años. Proceda como se indica a continuación:
Si está instalado, desprenda la línea de escape de la parte superior de la unidad.
Desensamble la parte superior de la tapa de la parte inferior empujando las 4 pestañas
de retención (una por una) ubicadas en la parte inferior y jalando en la parte superior para
desengancharla.
NOTA: Puede utilizar también un pequeño destornillador de punta plana para empujar
sobre las 4 pestañas de retención, como se muestra en la ilustración A en la parte
baja de la página.
ADVERTENCIA
Riesgo de superficies calientes y bordes afilados. Se recomienda utilizar
guantes de seguridad para manipular este filtro HEPA.
Deseche el filtro usado y reemplace con uno nuevo (número de pieza S10941416).
Asegúrese de instalarlo con el empaque en la parte superior como se muestra en la
ilustración B (en la parte baja de la página), después encaje en su lugar la parte superior
de la tapa superior. Si es necesario, reconecte la línea de escape a la tapa superior.
AB
4 X
AR0053
7
Page 20

PIEZAS DE SERVICIO
UNIDAD PP7001
UNIDADES
PP5501 Y PP6501
1
1
2
5
3
4
4
5
6
16
15
6
8
12
13
7
17
14
9
11
10
AL0026
PIEZAS DE REPUESTO Y REPARACIONES
Para poder asegurar que su unidad permanezca en buenas condiciones de funcionamiento,
debe usar únicamente piezas de repuesto genuinas de NuTone. Las piezas de repuesto
genuinas de NuTone están diseñadas especialmente para cada unidad y son fabricadas
para cumplir con todos los estándares de certificación aplicables y para mantener un alto
estándar de seguridad. Cualquier pieza de repuesto fabricada por terceros puede causar
graves daños y reducir drásticamente el nivel de rendimiento de su unidad, lo cual resultará
en falla prematura. NuTone también recomienda contactar a un centro de servicio autorizado
de NuTone para todas las reparaciones y piezas de repuesto necesarias.
8
Page 21

PIEZAS DE SERVICIO (CONT.)
NÚMERO
ELEMENTO
DE
1
NÚMERO DE
PIEZA
S10941409
S10941424
DESCRIPCIÓN
E
NSAMBLE DE TAPA SUPERIOR
PP7001 (INCLUIDO EL ELEMENTO 8)
(PA RT E SUPERIOR)
ENSAMBLE DE TAPA SUPERIOR
PP5501 Y PP6501
PP5501 PP6501 PP7001
1
11
2 S10941416 FILTRO DE ESCAPE HEPA PP7001 1
ENSAMBLE DE TAPA SUPERIOR
3 S10941413
PP7001 (INCLUIDO EL ELEMENTO 8)
1
(PA RT E INFERIOR)
66368
4
S10941418
S10941419
5 S10941420
MOTOR CON ESPUMAS SUPERIOR Y
INFERIOR Y TUERCAS
MOTOR CON ESPUMAS SUPERIOR Y
INFERIOR Y TUERCAS
MOTOR CON ESPUMAS SUPERIOR Y
INFERIOR Y TUERCAS
ARJETA ELECTRÓNICA CON ESPUMAS
T
INFERIOR Y LATERAL
1
1
1
111
6 S99670649 INTERRUPTOR BASCULANTE 111
7 66369
FILTRO DE ESPUMA DEL MOTOR CON
SUJETADOR
111
8 S10941400 EMPAQUE 113
9 S10941415 FILTRO PERMANENTE SELLADO HEPA 1 1
10 S99670648
BANDEJA DE DESECHOS (INCLUIDO EL
ELEMENTO NÚMERO 11)
111
11 S10941199 SEGURO Y TORNILLOS 222
12 S10941404 RETÉN DEL SEGURO CON TORNILLOS 222
13 S10941405
ADAPTADOR PARA BOLSA CON TUERCA
Y TORNILLO
111
14 S10941408 VÁLVULA DE SERVICIO 111
15 S10941406
16 S99670650
C
TORNILLOS Y TUERCAS
TOMA DE SALIDA CON EMPAQUE Y
TORNILLOS
111
11
ODO DE ENTRADA CON EMPAQUE,
17 S30390555 SOPORTE DE LA UNIDAD DE POTENCIA 111
* 391 BOLSA DESECHABLE (JUEGO DE 3) 1 1 1
* ELEMENTO NO MOSTRADO
NOTA: Pida las piezas de servicio por “Número de pieza” — no por “Número de elemento”
9
Page 22

GUÍA DE LOCALIZACIÓN Y SOLUCIÓN DE PROBLEMAS
PROBLEMAS CAUSA S PROBABLES REMEDIOS PROBABLES
1. Pérdida o
disminución
de
aspiración.
• La bandeja de desechos
o la bolsa desechable está
completamente llena.
• El empaque de la bandeja
de desechos está dañada
o falta.
• Obstrucción en la
manguera. Una obstrucción
en la manguera puede ser
determinada al insertar la
manguera en cualquier
toma de pared y, con
la unidad de potencia
funcionando, revisar cada
toma adicional para verificar
una aspiración normal
sosteniendo la palma de
la mano sobre abertura de
la toma. Si se siente una
aspiración normal en todas
las demás tomas, inserte la
manguera en una segunda
toma. Si la obstrucción aún
se siente, entonces está
ubicada en la manguera. No
obstante, si la obstrucción
no se siente cuando la
manguera se cambia a
otra toma, entonces la
obstrucción probablemente
está ubicada en el sistema
de tubería que lleva a la
toma original.
• Obstrucción en el sistema
de tubería en el interior de
las paredes.
• Filtro permanente sellado
HEPA o bolsa desechable
rota.
• La tapa de la toma de
pared no está sellada
correctamente.
• Tubería de escape o de
ventilación taponada.
• Cambie la bolsa desechable o vacíe la
• Reemplace el empaque de la bandeja
• Desconecte la manguera de la toma
• Inserte el extremo de la manguera en
• Limpie el interior de la unidad
• Revise todas las tapas de toma de pared
• Revise y elimine cualquier obstrucción.
10
bandeja de desechos como se indica en
la página 5.
de desechos.
de pared e inserte un instrumento
desafilado en la manguera — de diámetro
ligeramente más pequeño — como por
ejemplo una manguera flexible para jardín.
Empuje la manguera de jardín a través
de la manguera del sistema de limpieza
hasta que se despeje la obstrucción.
cualquier toma para activar la unidad
de potencia, luego coloque la palma de
su mano sobre el extremo opuesto de la
manguera. Cuando pueda sentir que la
aspiración aumenta, sostenga su mano
sobre el extremo de la manguera durante
unos cuantos segundos y luego quite la
mano rápidamente. Este procedimiento
repetido varias veces debe despejar
la obstrucción. En caso de que la
obstrucción no se despeje, contacte a su
Centro de servicio más cercano.
e instale un nuevo filtro permanente
(o bolsa desechable).
para asegurarse de que estén bien
cerradas y selladas.
Page 23
GUÍA DE LOCALIZACIÓN Y SOLUCIÓN DE PROBLEMAS (CONT.)
PROBLEMAS CAUSA S PROBABLES REMEDIOS PROBABLES
2. La unidad
de potencia
no arranca
o se
detiene
arepentinamente.
3. La unidad de
potencia
funciona
continuamente
cuando
se desconecta la
manguera.
• Toma defectuosa. Revise
las demás tomas de pared.
• El interruptor de circuito
interno de la unidad de
potencia se ha activado
(el botón de reposición
se ha disparado).
• Fusible fundido o interruptor
de circuito disparado en el
panel eléctrico local.
• Manguera defectuosa.
• El protector contra
sobrecorriente de la
unidad de potencia
se ha activado.
• El interruptor de la unidad
de potencia está en
posición de encendido.
• Ha ocurrido un corto
eléctrico en algún lugar
del sistema.
• Reemplace la toma de pared defectuosa.
• Presione el
botón de
reposición
del
interruptor
BOTÓN DE
REPOSICIÓN
de circuito
ubicado
en el lado
izquierdo de
la unidad de
INTERRUPTOR
ENCENDIDO
DE
potencia. Si
este botón
se dispara
otra vez,
AC0003
contacte a su Centro de
servicio autorizado.
• Reemplace el fusible o reposicione
el interruptor de circuito en el panel
eléctrico local.
• Reemplace la manguera como
sea requerido.
• Desenchufe la unidad de potencia,
espere al menos 15 minutos y enchufe de
nuevo la unidad de potencia.
• Ponga el interruptor de la unidad de
potencia en posición de apagado.
• Lleve a cabo una revisión completa
de todas las tomas de pared y de las
conexiones de terminales de control de
bajo voltaje. Contacte a su Centro de
servicio autorizado.
11
Page 24

GARANTÍA
GARANTÍA LIMITADA DE LA UNIDAD DE POTENCIA DE ASPIRACIÓN CENTRAL
NuTone garantiza al comprador original que su unidad de potencia de aspiración central
no tendrá defectos en materiales y fabricación durante (5) años para las unidades PP5501,
ocho (8) años para las unidades PP6501 y diez (10) años para las unidades PP7001.
Esta garantía cubre las piezas y mano de obra en un centro de servicio autorizado por
los primeros tres (3) años de garantía para las unidades PP5501, los primeros cinco
(5) años de garantía para las unidades PP6501, los primeros seis (6) años de garantía
para las unidades PP7001. Después estos periodos de tiempo, las piezas serán cubiertas
únicamente conforme a esta garantía. NO EXISTE NINGUNA OTRA GARANTÍA,
EXPRESA O IMPLÍCITA, INCLUIDO PERO NO LIMITADO A, GARANTÍAS IMPLÍCITAS
DE APTITUD O IDONEIDAD PARA UN PROPÓSITO PARTICULAR.
Durante estos periodos de tiempo, NuTone, a su propia opción, reparará o reemplazará
la unidad de potencia o parte de ella sin cargos, la cual se encuentre defectuosa bajo
condiciones normales de uso y servicio. ESTA GARANTÍA NO APLICA A LA INSTALACIÓN
DE LAS PIEZAS USADAS EN EL SISTEMA DE TUBERÍA INSTALADO. Todas las
mangueras de aspiración central, cepillos eléctricos o activados por aire, filtros, aditamentos
y accesorios están garantizados por un (1) año a partir de la fecha de compra original con la
excepción de los insumos tales como bombillas de iluminación y bandas de accionamiento.
Lo invitamos a registrar su producto en línea en www.nutone.com/register. NuTone se
reserva el derecho de limitar esta garantía en caso de que el producto no sea registrado.
Esta garantía no cubre (a) mantenimiento y reparaciones normales o (b) cualquier
producto o pieza la cual haya sido sometida a mal uso, negligencia, accidentes,
mantenimiento o reparaciones incorrectas (excepto las autorizadas por NuTone o por
un representante autorizado), instalación incorrecta o contraria a las instrucciones de
instalación recomendadas.
La duración de cualquier garantía implícita se limita al periodo especificado para la
garantía expresa.
LA OBLIGACIÓN DE NUTONE DE HACER REPARACIONES O REEMPLAZOS,
A OPCIÓN DE NUTONE, SERÁ UNA REPARACIÓN SOLA Y EXCLUSIVAMENTE
PARA EL COMPRADOR CONFORME A ESTA GARANTÍA. NUTONE NO SE HARÁ
RESPONSABLE POR DAÑOS Y PERJUICIOS QUE SURJAN DE O EN RELACIÓN CON
EL USO O RENDIMIENTO DEL PRODUCTO. No devuelva su unidad al lugar de compra.
Visite www.nutone.com para su centro de servicio más cercano. También puede llamar
al 1-888-336-3948 para el nombre de un representante autorizado en su localidad. Esta
garantía reemplaza a todas las garantías anteriores.
El servicio de garantía debe ser llevado a cabo en un Centro de servicio autorizado
designado por NuTone. Donde sea aplicable, el servicio a domicilio estará disponible
únicamente en áreas donde un proveedor de servicios contratado ofrezca sus servicios
durante los primeros tres (3) años de garantía para las unidades PP5501, durante los
primeros cinco (5) años de garantía para las unidades PP6501 y durante los primeros
seis (6) años de garantía para las unidades PP7001. Si el servicio a domicilio no está
disponible, el producto será reparado o reemplazado, a discreción de NuTone, por el
proveedor de servicio autorizado más cercano. Los trabajos de remoción y reinstalación
de la unidad de potencia son responsabilidad del cliente y NuTone no cubrirá esos gastos.
Para calificar para el servicio de garantía, debe notificar a NuTone en su dirección
o llamando al número telefónico proporcionado a continuación. Entonces lo remitiremos
a un centro de servicio autorizado en su localidad. Usted deberá presentar un comprobante
de la fecha de compra original.
NUTONE
Fecha de instalación Constructor o instalador
Número de modelo y descripción del producto
Para la ubicación de su Centro de servicio autorizado independiente NuTone más cercano:
Residentes contiguos a los Estados Unidos, llamar a la línea gratuita: 1-888-336-3948
Número del modelo del producto • Fecha y comprobante de compra • La naturaleza
Los residentes de Alaska o Hawái deben escribir a: NuTone Inc. Atención: Department
of National Field Service, 926 West State Street, Hartford, WI 53027
Las especificaciones del producto están sujetas a cambios sin previo aviso. Impreso en Canadá.
SI NECESITA ASISTENCIA O SERVICIO
Prepárese para proporcionar:
del problema.
12
 Loading...