

Page 1
QUICKSTART MANUAL
ENGLISH ( 1 – 4 )
INICIO RÁPIDO
ESPAÑOL ( 5 – 8 )
UTILISATION SIMPLIFIÉ
FRANÇAIS ( 9 – 12 )
GUIDA RAPIDA
ITALIANO ( 13 – 16 )
KURZANLEITUNG
DEUTSCH ( 17 – 20 )
Page 2

Page 3
1
This Quickstart Guide explains how to quickly setup and begin using the Numark STEALTH
CONTROL DJ system. Please take a few minutes to go through this Quickstart and get familiar
with the setup procedure and basic controls.
We have designed STEALTH CONTROL as a complete system for software-based DJs. STEALTH
CONTROL is a MIDI-compliant device and can be used with any software which supports the
MIDI protocol. We have included two software packages – Native Instruments’ Traktor 3 LE and
MixMeister Fusion Live – enabling you to DJ right out of the box.
We also highly recommend reading the software reference manuals, included on the installation
disc, in order to take full advantage of STEALTH CONTROL. Happy DJing!
Please Note: If you are using the Stealth Control with a USB hub, we recommend that you either use a
powered hub, or the optional 6V 1A power adapter. This will ensure proper operation.
BOX CONTENTS
STEALTH CONTROL
QUICKSTART MANUAL
SAFETY & WARRANTY INFORMATION
USB CABLE
TRAKTOR LE CD
MIXMEISTER FUSION LIVE COUPON
:: Stealth Control Quickstart Guide
A NOTE ABOUT MIDI CONTROL :::::
The Stealth Control was designed as a MIDI-compliant device, allowing you to
control any computer application which supports the MIDI protocol. This means that
you can not only use the Stealth Control with the included software, but can also use
the controller with a variety of other music and video applications as well. In order to
use the Stealth Control with your favorite software, you will have to enable the
Stealth Control as a MIDI input device in your software’s preferences. Please note
that depending on your software, the Stealth Control may not necessarily show up as
“Stealth Control” in the MIDI preferences.
Page 4
2
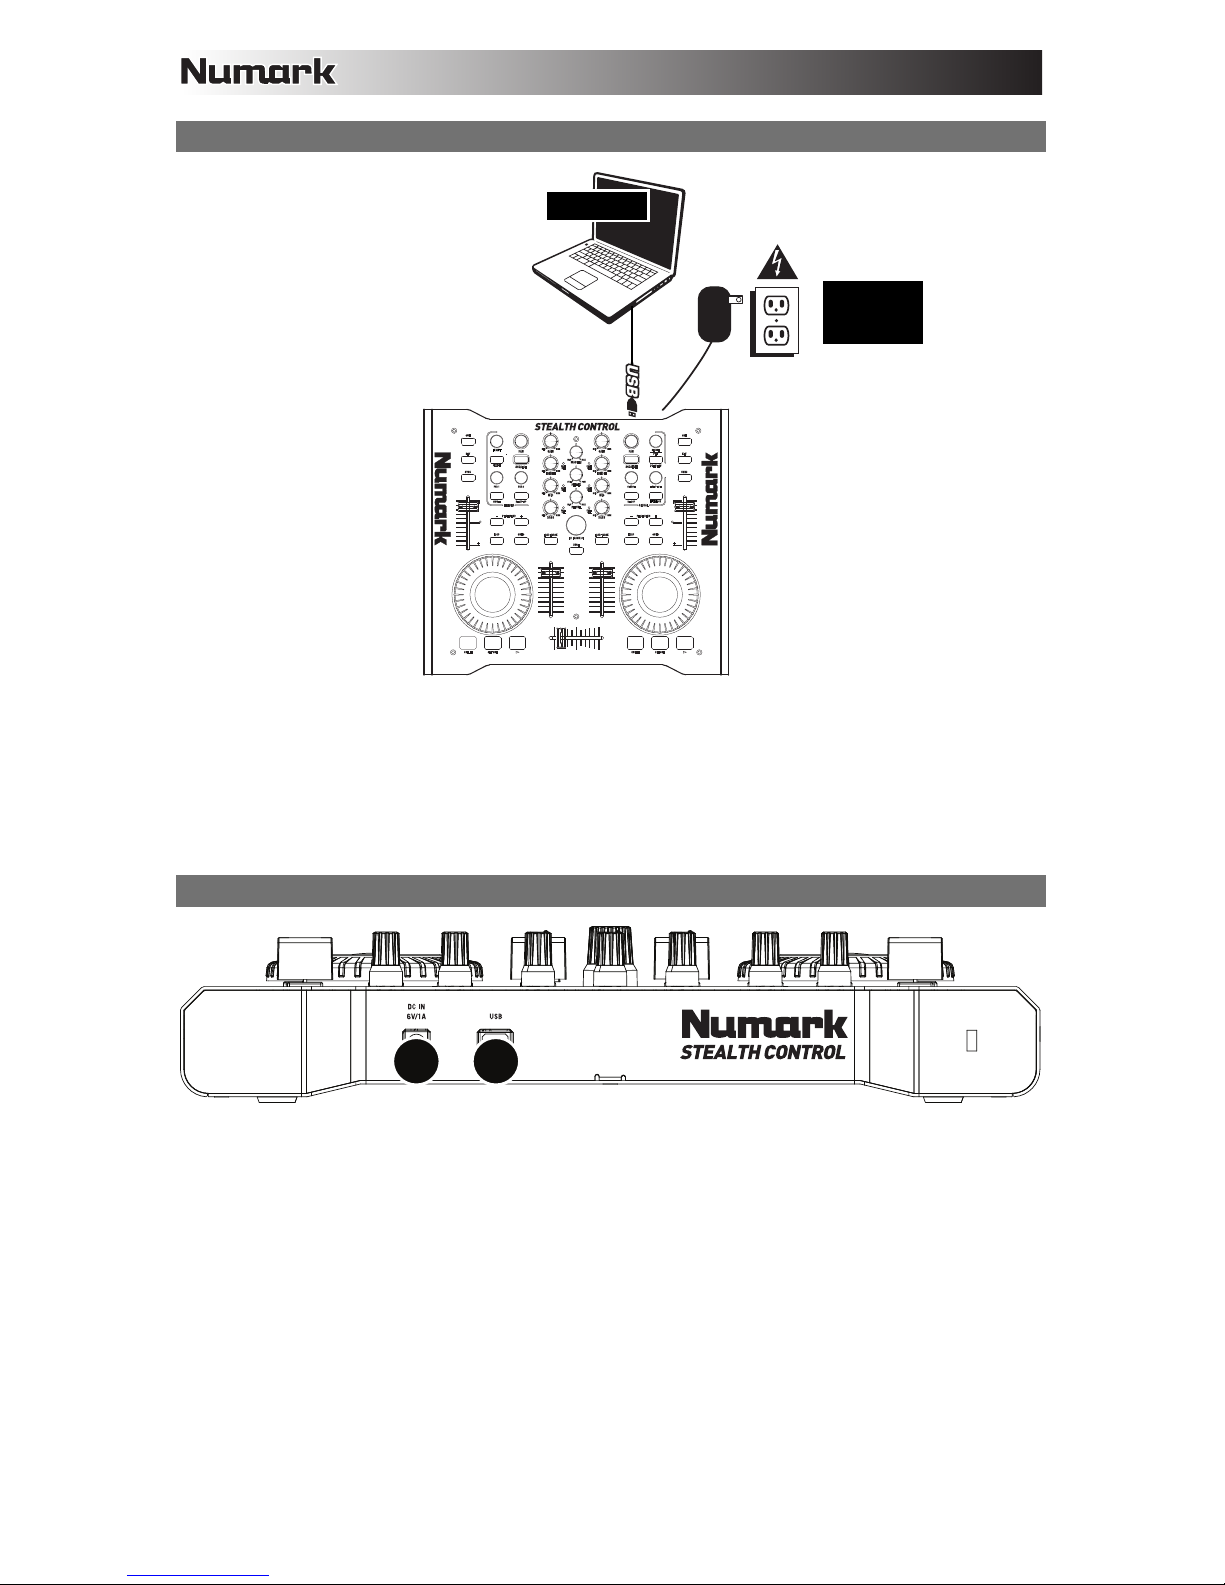
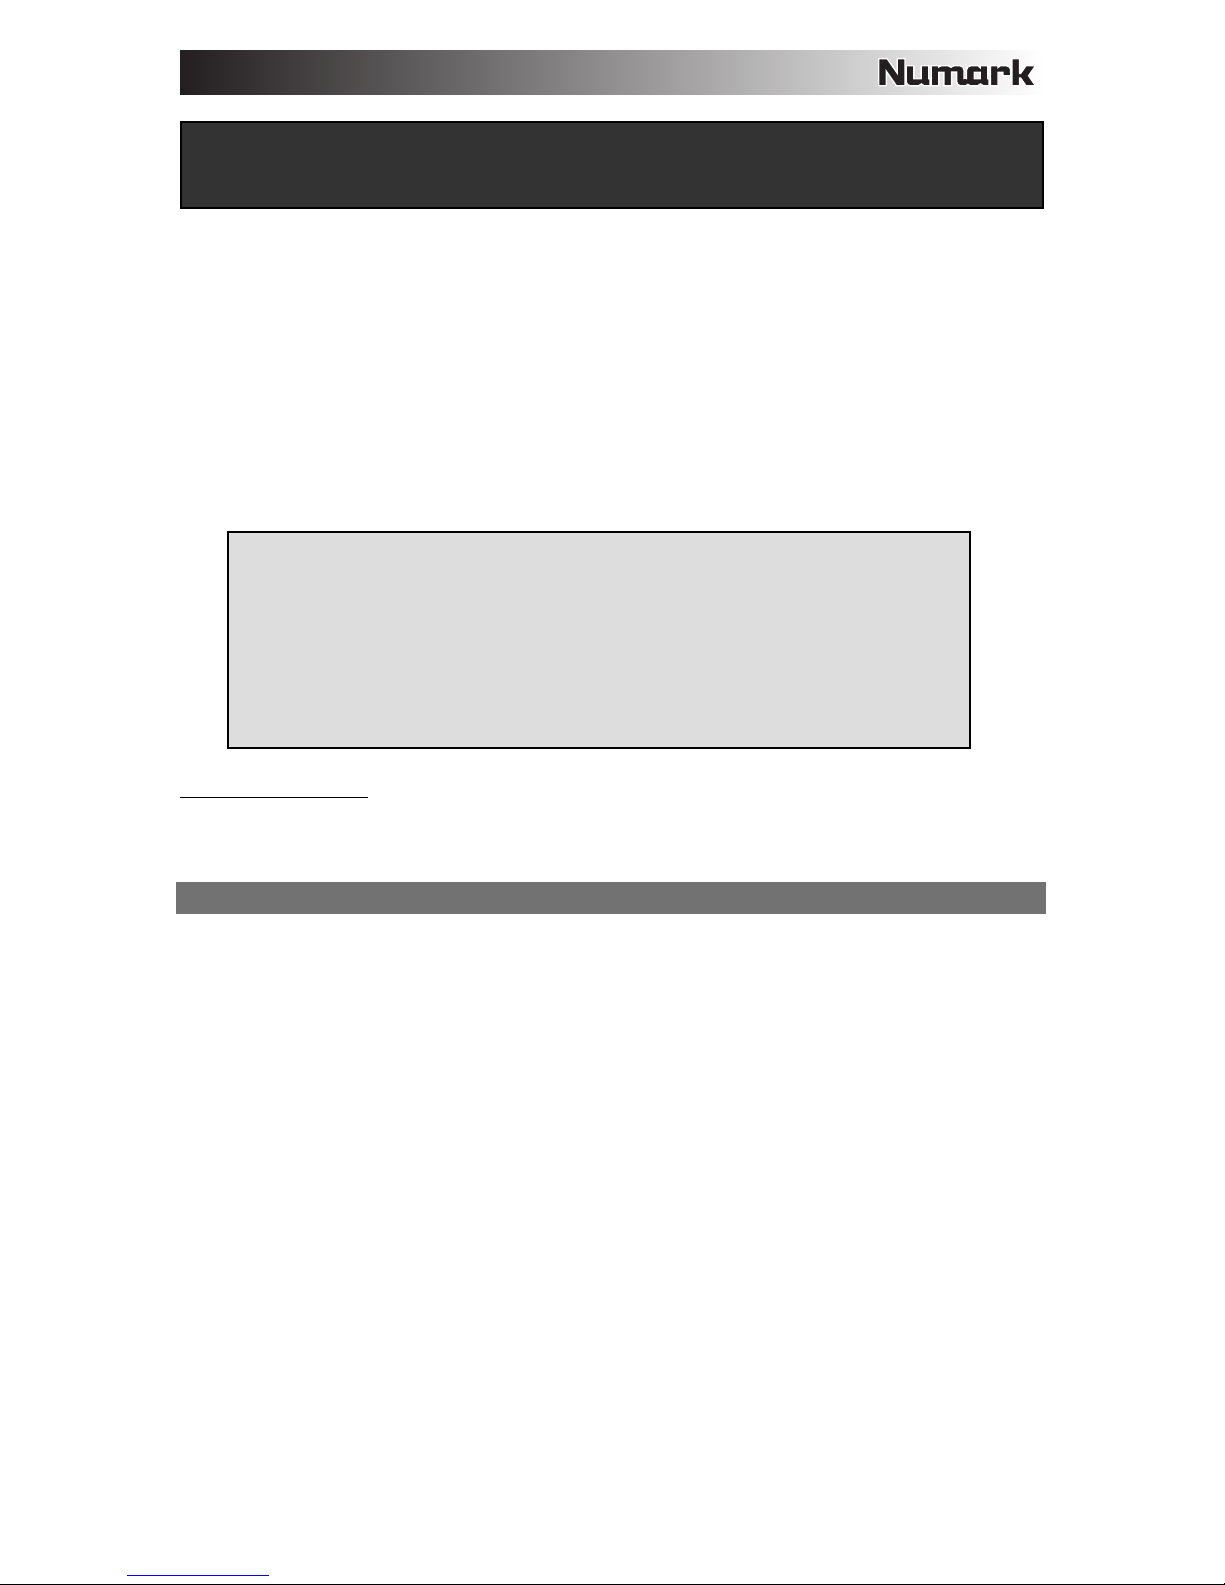
CONNECTION DIAGRAM
Please study the connection diagram above.
1. Connect the STEALTH CONTROL’s USB PORT to an available USB port on your computer, using the included
USB cable. The STEALTH CONTROL will be powered through your computer’s USB bus.
2. (Optional) You can power the STEALTH CONTROL by connecting an optional 6V 1A power adapter to the DC
IN input on the STEALTH CONTROL. Please note that it is not necessary to have the adapter plugged in for the
STEALTH CONTROL to work. However, you should connect this adapter if your computer is not able to supply
enough power to the STEALTH CONTROL.
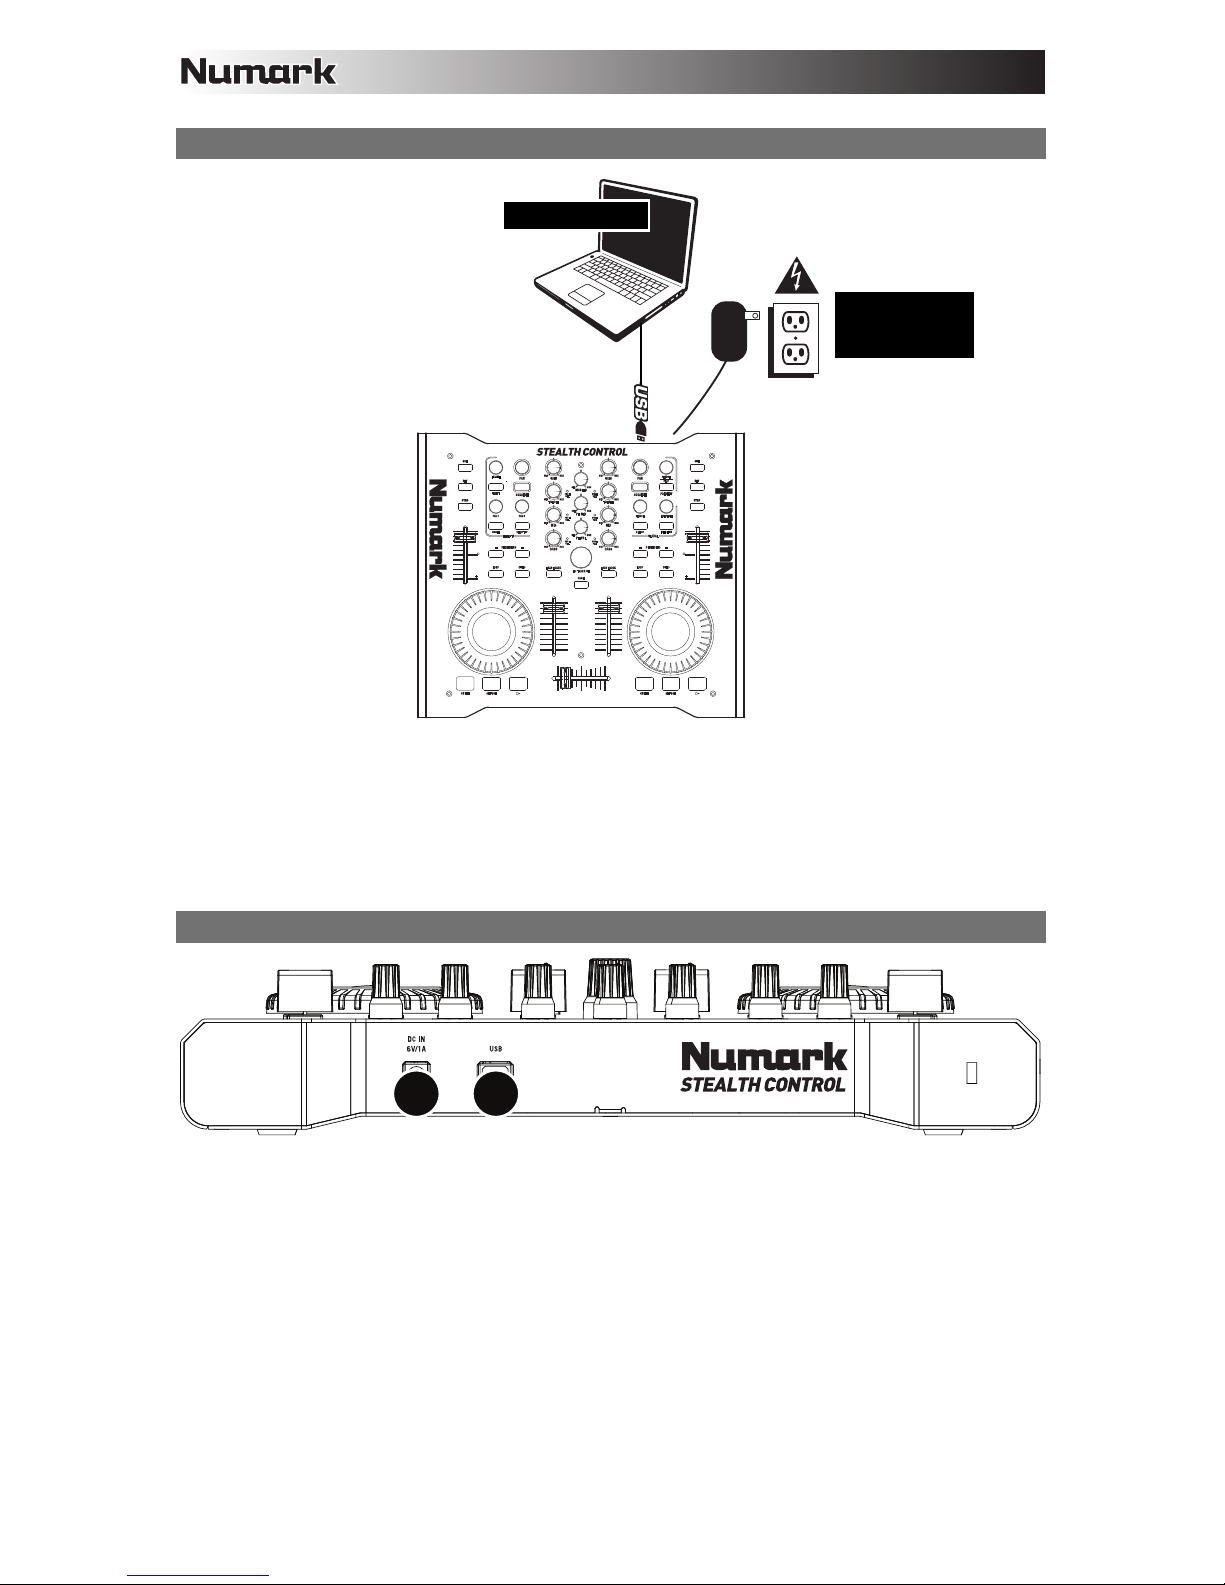
REAR PANEL CONNECTIONS
3
12
1. USB PORT – Please use the supplied USB cable to connect this port to an available USB port on your computer.
When plugged into your computer, the unit will draw power from the USB connection.
2. DC IN – If your computer does not supply enough power through the USB bus, you may wish to power the unit
externally by connecting an optional 6V/1A adapter to this input and plugging the adapter into a power supply.
COMPUTER
POWER
SUPPLY
(
OPTIONAL
Page 5
3
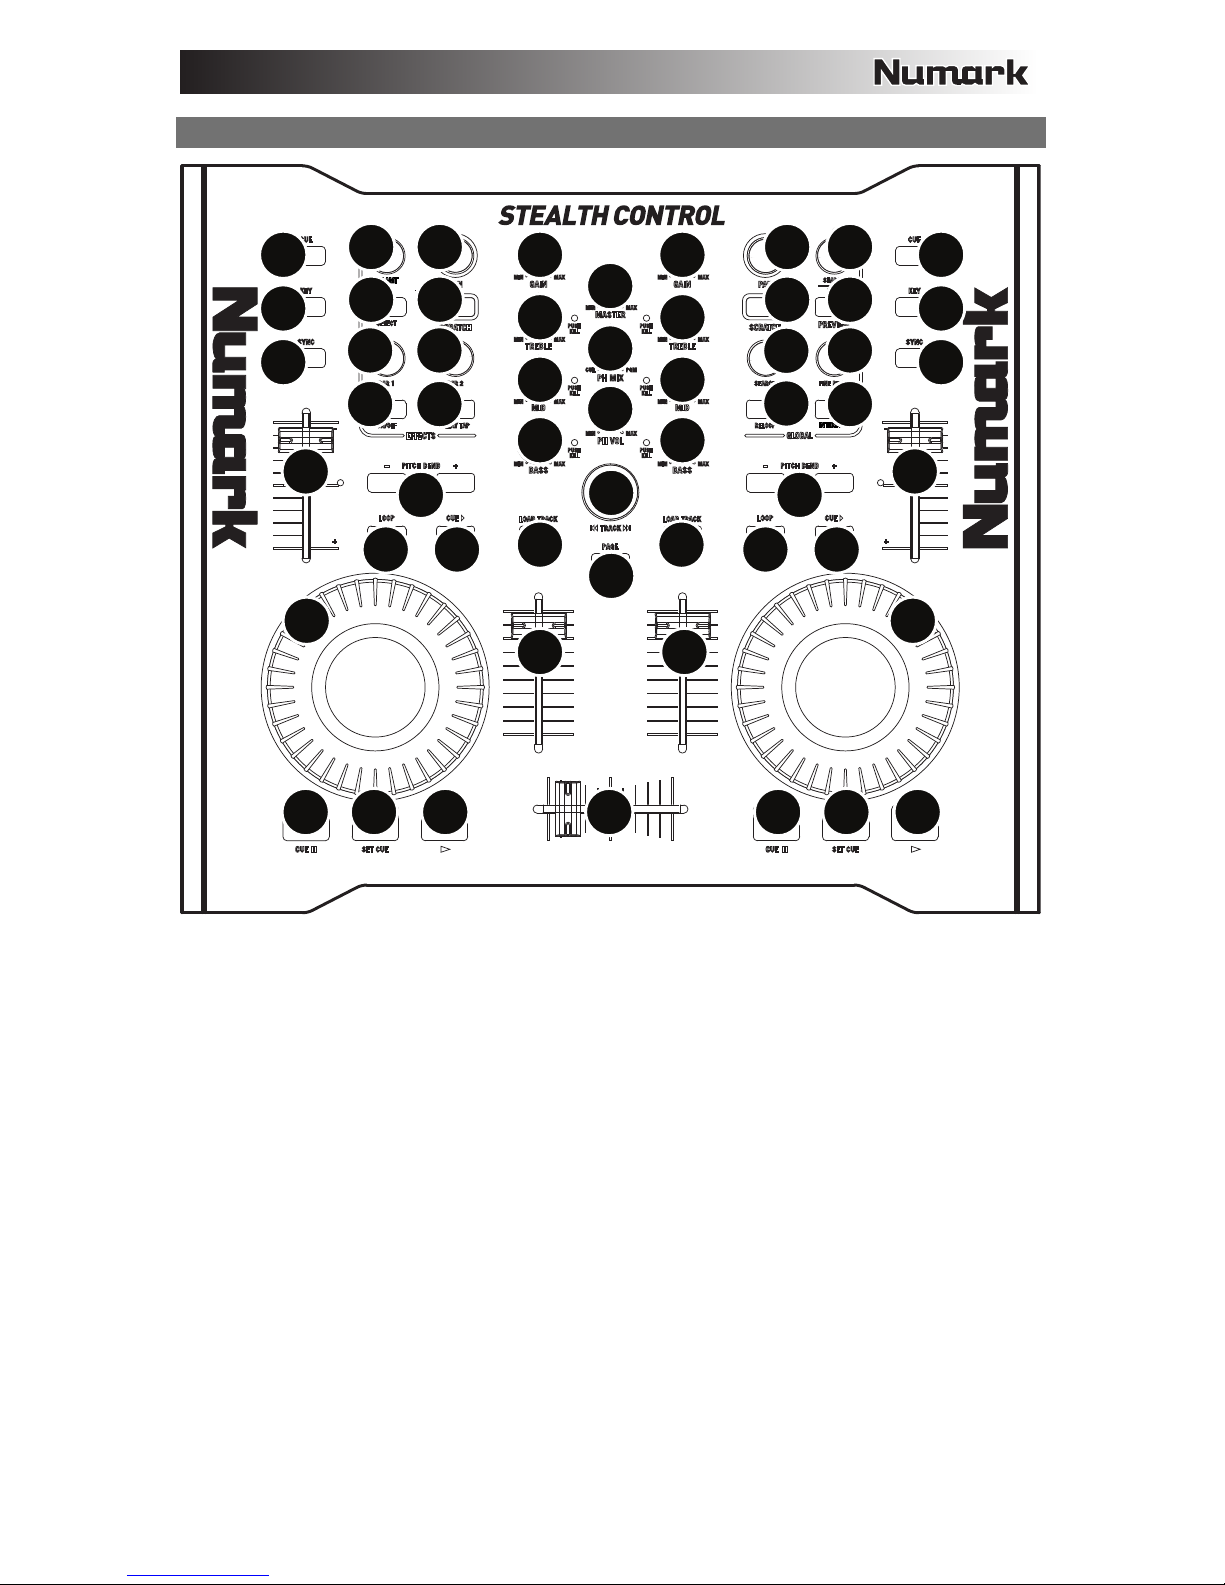
TRAKTOR 3 LE CONTROLLER MAPPING
1
15
22
23
22
23
26
27
24
25
28
29
30
31
34
35
32
33
16
16
16
19
21
20
17 17
18
15
16
16
16
2
8 8
9
10 10
13 13
9
5 6 4
14 7 14 7
5 6 4
3
11
12
3
11
12
1. TRACK - You can use the TRACK knob to scroll
through the music on your computer. Press down
on the TRACK knob to load the selected track in
the preview player. Use the TRACK knob while
pressing and holding down the PAGE button to
browse and navigate through your different drives,
folders and playlists. Once you release the PAGE
button, you can then use the TRACK knob to
browse the contents of the selected folder.
2. PAGE - Holding down the PAGE button while
using certain controls on the Stealth Control allows
for an additional layer of functionality.
3. CUE SOURCE - Press the CUE SOURCE button
to send the music playing on the deck to the
Monitor channel. Please note that if you are not
using a multiple output audio interface, the Monitor
(headphone) channel will be the same as the
Master channel. When browsing the folder
structure on the left of the screen, while holding
down the PAGE button, you can use the CUE
SOURCE buttons to expand and collapse the
selected folder. The left CUE SOURCE button will
collapse the selected folder, while the right CUE
SOURCE button will expand the selected folder.
4. PLAY - Press the PLAY button to begin playing
the track.
5. CUE - The CUE button will return and pause the
track at the last set cue point. For temporary
play of the cue point, you can hold down the
CUE button. The track will play for as long as
the button is held down and will return to the
cue point once it has been released.
6. SET CUE - You can use this button to set a
new cue point.
7. CUE PLAY - You can hold down the CUE
PLAY button to go back and pause at the last
set cue point. When you release the CUE
PLAY button, the track will begin playing.
8. VOLUME - Each virtual deck features a
VOLUME fader which can be used to make
volume adjustments to the music playing on
the corresponding deck.
9. PITCH - Each virtual deck features a PITCH
SLIDER, which can be used to change the
pitch or tempo of the music playing on the
corresponding deck.
10. PITCH BEND -/+ - You can use these two pitch
bend buttons to temporarily adjust the pitch
and tempo of the music playing on the
corresponding deck. Pitch bend is typically
used to make small adjustments when mixing
two tracks so their beats occur synchronously.
Page 6

4
11. KEY - The KEY button engages the Key Lock
feature in Traktor LE. When Key Lock is engaged,
the pitch of the music playing on the deck will be
locked to the current value. You can then adjust
the tempo of the music, independent of the pitch.
12. SYNC - Press this button to synchronize the
tempo of the deck to the tempo of the other virtual
deck. (To synchronize the beats of the two decks,
use the INTERLOCK button.)
13. JOG WHEEL – While a track is playing on the
deck, the jog wheel functions as a pitch bend.
While a track is paused, you can use the jog wheel
to quickly scan the current track. When the
SCRATCH button is engaged, the jog wheel
allows you to “scratch” the music on the deck.
14. LOOP - Press this button to create a seamless
one bar loop. When you press the LOOP button,
the track will begin looping until you release the
loop by pressing the LOOP button again.
15. GAIN - Each virtual deck features a GAIN knob
which can be used to make adjustments to the
gain level on the corresponding deck.
16. EQ - Each deck features an EQ which can be
used to make adjustments to the levels of the
Treble, Mid, and Bass frequencies of the music.
By pressing down, each EQ knob can also
function as a Kill switch, removing that frequency
band from the music. The LED next to the knob
will light to let you know that the Kill feature has
been engaged. To disengage the Kill feature,
press on the knob again.
17. LOAD TRACK - Each virtual deck features a
LOAD TRACK button. Selecting a track and
pressing the LOAD TRACK button will load the
track to the corresponding deck. You can "focus"
on one of the decks by holding down the PAGE
button and pressing the corresponding deck's
LOAD TRACK button. Certain controls on the
Stealth Control will only address the deck which is
currently "in focus".
18. CROSSFADER - You can use the CROSSFADER
to fade between the two tracks playing on the
virtual decks. If the crossfader is in the left-most
position, you will only hear the audio from deck A.
If the crossfader is in the middle position, you will
be able to hear both the audio from deck A and
the audio from deck B. If the crossfader is in the
right-most position, you will only be able to hear
the audio from deck B.
19. MASTER - The MASTER knob functions as
Master Level control, allowing you to change the
overall volume of the mix.
20. PH VOL - This knob adjusts the Monitor Mix level.
Please note that, unless you are using a multiple
output audio interface, the Monitor and Master
channels will be the same.
21. PH MIX - This knob adjusts the balance between
the Monitor and Master channels in the
headphones. Please note that, unless you are
using a multiple output audio interface, the Monitor
and Master Mix channels will be the same.
22. PAN - This knob functions as the deck’s left/right
balance control.
23. SCRATCH - Press and hold this button for Scratch
Mode. While Scratch Mode is activated, you can
use the jog wheel to scratch the audio playing on
the deck.
EFFECT SECTION
::::
24. FX AMT - This knob adjusts how much of the
selected effect will be mixed into the Master
Mix. In other words, if the knob is all the way
down, you will hear only the original sound.
Conversely, if the knob is all the way up, you
will hear only the effected sound.
25. SELECT - Press this button to select between
the different effects to be applied to the Master
Mix.
26. PAR 1 - This knob adjusts the first parameter
of the selected effect. Please note that this
parameter will be different, depending on which
effect you have selected.
27. ON/OFF - Press this button to turn the master
effect on and off.
28. PAR 2 - This knob adjusts the second
parameter of the selected effect, if available.
Please note that this parameter may be
different or unavailable, depending on which
effect you have selected.
29. DELAY TAP - This button can be used to
adjust a third parameter of the selected effect,
if available. For example, if you have selected
the Delay effect, you can use this button to tap
out the BPM of the Delay effect.
GLOBAL SECTION ::::
30. SEARCH/PLAY- This knob allows you to seek
through the preview player.
31. PREVIEW - Press this button to start and
pause the preview player.
32. SEARCH - This knob allows you to seek
through the music loaded on the deck which is
currently "in focus". You can focus on a deck
by holding down the PAGE button and
pressing the corresponding deck's CUE
SOURCE button.
33. RELOOP - You can press this button to enter
the last set loop. If no loop has been
previously set, pressing RELOOP will begin
looping the first bar of the track. You can focus
on a deck by holding down the PAGE button
and pressing the corresponding deck's CUE
SOURCE button.
34. FINE PITCH - This button allows you to make
fine pitch adjustments to the music on the deck
which is currently "in focus". You can focus on
a deck by holding down the PAGE button and
pressing the corresponding deck's CUE
SOURCE button.
35. INTERLOCK - This button allows you to
synchronize the downbeats of the music
playing on the deck currently "in focus" to the
downbeats of the other deck. You can focus
on a deck by holding down the PAGE button
and pressing the corresponding deck's CUE
SOURCE button.
Page 7
5
Esta Guía de inicio rápido explica cómo instalar y comenzar a usar rápidamente el sistema para
DJ STEALTH CONTROL de Numark. Tómese unos minutos para leer la guía y familiarizarse con
el procedimiento de instalación y los controles básicos.
Hemos diseñado al STEALTH CONTROL como sistema completo para los DJ basados en
software. STEALTH CONTROL es un dispositivo compatible con MIDI que se puede usar con
cualquier software que soporte el protocolo MIDI. Hemos incluido dos paquetes de software
Traktor 3 LE de Native Instruments y Fusion Live de MixMeister —que le permiten actuar como
DJ en cuanto saque el sistema de la caja.
Asimismo, recomendamos especialmente leer los manuales de referencia de software incluidos
en el disco de instalación, a fin de aprovechar al máximo el STEALTH CONTROL. ¡Éxito como
DJ
!
Para tener en cuenta
: Si va a operar el Stealth Control con un hub USB, recomendamos que use ya
sea un hub alimentado o el adaptador de alimentación de 6 V, 1 A opcional. De esta forma se
asegurará el funcionamiento correcto.
CONTENIDO DE LA CAJA
STEALTH CONTROL
MANUAL DE INICIO RÁPIDO DEL USUARIO
INSTRUCCIONES DE SEGURIDAD E INFORMACIÓN DE LA GARANTÍA
CABLE USB
CD DE TRAKTOR LE
CUPÓN DE MIXMEISTER FUSION LIVE
::: Inicio rápido de Stealth Control
NOTA ACERCA DEL CONTROL MIDI :::::
Stealth Control está diseñado como dispositivo compatible con MIDI, lo que le
permite controlar cualquier aplicación de computadora que soporte el protocolo
MIDI. Esto significa que no sólo puede usar Stealth Control con el software incluido,
sino que también puede usar el controlador con una variedad de aplicaciones de
música y video adicionales. A fin de usar Stealth Control con su software favorito,
debe habilitar Stealth Control como dispositivo de entrada MIDI en las preferencias
de su software. Tenga en cuenta que dependiendo de su software, Stealth Control
p
uede no aparecer necesariamente como “Stealth Control” en las preferencias MIDI.
Page 8
6
DIAGRAMA DE CONEXIÓN
Estudie el diagrama de conexión de arriba.
1. Conecte el puerto USB de la STEALTH CONTROL a un puerto USB disponible de su computadora, usando el
cable USB incluido. La interfaz STEALTH CONTROL se alimenta a través del bus USB de su computadora
2. (Opcional) Puede alimentar la STEALTH CONTROL conectando un adaptador de alimentación opcional de 6 V
1 A a la entrada DC IN de la interfaz. Tenga en cuenta que no es necesario tener el adaptador enchufado para
que funcione la STEALTH CONTROL. En cambio, debe conectar este adaptador si su computadora no puede
suministrar suficiente energía a la STEALTH CONTROL.
CONEXIONES DEL PANEL TRASERO
3
12
1. PUERTO USB – Use el cable USB provisto para conectar este puerto a un puerto USB disponible de su
computadora. Cuando esté enchufada a su computadora, la unidad extrae energía por la conexión USB.
2. DC IN (Entrada de CC) – Si su computadora no suministra suficiente energía a través del bus USB, es
conveniente que alimente la unidad conectando un adaptador opcional de 6 V/1 A a esta entrada y enchufando
el adaptador a una fuente de alimentación.
COMPUTADORA
ADAPTOR DE
ALIMENTACIÓN
(OPCIONAL)
Page 9

7
ASIGNACIÓN DEL CONTROLADOR PARA TRAKTOR 3 LE
1
15
22
23
22
23
26
27
24
25
28
29
30
31
34
35
32
33
16
16
16
19
21
20
17 17
18
15
16
16
16
2
8 8
9
10 10
13 13
9
5 6 4
14 7 14 7
5 6 4
3
11
12
3
11
12
1. PISTA – Puede usar la perilla TRACK para
desplazarse por la música en su computadora.
Pulse la perilla TRACK (Pista) para cargar la
pista seleccionada en el reproductor de vista
preliminar. Use la perilla TRACK mientras
mantiene presionado el botón PAGE para
examinar y navegar por sus diferentes discos,
carpetas y listas de reproducción. Cuando
suelte el botón PAGE, puede usar la perilla
TRACK para examinar el contenido de la
carpeta seleccionada.
2. PAGINACIÓN – Manteniendo oprimido el
botón PAGE mientras usa ciertos controles de
Stealth Control, es posible obtener una capa
adicional de funcionalidad.
3. FUENTE DE CUE – Pulse el botón CUE
SOURCE para enviar la música que se
reproduce en la bandeja al canal de monitor.
Tenga en cuenta que si no usa una interfaz de
audio con varias salidas, el canal monitor es el
mismo que el canal maestro. Cuando examina
la estructura de carpetas de la izquierda de la
pantalla mientras mantiene presionado el
botón PAGE, puede usar los botones CUE
SOURCE para expandir y comprimir la carpeta
seleccionada. El botón CUE SOURCE
izquierdo comprime la carpeta seleccionada y
el derecho la expande.
4. REPRODUCIR – Pulse el botón
REPRODUCIR para comenzar a reproducir la
pista.
5. CUE – El botón CUE regresa y detiene la pista
en el último punto de cue establecido. Para
reproducir temporalmente el punto de cue,
puede mantener presionado el botón CUE. La
pista se reproduce mientras el botón se
mantiene presionado y retorna al punto de cue
cuando se suelta.
6. ESTABLECER CUE – Puede usar este botón
para establecer un nuevo punto de cue.
7. REPRODUCIR CUE – Puede mantener
presionado el botón CUE PLAY para volver y
parar la música en el último punto de cue
seleccionado. Cuando suelte el botón CUE
PLAY, comienza a reproducirse la pista.
8. VOLUMEN – Cada bandeja virtual tiene un
fader de VOLUMEN que se puede usar para
hacer los ajustes del volumen de la música
que se reproduce en la bandeja
correspondiente.
9. PITCH – Cada bandeja virtual tiene un
CURSOR DE PITCH que se puede usar para
cambiar el pitch o tempo de la música que se
reproduce en la bandeja correspondiente.
10. INFLEXIÓN DE PITCH -/+ - Puede usar estos
dos botones de inflexión de pitch para ajustar
temporalmente el pitch y el tempo de la música
que se reproduce en la bandeja
correspondiente. La inflexión de pitch se usa
típicamente para hacer ajustes pequeños
cuando se mezclan dos pistas, de modo que
sus beats se produzcan sincronizadamente.
11. TONALIDAD – El botón KEY activa la función
de bloque de tonalidad en Traktor LE. Cuando
se acopla Key Lock, el pitch de la música que
se reproduce en la bandeja se bloquea en el
valor de ese momento. Puede ajustar
entonces el tempo de la música
independientemente del pitch.
12. SINCRONISMO – Pulse este botón para
sincronizar el tempo de la bandeja con el
tempo de la otra bandeja. (Para sincronizar
los beats de las dos bandejas, use el botón
INTERLOCK).
Page 10

8
13. RUEDA DE AVANCE LENTO – Cuando la
bandeja está reproduciendo, al girar la RUEDA
DE AVANCE LENTO se inflexiona
temporalmente el pitch de la pista. Cuando la
bandeja está en pausa, al girar la RUEDA DE
AVANCE LENTO se desplaza a través del
audio de la pista. Puede rayar con la RUEDA
DE AVANCE LENTO si el botón SCRATCH de
la bandeja está accionado.
14. CICLO – Pulse este botón para crear un ciclo
de una barra sin discontinuidades. Cuando
pulse el botón LOOP, la pista comienza a
efectuar un ciclo hasta que lo libere pulsando
el botón nuevamente.
15. GANANCIA – Cada bandeja virtual tiene una
perilla GAIN que se puede usar para ajustar el
nivel de ganancia de la bandeja
correspondiente.
16. ECUALIZADOR – Cada bandeja tiene un
ecualizador que se puede usar para ajustar los
niveles de las frecuencias altas, medias y
bajas de la música. Al pulsarla, cada perilla
del ecualizador puede funcionar también como
interruptor de supresión que elimina esa banda
de frecuencias de la música. El LED que está
junto a la perilla se enciende para indicarle que
se activó la función Kill (Supresión). Para
desactivar esta función, pulse nuevamente la
perilla.
17. CARGAR PISTA – Cada bandeja virtual posee
un botón LOAD TRACK. Seleccionando una
pista y pulsando el botón LOAD TRACK se
carga la pista en la bandeja correspondiente.
Es posible "enfocarse" en una de las bandejas
manteniendo presionado el botón PAGE y
pulsando el botón LOAD TRACK de la bandeja
correspondiente. Ciertos controles de Stealth
Control sólo se dirigen a la bandeja que está
"enfocada" en ese momento.
18. CROSSFADER – Se puede usar el
CROSSFADER para realizar la fusión entre las
dos pistas que se están reproduciendo en las
bandejas virtuales. Si el crossfader está en el
extremo izquierdo, sólo oirá el audio de la
bandeja A. Si está en la posición central,
podrá oír el audio de ambas bandejas A y B.
Si está en el extremo derecho, sólo podrá oír
el audio de la bandeja B.
19. NIVEL MAESTRO – La perilla MASTER
funciona como control de nivel maestro,
permitiéndole cambiar el volumen general de
la mezcla.
20. PH VOL – Esta perilla ajusta el nivel del canal
de monitor. Tenga en cuenta que, a menos
que esté usando una interfaz de audio con
varias salidas, el canal monitor es el mismo
que el canal maestro.
21. PH MIX – Esta perilla ajusta el balance entre
los canales de monitor y maestro. Tenga en
cuenta que, a menos que esté usando una
interfaz de audio con varias salidas, el canal
monitor es el mismo que el canal maestro.
22. PAN – Esta perilla funciona como control de
balance izquierda/derecha en la bandeja.
23. SCRATCH – Pulse y mantenga presionado
este botón para activar el modo Scratch
(Rayado). Cuando el modo Scratch está
activado, puede usar la rueda de avance lento
para rayar el audio que se reproduce en la
bandeja.
SECCIÓN DE EFECTOS ::::
24. FX AMT – Esta perilla ajusta la proporción del
efecto seleccionado que se mezcla en la
mezcla maestra. En otras palabras, si la
perilla está totalmente hacia abajo, oirá sólo el
sonido original. A la inversa, si está totalmente
hacia arriba, oirá sólo el sonido con efectos.
25. SELECT – Pulse este botón para seleccionar
entre los diferentes efectos a aplicar a la
mezcla maestra.
26. PAR 1 – Esta perilla ajusta el primer parámetro
del efecto seleccionado. Tenga en cuenta que
este parámetro será diferente en función del
efecto que seleccionó.
27. ON/OFF – Pulse este botón para activar y
desactivar el efecto maestro.
28. PAR 2 – Esta perilla ajusta el segundo
parámetro del efecto seleccionado. Tenga en
cuenta que este parámetro será diferente o no
disponible en función del efecto que
seleccionó.
29. DELAY TAP – Este botón se puede usar para
ajustar un tercer parámetro del efecto
seleccionado, si está disponible. Por ejemplo,
si seleccionó el efecto Delay (Retardo), puede
usar este botón para golpear los BPM del
efecto.
CONTROLES GLOBALES:::
30. SEARCH/PLAY– Esta perilla le permite buscar
en el reproductor de vista preliminar.
31. PREVIEW– Pulse este botón para iniciar y
poner en pausa el reproductor de vista
preliminar.
32. SEARCH – Este botón le permite buscar en la
música cargada en la bandeja que está
“enfocada” en ese momento. Puede enfocarse
en una bandeja manteniendo presionado el
botón PAGE y pulsando el botón FUENTE DE
CUE (CUE SOURCE) de la bandeja
correspondiente.
33. RELOOP – Puede pulsarlo para ingresar el
último ciclo determinado. Si no se determinó
ningún ciclo previamente, al pulsar el botón de
REPETICIÓN DE CICLO comienza el ciclo de
la primera barra de la pista. Puede enfocarse
en una bandeja manteniendo presionado el
botón PAGE y pulsando el botón FUENTE DE
CUE (CUE SOURCE) de la bandeja
correspondiente.
34. FINE PITCH – Este botón le permite hacer
ajustes finos de pitch en la música de la
bandeja que está “enfocada” en ese momento.
Puede enfocarse en una bandeja manteniendo
presionado el botón PAGE y pulsando el botón
FUENTE DE CUE (CUE SOURCE) de la
bandeja correspondiente.
35. INTERLOCK – Este botón le permite
sincronizar los downbeats de la música que se
reproduce en la bandeja que está “enfocada”
en ese momento a los downbeats de la otra
bandeja. Puede enfocarse en una bandeja
manteniendo presionado el botón PAGE y
pulsando el botón FUENTE DE CUE (CUE
SOURCE) de la bandeja correspondiente.
Page 11

9
Ce guide d’utilisation simplifié vous explique comment installer et utiliser rapidement le système
STEALTH CONTROL DJ de Numark. Veuillez prendre quelques minutes pour lire ce guide
d'utilisation simplifié afin de vous familiariser avec la procédure d’installation et les commandes
de base.
Nous avons conçu l’STEALTH CONTROL de manière qu’il soit un système des plus complet pour
les DJ qui se servent d’applications logicielles dans leurs prestations. L’STEALTH CONTROL est
un appareil MIDI et peut être utilisé avec tout logiciel qui prend en charge le protocole MIDI. Nous
avons inclus les logiciels Traktor 3 LE de Native Instruments et MixMeister Fusion Live qui vous
permettront de commencer immédiatement.
Nous vous recommandons également de lire les guides de référence des logiciels inclus sur le
disque d'installation afin de profiter pleinement de toutes les fonctions du STEALTH CONTROL.
Bon DJing!
Remarque :
Si vous branchez l’Stealth Control à un répéteur USB, nous vous recommandons d'utiliser
un câble d'alimentation 6 V 1 A vendu séparément. Ceci assurera le bon fonctionnement de l’appareil.
CONTENU DE LA BOÎTE INSTALLATION
STEALTH CONTROL
GUIDE D’UTILISATION SIMPLIFIÉ
INSTRUCTIONS DE SECURITE ET INFORMATIONS DE GARANTIE
CÂBLE USB
CD DE TRAKTOR LE
COUPON DE MIXMEISTER FUSION LIVE
::: Guide d’utilisation simplifié pour Stealth Control
REMARQUE A PROPOS DU CONTROLE MIDI :::::
Stealth Control est compatible avec le protocole MIDI, ainsi, vous permettant de
commander tout logiciel que supporte le protocole MIDI. Non seulement pouvezvous utiliser le Stealth Control avec les logiciels fournis, mais vous pouvez utiliser le
contrôleur avec une multitude d’autres applications audio et vidéo. Afin d’utiliser le
Stealth Control avec vos applications préférées, vous devrez l’ajouter en tant
qu’appareil d’entrée MIDI dans les préférences de vos applications. Veuillez noter
que selon vos applications, le Stealth Control peut ne pas apparaître comme
« Stealth Control » dans les préférences MIDI.
Page 12

10
SCHÉMA DE CONNEXION
Examinez bien le schéma d'installation ci-dessus.
1. Branchez une des extrémités du câble USB inclut au port USB du STEALTH CONTROL et l’autre au port USB de
l’ordinateur. Le STEALTH CONTROL sera alimenté par la connexion USB de l'ordinateur.
2. (Option) Vous pouvez également alimenter le STEALTH CONTROL à l’aide d’un câble d’alimentation 6 V 1A
branché dans l'entrée DC IN sur le STEALTH CONTROL. Veuillez noter qu'il n’est pas nécessaire de brancher le
câble d’alimentation pour que le STEALTH CONTROL fonctionne. Cependant, vous devez utiliser le câble
d’alimentation si l’ordinateur ne génère pas suffisamment d’énergie pour alimenter le STEALTH CONTROL.
PANNEAU ARRIÈRE
3
12
1. USB PORT – Branchez le câble USB depuis le port USB du STEALTH CONTROL au port USB disponible de votre
ordinateur. Lorsque branché à l’ordinateur, l’appareil tire son énergie de la connexion USB.
2. DC IN – Si votre ordinateur ne génère pas suffisamment d’énergie pour alimenter le STEALTH CONTROL par le
biais de son port USB, vous devrez brancher un câble d’alimentation 6 V 1A non fourni à cette entrée et à une
prise secteur.
ORDINATEUR
CÂBLE
D’ALIMENTATION
(OPTIONNEL)
Page 13

11
MAPPAGES POUR TRAKTOR 3 LE
1
15
22
23
22
23
26
27
24
25
28
29
30
31
34
35
32
33
16
16
16
19
21
20
17 17
18
15
16
16
16
2
8 8
9
10 10
13 13
9
5 6 4
14 7 14 7
5 6 4
3
11
12
3
11
12
1. TRACK – Utilisez le bouton TRACK pour parcourir
les pistes sur votre ordinateur. Pour charger une
piste sélectionnée dans le lecteur, appuyez sur le
bouton TRACK. Utilisez le bouton TRACK tout en
maintenant la touche PAGE enfoncée afin de
parcourir les différents disques, dossiers et listes
d’écoute. Une fois que vous avez relâché la
touche PAGE, vous pouvez utiliser le bouton
TRACK pour parcourir le contenu des dossiers
sélectionnés.
2. PAGE – Maitenir la touche PAGE enfoncée tout
en utilisant certaines commandes du Stealth
Control vous permet d’ajouter un autre niveau de
fonctionnalités.
3. CUE SOURCE – Enfoncez la touche CUE
SOURCE pour acheminer la musique en cours de
lecture au canal de la pré-écoute. Veuillez noter
que si vous n’utilisez pas d’interface audio à
multiples sorties, le canal de la pré-écoute et du
mix principal sera le même. Lorsque vous
parcourez la structure des dossiers à gauche de
l’écran tout en maintenant la touche PAGE, vous
pouvez utiliser les touches CUE SOURCE pour
agrandir ou diminuer l’arborescence du dossier
sélectionné. La touche CUE SOURCE gauche
permet de diminuer l’arborescence du dossier
sélectionné, alors que la touche droite permet
d'agrandir l’arborescence du dossier sélectionné.
4. PLAY – Appuyez sur la touche PLAY pour faire la
lecture de la piste.
5. CUE – La touche CUE permet de pauser la piste
et de retourner au dernier point de repère
programmé. Pour faire la lecture temporaire
du point de repère, maintenez la touche CUE
enfoncée. La piste joue aussi longtemps que
la touche est enfoncée et revient au point de
repère lorsqu’elle est relâchée.
6. SET CUE – Vous pouvez utiliser cette touche
pour créer un nouveau point de repère.
7. CUE PLAY – Vous pouvez maintenir la touche
CUE PLAY enfoncée pour retourner et faire un
arrêt de lecture sur le dernier point de repère
programmé. Lorsque vous relâchez la touche
CUE PLAY, la piste recommence à jouer.
8. VOLUME – Chaque lecteur virtuel est doté
d'un potentiomètre qui permet de faire des
ajustements à la musique en cours de lecture
sur le lecteur virtuel.
9. PITCH – Chaque lecteur virtuel est doté d'un
potentiomètre PITCH SLIDER qui permet de
faire des ajustements à la tonalité ou au tempo
de la musique en cours de lecture sur le
lecteur virtuel correspondant.
10. PITCH BEND –/+ – Vous pouvez utiliser ces
deux touches pour faire des ajustements
temporaires à la tonalité ou au tempo de la
musique en cours de lecture sur le lecteur
virtuel correspondant. Les modifications de la
vitesse de lecture sont typiquement faites pour
synchroniser les battements de deux pistes
afin de les mixer.
Page 14

12
11. KEY – La touche KEY permet d’activer la fonction
de verrouillage tonal dans Traktor LE. Lorsque la
fonction de verrouillage tonal est activée, la
tonalité de la musique est verrouillée avec les
valeurs actuelles. Vous pouvez modifier le tempo
de la musique, sans modifier la tonalité.
12. SYNC – Enfoncez cette touche afin de
synchroniser le tempo du module au tempo de
l’autre module. (Pour synchroniser le rythme des
deux modules, utilisez la touche INTERLOCK.)
13. JOG WHEEL – Lorsque le module est en mode
lecture, tourner la molette permet de modifier
temporairement la vitesse de lecture de la piste.
Lorsque le module est en mode pause, tourner la
molette permet de parcourir piste. Vous pouvez
faire du scratch à l’aide de la molette si la touche
SCRATCH est activée.
14. LOOP – Appuyez sur cette touche pour créer une
boucle parfaite d’une barre de mesure. Lorsque
vous appuyez sur la touche LOOP, la piste lance
la boucle et la joue jusqu’à ce que vous relâchiez
la touche LOOP en l’enfonçant de nouveau.
15. GAIN – Chaque lecteur virtuel est doté d'un
bouton GAIN qui permet de faire des ajustements
au volume du lecteur virtuel correspondant.
16. EQ – Chaque lecteur virtuel est doté d'une section
d’égalisation qui permet de modifier les
fréquences aiguës, moyennes et graves de la
musique : boutons Treble, Mid et Bass. En
l’enfonçant, chaque bouton EQ peut également
servir pour éliminer la fréquence (kill)
correspondante de la musique. Le témoin DEL à
côté du bouton indique si la fonction d’élimination
est activée. Pour désactiver la fonction
d’élimination de fréquence, appuyez de nouveau
sur le bouton.
17. LOAD TRACK – Chaque lecteur virtuel est doté
d’une touche LOAD TRACK. Sélectionner une
piste tout en enfonçant la touche LOAD TRACK
permet de charger la piste sur le lecteur
correspondant. Vous pouvez cibler un des
lecteurs en particulier en maintenant la touche
PAGE enfoncée et en appuyant sur la touche
LOAD TRACK du lecteur correspondant.
Certaines commandes du Stealth Control ne
fonctionneront que sur le lecteur présentement
ciblé.
18. CROSSFADER – Vous pouvez utiliser le
CROSSFADER pour faire un fondu entre les deux
pistes en cours de lecture. Si le crossfader est à
l'extrême gauche, vous entendrez uniquement
l'audio provenant du lecteur A. Si le crossfader
est au milieu, vous entendrez l'audio provenant du
lecteur A et du lecteur B. Si le crossfader est à
l'extrême droite, vous entendrez uniquement
l'audio provenant du lecteur B.
19. MASTER – Le bouton MASTER permet d'ajuster
les niveaux généraux, permettant de modifier le
volume du mix.
20. PH VOL – Ce bouton permet de régler le niveau
du canal de la pré-écoute. Veuillez noter que si
vous n’utilisez pas d’interface audio à multiples
sorties, le canal de la pré-écoute et du mix
principal sera le même.
21. PH MIX – Ce bouton permet de régler l’équilibre
entre le canal de la pré-écoute et du mix principal.
Veuillez noter que si vous n’utilisez pas d’interface
audio à multiples sorties, le canal de la pré-écoute
et du mix principal sera le même.
22. PAN – Ce bouton permet de régler les
niveaux acoustiques du lecteur.
23. SCRATCH – Enfoncez et maintenez la touche
pour activer le mode Scratch. Lorsque le
mode Scratch est activé, vous pouvez utiliser
la molette pour faire du scratch sur la musique
du lecteur.
SECTION DES EFFETS:
24. FX AMT – Ce bouton permet de régler la
quantité d’effet à ajouter au mix principal.
C’est-à-dire, si le bouton est au minimum,
uniquement le signal non traité sera entendu.
Inversement, si le bouton est au maximum,
uniquement le signal traité sera entendu.
25. SELECT – Appuyez sur cette touche pour
sélectionner l’effet à appliquer au mix principal.
26. PAR 1 – Ce bouton permet de régler le
premier paramètre de l’effet sélectionné.
Veuillez noter que ce paramètre sera différent,
selon l’effet sélectionné.
27. ON/OFF – Cette touche permet
d’activer/désactiver l’effet principal.
28. PAR 2 – Ce bouton permet de régler le
deuxième paramètre de l’effet sélectionné, si
disponible. Veuillez noter que ce paramètre
sera différent, selon l’effet sélectionné.
29. DELAY TAP – Cette touche permet de régler
le troisième paramètre de l’effet sélectionné, si
disponible. Par exemple, si vous avez
sélectionné l’effet Delay, vous pouvez utiliser
cette touche pour taper le BPM de l’effet Delay.
COMMANDES GÉNÉRALES:
30. SEARCH/PLAY – Ce bouton vous permet de
parcourir l’écran d’affichage du lecteur.
31. PREVIEW – Ce bouton permet de lancer la
lecture et de pauser le lecteur.
32. SEARCH – Ce bouton permet de faire une
recherche dans la musique chargée sur le
lecteur présentement ciblé. Vous pouvez
cibler un des lecteurs en maintenant la touche
PAGE enfoncée et en appuyant sur la touche
CUE SOURCE du lecteur correspondant.
33. RELOOP – Enfoncez cette touche pour entrer
la dernière boucle programmée.
Lorsqu’aucune boucle n’est programmée,
appuyer sur la touche RELOOP permet de
commencer le bouclage de la première barre
de mesure de la piste. Vous pouvez cibler un
des lecteurs en maintenant la touche PAGE
enfoncée et en appuyant sur la touche CUE
SOURCE du lecteur correspondant.
34. FINE PITCH – Ce bouton permet de faire des
réglages précis à la tonalité de la musique en
cours de lecture sur le lecteur présentement
ciblé. Vous pouvez cibler un des lecteurs en
maintenant la touche PAGE enfoncée et en
appuyant sur la touche CUE SOURCE du
lecteur correspondant.
35. INTERLOCK – Cette touche vous permet de
synchroniser les premiers battements de la
musique en cours sur le lecteur présentement
ciblé aux premiers battements de la musique
sur l’autre lecteur. Vous pouvez cibler un des
lecteurs en maintenant la touche PAGE
enfoncée et en appuyant sur la touche CUE
SOURCE du lecteur correspondant.
Page 15

13
Questa guida rapida spiega in maniera concisa ed efficace come impostare ed iniziare a usare il
Controller MIDI Stealth Control di Numark. Dedicare alcuni minuti alla lettura della guida per
familiarizzarsi con la procedura d’impostazione e i comandi fondamentali.
Questa Guida rapida spiega come configurare rapidamente e iniziare a utilizzare il sistema
Numark STEALTH CONTROL DJ. Dedicate alcuni minuti a leggere attentamente la guida e a
familiarizzare con la procedura di configurazione e con i comandi fondamentali.
Abbiamo concepito l’STEALTH CONTROL come un sistema completo per DJ che impiegano
software. L’STEALTH CONTROL è un dispositivo compatibile con MIDI e può essere utilizzato
con qualsiasi software che supporti il protocollo MIDI. Abbiamo incluso due pacchetti software, il
Traktor 3 LE di Native Instruments e il MixMeister Fusion Live, che vi permettono di cimentarvi
come DJ fin da subito.
Si raccomanda inoltre di leggere i manuali di riferimento dei software, inclusi nel disco di
installazione, per apprezzare appieno l’STEALTH CONTROL. Buon divertimento nel mondo dei
DJ
!
Nota bene: Se si utilizza l’Stealth Control con un hub USB, raccomandiamo che utilizziate o un hub
alimentato o l’adattatore di alimentazione 6V 1A opzionale. Ciò garantirà un funzionamento adeguato.
CONTENUTI DELLA CONFEZIONE
STEALTH CONTROL
MANUALE RAPIDO DI UTILIZZO
ISTRUZIONI DI SICUREZZA & LE INFORMAZIONI DELLA GARANZIA
CAVO USB
CD DI TRAKTOR LE
COUPON DI MIXMEISTER FUSION LIVE
::: Guida rapida Stealth Control :::
UNA NOTA SUL CONTROLLO MIDI :::::
Il Stealth Control è un dispositivo progettato per essere compatibile MIDI, che
permette di controllare qualsiasi applicazione del computer che supporti il protocollo
MIDI. Ciò significa che il Stealth Control può essere utilizzato con il software in
dotazione e anche con una varietà di altre applicazioni musicali e video. Per
utilizzare il Stealth Control con il proprio software preferito, bisogna abilitare il Stealth
Control come dispositivo d’ingresso MIDI a livello delle preferenze del software. A
seconda del software, il Stealth Control potrebbe non apparire come “Stealth
Control” tra le opzioni MIDI.
Page 16

14
SCHEMA DEI COLLEGAMENTI
Esaminare attentamente lo schema dei collegamenti di cui sopra.
1. Collegare la porta USB del STEALTH CONTROL ad una porta USB libera del computer, servendosi del cavo USB
in dotazione. Il STEALTH CONTROL verrà alimentato dalla porta USB del computer.
2. (Opzionale) i può alimentare il STEALTH CONTROL collegando un adattatore 6V 1A opzionale all’ingresso CC IN
del STEALTH CONTROL. Nota bene: affinché il STEALTH CONTROL funzioni, non è necessario che l’adattatore
sia inserito. Tuttavia, collegare l’adattatore nel caso in cui il computer non fosse in grado di fornire energia
sufficiente ad alimentare il STEALTH CONTROL.
COLLEGAMENTI PANNELLO POSTERIORE
3
12
1. USB PORT (Porta USB) – Servirsi del cavo USB in dotazione per collegare questa porta ad una porta USB
disponibile sul computer. Una volta collegato al computer, l’apparecchio trarrà l’alimentazione dal collegamento
USB.
2. DC IN (Ingresso CC) – Nel caso in cui il computer non fosse in grado di garantire energia a sufficienza tramite la
porta USB, si può alimentare l’apparecchio dall’esterno collegando a questo ingresso un adattatore 6V/1A e
collegando quest’ultimo all’alimentazione di rete.
COMPUTER
ADATTATORE DI
ALIMENTAZIONE
(OPZIONALE)
Page 17

15
MAPPATURE DI COMANDI IN TRAKTOR 3 LE
1
15
22
23
22
23
26
27
24
25
28
29
30
31
34
35
32
33
16
16
16
19
21
20
17 17
18
15
16
16
16
2
8 8
9
10 10
13 13
9
5 6 4
14 7 14 7
5 6 4
3
11
12
3
11
12
1. TRACK – Servirsi di questa manopola per
scorrere tra la musica presente sul computer.
Premere la manopola TRACK per caricare la
traccia selezionata nel lettore di anteprima.
Servirsi della manopola TRACK tenendo premuto
il pulsante PAGE per scorrere e navigare tra i vari
drive, cartelle e playlist. Una volta rilasciato il
pulsante PAGE, si può utilizzare la manopola
TRACK per navigare tra i contenuti della cartella
selezionata.
2. PAGE - La pressione del tasto PAGE durante
l’uso di determinati comandi del Stealth Control
offre un’ulteriore serie di funzioni.
3. CUE SOURCE – Premere il tasto CUE SOURCE
per inviare la musica che suona sul deck al canale
Monitor. Nota bene: a meno che non si faccia uso
di un’interfaccia audio multipla, i canali Monitor e
Master coincideranno. Quando si naviga all’interno
della struttura delle cartelle posta alla sinistra dello
schermo, tenendo premuto il tasto PAGE si
possono utilizzare i tasti CUE SOURCE per
ingrandire e ridurre la cartella selezionata. Il tasto
CUE SOURCE sinistro rimpicciolisce la cartella
selezionata, quello destro l’ingrandisce.
4. PLAY – Premere il tasto PLAY per avviare la
riproduzione della traccia.
5. CUE – La pressione del tasto CUE farà tornare e
interrompere la traccia all’ultimo punto cue
impostato. Per la riproduzione temporanea del
punto cue, si può tenere premuto il tasto CUE. La
traccia verrà riprodotta per il tempo in cui il
pulsante viene tenuto premuto e tornerà al punto
cue quando questo viene rilasciato.
6. SET CUE - Servirsi di questo pulsante per
impostare un nuovo punto cue.
7. CUE PLAY – Tenere premuto il tasto CUE PLAY
per far tornare e interrompere all’ultimo punto cue
impostato. Rilasciando la pressione del tasto CUE
PLAY, inizierà la riproduzione della traccia.
8. VOLUME - Ogni deck virtuale dispone di un fader
VOLUME che può essere utilizzato per regolare il
volume della musica riprodotta sul deck
corrispondente.
9. PITCH - Ogni deck virtuale dispone di un cursore
del pitch che può essere utilizzato per modificare il
pitch o il tempo della musica riprodotta sul deck
corrispondente.
10. PITCH BEND -/+ - Servirsi di questi due tasti per
modificare temporaneamente il pitch e il tempo
della musica riprodotta sul deck corrispondente. Il
bend del pitch è solitamente usato per apportare
piccole modifiche al momento di mixare due tracce
in modo tale che i rispettivi battiti siano
sincronizzati.
Page 18

16
11. KEY – Il tasto KEY attiva la funzione Key Lock in
Traktor LE. Quando Key Lock è attivo, il pitch della
musica riprodotta sul deck sarà bloccato al valore
attuale. Si può quindi regolare il tempo della
musica, indipendente dal pitch.
12. SYNC – Premere questo tasto per sincronizzare il
tempo del deck al tempo dell’altro deck (per
sincronizzare i battiti dei due deck, servirsi del
tasto INTERLOCK).
13. ROTELLA JOG WHEEL - Quando sul deck viene
riprodotta musica, ruotando la JOG WHEEL verrà
momentaneamente effettuato il bend del pitch
della traccia. Quando il deck è in pausa, ruotando
la JOG WHEEL si scorre lungo l’audio della
traccia. Se il tasto SCRATCH del deck è attivato,
si può scratchare servendosi della JOG WHEEL.
14. LOOP - Premere questo tasto per creare un loop
continuo da una battuta. Premendo il tasto LOOP,
la traccia inizierà il loop fino a quando questo non
viene rilasciato premendo nuovamente il tasto
LOOP stesso.
15. GAIN - Ogni deck virtuale dispone di una
manopola GAIN che può essere utilizzata per
regolare il livello di guadagno del deck
corrispondente.
16. EQ - Ogni deck virtuale dispone di un EQ che può
essere utilizzato per regolare i livelli delle
frequenze Treble, Mid e Bass (acute, medie e
basse) della musica. Se tenuta premuta, ogni
manopola EQ funziona inoltre come interruttore
Kill, rimuovendo quella banda di frequenza dalla
musica. Il LED di fianco alla manopola si illumina a
indicare che la funzione Kill è stata attivata. Per
disattivare la funzione Kill, premere nuovamente la
manopola.
17. LOAD TRACK – Ciascuno dei deck virtuali
dispone di un tasto LOAD TRACK (carica traccia).
Selezionando una traccia e premendo il tasto
LOAD TRACK, questa verrà caricata sul deck
corrispondente. Ci si può “focalizzare” su un deck
in particolare tenendo premuto il tasto PAGE e
premendo il tasto LOAD TRACK del deck
corrispondente. Determinati comandi del Stealth
Control coinvolgono unicamente il deck
attualmente “focalizzato”.
18. CROSSFADER - Si può utilizzare per dissolvere
tra le due tracce riprodotte sui deck virtuali. Se il
crossfader si trova all’estrema sinistra, si sentirà
l’audio unicamente dal deck A. Se il crossfader è
in posizione intermedia, si sentirà sia l’audio
proveniente dal deck A che quello proveniente dal
deck B. Se il crossfader si trova all’estrema destra,
si sentirà unicamente l’audio proveniente dal deck
B.
19. MASTER - La manopola MASTER funziona come
comando di livello Master, permettendo di
modificare il volume generale del mix.
20. PH VOL - Questa manopola regola il livello del
canale Monitor. Nota bene: a meno che non si
faccia uso di un’interfaccia audio multipla, i canali
Monitor e Master coincideranno.
21. PH MIX - Questa manopola regola l’equilibrio tra i
canali Monitor e Master. Nota bene: a meno che
non si faccia uso di un’interfaccia audio multipla, i
canali mix Monitor e Master coincideranno.
22. PAN - Questa manopola serve da controllo
dell’equilibrio sinistra/destra sul deck.
23. SCRATCH - Tenere premuto questo pulsante per
la modalità Scratch. Quando la modalità Scratch è
attiva, si può usare la rotella jog per scratchare
l’audio riprodotto sul deck.
SEZIONE EFFETTI :::
24. FX AMT - Questa manopola regola quanto
dell'effetto selezionato verrà mixato nel Master
Mix. In altre parole, se la manopola è
completamente abbassata, si sentirà solo il suono
originale. Viceversa, se la manopola è
completamente alzata, si sentirà solo il suono
coinvolto.
25. SELECT - Premere questo pulsante per scegliere
tra i vari effetti da applicare al Master Mix.
26. PAR 1 - Questa manopola regola il primo
parametro dell’effetto selezionato. Nota bene:
questo parametro varia a seconda dell’effetto
selezionato.
27. ON/OFF - Premere questo pulsante per
accendere e spegnere l’effetto master.
28. PAR 2 - Questa manopola regola il secondo
parametro dell’effetto selezionato, se disponibile.
Nota bene: questo parametro può variare o non
essere disponibile, a seconda dell’effetto
selezionato.
29. DELAY TAP - Questo pulsante può essere
utilizzato per regolare un terzo parametro
dell’effetto selezionato, se disponibile. Ad
esempio, se è stato selezionato l’effetto Delay, si
può utilizzare il pulsante per battere il BPM
dell’effetto Delay stesso.
COMANDI GLOBALI :::
30. SEARCH/PLAY - Questa manopola permette di
effettuare una ricerca nel lettore di anteprima.
31. PREVIEW (anteprima) - Premere questo tasto
per avviare e mettere in pausa il lettore di
anteprima.
32. SEARCH - Permette di cercare tra la musica
caricata sul deck attualmente “focalizzato”. Ci si
può focalizzare su un deck in particolare tenendo
premuto il tasto PAGE e premendo il tasto CUE
SOURCE del deck corrispondente.
33. RELOOP - Si può premere questo tasto per
inserire l’ultimo loop impostato. Se non è stato
inserito nessun loop in precedenza, la pressione di
RELOOP avvierà il loop della prima battuta della
traccia. Ci si può focalizzare su un deck in
particolare tenendo premuto il tasto PAGE e
premendo il tasto CUE SOURCE del deck
corrispondente.
34. FINE PITCH - Permette di effettuare regolazioni
fini del pitch sulla musica caricata sul deck
attualmente “focalizzato”. Ci si può focalizzare su
un deck in particolare tenendo premuto il tasto
PAGE e premendo il tasto CUE SOURCE del
deck corrispondente.
35. INTERLOCK - Questo pulsante permette di
sincronizzare i downbeat della musica riprodotta
sul deck attualmente “focalizzato” a quelli dell’altro
deck. Ci si può focalizzare su un deck in
particolare tenendo premuto il tasto PAGE e
premendo il tasto CUE SOURCE del deck
corrispondente.
Page 19

17
Die Schnellanleitung informiert darüber, wie das Numark STEALTH CONTROL DJ-System schnell
aufgebaut und eingesetzt werden kann. Nehmen Sie sich etwas Zeit, diese Anleitung zu lesen
und sich mit dem Aufbau und den wesentlichen Steuerelementen vertraut zu machen.
STEALTH CONTROL wurde von uns als komplettes System für DJs, die Software anwenden,
entwickelt. Bei STEALTH CONTROL handelt es sich um ein MIDI-konformes Gerät und es kann
daher mit Programmen verwendet werden, die das MIDI-Protokoll unterstützen. Damit Sie sofort
mit dem Mixen anfangen können, haben wir zwei Programme - Traktor 3 LE von Native
Instruments und MixMeister Fusion Live – beigelegt.
Um das Meiste aus Ihrem STEALTH CONTROL herauszuholen, empfiehlt es sich sehr, die
Software-Bedienungsanleitungen zu lesen. Viel Spaß beim Mixen
!
Bitte beachten Sie
: Falls Sie Stealth Control in Verbindung mit einem USB-Hub einsetzen, einen
aktiven Hub oder wahlweise den 6V 1A Netzadapter zu verwenden. Dies garantiert eine sichere
Funktionsweise.
INHALT DER VERPACKUNG
STEALTH CONTROL
KURZBEDIENUNGSANLEITUNG
SICHERHEITSANWEISUNGEN UND GARANTIEINFORMATIONEN
USB – KABEL
TRAKTOR LE-CD
MIXMEISTER FUSION LIVE GUTSCHEIN
::: Stealth Control Kurzanleitung :::
HINWEISE ZUR MIDI STEUERUNG :::::
Die Funktionen der Stealth Control entsprechen dem MIDI-Standard und
ermöglichen die Steuerung von Computerprogrammen, die das MIDI Protokoll
unterstützen. Das heißt, dass Sie Stealth Control nicht nur mit der beigelegten
Software verwenden können, sondern auch andere Musik- und Videoprogramme
steuern können. Damit Sie die Stealth Control mit Ihrem Lieblingsprogramm
verwenden können, müssen Sie die Stealth Control als MIDI Eingabegerät in den
Voreinstellungen Ihrer Software aktivieren. Beachten Sie dabei, dass, je nach
Software, die Stealth Control möglicherweise nicht als “Stealth Control” in den MIDI
Page 20

18
ANSCHLUSSÜBERSICHT
Sehen Sie sich bitte die Anschlussübersicht an.
1. Verbinden Sie den USB Anschluss des STEALTH CONTROL mit einem freien USB Port Ihres Computers.
Verwenden Sie das beiliegende USB Kabel. Das STEALTH CONTROL wird über den USB Bus des Computers
mit Strom versorgt.
2. (Optional) Sie können das STEALTH CONTROL auch durch ein optionales 6V 1A Netzteil mit Strom versorgen,
welches Sie am DC IN Eingang des STEALTH CONTROL anschließen. Beachten Sie bitte, dass zum Betrieb des
STEALTH CONTROL normalerweise kein separates Netzteil notwendig ist. Sie benötigen es nur, wenn der
Computer nicht ausreichend Spannung für das STEALTH CONTROL am USB Port ausgeben kann.
ANSCHLÜSSE DER RÜCKSEITE
3
12
1. USB PORT – Verwenden Sie bitte das beiliegende USB Kabel, um diesen Anschluss mit einem freien USB Port
des Computers zu verbinden. Beim Anschluss an den Computer wird das Gerät über USB mit Strom versorgt.
2. DC IN – Falls Ihr Computer nicht genügend Spannung am USB Port ausgibt, können Sie hier ein optionales 6V/1A
Netzteil anschließen.
COMPUTER
NETZEIL
(OPTIONAL)
Page 21

19
TRAKTOR 3 LE CONTROLLER ZUWEISUNG
1
15
22
23
22
23
26
27
24
25
28
29
30
31
34
35
32
33
16
16
16
19
21
20
17 17
18
15
16
16
16
2
8 8
9
10 10
13 13
9
5 6 4
14 7 14 7
5 6 4
3
11
12
3
11
12
1. TRACK – Verwenden Sie den TRACK Regler, um
durch die Musik auf Ihren Computer zu scrollen.
Drücken Sie den TRACK Regler, damit der
gewählte Track in den Preview Player geladen
wird. Verwenden Sie den TRACK Regler mit
gedrückter PAGE Taste, um durch verschiedene
Laufwerke, Ordner und Wiedergabeliste zu
navigieren. Wenn Sie die PAGE Taste loslassen,
können Sie mit dem TRACK Regler durch den
Inhalt des gewählten Ordners scrollen.
2. PAGE – Halten Sie die PAGE Taste beim
Bedienen verschiedener Stealth Control Elemente
gedrückt, um zusätzliche Funktionen zu erreichen.
3. CUE SOURCE – Drücken Sie die CUE SOURCE
Taste, um die Musik dieses Decks zum Monitor
Kanal routen möchten. Beachten Sie, dass
Monitor und Master Kanäle identisch sind, wenn
Sie kein Mehrkanal Audio Interface verwenden.
Falls Sie sich in einer Ordnerstruktur des
Browsers links bewegen und die PAGE Taste
halten, können Sie mit den CUE SOURCE Tasten
einen Ordner erweitern oder zusammenfalten. Die
linke CUE SOURCE Taste faltet den gewählten
Ordner zusammen, die rechte CUE SOURCE
Taste erweitert den gewählten Ordner.
4. PLAY – Beginnen Sie mit der PLAY Taste die
Wiedergabe eines Tracks.
5. CUE - Unterbricht die Wiedergabe und kehrt an
den ursprünglichen Cue Punkt zurück. Die
Wiedergabe startet zeitweilig von diesem Punkt,
wenn Sie die Taste gedrückt halten. Der Track
spielt so lange, wie Sie die Taste gedrückt halten
und kehrt an den Cue Punkt zurück, wenn Sie die
Taste loslassen.
6. SET CUE – Verwenden Sie diese Taste, um einen
neuen Cue Punkt zu setzen.
7. CUE PLAY – Halten Sie die CUE PLAY Taste, um
die Wiedergabe zu unterbrechen und zum letzten
Cue Punkt zu springen. Wenn Sie CUE PLAY
loslassen, beginnt der Track mit der Wiedergabe.
8. VOLUME – Jedes virtuelle Deck besitzt einen
VOLUME Schieberegler, mit dem man
Lautstärkeanpassungen der im Deck
wiedergegebenen Musik vornehmen kann.
9. PITCH - Jedes der virtuellen Decks besitzt einen
PITCH Schieberegler zur Pitch- oder Tempoanpassung der wiedergegebenen Musik im Deck
dient.
10. PITCH BEND -/+ - Verwenden Sie die beiden
Pitch Bend Tasten, um den Pitch und das Tempo
der Musik zeitweilig zu ändern. Pitch Bend wird
normalerweise für kleinere Anpassungen beim
Mixen von Beats verwendet, um Beats zu
synchronisieren.
Page 22

20
11. KEY - Die KEYLOCK Taste aktiviert die Key Lock
Funktion in Traktor LE. Key Lock bewirkt, dass die
Tonhöhe der Musik auf dem gegenwärtigen Wert
„festgesetzt“ wird. Nun können Sie das Tempo
der Musik ändern, ohne dass die Tonhöhe davon
beeinflusst wird.
12. SYNC - Um das Tempo der Musik im Deck zum
Tempo des anderen Decks synchronisieren zu
können, müssen Sie diese Taste drücken. (Zur
Beatsynchronisation beider Decks verwenden Sie
bitte die INTERLOCK Taste.)
13. JOG WHEEL – Falls das Deck Musik abspielt wird
durch das Drehen des JOG WHEEL will zeitweilig
die Tonhöhe (Pitch) des Tracks verändert. Sollte
die Wiedergabe des Decks unterbrochen worden
sein, können Sie mit dem JOG WHEEL durch das
Audiosignal scrollen. Damit Sie mit dem JOG
WHEEL scratchen können, muss die SCRATCH
Taste des Decks aktiviert sein.
14. LOOP – Drücken Sie diese Taste, um einen
eintaktigen Loop zu erzeugen. Wenn Sie die
LOOP Taste drücken, wird der Trackbereich
geloopt, bis Sie die LOOP Taste noch einmal
drücken.
15. GAIN – Jedes virtuelle Deck hat einen GAIN
Regler, um am Gain Pegel des jeweiligen Decks
Veränderungen vornehmen zu können.
16. EQ - Jedes Deck besitzt zur Einstellung der
Bässe, der Mitten und der Höhen einen EQ.
Wenn Sie den jeweiligen Regler drücken,
funktioniert jeder EQ Regler als Kill Schalter und
entfernt das gewünschte Frequenzband aus der
Musik. Die LED neben dem jeweiligen Regler
leuchtet dann auf, um Ihnen zu zeigen, dass die
Kill Funktion aktiviert wurde. Um die Kill Funktion
auszuschalten, drücken Sie den jeweiligen Regler
noch einmal.
17. LOAD TRACK – Jedes virtuelle Deck besitzt eine
LOAD TRACK Taste. Diese lädt einen gewählten
Track in das jeweilige Deck. Sie können auf ein
Deck "fokussieren", indem Sie die PAGE Taste
beim Drücken der LOAD TRACK Taste eines
Decks halten. Bestimmte Bedienelemente der
Stealth Control sprechen nur das gegenwärtig
„fokussierte“ Deck an.
18. CROSSFADER - Mit dem CROSSFADER können
Sie zwischen den beiden wiedergegebenen
Tracks in den Decks überblenden. In der äußerst
linken Position hören Sie nur das Signal des Deck
A. Wenn sich der Crossfader in der Mitte befindet,
hören Sie sowohl das Signal des Deck A als auch
die Musik des Deck B. Steht der Crossfader ganz
rechts, hören Sie nur die Musik des Deck B.
19. MASTER - Der MASTER Regler steuert die
Gesamtlautstärke des Mixes.
20. PH VOL - Dieser Regler bestimmt die Lautstärke
der Monitor Kanal. Beachten Sie, dass Monitorund Master Kanäle identisch sind, wenn Sie kein
Mehrkanal Audio Interface verwenden.
21. PH MIX - Dieser Regler stellt die Balance der
Monitor und Master Kanäle. Beachten Sie, dass
Monitor und Master Kanäle identisch sind, wenn
Sie kein Mehrkanal Audio Interface verwenden.
22. PAN – Dieser Regler funktioniert als links/rechts
Balanceregler für dem Deck.
23. SCRATCH – Halten Sie diese Taste für den
Scratch Modus gedrückt. Bei aktiviertem Scratch
Modus können Sie das Audiosignal aus dem Deck
scratchen.
EFFECT SEKTION:::
24. FX AMT – Mit dieser Taste bestimmen Sie, wie
hoch der Anteil des gewählten Effekts im Master
Mix Signal ist. Wenn also der Regler zugedreht
ist, hören Sie nur den Originalsound. Wird der
Regler jedoch ganz aufgedreht, hören Sie nur das
Effektsignal.
25. SELECT – Drücken Sie zur Auswahl
verschiedener Effekte für den Master Mix diese
Taste.
26. PAR 1 – Mit diesem Regler ändern Sie den ersten
Parameter des gewählten Effekts. Je nach
ausgewähltem Effekt unterscheidet sich dieser
Parameter von denen anderer Effekte.
27. ON/OFF – Diese Taste schaltet den Master Effekt
ein oder aus.
28. PAR 2 - Mit diesem Regler ändern Sie den
zweiten Parameter des gewählten Effekts. Je nach
ausgewähltem Effekt unterscheidet sich dieser
Parameter von denen anderer Effekte oder ist
nicht verfügbar.
29. DELAY TAP – Diese Taste kann zur Veränderung
eines dritten Parameters des gewählten Effekts
(falls vorhanden) verwendet werden. Bei einem
Delay Effekt können Sie mit durch wiederholtes
Drücken der Taste zum Beispiel das Tempo des
Effekts einstellen.
GLOBAL CONTROLS:::
30. SEARCH/PLAY – Dieser Regler ermöglicht die
Suche nach einer bestimmten Stelle im Track, der
in den Preview Player geladen wurde.
31. PREVIEW – Drücken Sie zum Wiedergabestart
oder zur Pause des Preview Players diese Taste.
32. SEARCH – Mit dieser Taste können Sie durch die
Musik, die im gerade „fokussierten“ Deck geladen
ist, suchen. Um ein Deck in den Fokus zu setzen,
halten Sie die PAGE Taste und drücken dann die
CUE SOURCE Taste des jeweiligen Decks.
33. RELOOP – Drücken Sie diese Taste, um in den
letzten Loop zu wechseln. Wenn noch kein Loop
gesetzt wurde, erzeugt RELOOP einen Loop aus
dem ersten Takt des Tracks. Um ein Deck in den
Fokus zu setzen, halten Sie die PAGE Taste und
drücken dann die CUE SOURCE Taste des
jeweiligen Decks.
34. FINE PITCH – Mit diesem Regler können Sie
Feineinstellungen am Pitch der Musik des
fokussierten Decks vornehmen. Um ein Deck in
den Fokus zu setzen, halten Sie die PAGE Taste
und drücken dann die CUE SOURCE Taste des
jeweiligen Decks.
35. INTERLOCK – Mit dieser Taste können Sie den
Downbeat der Musik des fokussierten Decks zu
den Downbeats der Musik des anderen Decks
synchronisieren. Um ein Deck in den Fokus zu
setzen, halten Sie die PAGE Taste und drücken
dann die CUE SOURCE Taste des jeweiligen
Decks.
Page 23

21
TECHNICAL SPECIFICATIONS
WEIGHT: 7 lbs.
DIMENSIONS: 12.5
” x 10 5/8” x 2.5” (W x D x H)
MANUAL VERSION 1.3
Page 24

www.numark.com
 Loading...