

Page 1

PROFESSIONAL DJ MIXER
Quick Start Owner’s Manual
Manual de inicio rápido para el usuario
(ESPAÑOL)
Schnellbedienungsanleitung (DEUTSCH)
Manuel d’utilisation du propriétaire
(FRANÇAIS)
Manuale rapido di utilizzazione (ITALIANO)
CONTENUTO DELLA CONFEZIONE
• MIXER
•
CAVI DI ALIMENTAZIONE
CONTENU DE LA BOÎTE
• MIXER
•
BLOC D’ALIMENTATION
SCHACHTELINHALT
• MISCHPULT
• STROMKABEL
BOX CONTENTS
• MIXER
•
POWER SUPPLY
CONTENIDOS DE LA CAJA
• MEZCLADOR
•
FUENTE DE ALIMENTACIÓN
Page 2
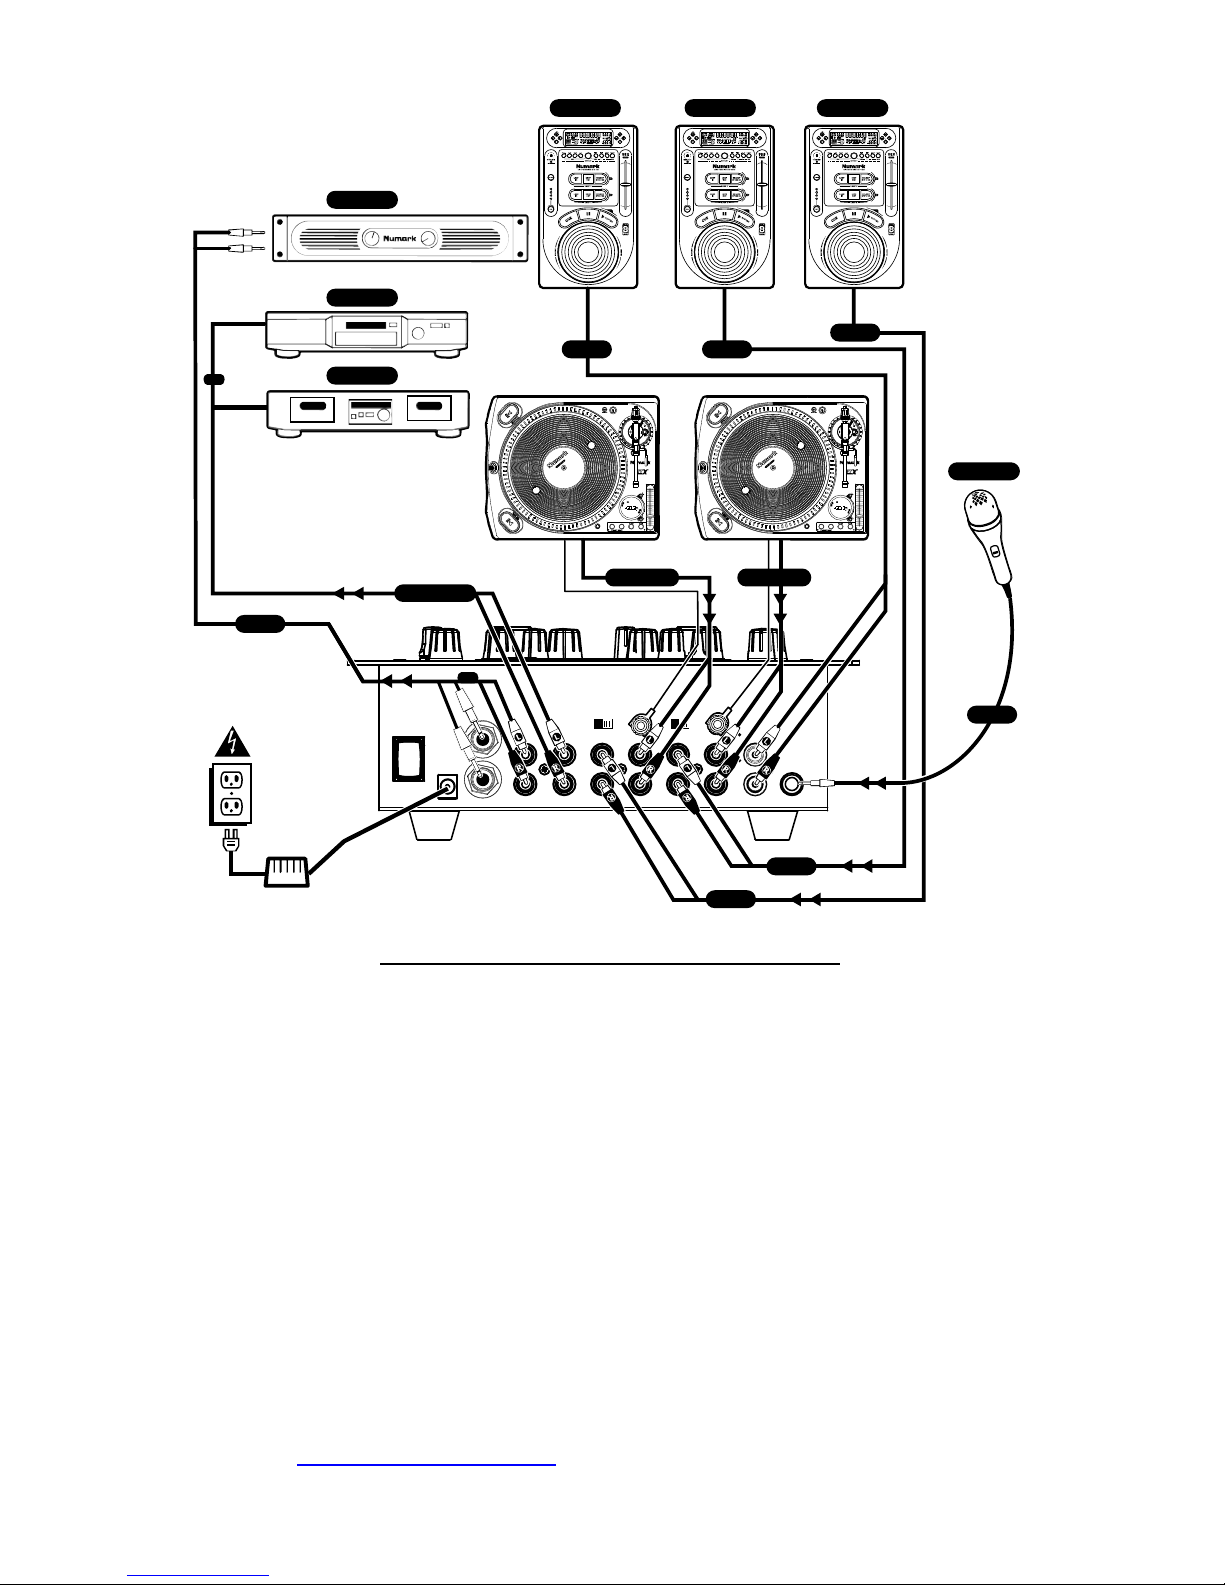
CD PLAYERCD PLAYER CD PLAYER
DJ MIC
TO PHONO 2 TO PHONO 1
TO LINETO LINE
TO LINE
TO MIC
HOUSE AMP
TO AMP
CD BURNER
TAPE DECK
FROM RECORD
OR
OR
TO LINE
TO LINE
MIXER QUICK SETUP GUIDE (ENGLISH)
1. Make sure all items listed on the front of this guide are included in the box.
2. READ SAFETY INSTRUCTION BOOKLET BEFORE USING THE
PRODUCT
3. Study this setup diagram.
4. Place mixer in an appropriate position for operation.
5. Make sure all devices are turned off and all faders are at “zero”
6. Connect all stereo input sources as indicated in the diagram.
7. Connect the stereo outputs to the power amplifier(s), tape decks, and/or
audio sources.
8. Plug your mixer and other devices into AC power.
9. Switch everything on in the following order.
• audio input sources (i.e. turntables or CD players)
• your mixer
• last, any amplifiers
10. When turning off, always reverse this operation by,
• turning off amplifiers
• your mixer
• last, any input devices
11. Go to http://www.numark.com for product registration.
Page 3

FRONT PANEL FEATURES
2
1
3
4
5
678
5
678
9
10
9
10
16
14
12
1817
11
15
19
22
24
25
23
26
27
21 2020
13
21
1. Mic /Aux Button: Activates Mic /Aux inputs.
2. Mic /Aux Gain: Adjusts the volume of the
microphone and AUX inputs.
3. Mic Treble: Adjusts the high-tone of the
microphone.
4. Mic Bass: Adjusts the low-tone of the microphone.
5. Channel Gain: Adjusts the pre-fader input level.
6. Channel Treble: Adjusts the high-tone level.
7. Channel Middle: Adjusts the middle-tone level.
8. Channel Bass: Adjusts the low-tone level.
9. Input Selector: Selects what input source is routed
to the channel from the rear panel connected units.
10. Channel Fader: Adjusts the level sent to program
mix.
11. Headphone Volume: Adjusts the volume level of
the headphone output.
12. Headphone Jack: Your headphones can be
connected to this ¼” terminal. The volume should
always be set at its lowest setting while connecting
and disconnecting headphones to prevent damage to
headphones and/or your hearing.
13. Cue Slider: Channels 1 and 2 can be previewed
using this mini-crossfader. Sliding this to the left
plays the left “channel-1” and sliding to the right
plays the right “channel-2”.
14. Cue Meter: Audio level display of the cue output.
Depending on the Cue Selector switch, this could be
Master, CH1-CH2 mini cue-fader mix, or FX. When
in CH-1-CH-2 this meter shows the peak, “PFL”, Pre
Fader levels of channels 1 and 2. You can use the
channel “Gain” and “EQ” controls to match the levels
of input signals while cueing.
15. Cue Selector: The cue selector has 3 modes:
a. Master: The Master Output is routed to the
headphones.
b. FX: The FX block output is routed to the
headphones. This allows you to cue the FX
before applying it.
c. CH1-CH2: Allows cueing of CH1-CH2 using the
mini cue-fader
16. Replaceable Crossfader: Blends audio between the
channels assigned to the left and right assign
switches.
Note: This fader is user replaceable if it should ever
wear out. Simply remove the facepanel and then
remove the screws holding it in position. Replace
the fader with a quality authorized replacement from
your local Numark retailer.
17. Crossfader Direction Button: Activation of this
switch reverses the assignment of CH-1 and CH-2 on
the crossfader.
18. Crossfader Slope Control: The position of this
knob determines how quickly or intensely the
crossfader will blend.
19. Master Output Knob: Adjusts the main output
volume.
20. Master Meter: Shows audio level of the master
output.
21. KILL Switches: Eliminate High, Mid, or Low
frequencies for a unique effect.
22. Effects Assign: Selects channel to be processed.
23. Effects Process: activates the processor.
24. Effect Select: Sets desired effect.
25. Rate/Frequency: Adjust the Rate/ Frequency of the
effect. Depending on the selected effect, this can be
a continuous control or synchronized to the beat.
26. Effect Mix: Adjusts amount of effect to be blended
with the original sound.
27. Beat Tap: Tap this button to the tempo (or half the
tempo) to align effects to the music. Press and hold
the button to disable beat synch control.
REAR PANEL FEATURES
2
1
2 5
44
33
567
8
9
Note: It is recommended that the mixer be turned
off before connecting and disconnecting any
sources to the inputs of the mixer.
1. Microphone Input: Microphones with a ¼”
connector can be connected to this input terminal.
2. Phono Inputs: This input is used for connecting
your turntables through the sensitive RIAA phono
preamplifiers. Only turntables with phono level
output should be attached. Line level turntables
and other devices may be attached if the Phono/Line
rear panel switch is set to the line position.
3. Phono/Line Source Switch: This switch activates
and deactivates the sensitive RIAA phono
preamplifiers. Only turntables with phono level
output should be assigned when the switch is
in the phono position. Some turntables offer line
level output. To use these turntables and other line
devices like CD players, switch the input to Line.
4. GND: This screw connector should be used to secure
any turntables or other devices connected to the
mixer that need to be grounded.
5. Line Inputs: CD players, Tape Decks, Samplers or
other line level input devices should be connected to
these inputs.
6. Record Output: This RCA output is for connecting a
recording device such as a tape deck or CD recorder.
The level of the record output is based upon premaster levels.
7. Master Output (RCA): This output is for connecting
an external monitoring device such as a PA system,
powered monitors or a home stereo. The level of the
master stereo output signal is controlled by the
master fader.
8. AC In: This mixer is designed to work with the
power supply assembly that comes with the unit.
While the power is switched off, plug the power
supply into the mixer first, then plug it into the
outlet.
9. Power Switch: Use this switch to turn on the mixer
after all input devices are already connected to
prevent damage to your equipment. Turn the mixer
on before you turn on amplifiers and turn of
amplifiers before you turn off the mixer.
Page 4

DXM06 Effects section
FX Assign: Move the toggle to select the channel you would like to process.
FX ON: Activates and deactivates the effects
FX Select: The effects can be applied to MIC/AUX, CH1, CH2, or MASTER. When FX Assign is set to
MIC/AUX, you can select from the 6 FX written in small text along the bottom row (Vocoder,
Tape echo, Echo, Reverb 1, Reverb 2, LMT+DSTR).
When set to CH1, CH2 or MASTER, you can select
from the 6 FX written in the in large text along the
top row (2XCopy, Tape Echo, Echo, Flanger, Phaser,
Filter).
FX Parameters: These controls vary by effect. WARNING Adjust slowly while learning these effects.
These effects are dangerously fun to play with. When you’re playing alone, go
nuts. When you play live, remember that your crowd sometimes just wants to
hear the song. Be subtle!
BEAT SYNC/TAP ASSIST: In order to align the effects with the beat, tap the beat sync to the rhythm 3-
4 times on the beat. If it has trouble syncing, try again. The beat sync often works best when
tapping to half the tempo. For example, try tapping on just the snare drums (typically the “2”
and “4” count). If the beat tap loses sync slightly, don’t worry about tapping it in again, the
FX will likely still maintain sync. Otherwise, you can tap on beat once to re-sync.
When in beat sync, effects below denoted with an asterisk (*) will have rates or times which
are related to the tempo. Use the RATE/FREQUENCY knob to adjust the multiple of the tempo
(1x,2x,4x, etc.).
To disable beat sync and have continuous control over the rate/time of an effect, simply press
and hold the beat sync button until it remains lit. Now the RATE/FREQUENCY knob will allow
you to precisely tune a rate or frequency. To re-enable beat sync, tap out the beat again.
Page 5

Channel FX:
2XCOPY*: A copy of the signal is delayed by a defined time. The WET/DRY fader will act like a
sharp contour crossfader, fading between the original (MIX/INTENSITY fader down) and
the delayed (MIX/INTENSITY fader up). Pro DJs will often keep 2 copies of a record so
they can do beat juggling tricks like this. Try using this effect with the beat tap sync
and move the MIX/INTENSITY fader up and down to the tempo. Now try it with different
multiples of the tempo using the RATE knob. You’re having fun, we know… when you’re
done annoying everyone, read on. There’s more!
TAPE ECHO*: A much sought after echo sound developed in the 1960s. No reggae, jungle, house,
techno, hip hop or soul DJ should be without one. In beat synch mode, the
RATE/FREQUENCY controls the tempo multiple. When beat synch is disabled, the
RATE/FREQUENCY will continuously control the delay time. The MIX/INTENSITY fader
controls the input into the echo. This makes it very useful for selecting a phrase, vocal
word or beat to echo. Simply turn up the mix momentarily during the snippet of music
you wish to emphasize and bring it back down. You’ll notice how the audio which was
playing during that time will now echo away. Now, try turning up the MIX/INTENSITY
fader for a measure, then cutting out the music with the phono/line switch. Let it echo
for a bit, then bring down the MIX fader and cut the music back in… Congratulations!
you are now a remix artist. WARNING! This tape echo, like its inspirations, will saturate
and have high feedback gain when the MIX/INTENSITY fader is set high. By carefully
riding the MIX/INTENSITY fader you can synthesize sounds; the trick is to tame them.
ECHO*: Regular echo effect. The configuration of this echo is a little different. This time, the
MIX/INTENSITY fader controls the output of echo. When the fader is up, it will echo.
Push the fader further, and it will feedback heavily_ just like the tape echo. When the
fader is at the bottom, the echo effect is cut out completely. This effect is very useful
for juggling beats and emphasizing musical phrases.
FLANGER*: Sweeping flanger effect. In beat synch mode, the RATE/FREQUENCY controls the
sweep rate as a multiple of the tempo. When beat synch is disabled, the
RATE/FREQUENCY will continuously control the sweep rate. The MIX/INTENSITY
controls the intensity of the flange effect.
PHASER*: Sweeping phase shifter effect. It is similar to the flanger effect, except that a flanger
has a more pronounced harmonic sound, reminiscent of a jet engine passing overhead.
A phase shifter is enharmonic, and has a more “swooshing” sound. In beat synch mode,
the RATE/FREQUENCY controls the sweep rate as a multiple of the tempo. When beat
synch is disabled, the RATE/FREQUENCY will continuously control the sweep rate. The
MIX/INTENSITY controls the intensity of the phase shifter effect.
FILTER: 4-pole Low Pass Filter. The RATE/FREQUENCY controls the corner frequency of the low
pass filter. The MIX/INTENSITY controls the resonance (Q) of the low pass filter. At
high resonance settings, the filter will “whistle”.
MIC FX:
VOCODER: Square Wave Vocoder with Sibilance. Robot voice sound straight from the early days
of electronic music. RATE/FREQUENCY controls the pitch of the vocoder.
MIX/INTENSITY mixes between your voice and the vocoder sound.
TAPE ECHO*: See description in section, “Channel FX”.
ECHO*: See description in section “Channel FX”.
REVERB 1: Hall Reverberation Simulator. RATE/FREQUENCY controls the decay (size of the room),
MIX/INTENSITY controls the wet/dry mix of the reverb effect.
REVERB 2: Reverse Reverb. A very eerie sound. RATE/FREQUENCY controls the delay time,
MIX/INTENSITY controls the wet/dry mix of the reverb effect.
LMT+DISTORT: Band limited Distortion. Shout out “Rock the house!” or “REWIND!!!” with this
effect. They’ll definitely get the point! RATE/FREQUENCY controls the distortion
amount, MIX/INTENSITY controls the wet/dry mix of the distortion effect.
 Loading...