

Page 1
Quick Reference Guide
Page 2

This Guide shows screen pictures made with Windows® 7 unless other-
wise stated. The appearance may vary under other Operating Systems.
Page 3

Why are PDF files popular?
The Portable Document Format has become a de-facto standard for
document exchange across different platforms and computing
environments. More than 200 million PDF documents are posted on the
World Wide Web. Key benefits that have driven this popularity are:
• Integrity: PDF files look like the original documents they were
created from. They conserve their appearance after sharing regardless of platform, operating system, installed fonts or local
settings on each computer or device.
• File size: In many cases, PDF files can be more compact than their
source documents - ideal for file transfer.
• Security: PDF files can be digitally signed and password protected
to prevent unauthorized changes.
• Sharing: While the basic document content can be frozen,
commenting and mark-up tools allow collective authoring and
document review.
PDF file viewers are freely available, but there are fewer options when it
comes to creating PDF files. This is the role of PDF Create 8.
What PDF Create does for you
Nuance® PDF Create 8 lets you create PDF files from a wide range of file
types. The Print dialog box in your print-capable applications will offer a
printer named ScanSoft PDF Create!
The PDF Create Assistant lets you compile a list of files generated by
different applications. Each file can be converted to a separate PDF file,
or they can be combined, overlaid or packaged into a single file.
When working in Microsoft® WordTM, Excel®, or PowerPoint you can
call on the program to create a PDF file directly from your current
document. During conversions hyperlinks and comments can be
transferred and you can set bookmarks to be generated from the
structure of the Word document, each worksheet in Excel or for each
slide in a PowerPoint presentation. Document information (metadata)
can also be transferred. When working in Microsoft Outlook® or Lotus
3
Page 4

Notes®, message attachments can be saved as PDF files. As you write a
new message or a reply, you can choose a non-PDF file from your
computer to have it converted to PDF and attached. You can convert a
web page in Internet Explorer to a PDF.
The program can create PDF files in versions 1.3 to 1.7 and PDF/A. Files
can be protected by passwords and can include watermarks.
Compression and font settings give you control over PDF file size and
appearance.
The PDF Product family
Nuance Communications, Inc. offers three PDF products:
• Nuance PDF Converter to unlock PDF and XPS files
• Nuance PDF Create to create PDF files
• Nuance PDF Converter Professional to unlock, create, edit,
comment and share PDF files and to unlock and create XPS files.
Installation and Activation
PDF Create 8 detects previous versions and prompts for your
confirmation to remove them. You must have administrator rights on the
computer to install and activate the program. You need web access for
activation.
1. Insert the delivery media into the appropriate drive
The installation program will start automatically. If it does not, locate
®
the drive in Microsoft
program's autorun.exe file. Select a language for installation. The
InstallShield
(If you have downloaded the program from the Nuance web site,
double-click its autorun.exe file.)
2. License and Serial Number
You must accept the license agreement in order to proceed. You must
enter a serial number. You will find it on the CD or DVD sleeve or on the
Nuance web site, or a reseller’s site at the download location. Some
resellers let you see the serial number at a later time, by returning to your
®
Wizard appears.
Windows® Explorer and double-click the
4
Page 5

purchase order. Be sure to keep the serial number in a safe place; it is
fully checked only during product activation and is also needed for any
re-installations.
3. Location and Setup Type
The installer offers a default location for the program. Accept it or define
a different one. Select Complete or Custom Setup. Choose Custom to
enable or disable the integration of PDF Create in other programs. By
default, all the programs offered in the PDF Create Integration panel of
the InstallShield Wizard will be enabled. You can change integration
settings later by choosing the program under Add or Remove Programs
in the Control Panel and clicking Change and then Repair.
4. Click Finish
Registration runs at the end of installation. Select Register Online to
establish a connection to the Nuance web site. We provide an easy
electronic form that can be completed in a few moments. When the form
is filled, click Submit. If you decide not to register or to be reminded
later, you can go to
http://www.nuance.com to register online any time
later. Click on Support and from the main support screen choose
Product Registration. For a statement on the use of your registration
data, please see Nuance's Privacy Policy.
5. Activate
You will be invited to activate the product at the end of installation.
Please ensure that web access is available. Provided your serial number is
found at its storage location and has been correctly entered, no user
interaction is required and no personal information is transmitted. If you
do not activate the product at installation time, you will be invited to do
this each time you start the program. PDF Create can be launched only
five times without activation.
How to Get Help
This guide is available in a PDF file on the CD and in the program folder
after installation. It can also be accessed from the About panel. When
the program is delivered electronically, this PDF is available at the
download site and is included in the download.
5
Page 6

Nuance PDF Create has a comprehensive HTML Help system. Access it
through a hyperlink in the PDF Create Assistant or through the Nuance
PDF menu in Microsoft Word, Excel, or PowerPoint.
Press F1 to open Help at the topic describing the currently
open panel. Some dialog boxes have Help buttons.
A Release Notes file wi
th latest information is available on the delivery
media and in the program folder. The Nuance web site offers program
information, with a regularly updated knowledge base and user forums.
Note: System requirements are presented on the product box and in the Help.
Overview of creating PDF files
PDF Creation can be done from the following locations as described in
the table and the following sections:
Location Source files Conversion method Target
Individual settings. A page
nge can typically be
ra
specified
Create Assistant, using
profiles
; page ranges are not
supported
Direct conversion using a
cho
sen profile and assembly
instruction
Direct conversion with current
tings. Word and general
set
settings can be accessed
from Word
Direct conversion with current
tings (can be accessed
set
from Excel)
Direct conversion with current
set
tings (can be accessed
from PowerPoint)
Pre-defined or via
Save
As
User defined. To local
f
ile, to e-mail or both
Pre-defined or via
e As to local file,
Sav
to e-mail or both
Via Save As to local
ile, to e-mail or both
f
Via Save As to local
ile, to e-mail or both
f
Via Save As to local
f
ile, to e-mail or both
Print dialog boxes
Windows Start Menu
(plus optionally desktop,
quick load bar and
system tray)
Windows Explorer
hortcut menu
s
Microsoft Word
(Create PDF button)
Microsoft Excel
(Create PDF button)
Microsoft PowerPoint
20
07 or 2010
(Create PDF button)
Current document in
t
he calling application
One or more local or
DMS files
One or more whole
local files
Whole current Word
file
Current Excel
w
orkbook or
worksheet
Whole current
p
resentation
6
Page 7

Location Source files Conversion method Target
Microsoft Outlook
and Lotus Notes
(exporting PDF)
Microsoft Outlook
and Lotus Notes
(importing PDF)
Microsoft Internet
Explorer
One or more
attachments to a mail
message
One or more files on
the local computer
Current web page or a
link to another page
Direct conversion of all
attachments or with a
selection box. Settings can
be accessed
Direct conversion using
current settings (no access t o
settings)
Direct conversion with current
settings. Settings can be
accessed from Explorer
Pre-defined or via
Save As to a local file
PDF attached to
current message
Via Save As to local
file, to e-mail or both
Create PDFs from Print dialogs
The Print dialog box appearing in your print-capable applications will
include a PDF Create printer driver. Load a file you want to make a PDF
from, then select File/Print. Select ScanSoft PDF Create! as the name of
your printer. Specify a page range and other settings as desired. One PDF
file is created; the number of copies value is ignored. Click Properties to
check or change PDF Create settings. Click OK to start the creation. By
default the Save As dialog appears, but you can give automated saving
instructions under Properties/PDF Settings.
Use the PDF Create Assistant
The Assistant is called from the Windows Start menu. It lets you
compile a list of files to be converted. These files may have been created
in different applications. Choose to combine the files in the given order
to create a single PDF file or have each file converted separately. You can
package a set of files into a single PDF. Files can also be overlaid for the
conversion. The Assistant lets you use profiles to control the PDF
creation.
Profiles contain a group of settings designed for a particular outcome.
The program includes seven profiles; you can create more for your own
needs. Help explains how to do this.
7
Page 8
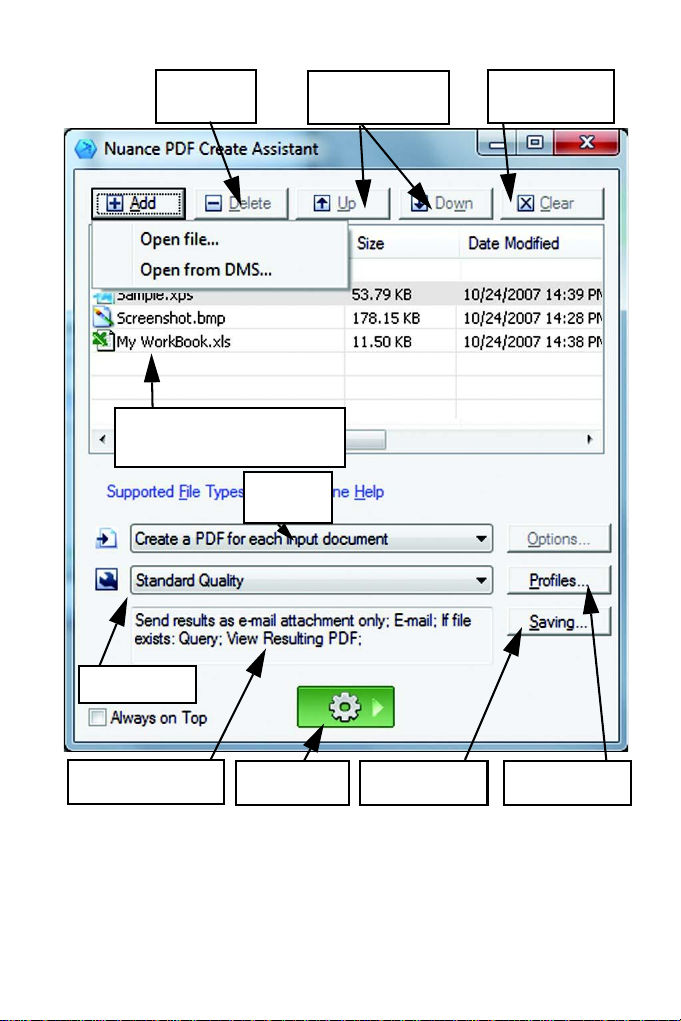
Change profile
settings
Remove all files
from the list
Remove
selected files
Move selected files
up or down
Drag and drop input files onto this
area, or use the Add button
Assembly
instruction*
Select a profile
This displays current
saving settings
Click to start
PDF creation
Click to change
save settings
* other assembly instructions are:
• Combine files into a single PDF (in listed order and ability to
generate a bookmark for each input file)
• Overlay files (with overlay options).
• Package files as PDFs inside a container PDF (with options)
8
Page 9
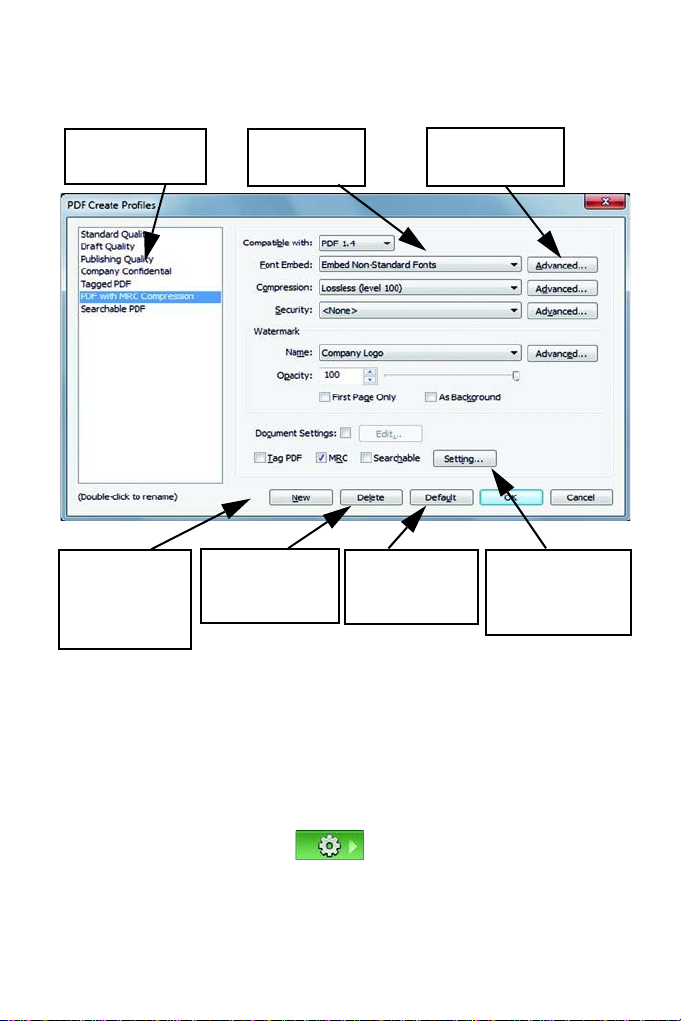
Click the Profiles... button to change settings for any profile, or to create
2. Make
selections here
Select a profile,
click this to name a
new profile based
on it, then change
settings and save it
with OK.
Click this to delete
the selected profile
after a warning.
1. Select a profile
here
3. Specify settings
for each selection
here
Click this to restore
default settings for
the selected profile.
Access settings for
MRC compression
and creating
searchable PDF files.
a new profile based on an existing one.
For information on making tagged or
searchable PDF files, and the
benefits of applying MRC compression, see Help.
Click OK to have the selected profile
applied, with the settings you
specified.
Then press the Create button
in the Assistant. The Print Info
dialog box appears, listing the input and output files and showing the
rsion status. Double-click any PDF name to view the created PDF.
conve
9
Page 10
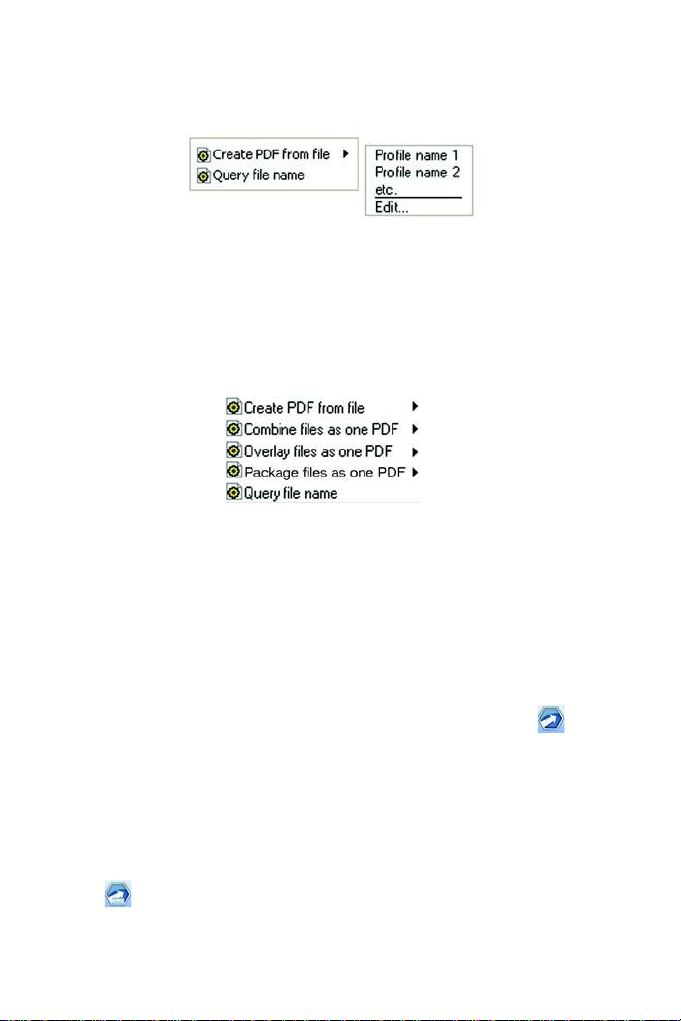
Create PDFs from Windows Explorer
Right click on a single file. The shortcut menu includes:
Choose a profile from the first item's sub menu. The current settings for
that profile will be used for the PDF creation. Click Edit… to modify
profile settings or create a new one before PDF creation. The second item
shows the current saving instruction. Click on it to set a different
instruction.
If you select a group of files and right cl
Choose the first option and then a profile to create one PDF from each
selected file. To generate a single PDF, choose the second, third or fourth
option, along with a profile. The last option displays the current saving
instruction. Click it to change this.
ick, the shortcut menu includes:
Create PDFs from Microsoft Word
1. Open the Word document.
2. Select Create PDF from the
Word 2007 or 2010 you can find this in the Nuance PDF tab.
3. Accept or change the default target folde
As dialog box that appears.
4. Optionally, add document information (keywords etc.) or choose
E
mbed Metadata (see below).
Click
to create a PDF and attach a copy of it to an e-mail message.
Nuance PDF menu or click . In
r and file name in the Save
10
Page 11

The Nuance PDF Settings for Word dialog box
This can be accessed from a toolbar button or an item in the Nuance
PDF menu. (In Word 2007 and 2010 you can
tab.) It lets you define settings that are applicable only when creating a
PDF from a Word document. Define which paragraph styles in the Word
document should be converted to bookmarks in the PDF, which
comments should be transferred, how hyperlinks should appear, and
which items should be tagged, if any. Choose Embed Metadata under
Advanced Settings to transfer document information (subject, author,
keywords, etc.) from the Word document into the PDF. Use the
Advanced Settings panel to access the full range of PDF creation settings.
find this in the Nuance PDF
Create PDFs from Microsoft Excel and PowerPoint
1. Open the Excel file or PowerPoint presentation.
2. Select Create PDF from the
3. Accept or change the default target folde
As dialog box that appears.
4. To create a PDF and attach a copy of it to an e-mail, click
5. To change creation properties, click
You can choose whether or not to ha
transferred to the PDF and bookmarks created. In Excel each
worksheet becomes a bookmark and in PowerPoint each slide.
Choose Embed Metadata to transfer document information from
the source document into the PDF.
Nuance PDF menu or click .
r and file name in the Save
.
.
ve comments and hyperlinks
Create PDFs in mailing applications
A toolbar is added to Microsoft Outlook, whose items appear in the
Actions menu in Lotus Notes (version 8.5). In Outlook 2007 and 2010:
1. Click
and save them to a defined folder.
to convert the attachments in the current message to PDF
11
Page 12

2. Click to access settings. Choose to have all attachments
converted in the background and sent to the last used folder, or to
e able to choose which attachments to convert and to change the
b
target folder.
3. Click
in the Nuance toolbar in a new message or a reply
window to choose one or more files from your computer to be
converted to
Note: These buttons have a different appearance in Outlook 2003.
Note: If you do not se
or your mailing application, go to View >
PDF and attached to the message.
e the buttons in Word, Excel, PowerPoint
Toolbars and select Nuance PDF.
Create PDFs from Internet Explorer
1. Open a web page you want to capture as a PDF.
2. Click the Create PDF button and choose to make a PDF from
the web page, or to add its
PDF and attach it to a new empty message in your default e-mail
program (Outlook or Lotus Notes).
The button's drop-down list also lets you access creation
make a PDF from a web page linked to the current one, right-click on the
link and choose Create PDF file from the content of the link.
content to an existing PDF, or to create a
options. To
12
Page 13
ScanSoft PDF Create! Properties dialog box
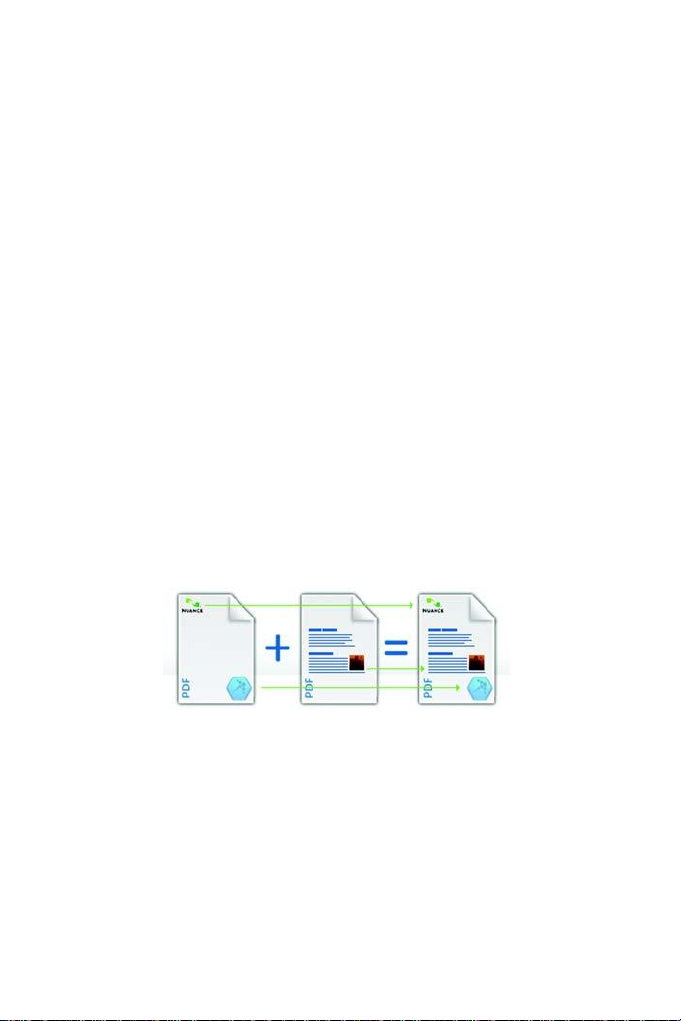
Page 1 of a multipage document
Cover page of
resulting PDF file
=
+
Single-page file with
repeated elements
This gives you full control over the conversions. In the General panel you
define page size, orientation, resolution for the PDF, choose whether or
not to view it after creation and choose a grayscale or color PDF. The
PDF Settings panel lets you define the PDF version, control font
embedding, set compression types and severity, define passwords and
add watermarks. It gives you choices for naming the created PDF file(s)
and defining properties such as title, author, subject and keywords. The
created file(s) can also be directed as attachments to an E-mail message,
ready for distribution.
The ScanSoft PDF Create! Properties dialog box can be accessed from the
Print dialog box in your
applications. When working from the Create
Assistant or Windows Explorer, these settings are made through the
profiles. If you need to access these settings from Microsoft Word,
choose File/Print instead of the Create PDF button.
How to overlay PDF files
Overlay options let you place artwork or other fixed items onto just the
first page of your PDF files, together with items that change from file to
file. Overlay example for a cover page:
To have this result, deselect the option 'Repeat the last page of the
shortest
document for page overlay'.
You can also use an overlay to add a company logo or other fixed item to
ery page of PDF files you create. To do this select the option named
ev
above.
For more information on overlay choices, please consult Help.
13
Page 14

How to package files
A package is a single PDF file that contains a set of PDF files. Packages
help you group related files, making it easier to send them by e-mail.
To package a set of files, maybe of differing file
PDF Create Assistant. Choose packaging as the assembly instruction.
Click Options to choose which cover page to use: a Create Assistant
Template or the first listed file.
types, select them in the
Click the Create button
to have PDF files created or
transmitted into the package.
To open a PDF package you must use a recent PDF viewer or editor, such
as Nuan
ce PDF Converter Professional 5 or above. All files in the package
are listed, you can open and save each one separately. With Nuance PDF
Converter Professional 4 and older PDF viewers/editors, the files are
indicated as attachments.
Cloud Connectors
Source files can be opened from popular Cloud storage sites, and
resulting files can be uploaded.
Supported systems are Dropbox, Evernote, PaperPort
Anywhere and the
Nuance Cloud Connector, that provides access to further sites. These are
listed under File > Open and they can be specified in saving options.
SharePoint and other DMS support
Microsoft SharePoint is supported in PDF Create 8, through a set of
dialog boxes that can be accessed from the Add button menu item Open
from DMS. Other Document Management Systems (Hummingbird
™, Interwoven
eDocs
and Xerox Docushare – for version information, see System
Requirements in Help) can be accessed directly through their own
interfaces. See Help for detail, and System Requirements for the full
DMS listing. Created PDF files can be stored in SharePoint or other
systems by choosing Save to DMS as target in the Destination Settings
dialog box.
®
Worksite, LiveLink®, NetDocuments®, Worldox®
14
Page 15

Inside SharePoint, Hummingbird Enterprise™ and Interwoven®
Worksite it is possible to choose a non-PDF file, open its shortcut menu
to call on PDF Create to make a PDF from it and place it in the same
location, with the same file name. It is also possible to select a non-PDF
file from the computer's file system and have it converted to PDF and
placed in the DMS at the current or a defined location.
XPS File Support
The support for XPS files provided by the PDF product family is:
Professional Create Converter
XPS to PDF
PDF to XPS
Unlock XPS
(XPS to Word, etc.)
Yes Yes No
Yes No No
Yes No Yes
15
Page 16

Un-installation
1. Select Add or Remove Programs from the Control Panel. Under
Vista, select Programs and Features from the Control Panel.
2. Select Nuance PDF Create 8.
3. Click Remove to
or to change the list of integrated programs.
A de-activation step is performed at the start
you to reinstall the program later without re-activation problems. Deactivation requires web access.
uninstall the program or Change to auto-repair it
of uninstallation, allowing
www.nuance.com
Copyright © 2012 Nuance Communications, Inc. All rights reserved. Subject to change without prior notice. Nuance,
the Nuance logo, ScanSoft and the PDF Create logo are trademarks or registered trademarks of Nuance
Communications, Inc. or its affiliates in the United States of America and/or other countries. All other trademarks are
the property of their respective owners.
This software is protected by US and Inte
The word verification, spelling and hyphenation portions of th
Technology. The Proximity Hyphenation System © Copyright 1988. All Rights Reserved. Franklin Electronic
Publishers, Inc. See the detailed acknowledgment in Help. INSO / Vantage Research dictionaries: International
CorrectSpell ™ spelling correction system © 1993 by Lernout & Hauspie. The software accompanying this
document is based, in part, on the work of the Independent JPEG Group, Colosseum Builders, Inc., and the
FreeType Team. The software was developed using Kakadu software and the Zlib compression library. AES
encryption/decryption copyright © 2001, Dr Brian Gladman, Worcester, UK. This product includes elements
developed by the OpenSSL project (http://www.openssl.org), including software written by Eric Young and Tim
Hudson.
For full acknowledgments please see Help. The End-Usee License
can be later viewed in the program’s About panel.
rnational patents and copyright laws.
is product are based in part on Proximity Linguistic
Agreement is displayed during installation and
16
 Loading...