

Page 1

F-05E
INSTRUCTION MANUAL
’12.11
Page 2
Thank you for purchasing "F-05E" mobile terminal.
Introduction
Before using your terminal, or when necessary, read this
manual to ensure safe use and handling.
Learning operations
"Quick Start Guide" (in Japanese only)
This manual provides information about screens and
operations of basic functions.
"Instruction Manual" app (e-manual) (installed in the
This manual provides information and operations of all the
functions.
<Operation steps>
Manual]→Select a search method
If you delete "Instruction Manual", you can access Google
Play from Play Store to download again.
<Operation steps>
→
Search "
説明書
This manual provides information and operations of all the
functions.
〈
From PC〉 http://www.nttdocomo.co.jp/english/support/
trouble/manual/download/index.html
*You can download the latest information.
terminal) (in Japanese only)
From the Application menu, [Instruction
From the Application menu, [Play Store]
取扱説明書
(Instruction Manual)"→[Install]
(Instruction Manual)" and select "
"Instruction manual" (PDF file)
取扱
・
Viewing this manual
In this manual, "F-05E" mobile terminal is usually referred to
as "the terminal".
・
The images or illustration used in this manual are examples.
They may differ from the actual displays.
・
In this manual, explanations and screen images for "docomo
Palette UI" as home app and "Standard mode" as Family use
setting are provided.
・
In this manual, "authenticate" indicates the operating
procedure for entering security code or performing
fingerprint authentication depending on functions.
・
Unauthorized copying of parts of or this entire manual is
prohibited.
・
The contents in this manual, URL and contents are subject to
change without prior notice.
Page 3
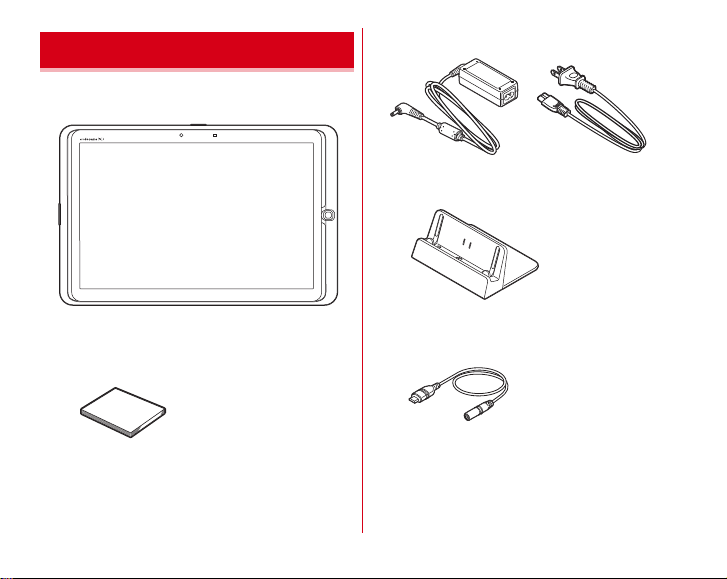
Basic package
■
F-05E (including warranty)
■
Quick start guide (Japanese)
■
Desktop Holder F
39
■
AC Adapter F07 (with warranty)
■
E arphone conversion cable with antenna (sample)
(with manual)
□
Other options→P148
1
Contents/Precautions
Page 4

Contents
■
Basic package .......................................................... 1
■
Before using the terminal ............................................
■
Precautions (Always follow these directions) ...........
■
Handling precautions ............................................ 13
■
Waterproofness/Dustproofness .......................... 19
Before using the terminal........... 25
Part names and functions ..............................................25
docomo mini UIM card ..................................................26
microSD card ..................................................................27
Charging .......................................................................... 29
Turning power ON/OFF..................................................32
Basic operation ...............................................................33
Character entry ...............................................................35
Initial settings.................................................................. 43
Indicator LED................................................................... 43
Screen/Icon...................................................................... 44
docomo Palette UI...................... 48
Home screen ...................................................................48
Application screen .......................................................... 50
Phonebook.................................. 54
Using Phonebook ...........................................................54
Communication ..............................................................56
Timeline........................................................................... 56
Editing My profile........................................................... 57
4
Mail/Internet................................58
5
sp-mode mail.................................................................. 58
SMS ................................................................................. 58
Email................................................................................ 60
Gmail ............................................................................... 63
Early warning "Area Mail" ............................................. 64
Google Talk..................................................................... 65
Browser ........................................................................... 65
Simplified Browser......................................................... 68
Settings....................................... 71
Setting menu .................................................................. 71
WIRELESS & NETWORKS.............................................. 74
Sound and Vibration ...................................................... 82
Display............................................................................. 84
Set style........................................................................... 87
Multimedia...................................................................... 88
Storage............................................................................ 88
Battery ............................................................................. 89
NX! eco............................................................................ 89
Apps................................................................................. 90
Accounts & sync............................................................. 91
Lock/Security................................................................... 91
Slide-in function ...........................................................103
Language & input......................................................... 104
Date & time ................................................................... 105
2
Contents/Precautions
Page 5

Accessibility ..................................................................105
About tablet................................................................... 106
File management ...................... 107
Bluetooth® communication......................................... 107
Connecting an external device .................................... 110
Linking with DLNA device............................................ 112
Applications ............................. 115
dmenu............................................................................ 115
dmarket.......................................................................... 115
Play Store ......................................................................115
Android Beam ............................................................... 117
Mobacas ........................................................................118
1Seg ............................................................................... 122
Camera ..........................................................................129
Gallery ...........................................................................133
Media Player .................................................................134
YouTube ........................................................................135
GPS/Navigation............................................................. 135
Clock ..............................................................................139
Calendar ........................................................................139
Calculator ......................................................................141
Electronic dictionary..................................................... 141
Search............................................................................ 142
Document Viewer .........................................................142
SD card backup ............................................................. 143
International roaming ...............145
Outline of international roaming (WORLD WING)..... 145
Available service overseas ..........................................145
Before using the terminal overseas............................ 145
Settings for overseas use ............................................147
After returning to Japan .............................................. 147
Appendix/Index .........................148
Options and related devices........................................ 148
Troubleshooting (FAQ) ................................................148
Smartphone Anshin Remote Support ........................ 154
Resetting the terminal.................................................. 155
Warranty and After-Sales Service............................... 156
Software update ........................................................... 158
Main specifications....................................................... 162
Certification and compliance....................................... 164
Declaration of Conformity ...........................................165
Federal Communications Commission (FCC) Notice 165
FCC RF Exposure Information ..................................... 165
Important Safety Information...................................... 167
Export Administration Regulations............................. 168
Intellectual Property Right ........................................... 168
SIM unlock ....................................................................172
Index.............................................................................. 173
3
Contents/Precautions
Page 6

Before using the terminal
・
This terminal supports LTE, W-CDMA, GSM/GPRS, Wireless
LAN System.
・
Because your terminal uses wireless transmission, it may
not function in locations where it is difficult for radio waves
to penetrate, such as tunnels, underground passages and
some buildings, in areas where radio waves are weak, or out
of Xi and FOMA service area. Even when you are high up in
a tall building or condominium and nothing blocks your
view outside, your terminal may not be able to receive or
transmit signals. Also, communication may be interrupted
even when there are strong radio waves with 4 signal status
icons on the terminal and you are not moving (traveling).
・
Your terminal performs wireless communication. When you
are operating your terminal while moving to a location
subject to weaker radio wave conditions, the transmitted
digital data may not be correctly decoded and as a result the
decoded data may differ somewhat from the actual data.
・
Maintain a separate record of the data (contacts, schedule,
memos, etc.) you saved in the terminal. Note that DOCOMO
assumes no responsibility for any loss of saved contents of
data resulting from malfunction, repair, changing of the
model or other handling of the terminal.
・
In the terminal, as it is for a PC, some applications that you
install may give instability of the operation, or may send
your location information or personal information
registered to the terminal to outside via the Internet and the
information may be used improperly. Please thoroughly
check a provider and operation status of the application etc.
which you want to use beforehand and then use it.
・
You are recommended to save important data to microSD
card.
・
This terminal supports Xi Area, FOMA Plus-Area and FOMA
HIGH-SPEED Area.
・
The terminal does not support i-mode sites (programs) or
i-αppli.
・
You can use the terminal only with docomo mini UIM card.
If you have a UIM or FOMA card, bring it to a docomo Shop
to replace.
・
The battery of the terminal is built-in and cannot be replaced
by yourself.
・
The terminal does not support voice call or digital
communication (videophone, 64K data communication).
・
Even in Manner mode, shutter sound, auto focus lock sound,
count down sound for self timer, and Find Me Ringtone
sound for Bluetooth Low Energy setting are emitted.
・
You can check your own phone number in the following
step.
From the Application menu, [docomo phonebook]→[My
profile]
・
The terminal automatically performs communication for
some functions, for example, to synchronize data, check the
latest software or maintain connection with the server. If you
transmit a large amount of data such as downloading
applications or watching video, a packet communication
charge becomes high. Subscription of packet flat-rate
service is highly recommended.
・
Depending on the applications or service you use, packet
communication charge may be applied even in Wi-Fi
communication.
・
The software on the terminal can be updated with the latest
information.
→
P158
4
Contents/Precautions
Page 7
・
Improving the terminals quality or upgrading operation
system may be included in the software update. And some
applications used in the previous version may not be
available or some unintended bugs may occur after
software update.
・
When the memory of the microSD card or the terminal is
almost full, running application may not operate normally.
In this case, delete saved data.
・
Google applications and service contents are subject to
change without prior notice.
・
For the information on the services provided by Google,
refer to the terms of use for Google Inc. And for the details
on other web services, read terms of use for each service.
・
If your terminal is lost, change your each account password
using a PC to prevent other persons from using Google
services such as Google Talk, Gmail, Google Play, etc.
・
Set the screen lock to ensure the security of your terminal for
its loss.→P94
・
The terminal supports only sp-mode, mopera U and
Business mopera Internet (VPN setting is limited only to
PPTP). Other providers are not supported.
・
To use tethering, a subscription to sp-mode is required.
・
Packet communication charge when using tethering varies
depending on the charging plan you use. Subscription of
packet flat-rate service is highly recommended.
・
Since Mobacas is a service using communications, using the
service incurs packet communication charge. Subscription
of packet flat-rate service is recommended.
・
For details on usage fee, refer to http://
www.nttdocomo.co.jp/english/.
Precautions (Always follow these directions)
・
Before using your terminal, or when necessary, read the
precautions below to ensure safe use and handling. After
reading this manual, keep it carefully.
・
These precautions are intended to protect you and others
around you. Read and follow them carefully to avoid injury,
damage to the product or damage to property.
・
The signs below differentiate between the levels of danger
that can occur if the product is not used within the specified
guidelines.
This sign denotes that death or
serious injury may directly result
DANGER
WARNING
CAUTION
from improper use.
This sign denotes that death or
serious injury may result from
improper use.
This sign denotes that minor
injury or damage to property may
result from improper use.
5
Contents/Precautions
Page 8
・
Don’t
No disassembly
No liquids
No wet hands
Do
Unplug
Don’t
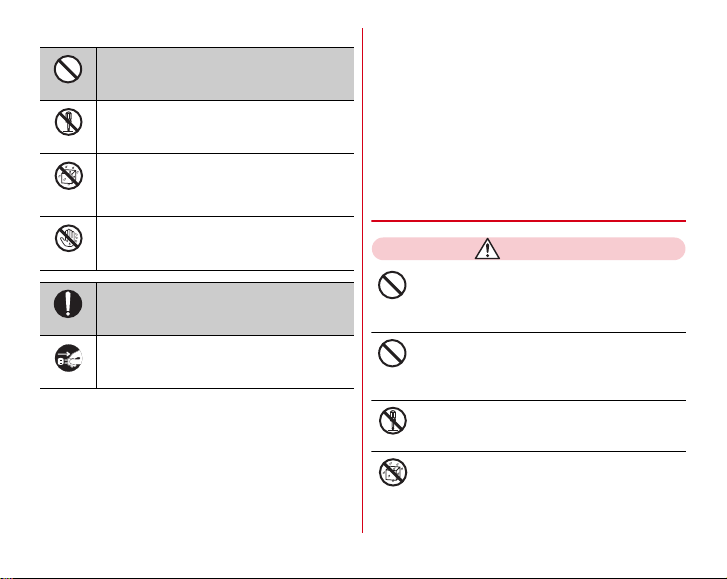
The symbols below show specific directions.
This symbol denotes that the action is
prohibited.
This symbol denotes that disassembling the
phone or its components is not allowed.
This symbol denotes that using the phone or its
components in a bathroom or other highly
humid area is not allowed.
This symbol denotes that using the phone or its
components with wet hands is not allowed.
This symbol denote s that an instruction must be
obeyed at all times.
This symbol denotes that the equipment should
be unplugged.
■
Precautions contain the description below.
Handling the terminal, adapter, desktop holder and docomo
mini UIM card (common)........................................................6
Handling the terminal..................................................................8
Handling adapter and desktop holder .....................................10
Handling docomo mini UIM card.............................................11
Handling mobile phones near electronic medical equipment
.................................................................................................11
Material list.................................................................................12
◆
Handling the terminal, adapter, desktop
holder and docomo mini UIM card
(common)
DANGER
Do not use, store or leave the terminal in hot
places (e.g. by the fire, near a heater, under a
kotatsu, in direct sunlight, in a car in the hot sun).
Don’t
May cause fire, burns or injuries.
Do not put the terminal into heating cooking
device such as microwave oven or high-pressure
container.
May cause fire, burns, injuries, electric shock.
Do not disassemble or remodel the equipment.
May cause fire, burns, injuries, electric shock.
No disassembly
Do not let the terminal get wet with water,
drinking water, urine of pet animals, etc.
May cause fire, burns, injuries, electric shock.
No liquids
For waterproofness, see here.
Dustproofness”
6
→
P19“Waterproofness/
Contents/Precautions
Page 9
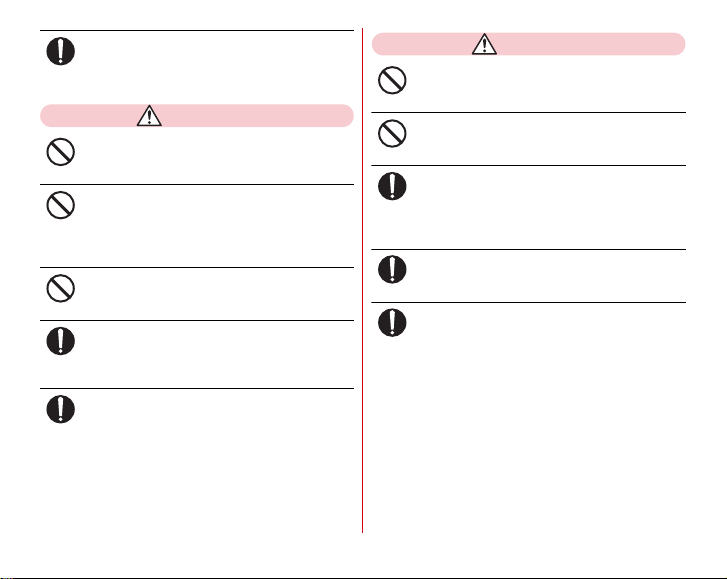
Use an adapter specified by NTT DOCOMO for
Do
Don’t
Don’t
Don’t
Do
Do
Do
your terminal.
May cause fire, burns, injuries, electric shock.
WARNING
Do not throw the equipment or give a strong
force or hard shock to it.
May cause fire, burns, injuries, electric shock.
Keep conductive materials (metal pieces, pencil
lead, etc.) from coming in contact with the
charging terminals or external connection jack.
Do not put those materials inside the terminal.
May cause fire, burns, injuries, electric shock.
Do not cover or wrap the terminal with a blanket,
etc while using or charging.
May cause fire or burns.
Turn the terminal OFF and stop charging before
entering a place such as a gas station where
flammable gases are generated.
The gas may catch fire.
If the equipment starts giving off a strange smell,
overheats, becomes discolored or deformed
during use, charging or in storage, immediately
perform the following operations.
・
Remove the power plug from the wall outlet or
cigarette lighter socket.
・
Turn the terminal OFF.
May cause fire, burns, injuries, electric shock.
CAUTION
Do not leave the equipment on unstable or
sloping surfaces.
May cause inju ries.
Don’t
Do not store the equipment in extremely humid,
dusty or hot areas.
May cause fire, burns, electric shock.
Don’t
Children using the equipment should be
instructed in proper operation by an adult. Do
Do
not allow them to use the equipment without
adult supervision.
May cause inju ries.
Store the equipment out of reach of small
children.
May be accidentall y swallowed or cause injuries.
Do
Be careful especially when using the terminal
connected to the adapter continuously for a long
time.
If you use applications, watch 1Seg, etc. while charging
the battery for a long time, the terminal and adapter may
be heated.
Directly touching a hot part for a long time, you may have
redness, itching or rash on your skin, or it may result in
low-temperature burns depending on your constitution
and/or health condition.
7
Contents/Precautions
Page 10
◆
Don’t
Don’t
Do
Don’t
Do
Handling the terminal
■
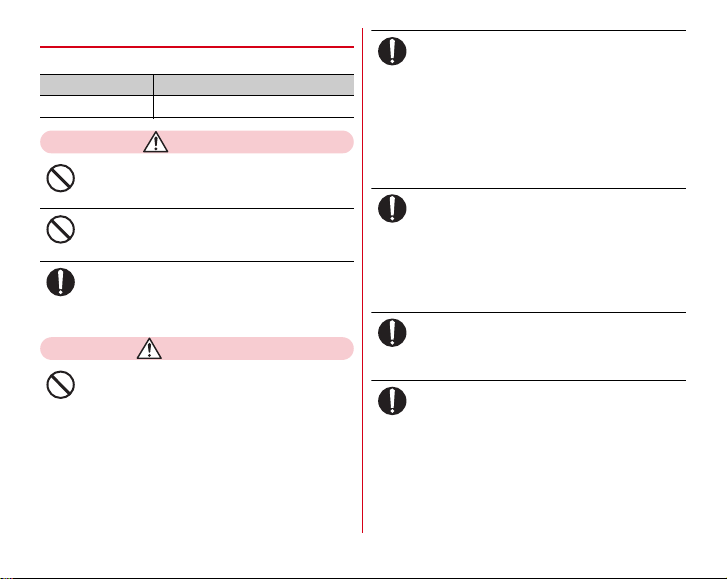
Type of the internal battery is as follows:
Display Battery type
Li-ion 00 Lithium polymer battery
DANGER
Do not throw the battery pack into the fire.
May cause the internal battery to ignite, bu rst, heat or leak.
Do not nail the battery pack, hit with a hammer
or step on it.
May cause the internal battery to ignite, bu rst, heat or leak.
If the internal battery fluid etc. contacts eyes,
immediately flush the eyes with clean water and
see a doctor right away. Do not rub the eyes.
May cause loss of sight.
WARNING
Do not put foreign objects such as liquid like
water, metal pieces or burnable things into
docomo mini UIM card slot or microSD card slot.
May cause fire, burns, injuries, electric shock.
Turn the terminal OFF in areas where use is
prohibited, such as in airplanes and hospitals.
May cause electronic equipment or electronic medical
Do
equipment to fail or malfunction.
When using the phone in a medical facility, be sure to
observe the regulations of the facility.
If you do prohibited act such as using the phone in an
airplane, you will be punished according to law.
If usage of mobile phones in an aircraft is admitted by
setting airplane mode, etc., use the terminal under the
direction of the airline.
Keep the terminal away from your ear when ring
alert is sounding etc.
Do
When connecting the earphone/microphone etc.
to the terminal and playing a game or music,
adjust the volume moderately.
Too loud volume may cause a hearing loss.
And, if you cannot hear the sound around you clearly, it
may cause an accident.
If you have weak heart, be careful when setting
the incoming vibrate alert (vibration) or alert
volume setting.
May cause harmful effect on heart.
When you use electronic medical equipment,
check with the equipment manufacturer to
Do
determine how the device is affected by radio
waves before using.
May cause harmful effect on electronic medical equipment
etc.
8
Contents/Precautions
Page 11
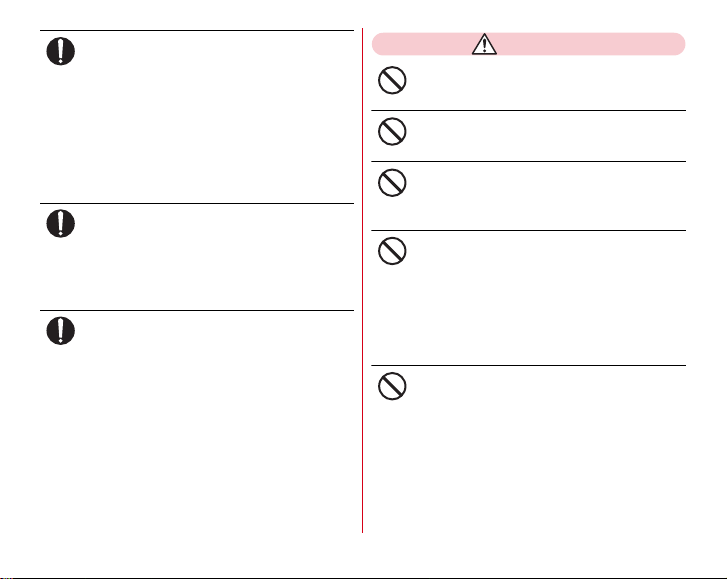
Turn the terminal OFF near high-precision
Do
Do
Do
Don’t
Don’t
electronic control equipment or electronic
equipment using low-power signals.
May cause the equipment to fail or malfunction.
Examples of electronic equipment t o avoid.
*
Hearing aids, implanted pacemakers or d efibrillators, other
electronic medical equipment, fire alar ms, automatic doors and
other automatic control equipment.
Users wearing implanted pacemakers or def ibrillators or other
electronic medical equipment should check with the
manufacturer or sales outlet about the effect of radio freq uencies
on the equipment.
When the display or camera lens is accidentally
broken, be careful of fragments of broken glass
or exposed internal parts of the terminal.
Surface of display is made of hardened glass and camera
lens is made of plastic panel so as not to be shattered,
however, if you mistakenly touch broken or exposed parts,
you may be injured.
If the internal battery leaks or gives off a strange
smell, immediately remove it from the vicinity of
open flames.
The vapors from leaking battery pack fluid may ignite or
explode.
CAUTION
Do not swing the terminal by the antenna, etc.
May cause accident such as injury to yourself or others by
hitting.
Don’t
Do not use the damaged terminal.
May cause fire, burns, injuries, electric shock.
Don’t
When using the motion sensor, check the safety
around you, hold the terminal firmly, and do not
shake it unnecessarily.
Don’t
May cause accident such as injuries.
If the display part is accidentally broken and the
liquid crystal leaks out, do not make the
substance contact with your skin of face or
hands.
May cause loss of sight or skin problems.
If the liquid crystal gets into your eyes or mouth, rinse it
with clean water and see a doctor immediately.
And, if the liquid adheres to skin or clothing, use alcohol
etc. to wipe it off, then wash with soap.
Do not discard old battery packs together with
other garbage.
May cause ignition or environmental destruction. Bring an
old terminal into a sales outlet such as docomo Shop or if
your local municipality has a battery recycling program,
dispose of it as provided for.
9
Contents/Precautions
Page 12
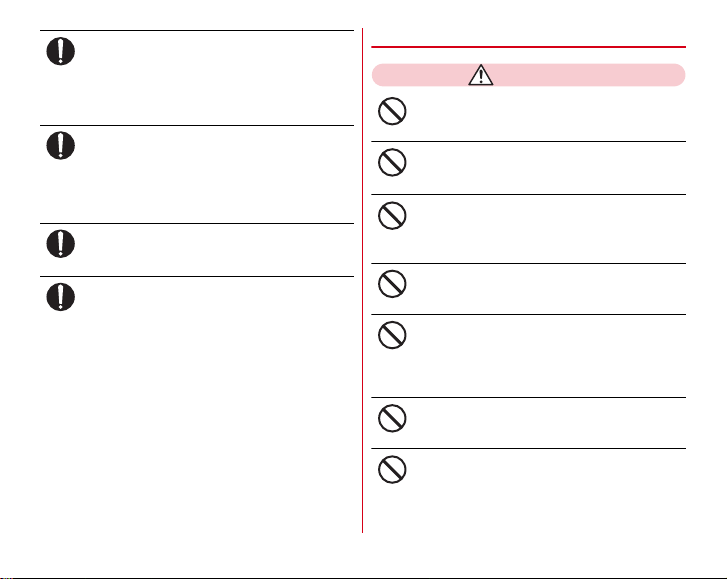
To use the terminal in car, check with automobile
Do
Do
Do
Do
Don’t
Don’t
manufacturer or dealer to determine how the
device is affected by radio waves before using.
In rare cases, using the phone in some vehicle models can
cause the vehicle's electronic equipment to malfunction. In
that case, stop using the terminal immediately.
The use of the terminal may cause itching,
rashes, eczema, or other symptoms depending
on the user's physical condition. If you develop
skin problems, stop using the phone
immediately, and see a doctor.
For material of each part →P12"Material list"
When watching the display, take a certain
distance from the display in a fully bright place.
May reduce visual a cuity.
If fluid etc. leaks out from the internal battery, do
not make the fluid contact with your skin of face
or hands.
May cause loss of sight or skin problems.
If the fluid etc. put into your eyes or mouth, or contacts
skin or clothes, immediately flush the contacted area with
clean water.
If the fluid etc. put into the eyes or mouth, immediately see
a doctor after flushing.
◆
Handling adapter and desktop holder
WARNING
Do not use the adapter cord if it gets damaged.
May cause fire, burns, electric shock.
Don’t
Do not use the AC adapter or desktop holder in a
bathroom or other highly humid area.
May cause fire, burns, electric shock.
Always use the DC adapter with a negativeground vehicle. Do not plug it into a positiveground vehicle.
Don’t
May cause fire, burns, electric shock.
When it starts to thunder, do not touch adapter.
May cause electric shock.
Don’t
Do not short the charging jack while it is
connected to the outlet or cigarette lighter
socket. Do not touch the charging jack with a
part of your body such as your hand or finger.
May cause fire, burns, electric shock.
Do not place heavy objects on the adapter cord.
May cause fire, burns, electric shock.
Don’t
When you insert and remove the AC adapter
from power outlet, do not contact a metal strap
or other metal objects with the jack.
Don’t
May cause fire, burns, electric shock.
10
Contents/Precautions
Page 13
Do not touch the adapter cord, desktop holder or
No wet hands
Do
Do
Do
Do
Do
Unplug
outlet with wet hands.
May cause fire, burns, electric shock.
Only use with the specified power source and
voltage. When charging the terminal overseas,
use AC adapter for global use.
If incorrect voltage is used, this may cause fire, burns or
electric shock.
AC adapter : 100V AC
DC adapter : 12V or 24V DC (specific for negative ground
vehicle)
AC adapter for global use : Between 100V and 240V AC
(Connect to the AC outlet for internal household use)
If the DC adapter's fuse blows, replace it only
with the specified fuse.
May cause fire, burns, electric shock. For the specified
fuse, see the instructions that come with the DC adapter.
Wipe off any dust that accumulates on the power
plug.
May cause fire, burns, electric shock.
When you connect the AC adapter to an outlet,
firmly connect to the outlet.
May cause fire, burns, electric shock.
When you disconnect the power plug from the
outlet or cigarette lighter socket, do not pull the
adapter cord with excessive force. Instead, hold
the adapter to disconnect.
May cause fire, burns, electric shock.
Always remove the power plug from the outlet
or cigarette lighter when not using the adapter
Unplug
for an extended period.
May cause fire, burns, electric shock.
Immediately remove the power plug from the
outlet or cigarette lighter socket if water or other
fluids get into the adapter.
May cause fire, burns, electric shock.
Always remove the power plug from the
cigarette lighter socket when cleaning the
Unplug
equipment.
May cause fire, burns, electric shock.
◆
Handling docomo mini UIM card
CAUTION
Be careful of the cut surface when removing
docomo mini UIM card.
May cause inju ries.
Do
◆
Handling mobile phones near electronic
medical equipment
■
These precautions are based on the guidelines
produced at the Electromagnetic Compatibility
Conference Japan, regarding the protection of
electronic medical equipment from radio waves
emitted by mobile phone units.
11
Contents/Precautions
Page 14
WARNING
Do
Do
Do
Do
Obey the following rules inside medical facilities.
・
Do not bring the terminal into operating rooms (ORs),
intensive care units (ICUs) or coronary care units
(CCUs).
・
Turn the terminal OFF in hospital wards.
・
Turn the terminal OFF in hospital lobbies and corridors
if electronic medical equipment could be nearby.
・
If the medical facility has specified zones where use or
possession of mobile devices is prohibited, obey those
instructions.
Turn the terminal OFF in crowded trains or other
public places where pacemaker or defibrillator
wearers could be nearby.
The terminal's signals may affect the operation of
implanted pacemakers or defibrillators, and other devices.
Wearers of medical equipment such as
implanted pacemakers or defibrillators must
carry and use the terminal at least 22 cm away
from the implanted device.
The terminal's signals may affect the performance of
electronic medical equipment.
When electronic medical equipment other than
implanted pacemakers or defibrillators are in use
outside of medical facilities (such as in home care
settings), check with the device manufacturer to
determine how the device is affected by
electrical signals.
The terminal's signals may affect the performance of
electronic medical equipment.
◆
Material list
Part Material/Surface treatment
Display panel Hardened glass/AF coating
Exterior case Display side PC resin/Acrylic UV curable
Back side PC resin/UV curable coating
TV antenna Antenna top
Camera panel High-intensity acrylic resin/
Power key PC resin/Acrylic UV curable
Volume key PC resin/Acrylic UV curable
Stereo earphone jack PA resin
External connection jack Stainless steel/Tin plating
Jack cap PC resin+Polyester elastomer
Slot cap PC resin+Polyester elastomer
section
Pipe section Stainless steel
Root flexure
section
Root rotation
section
coating
PC+ABC resin/Acrylic UV
curable coating
Nickel titanium alloy
Stainless steel/Nickel plating
Acrylic UV curable coating
coating
coating
resin/Acrylic UV curable coating
resin/Acrylic UV curable coating
12
Contents/Precautions
Page 15
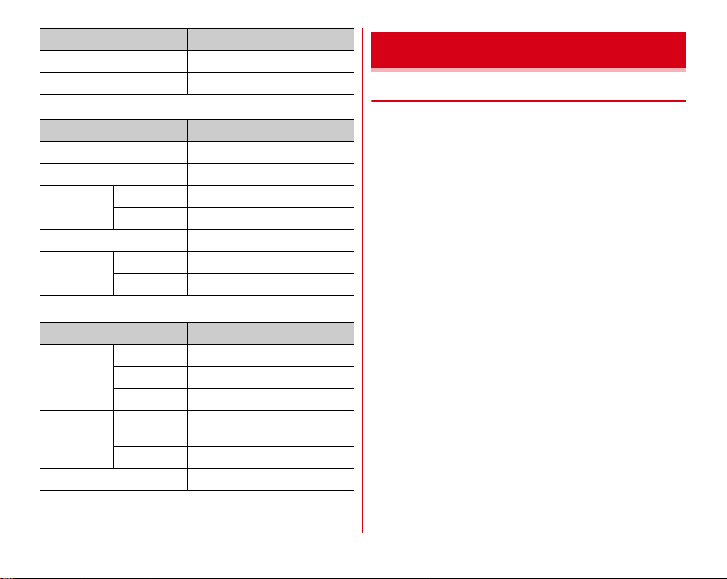
Part Material/Surface treatment
Fingerprint sensor Flexible PC board
Charging terminals Stainless steel/Gold plating
■
AC Adapter F07
Part Material/Surface treatment
Case PC resin
Label Polyester/PET
AC inlet Resin part PBT, GF compound
Metal parts Brass/Nickel plating
Cord skin PVC resin
DC plug Resin part PVC resin
Metal parts Brass/Nickel plating
■
Desktop Holder F39
Part Material/Surface treatment
Exterior case Upper case ABS resin
Back case ABS resin
Bottom case ABS resin
Charging
terminals
Rubber part PORON
Terminal
lever
Contacts C5191W-H/Gold plating
POM resin
Handling precautions
◆
General
・
F-05E is waterproof/dustproof, however, do not allow
water or dust to seep into the terminal and do not allow
accessories or optional devices to get wet or attached with
dust.
- Adapter, desktop holder, docomo mini UIM card are not
waterproof/dustproof. Do not use in a bathroom or other
highly humid area or do not let rain touch. Or putting the
terminal on your body, humidity of sweat may cause
internal corrosion and malfunction. Note that
malfunctions, which are determined to be caused by water
as result of inspections, are not covered by the warranty.
Since these conditions are outside the scope of the
warranty, a repair, if at all possible, is charged.
・
Clean the terminal with a dry soft cloth (such as a cloth for
eyeglasses).
- Rubbing it roughly with a dry cloth may scratch the
display.
- Drops of water or dirt left on the display may cause stains.
- If the terminal is wiped with alcohol, paint thinner, benzine
or detergent, the printing may disappear or color may
fade.
・
Clean the jack occasionally with a dry cotton swab etc.
- If the jack is soiled, connection gets worse and it may
cause power to be turned off or insufficient battery charge,
so clean the jack with a dry cotton swab etc.
Also, be careful never to damage the jack when cleaning it.
13
Contents/Precautions
Page 16

・
Do not place the terminal near an air-conditioner outlet.
- The rapid change in temperature may cause condensation,
causing internal corrosion and malfunction.
・
When using, be careful not to put excessive force to the
terminal etc.
- If the terminal is crammed into a brimming bag, display or
internal PCBs may be damaged or malfunction. And, if
external devices are plugged into the external connection
jack or the stereo earphone jack, the breakage of the
connector or malfunction may result.
・
Do not rub or scrape the display with a metal piece etc.
- May scratch the display, causing malfunction or damage.
・
Carefully read the separate instructions that come with
optional devices.
◆
The terminal
・
Do not press the surface of the touch panel strongly or
operate it with sharp objects such as a nail, a ballpoint pen
and a pin.
- It may damage the touch panel.
・
Avoid extreme temperature.
- Use the terminal where the temperature ranges between 5
and 35℃ and humidity ranges between 45 and 85%. For
information on use in a bathroom, see "What you can do
with waterproofness of F-05E".→P19
・
The terminal may affect land-line phones, TVs or radios in
use nearby, so use it as far as possible from these
appliances.
・
Maintain a separate record of the data you saved in the
terminal.
- If the data is deleted, DOCOMO assumes no responsibility
for the loss of any data.
・
Do not drop the terminal or subject it to shocks.
- May cause malfunction or damage.
・
Do not plug external devices into the external connection
jack or stereo earphone jack at a slant, or do not pull it
forcibly while it is plugged.
- May cause malfunction or damage.
・
It is normal for the terminal to become warm during use or
charging. Continue to use it.
・
Do not leave the terminal with the camera in areas under
strong direct sunlight.
- May cause discoloring or burn-in of elements.
・
Use the terminal with the jack cap and slot cap closed.
- Dust and/or water brought into the terminal cause
troubles.
・
Do not give a strong impact on the fingerprint sensor or
scratch the surface.
- It may cause not only malfunction of the fingerprint sensor
but also disabling authentication.
・
Clean the fingerprint sensor with a dry soft cloth (such as a
cloth for eyeglasses).
- When the fingerprint sensor is dirty or gets wet on the
surface, it cannot read the fingerprint and may cause
decrease the authentication performance or erroneous
operation.
・
While microSD card is being used, do not take the card out
and do not turn off the terminal.
- May cause data loss or malfunction.
・
Do not bring magnetic cards etc. close to the terminal.
- Magnetic data in cash cards, credit cards, telephone cards,
floppy disks, etc. may be erased.
・
Do not bring magnetized objects close to the terminal.
- Bringing strong magnetism close may cause a
malfunction.
14
Contents/Precautions
Page 17

・
The internal battery is a consumable part.
- Replace the internal battery if the terminal has extremely
short operation time on a full charge, though it may vary
by operating conditions. For information on the internal
battery replacement, contact "General Inquiries" on the
last page of this manual.
・
Charge the battery in an area within the proper ambient
temperature range (5-35℃).
・
The operation time provided by the internal battery varies
by the operating environment and internal battery
deterioration.
・
Be careful especially about the following points when
preserving the internal battery.
- Keeping under the state of the full charge (right after
charging ends)
- Keeping under the state of the empty charge (too
exhausted to turn on the terminal)
They may cause the internal battery performance to be
degraded or its lifetime to be shortened.
A recommended battery level to keep the battery pack is
approximately 40% of remaining battery level as a guide.
◆
Adapter
・
Charge the battery in an area within the proper ambient
temperature range (5-35℃).
・
Do not charge the battery in the areas below.
- In areas of excessive humidity, dust or vibrations
- Near land-line phones or TVs/radios
・
It is normal for the adapter to become hot while charging.
Continue to use it.
・
When using the DC adapter for charging, keep the vehicle
engine running.
- The vehicle's battery could become flat.
・
When using an outlet with a mechanism preventing
unplugging, follow the handling instructions for that outlet.
・
Do not give strong shock. Do not deform the charging jack.
- May cause malfunction.
◆
docomo mini UIM card
・
Do not use excessive force to install/remove docomo mini
UIM card.
・
Note that DOCOMO assumes no responsibility for
malfunctions occurring as the result of inserting and using
docomo mini UIM card with another IC card reader/writer.
・
Always keep UIM ICs clean.
・
Clean docomo mini UIM card with a soft, dry cloth (such as
a cloth for eyeglasses).
・
Maintain a separate record of the data you saved in docomo
mini UIM card.
- If the data is deleted, DOCOMO assumes no responsibility
for the loss of any data.
・
To preserve the environment, bring the old docomo mini
UIM card to a sales outlet such as docomo Shop.
・
Take care not to scratch, touch accidentally or short IC.
- May cause data loss or malfunction.
・
Do not drop docomo mini UIM card or subject it to shocks.
- May cause malfunction.
・
Do not bend docomo mini UIM card or place heavy objects
on it.
- May cause malfunction.
・
Do not install docomo mini UIM card into the terminal with
a label or sticker put on.
- May cause malfunction.
15
Contents/Precautions
Page 18
◆
Bluetooth devices
・
This terminal is equipped with the security features, that
are compliant with Bluetooth standards for communication
via Bluetooth. However, depending on the settings, there
may not be enough security. Be aware of security risks
when using Bluetooth.
・
DOCOMO assumes no responsibility for any information
which may be leaked during communication via Bluetooth.
・
Frequency bands
Frequency bands used by the terminal Bluetooth function
are as below.
Frequency band : 2400 MHz band
Modulation : FH-SS method and other method (method
other than DS-SS method/DS-FH method/FH-OFDM
composite method/OFDM method)
Expected interference distance : 10 m or shorter
Whether to change frequency : All bandwidths between
2400 MHz and 2483.5 MHz are used, and the bandwidth used
by mobile object identification devices cannot be avoided.
Cautions on using Bluetooth devices
In the bandwidth used by the product, in addition to home
electric appliances such as a microwave oven and
industrial/scientific/medical devices, in-plant radio
stations used to identify mobile objects used in
production lines of a factory that require a license,
specified low power radio stations, or amateur radio
stations that do not require a license (hereafter "other
radio stations") can be in operation.
1. Before using the product, check whether other radio
stations are in operation in your neighborhood.
2. If radio wave interference occurs between the product
and "other radio stations", use the terminal in a
different location or "Turn the power OFF" to avoid the
radio wave interference.
3. For details, contact "General Inquiries" on the last page
of this manual.
◆
Wireless LAN (WLAN)
・
Wireless LAN (WLAN) exchanges information using radio
waves, and allows you to freely establish LAN connection if
you are within an area where radio wave reaches. On the
other side, if you communicate without appropriate
security settings, communications may be intercepted or
hacked by malicious parties. It is recommended to make
necessary security settings on your judgement and
responsibility.
・
Wireless LAN
Do not use wireless LAN in a place where magnetized by
electric products, AV, OA equipment, etc. or where
electromagnetic wave is generated.
- If magnetism or electrostatic noise affects the terminal,
noise may be increased or communication may not be
available (especially when using microwave oven, it may
affect the terminal).
- Using near TV or radio may cause poor reception or TV
screen may be blurred.
- When multiple wireless LAN access points exist near the
terminal and they use the same channel, search may not
be performed correctly.
16
Contents/Precautions
Page 19
・
Frequency bands
Frequency bands used by WLAN devices are as follows:
Frequency band : 2400 MHz band
Modulation : DS-SS method, OFDM method
Expected interference distance : 40 m or shorter
Whether to change frequency : All bandwidths between
2400 MHz and 2483.5 MHz are used, and the bandwidth used
by mobile object identification devices can be avoided.
Using wireless LAN built-into the terminal in 5.2/5.3 GHz
outdoors is prohibited by the Radio Law.
Available channel varies by countries. To use WLAN
overseas, check the conditions such as available frequency,
regulation, etc. for the country.
To use in airplane, confirm with airline company in advance.
Cautions on using 2.4 GHz devices
In the frequency band used by WLAN devices, in addition
to home electric appliances such as a microwave oven
and industrial/scientific/medical devices, in-plant radio
stations for identification of mobile objects used in
production lines of a factory (a license is required),
specified low power radio stations (a license is not
required), or amateur radio stations (a license is required)
can be in operation.
1. Before using this device, confirm that in-plant radio
stations for identification of mobile objects, specified
low power radio stations or amateur radio stations are
not in operation in your neighborhood.
2. If this device generates harmful radio wave
interference against in-plant radio stations for
identification of mobile objects, change the using
frequency promptly or stop using wireless LAN
function, and contact "General Inquiries" on the last
page of this manual, then consult about treatment for
prevention of the interference (for example, installation
of partitions etc.).
3. If this device generates harmful radio wave
interference against in-plant radio stations for
identification of mobile objects or amateur radio
stations, or if any trouble, contact "General Inquiries"
on the last page of this manual.
Cautions on using 5 GHz devices
Channel numbers and frequency bands available in Japan
are as follows.
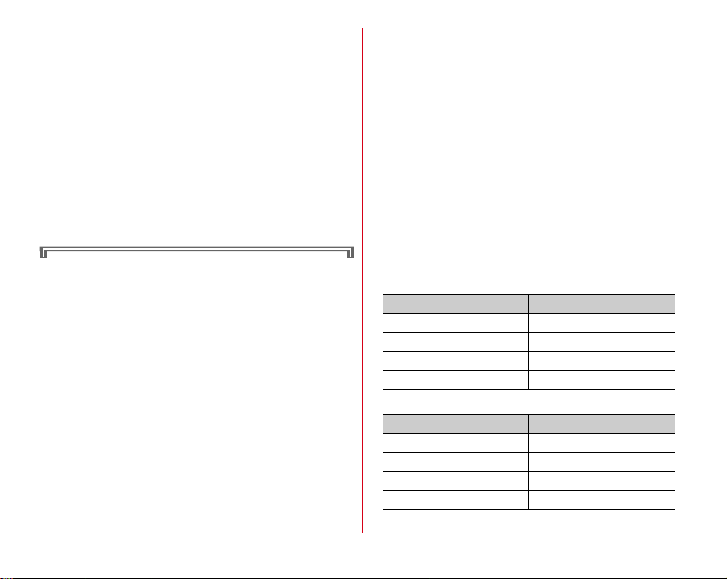
5.2 GHz band
Channel number (Ch) Frequency bands (MHz)
36 5,180
40 5,200
44 5,220
48 5,240
5.3 GHz band
Channel number (Ch) Frequency bands (MHz)
52 5,260
56 5,280
60 5,300
64 5,320
17
Contents/Precautions
Page 20
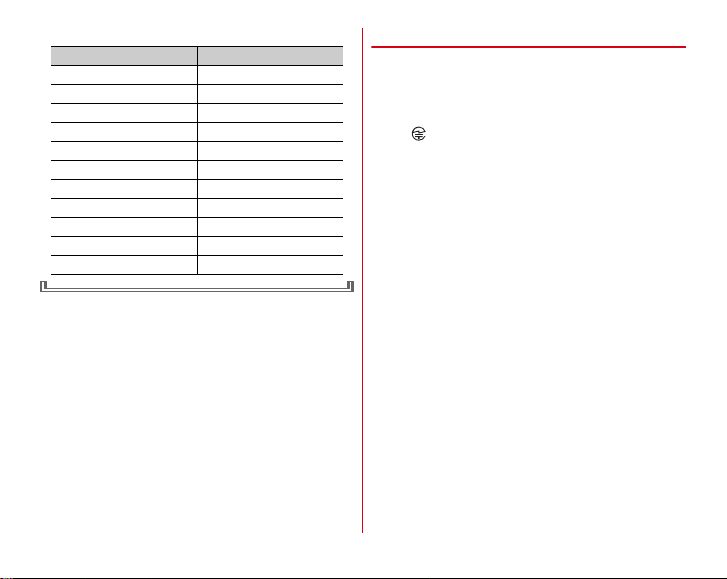
5.6 GHz band
Channel number (Ch) Frequency bands (MHz)
100 5,500
104 5,520
108 5,540
112 5,560
116 5,580
120 5,600
124 5,620
128 5,640
132 5,660
136 5,680
140 5,700
◆
CAUTION
・
Do not use a remodeled terminal. Using a remodeled
terminal violates the Radio Law.
The terminal is certified according to technical standard
conformance of specified wireless equipment based on the
Radio Law, and as a proof of it, the "Technical Compliance
Mark " can be shown on the the terminal. The mark can
be checked by the following step.
From the Application menu, [Settings]→[About phone]
[Auth]
If you remodel the terminal by removing its screws, your
certification of technical standard conformance becomes
invalid.
Do not use the terminal with its certification of technical
standard conformance invalid as it violates the Radio Law.
・
Be careful when you use the terminal while driving a car etc.
Using a mobile phone while driving is subject to penal
regulations.
However, absolutely necessary cases such as rescue of a
sick person or maintaining public's safety are exempted.
・
Use the Bluetooth function only in Japan.
The Bluetooth function of the terminal is compliant with
wireless standards and is authorized for use only in Japan.
If you use this function overseas, you may be punished.
・
Do not alter the basic software.
Repairs may be refused as a modification of software.
・
During communication, use the terminal at least 15 mm
away from your body.
→
18
Contents/Precautions
Page 21
Waterproofness/Dustproofness
F-05E provides waterproofness of IPX5*1, IPX8*2 and
dustproofness of IP5X*3 with the jack cap and slot cap firmly
closed.
*1
IPX5 means that a communication device keeps functioning after
applying a jet flow of 12.5 L/min. from every direction from a
distance of approximately 3 m for at least 3 minutes using water
nozzle in 6.3 mm inner diameter.
*2
For F-05E, IPX8 means that F-05E keeps functioning as a
communication device after it is slowly submerged to depth of 1.5
m in static tap water at room temperature, left there for 30 minutes
and then taken out. (Camera function cannot be used under water.)
*3
IP5X means a protection degree that a communication device
keeps functioning and safety after it is placed in a device with dust
in diameter 75μ or less for 8 hours, agitated and then taken out.
❖
What you can do with waterproofness of
F-05E
・
You can perform communication without an umbrella in the
rain (for rainfall of 20 mm or less per hour).
- When your hands or the terminal are wet, avoid opening/
closing the jack cap or slot cap.
・
The terminal can be submerged into a pool which has a
depth of 1.5 m.
- Do not operate under water.
- If you put the terminal in water of swimming pool, be sure
to have it within 30 minutes.
- If the terminal gets wet with water from a swimming pool,
drain water from the terminal in the following procedure (
→
P22).
・
You can use the terminal in a bathroom.
- Do not immerse the terminal into a bathtub. Also, do not
use the terminal in hot water. May cause malfunction.
If you should fall the terminal into the bathtub,
immediately pick it up to drain water in specified
procedure (→P22).
- Never put the terminal in hot spring water or water
containing soap, detergent or bath powder.
In case the terminal gets wet with water other than tap
water, wash it in specified procedure (→P22).
- You can use the terminal within 2 hours in a bathroom
where the temperature range between 5 and 45℃ and
humidity range between 45 and 99%.
- Rapid temperature change may cause condensation. If you
bring the terminal from a cold place to warm place such as
a bathroom, wait until the terminal reaches the room
temperature.
- Do not put water, hot water, etc. from a faucet or shower.
19
Contents/Precautions
Page 22
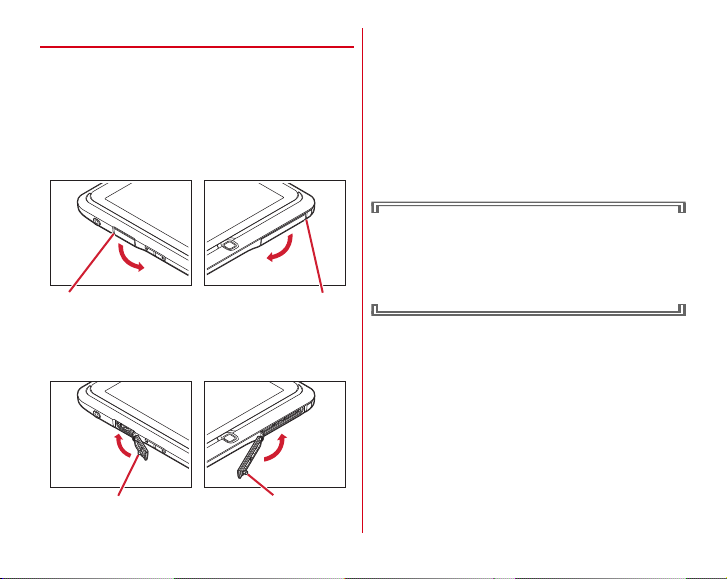
◆
Groove Groove
To ensure waterproofness/dustproofness
To avoid water/dust ingress, be sure to observe the following
points.
・
Do not throw any liquid other than room-temperature tap
water on the terminal, or soak it in such liquid.
・
When attaching/removing docomo mini UIM card or
microSD card or using the external connection jack, pull the
cap up with your finger by the groove as shown in the
illustration.
After docomo mini UIM card or microSD card is attached/
removed or the external connection jack is used, close the
cap in the direction shown, and make sure that the cap is
completely closed without slack by pushing the tab in.
TabTab
・
Firmly close the jack cap and slot cap. Even a fine obstacle
(one hair, one grain of sand, tiny fiber, etc.) put between
contact surfaces may allow water to enter.
・
Do not poke the stereo earphone jack, microphone, or
speaker with a sharp object.
・
Do not let the terminal fall. It may become scratched causing
the waterproof/dustproof performance to degrade.
・
The rubber gaskets of the jack cap and slot cap play
important roles for keeping waterproof/dustproof
performance. Do not scratch or remove the gaskets. Also,
prevent dust from adhering to them.
To keep the terminal waterproofness/dustproofness,
replacement of parts is required every 2 years regardless
of whether the terminal appears normal or abnormal.
DOCOMO takes the terminal to replace the parts as a
chargeable service. Bring the terminal to a sales outlet
such as a DOCOMO-specified repair office.
20
Contents/Precautions
Page 23
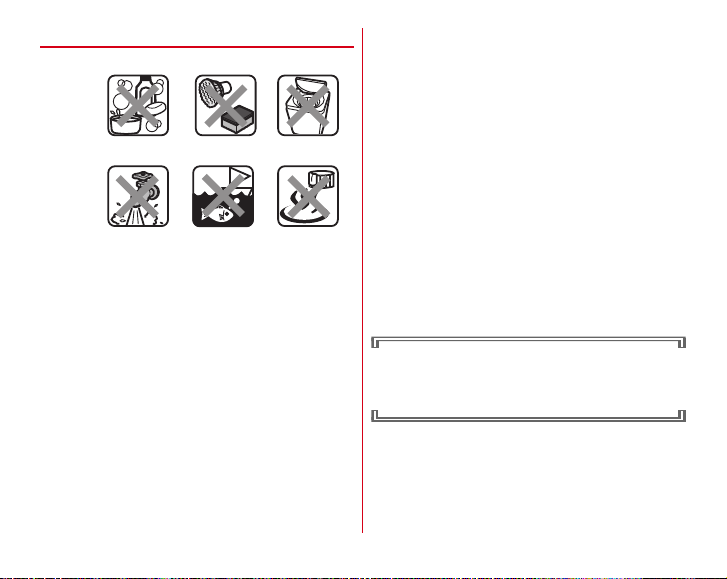
◆
<Example>
Using Soap/
Detergent/Bath powder
Soaking in
ocean water
Using in
hot spring
Applying strong
water flow
Washing with
brush/sponge
Machine-washing
Important precautions
Do not perform actions shown in the illustrations below.
Observe the following precautions to use the terminal
properly.
・
Accessories and optional devices are not waterproof/
dustproof. When playing video, etc. with the terminal
installed in the included Desktop Holder, do not use it in a
bathroom, shower room, kitchen or lavatory even if it is not
connected to the AC adapter.
・
Do not apply water flow stronger than allowed (→P19) (e.g.,
such water flow that gives you pain when applied to your
skin directly from a faucet or shower). F-05E provides IPX5
waterproof performances. However, it causes malfunction.
・
If the terminal gets wet with salt water, sea water, refreshing
beverage or mud or soil adhered, wash it immediately. If
they dry out, it is hard to remove the dirt and it may cause
damage or malfunction.
・
Do not put the terminal in hot water, use it in a sauna or
apply hot airflow (from a hair dryer etc.) to it.
・
Do not move the terminal in water or slam the terminal
against the surface of water.
・
If you put the terminal in tap water or in water of swimming
pool, be sure to have it within 30 minutes.
・
When you use the terminal in swimming pool, obey rules of
the facility.
・
The terminal does not float on water.
・
Do not leave water on the terminal. May short-circuit the
power jacks, or in a cold region, water may freeze causing
malfunction.
・
Do not leave water on the stereo earphone jack,
microphone, or speaker. Such water may interfere with
functioning.
・
If the terminal gets wet with water or other liquids with the
external connection jack cap or slot cover open, liquid may
get inside the terminal and may cause electric shocks or
malfunction. Stop using the terminal, turn the power OFF,
and contact a DOCOMO-specified repair office.
・
If the rubber gasket of the jack cap or slot cap is damaged or
deformed, replace it at DOCOMO-specified repair office.
DOCOMO does not guarantee actual operations under all
states. Malfunctions deemed to be caused by
inappropriate operation by the customer are not covered
by the warranty.
21
Contents/Precautions
Page 24
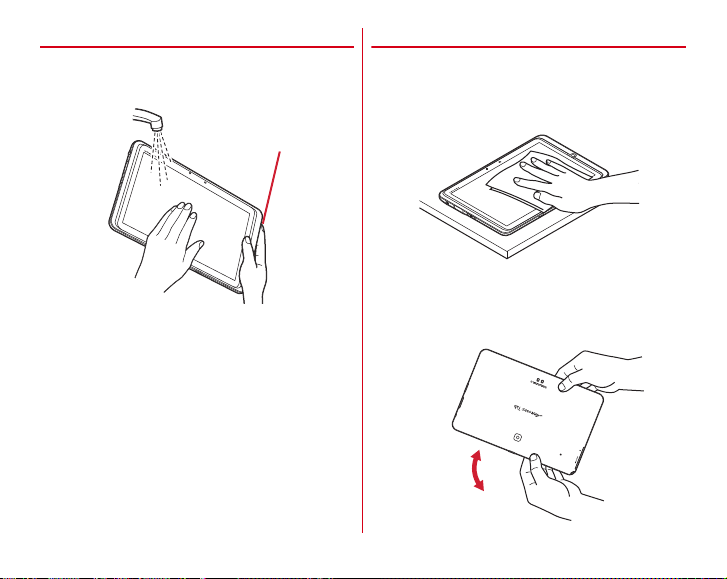
◆
Pour tap water from above
steadying the cap with hand
holding the terminal
Washing the terminal
Wash the terminal in tap water without rubbing hard. Be
careful not to directly get water to the jack cap and slot cap by
using both hands to hold the caps.
・
Do not apply water flow stronger than allowed (→P19) (e.g.,
such water flow that gives you pain when applied to your
skin directly from a faucet or shower).
・
Do not use brush, sponge, soap, detergent, etc.
・
If mud or soil is adhered to the terminal, do not operate the
terminal. Eliminate the dirt first by shaking several times in
tap water of wash-basin and then wash the terminal with
running water.
・
After washing, wipe the surface with dry cloth well, drain
water by the following procedure and let the terminal dry
naturally.
◆
Draining water from the terminal
When the terminal gets wet, water may flow out after wiping
it off; drain the water in the following steps.
a
Put the terminal on a stable platform etc. and wipe off
moisture on the terminal surface and back side with dry,
clean cloth etc.
b
Firmly hold the terminal's long side with your both hands
and shake the terminal approximately 10 times, until there
is no more water splattering. Then turn the terminal 180
degrees and shake it again approximately 10 times until
there is no more water splattering.
22
Contents/Precautions
Page 25
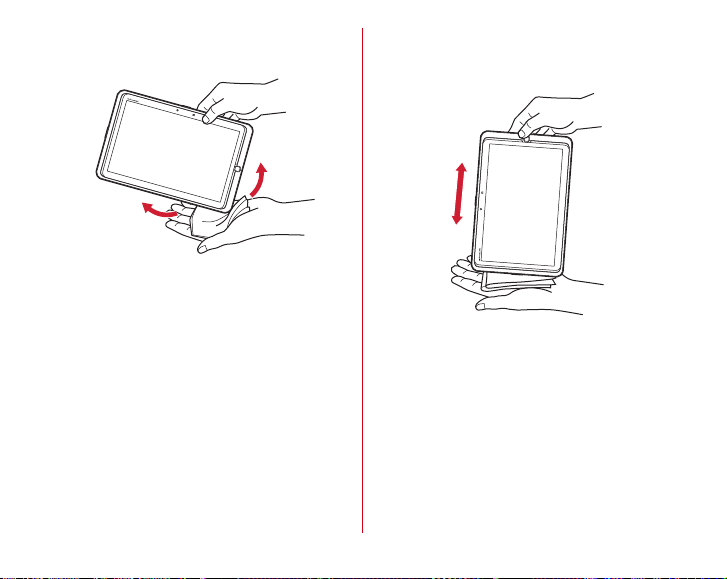
c
Swing each corner of the terminal in about 10 times
against a dry, clean cloth etc. to wipe off water remaining
in the surrounding gaps.
d
Swing the terminal in about 10 times against a dry, clean
cloth etc. to wipe off water remaining in the stereo
earphone jack, microphone, speaker, keys, or charging
terminals, etc.
e
Wipe off water drained from the terminal with dry, clean
cloth etc., and dry naturally.
・
Water, if any, remaining in the terminal may ooze up after
wiping off.
・
Do not wipe off water remaining in gaps directly with a
cotton swab etc.
23
Contents/Precautions
Page 26

◆
Charging
Check the following before and after charging.
・
Check if the terminal is not wet. Never try to charge the
battery pack when the terminal is wet.
・
Accessories and optional devices are not waterproof/
dustproof.
・
When charging the battery when or after the terminal is wet,
adequately drain it and wipe off water with a dry, clean cloth
etc., before connecting the accessory desktop holder or
opening the jack cap.
・
When the jack cap is opened for charging, close the cap
firmly after charging. It is recommended to use the desktop
holder for charging to prevent water from seeping inside
through the external connection jack.
・
Do not use the AC adapter or desktop holder in a bathroom,
shower room, kitchen, lavatory or other highly humid area.
May cause fire or electric shock.
・
Do not touch the AC adapter or desktop holder with wet
hands. May cause electric shock.
24
Contents/Precautions
Page 27
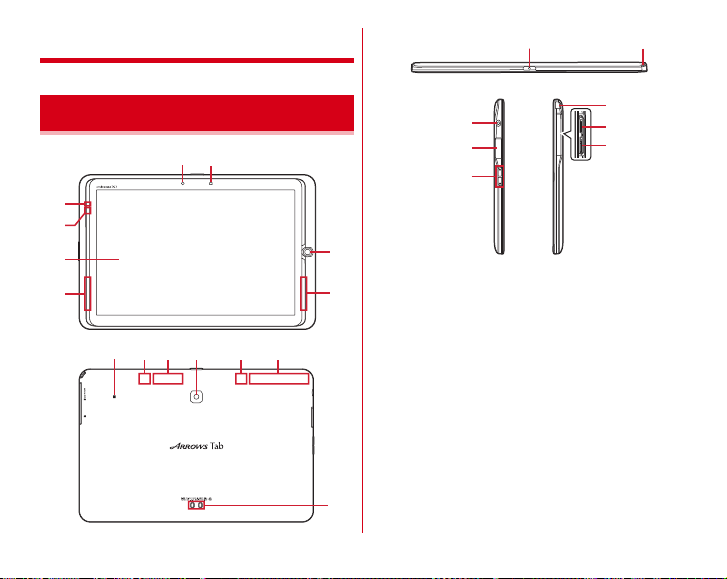
Before using the terminal
b
a o
o
p
q
r
s
Part names and functions
a
b
c
d
e
f
h i
l mj k
g
<Functions>
a
In-camera
f
b
RGB sensor
Sense ambient light and brightness and automatically
adjusts the display backlight.
*
If you cover the sensor, detection may not be done correctly.
c
Indicator LED
*
Color of light or flash may be different depending on settings or
application.
d
Microphone
e
Display (Touch panel)
f
Speaker
g
Fingerprint sensor
Slide your finger : Fingerprint authentication, unlock the
lock screen
Press : Activate/Deactivate sleep mode
n
25
Before using the terminal
Page 28

h
NFC mark
*
Hold NFC mark over a device equipped an NFC module, etc. to
communicate.
i
Bluetooth/Wi-Fi antenna
*
The antenna is built-in the terminal. Covering around the antenna
by the hand may affect the quality.
j
Xi antenna
*
The antenna is built-in the terminal. Covering around the antenna
by the hand may affect the quality.
k
Out-camera
l
GPS antenna
*
The antenna is built-in the terminal. Covering around the antenna
by the hand may affect the quality.
m
Xi/FOMA antenna
*
The antenna is built-in the terminal. Covering around the antenna
by the hand may affect the quality.
n
Charging terminals
o
TV antenna
*
Extend when watching 1Seg/Mobacas.
p
Stereo earphone jack (waterproof)
q
External connection jack (MHL available)
Connect optional PC connection USB cable T01 etc.
*
To connect HDMI cable (commercially available), HDMI
conversion cable L01 (optional) or HDMI conversion cable SC01
(optional) is needed.
r
microSD card slot→P27
s
docomo mini UIM slot→P26
<Key functions>
a
Power key
X
Press : Activate/Deactivate sleep mode
Press and hold : Turn power ON/OFF, restart
b
Volume key
Press : Adjust volume
SD
docomo mini UIM card
docomo mini UIM card is an IC card in which user information
is saved.
・
You can use the terminal only with docomo mini UIM card.
If you have a UIM or FOMA card, bring it to a docomo Shop
to replace.
・
When docomo mini UIM card is not inserted to the terminal,
some functions are not available.
・
For details on docomo mini UIM card, refer to the docomo
mini UIM card manual.
◆
Installing/Removing docomo mini UIM
card
・
Attach/Remove docomo mini UIM card after turning OFF the
power.
26
Before using the terminal
Page 29
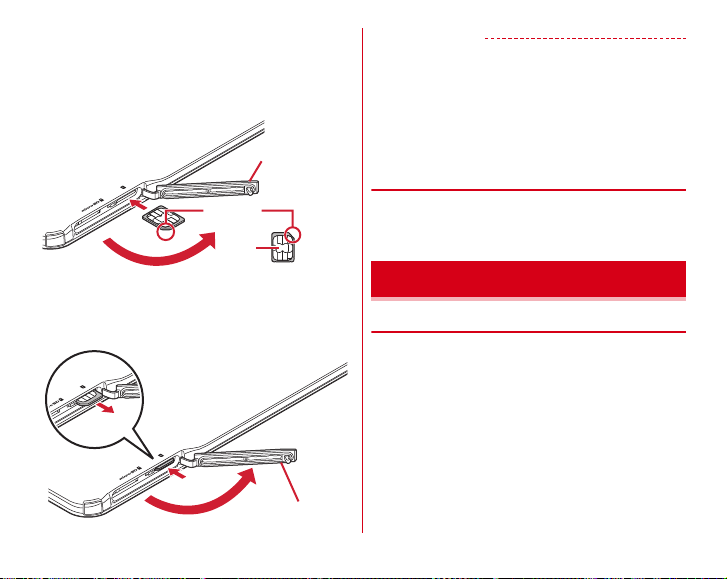
■
IC
docomo mini UIM card
Slot cap
Corner cut
Installing
Open the slot cover of the terminal and insert docomo mini
UIM card until it clicks with the IC side facing up as shown on
the back side of the terminal.
・
Check the orientation of docomo mini UIM card corner cut.
■
Removing
Open the slot cap of the terminal, lightly push docomo mini
UIM card, and release it, then pull it straight out
✔
INFORMATION
・
When handling docomo mini UIM card, take care not to touch
or scratch the IC part. Note that inserting docomo mini UIM
card forcibly into the terminal may damage docomo mini
UIM card.
・
Note that docomo mini UIM card may jump out of the
terminal when removing it.
◆
Security code of docomo mini UIM
card
There is a security code called PIN code in the docomo mini
UIM card. The code is set to "0000" at subscription, which you
can change by yourself.→P93
microSD card
◆
microSD card
・
The terminal supports microSD card of up to 2 GB,
microSDHC card and microSDHC UHS-I card of up to 32 GB,
microSDXC card and microSDXC UHS-I card of up to 64 GB
(as of November, 2012). Note that DOCOMO does not
guarantee actual operations of all microSD cards. For
information on compatible microSD cards, contact
manufacturers of microSD cards.
・
Do not turn the power OFF or give shock while accessing
data on the microSD card. The data may corrupt.
Slot cap
27
Before using the terminal
Page 30
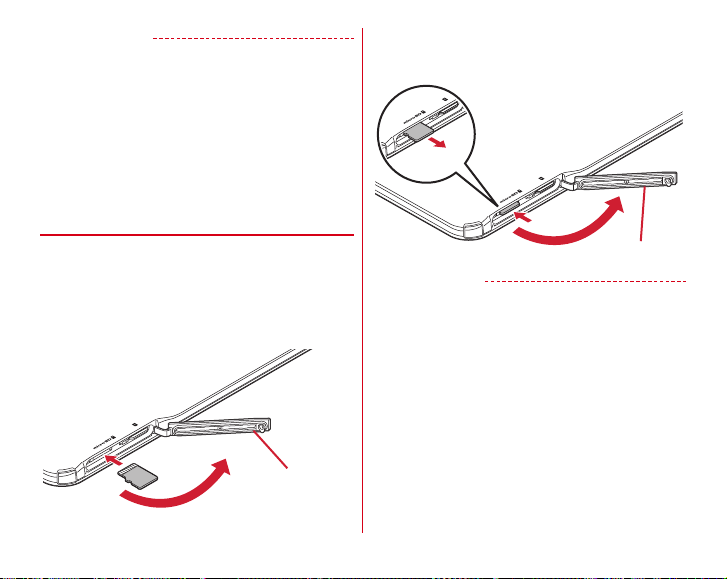
✔
Slot cap
Slot cap
INFORMATION
・
A microSDXC card can be used only on a compatible device.
Inserting a microSDXC card into a non-microSDXCcompatible device may damage or destroy data saved on the
microSDXC card. Do not insert one. If you want to reuse a
microSDXC card on which data is destroyed, format
microSDXC card (all data will be erased) on an SDXCcompatible device.
・
When copying data to/from a non-SDXC-compatible device,
use a microSDHC card or microSD card complying with
standards of device to share data.
◆
Installing/Removing microSD card
・
Attach/Remove microSD card after unmounting or turning
OFF the power.
■
Installing
Open the slot cover of the terminal and insert microSD card
until it clicks with the metal side facing up as shown on the
back side of the terminal.
■
Removing
Open the slot cap of the terminal, lightly push microSD card,
and release it, then pull it straight out
✔
INFORMATION
・
Note that the microSD card may jump out of the terminal
when removing it.
28
Before using the terminal
Page 31
Charging
❖
Precautions on charging
・
If you use the terminal while charging, it may take time to
complete charging or charging may not complete.
・
It is normal for the terminal or AC adapter to become warm
while charging. When the terminal becomes warm, charging
may stop temporarily for the safety. When the terminal
becomes extremely hot, stop using immediately.
・
The following conditions will lead to a charging error and
the indicator LED turns off. Charging restarts when the
charging becomes possible.
- When the power voltage of the charger becomes out of
chargeable range
- When the temperature of the internal battery or terminal
becomes too high or too low
・
If charging is not complete even after a very long time, a
charging error is notified and the indicator LED turns off. Exit
out of applications, remove the terminal from the charger
and retry.
・
When power voltage of the internal battery is abnormal,
charging error occurs and the indicator LED flashes. Remove
the terminal from the charger. If the terminal is powered on,
press X for 10 seconds to power off and contact
"Repairs" on the last page of this manual (in Japanese only)
or DOCOMO-specified repair office.
・
When charging starts with the battery empty, the terminal
may not be immediately activated after turning the power
ON. In this case, charge the terminal while keeping it turned
OFF, and turn it ON after a while.
❖
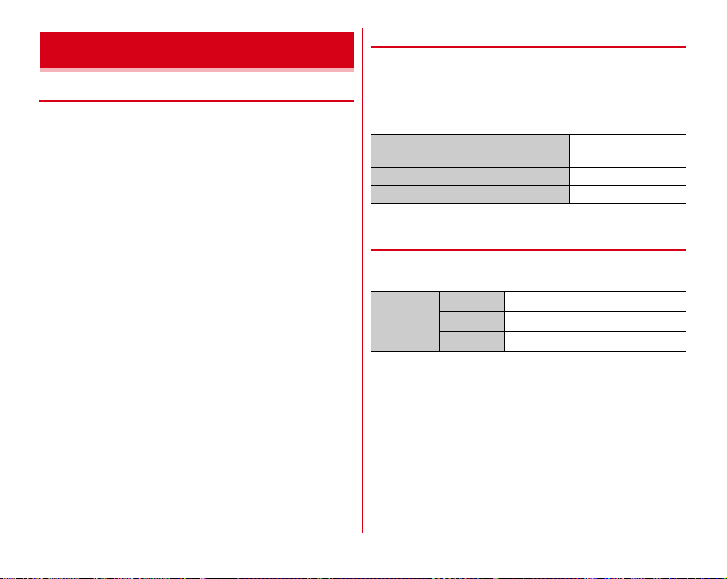
Charging times (approximate)
The following is the time for charging an empty internal
battery with F-05E's power switched OFF. Charging with the
terminal ON or under low temperature requires longer time.
Note that using the terminal while charging may take a
substantially long time.
AC Adapter F07
(with Desktop Holder F39)
AC Adapter 03
DC Adapter 03
❖
Operation time on full charge
Approx. 300 min.
Approx. 800 min.
Approx. 950 min.
(approximate)
The following time varies by the charging method and
operating environment.→P162
Continuous
stand-by
time
FOMA/3G
GSM
LTE
Stationary (Auto) : Approx. 2,190 H
Stationary (Auto) : Approx. 1,590 H
Stationary (Auto) : Approx. 1,430 H
29
Before using the terminal
Page 32

❖
Internal battery life
・
The internal battery is a consumable part. Each time it is
charged, time available with each charging reduces.
・
When a time available with each charging is reduced to
about a half from that by default, replacement of the internal
battery is recommended because it is near the end of life.
For information on the internal battery replacement, contact
"General Inquiries" on the last page of this manual or
DOCOMO-specified repair office.
❖
Available charging adapter
For details, refer to the operation manual of AC adapter or DC
adapter.
FOMA AC Adapter 01 (optional) :
FOMA AC Adapter 02 (optional)/FOMA AC Adapter 01 for
Global use (optional)/AC Adapter 03 (optional)/AC Adapter
F05 (optional)/AC Adapter F06 (optional)/AC Adapter F07
(included accessory) :
adapters have a plug dedicated to 100V AC (for domestic
use). When using AC adapters in the range of AC 100V and
240V overseas, a conversion plug adapter applicable to the
country you are staying is required. Also, do not charge the
battery with a transformer for overseas travel.
FOMA DC Adapter 01 (optional)/FOMA DC Adapter 02
(optional)/FOMA DC Adapter 03 (optional) :
charging in a car.
100V AC only
Between 100V and 240V AC. AC
Use for
◆
Charging with Desktop Holder
Charge with supplied Desktop Holder F39 and optional AC
Adapter F07.
a
Insert the AC power cable into the AC adapter
b
Insert the AC adapter's connector into the connection jack
of the Desktop Holder
c
Insert the AC power cable's power plug into an outlet
d
Insert the terminal into the Desktop Holder and make sure
the indicator LED turns on
・
Indicator LED lights red while charging, and turns off
when charging is complete.
e
When charging is complete, remove the terminal from the
Desktop Holder and remove the AC power cable's power
plug from the outlet
30
Before using the terminal
Page 33
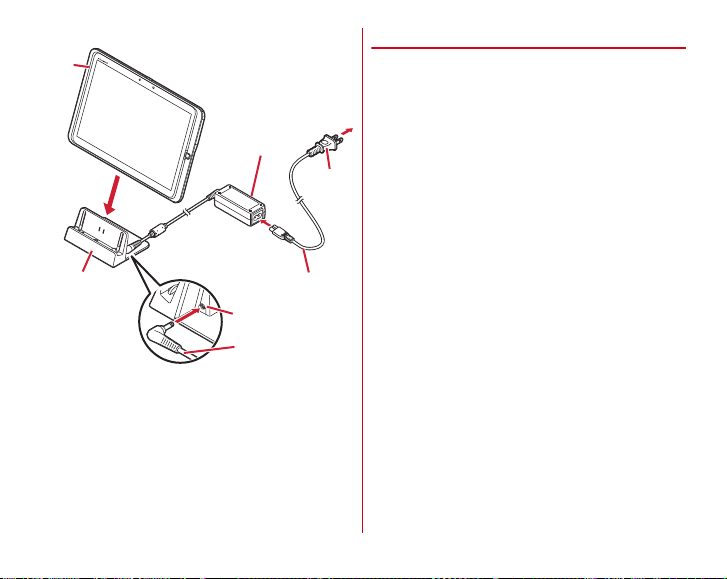
f
To AC
100
V
outlet
Indicator
LED
Desktop Holder
Jack on the Desktop
Holder
Power
plug
Connector
AC adapter main unit
AC power cable
Remove AC adapter's connector from the Desktop Holder
◆
Charging with AC adapter
You can charge with an optional AC Adapter 03.
a
Open the jack cap of the terminal, insert a microUSB plug
of a microUSB cable into the external connection jack with
engraved side facing up
b
Insert the USB plug of the microUSB cable into the AC
adapter jack
c
Insert the AC adapter's power plug into an outlet
・
Indicator LED lights red while charging, and turns off
when charging is complete.
d
When charging is complete, remove the AC adapter's
power plug from the outlet
e
Remove the microUSB cable from the AC adapter and
terminal, and close the jack cap of the terminal
31
Before using the terminal
Page 34
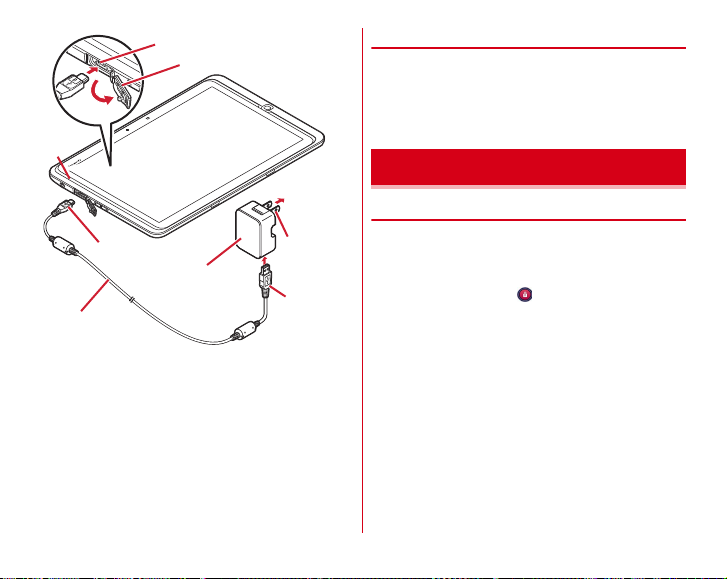
To AC
100
V
outlet
microUSB plug
External connection jack
Jack cap
Power plug
Indicator
LED
AC adapter main unit
microUSB cable
USB plug
◆
Charging with a PC
If you connect the terminal with a PC using a USB Cable for PC
connection T01 (optional), you can charge the terminal with a
PC.
・
When a screen of new hardware detection or operation
selection appears on the PC, select "
キャンセル
(Cancel)".
Turning power ON/OFF
◆
Turning power ON
X
1
2
(2 sec. or more)
Indicator LED lights in green and the terminal vibrates.
The lock screen appears following the startup screen.
On the lock screen,
・
Lock screen→P46
32
Before using the terminal
Page 35

■
Turning power ON for the first time
After setting up Google account and Family use setting, make
initial setting of docomo service. Follow the onscreen
instructions.
・
In this manual, explanations and screen images for
"Standard mode" as Family use setting are provided.
・
When a software update confirmation screen appears, tap
[OK].
・
When the instruction guide appears, tap [Do not show this
again] or [OK].
■
Changing home app
[docomo Palette UI] is set in Home screen for the first
activation. To change to [NX!Home], from the Application
menu, [Settings]→[Display]→Select a home app to switch to
from [Homescreen selector].
◆
Turning power OFF
Press and hold
1
menu appears
・
Press X for 10 seconds or more to force the power
turned off.
[Shut Down]
2
The terminal turns off vibrating.
Restarting : [Restart]
X
until the power option
Basic operation
◆
Using touch panel
You can operate the terminal by directly touching with your
finger.
・
Set whether to vibrate when tapping is recognized (Distinct
touch →P83).
❖
Notes for using the touch panel
The touch panel is designed for being touched lightly with
fingers. Do not push it forcibly with a finger or press it with
sharp objects (nail, ballpoint pen, pin, etc.).
・
Touching the touch panel may not work in the following
cases. Note that it may cause malfunction.
- Operation with gloved hands
- Operation with tip of fingernail
- Operation with a foreign object on the display
- Operation with protective sheet or seal on the display
- Operation with the touch panel wet
- Operation with finger wet by sweat or water
33
Before using the terminal
Page 36
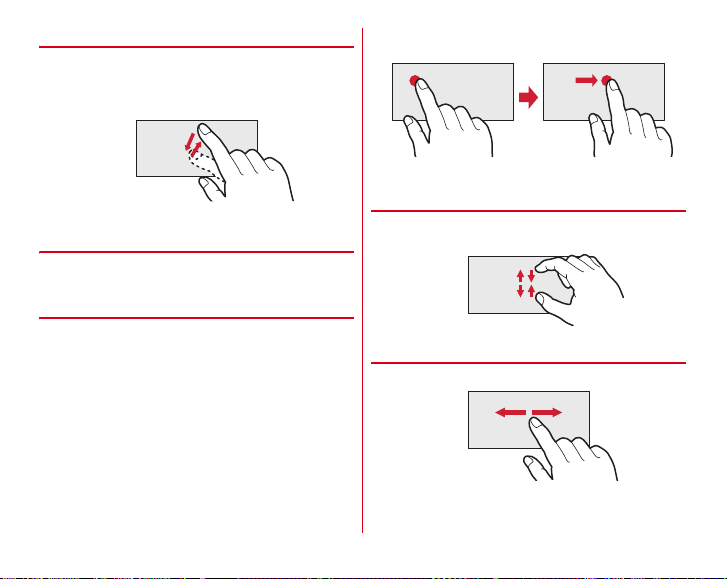
❖
Example : Tap
Example : D rag
Tap/Double-tap
Tap :
Touch the screen lightly and release the finger. Operation
can be valid at the instant of releasing the finger from the
screen.
Double-tap :
❖
Touch the screen for a while. Some operations can be
operated by keeping touching the screen with a finger.
❖
Drag :
Slide (Swipe) :
・
Tap twice quickly.
Touch and hold
Drag/Slide (Swipe)/Pan
Touch an item or icon on the screen and move it to the
desired position.
the desired position.
For some applications, you can touch the screen with your
fingers and move them up and down or rotate them to
operate.
Touch the screen with your finger and drag to
Pan :
Drag the screen in some direction to view the desired
part.
❖
Pinch
Touch the screen with two fingers and widen (pinch-out) or
narrow (pinch-in) the fingers distance.
❖
Flick
Touch the screen and sweep the finger quickly.
34
Before using the terminal
Page 37
◆
Switching the portrait/landscape view
The terminal supports a motion sensor that senses orientation
or motion of the terminal. You can switch display view by
tilting the terminal vertical or horizontal (Auto-rotate screen
P86).
・
Even when you change the orientation of the terminal, the
screen may not change depending on the screen displayed.
◆
Screenshot
You can save a screen displayed on the terminal as an image.
・
Some screens may not be saved.
Press
X
1
To check the image, open the Notification panel and tap a
notification for screen shot, or from the Application menu,
tap [Gallery]→[Screenshots].
and D (1 sec. or more)
Character entry
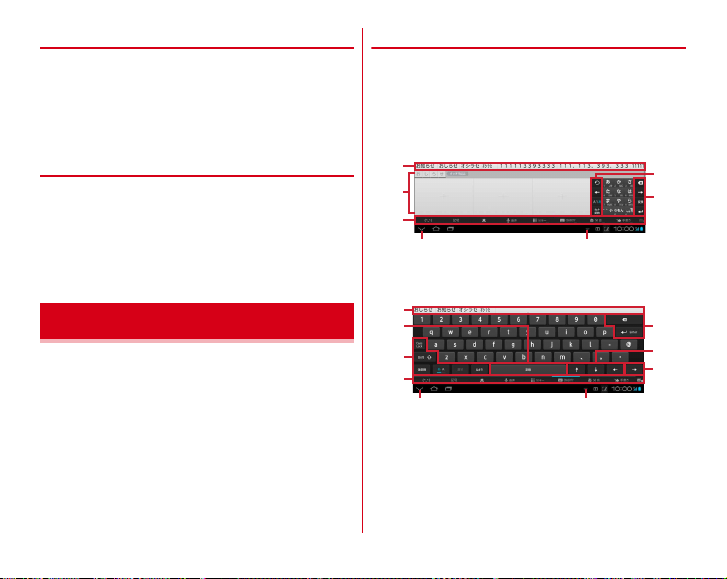
Enter characters using software keyboard displayed on the
screen.
・
Entering characters with NX!input is mainly described in
this section.
・
Switching to other input method is available.→P40
・
You can connect an external keyboard to enter characters.
P42
◆
Using keypad
You can enter characters using numeric keypad, QWERTY
keypad, handwritten input, and Japanese syllabary keypad.
→
・
You can activate voice input from each keypad.→P40
■
Numeric keypad
3 types of input methods can be used : Flick input, Numeric
keypad input, Gesture input.→P38
a
g
d
fe
■
QWERTY keypad
Enter characters using Romaji input.
a
c
b
d
e f
→
b
c
c
b
c
35
Before using the terminal
Page 38
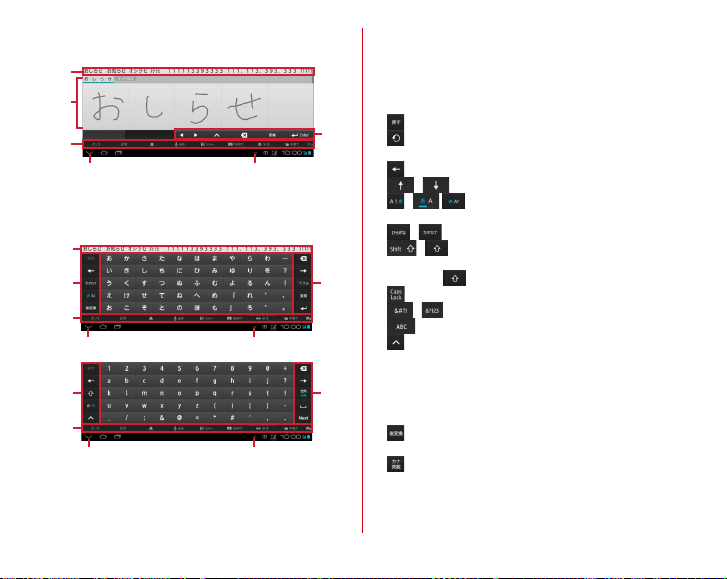
■
c
e f
d
a
g
a
b c
e f
d
b c
e f
Alphanumeric input mode
d
Handwritten input
Enter characters in handwriting.
■50音キーボード
Enter characters using Japanese syllabary keypad or
alphabetical ordered keypad.
(Japanese syllabary keypad)
a
Conversion suggestions display area : Display conversion
suggestions to be selected when characters are entered.
・
Slide the display area left or right to show hidden
suggestions. For some keypad, character string before
fixed is shown under suggestions.
・
In some entry field, suggestions may not be displayed.
b
: Restore the latest fixed text to the original.
: Display characters assigned in the numeric keypad
input in the reverse order.
: Move the cursor to left.
/ : Move the cursor up or down.
/ / : Switch input modes (Kana/Alphabet/
Number)/ (Kana/Alphabet)/(Kana/Alphanumeric).
/ : Switch to Hiragana/Katakana.
/ : Switch uppercase and lowercase in alphabet
input.
・
Tapping toggles uppercase→caps lock→lowercase.
: Set/Cancel caps lock.
/ : Switch to symbol input mode.
: Switch to Alphabet input mode.
: Use Password manager, Phonebook/ATOK direct
input, NX!input settings, character code input, register
words, switch to common phrase.
・
[
定型文
(Phrase)] appears when pict/pict D can be
entered.
・
Also used for hiding the keypad.
: Select from the post-conversion candidates of Kana/
two-byte katakana/one-byte katakana, alphabet.
: Convert to katakana/number/alphanumerics/yearmonth-day (two-byte/one-byte), etc.
36
Before using the terminal
Page 39
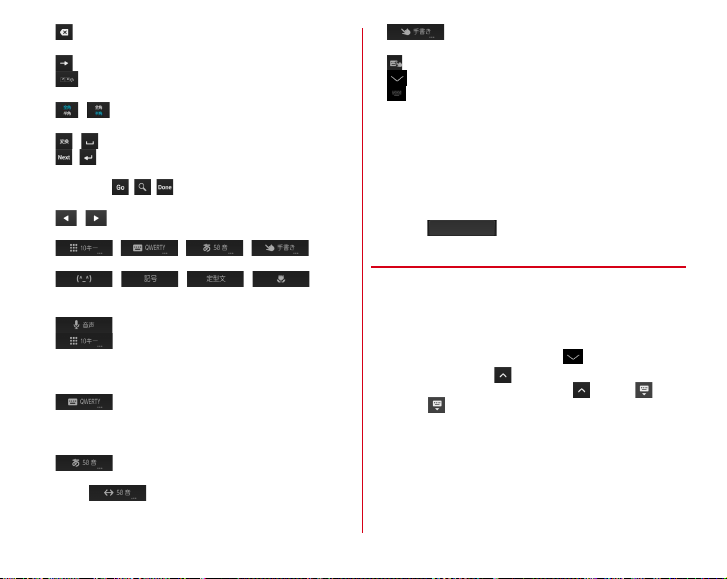
c
: Delete a character to the left of the cursor.
・
Flick up to delete a character to the right of the cursor.
: Move the cursor to right.
: Switch between lowercase, voiced/semi-voiced
sound, and uppercase.
/ : Switch between two-byte character and one-
byte character.
/ : Convert characters/Enter a space.
/ : Move the cursor to the next item/Confirm or insert
a line feed.
・
Besides, , , , etc. may appear depending on the
situation.
/ : Move one letter space left or right on the
handwritten keypad.
d
/ / / : Switch
keypads.
/ / / : Enter
smiley/symbol/phrase (except for sp-mode mail
message)/pictogram (for sp-mode mail message).
: Activate voice input.
: Touch and hold to change display location of
the numeric keypad.
・
Drag the numeric keypad in the direction to move to with
2 fingers to change display location.
: Touch and hold to switch between split
QWERTY keypad and normal QWERTY keypad.
・
Pinch out or pinch in the QWERTY keypad to separate or
combine.
: Touch and hold to change display order of
Japanese syllabary keypad (starting from the left/right).
・
Tap on the Japanese syllabary keypad to
change display order (starting from the left/right).
: Touch and hold to change number of entry
boxes on the handwritten input.
: Enable/Disable overwrite handwritten input.
e
: Hide keypad.
f
: Make keypad settings.
g
Handwritten input area : Write a character with your finger
to enter.
・
Tap a letter not fixed to show correction suggestions. Tap
a character to replace.
・
Letters written in the right entry box is automatically
scrolled to the left box.
・
Displayed in the center when the QWERTY keypad is
separated.
・
Slide to show hidden entry area.
❖
Displaying/hiding keyboard
■
Displaying the keypad
Select the text input field
1
■
Hiding keypad
While keypad is displayed,
1
・
Alternatively, tap to display the guide and slide it to
the desired direction, then when turns to , slide
it to again and release your finger.
37
Before using the terminal
Page 40
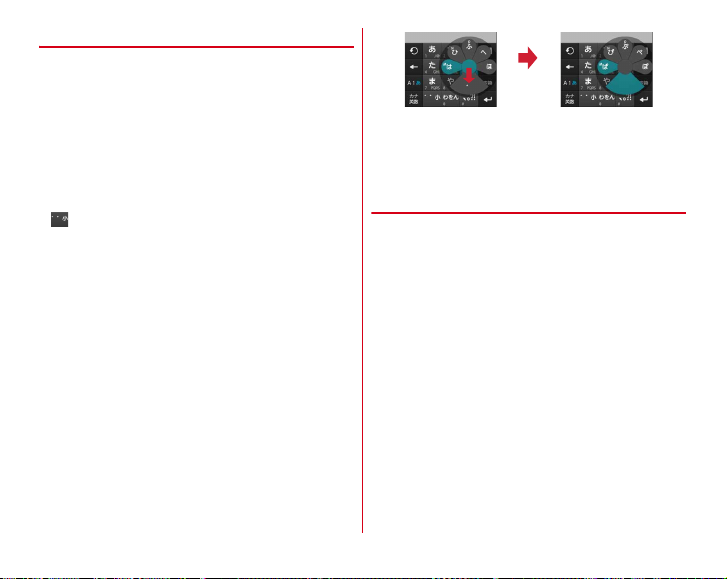
❖
Slide
downward
twice
Example: Entering "
ぱ
"
Numeric keypad input mode
You can use the following 3 input methods in the numeric
keypad.
・
Select an input mode in "Numeric keypad settings" of the
keypad setting.→P40
■
Flick input
If you touch and keep on the key assigned the character you
want to enter, characters (flick guide) will be displayed on that
key. Flick towards the desired character without releasing your
finger from the screen.
・
To enter voiced/semi-voiced sound or small characters, tap
once or twice after flicking.
■
Numeric keypad input mode
Tap continuously a key assigned the character you want to
enter until the desired character is displayed.
■
Gesture input
If you tap and keep your finger on the key assigned the
character you want to enter, characters (gesture guide) will be
displayed around that key. Slide your finger to the desired
character without removing your finger from the screen.
・
To enter voiced/semi-voiced sound or small characters, slide
once or twice downwards without releasing your finger
from the key. A gesture guide for voiced/semi-voiced sound
or small characters will be displayed around that key. Slide
your finger to the desired character without releasing your
finger from the screen.
・
In the alphanumeric input mode, you can switch between
uppercase and lowercase characters by sliding downwards
without releasing your finger from the screen.
◆
Convenient input function
You can enter pictograms, symbols, phrases or enter by
quoting from Phonebook or Password manager data. Also,
voice input can be available.
38
Before using the terminal
Page 41
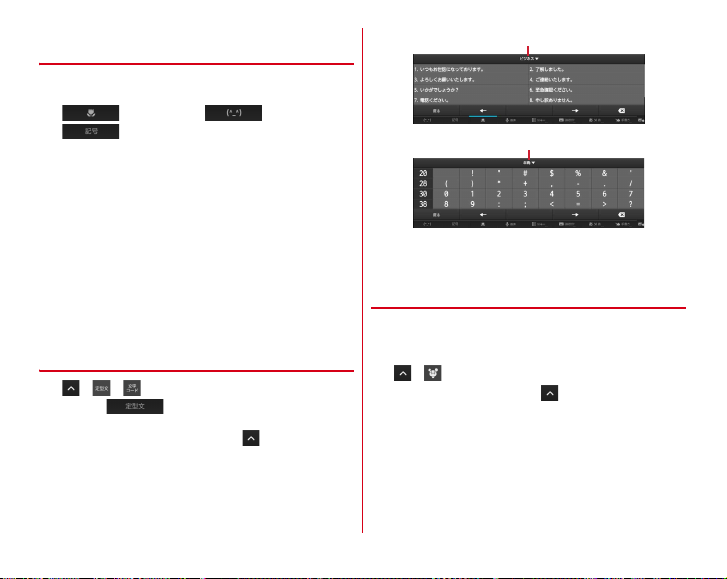
❖
Category
Category
Entering by the pictogram/smiley/symbol
palette
・
Pictograms cannot be entered depending on the text input
field.
1
2
❖
Entering from the phrase/character code
(pictogram)/ (smiley)/
(symbol)
Select the category →Select a pictogram/
smiley/symbol from the item list
・
You can display categories not on screen by scrolling
the category field at the top of the palette to the left and
right.
・
You can display items not on screen by scrolling the list
to the left and right.
・
You can display the history list beginning with the
newest entered item by tapping [履歴 (History)] at the
top left of the palette. You can also enter items from this
history list.
table
→
1
/
・
When is displayed on the keypad, tap it to
perform the same operation.
・
If you use the handwritten input, →Select [
(Phrase)]/[
文字コード
menu.
(Character code)] in the NX!input
定型文
Select a category→Select a phrase/character
2
from the list
❖
Entering by quoting another data
You can enter characters quoting from the data of Phonebook
or Password manager.
・
Password manager→P99
→
1
・
For the handwritten input, →Select [ATOK
ト
(ATOK direct input)] in the NX!input menu.
Perform required operations
2
Quoting from Phonebook : [
(Phonebook/ATOK direct input)]
contacts list→Mark item→[OK]
電話帳/
ATOK
→
Select a name in the
ダイレクト
ダイレク
39
Before using the terminal
Page 42
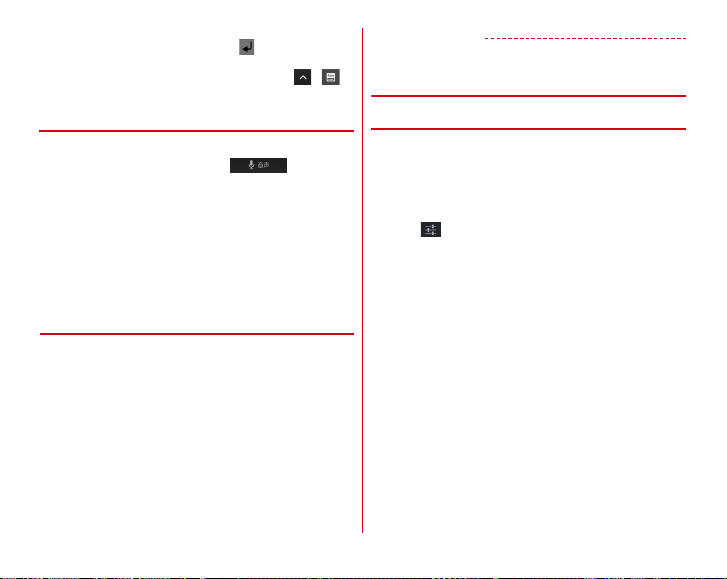
Quoting from Password manager : [Password manager]
→
Authenticate→Select a title→ in "ID (account)"
field or "Password" field
・
Alternatively, while entering characters, tap
operate.
❖
Entering by voice input
You can enter characters by converting your voice.
While entering characters,
1
word
Select a character from the search suggestion
2
list
・
If the spoken word is not recognized properly, tap [
直す
(Redo)] to speak again.
・
You can display candidates not on screen by scrolling
the recognition candidate list up and down.
◆
Switching to other input method
You can also switch to another input method such as the
Android keyboard to enter characters.
・
The Android keyboard does not support the Japanese input
mode.
・
When you switch to "NX!input Chinese" or "NX!input
Korean", you can enter characters only with handwritten
input.
From the Application menu, [Settings]→In
1
PERSONAL, [More...]
→
[Language & input]
→
→
Speak a
[Default]→Select input method
✔
INFORMATION
・
To return to the ATOK Japanese keypad, select [NX!input].
to
◆
Setting NX!input and ATOK
❖
Keypad settings
Set operations, design, etc. of each keypad during character
input. Also, you can register words or common phrases,
initialize settings, etc.
From the Application menu, [Settings]→In
1
PERSONAL, [More...]
→
[Language & input]
Tap in [NX!input]
やり
→
Set each item
2
Operation sound/Vibrate :
vibration.
Numeric keypad settings :
Numeric keypad input/Gesture input), Flick input (multitap input, Flick guide, Flick Sensitivity, Modifier key
flick), Numeric keypad (auto cursor moving), Gesture
input (multi-tap input, Gesture guide) or Character
delete key.
QWERTY keypad settings :
Show numeric keys (vertical screen), Show numeric
keys (horizontal screen), Flick guide, Flick Sensitivity.
Handwritten input setting :
input (Numeric keypad, QWERTY keypad, Japanese
syllabary keypad), Number of entry boxes (Vertical
display/Horizontal display), Display guide, Recognition
speed, Set lines (Thickness, Color). Demonstrative
animation on Handwritten gesture can be displayed.
40
Set Keypad sound and Keypad
Set Input mode (Flick input/
Set Direct alphanumeric input,
Set Overwrite handwritten
Before using the terminal
→
Page 43
Conversion setting :
prediction candidates, Use half-width space, Auto
space insert.
Set selection list :
(vertical screen), Number of lines to display (horizontal
screen).
Design :
Set Theme, Key size (vertical screen), Key size
(horizontal screen) for the screen display.
Utility :
Register words with the Dictionary utility (→P41),
register and edit common phrases (→P41) with the
Common phrase utility.
Initialize :
・
Learned data, words in the user dictionary and
registered common phrases are not deleted even if
[Initialize] is executed.
❖
Registering words (User dictionary)
You can register frequently used words to a user dictionary in
advance. When you enter characters with the same reading,
words in the user dictionary will be given priority over other
conversion candidates and displayed first.
■
Save words in the user dictionary
From the Application menu, [Settings]→In
1
PERSONAL, [More...]
Set Input prediction, Showing
Set Font size, Number of lines to display
Initialize settings or learning data.
→
[Language & input]
→
Tap in [NX!input]
[Utility]→[Dictionary utility]
2
3
→[新規登録
単語
in [
(New)]→Enter a word to register
(Word)]→Enter the reading in [読み
→
(Reading)]
Select the part of speech→[登録
(Register)]
Modifying registered words : Tap a word to edit→Edit→[
修正
(Edit)]
Deleting 1 registered word : Touch and hold a word to
delete→[削除 (Delete)]→[はい (Yes)]
Deleting all registered words : →[
[はい (Yes)]
Saving registered words to a microSD card : →[
力
(Output list)]→In the "場所 (Output to)" field,
[sdcard]→Select a folder to save registered words in
Enter a file name→[OK]→[実行 (Execute)]→[
(Close)]
Reading word data saved on a microSD card : →[
(Batch register)]→In the "場所 (Output to)" field,
登録
[sdcard]→Select a folder→Select a file→[OK]→[登録
(Register)]→Tap [
・
If you register automatically learned words when fixing
entered characters, Unmark [
(Do not include auto-registered words)].
❖
Registering common phrases
From the Application menu, [Settings]→In
1
PERSONAL, [More...]
閉じる
全削除
(Delete all)]
(Close)]
自動登録単語は含めない
→
[Language & input]
Tap in [NX!input]
[Utility]→[Common phrase utility]
2
→[新規作成
3
→
Select a category in the "
(Category)" field
(New)]→Enter a common phrase
カテゴリー
→[登録
(Save)]
閉じる
→
一覧出
→
一括
→
41
Before using the terminal
Page 44
Editing a common phrase : Tap a common phrase to edit
→
Edit→[登録 (Save)]
・
When the body text of a newly created common phrase
is modified, changes will also be made to its title. To
disable the link between a title and body text, change
the title of a common phrase.
Deleting a common phrase : Touch and hold a common
phrase→[削除 (Delete)]→[はい (Yes)]
Changing title of a common phrase : Touch and hold a
common phrase→[
→
[OK]
Adding a category : →[
[
新規作成
Changing a category : Touch and hold a common phrase
→[カテゴリー移動
in the destination
Restoring to the default : →[
(Yes)]
◆
Editing text
You can copy texts in the character entry field, web page or
received mail and cut and paste texts in the character entry
field.
・
Operation method may vary by application.
❖
Copying/Cutting texts
■
Copying/cutting in the character entry field
Touch and hold a text
1
Selected text is highlighted.
・
Slide knobs on the both end of text range to adjust
selected range.
タイトル変更
(New)]→Enter a category name→[OK]
(Move category)]→Select a category
(Change title)]→Edit
カテゴリー
初期化
(Category)]
(Initialize)]→[はい
→→
・
To select all, tap [SELECT ALL].
・
To deselect, tap out of selected range.
(COPY)/ (CUT)
2
■
Copying text in a web page
Touch and hold a text
1
Text range is highlighted.
・
Slide knobs on the both end of text range to adjust
selected range.
・
To select all, tap [SELECT ALL].
・
To deselect, tap out of selected range.
・
For some websites, tap [Select text] from the displayed
menu.
(COPY)
2
The text is copied to the clipboard.
❖
Pasting a text
Move the cursor to the destination to paste and
1
touch and hold
The text is pasted to the cursor position.
◆
Using external keyboard
You can enter characters by connecting the terminal with a
USB keyboard or Bluetooth keyboard (HID/SPP).
・
101 keyboard, 104 keyboard,106 keyboard, OADG 109
keyboard and OADG 109A keyboard are supported.
42
→
[PASTE]
Before using the terminal
Page 45
❖
Connecting external keyboard
・
Connecting with Bluetooth keyboard→P108
■
Connecting with USB keyboard
Plug a USB keyboard into the external
1
connection jack of the terminal
❖
Setting external keyboard
From the Application menu, [Settings]→In
1
PERSONAL, [More...]
→
[Language & input]
→
[Keyboard layout]→Select keypad
Initial settings
You can set necessary items collectively for the first time to
use the terminal.
・
Each setting can be changed anytime.
From the Application menu, [Settings]→[Initial
1
settings]
Set each item
2
Slide-in function :
activate an application by sliding your finger from the
edge of the screen and to capture screen as an image.
→
P103
Screen lock auth :
authentication.
Security unlock preference :
screen lock.→P94
Set a function which allows you to
Set whether to activate screen lock
→
P94
Set unlocking method of the
❖
About other initial settings
Set the following items as required in addition to the initial
setting items.
・
Google account setup etc.→P91
・
Email account settings→P60
・
Wi-Fi functions settings→P75
・
Access point (APN) settings→P74
・
Switching to English display→P104
Indicator LED
Indicator LED notifies the terminal states such as charging
and new SMS by lighting or flashing.
■
Notification type, lighting/flashing
Turning power ON :
Charging error :
New SMS :
Charging :
✔
INFORMATION
・
You can set information LED action for each application.
43
Light once in green
Flash in red
Flash in a color specified in [Messaging]→P59
Light in red
Before using the terminal
Page 46
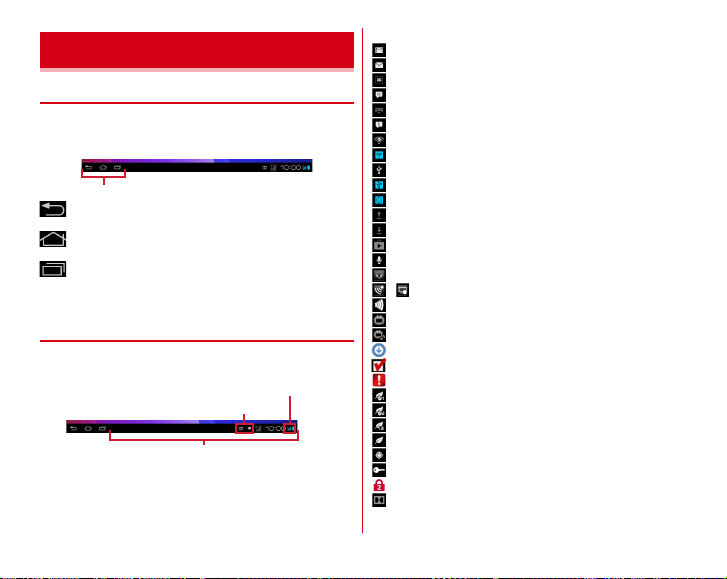
Screen/Icon
Notification icon
Status icon
Status bar
◆
Keys on the navigation bar
Operation keys (icons) appear on the navigation bar shown at
the bottom left of the screen. Names and actions of keys are as
follows.
Navigation bar
Back key
Tap : Return to the previous screen, exit out of application
Home key
Tap : Return to the Home screen→P48
Task key
Tap : Recently used applications are listed.
Touch and hold : Activate Task manager →P47
◆
Icons on the status bar
Various conditions can be checked with notification icons and
status icons appearing on the status bar.
■
Main notification icons
: New Gmail
: New Email
: sp-mode mail
: New SMS
: Area Mail
: Sending SMS is failed.
: Wi-Fi is on, and Wi-Fi network is available.
: Wi-Fi tethering is enabled, Wi-Fi Direct is in use.
: USB is connected.
: USB tethering is enabled.
: Wi-Fi tethering and USB tethering are enabled.
: Uploading data is complete.
: Downloading data is complete.
: Installing applications from Google Play etc. is complete.
: Earphone is connected (terminal microphone input).
: Earphone is connected (earphone microphone input).
/ : Receiving/Recording 1Seg
: Receiving Mobacas
: Notifications from NOTTV
: Playing voice content in background
: Software Update is available.
: Software Update is complete.
: Unable to continue updating software.
: NX! eco (Timer eco-mode setting 1)
: NX! eco (Timer eco-mode setting 2)
: NX! eco (Battery care eco-mode)
: NX! eco (Instant eco-mode)
: Positioning with GPS
: VPN connection
: Omakase Lock is set.
: Dolby Digital Plus is turned ON.
44
Before using the terminal
Page 47
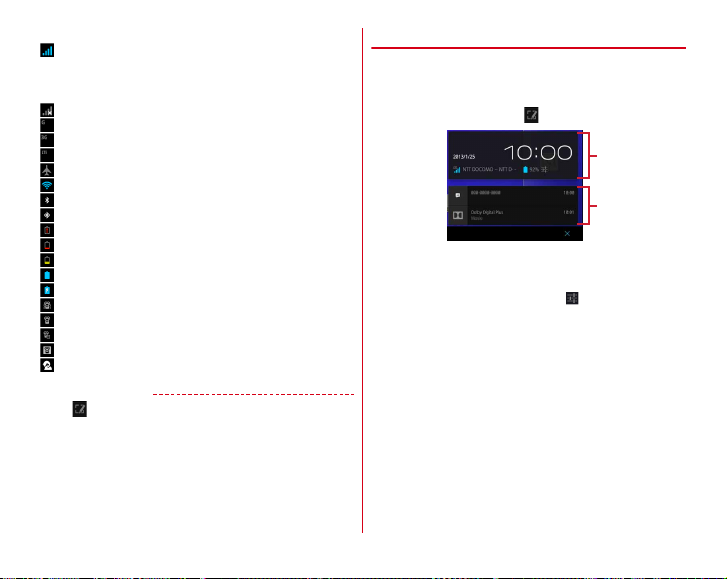
■
Main status icons
: Signal strength
・
△
(Uploading) or ▽ (Downloading) appears during
communication.
・
During international roaming, [R] appears on the top left.
: Out of service area
: GPRS is connected.
: 3G is connected.
: LTE is connected.
: Airplane mode
: Wi-Fi is connected.
: Bluetooth function is ON.
: Bluetooth device is connected.
: Charging is needed.
: Battery is nearly empty.
: Battery level is low.
: Battery level is enough.
: Charging
: Manner mode (Manner mode)
: Manner mode (Manner mode (Silent))
: Manner mode (Manner mode (Alarm))
: Manner mode (Original manner)
: Sound quality support of IP phone app
✔
INFORMATION
・
Tap on the status bar to use Capture & Draw.
◆
Notification panel
Open the Notification panel to check information of
notification icon or make settings.
Tap the clock or icon on the status bar
1
・
Tap an item other than .
a
b
a
Notification panel
View date & time, signal strength, available networks,
battery level, status of the terminal, etc.
・
Tap the Notification panel when is displayed to
change the notification list to setting panel.→P46
b
Notification list
Notification icon and description
・
Tap each notification to check the details or make
necessary settings.
・
Tap [×] under the notification list to delete notifications.
For some notifications, [×] does not appear.
Closing the Notification panel and notification list : Tap an
area other than the Notification panel and notification list
45
Before using the terminal
Page 48
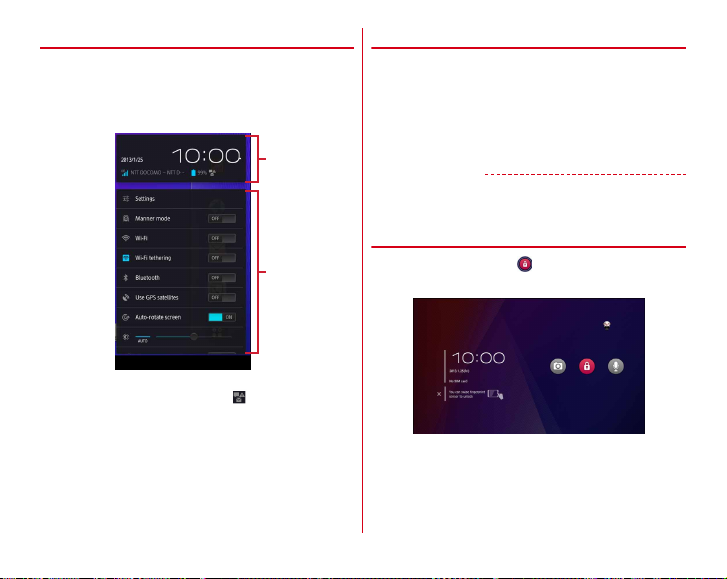
◆
a
b
Setting panel
Open the setting panel at the lower part of the Notification
panel.
Tap the clock or icon on the status bar→Tap
1
the Notification panel
a
Notification panel
・
Tap the Notification panel when is displayed to open
the notification information list.→P45
b
Setting panel
Turning settings on/off, opening setting menu
・
Setting menu→P71
Closing the Notification panel and setting panel : Tap an area
other than the Notification panel and setting panel
◆
When the screen display is turned off
When no operation is performed in a certain period of time, the
screen automatically turns off according to the [Sleep] setting
in [Display] and the terminal turns into sleep mode.
X
1
Sleep mode is deactivated, and the lock screen appears.
Setting sleep mode manually :
✔
INFORMATION
・
Alternatively, press the fingerprint sensor to activate/
deactivate sleep mode.
◆
When lock screen appears
On the lock screen,
1
The lock is canceled.
"
ひつじのしつじくん® (Butler Sheep)" ©NTT DOCOMO
X
46
Before using the terminal
Page 49
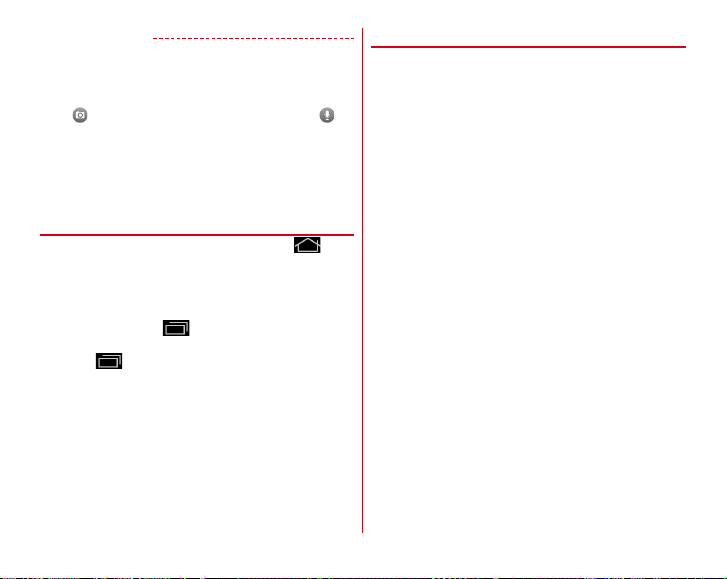
✔
INFORMATION
・
Alternatively, slide your finger on the fingerprint sensor to
cancel the screen lock. When you operate after sleep mode is
deactivated by pressing the fingerprint sensor, release your
finger from the sensor and then slide the finger.
・
Tap on the l ock screen to activate camera and tap to
activate Shabette concier. If the screen lock authentication is
activated, Shabette concier activates after authentication on
the lock screen.
・
If the screen lock authentication is disabled, the Notification
panel can be opened on the lock screen.
◆
Task manager
If you stop operation of an application by tapping etc.,
the application may remain active in the background. Also, 2
or more applications may be running depending on the
operations. Activate Task manager to check running
applications, switch display, or end applications.
Touch and hold
1
Task manager activates and running applications appear.
・
Tap to display recently used applications. Tap a
thumbnail to activate an application. Touch and hold a
thumbnail to delete from the list or check application
information.
Perform target operations
2
Displaying applications : [Show]
Ending applications : [End]/[End all]
❖
Slide-in launcher
By default, you can call out Slide-in launcher by sliding your
finger from the bottom left corner of the screen. And use
shortcuts in Slide-in launcher to activate applications.
・
Slide-in function→P103
47
Before using the terminal
Page 50
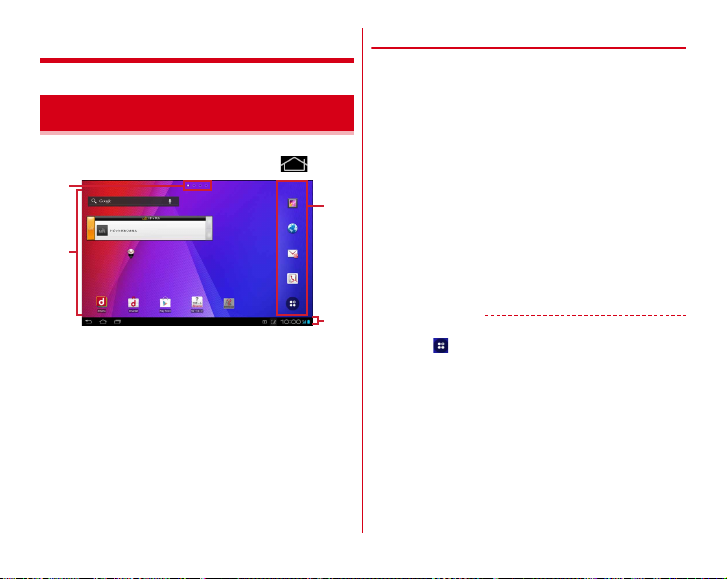
docomo Palette UI
a
c
d
b
"
ひつじのしつじくん® (Butler Sheep)" ©NTT DOCOMO
Home screen
Home screen is a start screen to use applications. You can
return to the Home screen anytime by tapping .
a
Indicator
Notify which home screen you are in.
b
Customize area
You can locate shortcuts, widgets, and folders.
c
Dock
Displayed on the Home screen.
d
Status bar→P44
Tap the clock or icon on the status bar to display
Notification panel.→P45
◆
Customizing the Home screen
You can locate desired application shortcuts, widgets, etc. on
the Home screen.
Flick left and right to display the Home screen
1
you want to customize
→
Touch and hold blank
area in the customize area
[Shortcut]/[Widget]/[Folder]/[Group]→Select
2
or set items as required
・
Touch and hold an item and drag it to move.
・
Some widgets can be changed their sizes by touching
and holding.
・
Touch and hold a shortcut and drag it onto another
shortcut to create a folder including these shortcuts.
・
Touch and hold a folder and tap [Edit name] to rename
folder.
✔
INFORMATION
・
You can also locate shortcuts, folders or groups in the Dock.
However, cannot be moved/deleted/changed.
48
docomo Palette UI
Page 51

❖
Deleting shortcuts etc.
Flick left and right to display a home screen you
1
want to customize
Touch and hold a shortcut etc. you want to
2
delete
→
[Delete]
・
Alternatively, after touching and holding a shortcut,
drag it to at the bottom of the screen to delete.
❖
Uninstalling applications or widgets
Flick left and right to display a home screen you
1
want to customize
Touch and hold a shortcut or widget you want
2
to uninstall
◆
Changing Kisekae/wallpaper
Touch and hold blank area in the customize
1
area
[Kisekae]/[Wallpaper]/[Wallpaper loop
2
settings]
✔
INFORMATION
・
[Wallpaper loop settings] is not available for the terminal.
→
[Uninstall]→[OK]→[OK]
→
Select or set items
◆
Adding/Deleting home screens
Up to 12 home screens can be set.
Touch and hold blank area in the customize
1
→
[Home screens]
area
Perform target operations
2
Adding : [+]
Sorting : Touch and hold a thumbnail of home screen
Drag to the position you want
Deleting : [×]
・
If any items are located, a confirmation screen for
deleting appears.
・
Alternatively, you can touch and hold a thumbnail of
home screen, then tap [Delete] to delete.
Displaying : Tap a thumbnail of home screen
✔
INFORMATION
・
Alternatively, pinch-in anywhere in the Home screen to
display the home screen list.
→
49
docomo Palette UI
Page 52
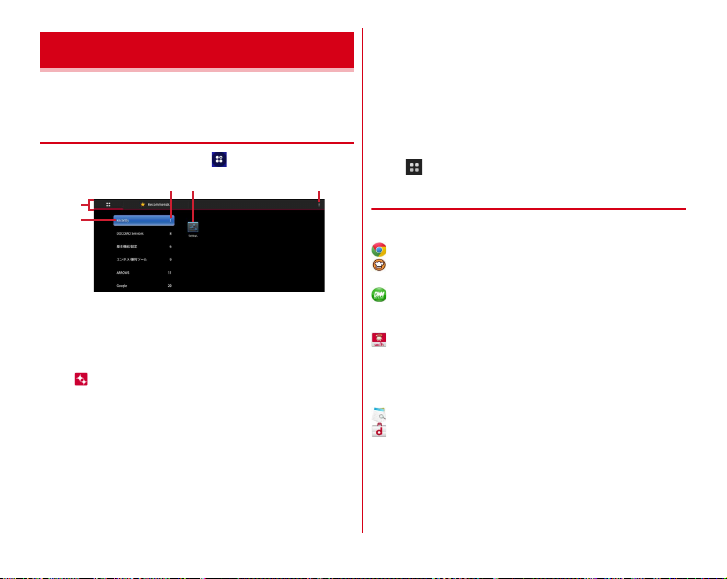
Application screen
a
b
c
d e
Display the Application menu so that you can activate
registered applications or change the terminal settings.
◆
Displaying Application menu
From the Home screen,
1
a
Application/Recommends switching tab
b
Group
c
Number of applications in a group
d
Applications in a group
e
Menu
・
appears on a new application icon.
・
Number of unread messages appears on some
application icon.
・
You can display Settings menu, Kisekae, docomo
Palette UI guide, etc. from the menu.
Showing/Hiding applications in a group : Tap a group
name on the vertical screen
・
On the horizontal screen, only applications can be
displayed.
Showing/Hiding applications in all groups : Pinch-out/
Pinch-in on the vertical screen
Ad ding to H ome s cre en : Touch and hold an application or
→
[Add]
group
Switching to application list/recommended applications :
/[Recommends]
◆
Application list
・
Some applications require separate subscriptions (charged)
to be used.
Chrome :
View web pages like on a PC.
COOKPAD :
Japan "COOKPAD".
DiXiM Player :
photos, music, videos on the home network with your
devices. For usage, Wi-Fi environment is required.→P112
docomo Wi-Fi Easy Connection :
helps you use public wireless LAN provided by DOCOMO,
"docomo Wi-Fi" and home wireless environment. The
widget allows you to connect/disconnect to/from Wi-Fi by
one-touch operation in a Wi-Fi area.
Document Viewer :
dmarket :
dmarket, you can purchase contents such as music, videos,
books, etc. Applications on Google Play are also introduced
there.→P115
Search recipe in the biggest cocking website in
Watch and listen recorded TV programs,
An application which
Display Microsoft office file etc.→P142
An application for launching dmarket. In
50
docomo Palette UI
Page 53
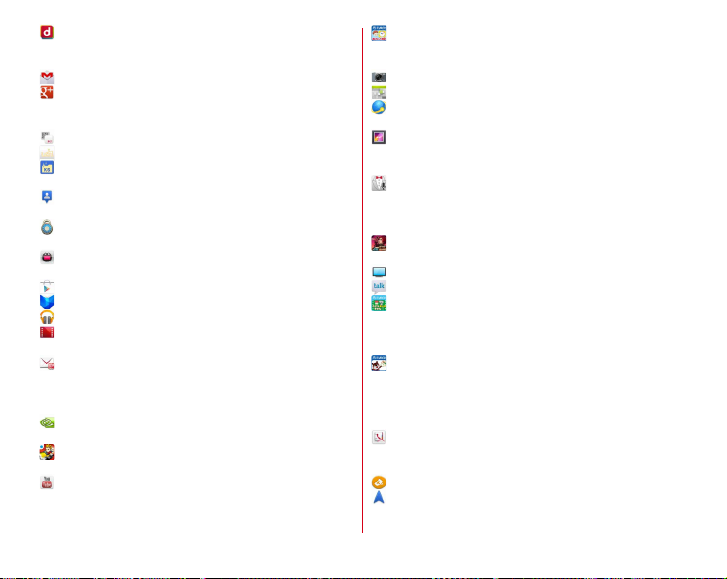
dmenu :
A shortcut applic ation for "dmenu" to find cont ents
that you have used in i-mode and joyful and convenient
contents for smartphones.→P115
Gmail :
Send/Receive Google account mails.→P63
Google+ :
You can use SNS to make better use of a large
amount of data (such as mail, contacts, photos, office
documents, etc.).
IC Tag/Barcode Reader :
iチャネル
(i-channel) :
Ksfilemanager :
manage data contents in the terminal, microSD card, etc.
Latitude :
You and your friends can check where you are on
the map.→P138
milock :
Protect specified applications. Protected
applications need authentication when activating.
NOTTV :
Watch Mobacas. Enjoy broadcast programs/
contents such as "NOTTV".→P118
Play Store :
Play Books :
Play Music :
Play Movies :
movies to watch anytime you want.
sp
using i-mode mail address (@docomo.ne.jp). Pictograms
and Deco-mail can be used, and automatic reception also is
supported.→P58
TegraZone :
of the Tegra mobile processor.
Wacky Motors for F :
characters or customizing machines.
YouTube :
Use Google Play.→P115
View downloaded e-books.
Play music.
モードメール
Find games optimized for getting the best out
You can watch YouTube video.→P135
Read IC tags and barcodes.
Use i-channel.
An application which allows you to
Rent movies to watch. You can download
(sp-mode mail) :
Send and receive mail
It is a race game bringing up
おけいこ時計
時計
way.
Still camera :
Calendar :
Simplified Browser :
viewing web pages like a PC.
Gallery :
or downloaded from website and saved in a microSD card
or terminal memory.→P133
しゃべってコンシェル
want to search" or "what you want to do" to the terminal. It
understands your intention and show the best solution (in
Japanese only).
デモンズ体験版
which you play by tapping the screen in rhythm.
TV :
Talk :
ドコモゼミ キッズえいご こどもえいごずかん
seminar Kids English Kids English picture book 1) :
picture and ask "What's this?". Names of animals and
vehicles can be learned.
ドコモゼミ キッズ絵本 アニーのちいさなかばん
seminar Kids picture book Annie's little bag) :
of a popular picture book written by Michiko Tachimoto.
Kids will be carried away with its narration and moving
characters.
docomo phonebook :
addresses so that you can address someone from the
contacts by simple operation.→P54
ToruCa :
Navigation :
Google Maps Navigation.→P138
(Clock lesson) :
(Clock lesson)" to learn how to read clock in a joyful
Shoot still images or videos.→P129
View calendar and register schedule.→P139
View still images or videos taken with the camera
(Demons Trial version) :
Watch 1Seg.→P122
Chat via Google Talk→P65
Acquire, display, search or refresh ToruCa.
Search routes toward destinations using
Touch and operate "
With simple operations, you can enjoy
→
P68
(Shabette concier) :
Register phone numbers or email
おけいこ
Speak "what you
An action game
1 (DOCOMO
Point a
(DOCOMO
Application
51
docomo Palette UI
Page 54
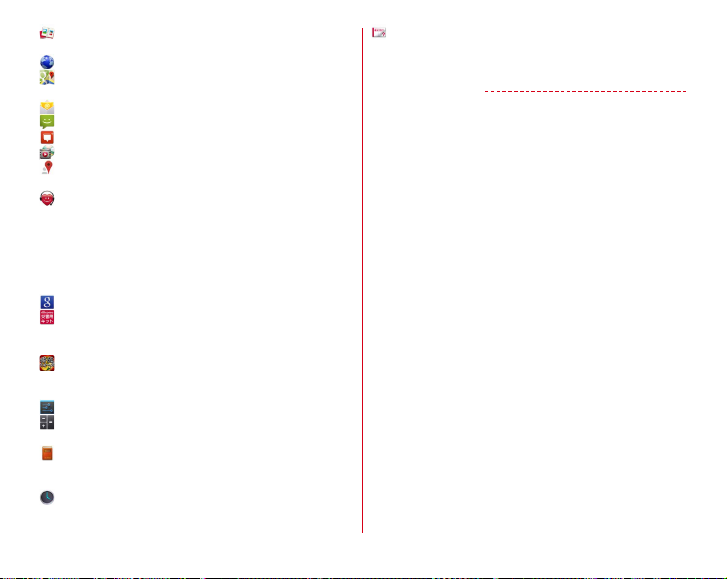
Photo Collection :
arrange them on the Cloud.
Browser :
Maps :
calculate routes.→P137
Email :
Messaging :
Messenger :
Media Player :
Local :
→
P139
遠隔サポート
マートフォンあんしん遠隔サポート
Remote Support)". "
(Smartphone Anshin Remote Support)" is a service that
allows staff of the Call center to support the terminal
operations by remotely checking the display of your own
terminal.
Search :
Disaster kit :
make settings and record/check messages on the docomo
Disaster Message Board.
将棋ウォーズ
game played by tapping the screen. You can enjoy online
play, too.
Settings :
Calculator :
subtraction, multiplication, and division.→P141
e-Dictionaries+ :
integrated in one package dictionary software, which
supports your daily study/business scene.
Clock :
P139
Upload photos and videos to view and
View web pages like a PC.→P65
View your current location, find other locations and
Send/receive emails to/from users of PC.→P60
Send/receive SMS.→P58
Use chat function (group chat, etc.).
Play music and videos.→P134
Search detailed information around where you are.
(Remote support) :
スマートフォンあんしん遠隔サポート
→
P154
Search functions in the terminal or website.→P142
Check received early warning "Area Mail",
(Japanese chess wars):
Make the terminal settings.→P71
Perform calculations such as addition,
Leading dictionaries in Japan are
Check time and set alarms with this application.
Application for using "
(Smartphone Anshin
It is a Japanese chess
→
P141
Instruction Manual :
(in Japanese only). You can start function directly from the
description.
✔
INFORMATION
・
Applications preinstalled by the default are shown. Some
preinstalled applications can be uninstalled. Even if you
uninstall them, you can download them again in Play Store.
→
P115
ス
→
Instruction Manual for this terminal
52
docomo Palette UI
Page 55
◆
Managing Application menu
When the Application menu is displayed,
1
perform target operations
Uninstalling an application : Touch and hold an
application →[Uninstall]→[OK]→[OK]
Sorting : Touch and hold an application or group
to the position you want
・
Alternatively, you can touch and hold an application,
then select [Move] to move the application.
Adding a group : →[Add group]→Enter group name
[OK]
・
Up to 50 groups can be set.
Editing group name : Touch and hold a group→[Edit
→
Enter group name→[OK]
name]
Deleting a group : Touch and hold a group→[Delete]
[OK]
Confirming home screen application information :
[Application info]
Searching : →[Search]
・
Search an application in the terminal or information on
the Web.
◆
Installing "Recommends" applications
Tap "Recommends" tab to display applications recommended
by NTT DOCOMO.
From the Home screen, →[Recommends]→[
1
→
Drag
おすすめアプリを見る
→
Select application→Download
apps)]
(View recommended
application following the onscreen instructions
・
Downloaded applications are displayed in the
→
→
→
[Download Application] group in the Application menu.
・
To check all recommended applications, tap [
プリをすべて見る
[Recommends] tab.
(View all recommended apps)] in
おすすめア
53
docomo Palette UI
Page 56
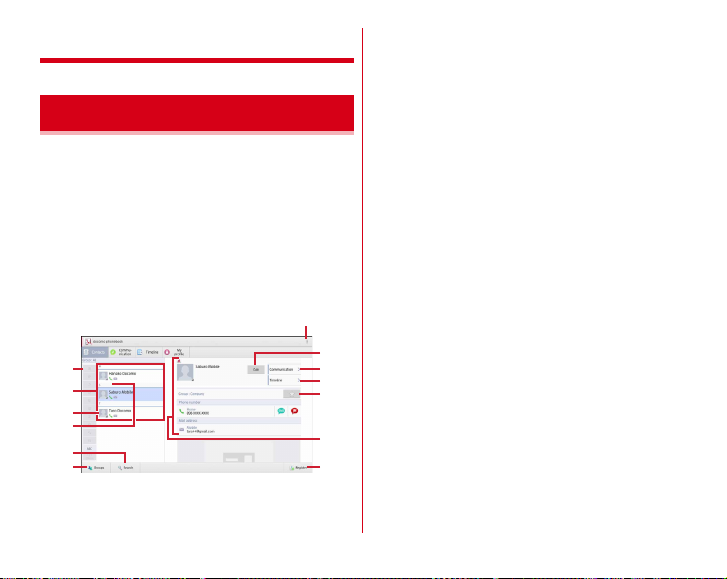
Phonebook
a
h
i
m
j
k
l
b
g
f
d
e
c
Contact screen
Using Phonebook
You can enter phone numbers, email addresses, etc. to
contacts in the Phonebook. You can contact registered parties
from the contacts with simple operations.
・
To use Cloud, you need to perform Cloud ON with docomo
phonebook application. For the first time activation of
docomo phonebook application (including after the
application is initialized), "Use of Cloud" screen appears, and
then you can start using Cloud.
From the Application menu, [docomo
1
phonebook]
a
Menu
→
[Contacts]
b
Index
Select a character to search contacts.
c
Contacts list
d
Name
Tap to display information on a profile screen. Tap a
thumbnail image to send SMS or mail, etc.
e
Index bar
f
Search
g
Show group list
h
Edit
i
Communication
History of sent/received SMS, sp-mode mail, etc.
appears.→P56
j
Timeline
Display the timeline of SNS・Blog by "Friends NEWS"
and "My SNS" functions.→P56
k
Favorites
Tap to add to "Favorites" group in the contacts.
l
Profile screen
Display profile of selected party. Tap an item to send
SMS, mail, etc.
m
Register new contact
54
Phonebook
Page 57

❖
Menu on contact
On the contact screen, tap to operate the following menu.
Delete one/Select and delete
General settings
or Wi-Fi service settings.
Cloud menu
Announcement
etc.
Contact update notice
update function.
Help
Others
Center, Share, Contacts display order, Accounts to display,
etc.
◆
Displaying contacts by group
You can display contacts by group specified in registration.
1
❖
Creating a new group
1
: Set International use settings for phonebook
: Change Cloud settings.
: Check history of the contact update function,
: Check details of phonebook.
: Operate Import/Export (→P56), Sync with Data
In the Contacts screen, [Groups]→Select a
group
In the group list, [Add]→Select an account if
necessary
・
Renaming group : Touch and hold a group to edit in the
Deleting group : Touch and hold a group→[Delete group]
→
Creating groups is available only for docomo account or
Google account.
group list→[Edit group]→Rename group→[OK]
→
[OK]
: Delete contacts list.
: Check received notice by the contact
Enter a group name→[OK]
✔
INFORMATION
・
You cannot edit/delete "No group" and Google default
groups.
❖
Registering a contact to group
In the group list, touch and hold a contact
1
Drag & drop it to a group to be registered
Deleting from group : On the Group list, tap a group you
want to delete from the group list →Touch and hold a
contact→Drag & drop it to a registered group
◆
Adding entries to Contacts
In the Contacts screen, [Register]→Select an
1
account if necessary
[Save]
✔
INFORMATION
・
Contacts data registered in docomo account can be
synchronized with Cloud.
◆
Editing a contact
In the Contacts screen, select a contact to edit
1
→
[Edit]→Edit each item→[Save]
→
Set required items
→
→
55
Phonebook
Page 58
◆
Deleting a contact
In the Contacts screen, select a contact to
1
delete
→→
・
In the Contacts screen, →Tap [Select and delete] to
select and delete contacts. Tap [Select all] to delete all
contacts.
◆
Importing/Exporting contacts
In the Contacts screen, →[Others]→[Import/
1
Export]
[Delete one]→[OK]
→
Select an item→Perform each
operation
Import from SIM card :
docomo mini UIM card, specify contacts you want to
add and import them.
Import from SD card :
saved in a microSD card to a specified account. When
there are multiple files, select a file to register.
Export to SD card :
except "My profile" to microSD card.
Share phonebook data:
Bluetooth or mail attachment.
✔
INFORMATION
・
Use SD card backup application to back up and restore
phonebook data and other data all at once. For details, see
"SD card backup".
From contacts saved on the
Register contacts data (vCard file)
Save all contacts data (vCard file)
Send all contacts data via
→
P143
Communication
History of sent/received SMS, sp-mode mail and SNS
messages* appears.
*
Displayed only when Cloud is ON and My SNS function is used.
From the Application menu, [docomo
1
phonebook]
Changing display items : [Disp. item]→Check items to be
displayed→[OK]
→
[Communication]
Timeline
・
Display the timeline of SNS
"My SNS" functions.
*
To display, start use of Cloud.
From the Application menu, [docomo
1
phonebook]
Changing display items : [Disp. item]→Check items to be
displayed→[OK]
Blog by "Friends NEWS" and
→
[Timeline]
56
Phonebook
Page 59
Editing My profile
You can check your subscribed phone number. You can also
enter or edit your own information.
From the Application menu, [docomo
1
phonebook]
item
◆
Creating name card
You can create your name card from My profile to exchange
with the other party.
・
To create or exchange name cards, you need to install Name
card creator app.
・
For using Create new/Edit of name card, a guidance screen
of the Name card creator application appears. Tap [Start].
From the Application menu, [docomo
1
phonebook]
[Create new]→Select template→[Select]
2
[Decided]→[Editing tool]→Edit each item
Editing : [Edit]→[Editing tool]→Set each item→[Save]
[Overwrite]/[Save new]
Deleting : [Delete]→[OK]
[Save]→Select the saving location
3
・
To exchange name cards, save your name card in
Phonebook(My profile).
→
→
[My profile]→[Edit]→Set each
[Save]
→
[My profile]
→
◆
Exchanging name cards
You can exchange created name cards between the
compatible terminals.
From the Application menu, [docomo
→
1
phonebook]
name card]
→
[My profile]→[Exchange this
→
Follow the guidance to operate
57
Phonebook
Page 60
Mail/Internet
sp-mode mail
You can send and receive mail using i-mode mail address
(@docomo.ne.jp).
Pictograms and Deco-mail can be used, and automatic
reception also is supported.
・
For details on sp-mode mail, refer to "Mobile Phone User's
Guide [sp-mode] smartphone version".
From the Application menu, [sp
1
(sp-mode mail)]
From here on, follow the onscreen instructions.
SMS
You can send and receive text messages up to 70 two-byte
characters long (up to 160 one-byte characters for only
alphanumerics) addressed to a mobile phone number.
◆
Composing and sending SMS
From the Application menu, [Messaging]
1
[NEW MESSAGE]
[To]→Enter a mobile phone number
2
モードメール
→
・
For entering a phone number directly, enter in one-byte
character.
[Type message]→Enter a message
3
✔
INFORMATION
・
SMS can be also sent to or received from the parties using
overseas network operators. For countries and overseas
network operators available, refer to "Mobile Phone User's
Guide [International Services]" or DOCOMO International
Services website.
・
To send to users of overseas network operators, enter "+",
"Country code" and then "the recipient mobile phone
number". You can also enter "010", "Country code" and "the
recipient mobile phone number" to send messages. (To reply
to a received SMS overseas, enter "010".) Enter a phone
number without a leading "0", if any.
◆
When SMS is received
When SMS is received, the notification icon appears on the
status bar. Open the Notification panel to check new SMS.
✔
INFORMATION
・
You cannot inquire new SMS in the SMS center from the
terminal.
・
If the terminal is initialized and an SMS is received right after
rebooting, ringtone and vibrator may not work regardless of
notification settings for new SMS.
・
SMS cannot be received when the terminal is low on
memory. Delete unnecessary applications etc. to obtain
memory space.
→
P90, 117
→
58
Mail/Internet
Page 61
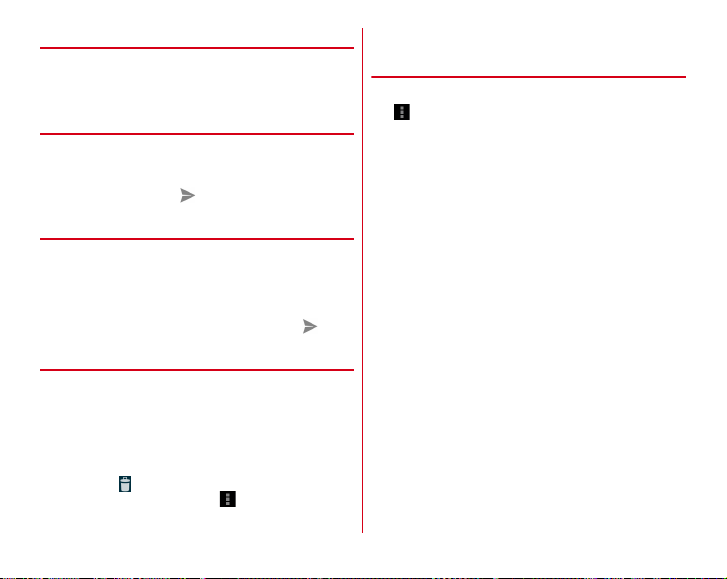
◆
Displaying received SMS
From the Application menu, [Messaging]
1
Select a message thread
2
◆
Replying to SMS
From the Application menu, [Messaging]
1
Select a message thread→[Type message]
2
Enter a message
◆
Forwarding SMS
From the Application menu, [Messaging]
1
Select a message thread→Touch and hold a
2
message
[To]→Enter a mobile phone number
3
◆
Deleting SMS
<Example> Deleting an SMS
From the Application menu, [Messaging]
1
Select a message thread→Touch and hold a
2
message
Deleting a message thread : Touch and hold a message
thread
Deleting all message threads : →[Delete all threads]
→
→
→
→
[Forward]
→
[Delete]
[Delete]
3
◆
Setting SMS
From the Application menu, [Messaging]
1
→
[Settings]
Set required items
2
Delete old messages :
→
if the number of saved messages reaches upper limit.
Message limit :
thread.
Backup :
Copy messages between the terminal and a
microSD card.
Delivery reports :
acknowledgement of receipt for a message to send
each time.
Manage SIM card messages :
the docomo mini UIM card.
Notifications :
status bar when receiving a message.
Choose ringtone :
message.
Vibrate :
Set vibration when receiving a message.
LED :
Set notification LED when receiving a message.
Set whether to delete old messages
Set the number of messages to save per
Set whether to require
Manage messages saved on
Set whether to show notification on the
Set ringtone when receiving a
→
59
Mail/Internet
Page 62
Set mail accounts provided by mopera U or general providers
to use Email.
◆
Setting mopera U mail account
Set mopera U account to use mopera U mail.
・
The mailbox capacity of mopera U mail is approximately 50
MB. Each mail can be sent or received with an attachment of
up to about 5 MB.
■
Using a POP server
From the Application menu, [Email]
1
[Email address]→Enter the mopera U mail
2
3
4
5
6
→
address
password
[Username]→Enter mopera U user ID
[Password]→Enter mopera U password
[POP3 server]→Enter "mail.mopera.net"
[Security type]→Select a security
Check entered settings→[Next]
[SMTP server]→Enter "mail.mopera.net"
Check the entered mopera U user name and
password
[Password]→Enter mopera U
→
[Manual setup]→[POP3]
→
[Next]
→
→
→
In the option settings screen, set the email
7
check [Inbox check frequency], etc.
On the mail account registration screen, [Your
8
name]
→
Enter your name→[Next]
◆
Setting up a general provider mail
→
[Next]
account
・
Obtain the information required for setting up the mail
account from your service provider in advance.
From the Application menu, [Email]
1
[Email address]→Enter a mail address
2
[Password]→Enter a password→[Next]
From here on, follow the onscreen instructions.
✔
INFORMATION
・
If automatic setting of the mail account does not complete,
tap [Manual setup] in Step 2, and manually enter the account
settings.
・
With some service providers, settings for "OP25B (Outbound
Port 25 Blocking) : spam mail transmission blocking" are
needed. For details, contact the service provider you are
subscribed to.
・
If you have already set a mail account and want to add on
another mail account, on the mail list, tap
[ADD ACCOUNT].
→
[Settings]
→
→
60
Mail/Internet
Page 63
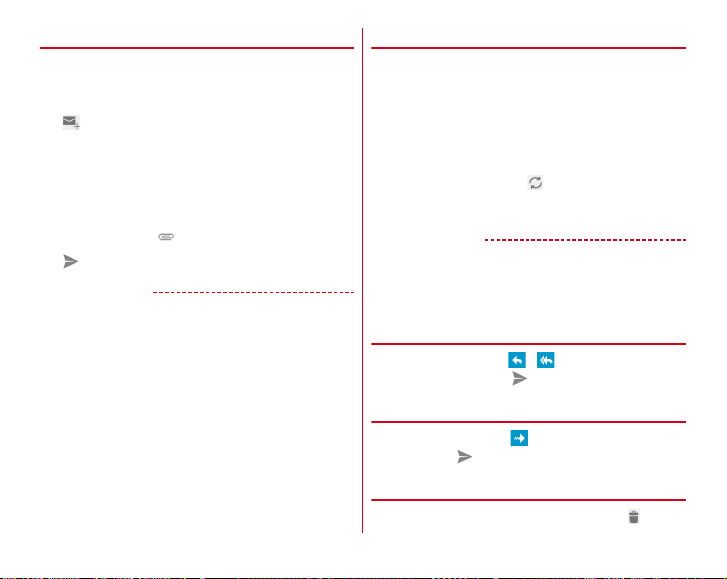
◆
Composing and sending email
From the Application menu, [Email]
1
・
If you have several mail accounts, tap the account at the
upper left of the screen to switch.
2
[To]→Enter an address
3
・
To add a Cc or Bcc, tap [+ CC/BCC].
[Subject]→Enter a subject
4
[Compose email]→Enter a message
5
・
To attach a file, →Select a file.
6
✔
INFORMATION
・
Email is handled as email from a PC. If the receiver sets
rejection of emails from PCs, the email cannot be sent.
◆
Receiving/Displaying emails
From the Application menu, [Email]
1
・
If you have several mail accounts, tap the account at the
upper left of the screen to switch.
If you tap an account and then the [Combined view], an
inbox containing a mixture of emails for all mail
accounts is displayed. Each of the mail accounts is
distinguished by a color bar on the right of emails.
To refresh the inbox,
2
Select an email
3
✔
INFORMATION
・
If Inbox checking frequency and email notifications (→P62) in
Account settings are set, notification icon appears on the
status bar. Open the Notification panel and tap the
notification to display the inbox.
◆
Replying to an email
Display an email→ / →[Compose email]
1
Enter a message
◆
Forwarding an email
Display an email
1
address
◆
Deleting emails
Display the email list→Check mails
1
→
→→
→
[To]→Enter a mail
→
61
→
Mail/Internet
Page 64

◆
Setting Email
Make Email settings.
❖
General settings
From the Application menu, [Email]
1
→
[Settings]→[General]
2
Set required items
3
Auto-advance :
message.
Message text size :
Ask to show pictures :
automatically.
❖
Setting Email account
From the Application menu, [Email]
1
→
2
Set screen to display after deleting a
Set text size.
Do not show pictures in messages
[Settings]→Select an account
Set required items
3
Account name :
Your name :
Signature :
Quick responses :
when creating emails.
Default account :
account when creating an email.
Inbox check frequency :
Download attachments :
download attachment file when connected to Wi-Fi for
IMAP account.
Email notifications :
the status bar when receiving an email.
Choose ringtone :
Vibrate :
Incoming settings :
Outgoing settings :
Remove account :
❖
Backing up/Restoring emails
From the Application menu, [Email]
1
→
2
[Restore]
Edit account name.
Edit name.
Register signature.
Edit frequently inserting sentences
Set whether to give priority to the
Set check frequency for inbox.
Set whether to automatically
Set whether to show notification on
Set ringtone when receiving an email.
Set vibration when receiving an email.
Set incoming mail server.
Set outgoing mail server.
Delete an account.
[Settings]→[Backup/Restore]→[Backup]/
→
[Start]
62
Mail/Internet
Page 65
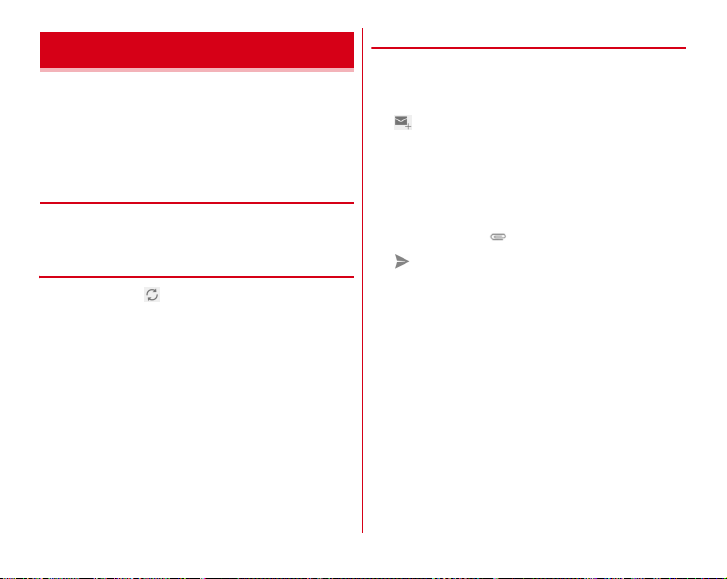
Gmail
Gmail is a Google online email service. You can send and
receive emails using Gmail on the terminal.
・
To use Gmail, you need to set up a Google account on the
terminal. If a Google account is not yet set, follow the
onscreen instructions that are displayed when Gmail is
activated for the first time.
◆
Opening Gmail
From the Application menu, [Gmail]
1
A list of message threads is displayed in the inbox.
❖
Refreshing Gmail
In the inbox,
1
The inbox is refreshed with Gmail on the terminal and
Gmail on the website synchronized with each other.
◆
Composing and sending Gmail
From the Application menu, [Gmail]
1
・
If you have several mail accounts, tap the account at the
upper left of the screen to switch.
2
[To]→Enter an address
3
・
To add a Cc or Bcc, tap [Add Cc/Bcc].
[Subject]→Enter a subject
4
[Compose email]→Enter a message
5
・
To attach a file, →Select a file.
6
63
Mail/Internet
Page 66
Early warning "Area Mail"
This is a service with which you can receive emergency
earthquake flash report delivered by the Meteorological
Agency etc.
・
Area Mail is a free service and subscription is not required.
・
Up to 50 items can be saved.
・
Area Mail cannot be received when the power off or in
Airplane mode, while displaying PIN unlock screen, etc.
When the terminal is low on memory, reception may be
failed.
・
Area Mail that could not be received cannot be received
later.
◆
When receiving Early warning "Area
Mail"
When Area Mail is received, the buzzer alarm or the Area Mail
ringtone sounds, the notification icon appears on the status
bar, and the content screen is displayed.
・
The buzzer alarm or the incoming ringtone sounds in
maximum volume. The setting cannot be changed.
・
By default, the sound is emitted even in Manner mode. You
can set to disable the sound.→P64
◆
Displaying received Area Mail
From the Application menu, [Disaster kit]
1
[Early Warning "Area Mail"]→Select an Area
Mail
・
For the first activation, read "
this application)" and tap [Agree].
◆
Setting Early warning "Area Mail"
From the Application menu, [Disaster kit]
1
[Early Warning "Area Mail"]
Set required items
2
Receive setting :
Beep tone :
when Area Mail arrives in Manner mode.
Check screen image and beep tone :
reception screen and beep tone for Area Mail such as
emergency earthquake flash report, tsunami warning,
disaster/evacuation information.
Other settings :
emergency earthquake flash report, tsunami warning,
disaster/evacuation information to be received.
Set whether to receive Area Mail.
Set sounding time of beep tone and action
Register/Edit/Delete Area Mail other than
ご利用にあたって
→→
[Settings]
Check actual
→
(Using
→
64
Mail/Internet
Page 67
Google Talk Browser
Google Talk is an online instant message service provided by
Google. You can enjoy chat with Google members by using
Google Talk on the terminal.
・
To use Google Talk, you need to set up a Google account on
the terminal. If a Google account is not yet set, follow the
onscreen instructions that are displayed when Google Talk
is activated for the first time.
◆
Online chat
❖
Activating Google Talk
From the Application menu, [Talk]→Log in
1
The Friends list is displayed.
・
For details on Google Talk, refer to the mobile help by
the following operations.
In the Google Talk friends list, →[Help]
You can view web pages like on a PC using Browser.
On the terminal, Browser can be used over a packet
communication or Wi-Fi connection.
In the terminal, 2 browsers are preinstalled: Android
"Browser" and "Simplified Browser" (
◆
Operation while viewing website
■
Switching web page in portrait/landscape view
Hold the terminal vertically or horizontally to switch the
portrait/landscape view.
■
Zooming in/out on web page
You can zoom in/out on web page by the following operations.
Pinch-out/Pinch-in :
Double-tap :
・
To return to the view before it is zoomed in, double-tap
again.
■
Scroll/Pan
Scroll the screen up/down or left/right or pan in all directions
to display the desired part of the screen.
Zoom in.
Zoom in/out.
65
→
P68).
Mail/Internet
Page 68
◆
Activating Browser to display a
website
From the Application menu, [Browser]
1
Slide to the top of web page→Enter a URL/
2
keyword in the address bar
[Go]/Select a candidate
3
◆
Opening a new tab
・
Up to 16 tabs can be opened.
Display a web page
1
・
Displaying a web page→P66
→
[New tab]/[New incognito tab]
2
・
appears on a tab while a web page is displayed in
an incognito tab.
Switching : Select a tab
Closing : Select a tab
✔
INFORMATION
・
Alternatively, when a web page is displayed, tap t o open
a new tab.
→
◆
Displaying web pages from history
When a web page is displayed, slide to the top
1
of the web page
Select a history type
2
・
To display the history of frequently viewed web pages,
tap [Most visited].
Select a history of the web page
3
◆
Registering a bookmark to quickly
display a web page
❖
Registering a bookmark
When a web page is displayed, slide to the top
1
of the web page
Detailed information for bookmark is displayed.
[OK]
2
❖
Displaying web pages from bookmarks
When a web page is displayed, slide to the top
1
of the web page
Select a bookmark
2
Editing : Touch and hold a bookmark image→[Edit
bookmark]→Set required items→[OK]
Deleting : Touch and hold a bookmark image→[Delete
bookmark]→[OK]
→→
[HISTORY]
→
→
66
Mail/Internet
Page 69
◆
Prefetch Cache
Dedicated cache fetches a linked page for displayed web page.
If prefetched in cache, tapping the link opens linked page
quickly, regardless of conditions of communication lines.
・
Depending on linked page, this feature may not be available.
When a web page is displayed, slide to the top
1
of the web page
・
Also, →Tap [Prefetch Cache] to operate.
・
If you open Notification panel while prefetching and tap
[〜% prefetch], prefetch stops.
✔
INFORMATION
・
Some pages cannot be displayed correctly when viewing
prefetched links.
・
Prefetch caches are cleared in the following cases.
- When starting prefetching
- When exiting browser
- When clearing caches from browser setting
- When prefetching again
・
Prefetch function performs communication until linked pages
are acquired. Therefore packet communication charges may
become high. Subscription of packet flat-rate service is highly
recommended.
・
Prefetch function cannot be used while incognito tab is
displayed.
→→
[Yes]
◆
Web page link operations
By tapping a link displayed on a web page, the followings can
be operated.
URL
・
Tap :
Open a web page.
・
Touch and hold :
Email address
・
Tap :
Create a mail.
・
Touch and hold :
Phone number
・
Touch and hold :
File
・
Tap :
View or save a file.
・
Touch and hold :
✔
INFORMATION
・
You can check a saved file with Document Viewer (→P142)
etc.
◆
Saving images displayed on a web
Copy URL.
Copy mail address.
Add or copy phone number to a contact.
Save a file.
page
When a web page is displayed, select an image
1
(touch and hold)
・
You can check a saved image in Gallery (→P133).
→
[Save image]
67
Mail/Internet
Page 70
◆
Searching words on websites in
dictionary
Search words on a website in a dictionary.
・
Set "Display balloon" in "General" of browser setting to use.
→
P68
When a web page is displayed, touch and hold
1
text
Selected text is highlighted.
・
Slide knobs on the both end of text range to adjust
selected range.
Tap a balloon
2
Search results are listed.
・
If no matching words are found, no balloon appears.
Tap a word you want to check
3
◆
Setting Browser
When a web page is displayed, →[Settings]
1
→
[General]/[Privacy & security]/
[Accessibility]/[Advanced]/[Bandwidth
management]/[Labs]
Set required items
2
General :
Set home page displayed when Browser is
activated, downloaded file saving location, filling forms
automatically, entering texts automatically, or
searching in dictionary.
Privacy & security :
displaying/hiding alert screen, Cookie, form data,
current location information or password.
Accessibility :
text size, or reversal rendering of the screen.
・
[Contrast] can be adjusted when [Inverted rendering] is
marked.
Advanced :
display, JavaScript settings, plug-in settings, website
settings, PREFETCH setting, PAGE CONTENT or default
settings reset.
・
If "Prefetch priority" in PREFETCH is marked, action for
JavaScript in a prefetched page and new
communication, refreshing information are partly
restricted. In this reason, pages may not be displayed
correctly. "Prefetch priority" is enabled when only 1 tab
is displayed in browser.
・
When [Auto-fit pages] is marked, displayed texts or
other items in the web page are automatically
optimized for the screen.
Double-tap a line of text to fit in the width of the screen
for displaying.
Bandwidth management :
image loading.
Labs :
Set the quick control.
Set cache, deleting browser history,
Set overwriting zoom in/zoom out settings,
Set search engine settings, tab background
Set preload of search result or
Simplified Browser
You can view web pages with easily comprehensive and
simple operations.
68
Mail/Internet
Page 71
◆
Screen operations on web page with
Simplified Browser
Operate with the buttons displayed on the operation bar at the
top of the screen.
■
Switching web page in portrait/landscape view
Hold the terminal vertically or horizontally to switch the
portrait/landscape view.
■
Zooming in/out on web page
You can zoom in/out on pages by the following operations.
Pinch-out/Pinch-in :
Double tap :
・
To return to the view before it is zoomed in, double-tap
again.
Zoom control :
■
Scroll/Pan
Scroll the screen up/down or left/right or pan in all directions
to display the desired part of the screen.
■
Back/Forward web page
Move to the previously displayed web page with
■
Back to the homepage
Move to the homepage with .
Zooms in/out.
Zooms in.
Zooms in with and zooms out with
.
.
◆
Activate Simplified Browser to display
a web page
From the Application menu, [Simplified
1
Browser]
On the operation bar, [Search]→Enter a URL in
2
the search word input area/Enter or select a
keyword
[Go]/[検索 (Search)]/[
3
search)]
Refresh : When a web page is displayed, [Menu]
[Refresh]
Displaying URL etc. : When a web page is displayed,
[Menu]→[Display URL, etc.]→[OK]
Connecting by entering URL : When a web page is
displayed, [Menu]→[Enter URL to connect]→Enter a
URL→[Connect]
Checking download history : When a web page is
displayed, [Menu]→[Download history]
Operating a link on web page : →P67
✔
INFORMATION
・
You can change the search service.→P70
検索実行
(Execute
→
69
Mail/Internet
Page 72

◆
Registering bookmark in Simplified
Browser to display a web page quickly
❖
Registering a bookmark
When a web page is displayed, [Favorite]
1
[Register in bookmarks]→[OK]
❖
Displaying web pages from bookmarks
When a web page is displayed, [Favorite]
1
[View bookmarks]
Select a bookmark
2
Changing a title : [Menu]→[Change title]→Select a
bookmark→Change a title→[Finish]→[OK]
Deleting : [Menu]→[Delete]→Select a bookmark
[Delete]→[Delete]→[OK]
Changing sort order : [Menu]→[Sort]→Select an item
Displaying URL : [Menu]→[Display URL]→Select a
bookmark→[OK]
Switching display type : [Menu]→[Switch display
method]
◆
Displaying a web page from history of
Simplified Browser
When a web page is displayed, [Favorite]
1
→
→
→
[View browser history]
Select a history→[Connect]
2
Registering in bookmarks : [Menu]→[Register in
bookmarks]→Select a history→[OK]
Deleting : [Menu]→[Delete]→Select a history→[Delete]
→
[Delete]→[OK]
Displaying URL : [Menu]→[Display URL]→Select a
history→[OK]
Copying URL : [Menu]→[Copy URL]→Select a history
[OK]
◆
Setting Simplified Browser
When a web page is displayed, [Menu]→[Set
1
browser]
→
[Advanced settings]
Set required items
2
Character size :
Set homepage :
Advanced settings :
[Character size]/[Set homepage]/
Select a character size.
Select a method for setting a homepage.
password, setting Cookie, JavaScript, or allowing/
denying location information, selecting search engine,
restoring to the default settings.
Settings for saving form data or
→
→
70
Mail/Internet
Page 73
Settings
Setting menu
You can make various settings in the menu displayed by
selecting [Settings] in the Application menu.
Initial settings Slide-in function
■
WIRELESS & NETWORKS
Wi-Fi 75
Easy Wi-Fi
registration
Bluetooth 107
Menu Page
Security unlock preference
Menu Page
AOSS system
WPS system
More... Data usage 78
43Screen lock auth
■
DEVICE
Sound and Vibration Volumes 83
78
Menu Page
Airplane mode 78
VPN settings 79
Tethering 79
NFC
Android Beam
Wi-Fi direct 81
Mobile networks 74
Bluetooth Low Energy
Settings
Menu Page
Manner mode 82
MIC input 84
Improved sound for IP calls 83
Notification sound
Vibrate and ring
Touch sounds
Screen lock sound
Charge vibrate
Vibrate when touch
Distinct touch
Vibration level
71
117
81
147
109
84
83
Settings
Page 74
Display Brightness 84
Set style Switch style 87
Multimedia Launch Application 88
Storage Unmount SD card/Mount
Battery 89
NX! eco 89
Menu Page
Sleep 84
Photo Frame 85
Wallpaper 49
Homescreen selector 32
Lock screen enable 85
Lock screen timeout 85
Customize screen 85
Battery icon 85
Auto-rotate screen 86
Font settings 86
Font size 86
Intelligent color adjust 86
Best view adjust 86
Kids switching guard 87
Select apps used in Kids 87
Set Family use 87
SD card
Erase SD card
Unmount USB storage/
Mount USB storage
111
Apps 90
■
PERSONAL
docomo service Application manager
Accounts & sync 91
Location services Google's location service 137
88
Menu Page
Menu Page
Wi-Fi settings for docomo
apps
docomo apps password
AUTO-GPS
docomo location
information
docomo Wi-Fi Easy
Connection
データ量確認アプリ
checking app)
SD card backup
Open source licenses
GPS satellites 136
Location & Google search 137
ー
(Data
72
Settings
Page 75
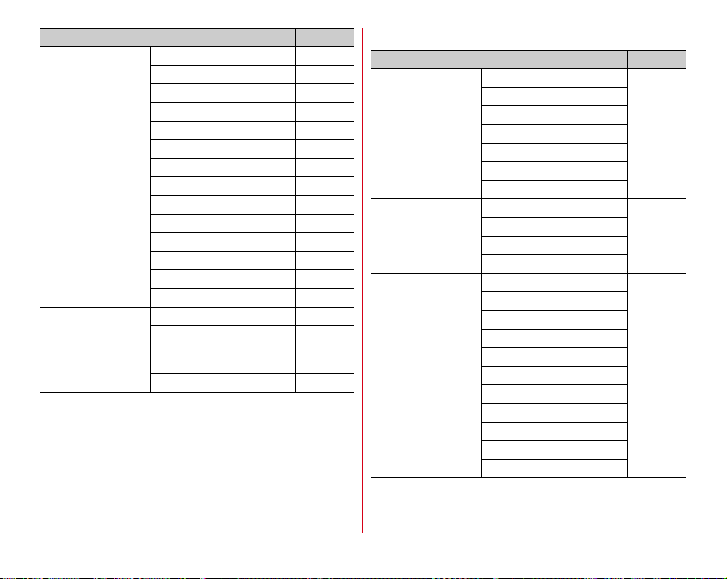
Security Screen lock auth 94
More... Slide-in function 103
Menu Page
Security unlock preference 94
Fingerprint settings 98
Owner info 96
Set up SIM card lock 93
Make passwords visible 98
Password manager 99
Privacy mode settings 99
Device administrators
Unknown sources 102
Trusted credentials 102
Install from SD card 102
Clear credentials 102
SD card password settings 102
Language & input 40
Data reset 155
ー
43
104
■
SYSTE M
Date & time Automatic date & time
Accessibility Large text
Developer options USB debugging
Menu Page
Automatic time zone
Set date
Set time
Select time zone
Use 24-hour format
Select date format
Auto-rotate screen
Speak passwords
Install web scripts
Development device ID
Stay awake
Allow mock locations
Strict mode enabled
Pointer location
Show touches
Show CPU usage
Window animation scale
Transition animation scale
Show all ANRs
105
105
ー
73
Settings
Page 76
About tablet Software Update 158
✔
INFORMATION
・
To use USB debugging function for [Developer options],
install USB driver to a PC. For details, refer to the information
about this product in the following site.
http://spf.fmworld.net/fujitsu/c/develop/sp/android/ (in
Japanese only)
・
For functions for software developers such as USB
debugging, Allow mock locations, etc. in [Developer options],
refer to the following website.
http://developer.android.com/
Menu Page
My profile 57
Status
Legal information
Auth
Model number
Android version
Baseband version
Kernel version
Build number
106
WIRELESS & NETWORKS
◆
Setting access point (APN)
Access points for connecting to the Internet (sp-mode, mopera
U) are already registered. You can add or change it if
necessary.
・
By default, sp-mode is set for the default access point.
・
When Tethering is set to on, access point setting is
unavailable.→P79
❖
Checking the access point in use
From the Application menu, [Settings]→In
1
WIRELESS & NETWORKS, [More...]
networks]
❖
Adding new access point (New APN)
・
Do not change the MCC/MNC to other than 440/10. The
setting disappears from the screen.
From the Application menu, [Settings]→In
1
WIRELESS & NETWORKS, [More...]
networks]
2
[Name]→Enter a network profile→[OK]
3
[APN]→Enter the access point name→[OK]
4
→
[New APN]
→
[Access Point Names]
→
[Access Point Names]
→
[Mobile
→
[Mobile
74
Settings
Page 77
Enter other items required by network
5
operator
→→
[Save]
✔
INFORMATION
・
If you have changed MCC/MNC settings and they do not
appear on the APN list screen, reset access point or make
access point settings in [New APN] again.
❖
Initializing an access point
By initializing an access point, the default state is restored.
From the Application menu, [Settings]→In
1
WIRELESS & NETWORKS, [More...]
networks]
2
✔
INFORMATION
・
You can delete access point one by one by selecting an
access point from the APNs list screen,
APN].
❖
sp-mode
sp-mode is an ISP for NTT DOCOMO smartphone. In addition
to accessing Internet, you can use the mail service using the
same address as i-mode mail (@docomo.ne.jp), etc.
・
sp-mode is a service requiring subscription. For details on
sp-mode, refer to NTT DOCOMO website.
→
[Access Point Names]
→
[Reset to default]
→
[Mobile
→
Tap [Delete
❖
Setting mopera U
mopera U is an ISP of NTT DOCOMO. If you have subscribed
to mopera U, just make simple settings to use Internet.
・
mopera U is a service requiring subscription.
From the Application menu, [Settings]→In
1
WIRELESS & NETWORKS, [More...]
networks]
[mopera U]/[mopera U設定 (mopera U
2
settings)]
✔
INFORMATION
・
[mopera U設定 (mopera U settings)] is an access point for
setting mopera U. When you use the access point for setting
mopera U, packet communication charges for setting do not
apply. Note that from the access point, you can connect only
to the initial setting screen and the change setting screen. For
details on mopera U settings, refer to mopera U website.
◆
Wi-Fi
With Wi-Fi function of the terminal, you can use mail and
access the Internet by connecting to the home or company
network or public wireless LAN access point.
To connect to a wireless LAN access point, you need to set
connection information.
→
[Access Point Names]
→
[Mobile
75
Settings
Page 78

■
Reception interference caused by Bluetooth
Wireless LAN (IEEE802.11b/g/n) and Bluetooth function use
the same frequency band (2.4GHz). If you use the wireless LAN
function and Bluetooth function of the terminal at the same
time, reception interference may occur and the
communications speed may lower. Also, you may hear noise
or have a connection problem.
Even when you use only wireless LAN function of the terminal,
the same problem may occur when someone uses a Bluetooth
device near you. In these cases, do the following.
・
Keep the terminal over 10 m away from a Bluetooth device.
・
If you use the terminal within 10 m, turn off a Bluetooth
device.
❖
Connecting to network with Wi-Fi ON
From the Application menu, [Settings]
1
Set [Wi-Fi] to [ON]
2
[Wi-Fi]→Select a Wi-Fi network
3
・
When you select a Wi-Fi network protected by security,
enter a password (security key) and tap [Connect].
・
After selecting Wi-Fi network, connection selection
screen may appear.
✔
INFORMATION
・
Even when Wi-Fi is ON, packet communication is available.
However, while you connect Wi-Fi network, Wi-Fi comes first.
When the Wi-Fi network is disconnected, connection
switches to LTE/3G/GSM network automatically. Note that
packet communication fee may apply if network connection
stays switched.
・
If you enter a wrong password (security code) when selecting
an access point to connect, [Private IP address has been
assigned. Connection is restricted.] appears. Make sure the
password (security code). If [Private IP address has been
assigned. Connection is restricted.] appears in spite of
entering correct password (security code), correct IP address
may not have been obtained. Check signal condition and
reconnect.
・
To use docomo services via Wi-Fi when you use Wi-Fi, set W iFi option password beforehand. To make settings, from the
Application menu
docomo apps], tap [Wi-Fi option password] to operate.
❖
Scanning Wi-Fi network
・
Set Wi-Fi to ON in advance.
From the Application menu, [Settings]→[Wi-Fi]
1
→
[SCAN]
→
[docomo service]→In [Wi-Fi settings for
76
Settings
Page 79
❖
Adding Wi-Fi network
Enter network SSID or security to add Wi-Fi network manually.
・
Set Wi-Fi to ON in advance.
From the Application menu, [Settings]→[Wi-Fi]
1
[ADD NETWORK]
2
Enter a network SSID of Wi-Fi network to add
3
→
Select security
・
Security can be set to [None], [WEP], [WPA/WPA2 PSK]
or [802.1x EAP].
Enter additional security information as
4
required
→
[Save]
❖
Disconnecting Wi-Fi network
From the Application menu, [Settings]→[Wi-Fi]
1
Select a connected Wi-Fi network→[Forget]
2
✔
INFORMATION
・
When you disconnect Wi-Fi network turning Wi-Fi OFF,
connection is automatically made if available Wi-Fi network
exists when Wi-Fi is turned ON next time.
❖
Advanced Wi-Fi settings
From the Application menu, [Settings]→[Wi-Fi]
1
→
[Advanced]
2
Set each item
3
Network notification :
network is available.
Wi-Fi Auto ON/OFF :
Wi-Fi to ON or OFF if available Wi-Fi network is detected
in the area where you have connected to Wi-Fi once.
Wi-Fi sleep policy :
terminal screen is OFF or while the battery is charged.
Wi-Fi frequency band :
MAC address/IP address :
address.
✔
INFORMATION
・
[Wi-Fi Auto ON/OFF] does not work if Airplane mode or Wi-Fi
tethering is ON.
・
The terminal may not connect automatically even when [WiFi Auto ON/OFF] is activated because Wi-Fi information in the
area is changed etc. In such case, connect manually.
Set to notify you when Wi-Fi open
Set whether to automatically turn
Set whether to use Wi-Fi when the
Set Wi-Fi frequency band.
Display MAC address, IP
77
Settings
Page 80

◆
Simple registration of Wi-Fi network
You can connect through simple operations if connecting via a
Wireless access point supporting AOSS™ or WPS.
From the Application menu, [Settings]→[Easy
1
Wi-Fi registration]
Select a registration method
2
AOSS™ system : [AOSS system]→Press AOSS™ button
on the Access point
WPS system : [WPS system]→[Push button system]/[PIN
entry system (8digit)]/[PIN entry system (4digit)]
Perform necessary operations on the access point
・
In case of push button method, press a dedicated button
on an access point. In case of PIN entry method, enter
PIN code displayed on the terminal to an access point
and tap [OK].
✔
INFORMATION
・
For some wireless LAN access points, AOSS™ connection
may not be established. If connection failed, use WPS
connection or connect manually.
・
When security on the wireless LAN access point is set to WEP,
you cannot connect in WPS system.
・
Only 2.4 GHz is supported for AOSS™ system.
→
◆
Data usage
You can enable Internet access via mobile network, set limit of
mobile data communications on graph, or set alert when
usage exceeds the limit.
From the Application menu, [Settings]→In
1
WIRELESS & NETWORKS, [More...]
→
[Data
usage]
Set [Mobile data] to [ON]
2
Data usage managing screen appears and mobile data
communication volume (estimate) per period and per
application are displayed.
・
To restrict volume of data usage, mark [Set mobile data
limit].
・
With [Set mobile data limit] marked, →Mark [Restrict
background data] to restrict data communication in
background.
◆
Airplane mode
When Airplane mode is set, wireless functions of the terminal
(packet communication, Wi-Fi, tethering, Bluetooth function)
are disabled. Wi-Fi and Bluetooth function can be manually
turned on in Airplane mode.
From the Application menu, [Settings]→In
1
WIRELESS & NETWORKS, [More...]
→
Mark
[Airplane mode]
78
Settings
Page 81

◆
Connecting VPN (Virtual Private
Network)
VPN (Virtual Private Network) is a technology to connect to the
information in a protected local network such as enterprises or
universities from another network. To set up a VPN connection
from the terminal, you need to retrieve the information related
to security from your network administrator.
・
When ISP is set to sp-mode, PPTP is not available.
❖
Adding a VPN
From the Application menu, [Settings]→In
1
WIRELESS & NETWORKS, [More...]
settings]
→
[Add VPN network]
Set required items for VPN settings→[Save]
2
❖
Connecting to VPN
From the Application menu, [Settings]→In
1
WIRELESS & NETWORKS, [More...]
settings]
Select a VPN to connect to
2
Enter necessary authentication information
3
[Connect]
・
When you are connected, a notification icon appears on
the status bar.
→
→
[VPN
[VPN
→
❖
Disconnecting VPN
Open the Notification panel
1
Select a notification of VPN connection
2
On the VPN setting screen, tap connected VPN
3
→
[Disconnect]
◆
Tethering
Tethering is a function for using mobile devices such as
smartphones as modems to allow external devices connected
via USB or Wi-Fi to access the Internet.
・
When tethering is enabled, sp-mode functions other than
Internet connection and mail service are not available.
・
When you connect to Internet using tethering, Wi-Fi device
applications such as web browser or game may not work
properly depending on the condition of use.
✔
INFORMATION
・
You can check information about tethering from the
Application menu, [Settings]
[More...]
→
[Tethering]→[Help].
→
In WIRELESS & NETWORKS,
79
Settings
Page 82

❖
USB tethering
If you connect the terminal to a PC with the optional USB Cable
for PC connection T01 to use as a modem, you can access the
Internet.
Connect the terminal and a PC with the USB
1
cable
From the Application menu, [Settings]→In
2
WIRELESS & NETWORKS, [More...]
[Tethering]
[USB tethering]
3
・
If you use Windows XP PC, remove the USB cable from
the PC without turning off the USB tethering on the
terminal.
Check the precautions and [OK]
4
✔
INFORMATION
・
The system requirements of PCs for USB tethering are as
follows. Operations on upgraded OS or added/modified
environment are not guaranteed.
- Windows XP (Service Pack 3 or later), Windows Vista and
Windows 7
・
To perform USB tethering with Windows XP, install
dedicated driver to a PC. For download information of the
dedicated driver, refer to the following website.
http://www.fmworld.net/product/phone/usb/ (in Japanese
only)
→
❖
Wi-Fi tethering
You can allow Wi-Fi devices to access the Internet by using the
terminal as Wi-Fi hotspot.
・
You can connect up to 8 Wi-Fi devices.
・
Only 2.4 GHz is supported for tethering.
■
Setting Wi-Fi tethering
Set Wi-Fi tethering to ON for connection setting.
・
By default, [WPA/WPA2 PSK] is set for Security and random
characters are set for [Password]. Make the security setting
as required.
From the Application menu, [Settings]→In
1
WIRELESS & NETWORKS, [More...]
[Tethering]
[Wi-Fi tethering]
2
Check the alert and [OK]
3
[Network SSID]→Enter a network SSID
4
・
By default, "F-05E_AP" is set.
・
When changing registered setting, select [Configure WiFi hotspot] to display the setting screen.
[Security]→Select a security
5
・
Security can be se t to [Open], [WEP64], [WEP128], [WPA
PSK TKIP], [WPA PSK AES], [WPA2 PSK AES] or [WPA/
WPA2 PSK].
[Password]→Enter a password→[Save]
6
→
80
Settings
Page 83

❖
Simple registration of Wi-Fi device
Register Wi-Fi device supporting AOSS™ or WPS.
・
Set Wi-Fi tethering to ON in advance.
From the Application menu, [Settings]→In
1
WIRELESS & NETWORKS, [More...]
→
[Tethering]→[Easy Wi-Fi registration]
Select a registration method
2
AOSS™ system : [AOSS system]→Press AOSS™ button
on a Wi-Fi device
WPS system : [WPS system]→[Push button system]/[PIN
entry system]→Set required items→On the
registration screen, [OK]
・
In case of push button method, press a dedicated button
on a Wi-Fi device. In case of PIN entry method, enter PIN
code displayed on a Wi-Fi device and tap [OK].
✔
INFORMATION
・
When number of AOSS™ registration devices exceeds 24, a
confirmation screen for deleting old registration appears. To
use AOSS
™
・
To cancel AOSS™ setting, on the [Configure Wi-Fi hotspot]
screen, tap [AOSS OFF].
・
For some Wi-Fi devices, AOSS™ connection may not be
established. If connection failed, use WPS connection or
connect manually.
・
Only 2.4 GHz is supported for AOSS™ system.
connection with new device, tap [Yes].
◆
Wi-Fi direct
Connect between Wi-Fi direct devices without routing an
access point etc.
・
To use this function, acquire and install an application to use
Wi-Fi direct function from Play Store.
From the Application menu, [Settings]→In
1
WIRELESS & NETWORKS, [More...]
→
Mark/
Unmark [Wi-Fi direct]
◆
Stopping packet connection
Some applications automatically perform packet
communications. Packet communication is kept active unless
you cut off the connection or the time-out occurs. Activate or
deactivate packet communication as required.
From the Application menu, [Settings]→In
1
WIRELESS & NETWORKS, [More...]
→
[Mobile
networks]
Unmark [Data enabled]
2
81
Settings
Page 84
Sound and Vibration
◆
Manner mode
Set/Cancel Manner mode.
・
You can change the Manner mode type.→P82
From the Application menu, [Settings]
1
[Sound and Vibration]→[Manner mode]
Mark [Enable manner mode]
2
・
When the Manner mode is activated, a status icon
appears on the status bar. The icon varies by manner
mode type. For each icon, see "Icons on the status bar".
→
P44
✔
INFORMATION
・
Even in manner mode, shutter sound, auto focus lock sound,
count down sound for self timer and Find Me ringtone for
Bluetooth Low Energy Settings are emitted.
→
❖
Changing Manner mode type
From the Application menu, [Settings]
1
[Sound and Vibration]→[Manner mode]
[Select manner mode]
Selecting an item
2
Manner mode :
of the terminal.
Manner mode (Silent) :
off the vibration.
Manner mode (Alarm) :
except alarm volume and vibration go along to the
alarm settings.
Original manner :
each sound type.
・
When you select original manner mode, adjusting
sound volume supporting original manner reflects to
the Original manner settings.
❖
Original manner
From the Application menu, [Settings]
1
[Sound and Vibration]→[Manner mode]
[Original manner]
[Volume]
2
[Media volume]/[Alarm volume]/[Notification
3
volume]
Slide the slider to adjust sound volume→[OK]
4
→
No sounds are emitted from the speaker
In addition to mute sounds, turn
Same operation as Manner mode
Set sound volume and vibration for
82
→
→
→
→
Settings
Page 85

[Vibration]
5
Mark/Unmark [Alarm]/[Notification]
6
◆
Distinct touch
Set whether to notify you of tap recognition by vibration.
From the Application menu, [Settings]
1
[Sound and Vibration]→Mark/Unmark
[Distinct touch]
・
To adjust vibration level for [Distinct touch], from the
Application menu, [Settings]→[Sound and Vibration]
[Vibration level]. If [Strong]/[Normal] is selected, the
terminal vibrates with set level when scrolling or
tapping the screen. If [Mild] is selected, it does not
vibrate when scrolling but only when tapping.
→
◆
Improved sound for IP calls
Set whether to use Improved sound for IP calls.
・
For calls by application using Voice over IP technology,
sound quality may be inferior as compared with phone call
due to delay time of network. The function reduces noise or
echo that the other party hears based on the sound quality
realized by the application. It does not have effect on sound
interruption, delay, etc.
・
The function may not have positive effect on some
applications. In that case, turn off the setting.
・
The function may not have positive effect on some
→
upgraded applications. In that case, turn off the setting.
・
The function does not work for calls via Bluetooth.
From the Application menu, [Settings]
1
[Sound and Vibration]→Mark/Unmark
[Improved sound for IP calls]
◆
Volumes
You can adjust volume of media playing sound, ringtone/
notification sound and alarm sound.
From the Application menu, [Settings]
1
[Sound and Vibration]→[Volumes]
Slide the slider to adjust sound volume→[OK]
2
→
→
83
Settings
Page 86
◆
Setting ringtone/notification sound/
operation sound/vibration
From the Application menu, [Settings]
1
[Sound and Vibration]
Set each item
2
MIC input :
Set microphone when connecting stereo
earphones. When connecting stereo earphones without
microphone, select [Phone MIC].
Notification sound :
Vibrate and ring :
sounding.
Touch sounds :
menu to ON/OFF.
Screen lock sound :
and canceling screen lock to ON/OFF.
Charge vibrate :
completion of charging.
Vibrate when touch :
on the lock screen to unlock.
Set notification sound.
Set whether to vibrate while ringtone is
Switch operation sound when selecting
Switch notification sound for setting
Set whether to vibrate when starting and
Set whether to vibrate when tapping
Display
→
◆
Brightness
Set brightness of screen backlight.
From the Application menu, [Settings]
1
[Display]→[Brightness]
Slide the slider to adjust brightness→[OK]
2
・
To adjust brightness automatically according to the
environment, mark [Automatic brightness] and slide the
slider to adjust brightness.
◆
Sleep
Set screen timeout.
From the Application menu, [Settings]
1
[Display]→[Sleep]→Select a time
→
→
84
Settings
Page 87

◆
Photo Frame
Show set multiple images in slideshow style.
From the Application menu, [Settings]
1
[Display]→[Photo Frame]
[Use Photo frame]→Set each item
2
・
To change the former settings, tap [Picture setting] with
[Use Photo frame] marked.
・
When you select [Flickr]/[Picasa], images matching a
keyword are obtained automatically and displayed in
slideshow. If selected, set [Update interval] and
[Network to be used].
・
If [Specified time] is selected for [Update interval],
select [Update time] to specify time.
・
If you select [Timeout of Photo frame], you can set
timeout when the Photo frame is activated.
・
When [Start at put on cradle] is selected, you can set
whether to start the Photo frame soon when charging
starts by inserting the terminal into the desktop holder.
✔
INFORMATION
・
Time set in [Specified time] is the time to start acquiring
images. It is not the time to display images.
・
While the Photo frame is activated, fingerprint reading
function of the finger print sensor is unavailable.
◆
Lock screen enable
Set whether to display the lock screen.
From the Application menu, [Settings]
1
[Display]→Mark/Unmark [Lock screen enable]
◆
Lock screen timeout
Set lock screen timeout.
→
→
From the Application menu, [Settings]
1
[Display]→[Lock screen timeout]→Select a
time
✔
INFORMATION
・
If a set time for [Sleep] is longer than this setting, timeout will
be executed in accordance with the time set for [Sleep] while
charging.
◆
Customize screen
You can customize screens for pattern authentication,
fingerprint authentication or NX!input keyboard.
From the Application menu, [Settings]
1
[Display]→[Customize screen]→Set each item
◆
Battery icon
Change the battery icon.
From the Application menu, [Settings]
1
[Display]→[Battery icon]→Select an icon
→
→
→
85
Settings
Page 88

◆
Auto-rotate screen
Set whether to rotate screen automatically according to the
terminal orientation.
From the Application menu, [Settings]
1
[Display]
Mark/Unmark [Auto-rotate screen]
2
✔
INFORMATION
・
Some applications such as Still camera or Video camera
record do not go along to this setting.
◆
Font settings
Change display font type.
From the Application menu, [Settings]
1
[Display]→[Font settings]→Set a font→[OK]
・
With [Original handwriting font] selected, you can
create original font to use. By selecting [
(Edit individual letter)] in [Original handwriting font],
you can replace created font character with your
handwriting character.
✔
INFORMATION
・
Depending on screen, turning the power OFF and ON reflects
font settings.
・
The font settings may not be reflected or set font may not be
displayed correctly on some applications or Web sites.
→
→
個別文字編集
・
Note that if you replace handwritten characters created by [
別文字編集
(Edit individual letter)] in [Original handwriting
font] with your own handwritten characters, some characters
may be hard to read.
◆
Font size
Change font size.
From the Application menu, [Settings]
1
[Display]→[Font size]→Select a size
◆
Intelligent color adjust
Set whether to adjust screen color tone according to the
ambient lighting condition.
From the Application menu, [Settings]
1
[Display]→Mark/Unmark [Intelligent color
adjust]
◆
Beset view adjust
Adjust screen color shade matching your age.
From the Application menu, [Settings]
1
[Display]→[Best view adjust]→Set each item
個
→
→
→
86
Settings
Page 89
Set style
◆
Switch style
You can create/set style.
From the Application menu, [Settings]→[Set
1
style]
→
[Switch style]
Select a style
2
・
You can create a new style by tapping [New]. To edit a
style name or delete a style, touch and hold a style on
the style selection screen. However, the operations are
unavailable when
✔
INFORMATION
・
If security unlock preference is set when
style) is set, authentication is required for displaying menu
items in Settings. Also, authentication is required for
displaying some menu items.
キッズスタイル
(Kids style) is set.
キッズスタイル
◆
Kids switching guard
When it is marked, changing style to other than
(Kids style) requires authentication.
・
Set Security unlock preference in advance.→P94
From the Application menu, [Settings]→[Set
1
style]
→
[Kids switching guard]→Authenticate
◆
Select apps used in Kids
Select apps available for Kids style.
・
Set Security unlock preference in advance.→P94
From the Application menu, [Settings]→[Set
1
→
[Select apps used in Kids]
style]
・
When
キッズスタイル
(Kids
is required.
Select applications→[Selection completed]
2
◆
Set Family use
Select Standard mode/Family mode.
From the Application menu, [Settings]→[Set
1
style]
→
[Set Family use]→[Use in standard
mode]/[Use in Family mode]
キッズスタイル
(Kids style) is set, authentication
87
Settings
Page 90
Multimedia Storage
◆
Dolby Digital Plus Settings
Set whether to use Dolby Digital Plus for playing video or
music.
From the Application menu, [Settings]
1
[Multimedia]→[Launch Application]
Set each item
2
・
Each time you tap , ON/OFF of Dolby Digital Plus
switches. When it is ON, appears on the status bar.
・
Tap / / / /
・
・
✔
INFORMATION
・
When Dolby Digital Plus is set to ON, [Audio effect settings]
in [Media Player] is disabled.
/ to select desired profile.
Tap to display explanation for each function.
Tap to reset a selected profile to the default state.
→
◆
Checking the memory space
You can check memory space of the terminal, microSD card,
and USB mass storage connected via USB.
From the Application menu, [Settings]
1
[Storage]
・
For microSD card, volume of "Apps" is displayed
besides "Available" if any application is included.
◆
Erasing data in microSD card (Format)
・
Note that this operation erases all data in the microSD card.
From the Application menu, [Settings]
1
[Storage]→[Unmount SD card]
・
When precautions about unmount SD card appear, tap
[OK].
[Erase SD card]→[Erase SD card]
2
・
When Security unlock preference is set, authentication
is required.
[Erase everything]
3
→
→
88
Settings
Page 91
Battery
Check battery usage status.
From the Application menu, [Settings]
1
[Battery]
・
Tapping [BATTERY DOCTOR] at the upper right of the
screen→[Battery Doctor] tab displays applications
affecting battery power consumption such as
applications which operate in the background while
screen backlight is OFF.
→
NX! eco
You can reduce the battery power consumption by adjusting
the screen brightness or each function according to the
remaining battery level or at a set period of time.
◆
Setting eco-mode
Set/Cancel eco-mode.
・
When eco-mode is activated, a status icon appears on the
status bar. Icon varies by eco-mode type. For each icon, see
"Icons on the status bar".→P44
From the Application menu, [Settings]→[NX!
1
eco]
→
Set required items
Timer eco-mode :
Battery care eco-mode :
remaining battery power becomes less than set level.
Activate eco-mode at the set time.
Activate eco-mode when the
Instant eco-mode :
option is selected.
✔
INFORMATION
・
The priority of eco-mode operations is as follows: a Instant
eco-mode,
・
When [Cancel eco-mode when charging] is marked, ecomode is canceled while the battery is charging.
・
When the terminal is in default status, charge the battery fully
and then use this function. If charging is not enough, "Battery
care eco-mode" may not activate.
・
Tapping at the upper right of the screen→[Battery Doctor]
tab displays applications affecting battery power
consumption such as applications which operate in the
background while screen backlight is OFF.
❖
Setting eco level
From the Application menu, [Settings]→[NX!
1
eco]
→
Select a level→[OK]
2
・
Tap [Confirm] to check set value for each level. You can
customize the values.→P89
❖
Setting original eco-level
From the Application menu, [Settings]→[NX!
1
eco]
→
[Original eco-mode]→[Edit]→Set each item
2
[Complete]→[OK]
Activate eco-mode as soon as this
b
Battery care eco-mode, c Timer eco-mode.
[Setting] in each mode→[Eco level]
[Setting] in each mode→[Eco level]
→
89
Settings
Page 92
Apps
◆
Viewing permitted operation of the
applications in the terminal
From the Application menu, [Settings]→[Apps]
1
Select an application
2
・
If all permitted operations do not appear, tap [Show all].
◆
Deleting application data or cache
From the Application menu, [Settings]→[Apps]
1
Select an application→[Clear data]/[Clear
2
cache]
・
For [Clear data], tap [OK].
◆
Uninstalling applications
・
For deleting the applications you obtained from Play Store,
operating from the Google Play screen is recommended.
P117
・
You cannot uninstall some pre-installed applications by
default. And if pre-installed applications are unistalled, you
can reset the terminal to restore.
From the Application menu, [Settings]→[Apps]
1
Select an application→[Uninstall]→[OK]→[OK]
2
◆
Disabling applications
・
Disabling application is available for some applications and
services that cannot be uninstalled. Disabled applications
are not displayed on the Application list or cannot be
launched either. But they are not uninstalled.
From the Application menu, [Settings]→[Apps]
1
Select an application→[Disable]/[Enable]
2
・
When you select [Disable], tap [OK].
✔
INFORMATION
・
When you disable an application, some other applications
linked to the disabled application may not be operated
correctly. In such case, enable the application again to
operate them correctly.
→
90
Settings
Page 93
Accounts & sync
◆
Adding accounts
From the Application menu, [Settings]
1
[Accounts & sync]
[ADD ACCOUNT]→Select account type→Set
2
each item
Setting account : Select an account→Set each item
✔
INFORMATION
・
Multiple Google accounts can be added on the terminal.
・
Tapping free area other than displayed screen may cancel
operation.
◆
Removing accounts
From the Application menu, [Settings]
1
[Accounts & sync]→Select an account
[Remove account]→[Remove account]
✔
INFORMATION
・
docomo account and fujitsu account cannot be removed.
→
→
→→
◆
Setting automatic synchronization
From the Application menu, [Settings]
1
[Accounts & sync]
Turn upper right of the Account & sync screen
2
to [ON]
◆
Starting synchronization manually
From the Application menu, [Settings]
1
[Accounts & sync]→Select an account
[Sync now]
❖
Canceling synchronization
During synchronization, →[Cancel sync]
1
→
→
→→
Lock/Security
◆
Security codes for the terminal
Some functions provided for convenient use of the terminal
require the security code to use them. Besides the security
code for locking the terminal, the network security code
necessary for the network services etc. are available. Make use
of the terminal using an appropriate security code according to
your purpose.
91
Settings
Page 94

Notes on the security codes
・
To set a security code, avoid imaginable numbers such
as "birth date", "a part of phone number", "street
address or room number", "1111" or "1234". Maintain a
separate record not to forget the numbers.
・
Be careful never to reveal your security code to others.
If a security code is misused by others, DOCOMO
assumes no responsibility for damages resulted from it.
・
If you forget your security codes, you need to bring a
document (a driver's license etc.) to identify your
subscription, the terminal and the docomo mini UIM
card to a docomo Shop. For details, contact "General
Inquiries" on the last page of this manual.
・
The PUK code is written on a subscription form (copy
for user) handed at subscription in a docomo Shop. For
users subscribed in other than docomo Shop, bring a
document (a drivers license etc.) to identify your
subscription and the docomo mini UIM card to a
docomo Shop, or contact "General Inquiries" on the last
page of this manual.
❖
Network security code
The network security code is a 4-digit number necessary for
identification or using the docomo Network Services at
reception of your request in docomo Shop or at a docomo
Shop or docomo Information Center. It can be set any number
at the subscription and also changed later by yourself.
You can change your network security code to the new one
using the PC if you have the "docomoID/Password" for the "My
docomo" General support site for PC. If you use dmenu,
dmenu→"
お客様サポート
change them yourself from "
application/Procedures)" (in Japanese only).
*
For "My docomo", "
(for the "Instruction Manual" application, "
帯しましょう
(Appendix)").
❖
PIN code
Security code called as PIN code can be set in the docomo mini
UIM card. The code is set to "0000" at the time of subscription,
but you can change the number by yourself.→P93
PIN is a 4- to 8-digit number (code) that must be entered for
user confirmation to prevent unauthorized use by a third party
every time you insert the docomo mini UIM card into the
terminal or when the terminal is powered ON. Entering the PIN
code enables terminal operation.
・
For using the docomo mini UIM card that you have used on
another terminal by inserting to this terminal, use the set PIN
code on the former terminal. If you did not change the
setting, the code is "0000".
(Customer support)"→You can
各種お申込・お手続き
お客様サポート
(Using mobile phone with your manners!)" in "付録
(Customer support)", see P178
(Various
マナーもいっしょに携
92
Settings
Page 95

・
If you enter a wrong PIN code 3 times consecutively, the PIN
code is locked and cannot be used anymore. In this case,
unlock with "PUK". Unlock the PIN code before setting new
PIN code.
・
When docomo mini UIM card is locked by PIN or PUK,
remove the docomo mini UIM card. The Home screen will
appear and you can perform communication using Wi-Fi
function.
❖
PUK code
The PUK code is an 8-digit number for canceling the locked PIN
code. The PUK code cannot be changed by yourself.
・
If you enter a wrong PUK code 10 times consecutively, the
docomo mini UIM card is locked. Please contact a docomo
Shop.
・
When docomo mini UIM card is locked by PIN or PUK,
remove the docomo mini UIM card. The Home screen will
appear and you can perform communication using Wi-Fi
function.
❖
SD CARD PASSWORD
You can set a password to a microSD card. If you use the
microSD card with password set by inserting to another
terminal, password authentication on the terminal is required.
If you insert it to a PC or phone without password setting
function, use of data or formatting cannot be made.
・
Some microSD cards may not support this function.
◆
Setting the PIN code
❖
Set up SIM card lock
Set PIN code to be entered when the terminal is turned ON.
From the Application menu, [Settings]
1
[Security]→[Set up SIM card lock]
[Lock SIM card]→Enter the PIN code→[OK]
2
[Lock SIM card] is marked.
・
To cancel the setting, [Lock SIM card]→Enter PIN code
→
[OK] to unmark.
✔
INFORMATION
・
When entering the PIN code for the first time, ente r "0000".
❖
Changing the PIN code
To change the PIN code, set the PIN code (mark [Lock SIM
card]) in advance.
From the Application menu, [Settings]
1
[Security]→[Set up SIM card lock]
[Change SIM PIN]
2
Enter the current PIN code→[OK]
3
Enter the new PIN code→[OK]
4
Re-enter the new PIN code→[OK]
5
→
→
93
Settings
Page 96

❖
Entering the PIN code
Turn power ON→Enter PIN code on the PIN
1
code entry screen
❖
Disabling the PIN lock
If PIN code is locked, unlock PIN and set new PIN code.
Enter Personal Unblocking Key code in the PUK
1
code field
Enter a new PIN code in the New SIM PIN field
2
Enter the new PIN code in the Re-type new PIN
3
→
[OK]
field
◆
Security lock
By setting to require authentication on the locked screen, you
can prevent others from misusing the terminal.
You can also use authentication operation set in Security
unlock preference when using Password manager.
→
[OK]
❖
Screen lock auth
Set to authenticate on the screen when returning from the
sleep mode.
・
To validate authentication setting for the screen lock, set
Security unlock preference in advance.→P94
From the Application menu, [Settings]
1
[Security]→[Screen lock auth]→Authenticate
✔
INFORMATION
・
If you operate from the Application menu, [Settings]
[Security]→Mark [Power button instantly locks], the screen is
locked by pressing
cancel the screen lock, authentication is needed.
❖
Security unlock preference
Set unlock the screen lock or type of authentication operation
for Password manager.
From the Application menu, [Settings]
1
[Security]→[Security unlock preference]
Authenticate
2
・
To set for the first time, authentication is not required.
X
/the fingerprint sensor soon. To
→
→
→
94
Settings
Page 97
Select an unlock preference
3
Pattern :
Set to unlock by a pattern connecting at least 4
points.
・
To hide the pattern when unlocking the screen, from the
Application menu, [Settings]→[Security]→Unmark
[Make pattern visible].
Security code :
digit number).
Password :
4 to 16 alphanumerics/symbols).
Fingerprint :
・
For using fingerprint authentication, confirm the
precautions (→P96) and then register fingerprint.
・
To set security unlock preference for the first time after
fingerprint is registered, tap [Fingerprint] and
authenticate with fingerprint.
Face recognition :
・
Face recognition is only valid for unlocking screen. For
other security unlock except screen lock, use the unlock
preference selected for backup lock.
✔
INFORMATION
・
To vibrate when authenticating by an unlock preference other
than face recognition, from the Application menu, [Settings]
→
[Security]→Mark [Vibrate on touch]
・
If you use authentication storage, only security code and
password are available for unlock preference.
・
If you use authentication storage and set unlock preference in
combination with fingerprint, fingerprint authentication may
not be available temporarily after turning the power OFF and
ON. In this case, authenticating with unlock preference in
combination with the fingerprint once makes fingerprint
authentication available.
Set to unlock by a security code ( 4- to 16-
Set to unlock by a password (which consists of
Set to unlock by fingerprint authentication.
Set to unlock by face recognition.
❖
Locking screen automatically
・
To set Automatically lock, set security unlock preference in
advance.→P94
From the Application menu, [Settings]
1
[Security]→[Automatically lock]→Select a
time
When set time elapses after sleep mode, the screen is
locked automatically.
❖
Manual screen lock
X
1
❖
1
2
/Press the fingerprint sensor
The terminal goes into sleep mode and the screen is
locked.
Unlocking the screen
In sleep mode, press
X
/the fingerprint
sensor
On the lock screen, →Unlock according to
the security unlock preference
・
Depending on the lock screen display (→P85),
operation on the lock screen is not required.
・
For fingerprint authentication, if you press the
fingerprint sensor in Step 1, release your finger from the
fingerprint sensor and then slide with the registered
fingerprint to unlock.
・
When the fingerprint authentication is not available,
you can authenticate by tapping other unlocking
method button.
95
→
Settings
Page 98

❖
When you forget unlocking method
When you forget unlocking method of lock screen, set a
security unlock preference according to the followings and
then unlock.
・
If you fail unlocking screen 5 times, retry 30 seconds later.
・
If you do not sign in to Google account, the operation is
unavailable.
On the unlocking screen, [Forgot pattern?]/
1
[Forgot security code?]/[Forgot password?]
Sign in to Google account→According to the
onscreen instructions, set a new security
unlock preference
❖
Displaying owner information on the
lock screen
From the Application menu, [Settings]
1
[Security]→[Owner info]
Enter owner information
2
・
If [Show owner info on lock screen] is unmarked, mark
it.
→
◆
Fingerprint authentication function
Fingerprint authentication is an authentication sliding your
finger over the fingerprint sensor.
❖
Precautions for using fingerprint
authentication
Precautions for using fingerprint authentication are as follows:
・
This function is used to authenticate the information on the
characteristics of fingerprint image. For this reason, user
→
with fingerprint that does not provide enough
characteristics information may not be able to use the
fingerprint authentication.
・
Scanning 3 times or more with the same finger is needed to
register your fingerprint. Do not use different fingers to
register.
・
Authentication performance (the probability of successful
fingerprint authentication for correct sliding of the finger)
depends on the condition of use. The following finger
conditions may make fingerprint registration difficult or
reduce the authentication performance. Taking measures
according to the condition of your finger including washing
hands, wiping hands, using a different finger for fingertip
authentication and applying cream if the hand is rough or
dry may improve the authentication performance.
- Finger is wrinkled, wet or sweaty after taking a bath etc.
- Finger is sweaty or oily enough to obscure ridges of
fingertip, or is soiled with dirt or oil
- Rough or damaged (cut, inflamed, etc.)
- Extremely dry or having tendency to get dry
- Became fat or thin to cause the fingerprint to change
- Fingerprint unclear by wearing away
96
Settings
Page 99
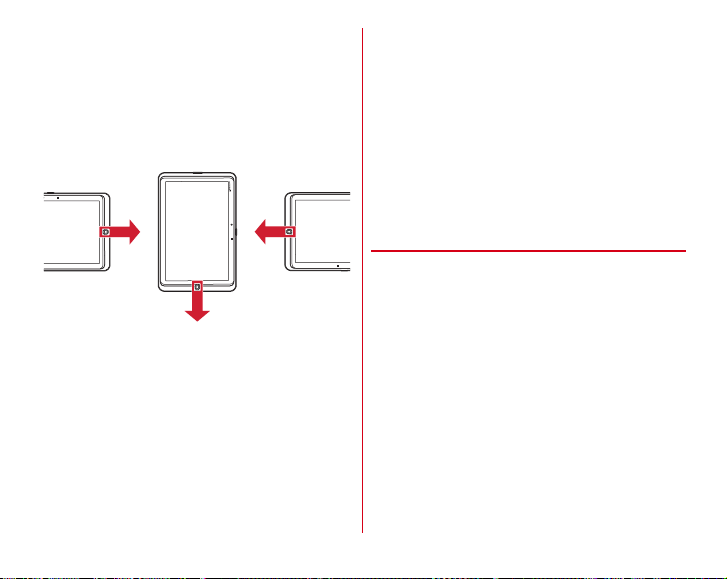
- Surface in a condition extremely different from that at the
time of fingerprint registration
・
For registration/authentication of your fingerprint, align the
first joint of one of your fingers to the center of the sensor,
press your finger parallel/vertical to the sensor and slide it
downward/sideways until it passes the fingerprint sensor
area. To prevent authentication failure due to difference in
finger positions at registration and authentication, keep your
finger parallel to the terminal as you slide it.
・
If the sliding movement is too fast or too slow, the
fingerprint may not be correctly recognized.
・
Registration/Authentication of fingerprint may be difficult
with your thumb as the center of the whorl of the fingerprint
may be displaced or distorted. Try as much as possible to
slide your finger so that the center of the whorl of the
fingerprint passes the center of the fingerprint sensor.
・
If the fingerprint is not correctly read, a warning message
appears.
・
If fingerprint registration or authentication is started with the
finger put on the fingerprint sensor, activation may be
unavailable. Put the finger off from the fingerprint sensor
and retry the operation.
・
When connecting the terminal using a USB cable to a device
which requires grounding such as a desktop PC, make sure
that the device is grounded in advance. If the connected
device is not grounded, fingerprint authentication may be
unavailable. In this case, perform fingerprint authentication
while touching a metallic part (frame, external connector,
etc.) of the connected device or after disconnecting the
terminal.
・
Fingerprint authentication technology does not guarantee
complete identity authentication or verification. Note that
DOCOMO assumed no responsibility for any damage
caused by use of this product or unavailability of this
product.
❖
Usage precautions for fingerprint sensor
Usage precautions for fingerprint sensor are as follows:
・
The sheet on the fingerprint sensor is a protective film to
maintain waterproofness. Do not remove or poke the film
with a pointed object such as a pen.
・
The fingerprint sensor is waterproof, however malfunction
may occur if a drop or water or dirt adheres to the surface of
the fingerprint sensor or your finger. Wipe any water or dirt
with a soft cloth before use. Also wrinkled finger with water
may cause malfunction.
・
The following conditions may cause failure or damage:
- Strike or give a hard shock
- Scratch or pick with a pointed object
- Rub hard with a fingernail or hard object such as metal
piece of strap and scratch the surface of the fingerprint
sensor
- Scratch or stain the surface of the fingerprint sensor with
soil etc.
- Cover with a sticker or paint with ink etc.
97
Settings
Page 100

・
The following conditions may make fingerprint scanning
difficult or reduce the authentication performance. Clean the
surface of the fingerprint sensor from time to time.
- Dirt of dust, sebum, etc. attachment or condensation of
moisture of sweat etc.
・
When the following phenomenon occurs, clean the surface
of fingerprint sensor. The phenomenon may be improved.
- Fingerprint registration or authentication fails often
・
To clean the fingerprint sensor, wipe its surface with a dry,
soft and static-free cloth. Long-term use may cause the
fingerprint sensor to get dusty, but do not try to remove the
dust with a pointed object even in such a case.
・
Static electricity may cause malfunction. Before placing the
finger on the fingerprint sensor, eliminate static electricity
by touching a metal object with the hand etc. Take particular
care in dry seasons such as winter.
❖
Registering fingerprint
Register your fingerprint for authentication.
・
To use fingerprint authentication, register 2 or more
fingerprints. Up to 10 items can be registered.
From the Application menu, [Settings]
1
[Security]→[Fingerprint settings]
・
When Security unlock preference is set, authentication
is required. Even when the Security unlock preference is
not set, if you have already registered fingerprint,
authentication by fingerprint is required.
→
Select an item→Following the onscreen
2
message, put your finger onto the fingerprint
sensor and then slide
・
Register second fingerprint in the same operation.
Deleting registered fingerprint : Select an item→[Yes]
・
When the security unlock preference is set to fingerprint
authentication, you cannot delete the registrations if
there are 2 registrations in all.
[OK]
3
❖
Operating fingerprint authentication
When the fingerprint authentication screen is
1
displayed, slide the registered finger on the
fingerprint sensor
・
If the authentication failed, remove the finger from the
fingerprint sensor and retry authentication.
◆
Showing password
You can set the entered characters to be visible for entering a
password.
From the Application menu, [Settings]
1
[Security]→Mark [Make passwords visible]
→
98
Settings
 Loading...