

Page 1

Contra Angled Handpiece
OM-C0353E
004
Page 2

Intended to use
The handpiece is designed only for clinical dental treatment use by qualified personnel.
CAUTION
· Check for vibration, noise and overheating outside the patient's oral cavity before use. If any abnormalities are found, stop using the handpiece
immediately and contact your authorized dealer.
· Do not attempt to disassemble the handpiece or tamper with the mechanism.
· Do not connect or disconnect the bur and/or handpiece until the motor has completely stopped.
· Do not use bent, damaged or sub-standard burs. This may cause shank bend or brake even within the recommended speed.
· Always keep bur shanks clean. Dirt or debris in a chuck could cause poor bur concentricity or low chuck retention force.
· Do not use the bur other than NSK recommended and do not exceed the drive motor speed recommended the bur manufacturers.
· Always operate with water spray. Failure to do so may result in OVERHEATING.
· Perform periodical maintenance check.
· Do not overpressure to the handpiece and treatment area.
ENGLISH
1
Page 3

X10L/X10,X12L/X12,X15L/X15,X20L/X20,X25L/X25
Never perform PMTC (operation to give heavy torque by a low speed rotation) which it used rubber cap or brush. It may reason for the
malfunction or stop rotation by less torque. Special Reduction Contra Angle Handpiece is required for the PMTC. However, if the micromotor has
a function for the root canal explanation, you can perform it.
X85L/X85,X95L/X95
· Do not use long surgical burs. Do not use burs longer than 26mm.
· Entering foreign object into gear or inside of handpiece head may cause burn injury.
· Wear protection glass and dust mask for your health and safety.
· Depressing the push-button while the handpiece is rotating will result in OVERHEATING of the handpiece head. Special
caution must be exercised during use to keep cheek tissue AWAY from the push-button of the handpiece. Contact with cheek
tissue may cause the push-button to depress and burn injury to the patient may occur.
· Even if it does irrigation during operation, bearing is worn and it may overheat or noise. Ask repair for your dealer.
2
Page 4
1. Mounting/Removing the Handpiece and Motor
1-1 Mounting
Align the handpiece to the Motor and push together. For X10L,X12L,X15L,X25L,X85L,X95L, Locate the handpiece and alignment pin straight into
positioning of the motor.
1-2 Removing
Hold the motor and the handpiece, and pull off carefully, in a straight line.
2. Connecting/ Disconnecting the Bur
2-1 Connecting
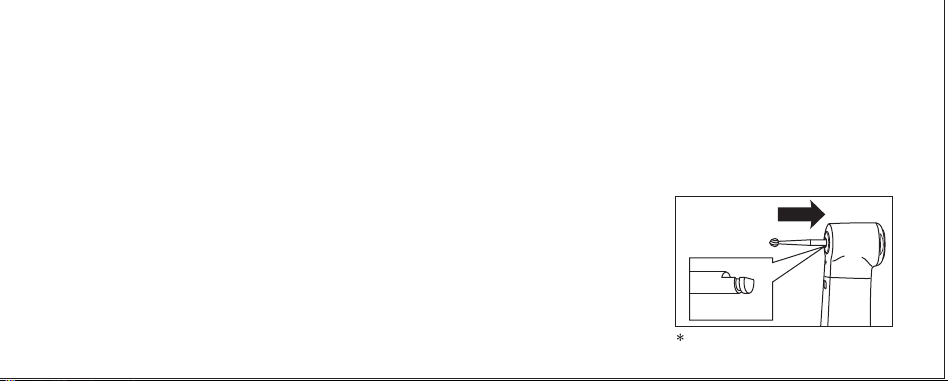
a) X10L/X10,X12L/X12,X15L/X15,X25L/X25 (Contra Angled Bur
1) Insert the bur into the head and turn it slightly. (If bur and head in right position, bur is all the way
seated in the head
2) Insert the bur into the head until it click. (Fig.1
)
)
)
D-shape
X15L
Fig. 1
ENGLISH GERMAN FRENCH SPANISH ITALIAN
3
Page 5
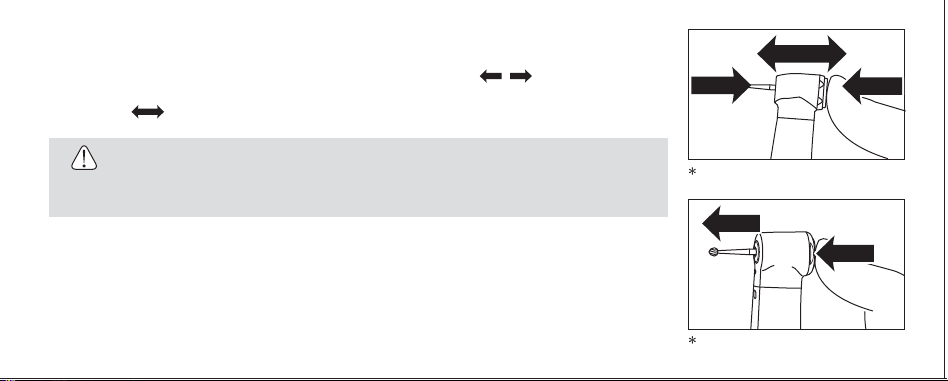
b) X20L/X20,X85L/X85,X95L/X95 (FG bur
1) Mount handpiece and Micromotor.
2) Depressing the pushbutton and insert the bur into the chuck. (Fig.2, ,
3) Make sure it inserted firmly till the end of the head. Do not push the Push Button.
(
Fig.2,
3
)
)
2
1
3
)
2
1
CAUTION
If the bur turn and it can not match the D-shape area, connect the motor then connect it again. (Fig.1
2-2
Removing
Press the button and pull the bur from the head.(Fig.3
3. Check before treatment
Check that the Head Cap is firmly tightened. Also check for handpiece vibration, noise and overheating. If any
abnormalities are found do not use the handpiece and contact your Authorised NSK Dealer.
4
)
X20L
Fig. 2
)
2
1
X15L
Fig. 3
Page 6
4. Maintenance
Refer to the Maintenance Guide OM-Z0135E.
This handpiece can be cleaned and disinfected with a Thermo-Disinfector.
ENGLISH GERMAN FRENCH SPANISH ITALIAN
This handpiece can be autoclavable up to Max.135°C.
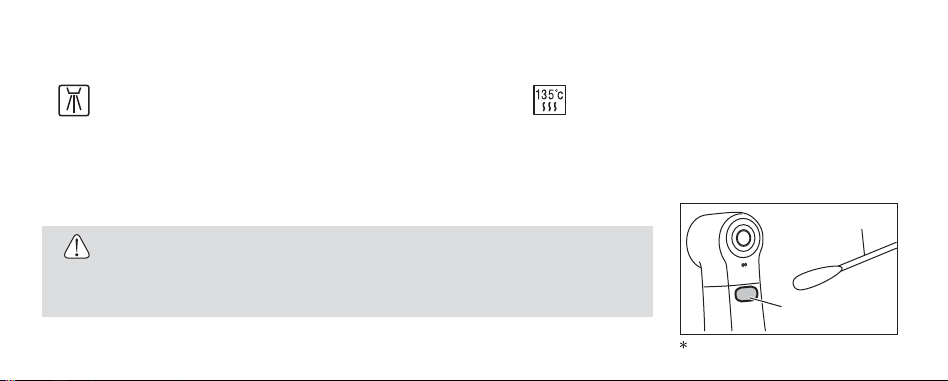
5. Cleaning the Cellular Glass Optic Rod (X10L,X12L,X15L,X20L,X25L,X85L,X95L
Wipe clean the Cellular Glass Optic Rod entry point and exit point with an alcohol-immersed cotton swab. Remove all debris and oil.(Fig.4
)
CAUTION
Do not use a sharp tool to clean the Cellular Glass Optic Rod. It could damage the glass and reduce
the light transmission. If illumination becomes dim contact your dealer.
X15L
Glass Rod End
)
Cotton Swab
Fig. 4
5
Page 7

6. Servicing
Exclusive part is necessary for cartridge exchange. If you need service for those handpieces, contact your dealer.
Specification
Max. Rotation Speed (Motor
Max. Rotation Speed (Bur
6
Model
Gear Ratio
Spray
Glass Rod Optic
Bur Type
X12L
X10X10L X15L X20L X20 X25 X85 X95X95LX85LX25LX15X12
10:1 Reduction
)
-1
2,500min
)
4,000min
4:1 Reduction
-1
10,000min
40,000min
-1
1:1
-1
40,000min
-1
Single Spray
Ø
2.35 Latch Bur
Ø1.59 - 1.60mm
Standard FG Bur
Ø2.35 Latch Bur
1:5 Increasing16:1 Reduction
200,000min
Ø1.59 - 1.60mm
Short Shank FG Bur
-1
Quadruple Spray
Ø1.59 - 1.60mm
Standard FG Bur
Page 8

Verwendung
Das Winkelstück wurde ausschließlich für den zahnmedizinischen klinischen Gebrauch durch qualifiziertes Personal entworfen.
VORSICHT
· Berücksichtigen Sie beim Betrieb des Winkelstücks immer die Sicherheit des Patienten.
· Überprüfen Sie das Gerät vor dem Einsatz außerhalb der Mundhöhle des Patienten auf Schwingungen, Geräuschbildung und Überhitzung.
Verwenden Sie das Gerät nicht, sobald Abnormalitäten festgestellt werden und setzen Sie sich mit Ihrem autorisierten Händler in Verbindung.
· Tragen Sie zu Ihrer Sicherheit eine Schutzbrille und einen Mundschutz.
· Versuchen Sie nicht das Winkelstück auseinanderzubauen, und basteln Sie auch nicht an dem Mechanismus herum.
· Das Winkelstück nicht anschließen oder abnehmen, solange der Motor nicht komplett zum Stillstand gekommen ist.
· Verwenden Sie keine verbogenen, beschädigten oder minderwertigen Bohrer. Dies kann zum Verbiegen oder Brechen des Schafts auch bei der
empfohlenen Geschwindigkeit führen.
· Halten Sie die Bohrerschäfte immer sauber. Schmutz oder Ablagerungen im Spannsystem könnten den Rundlauf des Bohrers beeinträchtigen
oder eine verminderte Rückhaltekraft des Spannsystems verursachen.
· Verwenden Sie nur empfohlene Bohrer, und überschreiten Sie nicht die vom Hersteller empfohlene maximale Motorgeschwindigkeit.
DEUTSCH
7
Page 9

· Arbeiten Sie immer mit Wasserspray. Andernfalls kommt es zu ÜBERHITZUNG.
· Nicht mit Säuren oder oder stark oxidierenden Lösungen abwischen, reinigen oder darin eintauchen.
· Führen Sie regelmäßige Wartungen durch.
· Üben Sie keinen zu hohen Druck auf das Winkelstück sowie den Behandlungsbereich aus.
X10L/X10,X12L/X12,X15L/X15,X20L/X20,X25L/X25
Führen Sie keine Prophylaxebehandlungen (Betrieb mit hohem Drehmoment bei geringer Rotationsgeschwindigkeit) mit Gummikappen oder
-bürsten aus. Dies kann zu Fehlfunktionen oder zum Stoppen der Rotation bei geringem Drehmoment führen. Für Prophylaxebehandlungen ist
ein speziell reduziertes Winkelstück vonnöten. Hat der Mikromotor jedoch eine Funktion für Wurzelkanalbehandlungen, dann können Sie diese
damit ausführen.
X85L/X85,X95L/X95
· Verwenden Sie keine langen chirurgischen Bohrer. Verwenden Sie keine Bohrer, die länger sind als 26 mm.
· Dringen Fremdkörper in das Gerät oder in den Winkelstückkopf ein, so kann es zu Verbrennungen kommen.
· Tragen Sie bei Benutzung dieses Handstücks für Ihre Sicherheit eine Schutzbrille.
· Drücken des Druckknopfdeckels bei rotierendem Instrument führt zu Überhitzung des Winkelstückkopfes. Lassen Sie besondere Vorsicht
während des Einsatzes walten, damit das Wangengewebe nicht mit dem Druckknopfdeckel des Winkelstücks in Kontakt kommt. Ein Kontakt
mit dem Wangengewebe kann dazu führen, dass der Druckknopfdeckel gedrückt wird und der Patient verletzt wird.
8
Page 10
1. Anschließen/Abnehmen von Motor und Winkelstück
1-1 Anschließen
Zum Anschließen des Winkelstücks führen Sie den Motor gerade in das Winkelstück ein. Drehen Sie das Winkelstück gegebenenfalls solange, bis
der Lichtmechanismus in der Vertiefung am Motor einrastet. Für X10L,X12L,X15L,X25L,X85L,X95L, Handstück und Motorpassstift ausrichten.
1-2Abnehmen
Halten Sie den Motor und das Winkelstück fest und ziehen Sie beide vorsichtig und gerade auseinander.
2. Einsetzen/Herausnehmen des Bohrers
2-1
Einsetzen
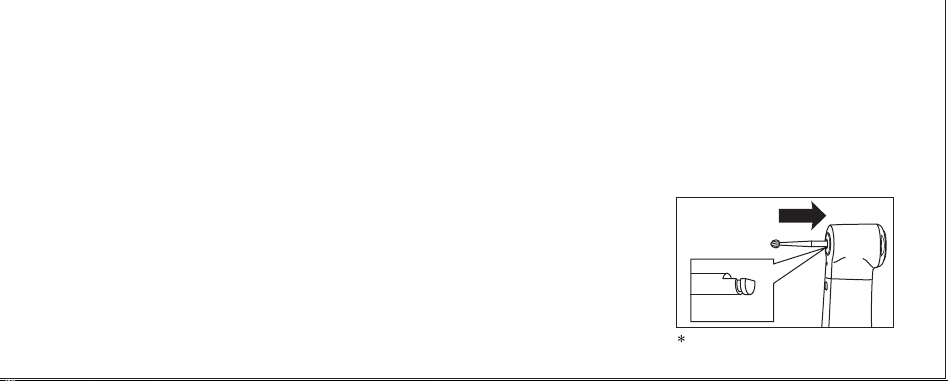
a) X10L/X10,X12L/X12,X15L/X15,X25L/X25 (Winkelstückbohrer
1) Drehen Sie den Bohrer leicht, bis er mit dem Schnappmechanismus ineinander greift.
2)
Drehen Sie den Bohrer weiter nach innen, bis er einrastet.
)
Winkelstückbohrer
X15L
Abb. 1
ENGLISCH DEUTSCH FRANZÖSISCH SPANISCH ITALIENISCH
9
Page 11

b) X20L/X20,X85L/X85,X95L/X95 (FG-Schaft
Führen Sie den Bohrer in das Spannsystem ein, drücken Sie erst dann den
Druckknopf und schieben Sie den Bohrer bis zum Anschlag hinein.
)
VORSICHT
Wenn sich der Bohrer dreht und nicht in den D-förmigen Bereich passt, lösen Sie den Motor und
schließen Sie ihn erneut an. (Abb. 1
2-2
Herausnehmen
Druckknopfdeckel drücken und Bohrer herausziehenl. (Abb.3
3. Überprüfung vor der Behandlung
Überprüfen Sie, ob der Kopfdeckel fest angezogen ist. Überprüfen Sie das Handstück zudem auf Vibrationen,
Geräusche und Überhitzung. Wenn Sie irgendwelche Auffälligkeiten feststellen, darf das Handstück nicht
benutzt werden. Nehmen Sie in diesem Fall Kontakt mit Ihrem NSK-Fachhändler auf.
10
)
)
X20L
X15L
3
2
2
1
Abb. 2
1
Abb. 3
Page 12

4. Wartung
Siehe Wartungsleitfaden OM-Z0135E.
Alle Winkelstücke können mit einem Thermodesinfektor gereinigt und
desinfiziert werden.
ENGLISCH DEUTSCH FRANZÖSISCH SPANISCH ITALIENISCH
Alle Winkelstücke sind autoklavierbar bis 135ºC.
5. Reinigen des Glasstabs (X10L,X12L,X15L,X20L,X25L,X85L,X95L
Wischen Sie den Eingangs- und den Ausgangspunkt des Glasstabs mit einem in Alkohol getränkten Tupfer ab.
Entfernen Sie alle Ablagerungen und alles Öl. (Abb.4
)
)
VORSICHT
Verwenden Sie zum Reinigen des Glasstabs keine scharfen Gegenstände. Diese können das Glas
beschädigen und die Lichtübertragung beeinträchtigen. Wenn die Beleuchtung schwächer wird,
wenden Sie sich an Ihren Händler.
X15L
Glasstabende
Tupfer
Abb. 4
11
Page 13

6. Instandhaltung
Für den Austausch des Spannsystems oder der Getriebeteile sind spezielle Ersatzteile vonnöten. Wenn Sie für diese Winkelstücke Service benötigen,
wenden Sie sich an Ihren Händler.
Technische Daten
Modell
Übersetzungsverhältnis
Max. Rotationgeschwindigkeit (Motor
Max. Rotationgeschwindigkeit (Boher
Spray
Licht
12
Typ
)
)
X10X10L X15L X20L X20 X25 X85 X95X95LX85LX25LX15X12
-1
2.500min
Ø2,35 Winkelstückbohrer
X12L
4.000min
-1
4:1 Untersetzung 1:110:1 Untersetzung
10.000min
Einfaches Spray
40.000min
-1
Ø1,59 - 1,60mm
FG Standardbohrer
-1
40.000min
Winkelstückbohrer
-1
Ø2,35
Übersetzung 1:516:1 Untersetzung
200.000min
Ø1,59 - 1,60mm
Kurzschaft FG bohrer
-1
Vierfach Spray
Ø1,59 - 1,60mm
FG Standardbohrer
Page 14

Destination
Ce contre-angle est uniquement conçu pour des traitements dentaires cliniques et par des personnes qualifiées.
AVERTISSEMENT
· Lorsque vous utilisez ce contre-angle, veillez à toujours vous assurer de la sécurité du patient.
· Vérifiez la vibration, le bruit et la surchauffe à l’extérieur de la cavité buccale du patient avant d’utiliser l’appareil. En cas d’anomalies, arrêtez
immédiatement d’utiliser l’instrument et contactez votre revendeur agréé.
· Portez des lunettes de protection et un masque anti-poussières pour votre protection et votre santé.
· N’essayez pas de démonter le contre-angle ou son mécanisme.
· Ne connectez/déconnectez pas la fraise et/ou le contre-angle avant que le moteur ne soit complètement arrêté.
· N’utilisez pas de fraises endommagées, courbées ou ne répondant pas aux normes. Sinon, le mandrin de la fraise pourrait se courber ou se
briser, même à la vitesse recommandée par le fabricant de fraises.
· Veillez à ce que les mandrins des fraises soient toujours propres. Les saletés ou les débris présents dans la griffe peuvent engendrer une
mauvaise concentricité de la fraise ou une faible force de rétention de la griffe.
· Utilisez des fraises recommandées et ne dépassez pas la vitesse de moteur conseillée par les fabricants de fraises.
· Utilisez toujours l’appareil avec le spray. Sinon, il peut y avoir un risque de SURCHAUFFE.
FRANÇAIS
13
Page 15

· N’essuyez pas, ne nettoyez pas ou n’immergez pas dans de l’eau très acide ou des solutions de stérilisation.
· Réalisez des contrôles d’entretien périodiques.
· N’exercez pas de pression excessive sur l’instrument et dans la zone de traitement.
X10L/X10,X12L/X12,X15L/X15,X20L/X20,X25L/X25
Ne réalisez jamais de PMTC (opération visant à obtenir un couple élevé à une faible vitesse de rotation) avec une brosse ou un cupule en
caoutchouc. Cela pourrait engendrer un dysfonctionnement ou bloquer la rotation. Le contre-angle avec réduction spéciale est requis pour le
PMTC. Toutefois, si le micromoteur présente une fonction pour le nettoyage du canal radiculaire, vous pouvez le réaliser.
X85L/X85,X95L/X95
· N’utilisez pas de fraises chirurgicales longues. N’utilisez pas de fraises de plus de 26 mm.
· L’introduction d’objets étrangers dans les transmissions ou dans la tête du contre-angle peut engendrer des brûlures.
· Si vous relâchez le bouton-poussoir pendant la rotation de l’instrument, vous pourriez causer une surchauffe au niveau de la tête du
contre-angle. Lorsque vous utilisez l’appareil, veillez à ce que le tissu de la joue reste LOIN du bouton-poussoir. Un contact avec le tissu de la
joue peut en effet entraîner le relâchement du bouton-poussoir et brûler le patient.
· Même si l'irrigation est bien réalisée pendant l'utilisation, si les roulements sont usés, cela peut déboucher sur une surchauffe ou la génération
de bruit. Remettez l’appareil à votre revendeur pour réparation.
14
Page 16

1. Montage/Démontage du moteur
1-1 Montage
Insérez le moteur dans l’orifice arrière du contre-angle en ligne droite.
Pour X10L,X12L,X15L,X25L,X85L,X95L, Placez le contre-angle et la broche d’alignement en ligne droite dans le positionnement du moteur.
1-2 Démontage
Maintenez le moteur et le contre-angle et détachez-les avec précaution en ligne droite.
2. Connexion/déconnexion de la fraise
2-1
Connexion
a) X10L/X10,X12L/X12,X15L/X15,X25L/X25 (Fraise Contre-Angle
1) Insérez la fraise dans la tête et tournez légèrement. (Si la fraise et la tête sont bien placées, la fraise
est toujours enchâssée dans la tête
2) Insérez la fraise dans la tête jusqu'à ce que vous entendiez un clic. (Fig.1
)
)
)
FORM
X15L
Fig. 1
ANGLAIS ALLEMAND FRANÇAIS ESPAGNOL ITALIEN
15
Page 17

b) X20L/X20,X85L/X85,X95L/X95 (Fraise FG
)
1) Montez le contre-angle sur le micromoteur.
2
1
2) Appuyez sur le bouton-poussoir et insérez la fraise dans la griffe.(Fig.2, ,
)
3) Veillez à bien l’insérer jusqu’au bout de la tête. N’appuyez pas sur le bouton-poussoir. (Fig.2,
AVERTISSEMENT
ISi la fraise tourne et ne peut pas s’adapter à la forme en D, déconnectez le moteur et
reconnectez-le. (Fig.1
2-2
Démontage
APPUYEZ SUR le bouton-poussoir et tirez sur la fraise pour l’enlever. (Fig.3
3. Vérification avant utilisation
Vérifiez que le capuchon de tête est fermement serré. Vérifiez également que la pièce à main ne présente
pas de vibrations, de bruit ni une surchauffe. En cas d’anomalies, n'utilisez pas la pièce à main et contactez
votre revendeur NSK agréé.
16
)
)
3
3
2
)
X20L
1
Fig. 2
2
1
X15L
Fig. 3
Page 18

4. Entretien
Référez-vous au Guide d'entretien OM-Z0135E.
Tous les contre-angles peuvent être nettoyés et désinfectés avec un
thermodésinfecteur
ANGLAIS ALLEMAND FRANÇAIS ESPAGNOL ITALIEN
Tous les contre-angles peuvent être stérilisés en autoclave
jusqu’à max. 135°C
5. Nettoyage du barreau de quartz (X10L,X12L,X15L,X20L,X25L,X85L,X95L
Nettoyez les extrémités d’entrée et de sortie du barreau de quartz avec un coton-tige imbibé d’alcool. Eliminez
tous les débris et l’huile. (Fig.4
)
)
AVERTISSEMENT
N’utilisez pas d’outil pointu pour nettoyer le barreau de quartz. Vous pourriez endommager le verre
et réduire la transmission de lumière. Si l’éclairage s’assombrit, contactez votre revendeur.
X15L
Glasstabende
Tupfer
Fig. 4
17
Page 19

6. Service/Réparation
Il convient de présenter des pièces originales pour l’échange de cartouches. Si vous devez faire réparer vos contre-angles, veuillez contacter votre
revendeur.
Caractéristiques
Modèle
Rapport de vitesse
Vitesse de rotation max. (Moteur
Vitesse de rotation max. (Fraise
Eclairage
18
Spray
Type
Réduction 16:1
)
2.500min
)
X12L
X10X10L X15L X20L X20 X25 X85 X95X95LX85LX25LX15X12
Réduction 10:1
4.000min
-1
-1
Ø
2,35 Fraise Contre-Angle
Réduction 4:1
10.000min
Aérosol seul
40.000min
-1
Ø1,59 - 1,60mm
Standard fraise FG
1:1
-1
40.000min
Fraise Contre-Angle
-1
Ø2,35
Multiplicateur
200.000min
Ø1,59 - 1,60mm
Court fraise FG
1:5
-1
Aérosol quadruple
Ø1,59 - 1,60mm
Standard fraise FG
Page 20

Uso previsto
La pieza de mano está diseñada únicamente para un tratamiento dental clínico llevado a cabo por personal cualificado.
PRECAUCIÓN
· Al utilizar una pieza de mano, piense siempre en la seguridad del paciente.
· Antes de utilizarla compruebe la vibración, el ruido y el sobrecalentamiento fuera de la cavidad oral del paciente. Si se produjera alguna
anormalidad, pare inmediatamente la pieza de mano y póngase en contacto con su distribuidor autorizado.
· Por razones de seguridad y salud, es necesario el uso de gafas protectoras y mascarilla antipolvo.
· No intente desmontar la pieza de mano ni modificar su mecanismo.
· No conecte ni desconecte la fresa y/o la pieza de mano hasta que el motor se haya detenido completamente.
· No utilice fresas dobladas, dañadas o no originales. El adaptador se podría llegar a romper aunque se aplique la velocidad recomendada.
· Mantenga siempre limpio el adaptador de la fresa. La suciedad o los restos en un dispositivo de sujeción pueden provocar una baja
concentricidad de la fresa o una baja fuerza de retención del dispositivo de sujeción.
· Utilice únicamente las fresas recomendadas y no supere la velocidad del motor recomendada por los fabricantes de la fresa.
· Trabaje siempre con el vaporizador de agua. En caso contrario, se podría producir un SOBRECALENTAMIENTO.
· No limpie, frote ni sumerja el aparato en agua muy ácida o en soluciones esterilizantes.
ESPAÑOL
19
Page 21

· Realice comprobaciones de mantenimiento periódicas.
· No presione en exceso la zona de tratamiento ni la pieza de mano.
X10L/X10,X12L/X12,X15L/X15,X20L/X20,X25L/X25
Nunca realice PMTC (operación para obtener un torque elevado y una velocidad de rotación reducida) con el uso de una copa de goma o cepillo.
Puede provocar un malfuncionamiento o detener la rotación con un torque inferior. Para realizar el PMTC, es necesario llevar a cabo una
reducción especial contra ángulo. Sin embargo, podrá llevarlo a cabo si el micromotor tiene una función para el canal radicular.
X85L/X85,X95L/X95
· No utilice fresas quirúrgicas largas. No utilice fresas de más de 26mm.
· La introducción de objetos extraños en el engranaje o en el interior del cabezal de la pieza de mano puede provocar heridas por quemaduras.
· Al pulsar el botón de arranque mientras el aparato esté en funcionamiento se producirá un sobrecalentamiento del cabezal de la pieza de
mano. Preste especial atención durante el uso para que los tejidos faciales queden LEJOS del botón de arranque de la pieza manual. Al estar
en contacto con los tejidos faciales, el botón de arranque podría activarse y provocar quemaduras al paciente.
· Incluso realizando la irrigación durante el funcionamiento, el cojinete puede desgastarse, puede sobrecalentarse o emitir ruido. Solicite la
reparación a su distribuidor autorizado.
20
Page 22

1. Montaje/ Desmontaje del motor
1-1 Montaje
Introduzca, de forma recta, un motor en el orificio posterior de la pieza de mano.
Para X10L,X12L,X15L,X25L,X85L,X95L, Sitúe la pieza de mano y la ranura de alineación, de forma recta, en el clip de sujeción del motor.
1-2 Desmontaje
Sostenga el motor y la pieza de mano y tire cuidadosamente en línea recta.
2. Conexión/Desconexión de la fresa
2-1
Conexión
a) X10L/X10,X12L/X12,X15L/X15,X25L/X25 (Fresa de contra-ángulo
1) Introduzca la fresa en el cabezal y gírelo ligeramente.(Si la fresa y el cabezal están en posición recta,
la fresa estará siempre asentado en el cabezal
2) Introduzca la fresa en el cabezal hasta que haga clic. (Fig.1
)
)
)
Forma en D
X15L
Fig. 1
INGLÉS ALEMÁN FRANCÉS ESPAÑOL ITALIANO
21
Page 23

b) X20L/X20,X85L/X85,X95L/X95 (Fresa FG)
1) Montaje de la pieza de mano y el micromotor.
2) Pulse el botón porta-fresas e introduzca la fresa en el dispositivo de sujeción. (Fig.2, , )
3) Asegúrese de que esté introducido con firmeza hasta el final del cabezal pulse el botón porta-fresas
bouton-poussoir. (Fig.2, )
3
1
2
2
1
3
PRECAUCIÓN
Si la fresa gira y no puede coincidir en la zona en forma de D, desconecte el motor y vuelva a
conectarlo. (Fig.1
2-2
Retirada
Suelte el botón y tire de la fresa desde el cabezal. (Fig.3
3. Verificación antes de tratamiento
Compruebe que el tapón del cabezal está firmemente apretado. Compruebe también la vibración, ruido y
sobrecalentamiento. Si se produjera alguna anormalidad, deje de utilizar la pieza de mano y póngase en
22
contacto con su distribuidor NSK autorizado.
)
)
X20L
X15L
Fig. 2
2
1
Fig. 3
Page 24

4. Mantenimiento
Consulte la guía de mantenimiento OM-Z0135E.
Todas las piezas de mano pueden limpiarse y desinfectarse con
termo-desinfección.
INGLÉS ALEMÁN FRANCÉS ESPAÑOL ITALIANO
Todas las piezas de mano pueden esterilizarse con
autoclave hasta un máximo de 135ºC.
5. Limpieza de la fibra de vidrio celular (X10L,X12L,X15L,X20L,X25L,X85L,X95L
Limpie la punta de entrada y de salida de la fibra de vidrio celular con un bastoncillo de algodón humedecido
con alcohol. Elimine todos los restos y aceite. (Fig.4
)
PRECAUCIÓN
No utilice una herramienta cortante para limpiar la fibra óptica de vidrio celular. Podría dañar el
vidrio y reducir la transmisión de la luz. En caso de que la iluminación pierda calidad, póngase en
contacto con su distribuidor.
)
Bastoncillo
de algodón
Extremidad de fibra
de vidrio
X15L
Fig. 4
23
Page 25

6. Servicio técnico
Es necesario utilizar una pieza exclusiva para el cambio del cartucho. Si necesita realizar el mantenimiento de estas piezas de mano, póngase en
contacto con su distribuidor.
Características técnicas
Modelo
Relación de cambio
Velocidad de rotación máxima (Motor
Velocidad de rotación máxima (Motor
Pulverización
Iluminación
24
Tipo
Reducción
)
2.500min
)
X12L
X10X10L X15L X20L X20 X25 X85 X95X95LX85LX25LX15X12
16:1
-1
4.000min
10:1
-1
Reducción
10.000min
Fresa de contra ángulo Ø2,35
4:1
40.000min
-1
Pulverización única
Ø1,59 - 1,60mm
Normal Fresa FG
1:1Reducción
-1
40.000min
Fresa de contra ángulo
-1
Ø2,35
Incremento 1:5
200.000min
Ø1,59 - 1,60mm
Calzón zanca courtFresa FG
-1
Pulverizador de
agua Quattro
Ø1,59 - 1,60mm
Normal Fresa FG
Page 26

Destinazione d’uso
II Manipolo è progettato esclusivamente per trattamenti clinici e dentali da parte di personale qualificato.
ATTENZIONE
· Durante l’utilizzo del Manipolo dare sempre priorità alla sicurezza del paziente.
· Verificare la vibrazione, la rumorosità ed il surrisoaldamento prima dell’uso e dell’inserimento nella bocca del paziente. In caso di anomalie
sospendere immediatamente l’uso del Manipolo e contattare il distributore autorizzato di riferimento.
· Utilizzare occhiali di protezione e una maschera antipolvere per la vostra sicurezza e incolumità.
· Non cercare di smontare il Manipolo o di manometterne il meccanismo.
· Non collegare e/o scollegare la fresa e/o il Manipolo prima dell’arresto completo del motore.
· Non utilizzare frese piegate, danneggiate o scadenti. ll manico potrebbe piegarsi o rompersi anche se utilizzato alla velocità raccomandata.
· Mantenere i manici della fresa sempre puliti. Sporcizia o detriti accumulati nel mandrino possono portare ad una scarsaconcentricità della fresa
o ad una bassa forza di ritenzione del mandrino.
· Usare solo le frese consigliate e non superare la velocità del motore raccomandata dai produttori delle frese.
· Lavorare sempre con un getto d’acqua. ll mancato uso del getto può provocare SURRISCALDAMENTO.
· Non asciugare o pulire o bagnare con acqua molto acida o soluzioni sterilizzanti.
ITALIANO
25
Page 27

· Eseguire controlli periodici di manutenzione.
· Non esercitare una pressione eccessiva sul Manipolo e sull’area da trattare.
M15L/M15,M25L/M25
Non effettuare mai PMTC (funzione per ottenere torque elevato tramite bassa velocità di rotazione) se si usano spazzola o tappo di gomma.
Si potrebbe causare un malfunzionamento o interrompere la rotazione con un torque inferiore. Per PMTC è necessario il Manipolo
Contrangolo con Riduzione Speciale Ad ogni modo il PMTC sarà consentito, qualora il micromotore abbia una funzione per la preparazione del
canale radicolare.
M95L/M95
· Non utilizzare frese chirurgiche lunghe, Non utilizzare frese di lunghezza superiore ai 26mm.
· La penetrazione di corpi estranei nell’ingranaggio o all’interno della testina del Manipolp può causare lesioni da ustione.
· Premendo il pulsante durante la rotazione del Manipolo si causerà il Surriscaldamento della testina del Manipolo. Durante l’utilizzo si
raccomanda di prestare la massima attenzione per IMPEDIRE IL CONTATTO tra i tessuti del paziente ed il pulsante del Manipolo.
A contatto con i tessuti della guancia il pulsante potrebbe infatti abbassarsi causando così lesioni da ustione al paziente ustione al paziente.
· Nonostante l’irrigazione durante il funzionamento, se il cuscinetto risulta usurato potrebbe surriscaldarsi o diventare rumoroso. Richiedere la
riparazione presso il distributore.
26
Page 28

1. Montaggio/Smontaggio del Motere
1-1 Montaggio
Inserire il motore direttamente nella parte posteriore del Manipolo.
Per X10L,X12L,X15L,X25L,X85L,X95L, Posizionare il Manipolo ed il perno di allineamento direttamente nel posizionamento del motore.
1-2 Smontaggio
Afferrare motore e Manipolo e separarli con cura mantenendone l’allineamento.
2. Collegamento/Disconnessione della Fresa
2-1
Collegamento
a) X10L/X10,X12L/X12,X15L/X15,X25L/X25 (Fresa per Contraangolo
1) Montare il Manipolo e il micromotore.
2) Inserire la fresa nella testina e ruotarla leggermente. (Se la fresa e la testina sono in posizione corretta,
la fresa sarà alloggiata fino in fondo nella testina)
3) Inserire la fresa nella testina fino a sentire un clic. (Fig.1)
)
X15L
Fig. 1
INGLESE TEDESCO FRANCESE SPAGNOLO ITALIANO
27
Page 29

b) X20L/X20,X85L/X85,X95L/X95 (Fresa FG
1) Montare il Manipolo e il micromotore.
2) Premere completamente il pulsante e inserire la fresa nel Mandrino.(Fig.2, )
3) Assicurarsi che sia saldamente inserita fino in fondo alla testina. Non premere il pulsante. (Fig.2, )
)
ATTENZIONE
Se la fresa ruota e non corrisponde all’area a D, dicconnettere e riconnettere il motore.(Fig.1)
X20L
3
2
1
Fig. 2
2-2 Rimozione
Rilasciare il pulsante ed estrarre la fresa dalla testina. (Fig.3
)
3. Controllo prima del trattamento
Verificare che il cappuccio della testina sia fissato saldamente. Verificare inoltre l'assenza di eventuali
vibrazioni, rumorosità e surriscaldamento del manipolo. Se si riscontrano anomalie, non usare il manipolo e
contattare il distributore NSK autorizzato.
28
X15L
2
1
Fig. 3
Page 30

4. Mantenimiento
Consultare la Guida alla manutenzione OM-Z0135E.
INGLESE TEDESCO FRANCESE SPAGNOLO ITALIANO
Tutti i Manipoli possono essere puliti e disinfettari con
Disindezione Termica.
Tutti l Manipoli possono essere sterilizzati inautoclave
fino a 135˚C max.
5. Pulizia delle fibre ottiche Cellular Glass (X10L,X12L,X15L,X20L,X25L,X85L,X95L)
Pulire il punto di entrata e di uscita delle fibre ottiche Cellular Glass con un tampone dicotone imbevuto di
alcol. Rimuovere residui di olio o impurità. (Fig.4)
ATTENZIONE
Non utilizzare attrezzi taglienti per la pulizia delle fibre ottiche Cellular Glass.
Potrebbe danneggiare il vetro e ridurre la trasmissione di luce. Se l’illuminazione diminuisse, contattare
il distributore.
X15L
Fig. 4
29
Page 31

6. Assistenza
Le cartucce vanno sostituite con pezzi originali. Per assistenza relativa a tali Manipoli, contattare il distributore.
Specifiche Tecniche
Modello
Rapporto di trasmissione
Massima velocità di rotazione
Massima velocità di rotazione (Fresa
Spray
Luce
Tipo
30
(
Motore
)
X10X10L X15L X20L X20 X25 X85 X95X95LX85LX25LX15X12
Riduttore
2.500min-1(giri/min)
)
X12L
16:1
Fresa de contra ángulo Ø2,35
10:1
Riduttore
4.000min-1(giri/min)
Riduttore
10.000min-1(giri/min)
4:1
40.000min
Spray singolo
Ø1,59 - 1,60mm
Standard Fresa FG
1:1
-1
(giri/min)
40.000min-1(giri/min)
Ø2,35
Fresa de contra ángulo
Incremento 1:5
200.000min-1(giri/min)
Ø1,59 - 1,60mm
Corto manico Fresa FG
Spray quadruplo
Ø1,59 - 1,60mm
Standard Fresa FG
Page 32

The EU directive 93/42/EEC was applied in the design and production of this medical device.
2014.07.20 05
S
 Loading...