

Page 1
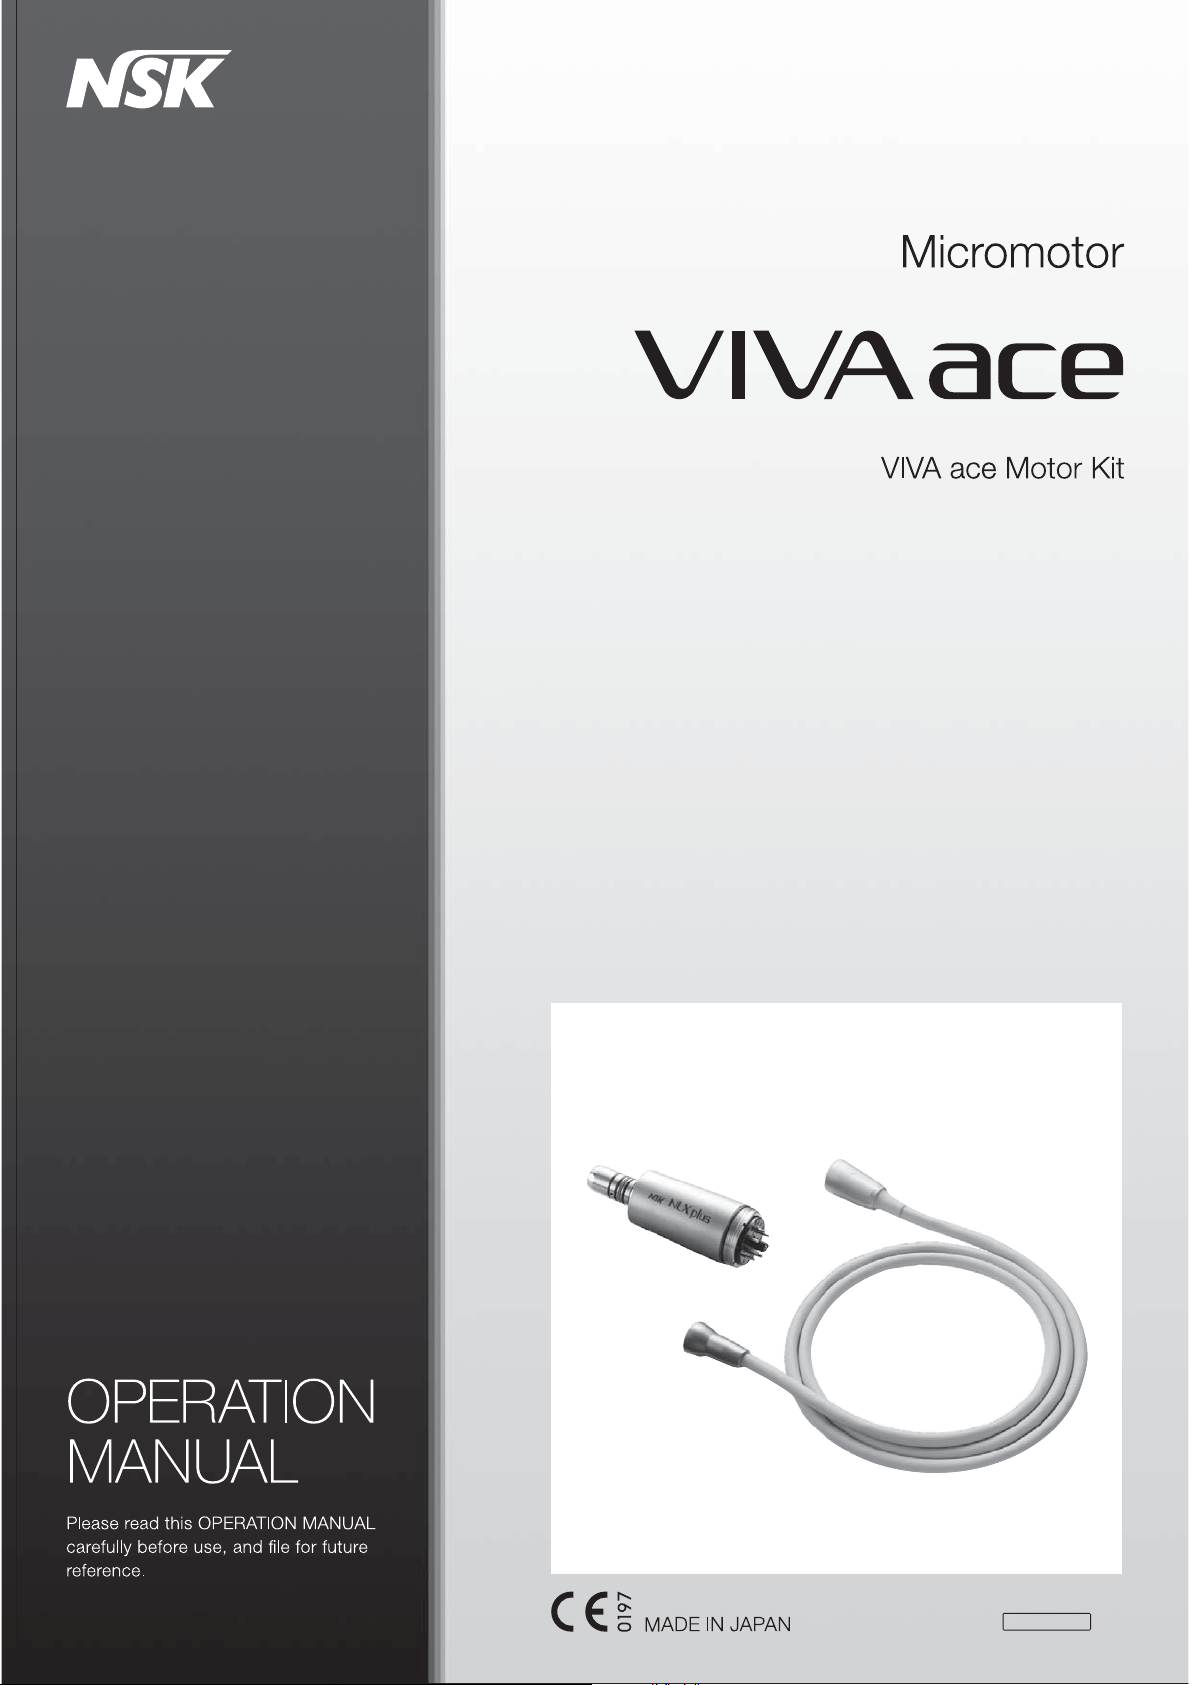
000OM-E0799E
Page 2

English
Thank you for purchasing VIVA ace Motor Kit.
Please read this Operation Manual and the VIVA ace Basic Set Operation Manual carefully before use for
operating instructions and care and maintenance guidelines so that you can use it for many years to come
through a correct use.
Keep this Operation Manual within easy reach of users for future reference.
Table of Contents
English
1. User and Indications for Use .....................2
2. Precautions for handling and
operation ..................................................2
3. Package Contents.....................................6
4. Preparation for Use ...................................7
4-1 Connecting and Disconnecting
the Motor Cord and the Motor ...............................7
4-2 Connecting the Motor Cord and
VIVA ace Control Unit ...........................................8
4-3 Connecting and Disconnecting
the Handpiece (optional) ....................................... 9
4-4 Check before treatment ........................................9
5. Operation Procedure ...............................10
6. Post-use Maintenance ............................10
6-1 Preparation for Maintenance ............................... 10
6-2 Maintenance for Between Each Patient ..............12
6-3 Maintenance After Close .................................... 15
6-4 Sterilization ........................................................ 18
6-5 Maintenance of the Water Line for the Motor
and the Motor Cord ............................................ 20
7. Maintenance .......................................... 26
7-1 Replacing the O-ring ...........................................26
7-2 Periodical Maintenance Checks ...........................26
8. Troubleshooting ......................................27
8-1 Problems and Solutions ......................................27
9. Specifications .........................................28
9-1 Specifications .....................................................28
9-2 Classification of Equipment .................................28
9-3 Symbol ..............................................................28
10. After-sales Service ................................ 29
10-1 Warranty ..........................................................29
10-2 Disposing Product ............................................29
Operation procedure of this product is introduced in a movie.
Check the following URL or the QR code.
URL
http://www.nsk-dental.com/support/videos/
*This product is used connecting to VIVA ace Basic Set.
1
Page 3
1
User and Indications for Use
User : Dentist, Dental hygienist
Indications for use : The motor is intended for teeth and denture cutting, polishing and root canal treatment.
2
Precautions for handling and operation
Please read these precautions carefully and use only as intended or instructed.
Safety instructions are intended to avoid potential hazards that could result in personal injury or
damage to the device.
Safety instructions are classified as follows in accordance with the seriousness of the risk.
Class Degree of Risk
WARNING
CAUTION
NOTICE
Hazard that could result in serious injury or damage to the device if the
safety instructions are not correctly followed.
Hazard that could result in light or moderate injury or damage to the device if
the safety instructions are not correctly followed.
General product specification information highlighted to avoid product
malfunction and performance reduction.
2
Page 4

English
Precautions for handling and operation
WARNING
• Do not attempt to disassemble the product nor tamper with the mechanism except as recommended by NSK
in this Operation Manual.This may result in an injury, electric shock or fire.
• Do not touch the connection (terminal section) of the Motor and the Motor Cord. This could cause an electric
shock.
• Do not use the product when the patient or the operator is using cardiac pacemakers as there is a danger
that could affect the pacemaker.
• Keep away from explosive substances and flammable materials. Also, keep away from patients whom a
flammable anesthetic (laughing gas) is administered as this may cause fire.
• Electromagnetic waves may cause malfunction of the product. Keep away from devices that generate
electromagnetic waves. Turn off the product around ultrasonic generators (excluding the product) or electrode
knife. Keep away from communication equipment or elevators that generate electromagnetic waves.
3
Page 5

Precautions for handling and operation
CAUTION
• When operating the product always consider the safety of the patient.
• Use only as indicated.
• Users are responsible for the operational control, maintenance and periodical maintenance checks of this
product.
• Operators and all others in the area must wear eye protection, a mask, and gloves when operating this
product.
• Should the product functions abnormally, cease operation immediately and contact your Authorized NSK
Dealer.
• Do not turn the lighting of the motor directly to the eyes of the patients or the operators. There is a danger
that it may damage the eyes.
• Do not clean, immerse, or wipe with electrolyzed-oxidizing water (strong acidic water, super acidic water),
strong acidic and strong alkaline liquid medicine, solvent containing chlorine, benzene, or thinner.
(Reference : 6 Post-use Maintenance
)
• The motor is delivered in a non-sterile condition and must be autoclaved prior to use.
(Reference : 6-4 Sterilization
• Immediately wipe off any moisture, liquid medicine, solvent, or liquid disinfection on the Handpiece and Motor
Cord after use. Failure to do so may cause discoloration and deformation.
• Check for motor vibration, noise and overheating. If any abnormalities are found do not use the motor and
contact your Authorized NSK Dealer. (Reference : 4-4 Check before treatment
• Avoid excessive load and long-time use because it could cause overheating.
• Do not allow any impact on to the product. Do not drop the product. It could cause damage.
• Perform regular function and maintenance checks. (Reference : 7-2 Periodical Maintenance Checks
• If the product is not used for a long period, check for motor vibration, noise and overheating before using on
a patient.
• Portable and mobile RF communications equipment may affect Medical Electrical equipment. Do not use RF
equipment near the product.
• The temperature of the motor surface may reach up to 50 degrees depending on the condition of use. In that
case, leave the motor until it cools down before using it again.
)
)
)
4
Page 6

Precautions for handling and operation
NOTICE
• The motor and Motor Cord during operation could interfere with the computers, LAN cables in vicinity of use
or could cause noise in radio receivers nearby.
• To avoid clinical downtime, it is recommended that a spare is kept on hand in case of a breakdown during
surgery.
• Contact the Authorized NSK Dealer for repairing. The service staff of the company will take care of the
product in accordance with the service manual.
• No special training is required for this device.
• EMC (Electromagnetic compatibility) has been evaluated with the VIVA ace Control Unit and conforms to the
requirements.
English
5
Page 7
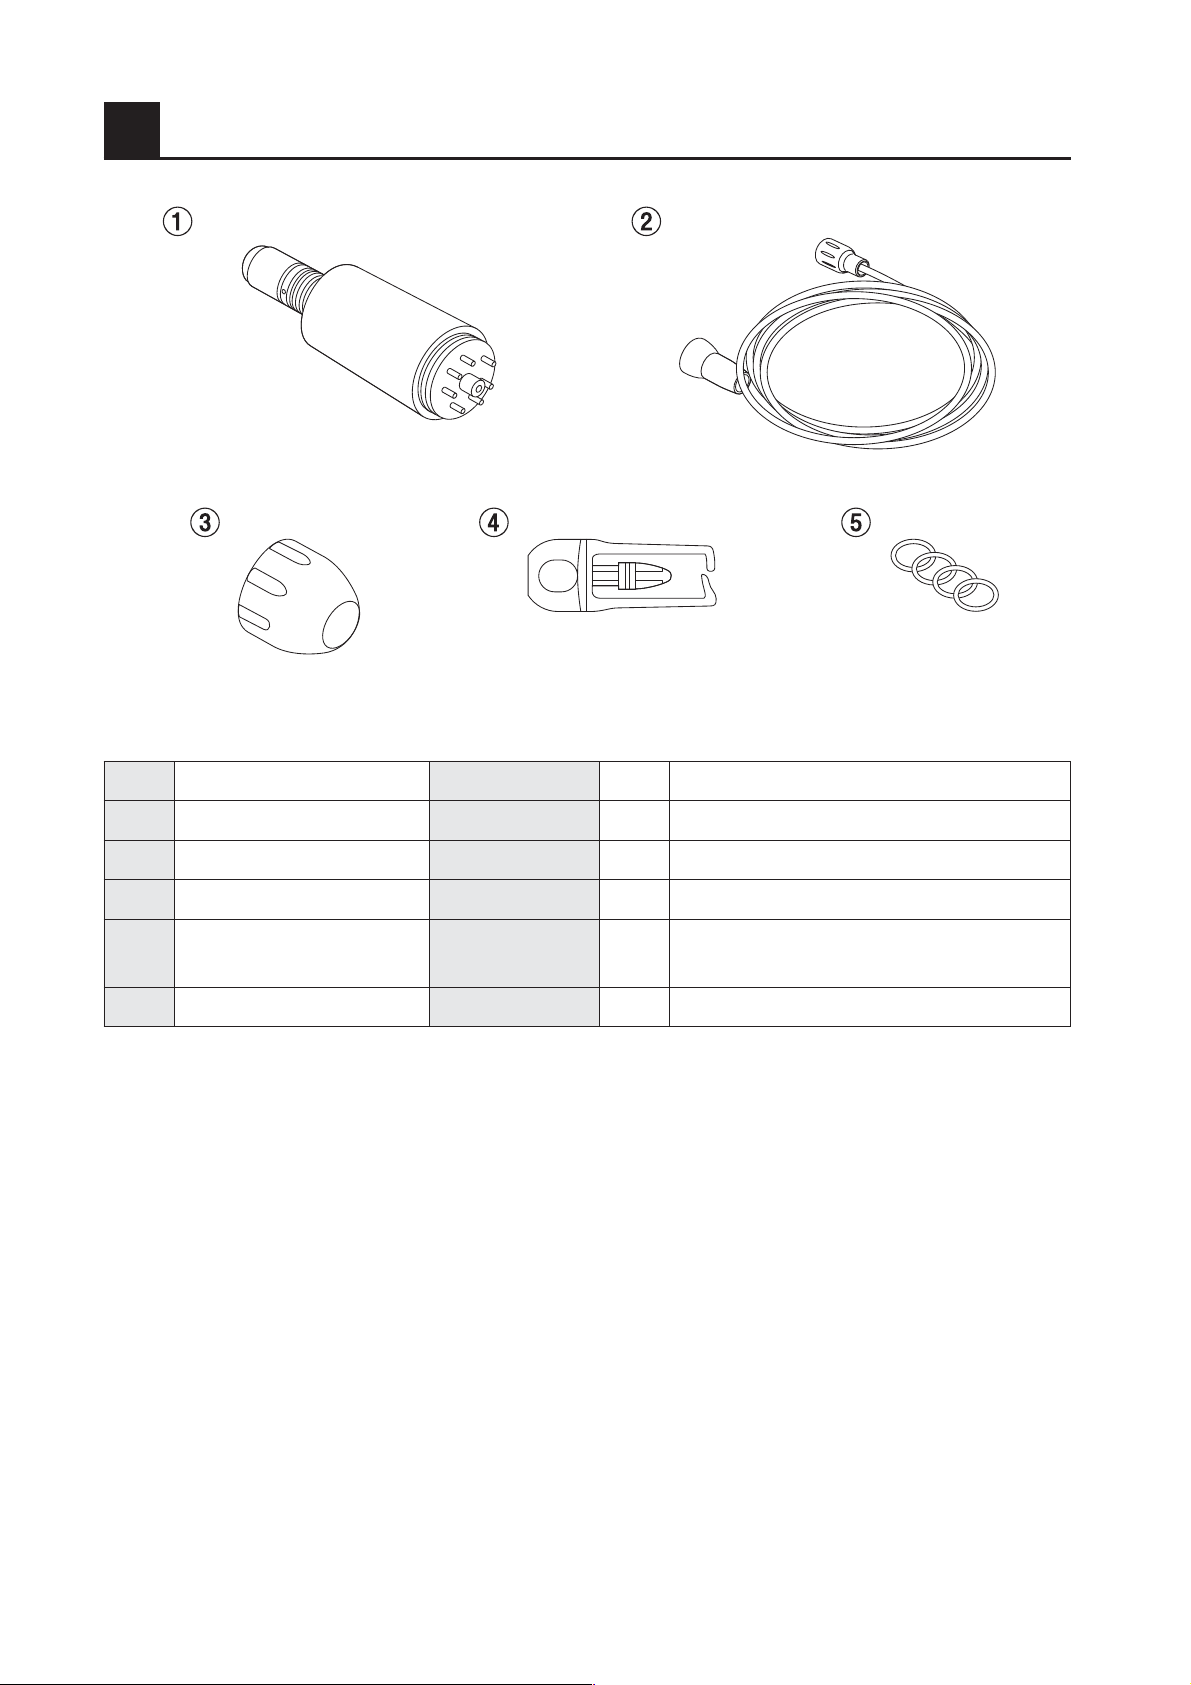
3
Package Contents
No. Part Name Order Code Quantity Remarks
1Motor E10400511
2Motor Cord E10400701
3 Motor Cap 20001300 1
4 Protection Plug 10001595 1
5O-ring Set Y10037281
6 Operation Manual - 1 *Not in the illustration.
Spare for replacement for Motor inserting part
(
Black 3 pieces, Blue 1 piece
-
-
-
-
Please specify the order code listed above when purchasing the spare parts.
)
6
Page 8
4
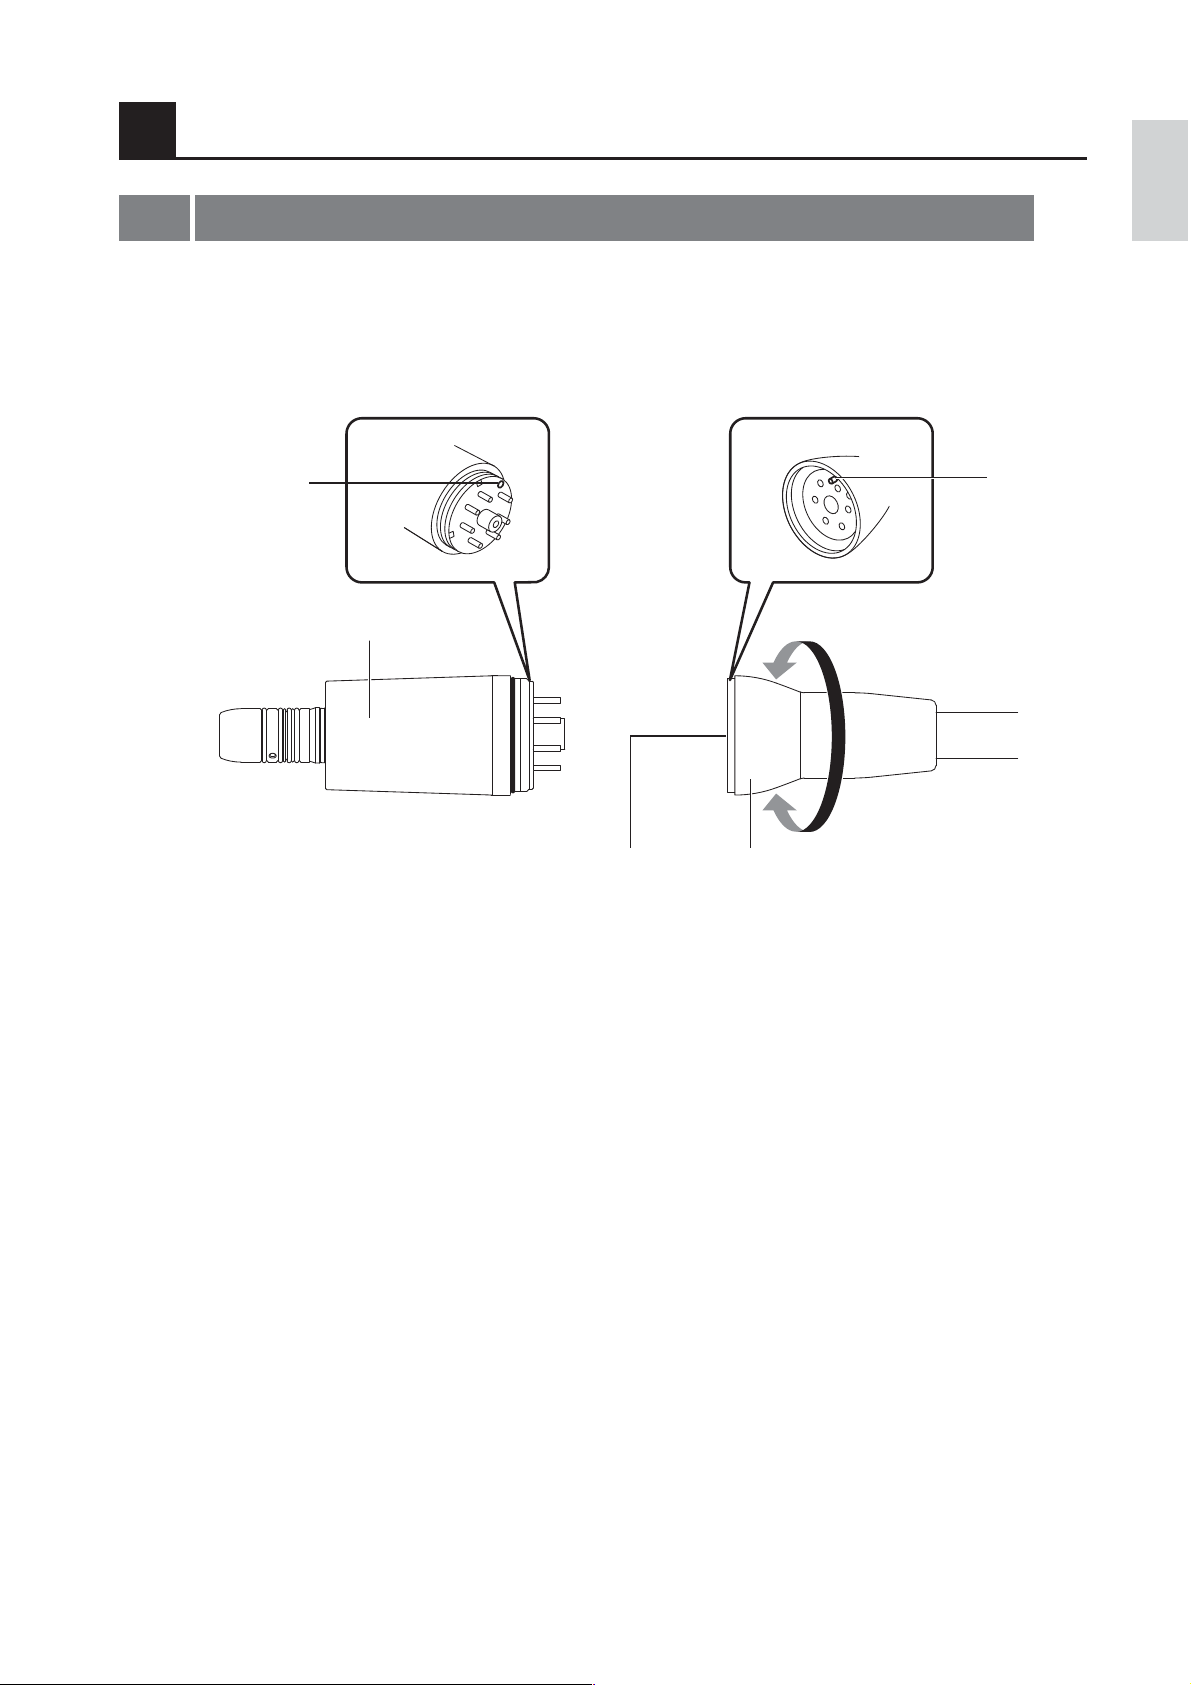
Preparation for Use
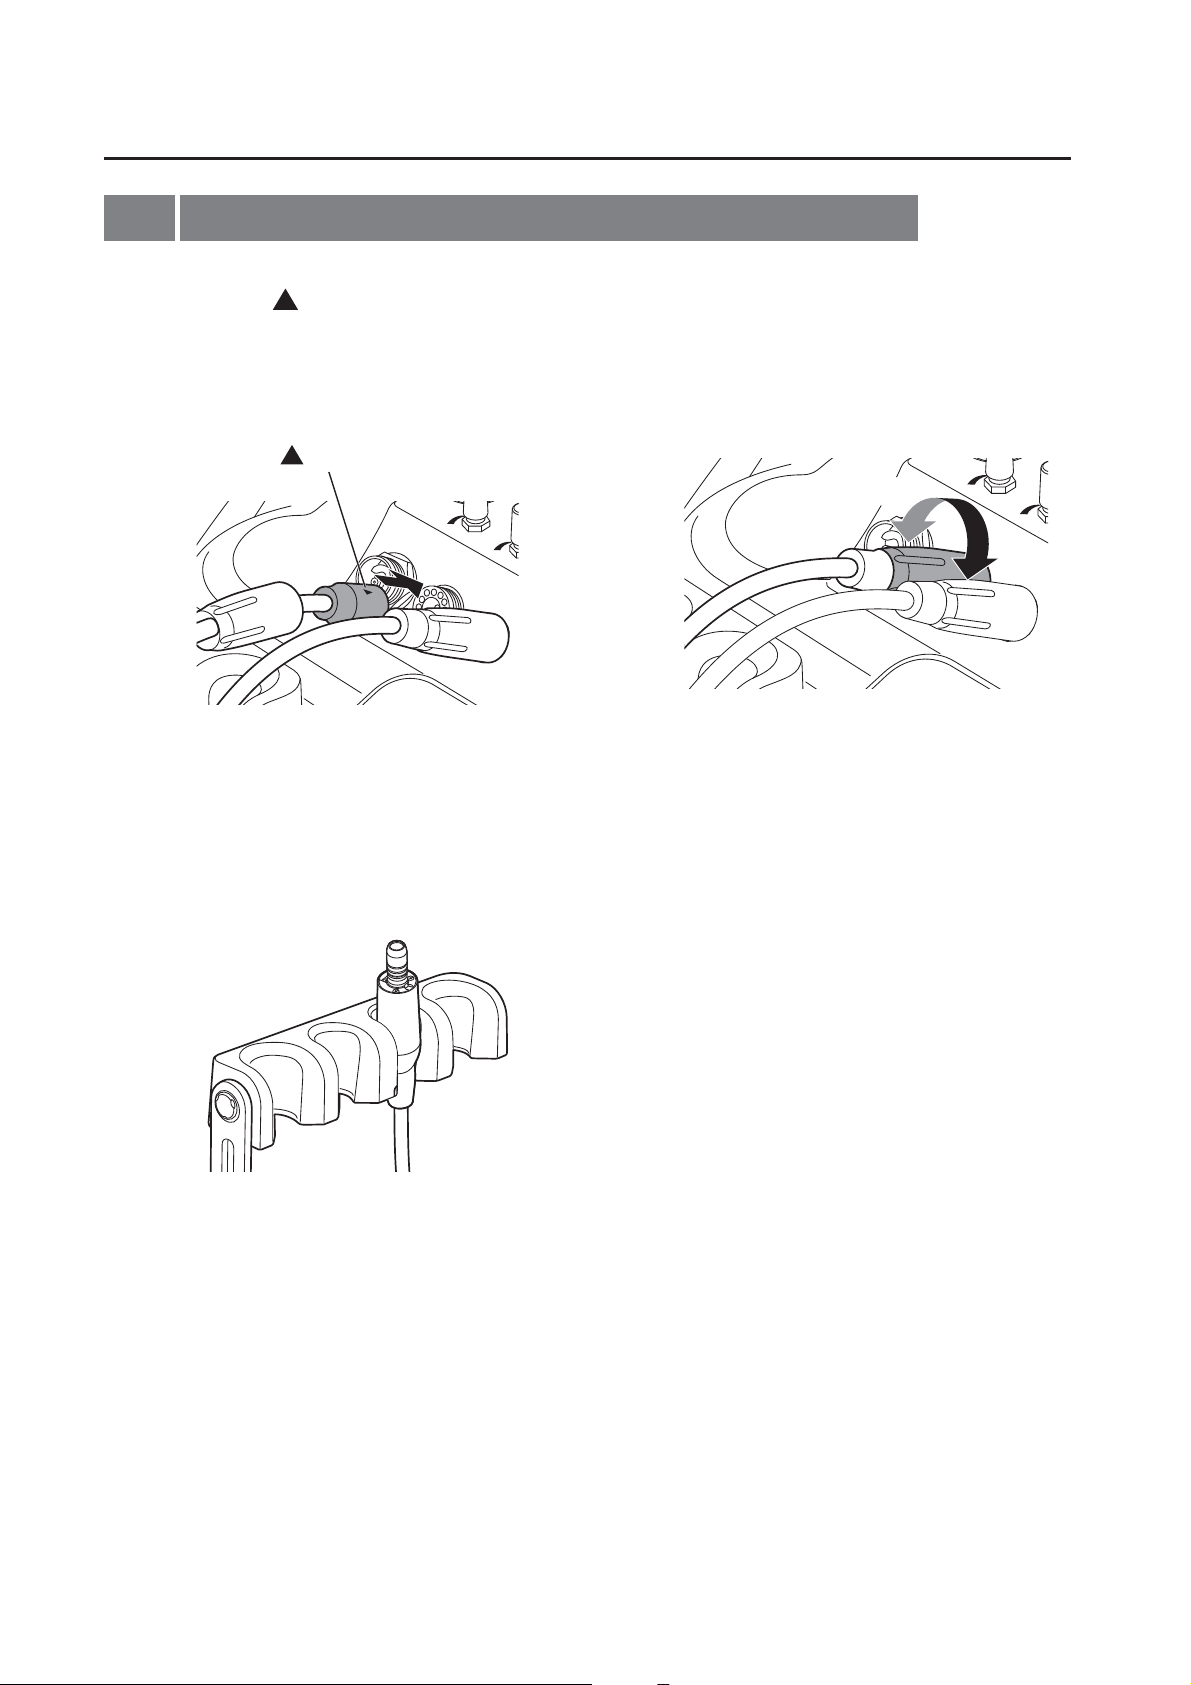
4-1 Connecting and Disconnecting the Motor Cord and the Motor
<Connection>
Aligning the hole on the back of the Motor and the pin on the Motor Cord Connector, insert the pin straight
into the hole and tighten the Motor Cord Nut firmly.
Hole
Motor
Tighten
Pin
English
Motor Cord Connector
<Disconnection>
Loosen the Motor Cord nut. Gently separate the motor from the cord.
Motor Cord Nut
Loosen
7
Page 9
Preparation for use
4-2 Connecting the Motor Cord and VIVA ace Control Unit
Aligning the mark of the Motor Cord plug
1
and the shape of the terminal as shown
below, insert the plug deep into the motor
connector.
mark
Put the Motor on the holder.
3
6&$/(5
02725
Turn the Plug Cover for tightening.
2
Loosen
6&$/(5
02725
Tighten
8
Page 10
Preparation for Use
4-3 Connecting and Disconnecting the Handpiece (optional)
Insert the Handpiece straight into the Motor.
1
When connecting an optic handpiece, turn
the Handpiece either to the right or left
until hearing a clicking sound securing the
position.
Positioning pin
Handpiece
(optional)
Motor
Confirm that the Handpiece is connected
2
firmly.
<Disconnecting>
Holding the front part of the Motor and the end
part of the Handpiece, gently pull straight apart.
English
CAUTION
• Use the following handpiece.
-ISO 3964 (EN 23964) compliant handpiece
-93/42/EEC compliant handpiece
• Connect/disconnect the Handpiece after the Motor has completely stopped.
• Adjust the speed within its allowable speed of the Handpiece (optional).
• Do not leave the lubricated Handpiece attached to the Motor. The oil may enter the Motor and cause a
malfunction.
• Keep the lubricated Handpiece in a different place in a standing condition and attach it to the Motor before
using it.
• Be careful not to get water into the Motor because it could cause a malfunction.
4-4 Check before treatment
Follow the Instruction manual for VIVA ace Basic Set. (Reference : 5-10 Check before treatment
)
9
Page 11

5
Operation Procedure
Follow the Operation Manual for VIVA ace Basic Set. (Reference : 6 Operation Procedure
6
Post-use Maintenance
6-1 Preparation for Maintenance
Wear eye protection, a mask, and gloves to
prevent infection.
1
Turn off the Power Switch of the Control
Unit.
2
Remove the Water Plug (IN) [Clear Tube]
while pulling the Slide Ring.
3
Remove the Water Plug (OUT) [Blue Tube]
pressing the Slide Ring.
4
Water Plug (IN)
[Clear Tube]
Slide Ring
)
Dispose of the water in the Water Bottle and
place the empty bottle again in the Control
5
Unit.
Turn on the Power Switch of the Control Unit.
6
Maximize Motor Water Adjuster, activate the Motor to let out the water remaining in the Motor Cord.
7
10
Page 12

Post-use Maintenance
CAUTION
• Do not clean, immerse, or wipe with electrolyzed-oxidizing water (strong acidic water, super acidic water),
strong acidic and strong alkaline liquid medicine, solvent containing chlorine, benzene, or thinner.
• Do not lubricate the Motor. It may cause overheating and a malfunction.
NOTICE
Be sure to remove the Water Plug (IN) [Clear Tube] first.
•
Note that if the Water Plug (OUT) [Blue Tube] is removed first, the water in the bottle may blow out for a
•
moment.
When the Water Bottle (IN) [Clear Tube] is removed, the air in the bottle bursts out and makes a noise.
•
However, this is not a failure.
English
11
Page 13

Post-use Maintenance
6-2 Maintenance for Between Each Patient
6-2-1
< Cleaning >
1
Cleaning and Disinfection of the outside of the
Motor and the Motor Cord, and Replacing the Motor
Remove the all debris on the surface of the Handpiece, Motor and the Motor Cord with a wipes
(Minuten Wipes: ALPRO).
Minuten Wipes (ALPRO)
Remove the bur form the Handpiece with tweezers.
2
* Maintenance of the bur should be done in accordance with the operation manual issued
manufacturer.
by
12
Page 14

Post-use Maintenance
Remove the Handpiece from the Motor
3
* Reference: "4-3 Connecting and Disconnecting the Handpiece (optional)".
* Maintenance of the Handpiece should be done in accordance with its operation manual.
Handpiece
(optional)
Wipe the debris on the surface of the Motor and the Motor cord using a cloth moistened with water.
Motor
4
English
Under appropriate lighting (500 lx or higher), inspect the Motor and the Motor cord for
5
contamination.
If any visible contamination remains, repeat the process until it is visually clean. Be sure to repeat
from the procedure No.4.
≥ 500 lx
13
Page 15

Post-use Maintenance
6-2-1
< Disinfection >
1
Cleaning and Disinfection of the outside of the Motor and
the Motor Cord, and Replacing the Motor (Continued)
Wipe the surface of the Motor, the Motor Cord and the Holder of the Control Unit with the
disinfectant wipes (Minuten Wipes: ALPRO).
Minuten Wipes (ALPRO)
Disconnect the Motor from the Motor Cord, then attach a sterilized Motor and place it on the Holder.
2
* Be sure to sterilize a used Motor. Reference: “6-4 Sterilization".
14
Page 16

Post-use Maintenance
6-3 Maintenance After Close
6-3-1
< Cleaning >
Remove the all debris on the surface of the Handpiece, Motor and the Motor Cord with a wipes
1
(Minuten Wipes: ALPRO).
Cleaning and Disinfection of the outside
of the Motor and the Motor Cord
English
2
Minuten Wipes (ALPRO)
Remove the bur form the Handpiece with tweezers.
* Maintenance of the bur should be done in accordance with the operation manual issued
manufacturer.
by
15
Page 17

Post-use Maintenance
6-3-1
< Cleaning (Continued) >
Remove the Handpiece from the Motor
3
* Reference: "4-3 Connecting and Disconnecting the Handpiece (optional)".
* Maintenance of the Handpiece should be done in accordance with its operation manual
Cleaning and Disinfection of the outside of
the Motor and the Motor Cord (Continued)
Handpiece
(optional)
Motor
Wipe the debris on the surface of the Motor and the Motor cord with a cloth moistened with water.
4
16
Page 18

Post-use Maintenance
Under appropriate lighting (500 lx or higher), inspect the Motor and the Motor cord for
5
contamination.
If any visible contamination remains, repeat the process until it is visually clean. Be sure to repeat
from the procedure No.4.
≥ 500 lx
< Disinfection >
Wipe the surface of the Motor, the Motor Cord and the Holder of the Control Unit with the
1
disinfectant wipes (Minuten Wipes: ALPRO).
English
Minuten Wipes (ALPRO)
Disconnect the Motor from the Motor Cord.
2
Motor Cord: Place the Holder of the Control Unit.
Motor: Proceed to section "6-4 Sterilization"
17
Page 19

Post-use Maintenance
6-4 Sterilization
CAUTION
Follow local rules, regulations, and guidelines regarding the reprocessing of devices.
•
Do not autoclave the product with other instruments even when it is in a pouch. This is to prevent possible
•
discoloration and damage to the product from chemical residue on other instruments.
Be sure to use sterilizers that can perform sterilization up to 135°C. In some sterilizers, the chamber
•
temperature may exceed 135°C. Do not use these sterilizers as failure of the product could occur. Contact
the sterilizer manufacturer for detailed information about cycle temperatures.
Keep the product in suitable atmospheric pressure, temperature, humidity, ventilation, and sunlight. The
•
air should be free from dust, salt and sulphur.
Do not touch the product immediately after autoclaving as it will be very hot and must remain in a sterile
•
condition.
Autoclave sterilization is recommended for the product. The validity of other sterilization methods (such as
•
plasma sterilization or EOG sterilization) is not confirmed.
Immediately after sterilization is complete (within 1 hour), remove the Motor from the sterilozer. Failure to
•
do so may cause corrotion.
NOTICE
NSK recommends Class B sterilizer as stated in EN 13060.
•
For details, confirm to the manufacturer's of the sterilizer operation manuals.
•
18
Page 20

Post-use Maintenance
Apply autoclave sterilization for the following products. After each patient treatment, sterilize the products
as follow.
Autoclavable equipment: Motor, Motor Cap, Protection Plug,
< Preparation before sterilization >
Tighten the Motor Cap to the connection
1
part of the Motor Cord and place the
Protection Plug in the insert part of the
Motor.
Prote ction Plug Motor Cap
Tighten
Insert the Motor with the Protection Plug
2
and the Motor Cap to the sterilization pouch
that conform to ISO 11607-1 and seal the
pouch.
English
< Sterilization >
Autoclave the Motor. Conduct autoclave sterilization as follow.
Type Gravity Displacement Pre-Vacuum (Dynamic Air Removal)
Temperature 121
Full Cycle Time 20 min. or longer 15 min or longer 3-18 min
Drying Time 30 min or longer 30 min or longer 30 min or longer
Store the product in a place where it is kept clean and keep it in a sterilization pouch until it is used next.
°C (
0 / +4
°C)
132
°C
(0 / +4
°C)
134
°C
(0 / +4
°C)
19
Page 21

Post-use Maintenance
6-5
Maintenance of the Water Line
for the Motor and the Motor Cord
Cleaning and Disinfection should be done in the cleaning tank.
CAUTION
Be sure to perform Cleaning and Disinfection the "6-3 Maintenance after Close (Cleaning and Disinfection
•
of the outside of the Motor and the Motor Cord)" before "6-5 Maintenance of the Water Line for the Motor
and the Motor Cord".
6-5-1 Preparation of the Water Line before Disinfection
Disinfect with Alpro Bilpron (ALPRO) (undiluted) is recommended as maintenance once or twice week.
Put 200 mL of disinfectant solution in the Water Bottle. Tightly close the Water Bottle lid and place
1
the Water Bottle in the Control Unit.
* For details, confirm the operation manual isseued by manufacturer.
Disinfectant Solution: Alpro
Disinfectant Solution
200
Bilpron (ALPRO) (undiluted)
mL
· When there is not enough disinfectant solution,
turn off the Power Switch of the Control Unit,
take out the Water Bottle, and add disinfectant
solution.
20
Page 22

Post-use Maintenance
Insert the Water Plug (OUT) [Blue Tube] and the Water Plug (IN) [Clear Tube] to the lid until hearing
2
a clicking sound.
English
Water Plug (OUT)
[Blue Tube]
Turn on the Power Switch of the Control
3
Unit.
Water Plug (IN)
[Clear Tube]
Maximize the Motor Water Adjuster.
4
21
Page 23

Post-use Maintenance
6-5-2
Push the MOTOR Key.
1
Turn ON the SPRAY Key to irrigation.
Press the ON/OFF Key for 2 seconds and
3
activate for
that the disinfectant solution comes out
from the tip of the Motor.
Disinfection of the Water Line of
the Motor and the Motor Cord
10 seconds or more to confirm
Hold the Motor and the Motor Cord in the
2
cleaning tank.
Place the Motor and the Motor Cord on the
4
Holder of the Control Unit state for a night (at
least 12 hours).
CAUTION
Disinfectant solution remains in the Water Line by letting the solution out from the tip of the Motor.
•
It takes 12 hours to complete the disinfection after disinfectant solution remain on the Water Line of the
•
Motor and the Motor Cord.
22
Page 24

Post-use Maintenance
6-5-3
Put 250 mL of drinking water in the Water Bottle. Tightly close the Water Bottle Lid and place the
1
Water Bottle in the Control Unit.
Rinsing of Water Line of the Motor
and the Motor Cord after Disinfection
Drinking water
250 mL
English
Insert the Water Plug (OUT) [Blue Tube] and the Water Plug (IN) [Clear Tube] to the lid until hearing
2
a clicking sound.
Water Plug (OUT)
[Blue Tube]
Water Plug (IN)
[Clear Tube]
23
Page 25

Post-use Maintenance
6-5-3
Turn on the Power Switch of the Control
3
Unit.
Rinsing of Water Line of the Motor and the
Motor Cord after Disinfection (Continued)
Maximize the Motor Water Adjuster
4
Push the MOTOR Key.
5
Turn ON the SPRAY Key to irrigation.
Hold the Motor and the Motor Cord in the
6
cleaning tank.
24
Page 26

Post-use Maintenance
English
Press the ON/OFF Key for 2 seconds and
7
activate for
that drinking water comes out from the tip
of the Motor.
· When there is not enough drinking water,
turn off the Power Switch of the Control
Unit, take out the Water Bottle, and add
drinking water.
Disconnect the Motor from the Motor Cord then attach the sterilized Motor to the Motor Cord and
9
place it on the Holder.
· Be sure to sterilize th
Reference: "6-4 Sterilization.
10 seconds or more to confirm
e rinsed Motor (Including Water Line) before use.
Wipe the surface of the Motor and the Motor
8
Cord with the disinfectant wipes (Minuten
Wipes: ALPRO).
Minuten Wipes: ALPRO
CAUTION
After rinsing, be sure to sterilize the Motor. Reference: "6-4 Sterilization".
•
25
Page 27

7
Maintenance
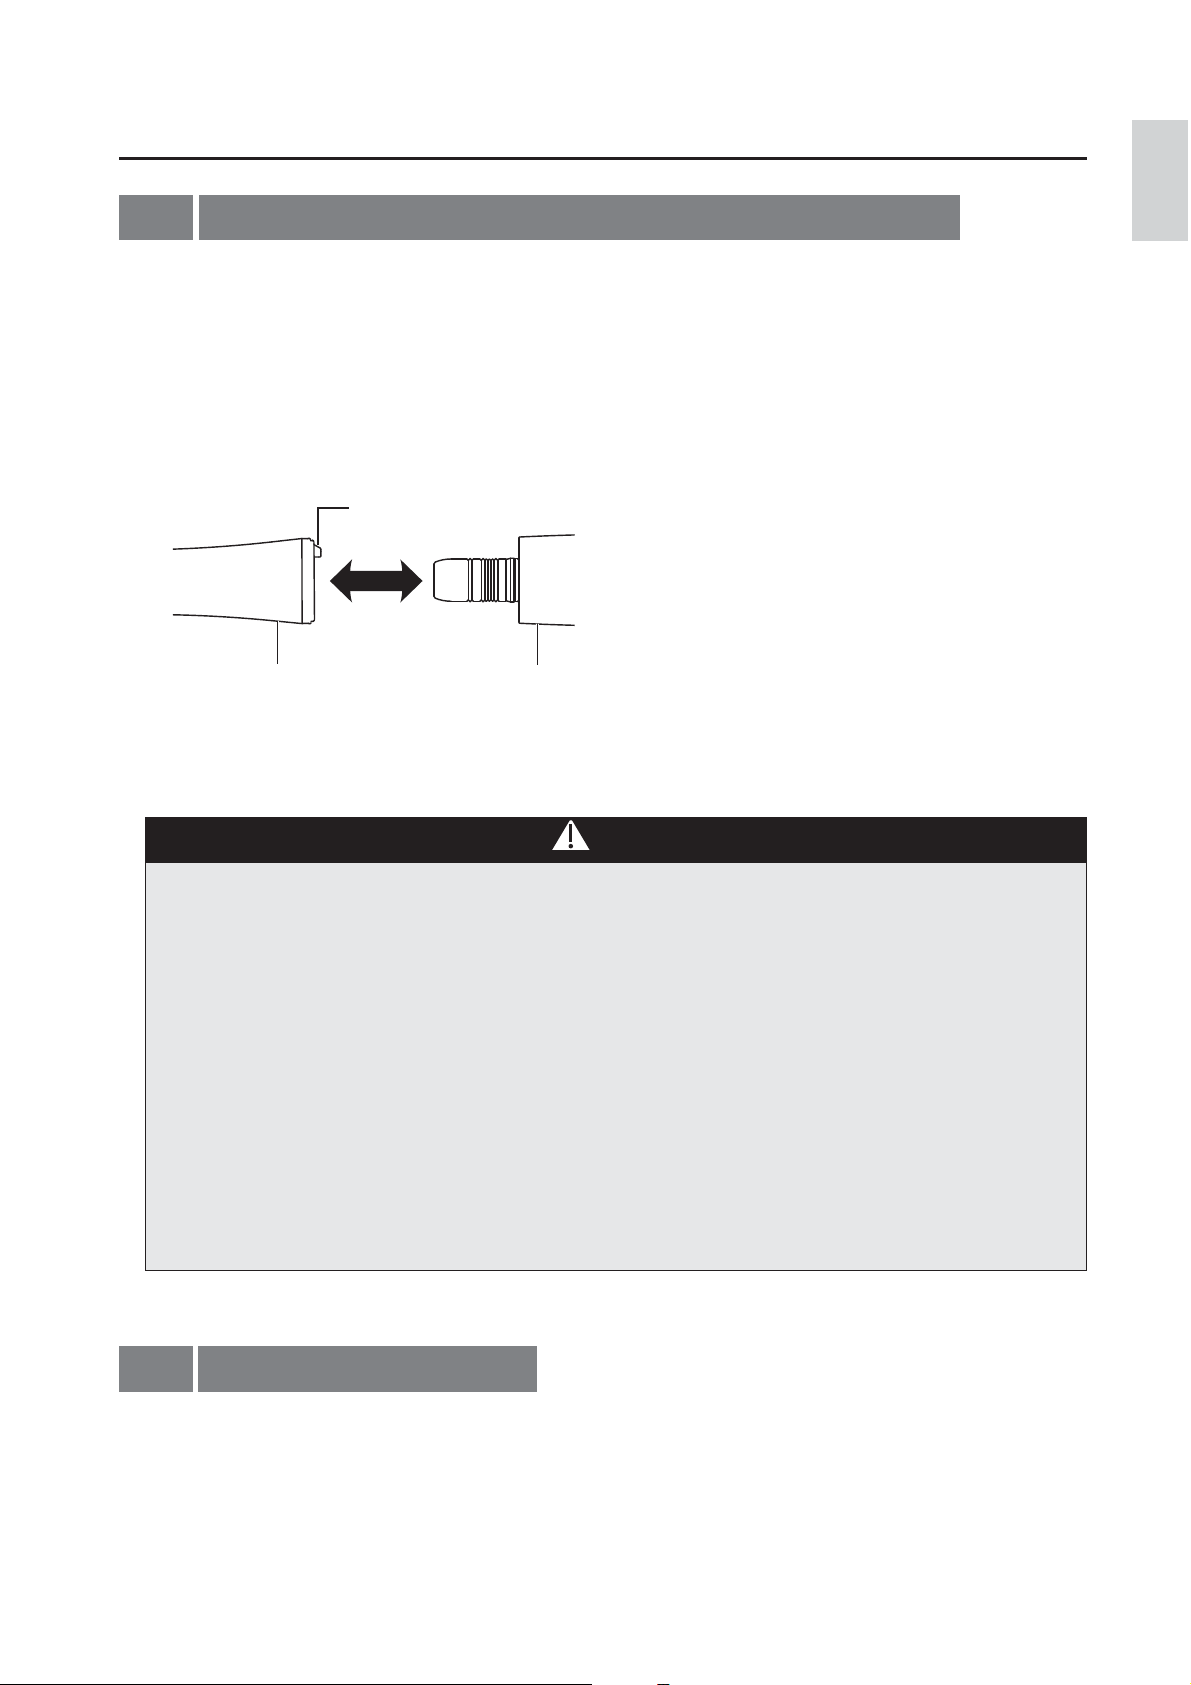
7-1 Replacing the O-ring
When the Handpiece does not come off easily or water or air leaks because of deterioration of the O-ring,
replace the O-ring.
Take off the O-ring at the insert part of the Motor with
a needle and fit a new O-ring in the O-ring groove.
* Refer to “3. Package Contents” to
identify the replacement O-ring.
CAUTION
• There are four O-rings in total. The size of the blue one is different
from the other ones. Refer to the illustration and place it in the correct
position.
• Problems below could occur due to deterioration of the O-ring.
•
Water leakage, No water supply.
•
Air leakage, No air supply.
•
Generates Vibration.
•
The Handpiece cannot be connected/disconnected easily.
7-2 Periodical Maintenance Checks
O-ring (Blue
O-ring (Black
)
)
Every 3 months perform periodical maintenance checks, referring to the check sheet below. If any
abnormalities are found, contact your Authorized NSK Dealer.
Points to check Details
Rotation Rotate the Motor and check if there is any abnormal vibration, noise, or generation of heat.
26
Page 28

8
Troubleshooting
8-1 Problems and Solutions
When a problem is detected, check the following again before requesting a repair. If none of these is
applicable or if the trouble is not remedied even after an action has been taken, a malfunction of this
product is suspected. Contact your Authorized NSK Dealer.
Problem Cause Remedy
No rotation of the Motor
No LED lighting Blowout of LED Contact your Authorized NSK Dealer.
Water leakage
Insufficient connection of the
Motor Cord
Insufficient connection of the
Motor Cord
Check the connection.
Check the connection.
English
27
Page 29

9
Specifications
9-1 Specifications
Model
Rotation Speed
Maximum Torque
Dimension
Use environment
Transportation and
storage environment
*No condensation.
Temperature Humidity Pressure
0 - 40ºC 30 - 75%*
-10 - 50 ºC 10 - 85%* 500 - 1060hPa
NLX Plus
100 - 40,000 min
4.0N · cm
DØ22 x H77 mm
-1
9-2 Classification of Equipment
• Method of sterilization or disinfection recommended by the manufacturer:
Reference : 6-4 Sterilization
• Degree of safety of application in the presence of a flammable anesthetic mixture with air or with
oxygen or nitrous oxide:
Equipment NOT suitable for use in the presence of a flammable anesthetic mixture with air or with oxygen or
nitrous oxide:
• Mode of operation:
Intermittent operation device
(
ON : 2 minutes, OFF : 3 minutes
)
28
Page 30

9-3 Symbol
This product is Autoclavable up to Max.135ºC.
Conforms to CE European Directive of “Medical device directive 93/42/EEC.”
Manufacturer.
Authorized representative in the European community.
Consult operation instructions.
Caution, Refer to attached instructions.
English
10
After-sales Service
10-1 Warranty
NSK products are warranted against manufacturing errors and defects in materials. NSK reserves the right
to analyze and determine the cause of any problem. Warranty is voided should the product be not used
correctly or for the intended purpose or has been tampered with by unqualified personnel or has had non
NSK parts installed. Replacement parts are available for seven years beyond discontinuation of the model.
10-2 Disposing Product
In order to avoid the health risks of operators handling the disposal of medical equipment, as well as the
risks of environmental contamination caused thereof, a surgeon or a dentist is required to confirm the
equipment is sterile. Ask specialist firms who are licensed to dispose of specially controlled industrial
wastes, to dispose the product for you.
29
Page 31

2018.08.10 002
 Loading...