

NSI MIDI 616 Operation Manual

MIDI 616
Operation Manual
All information subject to change without notice
February 1997
NSI Corporation
PO BOX 2210
Tualatin OR 97062
Technical Service Phone 800-864-2502
EMAIL: SERVICE@NSICORP.COM
www.nsicorp.com

Table of contents
CONTROL FUNCTIONS - - - - - - - - - - - - - - - - - - - - - - - - - - - - - - - - - - - - - - - - - - - - - - - - - - - - - - - - - - - - - - - - - - - 1
Channel Levels
Master Level
Chase Rate
Fade Rate
PUSHBUTTON FUNCTIONS - - - - - - - - - - - - - - - - - - - - - - - - - - - - - - - - - - - - - - - - - - - - - - - - - - - - - - - - - - - - - - - - - - - 2
Blackout
Blackout Technical info. (MIDI)
Go
Back
Memory - - - - - - - - - - - - - - - - - - - - - - - - - - - - - - - - - - - - - - - - - - - - - - - - - - - - - - - - - - - - - - - - - - - 3
Memory Technical Info. (MIDI)
Flash
Flash Technical Info. (MIDI)
Program - - - - - - - - - - - - - - - - - - - - - - - - - - - - - - - - - - - - - - - - - - - - - - - - - - - - - - - - - - - - - - - - - - - 4
Manual
Manual Technical Info. (MIDI)
Chase
Chase Technical Info. (MIDI) - - - - - - - - - - - - - - - - - - - - - - - - - - - - - - - - - - - - - - - - - - - - - - - - - - - - - - - - - - - - 5
STEP-BY-STEP PROCEDURES - - - - - - - - - - - - - - - - - - - - - - - - - - - - - - - - - - - - - - - - - - - - - - - - - - - - - - - - - - - - 6
Blackout (without Chase)
Blackout (with Chase)
Presetting and Activating a Scene - - - - - - - - - - - - - - - - - - - - - - - - - - - - - - - - - - - - - - - - - - - - - - - - - - - - - - - - - - - - 7
Recalling the Last Scene
Storing a Scene in Memory - - - - - - - - - - - - - - - - - - - - - - - - - - - - - - - - - - - - - - - - - - - - - - - - - - - - - - - - - - - - 8
Recalling a Scene from Memory
Programming a Flash - - - - - - - - - - - - - - - - - - - - - - - - - - - - - - - - - - - - - - - - - - - - - - - - - - - - - - - - - - - - 9
Activating a Flash
Manual Control - - - - - - - - - - - - - - - - - - - - - - - - - - - - - - - - - - - - - - - - - - - - - - - - - - - - - - - - - - - 10
Selecting a Chase Mode - - - - - - - - - - - - - - - - - - - - - - - - - - - - - - - - - - - - - - - - - - - - - - - - - - - - - - - - - - - 11
Programming a Chase Sequence - - - - - - - - - - - - - - - - - - - - - - - - - - - - - - - - - - - - - - - - - - - - - - - - - - - - - - - - - - - 12
Activating a Chase Sequence - - - - - - - - - - - - - - - - - - - - - - - - - - - - - - - - - - - - - - - - - - - - - - - - - - - - - - - - - - - 14
Stepping Through a Chase Sequence - - - - - - - - - - - - - - - - - - - - - - - - - - - - - - - - - - - - - - - - - - - - - - - - - - - - - - - - - - - 15
Stopping a Chase Sequence
SET-UP - - - - - - - - - - - - - - - - - - - - - - - - - - - - - - - - - - - - - - - - - - - - - - - - - - - - - - - - - - - - - - - - - - 16
Placement
System Hookup
CONSOLE OPERATION Without MIDI - - - - - - - - - - - - - - - - - - - - - - - - - - - - - - - - - - - - - - - - - - - - - - - - - - - - - - - - - - - 17
CONSOLE OPERATION With MIDI - - - - - - - - - - - - - - - - - - - - - - - - - - - - - - - - - - - - - - - - - - - - - - - - - - - - - - - - - - - 18
CONFIGURATION MODE - - - - - - - - - - - - - - - - - - - - - - - - - - - - - - - - - - - - - - - - - - - - - - - - - - - - - - - - - - - 19
CONFIGURATION MODE STEP-BY-STEP PROCEDURE - - - - - - - - - - - - - - - - - - - - - - - - - - - - - - - - - - - - - - - - - - - - - 20
CONFIGURATION MODE SWITCHES - - - - - - - - - - - - - - - - - - - - - - - - - - - - - - - - - - - - - - - - - - - - - - - - - - - - - - - - - - - 25
Preheat - - - - - - - - - - - - - - - - - - - - - - - - - - - - - - - - - - - - - - - - - - - - - - - - - - - - - - - - - - - - - - - - - - - - - - - - - - - - - - - 26
Chase Dump - - - - - - - - - - - - - - - - - - - - - - - - - - - - - - - - - - - - - - - - - - - - - - - - - - - - - - - - - - - - - - - - - - - - - - - - - - - - - - - 26
MIDI TRANSMISSION and RECEPTION DATA - - - - - - - - - - - - - - - - - - - - - - - - - - - - - - - - - - - - - - - - - - - - - 27
Recognized MIDI Commands
(Chart)
Control Changes
(Chart)
TRANSMITTED DATA (Chart) - - - - - - - - - - - - - - - - - - - - - - - - - - - - - - - - - - - - - - - - - - - - - - - - - - - - - - - - - - - 28
SOFTPATCH OPTION - - - - - - - - - - - - - - - - - - - - - - - - - - - - - - - - - - - - - - - - - - - - - - - - - - - - - - - - - - - 29
PROGRAMMING SOFTPATCH - - - - - - - - - - - - - - - - - - - - - - - - - - - - - - - - - - - - - - - - - - - - - - - - - - - - - - - - - - - 30
PROGRAMMING SOFTPATCH STEP-BY-STEP PROCEDURE - - - - - - - - - - - - - - - - - - - - - - - - - - - - - - - - - - - - - - - - - - - - - 32

Introduction
Welcome. You are entering a new era of memory controlled stage lighting technology. The powerful
NOVA Micro-Plex designs involve the electrical marriage of microprocessor technology and digitally
controlled multiplexing. The result is a comprehensive memory control package with unlimited
flexibility for a variety of innovative applications.
The NOVA MIDI 616 Memory Controller --console features an advanced computer based
microprocessor design containing many benefits found in today's mainframe computers. When used by
itself, the MIDI 616 is an extremely “user friendly” microprocessor-assisted lighting console that allows
full operation in real-time to adapt to any live performance situation.
When used with a MIDI sequencer, the MIDI 616 provides a fully automated lighting show. Lighting
changes not possible with manual control are now simple to create and execute precisely on cue. Most
functions of your sequencer are supported, allowing complete creative control. In addition, the MIDI
616 features a variety of programmable special effects. The nonvolatile memory design in the MIDI 616
retains programmed information for the life of the product, or until it is reprogrammed.
The NOVA Micro-Plex technology found in all NOVA Systems products allows components of your
lighting system to be interconnected by way of standard 3-conductor microphone cables or audio snakes.
Up to 64 individual control signals may be transmitted to dimmer packs through a single microphone
cable. In addition, the MIDI 616 receives DC phantom power from the dimmer packs via the same
microphone cable, eliminating the need for AC power cords on NOVA Systems controllers. This makes
the remote placement of the MIDI 616 easy and convenient.
The NOVA Systems MIDI 616 Memory Controller represents our commitment of leading the industry
in defining technological advances for stage lighting control.
Welcome to the new era of memory controlled stage lighting!
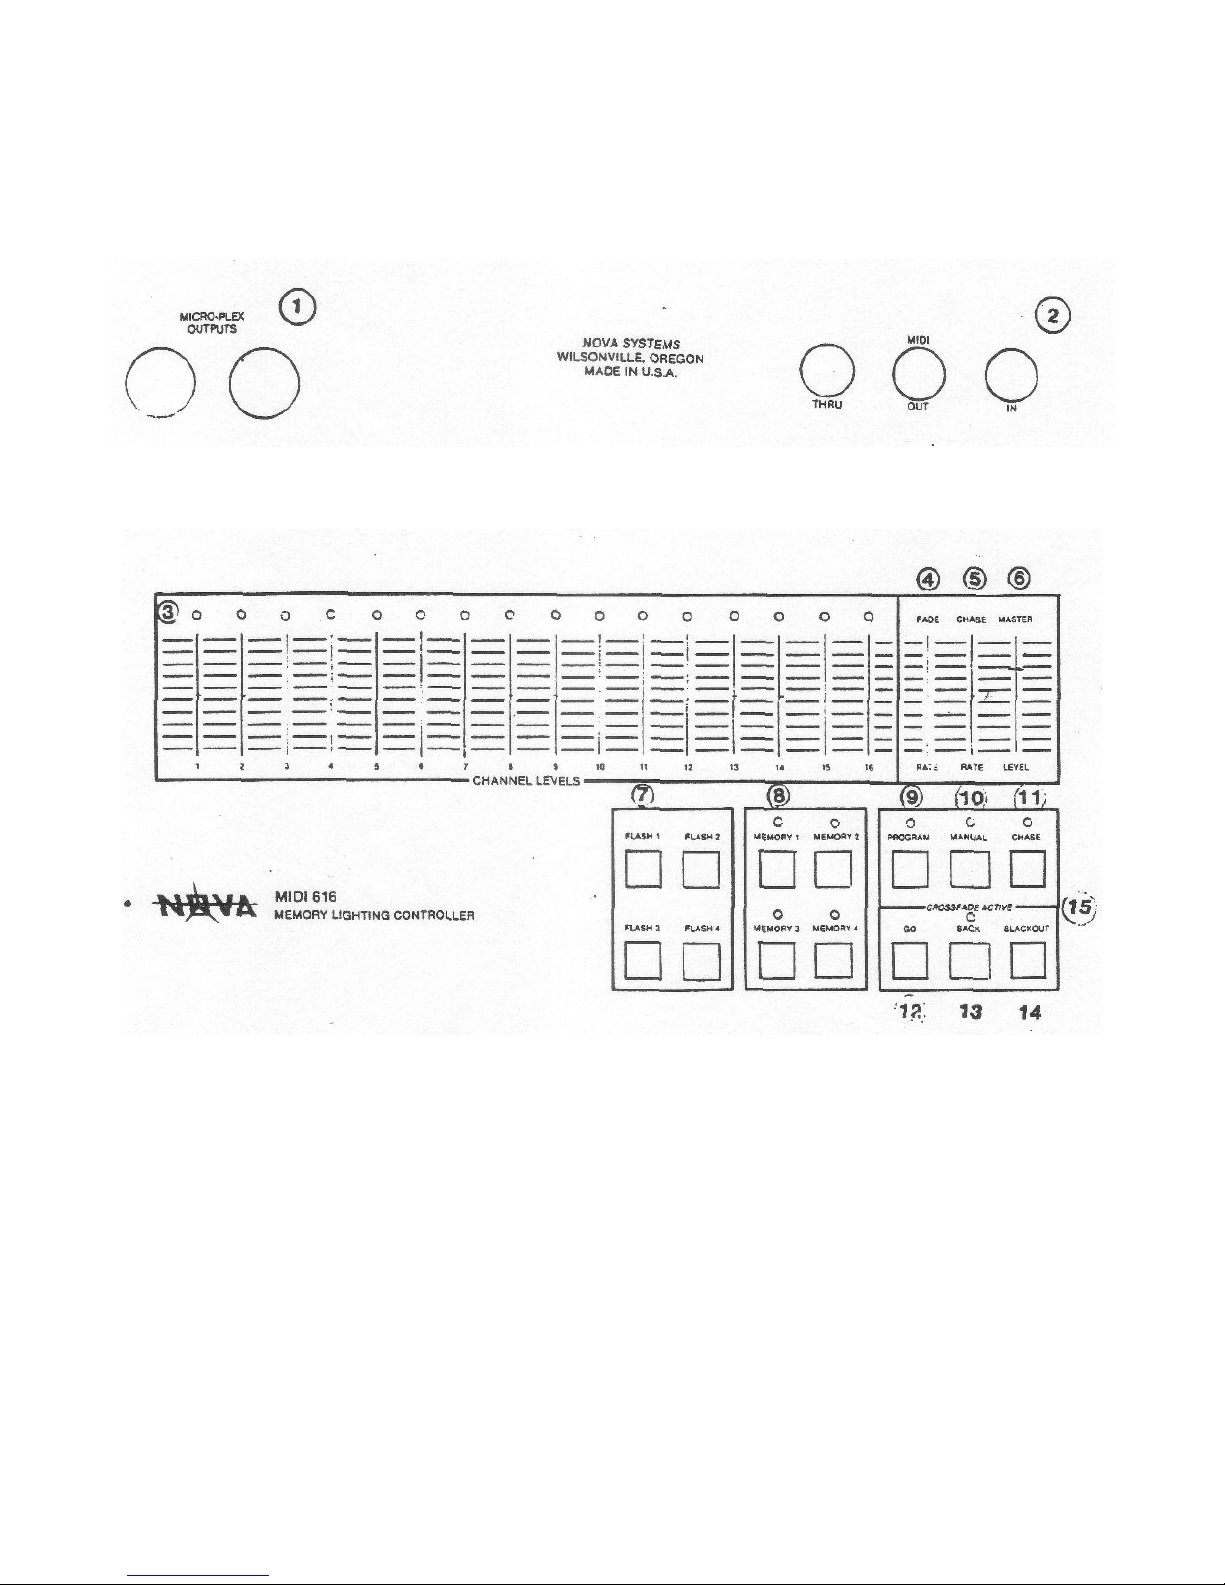
Visual Layout
(REAR VIEW)
(TOP VIEW)
1: Micro-Plex Outputs 6: Raster Power Level Slide Control 11: Chase Mode Button
2: MIDI In-Out-Thru 7: Flash Select Buttons 1-4 12: Go Button
3: Channel Level LEDS 8: Scene Select Buttons 1-4 13: Back Button
4: Fide Rate Slide Control 9: Program Button 14: Blackout Button
5: Chase Rate Slide Control 10: Manual Button 15: Crossfade Active LED
LEGEND

SOFTPATCH DUMP
Softpatch data may be dumped to most sequencers for automatic reconfiguration of Softpatch when the
sequence is played back.
To initiate a dump; hold the GO and BACK buttons down together, while pressing the FLASH 4 button.
The current Softpatch configuration will then be instantly sent out of the MIDI port in the form of a
System Exclusive command.
SOFTPATCH RESET
The Softpatch configuration may be reset to the factory default setting by following this procedure:
1. Remove microphone cord from MIDI 616 console.
2. Hold all four FLASH buttons down together.
3. Reconnect microphone cord to MIDI 616 console while still holding all FLASH buttons down.
4. Release Flash buttons. Softpatch is now reset.

Control Functions
Channel Levels
Light intensity for each of the 16 control channels of the MIDI 616 can be preset using the 16 slide
controls. Adjustment of these controls increases or decreases light Intensities to desired levels for
storage in memory display on stage.
Master Level
Overall light intensity is controlled using the Master Level slide control. While this control usually
remains at maximum, all light levels be increased or decreased proportionately its adjustment. This
control does not affect the brightness of the preview LEDs, and it does not affect the preheat level of the
dimmers.
Chase Rate
The Chase Rate controls adjusts the rate at which the lights will chase. The red LED above the CHASE
button will flash at the selected chase rate whenever Chase is active. When the Chase Rate control is off,
the chase LED will be steadily lit (no flicker), and the CHASE button changes to manual mode for
tapping through the sequence by hand.
Fade-Rate
The Fade Rate control adjusts the rate at which most functions of the MIDI 616 fade in and out. The
minimum, fully down position of the slide control will cause instant changes of the scenes, etc., while a
maximum setting of the slide control will produce fades in excess of 30 seconds. The yellow LED
labeled “CROSSFADE ACTIVE” will be illuminated when a fade is In progress.
In Configuration Mode 3, this control also controls the preheat level control.
1

Pushbutton Functions
BLACKOUT
Pressing the BLACKOUT button instructs all lights to fade out instantly, or at a predetermined fade rate.
A short “tap” of the button will allow a gradual fade-out, while a “press and hold” action will cause an
instant blackout.
When a Chase Is active and the CHASE LED is lit or active, the first “tap” of the BLACKOUT button
will only cancel the chase. A second tap of the button will initiate a complete blackout. The button
should only be held down for the second tap, to initiate an instant blackout.
TECHNICAL NOTE
MIDI Information
When the BLACKOUT button is tapped, the current Fade Rate control setting is sent out the MIDI port
(on the back of the controller), followed by a “note-off” command (see MIDI data) for all 16 channels.
A “push and hold” action causes an “all-notes-off” command to follow the above data.
GO
When the GO button is tapped, all lights will fade to the current channel levels represented by the
current channel level slide control settings. A “push and hold” action will cause the lights to instantly
change to the current slide control settings. Once the lights have started to fade, and the “CROSSFADE
ACTIVE” LED is lit, the channel level slide controls can be readjusted without affecting the fade in
progress.
Lighting levels already in effect when the GO button is tapped twice in a row are stored, and can be
recalled by pressing the BACK button.
BACK
The BACK button is used to recall any scene lighting levels that were stored in memory when the GO
button was pressed the second time. When recalled, these light levels will be restored instantly or at the
preset Fade Rate.
2

MEMORY
The four MEMORY buttons (1-4) are used for storing channel intensity levels for later recall much like
a calculator's memory. MEMORY buttons can be programmed “on the fly” without affecting the lights
on stage or the fade in progress.
To program a MEMORY button, simply adjust the channel level slide controls to the desired settings.
By tapping the PROGRAM button, followed by the proper MEMORY button, the current slide control
settings will be stored in that memory.
When needed, the light intensity levels stored in a memory location can be recalled by pressing the
proper MEMORY button alone. A tap of the button will initiate a gradual fade of the lights to the new
settings, while a “push and hold” action will cause instant changes. The green LED above the
MEMORY button will light when it is active.
TECHNICAL NOTE
MIDI Information
When any of the above buttons are tapped (GO, BACK, or MEMORY), the current Fade Rate control
setting is sent out the MIDI port followed by “note-on” commands for the lighting levels affected
(ONLY). A Fade Rate of 0 and the above commands are sent again 0.2 seconds later if the button is held
down (see MIDI data).
FLASH
FLASH buttons are used for storing momentary full intensity increases in lighting channel levels.
FLASH buttons, like MEMORY buttons, can be programmed “on the fly” without affecting any current
lighting levels in effect.
To program a FLASH button, set the channel level controls of the channels to be flashed at full
Intensity, and the channel level controls of the channels not being flashed at minimum intensity. Tap the
PROGRAM button, followed by the proper FLASH button. The next time that FLASH button is
depressed the programmed channels will instantly come to full intensity and remain at full as long as
that FLASH button is depressed.
TECHNICAL NOTE
MIDI Information
When a FLASH button is depressed, special “note-on” commands for the lighting control channels
selected (ONLY) are sent out the MIDI port. Releasing a FLASH button will generate matching “noteoff” commands which are also sent out through the MIDI port.
3

PROGRAM
The PROGRAM button is used when programming most of the functions of the MIDI 616. When this
button is tapped, the red LED above it will light, indicating the MIDI 616 is in programming mode. To
program various functions, refer to the specific section regarding that function. If the PROGRAM button
was pressed in error, simply press the button again to exit the programming mode, turning off the red
indicator LED. While in program mode, no MIDI Information is transmitted.
MANUAL
The MANUAL Mode can be activated at any time in conjunction with any other mode. When the
Manual Mode is activated by pressing the MANUAL button, the channel level slide controls can be
adjusted to any light level in “real time.” While in Manual Mode, none of the light intensity levels will
be affected until one of the channel level slide controls Is moved. Once a slide control is moved, the
lighting intensity for that channel will immediately change to the new control level, regardless of the
current lighting level. The new lighting level will then follow the control setting until the scene is
changed, or until Manual Mode is defeated by tapping the MANUAL button again, turning off the red
indicator LED.
TECHNICAL NOTE
MIDI Information
Manual Mode should be avoided when recording MIDI data on a sequencer. When a channel level slide
control is moved, a Fade Rate of 0 is sent, followed by a “note-on” command for the control level. Many
of these sequences are sent out through the MIDI port for even small control movements.
CHASE
The MIDI 616 is capable of storing 3 chase sequences of up to 32 steps in non-volatile memory. Any of
these chase effects can be selected by tapping the CHASE button the number of times corresponding to
the Chase Mode desired. For example, to select Chase Mode 1, tap the CHASE button once (ONLY). To
select Chase Mode 3, tap the CHASE button 3 times.
When selecting Chase Modes 2 and 3, the CHASE button MUST be tapped the second and third times
within 5 seconds of the first tap. Also, Chase Modes can only be selected while there is no chase active.
After 5 seconds has elapsed since the first tap of the CHASE button, the Chase selection is defeated. The
CHASE button then becomes a Manual Chase key to manually step through a chase sequence (with the
CHASE RATE at minimum) or halt chasing altogether while held down.
4

Chase can be canceled only by the use of the BLACKOUT button. When a chase is active, the
BLACKOUT button must be pressed twice to achieve a full blackout.
Chase Modes 1, 2, and 3 can be programmed in from 1 to 32 step sequences. Any of the 16 channels can
be either on or off during each of these steps. To program a Chase Mode sequence, follow these
instructions:
1. Select the Chase Mode desired, as described above.
2. Press the PROGRAM button. The red LED above the PROGRAM button will light.
3. Press the CHASE button again. The CHASE LED will light steady, and the existing Chase
program will be erased.
4. Select the channels to be energized on the first step. Adjust the controls for these channels to full
maximum, and set the remaining channel controls to minimum.
5. Press the CHASE button to store the step in memory.
6. Repeat instructions 4-5 to program any remaining steps, up to 32. If an error is made, you must
press BLACKOUT and begin at the first step again.
7. When finished programming up to the 32 available sequences steps, press BLACKOUT to
release the Programming Mode.
TECHNICAL NOTE
MIDI Information
When Chase Mode 1 is activated, the current Fade Rate is sent out the MIDI port, followed by the
current Chase Rate. This data is then followed by a Chase Mode command for Chase Mode 1. If the
CHASE button pressed again (within 5 seconds), another sequence of the above data is sent with a
Chase Mode command for Chase Mode 2. Another sequence of data is sent for Chase Mode 3, if it is
selected.
When Chase Mode is defeated, only the current Fade Rate followed by a Chase Mode command of 0 is
sent.
Chase memory for each of the above sequences can be saved on the MIDI sequencer, and reloaded at the
beginning of songs.
5
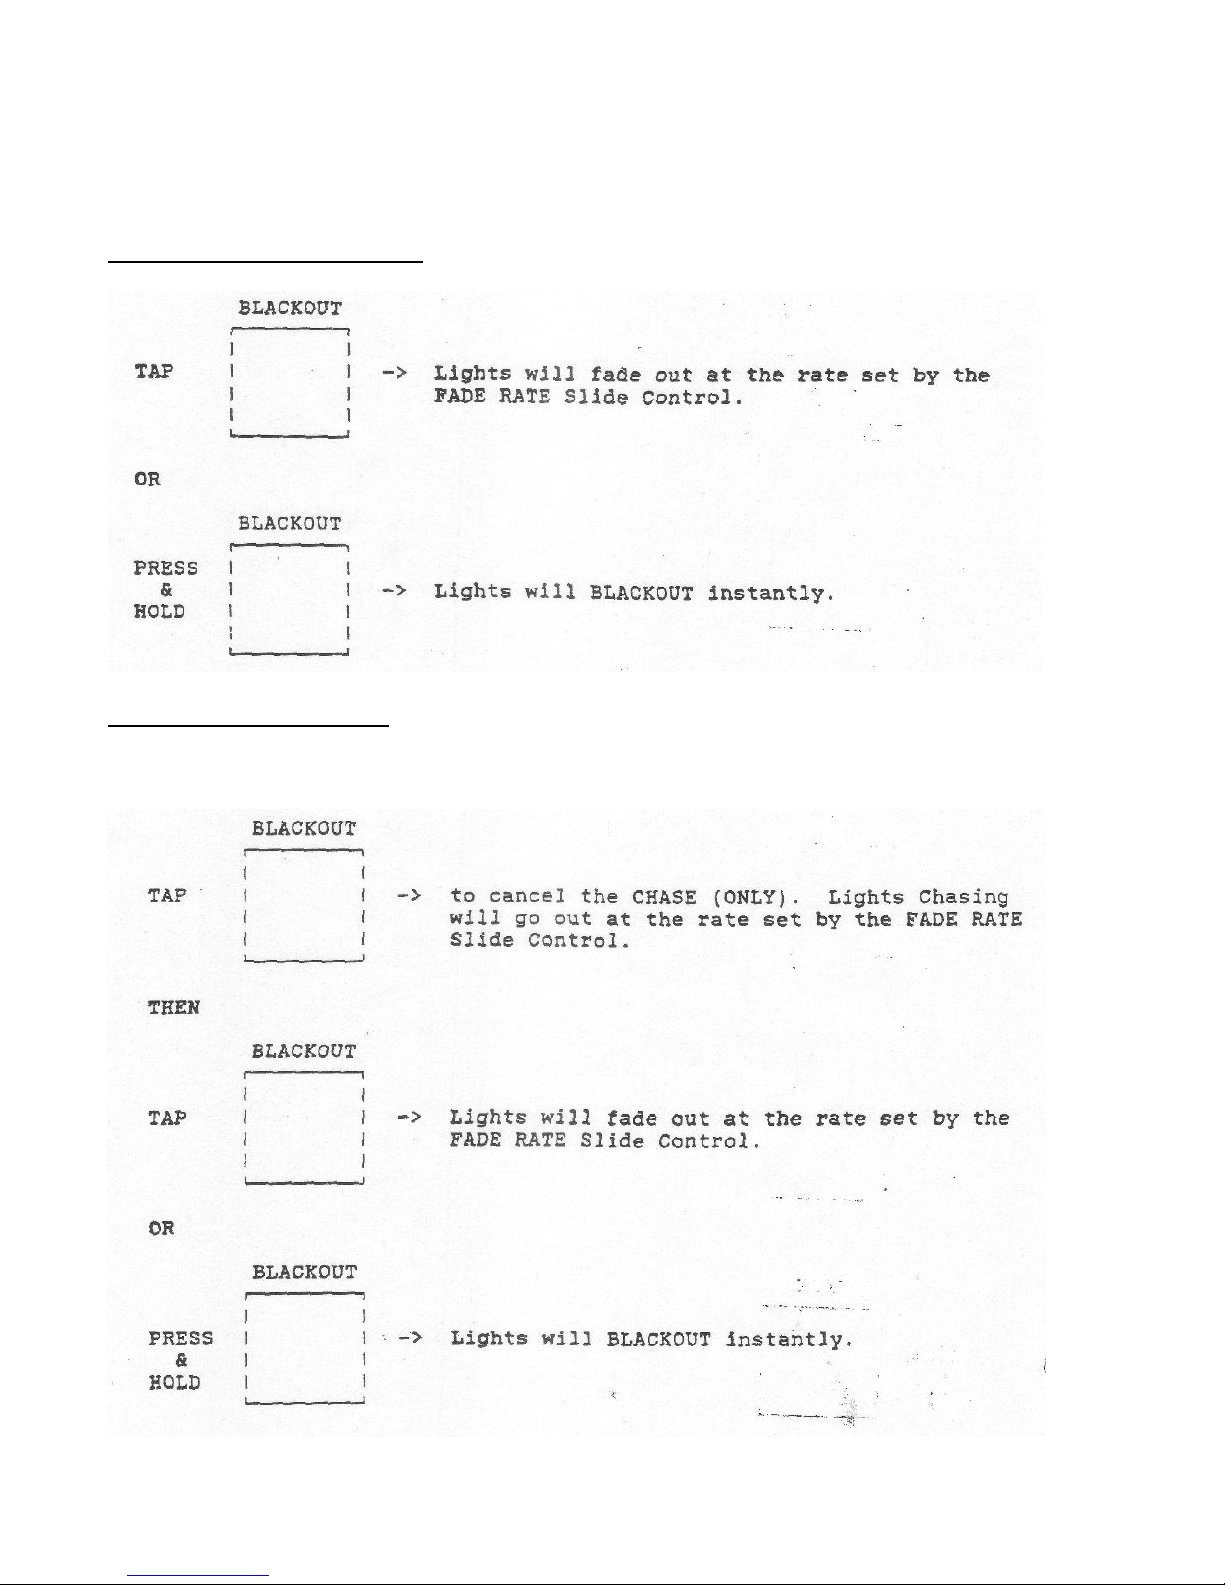
BLACKOUT (without Chase):
BLACKOUT (with Chase):
When CHASE LED is ON,
Step-By-Step
Procedures
6
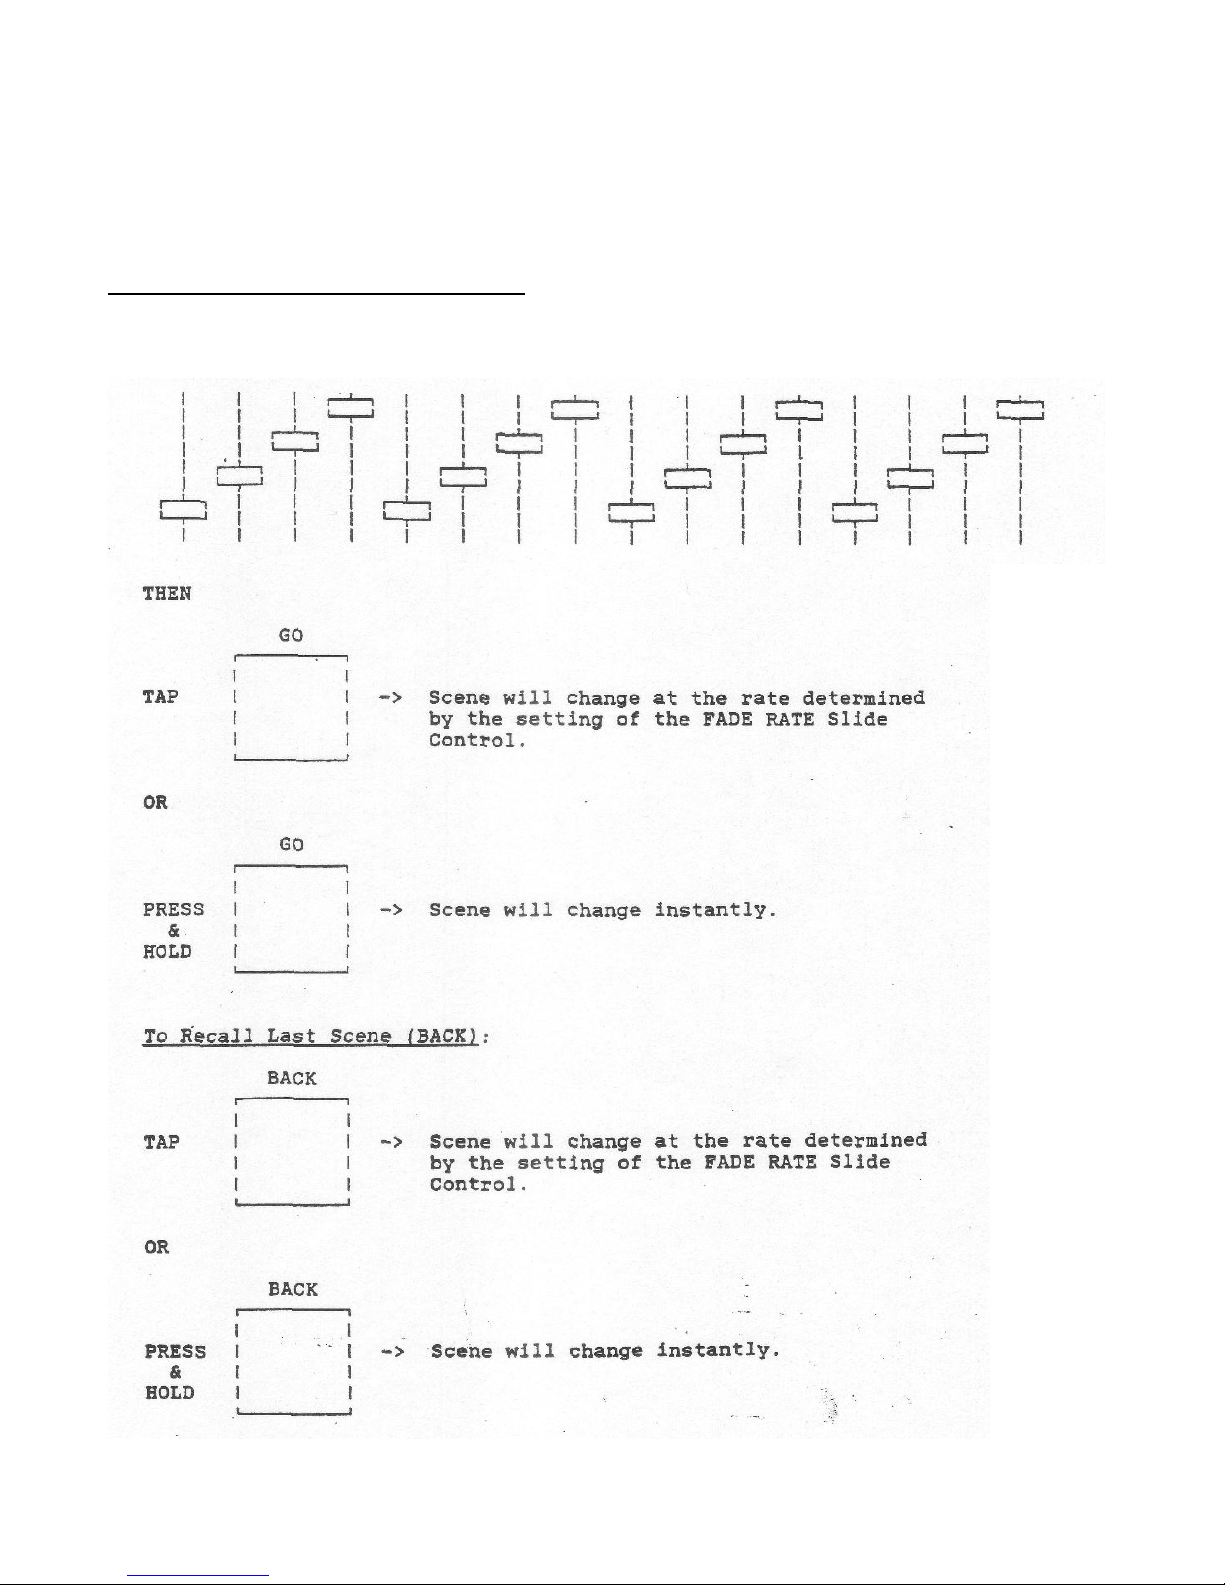
Presetting and Activating a Scene (GO) :
Adjust Light Level Channel Slide Controls
Step-By-Step
Procedures
(Continued)
7
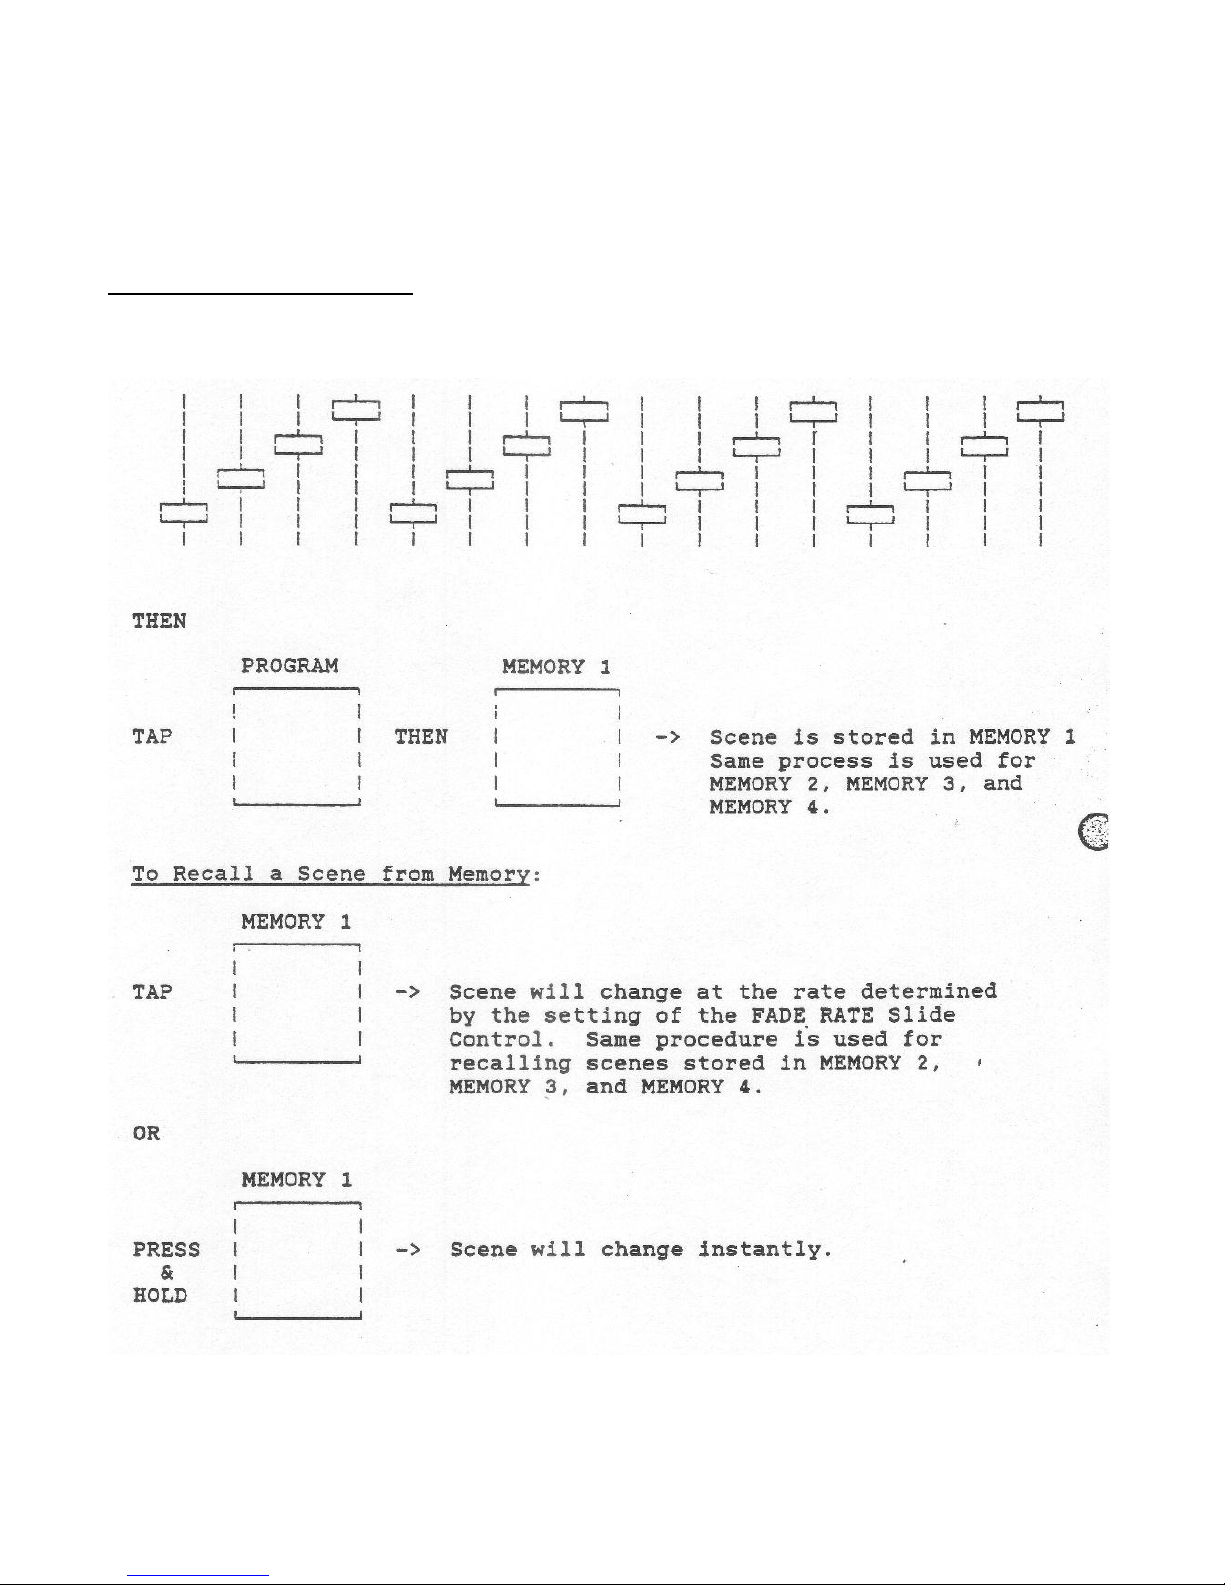
To Store a Scene in Memory :
Adjust Light Level Channel Slide Controls
Step-By-Step
Procedures
(Continued)
8
 Loading...