

Page 1

Instructions for use and installation
Pro induction hob
Instrucciones de uso y de instalación
Placa de inducción Pro
Istruzioni per l'uso e l'installazione
Piastra di induzione di potenza
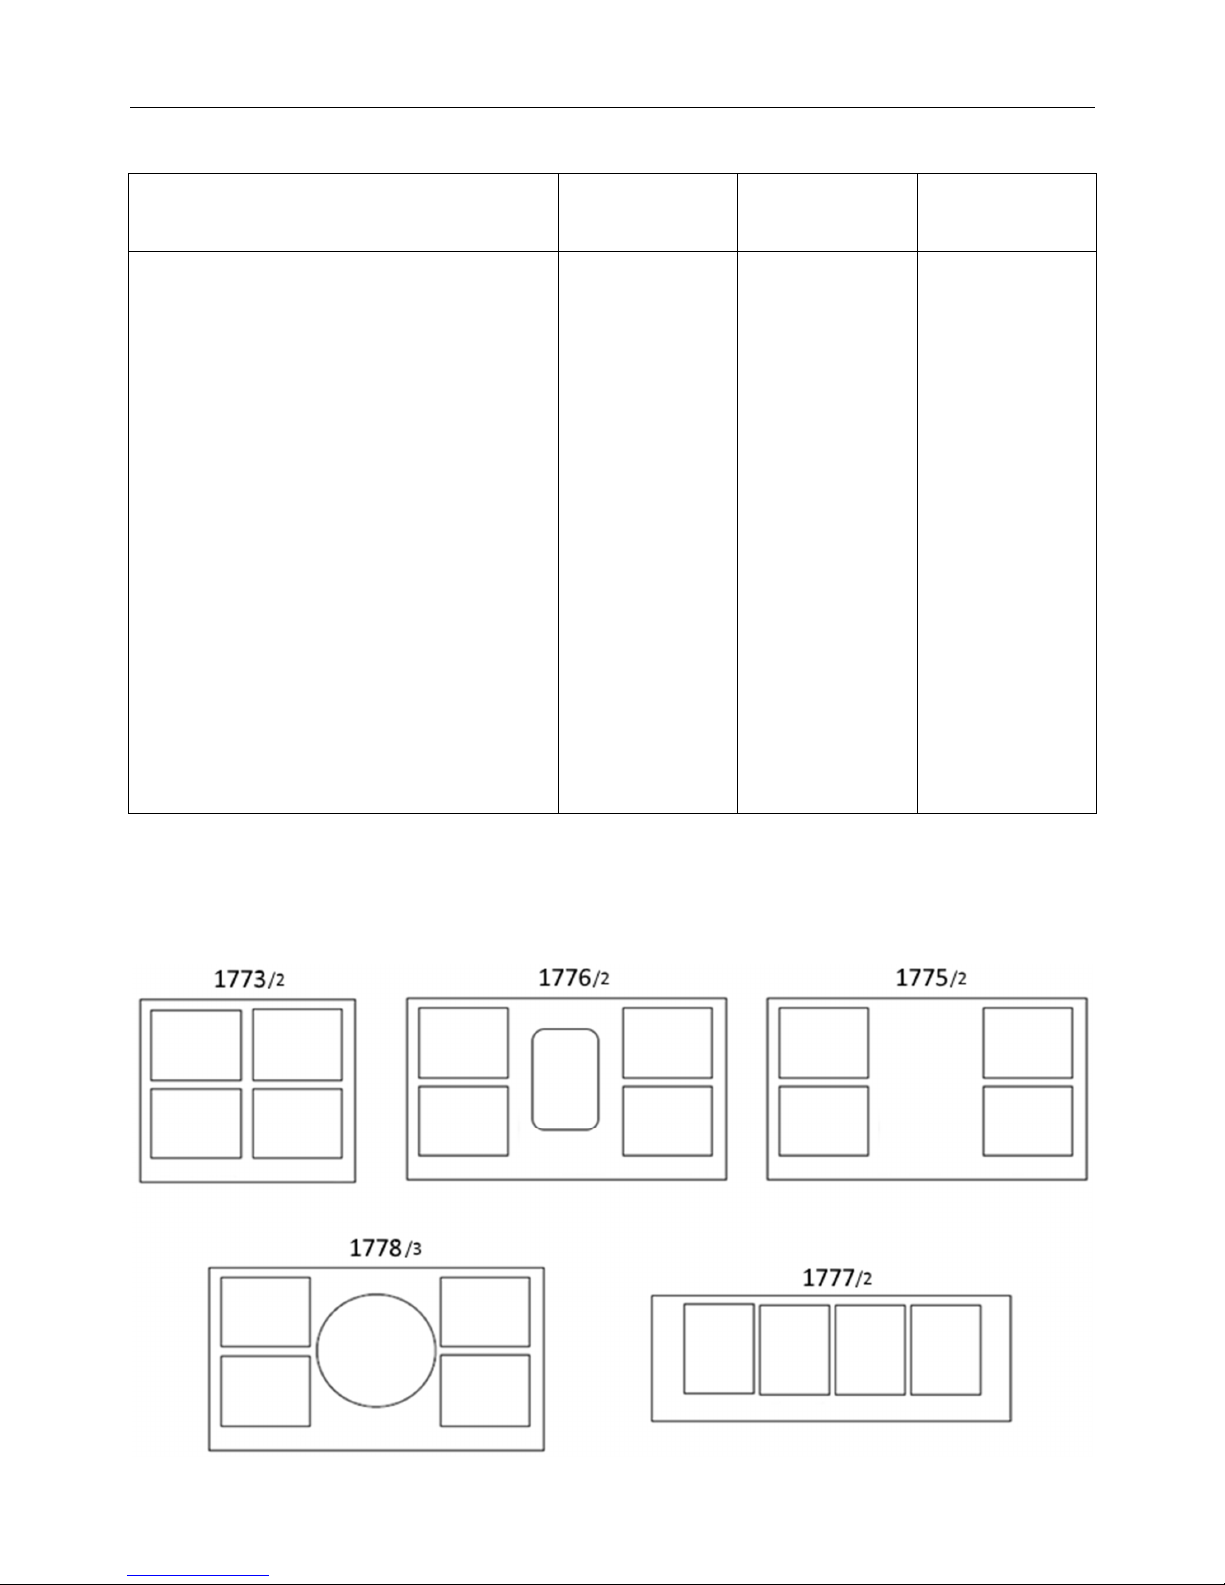
1773/2 – 1775/2 – 1776/2 – 1777/2 – 1778/3
Page 2

2
SUMMARY
SAFETY ....................................................................................................................................... 3
P
RECAUTIONS BEFORE USING
...................................................................................................... 3
U
SING THE APPLIANCE
................................................................................................................ 3
P
RECAUTIONS NOT TO DAMAGE THE APPLIANCE
............................................................................ 4
P
RECAUTIONS IN CASE OF APPLIANCE FAILURE
.............................................................................. 5
O
THER PRECAUTIONS
................................................................................................................. 5
DESCRIPTION OF THE APPLIANCE ......................................................................................... 6
T
ECHNICAL CHARACTERISTICS
..................................................................................................... 6
I
MPLEMENTATION POTS
............................................................................................................... 6
C
ONTROL PANEL
........................................................................................................................ 7
USE OF THE APPLIANCE .......................................................................................................... 7
D
ISPLAY
.................................................................................................................................... 7
V
ENTILATION
.............................................................................................................................. 8
STARTING-UP AND APPLIANCE MANAGEMENT ................................................................... 8
B
EFORE THE FIRST USE
............................................................................................................... 8
I
NDUCTION PRINCIPLE
................................................................................................................. 8
S
ENSITIVE TOUCH
....................................................................................................................... 8
P
OWER SELECTION ZONE
“SLIDER”
AND TIMER SETTING ZONE
...................................................... 9
S
TARTING-UP
............................................................................................................................. 9
P
AN DETECTION
......................................................................................................................... 9
R
ESIDUAL HEAT INDICATION
...................................................................................................... 10
B
OOSTER FUNCTION
................................................................................................................. 10
T
IMER
..................................................................................................................................... 11
A
UTOMATIC COOKING
............................................................................................................... 12
S
TOP&GO FUNCTION
................................................................................................................ 13
« K
EEP WARM » FUNCTION
....................................................................................................... 13
C
ONTROL PANEL LOCKING
......................................................................................................... 14
B
RIDGE AND AUTOMATIC BRIDGE FUNCTION
............................................................................... 14
“C
HEF“ FUNCTION
..................................................................................................................... 15
G
RILL FUNCTION
....................................................................................................................... 15
C
LEAN-LOCK FUNCTION
............................................................................................................ 16
B
RIGHTNESS SETTING
.............................................................................................................. 16
L
OUDNESS SETTING
................................................................................................................. 16
C
OOKING MEMORY FUNCTION
.................................................................................................... 17
P
OT MOVE FUNCTION
................................................................................................................ 17
O
PERATING TIME LIMITATION
..................................................................................................... 18
COOKING ADVICE ................................................................................................................... 19
P
AN QUALITY
........................................................................................................................... 19
P
AN DIMENSION
........................................................................................................................ 19
E
XAMPLES OF COOKING POWER SETTING
.................................................................................... 20
MAINTENANCE AND CLEANING ............................................................................................ 20
WHAT TO DO IN CASE OF A PROBLEM ................................................................................ 21
ENVIRONMENT PRESERVATION ........................................................................................... 22
INSTALLATION INSTRUCTIONS ............................................................................................. 23
ELECTRICAL CONNECTION ................................................................................................... 24
Page 3

3
SAFETY
Precautions before using
• Unpack all the materials.
• The installation and connecting of the appliance must be done
by a qualified electrican. The manufacturer can not be
responsible for damage caused by building-in or connecting
errors.
• The appliance must be installed in a proper worktop.
• This domestic appliance is exclusively for the cooking of food,
to the exclusion of any other domestic, commercial or industrial
use.
• Remove all labels and self-adhesives from the ceramic glass.
• Do not change or alter the appliance.
• The cooking plate can not be used as a working surface.
• The appliance must be grounded and connected conforming to
local standards.
• Do not use an extension cable to connect it.
• The appliance can not be used above a dishwasher or a tumble-
dryer: steam may damage the electronic components.
• The appliance is not intended to be operated by means of
external timer or separate remote control system.
Using the appliance
• Switch the heating zones off after using.
• Keep an eye on cooking using grease or oils: they may quickly
ignite.
• Be careful not to burn yourself while or after using the appliance.
• Make sure no cable of any fixed or moving appliance contacts
with the glass or the hot saucepan.
• Magnetic objects (credit cards, floppy disks, calculators) should
not be placed near to the operating appliance.
• Metallic objects such as knives, forks, spoons and lids should
not be placed on the hob surface since they can get hot.
• In general do not place any metallic object except cooking pots
on the glass surface.
Page 4

4
• Never cover the appliance with a cloth or a protection sheet.
This may become very hot and catch fire.
• This appliance is not intended for use by persons (including
children) with reduced physical, sensory or mental capabilities,
or lack of experience and knowledge, unless they have been
given supervision or instruction concerning use of the appliance
by a person responsible for their safety.
• Children should be supervised to ensure that they do not play
with the appliance.
• This appliance is not intended to be operated by means of an
external timer or separate remote-control system.
Precautions not to damage the appliance
• Unfinished pan bottoms or damaged saucepans (non
enamelled cast iron pots,) may damage the ceramic glass.
• Sand or other abrasive materials may damage ceramic glass.
• Avoid dropping objects, even small ones, on the vitroceramic
glass.
• Do not hit the edges of the glass with saucepans.
• Make sure that the ventilation of the appliance works according
to the manufacturer’s instructions.
• Do not put or leave empty saucepans on the vitroceramic hobs.
• Sugar, synthetic materials or aluminium foil must not contact the
heating zones. These may cause breaks or other alterations of
the vitroceramic glass by cooling: switch off the appliance and
take them immediately off the hot heating zone (be careful: do
not burn yourself).
• WARNING: Danger of fire: do not store items on the cooking
surface.
• Never place any hot sauce pan over the control panel.
• If a drawer is situated under the installed appliance, make sure
the space between the content of the drawer and the underside
of the appliance is at least 2 cm. This is essential to ensure
correct ventilation.
• Never put any flammable object (eg. sprays) into the drawer
situated under the vitroceramic hob. Cutlery drawers must be
resistant to heat.
Page 5

5
Precautions in case of appliance failure
• If a defect is noticed, switch off the appliance and turn off the
electrical supply.
• If the ceramic glass is cracked or fissured, you must disconnect
the appliance at the switchboard and contact the after sales
service.
• Repairing has to be done by specialists. Do not open the
appliance by yourself.
• WARNING: If the surface is cracked, switch off the appliance to
avoid the possibility of electric shock.
Other precautions
• Make sure that the cooking pan is always centred on the
cooking zone. The bottom of the pan should cover as much as
possible of the cooking zone.
• For the users of cardiac pacemakers. The magnetic field may
influence the operation. We recommend getting information
from the retailer or the doctor.
• Do not place aluminium or synthetic material containers on the
hob; they could melt on residual hot cooking zones.
• NEVER try to extinguish a fire with water, but switch off the
appliance and then cover flame e.g. with a lid or a fire blanket.
THE USE OF EITHER POOR QUALITY POT OR ANY
INDUCTION ADAPTOR PLATE FOR NON-MAGNETIC
COOKWARE RESULTS IN A WARRANTY BREACH.
IN THIS CASE, THE MANUFACTURER CANNOT BE
HELD RESPONSIBLE FOR ANY DAMAGE CAUSED TO
THE HOB AND/OR ITS E
NVIRONMENT.
Page 6
6
DESCRIPTION OF THE APPLIANCE
Technical characteristics
Type 1773/2
1775/2
1777
/2
1776/2 1778/3
Total power
7400 W
11100 W
11100 W
Energy consumption for the hob EC
hob
** 187.4 Wh/kg
188 Wh/kg
188 Wh/kg
H
eating zone
24
0 x 200 mm
24
0 x 200 mm
24
0 x 200 mm
Minimum detection
Ø 100 mm
Ø 100 mm
Ø 100 mm
Nominal
level
* 2100 W
2100 W
2100 W
Power
level
* 2600 W
2600 W
2600 W
Super
Power
level
* 3700 W
3700 W
3700 W
Central
heating zone
-
300 x 200
mm
Ø 280 mm
Minimum detection - Ø 90 /220 mm Ø 90 /220 mm
Nominal level* - 2100 W 1850 / 2600 W
Power level* - 2600 W 2500 / 3300 W
Super Power level* - 3700 W 3000 / 5500 W
Cookware
**
Ø 150 mm
Ø 150 mm
Ø 150 mm
Energy consumption EC
cw
** 182.8 Wh/kg
182.8 Wh/kg
182.8 Wh/kg
Cookware
**
Ø 180 mm
Ø 180 mm (x2)
Ø 180 mm (x2)
Energy consumption EC
cw
** 190.6 Wh/kg
190.6 Wh/kg
190.6 Wh/kg
Cookware
**
Ø 210 mm (x2)
Ø 210 mm (x2)
Ø 210 mm (x2)
Energy consumption
ECcw** 188.1 Wh/kg
188.1 Wh/kg
188.1 Wh/kg
* The given power may change according to the dimensions and material of the pan.
** calculated according to the method of measuring performance (EN 60350-2).
Implementation pots
Important: For optimal effect, it is important that the pan is centered on area heating zone (see
diagram).
Page 7
7
Control panel
USE OF THE APPLIANCE
Display
Display Designation Description
0 Zero The heating zone is activated.
1…9 Power level Selection of the cooking level.
U No pan detection No pan or inadequate pan.
A Heat accelerator Automatic cooking.
E Error message Electronic failure.
H Residual heat The heating zone is hot.
P 1st Booster The 1st Booster is activated.
2nd Booster The 2nd Booster is activated.
L Locking Control panel locking.
Keep warm Maintain automatically at approximately 42°C.
Keep warm Maintain automatically at approximately 70°C.
Keep warm Maintain automatically at approximately 94°C.
II Stop & Go The hob is in pause.
Grill Function The Grill Function is activated.
Keep warm
key
Booster key
MY function
Counter light
Timer / Counter
display
Booster selection zone “SLIDER” and timer setting
Menu key
On / off key
Timer
light
Power
display
Menu display
Page 8

8
Ventilation
The cooling system is fully automatic. The cooling fan starts with a low speed when the heat
created by the electronic system reaches a certain level. The ventilation starts its high speed
when the hob is intensively used. The cooling fan reduces its speed and stops automatically
when the electronic circuit is cooled enough.
STARTING-UP AND APPLIANCE MANAGEMENT
Before the first use
Clean your hob with a damp cloth, and then dry the surface thoroughly. Do not use detergent.
This may cause blue-tinted colour on the glass surface.
Induction principle
An induction coil is located under each heating zone. When it is engaged, it produces a variable
electromagnetic field which produces inductive currents in the ferromagnetic bottom plate of the
pan. The result is a heating-up of the pan located on the heating zone.
Of course the pan has to be suitable:
• All ferromagnetic pans are recommended (please test to see if it attracts a magnet): cast
iron and steel pans, enamelled pans, stainless-steel pans with ferromagnetic bottoms…
• NOT suitable: copper, pure stainless-steel, aluminium, glass, wood, ceramic,
stoneware,…
The induction heating zone adapts automatically to the size of the pan. Pans with too small
diameter may not work. This diameter is varying in relationship to the heating zone diameter.
If the pan is not suitable to the induction hob the display will show [ U ].
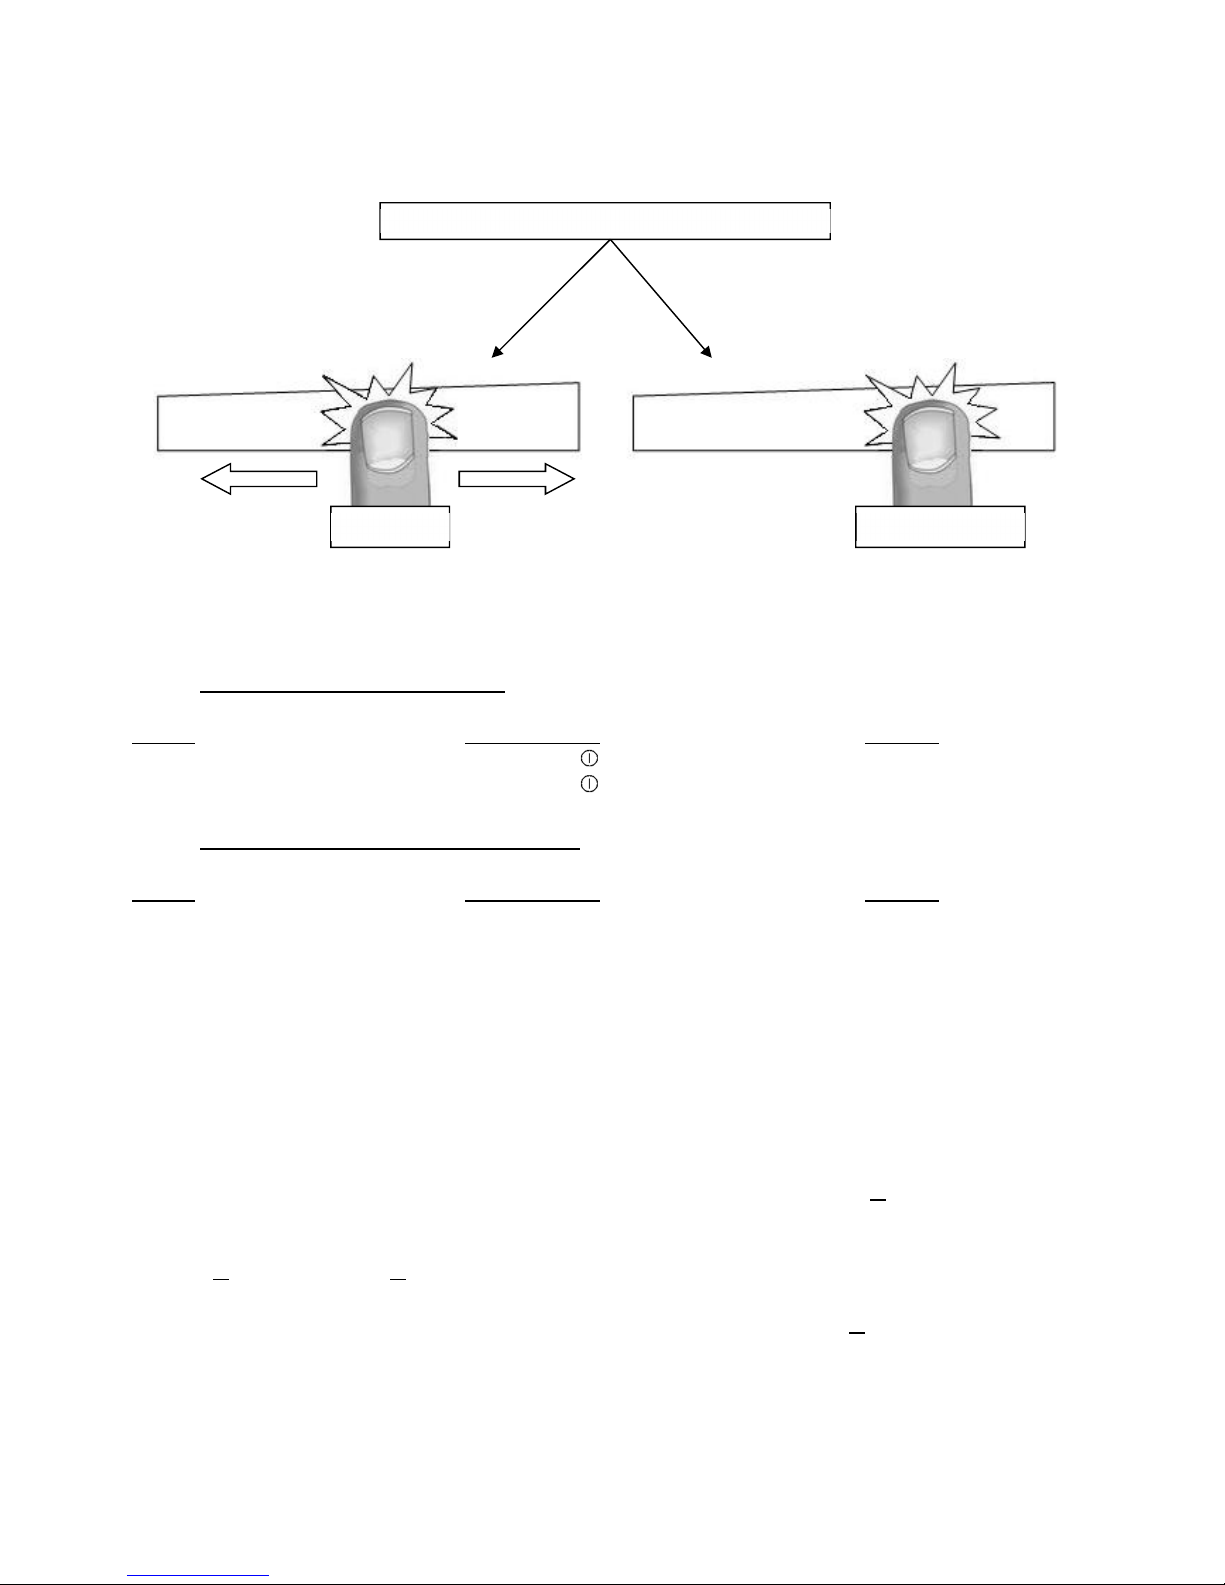
Sensitive touch
Your induction hob is equipped with electronic controls with sensitive touch keys. When your
finger presses the key, the corresponding command is activated. This activation is validated by
a control light, a letter or a number in the display and/or a “beep” sound.
For normal use, press only one key at any time.
Page 9
9
Power selection zone “SLIDER” and timer setting zone
To select the power with the slider, slide your finger on the “SLIDER” zone. You can also
directly access a particular level if you put your finger directly on the chosen level.
Starting-up
• Start up / switch off the hob:
Action Control panel Display
To start press key [ ] for 2 sec. [ 0 ] are blinking
To stop press key [ ] for 2 sec. nothing or [ H ]
• Start up / switch off a heating zone:
Action Control panel Display
Zone selection press display [ 0 ] selected [ 0 ]
To set slide on the “SLIDER“ [ 0 ] to [ 9 ]
(adjust the power) to the right or to the left
To stop slide to [ 0 ] on “SLIDER“ [ 0 ] or [ H ]
If no action is made within 20 seconds the electronics returns to waiting position.
Pan detection
The pan detection ensures perfect safety. The induction doesn’t work:
• If there is no pan on the heating zone or if this pan is not suitable to the induction. In this
case it is impossible to increase the power and the display shows [ U ]. This symbol
disappears when a pan is put on the heating zone.
• If the pan is removed from the heating zone the operation is stopped. The display shows
[ U ]. The symbol [ U ] disappears when the pan is put back on the heating zone. The
cooking continues with the power level set before.
• After use, switch the heat element off: don’t let the pan detection [ U ] active.
Power selection zone “SLIDER” and timer setting
“SLIDER“ Direct access
Page 10

10
Residual heat indication
After the switching off of a heating zone or the complete stop of the hob, the heating zones
are still hot and indicates [ H ] on the display.
The symbol [ H ] disappears when the heating zones may be touched safely.
As long as the residual heat indicators are on, don’t touch the heating zones and don’t put any
heat sensitive object on them. There are risks of burn and fire.
Booster function
The Booster function [ P ] and the Double Booster [ ] adds a booster power to the selected
heating zone.
If this function is activated the heating zones work for 10 minutes with an ultra high Booster.
Booster is useful for example to heat up rapidly big quantities of water, like rice, pasta or
noodles.
• Start up / Stop the booster function:
Action Control panel Display
Zone selection Press key [ 0 ] from the zone [ 0 ]
Start up the Booster Press key [ B² ] [ P ]
Stop the Booster Slide on the “SLIDER“ [ 9 ] to [ 0 ]
• Start up / Stop the double booster function:
Action Control panel Display
Selection of the zone Press key [ 0 ] [ 0 ]
Start up Booster Press key [ B² ] [ P ]
Start up Double Booster Re-press key [ B² ] [ and P ]
Stop the Double Booster Press key [ B² ] [ P ]
Stop Booster Slide on the “SLIDER“ [ 9 ] to [ 0 ]
• Power management:
The total cooking hob is equipped with an overall maximum of Booster power. When the Booster
function is activated, the electronic system automatically regulates all “Boosters” selected to
equalise the available power to each element selected for booster. The display is blinking on [ 9 ]
for a few seconds and then shows the maximum of Booster allowed :
Heating zone selected The other heating zone: (example: Booster level 9)
[ P ] is displayed [ 9 ] goes to [ 6 ] or [ 8 ] depending on the type of zone
Page 11

11
Timer
The timer is able to be used simultaneous with all heating zones and this with different time
settings (from 0 to 99 minutes) for each heating zone.
• Setting and modification of the cooking time :
Example for 16 minutes at power 7 :
Action Control panel Display
Zone selection press display [ 0 ] selected [ 0 ] and control light
on
Select the power level slide on the “SLIDER“ to [ 7 ] [ 7 ]
Select « Timer » press 3s the timer/counter display [ 00 ]
Set the tens slide on the “SLIDER“ to [ 1 ] [ 1 blinking ] [ 0 fixed ]
Validate the tens press display [ 10 ] [ 1 fixed ] [ 0 blinking ]
Set the units slide on the “SLIDER“ to [ 6 ] [ 1 fixed ] [ 6 blinking ]
Validate the units wait 2 seconds [ 16 ]
The time is confirmed and the cooking starts.
• To stop the cooking time:
Example for 13 minutes at power 7 :
Action Control panel Display
Zone selection press display [ 7 ] selected [ 7 ] and control light
on
Select « Timer » press 3s key [ 13 ] [ 13 ]
Set the tens slide on the “SLIDER“ to [ 0 ] [ 0 blinking ] [ 3 fixed ]
Validate the tens press display [ 10 ] [ 0 fixed ] [ 3 blinking ]
Set the units slide on the “SLIDER“ to [ 0 ] [ 0 fixed ] [ 0 blinking ]
Validate the units wait 2 seconds [ 00 ]
• Automatic stop at the end of the cooking time:
As soon as the selected cooking time is finished the timer displays blinking [ 00 ] and a sound
rings.
To stop the sound and the blinking, press the key [ 00 ].
Page 12
12
• Egg timer function :
Example for 29 minutes :
Action Control panel Display
Activate the hob press display [ ] zone control lights are
on
Select« Timer » press 3s [CL] display [ 00 ]
Set the units slide on the “SLIDER“ to [ 2 ] [ 2 blinking ] [ 0 fixed ]
Validate the units press display [ 20 ] [ 2 fixed ] [ 0 blinking ]
Set the tens slide on the “SLIDER“ to [ 9 ] [ 2 fixed ] [ 9 blinking ]
Validate the tens wait 2 seconds [ 29 ]
After a few seconds the control light stops blinking.
As soon as the selected cooking time is finished the timer display will blink [ 00 ] and a sound
will be heard.
To stop the sound and the blinking, press the display [ 00 ]. The hob switches off.
Automatic cooking
All the cooking zones are equipped with an automatic “go and stop” cooking function. The
cooking zone starts at full power for a certain time, and then reduces automatically its power to
the pre-selected level.
• Start-up :
Action Control panel Display
Zone selection press display [ 0 ] selected [ 0 ] and control light
on
Full power setting slide on the “SLIDER“ and keep on
the power level the power level is
blinking with [ A ]
Selected power
Automatic cooking
time (Min:S)
1 0:40
2 1:12
3 2:00
4 2:56
5 4:16
6 7:12
7 2:00
8 3:12
9 - : -
• Switching off the automatic cooking :
Action Control panel Display
Zone selection press on the zone the power level is
blinking with [ A ]
Power level selection slide on the “SLIDER“ [ 0 ] to [ 9 ]
Page 13
13
Stop&Go function
This function stops the entire hob’s cooking activity temporarily and allows restarting with the
same settings.
• Startup/stop the pause function :
Action Control panel Display
Enter on the Menu Press menu key [ ] the menu is displayed
Engage pause Press on the “SLIDER“ under the
[ II ] light [ II ] on display
Stop the pause Press 3s on the “SLIDER“ under the
[ II ] light Previous setting on
display
Recall Function
After switching off the hob [ ], it is possible to recall the last settings.
• cooking stages of all cooking zones (Power)
• minutes and seconds of programmed cooking zone-related timers
• Keep warm function
The recall procedure is following:
• Press the key [ ]
• Press on the “SLIDER“ under the [ II ] light
The previous settings are again active.
« Keep warm » Function
This function allows the cooktop to reach and maintain automatically a temperature of
approximately 42°C, approximately 70°C or approximately 94°C.
This will avoid liquids overflowing and burning on the bottom of the pan.
• To engage, to start the function « Keep warm » :
Action Control panel Display
Zone selection Press display [ 0 ] selected [ 0 ] to [ 9 ] or [ H ]
42°C to engage Press on key [ ] [ ]
70°C to engage Press on key [ ] [ ]
94°C to engage Press on key [ ] [ ]
To stop Slide on the “SLIDER“ [ 0 ] to [ 9 ] or [ H ]
This function can be started independently on all the heating zones.
When the pan is removed from the cooking zone, the "Keep warm" function remains active for
approximately 10 minutes.
The maximum duration of “keeping warm” is 2 hours.
Page 14
14
Control panel locking
To avoid accidentally activating or interfering with the setting of the cooking zones , in particular
during cleaning, the control panel can be locked (with exception of the On/Off key [ ]).
• Lock :
Action Control panel Display
Start Press on key [ ] for 2 sec. [ 0 ] or [ H ]
Enter on the Menu Press menu key [ ] the menu is displayed
Locking the hob Press on the “SLIDER“ under the
[ ] light [ L ] on displays
• Unlock :
Action Control panel Display
Enter on the Menu Press menu key [ ] the menu is displayed
Unlock the hob Press on the “SLIDER“ under the
[ ] light during 3s [ 0 ] or [ H ]
The hob is unlocked when the [ L ] disappears.
Bridge and automatic Bridge Function
This function allows the use of 2 cooking zones at the same time with the same features as a
single cooking zone. With this function the Booster function isn’t allowed.
Action Control panel Display
Start up the bridge Place a pan on one of the two zones
that will be bridged and press
simultaneously the corresponding
selection keys
or put a great pan on the 2 zones [ 0 ] [ ] on rear zone
Select the power level and slide on the “SLIDER“ [ 0 ] to [ 9 ] and [ ]
on rear zone
Stop the bridge Press simultaneously on the two
bridged zones to bridge [ 0 ]
Page 15
15
“Chef“ function
This function changes the hob in 2 or 3 big zones.
The front and rear zones are automatically switched to the bridge function with a certain power.
This power level can be set here and then becomes the new standard setting. With the Chef
function you change your hob in a professional appliance where you can set the zones for
intensive cooking, simmering or keeping warm.
• Start up the “Chef“ function:
Action Control panel Display
Enter on the Menu Press menu key [ ] the menu is displayed
Engage “Chef“ function Press on the “SLIDER“ under the
[ ] light [ C ], [ H ], [ E ], [ F ]
then
[ 3 ] and [ ], [6], [ 9 ]
and [ ]
Selection of the “Chef“ zone Press key of the left, middle or right [ 0 ] to [ 9 ] and [ ]
on rear zone
Change the power level Slide on the “SLIDER“ [ 0 ] to [ 9 ] and [ ]
on rear zone
• Stop the “Chef“ function:
Action Control panel Display
Enter on the Menu Press menu key [ ] the menu is displayed
Stop the “Chef“ function Press on the “SLIDER“ under the
[ ] light [ 0 ]
Grill function
This function allows the optimal use of the grill plate “zub.-Nr. 1303” with combining two areas
and using appropriate powers.
• Start up the Grill function:
Action Control panel Display
Enter on the Menu Press menu key [ ] the menu is displayed
Engage the Grill function Press on the “SLIDER“ under the
[ GRILL ] light [ ] and [ ] on rear
zone
Change the power level Slide on the “SLIDER“ [ ] and [ ] on rear
zone
Page 16
16
• Stop the Grill function:
Action Control panel Display
Enter on the Menu Press menu key [ ] the menu is displayed
Stop the Grill function Press on the “SLIDER“ under the
[ GRILL ] light [ 0 ]
Clean-Lock function
To avoid accidentally activating or interfering with the settings of the cooking zones, for instance
when cleaning, the control panel can be locked (with exception of the On/Off key [ ]).
• Start up the Clean-Lock function:
Action Control panel Display
Enter on the Menu Press menu key [ ] the menu is displayed
Engage the Clean-Lock Press on the “SLIDER“ under the
[ CLEAN ] light [ 20 ], [ 19 ], [ 18 ]…
on timer/counter
display
Brightness Setting
This function allows to change the brightness level.
• Change the Brightness level:
Action Control panel Display
Enter on the Menu Press menu key [ ] the menu is displayed
Enter on the Brightness setting Press on the “SLIDER“ under the
[ ] light the “SLIDER“ displays
the brightness level
Change the Brightness level Slide on the “SLIDER“ the “SLIDER“ displays
the brightness level
Validate the setting Press menu key [ ] [ 0 ]
Loudness Setting
This function allows to change the loudness level.
• Change the loudness level:
Action Control panel Display
Enter on the Menu Press menu key [ ] the menu is displayed
Enter on the Loudness setting Press on the “SLIDER“ under the
[ ] light the “SLIDER“ displays
the loudness level
Change the Loudness level Slide on the “SLIDER“ the “SLIDER“ displays
the loudness level
Validate the setting Press menu key [ ] [ 0 ]
Page 17
17
Cooking memory function
After having set cooking level and timer value for the zone, it is possible to memorize the
settings on the same zone.
• cooking stages of cooking zone (power)
• minutes and seconds of programmed cooking zone-related timer
• Keep warm function
• Automatic cooking function
• Memorize setting on a zone:
Action Control panel Display
Zone selection press display [ 0 ] selected [ 0 ]
to set (adjust the power slide on the “SLIDER“ [ 7 ]
on « 7 », for example) to the right or to the left
Select« Timer » press 2s timer/counter display [ 00 ]
Set the units slide on the “SLIDER“ to [ 9 ] [ 0 fixed ] [ 9 blinking ]
Validate the units press display [ 09 ] [ 0 blinking ] [ 9 fixed ]
Set the tens slide on the “SLIDER“ to [ 2 ] [ 2 blinking ] [ 9 fixed ]
Validate the tens wait 2 seconds [ 29 ]
Select the zone press display [ 7 ] selected [ 7 ]
Enter on the Menu Press menu key [ ] the menu is displayed
Memorize setting Press 3s on the “SLIDER“ under the
[ ] light [ ] next to the [ 7 ]
• Recall setting on a zone:
Action Control panel Display
Select a zone with [ ] Press display [ 0 ] selected [ 0 ] and [ ]
Enter on the Menu Press menu key [ ] the menu is displayed
Memorize setting Press on the “SLIDER“ under the
[ ] light [ ] next to the [ 7 ]
and [ 29 ] on the
timer display
• Delete setting on a zone:
Action Control panel Display
Select a zone with [ ] Press display [ 0 ] selected [ 0 ] and [ ]
Enter on the Menu Press menu key [ ] the menu is displayed
Memorize setting Press 3s on the “SLIDER“ under the
[ ] light [ 0 ]
Pot move function
This function allows to invert 2 zones with all parameters.
• Invert 2 zones:
Action Control panel Display
Select a zone Press 3s on display of a zone All other zones blink
Move the zone Press another zone or move a pot The two zones are
switched
Page 18

18
Operating time limitation
Each cooking zone is equipped with an operating time limitation: the cooking zone is
automatically switched off after a certain time without any change of settings. This time is
varying according to the selected power level as described in the table below.
Power level
Operating time
(H : Min)
1 08:36
2 06:42
3 05:18
4 04:18
5 03:30
6 02:18
7 02:18
8 01:48
9 01:30
Page 19
19
COOKING ADVICE
Pan quality
Suitable materials: steel, enamelled steel, cast iron, ferromagnetic stainless-steel, aluminium
with ferromagnetic bottom.
Not suitable materials: aluminium and stainless-steel without ferromagnetic bottom, copper,
brass, glass, ceramic, porcelain.
The manufacturers specify if their products are compatible with induction.
To check if pans are compatible:
• Put a little water in a pan placed on an induction heating zone set at level [ 9 ].This water
must heat in a few seconds.
• A magnet sticks to the bottom of the pan.
Certain pans can make noise when they are placed on an induction cooking zone. This noise
doesn’t mean any failure of the appliance and doesn’t influence the cooking operation.
The composition of the pan base can affect the evenness of the cooking results and power
reception by the inductors.
Only use pots and pans with smooth bases. Rough bases will scratch the ceramic glass.
Where possible, use pans with vertically straight side. If a pan has angular sides, induction also
acts on the side of the pan. The sides of the pan may discolour.
Pan dimension
The cooking zones are, within a certain limit, automatically adapted to the diameter of the pan.
However the bottom of the pan must have a minimum diameter according to the corresponding
cooking zone.
To obtain the best efficiency of your hob, please place the pan in the centre of the cooking
zone.
Page 20
20
Examples of cooking power setting
(the values below are indicative)
1 to 2
Melting
Reheating
Sauces, butter, chocolate, gelatine
Dishes prepared beforehand
2 to 3
Simmering
Defrosting
Rice, pudding, sugar syrup
Dried vegetables, fish, frozen products
3 to 4
Steam
Vegetables, fish, meat
4 to 5 Water
Steamed potatoes, soups, pasta,
fresh vegetables
6 to 7
Medium cooking,
Simmering
Meat, liver, eggs, sausages, pancakes
7 to 8
Cooking
Potatoes, fritters, waffles
9
Frying, roasting, Boiling
water
Steaks, omelettes, fried dishes, water
P or
Frying, roosting
Boiling water
scallops, steaks
Boiling significant quantities of
water
MAINTENANCE AND CLEANING
Switch-off the appliance before cleaning.
Do not clean the hob if the glass is too hot because there is a risk of burning.
• Remove light marks with a damp cloth with washing up liquid diluted in a little water.
Then rinse with cold water and dry the surface thoroughly.
• Highly corrosive or abrasive detergents and cleaning equipment are likely to cause
scratches and must be absolutely avoided.
• Do not ever use any steam-cleaner or pressure washer.
• Do not use any object that may scratch the ceramic glass.
• Ensure that the pan is dry and clean. Ensure that there are no grains of dust on your
ceramic hob or on the pan. Sliding rough saucepans will scratch the surface.
• Spillages of sugar, jam, jelly, etc. must be removed immediately. You will thus prevent
the surface being damaged.
Page 21

21
WHAT TO DO IN CASE OF A PROBLEM
The hob or the cooking zone doesn’t start-up :
• The connection to the network is wrong.
• The protection fuse has disconnected.
• The locking function is activated.
• The sensitive keys are covered with grease or water.
• An object is put on a key.
The control panel displays [ U ]:
• There is no pan on the cooking zone.
• The pan is not compatible with induction.
• The bottom diameter of the pan is too small.
The control panel displays [ E ] :
• The electronic system is defective.
• Disconnect and reconnect the hob at the circuit breaker.
One or all cooking zone cut-off :
• The safety system is activated.
• You forgot to turn off the cooking zone for a long time.
• One or more sensitive keys are covered.
• The pan is empty and its bottom overheated.
• The hob also has an automatic reduction of power level to prevent overheating
Continuous ventilation after turning off the hob :
• This is not a failure; the fan continues to run to protect the electronic components.
• The fan cooling stops automatically.
The automatic cooking system doesn’t start-up :
• The cooking zone is still hot [ H ].
• The highest power level is set [ 9 ].
The control panel displays [ L ] :
• Refer to the chapter “control panel locking” page.
The control panel displays [ U ] :
• Refer to the chapter “Keep warm“.
The control panel displays [ II ]:
• Refer to the chapter “Stop&Go“.
The control panel displays [ ] or [ Er03 ] :
• An object or liquid covers the control keys. The symbol disappear as soon as the key is
released or cleaned.
The control panel displays [ E2 ] :
• The hob is overheated, let it cool and then turn it on again.
The control panel displays [ E8 ] :
• The air inlet of the ventilator is obstructed, release it.
The control panel displays [ U400 ] :
• The hob is not connected to the network. Check the connection and reconnect the hob.
The control panel displays [ Er47 ] :
• The hob is not connected to the network. Check the connection and reconnect the hob.
If one of the symbols above persists, call the SAV.
Page 22

22
ENVIRONMENT PRESERVATION
• The materials of packing are ecological and recyclable.
• The electronic appliances are composed of recyclable, and sometimes harmful materials
for the environment, but necessary to the proper operation and the safety of the
appliance.
• Don't throw your appliance into the household rubbish
• Get in touch with the waste collection centre of your
council that is familiar with the recycling of household
Page 23

23
INSTALLATION INSTRUCTIONS
The installation comes under the exclusive responsibility of specialists.
The installer is held to respect the legislation and the standards enforce in his home country.
How to stick the gasket:
The gasket supplied with the hob avoids all infiltration of liquids in the cabinet.
His installation has to be done carefully, in conformity of the following drawing.
Warning: Do not apply sealant between the bottom side of the hob and worktop
Fitting - installing:
• The cut out sizes are:
Type Cut size Glass size Cut size of flush mouting
Width Depth Width Depth Thickness Width Depth Radius
1773/2 560
490
654 524 7 650 520 4
1775/2 750
490
804 524 7 800 520 4
1776/2 750
490
804 524 7 800 520 4
1777/2 890
390
914 414 7 910 410 4
1778/3 850
490
904 524 7 900 520 4
• Ensure that there is a distance of 50 mm between the hob and the wall or sides.
• The hobs are classified as “Y” class for heat protection. Ideally the hob should be installed
with plenty of space on either side. There may be a wall at the rear and tall units or a wall
at one side. On the other side, however, no unit or divider must stand higher than the
hob.
• The piece of furniture or the support in which the
hob is to be fitted, as well as the edges of
furniture, the laminate coatings and the glue used
to fix them, must be able to resist temperatures of
up to 100 °C.
• The mural rods of edge must be heat-resisting.
• Not to install the hob to the top of a not ventilated
oven or a dishwasher.
• To guarantee under the bottom of the hob casing
a space of 20 mm to ensure a good air
circulation of the electronic device.
• If a drawer is placed under the work, avoid to put
into this drawer flammable objects (for
example: sprays) or not heat-resistant objects.
• Provide a ventilation opening from 4 mm just
under the worktop over a width of min. 600 mm for sufficient cooling of the hob.
Stick the gasket (2) two
millimeters from the external
edge of the glass, after removing
the protection sheet (3).
Page 24

24
• Materials which are often used to make worktops expand on contact with water. To protect
the cut out edge, apply a coat of varnish or special sealant. Particular care must be given
to applying the adhesive joint supplied with the hob to prevent any leakage into the
supporting furniture. This gasket guaranties a correct seal when used in conjunction with
smooth work top surfaces.
• The safety gap between the hob and the cooker hood placed above must respect the
indications of the hood manufacturer. In case of absence of instructions respect a distance
minimum of 760 mm.
• The connection cord should be subjected, after building, with no mechanical constraint,
such for example of the fact of the drawer.
• WARNING: Use only hob guards designed by the manufacturer of the cooking appliance
or indicated by the manufacturer of the appliance in the instructions for use as suitable or
hob guards incorporated in the appliance. The use of inappropriate guards can cause
accidents.
ELECTRICAL CONNECTION
• The installation of this appliance and the connection to the electrical network should be
entrusted only to an electrician perfectly to the fact of the normative regulations and
which respects them scrupulously.
• Protection against the parts under tension must be ensured after the building-in.
• The data of connection necessary are on the stickers place on the hob casing near the
connection box.
• The connection to the main must be made using an earthed plug or via an omnipolar
circuit breaking device with a contact opening of at least 3 mm.
• The electrical circuit must be separated from the network by adapted devices, for
example: circuit breakers, fuses or contactors.
• If the appliance is not fitted with an accessible plug, disconnecting means must be
incorporated in the fixed installation, in accordance with the installation regulations.
• The inlet hose must be positioned so that it does not touch any of the hot parts of the hob
or oven.
Caution!
This appliance has only to be connected to a network 230 V~ 50/60 Hz.
Connect always the earth wire.
Respect the connection diagram.
The connection box is located underneath at the back of the hob casing. To open the cover use
a medium screwdriver. Place it in the slits and open the cover.
Page 25

25
CONNECTION OF THE HOB FOR 1773
/2
– 1775/2 – 1777/2
* calculated with the simultaneous factor following the standard EN 60 335-2-6
CONNECTION OF THE HOB FOR 1776/2 – 1778/3
* calculated with the simultaneous factor following the standard EN 60 335-2-6
Caution! Be careful that the cables are correctly engaged and tightened.
Mains Connection Supply cord Supply cord Wiring diagram Circuit braker
230 V~ 50/60 Hz 1 phase +N 3 x 2,5 mm2
H 05 VV - F
H 05 RR - F
25 A *
400 V~ 50/60Hz 2 phases + N 4 x 1,5 mm2
H 05 VV - F
H 05 RR - F
16 A *
400 V~ 50/60Hz
(NL)
2 phases +
2N
5 x 1,5 mm2
H 05 VV - F
H 05 RR - F
16 A *
230 V~ 50/60 Hz 2 phases 3 x 2,5 mm2
H 05 VV - F
H 05 RR - F
25 A *
230 V~ 50/60 Hz
(BE)
3 phases 4 x 1,5 mm2
H 05 VV - F
H 05 RR - F
16 A *
Mains Connection Supply cord Supply cord Wiring diagram Circuit braken
230 V~ 50/60 Hz 1 phase +N 3 x 4 mm2
H 05 VV - F
H 05 RR - F
40 A *
400 V~ 50/60Hz 2 phases + N 4 x 2,5 mm2
H 05 VV - F
H 05 RR - F
25 A *
400 V~ 50/60Hz
(NL)
2 phases + 2N 5 x 2,5 mm2
H 05 VV - F
H 05 RR - F
25 A *
400 V~ 50/60Hz 3 phases + N 5 x 1,5 mm2
H 05 VV - F
H 05 RR - F
16 A *
230 V~ 50/60 Hz
2 phases 3 x 4 mm2
H 05 VV - F
H 05 RR - F
40 A *
230 V~ 50/60 Hz
(BE)
3 phases 4 x 2,5 mm2
H 05 VV - F
H 05 RR - F
25 A *
We cannot be held responsible for any incident resulting from incorrect connection or
which could arise from the use of an appliance which has not been earthed or has been
equipped with a f
aulty earth connection.
Page 26

26
RESUMEN
SEGURIDAD ............................................................................................................................. 27
P
RECAUCIONES ANTES DE UTILIZARLA PARA COCINAR
................................................................. 27
U
TILIZACIÓN DEL APARATO
........................................................................................................ 28
P
RECAUCIONES PARA NO DETERIORAR EL APARATO
.................................................................... 29
P
RECAUCIONES EN CASO DE FALLO DEL APARATO
....................................................................... 30
O
TRAS PRECAUCIONES
............................................................................................................. 30
DESCRIPCIÓN DEL APARATO ............................................................................................... 31
C
ARACTERÍSTICAS TÉCNICAS
.................................................................................................... 31
D
ISPOSICIÓN DE CACEROLA
....................................................................................................... 31
Z
ONA DE MANDOS
.................................................................................................................... 32
UTILIZACIÓN DEL APARATO ................................................................................................. 32
I
NDICACIONES
.......................................................................................................................... 32
V
ENTILACIÓN
........................................................................................................................... 33
PUESTA EN MARCHA Y USO DEL APARATO ....................................................................... 33
A
NTES DE LA PRIMERA UTILIZACIÓN
............................................................................................ 33
P
RINCIPIO DE LA INDUCCIÓN
...................................................................................................... 33
T
ECLAS TÁCTILES
..................................................................................................................... 33
Z
ONA DE SELECCIÓN DE POTENCIA
“SLIDER”
Y AJUSTE DE MINUTERO
.......................................... 34
P
UESTA EN MARCHA
................................................................................................................. 34
D
ETECCIÓN DEL RECIPIENTE
..................................................................................................... 34
I
NDICADOR DE CALOR RESIDUAL
................................................................................................ 35
F
UNCIÓN POWER
...................................................................................................................... 35
F
UNCIÓN TEMPORIZADOR
......................................................................................................... 36
P
ROGRAMACIÓN DE LA COCCIÓN AUTOMÁTICA
: ........................................................................... 37
F
UNCIÓN PAUSA
....................................................................................................................... 38
F
UNCIÓN DE RECUPERACIÓN
..................................................................................................... 38
F
UNCIÓN “MANTENER CALIENTE
” ............................................................................................... 38
B
LOQUEO DE LA ZONA DE MANDOS
............................................................................................. 39
P
UENTE Y FUNCIÓN PUENTE AUTOMÁTICA
................................................................................... 39
F
UNCIÓN "CHEF
" ...................................................................................................................... 40
F
UNCIÓN DE PARRILLA “GRILL
“ .................................................................................................. 40
B
LOQUEO DE LA ZONA DE MANDOS
............................................................................................. 41
A
JUSTE DE BRILLO
.................................................................................................................... 41
C
ONFIGURACIÓN DE SONORIDAD
............................................................................................... 41
F
UNCIÓN DE MEMORIA DE COCINA
.............................................................................................. 42
F
UNCIÓN DE MOVIMIENTO DE CAZUELA
....................................................................................... 42
L
IMITACIÓN DE TIEMPO DE OPERACIÓN
....................................................................................... 43
CONSEJOS DE COCCIÒN ....................................................................................................... 44
C
ALIDAD DE LAS CACEROLAS
..................................................................................................... 44
D
IMENSIÓN DE LAS CACEROLAS
................................................................................................. 45
E
JEMPLOS DE AJUSTE DE LAS POTENCIAS DE COCCIÓN
................................................................ 45
CONSERVACIÓN Y LIMPIEZA ................................................................................................. 45
QUÉ HACER EN CASO DE PROBLEMA ................................................................................. 45
PROTECCIÓN DEL MEDIO AMBIENTE................................................................................... 47
INSTRUCCIONES DE INSTALACIÓN ...................................................................................... 48
CONEXIÓN ELÉCTRICA .......................................................................................................... 49
Page 27

27
SEGURIDAD
Precauciones antes de utilizarla para cocinar
• Retire todos los elementos del embalaje.
• La instalación y el conexionado eléctrico del aparato deben
encargarse a un especialista autorizado. El fabricante no será
responsable de los daños resultantes de un error de
empotramiento o de conexionado.
• El aparato sólo debe utilizarse si está montado e instalado en
un mueble y una superficie de trabajo homologados y
adaptados.
• Su utilización va únicamente destinada a los usos domésticos
habituales (preparación de alimentos), con exclusión de
cualquier otra utilización doméstica, comercial o industrial.
• Retire todas las etiquetas y autoadhesivos del cristal
vitrocerámico.
• No transforme ni modifique el aparato.
• La placa de cocción no debe servir como soporte ni como
superficie de trabajo.
• La seguridad sólo está asegurada si el aparato está conectado
a una toma de tierra de protección conforme a los reglamentos
vigentes.
• No utilice alargadoras para la conexión a la red eléctrica.
• El aparato no debe utilizarse encima de un lavavajillas o de una
secadora de ropa: los vapores de agua desprendidos podrían
deteriorar la electrónica.
• Este aparato no está previsto para el funcionamiento con un
reloj temporizador externo o un mando a distancia.
Page 28

28
Utilización del aparato
• Apague siempre los fogones después de utilizarlos.
• Vigile constantemente los guisos que utilizan grasas y aceites,
ya que son susceptibles de inflamarse rápidamente.
• Tenga cuidado del riesgo de quemaduras durante y después de
la utilización del aparato.
• Los niños no deben manipular el aparato.
• Asegúrese de que ningún cable eléctrico, fijo o móvil, del
aparato toca el cristal o el recipiente caliente.
• Los objetos magnetizables (tarjetas de crédito, disquetes
informáticos, calculadoras) no deben estar cerca del aparato en
funcionamiento.
• No coloque ningún objeto metálico, excepto los recipientes a
calentar. En caso de conexión accidental o de calor residual,
este objeto, según el material, tiene el riesgo de fundirse o de
empezar a arder.
• No cubra nunca el aparato con un trapo o con una hoja de
protección. Podría calentarse mucho y encenderse.
• Este aparato electrodoméstico puede ser usado por niños a
partir de 8 años e igualmente por personas con capacidades
físicas, sensoriales o mentales reducidas o que carezcan falta
de experiencia y conocimiento del producto si se les ha dado
la supervisión instrucción adecuada para el uso del mismo de
un modo seguro y entienden de igual manera los peligros que
puedan implicar.
• Los niños no deben usar éste electrodoméstico para jugar.
• La limpieza o el uso de éste aparato no debe realizarse por
niños sin supervisión.
Page 29

29
Precauciones para no deteriorar el aparato
• Las cacerolas con base sin pulir (fundición no esmaltada,…) o
estropeadas pueden dañar la vitrocerámica.
• La presencia de arena u otros materiales abrasivos puede
dañar la vitrocerámica.
• Evite dejar caer objetos, aunque sean pequeños, sobre la
vitrocerámica.
• No dé golpes a los bordes del cristal con las cacerolas.
• Asegúrese de que la ventilación del aparato se haga según las
instrucciones del fabricante.
• No coloque ni deje cacerolas vacías sobre la placa de cocción.
• Evite que azúcar, materiales sintéticos o papel de aluminio
toquen las zonas calientes. Estas substancias pueden, al
enfriarse, provocar roturas u otras modificaciones en la
superficie vitrocerámica: desconecte al aparato y retírelas
inmediatamente de la zona de cocción cuando aún está caliente
(atención: peligro de quemaduras).
• No almacenar objetos sobre la placa de cocción
• No coloque nunca recipientes calientes sobre la zona de los
mandos.
• Si hay un cajón situado bajo el aparato empotrado, asegúrese
que hay distancia suficiente (2 cm) entre el contenido de este
cajón y la parte inferior del aparato con el fin de asegurar una
buena ventilación.
• No deposite objetos inflamables (por ejemplo sprays) en el
cajón situado bajo la placa de cocción. Las eventuales bandejas
para cubiertos deben ser de material resistente al calor.
Page 30

30
Precauciones en caso de fallo del aparato
• Si se constata una avería, es necesario desconectar el aparato
y desenchufar la línea de alimentación eléctrica.
• En caso de desconchados o fisuras en la vitrocerámica es
imperativo desconectar el aparato de la red eléctrica y avisar al
servicio posventa.
• Las reparaciones sólo pueden ser realizadas por personal
especializado. En ningún caso abra el aparato usted mismo.
• ADVERTENCIA: Si la superficie está agrietada, apagar el
aparato para evitar la posibilidad de descargas eléctricas.
Otras precauciones
• Asegúrese siempre de que el recipiente de cocción esté
centrado en la zona de cocción. El fondo de la cacerola debe
cubrir, tanto como sea posible, la zona de cocción.
• Para usuarios que lleven un marcapasos, el campo magnético
puede influir en su funcionamiento. Le recomendamos se
asesore con el proveedor o el médico.
• No utilice recipientes de material sintético o de aluminio:
podrían fundirse sobre los fogones aún calientes.
• El deshecho de este aparato requiere un procedimiento
especial. Consulte con su administración local sobre las
posibilidades de reciclaje.
• No apagar nunca con agua un fuego. Apagar la zona de
cocción. Sofocar con cuidado las llamas con una tapa, una tapa
extintora u otro medio similar.
EL USO DE OLLAS INADECUADAS O DE UN CRISTAL
ADAPTADOR PARA INDUCCIÓN ORIGINA LA
CONCLUSIÓN PREMATURA DE LA GARANTÍA.
EL FABRICANTE NO ASUME NINGUNA
RESPONSABILIDAD POR DAÑOS QUE PUEDAN
PRODUCIRSE EN LA PLACA DE COCINA O EN SU
ENTORNO.
Page 31

31
DESCRIPCIÓN DEL APARATO
Características técnicas
Modelo 1773/2
1775/2
1777
/2
1776/2 1778/3
Potencia total
7400 W
11100 W
11100 W
Consumo energético para placas
EC
hob
**
187.4 Wh/kg 188 Wh/kg 188 Wh/kg
Fogón
24
0 x 200 mm
24
0 x 200 mm
24
0 x 200 mm
Diámetro mínimo
Ø 100 mm
Ø 100 mm
Ø 100 mm
Potencia nominal *
2100 W
2100 W
2100 W
Potencia de refuerzo *
2600 W
2600 W
2600 W
Doble
Potencia de refuerzo
* 3700 W
3700 W
3700 W
Fogón central
-
300 x 200
mm
Ø 280 mm
Diámetro mínimo
- Ø 90 /220 mm Ø 90 /220 mm
Potencia nominal *
- 2100 W 1850 / 2600 W
Potencia de refuerzo *
- 2600 W 2500 / 3300 W
Doble Potencia de refuerzo * - 3700 W 3000 / 5500 W
U
tensilios de cocina
**
Ø 150 mm
Ø 150 mm
Ø 150 mm
Consumo energetico EC
cw
** 182.8 Wh/kg
182.8 Wh/kg
182.8 Wh/kg
U
tensilios de cocina
**
Ø 180 mm
Ø 180 mm
(x2) Ø 180 mm (x2)
Consumo energetico EC
cw
** 190.6 Wh/kg
190.6 Wh/kg
190.6 Wh/kg
U
tensilios de cocina
**
Ø 210 mm (x2)
Ø 210 mm (x2)
Ø 210 mm (x2)
Consumo energetico EC
cw
** 188.1 Wh/kg
188.1 Wh/kg
188.1 Wh/kg
* la potencia puede variar en función de las dimensiones y de los materiales de las cacerolas.
** calculado según método de medida (EN 60350-2)
Disposición de cacerola
Importante: Para un efecto óptimo, es importante que la recipiente está centrada en las zonas
(véase la figura)
Page 32

32
Zona de mandos
UTILIZACIÓN DEL APARATO
Indicaciones
Indicación Designación Función
0 Cero Zona de cocción activada
1…9 Nivel de potencia Elección nivel de cocción
U Detección de cacerola Falta recipiente o es inadecuado
A Acelerador de calor Cocción automática
E Mensaje de error Fallo electrónico
H Calor residual La zona de cocción aún caliente
P Booster Activada la potencia Booster
Doble Booster Activada la potencia Doble Booster
Mantener caliente La placa mantiene el recipiente a
temperatura constante de 42ºC
Mantener caliente La placa mantiene el recipiente a
temperatura constante de 70ºC
Mantener caliente La placa mantiene el recipiente a
temperatura constante de 94ºC
II Stop&Go La pausa está activada
∏ Bridge 2 zonas de cocción se combinan
Tecla
“Mantener
Tecla
Power
Indicador de zona
Indicador
de tiempo
Indicador de
tiempo
Zona de selección de potencia “SLIDER”
y ajuste de tiempo
Tecla de menú
Tecla
Marcha/Para
Temporizador
Indicador
de potencia
Pantalla de
menú
Page 33

33
Ventilación
El ventilador de enfriamiento tiene un funcionamiento totalmente automático. Se pone en
marcha a velocidad baja a partir del momento en que el calor desprendido por el sistema
electrónico sobrepasa un cierto umbral. La ventilación activa su velocidad más alta cuando la
placa de cocción se usa de forma intensiva. El ventilador reduce su velocidad y se para
automáticamente cuando el circuito electrónico está suficientemente frío.
PUESTA EN MARCHA Y USO DEL APARATO
Antes de la primera utilización
Limpie el aparato con un trapo húmedo y séquelo. No utilice detergente ya que podría provocar
una coloración azulada en las superficies vitrificadas.
Principio de la inducción
Debajo de cada placa de cocción hay una bobina de inducción. Cuando ésta está conectada,
produce un campo electromagnético variable el cual produce a su vez corrientes inducidas en
el fondo ferromagnético del recipiente. De ello resulta un calentamiento del recipiente colocado
sobre la zona de calentamiento.
Como es lógico, el recipiente debe ser adecuado:
• Se recomiendan todos los recipientes metálicos ferro-magnéticos (a verificar
eventualmente con un pequeño imán) tales como: cazuelas de fundición, sartenes de
hierro negro, cacerolas metálicas esmaltadas, en acero inoxidable con base ferromagnética…
• Quedan excluidos los recipientes de cobre, inoxidable, aluminio, cristal, madera,
cerámica, gres, barro cocido, inoxidable no ferro-magnético…
La zona de cocción por inducción tiene automáticamente en cuenta el tamaño del recipiente
utilizado. Con un diámetro demasiado pequeño, el recipiente no funciona. Este diámetro varía
en función del diámetro de la zona de cocción.
Cuando el recipiente no es adecuado para la placa de cocción, queda encendido el símbolo
(U).
Teclas táctiles
Su aparato está provisto de teclas táctiles que permiten controlar las distintas funciones. Un
pequeño roce con la tecla activa su funcionamiento. Esta activación queda confirmada por un
piloto, un indicador y/o por una señal sonora.
No toque una tecla más de una vez.
Page 34

34
Zona de selección de potencia “SLIDER” y ajuste de minutero
Para la selección de potencia con el slider deslizar el dedo sobre la zona “SLIDER”.
Se beneficia de un acceso directo apoyando el dedo directamente en el nivel deseado.
Puesta en marcha
• Conectar / Apagar la placa de cocción:
Acción Panel de control Display
Conectar pulsar [ ] 2 seg. [ 0 ] parpadear
Apagar pulsar [ ] 2 seg. ninguno o [ H ]
• Arranque / apague una zona de calentamiento:
Acción Panel de control Display
Seleccionar la zona pulsar [ 0 ] de la zona [ 0 ]
Ajuste la potencia deslizar en “SLIDER“ [ 0 ] a [ 9 ]
hacia la derecha o la izquierda
Apagar deslizar hasta [ 0 ] en “SLIDER“ [ 0 ] o [ H ]
Si no se realiza ningún ajuste en el plazo de 20 segundos, el sistema vuelve a la posición de
espera.
Detección del recipiente
La detección de pan garantiza una seguridad perfecta. La inducción no funciona:
• Si no hay una bandeja en la zona de calentamiento o si esta bandeja no es adecuada para
la inducción. En este caso, es imposible aumentar la potencia y la pantalla muestra [U].
Este símbolo desaparece cuando se coloca una sartén en la zona de calentamiento.
• Si se retira la bandeja de la zona de calentamiento, la operación se detiene. La pantalla
muestra [U]. El símbolo [U] desaparece cuando la sartén vuelve a colocarse en la zona de
calentamiento. La cocción continúa con el nivel de potencia establecido anteriormente.
•
Después del uso, apague el elemento térmico: no permita que la detección de recipiente
[U] esté activa.
Zona de selección de potencia
“SLIDER“ y ajuste de minutero
“SLIDER“
Acceso directo
Page 35

35
Indicador de calor residual
Después de la desconexión de una zona de calentamiento o la parada completa de la placa,
las zonas de calentamiento todavía están calientes e indica [H] en la pantalla.
El símbolo [H] desaparece cuando las zonas de calentamiento pueden tocarse con seguridad.
Mientras los indicadores de calor residual estén encendidos, no toque las zonas de
calentamiento y no coloque ningún objeto sensible al calor sobre ellos. ¡Hay riesgos de
quemaduras e incendio !
Función power
La función power [B] y Super power [] agrega una potencia de refuerzo a la zona de
calentamiento seleccionada.
Si esta función está activada, las zonas de calentamiento funcionan durante 10 minutos con un
Booster ultra alto.
Power es útil, por ejemplo, para calentar rápidamente grandes cantidades de agua, como arroz,
pasta o fideos.
• Conectar / Apagar la función Power:
Acción Panel de control Display
Selección de zona pulsar [ 0 ] de la zona [ 0 ]
Conectar el power pulsar [ B² ] [ P ]
Apagar el power Deslice en el “SLIDER“ [ 9 ] a [ 0 ]
• Conectar/ desconectar Super Power:
Acción Panel de control Display
Selección de zona pulsar [ 0 ] [ 0 ]
Conectar power pulsar [ B² ] [ P ]
Conectar super power pulsar de nuevo [ B² ] [ and P ]
Desconectar super power pulsar [ B² ] [ P ]
Desconectar power deslizar en “SLIDER“ [ 9 ] hasta [ 0 ]
Gestión de la potencia máxima:
El conjunto de la placa de cocción está dotado de una potencia máxima. Cuando está activada
la función power, y para no sobrepasar esta potencia máxima, el mando electrónico reduce
automáticamente el nivel de cocción de otra zona de calentamiento.
Durante algunos segundos, el indicador de esta zona de cocción parpadea [ 9 ] y después
queda en el nivel de cocción más alto posible:
Zona de cocción seleccionada Otra zona de cocción: (por ej.: cocción de nivel 9 )
[ P ] está indicado [ 9 ] pasa a [ 6 ] u [ 8 ] según el tipo de placa
Page 36

36
Función Temporizador
El temporizador puede asignarse simultáneamente a varias placas de cocción y con ajustes
diferentes de tiempo en minutos (de 0 a 99 minutos) para cada una de las placas.
• Configuración y modificación del tiempo de cocción:
Ejemplo para 16 minutos hasta potencia 7
Acción Panel de control Display
Seleccionar la zona pulsar [ 0 ] de la zona [ 0 ] y piloto de zona
encendido
Seleccionar la potencia deslizar en “SLIDER“ hasta [ 7 ] [ 7 ]
Seleccionar "Temporizador" pulsar 3s temporizador/ indicador [ 00 ]
Ajuste de unidad deslizar en “SLIDER“ hasta [ 1 ] [ 1 parpadea ] [ 0 fijo ]
Validar de unidad pulsa [ 10 ] [ 1 fijo ] [ 0 parpadea ]
Ajuste de decena deslizar en “SLIDER“ hasta [ 6 ] [ 1 fijo ] [ 6 parpadea
Validar de decena espera 2 segundos [ 16 ]
La duración queda seleccionada y se inicia la cuenta atrás.
• Detener la función temporizador de cocción:
Ejemplo para 13 minutos hasta potencia 7:
Acción Panel de control Display
Seleccionar la zona pulsar [ 7 ] de la zona [ 7 ] y piloto de zona
encendido
Seleccionar "Temporizador" pulsar 3s [ 13 ] [ 13 ]
Ajuste de decena deslizar en “SLIDER“ hasta [ 0 ] [ 0 parpadea ] [ 3 fijo ]
Validar de decena pulsar [ 10 ] [ 0 fijo ] [ 3 parpadea]
Ajuste de unidad deslizar en “SLIDER“ hasta [ 0 ] [ 0 fijo ] [ 0 parpadea ]
Validar de unidad espera 2 segundos [ 00 ]
• Paro automático al final de la cocción:
Cuando ha transcurrido el tiempo de cocción seleccionado, el temporizador aparece
parpadeando [00] y suena un sonido.
Para detener el sonido y el parpadeo, presione la tecla [00].
Page 37

37
• Función Temporizador
Ejemplo para 29 minutos :
Acción Panel de control Display
Activar la placa de cocción pulsar [ ] 2 seg. Luces de los controles
encendidas
Seleccionar "Temporizador" pulsar 3s [CL] de la zona [ 00 ]
Ajuste de unidad deslizar en “SLIDER“ hasta [ 2 ] [ 2 parpadea ] [ 0 fijo ]
Validar la unidad pulsar [ 20 ] [ 2 fijo ] [ 0 parpadea ]
Ajuste de decena deslizar en “SLIDER“ to [ 9 ] [ 2 fijo ] [ 9 parpadea ]
Validar la decena espera 2 segundos [ 29 ]
Después de unos segundos, la luz de control deja de parpadear. Tan pronto como finalice el
tiempo de cocción seleccionado, la pantalla del temporizador parpadeará [00] y se escuchará
un sonido. Para detener el sonido y el parpadeo, presione la pantalla [00]. La placa se apaga.
Programación de la cocción automática:
Todas las zonas de cocción están equipadas con una función de cocción automática. La zona
de cocción se pone en marcha a plena potencia durante un cierto tiempo y después reduce
automáticamente su potencia hasta el nivel preseleccionado.
• Programación:
Acción Panel de control Display
Seleccionar la zona pulsar [ 0 ] de la zona [ 0 ] y piloto de zona
encendido
Activar la potencia total deslizar en “SLIDER“y mantente
en el nivel de potencia El nivel de potencia
parpadea con [ A ]
Poder
seleccionado
Cocina automática
tiempo (Min: Sec)
1 0:40
2 1:12
3 2:00
4 2:56
5 4:16
6 7:12
7 2:00
8 3:12
9 - : -
• Desconectar la cocción automática:
Acción Panel de control Display
Seleccionar la zona pulsar en la zona El nivel de potencia
parpadea con A ]
Seleccionar nivel deslizar en “SLIDER“ [ 0 ] to [ 9 ]
Page 38

38
Función pausa
Esta función detiene temporalmente la actividad de cocción de la placa y permite reiniciar con
la misma configuración.
• Conectar / apagar a función pausa:
Acción Panel de control Display
Ingresar al menú Presione la tecla de menú [ ] Se muestra el menú
Activar pausa pulsar en el “SLIDER“debajo
de la luz [ II ] [ II ] indicador
Detener pausa pulsar 3s en el “SLIDER“ debajo
de la luz de [ II ] Previamente
seleccionado en el
display
Función de recuperación
Después de apagar la placa [ ], es posible recordar los últimos ajustes.
• Cocinar en todas las zonas de cocción (Potencia).
• Minutos y segundos de cocción programados en el minutero.
• Mantener la función de calentamiento
Procedimiento para recuperar la configuración:
• Presione la tecla [ ]
pulsar en el “SLIDER“debajo de la luz de [ II ]
Las configuraciones previas están otra vez activas.
Función “Mantener caliente”
Esta función permite que la cubierta alcance y mantenga automáticamente una temperatura de
aproximadamente 42 ° C, aproximadamente 70 ° C o aproximadamente 94 ° C.
Esto evitará que los líquidos se desborden y quemen en el fondo de la sartén
• Iniciar / Detener la función Conservador de calor
Acción Panel de control Display
Seleccionar la zona pulsar [ 0 ] de la zona [ 0 ] hasta [ 9 ] o [ H ]
42°C para ajustar presione la tecla [ ] [ ]
70°C para ajustar presione la tecla [ ] [ ]
94°C para ajustar presione la tecla [ ] [ ]
Detener pulsar en el “SLIDER“ [ 0 ] hasta[ 9 ] o [ H ]
Esta función se puede iniciar independientemente en todas las zonas de calentamiento.
Cuando se retira la bandeja de la zona de cocción, la función "Mantener caliente" permanece
activa durante aproximadamente 10 minutos. La duración máxima de "mantenerse caliente" es
de 2 horas.
Page 39

39
Bloqueo de la zona de mandos
Para evitar activar accidentalmente o interferir con el ajuste de las zonas de cocción, en
particular durante la limpieza, el panel de control puede bloquearse (a excepción de la tecla de
encendido / apagado [ ]).
• Bloqueo:
Acción Panel de control Display
Iniciar Pulsar [ ] 2 seg. [ 0 ] or [ H ]
Ingresa en el menú Presione la tecla de menú [ ] Se muestra el menú
Bloquear la placa pulsar en el “SLIDER“ debajo de
la luz [ ] [ L ] indicador
• Desbloqueo:
Acción Panel de control Display
Ingresa en el menú Presione la tecla de menú [ ] Se muestra el menú
Desbloquear la placa pulsar en el “SLIDER“debajo de
la luz [ ] durante 3s [ 0 ] o [ H ]
La placa está desbloqueada cuando desaparece [L].
Puente y función puente automática
Esta función permite el uso de 2 zonas de cocción al mismo tiempo con las mismas
características que una sola zona de cocción. Con esta función, la función Power no está
permitida.
Acción Panel de control Display
Iniciar el puente Coloque una bandeja en una de las dos
zonas que se puentearán y presione
simultáneamente las teclas de selección
correspondientes
o pon una gran sartén en las 2 zonas [ 0 ] [ ] zona posterior
Seleccionar la potencia pulsar en el “SLIDER“ [ 0 ] hasta[ 9 ] y [ ]
Zona posterior
Detener el puente Presione simultáneamente en las dos
zonas puentes [ 0 ]
Page 40

40
Función "Chef"
Esta función divide la placa en 2 o 3 zonas grandes.
Las zonas delantera y trasera se cambian automaticamente a la funcion de puente con una
cierta potencia. Este nivel de potencia se puede establecer aqui y luego se convierte en la
nueva configuracion estandar. Con la funcion Chef, cambia su placa en un aparato profesional
donde puede configurar las zonas para una coccion intensiva, a fuego lento o para mantener el
calor.
• Inicio de la función Chef:
Acción Panel de control Display
Ingresa en el menú Presione la tecla de menú [ ] Se muestra el menú
Activar la función Chef pulsar en el “SLIDER“ debajo de
la luz [ ] [ C ], [ H ], [ E ], [ F ]
then
[ 3 ] y [ ], [6], [ 9 ]
y [ ]
Selección de la zona "Chef". Presionar tecla de la izquierda, [ 0 ] hasta [ 9 ] y [ ]
centro o derecha zona posterior
Seleccionar la potencia deslice en el “SLIDER“ [ 0 ] hasta [ 9 ] y [ ]
zona posterior
• Stop the “Chef“ function:
Acción Panel de control Display
Ingresa en el menú Presione la tecla de menú [ ] Se muestra el menú
Desactivar la función Chef pulsar en el “SLIDER“ debajo de
la luz [ ] [ 0 ]
Función de parrilla “Grill“
Esta función permite el uso óptimo de una sarten rectangular con la combinación de dos zonas
unidas que se gestionan con un solo mando/slider.
• Inicio de la función Grill:
Acción Panel de control Display
Ingresa en el menú Presione la tecla de menú [ ] Se muestra el menú
Activar la función Grill pulsar en el “SLIDER“ debajo de
la luz [ GRILL ] [ ] y [ ] zona
posterior
Seleccionar la potencia deslice en el “SLIDER“ [ ] y [ ] zona
posterior
Page 41

41
• Detener la función Grill
Acción Panel de control Display
Ingresa en el menú Presione la tecla de menú [ ] Se muestra el menú
Desactivar la función Grill pulsar en el “SLIDER“ debajo de
la luz [ GRILL ] [ 0 ]
Bloqueo de la zona de mandos
Para evitar activar o interferir accidentalmente con la configuración de las zonas de cocción, por
ejemplo, durante la limpieza, el panel de control puede bloquearse (a excepción de la tecla de
encendido / apagado [ ]).
• Activar bloqueo:
Acción Panel de control Display
Ingresa en el menú Presione la tecla de menú [ ] Se muestra el menú
Conectar bloqueo pulsar en el “SLIDER“ debajo de
la luz [ CLEAN ] [ 20 ], [ 19 ], [ 18 ]…
en timer/contador del
display
Ajuste de brillo
Esta función permite cambiar el nivel de brillo.
• Cambiar el nivel de Brillo:
Acción Panel de control Display
Ingresa en el menú presione la tecla de menú[ ] Se muestra el menú
configuración de Brillo pulsar en el “SLIDER“ debajo de
la luz [ ] el “SLIDER“ muestra
el nivel de brillo
Cambiar el nivel de brillo deslice en el “SLIDER“ el “SLIDER“ muestra
el nivel de brillo
Validar la configuración presione la tecla de menú [ ] [ 0 ]
Configuración de sonoridad
Esta función permite cambiar el nivel de volumen.
• Cambiar el nivel de volumen:
Acción Panel de control Display
Ingresa en el menú presione la tecla de menú [ ] Se muestra el menú
configuración volumen pulsar en el “SLIDER“ debajo de
la luz [ ] el “SLIDER“ muestra
el nivel de volumen
Cambiar el nivel de Sonoridad deslice en el “SLIDER“ el “SLIDER“ muestra
el nivel de volumen
Validar la configuración presione la tecla de menú [ ] [ 0 ]
Page 42

42
Función de memoria de cocina
Después de establecer el nivel de cocción y el valor del temporizador para la zona, es posible
memorizar los ajustes en la misma zona.
• Etapas de cocción de la zona de cocción (potencia)
• Minutos y segundos de temporizador relacionado con la zona de cocción programada
• Mantener la función de calentamiento
• Función de cocción automática
• Memorizar configuración en una zona:
Acción Panel de control Display
Selección de zona pulsar [ 0 ] de la zona [ 0 ]
establecer (ajustar la potencia deslizar en “SLIDER“ [ 7 ]
en « 7 », por ejemplo) a la derecha o a la izquierda
Seleccione «Temporizador» pulsar 2s temporizador/contador [ 00 ]
Ajuste de unidad deslizar en “SLIDER“ hasta [ 9 ] [ 0 fijo ] [ 9 parpadea ]
Validar la unidad pulsar [ 09 ] [ 0 parpadea ] [ 9 fijo ]
Ajuste de decena deslizar en “SLIDER“ hasta [ 2 ] [ 2 parpadea ] [ 9 fijo ]
Validar la decena espera 2 segundos [ 29 ]
Seleccione la zona pulsar [ 7 ] de la zona [ 7 ]
Ingresa en el menú presione la tecla de menú [ ] Se muestra el menú
Memorizar configuración Presione 3s en el “SLIDER“ debajo de
la luz [ ] [ ] cerca de [ 7 ]
• Recuperar configuración de una zona:
Acción Panel de control Display
Selecciona una zona con [ ] Presiona display [ 0 ] seleccionado [ 0 ] y [ ]
Introducir en menú Presiona la tecla menú [ ] menú se muestra
Memoriza la configuración Presiona sobre “SLIDER“ [ ] cerca de [ 7 ]
debajo de [ ] luz y [ 29 ] en el display de tiempo
• Eliminar configuración en una zona:
Acción Panel de control Display
Selecciona una zona con [ ] Presiona display [ 0 ] seleccionado [ 0 ] y [ ]
Introducir en menú Presiona la tecla menú [ ] menú se muestra
Memoriza la configuración Presiona 3s sobre el “SLIDER“
debajo de la luz [ ] [ 0 ]
Función de movimiento de cazuela
Esta función permite invertir 2 zonas con todos los parámetros.
• Invertir 2 zonas:
Acción Panel de control Display
Selecciona una zona Presiona 3s sobre le display Todas las otras zonas
de la zona parpadean
Mueve la zona Presiona otra zona o mueve las dos zonas están
cazuela conmutadas
Page 43

43
Limitación de tiempo de operación
Cada zona de cocción está equipada con una limitación de tiempo de funcionamiento: la zona
de cocción se apaga automáticamente después de un cierto tiempo sin ningún cambio de
configuración. Este tiempo varía según el nivel de potencia seleccionado como se describe en
la tabla a continuación
Nivel de potencia
Tiempo de
funcionamiento
(H : Min)
1 08:36
2 06:42
3 05:18
4 04:18
5 03:30
6 02:18
7 02:18
8 01:48
9 01:30
Page 44

44
CONSEJOS DE COCCIÒN
Calidad de las cacerolas
Materiales adecuados: acero, acero esmaltado, fundición, inoxidable con fondo ferro-
magnético, aluminio con fondo ferro-magnético
Materiales no adecuados: aluminio e inoxidable con fondo no ferro-magnético, cobre, latón,
vidrio, cerámica, porcelana
Los fabricantes especifican si sus productos son compatibles con la inducción.
Para verificar si las cacerolas son compatibles:
• Ponga un poco de agua en una cacerola colocada sobre una zona de cocción por
inducción regulada a nivel [ 9 ]. Este agua debe calentarse en algunos segundos.
• Ponga un imán sobre el fondo externo de la cacerola; debe quedarse pegado.
Algunas cacerolas pueden hacer ruido al colocarlas sobre una zona de cocción por inducción.
Estos ruidos no representan en ningún caso un defecto en el aparato ni tienen influencia en su
funcionamiento.
Page 45

45
Dimensión de las cacerolas
Las zonas de cocción se adaptan automáticamente a la dimensión del fondo de la cacerola, hasta
un cierto límite. Por ello, el fondo de esta cacerola debe tener un diámetro mínimo en función del
diámetro de la zona de cocción correspondiente.
Para obtener el máximo rendimiento de la placa de cocción, coloque la cacerola bien centrada
en la zona de cocción.
Ejemplos de ajuste de las potencias de cocción
(los siguientes valores son indicativos)
1 a 2 Hacer fundir
Recalentar
Salsas, mantequilla, chocolate, gelatina
Platos precocinados
2 a 3 Inflar
Descongelar
Arroz, puddings y platos cocinados
Legumbres, pescados, productos
congelados
3 a 4
Vapor
Legumbres, pescados, carne
4 a 5 Agua Patatas hervidas, sopas, pastas
Legumbres frescas
6 a 7 Cocer a fuego suave Carnes, hígado, huevos, salchichas
Goulasch, filetes rellenos, callos
7 a 8
Cocer
,
Freír
Patatas, buñuelos, tortas
9 Freír,
llevar a ebullición
Filetes, tortillas
,
agua
P y
Freír,
Llevar a ebullición
Llevar a ebullición cantidades importantes
de agua
CONSERVACIÓN Y LIMPIEZA
Es necesario apagar completamente el aparato para limpiarlo.
Deje enfriar el aparato, ya que hay riesgo de quemaduras.
• Limpie los restos de cocción con agua a la que haya añadido un producto lavavajillas o un
producto comercial aconsejado para vitrocerámica.
• No utilice productos de limpieza abrasivos que podrían dañar el aparato.
• Seque el aparato con un trapo limpio.
• Retire inmediatamente el azúcar o materiales que contengan azúcar.
• No utilice en ningún caso aparatos "a vapor" o "a presión".
• No utilice objetos que comporten riesgo de rayar la vitrocerámica (como estropajos
abrasivos o puntas de cuchillo…).
QUÉ HACER EN CASO DE PROBLEMA
La placa de cocción o las zonas de cocción no se encienden:
• La placa está mal conectada a la red eléctrica
• El fusible de protección ha saltado
• Verifique que no esté activado el bloqueo
• Las teclas táctiles están cubiertas de agua o de grasa
• Hay un objeto encima de las teclas táctiles
Page 46

46
El símbolo [ U ] se enciende:
• No hay cacerola en la zona de cocción
• El recipiente utilizado no es compatible con la inducción
• El diámetro del fondo de la cacerola es demasiado pequeño respecto a la zona de
cocción
El símbolo [ E ] se enciende:
• Hay un fallo en el sistema electrónico
• Desconecte y vuelva a conectar el aparato
Una de las zonas o el conjunto de la placa de cocción se desconecta:
• Ha saltado la desconexión de seguridad
• Ésta se acciona en caso que haya olvidado de apagar una de las zonas de
calentamiento
• Se conecta igualmente cuando una o varias teclas táctiles están tapadas
• Una de las cacerolas está vacía y su fondo se ha sobrecalentado
• La placa dispone igualmente de un dispositivo de reducción automática del nivel de
potencia y de corte automático en caso de sobrecalentamiento
La ventilación continúa funcionando después de parar la placa:
• Esto no es un fallo, el ventilador continúa protegiendo la electrónica del aparato
• La ventilación se parará automáticamente
El mando de cocción automática no se conecta:
• La zona de cocción está aún caliente [ H ]
• Está conectado el nivel máximo de cocción [ 9 ]
• El nivel de cocción se ha conectado con la tecla [ - ]
El panel de control indica [ U ]:
• Referirse al capítulo “Mantener caliente”
El panel de control indica [ II ]:
• Referirse al capítulo “Pausa”
El símbolo [ ] o [ Er03 ] aparece en la pantalla:
• • Un objeto o líquido cubre las teclas de control. El símbolo desaparece cuando la llave de
libertad o limpiar
El símbolo [ E2 ] aparece en la pantalla:
• La placa se ha sobrecalentado, deje que se enfríe y vuelva a ponerla en marcha.
El símbolo [ E8 ] aparece en la pantalla:
• Entrada de aire al ventilador obstruida, Libérela.
El símbolo [ U400 ] aparece en la pantalla:
• El aparato está mal conectado a la red. Compruebe la conexión y vuelva a poner en
marcha la placa.
El símbolo [ Er47 ] aparece en la pantalla:
• El aparato está mal conectado a la red. Compruebe la conexión y vuelva a poner en
marcha la placa.
Si uno de los símbolos anteriores persiste, llame al servicio técnico.
Page 47

47
PROTECCIÓN DEL MEDIO AMBIENTE
• Los materiales de embalaje son ecológicos y reciclables
• Los aparatos electrónicos están formados por materiales reciclables y a veces de
materiales nocivos para el medio ambiente, pero necesarios para el buen
funcionamiento y la seguridad del aparato
• No tirar nunca su aparato con los residuos domésticos
• Llame al servicio de retirada de electrodomésticos o
déjelo en los lugares de depósito establecidos por su
municipio y adaptados al reciclaje de los aparatos
electrodomésticos
Page 48

48
INSTRUCCIONES DE INSTALACIÓN
El montaje es competencia exclusiva de especialistas.
El usuario está obligado a respetar la legislación y las normas en vigor en su país de
residencia.
Colocación de la junta de estanqueidad
La junta adhesiva suministrada con el aparato permite evitar cualquier filtración en el mueble.
Su colocación debe efectuarse con gran cuidado según el croquis adjunto.
Advertencia: No aplique un sellador entre la placa de cocción y la encimera, la tira
impermeable ofrece suficiente estanqueidad de la encimera.
Encaje:
• La abertura en la superficie de trabajo será, según el modelo, de:
Tamanho de corte Montagem embutida Tamanho do vidro
Type Larg. Prof. Larg. Prof. Raio Larg. Prof. Espessura
1773/2 560
490
654 524 7 650 520 4
1775/2 750
490
804 524 7 800 520 4
1776/2 750
490
804 524 7 800 520 4
1777/2 890
390
914 414 7 910 410 4
1778/3 850
490
904 524 7 900 520 4
• La distancia entre la placa de cocción y la pared debe ser de 50 mm. como mínimo.
• La placa de cocción es un aparato perteneciente a la clase de protección "Y". Cuando se
empotre, en la parte posterior y en uno de los lados puede haber una pared o un armario
alto. Pero en el otro lado no debe haber ningún mueble ni aparato que sea más alto
que la superficie de cocción
• Las placas y revestimientos de las superficies de trabajo deben ser de materiales
resistentes al calor (100°C)
• Las juntas de los bordes de la pared deben ser termo-resistentes
• Los materiales de las superficies de trabajo
pueden hincharse en contacto con la humedad.
Para los cantos del corte, aplique un barniz o una
cola especial.
• No instale la placa encima de un horno sin
ventilación ni de un lavavajillas
• Asegure un espacio de 20 mm entre el fondo de
la caja del aparato y la pared para asegurar una
buena circulación de aire para la refrigeración de
la electrónica
• Si hay un cajón debajo de la superficie de
cocción, evite guardar en él objetos inflamables
(por ejemplo: sprays) y objetos que no resistan
el calor
• Proporcione una abertura de ventilación justo debajo de la encimera de 4 mm en un ancho
de 600 mm para una refrigeración suficiente de la placa.
Pegar la junta (2) sobre el reborde de la placa,
a 2 mm del borde exterior, después de haber
quitado la lámina de protección (3).
Page 49

49
• La distancia de seguridad entre la placa de cocción y la campana de aspiración situada
encima debe respetar las indicaciones del fabricante de la campana. En caso de falta de
instrucciones, respete una distancia mínima de 760 mm.
• El cable de conexión no debe estar sometido, después de la colocación, a ninguna tensión
mecánica, como la causada por un cajón
•
ADVERTENCIA: Use sólo protectores de las placas fabricados por el fabricante del
electrodoméstico de cocción o en su defecto los que el mismo indique en su manual de
uso y que sean compatibles con los protectores incorporados en el aparato
electrodoméstico. El uso de protecciones inadecuadas puede causar accidentes.
CONEXIÓN ELÉCTRICA
• La instalación de este aparato y su conexión a la red eléctrica sólo deben confiarse a un
electricista que esté al día de las prescripciones reglamentarias.
• La protección contra las piezas bajo tensión eléctrica debe asegurarse después del
montaje.
• Los datos necesarios para la conexión se encuentran en la placa de características y en
la placa de conexión situadas debajo del aparato.
• Este aparato debe poderse aislar del sector por medio de un dispositivo de seccionamiento
omnipolar. Cuando esté abierto (desconectado) debe asegurarse una separación de 3
mm.
• El circuito eléctrico debe estar separado de la red por dispositivos adecuados, por ejemplo
disyuntores, fusibles, interruptores diferenciales y contactores.
• Si el aparato no esta provisto de una fiche accesible, otros medios de desconexión deben
incorporarse a la instalación fija segun las reglamentaciones de la instalación.
• El cable de alimentación debe colocarse de manera que no toca las partes calientes de la
placa de cocción.
Atención!
Este aparato está diseñado sólo para una alimentación de 230 V~ 50/60 Hz
Conecte siempre la toma de tierra de protección.
Siga el esquema de conexión.
La caja de conexión se encuentra debajo de la placa de cocción. Para abrir la tapa, utilice un
destornillador medio. Colóquelo en las 2 ranuras situadas en la parte anterior de las 2 flechas.
CONEXION EL APARATO 1773/2 – 1775/2 – 1777/2 :
* calculado con el coeficiente de simultaneidad según la norma EN 60 335-2-6
Red conexión
Diámetro
del cable
Cable Esquema de conexiones
Calibre de
protección
230 V~ 50/60 Hz
1 fase +N 3 x 2,5 mm
2
H 05 VV - F
H 05 RR - F
25 A *
400 V~ 50/60Hz 2 fasen + N 4 x 1,5 mm
2
H 05 VV - F
H 05 RR - F
16 A *
400 V~ 50/60Hz
(NL)
2 fasen + 2N 5 x 1,5 mm
2
H 05 VV - F
H 05 RR - F
16 A *
230 V~ 50/60 Hz
2 fasen 3 x 2,5 mm
2
H 05 VV - F
H 05 RR - F
25 A *
230 V~ 50/60 Hz
(BE)
3 fasen 4 x 1,5 mm
2
H 05 VV - F
H 05 RR - F
16 A *
Page 50

50
CONEXION EL APARATO 1776
/2
– 1778/3 :
* calculado con el coeficiente de simultaneidad según la norma EN 60 335-2-6
Atención! Introduzca bien los cables y apriete bien los tornillos.
No somos responsables de ningún incidente debido a una conexión incorrecta o que
pudiere ocurrir a causa del uso de un aparato no conectado a tierra o equipado con una
tierra defectuosa.
Red conexión
Diámetro
del cable
Cable
Esquema de
conexiones
Calibre de protección
230 V~ 50/60 Hz
1 fase +N 3 x 4 mm2
H 05 VV - F
H 05 RR - F
40 A *
400 V~ 50/60Hz 2 fasen + N 4 x 2,5 mm
2
H 05 VV - F
H 05 RR - F
25 A *
400 V~ 50/60Hz
(NL)
2 fasen + 2N 5 x 2,5 mm
2
H 05 VV - F
H 05 RR - F
25 A *
400 V~ 50/60Hz 3 fasen + N 5 x 1,5 mm
2
H 05 VV - F
H 05 RR - F
16 A *
230 V~ 50/60 Hz
2 fasen 3 x 4 mm2
H 05 VV - F
H 05 RR - F
40 A *
230 V~ 50/60 Hz
(BE)
3 fasen 4 x 2,5 mm
2
H 05 VV - F
H 05 RR - F
25 A *
Page 51

51
INDICE
SICUREZZA .................................................................................................................................... 52
PRECAUZIONI PRIMA DEL PRIMO UTILIZZO .......................................................................................... 52
ISTRUZIONI DI SICUREZZA ................................................................................................................ 53
PRECAUZIONI ONDE NON DANNEGGIARE L’APPARECCHIO .................................................................... 54
PRECAUZIONI IN CASO DI MALFUNZIONAMENTO DELL’APPARECCHIO ..................................................... 55
ALTRE PRECAUZIONI ....................................................................................................................... 55
DESCRIPTION DE L’APPAREIL .................................................................................................... 56
CARACTÉRISTIQUES TECHNIQUES .................................................................................................... 56
METTETE LE PENTOLE IN POSIZIONE ................................................................................................. 56
PANNELLO DEI COMANDI ................................................................................................................. 57
USO DEL PIANO DI COTTURA...................................................................................................... 57
INDICAZIONE .................................................................................................................................. 57
VENTILAZIONE ............................................................................................................................... 58
PRIMA ACCENSIONE E UTILIZZO DEL PIANO DI COTTURA ..................................................... 58
PRIMA DEL PRIMO RISCALDAMENTO .................................................................................................. 58
PRINCIPIO DELL’INDUZIONE.............................................................................................................. 58
LE FUNZIONI DEI SENSORI ................................................................................................................ 58
POWER SELECTION ZONE “SLIDER” AND TIMER SETTING ZONE ........................................................... 59
SPEGNIMENTO ED ACCENSIONE DEL PIANO DI COTTURA ...................................................................... 59
RILEVAMENTO PENTOLA .................................................................................................................. 59
INDICATORE DEL CALORE RESIDUO ................................................................................................... 60
FUNZIONE BOOSTER E BOOSTER DOPPIO (LIVELLO POWER) ................................................................ 60
FUNZIONE CONTATORE ................................................................................................................... 60
OROLOGIO TEMPORIZZATORE .......................................................................................................... 61
COTTURA CON AVVIO RAPIDO .......................................................................................................... 62
FUNZIONE PAUSA ........................................................................................................................... 63
FUNZIONE MEMORY ....................................................................................................................... 63
FUNZIONI DI MANTENIMENTO AL CALDO ............................................................................................. 63
BLOCCO DEL PIANO DI COTTURA/DEI SENSORI .................................................................................... 64
PONTE AUTOMATICO E FUNZIONE PONTE ........................................................................................... 64
FUNZIONE “CHEF“ .......................................................................................................................... 65
FUNZIONE GRILL ............................................................................................................................ 65
BLOCCARE PER LA PULIZIA .............................................................................................................. 66
REGOLAZIONE DELLA LUMINOSITÀ .................................................................................................... 66
REGOLATORE DI VOLUME ................................................................................................................ 66
FUNZIONE DI MEMORIA DI COTTURA .................................................................................................. 67
FUNZIONE ‘’POT MOVE’’ ................................................................................................................... 68
LIMITAZIONE DELLA DURATA D'ESERCIZIO .......................................................................................... 68
CONSIGLI PER LA COTTURA ....................................................................................................... 69
RECIPIENTI DI COTTURA .................................................................................................................. 69
DIMENSIONI DEI RECIPIENTI DI COTTURA ........................................................................................... 70
ESEMPI DI REGOLAZIONE DELLA POTENZA ......................................................................................... 70
PULIZIA E MANUTENZIONE .......................................................................................................... 70
COSA FARE SE... ........................................................................................................................... 70
TUTELA AMBIENTALE .................................................................................................................. 72
ISTRUZIONI DI INSTALLAZIONE .................................................................................................. 73
CONNESSIONE ELETTRICA ......................................................................................................... 74
Page 52

52
SICUREZZA
Precauzioni prima del primo utilizzo
• Sballare eliminando tutti i materiali di imballo.
• L’installazione e connessione dell’apparecchio devono essere
effettuate da personale specializzato Il fabbricante declina ogni
responsabilità civile e penale per danni causati da installazione
e/o connessione non realizzate a regola d’arte. Per essere
utilizzato, l’apparecchio deve essere correttamente installato in
una cucina e su una superficie di lavoro idonea.
• Per essere utilizzato, l’apparecchio deve essere correttamente
installato in una cucina e su una superficie di lavoro idonea
attenendosi naturalmente alle disposizioni di sicurezza vigenti
in materia.
• Questo elettrodomestico è progettato esclusivamente per la
cottura di cibo, con l’espressa esclusione di ogni altro uso
domestico, commerciale o industriale.
• Rimuovere tutte le etichette adesive dal vetro.
• Non apportare alcuna modifica o alterazione all’apparecchio.
• La superficie in vetro dell’apparecchio non può essere utilizzata
come zona di appoggio o di lavoro.
• L’apparecchio deve essere opportunamente messo a terra e
collegato alla rete elettrica secondo la normativa in vigore
localmente.
• Non usare nessuna prolunga elettrica per collegare il cavo di
alimentazione.
• L’apparecchio non può essere utilizzato sopra una lavastoviglie
o una asciugatrice: il vapore potrebbe danneggiare i
componenti elettronici dell’apparecchio.
• Questo apparecchio non è da utilizzare con un timer esterno o
un telecomando separato.
Page 53

53
Istruzioni di sicurezza
• La parte elettronica (relais) può provocare durante l‘esercizio
rumori udibili di attivazione. Può essere percepibile anche la
ventola di raffreddamento. La ventola di raffreddamento può
continuare a girare anche dopo la fine del processo di cottura
per raffreddare i componenti elettronici. Ciò non significa che il
piano ad induzione sia difettoso o che funzioni in modo anomalo
e il piano di cottura funziona senza problemi.
• Spegnere le zone di cottura dopo l’uso.
• Grassi ed olii surriscaldati prendono facilmente fuoco.
Controllare le cotture che utilizzano grasso o olio: potrebbero
incendiarsi con facilità.
• Le zone di cottura si riscaldano durante la cottura. Fare
attenzione a non ustionarsi durante o dopo l’uso
dell’apparecchio.
• Verificare che nessun cablaggio di apparecchi fissi o mobili
venga in contatto con il vetro dell’apparecchio o con pentole
bollenti.
• Gli oggetti magnetici (carte di credito, floppy discs, calcolatrici)
non devono essere piazzati vicino all’apparecchio quando
questo è acceso. Questi oggetti potrebbero danneggiarsi.
• Gli oggetti metallici quali coltelli, forchette, cucchiai e coperchi
non devono essere piazzati sull’apparecchio perché potrebbero
diventare incandescenti.
• Gli oggetti metallici quali cucchiai e coperchi non devono essere
piazzati sull’apparecchio ad induzione perché potrebbero
diventare incandescenti.
• Non coprire mai l’apparecchio con un panno o telo protettivo,
perché potrebbe surriscaldarsi e bruciare.
• Questo apparecchio può essere usato da bambini con una età
minima di otto anni e da persone le cui capacità fisiche,
sensoriali o mentali sono ridotte, o le cui esperienze e
conoscenze sono inadatte, unicamente se sotto sorveglianza e
dietro formazione sull’uso dell’apparecchio, in condizioni di
sicurezza e dopo essere state informate sui rischi in cui
potrebbero incorrere.
Page 54

54
• I bambini non devono giocare con l’apparecchio.
• La pulizia e la manutenzione non possono essere affidate a
bambini senza la sorveglianza di un adulto.
Precauzioni onde non danneggiare l’apparecchio
• Pentole con fondo graffiato o danneggiato possono
danneggiare il vetro ceramico. Le pentole potrebbero graffiare
la superficie in vetroceramica.
• Sabbia o altre sostanze abrasive possono danneggiare il vetro
ceramico.
• Il vetro ceramico non è sensibile agli shock termici ed è molto
resistente, non è tuttavia infrangibile. Evitare di far cadere
oggetti, anche piccoli, sul vetro ceramico.
• Non colpire i bordi del vetro con le pentole.
• Non mettere o lasciare pentole vuote sul vetro ceramico.
• Lo zucchero, i materiali sintetici e i fogli di alluminio non devono
venire a contatto con le zone riscaldante, perché possono
causare rotture o altre alterazioni del vetro ceramico durante il
raffreddamento. Nel caso, accendere immediatamente
l’apparecchio e rimuovere l’oggetto dalla piastra, prendendo le
opportune precauzioni per non ustionarsi.
• Non piazzare mai un contenitore bollente sul pannello di
controllo. L'elettronica sotto il vetro potrebbe danneggiarsi.
• Pericolo di incendio! Non appoggiare alcun oggetto sul piano
di cottura.
• Se sotto il piano cottura incassato c’è un cassetto, assicurarsi
che lo spazio tra il contenuto dello stesso e la parte inferiore
dell’apparecchio sia sufficiente (almeno 2 cm) per evitare
contatti accidentali.
• Non mettere mai oggetti infiammabili (ad es. spray) nel cassetto
situato sotto l’apparecchio. Gli eventuali contenitori per posate
posti in cassetti sotto l’apparecchio devono essere resistenti al
calore.
• Non riscaldare contenitori chiusi (per es. barattoli di conserve)
sulle zone cottura. A causa della conseguente sovrappressione
i contenitori e/o i barattoli possono scoppiare, e sussiste il
pericolo di lesioni!
Page 55

55
Precauzioni in caso di malfunzionamento dell’apparecchio
• Se si nota un difetto di funzionamento, spegnere l’apparecchio
e disconnetterlo dalla rete elettrica.
• Se il vetro ceramico è rotto o crepato: disconnettere
immediatamente l’apparecchio dalla rete elettrica, svitando e
rimuovendo il fusibile e chiamare l’assistenza tecnica.
• Qualsiasi riparazione deve essere compiuta esclusivamente da
personale qualificato.
• ATTENZIONE! Se la superficie del vetro è crepata o rotta,
spegnere immediatamente l’apparecchio per evitare il rischio di
scosse elettriche.
Altre precauzioni
• Assicurarsi che la pentola o padella sia sempre centrata sulla
zona di cottura. Il fondo dell’utensile deve coprire il più possibile
la zona di cottura.
• Per gli utilizzatori di pace-makers: il campo magnetico
dell’apparecchio potrebbe influenzare il funzionamento del
pace-maker. Si raccomanda di richiedere preventivamente
informazioni al venditore dell’apparecchio e/o al medico
curante.
• Non utilizzare contenitori di alluminio o di materiali sintetici!
Potrebbero fondere se appoggiati alle zone accese o ancora
calde dopo l’uso.
• Non utilizzare mai acqua per spegnere il fuoco. Disattivare la
zona di cottura. Soffocare le fiamme con un coperchio, una
coperta ignifuga o qualcosa di simile.
L’UTILIZZO DI PENTOLE NON IDONEE OPPURE DI
ACCESSORI RIMUOVIBILI POSTI TRA LA PENTOLA E
LA PIASTRA PER RISCALDARE PENTOLE NON IDONEE
ALL’INDUZIONE FA DECADERE LA GARANZIA.
IL COSTRUTTORE NON PUÒ ESSERE CONSIDERATO
RESPONSABILE PER QUALSIASI DANNO AL PIANO DI
COTTURA O DANNI
CORRELATI.
Page 56

56
DESCRIPTION DE L’APPAREIL
Caractéristiques techniques
Typo 1773/2
1775/2
1777
/2
1776/2 1778/3
Potenza totale
7400 W
11100 W
11100 W
Consumo di energia del piano
cottura EC
hob
**
187.4 Wh/kg 188 Wh/kg 188 Wh/kg
Zona di cottura
24
0 x 200 mm
24
0 x 200 mm
24
0 x 200 mm
Identificazione minimo
Ø 100 mm
Ø 100 mm
Ø 100 mm
Potenza nominale
*
2100 W
2100 W
2100 W
Potenza booster
*
2600 W
2600 W
2600 W
Potenza doppio
booster*
3700 W
3700 W
3700 W
Zona di cottura centrale
-
300 x
200 mm Ø 280 mm
Identificazione minimo - Ø 90 /220 mm Ø 90 /220 mm
Potenza nominale * - 2100 W 1850 / 2600 W
Potenza booster * - 2600 W 2500 / 3300 W
Potenza doppio booster* - 3700 W 3000 / 5500 W
Categoria standard di pentola **
Ø 150 mm
Ø 150
mm Ø 150 mm
Consumo di energia EC
cw
** 182.8 Wh/kg
182.8 Wh/kg
182.8 Wh/kg
Categoria standard di pentola **
Ø 180 mm
Ø 180 mm (x2)
Ø 180 mm (x2)
Consumo di energia EC
cw
** 190.6 Wh/kg
190.6 Wh/kg
190.6 Wh/kg
Categoria standard di pentola **
Ø 210 mm (x2)
Ø 210 mm (x2)
Ø 210 mm (x2)
Consumo di energia EC
cw
** 188.1 Wh/kg
188.1 Wh/kg
188.1 Wh/kg
* La Potenza dichiarata può cambiare a seconda delle dimensioni e del material della pentola.
** metodo di misura delle prestazioni secondo la norma (EN60350-2)
Mettete le pentole in posizione
Importante: Per ottenere un effetto ottimale, è importante che la teglia sia centrata sulle zone
(vedi diagramma).
Page 57

57
Pannello dei comandi
USO DEL PIANO DI COTTURA
Indicazione
Indicazione Definizione Descrizione
0 Zero Zona di cottura attivata
1…9 Livello di potenza Selezione del livello
U Nessun rilevamento pentole Manca recipiente o non adatto
A Cottura con avvio rapido Potenza massima + cottura preliminare
E Indicazione guasto Anomalia dei dispositivi elettronici
H Calore residuo La zona di cottura è ancora calda
P Booster Funzione booster attivata.
Doppio booster Funzione doppio booster attivata
Mantenimento al caldo Cottura viene mantenuta a 42°C.
Mantenimento al caldo Cottura viene mantenuta a 70°C.
Mantenimento al caldo Cottura viene mantenuta a 90°C.
II Pausa Arresto temporaneo del piano di cottura
Funzione grill La funzione grill è attivata.
Tasto
mantenimento
Tasto
Booster
Indicatore del
funzione MY
Espositore da
banco
Indicazione da
banco / del timer
SLIDER: Campo sensorico per potenza e timer
Tasto Menu
Tasto di
accensione/spegniment
Indicatore del
timer
Indicatore del
grado di cottura
Indicatore
del menu
Page 58

58
Ventilazione
La ventola si attiva automaticamente. Si avvia a bassa velocità appena i valori dei dispositivi
elettronici superano una determinata soglia.
Quando il piano ad induzione viene usato intensamente, la ventola funziona ad alta velocità. La
ventola funziona più lentamente appena i dispositivi elettronici si sono sufficientemente
raffreddati.
PRIMA ACCENSIONE E UTILIZZO DEL PIANO DI COTTURA
Prima del primo riscaldamento
Pulire l’apparecchio con uno straccio umido, indi asciugarlo accuratamente. Non utilizzare
detergenti che possano causare colorazioni anomale del vetro.
Principio dell’induzione
Sotto ogni zona di cottura si trova un magnete induttore. Quanto viene attivato, questo produce
un campo elettromagnetico che genera una corrente induttiva nel fondo ferromagnetico della
pentola. Il risultato è il riscaldamento della pentola posizionata sulla zona. La trasmissione di
energia avviene solo al recipiente appoggiato sul piano di cottura.
Sono necessarie stoviglie apposite in materiali magnetizzabili.
• Tutte le pentole in materiale ferromagnetico sono consigliate: pentole in ghisa, acciaio,
smaltate e di acciaio inossidabile con fondo ferromagnetico
• Da escludere: pentole in rame, acciaio inossidabile senza fondo ferromagnetico, alluminio,
vetro, legno, ceramica, terracotta
La zona ad induzione si adatta automaticamente alla dimensione della pentola. Se il diametro di
quest’ultima è troppo piccolo tuttavia, la zona non funziona. Il diametro minimo varia in funzione
del diametro della zona di cottura.
Se la pentola non è adatta al piano di cottura a induzione, il display mostrerà la lettera [U].
Le funzioni dei sensori
Il piano di cottura viene comandato con sensori che reagiscono sfiorando il vetro col dito. Se si
sfiorano i sensori per un secondo circa, le funzioni selezionate si attivano. Ogni reazione dei
sensori viene confermata da un segnale acustico e/o visivo.
Per gli usi convenzionali, sfiorare un sensore alla volta.
Page 59

59
Power selection zone “SLIDER” and timer setting zone
To select the power with the slider, slide your finger on the “SLIDER” zone. You can also
directly access a particular level if you put your finger directly on the chosen level.
Spegnimento ed accensione del piano di cottura
• Accensione/spegnimento del piano di cottura :
Operazione Sensore di comando Indicazione
Accendere Premere [ ] [ 0 ]
Spegnere ^ Premere [ ] nessuna o [ H ]
• Accensione/spegnimento delle zone di cottura :
Operazione Sensore di comando Indicazione
Selezionare la zona Premere [ 0 ] della zona scelta [ 0 ]
Selezionare la potenza Scivolare sullo Slider da [ 0 ] a [ 9 ]
Spegnere Scivolare sullo Slider fino a [0] [ 0 ] o [ H ]
Se non si effettuano altre impostazioni, per motivi di sicurezza il piano di cottura si spegne
automaticamente dopo 20 secondi unitamente all’indicazione degli Zeri.
Rilevamento pentola
Il dispositivo di riconoscimento del recipiente di cottura garantisce una sicurezza completa.
• L’induzione non funziona se sulla zona di cottura non si trova una pentola o se la pentola
non è adatta per l’induzione. In questi casi non è possibile aumentare la gradazione e
nell’indicatore viene visualizzato il simbolo [U]. Il simbolo [U] si spegne se sulla zona di
cottura si pone il recipiente di cottura.
• Se durante la cottura si toglie il recipiente dalla zona di cottura, la zona di cottura si spegne
subito e nell'indicatore appare il simbolo [U]. Il simbolo [U] si spegne se sulla zona di cottura
si pone di nuovo il recipiente di cottura. La zona di cottura si attiva nuovamente con la
gradazione precedentemente impostata.
A cottura ultimata, spegnere la zona di cottura per evitare che venga visualizzato il simbolo [U].
Power selection zone “SLIDER” and timer setting
“SLIDER“ Direct access
Page 60

60
Indicatore del calore residuo
Dopo aver spento la zona di cottura o il piano di cottura, per le zone di cottura ancora calde viene
visualizzato il simbolo [ H ] per il calore residuo. Il simbolo [ H ] si spegne quando si possono
toccare le zone di cottura senza scottarsi. Fintanto che il simbolo del calore residuo rimane
visualizzato, evitare di toccare le zone calde e di mettervi oggetti non resistenti al calore. Pericolo
di ustionarsi!
Funzione booster e booster doppio (livello Power)
Tutte le zone di cottura sono dotate di funzioni booster e doppio booster, ossia con una potenza
maggiorata. La funzione booster viene visualizzata col simbolo [ P ]; la funzione doppio booster
con [ P ] e inoltre con [ ] lampeggiante.
Se le funzioni booster sono attivate, le zone di cottura interessate si riscaldano per 10 minuti
con una potenza maggiorata. Tale funzione potenziata è pratica per portare ad ebollizione in
poco tempo una notevole quantità d’acqua per cuocere, ad esempio, la pasta.
• Accensione/spegnimento del booster :
Operazione Sensore di comando Indicazione
Selezionare la zona Premere [ 0 ] della zona scelta [ 0 ]
Accendere del booster Premere [ B² ] [ P ]
Spegnere del booster Scivolare sullo Slider [ 9 ] a [ 0 ]
• Accensione/spegnimento del doppio booster :
Operazione Sensore di comando Indicazione
Selezionare la zona Premere [ 0 ] della zona scelta [ 0 ]
Accensione del booster Premere [ B² ] [ P ]
Accensione del doppio booster Premere di nuovo [ B² ] [ e P ]
Spegnere del doppio booster Premere di nuovo [ B² ] [ P ]
Spegnere del booster Scivolare sullo Slider [ 9 ] a [ 0 ]
• Gestione della potenza:
L’apparecchio ha un sistema di limitazione della potenza massima. Quando la funzione Booster
è attiva, al fine di non eccedere in potenza, il sistema elettronico riduce automaticamente la
potenza di una delle altre piastre. Il display lampeggia su [ 9 ] per qualche secondo e poi indica
la Potenza massima consentita:
Piastra selezionata L’altra piastra: (esempio: livello potenza 9)
Compare il simbolo[ P ] [ 9 ] diventa [ 6 ] o [ 8 ] a seconda del tipo di piastra coinvolta
Funzione contatore
Quando si seleziona una zona di cottura, suo è visualizzato tempo di funzionamento, in secondi
da 1 a 59, poi in minuti da 1 a 99.
Page 61

61
Orologio temporizzatore
Con il timer integrato si può impostare per tutte le quattro zone una durata di cottura da 1 a 99
minuti. Per ogni zona di cottura è possibile impostare una durata diversa.
• Impostare o modificare la durata del timer:
Esempio: per 16 minuti a Potenza 7 :
Operazione Sensore di comando Indicazione
Selezionare la zona Premere [ 0 della zona scelta [ 0 ]
Selezionare la potenza Scivolare sullo Slider [ 7 ]
Selezionare il timer Premere 3s indicazione del timer [ 00 ]
Selezionare le decine Scivolare sullo Slider fino a [ 1 ] [ 1 lampeggia ] [ 0
fissa ]
Convalidare le decine Premere l’Indicazione [ 10 ] [ 1 fissa ] [ 0
lampeggia ]
Selezionare le unità Scivolare sullo Slider fino a [ 6 ] [ 1 fissa ] [ 6
lampeggia ]
Convalidare le unità Attendere 2 secondi [ 16 ]
Il tempo è confermato e la cottura ha inizio.
• Per arrestare il tempo di cottura
Esempio: per 13 minuti a Potenza 7 :
Operazione Sensore di comando Indicazione
Selezionare la zona Premere [ 7 ] de la zone [ 0 ]
Selezionare il timer Premere 3s indicazione del timer [ 13 ] [ 13 ]
Selezionare le decine Scivolare sullo Slider fino a [ 0 ] [ 0 lampeggia ] [ 3
fissa ]
Convalidare le decine Premere l’Indicazione [ 03 ] [ 0 fissa ] [ 3
lampeggia ]
Selezionare le unità Scivolare sullo Slider fino a [ 0 ] [ 0 fissa ] [ 0
lampeggia ]
Convalidare le unità Attendere 2 secondi [ 00 ]
• Arresto automatico alla fine del tempo di cottura
Quando viene raggiunto il tempo impostato per la cottura, il display del timer lampeggia su [00],
viene prodotto un segnale acustico e la piastra si spegne. Per arrestare il segnale acustico è
sufficiente premere il tasto [ 00 ].
Page 62

62
• Funzione timer al di fuori della cottura:
Esempio: per 29 minutes :
Operazione Sensore di comando Indicazione
Attivare l’apparecchio Premere [ ] [ 0 ]
Selezionare il timer Premere 3s indicazione del timer [ CL ] [ 00 ]
Selezionare le decine Scivolare sullo Slider fino a [ 2 ] [ 2 lampeggia ] [ 0
fissa ]
Convalidare le decine Premere l’Indicazione [ 20 ] [ 2 fissa ] [ 0
lampeggia ]
Selezionare le unità Scivolare sullo Slider fino a [ 9 ] [ 2 fissa ] [ 9
lampeggia ]
Convalidare le unità Attendere 2 secondi [ 29 ]
Dopo qualche secondo la spia smette di lampeggiare.
Appena il tempo impostato è esaurito i display del timer lampeggiano a [ 00] e si ode un
segnale acustico. Per arrestare il segnale acustico è sufficiente premere il display [ 00].
L’apparecchio si spegne.
Cottura con avvio rapido
Tutte le piastre sono equipaggiate con una funzione automatica. La piastra si accende a piena
Potenza per un dato tempo, poi riduce automaticamente la Potenza a un livello prestabilito.
• Accensione cottura con avvio rapido :
Operazione Sensore di comando Indicazione
Selezionare la zona Premere [ 0 ] della zona scelta [ 0 ]
Selezionare la cottura con
avvio rapido Scivolare sullo Slider
e mantenere [ 0 ] a [ 9 ] lampeggia con [A]
• Spegnimento cottura con avvio rapido :
Operazione Sensore di comando Indicazione
Sélectionner la zone Premere [ A ] de la zone livello di potenza
lampeggia con [ A ]
Selezionare la potenza Scivolare sullo Slider da [ 0 ] a [ 9 ]
Livello di cottura di
proseguimento
impostato
Cottura con avvio
rapido
Tempo (min:sec)
1 00:40
2 01:12
3 02:00
4 02:56
5 04:16
6 07:12
7 02:00
8 03:12
9 - : -
Page 63

63
Funzione Pausa
Questa funzione arresta tutte le attività di cottura e permette di ri-attivarle in un secondo
momento con le stesse regolazioni.
• Attivare / Disattivare la funzione pausa:
Operazione Sensore di comando Indicazione
Accedere al menu Premere menu [ ] tasto viene visualizzato il
menu
Attivare la funzione pausa Premere il “SLIDER“ sotto il
indicazione [ II ] [ II ] in tutte le
indicazioni
Disattivare la funzione pausa Premere il “SLIDER“ sotto il
indicazione [ ] [ II ] Impostazioni
precedenti
Funzione Memory
Dopo aver spento il piano di cottura, le ultime impostazioni attuate rimangono memorizzate. Con
la funzione memory si possono attivare nuovamente tale valori. Con la funzione memory si
possono attivare nuovamente le seguenti impostazioni.
• Livelli di potenza delle zone di cottura
• Impostazioni timer delle zone di cottura
• Impostazioni della cottura con avvio rapido
Attivare la funzione Memory
• Premere [ ].
• Premere il “SLIDER“ sotto il indicazione [ II ] entro 6 secondi
La regolazione precedente viene attivata.
Funzioni di mantenimento al caldo
Queste funzioni consentono di mantenere al caldo gli alimenti a 42, 70 o 94 °C.
• Accensione e spegnimento
Operazione Sensore di comando Indicazione
Selezionare la zona Premere [ 0 ] della zona scelta [ 0 ]
Mantenimento al caldo (42°C) Premere una volta [ ] [ ]
Mantenimento al caldo (70°C) Premere due volte [ ] [ ]
Mantenimento al caldo (94°C) Premere tre volte [ ] [ ]
Disattivare la funzione Scivolare sullo Slider [ 0 ] a [ 9 ] o [ H ]
Questa funzione può essere attivata indipendentemente su tutte le piastre.
Quando la pentola viene tolta dalla piastra, la funzione di Mantenimento calore resta attiva per
circa 10 minuti.
La durata massima della funzione di mantenimento calore è di due ore.
Page 64

64
Blocco del piano di cottura/dei sensori
Per evitare di modificare inavvertitamente una regolazione, in particolare durante le operazioni
di pulizia, il Pannello di controllo può essere bloccato (con l’eccezione del tasto On/Off [ ]).
• Attivazione del blocco dei sensori:
Operazione Sensore di comando Indicazione
Attivare l’apparecchio Premere [ ] [ 0 ]
Accedere al menu Premere menu [ ] tasto viene visualizzato il
menu
Accendere il bloccaggio Premere il “SLIDER“ sotto il
indicazione [ ] [ L ] in tutte le
indicazioni
Il piano di cottura non può essere bloccato quando ci sono uno potenza sulle zone di cottura.
• Disattivazione del blocco dei sensori:
Operazione Sensore di comando Indicazione
Accedere al menu Premere menu [ ] tasto viene visualizzato il
menu
Spegnere il bloccaggio Premere il “SLIDER“ sotto il
indicazione [ ] durande 3s [ 0 ]
Ponte automatico e funzione ponte
Questa funzione permette di interconettere due zone di cottura in un'unica zona cottura.
Operazione Sensore di comando Indicazione
Attivare la funzione Ponte Posiziona una padella su una delle due
zone che saranno collegate e premi
simultaneamente i tasti di selezione
corrispondenti o posizionare una
grande pentola sui
due zone di cottura [ 0 ] e [ ] sulla zona
posteriore
Selezionare la potenza Scivolare sullo Slider da [ 0 ] a [ 9 ] e [ ]
sulla zona posteriore
Disattivare la funzione Ponte Premere contemporaneamente
entrambi delle zone [ 0 ]
Page 65

65
Funzione “Chef“
Questa funzione cambia il piano di cottura in 2 o 3 aree principali.
Le zone anteriore e posteriore vengono automaticamente commutate alla funzione ponte con
une certa potenza. Questo livello di potenza puo essere impostato qui e quindi diventa la nuova
impostazione standard. Con la funzione Chef si cambia piano cottura in un apparecchio
professionale in cui è possibile impostare le zone per cucinare intensivamente, sobbollire o
tenere al caldo.
• Attivazione della funzione “Chef“ :
Operazione Sensore di comando Indicazione
Accedere al menu Premere menu [ ] tasto viene visualizzato il
menu
Attivare la funzione “Chef“ Premere il “SLIDER“ sotto il
indicazione [ ] [ C ], [ H ], [ E ] [ F ]
poi [ 3 ] e [ ], [6],
[ 9 ] e [ ]
Selezionare la zona “Chef“ Premere uno dei tre zone da [ 0 ] a [ 9 ] e [ ] sulla
zona posteriore
Selezionare la potenza Scivolare sullo Slider da [ 0 ] a [ 9 ] e [ ]
sulla zona posteriore
• Disattivazione della funzione “Chef“ :
Operazione Sensore di comando Indicazione
Accedere al menu Premere menu [ ] tasto viene visualizzato il
menu
Disattivare la funzione “Chef“ Premere il “SLIDER“ sotto il
indicazione [ ] [ 0 ]
Funzione Grill
Questa funzione permette l'ottimale utilizzo della piastra grill "acc.no. 1303" interconnettendo
due zone e l'utilizzo di adeguati livello di potenza.
• Attivazione della funzione Grill :
Operazione Sensore di comando Indicazione
Accedere al menu Premere menu [ ] tasto viene visualizzato il menu
Attivare la funzione Grill Premere il “SLIDER“ sotto il
indicazione [ GRILL ] [ ] e [ ] sulla zona
posteriore
Selezionare la potenza Scivolare sullo Slider [ ] e [ ] sulla zona
posteriore
• Disattivazione della funzione Grill :
Operazione Sensore di comando Indicazione
Accedere al menu Premere menu [ ] tasto viene visualizzato il
menu
Disattivare la funzione Grill
Premere il “SLIDER“ sotto il
indicazione [ GRILL ] [ 0 ]
Page 66

66
Bloccare per la pulizia
Per evitare di modificare inavvertitamente una regolazione durante le operazioni di pulizia, il
Pannello di controllo può essere bloccato durante 20 secondi (con l’eccezione del tasto On/Off [
]).
• Attivazione del Bloccare per la pulizia
Operazione Sensore di comando Indicazione
Accedere al menu Premere menu [ ] tasto viene visualizzato il
menu
Accendere il bloccaggio Premere il “SLIDER“ sotto il
indicazione [ CLEAN ] [ L ] viene visualizzato
su tutte le zone di
cottura e viene
visualizzato un
contatore [ 20 ], [ 19 ],
[ 18 ]…
Regolazione della luminosità
Questa funzione cambia il livello di luminosità.
• Modificare il livello di luminosità:
Operazione Sensore di comando Indicazione
Accedere al menu Premere menu [ ] tasto viene visualizzato il
menu
Selezionare la funzione Premere il “SLIDER“ sotto il
indicazione [ ] il “SLIDER“ visualizza
il livello di luminosità
Modificare la luminosità Scivolare sullo Slider il “SLIDER“ visualizza
il livello di luminosità
Convalidare le impostazioni Premere menu [ ] tasto
o aspettare 3s [ 0 ]
Regolatore di volume
Questa funzione regola il volume.
• Modificare il livello di volume:
Operazione Sensore di comando Indicazione
Accedere al menu Premere menu [ ] tasto viene visualizzato il
menu
Selezionare la funzione Premere il “SLIDER“ sotto il
indicazione [ ] il “SLIDER“ visualizza
il volume
Modificare il volume Scivolare sullo Slider il “SLIDER“ visualizza
il volume
Convalidare le impostazioni Premere menu [ ] tasto
o aspettare 3s [ 0 ]
Page 67

67
Funzione di memoria di cottura
Dopo aver impostato una potenza e un timer per una zona, è possibile memorizzare le
impostazioni per questa zona.
• lo stato di cottura del piano di cottura (di potenza)
• minuti e secondi della zona di cottura programmata
• Funzione "Auto Cooking"
• Funzione di "tenere caldo"
• Memorizza le impostazioni de zona :
Operazione Sensore di comando Indicazione
Selezionare la zona Premere [ 0 ] zona [ 0 ]
Selezionare la potenza Scivolare sullo Slider [ 7 ]
Selezionare il timer Premere 3s indicazione del timer [ 00 ]
Selezionare le decine Scivolare sullo Slider fino a [ 1 ] [ 1 lampeggia ] [ 0
fissa ]
Convalidare le decine Premere l’Indicazione [ 10 ] [ 1 fissa ] [ 0
lampeggia ]
Selezionare le unità Scivolare sullo Slider fino a [ 6 ] [ 1 fissa ] [ 6
lampeggia ]
Convalidare le unità Attendere 2 secondi [ 16 ]
Selezionare la zona Premere [ 7 ] de la zone [ 7 ]
Accedere al menu Premere menu [ ] tasto viene visualizzato il
menu
Memorizza le impostazioni Premere il “SLIDER“ sotto il
indicazione [ ] durante 3s [ ] accanto a [ 7 ]
• Attivare le impostazioni de zona :
Operazione Sensore di comando Indicazione
Selezionare la zona con [ ] Premere [ 0 ] della zona scelta [ 0 ] e [ ]
Accedere al menu Premere menu [ ] tasto viene visualizzato il
menu
Attivare le impostazioni Premere il “SLIDER“ sotto il
indicazione [ ] [ ] accanto a [ 7 ] e [
16 ] sul Indicazione
del timer
• Rimuovere le impostazioni de zona :
Operazione Sensore di comando Indicazione
Selezionare la zona con [ ] Premere [ 0 ] della zona scelta [ 0 ] e [ ]
Mettre la puissance à 0 Scivolare sullo Slider fino a [ 0 ] [ 0 ] e [ ]
Accedere al menu Premere menu [ ] tasto viene visualizzato il
menu
Memorizza le impostazioni Premere il “SLIDER“ sotto il
indicazione [ ] durante 3s [ 0 ]
Page 68

68
Funzione ‘’pot move’’
Questa funzione permette di invertire i parametri di due zone di cottura (poteri, timer ...).
• Intervertir 2 foyers:
Operazione Sensore di comando Indicazione
Sélectionner une zone Premere della zona scelta
pendant 3s Les autres zones
clignotent
Déplacer les paramètres Premere une autre zone ou
placer une casserole sur une zone Les 2 zones sont
interverties
Limitazione della durata d'esercizio
Il funzionamento continuo dell'apparecchio è limitato nel tempo da un dispositivo automatico. La
durata di funzionamento di ogni singola zona di cottura dipende dal livello di cottura selezionato.
Il presupposto è che non si modifichino le impostazioni della zona di cottura durante il suo
funzionamento. Quando è attiva la funzione limitazione della durata d'esercizio, la zona di
cottura si spegne.
Livello di potenza
impostato
Limitazione della durata
d'esercizio (ore)
1 8.7
2 6.7
3 5.3
4 4.3
5 3.5
6 2.8
7 2.3
8 1.9
9 1.5
Page 69

69
CONSIGLI PER LA COTTURA
Recipienti di cottura
Materiali adatti: acciaio smaltato, ghisa, acciaio con fondo magnetizzabile, alluminio
con fondo magnetizzabile
Materiali non adatti: alluminio e acciaio con fondo non magnetizzabile, rame, ottone, cotto,
porcellana
In via di massima, i fabbricanti indicano se i recipienti di cottura sono adatti per i piani ad
induzione.
Per verificare se i recipienti di cottura sono indicati per il piano ad induzione:
• Versare nella pentola un po’ d’acqua e collocarlo sulla zona di cottura ad induzione.
Accendere la zona e selezionare la gradazione [ 9 ]. L’acqua deve riscaldarsi in pochi
secondi.
• Toccare con una calamita il fondo della pentola. Se la calamita rimane attaccata, la
pentola è indicata per il piano ad induzione.
Alcuni recipienti possono generare rumori se vengono posti su una zona di cottura ad
induzione. Ciò non significa che il piano ad induzione sia difettoso o che funzioni in modo
anomalo.
Page 70

70
Dimensioni dei recipienti di cottura
Entro certi limiti, le zone di cottura si adattano automaticamente al diametro del recipiente di
cottura. Se il diametro di quest’ultima è troppo piccolo tuttavia, la zona non funziona.
Per sfruttare la massimo la potenza della zona di cottura, collocare il recipiente al centro della
zona.
Esempi di regolazione della potenza
(I valori sotto sono indicativi)
1 - 2
far sciogliere,
stemperare, riscaldare
salsine, burro, cioccolato,
gelatina, yogurt
2 - 3
mettere in ammollo,
scongelare, riscaldare
riso, prodotti congelati,
pesce, verdura
3 - 4
cuocere con acqua
pesce, verdura, frutta
4 - 5
cuocere a calore
moderato, cuocere con
acqua, scongelare
pesce, verdura, pasta, cereali, legumi,
cibo congelato
6 - 7
cuocere (di
proseguimento)
carne, fegato, uova, salsiccia involtini,
frittelle
7 - 8 arrostire
pesce, bistecche, salsiccia, uova
strapazzata
9
arrostire, portare ad
ebollizione
bistecche, frittate
lenticchie
P ou
cuocere notevoli quantità d'acqua
PULIZIA E MANUTENZIONE
Prima di pulire il piano di cottura aspettare che si raffreddi. Pericolo di ustionarsi!
Eliminare lo sporco regolarmente. Usare uno straccio umido e poco detersivo o un prodotto
specifico per vetroceramica.
• Spegnere il piano di cottura prima di pulirlo.
• Per motivi di sicurezza non usare la pulitrice a vapore o ad alta pressione.
• Evitare assolutamente di usare prodotti abrasivi o aggressivi, ad esempio spray per forno
o grill, smacchiatori o prodotti antiruggine, pomice o spugnette abrasive.
• Asciugare alla fine il piano con uno straccio pulito.
Eliminare subito residui di zucchero o di sostanze zuccherine.
COSA FARE SE...
Il piano o le zone di cottura non si accendono:
• Il piano di cottura non è collegato correttamente alla rete elettrica.
• Il fusibile non è correttamente in sede o è difettoso.
• È stato attivato il dispositivo di blocco del piano.
• I sensori sono umidi o unti.
• I sensori sono coperti da una pentola o da altri oggetti.
Nell’indicatore viene visualizzato [ U ]:
• Il recipiente di cottura non è sistemato correttamente sulla zona di cottura.
• Il recipiente di cottura non è adatto per il funzionamento ad induzione.
• Il diametro del fondo del recipiente di cottura è troppo piccolo per la zona di cottura.
Page 71

71
Nell’indicatore viene visualizzato [ E ]:
• Staccare il piano di cottura dalla rete elettrica e collegarlo di nuovo.
• Contattare il servizio assistenza.
Una zona di cottura o il piano di cottura si spengono:
• È scattato il dispositivo di disinserimento di sicurezza.
• Si è dimenticato di spegnere una zona di cottura.
• Uno o più sensori sono coperti.
• Un recipiente di cottura vuoto si è surriscaldato.
• A causa del surriscaldamento, i dispositivi elettronici hanno ridotto la potenza o spento il
piano.
• L'aerazione probabilmente non è sufficiente. Si consiglia di aprire la parete posteriore del
mobile di base nell'area del ritaglio piano di lavoro e togliere il listello traversale del
mobile per l'intera larghezza del piano di cottura per garantire uno scambio aria migliore.
Il ventilatore di raffreddamento continua a funzionare anche dopo lo spegnimento del
piano di cottura:
• Non si tratta di un guasto. Il ventilatore continua a funzionare fino a quando il piano si è
raffreddato.
• Il ventilatore si spegne automaticamente.
La cottura con avvio rapido non si attiva:
• La zona di cottura è ancora calda [ H ].
• È stata selezionata la gradazione più alta [ 9 ].
Nell’indicatore viene visualizzato [ U ]:
• Vedi voce: ”Funzione mantenere al caldo".
Nell’indicatore viene visualizzato [ II ]:
• Vedi voce: ”Funzione Pausa".
Il pannello di controllo indica [ ] or [ Er03 ]:
• Un oggetto o un liquido copre i comandi Il simbolo scomparirà non appena i comandi
verranno puliti o l'oggetto sarà rimosso.
Il pannello di controllo indica [ E2 ]:
• Il piano di cottura è surriscaldato, lasciarlo raffreddare e poi riaccenderlo.
Il pannello di controllo indica [ E8 ]:
• La presa d'aria del ventilatore è ostruito, rilasciarla.
Il pannello di controllo indica [ U400 ]:
• Il piano di cottura non è collegato alla rete. Controllare il collegamento e eventualmente
ricollegare il piano di cottura.
Il pannello di controllo indica [ Er47 ]:
• Il piano di cottura non è collegato alla rete. Controllare il collegamento e ricollegare il
piano di cottura.
Se uno dei simboli di cui sopra persiste, chiamare il centro assistenza.
Page 72

72
TUTELA AMBIENTALE
• I materiali dell'imballaggio sono consoni alla tutela della natura e riciclabili.
• Gli apparecchi elettrici ed elettronici fuori uso contengono spesso materiali riutilizzabili.
Contengono pure sostanze nocive per l’ambiente ma necessarie per il corretto
funzionamento e la sicurezza dell’apparecchio.
• Per questo motivo non gettare l’apparecchio nei rifiuti.
• Contattare l’organizzazione del vostro comune preposta al
riciclaggio degli elettrodomestici.
Page 73

73
ISTRUZIONI DI INSTALLAZIONE
L’installazione è di esclusiva responsabilità dell’installatore specializzato.
L’installatore è tenuto a rispettare la legislazione locale e le normative in vigore nel Paese in cui
viene installato l’apparecchio.
Come fissare la guarnizione
La guarnizione fornita con l’apparecchio serve a evitare le infiltrazioni di acqua o altri liquidi nel
mobile sottostante l’apparecchio.
La sua installazione deve essere fatta attentamente, seguendo il disegno qui sotto.
Attenzione: Non applicare sigillante tra il piano di cottura e il piano di lavoro, la striscia
impermeabile fornisce una sufficiente tenuta del piano di lavoro
Inserimento – installazione
• Le misure di incasso sono:
Dimensioni del foro
Dimensioni del foro per il
montaggio a incasso
Misura del vetro
Tipo Larghezza Profondità
Larghezza Profondità Raggio Larghezza Profondità Spessore
1773/2 560
490
654 524 7 650 520 4
1775/2 750
490
804 524 7 800 520 4
1776/2 750
490
804 524 7 800 520 4
1777/2 890
390
914 414 7 910 410 4
1778/3 850
490
904 524 7 900 520 4
• Assicurarsi che ci sia una distanza di almeno 50 mm tra l’apparecchio e il muro o le pareti
o paratie laterali.
• L’apparecchio è classificato come classe “Y” di protezione dal calore. Idealmente
l’apparecchio dovrebbe essere installato con un ampio spazio da entrambi i lati. Ci può
essere un muro posteriormente e mobili alti o un muro su un lato. Sull’altro lato tuttavia,
non deve esserci un divisorio o un mobile più alto della posizione dell’apparecchio.
• Il mobile o piano di lavoro sul quale l’apparecchio è installato, nonché i bordi dei mobili e/o
unità pensili, i rivestimenti laminati che li rivestono
e la colla di assemblaggio, devono essere in grado
di resistere a temperature fino a 100 °C.
• I supporti a muro devono essere resistenti al
calore.
• I materiali utilizzati per i piani di lavoro spesso tendono
a gonfiarsi con l’umidità. Per proteggere il foro di
incasso dell’apparecchio, applicare uno strato di
vernice o sigillante apposito. Una particolare cura deve
essere dedicata alla corretta applicazione della
guarnizione fornita con l’apparecchio, onde evitare
qualsiasi infiltrazione nel mobile sottostante. La
guarnizione garantisce una corretta tenuta se utilizzata
su superfici lisce.
• Prevedere un’apertura di ventilazione appena sotto
il piano di lavoro da 4 mm su una larghezza di 600 mm per un sufficiente raffreddamenta.
Incollare la guarnizione a (2) due mm
dal bordo inferiore esterno del vetro,
dopo aver rimosso la protezione della
stessa (3).
Page 74

74
• Non installare l’apparecchio al di sopra di un forno non opportunamente ventilato, o di una
lavastoviglie.
• Garantire la presenza di uno spazio di almeno 20 mm al di sotto della cassetta
dell’apparecchio, onde permettere una corretta areazione dell’apparecchio.
• Se sotto l’apparecchio c’è un cassetto, non riporvi oggetti infiammabili, come bombolette
di spray, od oggetti non resistenti al calore.
• La distanza di sicurezza tra l’apparecchio e una eventuale cappa di aspirazione
sovrastante deve essere quello previsto dal fabbricante della cappa. In caso di mancanza
di indiazioni in merito, rispettare una distanza minima di 760 mm.
• Il cavo di alimentazione, dopo l’installazione dell’apparecchio, non deve essere soggetto a
sollecitazioni meccaniche, come ad esempio schiacciamento a causa del movimento di
cassetti o altro.
• ATTENZIONE: Usare solo griglie di protezione che vengono proposte o consigliate dal
produttore del piano di cottura. L’uso di griglie di protezione non appropriate possono
causare incidenti.
•
CONNESSIONE ELETTRICA
• L’installazione di questo apparecchio e la connessione alla rete elettrica devono essere
affidate esclusivamente a personale qualificato e autorizzato, nel rispetto della normativa
in vigore.
• Dopo l’installazione, una adeguata protezione delle parti sotto tensione deve essere
garantita.
• I necessari dati di connessione si trovano sull’etichetta posta sulla cassetta
dell’apparecchio, in prossimità della morsettiera.
• La connessione alla rete elettrica deve essere fatta utilizzando una presa con messa a
terra, o tramite un circuito omnipolare con fusibile di interruzione con un’apertura di almeno
3 mm.
• Il circuito elettrico dell’apparecchio deve essere separato dalla rete tramite opportuni
apparecchi, quali fusibili, interruttori di apertura circuito o capacitatori.
• Se l’apparecchio non viene installato con una spina accessibile, un dispositivo di
disconnessione conforme alle norme di installazione deve essere previsto
nell’installazione.
• Il cavo di alimentazione deve essere posizionato in modo che non venga a contatto con
alcuna delle parti calde del piano.
Attenzione!
Questo apparecchio può solo essere collegato ad una rete elettrica a 230 V~ 50/60 Hz
Collegare sempre il cavo di terra.
Rispettare il diagramma di connessione.
Page 75

75
Collegamento della tabella 1773
/2
– 1775/2 – 1777/2:
* Calcolato con il fattore di simultaneità secondo la norma EN 60 335-2-6
Collegamento della tabella 1776/2 – 1778/3:
Attenzione! Assicurarsi di aver fissato correttamente i cavi e i ponticelli e di aver serrato
correttamente le viti.
Il fab
Rete Connessione
Diametro
cavo
Cavo Schema di collegamento
Fusibile di
protezione
230 V~ 50/60 Hz
1 Fase +N 3 x 2,5 mm
2
H 05 VV - F
H 05 RR - F
25 A *
400 V~ 50/60Hz 2 Fase + N 4 x 1,5 mm
2
H 05 VV - F
H 05 RR - F
16 A *
400 V~ 50/60Hz
(NL)
2 fasen + 2N 5 x 1,5 mm
2
H 05 VV - F
H 05 RR - F
16 A *
230 V~ 50/60 Hz
2 Fase 3 x 2,5 mm
2
H 05 VV - F
H 05 RR - F
25 A *
230 V~ 50/60 Hz
(BE)
3 Fase 4 x 1,5 mm
2
H 05 VV - F
H 05 RR - F
16 A *
Rete Connessione
Diametro
cavo
Cavo
Schema di
collegamento
Fusibile di protezione
230 V~ 50/60 Hz 1 Fase +N 3 x 4 mm2
H 05 VV - F
H 05 RR - F
40 A *
400 V~ 50/60Hz 2 Fase + N 4 x 2,5 mm
2
H 05 VV - F
H 05 RR - F
25 A *
400 V~ 50/60Hz
(NL)
2 Fase + 2N 5 x 2,5 mm
2
H 05 VV - F
H 05 RR - F
25 A *
400 V~ 50/60Hz 3 Fase + N 5 x 1,5 mm
2
H 05 VV - F
H 05 RR - F
16 A *
230 V~ 50/60 Hz
2 Fase 3 x 4 mm2
H 05 VV - F
H 05 RR - F
40 A *
230 V~ 50/60 Hz
(BE)
3 Fase 4 x 2,5 mm
2
H 05 VV - F
H 05 RR - F
25 A *
Il fabbricante declina qualsiasi responsabilità per ogni incidente risultante da
connessione sbagliata dell’apparecchio, incluso l’utilizzo di un apparecchio non
correttamente messo a terra, o connesso con una messa a terra difettosa.
Page 76

76
24275-3
 Loading...