

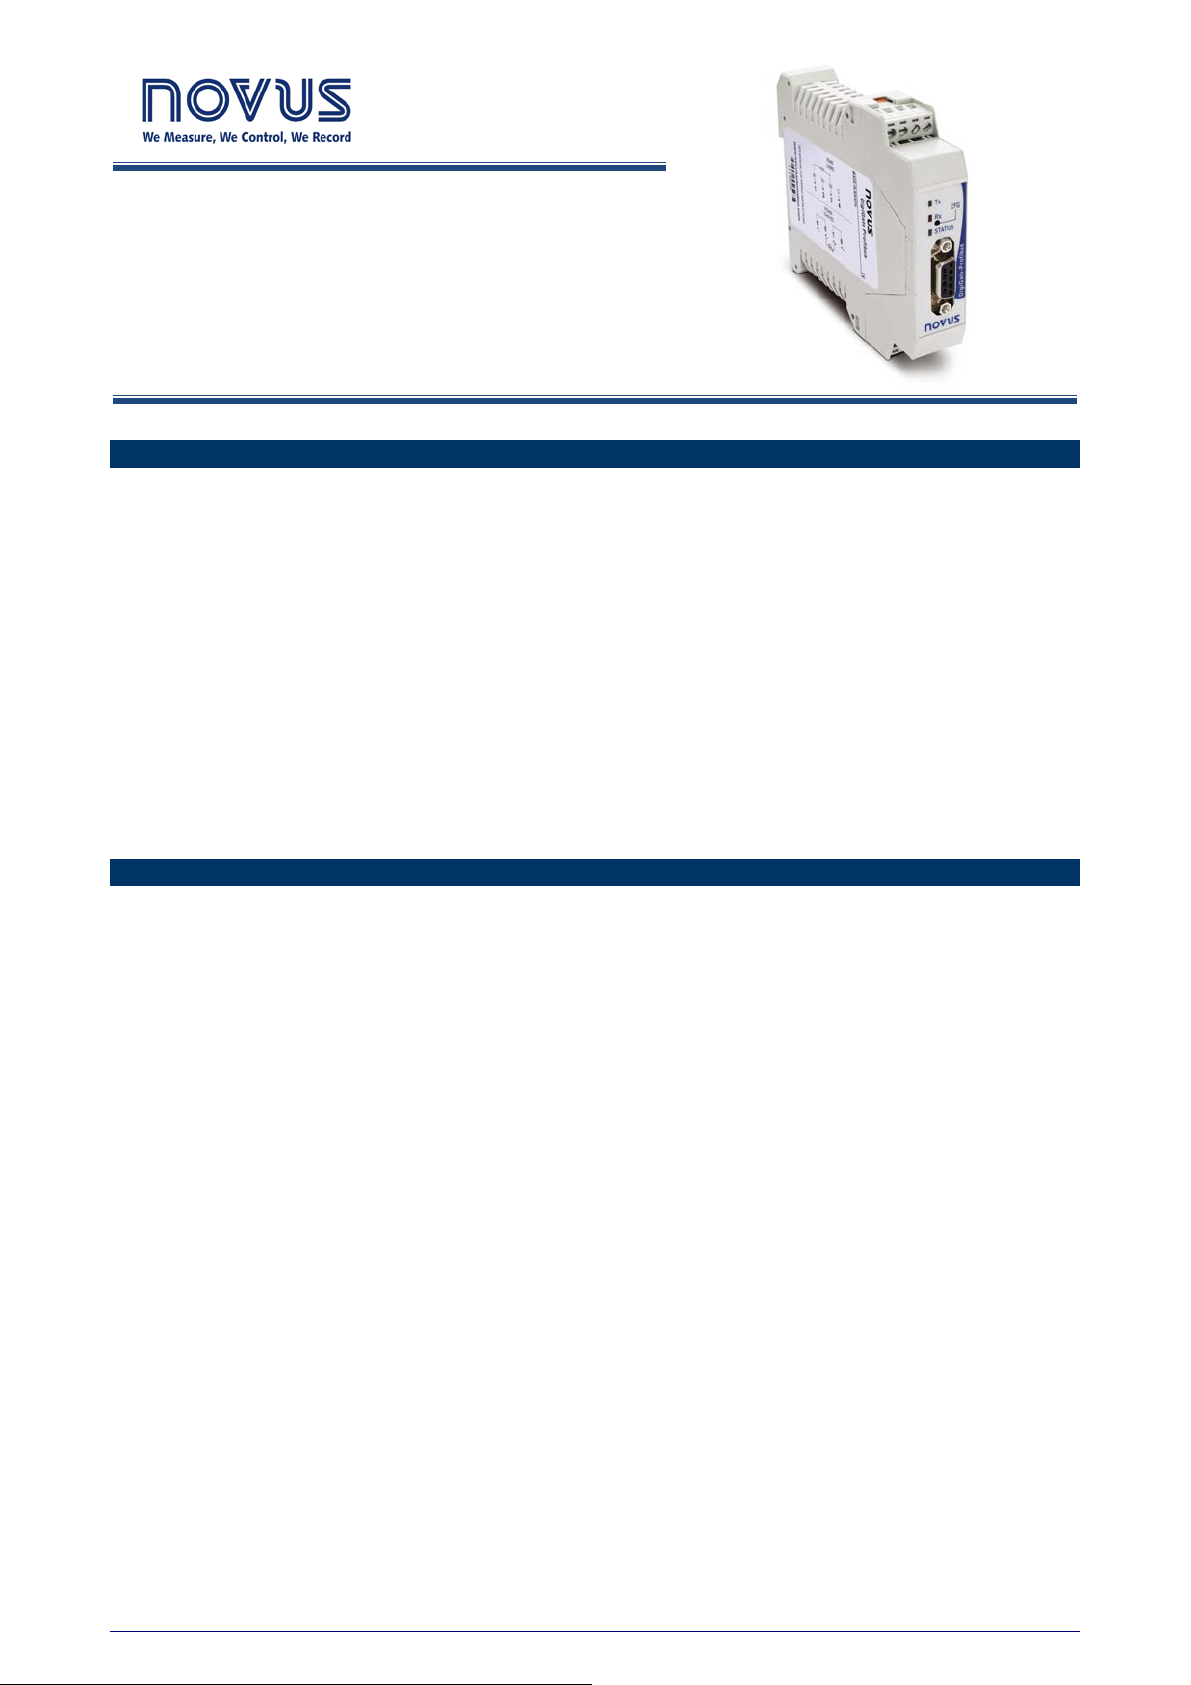
DigiGate Profibus
INSTRUCTIONS MANUAL - V1.0x B
INTRODUCTION
DigiGate Profibus is the ideal equipment for interconnecting a Profibus DP network with a Modbus RTU network. It
Works as a gateway, operating as a master station in the Modbus network and as a slave station in the Profibus network.
Thus, according to its previous configuration, DigiGate will read the data of the other devices (slaves) of the Modbus
network and send the read values to the Profibus master. In the same way, it will write at the output of the Modbus
slaves according to the Profibus master requests, providing a complete control of the Modbus network devices through
the Profibus network.
The data interchange is performed through internal memory tables of the device, which are shared between the Profibus
side and the Modbus side. This data interchange mode is very simple, since the Profibus control system will only need
reading the data from the reading table, which is continuously fed and updated through the reading operation performed
by the Modbus. In the same way, the Profibus will write the data in the writing table so that the Modbus can forward the
new values to the correct registers of the corresponding slaves.
The device is totally configurable through the application DigiConfig for Windows®, which comes with the product,
making access and change of its parameters really easy.
This manual will present the instructions necessary for installation and connection of the module. The installer for the
DigiConfig is contained in the CD which comes with the product. The installer program can also be found at the
manufacturer’s homepage for download.
SPECIFICATIONS
General:
● Operating environment: 0 to 50 °C, 30 to 80 % of relative humidity, without condensation.
● Mounting: DIN 35 mm rail.
● Electrical insulation between Profibus output and the rest of the device: 1000 Vac.
● Power supply: 10 to 35 Vdc / 100 mA maximum. Internal protection against inverse polarity.
● Front lit indicators for communication and status.
● The CFG key at the front panel will set the device into “Configuration mode” (Modbus slave: address 246, baud
rate 1200, even parity, 1 stop bit), able to be detected and configured through the DigiConfig software.
● Configuration software in Windows environment: DigiConfig.
● Electromagnetic compatibi lity : EN 61326:200 0.
● Mounting: DIN 35 mm rail.
Profibus:
● Protocol: Profibus DP.
● Operates at the entire range of communication rates, from 9600 bps to 12 Mbps.
● Addressing range: 0 to 125.
● Automatic detection of supported baud rate.
● “.GSD” file included.
● Termination and polarization resistors included (activated by jumper).
● Profibus connection: Terminals for wires, comes with an adapter for DB9.
NOVUS AUTOMATION 1/11
Modbus:
● Operates from 1200 bps to 115200 bps.
● Termination and polarization resistors included (act iv ated by jumper) .
● Protection at the bus: ±60 Vdc, 15 kV ESD.
● Commands available for data reading:
● “01 – Read Coil Status”
● “02 – Read Input Status”
● “03 – Read Holding Register”
● “04 – Read Input Register”
● Commands available for data wr iting:
● “05 – Force Single Coil”
● “06 – Preset Single Register”
● “15 – Force Multiple Coils”
● “16 – Preset Multiple Registers”
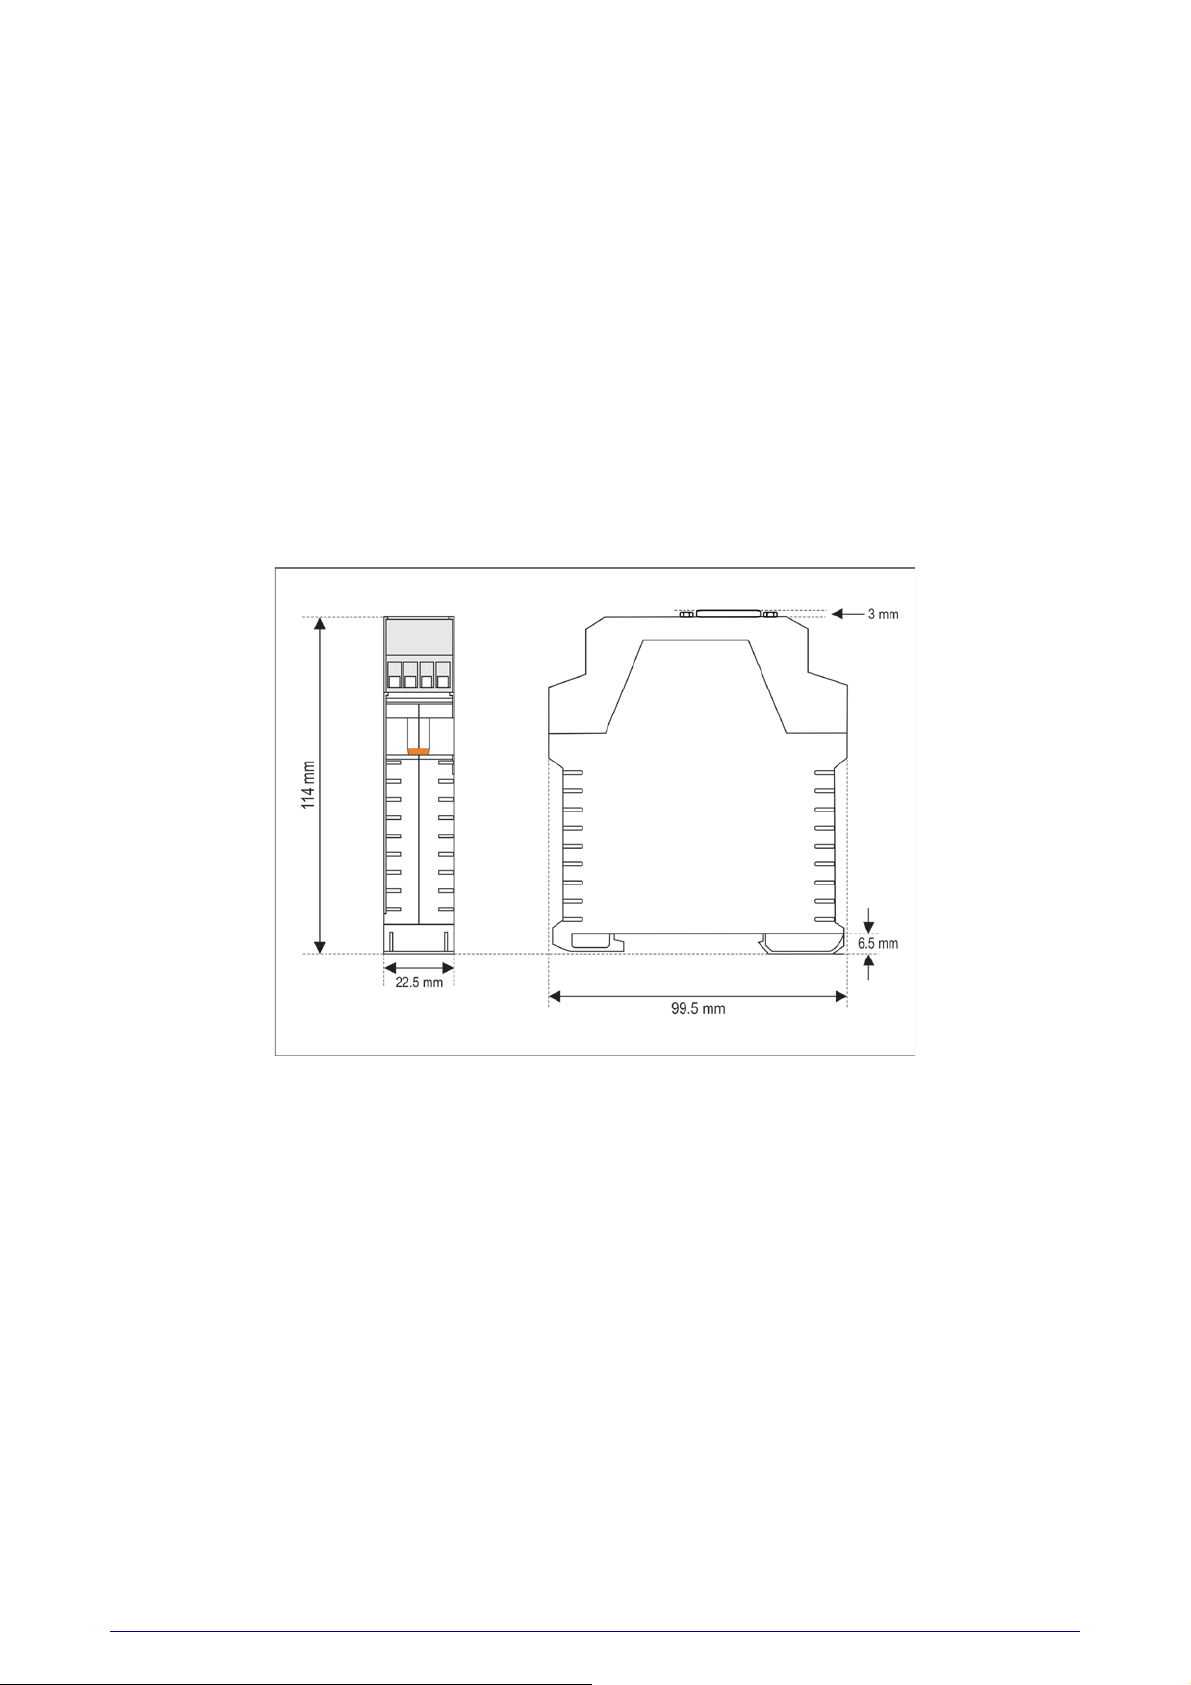
Measures: Fig. 1 shows the dimensions of the device.
DigiGate Profibus
Fig. 1 – Dimensions
NOVUS AUTOMATION 2/11
DigiGate Profibus
. If the positive
conductor of the power source is fastened, even momentarily, at any of the other terminals, the
ELECTRICAL INSTALLATION
Recommendations for installation
• When mounting the device on the DIN rail be sure to let a space of approx. 1 cm between the adjacent devices, in order
to allow heat dissipation and avoid overheating of the product.
• Input and communication signal conductors must go through the system base separated from electrical network
conductors, if possible, in grounded conduit s.
• The power supply for the instruments must be provided from a network appropriate for instrumentation.
• In control and monitoring applications it is essential to consider what may occur in case of failure of any part of the
system.
• It is recommended using RC FILTERS (47 Ω and 100 nF, series) in parallel with contactor and solenoid coils which
are next to or connected to the DigiGate.
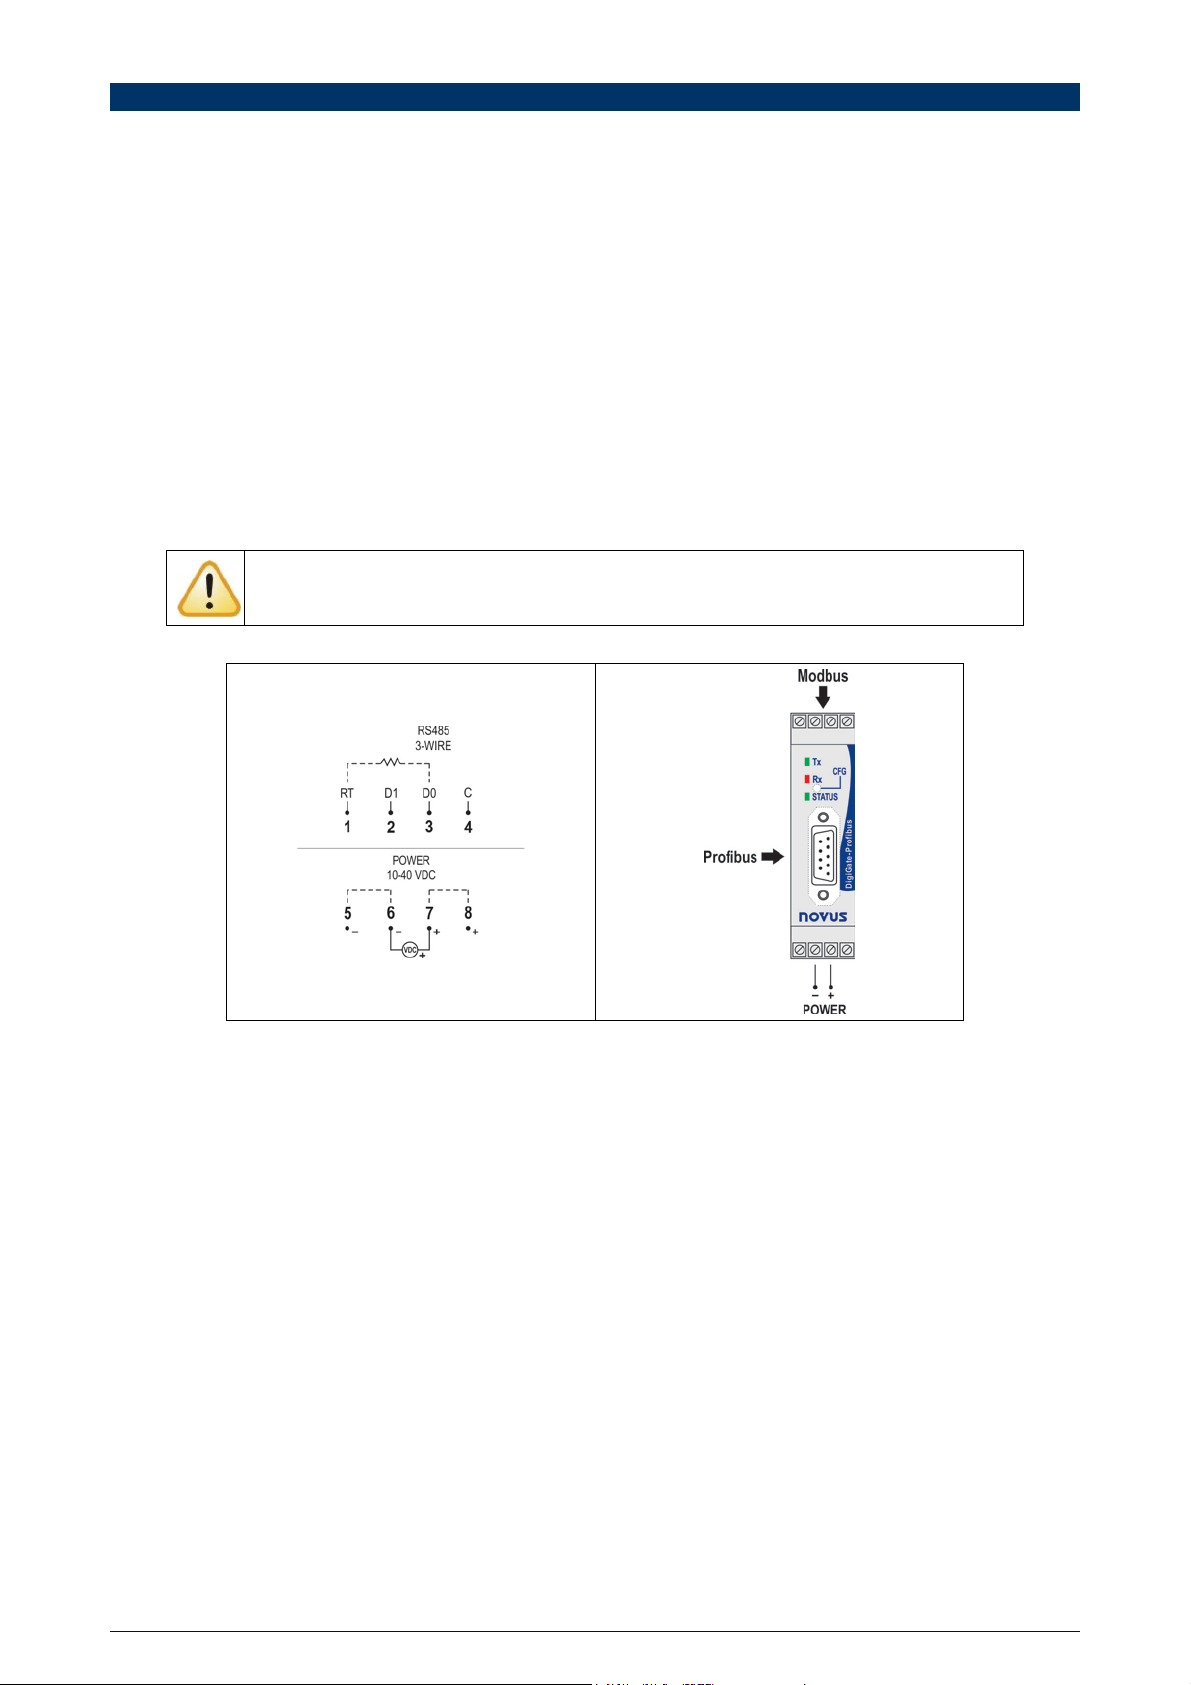
Electrical Connections
Fig. 2 shows the necessary electrical connections. The terminals 1, 2, 3, 7, 8 and 9 are intended for the Profibus network
connections (being mandatory only the connections at the terminals 7 and 8), 5 and 6 are for the power supply of the
module, while 10, 11 and 12 are intended for communication with the Modbus network. For obtaining better electrical
contact to the connectors, it is recommended using pin shape terminals at the end of the conductors. For direct wire
connection the recommended minimum gauge is 0.14 mm², not exceeding 4.00 mm².
Attention when connecting the power supply terminals to the DigiGate
device may be damaged.
Fig. 2 – Electrical connecti ons
NOVUS AUTOMATION 3/11
DigiGate Profibus
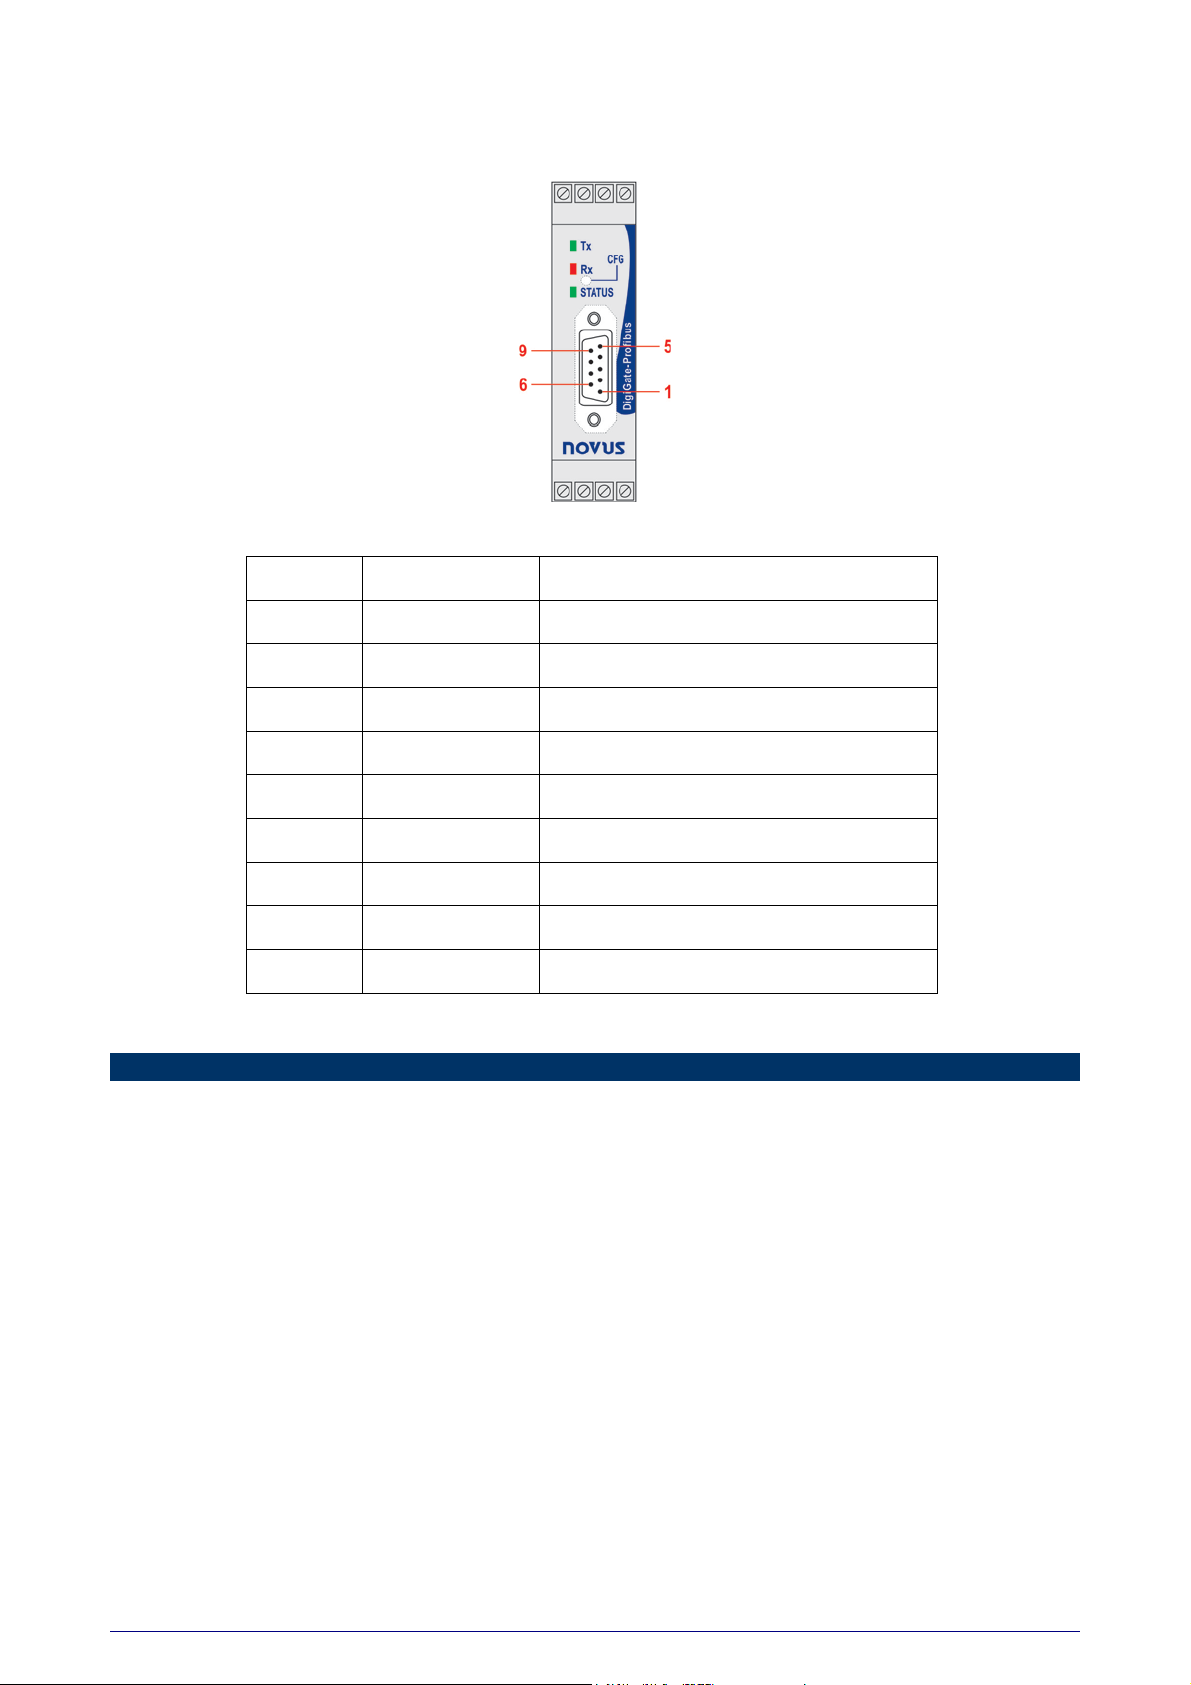
DB9 Adapter
The product comes with a DB9 adapter which can be optionally connected at the indicated pins, making the DigiGate
connection available in the way recommended by the Profibus DP standard (refer to Fig. 3 and Table 1).
Fig. 3 – DB9 Adapter
Pin Signal Description
1 - 2 - 3 B / D1 / D+ / D Tx/Rx data - positive (RS485)
4 RTS Request to send
5 GND Profibus bus grounding (insulated)
6 +5V +5 Vdc of the Profibus bus (insulated)
7 - 8 A / D0 / D- / D\ Tx/Rx data - negative (RS485)
9 - -
Table 1 – Pin assignment of the DB9 adapter
CONFIGURATION
The DigiGate device is configurable through the DigiConfig via Modbus interface. For this purpose, the device must be
set into the “Configuration mode“. In this mode, the device does not work as a master in the Modbus network, but starts
operating as a slave, receiving commands from the configuration software, which will assume the master function during
the configuration procedure. For entering the “Configuration mode“, press the CFG key, make sure that the status LED
starts flashing slowly (once per second, approximately).
For leaving the “Configuration mode“, press the CFG key again. At this moment, the device will be reset and will then
start operating with the new configuration applied.
Configuration software The DigiConfig application is a program for Windows® used for configuration of all operation parameters of the
DigiGate. For installing the application, run the DigiConfigSetup.exe file from the product CD and follow the given
instructions.
DigiConfig contains a complete help file, providing all the information necessary for its full use. For consulting the help
file, start the application and select the “Help” menu or press the F1 key.
If you do not have the CD which comes with the product, consult the manufacturer’s homepage in order to obtain the
DigiConfig installer as well as the additional manuals of the product.
NOVUS AUTOMATION 4/11

DigiGate Profibus
OPERATION
Termination resistors
The Profibus and Modbus network buses are designed for using termination and/or polarization resistors (see Fig. 4). It
is recommended that the resistors be used when the device is installed at one of the bus ends and/or when it is used at a
high communication speed (higher than 115200 bps).
Fig. 4 – Device internal resi st ors (term i nation and pol ari zation)
DigiGate is equipped internally with these resistors, being possible to activate them or not through jumpers (see Fig. 5).
Jumpers J1 and J3 (Modbus termination resistors) are on the right side, while jumpers J4, J5 and J6 (Profibus
termination resistors) are on the left side.
Looking at the product as in Fig. 5, an “open” jumper has always its strap in the higher position.
Fig. 5 – Localization of the jumpers in the device
Resistors come from the factory in disconnected position (jumpers open), both at the Profibus bus and at the Modbus
bus. Before manipulating the m , be sure to power off the equipmen t.
NOVUS AUTOMATION 5/11

DigiGate Profibus
Front lit indicators for communication and status
Tx: Signalizes that the device is sending data through the Modbus RTU network;
Rx: Signalizes that the device is receiving data through the Modbus RTU network;
Status: When permanently lit up, it informs that the device is connected to the Profibus network (normal
operation); when flashing rapidly, it means that there is no connection with the Profibus DP network; when
flashing slowly (once per second, approximately), it means that the device is in “Configuration mode”.
Fig. 6 – Front panel of the DigiGate Profibus
Operation principle
This product is designed for transmitting data between two networks with distinct communication pr otoc ol s. It opera tes as
slave in a Profibus DP network and simultaneously as master in a Modbus RTU network. The data transfer between both
networks is performed through two tables: the reading table, responsible for making available the data read from the
Modbus network to the Profibus network, and the writing table, responsible for forwarding the data from the Profibus
network to the Modbus network. These tables are configured through the DigiConfig software.
Fig. 7 – Operation of the Profibus DP and Modbus RTU buses
NOVUS AUTOMATION 6/11

DigiGate Profibus
Once configured, the product will operate in both networks independently, i.e., it will continuously read the Modbus
network, feeding the reading table, independently from the connection status of the Profibus network. In the same way, it
will proceed communicating with the Profibus master even if there are problems existing in the Modbus network.
At the Modbus side, the device will continue scanning the slaves and reading the desired registers. In case of
communication error, a configurable number of new attempts will be executed. If none of the attempts in a number of
scanning operations (also configurable) is executed successfully, the register block will be considered “disconnected”. In
this case, the communication attempts with this block will be less frequent, i.e., for a configurable number of scanning
operations there will be no communication attempt with this block, and at the following scanning, a new communication
attempt is executed in order to check if the block is now communicating again.
Among the parameters that need to be configured at the Modbus side, we have the baud rate, the parity, the scanning
interval, the number of transmission attempts, the maximum response time, the maximum time between bytes, the
minimum time between commands, the number of attempts before disconnection, scanning factor with disconnected
block. All of these parameters are described in detail in the Help file of the DigiConfig software.
At the Profibus side, it is only necessary to configure the Profibus address of the device. The baud rate of the network
will be automatically detected.
NOVUS AUTOMATION 7/11

Tables for data interchange
Reading Table:
DigiGate Profibus
Fig. 8 – Reading of the Modbus slaves by the Profibus master
The Reading Table or Input Table contains the values read of the Modbus network equipment registers (according to
the equipment configuration), besides a status register (1st position of the table). The table corresponds to the field of
data sent from the DigiGate to the Profibus master. Its format is as follows:
Position 0
Position 1
Position 2
.................
Position 121
Status Register – in details as follows
Register value of the equipment in the Modbus network
Register value of the equipment in the Modbus network
.......................................................................................................
Register value of the equipment in the Modbus network
At the equipment configuration the table positions are associated to the Modbus registers which are to be made
available. All positions are values of 16 bits. The table size is preset (122 words of 16 bits), the size of the data block
sent to the Profibus network, however, is configurable and may not correspond to the table in its totality.
Status Register
Bit15 Bit14 Bit13 Bit12 Bit11 Bit10 Bit9 Bit8 Bit7 Bit6 Bit5 Bit4 Bit3 Bit2 Bit1 Bit0
DV WDN RS1 RS0 ET2 ET1 ET0 EQ AN7 AN6 AN5 AN4 AN3 AN2 AN1 AN0
• Bit 15 – DV (Data Valid) – This bit is inverted, becoming equal to bit 15 of the control register when the input
table has been updated.
• Bit 14 – WDN (Write Done) - This bit is inverted, becoming equal to bit 14 of the control register when a
writing operation has been performed in the Modbus network.
• Bit 13, Bit 12 – RS1, RS0 (Reset State)
00 – Gateway not reset
01 – At least one reading scan operation of the Modbus already executed
10 – First writing operation performed (invalid)
11 – First reading and first writing operation already performed.
• Bit 11, Bit 10, Bit 9 - ET2, ET1, ET0 (Error Type)
000 - No error
001 - Parity error
010 - CRC error
011 – Byte Time out error – response not complete
100 – Response Delay error – no response
101 - Exception error– probable incoherency in the message requested to the slave
NOVUS AUTOMATION 8/11

• Bit 8 – EQ (Error Qualifier) – valid for “Error Type” (bits 11, 10 and 9) different from 000
0 – one slave presenting a failure
1 – more than one slave with failure
In case we have more than one reading command for each Modbus slave:
0 – one reading command with failure
1 – more than one reading command with failure
• Bit 7 a Bit 0 – AN7 to AN0 (Address/Number) – slave address presenting a failure (if there is only 1 slave
with failure) or number of slaves with failure.
Note: The initial status of all bits of the status register is zero.
Writing Table:
DigiGate Profibus
Fig. 9 – Writing in the Modbus slaves by the Profibus master
The Writing Table or Output Table contains the values that are to be written in the registers of the Modbus network
(according to configuration), besides a control register (1st position of the table). It is aligned to the field of data sent from
the Profibus master to the DigiGate. However, the values of this table will correspond to the values sent by the Profibus
master only if there is a request by the control register. Its format is as follows:
Position 0
Position 1
Position 2
.................
Position 121
Control Register– in details bel ow
Value to be written in the equipment register in the Modbus network
Value to be written in the equipment register in the Modbus network
.......................................................................................................
Value to be written in the equipment register in the Modbus network
At the equipment configuration the table positions are associated to the Modbus registers for which writing shall be
allowed. All positions are values of 16 bits. The table size is preset (122 words of 16 bits), the size of the data block
received from the Profibus network, however, is configurable and may not correspond to the table in its totality.
NOVUS AUTOMATION 9/11

DigiGate Profibus
Control Register
Bit15 Bit14 Bit13 Bit12 Bit11 Bit10 Bit9 Bit8 Bit7 Bit6 Bit5 Bit4 Bit3 Bit2 Bit1 Bit0
RD WD WT1 WT0 res res RCD1 RCD0 SA7 SA6 SA5 SA4 SA3 SA2 SA1 SA0
• Bit 15 – RD (Request Data Valid) - This bit is inverted by the Profibus master when valid data are to be
read. When the gateway is in not reset state (RS0=0, RS1=0), the master must mandatorily invert this bit for
resetting the gateway. Otherwise the inversion will not be necessary for updating the data; however, it will be
useful to confirm updating.
• Bit 14 – WD (Write Data) - This bit is inverted by the Profibus master when a writing operation is to be
executed in the gateway.
• Bit 13 e Bit 12 – W T1, WT0 (Write Type) – the Profibus master will indicate through these bits the type of
writing associated to bit 14.
00 - the entire table shall be transferred to the Modbus network.
01 - only those table values shall be transferred to the Modbus which have been changed since the last
writing operation.
10 - a writing operation will be executed in the table, but no value shall be sent to the Modbus network.
11 - reserved
• Bit 11 – reserved
• Bit 10 – reserved
• Bit 9, Bit 8 - RCD1, RCD0 (Request connect/disconnect) – A user disconnected block will remain
disconnected until a block reconnection request is sent or until a DigiGate is reset.
• Bit 7 a Bit 0 – SA7 to SA0 (Slave Adress)
Slave address related to Bit9 and Bit8
Usage hints:
• Use the bits of the status and control registers for correct operation of the device.
• Before performing a writing operation, it is recommended to check the state of the Profibus connection by
• After having established the connection to the Profibus network, execute the entire output table writing
• The best way of assuring that a writing operation has been executed correctly is verifying the registers after
Request for disconnection / reconnection – will be executed by a request for writing through WD (has higher priority than writing in table)
00 - No operation
01 - Disconnect device
10 - Reconnect device
11 - Reserved
changing the RD pin (control register) and later checking the DV pin (status register).
(WT1=0 and WT0=0) as the first writing operation.
the writing operation is done.
NOVUS AUTOMATION 10/11

WARRANTY
Warranty conditions are available on our web site www.novusautomation.com.
DigiGate Profibus
NOVUS AUTOMATION 11/11
 Loading...