

Page 1

Novell®
www.novell.com
Installation Guide
Sentinel Log Manager
1.1
December 2010
AUTHORIZED DOCUMENTATION
Page 2

Legal Notices
Novell, Inc., makes no representations or warranties with respect to the contents or use of this documentation, and
specifically disclaims any express or implied warranties of merchantability or fitness for any particular purpose.
Further, Novell, Inc., reserves the right to revise this publication and to make changes to its content, at any time,
without obligation to notify any person or entity of such revisions or changes.
Further, Novell, Inc., makes no representations or warranties with respec t to any sof tware, a nd sp ecific ally disc laims
any express or implied warranties of merchantability or fitness for any particular purpose. Further, Novell, Inc.,
reserves the right to make changes to any and all parts of Novell software, at any time, without any obligation to
notify any person or entity of such changes.
Any products or technical information provided under this Agreement may be subject to U.S. export contr ols and the
trade laws of other countries. You agree to comply with all export control regulations and to obtain any required
licenses or classification to export, re-export or import deliverables. You agree not to export or re-export to entities on
the current U.S. export exclusion lists or to any embargoed or terrorist countries as specified in the U.S. export laws.
You agree to not use deliverables for prohibited nuclear, missile, or chemical biological weaponry end uses. See the
Novell International Trade Services Web page (http://www.novell.com/info/exports/) for more information on
exporting Novell software. Novell assumes no responsibility for your failure to obtain any necessary export
approvals.
Copyright © 2009-2010 Novell, Inc. All rights reserved. No part of this publication may be reproduced, photocopied,
stored on a retrieval system, or transmitted without the express written consent of the publisher.
Novell, Inc.
404 Wyman Street, Suite 500
Waltham, MA 02451
U.S.A.
www.novell.com
Online Documentation: To access the latest online documentation for this and other Novell products, see
the Novell Documentation Web page (http://www.novell.com/documentation).
Novell Trademarks
For Novell trademarks, see the Novell Trademark and Service Mark list (http://www.novell.com/company/legal/
trademarks/tmlist.html).
Third-Party Materials
All third-party trademarks are the property of their respective owners.
Page 3

Contents
About This Guide 5
1 Introduction 7
1.1 Product Overview. . . . . . . . . . . . . . . . . . . . . . . . . . . . . . . . . . . . . . . . . . . . . . . . . . . . . . . . . . . . 7
1.1.1 Event Sources . . . . . . . . . . . . . . . . . . . . . . . . . . . . . . . . . . . . . . . . . . . . . . . . . . . . . . . 9
1.1.2 Event Source Management . . . . . . . . . . . . . . . . . . . . . . . . . . . . . . . . . . . . . . . . . . . . 9
1.1.3 Data Collection . . . . . . . . . . . . . . . . . . . . . . . . . . . . . . . . . . . . . . . . . . . . . . . . . . . . . 10
1.1.4 Collector Manager . . . . . . . . . . . . . . . . . . . . . . . . . . . . . . . . . . . . . . . . . . . . . . . . . . . 11
1.1.5 Data Storage . . . . . . . . . . . . . . . . . . . . . . . . . . . . . . . . . . . . . . . . . . . . . . . . . . . . . . . 11
1.1.6 Searching and Reporting. . . . . . . . . . . . . . . . . . . . . . . . . . . . . . . . . . . . . . . . . . . . . . 11
1.1.7 Sentinel Link . . . . . . . . . . . . . . . . . . . . . . . . . . . . . . . . . . . . . . . . . . . . . . . . . . . . . . . 12
1.1.8 Web-Based User Interface . . . . . . . . . . . . . . . . . . . . . . . . . . . . . . . . . . . . . . . . . . . . 12
1.2 Installation Overview . . . . . . . . . . . . . . . . . . . . . . . . . . . . . . . . . . . . . . . . . . . . . . . . . . . . . . . . 12
2 System Requirements 15
2.1 Hardware Requirements . . . . . . . . . . . . . . . . . . . . . . . . . . . . . . . . . . . . . . . . . . . . . . . . . . . . . 15
2.1.1 Sentinel Log Manager Server . . . . . . . . . . . . . . . . . . . . . . . . . . . . . . . . . . . . . . . . . . 15
2.1.2 Collector Manager Server . . . . . . . . . . . . . . . . . . . . . . . . . . . . . . . . . . . . . . . . . . . . . 16
2.1.3 Data Storage Requirement Estimation . . . . . . . . . . . . . . . . . . . . . . . . . . . . . . . . . . . 17
2.1.4 Recommended Limits . . . . . . . . . . . . . . . . . . . . . . . . . . . . . . . . . . . . . . . . . . . . . . . . 18
2.1.5 Virtual Environment . . . . . . . . . . . . . . . . . . . . . . . . . . . . . . . . . . . . . . . . . . . . . . . . . . 19
2.2 Supported Operating Systems. . . . . . . . . . . . . . . . . . . . . . . . . . . . . . . . . . . . . . . . . . . . . . . . . 19
2.2.1 Sentinel Log Manager . . . . . . . . . . . . . . . . . . . . . . . . . . . . . . . . . . . . . . . . . . . . . . . . 19
2.2.2 Collector Manager . . . . . . . . . . . . . . . . . . . . . . . . . . . . . . . . . . . . . . . . . . . . . . . . . . . 19
2.3 Supported Browsers. . . . . . . . . . . . . . . . . . . . . . . . . . . . . . . . . . . . . . . . . . . . . . . . . . . . . . . . . 20
2.3.1 Linux . . . . . . . . . . . . . . . . . . . . . . . . . . . . . . . . . . . . . . . . . . . . . . . . . . . . . . . . . . . . . 20
2.3.2 Windows . . . . . . . . . . . . . . . . . . . . . . . . . . . . . . . . . . . . . . . . . . . . . . . . . . . . . . . . . . 20
2.4 Supported Virtual Environment . . . . . . . . . . . . . . . . . . . . . . . . . . . . . . . . . . . . . . . . . . . . . . . . 20
2.5 Supported Connectors. . . . . . . . . . . . . . . . . . . . . . . . . . . . . . . . . . . . . . . . . . . . . . . . . . . . . . . 20
2.6 Supported Event Sources . . . . . . . . . . . . . . . . . . . . . . . . . . . . . . . . . . . . . . . . . . . . . . . . . . . . 21
3 Installing on an Existing SLES 11 System 23
3.1 Before You Begin. . . . . . . . . . . . . . . . . . . . . . . . . . . . . . . . . . . . . . . . . . . . . . . . . . . . . . . . . . . 23
3.2 Standard Installation . . . . . . . . . . . . . . . . . . . . . . . . . . . . . . . . . . . . . . . . . . . . . . . . . . . . . . . . 24
3.3 Custom Installation. . . . . . . . . . . . . . . . . . . . . . . . . . . . . . . . . . . . . . . . . . . . . . . . . . . . . . . . . . 25
3.4 Silent Installation . . . . . . . . . . . . . . . . . . . . . . . . . . . . . . . . . . . . . . . . . . . . . . . . . . . . . . . . . . . 27
3.5 Non-Root Installation . . . . . . . . . . . . . . . . . . . . . . . . . . . . . . . . . . . . . . . . . . . . . . . . . . . . . . . . 28
4 Installing the Appliance 31
4.1 Before You Begin. . . . . . . . . . . . . . . . . . . . . . . . . . . . . . . . . . . . . . . . . . . . . . . . . . . . . . . . . . . 31
4.2 Ports Used . . . . . . . . . . . . . . . . . . . . . . . . . . . . . . . . . . . . . . . . . . . . . . . . . . . . . . . . . . . . . . . . 31
4.2.1 Ports Opened in the Firewall . . . . . . . . . . . . . . . . . . . . . . . . . . . . . . . . . . . . . . . . . . . 32
4.2.2 Ports Used Locally. . . . . . . . . . . . . . . . . . . . . . . . . . . . . . . . . . . . . . . . . . . . . . . . . . . 32
4.3 Installing the VMware Appliance . . . . . . . . . . . . . . . . . . . . . . . . . . . . . . . . . . . . . . . . . . . . . . . 33
4.4 Installing the Xen Appliance. . . . . . . . . . . . . . . . . . . . . . . . . . . . . . . . . . . . . . . . . . . . . . . . . . . 34
4.5 Installing the Appliance on Hardware. . . . . . . . . . . . . . . . . . . . . . . . . . . . . . . . . . . . . . . . . . . . 36
Contents 3
Page 4

4.6 Post-Installation Setup for the Appliance . . . . . . . . . . . . . . . . . . . . . . . . . . . . . . . . . . . . . . . . . 37
4.7 Configuring WebYaST . . . . . . . . . . . . . . . . . . . . . . . . . . . . . . . . . . . . . . . . . . . . . . . . . . . . . . . 37
4.8 Stopping and Starting the Server by Using Web UI. . . . . . . . . . . . . . . . . . . . . . . . . . . . . . . . . 39
4.9 Registering for Updates . . . . . . . . . . . . . . . . . . . . . . . . . . . . . . . . . . . . . . . . . . . . . . . . . . . . . . 40
5 Logging In to the Web Interface 41
6 Upgrading Sentinel Log Manager 43
6.1 Upgrading from 1.0 to 1.1 . . . . . . . . . . . . . . . . . . . . . . . . . . . . . . . . . . . . . . . . . . . . . . . . . . . . 43
6.1.1 Upgrading Sentinel Log Manager Application from 1.0 to 1.1 . . . . . . . . . . . . . . . . . . 43
6.1.2 Migrating from 1.0 to 1.1 Appliance. . . . . . . . . . . . . . . . . . . . . . . . . . . . . . . . . . . . . . 44
6.2 Upgrading to Latest Patch Versions. . . . . . . . . . . . . . . . . . . . . . . . . . . . . . . . . . . . . . . . . . . . . 45
6.2.1 Upgrading to Latest Patch Versions . . . . . . . . . . . . . . . . . . . . . . . . . . . . . . . . . . . . . 45
6.2.2 Automatically Upgrading the Appliance to Latest Updates . . . . . . . . . . . . . . . . . . . . 46
6.3 Upgrading the Collector Manager . . . . . . . . . . . . . . . . . . . . . . . . . . . . . . . . . . . . . . . . . . . . . . 47
7 Installing Additional Collector Managers 49
7.1 Before You Begin. . . . . . . . . . . . . . . . . . . . . . . . . . . . . . . . . . . . . . . . . . . . . . . . . . . . . . . . . . . 49
7.2 Advantages of Additional Collector Managers. . . . . . . . . . . . . . . . . . . . . . . . . . . . . . . . . . . . . 49
7.3 Installing Additional Collector Managers . . . . . . . . . . . . . . . . . . . . . . . . . . . . . . . . . . . . . . . . . 49
8 Uninstalling Sentinel Log Manager 51
8.1 Uninstalling the Appliance . . . . . . . . . . . . . . . . . . . . . . . . . . . . . . . . . . . . . . . . . . . . . . . . . . . . 51
8.2 Uninstalling from an Existing SLES 11 System . . . . . . . . . . . . . . . . . . . . . . . . . . . . . . . . . . . . 51
8.3 Uninstalling the Collector Manager . . . . . . . . . . . . . . . . . . . . . . . . . . . . . . . . . . . . . . . . . . . . . 51
8.3.1 Uninstalling the Linux Collector Manager . . . . . . . . . . . . . . . . . . . . . . . . . . . . . . . . . 52
8.3.2 Uninstalling the Windows Collector Manager . . . . . . . . . . . . . . . . . . . . . . . . . . . . . . 52
8.3.3 Manual Cleanup of Directories . . . . . . . . . . . . . . . . . . . . . . . . . . . . . . . . . . . . . . . . . 52
A Troubleshooting Installation 55
A.1 Failed Installation Because of an Incorrect Network Configuration . . . . . . . . . . . . . . . . . . . . . 55
A.2 Trouble Configuring the Network with VMware Player 3 on SLES 11 . . . . . . . . . . . . . . . . . . . 55
A.3 Upgrading Log Manager installed as a Non-Root User Other Than Novell User. . . . . . . . . . . 56
Sentinel Terminology 57
4 Sentinel Log Manager 1.1 Installation Guide
Page 5

About This Guide
This guide provides an overview of Novell Sentinel Log Manager and its installation.
Chapter 1, “Introduction,” on page 7
Chapter 2, “System Requirements,” on page 15
Chapter 3, “Installing on an Existing SLES 11 System,” on page 23
Chapter 4, “Installing the Appliance,” on page 31
Chapter 5, “Logging In to the Web Interface,” on page 41
Chapter 6, “Upgrading Sentinel Log Manager,” on page 43
Chapter 7, “Installing Additional Collector Managers,” on page 49
Chapter 8, “Uninstalling Sentinel Log Manager,” on page 51
Appendix A, “Troubleshooting Installation,” on page 55
“Sentinel Terminology” on page 57
Audience
This guide is intended for Novell Sentinel Log Manager administrators and end users.
Feedback
We want to hear your comments and suggestions about this manual and the other documentation
included with this product. Please use the User Comments feature at the bottom of each page of the
online documentation, or go to Novell Documentation Feedback Web site (http://www.novell.com/
documentation/feedback.html) and enter your comments there.
Additional Documentation
For more information about building your own plug-ins (for example, JasperReports), go to the
Sentinel SDK Web page (http://developer.novell.com/wiki/index.php/Develop_to_Sent inel). The
build environment for Sentinel Log Manager report plug-ins is identical to what is documented for
Novell Sentinel.
For more information about the Sentinel documentation, refer to the Sentinel Documentation Web
site (http://www.novell.com/documentation/sentinel61/index.html).
For additional documentation about configuring Sent inel Log Manager, see the Sentinel Log
Manager 1.1 Administration Guide.
Contacting Novell
Novell Web site (http://www.novell.com)
Novell Technical Support (http://support.novell.com/
phone.html?sourceidint=suplnav4_phonesup)
Novell Self Support (http://support.novell.c om/
support_options.html?sourceidint=suplnav_supportprog)
About This Guide 5
Page 6

Patch Download Site (http://download.novell.com/index.jsp)
Novell 24x7 Support (http://www.novell.com/company/contact.html)
Sentinel TIDS (http://support.novell.com/products/sentinel)
Sentinel Community Support Forum (http://forums.novell.com/novell-product-support-
forums/sentinel/)
6 Sentinel Log Manager 1.1 Installation Guide
Page 7

1
Introduction
Novell Sentinel Log Manager collects and manages data from a variety of devic es and appl icatio ns,
including intrusion detection systems, firewal ls, op erat ing systems, routers, Web servers, databases,
switches, mainframes, and antivirus event sources. Novell Sentinel Log Manager provides high
event-rate processing, long-term data retention, policy-based data retention, regional data
aggregation, and simple searching and reporting functionality for a variety of applications and
devices.
Section 1.1, “Product Overview,” on page 7
Section 1.2, “Installation Overview,” on page 12
1.1 Product Overview
Novell Sentinel Log Manager 1.1 provides a flexible and scalable log management solution to
organizations. Novell Sentinel Log Manager is a log management solution that addresses basic log
collection and management challenges and also delivers a complete solution focused on reducing
the cost and complexity of managing risk and simplifying compliance requirements.
1
Introduction
7
Page 8
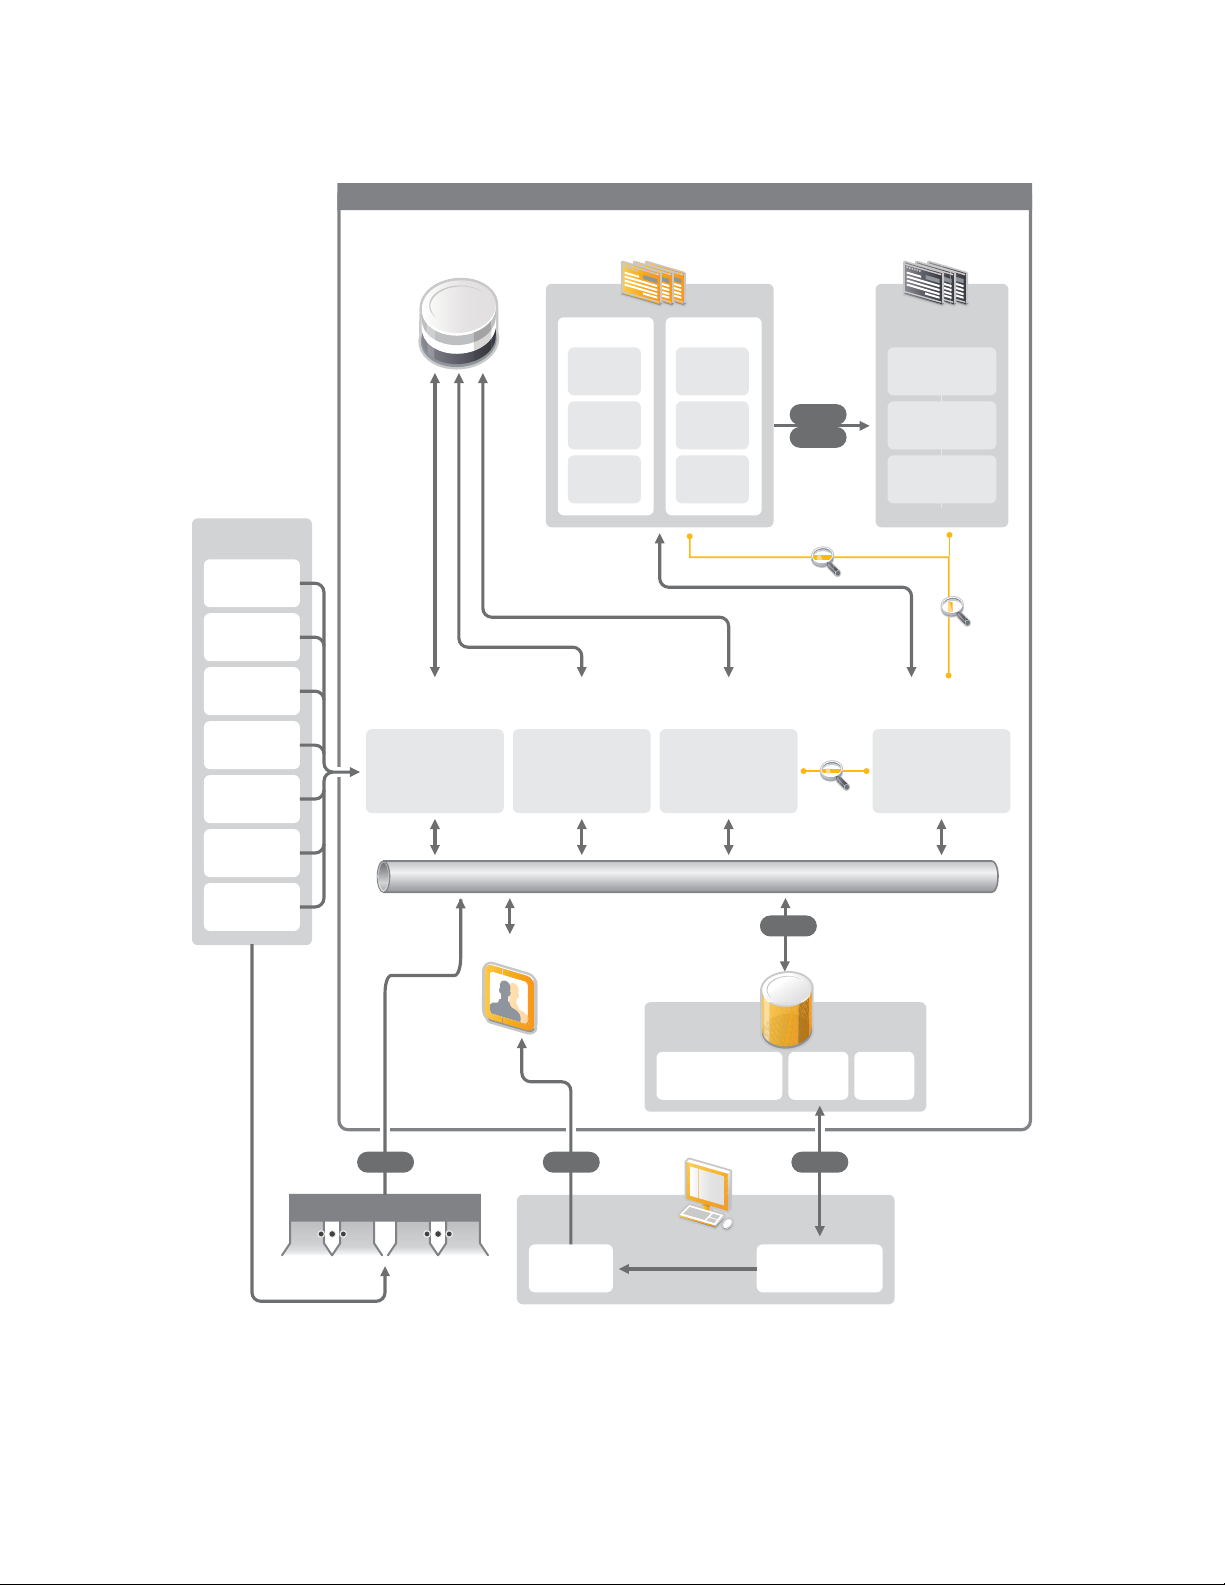
Figure 1-1 Novell Sentinel Log Manager Architecture
Devices
Java Web Start
Message Bus (ActiveMQ)
Search
Search
NFS
httpsSSL SSL
CIFS
Search
Data Collection
Service
Data Access
Service
Reporting Service
(Jasper)
Event
Service
Tomcat Servlet Container
SSL Proxy
Client
Log Manager Appliance
Configuration Database
(PostgreSQL)
Online Event Store
• Event Source
Management
• Channels
Enterasys
Dragon
Raw
Data
Event
Index
Communication
Remoting
Partition 1
GWT
JSP
HP-UX
Events
Raw
Data
Event
Index
Partition 2
Events
Archive Event Store
Partition N-2
(zip)
Partition N-1
(zip)
Partition N
(zip)
SLES
Check Point
IPS
Cisco
Firewall
IBM
AIX
Tripwire
• Configuration
• User
Management
• Report Storage
• Report
Execution
• Event/Raw Data
Storage
• Event Search
• Archiving
ESM
Swing UI
Firefox/Internet
Explorer
Collector Manager
SSL
8 Sentinel Log Manager 1.1 Installation Guide
Page 9

Novell Sentinel Log Manager has the following features:
Distributed search capabilities allow customers to search collected events not only on the local
Sentinel Log Manager server but also on one or more Sentinel Log Manager servers from one
centralized console
Pre-built compliance reports to simplify the task of generating compliance reports for audit or
forensic analysis
By utilizing non-proprietary storage technology, customers can leverage their existing
infrastructure to further manage cost.
Enhanced browser-based user interface supporting collection, storage, reporting and searching
of log data to greatly simplify monitoring and management tasks.
Granular and efficient controls and customization for IT administrators through new group and
user permissions capabilities to provide increased transparency into IT infrastructure activities.
This section has the following information:
Section 1.1.1, “Event Sources,” on page 9
Section 1.1.2, “Event Source Management,” on page 9
Section 1.1.3, “Data Collection,” on page 10
Section 1.1.4, “Collector Manager,” on page 11
Section 1.1.5, “Data Storage,” on page 11
Section 1.1.6, “Searching and Reporting,” on page 11
Section 1.1.7, “Sentinel Link,” on page 12
Section 1.1.8, “Web-Based User Interface,” on page 12
1.1.1 Event Sources
Novell Sentinel Log Manager collects data from event sources that generate logs to syslog,
Windows event log, files, databases, SNMP, Novell Audit, Security Device Event Exchange
(SDEE), Check Point Open Platforms for Security (OPSEC), and other storage mechanisms and
protocols.
Sentinel Log Manager supports all event sources if there are suitable Connectors to parse data from
those event sources. Novell Sentinel Log Manager provides Collectors for many event sources. The
Generic Event Collector collects and processes data from unrecognized event sources that have
suitable connectors.
You can configure the event sources for data collection by using the Event Source Management
interface.
For a complete list of supported event sources, see Section 2.6, “Supported Event Sources,” on
page 21.
1.1.2 Event Source Management
The Event Source Management interface enables you to import and configure the Sentinel 6.0 and
6.1 Connectors and Collectors.
Introduction 9
Page 10

You can perform the following tasks through the Live View of the Event Source Management
window:
Add or edit connections to event sources by using Configuration wizards.
View real-time status of connections to event sources.
Import or export configuration of event sources to or from the Live View.
View and configure Connectors and Collectors installed with Sentinel.
Import or export Connectors and Collectors from or to a centralized repository.
Monitor data flowing through the configured Collectors and Connectors.
View the raw data information.
Design, configure, and create the components of the Event Source hierarchy, and execute
required actions by using these components.
For more information, see to the Event Source Management section of the Sentinel User Guide
(http://www.novell.com/documentation/sentinel61/#admin).
1.1.3 Data Collection
Novell Sentinel Log Manager collects data from configured even t sources with the help of
Connectors and Collectors.
Collectors are scripts that parse the data from a variety of event sources into the normalized Sentinel
event structure, or in some cases collect other forms of data from external data sources. Each
Collector should be deployed with a compatible Connector. Connectors facilitate the connectivity
between Sentinel Log Manager Collectors and event or data sources.
Novell Sentinel Log Manager provides enhanced Web-based user interface support for syslog and
Novell Audit to easily collect logs from different event sources.
Novell Sentinel Log Manager collects data using a variety of connection methods:
The Syslog Connector automatically accepts and configures syslog data sources that send data
over the User Datagram Protocol (UDP), the Transmission Control Protocol (TCP), or the
secure Transport Layer System (TLS).
The Audit Connector automatically accepts and configures audit-enabled Novell data sources.
The File Connector reads log files.
The SNMP Connector receives SNMP traps.
The JDBC Connector reads from database tables.
The WMS Connector accesses Windows event logs on desktops and servers.
The SDEE Connector connects to devices that support the SDEE protocol such as the Cisco
devices.
Check Point Log Export API (LEA) Connector facilitates integration between Sentinel
Collectors and Check Point firewall servers.
The Sentinel Link Connector accepts data from other Novell Sentinel Log Manager servers.
The Process Connector accepts data from custom-written processes that output event logs.
You can also purchase an additional license to download connectors for SAP and mainframe
operating systems.
10 Sentinel Log Manager 1.1 Installation Guide
Page 11

To get the license, either call 1-800-529-3400 or contact Novell Technical Support (http://
support.novell.com).
For more information on configuring Connectors , see the Connector documents at the Sentinel
Content Web site (http://support.novell.com/products/sentinel/sentinel61.html).
For more information on configuring data collection, see “Configuring Data Collection” in the
Sentinel Log Manager 1.1 Administration Guide.
NOTE: You must always download and import the latest version of the Collectors and Connectors.
Updated Collectors and Connectors are posted to the Sentinel 6.1 Content Web site (http://
support.novell.com/products/sentinel/sentinel61.html) on a regular basis. Updates to Connectors
and Collectors include fixes, support for additional events, and performance improvements.
1.1.4 Collector Manager
The Collector Manager provides a flexible data collection point for Sentinel Log Manager. The
Novell Sentinel Log Manager installs a Collector Manager by default during installation. However,
you can remotely install Collector Managers at suitable locations in your network, These remote
Collector Managers run Connectors and Collectors and fo rward the collected d ata to Novell Sentinel
Log Manager for storage and processing.
For information on installing additional Collector Managers, see “Installing Additional Collector
Managers” on page 49.
1.1.5 Data Storage
The data flows from data collection components to data storage components. These components use
a file-based data storage and indexing system to keep the collected device log data, and a
PostgreSQL database to keep Novell Sentinel Log Manager configurat ion data.
The data is stored in a compressed format on the server file system and then stored in a configured
location for long-term storage.The data can be stored either locally or on a remotely mounted SMB
(CIFS) or NFS share. Data files are deleted from the local and networked storage locations based on
the schedule configured in the data retention policy
You can configure data reten tion policies to del ete data from the storage location i f the data reten tion
time limit exceeded for that particular data or if the available space is reduced below a specified disk
space value.
For more information on configuring data storage, see “Conf iguring Data Storage” in the Sentinel
Log Manager 1.1 Administration Guide.
1.1.6 Searching and Reporting
The searching and reporting components help you to search and report the event log data in both
local and networked data storage and indexing systems. The stored event data can be searched
either generically or against specific event fields such as source username. These search results can
be further refined or filtered and saved as a report template for future use.
The Sentinel Log Manager comes with preinstalled reports. You can also upload additional reports.
You can run reports on a schedule or whenever it is necessary.
Introduction 11
Page 12

For information on list of default reports, see “Reporting” in the Sentinel Log Manager 1.1
Administration Guide.
For information on searching events and generating report s, see “Searching” and “Reporting” in the
Sentinel Log Manager 1.1 Administration Guide.
1.1.7 Sentinel Link
Sentinel Link can be used to forward event data from one Sentinel Log Manager to another. With a
hierarchical set of Sentinel Log Managers, complete logs can be retained at multiple regional
locations while more important events are forwarded to a single Sentinel Log Manager for
centralized search and reporting.
In addition, Sentinel Link can forward important events to Novell Sentinel, a full-fledged Security
Information Event Management (SIEM) system, for advanced correlation, incident remediation, and
injection of high-value contextua l informa tion suc h as server cri ticality or ident ity informat ion fro m
an identity management system.
1.1.8 Web-Based User Interface
The Novell Sentinel Log Manager comes with a Web-based user interface to configure and use Log
Manager. The user interface functionality is provided by a W eb server and a graphical user interface
based on Java Web Start. All user interfaces communicate with the server by using an encrypted
connection.
You can use the Novell Sentinel Log Manager Web interface to perform the following tasks:
Search for events
Save the search criteria as a report template
View and manage reports
Launch the Event Source Management interface to configure data collection for data sources
other than syslog and Novell applications. (administrators only)
Configure data forwarding (administrators only)
Download the Sentinel Collector Manager installer for remote installation (administrators only)
View the health of event sources (administrators only)
Configure data collection for syslog and Novell data sources (administrators only)
Configure data storage and view the health of the database (administrators only)
Configure data archiving (a dministrators only)
Configure associated actions to send matching event data to output channels (administrators
only)
Manage user accounts and permissions (administrators only)
1.2 Installation Overview
Novell Sentinel Log Manager can be installed either as an appliance or on an existing SUSE Linux
Enterprise Server (SLES) 11 operating system. When Sentinel Log Manager is installed as an
appliance, the Log Manager server is installed on a SLES 11 operating system.
12 Sentinel Log Manager 1.1 Installation Guide
Page 13

The Novell Sentinel Log Manager installs the following components by default:
Sentinel Log Manager server
Communications server
Web server and Web-based user interface
Reporting server
Collector Manager
Some of these components require additional configuration.
The Novell Sentinel Log Manager installs a Collector Manager by default. If you want additional
Collector Managers, you can install them separa tely on remote machines. Fo r more informa tion, see
Chapter 7, “Installing Additional Collector Managers,” on page 49.
Introduction 13
Page 14

14 Sentinel Log Manager 1.1 Installation Guide
Page 15

2
System Requirements
The following sections describe the hardware, operating system, browser, supported Connectors,
and event source compatibility requirements for Novell Sentinel Log Manager.
Section 2.1, “Hardware Requirements,” on page 15
Section 2.2, “Supported Operating Systems,” on page 19
Section 2.3, “Supported Browsers,” on page 20
Section 2.4, “Supported Virtual Environment,” on page 20
Section 2.5, “Supported Connectors,” on page 20
Section 2.6, “Supported Event Sources,” on page 21
2.1 Hardware Requirements
Section 2.1.1, “Sentinel Log Manager Server,” on page 15
Section 2.1.2, “Collector Manager Server,” on page 16
Section 2.1.3, “Data Storage Requirement Estimation,” on page 17
Section 2.1.4, “Recommended Limits,” on page 18
Section 2.1.5, “Virtual Environment,” on page 19
2
2.1.1 Sentinel Log Manager Server
Novell Sentinel Log Manager is supported on 64-bit Intel Xeon and AMD Opteron processors, but
is not supported on Itanium processors.
NOTE: These requirements are for an average event size of 300 bytes.
The following hardware requirements are recommended for a production system that holds 90 days
of online data:
Table 2-1 Sentinel Log Manager Hardware Requirements
Requirements
Compression Up to 10:1 Up to 10:1 Up to 10:1
Maximum Event
Sources
Maximum Event
Rate
Sentinel Log Manager
(500 EPS)
Up to 1000 Up to 1000 Up to 2000
500 2500 7500
Sentinel Log Manager (2500
EPS)
Sentinel Log Manager (7500
EPS)
System Requirements
15
Page 16

Requirements
Sentinel Log Manager
(500 EPS)
Sentinel Log Manager (2500
EPS)
Sentinel Log Manager (7500
EPS)
CPU One Intel Xeon E5450
3-GHz (4 core) CPU
or
Two Intel Xeon L5240
3-(2 core) CPUs (4
cores total)
Random Access
Memory (RAM)
Local Storage (30
days)
Networked Storage
(90 days)
4 GB 4 GB 8 GB
2x 500 GB, 7.2k RPM
drives (Hardware RAID
with 256 MB cache,
RAID 1)
600 GB 2 TB 5.8 TB
One Intel Xeon E5450 3GHz (4 core) CPU
or
Two Intel Xeon L5240 3-(2
core) CPUs (4 cores total)
4 x 1 TB, 7.2k RPM drives
(Hardware RAID with 256
MB cache, RAID 10)
Two Intel Xeon X5470 3.33GHz (4 core) CPUs (8 cores
total)
16 x 600 GB, 15k RPM
drives, (Hardware RAID with
512 MB cache, RAID 10) or
an equivalent storage area
network (SAN)
NOTE: Networked storage contains all 90 days worth of data, including a fully compressed copy of
the event data in local stor age. A copy of the event data is kept on local storage for search and
reporting performance reasons. Local storage size can be decreased if storage size is a concern,
however an estimated 70% penalty will be incurred while searching or reporting on data that would
otherwise be in local storage, due to decompression overhead.
NOTE:
One machine can include more than one event source. For example, a Windows server can
include two Sentinel event sources because you want to collect data from the Windows
operating system and also the SQL Server database hosted on that machine
You must set up the networked storage location to an external multi-drive storage network area
(SAN) or network-attached storage (NAS).
The recommended steady state volume is 80% of the maximum licensed EPS. Novell
recommends that you add additional Sentinel Log Manager instances if this limit is reached.
NOTE: Maximum event source limits are not hard limits, but, are recommendations based on the
performance testing done by Novell and assume a low average events rate per second per event
source (less than 3 EPS). Higher EPS rates result in lower sustainable maximum event sources.
You can use the equation (maximum event sources) x (average EPS per event source) = maximum
event rate to arrive at the approximate limits for your specific average EPS rate or number of event
sources, as long as the maximum number of event sources does not exceed the limit indicated above.
2.1.2 Collector Manager Server
One Intel Xeon L5240 3-GHz (2 core CPU)
256 MB RAM
10 GB free disk space.
16 Sentinel Log Manager 1.1 Installation Guide
Page 17

2.1.3 Data Storage Requirement Estimation
Sentinel Log Manager is used to retain raw data for a long period of time to comply with legal and
other requirements. Sentinel Log Manager employs compression to help you make efficient use of
local and networked storage space. However, storage requirements might become significant over a
long period of time.
To overcome cost constraint issues with large storage systems, you can use cost-effective data
storage systems to store the data for a long term. Tape-based storage systems are the most common
and cost-effective solution. However, tape does not allow random access to the stored data , which is
necessary to perform quick searches. Because of this, a hybrid approach to long-term data storage is
desirable, where the data you need to search is available on a random-access storage syst em and data
you need to retain, but not search, is kept on a cost-effective alternative, such as tape. For
instructions on employing this hybrid approach, see “Using Sequen tial-Access Storage for Long
Term Data Storage” of in the Sentinel Log Manager 1.1 Administration Guide.
To determine the amount of random-access storage space required for Sentinel Log Manager, first
estimate how many days of data you need to regularly perform searches or run reports on. You
should have enough hard drive space either locally on the Sentinel Log Manager machine, or
remotely on the Server Message Block (SMB) protocol or CIFS protocol, the network file system
(NFS), or a SAN for Sentinel Log Manager to use for archiving data.
You should also have the following additional hard drive space beyond your minimum
requirements:
To account for data rates that are higher than expected.
To copy data from tape and back into the Sentinel Log Manager in order to perform searching
and reporting on historical data.
Use the following formulas to estimate the amount of space required to store data:
NOTE: The coefficients in each formula represent ((seconds per day) x (GB per byte) x
compression ratio).
Local event storage (partially compressed): {average byte size per event} x {number of
days} x {events per second} x 0.00007 = Total GB storage required
Networked event storage (fully compressed): {average byte size per event} x {number of
days} x {events per second} x 0.00002 = Total GB storage required
Raw Storage (fully compressed on both local and networked storage): {average byte size
per raw data record} x {number of days} x {events per second} x 0.00 0012 = Total GB storage
required
NOTE: These numbers are only estimates and depend on the size of your event data as well as on
the size of compressed data.
The above formulas calculate the minimum storage space required to store fully compressed data on
the external storage system. When local storage fills up, Sentinel Log Manager compresses and
moves data from a local (partially compressed) to an external (fully compressed) storage system.
Therefore, estimating the external storage space requirements becomes most critical for data
retention. To improve the search and reporting performance for recent data, you can increase the
local storage space beyond the hardware requirements of Sentinel Log Manager; however, it is not
required.
System Requirements 17
Page 18

You can also use the above formulas to determine how much storage space is required for a longterm data storage system such as tape.
2.1.4 Recommended Limits
The limits mentioned in this section are recomme nd ati on s based on the performance testing done at
Novell or at customer sites. They are not hard-limits. The recommendations are approximations. In
highly dynamic systems, it is a good practice to build in buffers and allow room for growth.
Collector Manager Limits
Unless otherwise specified, Collector Manager limits assume 4 CPU cores at 2.2 GHz each, 4 GB of
RAM, running on SLES 11.
Table 2-2 Collector Manager Performance Numbers
Attribute Limits
Maximum number of Collector Managers
This limit assumes each Collector Manager is running at low
EPS (e.g, less than 100 EPS). The limit decreases as the
events per second increase.
Maximum number of Connectors (fully utilized) on a single
Collector Manager
A fully utilized Connector is one that is running at the highest
EPS possible for that type of Connector.
Maximum number of Collectors (fully utilized) on a single
Collector Manager
A fully utilized Collector is one that is running at the highest
EPS possible for that type of Collector.
Maximum number of event sources on a single Collector
Manager
The limit of the Sentinel 6.1 Rapid Deployment server is also
2000, so if 2000 event sources are on a single Collector
Manager, then the limit of event sources for the overall Sentinel
system has been reached with that single Collector Manager.
Maximum number of event sources on the Sentinel Log
Manager server
20
1 per CPU core, with at least 1 CPU
core reserved for the operating system
and other processing
1 per CPU core, with at least 1 CPU
core reserved for the operating system
and other processing
2000
2000
Reports Limits
Table 2-3 Reports Performance Numbers
Attribute Limits
Maximum number of saved reports 2000
18 Sentinel Log Manager 1.1 Installation Guide
Page 19

Attribute Limits
Maximum number of reports running
simultaneously
The limit assumes that the server is not already
highly utilized performing data collection or other
tasks.
3
2.1.5 Virtual Environment
Sentinel Log Manager is extensively tested and fully supported on a VMware ESX server.
Performance results in a virtual environment can be comparable to th e results achieved in tests on a
physical machine, but the virtual environment should provide the same memory, CPU, disk space,
and I/O as the physical machine recommendations.
2.2 Supported Operating Systems
Novell supports Sentinel Log Manager and remote Collector Managers on the operating systems
described in this section. Novell also supp orts Sentinel Log Manager on systems with minor updates
to these operating systems, such as service packs or hotfixes. However, running Sentinel Log
Manager on systems with major updates to these operating systems is not supported.
Section 2.2.1, “Sentinel Log Manager,” on page 19
Section 2.2.2, “Collector Manager,” on page 19
2.2.1 Sentinel Log Manager
64-bit SUSE Linux Enterprise Server 11
A high-performing file system.
NOTE: All Novell testing is done with the ext3 file system.
2.2.2 Collector Manager
You can install additional Collector Managers on the following operating systems:
“Linux” on page 19
“Windows” on page 19
Linux
SUSE Linux Enterprise Server 10 SP2 (32-bit and 64-bit)
SUSE Linux Enterprise Server 11 (32-bit and 64-bit)
Windows
Windows Server 2003 (32-bit and 64-bit)
System Requirements 19
Page 20

Windows Server 2003 SP2 (32-bit and 64-bit)
Windows Server 2008 (64-bit)
2.3 Supported Browsers
The Sentinel Log Manager interface is optimized for viewing at 1280 x 1024 or higher resolution in
the following supported browsers:
Section 2.3.1, “Linux,” on page 20
Section 2.3.2, “Windows,” on page 20
2.3.1 Linux
Mozilla Firefox 3.6
2.3.2 Windows
Mozilla Firefox 3 (works best on 3.6)
Microsoft Internet Explorer 8 (works best on 8.0)
Prerequisites for Internet Explorer 8
If the Internet Security Level is set to High, only a blank page appears after logging in to
Novell Sentinel Log Manager. To work around this issue, navigate to Tools > Internet Options
> Security tab > Trusted Sites. Click the Site button and add the Sentinel Log Manager Web
site to the list of trusted sites.
Make sure that the Tools > Compatibility View option is not sele cte d.
If the Automatic Prompt ing for File Down loads option is n ot enabled, the fil e download pop-up
might be blocked by the browser. To work around this issue, navigate to Tools > Internet
Options > Security tab> Custom Level, then scroll down to the download section and select
Enable to enable the Automatic Prompting for File Downloads option.
2.4 Supported Virtual Environment
VMware ESX/ESXi 3.5/4.0 or higher
VMPlayer 3 (for demo only)
Xen 3.1.1
2.5 Supported Connectors
The Sentinel Log Manager supports all Connectors that are supported by Sentinel and Sentinel RD.
Audit Connector
Check Point LEA Process Connector
Database Connector
Data Generator Connector
File Connector
20 Sentinel Log Manager 1.1 Installation Guide
Page 21

Process Connector
Syslog Connector
SNMP Connector
SDEE Connector
Sentinel Link Connector
WMS Connector
Mainframe Connector
SAP Connector
NOTE: The Mainframe and SAP Connectors require a separate license.
2.6 Supported Event Sources
Sentinel Log Manager supports a variety of devices and applications, in cluding intrusion detection
systems, firewalls, operating systems, routers, Web servers, databases, switches, mainframes, and
antivirus event sources. The data from these event sources is parsed and normalized to varying
degrees depending on whether the data is processed by using the generic event Col lector that puts
the entire payload of the event into a common field, or by using a device-specific Collector that
parses the data into individual field s .
The following event sources are supported by Sentinel Log Manager:
Cisco Firewall (6 and 7)
Cisco Switch Catalyst 6500 Series (CatOS 8.7)
Cisco Switch Catalyst 6500 Series (IOS 12.2SX)
Cisco Switch Catalyst 5000 Series (CatOS 4.x)
Cisco Switch Catalyst 4900 Series (IOS 12.2SG)
Cisco Switch Catalyst 4500 Series (IOS 12.2SG)
Cisco Switch Catalyst 4000 Series (CatOS 4.x)
Cisco Switch Catalyst 3750 Series (IOS 12.2SE)
Cisco Switch Catalyst 3650 Series (IOS 12.2SE)
Cisco Switch Catalyst 3550 Series (IOS 12.2SE)
Cisco Switch Catalyst 2970 Series (IOS 12.2SE)
Cisco Switch Catalyst 2960 Series (IOS 12.2SE)
Cisco VPN 3000 (4.1.5, 4.1.7, and 4.7.2)
Extreme Networks Summit X650 (with ExtremeXOS 12.2.2 and earlier)
Extreme Networks Summit X450a (with ExtremeXOS 12.2.2 and earlier)
Extreme Networks Summit X450e (with ExtremeXOS 12.2.2 and earlier)
Extreme Networks Summit X350 (with ExtremeXOS 12.2.2 and earlier)
Extreme Networks Summit X250e (with ExtremeXOS 12.2.2 and earlier)
Extreme Networks Summit X150 (with ExtremeXOS 12.2.2 and earlier)
Enterasys Dragon (7.1 and 7.2)
System Requirements 21
Page 22

Generic Event Collector
HP HP-UX (11iv1 and 11iv2)
IBM AIX (5.2, 5.3, and 6.1)
Juniper Netscreen Series 5
McAfee Firewall Enterprise
McAfee Network Security Platform (2.1, 3.x, and 4.1)
McAfee VirusScan Enterprise (8.0i, 8.5i, and 8.7i)
McAfee ePolicy Orchestrator (3.6 and 4.0)
McAfee AV Via ePolicy Orchestrator 8.5
Microsoft Active Directory (2000, 2003, and 2008)
Microsoft SQL Server (2005 and 2008)
Nortel VPN (1750, 2700, 2750, and 5000)
Novell Access Manager 3.1
Novell Identity Manager 3.6.1
Novell Netware 6.5
Novell Modular Authentication Services 3.3
Novell Open Enterprise Server 2.0.2
Novell Privileged User Manager 2.2.1
Novell Sentinel Link 1
Novell SUSE Linux Enterprise Server
Novell eDirectory 8.8.3 with the eDirectory instrumentation patc h found on the Novell Support
Web Site (http://download.novell.com/Download?buildid=RH_B5b3M6EQ~)
Novell iManager 2.7
Red Hat Enterprise Linux
Sourcefire Snort (2.4.5, 2.6.1, 2.8.3.2, and 2.8.4)
Snare for Windows Intersect Alliance (3.1.4 and 1.1.1)
Sun Microsystems Solaris 10
Symantec AntiVirus Corporate Edition (9 and 10)
TippingPoint Security Management System (2.1 and 3.0)
Websense Web Security 7.0
Websense Web Filter 7.0
NOTE: To enable data collection from the Novell iManager and Novell Net ware 6.5 event sources,
add an instance of a collector and a child connector (Audit connector) in the Event Source
Management interface for each of the event sources. When this is done, these event sources appear
in the Sentinel Log Manager Web console under the Audit Server tab.
Collectors supporting additional event sources can either be obtained from the Sentinel 6.1 Content
Web site (http://support.novell.com/products/sentinel/sentinel61.html) or built by using the SDK
plug-ins that are available on the Sentinel Plug-in SDK Web site (http://developer.novell.com/wiki/
index.php?title=Develop_to_Sentinel).
22 Sentinel Log Manager 1.1 Installation Guide
Page 23

3
Installing on an Existing SLES 11 System
The section describes the procedure to install Sentinel Log Manager on an existing SUSE Linux
Enterprise Server (SLES) 11 system by using the application installer. You can install the Sentinel
Log Manager server in several ways: the standard installation procedure, the custom installation
procedure, or the silent installation procedure where the installation proceeds without user input and
uses the default values. You can also install Sentinel Log Manager as a non-root user.
If you choose the custom installation method, you have the option to install the product with a
license key and also select an authentication option.You can set up LDAP authentication for Sentinel
Log Manager in addition to the datab ase authe nticatio n. When you configure Sentine l Log Man ager
for LDAP authentication, users can log in to the server by using their Novell eDirectory or
Microsoft Active Directory credentials.
If you want to install multiple Sentinel Log Manag er servers in your deployment, you can record the
installation options in a configuration file and th en use the file to run an unattend ed installa tion. See
Section 3.4, “Silent Installation,” on page 27 for more information.
Before you proceed with the installation, make sure that the minimum requirements specified in
Chapter 2, “System Requirements,” on page 15 are met.
Section 3.1, “Before You Begin,” on page 23
Section 3.2, “Standard Installation,” on page 24
3
Section 3.3, “Custom Installation,” on page 25
Section 3.4, “Silent Installation,” on page 27
Section 3.5, “Non-Root Installation,” on page 28
3.1 Before You Begin
Make sure that your hardware and software meet the minimum requirements mentioned in
Chapter 2, “System Requirements,” on page 15.
Configure the operating system in such a way that the
hostname.
Obtain your license key from the Novell Customer Care Center (https://secure-
www.novell.com/center/ICSLogin/?%22https://secure-www.novell.com/center/regadmin/jsps/
home_app.jsp%22), to install the licensed version.
Synchronize time by using the Network Time Protocol (NTP).
Install the following operating system commands:
mount
umount
id
df
hostname -f
command returns a valid
Installing on an Existing SLES 11 System
23
Page 24

du
sudo
Make sure that the following ports are opened on the firewall:
TCP 8080, TCP 8443, TCP 61616, TCP 10013, TCP 1289, TCP 1468, TCP 1443, and UDP
1514
For more information on what these ports are used for, see Section 4.2, “Ports Used,” on
page 31.
3.2 Standard Installation
The standard installation procedure installs Sentinel Log Manager with all the default options and a
90-day evaluation license.
1 Download and copy the install files from the Novell Download site.
2 Log in as
3 Specify the following command to extract the install files from the tar file:
tar xfz <install_filename>
Replace <install_filename> with the actual name of the install file.
root
to the server where you want to install Sentinel Log Manager.
4 Specify the following command to run the
install-slm
script to install Sentinel Log
Manager:
./install-slm
If you want to install Sentinel Log Manager on more than one system, you can record your
installation options in a file. You can use this file to install Sentinel Log Manager on other
systems unattended. To record your installation options, specify the following command:
./install-slm -r responseFile
5 To proceed with a language of your choice, select the number specified next to the language.
The end user license agreement is displayed in the selected language.
6 Read the end user license and enter
yes
or y to accept the license and continue with the
installation.
The installation starts installing all RPM packages. This installation might take a few seconds
to complete.
The installation creates a
novell
group and a
novell
user, if they do not already exist.
7 When prompted, specify the option to proceed with standard installation.
Installation proceeds with the 90-day evaluation license key included with the installer. This
license key activates the full set of prod uct features for a 90 -day trial period. A t any time during
or after the trial period, you can replace the evaluation license with a license key you have
purchased.
8 Specify the password for the administrator user.
9 Confirm the password for the admin istrator user.
The installer selects the Authenticate to database only method and proceeds with the
installation.
The Sentinel Log Manager installation compl etes and the serve r starts.It mig ht tak e abou t 5-10
minutes for all services to start up after installation as the system performs a one time
initialization. Wait for this duration before you log in to the server.
24 Sentinel Log Manager 1.1 Installation Guide
Page 25

10 To log in to the Sentinel Log Manager server, use the URL specified in the installation output.
The URL is similar to
https://10.0.0.1:8443/novelllogmanager
.
For more information on logging in to the server, see Chapter 5, “Logging In to the Web
Interface,” on page 41.
11 To configure event sources to send data to Sentinel Log Manager, see “Configuring Data
Collection” in the Sentinel Log Manager 1.1 Administration Guide.
NOTE: When you start the system for the first time after installation, it might take approximately
five minutes for the system to initialize before you can start using it. This delay only occurs when
you start the system for the first time after the installation or an update.
Sentinel Log Manager does not support usage of symbolic links to point to the install directory
because that causes errors during the data archiving process. Therefore, to re-locate the install
directory, you can not just move the directory and then set up a symbolic link from the original
directory location.
3.3 Custom Installation
If you choose the custom installation method, you have the option to install the product with a
license key and also select an authentication option.You can set up LDAP authentication for Sentinel
Log Manager in addition to the datab ase authe nticatio n. When you configure Sentine l Log Man ager
for LDAP authentication, users can log in to the server by using the LDAP directory credentials.
If you do not configure the Sentinel Log Manager for LDAP authentication during the installation
process, you can configure authentication after the installation, if necessary. To set up LDAP
authentication after installation, see “LDAP Authentication” in the Sentinel Log Manager 1.1
Administration Guide.
1 Download and copy the install files from the Novell Download site.
root
2 Log in as
to the server where you want to install Sentinel Log Manager.
3 Specify the following command to extract the install files from the tar file:
tar xfz <install_filename>
Replace <install_filename> with the actual name of the install file.
4 Specify the following command to run the
install-slm
script to install Sentinel Log
Manager:
./install-slm
5 To proceed with a language of your choice, select the number specified next to the language.
The end user license agreement is displayed in the selected language.
6 Read the end user license and enter
yes
or y to accept the license and continue with the
installation.
The installation starts installing all RPM packages. This installation might take a few seconds
to complete.
The installation creates a
novell
group and a
novell
user, if they do not already exist.
7 When prompted, specify the option to proceed with the custom installation.
8 When prompted to specify the license key option, enter
purchased product.
2
to specify the license key for the
Installing on an Existing SLES 11 System 25
Page 26

9 Specify the license key, then press Enter.
For more information about license keys, see “Managing License Keys ” in the Sentinel Log
Manager 1.1 Administration Guide.
10 Specify the password for the administrator user.
11 Confirm the password for the administrato r user.
12 Specify the password for the database administrator (dbauser).
13 Confirm the password for the database administrator (dbauser).
14 You can configure any valid port number within the specified range for the following services:
Web Server
Java Message Service
Client Proxy Service
Database Service
Agent Internal Gateway
If you want to proceed with the default ports, enter option 6 to continue with the custom
installation.
15 Specify the option to authenticate users through an external LDAP directory.
16 Specify the IP address or the hostname of the LDAP server.
The default value is localhost. However, you should not install the LDAP server on the same
machine as the Sentinel Log Manager server.
17 Select one of the following LDAP connection types:
SSL/TSL LDAP connection: Establishes a secured connection between the browser and
the server for the authentication. Enter 1 to specify this option.
Unencrypted LDAP connection: Establishes an unencrypted connection. Enter 2 to
specify this option.
18 Specify the LDAP server port number. The default SSL port is 636 and the default non SSL
port is 389.
19 (Conditional) If you selected SSL/TSL LDAP connection, specify whether the LDAP server
certificate is signed by a well known CA.
n
20 (Conditional) If you specified
, specify the filename of the LDAP server certificate.
21 Select whether you want to perform anonymous searches on the LDAP directory:
Perform anonymous searches on the LDAP directory: Sentinel Log Manager server
performs an anonymous search on the LDAP directory based on the specified user name
to fetch the corresponding LDAP user distinguished name (DN). Enter 1 to specify this
method.
Do not perform anonymous searches on the LDAP directory: Enter 2 to specify this
option.
22 (Conditional) If you selected anonymous search, specify the search attribute and move to
Step 25.
23 (Conditional) If you did not select anonymous search in Step 21, specify whether you are using
Microsoft Active Directory.
26 Sentinel Log Manager 1.1 Installation Guide
Page 27

For Active Directory, the
userName@domainName
userPrincipalName
attribute whose value is of the form
can be optionally used to authenticate the user before search ing for the
LDAP user object, with out the need to enter user DN.
24 (Conditional) If you want to use the above approach for Active Directory, specify the domain
name.
25 Specify the Base DN.
26 Press y to specify that the options provided are correct, else press n and change the
configuration.
27 To log in to the Sentinel Log Manager server, use the URL specified in the installation output.
The URL is similar to
https://10.0.0.1:8443/novelllogmanager
.
For more information on logging in to the server, see Chapter 5, “Logging In to the Web
Interface,” on page 41.
NOTE: When you start the system for the first time after installation, it might take approximately
five minutes for the system to initialize before you can start using it. This delay only occurs when
you start the system for the first time after the installation or an update.
3.4 Silent Installation
The silent or unattended installation of Sentinel Log Manager is useful if you need to install more
than one Sentinel Log Manager servers in your deployment. In such a scenario, you can record the
installation parameters during the first installation and then run the recorded file on all the other
servers.
1 Download and copy the install files from the Novell Download site.
root
2 Log in as
to the server where you want to install Sentinel Log Manager.
3 Specify the following command to extract the install files from the tar file:
tar xfz <install_filename>
Replace <install_filename> with the actual name of the install file.
4 Specify the following command to run the
install-slm
script to install Sentinel Log
Manager in a silent mode:
./install-slm -u responseFile
For information on creating the response file, see Section 3.2, “Standard Installation,” on
page 24.The installation proceeds with the values stored in the response file.
5 To log in to the Sentinel Log Manager server, use the URL specified in the installation output.
The URL is similar to
https://10.0.0.1:8443/novelllogmanager
.
For more information on logging in to the server, see Chapter 5, “Logging In to the Web
Interface,” on page 41.
6 To configure event sources to send data to Sentinel Log Manager, see “Configuring Data
Collection” in the “Sentinel Log Manager 1.1 Administration Guide”.
NOTE: When you start the system for the first time after installation, it might take approximately
five minutes for the system to initialize before you can start using it. This delay only occurs when
you start the system for the first time after the installation or an update.
Installing on an Existing SLES 11 System 27
Page 28

3.5 Non-Root Installation
If your organizational policy do es not allow you to run the fu ll installa tion of Sent inel Log Man ager
root
as
, most of the installation steps can be run as another user.
1 Download and copy the install files from the Novell Download site.
2 Specify the following command to extract the install files from the tar file:
tar xfz <install_filename>
Replace <install_filename> with the actual name of the install file.
3 Log in as
root
to the server where you want to install Sentinel Log Manager as
4 Specify the following command:
./bin/root_install_prepare
A list of commands to be executed with root privileges is displayed.
root
.
This also creates a
novell
group and a
novell
user, if they do not already exist.
5 Accept the command list.
The displayed commands are executed.
6 Specify the following command to change to the newly created non-root
su novell
novell
user:
novell
7 Specify the following command:
./install-slm
8 To proceed with a language of your choice, select the number specified next to the language.
The end user license agreement is displayed in the selected language.
9 Read the end user license and enter
yes
or y to accept the license and continue with the
installation.
The installation starts installing all RPM packages. This installation might take a few seconds
to complete.
10 You are prompted to specify the mode of installation.
If you select to proceed with the standard installation, con tinue with Step 8 in Section 3.2,
“Standard Installation,” on page 24.
If you select to proceed with the custom installation, continue with Step 8 in Section 3.3,
“Custom Installation,” on page 25.
The Sentinel Log Manager installation finishes and the server starts.
root
11 Specify the following command to change to the
su root
user:
12 Specify the following command to finish installation:
./bin/root_install_finish
13 To log in to the Sentinel Log Manager server, use the URL specified in the installation output.
The URL is similar to
https://10.0.0.1:8443/novelllogmanager
.
For more information on logging in to the server, see Chapter 5, “Logging In to the Web
Interface,” on page 41.
:
28 Sentinel Log Manager 1.1 Installation Guide
Page 29

NOTE: When you start the system for the first time after installation, it might take
approximately five minutes for the system to initialize before you can start using it. This delay
only occurs when you start the system for the first time after the installation or an update.
Installing on an Existing SLES 11 System 29
Page 30

30 Sentinel Log Manager 1.1 Installation Guide
Page 31

4
Installing the Appliance
Novell Sentinel Log Manager Appliance is a ready to run software appliance built on SUSE Studio
that combines a hardened SUSE Linux Enterprise Server (SLES) 11 operating system and Novell
Sentinel Log Manager software integrated update service to provide an easy and seamless user
experience as well as allow customers to leverage existing investments. The software appliance can
be installed either on hardware or in a virtual environment.
Section 4.1, “Before You Begin,” on page 31
Section 4.2, “Ports Used,” on page 31
Section 4.3, “Installing the VMware Appliance,” on page 33
Section 4.4, “Installing the Xen Appliance,” on page 34
Section 4.5, “Installing the Ap pliance on Hardware,” on page 36
Section 4.6, “Post-Installation Setup for the Appliance,” on page 37
Section 4.7, “Configuring WebYaST,” on page 37
Section 4.8, “Stopping and Starting the Server by Using Web UI,” on page 39
Section 4.9, “Registering for Updates,” on page 40
4
4.1 Before You Begin
Make sure that the hardware requirements are met. For more information, see Section 2.1,
“Hardware Requirements,” on page 15.
Obtain your license key from the Novell Customer Care Center (http://www.novell.com/
center), to install the licensed version.
Obtain your registration code from the Novell Customer Care Center (http://www.novell.com/
center)to register for software updates.
Synchronize time by using the Network Time Protocol (NTP).
(Conditional) If you are planning to use VMware, make sure that you have the VMware
Converter to simultaneously upload the image to the VMware ESX server and convert it to a
format that can run on the ESX server.
4.2 Ports Used
Note that Novell Sentinel Log Manager appliance uses the following ports for communication, and
some of them are opened on the firewall:
Section 4.2.1, “Ports Opened in the Firewall,” on page 32
Section 4.2.2, “Ports Used Locally,” on page 32
Installing the Appliance
31
Page 32

4.2.1 Ports Opened in the Firewall
Table 4-1 Network Ports Used by Sentinel Log Manager
Ports Description
TCP 1289 Used for Novell Audit connections.
TCP 289 Forwarded to 1289 for Novell Audit connections.
TCP 22 Used for secure shell access to the Sentine l Log Manager appliance.
UDP 1514 Used for syslog messages.
UDP 514 Forwarded to 1514 for syslog messages.
TCP 8080 Used for HTTP communication. Also used by the Sentinel Log Manager
Appliance for the update service.
TCP 80 Fo rwarded to 8080 for the Sentinel Log Manager Web Server for HTTP
communication. Also used by the Sentinel Log Manager Appliance for
the update service.
TCP 8443 Used for HTTPS communication. Also used by the Sentinel Log
Manager Appliance for the update service.
TCP 1443 Used for SSL encrypted syslog messages.
TCP 443 Forwarded to 8443 for the Sentinel Log Manager Web server for HTTPS
communication. Also used by the Sentinel Log Manager Appliance for
the update service.
TCP 61616 Used for communication between Collector Managers and the server.
TCP 10013 Used by the Event Source Management user interface SSL Proxy.
TCP 54984 Used by the Sentinel Log Manager appliance Management Console
(WebYaST).
TCP 1468 Used for syslog messages.
4.2.2 Ports Used Locally
Table 4-2 Ports Used for Communication Locally
Ports Description
TCP 61617 Used for internal communication between the Web
server and the server.
TCP 5556 Used on the loop back interface for internal
communication, with the internal_gateway_server
and internal_gateway. It is used for communication
between the agent engine and the Collector
Manager.
32 Sentinel Log Manager 1.1 Installation Guide
Page 33

Ports Description
TCP 5432 Used for the PostgreSQL database. You do not
need to open this port by default. However, if you
are developing reports by using the Sentinel SDK,
then you must open this port. For more information,
see Sentinel Plug-in SDK Web site (http://
developer.novell.com/wiki/
index.php?title=Develop_to_Sentinel).
Two additional randomly selected TCP ports Used for internal communication between the agent
engine and the Collector Manager.
TCP 8005 Used for internal communication with Tomcat
processes.
TCP 32000 Used for internal communication between the agent
engine and the Collector Manager.
4.3 Installing the VMware Appliance
T o run the appliance image from the VMware ESX server, import and install the appliance image on
the server.
1 Download the VMware appliance installation file.
The correct file for the VMware appliance has
Sentinel_Log_Manager_1.1.0.0_64_VMX.x86_64-0.777.0.vmx.tar.gz
2 Establish an ESX datastore to which the appliance image can be installed.
3 Log in as Administrator to the server where you want to install the appliance.
vmx
in the filename. For example,
4 Specify the following command to extract the compressed appliance image from the machine
where VM Converter is installe d:
tar zxvf <install_file>
Replace <install_file> with the actual file name.
5 T o import the VMware image to the ESX server, use the VMware Converter and follow the on-
screen instructions in the installation wizard.
6 Log in to the ESX server machine.
7 Select the imported VMware image of the appliance and click the Power On icon.
8 Select the language of your choice, then click Next.
9 Select the keyboard layout, then click Next.
10 Read and accept the Novell SUSE Enterprise Server Software License Agreement.
11 Read and accept the Novell Sentinel Log Manager End User License Agreement.
12 In the Hostname and Domain Name screen, specify the hostname and domain name.
Ensure that the Write hostname to /etc/hosts option is selected.
13 Select Next. The hostname configurations are saved.
Installing the Appliance 33
Page 34

14 Do one of the following:
To use the current network connection settings, select Use the following configuration in
the Network Configuration II screen.
To change the network connection settings, select Change.
15 Set the Time and Date, click Next, then click Finish.
NOTE: To change the NTP configuration after in stallation, use YaST from the appliance
command line. You can use WebYast to change the time and date, but not the NTP
configuration.
If the time appears out of sync immediately after the install, run the following command to
restart NTP:
rcntp restart
16 Set the Novell SUSE Enterprise Server
root
17 Set the
password, then click Next.
root
password, then click Next.
18 Set Sentinel Log Manager admin password and dbauser passwo rd, then click Next.
19 Select Next. The network connection settings are saved.
The installation proceeds and completes. Make a note of the applian ce IP address that is shown
in the console.
20 Proceed with Section 4.6, “Post-Installation Setup for the Appliance,” on page 37.
NOTE: When you start the system for the first time after installation, it might take approximately
five minutes for the system to initialize before you can start using it. This delay only occurs when
you start the system for the first time after the installation or an update.
4.4 Installing the Xen Appliance
1 Download and copy the Xen virtual appliance installation file to
The correct filename for the Xen virtual appliance contains
Sentinel_Log_Manager_1.1.0.0_64_Xen.x86_64-0.777.0.xen.tar.gz
2 Specify the following command to unpack the file:
tar -xvzf <install_file>
Replace <install_file> with the actual name of the installation file.
3 Change to the new installation directory. This directory has the following files:
<file_name>.raw
image file
/var/lib/xen/images
xen
. For example,
.
<file_name>.xenconfig
4 Open the
<file_name>.xenconfig
5 Modify the file as follows:
Specify the full path to
.raw
file in the
Specify the bridge setting for your network configuration. For example,
"bridge=xenbr0"
Specify values for
.
name
and
memory
For example:
34 Sentinel Log Manager 1.1 Installation Guide
file
file by using a text editor.
disk
setting.
settings.
"bridge=br0"
or
Page 35

# -*- mode: python; -*name="Sentinel_Log_Manager_1.1.0.0_64"
memory=4096
disk=[ "tap:aio:/var/lib/xen/images/Sentinel_Log_Manager_1.1.0.0_64_Xen-
0.777.0/Sentinel_Log_Manager_1.1.0.0_64_Xen.x86_64-0.777.0.raw,xvda,w" ]
vif=[ "bridge=br0" ]
6 After you have modified the
<filename>.xenconfig
file, specify the following command to
create the VM:
xm create <file_name>.xenconfig
7 (Optional) To verify if the VM is created, specify the following command:
xm list
The VM appears in the list.
For example, if you have configured
.xenconfig
file, then the VM appears with that name.
name=”Sentinel_Log_Manager_1.1.0.0_64”
8 To start the installation, specify the following command:
xm console <vm name>
Replace <vm_name> with the name specified in the name setting of the
.xenconfig
which is also the value returned in Step 7. For example:
xm console Sentinel_Log_Manager_1.1.0.0_64
9 Select the language of your choice, then click Next.
in the
file,
10 Select the keyboard layout, then click Next.
11 Read and accept the Novell SUSE Enterprise Server Software License Agreement.
12 Read and accept the Novell Sentinel Log Manager End User License Agreement.
13 In the Hostname and Domain Name screen, specify the hostname and domain name.
Ensure that the Write hostname to /etc/hosts option is selected.
14 Select Next. The hostname configurations are saved.
15 Do one of the following:
To use the current network connection settings, select Use the following configuration in
the Network Configuration II screen.
To change the network connection settings, select Change.
16 Set the Time and Date, click Next, then click Finish
NOTE: To change the NTP configuration after in stallation, use YaST from the appliance
command line. You can use WebYast to change the time and date, but not the NTP
configuration.
If the time appears out of sync immediately after the install, run the following command to
restart NTP:
rcntp restart
17 Set the Novell SUSE Enterprise Server
root
password, then click Next.
18 Set the Sentinel Log Manager admin password and dbauser password, then click Next.
Installing the Appliance 35
Page 36

The installation proceeds and completes. Make a note of the applian ce IP address that is shown
in the console.
19 Proceed with Section 4.6, “Post-Installation Setup for the Appliance,” on page 37.
NOTE: When you start the system for the first time after installation, it might take approximately
five minutes for the system to initialize before you can start using it. This delay only occurs when
you start the system for the first time after the installation or an update.
4.5 Installing the Appliance on Hardware
Before installing the applian ce on the hardware, ensure that the appliance ISO disk image is
downloaded from the support site, unpacked, and is available on a DVD.
1 Boot the physical machine from the DVD drive with the DVD.
2 Use the on-screen instructions of the installation wizard.
3 Run the Live DVD appliance image by selecting the top entry in the boot menu.
4 Read and accept the Novell SUSE Enterprise Server Software License Agreement.
5 Read and accept the Novell Sentinel Log Manager End User License Agreement.
6 Select Next.
7 In the Hostname and Domain Name screen, specify the hostname and domain name.
Ensure that the Write hostname to /etc/hosts option is selected.
8 Select Next.The hostname configurations are saved.
9 Do one of the following:
To use the current network connection settings, select Use the following configuration in
the Network Configuration II screen.
To change the network connection settings, select Change.
10 Select Next. The network connection settings are saved.
11 Set the Time and Date, then click Next.
NOTE: To change the NTP configuration after installation, use YaSTfrom the appliance
command line. You can use WebYast to change the time and date, but not the NTP
configuration.
If the time appears out of sync immediately after the install, run the following command to
restart NTP:
rcntp restart
12 Set the
13 Set the Sentinel Log Manager admin password and dbauser password, then click Next.
14 Enter the username and password at the console to log in to the appliance.
The default value for the username is
15 To install the appliance on the physical server, run the following command:
/sbin/yast2 live-installer
root
password, then click Next.
root
and the password is
password
.
36 Sentinel Log Manager 1.1 Installation Guide
Page 37

The installation proceeds and completes. Make a note of the applian ce IP address that is shown
in the console.
16 Proceed with Section 4.6, “Post-Installation Setup for the Appliance,” on page 37.
NOTE: When you start the system for the first time after installation, it might take approximately
five minutes for the system to initialize before you can start using it. This delay only occurs when
you start the system for the first time after the installation or an update.
4.6 Post-Installation Setup for the Appliance
To log in to the appliance Web console and initialize the software :
1 Open a Web browser and log in to https://<IP address>:8443. The Sentinel Log Manager Web
page is displayed.
The IP address of the appliance is displayed on the appliance console after the installation
completes and the server restarts.
2 Y o u can configure the Sentinel Log Manager appliance for data storage and data collection. For
more information about configuring the appliance, see the Sentinel Log Manager 1.1
Administration Guide.
3 To register for updates, see Section 4.9, “Registering for Updates,” on page 40.
4.7 Configuring WebYaST
The Novell Sentinel Log Manager appliance user interface is equipped with W ebYaST. WebYaST is
a Web-based remote console for controlling appliances based on SUS E Linux Enterprise. You can
access, configure, and monitor the Sentinel Log Manager appliances with WebYaST. Th e fo llo wi ng
procedure briefly describes the steps to configure WebYaST. For more information on detailed
configuration, see the WebYaST User Guide (http://www.novell.com/documentation/webyast/).
1 Log in to the Sentinel Log Manager appliance.
2 Click Appliance.
Installing the Appliance 37
Page 38

3 Specify the login credentials for the system, then click Login.
4 Select a language of your choice, then click Next.
5 Specify details to configure mail server, then click Save.
The registration page is displayed.
38 Sentinel Log Manager 1.1 Installation Guide
Page 39

6 Configure the Sentinel Log Manager Server to receive updates as described in Section 4.9,
“Registering for Updates,” on page 40.
7 Click Next to finish the initial setup.
4.8 Stopping and Starting the Server by Using Web UI
You can start and stop the Sentinel Log Manager server by using the Web UI as follows:
1 Log in to the Sentinel Log Manager appliance.
The Sentinel Log Manager Web User Interface is displayed.
2 Click Appliance to launch WebYaST.
3 Click Custom Service.
4 To stop the Sentinel Log Manager server, click stop.
5 To start the Sentinel Log Manager server, click start.
Installing the Appliance 39
Page 40

4.9 Registering for Updates
1 Log in to the Sentinel Log Manager appliance.
The Sentinel Log Manager Web UI is displayed.
2 Click Appliance to launch WebYaST.
3 Click Registration.
4 Specify the appliance registration code.
5 Click Save.
6 To upgrade your applian ce to latest security patches, see Section 6.2.2, “Automatically
Upgrading the Appliance to Latest Updates,” on page 46.
40 Sentinel Log Manager 1.1 Installation Guide
Page 41

5
Logging In to the Web Interface
The administrator user created during the installation can log in to the Web interface to configure
and use Sentinel Log Manager:
1 Open a supported Web browser. For more information, see Section 2.3, “Supported Browsers,”
on page 20.
2 Specify the URL for the Novell Sentinel Log Manager page (for example,
10.0.0.1:8443/novelllogmanager
3 (Conditional) The first time you log in to the Sentinel Log Manager, you are prompted to
accept a certificate. The Sentinel Log Manager login page is displayed when you accept the
certificate.
), then press Enter.
https://
5
4 Specify the username and password for the Sentinel Log Manager administrato r.
5 Select the language for the Sentinel Log Manager interface.
The Sentinel Log Manager user interface is available in English, Portuguese, French, Italian,
German, Spanish, Japanese, Traditional Chinese, or Simplified Chinese.
6 Click Sign in.
Logging In to the Web Interface
41
Page 42

The Novell Sentinel Log Manager Web User Interface is displayed.
42 Sentinel Log Manager 1.1 Installation Guide
Page 43

6
Upgrading Sentinel Log Manager
You can upgrade Novell Sentinel Log Manager from 1.0.0.4 or higher to Sentinel Log Manager 1.1
by using the upgrade script.
Section 6.1, “Upgrading from 1. 0 to 1.1,” on page 43
Section 6.2, “Upgrading to Latest Patch Versions,” on page 45
Section 6.3, “Upgrading th e Collector Manager,” on page 47
6.1 Upgrading from 1.0 to 1.1
This section describes the procedure to upgrade Sentinel Log Manager application from 1.0 to 1.1
version or migrate the Sentinel Log Manager application 1.0 to Sentinel Log Manager Appliance
1.1.
Section 6.1.1, “Upgrading Sentinel Log Manager Application from 1.0 to 1.1,” on page 43
Section 6.1.2, “Migrating from 1.0 to 1.1 Appliance,” on page 44
6.1.1 Upgrading Sentinel Log Manager Application from 1.0 to
1.1
6
1 Make a backup of your configuration and create an ESM export.
2 (Conditional) If the version of installed Sentinel Log Manager is lower than 1.0 hotfix 4, then
upgrade it to Sentinel Log Manager 1.0 hot fix 5, wh ich is the l atest hotfix ava ilabl e. Download
the hotfix from the Novell Patch Download site (http://download.novell.com/protected/
Summary.jsp?buildid=VgZ3aerzjYc~).
NOTE: You must be a registered user to download patches. If you have not registered, click
Register to create a user account in the patch download site.
3 Log in as
4 Specify the following command to stop the Sentinel Log Manager server:
/opt/novell/sentinel_log_mgr/bin/server.sh stop
For example,
5 Specify the following command to extract the install files from the tar file:
tar xfz <install_filename>
Replace <install_filename> with the actual name of the install file.
6 Specify the following command to run the
Manager:
./install-slm
7 To proceed with a language of your choice, select the number specified next to the language.
The end user license agreement is displayed in the selected language.
8 Read the end user license and enter
installation.
root
to the server where you want to install Sentinel Log Manager.
/opt/novell/sentinel_log_mgr_1.0_x86-64/bin/server.sh stop
install-slm
yes
or y, to accept the license and continue with the
script to upgrade Sentinel Log
Upgrading Sentinel Log Manager
43
Page 44

9 The installation script detects that an older version of the product already exists and prompts
you to specify if you want to upgrade the product. If you press n, the installation terminates. To
continue with the upgrade, press y.
The installation starts installing all RPM packages. This installation might take a few seconds
to complete.
The existing Sentinel Log Manager 1.0 installation is left intac t, wi th the foll owin g ex cep tions:
If the 1.0 data directory (For example,
sentinel_log_manager_1.0_x86-64/data
var/opt/novell/sentinel_log_mgr/data
<1.0>/data/eventuate
and
<1.0>/data/rawdata
/opt/novell/
) and the 1.1 data directory (For example,
) are in the same file system, then the
subdirectories are moved to the 1.1
location because the eventdata and rawdata directories are typically very large. If the 1.0
data and 1.1 data directories are in different file systems, then the eventdata and rawdata
subdirectories are copied to the 1.1 location, and the 1.0 files are left intact.
If the existing 1.0 data directory (For example,
sentinel_log_mgr_1.0_x86-64
) is on a separately mounted file system and there is
insufficient space on the file system containing the 1.1 data directory (
novell/sentinel_log_mgr/data
) then you can allow the installer to remount the file
system from the 1.0 location to the 1.1 location. An y entry in
/opt/novell/
/etc/fstab
/var/opt/
is also updated.
If you decide not to allow the installer to remount the existing file system, the upgrade
exits. You can then create sufficient space on the file system for the 1.1 data directory.
10 When the Sentinel Log Manager 1.1 installation i s successful and the server is functional, then
you must specify the following command to manually remove Sentinel Log Manager 1.0
directory:
rm -rf /opt/novell/slm_1.0_install_directory
For example:
rm -rf /opt/novell/sentinel_log_mgr_1.0_x86-64
Removing the installation directory permanently deletes the Sentinel Log Manag er 1.0
installation.
11 Make sure that all the Collector Managers are upgraded to a version compatible with the
upgraded Sentinel Log Manager server. For more information on upgrading Collector
Managers, see Section 6.3, “Upgrading the Collector Manager,” on page 47.
/
NOTE: When you start the system for the first time after upgrading, it might take approximately
five minutes for the system to initialize before you can start using it. This delay only occurs when
you start the system for the first time after the installation or an update.
6.1.2 Migrating from 1.0 to 1.1 Appliance
If you have installed Sentinel Log Manager 1.0 and you want to migrate to Sentinel Log Manager
Appliance 1.1, follow the steps given below to migrate data and configuration:
1 Make a backup of your configuration and create an ESM export.
2 Upgrade to Sentinel Log Manager 1.1. For more information, see Section 6.1.1, “Upgrading
Sentinel Log Manager Application from 1.0 to 1.1,” on page 43.
3 Specify the following command to change to
su -novell
44 Sentinel Log Manager 1.1 Installation Guide
novell
user:
Page 45

4 Specify the following command to change to the
cd /opt/novell/sentinel_log_mgr/bin
/bin
directory:
5 Specify the following command to take a full backup of Sentinel Log Manager 1.1 data and
configuration.
./backup_util.sh -m backup -c -e -l -r -s -w -f $APP_HOME/data/
<backupfilename>
Replace <backupfilename> with a file name to store backup data.
For more information on backing up data, see “Backing Up and Restoring Data”.
6 Install Sentinel Log Manager Appliance 1.1 on a separate machine. For more information, see
Chapter 4, “Installing the Appliance,” on page 31.
7 Copy the file which contains the backed up dat a onto the newly instal led Sentinel Log Mana ger
1.1 appliance.
8 Specify the following command:
chown novell:novell <backfupfilename>
9 Specify the following command to change to the
cd /opt/novell/sentinel_log_mgr/bin
/bin
directory:
10 Specify the following command to fully restore the data backed up from the Sentinel Log
Manager 1.1 application:
./backup_util.sh -m restore -f $APP_HOME/data/<backupfilename>
For more information, see “Backing Up and Restoring Data”.
6.2 Upgrading to Latest Patch Versions
This section has the following information:
Section 6.2.1, “Upgrading to Latest Patch Versions,” on page 45
Section 6.2.2, “Automatically Upgrading the Appliance to Latest Updates,” on page 46
6.2.1 Upgrading to Latest Patch Versions
NOTE:
When Sentinel Log Manager is upgraded, all the plug-ins in the system are automatically
upgraded.
After the upgrade, any Collector customizations performed by using the Custom Execution
Mode and auxiliary file method recommended in the SDK documentation, are preserved.
1 Before upgrading, make a backup of your configuration and create an ESM export. For more
information, see “Backing Up and Restoring Data”
2 Download the latest version of patch for Sentinel Log Manager 1.1 from the Novell Patch
Finder (http://download.novell.co m/p atch/finder/).
3 Copy the install files to the Sentinel Log Manager 1.0 server.
4 Log in as
root
to the server where you want to upgrade Sentinel Log Manager.
5 Specify the following command to extract the install files from the tar file:
Upgrading Sentinel Log Manager 45
Page 46

tar xfz <install_filename>
Replace <install_filename> with the actual name of the install file.
6 Change to the directory where you have extracted the install file.
7 (Optional) Specify the following command to stop the Sentinel Log Manager server:
/opt/novell/sentinel_log_mgr/bin/server.sh stop
For example,
/opt/novell/sentinel_log_mgr/bin/server.sh stop
8 Specify the following command to run the
install-slm
script to patch the Sentinel Log
Manager server:
./install-slm
9 To proceed with a language of your choice, select the number specified next to the language.
The end user license agreement is displayed in the selected language
10 Read the end user license and enter yes or y, to accept the license and continue with the
installation.
11 The installation script detects that an older version of the product already exists and prompts
you to specify if you want to patch the product. If you press n, the installation terminates. To
continue with the upgrade, press y.
The installation starts installing all RPM packages. This installation might take a few seconds
to complete.
NOTE: When you start the system for the first time after upgrading, it might take approximately
five minutes for the system to initialize before you can start using it. This delay only occurs when
you start the system for the first time after the installation or an update.
6.2.2 Automatically Upgrading the Appliance to Latest Updates
1 Log in to the Sentinel Log Manager appliance.
The Sentinel Log Manager Web UI is displayed.
2 Click Appliance to launch WebYaST.
3 (Conditional) If you have not already registered your appliance, register it. For more
information, see Section 4.9, “Registering for Updates,” on page 40.
NOTE: If the appliance is not registered, a yellow warning is displayed, indicating that the
appliance is not registered.
4 To check if there are any updates, click Update.
The resulting page indicates if there are any updates.
46 Sentinel Log Manager 1.1 Installation Guide
Page 47

5 Before upgrading to the latest security patches, stop the Sentinel Log Manager server by using
the W eb UI. For more information, see Section 4.8, “Stopping and Starting the Server by Usin g
Web UI,” on page 39.
6 Select and apply the updates.
7 Restart the Sentinel Log Manager server by using the Web UI. For more information, see
Section 4.8, “Stopping and Starting the Server by Using Web UI,” on page 39.
6.3 Upgrading the Collector Manager
1 Make a backup of your configuration and create an ESM export.
2 Log in to the Sentinel Log Manager as an administrator.
3 Select collection > Advanced.
You can download the latest upgrade installer from this page.
4 Click the Download Installer link in the Collector Manager Upgrade Installer section.
A window is displayed with options to either open or to save the
scm_upgrade_installer.zip
5 Copy the file to a temporary location.
6 Extract contents of the
7 As owner of Collector Manager installation, run one of the followin g upgrade files depending
on your operating software:
To upgrade the Windows Collector Manager, run
To upgrade the Linux Collector Manager, run
.zip
file on the local machine. Save the file.
file.
service_pack.bat
service_pack.sh
.
.
8 Follow the on screen instructions to complete the installation.
9 Restart the machine.
Upgrading Sentinel Log Manager 47
Page 48

48 Sentinel Log Manager 1.1 Installation Guide
Page 49

7
Installing Additional Collector Managers
The Collector Managers manage all data collection and data parsing for Novell Sentinel Log
Manager. The Sentinel Log Manager installation process installs a Collector Manager by de fa ult on
the Sentinel Log Manager server. However, you can install multiple Collector Managers in a
distributed setup.
Section 7.1, “Before You Begin,” on page 49
Section 7.2, “Advantages of Additional Collector Managers,” on page 49
Section 7.3, “Installing Additional Collector Managers,” on page 49
7.1 Before You Begin
Make sure that your hardware and software meet the minimum requirements mentioned in
Chapter 2, “System Requirements,” on page 15.
Synchronize time by using the Network Time Protocol (NTP).
A Collector Manager requires network connectivity to the message bus port (61616) on the
Sentinel Log Manager server. Before you start installing the Collector Manager, make sure that
all firewall and other network settings are allowed to communicate over this port.
7
7.2 Advantages of Additional Collector Managers
Installing more than one Collector Manager in a distributed network provides several advantages:
Improved system performance: The additional Collector Managers can parse and process
event data in a distributed environment, thus increasing the system performance.
Additional data security and decreased network bandwidth requirements: If the Collector
Managers are co-located with event sources, then filtering, encryption, and data compression
can be performed at the source.
Ability to collect data from additional operating systems: For example, you can install a
Collector Manager on Microsoft Windows to enable data collection through the WMI protocol.
File caching: When you enable file caching, the remote Collector Manager can cache large
amounts of data while the server is temporarily busy archiving events or processing a spike in
events. This feature is an advantage for protocols, such as syslog, that do not natively support
event caching.
7.3 Installing Additional Collector Managers
1 Log in to the Sentinel Log Manager as an administrator.
2 Select collection > Advanced.
3 Click the Download Installer link. in the Collector Manager installer section.
Installing Additional Collector Managers
49
Page 50

A window is displayed with options to either open or to save the
scm_installer.zip
file on
the local machine. Save the file.
4 Copy and extract the file to the location where you want to install the Collector Manager.
5 Run one of the following install files depending on yo ur operating software:
To install Collector Manager on a Windows system, run
To install the Collector Manager on a Linux system, run
setup.bat
setup.sh
.
.
6 Select a language, then click OK.
The install shield is displayed.
7 Click OK.
8 Read and accept the license agreement, then click Next.
9 You can either proceed with the defa ult installation directory or browse an d select the directory,
then click Next.
10 Leave the default Message bus port (61616) unchanged and specify the host name of the
communication server, then click Next.
11 Click Next to proceed with the default Automatic Memory Configuratio n (256 Megabytes).
A Summary of the installation is displayed.
12 Click Install.
13 Specify the username and password for the Collector Manager.
NOTE: The username and password is stored in the
config/activemqusers.properties
file located on the Sentinel Log Manager server.
/etc/opt/novell/sentinel_log_mgr/
14 Accept the certifica te permanently when prompted .
15 Click Finish to complete the installation.
16 Restart the machine.
50 Sentinel Log Manager 1.1 Installation Guide
Page 51

8
Uninstalling Sentinel Log Manager
This section discusses the procedures to uninstall Novell Sentinel Log Manager server and the
Collector Manager.
Section 8.1, “Uninstalling the Appliance,” on page 51
Section 8.2, “Uninstalling from an Existing SLES 11 System,” on page 51
Section 8.3, “Uninstalling the Collector Manager,” on page 51
8.1 Uninstalling the Appliance
If you want to retain any Log Manager data, then you must back up the data before uninstalling the
appliance, so that you can restore the data later. For more information, see “Backing Up and
Restoring Data” in the Sentinel Log Manager 1.1 Admi nistration Guide.
If you do not need to retain any data, use the following procedures to uninstall the appliance:
VMware ESX Appliance: If the virtual machine is dedicated to Novell Sentinel Log Manager
and you do not need to retain any data, delete the virtu al machine to unin stall the Log Manage r
virtual appliance.
Xen Appliance: If the Xen virtual machine is dedicated to Novell Sentinel Log Manager and
you do not need to retain any data, delete it to uninstall the Log Manager virtual appliance.
Hardware Appliance: If the system is dedicated to Novell Sentinel Log Manager and if you
do not need to retain any data, reformat the hard drive to uninstall the Log Manager on a
physical machine.
8
8.2 Uninstalling from an Existing SLES 11 System
1 Log in to the Sentinel Log Manager server as
2 To run the uninstall script, execute the following command:
/opt/novell/sentinel_log_mgr/setup/uninstall-slm
3 When you are prompted to reconfirm that you want to proceed with the uninstall, press y.
The Sentinel Log Manager server is first stopped and then uninstalled.
root
.
8.3 Uninstalling the Collector Manager
This section discusses the procedures t o un inst all t he Sen tin el Collector Manager installed either on
Windows or on Linux machines.
Section 8.3.1, “Uninstalling the Li nux Collector Manager,” on page 52
Section 8.3.2, “Uninstalling the Windows Collector Manager,” on page 52
Section 8.3.3, “Manual Cleanup of Directories,” on page 52
Uninstalling Sentinel Log Manager
51
Page 52

8.3.1 Uninstalling the Linux Collector Manager
1 Log in as
2 In the machine where the Collector Manager is installed, navigate to the following location:
$ESEC_HOME/_unist
3 Run the following command:
./uninstall.bin
4 Select a language, then click OK.
5 Click Next in the install shield wizard.
6 Select the features that you want to uninstall, then click Next.
7 Stop all the Sentinel Log Manager applications that are running, then click Next.
8 Click Uninstall.
9 Click Finish.
10 Select Reboot the system and click Finish.
root
.
8.3.2 Uninstalling the Windows Collector Manager
1 Log in as administrator.
2 Stop the Sentinel Log Manager server.
3 Select Start > Run.
4 Specify the following:
%Esec_home%\_uninst
5 Double
6 Select a language, the click OK.
The Install Shield Wizard is displayed.
7 Click Next.
8 Select the features that you want to uninstall, then click Next.
9 Stop all the Sentinel Log Manager applications that are running, then click Next.
10 Click Uninstall.
11 Click Finish.
12 Select Reboot the system and click Finish.
uninstall.exe
to run it.
8.3.3 Manual Cleanup of Directories
“Linux” on page 52
“Windows” on page 53
Linux
1 Log in to the machine from where uninstalled the Collector Manager as
root
.
52 Sentinel Log Manager 1.1 Installation Guide
Page 53

2 Stop all the Sentinel Log Manager processes.
3 Remove the contents of
/opt/novell/sentinel6
Windows
1 Log in to the machine from where uninstalled the Collector Manager as administrator.
2 Delete the
%CommonProgramFiles%\InstallShield\Universal
folder and all of its
contents.
3 Delete the
%ESEC_HOME%
folder. This is by default
C:\Program Files\Novell\Sentinel6
.
Uninstalling Sentinel Log Manager 53
Page 54

54 Sentinel Log Manager 1.1 Installation Guide
Page 55

A
Troubleshooting Installation
This sections contains some of the issues that might occur during installation and the procedure to
work around the issues.
Section A.1, “Failed Installation Because of an Incorrect Network Configuration,” on page 55
Section A.2, “Trouble Configuring the Network with VMware Player 3 on SLES 11,” on
page 55
Section A.3, “Upgrading Log Manager installed as a Non-Ro ot User O ther Tha n Nove ll User,”
on page 56
A.1 Failed Installation Because of an Incorrect Network Configuration
During the first boot, if the installer finds that the network settings are inco rrect, an error message is
displayed. If the network is unavailable, installing Sentinel Log Manager on the ap pliance fails.
T o resolve this issue, prope rly configure the network settings. When verify ing the configurat ion, the
ifconfig
return the valid hostname.
command should return the valid IP address, and the
hostname -f
command should
A
A.2 Trouble Configuring the Network with VMware Player 3 on SLES 11
You might see the following error when yo u try to co nfig ure t he n etw o rk with VMware Player 3 on
SLES 11:
Jan 12 14:57:34.761: vmx| VNET: MACVNetPortOpenDevice: Ethernet0: can't open
vmnet device (No such device or address)
Jan 12 14:57:34.761: vmx| VNET: MACVNetPort_Connect: Ethernet0: can't open
data fd
Jan 12 14:57:34.761: vmx| Msg_Post: Error
Jan 12 14:57:34.761: vmx| [msg.vnet.connectvnet] Could not connect Ethernet0
to virtual network "/dev/vmnet0". More information can be found in the
vmware.log file.
Jan 12 14:57:34.761: vmx|[msg.device.badconnect] Failed to connect virtual
device Ethernet0.
Jan 12 14:57:34.761: vmx| --
This error indicates that the VMX file might have been opened by another VM . To work around this
issue, you must update the MAC address in the VMX file as follows:
1 Open the VMX file in a text editor.
2 Copy the MAC address from the
3 Open the
system.
4 Comment out the original line, then type a
/etc/udev/rules.d/70-persistent-net.rules
ethernet0.generatedAddress
file from the guest operating
SUBSYSTEM
line as follows:
field.
Troubleshooting Installation
55
Page 56

SUBSYSTEM=="net", DRIVERS=="?*", ATTRS{address}==<MAC address>,
NAME="eth0"
5 Replace <MAC address> with the MAC address you copied in Step 2Step 2.
6 Save and close the file.
7 Open the VM in VMware Player.
A.3 Upgrading Log Manager installed as a NonRoot User Other Than Novell User
The upgrade procedure fails if you try to upgrade the Novell Sentinel Log Manager 1.0 server
installed as a non-root user other than the
file permissions set during the Sentinel Log Manager 1.0 installation.
novell
user. This issue occurs because of the nature of
To upgrade the Sentinel Log Manager 1.0 server installed as a non-root user other than
the following:
1 Create
2 Change the ownership of the Sentinel Log Manager 1.0 installation to
3 Change the ESEC_USER entry in
4 Login as
novell
chown -R novell:novell /opt/novell/<install_directory>
Change <install_directory> to the name of the installation directory. For example,
chown -R novell:novell /opt/novell/sentinel_log_mgr_1.0_x86-64
upgrading, see Section 6.1.1, “Upgrading Sentinel Log Manager Application from 1.0 to 1.1,”
on page 43.
user.
novell:novell
config/esecuser.properties
root
, then upgrade to Sentinel Log Manager 1.1. For more information on
to
novell
novell
.
, do
.
56 Sentinel Log Manager 1.1 Installation Guide
Page 57

Sentinel Terminology
This section describes the terminology used in this document.
Collectors
A utility that parses the data and delivers a richer event stream by injecting taxonomy,
exploit detection, and business relevance into the data stream before events are
correlated, analyzed, and sent to the database.
Connectors
A utility that uses industry standard methods to connect to the data source to get raw data.
Data Retention
A policy that defines the duration for which the events remain before they are deleted from
the Sentinel Log Manager server.
Event Source
The applicator or system that logs the event.
Event Source Management
ESM. The interface that allows you to manage and monitor connections between Sentinel
and its event sources by using Sentinel Connectors and Sentinel Collectors.
Events Per Second
EPS. A value that measures how fast a network generates data from its security devices
and applications. It is also a rate on which Sentinel Log Manager can collect and store data
from the security devices.
Integrator
Plug-ins that allow Sentinel systems to connect to other external systems. JavaScript
actions can use Integrators to interact with other systems.
Raw Data
The unprocessed events that are received by the connector and sent directly to the
Sentinel Log Manager message bus and then written to the disk on the Sentinel Log
Manager server. Raw data varies from Connector to Connector because of the format of
the data stored on the de vice.
Sentinel Te rminology 57
Page 58

58 Sentinel Log Manager 1.1 Installation Guide
 Loading...