


Novell®
www.novell.com
Installation Guide
novdocx (en) 7 January 2010
AUTHORIZED DOCUMENTATION
Sentinel
6.1 SP2
February 2010
TM
Sentinel 6.1 Installation Guide

Legal Notices
Novell, Inc., makes no representations or warranties with respect to the contents or use of this documentation, and
specifically disclaims any express or implied warranties of merchantability or fitness for any particular purpose.
Further, Novell, Inc., reserves the right to revise this publication and to make changes to its content, at any time,
without obligation to notify any person or entity of such revisions or changes.
Further, Novell, Inc., makes no representations or warranties with respect to any software, and specifically disclaims
any express or implied warranties of merchantability or fitness for any particular purpose. Further, Novell, Inc.,
reserves the right to make changes to any and all parts of Novell software, at any time, without any obligation to
notify any person or entity of such changes.
Any products or technical information provided under this Agreement may be subject to U.S. export controls and the
trade laws of other countries. You agree to comply with all export control regulations and to obtain any required
licenses or classification to export, re-export or import deliverables. You agree not to export or re-export to entities
on the current U.S. export exclusion lists or to any embargoed or terrorist countries as specified in the U.S. export
laws. You agree to not use deliverables for prohibited nuclear, missile, or chemical biological weaponry end uses.
See the Novell International Trade Services Web page (http://www.novell.com/info/exports/) for more information
on exporting Novell software. Novell assumes no responsibility for your failure to obtain any necessary export
approvals.
novdocx (en) 7 January 2010
Copyright © 1999-2010 Novell, Inc. All rights reserved. No part of this publication may be reproduced, photocopied,
stored on a retrieval system, or transmitted without the express written consent of the publisher.
Novell, Inc., has intellectual property rights relating to technology embodied in the product that is described in this
document. In particular, and without limitation, these intellectual property rights may include one or more of the U.S.
patents listed on the Novell Legal Patents Web page (http://www.novell.com/company/legal/patents/) and one or
more additional patents or pending patent applications in the U.S. and in other countries.
Novell, Inc.
404 Wyman Street, Suite 500
Waltham, MA 02451
U.S.A.
www.novell.com
Online Documentation: To access the latest online documentation for this and other Novell products, see
the Novell Documentation Web page (http://www.novell.com/documentation).

Novell Trademarks
For Novell trademarks, see the Novell Trademark and Service Mark list (http://www.novell.com/company/legal/
trademarks/tmlist.html).
Third-Party Materials
All third-party trademarks are the property of their respective owners.
novdocx (en) 7 January 2010

novdocx (en) 7 January 2010
4 Sentinel 6.1 Installation Guide

Contents
Preface 9
1 Introduction 11
1.1 Sentinel Overview . . . . . . . . . . . . . . . . . . . . . . . . . . . . . . . . . . . . . . . . . . . . . . . . . . . . . . . . . . 11
1.2 Sentinel User Interfaces. . . . . . . . . . . . . . . . . . . . . . . . . . . . . . . . . . . . . . . . . . . . . . . . . . . . . . 12
1.2.1 Sentinel Control Center . . . . . . . . . . . . . . . . . . . . . . . . . . . . . . . . . . . . . . . . . . . . . . . 12
1.2.2 Sentinel Data Manager . . . . . . . . . . . . . . . . . . . . . . . . . . . . . . . . . . . . . . . . . . . . . . . 13
1.2.3 Sentinel Solution Designer . . . . . . . . . . . . . . . . . . . . . . . . . . . . . . . . . . . . . . . . . . . . 13
1.2.4 Sentinel Collector Builder . . . . . . . . . . . . . . . . . . . . . . . . . . . . . . . . . . . . . . . . . . . . . 13
1.3 Sentinel Server Components . . . . . . . . . . . . . . . . . . . . . . . . . . . . . . . . . . . . . . . . . . . . . . . . . . 13
1.3.1 Sentinel Server . . . . . . . . . . . . . . . . . . . . . . . . . . . . . . . . . . . . . . . . . . . . . . . . . . . . . 13
1.3.2 Sentinel Communication Server . . . . . . . . . . . . . . . . . . . . . . . . . . . . . . . . . . . . . . . . 14
1.3.3 Sentinel Database . . . . . . . . . . . . . . . . . . . . . . . . . . . . . . . . . . . . . . . . . . . . . . . . . . . 14
1.3.4 Sentinel Collector Manager . . . . . . . . . . . . . . . . . . . . . . . . . . . . . . . . . . . . . . . . . . . . 14
1.3.5 Correlation Engine . . . . . . . . . . . . . . . . . . . . . . . . . . . . . . . . . . . . . . . . . . . . . . . . . . . 14
1.3.6 iTRAC . . . . . . . . . . . . . . . . . . . . . . . . . . . . . . . . . . . . . . . . . . . . . . . . . . . . . . . . . . . . 14
1.3.7 Crystal Reports Server . . . . . . . . . . . . . . . . . . . . . . . . . . . . . . . . . . . . . . . . . . . . . . . 14
1.3.8 Sentinel Advisor and Exploit Detection . . . . . . . . . . . . . . . . . . . . . . . . . . . . . . . . . . . 14
1.4 Sentinel Plugins . . . . . . . . . . . . . . . . . . . . . . . . . . . . . . . . . . . . . . . . . . . . . . . . . . . . . . . . . . . . 15
1.4.1 Collectors. . . . . . . . . . . . . . . . . . . . . . . . . . . . . . . . . . . . . . . . . . . . . . . . . . . . . . . . . . 15
1.4.2 Connectors and Integrators . . . . . . . . . . . . . . . . . . . . . . . . . . . . . . . . . . . . . . . . . . . . 15
1.4.3 Correlation Rules and Actions . . . . . . . . . . . . . . . . . . . . . . . . . . . . . . . . . . . . . . . . . . 15
1.4.4 Reports . . . . . . . . . . . . . . . . . . . . . . . . . . . . . . . . . . . . . . . . . . . . . . . . . . . . . . . . . . . 16
1.4.5 iTRAC Workflows. . . . . . . . . . . . . . . . . . . . . . . . . . . . . . . . . . . . . . . . . . . . . . . . . . . . 16
1.4.6 Solution Packs . . . . . . . . . . . . . . . . . . . . . . . . . . . . . . . . . . . . . . . . . . . . . . . . . . . . . . 16
1.5 Language Support . . . . . . . . . . . . . . . . . . . . . . . . . . . . . . . . . . . . . . . . . . . . . . . . . . . . . . . . . . 16
novdocx (en) 7 January 2010
2 System Requirements 17
2.1 Supported Software . . . . . . . . . . . . . . . . . . . . . . . . . . . . . . . . . . . . . . . . . . . . . . . . . . . . . . . . . 17
2.1.1 Patch Levels . . . . . . . . . . . . . . . . . . . . . . . . . . . . . . . . . . . . . . . . . . . . . . . . . . . . . . . 17
2.1.2 Database Supported Platforms . . . . . . . . . . . . . . . . . . . . . . . . . . . . . . . . . . . . . . . . . 18
2.1.3 Sentinel Component Supported Platforms . . . . . . . . . . . . . . . . . . . . . . . . . . . . . . . . 19
2.1.4 Platform Support Exceptions and Cautions . . . . . . . . . . . . . . . . . . . . . . . . . . . . . . . . 20
2.2 Hardware Recommendations. . . . . . . . . . . . . . . . . . . . . . . . . . . . . . . . . . . . . . . . . . . . . . . . . . 21
2.2.1 Architecture Considerations. . . . . . . . . . . . . . . . . . . . . . . . . . . . . . . . . . . . . . . . . . . . 21
2.2.2 Supported Hardware . . . . . . . . . . . . . . . . . . . . . . . . . . . . . . . . . . . . . . . . . . . . . . . . . 23
2.2.3 Proof of Concept Configuration . . . . . . . . . . . . . . . . . . . . . . . . . . . . . . . . . . . . . . . . . 23
2.2.4 Production Configuration . . . . . . . . . . . . . . . . . . . . . . . . . . . . . . . . . . . . . . . . . . . . . . 24
2.2.5 High-Performance Production Configuration . . . . . . . . . . . . . . . . . . . . . . . . . . . . . . . 25
2.2.6 Virtual Environments . . . . . . . . . . . . . . . . . . . . . . . . . . . . . . . . . . . . . . . . . . . . . . . . . 26
3 Installing Sentinel 6.1 SP2 27
3.1 Installer Overview . . . . . . . . . . . . . . . . . . . . . . . . . . . . . . . . . . . . . . . . . . . . . . . . . . . . . . . . . . 27
3.2 Sentinel Configurations . . . . . . . . . . . . . . . . . . . . . . . . . . . . . . . . . . . . . . . . . . . . . . . . . . . . . . 28
3.2.1 Linux . . . . . . . . . . . . . . . . . . . . . . . . . . . . . . . . . . . . . . . . . . . . . . . . . . . . . . . . . . . . . 28
3.2.2 Solaris . . . . . . . . . . . . . . . . . . . . . . . . . . . . . . . . . . . . . . . . . . . . . . . . . . . . . . . . . . . . 29
3.2.3 Windows . . . . . . . . . . . . . . . . . . . . . . . . . . . . . . . . . . . . . . . . . . . . . . . . . . . . . . . . . . 29
3.2.4 High-Performance Configuration . . . . . . . . . . . . . . . . . . . . . . . . . . . . . . . . . . . . . . . . 29
Contents 5

3.3 Port Numbers Used for Sentinel 6.1 . . . . . . . . . . . . . . . . . . . . . . . . . . . . . . . . . . . . . . . . . . . . 31
3.4 General Installation Prerequisites . . . . . . . . . . . . . . . . . . . . . . . . . . . . . . . . . . . . . . . . . . . . . . 31
3.4.1 Providing Power User Privileges to Domain Users . . . . . . . . . . . . . . . . . . . . . . . . . . 33
3.4.2 Sentinel Database Installation Prerequisites . . . . . . . . . . . . . . . . . . . . . . . . . . . . . . . 33
3.4.3 Authentication Mode Settings on Microsoft SQL . . . . . . . . . . . . . . . . . . . . . . . . . . . . 36
3.4.4 Sentinel Server Installation Prerequisites . . . . . . . . . . . . . . . . . . . . . . . . . . . . . . . . . 37
3.5 Database Installation . . . . . . . . . . . . . . . . . . . . . . . . . . . . . . . . . . . . . . . . . . . . . . . . . . . . . . . . 37
3.5.1 Setting Kernel Values . . . . . . . . . . . . . . . . . . . . . . . . . . . . . . . . . . . . . . . . . . . . . . . . 37
3.5.2 Creating Group and User Accounts for Oracle (Solaris Only) . . . . . . . . . . . . . . . . . . 39
3.5.3 Setting Environment Variables for Oracle (Solaris Only) . . . . . . . . . . . . . . . . . . . . . . 39
3.5.4 Installing Oracle . . . . . . . . . . . . . . . . . . . . . . . . . . . . . . . . . . . . . . . . . . . . . . . . . . . . . 40
3.6 Simple Installation . . . . . . . . . . . . . . . . . . . . . . . . . . . . . . . . . . . . . . . . . . . . . . . . . . . . . . . . . . 40
3.7 Custom Installation. . . . . . . . . . . . . . . . . . . . . . . . . . . . . . . . . . . . . . . . . . . . . . . . . . . . . . . . . . 42
3.7.1 Starting the Installation . . . . . . . . . . . . . . . . . . . . . . . . . . . . . . . . . . . . . . . . . . . . . . . 43
3.7.2 Configuring the Database on Windows . . . . . . . . . . . . . . . . . . . . . . . . . . . . . . . . . . . 48
3.7.3 Configuring the Database on Linux or Solaris . . . . . . . . . . . . . . . . . . . . . . . . . . . . . . 49
3.7.4 Completing the Installation . . . . . . . . . . . . . . . . . . . . . . . . . . . . . . . . . . . . . . . . . . . . 51
3.7.5 Console Installation on Linux or Solaris. . . . . . . . . . . . . . . . . . . . . . . . . . . . . . . . . . . 52
3.8 Installing Sentinel as a Domain user . . . . . . . . . . . . . . . . . . . . . . . . . . . . . . . . . . . . . . . . . . . . 54
3.9 Post-Installation Configuration . . . . . . . . . . . . . . . . . . . . . . . . . . . . . . . . . . . . . . . . . . . . . . . . . 54
3.9.1 Configuring the SMTP Integrator to Send Sentinel Notifications . . . . . . . . . . . . . . . . 55
3.9.2 Sentinel Database . . . . . . . . . . . . . . . . . . . . . . . . . . . . . . . . . . . . . . . . . . . . . . . . . . . 55
3.9.3 Collector Service . . . . . . . . . . . . . . . . . . . . . . . . . . . . . . . . . . . . . . . . . . . . . . . . . . . . 56
3.9.4 Starting the Collector Manager Service . . . . . . . . . . . . . . . . . . . . . . . . . . . . . . . . . . . 56
3.9.5 Configuring the Light weight Collector Manager . . . . . . . . . . . . . . . . . . . . . . . . . . . . 56
3.9.6 Managing Time . . . . . . . . . . . . . . . . . . . . . . . . . . . . . . . . . . . . . . . . . . . . . . . . . . . . . 59
3.9.7 Modifying Oracle dbstart and dbshut scripts . . . . . . . . . . . . . . . . . . . . . . . . . . . . . . . 59
3.9.8 High-Performance Configuration . . . . . . . . . . . . . . . . . . . . . . . . . . . . . . . . . . . . . . . . 60
3.10 LDAP Authentication . . . . . . . . . . . . . . . . . . . . . . . . . . . . . . . . . . . . . . . . . . . . . . . . . . . . . . . . 62
3.10.1 Configuring the Sentinel 6.1 Server for LDAP Authentication . . . . . . . . . . . . . . . . . . 62
3.10.2 Configuring Multiple LDAP Servers for Failover . . . . . . . . . . . . . . . . . . . . . . . . . . . . 66
3.10.3 Migrating LDAP User Accounts from Sentinel 6.1 SP1 Hotfix 2 to Sentinel 6.1 SP2 68
3.11 Updating the License Key . . . . . . . . . . . . . . . . . . . . . . . . . . . . . . . . . . . . . . . . . . . . . . . . . . . . 69
3.11.1 Unix . . . . . . . . . . . . . . . . . . . . . . . . . . . . . . . . . . . . . . . . . . . . . . . . . . . . . . . . . . . . . . 69
3.11.2 Windows . . . . . . . . . . . . . . . . . . . . . . . . . . . . . . . . . . . . . . . . . . . . . . . . . . . . . . . . . . 69
novdocx (en) 7 January 2010
4 Testing the Installation 71
4.1 Testing the Installation . . . . . . . . . . . . . . . . . . . . . . . . . . . . . . . . . . . . . . . . . . . . . . . . . . . . . . . 71
4.2 Clean Up from Testing . . . . . . . . . . . . . . . . . . . . . . . . . . . . . . . . . . . . . . . . . . . . . . . . . . . . . . . 79
4.3 Getting Started . . . . . . . . . . . . . . . . . . . . . . . . . . . . . . . . . . . . . . . . . . . . . . . . . . . . . . . . . . . . . 80
5 Adding Sentinel Components 81
5.1 Adding Sentinel Components to an Existing Installation . . . . . . . . . . . . . . . . . . . . . . . . . . . . . 81
5.2 Installing Additional Load Balancing Nodes . . . . . . . . . . . . . . . . . . . . . . . . . . . . . . . . . . . . . . 81
5.2.1 Multiple DAS_Binary Processes . . . . . . . . . . . . . . . . . . . . . . . . . . . . . . . . . . . . . . . . 82
6 Communication Layer (iSCALE) 91
6.1 SSL Proxy and Direct Communication. . . . . . . . . . . . . . . . . . . . . . . . . . . . . . . . . . . . . . . . . . . 92
6.1.1 Sentinel Control Center . . . . . . . . . . . . . . . . . . . . . . . . . . . . . . . . . . . . . . . . . . . . . . . 92
6.1.2 Collector Manager . . . . . . . . . . . . . . . . . . . . . . . . . . . . . . . . . . . . . . . . . . . . . . . . . . . 93
6.2 Changing the Communication Encryption Key. . . . . . . . . . . . . . . . . . . . . . . . . . . . . . . . . . . . . 94
6.3 Increasing AES Key Strength. . . . . . . . . . . . . . . . . . . . . . . . . . . . . . . . . . . . . . . . . . . . . . . . . . 95
6 Sentinel 6.1 Installation Guide

7 Crystal Reports for Windows 97
7.1 Overview . . . . . . . . . . . . . . . . . . . . . . . . . . . . . . . . . . . . . . . . . . . . . . . . . . . . . . . . . . . . . . . . . 97
7.2 System Requirements . . . . . . . . . . . . . . . . . . . . . . . . . . . . . . . . . . . . . . . . . . . . . . . . . . . . . . . 98
7.3 Configuration Requirements . . . . . . . . . . . . . . . . . . . . . . . . . . . . . . . . . . . . . . . . . . . . . . . . . . 98
7.4 Installation Overview . . . . . . . . . . . . . . . . . . . . . . . . . . . . . . . . . . . . . . . . . . . . . . . . . . . . . . . . 99
7.4.1 Installation Overview of Crystal Reports Server with SQL Server 2005 . . . . . . . . . 100
7.4.2 Installation Overview of Crystal Reports Server with Oracle . . . . . . . . . . . . . . . . . . 101
7.5 Installation . . . . . . . . . . . . . . . . . . . . . . . . . . . . . . . . . . . . . . . . . . . . . . . . . . . . . . . . . . . . . . . 101
7.5.1 Installing Microsoft Internet Information Server (IIS) and ASP.NET . . . . . . . . . . . . 102
7.5.2 Installing Crystal Reports Server for Microsoft SQL Server 2005 with Windows
Authentication . . . . . . . . . . . . . . . . . . . . . . . . . . . . . . . . . . . . . . . . . . . . . . . . . . . . . 102
7.5.3 Installing Crystal Reports Server for Microsoft SQL Server 2005 with SQL
Authentication . . . . . . . . . . . . . . . . . . . . . . . . . . . . . . . . . . . . . . . . . . . . . . . . . . . . . 106
7.5.4 Installing Crystal Reports Server for Oracle . . . . . . . . . . . . . . . . . . . . . . . . . . . . . . 109
7.6 Downloading the Service Packs for Crystal Reports . . . . . . . . . . . . . . . . . . . . . . . . . . . . . . . 112
7.7 Configuring Crystal Reports Server to Work with the Sentinel Control Center . . . . . . . . . . . 112
7.7.1 Configuring inetmgr . . . . . . . . . . . . . . . . . . . . . . . . . . . . . . . . . . . . . . . . . . . . . . . . . 112
7.7.2 Patching Crystal Reports . . . . . . . . . . . . . . . . . . . . . . . . . . . . . . . . . . . . . . . . . . . . . 113
7.8 Publishing Crystal Report Templates. . . . . . . . . . . . . . . . . . . . . . . . . . . . . . . . . . . . . . . . . . . 115
7.8.1 Using the Solution Manager to Publish Report Templates . . . . . . . . . . . . . . . . . . . 116
7.8.2 Using the Crystal Publishing Wizard to Publish Report Templates . . . . . . . . . . . . . 116
7.8.3 Using the Central Management Console to Publish Report Templates. . . . . . . . . . 118
7.8.4 Setting a Named User Account . . . . . . . . . . . . . . . . . . . . . . . . . . . . . . . . . . . . . . . . 119
7.8.5 Configuring Report Permissions and Testing Connectivity . . . . . . . . . . . . . . . . . . . 119
7.8.6 Disabling the Sentinel Top 10 Reports . . . . . . . . . . . . . . . . . . . . . . . . . . . . . . . . . . 120
7.8.7 Configuring the Sentinel Control Center to Integrate with Crystal Reports Server . 121
7.9 High-Performance Configurations for Crystal. . . . . . . . . . . . . . . . . . . . . . . . . . . . . . . . . . . . . 122
7.9.1 Increasing the Report Refresh Record Limit for Crystal Reports Server . . . . . . . . 122
7.9.2 Using the Aggregration Service for Reports . . . . . . . . . . . . . . . . . . . . . . . . . . . . . . 123
7.9.3 Report Development . . . . . . . . . . . . . . . . . . . . . . . . . . . . . . . . . . . . . . . . . . . . . . . . 124
7.10 Using Crystal Reports . . . . . . . . . . . . . . . . . . . . . . . . . . . . . . . . . . . . . . . . . . . . . . . . . . . . . . 124
7.11 Uninstalling Crystal Reports . . . . . . . . . . . . . . . . . . . . . . . . . . . . . . . . . . . . . . . . . . . . . . . . . . 124
novdocx (en) 7 January 2010
8 Crystal Reports for Linux 125
8.1 Overview . . . . . . . . . . . . . . . . . . . . . . . . . . . . . . . . . . . . . . . . . . . . . . . . . . . . . . . . . . . . . . . . 126
8.2 Installation . . . . . . . . . . . . . . . . . . . . . . . . . . . . . . . . . . . . . . . . . . . . . . . . . . . . . . . . . . . . . . . 126
8.2.1 Pre-Install Crystal Reports Server
8.2.2 Installing Crystal Reports Server XIR2 . . . . . . . . . . . . . . . . . . . . . . . . . . . . . . . . . . 129
8.2.3 Patching Crystal Reports . . . . . . . . . . . . . . . . . . . . . . . . . . . . . . . . . . . . . . . . . . . . . 130
8.3 Downloading the Service Packs for Crystal Reports . . . . . . . . . . . . . . . . . . . . . . . . . . . . . . . 131
8.4 Publishing Crystal Reports Templates . . . . . . . . . . . . . . . . . . . . . . . . . . . . . . . . . . . . . . . . . . 131
8.4.1 Publishing Report Templates using Solution Manager . . . . . . . . . . . . . . . . . . . . . . 132
8.4.2 Publishing Report Templates – Crystal Publishing Wizard . . . . . . . . . . . . . . . . . . . 133
8.4.3 Publishing Report Templates – Central Management Console . . . . . . . . . . . . . . . . 135
8.5 Using the Crystal XI R2 Web Server . . . . . . . . . . . . . . . . . . . . . . . . . . . . . . . . . . . . . . . . . . . 136
8.5.1 Testing connectivity to the Web Server . . . . . . . . . . . . . . . . . . . . . . . . . . . . . . . . . . 136
8.5.2 Setting a “Named User” Account . . . . . . . . . . . . . . . . . . . . . . . . . . . . . . . . . . . . . . . 136
8.5.3 Configuring Reports Permissions . . . . . . . . . . . . . . . . . . . . . . . . . . . . . . . . . . . . . . 137
8.6 Increasing Crystal Reports Server Report Refresh Record Limit . . . . . . . . . . . . . . . . . . . . . . 137
8.7 Configuring Sentinel Control Center to Integrate with Crystal Reports Server. . . . . . . . . . . . 138
8.8 Utilities and Troubleshooting . . . . . . . . . . . . . . . . . . . . . . . . . . . . . . . . . . . . . . . . . . . . . . . . . 139
8.8.1 Starting MySQL . . . . . . . . . . . . . . . . . . . . . . . . . . . . . . . . . . . . . . . . . . . . . . . . . . . . 139
8.8.2 Starting Tomcat . . . . . . . . . . . . . . . . . . . . . . . . . . . . . . . . . . . . . . . . . . . . . . . . . . . . 139
8.8.3 Starting Crystal Reports Servers . . . . . . . . . . . . . . . . . . . . . . . . . . . . . . . . . . . . . . . 139
TM
XI R2 . . . . . . . . . . . . . . . . . . . . . . . . . . . . . . . 127
Contents 7

8.8.4 Crystal Host Name Error . . . . . . . . . . . . . . . . . . . . . . . . . . . . . . . . . . . . . . . . . . . . . 139
8.8.5 Cannot Connect to CMS . . . . . . . . . . . . . . . . . . . . . . . . . . . . . . . . . . . . . . . . . . . . . 139
8.9 High-Performance Configurations for Crystal. . . . . . . . . . . . . . . . . . . . . . . . . . . . . . . . . . . . . 140
8.9.1 Reports Using Aggregation Service. . . . . . . . . . . . . . . . . . . . . . . . . . . . . . . . . . . . . 141
8.9.2 Report Development . . . . . . . . . . . . . . . . . . . . . . . . . . . . . . . . . . . . . . . . . . . . . . . . 142
8.10 Using Crystal Reports . . . . . . . . . . . . . . . . . . . . . . . . . . . . . . . . . . . . . . . . . . . . . . . . . . . . . . 142
9 Uninstalling Sentinel 143
9.1 Uninstalling Sentinel . . . . . . . . . . . . . . . . . . . . . . . . . . . . . . . . . . . . . . . . . . . . . . . . . . . . . . . 143
9.1.1 Uninstall for Solaris and Linux . . . . . . . . . . . . . . . . . . . . . . . . . . . . . . . . . . . . . . . . . 143
9.1.2 Uninstall for Windows . . . . . . . . . . . . . . . . . . . . . . . . . . . . . . . . . . . . . . . . . . . . . . . 144
9.2 Post-Uninstall . . . . . . . . . . . . . . . . . . . . . . . . . . . . . . . . . . . . . . . . . . . . . . . . . . . . . . . . . . . . . 144
9.2.1 Sentinel Settings . . . . . . . . . . . . . . . . . . . . . . . . . . . . . . . . . . . . . . . . . . . . . . . . . . . 145
A Pre-installation Questionnaire 151
B Oracle Setup 153
B.1 Installing Oracle 11g . . . . . . . . . . . . . . . . . . . . . . . . . . . . . . . . . . . . . . . . . . . . . . . . . . . . . . . 153
B.1.1 Oracle 11g Installation on SLES 11 . . . . . . . . . . . . . . . . . . . . . . . . . . . . . . . . . . . . . 153
B.1.2 Oracle 11g Installation on SLES 10 . . . . . . . . . . . . . . . . . . . . . . . . . . . . . . . . . . . . . 155
B.1.3 Oracle 11g Installation on Red Hat Linux 4 . . . . . . . . . . . . . . . . . . . . . . . . . . . . . . . 156
B.1.4 Oracle 11g Installation on Solaris 10 . . . . . . . . . . . . . . . . . . . . . . . . . . . . . . . . . . . . 158
B.2 Upgrading the Database from Oracle 10g to Oracle 11g. . . . . . . . . . . . . . . . . . . . . . . . . . . . 160
B.3 Installing Oracle 10g . . . . . . . . . . . . . . . . . . . . . . . . . . . . . . . . . . . . . . . . . . . . . . . . . . . . . . . 161
B.3.1 Oracle 10g Installation on SLES 10 . . . . . . . . . . . . . . . . . . . . . . . . . . . . . . . . . . . . . 161
B.3.2 Oracle 10g Installation on Red Hat Linux 4 . . . . . . . . . . . . . . . . . . . . . . . . . . . . . . . 162
B.3.3 Oracle 10g Installation on Solaris 10 . . . . . . . . . . . . . . . . . . . . . . . . . . . . . . . . . . . . 164
B.4 Manual Oracle Instance Creation (Optional) . . . . . . . . . . . . . . . . . . . . . . . . . . . . . . . . . . . . . 164
novdocx (en) 7 January 2010
C Sentinel with Oracle Real Application Clusters 167
C.1 Configuring the Oracle RAC Database . . . . . . . . . . . . . . . . . . . . . . . . . . . . . . . . . . . . . . . . . 167
C.1.1 Creating the RAC Database . . . . . . . . . . . . . . . . . . . . . . . . . . . . . . . . . . . . . . . . . . 167
C.1.2 Creating the Sentinel Tablespaces . . . . . . . . . . . . . . . . . . . . . . . . . . . . . . . . . . . . . 170
C.1.3 Creating the Sentinel Database User . . . . . . . . . . . . . . . . . . . . . . . . . . . . . . . . . . . 171
C.2 Installing the Sentinel Database. . . . . . . . . . . . . . . . . . . . . . . . . . . . . . . . . . . . . . . . . . . . . . . 171
C.3 Configuring the Connection Properties File . . . . . . . . . . . . . . . . . . . . . . . . . . . . . . . . . . . . . . 173
C.4 Configuring the Connection for Sentinel Data Manager. . . . . . . . . . . . . . . . . . . . . . . . . . . . . 174
C.4.1 Known Issue . . . . . . . . . . . . . . . . . . . . . . . . . . . . . . . . . . . . . . . . . . . . . . . . . . . . . . 174
C.5 Configuring the Connection for Crystal Enterprise Server . . . . . . . . . . . . . . . . . . . . . . . . . . . 174
8 Sentinel 6.1 Installation Guide

Preface
SentinelTM is a security information and event management solution that receives information from
many sources throughout an enterprise, standardizes it, prioritizes it and presents it to you to make
threat, risk and policy related decisions.
This guide describes the installation procedures for Sentinel 6.1 SP2.
Chapter 1, “Introduction,” on page 11
Chapter 2, “System Requirements,” on page 17
Chapter 3, “Installing Sentinel 6.1 SP2,” on page 27
Chapter 4, “Testing the Installation,” on page 71
Chapter 5, “Adding Sentinel Components,” on page 81
Chapter 6, “Communication Layer (iSCALE),” on page 91
Chapter 7, “Crystal Reports for Windows,” on page 97
Chapter 8, “Crystal Reports for Linux,” on page 125
Chapter 9, “Uninstalling Sentinel,” on page 143
novdocx (en) 7 January 2010
Appendix A, “Pre-installation Questionnaire,” on page 151
Appendix B, “Oracle Setup,” on page 153
Appendix C, “Sentinel with Oracle Real Application Clusters,” on page 167
Audience
This documentation is intended for Information Security Professionals.
Feedback
We want to hear your comments and suggestions about this manual and the other documentation
included with this product. Please use the User Comments feature at the bottom of each page of the
online documentation and enter your comments there.
Additional Documentation
Sentinel Technical documentation is broken down into several different volumes. They are:
Sentinel 6.1 Install Guide (http://www.novell.com/documentation/sentinel61/s61_install/data)
Sentinel 6.1 User Guide (http://www.novell.com/documentation/sentinel61/s61_user/data)
Sentinel 6.1 Reference Guide (http://www.novell.com/documentation/sentinel61/
s61_reference/data)
Sentinel SDK (http://developer.novell.com/wiki/index.php?title=Develop_to_Sentinel)
This site gives you details about developing collectors (proprietary or JavaScript) and
JavaScript correlation actions.
Preface 9

Documentation Conventions
The following are the conventions used in this manual:
Notes and Warnings
NOTE: Notes provide additional information that may be useful or for reference.
WARNING: Warnings provide additional information that helps you identify and stop performing
actions in the system that cause damage or loss of data.
Commands appear in courier font. For example:
useradd –g dba –d /export/home/oracle –m –s /bin/csh oracle
Go to Start > Program Files > Control Panel to perform this action: Multiple actions in a step.
References
For more information, see “Section Name” (if in the same Chapter).
For more information, see “Chapter Name” (if in the same Guide).
novdocx (en) 7 January 2010
For more information, see “Section Name” in “Chapter Name”, Name of the Guide (if in a
different Guide).
In Novell documentation, a greater-than symbol (>) is used to separate actions within a step and
items in a cross-reference path.
®
A trademark symbol (
, TM, etc.) denotes a Novell trademark. An asterisk (*) denotes a third-party
trademark.
When a single pathname can be written with a backslash for some platforms or a forward slash for
other platforms, the pathname is presented with a backslash. Users of platforms that require a
forward slash, such as Linux or UNIX, should use forward slashes as required by your software.
Contacting Novell
Web Site: http://www.novell.com (http://www.novell.com)
Novell Technical Support: http://support.novell.com/
phone.html?sourceidint=suplnav4_phonesup (http://support.novell.com/
phone.html?sourceidint=suplnav4_phonesup)
Self Support: http://support.novell.com/
support_options.html?sourceidint=suplnav_supportprog (http://support.novell.com/
support_options.html?sourceidint=suplnav_supportprog)
Patch Download Site: http://download.novell.com/index.jsp (http://download.novell.com/
index.jsp)
24x7 support: http://www.novell.com/company/contact.html (http://www.novell.com/
company/contact.html)
For Collectors/Connectors/Reports/Correlation/Hotfixes/TIDS: http://support.novell.com/
products/sentinel (http://support.novell.com/products/sentinel)
10 Sentinel 6.1 Installation Guide

1
Introduction
Section 1.1, “Sentinel Overview,” on page 11
Section 1.2, “Sentinel User Interfaces,” on page 12
Section 1.3, “Sentinel Server Components,” on page 13
Section 1.4, “Sentinel Plugins,” on page 15
Section 1.5, “Language Support,” on page 16
The following sections will walk you through the product basics. The rest of the Sentinel User
Guide has more detailed architecture, operation and administrative procedures.
These sections assumes that you are familiar with Network Security, Database Administration,
Windows* and UNIX* operating systems.
1.1 Sentinel Overview
novdocx (en) 7 January 2010
1
SentinelTM is a security information and event management solution that receives information from
many sources throughout an enterprise, standardizes it, prioritizes it and presents it to you to make
threat, risk, and policy-related decisions.
Sentinel automates log collection, analysis, and reporting processes to ensure that IT controls are
effective supporting threat detection and audit requirements. Sentinel replaces these labor-intensive
manual processes with automated, continuous monitoring of security and compliance events and IT
controls.
Sentinel gathers and correlates security and non-security information from across an organization's
networked infrastructure, as well as third-party systems, devices, and applications. Sentinel presents
the collected data in a more sensible GUI, identifies security or compliance issues, and tracks
remediation activities, to streamline previously error-prone processes and build a more rigorous and
secure management program.
Automated incident response management enables you to document and formalize the process of
tracking, escalating, and responding to incidents and policy violations, and provides two-way
integration with trouble-ticketing systems. Sentinel enables you to react promptly and resolve
incidents efficiently.
Solution Packs are a simple way to distribute and import Sentinel correlation rules, dynamic lists,
maps, reports, and iTRAC workflows into controls. These controls may be designed to meet specific
regulatory requirements, such as the Payment Card Industry Data Security Standard, or they may be
related to a specific data source, such as user authentication events for an Oracle database.
With Sentinel, you get:
Integrated, automated real-time security management and compliance monitoring across all
systems and networks
A framework that enables business policies to drive IT policy and action
Automatic documenting and reporting of security, systems, and access events across the
enterprise
Introduction
11

Built-in incident management and remediation
The ability to demonstrate and monitor compliance with internal policies and government
regulations such as Sarbanes-Oxley, HIPAA, GLBA, FISMA and others. The content required
to implement these controls is simply distributed and implemented using Solution Packs.
The following is a conceptual architecture of Sentinel, which illustrates the components involved in
performing security and compliance management.
Figure 1-1 Conceptual Architecture of Sentinel
novdocx (en) 7 January 2010
1.2 Sentinel User Interfaces
Sentinel includes several easy-to-use user interfaces:
Sentinel Control Center
Sentinel Data Manager
Sentinel Solution Designer
Sentinel Collector Builder
1.2.1 Sentinel Control Center
Sentinel Control Center provides an integrated security management dashboard that enables analysts
to quickly identify new trends or attacks, manipulate and interact with real-time graphical
information, and respond to incidents. Key features of Sentinel Control Center include:
Active Views: Real-time analytics and visualization
Incidents: Incident creation and management
Correlation: Correlation rules definition and management
iTRAC: Process management for documenting, enforcing, and tracking incident resolution
processes
12 Sentinel 6.1 Installation Guide

Reporting: Historical reports and metrics
Event Source Management: Collector deployment and monitoring
1.2.2 Sentinel Data Manager
Sentinel Data Manager (SDM) allows you to manage the Sentinel Database. You can perform the
following operations in the SDM:
Monitor Database Space Utilization
View and Manage Database Partitions
Manage Database Archives
Import Data into the Database
1.2.3 Sentinel Solution Designer
Sentinel Solution Designer is used to create and modify Solution Packs, which are packaged sets of
Sentinel content, such as reports, correlation rules, and workflows.
novdocx (en) 7 January 2010
1.2.4 Sentinel Collector Builder
Sentinel Collector Builder enables you to build Collectors in the Sentinel proprietary language to
process events. You can create and customize the templates so that the Collector can parse the data.
1.3 Sentinel Server Components
Sentinel is made up of several components:
Data Access Service (DAS)
Sentinel Communication Server
Sentinel Database
Sentinel Collector Manager
Correlation Engine
iTRAC
Crystal Reports Server *
Sentinel Advisor and Exploit Detection (optional)
1.3.1 Sentinel Server
The Data Access Service (DAS) is the primary component used to communicate with the Sentinel
database. DAS and other server components work together to store events received from the
Collector Managers in the database, filter data, process Active View displays, perform database
queries and process results, and manage administrative tasks such as user authentication and
authorization.
TM
Introduction 13

1.3.2 Sentinel Communication Server
The iSCALETM Message Bus is capable of moving thousands of message packets in a second among
the components of Sentinel. This allows independent scaling of components and standards-based
integration with external applications.
1.3.3 Sentinel Database
The Sentinel product is built around a back-end database that stores security events and all of the
Sentinel metadata. The events are stored in normalized form, along with asset and vulnerability data,
identity information, incident and workflow status, and many other types of data.
1.3.4 Sentinel Collector Manager
Collector Manager manages data collection, monitors system status messages, and performs event
filtering as needed. Main functions of the Collector Manager include transforming events, adding
business relevance to events through taxonomy, performing global filtering on events, routing
events, and sending health messages to the Sentinel server.
novdocx (en) 7 January 2010
The Sentinel Collector Manager can connect directly to the message bus or it can use an SSL proxy.
1.3.5 Correlation Engine
Correlation adds intelligence to security event management by automating analysis of the incoming
event stream to find patterns of interest. Correlation allows you to define rules that identify critical
threats and complex attack patterns so that you can prioritize events and initiate effective incident
management and response.
1.3.6 iTRAC
Sentinel provides an iTRAC workflow management system to define and automate processes for
incident response. Incidents that are identified in Sentinel, either by a correlation rule or manually,
can be associated with an iTRAC workflow.
1.3.7 Crystal Reports Server
Comprehensive reporting services within the Sentinel Control Center are powered by Crystal
Reports Server by Business Objects*. Sentinel comes with predefined reports geared toward the
most common reporting requests by organizations monitoring their security and compliance
postures. Using the Crystal Reports Developer, new or customized reports can also be developed
against the Sentinel published report view schema.
1.3.8 Sentinel Advisor and Exploit Detection
Sentinel Advisor is an optional data subscription service that includes known attacks,
vulnerabilities, and remediation information. This data, combined with known vulnerabilities and
real-time intrusion detection or prevention information from your environment, provide proactive
exploit detection and the ability to immediately act when an attack takes place against a vulnerable
system.
14 Sentinel 6.1 Installation Guide

1.4 Sentinel Plugins
Sentinel supports a variety of plugins to expand and enhance system functionality. Some of these
plugins are installed automatically. Additional plugins (and updates) are available for download at
http://support.novell.com/products/sentinel/sentinel61.html (http://support.novell.com/products/
sentinel/sentinel61.html).
Some plugins, such as the Remedy* Integrator and the IBM* Mainframe Connector, require an
additional license for download.
1.4.1 Collectors
Sentinel collects data from source devices and delivers a richer event stream by injecting taxonomy,
exploit detection, and business relevance into the data stream before events are correlated and
analyzed and sent to the database. A richer event stream means that data is correlated with the
required business context to identify and remediate internal or external threats and policy violations.
Sentinel Collectors can parse data from the types of devices listed below:
novdocx (en) 7 January 2010
Intrusion Detection Systems (host)
Intrusion Detection Systems (network)
Firewalls
Operating Systems
Policy Monitoring
Authentication
Routers and Switches
VPNs
JavaScript Collectors can be written and run on Sentinel 6.0 SP1 and above using standard
JavaScript development tools and the Collector SDK. Proprietary Collectors can be built or
modified using Section 1.2.4, “Sentinel Collector Builder,” on page 13, a standalone application
included with the Sentinel system.
Anti-Virus Detection Systems
Web Servers
Databases
Mainframe
Vulnerability Assessment Systems
Directory Services
Network Management Systems
Proprietary Systems
1.4.2 Connectors and Integrators
Connectors provide connectivity from the Collector Manager to event sources using standard
protocols such as JDBC* and syslog. Events are passed from the Connector to the Collector for
parsing.
Integrators enable remediation actions on systems outside of Sentinel. For example, a correlation
action can use the SOAP Integrator to initiate a Novell Identity Manager workflow.
The optional Remedy AR Integrator provides the ability to create a Remedy ticket from Sentinel
events or incidents.
1.4.3 Correlation Rules and Actions
Correlation rules identify important patterns in the event stream. When a correlation rule triggers, it
initiates correlation actions, such as sending email notifications, initiating an iTRAC workflow, or
executing an action using an Integrator.
Introduction 15

1.4.4 Reports
Users can run a wide variety of dashboard and operational reports from the Sentinel Control Center
using Crystal Reports Server. In Sentinel 6.1 and later versions, reports are typically distributed via
Solution Packs.
1.4.5 iTRAC Workflows
iTRAC workflows provide consistent, repeatable processes for managing incidents. In Sentinel 6.1
and later versions, workflow templates are typically distributed via Solution Packs.
1.4.6 Solution Packs
Solution Packs are packaged sets of related Sentinel content, such as correlation rules, actions,
iTRAC worflows, and reports. Novell provides Solution Packs that focus on specific business needs,
such as the PCI-DSS Solution Pack, which addresses compliance with the Payment Card Industry
Data Security Standard. Novell also creates “collector packs,” which include content focused on a
specific event source, such as Windows Active Directory*.
novdocx (en) 7 January 2010
1.5 Language Support
Sentinel components are localized for the following languages:
English
Portuguese (Brazil)
French
Italian
German
Spanish
Japanese
Chinese (Traditional)
Chinese (Simplified)
There are several exceptions:
The Collector Builder interface and scripting are in English only, although it can run on the
non-English operating systems listed above.
JavaScript Collectors can be modified to parse either ASCII or Unicode (double-byte) data, but
the Collectors posted on the Sentinel Content site are currently written for English data only.
Collectors written in the proprietary Collector language are only capable of processing ASCII
and extended ASCII data.
Internal events (to audit Sentinel operations) are in English only.
16 Sentinel 6.1 Installation Guide

2
System Requirements
Section 2.1, “Supported Software,” on page 17
Section 2.2, “Hardware Recommendations,” on page 21
2.1 Supported Software
For best performance and reliability, Novell® recommends installing all SentinelTM components on
the approved software listed in this section. This software is quality assured and certified. For the
latest information on the minimum requirements, see the Sentinel Documentation site (http://
www.novell.com/documentation/sentinel61).
Section 2.1.1, “Patch Levels,” on page 17
Section 2.1.2, “Database Supported Platforms,” on page 18
Section 2.1.3, “Sentinel Component Supported Platforms,” on page 19
Section 2.1.4, “Platform Support Exceptions and Cautions,” on page 20
novdocx (en) 7 January 2010
2
2.1.1 Patch Levels
The following table lists the specific patch levels that were used to perform Sentinel testing. For
convenience in this document, these platforms are referred to by the short name in the left column.
In situations in which the bit length does not matter in this document, the bit length might be
truncated from the short name.
Table 2-1 Patch Level Information
Short Name Full Name and Patch Level
SLES 11 (64-bit) SUSE® Linux Enterprise Server 11 (64-bit)
SLES 10 (32-bit) SUSE Linux Enterprise Server 10 SP2 (32-bit)
SLES 10 (64-bit) SUSE Linux Enterprise Server 10 SP2 (64-bit)
RHEL 4 (32-bit) Red Hat* Enterprise Linux 4 Nahant Update-4 (32-bit)
RHEL 4 (64-bit) Red Hat Enterprise Linux 4 Nahant Update-4 (64-bit)
Solaris* 10 (64-bit) Sun* Solaris 10 6/06 s10s_u2wos_09a (64-bit SPARC*)
Microsoft* Windows* 2003 (32-bit) Windows 2003 SP2, Standard or Enterprise Edition (32-bit)
Windows 2003 (64-bit) Windows 2003 SP1, Standard or Enterprise Edition (64-bit)
Windows 2008 (64-bit) Windows 2008 SP1, Standard Edition (64-bit)
SLED 10 (32-bit) SUSE Linux Enterprise Desktop 10 SP1 (32-bit)
Windows XP (32-bit) Windows XP SP2 (32-bit)
Windows Vista* (32-bit) Windows Vista SP1 (32-bit)
System Requirements
17

Short Name Full Name and Patch Level
Oracle* 10g (32-bit) Oracle 10g Enterprise Edition with partitioning (v 10.2.0.4)
Oracle 10g (64-bit) Oracle 10g Enterprise Edition with partitioning (v 10.2.0.4)
Oracle 11g (64-bit) Oracle 11g Enterprise Edition with partitioning
SQL Server* 2005 (32-bit) Microsoft SQL Server 2005 SP2, Standard or Enterprise Edition (32-
bit)
SQL Server 2005 (64-bit) Microsoft SQL Server 2005 SP2, Standard or Enterprise Edition (64-
bit)
SQL Server 2008 (64-bit) Microsoft SQL Server 2008 (Version 10.0.1300.13)
SLES 9 (32-bit) SUSE Linux Enterprise Server 9 SP2 (32-bit)
You should check with the vendors for security updates and patches. Hot fixes and security patches
typically have no impact on Sentinel operations and are therefore supported. Because major or
minor releases of a database or operating system typically involve more substantial changes, only
the versions mentioned in Table 2-1 on page 17 are supported for this release.
novdocx (en) 7 January 2010
2.1.2 Database Supported Platforms
The following database and operating system combinations are certified or supported. Certified
combinations have been tested with Novell Engineering’s full test suite. Supported combinations are
expected to be fully functional.
Table 2-2 Database Supported Platforms
Oracle 10g (32bit)
SLES 11 (64) Not Supported Certified only
SLES 10 (32) Supported Not Supported Not Supported Not Supported Not Supported
SLES 10 (64) Not Supported Certified Not Supported Not Supported Not Supported
RHEL 4 (32) Supported Not Supported Not Supported Not Supported Not Supported
RHEL 4 (64) Not Supported Supported Not Supported Not Supported Not Supported
Solaris 10 (32) Supported Not Supported Not Supported Not Supported Not Supported
Solaris 10 (64) Not Supported Supported Not Supported Not Supported Not Supported
Oracle 10g and
Oracle 11g (64bit)
on Oracle 11g
SQL Server 2005
(32)
Not Supported Not Supported Not Supported
SQL Server 2005
(64)
MS SQL 2008
(64)
Windows 2003
(32)
Windows 2003
(64)
Windows 2008
(64)
Not Supported Not Supported Supported Not Supported Not Supported
Not Supported Not Supported Not Supported Certified Not Supported
Not Supported Not Supported Not Supported Not Supported Supported
18 Sentinel 6.1 Installation Guide

Although 32-bit platforms are supported for the Sentinel database in development or proof-ofconcept environments, Novell recommends 64-bit platforms for production databases in order to
obtain the best performance results.
NOTE: All databases should be installed on an operating system that is certified by the database
vendor and also by Novell for use with Sentinel components. Oracle must run on Linux* or Solaris
(not Windows). When you use the Oracle client to install or load seed data to the Sentinel database,
ensure that the Oracle client version is same or later than the Oracle server version.
2.1.3 Sentinel Component Supported Platforms
The Sentinel Server components include the Communication Server, Correlation Engine, Data
Access Service (DAS), and the Advisor data subscription service (which resides on the same
machine as DAS).
The Sentinel user applications that are mentioned in Table 2-3 on page 19 include the Sentinel
Control Center (SCC), Sentinel Data Manager (SDM), and Sentinel Solution Designer (SSD).
The Collector Manager, Collector Builder, and Crystal Reports* Server also have specific platform
requirements.
novdocx (en) 7 January 2010
The following software and operating system combinations are certified or supported. Certified
combinations have been tested with Novell Engineering’s full test suite. Supported combinations are
expected to be fully functional.
Table 2-3 Supported and Certified Components
Sentinel Server
Components
SLES 11 (64) Certified Certified Supported Not Supported Not Supported
SLES 10 (32) Supported Supported Certified Not Supported Not Supported
SLES 10 (64) Certified Supported Supported Not Supported Not Supported
RHEL 4 (32) Supported Supported Supported Not Supported Certified
RHEL 4 (64) Supported Supported Supported Not Supported Not Supported
Solaris 10 (32) Supported Supported Certified Not Supported Not Supported
Solaris 10 (64) Certified Supported Supported Not Supported Not Supported
Windows 2003
(32)
Windows 2003
(64)
Supported Supported Certified Supported Certified
Certified Supported Supported Supported Not Supported
Sentinel User
Applications
Collector
Manager
Collector
Builder
Crystal Reports
Server
Windows 2008
(64)
SLED 10 Not Supported Certified Not Supported Not Supported Not Supported
Windows XP Not Supported Certified Not Supported Supported Not Supported
Supported Supported Supported Supported Not Supported
System Requirements 19

novdocx (en) 7 January 2010
Sentinel Server
Components
Windows Vista Not Supported Supported Not Supported Supported Not Supported
SLES 9 (32) Not Supported Not Supported Not Supported Not Supported Certified
Sentinel User
Applications
Collector
Manager
Collector
Builder
Crystal Reports
Server
The supported reporting server is Crystal Reports Server XI R2 SP4, which is supported only on 32bit hardware. The supported Crystal Reports service packs can be downloaded from the Novell
download Web site (http://download.novell.com/).
1 Go to the Novell download Web site (http://download.novell.com).
2 Select
3 Specify
SIEM/Sentinel
crystal
as the Keyword, then click search.
from the Product or Technology list.
The download page displays the required service packs for Crystal Reports and also includes
the instructions for installing the service packs.
For more information on installing and configuring Crystal Reports, see Chapter 7, “Crystal Reports
for Windows,” on page 97 and Chapter 8, “Crystal Reports for Linux,” on page 125.
Crystal requires a Web server and a Central Management Server (CMS) database for operation, in
addition to the Sentinel database. The Crystal Reports Server can run on the following platforms in
the Sentinel environment:
Red Hat Enterprise Linux 4 (32-bit)
Crystal CMS database on MySQL*
Web server on Apache Tomcat*
Sentinel database on Oracle recommended; other configurations untested
SUSE Linux Enterprise Server 9 SP2 (32-bit)
Crystal CMS database on MySQL
Web server on Apache Tomcat
Sentinel database on Oracle recommended; other configurations untested
Windows 2003 SP1 Server, Standard or Enterprise Edition (32-bit)
Crystal CMS database on Microsoft SQL Server 2005
Web server on Microsoft IIS with .NET
Sentinel database on SQL Server recommended; other configurations untested
See the vendor documentation for additional details about system requirements, supported version
numbers, and known issues for these platforms.
2.1.4 Platform Support Exceptions and Cautions
The following platforms are not supported by their respective vendors and therefore are not
supported by Novell:
The vendor for Crystal Reports Server XI R2 does not currently support Crystal on Solaris or
SUSE Linux Enterprise Server 10.
Oracle does not currently support Oracle 10 (32-bit) on 32-bit Solaris 10.
20 Sentinel 6.1 Installation Guide

Although the following platform configurations might be supported by their respective vendors,
Novell does not recommend these configurations in a Sentinel environment:
Sentinel on SUSE Linux Enterprise Server 10 running with the ReiserFS file system
Oracle database on Microsoft Windows
Crystal Reports Server on Microsoft Windows 2000
Crystal Reports Server with MSDE as the database
Novell recommends running the Sentinel database and reporting engine on platforms that have been
fully quality assured by Novell. However, both the Oracle database and Crystal Reports Server are
supported by their respective vendors on additional platforms that are not fully quality assured by
Novell. If a customer wants to use one of these additional platforms, Novell support for these
platforms includes the following conditions.
Because the Sentinel database installation and configuration are platform specific, only Novell
Consulting or a qualified partner should be engaged to perform the initial Sentinel installation
and setup.
The standard installer might not work as expected on an untested platform.
novdocx (en) 7 January 2010
When the Sentinel system is functional, any database or reporting issue that cannot be
duplicated on Novell in-house supported platforms must be addressed by the appropriate
vendor.
Finally, for full functionality, Novell recommends that the database and DAS be installed with the
same operating system (although not necessarily on the same machine). For example, Windows
Authentication cannot be used if DAS is installed in a mixed environment where DAS is on
Windows and the database is Oracle or where DAS is on UNIX* or Linux and the database is SQL
Server.
Collector Builder runs only on the Windows platform.
2.2 Hardware Recommendations
Sentinel has a highly scalable architecture, and if high event rates are expected, components can be
distributed across several machines to achieve the best performance for the system. As you plan
your system, make sure you take into account the following considerations:
Section 2.2.1, “Architecture Considerations,” on page 21
Section 2.2.2, “Supported Hardware,” on page 23
Section 2.2.3, “Proof of Concept Configuration,” on page 23
Section 2.2.4, “Production Configuration,” on page 24
Section 2.2.5, “High-Performance Production Configuration,” on page 25
Section 2.2.6, “Virtual Environments,” on page 26
2.2.1 Architecture Considerations
There are many factors that should be considered when designing a Sentinel system.:
Event rate (events per second, or EPS)
Geographic/network location of event sources, and bandwidth between networks
System Requirements 21

Available hardware
Preferred operating systems
Plans for future scalability
Amount of event filtering expected
Local data retention policies
Desired number and complexity of correlation rules
Expected number of incidents per day
Expected number of workflows to be managed per day
Number of users logging in to the system
Vulnerability and asset infrastructure
The most significant factor in the Sentinel system design is the event rate; almost every component
of the Sentinel architecture is affected by increasing event rates. In a high-event-rate environment,
the greatest demand is placed on the database, which is I/O-dependent and might be simultaneously
handling inserts of hundreds or thousands of events per second, object creation by multiple users,
workflow process updates, simple historical queries from the Sentinel Control Center, and long-term
reports from the Crystal Reports Server. Therefore, Novell makes the following recommendations:
novdocx (en) 7 January 2010
The database should be installed without any other Sentinel components.
The database server should be dedicated to Sentinel operations. Additional applications or
Extract Transform Load (ETL) processes might impact database performance.
The database server should have a high-speed storage array that meets the I/O requirements
based on the event insertion rates.
A dedicated database administrator should regularly evaluate and maintain the following
aspects of the database:
Size
I/O operations
Disk space
Memory
Indexing
Transaction logs
In low-event-rate environments (for example, EPS < 25), these recommendations can be relaxed,
because the database and other components use fewer resources.
This section includes some general hardware recommendations as guidance for Sentinel system
design. In general, design recommendations are based on event rate ranges. However, these
recommendations are based on the following assumptions:
The event rate is at the high end of the EPS range.
The average event size is 600 bytes.
All events are stored in the database (that is, there are no filters to drop events).
Thirty days worth of data is stored online in the database.
Storage space for Advisor data is not included in the specifications mentioned in the tables later
in this section.
22 Sentinel 6.1 Installation Guide

The Sentinel Server has a default 5 GB of disk space for temporarily caching event data that
fails to insert into the database.
The Sentinel Server also has a default 5 GB of disk space for events that fail to be written to
aggregation event files.
The optional Advisor subscription requires an additional 50 GB of disk space on the database
server.
The hardware recommendations for a Sentinel implementation can vary based on the individual
implementation, so you should consult Novell Consulting Services prior to finalizing the Sentinel
architecture. The recommendations in this section can be used as guidelines.
NOTE: The Sentinel Server machine with Data Access Server (DAS) must have a local or shared
striped disk array (RAID) with a minimum of four disk spindles because of high event loads and
local caching.
The distributed hosts must be connected to the other Sentinel Server hosts through a single highspeed switch (GigE) in order to prevent network traffic bottlenecks.
Novell recommends that the Crystal Reports Server be installed on its own dedicated machine,
particularly if the database is large or reporting usage is heavy. Crystal can be installed on the same
machine as the database if the database is small, the reporting usage is light, and the database is
installed on either Windows or Linux and not Solaris.
novdocx (en) 7 January 2010
2.2.2 Supported Hardware
When you install Sentinel on Linux or Windows, the Sentinel server and database components can
run on x86 (32-bit) or x86-64 (64-bit) hardware, with some exceptions based on the operating
system, as described in Section 2.2.1, “Architecture Considerations,” on page 21. Sentinel is
certified on AMD* Opteron* and Intel* Xeon* hardware. Itanium* servers are not supported.
For Solaris, the SPARC architecture is supported.
2.2.3 Proof of Concept Configuration
The proof of concept configuration supports up to 1350 events per second (EPS). This configuration
is suitable for demonstrations or limited proofs of concept and can be installed by using the Simple
option in the Sentinel installer. This configuration is not recommended for use in a production
system and has been tested only with the configuration described below.
Table 2-4 Hardware for Proof of Concept
Function RAM Model
Sentinel Server + Database (Oracle) 5 GB, Software RAID 5
with 5 SATA hard drives
SLES 10 SP1, two 64-bit dual core
processors (tested with two Intel
Xeon 5160s, 3.00 GHz)
Collector Manager, Correlation Engine,
and Sentinel Control Center
4 GB RAM Windows 2003 SP2, two 32-bit
single-core processors (tested with
Intel Xeon, 2.4 GHz)
System Requirements 23

Function RAM Model
novdocx (en) 7 January 2010
Crystal Reports Server 4 GB RAM
40 GB disk space
Table 2-5 System Setup for Proof of Concept
Attribute Rating Comments
Collectors deployed per Collector
Manager
Rules deployed per correlation
engine
Active Views running 10
Number of simultaneous users 3
Number of maps deployed 5 The largest map is 40 KB with over
3
10
One 32-bit dual core processor
(tested with Intel Xeon 5150, 2.66
GHz)
800 rows.
2.2.4 Production Configuration
This production configuration supports up to 3200 EPS. The Sentinel components are distributed to
enable a higher event rate than the proof of concept configuration.
To achieve optimal performance, the Oracle database uses a StorCase disk array (16 disks) to
store data files, and a separate local SATA drive to hold the Oracle Redo log.
To achieve optimal performance on the Sentinel server, the file directory that holds DAS
aggregation data and
Table 2-6 Hardware for Production Configuration
Function RAM Model
Sentinel Server and
Correlation Engine
Database (Oracle) 4 GB RAM
Collector Manager 1 4 GB RAM
insertErrorBuffer
4 GB RAM
90 GB disk
space
3 TB+ disk
space
20 GB disk
space
was pointed to a separate local SATA hard drive.
SLES 10 SP1, two 64-bit dual core processors (tested with
two Intel Xeon 5160s, 3.00 GHz)
SLES 10 SP1, two 64-bit dual core processors (tested with
two Opteron 275s, 2.2 GHz), StorCase disk array, and
software RAID 5
SLES 10 SP1, two 64-bit dual core processors (tested with
two Opteron 275s, 2.2 GHz)
24 Sentinel 6.1 Installation Guide

Function RAM Model
novdocx (en) 7 January 2010
Collector Manager 2 4 GB RAM
20 GB disk
space
Crystal Reports Server 4 GB RAM
40 GB disk
space
Table 2-7 System Setup for Production Configuration
Attribute Rating Comments
Collectors deployed per Collector
Manager
Rules deployed per Correlation
Engine
10 The Collector Manager 1 configuration handles up
20
Windows 2003, one dual core processor (tested with dual
core Intel Xeon, 2.50 GHz)
One 32-bit dual core processor (tested with Intel Xeon
5150, 2.66 GHz)
to 1750 EPS; the Collector Manager 2
configuration handles up to 850 EPS. A typical
collector running alone can output up to 600 EPS,
but adding more collectors to a Collector Manager
or using collectors with more complex parsing will
reduce the per-collector output.
Active Views running 20
Number of simultaneous users 5
Number of maps deployed 5 The largest map is 40 KB with over 800 rows.
2.2.5 High-Performance Production Configuration
The high-performance production configuration supports up to 5000 EPS.
To achieve optimal performance, the Oracle database uses a StorCase disk array (16 disks) to
store data files and a separate local SATA drive to hold the Oracle Redo log.
A secondary DAS_Binary process (which is responsible for event inserts into the database) is
installed on a dedicated machine to reduce the CPU utilization on the primary server.
To achieve optimal performance on both DAS machines, the file directory that holds DAS
aggregation data and
Table 2-8 Hardware for High-Performance Production Configuration
Function Sizing Model
Sentinel Server (including primary
DAS_Binary process) and Correlation
Engine
insertErrorBuffer
4 GB RAM
90 GB disk space
was pointed to a separate local SATA hard drive.
SLES 10 SP1, two 64-bit dual core
processors (tested with two Intel Xeon
5160s, 3.00 GHz)
System Requirements 25

Function Sizing Model
novdocx (en) 7 January 2010
Database (Oracle) 4 GB RAM
4 TB+ disk space
Collector Manager 1 and secondary
DAS_Binary process
Collector Manager 2 4 GB RAM
Crystal Reports Server 4 GB RAM
Table 2-9 System Setup for High-Performance Production Configuration
Attribute Rating Comments
Collectors deployed per Collector
Manager
4 GB RAM
40 GB disk space
20 GB disk space
40 GB disk space
10 The Collector Manager 1 configuration
SLES 10 SP1, two 64-bit dual core
processors (tested with two Opteron
275s, 2.2 GHz), StorCase disk array,
and software RAID 5
SLES 10 SP1, two 64-bit dual core
processors (tested with two Opteron
275s, 2,2 GHz)
Windows 2003, one dual core processor
(tested with dual core Intel Xeon, 2.50
GHz)
One 32-bit dual core processor (tested
with Intel Xeon 5150, 2.66 GHz)
handles up to 1750 EPS; the Collector
Manager 2 configuration handles up to
850 EPS. A typical collector running
alone can output up to 600 EPS, but
adding more collectors to a Collector
Manager or using collectors with more
complex parsing will reduce the percollector output.
Rules deployed per correlation Engine 20
Active Views running 20
Number of simultaneous users 4
Number of maps deployed 5 The largest map is 40 KB with over 800
rows.
2.2.6 Virtual Environments
Sentinel 6.1 has been tested extensively on VMware* ESX Server, and Novell fully supports
Sentinel running in this environment. Performance results in a virtual environment can be
comparable to the results achieved in tests on a physical machine, the virtual environment should
provide the same memory, CPU, disk space, and I/O as the physical machine recommendations.
26 Sentinel 6.1 Installation Guide

3
Installing Sentinel 6.1 SP2
Section 3.1, “Installer Overview,” on page 27
Section 3.2, “Sentinel Configurations,” on page 28
Section 3.3, “Port Numbers Used for Sentinel 6.1,” on page 31
Section 3.4, “General Installation Prerequisites,” on page 31
Section 3.5, “Database Installation,” on page 37
Section 3.6, “Simple Installation,” on page 40
Section 3.7, “Custom Installation,” on page 42
Section 3.8, “Installing Sentinel as a Domain user,” on page 54
Section 3.9, “Post-Installation Configuration,” on page 54
Section 3.10, “LDAP Authentication,” on page 62
Section 3.11, “Updating the License Key,” on page 69
novdocx (en) 7 January 2010
3
3.1 Installer Overview
This section helps you install the major components of the SentinelTM system. The Sentinel installer
offers the option of a Simple installation or Custom installation. The Simple installation installs all
components on one machine and is intended for demonstration or training systems. This is not
intended for production use as many minimal default settings are used for a Simple installation. The
Custom installation can be used to install one or more Sentinel components at a time and can be used
for distributed production installations.
In addition to the Sentinel components, there are several other applications that can be part of the
Sentinel system:
Database: The database stores the events, correlated events, and configuration information.
The database must be installed according to the best practices recommended by Oracle and
Microsoft for database installation, directory structure, and so on.
Crystal Reports Server: Crystal (and its associated Web Server and database) is used to
generate reports from the Novell
installer for Crystal components. For more information about installing Crystal, see Chapter 7,
“Crystal Reports for Windows,” on page 97 and Chapter 8, “Crystal Reports for Linux,” on
page 125.
Crystal Reports Developer: This application is used to create and modify reports.
Advisor: Advisor provides real-time intelligence about attacks and vulnerabilities, including
real-time exploit detection to determine which threats are taking place against vulnerable
systems. For more information about Advisor, see “Advisor Usage and Maintenance” in the
Sentinel 6.1 User Guide.
®
report library or custom-designed reports, and has a separate
Sentinel Link Solution: Sentinel Link is a mechanism that provides the ability to
hierarchically link multiple Sentinel systems, including Novell Sentinel Log Manager, Novell
Sentinel, and Novell Sentinel Rapid Deployment. You can hierarchically link two or more
Installing Sentinel 6.1 SP2
27
Sentinel systems to forward filtered events from one Sentinel system to another for further
evaluation. For more information on Sentinel Link Solution, see “Sentinel Link Solution” in
the Sentinel 6.1 User Guide.
NOTE: Remedy Service Desk integration was previously available as an installer option. With the
Sentinel 6.1 release, Remedy integration is available separately as an Integrator plug-in and is no
longer included in the Sentinel installer. With the proper license, the Remedy Integrator and
associated Action can be downloaded at the Novell Content Web site (http://support.novell.com/
products/sentinel/sentinel61.html).
3.2 Sentinel Configurations
The following are some typical configurations for Sentinel.
Section 3.2.1, “Linux,” on page 28
Section 3.2.2, “Solaris,” on page 29
Section 3.2.3, “Windows,” on page 29
Section 3.2.4, “High-Performance Configuration,” on page 29
novdocx (en) 7 January 2010
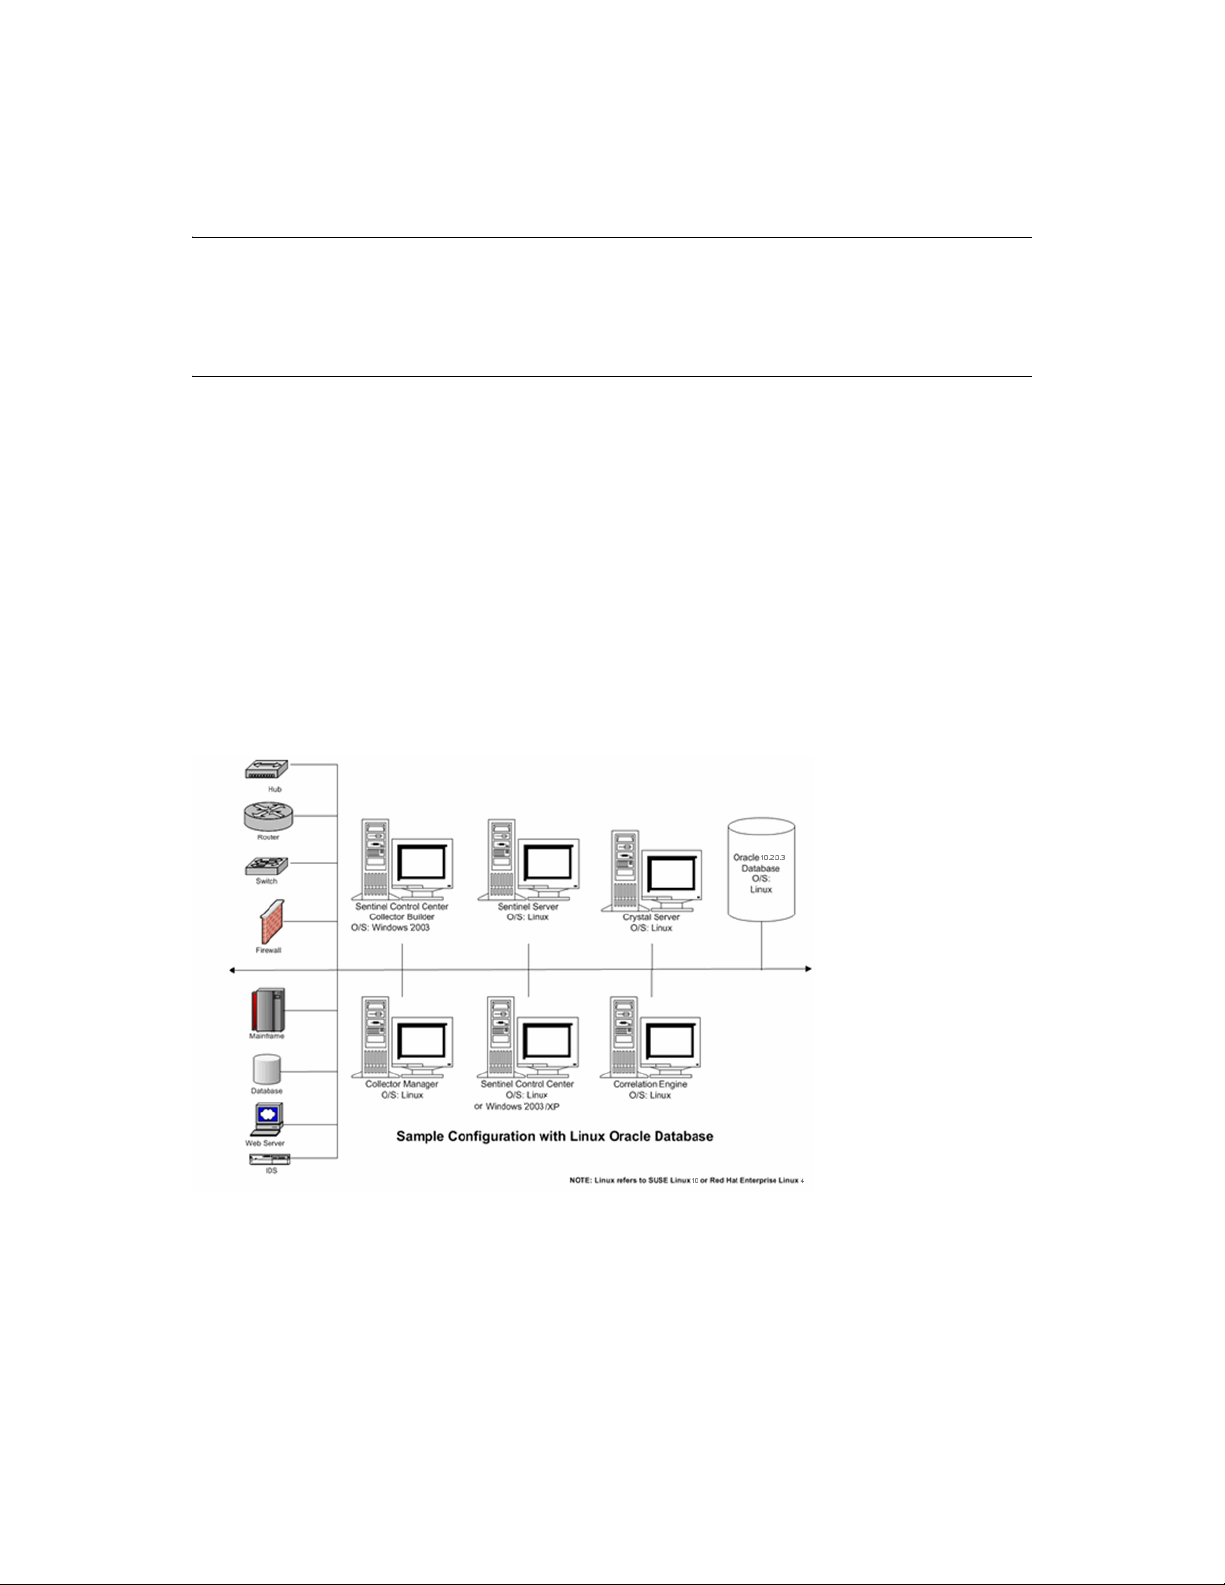
3.2.1 Linux
Figure 3-1 Sentinel Configuration on Linux
28 Sentinel 6.1 Installation Guide

3.2.2 Solaris
Figure 3-2 Sentinel Configuration on Solaris
novdocx (en) 7 January 2010
3.2.3 Windows
Figure 3-3 Sentinel Configuration on Windows
3.2.4 High-Performance Configuration
The 64-bit JVM*can allocate much more RAM to Sentinel processes than the 32-bit JVM. The
highest Xmx value that can be used by a 32-bit JVM is 1200m, but it is virtually unlimited in a 64bit JVM. Therefore, a 64-bit JVM is useful if processing requires a lot of RAM and it is available on
Installing Sentinel 6.1 SP2 29

the machine. However, performance testing shows that the 64-bit JVM requires nearly double the
RAM to perform the same tasks as compared to the 32-bit JVM. So using the 64-bit JVM for a
process that does not require this additional RAM wastes memory resources. For example, if a
process was allocated 1200m with a 32-bit JVM, there is no benefit to running that process on a 64bit JVM unless more than double the amount of RAM is allocated to it. In this example, the amount
must be more than 2400m.
There are several processes that can benefit from having an additional RAM at their disposal
(beyond the 1200m limit of a 32-bit JVM). For example, DAS_RT can hold more Active Views. A
Collector Manager can support more Collectors and Connectors. The Correlation Engine can
support more rules. DAS_Query, DAS_Binary, and DAS_Aggregation can also take advantage of
additional RAM. However, a few processes such as DAS_iTRAC, DAS_Proxy, and Sonic are not
likely to make use of memory beyond the 1200m that is supplied with a 32-bit JVM.
To move all the processes on a machine to use the 64-bit JVM:
1 Stop the Sentinel services. Select Start > Control Panel > Administrative Tools > Services,
right-click Sentinel, then select Stop.
novdocx (en) 7 January 2010
2 Back up the
3 Modify the
Windows: Set
Linux: Set
ESEC_HOME/config/configuration.xml
ESEC_JAVA_HOME
ESEC_JAVA_HOME
ESEC_JAVA_HOME
path environment variable to point to 64-bit JVM.
to
%ESEC_HOME%\jre64\bin
to
$ESEC_HOME/jre64/bin
file.
4 Reload the environment variables.
Windows: Replace
%ESEC_HOME%\lib\x86
with
%ESEC_HOME%\lib\x86_64
in the path
variable.
Linux: Log out and log in to Sentinel.
5 Open the
6 Modify the
ESEC_HOME/config/configuration.xml
-Xmx<#>m
setting of every process entry in the
file in a text editor.
configuration.xml
file for which
you want to allocate additional memory.
Start by doubling the value that was already there for every process. This is necessary because
of the overhead of the 64-bit JVM as described earlier. Then, for processes that you want to
have additional RAM, modify their values again and choose an even higher number.
7 Save the
configuration.xml
file and open the file in a Web browser to validate the XML
syntax.
8 Start the Sentinel services. Select Start > Control Panel > Administrative Tools > Services,
right-click Sentinel, then select Start.
To move individual processes on a machine to use the 64-bit JVM:
NOTE: On Windows, only the Correlation Engine and Collector Manager can be moved
individually to 64-bit JVM. This limitation exists because other processes use the dynamic link
libraries (DLLs) found in the PATH environment variable, and there is only one PATH environment
variable for both 32-bit and 64-bit processes. Only one type of DLL (32-bit or 64-bit) can appear
first in the PATH. On UNIX, any process can be moved individually to 64-bit.
1 Stop the Sentinel services. Select Start > Control Panel > Administrative Tools > Services,
right-click Sentinel, then select Stop.
2 Back up the
30 Sentinel 6.1 Installation Guide
ESEC_HOME/config/configuration.xml
file.

novdocx (en) 7 January 2010
3 Open the
ESEC_HOME/config/configuration.xml
file in a text editor.
4 Locate the entry for the process to move to 64-bit at the end of the file. For each of these
process that should run as 64-bit in the
environment variable to
java
5 Modify the
-Xmx<#>m
setting of the process entries in the
$(ESEC_HOME)/jre64/bin/java
attribute, change the
configuration.xml
$(ESEC_JAVA_HOME)/
.
file for which
image
you want to allocate additional memory.
Start by doubling the value that was already there for the processes that will be running in a 64bit JVM. This is necessary because of the overhead of the 64-bit JVM as described earlier.
Then, modify their values again and choose an even higher number.
6 Save the
configuration.xml
file and open the file in a Web browser to validate the XML
syntax.
7 Start the Sentinel services. Select Start > Control Panel > Administrative Tools > Services,
right-click Sentinel, then select Start.
3.3 Port Numbers Used for Sentinel 6.1
On the Sentinel 6.1 server, configure the following ports in the firewall to enable communication
between Sentinel 6.1 and its components:
Table 3-1 Port Numbers for Sentinel 6.1 Server
Component Port Number Description
Message bus 10012 The port on which the communication server is listening.
Components connecting directly to the communication server
use this port.
Sentinel Control Center
proxy
Collector Manager
certificate authentication
10013 The port on which the SSL proxy server (DAS Proxy) is
listening to accept username and password based
authenticated connections. When prompted for a username
and password, it uses this port to connect to the Sentinel
server.
10014 The port on which the SSL proxy server (DAS Proxy) is
listening to accept certificate-based authenticated
connections. Because the Collector Manager cannot prompt
for a username and password, it uses this port to connect to
Sentinel server if it is configured to connect through the proxy.
The Sentinel Data Manager (SDM) uses port 1521 to connect to the Oracle database and port 1433
to connect to the MS SQL database. These are the default ports that are used, however, you can
change the port numbers.
3.4 General Installation Prerequisites
Perform the following tasks before installing Sentinel. For more information on these prerequisites,
including the list of certified platforms, see Chapter 2, “System Requirements,” on page 17.
Ensure that each machine in the Sentinel architecture meets the minimum system requirements.
Installing Sentinel 6.1 SP2 31

Ensure that the operating systems for all components of the system are certified platforms and
that the operating system has been hardened by using current best security practices.
If you are installing on SUSE
®
Linux Enterprise Server (SLES) 10, ensure that SLES is using
the ext3 file system.
For a minimal or headless installation, the operating system for the Sentinel Server machine
must include at least the Base Server and X Window components of SuSE Linux Enterprise
Server.
If you are installing the Collector Manager on a 64-bit machine, ensure that the 32-bit libraries
are available. The 32-bit libraries are required when running a Collector that is written in the
proprietary Collector language (this includes almost all Collectors written before June 2008) as
well as when running certain Connectors such as the LEA Connector. JavaScript* based
Collectors and the plug-ins of Sentinel are 64-bit enabled. Verifying the availability of these
libraries is important on Linux platforms, which might not include them by default.
You must install
Ensure that a Sentinel-certified database is installed. If you are using Oracle, Enterprise Edition
SUNWxcu4
package on your Solaris machine before installing Sentinel 6.1.
with partitioning is required for the data archive to work. For more information on certified
versions, see Chapter 2, “System Requirements,” on page 17.
Get the Sentinel, Crystal Reports Server, and Crystal Reports Developer serial numbers and
license keys from the Novell Customer Center (https://secure-www.novell.com/center/
regadmin). If you have purchased the optional Advisor exploit detection data feed, verify in the
Customer Center that this data subscription is listed with the rest of your Novell products.
novdocx (en) 7 January 2010
Install and configure an SMTP server if you want to send e-mail notifications from Sentinel.
Create a directory with ASCII-only characters (and no special characters) from which you want
to run the Sentinel installer.
Provide Power user privileges to the Domain User. For more information, see Section 3.4.1,
“Providing Power User Privileges to Domain Users,” on page 33.
Sentinel installations using the full installer should always take place on a clean system. If Sentinel
6.0 was previously installed on any of the machines, Novell recommends that you follow the
uninstallation procedures in Chapter 9, “Uninstalling Sentinel,” on page 143. For information on
uninstalling previous versions of Sentinel, see the relevant Installation guides on the Novell
Documentation Web site (http://www.novell.com/documentation/).
NOTE: Instructions for upgrading from a previous version of Sentinel 6.0 to Sentinel 6.1 are
included with the patch installer.
Section 3.4.1, “Providing Power User Privileges to Domain Users,” on page 33
Section 3.4.2, “Sentinel Database Installation Prerequisites,” on page 33
Section 3.4.3, “Authentication Mode Settings on Microsoft SQL,” on page 36
Section 3.4.4, “Sentinel Server Installation Prerequisites,” on page 37
32 Sentinel 6.1 Installation Guide

3.4.1 Providing Power User Privileges to Domain Users
IMPORTANT: If you install Sentinel as a domain user, where the user is not a part of administrator
group in the Active Directory* machine and the local machine, then the domain user should be a
Power User to start the Sentinel Services.
1 On the Windows desktop, right-click My Computer and select Manage.
2 In the Computer Management window, select Local > Users and Groups > Groups.
3 Double-click Power User and add the domain user in
domain/domain user
format in the
local system where Sentinel is installed by using this domain user.
3.4.2 Sentinel Database Installation Prerequisites
Before installing the Sentinel Database components, you must ensure the following prerequisites are
met:
“Linux and Solaris” on page 33
“Windows” on page 35
novdocx (en) 7 January 2010
Linux and Solaris
If you are installing on SLES 10, the file system for the operating system must be ext3.
The Oracle database must be installed and running.
The Oracle client and the Oracle JDBC client (for Oracle 10g, use
11g, use
ojdbc6.jar
) must be installed on the machine from which you are running the
ojdbc14.jar
and for Oracle
installer. If you run the Sentinel installer on the database machine, ensure that a compatible
JDBC client is already installed by the database installer. If you run the Sentinel installer on
another machine, the database instance must be manually created and the compatible JDBC
client must be manually installed on the machine with the installer. Although newer Oracle
drivers are backward compatible, Sentinel testing was performed with the drivers that were
shipped with the Oracle database (for example, 10.2.0.3 drivers were tested with the 10.2.0.3
database).
NOTE: Sentinel cannot start the Oracle 10 database because of the errors in the Oracle
dbstart
and
dbshut
scripts. You need to modify the
dbstart
and
dbshut
scripts after
installing Sentinel. For more information on modifying these scripts, see Section 3.9.7,
“Modifying Oracle dbstart and dbshut scripts,” on page 59.
For performance reasons it is highly recommended that if you are installing in a RAID system
and if your RAID environment allows, configure the Sentinel database so that the Transaction
Log points are stored on the fastest write disk available. This Transaction log disk is a separate
physical disk where the database files are stored.
You should allow the Sentinel installer to create the Oracle database instance for Sentinel.
The database instance creation can be performed manually if required. To ensure the
compatibility of this instance with Sentinel, see Section B.4, “Manual Oracle Instance
Creation (Optional),” on page 164. If you chose this option, you must run the Novell
createEsecDBA.sh
script and use the Sentinel installer to add the database objects to the
manually created Oracle database instance. For more information, see Section 3.7,
“Custom Installation,” on page 42.
Installing Sentinel 6.1 SP2 33

NOTE: If you are using an existing or manually created Oracle database instance, it must be
empty except for the Sentinel Database User for successful installation.
novdocx (en) 7 January 2010
Get the login credentials for the Oracle operating system user (default:
Get the login credentials for Oracle users
SYSTEM
and
SYS
.
oracle
).
Ensure that the following environment variables are set for the Oracle operating system user:
ORACLE_HOME
product/10gR2/db
ORACLE_BASE
PATH
(must include
(for example,
)
(for example,
$ORACLE_HOME/bin
echo $ORACLE_HOME
echo $ORACLE_BASE
)
might produce
produces
/opt/oracle
/opt/oracle/
)
Determine an appropriate Oracle listener port number (the default port number is 1521).
Create directories for the following storage locations:
Data Directory
Index Directory
Summary Data Directory
Summary Index Directory
Temp and Undo Directory
Redo Log Member A Directory
Redo Log Member B Directory
Archive Directory
NOTE: The oracle user must have the write permissions for these directories. To provide write
permissions for these directories, execute the following commands for each directory as the
root
user:
chown –R oracle:dba <directory_path>
chmod –R 770 <directory_path>
After the Sentinel Database is installed on Oracle, the database contains the following users:
Table 3-2 Database Users
User Description Server Roles Need for the Role
esecdba Database schema owner. The
DBA privilege is not granted to
the Sentinel Database User
because of security concerns.
To use Enterprise Manager,
you must create a user with
DBA privileges.
Serveradmin and
Sysadmin
esecdba needs
serveradmin and sysadmin,
because Sentinel Data
Manager needs the
privilege to use a built-in
SQL Server stored
procedure to write to the file
system.
34 Sentinel 6.1 Installation Guide

User Description Server Roles Need for the Role
novdocx (en) 7 January 2010
esecapp Database application user.
This is the application user
used to connect to the
database.
esecadm Database user. This is the
Sentinel Administrator. This is
not the same user account as
the Sentinel Administrator
operating system user.
esecrpt Database report user Not required
SYS SYS database user Not required
SYSTEM SYSTEM database user Not required
securityadmin esecapp needs the
securityadmin role, because
Sentinel applications run
under the esecapp user and
this role is required to
create new users in
Sentinel and the database.
Not required
Windows
The SQL Server database must be installed and running.
The Sentinel Database installer requires the SQL Server client tools to be installed on the
system where the Sentinel Database installer is run.
The
sc
command to start the SQL Server Agent Service must be available on your database
operating system. If not, the SQL Server Agent Service must be started manually for
partitioning and data archiving to work properly. Also, it must be scheduled to restart after a
reboot using another utility.
Get the login credentials for the System Administrator database user
If the database uses SQL Authentication mode, the default database administrator user is
sa
.
If the database uses Windows Authentication only mode, you must run the installer when
you are logged into Windows as a System Administrator database user.
Set the
MSSQLSERVER
service to log in using the Local System Account.
Determine the SQL Server Instance Name, if applicable.
NOTE: If you named your database instance during the SQL Server install, use the same name
when prompted for the SQL Server instance name when installing the Sentinel Database and
DAS components. If you did not name your database instance during the SQL Server install,
leave the instance name blank during installation (if you are typing the hostname, do not add
\<instance_name> to the database hostname).
Create directories for the following storage locations:
Data Directory
Index Directory
Summary Data Directory
Summary Index Directory
Installing Sentinel 6.1 SP2 35

Log Directory
Archive Directory
Determine the SQL Server Instance port number (the default port number is 1433).
The Sentinel system uses several accounts for installation and system operation.These accounts exist
in the Sentinel database and might use SQL Server authentication or Windows authentication. To
use Windows authentication for one or more of the Sentinel users during Sentinel installation, the
corresponding Windows Domain user must exist before installing the Sentinel Database.
The domain user should have Power User privileges to start the Sentinel services. See Section 3.4.1,
“Providing Power User Privileges to Domain Users,” on page 33 for more information.
The following Sentinel users can be assigned to a Windows Domain User:
novdocx (en) 7 January 2010
Sentinel Database Administrator, used as the schema owner (named
esecdba
by default, if
using SQL authentication; might be any domain account if using Windows Authentication).
Sentinel Application User, used by Sentinel applications to connect to the database (named
esecapp
by default, if using SQL Authentication; might be any domain account if using
Windows authentication).
Sentinel Administrator, used as the administrator for logging to the Sentinel Control Center
(named
esecadm
by default, if using SQL authentication; might be any domain account if using
Windows authentication).
Sentinel Report User, used for creating reports (named
esecrpt
by default, if using SQL
authentication; might be any domain account if using Windows authentication).
NOTE: The database contains the Sentinel Database Administrator user, Sentinel Application User,
and Sentinel Administrator user by default.
Sentinel does not support Microsoft clustering or High Availability for Windows.
After installing the Sentinel Database on SQL Server using local authentication, the database
contains the following users:
esecdba: Database schema owner. The DBA privilege is not granted to the Sentinel Database
User because of security concerns, so to use Enterprise Manager (the GUI for the SQL
database), you must create a user with DBA privileges.
esecapp: Database application user. This is the application user used to connect to the database.
esecadm: Database user that is the Sentinel Administrator. This is not the same user account as
the Sentinel Administrator operating system user.
esecrpt: Database report user.
sa: System administrator database user.
3.4.3 Authentication Mode Settings on Microsoft SQL
On Windows, you need to install SQL Server with mixed mode authentication to log in to the
Sentinel Control Center using either Windows or SQL Server authentication. If you install SQL
Server with Windows authentication, you can log in through Windows authentication only.
36 Sentinel 6.1 Installation Guide

To modify your authentication mode settings:
1 In Microsoft SQL Server Management Studio, right-click the server for which you want to
modify the settings.
2 Select Properties, then click Security.
3 From the options SQL Server and Windows Authentication Mode or Windows Authentication
Mode, select your option for authentication.
3.4.4 Sentinel Server Installation Prerequisites
If you are not installing the Sentinel Database on the same machine as the Sentinel server, you must
install the Sentinel Database before installing the other components of Sentinel.
3.5 Database Installation
An experienced DBA should install Oracle or SQL Server. In addition to the recommendations from
the DBA, Novell also has some recommendations for installing Oracle. These recommendations are
in the following areas:
novdocx (en) 7 January 2010
Section 3.5.1, “Setting Kernel Values,” on page 37
Section 3.5.2, “Creating Group and User Accounts for Oracle (Solaris Only),” on page 39
Section 3.5.3, “Setting Environment Variables for Oracle (Solaris Only),” on page 39
Section 3.5.4, “Installing Oracle,” on page 40
3.5.1 Setting Kernel Values
IMPORTANT: The kernel values suggested in this section are minimum values only. These
settings should be changed only if your system settings are lower than the recommended minimum
values, and only after consulting your system administrator and Oracle documentation. For more
information, see the Oracle Web site (http://www.oracle.com/technology/documentation/
database.html). This URL was current at the time of publishing the document.
“Linux” on page 37
“Solaris 10” on page 38
Linux
1 Log in as
2 Back up
3 Using a text editor, change the kernel parameters by appending the following text to the
sysctl.conf
The kernel settings below are minimal recommended settings. These settings can be increased
if the machine hardware can support it.
To determine your current setting for a particular kernel parameter, execute the command:
sysctl <kernel_parameter>
root
.
/etc/sysctl.conf
file:
.
/etc/
For example, to check the current value of the kernel parameter
command:
sysctl kernel.sem
kernel.sem
Installing Sentinel 6.1 SP2 37
, execute the

On SUSE Linux 10 SP2:
# Oracle requires MLOCK privilege for hugetlb memory.
vm.disable_cap_mlock=1
On Red Hat Linux 4:
# Kernel settings for Oracle
kernel.core_uses_pid = 1
kernel.shmall = 2097152
kernel.shmmax = 2147483648
kernel.shmmni = 4096
kernel.sem = 250 32000 100 128
fs.file-max = 65536
net.ipv4.ip_local_port_range = 1024 65000
net.core.rmem_default = 262144
net.core.rmem_max = 262144
net.core.wmem_default = 262144
net.core.wmem_max = 262144
4 Execute the following command to load the modifications to the
sysctl -p
/sbin/sysctl –p (on Red Hat Linux4)
5 Set the file handles and process limits by appending the following text to the
file.
nproc
limits.conf
is the maximum limit on the number of processes and
/etc/sysctl.conf
/etc/security/
nofile
file:
maximum limit on the number of open files. These are the recommended values, but they can
be modified if needed. The following is an example if your Oracle userid is
# Settings added for Oracle
oracle soft nofile 65536
oracle hard nofile 65536
oracle soft nproc 16384
oracle hard nproc 16384
oracle
.
novdocx (en) 7 January 2010
is the
Solaris 10
Oracle 10g
noexec_user_stack=1
semsys:seminfo_semmni=100
semsys:seminfo_semmns=1024
semsys:seminfo_semmsl=256
1 By default, Oracle instances are run as the
group.dba
name is created to serve as the default project for the oracle user. Run the id
semsys:seminfo_semvmx=32767
shmsys:shminfo_shmmax=4294967295
shmsys:shminfo_shmmni=100
oracle
user of the dba group. A project with the
command to verify the default project for the oracle user.
# su - oracle
$ id -p
uid=100(oracle) gid=100(dba) projid=100(group.dba)
$ exit
2 To set the maximum shared memory size to 2 GB, run the
# projmod -sK "project.max-shm-memory=(privileged,2G,deny)" group.dba
Alternatively, add the project.max -
shm-memory=(privileged,2147483648,deny)
projmod
command
control to the last field of the project entries for the Oracle project.
resource
38 Sentinel 6.1 Installation Guide

novdocx (en) 7 January 2010
3 After these steps are complete, the
# cat /etc/project
/etc/project
file should contain the following:
The following is the output of the command:
system:0::::
user.root:1::::
noproject:2::::
default:3::::
group.staff:10::::
group.dba:100:Oracle default
project:::project.max-shmmemory=(privileged,2147483648,deny
4 To verify that the resource control is active, run the id and
# su - oracle
$ id -p
uid=100(oracle) gid=100(dba) projid=100(group.dba)
$ prctl -n project.max-shm-memory -i process $$
process: 5754: -bash
NAME PRIVILEGE VALUE FLAG ACTION RECIPIENT
project.max-shm-memory
privileged 2.00GB – deny
prctl
commands:
Oracle 11g
For information on setting the kernel values for Oracle 11g, see Section B.1, “Installing Oracle 11g,”
on page 153 in Appendix B, “Oracle Setup,” on page 153.
NOTE: For additional information, see the Oracle documentation for Solaris 10 installation (http://
www.oracle.com/technology/documentation/database.html). This URL was current at the time of
publication of the document.
3.5.2 Creating Group and User Accounts for Oracle (Solaris Only)
1 Log in as
2 Create a UNIX group and UNIX user accounts for the Oracle database owner.
Add a dba group (as root):
Add the oracle user (as root) for the csh shell:
Add the oracle user (as root) for the bash shell:
root
.
groupadd –g 400 dba
useradd –g dba –d /export/home/oracle –m –s /bin/csh oracle
useradd –g dba –d /export/home/oracle –m –s /bin/bash oracle
3.5.3 Setting Environment Variables for Oracle (Solaris Only)
1 Log in as
2 To set the necessary environment variables for Oracle in the
information to the
root
.
local.cshrc
file:
csh
shell, add the following
Installing Sentinel 6.1 SP2 39

setenv ORACLE_HOME /opt/oracle
setenv ORACLE_SID ESEC
setenv LD_LIBRARY_PATH ${ORACLE_HOME}/lib
setenv DISPLAY :0.0
set path=(/bin /bin/java /usr/bin /usr/sbin ${ORACLE_HOME}/bin /usr/ucb/
etc.)
if ( $?prompt ) then
set history=32
endif
3 To set the necessary environment variables for Oracle in the bash shell, add the following
information to the
setenv ORACLE_HOME /opt/oracle
setenv ORACLE_SID ESEC
setenv LD_LIBRARY_PATH ${ORACLE_HOME}/lib
setenv DISPLAY :0.0
set path=(/bin /bin/java /usr/bin /usr/sbin ${ORACLE_HOME}/bin /usr/ucb/
etc.)
if ( $?prompt ) then
set history=32
endif
.profile
file in the
$ORACLE_HOME
directory:
novdocx (en) 7 January 2010
3.5.4 Installing Oracle
To install Oracle, see Appendix B, “Oracle Setup,” on page 153. This section describes installation
settings recommended for Sentinel operations. It also describes the procedures for creating the
Oracle instance. (Novell recommends creating the instance by using the Sentinel installer, but
provides instructions if corporate policy requires that the DBA create the instance manually.)
3.6 Simple Installation
The Simple Installation option is an all-in-one installation option that installs Sentinel Services,
Collector Manager, and Sentinel Applications with the database on the same machine. This
installation is only for demonstration or training purposes and should not be used in production
environments.
After performing the database installation and meeting the prerequisites mentioned in Section 3.4,
“General Installation Prerequisites,” on page 31 proceed with installing Sentinel. If you choose the
Simple Installation, the following default settings are used:
On Windows, SQL authentication is allowed on the SQL Server database.
The same password is used for the Sentinel Database Administrator, the Sentinel
Administrator, the Sentinel Application User, and the Sentinel Report User.
The size of the database is 10 GB.
1 Log in as
2 Extract the
The files are extracted to disk1 folder.
root
user on Solaris/Linux or
<SENTINEL_6.1.2.zip>
administrator
user on Windows.
file to a location of your choice.
3 From the disk1 folder, run the following script:
Windows:
Solaris/Linux:
40 Sentinel 6.1 Installation Guide
setup.bat

For GUI mode:
./setup.sh
For text-based (serial console) mode:
./setup.sh –console
You cannot run the installer on UNIX from a directory path that has special characters such as
a space or non-ASCII characters.
4 Click the down-arrow and select one of the following language options:
novdocx (en) 7 January 2010
English
French
German
Simplified Chinese
Traditional Chinese
Italian
Portuguese (Brazil)
Spanish
Japanese
5 Read the Welcome screen, then click Next.
6 Read and accept End User License Agreement, then click Next.
7 Accept the default installation directory or click Browse to specify the installation location.
Click Next.
IMPORTANT: You cannot install Sentinel into a directory with special characters or nonASCII characters. For example, when installing Sentinel 6.1on Windows x86-64, the default
C:\Program Files (x86)
path is
. You must change the default path to avoid the special
characters and continue installation.
8 Select Simple, then click Next.
9 Provide the configuration information and click Next.
Serial Number
License Key
SMTP Server
Sentinel sends e-mail through this server.
E-mail
E-mail sent by Sentinel displays as sent from this e-mail address.
Global System Password
The password you enter here is valid for all default users. This includes both the Sentinel
Administrator user and the database users. For more information on the list of default
database users created during installation, see Section 3.9.2, “Sentinel Database,” on
page 55.
10 Select the target database platform for database configuration:
On Solaris/Linux, you are prompted to specify the Oracle username. Specify the username and
click OK.
Installing Sentinel 6.1 SP2 41

11 Specify the database name.
Linux/Solaris: Specify the path for the Oracle JDBC Driver file.
Windows: Specify the database user credentials and SQL Server instance name.
12 Click Next.
On Linux/Solaris, the installer backs up the existing
$ORACLE_HOME/network/admin
in the
directory. It overwrites the
tnsnames.ora
and
listener.ora
listener.ora
file with
Sentinel Database connection information, and appends the Sentinel Database connection
information to the
tnsnames.ora
file.
NOTE: If you have other databases on the same server as the Sentinel Database, the
administrator must manually merge the information from the backed-up
listener.ora
into the new file and restart the Oracle listener for other applications to continue to connect to
the database.
novdocx (en) 7 January 2010
files
files
A summary of the selected database parameters is displayed.
13 Click Next.
A summary of the installation is displayed.
14 Click Install.
15 After the install is complete, click Finish.
16 Restart the machine.
3.7 Custom Installation
The Custom Installation option allows for a fully distributed installation, with more control over
memory and other installation settings. The Custom Installation option can install one or more
Sentinel components, including:
Sentinel Database Components
42 Sentinel 6.1 Installation Guide

Sentinel Services
Communication Server
Correlation Engine
Data Access Server (DAS)
Sentinel Collector Service (Collector Manager)
Applications
Sentinel Control Center
Sentinel Data Manager
Sentinel Solution Designer
Ensure that the prerequisites mentioned in Section 3.4, “General Installation Prerequisites,” on
page 31 are met before you proceed with installing Sentinel.
The Sentinel Database components should always be installed first. Other components can be
installed at the same time if the system architecture includes multiple components on the database
machine. The procedure below shows the steps for installing all the components on the same
machine; a distributed installation includes a subset of the steps below.
novdocx (en) 7 January 2010
Section 3.7.1, “Starting the Installation,” on page 43
Section 3.7.2, “Configuring the Database on Windows,” on page 48
Section 3.7.3, “Configuring the Database on Linux or Solaris,” on page 49
Section 3.7.4, “Completing the Installation,” on page 51
Section 3.7.5, “Console Installation on Linux or Solaris,” on page 52
3.7.1 Starting the Installation
1 Log in as the
To install the Sentinel Database components on Windows when the target MS SQL Server
instance is in Windows Authentication only mode, you must log in to Windows as a System
Administrator database user.
2 Extract the
The files are extracted to disk1 folder.
3 From the disk1 folder, run the following script:
Windows:
Solaris/Linux:
GUI mode:
./setup.sh
Textual (headless) mode:
./setup.sh –console
You cannot run the installer on UNIX from a directory path that has special characters such as
a space or non-ASCII characters.
4 Click the down-arrow and select one of the following language choices:
root
user on Solaris/Linux or the
<SENTINEL_6.1.2.zip>
setup.bat
administrator
user on Windows.
file to a location of your choice.
Installing Sentinel 6.1 SP2 43

English
French
German
Simplified Chinese
Traditional Chinese
Italian
Portuguese (Brazil)
Spanish
Japanese
5 Read the Welcome screen, then click Next.
6 Read and accept End User License Agreement. Click Next.
7 Accept the default install directory or click Browse to specify your installation location. Click
Next.
You cannot install Sentinel in a directory with special characters or non-ASCII characters.
novdocx (en) 7 January 2010
8 Select Custom, then click Next.
9 Select the components of Sentinel to install.
The following options are available:
Component Description
Database Installs Sentinel database objects (tables, views, stored
procedures, and so on) into a database instance. Optionally
creates the database instance first.
TM
Communication Server Installs the message bus (iSCALE
) and DAS Proxy.
Correlation Engine Installs the correlation engine.
44 Sentinel 6.1 Installation Guide

Component Description
Data Access Server (DAS) Installs the components that communicate with the Sentinel
database. Requires a Sentinel license key and serial number.
(Required for using Advisor.)
Sentinel Collector Service Installs the Collector Manager that handles connections to
event sources, data parsing, mapping, and so on.
Sentinel Control Center Installs the main console for security or compliance analysts.
Sentinel Data Manager (SDM) Installs the SDM that is used for manual database
management activities.
Solution Designer Installs Solution Designer.
There is a time delay in the interface when you select or deselect a component.
If none of the child features of Sentinel Services are selected, make sure that you also deselect
the Sentinel Services feature. This option looks like it is disabled (with a white check mark)
even if all of its child features are deselected.
As part of the installation of the Sentinel Database component, the installer stores the files in
the
%ESEC_HOME%\ unist\db
folder.
If you are using the console mode, the component selection page only displays a few
components. Follow the on-screen instructions to view and edit the selected child components.
For more information, see Section 3.7.5, “Console Installation on Linux or Solaris,” on
page 52.
novdocx (en) 7 January 2010
NOTE: For MS SQL (MS SQL 2005 and 2008) databases, the maximum number of online
partitions allowed is 255. You must schedule the offline delete/archive operations so that the
online partitions do not exceed 255.
10 If you select to install DAS, supply the serial number and license key when you are prompted.
11 On Linux/Solaris, specify the Sentinel Administrator username and the location of its home
directory. This is the username that owns the installed Sentinel product. If the user does not
already exist, the user role is created along with a home directory in the specified directory.
OS Sentinel Administrator username: The default username is
OS Sentinel Administrator user home directory: The default location is
esecadm
is the username, the home directory of the user is
esecadm
/export/home
/export/home/esecadm
. If
.
To meet stringent security configurations required by the Common Criteria Certification, the
esecadm
user is created without a password. To log in as the
esecadm
user, you must first set a
password.
12 If you chose to install the Sentinel Control Center, the installer prompts for the maximum
memory space to be allocated to the Sentinel Control Center. Specify the maximum JVM heap
size (MB) that you want to allocate only for the Sentinel Control Center.
By default, this is 256 MB. The maximum is1024 MB.
Installing Sentinel 6.1 SP2 45

13 If you select only Collector Manager and do not select Data Access Server (DAS), select the
option for establishing communication between the Sentinel Collector Managers and the
Sentinel Server. You can select Connect to message bus directly or Connect to message bus
using proxy.
For more information on these two options, see Chapter 6, “Communication Layer (iSCALE),”
on page 91.
If you select Connect to message bus using proxy, immediately after the installation is complete
you are prompted for the information that is required to register this Collector Manager as a
trusted client. Before you select this option, ensure that the Communication Server is running.
If the Communication Server is not available, first select Connect to message bus directly and
later manually configure the Proxy type communication by performing Step 5 on page 52.
novdocx (en) 7 January 2010
14 Specify the Communication Server port or host server name information.
The port numbers must be identical on every machine in the Sentinel system to enable
communications. For more information on the port numbers used for Sentinel 6.1, see
Section 3.3, “Port Numbers Used for Sentinel 6.1,” on page 31. Make a note of these ports for
future installations on other systems.
15 Click Next.
46 Sentinel 6.1 Installation Guide

16 If you are installing a component that makes a direct connection to the message bus or if you
are installing the Communication Server, specify how to obtain the shared message bus
encryption key:
All components connecting directly to the message bus must share the same encryption key.
Novell recommends that you generate a random encryption key when you install the
Communication Server and import this key when you install components on other machines.
Components that connect through the proxy do not require the shared message bus encryption
key.
.keystore
The
%ESEC_HOME%\config
file is stored at
on Windows.
$ESEC_HOME/config
on Linux/Solaris or
17 Select the target Database Server platform based on the target database version that you have
installed, then click Next.
If you chose to install DAS and the Sentinel Database components are already installed on a
different system, you are prompted for the following Sentinel Database information. This
information is used to configure DAS to point to the Sentinel Database.
Database hostname or IP address: The name or IP address of the existing Sentinel
Database where events and configuration information are stored.
novdocx (en) 7 January 2010
Database name: The name of the Sentinel Database instance that you want to configure
for the DAS component (the default name is ESEC).
Database port: The default port number. For Microsoft SQL Server, the port number is
1433 and for Oracle it is1521.
Sentinel Application Database User: Specify the login for the Sentinel Application User
esecapp
(
by default) and the password given for this user during Sentinel Database
installation.
18 Click Next.
19 If you chose to install the database component, configure the database for installation:
To configure the database on Windows, continue with Section 3.7.2, “Configuring the
Database on Windows,” on page 48.
To configure the database on Linux or Solaris, continue with Section 3.7.3, “Configuring
the Database on Linux or Solaris,” on page 49
20 Continue with Section 3.7.4, “Completing the Installation,” on page 51.
Installing Sentinel 6.1 SP2 47

3.7.2 Configuring the Database on Windows
1 Complete Step 1 through Step 18 in Section 3.7.1, “Starting the Installation,” on page 43.
2 Select Microsoft SQL Server 2005 or Microsoft SQL Server 2008 as the target database server
platform, then select one of the following options:
Create a new database with database objects: Creates a new Microsoft SQL database
and populates the new database with database objects.
Add database objects to an existing empty database: Adds the database objects to an
existing Microsoft SQL Server 2005 database. The existing database must be empty.
3 Specify the Database Install log directory.
4 Click Next.
5 If you are creating a new database, specify the existing directories to use as storage for:
Data Directory
Index Directory
Summary Data Directory
Summary Index Directory
Log Directory
novdocx (en) 7 January 2010
Continue with Step 7.
6 If you chose to add database objects to an existing empty database, continue with Section 3.7.4,
“Completing the Installation,” on page 51.
7 Click Next.
8 Select the database character set support option and click OK.
If the installer is running in an Asian language, the Unicode database option is set by default. If
the installer is running in a non-Asian language, the system prompts you to select from either
ASCII only or Unicode.
The Unicode database installation requires more hard disk space than the ASCII only database
installation.
48 Sentinel 6.1 Installation Guide

9 Select a database size option. If you selected a Custom database size, specify custom database
size settings:
Maximum Database Size: The maximum amount of disk space the database occupies.
The database automatically increases up to this size as it accumulates data. Regardless of
the value specified here, the initial size of the database is 1000 MB.
Log File Size: The size of the transaction log file.
Maximum Database File Size: No single database file grows beyond this size.
10 Click Next.
11 Continue with Section 3.7.4, “Completing the Installation,” on page 51.
3.7.3 Configuring the Database on Linux or Solaris
1 Complete Step 1 through Step 18 in Section 3.7.1, “Starting the Installation,” on page 43.
2 Select the target Oracle database server version, then select whether to use a new database or an
existing database.
Create a new database with database objects: Creates a new Oracle database instance
and populates the new database with database objects.
Add database objects to an existing empty database: Adds database objects to an
existing Oracle database instance. The existing database must be empty except for the
esecdba user.
3 Specify the Database Install log directory.
4 Click Next.
novdocx (en) 7 January 2010
5 Specify the Oracle user name or accept the default user name, then click OK.
6 If you chose to create a new database, specify the following:
The path for Oracle JDBC driver file: Specify the path to the jar file (do not use
environment variables in this field.)
Hostname: The hostname of the local machine, where the Oracle database is installed.
The installer only supports creating a new database instance on the local host.
Database Name: The name of the database instance to create.
Continue with Step 8.
7 If you chose to add database objects to an existing empty Oracle database or perform a remote
installation, specify the following information:
The path for Oracle JDBC driver file: Specify the path to the jar file (do not use
environment variables in this field.)
Database hostname or IP address: The hostname or IP address of the machine where
the Oracle database is installed. This can be the local hostname or a remote hostname.
Database name: The name of the existing empty Oracle database instance (the default
name is ESEC). This database name must display as a service name in the
file (in the directory
$ORACLE_HOME/network/admin/
) on the system from which you
tnsnames.ora
are running the installation.
Database port: The default database port is 1521.
Password: For Sentinel Database Administrator User (DBA), specify the password for
the
esecdba
user. The Username field in this prompt is not editable.
Installing Sentinel 6.1 SP2 49

novdocx (en) 7 January 2010
IMPORTANT: If the database name is not in the
tnsnames.ora
file, the installer does not
give an error at this point in the installation (because it verifies the connection using a direct
JDBC connection), but the database installation fails when the database installer tries to
connect to the database through SQL Plus. If the Database installation fails at that point, do not
exit the installer. Modify the Service Name for this database in the
tnsnames.ora
file on that
machine, then go back in the installer one screen and then forward again. This retries the
Database installation with the new values in the
The installer takes a back up of the existing
$ORACLE_HOME/network/admin
directory. It overwrites the
tnsnames.ora
tnsnames.ora
file.
and
listener.ora
listener.ora
files in the
file with Sentinel
database connection information, and appends Sentinel database connection information to the
tnsnames.ora
the administrator must manually merge information from the backed-up
file. If you have other databases on the same server as the Sentinel database,
listener.ora
files
into the new file and restart the Oracle listener in order for other applications to continue to
connect to the database.
Continue with Section 3.7.4, “Completing the Installation,” on page 51.
8 Specify the Oracle memory (RAM) allocation and listener port or accept the default values.
9 Specify the passwords to set for the default
SYS
and
SYSTEM
database users, then click Next.
10 Select a database size option. If you selected to use a custom database size, specify the custom
database size settings:
Maximum Database Size: The maximum amount of disk space the database occupies.
The database automatically increases to this size as it accumulates data. Regardless of the
value specified here, the initial size of the database is 5000 MB.
Log File Size: The size of each redo log file
Maximum Database File Size: No single database file grows beyond this size.
11 Click Next.
12 Specify the existing directories to use for database storage:
Data Directory
Index Directory
Summary Data Directory
Summary Index Directory
Temp and Undo Directory
50 Sentinel 6.1 Installation Guide

Redo Log Member A Directory
Redo Log Member B Directory
13 Click Next.
IMPORTANT: For recovery and performance purposes, Novell recommends that these
locations be on different I/O devices.
For performance reasons, the Redo Log should point to the fastest write disk you have
available.
The installer does not create these directories, so they must be created externally before
continuing beyond this step, and they must be writable by the oracle user. For more
information, see Section 3.4.2, “Sentinel Database Installation Prerequisites,” on page 33.
14 Continue with Completing the Installation.
3.7.4 Completing the Installation
After you have configured the database, perform the following steps to complete the installation.
novdocx (en) 7 January 2010
1 If you chose to install the database component, configure the database partitions:
1a Select Enable automatic partition management to allow Sentinel Data Manager to handle
database partitioning and archiving.
1b For data partitions, specify an existing directory for archive files.
1c Specify start time for adding partitions and archiving data. These operations should not
overlap because they use shared resources.
1d Click Next.
1e Provide authentication information for the following:
Sentinel Database Administrator User
Sentinel Application Database User
Sentinel Administrator User
Sentinel Report User (only on Windows)
NOTE: If the DAS component is also being installed, the Sentinel Application Database
User password is required even if Windows authentication is selected. This is required to
install the Sentinel Service to log in as the Sentinel Application Database User. No other
users require a password to be specified if you are using Windows authentication.
On a Windows Server 2008 platform with MS SQL Server 2008 database, the Sentinel
installation fails if you enter a weak password that does not meet Windows policy
requirements.
1f Click Next.
2 A summary of the specified Database parameters displays. Click Next.
3 If you chose to install any of the Sentinel Server components, specify the amount of memory
(RAM) to allocate to these components.
Installing Sentinel 6.1 SP2 51

The installer factors in operating system and database overhead when determining what
allocation options to display. There are two ways to specify memory allocation:
Automatic Memory Configuration: Select the total amount of memory to allocate to
Sentinel Server. The installer automatically determines the optimal distribution of memory
across components taking into account the estimated operating system and database
overhead.
novdocx (en) 7 January 2010
IMPORTANT: You can modify the-Xmx value in
the RAM allocated to Sentinel Server processes. The
at
$ESEC_HOME/config
Custom Memory Configuration: Click the Configure button to allocate memory for
on Linux/Solaris or
configuration.xml
configuration.xml
%ESEC_HOME%\config
file to change
file is placed
on Windows.
specific components. This option is only available if there is sufficient memory on the
machine.
4 Click Next, verify the selected features for installation, then click Install.
5 If Collector Manager was selected to be installed and it was configured to use Proxy type
communication, you are prompted for username and password of a Sentinel user that has the
permission to register to a trusted client (For example, esecadm).
To complete this step, the Communication Server must be running and a valid username and
password must be specified.
5a Accept the Communication Server SSL certificate and upload the Collector Manager SSL
certificate to the Communication Server.
When the connection with the Communication Server is initiated, you are prompted to
accept the server certificate.
5b Review the certificate attributes, then select Accept Permanently.
The installer automatically uploads the Collector Manager certificate to the
Communication Server.
6 After installation, you are prompted to reboot or to log in again and start Sentinel services
manually. Click Finish to reboot the system.
NOTE: The Sentinel installer, by default, turns off archive logging. For database recovery
purposes, it is highly recommended that you enable archive logging after you install and before
you begin to receive your production event data. You should also schedule backups for your
archive logs to free up space in your archive log destination, or your database might stop
accepting events.
3.7.5 Console Installation on Linux or Solaris
If you are using console mode, the installer’s component selection page does not display all of the
components together. Follow the on-screen instructions to view and edit the selected child
components.
The following is an example of how to navigate the console mode component selection page:
52 Sentinel 6.1 Installation Guide

Sentinel 6.1 - InstallShield Wizard
Select the features for "Sentinel 6.1" you would like to install:
Sentinel 6.1
To select/deselect a feature or to view its children, type its number:
1. [ ] Database
2. +[x] Sentinel Services
3. +[x] Applications
Other options:
0. Continue installing
Enter command [0] 1
Select the features for "Sentinel 6.1" you would like to install:
Sentinel 6.1
novdocx (en) 7 January 2010
To select/deselect a feature or to view its children, type its number:
1. [x] Database
2. +[x] Sentinel Services
3. +[x] Applications
Other options:
0. Continue installing
Enter command [0] 2
1. Deselect 'Sentinel Services'
2. View 'Sentinel Services' subfeatures
Enter command [1] 2
Select the features for "Sentinel 6.1" you would like to install:
Sentinel 6.1
- Sentinel Services
To select/deselect a feature or to view its children, type its number:
1. [ ] Communication Server
2. [x] Correlation Engine
3. [x] Data Access Server
4. [x] Sentinel Collector Service
Other options:
-1. View this feature's parent
0. Continue installing
Enter command [0] 1
Select the features for "Sentinel 6.1" you would like to install:
Installing Sentinel 6.1 SP2 53

Sentinel 6.1
- Sentinel Services
To select/deselect a feature or to view its children, type its number:
1. [x] Communication Server
2. [x] Correlation Engine
3. [x] Data Access Server
4. [x] Sentinel Collector Service
Other options:
-1. View this feature's parent
0. Continue installing
Enter command [0] 2
Select the features for "Sentinel 6.1" you would like to install:
Sentinel 6.1
- Sentinel Services
novdocx (en) 7 January 2010
To select/deselect a feature or to view its children, type its number:
1. [x] Communication Server
2. [x] Correlation Engine
3. [x] Data Access Server
4. [x] Sentinel Collector Service
Other options:
-1. View this feature's parent
0. Continue installing
3.8 Installing Sentinel as a Domain user
1 Map a domain user to any of the Sentinel users (
2 Perform the actions in Section 3.4.1, “Providing Power User Privileges to Domain Users,” on
page 33 to provide power user privileges.
3 Install Sentinel 6.1 as an administrator user. See Section 3.7, “Custom Installation,” on page 42
to install Sentinel.
4 When the installer prompts for esecdba, esecadm, and esecrpt user credentials, specify the
created domain user in domain\domain user format, provide the password, and continue
installation.
esecdba, esecadm, esecrpt
).
3.9 Post-Installation Configuration
Section 3.9.1, “Configuring the SMTP Integrator to Send Sentinel Notifications,” on page 55
Section 3.9.2, “Sentinel Database,” on page 55
Section 3.9.3, “Collector Service,” on page 56
Section 3.9.4, “Starting the Collector Manager Service,” on page 56
54 Sentinel 6.1 Installation Guide

Section 3.9.5, “Configuring the Light weight Collector Manager,” on page 56
Section 3.9.6, “Managing Time,” on page 59
Section 3.9.7, “Modifying Oracle dbstart and dbshut scripts,” on page 59
Section 3.9.8, “High-Performance Configuration,” on page 60
3.9.1 Configuring the SMTP Integrator to Send Sentinel Notifications
In Sentinel 6.1, a JavaScript SendEmail action works with an SMTP integrator to send e-mail
messages from various contexts within the Sentinel interface to e-mail recipients. The recipients of
the e-mail message and the message contents are configured in the action parameters.
A single action instance of the SendEmail action plug-in is created automatically in every Sentinel
installation. This action is used internally by Sentinel to send e-mail in the following situations:
When a Correlation rule that is deployed with a Send Email action is triggered. The Send Email
action referred to here is the action indicated by the gear icon, which is only valid for
correlation (as opposed to the JavaScript SendEmail action, which is indicated by the JS
JavaScript icon).
If the workflow includes a Mail Step or Activity that is configured to send e-mail.
novdocx (en) 7 January 2010
If the user opens an incident and selects to execute an Activity that is configured to send e-mail.
If the user right-clicks an event and selects Email.
If the user opens an incident and selects Email Incident.
No configuration is necessary for the SendEmail action, but the SMTP Integrator must be
configured with valid connection information before it works.
3.9.2 Sentinel Database
Unless the DBA wants to manage database archiving using his or her own procedures, Sentinel
database automatic partition management (archiving, dropping, and adding partitions) should be
enabled during installation to keep event data within a controlled size. Automatic partition
management can also be configured post-installation by using the Sentinel Data Manager (SDM).
By default, the Sentinel Data Manager might not be able to write to the file system in order to
archive data. This can be enabled by editing the
init<OracleSID>.ora
NOTE: By default, the installer sets all tablespaces to autogrow. By default, the file grow size is 200
MB, but the maximum file size depends on the value provided during the installation.
To enable Oracle to write to the archive directory:
1 Log in to the database machine.
file for the database.
2 Navigate to the
3 Open the init
4 Edit the
<OracleSID>.ora
UTL_FILE_DIR
$ORACLE_HOME/dbs
parameter to specify the directory path to which the archived Sentinel
directory.
file in a text editor.
data should be written. You should have one of the following:
UTL_FILE_DIR = *
Installing Sentinel 6.1 SP2 55

or
UTL_FILE_DIR = [specific directory path]
5 Save the file and exit.
3.9.3 Collector Service
During the installation of the Collector Service, a Collector called the General Collector is
configured. By default, it creates events at a rate of 5 events per second (eps). This Collector can be
used to test the installation. Additional Collectors can be downloaded from the Novell Web site
(http://support.novell.com/products/sentinel/collectors.html).
3.9.4 Starting the Collector Manager Service
1 Start Sentinel 6.1.
2 Click Admin > Servers View.
You can also click Servers View in the Navigator pane.
3 Expand the Servers view.
novdocx (en) 7 January 2010
The list of processes is displayed.
4 Right-click the Collector Manager that you want to start, then select Actions > Start.
Alternatively, click Event Source Management > Live View. Right-click the Collector Manager that
you want to start, then select Start.
3.9.5 Configuring the Light weight Collector Manager
The EventRouter component of the Collector Manager handles internal functions such as processing
maps and applying global filters on the events parsed by the Collector Manager. These processes can
cause high CPU and RAM usage on a remote system.
With Sentinel 6.1 SP1 Hotfix 2 and later, you can configure a lightweight version of the Collector
Manager on remote systems that have limited CPU and RAM. The internal functions of a
Lightweight Collector Manager (LWCM) are handled by the Sentinel server (or whichever system is
running DAS), so they consume less CPU and RAM on the remote system.
The EventRouter must be configured to operate in server and client modes on the DAS system and
Collector Manager system. The Collector Manager system on which the EventRouter is configured
to run in the client mode is referred to as the LWCM.
“Configuring the LWCM on the DAS Machine” on page 56
“Configuring the LWCM on the Collector Manager Machine” on page 58
Configuring the LWCM on the DAS Machine
The EventRouter must be configured to run in the server mode. This enables the DAS Query
container to provide centralized event routing for multiple LWCMs.
The
das_query.xml
EventRouter. By default, the EventRouter section is commented in the
56 Sentinel 6.1 Installation Guide
file under the
<ESEC_HOME>/config
folder contains a preconfigured
das_query.xml
file.

Perform the following steps to configure the EventRouter for server mode:
novdocx (en) 7 January 2010
1 Open the
Windows:
Linux:
das_query.xml
%ESEC_HOME%\config\das_query.xml
$ESEC_HOME/config/das_query.xml
file for edit.
2 Comment the following section:
<obj-component id="EventRouter">
<class>esecurity.ccs.comp.router.EventRouter</class>
<property name="esecurity.router.mode">standalone</property>
<property name="esecurity.router.disable.compression">true</property>
- <obj-component-ref>
<name>DispatchManager</name>
<ref-id>DispatchManager</ref-id>
</obj-component-ref>
- <obj-component-ref>
<name>EventPublisher</name>
<ref-id>DispatchManager</ref-id>
</obj-component-ref>
</obj-component>
3 Uncomment the following section:
Installing Sentinel 6.1 SP2 57

<!- <obj-component id="DispatchManagerEvents">
<class>esecurity.ccs.comp.dispatcher.CommDispatcherManager</
class>
<property name="esecurity.communication.service">Sentinel</
property>
<property
name="EventPublisher.performanceEventChannel">ewizard_binary_event</
property>
</obj-component>
<obj-component id="EventRouterServer">
<class>esecurity.ccs.comp.dispatcher.CommDispatcherManager</
class>
<property name="esecurity.communication.service">Sentinel</
property>
</obj-component>
<obj-component id="EventRouter">
<class>esecurity.ccs.comp.router.EventRouter</class>
<property name="esecurity.router.mode">server</property>
<property name="esecurity.router.disable.compression">true</
property>
<obj-component-ref>
<name>DispatchManager</name>
<ref-id>DispatchManager</ref-id>
</obj-component-ref>
<obj-component-ref>
<name>EventPublisher</name>
<ref-id>DispatchManagerEvents</ref-id>
</obj-component-ref>
<obj-component-ref>
<name>EventRouterServer</name>
<ref-id>EventRouterServer</ref-id>
</obj-component-ref>
</obj-component>
-->
4 Restart the Sentinel services.
novdocx (en) 7 January 2010
NOTE: To return the EventRouter to standalone mode, comment the EventRouter section in the
das_query.xml
file and restart the Sentinel services.
Configuring the LWCM on the Collector Manager Machine
To switch the EventRouter from standalone mode to client mode, rename the default
collector_mgr.xml
1 Change the
2 Change the
collector_mgr.xml
collector_mgr_lwcm.xml
3 Restart the Collector Manager services.
NOTE: To return the EventRouter to standalone mode, change the filenames to the original names
and restart the Collector Manager services.
58 Sentinel 6.1 Installation Guide
file, which is in the
filename to
ESEC_HOME/config
collector_mgr_standalone.xml
filename to
collector_mgr.xml
folder.
.
.

3.9.6 Managing Time
Novell strongly recommends that all Sentinel components, particularly the Correlation Engine and
Collector Manager machines, be connected to an NTP (Network Time Protocol) server or other type
of time server. If the system time across machines is not synchronized, the Sentinel Correlation
Engine and Active Views do not work properly. The events from the Collector Managers are not
considered to be real-time and are therefore sent directly to the Sentinel database, bypassing the
Sentinel Control Centers and Correlation Engines.
By default, the threshold for real-time data is 120 seconds. This can be modified by changing the
value of
esecurity.router.event.realtime.expiration
in the
event-router.properties
file. The Sentinel event time populates based on the Trust Device Time or the Collector Manager
Time. You can select the Trust Device Time while configuring a collector. The Trust Device Time is
the time when the log was generated by the device and the Collector Manager Time is the local
system time of the Collector Manager system.
3.9.7 Modifying Oracle dbstart and dbshut scripts
novdocx (en) 7 January 2010
Sentinel cannot start the Oracle 10 database because of errors in the Oracle
dbstart
and
dbshut
scripts. For details on the script errors, see Oracle Support (https://metalink.oracle.com) for the error
numbers 336299.1 with the subject “dbstart errors out when executing in 10.2.0.1.0”, 5183726 and
4665320.
After the installation of Sentinel 6.1, you need to modify the
dbstart
and
dbshut
scripts for
Sentinel to start an Oracle 10 database.
To modify the dbstart and dbshut scripts on Solaris 10:
1 In a text editor, open the
dbstart
2 Go to line 78 and replace the line with
3 Add
#!/bin/bash
at the start to request the bash shell.
4 Ensure that ORATAB is pointing to
script from
ORACLE_HOME_LISTNER=$ORACLE_HOME
ORATAB=/var/opt/oracle/oratab
$ORACLE_HOME/bin/dbstart
.
.
.
If ORATAB is not in this location on your system, modify the ORATAB path manually to the
correct location.
5 Click Save.
6 In a text editor, open the
dbshut
7 Ensure that ORATAB is pointing to
script from
ORATAB=/var/opt/oracle/oratab
$ORACLE_HOME/bin/dbshut
.
.
If ORATAB is not in this location on your system, modify the ORATAB path manually to the
correct location.
8 Click Save.
To modify the dbstart script on Red Hat Linux ES4:
1 In a text editor, open
2 Ensure that ORATAB is pointing to
dbstart
script from
$ORACLE_HOME/bin/dbstart
ORATAB=/etc/oratab
.
.
If ORATAB is not in this location on your system, modify the ORATAB path manually to the
correct location.
3 Click Save.
Installing Sentinel 6.1 SP2 59

novdocx (en) 7 January 2010
4 Open the
5 Ensure that ORATAB pointing is to
dbshut
script for edit from
$ORACLE_HOME/bin/dbshut
ORATAB=/etc/oratab
.
.
NOTE: If ORATAB is not in the above specified location on your system, modify the
ORATAB path manually to the exact location.
6 Click Save.
After Sentinel is installed, you must install the Crystal Reporting server and the Sentinel Core
Solution Pack.
DAS and the Sentinel Database are typically located in a secure area of your network.
However, you might want to add another security layer to protect the data being transmitted
from DAS to the database. For Oracle, the DBA can use the Advanced Security feature. For
SQL Server, the DBA can enable the SSL functionality in the jTDS driver. For more
information, go to jTDS FAQ (http://jtds.sourceforge.net/faq.html) and search for "ssl".
3.9.8 High-Performance Configuration
There are several recommendations for configuring a high-performance Sentinel system.
The Sentinel Server machine with Data Access Server (DAS) must have a local or shared
striped disk array (RAID) with a minimum of four disk spindles because of high event loads
and local caching.
The distributed hosts must be connected to the other Sentinel Server hosts through a single
high-speed switch (GigE) in order to prevent network traffic bottlenecks.
The Crystal Reports Server should be installed on its own dedicated machine, particularly if the
database is large or reporting usage is heavy.
To achieve optimal performance on systems using an Oracle database, the Oracle database uses
a StorCase Disk Array (16 disks) to store data files and a separate local SATA drive to hold the
Oracle Redo log.
To achieve optimal performance on the Sentinel server, the file directory that holds DAS
aggregation data and
insertErrorBuffer
can be pointed to a separate local SATA hard drive.
To change the file directory for aggregation and buffers:
NOTE: The esecadm user or the user running the Sentinel services must have write permission to
the file directory that holds the DAS aggregation data and insertErrorBuffer.
1 On the Sentinel server (DAS installed machine), open the
On Windows:
On Linux:
2 Change the
%ESEC_HOME%\config\das_binary.xml
$ESEC_HOME/config/das_binary.xml
rootDirectory
value in the following component:
das_binary.xml
file for editing.
60 Sentinel 6.1 Installation Guide

<obj-component id="EventInsertErrorHandler">
<class>esecurity.ccs.comp.event.EventInsertErrorHandlerService</class>
<property
name="cacheImpl">esecurity.ccs.comp.event.SmallFileMultiDirectoryEventMes
sageCache</property>
<property name="rootDirectory">../data/events/insertErrorBuffer</
property>
<property name="reportInterval">300</property>
<property name="takeDelaySec">60</property>
<property name="eventTimeoutSec">28800</property>
<property name="onlineCapacity">1000</property>
<property name="capacity">5368709120</property>
</obj-component>
3 In the same file, change the
<obj-component id="EventProcessingErrorHandler">
<class>esecurity.ccs.comp.event.EventInsertErrorHandlerService</class>
<property
name="cacheImpl">esecurity.ccs.comp.event.SmallFileMultiDirectoryEventMes
sageCache</property>
<property name="rootDirectory">../data/events/insertErrorBuffer</
property>
<property name="reportInterval">300</property>
<property name="takeDelaySec">60</property>
<property name="eventTimeoutSec">28800</property>
rootDirectory
value of the following component:
novdocx (en) 7 January 2010
<property name="onlineCapacity">1000</property>
<property name="capacity">5368709120</property>
</obj-component>
4 Change the
<obj-component id="EventFileRedirectService">
<class>esecurity.ccs.comp.event.redirect.EventFileRedirectService</
class>
<property name="status">on</property>
<property name="handler">esecurity.event.fileredirect</property>
<property name="directory">../data/events/aggregation</property>
<property name="outputDirectory">../data/events/aggregation/done</
property>
<property name="filePrefix">events</property>
<property name="fileSuffix">dat</property>
<property name="maxFileSize">500000000</property>
<property name="maxFileTime">1800</property>
<property name="notificationChannel">event_file_redirect</property>
<obj-component-ref>
<name>Publisher</name>
<ref-id>DispatchManager</ref-id>
</obj-component-ref>
</obj-component>
5 Save the
6 On the Sentinel server (DAS installed machine), open the
config
directory
das_binary.xml
and
outputDirectory
file and exit.
directory file for editing.
values of the following component:
das_aggregation.xml
in the
7 Change the
EventFileRedirectService
directory
value in the following component to match the
component in the
das_binary.xml
directory
value in the
file.
Installing Sentinel 6.1 SP2 61

<obj-component id="EventAggregationService">
<class>esecurity.ccs.comp.event.transformer.EventAggregationService</
class>
<property name="directory">c:\test\Aggregation\done</property>
<property name="reporterChannel">event_aggregation_status</property>
<property name="updateBatchSize">200</property>
<property name="updateDB">enabled</property>
<property name="nullHashValid">false</property>
<property name="maxNumberEntries">30000</property>
<property name="maxEntrySize">50</property>
<property name="startOffsetInDays">7</property>
<property name="deleteProcessedFiles">true</property>
<obj-component-ref>
<name>Publisher</name>
<ref-id>DispatchManager</ref-id>
</obj-component-ref>
</obj-component>
8 Save the
das_aggregation.xml
file and exit.
9 Restart the Sentinel server for the changes to take effect.
novdocx (en) 7 January 2010
3.10 LDAP Authentication
You can enable users to login to Sentinel using their Novell eDirectory™ or Microsoft Active
Directory credentials by configuring a Sentinel 6.1 server for LDAP authentication.
Section 3.10.1, “Configuring the Sentinel 6.1 Server for LDAP Authentication,” on page 62
Section 3.10.2, “Configuring Multiple LDAP Servers for Failover,” on page 66
Section 3.10.3, “Migrating LDAP User Accounts from Sentinel 6.1 SP1 Hotfix 2 to Sentinel
6.1 SP2,” on page 68
3.10.1 Configuring the Sentinel 6.1 Server for LDAP Authentication
1 Export the self-signed certificate of the Certificate Authority (CA) for the eDirectory/Active
Directory server to a Base64-encoded file.
eDirectory: For more information on exporting an eDirectory CA certificate, see Exporting an
Organizational CA's Self-Signed Certificate (http://www.novell.com/documentation/edir88/
edir88/?page=/documentation/edir88/edir88/data/a7elxuq.html).
To export an eDirectory CA certificate to iManager, the Novell Certificate Server
for iManager must be installed. For more information on installing an iManager plug-in, see
Downloading and Installing Plug-in Modules (http://www.novell.com/documentation/
imanager27/imanager_admin_273/?page=/documentation/imanager27/imanager_admin_273/
data/hk42s9ot.html).
TM
plug-ins
Active Directory: For more information on exporting an Active Directory CA certificate, see
How to enable LDAP over SSL with a third-party certification authority (http://
support.microsoft.com/kb/321051).
2 Log in to the Sentinel 6.1 server as
3 Copy the certificate file to the following directory on the Sentinel 6.1 server:
Windows:
62 Sentinel 6.1 Installation Guide
root
%ESEC_HOME%\config
user.

novdocx (en) 7 January 2010
Linux/Solaris:
$ESEC_HOME/config
4 Set the ownership and permissions of the certificate file as follows:
Windows: Not applicable
Linux/Solaris: Run the following commands:
chown esecadm:esec
chmod 700 <Install_Directory>/config/<cert-file>
5 Switch to
esecadm
user:
<Install_Directory>/config/<cert-file>
Windows: Not applicable
Linux/Solaris: Run the following command:
su - esecadm
6 Change to the following directory:
Windows:
Linux/Solaris:
%ESEC_HOME%\bin
$ESEC_HOME/bin
7 Run the LDAP authentication configuration script:
Windows:
Linux/Solaris:
The script takes a back up of the
config
the
ldap_auth_config.bat
./ldap_auth_config.sh
directory as
auth.login.sav
auth.login
and
and
configuration.xml
configuration.xml.sav
configuration files in
before modifying
them for LDAP authentication.
8 Specify the following information:
Press Enter to accept the default value suggested in the brackets [ ] or specify a new value to
override the default value.
Parameter Description/Action
Sentinel install location The installation directory on the Sentinel 6.1 server. The
default location is:
Windows:
Linux/Solaris:
LDAP server hostname or IP address The hostname or the IP address of the machine where
the LDAP server is installed. The default value is
localhost. However, it is not recommended to install the
LDAP server on the same machine as the Sentinel 6.1
server.
LDAP server port The port number for a secure LDAP connection. The
default port number is 636.
%ESEC_HOME%
$ESEC_HOME
Installing Sentinel 6.1 SP2 63

Parameter Description/Action
novdocx (en) 7 January 2010
Anonymous searches on LDAP
directory
Specify y to perform anonymous searches on the LDAP
directory to fetch the LDAP user DN for authentication
n
based on Sentinel username. Otherwise, specify
default value is y.
You can search the LDAP directory anonymously to fetch
the LDAP user DN based on the Sentinel LDAP
username to perform LDAP authentication, by using an
LDAP connection that does not use a username or
password. For more information on anonymous
searches, see Section 5 “Anonymous authentication”
(http://www.ietf.org/rfc/rfc2829.txt).
For Active Directory, if you specify y, the ANONYMOUS
LOGON user object must be given appropriate list
permission and read access to
objectclass
Configuring Active Directory to Allow Anonymous
Queries (http://support.microsoft.com/kb/320528).
For Windows Server 2003, you must perform additional
configuration. For more information, see Configuring
Active Directory on Windows Server 2003 (http://
support.microsoft.com/kb/326690/en-us).
If you specify n, complete the LDAP configuration and
perform the steps mentioned in the section “LDAP
Authentication Without Performing Anonymous
Searches” on page 65.
attributes. For more information, see
sAMAccountName
. The
and
LDAP Directory used
This parameter is displayed only if you
have specified ‘y’ for anonymous
searches.
LDAP subtree to search for users
This parameter is displayed only if you
have specified ‘y’ for anonymous
searches.
Specify 1 for Novell eDirectory or 2 for Active Directory.
The default value is 1.
The subtree in the directory that has the user objects.
The following are examples for specifying the subtree in
eDirectory and Active Directory:
eDirectory:
ou=users,o=novell
NOTE: For eDirectory, if no subtree is specified,
then the search is run on the entire directory.
Active Directory:
CN=users,DC=TESTAD,DC=provo,
DC=novell,DC=com
NOTE: For Active Directory, the subtree cannot be
blank.
Filename of the LDAP server certificate The filename of the eDirectory/Active Directory CA
certificate that you have copied in Step 3.
64 Sentinel 6.1 Installation Guide

9 Enter one of the following:
y
: to accept the entered values
n
: to enter new values
q
: to quit the configuration
On successful configuration:
The LDAP server certificate is added to a keystore named
.
directory are updated to enable LDAP authentication.
The
10 Enter
config/ldap_server.keystore
auth.login
<Install_Directory>/config
y
to restart the Sentinel service.
and
configuration.xml
<Install_Directory>/
configuration files in the
novdocx (en) 7 January 2010
IMPORTANT: If there are any errors, revert the changes made to the
configuration.xml
cp -p auth.login.sav auth.login
cp -p configuration.xml.sav configuration.xml
configuration files in the
config
directory:
auth.login
and
LDAP Authentication Without Performing Anonymous Searches
1 Ensure that you have performed Step 1 through Step 10 in section “Configuring the Sentinel
n
6.1 Server for LDAP Authentication” on page 62, and you specified
for Anonymous searches
on LDAP directory.
2 Specify the LDAP user DN that is used for non anonymous LDAP authentication, while
creating the LDAP user account in Sentinel Control Center. For more information, see
“Creating an LDAP User Account for Sentinel” in the Sentinel 6.1 User Guide.
Alternatively, for Active Directory, you can perform LDAP authentication without anonymous
searches by using the
userPrinicipalName
attribute:
1 Ensure that you have performed Step 1 through Step 10 in section “Configuring the Sentinel
n
6.1 Server for LDAP Authentication” on page 62, and you specified
for Anonymous searches
on LDAP directory.
2 Ensure that the
userPrinicipalName
attribute is set to <sAMAccountName@domain> for the
Active Directory user.
For more information, see User-Principal-Name Attribute (http://msdn.microsoft.com/en-us/
library/ms680857(VS.85).aspx).
3 On the Sentinel server, edit the
auth.login
LdapLogin {
com.sun.security.auth.module.LdapLoginModule required
userProvider="ldap://LDAP server IP:636/DN of the Container that
contains the user objects"
authIdentity="{USERNAME}@Domain Name"
userFilter="(&(sAMAccountName={USERNAME})(objectclass=user))"
useSSL=true;
};
file:
LdapLogin
section in the
<Install Directory>/config/
For example:
Installing Sentinel 6.1 SP2 65

LdapLogin {
com.sun.security.auth.module.LdapLoginModule required
userProvider="ldap://137.65.151.12:636/DC=Test-
AD,DC=provo,DC=novell,DC=com"
authIdentity="{USERNAME}@Test-AD.provo.novell.com"
userFilter="(&(sAMAccountName={USERNAME})(objectclass=user))"
useSSL=true;
};
4 Restart the Sentinel service:
/etc/init.d/sentinel stop
/etc/init.d/sentinel start
You have successfully configured the Sentinel 6.1 server for LDAP authentication, and now you can
create Sentinel LDAP user accounts in the Sentinel Control Center. For more information on
creating LDAP user accounts, see “Creating an LDAP User Account for Sentinel” in the Sentinel 6.1
User Guide.
novdocx (en) 7 January 2010
NOTE: To modify an existing LDAP configuration, run the
ldap_auth_config
script again and
specify the new values for the parameters.
3.10.2 Configuring Multiple LDAP Servers for Failover
You can configure multiple LDAP servers for failover only on Windows and Linux platforms.
To configure one or more LDAP servers as failover servers for LDAP authentication:
1 Log in to the Sentinel server as
2 Stop the Sentinel service.
/etc/init.d/sentinel stop
3 Change to the
cd <Install_Directory>/config
4 Open the
vi auth.login
5 Update the
<Install_Directory>/config
auth.login
userProvider
file for editing.
each URL by a blank space.
For example:
userProvider="ldap://ldap-url1 ldap://ldap-url2"
esecadm
.
directory:
in the LdapLogin section to specify multiple LDAP URLs. Separate
NOTE: For Active Directory, ensure that the subtree in the LDAP URL is not blank.
For more information on specifying multiple LDAP URLs, see the description of the
userProvider
option in Class LdapLogin Module (http://java.sun.com/javase/6/docs/jre/api/
security/jaas/spec/com/sun/security/auth/module/LdapLoginModule.html).
6 Save the changes.
7 Export the certificate of each failover LDAP server and copy the certificate file to the
<Install_Directory>/config
For more information, see Step 1 in section “Configuring the Sentinel 6.1 Server for LDAP
Authentication” on page 62.
66 Sentinel 6.1 Installation Guide
directory on the Sentinel 6.1 server.

8 Ensure that you set the necessary ownership and permissions of the certificate file for each
failover LDAP sever.
Windows: Not applicable.
Linux/Solaris: Run the following commands:
chown esecadm:esec <Install_Directory>/config/<cert-file>
chmod 700 <Install_Directory>/config/<cert-file>
9 Add each failover LDAP server certificate to the keystore ldap_server.keystore that is created
in Step 9 in section “Configuring the Sentinel 6.1 Server for LDAP Authentication” on
page 62.
Windows:
"%ESEC_HOME%\jre64\bin\keytool.exe" -importcert -noprompt -trustcacerts file <certificate-file> -alias <alias_name> -keystore ldap_server.keystore
-storepass sentinel
Linux/Solaris:
$ESEC_HOME/jre64/bin/keytool -importcert -noprompt -trustcacerts -file
<certificate-file> -alias <alias_name> -keystore ldap_server.keystore storepass sentinel
where
<certificate-file>
<alias_name>
is the alias name for the certificate to be imported.
is the LDAP certificate filename in Base64-encoded format and
novdocx (en) 7 January 2010
IMPORTANT: Ensure that you specify the alias. If no alias is specified, the keytool takes
mykey
as the alias by default. When you import multiple certificates into the keystore without
specifying an alias, the keytool reports an error that the alias already exists.
10 Start the Sentinel service.
/etc/init.d/sentinel start
Additional Configuration for Linux Platform
In Linux, the Sentinel 6.1 server times out before it finds that the primary LDAP server is down, and
hence does not connect to the failover LDAP server. To ensure that the Sentinel 6.1 server connects
to the failover LDAP server without timing out, perform the following steps:
root
1 Log in to the Sentinel 6.1 server as
2 Open the
vi /etc/sysctl.conf
sysct1.conf
file for editing:
user.
3 Ensure that the net.ipv4.tcp_syn_retries value is set to 3. If the entry does not exist, add the
entry. Save the file:
net.ipv4.tcp_syn_retries = 3
4 Execute the following commands for the changes to take effect:
/sbin/sysctl -p
/sbin/sysctl -w net.ipv4.route.flush=1
5 Set the Sentinel 6.1 server time out value by adding the
parameter in
control_center.sh
and
solution_designer.sh
-Desecurity.remote.timeout=60
in the
$ESEC_HOME/bin
directory:
control_center.sh:
Installing Sentinel 6.1 SP2 67

"$ESEC_HOME/jre/bin/java" $MEMORY Dcom.esecurity.configurationfile=$ESEC_CONF_FILE Desecurity.cache.directory="$ESEC_HOME/data/control_center.cache" Desecurity.communication.service="sentinel_client" -Dfile.encoding=UTF8 Desecurity.dataobjects.config.file="/xml/BaseMetaData.xml,/xml/
WorkflowMetaData.xml,/xml/ActMetaData.xml" Djava.util.logging.config.file="$ESEC_HOME/config/
control_center_log.prop" -Djava.security.auth.login.config="$ESEC_HOME/
config/auth.login" $SENTINEL_LANG_PROP $SENTINEL_CTRY_PROP Dice.pilots.html4.baseFontFamily="Arial Unicode MS" Desecurity.remote.timeout=60 -jar ../lib/console.jar
solution_designer.sh:
"$ESEC_HOME/jre/bin/java" -classpath $LOCAL_CLASSPATH $MEMORY Dcom.esecurity.configurationfile="$ESEC_CONF_FILE" Dsentinel.installer.jar.location="$ESEC_HOME/lib/contentinstaller.jar" Desecurity.communication.service="sentinel_client" -Dfile.encoding=UTF8 Desecurity.dataobjects.config.file="/xml/BaseMetaData.xml,/xml/
WorkflowMetaData.xml,/xml/ActMetaData.xml" Djava.util.logging.config.file="$ESEC_HOME/config/
solution_designer_log.prop" Djava.security.auth.login.config="$ESEC_HOME/config/auth.login"
$SENTINEL_LANG_PROP $SENTINEL_CTRY_PROP -Desecurity.cache.directory=../
data/solution_designer.cache -Desecurity.remote.timeout=60
com.esecurity.content.exportUI.ContentPackBuilder
novdocx (en) 7 January 2010
3.10.3 Migrating LDAP User Accounts from Sentinel 6.1 SP1 Hotfix 2 to Sentinel 6.1 SP2
In Sentinel SP1 Hotfix 2, LDAP users are created by using the Domain authentication option in the
User Manager window of Sentinel Control Center. In Sentinel 6.1 SP2, LDAP users are created by
using a new option called LDAP Authentication.
Use the following procedure to ensure that the existing LDAP users created in SP1 Hotfix 2 function
properly in SP2:
1 Run the LDAP Authentication configuration script.
2 Log in to Sentinel Control Center, select Admin tab, then open the User Manager window.
3 For each existing LDAP user, right-click and select User Details.
The LDAP user who was created by using the Domain option is displayed as LDAP type.
4 If you specified
LDAP authentication, specify the fully qualified DN of the LDAP user in the LDAP User DN
field.
For more information, see “Creating an LDAP User Account for Sentinel” in the Sentinel 6.1
User Guide.
5 Click OK.
n
for “Anonymous searches on LDAP directory” parameter while configuring
68 Sentinel 6.1 Installation Guide

3.11 Updating the License Key
If you purchase the product after evaluation, follow the procedure given below to update your
license key in the system to avoid re-installation.
Section 3.11.1, “Unix,” on page 69
Section 3.11.2, “Windows,” on page 69
3.11.1 Unix
1 As the Sentinel Administrator operating system user, log in to the machine where the DAS
component is installed (The default is
2 In the command prompt, change the directory to
3 Enter the following command:
./softwarekey.s h
4 Specify number 1 to set your primary key, then press Enter.
esecadm
).
$ESEC_HOME/bin
.
novdocx (en) 7 January 2010
3.11.2 Windows
1 As a user with administrative rights, log in to the machine where the DAS component is
installed.
2 In the command prompt, change directory to
3 Enter the following command:
.\softwarekey.bat
4 Specify number 1 to set your primary key, then press Enter.
%ESEC_HOME%\bin
.
Installing Sentinel 6.1 SP2 69

novdocx (en) 7 January 2010
70 Sentinel 6.1 Installation Guide

4
Testing the Installation
Section 4.1, “Testing the Installation,” on page 71
Section 4.2, “Clean Up from Testing,” on page 79
Section 4.3, “Getting Started,” on page 80
4.1 Testing the Installation
Sentinel is installed with a demonstration collector that can be used to test many of the basic
functions of the system. Using this collector, you can test Active Views, Incident creation,
Correlation rules, and Reports. The following procedure describes the steps to test the system and
the expected results. You might not see the exact events, but your results should be similar to the
results below.
At a basic level, these tests allow you to confirm the following:
novdocx (en) 7 January 2010
4
Sentinel Services are up and running
Communication over the message bus is functional
Internal audit events are being sent
Events can be sent from a Collector Manager
Events are being inserted into the database and can be retrieved using either Historical Event
Query or the Crystal Reports
Incidents can be created and viewed
The Correlation Engine is evaluating rules and triggering correlated events
The Sentinel Data Manager can connect to the database and read partition information
If any of these tests fail, review the installation log and other log files, and contact Novell Technical
Support (http://support.novell.com/phone.html?sourceidint=suplnav4_phonesup), if necessary.
To test the installation:
1 Start the Sentinel Control Center:
Windows: Double-click the Sentinel Control Center icon on the desktop.
Linux/Solaris: Log in as an admin user (esecadm), change the directory to
and run
bin
and press Enter.
2 Log in to the system as an admin user (esecadm by default).
The Sentinel Control Center opens and you can see the events in the Active Views filtered by
public filters: Internal_Events and High_Severity.
./control_center.sh
from the command prompt. Specify the credentials
$ESEC_HOME/
Testing the Installation
71

novdocx (en) 7 January 2010
3 Click the Event Source Management menu, and select Live View.
4 In the Graphical view, right-click 5 eps event source and select Start.
5 Close the Event Source Management Live View window.
6 Click the Active Views tab.
The Active window titled PUBLIC: High_Severity, Severity. The collector might take some
time to start and send the data to get displayed in the Active View window.
7 Click the Event Query button in the toolbar.
The Historical Event Query window is displayed.
8 In the Historical Event Query window, click the Filter drop-down arrow to select the filter.
Highlight Public: All filter and click Select.
9 Select a time period that covers the time that the Collector has been active. Select the date
range from the From and To drop-down list.
10 Select a batch size from the Batch size drop-down list.
11 Click the Magnifying Glass icon to run the query.
72 Sentinel 6.1 Installation Guide

12 Hold down the Ctrl or Shift key, and select multiple events from the Historical Event Query
window.
13 Right-click and select Create Incident.
novdocx (en) 7 January 2010
14 Enter a name for the incident TestIncident1 and click Create. A success notification displays.
15 Click OK.
16 Click the Incident tab.
The Incident View Manager window is displayed that lists the incident that you created.
Testing the Installation 73

17 Double-click the incident to display.
novdocx (en) 7 January 2010
18 Click File > Exit or click the X button on the upper right corner of the window to close the
Incident window.
19 Click the Analysis tab.
The Analysis Navigator window with the
20 Click Historical Event Queries.
21 Click Analysis > Create Report or click the Create Report icon.
An Event Query window is displayed. Set the following:
time frame
filter
severity level
batch size (this is the number of events to view – events display from oldest events to
newer events)
22 Click the Begin Searching icon.
74 Sentinel 6.1 Installation Guide
Events
folder is displayed.

23 To view the next batch of events, click More.
24 Rearrange the columns by dragging and dropping them, and sort the events as required by
clicking the respective column heading.
When the query is complete, it gets added to the list of quick queries in the Navigator.
25 Click the Correlation tab.
The Correlation Rule Manager window is displayed.
26 Click Add.
The Correlation Rule wizard is displayed.
novdocx (en) 7 January 2010
27 Click Simple.
The Simple Rule window is displayed.
Testing the Installation 75

novdocx (en) 7 January 2010
28 Use the drop-down menus to set the criteria to Severity 4. Click Next.
The Update Criteria window is displayed.
29 Select Do not perform actions every time this rule fires for the next and set the time period to 1
Minute using the drop-down menu. Click Next.
The General Description window displays.
76 Sentinel 6.1 Installation Guide

novdocx (en) 7 January 2010
30 Enter a name and description for the rule, and click Next.
31 Select No, do not create another rule and click Next.
32 Create an action to associate the rule that you have created:
32a Perform either of the following:
Select Tools > Action Manager > Add.
In the Deploy Rule window, click Add Action. For more information, see Step 33 thru
Step 34 on page 78.
The Configure Action window is displayed.
Testing the Installation 77

32b In the Configure Action window, specify the following:
Specify the action name. For example, CorrelatedEvent Action.
Select Configure Correlated Event from the Action drop-down list.
Set the Event Options.
Set the Severity to 5.
Specify the EventName. For example, CorrelatedEvent.
Specify a message if required.
32c Click Save.
33 Open the Correlation Rule Manager window.
34 Select a rule and click the Deploy rules link.
The Deploy Rule window is displayed.
novdocx (en) 7 January 2010
35 In the Deploy rule window, select the Engine to deploy the rule from the drop-down list.
36 Select the action that you created in Step 32 on page 77 to associate with the rule and click OK.
37 Select Correlation Engine Manager.
In the Correlation engine, you can see the rule is deployed/enabled.
38 Click the Active Views tab and verify that the Correlated Event is generated.
39 Close the Sentinel Control Center.
40 Double-click the Sentinel Data Manager (SDM) icon on the desktop.
41 Log in to SDM using the Database Administrative User specified during installation (esecdba
by default).
78 Sentinel 6.1 Installation Guide

42 Click each tab to verify that you can access them.
43 Close Sentinel Data Manager.
novdocx (en) 7 January 2010
If you were able to proceed through all of these steps without errors, you have completed a basic
verification of the Sentinel system installation.
4.2 Clean Up from Testing
After completing the system verification, you should remove the objects that were created for the
tests.
To perform a clean up after system testing:
1 Log in to the system as an admin user (esecadm by default).
2 Click the Correlation tab.
3 Open Correlation Engine Manager.
4 Right-click
5 Open Correlation Rule Manager.
6 Select
TestRule1
TestRule1
in the Correlation Engine Manager and select Undeploy.
and click Delete.
7 Click the Event Source Management menu, and select Live View.
8 In the Graphical event source hierarchy, right-click General Collector and select Stop.
Testing the Installation 79

9 Close the Event Source Management window.
10 Click the Incidents tab.
11 Open the Incident View Manager.
12 Select
TestIncident1
, right-click and select Delete.
4.3 Getting Started
To get started with real data, import and configure the Collectors that are appropriate for your
environment, configure your own rules, build iTRAC workflows, and so on. The Sentinel Solution
Packs help you get started quickly.
novdocx (en) 7 January 2010
80 Sentinel 6.1 Installation Guide

5
Adding Sentinel Components
Section 5.1, “Adding Sentinel Components to an Existing Installation,” on page 81
Section 5.2, “Installing Additional Load Balancing Nodes,” on page 81
5.1 Adding Sentinel Components to an Existing Installation
It might be necessary, at times, to install additional Sentinel components on a machine that already
has a Sentinel installation. For example, you may need to install Collector Builder where Sentinel
Control Center is already installed.
The Sentinel installer makes it simple to perform this kind of installation. Ensure that you met the
prerequisites of the additional component being installed as specified in Chapter 3, “Installing
Sentinel 6.1 SP2,” on page 27. The requirements on the machine are likely to increase when
installing additional components. Then run the Sentinel installer on the target machine just as if you
were installing on a “clean” machine. When running in add component mode, the installer slightly
changes its behavior in the following ways:
novdocx (en) 7 January 2010
5
The installer will automatically detect the existing Sentinel installation and displays a screen
indicating the location of the existing install and which components are already installed.
The installer will not prompt for the destination directory. The destination directory of the
existing installation will be used.
The install will not prompt to select Simple or Custom install type. The Custom install type is
assumed.
NOTE: Only one instance of Advisor and the Communication Server can exist in a distributed
Sentinel installation.
5.2 Installing Additional Load Balancing Nodes
Occasionally, it might be necessary to add an additional Sentinel processing node to the Sentinel
distributed environment in order to load balance across machines. For example, if the memory usage
is high on a machine running a Correlation Engine, you might decide to add another machine
running Correlation Engine. (This may require an additional license.) You can then redeploy your
correlation rules across these two engines in order to decrease the load on a single machine if all the
rules were deployed on it.
To do this, simply run the installer on the new machine as described in Chapter 3, “Installing
Sentinel 6.1 SP2,” on page 27. As you step through the installer, select only the components you
want to add additional load balancing nodes for. The following components can be load balanced:
Correlation Engine
Collector Manager
DAS_Binary process
Adding Sentinel Components
81

The DAS_Binary process is responsible for event database insertion. Because event database
insertions can be an event flow bottleneck, load balancing the DAS_Binary process typically results
in a significant performance gain, in terms on events per second throughput. Additionally, the
Correlation Engine and Collector Manager components can be load balanced by installing instances
of these components on additional machines
5.2.1 Multiple DAS_Binary Processes
Although not true load-balancing, it is possible to configure multiple DAS_Binary instances in a
Sentinel system to improve performance of event insertion. This should only be considered after
analyzing the system for bottlenecks and finding that DAS_Binary has fully utilized the CPU.
DAS_Binary is the process that manages event insertion into the database, and the highest event
rates Novell has achieved in internal testing were with multiple DAS_Binary processes.
For more information on the Sentinel 6.1 performance test results, see the Novell Documentation
site (http://www.novell.com/documentation/sentinel61).
Multiple DAS_binary processes can be installed on the same machine or distributed across multiple
machines. You must have a mapped drive (Windows) or mounted drive (Unix) for the secondary
DAS_Binary to work with aggregation.
novdocx (en) 7 January 2010
Distributing Multiple DAS_binary Instances Across Different Machines
IMPORTANT: Before you proceed, ensure that you have installed the Sentinel Server including
the DAS. This installation is referred to as the Sentinel Server or the primary DAS_Binary.
1 Use the Sentinel installer to install the DAS component on each of the other machines that you
want to run a DAS_Binary process. All DAS_Binary should connect to the same database;
therefore, during installation provide the same database connection information you provided
for the initial DAS installation.
2 On all machines where you want to run the DAS_Binary, including the primary DAS_Binary,
make the following modifications:
2a Log in as
esecadm
that run an instances of the DAS_Binary process and locate the
(UNIX) or an
Administrator
(Windows) to any one of the machines
configuration.xml
file
in the $ESEC_HOME/config (%ESEC_HOME%\config on Windows) directory.
2b Add the following information to services section of the
<service name="DAS_Binary_EventStore" plugins=""
strategyid="sentinel_client" subscriptiongroup="dasbin" />
2c Save the
configuration.xml
file.
configuration.xml
file:
3 On the machines that are running secondary DAS_Binary processes, make the following
modifications. A secondary DAS_Binary is the one that is not running on the main Sentinel
Server.
3a Remove the file
sentinelhost.id
from the
$ESEC_HOME/data (%ESEC_HOME%\data
Windows) directory. This will force the Collector Manager on this machine to generate a
new ID rather than using the same one that Sentinel Server’s Collector Manager is using.
3b The other DAS processes should be disabled. To do this, in the process section of the
configuration.xml
file on the DAS_Binary-only machines, set the
min_instances
attribute as follows:
min_instances=”0”
on
82 Sentinel 6.1 Installation Guide

for the following process entries:
DAS_RT
DAS_Aggregation
DAS_Query
DAS_ITRAC
3c The secondary Sentinel service should be used. Therefore, the
ESEC_HOME/config
directory must be modified by uncommenting the following line by
removing the # character from the beginning of the line:
wrapper.app.parameter.1=../config/sentinel.xml
and commenting out the following line by inserting the # character at the beginning of the
line:
#wrapper.app.parameter.1=../config/sentinel_primary.xml
4 Make the following changes to the
das_binary.xml
file on one of the machines that run a
DAS_Binary process:
sentinel.conf
novdocx (en) 7 January 2010
in the
NOTE: The
4a Make a copy of the entire
component’s id from
das_binary.xml
DispatchManager
file will later be copied to other DAS_Binary installations.
DispatchManager
component and change the new
to
EventStoreDispatchManager
making this change, you should have one component with the id
another component with the id
what the new
EventStoreDispatchManager
EventStoreDispatchManager
4b Update the value of the property named
EventStoreDispatchManager
4c Remove the property with name
DispatchManager
component.
component to DAS_Binary_EventStore.
handler:esecurity.event.create
component should look like.
esecurity.communication.service
. See the example below of
4d Remove all properties with a name that starts with “handler:*” except for
handler:esecurity.event.create
component. The handler
handler defined in the
handler:esecurity.event.create
EventStoreDispatchManager
4e Add the following XML element to the
<obj-component-ref>
<name>DispatchManager</name>
<ref-id>EventStoreDispatchManager</ref-id>
</obj-component-ref>
4f The
outputDirectory
das_binary.xml
property in the EventFileRedirect component of the
file must have the same value as the
EventAggregationService component of the
from the
EventStoreDispatchManager
component.
EventStoreService
directory
das_aggregation.xml
should be the only
component:
the DAS_Aggregation to pick up the event files from a secondary DAS_Binary.
4g Save the
5 Copy the modified
das_binary.xml
das_binary.xml
file.
file to all machines that run a DAS_Binary process,
including the primary DAS_Binary.
Following is a sample excerpt from the
EventStoreDispatchManager
component.
das_binary.xml
file showing the
. After
DispatchManager
of the
from the
property in the
file. This allows the
and
Adding Sentinel Components 83

<obj-component id="EventStoreDispatchManager">
<class>esecurity.ccs.comp.dispatcher.CommDispatcherManager</class>
<property name="esecurity.communication.service">DAS_Binary_EventStore</
property>
<property name="dependencies">DAS_Query</property>
<property
name="handler:esecurity.event.create">esecurity.ccs.cracker.EventCracker@
ewizard_binary_event,correlation_binary_event,database_binary_event,datab
ase_tagged_event,correlation_binary_event_update</property>
<obj-component id="DispatcherStatsService">
<class>esecurity.ccs.comp.dispatcher.stats.DispatcherStatsManager</class>
<property name="ReportIntervals">900,3600,14400,86400</property>
<property name="MinLogReportInterval">900</property>
<property name="MinPublishReportInterval">86400</property>
<property name="ReportByServiceName">true</property>
<property name="ReportByMethodName">true</property>
<obj-component-ref>
<name>EventPublisher</name>
<ref-id>DispatchManager</ref-id>
</obj-component-ref>
<obj-component-ref>
<name>DispatchManager</name>
<ref-id>DispatchManager</ref-id>
</obj-component-ref>
</obj-component>
</obj-component>
Here is a sample excerpt from the
das_binary.xml
file showing the EventStoreService
component:
novdocx (en) 7 January 2010
84 Sentinel 6.1 Installation Guide

<obj-component id="EventStoreService">
<class>esecurity.ccs.comp.event.EventStoreService</class>
<property name="handler">esecurity.event.create</property>
<property name="waitBlocked">true</property>
<property name="maxThreads">6</property>
<property name="minThreads">6</property>
<property name="maxThreadsQueued">10</property>
<property name="queueSize">1000000</property>
<obj-component-ref>
<name>ThreadPool</name>
<ref-id>EventStoreThreadPool</ref-id>
</obj-component-ref>
<obj-component-ref>
<name>DispatchManager</name>
<ref-id>EventStoreDispatchManager</ref-id>
</obj-component-ref>
<obj-component id="Persistor">
<class>esecurity.ccs.comp.event.jdbc.JDBCEventStore</class>
<property name="insert.batchsize">600</property>
<property
name="insert.strategy">esecurity.ccs.comp.event.jdbc.JDBCLoadStrategy</
property>
<property name="insert.oci.workerCount">5</property>
<property name="insert.oci.queueWaitTime">1</property>
<property name="insert.oci.highWatermark">10000000</property>
<property name="insert.oci.lowWatermark">9000000</property>
<property name="insert.oci.optimizationFlag">on</property>
<property name="insert.pmaxWarningTime">300</property>
<property name="insert.pminWarningTime">300</property>
</obj-component>
<obj-component-ref>
<name>EventRedirect</name>
<ref-id>EventFileRedirectService</ref-id>
</obj-component-ref>
</obj-component>
6 Delete the unneeded durable subscription.
novdocx (en) 7 January 2010
After the system is restarted, the multiple DAS_Binary processes share a new, single, durable
shared subscription to the Sentinel message bus event channels. In order to avoid the message
bus cache from growing indefinitely and filling up the hard drive, the durable subscription that
was initially created by the primary DAS_Binary must be deleted.
6a Open the Sonic Management Console.
6b Windows: Select Start > Programs > Sentinel >SonicMQ >SonicMQ 7.0 >Management
Console
Unix: Open a terminal console and run the following command:
$ESEC_HOME/3rdparty/SonicMQ/MQ7.0/bin/startmc.sh
6c Specify the following to log in to the management console:
Options Description
Connection Name Leave as default
Domain Name esecDomain
Connection URL tcp://localhost:10012
Adding Sentinel Components 85

Options Description
User Name Leave as default
Password Leave as default
6d In the management console, select Manage tab >Containers > esecContainer >
esecBroker >Durable Subscriptions.
6e Select the first empty row in the Users & Groups table on the right side of the GUI.
novdocx (en) 7 January 2010
When you select the empty row at top of this table, view the details of the DAS_Binary
durable subscriptions below the empty row.
6f Select all durable subscriptions, right click, and then select Delete.
7 To activate your changes, restart the Sentinel service on all machines where you have made the
modifications.
UNIX: Run the following command:
$ESEC_HOME/bin/sentinel.sh restart
Windows: Restart the "Sentinel" service using the Windows Service Manager.
Configuring Multiple DAS_binary Instances on the Same Machine
1 Log in as esecadm (UNIX) or an Administrator (Windows) to the machine that will run
multiple instances of the DAS_Binary processes and locate the
$ESEC_HOME/config (%ESEC_HOME%\config
2 In the
configuration.xml
entries (see example below). Make a copy of the DAS_Binary service entry for every instance
of DAS_Binary you want to run. For example, to run two DAS_Binary processes, make two
86 Sentinel 6.1 Installation Guide
configuration.xml
file in the
on Windows) directory.
file, locate the section of the xml file that defines the services

copies of the DAS_Binary service entry. Delete the uuid attribute for each of the service entries
(the uuid attribute will automatically be regenerated when Sentinel is started). The following is
an example of one DAS_Binary service entry.
<service name="DAS_Binary" plugins="" strategyid="sentinel_client"
uuid="4DA52BE0-E7A4-1029-BB2F-00132168CBDF"/>
3 In the
configuration.xml
service entry
exist in the
configuration.xml
file, create a copy of the following
DAS_Binary_EventStore
xml for every instance of DAS_Binary you want to run. This service does not
file, so you should copy it from the example below. For
example, to run two DAS_Binary processes, make two copies of the following
DAS_Binary_EventStore service entry:
<service name="DAS_Binary_EventStore" plugins=""
strategyid="sentinel_client" subscriptiongroup="dasbin" />
4 Give each copy of the DAS_Binary and DAS_Binary_EventStore service entry a unique name.
For example, the service names might be DAS_Binary1, DAS_Binary_EventStore1,
DAS_Binary2, and DAS_Binary_EventStore2.
novdocx (en) 7 January 2010
5 Locate the section of the
configuration.xml
file that defines the processes entries (see
example below). Make a copy of the DAS_Binary process entry for every instance of
DAS_Binary you want to run. For example, to run two DAS_Binary processes, make two
copies of the DAS_Binary process entry. For each DAS_Binary process entry, modify sections
of the entry as described below:
DAS_Binary Dsrv_name: Change to match the DAS_Binary service names defined in
step 4, such as DAS_Binary2.
DAS_Binary communication service name: Insert the following text into the process
entry’s image attribute at the location shown in bold in the process entry example below.
For each DAS_Binary process entry, replace the DAS_Binary part of the text below with
the associated service name, such as DAS_Binary2.
-Desecurity.communication.service=DAS_Binary
das_binary.xml
file name: Use any unique name(s), such as
das_binary_2.xml
These names are used in a later step.
das_binary_log_prop file name: Use any unique name(s), such as
das_binary_log_2.prop
das_binary.cache directory name: Use any unique name(s), such as
das_binary2.cache
das_binary.cache
DAS_Binary process name: Change the value of the process entry’s name attribute to
. These names are used in a later step.
. Each instance of DAS_Binary must use a different
directory.
match the DAS_Binary service names defined in step 4, such as DAS_Binary2.
.
The following xml is an example of a process entry as discussed in the instructions above:
Adding Sentinel Components 87

process component="DAS" depends="UNIX Communication Server,Windows
Communication Server" image=""$(ESEC_JAVA_HOME)/java" -server Dsrv_name=DAS_Binary -Xmx160m -Xms64m -XX:+UseParallelGC XX:+HeapDumpOnOutOfMemoryError -XX:HeapDumpPath=../log/DAS_Binary.hprof Xss136k -Xrs -Desecurity.communication.service=DAS_Binary Duser.language=en -Djava.net.preferIPv4Stack=true -Dfile.encoding=UTF8 Desecurity.cache.directory=../data/das_binary.cache Desecurity.dataobjects.config.file=/xml/BaseMetaData.xml Djava.util.logging.config.file=../config/das_binary_log.prop Dcom.esecurity.configurationfile=../config/configuration.xml Djava.security.auth.login.config=../config/auth.login Djava.security.krb5.conf=../config/krb5.conf -jar ../lib/ccsbase.jar ..//
config//das_binary.xml" min_instances="1" name="DAS_Binary"
post_startup_delay="20" type="container" working_directory="$(ESEC_HOME)/
data"/>
6 Save the
7 Locate the
configuration.xml
das_binary.xml
file in the $ESEC_HOME/config (%ESEC_HOME%\config on
file.
Windows) directory.
novdocx (en) 7 January 2010
8 Create a copy of the
das_binary.xml
file for each instance of DAS_Binary you want to run.
For example, to run two instances of DAS_Binary, create two copies of
9 Rename the copied
10 Make the following changes to each of the
Make a copy of the entire
component’s id from
das_binary.xml
DispatchManager
DispatchManager
files to match the names selected in step 5.
das_binary.xml
files:
component and change the new
to
EventStoreDispatchManager
making this change, you should have one component with the id
another component with the id
Update the value of the property named
DispatchManager
component with the appropriate unique name for DAS_Binary, such
EventStoreDispatchManager
esecurity.communication.service
as DAS_Binary2.
Update the value of the property named
EventStoreDispatchManager
component with the appropriate unique name for
esecurity.communication.service
DAS_Binary_EventStore, such as DAS_Binary_EventStore2.
Remove the property with name
DispatchManager
Remove all properties with a name that starts with “
handler:esecurity.event.create
component. The handler
handler defined in the
Add the following XML element to the
<obj-component-ref>
<name>DispatchManager</name>
<ref-id>EventStoreDispatchManager</ref-id>
</obj-component-ref>
The
outputDirectory
das_binary.xml
component.
handler:esecurity.event.create
EventStoreDispatchManager
property in the EventFileRedirect component of the
file must have the same value as the
EventAggregationService component of the
handler:esecurity.event.create
handler:*
from the
EventStoreDispatchManager
component.
EventStoreService
directory
das_aggregation.xml
DAS_Aggregation to pick up the event files from a secondary DAS_Binary.
das_binary.xml
. After
DispatchManager
.
from the
” except
for
should be the only
component.
property in the
file. This allows the
.
and
of the
of the
Save the
88 Sentinel 6.1 Installation Guide
das_binary.xml
file.

novdocx (en) 7 January 2010
11 Locate the
das_binary_log.prop
file in the
$ESEC_HOME/config (%ESEC_HOME%\config
on Windows) directory.
12 Create a copy of the
das_binary_log.prop
file for each instance of DAS_Binary you want to
run. For example, to run two instances of DAS_Binary, create two copies of
das_binary_log.prop
13 Rename the
das_binary_log.prop
.
files to match the names selected in step 5.
14 Delete the unneeded durable subscription.
After the system is restarted, the multiple DAS_Binary processes share a new, single, durable
shared subscription to the Sentinel message bus event channels. In order to avoid the message
bus cache from growing indefinitely and filling up the hard drive, the durable subscription that
was initially created by the primary DAS_Binary must be deleted.
14a Open the Sonic Management Console.
14b Windows: Select Start > Programs > Sentinel > SonicMQ > SonicMQ 7.0 >
Management Console
Unix: Open a terminal console and run the following command:
$ESEC_HOME/3rdparty/SonicMQ/MQ7.0/bin/startmc.sh
14c Specify the following to log in to the management console:
Connection Name Leave as default
Domain Name esecDomain
Connection URL tcp://localhost:10012
User Name Leave as default
Password Leave as default
14d In the management console, select Manage tab >Containers > esecContainer >
esecBroker > Durable Subscriptions.
14e Select the first empty row in the Users & Groups table on the right side of the GUI.
Adding Sentinel Components 89

novdocx (en) 7 January 2010
When you select the empty row at top of this table, view the details of the DAS_Binary
durable subscriptions below the empty row.
14f Select all durable subscriptions, right click, and then select Delete.
15 Restart the Sentinel services to activate your changes.
UNIX:
$ESEC_HOME/bin/sentinel.sh restart
Windows: Restart the Sentinel service using the Windows Service Manager.
90 Sentinel 6.1 Installation Guide

6
Communication Layer (iSCALE)
Section 6.1, “SSL Proxy and Direct Communication,” on page 92
Section 6.2, “Changing the Communication Encryption Key,” on page 94
Section 6.3, “Increasing AES Key Strength,” on page 95
The communication layer (iSCALE) connecting all components of the architecture is an encrypted
TCP/IP based connection built on a JMS (Java Messaging Service) backbone. With Sentinel 6, an
optional SSL proxy has been added to secure the Collector Manager and Sentinel Control Center
components if they are installed outside the firewall.
Figure 6-1 Sentinel Architecture
novdocx (en) 7 January 2010
6
There are two communication options available when installing the Collector Manager:
Connect directly to the message bus (default): This is a simplest and fastest option. It
requires the Collector Manager to know the shared message bus encryption key, however,
which can be a security risk if the Collector Manager is running on a machine that is exposed to
security threats (for example, a machine in the DMZ). This option will encrypt
communications using AES 128-bit encryption based on the data in a file called
Connect to the message bus through the proxy: This option adds an additional layer of
security by configuring the Collector Manager to connect through an SSL proxy server. In this
case, certificate-based authentication and encryption will be used, so the
need to be stored on the Collector Manager machine. This is a good option when the Collector
Manager is installed in a less secure environment.
Either of these options can be selected when installing the Collector Manager. The Sentinel Control
Center uses the proxy by default.
.keystore
Communication Layer (iSCALE)
.keystore
does not
.
91

6.1 SSL Proxy and Direct Communication
The Sentinel components that might use the SSL proxy are the Sentinel Control Center and the
Collector Manager.
6.1.1 Sentinel Control Center
The Sentinel Control Center uses the SSL proxy by default. The Sentinel Control Center connects to
SSL through the
authentication only. The client side authentication uses the Sentinel Control Center user’s username
and password.
To Log into Sentinel Control Center for the First Time:
1 Go to Start > Programs > Sentinel and select Sentinel Control Center. Sentinel Login window
displays.
proxied_client
port. This port is setup to use server-side SSL certificate
novdocx (en) 7 January 2010
2 Provide the user credentials you are provided with to log-in to Sentinel Control Center.
Username and password, if using SQL Server authentication, OR
Domain\username and password, if using Windows authentication
3 Click Login.
4 A warning message displays as shown in the figure below, for the first logon attempt.
92 Sentinel 6.1 Installation Guide

5 If you select Accept, this message displays every time you try to open Sentinel on your system.
To avoid this, you can select Accept permanently.
novdocx (en) 7 January 2010
To Start the Sentinel Control Center on Linux and Solaris:
1 As the Sentinel Administrator User (esecadm), change directory to:
$ESEC_HOME/bin
2 Run the following command:
control_center.sh
3 Provide your username and password and click OK.
4 A Certificate window displays, click Accept.
The Sentinel Control Center users will need to repeat the procedure above to accept a new certificate
under these circumstances:
The Sentinel communication server is reinstalled
The Sentinel communication server is moved to a new server
6.1.2 Collector Manager
Collector Manager can be installed in either proxy mode (using the SSL proxy) or direct mode
(connecting directly to the message bus).
For Collector Managers that could be more easily compromised (for example, a machine in the
DMZ), the SSL proxy is the more secure method of communication.
For Collector Managers in a more secure environment or where high event throughput is
important or installed on the same machine as the Data Access Service (DAS), direct
communication to the message bus is recommended.
The Collector Manager connects to SSL through the
proxied_trusted_client
. To enable
Collector Manager to restart without human intervention after a reboot, this port is set up to use both
server and client SSL certificate authentication. A trust relationship is established between the proxy
and Collector Manager (certificate exchange), with future connections using the certificates to
authenticate. This trust relationship is set up automatically during installation.
Communication Layer (iSCALE) 93

The trust relationship will need to be reset for every Collector Manager using the SSL proxy if the
following circumstances apply:
The Sentinel communication server is reinstalled
The Sentinel communication server is moved to a new server
This procedure can also be used to change a Collector Manager from direct mode to proxy mode.
To Reset Trust Relationship for a Collector Manager:
1 Log into the Collector Manager server as the Sentinel Administrator (esecadm by default).
novdocx (en) 7 January 2010
2 Open the
configuration.xml
file in $ESEC_HOME/config or %ESEC_HOME%\config in a
text editor.
3 Modify "Collector_Manager", "agentmanager_events", and "Sentinel" services in
configuration.xml
to use "proxied_trusted_client" strategy ID. Here is an excerpt from a
sample file:
<service name="Collector_Manager" plugins=""
strategyid="proxied_trusted_client"/>
<service name="agentmanager_events" plugins=""
strategyid="proxied_trusted_client"/>
<service name="Sentinel" plugins="" strategyid="proxied_trusted_client"/>
4 Save the file and exit.
5 Run
%ESEC_HOME%\bin\register_trusted_client.bat
(or
.sh
file if on UNIX). You will
see output similar to this:
E:\Program Files\novell\sentinel6>bin\register_trusted_client.bat
Please review the following server certificate:
Type: X.509
Issued To: foo.bar.net
Issued By: foo.bar.net
Fingerprint (MD5): A8:DF:BA:B2:F3:21:C9:27:28:48:13:B3:FE:F8:B4:AD
Would you like to accept this certificate? [Y/N] (defaults to N): Y
Please enter a Sentinel username and password that has permissions to
register a trusted client.
Username: esecadm
Password:*********
*Writing to keystore file: E:\Program
Files\Novell\Sentinel6\config\.proxyClientKeystore
6 Restart the Sentinel Service on the server hosting the Collector Manager.
7 Repeat these steps on all Collector Managers using the proxy communication.
6.2 Changing the Communication Encryption Key
The Sentinel installation allows the administrator to generate a new, random encryption key (stored
.keystore
in the
file must be the same on every machine that has a Sentinel Server component installed in order for
communication to work properly.
94 Sentinel 6.1 Installation Guide
file) or import an existing
.keystore
file. With either approach, the
.keystore

novdocx (en) 7 January 2010
NOTE: The
.keystore
file is not necessary on the database machine if the database is the only
Sentinel component installed on that machine. It is also not necessary on machines with only the
Sentinel Control Center, Collector Builder, Sentinel Data Manager, or Collector Manager (using a
proxy) installed.
The encryption key can be changed after installation using the
keymgr
utility. This utility generates
a file containing a randomly generated encryption key. This file must be copied to every machine
that has a Sentinel Server component installed.
To change the encryption key for Direct Communication:
1 For UNIX, log in as the Sentinel Administrator User (esecadm by default). For Windows, login
as a user with administrative rights.
2 Go to:
For UNIX:
$ESEC_HOME/lib
For Windows:
%ESEC_HOME%\lib
3 Run the following command:
On UNIX:
keymgr.sh -–keyalgo AES --keysize 128 –-keystore <output filename, usually
.keystore>
On Windows:
keymgr.bat –-keyalgo AES --keysize 128 –-keystore <output filename,
usually .keystore>
4 Copy
.keystore
to each machine with a Sentinel Server component installed (unless it is
using proxy communication). The file should be copied to:
For UNIX:
$ESEC_HOME/config
For Windows:
%ESEC_HOME%\config
NOTE: If you are using Advisor in Direct Download mode, you must update the Advisor password
stored in Advisor’s configuration files. This password is encrypted using the information in
.keystore
and must be recreated using the new
.keystore
value. To update the password, follow
the instructions in .
6.3 Increasing AES Key Strength
Sentinel uses AES encryption for Communication over Sonic and Encryption passwords stored in
config files and sent over Sonic. By default, Sentinel uses the AES 128-bit encryption algorithm
because of certain import restrictions. If these import restrictions do not apply to you, you can
configure Sentinel to use a stronger AES 256-bit algorithm.
Communication Layer (iSCALE) 95

NOTE: It is highly recommended that you review the “Understanding the Export/Import
Issues” section of the Java
Readme.txt
file before enabling 256-bit encryption.
To configure AES 256-bit encryption:
1 Download Unlimited Encryption policies from Sun (http://java.sun.com/javase/downloads/
index_jdk5.jsp). In the Other Downloads section, download “Java Cryptography Extension
(JCE) Unlimited Strength Jurisdiction Policy Files 5.0”.
2 Apply the above mentioned policy file to all the JRE's that run processes that connect directly
to Sonic (DAS, Correlation Engine, Communication Server, Collector Manager if used in
Direct to Sonic mode). To understand how to apply policy files, go through the
Readme.txt
available in the policy you downloaded.
3 Use the keymgr utility to generate a 256-bit
AES .keystore
file by follow the instructions in
Section 6.2, “Changing the Communication Encryption Key,” on page 94.
4 Copy this
.keystore
file to all machines in step #2 and place in the $ESEC_HOME/config or
%ESEC_HOME%\config directory.
novdocx (en) 7 January 2010
NOTE: If you are using Advisor in Direct Download mode, you must update the Advisor password
stored in Advisor’s configuration files. This password is encrypted using the information in
.keystore
and must be recreated using the new
.keystore
value. For more information on
updating a password, see “Certificate Management for DAS_Proxy” section in Sentinel 6.1
Reference Guide.
96 Sentinel 6.1 Installation Guide

7
Crystal Reports for Windows
novdocx (en) 7 January 2010
7
Business Objects Crystal Reports Server is Section 7.10, “Using Crystal Reports,” on page 124the
reporting tool used with Sentinel
Crystal Reports Server for Sentinel on Windows platform. For more information on supported
platforms for Crystal Reports Server in a Sentinel environment, see Chapter 2, “System
Requirements,” on page 17.
On Windows, Sentinel has been tested with Crystal Reports Server XI R2 SP4. For more
information on downloading the latest service packs, see Section 7.6, “Downloading the Service
Packs for Crystal Reports,” on page 112.
Section 7.1, “Overview,” on page 97
Section 7.2, “System Requirements,” on page 98
Section 7.3, “Configuration Requirements,” on page 98
Section 7.4, “Installation Overview,” on page 99
Section 7.5, “Installation,” on page 101
Section 7.6, “Downloading the Service Packs for Crystal Reports,” on page 112
Section 7.7, “Configuring Crystal Reports Server to Work with the Sentinel Control Center,”
on page 112
Section 7.8, “Publishing Crystal Report Templates,” on page 115
Section 7.9, “High-Performance Configurations for Crystal,” on page 122
Section 7.10, “Using Crystal Reports,” on page 124
TM
. This section discusses the installation and configuration of
Section 7.11, “Uninstalling Crystal Reports,” on page 124
For information on running Crystal Reports Server on Linux* and Solaris*, see Chapter 8, “Crystal
Reports for Linux,” on page 125.
7.1 Overview
Crystal Reports Server uses Central Management Server (CMS) database to store information about
the Crystal Reports Server system and its users. Other components of Crystal Reports Server can
access this information as required.
You must set up the CMS database on top of a local Microsoft SQL Server 2005 database for a
Crystal installation on Windows. Although the Crystal Reports Server installer allows you to set up
the CMS database on top of an MSDE database, this configuration is not tested or supported with
Sentinel.
Crystal Reports for Windows
97

novdocx (en) 7 January 2010
7.2 System Requirements
Windows Server 2003 SP1 with an NTFS-formatted partition, with IIS (Microsoft Internet
Information Server) and ASP.NET installed. Sentinel does not support Crystal XI R2 on
Windows Server 2000.
NET Framework 1.1 or 2.0 is installed by default on Windows Server 2003. To determine
which version of .NET Framework is on your machine, go to
%SystemRoot%\Microsoft.NET\Framework
greater than
Figure 7-1 Version of .NET Framework
For more information on supported platforms for Crystal Reports Server in a Sentinel environment,
see Chapter 2, “System Requirements,” on page 17.
v.1.1.xxxx
. For example, see the figure below:
. The highest numerical folder should not be
7.3 Configuration Requirements
Ensure that a local administrator account is used to install Crystal Reports Server.
98 Sentinel 6.1 Installation Guide

Set Data Execution Prevention (DEP) to run on essential Windows programs and services only.
1. Go to Control Panel > System > Advanced tab > Performance Settings > Data Execution
Prevention.
2. Select Turn on DEP for essential Windows programs and services only.
NOTE: This is required to avoid Error 1920. Service Crystal Report Cache Server on
Windows Server 2003.
Ensure that the Sentinel server and database is already installed.
novdocx (en) 7 January 2010
Ensure that you know the authentication mode that was chosen for the Sentinel Report User. If
you are using the local database authentication,
Windows authentication, the username can be anything of your choice. The authentication
mode is set during the Sentinel installation process, as shown in the screen below. For more
information on the Sentinel installation process, see Chapter 3, “Installing Sentinel 6.1 SP2,”
on page 27.
NOTE: The
Video resolution should be set to 1024 x 768 or higher.
Ensure that Microsoft Internet Information Server (IIS) and ASP.NET are installed. For more
information, see Section 7.5.1, “Installing Microsoft Internet Information Server (IIS) and
ASP.NET,” on page 102.
esecrpt
password can be explicitly set in Windows.
esecrpt
is the username. If you are using
7.4 Installation Overview
1 Install Microsoft IIS and ASP.NET.
2 Install Microsoft SQL (depending on whether you are using Windows authentication or SQL
Server authentication).
3 Install Asian fonts (for example, Arial Unicode MS).
NOTE: This is required only for Chinese (traditional and simple) and Japanese users so they
can view the reports in these languages.
Crystal Reports for Windows 99

4 Install Crystal Reports Server:
Configuring Open Database Connectivity (ODBC)
Installing and configuring Oracle Client Software
5 Configure
6 Patch Crystal Reports.
7 Publish (import) Crystal Reports.
8 Set a named user account.
9 Test the connectivity to the Web server.
10 Increase the Crystal Reports Server report refresh record limit (recommended)
11 Configure Sentinel Control Center to integrate with Crystal Reports Server.
This section includes the following topics:
Section 7.4.1, “Installation Overview of Crystal Reports Server with SQL Server 2005,” on
page 100
Section 7.4.2, “Installation Overview of Crystal Reports Server with Oracle,” on page 101
inetmgr
.
novdocx (en) 7 January 2010
For more information on installing Crystal Reports, see Crystal Reports Server documentation
(http://help.sap.com/businessobject/product_guides/boexir2SP4/en/
xir2_sp4_install_win_unix_en.pdf).
7.4.1 Installation Overview of Crystal Reports Server with SQL Server 2005
The following are the high-level steps for installing Crystal Reports Server with a Microsoft SQL
Server 2005 Sentinel database, using Windows authentication or SQL authentication.
1 Install Crystal Reports Server XI R2.
If you selected Windows Authentication for the Sentinel Report user when installing
Sentinel, see Section 7.5.2, “Installing Crystal Reports Server for Microsoft SQL Server
2005 with Windows Authentication,” on page 102.
If you selected SQL Authentication for the Sentinel Report user when installing Sentinel,
see Section 7.5.3, “Installing Crystal Reports Server for Microsoft SQL Server 2005 with
SQL Authentication,” on page 106.
2 Configure Open Database Connectivity (ODBC). For more information, see “Configuring
Open Database Connectivity (ODBC)” on page 107.
3 Map Crystal Reports for use with Sentinel. For more information, see Section 7.7,
“Configuring Crystal Reports Server to Work with the Sentinel Control Center,” on page 112.
4 Patch Crystal Reports. For more information, see Section 7.7.2, “Patching Crystal Reports,” on
page 113.
5 Publish the reports. For more information, see Section 7.8, “Publishing Crystal Report
Templates,” on page 115.
6 Set the Named User Account. For more information on setting, see Section 7.8.4, “Setting a
Named User Account,” on page 119.
100 Sentinel 6.1 Installation Guide
 Loading...