

Page 1

Development Client Reference
Novell®
PlateSpin® Orchestrate
novdocx (en) 13 May 2009
AUTHORIZED DOCUMENTATION
2.0.2
August 28, 2009
www.novell.com
PlateSpin Orchestrate 2.0 Development Client Reference
Page 2

Legal Notices
Novell, Inc. makes no representations or warranties with respect to the contents or use of this documentation, and
specifically disclaims any express or implied warranties of merchantability or fitness for any particular purpose.
Further, Novell, Inc. reserves the right to revise this publication and to make changes to its content, at any time,
without obligation to notify any person or entity of such revisions or changes.
Further, Novell, Inc. makes no representations or warranties with respect to any software, and specifically disclaims
any express or implied warranties of merchantability or fitness for any particular purpose. Further, Novell, Inc.
reserves the right to make changes to any and all parts of Novell software, at any time, without any obligation to
notify any person or entity of such changes.
Any products or technical information provided under this Agreement may be subject to U.S. export controls and the
trade laws of other countries. You agree to comply with all export control regulations and to obtain any required
licenses or classification to export, re-export or import deliverables. You agree not to export or re-export to entities on
the current U.S. export exclusion lists or to any embargoed or terrorist countries as specified in the U.S. export laws.
You agree to not use deliverables for prohibited nuclear, missile, or chemical biological weaponry end uses. See the
Novell International Trade Services Web page (http://www.novell.com/info/exports/) for more information on
exporting Novell software. Novell assumes no responsibility for your failure to obtain any necessary export
approvals.
novdocx (en) 13 May 2009
Copyright © 2008-2009 Novell, Inc. All rights reserved. No part of this publication may be reproduced, photocopied,
stored on a retrieval system, or transmitted without the express written consent of the publisher.
Novell, Inc. has intellectual property rights relating to technology embodied in the product that is described in this
document. In particular, and without limitation, these intellectual property rights may include one or more of the U.S.
patents listed on the Novell Legal Patents Web page (http://www.novell.com/company/legal/patents/) and one or
more additional patents or pending patent applications in the U.S. and in other countries.
Novell, Inc.
404 Wyman Street, Suite 500
Waltham, MA 02451
U.S.A.
www.novell.com
Online Documentation: To access the latest online documentation for this and other Novell products, see
the Novell Documentation Web page (http://www.novell.com/documentation).
Page 3

Novell Trademarks
For Novell trademarks, see the Novell Trademark and Service Mark list (http://www.novell.com/company/legal/
trademarks/tmlist.html).
Third-Party Materials
All third-party trademarks are the property of their respective owners.
novdocx (en) 13 May 2009
Page 4

novdocx (en) 13 May 2009
4 PlateSpin Orchestrate 2.0 Development Client Reference
Page 5

Contents
About This Guide 9
1 Layout 11
2 Orchestrate Development Client Menus and Tools 15
2.1 The Operations Menu Bar . . . . . . . . . . . . . . . . . . . . . . . . . . . . . . . . . . . . . . . . . . . . . . . . . . . . 15
2.1.1 File . . . . . . . . . . . . . . . . . . . . . . . . . . . . . . . . . . . . . . . . . . . . . . . . . . . . . . . . . . . . . . . 15
2.1.2 Edit. . . . . . . . . . . . . . . . . . . . . . . . . . . . . . . . . . . . . . . . . . . . . . . . . . . . . . . . . . . . . . . 16
2.1.3 View . . . . . . . . . . . . . . . . . . . . . . . . . . . . . . . . . . . . . . . . . . . . . . . . . . . . . . . . . . . . . . 19
2.1.4 Actions . . . . . . . . . . . . . . . . . . . . . . . . . . . . . . . . . . . . . . . . . . . . . . . . . . . . . . . . . . . . 19
2.1.5 Provision . . . . . . . . . . . . . . . . . . . . . . . . . . . . . . . . . . . . . . . . . . . . . . . . . . . . . . . . . . 19
2.1.6 Server . . . . . . . . . . . . . . . . . . . . . . . . . . . . . . . . . . . . . . . . . . . . . . . . . . . . . . . . . . . . 21
2.1.7 Windows . . . . . . . . . . . . . . . . . . . . . . . . . . . . . . . . . . . . . . . . . . . . . . . . . . . . . . . . . . 23
2.1.8 Help . . . . . . . . . . . . . . . . . . . . . . . . . . . . . . . . . . . . . . . . . . . . . . . . . . . . . . . . . . . . . . 23
2.2 The Orchestrate Development Client Toolbar . . . . . . . . . . . . . . . . . . . . . . . . . . . . . . . . . . . . . 23
novdocx (en) 13 May 2009
3 The PlateSpin Orchestrate Job Scheduler 25
3.1 Understanding the Job Scheduler View . . . . . . . . . . . . . . . . . . . . . . . . . . . . . . . . . . . . . . . . . . 25
3.1.1 Navigating The Job Schedules Table . . . . . . . . . . . . . . . . . . . . . . . . . . . . . . . . . . . . 26
3.1.2 Creating or Modifying a Job Schedule. . . . . . . . . . . . . . . . . . . . . . . . . . . . . . . . . . . . 28
3.1.3 Understanding Cron Syntax in the Job Scheduler. . . . . . . . . . . . . . . . . . . . . . . . . . . 37
3.2 Walkthrough: Scheduling a System Job . . . . . . . . . . . . . . . . . . . . . . . . . . . . . . . . . . . . . . . . . 41
3.2.1 Deploying a Sample System Job. . . . . . . . . . . . . . . . . . . . . . . . . . . . . . . . . . . . . . . . 41
3.2.2 Creating a New Schedule for the Job . . . . . . . . . . . . . . . . . . . . . . . . . . . . . . . . . . . . 42
3.2.3 Defining the New Schedule . . . . . . . . . . . . . . . . . . . . . . . . . . . . . . . . . . . . . . . . . . . . 43
3.2.4 Activating the New Schedule . . . . . . . . . . . . . . . . . . . . . . . . . . . . . . . . . . . . . . . . . . . 48
3.2.5 Running the New Schedule Immediately . . . . . . . . . . . . . . . . . . . . . . . . . . . . . . . . . . 48
4 The Policy Debugger 51
4.1 The Constraints Table View . . . . . . . . . . . . . . . . . . . . . . . . . . . . . . . . . . . . . . . . . . . . . . . . . . . 51
4.1.1 The Match Context Area . . . . . . . . . . . . . . . . . . . . . . . . . . . . . . . . . . . . . . . . . . . . . . 52
4.1.2 The Constraint Type List . . . . . . . . . . . . . . . . . . . . . . . . . . . . . . . . . . . . . . . . . . . . . . 53
4.1.3 The Verbose Check Box . . . . . . . . . . . . . . . . . . . . . . . . . . . . . . . . . . . . . . . . . . . . . . 54
4.1.4 The Capable Resources Summary . . . . . . . . . . . . . . . . . . . . . . . . . . . . . . . . . . . . . . 54
4.1.5 The Constraints Column of the Constraints Table View . . . . . . . . . . . . . . . . . . . . . . 54
4.1.6 The Policy Column of the Constraints Table . . . . . . . . . . . . . . . . . . . . . . . . . . . . . . . 55
4.2 The Facts Table View . . . . . . . . . . . . . . . . . . . . . . . . . . . . . . . . . . . . . . . . . . . . . . . . . . . . . . . 56
4.2.1 The All Facts Check Box . . . . . . . . . . . . . . . . . . . . . . . . . . . . . . . . . . . . . . . . . . . . . . 56
4.3 Policy Debugger Use Cases . . . . . . . . . . . . . . . . . . . . . . . . . . . . . . . . . . . . . . . . . . . . . . . . . . 57
4.3.1 Use Case 1: Determining Why a Job is in a Waiting State . . . . . . . . . . . . . . . . . . . . 57
5 The Explorer Tree 59
5.1 The Orchestrate Server Object . . . . . . . . . . . . . . . . . . . . . . . . . . . . . . . . . . . . . . . . . . . . . . . . 59
5.1.1 The Orchestrate Server Info/Configuration Tab. . . . . . . . . . . . . . . . . . . . . . . . . . . . . 60
5.1.2 The Orchestrate Server Authentication Tab . . . . . . . . . . . . . . . . . . . . . . . . . . . . . . . 65
5.1.3 The Orchestrate Server Policies Tab. . . . . . . . . . . . . . . . . . . . . . . . . . . . . . . . . . . . . 67
Contents 5
Page 6

5.1.4 The Orchestrate Server Constraints/Facts Tab . . . . . . . . . . . . . . . . . . . . . . . . . . . . . 67
5.2 The Server Admin Object. . . . . . . . . . . . . . . . . . . . . . . . . . . . . . . . . . . . . . . . . . . . . . . . . . . . . 67
5.3 The Job Object. . . . . . . . . . . . . . . . . . . . . . . . . . . . . . . . . . . . . . . . . . . . . . . . . . . . . . . . . . . . . 68
5.3.1 Job Groups . . . . . . . . . . . . . . . . . . . . . . . . . . . . . . . . . . . . . . . . . . . . . . . . . . . . . . . . 68
5.3.2 The Job Info/Groups Tab. . . . . . . . . . . . . . . . . . . . . . . . . . . . . . . . . . . . . . . . . . . . . . 68
5.3.3 The JDL Editor Tab . . . . . . . . . . . . . . . . . . . . . . . . . . . . . . . . . . . . . . . . . . . . . . . . . . 78
5.3.4 The Job Library Editor Tab . . . . . . . . . . . . . . . . . . . . . . . . . . . . . . . . . . . . . . . . . . . . 79
5.3.5 The Job Policies Tab . . . . . . . . . . . . . . . . . . . . . . . . . . . . . . . . . . . . . . . . . . . . . . . . . 80
5.3.6 The Job Constraints/Facts Tab . . . . . . . . . . . . . . . . . . . . . . . . . . . . . . . . . . . . . . . . . 81
5.4 The Resource Object . . . . . . . . . . . . . . . . . . . . . . . . . . . . . . . . . . . . . . . . . . . . . . . . . . . . . . . . 81
5.4.1 Resource Groups. . . . . . . . . . . . . . . . . . . . . . . . . . . . . . . . . . . . . . . . . . . . . . . . . . . . 81
5.4.2 The Resource Info/Groups Tab . . . . . . . . . . . . . . . . . . . . . . . . . . . . . . . . . . . . . . . . . 82
5.4.3 The Provision Info Tab. . . . . . . . . . . . . . . . . . . . . . . . . . . . . . . . . . . . . . . . . . . . . . . 102
5.4.4 The Resource Log Tab . . . . . . . . . . . . . . . . . . . . . . . . . . . . . . . . . . . . . . . . . . . . . . 103
5.4.5 The Resource Policies Tab . . . . . . . . . . . . . . . . . . . . . . . . . . . . . . . . . . . . . . . . . . . 103
5.4.6 The Resource Health Debugger Tab. . . . . . . . . . . . . . . . . . . . . . . . . . . . . . . . . . . . 103
5.4.7 The Resource Constraints/Facts Tab . . . . . . . . . . . . . . . . . . . . . . . . . . . . . . . . . . . 104
5.5 The VM Host Object. . . . . . . . . . . . . . . . . . . . . . . . . . . . . . . . . . . . . . . . . . . . . . . . . . . . . . . . 104
5.5.1 The VM Host Info Tab . . . . . . . . . . . . . . . . . . . . . . . . . . . . . . . . . . . . . . . . . . . . . . . 104
5.5.2 The VM Host Policies Tab . . . . . . . . . . . . . . . . . . . . . . . . . . . . . . . . . . . . . . . . . . . . 108
5.5.3 The VM Host Health Debugger Tab . . . . . . . . . . . . . . . . . . . . . . . . . . . . . . . . . . . . 108
5.5.4 The VM Host Constraints/Facts Tab . . . . . . . . . . . . . . . . . . . . . . . . . . . . . . . . . . . . 108
5.5.5 The VM Host Action History Tab . . . . . . . . . . . . . . . . . . . . . . . . . . . . . . . . . . . . . . . 108
5.6 The Repository Object . . . . . . . . . . . . . . . . . . . . . . . . . . . . . . . . . . . . . . . . . . . . . . . . . . . . . . 109
5.6.1 Repository Groups. . . . . . . . . . . . . . . . . . . . . . . . . . . . . . . . . . . . . . . . . . . . . . . . . . 109
5.6.2 The Repository Info/Groups Tab . . . . . . . . . . . . . . . . . . . . . . . . . . . . . . . . . . . . . . . 109
5.6.3 The Repository Policies Tab . . . . . . . . . . . . . . . . . . . . . . . . . . . . . . . . . . . . . . . . . . 116
5.6.4 The Repository Health Debugger Tab . . . . . . . . . . . . . . . . . . . . . . . . . . . . . . . . . . . 116
5.6.5 The Repository Constraints/Facts Tab . . . . . . . . . . . . . . . . . . . . . . . . . . . . . . . . . . 117
5.6.6 The Repository Action History Tab . . . . . . . . . . . . . . . . . . . . . . . . . . . . . . . . . . . . . 117
5.7 The User Object . . . . . . . . . . . . . . . . . . . . . . . . . . . . . . . . . . . . . . . . . . . . . . . . . . . . . . . . . . . 117
5.7.1 User Groups . . . . . . . . . . . . . . . . . . . . . . . . . . . . . . . . . . . . . . . . . . . . . . . . . . . . . . 117
5.7.2 The User Info/Groups Tab . . . . . . . . . . . . . . . . . . . . . . . . . . . . . . . . . . . . . . . . . . . . 118
5.7.3 The User Policies Tab . . . . . . . . . . . . . . . . . . . . . . . . . . . . . . . . . . . . . . . . . . . . . . . 123
5.7.4 The User Health Debugger Tab. . . . . . . . . . . . . . . . . . . . . . . . . . . . . . . . . . . . . . . . 124
5.7.5 The User Constraints/Facts Tab . . . . . . . . . . . . . . . . . . . . . . . . . . . . . . . . . . . . . . . 124
5.7.6 The User Action History Tab . . . . . . . . . . . . . . . . . . . . . . . . . . . . . . . . . . . . . . . . . . 124
5.8 Other Displayed Objects . . . . . . . . . . . . . . . . . . . . . . . . . . . . . . . . . . . . . . . . . . . . . . . . . . . . 124
5.8.1 The Policy Object. . . . . . . . . . . . . . . . . . . . . . . . . . . . . . . . . . . . . . . . . . . . . . . . . . . 125
5.8.2 Computed Fact Objects . . . . . . . . . . . . . . . . . . . . . . . . . . . . . . . . . . . . . . . . . . . . . . 125
5.8.3 Event Objects . . . . . . . . . . . . . . . . . . . . . . . . . . . . . . . . . . . . . . . . . . . . . . . . . . . . . 125
5.8.4 Metrics . . . . . . . . . . . . . . . . . . . . . . . . . . . . . . . . . . . . . . . . . . . . . . . . . . . . . . . . . . . 125
novdocx (en) 13 May 2009
6 The Health Debugger 127
6.1 The Constraints Table Panel . . . . . . . . . . . . . . . . . . . . . . . . . . . . . . . . . . . . . . . . . . . . . . . . . 127
6.1.1 The Match Context Area . . . . . . . . . . . . . . . . . . . . . . . . . . . . . . . . . . . . . . . . . . . . . 128
6.1.2 The Verbose Check Box . . . . . . . . . . . . . . . . . . . . . . . . . . . . . . . . . . . . . . . . . . . . . 129
6.1.3 The Capable Objects Summary. . . . . . . . . . . . . . . . . . . . . . . . . . . . . . . . . . . . . . . . 129
6.1.4 The Constraints Column of the Constraints Table View . . . . . . . . . . . . . . . . . . . . . 129
6.2 The Facts Table View . . . . . . . . . . . . . . . . . . . . . . . . . . . . . . . . . . . . . . . . . . . . . . . . . . . . . . 130
6.2.1 The All Facts Check Box . . . . . . . . . . . . . . . . . . . . . . . . . . . . . . . . . . . . . . . . . . . . . 131
6.3 Health Debugger Use Cases . . . . . . . . . . . . . . . . . . . . . . . . . . . . . . . . . . . . . . . . . . . . . . . . . 131
6.3.1 Use Case 1: ?? . . . . . . . . . . . . . . . . . . . . . . . . . . . . . . . . . . . . . . . . . . . . . . . . . . . . 132
6 PlateSpin Orchestrate 2.0 Development Client Reference
Page 7

A Grid Object Health Monitoring 133
A.1 Health Facts . . . . . . . . . . . . . . . . . . . . . . . . . . . . . . . . . . . . . . . . . . . . . . . . . . . . . . . . . . . . . . 133
A.2 Health Events. . . . . . . . . . . . . . . . . . . . . . . . . . . . . . . . . . . . . . . . . . . . . . . . . . . . . . . . . . . . . 135
B Understanding Policy Elements 137
B.1 Constraints . . . . . . . . . . . . . . . . . . . . . . . . . . . . . . . . . . . . . . . . . . . . . . . . . . . . . . . . . . . . . . . 137
B.2 Facts . . . . . . . . . . . . . . . . . . . . . . . . . . . . . . . . . . . . . . . . . . . . . . . . . . . . . . . . . . . . . . . . . . . 137
B.3 Computed Facts. . . . . . . . . . . . . . . . . . . . . . . . . . . . . . . . . . . . . . . . . . . . . . . . . . . . . . . . . . . 137
C Events 141
C.1 Event Object Visualization and Management in the Development Client . . . . . . . . . . . . . . . 141
C.1.1 Deploying a New Rule-Based Event . . . . . . . . . . . . . . . . . . . . . . . . . . . . . . . . . . . . 142
C.1.2 Deploying a Pre-written Rule-Based Event . . . . . . . . . . . . . . . . . . . . . . . . . . . . . . . 142
C.1.3 Undeploying an Event . . . . . . . . . . . . . . . . . . . . . . . . . . . . . . . . . . . . . . . . . . . . . . . 142
C.1.4 The Event Editor . . . . . . . . . . . . . . . . . . . . . . . . . . . . . . . . . . . . . . . . . . . . . . . . . . . 143
C.2 The Event Debugger . . . . . . . . . . . . . . . . . . . . . . . . . . . . . . . . . . . . . . . . . . . . . . . . . . . . . . . 143
C.2.1 The Constraints Table . . . . . . . . . . . . . . . . . . . . . . . . . . . . . . . . . . . . . . . . . . . . . . . 144
C.2.2 The Facts Table. . . . . . . . . . . . . . . . . . . . . . . . . . . . . . . . . . . . . . . . . . . . . . . . . . . . 145
C.3 Understanding the PlateSpin Orchestrate Events System. . . . . . . . . . . . . . . . . . . . . . . . . . . 146
C.3.1 Event Notification. . . . . . . . . . . . . . . . . . . . . . . . . . . . . . . . . . . . . . . . . . . . . . . . . . . 147
C.3.2 Built-in Events . . . . . . . . . . . . . . . . . . . . . . . . . . . . . . . . . . . . . . . . . . . . . . . . . . . . . 147
C.3.3 Rule-based Events . . . . . . . . . . . . . . . . . . . . . . . . . . . . . . . . . . . . . . . . . . . . . . . . . 148
novdocx (en) 13 May 2009
D Provisioning Actions and History 151
D.1 What are Provisioning Actions? . . . . . . . . . . . . . . . . . . . . . . . . . . . . . . . . . . . . . . . . . . . . . . . 151
D.2 How Actions Are Displayed in the Development Client . . . . . . . . . . . . . . . . . . . . . . . . . . . . . 151
D.2.1 Action History in Monitor Views of the Development Client . . . . . . . . . . . . . . . . . . . 151
D.2.2 Action History in Admin Views of the Development Client. . . . . . . . . . . . . . . . . . . . 152
E Documentation Updates 155
E.1 August 28, 2009 . . . . . . . . . . . . . . . . . . . . . . . . . . . . . . . . . . . . . . . . . . . . . . . . . . . . . . . . . . . 155
E.2 August 7, 2009 . . . . . . . . . . . . . . . . . . . . . . . . . . . . . . . . . . . . . . . . . . . . . . . . . . . . . . . . . . . . 155
E.3 July 20, 2009 . . . . . . . . . . . . . . . . . . . . . . . . . . . . . . . . . . . . . . . . . . . . . . . . . . . . . . . . . . . . . 155
E.4 June 17, 2009 (2.0.2 Release). . . . . . . . . . . . . . . . . . . . . . . . . . . . . . . . . . . . . . . . . . . . . . . . 156
Contents 7
Page 8

novdocx (en) 13 May 2009
8 PlateSpin Orchestrate 2.0 Development Client Reference
Page 9

About This Guide
novdocx (en) 13 May 2009
This PlateSpin Orchestrate Development Client Reference introduces the Development Client of
PlateSpin
provides an introductory overview of the Orchestrate Development Client interface. The guide is
organized as follows:
Chapter 1, “Layout,” on page 11
Chapter 2, “Orchestrate Development Client Menus and Tools,” on page 15
Chapter 3, “The PlateSpin Orchestrate Job Scheduler,” on page 25
Chapter 4, “The Policy Debugger,” on page 51
Chapter 5, “The Explorer Tree,” on page 59
Appendix A, “Grid Object Health Monitoring,” on page 133
Appendix B, “Understanding Policy Elements,” on page 137
Appendix C, “Events,” on page 141
Appendix D, “Provisioning Actions and History,” on page 151
Appendix E, “Documentation Updates,” on page 155
Audience
This book is intended for data center managers and IT or Operations administrators. It assumes that
users of the product have the following background:
®
Orchestrate from Novell®, the product’s basic administration environment. The guide
General understanding of network operating environments and systems architecture.
Knowledge of basic UNIX* shell commands and text editors.
Feedback
We want to hear your comments and suggestions about this manual and the other documentation
included with this product. Please use the User Comments feature at the bottom of each page of the
online documentation, or go to www.novell.com/documentation/feedback.html (http://
www.novell.com/documentation/feedback.html) and enter your comments there.
Documentation Updates
For the most recent version of this Development Client Reference, visit the PlateSpin Orchestrate 2.0
documentation Web site (http://www.novell.com/documentation/pso_orchestrate20/).
Documentation Conventions
In Novell documentation, a greater-than symbol (>) is used to separate actions within a step and
items in a cross-reference path.
®
A trademark symbol (
trademark.
, TM, etc.) denotes a Novell trademark. An asterisk (*) denotes a third-party
About This Guide 9
Page 10

When a single pathname can be written with a backslash for some platforms or a forward slash for
other platforms, the pathname is presented with a backslash. Users of platforms that require a
forward slash, such as Linux* or UNIX, should use forward slashes as required by your software.
novdocx (en) 13 May 2009
10 PlateSpin Orchestrate 2.0 Development Client Reference
Page 11
1
Layout
Both the grid administrator and the job developer need to have access to and use the PlateSpin®
Orchestrate Development Client. The administrator needs to use the console to perform any
management functions, such as creating user accounts and managing Orchestrator Server activities.
The developer uses the console to access the JDL editor for creating or modifying jobs and policies.
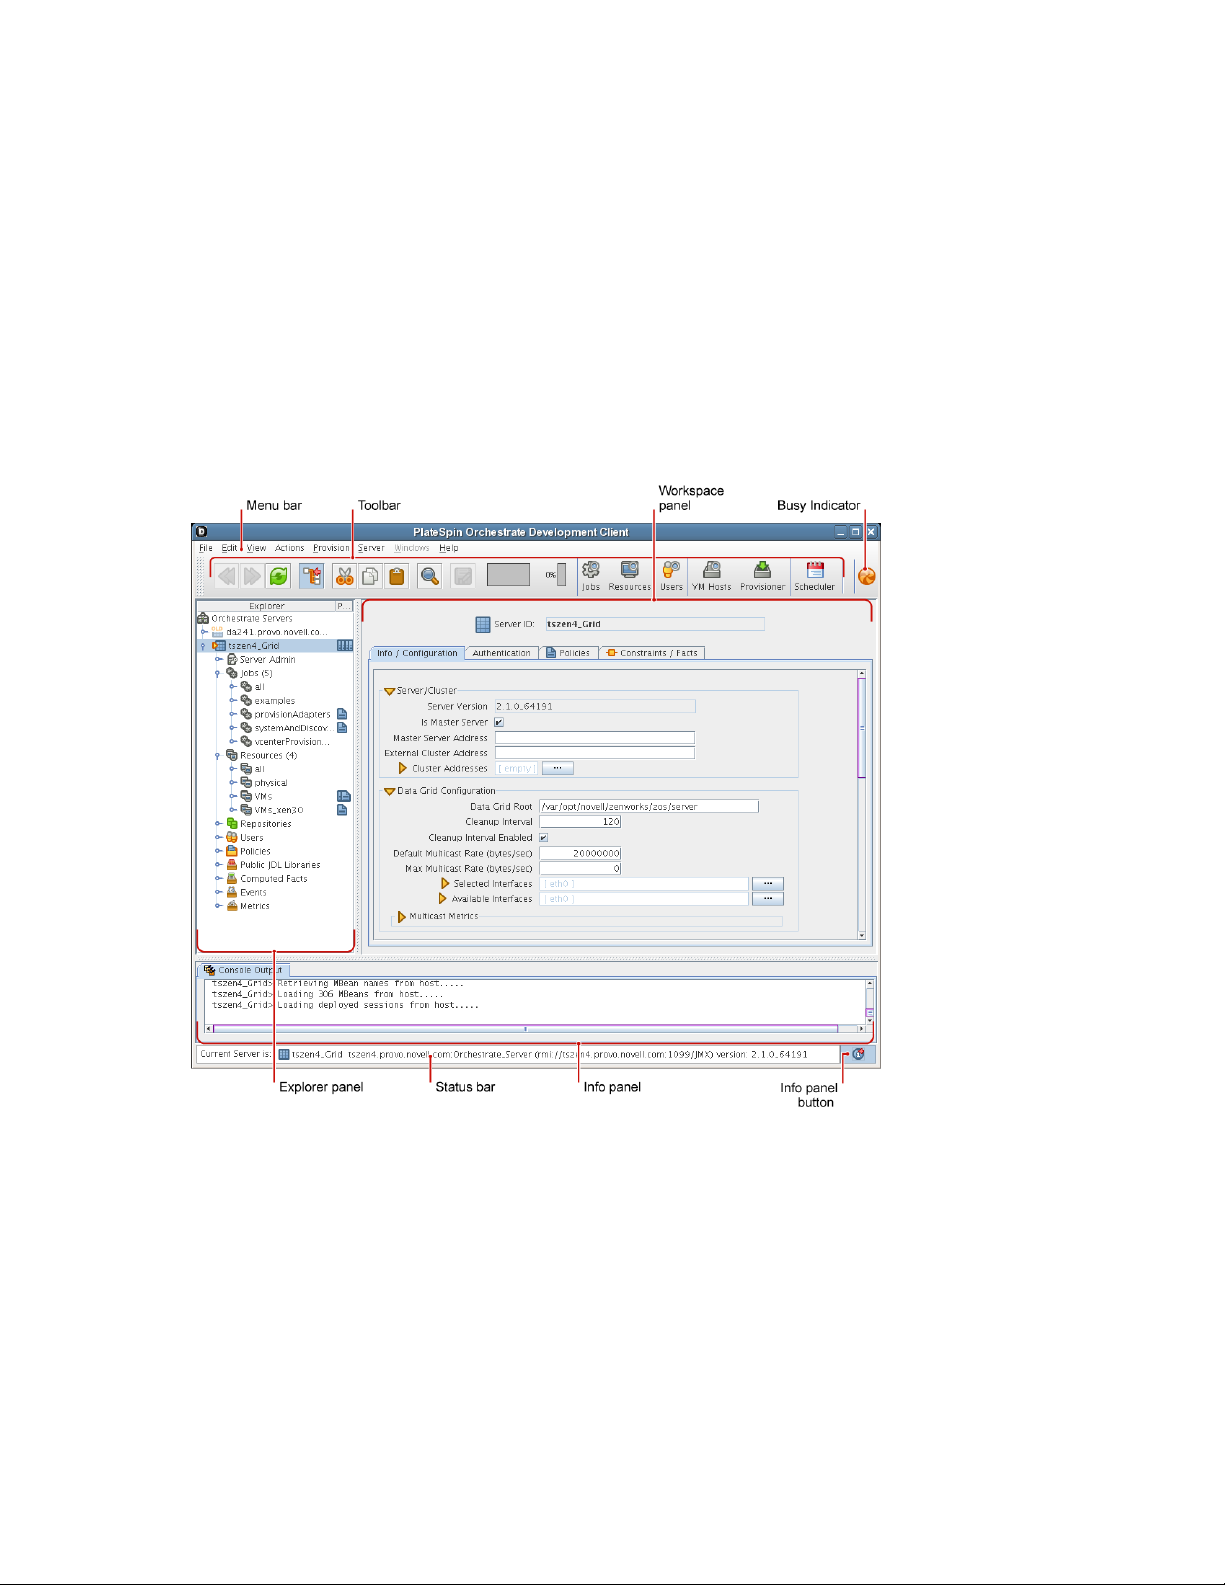
The following figure shows the general areas on the console interface that are referred to in this
guide.
Figure 1-1 The PlateSpin Orchestrate Development Client with Parts Identified
novdocx (en) 13 May 2009
1
The following chart describes the functional areas of the main PlateSpin Orchestrate Development
Client display.
Layout
11
Page 12

Table 1-1 Detailed Description of Console Areas
Area Description
Menu bar Provides operations categorized under menus such as File, Edit, View, Grid,
Server, Windows, and Help.
The File menu lets you save any changes you’ve made or exit the
console.
The Edit menu lets cut, copy, and paste items and choose general and
server preferences for console.
The View menu lets you manipulate the display of the different
components of the console and refresh the Explorer and Workspace
panels.
The Actions menu lets you launch specific tools that create and delete
users or user groups, computing resources, jobs, policies, and
computed facts.
The Server menu lets you start a local server, log in to the server, create
and display logs for logged in servers, log out from the server, and shut
down the server.
The Windows menu lets you select console windows to display when
you have more than one console window open. You can open the
Explorer panel and the two tabs of the Info panel (<Orchestrator> Log
and Console Output) in their own windows by right-clicking the tab and
choosing Open in window in the pop-up menu.
The Help menu provides access to the About box for the console. It also
provides a link to ZENworks Orchestrator documentation on the Web.
novdocx (en) 13 May 2009
Main toolbar The main toolbar has buttons for executing common tasks. The basic tasks
are Go Back, Go Forward, Refresh the view, Hide or Show the Explorer
Panel, Cut, Copy, Paste, and Save changes in workspace view and Open the
Find Dialog.
The toolbar also includes buttons that open monitoring views for Jobs,
Resources, and Users.
To the far left of the toolbar, a pinwheel icon indicates when the console is
busy.
Explorer panel The Explorer panel displays a hierarchical tree. The tree lets you navigate to
different objects; you can click items in the tree to see their details. For
example, you can display computing resources for a selected grid. When you
click Computing Resources in the tree, its details appear in the Workspace
panel with a list of active computing resources. You can edit the Computing
Resource attributes in the workspace panel.
Workspace panel The Workspace panel displays a detailed view for an item you select in the
Explorer panel. For example, if you select a computing resource under
physical in the Explorer panel, the Workspace panel view changes to show
the details for that resource. You can edit the properties of an Orchestrator
object in the views displayed in the Workspace panel.
Info panel The Info panel displays a variety of information, such as validation and error
messages, log files, and query results. You can display or hide the Info panel
by clicking the Info panel button in the Status bar.
12 PlateSpin Orchestrate 2.0 Development Client Reference
Page 13

Area Description
Status bar The status bar displays general identity information about the Orchestrator
Server where you are logged in.
For information about launching the console and using it for the first time, see “Walkthrough:
Launching the PlateSpin Orchestrate Development Client”in the PlateSpin Orchestrate 2.0
Installation and Configuration Guide.
For detailed information about the components, icons, and usage of the PlateSpin Orchestrate
Development Client, see Chapter 2, “Orchestrate Development Client Menus and Tools,” on
page 15.
novdocx (en) 13 May 2009
Layout 13
Page 14

novdocx (en) 13 May 2009
14 PlateSpin Orchestrate 2.0 Development Client Reference
Page 15

2
Orchestrate Development Client
novdocx (en) 13 May 2009
Menus and Tools
A number of operations are available from the PlateSpin Orchestrate Development Client from
®
Novell
2.1 The Operations Menu Bar
The Operations Menu Bar in the Orchestrate Development Client provides options that help you to
create and administer objects in the Explorer Tree.
and can be accessed from its menu bar and toolbar.
Section 2.1, “The Operations Menu Bar,” on page 15
Section 2.2, “The Orchestrate Development Client Toolbar,” on page 23
Section 2.1.1, “File,” on page 15
Section 2.1.2, “Edit,” on page 16
Section 2.1.3, “View,” on page 19
Section 2.1.4, “Actions,” on page 19
Section 2.1.5, “Provision,” on page 19
Section 2.1.6, “Server,” on page 21
Section 2.1.7, “Windows,” on page 23
2
Section 2.1.8, “Help,” on page 23
2.1.1 File
The File menu (Alt+F) provides keyboard and mouse accessible methods for users to save changes
or to exit the application.
“Save” on page 15
“Exit” on page 15
Save
The Save operation provides a mouse and keyboard (File > Ctrl+S) accessible method for users to
save any changes made in the visible view.
Exit
The exit operation provides a mouse and keyboard (File > Alt+X) accessible method for users to
close all server connections and to exit the Orchestrate Development Client application.
Orchestrate Development Client Menus and Tools
15
Page 16

2.1.2 Edit
The Edit menu (Alt+E) provides keyboard and mouse accessible methods for users to save changes
or to exit the application.
“Undo Addition” on page 16
“Redo” on page 16
“Cut” on page 16
“Copy” on page 16
“Paste” on page 16
“Find” on page 17
“Find Next” on page 17
“Find Previous” on page 17
“Enter Find String” on page 17
“Load Text” on page 17
“Save Text” on page 17
novdocx (en) 13 May 2009
“Preferences” on page 17
Undo Addition
The Undo operation provides a mouse-accessible method for users to undo the action they have just
performed in the Orchestrate Development Client. The operation can also be executed from the
keyboard (Ctrl+Z).
Redo
The Redo operation provides a mouse-accessible method for users to redo the action they have just
performed in the Orchestrate Development Client. The operation can also be executed from the
keyboard (Ctrl+Y).
Cut
The Cut operation provides a mouse-accessible method for users to cut the selected object and move
it to the clipboard. The operation can also be executed from the keyboard (Ctrl+X).
Copy
The Copy operation provides a mouse-accessible method for users to copy the selected object to the
clipboard. The operation can also be executed from the keyboard (Ctrl+C).
Paste
The Paste operation provides a mouse-accessible method for users to paste the contents of the
clipboard to the desired location. The operation can also be executed from the keyboard (Ctrl+V).
16 PlateSpin Orchestrate 2.0 Development Client Reference
Page 17

Find
The Exit operation provides a mouse-accessible method for users to open the Find and Replace
dialog box, where they can search for and replace (if necessary) editable strings located in logs and
editing views (for example, the Policy Editor).
Figure 2-1 The Find and Replace Dialog Box Invoked From the Policy Editor
The operation can also be executed from the keyboard (Ctrl+F).
Find Next
novdocx (en) 13 May 2009
The Find Next operation provides a mouse-accessible method for users to find the next occurrence
of the string they previously searched for. The operation can also be executed from the keyboard
(F3).
Find Previous
The Find Previous operation provides a mouse-accessible method for users to find the previous
occurrence of the string they searched for. The operation can also be executed from the keyboard
(Shift+F3).
Enter Find String
The Enter Find String operation provides a mouse-accessible method for users to load the text of the
string they want to search for. The operation can also be executed from the keyboard (Ctrl+E).
Load Text
The Load Text operation provides a method for users to load text from an existing file into the open,
editable view. When selected, the operation opens a browse dialog box where the file can be
selected.
Save Text
The Save Text operation provides a method for users to save text in an editable, active view to a file.
When selected, the operation opens a save dialog box where you can browse to a network location
where you want to save the file. By default, the file is named according to the view and the context
within which you are viewing it. You can change the name of the file when you save it.
Preferences
The Preferences operation provides a method for users to change the preferences for the Orchestrate
Development Client display. When selected, the operation opens the Orchestrate Development
Client Preferences dialog box.
Orchestrate Development Client Menus and Tools 17
Page 18
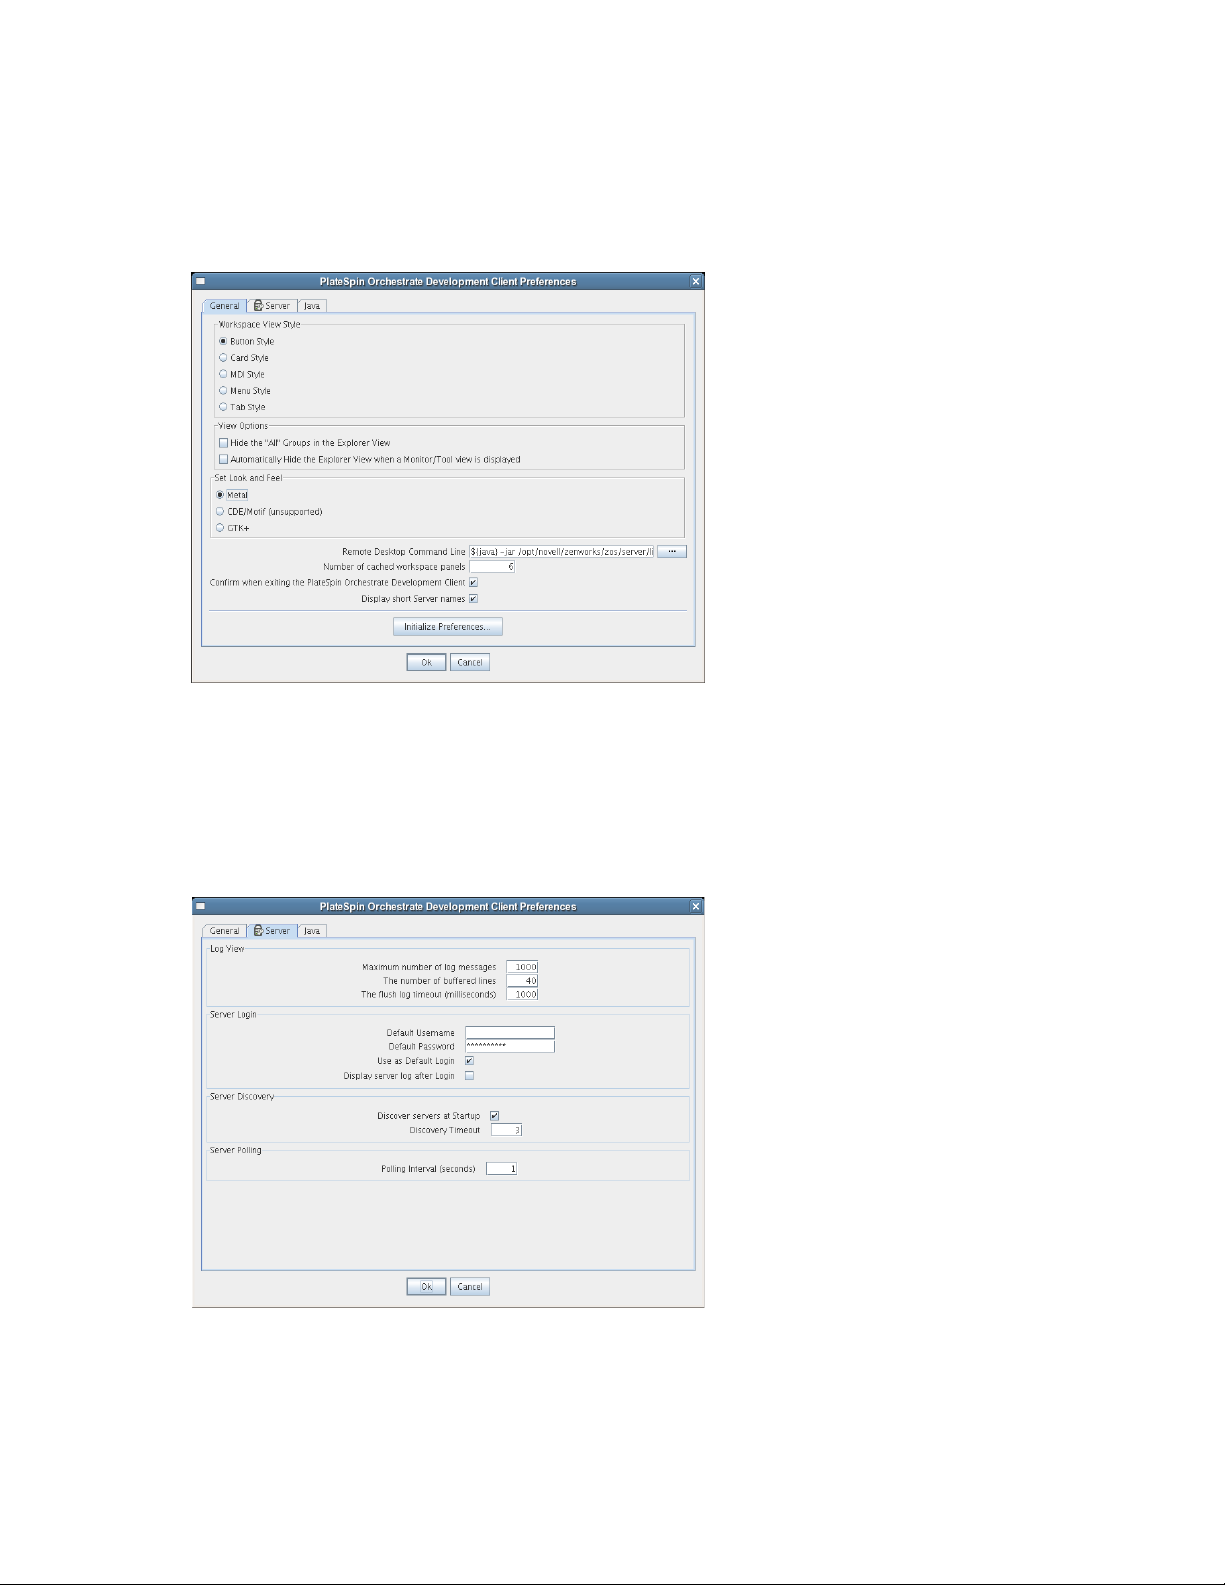
The dialog box has three tabbed pages.
General Page
Figure 2-2 General Page of the Orchestrate Development Client Preferences
novdocx (en) 13 May 2009
Preference settings on this page that you can change are self-explanatory. If you click Initialize
Preferences, the preference settings (except Look and Feel settings) are initialized to installation
values.
Server Page
Figure 2-3 Server Page of the Orchestrate Development Client Preferences
Preference settings on this page that you can change are self-explanatory.
18 PlateSpin Orchestrate 2.0 Development Client Reference
Page 19
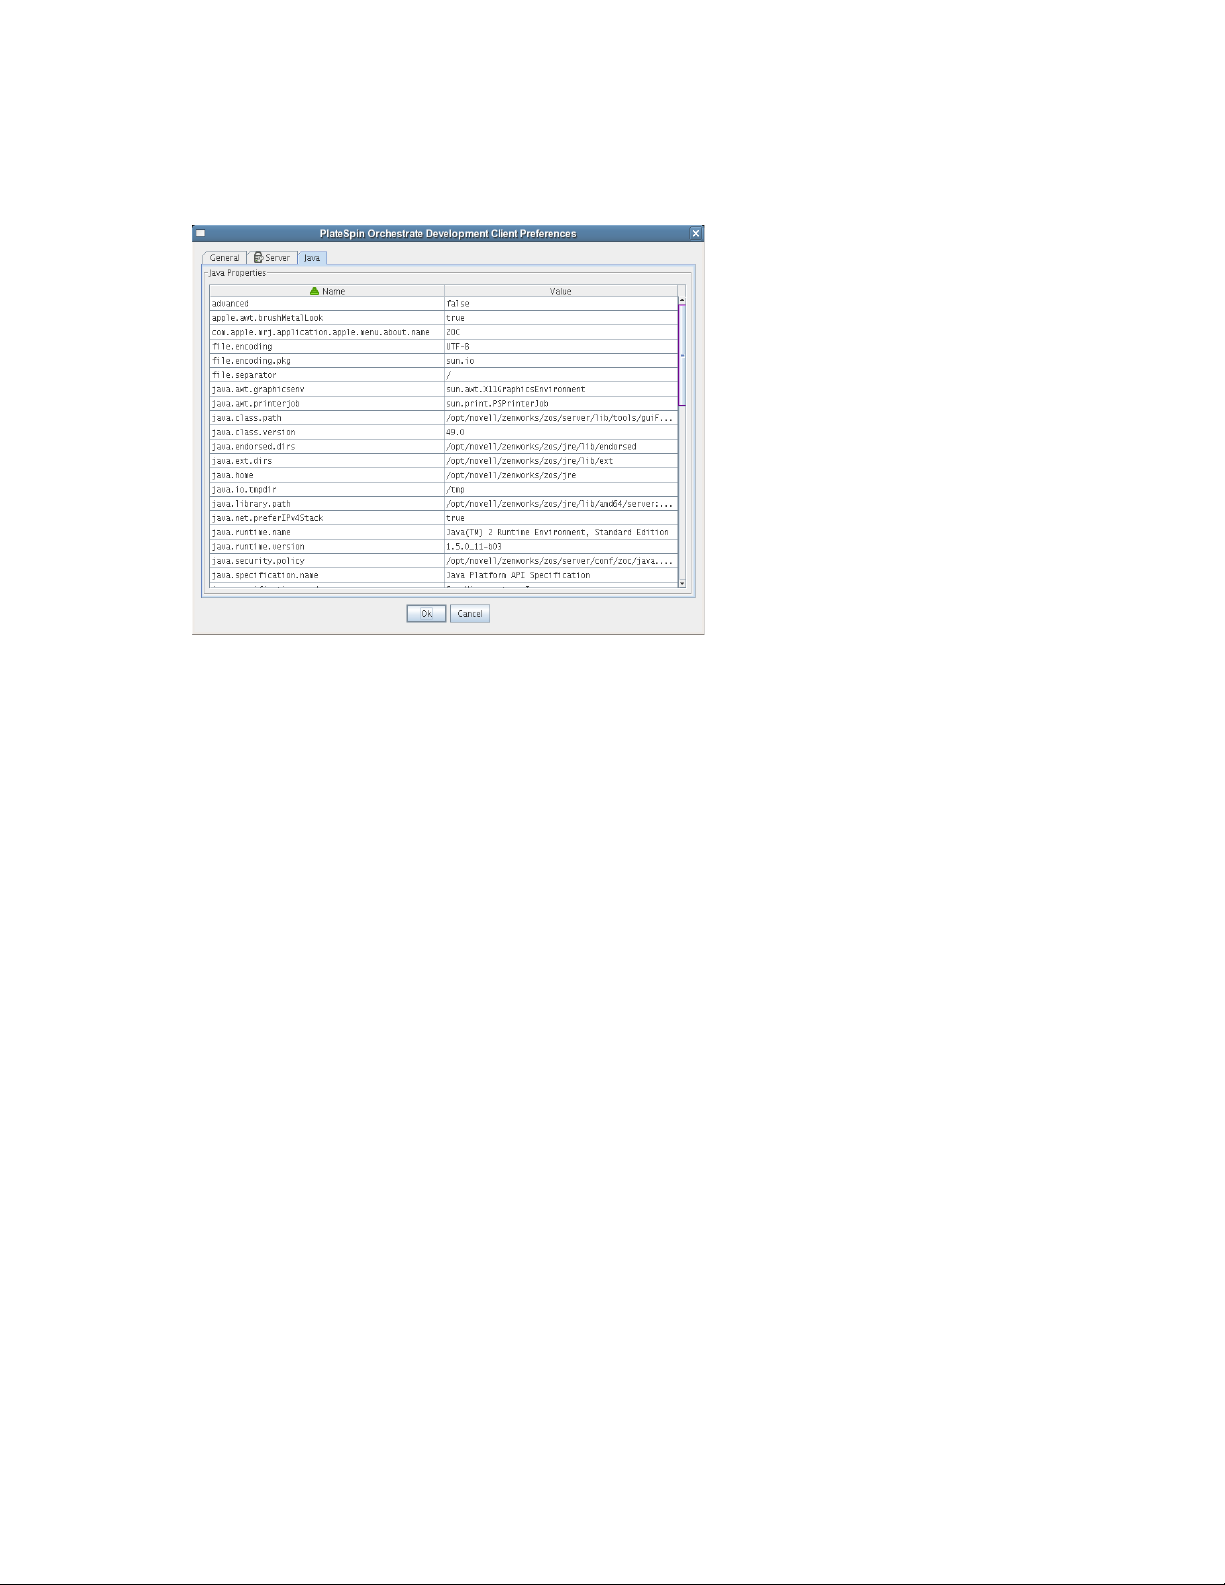
Java Properties Page
Figure 2-4 The Java Properties Page of the Orchestrate Development Client Preferences
novdocx (en) 13 May 2009
This page lists the Java property names and values that Novell uses to render the Orchestrate
Development Client interface in Java Swing. The list is for your information only.
2.1.3 View
The View menu includes various operations that let you manipulate the Orchestrate Development
Client display of the various PlateSpin Orchestrate component views. The function of the options
under this menu are self explanatory, and are a compilation of view operations that are also available
from the Operations toolbar.
For more information about the View operations, see Section 2.2, “The Orchestrate Development
Client Toolbar,” on page 23.
2.1.4 Actions
The multiple operations listed as options under the Actions menu provide a quick way for you to
perform operations that can also be performed (generally by right-clicking an object) in the Explorer
Vie w.
For example, if you select a Create option from the Actions menu, the create dialog remains open
after you create each object. Here you can repeatedly create new objects in the dialog, pressing OK
or Create after each is created. Similarly, in the dialog boxes of some operations in the Actions
menu, you can select many objects and delete them at the same time.
2.1.5 Provision
The Provision menu is added to the menu bar only if you have installed Virtual Machine
Management. The multiple operations listed in the menu include two of the provisioning actions that
you can execute by right-clicking a VM object in the Explorer Tree.
Orchestrate Development Client Menus and Tools 19
Page 20
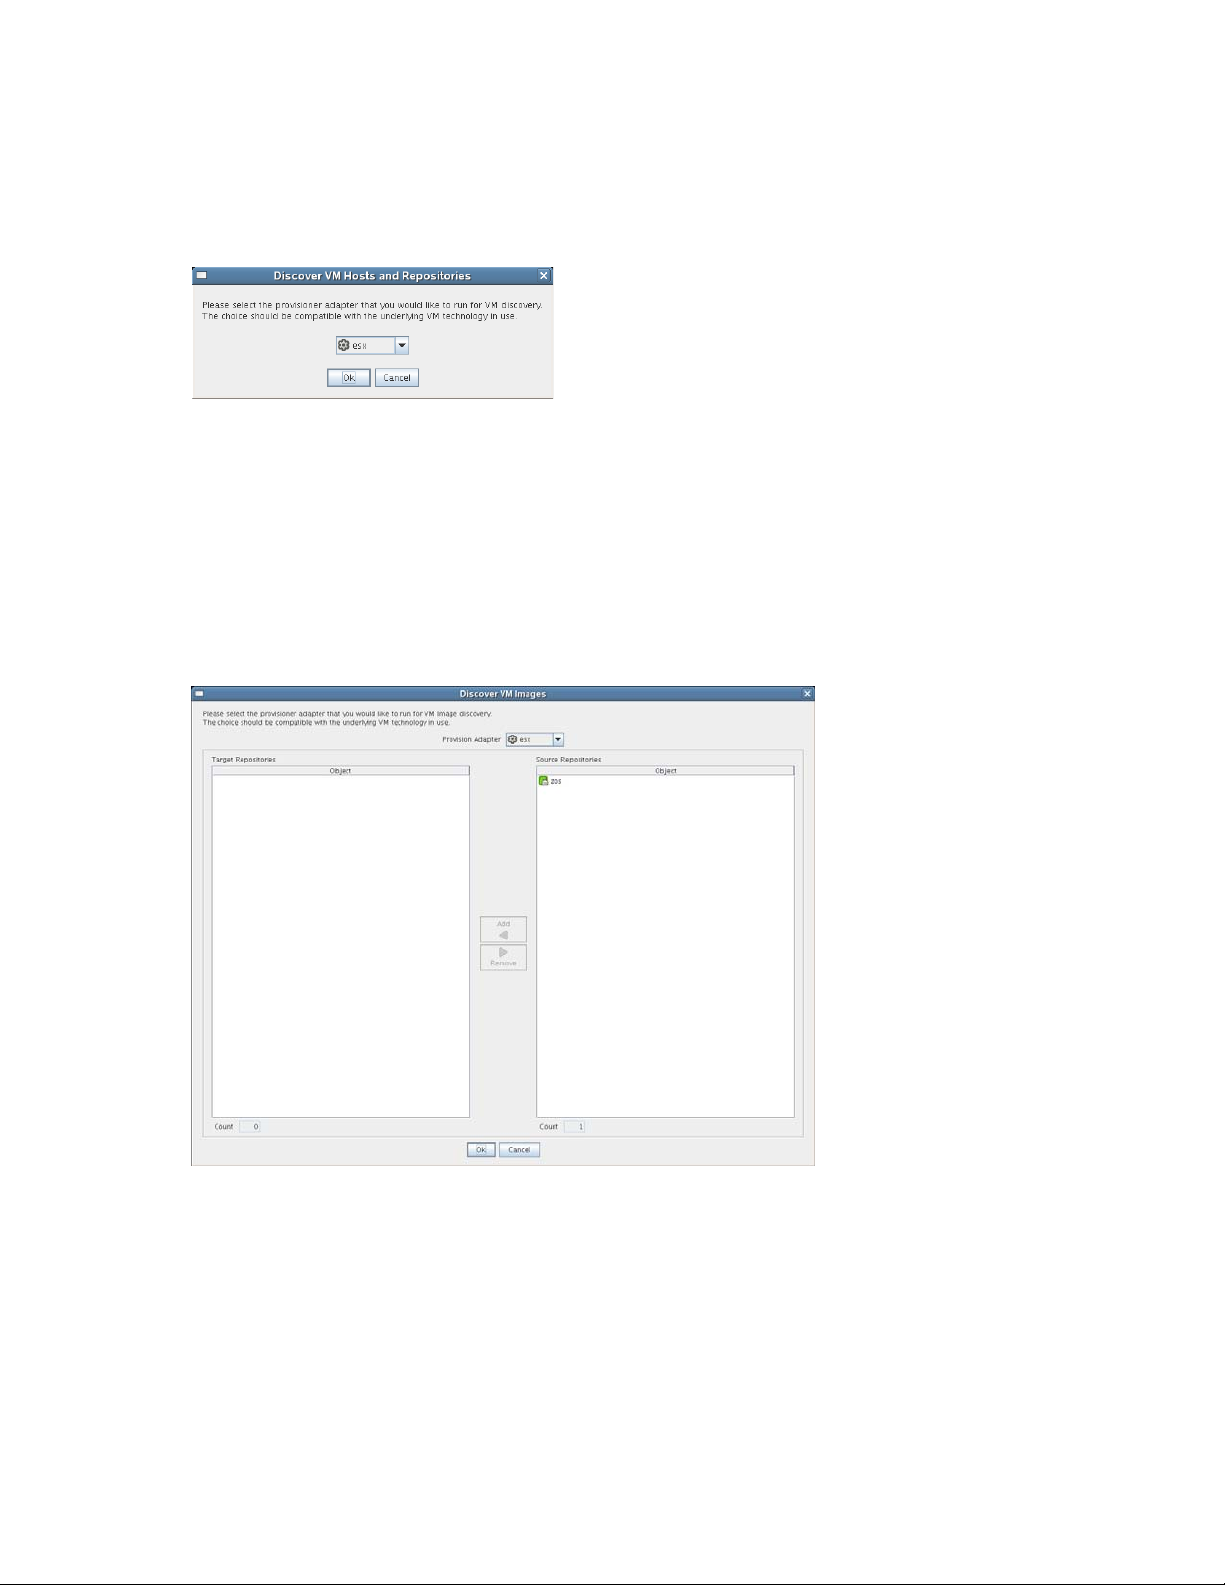
Discover VM Hosts & Repositories
When you select this option, the Discover VM Hosts and Repositories dialog box is displayed.
Figure 2-5 VM Discovery Dialog Box
novdocx (en) 13 May 2009
Using this dialog box, you can select a provisioning adapter (
xen30
) that discovers all VM host machines where the PlateSpin Orchestrate Agent is installed and
esx, hyperv, vcenter, vmserver
creates objects in the model. The provisioning adapter also discovers the VM Repositories where
VM hosts reside.
Discover VM Images
When you select this option, the Discover VM Images dialog box is displayed.
Figure 2-6 VM Images Discover Dialog Box
, or
Using this dialog box, you can select a provisioning adapter (
xen30
) that discovers all VM images and creates objects in the model.
Other Provisioning Operations
The other operations listed in the menu are self-explanatory.
Start VM Hosts
Shutdown VM Hosts
20 PlateSpin Orchestrate 2.0 Development Client Reference
esx, hyperv, vcenter, vmserver
, or
Page 21
Shutdown VMs
Resync VM’s State
Resync VMs’s Host State
Reset State of all VMs
2.1.6 Server
The Server menu lets you start a local server, log in to the server, create and display logs for logged
in servers, log out from the server, and shut down a server.
“Select Server” on page 21
“Discover Servers” on page 21
“Shutdown Server” on page 21
“Login” on page 21
“Logout” on page 22
“Display Log” on page 22
“Create Custom Log” on page 22
novdocx (en) 13 May 2009
Select Server
The Select Server operation lets you select one of the Orchestrate Servers in your grid to log onto.
When you select a server, you are required to log on. This operation accomplishes the same thing as
selecting a server object from the Explorer Tree.
Discover Servers
The Discover Servers operation lets you launch the discovery process for servers. This is the same
process that initiates (if so chosen in your server preferences) when the Orchestrate Development
Client starts.
Shutdown Server
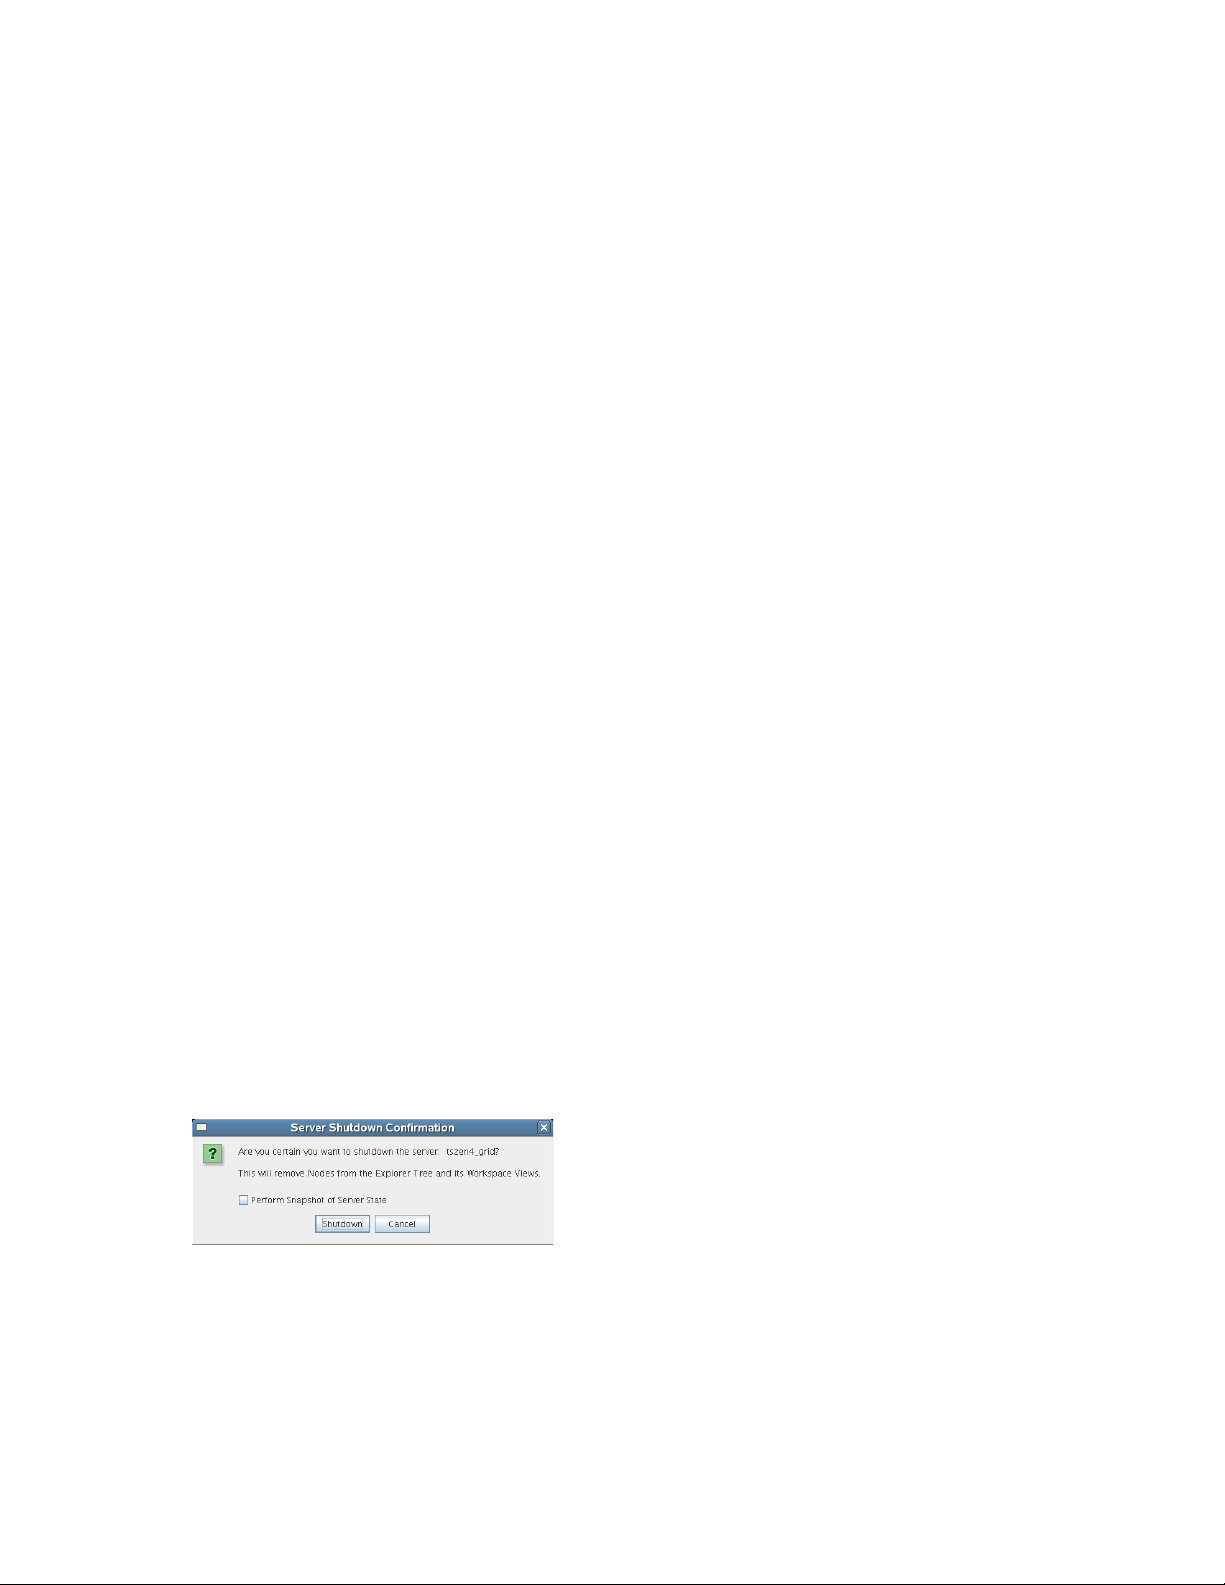
The Shutdown Server operation lets you shut down the current, logged on Orchestrate Server. The
shutdown dialog box also lets you create a snapshot of the server state when you shut down.
Figure 2-7 The Server Shutdown Dialog Box
Login
The Login operation lets you establish a remote connection to another Orchestrate Server. The server
IP address is required for the login. When you enter the IP address, you need to provide the
username and password for the server where you are logging on.
Orchestrate Development Client Menus and Tools 21
Page 22
Logout
The Logout operation lets you log out of the current, logged on Orchestrate Server without exiting
the Orchestrate Development Client. Logging out removes the server’s nodes from the Explorer
Tree and its workspace views.
Display Log
The Display Log operation displays the default server log for the current, logged on Orchestrate
Server. The display is in the Information window located at the bottom of the Orchestrate
Development Client. The server log file is also located by default in the
zenworks/zos/server/logs
Figure 2-8 Server Log Opened in Information Window of the Orchestrate Development Client
directory.
/var/opt/novell/
novdocx (en) 13 May 2009
When a log is displayed, you can right-click its tab to further direct the actions of the display. You
can pause logging in the window, copy the log to the clipboard, clear its contents, undock the log
display as a new window, or remove it from the Information window.
If you right-click on the log display, all of the default editing capabilities of the Orchestrate
Development Client are available for your use inside the window. For more information, see
Section 2.1.2, “Edit,” on page 16.
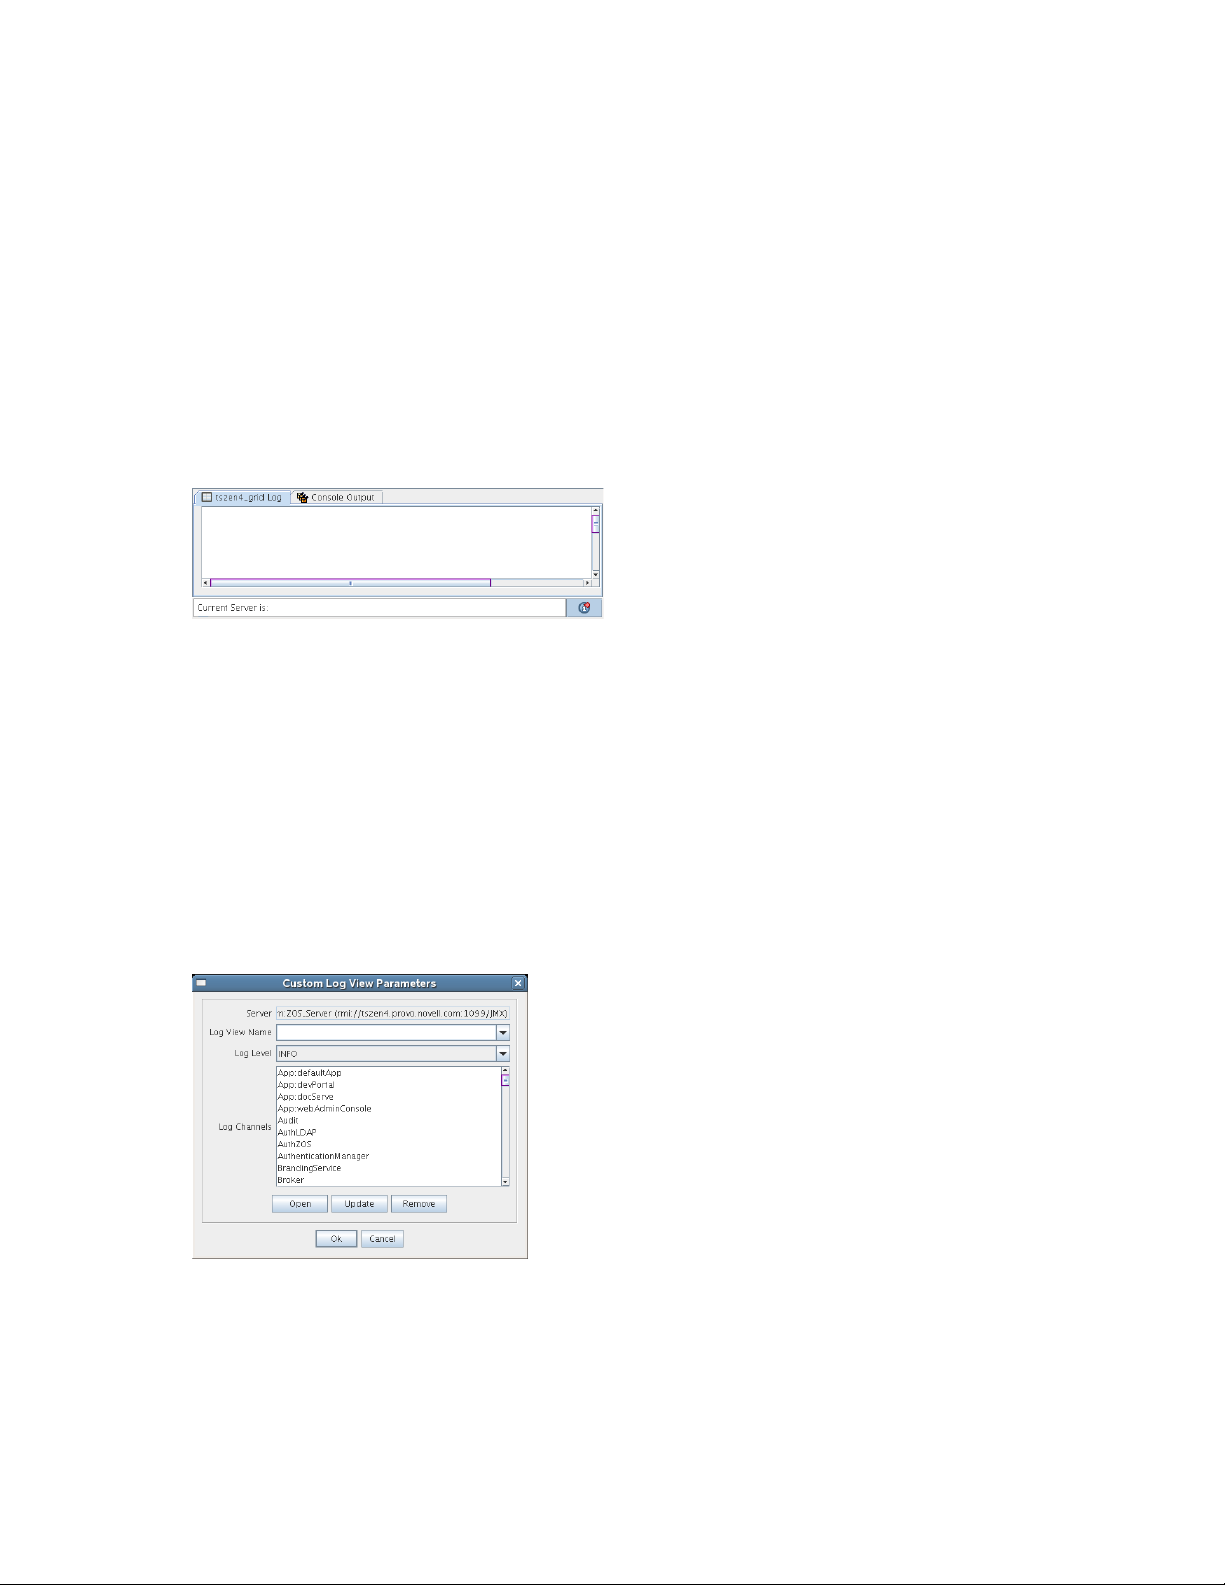
Create Custom Log
The Create Custom Log operation opens the Custom Log View Parameters dialog box.
Figure 2-9 The Custom Log View Parameters Dialog Box
By enabling a custom log, you can monitor various components of the Orchestrate Server. For
example, you can view debugging information for the Audit facility. You can create, update, or
remove a log view from the dialog box. You can open a custom view in the Information window by
selecting Open in the dialog box.
22 PlateSpin Orchestrate 2.0 Development Client Reference
Page 23

Log View Name: Enter the name of the log view. This will be displayed on a tab in the log display
panel.
NOTE: You can enter only alphanumeric characters and spaces in the Log View Name field.
Log Level: From the drop-down list, select the minimum log level for the log view. The log
messages included in the custom view will be of this level and those of greater severity.
Log Channels: A log channel provides log information specific to an PlateSpin Orchestrate
component or facility, such as the Audit facility.
When the custom view is displayed, you can right-click its tab to further direct the actions of the
display. You can pause logging in the window, copy the log to the clipboard, clear its contents,
undock the log display as a new window, or remove it from the Information window.
If you right-click on the log display, all of the default editing capabilities of the Orchestrate
Development Client are available for your use inside the window. For more information, see
Section 2.1.2, “Edit,” on page 16.
2.1.7 Windows
novdocx (en) 13 May 2009
When you right-click various views and panels in the Orchestrate Development Client, you can
select the Open in Window option to open these views and panels in separate windows. This allows
you the perspective you sometimes need when working with PlateSpin Orchestrate objects in
conjunction with one another. The Windows menu lets you toggle between the various views or
panels that are open. You can also choose to Show All, Hide All, or Close All of these windows.
When a given window is open, its fields and selectable dialogs remain functional so that you can
perform object operations or text editing as you would when these views or panels are docked
normally to the Orchestrate Development Client.
2.1.8 Help
From the Help menu, you can access a link to the online PlateSpin Orchestrate documentation
(available in
view its version number, its license expiration date, and a list of its current management pack
capabilities (for example, the Virtual Machine Management capability).
.html
or
.pdf
format) or you can open the About box for the product, where you can
2.2 The Orchestrate Development Client Toolbar
The Orchestrate Development Client Toolbar includes several iconic buttons that let you perform
command tasks in the Development Client workspace views and the Explorer Tree. The table below
lists the functions of these buttons.
Table 2-1 Tool Buttons from the Orchestrate Development Client Toolbar
Tool Icon Tool Name Tool Function
Back Go back to the previous workspace view seen.
Orchestrate Development Client Menus and Tools 23
Page 24
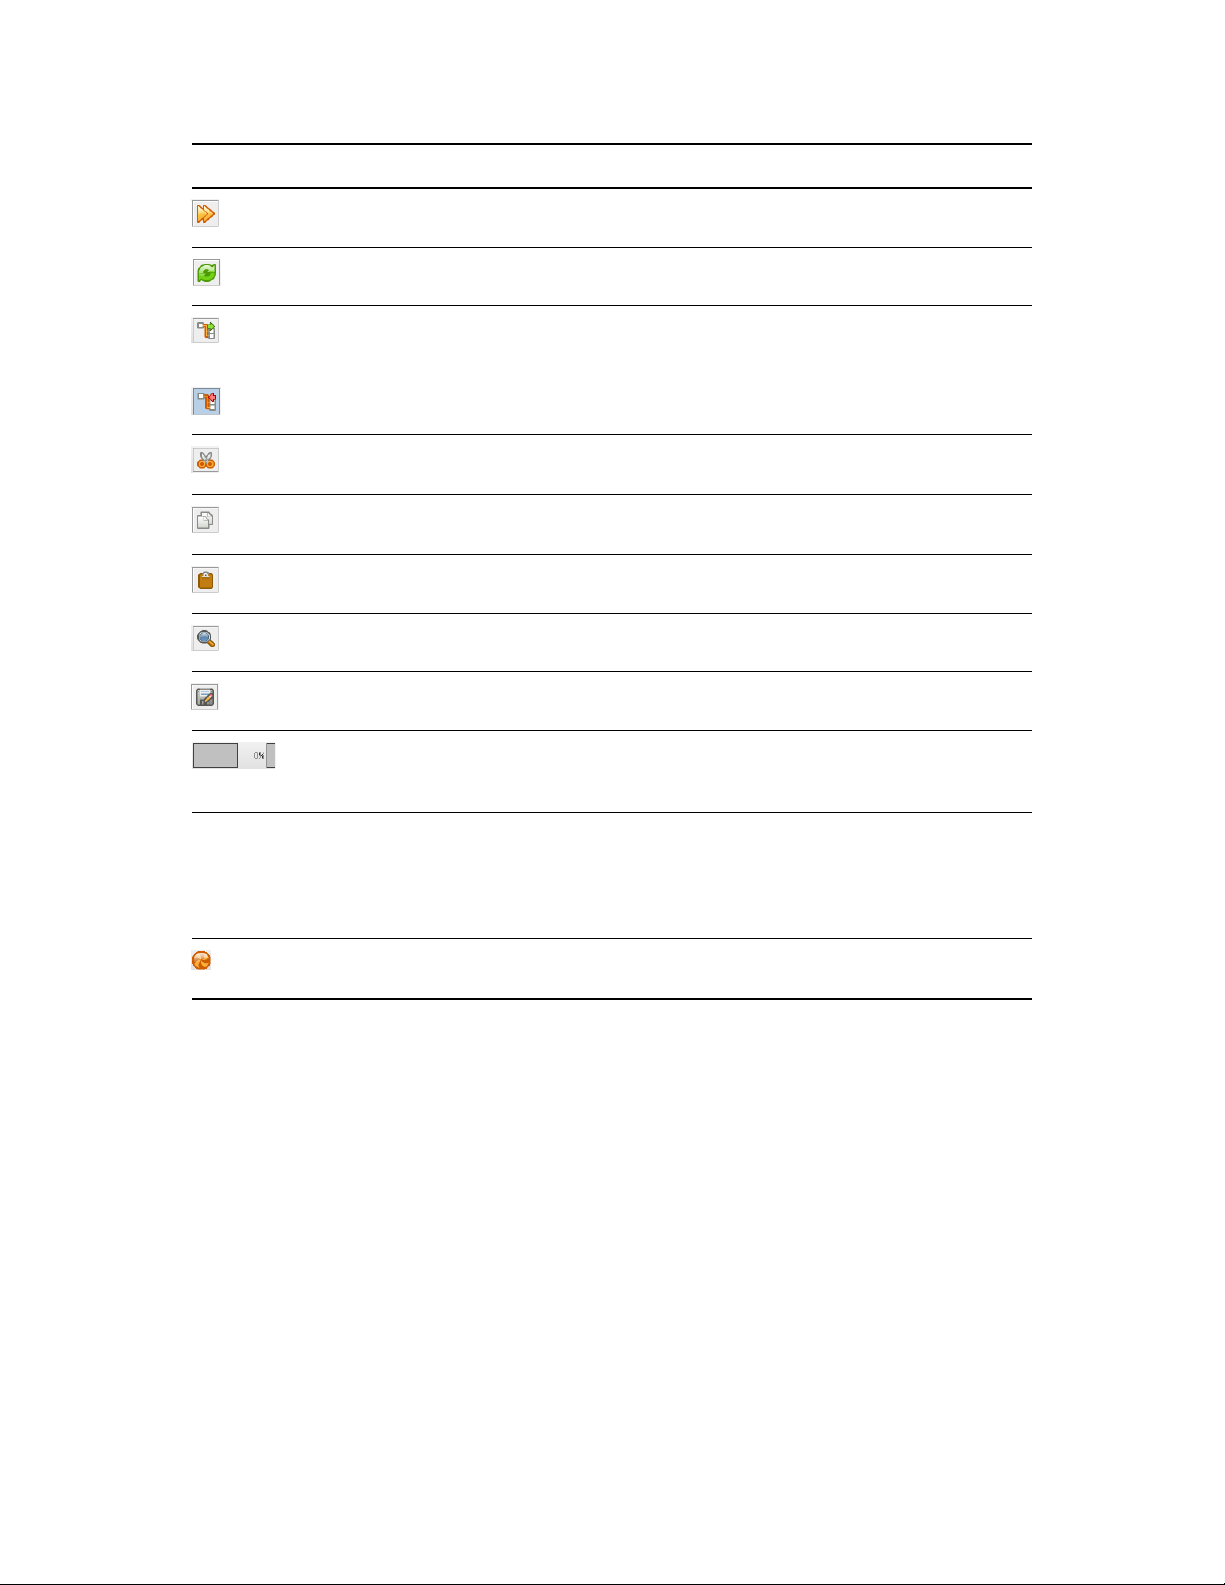
Tool Icon Tool Name Tool Function
Forward Go forward to the next workspace view.
Refresh Refresh the Explorer and Workspace views.
Open/Hide Explorer Open the Explorer Tree in a window
Hide the Explorer window
Cut Cut the selected object from the workspace and copy it to the
clipboard
Copy Copy the selected object to the clipboard while keeping the original
in place
Paste Paste the contents of the clipboard
novdocx (en) 13 May 2009
none (blank
area)
Find and Replace Open the Find dialog box
Save Save changes (in the workspace views or in the Explorer)
Resource Usage
Meter
Bookmark Toolbox Click and drag any object from the Explorer tree into this area to
Busy Indicator (Not an active button). This pinwheel shape appears to rotate when
(Not an active button) visual indication of resource usage. Mouse
over for a listing of Active Resources, Busy resources and Available
Resources, right-click to stop the meter
create a bookmark to jump to that object’s view. Right-click the
bookmark to select options to open and show the object or to
remove it from the toolbox. Right-click to remove all objects when
some are not visible.
the Server is busy performing an operation.
24 PlateSpin Orchestrate 2.0 Development Client Reference
Page 25

3
The PlateSpin Orchestrate Job
novdocx (en) 13 May 2009
Scheduler
You can use the Job Scheduler in PlateSpin® Orchestrate Server from Novell® to automatically start
deployed jobs on your grid by using either time or event triggers.
You can think of the functionality provided by the time triggers as being similar to a distributed cron
system (in fact, time triggers can be described in cron syntax). This triggering, coupled with the job
control functions in PlateSpin Orchestrate, allows for the sophisticated automation of routine data
center tasks.
For example, suppose you want to periodically harvest a large log file in a coordinated way from a
farm of several hundred machines. First, you could create an PlateSpin Orchestrate job that uses the
datagrid for file movement. The job control options specify that the job should run on not more than
three machines at once and sweep across the entire grid. You would then create a schedule to run this
job at the desired interval.
As another example, you could use the Job Scheduler to trigger a discovery job every time a new
resource is added to the grid. In this case, the job developer writes the discovery job to discover and
set facts about the resource. Next, you would create a schedule to run this job on the
RESOURCE_ONLINE
set of deployed discovery jobs to detect specific resource CPU and OS information.
Yet another example would be to run a job on server startup that sends a notification e-mail to an
administrator.
built-in trigger. In fact, this type of triggered job is currently used in the standard
3
This section includes the following information:
Section 3.1, “Understanding the Job Scheduler View,” on page 25
Section 3.2, “Walkthrough: Scheduling a System Job,” on page 41
3.1 Understanding the Job Scheduler View
Click Scheduler on the main toolbar of the PlateSpin Orchestrate Development Client to open the
Job Scheduler view.
The PlateSpin Orchestrate Job Scheduler
25
Page 26
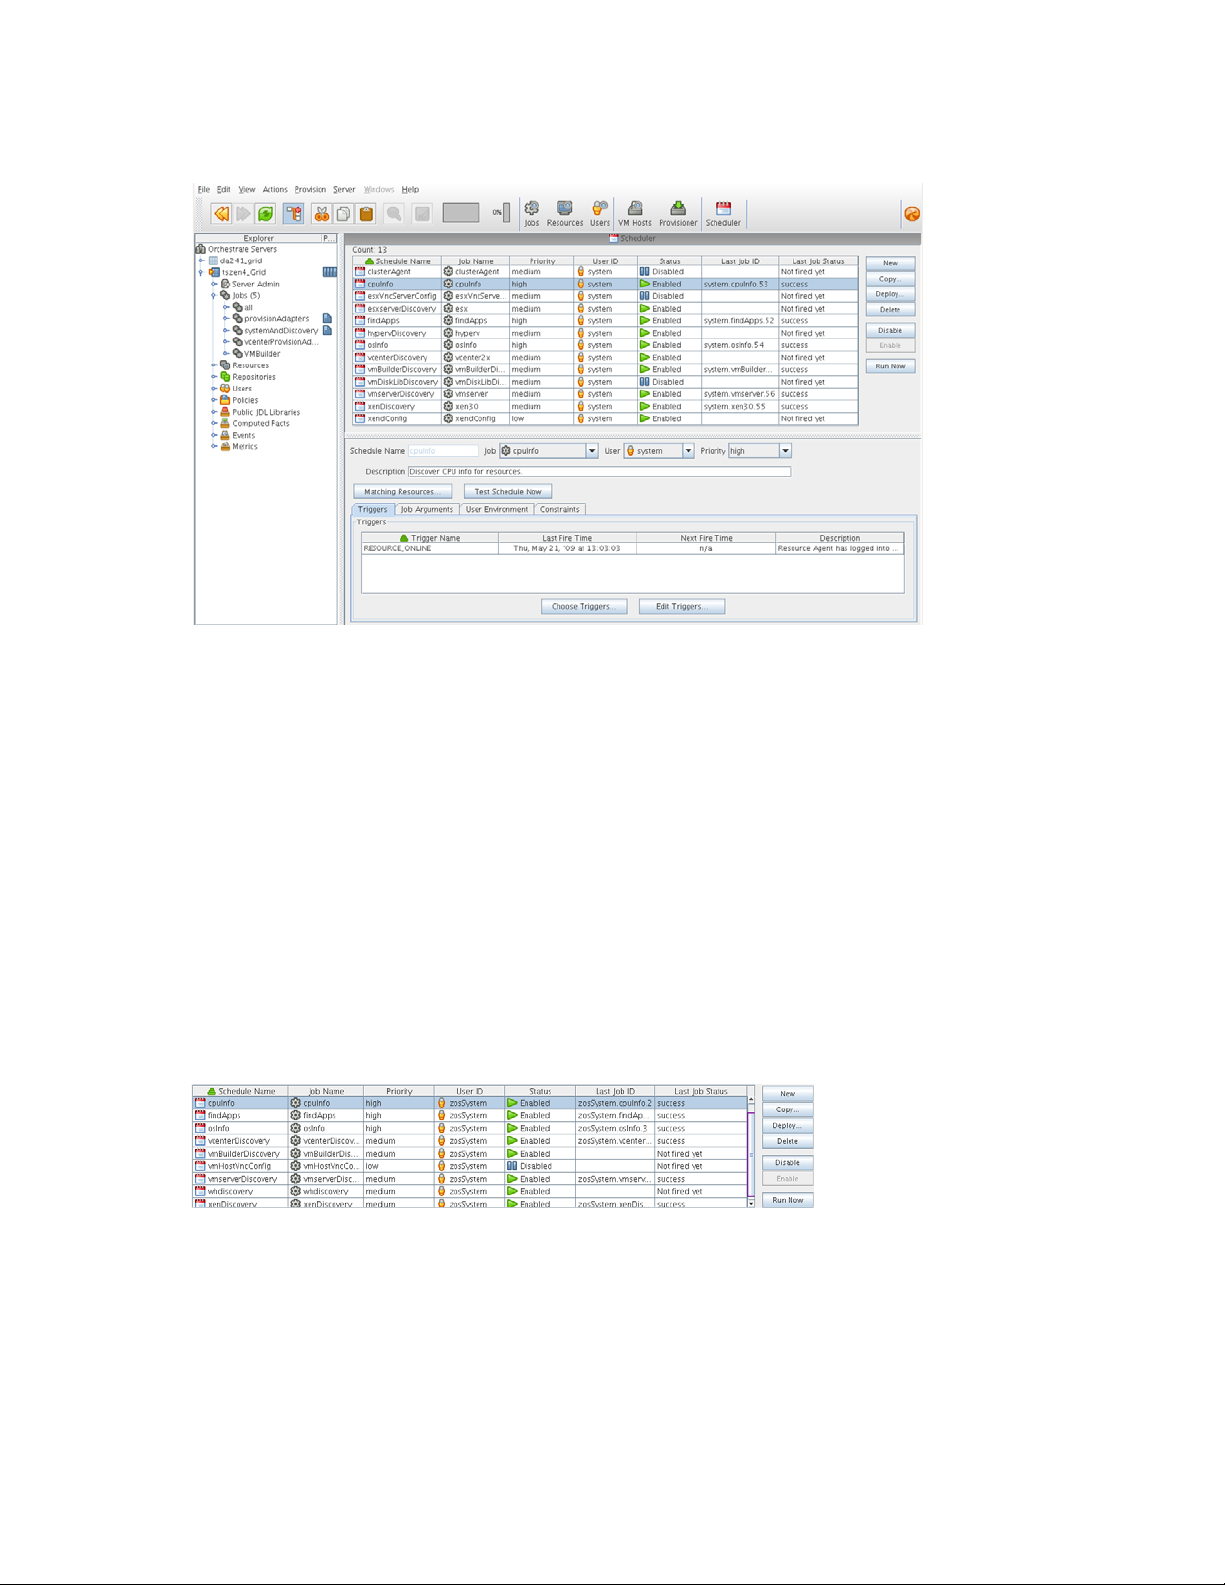
Figure 3-1 Job Scheduler View of the Orchestrate Development Client
novdocx (en) 13 May 2009
This section includes information to help you understand the functions of the Job Scheduler and how
to use it to launch PlateSpin Orchestrate jobs.
Section 3.1.1, “Navigating The Job Schedules Table,” on page 26
Section 3.1.2, “Creating or Modifying a Job Schedule,” on page 28
Section 3.1.3, “Understanding Cron Syntax in the Job Scheduler,” on page 37
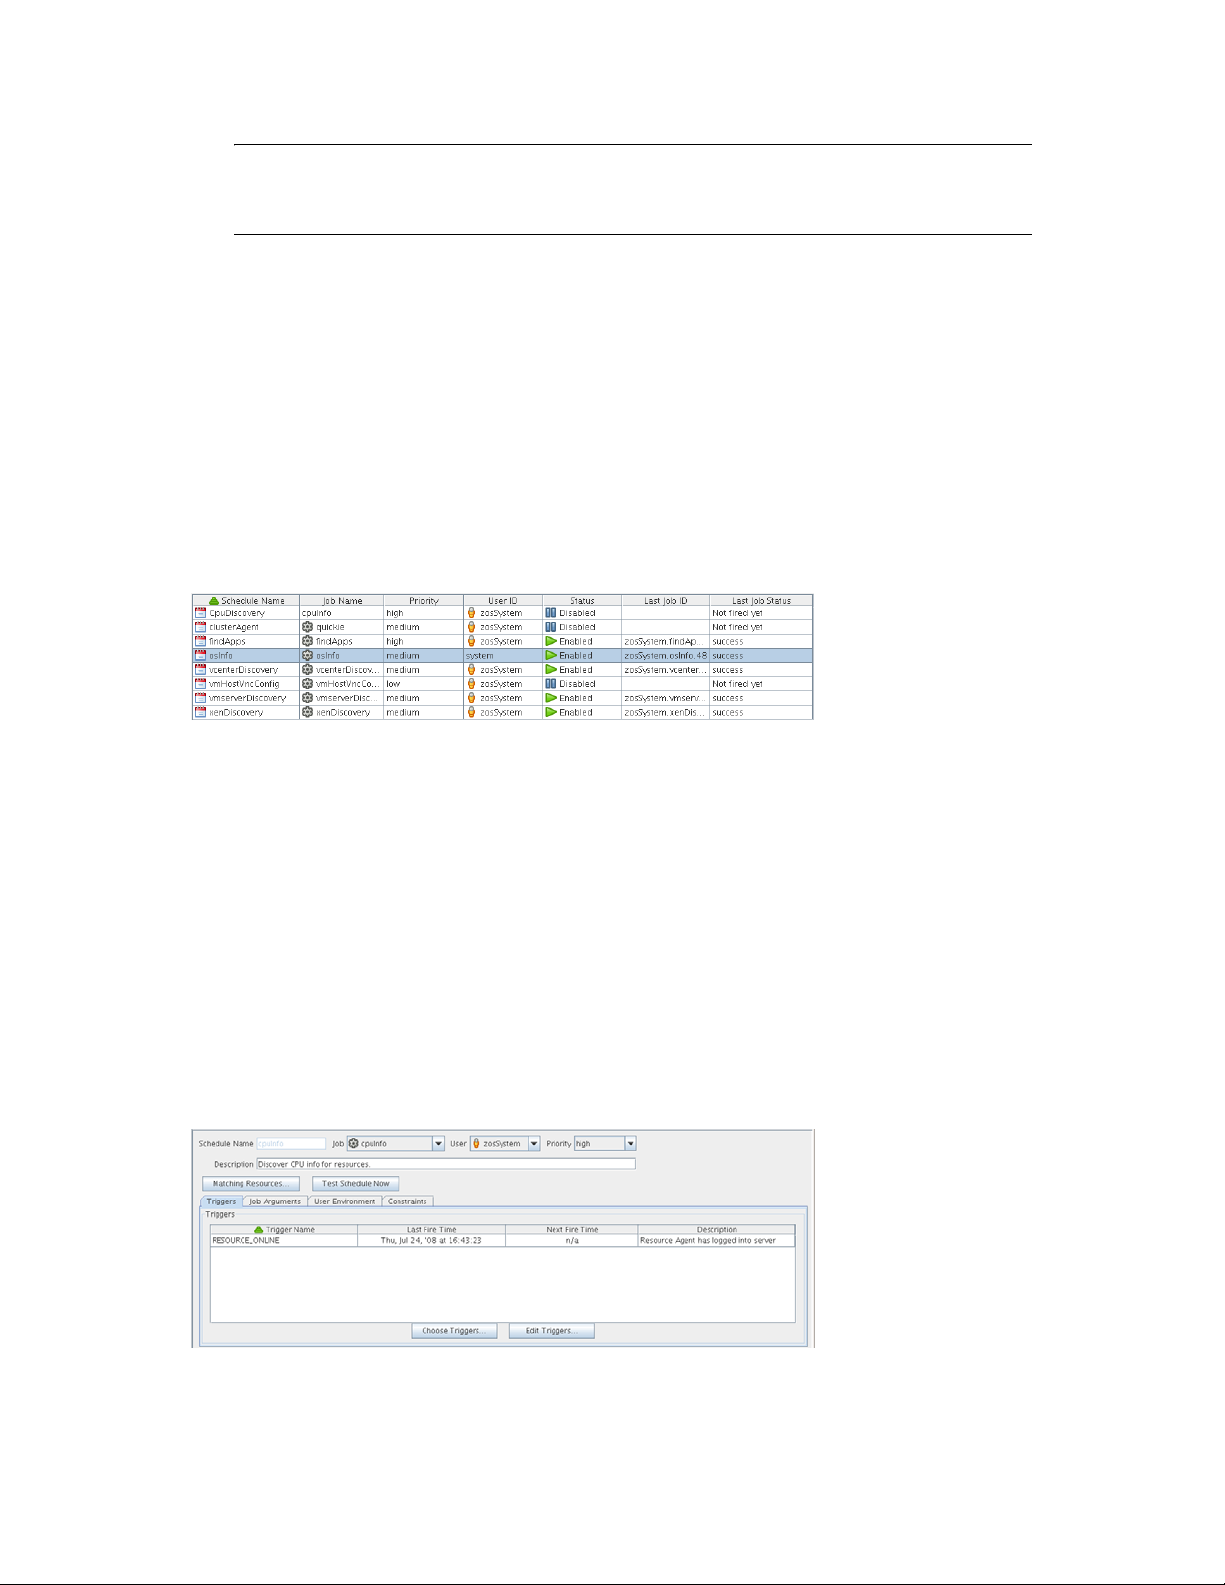
3.1.1 Navigating The Job Schedules Table
PlateSpin Orchestrate includes several predefined and predeployed discovery jobs that have
predefined launch schedules. Among these jobs are the
cpuinfo, findapps, osinfo
jobs, depending on the options (that is, the “server profile”) you chose and the configuration you
used during the installation. After installation, these jobs are listed by name in a table in the Job
Scheduler view.
Figure 3-2 The Job Schedules Table in the Job Scheduler View
, and other
By default, PlateSpin Orchestrate uses schedule names that are similar to the job name so that
schedules are easy to match (although this is not required). The schedules list shows all of the
existing job schedules that accompany predefined jobs, along with the schedules that you create in
the Job Scheduler.
26 PlateSpin Orchestrate 2.0 Development Client Reference
Page 27
NOTE: The Job Scheduler view is not a real-time monitor view of jobs, so if a job attribute (for
example, Last Job Status or Last Fire Time) has changed, it might not be displayed until you click
Refresh.
The Job Schedules Table has functionality that lets you decide how you want to display information
about the job schedules:
You can drag any column in the table to move it left or right in the table according to your
preference.
You can mouse over any column heading in the table to view tool tip text about the purpose of
the data in that column.
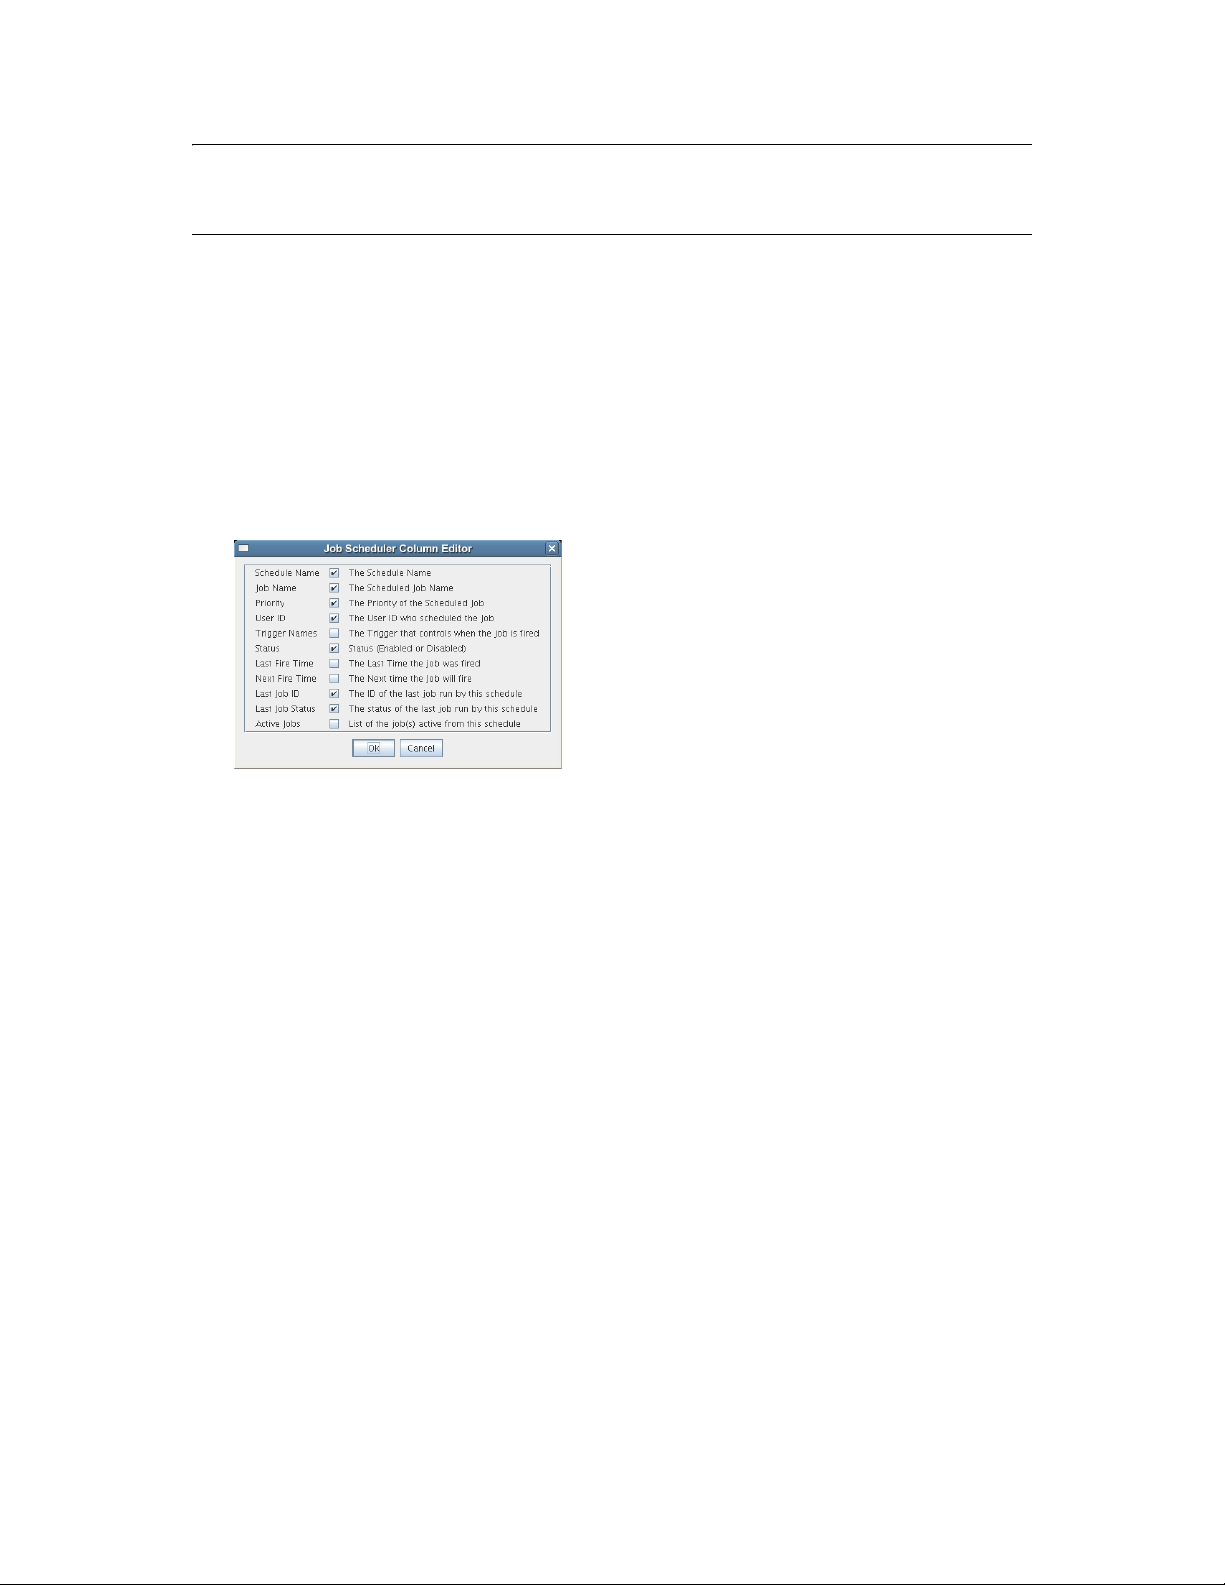
You can right-click any column heading in the table to open the Job Scheduler Column Editor
dialog box.
Figure 3-3 Job Scheduler Column Editor Dialog Box
novdocx (en) 13 May 2009
You can select any column heading in this dialog box to display it in the Job Schedules Table.
The columns display the attributes of a previously configured job schedule. As the figure
shows, this dialog box also includes text that clarifies the purpose of the data in each column.
In the Job Scheduler view, there are seven function buttons next to the Job Schedules Table (see
Figure 3-2 on page 26) that let you take action on any schedule you select inside the table. (Only one
schedule at a time can be selected.)
New: Opens a dialog box where you can create a new schedule. When you create a new
schedule, the Job Scheduler adds a new line to the Job Schedules Table. When the new line is
added, you can use the Job Schedule Editor to edit the attributes of the schedule. A new
schedule must be given a unique schedule name.
The Job Scheduler forces a new schedule to be created in the Disabled state to prevent it from
running while it is being defined. You click Enable when a job is ready to be used.
Copy: Copies a schedule you have selected in the Job Schedules Table. Clicking this button
opens a dialog box where you rename the copy. If you want to create a schedule similar but not
identical to an existing schedule, use this button to save time in adding attributes to a job
schedule configuration. A copy of a schedule must be given a unique schedule name.
Deploy: Opens a dialog box where you can select a schedule (that is, a deployable
.sched
file)
to deploy.
Delete: Deletes the selected schedule from the Job Schedules Table. You cannot recover a
deleted job schedule.
The PlateSpin Orchestrate Job Scheduler 27
Page 28
novdocx (en) 13 May 2009
NOTE: Deleting a schedule that was deployed as part of a
confirmation dialog box. Deleting the schedule undeploys all contents of the
.job
or
.sar
displays a
.job
or
.sar
that
contains the schedule.
Disable: Disables the selected schedule in the Job Schedules Table. The jobs associated with
the schedule are not re-run, but any currently running instances of this job continue to run.
Enable: Enables a disabled job schedule.
Run Now: Forces the specified schedule to run immediately. This updates statistics such as
Last Fire Time.
Removed Jobs or Users: Scheduler Behavior
If a job or a user is undeployed or removed from PlateSpin Orchestrate, the Job Schedules Table
continues to list the schedule previously associated to that removed grid object, but the removed grid
object no longer displays the icon that represents the object (job or user).
Figure 3-4 Some User Object and Job Object Icons Not Displayed
In the preceding figure, the CpuDiscovery schedule displays no Job icon for the cpuInfo job in the
schedules table. Even though the job has been undeployed, the schedule is still listed.
In the osinfo schedule, the system user has no User icon. That user has been removed from PlateSpin
Orchestrate.
If you choose a new user or job to be associated with a schedule, a deleted or undeployed user or job
is never displayed in the popup menu for that schedule again.
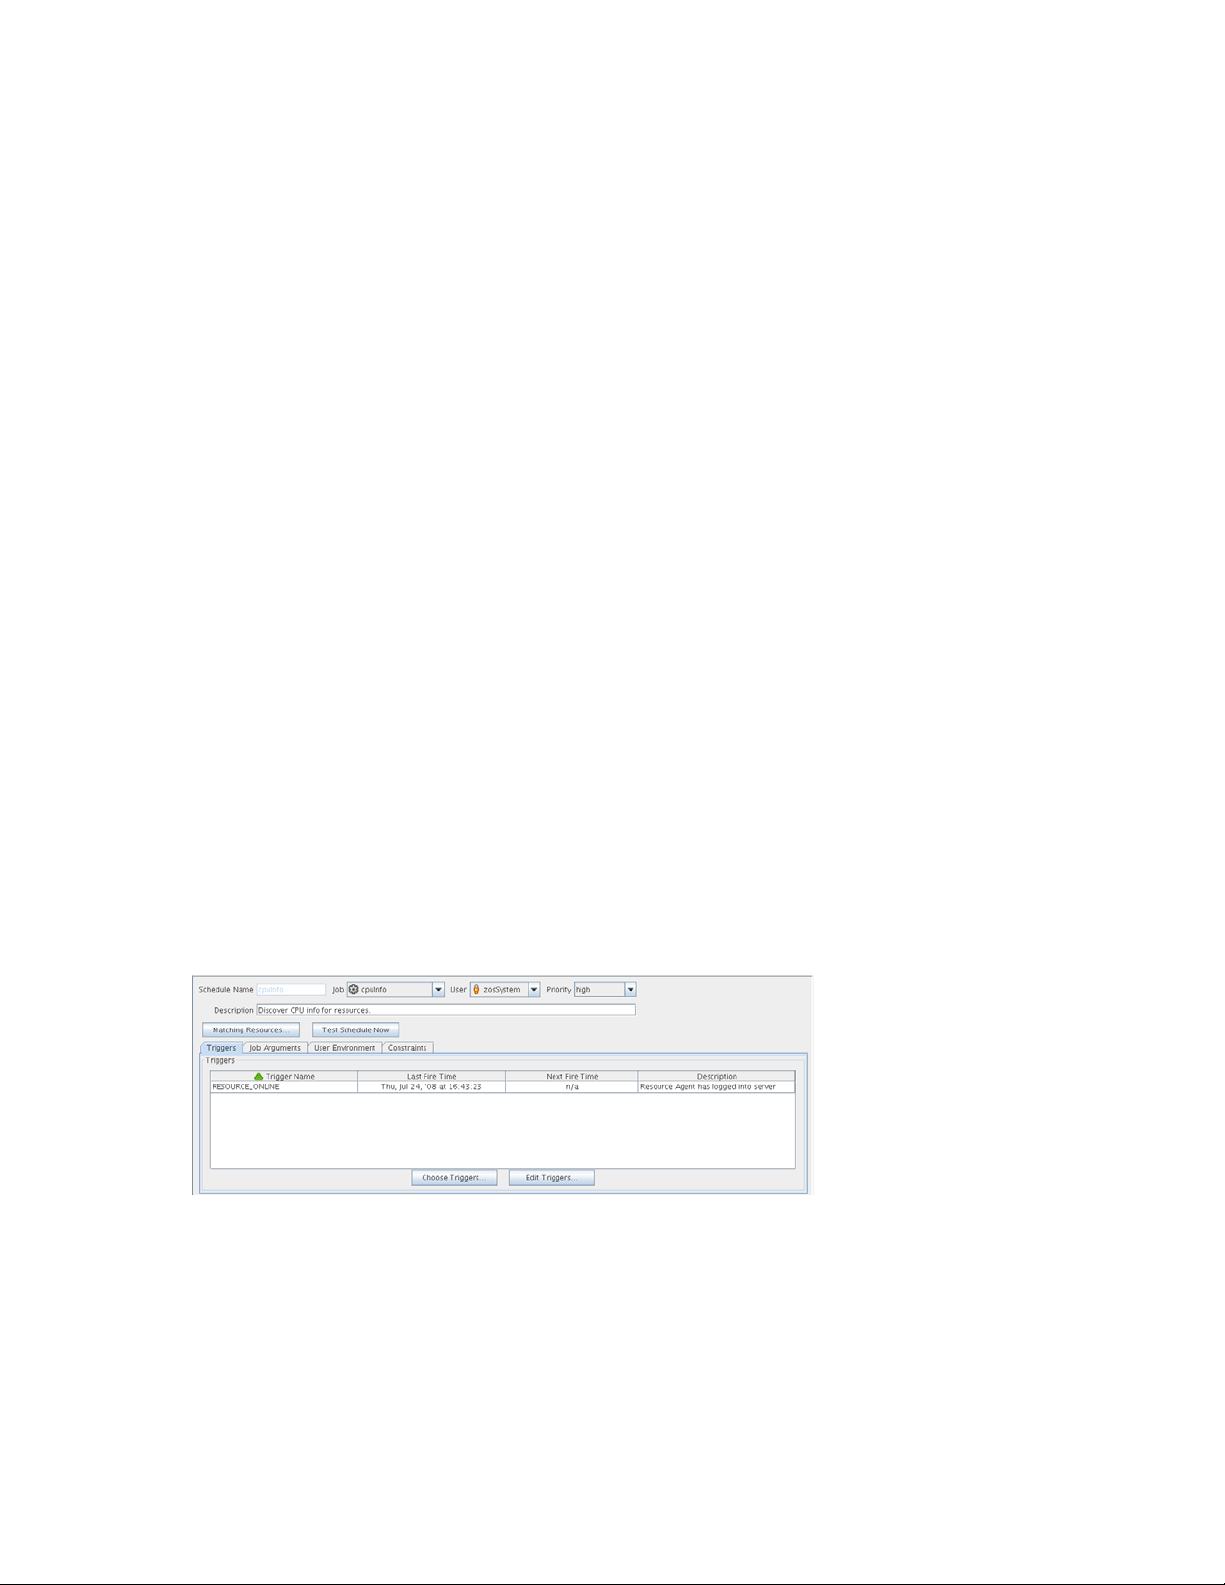
3.1.2 Creating or Modifying a Job Schedule
The Job Schedule Editor is located immediately below the Job Schedules Table in the Job Scheduler
view.
Figure 3-5 The Job Schedule Editor in the Job Scheduler View
28 PlateSpin Orchestrate 2.0 Development Client Reference
Page 29

There are several times when you can use this part of the Job Scheduler tool:
When you create a new schedule by clicking New.
When you modify the attributes of an existing schedule (available when you select a schedule
in the table).
When you create a copy of an existing schedule by clicking Copy.
The Job Schedule Editor lets you create or modify a job schedule by specifying its attributes.
You can use the following controls and data when you create or modify a job schedule:
“Schedule Name” on page 29
“Job” on page 29
“User” on page 29
“Priority” on page 30
“Description” on page 30
“Matching Resources” on page 30
“Test Schedule Now” on page 30
“Triggers” on page 30
“Job Arguments” on page 35
novdocx (en) 13 May 2009
“User Environment” on page 36
“Constraints” on page 37
Schedule Name
When you create a new schedule, the unique name you specify is displayed in this field. If you select
a schedule from the Job Schedules Table, the name of the schedule is displayed in this field. The
field is not editable, because schedules cannot be renamed after they are created. (You can use a
copy if this is required.)
Job
When you create a new schedule, you need to associate a deployed job with it. You can select the job
you want to run from this drop-down list.
If you want to use a previously created schedule to run a different job, you can change the job here.
User
When you create a new schedule, you need to associate a user with it. The user represents the user
for whom the job will run. The choice of user might affect the permissions, privileges and
constraints of the job. You can select the user from this drop-down list.
If you want a different user to run a job on a previously created schedule, you can change the user
here.
If you decide to change the user who runs the job, check the Priority field to make sure that the
priority you want is selected.
The PlateSpin Orchestrate Job Scheduler 29
Page 30
Priority
When you create a new schedule and associate a job and a user with it, a list of possible run
priorities becomes available in this drop-down list. The list of priorities varies, depending on the
user that is specified in the previous field. In this field, you select the priority of the job that is to be
run so that if other jobs are to start concurrently or are competing for resources, PlateSpin
Orchestrate can determine which job takes priority.
Description
For predeployed jobs, this field contains a default description of what the job’s schedule does. The
field is editable, so you can enter a description of your own for job schedules that you create.
Matching Resources
This button displays a list of resources where the job runs now or where it could run. This list is
useful for checking the context of constraints that might have been affected by a choice of user or by
manually specifying additional constraints under the Policy tab. The list is also useful to verify that
a discovery job (that is, one that is triggered by the Run on Resource Start option) runs on the
preferred set of machines.
novdocx (en) 13 May 2009
Test Schedule Now
Click this button to test the new or modified schedule you are working with. The test runs the new or
modified schedule without permanently saving the current configuration of the schedule or
recording statistics. This control differs from the Run Now control in the Job Schedules Table, which
runs a saved (persisted) schedule, disregarding any unsaved modifications that have been made to it
in the Job Schedule Editor.
Triggers
When you click the Triggers tab in the Job Scheduler view, the following page opens:
Figure 3-6 The Schedule Triggers Page in the Job Scheduler
In this view, you can add or define the triggers you want to associate with job schedules. A trigger is
the signal to the Job Scheduler to initiate, or “fire” a schedule at a given time or at the occurrence of
a given event. Job Scheduler triggers can be classified with regard to two conditions: events and
time.
30 PlateSpin Orchestrate 2.0 Development Client Reference
Page 31
The Triggers table on this page has functionality that lets you decide how you want to display
information about the triggers:
You can drag any column in the table to move it left or right in the table according to your
preference.
You can mouse over any column heading in the table to view tool tip text about the purpose of
the data in that column.
You can right-click any column heading in the table to open the Triggers table column editor
dialog box.
Figure 3-7 Trigger Table Column Editor Dialog Box
You can select any column heading in this dialog box to display it in the Triggers table. The
columns display the attributes of a previously configured Triggers table. As the figure shows,
this dialog box also includes text that clarifies the purpose of the data in each column.
novdocx (en) 13 May 2009
You can create as many triggers as you want to meet any scheduling situation you might have.
Multiple time triggers can be associated with a schedule and multiple schedules can use the same
trigger. The triggers you create are retained by the Job Scheduler for you to choose from when you
create a schedule for a job. The currently associated triggers are displayed in the list along with a
description.
Choose Triggers
This button opens a dialog box where you can choose both predefined and user defined time triggers
to associate with this job schedule.
Figure 3-8 Choose Triggers Dialog Box
The PlateSpin Orchestrate Job Scheduler 31
Page 32

In this dialog box, you can click Add to move a selected trigger to the active, scheduled triggers that
are to be associated with this job schedule. You can also click Remove to unassociate a trigger.
When a trigger is moved to the scheduled list, it becomes associated to the job schedule and it is
displayed in the Job Scheduler view.
Most example jobs in PlateSpin Orchestrate are associated with event triggers, which are shown in
the previous illustration. The dialog box can also list other job schedule triggers that are based on
time.
Event Triggers
An Event trigger is the signal to the Job Scheduler to initiate, or “fire” a job when a given event
occurs. An Event can be one of three types:
Event objects: These objects are user defined events that are fired when an event rule is
triggered. If an event object is deployed, it automatically shows in the trigger chooser as a
possible choice.
built-in events: These events are system wide events such as when a resource comes online or
when a resource health condition change occurs. Built-in events are always available as a
trigger choice. The Job Scheduler has eight possible built-In event triggers:
AGENT_VERSION_MISMATCH
novdocx (en) 13 May 2009
RESOURCE_ONLINE
REPOSITORY_HEALTH
RESOURCE_HEALTH
SERVER_UP
USER_HEALTH
USER_ONLINE
VMHOST_HEALTH
You can select any combination of these event triggers for a single schedule.
The first trigger,
AGENT_VERSION_MISMATCH
, triggers the job when a PlateSpin Orchestrate
Agent of an incompatible version attempts to connect to this Orchestrate Server. It can be used
to initiate a configuration management tool for an agent software update or the job could e-mail
an administrator to report the incompatible agent. The other seven available built-in event
triggers are listed with accompanying descriptions in the dialog box.
External events: These events are fired by an outside process. These are not automatically
shown as choices in the trigger chooser, but must be defined by the trigger editor.
An event trigger can be used in conjunction with a time trigger to allow flexibility in scheduling the
job application for maximum effectiveness or convenience. Jobs triggered by events require that
their job arguments contain a dictionary named
context
. For example, your event-triggered job
should have this jobarg element in its policy:
<policy>
<jobargs>
<fact name="context" type="Dictionary"
description="Dictionary containing the context for the event" />
</jobargs>
</policy>
32 PlateSpin Orchestrate 2.0 Development Client Reference
Page 33

The key/values of the dictionary are dependent on the event type. For event objects, the
jobargs.context
events, the
jobargs.context
dictionary contains the matching context of the triggered rule. For built-in
dictionary contains the key of the object type corresponding to the
built-in event and the object ID that caused the event.
novdocx (en) 13 May 2009
For example, if the
jobargs.context
{ user : foo }
Likewise, if the RESOURCE_ONLINE event is triggered because the resource agent
named “vmhost1” comes online, the jobargs.context dictionary contains:
{ resource : vmhost1 }
For the
AGENT_VERSION_MISMATCH
USER_ONLINE
dictionary contains:
event triggers because the user named
event, the
jobargs.context
dictionary contains more
foo
logs in, the
information, as shown in the following table:
Table 3-1 Dictionary Information
Key Type
AgentBuild
AgentIP
AgentId
AgentMajor
AgentMinor
Long
String
String
Integer
Integer
AgentPoint
JavaMajor
JavaMinor
JavaPoint
JavaVendor
JavaVersion
OsMajor
OsMinor
OsName
OsPoint
OsVendor
OsVersion
SystemArch
UsingJRE
esource
r
Integer
Integer
Integer
Integer
String
String
Integer
Integer
String
Integer
String
String
String
Boolean
String
The PlateSpin Orchestrate Job Scheduler 33
Page 34

Time Triggers
A time trigger is the signal to the Job Scheduler to initiate, or “fire” a job when a prescheduled time
occurs. A time trigger can be used in conjunction with an event trigger to allow flexibility in
scheduling the job application for maximum effectiveness or convenience. No default time triggers
are defined in the Job Scheduler. You need to create new time triggers by clicking Edit Triggers.
Edit Triggers
Click Edit Triggers to open the Triggers dialog box.
Figure 3-9 The Triggers Dialog Box
novdocx (en) 13 May 2009
The following controls and information are available in the dialog box:
New: Opens a secondary dialog box where you can create a new time trigger name. When you
create the trigger name, the attribute fields in the Triggers dialog box are cleared and you can
specify new attributes for the trigger. A new trigger must be given a unique trigger name.
Copy: Lets you modify an existing time trigger by giving it a new name and attributes. This
can be helpful if there are only slight differences in the new attributes. A copy of a trigger must
be given a unique trigger name.
Deploy: Opens a file chooser where you can choose an existing, stored trigger (that is, a
file) to deploy.
Delete: Deletes a selected time trigger.
IMPORTANT: Deleted triggers are not recoverable. If the trigger is used by existing
schedules, it is removed from all of those schedules when it is deleted.
Trigger Name: Specifies the unique name of the trigger you are creating or modifying. This
name is displayed in the Job Scheduler if you choose to associate this trigger with a schedule.
After you create the trigger name, it cannot be modified.
34 PlateSpin Orchestrate 2.0 Development Client Reference
.trig
Page 35

Description: Specifies a description for the time trigger you are creating or modifying. The
description is optional and can be as detailed as you want.
If the number of characters in the description string exceeds the space in the Description field,
a button is enabled that opens a string editor when clicked.
Save: Clicking this icon saves the defined time trigger and its attributes.
Fire Starting In: Displays multiple fields specifying the time increment and frequency to be
used by the trigger to fire the job. If you select this type of time trigger, the Fire using CRON
Expression button becomes inactive.
NOTE: You can use the Fire Starting In control to create either a “one-shot” time trigger or a
“reoccurring” time trigger.
A one-shot time trigger fires just once after a specified period of time. To specify a one-shot
trigger, click Fire Starting in, specify the amount of time before firing, then specify 0 as the
time to Repeat Indefinitely.
A reoccurring time trigger fires after a specified period and then either fires repeatedly for an
indefinite number of times or it fires for a specified number of times. To specify a reoccurring,
indefinite trigger, click Fire Starting in, specify the amount of time before firing, then select
Repeat Indefinitely. To specify a reoccurring but finite trigger, click Fire Starting in, specify the
amount of time before firing, select Repeat Range, then specify the number of times you want
the trigger to fire.
novdocx (en) 13 May 2009
Fire using CRON Expression: Specifies the cron expression that enables the job to fire
automatically at a specified time or date. You need to be familiar with cron to use this field.
The Examples list box of selected cron expressions and their associated descriptions is located
just below this button. You can use a listed expression as is, or use it as a template to modify the
expression to meet your needs.
If you select this type of time trigger, the Fire Starting In and the Fire Using Event buttons
become inactive.
For an example of how a cron expression can be implemented in a trigger, see “Creating and
Assigning a Time Trigger for the New Schedule” on page 44. For detailed information about
cron syntax, see “Understanding Cron Syntax in the Job Scheduler” on page 37.
Fire Using Event: Specifies a deployed event or an external event that enables the job to fire
when a specified event occurs. Deployed events are defined using an XML syntax. You can
specify a deployed event from Events (that is, listed in the Events drop down list) or you can
enter the name of an external event. For more information on creating and firing an event, see
If the number of characters in the Fire Using Event description string exceeds the space in the
field, a button is enabled that opens a string editor when clicked.
Job Arguments
This tab displays an area (in the lower left corner of the Job Schedule Editor) where possible job
arguments are listed. If you select an existing schedule in the Job Schedules Table, any optional job
arguments (jobargs) for the associated job are displayed in this area.
The PlateSpin Orchestrate Job Scheduler 35
Page 36

Figure 3-10 The Job Arguments Area of the Job Scheduler View
The jobargs are defined by the deployed job. Some jobs might already have a default value
displayed, but others must have values specified in order for the job to be able to run.
IMPORTANT: Job arguments displayed in blue are required. You must supply data in the
accompanying fields.
A job argument defines the values that can be passed in when a job is invoked. These values let you
statically define and control job behavior. To learn more about each job argument, mouse over each
jobarg line to display tool tip text.
novdocx (en) 13 May 2009
The Job Scheduler uses the values you enter into the fields of this area to build a jobargs namespace
in the policy for this job.
Each job argument has an accompanying Lock check box. When Lock is not selected, the
accompanying job argument uses the default value specified in the job’s policy. When Lock is
selected, the value specified in the field is locked down and overrides the default value in the policy.
A locked value continues to be used even if the policy value is modified.
You can click Restore Jobargs to restore job arguments to the values specified in the job policy. This
function removes any changes you might have specified in the Job Scheduler and deselects all Lock
check boxes.
For more information, see “Job Arguments and Parameter Lists” in the PlateSpin Orchestrate 2.0
Developer Guide and Reference.
User Environment
This tab displays an area (in the lower left corner of the Job Schedule Editor) that includes the Pass
User Environment check box. Select this check box if you want to pass the assigned user’s
environment variables to the job when it runs. When environment variables are recorded on the user
account, selecting the Pass User Environment check box makes those environment variables
available to the job and joblet.
A user’s environment is recorded under the
user.env
fact on his or her account. This fact can be set
when a user logs in to PlateSpin Orchestrate and is persisted until changed. A user’s environment
variables can be uploaded with the zos command line tool at login time in one of two variations:
zos login --user=foo --env
This command uploads the entire environment to the Job Scheduler. The upload can also be
seen on the User object in the Orchestrate Development Client.
zos login --user=foo --env=PATH
When the user logs in, he or she can specify one or more environment variables to use at login.
The example above would result in just the PATH environment variable being uploaded.
36 PlateSpin Orchestrate 2.0 Development Client Reference
Page 37

Multiple environment variables can be specified by delimiting with a comma, as in the
following example:
--env=PATH,LD_PATH,ID
NOTE: The user’s environment variables can also be passed to the server when the user implements
the zos command line tool when running a job (as opposed to logging in). The command passes the
environment variable only for that particular job run.
zos run jobname --env=environment_variable
Constraints
This tab displays a constraint editor that you can use to create additional constraints for the job being
scheduled. Typically, additional “resource constraints” (such as “start”) are useful to delay the start
of a job when it is triggered. For more information about working with constraints, see “Constraints”
in the PlateSpin Orchestrate 2.0 Developer Guide and Reference.
3.1.3 Understanding Cron Syntax in the Job Scheduler
novdocx (en) 13 May 2009
The cron triggers you can configure in the PlateSpin Orchestrate Job Scheduler use a Quartz
crontrigger class for deciding when to invoke job execution. This is based on the standard Quartz
format that you can find further described on the OpenSymphony (http://www.opensymphony.com/
quartz/wikidocs/CronTriggers%20Tutorial.html) Web site, or the KickJava (http://kickjava.com/src/
org/quartz/CronTrigger.java.htm) Web si t e .
This section includes the following information:
“Format” on page 37
“Special Characters” on page 38
“Examples of Cron Syntax” on page 39
“Cron Scheduling Precautions” on page 40
Format
A cron expression is a string comprised of 6 or 7 fields separated by white space. Fields can contain
any of the allowed values, along with various combinations of the allowed special characters for that
field. The fields are explained in the following table:
Table 3-2 Fields in a Cron Expression
Field Name Mandatory? Allowed Values
Allowed special
Characters
Seconds Yes 0-59 , - * /
Minutes Yes 0-59 , - * /
Hours Yes 0-23 , - * /
Day of the Month Yes 1-31 , - * ? / L W
Month Yes 1-12 or JAN-DEC , - * /
The PlateSpin Orchestrate Job Scheduler 37
Page 38

novdocx (en) 13 May 2009
Field Name Mandatory? Allowed Values
Day of the Week Yes 1-7 OR SUN-SAT , - * ? / L #
Year No EMPTY, 1970-2099 , - * /
Allowed special
Characters
So cron expressions can be as simple as this:
* * * * ? *
Or cron expressions can be more complex, like this:
0 0/5 14,18,3-39,52 ? JAN,MAR,SEP MON-FRI 2002-2010
Special Characters
Cron syntax incorporates logical operators, special characters that perform operations on the values
provided in the cron fields.
Table 3-3 Special Characters in PlateSpin Orchestrate Cron Syntax
Operator Purpose Example
asterisk ( * ) Specifies all possible values for a field An asterisk in the hour time field is
equivalent to “every hour.”
question mark
(?)
dash (
-
) Specifies a range of values
comma ( , ) Specifies a list of values
slash ( / ) Used to skip a given number of values
A question mark (
day-of-month and day-of-week fields. It
is used to specify “no specific value,”
which is useful when you need to
specify something in one of these two
fields, but not in the other.
?
) is allowed in the
If you want a trigger to fire on a particular
day of the month (for example, the 10th), but
you don't care what day of the week that is,
10
enter
the day-of-week field. See the examples
below for clarification.
2-5
in the day-of-month field, and ? in
, which is equivalent to
2,3,4,5
1,3,4,7,8
*/3
in the hour time field is equivalent to
0,3,6,9,12,15,18,21
specifies “every hour,” but the
only the first, fourth, seventh.
You can use a number in front of the slash to
set the initial value. For example,
2,5,8,11,
means
. The asterisk ( * )
and so on.
/3
means
2/3
38 PlateSpin Orchestrate 2.0 Development Client Reference
Page 39

Operator Purpose Example
novdocx (en) 13 May 2009
L (“last”) The L character is allowed for the day-
of-month and day-of-week fields.
Specifies either the last day of the
month, or the last xxx day of the month.
W
W (“weekday”) The
character is allowed for the day-
of-month field.
Specifies the weekday (Monday-Friday)
nearest the given day.
L
The value
“the last day of the month”––day 31 for
January, day 28 for February in non-leap
years. If you use
by itself, it simply means
use it in the day-of-week field after another
value, it means “the last xxx day of the
month.” For example,
Friday of the month.”
TIP: When you use the L option, be careful
not to specify lists or ranges of values. Doing
so causes confusing results.
If you specify
of-month field, the meaning is “the nearest
weekday to the 15th of the month.” So if the
15th is a Saturday, the trigger fires on Friday
the 14th. If the 15th is a Sunday, the trigger
fires on Monday the 16th. If the 15th is a
Tuesday, it fires on Tuesday the 15th.
However, if you specify
day-of-month, and the 1st is a Saturday, the
trigger fires on Monday the 3rd, because it
does not “jump” over the boundary of a
month’s days. The
specified when the day-of-month is a single
day, not a range or list of days.
in the day-of-month field means
L
in the day-of-week field
7
or
SAT
. But if you
6L
means “the last
15W
as the value for the day-
1W
as the value for
W
character can only be
TIP: You can combine the L and W
characters for the day-of-month expression
LW
, which translates to “last
6#3
in the day-of-week field
#3
= the 3rd one in the month).
2#1
specifies the first
4#5
specifies the
6
=
pound sign ( # ) The pound sign (
allowed for the day-of-week field. This
character is used to specify “the nth” xxx
day of the month.
#
) character is
to yield
weekday of the month.”
The value of
means the third Friday of the month (day
Friday and
Other Examples:
Monday of the month and
fifth Wednesday of the month. However, if
you specify #5 and there are fewer than 5 of
the given day-of-week in the month, no firing
occurs that month.
NOTE: The legal characters and the names of months and days of the week are not case sensitive.
MON
is the same as
mon
.
You can specify days in two fields: month day and weekday. If both are specified in an entry, they
are cumulative, meaning that both of the entries are executed.
Examples of Cron Syntax
The following table shows examples of full cron expressions and their respective meanings.
The PlateSpin Orchestrate Job Scheduler 39
Page 40

Table 3-4 Results of Altered Cron Syntax on Execution Times
Cron Expression Example Description
novdocx (en) 13 May 2009
0 0 12 * * ?
0 15 10 ? * *
0 15 10 * * ?
0 15 10 * * ? *
0 15 10 * * ? 2008
0 * 14 * * ?
0 0/5 14 * * ?
0 0/5 14,18 * * ?
0 0-5 14 * * ?
0 10,44 14 ? 3 WED
0 15 10 ? * MON-FRI
0 15 10 15 * ?
Fire at 12:00 p.m. (noon) every day
Fire at 10:15 a.m. every day
Fire at 10:15 a.m. every day
Fire at 10:15 a.m. every day
Fire at 10:15 a.m. every day during the year 2008
Fire every minute starting at 2:00 p.m. and ending at 2:59.p.m., every
day
Fire every five minutes starting at 2:00 p.m. and ending at 2:55 p.m.,
every day
Fire every five minutes starting at 2:00 p.m. and ending at 2:55 p.m.,
and fire every five minutes starting at 6:00 p.m. and ending at 6:55
p.m., every day
Fire every minute starting at 2:00 p.m. and ending at 2:05.p.m., every
day
Fire at 2:10 p.m. and at 2:44 p.m. every Wednesday in the month of
March
Fire at 10:15 a.m. every Monday, Tuesday, Wednesday, Thursday and
Friday
Fire at 10:15 a.m. on the 15th day of every month
0 15 10 15 * ?
0 15 10 ? * 6L
0 15 10 ? * 6L 2008-2011
0 15 10 ? * 6#3
0 0 12 1/5 * ?
0 11 11 11 11 ?
Fire at 10:15 a.m. on the last day of every month
Fire at 10:15 a.m. on the last Friday of every month
Fire at 10:15 a.m. on every last Friday of every month during the years
2008, 2009, 2010, and 2011
Fire at 10:15 a.m. on the third Friday of every month
Fire at 12:00 p.m. (noon) every five days every month, starting on the
first day of the month
Fire every November 11th at 11:11 a.m.
Cron Scheduling Precautions
You should remember the following items when you use cron scheduling:
Always check the effect of adding the
?
and * characters in the day-of-week and day-of-month
fields to make sure the expected behavior fires correctly.
Support for specifying both a day-of-week and a day-of-month value is not complete (you must
?
currently use the
character in one of these fields).
Be careful when setting fire times to occur between 12:00 a.m. and 1:00 a.m.— changing to or
out of Daylight Saving Time can cause a skip or a repeat in the schedule firing, depending on
whether the clock moves backward or forward.
40 PlateSpin Orchestrate 2.0 Development Client Reference
Page 41

3.2 Walkthrough: Scheduling a System Job
This section demonstrates how you can use the Orchestrate Development Client to deploy and
schedule an existing system job named
examples
directory of your PlateSpin Orchestrate installation.
auditcleaner.job
This section includes the following information:
Section 3.2.1, “Deploying a Sample System Job,” on page 41
Section 3.2.2, “Creating a New Schedule for the Job,” on page 42
Section 3.2.3, “Defining the New Schedule,” on page 43
Section 3.2.4, “Activating the New Schedule,” on page 48
Section 3.2.5, “Running the New Schedule Immediately,” on page 48
3.2.1 Deploying a Sample System Job
Before a job can run, the PlateSpin Orchestrate administrator must deploy it, which involves moving
it from a developed package state to a state where it is ready and available for users. Only the
administrator has the necessary rights to deploy a job.
. This example job is included in the
novdocx (en) 13 May 2009
There are four methods you can use to deploy a job:
Deploy it from the PlateSpin Orchestrate Development Client by right-clicking the Jobs
container in the Explorer panel.
Deploy it from the PlateSpin Orchestrate Development Client by selecting the Actions menu in
the Orchestrate Development Client.
Deploy it from the
Copy the deployable component to the “hot” deployment directory under the Orchestrate
Server instance directory. Typically, this directory is located at
zos/server/deploy
zosadmin
command line (
zosadmin deploy path_to_job
/var/opt/novell/zenworks/
. Using this method, deployment proceeds within a few seconds.
).
PlateSpin Orchestrate monitors this directory.
A runnable job can also be scheduled, which means that the schedule for running the job and the
trigger or triggers that initiate or “fire” the schedule (or both) are configured and packaged with the
job.
For this walkthrough, you deploy one of several system jobs (
auditCleaner.job
) developed for
PlateSpin Orchestrate customers to demonstrate how system jobs are deployed and run. This job
.jar
package, which is actually a
component. It does not have a
Development Client to add the
archive, includes only a
.sched
component. You can use the Job Scheduler in the Orchestrate
.sched
component separately.
NOTE: A PlateSpin Orchestrate job developer can create and package jobs that include a
.policy
a
file, a
.trig
file (trigger), and a .
sched
file (schedule). The presence of the
.policy
component and a
.jdl
.jdl
.sched
file,
file
in the job package is also typical of the predeployed discovery jobs installed with PlateSpin
Orchestrate, which run without intervention when the criteria for firing the schedule are satisfied.
Such jobs are visible in the Job Scheduler because they already include the
.sched
components.
For more information about developing jobs and schedules in a job archive, see “Job Scheduling” in
the PlateSpin Orchestrate 2.0 Developer Guide and Reference.
The PlateSpin Orchestrate Job Scheduler 41
Page 42

Although this walkthrough demonstrates only the first method listed above for deploying, the other
methods are relatively simple, so no further examples are provided to illustrate them.
1 In the Explorer panel of the PlateSpin Orchestrate Development Client, right-click the Jobs
container, then click Deploy Job to open the Select the Component File to Deploy dialog box.
2 Open the Look In drop-down list, then navigate to the location of the job you want to deploy.
Although a job developer can store PlateSpin Orchestrate jobs at any location on the network,
the sample jobs shipped with PlateSpin Orchestrate are limited to the directories where the
product is installed. For this walkthrough, navigate to the
server/components/systemJobs
directory.
/opt/novell/zenworks/zos/
3 Select auditCleaner.job, then click OK to deploy the job to the Jobs container.
The job appears in the all container and in the examples container in the tree.
novdocx (en) 13 May 2009
3.2.2 Creating a New Schedule for the Job
When a job has been deployed, you can create a schedule to specify when you want it to run. In this
walkthrough, you create a schedule for the
Orchestrate Development Client.
1 From the toolbar in the Orchestrate Development Client, click the Job Scheduler icon to
open the Job Scheduler view.
2 In the Job Scheduler view, click New to open the Enter Unique Schedule Name dialog box.
3 Specify a name for the schedule you want to create for this job. For this walkthrough, specify
the name
cleaner
in the Schedule Name field, then click OK to return to the Job Scheduler
view.
42 PlateSpin Orchestrate 2.0 Development Client Reference
auditCleaner
job by using the Scheduler tool in the
Page 43

The new schedule is highlighted in the Job Schedules Table and is flagged with a pencil icon,
signifying that the schedule has not been committed yet. Continue with Section 3.2.3,
“Defining the New Schedule,” on page 43 to define this new schedule by adding the specific
information you want.
3.2.3 Defining the New Schedule
Defining a new job schedule consists of selecting its general properties, its specific properties, and
the triggers you want to be associated with it. This section includes the following information:
“Choosing General Properties for a New Schedule” on page 43
“Creating and Assigning a Time Trigger for the New Schedule” on page 44
“(Optional) Adding Specific Parameters to the New Schedule” on page 46
Choosing General Properties for a New Schedule
novdocx (en) 13 May 2009
After you have created a new job schedule, its name cannot be changed, but you can add properties
to it that help to identify and classify it in a general way. Use the following steps to add these
properties:
1 In the Job Schedule Editor panel of the Scheduler view, select the Job drop-down list.
2 From the list of available jobs, select auditCleaner as the job to which this schedule applies.
3 In the Job Schedule Editor, select the User drop-down list.
4 From the list of available users, select zosSystem as the user who runs this job.
The zosSystem user is the built-in user that is always present. It is commonly used for routine
jobs like this example.
5 In the Job Schedule Editor, select the Priority drop-down list.
The PlateSpin Orchestrate Job Scheduler 43
Page 44

6 From the list of available priorities, select high as the priority for this job schedule.
The maximum selectable priority is dependent on an attribute associated with the selected user.
7 Click the Save icon on the toolbar of the Orchestrate Development Client to save the general
properties you have selected for the new schedule.
The schedule is now committed, and the attribute columns in the Job Schedules Table are
populated with the name of the job that the schedule will run, the user it will run as, the priority
at which it will run, and its current status. Because the schedule has not been activated yet, it
remains in a Disabled state.
When you have chosen the general properties of the new schedule, you can either continue by
“(Optional) Adding Specific Parameters to the New Schedule” on page 46 or by proceeding directly
to “Creating and Assigning a Time Trigger for the New Schedule” on page 44.
novdocx (en) 13 May 2009
Creating and Assigning a Time Trigger for the New Schedule
A job already defined in a schedule can be triggered with two main themes: the occurrence of an
event or the arrival of a point in time. In this walkthrough, you define a time trigger for the
cleaner
schedule.
In this example, there are no defined time triggers in the Job Scheduler, so use the following steps to
define a time trigger.
1 In the Job Schedule view, click Edit Triggers to display the Triggers dialog box.
44 PlateSpin Orchestrate 2.0 Development Client Reference
Page 45

Time triggers are shareable across schedules. After a time trigger is defined, it is added to a list
of triggers in this dialog box. You can select a predefined trigger from this list when you create
a new schedule, or you can create a new time trigger, as the next steps demonstrate.
NOTE: For detailed information about cron syntax, see “Understanding Cron Syntax in the
Job Scheduler” on page 37.
2 In the Triggers dialog box, click New to clear and activate the fields in the dialog box for the
creation of a unique time trigger.
3 In the Enter Unique Trigger Name dialog box, specify
24 hour
as the unique name of this time
trigger, then click OK.
novdocx (en) 13 May 2009
4 In the Description field, specify
Runs every 24 hours at noon
as the description for this
time trigger.
5 Click Fire Using CRON Expression to activate the fields for defining a cron expression.
6 Click the drop-down list of sample cron expressions, then select the default cron expression,
0 12 * * ?
, which is listed first.
The sample expressions in the drop-down list show cron strings with accompanying
descriptions to remind you how a cron string is constructed. The examples are selectable and
editable and can be used in the schedule, just as you have done in this step.
7 Click Save to save the trigger you just created, then click Close to return to the Job Scheduler
view.
8 From the Job Scheduler view, make sure that the cleaner schedule is selected, then click
Choose Triggers to display the Choose Triggers dialog box.
0
9 In the Choose Triggers dialog box, select 24 hour (the name of the trigger you created), click
Add to move the trigger definition to the Scheduled Job Triggers list, then click OK to return to
the Job Scheduler view.
The PlateSpin Orchestrate Job Scheduler 45
Page 46

NOTE: You can select and combine as many time triggers as you want to apply to a given
schedule. You can also combine time triggers with event triggers on a given schedule.
In the Triggers list of the Job Scheduler view, the 24 hour trigger is now associated with the
new schedule.
10 Click the Save icon to update the Orchestrate Server with the new schedule/trigger
association.
(Optional) Adding Specific Parameters to the New Schedule
novdocx (en) 13 May 2009
You can now add specific parameters to the schedule to edit its job arguments, to choose whether
you want to pass the user environment variables to the schedule, or to specify policy constraints to
further focus the purpose of this schedule when it fires.
For the purpose of this walkthrough, none of these specific parameters is modified, although a
general overview of how to do so is explained.
The following specific parameters can be managed in the Job Scheduler Editor:
“Job Arguments” on page 46
“User Environment” on page 47
“Constraints” on page 47
Job Arguments
As explained in Section 3.1.2, “Creating or Modifying a Job Schedule,” on page 28, a job argument
defines the values that can be passed in to the process when a job is invoked. These values let you
statically define and control job behavior. The job arguments that appear in the Job Arguments tab of
the Schedule Editor depend on the job. The job might have no arguments.
By default, the
Figure 3-11 The Job Arguments Tab of the Job Schedule Editor
auditCleaner
job lists only one job argument, jobargs.days.
46 PlateSpin Orchestrate 2.0 Development Client Reference
Page 47

According to the tool tip text, this argument is the number of days of job history to keep, so this job
cleans up the history of the job in the PlateSpin Orchestrate audit database after the job reaches the
age of 60 days. Data older than 60 days is to be deleted. If you want to, you can change this
parameter, or any other parameter in a job argument.
If the default value for a job argument parameter is missing, the job might fail, so you should inspect
these parameters carefully.
User Environment
As explained in Section 3.1.2, “Creating or Modifying a Job Schedule,” on page 28, a user’s
environment variables are available in the Job Scheduler only if that user utilizes the zos command
line tool and elects to pass those environment variables to the server at login time or when he or she
runs a job (running the job creates the environment variables as facts in the job). The
zos run
command passes the environment for that particular job run only.
novdocx (en) 13 May 2009
In this walkthrough, the
Figure 3-12 The User Environment Tab of the Job Scheduler Editor, No User Environment Variables Available
zosSystem
user shows no user environment variables.
Because there are no environment variables listed, there are none to pass to the schedule, so it is not
necessary to select the Pass User Environment check box. By default, this check box is not selected,
even if environment variables are present for a user specified to run the job.
Sometimes a job is written to work from a user’s environment variables. In this case, if a user has
not logged in or has not run the job from the zos command line using the necessary environment
option, the schedule must pass those variables to the job when it is invoked.
If you associated a user who had user environment variables with this schedule, you would see a list
of those environment variables as they would be passed to the job.
Figure 3-13 The User Environment Tab of the Job Schedule Editor, User Environment Variables Available
Selecting the Pass User Environment check box in this scenario would create these variables as facts
used for this job invocation.
Constraints
As explained in Section 3.1.2, “Creating or Modifying a Job Schedule,” on page 28, the Constraints
tab displays a constraint editor that you can use to create additional constraints for the job being
scheduled.
The PlateSpin Orchestrate Job Scheduler 47
Page 48
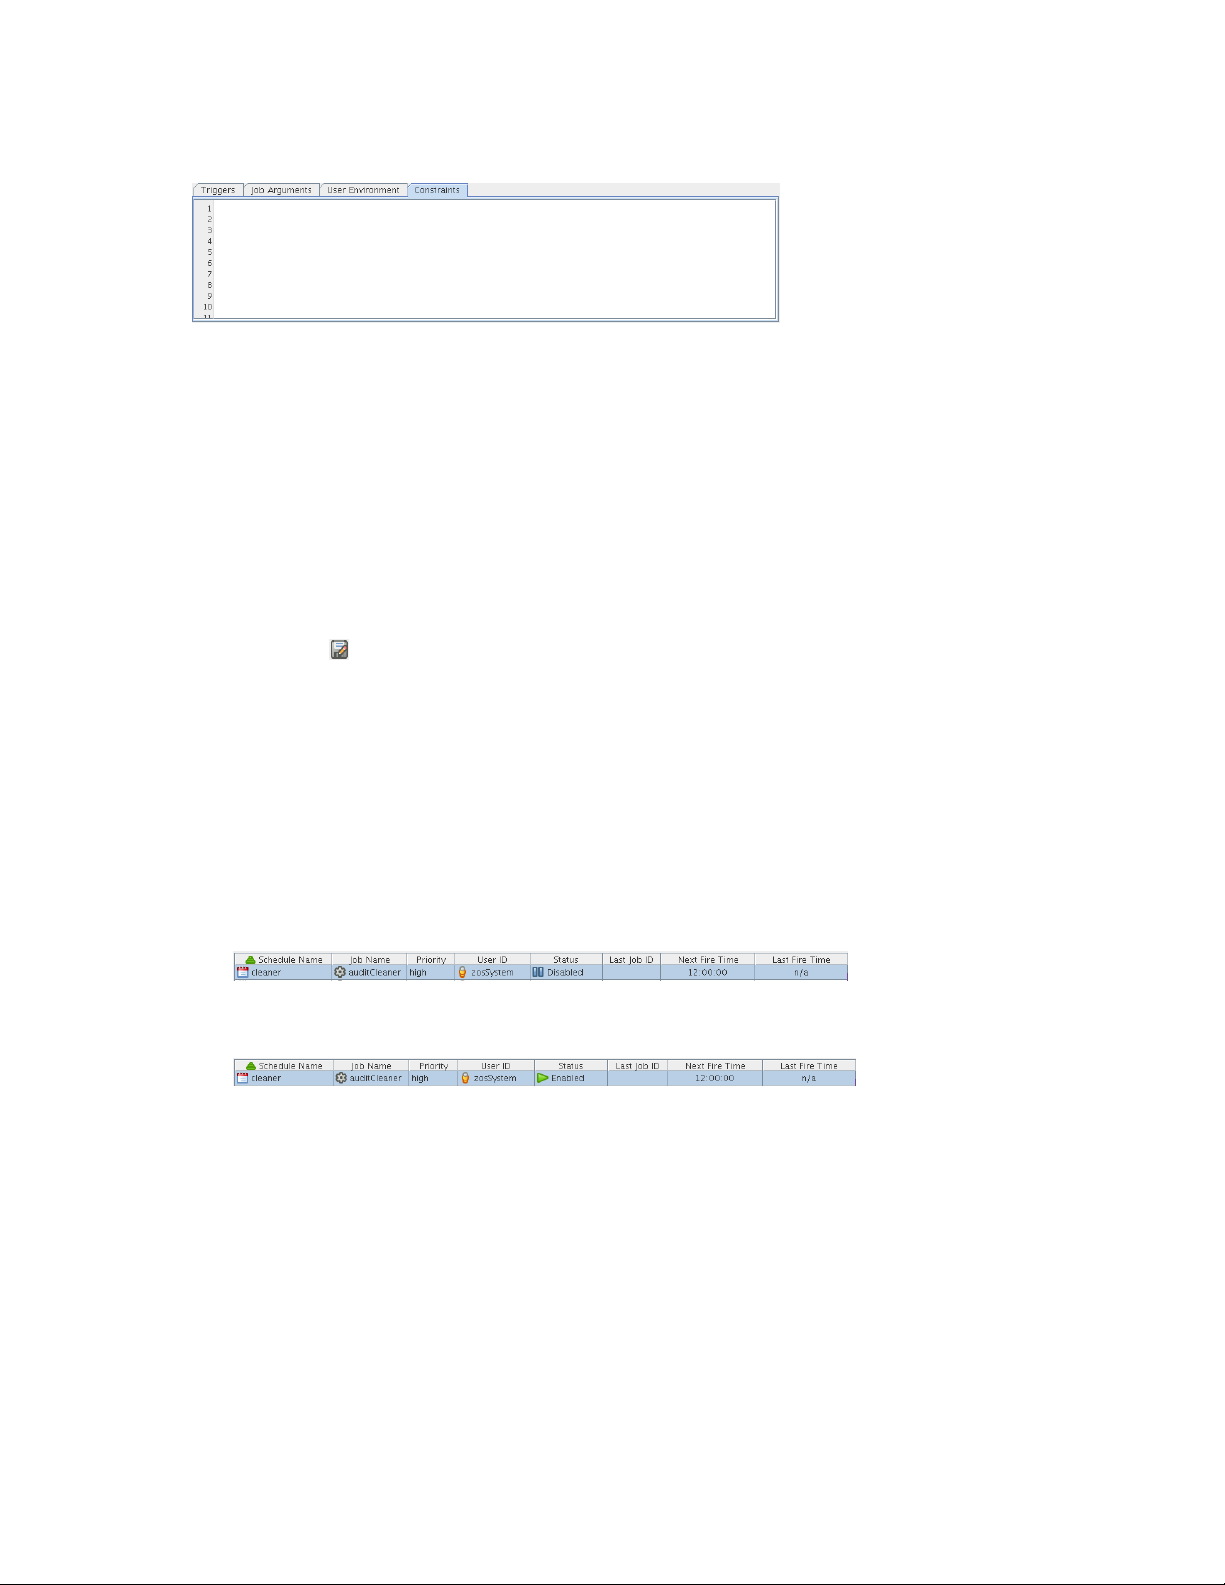
Figure 3-14 The Constraints Tab of the Job Schedule Editor
Any other constraints associated with the context of this job invocation (including but not limited to
this job), with the user you’ve selected, with that user’s group, with the jobs group, with the
resources that the job uses, or with the resource groups that the job uses, run in spite of the policy
that you define here. These additional constraints usually restrict or refine what the job does when
this schedule fires.
These constraints are passed to the job only when this schedule is invoked. For example, you could
add a start constraint to delay the start of a job, a resource constraint to run on only one of three
named machines, or a continue constraint to automatically time out the job if it takes too long to run.
Anything you can do with a regular job policy constraint, you can add as a special constraint here for
this particular schedule invocation.
novdocx (en) 13 May 2009
Click Save icon to update the Orchestrate Server with the new schedule.
For more information about policies, see “Policy Elements” in the PlateSpin Orchestrate 2.0
Developer Guide and Reference.
3.2.4 Activating the New Schedule
When the new schedule has been created and its triggers defined, you need to take it from the
disabled state to an active state where it is ready to run.
1 In the Job Scheduler view, select the newly created job. The job shows that it is in a Disabled
state.
2 Click Enable to enable the schedule.
The schedule is now enabled, but has not run yet.
3.2.5 Running the New Schedule Immediately
You can trigger the schedule immediately, rather than waiting for the triggers to fire.
1 In the Job Schedules Table of the Job Scheduler view, select cleaner (the name of the schedule
you want to run), click Run Now, then click the job monitor icon on the toolbar (Jobs) to open
the Job Monitor view.
48 PlateSpin Orchestrate 2.0 Development Client Reference
Page 49

The joblet icon shows that the job is running.
2 Click the Job Scheduler icon on the toolbar to open the Job Scheduler view.
novdocx (en) 13 May 2009
The
cleaner
schedule is listed as an active job. This indicates that the schedule has started the
job as anticipated.
If you click the refresh icon , you can see that the job now has a Job ID.
If the job invocation fails, as in this example, a red exclamation icon is also displayed.
The PlateSpin Orchestrate Job Scheduler 49
Page 50

novdocx (en) 13 May 2009
50 PlateSpin Orchestrate 2.0 Development Client Reference
Page 51

4
The Policy Debugger
novdocx (en) 13 May 2009
4
The Policy Debugger is a tabbed page available in several views of the PlateSpin® Orchestrate
Development Client from Novell
of a job. The following figure shows the Policy Debugger tab opened in the Jobs view of the
Orchestrate Development Client.
Figure 4-1 PlateSpin Orchestrate Jobs View with the Policy Debugger Page Open
®
. This tool helps you to determine the reasons for the current state
The Policy Debugger tab is also available in the VM Hosts view and in the Provisioner view of the
Orchestrate Development Client.
Section 4.1, “The Constraints Table View,” on page 51
Section 4.2, “The Facts Table View,” on page 56
Section 4.3, “Policy Debugger Use Cases,” on page 57
4.1 The Constraints Table View
The left side of the Policy Debugger page is referred to as the Constraints Table view.
The Policy Debugger
51
Page 52

Figure 4-2 The Constraints Table View
novdocx (en) 13 May 2009
The appearance of this view can change, depending on the constraint type you select in the drop
down menu. For a description of these types, see Section 4.1.2, “The Constraint Type List,” on
page 53.
The Constraints Table View is composed of several parts:
Section 4.1.1, “The Match Context Area,” on page 52
Section 4.1.2, “The Constraint Type List,” on page 53
Section 4.1.3, “The Verbose Check Box,” on page 54
Section 4.1.4, “The Capable Resources Summary,” on page 54
Section 4.1.5, “The Constraints Column of the Constraints Table View,” on page 54
Section 4.1.6, “The Policy Column of the Constraints Table,” on page 55
4.1.1 The Match Context Area
The policy debugger provides the general identification of a job instance in the Match Context area
of the Constraints Table View. The Match Context defines everything associated with running a job
on a particular resource it references Facts, which are also referenced in Policies. The Policies define
how, when, and where the job runs.
Figure 4-3 The Match Context Area of the Constraints Table View in the Policy Debugger
That identifying Facts in the Match Context include:
Matrix: The icon and a text string identifies the machine that matches the grid name given
to the Orchestrate Server where this job is running.
User: The icon and a text string identifies the User object that matches the user who is
running the job.
52 PlateSpin Orchestrate 2.0 Development Client Reference
Page 53

Job: The icon and a text string identifies the deployed Job that matches the one that is
running on the grid.
Job Instance: The icon and a fully qualified text string identifies the specific Job instance
that matches the deployed job running on the grid.
Resource: The Resource drop down list shows all resources. The list appears in the Match
Context if the resource constraint type is selected. The resources in the list that are currently
offline display with a dimmed icon. If available, a listed resource has a colored dot by its side.
The color of the dot (blue or gray ) and the resource type it accompanies has significance:
A blue dot with the All Resources label indicates that at least one resource matches the
constraints and is capable of servicing the job.
A gray dot with the All Resources label indicates that no resources match the constraints.
A blue dot with a named, selected resource indicates that its constraints match and it is
capable of servicing the job.
A gray dot by a named, selected resource indicates that its constraints do not match and
that it is not capable of servicing the job.
The following figure shows a list of eight resources. Four of those resources (lab.a, lab.b, lab.c
and lab.d) are online, and their constraints match so they are capable of servicing the job.
novdocx (en) 13 May 2009
Figure 4-4 Resource Drop Down List Showing Online and Offline Resources
4.1.2 The Constraint Type List
Select one of the constraint types in the drop down list to specify a policy context. Constraint types
in the list are disabled (dimmed) if they do not apply to the job that you are debugging.
accept: accept
start: start
continue: continue
provision: provision
allocation: allocation
resource: resource
vmhost: vmhost
repository: repository
health: health
The Policy Debugger 53
Page 54

4.1.3 The Verbose Check Box
novdocx (en) 13 May 2009
When you select the Verbose check box, the
Constraints tree. For more information, see Section 4.1.5, “The Constraints Column of the
Constraints Table View,” on page 54.
reason
string specified in the policy is displayed in the
4.1.4 The Capable Resources Summary
Directly under the Resource List in the constraint view, a populated string summarizes the resources
that are capable of servicing the job. For example,
indicates that four of the ten total online resources are capable of servicing the job.
4 matching Resource of 10 online
4.1.5 The Constraints Column of the Constraints Table View
The Constraints column of the constraints table view shows the logical hierarchy (that is, a “tree”
format) of the constraints that are defined by the Policies associated with the Job. You can identify
the status of the listed constraints by the icons that might be displayed in the far left column of the
table:
no icon: The constraint passes the match. It is a “true” match. The figure below shows that the
lab.a
resource
displayed next to any listed constraint.
is available to run the job because all of its constraints match. No red icons are
red dot icon: The constraint does not pass the match. The figure below shows that the resource
eng.a
cannot run the job because its constraints do not match.
red octagonal icon: The constraint does not pass the match and is blocking the job. The figure
above also shows the blocking constraint (red octagon).
54 PlateSpin Orchestrate 2.0 Development Client Reference
Page 55

green dot icon: A blocking constraint has been disabled so that it behaves like a match. The
figure below shows the green dot icon next to that the constraint that was formerly blocked and
can now behave as a match.
If you right-click a constraint in the table, a popup menu with three options is displayed. This menu
lets you change the status of the constraint.
Show Admin View: Select this option to open the Admin View for the specific resource
selected.
Disable Constraint: Select this option to disable (attach a green dot icon to) a constraint.
Disabling a constraint with this function effectively makes it match, a condition that can prove
useful if you want to perform a “what if” test without actually changing a policy.
novdocx (en) 13 May 2009
Enable All Constraints: Select this option if you have disabled one or more constraints during
testing and you want to restore them to the enabled state.
Cached Constraints in the Constraints Column
When you change the constraint type in the Constraints Type List, the background of the table
changes to green for some types. These are “cached” constraints that are saved with the job after it
has completed. Their purpose is to help you debug the policy.
Figure 4-5 Cached Constraints Displayed in the Constraints Table View
4.1.6 The Policy Column of the Constraints Table
The Policy column of the constraints table displays the policy name that contributed the constraint.
Right-click a policy name to open a popup menu offering the option to open the policy editor for the
specified policy. The menu also includes constraint enabling or disabling options, just as the popup
menu for constraint column does.
The Policy Debugger 55
Page 56

Figure 4-6 The Popup Menu Launched from the Policy Column
4.2 The Facts Table View
The Facts Table view displays the facts referenced in the Constraint Tree view for a specified
Resource. Selecting a fact in the Constraint tree automatically selects that fact in the table.
Figure 4-7 The Constraints Table View and the Accompanying Facts Table View
novdocx (en) 13 May 2009
If you right-click a column head in this table, a menu is launched where you can select the columns
that you want to display.
Figure 4-8 Menu Used to Select the Columns Displayed in the Facts Table View of the Policy Debugger
Section 4.2.1, “The All Facts Check Box,” on page 56
4.2.1 The All Facts Check Box
If you select the All Facts check box at the top of the Facts Table view, all of the facts (including
matrix, user, job, jobargs, jobinstance, and resource facts) associated with the Match Context are
listed.
If you select All Resources in the Match Context (see Section 4.1.1, “The Match Context Area,” on
page 52) and you also select the All Facts check box, the Facts Table view displays all the facts for
all resources for the specified Match Context.
56 PlateSpin Orchestrate 2.0 Development Client Reference
Page 57

Figure 4-9 All Facts Check Box Selected with All Resources in Match Context
4.3 Policy Debugger Use Cases
This section includes several use cases that show how the Policy Debugger works and how to use it.
The following use cases are included:
Section 4.3.1, “Use Case 1: Determining Why a Job is in a Waiting State,” on page 57
4.3.1 Use Case 1: Determining Why a Job is in a Waiting State
novdocx (en) 13 May 2009
The objective of this use case is to run a job that sits in the waiting state and to use the policy
debugger to identify why it is in the state and to make the necessary changes to get the job to run.
quickie.job
The
used must be in a Resource group called
is used along with a simple policy that specifies that the Resources that are to be
debugger
.
Use the following steps to recreate the use case.
1 In the Orchestrate Development Client, create a user named
2 Deploy
quickie.job
from the
/examples
directory.
3 In the Orchestrate Development Client, create a schedule named
quickie
job and the
debugger
user.
4 In the Orchestrate Development Client, create a policy and name it
policy needs to specify that the resource used belongs to the group called
debugger
.
quickie
debuggerExample
, specifying the
. The
debugger
.
5 In the Orchestrate Development Client, associate the
job.
debuggerExample
policy to the
The Policy Debugger 57
quickie
Page 58
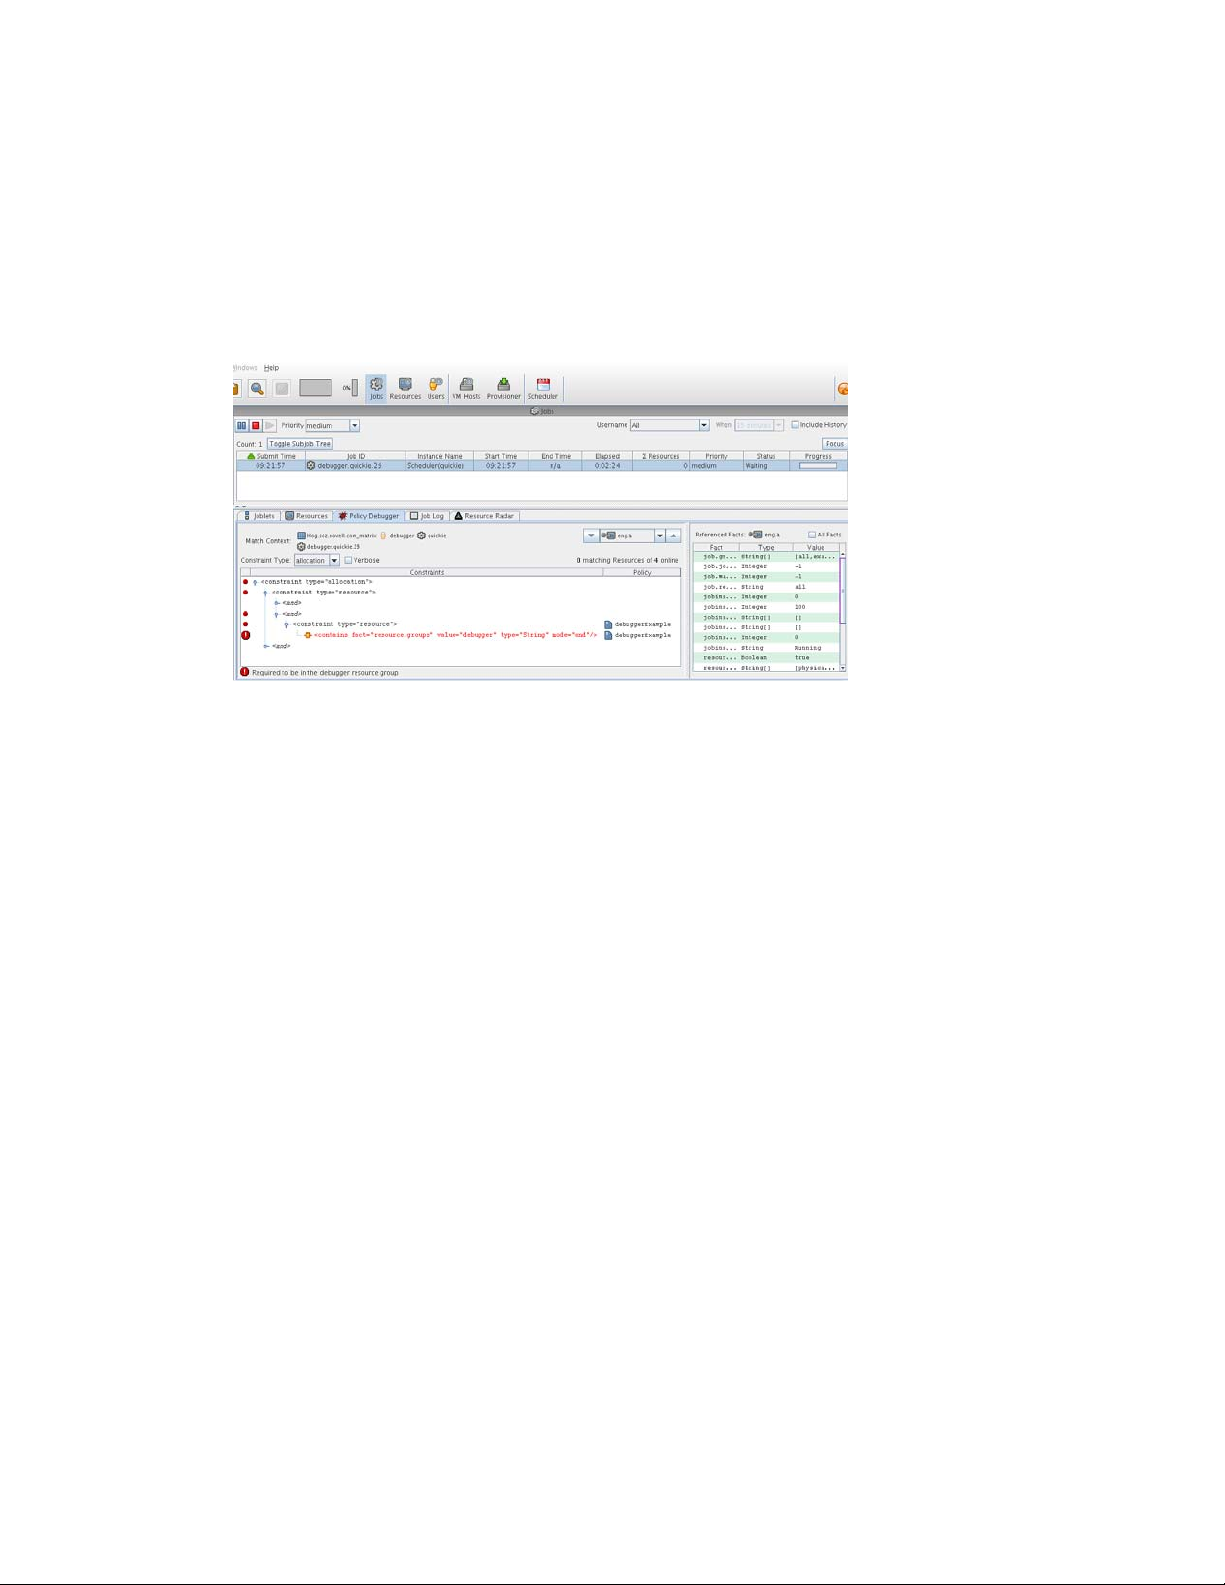
novdocx (en) 13 May 2009
6 In the Job Scheduler view of the Orchestrate Development Client, select the
then click Run Now to run the
quickie
schedule.
quickie
schedule,
7 In the Job Monitor view of the Orchestrate Development Client, select the Policy Debugger tab
and verify that the job is in the waiting state.
8 In the Constraints Table view, open the Constraint Type drop down list, then select Allocation.
9 In the Match Context area of the Constraints Table view, open the Resource drop down list,
then select any resource to refresh the Constraints Table and Facts Table views.
The Policy Debugger displays a red icon near the constraints that fail to match. The larger, red
octagonal icon shows the particular constraint that is “blocking” and preventing the job from
running on the resource. This is the constraint that is causing the job to be in a “waiting” state.
The Constraints Table also displays the policy name (
debuggerExample
) that is contributing
the constraint that is causing problems.
There are a few ways to get the job to run:
Create a Resource group called
debugger
, then place a resource in that group to satisfy the
constraint specified in the policy.
Disassociate the policy (
In the Constraints Table, right-click on the blocking constraint and select Disable Constraint.
debuggerExample
) from the job (
quickie
).
58 PlateSpin Orchestrate 2.0 Development Client Reference
Page 59

5
The Explorer Tree
The PlateSpin® Orchestrate Development Client from Novell® lets you visualize the model
maintained by the Orchestrate Server used to make Virtual Machine (VM) provisioning decisions.
The left pane of the Orchestrate Development Client displays a hierarchical tree known as the
Explorer Tree or the Explorer View. This tree lets you navigate to different objects to see their
details. When you navigate to these objects, you can edit their attributes and view more detail about
their configurations. The two objects highest in the tree are The Orchestrate Server Object (page 59)
and The Server Admin Object (page 67). Each object in the Explorer Tree is referred to as a “Grid
object.” Most Grid objects can also be associated with one or more containers called Groups.
The primary Grid objects include the following:
Jobs: These objects are deployed to the Orchestrate Server to automate processes, such as on-
demand provisioning. Jobs consist of JDL scripts(s) and might have one or more Policies
associated with them. For more information about Jobs, see Section 5.3, “The Job Object,” on
page 68.
novdocx (en) 13 May 2009
5
Resources: These objects represent physical or virtual machines managed by PlateSpin
Orchestrate. If a resource is running the PlateSpin Orchestrate Agent, that resource can be
scheduled for remote execution of a job. For more information about resources, see Section 5.4,
“The Resource Object,” on page 81.
VM Hosts: These objects represent a VM host technology (for example,. Xen*, Hyper-V, and
so on) running on a physical resource. VM host objects can be used when making provisioning
decisions to a resource. For more information about VM hosts, see Section 5.5, “The VM Host
Object,” on page 104.
Repositories: These objects represent the physical or virtual storage that is accessible for VM
images or other use. For more information about repositories, see Section 5.6, “The Repository
Object,” on page 109.
Users: These objects represent the individual accounts that are allowed to connect to the
PlateSpin Orchestrate Server. Administrator users are also allowed to connect by using the
zosadmin
For more information about Users, see Section 5.7, “The User Object,” on page 117.
For information on creating individual user login accounts for VM operators, see “Adding User
Logins for VM Operators” in the PlateSpin Orchestrate 2.0 VM Client Guide and Reference.
Grid objects can be visualized in various ways. One of the most important of these depicts the health
of the object. For more information, see Appendix A, “Grid Object Health Monitoring,” on
page 133.
Additional objects, such as Policies, Public JDL Libraries, Computed Facts, Events, and Metrics are
also displayed in the Explorer panel. To learn more about these other objects, see Section 5.8, “Other
Displayed Objects,” on page 124.
command line and the PlateSpin Orchestrate Development Client user interfaces.
5.1 The Orchestrate Server Object
The object highest in the Explorer Tree is the Orchestrate Server Object, sometimes called the “grid
server” object because it represents the PlateSpin Orchestrate Server acting as the holding place for
all of the information used to manage objects for a single computing grid.
The Explorer Tree
59
Page 60

The PlateSpin Orchestrate Development Client is “version aware.” When the Orchestrate
Development Client is launched or when server discovery is manually run, the client recognizes
both current PlateSpin Orchestrate installations and old installations of discovered servers and
displays their icons accordingly. This visual cue helps you to recognize when older Orchestrate
Servers need to be upgraded.
Figure 5-1 Current and “Old” Server Objects
The tool tip for a Orchestrate Server lists its RMI configuration, its IP address, the directory location
where the server instance was installed, and its exact version number.
The icons to the right of a current Orchestrate Server represent its polices, either those added by
default upon server install and configuration, or those added later. A drop-down menu of all
associated policies is opened when you right-click the policy icon(s). From there, you can select a
policy to open in the Policy Editor. For more information about policies, see Section 5.8.1, “The
Policy Object,” on page 125.
novdocx (en) 13 May 2009
When selected, the Server Object exposes four tabs where you can further configure its attributes.
Further information about these tabs is available in the following sections:
Section 5.1.1, “The Orchestrate Server Info/Configuration Tab,” on page 60
Section 5.1.2, “The Orchestrate Server Authentication Tab,” on page 65
Section 5.1.3, “The Orchestrate Server Policies Tab,” on page 67
Section 5.1.4, “The Orchestrate Server Constraints/Facts Tab,” on page 67
5.1.1 The Orchestrate Server Info/Configuration Tab
The page that opens under the Info/Configuration tab includes several collapsible sections on the
page where you can configure the general information and attributes of the server.
“Server/Cluster” on page 60
“Data Grid Configuration” on page 61
“Security/TLS Configuration” on page 62
“Agent/User Session Configuration” on page 63
“Audit Database Configuration” on page 64
“job.limits” on page 64
Server/Cluster
If you are using this server in a High Availability environment, the information in this section is
populated as a result of the configuration you managed during the High Availability installation. The
following items are included in the section:
Server Version: This non-editable field lists the version of this server in the form
<major>.<minor>.<point>.<build_number>
60 PlateSpin Orchestrate 2.0 Development Client Reference
. This is the data for the fact
”matrix.version”
.
Page 61

Is Master Server: This check box in non High Availability cluster configurations. It is unchecked if
the server is not the Master Server in a High Availability cluster configuration.
Master Server Address: Set this value when the Orchestrate Server participates in a High
Availability cluster.
External Cluster Address: Set this value when the Orchestrate Server participates in a High
Availability cluster.
Cluster Addresses: This list shows the hostname(s) or IP Address(es) associated with a Orchestrate
Server when it configured in a High Availability configuration.
The button opens the Attribute element values dialog box, where you can add, remove, or
reorder addresses (element values) in an array of address choices.
For more information about using PlateSpin Orchestrate in a High Availability environment, see the
PlateSpin Orchestrate 2.0 High Availability Configuration Guide.
Data Grid Configuration
This section of the Info/Configuration tab allows for advanced configuration of datagrid related
tuning parameters. The properties on the page and their descriptions are listed below.
novdocx (en) 13 May 2009
Data Grid Root: This field sets the location of the PlateSpin Orchestrate datagrid in the file system.
For example, you might change this location to use a different file system mount point
(recommended when there is a lot of datagrid I/O).
Cleanup Interval: This is the interval at which the Orchestrate Server scans through user job
history files on the datagrid. Job history files older than the owning user’s job history retention time
user.datagrid.maxhistory
limit (
) are deleted.
Cleanup Interval Enabled: Select this check box to set a flag to enable periodic job history
cleanup checking. Deselect to disable the checking.
Default Multicast Rate: This field sets the default data rate in bytes per second for multicast
operations in which the client has not explicitly set a rate for a particular file transfer.
Max Multicast Rate: This field sets the maximum data rate in bytes per second that a client can
specify for a multicast file transfer.
Selected Interfaces: This field names the interfaces on which multicast file transfers are to be sent.
This allows an administrator to limit multicast traffic to specific interfaces (that is, the interfaces
where the agents are connected). You can add or delete interfaces by clicking the button.
Available Interfaces: This field list lists the network interfaces that are available on the local
machine for multicasting.
NOTE: The property is “read-only” and is provided for your information.
Multicast Metrics: This panel lets you monitor multicast data transfer, including:
Total Packets Sent: The total number of multicast data packets sent by the file multicaster
since the last reset of the counters.
Total Packets Resent: The total number of multicast packets resent due to errors since the last
counter reset.
The Explorer Tree 61
Page 62

Total Resend Rate: The total packet resend rate as a percentage since the last counter reset.
Current Packets Sent: The total number of multicast packets sent during the current or most
recent multicast file transfer.
Current Packets Resent: The total number of multicast packets resent due to errors,
corruption, or loss during the current or most recent multicast file transfer.
Current Resend Rate: The packet resend rate as a percentage of packets sent since the start of
the current or most recent multicast file transfer.
Current File Size: The file size in bytes for the current or most recent multicast file transfer.
Current Bytes Sent: The number of bytes sent so far in the current or most recent multicast
file transfer.
Current Percent Complete: The completion percentage of the current or most recent
multicast file transfer.
Skipped (Sparse) Bytes: The umber of bytes skipped because of long runs of zeros. These
“holes” are skipped in order to reduce file transfer time for large sparse files like VM images.
Current Receiver Count: The number of recipient agents for the current or most recent
multicast file transfer.
Current File Name: The name of the file transferred in the current or most recent multicast
file transfer.
novdocx (en) 13 May 2009
The data list includes a check box that is selected if the current multicast transfer is finished. It also
includes a Reset Stats button that you can select to clear the total metrics in order to begin
monitoring multicast statistics from a new point in time.
Security/TLS Configuration
This section lets you configure TLS (or SSL) data encryption for both user and agent connections.
There are four different levels of encryption that may be set for both users and nodes. These are
described below. The properties in this section also let the TCP/IP socket listener address and port
for TLS connections to be configured.
TLS On Agent: This setting allows the encryption level to be set to one of four values, as described
(in order of security level) below.
Forbid TLS for agents
Only unencrypted connections are allowed for nodes (that is, agents) authenticating to this
server. If the agent attempts to initiate encrypted communication, the connection attempt is
rejected. This is the least secure of the encryption levels and is only recommended for
installations where encryption is forbidden due to legal or policy restrictions, or where the
performance benefits of disabling encryption outweigh security concerns.
Allow TLS on the agents; default to falling back to unencrypted
This level specifies that the server defaults to unencrypted communication, but that the agent
can optionally enable encryption.
This is the default setting for the Orchestrate Server. More secure installations might require a
setting to one of the higher levels below.
Allow TLS on the agents; default to TLS encrypted if not configured
encrypted
The server defaults to using encryption, but the agent can optionally disable encryption.
62 PlateSpin Orchestrate 2.0 Development Client Reference
Page 63

Make TLS mandatory on the agents
The Orchestrate Server rejects any connections that do not establish TLS encryption. This is the
most secure encryption level because it ensures that all message communication between the
node (that is, an agent) and the server are protected from tampering or interception.
TLS On Client: This setting allows the encryption level to be set to one of four values, as described
(in order of security level) below.
Forbid TLS for clients
Only unencrypted connections are allowed for users of this server. If the user or client attempts
to initiate encrypted communication, the connection attempt is rejected. This is the least secure
of the encryption levels and is only recommended for installations where encryption is
forbidden due to legal or policy restrictions, or where the performance benefits of disabling
encryption outweigh security concerns.
Allow TLS on the clients; default to falling back to unencrypted
This level specifies that the server defaults to unencrypted communication, but that the user can
optionally enable encryption.
This is the default setting for the Orchestrate Server. More secure installations might require a
setting to one of the higher levels below.
Allow TLS on the agents; default to TLS encrypted if not configured
encrypted
The server defaults to using encryption, but the user can optionally disable encryption.
Make TLS mandatory on the clients
novdocx (en) 13 May 2009
The Orchestrate Server rejects any connections that do not establish TLS encryption. This is the
most secure encryption level because it ensures that all message communication between the
user’s client programs and the server are protected from tampering or interception.
TLS Address: This is the port number and optional bind address for incoming encrypted
connections from users and nodes. The format is
10.10.10.10:8101
8101
on port
. If “*” is used as the host name, then the Orchestrate Server listens on all available
network interfaces. The default is
causes the server to accept only TLS connections on the address
*:8101
, which causes the Orchestrate Server to listen for
hostname:port
. For example,
10.10.10.10
encrypted sessions on all available interfaces on the system.
Agent/User Session Configuration
When nodes (agents) and users log on to the Orchestrate Server, they establish a session context
used to manage the state of the messaging connection between client and server. This session can be
revoked by the administrator, and it can also expire if the connection exceeds its maximum lifetime
or idle timeout.
Agent Session Lifetime: The maximum number of seconds that an agent’s session can last
-1
before the agent is disconnected and must re-authenticate with the server. A value of
” means
“forever.”
Agent Session Timeout: The idle timeout for agents. If an agent connection remains idle with
no message traffic in either direction for this time period (in seconds), the session times out, the
agent is disconnected and must reauthenticate when it is ready to communicate with the server
again.
The Explorer Tree 63
Page 64

Socket Keeps Agent Sessions Alive: Select this check box to set a flag that causes the server
and agent to maintain a keep alive “ping” in order to detect hung/stalled network connections.
This allows the agent to recover from hung connections and to transparently reconnect with the
server.
User Session Lifetime: The maximum number of seconds that a user’s session can last before
-1
the user is required to re-authenticate with the server. A value of
User Session Timeout: This is the idle timeout (in seconds) for user sessions. If a user’s
means “forever.”
session encounters no message traffic or requests in either direction for time, then any
connection with user software is closed and the session expires. At this point, the user must reauthenticate.
Socket Keeps User Sessions Alive: Select this check box to set a flag that causes the server
and user client to maintain a keep alive “ping” in order to detect hung/stalled network
connections. This allows the agent to recover from hung connections and to transparently
reconnect an with the server. This setting applies only in situations where you are using custom
user client software or certain subcommands of the zos command line utility to maintain a
long-lived connection.
Audit Database Configuration
novdocx (en) 13 May 2009
This section of the Info/Configuration page lets you configure the connection to a relational
database that uses a deployed JDBC driver and connection properties. The PostgreSQL driver is
deployed by default.
JDBC Driver Name: Specifies the Java class for the driver.
JDBC Library: Specifies the deployed library that contains the driver.
JDBC Connection URL: Specifies the driver-dependent connection string.
Database Username: Specifies the username for database authentication.
Database Password: Specifies the password to be used for database authentication.
Is Connected: When selected, this indicates that the driver is successfully connected.
Connect (button): Click to connect using the current connection settings.
Disconnect (button): Click to disconnect the current connection.
Clear Queue (button): Clear queued records that have not yet been written to the database.
job.limits
The facts in this section of the page are used in the default constraints to help protect the Orchestrate
Server from denial of service type attacks or badly written jobs and might otherwise get stuck in the
server queue, consume resources and cause adverse server performance.
max.active.jobs: Set a (global default) limit on the number of active jobs.
The Orchestrate Server uses this value in the
this number of jobs (including child jobs) to be actively running at the same time. Jobs that
exceed this number might be queued. See
max.queued.jobs: Set a (global default) limit on the number of queued jobs.
64 PlateSpin Orchestrate 2.0 Development Client Reference
max.queued.jobs
start
constraint and does not allow more than
, below.
Page 65

novdocx (en) 13 May 2009
This value is similar to
max.active.jobs
(see above) but it is used in the
accept
constraint
and limits the number of jobs sitting in a queue waiting to be started. Therefore, the maximum
jobs that can be present on an Orchestrate Server is
max.active.jobs
+
max.queued.jobs
New jobs are not be accepted by the server if, when added, they would exceed this total.
job.finishing.timeout: Set a (global default) limit on the timeout for job completion.
This value represents the number of seconds that the Orchestrate Server allows a job to execute
it's
job_cancelled_event()
(if defined) before forcibly aborting the job. This prevents jobs
from potentially hanging during cancellation.
5.1.2 The Orchestrate Server Authentication Tab
The Authentication tab opens a page with several collapsible sections where you can configure
various methods for authenticating both users and resources to the PlateSpin Orchestrate Server.
“Resources” on page 65
“Users” on page 65
Resources
The resources in a PlateSpin Orchestrate grid are actually PlateSpin Orchestrate Agents that
authenticate or “register” with the PlateSpin Orchestrate Server.
Auto Register Agents: Select this check box if you want the PlateSpin Orchestrate Server to
automatically register agents when they first connect to the Orchestrate Server.
.
Users
Only authenticated users can log into the PlateSpin Orchestrate Server. As an administrator, you can
configure this authentication to use an internal user database or to externally authenticate users
through an LDAP server.
Auto Register Users
Select this check box if you want the PlateSpin Orchestrate Server to automatically register users
when they first connect to the Orchestrate Server.
Enable LDAP
Select this check box if you want the Orchestrate Server to authenticate users externally using an
LDAP server. Additional LDAP-related configuration fields are displayed when you select check
box.
Administrators
The Administrators list specifies the group names whose membership includes PlateSpin
Orchestrate administrators as returned by the specified authentication provider. You can add groups
to this list by clicking the button to open an array editor dialog box, which allows groups to
be added, removed, and reordered. A group must be in the format
<provider>:<group|groupnocase>:<groupname>
“LDAP”. For example, adding
LDAP:groupnocase:XyZ
, where the
<provider>
is either “ZOS” or
allows users reported by the LDAP server
The Explorer Tree 65
Page 66

as members of a group “xyz”, or “XYZ”, “xYz”, etc. to authenticate as an administrator. To enforce
to case-sensitive matching, use
LDAP:group:XyZ
instead. Non-case-sensitive matching is needed
for Active Directory* servers.
Active Directory Service Settings
If you select Active Directory Service in the Server Type drop down list, the following settings are
available:
Directory Name: Enter the name of the Active Directory Service server.
novdocx (en) 13 May 2009
Servers: This property is a list of strings containing
server:port
entries for a list of servers to be
used.
Each entry can be of one of three forms:
<hostname>
<hostname>:<port>
<hostname>:<port>:<sslport>
In all cases,
<hostname>
is a resolvable DNS name or an IP address. If SSL or TLS are in use,
however, the host name must exactly match the name on the ADS server SSL certificate.
You can modify this list by clicking the button to open an Attribute Element Values dialog
box, where you can add, remove, or change the order of server names.
Advanced: The settings in this section are for more selective ADS authentication.
SSL: Selecting this option (assuming that the accompanying Start TLS check box is not also
selected and also assuming that the ADS server’s SSL certificate has been installed on the
PlateSpin Orchestrate Server JVM) securely connects to the ADS server using SSL encryption.
The older style LDAP protocol (
Start TLS: Selecting this option immediately promotes the connection to SSL encryption by
ldaps://)
bypassing the older style protocol in favor of the LDAPv3
the
nonSSL
LDAP port. To use this option, the ADS server’s SSL certificate must be installed
is used for the connection.
Start TLS
extended operation on
on the JVM of the PlateSpin Orchestrate Server.
Query Account: Enter the account name that is to be used for querying group information on
authenticated users.
Query Password: Enter the clear text password used to authenticate the query account on the
LDAP server.
Generic Settings
When you select Generic LDAP Directory Service as the Server Type, the following additional
settings are displayed:
Base Domain Name: Specifies the Root DN of the LDAP server’s directory tree. This must be
obtained by the administrator, and is usually in the form of:
User Attribute: Specifies the attribute on a user’s entry that identifies his or her login account
name. For ADS servers, this attribute is
66 PlateSpin Orchestrate 2.0 Development Client Reference
sAMAccountName
dc=adsroot,dc=novell,dc=com
.
Page 67

User Filter: Specifies the name of the filter to be used in the lookup for the user’s LDAP
distinguished name.
User Prefix: Specifies the prefix used to define the LDAP subtree within the BaseDN tree that
contains user accounts. If you leave this property blank, the Orchestrate Server uses the BaseDN.
novdocx (en) 13 May 2009
For ADS, this prefix is
Group Attribute: Specifies the attribute of a group entry describing the login name of that group.
Group Filter: Specifies a filter to be used in the lookup for group memberships on some LDAP
schemas. The filter can use either
example:
Not used for Active Directory authentication.
Group Prefix: Specifies the prefix used to define the LDAP subtree within the BaseDN tree that
contains group accounts.
Not used for Active Directory authentication.
Group DNA Attribute: Specifies the directory root where all queries for a user’s group
memberships (stored as a list of “member of” attributes on the user’s entry on an ADS server) are to
occur.
Nested DNA Attribute: Specifies the attribute of a group entry where subgroups can be queried.
memberUid=${USER_NAME}
cn=Users
.
${USER_NAME}
.
or
${USER_DN}
to substitute that value. For
5.1.3 The Orchestrate Server Policies Tab
The Polices tab opens a page that contains a policy viewer for each of the policies associated with
the Server Object.
NOTE: You can edit a policy by right-clicking a policy icon, selecting Edit Policy and clicking the
Save icon.
5.1.4 The Orchestrate Server Constraints/Facts Tab
The Constraints/Facts tab opens a page that shows all of the effective constraints and facts for the
Server object. The server object has an associated set of facts and constraints that define its
properties. In essence, by building, deploying, and running jobs on the PlateSpin Orchestrate Server,
you can individually change the functionality of any and all system resources by managing an
object’s facts and constraints.The Orchestrate Server assigns default values to each of the
component facts, although they can be changed at any time by the administrator, unless they are
r/o
read-only. Facts with mode
“pencil” icon) in order to view their value(s) but changes cannot be made.
have read-only values, which can be edited (that is, using the
5.2 The Server Admin Object
The Server Admin object lists the accessible PlateSpin Orchestrate Servers and their deployed
components. Clicking on a deployed component displays information about that component's
associated Deployment Session.
The Explorer Tree 67
Page 68

5.3 The Job Object
A job is deployed to the Orchestrate Server to automate processes, such as coordinating VM
provisioning, high-performance computing, or general data center management. Jobs consist of Job
Development Language (JDL) scripts(s) and might have one or more policies associated with them.
Policies define job arguments and other facts that are used by the job.
Usually a Job has logic that runs on the PlateSpin Orchestrate Server itself and schedules work to
run on one or more managed resources that are running the PlateSpin Orchestrate Agent. The logic
that is dispatched and run on the managed resources is called a joblet. A job may or may not define
one or more joblets.
A JDL script is partitioned into a “Job” section and one or more “Joblet” sections. The joblet
sections of the script describe most of the work of a job. The PlateSpin Orchestrate Server
dispatches joblets to resources in the grid where the work is done.
The Job object also contains Facts with attributes that are used for job and joblet control. Policies
associated with the job also control the job. The Orchestrate Development Client has an
administrative (“admin”) view in the Explorer Panel that lets you edit these objects.
novdocx (en) 13 May 2009
This section includes information about a Job object that is visible in the Explorer view and the
accompanying Admin view of the Orchestrate Development Client:
Section 5.3.1, “Job Groups,” on page 68
Section 5.3.2, “The Job Info/Groups Tab,” on page 68
Section 5.3.3, “The JDL Editor Tab,” on page 78
Section 5.3.4, “The Job Library Editor Tab,” on page 79
Section 5.3.5, “The Job Policies Tab,” on page 80
Section 5.3.6, “The Job Constraints/Facts Tab,” on page 81
5.3.1 Job Groups
Any group object displayed in the Explorer panel represents a collection of similar object types.
Groups can also be created automatically, as in the case when a provisioning adapter (PA) discovers
xen30
a local repository on a VM host. For example, the
automatically creates a local repository for that VM host and places the created repository in a
xen30
repository group. You can also create groups manually in the Development Client, either by
clicking the Actions menu and choosing Create Job Group or by right clicking a Job Group object
(anywhere in the Job hierarchy) and selecting New Job Group.
PA, upon discovery of a VM host,
5.3.2 The Job Info/Groups Tab
The page that opens under the Info/Configuration tab of the Job admin view includes several
collapsible sections on the page where you can configure the general information and attributes of
the job.
“Info” on page 69
“Groups” on page 78
68 PlateSpin Orchestrate 2.0 Development Client Reference
Page 69

NOTE: Whenever you make changes to any Grid object, that object’s icon is overlaid with the write
icon , signifying that the object has been altered. If you want to save the changes you have made,
you need to click the Save icon on the Development Client toolbar.
Info
The following fields on the Information panel provide facts for the Repository object:
“Show Inherited Fact Values Check Box” on page 69
“Job Control Settings” on page 69
“Joblet Control Settings” on page 72
“Automatic Resource Provisioning Settings” on page 74
“Resource Preemption Settings” on page 75
“Job Counts” on page 75
“Job History” on page 76
Show Inherited Fact Values Check Box
novdocx (en) 13 May 2009
Select this check box to show facts with overridden values supplied through attached and/or
inherited polices. Such fact values are read only (non-editable).
Job Control Settings
The Job Control Settings panel on the Info/Groups page includes the following fields:
NOTE: Tool tip text is available when you mouse over any of these fields.
Description: Enter information in this box that describes the nature or purpose of this job.
In the Fact Editor, this fact is listed as
<fact name="job.description" value="" type="String" />
job.description
:
Enabled: This check box is selected by default. When it is selected (that is, its value is “true”), the
job is enabled (that is, it is ready to run).
In the Fact Editor, this fact is listed as
<fact name="job.enabled" value="true" type="Boolean" />
job.enabled
:
Job Visible to Users: This check box is selected by default. When it is selected (that is, its value is
“true”), the job can be viewed in the Development Client, by using command line queries, or in the
Orchestrate Server Portal. Deselecting this check box does not keep the job from running.
In the Fact Editor, this is fact is listed as
<fact name="job.visible" value="true" type="Boolean" />
job.visible
:
JDL Debug Tracing: This check box is not selected by default. When it is selected (that is, its value
is “true”), the job log includes tracing information when job events are executed.
In the Fact Editor, this fact is listed as
<fact name="job.tracing" value="false" type="Boolean" />
job.tracing
:
The Explorer Tree 69
Page 70

Job Type: This drop-down list lets you choose the job type that applies to this job. This setting is
optional and is leveraged by the server to provide better quality completion time calculation for the
job.
The job type options (completion time algorithms) include:
normal: The default job type. If this job has joblets, the job is based on PSPACE progression
algorithm. If it does not have joblets, it is based on historical wall time average.
workflow: This job type does not offer a time algorithm to the server.
pspace: If this job has joblets, the job is based on PSPACE progression. If it does not have
joblets, do not offer a time algorithm.
fixedtime: This job type directs the server to use a time algorithm based on historical wall time
average.
fixedgcycles: If this job has joblets, the job is based on average gcycles and current
consumption rate. If it does not have joblets, the job is based on historical wall time average.
NOTE: You can change this setting at runtime to refine the calculation time as the job progresses.
For example, the zosmake job might start out as type normal, but when all tasks have been
submitted, you could change it to type workflow to allow its subjobs to drive the end time.
novdocx (en) 13 May 2009
In the Fact Editor, the Job Type fact is listed as
<fact name="job.jobtype" value="normal" type="String" />
job.jobtype
:
Job Timeout: Enter the amount of time (in seconds) after which the server can take action to cancel
-1
the whole job, including all joblets and subjobs. A value of
In the Fact Editor, this fact is listed as
<fact name="job.timeout" value="-1" type="Integer" />
job.timeout
:
indicates no timeout.
Job Auto Terminate: This check box is selected by default. When it is selected (that is, its value is
“true”), the job ends when all child jobs and joblets are executed.
In the Fact Editor, this fact is listed as
<fact name="job.autoterminate" value="true" type="Boolean" />
job.autoterminate
.
Queue Type: This drop-down list lets you choose the queue type that applies to this job. This setting
is optional and is leveraged by the server to provide a better quality start time calculation for the job.
The queue type options (start time algorithms) include:
none: The start time is always unknown for jobs that are queued.
pfifo: (Packet First In First Out) The start time implemented through policies. The server is
directed to look at the job as having a finite number of active slots, so its start time depends on
its position in the queue and the estimated end time of running jobs of this type. The FIFO
queue for this queue reshuffles based on priority.
fifo: (First In First Out) The start time implemented through policies. The server is directed to
look at the job as having a finite number of active slots, so its start time depends on its position
in the queue (first-come, first-served) and the estimated end time of running jobs of this type.
The FIFO queue for this job does not reshuffle based on priority.
70 PlateSpin Orchestrate 2.0 Development Client Reference
Page 71

lifo: (Last In First Out) The start time implemented through policies. The server is directed to
look at the job as having a finite number of active slots, so its start time depends on its position
in the queue and the estimated end time of running jobs of this type. The queue for this job does
not reshuffle based on priority.
fixedtime: The start time is based on the historical average queue time. This can be explicitly
overridden through setting the
job.history.queuetime.average
fact.
novdocx (en) 13 May 2009
In the Fact Editor, this fact is listed as
<fact name="job.queuetype" value="pfifo" type="String" />
job.queuetype
:
Job Queued Timeout: Enter the amount of time (in seconds) after which the server can take action
-1
to cancel a queued job, including all joblets and subjobs. A value of
In the Fact Editor, this fact is listed as
<fact name="job.queuedtimeout" value="-1" type="Integer" />
job.queuedtimeout
:
indicates no timeout.
Resource Match Cache TTL: This value specifies the job’s willingness to allow resource matches
to be cached if the Job Scheduler becomes too loaded. The value is the time (in seconds) to live
(TTL) of the cache. Enter a value less zero (<0) to disable caching.
In the Fact Editor, this fact is listed as
<fact name="job.cacheresourcematches.ttl" value="30" type="Integer" />
jopb.cacheresourcematches.ttl
:
Preemptible: This check box is not selected by default. When it is selected (that is, its value is
“true”), you set the job’s ability to be preempted. This setting can be overridden by the job instance.
In the Fact Editor, this fact is listed as
<fact name="job.preemptible" value="false" type="Boolean" />
job.preemptible
:
Restartable: This check box is not selected by default. When it is selected (that is, its value is
“true”), you set the job’s ability to be restarted when the server restarts. This setting can be
overridden by the job instance.
In the Fact Editor, this fact is listed as
<fact name="job.restartable" value="false" type="Boolean" />
job.restartable
:
Absolute Max Joblets: This value specifies the absolute maximum number of joblets that you want
this job to schedule.
In the Fact Editor, this fact is listed as
<fact name="job.joblet.max" value="1000" type="Integer" />
job.joblet.max
:
Max Joblet Failures: This value specifies the number of non-fatal joblet errors that you want this
-1
job to tolerate before the job fails completely. Set the value at
In the Fact Editor, this fact is listed as
<fact name="job.joblet.maxfailures" value="0" type="Integer" />
job.joblet.maxfailures
to attempt to continue after errors.
:
Max Node Failures: This value specifies the number resource failures that you want this job to
-1
tolerate before the node is excluded from further joblet processing. Set the value at
to specify that
limited failures are acceptable.
The Explorer Tree 71
Page 72

novdocx (en) 13 May 2009
In the Fact Editor, this fact is listed as
<fact name="job.maxnodefailures" value="2" type="Integer" />
job.maxnodefailures
:
Max Resources: This value specifies the absolute maximum number of resources that you want the
job to use at one time. PlateSpin Orchestrate does not exceed the value set here. Set the value at
-1
to specify unlimited resources.
In the Fact Editor, this fact is listed as
<fact name="job.maxresources" value="-1" type="Integer" />
job.maxresources
:
Max Joblets Running: This value specifies the absolute maximum number of joblets that you want
the job to have running at one time. PlateSpin Orchestrate does not exceed the value set here. Set the
-1
value at
In the Fact Editor, this fact is listed as
<fact name="job.joblet.maxrunning" value="-1" type="Integer" />
to specify unlimited joblets.
job.joblet.maxrunning
:
Max Joblets Per Resource: This value specifies the absolute maximum number of joblets that you
-1
want the job to occupy on a resource. Set the value at
In the Fact Editor, this fact is listed as
<fact name="job.joblet.maxperresource" value="-1" type="Integer" />
job.joblet.maxperresource
to specify unlimited joblets.
:
Resource Selection Ranking: This field displays ranking specification used to select suitable
resources. Element syntax is
fact/order
where order is either ascending or descending
In the Fact Editor, this fact is listed as an array:
<fact name="job.resources.rankby">
<array>
<string>resource.loadaverage/a</string>
<string>resource.anything/a</string>
</array>
</fact>
You can edit this array by clicking the button to open the Attribute element values dialog
box. In this dialog box you can add or remove fact specifications to the array of element choices.
Persist Facts on Completion: This check box is not selected by default. When it is selected (that is,
its value is “true”), you specify that the Grid objects that this job modifies are persisted at the end of
the job. This setting is available and applicable only in a high availability setup.
In the Fact Editor, this fact is listed as
<fact name="job.persistfactsonfinish" value="false" type="Boolean" />
job.persistfactsonfinish
:
Joblet Control Settings
Joblet Timeout: This value specifies the amount of time (in seconds) you want the Orchestrate
-1
Server to wait until cancelling the joblet. Set the value at
In the Fact Editor, this fact is listed as
job.joblet.timeout
to specify no timeout.
:
<fact name="job.joblet.timeout" value="-1" type="Integer" />
72 PlateSpin Orchestrate 2.0 Development Client Reference
Page 73

Max Joblet Retries: This value specifies the number of joblet retries (of any type) to be attempted
before the Orchestrate Server considers the joblet as failed. A value of zero (0) specifies that the
joblet should not be retried. A value of less than zero (<0) specifies the joblet should be continually
retried.
novdocx (en) 13 May 2009
In the Fact Editor, this fact is listed as
<fact name="job.joblet.maxretry" value="0" type="Integer" />
job.joblet.maxretry
:
Retry Limit (Forced): This value specifies the number of forced joblet retries (that is, requested by
the joblet to run on another resource) to be allowed before the Orchestrate Server considers the
joblet as failed. A value of zero (0) specifies that the joblet should not be retried. A value of less than
zero (<0) specifies the joblet should be continually retried. This value should never exceed the value
job.joblet.maxretry
in
In the Fact Editor, this fact is listed as
<fact name="job.joblet.retrylimit.forced" value="-1" type="Integer" />
.
job.joblet.retrylimit.forced
:
Retry Limit (Unforced): This value specifies the number of unforced joblet retries to be allowed
before the Orchestrate Server considers the joblet as failed. A value of zero (0) specifies that the
joblet should not be retried. A value of less than zero (<0) specifies the joblet should be continually
retried. This value should never exceed the value in
In the Fact Editor, this fact is listed as
<fact name="job.joblet.retrylimit.unforced" value="-1" type="Integer" />
job.joblet.retrylimit.unforced
job.joblet.maxretry
.
:
Retry Limit (Resource Disconnect): This value specifies the number of joblet retries caused by
unexpected resource disconnect to be allowed before the Orchestrate Server considers the joblet as
failed. A value of zero (0) specifies that the joblet should not be retried. A value of less than zero
(<0) specifies the joblet should be continually retried. This value should never exceed the value in
job.joblet.maxretry
.
In the Fact Editor, this fact is listed as
<fact name="job.joblet.retrylimit.disconnect" value="-1" type="Integer" />
job.joblet.retrylimit.disconnect
:
Retry Limit (Timeout): This value specifies the number of joblet retries caused by server-initiated
joblet timeout to be allowed before the Orchestrate Server considers the joblet as failed. A value of
zero (0) specifies that the joblet should not be retried. A value of less than zero (<0) specifies the
joblet should be continually retried. This value should never exceed the value in
job.joblet.maxretry
In the Fact Editor, this fact is listed as
<fact name="job.joblet.retrylimit.timeout" value="-1" type="Integer" />
.
job.joblet.retrylimit.timeout
:
Immediately Retry Failed Joblet: This check box is not selected by default. When it is selected
(that is, its value is “true”), you specify that you want the system to immediately retry a joblet rather
than waiting until all others are either running or complete before retrying.
In the Fact Editor, this fact is listed as
<fact name="job.joblet.immediateretry" value="true" type="Boolean" />
job.joblet.immediateretry
:
Max Joblet Wait Time: This value specifies the amount of time (in seconds) you want a resource
to wait before being utilized by a joblet. A setting of -1 indicates no timeout.
The Explorer Tree 73
Page 74

novdocx (en) 13 May 2009
In the Fact Editor, this fact is listed as
<fact name="job.joblet.maxwaittime" value="-1" type="Integer" />
job.joblet.maxwaittime
:
Joblet JDL Debug Tracing: This check box is not selected by default. When it is selected (that is,
its value is “true”), you specify that you want the joblet to include tracing information on the job log
as it executes joblet events.
In the Fact Editor, this fact is listed as
<fact name="job.joblet.tracing" value="false" type="Boolean" />
job.joblet.tracing
:
Joblet Run Type: From the drop-down list, you can select whether or not the file and executable
operations that run in the joblet are in behalf of the job user.
RunAsJobUserFallingB ackToNodeUser: (The default setting.) If this option is selected, any
joblet logic executes as the local user with the same name as the grid user. If a local user of a
matching name is not available, the joblet logic runs as the same user who is running the
Orchestrate Agent (also known as the “Node User”). By default, the agent (Node User) is
root.
RunOnlyAsJobUser: If this option is selected, any joblet logic executes as the local user
using the same name as the grid user (that is, the Orchestrate Server user who matches the
PlateSpin Orchestrate username. If a local user of a matching name is not available, the joblet
logic (and perhaps the job) fails. By default, the agent (Node User) is
RunOnlyAsNodeUser: If this option is selected, any joblet logic runs as the same user who is
root.
running the Orchestrate Agent (also known as the “Node User”). It does not run as the OS user
whose username matches the PlateSpin Orchestrate user name. By default, the agent (Node
User) is
root.
In the Fact Editor, this fact is listed as
<fact name="job.joblet.runtype" value="RunAsJobUserFallingBackToNodeUser"
type="String" />
job.joblet.runtype
:
Automatic Resource Provisioning Settings
Max Resource Provisions: This value specifies the number of resources that can be automatically
provisioned in behalf of this job. A setting of zero (0) turns off automatic provisioning behavior. A
setting of -1 allows unlimited provisioning.
In the Fact Editor, this fact is listed as
<fact name="job.provision.maxcount" value="0" type="Integer" />
job.provision.maxcount
:
Max Pending Provisions: This value specifies the number of resources that can be automatically
provisioned at one time (that is, simultaneously) in behalf of this job. A setting of less than or equal
to zero (<=0) turns off automatic provisioning behavior.
In the Fact Editor, this fact is listed as
<fact name="job.provision.maxpending" value="1" type="Integer" />
job.provision.maxpending
:
Max Resource Provision Failures: This value specifies the maximum number of provision failures
resources to be tolerated before excluding the node from future automatic provisioning. A setting of
-1 indicates that unlimited failures are acceptable.
In the Fact Editor, this fact is listed as
74 PlateSpin Orchestrate 2.0 Development Client Reference
job.provision.maxnodefailures
:
Page 75

<fact name="job.provision.maxnodefailures" value="1" type="Integer" />
Provision Selection Ranking: This field displays ranking specification used to select suitable
resources to automatically provision. Element syntax is
fact/order
where order is either ascending
or descending.
In the Fact Editor, this fact is listed as an array:
<fact name="job.provision.rankby">
<array type="String">
</array>
</fact>
You can edit this array by clicking the button to open the Attribute element values dialog
box. In this dialog box you can add or remove fact specifications to the array of element choices.
Host Selection Strategy: This drop-down list lets you choose the type of strategy you want to use in
finding a host for any automatically provisioned resource. The choices include:
queue: The queue option directs the server to use the default affinity wait period defined by the
resource before considering all possible hosts. The request is queued until a suitable resource
becomes available or a requesting job completes.
immediate: The immediate option directs the server to immediately consider the affinity host
before trying to find any matching resources and to fail if a suitable resource is not available.
novdocx (en) 13 May 2009
In the Fact Editor, this fact is listed as
<fact name="job.provision.hostselection" value="immediate" type="String" />
job.provision.hostselection
:
Resource Preemption Settings
Job Selection Ranking: This field displays ranking specification used to select suitable jobs to
automatically preempt on a resource. Element syntax is
fact/order
where order is either ascending
or descending.
In the Fact Editor, this fact is listed as an array:
<fact name="job.preemption.rankby">
<array>
<string>jobinstance.priority/a</string>
<string>jobinstance.joblets.running/d</string>
</array>
</fact>
You can edit this array by clicking the button to open the Attribute element values dialog
box. In this dialog box you can add or remove fact specifications to the array of element choices.
Job Counts
Total Instances: This field displays the total number of job instances of this type that exist in the
PlateSpin Orchestrate system.
In the Fact Editor, this fact is listed as
<fact name="job.instances.total" value="0" type="Integer" />
job.instances.total
:
Active Instances: This field displays the total number of job instances of this type that are in a
queued state in the PlateSpin Orchestrate system.
The Explorer Tree 75
Page 76

novdocx (en) 13 May 2009
In the Fact Editor, this fact is listed as
<fact name="job.instances.active" value="0" type="Integer" />
job.instances.active
:
Queued Instances: This field displays the total number of job instances of this type that are active
in the PlateSpin Orchestrate system.
In the Fact Editor, this fact is listed as
<fact name="job.instances.queued" value="0" type="Integer" />
job.instances.queued
:
Job Accounting Group: This drop-down list lets you select the Job Group whose statistics are
updated by default when the job runs.
In the Fact Editor, this fact is listed as
<fact name="job.accountinggroup" value="all" type="String" />
job.accountinggroup
:
Job Resource Group: This drop-down list lets you select the default Resource Group whose
members and any of its resource policies are selected for this job.
In the Fact Editor, this fact is listed as
<fact name="job.resourcegroup" value="all" type="String" />
job.resourcegroup
:
Job History
Shared Instance Count: (Read only) This field displays the total number of job instances
(including those denied by “accept” constraints) of this job that have ever been initiated on this
PlateSpin Orchestrate system.
In the Fact Editor, this fact is listed as
<fact name="job.history.jobcount" value="0" type="Integer" />
job.history.jobcount
:
Completed Count: (Read only) This field displays the total number of job instances (including
those denied by “accept” constraints) of this job that have been canceled.
In the Fact Editor, this fact is listed as
<fact name="job.history.jobcount.complete" value="0" type="Integer" />
job.history.jobcount.complete
:
Cancelled Count: (Read only) This field displays the total number of job instances (including those
denied by “accept” constraints) of this job that have been completed.
In the Fact Editor, this fact is listed as
<fact name="job.history.jobcount.cancelled" value="0" type="Integer" />
job.history.jobcount.cancelled
:
Failed Count: (Read only) This field displays the total number of job instances of this type that
have failed.
In the Fact Editor, this fact is listed as
<fact name="job.history.jobcount.failed" value="0" type="Integer" />
job.history.jobcount.failed
:
Total Cost: This field displays the total cost of running this job. The amount is calculated since the
job was deployed or last modified.
In the Fact Editor, this fact is listed as
76 PlateSpin Orchestrate 2.0 Development Client Reference
job.history.cost.total
:
Page 77

<fact name="job.history.cost.total" value="0.0000" type="Real" />
Average C o s t : This field displays the average cost of running this job. The amount is calculated
since the job was deployed or last modified and is updated only if the job finishes successfully.
novdocx (en) 13 May 2009
In the Fact Editor, this fact is listed as
<fact name="job.history.gcycles.average" value="0" type="Integer" />
job.history.cost.average
:
Tot a l R u nt i me : This field displays the total runtime (in seconds) since the job was deployed.
In the Fact Editor, this fact is listed as
<fact name="job.history.runtime.total" value="0" type="Integer" />
job.history.runtime.total
:
Average Runtime: This field displays the average runtime (in seconds) since the job was deployed.
In the Fact Editor, this fact is listed as
<fact name="job.history.runtime.average" value="0" type="Integer" />
job.history.runtime.average
:
Total Execution Time: This field displays the total combined resource wall time (in seconds) of all
work performed on behalf of this job since the job was deployed.
In the Fact Editor, this fact is listed as
<fact name="job.history.time.total" value="0" type="Integer" />
job.history.time.total
:
Average Execution Time: This field displays the average resource wall time (in seconds) of all
work performed on behalf of this job since the job was deployed.
In the Fact Editor, this fact is listed as
job.history.time.average
:
<fact name="job.history.time.average" value="0" type="Integer" />
Total Grid Time: This field displays the total amount of normalized grid time (in gcycles)
consumed by this job since deployment.
In the Fact Editor, this fact is listed as
<fact name="job.history.gcycles.total" value="0" type="Integer" />
job.history.gcycles.total
:
NOTE: A gcycle can be thought of as a normalized second of compute time. It is really a relative
measure and approximates to a second of real processing time of a 2Ghz Pentium* class Intel*
processor.
Average G r i d Ti m e: This field displays the average amount of normalized grid time (in gcycles,
which is a normalized grid cycle) consumed by running this job. The value is updated only if the job
finishes successfully.
In the Fact Editor, this fact is listed as
<fact name="job.history.gcycles.average" value="0" type="Integer" />
job.history.gcycles.average
:
Total Queue Time: This field displays the total amount of time (in seconds) since deployment that
the job has spent in a queued state.
In the Fact Editor, this fact is listed as
job.history.queuetime.total
:
<fact name="job.history.queuetime.total" value="0" type="Integer" />
The Explorer Tree 77
Page 78

Average Queue Time: This field displays the average amount of wall time (in seconds) spent
waiting for this job to start.
novdocx (en) 13 May 2009
In the Fact Editor, this fact is listed as
<fact name="job.history.queuetime.average" value="0" type="Integer" />
job.history.queuetime.average
:
Average Sample Size: This field displays the total number of points you want to use in the trailing
average calculation for all historical averages.
In the Fact Editor, this fact is listed as
<fact name="job.history.samplesize" value="2" type="Integer" />
job.history.samplesize
:
NOTE: Similar to a moving average, a trailing average is the mean average measured over the last x
datapoints.
Groups
This section of the Info/Groups page lists the groups of Job objects in the grid. Click Choose to open
the Job Group Selection dialog box. In this dialog box, you can choose which Job Groups to display
in the Explorer Panel by selecting a group and then clicking Add or Remove to move it to or from the
Source Job Groups list.
5.3.3 The JDL Editor Tab
The JDL Editor tab of the Job admin view opens an editor where you can inspect and modify the Job
Description Language (JDL) code. This code consists of a Python-based script and contains the bits
to control a job. The JDL code for each job includes commented documentation to explain the job’s
purpose and methods for implementation.
78 PlateSpin Orchestrate 2.0 Development Client Reference
Page 79
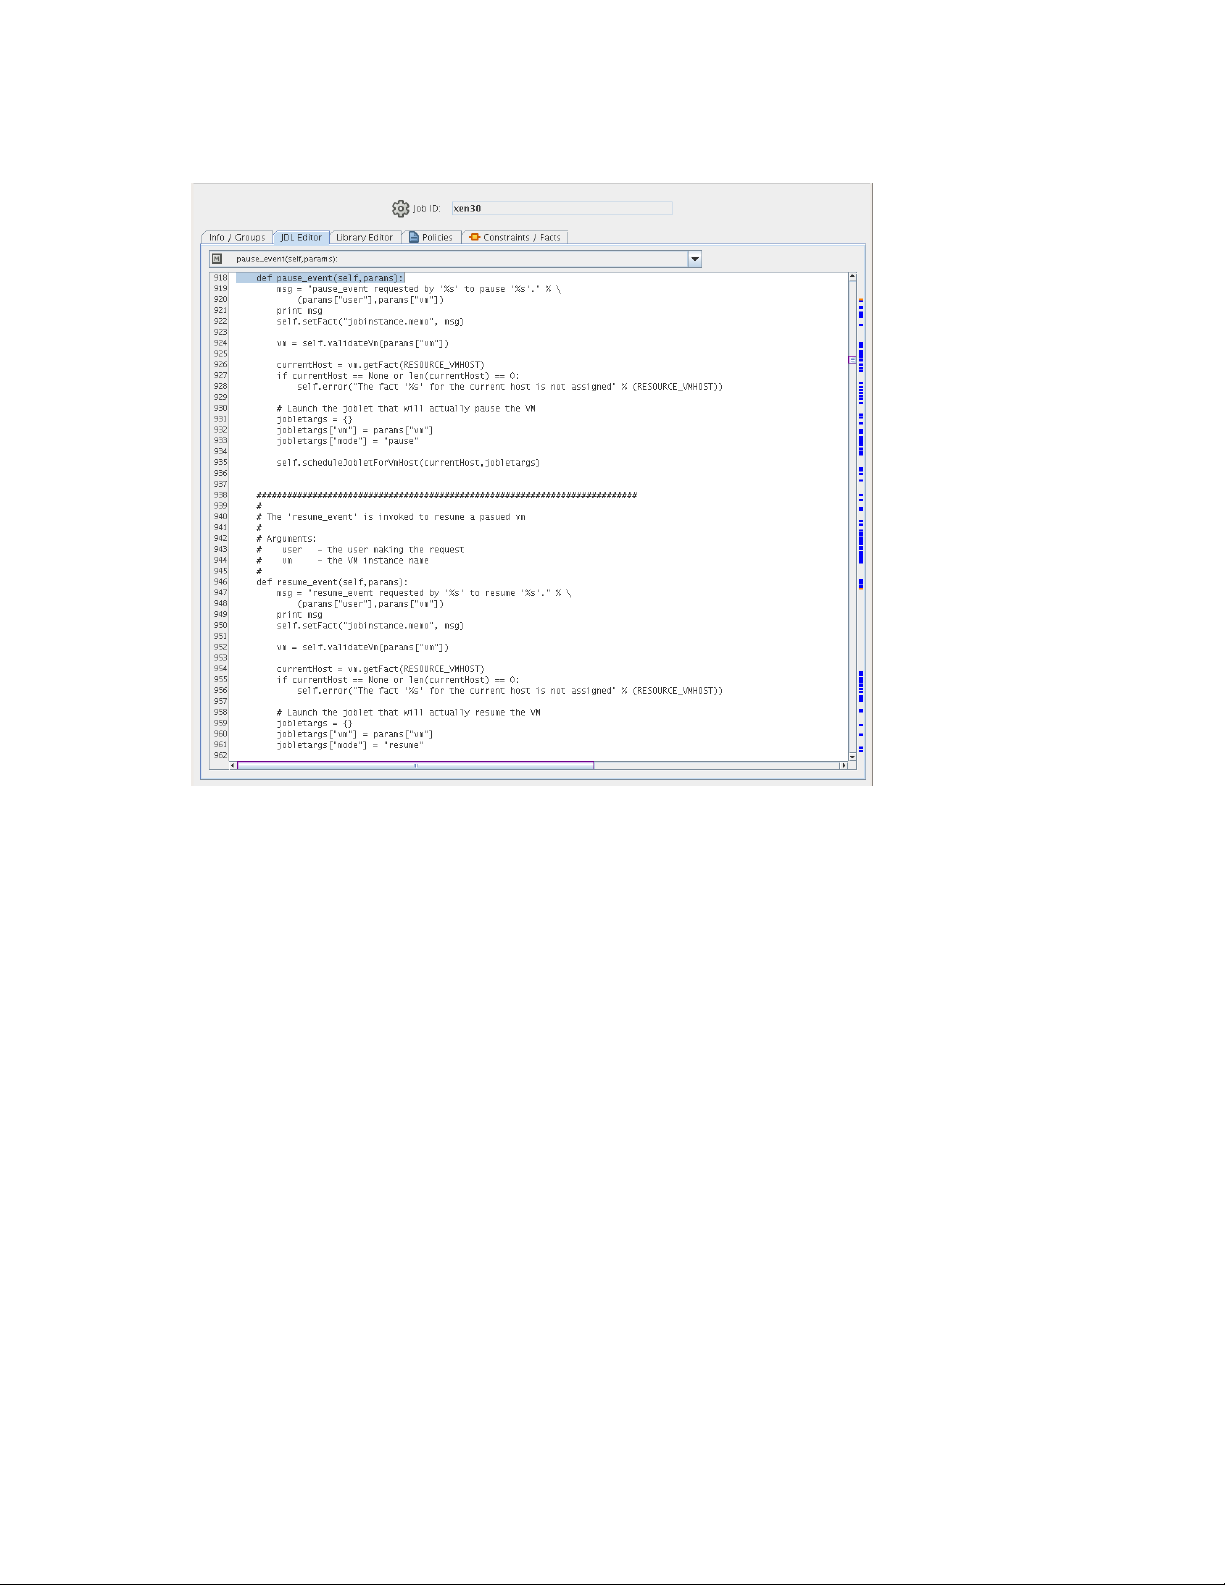
Figure 5-2 The JDL Editor
novdocx (en) 13 May 2009
A drop-down list at the top of the editor includes the Java classes and their methods that are
bookmarked in the code. Select any of these to go to the location in the code where they are invoked.
Clickable, colored blocks on the editor scroll bar perform a similar bookmarking function.
5.3.4 The Job Library Editor Tab
The Library Editor tab of the Job admin view opens an editor where you can inspect and modify the
different library scripts for a job. The scripts for each job include instructions to the Orchestrate
Server for handling job functions.
The Explorer Tree 79
Page 80

Figure 5-3 The Job Library Editor
novdocx (en) 13 May 2009
There are two drop down lists located at the top of the Library Editor view. The first labeled
“Library” lists the different libraries for the job, and the second lists the methods that are
bookmarked in the code. Select a method in the second drop-down list to go to the location in the
library code where that method is invoked. Clickable, colored blocks on the editor scroll bar perform
a similar bookmarking function.
5.3.5 The Job Policies Tab
The Polices tab of the Job admin view opens a page that contains a policy viewer for each of the
policies associated with a Job Grid object.
You can modify a policy using the Policy Grid object. for more information see Section 5.8.1, “The
Policy Object,” on page 125.
Click Choose in the admin view of the Policy viewer to launch a Policy Selection dialog box where
you can add or remove individual policies to be applied to the selected Job Grid object.
80 PlateSpin Orchestrate 2.0 Development Client Reference
Page 81
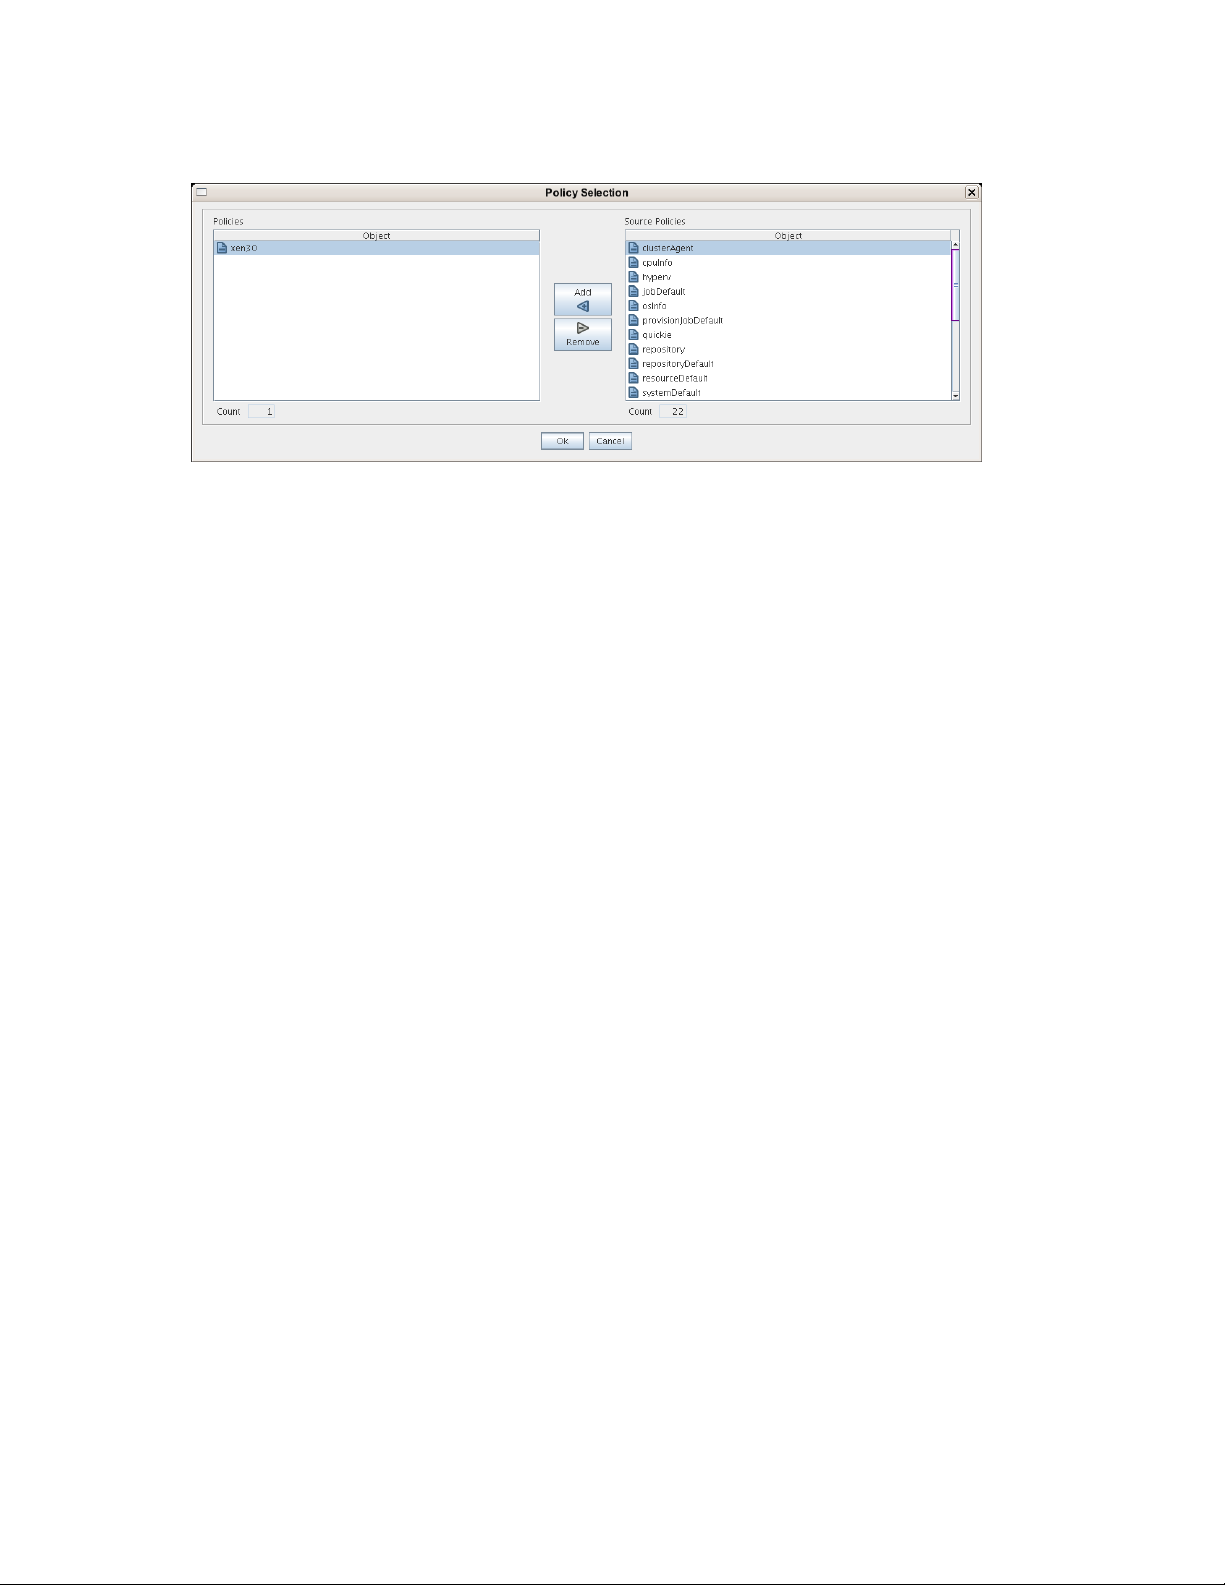
Figure 5-4 The Policy Selection Dialog Box
5.3.6 The Job Constraints/Facts Tab
The Constraints/Facts tab opens a page that shows all of the effective constraints and facts for a Grid
object. Each Grid object has an associated set of facts and constraints that define its properties. In
essence, by changing the policy constraints and fact values for a job, you can change the behavior of
the job and how the PlateSpin Orchestrate Server allocates available system resources to it. The
Orchestrate Server assigns default values to each of the component facts, although they can be
r/o
changed at any time by the administrator, unless they are read-only. Facts with mode
only values, which can be viewed (that is, using the edit “pencil” icon) but changes cannot be made.
have read-
novdocx (en) 13 May 2009
5.4 The Resource Object
A Resource object in the Explorer Panel represents a physical or virtual machine that is managed by
PlateSpin Orchestrate. If a resource is running the PlateSpin Orchestrate Agent, that resource can be
scheduled for remote execution of a job.
This section includes information about a Resource object that is visible in the Explorer view and
the accompanying Admin view of the Orchestrate Development Client:
Section 5.4.1, “Resource Groups,” on page 81
Section 5.4.2, “The Resource Info/Groups Tab,” on page 82
Section 5.4.3, “The Provision Info Tab,” on page 102
Section 5.4.4, “The Resource Log Tab,” on page 103
Section 5.4.5, “The Resource Policies Tab,” on page 103
Section 5.4.6, “The Resource Health Debugger Tab,” on page 103
Section 5.4.7, “The Resource Constraints/Facts Tab,” on page 104
5.4.1 Resource Groups
Any group object displayed in the Explorer panel represents a collection of similar object types.
Groups can also be created automatically, as in the case when a provisioning adapter (PA) discovers
xen30
a local repository on a VM host. For example, the
automatically creates a local repository for that VM host and places the created repository in a
PA, upon discovery of a VM host,
The Explorer Tree 81
Page 82

xen30
repository group. You can also create groups manually in the Development Client, either by
clicking the Actions menu and choosing Create Resource Group or by right clicking a Resource
Group object (anywhere in the Resource hierarchy) and selecting New Resource Group.
5.4.2 The Resource Info/Groups Tab
The page that opens under the Info/Configuration tab of the Resource admin view includes several
collapsible sections on the page where you can configure the general information and attributes of
the job.
NOTE: Whenever you make changes to any Grid object, that object’s icon is overlaid with the write
icon , signifying that the object has been altered. If you want to save the changes you have made,
you need to click the Save icon on the Development Client toolbar.
“Info” on page 82
“Groups” on page 102
Info
novdocx (en) 13 May 2009
The following fields on the Information panel provide facts for the Resource object:
“Show Inherited Fact Values Check Box” on page 82
“Resource Information” on page 82
“VM Host Info” on page 86
“Virtual Machine Configuration” on page 87
“Provisioning Information” on page 91
“OS Information” on page 96
“CPU Information” on page 98
“Memory Information” on page 98
“Disk/Network Information” on page 99
“Agent Information” on page 99
“Agent Configuration” on page 100
“Installed Components” on page 102
Show Inherited Fact Values Check Box
Select this check box to show facts with overridden values supplied through attached and/or
inherited polices. Such fact values are read only (non-editable).
Resource Information
The Job Control Settings panel on the Info/Groups page includes the following fields:
NOTE: Tool tip text is available when you mouse over any of these fields.
82 PlateSpin Orchestrate 2.0 Development Client Reference
Page 83

Resource Type: This drop-down list lets you choose the resource type. If you manually create a
resource, you must select the appropriate type.
Fixed Physical: The node is a physical, hardware-based computer.
VM: The node is a virtual, software-based container that can run its own operating system and
applications as if it were a physical computer.
VM Template: The node is an image of a server that can be used to create and provision new
virtual servers. The template includes a virtual hardware components, a guest operating system,
its configuration, and other software applications.
novdocx (en) 13 May 2009
In the Fact Editor, the Resource Type fact is listed as
<fact name="resource.type" value="Fixed Physical" type="String" />
resource.type
:
Resource Enabled: This check box is selected by default. When it is selected (that is, its value is
“true”), the resource is enabled (that is, it is allowed to accept work).
In the Fact Editor, this fact is listed as
<fact name="resource.enabled" value="true" type="Boolean" />
resource.enabled
:
Healthy: When this check box is selected (that is, its value is “true”), the resource is considered to
be in good health. You can set the health of the object by selecting or deselecting the health check
box. Changing the value in this way has an immediate effect unless the value is overriden by an
attached policy (this follows the normal rules of policy inheritance). For more information, see
Appendix A, “Grid Object Health Monitoring,” on page 133.
In the Fact Editor, this is fact is listed as
<fact name="resource.health" value="true" type="Boolean" />
resource.health
:
Shutting Down: (Read Only) When this check box is selected (that is, its value is “true”), the node
is attempting to shut down, pause, or suspend and does not want to accept new work.
In the Fact Editor, this fact is listed as
<fact name="resource.shuttingdown" value="false" type="Boolean" />
resource.shuttingdown
:
Host Name: The network hostname of the resource that is running the Orchestrate Agent. Often, the
resource ID and the hostname are the same, but this is not always the case.
In the Fact Editor, this fact is listed as
<fact name="resource.hostname" value="foonode" type="String" />
resource.hostname
:
Host Fully Qualified Name: The full network hostname of the resource that is running the
Orchestrate Agent.
In the Fact Editor, this fact is listed as
<fact name="resource.hostname.full" value="foonode.division.company.com"
type="String" />
resource.hostname.full
:
Password: The password you want the PlateSpin Orchestrate Agent on this node to use for
authentication to the PlateSpin Orchestrate Server.
In the Fact Editor, this fact is listed as
resource.password
.
The Explorer Tree 83
Page 84

<fact name="resource.password" value="xxx" type="String" />
Host IP Address: The network IP address of the resource running the Orchestrate Agent.
novdocx (en) 13 May 2009
In the Fact Editor, this fact is listed as
<fact name="resource.ip" value="10.255.255.255" type="String" />
resource.ip
:
VNC IP Address: The IP address for a VNC session running on this resource.
In the Fact Editor, this fact is listed as
<fact name="resource.vnc.ip" value="" type="String" />
resource.vnc.ip
:
VNC Port: The port number for a VNC session running on this resource.
In the Fact Editor, this fact is listed as
<fact name="resource.vnc.port" value="0" type="Integer" />
resource.vnc.port
:
Billing Rate: The billing rate (in dollars per hour) that you want to charge for this resource running
its assigned joblets.
In the Fact Editor, this fact is listed as
<fact name="resource.billingrate" value="1.0000" type="Real" />
resource.billingrate
:
Bill For: This drop-down list lets you choose the time scale you want to bill for.
walltime: The total time for the process to complete.
gcycles: The normalized average of compute cycles.
In the Fact Editor, this fact is listed as
<fact name="resource.billfor" value="walltime" type="String" />
resource.billfor
:
Power Factor: (Read Only) This value specifies the normalized power index of this machine
relative to a 2.0 GHz Intel Pentium 4 machine.
In the Fact Editor, this fact is listed as
<fact name="resource.powerfactor" value="1.0000" type="Real" />
resource.powerfactor
Load Average: (Read Only) The load average on this resource as determined with the
:
uptime
command or other similar methods. The resource is polled every 30 seconds to determine the
average.
In the Fact Editor, this fact is listed as
<fact name="resource.loadaverage" value="0.0000" type="Real" />
resource.loadaverage
:
CPU Load: (Read Only) This value specifies the percentage of CPU utilization currently used by
the resource.
In the Fact Editor, this fact is listed as
<fact name="resource.cpuload" value="0" type="Integer" />
resource.cpuload
Joblet Slots: This value specifies the number of joblets that this resource can run simultaneously.
In the Fact Editor, this fact is listed as
84 PlateSpin Orchestrate 2.0 Development Client Reference
resource.joblets.slots
:
Page 85

<fact name="resource.joblets.slots" value="1" type="Integer" />
Extra System Joblet Slots: This value specifies the number of extra slots you want to be made
available to privileged
system
joblets.
novdocx (en) 13 May 2009
In the Fact Editor, this fact is listed as
<fact name="resource.joblets.systemslots" value="1" type="Integer" />
resource.joblets.systemslots
:
Joblets Active: (Read Only) This value specifies the number of joblets that are currently active on
this resource.
In the Fact Editor, this fact is listed as
<fact name="resource.joblets.active" value="0" type="Integer" />
resource.joblets.active
:
Became Idle On: (Read Only) This field displays the date and time when the resource became idle.
-1
The field displays
In the Fact Editor, this fact is listed as
<fact name="resource.becameidle" value="7/23/09 5:02 PM" type="Date" />
if the resource is active.
resource.becameidle
:
Total Joblets Started: (Read Only) This field displays the total number of joblets that have run
historically on this resource.
In the Fact Editor, this fact is listed as
<fact name="resource.history.jobletcount" value="8" type="Integer" />
resource.history.jobletcount
:
Total Completed Joblets: (Read Only) This field displays the total number of joblets that have
completed historically on this resource.
In the Fact Editor, this fact is listed as
<fact name="resource.history.jobletcount.completed" value="8" type="Integer" /
>
resource.history.jobletcount.completed
:
Total Cancelled Joblets: (Read Only) This field displays the total number of joblets that have been
cancelled historically on this resource.
In the Fact Editor, this fact is listed as
<fact name="resource.history.jobletcount.cancelled" value="0" type="Integer" /
>
resource.history.jobletcount.cancelled
:
Total Failed Joblets: (Read Only) This field displays the total number of joblets that have failed
historically on this resource.
In the Fact Editor, this fact is listed as
<fact name="resource.history.jobletcount.failed" value="0" type="Integer" />
resource.history.jobletcount.failed
:
Total Charge: (Read Only) This field displays the cost (in dollars) of all of the joblets run on this
resource.
In the Fact Editor, this fact is listed as
<fact name="resource.history.cost.total" value="0.0088" type="Real" />
resource.history.cost.total
:
The Explorer Tree 85
Page 86

Total Wall Time: (Read Only) This field displays the total wall time (measured in seconds) that this
resource has spent running joblets.
novdocx (en) 13 May 2009
In the Fact Editor, this fact is listed as
<fact name="resource.history.time.total" value="31" type="Integer" />
resource.history.time.total
:
Total Grid Time: (Read Only) This field displays the amount of time (measured in gcycles, which
is the normalized average of compute cycles) of all work performed on this resource.
In the Fact Editor, this fact is listed as
<fact name="resource.history.gcycles.total" value="31" type="Integer" />
resource.history.gcycles.total
:
Sessions: (Read Only) This field displays the number of current active sessions (that is, the resource
instances with an active agent). The value will be either 1 or 0, unless the object is actually a
resource template, in which case it might be greater than 1.
In the Fact Editor, this fact is listed as
<fact name="resource.sessions" value="0" type="Integer" />
resource.sessions
:
Provisionable Resource: This check box is not selected by default. When it is selected (that is, its
value is “true”), you specify that this resource is a provisionable type. Ona a VM resource and a VM
template resource are currently provisionable.
In the Fact Editor, this fact is listed as
<fact name="resource.provisionable" value="false" type="Boolean" />
resource.provisionable
:
VM Host Info
VM Host Containers: This field displays a list of VM host containers that are supported by this
resource. The list is aggregated from the VM host containers.
In the Fact Editor, this fact is listed as an array:
<fact name="resource.vmhosts">
<array>
<string>host1slesx_xen30</string>
</array>
</fact>
You can edit this array by clicking the button to open an array editor. In this dialog box you
can add or remove VM host containers to the array of element choices.
VM Host Repositories: This field displays a list of VM host repositories visible to this resource.
The list is aggregated from the VM host repositories.
In the Fact Editor, this fact is listed as an array:
<fact name="resource.repositories">
<array>
<string>zos</string>
<string>vmh3slesx</string>
</array>
</fact>
86 PlateSpin Orchestrate 2.0 Development Client Reference
Page 87

You can edit this array by clicking the button to open an array editor. In this dialog box you
can add or remove VM host repositories to the array of element choices.
Virtual Machine Configuration
The settings in this section of the Info/Groups page are available when the resource is a VM.
Under Construction: This check box is not selected by default. When it is selected (that is, its
value is “true”), the VM is currently under construction (that is it is in the process of being created)
and cannot be provisioned.
novdocx (en) 13 May 2009
In the Fact Editor, this fact is listed as
<fact name="resource.vm.underconstruction" value="false" type="Boolean" />
resource.vm.underconstruction
:
VM Vendor: This value specifies the vendor name of the hypervisor that has provided the virtual
machine.
In the Fact Editor, this fact is listed as
<fact name="resource.vm.vendor" value="xen" type="String" />
resource.vm.vendor
:
VM UUID: This value specifies the vendor and adapter-specific UUID of the resource. You should
edit this value only if you are manually creating a Resource object.
In the Fact Editor, this fact is listed as
<fact name="resource.vm.uuid" value="237e9975-xxx15-yy1122-7c62-bf6d23d3a049"
type="String" />
resource.vm.uuid
:
VM Version: This fact is no longer used.
In the Fact Editor, this fact is listed as
<fact name="resource.vm.version" value="0" type="Integer" />
resource.vm.version
:
Default Storage Repository: This drop-down list lets you choose the repository where the images
of this VM disk and other configuration files are currently stored or where they will be stored.
In the Fact Editor, this fact is listed as
<fact name="resource.vm.repository" value="vmh1slesx" type="String" />
resource.vm.repository
:
Storage Location in Repository: This value specifies the file system location (either absolute or
relative to
repository.location
In the Fact Editor, this fact is listed as
<fact name="resource.vm.basepath" value="/var/lib/xen/images/win2kbuild"
type="String" />
) where the VM files are located.
resource.vm.basepath
:
Virtual Disks Layout: This visual map specifies the virtual disks that make up this VM.
In the Fact Editor, this fact is listed as a dictionary:
<fact name="resource.vm.vdisks">
<list>
<listelement>
<dictionary>
<dictelement key="moveableprefix">
The Explorer Tree 87
Page 88

<string>file:</string>
</dictelement>
<dictelement key="vdev">
<string>hda</string>
</dictelement>
<dictelement key="mode">
<string>w</string>
</dictelement>
<dictelement key="moveable">
<boolean>true</boolean>
</dictelement>
<dictelement key="size">
<integer>4096</integer>
</dictelement>
<dictelement key="location">
<string>file:/var/lib/xen/images/win2kbuild/disk0</string>
</dictelement>
<dictelement key="repository">
<string>vmh1slesx</string>
</dictelement>
</dictionary>
</listelement>
</list>
</fact>
novdocx (en) 13 May 2009
You can edit these dictionary keys by clicking the button to open the Virtual Disk Editor
dialog box and then expanding the map to open the details of the dictionary.
Figure 5-5 The Virtual Disk Editor
The editable dictionary keys (String values) include the following:
repository: The optional repository housing disk.
location: The URL referencing disk image.
size: The optional size (measured in Megabytes) of the virtual disk.
moveable: The true or false value showing whether the disk can be moved by PlateSpin
Orchestrate.
88 PlateSpin Orchestrate 2.0 Development Client Reference
Page 89

VM Files: This list includes the files (described by file types and file paths) that make up this VM.
In the Fact Editor, this fact is listed as a dictionary:
<fact name="resource.vm.files">
<dictionary>
<dictelement key="config">
<string>/var/lib/xen/images/win2kbuild/config.xen</string>
</dictelement>
</dictionary>
</fact>
The dictionary key (String) represents the file type (adapter specific). The value is the file path
(either absolute or relative to
repository.location
) of the
resource.vm.repository
.
You can edit this dictionary by clicking the button to open an array editor. In this dialog box
you can add or remove file types and paths to the array of element choices.
Required Virtual Memory: This value specifies the amount (measured in Mb) of virtual memory
required for this VM image.
novdocx (en) 13 May 2009
In the Fact Editor, this fact is listed as
<fact name="resource.vm.memory" value="1024" type="Integer" />
resource.vm.memory
:
Host CPU Architecture: This value specifies the type of CPU architecture required by this VM.
You should edit these values only when you are manually creating a Resource object.
Possible types include:
x86
x86_64
sparc
ppc
mips
alpha
In the Fact Editor, this fact is listed as
<fact name="resource.vm.cpu.architecture" value="x86" type="String" />
resource.vm.cpu.architecture
:
Requires Host HVM Support: This check box is selected by default. When it is selected (that is,
its value is “true”), this VM requires host HVM support. The setting is required when you want to
perform paravirtualization, otherwise only full virtualization is possible.
In the Fact Editor, this fact is listed as
resource.vm.cpu.hvm
:
<fact name="resource.vm.cpu.hvm" value="true" type="Boolean" />
Host CPU % Weight: This value specifies the CPU weight (as a percentage of the virtual processor
runtime) that you can assign to the virtual processor associated with this VM.
A value of
represents normal weighting. Setting another VM to a weight of
2.0
means that it
1.0
would get twice as much CPU runtime as this VM.
In the Fact Editor, this fact is listed as
resource.vm.cpu.weight
:
The Explorer Tree 89
Page 90

<fact name="resource.vm.cpu.weight" value="1.0000" type="Real" />
Host CPU Number: This value specifies the number of virtual CPUs assigned to this VM.
novdocx (en) 13 May 2009
In the Fact Editor, this fact is listed as
<fact name="resource.vm.vcpu.number" value="1" type="Integer" />
resource.vm.vcpu.number
:
Moveable Disk Size: This value specifies the total size (measured in Mb) of all the virtual
moveable disks for this VM image.
In the Fact Editor, this fact is listed as
<fact name="resource.vm.vdisksize" value="4096" type="Integer" />
resourc.vm.vdisksize
:
Prevent Disk Relocation: This check box is not selected by default. When it is selected (that is, its
value is “true”), PlateSpin Orchestrate cannot move VM disks and thus consideration of other
potential VM hosts.
In the Fact Editor, this fact is listed as
<fact name="resource.vm.preventmove" value="false" type="Boolean" />
resource.vm.preventmove
:
Max VMs Per Host: This value specifies the number of instances of this VM image that are
allowed on a VM host, configureable based on the known capacity of the VM host/hypervisor.
In the Fact Editor, this fact is listed as
<fact name="resource.vm.maxinstancespervmhost" value="1" type="Integer" />
resource.vm.maxinstancespervmhost
:
VM Host Ranking: This list box includes the ranking specifications used to select suitable VM
hosts. The element syntax is
fact/order
where order is either
ascending
or
descending
.
In the Fact Editor, this fact is listed as an array:
<fact name="resource.vm.vmhost.rankby">
<array>
<string>vmhost.vm.placement.score/a</string>
<string>vmhost.loadindex.slots/a</string>
</array>
</fact>
You can edit this array by clicking the button to open an array editor. In this dialog box you
/a
can add or remove ranking specifications to the array of element choices. A trailing
/d
ascending sort order. A trailing
indicates a descending sort order.
indicates an
Construction Specification: The VM Builder Specifications field in this section displays a list of
specifications that were used to build this VM. These specifications are interpreted by the
provisioning adapter. You should edit these values using the PlateSpin Orchestrate VM Client.
In the Fact Editor, this fact is listed as a dictionary:
<fact name="resource.vm.spec">
<dictionary>
<dictelement key="ssd">
<string>ddd</string>
</dictelement>
</dictionary>
</fact>
90 PlateSpin Orchestrate 2.0 Development Client Reference
Page 91

You can edit the dictionary by clicking the button to open an attribute editor where you can
add or remove dialog box and then expanding the map to open the details of the dictionary.
Provisioning Information
The settings on this section of the Info/Groups panel are not available unless the resource you select
is a VM.
Provisioning Job: This drop-down list lets you select the name of the provisioning job that
manages the life cycle of this resource.
novdocx (en) 13 May 2009
In the Fact Editor, this fact is listed as
<fact name="resource.provisioner.job" value="xen30" type="String" />
resource.provisioner.job
:
VM Warehouse Version: This value specifies the warehouse version number for this VM. This fact
is no longer used.
In the Fact Editor, this fact is listed as
<fact name="resource.provisioner.warehouse.version" value="0" type="Integer" /
>
resource.provisioner.warehouse.version
:
VM Warehouse GUID: This value specifies the warehouse ID for this VM. This fact is no longer
used.
In the Fact Editor, this fact is listed as
<fact name="resource.provisioner.warehouse.guid" value="" type="String" />
resource.provisioner.warehouse.guid
:
Provisioned Instances: This value specifies the total count of operational instances and provisions
in progress.
In the Fact Editor, this fact is listed as
<fact name="resource.provisioner.count" value="0" type="Integer" />
resource.provisioner.count
:
Cloned Instances: This value specifies the total count of cloned instances of the template.
In the Fact Editor, this fact is listed as
<fact name="resource.provisioner.instancecount" value="0" type="Integer" />
resource.provisioner.instancecount
:
Instances: This list includes the IDs of the instances of this template resource (if applicable).
In the Fact Editor, this fact is listed as an array:
<fact name="resource.provisioner.instances">
<array type="String">
</array>
</fact>
You can edit this array by clicking the button to open an array editor. In this dialog box you
can add or remove instance IDs to the array of choices.
Max Provisioned Instances: (For VM templates only) This value specifies the maximum allowed
number of instances of this provisionable resource.
In the Fact Editor, this fact is listed as
resource.provisioner.maxinstances
:
The Explorer Tree 91
Page 92

<fact name="resource.provisioner.maxinstances" value="1" type="Integer" />
Agent Shutdown Timeout: This value specifies the maximum amount of time (measured in
seconds) allowed for this VM to shut down and for the Orchestrate Agent to disconnect from the
Orchestrate Server.
novdocx (en) 13 May 2009
In the Fact Editor, this fact is listed as
<fact name="resource.provisioner.timeout.shutdown" value="" type="Integer" />
resource.provisioner.timeout.shutdown
:
Default Agent Idle Timeout: This value specifies the maximum amount of time (measured in
seconds) allowed for a VM instance to be idle before relaxing reservation policy or shutting down.
Behavior depends on mode, and can be overridden by the provision request.
In the Fact Editor, this fact is listed as
<fact name="resource.provisioner.timeout.idle" value="" type="Integer" />
resource.provisioner.timeout.idle
:
Host Wait Timeout: This value specifies the maximum amount of time (measured in seconds) to
<0
wait for a suitable host before timing out. A value of less than zero (
), means that the VM waits
indefinitely.
In the Fact Editor, this fact is listed as
<fact name="resource.provisioner.host.maxwait" value="-1" type="Integer" />
resource.provisioner.host.maxwait
:
Preferred Host Wait: This value specifies the amount of time (measured in seconds) after which
some VM Host constraints (for example, whether to move the disk image) are lifted to increase the
<0
available pool of hosts. A value of less than zero (
), means that the VM resource waits
indefinitely.
In the Fact Editor, this fact is listed as
resource.provisioner.host.preferredwait
:
<<fact name="resource.provisioner.host.preferredwait" value="0" type="Integer"
/>
Recommended Host: This drop-down list includes the names of VM hosts that you can choose
from to associate with this VM resource image. You might specify this host when you want a quick
VM startup or if you want to change hosts because the original host was suspended. When combined
with the
In the Fact Editor, this fact is listed as
<fact name="resource.provisioner.recommendedhost" value="" type="String" />
resource.provisioner.host.preferredwait
resource.provisioner.recommendedhost
fact, this fact can lock a VM to one host.
:
Debug Provision Log: This check box is not selected by default. When it is selected (that is, its
value is “true”), the debug log level in the provisioner is enabled.
In the Fact Editor, this fact is listed as
<fact name="resource.provisioner.debug" value="false" type="Boolean" />
resource.provisioner.debug
:
Parent Template: This value specifies the ID of the template resource from which this instance was
created. (This is only applicable if the template was copied from another template.)
In the Fact Editor, this fact is listed as
<fact name="resource.provision.template" value="" type="String" />
resource.provision.template
:
92 PlateSpin Orchestrate 2.0 Development Client Reference
Page 93

Current State: This value specifies the current state of this provisioned instance. The different
states include:
down
suspended
up
paused
unknown (when an administrative action is in process)
novdocx (en) 13 May 2009
In the Fact Editor, this fact is listed as
<fact name="resource.provision.state" value="down" type="String" />
resource.provision.state
:
Current Host: This value specifies the ID of the VM host that is currently housing this provisioned
resource.
In the Fact Editor, this fact is listed as
<fact name="resource.provision.vmhost" value="vmh6sles_xen30" type="String" />
resource.provision.vmhost
:
Current Status: (Read Only) This value specifies the current descriptive status of the provisioned
resource.
In the Fact Editor, this fact is listed as
<fact name="resource.provision.status" value="Undefined" type="String" />
resource.provision.status
:
Current Action: (Read Only) This value specifies the management action currently in progress on
this provisioned resource.
In the Fact Editor, this fact is listed as
<fact name="resource.provision.currentaction" value="" type="String" />
resource.provision.currentaction
:
Request Time: (Read Only) This value specifies the time when the last provision (or other
administrative action) was requested.
In the Fact Editor, this fact is listed as
<fact name="resource.provision.time.request" value="8/24/09 4:36 PM"
type="Date" />
resource.provision.time.request
:
Start Time: (Read Only) This value specifies the time when the resource was last successfully
provisioned.
In the Fact Editor, this fact is listed as
<fact name="resource.provision.time.start" value="12/31/69 4:59 PM"
type="Date" />
resource.provision.time.start
:
Shutdown Time: (Read Only) This value specifies the time when the resource was last shut down.
In the Fact Editor, this fact is listed as
<fact name="resource.provision.time.shutdown" value="12/31/69 4:59 PM"
type="Date" />
resource.provision.time.shutdown
:
The Explorer Tree 93
Page 94

Host Wait Time: (Read Only) This value specifies the amount of time (measured in seconds) that
this resource has been waiting for or did wait for a suitable host.
novdocx (en) 13 May 2009
In the Fact Editor, this fact is listed as
<fact name="resource.provision.time.hostwait" value="0" type="Integer" />
resource.provision.time.hostwait
:
Managing Job ID: (Read Only) This value specifies the current or last Job ID that performed a
provisioning action on this resource. This is useful when viewing the job log to monitor specific
provisioning actions.
In the Fact Editor, this fact is listed as
<fact name="resource.provision.jobid" value="system.xen30.74239" type="String"
/>
resource.provision.jobid
:
Automatic Provision: (Read Only) This check box is not selected by default. When it is checked
(that is, its value is “true”), the resource was cloned or provisioned automatically and so will be shut
down or destroyed automatically.
In the Fact Editor, this fact is listed as
<fact name="resource.provision.automatic" value="false" type="Boolean" />
resource.provision.automatic
:
Needs Resync: This check box is not selected by default. When it is selected (that is, its value is
“true”), you specify that the provisioned resource’s state needs to be resynchronized using the
associated provisioning technology at the next opportunity.
In the Fact Editor, this fact is listed as
resource.provision.resync
:
<fact name="resource.provision.resync" value="false" type="Boolean" />
Linux Autoprep Config: If any of the fields in this section are blank (that is, undefined), click
Define to install a fact editor that you can use to define the value.
This section includes the following settings:
Linux Computer Name: This value specifies the host name of a new VM. Enter “*” to
indicate that the VM ID is to be used rather than the host name you specify.
In the Fact Editor, this fact is listed as
resource.provisioner.autoprep.linuxglobal.ComputerName
<fact name="resource.provisioner.autoprep.linuxglobal.ComputerName"
value="afd" type="String" />
Linux Domain: This value specifies the domain to which the new VM belongs.
In the Fact Editor, this fact is listed as resource.provisioner.autoprep.linuxglobal.Domain
<fact name="resource.provisioner.autoprep.linuxglobal.Domain" value=""
type="String" />
Windows Sysprep Config: Although the fields in this section can be defined with a Fact Editor, the
entire section of facts is non-functional and is not currently supported.
Autoprep Network Adapter 0: This section of the Info/Groups page displays the configuration
information for a network adapter (0)you can prepare for autoprep work. A new VM resource or VM
template resource does not have these facts defined. When you click Define, a Fact Editor is enabled
where you can define the facts for the adapter.
94 PlateSpin Orchestrate 2.0 Development Client Reference
Page 95

The section includes the following settings/facts:
MAC Address: The value you specify in this field is the name for each NIC that represents the
MAC address of the interface. Specify an asterisk (*) to generate a new MAC address. If the
value is not set, the current configuration is used.
In the Fact Editor, this fact is listed as
resource.provisioner.autoprep.adapters[0].MACAddress
<fact name="resource.provisioner.autoprep.adapters[0].MACAddress"
value="dadf" type="String" />
Use DHCP: When this check box is selected (that is, its value is “true”), the new VM retrieves
:
its network settings from a DHCP server and any adapter settings are ignored. If the check box
is not selected (that is, its value is “false”), any required adapter settings must be defined.
In the Fact Editor, this fact is listed as
resource.provisioner.autoprep.adapters[0].UseDHCP
<fact name="resource.provisioner.autoprep.adapters[0].UseDHCP"
value="true" type="Boolean" />
IP Address: This field displays the IP address for the adapter.
:
In the Fact Editor, this fact is listed as
resource.provisioner.autoprep.adapters[0].IPAddress
<fact name="resource.provisioner.autoprep.adapters[0].IPAddress"
value="fddfasdf" type="String" />
Subnet Mask: This field displays the subnet mask for the adapter.
:
novdocx (en) 13 May 2009
In the Fact Editor, this fact is listed as
resource.provisioner.autoprep.adapters[0].subnetMask
<fact name="resource.provisioner.autoprep.adapters[0].subnetMask"
value="fadsafdasdf" type="String" />
Gateway IP Address: This field displays a list of the internet gateway IP addresses available
:
to the interface.
In the Fact Editor, this fact is listed as an array:
<fact name="resource.provisioner.autoprep.adapters[0].Gateways">
<array>
<string>afdasadfs</string>
</array>
</fact>
You can edit this array by clicking the button to open an array editor. In this dialog box
you can add or remove the IP address or change its order in the array of element choices.
DNS from DHCP: (Optional. SUSE VM only) When this check box is selected (that is, its
value is “true”), the SUSE VM is configured to retrieve its DNS server settings from DHCP.
In the Fact Editor, this fact is listed as
resource.provisioner.autoprep.adapters[0].DNSFromDHCP
<fact name="resource.provisioner.autoprep.adapters[0].DNSFromDHCP"
value="true" type="Boolean" />
DNS Server IP Addresses: This field displays a list of DNS servers for name lookup.
:
In the Fact Editor, this fact is listed as an array:
The Explorer Tree 95
Page 96

<fact name="resource.provisioner.autoprep.adapters[0].DNSServers">
<array>
<string>adfadsasdf</string>
</array>
</fact>
You can edit this array by clicking the button to open an array editor. In this dialog box
you can add or remove a server IP address or change its order in the array of element choices.
DNS Domain: (Windows only) This field displays the name of the adapter’s domain.
In the Fact Editor, this fact is listed as
resource.provisioner.autoprep.adapters[0].DNSDomain
<fact name="resource.provisioner.autoprep.adapters[0].DNSDomain"
value="afds" type="String" />
Primary WINS Server: This field displays the name of the adapter’s primary WINS server.
:
In the Fact Editor, this fact is listed as
resource.provisioner.autoprep.adapters[0].primaryWINS
<fact name="resource.provisioner.autoprep.adapters[0].primaryWINS"
value="dfasfasddasf" type="String" />
Secondary WINS Server: This field displays the name of the adapter’s secondary WINS
:
server.
In the Fact Editor, this fact is listed as
resource.provisioner.autoprep.adapters[0].secondaryWINS
<fact name="resource.provisioner.autoprep.adapters[0].secondaryWINS"
value="fdasadsfasd" type="String" />
DNS Suffixes: This field displays a list of the suffixes associated with this adapter that are
:
appended to the name for lookup.
In the Fact Editor, this fact is listed as an array:
<fact name="resource.provisioner.autoprep.adapters[0].DNSSuffixes">
<array>
<string>afjkdl</string>
</array>
</fact>
You can edit this array by clicking the button to open an array editor. In this dialog box
you can add or remove a suffix or change its order in the array of element choices.
novdocx (en) 13 May 2009
NetBIOS: This drop-down list box includes the NetBIOS options for this VM. Options include
EnableNetBIOSviaDhcp, EnableNetBIOS, and DisableNetBIOS.
In the Fact Editor, this fact is listed as
resource.provisioner.autoprep.adapters[0].netBIOS
<fact name="resource.provisioner.autoprep.adapters[0].netBIOS"
value="EnableNetBIOS" type="String" />
Autoprep Network Adapter 1: This section of the Info/Groups page displays the configuration
information for a network adapter (1) you can prepare for autoprep work. Definitions of its facts are
similar to Autoprep Network Adapter (0), except for its identification in the as Adapter [1] rather
than Adapter [0].
OS Information
OS Name: (Read Only) This field displays the name of the resource operating system.
96 PlateSpin Orchestrate 2.0 Development Client Reference
:
Page 97

novdocx (en) 13 May 2009
In the Fact Editor, this fact is listed as
<fact name="resource.os.name" value="Linux" type="String" />
resource.os.name
:
OS Version: (Read Only) This field displays the version number of the resource operating system.
For a VM resource, this fact remains undefined.
In the Fact Editor, this fact is listed as
<fact name="resource.os.version" value="2.6.16.46-0.12-smp" type="String" />
resource.os.version
:
OS Version String: (Read Only) This field displays the full identification string of the operating
system as supplied by the vendor of the operating system. The information is not available until the
osinfo
In the Fact Editor, this fact is listed as
<fact name="resource.os.version.string" value="Linux version 2.6.16.46-0.12smp (geeko@buildhost) (gcc version 4.1.2 20070115 (prerelease) (SUSE Linux))
#1 SMP Thu May 17 14:00:09 UTC 2007" type="String" />
system job runs. For a VM resource, this fact remains undefined.
resource.os.version.string
:
OS Architecture: This field displays the name of the operating system architecture (for example,
x86, amd64, i386, or sparc).
In the Fact Editor, this fact is listed as
<fact name="resource.os.arch" value="i386" type="String" />
resource.os.arch
:
OS Family: This value indicates the operating system family name (for example, windows, linux,
solaris, unix, aix, mac) of the resource, if known.
In the Fact Editor, this fact is listed as
<fact name="resource.os.family" value="linux" type="String" />
resource.os.family
:
OS Type: This drop-down list lets you select the unique string identifier for each OS release, for
example, sles11.
In the Fact Editor, this fact is listed as
<fact name="resource.os.type" value="sles10" type="String" />
resource.os.type
:
OS Vendor: (Read Only) This field displays the unique string identifier for each OS release.
In the Fact Editor, this fact is listed as
<fact name="resource.os.vendor" value="Novell" type="String" />
resource.os.vendor
:
OS Vendor Version: (Read Only) This field displays the vendor-defined version for the operating
system (for example, 10 for SUSE Linux Enterprise Server 10).
In the Fact Editor, this fact is listed as
<fact name="resource.os.vendor.version" value="10" type="String" />
resource.os.vendor.version
:
OS Vendor String: (Read Only) This field displays the full identification for the operating system
that is supplied by the vendor. The
osinfo
system job must run for this value to be displayed.
In the Fact Editor, this fact is listed as
resource.os.vendor.string
:
The Explorer Tree 97
Page 98

<fact name="resource.os.vendor.string" value="SUSE Linux Enterprise Server 10
(i586)" type="String" />
OS File Path Separator: (Read Only) This field displays the character used by the resource
operating system for file path separation.
novdocx (en) 13 May 2009
In the Fact Editor, this fact is listed as
<fact name="resource.os.file.separator" value="/" type="String" />
resource.os.file.separator
:
CPU Information
Number of CPUs: (Read only) This field displays the number CPUs available for this resource to
use. For a VM resource, this fact remains undefined.
In the Fact Editor, this fact is listed as
<fact name="resource.cpu.number" value="2" type="Integer" />
resource.cpu.number
CPU Speed: (Read only) This field displays the processor speed (measured in Mhz). The
:
cpuinfo
job must run for this value to be displayed. For a VM resource, this fact remains undefined.
In the Fact Editor, this fact is listed as
<fact name="resource.cpu.mhz" value="2594" type="Integer" />
resource.cpu.mhz
CPU Vendor: (Read only) This field displays the name of the CPU vendor. The
:
cpuinfo
system
job must run for this value to be displayed. For a VM resource, this fact remains undefined.
In the Fact Editor, this fact is listed as
<fact name="resource.cpu.vendor" value="GenuineIntel" type="String" />
resource.cpu.vendor
:
CPU Model Number: (Read only) This field displays the full vendor model number of the CPU.
The
cpuinfo
system job must run for this value to be displayed. For a VM resource, this fact
remains undefined.
In the Fact Editor, this fact is listed as
<fact name="resource.cpu.model" value="Intel(R) Pentium(R) 4 CPU 2.60GHz"
type="String" />
resource.cpu.model
CPU Architecture: This field displays the CPU architecture (for example, x86, x86_64, sparc) of
this resource. For a VM resource, this fact remains undefined.
In the Fact Editor, this fact is listed as
<fact name="resource.cpu.architecture" value="x86" type="String" />
resource.cpu.architecture
CPU HVM Support: This field is marked true if the CPU has hardware virtualization support.
In the Fact Editor, this fact is listed as
<fact name="resource.cpu.hvm" value="false" type="Boolean" />
resource.cpu.hvm
Memory Information
Virtual Memory: (Read only) This field displays the total amount of virtual memory (measured in
Mb) on the resource. The
98 PlateSpin Orchestrate 2.0 Development Client Reference
memInfo
system job must run for this value to be displayed
:
:
:
Page 99

novdocx (en) 13 May 2009
In the Fact Editor, this fact is listed as
<fact name="resource.memory.virtual.total" value="4060" type="Integer" />
resource.memory.virtual.total
:
Virtual Available: (Read only) This field displays the amount of available virtual memory
(measured in Mb) on the resource. The
In the Fact Editor, this fact is listed as
<fact name="resource.memory.virtual.available" value="19951" type="Integer" />
memInfo
resource.memory.virtual.available
system job must run for this value to be displayed.
:
Physical Memory: (Read only) This field displays the total amount of physical memory (measured
in Mb) on the resource. The
memInfo
In the Fact Editor, this fact is listed as
<fact name="resource.memory.physical.total" value="3889" type="Integer" />
system job must run for this value to be displayed
resource.memory.physical.total
:
Physical Available: (Read only) This field displays the amount of available physicall memory
(measured in Mb) on the resource. The
In the Fact Editor, this fact is listed as
<fact name="resource.memory.physical.available" value="3565" type="Integer" />
memInfo
resource.memory.physical.available
system job must run for this value to be displayed.
:
Swap Memory: (Read only) This field displays the total amount of configured swap space
(measured in Mb) on the resource. The
memInfo
system job must run for this value to be displayed
In the Fact Editor, this fact is listed as
<fact name="resource.memory.swap.total" value="16386" type="Integer" />
resource.memory.swap.total
:
Swap Available: (Read only) This field displays the total amount of free swap space (measured in
Mb) on the resource. The
memInfo
system job must run for this value to be displayed
In the Fact Editor, this fact is listed as resource.memory.swap.available:
<fact name="resource.memory.swap.available" value="16386" type="Integer" />
Disk/Network Information
The facts in the Disk/Network Information section of the Info/Groups page are not currently
functional and are not supported.
Agent Information
Agent Version: (Read only) This field displays the PlateSpin Orchestrate Agent version and build
number that is installed on this resource. The string uses the following syntax:
major.minor.point_build
In the Fact Editor, this fact is listed as
<fact name="resource.agent.version" value="2.0.2_70917" type="String" />
resource.agent.version
:
Agent Install Dir: (Read only) This field displays the name of the home directory of the PlateSpin
Orchestrate Agent installation files.
In the Fact Editor, this fact is listed as
resource.agent.home
:
The Explorer Tree 99
Page 100

<fact name="resource.agent.home" value="/opt/novell/zenworks/zos/agent"
type="String" />
Agent Java Version: (Read only) This field displays the version of the Java JVM currently in use
by the PlateSpin Orchestrate Agent installed on this resource.
novdocx (en) 13 May 2009
In the Fact Editor, this fact is listed as
<fact name="resource.agent.jvm.version" value="1.5.0_17" type="String" />
resource.agent.jvm.version
:
Agent Java Runtime: (Read only) This field displays the version of the Java JVM runtime
currently in use by the PlateSpin Orchestrate Agent installed on this resource.
In the Fact Editor, this fact is listed as
<fact name="resource.agent.jvm.runtime" value="1.5.0_17-b04" type="String" />
resource.agent.jvm.runtime
:
Agent Java Vendor: (Read only) This field displays the name of the vendor of the Java JVM
currently in use by the PlateSpin Orchestrate Agent installed on this resource.
In the Fact Editor, this fact is listed as
<fact name="resource.agent.jvm.vendor" value="Sun Microsystems Inc."
type="String" />
resource.agent.jvm.vendor
:
Agent Java Home Dir: (Read only) This field displays the path to the home directory of the Java
JVM currently in use by the PlateSpin Orchestrate Agent installed on this resource.
In the Fact Editor, this fact is listed as
<fact name="resource.agent.jvm.home" value="/opt/novell/zenworks/zos/agent/
jre" type="String" />
resource.agent.jvm.home
:
Available Agent Memory: (Read only) This field displays the amount of memory (measured in
Mb) available to the PlateSpin Orchestrate Agent installed on this resource.
In the Fact Editor, this fact is listed as
<fact name="resource.agent.jvm.memory" value="127" type="Integer" />
resource.agent.jvm.memory
:
Enhanced Exec Available: This check box is selected by default. When it is selected (that is, its
value is “true”), it indicates that the PlateSpin Orchestrate Agent installed on this resource is able to
use enhanced exec features (as opposed to unsupported agent installs, for example, AIX).
In the Fact Editor, this fact is listed as
<fact name="resource.agent.exec.installed" value="true" type="Boolean" />
resource.agent.exec.installed
:
Clustered Agent: This check box is not selected by default. When you select it (that is, its value is
“true”), you specify that the agent is “clustered” on this VM resource; that is, it converts duplicate
logins to failover logins.
In the Fact Editor, this fact is listed as
<fact name="resource.agent.clustered" value="false" type="Boolean" />
resource.agent.clustered
:
Agent Configuration
Gmond Port: This field specifies the port that the agent uses for gmond. Port 8649 is the default
port. A setting of zero 90) or less means that the values is not read.
100 PlateSpin Orchestrate 2.0 Development Client Reference
 Loading...