


Novell®
www.novell.com
VM Client Guide and Reference
PlateSpin® Orchestrate
novdocx (en) 13 May 2009
AUTHORIZED DOCUMENTATION
2.0.2
June 17, 2009
PlateSpin Orchestrate 2.0 VM Client Guide and Reference

Legal Notices
Novell, Inc. makes no representations or warranties with respect to the contents or use of this documentation, and
specifically disclaims any express or implied warranties of merchantability or fitness for any particular purpose.
Further, Novell, Inc. reserves the right to revise this publication and to make changes to its content, at any time,
without obligation to notify any person or entity of such revisions or changes.
Further, Novell, Inc. makes no representations or warranties with respect to any software, and specifically disclaims
any express or implied warranties of merchantability or fitness for any particular purpose. Further, Novell, Inc.
reserves the right to make changes to any and all parts of Novell software, at any time, without any obligation to
notify any person or entity of such changes.
Any products or technical information provided under this Agreement may be subject to U.S. export controls and the
trade laws of other countries. You agree to comply with all export control regulations and to obtain any required
licenses or classification to export, re-export or import deliverables. You agree not to export or re-export to entities on
the current U.S. export exclusion lists or to any embargoed or terrorist countries as specified in the U.S. export laws.
You agree to not use deliverables for prohibited nuclear, missile, or chemical biological weaponry end uses. See the
Novell International Trade Services Web page (http://www.novell.com/info/exports/) for more information on
exporting Novell software. Novell assumes no responsibility for your failure to obtain any necessary export
approvals.
novdocx (en) 13 May 2009
Copyright © 2007-2009 Novell, Inc. All rights reserved. No part of this publication may be reproduced, photocopied,
stored on a retrieval system, or transmitted without the express written consent of the publisher.
Novell, Inc. has intellectual property rights relating to technology embodied in the product that is described in this
document. In particular, and without limitation, these intellectual property rights may include one or more of the U.S.
patents listed on the Novell Legal Patents Web page (http://www.novell.com/company/legal/patents/) and one or
more additional patents or pending patent applications in the U.S. and in other countries.
Novell, Inc.
404 Wyman Street, Suite 500
Waltham, MA 02451
U.S.A.
www.novell.com
Online Documentation: To access the latest online documentation for this and other Novell products, see
the Novell Documentation Web page (http://www.novell.com/documentation).

Novell Trademarks
For Novell trademarks, see the Novell Trademark and Service Mark list (http://www.novell.com/company/legal/
trademarks/tmlist.html).
Third-Party Materials
All third-party trademarks are the property of their respective owners.
novdocx (en) 13 May 2009

novdocx (en) 13 May 2009
4 PlateSpin Orchestrate 2.0 VM Client Guide and Reference

Contents
About This Guide 9
1Overview 11
1.1 What Is the PlateSpin Orchestrate VM Client? . . . . . . . . . . . . . . . . . . . . . . . . . . . . . . . . . . . . 11
1.2 Understanding the Virtual Machine Life Cycle . . . . . . . . . . . . . . . . . . . . . . . . . . . . . . . . . . . . . 12
1.3 Using This Guide to Manage VMs . . . . . . . . . . . . . . . . . . . . . . . . . . . . . . . . . . . . . . . . . . . . . . 13
2 Getting Started 15
2.1 Starting and Logging In to the VM Client Interface . . . . . . . . . . . . . . . . . . . . . . . . . . . . . . . . . 15
2.1.1 Starting the Interface on a Windows Workstation . . . . . . . . . . . . . . . . . . . . . . . . . . . 15
2.1.2 Starting the Interface on a Linux Workstation . . . . . . . . . . . . . . . . . . . . . . . . . . . . . . 17
2.2 Logging In to Another Virtualization Grid . . . . . . . . . . . . . . . . . . . . . . . . . . . . . . . . . . . . . . . . . 19
2.3 Registering VM Hosts . . . . . . . . . . . . . . . . . . . . . . . . . . . . . . . . . . . . . . . . . . . . . . . . . . . . . . . 20
2.4 Discovering Registered VM Hosts . . . . . . . . . . . . . . . . . . . . . . . . . . . . . . . . . . . . . . . . . . . . . . 21
2.5 Discovering VMs of the Registered VM Hosts . . . . . . . . . . . . . . . . . . . . . . . . . . . . . . . . . . . . . 22
2.6 Registering VMs. . . . . . . . . . . . . . . . . . . . . . . . . . . . . . . . . . . . . . . . . . . . . . . . . . . . . . . . . . . . 22
novdocx (en) 13 May 2009
3 Understanding the VM Client Interface 25
3.1 Understanding and Navigating the Welcome Page . . . . . . . . . . . . . . . . . . . . . . . . . . . . . . . . . 26
3.1.1 Welcome Page Main Menu Options . . . . . . . . . . . . . . . . . . . . . . . . . . . . . . . . . . . . . 27
3.1.2 Welcome Page Buttons . . . . . . . . . . . . . . . . . . . . . . . . . . . . . . . . . . . . . . . . . . . . . . . 28
3.2 Understanding the VM Client Window . . . . . . . . . . . . . . . . . . . . . . . . . . . . . . . . . . . . . . . . . . . 30
3.2.1 Multiple VM Operator Logins . . . . . . . . . . . . . . . . . . . . . . . . . . . . . . . . . . . . . . . . . . . 31
3.2.2 Customizing the VM Client Sections . . . . . . . . . . . . . . . . . . . . . . . . . . . . . . . . . . . . . 32
3.2.3 Navigating the VM Client Window . . . . . . . . . . . . . . . . . . . . . . . . . . . . . . . . . . . . . . . 35
3.2.4 Sorting, Searching, and Filtering Lists . . . . . . . . . . . . . . . . . . . . . . . . . . . . . . . . . . . . 41
3.2.5 Viewing Additional Information in Fields or Cells . . . . . . . . . . . . . . . . . . . . . . . . . . . . 46
3.3 Using the Error Log . . . . . . . . . . . . . . . . . . . . . . . . . . . . . . . . . . . . . . . . . . . . . . . . . . . . . . . . . 48
3.4 Using the Progress View . . . . . . . . . . . . . . . . . . . . . . . . . . . . . . . . . . . . . . . . . . . . . . . . . . . . . 50
3.5 Resetting the VM Client Perspectives . . . . . . . . . . . . . . . . . . . . . . . . . . . . . . . . . . . . . . . . . . . 51
3.6 Changing the VM Client Theme . . . . . . . . . . . . . . . . . . . . . . . . . . . . . . . . . . . . . . . . . . . . . . . . 51
4 Managing VM Host Servers 55
4.1 Understanding VM Host Servers . . . . . . . . . . . . . . . . . . . . . . . . . . . . . . . . . . . . . . . . . . . . . . . 55
4.2 Viewing and Editing Host Server Details . . . . . . . . . . . . . . . . . . . . . . . . . . . . . . . . . . . . . . . . . 55
4.2.1 Accessing Host Server Details . . . . . . . . . . . . . . . . . . . . . . . . . . . . . . . . . . . . . . . . . 56
4.2.2 Using the Details Tabs. . . . . . . . . . . . . . . . . . . . . . . . . . . . . . . . . . . . . . . . . . . . . . . . 56
4.3 Using Feedback to Manage Host Servers . . . . . . . . . . . . . . . . . . . . . . . . . . . . . . . . . . . . . . . . 64
4.4 Accessing a Host Server’s Console . . . . . . . . . . . . . . . . . . . . . . . . . . . . . . . . . . . . . . . . . . . . . 64
4.5 Resynchronizing a Host Server’s State . . . . . . . . . . . . . . . . . . . . . . . . . . . . . . . . . . . . . . . . . . 65
5 Managing Virtual Machines 67
5.1 Viewing and Editing VM Details . . . . . . . . . . . . . . . . . . . . . . . . . . . . . . . . . . . . . . . . . . . . . . . . 67
5.1.1 Accessing VM Details . . . . . . . . . . . . . . . . . . . . . . . . . . . . . . . . . . . . . . . . . . . . . . . . 67
Contents 5

5.1.2 Using the Details Tabs. . . . . . . . . . . . . . . . . . . . . . . . . . . . . . . . . . . . . . . . . . . . . . . . 68
5.2 Using Feedback to Manage VMs . . . . . . . . . . . . . . . . . . . . . . . . . . . . . . . . . . . . . . . . . . . . . . . 70
5.2.1 Progress View . . . . . . . . . . . . . . . . . . . . . . . . . . . . . . . . . . . . . . . . . . . . . . . . . . . . . . 71
5.2.2 Progress Bar for Details Views . . . . . . . . . . . . . . . . . . . . . . . . . . . . . . . . . . . . . . . . . 73
5.2.3 Progress Bar in a Tool Tip . . . . . . . . . . . . . . . . . . . . . . . . . . . . . . . . . . . . . . . . . . . . . 75
5.2.4 Event Log Tab . . . . . . . . . . . . . . . . . . . . . . . . . . . . . . . . . . . . . . . . . . . . . . . . . . . . . . 76
5.2.5 Event Logs. . . . . . . . . . . . . . . . . . . . . . . . . . . . . . . . . . . . . . . . . . . . . . . . . . . . . . . . . 77
5.2.6 Error Log . . . . . . . . . . . . . . . . . . . . . . . . . . . . . . . . . . . . . . . . . . . . . . . . . . . . . . . . . . 79
5.3 Virtual Machine Actions . . . . . . . . . . . . . . . . . . . . . . . . . . . . . . . . . . . . . . . . . . . . . . . . . . . . . . 80
5.3.1 Understanding a VM’s Status . . . . . . . . . . . . . . . . . . . . . . . . . . . . . . . . . . . . . . . . . . 81
5.3.2 Canceling a VM’s In-Progress Action . . . . . . . . . . . . . . . . . . . . . . . . . . . . . . . . . . . . 81
5.3.3 Starting a VM . . . . . . . . . . . . . . . . . . . . . . . . . . . . . . . . . . . . . . . . . . . . . . . . . . . . . . . 82
5.3.4 Shutting Down a VM . . . . . . . . . . . . . . . . . . . . . . . . . . . . . . . . . . . . . . . . . . . . . . . . . 84
5.3.5 Accessing a VM’s Console . . . . . . . . . . . . . . . . . . . . . . . . . . . . . . . . . . . . . . . . . . . . 84
5.3.6 Pausing a VM . . . . . . . . . . . . . . . . . . . . . . . . . . . . . . . . . . . . . . . . . . . . . . . . . . . . . . 85
5.3.7 Resuming a Paused VM . . . . . . . . . . . . . . . . . . . . . . . . . . . . . . . . . . . . . . . . . . . . . . 85
5.3.8 Suspending a VM . . . . . . . . . . . . . . . . . . . . . . . . . . . . . . . . . . . . . . . . . . . . . . . . . . . 85
5.3.9 Resuming a Suspended VM . . . . . . . . . . . . . . . . . . . . . . . . . . . . . . . . . . . . . . . . . . . 86
5.3.10 Resynchronizing a VM’s State. . . . . . . . . . . . . . . . . . . . . . . . . . . . . . . . . . . . . . . . . . 86
5.4 Creating a Xen VM. . . . . . . . . . . . . . . . . . . . . . . . . . . . . . . . . . . . . . . . . . . . . . . . . . . . . . . . . . 87
5.5 Installing a VM . . . . . . . . . . . . . . . . . . . . . . . . . . . . . . . . . . . . . . . . . . . . . . . . . . . . . . . . . . . . . 97
5.6 Installing the PlateSpin Orchestrate Agent on a VM . . . . . . . . . . . . . . . . . . . . . . . . . . . . . . . . 99
5.7 Installing the Monitoring Agent on a VM . . . . . . . . . . . . . . . . . . . . . . . . . . . . . . . . . . . . . . . . 100
5.7.1 Installing the Agent in Windows . . . . . . . . . . . . . . . . . . . . . . . . . . . . . . . . . . . . . . . . 100
5.7.2 Installing the Agent in Linux . . . . . . . . . . . . . . . . . . . . . . . . . . . . . . . . . . . . . . . . . . . 100
5.8 Editing VMs . . . . . . . . . . . . . . . . . . . . . . . . . . . . . . . . . . . . . . . . . . . . . . . . . . . . . . . . . . . . . . 101
5.9 Moving VMs . . . . . . . . . . . . . . . . . . . . . . . . . . . . . . . . . . . . . . . . . . . . . . . . . . . . . . . . . . . . . . 108
5.9.1 Prerequisites . . . . . . . . . . . . . . . . . . . . . . . . . . . . . . . . . . . . . . . . . . . . . . . . . . . . . . 108
5.9.2 Moving a VM . . . . . . . . . . . . . . . . . . . . . . . . . . . . . . . . . . . . . . . . . . . . . . . . . . . . . . 109
5.10 Migrating VMs . . . . . . . . . . . . . . . . . . . . . . . . . . . . . . . . . . . . . . . . . . . . . . . . . . . . . . . . . . . . 110
5.10.1 Prerequisites . . . . . . . . . . . . . . . . . . . . . . . . . . . . . . . . . . . . . . . . . . . . . . . . . . . . . . 110
5.10.2 Migrating a VM. . . . . . . . . . . . . . . . . . . . . . . . . . . . . . . . . . . . . . . . . . . . . . . . . . . . . 111
5.11 Deleting VMs . . . . . . . . . . . . . . . . . . . . . . . . . . . . . . . . . . . . . . . . . . . . . . . . . . . . . . . . . . . . . 113
novdocx (en) 13 May 2009
6 Managing Repositories 115
6.1 Understanding Repositories. . . . . . . . . . . . . . . . . . . . . . . . . . . . . . . . . . . . . . . . . . . . . . . . . . 115
6.2 Viewing and Editing Storage Details . . . . . . . . . . . . . . . . . . . . . . . . . . . . . . . . . . . . . . . . . . . 117
6.2.1 Accessing Storage Details. . . . . . . . . . . . . . . . . . . . . . . . . . . . . . . . . . . . . . . . . . . . 117
6.2.2 Using the Details Tabs. . . . . . . . . . . . . . . . . . . . . . . . . . . . . . . . . . . . . . . . . . . . . . . 117
6.3 Adding Repositories . . . . . . . . . . . . . . . . . . . . . . . . . . . . . . . . . . . . . . . . . . . . . . . . . . . . . . . . 120
6.4 Associating Repositories to Host Servers . . . . . . . . . . . . . . . . . . . . . . . . . . . . . . . . . . . . . . . 122
6.5 Associating Host Servers to Repositories . . . . . . . . . . . . . . . . . . . . . . . . . . . . . . . . . . . . . . . 123
6.6 Removing Repositories . . . . . . . . . . . . . . . . . . . . . . . . . . . . . . . . . . . . . . . . . . . . . . . . . . . . . 124
6.6.1 Removing a Repository from a Host Server . . . . . . . . . . . . . . . . . . . . . . . . . . . . . . 124
6.6.2 Removing a Host Server from a Repository . . . . . . . . . . . . . . . . . . . . . . . . . . . . . . 125
6.6.3 Removing a Repository from the VM Client. . . . . . . . . . . . . . . . . . . . . . . . . . . . . . . 125
7 Managing Templates 127
7.1 Viewing and Editing Template Details . . . . . . . . . . . . . . . . . . . . . . . . . . . . . . . . . . . . . . . . . . 127
7.1.1 Accessing Template Details . . . . . . . . . . . . . . . . . . . . . . . . . . . . . . . . . . . . . . . . . . 127
7.1.2 Using the Details Tabs. . . . . . . . . . . . . . . . . . . . . . . . . . . . . . . . . . . . . . . . . . . . . . . 128
7.2 Creating a Template from a VM . . . . . . . . . . . . . . . . . . . . . . . . . . . . . . . . . . . . . . . . . . . . . . . 129
7.3 Editing Templates . . . . . . . . . . . . . . . . . . . . . . . . . . . . . . . . . . . . . . . . . . . . . . . . . . . . . . . . . 131
7.4 Moving a Template. . . . . . . . . . . . . . . . . . . . . . . . . . . . . . . . . . . . . . . . . . . . . . . . . . . . . . . . . 138
6 PlateSpin Orchestrate 2.0 VM Client Guide and Reference

7.5 Deleting Templates . . . . . . . . . . . . . . . . . . . . . . . . . . . . . . . . . . . . . . . . . . . . . . . . . . . . . . . . 138
8 Managing Clones of Templates 141
8.1 Cloning Templates . . . . . . . . . . . . . . . . . . . . . . . . . . . . . . . . . . . . . . . . . . . . . . . . . . . . . . . . . 141
8.2 Detaching Clones from Templates. . . . . . . . . . . . . . . . . . . . . . . . . . . . . . . . . . . . . . . . . . . . . 143
9 Managing with Groups 145
9.1 Understanding Groups . . . . . . . . . . . . . . . . . . . . . . . . . . . . . . . . . . . . . . . . . . . . . . . . . . . . . . 145
9.2 Creating a Group . . . . . . . . . . . . . . . . . . . . . . . . . . . . . . . . . . . . . . . . . . . . . . . . . . . . . . . . . . 146
9.3 Adding Members to an Existing Group . . . . . . . . . . . . . . . . . . . . . . . . . . . . . . . . . . . . . . . . . 146
9.4 Removing Members from a Group. . . . . . . . . . . . . . . . . . . . . . . . . . . . . . . . . . . . . . . . . . . . . 147
9.5 Deleting a Group . . . . . . . . . . . . . . . . . . . . . . . . . . . . . . . . . . . . . . . . . . . . . . . . . . . . . . . . . . 148
10 Troubleshooting Virtual Machine Management 149
10.1 Adding Multiple NPIV Disks to a VM . . . . . . . . . . . . . . . . . . . . . . . . . . . . . . . . . . . . . . . . . . . 149
10.2 Accessing VMs and Host Servers . . . . . . . . . . . . . . . . . . . . . . . . . . . . . . . . . . . . . . . . . . . . . 149
10.3 Moving or Migrating the VMs . . . . . . . . . . . . . . . . . . . . . . . . . . . . . . . . . . . . . . . . . . . . . . . . . 150
10.4 Registering VM Hosts . . . . . . . . . . . . . . . . . . . . . . . . . . . . . . . . . . . . . . . . . . . . . . . . . . . . . . 151
novdocx (en) 13 May 2009
A VM Installation Sources 153
A.1 Disk Installation Sources . . . . . . . . . . . . . . . . . . . . . . . . . . . . . . . . . . . . . . . . . . . . . . . . . . . . 153
A.2 Guest Operating System Installation Sources . . . . . . . . . . . . . . . . . . . . . . . . . . . . . . . . . . . . 153
A.2.1 SUSE . . . . . . . . . . . . . . . . . . . . . . . . . . . . . . . . . . . . . . . . . . . . . . . . . . . . . . . . . . . . 154
A.2.2 NetWare. . . . . . . . . . . . . . . . . . . . . . . . . . . . . . . . . . . . . . . . . . . . . . . . . . . . . . . . . . 154
A.2.3 Other Linux Installation Sources . . . . . . . . . . . . . . . . . . . . . . . . . . . . . . . . . . . . . . . 154
B NPIV Terminology 155
C VM Client Preferences 157
D Adding User Logins for VM Operators 159
E VM Client Documentation Quick Index 163
Contents 7

novdocx (en) 13 May 2009
8 PlateSpin Orchestrate 2.0 VM Client Guide and Reference

About This Guide
This guide introduces the PlateSpin® Orchestrate VM Client, including its basic administration
environment, which is accessed through an Eclipse* rich client platform. The guide provides an
introductory overview of the VM Client, and explains how to install, monitor, and manage VMs.
The guide is organized as follows:
Chapter 1, “Overview,” on page 11
Chapter 2, “Getting Started,” on page 15
Chapter 3, “Understanding the VM Client Interface,” on page 25
Chapter 4, “Managing VM Host Servers,” on page 55
Chapter 5, “Managing Virtual Machines,” on page 67
Chapter 6, “Managing Repositories,” on page 115
Chapter 7, “Managing Templates,” on page 127
Chapter 8, “Managing Clones of Templates,” on page 141
Chapter 9, “Managing with Groups,” on page 145
novdocx (en) 13 May 2009
Chapter 10, “Troubleshooting Virtual Machine Management,” on page 149
Appendix A, “VM Installation Sources,” on page 153
Appendix B, “NPIV Terminology,” on page 155
Appendix C, “VM Client Preferences,” on page 157
Appendix E, “VM Client Documentation Quick Index,” on page 163
Audience
This book is for data center VM operators. It assumes that users of the product have the following
background:
General understanding of network operating environments and systems architecture
Knowledge of basic Linux* shell commands, the Windows* command prompt, and text editors
Feedback
We want to hear your comments and suggestions about this manual and the other documentation
included with this product. Please use the User Comments feature at the bottom of each page of the
online documentation, or go to www.novell.com/documentation/feedback.html (http://
www.novell.com/documentation/feedback.html) and enter your comments there.
Additional Documentation
In addition to this VM Client Guide and Reference, PlateSpin Orchestrate 2.0.2 includes the
following additional guides that contain valuable information about the product:
PlateSpin Orchestrate 2.0 Getting Started Reference
PlateSpin Orchestrate 2.0 Installation and Configuration Guide
About This Guide 9

PlateSpin Orchestrate 2.0 Upgrade Guide
PlateSpin Orchestrate 2.0 High Availability Configuration Guide
PlateSpin Orchestrate 2.0 Administrator Reference
PlateSpin Orchestrate 2.0 Command Line Reference
PlateSpin Orchestrate 2.0 Virtual Machine Management Guide
PlateSpin Orchestrate 2.0 Development Client Reference
PlateSpin Orchestrate 2.0 Developer Guide and Reference
PlateSpin Orchestrate 2.0 Server Portal Reference
Documentation Updates
For the most recent version of this guide, visit the PlateSpin Orchestrate 2.0.2 documentation Web
site (http://www.novell.com/documentation/ps_orchestrate20/).
Documentation Conventions
In Novell
®
documentation, a greater-than symbol (>) is used to separate actions within a step and
items in a cross-reference path.
®
A trademark symbol (
, TM, etc.) denotes a Novell trademark. An asterisk (*) denotes a third-party
trademark.
novdocx (en) 13 May 2009
When a single pathname can be written with a backslash for some platforms or a forward slash for
other platforms, the pathname is presented with a backslash. Users of platforms that require a
forward slash, such as Linux, should use forward slashes as required by your software.
10 PlateSpin Orchestrate 2.0 VM Client Guide and Reference

1
Overview
Review the following sections to understand the PlateSpin® Orchestrate VM Client from Novell®:
Section 1.1, “What Is the PlateSpin Orchestrate VM Client?,” on page 11
Section 1.2, “Understanding the Virtual Machine Life Cycle,” on page 12
Section 1.3, “Using This Guide to Manage VMs,” on page 13
1.1 What Is the PlateSpin Orchestrate VM Client?
The VM Client is a management interface that VM operators can use to manage the life cycle of the
virtual machines (VMs) in your enterprise, including creating, starting, stopping, migrating, and
deleting VMs. PlateSpin Orchestrate lets you better align IT to your business, control costs, and
minimize risks across all VM platforms in the data center. You can increase the functionality of your
data center by fully leveraging VMs as a usable resource.
novdocx (en) 13 May 2009
1
The VM Client provides management of VMs from several different virtualization host types,
including SUSE
vCenter* technology that adds VMotion* capability to ESX servers), and Microsoft* Windows
Server* 2008 with Hyper-V*.
The VM Client also allows you to manage both VMs and VM host servers in your data center. A
VM host is a server running the Orchestrate Agent.
For information on installing the VM Client, see “Installing the Orchestrate VM Client” in the
PlateSpin Orchestrate 2.0 Installation and Configuration Guide.
The VM Client provides the following:
A VM creation wizard that covers a VM’s installation source and mode, its virtualization mode,
repository, and hardware configurations
A VM editing wizard, which can also be used to edit existing VMs, even those that are in a
running state
The ability to discover existing VMs residing on your VM host servers
The ability to discover VM host servers in your virtualization grid; a machine can be a host
server if it is running hypervisor software
Methods for controlling VMs, such as starting, stopping, pausing, and suspending
The ability to migrate a running VM from one host server to another in real time
The ability to install and manage the PlateSpin Orchestrate Agent on your VMs
The ability to make templates of VMs, including making clones of the templates
The ability to move a VM’s repository from one host server to another
®
Linux Enterprise Server (SLES) Xen*, VMware* ESX Server (including the
The ability to group VMs, VM hosts, repositories, and templates for easier management
Detailed views of the properties for each VM, host server, repository, and template
The ability to monitor your VMs and host servers in real time
Event logs for VMs, host servers, and templates
Overview
11

The VM Client enhances the functionality of the PlateSpin Orchestrate Server, enabling it to control
VMs in your data center.
PlateSpin Orchestrate also provides the Development Client, where you can manage and control
data center jobs and processes through the application of rules, policies, scheduling, utilization, and
billing data center resources. For more information on the Development Client, see the PlateSpin
Orchestrate 2.0 Development Client Reference.
The VM Client and the Development Client management interfaces work together to help you to
maximize the use of VMs in your data center. You can have fewer physical machines while giving
your data center many additional resources, and you can manage the physical VM host machines
and their VMs in your data center.
The Orchestrate Server manages resources to perform work. It does this through automated jobs
(written in Jython) that in turn are broken down into joblets that are distributed among multiple
resources. For more information about PlateSpin Orchestrate and Orchestrate Server operations, see
“What You Should Know” in the PlateSpin Orchestrate 2.0 Developer Guide and Reference.
In addition, as calls for resources lessen and resources are released, the Orchestrate Server evaluates
the capabilities of the active resources (VM or physical machine) and keeps the best resource for the
job. This might include any of the currently running VMs.
novdocx (en) 13 May 2009
1.2 Understanding the Virtual Machine Life Cycle
The life cycle of a VM includes its creation, testing, modifications, use in your environment, and
removal when it’s no longer needed.
For example, in setting up your VM environment, you might want to first create basic VMs from
which you can create templates. Then, to enable the most efficient use of your current hardware
capabilities, you can use those templates to create the many different specialized VMs that you need
to perform the various jobs. You can create and manage VM-related jobs through the Development
Client interface.
Life cycle functions are performed one at a time per given VM as jobs on the host server in order to
prevent conflicts in using the VM. Life cycle events include:
Creating a VM
Starting and stopping a VM
Pausing, suspending, and resuming a VM
Installing the Orchestrate Agent on a VM
Creating a template from a VM
Using the VM (starting, stopping, pausing, suspending, restarting, and shutting down)
Running jobs for the VM
Editing a VM
Editing a template
Moving a stopped VM to another host server
Migrating a running VM to another host server
12 PlateSpin Orchestrate 2.0 VM Client Guide and Reference

Resynchronizing a VM to ensure that the state of the VM displayed in the Orchestrate
Development Client is accurate
Cloning a VM from a template
To view the histories of life cycle events or why they might fail, simply review a VM’s logs. For
more information, see Section 5.2, “Using Feedback to Manage VMs,” on page 70.
1.3 Using This Guide to Manage VMs
After installing the PlateSpin Orchestrate VM Client, do the following:
1. Become familiar with the VM Client interface.
2. Start the VM Client interface.
3. Register existing VM host servers.
4. Discover the registered host servers.
5. Discover the registered VMs.
6. Log in to a virtualization grid.
novdocx (en) 13 May 2009
7. Create your VMs.
8. Install the VMs.
9. Install the Orchestrate Agent on the VMs.
10. Create templates of the VMs.
11. Add repositories.
12. Configure the VMs:
Edit a VM or template.
Delete a VM.
Delete a template.
Clone a template.
Move a VM.
Migrate a VM.
Create groups for managing VMs, host servers, repositories, and templates.
13. Use the VMs:
Understand the various VM statuses.
Start VMs.
Stop VMs.
View a VM’s server console.
Pause a VM.
Suspend a VM.
Resynchronize a host server with the Development Client.
Resynchronize a VM with the Development Client.
View logging details that are fed back from the Orchestrate Server.
View the error log for a VM.
Overview 13

Open the Progress View for a VM while a life cycle function is running.
View a VM’s details.
View a host server’s details.
View a repository’s details.
View a template’s details.
14. Troubleshoot VMs.
15. Find operating system installation sources for VMs.
novdocx (en) 13 May 2009
14 PlateSpin Orchestrate 2.0 VM Client Guide and Reference

2
Getting Started
To get started with the PlateSpin® Orchestrate VM Client, do the following:
Section 2.1, “Starting and Logging In to the VM Client Interface,” on page 15
Section 2.2, “Logging In to Another Virtualization Grid,” on page 19
Section 2.3, “Registering VM Hosts,” on page 20
Section 2.4, “Discovering Registered VM Hosts,” on page 21
Section 2.5, “Discovering VMs of the Registered VM Hosts,” on page 22
Section 2.6, “Registering VMs,” on page 22
2.1 Starting and Logging In to the VM Client Interface
novdocx (en) 13 May 2009
2
You can run the VM Client on both Windows and Linux workstations:
Section 2.1.1, “Starting the Interface on a Windows Workstation,” on page 15
Section 2.1.2, “Starting the Interface on a Linux Workstation,” on page 17
2.1.1 Starting the Interface on a Windows Workstation
1 On your Windows workstation, double-click the PlateSpin Orchestrate VM Client icon ( ) on
your desktop to open the interface.
If you do not have the icon, the executable’s location is determined by where you installed the
VM Client software. The default is
Client 2.0.2\bin\vmclient.bat
For information on multiple VM operators logging in to the VM Client, see Section 3.2.1,
“Multiple VM Operator Logins,” on page 31.
C:\Program Files\PlateSpin Orchestrate VM
.
Getting Started
15
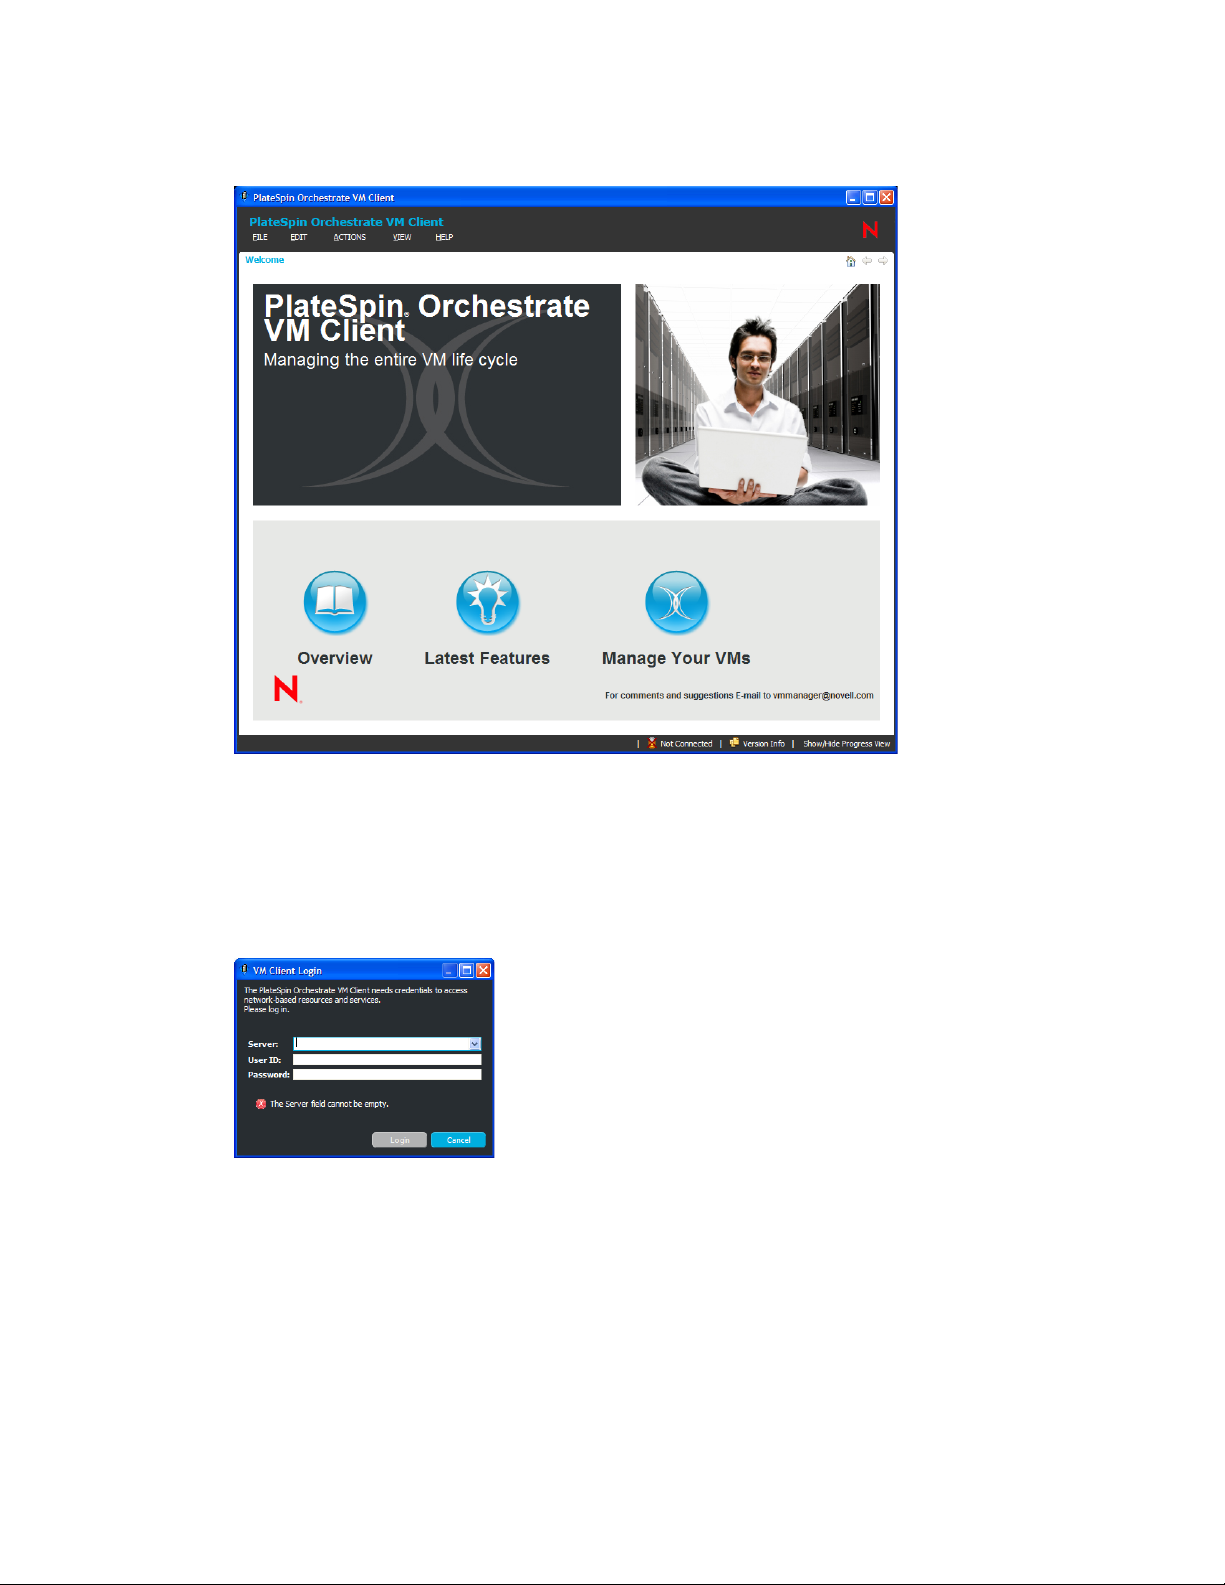
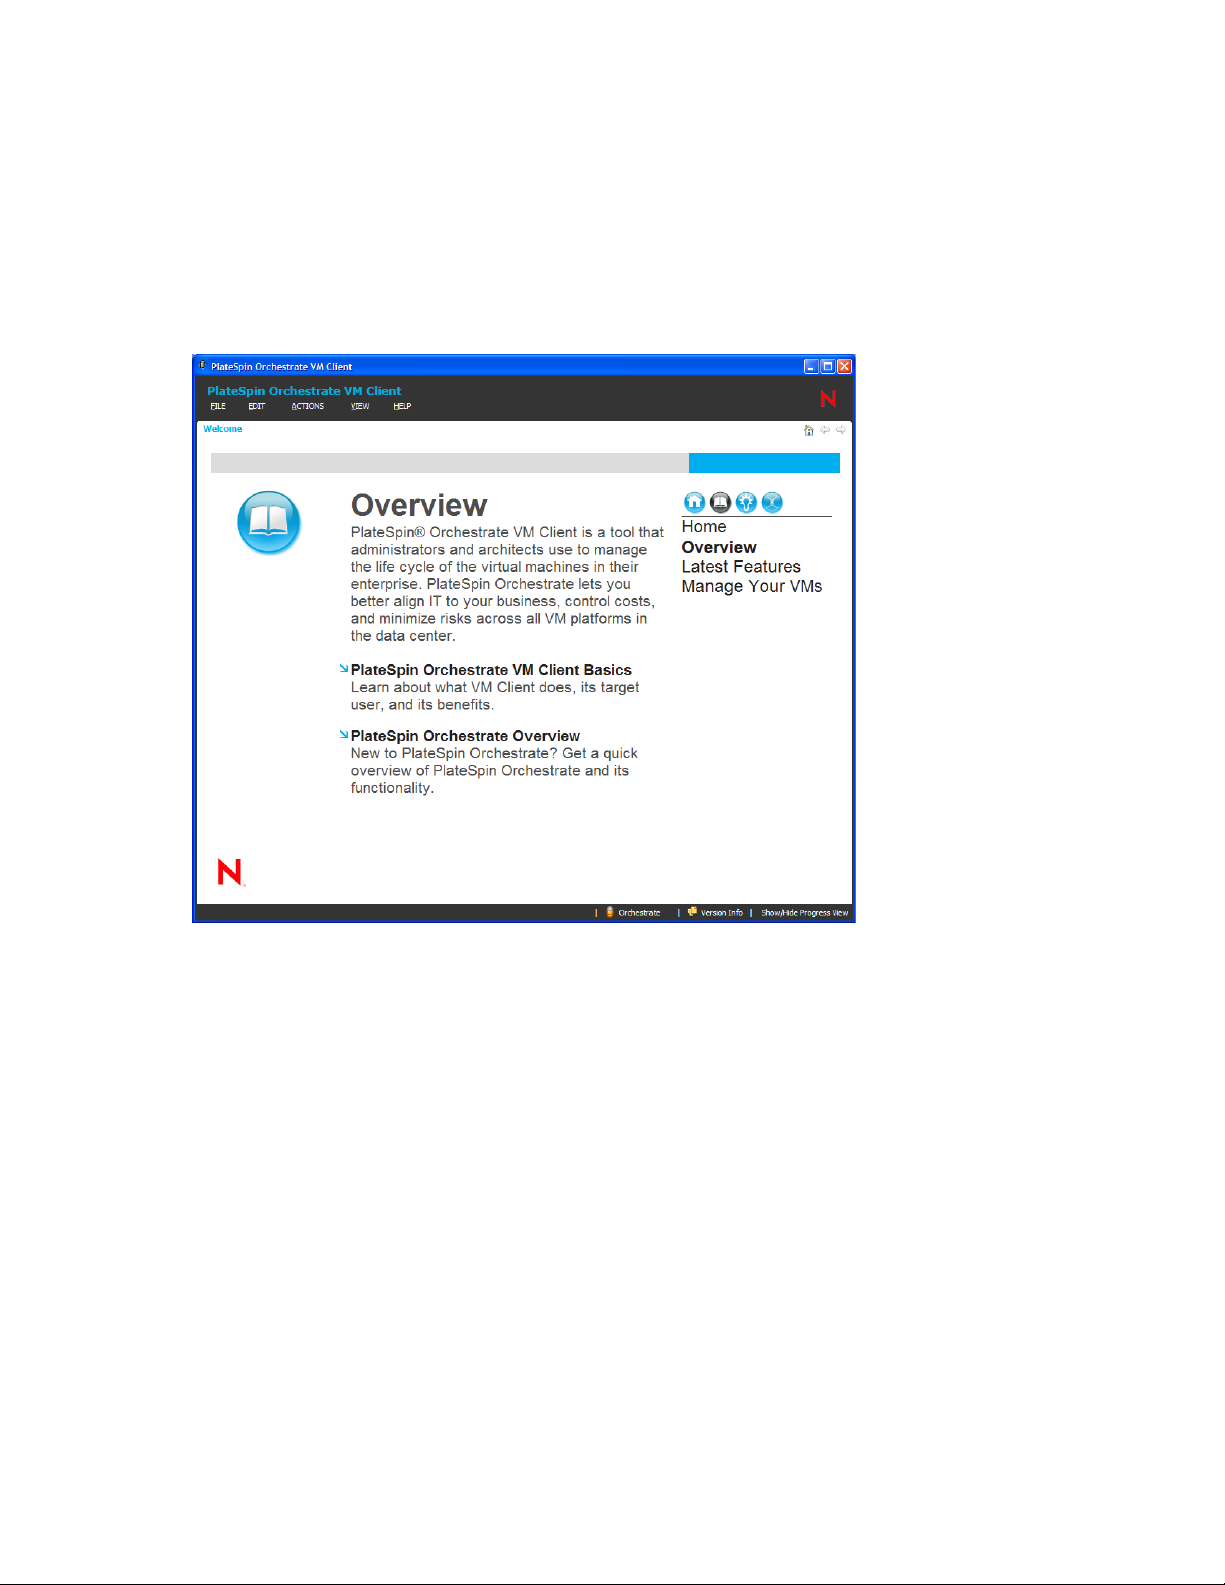
The first time you start the VM Client, the following Welcome page is displayed:
novdocx (en) 13 May 2009
The Welcome page does not display the next time you log in to the VM Client.
The Welcome page can be accessed at any time by clicking View > Show Welcome Page.
For more information, see Section 3.1, “Understanding and Navigating the Welcome Page,” on
page 26.
2 To close the Welcome page, click Manage Your VMs to display the following login dialog box:
16 PlateSpin Orchestrate 2.0 VM Client Guide and Reference
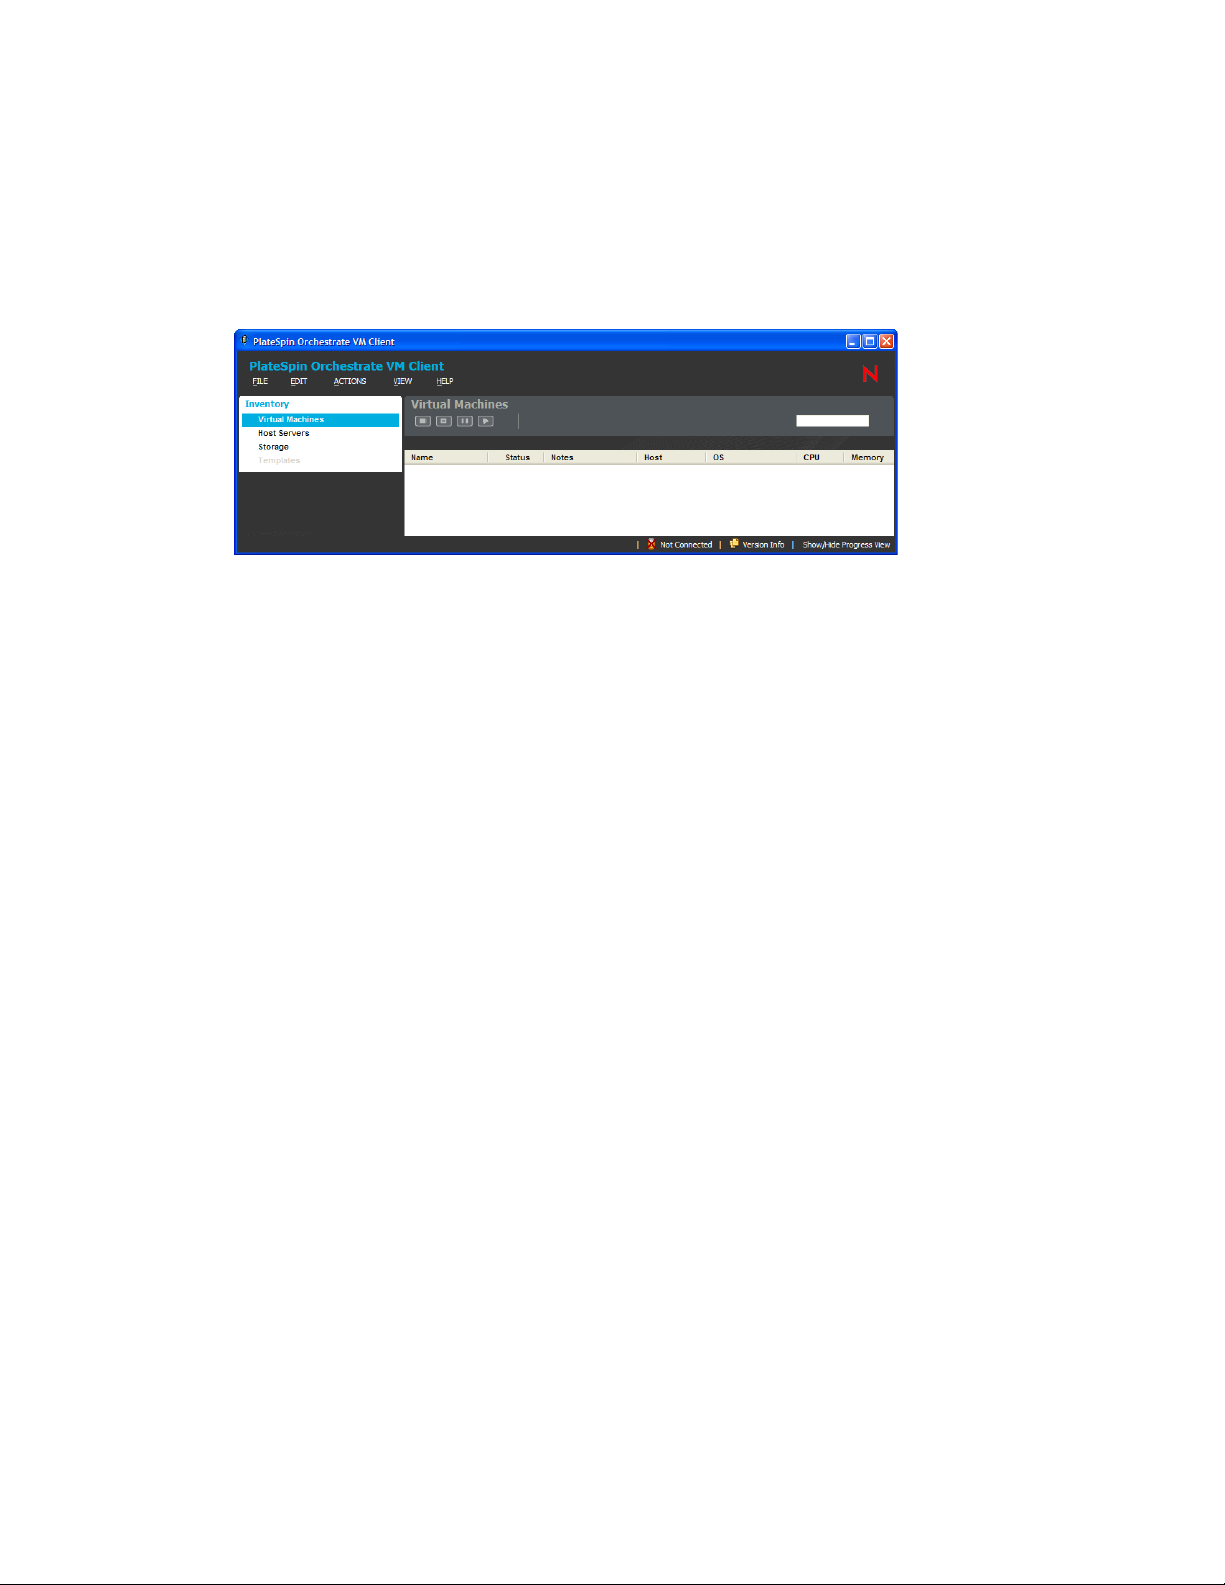
3 Specify the IP address or DNS name of a PlateSpin Orchestrate Server.
The PlateSpin Orchestrate Server is associated with a virtualization grid, which can be
associated with registered VM host servers. Therefore, logging in to one of the Orchestrate
Servers allows you to manage all VMs in the datagrid.
4 Enter a username and password to authenticate you as the administrator of the Orchestrate
Server, then click Login to view the VM Client interface:
This example shows how the interface looks the first time anyone logs in to the VM Client.
novdocx (en) 13 May 2009
5 (Conditional) If this is the first time that anyone has logged in to the VM Client, continue with
Section 2.3, “Registering VM Hosts,” on page 20 to set up the virtualization environment.
2.1.2 Starting the Interface on a Linux Workstation
1 On your Linux workstation, open a command terminal, change to the
zenworks/vmmanagement/bin/
directory (the default installation location), or to wherever
you installed the client, then enter the following command:
./vmclient.sh
For information on multiple VM operators logging in to the VM Client, see Section 3.2.1,
“Multiple VM Operator Logins,” on page 31.
/opt/novell/
Getting Started 17
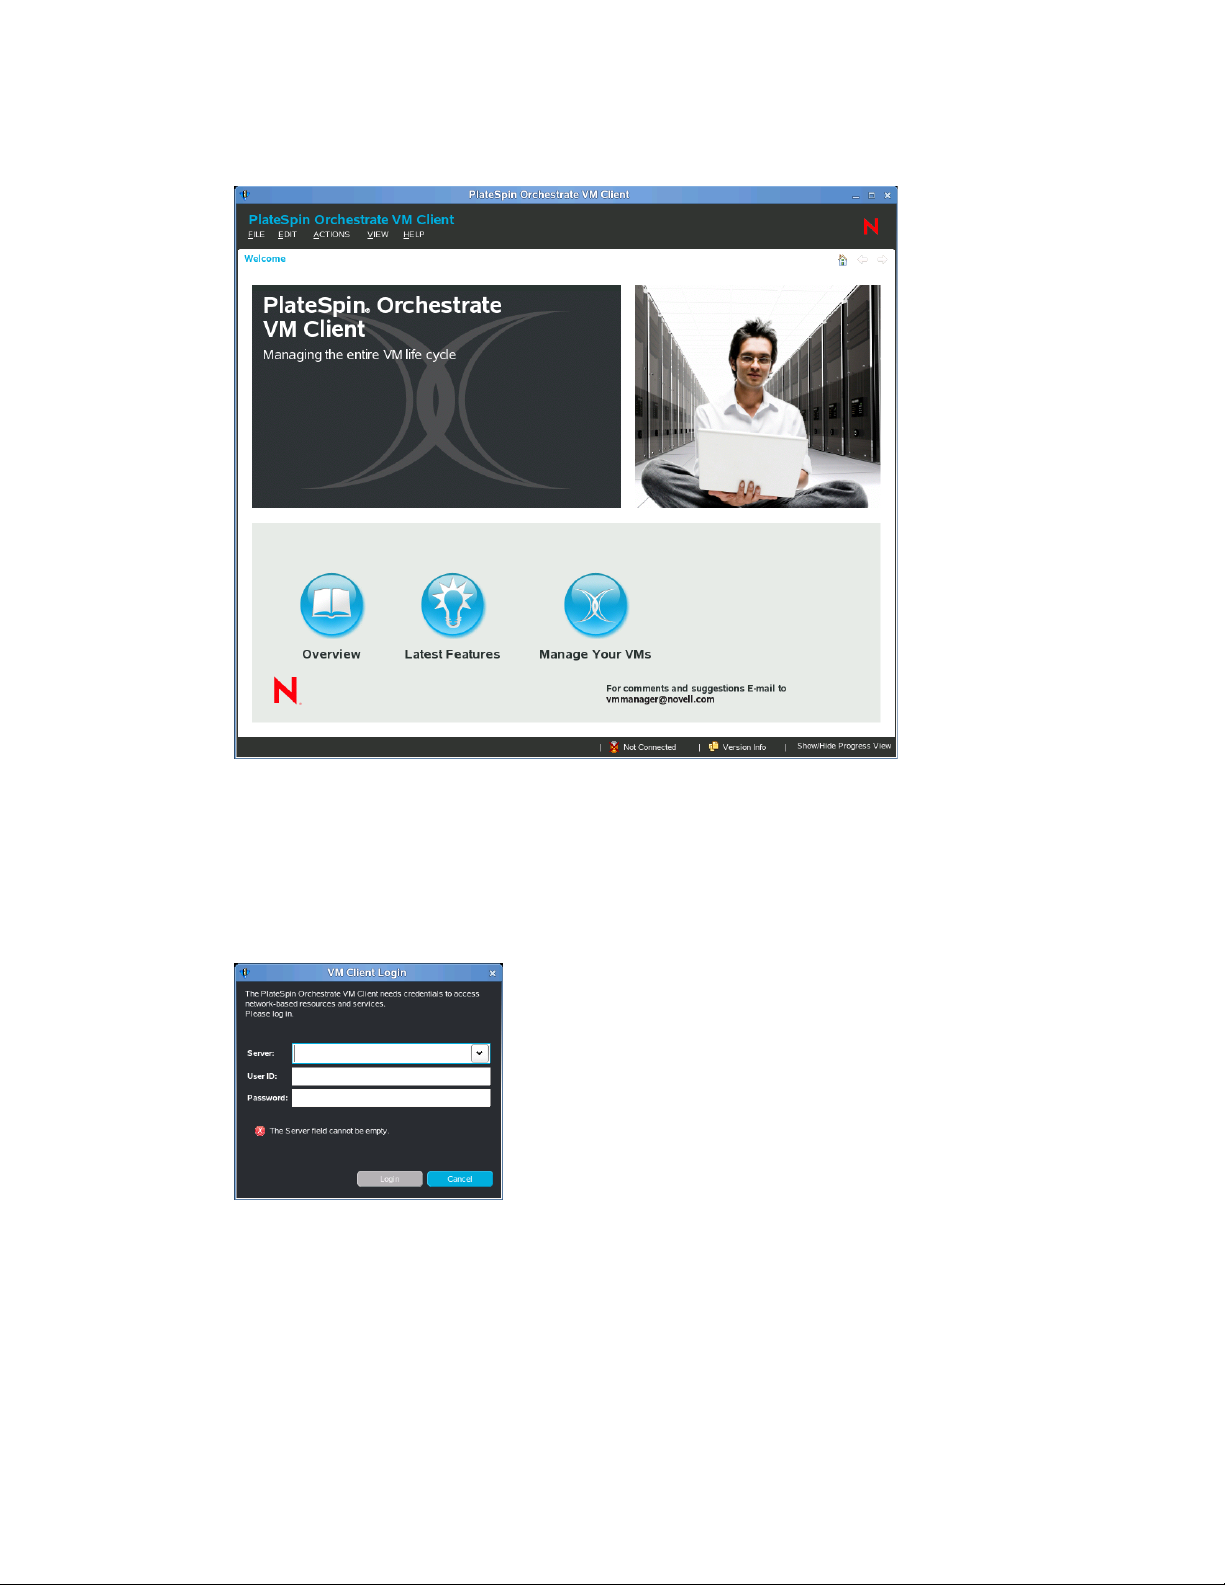
The first time you start the VM Client, the following Welcome page is displayed:
novdocx (en) 13 May 2009
The Welcome page does not display the next time you log in to the VM Client.
The Welcome page can be accessed at any time by clicking View > Show Welcome Page.
For more information, see Section 3.1, “Understanding and Navigating the Welcome Page,” on
page 26.
2 To close the Welcome page, click Manage Your VMs to display the login dialog box:
18 PlateSpin Orchestrate 2.0 VM Client Guide and Reference
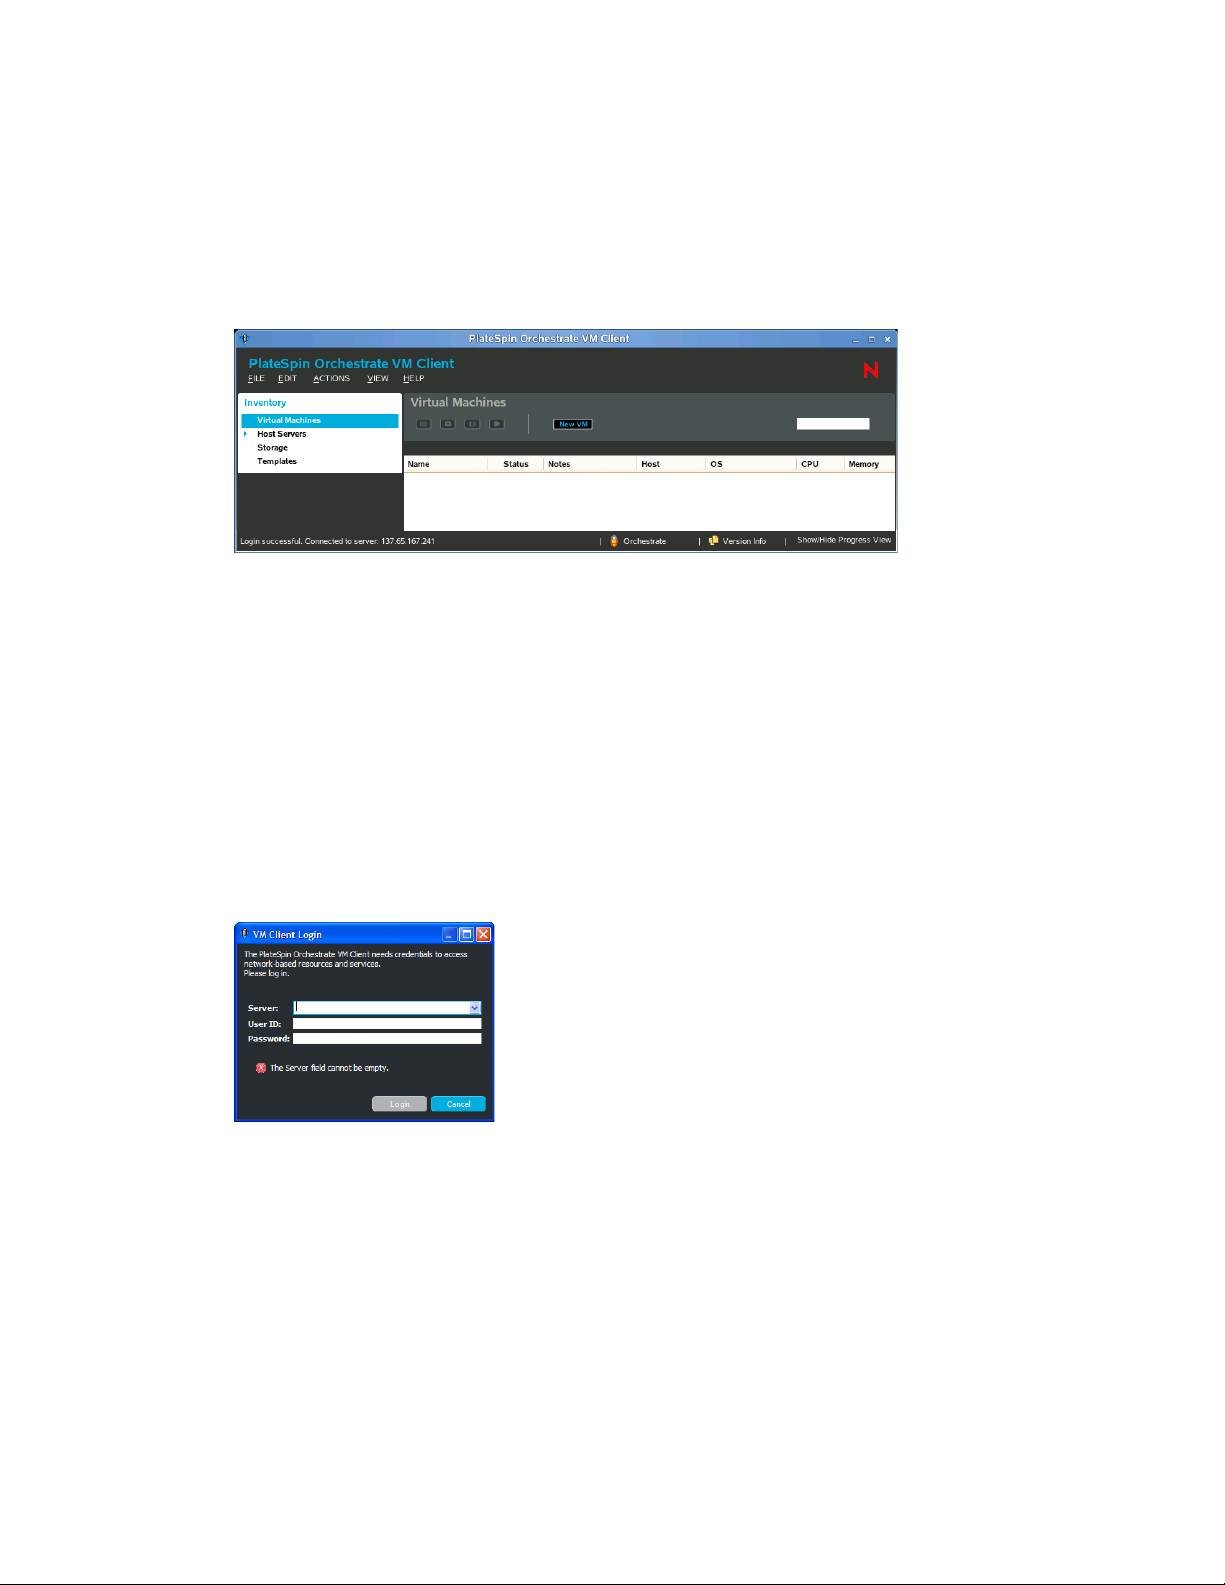
3 Specify the IP address or DNS name of a PlateSpin Orchestrate Server.
The PlateSpin Orchestrate Server is associated with a virtualization grid, which can be
associated with registered VM host servers. Therefore, logging in to an Orchestrate Server
allows you to manage all VMs in the grid.
4 Enter a username and password to authenticate you as the administrator of the Orchestrate
Server, then click Login to view the VM Client interface:
5 (Conditional) If this is the first time that anyone has logged in to the VM Client, continue with
Section 2.3, “Registering VM Hosts,” on page 20 to set up the virtualization environment.
novdocx (en) 13 May 2009
2.2 Logging In to Another Virtualization Grid
You can log in to a different Orchestrate Server at any time for access to a different virtualization
grid. However, you cannot be logged in to multiple Orchestrate Servers. If you log in to another
Orchestrate Server, the previous login is replaced.
For information on multiple VM operators logging in to the VM Client, see Section 3.2.1, “Multiple
VM Operator Logins,” on page 31.
1 In the VM Client, click File > Log In.
If you are already logged in to a virtualization grid, you can press Ctrl+Shift+I to log in to a
different datagrid.
2 Fill in the fields:
Server: Specify either the DNS name or IP address of the Orchestrate Server.
User ID: Specify a username that has admin rights on the server.
Password: Specify this user’s password.
3 Click Login.
Getting Started 19
2.3 Registering VM Hosts
After being installed on a computing node, having its credentials defined, and associating itself with
the computing node, the Orchestrate Agent begins broadcasting the availability of its host as a
potential computing resource. A host is defined as a machine running a supported hypervisor agent.
However, before the Orchestrate Server can allow an agent to authenticate and establish ongoing
communication, you need to create a resource account for the agent on the Orchestrate Server. When
this account is created or “registered,” the agent’s host node can be discovered and recognized as a
computing resource that can perform the jobs assigned to it. In the Orchestrate Development Client,
you can choose to automatically or manually register a VM host server to the Orchestrate Server by
configuring the Auto Register Agents option (the Resources panel in the Authentication tab of the
datagrid). If you choose to manually register to the Orchestrate Server, the unregistered VM host
servers are displayed in the VM Client. These hosts might or might not have a supported hypervisor
installed and running on them.
To register the VM host servers:
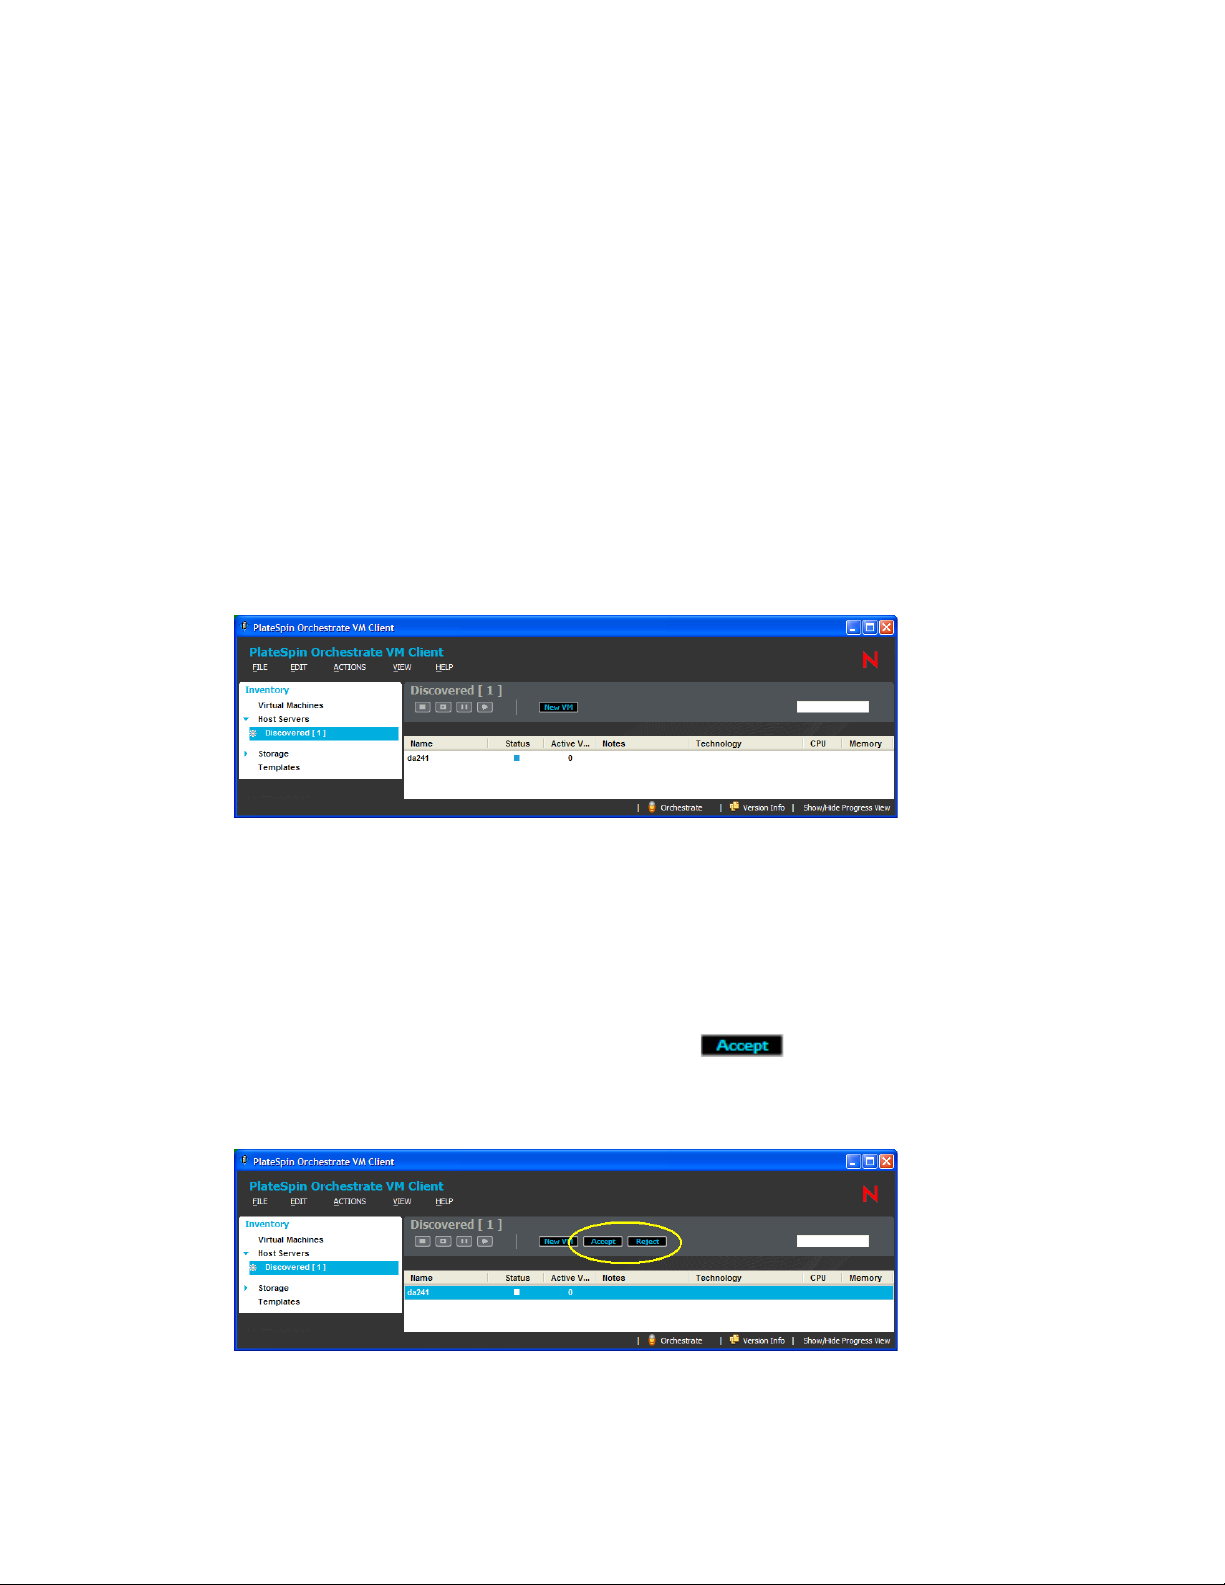
1 In the VM Client, click Host Servers in the Inventory panel:
novdocx (en) 13 May 2009
Discovered (#) is displayed below Host Servers, where # represents the number of host servers
that are waiting to be registered with the Orchestrate Server.
2 Click Discovered (#) to display the unregistered host servers in the details section on the right.
You can accept (see Step 3) or reject (see Step 4) any of the listed host servers. The host servers
that you accept become part of your virtualization grid.
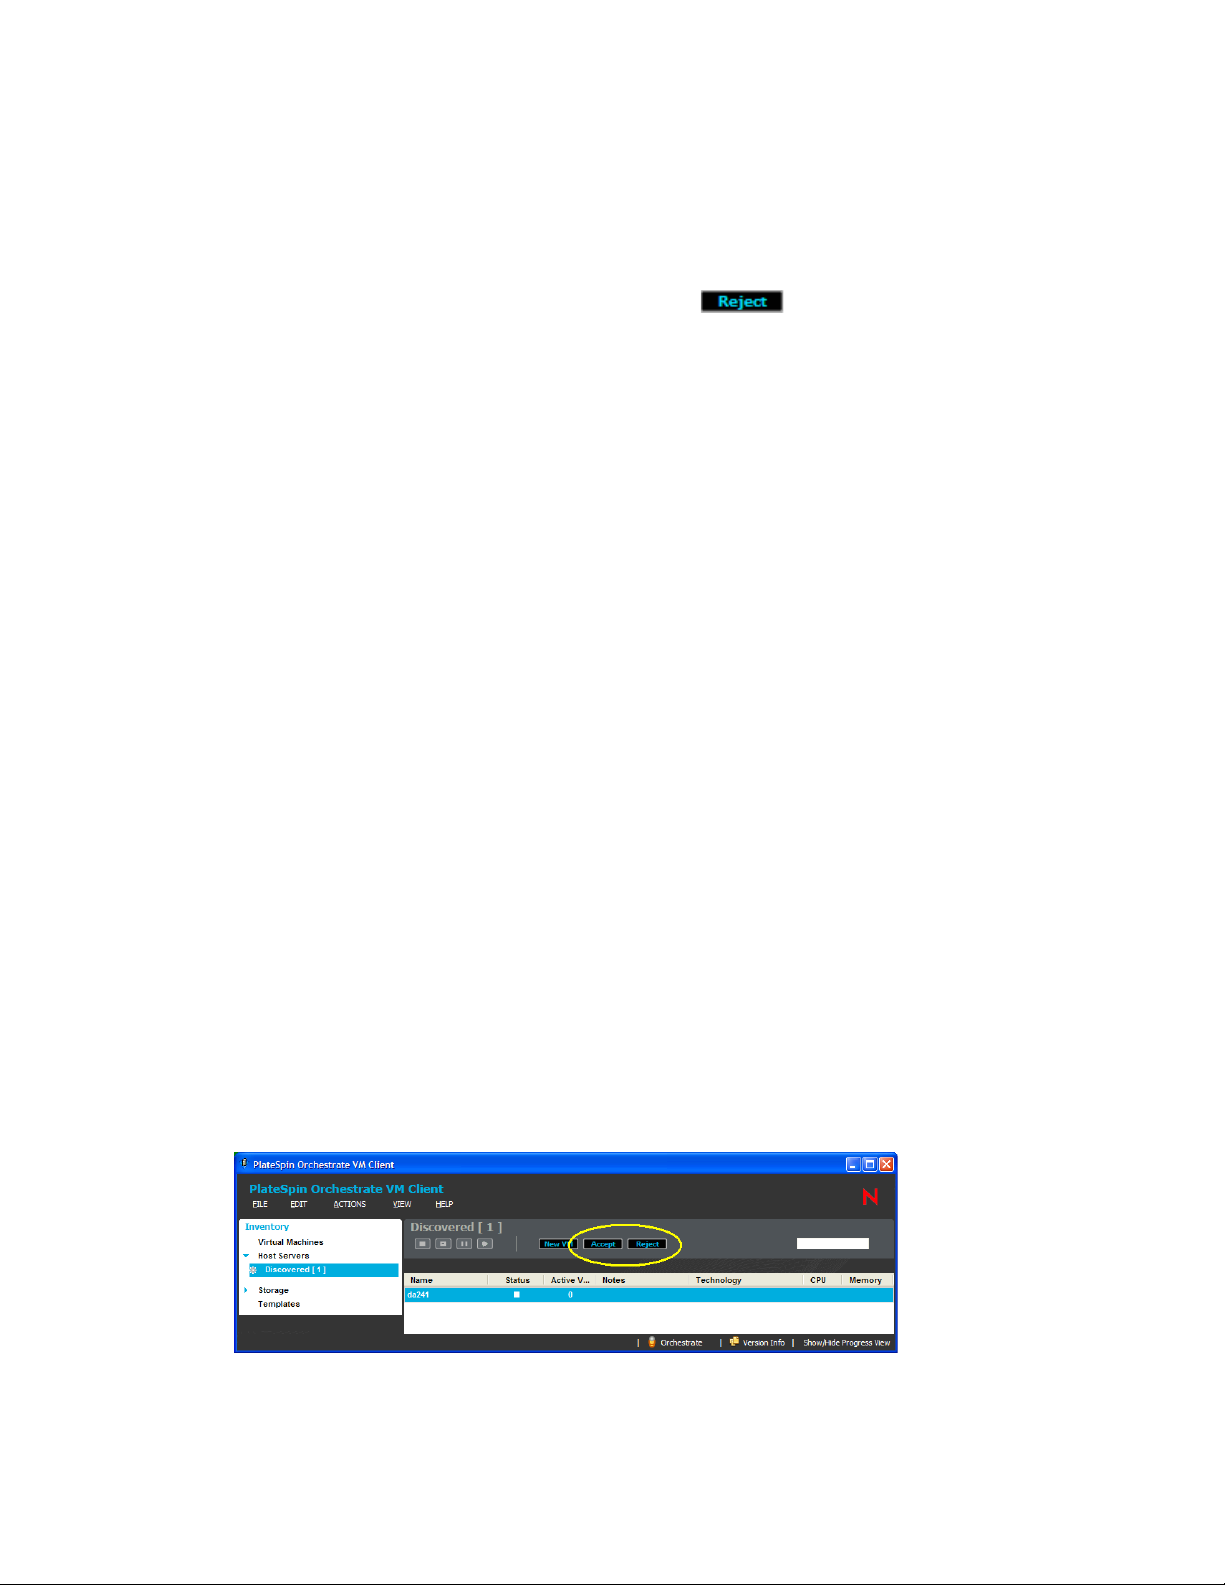
3 Accept an unregistered host server in one of the following ways:
Select the server in the details view, then click the button.
Right-click the server in the details view, then select Accept.
Select the server in the details view, then click Actions > Accept.
You can choose to register multiple host servers at a time.
20 PlateSpin Orchestrate 2.0 VM Client Guide and Reference
After the host server has been registered with the Orchestrate Server, it is listed with its
operating system.
If the host server doesn’t become registered after a few minutes, run the Discover Hosts job
from the Action menu.
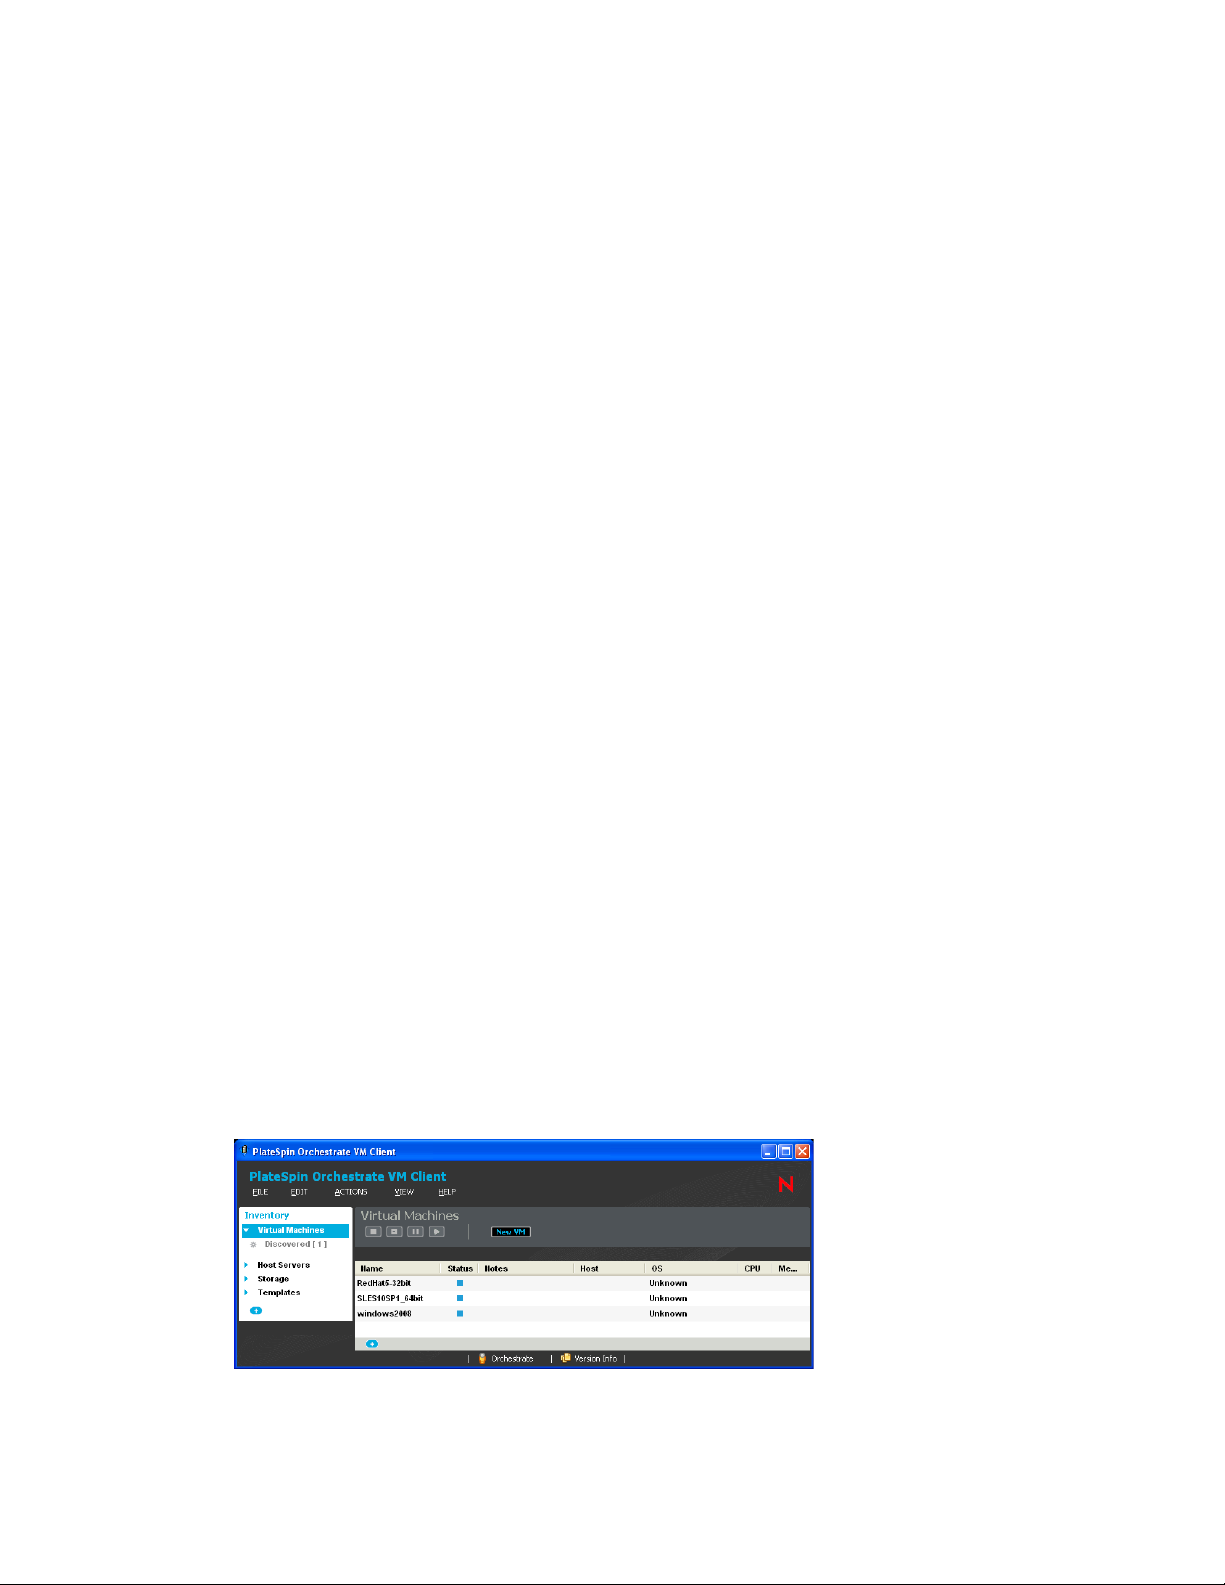
4 (Optional) To reject the registration of a host server, do one of the following:
Select the server in the details view, then click the button.
Right-click the server in the details view, then select Reject.
Select the server in the details view, then click Actions > Reject.
The unregistered server is removed from the Host Servers.
The next time that an unregistered host server attempts to register to the Orchestrate Server, the
rejected servers are again listed as candidates for acceptance into the virtualization grid.
5 Click the Storage view.
The only repositories shown are ZOS and the host’s local repository. ZOS is the shared datagrid
repository for all hosts to use in storing templates. For information on repositories, see
Chapter 6, “Managing Repositories,” on page 115. For information on templates, see
Chapter 7, “Managing Templates,” on page 127.
6 To discover whether there are other VM hosts in the datagrid, continue with Section 2.4,
“Discovering Registered VM Hosts,” on page 21.
novdocx (en) 13 May 2009
2.4 Discovering Registered VM Hosts
When you first install the VM Client, it is not aware of all of the possible registered VM hosts in the
virtualization grid that you log in to. The discovery process finds all hosts that have a supported
hypervisor installed and running on them.
You should discover these hosts before continuing to use the product. You should discover hosts
before attempting to discover VMs so that any VMs belonging to a particular host can be
discovered.
Before discovering the VMware technology-based hosts, ensure that the appropriate policies have
been configured in the Orchestrate Development Client. For more information on configuring the
policies, see “Configuring Policies for VM Provisioning Adapters” in the PlateSpin Orchestrate 2.0
Virtual Machine Management Guide.
To discover the existing registered VM hosts:
1 In the VM Client, click Actions > Discover Hosts.
Getting Started 21
All the registered VM hosts that are in the virtualization grid and that have hypervisors
installed are displayed.
2 To discover any VMs belonging to the VM hosts that you discovered, continue with
Section 2.5, “Discovering VMs of the Registered VM Hosts,” on page 22.
2.5 Discovering VMs of the Registered VM Hosts
You can use the VMs you have previously created or the VMs you have built by using other
hypervisors in your data center. To make use of these VMs, you need to run a discover job. You use
the VM Client to detect the VMware ESX, Microsoft Hyper-V, VMware Server, VMware Virtual
Center, and SUSE
detect the VMs contained on the host machines and in other VM storage repositories.
®
Xen VM host machines. After you have detected the host machines, you can
novdocx (en) 13 May 2009
The only VMs that are automatically discovered are those that are stored in the default location of
var/lib/xen/images
storage location.
Before discovering the VMware technology-based VMs, ensure that the appropriate policies have
been configured in the Orchestrate Development Client. For more information on configuring the
policies, see “Configuring Policies for VM Provisioning Adapters” in the PlateSpin Orchestrate 2.0
Virtual Machine Management Guide.
To discover the VMs belonging to the registered VM Hosts:
1 In the VM Client, click Actions > Discover Virtual Machines.
2 To accept the discovered VMs, continue with Section 2.6, “Registering VMs,” on page 22.
, unless an Orchestrate repository is created that represents an alternative
2.6 Registering VMs
If you install the Orchestrate Agent on a VM, it must then be registered (accepted) in order to be
managed in the VM Client.
In the Orchestrate Development Client, you can choose to automatically or manually register a VM
to the Orchestrate Server by configuring the Auto Register Agents option (the Resources panel in the
Authentication tab of the datagrid). If you choose to manually register to the Orchestrate Server, the
unregistered VMs are displayed in the VM Client in the Discovered (#) group.
To regi s t e r a VM:
/
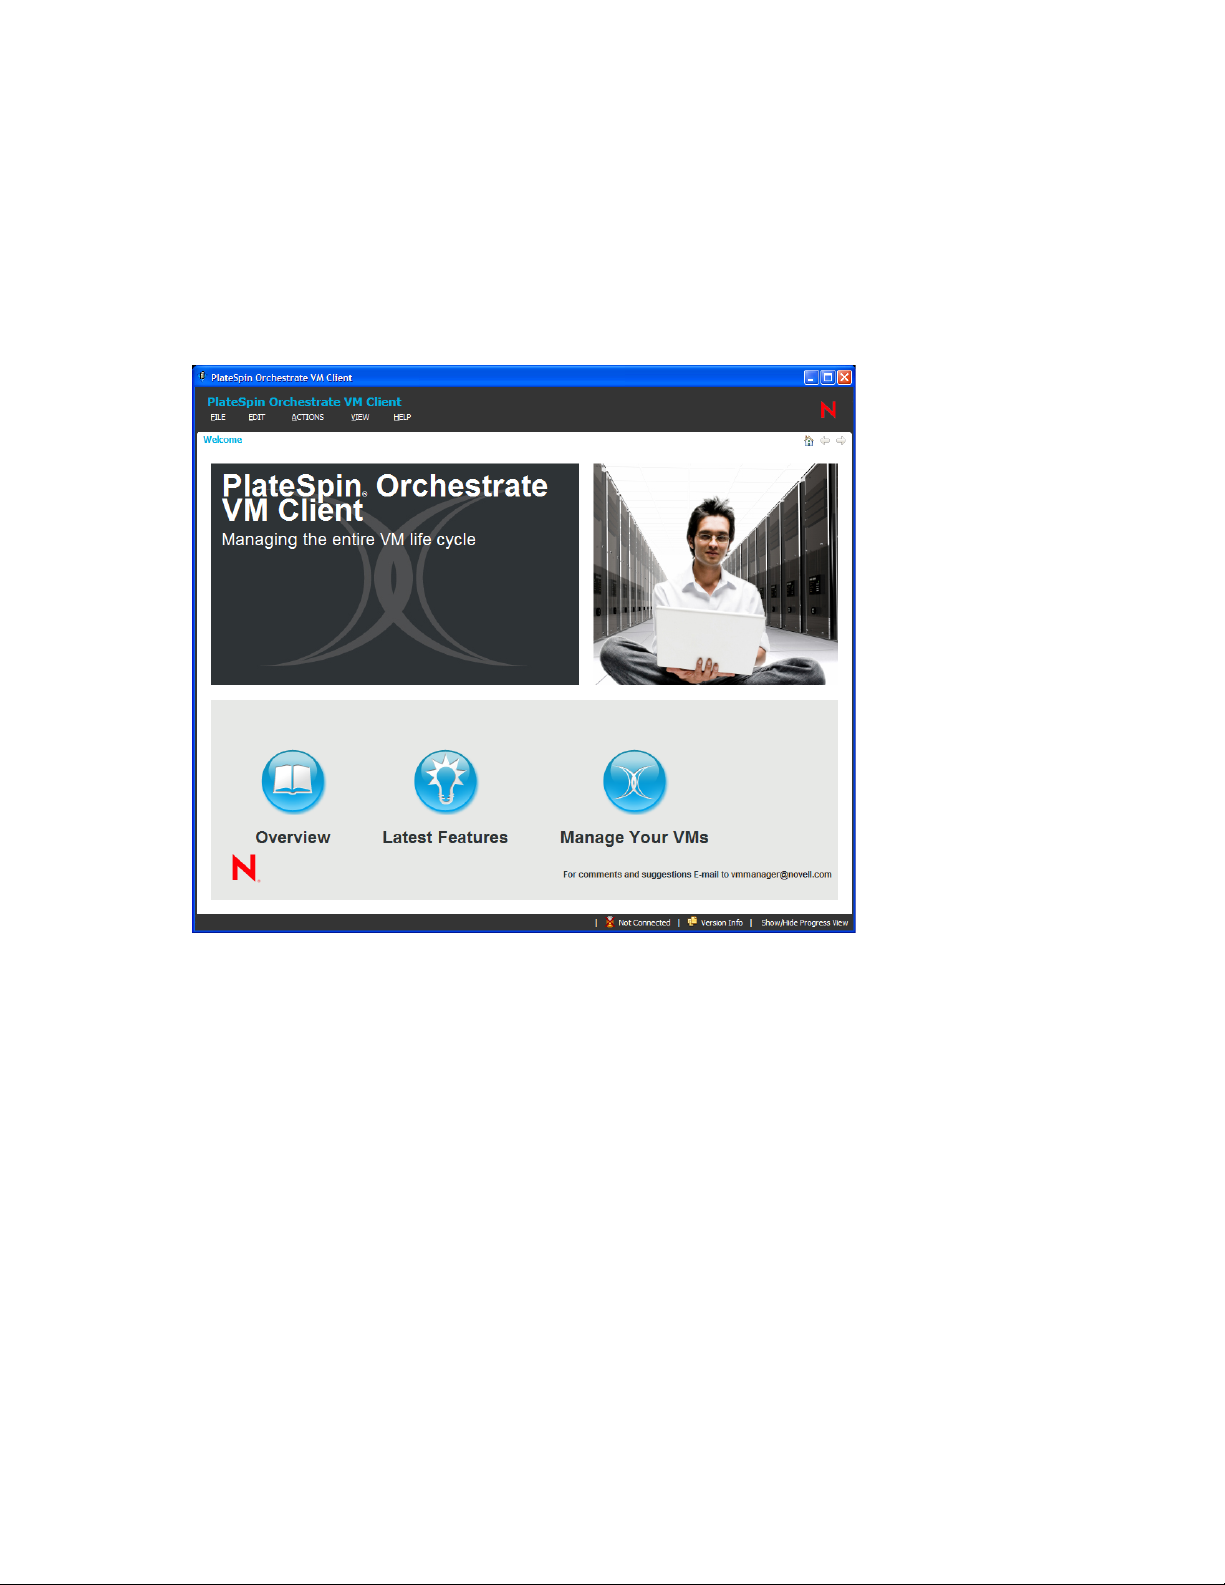
1 In the VM Client, double-click the Virtual Machines view.
22 PlateSpin Orchestrate 2.0 VM Client Guide and Reference

Discovered (#) is displayed below Virtual Machines, where # represents the number of VMs
that are waiting to be registered with the Orchestrate Server.
2 Click Discovered (#) to display the unregistered VMs in the details section on the right.
You can accept (see Step 3) or reject (see Step 4) any of the listed VMs that were discovered.
The VMs that you accept become part of your virtualization grid.
3 Accept a discovered VM in one of the following ways:
Select the VM in the details view, then click the button.
Right-click the VM in the details view, then select Accept.
Select the VM in the details view, then click Actions > Accept.
You can choose to register multiple VMs at a time.
After a VM has been registered, it is listed with its operating system.
It can take a few minutes for this acceptance process to be completed. Do not proceed with
using the VMs until the acceptance process is complete.
4 (Optional) To reject a VM, do one of the following:
Select the VM in the details view, then click the button.
novdocx (en) 13 May 2009
Right-click the VM in the details view, then select Reject.
Select the VM in the details view, then click Actions > Reject.
The unregistered VM is removed from the Virtual Machines list.
The next time that an unregistered VM attempts to register to the Orchestrate Server, the
rejected VMs are again listed as candidates for acceptance into the datagrid.
If the VM is running, you can tell whether a VM has the Orchestrate Agent installed on it by
whether there are pie charts in its CPU and Memory columns.
Getting Started 23

novdocx (en) 13 May 2009
24 PlateSpin Orchestrate 2.0 VM Client Guide and Reference

3
Understanding the VM Client
novdocx (en) 13 May 2009
Interface
The PlateSpin® Orchestrate VM Client interface, built on an Eclipse-based rich client platform, uses
a graphical user interface (GUI) to help you create, store, edit, and use VMs. This interface can be
installed on both Windows and Linux administration devices.
Review the following sections for tips on navigating and using the VM Client interface:
Section 3.1, “Understanding and Navigating the Welcome Page,” on page 26
Section 3.2, “Understanding the VM Client Window,” on page 30
Section 3.3, “Using the Error Log,” on page 48
Section 3.4, “Using the Progress View,” on page 50
Section 3.5, “Resetting the VM Client Perspectives,” on page 51
Section 3.6, “Changing the VM Client Theme,” on page 51
3
Understanding the VM Client Interface
25
3.1 Understanding and Navigating the Welcome Page
The Welcome page provides basic information on the VM Client. By default, it is displayed when
you first open the VM Client. Thereafter, you can access the Welcome page using Vie w > Show
Welcome Page.
Figure 3-1 PlateSpin Orchestrate the VM Client Welcome Page
novdocx (en) 13 May 2009
Starting the VM Client from your desktop icon or the program’s executable does not automatically
log you in to the VM Client. This Welcome Page is available without authenticating.
To authenticate, click the Manage Your VMs button on the Welcome page to open the VM Client
Login dialog box.
The Eclipse-based VM Client GUI allows you to detach any section from the main VM Client
window. For example, you can click within the Welcome page and drag it to another location on
your desktop. This can also be done with various other sections in the VM Client, such as the
Progress View and Error Log sections.
The VM Client window is resizable, as are any sections that can be dragged out of the VM Client
window. Sections can also be resized within the full VM Client window.
Review the following sections for other navigation tips:
Section 3.1.1, “Welcome Page Main Menu Options,” on page 27
Section 3.1.2, “Welcome Page Buttons,” on page 28
26 PlateSpin Orchestrate 2.0 VM Client Guide and Reference
3.1.1 Welcome Page Main Menu Options
The main VM Client menu options are available at the top of the Welcome page, but only those that
are applicable are enabled:
File > Exit: Closes the VM Client interface.
Closing the VM Client interface does not affect the status of any VMs, meaning that the VMs
that have processes running, such as cloning, starting, moving, and so on, continue to run those
processes. These processes are jobs that are being run on the servers hosting the VMs.
View > Show Welcome Page: Displays the Welcome page.
View > Show Inventory Views: Displays the Inventory panel. For more information, see
Section 3.2, “Understanding the VM Client Window,” on page 30.
View > Change Theme: Opens the Change Theme dialog box, where you can change the VM
Client’s appearance. For more information, see Section 3.6, “Changing the VM Client Theme,”
on page 51.
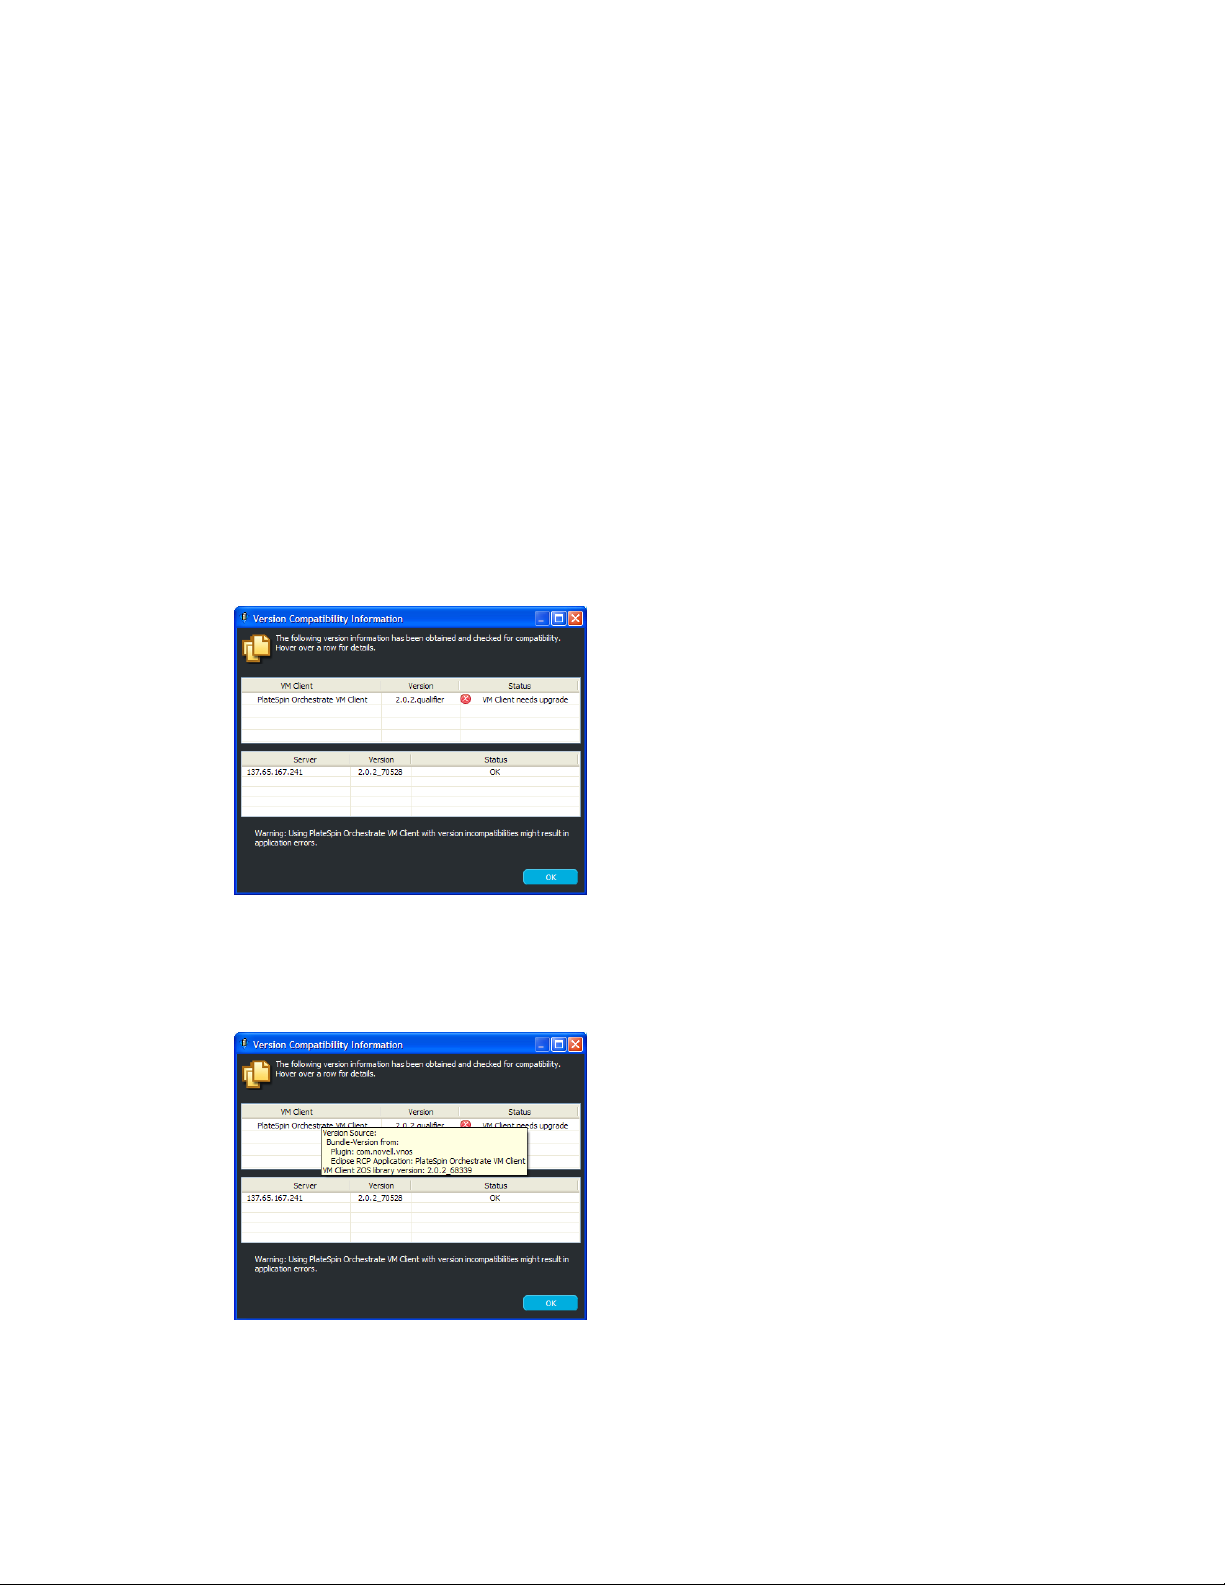
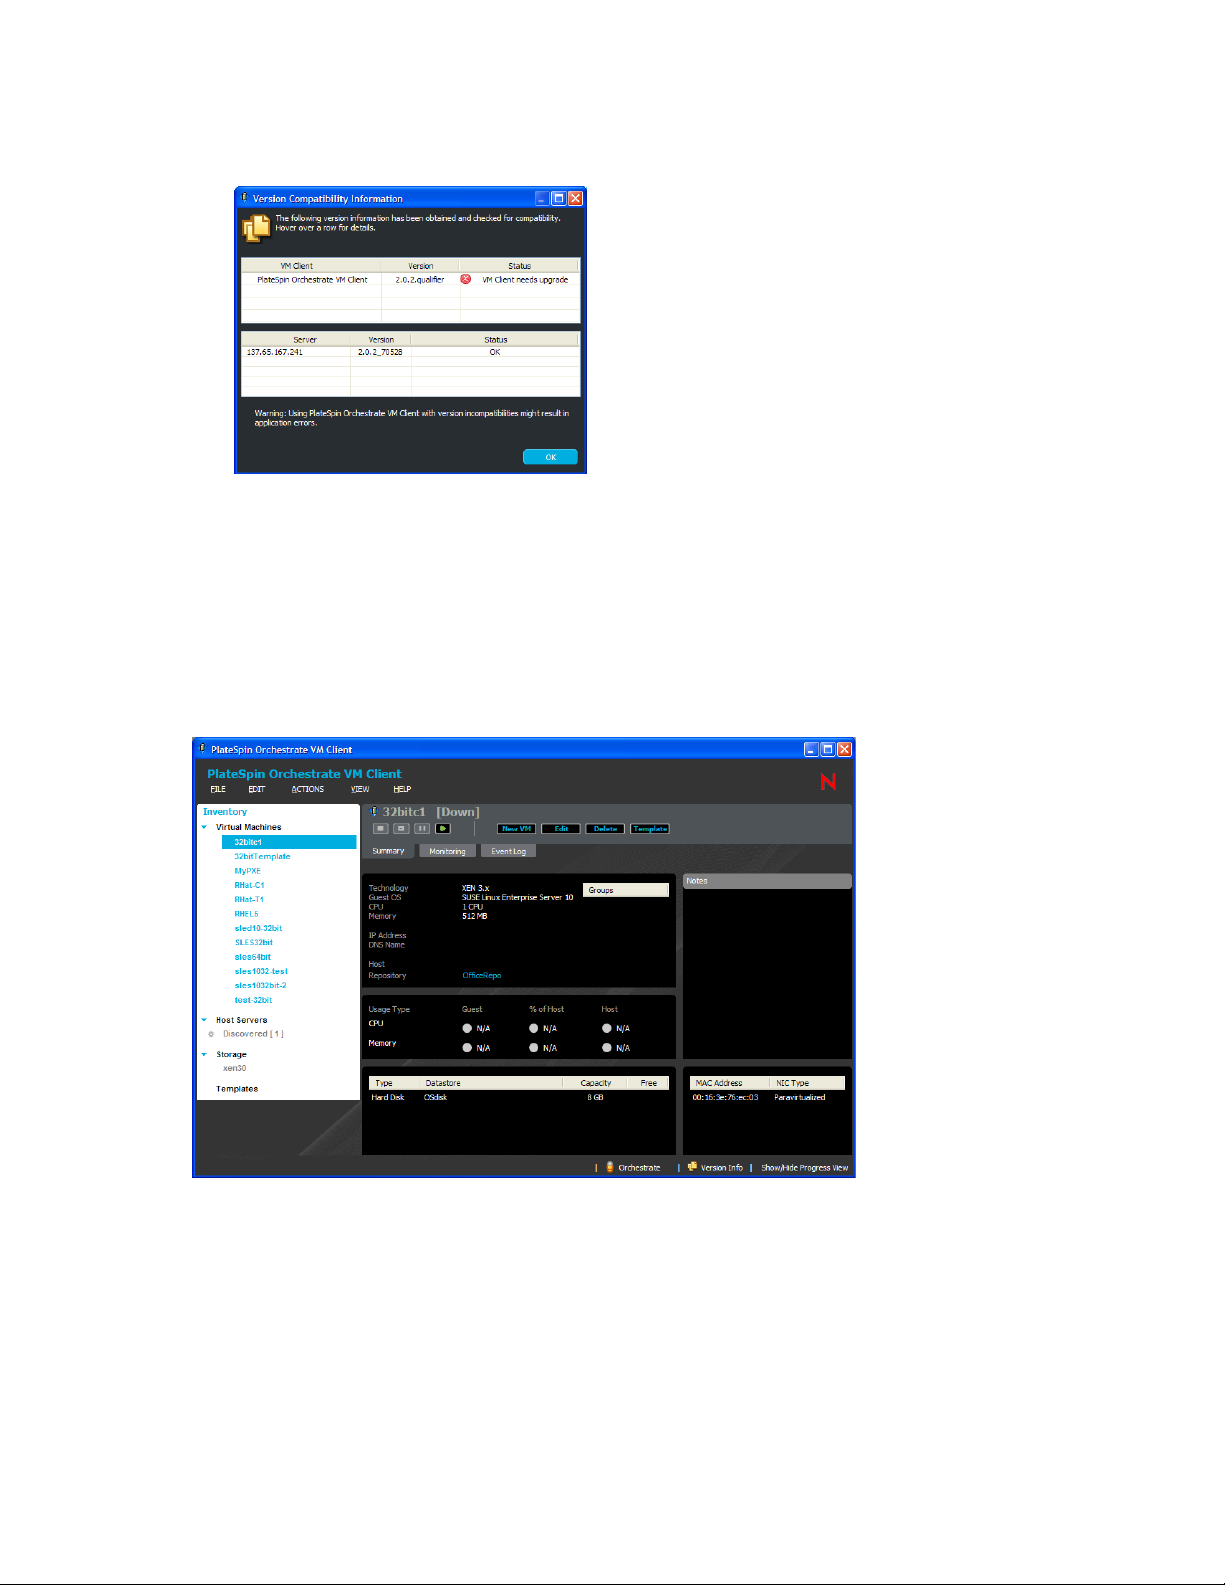
Help > Version Information: Opens the following dialog box:
novdocx (en) 13 May 2009
This provides software compatibility information that you might need to know when the
software is not working correctly.
To view more details for an entry, mouse over its row:
Help > Readme: Opens the product Readme in your default Web browser.
Help > VM Client Reference and Guide: Opens the product documentation for the VM Client in
your default Web browser.
Understanding the VM Client Interface 27
Help > How to Use This Guide: Opens a section of the product documentation in your default
Web browser and provides a list of things you can do in the VM Client. The list is ordered in a
tutorial fashion.
Help > Index: Opens a quick index to hard-to-find VM Client information in your default Web
browser.
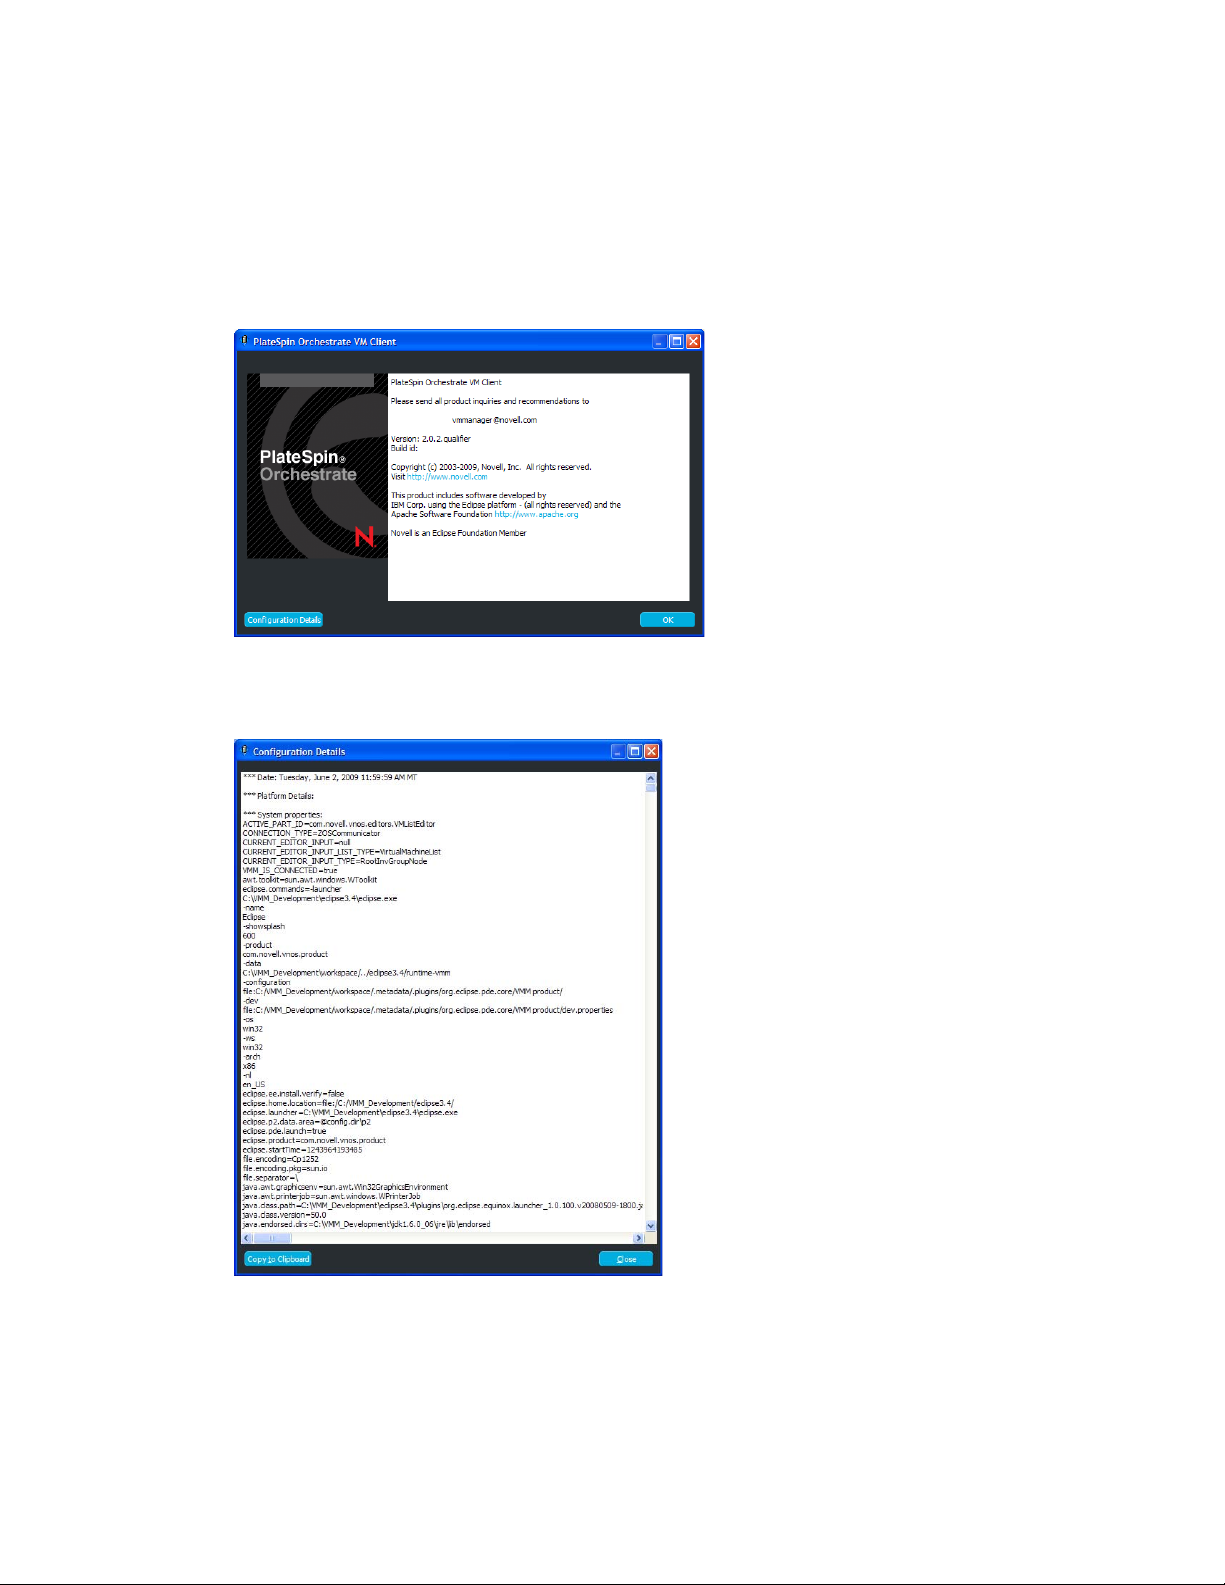
Help > About PlateSpin Orchestrate VM Client: Displays the following dialog box:
novdocx (en) 13 May 2009
The Configuration Details button opens the following dialog box where you can copy the textbased configuration information to your operating system’s clipboard for further use.
3.1.2 Welcome Page Buttons
The following buttons are available on the Welcome page:
“Overview” on page 29
28 PlateSpin Orchestrate 2.0 VM Client Guide and Reference
“Latest Features” on page 30
“Manage Your VMs” on page 30
Overview
The Overview button provides the following information:
Figure 3-2 Welcome Page Overview
novdocx (en) 13 May 2009
To navigate to the other locations on the Welcome page, you can use the links in the upper right of
the Overview page.
Understanding the VM Client Interface 29
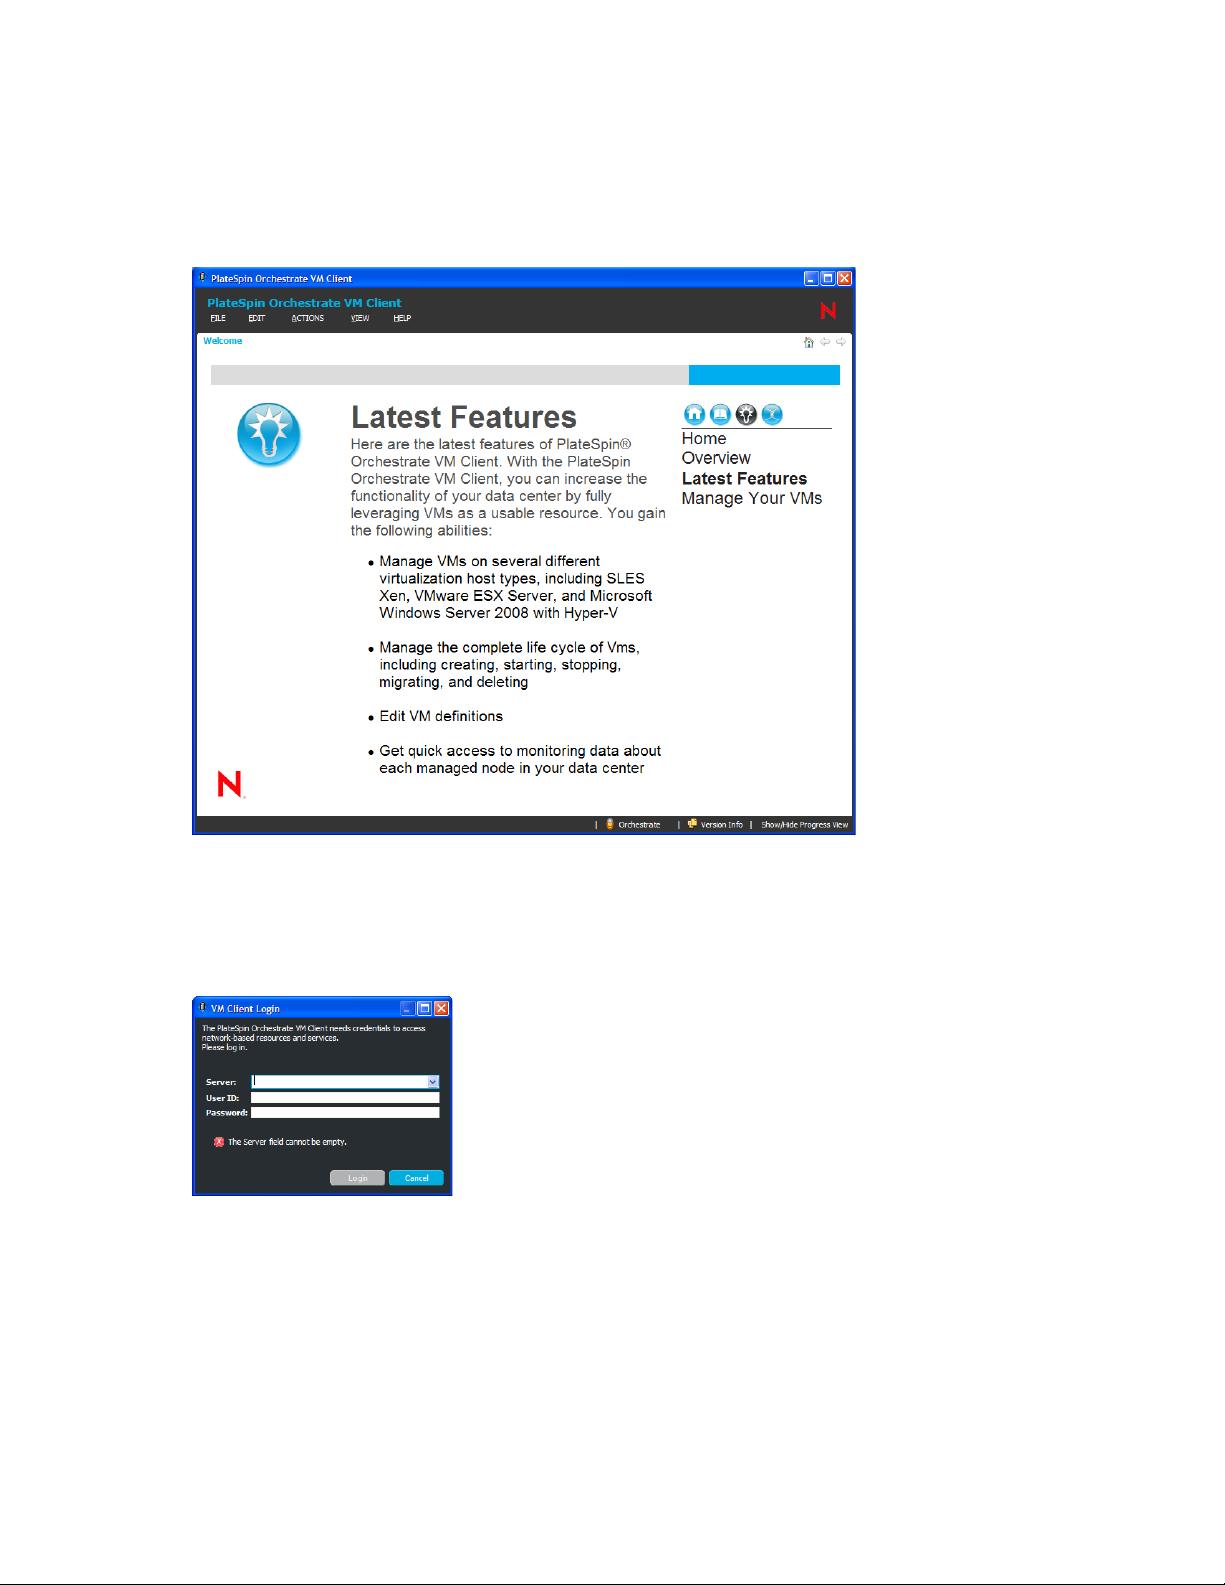
Latest Features
The Latest Features button provides the following information:
Figure 3-3 Welcome Page Latest Features
novdocx (en) 13 May 2009
Manage Your VMs
The Manage Your VMs button opens the VM Client Login dialog box:
Figure 3-4 The VM Client Login Dialog Box
For more information on logging in to the VM Client, see Section 2.2, “Logging In to Another
Virtualization Grid,” on page 19.
3.2 Understanding the VM Client Window
Review the following sections for an understanding of the VM Client window:
Section 3.2.1, “Multiple VM Operator Logins,” on page 31
30 PlateSpin Orchestrate 2.0 VM Client Guide and Reference

Section 3.2.2, “Customizing the VM Client Sections,” on page 32
Section 3.2.3, “Navigating the VM Client Window,” on page 35
Section 3.2.4, “Sorting, Searching, and Filtering Lists,” on page 41
Section 3.2.5, “Viewing Additional Information in Fields or Cells,” on page 46
3.2.1 Multiple VM Operator Logins
Multiple VM operators can each be running an instance of the VM Client that is logged in to the
same VM virtualization grid. In other words, multiple VM operators can simultaneously manage the
VMs on a particular virtualization grid. When any VM operator performs an action against a VM
Client object, all VM Clients that are opened to that virtualization grid are updated accordingly.
Because multiple VM operators can be performing actions independently of each other, the VM
Client interface automatically updates the appropriate locations in its window, such as displaying a
new VM in everyone’s VM Client when it is created by one VM operator.
Various functions in the VM Client have set polling intervals for displaying new information. These
polling intervals determine how quickly one VM operator’s VM Client instance shows another VM
operator’s actions. For example, starting a VM displays that action in the Progress View section in
just a few seconds, while it might take up to 30 seconds to show the start action for the VM in the
other VM operators’ Virtual Machines list.
novdocx (en) 13 May 2009
For information on creating multiple login IDs for VM operators, see Appendix D, “Adding User
Logins for VM Operators,” on page 159.
Understanding the VM Client Interface 31

3.2.2 Customizing the VM Client Sections
You can do several things to customize the sections in the VM Client. Any changes you make are
remembered the next time you start the VM Client.
Tiling: Multiple editors can be open at the same time. Select the status bar of an editor and drag
it to a different position in the VM Client window to create the tiling effect. This can provide
quicker access when you revisit an editor. For example:
novdocx (en) 13 May 2009
Maximizing Views: You can maximize a details tab view by double-clicking the VM or host
server’s name that is located just above the buttons. For example, click here:
32 PlateSpin Orchestrate 2.0 VM Client Guide and Reference

to display:
novdocx (en) 13 May 2009
To return to the previous unmaximzed view, double-click the VM or host server’s name again.
You can also maximize or minimuze the Progress View or Error Log sections by double-
clicking in the white area next to the Error Log or Progress View section’s title:
Understanding the VM Client Interface 33
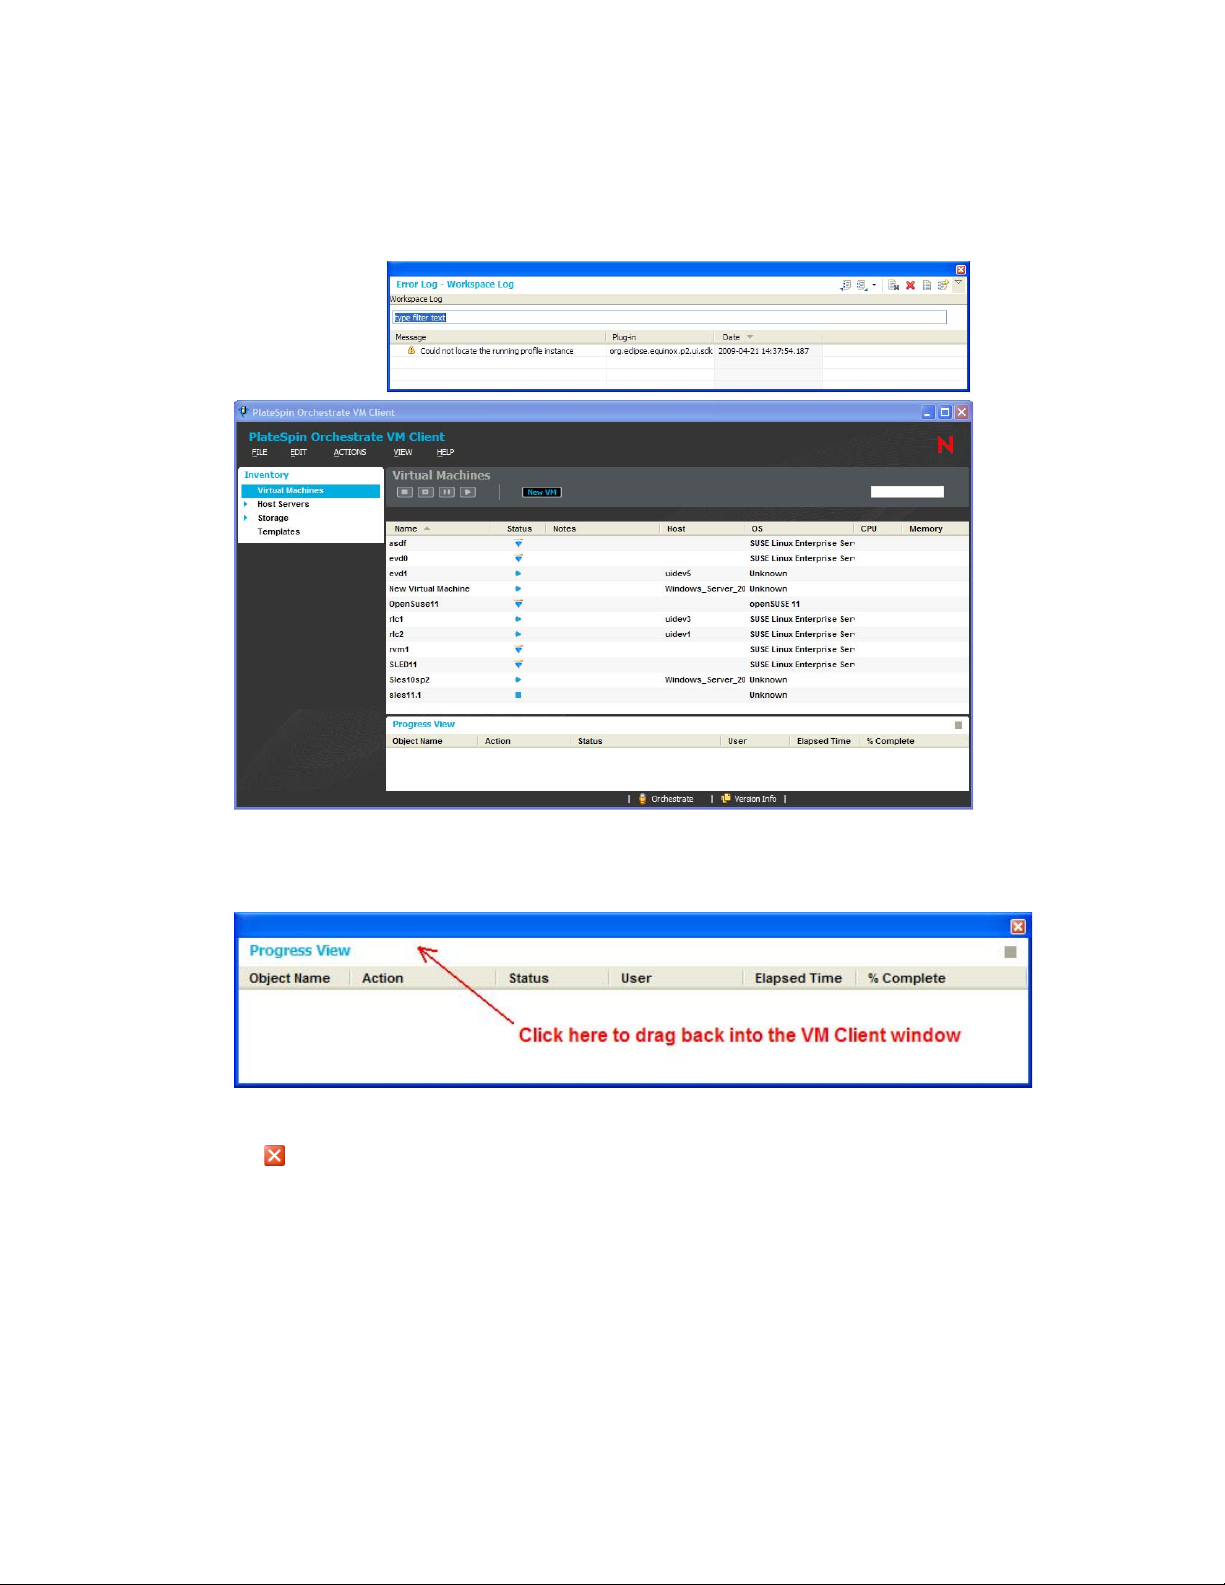
Dragging: You can drag sections (such as Progress View or Error Log) out of the VM Client
window to another position on your desktop. You can also drag sections to different locations
within the VM Client window. For example, the following illustrates that the Error Log section
has been dragged outside of the VM Client window:
novdocx (en) 13 May 2009
To move sections around, click in the white area and drag the section to its new location, either
within the VM Client window, or outside of it:
You can close a view that has been dragged outside of the main VM Client window by clicking
the in the upper-right corner of the window. To close a view that is contained within the VM
Client window, click Vi ew > Close Progress View or click Vie w > Close Error Log.
Returning to Defaults: To reset any changes that you have made to the positions of sections,
click Vie w > Reset Perspective, which returns everything to the default organization of the VM
Client window.
34 PlateSpin Orchestrate 2.0 VM Client Guide and Reference

Keystrokes and Mouse Clicks: The following functions are available in the VM Client:
Function Action
novdocx (en) 13 May 2009
Minimize or maximize of a section in
the VM Client window
Double-click the status bar
Press the Spacebar or Enter key
Press the Left-arrow or Right-arrow key
Go to the next or previous node
Go to the next or previous sibling
node
Open further details on a clickable
details item
Press the Left-arrow or Right-arrow key
Press the Tab or Shift+Tab keys
Double-click a details item, such as a line in the Event
Log tab that has the icon, to view further details on
the event entry.
NOTE: When you make a change to a field in the VM Client, then exit the field by pressing Enter or
changing focus to another field or option, the change made to the field is automatically saved. This
is different from the Development Client, where you must click File > Save to retain changes to
fields.
3.2.3 Navigating the VM Client Window
Review the following to understand the two main VM Client views:
“Inventory Lists” on page 35
“Inventory Details” on page 39
For information on the Progress View and Error Log sections, see Section 3.4, “Using the Progress
View,” on page 50 and Section 3.3, “Using the Error Log,” on page 48.
Inventory Lists
When you first log in to the VM Client, the following view is displayed:
Figure 3-5 The VM Client Inventory Panel - Initial View
The Inventory panel on the left contains four links in its navigation area:
Virtual Machines
Host Servers
Understanding the VM Client Interface 35

Storage
Templates
Each of these four links lists the available items, such as known VMs, known host servers, known
repositories, and any templates that you have created from the VMs. By default, the Virtual
Machines list is initially displayed when you log in.
When you double-click an item in a list, its details tabs are displayed (see “Inventory Details” on
page 39), usually with the Summary tab selected. However, if you click an item that has one of the
following states, its Event Log tab is selected instead:
In progress ( icon). This icon represents that an action is currently ongoing, such as those
described in Section 5.3, “Virtual Machine Actions,” on page 80.
Installing ( icon). Used to indicate that a VM is being installed.
Unknown ( icon). Indicates that the VM Client and Orchestrate Server are out of sync, so that
the VM’s state is unknown. You need to resynchronize the VM.
novdocx (en) 13 May 2009
36 PlateSpin Orchestrate 2.0 VM Client Guide and Reference

The following describes the various features of the VM Client window:
Inventory item’s title area: This area provides information for what is being viewed,
including an icon to indicate which type of resource is being viewed, and square brackets to
indicate any action or viewing condition that is in effect. For example, the following indicates
where the Inventory item’s title area is located:
novdocx (en) 13 May 2009
In this case, the icon indicates that
is a VM name, and
[Down]
indicates its current
evd1
status. Other icons that can appear in this title area:
Host server
Repository
Te mp l at e
If a list is being filtered,
Groups: Each of the four Inventory panel items can have groups listed under them:
[Filtered]
is displayed.
The icon indicates that one or more groups exist. Click the icon to display the groups. For
more information on using groups, see Chapter 9, “Managing with Groups,” on page 145.
When you first log in to the VM Client, the Virtua l M a c hines or Host Servers sections are
automatically expanded to display a Discovered group if there are newly discovered VMs or
host servers that you have not yet accepted into the virtualization grid. Click the group to show
the candidates in the right panel. For information on managing them, see Section 2.3,
“Registering VM Hosts,” on page 20.
Understanding the VM Client Interface 37

Available Options: For each of the Inventory sections, items listed in the right panel have
various main menu options, right-click menu options, and function buttons displayed, not
displayed, enabled, or disabled according to the item’s status.
novdocx (en) 13 May 2009
Column Sorting: You can sort the various columns of information alphanumerically. Simply
click a column heading to sort it in ascending or descending order. The or arrows indicate
which column was last sorted and whether it was sorted in ascending or descending order. For
more information, see “Sorting Lists” on page 42.
Logging In/Out: Mouse over the Orchestrate icon to display which host server you are logged
in to:
Double-click the icon to log out of that host server and the VM Client:
This option is always available.
Version Information: To access the Version Compatibility dialog box, double-click the
Version Info icon:
38 PlateSpin Orchestrate 2.0 VM Client Guide and Reference
This is the same dialog box that clicking Help > Version Information accesses:
This option is also available for the Inventory details views.
Inventory Details
In each of the four Inventory sections you can display detailed information by either double-clicking
an item or right-clicking it and selecting Show Details. For example, double-clicking a VM displays
its details tabs:
novdocx (en) 13 May 2009
Figure 3-6 Virtual Machines Details Tabs
In the Figure 3-6 example, the VMs that were listed to the right of the Inventory panel are now listed
on the left within the panel. The details tabs that are displayed are for the VM that is selected in the
Inventory panel list. This allows you to navigate the details tabs per VM more quickly.
This same functionality exists for the other three Inventory items.
Understanding the VM Client Interface 39

You can easily navigate between the different Inventory types’ details tabs. For example:
While viewing the details of a VM, you can double-click a host server or repository name that
is listed in the first section on the VM’s Summary tab to display the details tabs for the host or
repository instead of the VM’s tabs. The Inventory panel on the left remains unchanged. This
allows you to return to the VM’s details tabs by simply clicking the VM name in the Inventory
panel list.
Conversely, you can view the details of a host server or a repository, then double-click a VM’s
name in the details to display the VM’s details tabs. You can return to the host or repository by
simply clicking its name in the Inventory panel list.
You can navigate through the details for each Inventory item by using the tabs, such as those
illustrated in Figure 3-6. Each Inventory type has the Summary and Event Log tabs plus other tabs
particular to its own details.
Tab viewing is sticky, meaning the last tab that you viewed for an item is displayed again when you
return to that item.
The Event Log tab provides access to details on the status of any jobs that have been run or are
running, no matter which VM operator initiated the action. You can open multiple views for logging
information. Figure 3-7 and Figure 3-8 provide some examples:
novdocx (en) 13 May 2009
Figure 3-7 Event Log Tab with Event Log Dialog Box and Mouse-Over Display of Detailed Information
40 PlateSpin Orchestrate 2.0 VM Client Guide and Reference
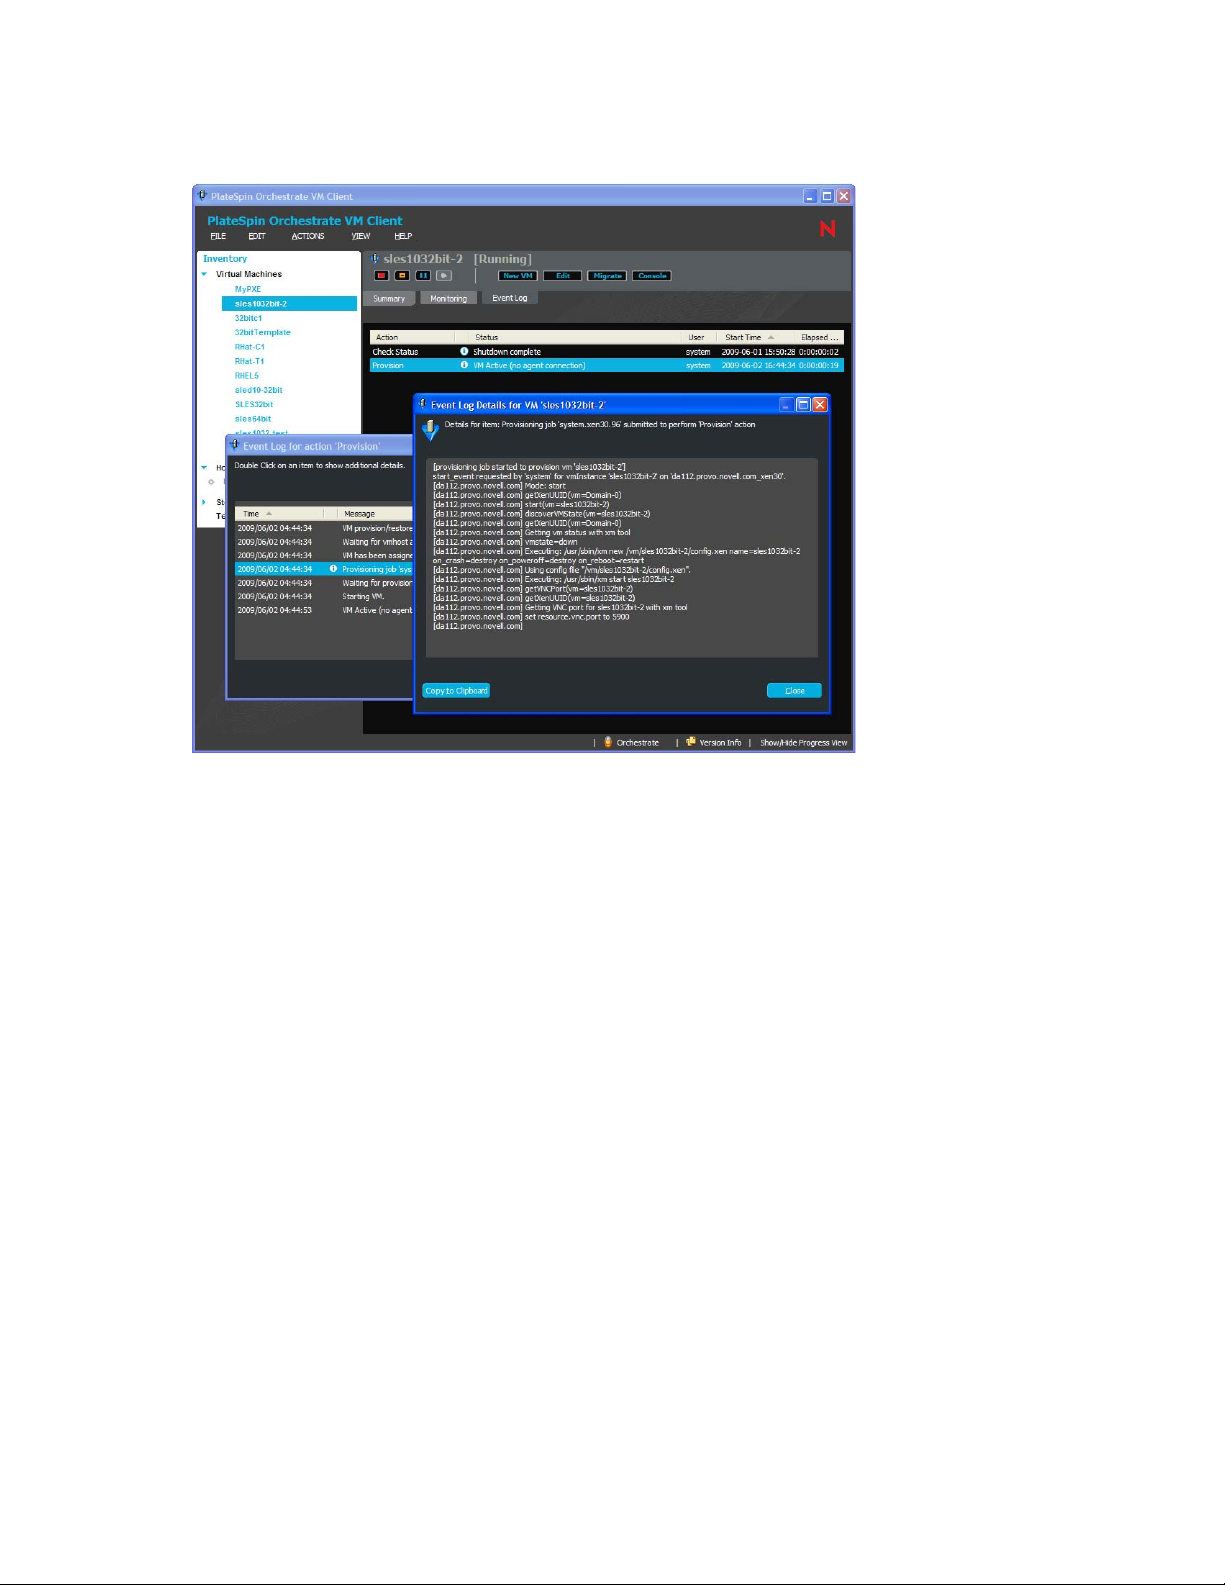
Figure 3-8 Event Log Tab with Event Log and Event Log Details Dialog Boxes
novdocx (en) 13 May 2009
For more information, see “Using Feedback to Manage VMs” on page 70.
For information on using and editing information in each of the details tabs, see the applicable
sections in:
Section 4.2, “Viewing and Editing Host Server Details,” on page 55
Section 5.1, “Viewing and Editing VM Details,” on page 67
Section 6.2, “Viewing and Editing Storage Details,” on page 117
Section 7.1, “Viewing and Editing Template Details,” on page 127
3.2.4 Sorting, Searching, and Filtering Lists
You can manage information in the VM Client by using lists in the following ways:
“Sorting Lists” on page 42
“Filtering Lists” on page 44
“Locating Items in a List” on page 45
Understanding the VM Client Interface 41

Sorting Lists
Any list in the VM Client can be sorted alphanumerically in an ascending or descending order by
clicking the column heading. You can sort rows of information by any column. Most lists default to
sorting alphabetically on the first column. For example:
Figure 3-9 VMs Sorted by Name
novdocx (en) 13 May 2009
VMs, host servers, repositories, and templates are sorted alphanumerically by default. If there are
multiple VM operators and one of them adds new objects to a list, the items are correctly sorted
according to each VM operator’s preference.
For all lists, the most recently sorted column displays its current sort order with an arrow ( or ).
This is per instance of the VM Client; VM operators do not see each others’ sorting changes.
Sorting in the VM Client provides benefits such as the following:
Technology groups: Sorting is available wherever lists exist in the VM Client. You can sort
any listed information by various technology groups.
Virtual Machines’ Status column: Sorting allows you to group the VMs by their status type
icons in the following order:
Virtual Machines’ Host column: Sorting is a quick way to determine which VMs are running
or in a progress state. It also quickly indicates which servers are hosting VMs.
Host Servers’ Active VMs column: Sorting is a quick way to determine the most and least
active host servers.
42 PlateSpin Orchestrate 2.0 VM Client Guide and Reference

Host Servers’ CPU or Memory columns: Sorting is a quick way to determine your host
servers’ utilization if the Orchestrate Agent and Monitoring Agent are installed and running on
them.
Storage’s Stored VMs, Type, Capacity, and Free columns: Sorting might help you in
selecting repositories for new VMs, viewing how many repositories you have by type, and
determining which repositories are most or least utilized.
Templates’ # Clones column: Sorting can show which templates have clones when you have
more templates than can be listed in the window.
Templates’ Location column: Sorting can show the location that most templates are using.
Tem p l at e s ’ O S co l u mn : Sorting helps you to find templates by their defined operating system.
Templates’ Technology column: Sorting shows which technologies are used most by the
templates.
Templates’ CPUs and Memory columns: Sorting orders templates by their capacities.
Event Log’s Action column: Sorting allows you to group actions so that you can more quickly
find a particular action in a long list of actions.
Event Log’s Status column: Sorting allows you to more quickly locate a particular status in a
long list of statuses.
Event Log’s User column: Sorting allows you to view log entries by the user who initiated the
actions.
Event Log’s Start Time column: Sorting allows you to view the list from either the latest or
earliest log posts.
novdocx (en) 13 May 2009
Event Log’s Elapsed Time column: Sorting makes it easier to locate time-consuming events.
Progress View section’s Action column: Sorting allows you to group actions so that you can
find a particular action.
Progress View section’s Status column: Sorting allows you to group statuses so that you can
quickly discover problem statuses.
Progress View section’s User column: Sorting makes it easier to discover how many actions
are being intiated by each user.
Progress View section’s Elapsed Time column: Sorting helps you to discover actions that
might be taking too long.
Progress View section’s % Complete column: Sorting shows which actions have longer to
complete.
Understanding the VM Client Interface 43
Filtering Lists
You can shorten any list by filtering on its items. This function is best used when you have a very
long list and some of the items contain the same characters. This way, you can display only the few
items that you want to focus on. For example, you might have a list of VMs similar to the following:
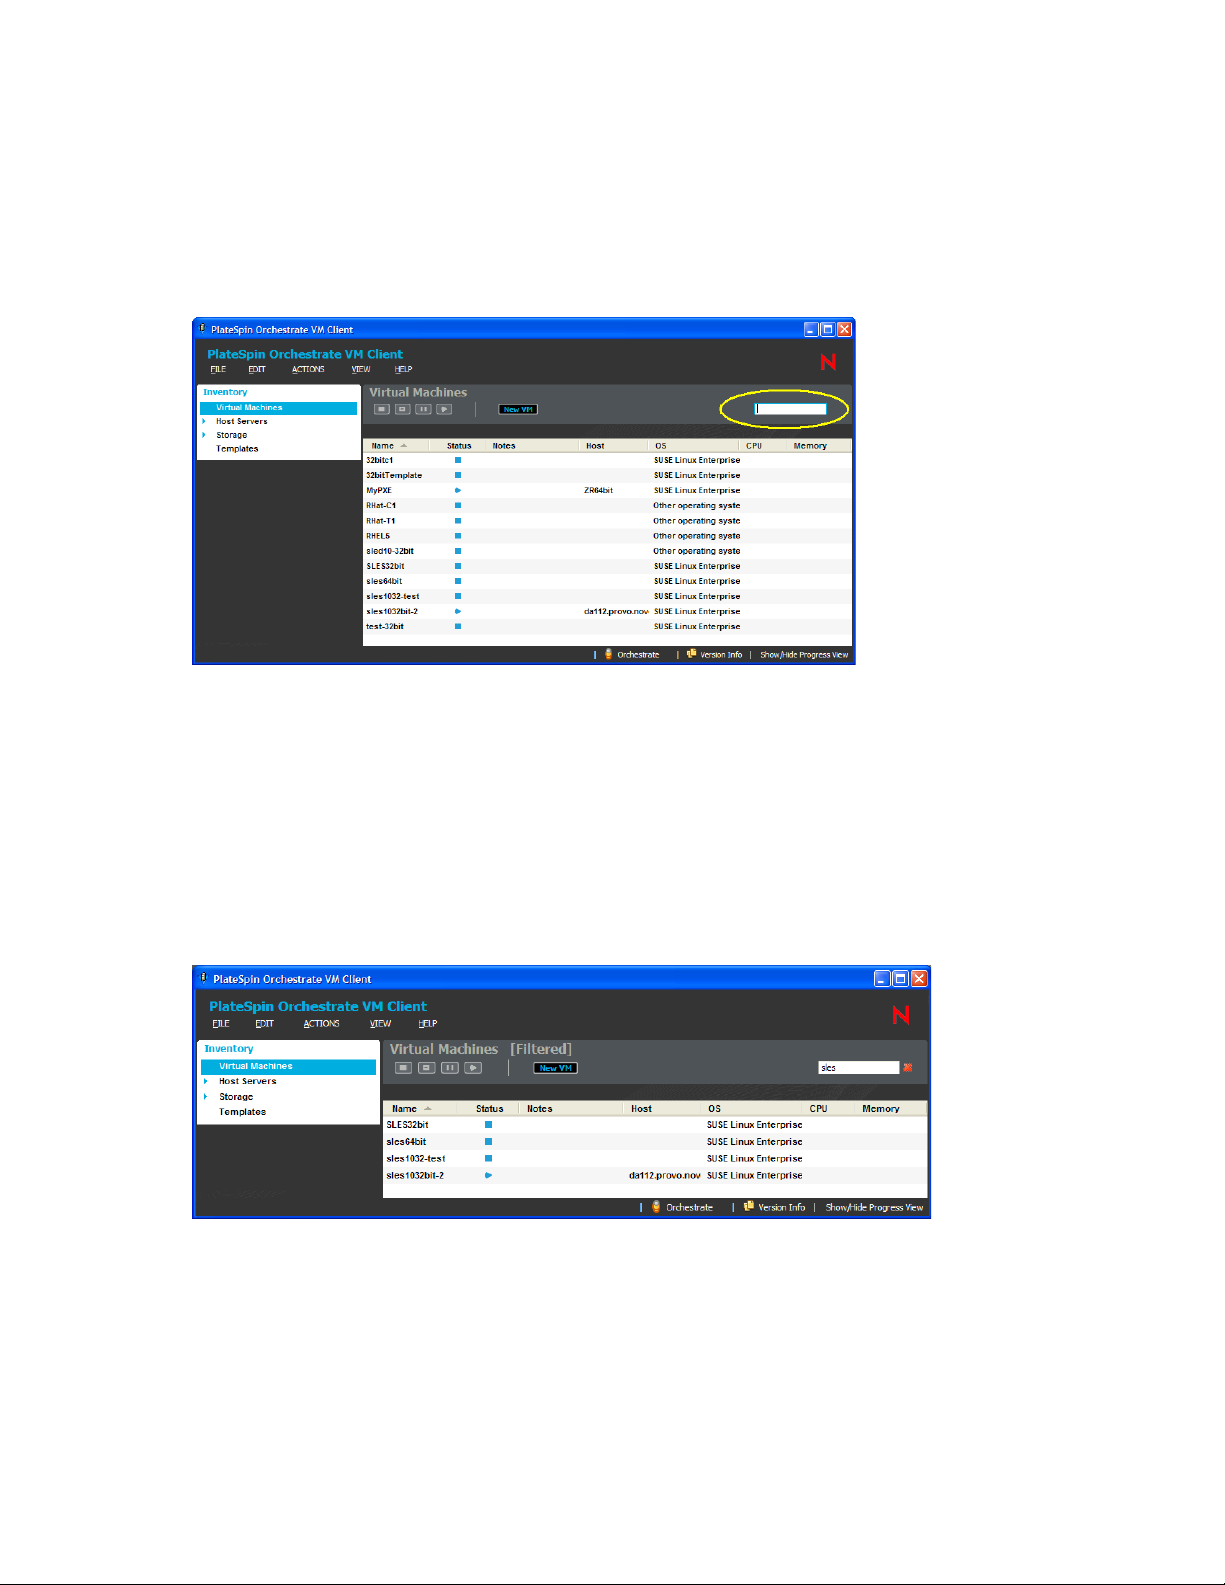
Figure 3-10 VM Client Showing the Filter Field
novdocx (en) 13 May 2009
The field circled in the above example is the filter field. This is where you type characters to create
the filter. The filter string is not case-sensitive.
You must place the mouse pointer’s focus in the filter field in order to use this feature. If you start
typing characters when the mouse pointer’s focus is on a listed item, the locator pop-up is displayed
instead.
sles
For example, to display just the VMs containing the letters
in one or more of the columns, type
the characters in the field as depicted in Figure 3-11:
Figure 3-11 Using the Filter Field in the VM Client
The list is automatically updated to reflect all VMs that have characters in any of their rows that
match what you are typing.
If the list is long, it might take a few seconds to display the filtered hits. You don’t need to click
somewhere else or press the Enter key to make the listed items change. You can continue to type
characters to refine the filter with each character you type in the filter field. If you press Enter, the
typed filter is executed, but the mouse pointer’s focus remains within the field.
44 PlateSpin Orchestrate 2.0 VM Client Guide and Reference
If you enter a string that has no match, the list is empty. To redisplay the full list, click the icon to
clear the filter string, or manually delete the filter string. Because the filter string is dynamically
read, you can delete recently typed characters to redisplay previous hits.
For any list in the VM Client, the filter strings that you enter are remembered when you return to
those lists. This allows you to set up filter strings for various lists so that you do not need to refilter
the lists each time you return to them, even if you log out and log back in to the VM Client.
novdocx (en) 13 May 2009
To show you whether a list is filtered,
[Filtered]
is displayed above the action buttons, as shown
in Figure 3-11 on page 44.
When you double-click a VM that is in a filtered list, the details tabs for the VM are displayed and
the filtered VMs list is now displayed in the Inventory panel.
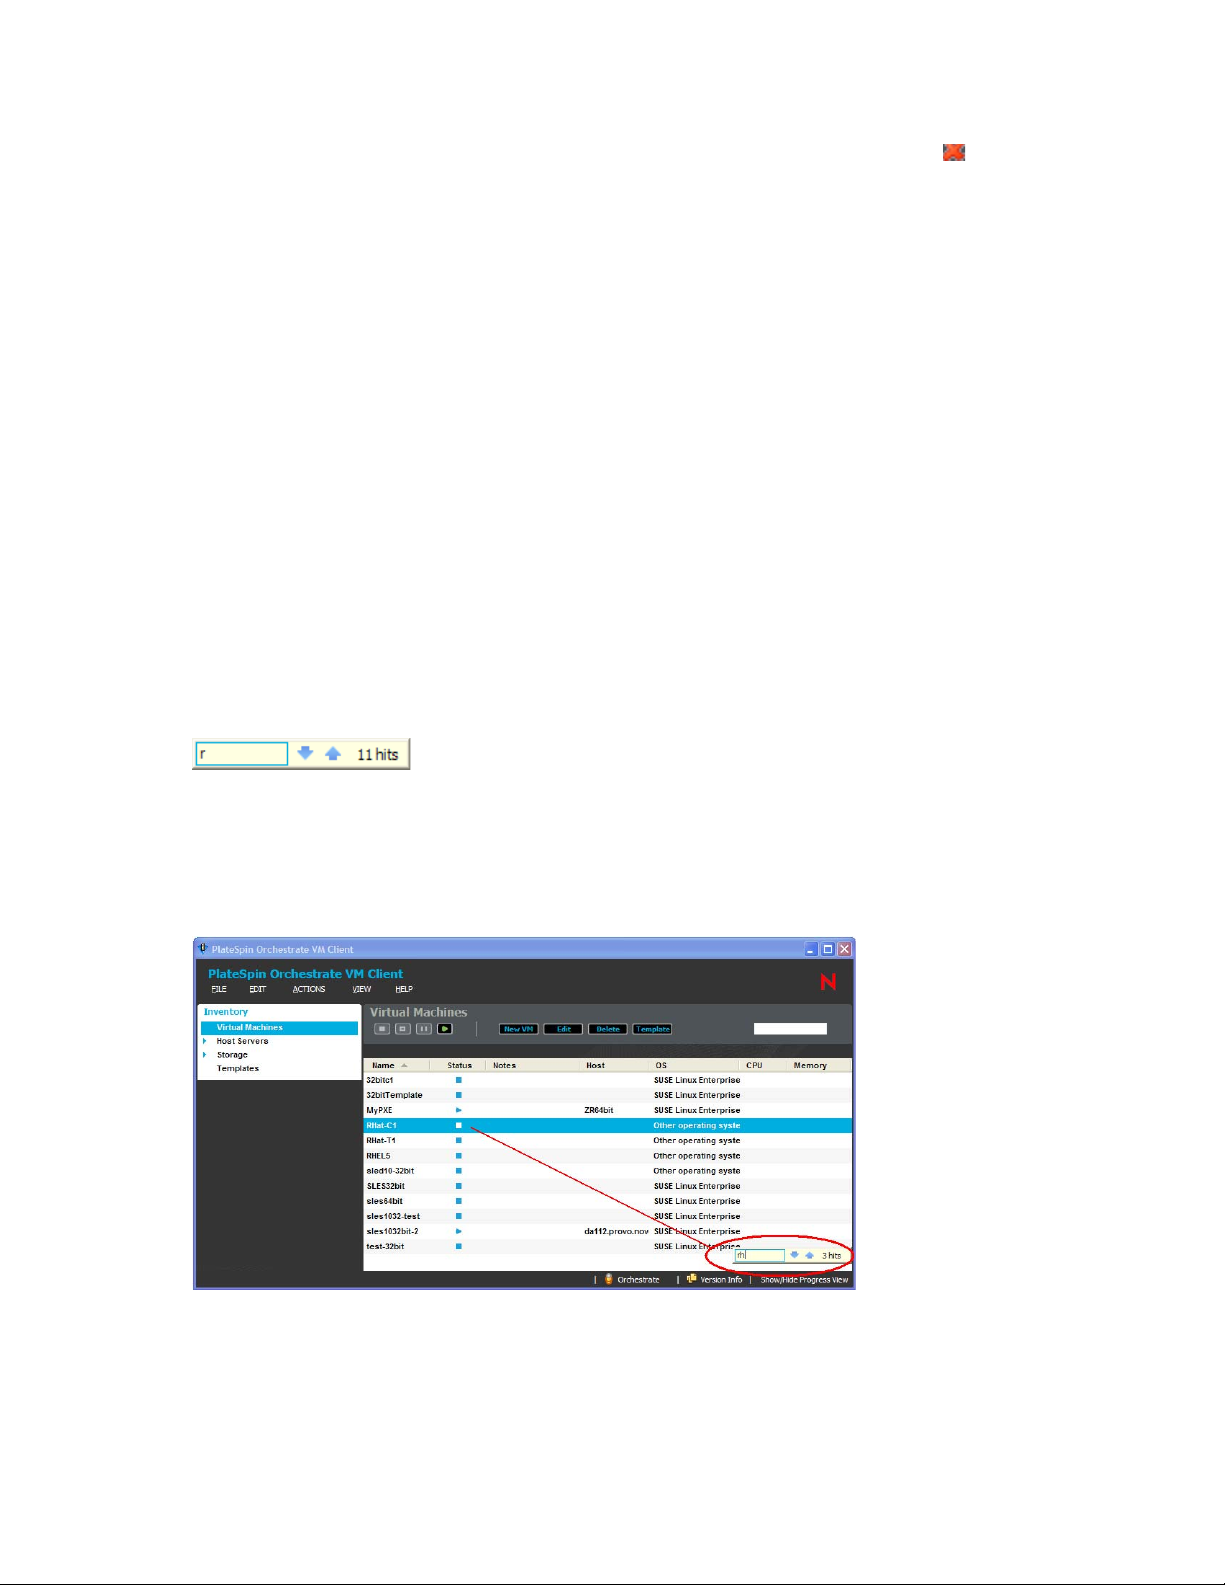
Locating Items in a List
You can use the locator pop-up to move quickly to a specific item, or to identify all relative items in
a list of VMs, host servers, storage items, or templates, or in any other kind of list in the VM Client.
Hits are based on any of the entries in any column. The hits are based on exact matches to the string
that you type. The strings are not case-sensitive.
To use this feature, click anywhere in a list, then begin typing characters. The locator pop-up is
automatically displayed, showing the characters that you are typing:
Figure 3-12 Locator Pop-Up with String Field, Arrows, and Number Hits
Focus is immediately moved to the first item in the list that matches what you have typed. (If this
doesn’t happen immediately, click the down-arrow on the locator pop-up.) You can continue to type
characters in the locator pop-up to refine the filter:
Figure 3-13 Virtual Machines List with a Located Item Highlighted
If there are no matches for your string, nothing is highlighted; or, if there are no further matches, the
last hit remains highlighted.
Understanding the VM Client Interface 45

The up-arrow and down-arrow in the locator pop-up allow you to move from hit to hit in the list.
The arrow keys on the keyboard also perform this action when the locator pop-up is visible. This
arrow action is very useful in long lists where the hits might not all occur together. For example,
start
typing
might find hits that are scattered across an Event Log. The arrows can help you to
quickly locate them.
The locator pop-up dynamically displays how many of the items in the list match the characters that
you have typed thus far. This lets you know how many hits you can move to by using arrows.
The locator pop-up closes after a brief pause if no further action is taken. To clos the locator
immediately, click outside of it, or press the Enter key.
When you close the locator pop-up, its content is cleared and is not remembered.
3.2.5 Viewing Additional Information in Fields or Cells
To view more information for any entry in a field or an entry in a table cell, simply mouse over the
field or cell. For example:
Figure 3-14 Mousing Over a Cell
novdocx (en) 13 May 2009
This example shows that 12 VMs are stored in this repository.
Following are examples of the kind of useful information that you can view by mousing over fields
or entries in table cells:
General viewing functionality:
Notes column: Displays the full text of the note.
Status column on the Event Log tab: For any entry with the icon, displays the same
information that you can view by double-clicking the entry to open the Event Log dialog
box. This is just a quicker way to view that information. However, the dialog box remains
open, but the mouse-over information disappears when you change the mouse’s focus.
Progress View section:
Status column: Displays the same status log information that is in the Event Log dialog
box (right-click the entry in the Status column and select Show Log).
46 PlateSpin Orchestrate 2.0 VM Client Guide and Reference

Virtual Machines view:
Name column: Displays the VM’s name, its host, and its repository.
Status column: Displays the VM’s status. For the in-progress status ( ), it shows the
action name, action detail, start time, elapsed time, a progress bar, and the latest three log
entries (which are updated dynamically).
Host column: Displays the VM’s host’s DNS name or IP address, the type of hypervisor
being used, and the repository.
Host Servers view:
Name column: Displays either the host server’s DNS name or IP address.
Active VMs column: Displays the names of the VMs that are actively using the host.
Nothing is displayed if the count is zero.
Virtualization Technology column: Displays the virtualization type and its source.
Stored VMs column on the Summary tab: Displays the names of the VMs that are
assigned to the repository, even if they are not running. Nothing is displayed if the count is
zero.
Status column on the Summary tab: Displays the VM’s status. For the in-progress
status ( ), it shows the action name, action detail, start time, elapsed time, a progress bar,
and the latest three log entries (which are updated dynamically).
novdocx (en) 13 May 2009
Storage view:
Stored VMs column: Displays the names of the VMs that are assigned to the repository,
even if they are not running. Nothing is displayed if the count is zero.
Status column on the Virtual Machines tab: Displays the VM’s status. For the in-
progress status ( ), it shows the action name, action detail, start time, elapsed time, a
progress bar, and the latest three log entries (which are updated dynamically).
Active VMs column on Hosts tab: Displays the names of the VMs that are actively
using the host. Nothing is displayed if the count is zero.
Virtualization Technology column on Hosts tab: Displays the virtualization type and its
source.
Templa t e s v i e w:
# Clones column: Displays the names of the VMs that were cloned from the template.
Nothing is displayed if the count is zero.
Hypvervisor: Displays the hypervisor type and its source.
Name column on the Summary tab: Displays the cloned VM’s name, its host, and its
repository.
Status column on the Summary tab: Displays the cloned VM’s status. For the in-
progress status ( ), it shows the action name, action detail, start time, elapsed time, a
progress bar, and the latest three log entries (which are updated dynamically).
Host column on the Summary tab: Displays the cloned VM’s host’s DNS name or IP
address, the type of hypervisor being used, and the repository.
Understanding the VM Client Interface 47

3.3 Using the Error Log
The Error Log section is displayed at the bottom of the interface window when you click View >
Show Error Log. You can also double-click an error message in the lower left of the VM Client
window to open this view.
Both the Error Log and Progress View sections use the same position in the VM Client window. You
can drag them to other positions or toggle between them by using the Vie w menu options.
Figure 3-15 Detached Error Log Section
You can double-click in the Error Log section’s title area to expand it to use the entire VM Client
window, or the entire computer monitor window if it is detached. Double-click again to return it to
its previous size and location.
novdocx (en) 13 May 2009
You can right-click a log entry for access to the same options that are available in the upper right
corner of the Error Log section. Included in the right-click menu is the Event Details option:
Figure 3-16 Right-Click Menu Options for Error Log Entries
48 PlateSpin Orchestrate 2.0 VM Client Guide and Reference

Use these menu options to do the following:
Table 3-1 Right-Click Menu Options for the Error Log Section
Option Function
Copy Copies information about the error entry that you right-click to your
computer’s clipboard.
Clear Log Viewer Clears all entries from the Error Log section.
Delete Log Clears all entries from the Error Log section and deletes the log file. It cannot
be recovered.
Open Log Same functionality as the Restore Log option. Because the VM Client uses a
hard-coded log file on the host server the you are logged in to, an Open
dialog box is not displayed.
Restore Log Restores all entries to the Error Log section from an existing log.
Export Log Exports the complete log to a file that you specify.
novdocx (en) 13 May 2009
Import Log Same functionality as the Restore Log option. This option is not used in the
VM Client because a hard-coded log file located on the host server that you
are logged in to is used for logging.
Export Entry Exports only the selected error log entry to a file that you specify.
Event Details Provides more detail on the error. See Figure 3-17 on page 49.
The Event Details option displays the following dialog box:
Figure 3-17 Event Details Dialog Box
The VM Client is based on Eclipse and uses the standard Eclipse Error Log view. For more
information, see Error Log (http://help.eclipse.org/ganymede/topic/org.eclipse.pde.doc.user/guide/
tools/views/error_log.htm).
Understanding the VM Client Interface 49
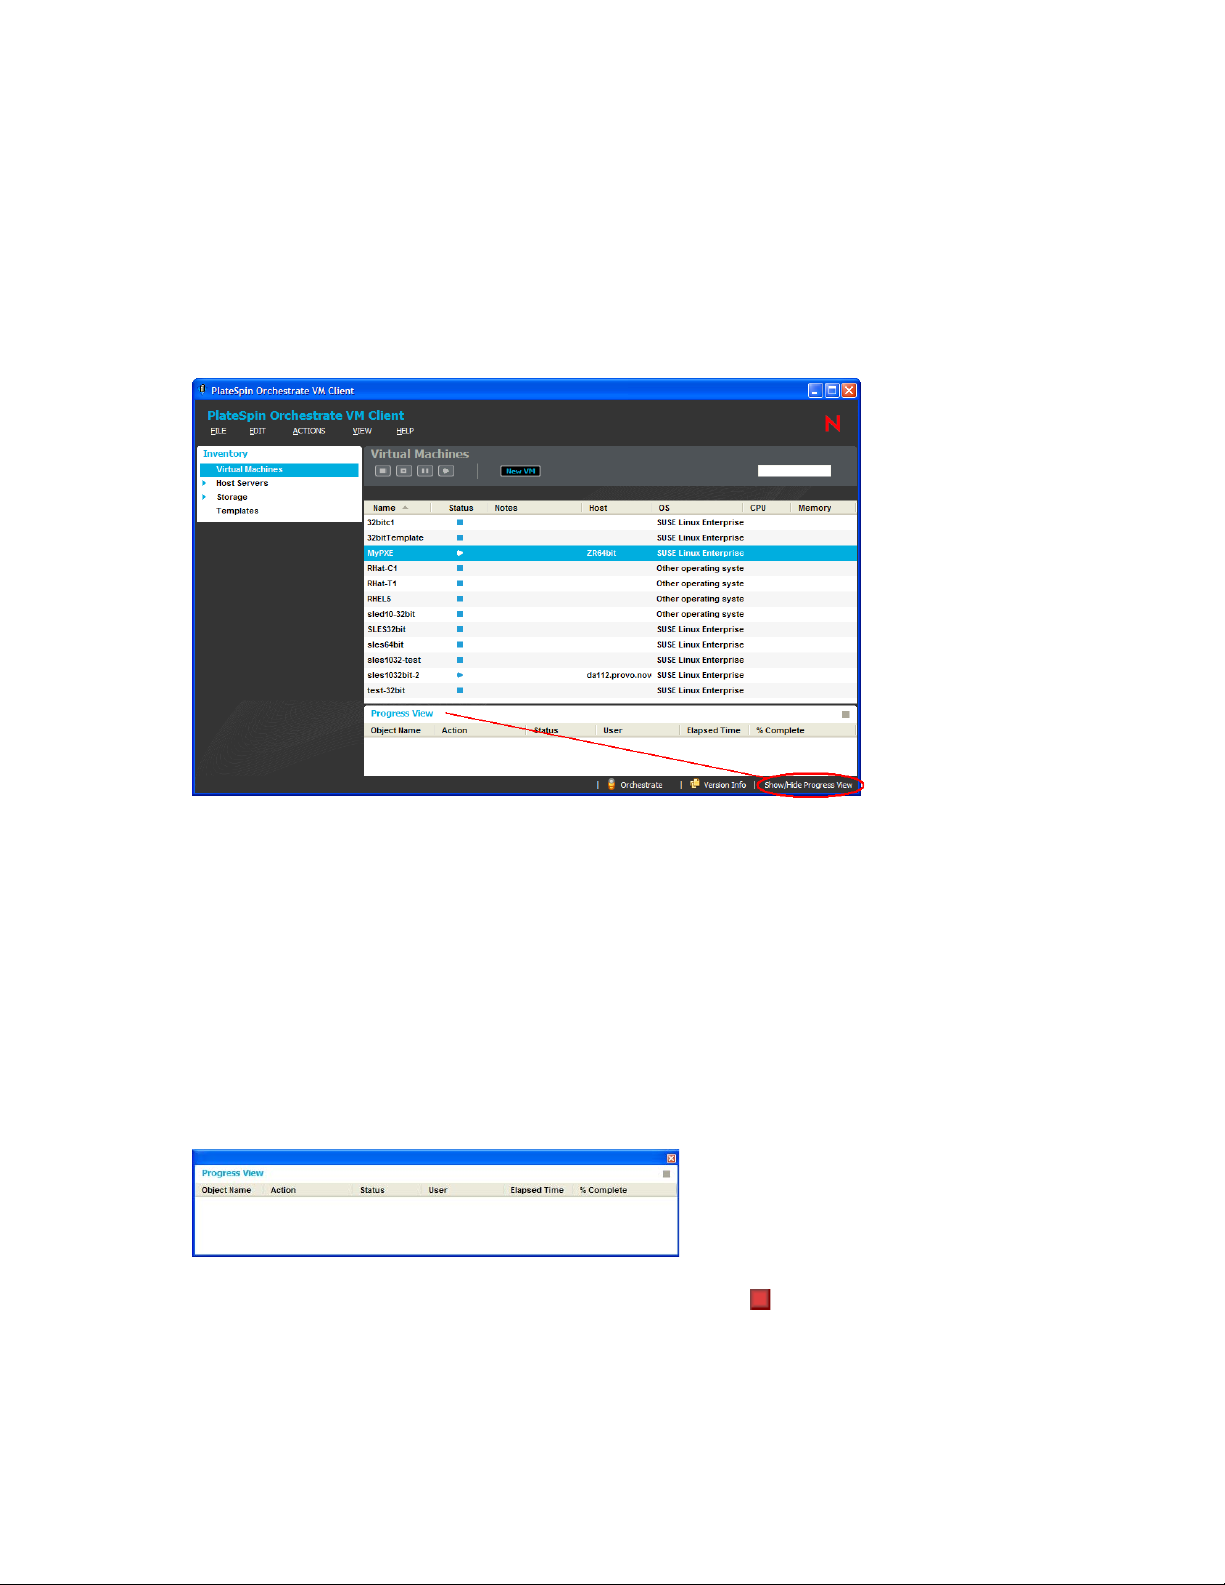
3.4 Using the Progress View
The Progress View section is useful for when you have actions occurring simultaneously for
multiple VMs because you can keep track of which ones are still running. The Progress View section
is displayed at the bottom of the interface window. When is not displayed, you click Vie w > Show
Progress View or double-click Show/Hide Progress View in the lower right of the VM Client
window:
Figure 3-18 Show/Hide Progress View Option
novdocx (en) 13 May 2009
The Progress View section can be both opened and closed by double-clicking Show/Hide Progress
View.
Both the Progress View and Error Log sections use the same position in the VM Client window. You
can double-click in the Progress View section’s title area to expand it to use the entire VM Client
window, or the entire computer monitor window if it is detached. Double-click again to return it to
its previous size and location.
You can also drag the sections to other positions, including to their own window on the desktop
(detached), or use the Vie w menu options to toggle between them inside the VM Client window. The
following illustrates the Progress View section as a detached window:
Figure 3-19 Detached Progress View Section
To stop an event that is in progress, select the event, then click the icon located in the upper right
of the view. The icon is dimmed when an event is not selected.
50 PlateSpin Orchestrate 2.0 VM Client Guide and Reference

3.5 Resetting the VM Client Perspectives
You can reset the various perspectives to their original configuration:
1 In the VM Client, click Vie w > Reset Perspective.
The following dialog box is displayed:
2 Click OK to reset the perspectives:
The Inventory panel is reset to its original size and location, to the left of the VM Client
window.
The Details lists and editors are reset to their original location, to the right of the Inventory
panel.
novdocx (en) 13 May 2009
If the Error Log or Progress View section is open, it is reset to the lower right portion of
the window.
This action cannot be undone. You can reconfigure the perspectives again as needed.
3.6 Changing the VM Client Theme
The default theme is Black Pearl. Following are examples of the available themes:
Black Pearl
Understanding the VM Client Interface 51

Tahiti Ocean Classic
novdocx (en) 13 May 2009
Graphite Moon
To change the VM Client’s color theme:
1 In the VM Client, click Vie w > Change Theme to display the Change Theme dialog box:
The currently selected theme has
52 PlateSpin Orchestrate 2.0 VM Client Guide and Reference
(current)
next to its name.

This option is available on both the Welcome page as well as in the Inventory sections, so you
can change the theme on the Welcome page before logging in to a host.
2 In the drop-down list, select a theme and click OK to display the Restart VM Client dialog box:
novdocx (en) 13 May 2009
If you select the theme with
(current)
next to its name and click OK, the Restart VM Client
dialog box is not displayed because you have not selected to change the theme.
3 To make the theme change take effect, click Yes to restart the VM Client.
You must log in to your host server again when the client restarts.
If you click No, the theme change takes effect the next time you reopen the VM Client.
Logging in and out of a host server does not make the theme change take effect.
Understanding the VM Client Interface 53

novdocx (en) 13 May 2009
54 PlateSpin Orchestrate 2.0 VM Client Guide and Reference

4
Managing VM Host Servers
You can do the following with VM host servers:
Section 4.1, “Understanding VM Host Servers,” on page 55
Section 4.2, “Viewing and Editing Host Server Details,” on page 55
Section 4.3, “Using Feedback to Manage Host Servers,” on page 64
Section 4.4, “Accessing a Host Server’s Console,” on page 64
Section 4.5, “Resynchronizing a Host Server’s State,” on page 65
4.1 Understanding VM Host Servers
VM host servers are generally separate machines from the Orchestrate Server, because the
Orchestrate Server is highly utilized by the Orchestrate functions. Host servers’ main function is to
manage and run virtual machines, which can also create high utilization.
novdocx (en) 13 May 2009
4
VM host servers provide the capability to run virtual machines in their RAM. They are also used to
store and manage VM files and templates in their local or shared repositories.
Machines must have the following installed on them to qualify as VM host servers:
The Xen kernel, Hyper-V, or VMware VCenter, which provides the hypervisor capability
The Orchestrate Agent, which provides access to the Orchestrate Server in order to work with
VMs in the virtualization grid
For more information on setting up VM host servers, see Section 2.3, “Registering VM Hosts,” on
page 20.
4.2 Viewing and Editing Host Server Details
Review the following sections for information on the details views:
Section 4.2.1, “Accessing Host Server Details,” on page 56
Section 4.2.2, “Using the Details Tabs,” on page 56
Managing VM Host Servers
55

4.2.1 Accessing Host Server Details
The details for each host server consist of a summary, configuration information, monitoring
information, and an event log.
1 In the VM Client, click the Host Servers view.
The host servers are displayed:
2 Do one of the following:
Double-click one of the host servers.
Right-click one of the host servers, then select Show Details.
novdocx (en) 13 May 2009
The tabs for the selected host are displayed.
3 For details on the tabs, see:
“Summary Tab” on page 57
“Configuration Tab” on page 58
“Monitoring Tab” on page 59
“Event Log Tab” on page 63
4 To close the details view, click the view name in the Inventory perspective panel.
4.2.2 Using the Details Tabs
The following sections provide information on the various details tabs:
“Summary Tab” on page 57
“Configuration Tab” on page 58
“Monitoring Tab” on page 59
“Event Log Tab” on page 63
56 PlateSpin Orchestrate 2.0 VM Client Guide and Reference

Summary Tab
This details tab is used by each Inventory panel type:
Figure 4-1 Summary Tab for Host Servers
novdocx (en) 13 May 2009
You can do the following with the Summary tab for host servers:
In the first section, right-click a group name under Groups, then select Remove to revoke the
host server’s membership in the group.
In the Notes section, enter and edit notes for the host server.
View basic information about the host server, including:
The host server’s operating system
The virtual machine technology being used by the host server
Percentage of CPU and memory in use
IP address and DNS name, if it is not DHCP
Storage items being used by the host server, including how many VMs are using each
repository, the type of network access to the repository, and each repository’s capacity and
percent free
A list of VMs being hosted by this server
The host server’s MAC address
Right-click a listed storage item, then select either Remove Repository or Associate Repository.
Double-click a listed storage item to view its details tabs.
Managing VM Host Servers 57

Right-click a listed VM, then select any of the available menu options. These are the same
right-click menu options that are available for the VM in the Virtual Machines Inventory list.
Double-click a listed VM to view its details tabs.
Wherever N/A appears in the details, it means that the information is not available.
Configuration Tab
This details tab is used only by host servers. You use information available in the tab to effectively
manage the existing VMs hosted on the VM hosts. For example, you can decide to stop a VM when
the memory utilization is high. You can also effectively utilize the VM host by deploying additional
VMs, if required, and you can install applications on the VMs.
You can do the following with this tab:
Click Processors to view information about the processors on the host server. This is the
default view:
novdocx (en) 13 May 2009
Click Memory to view information about memory usage on the host server:
58 PlateSpin Orchestrate 2.0 VM Client Guide and Reference
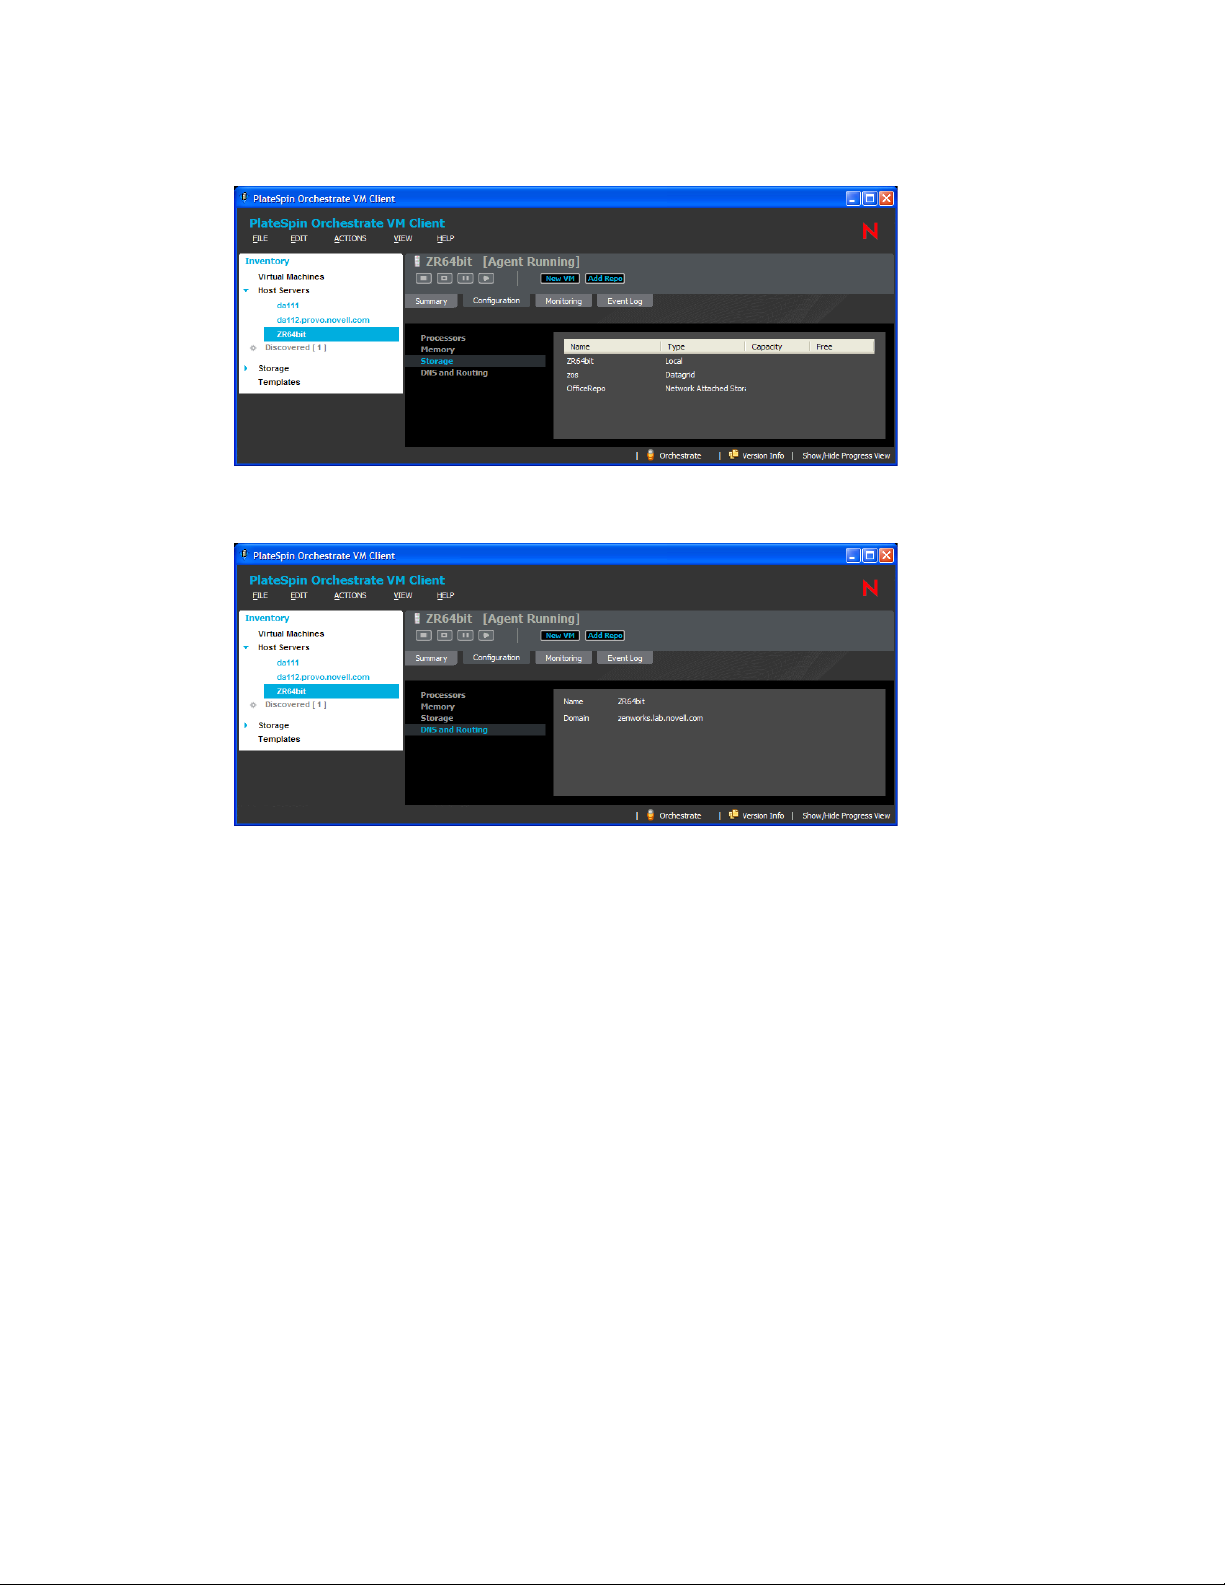
Click Storage to view information about storage availability on the host server:
Click DNS and Routing to view the computer name and domain name for the host server:
novdocx (en) 13 May 2009
Monitoring Tab
This details tab allows you to monitor many elements of both the virtual machines and physical host
machines, aiding you in the overall management of your data center.
The Monitoring Agent must be installed on the device in order for this tab to show any information.
For instructions to install the agent manually, see Section 5.7, “Installing the Monitoring Agent on a
VM,” on page 100.
Review the following to understand the Monitoring tab and how to access and use it:
“Understanding Monitoring” on page 60
“Monitoring VMs and Host Servers” on page 61
Managing VM Host Servers 59

Understanding Monitoring
The Monitoring tab displays information about the VM or host server that you can use to monitor
whether it is performing correctly, is overused or underused, its history, and details about its
capacities.
The default window size for the VM Client only allows one column of graphics to be displayed. The
following is an example of the Monitoring tab’s information:
Figure 4-2 Monitoring Tab for a Host Server Showing Default Single Column View of Graphics
novdocx (en) 13 May 2009
60 PlateSpin Orchestrate 2.0 VM Client Guide and Reference

The following example shows that graphics can be displayed side-by-side when you expand the
width of the VM Client window.
Figure 4-3 Monitoring Tab for a Host Server Showing Multiple Column View of Graphics
novdocx (en) 13 May 2009
Monitoring VMs and Host Servers
1 In the VM Client, click the Virtual Machines view or the Host Servers view, then double-click
a VM or host server that you want to monitor.
Wherever N/A appears in the details, it means that this information is not available.
2 Click the Monitoring tab to display the Monitoring view.
3 If you are requested to provide credentials, enter the Monitoring login name and password.
4 To set the time interval for which you want the data displayed (hour/day/week/month/year), go
to the Last field and select the time from the drop-down options.
5 To maximize the Monitoring tab view in the VM Client window, double-click the VM or Host
name located in the Inventory item’s title area just above the action buttons:
Managing VM Host Servers 61

The following illustrates the Monitoring tab maximized in the VM Client Window:
novdocx (en) 13 May 2009
Double-click the item’s title again to return the tab to its previous view.
6 To refresh the graphics, click the Get Fresh Data button.
You can refresh the view at any time.
62 PlateSpin Orchestrate 2.0 VM Client Guide and Reference

Event Log Tab
This details tab is used by VMs and host servers:
Figure 4-4 Event Log Tab for VMs
novdocx (en) 13 May 2009
This tab provides information from both the resource log messages and the action status history log,
intermingled based on start times. Therefore, the log provides both information on the host server as
well as actions for any VMs it is currently hosting. Double-click the icon to display the host’s
Event Log Details dialog box.
Managing VM Host Servers 63

You can do the following with this tab:
View the Event Log information.
Double-click an event item that contains the icon to view the details of the event as reported
by the Orchestrate Server. The following is an example of an event’s details:
novdocx (en) 13 May 2009
4.3 Using Feedback to Manage Host Servers
The VM Client is integrated with the Orchestrate Server and the Development Client to provide
event details for the host servers that are listed in the VM Client. This integration with the
Orchestrate Server resource log enables you to see details on any jobs run on each host. You do not
need to open the Development Client to discover the events for the host servers that are listed in the
VM Client.
The Event Log tab for a host server shows all jobs that have been run for VMs hosted by that server.
This allows you to view all provisioning and life cycle actions that are being or have been run on
that host server.
Some actions for a host server that aren’t yet associated with a resource in the system, such as
Accept Pending Registration
been completed. You can click any of the icons in the Additional Information column of the Event
Log tab for that host to obtain the details of any registration event. For example, the
Pending Registration
events to be logged. Each of those job-related entries in the Event Log tab might have further
information, as indicated by the icon.
action runs multiple jobs on the Orchestrate Server, causing multiple
for the host, can be reviewed for that host after the action has
Accept
4.4 Accessing a Host Server’s Console
In order to access a host server’s console using VNC, it first must be configured on the server, then
set up and configured in the Development Client. This is normally done when you install and
configure the Orchestrate Server. For more information, see “Launching a VNC Terminal of the VM
” in the PlateSpin Orchestrate 2.0 Virtual Machine Management Guide.
1 In the VM Client, click the Host Servers view.
2 Do one of the following:
Select the host, then click the button.
64 PlateSpin Orchestrate 2.0 VM Client Guide and Reference

Select the host, then click Vie w > Show Console.
Right-click the host, then select Show Console.
3 Provide the VNC password, then click OK.
When attempting to make a VNC connection, VNC tests for a fully qualified domain name
(FQDN), simple host name, or IP address.
4.5 Resynchronizing a Host Server’s State
The Orchestrate Server is automatically updated to list the state of the hosted VMs after every
provisioning action. However, the state of the hosted VMs is not automatically updated if the VM
state is changed by any third-party tool. You must manually synchronize the state of the hosted VMs
in the Orchestrate Server to reflect the current state of the host server’s VMs.
When a host server is resynchronized, the VM Client in conjuction with the Orchestrate Server does
the following:
Runs the provisioning adapter to discover jobs
Discovers what is enabled with each host
Discovers the host’s capabilities
Updates the state of active and known VMs
novdocx (en) 13 May 2009
Detects the types of its hosted VMs
Does not sync up the states of the host’s VMs
Removes association with any VMs that cannot be found on the host
Does not discover any VMs that might be on the host’s disks
Resynchronizing a host server can be useful when a VM hypervisor has changed and the Orchestrate
Server needs to be aware of the changes.
IMPORTANT: When a VM is on shared storage, resynchronization is only tried on the host server
where the VM was last running.
To resynchronize a host server:
1 In the VM Client, click the Host Servers view.
2 Right-click the host server to be resynchronized, then select Resync State.
This resynchronizes the state of all VMs hosted by the host server.
You can resynchronize only one host server at a time.
3 You can view the progress in any of the following ways:
Double-click the host being synchronized, click the Event Log tab, then double-click the
entry related to the process that has the icon next to it. The Event Log Details dialog
box is displayed and is automatically updated as events occur.
Observe messages at the bottom of the VM Client interface.
Click View > Show Progress View to open the Progress window.
View the synchronization progress in the Jobs tab of the Development Client.
Managing VM Host Servers 65

novdocx (en) 13 May 2009
66 PlateSpin Orchestrate 2.0 VM Client Guide and Reference

5
Managing Virtual Machines
You can do the following for hands-on management of virtual machines (VMs) in the PlateSpin®
Orchestrate VM Client:
Section 5.1, “Viewing and Editing VM Details,” on page 67
Section 5.2, “Using Feedback to Manage VMs,” on page 70
Section 5.3, “Virtual Machine Actions,” on page 80
Section 5.4, “Creating a Xen VM,” on page 87
Section 5.5, “Installing a VM,” on page 97
Section 5.6, “Installing the PlateSpin Orchestrate Agent on a VM,” on page 99
Section 5.7, “Installing the Monitoring Agent on a VM,” on page 100
Section 5.8, “Editing VMs,” on page 101
Section 5.9, “Moving VMs,” on page 108
Section 5.10, “Migrating VMs,” on page 110
novdocx (en) 13 May 2009
5
Section 5.11, “Deleting VMs,” on page 113
5.1 Viewing and Editing VM Details
Review the following sections for information on the Details views:
Section 5.1.1, “Accessing VM Details,” on page 67
Section 5.1.2, “Using the Details Tabs,” on page 68
5.1.1 Accessing VM Details
The details for each VM consist of a summary, monitoring information, and an event log.
1 In the VM Client, click the Virtual Machines view.
The VMs are displayed:
Managing Virtual Machines
67

2 Do one of the following:
Double-click one of the VMs.
Right-click one of the VMs, then select Show Details.
The tabs for the selected VM are displayed.
3 For details on the tabs, see:
“Summary Tab” on page 57
“Monitoring Tab” on page 59
“Event Log Tab” on page 63
4 To close the details view, click the view name in the Inventory perspective panel.
5.1.2 Using the Details Tabs
The following sections provide information on the various details tabs:
“Summary Tab” on page 68
“Monitoring Tab” on page 69
“Event Log Tab” on page 69
novdocx (en) 13 May 2009
Summary Tab
This details tab is used by each Inventory panel type:
Figure 5-1 Summary Tab for Virtual Machines
You can do the following with the Summary tab for VMs:
In the first section, right-click a group name under Groups, then select Remove to revoke the
VM’s membership in the group.
In the Notes section, enter and edit notes for the VM.
68 PlateSpin Orchestrate 2.0 VM Client Guide and Reference

View basic information about the VM:
The VM’s operating system
The virtual machine technology being used by the VM
CPU and memory, including how it is used by the guest and host and the percentage of the
host memory being used
IP address and DNS name, if it is not DHCP
Storage names and types associated with the host, storage capacity information, and how
many VMs are stored on the host per storage name
The VM’s MAC address and NIC type (paravirtualized)
Hosted VMs and their operating status, name, OS type, and CPU/memory statuses
Some of the above items are only applicable if the Orchestrate Agent is installed on the VM.
Double-click the Host entry to view that host server’s details tabs.
Double-click the Repository entry to view that storage item’s details tabs.
Wherever N/A appears in the details, it means that the information is not available.
novdocx (en) 13 May 2009
Monitoring Tab
For information on the Monitoring tab, see “Monitoring Tab” on page 59, which documents this tab
for host servers. The functionality is the same for VMs, although the information displayed can be
different.
Event Log Tab
This details tab is used by VMs and host servers:
Figure 5-2 Event Log Tab for VMs
Managing Virtual Machines 69
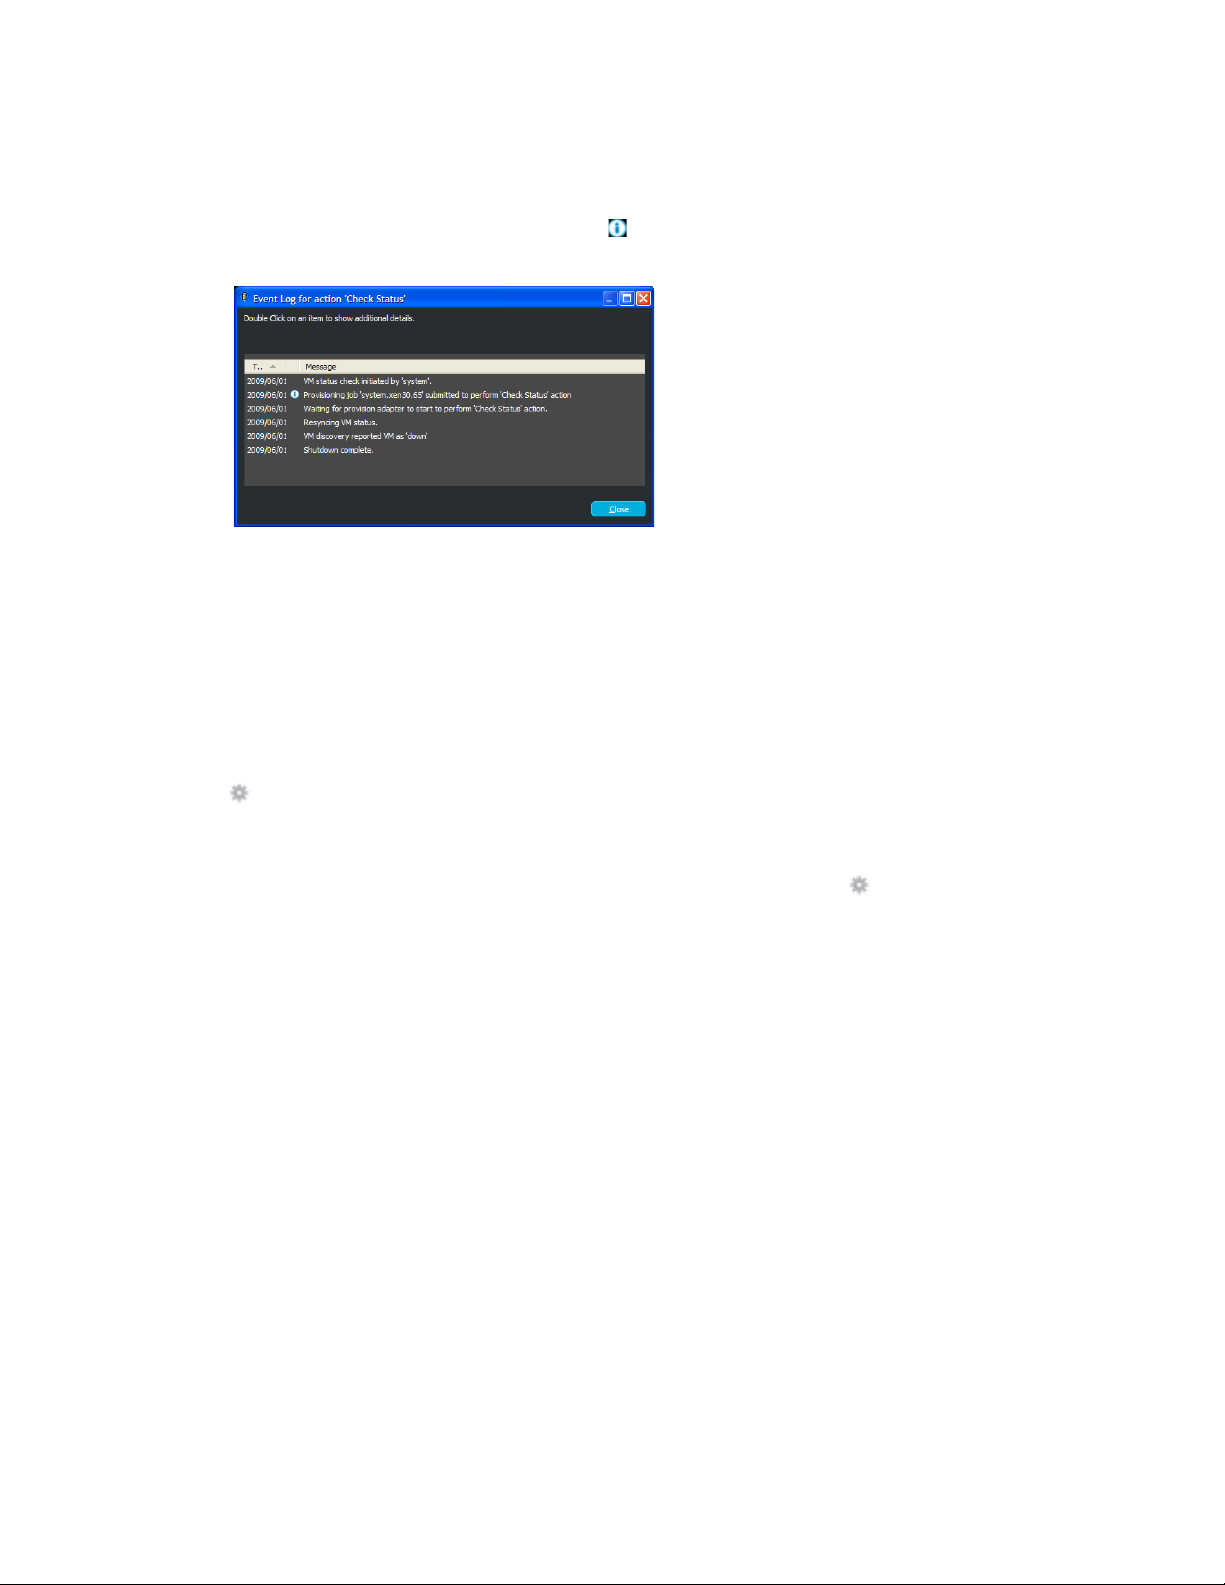
You can do the following with this tab:
View the Event Log information.
Double-click an event item that contains the icon to view the details of the event as reported
by the Orchestrate Server. The following is an example of an event’s details:
5.2 Using Feedback to Manage VMs
novdocx (en) 13 May 2009
The VM Client is integrated with the Orchestrate Server and the Development Client to provide
details from any Orchestrate jobs that are started by actions you take in the VM Client. This
provisioning log integration enables you to see the current status on jobs that are running and to
review the status of jobs that are finished. The information is provided in three levels: actions taken,
provisioning logs, and job logs. You do not need to open the Development Client to discover the
status of jobs started in the VM Client.
The icon is displayed in Status columns when a VM is in a progress state. The Status column can
be viewed in the Virtual Machines view and in the VMs sections of the Summary tabs for host
servers and templates.
Other actions cannot be performed on a VM when it is in a progress state (the icon) because
Orchestrate jobs are run sequentially per VM.
If you double-click a VM that is in a progress state, its Event Log tab is immediately displayed.
All logging information is dynamically updated so that you do not need to refresh or return to a view
to see event changes.
Even if you log in and log out of the VM Client, all logs are maintained and continue to progress so
that you can still monitor an action after logging back in to the VM Client.
You can view the progress of any action, including error information, using the following features:
Section 5.2.1, “Progress View,” on page 71
Section 5.2.2, “Progress Bar for Details Views,” on page 73
Section 5.2.3, “Progress Bar in a Tool Tip,” on page 75
Section 5.2.4, “Event Log Tab,” on page 76
Section 5.2.5, “Event Logs,” on page 77
Section 5.2.6, “Error Log,” on page 79
70 PlateSpin Orchestrate 2.0 VM Client Guide and Reference
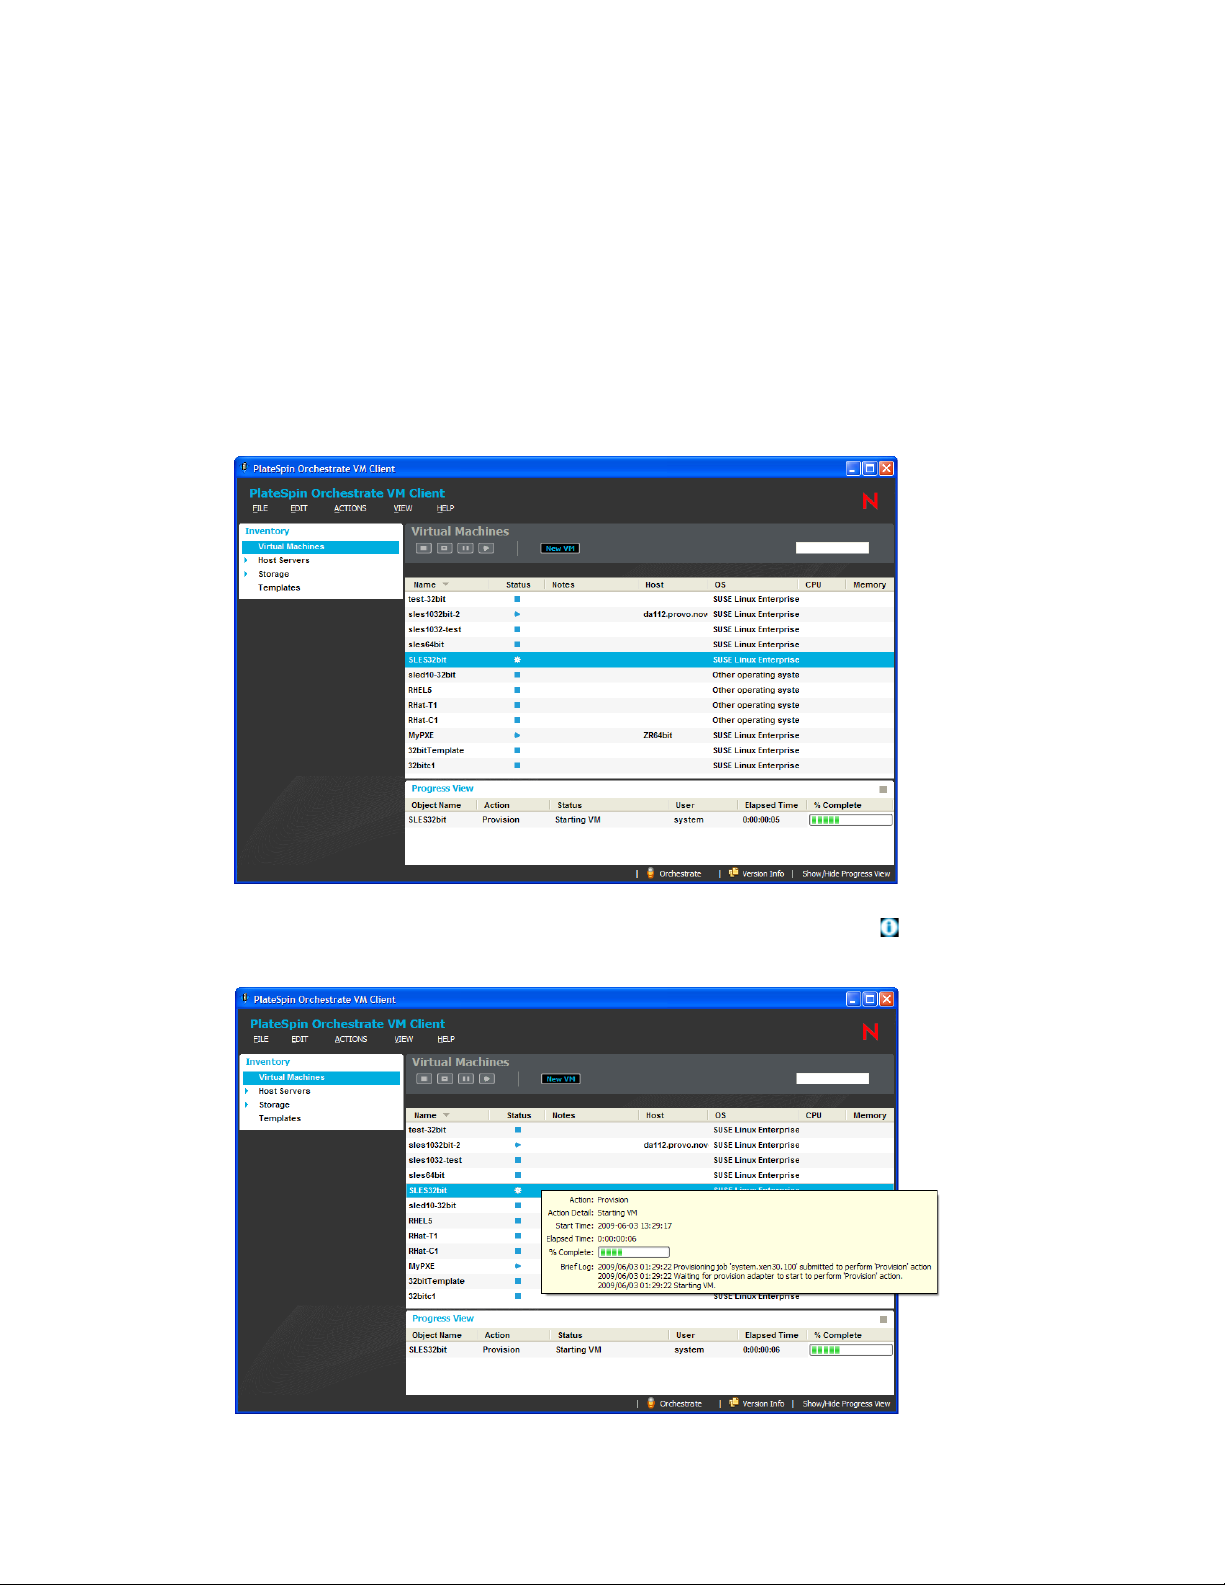
5.2.1 Progress View
The Progress View displays the progress of all VM actions initiated by any VM operator. To use the
Progress View:
1 The Progress View section is displayed by default; if it is not being displayed, do one of the
following:
In the VM Client, click View > Show Progress View.
In the VM Client, double-click Show/Hide Progress View in the lower right corner of the
VM Client window.
The following view is displayed:
novdocx (en) 13 May 2009
2 For another view of the progress bar with other information, mouse-over the icon in the
Status column for the Inventory item:
Managing Virtual Machines 71
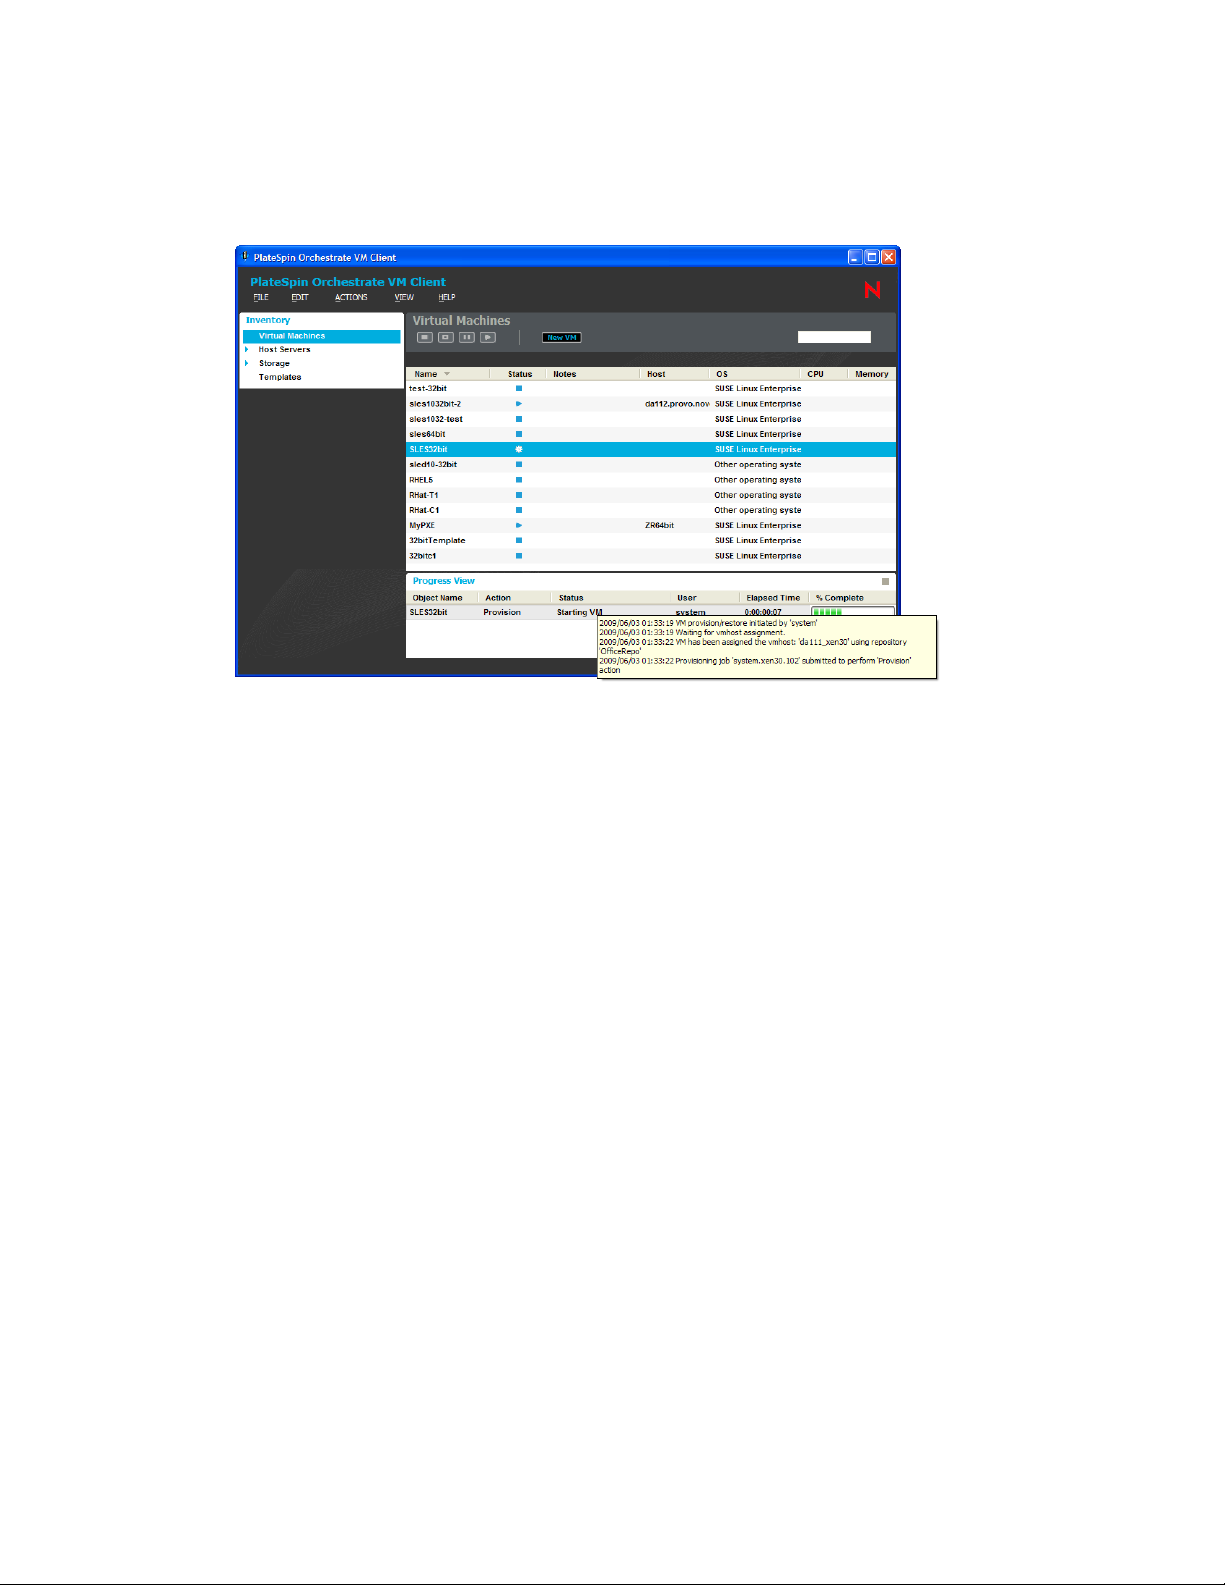
For more information, see Section 5.2.3, “Progress Bar in a Tool Tip,” on page 75.
3 To view information specific to a progress task, mouse-over the name in the Status column of
the Progress View section:
novdocx (en) 13 May 2009
For more information, see Section 5.2.5, “Event Logs,” on page 77.
72 PlateSpin Orchestrate 2.0 VM Client Guide and Reference

5.2.2 Progress Bar for Details Views
If you start an action on a VM from within a details view, a progress bar is displayed in the upper
right of the VM Client window. To view it:
1 To get a VM in an action state, in the host server’s Summary tab, right-click a VM and select an
action.
2 To view a progress bar on the host server’s details tab view, mouse over the VM:
novdocx (en) 13 May 2009
Managing Virtual Machines 73

3 In the Virtual Machines view, double-click the VM.
This changes the to details view to of the VM and displays the progress bar and progress
description in the upper right of the VM Client window:
novdocx (en) 13 May 2009
The progress bar shows the percentage completed. It only displays for a selected VM that has
an action in progress.
4 To view the log information, do one of the following:
Single-click the text to the left of the progress bar:
Double-click the progress bar:
74 PlateSpin Orchestrate 2.0 VM Client Guide and Reference

This opens the Event Log dialog box:
You can click any icons that are displayed for more detailed log information.
5.2.3 Progress Bar in a Tool Tip
There are two places where you can use the mouse-over function to view progress information:
You can view the progress of an action by mousing over its icon in the Status column of the
Virtual Machines view, or the Status column of the Summary tabs for host servers and
templates:
novdocx (en) 13 May 2009
Managing Virtual Machines 75
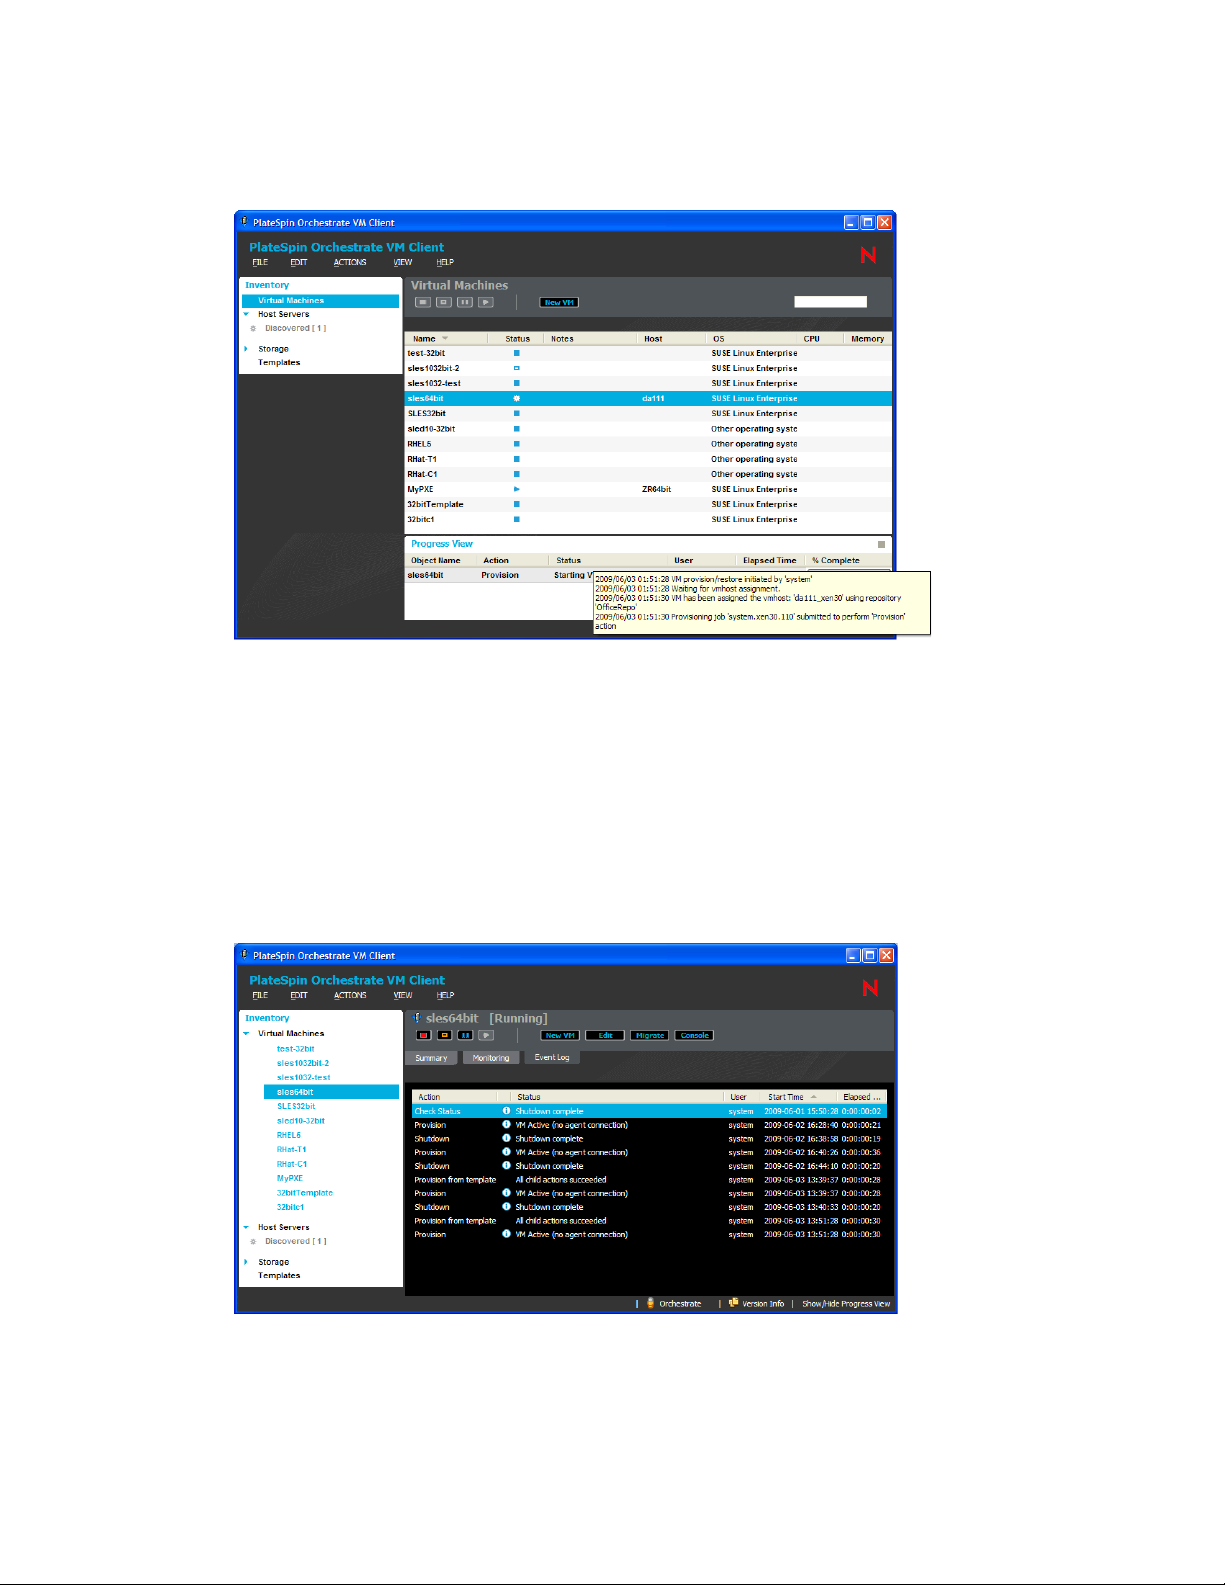
You can view the status log of the action by mousing over the entry in the Status column in the
Progress View:
novdocx (en) 13 May 2009
5.2.4 Event Log Tab
You can view the progress of all actions for a VM by viewing its Event Log tab:
1 In the VM Client, click Virtual Machines to display the VMs, then do one of the following to
open its details views:
Double-click the VM, then click the Event Log tab.
Right-click the VM, select Show Details, then click the Event Log tab.
The following view is displayed:
2 To view the information in a different order, click any column to sort by that column.
Click the column again to reverse the sorting order.
76 PlateSpin Orchestrate 2.0 VM Client Guide and Reference

3 To quickly locate specific information, click anywhere in the list, then begin typing a search
string.
This opens the locator pop-up and selects the first match. You can modify the string to refine
the search, and you can use the up-arrow and down-arrow to move from match to match.
4 To view more detailed information for an entry, double-click its icon.
For more information, see Section 5.2.5, “Event Logs,” on page 77.
5.2.5 Event Logs
You can view the progress of an action by accessing its individual event logs:
1 In the VM Client, do one of the following to open the Progress View section:
In the VM Client, click View > Show Progress View.
In the VM Client, double-click Show/Hide Progress View in the lower right corner of the
VM Client window.
The following view is opened:
novdocx (en) 13 May 2009
Managing Virtual Machines 77
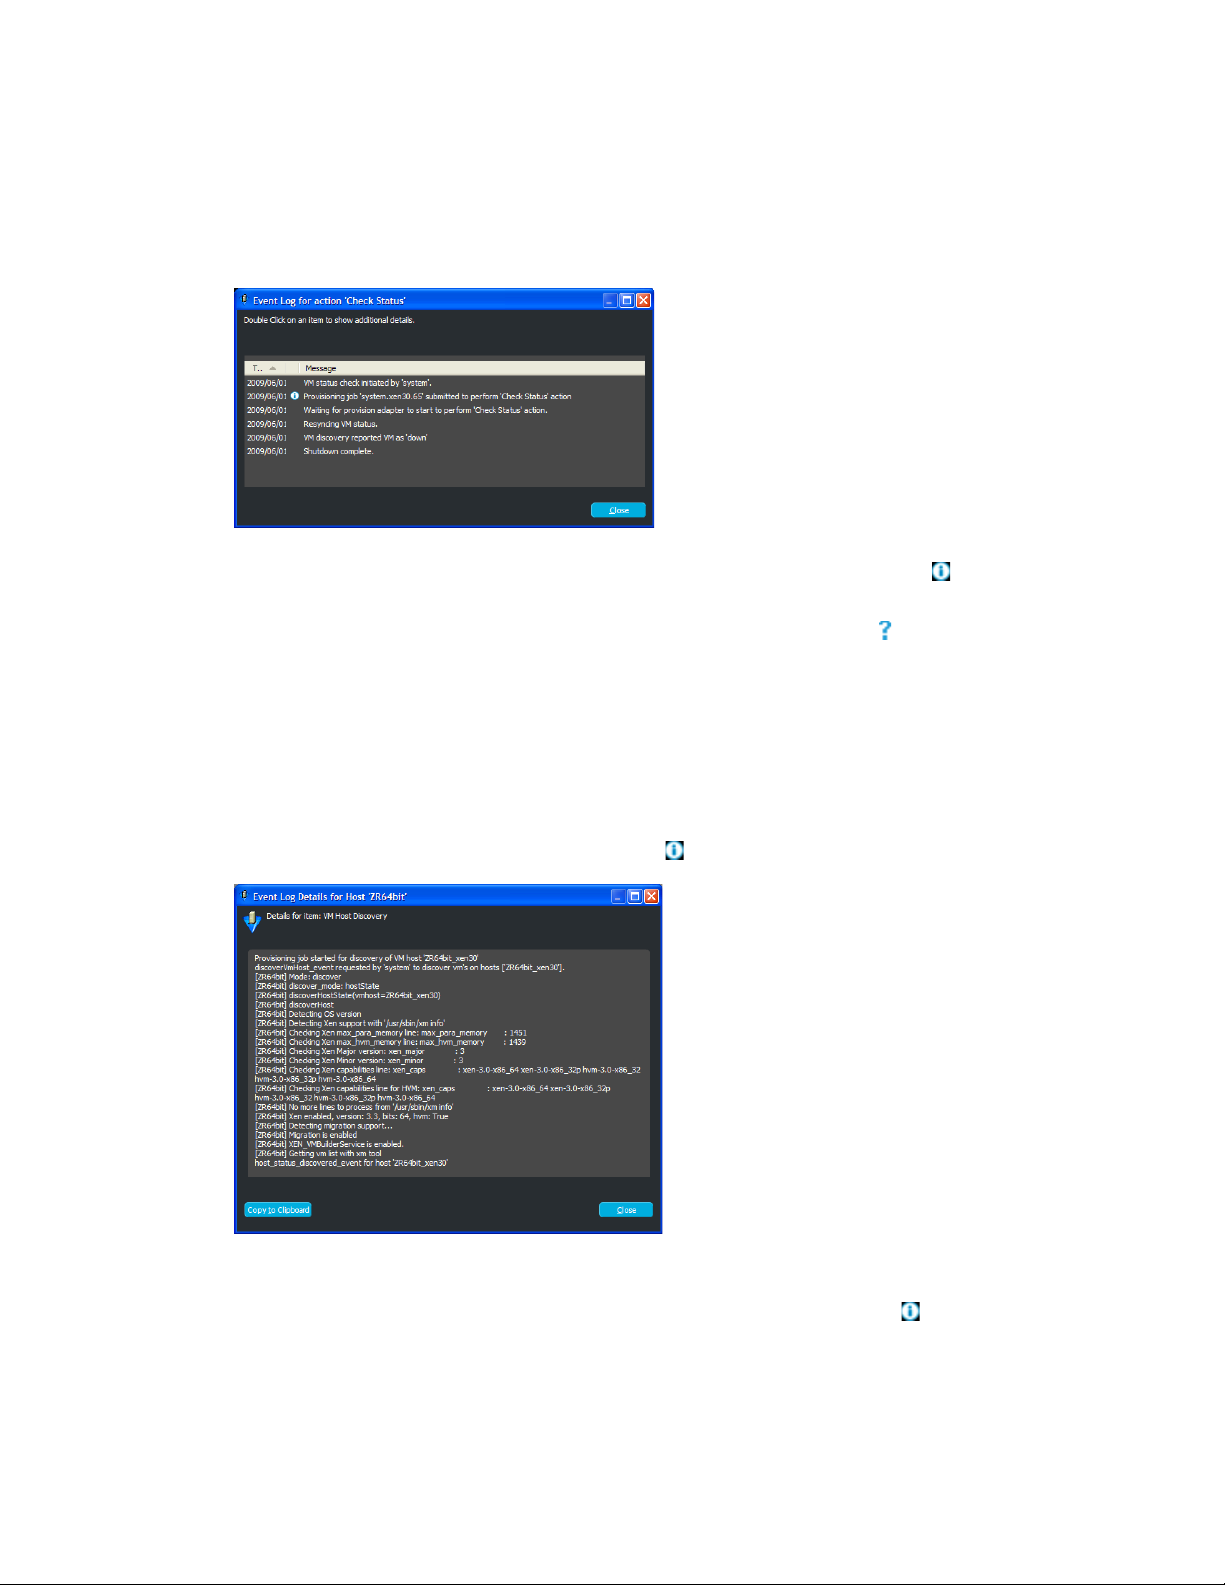
2 In the Progress View section, do one of the following:
Double-click the entry that is displayed in the Status column.
Right-click the entry that is displayed in the Status column and select Show Log.
The following dialog box is displayed:
These events are logged dynamically in the Event Log dialog box. Events with the icon
provide further detail (see Step 5).
novdocx (en) 13 May 2009
You can also view this dialog box for VMs that are in an unknown state (the icon).
3 To view the information in a different order, click any column to sort by that column.
Click the column again to reverse the sorting order.
4 To quickly locate specific information, click anywhere in the list, then begin typing a search
string.
This opens the locator pop-up and selects the first match. You can modify the string to refine
the search, and you can use the up-arrow and down-arrow to move from match to match.
5 For further job details on an event, double-click its icon:
These details are logged dynamically in the Event Log Details dialog box.
Only the Event Log entries that have further job information available have the icon in the
Additional Information column.
78 PlateSpin Orchestrate 2.0 VM Client Guide and Reference

You can have multiple Event Log Details dialog boxes open simultaneously to monitor
multiple tasks for the same VM or for multiple VMs.
The Event Log Details dialog box provides the same information as the Job Details dialog box
in the Development Client.
5.2.6 Error Log
To use the Error Log section:
1 In the VM Client, click View > Show Error Log to display the Error Log section:
novdocx (en) 13 May 2009
Managing Virtual Machines 79

2 To view further information on an error, double-click the error to display its Event Details
dialog box:
novdocx (en) 13 May 2009
5.3 Virtual Machine Actions
All of the actions that you can perform on a VM can be tracked during execution by viewing the
logging messages in the Event Log tab for the VM, and in the Event Log and Event Details dialog
boxes (see Section 5.2, “Using Feedback to Manage VMs,” on page 70). These logs provide a
history of all VM actions.
You can also see which VM operator initiated an action. The VM operator’s login name is displayed
in the User column of the Event Log details tab for the VM. For information on setting up different
VM operator login names, see Appendix D, “Adding User Logins for VM Operators,” on page 159.
Even if you log in and log out of the VM Client, all logs are maintained and continue to progress so
that you can still monitor an action after logging back in to the VM Client.
You can do the following for hands-on management of VMs:
Section 5.3.1, “Understanding a VM’s Status,” on page 81
Section 5.3.2, “Canceling a VM’s In-Progress Action,” on page 81
Section 5.3.3, “Starting a VM,” on page 82
Section 5.3.4, “Shutting Down a VM,” on page 84
Section 5.3.5, “Accessing a VM’s Console,” on page 84
Section 5.3.6, “Pausing a VM,” on page 85
Section 5.3.7, “Resuming a Paused VM,” on page 85
Section 5.3.8, “Suspending a VM,” on page 85
Section 5.3.9, “Resuming a Suspended VM,” on page 86
Section 5.3.10, “Resynchronizing a VM’s State,” on page 86
80 PlateSpin Orchestrate 2.0 VM Client Guide and Reference

5.3.1 Understanding a VM’s Status
In the Virtual Machines view, the Status column indicates the state of each VM:
Table 5-1 VM Status Icons
Icon VM’s Status Enabled Actions for the Selected VM
novdocx (en) 13 May 2009
Has been defined or is
being defined.
Has an action that is in
progress.
Is running. Show Details, Restart, Suspend, Pause, Shut Down, Edit, Resync
Is down. Show Details, Start, Edit, Create Template, Resync State, Move, Delete,
Is paused. Show Details, Resume, Edit, Resync State, Delete, New VM, and
Is suspended. Show Details, Resume, Edit, Resync State, Move, Delete, New VM, and
The state is unknown. Show Details
Show Details, Install, Edit, Resync State, Delete, New VM, and
Remove from Group.
The VM is eligible to be installed.
Other actions cannot be run against this VM until the current action has
finished.
State, Migrate, New VM, Show Console, and Remove from Group.
Install Agent, New VM, and Remove from Group.
Remove from Group.
Remove from Group.
, Edit, Resync State, Delete, New VM, and Remove from
Group.
For information on making an unknown state known, see Section 4.5,
“Resynchronizing a Host Server’s State,” on page 65 and
Section 5.3.10, “Resynchronizing a VM’s State,” on page 86.
VM statuses are updated globally; they show any status change that is made in your local instance of
the VM Client and any change made from other VM Client instances being run by other VM
operators.
You can tell whether a VM or host server has the Orchestrate Agent installed on it by whether there
are pie charts in its CPU and Memory columns, but only if the VM or host is running at the time.
5.3.2 Canceling a VM’s In-Progress Action
Sometimes the progress hangs for an action taken on a VM, or you might change your mind about
continuing with the action. You can do the following:
To determine whether an action is progressing normally, double-click the icon to open the
Event Log tab for the VM and review the log entries.
For more information, see Section 5.2, “Using Feedback to Manage VMs,” on page 70.
To cancel an action in the VM Client, right-click the VM in the Virtual Machin e s view, then
select Cancel Action.
Managing Virtual Machines 81

To cancel an action in the Development Client, go to the Explorer tree view. Under the
Resources subsection, locate the VM in one of the Resources subsections (such as VMs), right-
click the VM, then select Cancel Action.
In the VM Client window, the Status column should now show the previous state of the VM.
5.3.3 Starting a VM
In order to start a VM on a host server, the following conditions must exist:
The VM’s files and image must be either:
Stored locally on the host server.
or
Stored in a shared repository accessible by the host server.
The host server and VM must have the same architecture (such as 32-bit or 64-bit), mount
points, and routing of network connections to the virtual network.
For example, a 64-bit paravirtualized guest created on a 64-bit hypervisor can be started on a
host server running a 64-bit hypervisor, but not a 32-bit hypervisor. Or, a 32-bit VM created on
a 64-bit hypervisor can be started on a 64-bit hypervisor host. In other words, you cannot start a
VM on a host that has a different architecture from the host where the VM was created.
The host server cannot be fully utilized, because it would be incapable of hosting the VM.
The host server cannot have met its maximum allowable VMs. This value is set in the
Development Client in the Max Hosted VMs field. The default is 8. It doesn’t matter whether
the maximum VMs that the host server is already hosting are fully utilizing it.
The VM cannot be disabled by having its Resource Enabled check box deselected in the
Development Client. By default, this check box is enabled.
The VM cannot be out of sync, which can occur if it is manually accessed or manipulated via a
third-party tool. For example, you could manually start the VM on the physical host machine.
However, you can resynchronize the VM with the Orchestrate Server.
Host servers are only available if they are not out of sync.
novdocx (en) 13 May 2009
These conditions are automatically enforced with constraints.
If the above criteria are met by the VM and only one host server, then the VM is automatically
started on that host server, provided the VM’s files reside on that server or in a shared repository.
If the criteria are met by multiple host servers and the VM’s files reside in a shared repository, you
can start the VM by selecting any host server, or by selecting to have the Orchestrate Server
automatically select the host server.
If no host servers meet these requirements, or if the VM doesn’t meet its requirements, the No Start
Target Available dialog box is displayed, indicating that you need to resolve the issues to continue.
You can start any VM that is not running. However, starting a paused or suspended VM can cause its
previously saved state to be lost. For more information on paused or suspended VMs, see
Section 5.3.6, “Pausing a VM,” on page 85 and Section 5.3.8, “Suspending a VM,” on page 85.
82 PlateSpin Orchestrate 2.0 VM Client Guide and Reference

To star t a V M :
1 In the VM Client, click the Virtual Machines view.
2 Do one of the following:
Click the VM that you want to start, then click the button.
Click the VM that you want to start, then click Action > Start.
Right-click the VM that you want to start, then select Start.
If only one host server is available, it is automatically used if the VM’s files are either stored on
that server or in a shared repository.
If there are two or more target host candidates, the following dialog box is displayed if the
VM’s files are stored in a shared repository:
novdocx (en) 13 May 2009
3 Select a host server, or select the Auto-Select the Target Host check box.
The Auto-Select the Target Host option allows the Orchestrate Server to automatically select a
host server from those that are available by using ranking criteria such as architecture similarity
and available CPU and RAM resources. For example, hosts are selected that meet the
architecture requirements, the cost of moving information is then considered, and if there is still
no clear winner, then the least loaded machine is selected. The ranking criteria can be affected
by policies that you might have set in the Development Client.
The VM starts, using the processes for the operating system it is running. You can use the Show
Console menu option to authenticate if you want to view its console and log in to the operating
system.
If there is no available host server for starting the VM, the following dialog box is displayed:
4 Review the issues, resolve them, then repeat from Step 2.
5 You can view the startup progress in any of the following ways:
Double-click the VM being started, click the Event Log tab, then double-click the entry
related to the starting process that has the icon next to it. The Event Log Details dialog
box is displayed and is automatically updated as events occur.
Observe messages at the bottom of the VM Client interface.
Managing Virtual Machines 83

Click View > Show Progress View to open the Progress window.
View its progress in the Jobs tab of the Development Client.
5.3.4 Shutting Down a VM
Shutting down a VM is the same as shutting down any computer. Its current state is not saved. If you
want to retain a VM’s state, use one of the following options instead:
Section 5.3.6, “Pausing a VM,” on page 85
Section 5.3.8, “Suspending a VM,” on page 85
To shut down a VM:
1 In the VM Client, click the Virtual Machines view.
2 Do one of the following:
Select the VMs to be shut down, then click the button.
Select the VMs to be shut down, then click Actions > Shut Down.
Right-click each VM to be shut down, then select Shut Down.
The selected VMs are shut down. Their current state is not saved.
novdocx (en) 13 May 2009
3 You can view the shutdown progress in any of the following ways:
Double-click the VM being shut down, click the Event Log tab, then double-click the
entry related to the process that has the icon next to it. The Event Log Details dialog
box is displayed and is automatically updated as events occur.
Observe messages at the bottom of the VM Client interface.
Click View > Show Progress View to open the Progress window.
View its progress in the Jobs tab of the Development Client.
4 To restart a VM that is shut down, continue with Section 5.3.3, “Starting a VM,” on page 82.
5.3.5 Accessing a VM’s Console
1 In the VM Client, click the Virtual Machines view.
2 Do one of the following:
Select the VM, then click the button.
Select the VM, then click Vie w > Show Console.
Right-click the VM, then select Show Console.
3 Provide the VNC password, then click OK.
84 PlateSpin Orchestrate 2.0 VM Client Guide and Reference

5.3.6 Pausing a VM
If you need to free up CPU cycles on the host machine, you can pause some of the VMs. This option
writes the current state of the VM to the host machine’s RAM so that it can be recovered by
resuming the VM. A paused VM can also be moved to a suspended state without resuming it first.
1 In the VM Client, click the Virtual Machines view.
2 Do one of the following:
Select the VMs to be paused, then click the button.
Select the VMs to be paused, then click Actions > Pause.
Right-click the VMs to be paused, then select Pause.
Each VM’s state is saved to RAM on the host machine.
WARNING: If you use the Restart option to reboot a VM, its previous state is lost. If you want
to recover its previous state, use the Resume option, which reads the VM information from the
host machine’s RAM.
Also, if you reboot the host machine, the VM’s state is lost, because it was saved to the host
machine’s RAM. To prevent the loss of a VM’s state when you need to reboot the host
machine, first use the Suspend option to suspend the VM.
novdocx (en) 13 May 2009
5.3.7 Resuming a Paused VM
1 In the VM Client, click the Virtual Machines view.
2 Do one of the following:
Select the VMs to start again, then click the button.
Select the VMs to start again, then click Actions > Resume.
Right-click the VMs to start again, then select Resume.
The previous state of the VM is restored from the information that was written to the host
machine’s RAM when the Pause option was used.
If the VM’s console was open, it reopens automatically.
5.3.8 Suspending a VM
If you need to temporarily free up RAM on your host machine, or to save the state of any VMs
running when you reboot the host machine, use the Suspend menu option. This option writes the
current state of the VM to the host machine’s hard drive so that it can be recovered by resuming the
VM.
1 In the VM Client, click the Virtual Machines view.
2 Do one of the following:
Select the VMs to be suspended, then click the button.
Select the VMs to be suspended, then click Actions > Suspend.
Right-click the VMs to be suspended, then select Suspend.
Managing Virtual Machines 85

When you select multiple VMs, each suspend operation is done according to how jobs are
handled by Orchestrate Server.
WARNING: If you use the Restart option to reboot the VM, its previous state is lost. If you
want to recover its previous state, use the Resume option, which reads that information from the
host machine’s hard drive.
3 You can view the progress in any of the following ways:
Double-click the VM being suspended, click the Event Log tab, then double-click the
entry related to the process that has the icon next to it. The Event Log Details dialog
box is displayed and is automatically updated as events occur.
Observe messages at the bottom of the VM Client interface.
Click View > Show Progress View to open the Progress window.
View its progress in the Jobs tab of the Development Client.
5.3.9 Resuming a Suspended VM
1 In the VM Client, click the Virtual Machines view.
novdocx (en) 13 May 2009
2 Do one of the following:
Select the VMs to start again, then click the button.
Select the VMs to start again, then click Actions > Resume.
Right-click the VMs to start again, then select Resume.
The previous state of the VM is restored from the information that was written to the host
machine’s hard drive when the Suspend option was used.
If you had the VM’s console open, you need to reopen it by using the Show Console menu
option.
3 You can view the progress in any of the following ways:
Double-click the VM being resumed, click the Event Log tab, then double-click the entry
related to the process that has the icon next to it. The Event Log Details dialog box is
displayed and is automatically updated as events occur.
Observe messages at the bottom of the VM Client interface.
Click View > Show Progress View to open the Progress window.
View its progress in the Jobs tab of the Development Client.
5.3.10 Resynchronizing a VM’s State
The Orchestrate Server is automatically updated to show the VM’s state after every provisioning
action. However, the VM’s state is not automatically updated in the Orchestrate Server if the VM
state is changed by any third-party tool or by manually manipulating the VM on the physical host
machine (for example, if you use virt-man or XM, or if some process dies). You must manually
synchronize the VM’s state in the Orchestrate Server to reflect the VM’s current state.
Resynchronizing a VM allows the Orchestrate Server to determine the state of the VM and update
the Orchestrate Server with that state.
86 PlateSpin Orchestrate 2.0 VM Client Guide and Reference

To resynchronize a VM:
1 In the VM Client, click the Virtual Machines view.
2 Right-click the VM to be resynchronized, then select Resync State.
You cannot select multiple VMs for this operation.
If the resync state is not automatically updated for the VM, open the VM’s details page for the
VM in eigher of the following ways to get the updated status.
Double-click the VM.
Right-click the VMs, then click Show Details.
3 You can view the progress in any of the following ways:
Double-click the VM being synchronized, click the Event Log tab, then double-click the
entry related to the process that has the icon next to it. The Event Log Details dialog
box is displayed and is automatically updated as events occur.
Observe messages at the bottom of the VM Client interface.
Click View > Show Progress View to open the Progress window.
View the synchronization progress in the Jobs tab of the Development Client.
novdocx (en) 13 May 2009
5.4 Creating a Xen VM
Refer to the appropriate third-party documentation for how to create VMs for VMware ESX Server
and Microsoft Windows Server 2008 with Hyper-V. To bring them into the virtualization grid, see
Section 2.5, “Discovering VMs of the Registered VM Hosts,” on page 22.
To create a new Xen VM for the virtualization grid that you are logged in to, run the Virtual Machine
Properties Wizard:
1 In the VM Client, do one of the following to start the wizard:
Click the button in any view.
Click File > New VM in any view.
Press Ctrl+N in any view.
Right-click any listed item in any view, then select New VM.
Managing Virtual Machines 87

The following wizard page is displayed:
novdocx (en) 13 May 2009
2 Fill in the fields to define the basic information for the VM:
VM Name: (Required) Name for the VM.
This name applies to all versions of the VM and must be unique. It cannot already exist in
either the Virtual Machines or Te mp la te s lists.
The name cannot be longer than 100 characters and cannot start with the letters “xen.”
Description: Note the purpose and any other specifics you might require of the VM. These
notes apply to all versions of this VM.
UUID: Displays the UUID for the VM. This field is view-only.
Guest Operating System: The operating system you want to install on your VM. The
following are supported:
®
SUSE
Linux Enterprise Server 8
SUSE Linux Enterprise Server 9
SUSE Linux Enterprise Server 10
SUSE Linux Enterprise Server 11
SUSE Linux Enterprise Desktop 10
SUSE Linux Enterprise Desktop 11
openSUSE
®
openSUSE 11
®
Novell
Open Enterprise Server 2 (Linux)
Novell Open Enterprise Server 2 (NetWare)
®
Novell NetWare
6.5 SP6 and earlier
Red Hat* Enterprise Linux 3
Red Hat Enterprise Linux 4
Red Hat Enterprise Linux 5
88 PlateSpin Orchestrate 2.0 VM Client Guide and Reference

Solaris* 9 and older
Solaris 10
Microsoft Windows NT*
Microsoft Windows XP, 2000, 2003
Microsoft Windows XP, 2003 (x64)
Microsoft Windows Vista*
Microsoft Windows Vista (x64)
Microsoft Windows Server 2008
Microsoft Windows Server 2008 (x64)
There is also an “(other)” option for the following:
SUSE
Red Hat
Microsoft Windows
Virtualization Mode: Full Virtualization is hardware assisted virtualization, meaning the
guest runs on an operating system that is aware it’s being virtualized. Microsoft Virtual Server
with Hyper-V is an example of full virtualization. Paravirtualization means that the operating
system directly accesses elements of the hardware, including processor, display, memory,
network interface card, and hard drive, and uses the hypervisor to emulate other hardware
interactions. Xen is an example of a paravirtualization. However, Xen can also do full
virtualization.
Paravirtualization performs much faster and with better hardware efficiency than full
virtualization. However, full virtualization enables complete decoupling of the software from
the hardware, which streamlines migration between servers.
novdocx (en) 13 May 2009
NOTE: Refer to the SUSE Linux Enterprise Server (SLES) and Red Hat Enterprise Linux
(RHEL) documentation to verify supported platforms in each virtualization mode.
Architecture: The type of processor you want to have as the virtual processor for the VM.
Install Source: (Required, if not PXE) The path to the installation media for your guest
operating system. For a fully virtualized VM, the install source must be an ISO. For a
paravirtualized VM, an ISO or network install source is required. For more information, see
Appendix A, “VM Installation Sources,” on page 153.
Managing Virtual Machines 89

Use a PXE Install Source: This feature is only available when you select Full Virtualization
in the Virtualization Mode field, and it works only if the host server that is selected for building
this VM is on a network where PXE is running.
novdocx (en) 13 May 2009
If you select this option, it disables the Install Source, Auto Install File, and Additional
Arguments fields. The installation is then done from a PXE menu that is displayed when you
are automatically connected to the target VM via VNC after you click Install.
IMPORTANT: The default timeout for the PXE menu’s autoboot might be too short because
of the time that it takes for VNC to connect with target VM. For example, if your PXE timeout
is set to 10 seconds, most of that might be used up in getting the PXE menu to display via VNC.
If you want to select the installation source from the PXE menu, we recommend that you
change it to a timeout value that works for you, such as 15 or 20 seconds.
Auto Install File: This field applies only to paravirtual installations. The file listed here is used
to populate the answers needed during the installation of the guest operating system. Some
examples include time zone, language, firewall, and other settings given in response to the user
interactive areas of the installation. An AutoYaST file listed here can contain network settings
that are applied during the VM Builder job. For RHEL, the file is a kickstart file.
IMPORTANT: The auto install file must reside locally on the machine where you are running
the VM Client. It cannot be used from a host machine or another machine in your network.
Additional Arguments: This field applies only to paravirtual installations. These are Linux
install arguments, which are operating system parameters similar to the information entered in
a GRUB boot loader when running on bare hardware in SUSE Linux Enterprise Server (SLES)
and SUSE Linux Enterprise Desktop (SLED). Additional network installation information can
be added here, which is used during the build process to find the installation source for the VM
build process.
90 PlateSpin Orchestrate 2.0 VM Client Guide and Reference
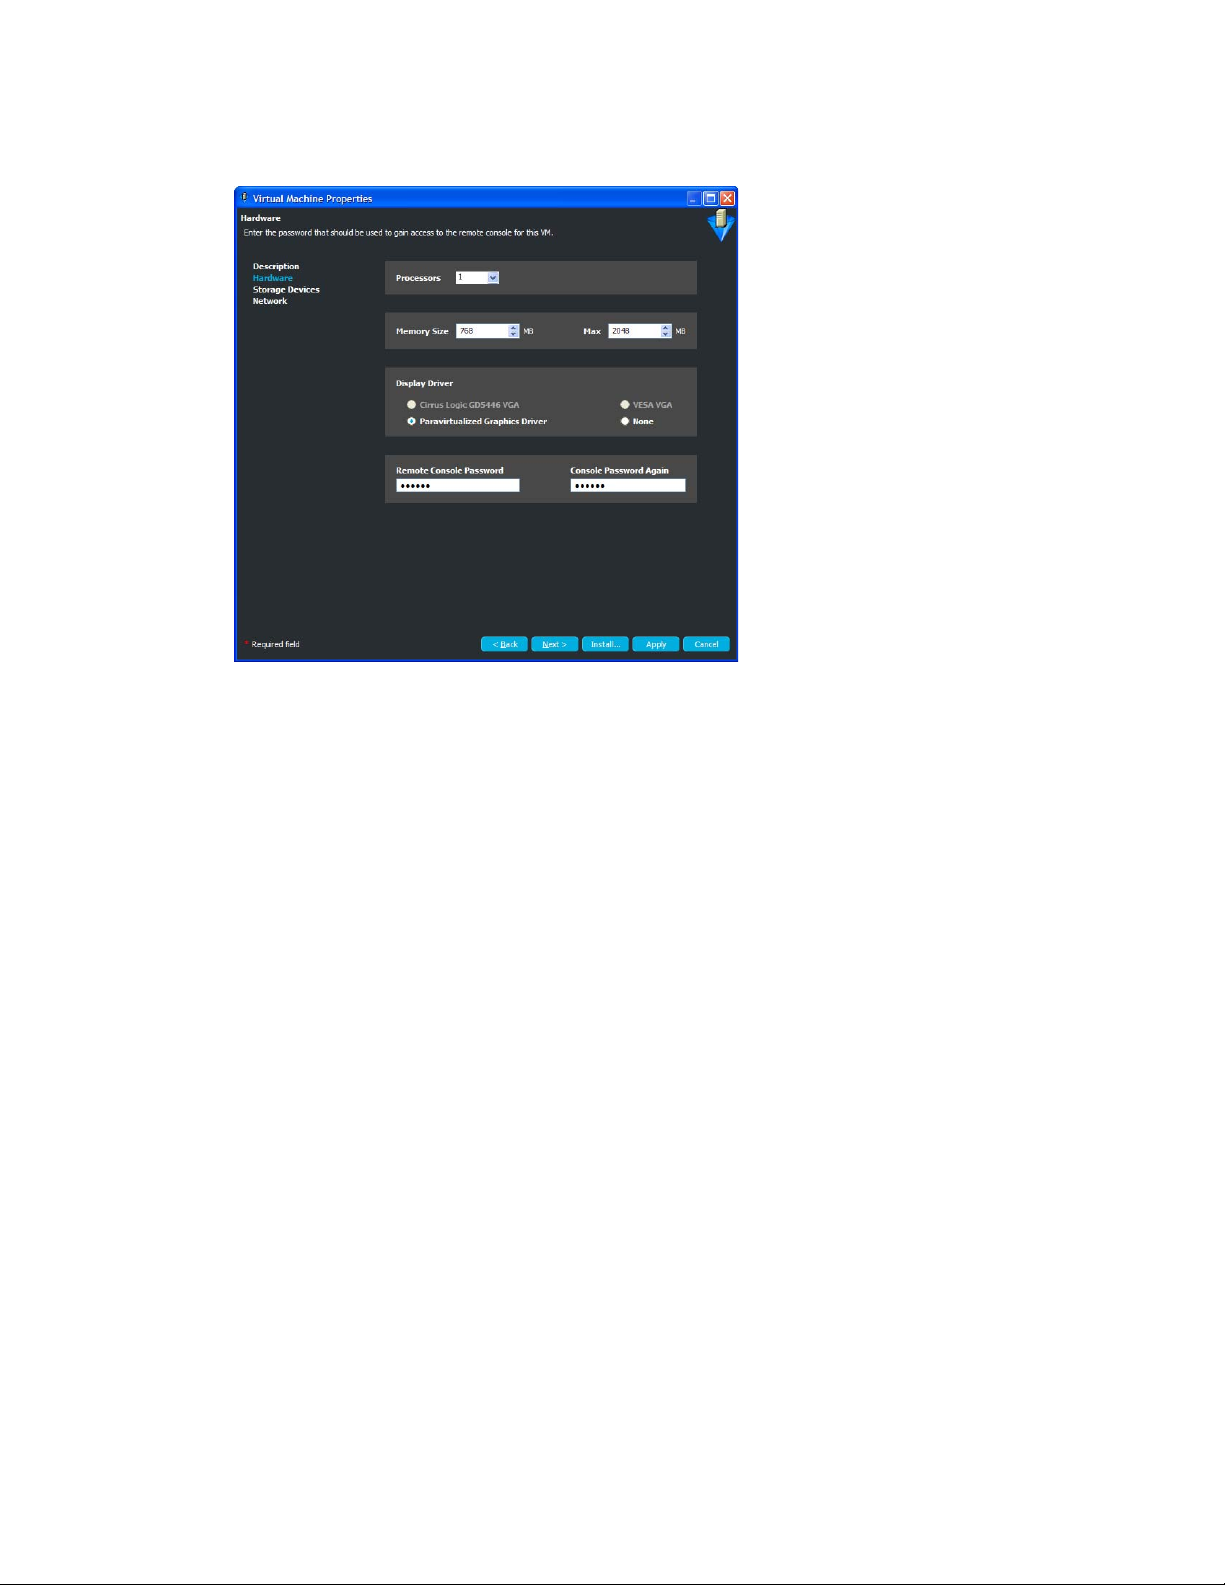
3 Click Next to display the following wizard page:
novdocx (en) 13 May 2009
4 Fill in the fields to define the kind of hardware to be virtualized for the VM:
Processors: The number of virtual processors the VM has.
Memory Size: The amount of virtual RAM the VM has, or paravirtualized memory that can be
used by the VM if it is paravirtualized.
Max: The amount of virtual RAM the VM has, or paravirtualized memory that can be used by
the VM if it is paravirtualized.
Display Driver: The properties of the VM’s display. If you have chosen paravirtualization for
this VM, your only option is Paravirtualized. If you have chosen full virtualization, you can
select between VESA or the on-board VGA. If you do not need a display, you can turn off the
display on a fully virtualized machine.
Remote Console Password: The password for remotely controlling the VM. Use the two
fields to verify that it is typed correctly.
Managing Virtual Machines 91

5 Click Next to display the following wizard page:
novdocx (en) 13 May 2009
The default for the Typ e field is Hard Disk. The other possible types are:
iSCSI:
92 PlateSpin Orchestrate 2.0 VM Client Guide and Reference

N_Port ID Virtualized Storage (NPIV):
novdocx (en) 13 May 2009
Network Attached Storage (NAS):
The Storage Devices page is for defining the hard drives and CD or DVD drives that you want
to include in the VM profile. The first device must always be a hard disk that cannot be
removed unless another hard disk has been put into the first slot. This is the only disk (Disk 0)
that is stored. All other disks are virtual and are created upon launching the VM. You can add
any other storage devices you want to the VM and prioritize their use in the list.
Managing Virtual Machines 93

6 To fill in the storage device information, select a task from the following table:
Tasks Steps Additional Details
novdocx (en) 13 May 2009
Adding a hard disk to
your VM
1. Click Add Hard Disk.
2. Fill in the following fields:
Name: The name is the number in the order
the drive appears in its VM image list.
Typ e: Select the type of hard disk you want
to create on the VM:
Hard Disk
iSCSI
Not supported as the first disk.
N_Port ID Virtualized Storage (NPIV)
Not supported as the first disk.
Network Attached Storage (NAS)
Source: The repository on the hard disk of
the VM.
Size (GB): The VM’s hard drive size,
ranging from 0.25 GB (250 MB) to 4 TB.
This is the maximum allowable size of the
VM.
Read Only Access: Select this option to
give the hard drive Read-Only access. By
default, hard drives are writable.
Fabric ID: (Available only for N_Port ID
Virtualized Storage). Select or specify a
fabric ID that uniquely identifies a SAN
repository.
The Fabric ID drop-down list is populated
with fabric IDs of the discovered SAN
repositories.
World Wide Name: (Available only for
N_Port ID Virtualized Storage). Select or
specify a unique World Wide Name.
The World Wide Name value is
automatically assigned for the NPIV disks.
You can edit it, if required.
Tar g et ID : (Available only for for N_Port ID
Virtualized Storage). Specify the target ID of
the SAN repository.
LUN: (Available only for N_Port ID
Virtualized Storage). Specify a LUN value
between 0 and 254.
3. Click Apply.
The following restrictions
apply per VM:
Limit of 4 fully
virtualized disks
(hda-hdd).
Limit of 16
paravirtualized
disks (xvda-xvdp).
While adding an
additional NPIV disk to a
VM, ensure that the disk
values for Fabric ID,
World Wide Name,
Target ID, and LUN are
unique for each NPIV
disk of the VM.
Creation of a blockbased VM is not
supported for NPIV.
IMPORTANT: iSCSI and
NPIV can be used for
secondary disks.
However, if you add
iSCSI or NPIV as a
secondary disk, you can
change the order of the
disks and make it to be
the first disk. This is not
supported.
If you define iSCSI or
NPIV as a first disk,
when the VM is stopped
and restarted, the
configuration file that is
stored on the iSCSI or
NPIV disk is looked for in
a local repository, and
when not found, a local
repository is created for
the VM, thus losing
connection to the iSCSI
or NPIV disk.
94 PlateSpin Orchestrate 2.0 VM Client Guide and Reference

Tasks Steps Additional Details
novdocx (en) 13 May 2009
Adding a CD-ROM
or DVD ROM to your
VM
Rearranging the
order in which each
storage device is
accessed
Deleting a storage
device
1. Click Add CD-ROM.
2. Fill in the following fields:
Name: The name is the number in the order
the drive appears in its VM image list.
Typ e: Select the type of CD-ROM you want
to create on the VM:
CD-ROM
DVD
Source: The repository on the hard disk of
the VM.
Size (GB): The size is zero and cannot be
changed.
Read Only Access: These drives can only
have Read-Only access.
3. Click Apply.
1. Select the storage device whose order you
want to change.
2. Click Move Up or Move Down.
1. Select the storage device you want to
delete.
2. Click Delete.
IMPORTANT: If you add
a CD-ROM or DVDROM, the VM can only
be moved, migrated, or
used to create a
template if the CDROM’s or DVD-ROM’s
ISO or image is
accessible through
shared storage.
The first storage device
in the list must be a hard
disk, which is the only
one actually stored in the
VM image.
Removes the selected
storage device from the
table.
WARNING: If the
storage device is based
on a disk image, that
could also be deleted. To
preserve the disk image,
manually copy it to
another location before
deleting the storage
device.
Managing Virtual Machines 95

7 Click Next to display the following wizard page:
novdocx (en) 13 May 2009
The network devices are added, deleted, and defined on the Network page, where you add
specific information about your network connections or intended network connections for your
VM. You can define more detailed NIC settings in your auto-install files or when performing a
guest installation.
8 To fill in the NIC information, select a task from the following table:
Tas ks St eps
Adding a NIC to your VM1. Click Add NIC.
2. Fill in the following fields:
Name: Name of the NIC card. This name is used to help you to
recognize each NIC.
Driver Type: Indicates whether the VM has direct access to the NIC. If
the NIC should only interface with the hypervisor, you can select the
specific type of full virtualization. You should have a paravirtualized NIC
with a paravirtualized VM.
MAC Address: Unless you have a specific MAC address you want to
assign to this VM, leave this set to Default, and Xen assigns it a unique
MAC address when you launch the VM.
3. Click Apply.
Rearranging the
order in which the
NICs are accessed
1. Select the storage device whose order you want to change.
2. Click Move Up or Move Down.
Deleting a NIC from
your VM
1. Select the NIC you want to remove.
2. Click Delete NIC.
96 PlateSpin Orchestrate 2.0 VM Client Guide and Reference

9 To complete the wizard, click one of the following buttons:
Install: Lists the VM in the Virtual Machines view, then immediately installs the
configured VM.
A VNC login dialog box is displayed so that you can view the progress of the installation
from the VM’s console. There is a 30-second timeout while the VNC sets up the
parameters of the VM.
You can cancel the use of VNC; however, if user interaction is necessary, you need to use
the VNC to help complete the installation. You can start the VNC for a VM being installed
by right-clicking the VM and clicking Show Console.
Apply: Applies the wizard configuration and saves the new VM in the Virtual Machines
view, but does not install the VM.
Focus is returned to the Virtual Machines view after you exit the wizard, with the new VM
selected in the list.
To install the VM at a later time, see Section 5.5, “Installing a VM,” on page 97.
You can click Back to make changes before installing or applying the VM definition.
novdocx (en) 13 May 2009
5.5 Installing a VM
To install an existing VM definition:
1 (Optional) In the VM Client, click the Virtual M a c h i n es view, right-click the VM that you want
to install, then select Edit.
If you have any changes for the VM, complete those by using the Next and Back buttons.
For more information on editing the wizard pages, see Section 5.8, “Editing VMs,” on
page 101.
2 To install the VM, do one of the following:
While you are in the Edit VM wizard, click Install.
In the Virtual Machines view, select the defined VM (it shows in the Status column),
then click the button.
In the Virtual Machines view, right-click the defined VM (it shows in the Status
column), then select Install.
3 One of three possibilities exists for selecting the host on which to build the VM:
No valid host exists: If you do not yet have a valid host server to for installing the VM,
the following dialog box is displayed:
Review the issues, resolve them, then repeat from Step 2.
Only one valid host exists: It is automatically selected, so continue with Step 5.
Managing Virtual Machines 97

Multiple valid hosts exist: The following dialog box is displayed if there are two or more
target host candidates:
Do one of the following:
Select the Auto-Select the Target Host check box.
The Auto-Select the Target Host option allows the Orchestrate Server to
automatically select a host server from those that are available by using a ranking
criteria, such as architecture similarity and available CPU and RAM resources. For
example, hosts are selected that meet the architecture requirements, the cost of
moving information is then considered, and if there is still no clear winner, then the
least loaded machine is selected. The ranking criteria can be affected by policies that
you might have set in the Development Client.
Select the VM host where you want to install the VM.
novdocx (en) 13 May 2009
These options are mutually exclusive, meaning that selecting one disables the other.
4 Click OK when you have selected a host server or selected the Auto-Select the Target Host
check box.
5 Do one of the following:
If the installation is proceeding from an installation source that requires user input, the
VNC is automatically started. Log in with the VNC password to view and interact with the
installation as it progresses on the VM’s console, then continue with Step 6.
If the installation is using YaST, the VM is automatically installed without user input. You
can either manually use VNC (click Vie w > Show Console) to view the installation’s
progress, or you can continue with Step 6.
6 You can view the installation progress in any of the following ways:
Observe messages at the bottom of the VM Client interface.
Click View > Show Progress View or double-click Show/Hide Progress View to open the
Progress View window. In the Progress View you can mouse over the entry in the Status
column, or right-click that entry and select Show Log, to view the log information for
installing the VM.
Double-click the VM being installed, click the Event Log tab, then double-click the entry
related to the installation process that has the icon next to it. The Event Log Details
dialog box is displayed and is automatically updated as events occur.
View its progress in the Jobs tab of the Development Client.
98 PlateSpin Orchestrate 2.0 VM Client Guide and Reference

7 If you want to cancel the installation before it finished, do one of the following:
Select the VM being installed, then click Edit > Cancel Install.
Right-click the VM being installed, then select Cancel Install.
The VM’s status is returned to being configured but not installed.
5.6 Installing the PlateSpin Orchestrate Agent on a VM
For instructions on installing the agent on a host server, see “Installing the Orchestrate Agent Only”
in the PlateSpin Orchestrate 2.0 Installation and Configuration Guide.
1 In the VM Client, click the Virtual Machines view, right-click the VM where you want to
install the agent, then select Shut Down.
The VM cannot be running during installation of the agent because the VM’s image is
modified.
The agent cannot be installed on a template.
2 After the VM has completed shutting down, select the VM again, then do one of the following:
Click Actions > Install Agent.
Right-click the VM, then select Install Agent.
novdocx (en) 13 May 2009
The agent installation begins.
3 You can view the installation progress in any of the following ways:
Double-click the VM being installed, click the Event Log tab, then double-click the entry
related to the installation process that has the icon next to it. The Event Log Details
dialog box is displayed and is automatically updated as events occur.
Observe messages at the bottom of the VM Client interface.
Click View > Show Progress View to open the Progress window.
View the progress in the Jobs tab of the Development Client.
4 To have the VM accepted into the datagrid, follow the instructions in Section 2.6, “Registering
VMs,” on page 22.
After the Orchestrate Agent has been installed on a VM, the agent begins to communicate with
the Orchestrate Server. However, the VM is not yet available to the datagrid because it must be
accepted.
You can tell which VMs have the Orchestrate Agent installed by whether pie charts are being
displayed in the CPU and Memory columns in the Vir t u a l M a chines view, but only if the VM is
running.
Managing Virtual Machines 99

5.7 Installing the Monitoring Agent on a VM
In order to use the Monitoring feature on VMs or host servers, you must manually install the
Monitoring Agent on them, then configure the agent.
The Monitoring Agent is usually installed on host servers during installation of the PlateSpin
Orchestrate Server product.
To install the agent manually, use the following instructions, as applicable:
Section 5.7.1, “Installing the Agent in Windows,” on page 100
Section 5.7.2, “Installing the Agent in Linux,” on page 100
5.7.1 Installing the Agent in Windows
For instructions, see “Installing the Orchestrate Monitoring Agent On Windows Machines” in the
PlateSpin Orchestrate 2.0 Installation and Configuration Guide.
5.7.2 Installing the Agent in Linux
novdocx (en) 13 May 2009
1 Download the appropriate PlateSpin Orchestrate Server ISO (32-bit or 64-bit) to an accessible
network location.
2 (Optional) Create a DVD ISO (32-bit or 64-bit) that you can take with you to the machine
where you want to install it.
3 Install the Monitoring Agent software:
root
3a Log in to the target VM or host server as
3b In the YaST Control Center, click Software, then click Add-on Product to display the Add-
on Product Media dialog box.
3c In the Add-on Product Media dialog box, do one of the following to select the ISO media
for installation:
Select DVD, click Next, insert the DVD, then click Continue.
Select Local Directory, click Next, select the ISO Image check box, browse to and
select the ISO in the file system, then click OK.
3d Read and accept the license agreement, then click Next to display the following page:
, then open YaST2.
100 PlateSpin Orchestrate 2.0 VM Client Guide and Reference
 Loading...